

In This Article
Logitech MX Mechanical wireless keyboard review: Design
As always let’s first start with the design of the device. The Logitech MX Mechanical keyboard is a superbly well-built keyboard that exudes brilliance. Premium-ness is written all over it and it looks very futuristic. Since it is a full-size keyboard, it has the full function NUM pad also on it. Read also: Logitech MX Mechanical, MX Mechanical Mini Keyboards and Mouse launched Dressed in shades of grey and silver, Logitech has used 40% recycled plastic and low carbon aluminium, based on the carbon-neutral policy they have. Talking a little bit more about it, the packaging that Logitech has used is also made of recyclable materials. There is hardly any plastic used in the packaging and you will find cardboard or paper used to package and ship the device. This is great for eco-sustainability and they also provide distributor service, in case you want to recycle your old devices. Coming back to its looks, users get a USB Type-C charging port on the top right part of the Logitech MX Mechanical wireless keyboard. All the multimedia keys and more can be found on the top of the keyboard that double up as the function keys. These include search, calculator, media playback and volume buttons, a special emoji button and our favourite the computer lock button, which is located on the top right corner of the NUM pad is also there.
 The keys can be pulled out and set apart, which makes up for easy cleaning. The Logitech MX Mechanical wireless keyboard is also 7-level backlit with 5 illumination modes, which include breathing and random key illumination as well. In case you are wondering is it an RGB backlit keyboard? Then no, this has a single white colour lighting. The best part is, as soon as you bring your hand close to the keyboard the lights turn on their own.
 Lastly, you will see the Logi branding on the top of the keyboard on a nicely laid black bar with a low battery light indicator to its right. Yes, the ergonomics have been kept in mind and the user gets twin pull-out feet underneath it, which raise the keyboard a few millimetres for a better ergonomic feel.
Logitech MX Mechanical wireless keyboard review: Performance
Let’s talk about the performance of the Logitech MX Mechanical wireless keyboard now. We have written this review on the Logitech MX Mechanical wireless keyboard and were very happy with it. The keys on this keyboard are super smooth and are a treat to work with. When you switch keyboards, there is a subconscious learning curve of a device. But it did not happen to us, as soon as we laid our palms and fingers on this keyboard, we felt right at home. The Logitech MX Mechanical wireless keyboard is a mechanical keyboard as the name suggests. However, there is not a lot of travel space between the key presses. That is a good thing as the tactile feel is very good and with leaner, flatter keys you end up typing much faster.
 Another bright point of the Logitech MX Mechanical wireless keyboard is its multi-device support. Users can connect it to up to 3 devices at the same time and switch between them in real-time by pressing the 1, 2 or 3 keys placed above the home and page up keys. As per the company, you can switch between Windows and MAC as well. Though we could not try this, between Windows to Windows it worked fine.
The keyboard can be connected to any device using the supplied USB dongle or Bluetooth. A power button is also given next to the USB charging port to turn off the device completely. As for the battery, the company suggests that the Logitech MX Mechanical wireless keyboard can stay alive for 15 days after full charge (backlighting turned on), or up to 10 months when the backlight is turned off. We have been using it for the last 8-9 days with the backlight at 50% and it is working well without the need for a recharge.
Read Also: Logitech MX Anywhere 3 review: For the professional in you
To stress-test it further, we did play a few games with it like DOTA 2 and CS: Go. To our amazement, it performed rather well. Almost as good as full-time gaming keyboards by the company. Overall, we were very satisfied with this luggable keyboard.
Another bright point of the Logitech MX Mechanical wireless keyboard is its multi-device support. Users can connect it to up to 3 devices at the same time and switch between them in real-time by pressing the 1, 2 or 3 keys placed above the home and page up keys. As per the company, you can switch between Windows and MAC as well. Though we could not try this, between Windows to Windows it worked fine.
The keyboard can be connected to any device using the supplied USB dongle or Bluetooth. A power button is also given next to the USB charging port to turn off the device completely. As for the battery, the company suggests that the Logitech MX Mechanical wireless keyboard can stay alive for 15 days after full charge (backlighting turned on), or up to 10 months when the backlight is turned off. We have been using it for the last 8-9 days with the backlight at 50% and it is working well without the need for a recharge.
Read Also: Logitech MX Anywhere 3 review: For the professional in you
To stress-test it further, we did play a few games with it like DOTA 2 and CS: Go. To our amazement, it performed rather well. Almost as good as full-time gaming keyboards by the company. Overall, we were very satisfied with this luggable keyboard.

 Flip over and you will see the 6.44-inch display of the device that comes with a waterdrop notch on the top to house the selfie camera. It is outlined by thin bezels but the chin is obviously relatively bigger in size. There is also an in-display fingerprint scanner.
Speaking in more detail about the iQoo Z6 Pro 5G display, it is an FHD+ AMOLED HDR 10+ screen which comes with a peak brightness of 1,300 nits and a 90Hz refresh rate. The colours projected on the screen were vibrant and accurate and they remained consistent at different viewing angles. The text and images appeared sharp and clear and the sunlight readability could be better. Watching videos and playing
Flip over and you will see the 6.44-inch display of the device that comes with a waterdrop notch on the top to house the selfie camera. It is outlined by thin bezels but the chin is obviously relatively bigger in size. There is also an in-display fingerprint scanner.
Speaking in more detail about the iQoo Z6 Pro 5G display, it is an FHD+ AMOLED HDR 10+ screen which comes with a peak brightness of 1,300 nits and a 90Hz refresh rate. The colours projected on the screen were vibrant and accurate and they remained consistent at different viewing angles. The text and images appeared sharp and clear and the sunlight readability could be better. Watching videos and playing  Coming to the performance of the smartphone, iQoo Z6 Pro 5G did impress us, especially for its price. We threw a variety of tasks at the device, and most of them were handled well. Even when we tried to multitask and used navigation while watching videos on
  The battery of iQoo Z6 Pro 5G was another definite plus and the phone lasts a day and a half with usage involving gaming, watching videos and clicking pictures. The in-display fingerprint scanner worked well at all times while we had the phone with us.
Finally, let’s talk about the cameras of iQoo Z6 Pro 5G. The
The battery of iQoo Z6 Pro 5G was another definite plus and the phone lasts a day and a half with usage involving gaming, watching videos and clicking pictures. The in-display fingerprint scanner worked well at all times while we had the phone with us.
Finally, let’s talk about the cameras of iQoo Z6 Pro 5G. The  Pictures taken with the primary camera during the day had a good number of details and the colours appeared vibrant. But the images lacked a certain clarity and sharpness that one expects from a phone at this price. The Portrait Camera of the phone could also be better.
 When we tried using the ultra-wide camera, it did manage to get in a lot more space, the details in the picture went down too and we noticed some distortion. Even the colours of the images taken were affected, which is not the best thing to happen.
 The macro camera could also only do an average job. We weren’t too elated about the results of the selfie camera either. They could have been a lot better and more consistent and the colours could be more accurate too. The low-light photography of the device was definitely not among its pros. At best, we can call the shots taken as average and we highly recommend enabling the Night Mode to get better low-lit shots.


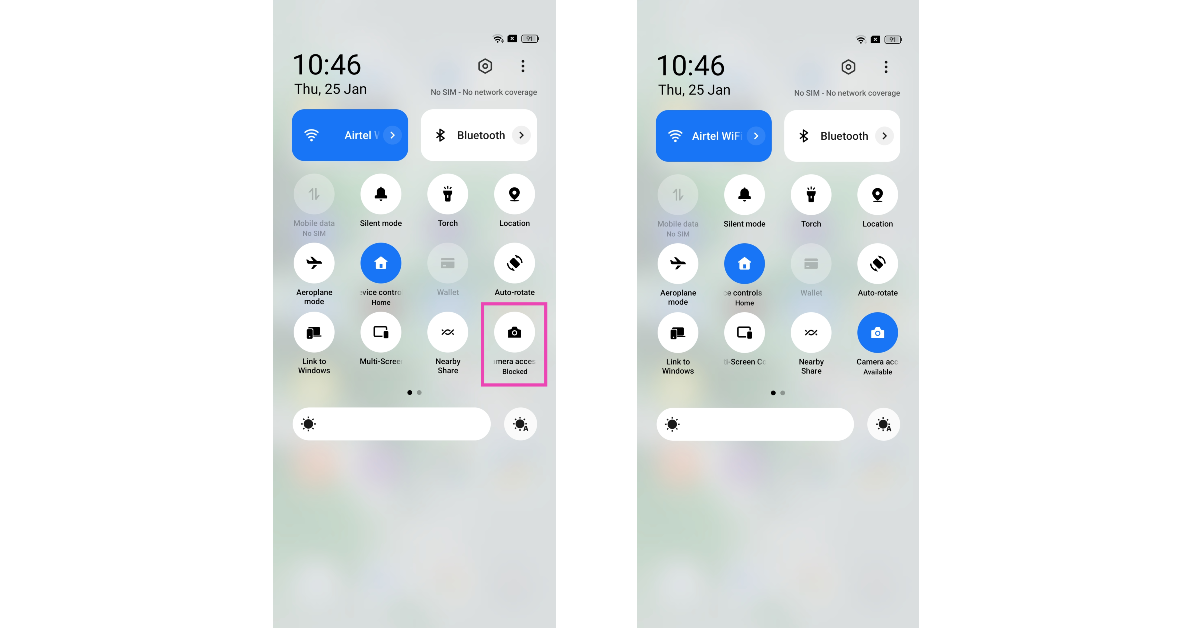 Some Android smartphones have the option to disable the camera access for every app directly from the Quick Settings Menu. This action is applied system-wide simply by tapping on a tile. Once you deny your smartphone access to the camera, even the native camera app will not work. In some cases, it can lead to the app crashing as soon as you try to launch it. Swipe down from the status bar and tap the Camera Access tile.

 Restarting your phone in Safe Mode limits the activity of third-party apps on your smartphone and only runs the essential system apps on the device. If your camera doesn’t work in Safe Mode either, you can safely conclude that it isn’t because of any of the installed apps on your device. Your next step should be to check the camera hardware.
To enter Safe Mode, press and hold the power button and volume down button. Once the power menu pops up on the screen, press and hold the power icon until the Safe Mode option shows up.
Restarting your phone in Safe Mode limits the activity of third-party apps on your smartphone and only runs the essential system apps on the device. If your camera doesn’t work in Safe Mode either, you can safely conclude that it isn’t because of any of the installed apps on your device. Your next step should be to check the camera hardware.
To enter Safe Mode, press and hold the power button and volume down button. Once the power menu pops up on the screen, press and hold the power icon until the Safe Mode option shows up.

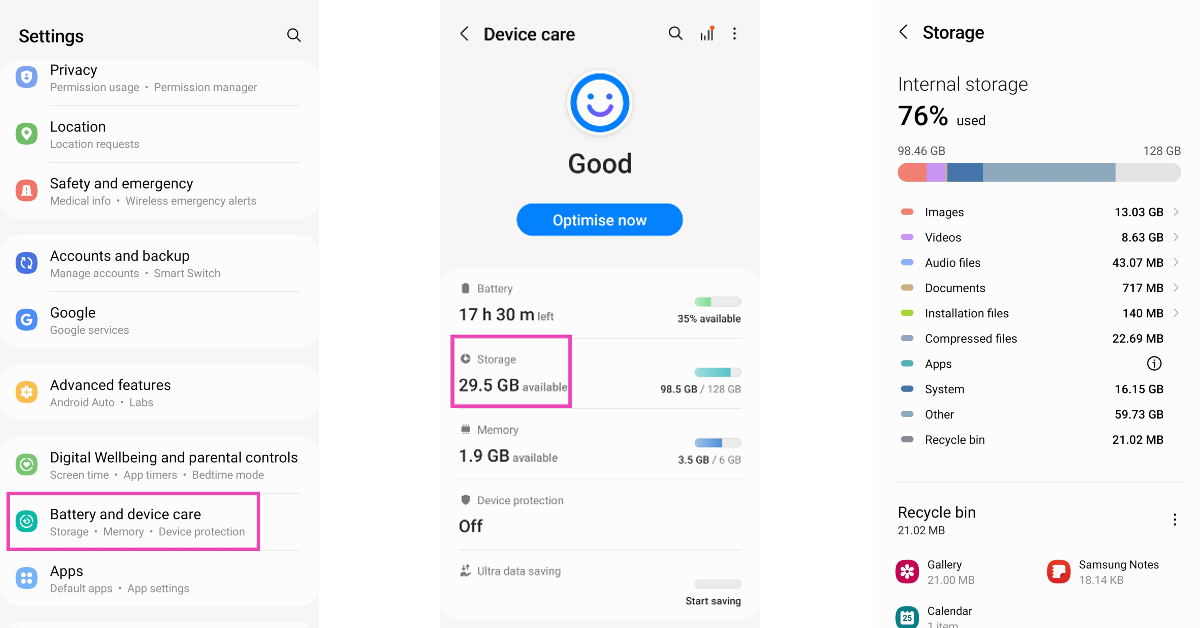 If the camera app on your phone crashes as soon as you take a picture, it is likely because your device is running out of storage. The camera app needs access to storage to store the pictures you take. If there is not enough storage available, the app will crash and you will lose the photograph. Go to Settings>Storage and clear some large files on your device to make space.
 If you can’t get the native camera app to behave properly, there are plenty of third-party apps you can replace it with. Apps like HD Camera, Open Camera, Pro CamX, and others can do everything the native camera app does and more. If these apps can’t get the camera to work, you are dealing with a hardware issue.


 Step 2:
  Step 3:
 Step 3:


 Step 2:
 Step 3:
 Step 4:
 Step 5:


 If you’re trying to download a new update for an app but its Play Store page isn’t displaying it, try force-stopping the Play Store app. If you’re in the middle of downloading an app from the store, it will get cancelled when the system force stops the app. Make sure there are no pending downloads while you’re doing this. Go to Settings>Apps>Google Play Store>Force Stop.


 While Google Play Store is the marketplace for all Android apps, Google Play Services links the downloaded apps to your Google Account. It also takes care of tasks like location tracking, ad integration, security checks, and more. If Google Play Services malfunctions, it may stop you from downloading any new apps from the Play Store. To fix this, clear Play Services cache by going to Settings>Apps>Google Play Services>Storage>Clear Cache.
 Force-stoping and restarting your device’s download manager can fix this issue as well. Download Manager is a system app on your device. To find it in the app manager, you will first need to go to the filter options and enable system apps. Once that is done, go to Download Manager>Force Stop.


 Step 4:
 Step 5:


 Step 3:
 Step 4:
 Step 4:
 Step 3:
 Step 4:
 Step 5:

 Step 2:
 Step 4:
 Step 5:
 Step 3:
 Step 4:
 Step 5:
 Step 3:
 Step 4:


 Step 3:
 Step 4:
 Step 5:
 Step 3:
 Step 4:
 Step 3:
 Step 4:


