

Keeping your PC organised can be a gargantuan task if you deal with a large volume of files on a regular basis. While this isn’t a big deal, it can throw a wrench in things while you’re trying to back up your data. While creating a backup, it is important to note that you don’t copy duplicate files. An unorganised drive often contains several duplicates. In this situation, you can quickly compare the contents of two folders before adding them to your backup. Today, we bring you the top 3 ways to compare two folders in your Windows 10 or 11 PC or laptop.
Read Also: New Google Maps and Search updates coming for sustainable travel
In This Article
Which method should you use?
There are three ways you can go about comparing two folders on your PC or laptop. Each method has its own advantages.
Using Properties: This is the easiest way to compare two folders, but it does not give a lot of details about them. You will also need to manually scan the attributes you are looking for. Using this method, you can compare the date of creation, size, contents, and location of the two folders.
Using Command Prompt: This method gives you a list of files that are unique in each folder. If a file is present in both folders, you can sort them by date of creation using this method.
Using WinMerge: Perhaps the most thorough way of comparing any two (or three) folders, WinMerge highlights the unique files in the two folders and lists their date of creation. Results that are highlighted in grey are present in only one of the two folders. The identical files are left unhighlighted.
Compare two folders in Windows 10/11 using Properties
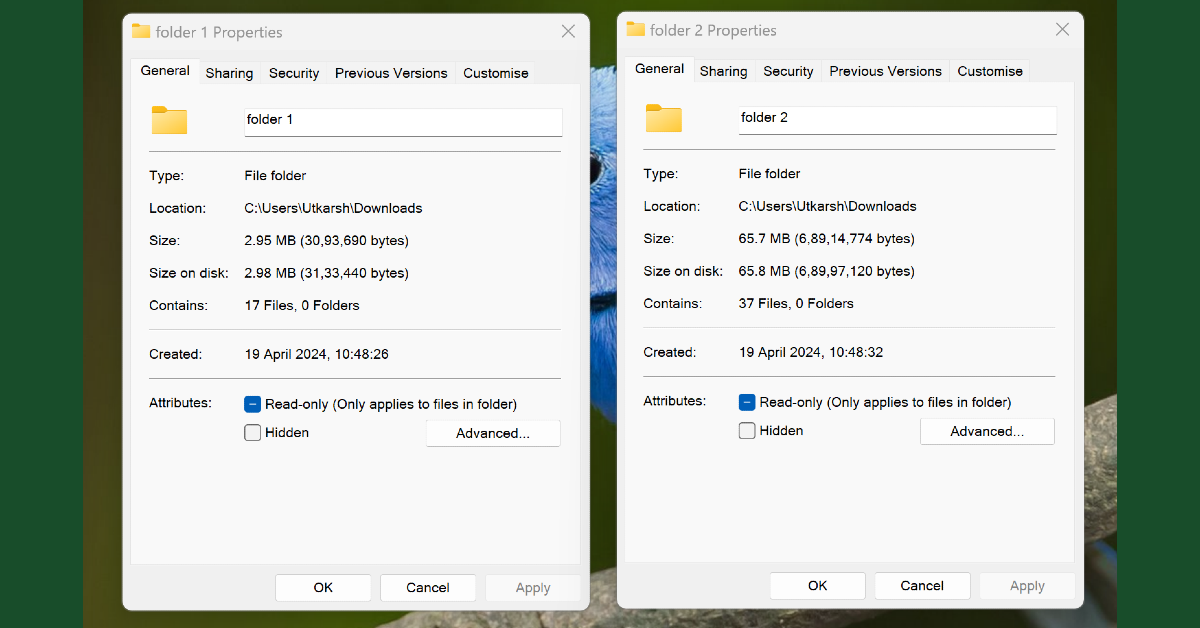
The easiest way to compare two folders in Windows 10/11 is by viewing their properties. Right-click a folder and select ‘Properties’ from the menu. Now, go to the location of the second folder, right-click on it, and select ‘Properties’ again. Place the two boxes side by side to compare the attributes of the two folders.
Use Command Prompt to compare two folders in Windows 10/11

Step 1: Right-click on the first folder and select Copy as path.
Step 2: Launch Notepad and paste the path.
Step 3: Right-click on the second folder and select Copy as path.
Step 4: Paste the path in Notepad.
Step 5: Launch Command Prompt as administrator and type robocopy. Hit Enter.
Step 6: Paste the two folder paths separated by a space and followed by /L /NJH /NJS /NP /NS. Hit Enter.
Use WinMerge to compare two folders in Windows 10/11

WinMerge is a great third-party open-source tool to compare two folders on your Windows PC or laptop. As the name suggests, WinMerge lets you merge the contents of two discrete folders. You can also use this tool to compare up to three folders. Here’s how.
Step 1: Download and install WinMerge from its official website.
Step 2: Click on File and select Open.
Step 3: In the ‘1st file or folder’ field, click on Browse and select the folder you wish to compare.
Step 4: Repeat Step 3 for the second and third folders as well.
Step 5: Click the check box for Read-only under every folder.
Step 6: Type *.* in the Folder: Filter field.
Step 7: Hit Compare.
Frequently Asked Questions (FAQs)
How do I compare two folders in Windows 10/11?
Launch WinMerge on your PC, go to File>Open, enter the locations of the two folders in their respective fields, select ‘Read-only’, and hit ‘Compare’.
How many folders can I compare using WinMerge?
You can compare up to 3 folders using WinMerge.
How do I compare two folders using Command Prompt?
Copy the paths of the two folders and paste them into Notepad. Launch Command Prompt and enter ‘robocopy’. Paste the two file paths in Command Prompt, and add /L /NJH /NJS /NP /NS next to them. Hit enter to compare the folders.
Read Also: Acer Launches AI-Powered Predator Helios Gaming Laptops In India
Conclusion
These are the top 3 ways to compare any three folders on Windows 10 or 11. If you know any other way to carry out this task, let us know in the comments! While you’re here, read this article to learn all the different ways to take a screenshot on your Windows 11 PC or laptop.
