

Solid State Drives are the new industry standard for storage in PCs and laptops. This is largely due to their compactness and fast speeds. An SSD’s speed not only determines how quickly file transfers take place but it also plays a big role in the performance of your device. If your PC feels slow and sluggish, it could be due to a slow SSD. Here are 4 ways you can check the SSD read and write speeds on a Windows 11 PC or laptop.
Read Also: Instagram introduced vertical profile grids, Story highlights moved to grids
In This Article
What is an SSD?
SSD is the storage device used by modern PCs. It stands for Solid State Drive and is the successor to Hard Disk Drives (HDD). SSDs hold a lot of advantages over HDDs, which has catapulted them into widespread popularity. While HDDs use spinning disks to store data, SSDs employ NAND flash memory, which is several times faster.
Not only are SSDs faster than HDDs, but they are also more compact. Their form factor allows laptops to be sleeker and lighter. SSDs are also more efficient and consume less power. If you’re wondering whether your PC uses HDD or SSD, you can go to the Device Manager in settings and select the disk drive option to view the detailed storage specs.
Check SSD speed using Command Prompt
Step 1: Run Command Prompt as administrator on your Windows 11 PC or laptop.
Step 2: Enter the following command to find the write speed:
winsat disk -ran -write -drive [letter assigned to the drive]
![winsat disk -ran -read -drive [letter assigned to the drive]](https://www.gadgetbridge.com/wp-content/uploads/2025/01/ssd4.webp)
Step 3: Enter the following command to find the read speed:
winsat disk -ran -read -drive [letter assigned to the drive]
![winsat disk -ran -write -drive [letter assigned to the drive]](https://www.gadgetbridge.com/wp-content/uploads/2025/01/ssd5.webp)
Check SSD speed using Task Manager
Step 1: Right-click on the Windows icon in the taskbar and select Task Manager.

Step 2: Go to the Performance tab in the sidebar.
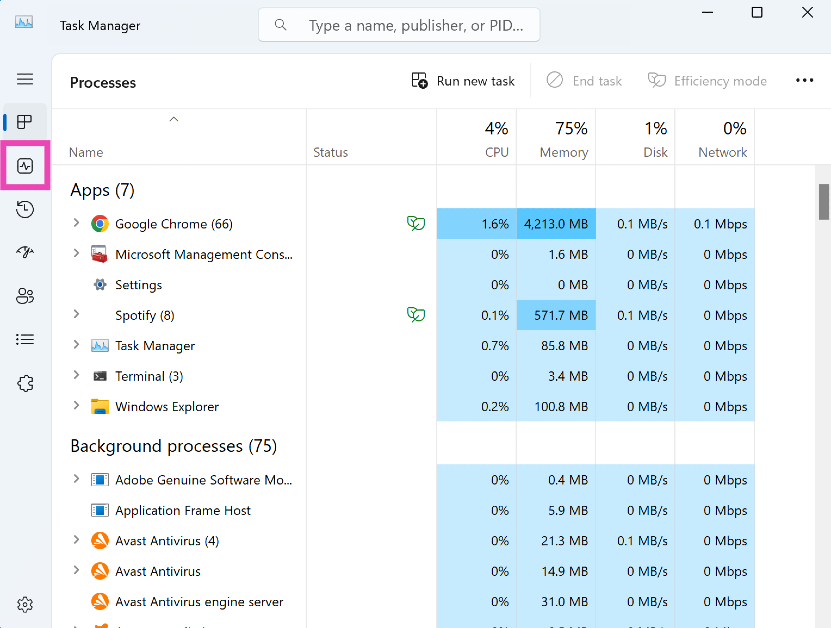
Step 3: Select a disk drive.

Step 4: The read and write speeds will be listed at the bottom of the screen.
Check SSD speed using MiniTool Partition Wizard
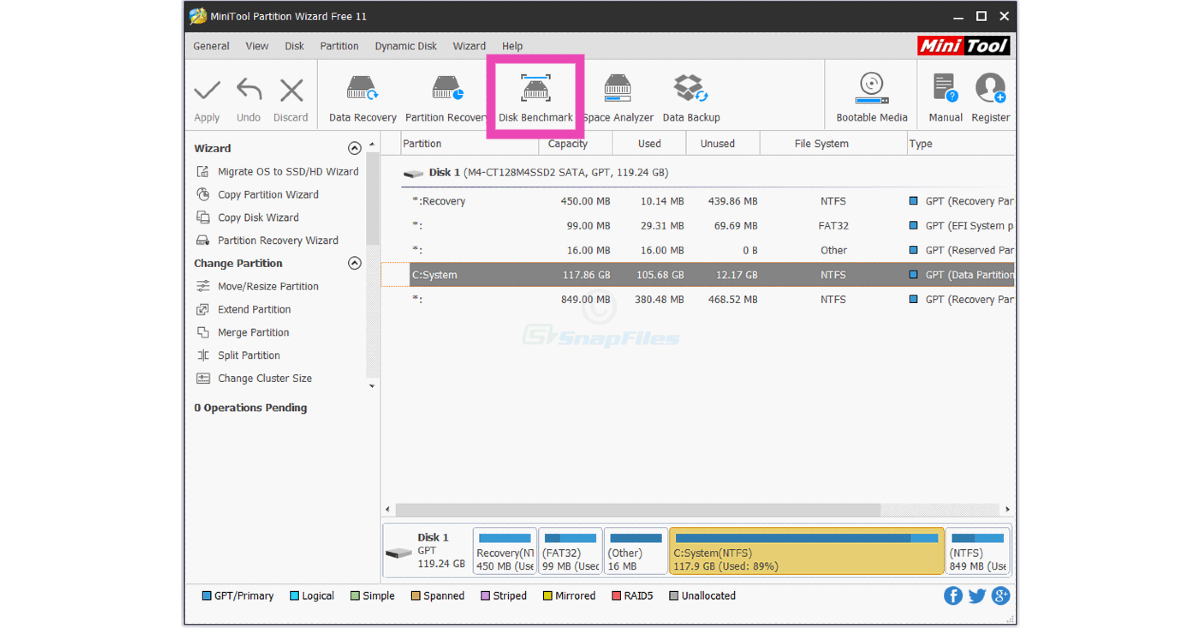
Step 1: Download and install MiniTool Partition Wizard on your Windows 11 PC or laptop.
Step 2: Hit the Disk Benchmark option in the top menu.
Step 3: Select a drive and set the requirements.
Step 4: Hit Start.
Check SSD speed usingCrystalDiskMark
Step 1: Download and install the CrystalDiskMark application on your Windows 11 PC or laptop.
Step 2: Launch the CrystalDiskMark application on your PC and set the number of runs, file transfer size, and disk drive from the top menu.

Step 3: Hit All.
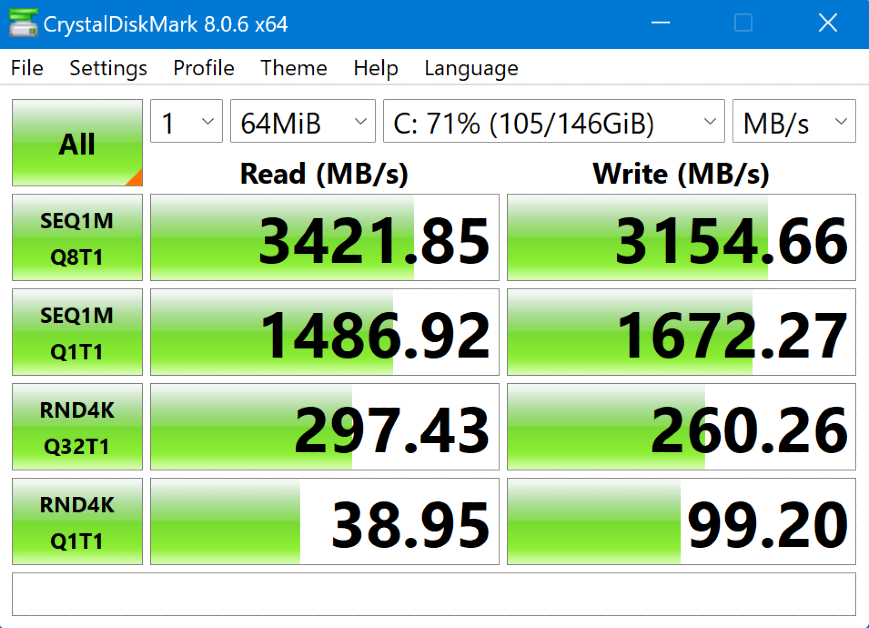
Step 4: The application will conduct a test to check the read and write speed of your chosen disk drive. Once the rest is over, the results will be displayed on the screen.
Frequently Asked Questions (FAQs)
How do I check my SSD’s speed?
To check SSD speed, launch Command Prompt as administrator and enter ‘winsat disk -drive [drive name]’.
How to test SSD speed with CrystalDiskMark?
Launch CrystalDiskMark and select the disk name, number of runs, and file size from the top menu. Hit ‘All’ to run the test. Once the test is completed, the SSD speed will be displayed on the screen.
How do I check SSD speed in Windows 11?
Launch the Task Manager, go to the Performance tab, select a drive, and view the read and write speeds at the bottom of the screen.
How do I check my SSD’s specs?
Go to File Explorer>This PC and right-click on a drive. Select ‘Properties’ to view its detailed specs.
How do I check that the SSD is working properly?
Go to Settings>System>About>Device Manager, expand the ‘Disk drives’ category, right-click on the drive name, and select ‘Properties’. Check the ‘Device Status’ section to find out if it is working as intended.
Read Also: WhatsApp notifications not working? Try these 10 fixes
Final Thoughts
This is how you can check the SSD read/write speed on your Windows 11 PC or laptop. While you’re here, check out how you can remap the Copilot key on your Windows 11 laptop. If you have any questions, let us know in the comments!
