

If you want to share your pictures on the internet but want to keep your anonymity intact, pixelating your face on the images is a good idea. You can blur your face while sharing pictures of your outfits and other accessories. The great thing is that you don’t need a third-party photo editing app to add a pixelated effect to your images. Your iPhone’s native photo editor is capable of handling this task. Here’s how you can pixelate faces on your iPhone.
Read Also: 3 Ways to Download Your Masked Aadhaar Card
In This Article
Before you begin
There are 2 ways to hide the faces in a picture. For the longest time, using the Markup tool was the sole way of going about this task. While the Markup tool does not have a pixelation tool, it offers a blur effect to hide certain parts of a picture. You can also use a shape, emoji, or sticker to hide the faces on a picture.
The recent addition of the Clean Up tool to iPhone’s native photo editor has given users the option to pixelate the faces on any image. Typically, the Clean Up tool erases unwanted objects from an image. However, when you use this tool on someone’s face, it applies a safety filter. This safety filter pixelates the person’s face. When you use the Clean Up tool on the pixelated face again, it ends up removing the face entirely.
Pixelate faces using the Clean Up tool on your iPhone
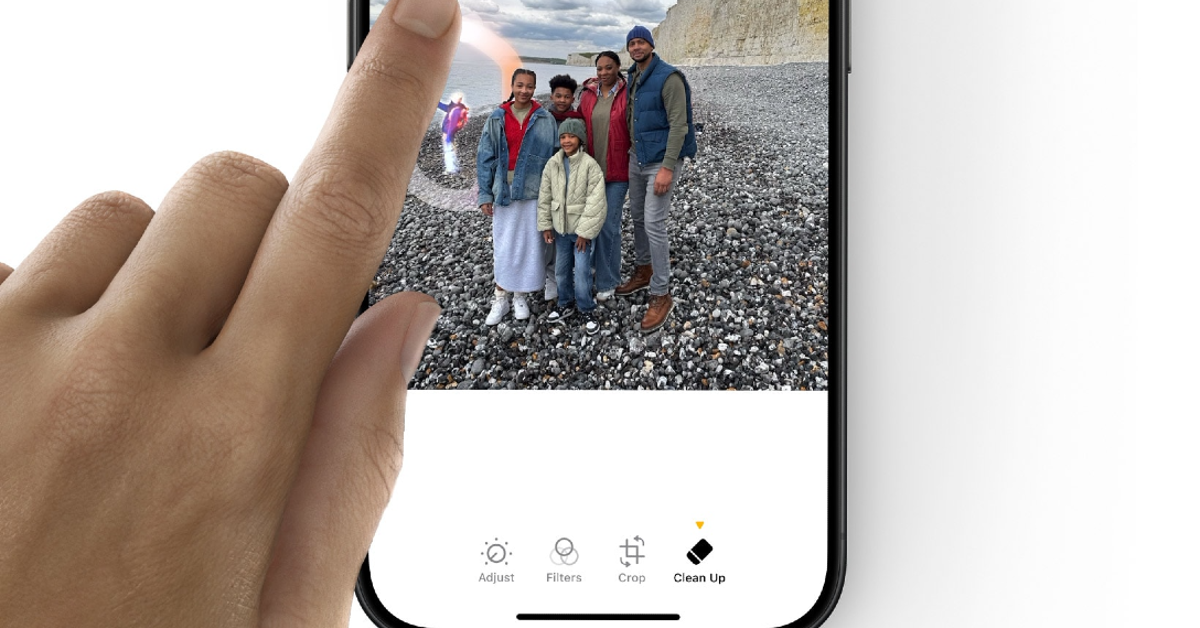
Step 1: Launch the Photos app on your iPhone and open a picture.
Step 2: Hit the Edit button at the bottom of the screen.
Step 3: Tap on Clean Up.
Step 4: Select the face by drawing a circle around it. You can also select the face by highlighting it.
Step 5: Once the face has been selected, Clean Up will pixelate it. If you want to remove the face entirely, select the pixelated part again.
Step 6: Hit Done to save the edited picture.
Bonus Tip: Hide faces by using the Markup tool on your iPhone
Step 1: Launch the Photos app on your iPhone and open a picture.
Step 2: Hit the Edit button at the bottom of the screen.
Step 3: Hit the pen icon at the top of the screen to access Markup.
Step 4: Tap the plus icon and select Add Shape.
Step 5: Select a shape from the list of options. A circle would be the ideal choice to hide a face.
Step 6: Drag the shape over the face. Use two fingers to adjust its size.
Step 7: Hit Done to save the edited picture.
Frequently Asked Questions (FAQs)
Can you pixelate a photo on an iPhone?
You can use the blur effect on the Markup tool to pixelate photos on your iPhone. The new Clean Up tool can pixelate people’s faces as well.
Is there a blur tool on the iPhone?
The native photo editor on the iPhone has a blur tool. You can access it by hitting the edit button on a picture and selecting Markup.
How to pixelate a face on an iPhone?
Open the image in the Photos app, tap the edit button at the bottom of the screen, select Clean Up, and draw a circle around the face. If you’re happy with the pixelation, hit ‘Done’.
How to use the pixel eraser on an iPhone?
iPhone’s object remover for images is called ‘Clean Up’. You can access this tool by tapping the edit button on an image. Select an object by circling it or scribbling over it. Once the object has been selected, it will be removed from the picture.
How do I turn on Apple Intelligence on my iPhone?
Go to Settings>Apple Intelligence & Siri and turn on the toggle switch to enable Apple Intelligence on your device.
Read Also: Itel A80 launched in India under Rs 7,000
Final Thoughts
This is how you can pixelate people’s faces on your iPhone using the Clean Up and Markup tools. You can use the Markup tool to blur any part of a picture too. If you have any questions, let us know in the comments!
