

Most people use Adobe Acrobat to make changes like adding shapes in PDF files. However, if you don’t have that expensive PDF editor and feel that it is too expensive to afford, you don’t have to worry because you can use Adobe Acrobat alternative – UPDF. Let’s learn from this article how to add shapes to PDF with and without Adobe Acrobat.
In This Article
Part 1: How to Add Shapes in PDF Without Adobe Acrobat?
UPDF is the most powerful PDF editor that helps you to make changes in PDFs without compromising its quality and formatting. Using this tool, you can edit, annotate and convert documents with a breeze. Moreover, this innovative tool is far better than Adobe Acrobat. Read the following comparative points to learn why you should choose UPDF instead of Adobe Acrobat to add shape to PDF:
- User-Friendly Interface: The interface of UPDF is very delightful and intuitive. Even new beginners can use this tool easily without any assistance. Each feature of it is perfectly displayed and given unique icons. However, Adobe Acrobat holds an outdated interface. You have to first watch tutorials on how to use Adobe, and after that, you can perform any task on it.
- Affordable Price: Users always prefer software that is affordable. UPDF wins the game here by providing affordable subscription plans. Moreover, it also offers a free-trail version in which you can enjoy all its features. In contrast, Adobe Acrobat is quite expensive, especially for students and low-pay grade professionals.
- Feature-Rich Tool: UPDF is loaded with unique features that are enough to solve all the problems related to PDF. With the help of this tool, you can add shapes, stickers, and stamps to PDF in a blink. However, Adobe Acrobat has fewer features compared to UPDF in the comments. Due to this limitation, people prefer UPDF more.
- OCR Technology: UPDF offers OCR technology at an affordable price through which it can easily convert scanned documents to editable and searchable PDFs. This advanced technology is beneficial to make the office work efficient and effective. However, the same technology is also offered by Adobe but with a higher price tag.
1. How to Insert a Shape in PDF Via Shape Feature?
In this section of the article, we will teach you how to insert a shape in PDF by using UPDF. Don’t be distressed because UPDF is the easiest software to operate. You just have to follow a few simple steps to add a shape to the document. To learn about these steps, have a look below:
Step 1: Download and Install UPDF
Access the official website of UPDF and download the tool from there. Once downloaded, install it by following the instructions of the installer. Afterwards, launch the UPDF on Windows or Mac.
Step 2: Open the PDF File
Click the “Open File” button and select the file in which you want to add shape. After selecting, press the “Open” button to import the file in UPDF. Now, tap the “Comment” icon at the left tool panel.
Step 3: Add Shape in the PDF File
Choose the “Shape” icon at the top navigation bar and select the shape you want to add. You can also adjust the shape’s border colour, fill colour, opacity, and border thickness by using the options provided underneath the shapes. Afterwards, insert the shape by clicking on the document. Go to the “File” menu and press the “Save” option to save changes.
2. How to Add Shape to PDF Via Sticker Feature?
Shapes and stickers are both graphical elements that are used to make PDF files more attractive. However, both these elements are distinguishable from each other. Shapes can be filled with text, gradients, colours, and patterns, while in stickers, you cannot sometimes add text or change colour. Moreover, shapes are mainly used to create complex designs and graphics, but stickers are usually used to add visual elements to documents.
UPDF offers a vast collection of shapes in its sticker features. You can easily add these shapes to your PDF file to give it a more aesthetic look. Some of the shapes of this powerful PDF tool are listed below:
- Rectangle
- Triangle
- Circle
- Arrow (Up, Down, Right, and Left)
- Pointer
- Cloud
- Text Callout
- Line
If you are interested in using the sticker feature for adding shapes, follow the below-provided instructions carefully to learn how to add shapes to PDF via the sticker feature:
Step 1: Access the Sticker Feature
Click the “Sticker” dropdown menu present at the top navigation bar and locate the shape you want to add by scrolling down the cursor.
Step 2: Add Shape to the PDF
After choosing the shape, take the cursor to the place where you want to add it and click to paste the shape there. Use the border handles to change the size and position of the shape.
3. How to Draw Shapes in PDF?
Do you want to draw shapes to make the document more personalized instead of adding available shapes in PDF? UPDF gives you a free hand to draw shapes on your PDF file and insert different colours into them. Follow the underneath steps to find out how to draw shapes in PDF by using UPDF:
Step 1: Go to the Pencil Feature
Click the “Pencil” icon available at the top tool panel. Now, select the border colour of the shape from the “Border Color” section. You can also adjust the opacity and thickness of the shape.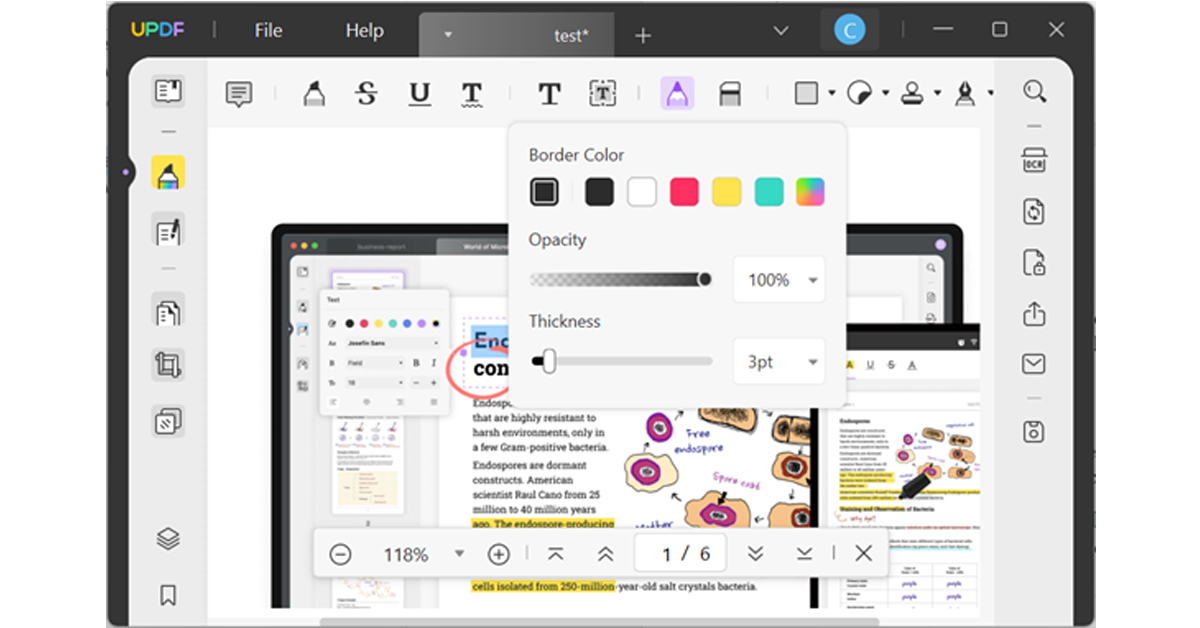
Step 2: Make Changes in Shape
After drawing the shape, you can use border handles to move its position and double-click on it to change its colour, size, and opacity. If you want to remove any portion of the shape, select the “Eraser” tool and rub the eraser over that part.
Part 2: How to Add Shapes to PDF in Adobe?
Adobe Acrobat also provides a shape feature with the help of which you can add shapes to your document. However, you have to first buy that tool by paying a heavy amount to use the shape feature. If you have already purchased it, read the following instructions to add shape to PDF acrobat:
Step 1: Open PDF on Adobe Acrobat Pro DC
Open Adobe Acrobat Pro DC on your device and click the “File” menu present at the top left corner. Select the “Open” button and choose the PDF. After selecting, press the “Open” button to import PDF in Adobe.
Step 2: Add Shape in the PDF
Afterwards, access the “Tools” tab and select the “Comment” option. Click the “Drawing Tools” icon and choose the shape. Place the shape on the document with the help of a cursor.
Step 3: Make Changes in the Shape
You can adjust the thickness of the shape border by using the “Change Shape Thickness” icon. Select the “Settings” icon to access the shape properties for changing the shape, colour, style, opacity, and other properties. Once done, click the “File” menu and select the “Save” option to save changes in a PDF file.
Final Words
In this article, you have learned how to add shapes to PDF using UPDF and Abode Acrobat. It is visible that UPDF is easier to use as it offers simple steps for inserting shapes. And Adobe Acrobat is challenging to operate, as you have to go through many complicated steps to add shapes. That’s why it is recommended to go for UPDF because it is a user-friendly and affordable PDF editor.
FAQS About Adding Shapes to PDF
- How to Add Objects in Adobe Acrobat Pro?
Abode Acrobat allows you to add a variety of objects to your documents. However, you have to follow complicated steps to add them. Read the following steps to find out how to add shapes to PDF in Adobe:
Step 1: Launch Adobe Acrobat Pro on your device and open the PDF file. Now, go to the “Tools” tab and select the “Comment” option.
Step 2: Next, choose the “Drawing Tools” option to expand the shapes menu for selection. After selecting the shape, paste it on the document using the cursor.
- How to Add Star to PDF?
In UPDF, there are two ways to add a star to a PDF file, and it’s your choice which one to follow. In the following, both these ways are provided:
Way 1: Open the PDF on UPDF and select the “Comment” icon. Click the “Pencil” option and draw the star.
Way 2: Press the “Shape” option and select the line shape. Place the line on the document with the help of a cursor. Now repeat the process to add more lines until you create a star by joining all the lines.
- How to Add a Line in PDF on Acrobat?
Adobe Acrobat also offers a line shape along with other basic shapes like rectangles, circles, or triangles. Go through the following instructions carefully to add a line in PDF on Adobe Acrobat:
Step 1: Open the PDF file on Adobe Acrobat and press the “Tools” tab. Select the “Comment” option and click the “Drawing Tools” icon.
Step 2: Following this, choose the line shape from the shapes menu and place it in PDF.
For the latest gadget and tech news, and gadget reviews, follow us on Twitter, Facebook and Instagram. For newest tech & gadget videos subscribe to our YouTube Channel. You can also stay up to date using the Gadget Bridge Android App. You can find the latest car and bike news here.
