

You create a signature when you watermark your photos. It helps you to protect all your hard work and make it safe on the internet. Downloading on the internet has become easier and this is why you should start to apply a watermark to your images today. Here are top 5 ways you can watermark your photos. Follow the steps below.
Read Also: Top 4 Ways to Turn On Your Android Phone’s Flashlight Without Waking Up The Screen
In This Article
Watermark in Photoshop
 Photographers and painters put their signatures on the photo or a painting. This is to maintain the authenticity of their work. Similarly, your edited work and photos on the internet should be under copyright. Your work on a digital platform can be safer with the watermark you will be creating. It will give you the ownership claim as well. These are some steps on how you can watermark in Photoshop.
- Save the image you want to watermark in a folder
- Open the Photoshop app
- Choose the image
- Select Layer > New layer
- Rename the new layer “Watermark”
- Click text tool
- Add text for your watermark
- Choose font, text size, colour
- Hit Enter
Read more: How to edit an image on an Android smartphone
In Watermarkly.com
 The website can watermark your images and protect them in a few easy steps. The best part of Watermarkly is that you can watermark it for free. It enables you to import it from computers, Google Drive, or dropbox. The website claims to watermark your images in 5 min. It is very easy. Follow the steps below.
- Save the files in a folder or you can choose from drive or dropbox
- Open the Watermarkly website
- Choose the option watermark for free
- The page: drag your file open up
- Select image from the options given
- Go to the next step on the top right corner
- There are two option: add text and logo
- Choose one: text or logo
- Enter all the option you like: text, font, colour, size, etc
- Now on the right top corner select watermark image
- The process is completed: Download it
Read also: 5 best photo editing apps for Android devices
Visual Watermark
 The app comes with many exciting features. You can watermark images offline also. The app has 260 fonts that you choose from. It is compatible with Windows or Mac. You can download the app from the website visualwatermark.com for free. To watermark your images from the app. It is fairly simple. Follow these simple steps to
- Save the images to a folder on your computer
- Open the app
- Drag your photos here
- Select image from the folder
- Go to the next step on the top right corner
- Now you see the page add text
- Enter text, font, size, colour
- Drag to where you put the watermarks
- Go to next step: top right corner
- Then again go to the next step
- Choose output folder
- Save it in a folder
- Press watermark
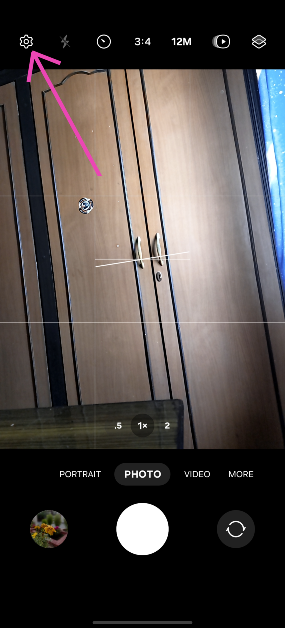
Add a watermark to your images on your Android phone
- Launch the native Camera app on your smartphone.
- Tap the gear icon for settings.
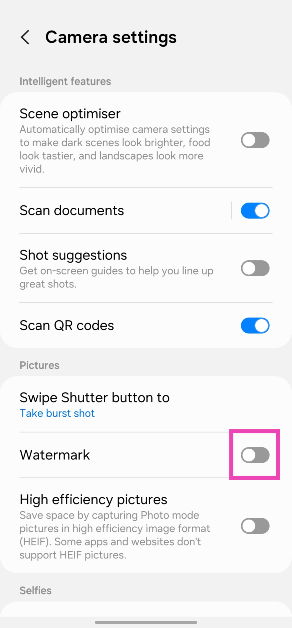
- Turn on the toggle switch for Watermark and tap on it.
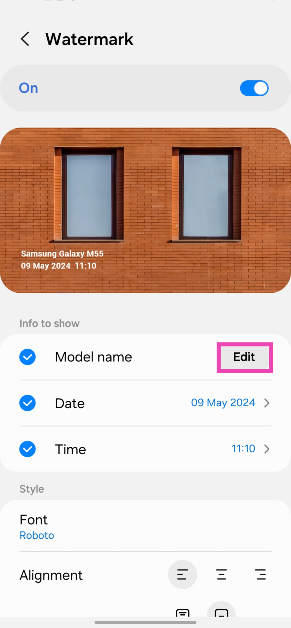
- Hit Edit next to Model name.
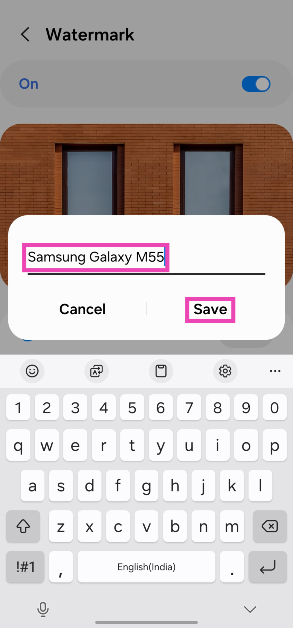
- Enter the text for your watermark and hit Save.
Any pictures you take will be watermarked with the text of your choice.
Watermark: Logo, Text on Photo
Download from the Google Play Store

The ‘Watermark: Logo, Text on Photo’ app is one of the best third-party tools you can use on your Android phone to add a watermark to your images. It has over 250 creative fonts and 1000+ stickers that can be utilised to create an eye-catching watermark. You can even create a signature for your images on this app. The app gives you the option to change the pen size and colour. Before posting your images on social media, you can use the ‘Logo, Text on Photo’ app to resize and edit them.
Frequently Asked Questions (FAQs)
How do I add a watermark to my images on an Android phone?
Go to Camera>Settings>Watermark, turn on its toggle switch, and add the text. Go back when you’re done. The pictures you take using your phone will now have the watermark.
How do I add a watermark to my images on a PC?
Install Visual Watermark on your PC. Open the app and drag your image in the box. Hit ‘Next’ and add text. Change its font and size and drag it along the picture to place it wherever you want. Hit ‘Next’ again and save the image in the target folder.
Which are some good apps to add watermarks to images?
For Android, Watermark Maker, Add Watermark on Photos, Watermark: Logo, Text on Photo, and Photo Watermark are great apps for this task.
Read Also: Meta brings AI-powered image and text generation tools for businesses to create ad creatives
Conclusion
These are the top 5 ways to put a watermark in your images on an Android phone or Windows PC. If you know any other ways to go about your task, let us know in the comments. While you’re here, read this article to learn how to watermark your Google Docs.
