

Clicking the perfect picture isn’t always an easy task. While you can change a lot of elements to take the ideal image, the background is almost entirely out of your control, especially when you’re taking a picture in an outdoor setting. Luckily, there are a few ways to remove the background in post-processing and add a new one according to your liking. This comes in very handy when it’s an up-close shot of the subject and the background doesn’t add much to it. In this article, we bring you 4 simple methods to remove or replace any image background on your Android phone.
Read Also: Not able to Download Apps on Android Phone? 6 quick fixes
In This Article
Remove any image background using your mobile web browser
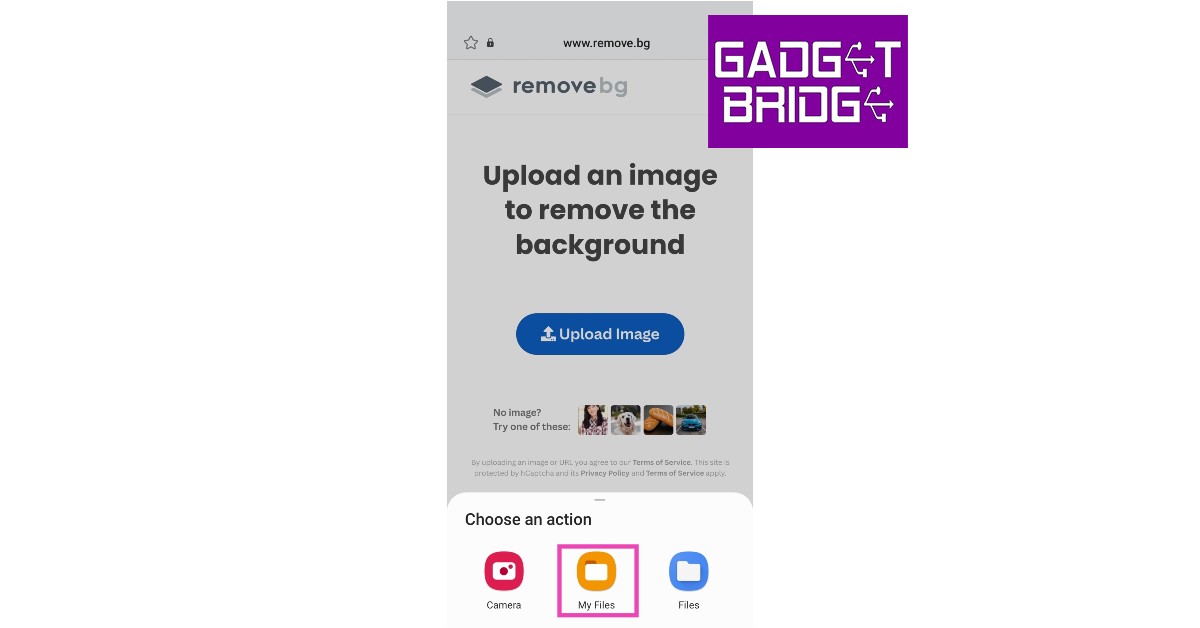
Step 1: Go to your smartphone’s web browser and open https://www.remove.bg/.

Step 2: Tap the ‘Upload Image’ option and upload an image from your phone’s gallery.
Step 3: The website will automatically remove the background from your image and show you a preview of the subject.
Step 4: Tap on ‘Download’. You can also download an HD version of the image.

Replace any image background using your mobile web browser
Step 1: Go to your smartphone’s web browser and open https://www.remove.bg/.
Step 2: Tap the ‘Upload Image’ option and upload the image from your phone’s gallery.
Step 3: Tap on ‘Edit’ and choose from the list of pre-set backgrounds. You can also upload a background to the website and it will be stitched to the image.


Step 4: Once you’ve decided upon a background, save the image to your phone by clicking on the download icon at the top right corner of the screen. The image will be saved to your device.

Remove any image background using the PhotoRoom app
Step 1: Install the PhotoRoom app on your Android device from Google Play Store.
Step 2: Open the app and upload a picture by tapping on the ‘+’ icon.

Step 3: PhotoRoom will scan the image and remove the subject from the background.
Step 4: Choose the kind of background you want. If you simply want a picture of the subject that you can stitch into other backgrounds, select ‘Transparent’.

Step 5: Tap the Export icon at the top right corner of the screen and select ‘Save to Gallery’.

Add any image background using the PhotoRoom app
Step 1: After you’ve successfully removed the background from the image, tap on the ‘background’ option before exporting the image.

Step 2: Use the colour wheel to select a new colour for the background.

Step 3: Press ‘Done’ once you’re finished and tap the ‘Export’ icon to save the image to your phone’s gallery.

Read Also: 5 quick methods to Save Mobile Data on Instagram
Conclusion
These are the 4 simple ways you can remove or replace any image background on your Android phone. Some smartphone’s come with a native magic background eraser, but it may not work all the time. If you’re shooting an image, make sure the foreground is clear and lucid, so you won’t have any trouble separating it from the background while editing. If the lighting in the original image is good, it will fit well into any artificial background.
For the latest gadget and tech news, and gadget reviews, follow us on Twitter, Facebook and Instagram. For newest tech & gadget videos subscribe to our YouTube Channel. You can also stay up to date using the Gadget Bridge Android App. You can find the latest car and bike news here.
For the latest gadget and tech news, and gadget reviews, follow us on Twitter, Facebook and Instagram. For newest tech & gadget videos subscribe to our YouTube Channel. You can also stay up to date using the Gadget Bridge Android App. You can find the latest car and bike news here.
