When attempting to access important files on your USB drive or SD card, you may encounter the frustrating error message ‘The disk structure is corrupted and unreadable.’ It typically indicates that there is an issue with the file system or the physical structure of your storage device.
However, there’s no need to worry. In this post, we’ll delve into the reasons behind this problem, offering you seven effective methods to address the issue. Additionally, we’ll also provide preventive measures to help you steer clear of similar situations in the future. So, let’s get started and say goodbye to any worries about the ‘Disc structure is corrupted and unreadable’ error.
Part 1: Why Does the ‘Disk Structure is Corrupted and Unreadable’ Error Occur?
Many users often ask questions like ‘the disk structure is corrupted and unreadable fix’ on help forums, but they are not interested in understanding the fundamental cause of this error.
File System Corruption
Over time, file systems on storage devices can become corrupted due to improper shutdowns, power outages, or software issues.
Outdated or Incompatible Drivers
Outdated or incompatible drivers may not only lead to file system issues but also have security vulnerabilities that can be exploited by malware.
Bad Sectors
Physical damage to the storage medium, such as the presence of bad sectors, can lead to the ‘Disc structure is corrupted and unreadable’ error.
Improper Disk Operations
You may have abruptly disconnected the storage device during read/write operations or file transfer.
Virus or Malware Attacks
Malicious software can infect and corrupt files, including those crucial for the proper functioning of the file system
Part 2: Recover Data from the Drive with the ‘Disk Structure is Corrupted and Unreadable’ Error
When encountering the ‘disc structure is corrupted and unreadable’ error, the primary step is to promptly recover the data on the problematic disk. This not only minimizes data loss caused by damage to the disk structure but also enables you to back up data in advance before performing any repairs.
Tenorshare 4DDiG, a professional and free data recovery software, can restore your lost files from over 2000 storage devices. Whether data is lost due to accidental deletion, formatting, system crashes, virus attacks, or any other reasons, this tool is your most reliable ally. In addition, the intuitive interface and straightforward data recovery process make it easy for users without technical knowledge to effortlessly get started.
Here is how to use it to recover lost date before resolving the ‘disk structure is corrupted and unreadable’ issue:
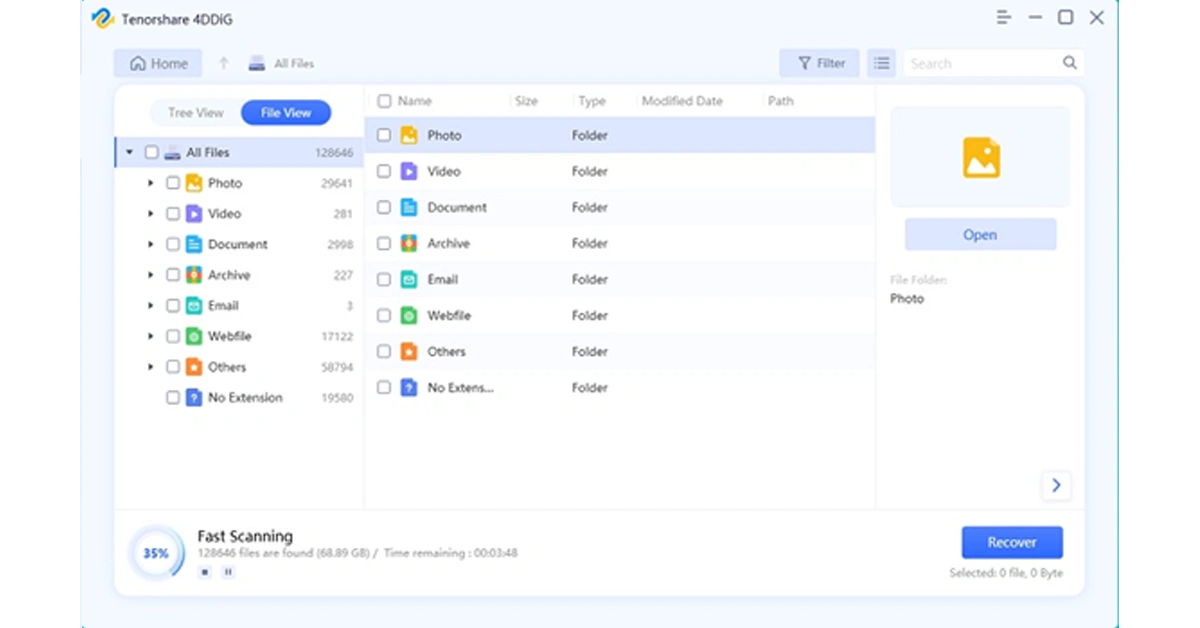
Step 1: Install and launch the 4DDiG Data Recovery tool on your computer. Then, choose the affected drive from the main interface and click on the “Scan” button.
Step 2: The tool will promptly start scanning for all lost files on the selected drive. During this process, you have the option to view files in either File View or Tree View. Additionally, you can pause or stop the scanning process once you’ve identified the necessary files.
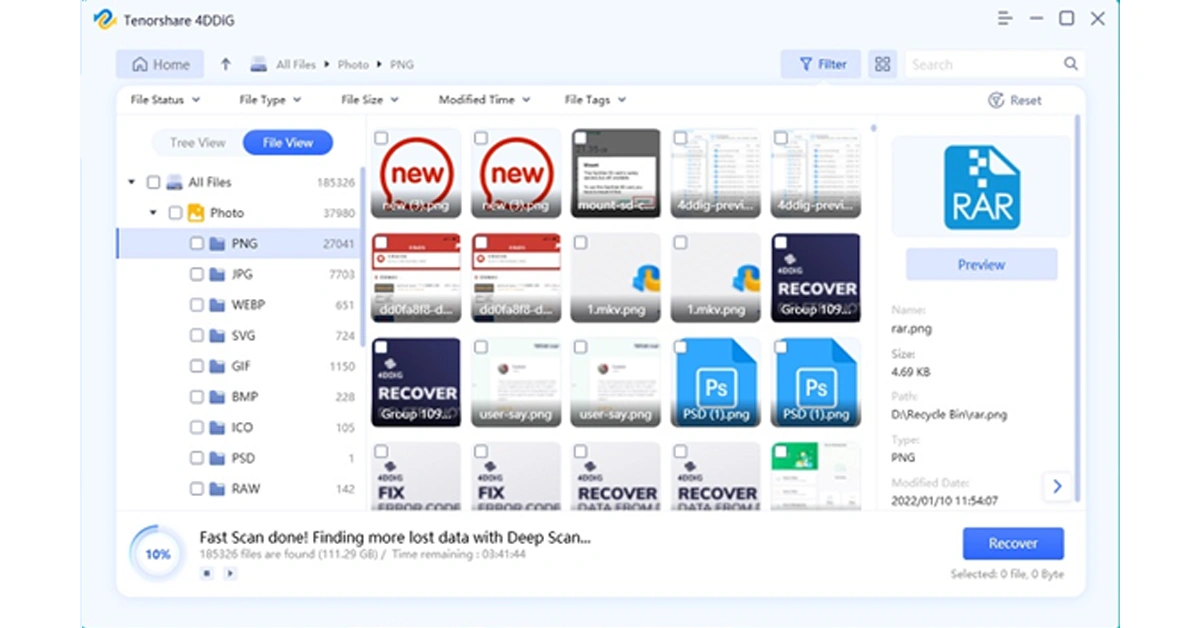
Step 3: Now, select the lost files and simply click on the “Recover” button. Remember to back up these files to a safe location.
Currently, the software provider is hosting an exciting Christmas promotion. Anyone participating in the event has the chance to win free Amazon e-gift cards and a brand-new iPad.
Part 3: 6 Ways to Fix the ‘Disk Structure is Corrupted and Unreadable’ Error
Solution 1: Perform Some Basic Checks
It’s often simple to repair ‘Disk structure corrupted unreadable’ error. Let’s begin with some basic checks:
Sometimes, you only need to restart your computer and reconnect the disk.
You can also try changing the drive port or connecting your device to another computer.
If the disk has suffered severe physical damage, we strongly recommend seeking professional assistance.
If the error persists, move on to other advanced solutions.
Solution 2: Check and Repair Disk Errors
You can easily fix the ‘Disc structure is corrupted and unreadable’ error using CHKDSK. This built-in tool can scan the disk and provides information about the disk’s status and the file system’s health. If any issues are found, CHKDSK automatically attempts to repair them. Follow these steps:
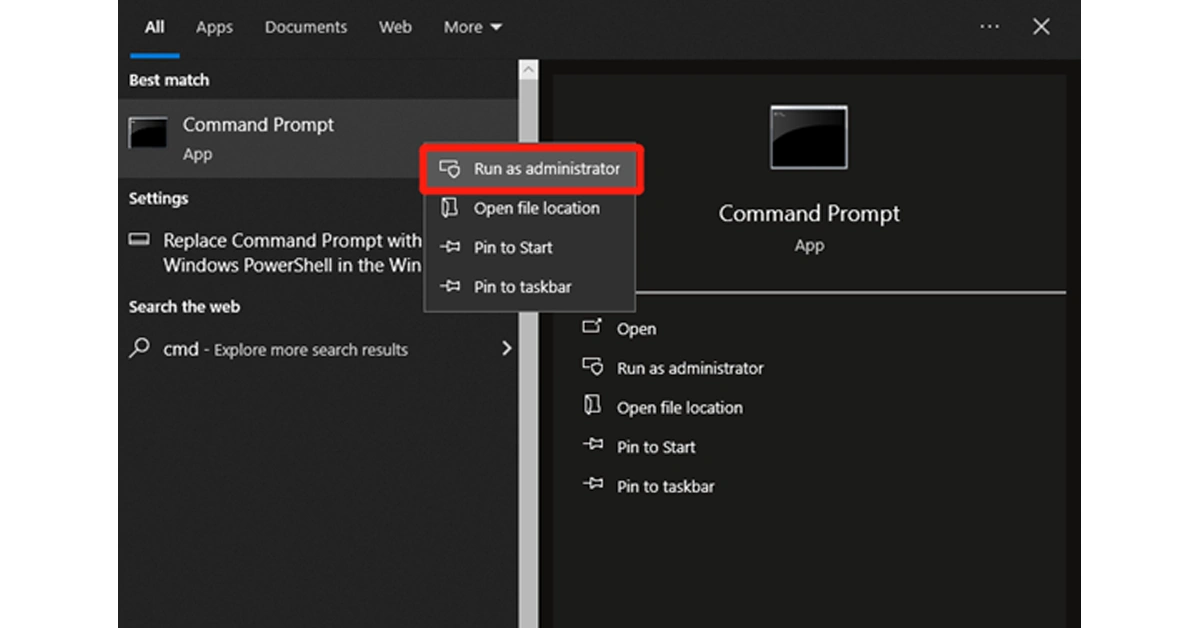
Step 1: press Win + S, type “cmd”, right-click, and choose to run as administrator.
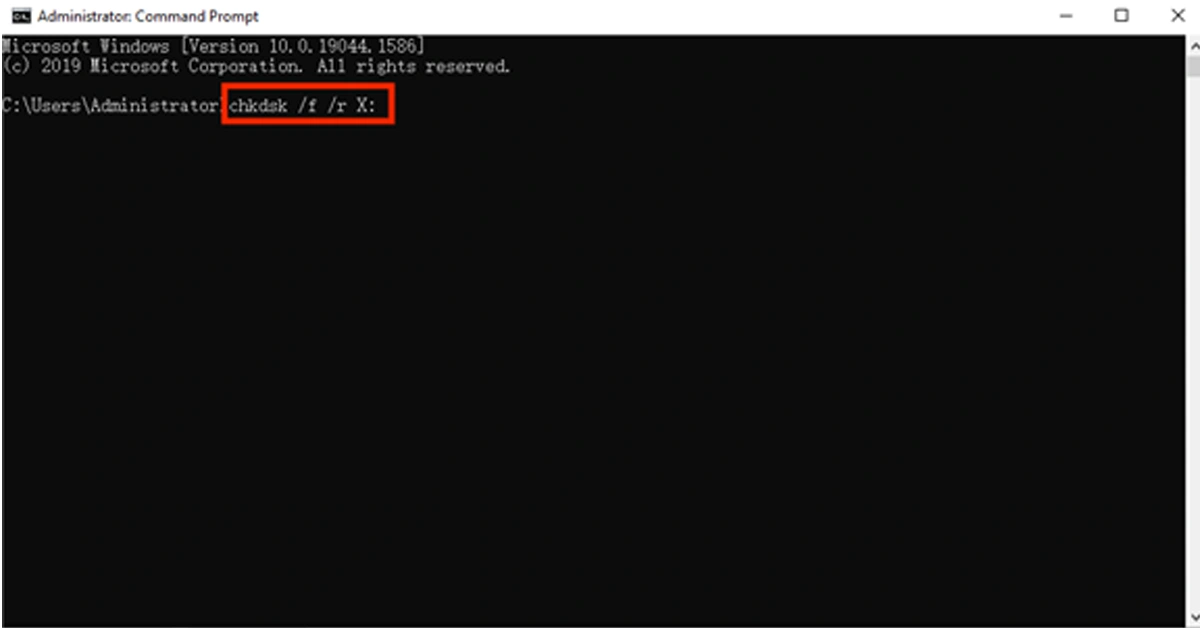
Step 2: Then, enter the “chkdsk /f /r X:” command and hit the Enter key. Remember to replace X: with your actual drive letter.
Step 3: If necessary, restart your computer to complete the repair process.
Solution 3: Update or Reinstall Disk Driver
As mentioned before, outdated or corrupted disk drivers can be the culprit of the ‘Disc structure is corrupted and unreadable’ error. To address this issue, you can update or reinstall the drivers by following these steps:
Update Disk Driver
Step 1: Perform a right-click on the Start menu and select “Device Manager.”
Step 2: Locate the disk drives section and expand it. Then, right-click on the problematic disk drive and opt for “Update driver.”
Step 3: Choose the option to search automatically for updated driver software.
Read Also:Best 6 ways to Fix ‘App Not Installed’ Error on Android? (2023)
Reinstall Disk Driver
Step 1: In the Device Manager, right-click on the disk drive and select “Uninstall device.” Then, restart your computer.
Step 2: Reconnect the affected disk, and Windows should automatically reinstall the drivers.
Step 3: If not, go back to the Device Manager, right-click, and choose “Scan for hardware changes.”
Solution 4: Run the Troubleshooter
Another simple method to address the ‘Disc structure is corrupted and unreadable’ issue is by running the hardware troubleshooter. Similar to CHKDSK, it also can automatically detect and resolve common hardware-related issues. Here is how:
Step 1: Press Win + I to open the Settings app and choose “Update & Security.”
Step 2: In the left sidebar, click on the “Troubleshoot” option.
Step 3: locate and select the “Hardware and Devices” option. Then, hit the “Run the troubleshooter” button.
Solution 5: Assign a Proper File System
It’s no surprise to receive the error message ‘The disk structure is corrupted and cannot be read’ when the partition is in RAW format or unallocated. In such case, you can try the following steps to resolve the issue:
Step 1: Press the Win + X keys and select “Disk Management.”
Step 2: Look for your problematic drive in the lower section of the window. If this drive is not initialized, right-click on it and choose “Initialize Disk.”
Step 3: Follow the on-screen instructions to initialize it.
Step 4: Right-click on the unallocated space and select “New Simple Volume.”
Step 5: Follow the wizard to create a new partition, assign a drive letter, and choose the file system (NTFS).
Solution 6: Format Your Drive
If all else fails to repair ‘Disk structure corrupted unreadable’ error, it may be time to format the problematic disk. You don’t need to worry about potential data loss because Tenorshare 4DDiG can help you get back deleted files in an eye of blink. Here is how:
Step 1: Open File Explorer by pressing the Win + E keys. Then, find and right-click on the affected drive. Click on “Format” to proceed.
Step 2: In the pop-up window, choose the file system (typically NTFS) and allocation unit size (recommended to use default). Additionally, make sure that the “Quick Format” option is checked.
Step 3: Click the “Start” button and then click “Yes” to initiate the formatting process.
Part 4: Preventing Data Loss Caused by the ‘Disk Structure is Corrupted and Unreadable’ Error
While there are several solutions for the ‘Disc structure is corrupted and unreadable’ error, you also need to take proactive measures to prevent data loss in the future.
Regularly back up your important data to cloud storage or another device.
Use a reliable disk monitoring tool to keep an eye on the health of your hard drives.
Always eject your external drives properly before disconnecting them.
Choose a reputable antivirus program and install it on your computer.
choose the proper file system when formatting your drive.
Bottom Line
Now, you should no longer be puzzled by the question ‘the Disk structure is corrupted and unreadable fix.’ Before attempting any repairs, take some time to consider the specific circumstances and causes behind the error. If you experience data loss during the repair process, especially when formatting the disk, give Tenorshare 4DDiG a try.
Recording videos outdoors is always challenging. There are a lot of factors that you need to take into account before hitting the record button. The most difficult aspect to manage is the surrounding noise. Even if you get the proper shot, an intrusive noise emanating from the background can ruin it all. Seasoned editors can fix these errors, but the average person may find it hard to do the same. Well, not anymore. Especially if you have the newest Pixel. Today, we show you how to use the Audio Magic Eraser on the Google Pixel 8 Series.Read Also:Mic Not Working On Your Android Phone? Here are the 11 quick fixes
What is the Audio Magic Eraser?
Every year, the Google Pixel smartphones create waves in the tech world with their software magic. With AI being the next big thing in tech, this year’s Pixel 8 Series lost no step in utilising its potential in unique and useful ways. The result is Audio Magic Eraser, which is easily our favourite tool from the new Pixel smartphones. You may be familiar with the ‘magic’ that Google’s Magic Eraser does in removing unwanted objects from your pictures. Similarly, the Audio Magic Eraser applies AI sorcery to suppress unwanted noise from your videos.It does this by using advanced machine learning models to study the video and extract all the different kinds of noise in it. This is also made possible by the new Google Tensor G3 processor on the Pixel 8 Series. Your Pixel can recognise sounds like wind, speech, crowd noise, sounds of nature, music, and more in any video. These sounds are then laid out in different tracks, which can then be controlled individually. Pretty neat, huh? Take a look at how you can use it on your Pixel smartphone.
Here’s how you can use the Audio Magic Eraser on Google Pixel 8 and 8 Pro
Step 1: Launch the Photos app and open the video you want to edit.Step 2: Hit the Edit button at the bottom of the screen.Step 3: Switch to the Audio tab and select Audio Eraser.Step 4: The Audio Eraser tool will separate the different kinds of noises (like wind, speech, noise, etc) found in the video using its AI skills.Step 5: Select the kind of noise you want to reduce and use the slider to turn it down.Step 6: If you don’t want to carry out the task manually, tap the Auto option. Your smartphone will intelligently suppress the noise in the video.Step 7: Tap the play icon in the preview window to check the result.Step 8: When you’re happy with the result, tap Save Copy at the bottom right corner of the screen.Read Also:How to find or track your iPhone if it’s switched off?
Frequently Asked Questions (FAQs)
What does the Audio Magic Eraser on the Google Pixel 8 do?
The Audio Magic Eraser tool on the Pixel 8 and Pixel 8 Pro uses AI to recognise the different sounds in a video and then lets you control their volume. If you don’t like an intrusive sound in your video, you can use this tool to completely suppress it.
Is the Magic Audio Eraser available on Google Pixel 7?
As of now, the Magic Audio Eraser tool is only available on the Google Pixel 8 Series. However, the tech giant may roll out the feature on other Pixel smartphones in the coming months.
Where can I find the Audio Magic Eraser on my Pixel smartphone?
If you own a Google Pixel 8 or 8 Pro, you can find the Audio Magic Eraser in the Photos app. Simply, open a video and hit the edit button to access this tool.Read Also:How to See Who Viewed Your Video on Facebook
Conclusion
This is how you can use the Audio Magic Eraser on Google Pixel 8 Series smartphones. Check out this article to learn how you can use the Magic Eraser to remove unwanted objects from your pictures on your Pixel smartphone. Apart from the Audio Magic Eraser, the Pixel 8 Series also debuted new features like Best Take, Face Unblur, AI Wallpapers, and more. Let us know what your favourite feature is in the comments!
Losing your iPhone can be a huge problem, and not just because they’re expensive. From credit card info to driver’s license, your iPhone contains vital personal information that you wouldn’t want to fall into malicious hands. While you should certainly file a police report for your missing iPhone, the first thing you should do is locate it yourself. Today, we show you how to find or track your lost iPhone even when it is switched off.Read Also:How to See Who Viewed Your Video on Facebook
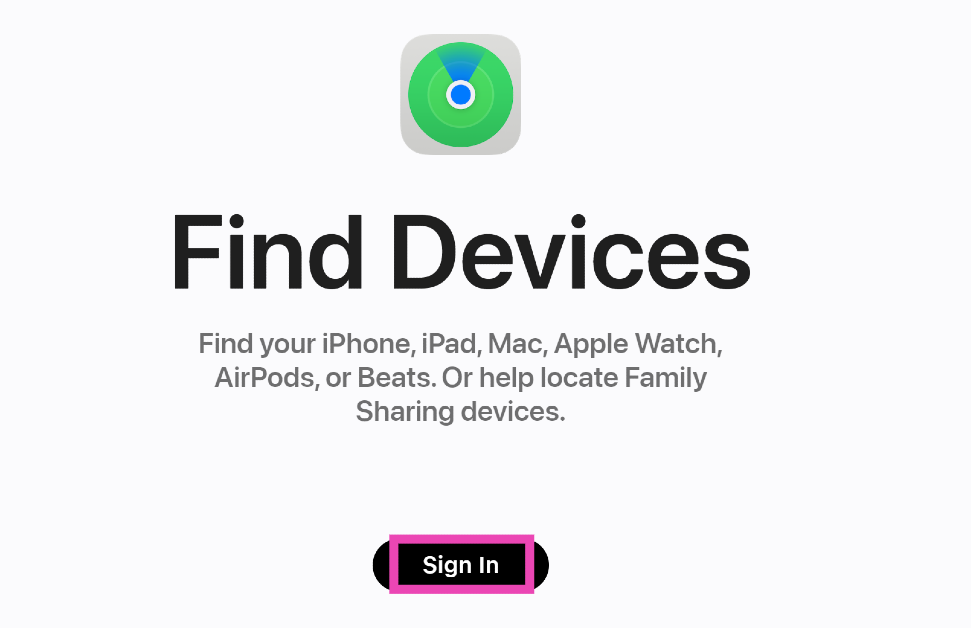
Here’s what you should do once you realise your iPhone is missing
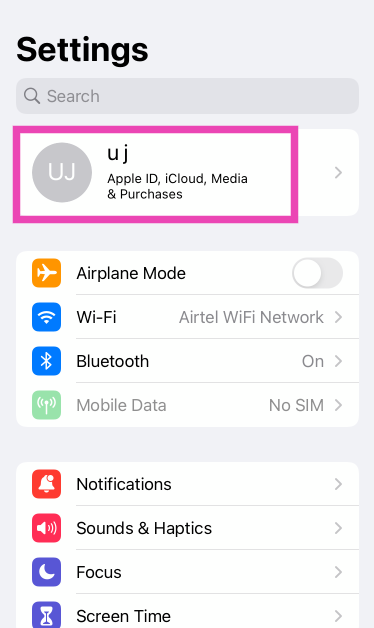
Locating a missing iPhone is fairly easy if you’ve enabled Find My iPhone on it. Apple’s Find My app also supports other devices like AirPods, Mac, iPad, and even your Beats headphones. But is it possible for Find My to track your iPhone even if it is switched off? While it can’t give you a live location of your device, you can certainly find out its last recorded location right before its battery died. If your iPhone is lost, not stolen, this information can be very crucial.Apart from tracking your lost iPhone, you can also display your contact information on its screen, in case someone finds it and wants to reach out to you to return it. This option is available on the Find My Devices webpage once you mark your iPhone as lost. If your iPhone does not have access to the Internet, Apple’s ‘Find My network’ feature can help you locate it using the Bluetooth data of all the iPhones near your device.Read Also:How to use the Audio Magic Eraser on Google Pixel 8 Series
Enable Find My iPhone
Step 1: Go to Settings and tap on your name at the top of the screen.Step 2: Select Find My.Step 3: Tap on Find My iPhone.Step 4: Turn on the toggle switch for Find My iPhone, Find My Network, and Send Last Location.Turning on ‘Find My network’ lets you locate your iPhone and enabling ‘Send Last Location’ makes sure the last location of your iPhone is recorded by Apple right before its battery is critically low.
Track your iPhone
Follow these steps to track your lost iPhone.Step 1: Go to the iCloud Find Devices page.Step 2:Sign in using your Apple ID.Step 3: Select your iPhone from the list of devices.Step 4: Your iPhone’s location will be marked on the map. If your iPhone is switched off, you will be able to view its last recorded location.
Frequently Asked Questions (FAQs)
How do I find or track my iPhone if it is switched off?
If the Find My service is enabled on your iPhone, you can track it from the Find Devices page on iCloud even if it is switched off. Go to Settings>Name>Find My>Find My iPhone and turn the toggle switch for ‘Send Last Location’.
What is ‘Find My network’ on iPhone?
Using ‘Find My network’ you can find your lost iPhone even if it is offline. Apple does this by using the Bluetooth sensors on its products to report the location data of lost devices near them. Apple claims the data is protected by end-to-end encryption so as to preserve the privacy of devices reporting the location.
How do I share my contact info on my lost iPhone?
Log into the iCloud Find Devices page and select your iPhone from the list. Select Mark as Lost>Activate from the menu. Once that’s done, you will be able to create a passcode for your iPhone if it doesn’t have one and display your contact info on the screen.Read Also:Poco M6 5G debuts in India, price starts at Rs 10,499
Conclusion
This is how you can find or track your iPhone even when it’s switched off. Not only can you use the Find My app to locate your iPhone, but it also works for AirPods, Apple Watch, iPad, Mac, Beats headphones, and AirTag. The first thing you should do when you get your hands on a new iPhone (or any other Apple product) is turn on the Find My service. If you know any other ways to find a lost iPhone that’s switched off, let us know in the comments!
2023 was an exciting year in tech, especially if you’re a smartphone enthusiast. Samsung and OnePlus kicked off the proceedings early in the year, with the release of their flagship devices. This year also marked OnePlus’ entry into the folding phone segment, with the launch of the OnePlus Open. So, as we step into the last week of the year, we thought we’d bring you our picks for the top 8 smartphones that were released this year. Check them out!Read Also:How to See Who Viewed Your Video on Facebook
This should come as no surprise but the iPhone 15 Pro Max was one of the best smartphones to be released in 2023. Apple also made the switch to the USB Type-C port for the iPhone this year, leaving behind the exclusive lightning port. Powering the iPhone 15 Pro Max is the new A17 Pro chipset, an upgrade over last year’s A16 Bionic SoC which now finds its way into the non-Pro iPhone 15 models. Another key upgrade on the new iPhone is the action button, which replaces the ringer switch. This action button can be customised to carry out quick tasks like taking a picture, switching the sound profile, launching an app, and much more. The camera panel remains largely unchanged, apart from the new 5x optical zoom capability on the telephoto lens. Read our full review of the iPhone 15 Pro Max.
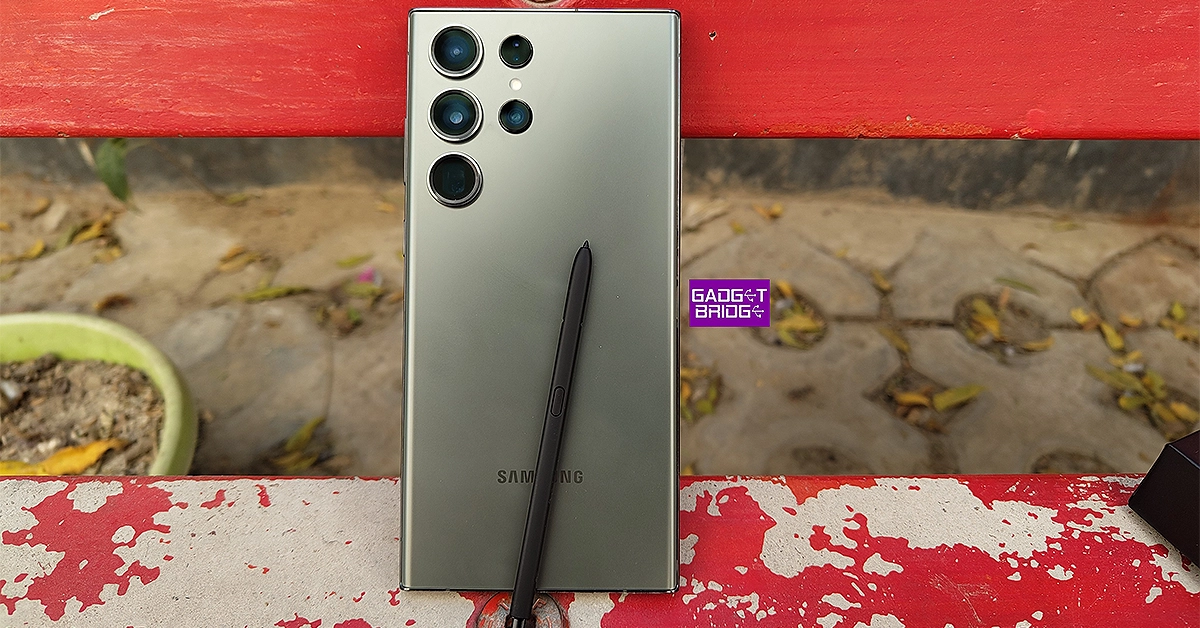
At the start of every year, Samsung launches its flagship S series smartphone and leaves the rest of the Android pack behind with some serious catching up to do. This year was no different. Launched at Samsung’s ‘Galaxy Unpacked’ event in February, the S23 Ultra is undoubtedly the best that Android has to offer. It gets the new Snapdragon 8 Gen 2 SoC under the hood, which has been slightly customised for Samsung’s flagship product. In terms of design, the Samsung Galaxy S23 Ultra retains the vertical camera alignment and general form factor from its previous iteration. This design philosophy also made it to Samsung’s midrange and budget offerings this year. The 6.8-inch Dynamic AMOLED display is super punchy as usual, and one of the best ones around. Check out our full review of Samsung Galaxy S23 Ultra to know more about the smartphone.
Being Android’s parent company, you expect Google’s flagship to deliver more than the average smartphone. And it does precisely. The new Pixel 8 Pro may just be the smartest of all smartphones. The Google Tensor G3 may not be the most powerful chipset on a premium smartphone, but Google’s software magic bridges that divide with ease. Features like call screen, face unblur, video boost, and magic eraser are incredible to use on the new Pixel. However, what really earns the Pixel 8 Pro its spot on this list is state-of-the-art photo processing, which still remains unmatched. The images taken with the Pixel are punchy, super detailed, and noise-free. The ultra-wide and telephoto sensors also produce stunning results. Read more about them in our Google Pixel 8 Pro review.
After a lukewarm response to the OnePlus 10 Pro in 2022, the company pulled up its socks and produced one of the best smartphones of the year in 2023. The OnePlus 11 seems like a return to the enthusiast-favourite OnePlus that we all know and love. Talking about the specs, the OnePlus 11 gets a 120Hz, 6.7-inch LTPO3 AMOLED display, the Snapdragon 8 Gen 2 SoC, 50MP + 48MP + 32MP triple camera array, and a 5,000 mAh battery. While it lacks wireless charging, it doesn’t seem like a big miss on the smartphone because of its 100W fast-charging support. It takes just 25 minutes for the smartphone to charge from 1 to 100%. Read our OnePlus 11 review here.
Although it often gets shoehorned into the ‘gaming phone’ category, the iQoo 11 is a complete flagship. Launched in December 2022, it was one of the first smartphones to ship with the new Snapdragon 8 Gen 2 SoC. Its supreme thermal management system earns it its gaming phone rep, but the dual-axis haptic motor is just as impressive. The latter makes the gaming experience on the smartphone more immersive and fun. The V2 chip pulls its weight while capturing images in limited lighting, delivering well-processed images that pack a lot of detail. Talking about the charging chops, the iQoo 11 supports 120W fast charging and can be fully charged in just 25 minutes. Check out more in our iQoo 11 review!
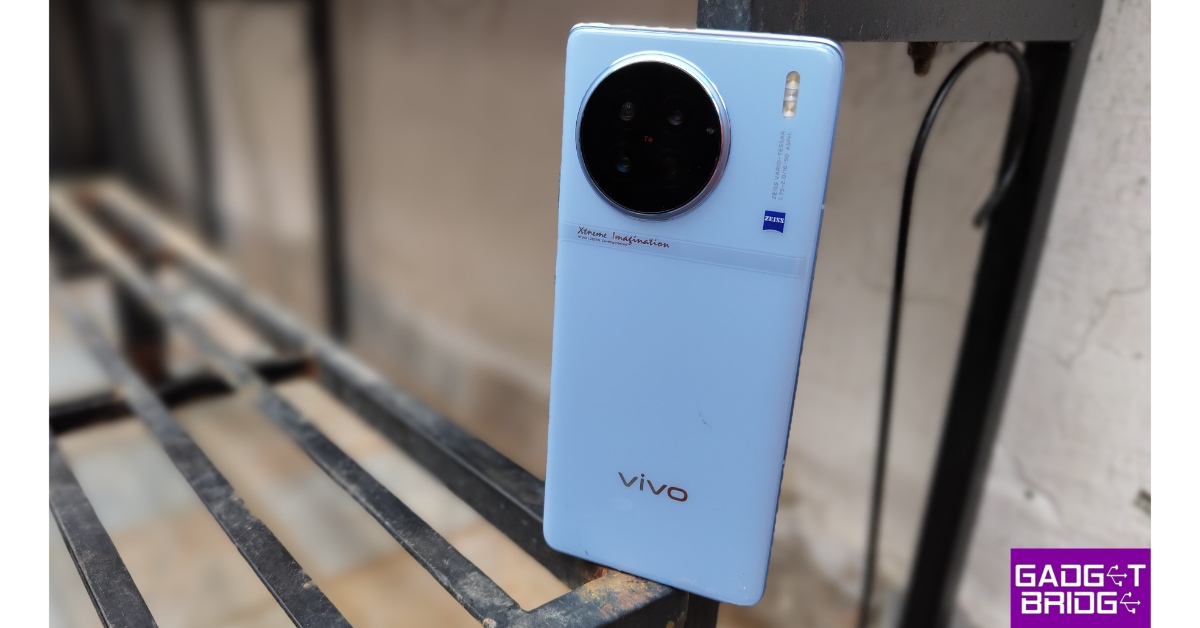
The Vivo X90 Pro is one of the few smartphones in the market to rock a leather finish on the back panel. This isn’t real leather of course, but rather ‘eco’ leather as Vivo likes to call it. The round camera setup is the highlight of the smartphone’s marvellous design. This camera array has been specially tuned by Zeiss. Needless to say, the results live up to the branding. The images taken with the X90 Pro are sharp, super detailed, and contrasty. Read more about them in our review of the smartphone.
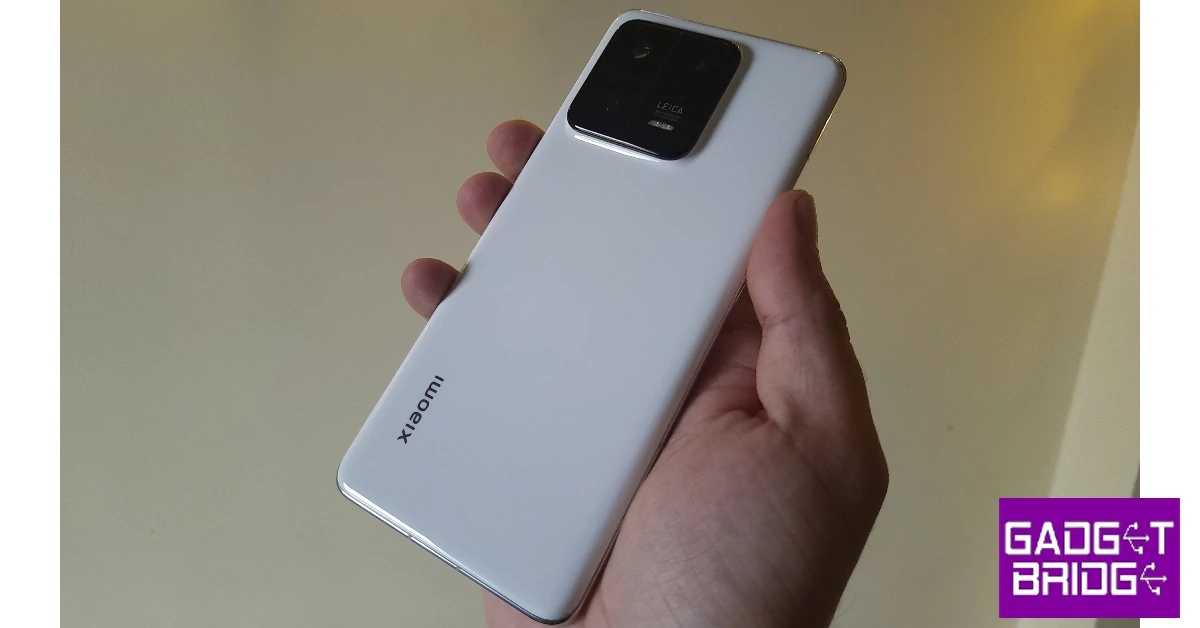
In 2023, Xiaomi shrugged off its midrange and budget smartphone manufacturer reputation and put out one of the most powerful smartphones of the year. The Chinese brand is finally here to play with the big boys. The Xiaomi 13 Pro is powered by the Snapdragon 8 Gen 2 SoC and runs Android 14 skinned with MIUI14. The ceramic glass back panel brings a lot of personality to the device. While reviewing the device, we were completely floored by its 1-inch primary sensor. This incredible camera produced stunning results even in extremely limited lighting. Since its camera setup is tuned by Leica, the smartphone offers two exclusive Leica profiles for shooting pictures – Leica Vibrant and Leica Authentic. You can check out the results in our Xiaomi 13 Pro review.
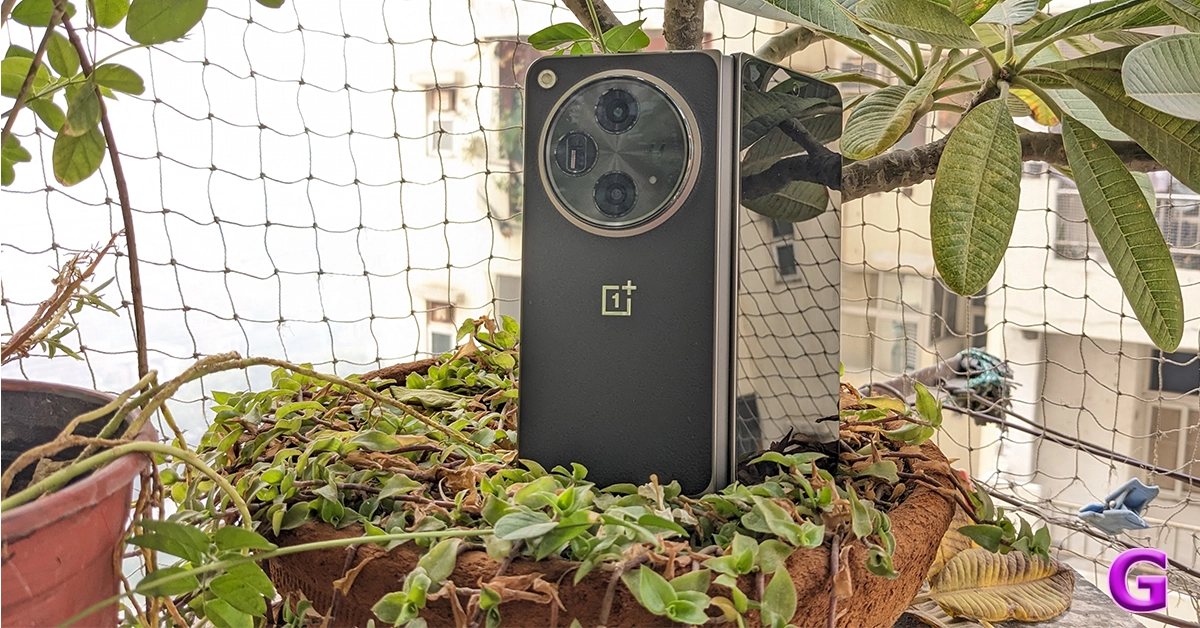
We’re saving the ‘Best Folding Phones of 2023’ for next week, but we’d be remiss if we didn’t mention the OnePlus Open in the best smartphone category. Even though it is OnePlus’ debut foldable, the Open goes toe to toe with its peers and even edges ahead in some departments. OnePlus certainly took some pointers from its sister company Oppo’s folding phones over the years in producing stellar hardware for the Open. The smartphone spans 7.2 inches in its unfolded form. The 6.31-inch cover display perfectly replicates a regular smartphone. The rear camera panel houses a 48MP primary shooter, another 48MP ultrawide lens, and a 64MP telephoto sensor. Read more about the OnePlus Open in our review of the device.Read Also:Poco M6 5G debuts in India, price starts at Rs 10,499
Conclusion
That’s it, folks! Hope you agree with our picks for the top 8 smartphones to come out in 2023. If you think we missed out on a smartphone, make the case for it in the comments! Watch this space for more lists next week, as we pick the best foldables, midrange phones, TVs, and laptops to come out this year. Also, make sure to cast your vote in the Gadget Bridge Awards 2023!
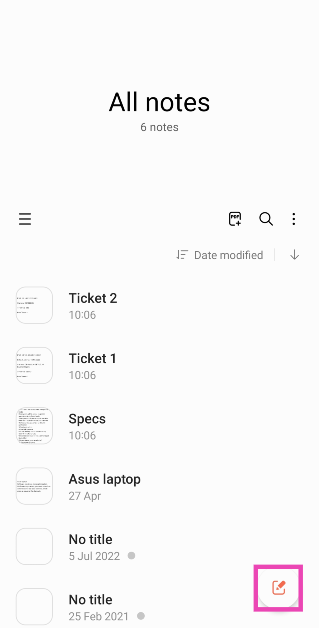
A clipboard is a location on your device’s memory that stores copied text items for a short time. Clipboards are designed to store one entry at a time. The moment you copy something on the clipboard, it erases the previous entry. But it doesn’t always have to be this way. Your Android phone can do more with the clipboard and tap into its full potential. Want to know more? Here are the top 4 easy ways to access and manage the clipboard on your Android phone.Read Also:Gadget Bridge Awards 2023: The biggest, best consumer technology and gadget awards nominations
Harness the full potential of your Android phone’s keyboard
Many of you may be wondering what’s the purpose of managing the clipboard on your Android device. After all, its sole purpose is to store a piece of text for a small period. While you may be correct about that, the clipboard can do more than just that. Remember how you always need to go back and forth between the notes app and the browser while filling in the key details on an online form? If you knew what your phone’s clipboard was capable of, you wouldn’t have to do that.Keyboard apps like Gboard and SwiftKey allow users to copy multiple items on the clipboard. You can access these items from the keyboard itself and delete them at any time. Filling out an online form that requires your bank account details, full address, passport-sized photograph and more? Instead of opening the notes app multiple times, you can individually copy these entries to the keyboard and paste them wherever necessary. Yes – even your photographs. If you don’t want to switch to another keyboard, you can use a third-party clipboard app for the same task.
Use the native Notes app on your Android phone
The easiest way to check what’s on your Android phone’s clipboard is by pasting its contents on an empty document. Every Android phone comes with a native ‘Notes’ app that can be used for this task. Here’s how.Step 1:Launch the native Notes app on your Android phone.Step 2: Tap the pad and pencil icon at the bottom right corner of the screen to create a new note.Step 3: Long-press anywhere on the screen and select paste from the popup menu.The latest entry in your phone’s clipboard will be pasted on the note.
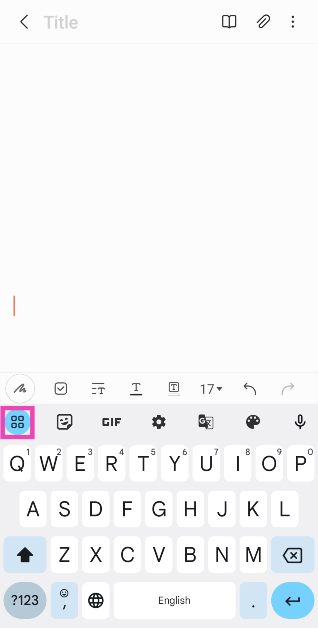
Use Gboard to access the clipboard on your Android phone
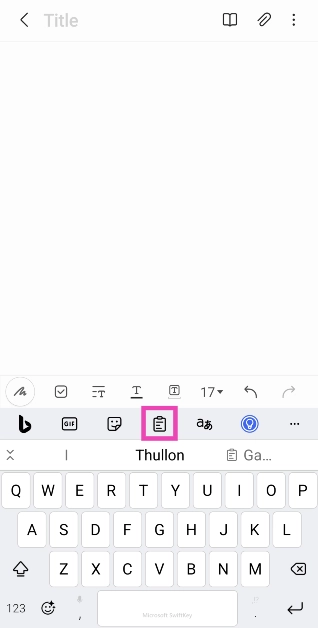
If you want to store multiple things in your phone’s clipboard, the Gboard app will come in very handy. But first, you need to enable clipboard history for the keyboard. Here’s how you can do that.Step 1: Make Gboard the default keyboard on your Android phone.Step 2:Tap any text box that triggers the keyboard.Step 3: Hit the menu icon at the top left corner of the keyboard.Step 4: Select Clipboard.Step 5: Turn on the toggle switch for the clipboard.The contents you copy on the clipboard stay there for one hour. You can copy anything from text to links and images on the Gboard clipboard. Follow these steps to access the clipboard on your Android phone.Step 1: Tap on a text box that triggers the onscreen keyboard.Step 2: Hit the menu icon at the top left corner of the keyboard.Step 3: Select Clipboard.Step 4: Tap on an entry to paste it. Long press an entry to pin or delete it.
Use Microsoft SwiftKey keyboard
Like Gboard, the Microsoft Switfkey keyboard also lets you access and manage your Android phone’s clipboard.Step 1:Download and install the Microsoft SwiftKey keyboard on your phone from the Google Play Store.Step 2: Set SwiftKey as the default keyboard on your phone.Step 3: Tap any text box to trigger the SwiftKey keyboard.Step 4: Hit the clipboard icon at the top of the keyboard.Step 5: Tap on an entry to paste it.
Use a third-party app: Clipboard – Copy Paste & Notes
Step 1:Download and install the Clipboard – Copy Paste & Notes app from the Google Play Store.Step 2:Launch the app and give it permission to display over other apps.Step 3: Long press any text and select copy.Step 4: The text will be copied to the clipboard and saved in the Clipboard app for future use. You can copy multiple entries on the app.
Frequently Asked Questions (FAQs)
How do I save multiple things on my Android phone’s keyboard?
Use Gboard or Microsoft SwiftKey keyboard to save multiple items on your Android phone’s keyboard. Both keyboards have a special ‘Clipboard’ category that lets you copy multiple entries and access them instantaneously.
Can my Android phone’s clipboard copy images?
Yes, your Android phone’s clipboard can copy any content ranging from text to images and links.
How do I access and manage my Android phone’s clipboard?
Use a third-party app like Clipboard – Copy Paste & Notes to manage your Android phone’s clipboard like a pro. Dedicated clipboard apps make it easier to store and sort through all the items that you have copied in the past.Read Also:Poco M6 5G debuts in India, price starts at Rs 10,499
Conclusion
These are the top 4 ways to access and manage your Android phone’s clipboard. Most native Android keyboards come with a dedicated clipboard option capable of storing multiple entries. If the default keyboard on your device lacks this feature, you can always switch to Gboard or SwiftKey. If you don’t want to change the keyboard, a third-party clipboard app is your best option. These apps usually require access to your clipboard and permission to draw over other apps to work as intended.
There is an All-Day Charging Protection, powered by AI on the phone.
The smartphone features a dual rear camera setup.
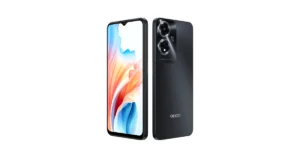
The Chinese smartphone manufacturer Oppo has arrived with a new smartphone in India. The company has launched Oppo A59 5G in the country which succeeds Oppo A58 5G. The device features a 90Hz display and is powered by MediaTek Dimensity 6020 SoC. In addition to this, it packs a 5,000mAh battery and operates on ColorOS 13.1 based on Android 13 out-of-the-box. Also, there is a dual rear camera setup consisting of a 13-megapixel primary lens.
Oppo A59 5G price in India, sale details
Oppo A59 5G price in India begins at Rs 14,999 for the base 4GB RAM with 128GB storage. The 6GB RAM and 128GB storage is priced at Rs 16,999. The phone comes in two colour options of Silk Gold and Starry Black. It is scheduled to go on sale from December 25 via OPPO store, Flipkart, Amazon, and other retail outlets in the country.Buyers can take advantage of the following offers on the purchase of OPPO A59 5G:Customers can avail a cashback of up to Rs 1,500 and no-cost EMI for up to 6 months from SBI Cards, IDFC First Bank, Bank of Baroda credit card, AU Finance Bank and One Card from mainline retail outlets and the OPPO Store.Attractive EMI payment options are available starting from just Rs 1,699 through leading financiers.As part of My OPPO Exclusive, consumers can win assured gifts on the purchase of OPPO A59 5GAdditionally, as a part of the New Year Bonanza smart savings offer- OPPO has introduced attractive discounts and offers on purchases of selected A series products. Customers can avail of cashback of up to 10%, no-cost EMI for up to 6 months, along a Zero down payment option on selected partners.Also Read:Poco M6 5G debuts in India, price starts at Rs 10,499
Oppo A59 5G specifications
The Oppo A59 5G features a 6.56-inch HD+ Waterdrop Display with 1612×720 pixels. The screen supports a 90Hz refresh rate, 750 nits of peak brightness and 96 per cent NTSC high colour gamut. The smartphone is IP54-rated for dust and water resistance,It runs on ColorOS 13.1 with Android 13 out-of-the-box. Under the hood, there is a MediaTek Dimensity 6020 processor with Mali-G57 MC2 GPU. The device is available with up to 6GB of RAM and 128GB of internal storage. The RAM expansion feature allows for flexible adjustments up to 6GB.For the optics, the Oppo A59 5G is highlighted with a dual rear camera setup that includes a 13-megapixel primary sensor with an f.2.2 aperture and a 2-megapixel bokeh camera with a f/2.4 aperture. There is an 8-megapixel front-facing camera with an f/2.0 aperture for taking selfies and video calling.The Oppo A59 5G is backed by a 5,000mAh battery with 33W SUPERVOOC flash charging support. As per the company, there is All-Day Charging Protection, powered by AI, which adapts to users’ charging patterns by developing a segmented charging plan for the day. It intelligently pauses charging at 80%, resumes when needed and prevents battery degradation. Additionally, the device also features the Superpower Saving Mode and Ultimate Standby at Night Mode.
Garena Free Fire is a battle royale game with regular awards and tournaments to keep players interested. If you play Garena Free Fire, you should be aware of the redeem codes that are released on a daily basis. However, because the battle royale game is banned in India, players from other countries can use the Free Fire Redeem codes daily. If you’re unfamiliar with the Garena Free Fire redeem codes or don’t know how to get them, we’ve put together a step-by-step guide to help you redeem them. Check out Garena Free Fire Redeem Codes for 23 December 2023.The Free Fire redeem codes are a great way to get free stuff. These are 12-digit codes that contain alphabets and numbers, as well as an expiration date and time. Because the Garena FF redeem codes cannot be used more than once, you should hurry to the redemption page to claim your free reward before someone else does. To get a free reward, all you have to do is go to reward.ff.garena.com/en, which is the official redemption page. Also, keep an eye on this space for daily updates on Garena Free Fire redemption codes and rewards.
Garena Free Fire Redeem Codes Today 23 December 2023
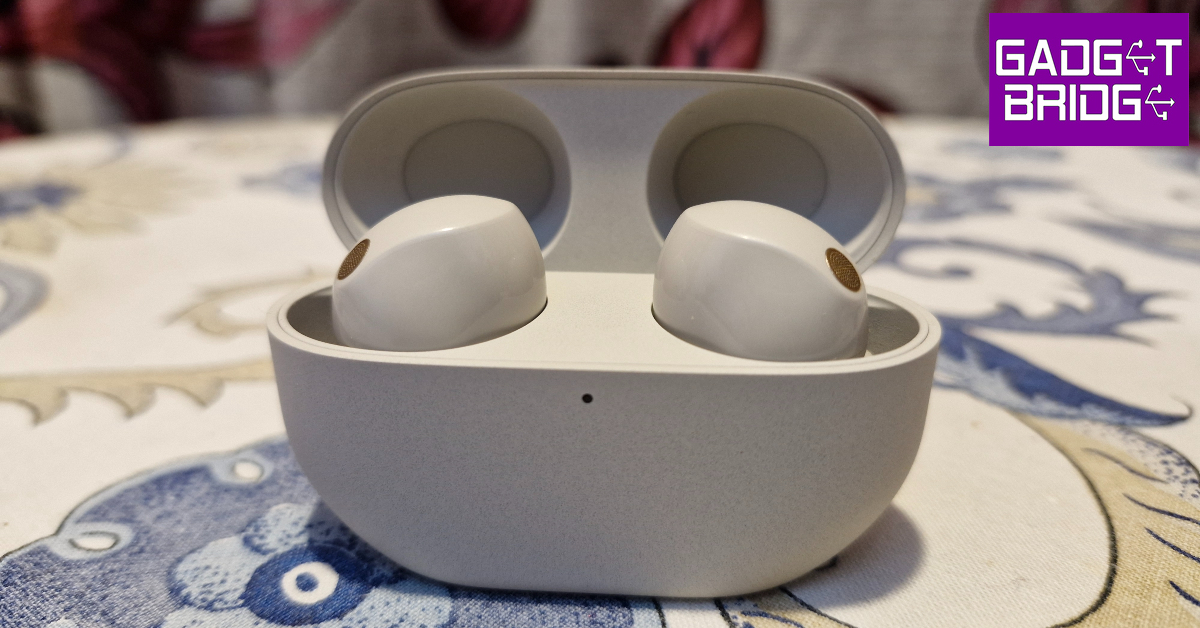
Your Android phone is capable of handling dozens of tasks at once, but they can all come crumbling down if there’s something wrong with the microphone. If you’re too reliant on the voice assistant, losing the microphone even for a day can get very annoying. Not to mention, it would make it nearly impossible to manage your device while driving. More often than not, the cause of this issue can be easily resolved. Here are the top 12 fixes for the ‘Mic not working’ problem on your Android phone.Read Also:Top 10 Tech Gifts for Christmas (2023)
Get to the bottom of the issue before moving to the fixes
If you notice something wrong with your Android phone’s mic, don’t jump to fixing it right away. First, you need to figure out what’s causing it to malfunction. It can take some time to determine the root cause of the issue when it is as general and open-ended as this one. If you’re experiencing microphone issues only on call, it could likely be due to a network-related issue. However, if other apps are replicating this behaviour, the network isn’t to blame.If your phone’s hardware is at fault, these fixes will be of no help. In this scenario, you will need to take your phone to an authorised service centre. But how does one verify that this is the case? The answer is simple. Launch the native voice recorder app on your phone and record a sample. If the microphone isn’t able to pick up any sound at all, the issue likely lies with the hardware. You can also download a diagnostic app from the Play Store to know if it is a hardware-related issue for sure.
Restart your phone
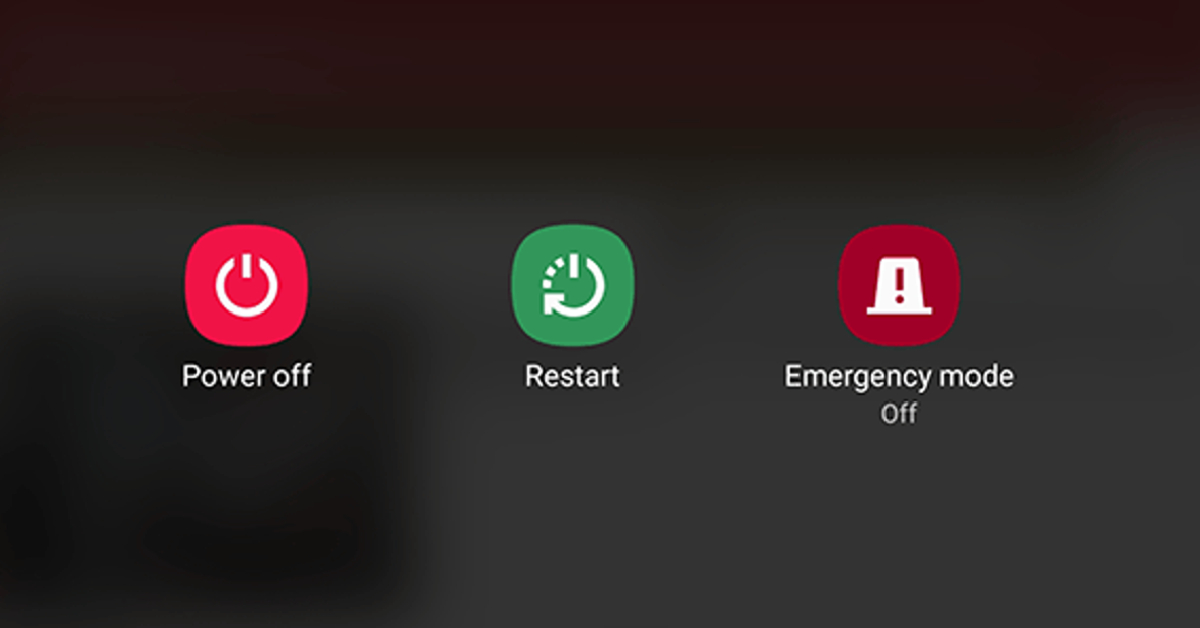
The first thing you should do upon encountering a problem with your microphone is restart the device. This will resolve any background glitches that may be causing the microphone to act up. To restart your smartphone, long-press the side key and select Restart from the power menu. You can also access this menu by tapping the power icon from the Quick Settings Menu. If long-pressing the side key triggers the voice assistant on your phone, press it along with the volume-up key to go to the power menu.
Clean the microphone
Accumulation of dirt and dust particles on your phone’s microphone can cause it to diminish the quality of recorded voice. This is more likely to happen if you haven’t cleaned your device in a while. Grab a microfibre cloth and wipe the area around the microphone. Blow some air into the tiny aperture and use a small needed to pry out the settled dirt particles. Be careful to not push the needle too far as this may end up damaging the microphone.
Remove the phone case
Poorly designed cases and cheap knock-offs of popular covers can cover the microphone in a manner that renders it unusable. If your voice on calls and recorded audio is muffled, this may be the case. Take off the phone cover and try again. If the quality doesn’t improve, the cover is not at fault and you should proceed to other fixes in this list.
Check if your phone is connected to any Bluetooth TWS or microphone
If your phone is connected to a TWS, it will use the integrated microphone on the earbuds. If your earbuds aren’t near the phone, the quality of the audio recording will take a massive hit. It is quite common to connect your phone to a TWS device and then forget about it. If the microphone stops working out of the blue, check your phone for any paired devices. You can do this by swiping down from the status bar and long-pressing the Bluetooth tile in the Quick Settings Menu.
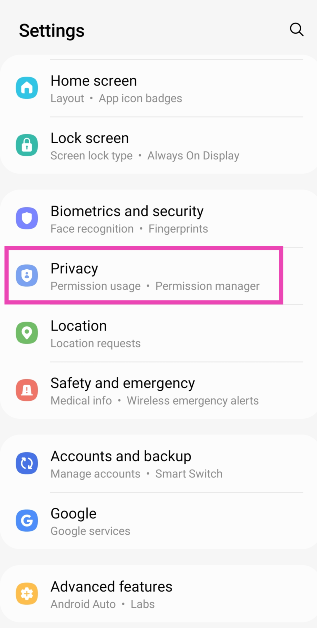
Allow microphone access
If access to your microphone is turned off, you won’t be able to use it on any app. Here’s how you can allow microphone access.Step 1: Go to Settings and select Privacy.Step 2: Scroll down and turn on the toggle switch for Microphone access.
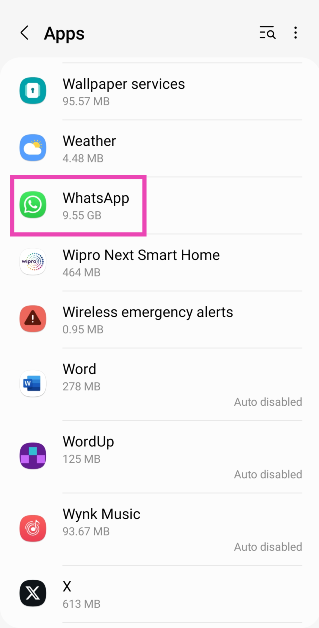
Allow microphone access to a particular app
If your Android phone’s mic isn’t working for a particular app, make sure it has the necessary permission. Here’s how you can allow an app microphone access.Step 1: Go to Settings and select Apps.Step 2: Select the app in question.Step 3: Tap on Permissions.Step 4: Select Microphone and tap on Allow only while using the app.
Test your phone’s mic on the voice recording app
If you’re facing microphone trouble on cellular calls, try recording a sample voice note on the voice recorder app to confirm that the mic is at fault. If the voice note has no aberrations and is recorded in perfect quality, there is nothing wrong with your phone’s microphone. The fault may lie with the cellular network.
Disable Noise Reduction
Some apps have a ‘Noise Reduction’ feature that helps suppress the background noise while you’re on a call. This may sometimes affect the call quality as well. Here’s how you can turn it off if your Android phone’s mic isn’t working.Step 1: Go to Settings and select Sound/Call.Step 2: Scroll down and turn off the toggle switch for Noise Reduction.
Restart your phone in Safe Mode
If you suspect that a third-party app is causing the app to malfunction, restart your phone in Safe Mode to confirm that this is the case. When Safe Mode is turned on, your phone is stripped to its bare bones. All third-party apps on the device are disabled and you can only use its native features. If you still experience any problems with the microphone, the third-party apps are not to blame. To restart your phone in Safe Mode, press and hold the Power Off option. Once ‘Safe Mode’ pops up on the screen, tap on it.
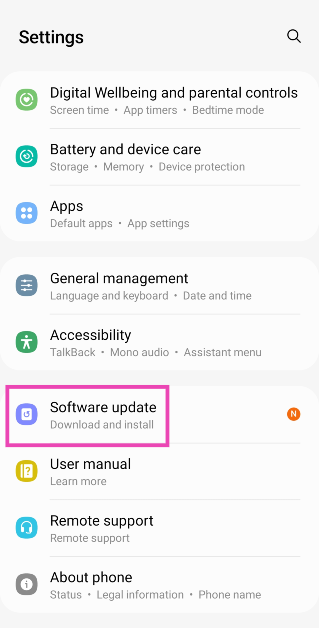
Update your phone’s OS
Step 1: Go to Settings and select Software update.Step 2: Tap on Download and install.Step 3: Select Install now.
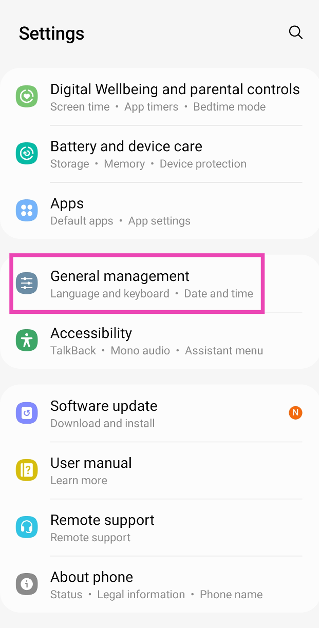
Perform a Factory Reset
If nothing works, you can perform a factory reset on your phone. This will wipe all data from the device, so make sure you create a backup before proceeding. Here’s how you can restore your device to its factory settings.Step 1: Go to Settings, scroll down and select General management.Step 2: Tap on Reset.Step 3: Select Factory data reset.Step 4: Scroll down and tap on Reset.
Turn off Bixby Voice (Samsung only)
Sometimes, the Bixby voice assistant on your Samsung phone can cause the microphone to malfunction. Here’s how you can turn it off.Step 1: Go to Settings and select Apps.Step 2: Scroll down and select Bixby Voice.Step 3: Turn off the toggle switches for Voice Wake-Up, Use While Phone is Locked, and Marketing Notifications.Step 4: Hit Unlink Device.
Frequently Asked Questions (FAQs)
Where is the microphone on my Android smartphone?
On most Android smartphones, the primary microphone is housed right next to the USB port at the bottom edge. The secondary microphone is present on the top edge of the frame.
Why is the microphone not working on my Android phone?
If you aren’t able to use the microphone on your Android phone, it is likely because you revoked the mic access and forgot about it. You can restore the former settings from the Privacy section in device settings. The mic also may not work if it is covered by the phone cover or if a significant amount of dirt has settled inside it.
Why is my mic not working during calls?
If your phone is connected to wireless headphones or TWS, its microphone will be disabled in favour of the mic on the audio device. Disconnect your phone from the earbuds to use the mic.
What to do if mic suddenly stops working?
If your phone’s mic suddenly stops working, perform a quick reboot to sort out the background issues causing this problem. Additionally, check that you have granted microphone access to your phone.
How do I revoke microphone access from all apps at once?
These are the top 12 ways to fix the ‘Mic not working’ issue on your Android phone. If you can’t get the mic to work after trying the fixes mentioned in this article, the problem likely lies with your device’s hardware. Take your phone to an authorised repair centre for further diagnosis. If you know of any other ways to fix this problem, let us know in the comments!
One of the most common questions that Facebook users have is if someone can view the videos posted on their profile. Users are also curious to know who visited their profile – a feature that will probably never make it to Facebook. A lot of people are less likely to watch content if they know a receipt will be sent to the person who posted it. Facebook Stories is the only place where the platform lets people know who viewed their stuff. Does the same go for Facebook Videos? Let’s find out.Read Also:Top 10 Tech Gifts for Christmas (2023)
Is it possible to see who viewed my Facebook video?
There is no direct way to see who viewed your video on Facebook. What you can check is the number of times a video has been viewed. This view count can be found at the bottom right corner of the post. A video needs to be played for at least three seconds for a view to be counted. Once a video is uploaded to the platform, it may take some time for it to reflect the accurate view count. Check the video after a few hours to get a better idea of its view count. It may take some time for the platform to register an individual view.Like the news feed videos, there is no way to check who viewed your Facebook Live video after the stream has ended. During the live stream, you can check out the live count of all the viewers as well as get to know who is watching. Simply go to the stream management page to view the list of people currently watching the broadcast. Facebook also sends you a notification when someone from your friend list tunes into the live broadcast.There are a bunch of third-party apps that claim to tell you who visited your profile or viewed the videos uploaded on your Facebook profile. Do not trust these apps with your Facebook data. Once you install these apps, your device is at risk of being vulnerable to malware. Some scam artists may even get you to pay for the “feature” without offering anything in return.
How to check who viewed my Facebook Video?
There is one way that will let you know who viewed your Facebook video. You must be aware of how to check your Story viewers. Tapping the ‘Viewers’ option in the bottom left corner of a story presents the list of people who viewed it. This is the only place on the entire platform where you get the option to see who viewed your content. If you upload a small section of the video as a story, you will know who viewed it. Of course, this method doesn’t tell you who viewed the video on your profile, but you will get to know which people are now aware of the video. You can also post a link to the full video on your Story and check the viewers. While it may not be the ideal solution, it is the best tool you have at your disposal.
Frequently Asked Questions (FAQs)
Does Facebook let you see who viewed your video?
No, there is no option to see who viewed your video on Facebook. A lot of apps claim to reveal who viewed your content but their sole intention is to mislead you into watching ads or pushing malware on your device.
Can I see who viewed my Facebook live broadcast?
You can view the people who are tuned into your live broadcast from the stream management page but that information is rescinded as soon as your live stream ends.
This is how you can find out who viewed your Facebook video. Similar to how you can’t find out who viewed your video, other users have no way of knowing if you viewed their content. Even Facebook pages and content creators are not provided with special tools to check the viewers on their videos. The management tools let the creators know how many people their videos reached and the trajectory of their growth along with other insights. If you know of any other way, let us know in the comments!
The device is powered by MediaTek Dimensity 6100+ SoC.
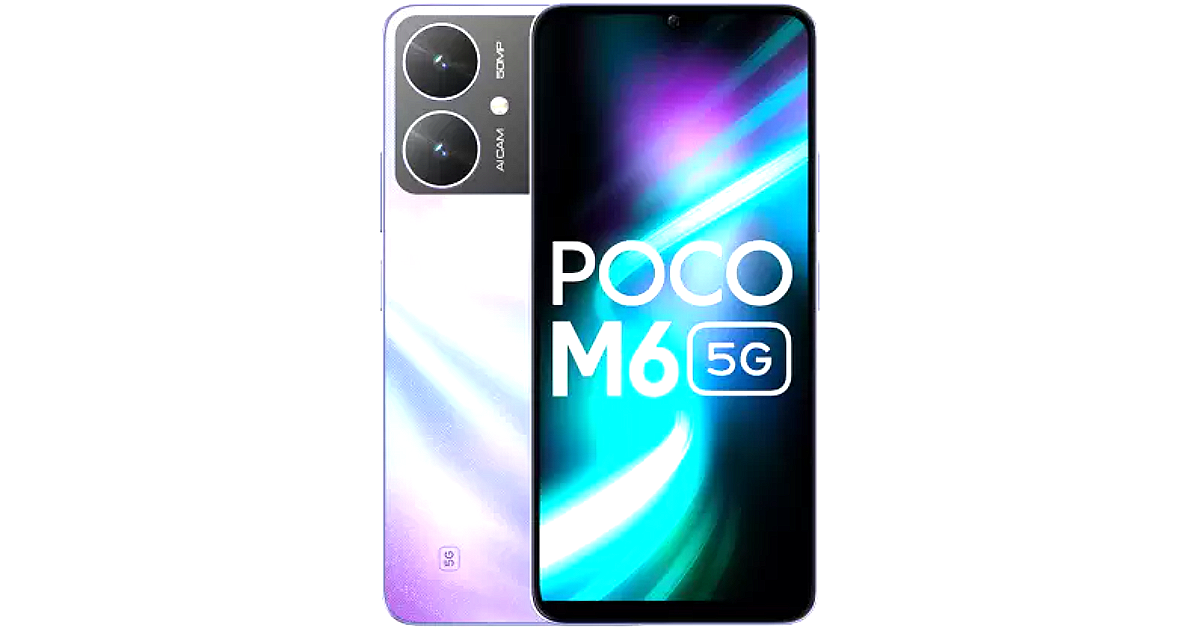
Poco M6 5G arrived in India today. The smartphone is a successor to Poco M5 and is a sibling to Poco M6 Pro 5G which launched in India in July this year. The smartphone operates on MIUI 14 on top of Android 13 out of the box. It is powered by MediaTek Dimensity 6100+ SoC. The device comes equipped with a 5,000mAh battery and a 90Hz HD+ display.
Poco M6 5G price in India, sale details
Poco M6 5G price in India starts at Rs 10,499 for the 4GB RAM with 128GB storage option. There are two more options 6GB RAM with 128GB storage priced at Rs 11,499 and 8GB RAM with 256GB storage at Rs 13,499. The device is being offered in two colours- Galactic Black and Orion Blue.The Poco M6 5G will go on sale for the first time in India on December 26. The sale will be accessible via Flipkart starting at noon.
Customers can get the device at an exciting price of INR 9,499, INR 10,499 and INR 12,499 for the 4+128GB, 6+128GB and 8+256GB variants, respectively, after an INR 1,000 offer with ICICI Debit/ Credit cards/ EMI transactions or an equivalent product exchange offer.
Also Read:What to expect from CES 2024: All eyes on AI
Poco M6 5G specifications
The 6.74-inch HD+ display on the Poco M6 5G has a 1,600 x 720 pixels resolution. It supports a 90Hz refresh rate and a 180Hz touch sampling rate. The screen comes with a peak brightness of 600 nits, and 260ppi pixel density and is TÜV low blue light and flicker-free certified. Moreover, the display is protected with Corning Gorilla Glass 3.Poco M6 5G runs on MIUI 14 with Android 13. It draws its power from MediaTek Dimensity 6100+ SoC with a Mali-G57 MC2 GPU. It comes with up to 8GB of LPDDR4X RAM and up to 256GB of UFS 2.2 storage. The RAM can be virtually expanded up to 8GB while the internal storage can also be further expanded up to 1TB using a microSD card.The 5,000mAh battery comes packed inside the phone. The device supports 18W wired charging. For photos and videos, Poco M6 5G features a dual rear camera setup that includes an AI-powered 50-megapixel main sensor and another camera lens. There is a front-facing 5-megapixel selfie camera as well.In terms of connectivity, there is 5G, 4G LTE, Wi-Fi 5, Bluetooth 5.3, GPS, and USB Type-C port for charging. The device comes with a side-mounted fingerprint sensor for phone unlocking.

![Fixed: the Disk Structure is Corrupted and Unreadable [2024]](https://www.gadgetbridge.com/wp-content/uploads/2023/12/dis-curruption-fixed-768x402.webp "Fixed: the Disk Structure is Corrupted and Unreadable [2024]")
 Step 2: The tool will promptly start scanning for all lost files on the selected drive. During this process, you have the option to view files in either File View or Tree View. Additionally, you can pause or stop the scanning process once you’ve identified the necessary files.
 Step 3: Now, select the lost files and simply click on the “Recover” button. Remember to back up these files to a safe location.
 Currently, the software provider is hosting an exciting Christmas promotion. Anyone participating in the event has the chance to win free Amazon e-gift cards and a brand-new iPad.
 Step 2: Then, enter the “chkdsk /f /r X:” command and hit the Enter key. Remember to replace X: with your actual drive letter.
 Step 3: If necessary, restart your computer to complete the repair process.

 Step 2:
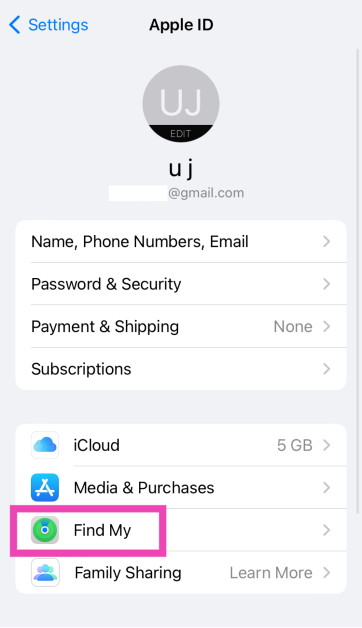 Step 3:
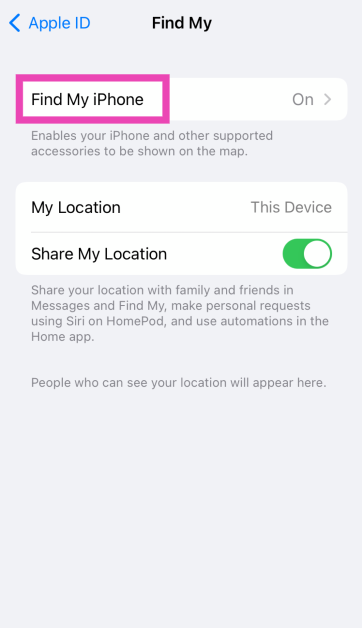 Step 4:
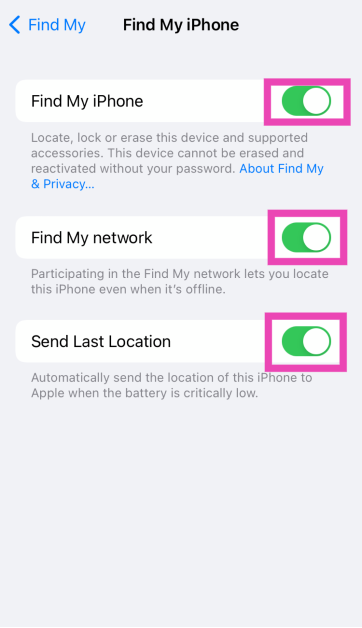
 Step 3:
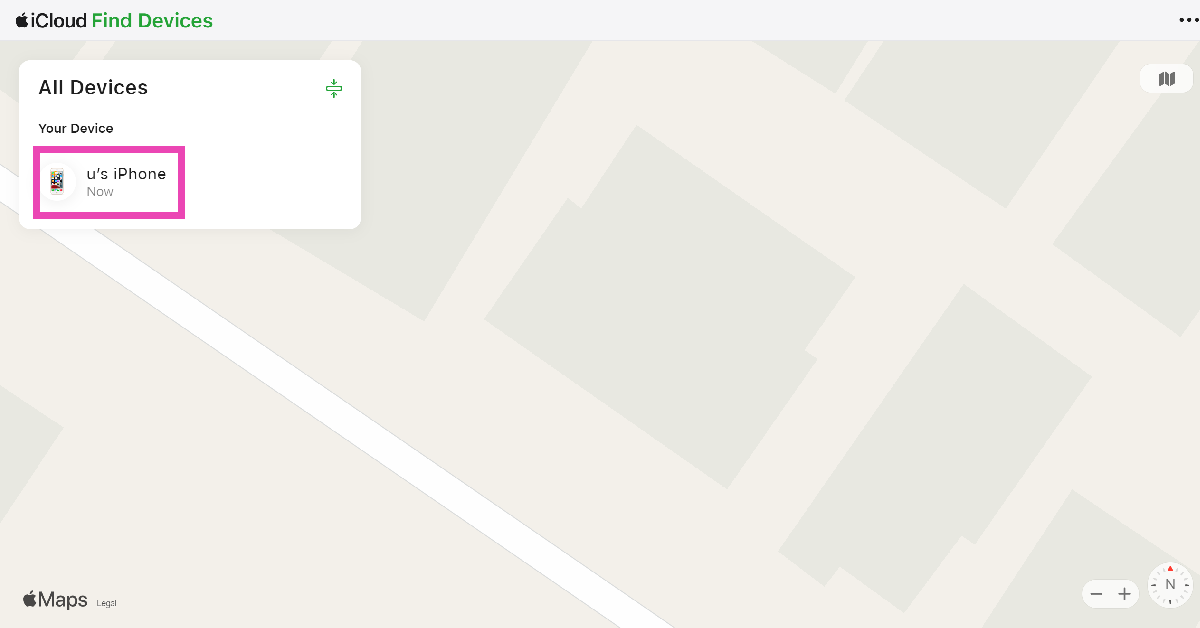 Step 4:
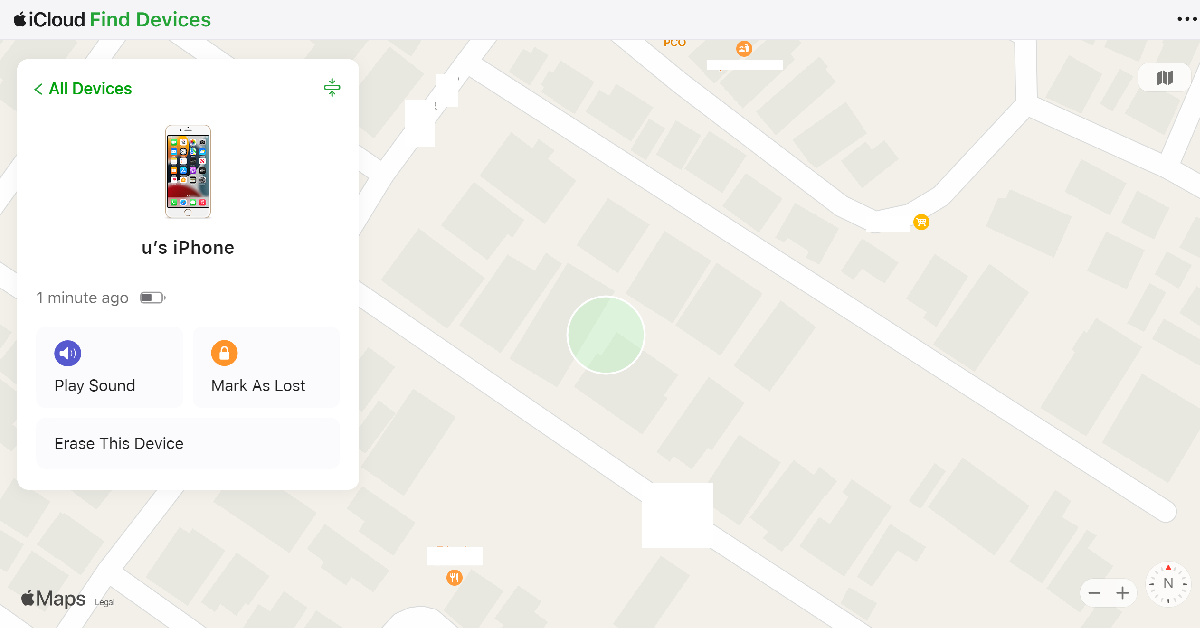


 Step 3:
 Step 4:
 Step 5:
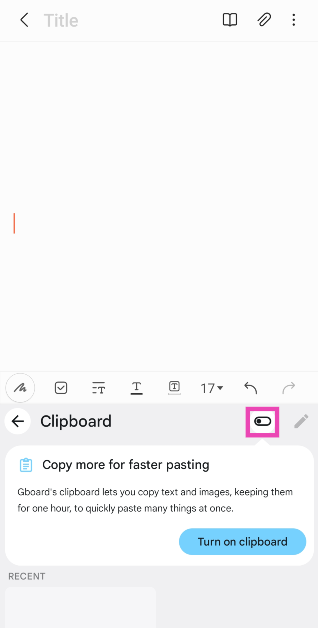

 Step 5:
 Step 4:
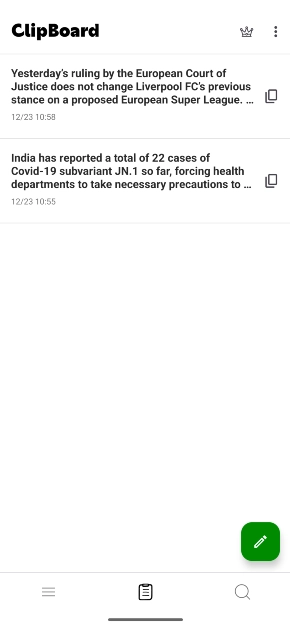


 Step 2:
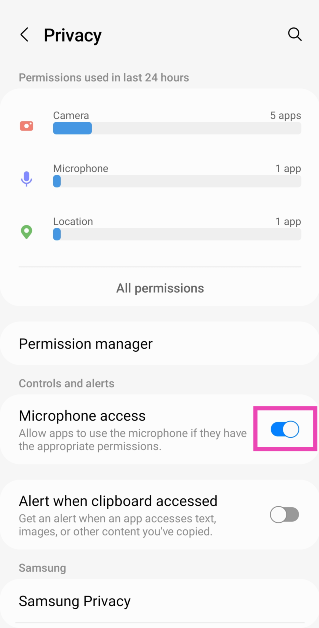
 Step 3:
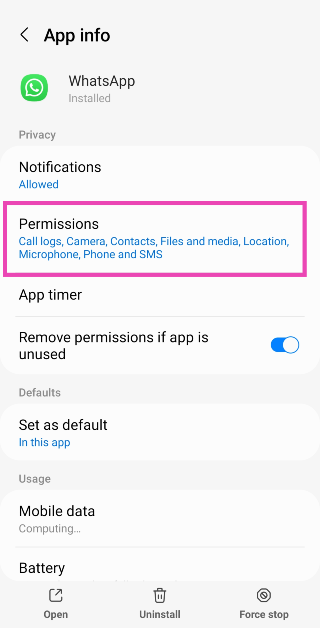 Step 4:
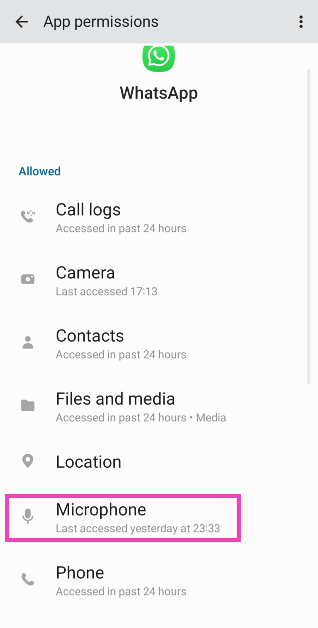
 If you’re facing microphone trouble on cellular calls, try recording a sample voice note on the voice recorder app to confirm that the mic is at fault. If the voice note has no aberrations and is recorded in perfect quality, there is nothing wrong with your phone’s microphone. The fault may lie with the cellular network.

 Step 2:
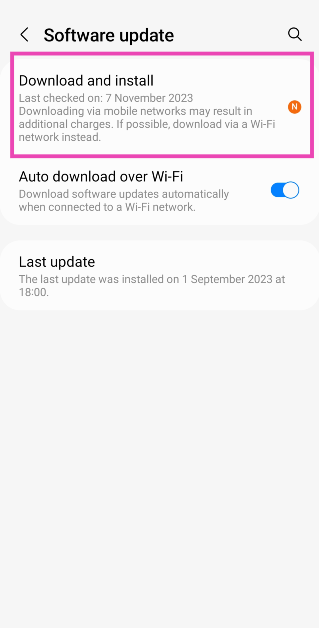 Step 3:
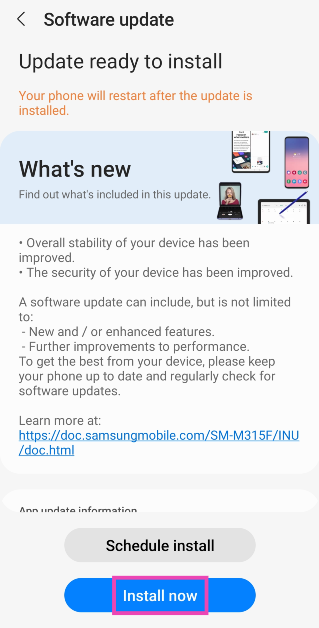
 Step 2:
 Step 3:
 Step 4:
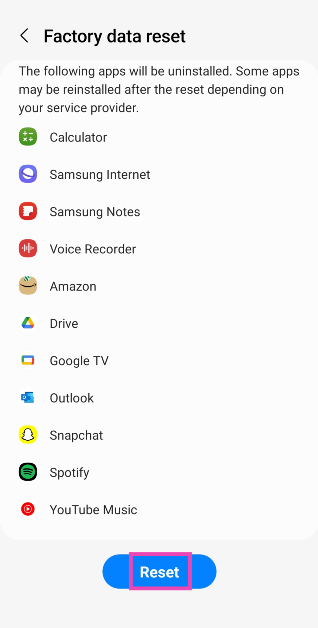


 Customers can get the device at an exciting price of INR 9,499, INR 10,499 and INR 12,499 for the 4+128GB, 6+128GB and 8+256GB variants, respectively, after an INR 1,000 offer with ICICI Debit/ Credit cards/ EMI transactions or an equivalent product exchange offer.
Also Read:
Customers can get the device at an exciting price of INR 9,499, INR 10,499 and INR 12,499 for the 4+128GB, 6+128GB and 8+256GB variants, respectively, after an INR 1,000 offer with ICICI Debit/ Credit cards/ EMI transactions or an equivalent product exchange offer.
Also Read: