
- Poco C65 comes with a 90Hz HD+ display.
- It is backed by a 5,000mAh battery.
- The smartphone is powered by MediaTek Helio G85 SoC.
Poco C65 India launch confirmed: Here is when the phone will launch

Key Highlights
iPhone 14 Plus getting a massive discount of Rs 35,250

Key Highlights
 The buyers can also take advantage of an additional exchange discount in addition to this. Customers can save up to Rs 50,299 on an iPhone or their previous smartphone. Additionally, customers of Kotak, RBL, or SBI credit cards will receive 10% off.
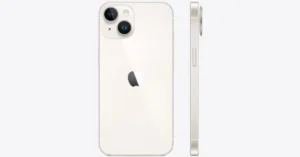
The iPhone 14 Plus was launched in India in three different configurations. The 128GB of storage costs Rs 79,900 in India. The price of 256GB and 512GB storage capacities are available for Rs 89,900 and Rs 1,09,900. It comes in five different colour options – Red, Midnight, Starlight, Blue and Purple.
Also Read: OnePlus 12 global launch date is no longer a secret
The buyers can also take advantage of an additional exchange discount in addition to this. Customers can save up to Rs 50,299 on an iPhone or their previous smartphone. Additionally, customers of Kotak, RBL, or SBI credit cards will receive 10% off.
The iPhone 14 Plus was launched in India in three different configurations. The 128GB of storage costs Rs 79,900 in India. The price of 256GB and 512GB storage capacities are available for Rs 89,900 and Rs 1,09,900. It comes in five different colour options – Red, Midnight, Starlight, Blue and Purple.
Also Read: OnePlus 12 global launch date is no longer a secret
- iPhone 14 Plus was launched at a starting price of Rs 89,990.
- The device is getting a massive temporary price cut during the ongoing Flipkart Big year-end sale.
 The buyers can also take advantage of an additional exchange discount in addition to this. Customers can save up to Rs 50,299 on an iPhone or their previous smartphone. Additionally, customers of Kotak, RBL, or SBI credit cards will receive 10% off.
The iPhone 14 Plus was launched in India in three different configurations. The 128GB of storage costs Rs 79,900 in India. The price of 256GB and 512GB storage capacities are available for Rs 89,900 and Rs 1,09,900. It comes in five different colour options – Red, Midnight, Starlight, Blue and Purple.
Also Read: OnePlus 12 global launch date is no longer a secret
The buyers can also take advantage of an additional exchange discount in addition to this. Customers can save up to Rs 50,299 on an iPhone or their previous smartphone. Additionally, customers of Kotak, RBL, or SBI credit cards will receive 10% off.
The iPhone 14 Plus was launched in India in three different configurations. The 128GB of storage costs Rs 79,900 in India. The price of 256GB and 512GB storage capacities are available for Rs 89,900 and Rs 1,09,900. It comes in five different colour options – Red, Midnight, Starlight, Blue and Purple.
Also Read: OnePlus 12 global launch date is no longer a secret
Apple iPhone 14 Plus specifications
Apple iPhone 14 Plus is endowed with a 6.7-inch Super Retina XDR OLED screen which offers a wide colour gamut, HDR, and 1200 nits of brightness. The device’s display has a pixel density of 460 ppi and supports a 60Hz refresh rate. The screen is protected by a tough Ceramic Shield front cover that is water and dust-resistant. For optics, the dual rear camera setup includes the iPhone 14 Plus: a primary 12MP wide-angle sensor with a bigger f/1.5 aperture, sensor-shift OIS, and a secondary 12MP ultra-wide-angle sensor. The Ultra Wide camera provides a distinctive viewpoint for broader views and enhances low-light images using a Photonic Engine. For selfies and video calls, the front camera has a 12MP sensor with autofocus. The iPhone 14 Plus has Face ID and is built to IP68 standards for water and dust protection. Under the hood, there is an Apple A15 Bionic SoC and up to 512GB of internal storage. The device runs on iOS 16.Top 4 Ways to Send Pictures from Android to iPhone

The rigidity of Apple’s ecosystem does not allow for fluid and seamless file sharing with Android devices. iPhones have AirDrop and Android devices have Nearby Share, but cross-platform sharing still requires jumping through some hoops. Hoping for any resolution in the near future would be wishful thinking. But, for the time being, here are the top 4 ways to send pictures from Android to iPhone.
Read Also: iPhone Battery Icon Yellow? Top 3 ways to fix it
 The easiest, most accessible way to send pictures from an Android phone to an iPhone is via WhatsApp or any other instant messaging app. The Meta-owned instant messaging app recently incorporated HD image sharing in its platform. However, this feature is not turned on by default. You will need to tap the HD icon at the top of the image preview page. Even though HD images on WhatsApp demand a higher storage space, they still go through some compression in the process. This isn’t a significant issue if your main purpose is to upload the images on social media platforms.
 One of the glaring problems of sharing images via IM apps is image compression. To bypass this issue use a cloud storage service instead. Google Drive is the most accessible online storage service to use if you’re an Android user. Since you already have a Google account, simply launch the Drive app from the Google folder in your device and start uploading the images you want to transfer. Once you’re done, share the folder with the iPhone user. If the iPhone belongs to you, simply install the Google Drive app from the App Store and log in using your Google account. All your shared images will be there, without any loss in quality.
Feem is a great file-sharing interface that works 50 times faster than Bluetooth-sharing. The best part of using Feem is that you don’t have to rely on an active internet connection to send pictures from an Android phone to an iPhone. Once both devices are connected to a common WiFi network, Feem will send images and files at a blazing speed. Don’t have access to WiFi? Feem also works on a mobile hotspot!
One of the glaring problems of sharing images via IM apps is image compression. To bypass this issue use a cloud storage service instead. Google Drive is the most accessible online storage service to use if you’re an Android user. Since you already have a Google account, simply launch the Drive app from the Google folder in your device and start uploading the images you want to transfer. Once you’re done, share the folder with the iPhone user. If the iPhone belongs to you, simply install the Google Drive app from the App Store and log in using your Google account. All your shared images will be there, without any loss in quality.
Feem is a great file-sharing interface that works 50 times faster than Bluetooth-sharing. The best part of using Feem is that you don’t have to rely on an active internet connection to send pictures from an Android phone to an iPhone. Once both devices are connected to a common WiFi network, Feem will send images and files at a blazing speed. Don’t have access to WiFi? Feem also works on a mobile hotspot!
 The methods mentioned above work great for sending a batch of pictures from an Android phone to an iPhone. But what if you are switching to an iPhone permanently and want to restore all your images on the new device? Well, the iPhone gives you a native option when you’re setting it up. However, the catch is that it only works when you’re setting up the device. Meaning, that once you skip this option and start using your iPhone, you won’t be able to access it again unless you factory reset your device.
The process is pretty simple. In the Apps & Data page, select Move Data from Android. Enter the code in the Move to iOS app on your Android phone. Select photos from the list of content that you want to transfer. The images will be transferred from your Android phone to your iPhone over a WiFi hotspot.
The methods mentioned above work great for sending a batch of pictures from an Android phone to an iPhone. But what if you are switching to an iPhone permanently and want to restore all your images on the new device? Well, the iPhone gives you a native option when you’re setting it up. However, the catch is that it only works when you’re setting up the device. Meaning, that once you skip this option and start using your iPhone, you won’t be able to access it again unless you factory reset your device.
The process is pretty simple. In the Apps & Data page, select Move Data from Android. Enter the code in the Move to iOS app on your Android phone. Select photos from the list of content that you want to transfer. The images will be transferred from your Android phone to your iPhone over a WiFi hotspot.
Sending pictures from Android to iPhone: Which method is the best for you?
There are numerous ways to share images across different platforms. Your choice of method should depend upon the volume of images you are sending, the quality of images sent to the other device, the speed of transfer, and ease of access. Here’s how you can decide which method is best for you. For high-quality image transfer: For a majority of users, restoring the image quality is the biggest priority while transferring them between two devices. This rules out using third-party messengers. While you can still use online cloud storage for the task, it can take a fair bit of time if you are transferring an entire batch of images. Not to mention, it will take time to download all the images on the iPhone as well. To cut down on time, use a WiFi transfer interface like Xender, Send Anywhere, or Feem to send pictures from your Android phone to an iPhone. You will be able to send dozens of images without any compression within seconds. For social media uploads: If you only need to send a couple of images to your friend, primarily for posting on social media, using a third-party messenger is the best option you have. Since social media platforms compress images anyway, a slight loss in quality while transferring them won’t hurt. Luckily, most instant messaging apps allow HD image sharing. No other method can match the accessibility provided by IM apps. For transferring all the images on your device: If you’re permanently switching to an iPhone, it is best you use the ‘Move to iOS’ app on your Android phone to transfer all your images. Apart from images, this app can also transfer your WhatsApp chats, apps, files, and other data. The only catch is that it can only be used while setting up your iPhone.Use WhatsApp (Or any other instant messenger)
 The easiest, most accessible way to send pictures from an Android phone to an iPhone is via WhatsApp or any other instant messaging app. The Meta-owned instant messaging app recently incorporated HD image sharing in its platform. However, this feature is not turned on by default. You will need to tap the HD icon at the top of the image preview page. Even though HD images on WhatsApp demand a higher storage space, they still go through some compression in the process. This isn’t a significant issue if your main purpose is to upload the images on social media platforms.
Use Google Drive
 One of the glaring problems of sharing images via IM apps is image compression. To bypass this issue use a cloud storage service instead. Google Drive is the most accessible online storage service to use if you’re an Android user. Since you already have a Google account, simply launch the Drive app from the Google folder in your device and start uploading the images you want to transfer. Once you’re done, share the folder with the iPhone user. If the iPhone belongs to you, simply install the Google Drive app from the App Store and log in using your Google account. All your shared images will be there, without any loss in quality.
Use Feem
 Feem is a great file-sharing interface that works 50 times faster than Bluetooth-sharing. The best part of using Feem is that you don’t have to rely on an active internet connection to send pictures from an Android phone to an iPhone. Once both devices are connected to a common WiFi network, Feem will send images and files at a blazing speed. Don’t have access to WiFi? Feem also works on a mobile hotspot!
Use the Move to iOS app
 The methods mentioned above work great for sending a batch of pictures from an Android phone to an iPhone. But what if you are switching to an iPhone permanently and want to restore all your images on the new device? Well, the iPhone gives you a native option when you’re setting it up. However, the catch is that it only works when you’re setting up the device. Meaning, that once you skip this option and start using your iPhone, you won’t be able to access it again unless you factory reset your device.
The process is pretty simple. In the Apps & Data page, select Move Data from Android. Enter the code in the Move to iOS app on your Android phone. Select photos from the list of content that you want to transfer. The images will be transferred from your Android phone to your iPhone over a WiFi hotspot.
The methods mentioned above work great for sending a batch of pictures from an Android phone to an iPhone. But what if you are switching to an iPhone permanently and want to restore all your images on the new device? Well, the iPhone gives you a native option when you’re setting it up. However, the catch is that it only works when you’re setting up the device. Meaning, that once you skip this option and start using your iPhone, you won’t be able to access it again unless you factory reset your device.
The process is pretty simple. In the Apps & Data page, select Move Data from Android. Enter the code in the Move to iOS app on your Android phone. Select photos from the list of content that you want to transfer. The images will be transferred from your Android phone to your iPhone over a WiFi hotspot.
Frequently Asked Questions (FAQs)
How do I send a picture from an Android phone to an iPhone?
You can send pictures from Android to iPhone through a messaging app, online cloud service, or a WiFi transfer interface.How do I send an image over 16MP on WhatsApp?
Since WhatsApp uses native compression to send images, the image size will be reduced to an acceptable level. However, if you don’t want this, you can send the image as a document. WhatsApp lets you send files up to 2GB in size.How do I transfer all my images from an Android phone to my new iPhone?
If you’re switching to an iPhone, you can transfer all your apps, data, and images from the ‘Apps & Data’ page. This will require downloading the Move to iOS app on your Android phone. Read Also: How to set an alarm on a Samsung smartphone? Top 2 WaysConclusion
These are the top 4 ways to send pictures from an Android phone to an iPhone. This process isn’t as tiresome and convoluted as it used to be, now that cloud-sharing services are super accessible to the average smartphone user. Even if you don’t want to use Google Drive, platforms like Dropbox, OneDrive, and Koofr can facilitate seamless sharing across platforms.Top 9 funky gadgets you can buy right now (2023)
")
Many believe that tech products have stagnated over the last few years, looking more alike with every passing iteration. While this may be true for smartphones and wearables, there is a wide range of whacky devices out there that bring a whole lot of personality to the table. If you’re looking for a fun device that can be incorporated into your daily routine, you’ve landed on the right page. So, without further ado, here are the top 9 funky gadgets you can buy right now.
Read Also: How to set an alarm on a Samsung smartphone? Top 2 Ways
The super-immersive Meta Quest 3 VR headset is one the best in its genre right now. Its incredible application support revolutionises the way you interact with real-world objects. You can play a video game on your coffee table or overlay a screen wherever you want to watch videos or play video games. The virtual and physical worlds align and blend seamlessly with the Meta Quest 3, a real testament to how far virtual reality headsets have progressed over the years. The Touch Plus controllers included with the Quest 3 offer intuitive controls for gaming along with haptic feedback.
If we’re talking about devices that go over the board to be excessive, nothing comes close to LG’s newest StanByMe Go Suitcase TV. Nestled inside a hard-sided briefcase, the StanByMe Go is a completely wireless TV that you can carry along wherever you go. The touchscreen display can also be controlled by a remote control or voice commands. A 3-hour battery life makes it ideal to watch movies or catch that unmissable game no matter where you are. You can also orient the 27-inch screen vertically in portrait mode. This is as funky as a gadget can get in 2023.
The Fujifilm Instax Mini 12 polaroid camera is available in 5 colour variants – Mint Green, Blossom Pink, Clay White, Lilac Purple, and Pastel Blue. This funky gadget is ultra-portable, with dimensions of 6.7 x 10.4 x 12.2 cm. It comes with an integrated flash which helps in taking bright images in limited lighting and a selfie mirror next to the lens. The shutter speed and flash brightness on the Instax Mini 12 are automatically adjustable. Taking closeups with this camera is super easy, all you need to do is twist the lens twice to activate the Close-up mode.
On its latest iteration, Samsung’s flagship flip phone rocks a sizeable 3.4-inch Super AMOLED cover display. In its unfolded form, the Flip 5 sports a 6.7-inch Dynamic AMOLED display with HDR10+ support and a refresh rate of 120Hz. The smartphone is powered by the latest Snapdragon 8 Gen 2 SoC that delivers a top-shelf performance as usual on the device. Talking about the cameras, the Flip 5 gets 12MP wide and ultrawide sensors along with a 10MP selfie camera. If you’re looking for a funky gadget, the Flip 5 is as good as it gets for smartphones. Read our full review here.
The WOpet Automatic SmartFeeder is certainly a pricey buy, but it can accomplish a range of tasks that make it easier to leave your pet alone at home. With a 7-litre storage capacity, this smart feeder can hold up to 10 days’ worth of meals for dogs (28 days for cats). You can set up and change the feeding scheduling remotely using the dedicated app. The feeder can also play up to 10 customised voice commands, which can be used to call your pet when it’s mealtime. The integrated camera on the device has a 120-degree wide angle view which allows you to communicate with your pet in real time.
The Belkin Boostcharge Magnetic Wireless Power Bank is one of our favourite smartphone accessories around. It can hold up to 5,000 mAh of charge and magnetically attaches itself to the back of your iPhone. Its compact design ensures that the rear cameras are never blocked. The Boostcharge power bank can wirelessly charge your iPhone at a maximum speed of 7.5W. With wired charging, this speed gets bumped up to 10W. The power bank also has a foldable stand attachment which allows you to place your iPhone on any flat surface while streaming or taking video calls. One of the underrated features of this accessory is pass-through charging, which means you can charge your phone while the power bank is getting charged.
Smart wearable and fitness enthusiasts will like the new boAt Smart Ring. This ring is made of premium ceramic and metal and offers a range of health monitoring and activity tracking functions. The smart touch controls on this ring can be used to control music playback, change tracks, click pictures, and navigate apps. For those who don’t like wearing a smartwatch all the time, this smart ring is an ideal replacement. You can use it to track your sleeping pattern, monitor your heart rate, check your body temperature and SpO2 level, and track a diverse range of physical activities.
The Smart Hybrid Pillow from The Sleep Company utilises the ‘smartGRID’ technology with a unique honeycomb structure to provide a super breathable and cool cushion for your head while you sleep. The high-quality TPE material keeps allergies at bay, providing a comfortable, deep sleep. The pillow has a size of 61cm x 41cm. With over a thousand air channels, you will never find ourself flipping the pillow over to access its ‘cool’ side.
This UV Sterilizer Box can be used to sanitize objects that get used on a daily basis and accumulate a lot of germs in the process. You can pop in your smartphone, jewellery, watch, or keys, and clean them in just 3 minutes. The box blasts powerful UV light at the object placed within it, effectively killing 99.9% of the germs and bacteria. It also has built-in aromatherapy chambers that release relaxing smells, wiping out any unwanted odour from the device.
Read Also: 5 ways to fix ‘A Problem Was Detected With the TrueDepth Camera’ on iPhone
Meta Quest 3
Price: Rs 61,930 on Amazon The super-immersive Meta Quest 3 VR headset is one the best in its genre right now. Its incredible application support revolutionises the way you interact with real-world objects. You can play a video game on your coffee table or overlay a screen wherever you want to watch videos or play video games. The virtual and physical worlds align and blend seamlessly with the Meta Quest 3, a real testament to how far virtual reality headsets have progressed over the years. The Touch Plus controllers included with the Quest 3 offer intuitive controls for gaming along with haptic feedback.
LG StanByMe Go Suitcase TV
Price: Rs 99,980 on LG.com If we’re talking about devices that go over the board to be excessive, nothing comes close to LG’s newest StanByMe Go Suitcase TV. Nestled inside a hard-sided briefcase, the StanByMe Go is a completely wireless TV that you can carry along wherever you go. The touchscreen display can also be controlled by a remote control or voice commands. A 3-hour battery life makes it ideal to watch movies or catch that unmissable game no matter where you are. You can also orient the 27-inch screen vertically in portrait mode. This is as funky as a gadget can get in 2023.
Fujifilm Instax Mini 12
Price: Rs 7,459 on Amazon The Fujifilm Instax Mini 12 polaroid camera is available in 5 colour variants – Mint Green, Blossom Pink, Clay White, Lilac Purple, and Pastel Blue. This funky gadget is ultra-portable, with dimensions of 6.7 x 10.4 x 12.2 cm. It comes with an integrated flash which helps in taking bright images in limited lighting and a selfie mirror next to the lens. The shutter speed and flash brightness on the Instax Mini 12 are automatically adjustable. Taking closeups with this camera is super easy, all you need to do is twist the lens twice to activate the Close-up mode.
Samsung Galaxy Z Flip 5
Price: Rs 99,999 on Samsung.com On its latest iteration, Samsung’s flagship flip phone rocks a sizeable 3.4-inch Super AMOLED cover display. In its unfolded form, the Flip 5 sports a 6.7-inch Dynamic AMOLED display with HDR10+ support and a refresh rate of 120Hz. The smartphone is powered by the latest Snapdragon 8 Gen 2 SoC that delivers a top-shelf performance as usual on the device. Talking about the cameras, the Flip 5 gets 12MP wide and ultrawide sensors along with a 10MP selfie camera. If you’re looking for a funky gadget, the Flip 5 is as good as it gets for smartphones. Read our full review here.
WOpet SmartFeeder
Price: Rs 28,193 on Amazon The WOpet Automatic SmartFeeder is certainly a pricey buy, but it can accomplish a range of tasks that make it easier to leave your pet alone at home. With a 7-litre storage capacity, this smart feeder can hold up to 10 days’ worth of meals for dogs (28 days for cats). You can set up and change the feeding scheduling remotely using the dedicated app. The feeder can also play up to 10 customised voice commands, which can be used to call your pet when it’s mealtime. The integrated camera on the device has a 120-degree wide angle view which allows you to communicate with your pet in real time.
Belkin Magnetic Wireless Power Bank
Price: Rs 6,273 on Croma The Belkin Boostcharge Magnetic Wireless Power Bank is one of our favourite smartphone accessories around. It can hold up to 5,000 mAh of charge and magnetically attaches itself to the back of your iPhone. Its compact design ensures that the rear cameras are never blocked. The Boostcharge power bank can wirelessly charge your iPhone at a maximum speed of 7.5W. With wired charging, this speed gets bumped up to 10W. The power bank also has a foldable stand attachment which allows you to place your iPhone on any flat surface while streaming or taking video calls. One of the underrated features of this accessory is pass-through charging, which means you can charge your phone while the power bank is getting charged.
boAt Smart Ring
Price: Rs 9,999 on boAt.com Smart wearable and fitness enthusiasts will like the new boAt Smart Ring. This ring is made of premium ceramic and metal and offers a range of health monitoring and activity tracking functions. The smart touch controls on this ring can be used to control music playback, change tracks, click pictures, and navigate apps. For those who don’t like wearing a smartwatch all the time, this smart ring is an ideal replacement. You can use it to track your sleeping pattern, monitor your heart rate, check your body temperature and SpO2 level, and track a diverse range of physical activities.
Smart Hybrid Pillow
Price: Rs 1,199 on TheSleepCompany.in The Smart Hybrid Pillow from The Sleep Company utilises the ‘smartGRID’ technology with a unique honeycomb structure to provide a super breathable and cool cushion for your head while you sleep. The high-quality TPE material keeps allergies at bay, providing a comfortable, deep sleep. The pillow has a size of 61cm x 41cm. With over a thousand air channels, you will never find ourself flipping the pillow over to access its ‘cool’ side.
LED UV Sterilizer Box
Price: Rs 3,490 on Amazon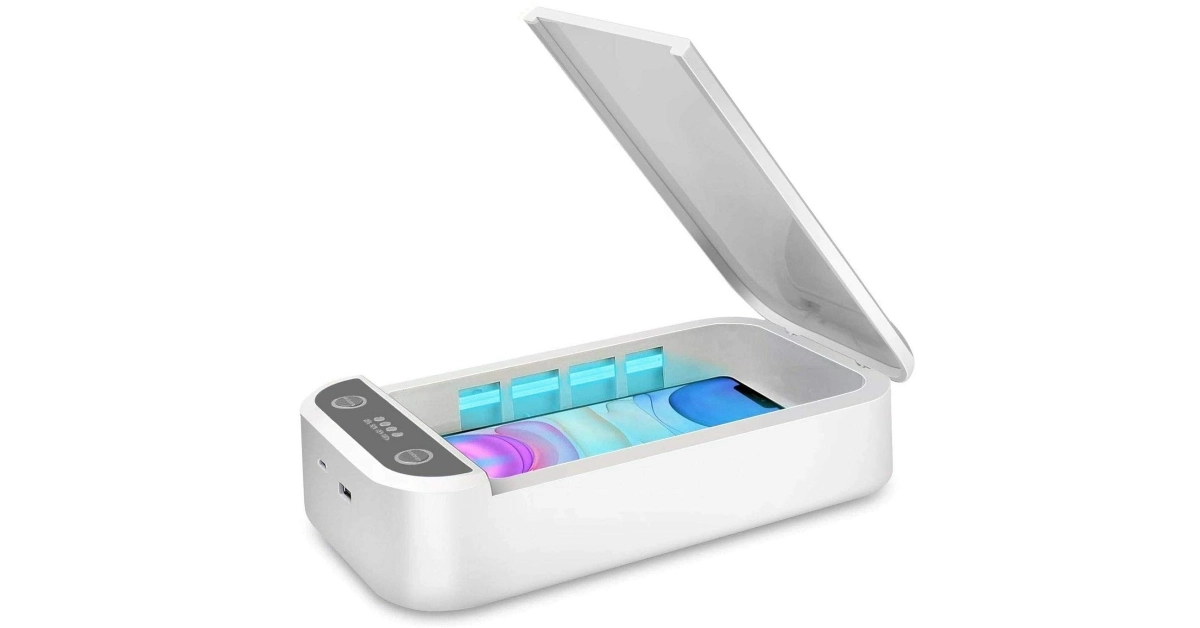 This UV Sterilizer Box can be used to sanitize objects that get used on a daily basis and accumulate a lot of germs in the process. You can pop in your smartphone, jewellery, watch, or keys, and clean them in just 3 minutes. The box blasts powerful UV light at the object placed within it, effectively killing 99.9% of the germs and bacteria. It also has built-in aromatherapy chambers that release relaxing smells, wiping out any unwanted odour from the device.
Read Also: 5 ways to fix ‘A Problem Was Detected With the TrueDepth Camera’ on iPhone
This UV Sterilizer Box can be used to sanitize objects that get used on a daily basis and accumulate a lot of germs in the process. You can pop in your smartphone, jewellery, watch, or keys, and clean them in just 3 minutes. The box blasts powerful UV light at the object placed within it, effectively killing 99.9% of the germs and bacteria. It also has built-in aromatherapy chambers that release relaxing smells, wiping out any unwanted odour from the device.
Read Also: 5 ways to fix ‘A Problem Was Detected With the TrueDepth Camera’ on iPhone
Conclusion
These are the top 9 funky gadgets you can buy online right now. All of these devices can be bought online from their respective e-retail outlets. This list covers a range of genres and price points. If there is a device that’s way ‘out there’ and deserves a spot on the list, let us know in the comments!OnePlus 12 global launch date is no longer a secret

Key Highlights
- OnePlus 12 will launch globally alongside OnePlus 12R.
- OnePlus 12R is a gaming smartphone.
- It will succeed the OnePlus 11R.
OnePlus 12 specifications
The OnePlus 12 was launched in China last week on Tuesday. It is highlighted with a 6.82-inch quad-HD+ LTPO OLED screen. The display has an adaptive refresh rate ranging between 1Hz and 120Hz. The screen supports 4,500 nits of screen brightness. The device is IP65 rated for dust and water resistance. Also Read: Vivo X100 Series global launch is on this day At its heart, there is Qualcomm’s 4nm Snapdragon 8 Gen 3 SoC. The device is offered with up to 24GB of LPDDR5X RAM and up to 1TB of UFS 4 inbuilt storage. The phone is endowed with a Hasselblad branded triple rear camera with a Sony LYT-808 sensor with a 50-megapixel primary camera (OIS, and f/1.6 aperture), a 64-megapixel telephoto secondary lens (OIS, 3X optical zoom and f/2.6 aperture) and a 48-megapixel ultra-wide-angle lens (114-degree field-of-view). Lastly, there is a 32-megapixel front-facing camera (f/2.4 aperture) for taking selfies and video calling. The handset houses a 5,400mAh battery with 100W SuperVOOC wired, 50W wireless and 10W reverse wireless charging support.Vivo X100 Series global launch is on this day

Key highlights
 Vivo X100 Series debuted in China in November and the pricing at which it arrived starts at CNY 3,999 (Rs 50,000) and goes up to CNY 5,999 (Rs 68,000). There are four models for Vivo 100 Pro whereas the X100 is made available in five variants with up to 16GB LPDDR5T RAM + 1TB storage.
All the models with their respective pricing are listed here.
Also Read: OnePlus 12 could launch in January 2024, company confirms
Vivo X100 Series debuted in China in November and the pricing at which it arrived starts at CNY 3,999 (Rs 50,000) and goes up to CNY 5,999 (Rs 68,000). There are four models for Vivo 100 Pro whereas the X100 is made available in five variants with up to 16GB LPDDR5T RAM + 1TB storage.
All the models with their respective pricing are listed here.
Also Read: OnePlus 12 could launch in January 2024, company confirms
- Vivo X100 Series launched in China last month.
- The series includes two models- Vivo X100 and Vivo X100 Pro.
- Both the devices are powered by MediaTek Dimensity 9300 SoC.
- The smartphones runs on OriginOS 4 with Android 14.
 Vivo X100 Series debuted in China in November and the pricing at which it arrived starts at CNY 3,999 (Rs 50,000) and goes up to CNY 5,999 (Rs 68,000). There are four models for Vivo 100 Pro whereas the X100 is made available in five variants with up to 16GB LPDDR5T RAM + 1TB storage.
All the models with their respective pricing are listed here.
Also Read: OnePlus 12 could launch in January 2024, company confirms
Vivo X100 Series debuted in China in November and the pricing at which it arrived starts at CNY 3,999 (Rs 50,000) and goes up to CNY 5,999 (Rs 68,000). There are four models for Vivo 100 Pro whereas the X100 is made available in five variants with up to 16GB LPDDR5T RAM + 1TB storage.
All the models with their respective pricing are listed here.
Also Read: OnePlus 12 could launch in January 2024, company confirms
Vivo X100 Series specifications
Both Vivo X100 and Vivo X100 Pro share a lot of similarities. The display software and processors are the same. They feature a 6.78-inch AMOLED 8T LTPO curved display with a 120Hz refresh rate and 3000 nits of peak brightness. The devices run on OriginOS 4 with Android 14 out of the box. They are powered by MediaTek Dimensity 9300 SoC with Vivo V3 chip. Both the handsets are highlighted with a triple-camera setup powered by Zeiss optics. Vivo X100 Pro includes a 50-megapixel Sony IMX989 1-inch type sensor with OIS (100x digital zoom), a 50-megapixel ultra wide-angle sensor and a 50-megapixel Zeiss APO super-telephoto lens with OIS (4.3x optical zoom and 100x digital zoom). On the other hand, the vanilla model includes a Sony IMX920 VCS bionic 50-megapixel primary sensor with OIS, a 50-megapixel ultra-wide-angle lens and a 64-megapixel Zeiss super-telephoto lens (100x clear zoom). Both smartphones come with a 32-megapixel selfie camera.Garena Free Fire Redeem Codes Today 11 December 2023: Here is how to claim them

Garena Free Fire is a battle royale game with regular awards and tournaments to keep players interested. If you play Garena Free Fire, you should be aware of the redeem codes that are released on a daily basis. However, because the battle royale game is banned in India, players from other countries can use the Free Fire Redeem codes daily. If you’re unfamiliar with the Garena Free Fire redeem codes or don’t know how to get them, we’ve put together a step-by-step guide to help you redeem them. Check out Garena Free Fire Redeem Codes for 11 December 2023.
The Free Fire redeem codes are a great way to get free stuff. These are 12-digit codes that contain alphabets and numbers, as well as an expiration date and time. Because the Garena FF redeem codes cannot be used more than once, you should hurry to the redemption page to claim your free reward before someone else does. To get a free reward, all you have to do is go to reward.ff.garena.com/en, which is the official redemption page. Also, keep an eye on this space for daily updates on Garena Free Fire redemption codes and rewards.
Garena Free Fire Redeem Codes Today 11 December 2023
B3G7A22TWDR7X 4ST1ZTBE2RP9 J3ZKQ57Z2P2P 8F3QZKNTLWBZ X99TK56XDJ4X WEYVGQC3CT8Q GCNVA2PDRGRZ MHM5D8ZQZP22 3IBBMSL7AK8G FF7MUY4ME6SCHow to Get Free Fire Redeem Codes for Garena on 11 December 2023?
- Visit the Garena Free Fire game’s official website at reward.ff.garena.com.
- Use your Facebook, Google, VK, Apple ID, Huawei ID, or Twitter account to log in.
- You’ll be taken to a valid redemption code (s)
- Copy and paste the 12-digit redemption code into the text box.
- On the screen, a dialogue box will appear.
- ‘Ok’ should be selected.
iPhone Battery Icon Yellow? Top 4 ways to fix it

The default colour for the battery indicator on iPhones is green. The colour green signifies that the battery level on your device is optimum and everything is working as intended. A yellow icon means that the Low Power Mode is currently active on your device. This mode typically kicks in when the battery level drops to 20%. But, it stays on until the battery reaches 80%. If the battery icon on your iPhone turns yellow out of the blue, you must have turned it on by accident. So, let’s take a quick look at how you can turn it off.
Read Also: Top 5 Ways To Tell if Someone Blocked You on Facebook
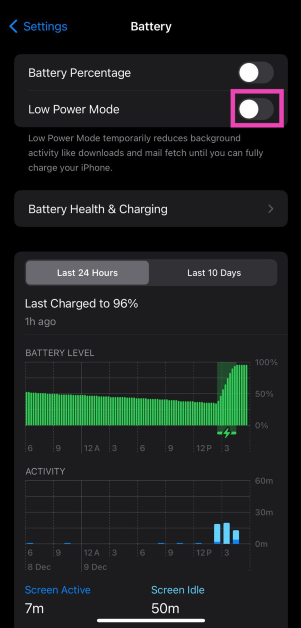
 Step 2: Turn off the toggle switch for Low Power Mode.

 Step 2: Hit the green plus sign next to Low Power Mode. The tile will be added to the Control Center.
 Step 3: Swipe down from the status bar and tap the Low Power Mode tile to turn it off.
If you don’t want to add the Low Power Mode tile to the Control Center or turn it from device settings, you can get Siri to do it. Simply say ‘Hey Siri, turn off Low Power Mode’ and the voice assistant will switch your phone’s battery usage to its normal settings.
Step 3: Swipe down from the status bar and tap the Low Power Mode tile to turn it off.
If you don’t want to add the Low Power Mode tile to the Control Center or turn it from device settings, you can get Siri to do it. Simply say ‘Hey Siri, turn off Low Power Mode’ and the voice assistant will switch your phone’s battery usage to its normal settings.
What does the Yellow Battery Icon mean on an iPhone?
When your iPhone’s battery level drops down to 20%, you may have noticed its battery icon turn yellow. This doesn’t just signify that your phone is running out of charge, it also means that the device’s system has activated Low Power Mode. When Low Power Mode is activated, your iPhone makes a decision to prioritise the most important tasks to preserve the battery life. If you don’t have access to a charger, the Low Mode Mode can keep your iPhone alive for a significant amount of time. It does this by cutting down on some tasks and drawing back the power from some functions. Here are all the features that get affected in this mode.- 5G disabled (except when you’re streaming videos) on iPhone 12 and 13.
- Auto-lock gets reduced to 30 seconds.
- Display brightness gets reduced.
- The display refresh rate drops down to 60Hz.
- Some visual effects are dialled down.
- iCloud syncing for photos is paused.
- Automatic downloads are paused.
- Your emails are fetched at a slower rate.
- Background apps are refreshed at a slower rate.
Turn off Low Power Mode from Settings to ‘fix’ the yellow battery icon on your iPhone
Step 1: Go to Settings and select Battery.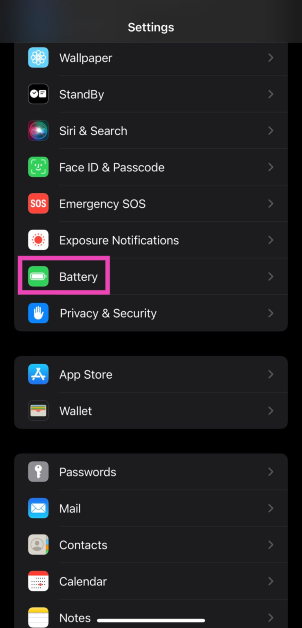 Step 2: Turn off the toggle switch for Low Power Mode.
Charge your iPhone
As we mentioned earlier, the Low Power Mode on your iPhone shuts off when the device reaches an 80% charge. If you’re running low on battery, it is a good idea to not have all the functions of your iPhone running at full blast, as it would deplete the leftover very quickly. If you have access to a charger, plug it into your device and wait for it to reach an 80% charge level.Add the Low Power Mode to tile to the Control Center
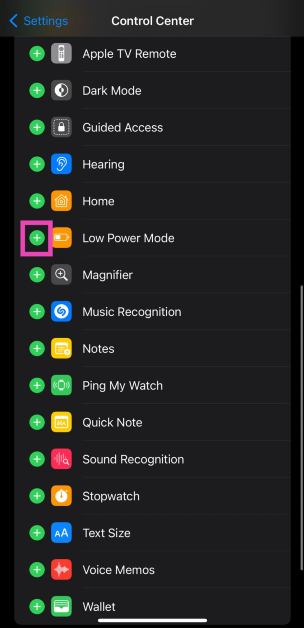
If you don’t want to visit the device settings every time you want to toggle the Low Power Mode, you can simply add its tile to the Control Center. Here’s how. Step 1: Go to Settings and select Control Center.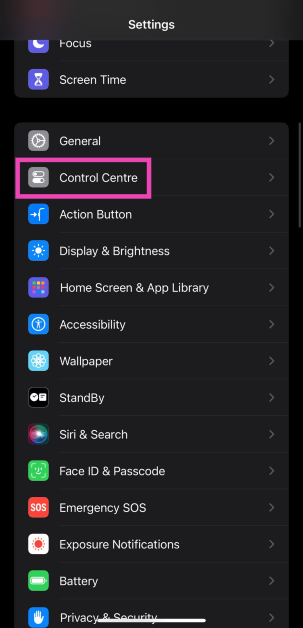 Step 2: Hit the green plus sign next to Low Power Mode. The tile will be added to the Control Center.
 Step 3: Swipe down from the status bar and tap the Low Power Mode tile to turn it off.
Use Siri to turn off Low Power Mode
 If you don’t want to add the Low Power Mode tile to the Control Center or turn it from device settings, you can get Siri to do it. Simply say ‘Hey Siri, turn off Low Power Mode’ and the voice assistant will switch your phone’s battery usage to its normal settings.
Frequently Asked Questions (FAQs)
Why is my iPhone’s battery icon yellow?
Your iPhone’s battery icon turns yellow when it is set to Low Power Mode. This mode kicks in automatically when your iPhone’s battery goes down to 20%. Once your iPhone is in Low Power Mode, its performance will be reduced to increase the battery life.When does the Low Power Mode go away?
The Low Power Mode on your iPhone is automatically disabled when the device is charged to 80%. You can also disable it from Battery settings.How do I check my iPhone’s battery health?
To check your iPhone’s battery health, go to Settings>Battery and tap on Battery Health & Charging.Can I use my iPhone in Low Power Mode?
You can carry out routine tasks on your iPhone when it is in Low Power Mode. However, certain functions like 5G reception, high brightness, background app refresh, and more will be curtailed.Does the iPhone receive phone calls in Low Power Mode?
Yes, basic cellular functions like calling and messaging remain unaffected in Low Power Mode. Read Also: Infinix Smart 8 HD smartphone with magic ring launched in IndiaConclusion
This is how you can fix the yellow battery icon on your iPhone. The Low Power Mode only preserves your iPhone’s battery life in the short term, but if you want it to last longer, you should take a look at your general usage. Practices like overcharging the battery, subjecting the device to extreme temperatures, and using counterfeit chargers aren’t good for the battery. Read this article to learn how you can improve your iPhone’s battery life.Garena Free Fire Redeem Codes Today 10 December 2023: Here is how to claim them

Garena Free Fire is a battle royale game with regular awards and tournaments to keep players interested. If you play Garena Free Fire, you should be aware of the redeem codes that are released daily. However, because the battle royale game is banned in India, players from other countries can use the Free Fire Redeem codes daily. If you’re unfamiliar with the Garena Free Fire redeem codes or don’t know how to get them, we’ve put together a step-by-step guide to help you redeem them. Check out Garena Free Fire Redeem Codes for 10 December 2023.
The Free Fire redeem codes are a great way to get free stuff. These are 12-digit codes that contain alphabets and numbers, as well as an expiration date and time. Because the Garena FF redeem codes cannot be used more than once, you should hurry to the redemption page to claim your free reward before someone else does. To get a free reward, all you have to do is go to reward.ff.garena.com/en, which is the official redemption page. Also, keep an eye on this space for daily updates on Garena Free Fire redemption codes and rewards.
Garena Free Fire Redeem Codes Today 10 December 2023
FFCMCPSEN5MX FF11NJN5YS3E ZZZ76NT3PDSH FF10617KGUF9 NPYFATT3HGSQ XZJZE25WEFJJ FFCMCPSJ99S3 EYH2W3XK8UPG UVX9PYZV54AC V427K98RUCHZ FFCMCPSUYUY7E 6KWMFJVMQQYG MCPW2D2WKWF2 MCPW3D28VZD6 VNY3MQWNKEGU FFIC33NTEUKA ZZATXB24QES8 U8S47JGJH5MG HNC95435FAGJ MCPW2D1U3XA3 BR43FMAPYEZZ FFCMCPSGC9XZHow to Get Free Fire Redeem Codes for Garena on 10 December 2023?
- Visit the Garena Free Fire game’s official website at reward.ff.garena.com.
- Use your Facebook, Google, VK, Apple ID, Huawei ID, or Twitter account to log in.
- You’ll be taken to a valid redemption code (s)
- Copy and paste the 12-digit redemption code into the text box.
- On the screen, a dialogue box will appear.
- ‘Ok’ should be selected.
How to set an alarm on a Samsung smartphone? Top 2 Ways

Setting an alarm on a smartphone is one of the easiest things you can do. However, if you’re new to using smartphones, this can be a confusing task. Most smartphones do not have a separate alarm app. The alarm functionality is usually integrated into the native clock app. You can access the clock settings from its widget or directly from its app in your phone’s app drawer. If you own a Samsung smartphone, here is how you can set an alarm on it.
Read Also: Infinix Smart 8 HD smartphone with magic ring launched in India
 Step 4: Set a time for the alarm. You can do this by swiping up and down on the hour and minute dials.
 Step 5: Select the days on which you want the alarm to ring.
Step 6: Give the alarm a name. This is entirely optional.
Step 7: Set the Alarm sound, Vibration pattern, and Snooze window & frequency.
Step 5: Select the days on which you want the alarm to ring.
Step 6: Give the alarm a name. This is entirely optional.
Step 7: Set the Alarm sound, Vibration pattern, and Snooze window & frequency.
 Step 8: Hit Save.
 Step 4: Hit the clock icon at the top right corner of the screen.
Step 5: Set a time for the alarm using the dial.
Step 6: Hit Set.
Step 7: Select the days on which you want the alarm to ring. You can also select its frequency from the drop-down menu.
Step 8: Sleep as Android is a smart alarm app. You can use the ‘Smart period’ feature to wake you up at an optimal sleep phase so you wake up feeling refreshed. You can set a window for Smart Period.
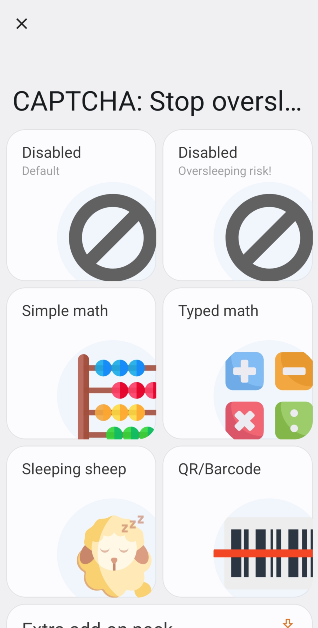
Step 9: Tap on Captcha if you want Sleep as Android to make you solve a puzzle to turn off the alarm.
Step 10: Hit Save once you’re done.
Step 4: Hit the clock icon at the top right corner of the screen.
Step 5: Set a time for the alarm using the dial.
Step 6: Hit Set.
Step 7: Select the days on which you want the alarm to ring. You can also select its frequency from the drop-down menu.
Step 8: Sleep as Android is a smart alarm app. You can use the ‘Smart period’ feature to wake you up at an optimal sleep phase so you wake up feeling refreshed. You can set a window for Smart Period.
Step 9: Tap on Captcha if you want Sleep as Android to make you solve a puzzle to turn off the alarm.
Step 10: Hit Save once you’re done.
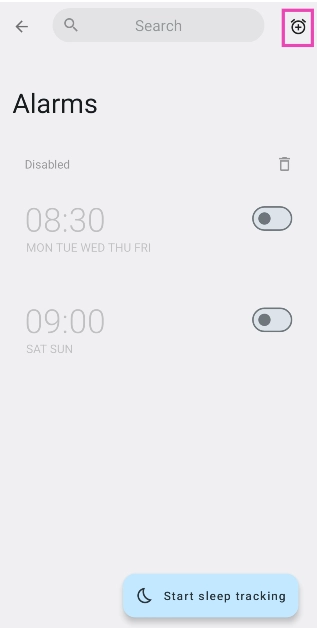
Features and limitations of the native alarm clock on a Samsung phone
If you want to set up a standard, no-nonsense alarm that wakes you up at the pre-set time, the native alarm clock on your smartphone should do the job. One of the things we like about Samsung’s alarm clock is that it lets you decide how many times you can hit the Snooze button. If you’re very liberal with the snooze button, you can allow yourself one snooze hit per alarm. You can also set a custom interval for snoozing. The standard alarm clock works perfectly fine, but there are a lot of other interesting options out there for you. For instance, the ‘Sleep as Android’ alarm app also tracks your sleeping pattern and wakes you up at the optimal sleeping phase so you wake up feeling refreshed. You can also use this app to set up a puzzle that turns off the alarm. If you struggle with waking up, you can also use a QR code as the key to turning off the alarm clock. For this, you’ll need to print out a QR code and place it somewhere far away from your bed. This will ensure that you walk up to the QR code every morning in order to turn off the alarm.Use the native clock app to set an alarm on a Samsung smartphone
Step 1: Launch the native clock app on your smartphone. Step 2: Tap the Alarm tab at the bottom of the screen. Typically, the clock app should open on the alarm page by default. Step 3: Tap the + icon on the right side of the screen.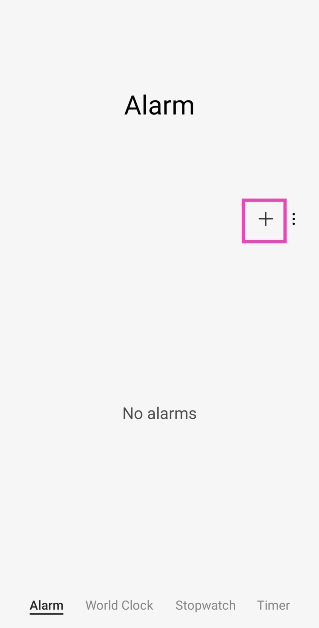 Step 4: Set a time for the alarm. You can do this by swiping up and down on the hour and minute dials.
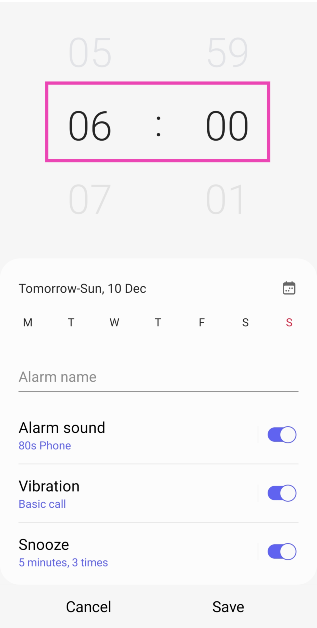 Step 5: Select the days on which you want the alarm to ring.
Step 6: Give the alarm a name. This is entirely optional.
Step 7: Set the Alarm sound, Vibration pattern, and Snooze window & frequency.
Step 5: Select the days on which you want the alarm to ring.
Step 6: Give the alarm a name. This is entirely optional.
Step 7: Set the Alarm sound, Vibration pattern, and Snooze window & frequency.
 Step 8: Hit Save.
Use a third-party app: Sleep as Android
Sleep as Android is one of our favourite alarm apps for Android devices. Here’s how you can use it to set an alarm on your Samsung smartphone. Step 1: Download and install the Sleep as Android app from the Google Play Store. Step 2: Launch the app on your device. Step 3: Tap on Set alarm.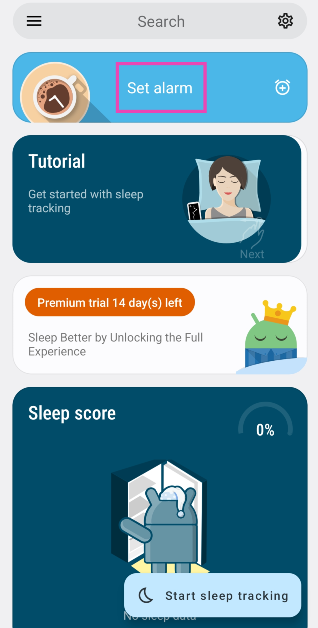 Step 4: Hit the clock icon at the top right corner of the screen.
 Step 5: Set a time for the alarm using the dial.
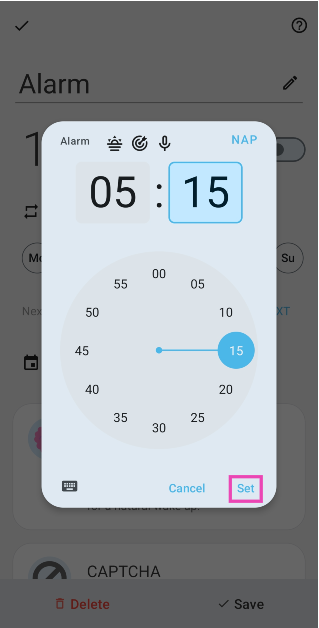 Step 6: Hit Set.
Step 7: Select the days on which you want the alarm to ring. You can also select its frequency from the drop-down menu.
Step 6: Hit Set.
Step 7: Select the days on which you want the alarm to ring. You can also select its frequency from the drop-down menu.
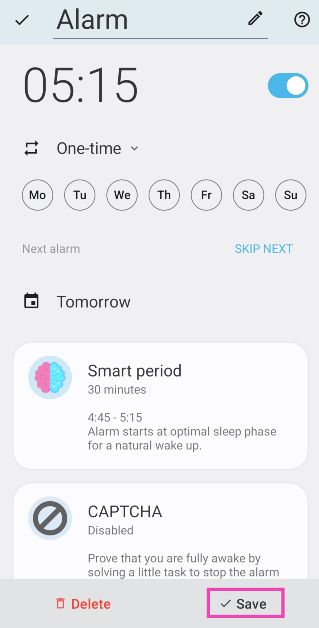 Step 8: Sleep as Android is a smart alarm app. You can use the ‘Smart period’ feature to wake you up at an optimal sleep phase so you wake up feeling refreshed. You can set a window for Smart Period.
Step 9: Tap on Captcha if you want Sleep as Android to make you solve a puzzle to turn off the alarm.
Step 8: Sleep as Android is a smart alarm app. You can use the ‘Smart period’ feature to wake you up at an optimal sleep phase so you wake up feeling refreshed. You can set a window for Smart Period.
Step 9: Tap on Captcha if you want Sleep as Android to make you solve a puzzle to turn off the alarm.
 Step 10: Hit Save once you’re done.