There are two ways to unlock your iPhone – Passcode and Face ID. While passcodes are the old-school and reliable method to unlock the device, the majority of users prefer Face ID because of its seamless operation and ease of use. Sometimes, your iPhone may throw ‘A Problem Was Detected With the TrueDepth Camera’ error message while you’re trying to unlock it. Some users may wonder what a TrueDepth Camera even is. If you’re caught in the same confusion, this article will address your queries and suggest some possible fixes.Read Also:Acer Nitro V 16 (ANV16-41) gaming laptop powered by up to Zen 4-based AMD Ryzen 7 8845HS CPU launched
What does the TrueDepth Camera do?
When you see the ‘problem detected with the TrueDepth camera’ error message on your iPhone, you might wonder what the TrueDepth camera even is. Well, the answer is quite simple. The TrueDepth Camera is a collective term used for the front camera, infrared camera, dot projector and other proximity sensors. These components are located on the notch of your iPhone’s display. The newer iPhones house them in the ‘Dynamic Island’.As you can guess by now, the TrueDepth Camera maps a 3D image of your face using thousands of dot particles. The 3D scan is matched with the image of your face captured by the front camera to verify your identity. This is the mechanism behind the Face ID on your iPhone. The TrueDepth Camera is also the reason why someone cannot unlock your iPhone simply by putting up your picture in front of the lock screen. Apart from Face ID, the TrueDepth Camera is also used for Memojis and Portrait Mode.
Wipe the camera area
The first thing you should do when you come across any error related to the TrueDepth camera is wipe the front camera panel with a clean microfibre cloth. Oftentimes, dirt and dust particles collect on the sensors and the dot projector, causing a failure to read your face accurately. The TrueDepth camera relies on the infrared dots to create a 3D map of your face. Any smudges or dirt on the sensor can cause it to malfunction. A quick wipe should solve this problem.
Remove any screen protection
Incorrectly installed tempered glass or other forms of screen protection can mess with the functioning of the TrueDepth camera. If the glass is hindering the camera cutout, it can cause unnecessary glare. Your phone may not be able to map your face correctly, leading to the TrueDepth camera error. Take off the screen protector and install it correctly. Make sure you only use Apple-authorised products to protect your iPhone’s display.
Restart your iPhone
So, you’ve wiped the front camera panel and removed the screen protector but the problem still won’t go away? It is likely that your hardware isn’t at fall. Software glitches are quite common on mobile devices and your iPhone is no exception. Luckily, these glitches can be quickly resolved by restarting your phone. Press and hold the side button and any volume key to reveal the power menu on your iPhone. Use the power slider to turn off your device. Wait for a few seconds and use the side key to restart your device.
Update your iPhone
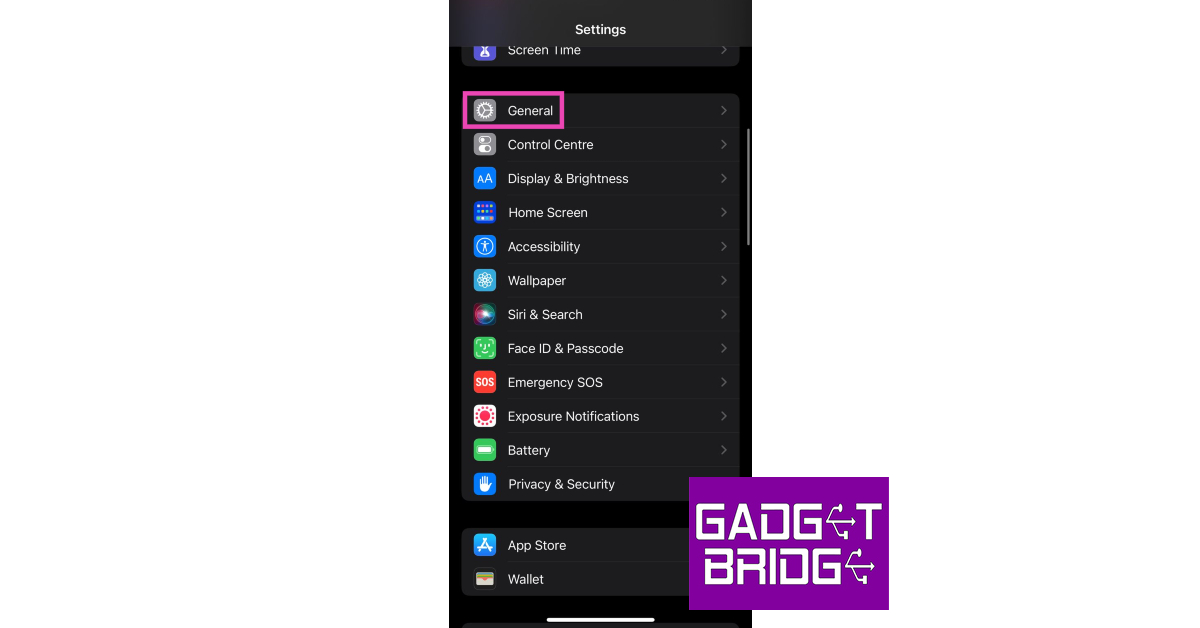
If the problem lies with your iPhone’s software, it can be quickly fixed by updating your device. Here’s how you can go about it.Step 1: Make sure your iPhone is connected to a WiFi network and plug in its charger.Step 2: Go to Settings and select General.Step 3: Select Software Update.Step 4: Tap on Download and Install.
Reset Face ID
Step 1: Go to Settings and select Face ID and Passcode.Step 2: Tap on Reset Face ID.Step 3: Go back to Face ID and Passcode.Step 4: Hit Set up Face ID.Step 5:Register your Face ID again.
Reset all settings
Step 1: Go to Settings and select General.
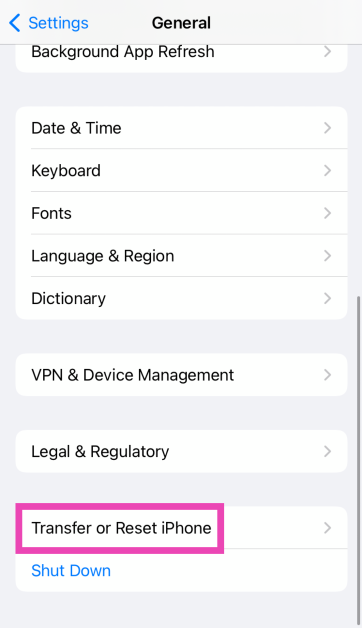
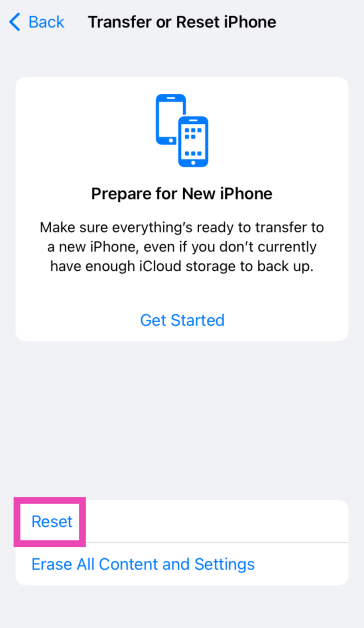
Step 2: Tap on Transfer or Reset iPhone.
Step 3: Hit Reset.
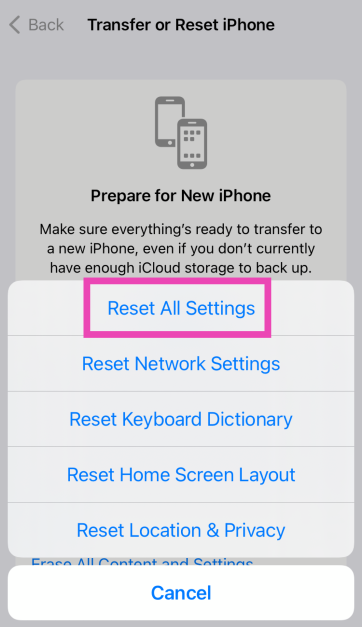
Step 4: Select Reset All Settings. Enter the passcode to confirm your decision.
Factory reset your iPhone
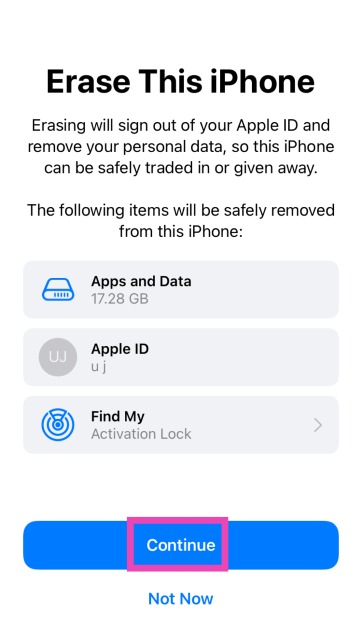
Resetting your iPhone to its factory settings restores its OS to out-of-the-box condition. However, it erases all the content on your phone along with your personal data.
Step 1: Go to Settings and select General.
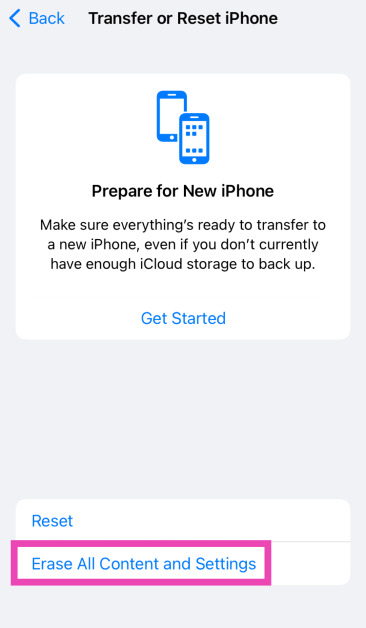
Step 2: Tap on Transfer or Reset iPhone.
Step 3: Hit Erase All Content And Settings.
Step 4: Tap on Continue and enter the passcode to reset your iPhone to its factory settings.
Frequently Asked Questions (FAQs)
Can I have 2 Face IDs on my iPhone?
Yes, you can have a maximum of 2 different Face IDs on your iPhone.
Why is the Face ID on my iPhone not working?
If you can’t unlock your iPhone using Face ID, clean the front camera panel and make sure there is nothing obstructing your face.
How does Face ID work?
Using the TrueDepth Camera, your iPhone is able to render a 3D scan of your face and judge that it is actually you who is trying to unlock the phone instead of someone holding up your picture.
What causes problems with the TrueDepth camera on the iPhone?
The TrueDepth camera on your iPhone can malfunction due to the collection of dust and grime on the notch/Dynamic Island, faulty screen protector, and background software issues.
These are the top 5 ways to fix ‘A Problem was Detected with the TrueDepth Camera’ issue on your iPhone. If these fixes do not work for you, take your iPhone to an Apple Repair Centre for further diagnosis. Make sure your personal data is backed up before checking your phone in for repair.
Installing Windows on your PC using a bootable USB drive is something that you should know how to do. The process is fairly simple to grasp, but if you hit a snag, it can get confusing to diagnose the problem. Most users often get the ‘No Device Drivers Were Found’ error while installing Windows 10/11. If you’ve hit the same error too, there is no need to panic. These fixes will resolve the error in no time.Read Also:Top 4 Ways to See Who Viewed Your Instagram Story (2023)
What could be causing the ‘No Device Drivers Were Found’ error to pop up while installing Windows 10/11 on your PC?
As you can probably guess, this error pops up when Windows fails to find the driver package during the installation process. This is very unusual because the installation media typically contains all the necessary drivers required for the installation of the OS on your PC. If you get this error it could be due to either one of these reasons:
The driver package in the installation media is corrupted.
The installation media file is corrupted.
Windows cannot verify the authenticity of the driver package.
The drivers are outdated and not supported by Windows anymore.
Step 4: Continue installing the Windows OS on your PC.
Manually download the drivers from the manufacturer’s website
If the Windows Installation Media on your USB drive does not contain the appropriate drivers, you will need to download them from the manufacturer’s website. Sometimes, a corrupt driver package may lead to the ‘no device drivers were found’ error showing up during the installation process. To fix this, simply download the SATA AHCI controller drivers from the OEM’s website. You will need another PC to do this. Once you have downloaded the driver package, plug the USB drive into the computer again until you reach the error window. In the error window, select Load Driver, followed by Browse. Locate the recently downloaded driver package and install it on the PC.
Reinstall Windows Installation Media
If there’s something wrong with the Windows Installation Media on your USB drive, reinstall it from the official Microsoft website. First, download the Windows Installation Assistant, followed by the Windows Installation Media and Windows Disk Image (ISO). Now, plug in the USB drive to your computer and launch mediacreationtool.exe that you installed on the PC. Select ‘Create installation media for another PC’ and choose your USB drive as the target storage. When the installation process is complete, use the USB drive to boot Windows on another PC.
Reset Motherboard Settings
Step 1:Restart your PC and enter BIOS using its assigned key. This varies among different manufacturers so Google which key leads to BIOS for your PC. Del, F2, or F10 should do the job.Step 2: Go to Exit and select Load Setup Defaults/Load Optimal Defaults.Step 3:Confirm your selection in the following popup box.Step 4:Save your changes and exit BIOS.
Plug the USB drive into a different port
If you’ve tried all the fixes mentioned above and are still getting the ‘no device drivers were found’ error while installing Windows 10 or 11 on your PC, it is possible that the fault may lie with the USB port that your drive is plugged into. Make sure that you plug it into a USB 2.0 port and not a USB 3.0 port. Once that’s done, start the installation process all over again.
Frequently Asked Questions (FAQs)
Why am I getting the ‘No Drivers Were Found Error’ while installing Windows 10/11 on my PC?
This error usually pops up when the driver package on your Windows Installation Media is missing or corrupted. It could also be due to a faulty ISO file for the OS or a dysfunctional USB port.
How do I fix the ‘No Drivers Were Found’ error?
To fix this error, you need to install a new driver package from your PC manufacturer’s official website. If the Windows ISO file is at fault, install a new one from Microsoft’s website.
These are the top 5 ways to fix the ‘No Device Drivers Were Found’ error while installing Windows 10 or 11 on your device. Check out this article to find out how you can update the audio drivers on your PC. This article lets you know how to install the WiFi driver on your device. If you know any more ways to fix this error, let us know in the comments!
Garena Free Fire is a battle royale game with regular awards and tournaments to keep players interested. If you play Garena Free Fire, you should be aware of the redeem codes that are released on a daily basis. However, because the battle royale game is banned in India, players from other countries can use the Free Fire Redeem codes daily. If you’re unfamiliar with the Garena Free Fire redeem codes or don’t know how to get them, we’ve put together a step-by-step guide to help you redeem them. Check out Garena Free Fire Redeem Codes for 9 December 2023.The Free Fire redeem codes are a great way to get free stuff. These are 12-digit codes that contain alphabets and numbers, as well as an expiration date and time. Because the Garena FF redeem codes cannot be used more than once, you should hurry to the redemption page to claim your free reward before someone else does. To get a free reward, all you have to do is go to reward.ff.garena.com/en, which is the official redemption page. Also, keep an eye on this space for daily updates on Garena Free Fire redemption codes and rewards.
Garena Free Fire Redeem Codes Today 9 December 2023
If you suspect someone has blocked you on Facebook, the first thing you should do is check whether they are still in your friend list. Once you block someone on Facebook, they are automatically removed from your friend list. This is also the case when you are on the receiving end of the action. However, someone mysteriously vanishing from your friend list is not a tell-tale sign of them blocking you on the platform. It could also be because they deactivated or deleted their Facebook profile. Move on to the other signs on this list to know for sure.
Perform a quick search of their username
So, you noticed that someone’s missing from your friend list. What do you do next? Instead of jumping to conclusions, perform a quick search of their profile name or username. Better yet, go to their Facebook profile’s URL, if possible. If it returns the ‘content isn’t available’ message, it is an ominous sign that you have been blocked. To confirm if this is the case, log out of your Facebook account and visit their profile URL again. If you’re able to view their profile, your main account has certainly been blocked by the user.
Try sending them a message on Facebook messenger
Once someone blocks you on Facebook, your access to contacting them is cut off for good. This means that the messages you send to them on Messenger will not be delivered. To make sure that the person has blocked you on Facebook, send them a message on Messenger. If it fails to send or returns an error, the person has blocked your profile.
Try to tag them in a post
If you try to tag the person who blocked you on Facebook, their profile simply won’t show up in the post. This is a quick method you can use to verify if your account has been blocked by another user. Click the status box, press ‘@’ and start typing the name of the person. If their profile does not show up as a prompt, it means they have blocked you on Facebook.
Ask a mutual friend for help
How will Facebook implement the new step?If you have a mutual friend with the person who you think has blocked you on Facebook, verifying their action may get a little easier. Simply ask the mutual friend if they are able to contact the person and view their profile on the platform. If you are not able to do the same thing, you have certainly been blocked by the user.Try finding a mutual friend who has regular interactions with the person. Go to a recent post and check if the mutual friend has tagged them on it. If their profile name is greyed out instead of showing up as a hyperlink, it is certain that they have blocked you on Facebook.
Frequently Asked Questions (FAQs)
How do I know for sure that someone has blocked me on Facebook?
Search for the person’s profile on Facebook. If it doesn’t show up in your search results, ask a friend to do the same. If the friend can see their profile, it means the user in question has blocked you on the platform.
Can I contact someone if they unfriended me on Facebook?
Yes, you can still contact someone even if they unfriended you on Facebook. You can send them another request or interact with their public posts. However, this won’t be possible if they have blocked you.
If I block someone on Facebook, do they get blocked on Messenger as well?
These are the top 5 ways to tell if someone has blocked you on Facebook. You can view your own block list by going to Settings & privacy>Settings>Blocking>Block users. Once you unblock someone on Facebook, you will need to add them as a friend again to re-establish contact with them.
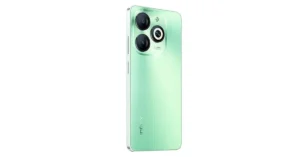
Infinix Smart 8 HD smartphone comes with a 13MP dual AI camera and 8MP selfie camera.
It is powered by a UniSOC T606 processor.
The smartphone operates on Android 13 Go with XOS 13.
The Chinese smartphone brand Infinix today officially introduced the Infinix Smart 8 HD smartphone in India. The device features a textured back panel in four colour variants. There is a camera module with Ring Flash on the back and a side-mounted fingerprint sensor. The magic ring feature on the device is said to improve user interaction. It also comes with a 90Hz HD+ display and is powered by an octa-core Unisoc T606 SoC.
Infinix Smart 8 HD price in India and availability
Infinix Smart 8 HD price in India has been set at Rs 5,669. The phone comes in a single 3GB RAM with a 64GB storage option. The budget smartphone is available in Crystal Green, Shiny Gold, and Timber Black colour options. According to the company, the device is scheduled to go on sale from December 13 via Flipkart and offline channels in the country. Interested buyers will get a 10 percent instant discount on Axis Bank cards.
Infinix Smart 8 HD specifications, features
Infinix Smart 8 HD comes with a 6.6-inch HD+ display with 720×1,612 pixels of resolution. The screen supports a 90Hz refresh rate and up to 500 nits of peak brightness. The display has a dynamic notch feature, known as the Magic Ring that shows Face Unlock, Background Call, Charging Animation, Charge Completion Reminder, and Low Battery Reminder.It features a timber texture finish back panel available in four appealing colour variants with a camera module with a Ring Flash and a colour-matched frame.The Smart 8HD runs on Android 13 Go with the latest XOS 13 version. The smartphone is powered by a UniSOC T606 processor with up to 6GB RAM and 64GB of internal storage (expandable up to 2TB with a microSD card). The device also comes with UFS 2.2 fast storage.The Infinix Smart 8 HD includes a dual rear camera setup with a 13-megapixel primary sensor and an AI lens. There is an 8-megapixel front-facing camera with LED flash for selfies and video calling.For biometrics, the budget smartphone incorporates a face unlock function and a side-mounted fingerprint sensor. The handset comes equipped with a 5000mAh battery.
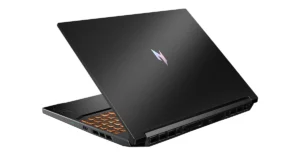
The Acer Nitro V 16 (ANV16-41) features a 165Hz display.
The gaming laptop has a dual-fan cooling system.
The device has over 500 popular games and applications, including blockbuster games such as Cyberpunk 2077 and Alan Wake 2.
Acer has introduced a new Nitro V 16 (ANV16-41) gaming laptop. The laptop is powered by the latest AMD Ryzen 8040 Series processors with Ryzen AI technology. In addition to this GeForce RTX 40 Series Laptop GPUs with DLSS 3.5 are given for graphics and is said to provide improved performance, long-lasting battery life, and AI-powered technologies.
Acer Nitro V 16 (ANV16-41) price and sale details
Nitro V 16 (ANV16-41) gaming laptop will come with a starting price of $999.99 which translates to Rs 83,375 in North America from March 2024. The machine will be available in EMEA in April 2024, starting at EUR 1199 which converts to Rs 1,07,550.
Acer Nitro V 16 (ANV16-41) specifications
Acer Nitro V 16 (ANV16-41) features 16-inch WQXGA or WUXGA display options with a 165 Hz refresh rate, 3 ms response time, and 16:10 aspect ratio. The gaming laptop is incorporated with Windows 11 out of the box. Under the chassis, there is AMD Ryzen 8040 series processor up to Zen 4-based AMD Ryzen 7 8845HS CPU paired with up to NVIDIA GeForce RTX 4060 Laptop GPUs and DLSS 3.5 technology. It supports over 500 popular games and applications, including blockbuster games such as Cyberpunk 2077 and Alan Wake 2. It comes with up to 32 GB of DRR55600 RAM and up to 2 TB of PCIe Gen 4 SSD storage.Acer Nitro V 16 gaming laptop also has a dual fan cooling system, the Nitro V 16 is well-equipped to take on heavy gameplay and data transfers. Also, the machine has a suite of AI-enabled features that can also be maximized when streaming or video chatting with the webcam’s AI-supported Acer PurifiedView and Acer PurifiedVoice 2.0 featuring three microphones with AI noise reduction technology.Also Read:Exciting deals and discounts on Kodak HD LED Television revealed ahead of Flipkart Big Year End SaleIn terms of audio, the laptop features DTS X: Ultra-tuned speakers. Also to monitor the device’s performance and temperature there is a NitroSense utility app with one click of the dedicated NitroSense key.For connectivity, there is a USB 4 Type C, two USB 3 ports (one which allows for offline charging), an HDMI port, a microSD card reader, and compatibility with Wi-Fi 6E. Lastly, the laptop also comes with one month of Xbox Game Pass so users can enjoy the latest titles with fellow gamers on PC.
The world’s biggest photo-sharing platform is all about being seen. Instagram is a great way to connect with people and let them know what you have going on in your life. The ephemeral story section is a perfect place to keep people updated on everyday things that you don’t demand a post of their own. Instagram Stories are also a great place to share funny Reels, videos, and memes made by other creators. Unlike your Instagram posts, you can always see who viewed your Instagram Story. Here are 4 ways you can go about it.Read Also:Best smartphones under Rs 35000 in India: Checkout our recommendations
See who viewed your Instagram Story (Android)
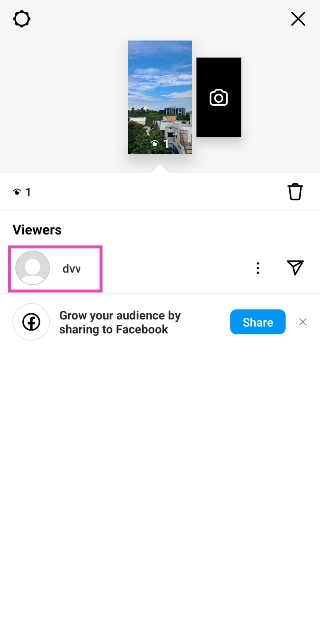
Step 1:Launch the Instagram app on your Android smartphone.Step 2: Tap on Your story at the top left corner of the screen.Step 3: Tap on Activity at the bottom left corner of the screen.This is where you will be able to see the view count on the story and the people who have viewed it.
See who viewed your Instagram Story (iPhone)
The iPhone app for Instagram is very similar to the Android one. You can use the method mentioned above on your iPhone as well. So, let’s take a look at another way you can see who viewed your Story.Step 1:Launch the Instagram app on your iPhone.Step 2: Tap your Instagram Story at the top left corner of the screen.Step 3:Swipe up to see who viewed your Story. This is where you will see the view count as well.
See who viewed your Instagram Story (Windows PC)
Step 1:Log into Instagram on your PC.Step 2: Click on the Profile option in the side menu.Step 3: Click on your profile picture to load the story.Step 4: Select the ‘Seen by’ option at the bottom right corner of the screen.You will be able to see who viewed your Instagram story in a popup box.
See who viewed your Instagram Stories 24 hours after posting them
Your Instagram Story expires 24 hours after being posted. If you’re on vacation and don’t have the time to be on Instagram as often, you may miss out on seeing who viewed your story. Luckily, there is a way you can still check your story viewers. Here’s how.Step 1:Launch the Instagram app on your phone.Step 2: Tap your profile icon at the bottom right corner of the screen.Step 3: Hit the hamburger menu at the top right corner of the screen.Step 4: Select Archive.Step 5:Open the Story for which you want to see the view count.Step 6: Tap on Activity.This is where you can see who viewed your Story.Note: Instagram archives your Story for 48 hours. If more time has lapsed since you posted the story, it will be gone forever.
How do I view someone’s story without showing up in their viewers list?
Unlike WhatsApp, Instagram does not let you view someone’s story inconspicuously, even though both are owned by Meta. Every time you view a story on Instagram, your profile will end up on the viewer’s list. Certain apps falsely claim to get around this situation by letting you peep stories while staying anonymous. Make sure you don’t fall prey to these claims as these apps may push malware on your device.So, is there a way to view someone’s story without them knowing about it? Well, you can always make a throwaway account, but that only works if the poster’s profile is public. If not, you’re at a dead end. Or, are you? There are a couple of workarounds, but they come with certain limitations. These methods only work for the first and the last story that the person has uploaded in their carousel. Let’s a quick look.There are a bunch of ways you can view someone’s Instagram Story. The most direct way is by tapping on their profile icon in the story bar on your Insta home page. You can also visit their profile to see what they have posted on their story. When you’re scrolling through your Instagram feed, you may have noticed a preview section full of stories from the people you follow. These previews always display the first story posted by the user. Tapping on it will count as a view, but merely glancing at them while you’re on your feed will go unnoticed.Another way you can stay incognito while watching stories is by pressing and dragging a story to move on to the one posted by the next user in the list. The only catch is to not drag it all the way so that it doesn’t completely load on your device. If that happens, you will end up on the viewer list. If you wanna check out the last story posted by the user, load the story posted by the person on their right and drag the screen to the right.
Frequently Asked Questions (FAQs)
How do I see my Story’s viewers list 24 hours after posting it?
Go to your Instagram profile, hit the hamburger menu at the top right corner of the screen, select Archive, and load the story of your choice. Swipe up to see the viewers.
Why does the view count on my Instagram Story not match the number of viewers?
This is because Instagram counts every replay as a view count. If someone plays your story multiple times, it will add to the views but their name will only show up once.
How do I view someone’s Instagram Story without showing up in the viewer list?
Scroll down on your home feed until reach the Story preview section. This may take some time. The preview thumbnail will always be the first story posted by the user.Read Also:2023 Australian Gaming Revenue Statistics by the Numbers
Conclusion
These are the top 4 ways to see who viewed your Instagram Stories on an iPhone, Android phone, and Windows PC. If you know any other way to see the view count, let us know in the comments! If you use a Business profile for Instagram, you will also get Story Analytics next to the view count.
If you’re someone who primarily consumes news online, you must be aware of how annoying constant popup ads can be. The constant distraction of having to deal with popups, tuning out certain plug-ins, and blocking intrusive ads can mar the reading experience. Luckily, there are a bunch of reading tools you can use to get rid of these distractions. And now, Google has stepped into a ring and added a helpful ‘Reading Mode’ to the Chrome browser. If you’re not sure where to find it, here’s your complete guide to enabling and using Reading Mode on Chrome like a pro.Read Also:4 Ways to Create a Remote Desktop Connection Shortcut in Windows 11
Can’t find Reading Mode on Google Chrome? Here’s how you can enable it
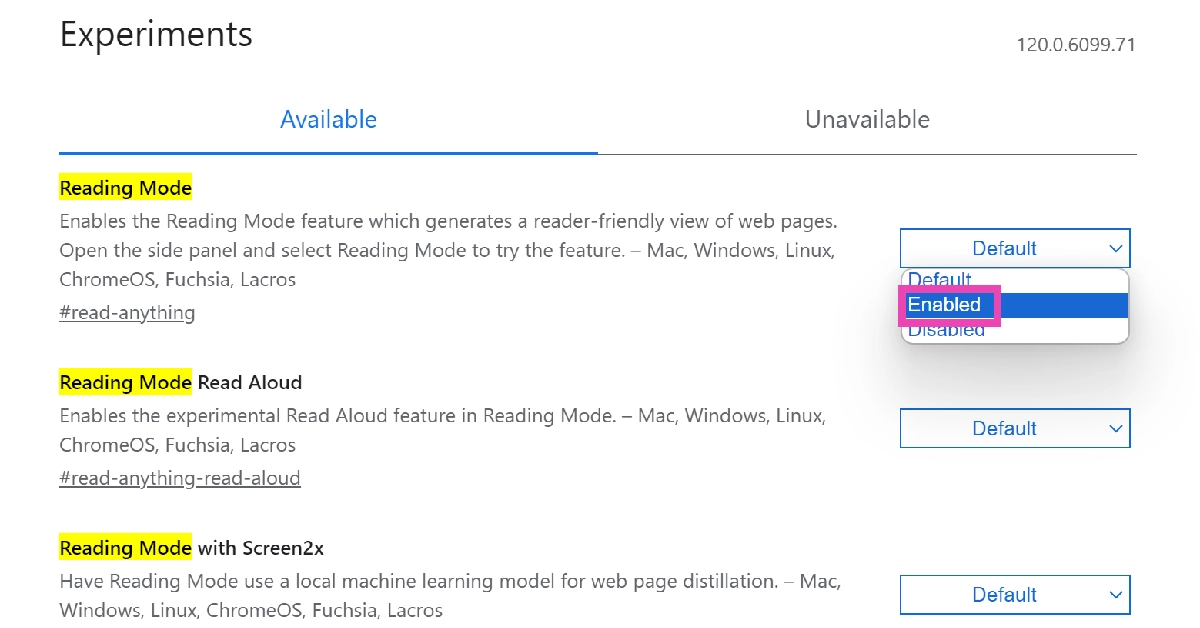
If your Google Chrome version does not have the Reading Mode turned on by default, here is how you can enable it.Step 1:Launch Google Chrome on your PC.Step 2: Type chrome://flags in the address bar and hit Enter. This will take you to Chrome’s Experimental Features page.Step 3: Type Reading Mode in the search bar and hit Enter.Step 4: Click on the drop-down menu for Reading Mode and select Enabled.
How to use Reading Mode?
So, you’ve enabled Reading Mode on Chrome. Now what? Well, the process is pretty simple. But before you begin, you need to take care of a couple of things.
Make sure there are no pop-up ads on the web page you’re trying to read. If there are any, clear them.
The webpage should not be locked behind a paywall. Chrome’s Reading Mode will not be able to bypass it. Make sure you are subscribed to the publication or use these methods to read the article for free.
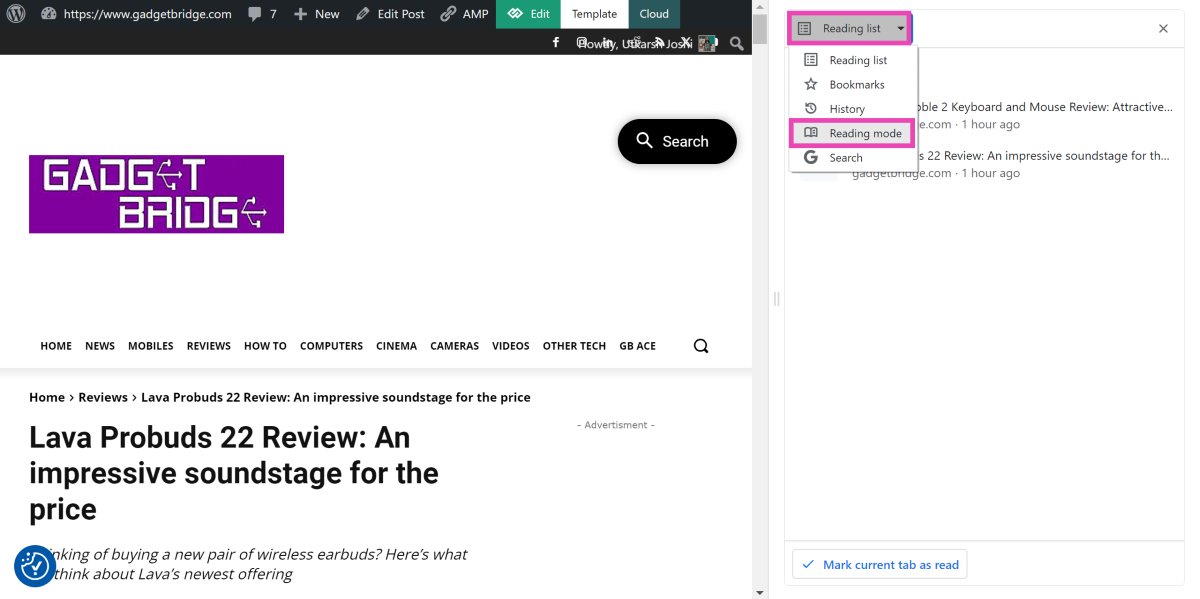
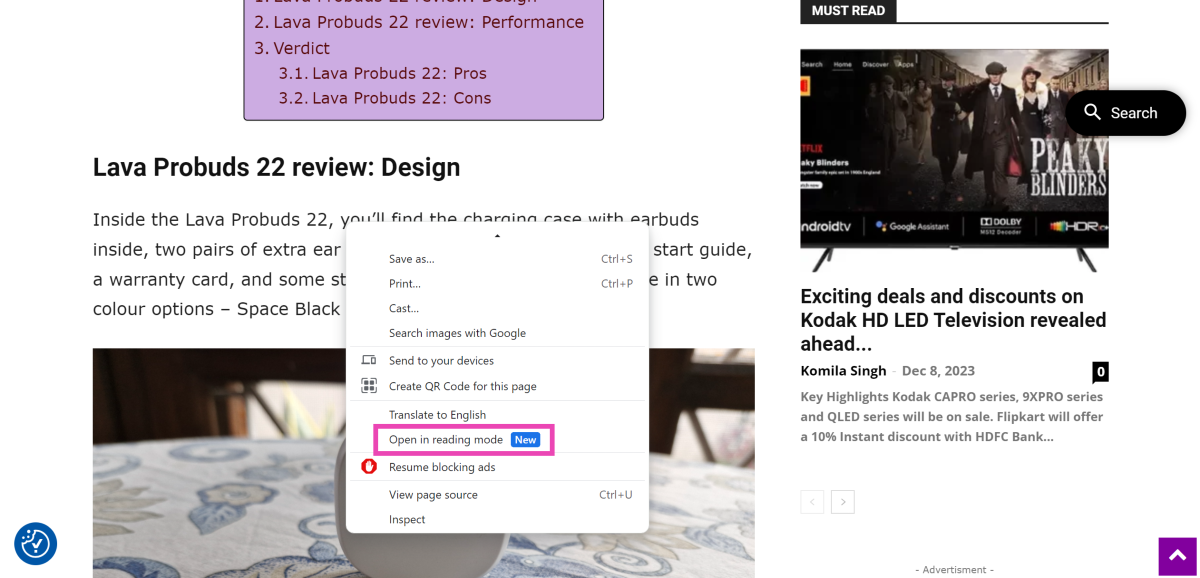
Now that you’ve got these hurdles out of the way, simply click on the Side Panel icon at the top right section of the Chrome window to access Reading Mode. Typically, it should open up as the default option. If it doesn’t, simply click on the drop-down menu and select Reading Mode. Another way you can access this mode is by right-clicking anywhere on the article and selecting Open in reading mode. That’s it!
Check out these tips to get the most out of Reading Mode
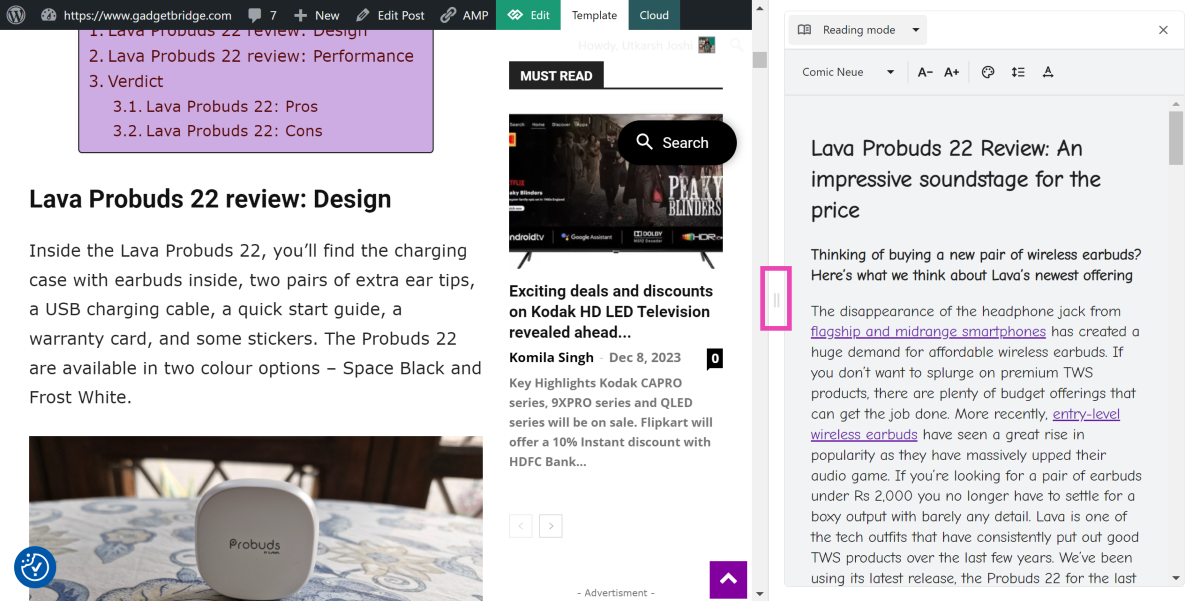
Once you open an article on reading mode, the first thing you should do is adjust the width of the panel. Drag the panel from its left border and move it towards the left to expand its size. This will allow the article to take centre stage on your screen while the webpage is pushed to the side. If you switch to a different tab and open a different article, it will automatically load on the reading panel.Chrome’s reading mode also gives a lot more control over how the text looks on the screen. You can change the font of the text from the drop-down menu at the top left section of the panel. At the time of writing this article, there are 7 fonts to choose from – Poppins, Sans-serif, Serif, Comic Neue, Lexend Deca, EB Garamond, and STIX Two Text. Right next to this drop-down menu, you will find the option to change the size of the text. The colour plate icon lets you choose the background colour for the reading panel. There are five options on offer – Default, Light, Dark, Yellow, and Blue. Finally, you can use the last two icons to select the level of spacing between the lines and the individual letters.Another thing that Chrome gets right with its Reading Mode feature is its integration with Reading List, Bookmarks, and Search History. You can use the Reading List option to load an article you’ve been meaning to read, then switch to the Reading Mode tab for easy, distraction-free reading. You can also use the side panel to carry out Google searches. If you bookmarked a page instead of saving it to your reading list, you can still access it from this side panel.
Frequently Asked Questions (FAQs)
Does Google Chrome’s Reading Mode display images?
No, Google Chrome’s Reading Mode does not display images yet. You can check out other reading companions like Postlight Reader for Chrome if you want the images displayed along with the text.
Does the Reading Mode on Chrome bypass paywalled articles?
No, Chrome’s reading mode does not give you free access to articles locked behind a paywall.
I can’t find Reading Mode on Chrome. What do I do?
This is how you can enable and use Reading Mode like a pro in Google Chrome. Since this feature is still in its early stages, it lacks image support and text to speech on it. As time goes on, it is expected that Google will expand upon its list of attributes and it will look more like a comprehensive reading tool.
Kodak CAPRO series, 9XPRO series and QLED series will be on sale.
Flipkart will offer a 10% Instant discount with HDFC Bank Credit cards.
Flipkart’s Big Year End Sale will start soon and before the sale begins SPPL has announced huge discounts and offers on the Kodak HD LED Television. The Flipkart Sale will run for 9 days with early access on December 8. During the sale period, customers can enjoy exciting deals on Kodak HD LED TVs.According to the company, recently launched, 8 new TV models in the Kodak CAPRO series, 9XPRO series and QLED series will be part of Flipkart’s Big Year End Sale. During the 9-day-long sale, Flipkart will provide a 10% instant discount with HDFC Bank credit cards. In addition to this, it will also offer credit up to 1 Lakh along with no-cost EMIs.During the Flipkart Big Year End Sale KODAK QLED televisions will be available in three screen sizes—50, 55, and 65 inches—and will start at Rs 23,999. On the other hand, KODAK 75-inch 4K QLED TV (75MT5044) will be offered at a starting price of Rs 94,999.The KODAK CA PRO range of televisions will come with a starting price of Rs 26,999. KODAK 9XPRO TVs is a premium TV series powered by Android 11 will be available at a starting price of Rs 9,999.Also Read:Acer highlights efforts to combat climate change and technology at Conscious Technology for a Brighter Tomorrow eventSharing his excitement for Christmas and New Year, Mr. Avneet Singh Marwah, Director and CEO, Super Plastronics Pvt Ltd, a Kodak brand Licensee said, “The advent of winters brings the joy of festivities in our lives. With Christmas and New year round the corner, we are delighted to announce exciting deals for the Flipkart Big Year End Sale. The kind of trust and love that the brand has received is truly mesmerising. We promise our customers that we are going to bring a lot of surprises for next year including the launch of our one-of-a-kind manufacturing facility in Hapur. We are determined to make India a manufacturing hub with more investments in the future.”Here are the prices of KODAK TVs during the sales-
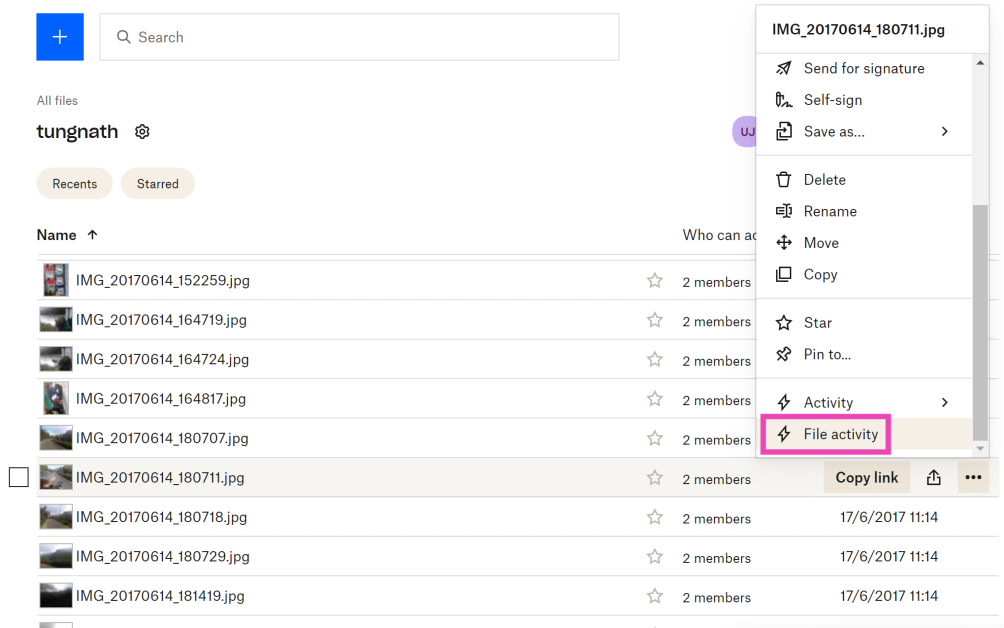
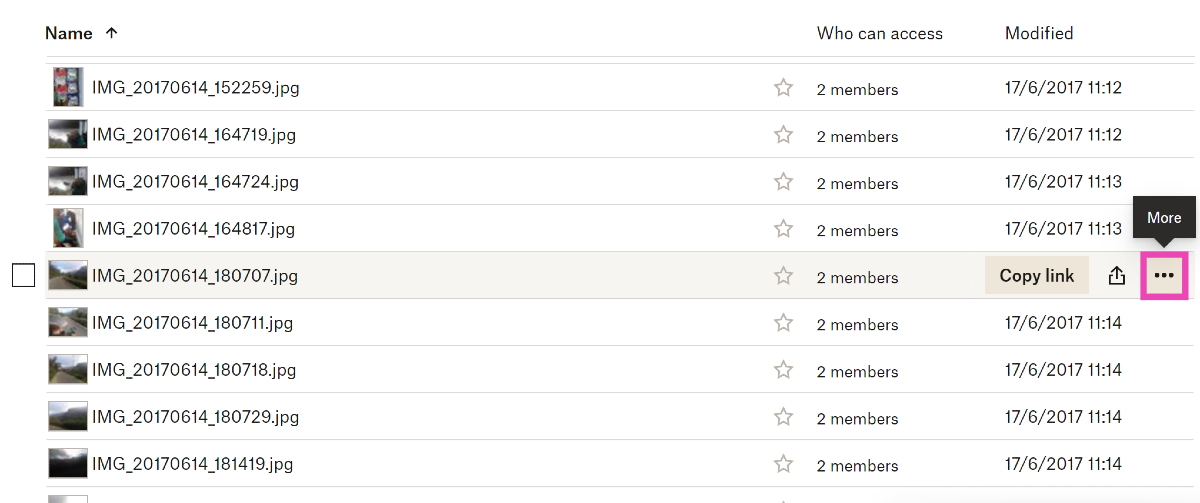
Dropbox is one of the biggest cloud-sharing services around. When you sign up for Dropbox, you get 2.5GB of free storage. When you cross this limit, you need to pay for a premium subscription package that adds more storage to your account. Apart from cloud sharing, one of the reasons why you may want to use Dropbox is its helpful fringe features. For instance, you can view your entire account history or just the history of edits you made on a particular file. Like what you read? Here’s how you can view Dropbox File Activity and Event Logs.Read Also:Redmi Note 13 series coming to India in January 2024, company confirms
What is the purpose of Dropbox File Activity and Event Logs?
Even though they may not seem like a big deal to casual users, Dropbox’s file activity and event logs hold a great deal of significance to users who carry out collaborative tasks on the platform. The ‘Activity’ tab for any file or folder helps you review any changes that have been made to them. It also lets you know which member carried out the changes. Using the ‘Filter’ options, you can check when the file was added, viewed, moved, renamed, edited, and more.Your ‘Event Log’ on Dropbox is a complete account of all your actions on the website. You can view when you added a particular file, made edits to it, or commented on it. Your event log spans your entire account and not just a particular file. All the entries are listed chronologically and can be sorted by date or event type. If you think something fishy is going on with your account, you can always check the event logs to confirm your suspicions.
View Dropbox file activity
Step 1:Log into your Dropbox account.Step 2: Open a file and select File>Activity.The Activity panel will open on the left. This is where you will be able to see the actions taken on the file throughout its history. It also lets you know when the file was shared, who has access to it, and who made changes to it.
View Dropbox file activity without opening the file
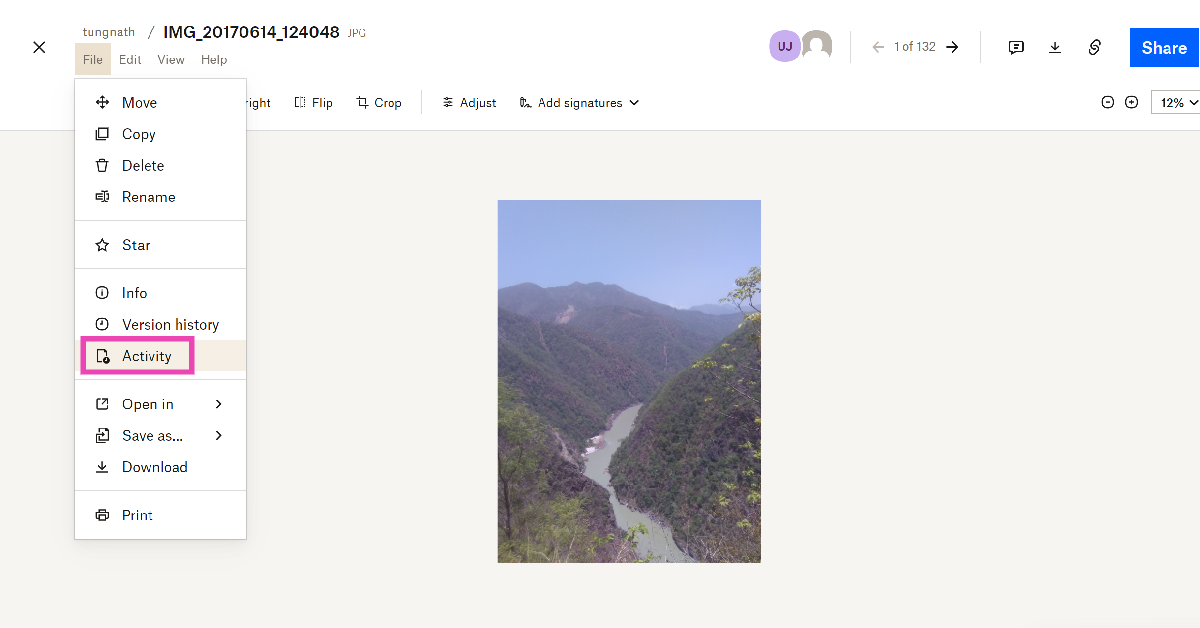
Step 1: Log into your Dropbox account.Step 2: Click on the ellipses next to a file.Step 3: Scroll down the menu and click on File activity.Similarly, you can also view the activity of any folder on Dropbox.
View your Event Log on Dropbox
Step 1: Go to https://www.dropbox.com/events.Step 2:Log into your Dropbox account.You will be able to view your Dropbox account history. You can view the event log for a particular folder using the menu on the right. You can also set a particular date to view the events from that particular day.
Frequently Asked Questions (FAQs)
How is Dropbox file activity different from the event log?
Dropbox file activity gives you a total account of the changes made to a particular file or folder. These changes may be made by you or other editors. The event log, on the other hand, is a chronological account of your activity on Dropbox.
Where do I view the activity log for a particular file?
Open the file and go to File>Activity to view its activity log or history.
This is how you can view Dropbox file activity and event logs. If you suspect someone has gained unauthorised access to your Dropbox account, you can view your account logs to check if they have carried out any activity on the account. To gain back access to your account, go to Security settings and delete all the devices that are logged into your account. Furthermore, turn on two-step authentication to make sure this doesn’t happen in future.


 When you see the ‘problem detected with the TrueDepth camera’ error message on your iPhone, you might wonder what the TrueDepth camera even is. Well, the answer is quite simple. The TrueDepth Camera is a collective term used for the front camera, infrared camera, dot projector and other proximity sensors. These components are located on the notch of your iPhone’s display. The newer iPhones house them in the ‘Dynamic Island’.
As you can guess by now, the TrueDepth Camera maps a 3D image of your face using thousands of dot particles. The 3D scan is matched with the image of your face captured by the front camera to verify your identity. This is the mechanism behind the Face ID on your iPhone. The TrueDepth Camera is also the reason why someone cannot unlock your iPhone simply by putting up your picture in front of the lock screen. Apart from Face ID, the TrueDepth Camera is also used for Memojis and Portrait Mode.
When you see the ‘problem detected with the TrueDepth camera’ error message on your iPhone, you might wonder what the TrueDepth camera even is. Well, the answer is quite simple. The TrueDepth Camera is a collective term used for the front camera, infrared camera, dot projector and other proximity sensors. These components are located on the notch of your iPhone’s display. The newer iPhones house them in the ‘Dynamic Island’.
As you can guess by now, the TrueDepth Camera maps a 3D image of your face using thousands of dot particles. The 3D scan is matched with the image of your face captured by the front camera to verify your identity. This is the mechanism behind the Face ID on your iPhone. The TrueDepth Camera is also the reason why someone cannot unlock your iPhone simply by putting up your picture in front of the lock screen. Apart from Face ID, the TrueDepth Camera is also used for Memojis and Portrait Mode.
 The first thing you should do when you come across any error related to the TrueDepth camera is wipe the front camera panel with a clean microfibre cloth. Oftentimes, dirt and dust particles collect on the sensors and the dot projector, causing a failure to read your face accurately. The TrueDepth camera relies on the infrared dots to create a 3D map of your face. Any smudges or dirt on the sensor can cause it to malfunction. A quick wipe should solve this problem.
 Incorrectly installed tempered glass or other forms of screen protection can mess with the functioning of the TrueDepth camera. If the glass is hindering the camera cutout, it can cause unnecessary glare. Your phone may not be able to map your face correctly, leading to the TrueDepth camera error. Take off the screen protector and install it correctly. Make sure you only use Apple-authorised products to protect your iPhone’s display.
 So, you’ve wiped the front camera panel and removed the screen protector but the problem still won’t go away? It is likely that your hardware isn’t at fall. Software glitches are quite common on mobile devices and your iPhone is no exception. Luckily, these glitches can be quickly resolved by restarting your phone. Press and hold the side button and any volume key to reveal the power menu on your iPhone. Use the power slider to turn off your device. Wait for a few seconds and use the side key to restart your device.
 Step 3: Select Software Update.
 Step 4: Tap on Download and Install.

 Step 2: Tap on Reset Face ID.
 Step 3: Go back to Face ID and Passcode.
Step 4: Hit Set up Face ID.
Step 3: Go back to Face ID and Passcode.
Step 4: Hit Set up Face ID.
 Step 5: Register your Face ID again.

 Step 2: Tap on Transfer or Reset iPhone.
 Step 3: Hit Reset.
 Step 4: Select Reset All Settings. Enter the passcode to confirm your decision.
 Step 4: Tap on Continue and enter the passcode to reset your iPhone to its factory settings.

 Step 1: Plug in

 Step 1: Restart


 gaming laptop powered by up to Zen 4-based AMD Ryzen 7 8845HS CPU launched")
")
 Step 3:
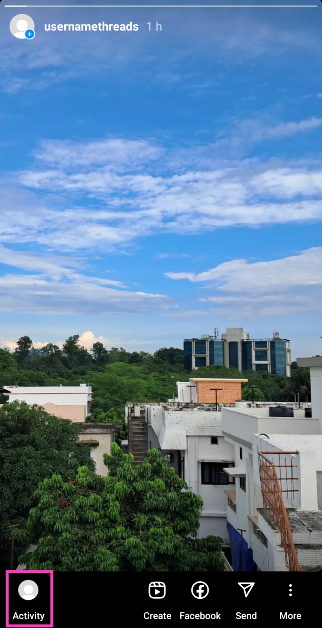
 Step 3:
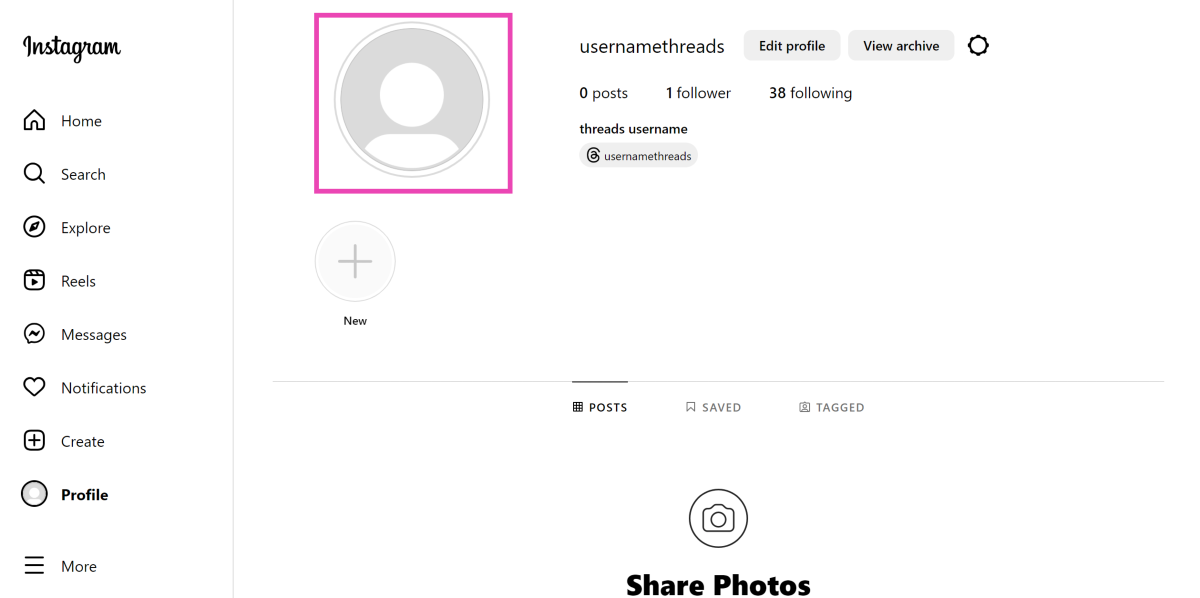 Step 4:
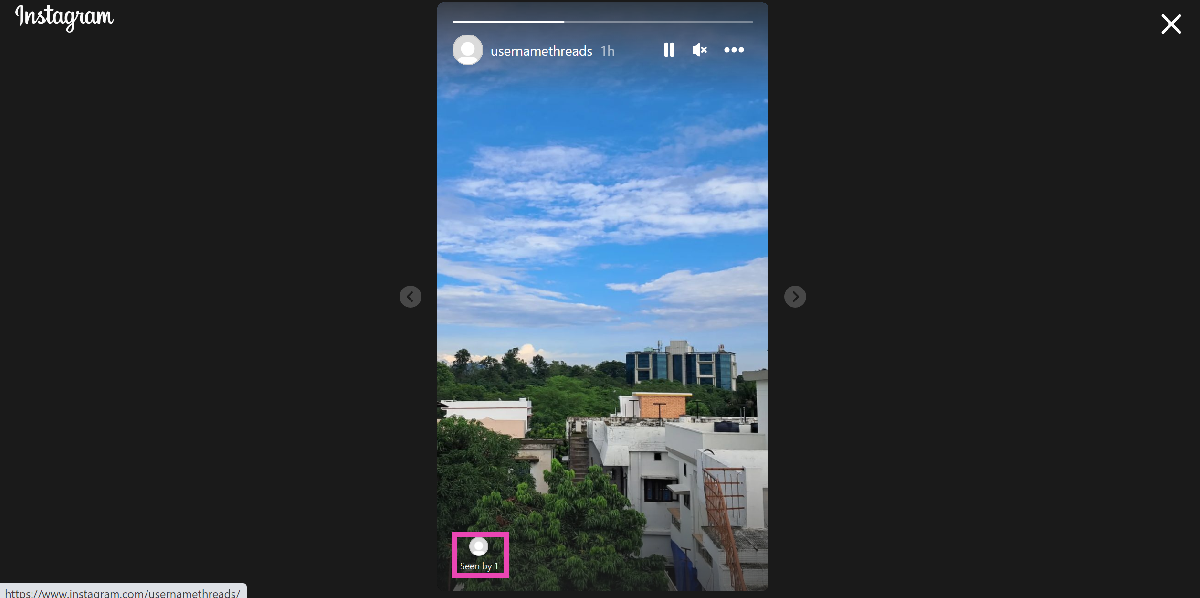
 Step 3:
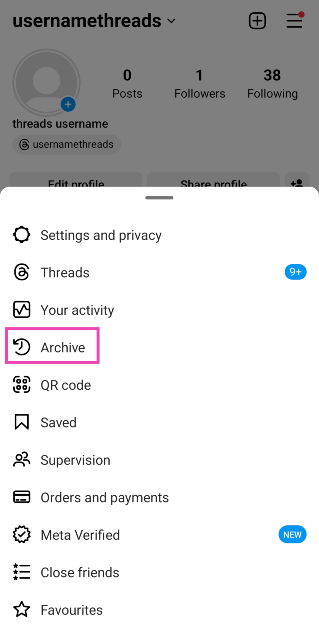 Step 5: Open
  Step 6:
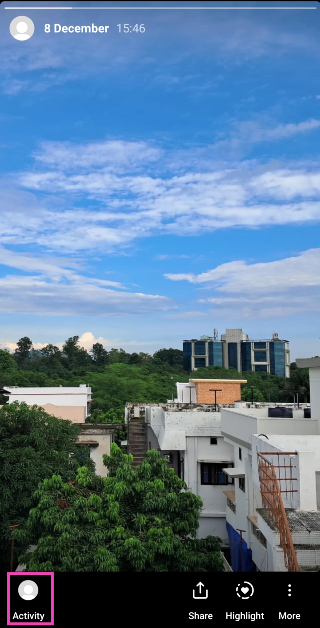


 Step 2:
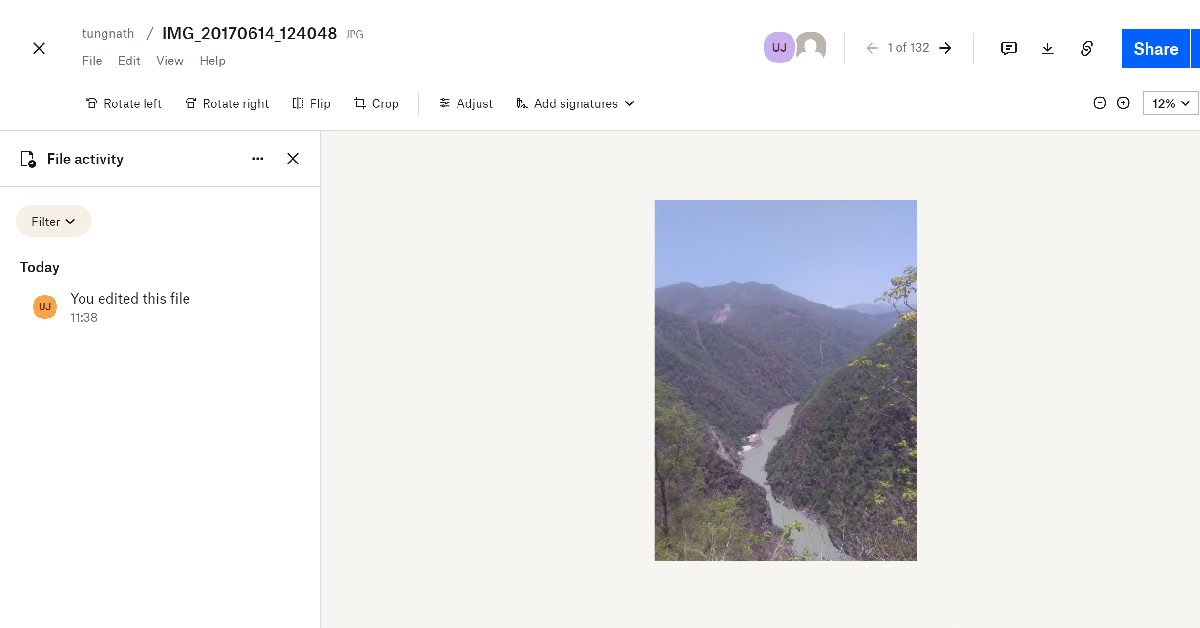
 Step 3: