Samsung Galaxy M55 5G Review: A serious contender under Rs 30,000

While Samsung’s flagship smartphones are considered the best Android devices, its midrange offerings are generally weighed down by the mediocre in-house Exynos chipsets. Enter the Samsung Galaxy M55 with its stunning Super AMOLED+ display, 45W fast charging, and the new Snapdragon 7 Gen 1 processor, all for the price of Rs 27,000.  At this price point, the Galaxy M55 not only rivals the likes of Nothing Phone (2a) (read our Nothing Phone (2a) review here) and OnePlus Nord CE4 (read our OnePlus Nord CE4 review here) but also its Samsung mid-range sibling, Galaxy A35 (read our Galaxy A35 review here). On paper, it certainly looks like this device will make a lot of smartphone enthusiasts happy. But how well does it perform when put through rigorous everyday use? Has Samsung made some tradeoffs to keep the smartphone’s price in check? Here’s our in-depth review of the Samsung Galaxy M55 to answer all your questions.

Read Also: SPPL reveals deals and offers on Kodak TVs, ahead of Amazon Great Summer Sale and Flipkart Big Saving Days Sale

Samsung Galaxy M55 5G review: Design and Display

The Galaxy M55’s retail box isn’t as sleek as its A and S series counterparts. You would think this is a good thing because all that room could only mean additional accessories inside the box. Sadly, the unboxing experience here falls flat. Here are the contents of the M55’s retail box.

  • Smartphone
  • USB Type-C to Type-C cable
  • SIM ejector
  • Regional Lock Guide
  • Quick Start Guide

Samsung Galaxy M55 review: Design and Display

The lack of a power adapter inside the box is disappointing for two reasons. The Galaxy M55 is one of the rare Samsung smartphones to support 45W charging. Even the entry-level Galaxy S24 can only charge at a 25W speed. If you’re making a step up from an older smartphone, this means splurging some extra cash on a 45W power brick. Secondly, the USB cable provided in the box is Type-C on both ends. This means if your existing charger has a Type-A slot, this cable will not be of much use to you.

Samsung Galaxy M55 review: Design and Display

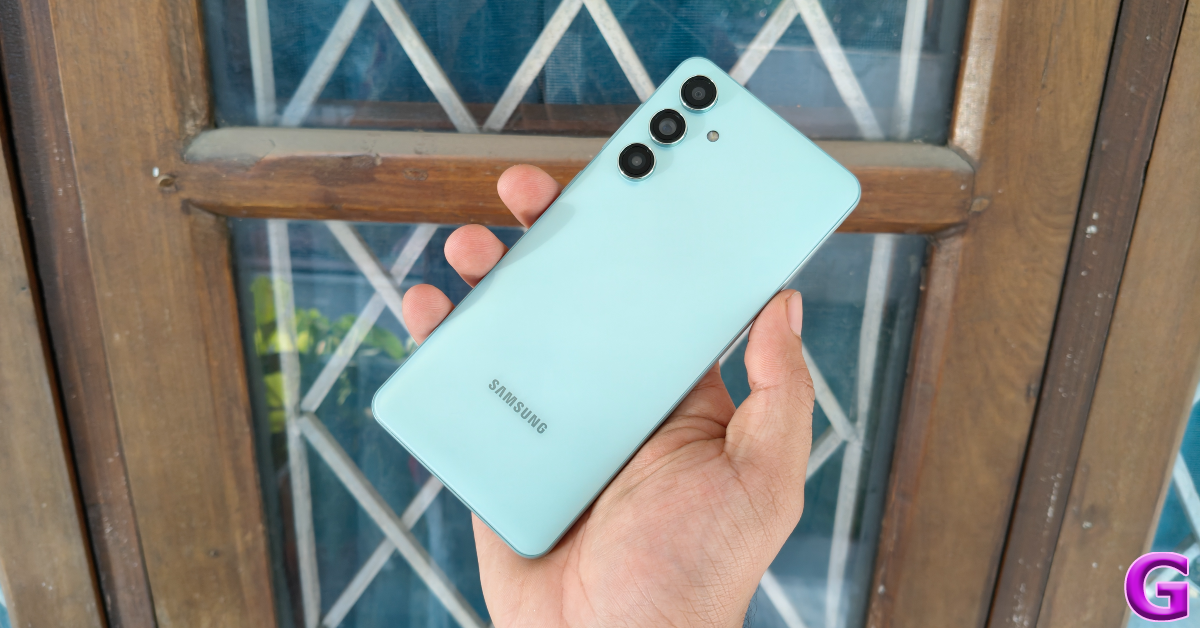
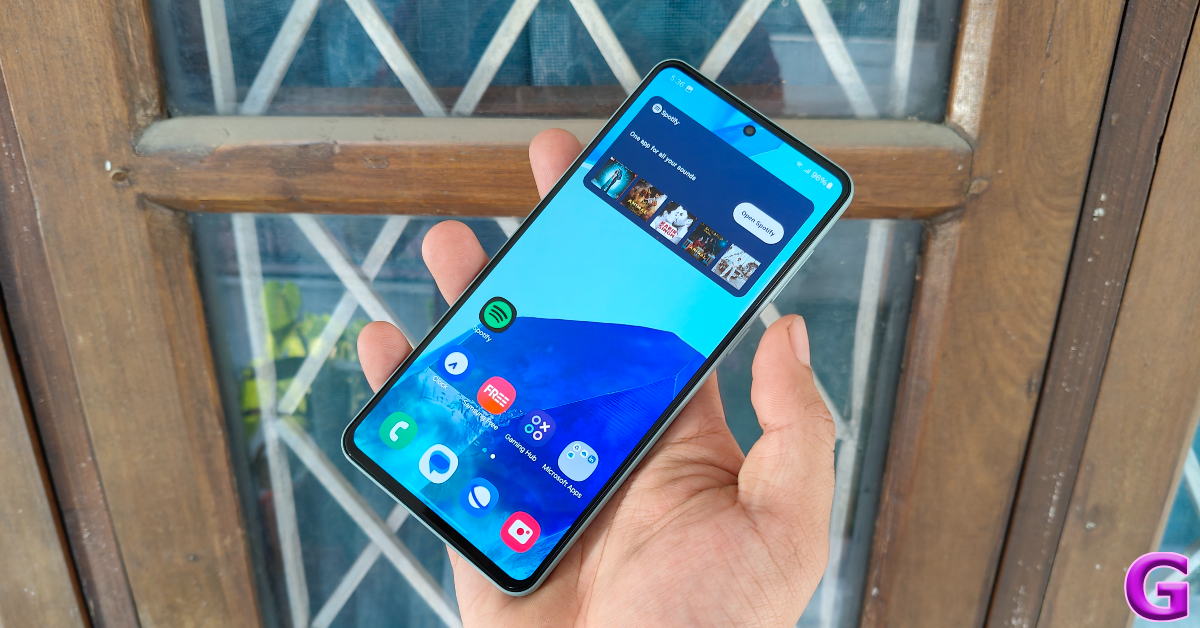
The homogeneous design language we’ve been seeing from Samsung for almost 2 years is also present on the Galaxy M55. The rear camera array is arranged in a vertical layout. The back panel is made out of plastic, which is not something you want in a Rs 27,000 smartphone. But, on the bright side, the smartphone weighs just 180g because of it. In comparison, the Galaxy A35 lifts the needle to 209g on the weighing scale.

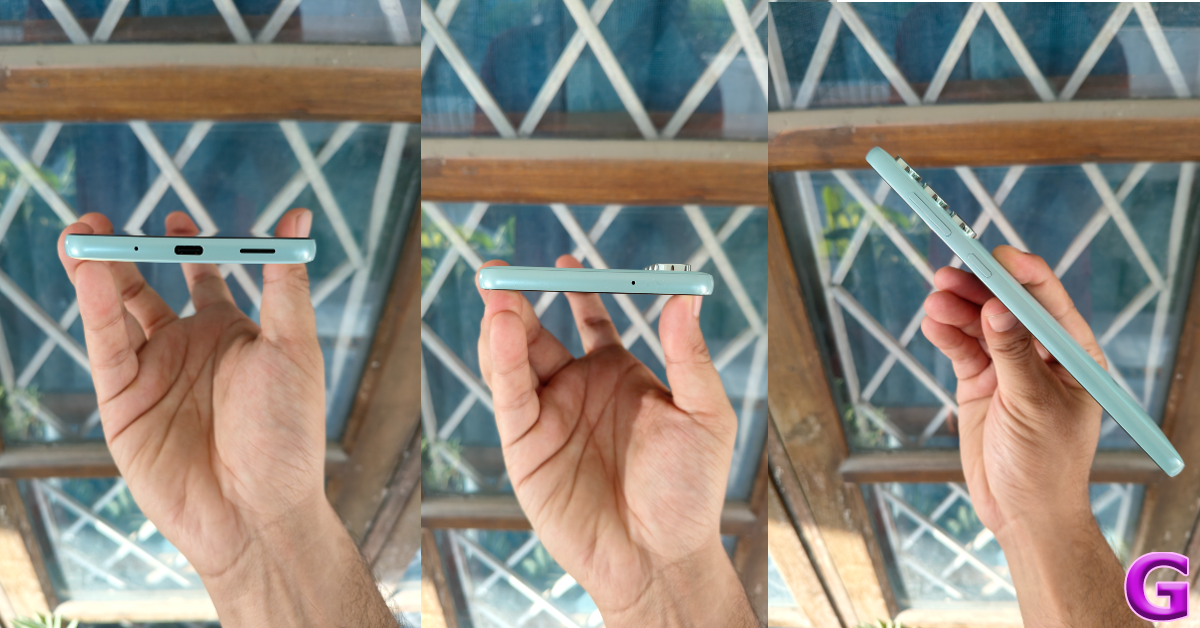
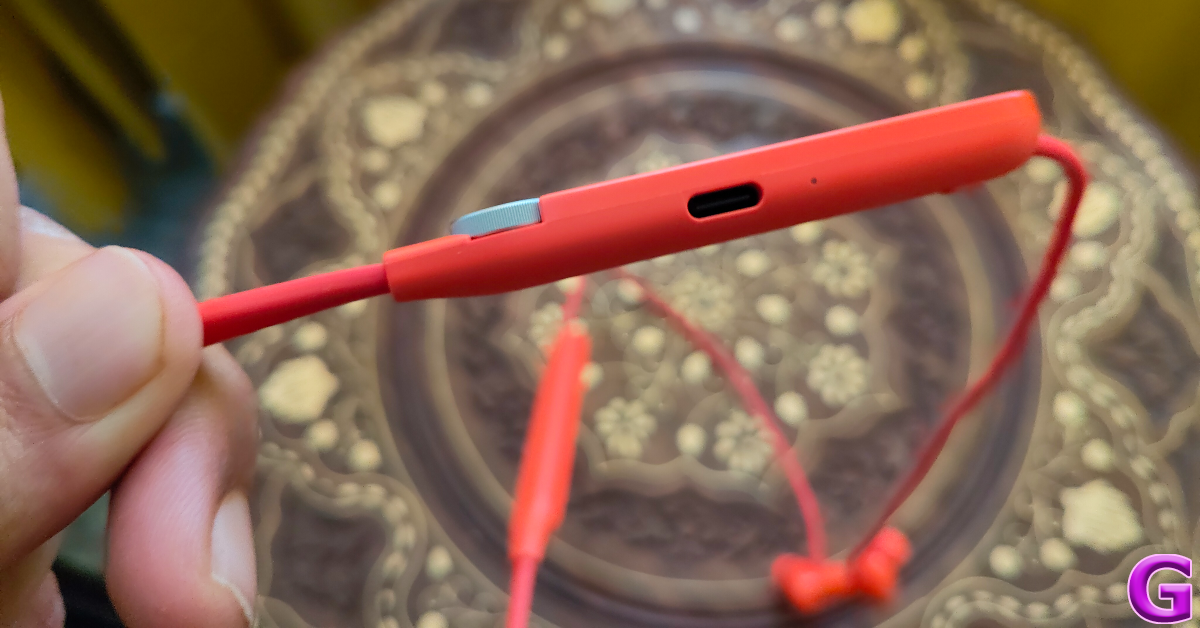
The plastic back panel curves slightly towards the edges. Its matte finish lends it a pleasant in-hand feel and ensures that it doesn’t collect excessive fingerprints or smudges. The finish on the rails is smoother than the back. The right edge of the smartphone houses the volume rocker keys and the side button. The rocker is positioned slightly higher than what we’re used to. You’ll find the primary microphone, USB port, and primary speaker slot on the bottom edge. The hybrid SIM slot is positioned on the left rail while the secondary microphone makes its way to the top. The M55’s earpiece acts as the secondary speaker outlet.

display

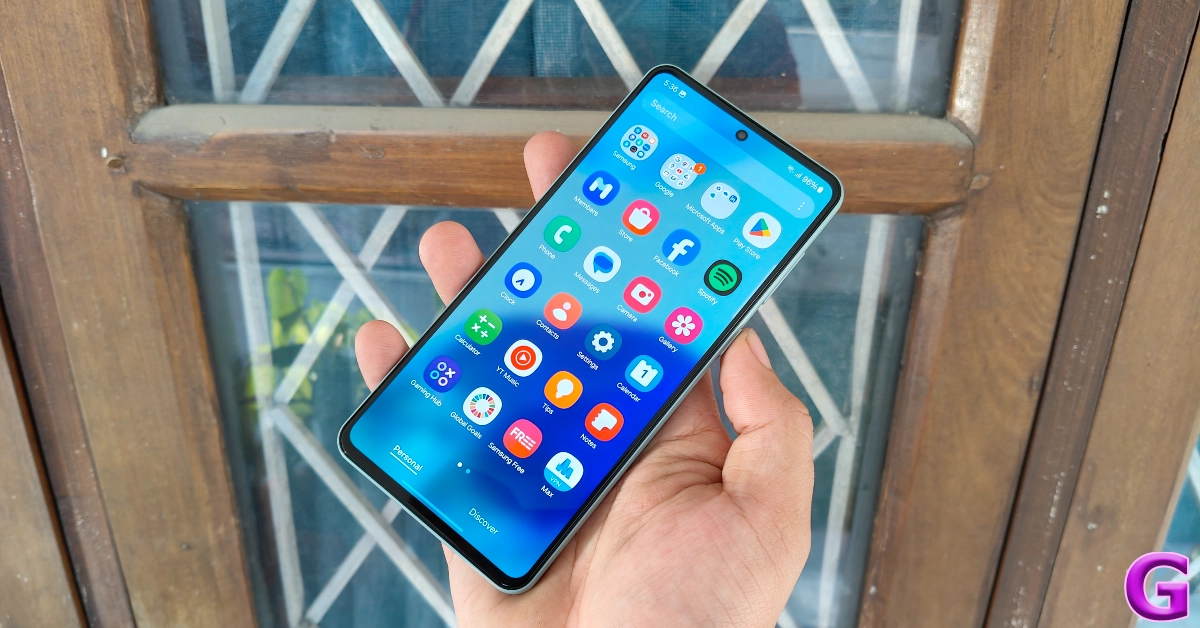
Samsung always delivers when it comes to displays and the Galaxy M55 is no different. The stunning 6.7-inch Super AMOLED+ display has a 120Hz refresh rate and can hit a peak brightness of 1,000 nits under direct sunlight. While this isn’t the brightest display we’ve ever used, it does a good job of maintaining its legibility in outdoor conditions. The bezels surrounding the display are slightly more pronounced around the chin, but overall, they are slimmer than the Galaxy A35 and A55.

display

While the Samsung Galaxy M55 has Widevine L1 certification, it doesn’t support HDR playback on Netflix. This didn’t bother us too much as the AMOLED display produced vivid colours and rendered exquisite details while streaming OTT content. The audio output from its stereo speakers is a little tinny and lacking in the low-end department, but it can go loud.

Samsung Galaxy M55 5G Review: Performance and Cameras

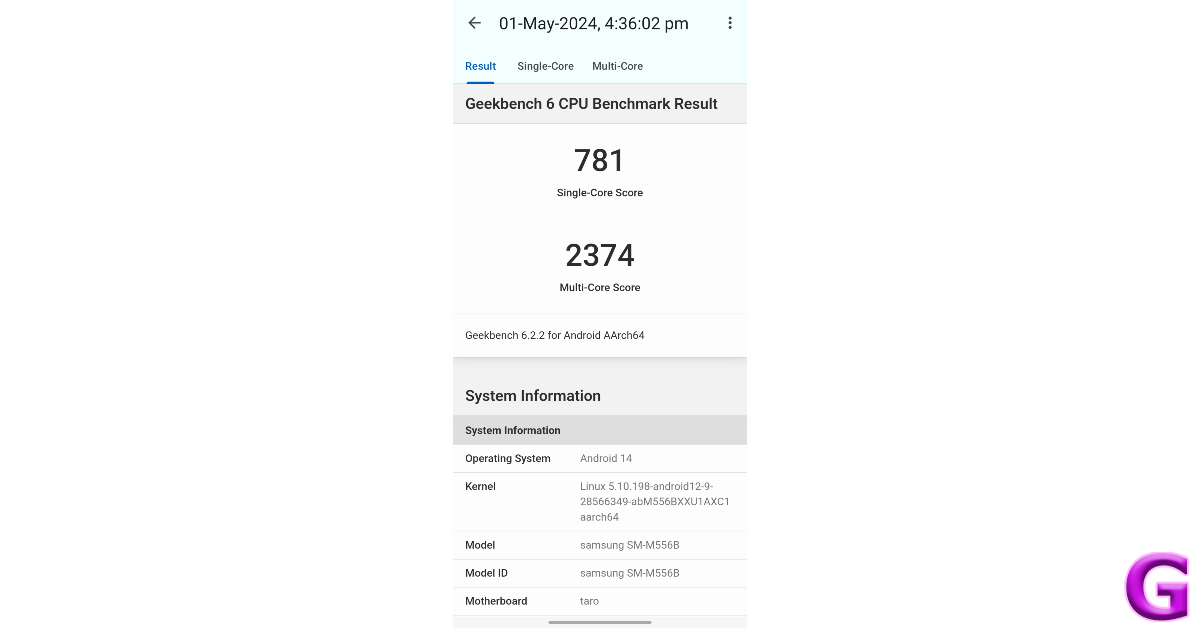
Powering the Samsung Galaxy M55 is the Snapdragon 7 Gen 1 SoC, a welcome respite from the Exynos chipsets that Samsung keeps shoehorning in its midrange (and in some cases, flagship) smartphones. In the Geekbench 6 test, the Galaxy M55 scored 781 points in the single-core test and 2,374 points in the multi-core test.

Samsung Galaxy M55 Review: Performance and Cameras

Using the smartphone as our daily driver for a week, there’s nothing bad we can say about its everyday performance. The apps load quickly, the touch response is snappy, and multitasking on the device is a breeze. During the review period, the Samsung Galaxy M55 did not once bother us with any unexpected malfunction. Our experience was entirely jitter-free.

The gaming experience offered by the Galaxy M55 is satisfactory. We stuck to a 60fps frame rate and were happy with the seamless gameplay experience on titles like Call of Duty Mobile and Asphalt 9. The internal temperature of the smartphone started rising after hitting the 30-minute mark, but it braved through and provided relatively stutter-free gameplay. With that being said, if you prioritise the frame rate and elite in-game graphics, there are better smartphones out there than the M55.

There is not much to complain about on the software front either, as you get the full OneUI 6.1 experience on this device. Gone are the days when affordable M Series smartphones were bogged down by the ‘Core’ version of the OS. You get Knox security on this device. Certain flagship-exclusive features like Galaxy AI and Samsung DeX are missing from the device, but that is also the case with the midrange A Series smartphones.

software

The presence of bloatware apps does marr the software experience, but thankfully all of the additional apps can be uninstalled from the device. Samsung’s ‘Shelf’ widget is also ridden with ads, but you can remove and replace the sponsored panel with useful widgets. Putting a neat bow on the OS experience is Samsung’s promise of 4 major updates and 5 years of security patches for the M55. You won’t find better future-proofing from any other OEM in this category.

Samsung’s M Series is known for its versatile battery performance and the M55 carries forward the mantle passed on to it by last year’s M54. Although it is equipped with a smaller 5,000 mAh battery pack (the M54 had a 6,000 mAh battery), it was still able to clock 6-7 hours of Screen on Time with ease. Our daily tasks on the Samsung Galaxy M55 during the review period consisted of video calling, social media browsing, IMing, navigation, media streaming, and gaming. 45W charging support is also a welcome upgrade as the M55 takes just under 50 minutes to fully charge. In comparison, it took us 90 minutes to charge the Galaxy A35.

Moving on, the camera performance on offer here is certainly above average but not something that sets the benchmark for the category. The rear camera setup comprises a 50MP primary shooter, an 8MP ultrawide lens, and a 2MP macro sensor. A 50MP sensor fulfils the role of the selfie camera.

camera

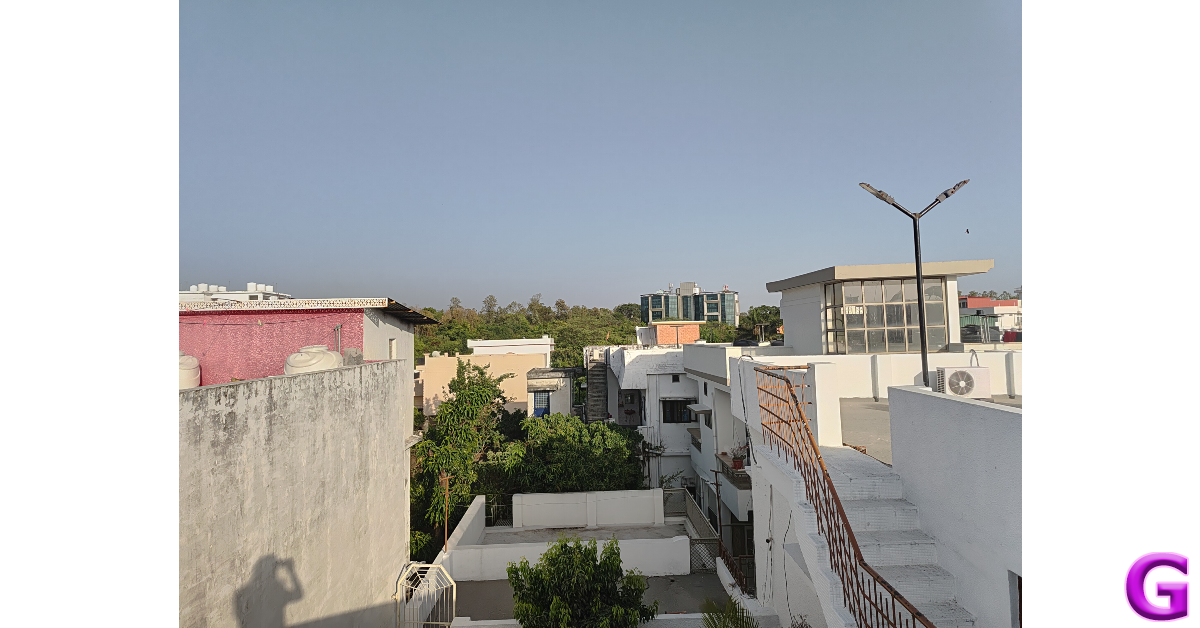
In outdoor daylight conditions, the 50MP primary shooter captures balanced pictures without subjecting them to excessive processing. The dynamic range is good, the shadows are crisp, and the images pack a lot of detail. While the colours certainly ‘pop’, they lack the tuning found in other Samsung smartphones. This isn’t a dealbreaker for us, but if you’re expecting colour science in the mould of A55 and A35, you will be left wanting more here.

Samsung Galaxy M55 Review: Performance and Cameras

camera

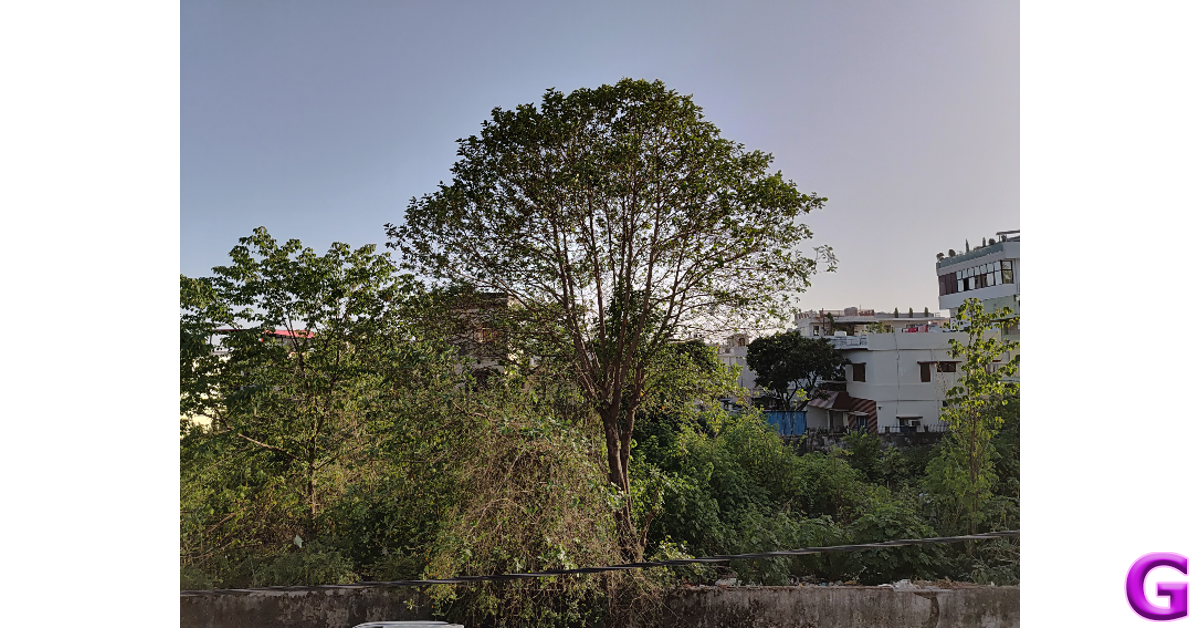
Images taken with the 8MP ultrawide lens are good, but there is a noticeable shift in the vibrancy of colours. We were happy with the field of view captured by this lens, but it didn’t enthral us with anything special. The macro sensor completes the triple camera layout, but it fails to leave a lasting impression.

ultrawide
Ultrawide Shot
Samsung Galaxy M55 Review: Performance and Cameras
Ultrawide Shot

Images taken in limited lighting using the primary shooter are well-composed and brightened to the right degree. The Night Mode plays a part in artificially brightening the subject and the phone does a good job of assigning colours to the images. The only downside is that shooting pictures in Night Mode requires holding the phone still for 8 seconds.

Samsung Galaxy M55 Review: Performance and Cameras

ultrawide shot
Ultrawide Shot

In Portrait Mode, the M55 does a good job of separating the subject from its background and applying the optimum level of blur. The 50MP selfie camera also captures good images but tends to brighten the skin tone of the subject. The good thing is that this front-facing camera can record 4K videos at 30fps. The primary shooter can accomplish this task as well.

Portrait
Portrait Shots

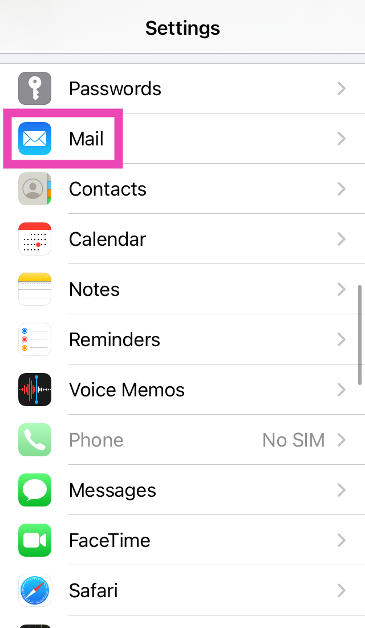
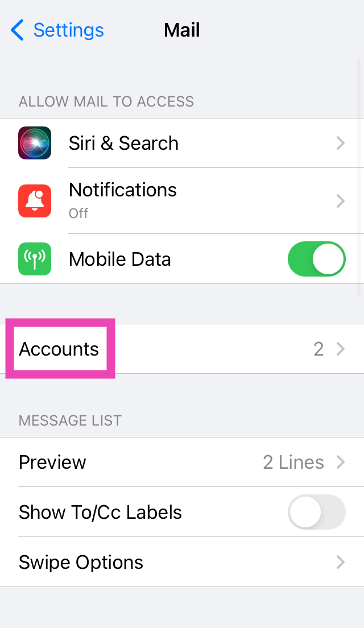
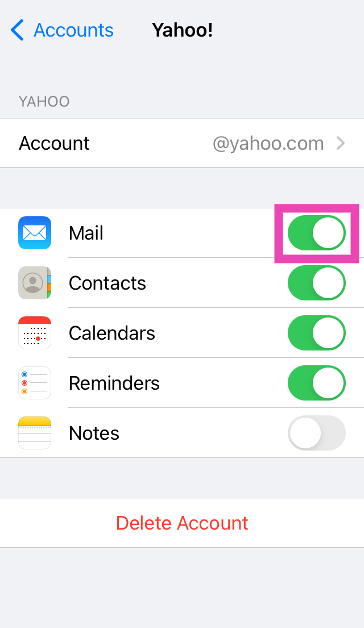
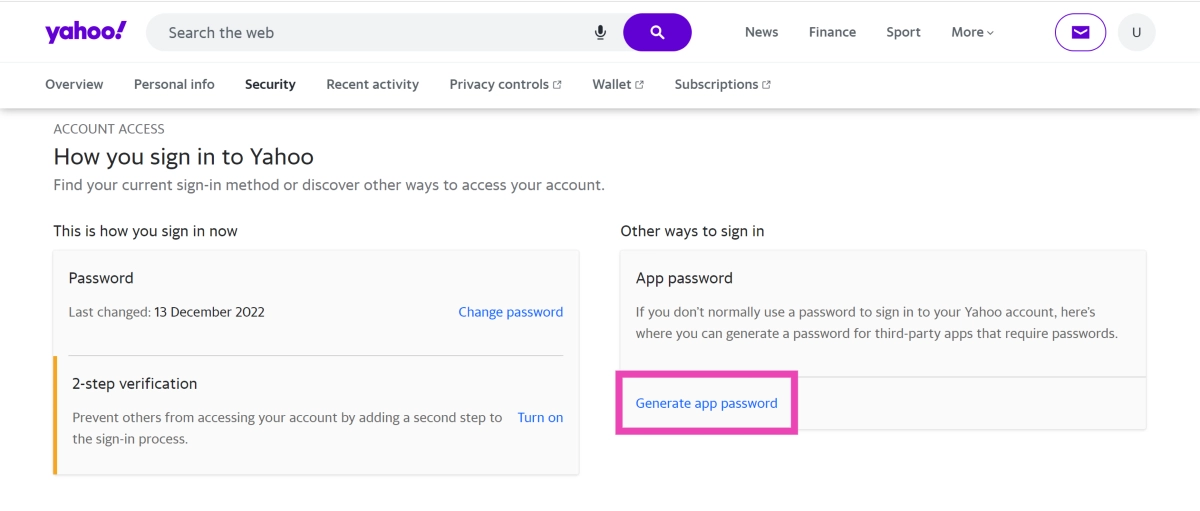
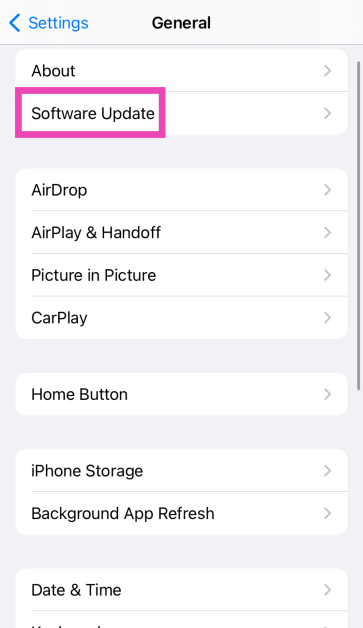
Read Also: Top 5 Ways to Fix Yahoo Mail Not Working On iPhone (2024)

Verdict

The Samsung Galaxy M55 is a great buy at Rs 27,000 if you’re willing to make certain tradeoffs. The glass back panel or IP67 rating of its A series cousins are missing from the M55, but its Snapdragon 7 Gen 1 chipset ensures smooth functioning for casual and heavy users alike. When it comes to battery performance, the M55 has the A35 (and even the A55) comfortably beat. And while its pictures may not be in line with Samsung’s signature shots, the M55’s camera is still incredibly fun to use.

Samsung Galaxy M55 5G: Pros

  • Great display
  • Slim bezels
  • Good processor
  • 4 major OS upgrades + 5 years of security patches
  • 45W fast charging

Samsung Galaxy M55 5G: Cons

  • Plastic back
  • Does not ship with a charger inside the box

Flipkart’s Big Saving Days Sale is set to bring about massive discounts on Blaupunkt Smart TVs: exclusive deals revealed

Eight days long, the Flipkart Big Saving Days Sale will begin tomorrow. Just ahead of the summer sale Blaupunkt has revealed exclusive discounts and offers across its product portfolio. The company will be offering great discounts on its Smart TV starting from May 2 and running till May 9. In addition to this Plus members gain exclusive early access to these discounted offerings.

At Flipkart’s Big Saving Days Sale, Blaupunkt will be offering a number of smart TVs at significant discounts. Customers who use credit cards or EMI transactions can expect to receive big savings on Blaupunkt Smart TVs from May 2nd to May 9th, 2024.

The price of the Blaupunkt 24Sigma707 drops to Rs 5,999 from Rs 6,499 during the Flipkart Big Saving Days Sale, while the 32CSA7101 remains the same at Rs 9,999. The price of the 32CSG7111 model has been lowered from Rs 10,499 to Rs 10,299 in India. The price of the 40Sigma703 BL has been reduced from Rs 14,499 to Rs 13,999. While the 43CSA7070 will retail for Rs 24,999, the 42CSA7707 will continue to be offered for sale at a price of Rs 16,999.

Also Read: SPPL reveals deals and offers on Kodak TVs, ahead of Amazon Great Summer Sale and Flipkart Big Saving Days Sale

While the 43CSG7105 will be discounted to Rs 16,999 from Rs 17,499, the 43CSA7121 will continue to be priced at Rs 17,499 in India. The 43QD7050 will now retail for Rs 21,999 instead of Rs 22,999, and the 50CSGT7022 will now cost Rs 25,999 instead of Rs 26,999. The 55QD7020 will continue to retail for Rs 33,999.

Also Read: Poco smartphones goes on sale, offers revealed ahead of the Flipkart and Amazon Sale

Reduced from Rs 42,999 to Rs 39,999, the 65QD7030 will be available for Rs 47,999, and the 65CSGT7024 for Rs 49,999. The 43-inch (43QD7050) Quantum Dot Series 4K Ultra HD QLED Google TV from Blaupunkt will cost Rs 21,999. The 55-inch Quantum Dot Series 4K Ultra HD QLED Google TV (55QD7020) from Blaupunkt will retail for Rs 33,999. The 55CSGT7023 will continue to be priced at Rs 29,999, while the 50QD7010 will decrease in price from Rs 29,999 to Rs 28,999. The 75QD7040, is now priced at Rs 89,999 instead of Rs 99,999.

SPPL reveals deals and offers on Kodak TVs, ahead of Amazon Great Summer Sale and Flipkart Big Saving Days Sale

This can be the ideal moment for you to buy a smart TV if you have been waiting to do so. Significant discounts and offers on the Kodak HD LED Television have been announced by SPPL, the official brand licensee of Kodak, ahead of the Flipkart Big Saving Days Sale and the Amazon Great Summer Sale. Interesting deals for Kodak’s CA PRO, 9XPRO, and KODAK Matrix QLED Series have been revealed.

Kodak is providing customers with amazing discounts on its full range of televisions during the Flipkart Big Saving Days Sale and the Amazon Great Summer Sale in an effort to make the ongoing IPL season more enjoyable for them. Sales on both platforms will begin on May 2, 2024. The initial price of the television is Rs 5,555.

When making EMI purchases and using an ICICI, Bank of Baroda, or OneCard card, Amazon offers a 10% instant discount. Flipkart is providing an instant 10% discount while using EMI and SBI Bank cards.

Also Read: Poco smartphones goes on sale, offers revealed ahead of the Flipkart and Amazon Sale

KODAK QLED televisions will be available in three screen sizes—50, 55, and 65 inches—and will start at Rs 21,999. The Google TV has a QLED 4K display with 1.1 billion colours, DTS TruSurround sound, Dolby Atmos, Dolby Vision, HDR 10+ with 2GB RAM, and 16GB of internal storage. A custom home screen for every user, manual and voice control for smart home devices, and support for multiple adult and kid user accounts are just a few of the enhanced features that come with these televisions.

KODAK 75-inch 4K QLED TV (75MT5044), on the other hand, will be available at a starting price of Rs 99,999. It offers DTS TruSurround, Dolby MS12, HDR 10+, QLED 4K display with 1.1 billion colours, 2GB RAM, and 16GB of internal storage. In addition to having an air-slim and bezel-less design, the televisions also feature built-in Chromecast and Airplay, which supports over 1000 apps, HDR10+, DOLBY ATMOS, DOLBY VISION, and DOLBY DIGITAL PLUS. Whereas model numbers 43MT5055 and 55MT5022 will be available at an exciting pricing of Rs 21,999 and Rs 30,999.

The KODAK CA PRO series of televisions will come at a starting price of Rs 25,499 during the Flipkart Big Saving Days Sale and the Amazon Great Summer Sale. They offer a Google TV interface, a 4K HDR10 display, Dolby Digital Plus, and DTS TruSurround.

Also Read: Redmi Note 13 Pro+ 5G World Champions Edition launched in India

KODAK 9XPRO TV line of high-end televisions can be purchased at Rs 9,899 for the 32-inch variant. The hero models 439X5081 and 429X5071 connected to this series are currently on sale and will be available at Rs 16,999 and Rs 15,499 respectively.

Here are the prices of KODAK TVs during the sales-

Model Sale Prices
24HDX100S 5,555
329X5051 9,899
32HDX7XPRO 9,499
32HDX900s 7,999
429X5071(Hero Model) 15,499
439X5081 (Hero Model) 16,999
43UHDX7XPROBL 19,999
50CAPROGT5012(Hero Model) 25,499
50MT5011 28,999
50UHDX7XPROBL 25,999
55CAPROGT5014 29,499
55MT5022(Hero Model) 30,999
55UHDX7XPROBL 27,999
65CAPRO5099 42,999
65MT5033 46,999
75MT5044 99,999
24SE5002 5,999
32SE5001BL 8,499
409X5061 14,999
43SE5004BL(Hero Model) 14,999
43MT5055(Hero Model) 21,999
40SE5003BL 13,999

Top 5 Ways to Fix Yahoo Mail Not Working On iPhone (2024)

0

The native Mail app on your iPhone is well-equipped to manage email hosts across the spectrum. Functional issues on the Mail app are rare, but they can be annoying when you come across them. Oftentimes, Yahoo Mail users report not being able to send or receive emails using the Mail app. So here are the top 5 fixes for the ‘Yahoo Mail not working’ issue on an iPhone.

Read Also: Poco smartphones goes on sale, offers revealed ahead of the Flipkart and Amazon Sale

Why is Yahoo Mail not working on my iPhone?

If you can’t get Yahoo Mail to work on your iPhone, it could be due to one of the following reasons.

  • Your Yahoo account is incompatible with the Mail app.
  • Your iPhone is facing connectivity issues.
  • The Yahoo Mail app on your iPhone is not updated to the latest version.
  • Your Yahoo account has been handed a ban.
  • Yahoo’s servers are down.

Use the Yahoo Mail app instead of the native Mail app

If you’re unable to send or receive new emails using the default Mail app on your iPhone, install the Yahoo Mail app. Log in using your Yahoo account and turn on the push notifications to ensure you don’t miss another email. Move on to other fixes if you want to make your Yahoo account work on the default Mail app.

Make sure your Yahoo account is synced with the Mail app

Step 1: Go to Settings and select Mail.

Step 1: Go to Settings and select Mail.

Step 2: Tap on Accounts.

Step 2: Tap on Accounts.

Step 3: Select Yahoo.

Step 3: Select Yahoo.

Step 4: Turn on the toggle switch for Mail.

Step 4: Turn on the toggle switch for Mail. Top 5 Ways to Fix Yahoo Mail Not Working On iPhone (2024)

Remove your account and add it back

Step 1: Go to Settings and select Mail.

Step 1: Go to Settings and select Mail. Top 5 Ways to Fix Yahoo Mail Not Working On iPhone (2024)

Step 2: Tap on Accounts.

Step 2: Tap on Accounts. Top 5 Ways to Fix Yahoo Mail Not Working On iPhone (2024)

Step 3: Select Yahoo.

Step 3: Select Yahoo. Top 5 Ways to Fix Yahoo Mail Not Working On iPhone (2024)

Step 4: Tap on Delete Account.

Step 4: Tap on Delete Account.

Step 5: Go back to the Accounts page and select Add Account.

Step 5: Go back to the Accounts page and select Add Account.

Step 6: Use your login credentials to sign into your Yahoo account.

Generate a third-party app password

Step 1: Go to your Yahoo Account Security Page.

Step 2: Click on Generate app password.

Step 2: Click on Generate app password. Top 5 Ways to Fix Yahoo Mail Not Working On iPhone (2024)

Step 3: Click on Get Started.

Step 3: Click on Get Started. Top 5 Ways to Fix Yahoo Mail Not Working On iPhone (2024)

Step 4: Enter ‘Mail’ in the app name field and hit Generate password.

Step 4: Enter ‘Mail’ in the app name field and hit Generate password. Top 5 Ways to Fix Yahoo Mail Not Working On iPhone (2024)

Step 5: Hit Done and sign into the Mail app using the single-use password displayed on the screen.

Step 5: Hit Done and sign into the Mail app using the single-use password displayed on the screen. Top 5 Ways to Fix Yahoo Mail Not Working On iPhone (2024)

Check if Yahoo’s servers are down

It is possible that Yahoo Mail is not working on your iPhone due to a server outage. To make sure that is the case, go to DownDetector.in and enter Yahoo Mail. If you see a spike in user reports, it means that Yahoo is currently experiencing a server outage.

Frequently Asked Questions (FAQs)

How do I link my Yahoo account to the Mail app on my iPhone?

Go to Settings>Mail>Accounts>Yahoo and log in using the proper credentials. Make sure the toggle switch for Mail is turned on.

How do I generate a third-party app password for my Yahoo account?

Go to your Yahoo Account Security page, click on ‘Generate app password’, enter the name of the app, and copy the single-use password presented on the screen.

How do I check if Yahoo’s servers are down?

Go to DownDetector.in, enter Yahoo, and see if there is a spike in user reports. A surge in reports suggests the service is down.

Read Also: Redmi Note 13 Pro+ 5G World Champions Edition launched in India

Conclusion

These are the top 5 ways to fix the ‘Yahoo Mail not working’ issue on your iPhone. If you know of any other ways to fix this issue, let us know in the comments! While you’re here, check out this article to learn how to send a text via email.

Garena Free Fire Redeem Codes Today 1 May 2024: Here is how to claim them

Garena Free Fire is a battle royale game with regular awards and tournaments to keep players interested. If you play Garena Free Fire, you should be aware of the redeem codes that are released on a daily basis. However, because the battle royale game is banned in India, players from other countries can use the Free Fire Redeem codes daily. If you’re unfamiliar with the Garena Free Fire redeem codes or don’t know how to get them, we’ve put together a step-by-step guide to help you redeem them. Check out Garena Free Fire Redeem Codes for 1 May 2024.

The Free Fire redeem codes are a great way to get free stuff. These are 12-digit codes that contain alphabets and numbers, as well as an expiration date and time. Because the Garena FF redeem codes cannot be used more than once, you should hurry to the redemption page to claim your free reward before someone else does. To get a free reward, all you have to do is go to reward.ff.garena.com/en, which is the official redemption page. Also, keep an eye on this space for daily updates on Garena Free Fire redemption codes and rewards.

Also Read: Sennheiser Accentum Plus wireless headphones with Hybrid Adaptive Noise Cancellation launched

Garena Free Fire Redeem Codes Today 1 May 2024

FT3O823G5V1M43I2

FFL5D9Q81T7G2N0E

FA1P0HX2K9D7L34Y

FQ1QK3R7CF9B8L5F

FN4Y8Q6U5EDD61B3

FFB2M0A5U9O18R7F

F13X4N6Q3R8WUU2H

FFE6C8G3X18N4S9H

FFC8H5E7Y0JDD4S1

FFM3FDDP1N9V2W7T6

How to Get Free Fire Redeem Codes for Garena on 1 May 2024?

  • Visit the Garena Free Fire game’s official website at reward.ff.garena.com.
  • Use your Facebook, Google, VK, Apple ID, Huawei ID, or Twitter account to log in.
  • You’ll be taken to a valid redemption code (s)
  • Copy and paste the 12-digit redemption code into the text box.
  • On the screen, a dialogue box will appear.
  • ‘Ok’ should be selected.

For the latest gadget and tech news, and gadget reviews, follow us on TwitterFacebook and Instagram. For newest tech & gadget videos subscribe to our YouTube Channel. You can also stay up to date using the Gadget Bridge Android App. You can find the latest car and bike news here.

Poco smartphones goes on sale, offers revealed ahead of the Flipkart and Amazon Sale

0

POCO has officially revealed exciting discounts and offers on its best-selling smartphones for the upcoming May Sale on Amazon and Flipkart. The May Sale will run from May 1 to May 10 on both e-commerce platforms. During this sale event, customers will have the chance to buy their favourite devices at never-before-seen prices, along with enticing discounts.

The company is offering the Poco M6 5G Airtel Bundle at a discounted price of Rs 2,750 during the May sale, making it available for Rs 7,749 in total. With Rs 2,200 off the retail price, the 4GB RAM with 128GB storage and the 6GB RAM with 128GB storage variants are now available for purchase at Rs 8,299 and Rs 9,299, respectively. The Poco M6 5G top variant, which comes with 8GB RAM and 256GB storage, will now only cost Rs 10,999 after a Rs 2,500 discount.

At launch, the Poco M6 5G‘s 4GB RAM with 128GB storage option cost Rs 10,499, while the 6GB RAM with 128GB storage and the 8GB RAM with 256GB storage versions were priced at Rs 11,499 and Rs 13,499, respectively.

On the other hand during the sale, the Poco M6 Pro 5G is discounted by up to Rs 3,500. The phone will cost Rs 8,999 for the 4GB RAM with 128GB storage version, Rs 9,999 for the 6GB RAM with 128GB storage model and the 8GB RAM with 256GB storage variants cost Rs 11,499.

During the upcoming May Sale on Amazon and Flipkart, buyers can purchase the Poco X6 Neo 5G 8GB RAM and 128GB storage model at a discounted price of Rs 13,999 which is Rs 2,000 down from its original cost. The device was initially priced at Rs 15,999. Whereas, the 12GB RAM with 256GB storage variant will cost you Rs 14,999 during the sale period. This model originally cost Rs 17,999.

In contrast, the Poco X6 Pro now costs Rs 4,000 less than when it was first released. The price of the 8GB RAM with 256GB storage has dropped from Rs 26,999 to Rs 22,999. Whereas, the 12GB RAM with 512GB storage will retail at a discounted price of Rs 24,999. The model previously cost Rs 28,999.

Similar to that, there will be a Rs 4,000 discount on the Poco X6 5G. Rather than retailing for Rs 21,999, the 8GB RAM with 256GB storage option will cost Rs 17,999. The 12GB RAM with 256GB storage was initially priced at Rs 23,999 and will now be available at Rs 19,999 during Poco’s May Sale. The top-of-the-line 12GB RAM with 512GB storage variant which originally cost Rs 24,999 is being made available at Rs 20,000.

The Poco C65 will be discounted during the sale by Rs 1,700, effectively bringing the price down to Rs 6,799 for the 4GB RAM with 128GB storage and Rs 7,799 for the 6GB RAM with 128GB storage option. Lastly, the price of the 8GB RAM with 256GB storage will be offered at Rs 11,499.

You can now get the Poco C61 at a discounted price of Rs 6,499 for 4GB RAM and 64GB storage, and Rs 6,999 for 6GB RAM and 128GB storage. For Rs 7,499 and Rs 8,499, respectively, the Poco C61 was released in India.

Redmi Note 13 Pro+ 5G World Champions Edition launched in India

Xiaomi under its sub-brand Redmi today introduced a new smartphone in India. The company has launched Redmi Note 13 Pro+ 5G World Champions Edition created together with the Argentina Football Association (AFA). The Redmi Note 13 Pro+ 5G World Champions Edition shares the same specifications as the Redmi Note 13 Pro+.

As per the company, all the features of this World Champions Edition smartphone have been carefully crafted to capture the hearts of ardent football fans in India, drawing inspiration from the striking blue and white stripes, rich legacy, and the symbolic number 10.

Redmi Note 13 Pro+ 5G World Champions Edition price in India

“From the striking hues of the AFA jersey to the subtle incorporation of the iconic three shining stars representing their victories, every element of the exudes a sense of respect and authenticity.”

Also Read: Samsung Galaxy F55 5G with triple rear cameras launching in India soon

The Redmi Note 13 Pro+ 5G World Champions Edition is presented in a uniquely designed collectible gift box. Bold colour splashes complement the box’s beautiful interiors, which mirror the movement and vitality of the football pitch. The package contains a card that honours the esteemed players who have achieved victory on the global stage during the 2022 World Cup.

A fully personalised AFA edition 120W HyperCharger, a colour-coordinated USB Type-C cable, and a sim ejector pin with a football theme are also included. From the lock screen to the backgrounds to the icons, the World Champions Edition’s user interface has been completely redesigned and customised to provide our Xiaomi fans with an incredibly engaging and unique experience.

Redmi Note 13 Pro+ 5G World Champions Edition price in India

The Redmi Note 13 Pro+ 5G features a 6.67-inch 1.5K full-HD+ AMOLED screen with 1,220×2,712 pixels resolution. The display has a 120Hz refresh rate and supports up to 1,800 nits of peak brightness. The screen comes with Corning Gorilla Glass Victus protection. The device is powered by MediaTek Dimensity 7200 Ultra SoC and runs MIUI 14 OS.

Also Read: iPhone 16 series is expected to undergo significant design changes, images leaked

There is a triple rear camera setup on the phone that includes a 200MP primary sensor (f/1.65 aperture and OIS), an 8MP ultra-wide angle lens (f/2.2 aperture), and a 2MP macro lens (f/2.4 aperture). The device is backed by a 5,000mAh battery with 120W fast charging support.

Redmi Note 13 Pro+ 5G World Champions Edition price in India

The company will be offering the Redmi Note 13 Pro+ 5G World Champions Edition 12GB RAM with 512GB storage model at an introductory price of Rs 34,999. In addition to this there will be an initial 3,000 discount on ICICI bank card purchases additionally, Xiaomi is offering an exchange bonus of Rs 3,000. The device will go on sale from May 15 via Flipkart, Amazon, Xiaomi physical locations, and Mi.com in the country.

Top 5 Fixes for ‘Tinder Not Showing Up in Settings’ on iPhone

0

Apart from the odd server outage issues, app malfunctions on Tinder are extremely uncommon. Oftentimes, iPhone users report that they cannot find the dating app on the settings page. The error can lie with the app or your iPhone. Let’s take a look at what’s causing this issue and its potential fixes. Here are the top 5 ways to fix the ‘Tinder not showing up in settings’ issue on your iPhone.

Read Also: Top Ways to Auto Restart a Router or Modem (2024)

Why is Tinder not showing up in iPhone’s settings?

If you can’t find the Tinder app in your iPhone’s settings, it could be due to one of these reasons.

  • The app was not installed correctly.
  • The settings app on your iPhone is glitching.
  • Background software issues on your iPhone are keeping the Tinder app from showing up in settings.
  • Your iOS version is buggy and needs an update.
  • You have restricted push notifications from Tinder.

Restart your iPhone

Restart your iPhone

A simple restart can fix the background glitches on your iPhone. If a software issue is keeping the Tinder app from showing up in the settings section of your iPhone, restarting the device will take care of it. Simply press the side button along with the volume up or volume down key and drag the power slider across the screen. After a few seconds, long-press the side key to turn your iPhone back on.

Update the Tinder app

Best 5 Ways to Update an App on iPhone or iPad Top 5 Fixes for ‘Tinder Not Showing Up in Settings’ on iPhone

If the fault lies with the Tinder app, make sure it is updated to the latest version.

Step 1: Go to the App Store and hit Search.

Step 2: Enter Tinder in the search tab and go to the app’s page.

Step 3: Hit Update.

Delete and Reinstall the Tinder app


If updating the app didn’t work, try deleting and reinstalling it. Long-press the app icon for Tinder on your iPhone’s home screen and select Remove app. In the popup box, tap on Delete app. Once the app has been deleted, go to the App Store and reinstall Tinder.

Grant Tinder notification access

How to complete photo verification on Tinder and get a Blue checkmark Top 5 Fixes for ‘Tinder Not Showing Up in Settings’ on iPhone

While this is not a solid fix, it has been known to work on iPhones that do not display the Tinder app in settings. If you have disabled the push notifications for Tinder, enable them using in-app settings and the app will appear in your iPhone’s settings.

Step 1: Launch Tinder on your iPhone and hit the profile icon at the bottom right corner of the screen.

Step 2: Hit the cog wheel icon to access settings.

Step 3: Tap on Push Notifications and turn on the toggle switches for the alerts you want.

Update iOS

Step 1: Make sure your iPhone is connected to a WiFi network and plug in its charger.

Step 2: Go to Settings and select General.

Step 1: Go to Settings and select General. Top 11 Ways to Fix 'Message Blocking is Active' on iPhone

Step 3: Select Software Update.

Step 3: Select Software Update. Top 11 Ways to Fix 'Message Blocking is Active' on iPhone

Step 4: Tap on Download and Install.

Step 4: Tap on Download and Install. Top 11 Ways to Fix 'Message Blocking is Active' on iPhone

Frequently Asked Questions (FAQs)

How do I find an app that’s missing on the home screen of my iPhone?

Use Spotlight and the search bar in the app drawer to find any missing apps on your iPhone.

Will I lose my matches if I delete the Tinder app on my iPhone?

No, deleting the Tinder app does not remove your matches.

How do I restore the Tinder app in my iPhone’s settings?

Reinstall the Tinder app and enable its push notifications to restore it to your iPhone’s settings page.

Read Also: Top 2 Ways to Turn Off Business Ads in Google Maps (2024)

Conclusion

These are the top 5 ways to fix the ‘Tinder not showing up in settings’ issue on your iPhone. If you know of any other ways to resolve this problem, let us know in the comments! While you’re here, check out this article to learn how to lock apps on your iPhone.

iPhone 16 series is expected to undergo significant design changes, images leaked

0

Key Highlights

  • Phone 16 Series to receive design and display changes.
  • iPhone 16 Pro and iPhone 16 Pro Max, may feature larger displays.
  • iPhone 16 and iPhone 16 Plus, may feature new camera alignment.
  • Capacitive buttons are also expected in the iPhone 16 series.

Online leaks allegedly detailing the Apple iPhone 16 lineup have surfaced on the web. There may be a significant redesign of the iPhone 16 series in terms of layout and screen sizes. The iPhone 16, iPhone 16 Pro, iPhone 16 Plus, and iPhone 16 Pro Max are shown as fake phones in leaks providing an overview of the models’ rear designs and possible size upgrades.

Sonny Dickson posted the pictures on X, and MacRumors said that they show four mockups that stand in for the iPhone 16, iPhone 16 Pro, iPhone 16 Plus, and iPhone 16 Pro Max. According to a fresh reveal, the iPhone 16 and 16 Plus may get a new camera alignment, while the Pro models—the iPhone 16 Pro and the iPhone 16 Pro Max—may get larger displays. The photos suggest that the iPhone 16 Pro will have a 6.3-inch display. Whereas, the iPhone 16 Pro Max would have a 6.9-inch display.

Also Read: Samsung Galaxy F55 5G with triple rear cameras launching in India soon

Note that iPhone 15 Pro and 15 Pro Max come with a 6.1-inch and 6.7-inch display, respectively. On the other hand, the iPhone 16 Plus is expected to carry over its predecessor’s 6.7-inch display, while the standard iPhone 16 is expected to keep its 6.1-inch display. The leaked image also shows how these sizes compare to the other models in the lineup.

Note that Apple has had constant design and display for the past three years. But this time the company is expected to bring changes with its upcoming lineup. So far we now know that the Pro models might have larger displays whereas the Non-Pro models are likely to retain the same display size. But the lineup may see more design modifications; the non-pro models may use a vertically oriented camera module similar to that we have seen on the previous models iPhone 11 and iPhone 12. It looks like the LED flash is not within the module.

Also Read: Google Meet’s new Switch Here feature makes smooth transfer between devices

There are rumours that the iPhone 16 and iPhone 16 Plus will be able to record spatial video thanks to the vertically aligned camera alignment. According to a report, the traditional power button and volume rockers on the iPhone 16 series may be replaced by capacitive buttons. Also, the non-pro models are expected to have the Action button, which is currently exclusive to the Pro models.

Top Ways to Auto Restart a Router or Modem (2024)

0

If you’re struggling with poor internet speeds on your home WiFi, performing a quick restart on the router and modem is not a bad idea. A reboot refreshes the network and resolves any background issues that could have been keeping the router/modem from functioning properly. Don’t know how to go about it? Here are the best ways to reboot a router or modem.

Read Also: Samsung Galaxy F55 5G with triple rear cameras launching in India soon

What happens when you restart your router

If you’re worried that restarting your router will change its settings, you can rest easy. Rebooting the device does not mess with your custom settings, including the password and MAC filter. However, if you use the reset button on the router or perform a factory reset using its web management portal, you will lose all of your saved settings.

Think of rebooting the router as a way of refreshing it. If its performance is sluggish due to background issues, a quick restart will get rid of them. Your saved settings will remain intact but the devices connected to the network will be disconnected for a brief period.

Auto restart your router

Step 1: Enter the router’s IP address in the web browser to access its management gateway. 192.168.1.1 should work for most routers.

Step 2: Login using your username and password.

Connect to your home router as an administrator using its IP address

Step 3: Select Maintenance from the sidebar and click on Auto Reboot.

Step 3: Select Maintenance from the sidebar and click on Auto Reboot.

Step 4: Turn on the toggle switch for Enabled.

Step 4: Turn on the toggle switch for Enabled.

Step 5: Enter the frequency of auto reboot in hours and minutes.

Step 5: Enter the frequency of auto reboot in hours and minutes.

Step 6: Hit Save.

Schedule your router to reboot at a particular time

Step 1: Enter the router’s IP address in the web browser to access its management gateway. 192.168.1.1 should work for most routers.

Step 2: Login using your username and password.

Connect to your home router as an administrator using its IP address

Step 3: Click on WiFi Setup and select WiFi Schedule.

Step 3: Click on WiFi Setup and select WiFi Schedule.

Step 4: Turn on the toggle switch next to Enabled.

Step 4: Turn on the toggle switch next to Enabled.

Step 5: Select the day on which you want the router to reboot.

Step 5: Select the day on which you want the router to reboot.

Step 6: Enter the WiFi refresh time in hours and minutes.

Step 7: Hit Save.

Restart your router using its management gateway

You can use your router’s management portal to reboot it whenever you want. Here’s how.

Step 1: Enter the router’s IP address in the web browser to access its management gateway. 192.168.1.1 should work for most routers.

Step 2: Login using your username and password.

Connect to your home router as an administrator using its IP address

Step 3: Select Maintenance from the sidebar and click on Reboot.


Step 4: Hit Reboot and confirm your selection in the popup box.

Step 4: Hit Reboot and confirm your selection in the popup box.

Step 3: Select Maintenance from the sidebar and click on Reboot.

Restart your router or modem manually

The easiest way to restart your home router or modem is by manually unplugging and replugging it. Turn off the power switch and unplug the connection from the wall outlet. Wait for at least 30 seconds before plugging the connection and turning on the power switch. Perform an internet speed test to ensure that the router and modem are working as intended.

Frequently Asked Questions (FAQs)

How do I restart my home router?

Go to the router’s management portal by entering its IP address in the web browser. Navigate to Maintenance>Reboot and hit ‘Reboot’. Confirm your selection.

How do I check the internet speed of my WiFi connection?

Connect your device to the WiFi and go to Ookla Speed Test to check your WiFi connection’s internet speed.

How do I schedule my home router to restart on a particular day?

Go to the router’s web management portal, navigate to WiFi Setup>WiFi Schedule, turn on the toggle switch for ‘Enabled’, and enter the day and time for reboot.

Read Also: Top 2 Ways to Turn Off Business Ads in Google Maps (2024)

Conclusion

These are the best ways to auto-restart your home router or modem. The process may differ based on your router’s OEM, but it will follow similar guidelines. If your router has a dedicated management app, you can use it to schedule a reboot. If you have any other questions, let us know in the comments!

Samsung Galaxy F55 5G with triple rear cameras launching in India soon

Samsung is all set to announce a new smartphone in the Indian market. The company has confirmed that Samsung Galaxy F55 5G will be added to its F-Series soon. Not much has been revealed by the company, but the upcoming phone is rumoured to be a rebranded variant of the Samsung Galaxy C55 5G which launched in China earlier this month. The firm has also confirmed the Flipkart availability for F55 5G. Keep on reading to know more.

The specific launch date for Samsung Galaxy F55 5G has not been disclosed but it will soon arrive in India. According to the teaser the upcoming device will feature a triple camera setup stacked vertically on the back panel. The phone will come in an orange vegan leather finish with a stitched design. In addition to this, as soon as the smartphone launches in India it will be available via Flipkart, Samsung.com and across select retail stores for purchase.

Also Read: Google Meet’s new Switch Here feature makes smooth transfer between devices

It is anticipated that the Samsung Galaxy F55 5G, a redesigned Galaxy C55 5G, will debut in India. C55 5G made its debut earlier this month in China. So the upcoming model is expected to share Galaxy C55’s features and design.

The Galaxy C55 5G and the Samsung Galaxy F55 5G share a similar design, according to the company’s teaser. Even the colour choice is comparable to the Orange phone model that was introduced in China. Additionally, the device was unveiled in a Black colour variant. The Galaxy F55 5G might get this shade as an option here in India as well.

The Samsung Galaxy F55 5G is expected to come with a 6.7-inch full-HD+ sAMOLED Plus screen. The display is speculated to have a refresh rate of 120Hz and a maximum brightness level of 1,000 nits

An anticipated Snapdragon 7 Gen 1 SoC will power the smartphone with 8GB of RAM, and up to 256GB of storage. It may run on One UI 6.0, which is based on Android 14.

Also Read: Exciting deals and offers on the Samsung Galaxy S23 announced in India

It is likely that the Galaxy F55 5G will enable 25W wired fast charging and will pack a 5,000mAh battery. Moreover, the triple rear camera setup is said to include a 50-megapixel main camera sensor with optical image stabilisation (OIS) support. The system may also include an 8-megapixel ultra-wide angle lens and a 2-megapixel macro lens. A 50-megapixel sensor on the front for selfies and video calls is also expected.

Top 4 Ways to Turn Off Business Ads in Google Maps

1

While browsing a locality on Google Maps, you may have come across customised icons for certain locations. These icons typically display the logo or branding of the business. Clicking on the location reveals that it is a sponsored result. These ads aren’t as invasive as banner advertisements, but they are still pesky. Here are the top 4 ways to turn off business ads in Google Maps.

Read Also: Best 4 Methods to Stop ‘Chrome Automatically Opens Apps’ on Android

Can you turn off ads in Google Maps?

Unsurprisingly, Google Maps does not have the option to turn off sponsored content. If you’re using the app for navigation or looking up places near you, you are bound to come across a bunch of ads. For more organic results, you need to look past the sponsored content. While there is no way to turn off these ads for good, there is something you can do to remove them from the map for now.

Most of the ads you see on Google Maps are personalised. Google examines your past activity to suggest ads that are relevant to your interests. You can turn off personalised ads in Google Account settings to avoid targeted advertisements. We’ve noticed that turning off this setting completely removes the business ads on Google Maps for now, but that may not be the case in the future.

Turn off business ads in Google Maps

Step 1: Go to Settings and select Google.

Step 1: Go to Settings and select Google.

Step 2: Select your Google Account.

Step 3: Tap on Personalise using shared data.

Step 3: Tap on Personalise using shared data.

Step 4: Turn off the toggle switch for Maps.

Step 4: Turn off the toggle switch for Maps.

Turn off Ad Personalisation on PC

Step 1: Go to your Google Account.

Step 2: Switch to the Data & privacy tab.

Step 2: Switch to the Data & privacy tab. Top 2 Ways to Turn Off Business Ads in Google Maps

Step 3: Click on My Ad Center.

Step 3: Click on My Ad Center. Top 2 Ways to Turn Off Business Ads in Google Maps

Step 4: Click on ‘On’ next to Personalised ads and select Turn off.

Step 4: Click on ‘On’ next to Personalised ads and select Turn off. Top 2 Ways to Turn Off Business Ads in Google Maps

Switch layers

Switching to a different layer often reduces the number of ads on the map. Google Maps currently offers 3 layers — Default, Satellite, and Terrain. Here’s how you can switch among them.

Step 1: Launch the Google Maps app on your phone.

Step 2: Hit the layers icon on the left side of the screen.

Step 2: Hit the layers icon on the left side of the screen.

Step 3: Choose your preferred layer.

Step 3: Choose your preferred layer.

Use Google Maps on a web browser

Can I track someone using their phone number on Google Maps?

If you’re getting too many ads on the Google Maps app, using the service on a web browser might help. Make sure you are signed into your Google account on the web browser to retain all your saved places in Google Maps.

Frequently Asked Questions (FAQs)

How do I spot a business ad in Google Maps?

Sponsored content in Google Maps has a custom icon on the map, typically with the brand logo. Clicking on the location reveals the ‘Sponsored’ tag.

How do I turn off business ads in Google Maps?

To turn off business ads in Google Maps, go to Settings>Google>Google Account>Personalise using shared data and turn off the toggle switch for Maps.

How do I turn off ad personalisation on my Google Account?

Go to your Google Account and select Data & privacy>My Ad Center>Personalised ads and select ‘Turn off’.

How do I switch to a different layer in Google Maps?

Launch the Google Maps app, hit the layers icon on the right side of the screen, and make a selection.

How do I go to Google Street View?

Go to a location or general area in Google Maps, tap the layers icon, select ‘Street View’, and tap on a blue path to view it.

Read Also: Google Meet’s new Switch Here feature makes smooth transfer between devices

Conclusion

These are the top 4 ways to turn off business ads in Google Maps. As of now, turning off ad personalisation removes the ads on the maps, but it may not work for long. If you know any other workarounds for this issue, let us know in the comments!

Top 7 Methods to Stop ‘Chrome Automatically Opens Apps’ on Android

1

Most people prefer using apps instead of a web browser on their smartphones. Google Chrome recognises the link you’re opening and automatically redirects you to the app that supports it. This is a seamless process, but you may not want it to take place all the time. Today, we bring you the top 7 ways to stop Google Chrome from automatically opening apps on Android.

Read Also: Google Meet’s new Switch Here feature makes smooth transfer between devices

Why you should stop Google Chrome from automatically opening apps

Android apps are optimised to work faster than their web counterparts. However, there are some cases when you would want to stick to the web browser instead of the app. For example, if you want to watch a YouTube video but don’t want it to influence the algorithm that dictates your feed, it is better to open it in a web browser.

If you want to browse Facebook anonymously, you should prevent Chrome from opening the app when you tap on the supported link. The same goes when you’re trying to make a payment using Paytm, but with a different UPI ID than the one registered in the app on your phone.

Disable Instant Apps

Step 1: Go to Settings and select Apps.

Step 1: Go to Settings and select Apps.

Step 2: Tap on Default apps.

Step 2: Tap on Default apps.

Step 3: Select Opening links.

Step 3: Select Opening links.

Step 4: Turn off the toggle switch for Instant Apps.

Step 4: Turn off the toggle switch for Instant Apps.

Stop Google Chrome from automatically opening a specific app

If there’s just one app that you don’t want Chrome to open automatically every time you tap a supported link, use this method.

Step 1: Go to Settings and select Apps.

Step 1: Go to Settings and select Apps.

Step 2: Select App management.

Step 2: Select App management. Best 4 Methods to Stop ‘Chrome Automatically Opens Apps’ on Android

Step 3: Tap on the app you wish to disable.

Step 3: Tap on the app you wish to disable. Best 4 Methods to Stop ‘Chrome Automatically Opens Apps’ on Android

Step 4: Select Open by default.

Step 4: Select Open by default. Best 4 Methods to Stop ‘Chrome Automatically Opens Apps’ on Android

Step 5: Turn off the toggle switch for Open supported links.

Step 5: Turn off the toggle switch for Open supported links. Best 4 Methods to Stop ‘Chrome Automatically Opens Apps’ on Android

Disable Upgrade Web Links

Step 1: Launch the Google Play Store and hit your profile icon at the top right corner of the screen.

Step 1: Launch the Google Play Store and hit your profile icon at the top right corner of the screen.

Step 2: Go to Settings and select General.

Step 2: Go to Settings and select General. Best 4 Methods to Stop ‘Chrome Automatically Opens Apps’ on Android

Step 3: Tap on Google Play Instant.

Step 3: Tap on Google Play Instant. Best 4 Methods to Stop ‘Chrome Automatically Opens Apps’ on Android

Step 4: Turn off the toggle switch for Ugrade web links.

Step 4: Turn off the toggle switch for Ugrade web links. Best 4 Methods to Stop ‘Chrome Automatically Opens Apps’ on Android

Use the incognito tab

How to take a screenshot in Google Chrome incognito mode

The incognito tab on Google Chrome lets you browse the web anonymously. This prevents Chrome from automatically redirecting you to an app when you open a website supported by it. The only downside of using this method is that you will need to log into the website again.

Use Google Chrome in Secure Folder (Samsung)

Step 1: On your Samsung phone, go to Settings.

Step 2: Tap on Security and privacy.

Step 2: Tap on Security and privacy.

Step 3: Select More security settings.

Step 3: Select More security settings.

Step 4: Tap on Secure Folder.

Step 4: Tap on Secure Folder.

Step 5: Hit Continue.

Step 6: Set up a password.

Step 6: Set up a password.


Step 7: Hit Next.

Step 8: Tap the plus icon.

Step 8: Tap the plus icon.

Step 9: Tap on Chrome and hit Add.

Step 9: Tap on Chrome and hit Add.

Update Google Chrome

Google Chrome for Windows and Mac users data at RISK, CERT-In warns

Sometimes, the older, bug-ridden versions of Google Chrome can override the ‘Opening Links’ settings and launch an app by default as soon as you tap a supported link. Luckily, developers push out routine updates to weed out these kinds of bugs. Keep the Chrome app on your phone updated to the latest version to patch it. Go to the Play Store, seach for Chrome, and hit the ‘Update’ button on its official page.

Use another browser

If you can’t get Google Chrome to stop opening other apps automatically on your phone, use another third-party browser instead. We’d recommend using a privacy-focused browser like Brave or DuckDuckGo. These browsers ask for your permission before opening another app on your phone.

Frequently Asked Questions (FAQs)

How do I open a link on Google Chrome instead of the supported app?

Go to Settings>Apps>Default Apps>Opening links and turn off the toggle switch for Instant Apps.

How do I keep Google Chrome from opening a specific app every time I tap its link?

Go to Settings>Apps and select the app you want to keep from opening by default. Tap on ‘Open by default’ and turn off the toggle switch for ‘Open supported links’.

How do I clear an app’s cache on Android?

Go to Settings>Apps, select the app, tap on ‘Storage’, and hit ‘Clear cache’.

How do I stop Google Chrome from automatically opening apps every time I click on a link?

Open the link in incognito mode if you want to prevent Chrome from automatically opening it in the supported app. Alternatively, if you own a Samsung phone, use Chrome in the Secure Folder.

How do I use Google Chrome in incognito mode on my Android phone?

Launch the Google Chrome app, tap the ellipses, and select ‘New Incognito Tab’.

Read Also: Top 3 ways to mute a site or tab in Google Chrome? (2024) 

Conclusion

These are the top 7 ways to stop Google Chrome from automatically opening apps on Android. If these fixes don’t work out for you, uninstall Chrome and then reinstall it on your device. Got any other methods of fixing this issue? Let us know in the comments!

Garena Free Fire Redeem Codes Today 30 April 2024: Here is how to claim them

Garena Free Fire is a battle royale game with regular awards and tournaments to keep players interested. If you play Garena Free Fire, you should be aware of the redeem codes that are released on a daily basis. However, because the battle royale game is banned in India, players from other countries can use the Free Fire Redeem codes daily. If you’re unfamiliar with the Garena Free Fire redeem codes or don’t know how to get them, we’ve put together a step-by-step guide to help you redeem them. Check out Garena Free Fire Redeem Codes for 30 April 2024.

The Free Fire redeem codes are a great way to get free stuff. These are 12-digit codes that contain alphabets and numbers, as well as an expiration date and time. Because the Garena FF redeem codes cannot be used more than once, you should hurry to the redemption page to claim your free reward before someone else does. To get a free reward, all you have to do is go to reward.ff.garena.com/en, which is the official redemption page. Also, keep an eye on this space for daily updates on Garena Free Fire redemption codes and rewards.

Also Read: Sennheiser Accentum Plus wireless headphones with Hybrid Adaptive Noise Cancellation launched

Garena Free Fire Redeem Codes Today 30 April 2024

2YV7BGTF3KH9PZCR

8XTD5NYQFZ1PV3M6

W1KG78CR4B6FTJXZ

P4TQZD8LW7RB1JXF

6KQ9R7P2ZM3YDHGX

N5V6RM3HBZFCP1XK

L9PZVCT7WY3XBH4K

QJRV3W7KHG5X1YB9

4G17ZK6W8NYXF2RT

W4X0Y6Z2A8B3C9

D5E1F7G3H9I4J0

K6L2M8N4O0P5Q1

U4V0W6X2Y8Z3A9

B1C7D3E9F5G0H6

I2J8K4L0M6N1O7

How to Get Free Fire Redeem Codes for Garena on 30 April 2024?

  • Visit the Garena Free Fire game’s official website at reward.ff.garena.com.
  • Use your Facebook, Google, VK, Apple ID, Huawei ID, or Twitter account to log in.
  • You’ll be taken to a valid redemption code (s)
  • Copy and paste the 12-digit redemption code into the text box.
  • On the screen, a dialogue box will appear.
  • ‘Ok’ should be selected.

For the latest gadget and tech news, and gadget reviews, follow us on TwitterFacebook and Instagram. For newest tech & gadget videos subscribe to our YouTube Channel. You can also stay up to date using the Gadget Bridge Android App. You can find the latest car and bike news here.

Google Meet’s new Switch Here feature makes smooth transfer between devices

Key Highlights

  • Google is gradually rolling out the Switch Here feature for Meet.
  • The functionality will replace the Join Now button.
  • This will allow smooth transfer between devices while on a Google Meet call without hanging up and rejoining.

Video Conferencing app Google Meet is rolling out a new update that allows seamless transfer between devices during a Google Meet call. The company has introduced a new function, Switch Here, which eliminates the need to end a call on one device and pick up from another. The Join Now button is replaced with Switch. Both the web-based and mobile apps of Google Meet will support this feature.

A new feature called Switch Here is coming soon to Google Meet to make the process smoother for users to share between two devices at once while on the conference call. The tool is now accessible to anyone with Workspace accounts as well as personal accounts on the web and mobile phones.

The company via blog post said, “In today’s world, getting our work done can happen from many locations, across many devices. Beginning today, you can smoothly transfer between devices while on a Google Meet call without hanging up and rejoining.”

Google Meet's new Switch Here feature makes smooth transfer between devices

As of right now, you can seamlessly switch between devices while participating in a Google Meet call without ending and rejoining. You might easily switch to your laptop when you get to your workplace, for instance, if you were taking a Meet call on your tablet or smartphone.

Also Read: India-only blue colour variant of the Nothing Phone 2a released: Here is how much it will cost

When entering a meeting on your laptop, you’ll see the new “Switch here” option. This allows you to switch the call from your mobile devices without stopping the meeting or fearing that you’ll miss something crucial. When travelling or when the laptop is not available, this capability comes in handy for people who have to attend meetings.
This function is free to use and accessible to both personal account holders and Google Workspace users with paid subscriptions.

Also Read: Exciting deals and offers on the Samsung Galaxy S23 announced in India

Google added the ability for hosts and co-hosts to pin up to three individuals on the screen to Google Meet earlier this year. The feature is useful in large meetings. Up to three specified tiles can now be pinned for each meeting attendee by the meeting host or co-host. By doing this, participants won’t need to do any action on their end to view the same individuals, presentations, or items highlighted on the screen.

Exciting deals and offers on the Samsung Galaxy S23 announced in India

Samsung India has rolled out exciting deals on the Galaxy S23. The device was introduced along with Galaxy S23+ and Galaxy S23 Ultra in the country last year. Read on to learn how to benefit from the best discounts and offers on the Galaxy phone.

Samsung announced a fascinating deal on the Galaxy S23 today. The Galaxy S23, which had an initial price of Rs 64999, will be offered during Flipkart’s Big Saving Days sale for a price tag of Rs 44,999. This is said to be the best deal on the Galaxy S23 that you will find anywhere, as it comes with a bank cashback of Rs 2000.

Samsung Galaxy S23 specifications

The Samsung Galaxy S23  features a 6.1-inch full-HD+ Dynamic AMOLED 2X display with a 240Hz touch sampling rate and a refresh rate of up to 120Hz, which can drop to 48Hz. A Vision Booster function is available for improved outside visibility. The entire phone is protected by the Gorilla Glass Victus 2 and is IP68-rated for water and dust resistance. It runs on Android 13 with One UI 5.1 and is powered by a Qualcomm Snapdragon 8 Gen 2 SoC with 8GB RAM and up to 256GB storage.

Also Read: India-only blue colour variant of the Nothing Phone 2a released: Here is how much it will cost

The S23 comes with a triple rear camera setup that includes a 50-megapixel primary wide-angle sensor with an 85-degree field of view and an f/1.8 aperture. A 12-megapixel ultra-wide angle camera with an f/2.2 aperture and a 120-degree field of view, as well as a 10-megapixel telephoto camera with an f/2.4 aperture and a 3x optical zoom, are also included in the system. It has a 12-megapixel selfie sensor with an f/2.2 aperture lens and an 80-degree field of view for selfies.

Also Read: Samsung Galaxy S24 new 8GB RAM with 128GB storage model tipped to launch in India soon

The smartphone sports a 3,900mAh battery that supports 25W wired and 15W wireless charging. It also comes with Wireless PowerShare so you can use it to charge other wirelessly charging devices. 

4 ways to mute a site or tab in Google Chrome

0

If you’re the kind of Chrome user who works with multiple open tabs at any given time, you must be familiar with the startling audio pop-ups that don’t go away until they’re located and turned off. Some websites purposely make it hard to locate the pop-up. Luckily, Chrome lets you mute any website with just a couple of clicks. If the website is open on multiple tabs, all of them will get muted using this action. Today, we bring you the top 4 ways to mute a site or tab in Google Chrome.

Read Also: Samsung Galaxy S24 new 8GB RAM with 128GB storage model tipped to launch in India soon

Where’s the option to mute tabs in Google Chrome?

When you play audio on a particular tab, a speaker icon is displayed on the tab. Earlier, clicking on this icon muted the tab. Now, you can only mute the website by right-clicking the tab and selecting the appropriate option. If you’re playing YouTube on several tabs, this option will mute the website on all of those tabs. This may not be what you wanted in the first place.

Even though Chrome does not offer the option to mute individual tabs anymore, you can use one of its ‘experimental’ features to carry out that action. If this experiential feature is not available on your device, you can always use the ‘Mute Tab’ extension. The latter requires you to open the tab in order to mute it, while the former lets you mute any tab, no matter which tab you’re currently working on.

Mute a site on Google Chrome

Step 1: Right-click on the tab playing the audio.

Step 1: Right-click on the tab playing the audio.

Step 2: Select Mute Site.

Mute a tab on Google Chrome

Step 1: Launch Google Chrome and enter chrome://flags/ in the URL bar.

Step 2: Search for Tab audio muting UI control.

Step 3: Click on the drop-down menu and select Enabled.

Step 3: Click on the drop-down menu and select Enabled. Top 3 ways to mute a site or tab in Google Chrome? (2024)

Step 4: Hit Relaunch.

Step 4: Hit Relaunch.

Step 5: Play a video on any website.

Step 5: Play a video on any website.

Step 6: Hit the speaker icon on the tab to mute it.

Use the ‘Mute Tab’ extension

The Mute Tab extension on Chrome Web Store restores the option to mute a tab with a single click. Here’s how you can use it.

Step 1: Install the Mute Tab extension from the Google Web Store.

Step 2: Go to the tab you wish to mute and click on the puzzle piece icon next to the address bar.

Step 2: Go to the tab you wish to mute and click on the puzzle piece icon next to the address bar. Top 3 ways to mute a site or tab in Google Chrome? (2024)

Step 3: Click on Mute Tab.

Use the ‘Mute Tab – Silent in a click’ extension

Step 1: Install the Mute Tab – Silent in a click extension from the Chrome Web Store.

Step 1: Install the Mute Tab - Silent in a click extension from the Chrome Web Store.

Step 2: Go to the tab playing the audio.

Step 3: Hit the extensions icon in the Chrome toolbar.

Step 2: Go to the tab playing the audio.

Step 4: Click on the Mute Tab extension.

Step 4: Click on the Mute Tab extension.

Frequently Asked Questions (FAQs)

How do I mute a site in Google Chrome?

Right-click the tab of the site you wish to mute and select ‘Mute Site’.

How do I mute a tab in Google Chrome?

Go to chrome://flags/ and enable the ‘Tab audio muting UI control’ option. Now, you can mute any tab by clicking the speaker icon.

How do I know which tab is playing audio on Google Chrome?

Any website playing audio on Google Chrome displays the speaker icon on its tab.

Which are the best extensions to mute tabs on Google Chrome?

‘Mute Tab’ and ‘Mute Tab – Silent in a click’ are the best extensions to mute tabs in Google Chrome.

How do I add more tools to Google Chrome’s toolbar?

Click the ellipses, go to More Tools>Customize Chrome>Toolbar and turn on the toggle switch next to the tools you want to add.

Read Also: CMF Neckband Pro Review: Packs a solid punch

Conclusion

These are the top 4 ways to mute a site or tab in Google Chrome. If you know any other way to carry out this task, let us know in the comments! While you’re here, check out this article to learn how to automatically translate web pages in Google Chrome.

India-only blue colour variant of the Nothing Phone 2a released: Here is how much it will cost

In India, Nothing has released a new colour variant for the Nothing Phone 2a. The new colourway will only be limited to India. The smartphone is a toned-down variant of Nothing Phone 2 that was launched last year. The handset has a revamped Glyph Interface. It is powered by the MediaTek Dimensity 7200 Pro SoC. The phone has a dual rear camera setup and a full-HD+ AMOLED display.

The Nothing Phone 2a now comes in a new Blue colour variant in India. The new colour option is specific to India and comes around a month after the phone’s introduction. When the phone was first released in March, it came in just two colourways: black and white. The new colourway has been launched at an introductory price of Rs 19,999. The device will go on sale from May 2 via Flipkart in the country at noon. Following its initial sale, the price of the new colour version in India is probably going to be the same as that of the other colour variants.

Also Read: HMD-branded smartphone arriving in India soon: Upcoming launch teased

India-Only Blue Colour Variant of the Nothing Phone 2a Released: Here is how much it will cost

Nothing Phone 2a was launched in India earlier this month. The price of the phone starts at Rs 23,999 for 8GB RAM with 128GB storage. The price of the 8GB RAM with 256GB storage and 12GB RAM with 256GB storage is set at Rs 25,999 and Rs 27,999 respectively.

Also Read: Samsung Galaxy S24 new 8GB RAM with 128GB storage model tipped to launch in India soon

The 6.7-inch FHD+ AMOLED 120Hz display on the  Nothing Phone 2a supports an adaptive refresh rate ranging from 30Hz to 120Hz. The phone comes with Corning Gorilla Glass 5 protection. The device is powered by MediaTek Dimensity 7200 Pro SoC paired with up to 12GB of RAM and up to 256GB of storage. The dual rear camera setup on the phone includes a 50-megapixel main camera (with OIS and EIS) and a 50-megapixel ultra-wide sensor. In addition to this, there is a 32-megapixel selfie camera. The handset runs on  Nothing OS 2.5 based on Android 14.

The handset is backed by a 5,000mAh with 45W fast charging technology.

Samsung Galaxy S24 new 8GB RAM with 128GB storage model tipped to launch in India soon

Samsung Galaxy S24 debuted in India earlier this year. There are two RAM and storage options available. A tipster now claims that Samsung plans to release a third, less expensive version in India soon. The device is powered by Snapdragon 8 Gen 3 Mobile Platform for Galaxy. It is shipped with Android 14-based One UI 6.1.

An image displaying the cost of a new Samsung Galaxy S24 model with 8GB RAM and 128GB of onboard storage was posted by tipster Abhishek Yadav on X formerly known as Twitter. Although the formal announcement of this model is pending, the leaked image indicates that it will cost Rs 74,999.

The Samsung Galaxy S24 was launched in India earlier this year in two different configurations: 8GB RAM with 256GB storage and 8GB RAM with 512GB storage models are priced at Rs 79,999 and Rs 89,999, respectively. S24 is available in Amber Yellow, Cobalt Violet, Onyx, and Black colour options.

Also Read: HMD-branded smartphone arriving in India soon: Upcoming launch teased

The Samsung Galaxy S24 comes with a 6.2-inch FHD+ and 6.7-inch QHD+ Dynamic AMOLED 2X display with 120Hz refresh rate. The screen has a layer of Corning Gorilla Armor for protection. The Phone includes Samsung Knox, Knox Vault, and Passkeys. The device is powered by Exynos 2400 SoC. It runs on Android 14 with UI 6.1. The company will provide seven generations of OS upgrades and seven years of security updates.

The Galaxy S24 come with a triple rear camera setup that includes a 12MP Ultra-Wide Camera (F2.2, FOV 120˚), 50MP Wide Camera (OIS F1.8, FOV 85˚) and a 10MP Telephoto Camera (3x Optical Zoom, F2.4, FOV 36˚). All the models come with a 12MP selfie camera (F2.2, FOV 80˚).

The smartphone includes Live Translate, Interpreter, Chat Assist, Note Assist, Transcript Assist, and Circle to Search, powered by built-in AI features.

Also Read: Pixel 8a promotional video leaked, reveals AI features and software info

The Samsung Galaxy S24 has a 4,000mAh battery that supports Wireless PowerShare technology in addition to 25W wired and 15W wireless charging. In addition, it has IP68 dust and splash resistance and supports 5G, 4G LTE, Wi-Fi 6E, Bluetooth 5.3, Wi-Fi direct, and USB Type-C connectivity.

CMF Neckband Pro Review: Packs a solid punch

Launched alongside the Buds TWS (our review here), the CMF Neckband Pro brings a lush soundstage and premium features to the affordable headset category. Much like their Nothing counterparts, CMF’s products have an easily recognisable design language even though they don’t utilise the ‘transparent’ aesthetic. The minimal, no-nonsense route taken by CMF is something we like a lot. We’ve been using its newest neckband for almost a week. Here is our CMF Necband Pro review. This neckband is currently priced at Rs 2,000.

Read Also: HMD-branded smartphone arriving in India soon: Upcoming launch teased

CMF Neckband Pro review: Design

Here’s what you get inside the CMF Neckband Pro retail package:

  • Neckband
  • Extra ear tips
  • Safety Guide

The Neckband Pro is available in three colour variants – Orange, Dark Grey, and Light Grey. It follows the traditional neckband design language but gets rid of some things in favour of a ‘cleaner’ look. The two stems on either side of the neckband have flat top panels. The right stem houses the rotating dial on the top panel. The bottom panel contains the pairing button and the microphone. A small LED notification light lies on the side. Right next to this notification light is the USB Type-C charging port.

CMF Neckband Pro review: Design

The rotating dial takes care of all the media controls. Pressing it once plays/pauses the music and accepts incoming calls. A double press skips the track and declines any incoming call. Rotating the dial alters the media volume. Pressing and holding it toggles between ANC and transparency mode. These controls can be customised using the Nothing X app.

design

The neckband is made out of plastic, which makes it quite lightweight. The matte texture on the stems feels premium. The earbuds follow the traditional in-ear design and offer a comfortable fit. These earbuds magnetically lock together when they’re not in use.

design

CMF Neckband Pro has an IP55 rating, which means it can easily withstand exposure to minor splashes of water. Wearing the headphones while working out did not present any issues. We were expecting the glossy earbuds to pop out when things got sweaty, but we were surprised to see that the fit held up quite well.

CMF Neckband Pro: Performance

Pairing the Neckband Pro to a smartphone or PC is a seamless process. Pressing the setup button on the right stem for 3 seconds puts the headset in pairing mode. Once it has been paired, you can enable Google Fast Pair for easy access across all your devices. Neckband Pro also supports Bluetooth 5.3. Delivering the audio output are 13.6mm custom dynamic drivers with Ultra Bass 2.0 tech.

CMF Neckband Pro: Performance

The audio output produced by Neckband Pro is balanced and detailed. The mids and the highs get ample representation in the sound stage. If you like a thumping bass with your music, the neckband’s ‘Ultra Bass’ feature can be accessed from the Nothing X app. The additional dollop of bass does make the listening experience quite fun.

CMF Neckband Pro: Performance

The equaliser section in the Nothing X app lets you choose from multiple sound profiles. We were happy with the default ‘balanced’ profile as it was versatile enough to handle a range of genres. Spatial Audio is another handy addition to the neckband. It can be toggled from the Nothing X app as well.

nothing x app

For a neckband priced at Rs 2,000, you expect good noise cancellation and the CMF Neckband Pro does not disappoint in this regard. This headset can cancel up to 50dB of surrounding noise. We were satisfied with its quality and found ourselves using it a lot while travelling on public transport. You choose from 3 ANC levels or simply set it to ‘adaptive’ mode. The 5 microphones onboard the Neckband Pro do a great job of relaying high-quality audio on voice calls as well.

cmf app

Dual connection is another handy feature that we were happy to find on the Neckband Pro. You can connect the headset to 2 devices and switch between them using the setup button on the right stem. This process works seamlessly and you get used to it fairly quickly. The low-lag mode helps in reducing the latency of the neckband while gaming. You can locate your neckband around the room using the ‘Find my earbuds’ feature. The only catch is that they must be connected to your smartphone. By hitting the play button, you can trace the neckband using the shrill sound emitted from it.

CMF claims the 220mAh battery pack on the Neckband Pro can power it for 37 hours with the ANC turned off. With ANC turned on, the neckband can last 23 hours on a single charge. During the review period, we got around 30 hours of playtime out of the CMF Neckband Pro with frequent ANC use. It took us 40 minutes to fully charge the headset. A quick 10-minute charge can power it for 18 hours.

Read Also: Interviewed: Navajith Karkera On What Sonic Lamb Has In Store, Its Journey And How The Indian Government Helped Them

Verdict

If you’re a neckband loyalist who refuses to make the switch to a TWS product, CMF has got your back. The Neckband Pro is an excellent device that offers a comprehensive soundstage with a garnish of premium features. The headset’s ANC is the X-factor here, cancelling up to 50dB of surrounding sound without breaking a sweat. Neckband Pro’s performance on call is also better than your average TWS. It doesn’t get any better than this at Rs 2,000.

Neckband Pro: Pros

  • Good audio output
  • Clean design
  • Rotating dial
  • ANC

Neckband Pro: Cons

  • No USB Type-C cable inside the box

HMD-branded smartphone arriving in India soon: Upcoming launch teased

The first smartphones to carry the branding of the Finnish company, the HMD Pulse Series, was introduced last week in a few European markets. The lineup includes three devices: HMD Pulse Pro, HMD Pulse+ and HMD Pulse. The company has disclosed that its own-brand phones will be available in India as well.

HMD India stated that it will disclose the name of the first HMD-branded smartphone to be launched in the nation next week. There have been no additional announcements regarding the anticipated devices thus far. The recently released HMD Pulse phones are rumoured to be headed towards India.

HMD Pulse series specifications

HMD Pulse series features a 6.65-inch HD+ LCD screen with 720×1,612 pixels of resolution. The display supports a refresh rate of 90Hz and has a 600-nit peak brightness. Under the hood, there is a 12nm Unisoc T606 SoC with up to 6GB of RAM and up to 128GB of storage that can be further expanded up to 256GB via microSD card. The phones run on Android 14 out of the box.

In terms of optics, the HMD Pulse Pro boasts a 50-megapixel main sensor along with a 2-megapixel depth sensor. A 50-megapixel selfie camera is also included.

Also Read: Pixel 8a promotional video leaked, reveals AI features and software info

The HMD Pulse+ and HMD Pulse on the other hand have 50-megapixel primary cameras and a 13-megapixel camera. The devices have an 8-megapixel front-facing camera for taking selfies and video calling.

Also Read: HMD Global unveiled its new Pulse series with Android 14

The series is backed by a 5,000mAh battery. The HMD Pulse Pro can be charged at 20W and the remaining two models at 10W. The phones come with a side-mounted fingerprint scanner, including an e-compass, proximity, ambient light, and accelerometer. All three variants come with a 3.5mm headphone socket, a USB Type-C port, support for 4G LTE, Wi-Fi AC, Bluetooth 5.0, NFC, and GPS.

Interviewed: Navajith Karkera On What Sonic Lamb Has In Store, Its Journey And How The Indian Government Helped Them

In the tranquil settings of Mangalore, Navajith Karkera, along with his colleague Jagath, embarked on a remarkable journey of innovation that sprouted from their college days at Sahyadri College of Engineering. Driven by a profound passion for creating and a supportive environment fostered by their college’s “Dreamers” team, they found themselves deeply engaged in national tech contests. Their curiosity about audio experiences was sparked during a project aimed at crafting a smart helmet for motorcyclists, which challenged them to deliver sound without distractions.

This exploration into how humans perceive sound led them to an ingenious breakthrough—developing audio technology that not only delivers sound through the air but also lets users feel it through their bodies. This groundbreaking discovery paved the way for the creation of Sonic Lamb, setting a new standard in the headphone industry by allowing a fully immersive audio experience that captivates both the ears and the body.

We recently got a chance to have a great conversation with Navajith Karkera about his entrepreneurial journey and what lies ahead for him and Sonic Lamb. Here is the full commentary.

What inspired the creation of Sonic Lamb?

I am from Mangalore, and Jagath hails from Madikeri. Our journey as makers began at Sahyadri College of Engineering in Mangalore, where we pursued our bachelor’s degrees. The passion for building things led us to actively participate in national tech and innovation contests organized by prestigious institutions like IITs and NITs.

Guided by the “Dreamers” team initiated by our college seniors, we found a supportive environment to work on innovative ideas and present them at national events. One of our significant projects was the development of a Smart helmet for motorcyclists, which earned us several victories in national innovation contests. Two remarkable moments stand out in our journey – the “Best Young Innovators” award in 2015 and a “Gold Award” in 2018.

During the project, we were challenged to reproduce sound for motorcyclists without distracting them. This led us to explore different ways humans experience sound, and our study revealed that while we hear sound when it comes to lower frequencies, we feel them rather than hear them. This discovery sparked our interest in finding a new way to address the challenge. We engineered audio drivers capable of delivering sound through the body, and the results were astonishing. This led us to experiment by integrating this technology into regular headphones – and we were amazed at the results.

Fuelled by our love for music and the desire for a more immersive audio experience, we created 3D-printed headphone prototypes for personal use. When we shared them with friends and family, their response encouraged us to revisit our invention.

After three years of dedicated research, development, and benchmarking, we developed an improved prototype that left us and fellow audio enthusiasts captivated.

As the word spread about our invention, we set up demo kiosks at high-footfall events, allowing people to experience our product and provide valuable feedback. The overwhelmingly positive response confirmed that we had something extraordinary on our hands, inspiring us to venture into building our own audio company.

From day one, our goal has been to create a seamless connection between people and sound, providing a high-fidelity and blissful audio experience like never before. Thus, the tagline for our first product was born – “Crafted for an Eargasmic Experience.”

Our mission has always been clear – to redefine the headphone experience and offer music lovers a new dimension in audio pleasure that traditional headphones couldn’t deliver.

As we embarked on this entrepreneurial journey, we realized that India had yet to make a mark in audio technology innovations or the production of audio products for the global market. This realization fueled our determination to create a world-class product designed, engineered, and proudly made in India for the world.

We are excited about the future of our company and the potential to make a real difference in how people experience sound. Together, we aim to push the boundaries of audio technology and leave a lasting impact on the Indian audio industry.

Read Also: Sonic Lamb Review: Audio immersion taken to the next level

How does Sonic Lamb redefine the audio experience?

We believe that over the past decade, the audio industry has shifted its focus away from its core value of improving audio quality and enhancing the overall listening experience. At Rapture Innovation Labs, we are committed to bringing the focus back to sound and its experience by redefining the very method of reproducing audio.

Our patented Hybrid Driver Acoustics technology utilizes a combination of air and body conduction, which incorporates our innovative Impulse driver to revolutionize the headphone audio experience.

It allows users to hear music through their ears and for the first time also feel it through their body (skin and bone) adding a new dimension to the headphone audio experience and making Sonic Lamb excel equally in clarity and bass response.

It emulates a full-range driver and subwoofer system in a headphone – A first of its kind. This makes Sonic Lamb deliver a powerful bass response and immersive audio experience.

For a personalized audio experience, Sonic Lamb comes equipped with a one-of-its-kind control dial called Multimode. Users can toggle through four different modes right at their fingertips to customize the sound profile based on music genre, preference, and activity. The companion smartphone app provides additional features for further personalization.

Could you explain the unique technology behind Sonic Lamb that sets it apart from traditional headphones?

Conventional headphones incorporate a single driver in each ear up to produce the entire sound spectrum of 20Hz to 20000Hz, unlike a loudspeaker which supports a separate driver for each audio band and a subwoofer unit for reproducing low frequencies to reproduce sound that we feel through our body which is missing on all headphones.

The challenge is to integrate a subwoofer for low-frequency (bass) while maintaining accurate reproduction of mid and high-frequency (vocals and instruments)

Our patented Hybrid driver technology uses a precision-tuned full-range dynamic driver along with our proprietary impulse driver to overcome the limitation and reproduce a true-to-the-ear, life-like and immersive sound

Unlike regular headphones that solely rely on air conduction to transmit sound waves to the ears, Sonic Lamb combines both body conductions. This innovative combination allows for a truly immersive audio experience where not only do you hear the sound, but you also feel it through your body.

Sonic Lamb offers high-fidelity audio with powerful bass that can be felt, providing a more dynamic and realistic sound experience.

Additionally, our headphones provide the flexibility of personalized sound based on music genre, user preferences, and specific activities. A high fidelity, fully immersive and personalized audio experience sets Sonic Lamb apart from traditional headphones in the market and we’re working on coupling this with great customer experience and after-sales support.

How have partnerships with programs like SoundTech contributed to Rapture’s growth and product development?

Rapture’s collaboration with SoundTech proved to be a game-changer for our growth and product development, especially in the Indian market, where access to cutting-edge audio technology and expertise can be limited.

Through the SoundTech partnership, we gained access to:

Testing equipment: World-class audio innovation centre equipped with the latest testing equipment for our headphones.

Advanced Development Tools: Tools specifically designed to fine-tune and optimise our headphone performance.

Invaluable Expertise: Mentorship from retired engineers from renowned premium audio companies, bringing their wealth of knowledge and experience to the table.

This partnership addressed a critical challenge for Rapture – the inability to validate product development efforts entirely within India. SoundTech provided the missing piece:

Validation and Feedback: The ability to rigorously test headphones against global standards and ensure they meet or exceed expectations.

Superior Sound Quality: Access to the latest advancements and expertise allowed Rapture to refine their headphones, delivering exceptional sound that surpassed existing market offerings.

In essence, the SoundTech partnership bridged the gap between Rapture’s potential and its ability to achieve it. They provided the resources and guidance to ensure Rapture’s headphones not only met global standards but also delivered superior sound quality.

Read Also: Sonic Lamb headphones launched in India

How does Rapture ensure its Indian-manufactured products meet global quality standards, particularly with testing at Soundhub in Struer?

We do not compromise on global quality despite manufacturing in India. Our partnership with SoundTech’s advanced audio innovation centre in Struer bridges the gap. This facility boasts cutting-edge testing equipment to ensure headphones meet rigorous global standards.  But it goes beyond just machines.

Rapture benefits from the expertise of Retired engineers from industry giants like Bang & Olufsen and Harman. This collaboration allows us to refine designs, verify our approach, and ultimately achieve superior sound quality, making our headphones a true contender in the global market.

How has support from government departments and investors influenced Rapture’s R&D efforts and product quality?

In the early stages, grants from the Government of India and the Government of Karnataka helped us a lot. These grants helped fund our R&D expenses – a crucial lifeline for any hardware startup. Building exceptional products takes time and money, and this support allowed us to focus on innovation without the constant pressure of immediate profitability.

The government programs didn’t just help with initial funding. This wasn’t limited to just R&D – it extended to prototyping and even patent filings.

This financial support was a major stepping stone for Rapture. It allowed us to not only develop our initial concepts but also refine them through prototyping, secure valuable collaborations, and protect our intellectual property. It’s a testament to the power of government initiatives in fostering a culture of innovation, and we’re incredibly grateful for their contribution to our journey.

How does Rapture gather and utilize customer feedback in its product development process?

At Rapture, we don’t just develop headphones, we craft experiences.  And those experiences are built with you, our valued listener, at the forefront.

From the initial spark of an idea, we involve our target audience. Through alpha and beta testing with prototypes, we get people’s feedback at every stage. It’s your honest opinions help us validate our designs and identify areas where we can push the boundaries even further.

Up until now, our sales strategy has involved direct selling, enabling us to maintain a direct dialogue with our customers, engaging with them and gathering feedback. However, as we expand our distribution channels, including making our products available on platforms like Amazon, we are encouraging customers to register their products. This registration provides customers with direct access to us, allowing them to receive regular product updates and upgrades, while also enabling us to gather relevant feedback.

Additionally, events provide us with another avenue to engage directly with customers and hear from them. We prioritize customer feedback and integrate it into our research and development process.

It’s through this ongoing talk with customers that we keep learning and growing, ensuring that every Rapture product not only delivers cutting-edge technology but also elevates your listening experience to new heights.

What upcoming products or advancements can we expect from Rapture Innovation Labs?

At Rapture, our focus is on providing a unique and premium audio experience driven by innovation and a vision to be the brand of choice globally for a blissful and immersive audio experience.

With our Hybrid Driver technology, we have identified various use cases for improved and immersive audio experience beyond consumer headphones which is on our product roadmap along with concepts of its implementation in loudspeakers and earbuds.

Top 2 Ways to Turn Off Wrist Detection on Apple Watch (2024)

Your Apple Watch works seamlessly because of its ability to know that it is tied around your wrist. When you’re wearing the watch, you don’t need to enter its passcode every time you want to see something on it. If you want the watch to function like this even when you’re not wearing it, you should disable Wrist Detection. Today, we bring you the top 2 ways to turn off Wrist Detection on an Apple Watch.

Read Also: How to Find and Delete Your Facebook Watch History? Top 2 Ways (2024)

What is Wrist Detection?

Your Apple Watch uses its sensors to determine whether it is tied around your wrist. If the watch is not able to detect your wrist, it will lock itself and hide the alerts, health metrics, and other information on the screen. You will need to enter the watch passcode to access its contents. This is an excellent way to ensure that no one else can access your Watch when you’re not wearing it.

If you frequently take your Watch off your wrist, you may not want to enter the passcode every time you want to use the watch. In this case, you can turn off Wrist Detection to ensure your watch doesn’t get locked if it is not on your wrist. There are a few tradeoffs you will have to make to turn off this feature. Without Wrist Detection, your Apple Watch isn’t able to measure health data like blood oxygen, respiratory rate, and heart rate in the background. Moreover, it will also turn off noise alerts and fall detection for your watch.

Turn off Wrist Detection on the Apple Watch

Step 1: Press the Digital Crown on your Apple Watch.

Step 2: Hit Settings.

Step 2: Hit Settings.

Step 3: Select Passcode.

Step 3: Select Passcode.

Step 4: Turn off the toggle switch for Wrist Detection.

Step 4: Turn off the toggle switch for Wrist Detection.

Step 5: Enter your Passcode and hit Turn Off.

Turn off Wrist Detection on the Watch app

Step 1: Launch the Watch app on your iPhone.

Step 2: Switch to the My Watch tab and select Passcode.

Step 2: Switch to the My Watch tab and select Passcode.

Step 3: Turn off the toggle switch for Wrist Detection.

Step 3: Turn off the toggle switch for Wrist Detection. Top 2 Ways to Turn Off Wrist or disable Detection on Apple Watch or watch app (2024)

Step 4: Confirm your selection in the popup box.

Step 4: Confirm your selection in the popup box. Top 2 Ways to Turn Off Wrist or disable Detection on Apple Watch or watch app (2024)

Frequently Asked Questions (FAQs)

What is Wrist Detection on the Apple Watch?

As the name suggests, Wrist Detection uses sensors on your Apple Watch to detect if it is tied around your wrist. When the Watch does not detect your wrist, it gets locked.

How do I turn off Wrist Detection on my Apple Watch?

Go to Settings>Passcode and turn off the toggle switch for Wrist Detection. Hit turn off.

Which features will stop working if I turn off Wrist Detection on my Apple Watch?

Disabling Wrist Detection suspends features like fall detection, sleep tracking, background blood oxygen measurement, noise alerts, and more.

Read Also: Pixel 8a promotional video leaked, reveals AI features and software info

Conclusion

These are the top 2 ways to turn off wrist detection on an Apple Watch. When Wrist Detection is disabled, you will have to enter your passcode every time you want to make a payment using Apple Pay on your watch. If you know any other way to turn off this feature, let us know in the comments!

How to Find and Delete Your Facebook Watch History? Top 2 Ways (2024)

0

Facebook keeps a complete record of your activity on the platform. You can review everything from search entries to your check-ins. While this makes it easier to fetch content you viewed in the past, it is a double-edged sword because of Facebook’s shady history of handling user data. If you’re not okay with the social media platform recording your watched videos, here are the top 2 ways to find and delete your Facebook Watch History.

Read Also: Top 2 Ways to Change App Icon Size on iPhone & iPad (2024)

When should you delete your Facebook Watch History?

If you’re not comfortable with Facebook keeping a record of your user activity, then keeping your watch history cleared at all times is a good idea. Facebook uses your watch history to suggest you similar content as well. For example, if you watch a knitting video, you will see other DIY videos pop up on your feed more frequently. If you’re not interested in knitting, you likely won’t be happy with the suggested content.

To fix this, you can delete the video from your watch history. This will reduce its influence on the suggested content algorithm. Another reason why you may want to delete video history is to keep your Facebook activity away from prying eyes. If someone gets access to your device, they can easily find out what you’ve been watching on the platform by visiting your ‘Activity log’.

Delete your Facebook Watch History on PC

Step 1: Launch your PC’s web browser and go to Facebook. Log into your Facebook profile.

Step 2: Click your profile icon at the top right corner of the screen.

Step 3: Select Settings & privacy.

Step 2: Hit the Profile icon at the top right corner of the screen and select Settings and privacy.

Step 4: Click on Activity log.

Step 4: Click on Activity log.

Step 5: Click on Videos you’ve watched.

Step 5: Click on Videos you’ve watched.

Step 6: Click on Clear Video Watch History and confirm your selection in the popup box.

Step 6: Click on Clear Video Watch History and confirm your selection in the popup box.

Step 7: Select ‘Live videos you’ve watched’ and clear it as well.

Delete your Facebook Watch History on Mobile

Step 1: Launch the Facebook app on your smartphone and go to your profile.

Step 2: Tap the ellipses.

Step 2: Tap the ellipses. How to Find and Delete Your Facebook Watch History? Top 2 Ways (2024)

Step 3: Select Activity log.

Step 3: Select Activity log.

Step 4: Swipe through the blue tiles and select Videos watched.

Step 4: Swipe through the blue tiles and select Videos watched. How to Find and Delete Your Facebook Watch History? Top 2 Ways (2024)

Step 5: Tap on Clear Video Watch History and confirm your selection.

Frequently Asked Questions (FAQs)

How do I delete my watched videos on Facebook?

Go to Profile>Ellipses>Activity log>Videos watched and select Clear Video Watch History.

How do I delete Facebook Watch History on PC?

Click the profile icon, then go to Settings & privacy>Activity log>Videos you’ve watched>Clear Video Watch History and confirm your selection in the popup box.

How do I fix Facebook’s video player if it isn’t working?

Update the Facebook app to its latest version and turn off the restrictions imposed by your phone’s data saver to fix the Facebook video player.

Read Also: Top 3 Ways to Rotate the Screen on iPhone (2024)

Conclusion

These are the top 2 ways to find and delete your Facebook watch history on the mobile app and PC. Using these methods you will be able to remove the entire record of the videos you’ve watched on the platform. You can choose to delete individual entries as well.

Pixel 8a promotional video leaked, reveals AI features and software info

Over the past few weeks, we have seen the upcoming Pixel 8a renders, specifications and pricing leaked on the internet. Although the company has not confirmed anything yet, a promotional video has recently surfaced in which the AI features of Pixel 8a have been shown.

Just a few weeks left before the Pixel 8a is expected to make its public debut at the yearly Google I/O conference, which gets underway on May 14. However, a promotional video showcasing the AI features of the phone has already been leaked. In association with MySmartPrice, tipster Steve Hemmerstoffer released a promotional film for the Pixel 8a, which reveals software support for the future Pixel 8a as well as additional Pixel-only features that have recently leaked online.

The leaked video indicates that the Pixel phone will also come with Circle to Search, offer live translation during voice calls and will come with Google’s Audio Magic Eraser feature, which uses artificial intelligence (AI) to eliminate unwanted background noise from recorded videos.

According to the video, the Pixel 8a will come with Google’s Best Take feature similar to the other Pixel 8 series phones. The function replaces faces in many group shots or burst photographs with those that have their eyes closed or display undesirable emotions.

Furthermore, the upcoming Pixel phone will reportedly have a Tensor G3 chip and receive seven years of security updates.

On the other hand leaked photos obtained by Android Headlines also reveal that the 8a will come equipped with an Audio Magic Eraser, Best Take, Call Assist, Circle to Search Support, and Google VPN support.

Online sightings of the rumoured  Pixel 8a price indicate that consumers may need to shell out a little more money to buy it. According to PassionateGeekz, the 128GB storage model of the Pixel 8a will cost CAD 708.99, or roughly Rs 42,830, in Canada, where the phone was listed by a store. The 256GB variation will cost CAD 792.99, or around Rs 47,900. The identity of the Canadian vendor who carried both  Pixel 8a models was withheld by the media. The price of the 8a could increase by much to Rs 2,000 in India this year.

The phone could come in the following colourways: Bay, Mint, Obsidian, and Porcelain, according to the rumour.