Since they went mainstream, cryptocurrencies have been the subject of ridicule from within and outside the tech sector. Apart from notions that the whole idea of a digital currency is nothing short of unattainable, others also pointed out the impossibility of regulating the entire sector as it grows.
In short, cryptocurrencies were expected to implode. Notwithstanding the collapse of FTX (one of the leading crypto exchanges until 2022), the sector is also feeling the financial aftershocks of the post-pandemic years. Surprisingly, Bitcoin and other assets are starting to recover in the first few months of 2024. For investors and traders who thought it was a good idea to abandon ship, it seems opportunities remain plentiful. It’s only a matter of knowing what to do now that the market is recovering.
In This Article
The Crypto Resurgence in Context
Before we go into the strategies that matter this year, let’s first talk about what caused cryptocurrencies to regain momentum. In this article from Euronews, experts say that Bitcoin prices will peak at around $90,000 this year with more optimistic forecasts seeing a maximum threshold of $200,000. One explanation for this is the Fed’s plans to cut interest rates amid a slightly weakening inflation environment.
Adding to that is the long-anticipated approval of spot Bitcoin exchange-traded funds by the Securities and Exchange Commission. This will motivate traders to stay in the game and encourage newcomers to buy Bitcoin without going through extra steps. Ethereum, on the other hand, will also see considerable gains following a much-awaited Dencun upgrade and the stellar performance of the Bitcoin market.
These developments will only bring in more players to the arena, but experts offer a word of caution. The market remains as volatile as ever and it’s important to develop a clear-cut strategy for reducing your risk exposure.
How to Maximize Your Crypto Portfolio This Year
In the first few years, cryptocurrencies became widespread, and everyone was on a buying spree as they saw digital assets to be the next big thing. This optimism gave way to massive losses following the collapse of major exchanges. Now that the sector has regained ground, avoiding the same mistake is wise.
This year, the best strategy to opt for is to spread the risk across multiple types of cryptocurrencies. A diversified portfolio has a better chance to perform well in times of high volatility, but it shouldn’t be your only approach.
You might also want to sell a certain portion of your Bitcoin in exchange for Ether. The difference in the exchange rate will translate to a profit, especially if one cryptocurrency is valued higher than the other.
Initial coin offerings are also great sources of opportunity so long as they ensure the credibility and legitimacy of an ICO. Expect massive returns from a promising ICO project. However, if you connect with one that doesn’t have a clear project roadmap, you could end up losing more than you could invest. To be on the safe side, ask for advice from seasoned traders and industry insiders who can point you towards high-value ICOs.
End Note
In this environment where cryptocurrencies are coming back to life, the least you can do is follow the bandwagon. Use the right strategies and you could rise above the uncertainty and build a digital fortune.
AI-based tech is steadily evolving and integrating into our most-used tools. You can now delegate labour-intensive chores like sound and video editing to an AI tool and get them done in no time. The newest crop of Android smartphones is already integrated with some AI tech, be it Galaxy AI in Samsung or Pixel’s magic eraser. Language and audio translation is one field in particular where AI has made tremendous strides. Today, we bring you the top 3 simple ways to translate or dub your videos into another language using AI tools online.
If you’re a visual content creator, dubbing your videos into multiple languages can rapidly increase your audience. Some of the fastest-growing YouTubers have successfully used this strategy to advance their reach beyond a monolingual audience and expand their viewer base across several continents. Using the state-of-the-art AI tools, you can dub your videos in your voice and even get the lip sync right.
If you’re not a content creator, you can use AI translation tools to access content which was previously undecipherable due to a language barrier. If you frequently watch tutorials on YouTube, you must have come across a video covering a niche topic in a language that is not familiar to you. Now, you can simply download the video and translate it into your preferred language.
Step 3:Upload the video to VEED.IO from your PC’s storage.
Step 4: Click on Translate Voice.
Step 5: In the ‘Translate to’ section, select the final language.
Step 6: Select the voice for the dub and the quality of the video.
Once the video is translated, it can be easily downloaded from the website.
Dub your YouTube videos
Step 1: Go to YouTube Studio on your PC or laptop. Sign in to your account.
Step 2: Select Settings from the side panel.
Step 3: Click on Channel.
Step 4: Switch to the Advanced settings tab.
Step 5: Scroll down and hit Enable next to Automatic dubbing.
Step 6: Tick the checkbox next to Allow automatic dubbing.
Step 7: Choose whether you want to manually review dubs before publishing them.
Step 8: Hit Save.
Step 9: Go back to YouTube Studio‘s home page.
Step 10: Select Content from the sidebar.
Step 11: Click on Languages.
Step 12: In the Language column, click on your preferred language.
Step 13: Select the language in the Preview menu.
Step 14: Hit Play to preview the dubs.
Step 15: Go back to the Languages section and click the downward arrow in the Audio column.
Step 16: Hit Publish.
Frequently Asked Questions (FAQs)
Which are the best AI tools to translate or dub a video online?
VEED.IO, Rask, Synthesia, and Speechify are some of the best tools to translate or dub your videos.
How do I turn on live captions on my phone?
Using live captions, you can generate subtitles for any video on your phone. To turn it on, go to Settings>General>Hearing enhancements>Live Caption and turn on its toggle switch.
How do I live translate phone calls on a Samsung phone?
Using Galaxy AI, you can translate phone calls on your Samsung phone. Go to Settings>Advanced features>Phone and turn on the toggle switch for ‘Live translate’.
These are the top 4 ways you can translate or dub videos to any language using an online AI tool. You should know that you need a subscription to these AI tools in order to use their services. While you may be able to dub a video using some of the AI tools, downloading them will certainly require a subscription to the service.
Garena Free Fire is a battle royale game with regular awards and tournaments to keep players interested. If you play Garena Free Fire, you should be aware of the redeem codes that are released on a daily basis. However, because the battle royale game is banned in India, players from other countries can use the Free Fire Redeem codes daily. If you’re unfamiliar with the Garena Free Fire redeem codes or don’t know how to get them, we’ve put together a step-by-step guide to help you redeem them. Check out Garena Free Fire Redeem Codes for 24 March 2024.
The Free Fire redeem codes are a great way to get free stuff. These are 12-digit codes that contain alphabets and numbers, as well as an expiration date and time. Because the Garena FF redeem codes cannot be used more than once, you should hurry to the redemption page to claim your free reward before someone else does. To get a free reward, all you have to do is go to reward.ff.garena.com/en, which is the official redemption page. Also, keep an eye on this space for daily updates on Garena Free Fire redemption codes and rewards.
Be it Wrapped, Blends, or Daily Mixes, Spotify knows how to keep things fresh and interesting for the listeners on the platform. Another great novelty feature of the app is the ‘daylist’. It was introduced last year for users in the US, Canada, Australia, New Zealand, Ireland and the UK. Now this feature is being rolled out to users in over 65 other countries. Let’s take a look at how you can find your daylist on Spotify.
A ‘daylist’ is a playlist that is specially curated for you, keeping your mood and listening patterns in mind. Your daylist changes throughout the day and gets updated with new songs based on your previous listening pattern. For example, if you mostly listen to acoustic and mellow music in the evenings, then those moods will be reflected on your evening daylist as well.
Your daylists are transitory. If you don’t add the songs to a new playlist, there is no way to get them back. The title of the daylist also changes according to the phase of the day. While sharing your daylist with your friends, you get to choose from three layouts – a standard screenshot, a social media sticker, and a sharecard with the background graphic reflecting the time of the day.
Step 2: Switch to the Search tab in the bottom toolbar.
Step 3: Tap on Made For You.
Step 4: Tap on daylist.
Step 5: Tap on the plus icon to save your daylist to your Spotify library.
Once saved, you can access your daylist from the ‘Your Library’ tab.
Search for your Daylist
Instead of navigating to the ‘Made for You’ section, you can search for your daylist directly from the search box. Simply go to the Search tab, hit the text box, and type ‘Daylist’. Your personalised playlist will appear as the first result. Hitting the plus icon in the Daylist saves it to the Your Library tab. You can pin it so as to not drown in the sea of new saved items.
How to save a particular daylist
If you’re enjoying the selection of songs on your current Daylist, you can save it before it gets updated to suit the next mood of the day. Here’s how.
Step 1: Launch the Spotify app and go to your daylist.
Step 2: Hit the Browseicon next to the search bar.
Step 3: Go to Made For You.
Step 4: Click on Daylist.
Frequently Asked Questions (FAQs)
Where is my daylist on Spotify?
You can find your daylist in the ‘Made For You’ section on Spotify. Hit the plus icon to add it to your library.
Why can I not find my daylist?
Spotify daylist is only available in certain countries right now. If you can’t find it in your Spotify app, it may be because it hasn’t been rolled out in your country yet. If that is not the case, make sure the app is updated and try again.
What is a Spotify daylist?
A Spotify daylist is a special playlist curated according to the kind of music you listen to at certain parts of the day. The daylist is ever-changing and gets updated with new songs at different parts of the day.
Can I save my Daylist?
Spotify does not let you save your Daylists. However, you can transfer it to a playlist by hitting the ellipses and selecting Add to other playlist>New playlist.
How often is Spotify Daylist updated?
Spotify updates your Daylist with new songs and themes multiple times a day. The time of the next update is displayed next to the Daylist’s length.
This is how you can find your daylist on Spotify. As of now, Daylist has been rolled out to more than 65 countries, including India, Bangladesh, Sri Lanka, and more. If you can’t find your daylist, make sure the Spotify app is updated to its latest version.
In December 2023, WhatsApp introduced the option to pin a text at the top of any conversation. Now, the instant messaging platform has updated the feature to allow three messages in the pinned banner at any given time. Users can now pin texts, images, voice notes, links, and polls to the top of any conversation. The duration of pinned messages can be set to 24 hours, 7 days, or 30 days. Here is how you can pin multiple messages in a WhatsApp chat.
At the time of introduction, message pinning was one of the most requested features on WhatsApp. It gives users the option to easily access the most important messages in the chat. This is particularly useful for WhatsApp groups which see a lot of activity. The important messages often get buried in the sea of chats following it. Pinning a message makes sure no member misses any important update. It comes in handy if you want maximum participation in a poll. Pinning to the top of the chat will boost its visibility and allow easier access to it.
One of the best things about pinning a message is that tapping on it takes you to where it is in the chat. You can then follow the conversation that happened after the message was posted. This is an excellent way to catch up on the discussion while also getting to know what is being talked about.
Apart from group discussions, you can use pinned messages in individual chats to save important addresses, notes, images, and links. You can also use it as a reminder for upcoming birthdays, anniversaries, and other important dates. Instead of saving a date to the calendar, you can simply pin the user’s message containing the date to the top of the chat to be reminded of it every time you open the conversation.
This is how you can pin multiple messages in a WhatsApp chat. This method applies to individual chats as well as WhatsApp groups. If you have any questions regarding pinning messages on the platform, let us know in the comments! While you’re here, check out this article if you want to learn how to make your avatar on WhatsApp.
When you take a Live Photo on your iPhone, it captures the moments before and after the shot. This gives the photo a moving effect. If it is not your thing, you can turn this feature off from the camera app and even turn the existing Live Photos into still images. Live Photos are recorded with sound. In this sense, a Live Photo is like a short video snippet. Sometimes, users report that they can’t hear the sound on Live Photos on their iPhones. If you’re facing a similar issue, these 9 fixes will help.
By default, the Live Photos captured by your iPhone do not play the recorded sound. While browsing through Live Photos in the Photos app, you can view the video snippet recorded by the camera, but not the sound. This is done on purpose, as hearing different sounds while flicking through pictures can get annoying very quickly.
So, how do you hear the sounds on your Live Photos? The answer is pretty simple. All you need to do is press and hold the photo to listen to the audio snippet. You can choose to mute a Live Photo by using the iPhone’s native image editor. You can also extract any frame of your choice from the Live Photo and turn it into an individual picture.
Put your iPhone off mute
If you’re unable to hear the sound on a Live Photo, it may be because your iPhone is on mute. Use the ringer switch to enable the ‘loud’ sound profile. Open the Live Photo again, then tap and hold it to hear the sound.
Unmute the Live Photo
Your iPhone’s photo editor allows you to mute a Live Photo. If you can’t hear the sound on a Live Photo on your iPhone, it is possible that you may have muted it and forgotten about it. Here’s how you can unmute a Live Photo.
Step 1: Go to the Photos app and open the Live Photo in question.
Step 2: Hit the Edit button at the top right corner of the screen.
Step 3: Tap the Live Photoicon at the bottom of the screen.
Step 4: Tap the speaker icon at the top left corner of the screen.
Step 5: Hit Done.
Remove any effect applied to the Live Photo
Your iPhone lets you add certain ‘effects’ to your Live Photos. These include Loop, Bounce, and Long Exposure. When you apply an effect to a Live Photo, its sound gets muted. Here’s how you can remove the effect.
Step 1: Go to the Photos app and open the Live Photo.
Step 2: Tap on the effect name at the top left corner of the screen.
Step 3: Select Live.
Remove the effect using the image editor
You can also remove the effect by reverting the image to the original in the photo editor. Here’s how.
Step 1: Go to the Photos app and open the Live Photo.
Step 2: Hit the Edit option at the top right corner of the screen.
Step 3: Tap on Revert at the bottom right corner of the screen.
Step 4: Select Revert to Original in the popup box.
Restart your iPhone
If a background glitch is keeping you from hearing the sound on Live Photos, a quick restart can easily fix the issue. Press and hold the side key along with a volume key to access the power menu. Swipe the power slider across the screen to turn off your iPhone. After a few seconds, press and hold the side key to turn the iPhone back on.
Disable Low Power Mode
Step 1: Go to Settings and select Battery.
Step 2: Turn off the toggle switch next to Low Power Mode.
Disable ‘Reduce Motion’
Step 1: Go to Settings and select Accessibility.
Step 2: Tap on Motion.
Step 3: Turn off the toggle switch next to Reduce Motion.
Enable Live Photos from settings
In case you’re unable to take live photos from the Camera app, make sure that the feature is enabled in Camera settings.
Step 1: Go to Settings.
Step 2: Select Camera.
Step 3: Tap on Preserve Settings.
Step 4: Turn on the toggle switch next to Live Photo.
Update your iPhone
If the issue is software-related, updating the iOS version on your iPhone will help. Here’s how you can do it.
Step 1: Make sure your iPhone is connected to a WiFi network and plug in its charger.
Step 2: Go to Settings and select General.
Step 3: Select Software Update.
Step 4: Tap on Download and Install.
Frequently Asked Questions (FAQs)
What are Live Photos?
Live Photos are images taken using your iPhone that contain some motion. When you take a Live Photo, your iPhone records what happened 1.5 seconds before and after hitting the shutter button. The result is a moving picture.
Can you hear sounds on Live Photos?
Yes, you can hear sounds on Live Photos. However, you can choose to mute them.
How do I listen to the sound on a Live Photo?
Open the Live Photo, then tap and hold it to hear the recorded sound.
How do I mute a Live Photo?
Open the Live Photo, tap on ‘Edit’, hit the Live Photo icon at the bottom, then tap the mute icon at the top left corner of the screen and hit ‘Done’.
How do I turn a Live Photo into a still photo?
Open the Live Photo in the image editor, switch to the Live tab, then unselect the ‘Live’ option at the top to turn it into a still photo.
These are the top 9 ways to hear the sound on the Live Photos on your iPhone. If you want to share the Live Photo as a still image, you can do so without using the editor. Simply deselect the ‘Live’ option on the image after hitting the Share button. It will be shared as a still image. If you know any other way to fix this problem, let us know in the comments!
iQOO smartphones are steadily becoming the hot favourites for the gaming community. The iQOO Neo 9 Pro, the newest flagship killer smartphone with the Snapdragon 8 Gen 2 CPU, was sent to us for review. It retails for Rs 37,999. We were astounded by this phone’s performance considering its price. An LTPO AMOLED screen with a refresh rate of up to 144 Hz is included on the smartphone. The phone has two rear cameras, one of which is a 50-megapixel main lens attached to a Sony sensor. We will discuss everything in detail, both the positive and the negative, so let’s check out this device’s experience. This is our in-depth iQOO Neo 9 Pro review.
In This Article
iQOO Neo 9 Pro Review: Design and Display
After more than two weeks of use, we can tell with certainty that the design immediately draws your attention. It has a dual-tone vegan leather finish, and lovely stitching along the length of the device from top to bottom. The mobile is made even more beautiful by the vibrant red colour used on the frame’s sides.
Despite it being incredibly thin and lighter, its build quality and finish are superb. Also, the distribution of weight is extremely balanced. The device is fairly comfortable to carry around and its faux leather surface provides a nice overall grip. Because of this we are glad there won’t be any fingerprints or smudges on the phone makes us happy. Two colours are available: the Fiery Red colour variant and the Conqueror Black version with AG glass protection. Over that, the gadget is splash and dust-resistant with an IP54 rating.
The phone’s two vertically arranged camera sensors are mounted separately, together with an LED flashlight. On the left side of the frame are power sensors and volume rockers. A SIM tray, USB-C port, speaker, and microphone are located at the bottom. One nano SIM card and one Micro SD card or two nano SIM cards can fit in the SIM tray.
The 6.78-inch 1.5K LTPO AMOLED display of the iQOO Neo 9 Pro has a resolution of 1,260×2,800 pixels. The refresh rate of the panel rises to 144Hz during gaming, from 120Hz during regular use. The screen also features iQOO’s Wet Touch technology, which lets users perform certain tasks with moist fingertips.
A 16-megapixel selfie camera is situated just above the screen. Additionally, the side bezels are minimal, which enhances the whole experience.
Keep in mind that while the 120Hz refresh rate is excellent for everyday use, the 144Hz refresh rate is available for gaming. Additionally, the phone supports HDR10+. The colour reproduction is sharp, colourful, and vivid. The UI also has the desperately needed smoothness thanks to the 120Hz refresh rate. It is effortless and much more enjoyable while browsing through your preferred social media platform, such as Instagram. When we tested the IQOO phone outdoors, it appeared incredibly clear, bright, and crisp, living up to its 3,000 nits of peak brightness claim. Then, we also have an excellent in-display fingerprint scanner that does a great job.
It’s a lot of pleasure to watch shows and movies since the content is visually stunning. The content appears much better because HDR support is there. You may stream full-resolution videos from apps like Netflix and Amazon Prime by having Widevine L1 certification. Additionally, we played YouTube HDR videos, and they streamed well at 4K quality without any lag. Additionally, MMC support allows for incredibly smooth video playback, which is also quite amazing.
Unfortunately, though, Dolby Vision support is not available; we would have appreciated this feature. But other than that, the display quality of the device is pretty good.
There are two stereo speakers on the phone. The earpiece functions as a secondary speaker in addition to the single bottom-firing speaker. We therefore initially believed that, because we have one down-firing speaker and one front-firing speaker, the audio would not be very well balanced. However, iQOO has produced a level of sound quality that is truly remarkable. The speakers are clear, loud and provide an immersive experience, particularly while viewing an action movie.
iQOO Neo 9 Pro Review: Performance and Cameras
Performance-wise, the Qualcomm Snapdragon 8 Gen 2 mobile processor powers the iQOO Neo 9 Pro. With its powerful processing prowess, the chipset can quickly manage all of your daily chores, including using apps like Instagram, WhatsApp, and other common ones.
Our device has 12GB of LPDDR5X RAM and 256GB of UFS 4.0 storage, allowing for an expansion of up to 8GB of virtual RAM, for a total of 20GB RAM. The application launches almost instantly and greatly improves the speed of multitasking. The best thing is that most recently used apps continue to run faster because they are still stored in memory.
After that, we even played BGMI, proving how much we enjoy using iQOO devices’ Ultra Game Mode for gaming. Overall, the gaming experience was quite fluid, and the unit hardly heated up even after an hour of gameplay. There were no lags or dropped frames that we noticed. A 144Hz refresh rate makes for an excellent gaming experience. For those who enjoy gaming, this is undoubtedly one of the better sub-Rs 40,000 machines.
Regarding the user interface (UI), it comes pre-installed with FuntouchOS 14 and the most recent version of Android 14. The programme is incredibly well-optimized; we had no app crashes or lags. Sure, some apps come pre-installed, but the good news is that you can uninstall them via the settings. The majority of the undesirable third-party programmes are also removable. Three years of software upgrades and four years of security patches are what the company guarantees.
The iQOO Neo 9 Pro has two rear cameras: an 8-megapixel OmniVision OV08D10 ultrawide-angle camera with an f/2.2 aperture and a 50-megapixel 1/1.49-inch Sony IMX920 sensor with optical image stabilisation (OIS) and an f/1.88 aperture. A 16-megapixel Samsung S5K3P9SP04-FGX9 sensor with an f/2.5 aperture is available for taking selfies.
The camera system is excellent, especially for taking pictures in the daytime. The colour and picture quality for a phone under 30K is remarkable. The sensor is amazing at capturing details, offering good dynamic range, sharpness, and detail. You can share any of these photos straight to your social media accounts because they haven’t been edited.
The colours are more vibrant since we selected the vivid mode, but you may also use the natural mode to make it look more realistic. A normal photograph gains the much-needed punch from the Vivid mode. However, as you can see, iQOO excels in portrait photography, producing stunning bokeh with flawless edge detection. This equipment captures incredibly detailed and sharp close-ups.
The nighttime photos show a lot of details which are still visible despite the extreme darkness, without noise and blurriness. We were taken aback by the ultra wide-angle camera’s quality, which was almost identical to that of the main camera. We were rather pleased with the results of the selfie camera, which also performed fairly well. We can’t complain because the skin tone is so excellent and clear.
At this price range, 4K at 60 frames per second video recording is also acceptable with OIS support. Because of OIS, handheld videos have an excellent level of clarity and stability. Overall, then, we would conclude that the iQOO Neo 9 Pro’s cameras are good.
When it comes to the battery, it boasts the 5,160mAh industry standard battery that will easily get you through a full day, even with heavy usage. For light use, you can extend it up to two days. For a phone at this price, the 120W SuperVOOC charging brick that comes in the box is quite impressive.
The build quality and design are unquestionably very high-end, and pleasant to hold in the hand. We find the iQOO Neo 9 Pro’s design to be rather satisfactory. The device’s performance is excellent, particularly for those seeking the best value within the Rs 37,999 price range.
In terms of game performance, it excelled. You won’t be disappointed with the iQOO Neo 9 Pro’s gaming capabilities. Get the iQOO Neo 9 Pro if you enjoy taking portraits; you won’t be sorry. This iQOO device has an amazing camera system that takes great pictures at any moment and excels at taking portraits. Right now, the iQOO Neo 9 Pro is arguably the easiest phone to suggest thanks to its excellent performance, remarkable battery life, and price under Rs 37,999.
Garena Free Fire is a battle royale game with regular awards and tournaments to keep players interested. If you play Garena Free Fire, you should be aware of the redeem codes that are released on a daily basis. However, because the battle royale game is banned in India, players from other countries can use the Free Fire Redeem codes daily. If you’re unfamiliar with the Garena Free Fire redeem codes or don’t know how to get them, we’ve put together a step-by-step guide to help you redeem them. Check out Garena Free Fire Redeem Codes for 23 March 2024.
The Free Fire redeem codes are a great way to get free stuff. These are 12-digit codes that contain alphabets and numbers, as well as an expiration date and time. Because the Garena FF redeem codes cannot be used more than once, you should hurry to the redemption page to claim your free reward before someone else does. To get a free reward, all you have to do is go to reward.ff.garena.com/en, which is the official redemption page. Also, keep an eye on this space for daily updates on Garena Free Fire redemption codes and rewards.
Lava O2 has been launched in India in a single variant.
The budget flaunts a 90Hz display.
It has a Glass back design.
Lava O2, the company’s newest low-cost offering, was introduced in India today. The Unisoc T616 SoC, which powers the new phone. The device features an HD+ punch-hole display with a refresh rate of 90Hz. It sports a dual rear camera setup led by a 50-megapixel sensor. In addition to this, there is a 5,000mAh battery with 18W charging support.
In This Article
Lava O2 price in India, availability details
Lava O2 has launched in India with a price tag of Rs 8,499 for the 8GB RAM with 128GB storage variant. However, the company will be offering the phone at a launch price of Rs 7,999. The budget phone comes in three colour options- Majestic Purple, Imperial Green and Royal Gold.
The sale for the newest O2 will start on March 27. Customers will be able to purchase it on Amazon and Lava E-store. Customers can avail of Industry First Free service at home under warranty.
Lava O2 boasts a punch-hole display, rounded edges, and an elegant appearance featuring a Premium AG glass back design with a side fingerprint sensor. It has a 6.5-inch HD+ display with 720×1,600 pixels of resolution. The display supports a refresh rate of 90Hz and 269ppi pixel density. An octa-core Unisoc T616 SoC powers the device. It comes with an 8GB LPDDR4X RAM and 128GB of UFS 2.2 storage. The RAM can be virtually expanded up to 16GB. Also, the memory can be included up to 512GB using a micoSD card. The phone operates on Android 13. It also offers 2 years of security updates for its users.
For photos and videos, Lava O2 features a 50-megapixel dual rear AI camera unit with LED flash. The system offers features like AI mode, HDR mode, portrait mode, beauty mode and night mode. For selfies and video calling the budget phone comes with an 8-megapixel front-facing camera.
The Lava O2 is fuelled by a 5,000mAh battery that comes with 18W charging support.
Speaking on the launch, Sumit Singh, Product Head, Lava International Limited said, “Consumer demands are constantly changing, especially among the younger generation who demand both style and functionality from their smartphones without compromise. Lava O2 addresses these evolving expectations by introducing cutting-edge features such as the latest Glass Back Design and delivering a smooth user experience with stock Android 13, with a guaranteed upgrade to Android 14, along with 2-year security updates. Moreover, the inclusion of a 50 MP Dual AI Camera transforms the O2 into an adaptable all-in-one solution, perfectly catering to the dynamic needs of modern consumers.”
As big smartphones with giant displays have become the norm, some users prefer to access the desktop versions of their most frequented websites. While desktop websites may not be perfectly optimised for the mobile platform, a good internet connection will be able to load them on your phone with ease. Today, we bring you the top 7 ways to access Facebook’s desktop version on your phone.
While Facebook’s mobile version works fine for the most part, on certain occasions, you’re better off using the desktop site. If you use a folding phone, the desktop site is more suited for the larger screen real estate. Using the fullscreen mode on your browser, you can maximise the space dedicated to the website and use it without any hiccups.
Another instance when you may want to use Facebook’s desktop version is when you want access to the exclusive features that are missing from the mobile version of the wesbite. For example, Facebook’s mobile website does not have Messenger. You need to download a separate app to use it. If that’s not something you are interested in, using the desktop version will help.
Access Facebook Desktop Website on Google Chrome
Step 1: Launch Google Chrome on your smartphone.
Step 2: Go to Facebook’s official website.
Step 3: Hit the ellipses at the top right corner of the screen.
Step 4: Select the check box for Desktop site.
Access Facebook Desktop Version on Safari
Step 1: Launch the Safari browser on your iPhone.
Step 2: Go to Facebook’s official website.
Step 3: Tap the aA icon next to the address bar.
Step 4: Hit Request Desktop Website.
Access Facebook Desktop Version on Firefox
Step 1: Launch the Mozilla Firefox web browser on your phone.
Step 2: Go to the official Facebook website.
Step 3: Hit the ellipses at the top right corner of the screen.
Step 4: Turn on the toggle switch for Desktop site.
Step 5: Facebook’s desktop version will load on Firefox.
Step 3: Hit the hamburger menu at the bottom of the screen.
Step 4: Tap the settings icon.
Step 5: Scroll down and select Advanced settings.
Step 6: Tap on User Agent ID and select Desktop. Hit OK.
Step 7: Go back to the Facebook tab and refresh the web page.
Frequently Asked Questions (FAQs)
Does Facebook’s desktop website consume more data on mobile?
The desktop version of any website consumes more data than its mobile counterpart. This is due to a heavier layout, different plug-ins, and higher-resolution images on the desktop version.
How do I access the desktop version of a website on a Vivo/iQOO browser?
Load the website on the browser, hit the hamburger menu icon at the bottom, go to Settings>Advanced settings>User Agent ID, and select Desktop.
How do I load a desktop site on Google Chrome?
Launch Chrome, go to the website, hit ellipses at the top right corner of the screen, and select the checkbox for ‘Desktop site’.
These are the top 7 ways to access Facebook’s desktop version on your phone. Desktop versions of websites consume more data than mobile layouts, so make sure you are connected to a WiFi network while browsing them. If you have any questions, let us know in the comments!
Fujifilm India has expanded its popular Instax lineup of instant cameras in India
The company introduced the new Instax Mini 99 instant camera in India.
The camera body houses four LED lights.
It has a Hammertone coating and coloured text.
Fujifilm is one of the leading companies in imaging technology. They have recently unveiled its latest edition to its instant cameras category called the Instax Mini 99. It comes with new analogue functions. It includes a Color Effect Dial with six unique effects. Mini 99 offers a Brightness Control Dial with five brightness. Also, there is a Vignette Switch on the lens with various shooting modes.
In This Article
Instax Mini 99 price in India, Sale details
The Fujifilm Instax Mini 99 instant camera is the newest member of the Fujifilm Instax line of analogue instant cameras. The latest camera will retail at Rs 20,000 in India. The company has also launched a new print film called Photo Slide. These designer films will improve the photo’s visual impact, enhancing the customer’s experience, which is priced at Rs 899. The product will be available starting on April 4 on www.Instax.in and other online retailers such as Amazon and Flipkart. The device can also be shopped at retail outlets across the country.
Instax Mini 99 is a successor to Instax Mini 90. The camera body features a traditional design with a matte texture similar to leather that is comfortable to handle. The camera has additional features including “Color Effect Control,” which applies lights of various colours directly to film to create six different colour expressions and “Vignette Mode,” which is said to reduce exposure around the edges to bring the focus to the centre of each picture.
The Mini 99 has a dial on the side of the camera body to control functions like Color Effect Control and Vignette Mode and further increase the number of print expressions possible. To take a high-key or low-key photo, turn the Brightness Control dial on the side. To freely modify colour tones and brightness, brightness can be modified in five levels, ranging from D- to L+. It can also be coupled with Vignette Mode or Colour Effect Control.
The new camera also has features carried over from the mini 90, such as improved image quality in the Landscape, Macro, and Indoor modes, Sports mode for capturing action images of moving subjects, and Self Timer for group selfies. Shooting modes for manipulating light, including Bulb and Double Exposure modes, are also available. The Self-Timer is a convenient tool for shooting events or group photos. The device runs on a detachable, rechargeable battery that can hold up to 100 frames between charges. The charge port is USB Type-C (a charging cable is included).
Galaxy Book4 combines sleek design with powerful performance, featuring a Full HD display and Intel Core processors.
With AI editing tools for photos and videos, it boosts creative possibilities on the move.
Offers improved video calls by using a smartphone as a webcam and ensures immersive audio with Dolby Atmos speakers.
Samsung has once again set a benchmark in the realm of consumer electronics with the launch of the Galaxy Book4 in India. This groundbreaking device is a testament to Samsung’s commitment to innovation, offering unparalleled connectivity, mobility, and productivity. Starting at Rs 74,990, the Galaxy Book4 is not just an electronic device; it’s a gateway to a new era of technological empowerment for consumers.
In This Article
Designed for Elegance and Performance
The Galaxy Book4 boasts a large 39.62 cm Full HD display, encapsulated in a sleek metal body that weighs a mere 1.55 kg. Available in two sophisticated colors, Gray and Silver, it merges elegance with cutting-edge technology. This design philosophy ensures that the Galaxy Book4 stands out not only for its performance but as a statement piece of technology.
Equipped with an AI-Powered Photo Remaster tool, the Galaxy Book4 breathes new life into old and low-quality images. This feature allows users to effortlessly edit photos, removing unwanted light and shadows, thereby enhancing the quality of their memories. Additionally, the inclusion of the Galaxy Video Editor empowers users to express their creativity without limits.
Unmatched Viewing Experience
Powered by One UI Book ver.6, the Galaxy Book4 delivers a crisp, vibrant display that brings content to life. It features a RJ45 LAN Port for uninterrupted connectivity and Stereo Speakers with Dolby Atmos for an immersive audio experience. The device’s hardware, powered by the latest Intel Core 5/7 processor and integrated Intel graphics, ensures smooth performance for streaming, gaming, and seamless multitasking. With up to 1TB expandable SSD storage, users have ample space for all their needs.
Connectivity Redefined
The Galaxy Book4 introduces an innovative way to upgrade video calls. By using a Samsung Galaxy smartphone as a connected camera, users can achieve stunning clarity, far surpassing the capabilities of standard laptop webcams.
Price And Offers
Samsung is making the Galaxy Book4 even more accessible with enticing offers. Consumers can enjoy a bank cashback of Rs 5,000 or an upgrade bonus of up to Rs 4,000. Additionally, no-cost EMI options of up to 24 months are available, along with an extra 10% discount for students. The Galaxy Book4 can be purchased from Samsung.com, leading online stores, and select retail outlets.
The launch of the Galaxy Book4 in India is part of a larger rollout that includes the Galaxy Book4 Pro 360, Galaxy Book4 Pro, and Galaxy Book4 360, with prices starting at Rs 163,990, Rs 131,990, and Rs 114,990, respectively. This lineup underscores Samsung’s vision of AI-powered innovation, aimed at enhancing productivity and enriching the quality of life for users.
Over the last few weeks, we have seen a slew of releases in the lower midrange smartphone category. Earlier this month, Nothing stepped into the cutthroat sub-Rs 25,000 segment with the release of the Phone 2a. Established players like Vivo, OnePlus, Poco, and Redmi already have solid contenders in this price range that enjoy a lot of popularity in the Indian market. Amidst all the humdrum, one of the releases that may have gone under the radar is the Oppo F25 Pro. Priced at Rs 24,000, this smartphone flaunts a unique back panel, an impressive set of cameras, and the efficient Dimensity 7050 chipset. Excited to see what the newest midrange Oppo had in store for us, we used this smartphone as our daily driver for a week. Here is our in-depth Oppo F25 Pro review.
Here’s what you get inside the Oppo F25 Pro retail box:
Smartphone
67W power adapter
USB Type-A to Type-C cable
Clear plastic case
SIM ejector tool
Quick Start Guide
Safety Guide
There are two colour variants on offer – Lava Red and Ocean Blue. Both shades have a unique look, which some may consider flashy. We used the Lava Red variant of the Oppo F25 Pro for this review and had mixed feelings about the shimmering back. While the sparkling effect does feel cool, we prefer having a solid colour on a device that will see a lot of everyday use. The flashy appeal of the back panel wanes very quickly.
The smartphone is incredibly light, weighing just 177 grams. Most of the credit for this goes to the plastic back panel. The matte finish on this panel gives it a nice in-hand feel and doesn’t collect any smudges or fingerprints. The two-step camera island has a glossy finish and houses the three cameras inside two cutouts.
The volume rocker and power button are positioned on the left edge of the plastic frame. The bottom rail houses the primary microphone, USB Type-C slot, and the primary speaker grille. On the left edge lies the hybrid SIM tray while the secondary microphone finds its way to the top of the frame. The F25 Pro does not have stereo speakers.
The 6.7-inch AMOLED display on the Oppo F25 Pro is surrounded on all sides by narrow, uniform bezels. The selfie camera is housed inside a punch-hole cutout. The uniformity of the bezels lends a premium look to the display. The touch response here is very good. We did not experience any lags or stutters while browsing the smartphone. However, the haptics of the smartphone failed to impress us. The blunt vibrational feedback felt like a distraction more than anything while typing on the onscreen keyboard. The vibrations for swipe gestures are okay at best. This is something that we’ve come to expect from the smartphones in this price range.
The AMOLED panel has a maximum refresh rate of 120Hz. This refresh rate is adaptive by default and can be set to 60 or 120Hz from device settings. Under direct sunlight, the F25 Pro can reach a maximum brightness of 900 nits, which is enough to make it perfectly legible. Its peak brightness is 1,100 nits. The screen resolution of this panel is 1,080 x 2,412p. It has Widevine L1 certification.
The Oppo F25 Pro does justice to HD video content. We streamed content from apps like YouTube, Netflix, and Prime, and did not face any issues with the image quality. The videos packed vibrant colours and showcased a lot of detail. The bottom-firing single speaker has a tinny output that is significantly lacking on the low end. It can reach a very loud volume but sacrifices a lot of clarity along the way.
An IP65 rating means you can take out the smartphone while it’s raining and not worry about water-related damage. The front panel gets Panda glass protection, which is good enough to absorb minor knocks.
Oppo F25 Pro review: Performance and Cameras
Under the hood, the Oppo F25 Pro is powered by the MediaTek Dimensity 7050 chipset. This is a 6nm chipset and a level below the Dimensity 7200 which is a 4nm process chip and powers a few other smartphones in this segment. There are two storage variants on offer – 128GB and 256GB. Both variants come with 8GB RAM. We used the 128GB base variant which is currently priced at Rs 24,000. The 256GB variant fetches Rs 26,000.
In the Geekbench 6 app, the Oppo F25 Pro scored 903 points in the single-core test and 2,338 points in the multicore test. In comparison, the Nothing Phone 2a, which is a direct rival to the F25 Pro scored 1,121 and 2,589 points respectively.
Benchmarks don’t mean everything, so we hit the F25 Pro with a bunch of diverse tasks. Browsing Instagram while watching YouTube in split-screen mode did not present any issues at all. The entire process was seamless and the phone did not break a sweat. Routine tasks like video calling, instant messaging, emailing, media streaming, and navigation were handled very well.
While gaming, the Oppo F25 Pro does well when it is not being pushed to the limit. We played games like Call of Duty Mobile and Asphalt 9 in medium settings and were happy with the results. The phone did a good job of managing the internal temperature and delivered a smooth and enjoyable gameplay. However, in high graphics, we did experience some stutters and lags on certain occasions. With that being said, if you’re a casual gamer, the Oppo F25 Pro will not disappoint you.
On the software front, Oppo’s Color 14 OS does a good job on this device. We like the privacy and security features like the hidden folder, app locker, private safe, and system cloner offered by the OS. The private safe can be accessed from device settings as well as the file manager and the photo gallery. Other than that, there are a bunch of customisation options for the home screen, always on display, quick settings, menu, and more.
There is a significant amount of bloatware on the device, which does marr the OS experience a bit when you pull the phone out of the box. The infamous ‘Hot Apps’ and ‘Hot Games’ ads disguised as folders are present on the app drawer as well as the home screen. Luckily, these ads can be hidden from the home screen and all of the bloatware apps can be removed from the device.
The 5,000 mAh battery inside the phone can power it for an entire day. We got between 5-6 hours of Screen On Time from the device. Our daily tasks on the Oppo F25 Pro during the week-long review period included emailing, texting, video calling, music playback, video streaming, web browsing, and light gaming. We were left with a 10-15% charge at the end of each day. The 67W adapter provided in the box can fully charge the phone in 50 minutes.
One of our favourite things about the Oppo F25 Pro is its camera performance. The rear camera module on the device comprises a 64MP primary shooter, an 8MP ultrawide lens, and a 2MP macro sensor. Up front, the 32 selfie camera lies inside the punch hole cutout.
In daylight conditions, the 64MP primary camera does an excellent job of capturing what’s in front of it. The pictures are detailed and flaunt colours that ‘pop’. The smartphone does a good job of not overprocessing the images. While the colours certainly are punchier than normal, they do justice to the scene you are capturing. We particularly like how the smartphone captured the colour tone of the sky while taking pictures in the daytime. We were happy with the dynamic range and contrast in the images as well.
The 8MP ultrawide lens also does a good job in daytime conditions. The images taken with this lens retain the punchy colours from the primary shooter. The photoprocessing is on point. However, the level of detail isn’t the same and the pictures are slightly soft. The dynamic range could have been better as well. Having said that, this is still one of the better ultrawide cameras in this category and certainly not meant to be ignored.
Ultrawide ShotPrimary lens vs Ultrawide lens
In limited lighting, you need to rely on the Night Mode. The primary shooter takes decent pictures which need a good amount of photo processing to be brightened and smoothened out. The images still appear to be a little grainy. However, the smartphone does a good job of illuminating the subject and assigning it the appropriate colours. In Portrait Mode, the Oppo F25 Pro takes decent close-up shots. The subject separation is okay but the background blur effect leaves a little more to be desired.
Without Night Mode vs Night ModePortrait Shots
Images taken with the 32MP selfie camera are well-composed and pack a good amount of details. We like that the smartphone does not overcorrect the skin tones and keeps the pictures closer to reality. This selfie camera can also record 4K videos at 30fps, a first in this category. The main sensor at the back can also record 4K footage at 30fps.
The Oppo F25 Pro is a consistent performer across the board. Be it the stunning AMOLED display or the powerful 64MP main camera, the F25 Pro always has your back. Its shimmering back panel may not be everyone’s cup of tea but the matte finish and lightweight design deserves praise. Its flat form factor gives it an amazing in-hand feel. 4K video recording support on the front camera, makes this smartphone an exciting option for vloggers and content creators who are looking to get the most value out of their money.
Microsoft has officially unveiled its latest business laptops- Surface Pro 10 and Surface Laptop 6. Both laptops have the same design as their predecessors and durable anti-reflective screens. They come with the newest Intel Core Ultra chipsets with AI capabilities and an enhanced Neural Processing Unit (NPU). In addition to this, they have a dedicated Copilot key.
In This Article
Microsoft Surface Pro 10 price
Intel Core Ultra 5 chipset with 8GB RAM and 256GB of built-in storage- $1,199 (around Rs 99,950)
Intel Core Ultra 7 chipset with 64GB RAM, 1TB of built-in storage- $2,799 (about Rs. 2,33,300)
Microsoft Surface Laptop 6 price
Intel Core Ultra 5 SoC with 8GB RAM, and 256GB storage- $1,199 (around Rs 99,950)
Intel Core Ultra 7 SoC with 64GB of RAM and 1TB of built-in storage- $299 (about Rs. 2,50,000)
There are two colour options for the Surface devices: Platinum and Black.
Availability
As these laptops are intended for business purposes so they won’t be offered for sale to customers directly at Best Buy, Target, or any other store that sells Surface devices. The orders can be placed through Microsoft’s commercial store and the shipping will begin on April 9.
The Microsoft Surface Pro 10 retains the same old design. The company also crammed in a brand-new 1,440p webcam which has been AI-enhanced and uses Core Ultra’s NPU to run AI workloads and access Windows Studio effects. The machine features an anti-reflective layer to lessen glares and is 33 percent brighter. flaunts a 13-inch IPS LCD touchscreen with a refresh rate of 120 Hz. The display
The Surface Pro 10 is powered by Core Ultra 5 135U or Ultra 7 165U CPU which can be upgraded to 64GB of LPDDR5x RAM and 1TB of built-in Gen 4 SSD storage.
Adjacent to the spacebar is a specific Copilot button as well. It has compatibility for 5G, NFC, Bluetooth 5.3, Wi-Fi 6E, and a 5G connection. It also has a Surface Connect connector for charging and two USB Type-C ports with Thunderbolt 4.
The Microsoft Surface Laptop 6 comes in two display sizes: 13.5-inch and 15-inch IPS LCD panels with touchscreens. Both are Corning Gorilla Glass 5 covered with anti-reflective coating. The laptop sports a 1080p webcam that is compatible with Windows Studio Effects. The device is fitted with Intel’s Core Ultra 5 135U and Core Ultra 7 165U processors, up to 64GB of LPDDR5X RAM, and 1TB of Gen 4 SSD internal storage. The Surface laptop offers Bluetooth 5.3 and Wi-Fi 6E for wireless connectivity. In addition to this, there are all the necessary ports USB Type-C port with Thunderbolt 4, one USB Type-A 3.1 port and a 3.5mm headphone jack,
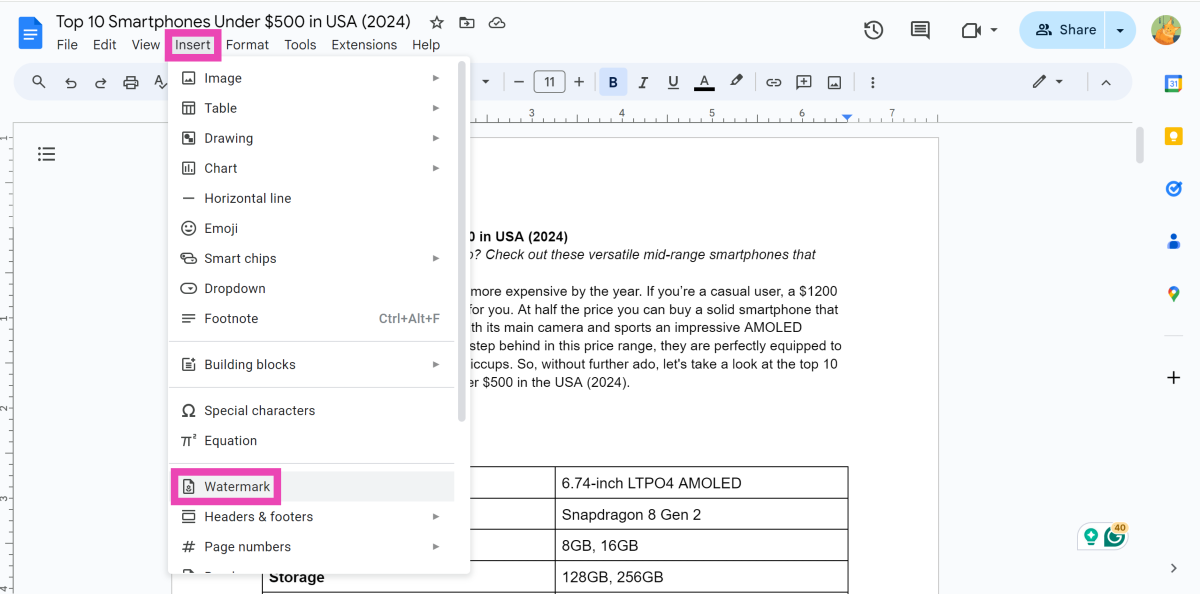
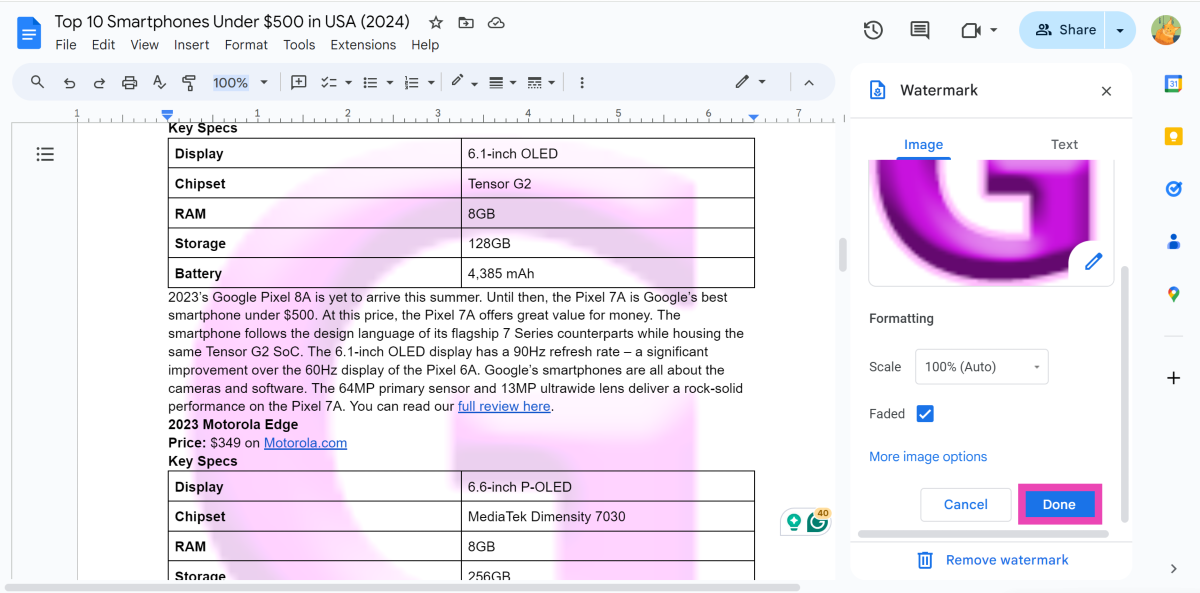
To make sure your work never goes uncredited, it is a good idea to watermark your documents. Watermarks are also useful to place your brand image on any document or signify that a piece of information is confidential. The ideal way to go about this is by placing the watermark behind the body of text in big and bold lettering. If you primarily use Google Docs to manage your work documents and have no idea how to add a watermark to them, this article will help.
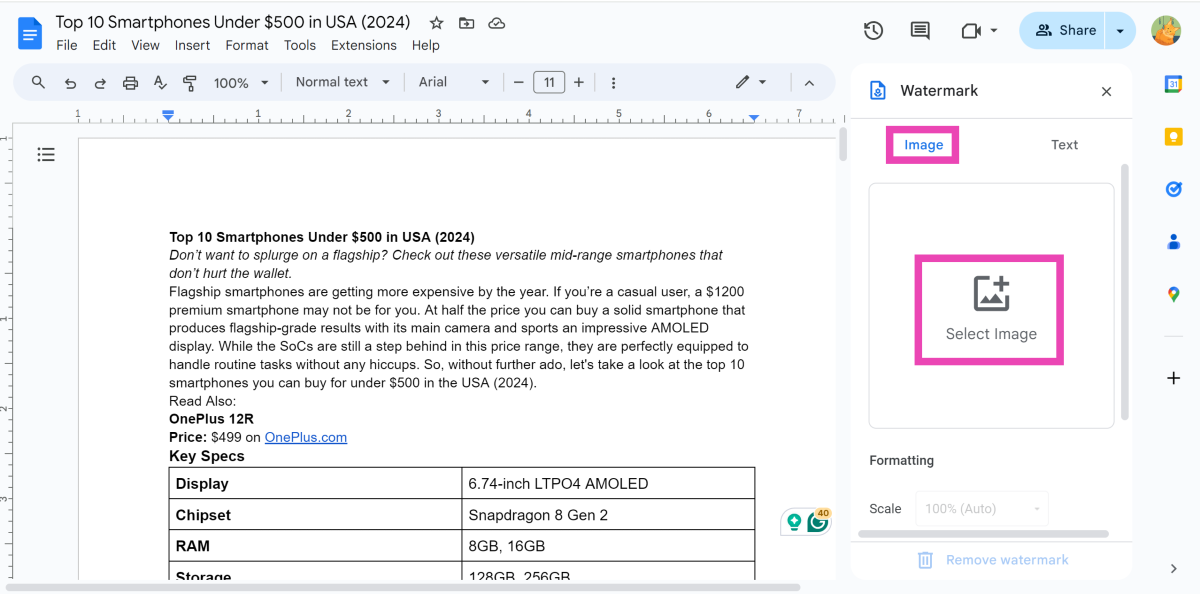
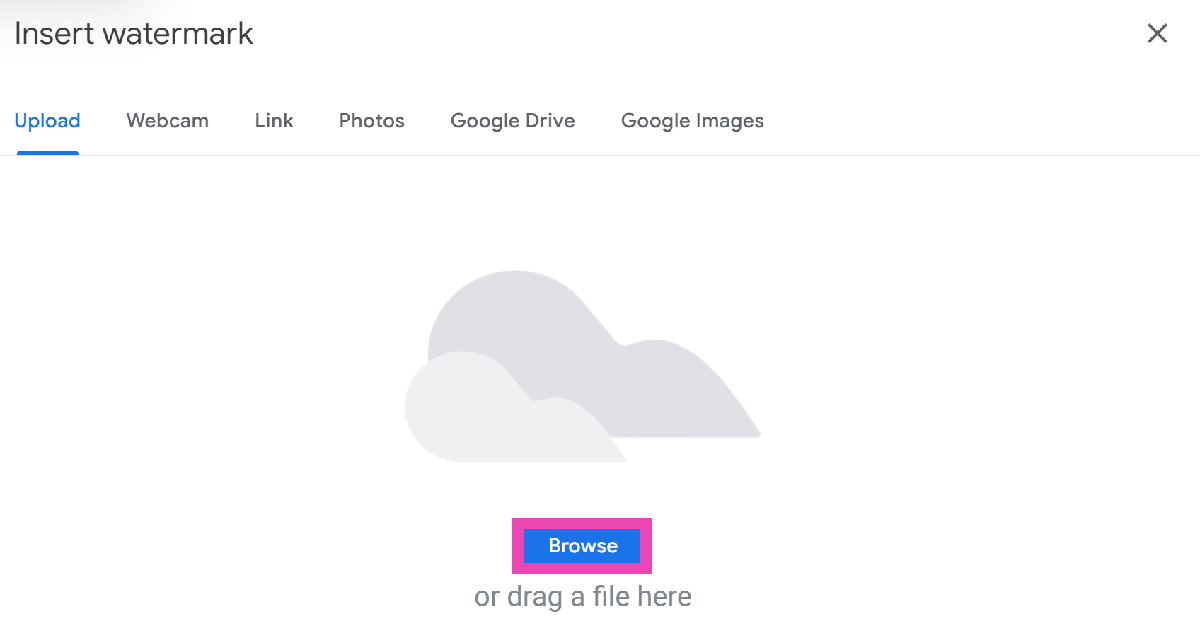
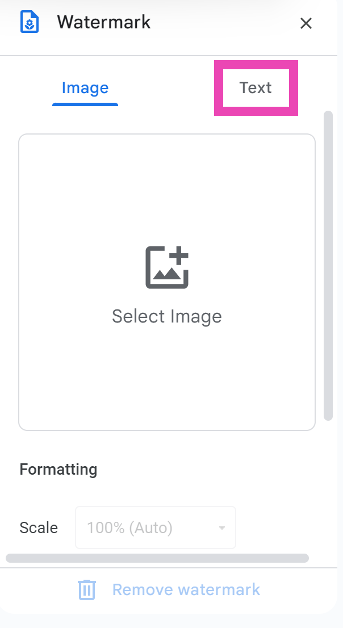
Google Docs allows two kinds of watermarks to be used in their files – Image and Text. Both serve unique purposes. If you want to use a personalised logo as the watermark, select ‘image’. This is perfect for creating pamphlets and flyers that are marked with your brand logo. You can adjust the positioning of the logo to attract the maximum attention. One of the best things about an image watermark is that you can upload the image directly from services like Google Drive, Photos, and Images without leaving the document. You can also upload the image from your PC’s internal storage.
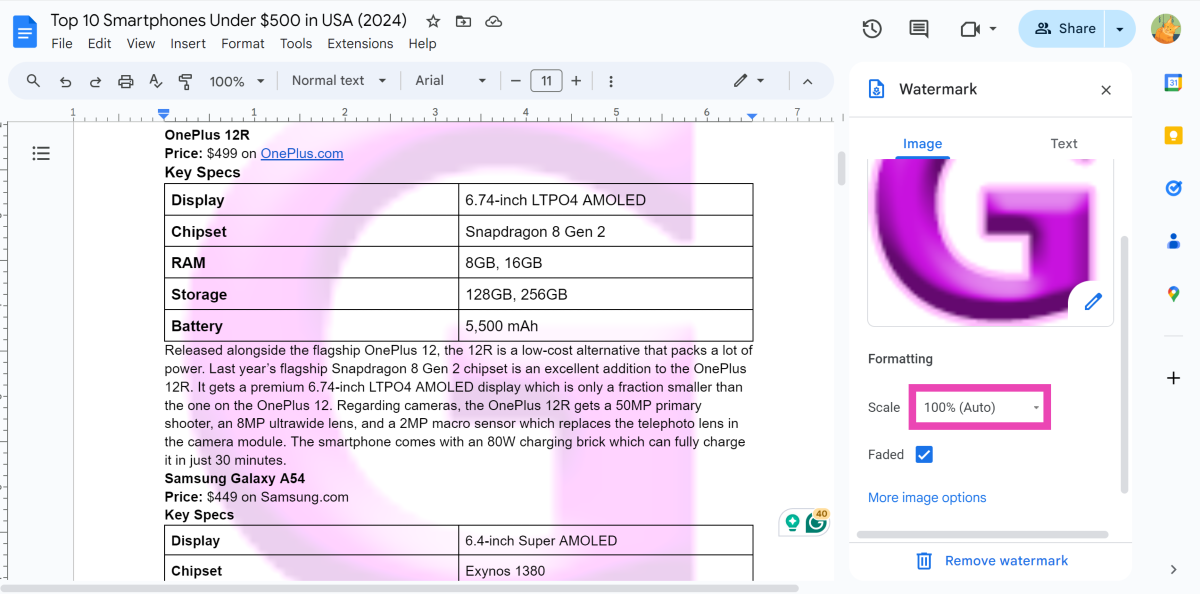
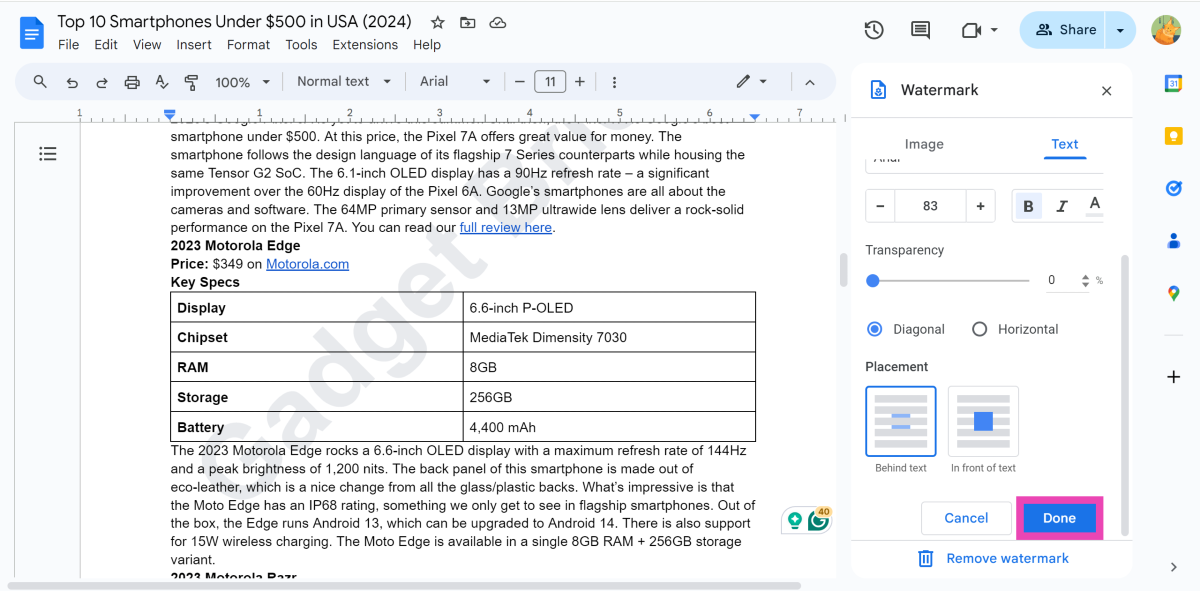
On the other hand, text watermarks can be used for all the internal documents at your workplace. You can change the opacity, font, and format of the text according to your liking. This is the kind of watermark you see on confidential documents. If you’re not happy with the results, watermarks can be removed very easily at the click of a button. Adjusting the opacity, positioning, and contrast of the watermarks yields the best results.
These are the top 2 ways to add image or text watermarks to your Google Docs. Google Docs allows you to search for any image using Google Images and use it as a watermark. You don’t need to leave the document for this. If you know any other way to go about this task, let us know in the comments!
Motorola Edge 50 Pro India is scheduled to launch in India next month.
The smartphone is said to come with AI capabilities.
The device will be available via Flipkart in the country soon after its debut.
Lenovo-owned smartphone brand Motorola is all set to launch a brand-new smartphone in the Indian market. The company has officially announced the launch date for the Motorola Edge 50 Pro India launch. Before the official announcement, the company has been teasing the key specs of the upcoming phone. The device has also been listed on the homegrown e-commerce website Flipkart to tease its availability.
The Motorola Edge 50 Pro is all set to make its debut in India on April 3, ending speculation over the exact date of the device’s arrival in the nation. Motorola has previously made it known that Flipkart, the company website, and a few brick-and-mortar shops would be the places where its next smartphone will be available for purchase.
As we mentioned earlier the Moto phone has been listed on Flipkart to tease the availability. The Flipkart listing and Motorola teasers have revealed some of the features that the Edge 50 Pro would offer.
Also Read:OnePlus 12R new 8GB RAM, 256GB storage variant now available in India A few important details about the smartphone, including colour options and display specifications, have already been verified by the Chinese manufacturer. Claimed to be an “AI phone,” it is said to include AI features similar to those found in the Google Pixel 8 series and the Samsung Galaxy S24 series. It is said to offer AI-powered wallpapers, including AI Adaptive Stabilisation, Auto-focus tracking, AI photo enhancement, and other features.
At least three colour options—black, purple, and a third with a cream and grey pattern—will be available for the Motorola Edge 50 Pro. The Snapdragon 7 Gen 3 SoC is confirmed to power the Motorola Edge 50 Pro. The company has further confirmed that its upcoming AI phone will feature a 6.67-inch 1.5K curved pOLED display. The screen is said to support a refresh rate of 144Hz and a peak brightness of 2,000. The panel is known to have SGS-certified blue light protection along with HDR10+, and a 100% DCI-P3 colour gamut. The phone will have an in-display fingerprint sensor for authentication.
It is also stated that the Motorola Edge 50 Pro’s display and camera are Pantone Validated. It will come with a triple rear camera system, which also includes an LED flash unit, and is expected to have a 50-megapixel primary sensor supported by AI.
The device is rumoured to come with 12GB of RAM. A 4,500mAh battery that supports both 50W wireless and 125W wired rapid charging is claimed to power it.
Garena Free Fire is a battle royale game with regular awards and tournaments to keep players interested. If you play Garena Free Fire, you should be aware of the redeem codes that are released on a daily basis. However, because the battle royale game is banned in India, players from other countries can use the Free Fire Redeem codes daily. If you’re unfamiliar with the Garena Free Fire redeem codes or don’t know how to get them, we’ve put together a step-by-step guide to help you redeem them. Check out Garena Free Fire Redeem Codes for 22 March 2024.
The Free Fire redeem codes are a great way to get free stuff. These are 12-digit codes that contain alphabets and numbers, as well as an expiration date and time. Because the Garena FF redeem codes cannot be used more than once, you should hurry to the redemption page to claim your free reward before someone else does. To get a free reward, all you have to do is go to reward.ff.garena.com/en, which is the official redemption page. Also, keep an eye on this space for daily updates on Garena Free Fire redemption codes and rewards.
A cryptocurrency wallet can be either a software program or a physical object used to keep cryptocurrency accounts’ public and private keys. Unlike traditional wallets that hold physical cash, these wallets interact with the blockchain to display balances and facilitate transactions. It is crucial to have a crypto wallet to handle, send, receive, and store cryptocurrencies securely.
These wallets come in different types and have public keys similar to bank account numbers, with private keys needing to be protected like passwords. This article discusses various types of cryptocurrency wallets available and provides advice on selecting the best option for individual needs.
In This Article
Understanding Various Types of Crypto Wallets
Different crypto wallets have unique characteristics, security measures, and levels of user-friendliness. However, the common features of crypto wallets are as follows:
Hot vs. Cold Wallets: Hot wallets are online and provide easy access to funds, but they are more susceptible to cyberattacks. On the other hand, cold wallets are offline and according to Kliment Dukovski “one of the safest storage solutions for your cryptocurrencies. That’s because they store your wallet’s seed phrase offline while being encrypted. In other words, if a hacker compromises your computer, they won’t be able to see the seed phrase and steal your funds.”
Public and Private Keys: Both paper, software, and hardware wallets utilize public and private keys essential for cryptocurrency transactions. Public keys are used to receive funds, while private keys are necessary to authorize transactions and access the funds in the corresponding addresses.
Custodial vs. Non-Custodial: Non-custodial wallets give users complete control over their private keys, meaning they have sole ownership and responsibility for their crypto. Custodial, again, is operated by third-party services that hold the private keys on behalf of users.
By understanding the specific attributes of paper, software, and hardware wallets, users can make informed choices regarding security, accessibility, and long-term storage requirements.
Hardware Wallets
Hardware wallets are tangible gadgets that store cryptocurrencies offline, providing optimal security. They are commonly considered the most secure form of wallet because they store private keys offline, significantly minimizing the chances of hacking and unauthorized entry compared to software wallets.
Private keys on hardware wallets are kept in a tangible form, usually a USB drive or specialized hardware tool. This physical segregation increases security because the keys are shielded from the risks of internet storage.
Software Wallets
Software wallets are accessible as desktop, mobile, or web applications, offering convenience and versatility.
Web Wallets: Web wallets are non-custodial, accessed through web browser extensions or online platforms, allow users to manage their cryptocurrency from any device with internet access. Despite their accessibility, web wallets are often perceived as less secure than others because they rely on online storage mechanisms.
Mobile Wallets: Mobile wallets are created for mobile devices, allowing users to send and receive cryptocurrencies quickly through QR code transactions. However, they could be at risk of malware and security breaches, particularly if the device is compromised.
Desktop Wallets: These wallets are software programs downloaded and installed on computers or laptops. They offer a combination of security and ease of use, giving users complete control over their private keys while being easily accessible from a device they are already familiar with.
Paper Wallets
Paper wallets can refer to physical paper wallets used to store cryptocurrency offline and documents containing private keys or seed phrases used for accessing and managing digital assets securely. These paper wallets are considered a secure way to store cryptocurrency because they are offline and not susceptible to hacking or online theft.
The process typically involves:
Generating a new wallet address and private key.
Printing them on paper.
Keeping them in a safe and secure location.
Factors to Consider When Choosing a Crypto Wallet
When deciding on a crypto wallet, it is important to take into account the following crucial factors:
Security
Ensuring the security of your cryptocurrency is of utmost importance. Seek out wallets with strong security measures like encryption, two-factor authentication (2FA), biometric authentication, and hierarchical deterministic (HD) wallet structures. Also, assess if the wallet follows industry-standard security protocols and has a proven history of protecting users’ funds from hacking and breaches.
Portability
Portability is about how easily you can reach your wallet and handle your money while you are out and about. Mobile wallets are especially handy for this, letting you have cryptocurrency wherever you go and carry out transactions from your phone. Make sure that portability doesn’t sacrifice security, and choose mobile wallets with strong security features.
Supported Cryptocurrencies
Consider the variety of cryptocurrencies the wallet can handle, especially if you have a diverse collection of digital assets. Some wallets may only support a limited number of cryptocurrencies, while others are compatible with a wide range of coins and tokens. Ensure the wallet can support the cryptocurrencies you currently have or plan to acquire to avoid compatibility issues.
Backup Options
It is crucial to have backup and recovery options in case your device is lost, damaged, or fails. Look for wallets with strong backup features like seed phrases, private key backups, and wallet file exports. It is also advisable to store multiple backup copies in different secure locations to prevent any loss of access to your funds.
FAQs
Do I need a different wallet for each cryptocurrency?
In many instances, separate wallets are required for each type of cryptocurrency. Each cryptocurrency runs on its own unique blockchain or network, and wallets are created to work specifically with certain blockchain protocols.
Where is the safest place to keep crypto?
The most secure way to store cryptocurrency is in cold storage, specifically by using a hardware wallet. Hardware wallets are regarded as one of the safest methods for storing cryptocurrency because they store private keys offline, reducing the risk of online attacks.
Do crypto wallets have a limit?
Crypto wallets do not have a set limit on the quantity of cryptocurrency they can store. The size of a crypto wallet is determined by factors like the type of wallet in use. Although certain wallets might have high limits, hardware wallets are recognized for their secure storage of large amounts. Selecting a wallet that aligns with your needs and security preferences is crucial.
Final Thoughts
Choosing the correct crypto wallet is an important choice that requires taking into account different elements like security, portability, types of supported cryptocurrencies, and backup choices. By thoroughly examining these factors and comprehending the various types of wallets offered, individuals can make educated decisions in choosing the most appropriate wallet for their requirements and preferences.
OnePlus 12R now comes with three RAM and storage variants.
The company has released a new variant of the device.
The phone was initially launched in January.
It comes with the Snapdragon 8 Gen 2 CPU and runs Android 14-based user interface.
The handset is backed by a 5,000mAh battery.
OnePlus is releasing a new version of the OnePlus 12R in India. The device was launched alongside the OnePlus 12 at the Smooth Beyond Belief launch event in January. The phone came with two RAM and storage variants at launch. OnePlus has since released a new storage version of the device. The Qualcomm Snapdragon 8 Gen 2 SoC powered the phone. It features a 1.5K AMOLED screen that supports up to 120Hz adaptive refresh rate. Additionally, the device houses a 5,500mAh battery with 100W SuperVOOC fast charging support.
In This Article
OnePlus 12R price in India sale details
OnePlus 12R is now available in a new storage variant 8GB RAM with 256GB storage model, which costs Rs 42,999. It goes on sale on March 21 at noon.
The phone comes with a starting price of Rs 39,999 for the 8GB RAM with 128GB storage and Rs 45,999 for the 16GB RAM with 256GB storage.
Customers can get an instant bank discount of Rs 1,000 using their ICICI Bank Credit Card and OneCard. Additionally, shoppers can choose to receive a 3000 INR exchange bonus with their purchase.
Also, there will be an extra INR 1000 exchange bonus when you replace your old OnePlus Nord smartphone. With the purchase of the 12R, eager users can also receive a free pair of OnePlus Buds Z2, valued at Rs 4,999. Offer valid for a limited time.
Customers can also use leading banks to apply for a 9-month No-Cost EMI. Jio Benefits on purchasing the new device – Rs 150 off per month | Applicable for 15 months | Total benefits: Rs 150 * 15 months = Rs 2250.
The handset will be available in two colourways Iron Gray and Cool Blue.
The OnePlus 12R flaunts a 6.78-inch Oriental AMOLED LTPO display with 1,264×2,780 pixels of resolution. The OLED screen supports up to 120Hz adaptive refresh rate, 360Hz touch sampling rate and 2160Hz instant touch sampling rate. The display also has 4,500 nits peak brightness and comes with Corning Gorilla Glass Victus 2 protection. Under the hood, there is an octa-core 4nm Snapdragon 8 Gen 2 SoC, along with an Adreno 740 GPU. The device comes with up to 8GB of LPDDR5x RAM options and 256TB storage.
The triple rear camera setup on the phone includes a 50-megapixel Sony IMX890 primary sensor with an f/1.8 aperture and OIS, an 8-megapixel ultra wide-angle sensor with f/2.2 aperture and a 2-megapixel macro camera with f/2.4 aperture. The device sports a 16-megapixel front-facing camera with f/2.4 aperture for taking selfies. The stereo speaker setup on the phone supports Dolby Atmos.
OnePlus 12R boasts a 5,500mAh battery with 100W SuperVOOC fast charging support. The 12R has the iconic OnePlus Alert Slider in its new home on the phone’s left.
The smartphone is powered by MediaTek Dimensity 7200 SOC.
It comes with a 120Hz AMOLED display.
The phone includes dual stereo speakers.
Chinese smartphone brand Vivo today announced the launch of a new smartphone Vivo T3 5G in India. It is a mid-range smartphone under 20K. The phone is powered by the MediaTek Dimensity 7200 mobile platform. It comes with a 6.67-inch FHD+ AMOLED screen. There is a dual stereo speaker setup and a 5000 mAh battery complemented by a 44W fast charging capability.
In This Article
Vivo T3 5G price in India, availability details
Vivo T3 5G price in India in India is set at Rs 19,999 for the 8GB RAM with 128GB storage. The 8GB RAM with 256GB storage will be available with a price tag of Rs 21,999. The device is offered in Cosmic Blue and Crystal Flake colour options.
The smartphone will go on sale starting March 27, 2024, across Flipkart and vivo India e-store. Consumers can also avail of various offers including a flat instant discount of INR 2,000 using HDFC and SBI cards, or an exchange bonus of up to Rs 2,000, along with 3 months No Cost EMI.
Vivo T3 5G is driven by MediaTek Dimensity 7200 5G processor paired with up to 8GB of RAM and up to 256GB of onboard storage. The handset operates on Funtouch OS 14 based on Android 14. It features a 6.67-inch 120Hz Ultra Vision AMOLED Display with 100% DCI-P3 wide colour gamut, pixel density of 394 PPI and HDR10+ Certification along with SGS Low Blue Light Eye Care certification. The screen supports a 120Hz refresh rate and 1800 nits of peak brightness.
It sports dual stereo speakers with a 200%-volume Audio Booster. With High-Resolution Wired and Wireless Certification. There is a triple rear camera setup on the Vivo T2 5G that includes a 50MP Sony IMX822 primary camera with OIS alongside a 2 MP Sony IMX882 sensor for bokeh. It uses 4-in-1 pixel binding to achieve a pixel size of 1.6 μm. The primary camera also supports 4K video recording capability. The camera system has an upgraded Supermoon Mode utilising AI detail enhancement, users can capture stunning moon shots at zoom levels of 5x or higher. Upfront there is a 16MP camera for taking selfies and video calling.
There is a 5,000mAh battery onboard which supports 44W fast charging tech.
Carl Pei, the CEO of the London Headquartered tech firm Nothing hinted that something fresh is on the way, just a few weeks after the Nothing Phone 2a was released. The company has now disclosed its plans for the “industry first” programme “Community Edition Project.”
Nothing is asking for suggestions from people worldwide for a new iteration of the newly released Nothing Phone 2a. Which is why it has made public its “Community Edition Project.
“Every product that Nothing has released to date has been designed with its community in mind. For the first time, we will be co-creating a product with you, our most creative members, to create the ultimate version of Phone (2a),” the community post said.
As per the company, the Nothing Team and the “community” co-created the Nothing Phone 2a Community Edition Project. There it will solicit ideas from the public—whether or not they are customers of Nothing products—for design, wallpaper, and packaging. Therefore everyone is invited to participate.
Depending on your interests and skills you can participate in any stage. Once submissions open, upload images, videos and/or other supporting media that best showcase your ideas. Note that voting will begin only after the submission periods have closed. After that, everyone in the community can vote for their preferred entries. According to Nothing, the internal Nothing panel will be judging all valid submissions to select the winner at each stage.
Stage 1, Hardware Design, will open to all on 26 March 2024 via nothing.tech. Stage 2 Wallpaper Design and Stage 3 Packaging Design will open in May and June respectively. Lastly, the Stage 4 Marketing Campaign will begin in July.
Make sure to carefully read the rules, guidelines, and guidelines provided by the company before submitting an idea. These will be shared with you when each stage opens.
Nothing Team will host the four category winners to introduce Community Edition later this year in London. The event will showcase the final product to the world, officially launching the device before it goes on sale.
Apollo Radiology International will be using Google’s AI models to help Indian patients with lung, breast, and tuberculosis get better care.
The tech giant is said to provide free screenings over the next 10 years.
Google Health and Apollo Radiology International have announced a new partnership to provide early disease screening in India using artificial intelligence (AI). The tech giant will provide access to its AI stack for early disease detection like breast cancer, lung cancer, and TB to Apollo. Check out the details below.
Google at its annual The Check Up event announced that it is collaborating with Apollo Radiology International for artificial intelligence (AI)-powered early disease screening in India. According to Google Health Apollo Radiology International will be using its AI models to help Indian patients with lung, breast, and tuberculosis get better care. In addition to this, over the following ten years, free screenings will also be offered.
“One of our biggest opportunities with AI in healthcare is the ability to increase access to high-quality, equitable care across the globe. Radiology is one area where expertise is critical to patient outcomes, but there aren’t always enough radiologists to meet patients’ needs. This is a situation where AI can make a difference. Our newest collaboration with Apollo Radiology International in India is building on these AI advancements in healthcare and bringing them to communities across the country,” Google said.
Tuberculosis (TB) can be cured, but treatment delays cause the illness to spread across the population and progress to the point where victims die from it. A frequent way to test for the condition is using chest X-rays, however, in rural areas and other places with limited access to hospitals and healthcare facilities, tuberculosis is typically diagnosed using tests that are not readily available. In order to aid in the early detection of tuberculosis Google has created an AI system to analyse chest X-ray scans.
Whereas, specialised screening and medical knowledge are also needed for the analysis of scans related to breast and lung cancer and Lung cancer ranks among the primary causes of cancer-related deaths in India.
“There is no nationalised screening program for high-risk individuals to try to catch the disease early, when treatment is most effective. Lung cancer can also be identified incidentally if a patient happens to get a scan for some other reason.”
But AI is said to help on both fronts, making screening more broadly accessible and providing an additional check to identify incidental nodules and follow-up as needed as per the company.
Also in India Breast cancer detection is not generally available, and there is a dearth of radiologists with the necessary training. With regard to mammography analysis: AI may be able to help radiologists in India with screening.
By using these models, Google aims to enable Apollo Radiology International and hundreds of thousands more individuals in India to receive timely care by offering 3 million free AI-powered screenings for breast cancer, lung cancer, and tuberculosis for the next ten years.
Garena Free Fire is a battle royale game with regular awards and tournaments to keep players interested. If you play Garena Free Fire, you should be aware of the redeem codes that are released on a daily basis. However, because the battle royale game is banned in India, players from other countries can use the Free Fire Redeem codes daily. If you’re unfamiliar with the Garena Free Fire redeem codes or don’t know how to get them, we’ve put together a step-by-step guide to help you redeem them. Check out Garena Free Fire Redeem Codes for 21 March 2024.
The Free Fire redeem codes are a great way to get free stuff. These are 12-digit codes that contain alphabets and numbers, as well as an expiration date and time. Because the Garena FF redeem codes cannot be used more than once, you should hurry to the redemption page to claim your free reward before someone else does. To get a free reward, all you have to do is go to reward.ff.garena.com/en, which is the official redemption page. Also, keep an eye on this space for daily updates on Garena Free Fire redemption codes and rewards.
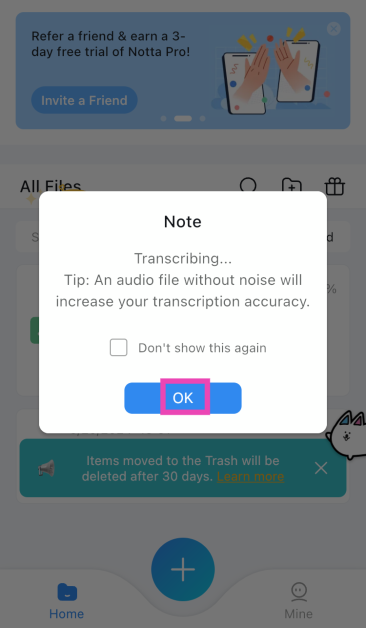
When it comes to AI integration, Android is well ahead of the curve. Google Pixel smartphones have had the native transcribe feature for voice notes in the voice recorder app for years. This year, Samsung brought a host of AI features to its Galaxy S24 Series. The Galaxy AI can efficiently transcribe your voice notes and summarise them with ease. While Apple Intelligence isn’t on par with its Samsung and Google counterparts just yet, it does offer basic transcription features. You can also use a few third-party apps to carry out the task. Today, we bring you the top 5 free ways to transcribe voice memos on an iPhone.
Does the iPhone have a native feature to transcribe voice memos?
Apple introduced the option to transcribe voice memos on iOS 18. You can choose to view the live transcription of a memo while it is being recorded or go through old memos in your library and access their transcripts. You can choose to copy any part of the text. Your iPhone also lets you search a text across all voice memos.
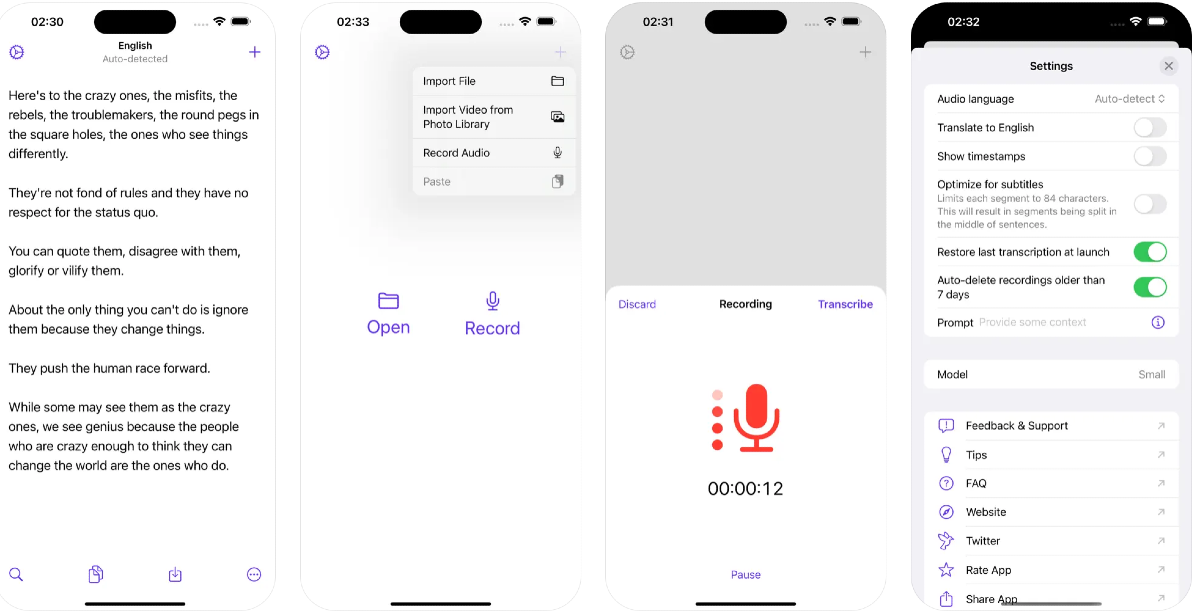
For long voice memos (or podcasts and interviews recorded on your iPhone), we would recommend using the Aiko app. Aiko is based on OpenAI’s Whisper model and uses it to transcribe voice memos in over 100 national and regional languages like English, Hindi, Afrikaans, French, Greek, Marathi and more. Other AI tools like TalkNotes can also be used for this task.
View transcription while recording
Step 1: Go to the Voice Memos app on your iPhone and hit the record button.
Step 2: Swipe up on the waveform and hit the quotes icon.
Step 3: The live transcription will appear on the screen.
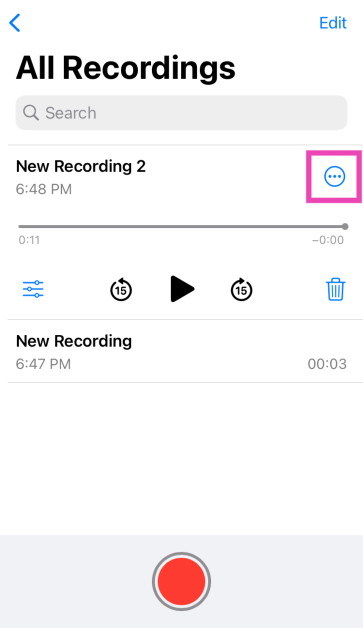
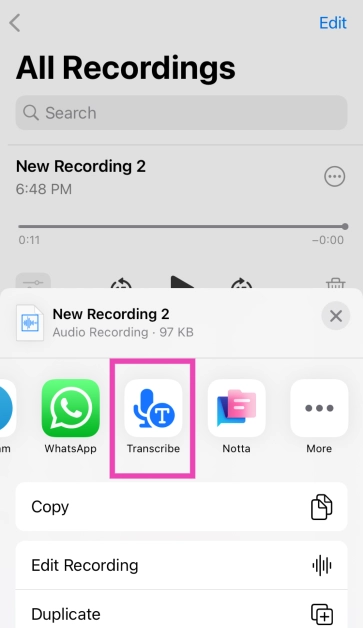
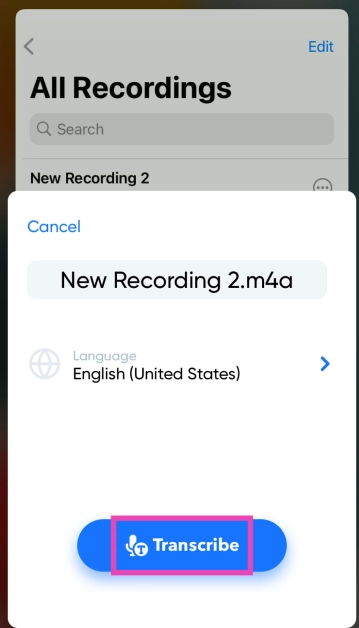
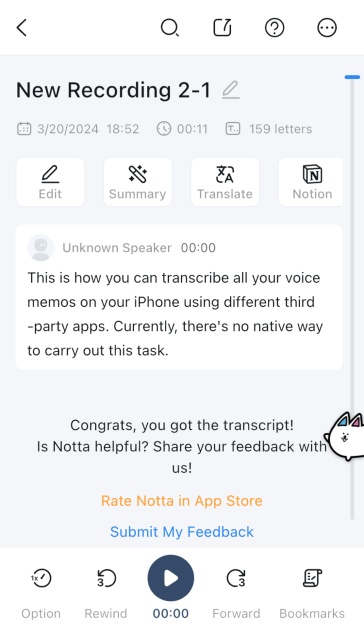
Step 2: Go to the Voice Memos app and find the recording you wish to transcribe.
Step 3: Hit the ellipses next to the recording and select Share.
Step 4: Select the Notta app from the list.
Step 5: Hit OK in the pop-up box.
Step 6: Once the voice memo has been transcribed it will appear as a text file in the Notta app.
Use the Aiko app
Based on Open AI’s Whisper, Aiko is one of the best apps to transcribe voice notes on your iPhone and Mac. The best part is that the app carries out all the computing on your device. Aiko’s accuracy while transcribing the voice notes is unmatched by any other app. It weeds out the noises that don’t add anything to the memo and presents a clean, clear transcription. You can use this app for voice notes that are multiple hours long. The only requirement is that your iPhone must run iOS 17.2 or later and should be equipped with an A12 Bionic chip or later.
Frequently Asked Questions (FAQs)
Is there a native way to transcribe voice memos on an iPhone?
Yes, you can use the Voice Memos app to natively transcribe your voice notes. This feature is only available on iPhones running iOS 18 and up.
Does Apple use AI to transcribe voice notes?
Yes, Apple uses Apple Intelligence to transcribe voice notes and memos on the iPhone.
How do I transcribe a voice memo on my iPhone?
To view a transcription, simply open the voice note, hit the ellipses, and select ‘View Transcript’.
How do I transcribe the voice notes on my Samsung Galaxy S Series phone?
Once you have downloaded the appropriate language packs, go to the recorder app, select the voice note and hit the ‘Transcribe’ button to view it in text.
What are the device requirements to run the Aiko app on my iPhone?
To run the Aiko app, your iPhone must have iOS 17.2 or later and must be powered by an A12 Bionic chip or later.
These are the top 5 free ways to transcribe voice memos on your iPhone. If you are not set on carrying out the computing on your device itself, you can use an AI web tool for this job. Which method do you prefer? Let us know in the comments!
Lenovo has officially announced the launch of new Legion laptops with AI and next-gen features for gamers in India. The latest lineup includes Legion Pro 7i, Legion Pro 5i, Legion 7i, and Legion 5i laptops. The laptops come with up to 14th Gen Intel Core processors and NVIDIA RTX 4090 graphics cards.
In This Article
Lenovo Legion 5i, Legion 7i, Legion Pro 5i and Legion Pro 7i pricing
Lenovo Legion 5i: Rs 1,29,990 (starting price)
Legion Pro 5i: Rs 1,57,990 (starting price)
Lenovo Legion 7i : Rs 1,77,990 (starting price)
Legion Pro 7i: Rs 3,24,990 (starting price)
Customers can buy these from Lenovo.com, Lenovo Exclusive Stores, leading e-commerce websites, and other offline retail stores.
Specifications
The updated Legion gaming laptop portfolio comes with up to 16-inch PureSight panels. They have variable refresh rates up to 240Hz and peak brightness of 500 nits. The Lenovo Legion 5i, Legion 7i, Legion Pro 5i and Legion Pro 7i come equipped with a proprietary LA1 AI chip, up to 14th Gen Intel Core i9-14900HX CPUs and up to 32GB of RAM. Nvidia GeForce RTX 4070 GPUs are fitted on the Lenovo Legion 5i and Legion 7i while RTX 4090 GPUs are available in the ‘Pro’ variants.
The machines sport PCIe SSD storage that can hold up to 2TB. These come equipped with 100 and 80-watt hours of batteries on the pro and the regular variants respectively.
With the help of Tobii Horizon & Aware, seamless head tracking technology, gamers can take control of the camera and immerse themselves in their favourite games on the Lenovo Legion Pro 7i and 5i laptops. Wi-Fi 6E and Bluetooth 5.1 are among the connectivity options; additional connections include an HDMI 2.1 port, an Ethernet port, two USB 3.2 Gen 1 Type-C ports, up to four USB 3.2 Gen 1 Type-A ports, and a 3.5mm audio jack.
Gamers who purchase the newest Legion laptops are eligible for a complimentary three-month Xbox Game Pass Ultimate subscription. With the Legion Arena app, players can access all their favourite titles in one central library, simplifying the gaming experience. Nahimic, a 3D audio technology from SteelSeries, guarantees crystal-clear communication between teammates during gameplay.
Additionally, the devices come with Legion Ultimate Support, which provides access to professional technicians for troubleshooting and round-the-clock game support. These machines feature advanced components like an extra-wide vapor chamber, liquid metal infusion with AI-driven power management, and Legion ColdFront for Esports-level performance for a competitive gaming advantage.


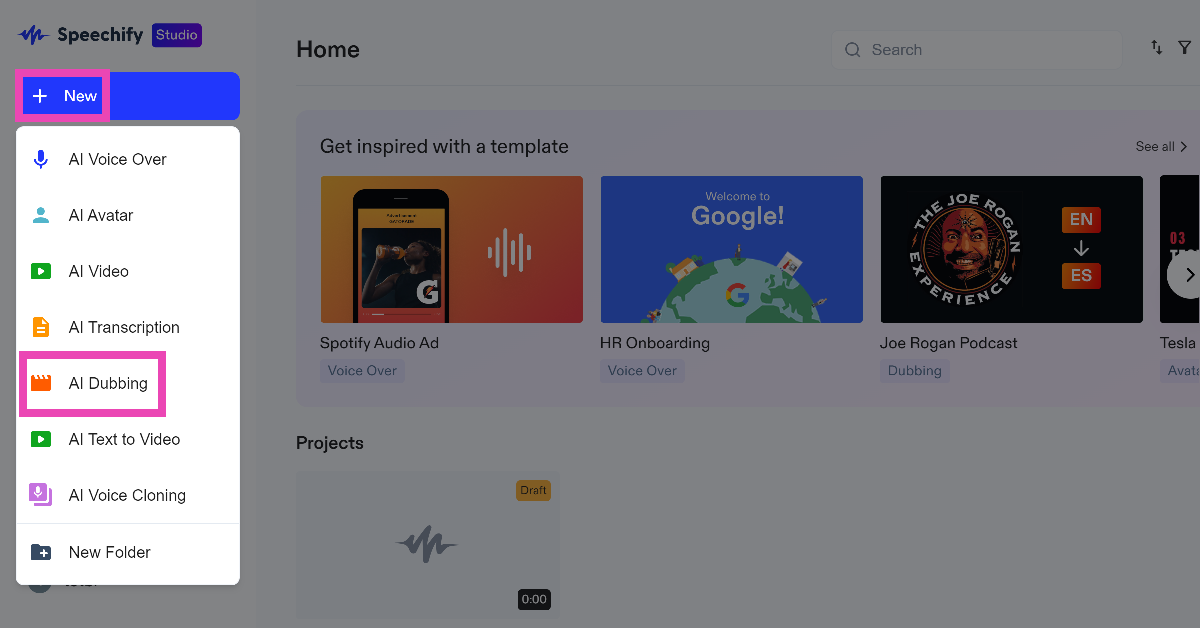
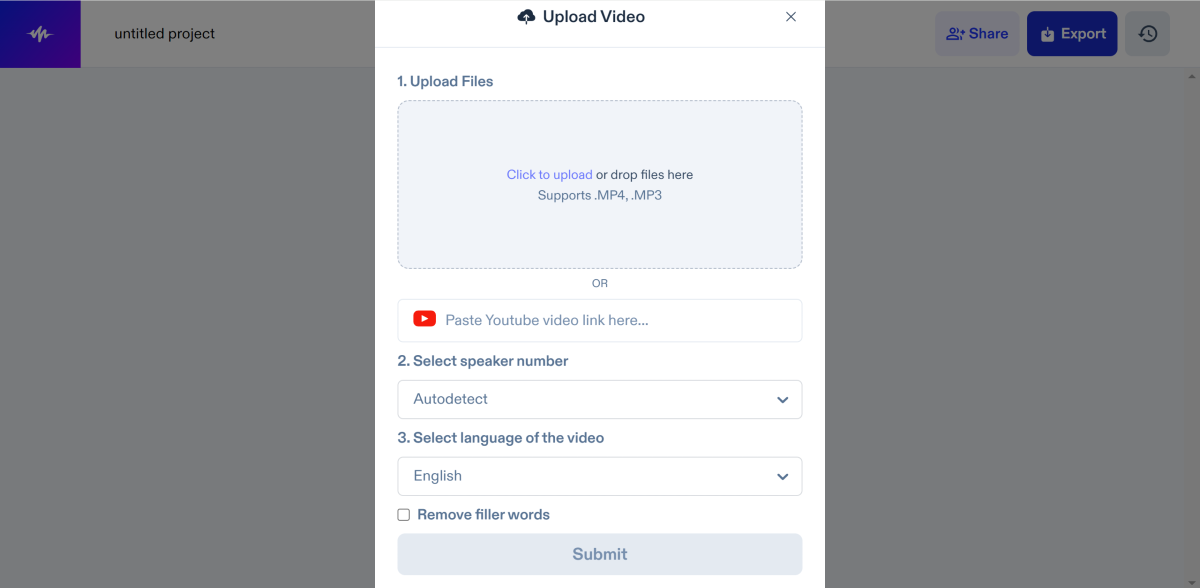
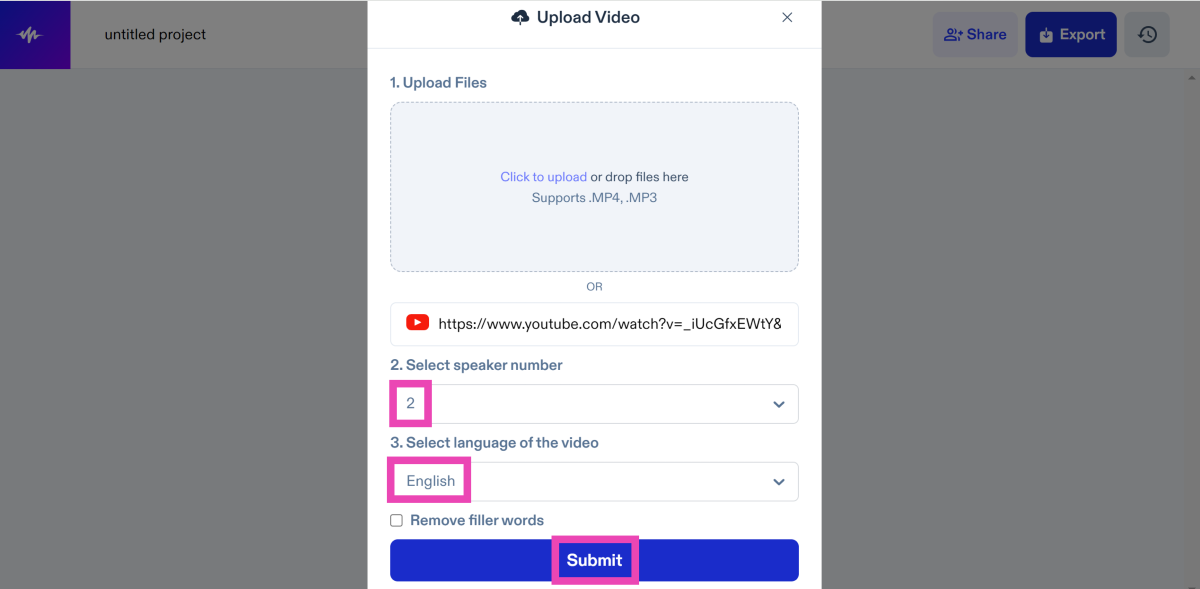
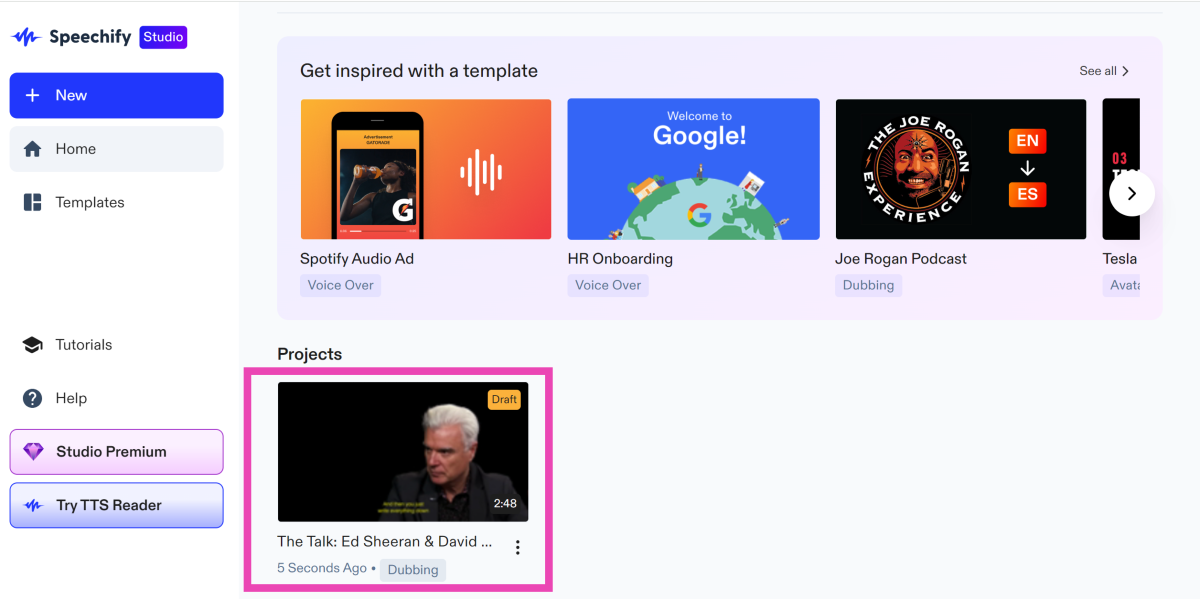
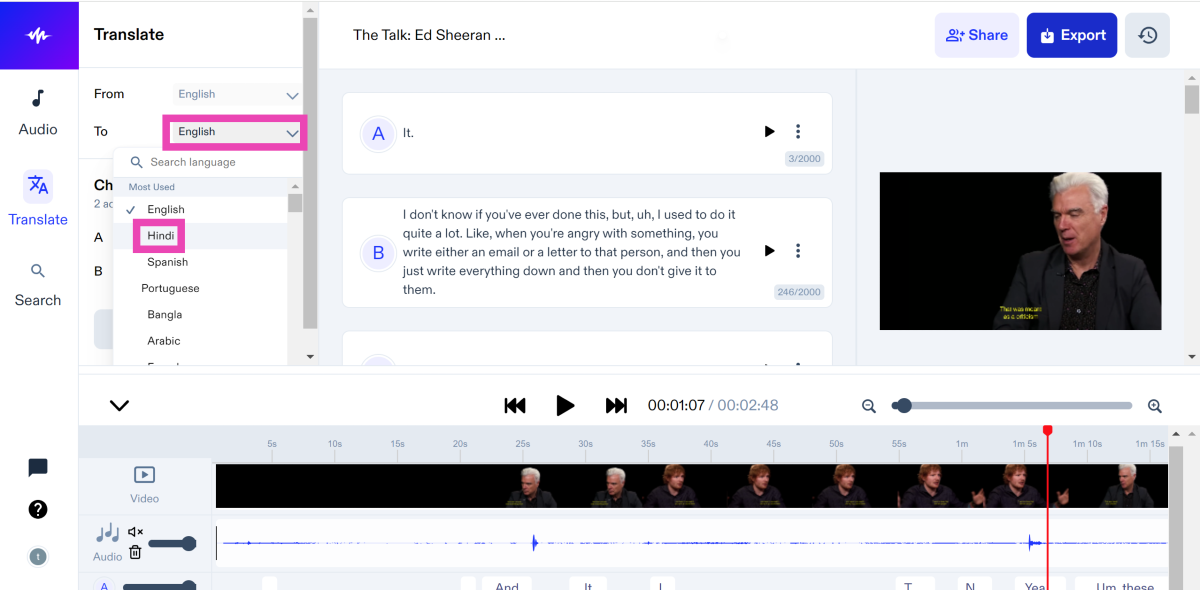
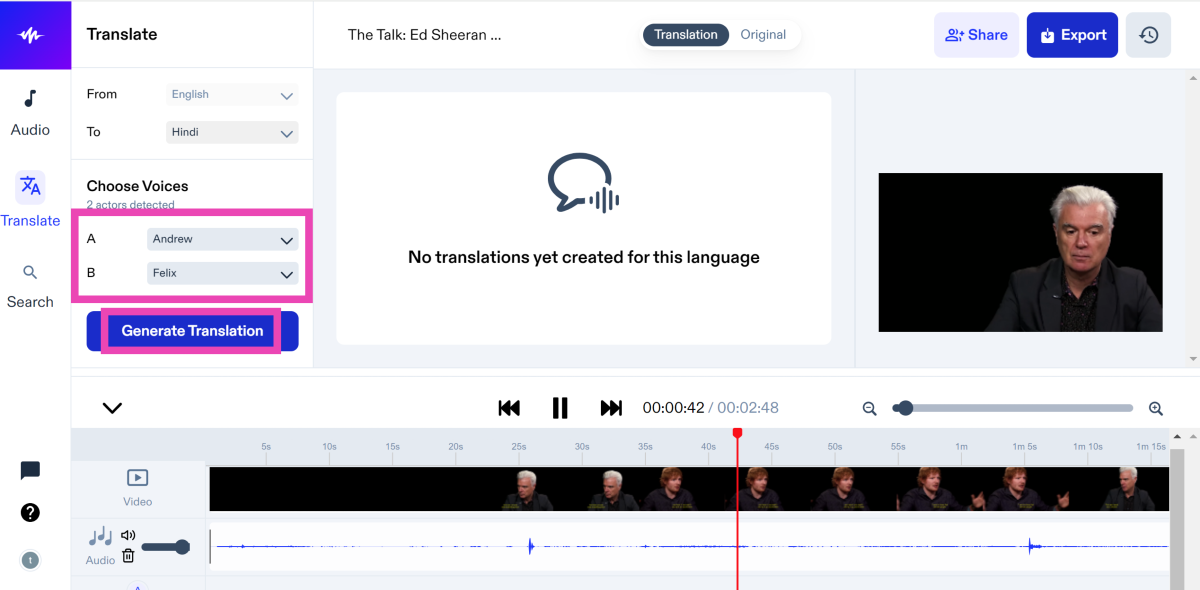
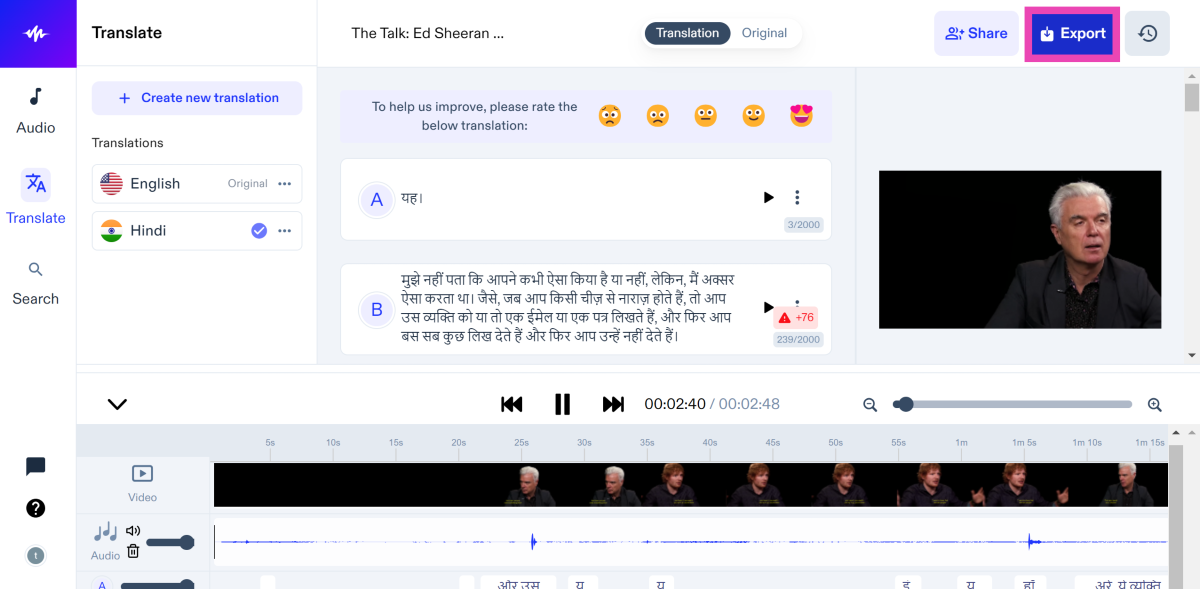
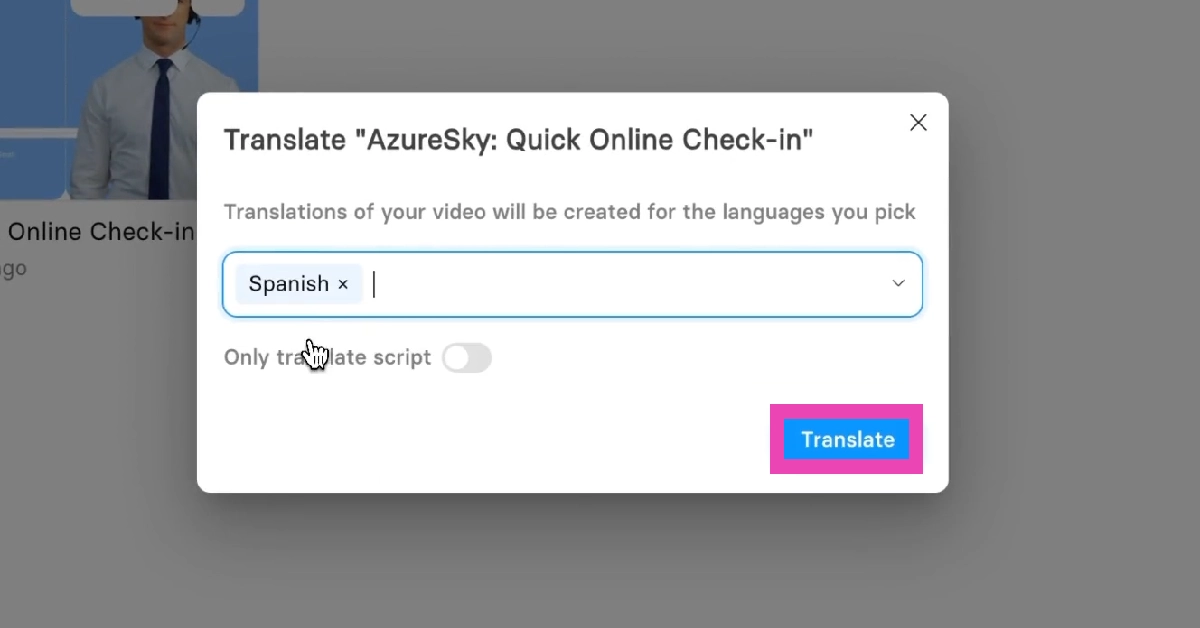
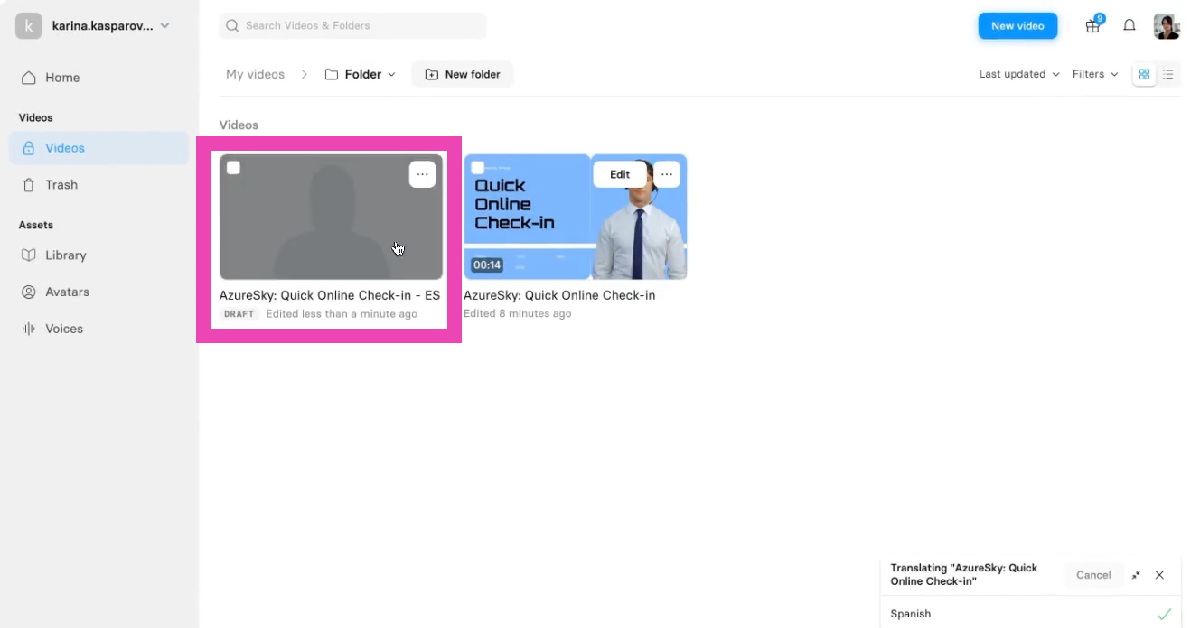
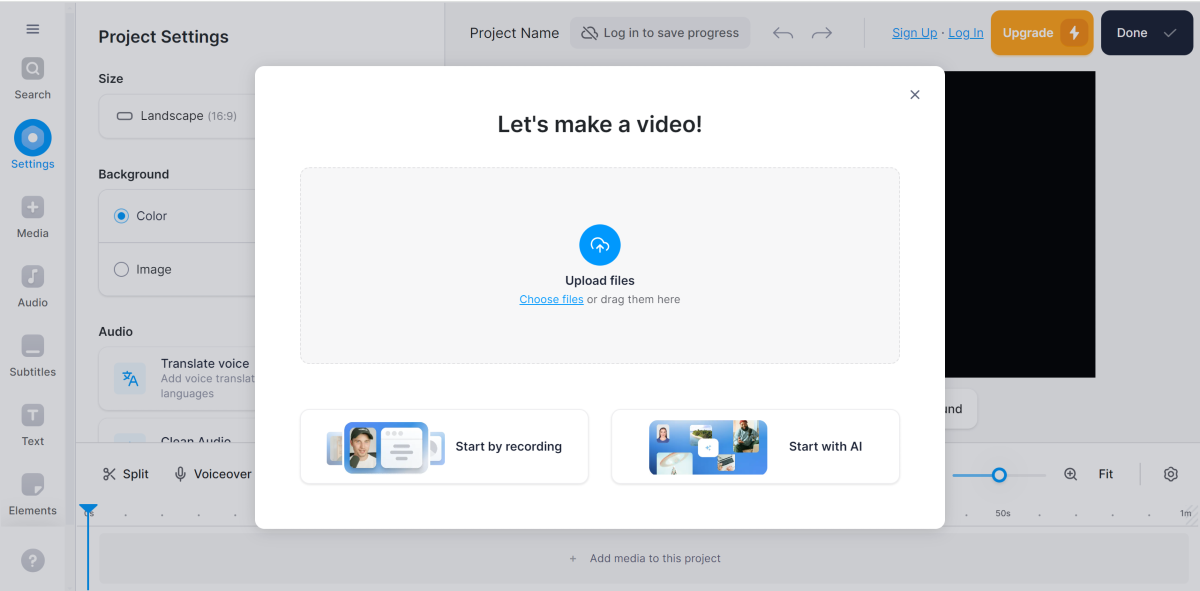
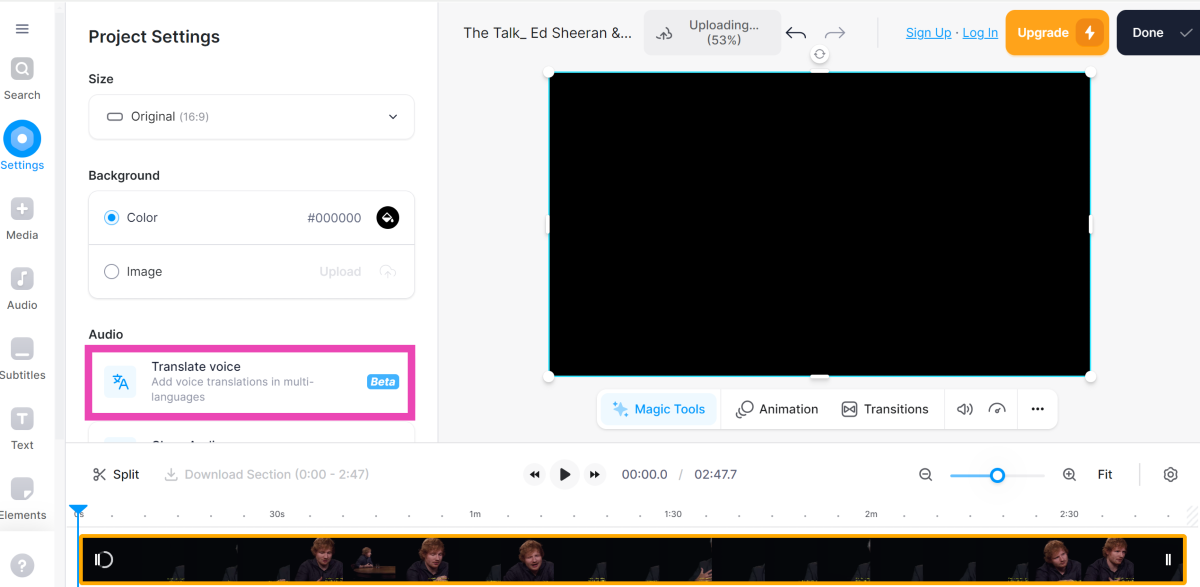
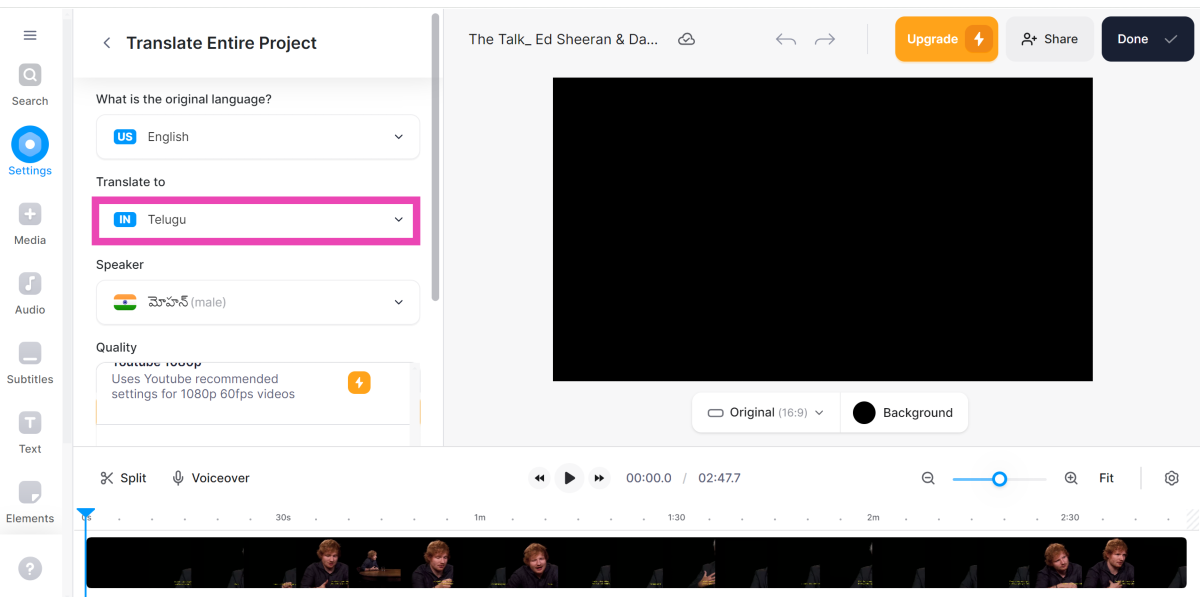
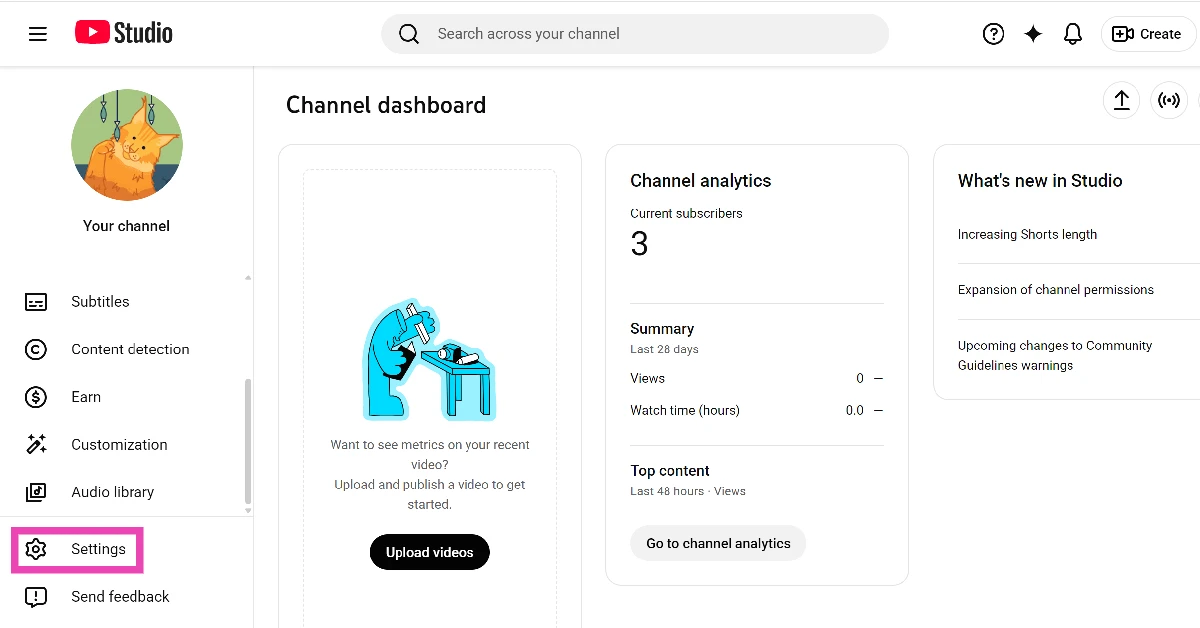

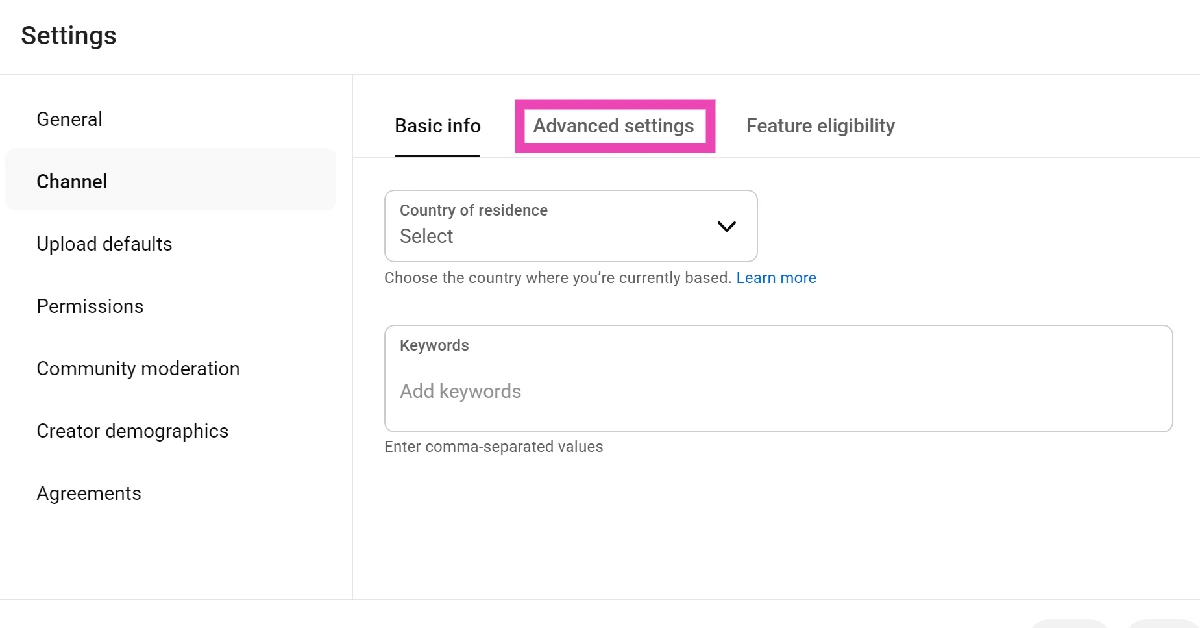
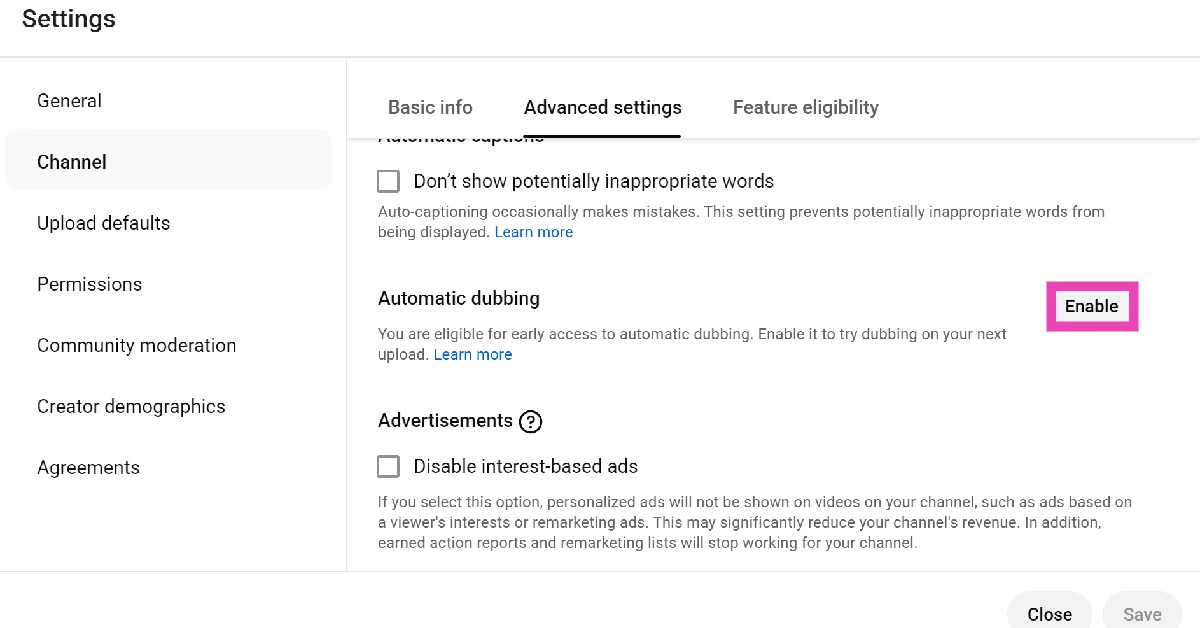
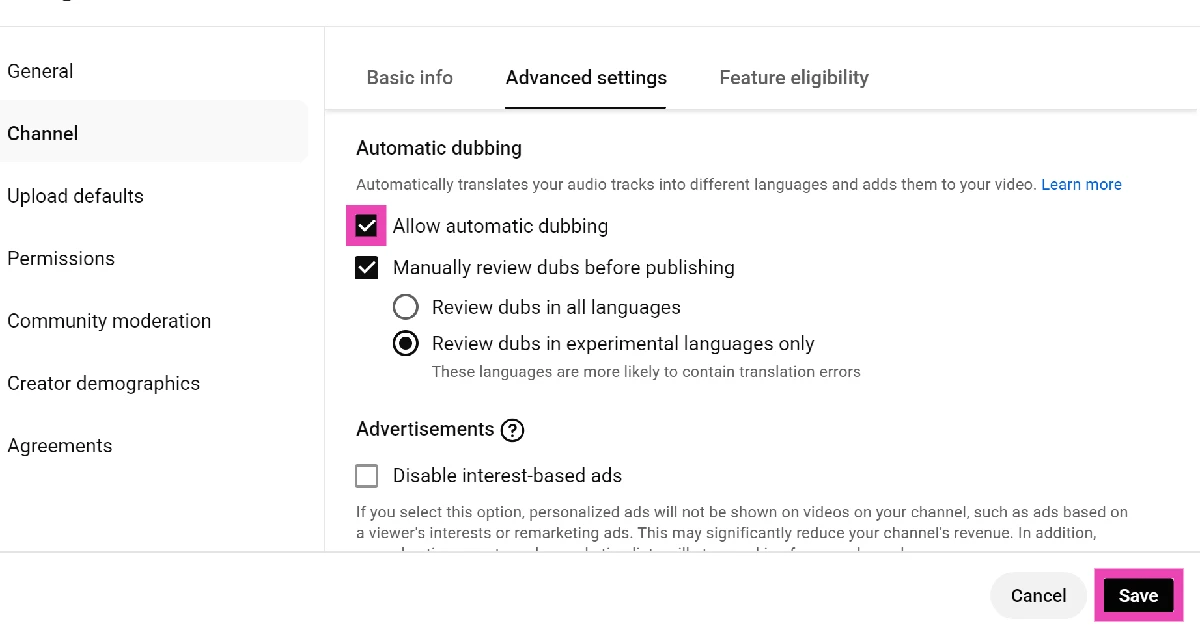


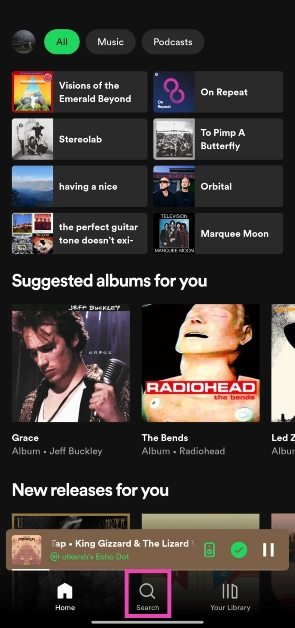
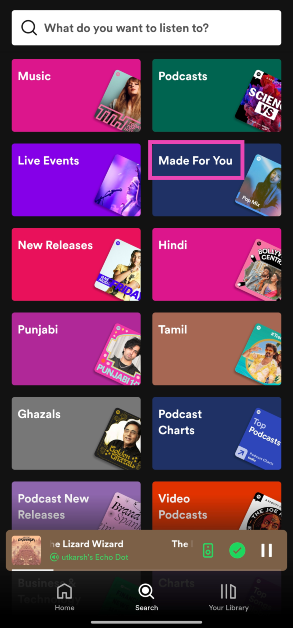
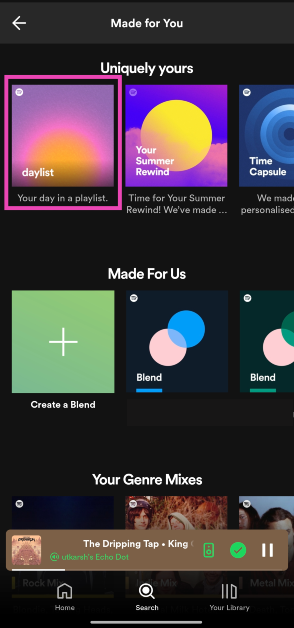


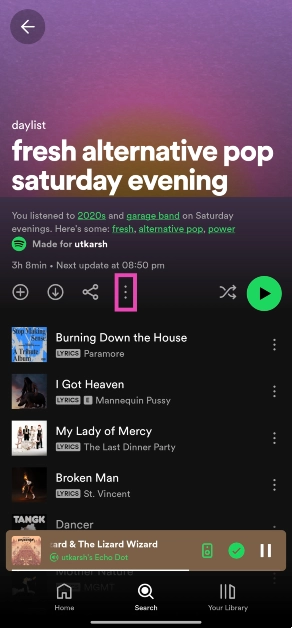
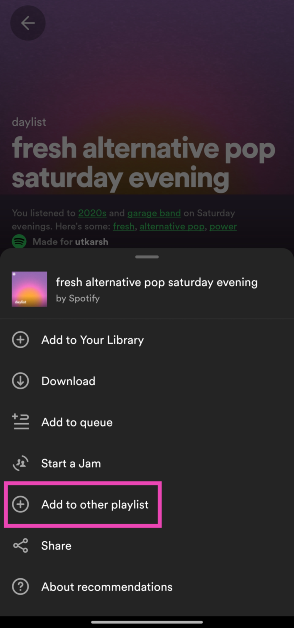

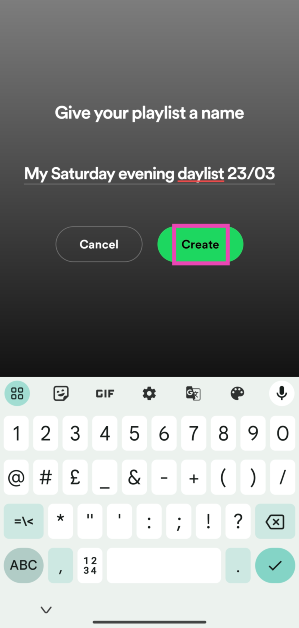
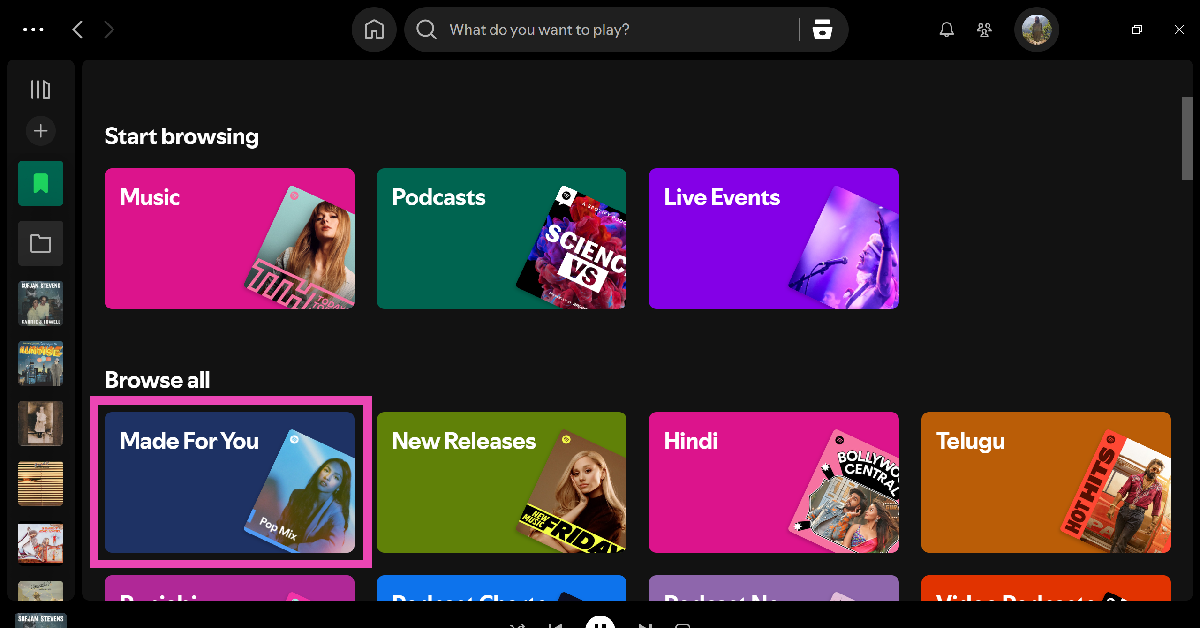
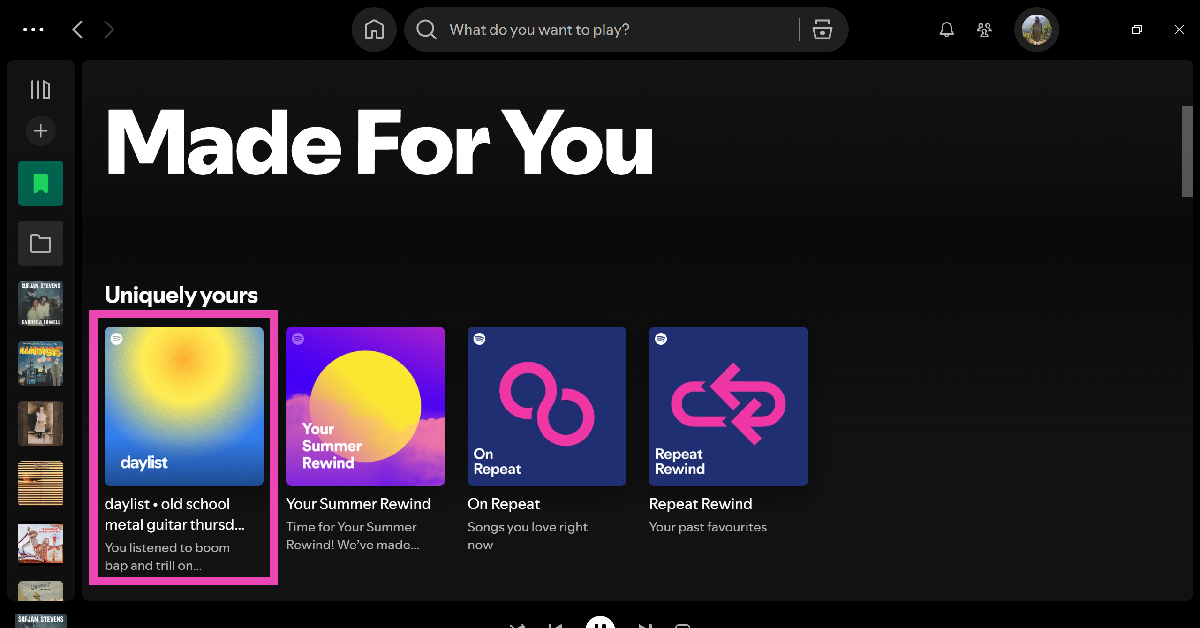


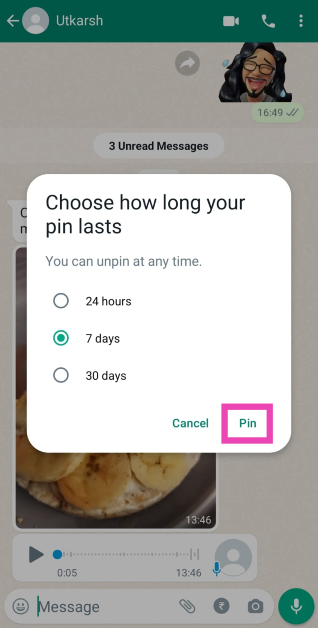


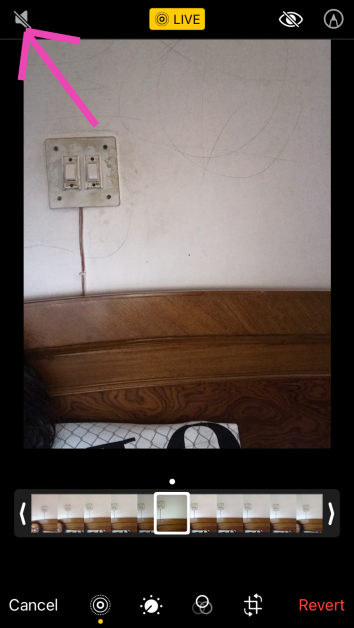


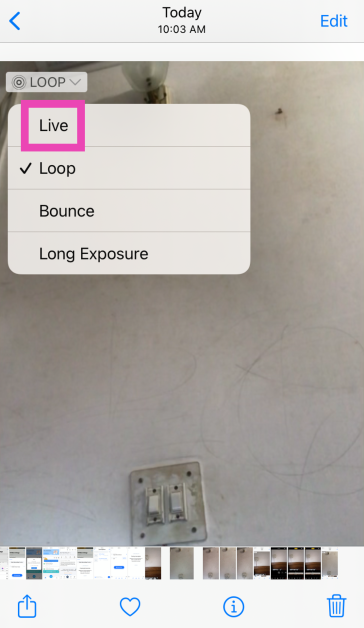


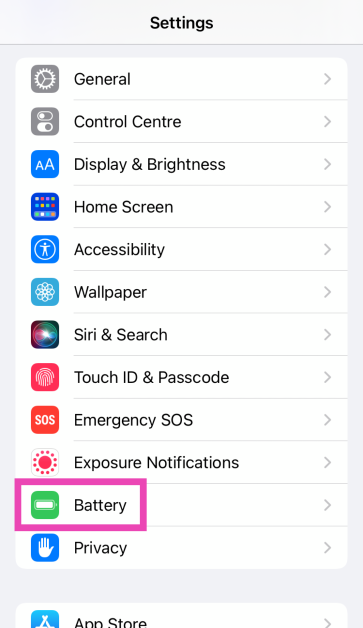
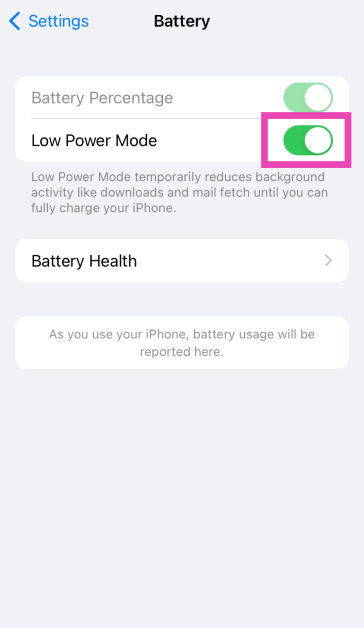
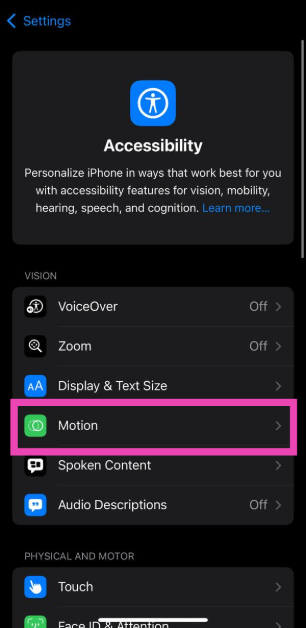
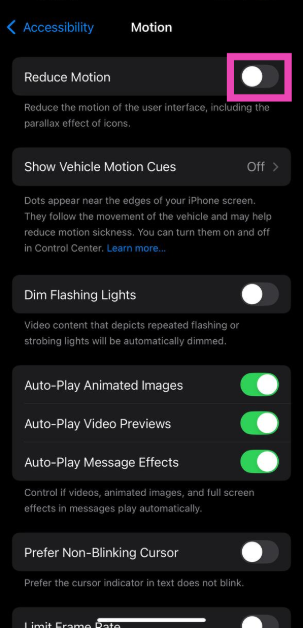


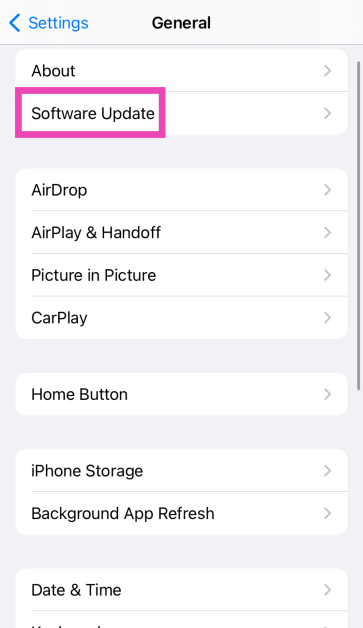
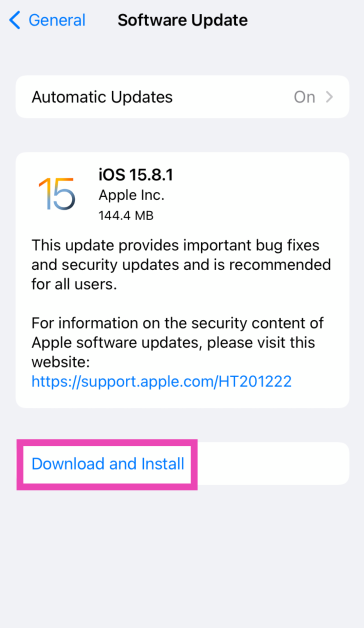

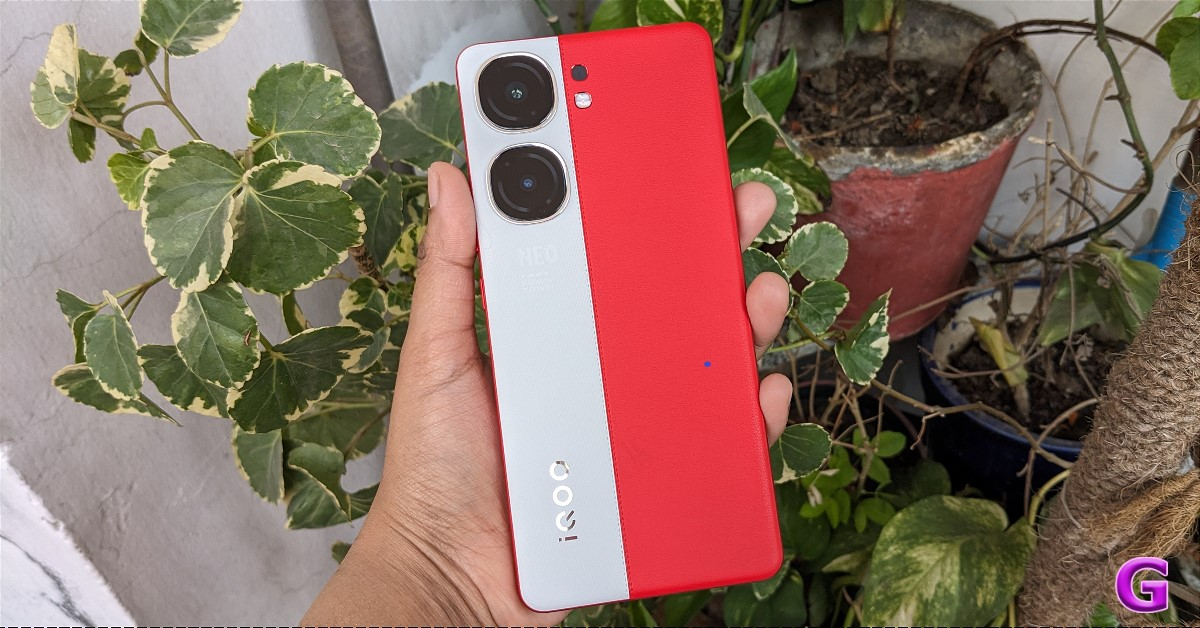
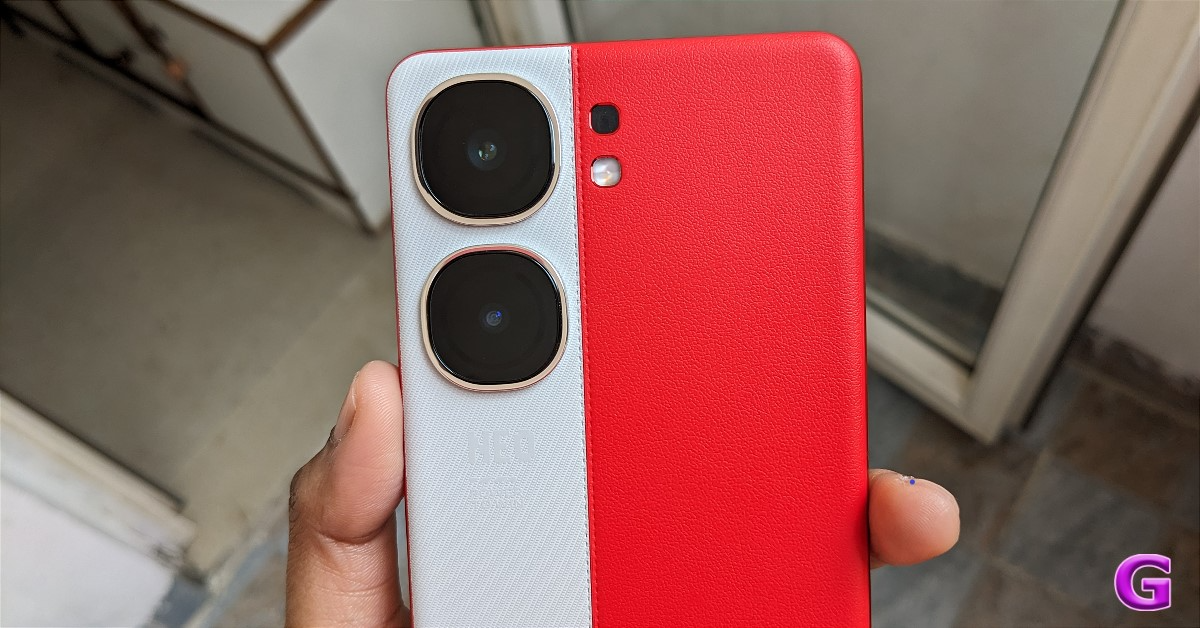


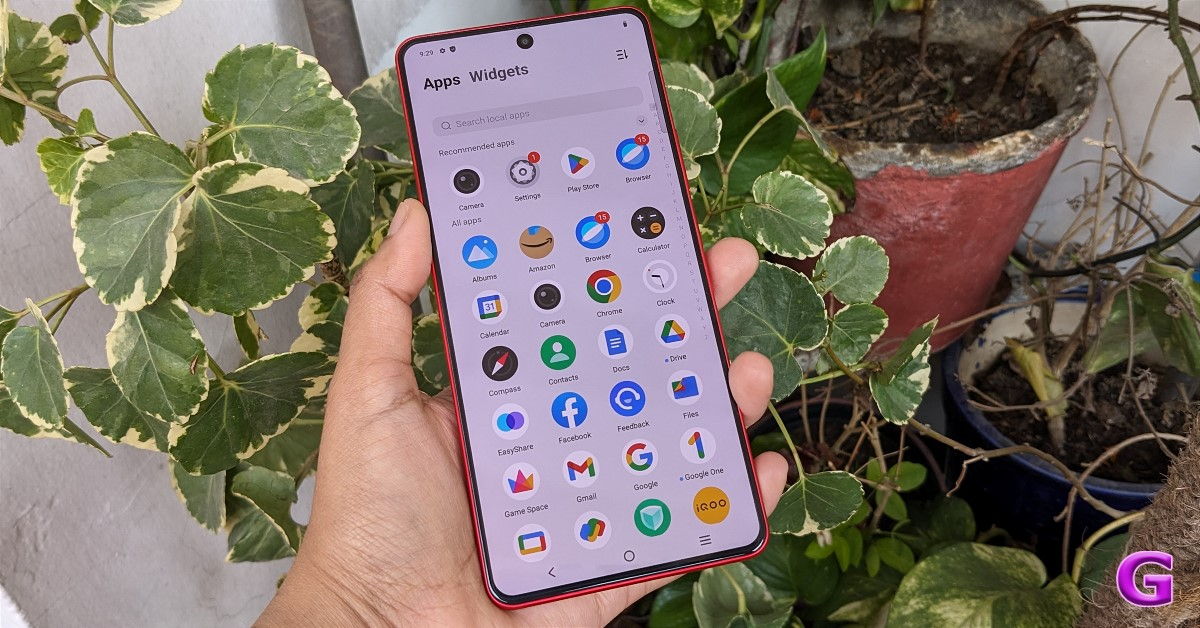


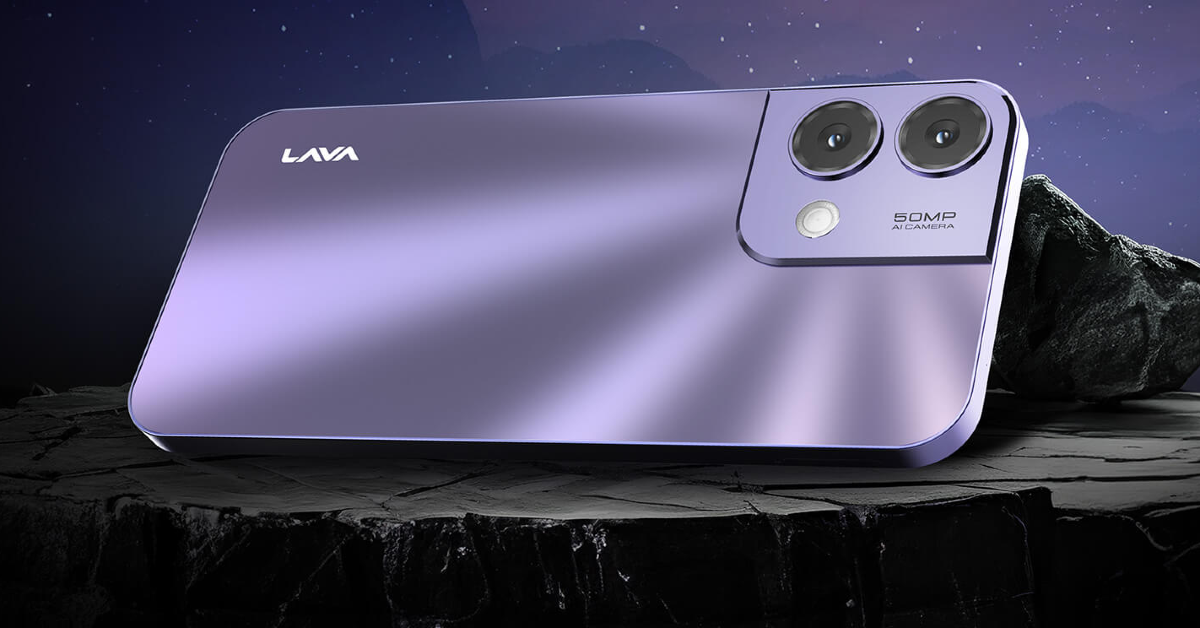
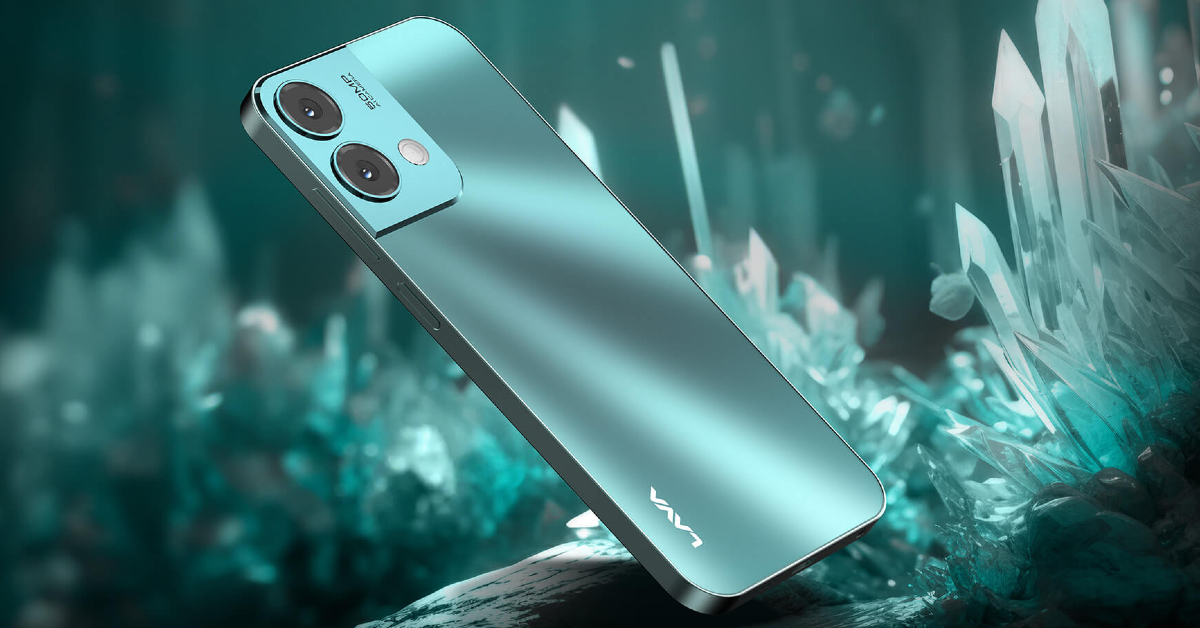
")

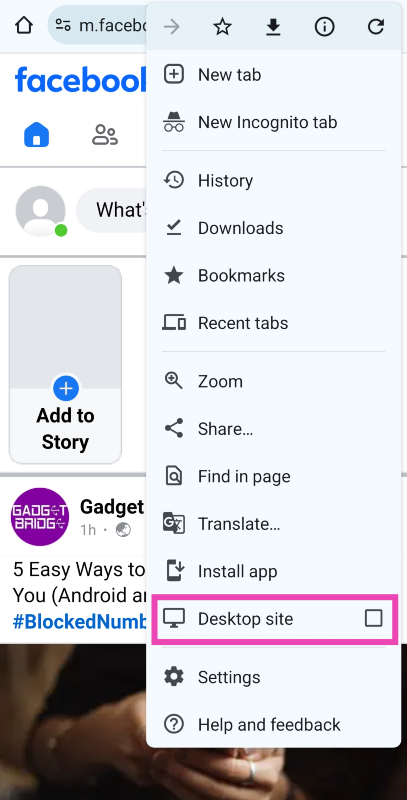


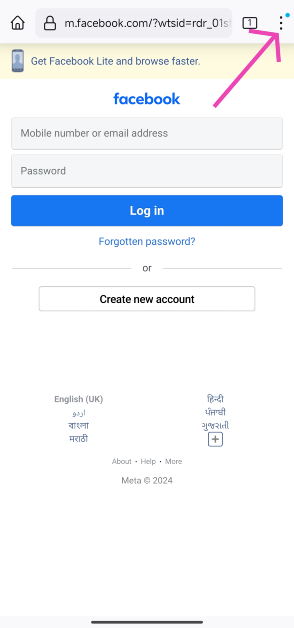
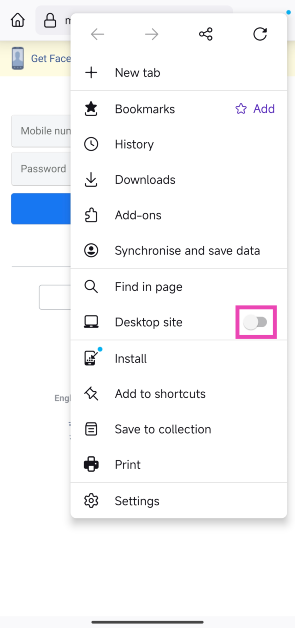


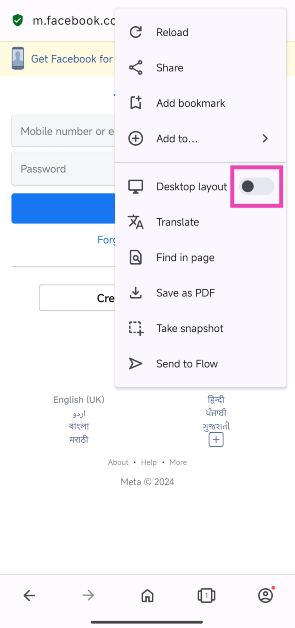

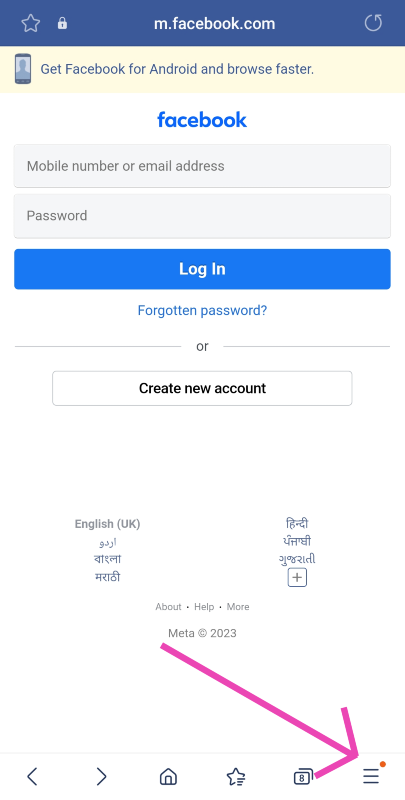
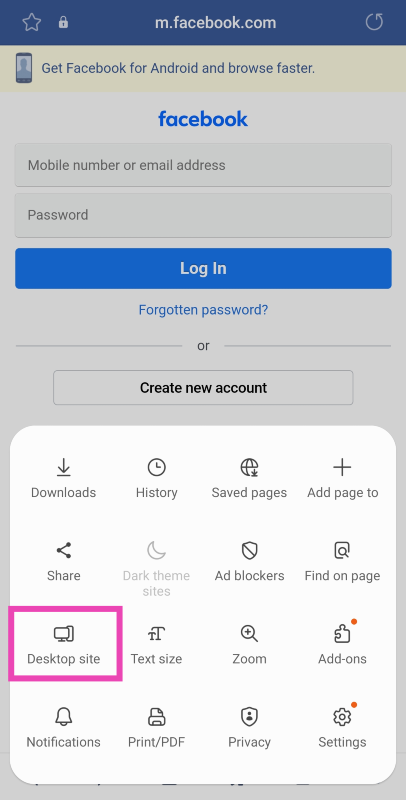
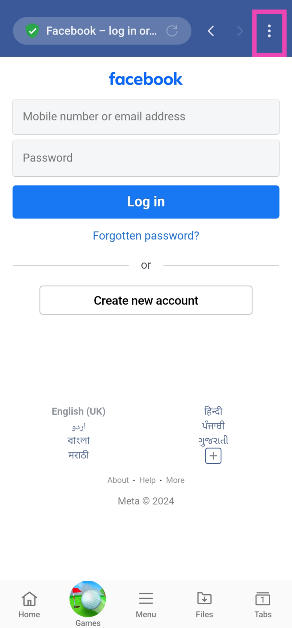
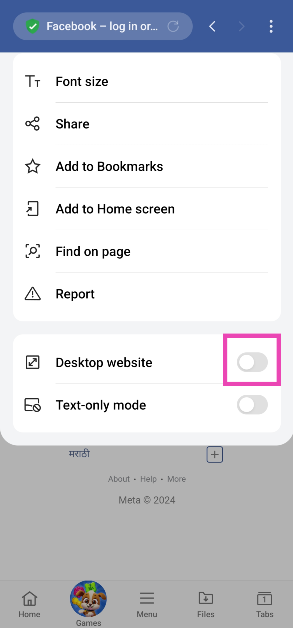

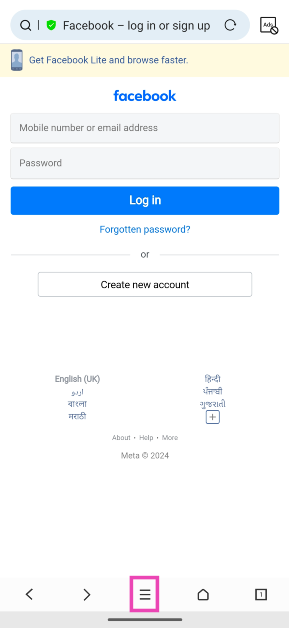
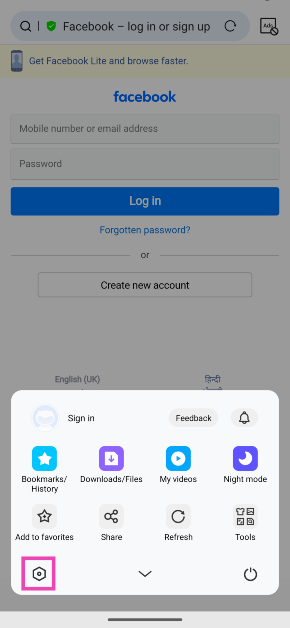
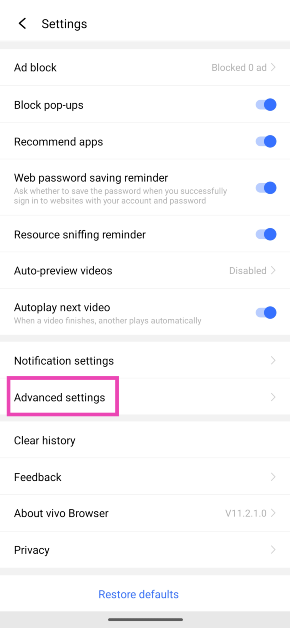
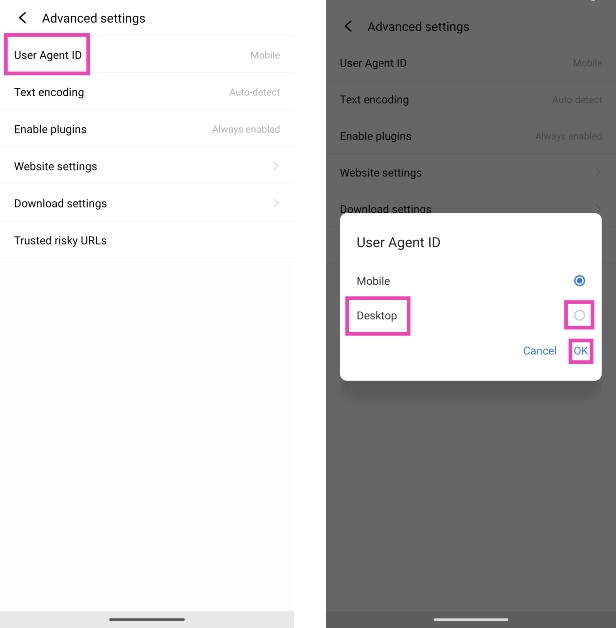


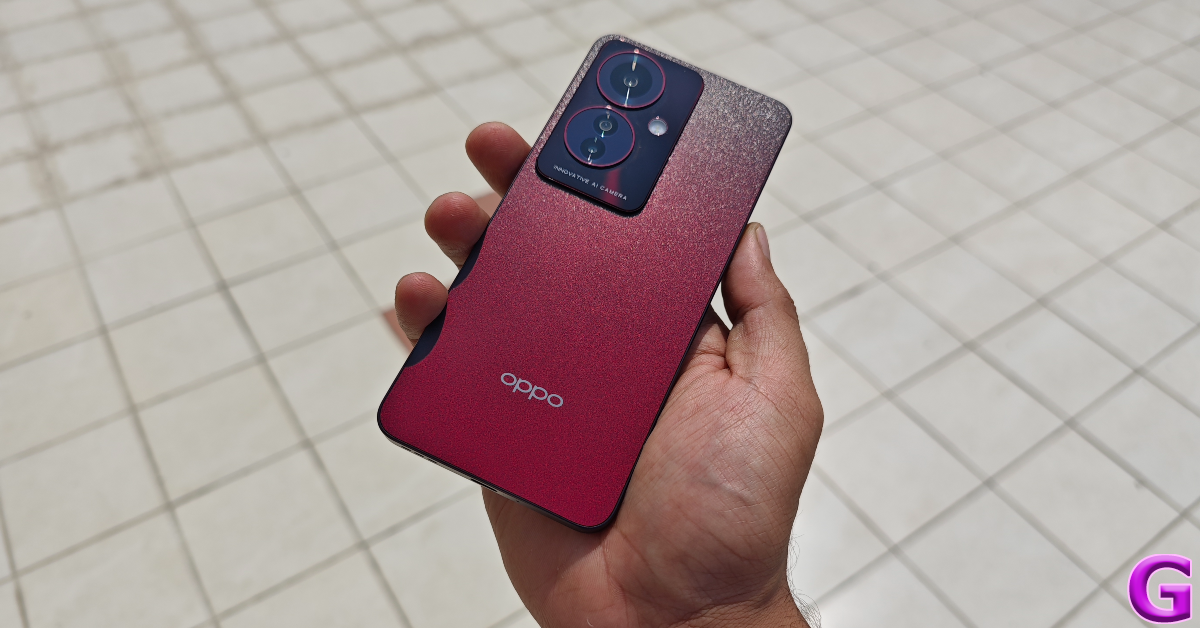
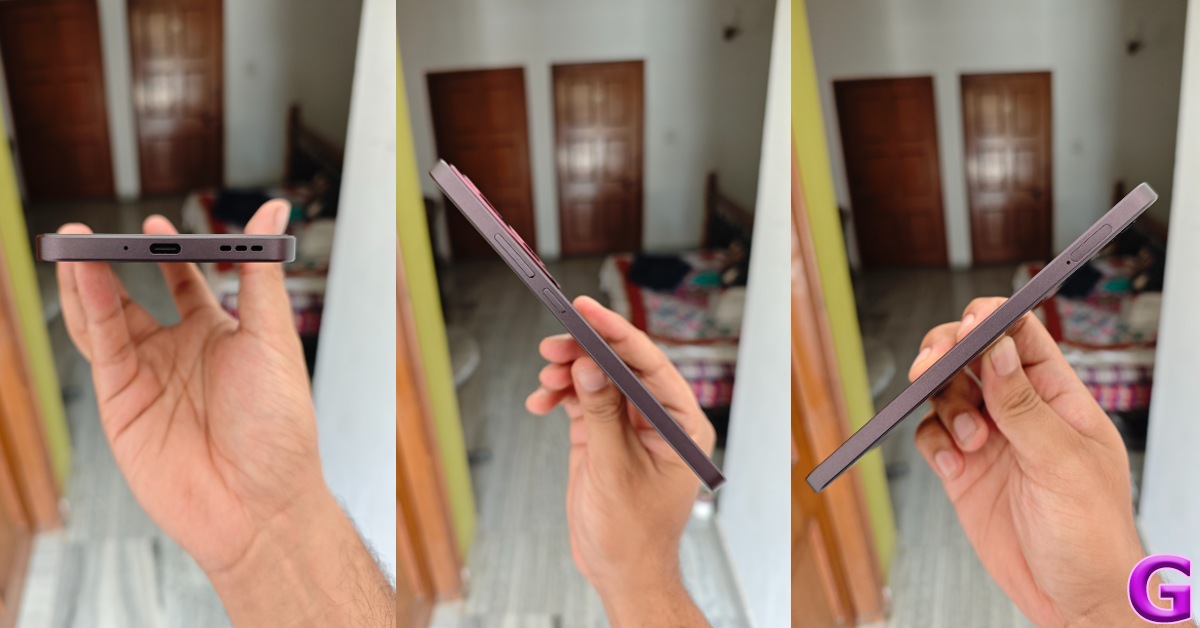

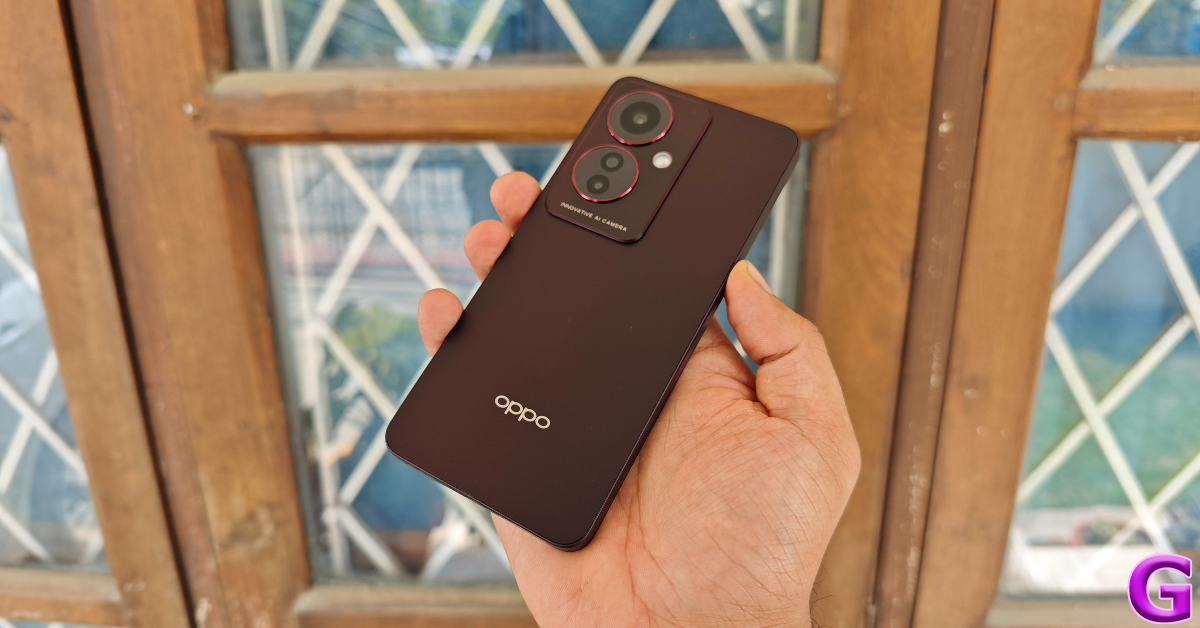


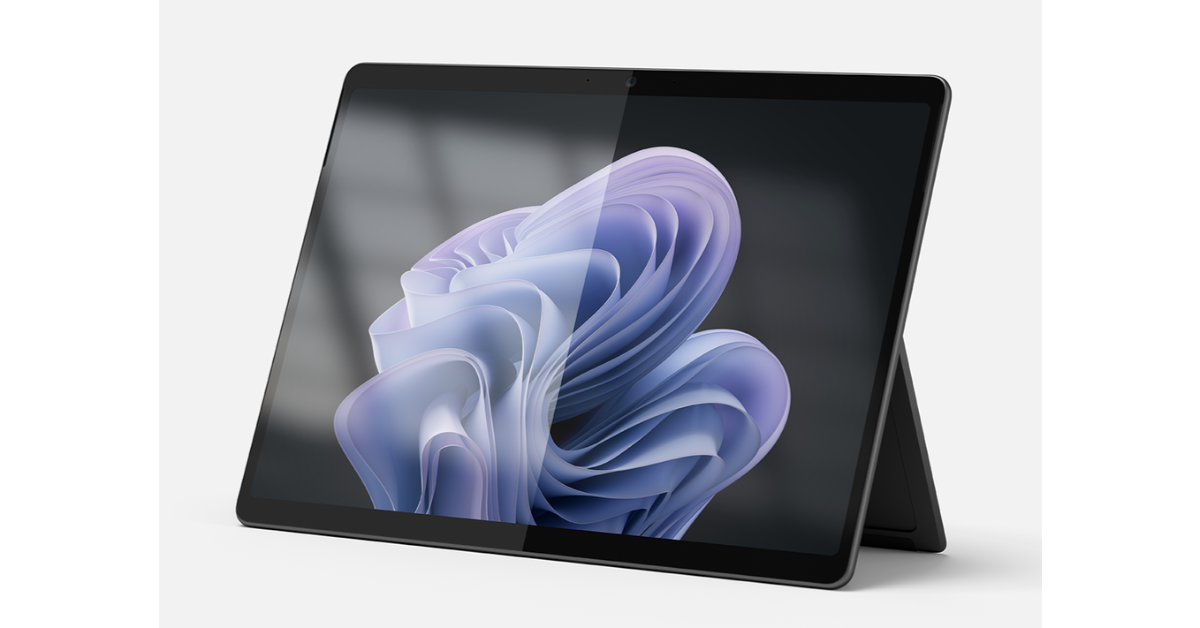
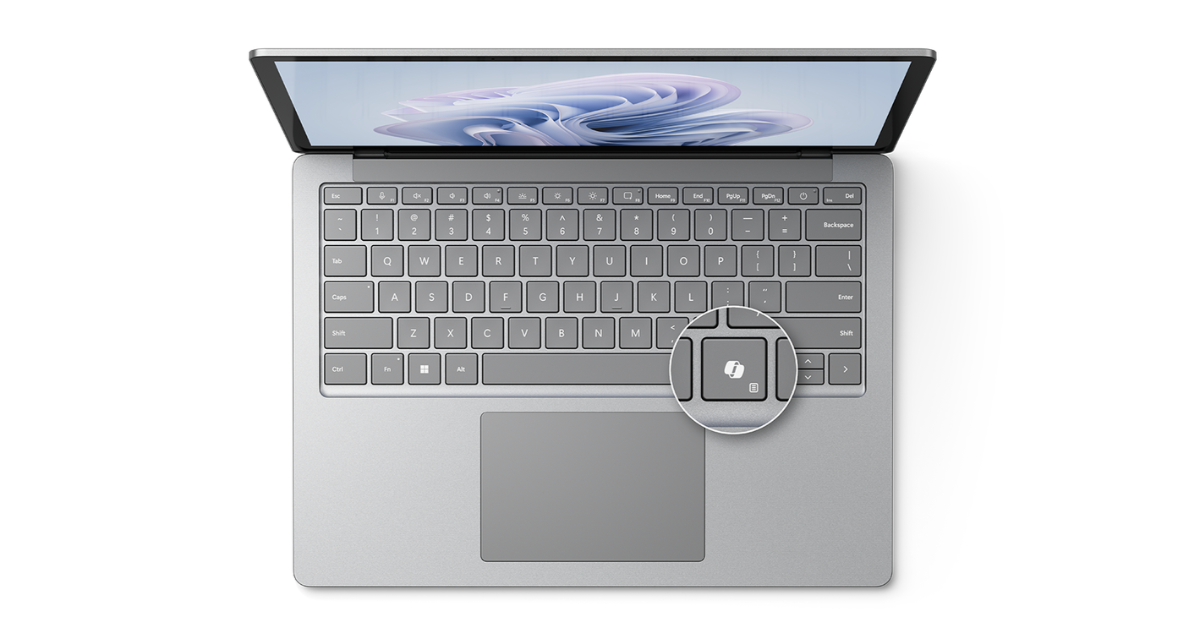
")