Over the years, YouTube has evolved to become the biggest video-sharing platform on the Internet, hosting incredible creators and tons of engrossing content. As the platform has evolved, so has the storytelling. Creators on YouTube divide their videos into different chapters, making it easy for the viewer to follow the content. If there’s a particular part in the video that you want to share with your friends, you don’t need to make them navigate to it. By sharing a timestamped link, the YouTube video will start at a specific time decided by you. Here’s how you can do that.Read Also:Top 7 Mechanical Keyboards under $200 in the USA
Why sending timestamped links is important
Back when YouTube was still new to the scene and the word ‘content creator’ was still finding its meaning, the videos on the platform used to be short and succinct. Now, better infrastructure and incredible connection speeds allow creators to upload longer videos. While this is great if you want to watch a long-form video essay, it does come with its drawbacks.If you want to watch a short video, wading through the annoying intros and ad reads can be very tedious. If you like the video and want to share it with a friend, you can save them the hassle of navigating to the part where the video starts. This is where timestamping comes in. Not only does it cut the clutter, but it is also a great tool to refer to certain parts of the video while tuning out the rest of the content.
Share a YouTube Video at a Specific Start Time (PC)
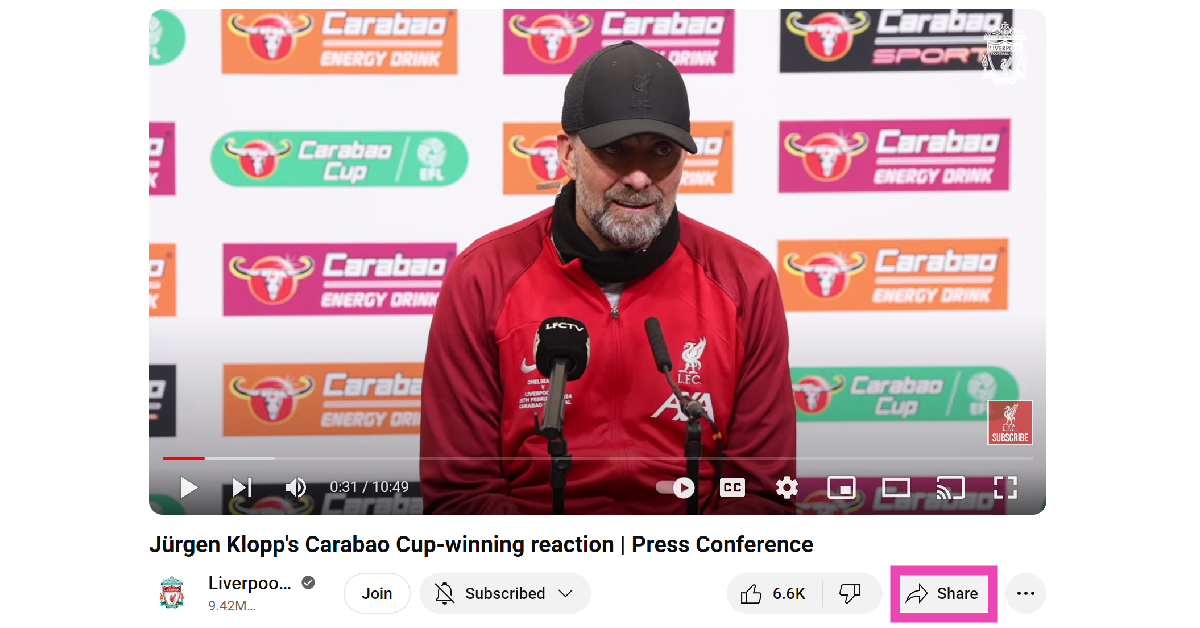
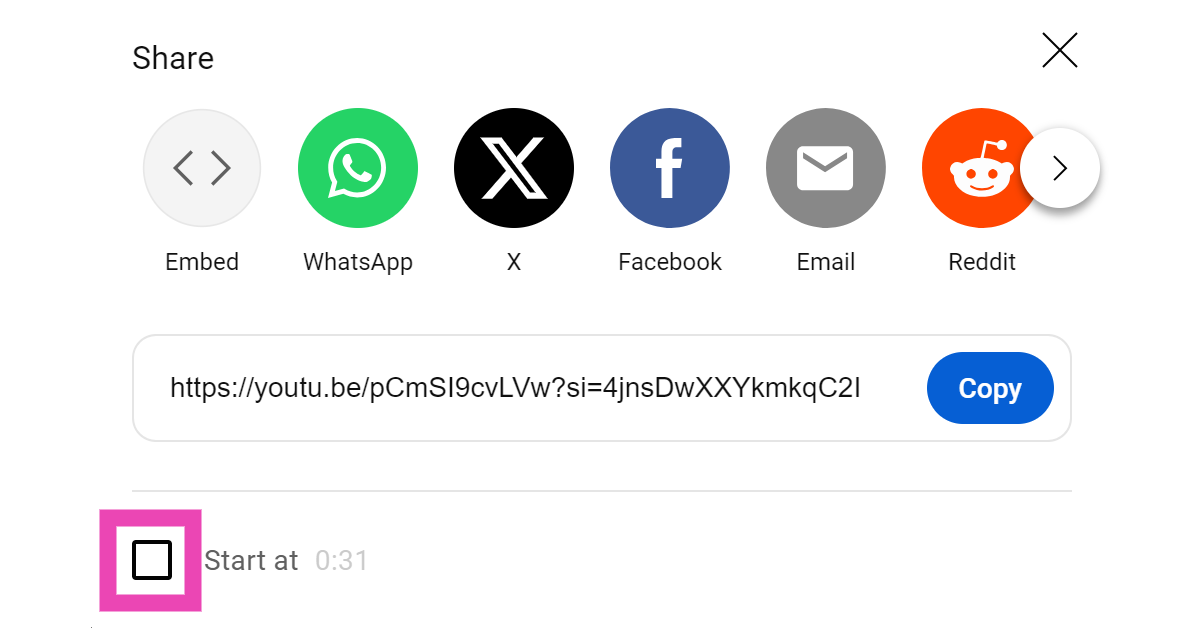
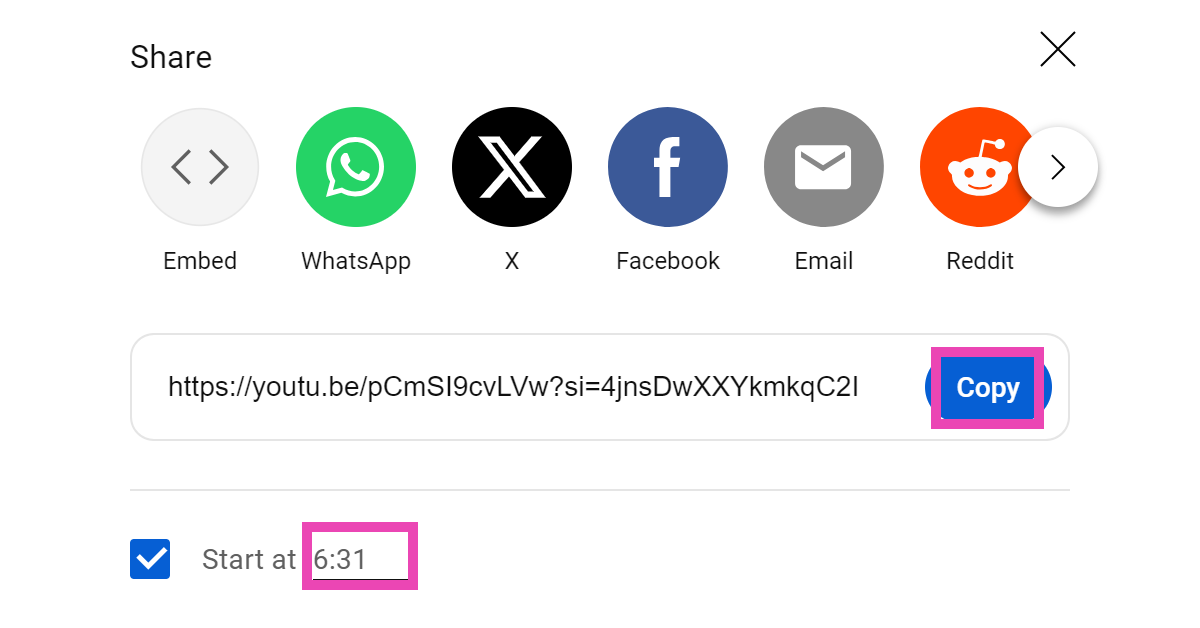
Step 1: Open the YouTube video on your PC’s web browser.Step 2: Hit the Share button.Step 3: Click the check box for ‘Start at’.Step 4: Enter the timestamp.Step 5: Click on the Copy button next to the video URL. You can also choose to directly share the video on the platform of your choice.Step 6:Paste the link. Once someone clicks on the link, the video will start at the specified time.
Use the video player options on a PC
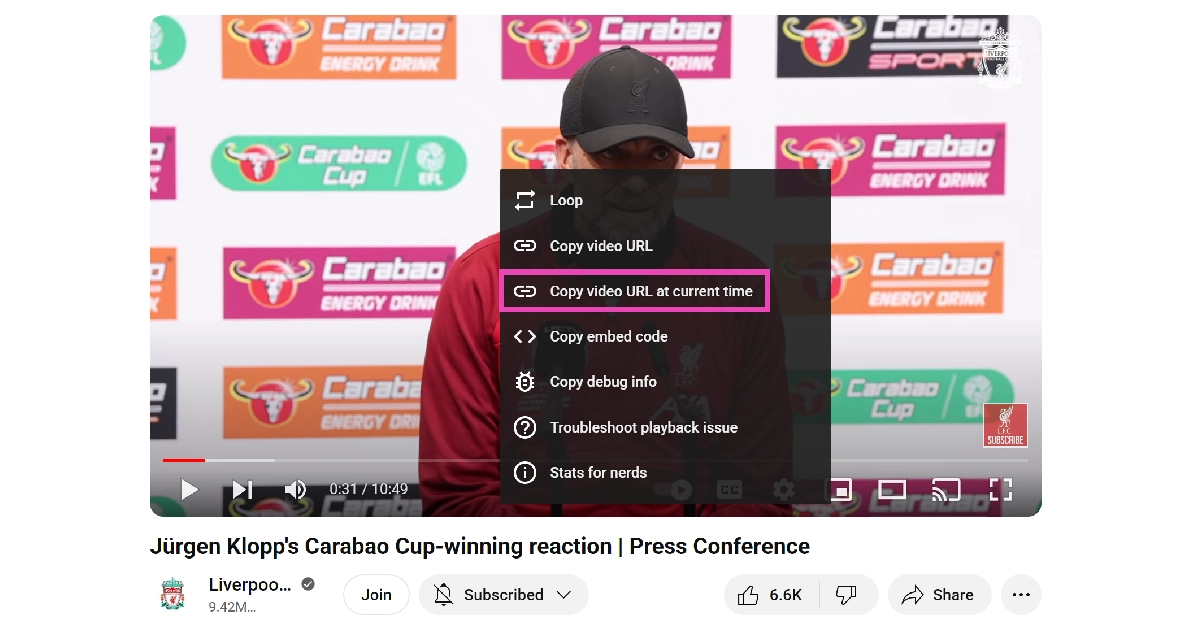
Looking for a quicker way to share timestamped YouTube videos on your PC? Here’s one method.Step 1: Open the YouTube video on your PC’s web browser.Step 2:Navigate to the part you wish to share.Step 3: Pause the video and right-click on the video player.Step 4: Click on Copy video URL at current time.Step 5:Share the URL.Read Also:OnePlus 12R Review: Flagship-grade performance at a mid-range price
Share a timestamped YouTube Video (Mobile)
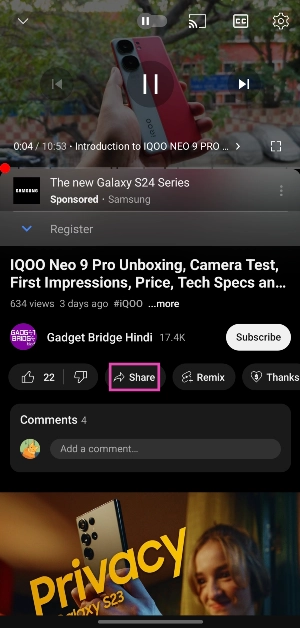
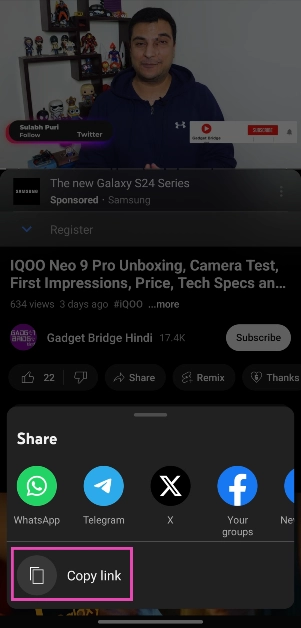
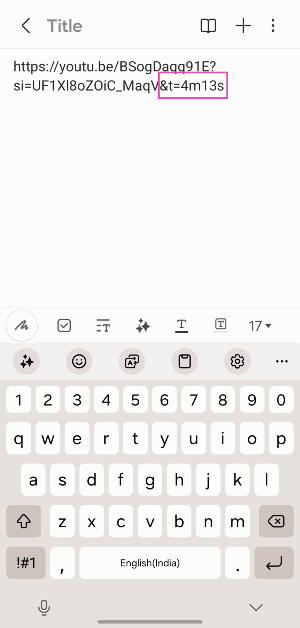
There is no direct way to share a timestamped video from the YouTube mobile app. However, there is one trick you can use to get around this roadblock.Step 1: Open the video in the YouTube app and hit the Share button.Step 2: Tap on Copy Link.Step 3: Open the Notes app on your phone and paste the link inside a new document.Step 4: Add the time stamp at the end of the URL. There are two ways to go about this. Let’s say you want the video to start at 6 minutes and 30 seconds.
For unshortened links: add &t=6m30s.
For shortened links: add ?t=6m30s.
You can also add the timestamp in seconds. Instead of 6m30s, adding 390s is perfectly acceptable.Step 5: Share the link. The person who clicks on the link will be taken to the timestamped part.
Use the desktop site for YouTube on mobile
Although the YouTube app for mobile does not have the option to share timestamped video links, you can still use the PC methods by requesting the desktop side on Chrome (or your preferred web browser). Launch Chrome and load the YouTube video you wish to share. Hit the ellipses and tap on ‘Desktop Site’. Once the desktop site opens up, use the first two methods in this list.
Frequently Asked Questions (FAQs)
Can you get a YouTube link with a timestamp?
To timestamp a YouTube video link, simply add ‘&t=’ or ‘?t=’ at the end of the URL followed by the specific time. For example, if you want the link to jump to 5 minutes and 17 seconds, add ‘&t=5m17s’.
How do you start a YouTube video at a specific time?
On PC, hit the ‘Share’ button for the video and tick the box for ‘Start at’. Mention the time at which you want the video to start and share it on the platform of your choice.
How much does a YouTube Premium subscription cost?
These are the top 4 ways to share a YouTube link that starts the video at a specific time on PC and mobile. If you know of any other way to share timestamped YouTube videos, let us know in the comments! YouTube also allows users to leave timestamps in the comments.
There’s nothing quite like the satisfying tactile feedback from a high-end mechanical keyboard. While you can get a decent one for less than $50, if you’re looking for the most premium switches and exquisite frames on a keyboard, you will need to splurge some extra cash. For $200, you can even customise certain elements like the switch type, keycaps, plates, and more. So, without further ado, here are the top 7 mechanical keyboards under $200 that you can buy in the USA right now.Read Also:Xiaomi 14 Ultra and Xiaomi 14 with next-gen Leica optics launched at MWC 2024
Logitech MX Mechanical
Price: $169.99 on Logitech.comLogitech’s flagship MX Mechanical keyboard is one of the best in business. Logitech also offers a ‘mini’ version of this keyboard without the NUM pad. The MX Mechanical can be had in one of three switch types – Tactile Quiet, Clicky, and Linear. The backlit automatically turns on when your hands approach the keyboard. It is tuned to adapt to the surrounding light. The MX Mechanical Keyboard can be paired with up to 3 devices at one time. On a full charge, it can last up to 15 days. With backlighting turned off, this can be pushed to 10 months. The backlighting and other aspects of the keyboard can be customised using the Logi Options+ app. Check out our review here.
Razer Pro Type Ultra
Price: $159.99 on Razer.comBuilt for maximising productivity, the Razer Pro Type Ultra features silent yellow mechanical switches that are perfect to be used in an office environment. Its ergonomic design, leatherette wrist rest, and a soft-touch coating on the keycaps bring a whole lot of ease and comfort to the typing experience. The Razer Pro Type Ultra has multi-connection which allows it to pair with a maximum of 4 devices at once. It can last up to 214 hours without backlighting turned on and up to 13 hours with the backlighting on full brightness. Certainly one of the best mechanical keyboards under $200 that you can buy in the USA right now.
Keychron Q1 Max
Price: $209 on Keychron.comThis full-metal custom mechanical keyboard supports a 2.4GHz wireless connection and a 1000Hz polling rate. The Keychron Q1 Max is available in two colour variants – Carbon Black and Shell White. There are three switch types on offer – Gateron Jupiter Red, Gateron Jupiter Brown, and Gateron Jupiter Banana. The double gasket design and PBT keycaps elevate the premium factor of this keyboard. With Bluetooth 5.1 support you can connect the Q1 Max to 3 devices at once. The RGB backlighting on this keyboard can be customised by the user. The Keychron Q1 Max may cost slightly more than $200, but it is worth the price.
NuPhy Gem80
Price: $149.95 on NuPhy.comThe wired version of Nuphy Gem80 fetches $149.95 and the wireless (Bluetooth) variant fetches $20 more. There are five colour options on offer – Cosmic Mocha, Mystic Indigo, Obsidian Black, Airy Lilac, and Inca Rose. The keyboard has a 1,000 Hz polling rate and QMK/VIA support. Its polished aluminium chassis gives it a premium, refined look. It comes with the Silicone Socket gasket mount preinstalled by default with the option to change it to Silicone Bean, Silicone Strip, and Screw & Silicone. Other aspects of the keyboard like the switch type, keycap, plates, and wrist rest can be customised as well.
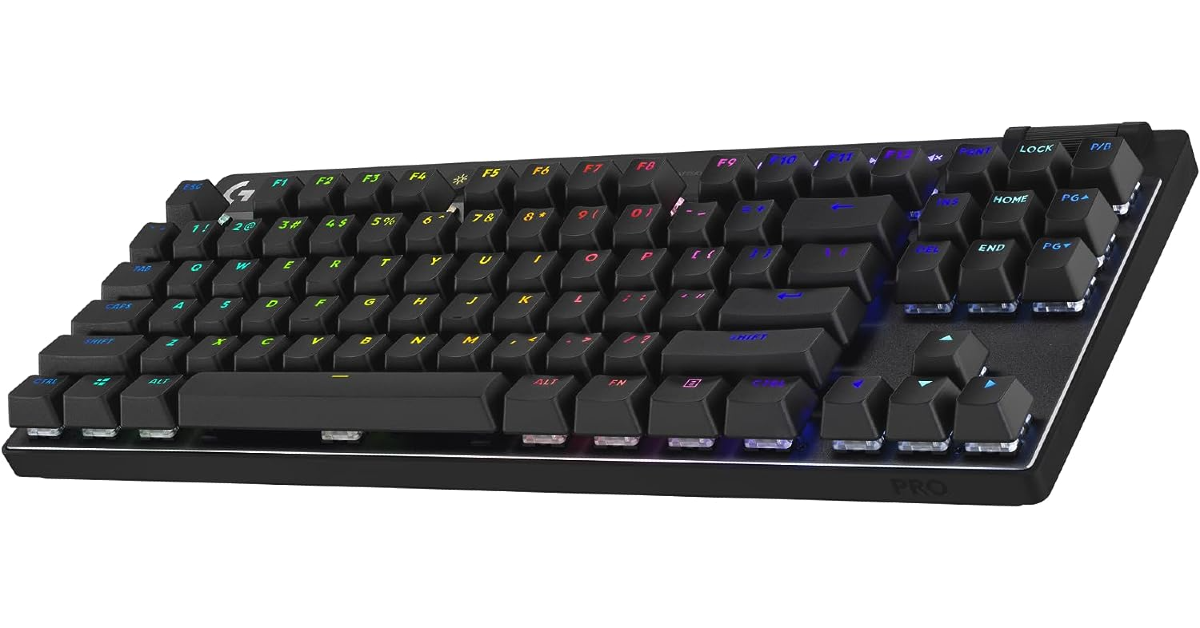
Logitech Pro X TKL
Price: $199 on Logitechg.comPriced just under $200, the Logitech Pro X TKL is one of the best gaming mechanical keyboards you can buy in the USA. This compact keyboard sports a tenkeyless design. Being a gaming keyboard, it features LIGHTSYNC RGB lighting which can be customised by the user. The Pro X can store multiple lighting profiles on the keyboard itself. A 1ms report rate makes it ideal for tournament gaming. The Pro X offers up to 50 hours of battery life on a single charge. Apart from a wireless connection, it can also be connected to your PC using a USB cable. A carrying case, USB LIGHTSPEED adapter, adapter extension, and a 6ft charging cable are provided in the box.
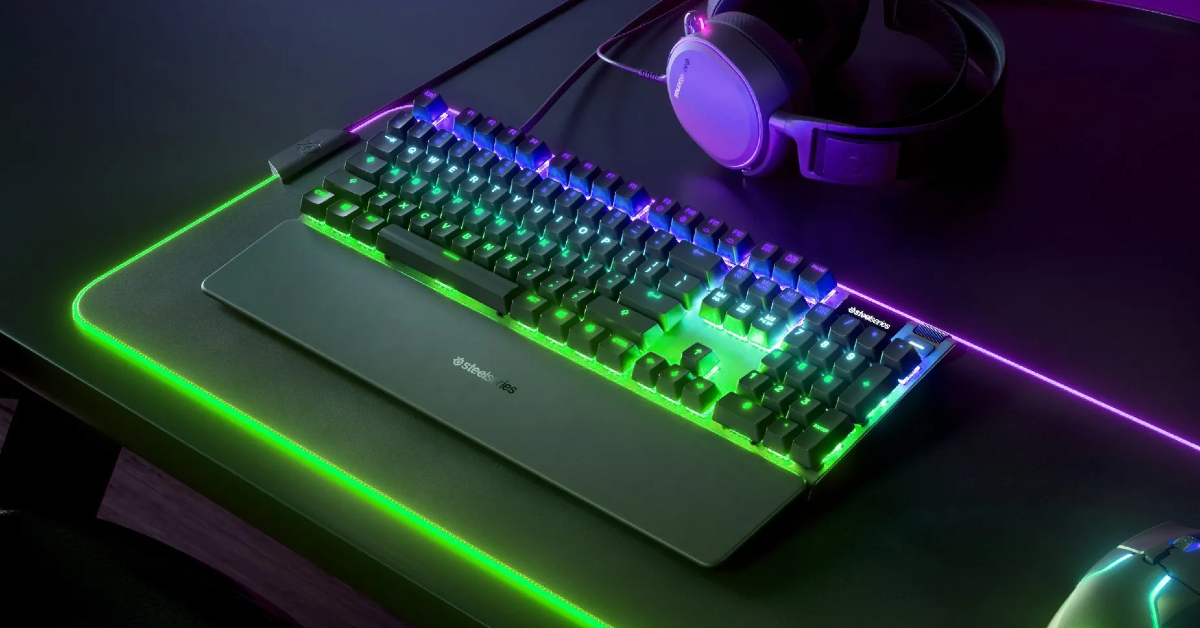
SteelSeries Apex 7
Price: $169.99 on Steelseries.comThe SteelSeries Apex 7 is available with three switch options – Red, Blue, and Brown. All three switches have a 2.0mm actuation point and are durable up to 50 million keypresses. The OmniPoint switch, with an actuation point of 0.4mm, is available on the Apex Pro model. The Apex 7 has an integrated OLED smart display that notifies the user whenever they switch to a different profile or change a setting. The keyboard can store up to 5 profiles on board. The premium magnetic wrist rest brings a lot of comfort to the user during long gaming sessions.
MSI Vigor GK41 Dusk
Price: $49 on MSI StoreLooking for something cheap and affordable? The MSI Vigor GK41 Dusk is your guy. It features Kailh Red Mechanical Switches and per-key RGB with additional lightbars. The keyboard can be adjusted to accommodate three resting angles – 0°, 3°, or 7°. The feedback offered by the mechanical keys is satisfying and precise. Users can store up to 3 profiles on the keyboard, using the MSI Center app. This app can also be used to customise the macro keys, adjust the settings, and control the RGB lighting pattern on the keyboard.Read Also:Top 3 ways to copy text from images on Android and iPhone? (2024)
Conclusion
These are the top 7 mechanical keyboards under $200 that you can buy in the USA. If you think we missed out on a keyboard that deserves to be on this list, give it a shout-out in the comments! While you’re here, check out this article to learn how to clean your mechanical keyboard and fix a broken key.
The lineup includes- Xiaomi 14 Ultra and Xiaomi 14.
Xiaomi is also scheduled to launch Xiaomi 14 on March 7 in India.
Chinese smartphone maker Xiaomi has officially launched its latest flagship smartphone series Xiaomi 14 series. The company showcased two smartphones under the lineup Xiaomi 14 and Xiaomi 14 Ultra at MWC 2024. Both the devices are powered by the Qualcomm Snapdragon 8 Gen 3 processor. The phones come with Leica optics. In India, the company will launch the regular variant on March 7.
Xiaomi 14 Series price and availability
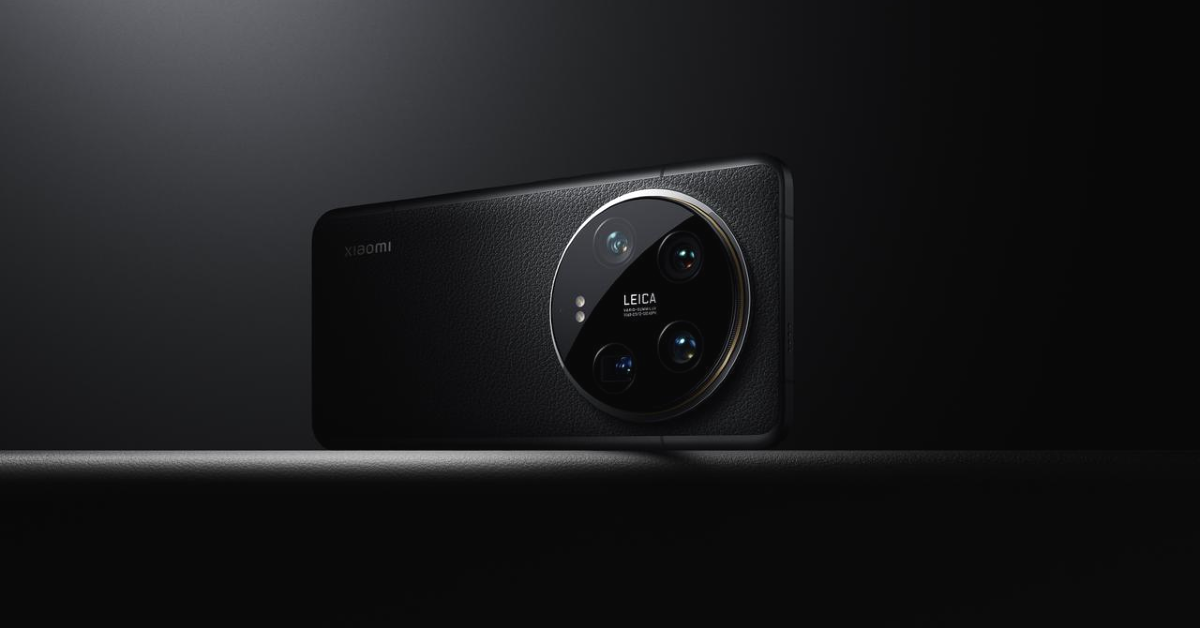
The Xiaomi 14 Ultra is offered in Black or White with 16GB RAM with 512GB of storage for EUR 1,499, or roughly Rs 1.3 lakh. It will be available in two colour options Black or White.
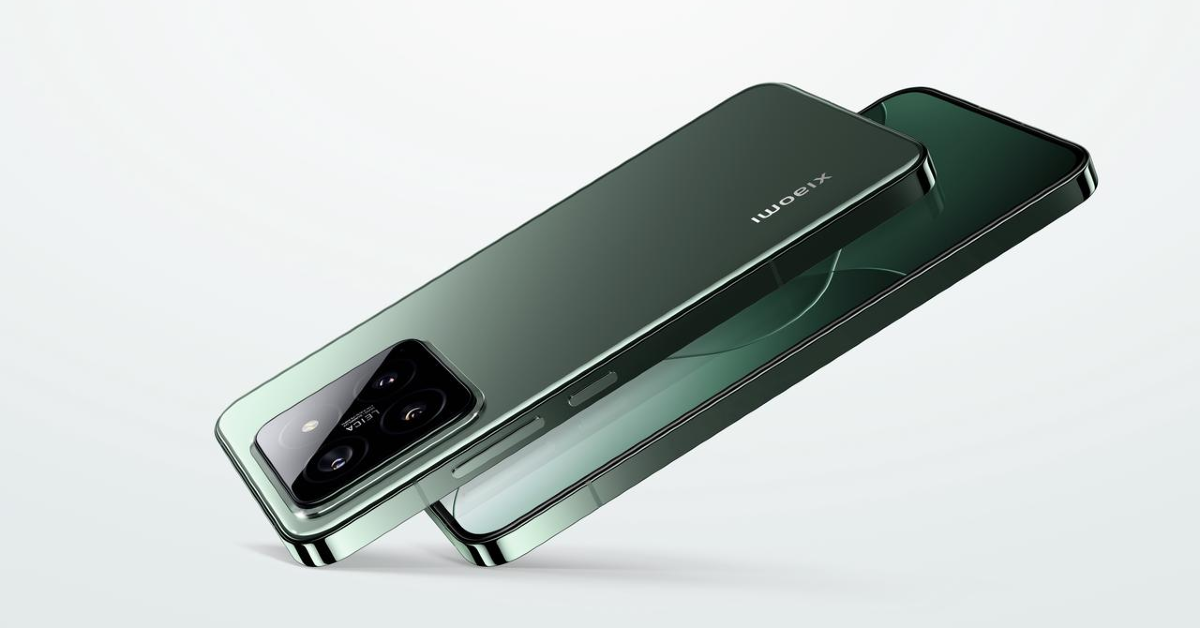
On the other hand, the pricing for the Xiaomi 14 begins at EUR 999, or around Rs 89,700. It will come in available in Black, White, and Jade Green colour options.
Xiaomi 14 Ultra specifications
Xiaomi 14 Ultra features a 6.73-inch QHD+ LTPO OLED display with 3200 x 1440 pixels of resolution. It has a Xiaomi Shield Glass Front with Xiaomi nano-tech vegan leather back. The screen has support for 120Hz refresh rate and 240Hz touch sampling rate. The display comes with HDR10+, Dolby Vision support and 3000 nits peak brightness. The device is powered by a Qualcomm Snapdragon 8 Gen 3 processor with up to 16GB LPDDR5x RAM and 1TB UFS 4.0 storage. It runs on a HyperOS interface with Android 14 out of the box.For optics, the 14 Ultra features a quad-camera setup developed in coordination with German camera maker Leica. The setup includes a 50MP Sony LYT900 primary sensor, a 50MP Sony IMX858 telephoto zoom lens (Supports 10cm macro photography), a 50MP Sony IMX858 telephoto zoom lens (Supports 5cm macro photography) and a 50MP ultra wide-angle camera. For selfies, it flaunts a 32MP front-facing camera.Also Read:Airtel launched in-flight roaming packs, starting at Rs 195The Ultra is backed by a 5,300mAh battery with 90W wired charging and 80W wireless charging support. Regarding connectivity, there is 5G, Wi-Fi, Bluetooth, GPS, NFC, and a USB-C Type-C port.
Xiaomi 14 Specifications
Xiaomi 14 has a 6.36-inch 1.5K C8 LTPO OLED display with 1,200×2,670 pixels of resolution. It has an adaptive refresh rate ranging from 1Hz to 120Hz and up to 240Hz touch sampling rate. Moreover, the screen features 3,000 nits of peak brightness and HDR10+ support. It has a Corning Gorilla Glass Victus front and 3D curved glass back. It operates on Android 14-based HyperOS. Under the hood, there is a Qualcomm Snapdragon 8 Gen 3 chipset with Adreno GPU. It includes up to 16GB of RAM and 1TB of storage.In terms of cameras, there is a triple rear camera setup that includes a 50MP Light Hunter 900 sensor with OIS, a 50MP telephoto camera (Supports 10cm macro photography) and a 50MP ultrawide camera. The selfie camera is the same as the Ultra variant.Also Read:Sony SRS-XV500 portable party speaker with up to 25 hours of battery life launched in IndiaIn terms of battery, Xiaomi 14 includes a 4,610mAh capacity battery with 90W fast charging and 50W wireless charging support. For connectivity, there is 5G, Wi-Fi 7, NFC, Bluetooth 5.4, GPS, Galileo, GLONASS, Beidou, NavIC, and a USB Type-C port for charging
Garena Free Fire is a battle royale game with regular awards and tournaments to keep players interested. If you play Garena Free Fire, you should be aware of the redeem codes that are released on a daily basis. However, because the battle royale game is banned in India, players from other countries can use the Free Fire Redeem codes daily. If you’re unfamiliar with the Garena Free Fire redeem codes or don’t know how to get them, we’ve put together a step-by-step guide to help you redeem them. Check out Garena Free Fire Redeem Codes for 26 February 2024.The Free Fire redeem codes are a great way to get free stuff. These are 12-digit codes that contain alphabets and numbers, as well as an expiration date and time. Because the Garena FF redeem codes cannot be used more than once, you should hurry to the redemption page to claim your free reward before someone else does. To get a free reward, all you have to do is go to reward.ff.garena.com/en, which is the official redemption page. Also, keep an eye on this space for daily updates on Garena Free Fire redemption codes and rewards.Also Read: Sennheiser Accentum Plus wireless headphones with Hybrid Adaptive Noise Cancellation launched
Garena Free Fire Redeem Codes Today 26 February 2024
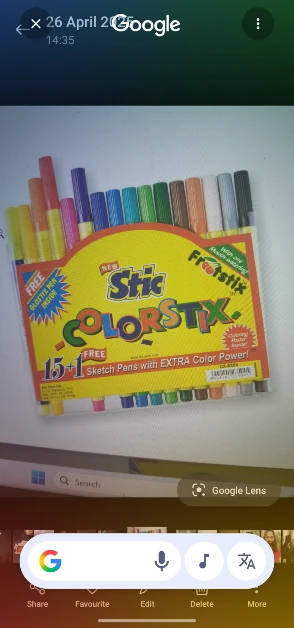
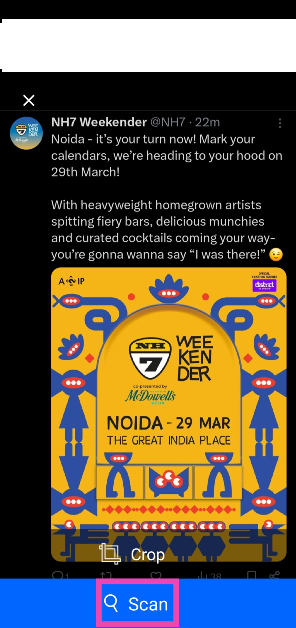
Have you ever taken a picture of a random billboard and wanted to call the number listed on it? In the past, you would switch back and forth between the dialer app and the picture a couple of times to enter the contact number. But now, the process is much simpler on iPhone as well as Android smartphones. Today, we bring you the top 7 ways to copy or extract text from images on Android and iPhone.Read Also:How to Fix Bluetooth Audio Delay on Android? Top 8 Ways
What if your Android phone doesn’t allow you to copy text?
Not all Android phones are alike. Depending on the manufacturer, your smartphone’s native gallery app may or may not allow you to extract text from pictures. If you own a Samsung smartphone with the updated One UI OS, you will be able to copy text from any image in just a few taps. This text can be pasted into any text field using the clipboard.But what happens if your phone’s native gallery app does not have this feature? There’s no need to fret. The Google Photos app, which comes pre-installed in every Android smartphone, has this feature baked into it. Google Photos makes use of Google Lens to scan the text in the image and lets you copy it to the clipboard. Read along to learn the step-by-step process.
Copy text from images on Android (Google Photos)
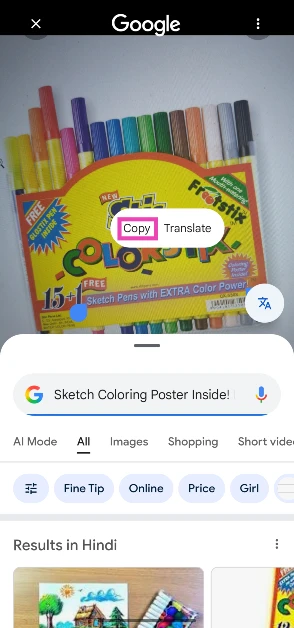
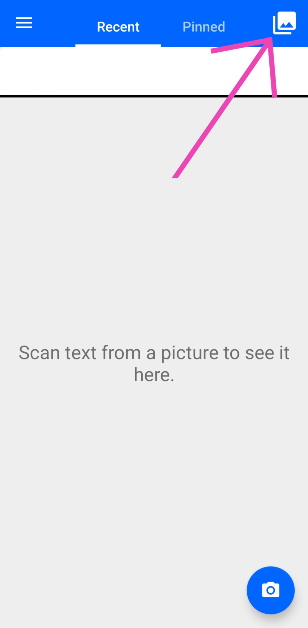
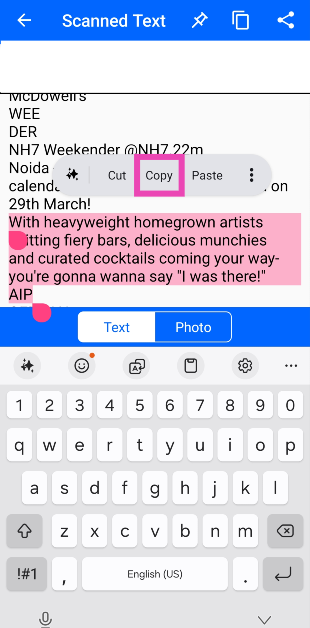
Step 1: Open the image in the Google Photos app.Step 2: The Copy text from image option should pop up at the bottom of the screen. Tap on it.Step 3:Highlight the text you wish to copy from the image.Step 4: Select Copy from the popup menu.Alternatively, you can hit the Lens icon at the bottom of the screen and tap on ‘Select Text’ to carry out the same task.
Copy text from images on a Samsung phone
Step 1:Open the image in the native Samsung gallery app.Step 2: Hit the T icon at the bottom right corner of the screen.Step 3:Highlight the text you want to copy.Step 4: Select Copy from the pop-up menu.The text will be copied to the clipboard.
Use AI Select (Samsung)
Samsung’s One UI 7 OS allows you to extract text from any image on your device. Here’s how you can use it.
Step 1: Go to the page with the image.
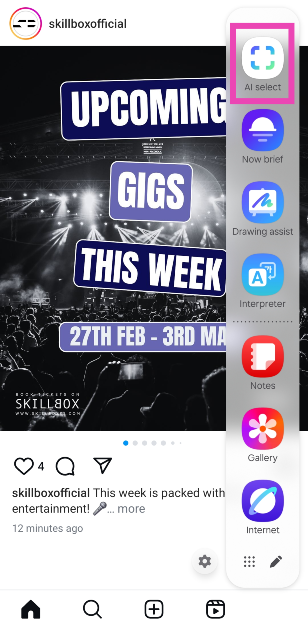
Step 2: Swipe left on the edge panel and select AI Select.
Step 3: AI Select will scan the current screen for content.
Step 4: Hit the Text icon.
Step 5: The text from the image will be selected. Hit the Copy icon.
Copy text from an image using Circle to Search
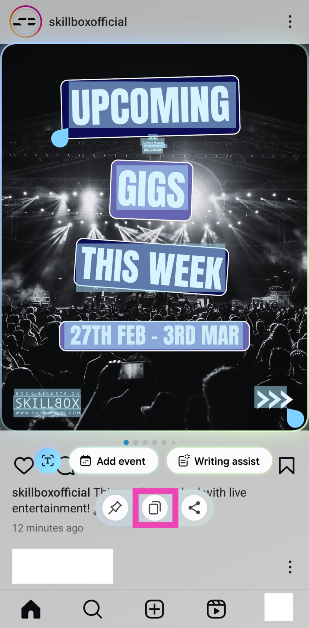
Step 1:Open the image on your phone.
Step 2:Long-press the homeicon or the navigation bar to trigger Circle to Search.
Step 3:Highlight the text in the image that you wish to copy.
Step 4: Hit Copy.
Copy text from images on an iPhone
Turn on Live Text
Step 1: Go to Settings and select General.Step 2: Tap on Language and Region.Step 3: Turn on the toggle switch for Live Text.
Use Live Text in the native Photos app
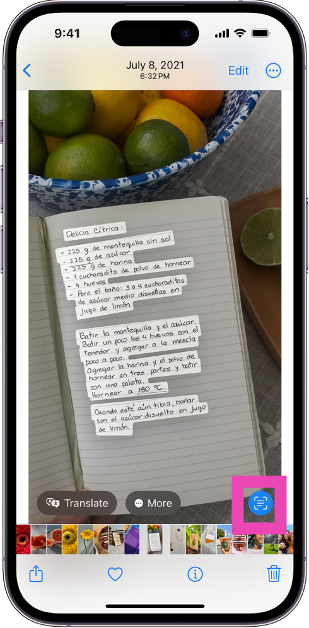
Step 1: Open an image in the Photos app.Step 2: Hit the scanner icon at the bottom right corner of the screen.Step 3: Tap and hold the text you want to select.Step 4: Select Copy from the pop-up menu.The text will be copied to the clipboard.
Use a third-party app (Text Scanner – Image to Text)
Step 1:Download and install the Text Scanner – Image to Text app on your phone.
Step 2:Launch the app and hit the photos icon in the top right corner of the screen.
Step 3: Select the image from your phone’s gallery.
Step 4: Hit Scan.
Step 5: Highlight the text and hit Copy.
Frequently Asked Questions (FAQs)
How do I extract text from pictures on my Android phone?
Open the image in the Google Photos app, hit the Lens option at the bottom, and select the text in the picture. Hit ‘Copy’ in the pop-up menu.
How do I extract an object from an image on a Samsung phone?
Press and hold the object to separate it from the background and copy it to the clipboard.
How do I turn on Live Text on an iPhone?
Go to Settings>General>Language and Region and turn on the toggle switch for ‘Live Text’.
Which are the best apps to extract text from images?
Text Scanner, Adobe Scan, Text Fairy, and Microsoft Lens are some of the best apps to extract text from images.
This is how you can copy or extract text from images on Android and iPhone. The copied text can be accessed in any text field using the clipboard. Simply long-press any text field and select ‘Paste’ from the pop-up menu. If you know of any other way to go about this task, let us know in the comments!
Garena Free Fire is a battle royale game with regular awards and tournaments to keep players interested. If you play Garena Free Fire, you should be aware of the redeem codes that are released on a daily basis. However, because the battle royale game is banned in India, players from other countries can use the Free Fire Redeem codes daily. If you’re unfamiliar with the Garena Free Fire redeem codes or don’t know how to get them, we’ve put together a step-by-step guide to help you redeem them. Check out Garena Free Fire Redeem Codes for 25 February 2024.The Free Fire redeem codes are a great way to get free stuff. These are 12-digit codes that contain alphabets and numbers, as well as an expiration date and time. Because the Garena FF redeem codes cannot be used more than once, you should hurry to the redemption page to claim your free reward before someone else does. To get a free reward, all you have to do is go to reward.ff.garena.com/en, which is the official redemption page. Also, keep an eye on this space for daily updates on Garena Free Fire redemption codes and rewards.Also Read: Sennheiser Accentum Plus wireless headphones with Hybrid Adaptive Noise Cancellation launched
Garena Free Fire Redeem Codes Today 25 February 2024
While predictive text is an extremely handy feature on modern smartphones, some users do not like that extra strip on top of their onscreen keyboards. Luckily, most Android keyboards allow you to turn off this feature. On iPhone, disabling word predictions is pretty straightforward too. Today, we bring you the top 4 ways to turn off predictive text on Android and iPhone.Read Also:How to Fix Bluetooth Audio Delay on Android? Top 8 Ways
How does predictive text work?
As the name suggests, predictive text suggests words that you are most likely to type while texting. Once you type a word, predictive text will automatically come up with a suggestion. These suggestions appear in the topmost strip of the keyboard. You can tap on a word to use it in your sentence. If used correctly, it can increase your typing speed and bring a nice flow to the overall typing experience.So, how does predictive text work? To explain it simply, your smartphone’s onscreen keyboard examines your typing pattern via machine learning and recognises the words you use the most. It uses language models to make sure its suggestions are grammatically sound and make sense in the sentence you are typing. If you accept a suggestion from your phone, it will assume that the word that it suggested is correct. This helps it come up with better suggestions in future.
Turn off predictive text on Gboard (Android)
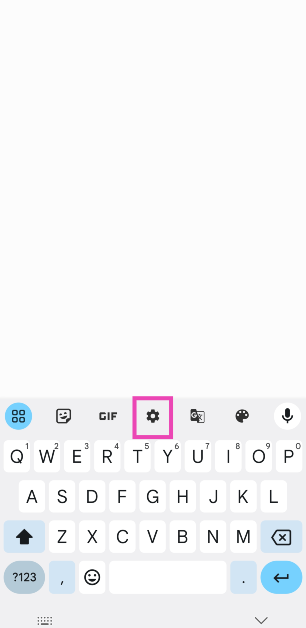
Step 1: Tap on a text field to trigger Gboard.Step 2: Hit the cog wheel icon to access settings.Step 3: Tap on Text correction.Step 4: Turn off the toggle switch for Next-word suggestions.Step 5: If you want to get rid of the suggestion bar altogether, turn off the toggle switch for ‘Show suggestion strip’.
Turn off predictive text on Samsung Keyboard (Android)
Step 1: Tap on a text field to trigger the Samsung Keyboard.Step 2: Hit the cog wheel icon to access settings.Step 3: Turn off the toggle switch for Predictive text.
Turn off ‘Quick prediction insert’ on Microsoft SwiftKey (Android)
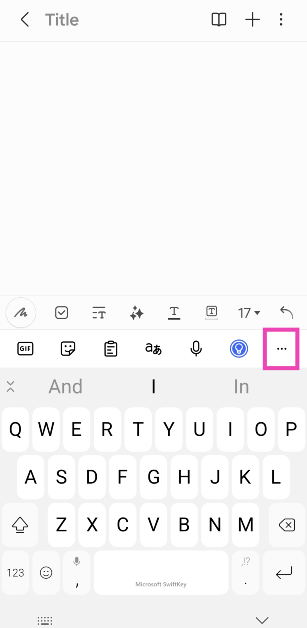
There is no way to turn off the predictive bar on Microsoft SwiftKey. However, you can turn off the ‘Quick prediction insert’ feature. Here’s how.Step 1: Tap on a text field to trigger Microsoft SwiftKey.Step 2: Hit the ellipses on the top right section of the keyboard.Step 3: Select Settings.Step 4: Tap on Typing.Step 5: Turn off the toggle switch for Quick prediction insert.
Turn off predictive text on an iPhone
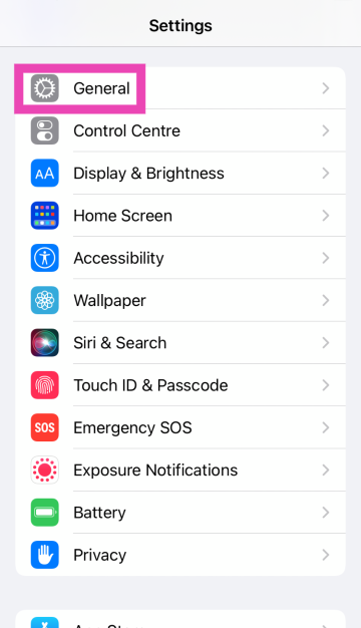
Step 1: Go to Settings and select General.Step 2: Scroll down and tap on Keyboard.Step 3: Turn off the toggle switch for Predictive.
Frequently Asked Questions (FAQs)
How do I turn off predictive text on Gboard (Android)?
Hit the Settings icon, go to Text correction, and turn off the toggle switch for ‘Next-word suggestions’.
Is there a way to turn off predictive text on Microsoft SwiftKey?
Microsoft SwiftKey does not allow users to turn off text suggestions from the keyboard. At best, you can turn off the ‘Quick prediction text’ option from settings.
These are the top 4 ways to turn off predictive text on Android and iPhone. Check out this article to learn how you can use Galaxy AI features on your Samsung Keyboard. Which is your preferred keyboard for your smartphone? Let us know in the comments!
No one likes audio delays. Even a slight lag in audio output while watching a movie or playing a video game can completely ruin the experience. This issue is more prevalent in Bluetooth headphones and earbuds. Luckily, even the most basic, entry-level wireless headsets have a low-latency mode to manage this problem. But what if even that doesn’t work? Try these top 11 ways to fix Bluetooth audio delay on your Android smartphone.Read Also:Top 6 ways to fix ‘Instagram Stories Music Not Working’
Why do Bluetooth headsets have an audio delay?
Bluetooth headsets rely on a wireless signal from the source device to produce an audio output. By its very nature, some latency is bound to creep in. This issue is not prevalent in wired headphones. The audio latency in wired headphones is less than 10 milliseconds. This delay is minuscule and impossible to notice. However, wireless earbuds and headphones may have a latency of more than 100ms (even 300ms in some cases), creating a visible lag between the audio output and the visuals on the screen.The Low Latency Mode in Bluetooth headsets does help in minimising this delay. But there are other factors at play here, too. These factors can be controlled to prevent the audio lag. If you use your Bluetooth headphones for gaming, you may want to check out what you can do to ensure a smooth, lag-free gaming experience.
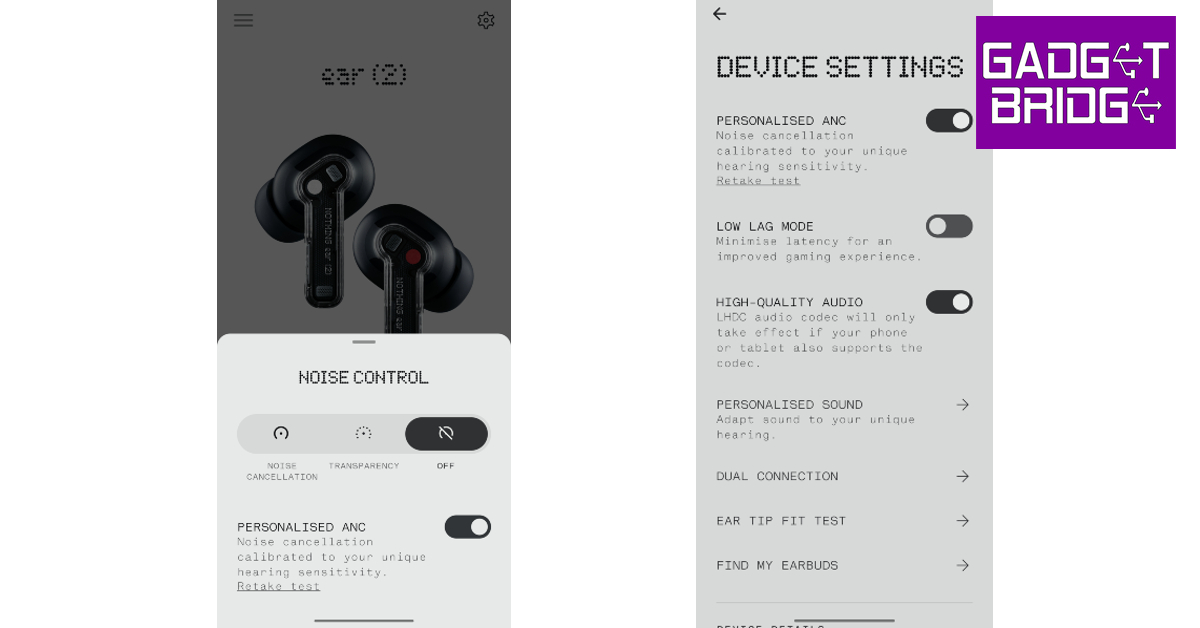
Turn on Low Latency Mode
Turning on the Low Latency Mode on your Bluetooth headphones or earbuds can help in fixing the audio delay. On some headphones, it may be called ‘Gaming Mode’ or ‘Low Lag Mode’. The process of turning on this mode is different for every headset. If you use a companion app for your earbuds, you will find this setting in the audio profile section. Some TWS devices allow users to turn on the Low Latency Mode directly from the earbuds. Check out the user manual to learn the dedicated controls.
Make sure your phone is within the functional range of the Bluetooth headset
One of the perks of using a Bluetooth headset is that you can keep your phone in one place and still listen to music while walking around the room. However, Bluetooth headsets and earbuds have a functional range of around 30 feet (10 metres). If you stray outside of this range, you may experience an audio delay. Make sure you are in the vicinity of the connected device to prevent this from happening.
Charge your Bluetooth headphones
When your TWS headset drops to a low charge level, its performance takes a hit. The intensity of the audio output diminishes significantly, and so does the strength of the audio signal. You may experience a slight audio delay in this situation. To fix it, simply charge your Bluetooth headphones. Once charged, the latency will likely be gone.
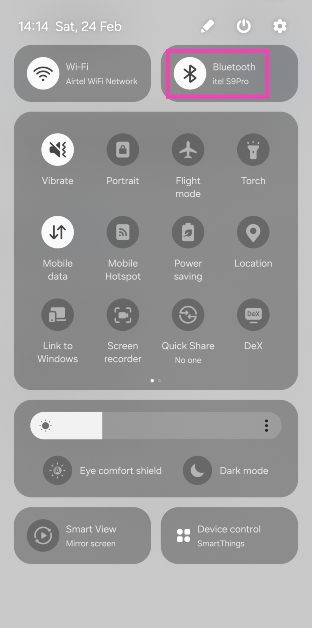
Re-pair your phone with your headphones
Step 1: Swipe down from the status bar and long-press the Bluetooth tile in the Quick Settings Menu.Step 2: Hit the cog wheel icon next to the connected TWS.Step 3: Hit Unpair.Step 4: Put your TWS in pairing mode.Step 5: Go to the previous page on your smartphone and re-pair the TWS.
Reduce the interference
If there’s a significant distance between your phone and the Bluetooth headphones, the wireless signals (Bluetooth and WiFi) from other devices in the vicinity can cause interference. These devices may include your laptop, TV, WiFi router, and more. Latency in audio output is one of the effects of interference. Disable the device that is causing interference to fix the Bluetooth audio delay. You can also bring your phone close to your Bluetooth headset to fix this problem.
Change the Bluetooth Codec
Modern Bluetooth headphones support multiple codecs. By default, your phone chooses the SBC audio codec. If you’re experiencing latency issues, switching to AAC, LDAC (Sony), or aptX codecs may help. You can change the audio codec from the companion app for your TWS or the device settings in the Bluetooth menu. If your headset doesn’t support multiple codecs, move on to the other fixes in this list to fix the Bluetooth audio delay.
Disable Power Saving Mode on your smartphone
Android smartphones automatically enable the Power Saving Mode when they are running low on charge. This may affect your Bluetooth headset’s performance. Turn off the Power Saving Mode to fix the Bluetooth audio delay. Here’s how.Step 1: Go to Settings and select Battery.Step 2: Turn off the toggle switch for Power Saving.
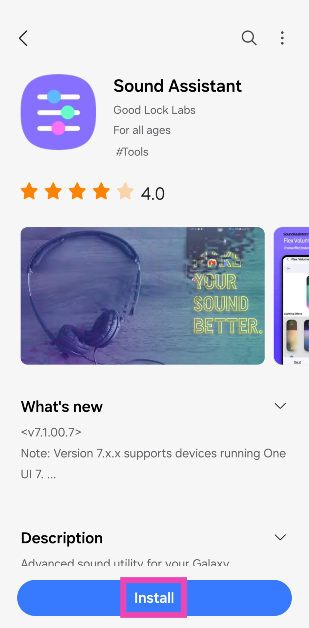
Use the Sound Assistant app (Samsung)
If you own a Samsung smartphone, use the Sound Assistant plugin for Good Lock to sync up the Bluetooth audio output and the visuals on the screen.
Step 1:Download and install the Sound Assistant app from the Galaxy Store.
Step 2:Launch the Good Lock app on your phone and switch to the Plugins tab.
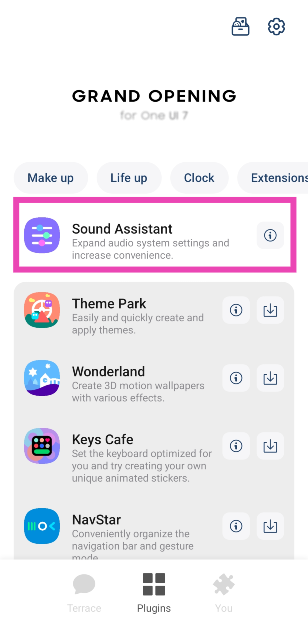
Step 3: Select Sound Assistant.
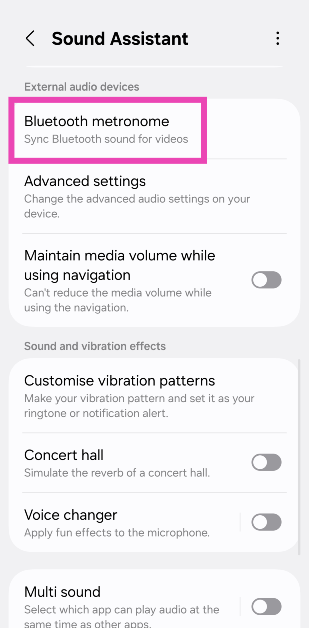
Step 4: Go to Bluetooth metronome.
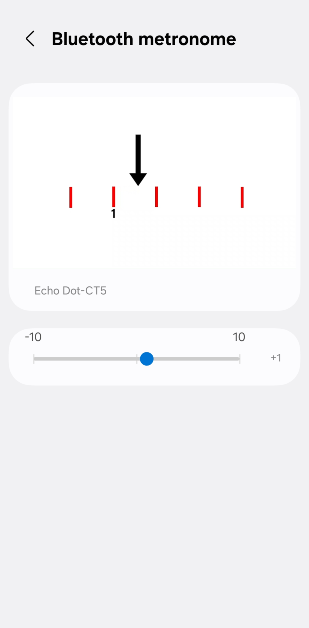
Step 5: Use the slider to match the audio.
Clear the Bluetooth cache
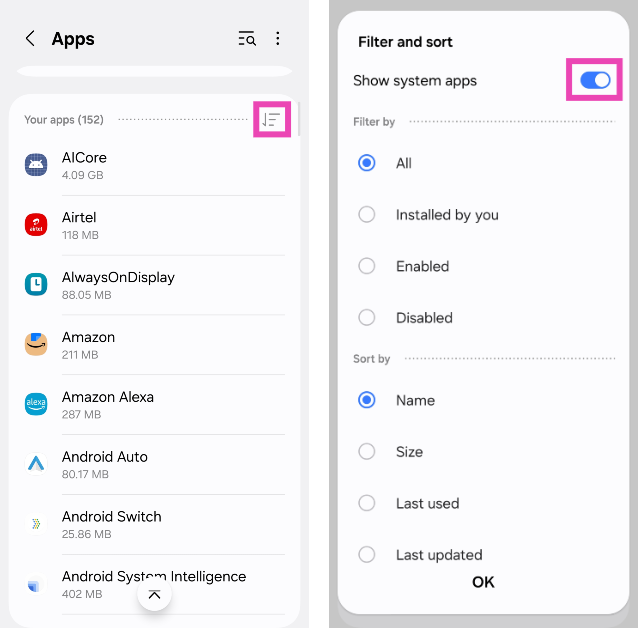
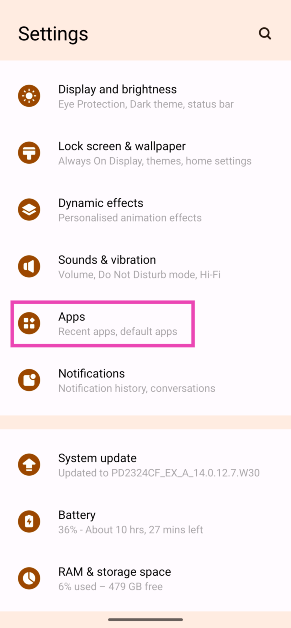
Step 1: Go to Settings and select Apps.
Step 2: Hit the filter icon and turn on the toggle switch next to Show system apps.
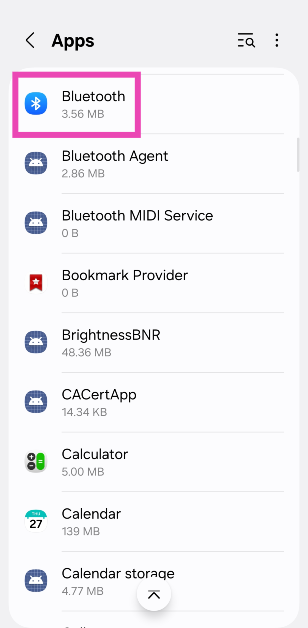
Step 3: Scroll down and select Bluetooth.
Step 4: Go to Storage.
Step 5: Select Clear cache.
Turn off HD/Lossless audio
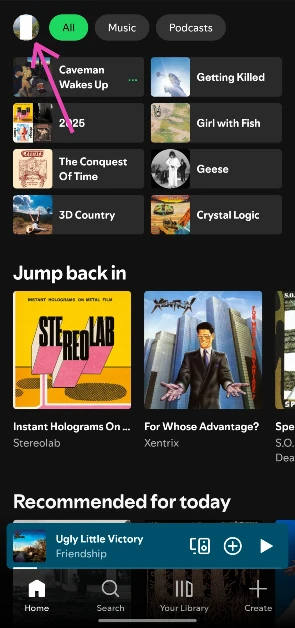
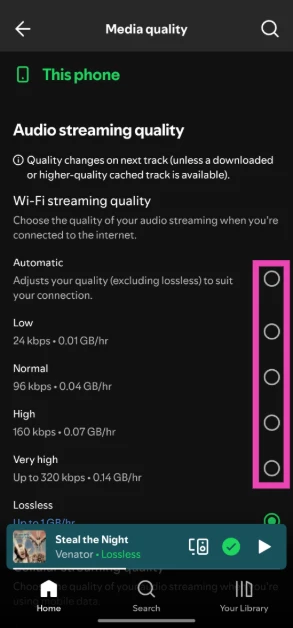
If you’re facing latency issues on a music streaming platform, try disabling HD/Lossless audio to see if it fixes the issue. Here’s how you can go about it on Spotify.
Step 1:Launch the Spotify app on your phone.
Step 2: Tap your profile picture in the top left corner of the screen.
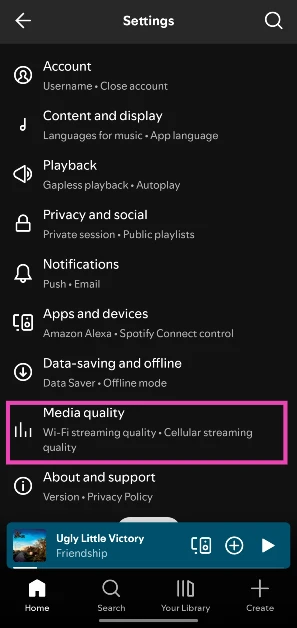
Step 3: Select Settings and privacy.
Step 4: Go to Media quality.
Step 5: Select any option but lossless.
Update your TWS’s firmware
Updating your wireless earbuds’ firmware fixes any bug-related issues, including Bluetooth audio delay. The process to update the firmware is fairly simple. Launch the companion app for your earbuds and go to the ‘About’ section. Find the software info category and check for any firmware updates. Install the latest OTA update for your device.
Frequently Asked Questions (FAQs)
What is the ideal audio latency for gaming?
If your Bluetooth audio headset has a latency under 100ms, it should not create any delay while gaming. However, an audio latency between 20-50ms is considered ideal for gaming.
How do I update my wireless earbuds’ firmware?
You can update the firmware of your wireless earbuds by launching the companion app for your smartphone and navigating to the software info section. This is where you will find the pending OTA updates.
How do I decrease the audio lag on my Bluetooth headphones?
To fix the audio delay on your Bluetooth headphones, make sure they are charged and the low-latency mode is turned on. Additionally, make sure the power saving mode on your phone is disabled, and the two devices are within the functional range of each other.
How do I change the Bluetooth audio codec on my phone?
Go to Settings>Connections>Bluetooth, hit the gear icon next to the connected Bluetooth headset and select your preferred audio codec on the following page.
These are the top 11 ways to fix the Bluetooth audio delay on your Android smartphone. Typically, this problem does not arise while using wired headphones. If you’re looking for a wireless gaming headset, always make sure that it offers low latency (<50ms). If you know of any other way to fix this issue, let us know in the comments!
Adding music to your Instagram Story gives it an edge and makes it more interesting to watch. Even the most basic pictures can be brought to life with a good background song. Instagram’s music sticker for Stories works great for the most part, but it isn’t immune to malfunctions. Today, we bring you the top 11 ways to fix the ‘Instagram Stories music not working’ issue on your smartphone.Read Also:Samsung Keyboard not working? Try these 11 fixes
Is there a way to add music to my Stories without using the Instagram sticker?
Instagram has a diverse music library for Stores, Reels, and posts. In the Story Creator, this music library can be accessed using the music sticker. However, if you’re looking for some niche or underground song, the chances of you finding it there are very slim. Luckily, there is a way you can still embed that song in your Story.Instead of using Instagram’s Story Creator, you will need to install a video editing app on your phone. You will also need an MP3 file of the song to set it as the background music for your Story. In the photo editing app, use the ‘Add background music’ option to attach the song to the Story. You can also add the music on a separate track if you want greater editorial control. Once the song has been added to the video, you can upload it as a Story on Instagram. You can use this trick to upload your own music in your Story as well.
Switch your account type from Business to Personal or Creator
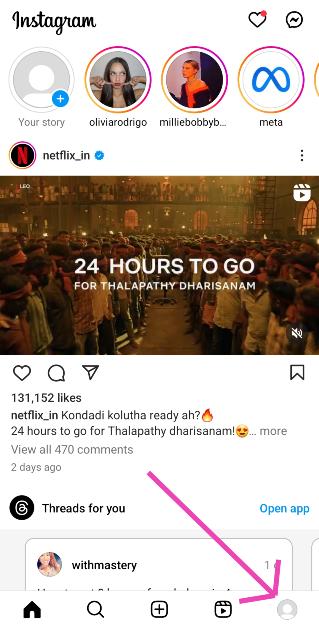
Due to copyright restrictions, Instagram does not allow Business accounts to use its music library for commercial use. Switch your account type to Personal or Creator to use music in your Stories. Here’s how.Step 1: Launch the Instagram app and hit your profile icon at the bottom right corner of the screen.Step 2: Hit the hamburger menu icon at the top right corner of the screen.Step 3: Select Settings and privacy.Step 4: Tap on Business tools and controls.Step 5: Select Switch account type.Step 6: Tap on Switch to personal/creator account.
Update the app
Instagram isn’t immune to bug-related problems. Luckily, developers are quick to pack these issues with an update. If you can access Instagram’s music library for your Stories or the music is always muted when you make a post, try updating the app as a quick fix. Go to the Google Play Store, search for Instagram, and open its page. Hit the ‘Update’ button and wait for your phone to download the update.
Log out and log in
Giving your Instagram account a quick refresh is not a bad idea if you can’t get the music library to work in the app. You can do this by logging out and then logging back in. Go to Profile>Menu>Settings and privacy, scroll all the way down, and hit ‘Log out’. Log back in using the correct account credentials.
Uninstall and reinstall the app
If the Instagram app on your phone is corrupted, deleting and reinstalling it may fix the issue. Long-press the Instagram app icon in the app drawer and select ‘Uninstall’. Alternatively, you can go to Settings>Apps>Instagram and hit ‘Uninstall’ in the bottom toolbar to remove the app from your phone. Once deleted, reinstall the app from the Google Play Store.
Save music from another Reel
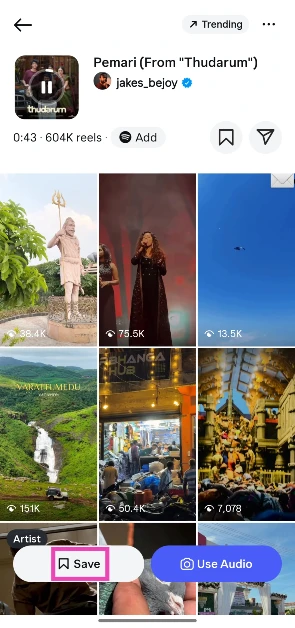
If you’re unable to find a viral song in Instagram’s music library, you can simply pull it from another Reel. Here’s how.
Step 1: Open the Reel with the song.
Step 2: Tap the song title at the bottom of the page or hit the box icon in the bottom right corner of the screen. This will take you to the song’s page.
Step 3: Hit Save.
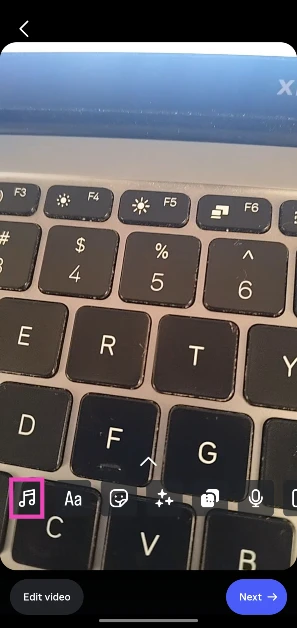
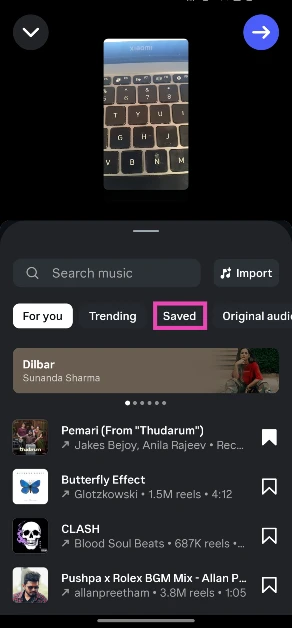
Step 4: Create your Reel and hit the music note icon.
Step 5: Switch to the Saved tab.
Step 6: Tap the song title.
Disable VPN
Are you using a VPN to access Instagram? Instagram’s music library may be geo-locked for some countries. If you are connected to a server from one of those countries, you will not be able to use music on your Instagram Stories. Disconnect the VPN or connect to another server and try again.
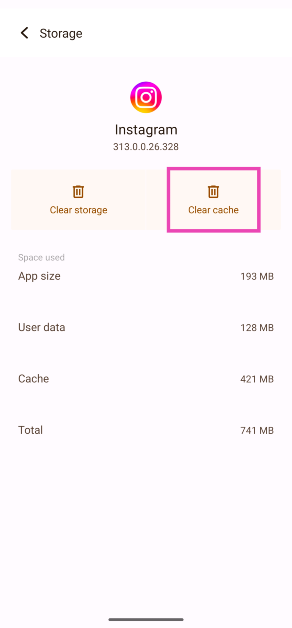
Clear Instagram’s cache
Step 1: Go to Settings and select Apps.
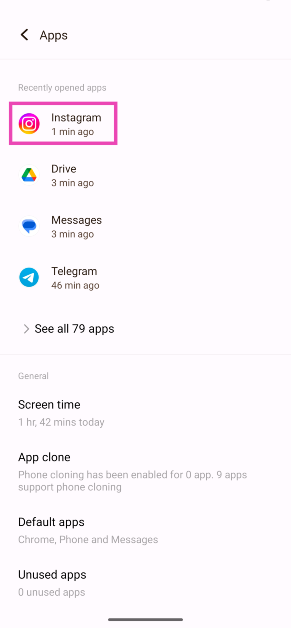
Step 2: Tap on Instagram.
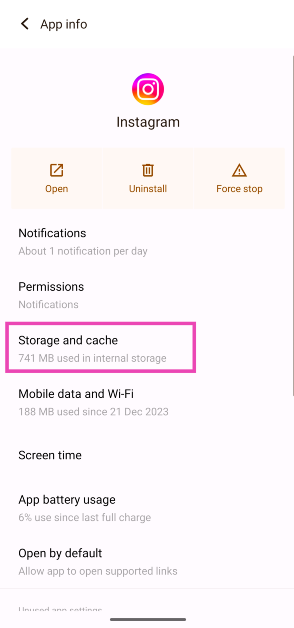
Step 3: Select Storage and cache.
Step 4: Hit Clear Cache.
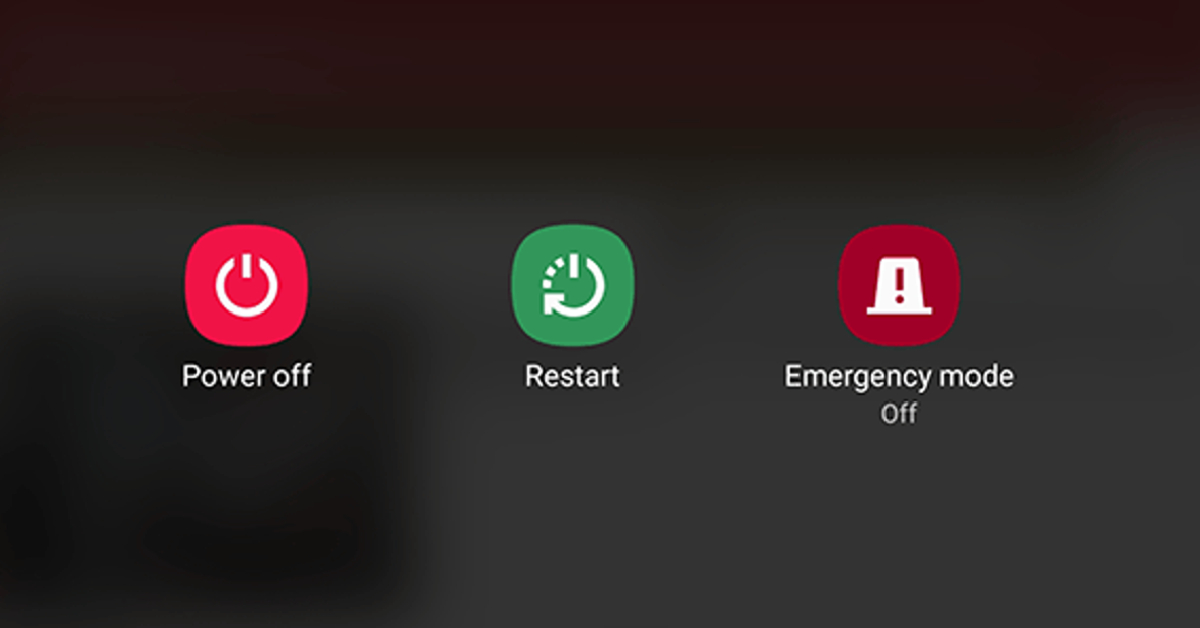
Restart your phone
It is possible that the issue lies with your smartphone, not your Instagram account. A quick restart can fix the background glitches causing this problem. Long-press the side button (or the side button + volume up key) to reveal the power menu. Select ‘Restart’ from the list.
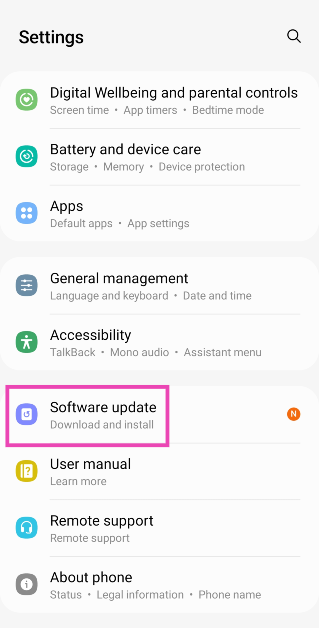
Update your phone
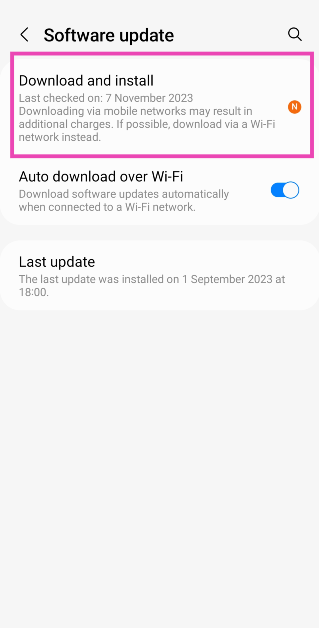
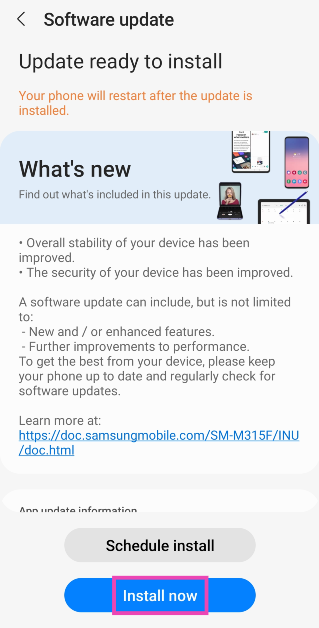
Step 1: Go to Settings and select Software update.
Step 2: Tap on Download and install.
Step 3: Select Install now.
Use a different device
If you’re using an old Android smartphone, chances are that Instagram hasn’t rolled out its latest features on it yet. It is unlikely that new features like Instagram music stickers will be rolled out on your device if they aren’t available already. Log in to your Instagram on a relatively newer device to use the full spectrum of features, including background music for Instagram stories.
Check if Instagram is down
Can’t get Instagram to work at all? Maybe the app is experiencing a server outage. To confirm, go to Downdetector.in and search for Instagram. If you see a spike in recent user reports, it means that the app is currently down. The only thing you can do in this situation is wait until the servers are restored. Downdetector also lets you know if any specific features of the app are not working.
Frequently Asked Questions (FAQs)
Why am I not able to use music in my Instagram Stories?
Instagram prevents Business accounts from using copyrighted music in their Stories for commercial use. Switch to a Personal or Creator account to start using music again.
How can I add music to my Instagram Stories?
Upload a Story, then tap the sticker icon and select ‘Music’ to add a song.
How do I find trending songs for Instagram Reels?
Watch the trending Reels in your country and see which songs they are using by hitting the waveform box at the bottom right corner of the screen. The song title usually shows up at the bottom of the Reel as well.
How do I send music via Instagram DMs?
Go to your Instagram DMs, open a conversation, tap the sticker icon, select ‘Music’, enter the song title and tap on it to send it in the chat.
These are the top 11 ways to fix the ‘Instagram Stories music not working’ on your smartphone. If the problem won’t go away, contact Instagram support and report the problem. If you know of any other way to fix this issue, let us know in the comments!
Garena Free Fire is a battle royale game with regular awards and tournaments to keep players interested. If you play Garena Free Fire, you should be aware of the redeem codes that are released on a daily basis. However, because the battle royale game is banned in India, players from other countries can use the Free Fire Redeem codes daily. If you’re unfamiliar with the Garena Free Fire redeem codes or don’t know how to get them, we’ve put together a step-by-step guide to help you redeem them. Check out Garena Free Fire Redeem Codes for 24 February 2024.The Free Fire redeem codes are a great way to get free stuff. These are 12-digit codes that contain alphabets and numbers, as well as an expiration date and time. Because the Garena FF redeem codes cannot be used more than once, you should hurry to the redemption page to claim your free reward before someone else does. To get a free reward, all you have to do is go to reward.ff.garena.com/en, which is the official redemption page. Also, keep an eye on this space for daily updates on Garena Free Fire redemption codes and rewards.Also Read: Sennheiser Accentum Plus wireless headphones with Hybrid Adaptive Noise Cancellation launched
Garena Free Fire Redeem Codes Today 24 February 2024


 Step 3: Click the check box for ‘Start at’.
 Step 4: Enter the timestamp.
 Step 5: Click on the Copy button next to the video URL. You can also choose to directly share the video on the platform of your choice.
Step 6: Paste the link. Once someone clicks on the link, the video will start at the specified time.
Step 5: Click on the Copy button next to the video URL. You can also choose to directly share the video on the platform of your choice.
Step 6: Paste the link. Once someone clicks on the link, the video will start at the specified time.
 Step 5: Share the URL.
Read Also: OnePlus 12R Review: Flagship-grade performance at a mid-range price
Step 5: Share the URL.
Read Also: OnePlus 12R Review: Flagship-grade performance at a mid-range price
 Step 2: Tap on Copy Link.
 Step 3: Open the Notes app on your phone and paste the link inside a new document.
Step 4: Add the time stamp at the end of the URL. There are two ways to go about this. Let’s say you want the video to start at 6 minutes and 30 seconds.
Step 3: Open the Notes app on your phone and paste the link inside a new document.
Step 4: Add the time stamp at the end of the URL. There are two ways to go about this. Let’s say you want the video to start at 6 minutes and 30 seconds.
 Step 5: Share the link. The person who clicks on the link will be taken to the timestamped part.


 Step 3: Highlight
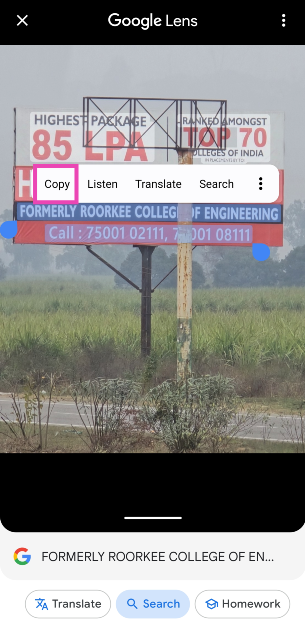
 Step 3: Highlight
 Step 3: AI Select will scan the current screen for content.
Step 4: Hit the Text icon.
Step 3: AI Select will scan the current screen for content.
Step 4: Hit the Text icon.
 Step 5: The text from the image will be selected. Hit the Copy icon.
 Step 3: Highlight the text in the image that you wish to copy.
 Step 4: Hit Copy.
 Step 3: Tap and hold
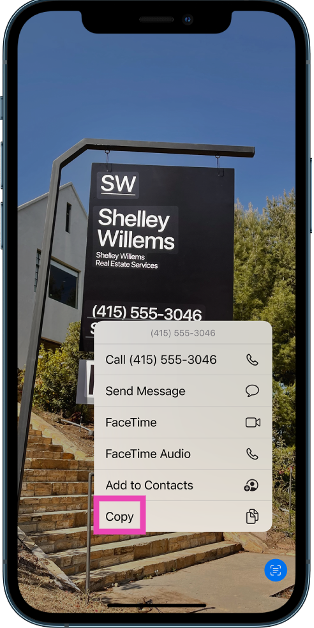
 Step 3: Select the image from your phone’s gallery.
Step 4: Hit Scan.
Step 3: Select the image from your phone’s gallery.
Step 4: Hit Scan.
 Step 5: Highlight the text and hit Copy.


 Step 3:
 Step 4:
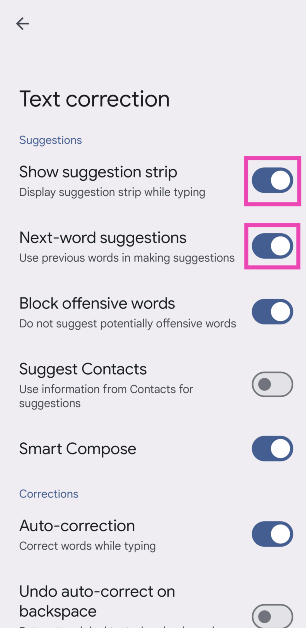 Step 5:
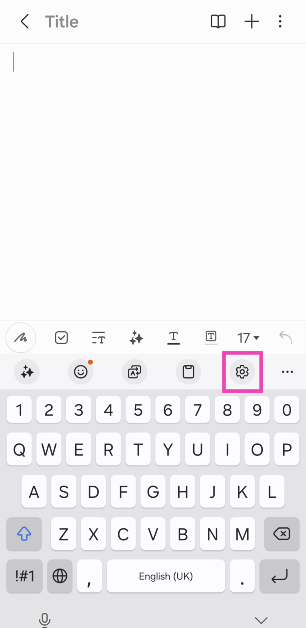 Step 3:
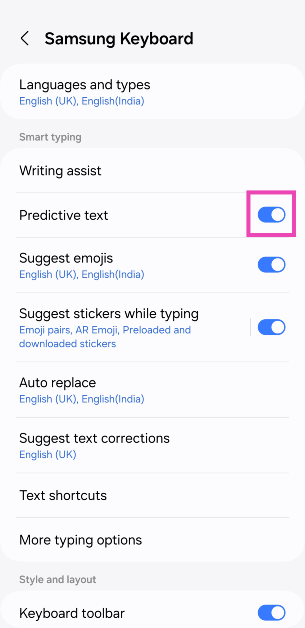
 Step 3:
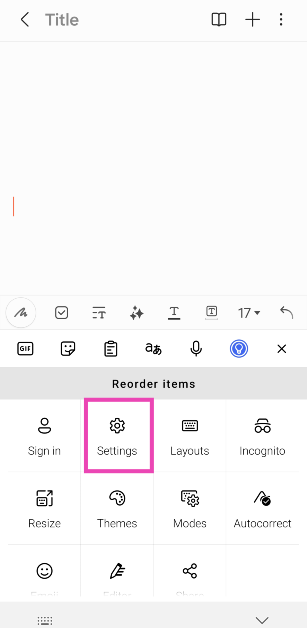 Step 4:
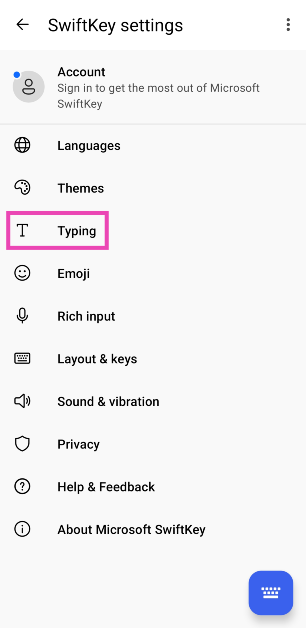 Step 5:
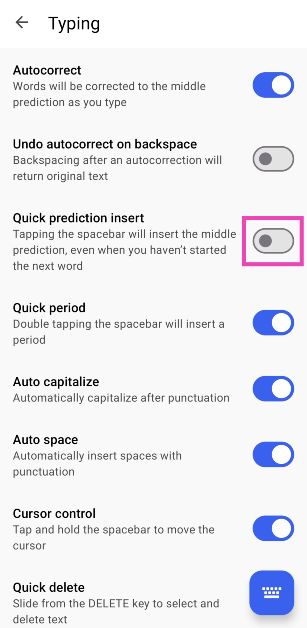
 Step 2:
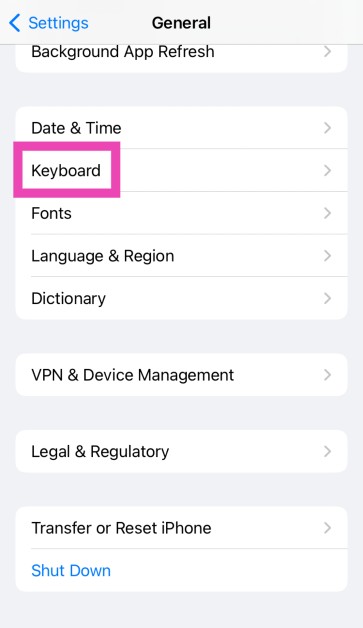 Step 3:
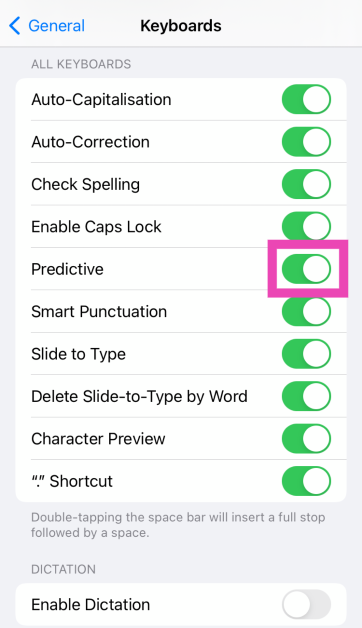

 Step 2:
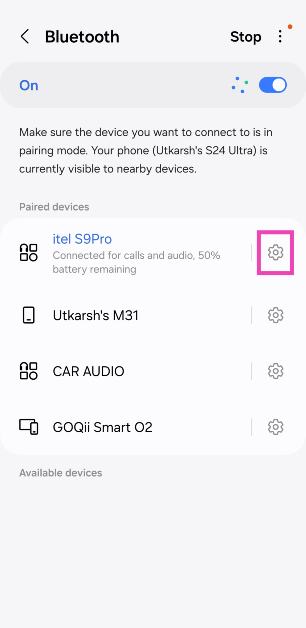 Step 3:
 Step 4:
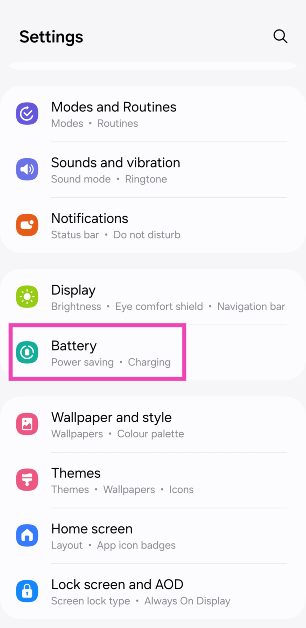 Step 2:
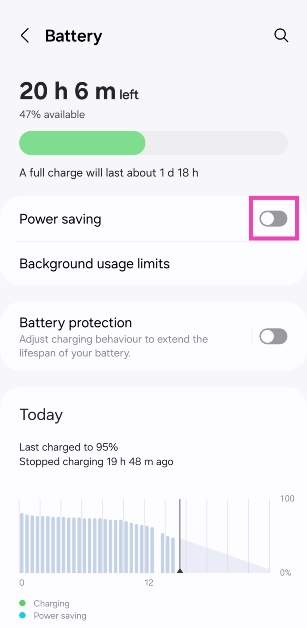
 Step 2: Launch the
 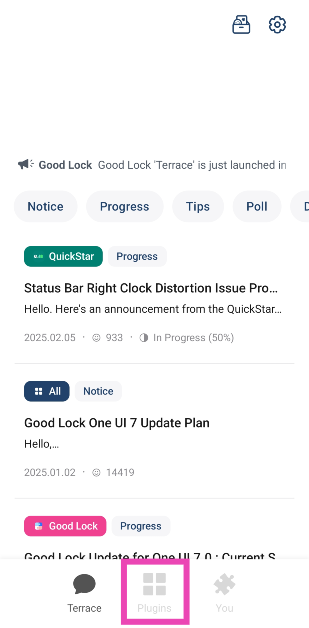 Step 3: Select Sound Assistant.
 Step 4: Go to Bluetooth metronome.
 Step 5: Use the slider to match the audio.
 Step 2: Hit the filter icon and turn on the toggle switch next to Show system apps.
 Step 3: Scroll down and select Bluetooth.
 Step 4: Go to Storage.
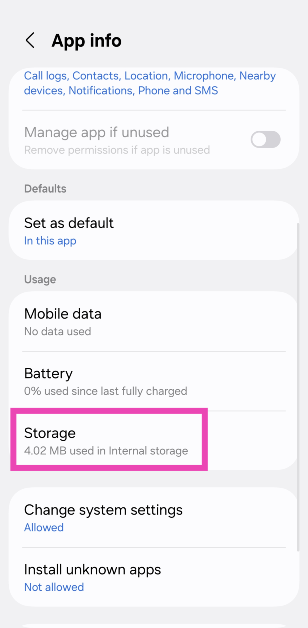 Step 5: Select Clear cache.

 Step 3: Select Settings and privacy.
 Step 4: Go to Media quality.
 Step 5: Select any option but lossless.

 Step 2:
 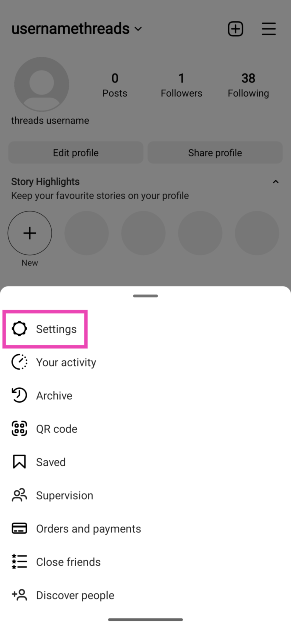 Step 4:
  Step 5:
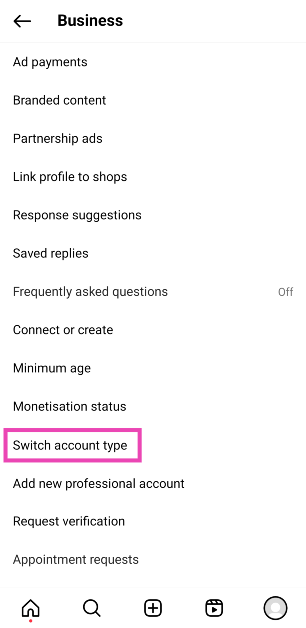 Step 6:


 Step 3: Hit Save.
 Step 4: Create your Reel and hit the music note icon.
 Step 5: Switch to the Saved tab.
 Step 6: Tap the song title.

 Step 2: Tap on Instagram.
 Step 3: Select Storage and cache.
 Step 4: Hit Clear Cache.
 It is possible that the issue lies with your smartphone, not your Instagram account. A quick restart can fix the background glitches causing this problem. Long-press the side button (or the side button + volume up key) to reveal the power menu. Select ‘Restart’ from the list.
 Step 2: Tap on Download and install.
 Step 3: Select Install now.
 If you’re using an old Android smartphone, chances are that Instagram hasn’t rolled out its latest features on it yet. It is unlikely that new features like Instagram music stickers will be rolled out on your device if they aren’t available already. Log in to your Instagram on a relatively newer device to use the full spectrum of features, including background music for Instagram stories.