Today OnePlus will be hosting a ‘Smooth Beyond Belief’ launch event.
At the OnePlus launch event today, the company will introduce the OnePlus 12 Series.
Alongside the OnePlus 12 and OnePlus 12R, the OnePlus Buds 3 TWS earphone will also make their debut.
Chinese brand OnePlus is all set to launch a bunch of new devices today at its Smooth Beyond Belief event. The company will update its flagship series in India, including two phones OnePlus 12 and OnePlus 12R. Apart from this, the firm will also introduce the OnePlus Bud 3, its premium TWS earphones. The devices will not only launch in India but it will be their global debut as well. OnePlus launch event will be held in New Delhi at Pragati Maidan.
How to watch OnePlus’s ‘Smooth Beyond Belief’ launch event
The ‘Smooth Beyond Belief’, a OnePlus launch event will be held today at the Pragati Maidan in New Delhi. The event is scheduled to begin at 7:30 PM IST. If you don’t have the invite or are not available in India you can experience the launch event virtually. The company will be streaming it live on their official YouTube Channel and across all their social media channels.We have also embedded the link below so you can watch the event on our website.
OnePlus 12, OnePlus 12R, OnePlus Buds 3 price in India expected
Before the official release, almost all of the relevant information about the new OnePlus 12 and OnePlus 12R was leaked online. In fact, before the official announcement, the anticipated price of the phones has already been revealed.The OnePlus 12 price in India is tipped to start at Rs 64,999 for the 12GB RAM variant. Whereas the 16GB RAM model is likely to launch at Rs 69,999. The device will likely go on sale in the country from January 30.The OnePlus 12R is said to be priced at Rs 39,999 for the 128GB storage option and Rs 41,999 for the 256GB internal memory model. OnePlus 12R’s first sale in India is expected to begin in February.The price of the OnePlus Buds 3 has also been tipped ahead of the January 23 launch. The audio device is likely to come with a price tag of Rs 10,499.The gadgets will be available for purchase on OnePlus.in, Amazon, and retail stores across the country as soon as they are officially released.
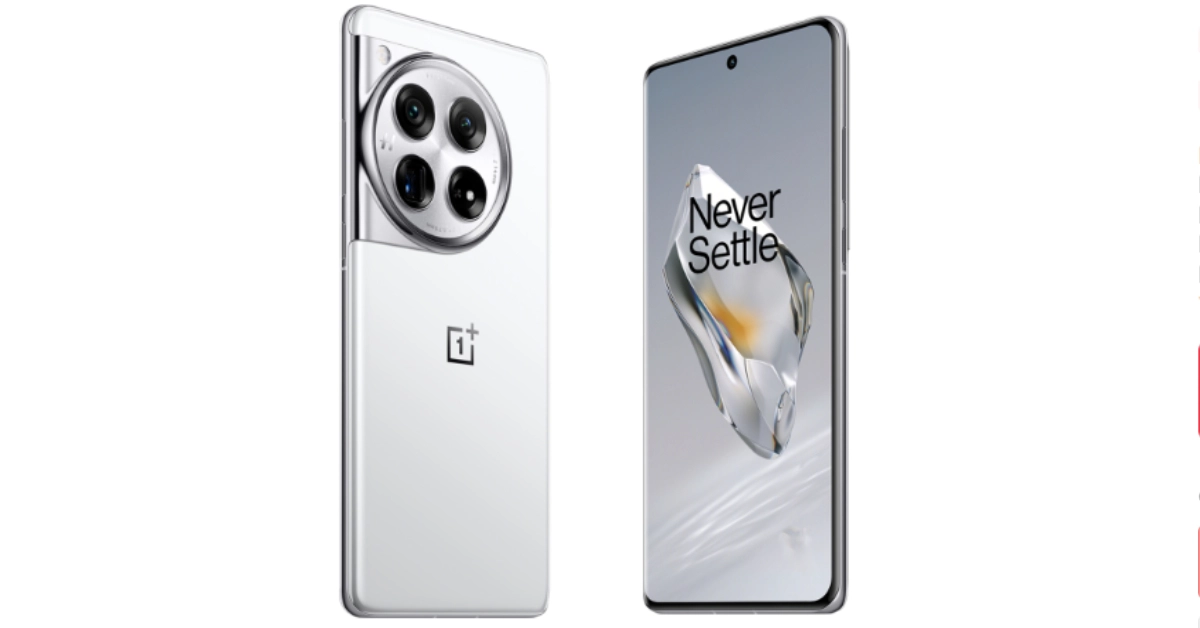
The OnePlus 12 features a 6.82-inch quad-HD+ LTPO OLED screen. The display has an adaptive refresh rate ranging between 1Hz and 120Hz. The screen supports 4,500 nits of screen brightness. The device is IP65-rated for dust and water resistance. The Qualcomm’s 4nm Snapdragon 8 Gen 3 SoC powers the phone. The device is offered with up to 24GB of LPDDR5X RAM and up to 1TB of UFS 4 inbuilt storage. The phone is endowed with a Hasselblad-branded triple rear camera with a Sony LYT-808 sensor, a 50-megapixel primary camera (OIS and f/1.6 aperture), a 64-megapixel telephoto secondary lens (OIS, 3X optical zoom, and f/2.6 aperture), and a 48-megapixel ultra-wide-angle lens (114-degree field-of-view). Lastly, there is a 32-megapixel front-facing camera (f/2.4 aperture) for taking selfies and video calling.The handset houses a 5,400mAh battery with 100W SuperVOOC wired, 50W wireless, and 10W reverse wireless charging support.OnePlus 12R is targeted at gamers and is a successor of the OnePlus 11R. The device will be available in two colour options Cool Blue and Iron Gray. The Cool Blue has a glossy finish with a light, fresh appearance, while Iron Gray has a matte feel to give a sophisticated and strong feeling. The gaming smartphone will also feature a similar coloured matte metal frame giving a more premium feel. OnePlus 12R has the iconic OnePlus Alert Slider located in its new home on the left of the phone.Also Read:Samsung Galaxy S24 series in India received 2.5 lakh pre-orders in India in just three daysOnePlus has officially revealed that the OnePlus Buds 3 will offer 44 hours of playback time. With a quick charge of 10 minutes, it will deliver 7 hours of battery life.Apart from this, the device will be offered in two colour options- Metallic Grey and Splendid Blue. The specs of the OnePlus Buds 3 India model is expected to be similar to Chinese variants.
Garena Free Fire is a battle royale game with regular awards and tournaments to keep players interested. If you play Garena Free Fire, you should be aware of the redeem codes that are released on a daily basis. However, because the battle royale game is banned in India, players from other countries can use the Free Fire Redeem codes daily. If you’re unfamiliar with the Garena Free Fire redeem codes or don’t know how to get them, we’ve put together a step-by-step guide to help you redeem them. Check out Garena Free Fire Redeem Codes for 23 January 2024.The Free Fire redeem codes are a great way to get free stuff. These are 12-digit codes that contain alphabets and numbers, as well as an expiration date and time. Because the Garena FF redeem codes cannot be used more than once, you should hurry to the redemption page to claim your free reward before someone else does. To get a free reward, all you have to do is go to reward.ff.garena.com/en, which is the official redemption page. Also, keep an eye on this space for daily updates on Garena Free Fire redemption codes and rewards.
Garena Free Fire Redeem Codes Today 23 January 2024
Perhaps you have been enjoying playing your favorite videos on your device then suddenly you cannot access or play them. When you try to open with your video player, you get an error message on the screen like “Windows player cannot play the file. The player might not support the file type or might not support the codec that was used to compress the file”.
While you can receive different error messages depending on your video player, just know that your video file is corrupted and you need to fix it. If you are in this mayhem, the best remedy is to recover these video files. However, this is not always an easy task especially if you are an amateur.
Fortunately, this article walks you through a complete guide on how to recover unplayable and inaccessible videos without dropping a sweat.
Can you recover Unplayable and Inaccessible Videos?
Yes, it is possible to recover inaccessible and unplayable videos on your device. The ease and efficacy depend on the recovery method of your choice. Traditional recovery methods are complicated and offer little chance of success. Their success often depends on the extent of video or storage damage. The higher the damages the lower the success rates.
On the other hand, using dedicated tools is a game-changer because it often guarantees success and is less complicated. They provide plenty of features to allow you to tackle various video/data recovery needs without hiring an expert. However, your choice of tool can make or break your video recovery experience. Therefore, if you select the right video recovery tool, you can recover your inaccessible and unplayable videos without much effort.
How to recover Unplayable and Inaccessible Videos without software
There are several ways you can recover unplayable or inaccessible videos without software. While these options can prove useful, they are often complicated and don’t guarantee success. Some of the possible options to recover unplayable and inaccessible videos without software include:
Way 1. Use VLC
While VLC is a media player, it comes with other tools to fix media file problems. However, it doesn’t provide comprehensive tools to solve several media file issues. With VLC, you cannot solve the video inaccessible issue. The following steps show how to fix an unplayable video on VLC.
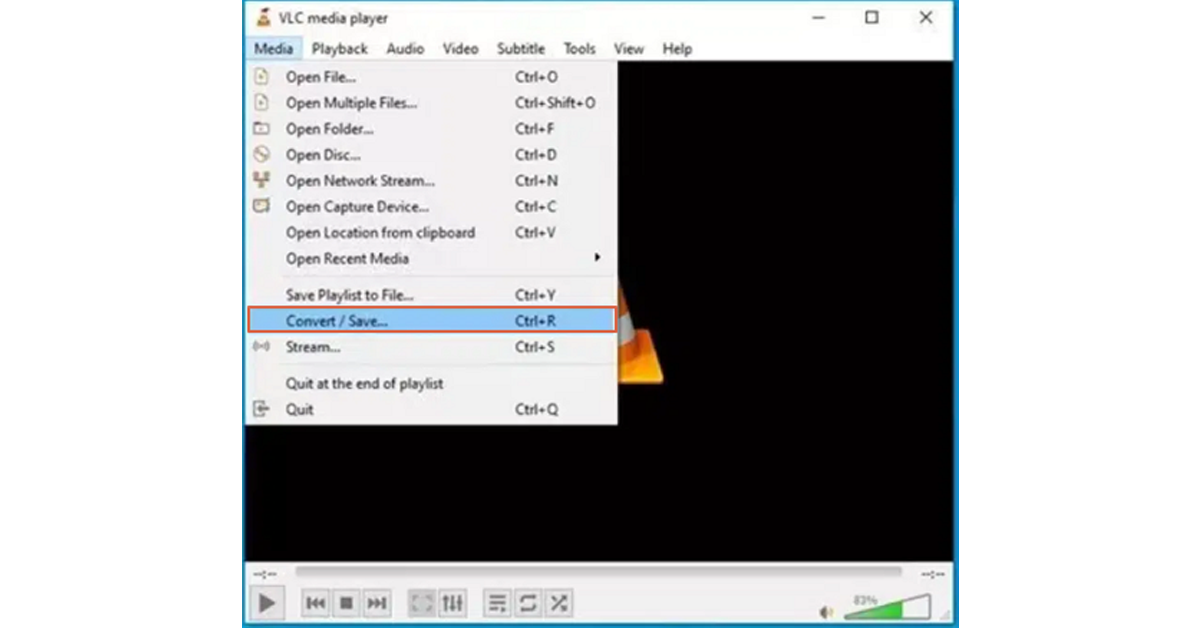
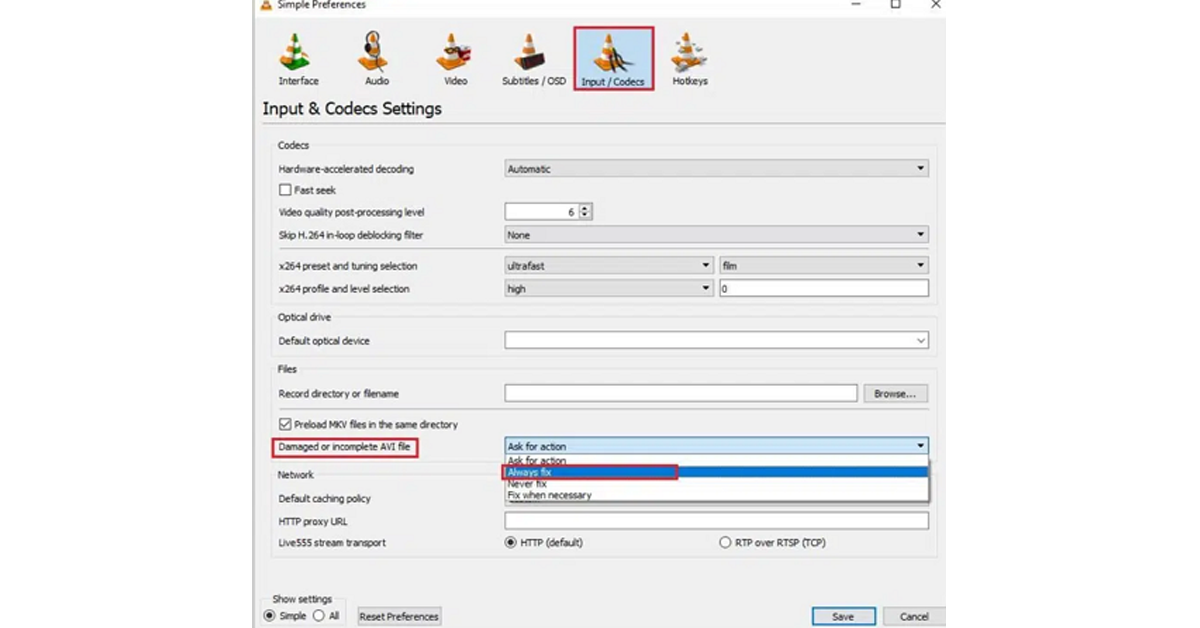
Step 1. Open VLC on your computer and navigate to Media>Convert/Save. Upload the unplayable video then hit the “Convert/Save” button.
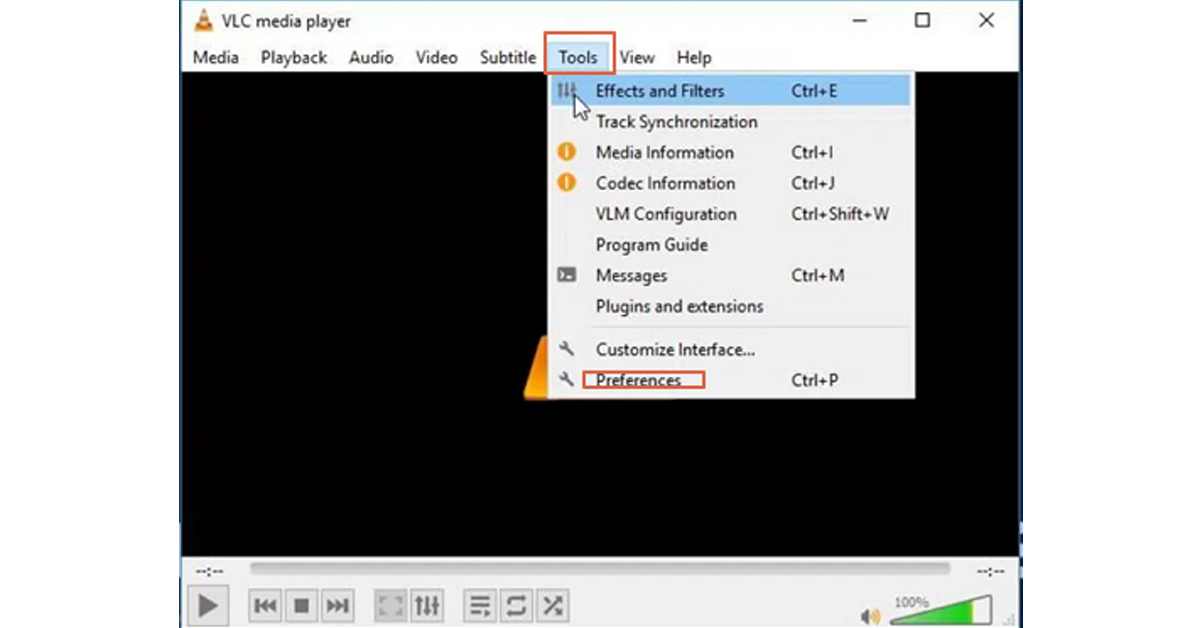
Step 2. In the next screen, choose a destination folder and tap the “Start” button. Proceed to Tools>Preferences.
Step 3. In the subsequent Preferences window, choose the “Always Fix” option beside the “Damaged or Incomplete AVI”. Finally, hit “Save” to save your repair file.
Play the file to see whether it is repaired or not.
Way 2. Contact Video Recovery Professionals
If you are stuck and cannot fix the unplayable or inaccessible video issues, then try a video recovery specialist near you. While these specialists have experience, they will probably charge you a lot and prove costly. Furthermore, some specialists are not as experienced as they purport. They might mess up with your device and end up having a series of issues to fix.
Suggested: Easily recover Unplayable and Inaccessible Videos free
Traditional methods of recovering unplayable and inaccessible videos are limited and you cannot bank on them. Therefore, using a dedicated video recovery tool is the most reliable option for all video/data recovery needs. Well, there are several video recovery tools in the market yet finding a tool that meets your needs within your budget is a hard nut to crack. Fortunately, Wondershare Recoverit ticks all the boxes. This amazing video recovery tool lets you recover unplayable and inaccessible videos with ease and speed for free.
Wondershare Recoverit provides an enhanced video recovery feature that offers specially developed data collection algorithms and technologies for video recovery. These enhanced capabilities let you do more and recover video data that other solutions can’t recognize, optimize, or extract. Therefore, you can use it to recover those videos that still can’t play even after you try to restore them by yourself.
Unlike other tools, Wondershare Recoverit Enhanced Video Recovery can search and recover inconsistent video fragments and restore them with enhanced video quality! The beauty of Wondershare Recoverit Enhanced Video Recovery is that it supports the recovery of myriads of video formats, is easy to use, is compatible with popular systems, and boosts amazing recovery success.
Key Features of Wondershare Recoverit
Recover over 1000 different types and formats of data files.
Recover files from over 2000 storage locations.
Data recovery from over 500 data loss scenarios including virus attacks, disk damage, accidental deletion, and system crashes among others.
Recover data from a crashed computer by creating a bootable USB drive.
Recover all types of video resolutions including Ultra HD, 4K, and 8K videos.
Recover surveillance and car camera video.
Provides two repair modes to fix corrupted, truncated, or broken videos to meet different user needs and repair quality.
Recover corrupted videos remotely from NAS storage devices.
How to Recover Unplayable and Inaccessible Video using Wondershare Recoverit Enhanced Video Recovery
Recovering inaccessible or unplayable video with Wondershare Recoverit is easy and can be done by anyone as illustrated below.
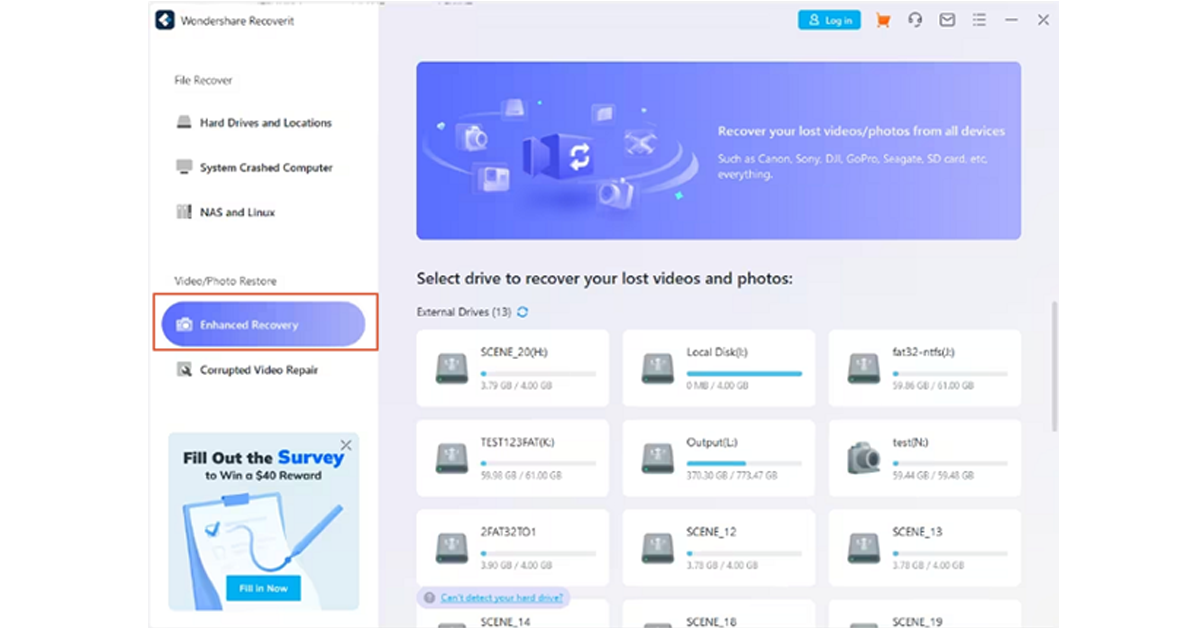
Step 1. First, download Wondershare Recoverit for free and install it on your computer. Once installed, launch it to access the primary interface. On the left pane of your main window, select the “Enhanced Recovery” option. Proceed and choose the recovery drive from the list displayed.
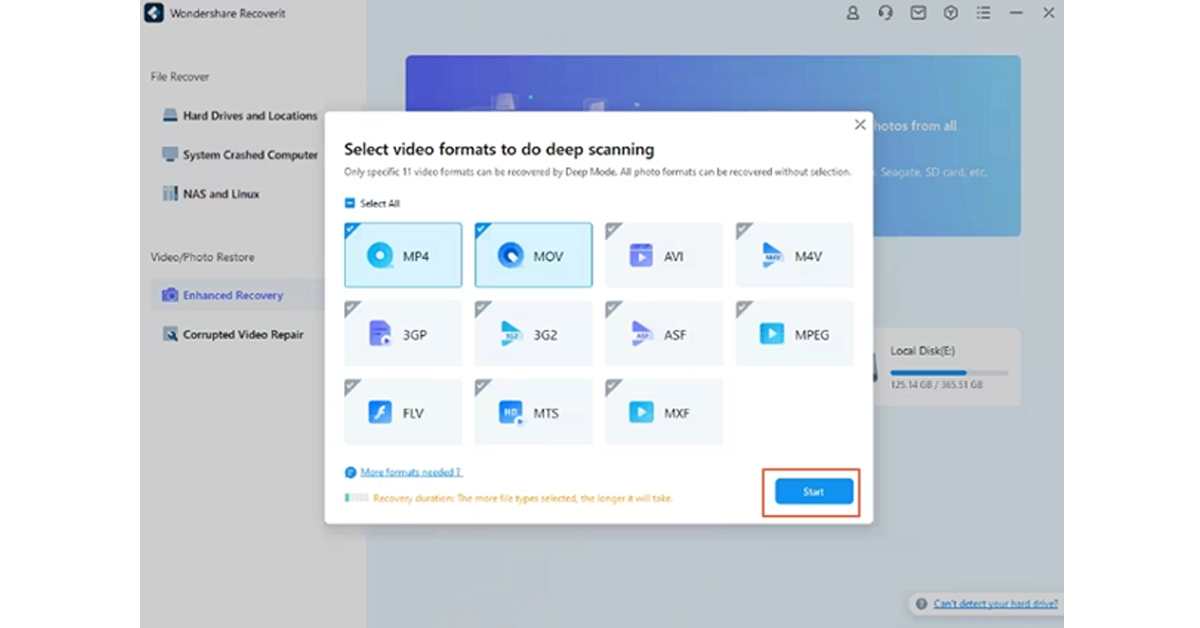
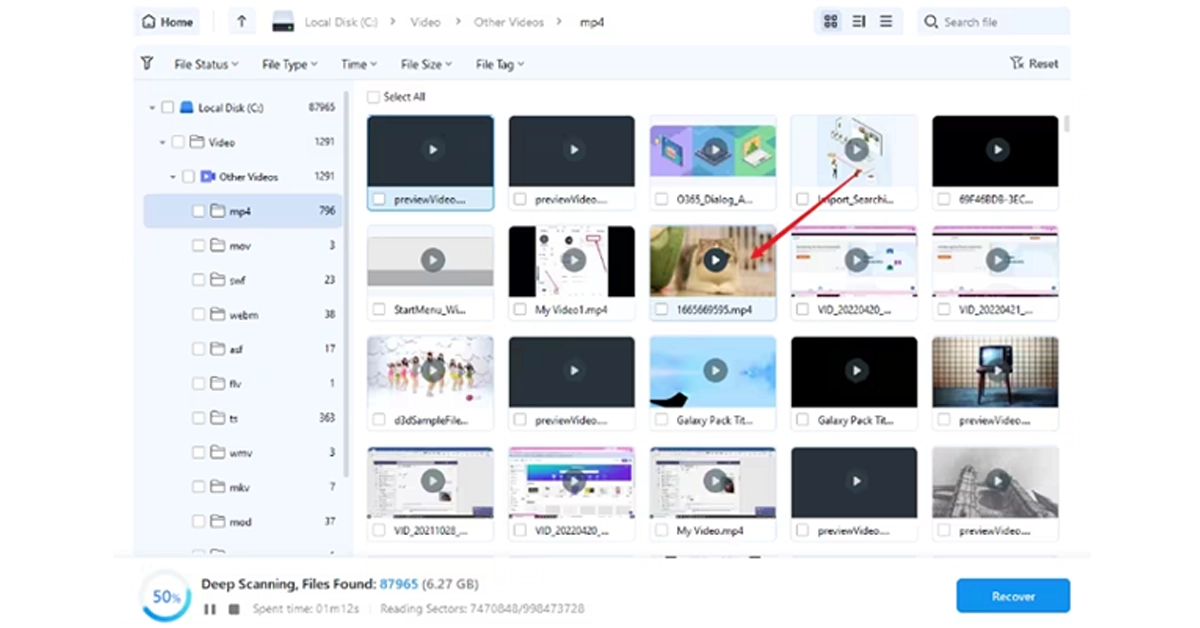
Step 2. Once you choose the desired disk, Wondershare Recoverit will ask you to select the video format. You can select more than one video format and click the “Start” button to allow the program to initiate the deep scan process.
Step 3. When the deep scan is completed, you should see the list of video files recovered. You can click the “Preview” button to confirm whether your unplayable or inaccessible videos have been recovered.
Step 4. Finally, select these videos and hit the “Recover” button. This will open a new window on your computer to allow you to save the recovered files. Make sure you choose a convenient and safe location.
Bonus tips to avoid Inaccessible or Unplayable Video Situations
While it is easy to recover unplayable or inaccessible videos with dedicated software like Wondershare Recoverit Enhanced Video Recovery, it is also important to prevent cases of inaccessible or unplayable videos if possible. Some of the practical tips include:
Install a good antivirus on your device to avoid cases of malware attacks on your videos.
Update your operating system regularly to have the latest security patches.
Keep your external storage devices appropriately to avoid physical damage or exposure to extreme conditions.
Always backup your videos so that you can easily retrieve them in case the primary storage location is corrupted.
Ensure your PC or device is always running under optimal conditions.
Avoid interrupting operations on your storage or PC because it can tamper with your files.
Conclusion
Unplayable and inaccessible videos can be quite annoying. While there are several traditional ways to recover these videos, using Wondershare Recoverit Enhanced Video Recovery gives you a platform to solve virtually all video/data recovery issues without spending much. Download Wondershare Recoverit today and seamlessly transform how you recover unplayable and inaccessible videos on your device.
Safari is one of the best mobile web browsers around, but it is not immune to weird malfunctions. Users often report being unable to access a website even with a working internet connection. This can get pretty annoying quickly, especially if you can’t figure out the reason behind it. Luckily, there are a few methods you can use right away to restore the optimum web browsing experience. Today, we bring you the top 8 methods to fix the ‘Safari cannot open the page because the address is invalid’ issue on your iPhone.Read Also:OnePlus 12, OnePlus 12R and OnePlus Buds 3 price in India, sale date with launch offers leaked ahead of tomorrow’s launch
Why is Safari displaying the ‘Cannot Open the Page Because the Address is Invalid’ error?
Even though the error message is pretty self-explanatory, it can pop up due to several reasons. The most obvious of them all is an incorrect URL entered by the user. This is the easiest to fix as well. All you need to do is tap on the address bar and closely examine the URL for any errors or typos.But what happens if you continue facing this error even after entering the correct URL? First, you need to ensure that the error message is not a website popup. A lot of dodgy websites (this mostly includes piracy platforms) are littered with malicious popups that are meant to push malware and ransomware on your device. These popups may be disguised as error messages to get you to click on them and extract further information about your device.If you’re certain that the error message is genuine and not a popup, there could be a couple of reasons triggering it on your iPhone. The most common reason behind this issue is a faulty internet connection. Other reasons may include software bugs, corrupted cache, and unresponsive servers. Here are some fixes.
Restart your iPhone
If a background software issue is causing the webpage to not load properly, it can be fixed with a quick restart. Press and hold the side key along with either volume button to reveal the power menu. Drag the power slider across the screen to turn it off. Wait for 30 seconds after the iPhone has switched off and long-press the side key to turn it on.
Refresh the page
If the Safari browser on your iPhone is unable to load a page and throws the ‘Address is invalid’ error your way, simply hit ‘Refresh’. It is entirely possible that a lapse in the internet connection caused Safari to run into that error. Refreshing the page can fix that. Make sure you have typed the correct URL before hitting refresh.
Clear Safari’s cache and cookies
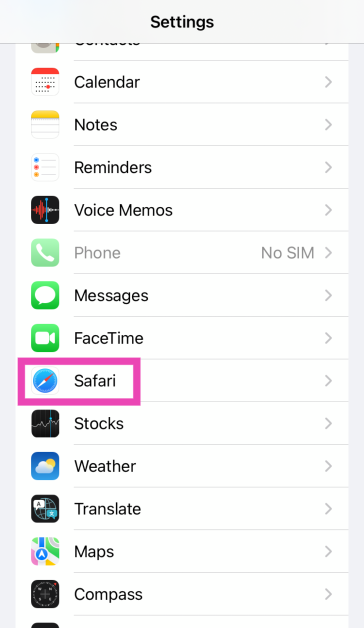
Step 1: Go to Settings and select Safari.Step 2: Scroll down and tap on Clear History and Website Data.Step 3:Confirm your selection in the popup box.
Check the internet connection
If you are trying to load a webpage without being connected to the internet, you will get the ‘Safari cannot open a page because the address is invalid’ error on your device. The same applies when you are connected to the internet, but the signal strength is not up to the mark. Switch to a better network and try again. If you do not have access to another connection, move to a spot where your device is able to receive a stronger signal.
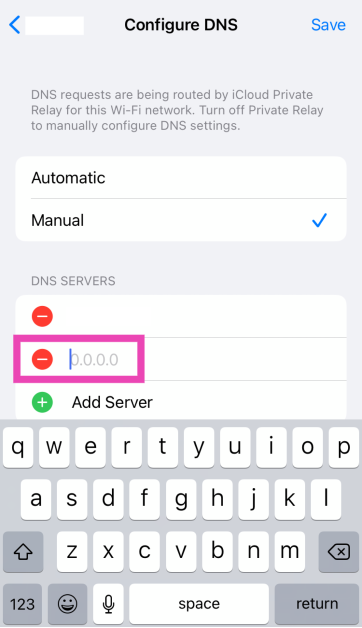
Change the DNS
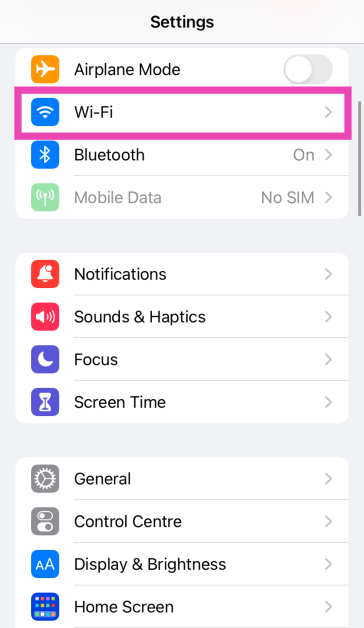
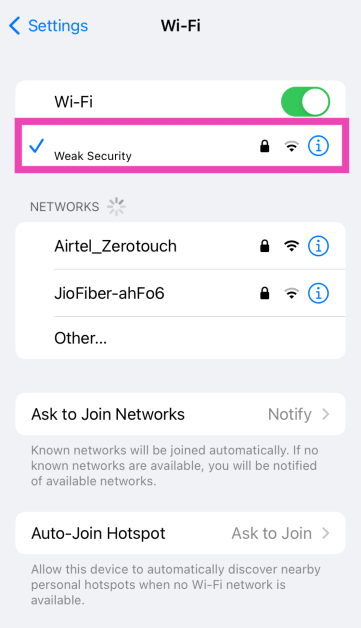
Step 1: Go to Settings and tap on WiFi.
Step 2: Hit the i icon next to the connected WiFi network.
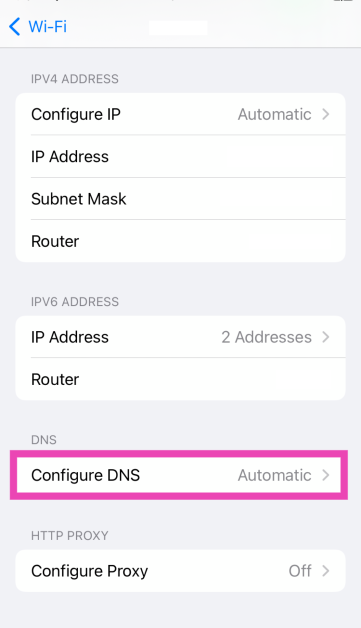
Step 3: Tap on Configure DNS.
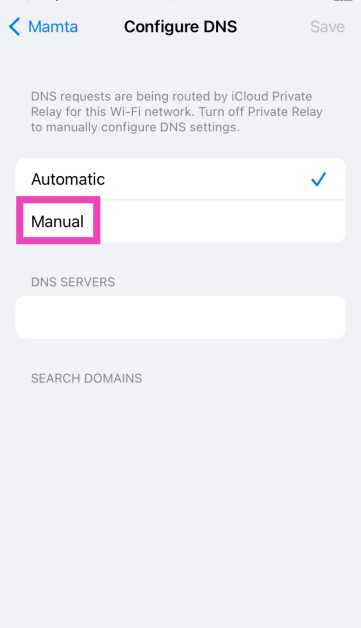
Step 4: Select Manual.
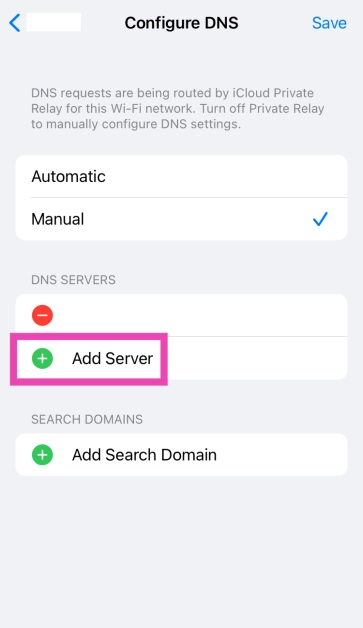
Step 5: Tap on Add Server.
Step 6: Enter the address of your preferred server.
Use Private Browsing
The Private Browsing tab in Safari can circumvent local cache and DNS issues. If you’re having trouble loading a web page on the browser, switch to the private tab to resolve the issue. Tap the Tabs icon in the bottom right corner of the screen and switch to the Private tab. Once you’re in Private mode, open a new tab and load the web page again.
Check if the website’s servers are down
If the problem still persists after checking the URL and internet connection, it would be a good idea to check whether the website’s servers are down. Go to Downdetector.in and enter the name of the website that isn’t loading in Safari. If you see a spike in user reports, it means the website is currently experiencing a server outage. The only thing you can do in this scenario is wait for the servers to be restored again.
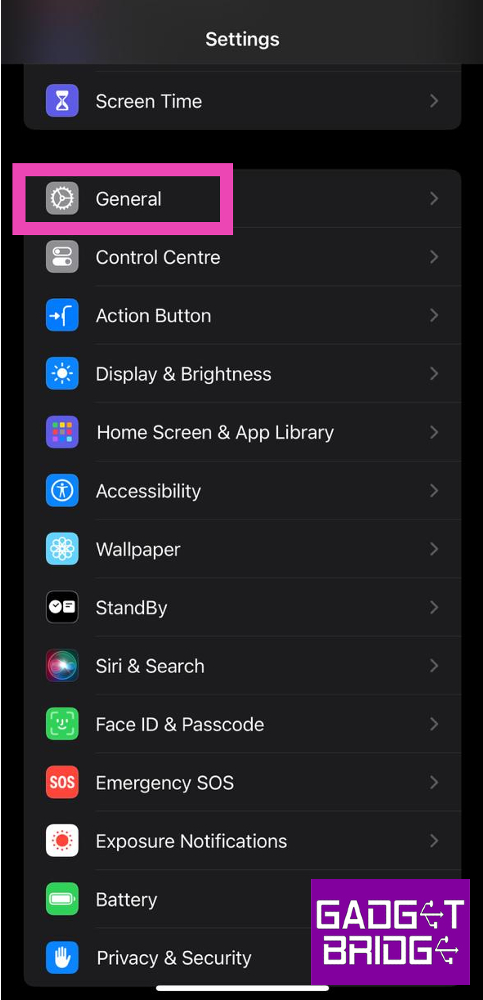
Update iOS
Step 1: Make sure your iPhone is connected to a WiFi network and plug in its charger.Step 2: Go to Settings and select General.Step 3: Select Software Update.Step 4: Tap on Download and Install.
Frequently Asked Questions (FAQs)
Why am I seeing the ‘Safari cannot open a page because the address is invalid’ error on my iPhone, and how can I fix it?
You may come across this error when you enter the wrong URL or if you are not connected to the internet. Anytime Safari isn’t able to make contact with the website’s servers, it displays this message.
How do I check if a website is experiencing a server outage?
Go to DownDetector.in, enter the name of the website, and check recent user reports to see if other people are experiencing a server outage as well.
Why does Safari keep saying that the address is invalid?
If you entered the incorrect URL, Safari will display the ‘Address is Incorrect’ error. This error also comes up when there’s a fault with your internet connection or DNS.
Why can’t Safari open a specific address?
If you’re having trouble going to a specific website on Safari, it could be because the website’s servers are down or it is restricted on your network.
These are the top 8 ways to fix the ‘Safari cannot open a page because the address is invalid’ error on your iPhone. Force-quitting and restarting the Safari web browser can also resolve this problem in certain situations. If you know any other way to fix this issue, let us know in the comments!
Samsung Galaxy S24 series includes Galaxy S24, Galaxy S24+, and Galaxy S24 Ultra.
The Ultra variant in India is powered by the Snapdragon 8 Gen 3 Mobile Platform for Galaxy.
Whereas S24 and S24+ come with an Exynos 2400 SoC.
Last week Samsung introduced an AI-powered Galaxy S24 Series. Five days after its release the new flagship lineup has amassed 2.5 lakh pre-orders. Samsung has announced Indian pricing for the Samsung Galaxy S24, Galaxy S24+, and Galaxy S24 Ultra. The phone runs on Android 14-based One UI 6.1. Moreover, the phone comes with a dynamic AMOLED 2X display with support for up to 120Hz refresh rate.Samsung revealed today that record pre-orders for its recently released flagship Galaxy S24 series have been placed. The series was officially announced 5 days ago. The pre-booking window went live three days ago on January 18, and over 250,000 buyers in India had placed orders. When Samsung Galaxy S23 was launched last year the company managed to obtain 250,000 pre-bookings during the course of three weeks in India.Raju Pullan, Senior Vice President, MX Business, Samsung India, said, “Galaxy S24 series, powered by Galaxy AI, ushers in a new era of mobile revolution and puts the power of AI in the hands of consumers to open up new possibilities. With Galaxy S24, consumers can transcend the barriers of communication and maximise their productivity and creativity to empower their everyday lives. The huge success of the Galaxy S24 series demonstrates that Indian consumers are early adopters of new technology. I would like to thank our consumers for their overwhelming response to the Galaxy S24 series.”
Samsung Galaxy S24, Galaxy S24+ and Galaxy S24 Ultra price in India
The Galaxy S24 Ultra is available in India in three different configurations. The price of the 12GB RAM + 1TB storage is set at Rs 1,59,999, 12GB RAM + 512GB storage comes with a price tag of Rs 1,39,999 and the 12GB RAM + 256GB storage costs Rs 1,29,999.The Galaxy S24+ will be available in two different variants. The 12GB RAM + 512GB storage is made available at Rs 1,09,999 and the 12GB of RAM and 256GB storage has been priced at Rs 99,999.Lastly, the Galaxy S24 has been launched at Rs 89,999 for the 8GB RAM + 512GB storage and 8GB RAM + 256GB storage at Rs 79,999.Colour options for:Galaxy S24: Amber Yellow, Cobalt Violet, Onyx, and BlackGalaxy S24 Plus: Cobalt Violet, Onyx BlackGalaxy S24 Ultra: Titanium Gray, Titanium Violet, Titanium Black and Titanium Gray
Samsung Galaxy S24 Series specifications
The Samsung Galaxy S24 Ultra features a 6.8-inch QHD+ Dynamic AMOLED 2X Display with a Super Smooth 120Hz refresh rate (1~120Hz), 2,600nit peak brightness, and a Vision booster. The screen is protected with Corning Gorilla Armor. Whereas the Galaxy S24 and S24+ come with 6.2-inch FHD+ and 6.7-inch QHD+ Dynamic AMOLED 2X displays, respectively.The smartphones come equipped with a tweaked version of the Snapdragon 8 Gen 3 SoC, which Samsung is calling the Snapdragon 8 Gen 3 Mobile Platform for Galaxy. In India, only the Ultra Variant comes with a Qualcomm processor, whereas the other two models house an Exynos 2400 SoC. The smartphone will be shipped with Android 14 with UI 6.1. The company will provide seven generations of OS upgrades and seven years of security updates.Galaxy S24 Ultra has a quad rear camera setup that includes a 12MP Ultra-Wide Camera (F2.2 aperture, FOV-120˚), 200MP Wide Camera (OIS, F1.7 Aperture, and FOV-85˚), 50MP Telephoto Camera (5x Optical Zoom, OIS, F3.4 aperture, and FOV of 22˚) and a 10MP Telephoto Camera (3x Optical Zoom, OIS, F2.4 aperture, and FOV 36˚).On the other hand, the Galaxy S24 and Galaxy S24+ have the same triple rear camera setup that includes a 12MP Ultra-Wide Camera (F2.2, FOV 120˚), 50MP Wide Camera (OIS F1.8, FOV 85˚) and a 10MP Telephoto Camera (3x Optical Zoom, F2.4, FOV 36˚). All the models come with a 12MP selfie camera (F2.2, FOV 80˚).Also Read:Samsung Galaxy S24, Galaxy S24+ and Galaxy S24 Ultra prices in India revealed: Details InsideFor connectivity, there is 5G, 4G LTE, Wi-Fi 7, Wi-Fi Direct, Bluetooth 5.3 and a USB Type-C port. The S24 Ultra, S24+, and S24 boast a 5,000mAh, 4,900mAh, and 4,000mAh battery, respectively.The Galaxy S24 Ultra comes with a S Pen stylus. In addition to this, all the variables include Samsung Knox, Knox Vault, and Passkeys.Also Read:OnePlus 12, OnePlus 12R and OnePlus Buds 3 price in India, sale date with launch offers leaked ahead of tomorrow’s launchBesides this, all the phones in the Galaxy S24 Series come pre-loaded with Live Translate, Note Assist, and Circle to Search, powered by built-in AI features.
WhatsApp is currently testing a new feature where users will be able to share files with people nearby.
In the future, beta testers will be able to trial a new feature that makes it simple to share files with someone nearby.
The upcoming feature will guarantee confidentiality and anonymity during all file sharing.
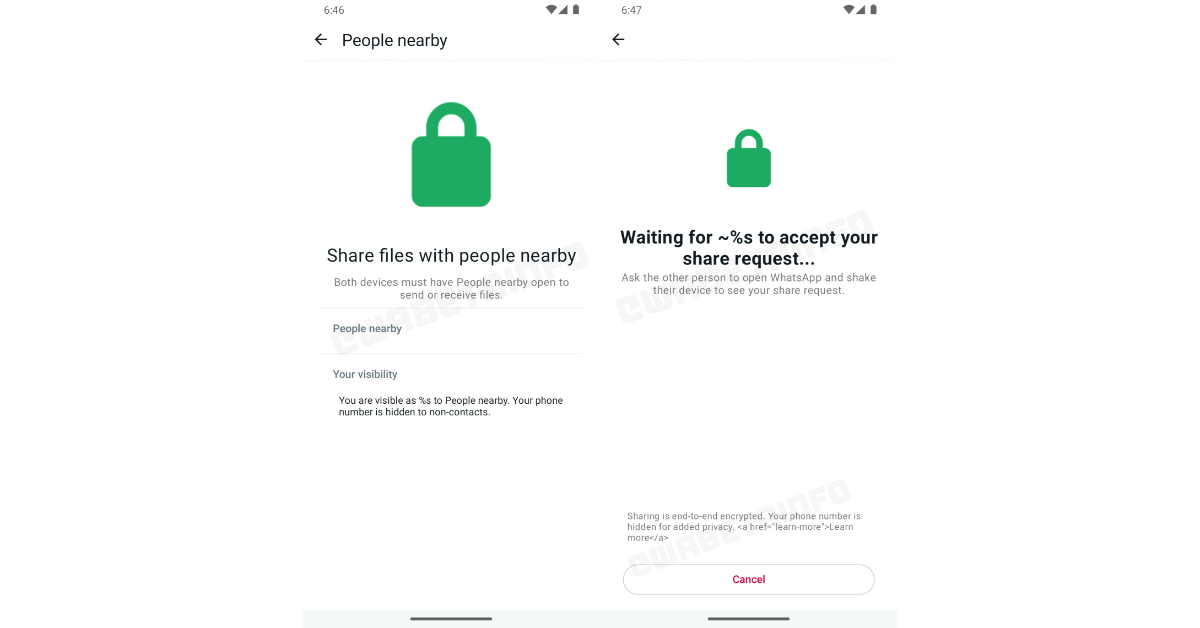
A new feature for sharing files with individuals nearby is being developed by WhatsApp. The new function would enable users to exchange files with contacts nearby. The feature will make sharing files across WhatsApp users easier and will be similar to Android’s Nearby Share.According to a report by WAbetaInfo, File transfers via Bluetooth are possible with WhatsApp for Android’s most recent beta version (2.24.2.17). It offers a quicker and more useful option by allowing users to trade files up to 2GB in size. The functionality is expected to be released to all the users in a later version.Image Courtesy: WABetaInfoAs per the shared screenshot beta testers have the ability to share files with someone nearby. The screenshot further illustrates that to share a file one needs to shake the device to generate a share request, maintaining a controlled approach to file exchanges. The sharing will also be end-to-end encrypted when done on an unidentified network and outside of a WhatsApp chat.Also Read:OnePlus 12, OnePlus 12R and OnePlus Buds 3 price in India, sale date with launch offers leaked ahead of tomorrow’s launchWe think that it is a safer way to share a file with someone in close proximity because your phone number is never disclosed to non-contacts, guaranteeing confidentiality and anonymity.Also Read:Vivo G2 powered by MediaTek Dimensity 6020 SoC announced: Pricing and availability details insideWhatsApp’s new file-sharing feature with others nearby is in the developmental phase and we are not sure when it will be available to all the users. But it is expected to arrive in a future update of the app.
The affordable mini projector segment is filled with numerous products with similar specs, making the task of choosing one quite overwhelming. We recently got our hands on the Clokowe T08, which is a portable LED projector that caters to your entertainment needs. Priced at $100, it seeks to offer the most bang for your buck. On paper, it gets the basics right. It can deliver 720p footage, supports all the major casting standards, comes with a remote control, and offers automatic keystone correction. We used it for a week to watch movies, TV, and live sports. Here is our in-depth review of the Clokowe T08 LED mini projector.Read Also:Is Mobile Gaming the Peak of the Gaming Industry Development: What’s Next?
Clokowe T08 Mini Projector review: Design
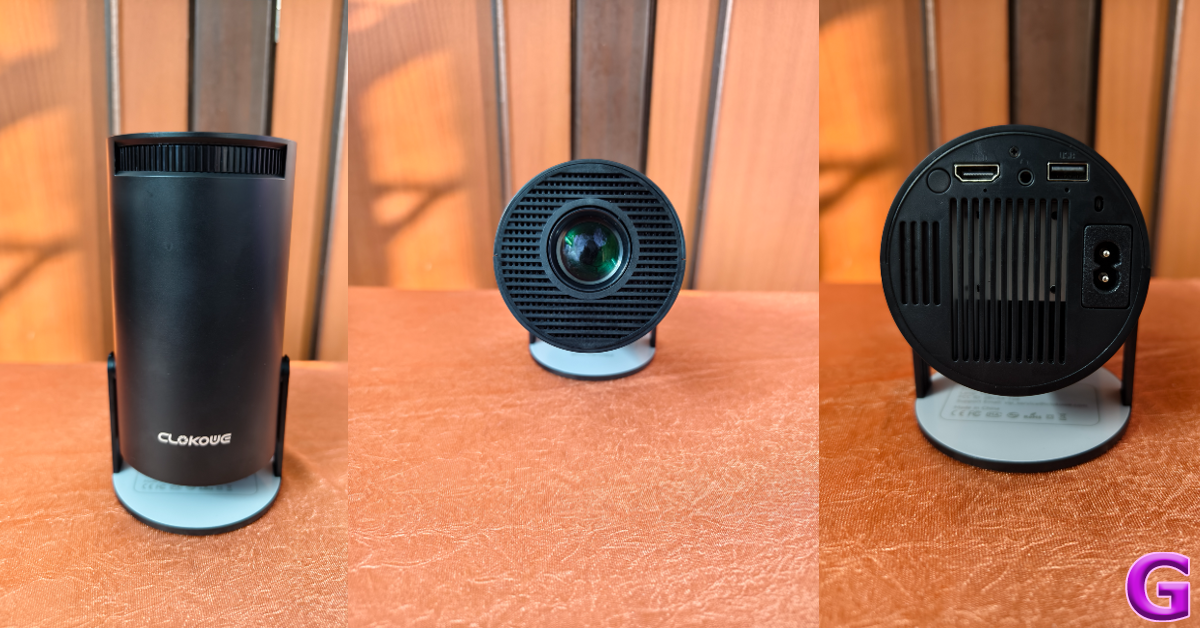
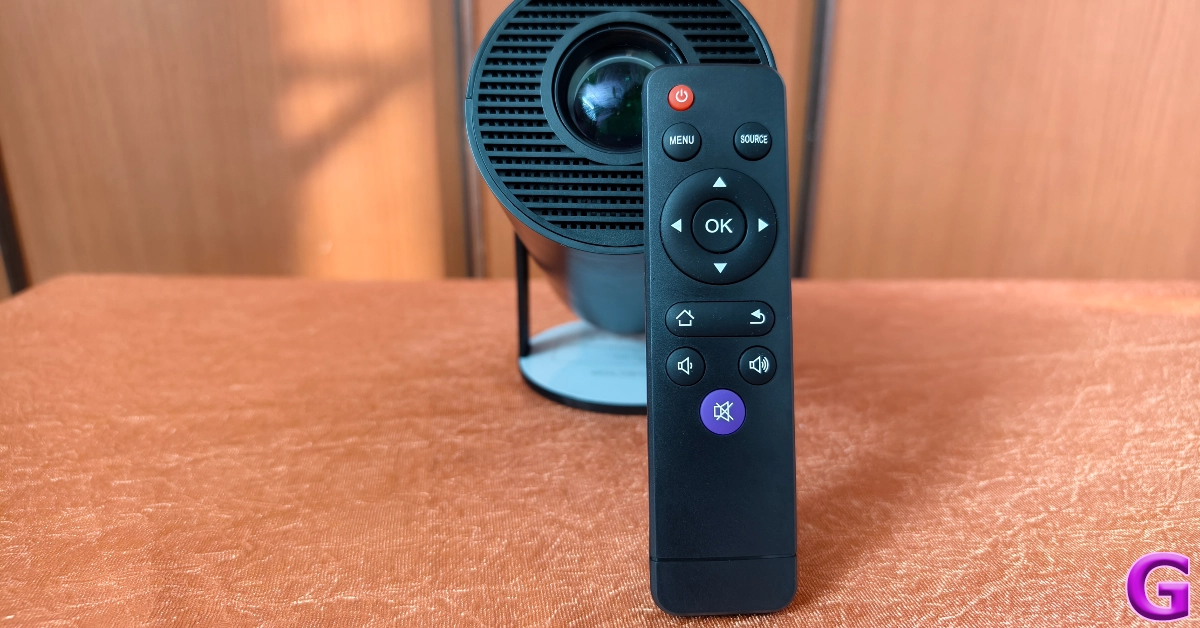
Inside the Clokowe T08 retail package, you will find the mini projector, a remote control, a power cable, an HDMI cable, a user manual, and a quick start guide. The remote control needs 2 AAA batteries to function. These batteries have not been provided in the box.The T08 mini projector has dimensions of 4.69 x 5.28 x 8.6 inches. Its tube-like design makes it easy to tuck away in your luggage or backpack while travelling. The circular platform uses two hinges to hold the device. Adjusting the position of the projector requires no effort whatsoever. The front and rear ends of the projector are covered with a mesh grille. The area surrounding the lens up front is used as an air inlet. The fan at the rear expels the warm air out of the device. Even when it is running at full force, the sound created by this fan does not amount to a distraction.The rear panel of the projector houses the power button, an HDMI port, a 3.5mm headphone port, a USB port, and the power input. There are no media controls on the projector. The only way to control the playback is through the remote. A 3W speaker is integrated into the device, and you can also pair it with your home speaker via a 3.5mm headphone jack (not included in the box) or a Bluetooth connection. There is a scroll wheel up top to focus the image on the screen.Once propped up on a flat surface, the Clokowe T08 mini projector can be rotated up to 180 degrees. Automatic keystone correction ensures that you always get a rectangular picture on the screen. If you’re feeling adventurous, you can even point the projector to the ceiling. The build of the device is all plastic but it does not feel flimsy at all. Weighing just over 500 grams, you can easily carry it around with you. Even though we didn’t test it for any falls, the device can take a few knocks.
Clokowe T08 Mini Projector review: Performance
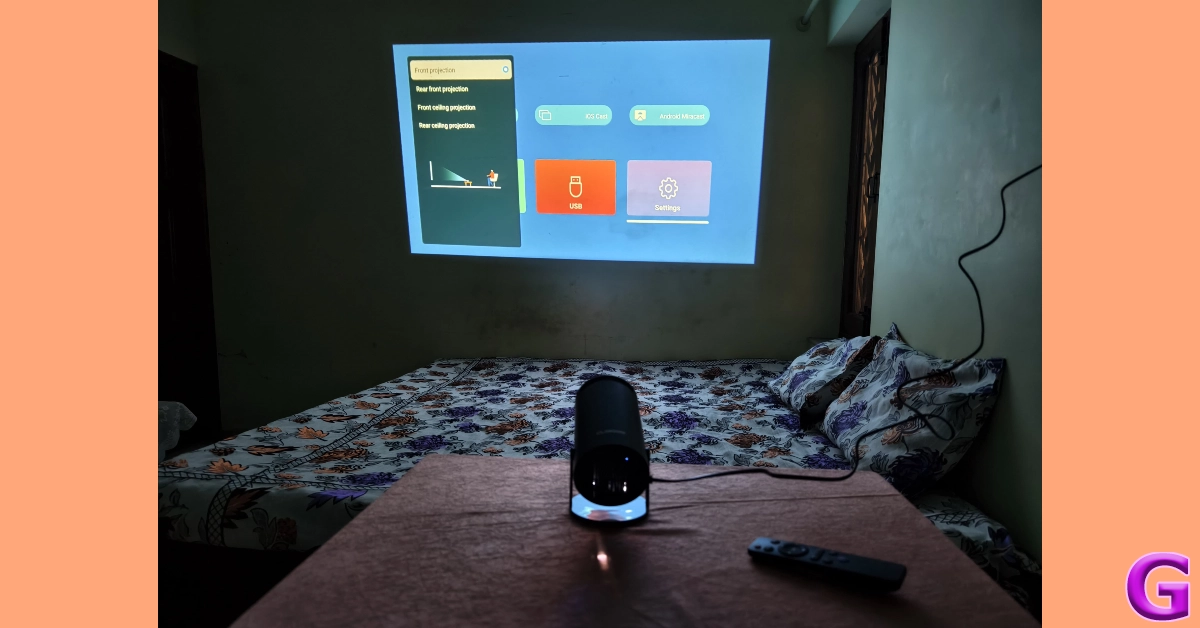
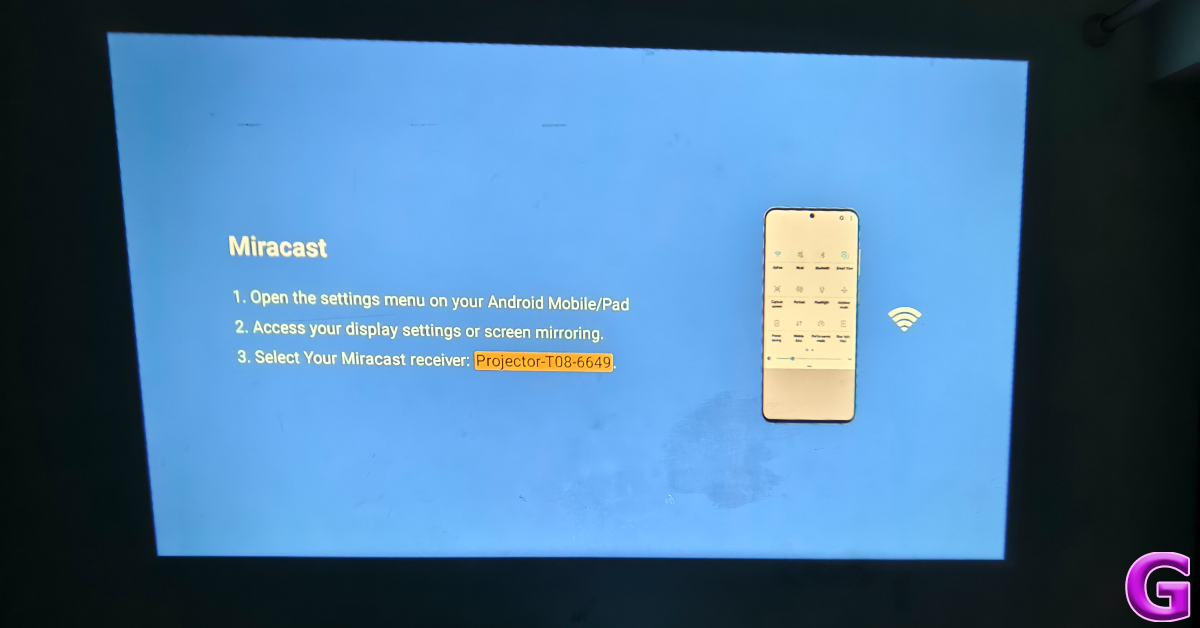
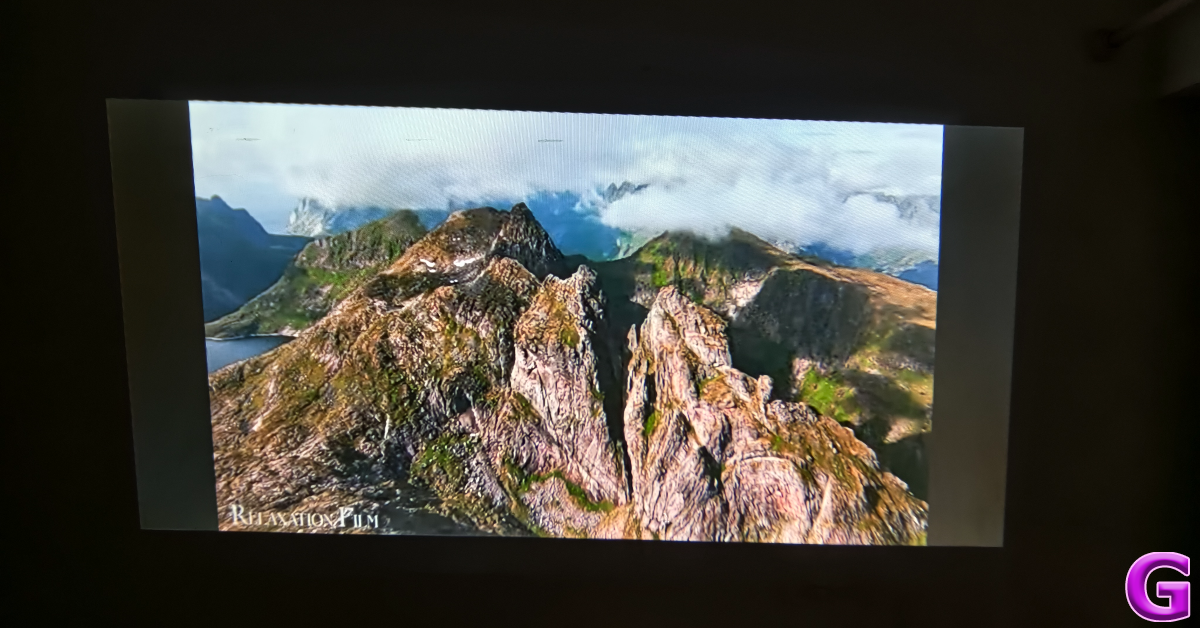
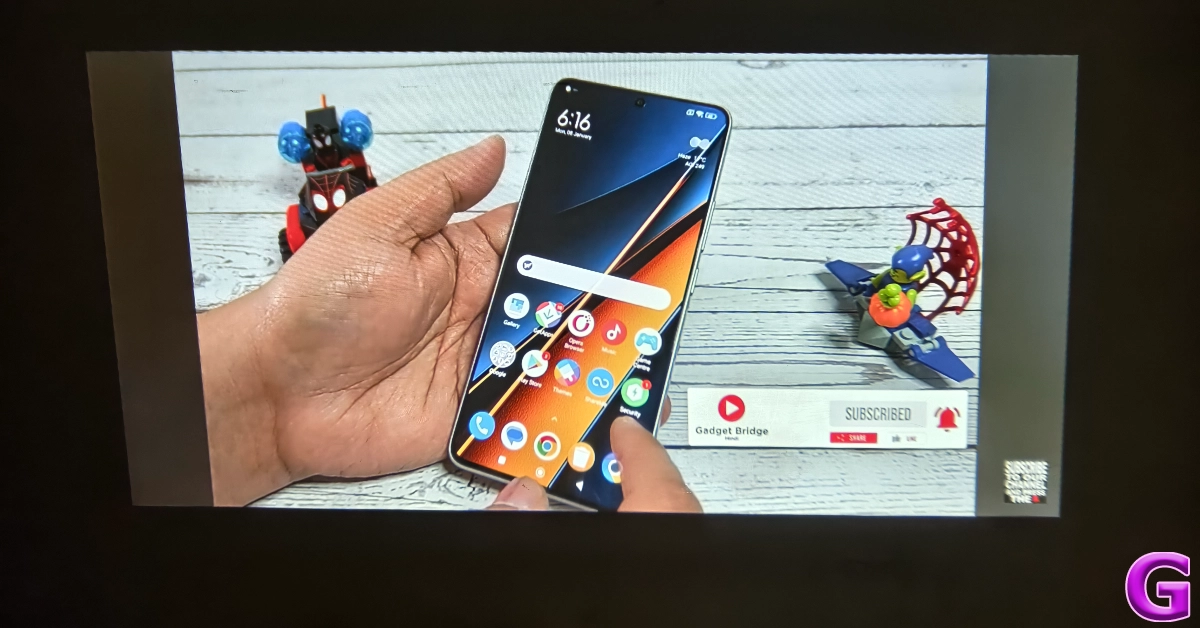
Setting up the Clokowe T08 is as easy as it gets. Since it does not have an internal battery pack, it requires an external power source. Once the power cable has been plugged in, you need to press and hold the power button for 3 seconds to start the projector.There are three ways you can go about connecting the projector to your device. The easiest is an HDMI connection using the cable provided in the box. If your device does not have an HDMI port, you can wirelessly cast its display using Miracast (Android), AirPlay (iOS), or DLNA (Windows). Lastly, you can connect a USB drive directly to the projector and play the content within it. Screen mirroring from your Android/iOS/Windows device requires connecting the projector to your home WiFi network first. The Bluetooth connection only supports audio output and not video input. The projector’s interface is simple and accessible, making it easy for the user to connect their device and carry out the basic functions.The Clokowe T08 offers a maximum projection display size of 200 inches, but while reviewing the device, we found a 100-inch display size to be ideal. The picture quality loses some detail when you push the display size to 200 inches. Once you have placed the projector at an optimum display from the screen, you can use its manual scroll wheel to focus the image.The native resolution on offer here is 720p. While it is a far cry from 4K resolution, we were happy with the image quality, especially when you take the price of the projector into account.The colour richness and contrast levels produced by the projector were very good. We did notice a little blurriness around the edges, but it did not prove to be a distraction while watching videos. We were quite surprised by the lack of any perceptible latency. After playing a couple of Call of Duty Mobile sessions, were happy with how the T08 performed.The 3W speaker on the projector is certainly not up to the task, but given it is a portable projector, we can let this one slide. The audio output is coarse and low in intensity. Luckily, you can connect your headphones or speakers using a 3.5mm audio jack or a wireless Bluetooth connection. It goes without saying, but you need to create a pitch-dark environment to enjoy the footage projected by this device. The image brightness isn’t powerful enough to overcome the daylight seeping in through a window.As we mentioned earlier, the Clokowe T08 offers automatic keystone correction, which means no matter the angle of the projector, it will cast a perfect rectangle display on the screen. You can also manually control the keystone from the device settings. The projector settings also let you change the aspect ratio and offer multiple projection modes.Read Also:Capture Button on the iPhone 16 series likely to offer zoom adjustment
Verdict
At $100, the Clokowe T08 Mini Projector is a good buy. While it may not cast a 4K display, it is ideal to watch live sports, TV, and movies in your living room. Its portability is another factor that works in its favour. You can easily carry this device around with you, without it being a hassle. Its compact size also ensures that you don’t have to keep it in one room of the house. The connection settings let you wirelessly cast your phone or laptop’s display on the screen while using a Bluetooth connection to use your headphones or speaker system as the audio output. A brighter display would have been ideal, but if you are able to manage the lighting conditions in your room, it won’t be an issue.
Even though every OEM has its own app marketplace, Google Play Store still remains the best source of apps on the Android platform. Google’s official marketplace does a great job of weeding out malicious apps and ensuring every app has the proper security certificate. On top of that, it is very easy to use as well. Sometimes, users report that they are unable to download new apps from the platform because their current apps are getting updated. If the app updates are stuck on ‘pending’, try these 11 fixes to get the queue moving.Read Also:Samsung Galaxy XCover 7 India launch may happen soon
Why are app updates stuck on pending?
This problem generally arises when you manually update all the apps on your device at once. If automatic updates are turned on, your device will automatically download the latest version of the apps as soon as they are published by the developer. However, if you are downloading all the updates at once, the apps will be put in a queue and updated one by one.If you notice that the app updates are stuck on pending and the queue hasn’t moved in a long time, you may need to take some quick measures. The most likely reason behind this issue is the lack of a steady internet connection. Other than that, the lack of storage on your device can also pause the app updates. Even though your phone isn’t downloading a new app, it needs a little breathing space to update the old ones. The new versions of the apps may also be larger in size, requiring some additional space in your phone’s internal memory.
Check current updates
When you choose to update multiple apps at once, they get put in a queue. The queued apps are labelled as ‘pending’. Here’s how you can view the list of apps being updated on your device.
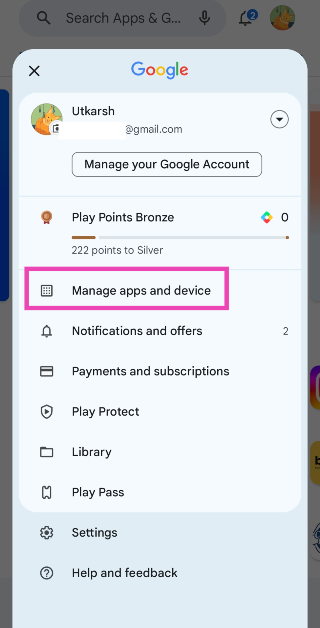
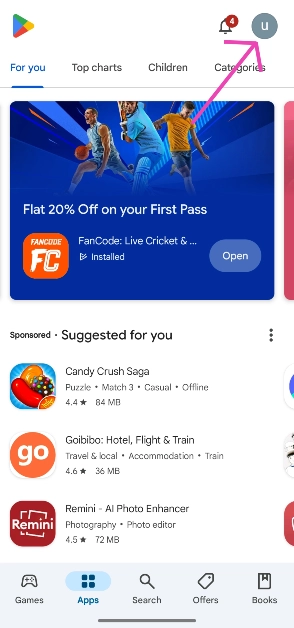
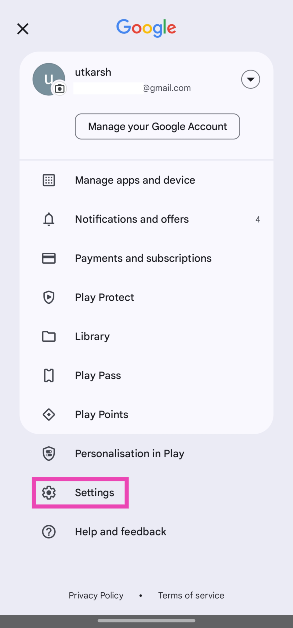
Step 1:Launch the Google Play Store and tap your profile picture in the top right corner of the screen.
Step 2: Tap on Manage apps and device.
Step 3: Hit See details under Updating apps.
Clear Google Play Store’s cache
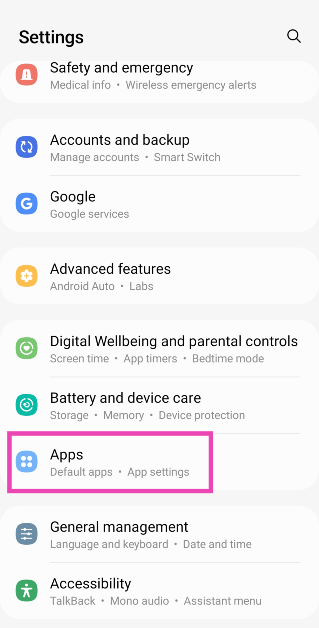
Step 1: Go to Settings and select Apps.Step 2: Tap on Google Play Store.Step 3: Select Storage.Step 4: Hit Clear Cache.
Check your phone’s storage capacity
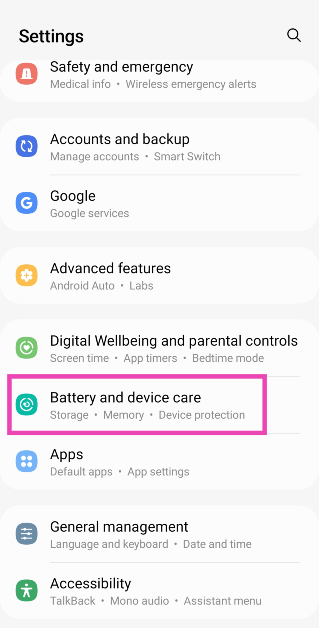
If your smartphone is running low on storage, it will not be able to download new apps or updates. Instead, the updates will get stuck on pending. Delete some of the large files on your device to make space for the updated apps. Here’s how.Step 1: Go to Settings and select Battery and device care.Step 2: Tap on Storage.Step 3: Go through the large files on your device and delete the ones you no longer use.
Make sure you are connected to the internet
Your smartphone relies on an internet connection to download and update apps. If your network isn’t up to the task, the app updates will get stuck on pending. Switch to a better network connection and try again. To test the strength of your current connection, you can perform a speed test online. It is preferable to use a WiFi connection for updating apps, as the downloads can consume a lot of mobile data.
Remove your Google account and re-add it
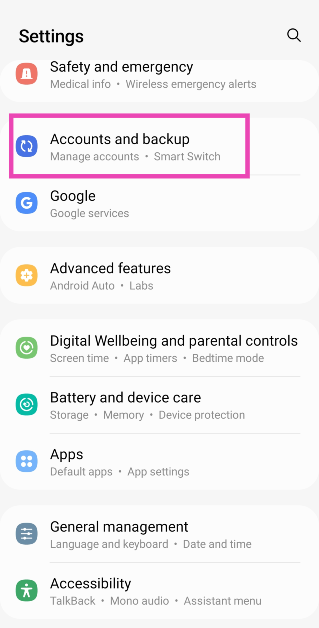
If the issue is related to your account, removing and re-adding can fix it. Here’s how you can go about it.Step 1: Go to Settings and select Accounts and backup.Step 2: Tap on Manage accounts.Step 3: Select your Google account.Step 4: Tap on Remove account.Step 5:Launch the Google Play Store app.Step 6: Hit Sign in.Step 7: Enter your Google account credentials and log in.
Clear the app updates and try again
If you want to download a particular app right away, but the pending updates are getting in the way, clear all of them and download the app first. Here’s how.Step 1:Launch the Google Play Store and hit your profile icon at the top right corner of the screen.Step 2: Tap on Manage apps and device.Step 3: Tap on Updating apps/See details.Step 4: Select Cancel all or hit the cross sign next to the update you want to cancel.
Update Google Play Store
Step 1:Launch the Google Play Store and tap your profile picture in the top right corner of the screen.
Step 2: Tap on Settings.
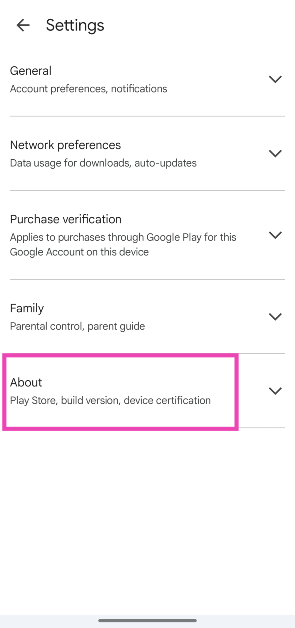
Step 3: Tap on About.
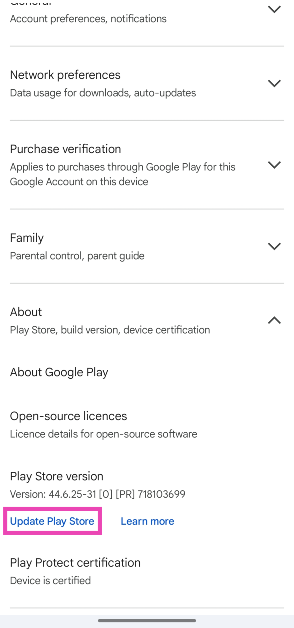
Step 4: Hit Update Play Store.
Turn off VPN
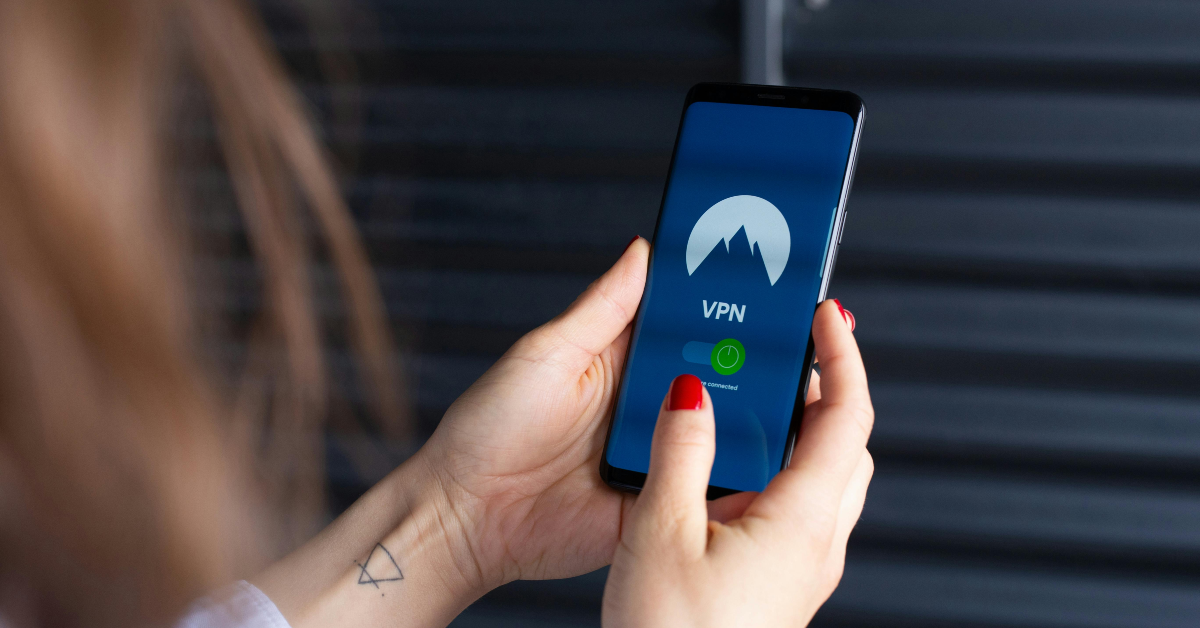
Sometimes, using a VPN to download and update apps can create unexpected issues. Apps that are geo-locked may not get updated if you are connected to a VPN server in a different location. This may cause the update to get stuck on pending. To fix this, launch the VPN app and hit ‘Disconnect’. Once the update is downloaded, connect the VPN again.
Make sure the time and date on your phone are correct
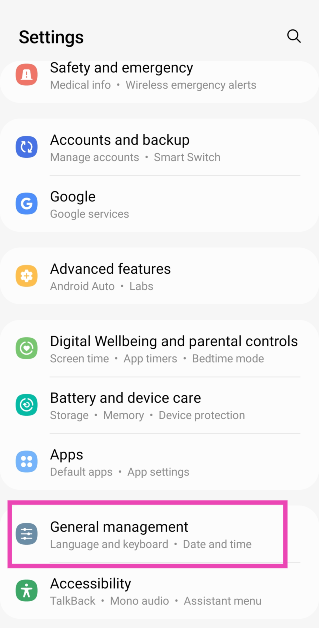
Google Play Store relies on accurate time and date information to carry out its functions. Here’s how you can ensure that the time and date on your smartphone are correct at all times.Step 1: Go to Settings and select General management.Step 2: Tap on Date and time.Step 3: Turn on the toggle switch for Automatic date and time.
Update your phone
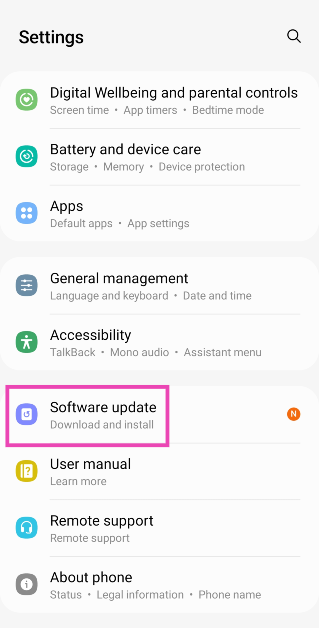
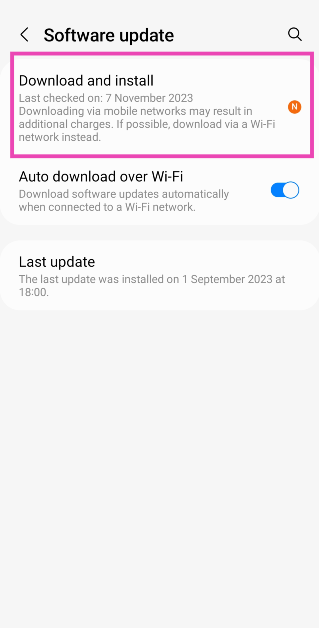
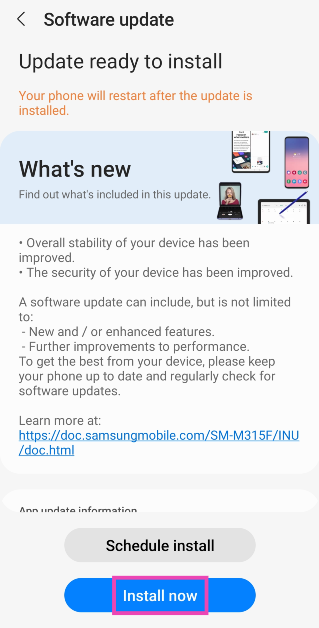
Step 1: Go to Settings and select Software update.
Step 2: Tap on Download and install.
Step 3: Select Install now.
Check if the Google Play Store is down
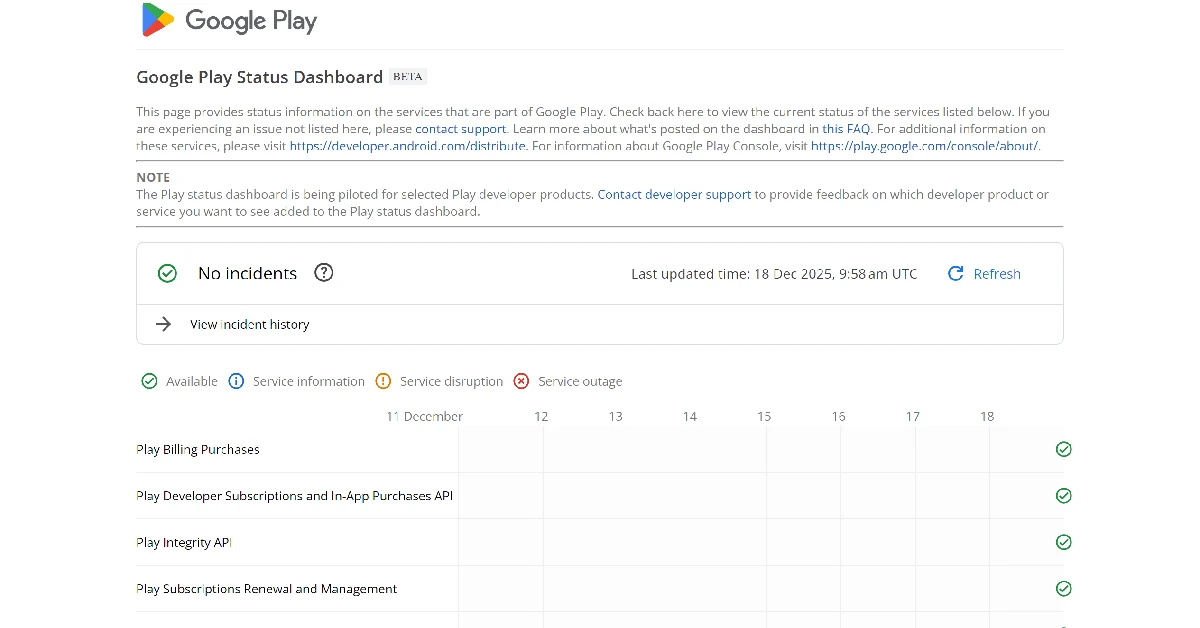
If none of the fixes mentioned above worked for you, it is highly probable that the Play Store is experiencing a server outage. Go to the Google Play Status Dashboard to confirm whether that is the case. While it does not mention the Play Store, you can get an idea of its server status by checking other Play services.
Frequently Asked Questions (FAQs)
How do I update a single app on my phone?
Launch the Google Play Store, go to Manage apps and device>Update apps and hit the Update option next to the app of your choice. You can also go to the app’s page on the Play Store and update it from there.
How do I disable automatic updates for a particular app?
To disable updates for an app, go to its Play Store page, hit the ellipses at the top right corner of the screen, and uncheck the box for ‘Enable auto-updates’.
Why are my apps stuck on pending?
When you update multiple apps at once, they are put in a queue and get updated one by one. The queued apps display the ‘pending’ tag.
How to fix an app stuck on pending?
To fix apps that are stuck on pending, go to the ‘updating apps’ list in the Play Store and hit the cross icon next to all the apps except the one you want to update.
How do I go back to using an older version of a particular app?
These are the top 11 ways to fix the ‘app updates stuck on pending’ issue on the Google Play Store. A quick restart of your smartphone can help resolve this issue as well. If you know of any other ways to fix this issue, let us know in the comments!
The OnePlus 12 Series will include two smartphones: the flagship OnePlus 12 and the gaming phone OnePlus 12R.
The company will also introduce the OnePlus Buds 3 at tomorrow’s event.
The launch event will be held at Pragati Maidan.
OnePlus 12 got accidently listed on Amazon recently therefore revealing the price. Along with the OnePlus 12 India price, availability details, sale date and offer information have leaked this time. The OnePlus 12 Series is scheduled to launch in India on January 23 at Pragati Maidan, Delhi. The upcoming smartphone series will include two devices: the OnePlus 12 and the OnePlus 12R.According to tipster Abhishek Yadav, the OnePlus 12 will launch in India at a starting price of Rs 64,999 for the 12GB RAM variant. Whereas the 16GB RAM model is likely to launch at Rs 69,999. The tipster further revealed that the OnePlus 12 will go on sale in the country from January 30. On the other hand, OnePlus 12R’s first sale in India is expected to begin in February.Another tipster Ishan Agarwal has shared information regarding early bird offers for the OnePlus 12 and OnePlus 12R in India. According to him, on the purchase of both the smartphones OnePlus 12 and OnePlus 12R the company will be offering an Exchange bonus, Bank discount, Gift for the first 1K orders, Up to 50% off on the Protection Plan, No-cost EMI and Rs 3,000 off on the OnePlus Pad. He further revealed that the firm will provide 4 years of Android OS upgrades.Also Read:Vivo G2 powered by MediaTek Dimensity 6020 SoC announced: Pricing and availability details insideAccording to the report, the OnePlus 12R will be priced at Rs 39,999 for the 128GB storage option and Rs 41,999 for the 256GB internal memory model. The price of the OnePlus Buds 3 has also been tipped ahead of the January 23 launch. The audio device is likely to come with a price tag of Rs 10,499.The report states that both the devices will go on sale from January 27.The OnePlus 12 features a 6.82-inch quad-HD+ LTPO OLED screen. The display has an adaptive refresh rate ranging between 1Hz and 120Hz. The screen supports 4,500 nits of screen brightness. The device is IP65-rated for dust and water resistance.Also Read:OnePlus 12R price in India, RAM, storage option and more leaked ahead of launchThe Qualcomm’s 4nm Snapdragon 8 Gen 3 SoC powers the phone. The device is offered with up to 24GB of LPDDR5X RAM and up to 1TB of UFS 4 inbuilt storage. The phone is endowed with a Hasselblad-branded triple rear camera with a Sony LYT-808 sensor, a 50-megapixel primary camera (OIS and f/1.6 aperture), a 64-megapixel telephoto secondary lens (OIS, 3X optical zoom, and f/2.6 aperture), and a 48-megapixel ultra-wide-angle lens (114-degree field-of-view). Lastly, there is a 32-megapixel front-facing camera (f/2.4 aperture) for taking selfies and video calling.The handset houses a 5,400mAh battery with 100W SuperVOOC wired, 50W wireless, and 10W reverse wireless charging support.
Garena Free Fire is a battle royale game with regular awards and tournaments to keep players interested. If you play Garena Free Fire, you should be aware of the redeem codes that are released on a daily basis. However, because the battle royale game is banned in India, players from other countries can use the Free Fire Redeem codes daily. If you’re unfamiliar with the Garena Free Fire redeem codes or don’t know how to get them, we’ve put together a step-by-step guide to help you redeem them. Check out Garena Free Fire Redeem Codes for 22 January 2024.The Free Fire redeem codes are a great way to get free stuff. These are 12-digit codes that contain alphabets and numbers, as well as an expiration date and time. Because the Garena FF redeem codes cannot be used more than once, you should hurry to the redemption page to claim your free reward before someone else does. To get a free reward, all you have to do is go to reward.ff.garena.com/en, which is the official redemption page. Also, keep an eye on this space for daily updates on Garena Free Fire redemption codes and rewards.
Garena Free Fire Redeem Codes Today 22 January 2024


 The price of the OnePlus Buds 3 has also been tipped ahead of the January 23 launch. The audio device is likely to come with a price tag of Rs 10,499.
The gadgets will be available for purchase on OnePlus.in, Amazon, and retail stores across the country as soon as they are officially released.
The price of the OnePlus Buds 3 has also been tipped ahead of the January 23 launch. The audio device is likely to come with a price tag of Rs 10,499.
The gadgets will be available for purchase on OnePlus.in, Amazon, and retail stores across the country as soon as they are officially released.
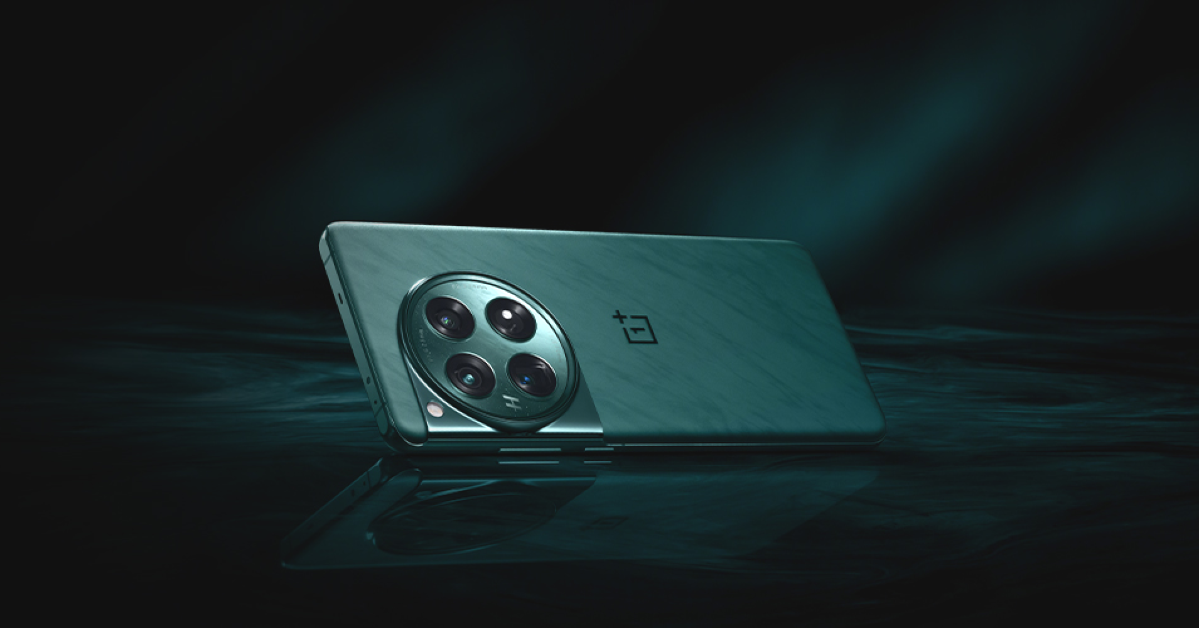 OnePlus 12R is targeted at gamers and is a successor of the OnePlus 11R. The device will be available in two colour options Cool Blue and Iron Gray. The Cool Blue has a glossy finish with a light, fresh appearance, while Iron Gray has a matte feel to give a sophisticated and strong feeling. The gaming smartphone will also feature a similar coloured matte metal frame giving a more premium feel. OnePlus 12R has the iconic OnePlus Alert Slider located in its new home on the left of the phone.
Also Read: Samsung Galaxy S24 series in India received 2.5 lakh pre-orders in India in just three days
OnePlus has officially revealed that the OnePlus Buds 3 will offer 44 hours of playback time. With a quick charge of 10 minutes, it will deliver 7 hours of battery life.
Apart from this, the device will be offered in two colour options- Metallic Grey and Splendid Blue. The specs of the OnePlus Buds 3 India model is expected to be similar to Chinese variants.
OnePlus 12R is targeted at gamers and is a successor of the OnePlus 11R. The device will be available in two colour options Cool Blue and Iron Gray. The Cool Blue has a glossy finish with a light, fresh appearance, while Iron Gray has a matte feel to give a sophisticated and strong feeling. The gaming smartphone will also feature a similar coloured matte metal frame giving a more premium feel. OnePlus 12R has the iconic OnePlus Alert Slider located in its new home on the left of the phone.
Also Read: Samsung Galaxy S24 series in India received 2.5 lakh pre-orders in India in just three days
OnePlus has officially revealed that the OnePlus Buds 3 will offer 44 hours of playback time. With a quick charge of 10 minutes, it will deliver 7 hours of battery life.
Apart from this, the device will be offered in two colour options- Metallic Grey and Splendid Blue. The specs of the OnePlus Buds 3 India model is expected to be similar to Chinese variants. 

 Step 2. In the next screen, choose a destination folder and tap the “Start” button. Proceed to Tools>Preferences.
 Step 3. In the subsequent Preferences window, choose the “Always Fix” option beside the “Damaged or Incomplete AVI”. Finally, hit “Save” to save your repair file.
 Play the file to see whether it is repaired or not.
 Unlike other tools, Wondershare Recoverit Enhanced Video Recovery can search and recover inconsistent video fragments and restore them with enhanced video quality! The beauty of Wondershare Recoverit Enhanced Video Recovery is that it supports the recovery of myriads of video formats, is easy to use, is compatible with popular systems, and boosts amazing recovery success.
 Step 2. Once you choose the desired disk, Wondershare Recoverit will ask you to select the video format. You can select more than one video format and click the “Start” button to allow the program to initiate the deep scan process.
 Step 3. When the deep scan is completed, you should see the list of video files recovered. You can click the “Preview” button to confirm whether your unplayable or inaccessible videos have been recovered.
 Step 4. Finally, select these videos and hit the “Recover” button. This will open a new window on your computer to allow you to save the recovered files. Make sure you choose a convenient and safe location.

 Step 2:
 Step 3: Confirm
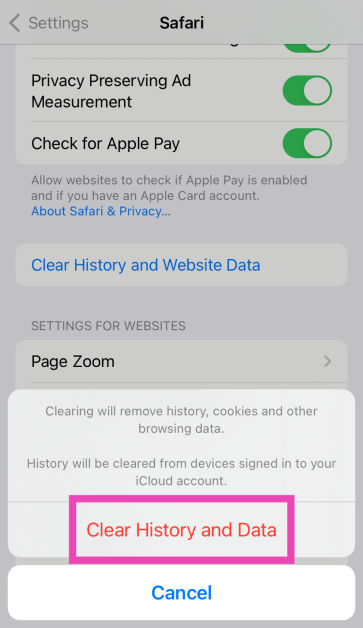
 Step 2: Hit the i icon next to the connected WiFi network.
 Step 3: Tap on Configure DNS.
 Step 4: Select Manual.
 Step 5: Tap on Add Server.
 Step 6: Enter the address of your preferred server.
 The Private Browsing tab in Safari can circumvent local cache and DNS issues. If you’re having trouble loading a web page on the browser, switch to the private tab to resolve the issue. Tap the Tabs icon in the bottom right corner of the screen and switch to the Private tab. Once you’re in Private mode, open a new tab and load the web page again.
 Step 3:
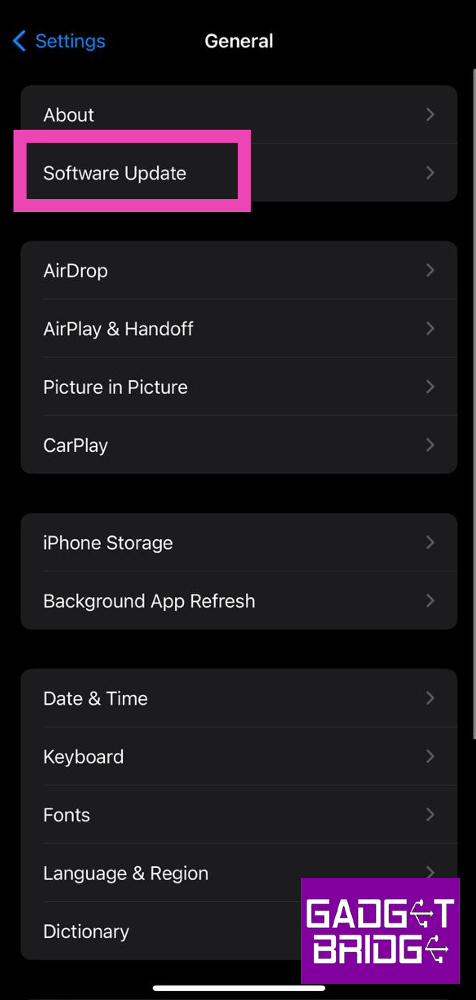 Step 4:


 Step 3: Hit See details under Updating apps.
 Step 2:
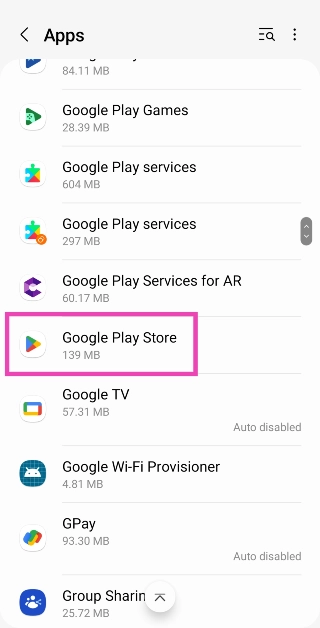 Step 3:
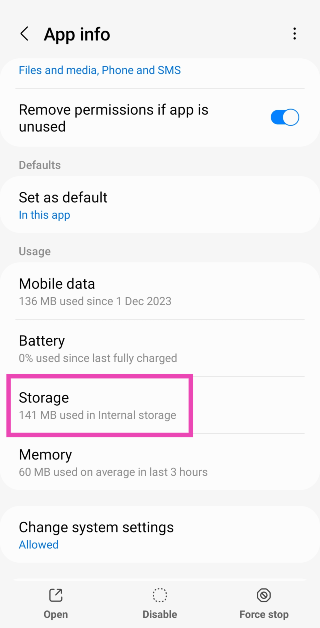 Step 4:
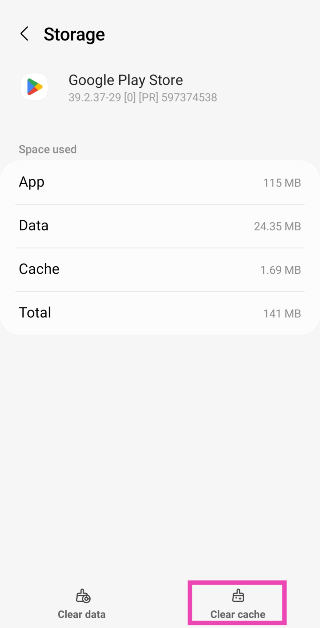
 Step 2:
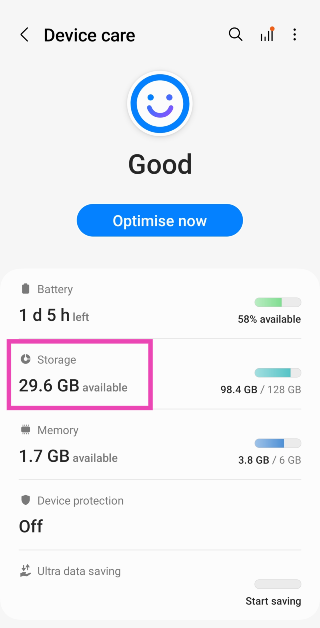 Step 3:
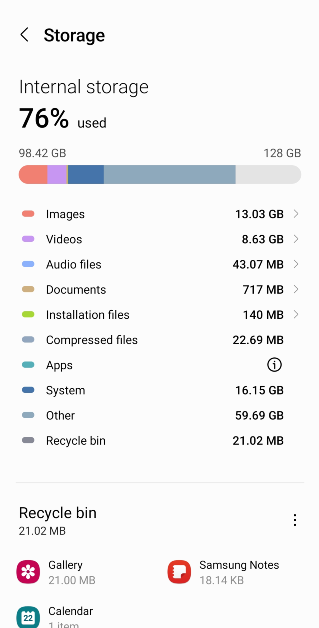
 Step 2:
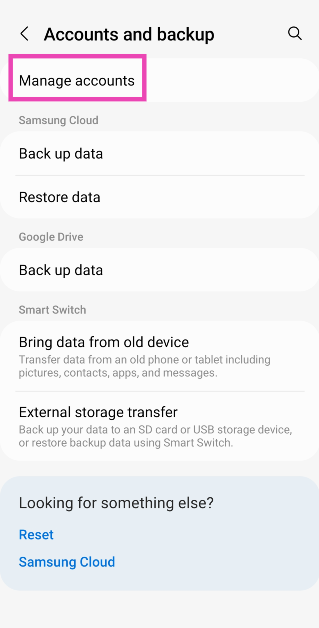 Step 3:
 Step 4:
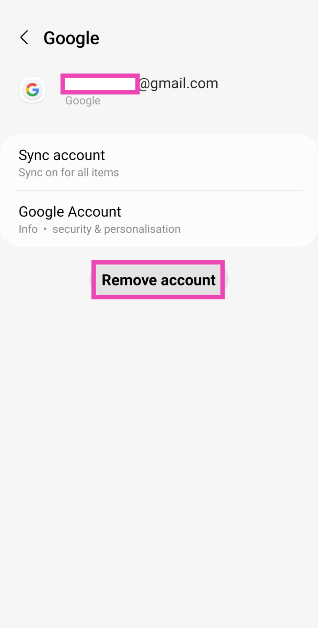 Step 5: Launch
 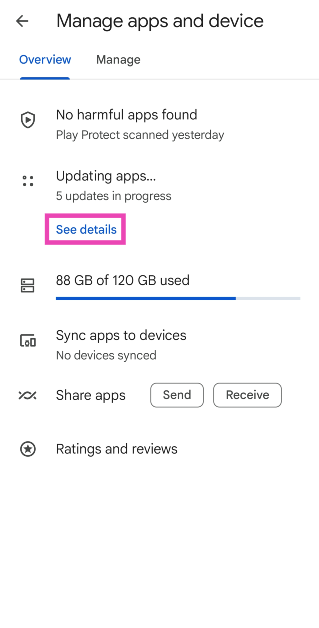 Step 4:
 Step 2: Tap on Settings.
 Step 3: Tap on About.
 Step 4: Hit Update Play Store.
 Step 2:
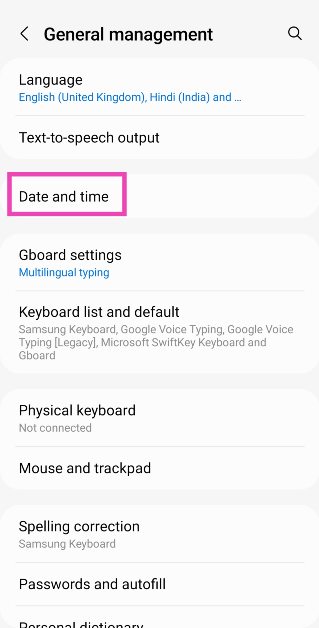 Step 3:
 Step 2: Tap on Download and install.
 Step 3: Select Install now.
 If none of the fixes mentioned above worked for you, it is highly probable that the Play Store is experiencing a server outage. Go to the Google Play Status Dashboard to confirm whether that is the case. While it does not mention the Play Store, you can get an idea of its server status by checking other Play services.

