After introducing ‘Notes’ to its platform last year, Instagram has gradually been adding more features to it. Instagram Notes are a quick way to communicate with your mutual followers and close friends. Much like a status update, you can let your friends know what you’re up to via Notes. Apart from text notes, you can even post a portion of a song on Notes. More recently, Instagram added the option to post a short 2-second video on Notes. Here’s how you can do it.Read Also:Grand Theft Auto: The Trilogy – The Definitive Edition now available on Netflix
How are Instagram Notes intended to be used?
Ever since their introduction in December 2022, Instagram Notes have routinely puzzled the app’s users. Some question the feature’s existence altogether, since Instagram already has several popular avenues for users to post their media.Instagram Notes are meant for sharing light and spontaneous posts that don’t necessarily deserve a Story of their own. The text limit for a note is just 60 characters, which means it’s good for posting a status update at best. Using notes, you can let your mutual followers and close friends know where you are, which activity you are currently engaged in, and ask them their thoughts about something. People who see your note can reply to them via DMs.Apart from text notes, you can also add a short segment of a song on notes. If there’s a particular tune or hook stuck in your head, you can share it with your followers instantly. And now, you can add a short video using your phone’s front-facing camera too.
Add a short video to Instagram Notes
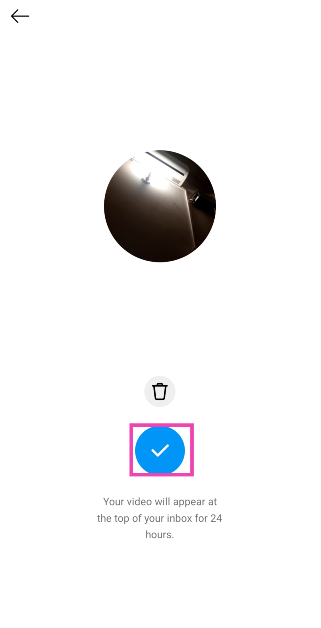
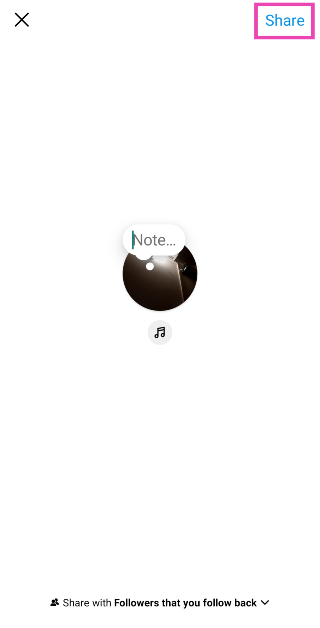
Step 1:Launch the Instagram app on your phone.Step 2:Swipe left on the home screen to access the DMs page.Step 3: Tap on Your Note at the top of the screen.Step 4: To add a text note tap on the text bubble on top of your avatar. Hit the music icon at add a song as a note. To record and add a short video, tap on your profile picture.Step 5: Make sure your subject is within the circle that appears on the screen. You can only use your phone’s front camera to record the video.Step 6: Hit the blue button to record a video.Step 7: Once the video has been recorded, you can preview it on the screen. If it’s acceptable, hit the blue tick icon. If not, hit the bin icon and try again.Step 8: Select whether you want to share the video note with close friends or mutual followers.Step 9: Hit the Share button at the top right corner of the screen.
Frequently Asked Questions (FAQs)
How long do the Instagram Notes stay up on my profile?
An Instagram Note automatically gets deleted after 24 hours.
Can I upload a video from my phone as an Instagram Note?
As of now, you are only allowed to put up 2-second videos recorded within the app as your Instagram Note. You cannot upload a video from your phone’s gallery.
Can I put up a Video Note and Text Note at the same time?
This is how you can add a short video to Instagram Notes. The time limit for video notes is 2 seconds for now. The app doesn’t let you upload snippets shorter than 2 seconds either. The video is played on a loop once someone taps on your note. Your mutual followers and close friends can reply to your notes in DMs. If you can’t find this feature on Instagram, update the app and try again.
Garena Free Fire is a battle royale game with regular awards and tournaments to keep players interested. If you play Garena Free Fire, you should be aware of the redeem codes that are released on a daily basis. However, because the battle royale game is banned in India, players from other countries can use the Free Fire Redeem codes daily. If you’re unfamiliar with the Garena Free Fire redeem codes or don’t know how to get them, we’ve put together a step-by-step guide to help you redeem them. Check out Garena Free Fire Redeem Codes for 16 December 2023.The Free Fire redeem codes are a great way to get free stuff. These are 12-digit codes that contain alphabets and numbers, as well as an expiration date and time. Because the Garena FF redeem codes cannot be used more than once, you should hurry to the redemption page to claim your free reward before someone else does. To get a free reward, all you have to do is go to reward.ff.garena.com/en, which is the official redemption page. Also, keep an eye on this space for daily updates on Garena Free Fire redemption codes and rewards.
Garena Free Fire Redeem Codes Today 16 December 2023
It comes with a 50-megapixel dual rear camera setup.
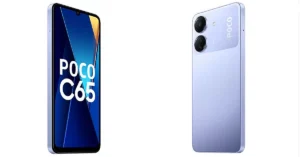
Poco C65 today officially launched in India. The device is a successor to Poco C55 which was launched a year ago. MediaTek Helio G85 SoC powers the handset. It features an HD+ display with a 90Hz refresh rate. The phone also includes a dual rear camera setup with a 50-megapixel primary sensor. In addition to this, it packs a 5,000mAh battery.
Poco C65 price in India and sale details
Poco C65 made its debut in India today. The company has introduced three models with price starting at Rs 8,499 for the base 4GB RAM with 128GB storage. The 6GB RAM with 128GB storage variant comes with a price tag of Rs 9,499 while the 8GB RAM with 256GB internal storage model costs Rs 10,999.The phone is made available in two colour options of Blue and Black. The handset can be purchased via Flipkart in the country.
Poco C65 specifications, features
Poco C65 features a 6.74-inch HD+ display, with 1,600 x 720 pixels of resolution. The device supports a refresh rate of 90Hz. The display gets Corning Gorilla Glass protection. The smartphone operates on MIUI 14 for Poco on top of Android 13. Under its hood, there is a MediaTek Helio G85 SoC paired with an ARM Mali-G52 2EEMC2 GPU.The Poco C65 sports a dual rear camera setup for photos and videos that includes a 50-megapixel primary sensor with an aperture of f/1.8. Additionally, it includes a 2-megapixel macro sensor with an aperture of f/2.4. The water drop notch at the centre of the display plays house to an 8-megapixel sensor with an aperture of f/2.0.For connectivity, Poco C65 includes 4G VoLTE, Wi-Fi, Bluetooth 5.1, GPS, GLONASS, a 3.5mm audio jack and support for FM radio. The Poco smartphone is equipped with a 5,000mAh battery that supports 18W wired fast charging via a micro USB port. A side-mounted fingerprint sensor is given to unlock the device.
Cross-platform data transfer comes with its hurdles and limitations. The risk of losing their WhatsApp messages and media keeps a lot of people from switching to an iPhone. Thankfully, over the years, the two ecosystems have made it easier to transfer data between each other. If you’re an Android user, you can restore your contacts, messages, files, and media on an iPhone with ease. Here are the top 6 easy ways to transfer data from Android to iPhone.Read Also:Instagram now allows users to add short videos to Notes
Which method is best for you?
Transferring your data between two devices shouldn’t be tricky if you have a clear plan laid out in front of you. Apple’s Move to iOS app makes things very easy for the average user, letting them choose the data they want to transfer to their new device. Since WhatsApp is a big part of the Android experience, it should be your major priority. You wouldn’t want to lose your precious chat history, after all. WhatsApp’s app data transfer is only possible through Move to iOS or other third-party cross-platform transfer tools.Once WhatsApp is taken care of, there are a bunch of ways you can go about transferring data like photos, videos, files, documents, and more. The rise of cloud storage services has made this task very easy for the average user. We’d suggest using Google Drive for this task as it offers up to 15GB of free storage and is easily available in the app marketplace of either platform. If you’re transferring stuff from your PC, you can even use iCloud for Windows.
Move to iOS to transfer data from Android to iPhone
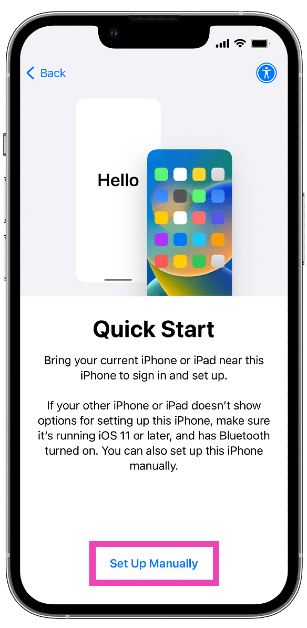
Apple’s Move to iOS app for Android provides a native way to transfer all your data to your new iPhone. On your iPhone, you can access the transfer interface on the Quick Start screen while setting up the device for the first time. This option won’t be available later.Step 1: On the Quick Start page, select Set Up Manually.Step 2: Tap on Move Data from Android.Step 3:Install the Move to iOS app on your Android phone and launch it.Step 4: Hit Continue on your iPhone.Step 5: Enter the code displayed on your iPhone into the Move to iOS app on your Android device.Step 6: Connect your Android phone to the WiFi hotspot created by your iPhone.Step 7: Select the stuff you want to transfer from the Android phone to your iPhone. Using Move to iOS you can transfer your pictures, videos, contacts, messages, files, settings, WhatsApp messages, calendar entries, bookmarks, and more. The data transfer may take some time so wait patiently.Step 8: Once the transfer is complete, tap on Finish on your Android phone and Continue on your iPhone.Step 9: Follow the rest of the instructions on the iPhone to finish setting it up.
Use iTunes to transfer your data from Android to iPhone
One of the biggest limitations of the Move to iOS app is that it cannot be used after you’ve set up your iPhone. If there are still more things you need to transfer to your iPhone, use iTunes. You will need a PC for this method. Here’s how you can go about it.Step 1:Connect your Android smartphone to your PC using a USB cable.Step 2: Import all the data on your phone to your PC using Windows’ default Autoplay tool. This method may not apply to apps and app data, but you can still transfer your images, videos, documents, files, and more.Step 3: Once the data transfer to your PC is complete, disconnect your Android phone from the computer.Step 4:Connect your iPhone to your PC and launch iTunes.Step 5: Hit File and select Add folder to library. Add the data from your Android phone to this folder.Step 6: Now, click on your iPhone’s icon in the sidebar.Step 7: If you want to transfer the pictures to your iPhone, click on Photos. Similarly, choose Music for songs.Step 8: Click on Sync and select Apply.
Use iCloud to transfer data from Android to iPhone
Another way to transfer your images, videos, documents and more to your iPhone is via iCloud.Step 1: Import your data from your Android phone to your PC.Step 2:Launch the iCloud app on your PC or log into the iCloud website using your Apple ID.Step 3:Upload the imported data to iCloud. Make sure you upload the appropriate files to their respective categories.Step 4: On your iPhone, go to Settings and tap on your name at the top of the screen.Step 5: Select iCloud and turn on syncing for media, documents, and other data you uploaded from your PC.
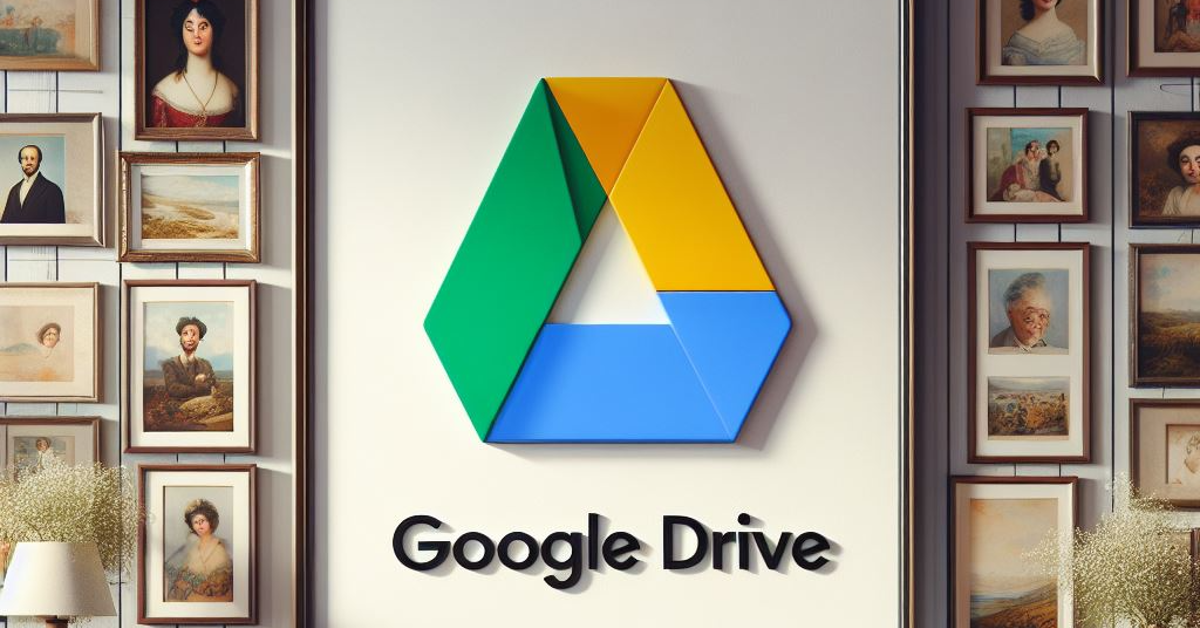
Use Google Drive
If your iCloud storage isn’t enough to support the data transfer, use Google Drive instead. You get up to 15GB of free storage on Google Drive. You don’t need a PC to complete the transfer of data when you’re using Google Drive. Simply launch the app on your Android smartphone and begin uploading the files, media, and other data you wish to transfer. When that’s done, install the Google Drive app on your iPhone and log in using the same Google Account as your Android phone. Now, download the data you uploaded from your Android device.
O+ Connect (Oppo and OnePlus smartphones)
If you have an Oppo/OnePlus smartphone, transferring files to an iPhone is a piece of cake with the O+ Connect app. Here’s how you can go about it.
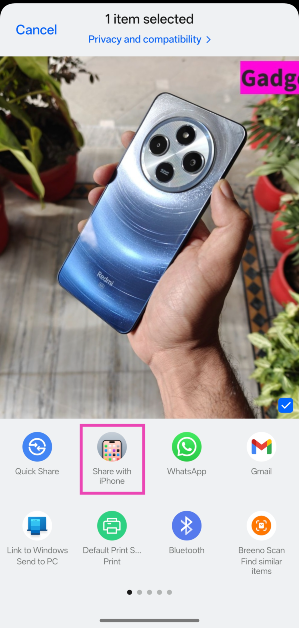
Step 1: Open the file on your OnePlus/Oppo smartphone.
Step 2: Hit the Share button at the bottom of the screen.
Step 3: Tap on Share with iPhone.
Step 4: Your smartphone will search for iPhones near you.
Step 5:Launch the O+ Connect app on your iPhone.
Step 6: Tap the name of the recipient on your OnePlus/Oppo smartphone.
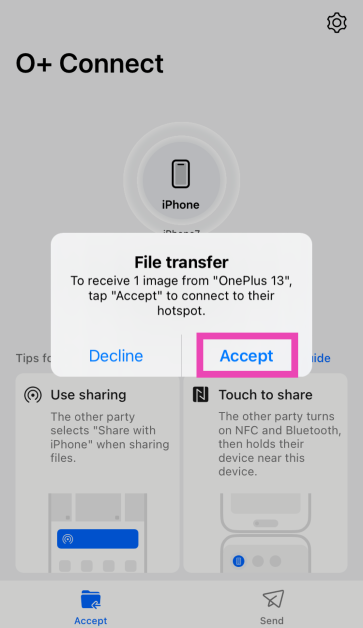
Step 7: Accept the transfer request on your iPhone.
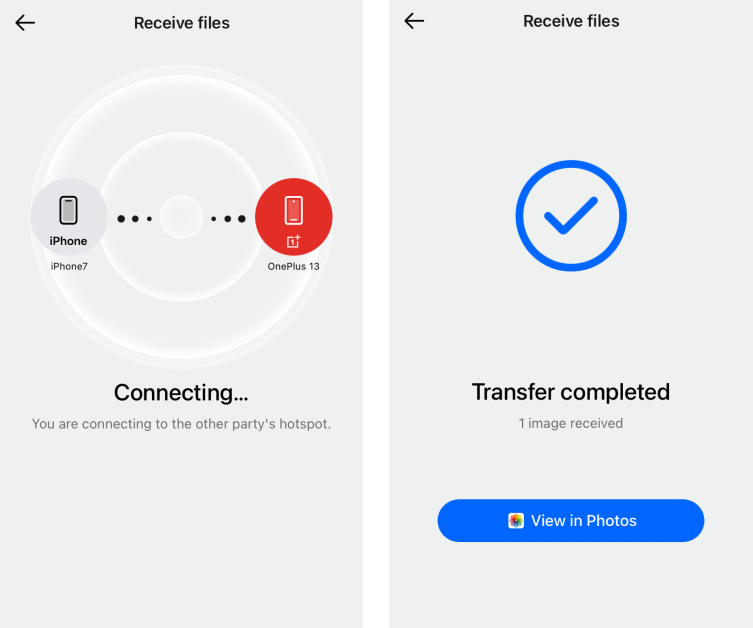
Step 8: Your iPhone will connect to your OnePlus/Oppo smartphone’s WiFi hotspot. Once that’s done, the transfer will be completed.
Feem
Feem is a wireless file-sharing interface that bridges the divide between the Android and Apple ecosystems. For Feem to work, both devices must be connected to a common WiFi network. If that’s not possible, you can simply use a mobile hotspot to link the two devices. Feem can transfer data up to 50 times faster than Bluetooth. The best part about using this app is that you save a lot of Internet data that would otherwise be lost on cloud storage services like Google Drive.
Frequently Asked Questions (FAQs)
How do I access Move to iOS after I’ve set up my iPhone?
You cannot transfer data to your iPhone using the Move to iOS app after you have set up the device. This option is only made available to you while setting up your iPhone. The only way to go back to that page is by performing a factory reset of your device.
How do I transfer my WhatsApp chats and data from my Android phone to an iPhone?
Your WhatsApp chats and data can be transferred to your new iPhone using the Move to iOS app. You can also use third-party transfer tools like Wondershare and Tenorshare.
How much data can I store on iCloud for free?
iCloud offers a free storage limit of 5GB. You can purchase 50GB of additional storage for Rs 75 per month.
How do I share files from my OnePlus phone to an iPhone?
OnePlus has a special ‘Share with iPhone’ option for transferring files to an iOS device. You will need to install the O+ Connect app on your iPhone to complete the transfer.
These are the 6 best ways to transfer data from Android to iPhone. Only Move to iOS and third-party tools like Tenorshare and Wondershare can transfer your WhatsApp chats and data between two devices. Apple backs up your WhatsApp data to iCloud and Android uses Google Drive for the same task. Since these are two different platforms, there is no way to natively transfer WhatsApp data between them.
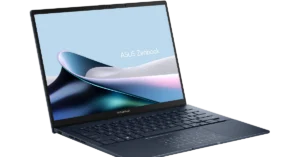
The Asus Zenbook 14 OLED (UX3405) includes Intel Evo Edition with up to flagship AI-powered Intel Core Ultra 9 processors.
The 3K ASUS Lumina OLED display supports up to 120Hz refresh rate.
The 75 Wh battery is said to deliver up to 15 hours of battery life.
Asus announced the launch of the new Zenbook 14 OLED (UX3405) laptop under its Zenbook Classic series. The device is powered by an Intel Core Ultra 9 processor. It comes with Intel Arc graphics and a 75 Wh battery. In addition to this, the laptop features a 3K ASUS Lumina OLED that supports a 120Hz refresh rate. Moreover, the machine has an FHD IR camera with a physical shutter.
Asus Zenbook 14 OLED (UX3405) features a 14-inch 3K Asus Lumina OLED nanoedge display with 2,880 x 1,800 pixels of resolution. The screen is DisplayHDR True Black 600 certified. It comes with up to 120Hz refresh rate support, adaptive sync automatically adjusts the refresh rate for always-smooth visuals and an aspect ratio of 16:10. Moreover the screen has 600 nits of peak brightness. Under the chassis, there is an Intel Core Ultra 9 185H, Intel Core Ultra 7 155H and Intel Core Ultra 5 125H processors. The laptop comes with up to 1 TB SSD storage and 32 GB RAM. The device is pre-installed with Windows 11. The AI-powered Intel Core Ultra processors are paired with Intel Arc graphics.For connectivity, there is WiFi 6E (802.11ax), two Thunderbolt 4, USB 3.2 Gen 1 Type-A, HDMI 2.1 (TMDS) and a 3.5 mm audio jack. As per the company, the USB-C Easy Charge makes it simple to recharge from any suitable USB-C adapter, power outlet or power bank. The laptop’s battery supports up to 20% more charging cycles than its predecessor. It is claimed to offer up to 15 hours of battery life.In addition to this, the new Asus Zenbook 14 OLED has new super-linear speakers, a smart amplifier and an ASUS Audio Booster in the Harman Kardon-certified audio system with Dolby Atmos sound support.The PC also includes an FHD IR camera offering a superlative video conferencing experience, enhanced by AI noise cancellation and built-in video enhancements for crystal-clear audio and crisp video. For privacy, the FHD IR camera has a physical shutter.
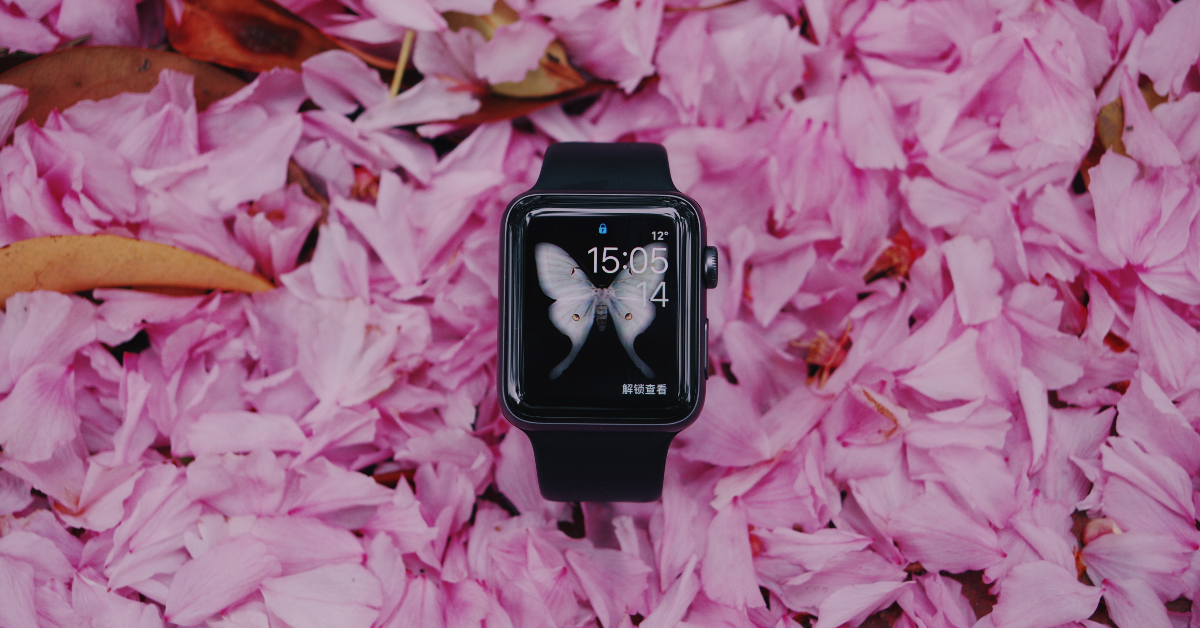
If you haven’t customised your Apple Watch yet, you are missing out on a lot. By creating your own wallpapers for the watch, you can add a splash of personality to it. The best part is that it doesn’t require a lot of time. If you know your way around the Watch app, this task won’t take more than a few minutes. If you’re new to the whole, you don’t need to worry. Today, we will walk you through the entire process. Here are the top 3 ways to find, download, and set the latest wallpapers on your Apple Watch.Read Also:Nothing to host an event at MWC 2024, February 27 event scheduled
Turn your Apple Watch face into a carousel of pictures
One of our favourite things about the Apple Watch is the diversity in its Face Gallery. You can access these Watch Faces from the Watch app on your iPhone. Apple’s default gallery has something in it for everyone, whether you’re a fitness enthusiast or a fan of minimalist design. Every Watch Face has its own set of customisation options. You can select the colour of the clock, dial shape, numerals on the watch, and more. To make the Watch Face more informative, you can add a bunch of features or ‘Complications’ to it. There are complications for activity, alarms, stopwatch, maps, blood oxygen level, and more.But what if you don’t want to limit yourself to Apple’s collection of Watch Faces? Well, your watch also lets you set any picture from your iPhone’s gallery as the wallpaper as well. You can even change the position of the time on the screen and add a few complications to it. Want more? By creating a dedicated folder of pictures, you can turn your Apple Watch’s display into a carousel of photos. Every time you raise your wrist, you will be greeted with a new picture on the screen. Read along to learn how you can do that.
Set your photos as the wallpaper on your Apple Watch
Step 1: Launch the Photos app on your iPhone and switch to the Albums tab.Step 2: Hit the plus icon at the top of the screen and select New Album. Give this album any name you like.Step 3: Now, select the images in your iPhone’s gallery that you want to set as your Apple Watch wallpaper and send them to the folder you just created.Step 4: Open the Watch app on your iPhone and switch to the ‘Face Gallery’ tab.Step 5: Scroll down and select Photos.Step 6: In the Content category, select Album and choose the one you just created.Step 7: In the Time Position category, choose whether you want the time to appear at the top or the bottom of the screen.Step 8: Select the position of the Complications relative to the position of the time.Step 9: Scroll up and hit the Add option under Photos.Step 10: Switch to the My Watch tab and hit Edit next to My Faces.Step 11: Long press the three lines icon next to Photos and drag that entry to the top of the list.Step 12: Hit Done at the top right corner of the screen.Your Apple Watch will display a different photo every time you raise your wrist.
Create your own Watch Face
Step 1: Launch the Photos app on your iPhone and select the photo you want to use as the Watch Face.Step 2: Hit the Share icon at the bottom left corner of the screen.Step 3: Select Create Watch Face.Step 4: Choose the effect you want for the Watch Face.Step 5: On the page, add the Complications of your choice.Step 6: Hit Add once you’re done.
Use Facer
If you don’t want to put in the effort of creating your own Watch Face, you can simply find tons of them on Facer.Step 1:Install the Watch Faces by Facer app on your iPhone.Step 2:Launch the app and select Apple Watch.Step 3:Browse Facer’s gallery and select the Watch Face you want.Step 4: Hit the blue Watch icon to load the face on the official Watch app.Step 5: Now, select the Watch Face from My Faces.Step 6: Customise the Face by adding the Complications of your choice.Step 7: Hit Save once you’re done.
Frequently Asked Questions (FAQs)
How do I create a Watch Face for my Apple Watch?
Select a picture from the Photos app, hit ‘Create Watch Face’, select an effect, add Complications to it, and hit ‘Add’ to save it.
How do I set a photo as a wallpaper on my Apple Watch?
Create a new album with all the photos you want to set as your Apple Watch background. Go to the Watch app, select Face Gallery>Photos>Album and select the album you just created. Select a position for the clock and add Complications to it. Hit ‘Add’ once you’re done.
Where do I find and set new Watch Faces or wallpapers for my Apple Watch?
These are the top 3 ways to find, download, and set the latest wallpapers on your Apple Watch. Setting your pictures as wallpaper is a fairly easy task, but you can make the result even better by applying effects, colour overlays, and different complications to the watch face. Which is your go-to app to find and download the latest Watch Faces for your Apple Watch? Let us know in the comments!
Grand Theft Auto: The Trilogy – The Definitive Edition has been made available on Netflix for iOS and Android platforms.
There will be a total of three games.
These games will be available for free to the Netflix subscribers.
Gamers, Rockstar Games has good news for you. Grand Theft Auto: The Trilogy – The Definitive Edition is currently playable on Netflix. The game developer has officially revealed that a total of three great games are included in this bundle. They can be easily played on both iOS and Android mobile platforms. The games are available to all Netflix subscribers without charge.Rockstar Games has officially announced that Grand Theft Auto: The Trilogy – The Definitive Edition is now available for Netflix Members to enjoy as part of their subscription, and also now available on iOS and Android devices.The mobile version of GTA will include three classic games Grand Theft Auto III, Grand Theft Auto: Vice City, and Grand Theft Auto: San Andreas.As per the company, all the three classic games are accessible to all the Netflix subscribers. In addition to this users who do not have a Netflix subscription can also play games on their devices. However, they have to purchase the games through the App Store or Play Store.Also Read: Instagram now allows users to add short videos to NotesRockstar Games says, “These mobile versions of the genre-defining classics Grand Theft Auto III, Grand Theft Auto: Vice City, and Grand Theft Auto: San Andreas are all available to be purchased individually and feature additional improvements, including a new Classic Lighting mode that restores the look and feel of the sky in the original games.”Note that Grand Theft Auto: The Trilogy – The Definitive Edition is also playable on other platforms like PlayStation 5, PlayStation 4, Xbox Series X|S, Xbox One, Nintendo Switch, and PC via the Rockstar Games Launcher, Steam, and Epic Games store.Besides this Rockstar Games also released the first trailer of GTA 6. Grand Auto Theft 6 will be officially released in 2025. It will come to PlayStation 5 computer entertainment systems and Xbox Series X|S games and entertainment systems in 2025. Note that Grand Auto Theft 6 aka GTA 6 is a successor of GTA 5 which was introduced in the year 2013. It’s been a decade since GTA 5 was released.
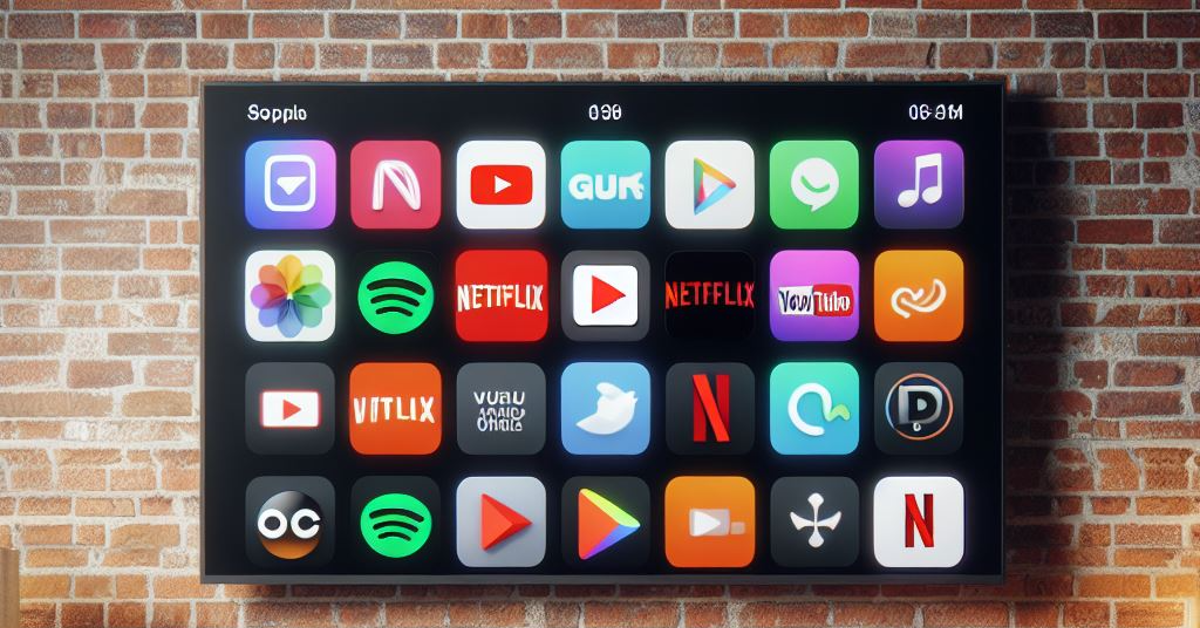
Any smart device is no good without apps. This includes your Smart TV. Over the years, the app marketplace for Smart TVs has grown tremendously. Not only can you download every streaming and OTT app under the sun, but you can also enjoy apps related to fitness, gaming, and lifestyle on your large-screen TV. The process for installing apps on your Smart TV is exactly the same as your smartphone. Simply launch the Play Store and browse your way through the sea of apps. But what if your TV does not have the app marketplace? You don’t need to worry, because in this article we show you how to install the Google Play Store on your Smart TV.Read Also:Top 2 ways to track a Samsung phone when it is switched off
Why can’t I find the Google Play Store on my Smart TV?
So, you just purchased a Smart TV but can’t find the Google Play Store on it? You might want to check the operating system running inside it. It is very rare for an Android TV to not come pre-installed with the Play Store. Some Smart TV and streaming box manufacturers have their own operating systems. For example, Samsung has Tizen OS, LG has WebOS, and Amazon has Fire TV. These operating systems have their own app marketplaces.Google Play Store is one of the largest app marketplaces, not just for smartphones but for Smart TVs as well. Even though it isn’t pre-installed on non-Android TVs, some devices may still be able to run it, albeit in a limited capacity. This can be done via a process called ‘sideloading’. Read along to learn how you can go about it.
Install Google Play Store on your Smart TV
Step 1: Hit the menu button on your TV remote and go to Settings.Step 2: Go to Security and Restrictions.Step 3: Enable Unknown sources for app installation.Step 4: On your PC, download the APK for the Google Play Store (Smart TV). Make sure you download this APK from a trusted source.Step 5:Transfer the APK to a USB drive and plug it into your TV.Step 6: On your TV, switch to the external storage tab.Step 7:Open the APK file and follow the installation process.The Google Play Store app will be installed on your Smart TV.
Frequently Asked Questions (FAQs)
Can I install the Google Play Store on non-Android TVs?
No, you can install the Google Play Store only on TVs that run Android OS. For example, Samsung Smart TVs that run Tizen OS will not be able to use the Play Store.
Why is my Smart TV not downloading any apps?
If your Smart TV is unable to download any apps, check the WiFi connection and restart the device. Also, make sure that your TV has enough storage to download new apps.
How do I install the Google Play Store on my Android TV?
This is how you can install the Google Play Store on your Smart TV. Once it has been installed on your device, you can use it to browse and download a diverse range of apps on your TV. If your Smart TV does not run Android OS, we’d suggest getting an Android-enabled set-top box or streaming device.
Only videos recorded from the front camera are allowed to be posted.
The video notes are 2 seconds long.
Meta-owned photo and reels sharing platform Instagram is upgrading. Its parent company has brought a slew of new features for improved user experience on its platform. The company is now enabling its users to share Video Notes. The social media platform brought Notes to Instagram last year which allowed you to post text or emojis as your status. But from now onwards you would be able to post a two-second looping video Notes. The feature works similar to how you share status on WhatsApp.Previously Instagram only allowed its users to add music, text or emoticons to Notes. But now the social media platform has brought Video Notes to its platform as an extension of its Status updates feature akin to WhatsApp. The Instagram users will be able to share a two-second looping video notes with their Close Friends list or with other users who follow them in common.Also Read:Nothing to host an event at MWC 2024, February 27 event scheduledNow you all might be wondering what was the need to add a video feature in Notes when we can already do it on the Stories. Of course, you can share video stories on Instagram, But in Video Notes you are allowed to share a video of 2 seconds duration which is a very short duration. For text Notes, one is also allowed to enter a note of up to 60 characters. In addition to this, you are only allowed to post Video Notes taken from your front/selfie camera. Also, it is necessary the selfies video should have been recorded from the app’s camera app.
Note: You cannot upload a video from the phone’s camera gallery.
To add a Video Notes one must first open their DM. Then at the top of your Chats list, tap your profile picture. After that tap Note… and enter a note, music or add a video with the front-facing camera.To add a video tap your profile picture and then tap the blue button at the bottom to begin recording your video. Videos can only be 2 seconds long. After that select to share your note with followers that you follow back or your close friends. Lastly, tap Share in the top right to share your note. One can also delete their Notes by tapping on it, then tapping Delete note.Just like any other Notes, the status will be visible to you and others at the top of the inbox for up to 24 hours. After this time, your note will no longer be visible on Instagram. Moreover others can also reply to your Note just like Instagram Stories and WhatsApp Status. This will initiate a chat between you and them only. Others cannot see who’s viewed or replied to your note.Besides this Instagram is also said to be working on a new privacy tool that will allow users to control who can see the Likes they have on posts and reels.
Garena Free Fire is a battle royale game with regular awards and tournaments to keep players interested. If you play Garena Free Fire, you should be aware of the redeem codes that are released on a daily basis. However, because the battle royale game is banned in India, players from other countries can use the Free Fire Redeem codes daily. If you’re unfamiliar with the Garena Free Fire redeem codes or don’t know how to get them, we’ve put together a step-by-step guide to help you redeem them. Check out Garena Free Fire Redeem Codes for 15 December 2023.The Free Fire redeem codes are a great way to get free stuff. These are 12-digit codes that contain alphabets and numbers, as well as an expiration date and time. Because the Garena FF redeem codes cannot be used more than once, you should hurry to the redemption page to claim your free reward before someone else does. To get a free reward, all you have to do is go to reward.ff.garena.com/en, which is the official redemption page. Also, keep an eye on this space for daily updates on Garena Free Fire redemption codes and rewards.
Garena Free Fire Redeem Codes Today 15 December 2023


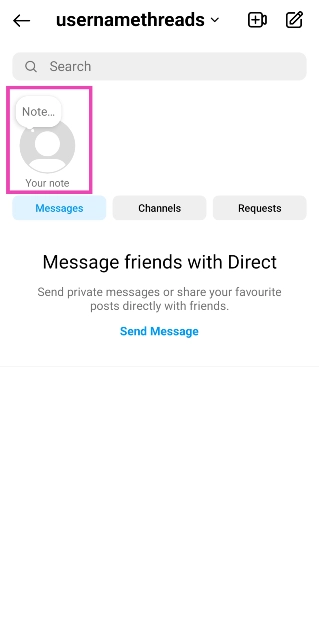 Step 4: To add a text note tap on the text bubble on top of your avatar. Hit the music icon at add a song as a note. To record and add a short video, tap on your profile picture.
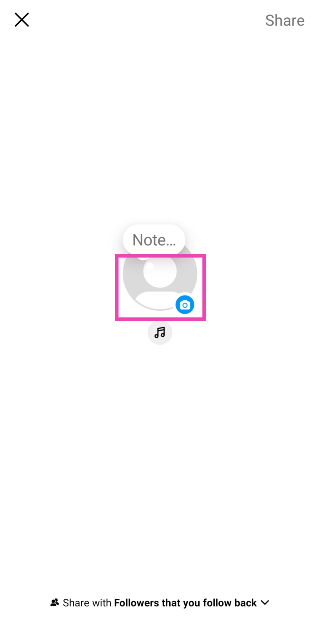 Step 5: Make sure your subject is within the circle that appears on the screen. You can only use your phone’s front camera to record the video.
Step 6: Hit the blue button to record a video.
Step 5: Make sure your subject is within the circle that appears on the screen. You can only use your phone’s front camera to record the video.
Step 6: Hit the blue button to record a video.
 Step 7: Once the video has been recorded, you can preview it on the screen. If it’s acceptable, hit the blue tick icon. If not, hit the bin icon and try again.
 Step 8: Select whether you want to share the video note with close friends or mutual followers.
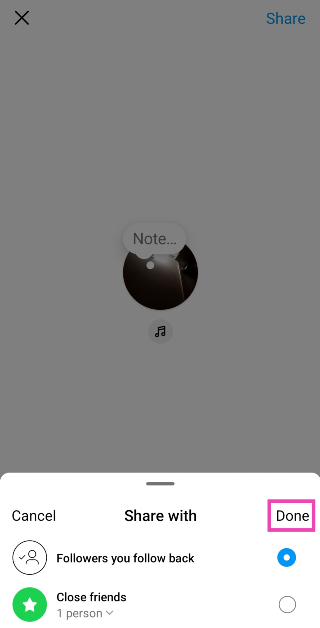 Step 9: Hit the Share button at the top right corner of the screen.


 Step 2:
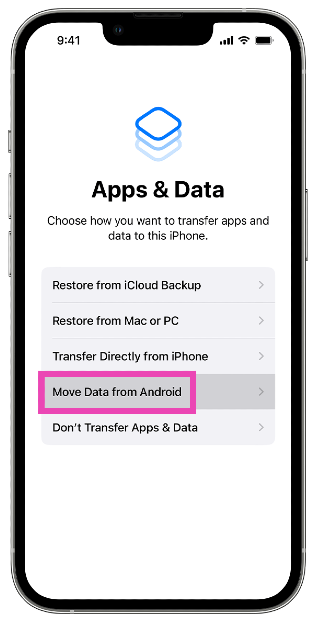 Step 3: Install
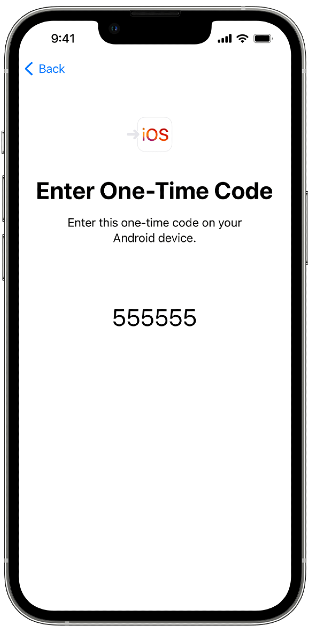 Step 6:

 Step 3: Tap on Share with iPhone.
 Step 4: Your smartphone will search for iPhones near you.
Step 5: Launch the
Step 4: Your smartphone will search for iPhones near you.
Step 5: Launch the 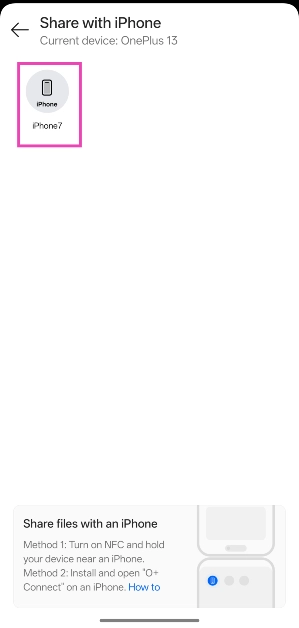 Step 7: Accept the transfer request on your iPhone.
 Step 8: Your iPhone will connect to your OnePlus/Oppo smartphone’s WiFi hotspot. Once that’s done, the transfer will be completed.

 laptop with Intel Core Ultra 9 CPU launched")


 Step 1:
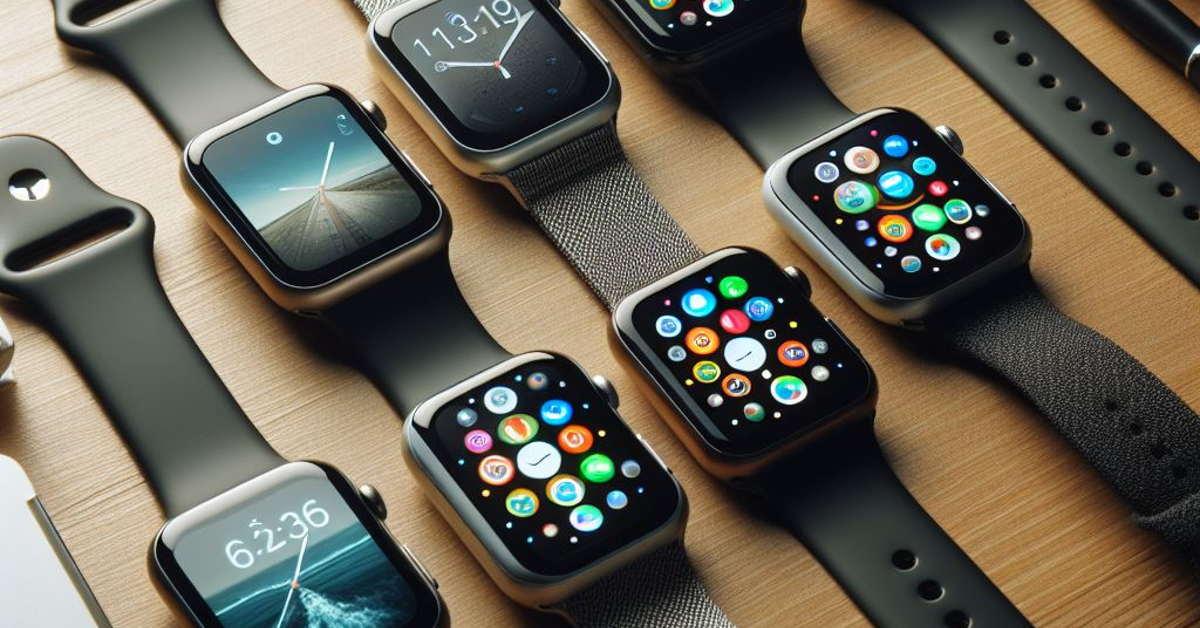 Step 1:


 Step 1:
