
- Samsung Mobile Android versions 11, 12, 13, and 14 are affected.
- Multiple vulnerabilities have been spotted in Apple products like iPhone, iPad, Mac, Apple TV, Apple Watch and Safari Web browser.
Samsung and Apple products are open to high-risk vulnerabilities: CERT-IN Reported

Key Highlights
Garena Free Fire Redeem Codes Today 18 December 2023: Here is how to claim them

Garena Free Fire is a battle royale game with regular awards and tournaments to keep players interested. If you play Garena Free Fire, you should be aware of the redeem codes that are released on a daily basis. However, because the battle royale game is banned in India, players from other countries can use the Free Fire Redeem codes daily. If you’re unfamiliar with the Garena Free Fire redeem codes or don’t know how to get them, we’ve put together a step-by-step guide to help you redeem them. Check out Garena Free Fire Redeem Codes for 18 December 2023.
The Free Fire redeem codes are a great way to get free stuff. These are 12-digit codes that contain alphabets and numbers, as well as an expiration date and time. Because the Garena FF redeem codes cannot be used more than once, you should hurry to the redemption page to claim your free reward before someone else does. To get a free reward, all you have to do is go to reward.ff.garena.com/en, which is the official redemption page. Also, keep an eye on this space for daily updates on Garena Free Fire redemption codes and rewards.
Garena Free Fire Redeem Codes Today 18 December 2023
FFDBGQWPNHJX V44ZZ5YY7CBS XFW4Z6Q882WY 4TPQRDQJHVP4 FFAC2YXE6RF2 FFCMCPSBN9CU FFBBCVQZ4MWA HFNSJ6W74Z48 2FG94YCW9VMV HHNAT6VKQ9R7 TDK4JWN6RD6 WD2ATK3ZEA55 E2F86ZREMK49How to Get Free Fire Redeem Codes for Garena on 18 December 2023?
- Visit the Garena Free Fire game’s official website at reward.ff.garena.com.
- Use your Facebook, Google, VK, Apple ID, Huawei ID, or Twitter account to log in.
- You’ll be taken to a valid redemption code (s)
- Copy and paste the 12-digit redemption code into the text box.
- On the screen, a dialogue box will appear.
- ‘Ok’ should be selected.

 Step 2:
 Step 3:
 Step 4:
 Step 5:
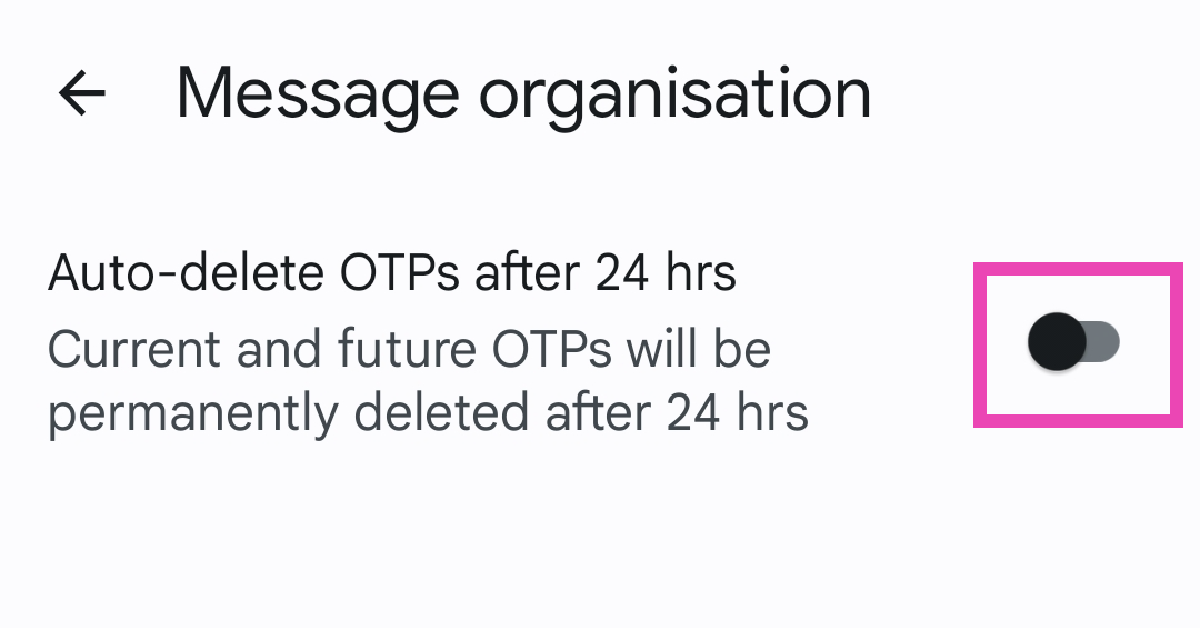
 Step 3:
 Step 4:
Garena Free Fire Redeem Codes Today 17 December 2023: Here is how to claim them

Garena Free Fire is a battle royale game with regular awards and tournaments to keep players interested. If you play Garena Free Fire, you should be aware of the redeem codes that are released on a daily basis. However, because the battle royale game is banned in India, players from other countries can use the Free Fire Redeem codes daily. If you’re unfamiliar with the Garena Free Fire redeem codes or don’t know how to get them, we’ve put together a step-by-step guide to help you redeem them. Check out Garena Free Fire Redeem Codes for 17 December 2023.
The Free Fire redeem codes are a great way to get free stuff. These are 12-digit codes that contain alphabets and numbers, as well as an expiration date and time. Because the Garena FF redeem codes cannot be used more than once, you should hurry to the redemption page to claim your free reward before someone else does. To get a free reward, all you have to do is go to reward.ff.garena.com/en, which is the official redemption page. Also, keep an eye on this space for daily updates on Garena Free Fire redemption codes and rewards.
Garena Free Fire Redeem Codes Today 17 December 2023
FKY89OLKJFH56GRG FUTYJT5I78OI78F2 FUKTY7UJIE56RYHI FBVFTYJHR67UY4IT FYHJTY7UKJT678U4 FYH6JY8UKY7JYGFH F6U7ITKJGYUJF6YU FVYHFT6HYJT67LYP FKJIT67UWEYHT4H4 FR4HII9FT5SDQ2HS FOGFUYJN67UR6OBI FV7CYTGDRTUNMJEK FYHJMKRT76HYR56C F6Y6FHRTJ67YHR57 FTDRU7HY5R6FEDG3 FTGBHDTRYHB56GRK FDYHGBNE5RDTGE87 FRJNTR67UH675Y4EHow to Get Free Fire Redeem Codes for Garena on 17 December 2023?
- Visit the Garena Free Fire game’s official website at reward.ff.garena.com.
- Use your Facebook, Google, VK, Apple ID, Huawei ID, or Twitter account to log in.
- You’ll be taken to a valid redemption code (s)
- Copy and paste the 12-digit redemption code into the text box.
- On the screen, a dialogue box will appear.
- ‘Ok’ should be selected.
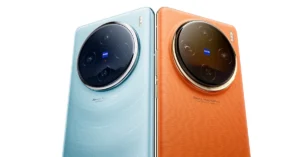
Vivo X100 and Vivo X100 Pro launched globally

Key Highlights

- The Vivo X100 and Vivo X100 Pro will launch in India next month.
- Both smartphones include a V3 imaging chip.
- They are powered by the MediaTek Dimensity 9300 SoC.
Vivo X100 and X100 Pro pricing and availability details
The company has not yet revealed the pricing of both the Vivo X100 and X100 Pro smartphones. Though the price of the Hong Kong has been revealed, the price of the X100 starts at HK$5,998, which converts to Rs 63,917 for the 12GB RAM with 256GB storage. On the other hand, the price of the X100 Pro with 16GB of RAM and 512GB of storage is set at HK$7,998, which is around Rs 85,224.Note that the Vivo X100 Series will launch in India in January 2024.The Vivo X100 Series debuted in China in November, and the pricing at which it arrived starts at CNY 3,999 (Rs 50,000) and goes up to CNY 5,999 (Rs 68,000). There are four models for the Vivo 100 Pro, whereas the X100 is made available in five variants with up to 16GB of LPDDR5T RAM and 1TB of storage.
Vivo X100 Series specifications
Both the Vivo X100 and the Vivo X100 Pro share a lot of similarities. The display software and processors are the same. They feature a 6.78-inch AMOLED 8T LTPO curved display with a 120Hz refresh rate and 3000 nits of peak brightness. The devices run on OriginOS 4 with Android 14 out of the box. They are powered by a MediaTek Dimensity 9300 SoC with a Vivo V3 chip. Both handsets are highlighted with a triple-camera setup powered by Zeiss optics. The Vivo X100 Pro includes a 50-megapixel Sony IMX989 1-inch type sensor with OIS (100x digital zoom), a 50-megapixel ultra-wide-angle sensor, and a 50-megapixel Zeiss APO super-telephoto lens with OIS (4.3x optical zoom and 100x digital zoom). On the other hand, the vanilla model includes a Sony IMX920 VCS bionic 50-megapixel primary sensor with OIS, a 50-megapixel ultra-wide-angle lens, and a 64-megapixel Zeiss super-telephoto lens (100x clear zoom). Both smartphones come with a 32-megapixel selfie camera.Top 4 ways to add a watermark to your pictures on Android and iOS

Android and iOS are not radically different from each other, but there are certain aspects where one has an added advantage over the other. When it comes to adding watermarks to your pictures, Android devices are ahead of the curve compared to their iOS counterparts. Perhaps, in future iOS versions, Apple will add the feature to the iPhone as well. But as of now, here are 4 ways you can go about this task.
Read Also: How to add a short video to Instagram Notes?
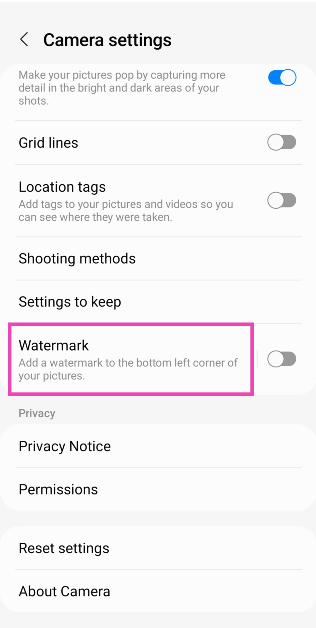
 Step 3: Scroll down and select Watermark.
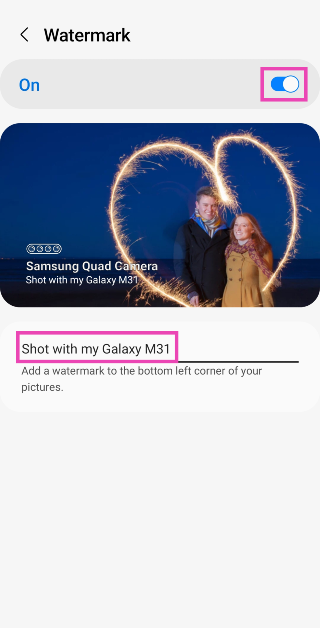
 Step 4: Turn on the toggle switch at the top of the page.
 Step 5: Add the text that you want to watermark on your pictures.
Step 6: Go back to the Camera app and start taking pictures.
Step 5: Add the text that you want to watermark on your pictures.
Step 6: Go back to the Camera app and start taking pictures.
 The native camera app on iPhone does not have the feature to add a watermark to your photos automatically. You can get around this roadblock by uploading your watermark as a signature on Markup and using it wherever necessary. Here’s how you can go about it.
Step 1: Launch the Photos app and open the picture to which you want to add a watermark.
Step 2: Hit Edit.
Step 3: Select the Markup icon at the top right corner of the screen.
Step 4: Tap the plus icon at the bottom right corner of the screen.
Step 5: Tap on Signature and select Add or Remove Signature.
Step 6: Scribble your name, logo, or sign that you want as the watermark.
Step 7: Hit Done.
Step 8: Place the watermark on the picture and hit Done.
The watermark will also be saved in Markup’s ‘Signature’ section. Whenever you want to add it to a picture, just open Markup and select signature.
The native camera app on iPhone does not have the feature to add a watermark to your photos automatically. You can get around this roadblock by uploading your watermark as a signature on Markup and using it wherever necessary. Here’s how you can go about it.
Step 1: Launch the Photos app and open the picture to which you want to add a watermark.
Step 2: Hit Edit.
Step 3: Select the Markup icon at the top right corner of the screen.
Step 4: Tap the plus icon at the bottom right corner of the screen.
Step 5: Tap on Signature and select Add or Remove Signature.
Step 6: Scribble your name, logo, or sign that you want as the watermark.
Step 7: Hit Done.
Step 8: Place the watermark on the picture and hit Done.
The watermark will also be saved in Markup’s ‘Signature’ section. Whenever you want to add it to a picture, just open Markup and select signature.
 Step 3: Tap on Library to import an image from your phone’s gallery. You can also import pictures from Instagram, Facebook, Google Drive, and more.
 Step 4: Hit the arrow icon in the bottom right corner of the screen.
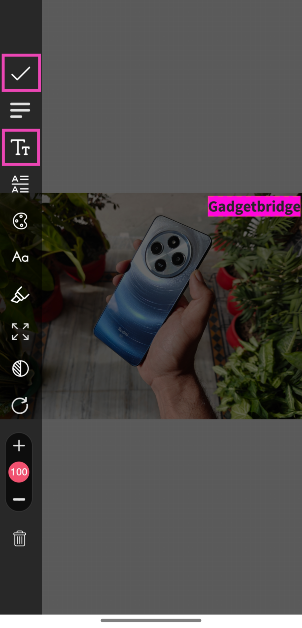
Step 5: Select the kind of watermark you want to add to the image. For this example, we’ve chosen Text.
Step 6: Hit the Tt icon in the sidebar and type the word(s) you want on the watermark. Use the sidebar options to change its font, size, opacity, colour, and more. Drag the watermark on the image to change to change its position. Hit the tick icon when you’re done.
Step 4: Hit the arrow icon in the bottom right corner of the screen.
Step 5: Select the kind of watermark you want to add to the image. For this example, we’ve chosen Text.
Step 6: Hit the Tt icon in the sidebar and type the word(s) you want on the watermark. Use the sidebar options to change its font, size, opacity, colour, and more. Drag the watermark on the image to change to change its position. Hit the tick icon when you’re done.
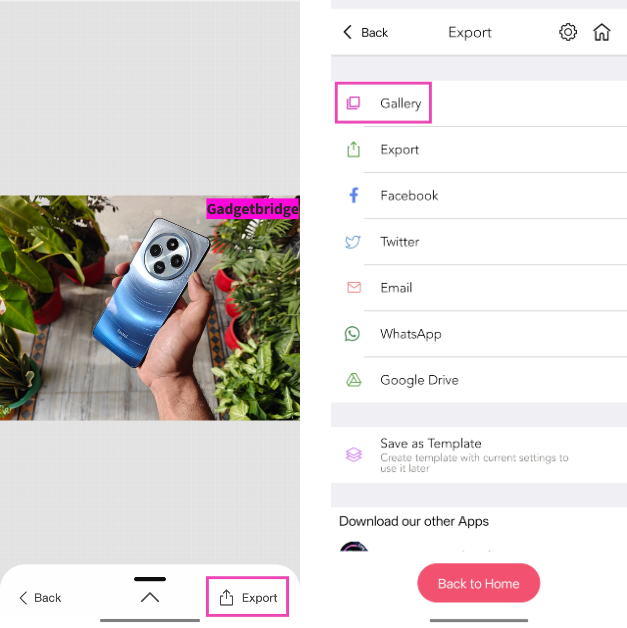
 Step 7: Hit Export and select Gallery. Give eZy Watermark Photos Lite permission to access your phone’s gallery.

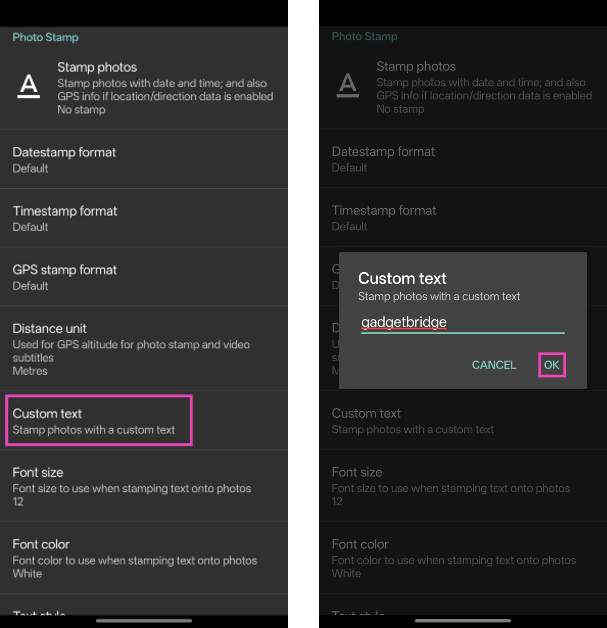
 Step 3: Tap on Photo settings.
Step 4: Scroll down and tap on Custom text.
Step 3: Tap on Photo settings.
Step 4: Scroll down and tap on Custom text.
 Step 5: Enter the text for the watermark. You can also change the font size, colour, and style.
Add a watermark to your pictures to make sure you are always credited
If you post your art or photography on the Internet, it is bound to get reposted somewhere. While common Internet etiquette dictates that one must credit the person behind the artwork, it rarely ever gets followed. The best thing you can do before uploading your work on the Internet is add a watermark to it. This ensures that you get the proper credit if the picture ever attains virality. Your smartphone is well-equipped to automatically add a basic watermark to every picture you take using its camera. However, if you’re looking for more extravagant designs or already have a logo for your work, you will need a third-party app to stitch it to your pictures. While designing a watermark, make sure you add your social media handles so people know where to reach you.Add a watermark to your pictures on Android
Step 1: Launch the Camera app on your Android smartphone. Step 2: Hit the gear icon at the top left corner of the screen.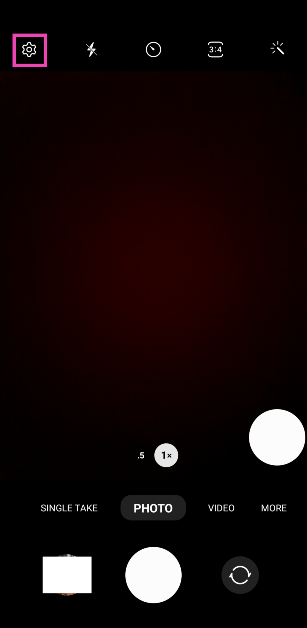 Step 3: Scroll down and select Watermark.
 Step 4: Turn on the toggle switch at the top of the page.
 Step 5: Add the text that you want to watermark on your pictures.
Step 6: Go back to the Camera app and start taking pictures.
Step 5: Add the text that you want to watermark on your pictures.
Step 6: Go back to the Camera app and start taking pictures.
Add a watermark to your pictures on iOS
 The native camera app on iPhone does not have the feature to add a watermark to your photos automatically. You can get around this roadblock by uploading your watermark as a signature on Markup and using it wherever necessary. Here’s how you can go about it.
Step 1: Launch the Photos app and open the picture to which you want to add a watermark.
Step 2: Hit Edit.
Step 3: Select the Markup icon at the top right corner of the screen.
Step 4: Tap the plus icon at the bottom right corner of the screen.
Step 5: Tap on Signature and select Add or Remove Signature.
Step 6: Scribble your name, logo, or sign that you want as the watermark.
Step 7: Hit Done.
Step 8: Place the watermark on the picture and hit Done.
The watermark will also be saved in Markup’s ‘Signature’ section. Whenever you want to add it to a picture, just open Markup and select signature.
The native camera app on iPhone does not have the feature to add a watermark to your photos automatically. You can get around this roadblock by uploading your watermark as a signature on Markup and using it wherever necessary. Here’s how you can go about it.
Step 1: Launch the Photos app and open the picture to which you want to add a watermark.
Step 2: Hit Edit.
Step 3: Select the Markup icon at the top right corner of the screen.
Step 4: Tap the plus icon at the bottom right corner of the screen.
Step 5: Tap on Signature and select Add or Remove Signature.
Step 6: Scribble your name, logo, or sign that you want as the watermark.
Step 7: Hit Done.
Step 8: Place the watermark on the picture and hit Done.
The watermark will also be saved in Markup’s ‘Signature’ section. Whenever you want to add it to a picture, just open Markup and select signature.
Use eZy Watermark Photos Lite by Whizpool
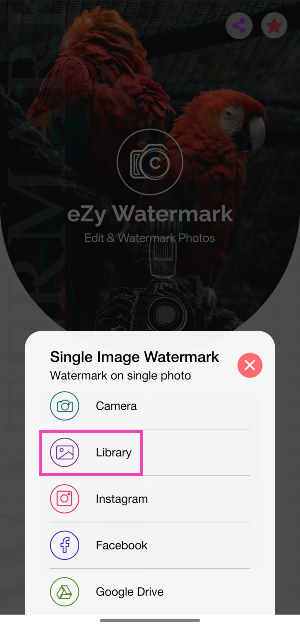
Download on App Store and Google Play Store Your smartphone may be able to add a watermark to your pictures natively, but a dedicated third-party app pays more attention to the design, layout, and appeal of your logo. If you’re looking for something more than just plain text as the watermark, you will need to download an app for it. The eZy Watermark Photos Lite app by Whizpool is one of the best ones around and is available on both platforms. This app has over 150 text fonts to choose from. You can also import your logo from your device’s storage and use eZy to place it on an entire batch of images. Step 1: Download and install the eZy Watermark Photos Lite app by Whizpool on your phone. Step 2: Launch the app and select whether you want to watermark a single photo or a bunch of images.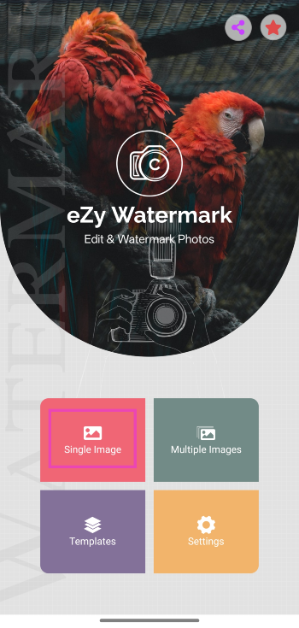 Step 3: Tap on Library to import an image from your phone’s gallery. You can also import pictures from Instagram, Facebook, Google Drive, and more.
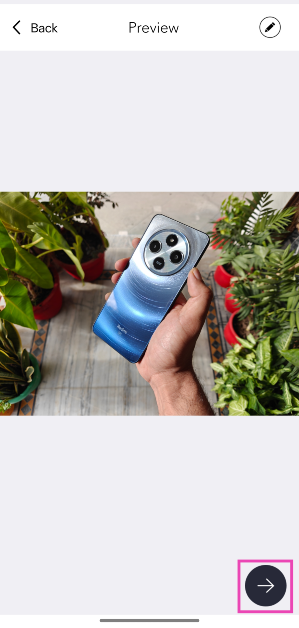
 Step 4: Hit the arrow icon in the bottom right corner of the screen.
 Step 5: Select the kind of watermark you want to add to the image. For this example, we’ve chosen Text.
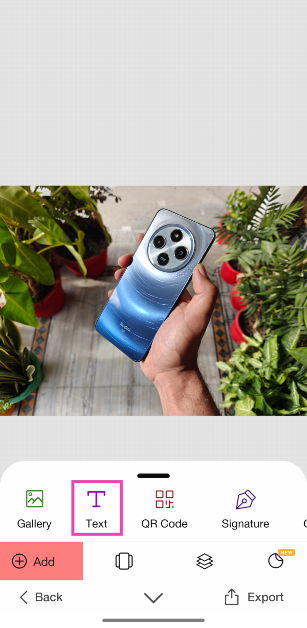 Step 6: Hit the Tt icon in the sidebar and type the word(s) you want on the watermark. Use the sidebar options to change its font, size, opacity, colour, and more. Drag the watermark on the image to change to change its position. Hit the tick icon when you’re done.
 Step 7: Hit Export and select Gallery. Give eZy Watermark Photos Lite permission to access your phone’s gallery.
Use the Open Camera app
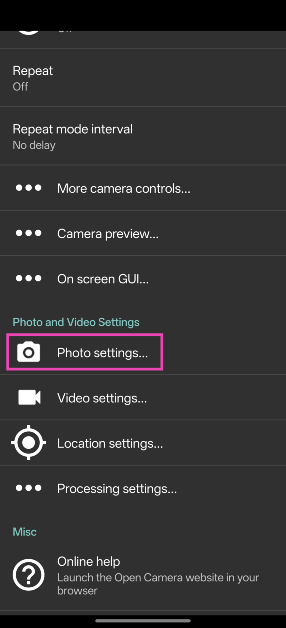
Third-party camera apps offer a diverse range of watermarking options. Let’s take a look at how you can add one using Open Camera. Step 1: Download and install the Open Camera app on your phone. Step 2: Launch the Open Camera app and hit the cog wheel icon in the top right corner of the screen.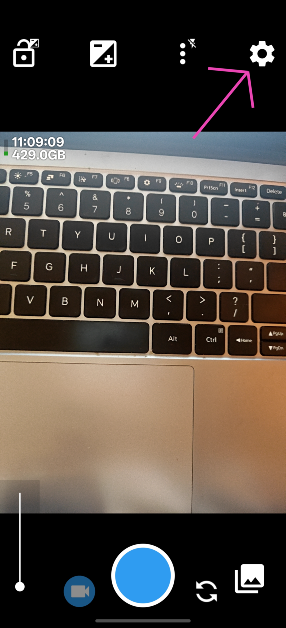 Step 3: Tap on Photo settings.
 Step 4: Scroll down and tap on Custom text.
 Step 5: Enter the text for the watermark. You can also change the font size, colour, and style.
Frequently Asked Questions (FAQs)
Is there a way to automatically add a watermark to the pictures I take using the iPhone’s camera?
iOS does not allow users to automatically add watermarks to their images. What you can do is use Markup to add your watermark as a signature.How do I add a watermark to my pictures on Android?
Go to Camera>Settings>Watermark, turn on the toggle switch, and enter the text you want for the watermark.How do I view the metadata of an image on Android?
To view the metadata of an image on Android, open it using your phone’s native gallery app, hit the ellipses, and select Details.How do I add a watermark to a picture I’ve already taken on Android?
Use the eZy Watermark Photos Lite app to watermark images in your phone’s gallery. You can also import pictures from Instagram, Facebook, Google Drive, and more.How do I add a timestamp to my pictures?
Use the Open Camera app to timestamp the images you take using your phone. Go the app’s photo settings and enable ‘Stamp photos’. Read Also: Poco C65 makes its India debut today, price starts at Rs 8,499Conclusion
These are the top 4 ways to add a watermark to your pictures on Android and iOS. Check out this article to view our list of the best watermark apps around. If you don’t want to use a third-party app, you can simply add your logo to any picture using your phone’s native photo editor. You can access it by tapping the ‘edit’ option after opening the image in your phone’s photo gallery.OnePlus 12 and OnePlus 12R global launch set to take place on January 23

Key Highlights
- The OnePlus 12 is powered by Qualcomm’s 4nm Snapdragon 8 Gen 3 SoC.
- Along with the OnePlus 12, the company will also announce the OnePlus 12R.
- The OnePlus 12R will be a gaming smartphone that will succeed the OnePlus 11R.
OnePlus 12, OnePlus 12R specifications
The OnePlus 12 was launched in China earlier this month. It is highlighted with a 6.82-inch quad-HD+ LTPO OLED screen. The display has an adaptive refresh rate ranging between 1Hz and 120Hz. The screen supports 4,500 nits of screen brightness. The device is IP65-rated for dust and water resistance. At its heart, there is Qualcomm’s 4nm Snapdragon 8 Gen 3 SoC. The device is offered with up to 24GB of LPDDR5X RAM and up to 1TB of UFS 4 inbuilt storage. The phone is endowed with a Hasselblad-branded triple rear camera with a Sony LYT-808 sensor, a 50-megapixel primary camera (OIS and f/1.6 aperture), a 64-megapixel telephoto secondary lens (OIS, 3X optical zoom, and f/2.6 aperture), and a 48-megapixel ultra-wide-angle lens (114-degree field-of-view). Lastly, there is a 32-megapixel front-facing camera (f/2.4 aperture) for taking selfies and video calling. The handset houses a 5,400mAh battery with 100W SuperVOOC wired, 50W wireless, and 10W reverse wireless charging support. On the other hand, the OnePlus 12R will launch for the first time. It was not launched along with the OnePlus 12 last week. Reports suggest that the OnePlus 12 will be a rebranded variant of the OnePlus Ace 3. Details about the smartphone are scarce, but as the launch gets closer, more details are expected to be revealed, so stay tuned to Gadget Bridge.
 Step 3:
 Step 4:
 Step 5:
 Step 1:
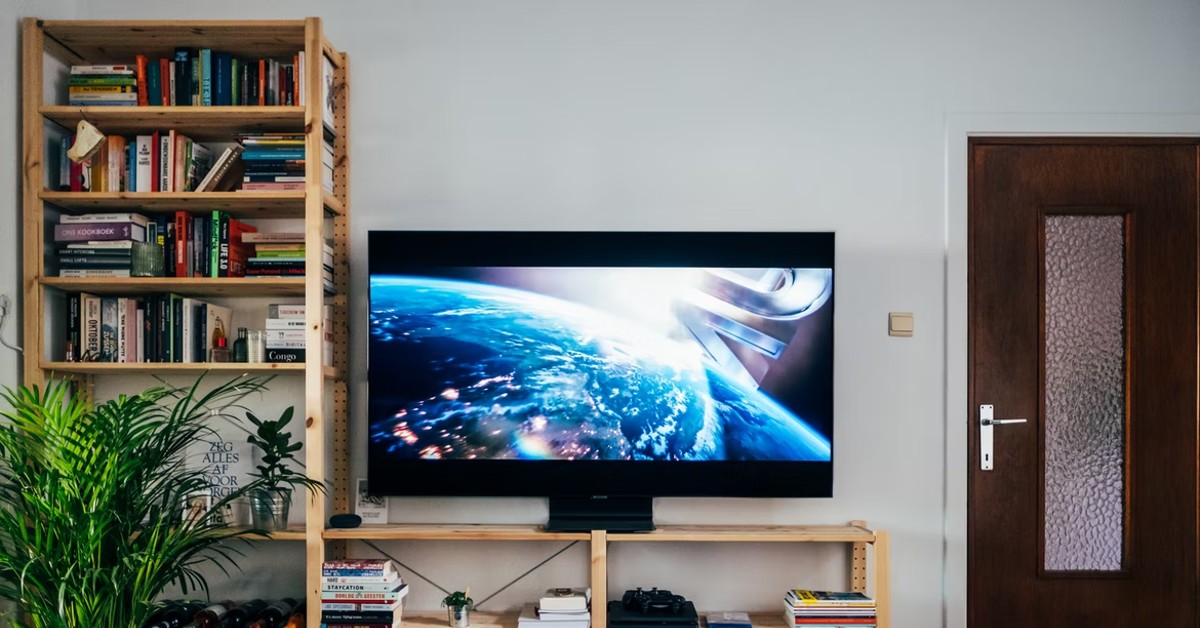
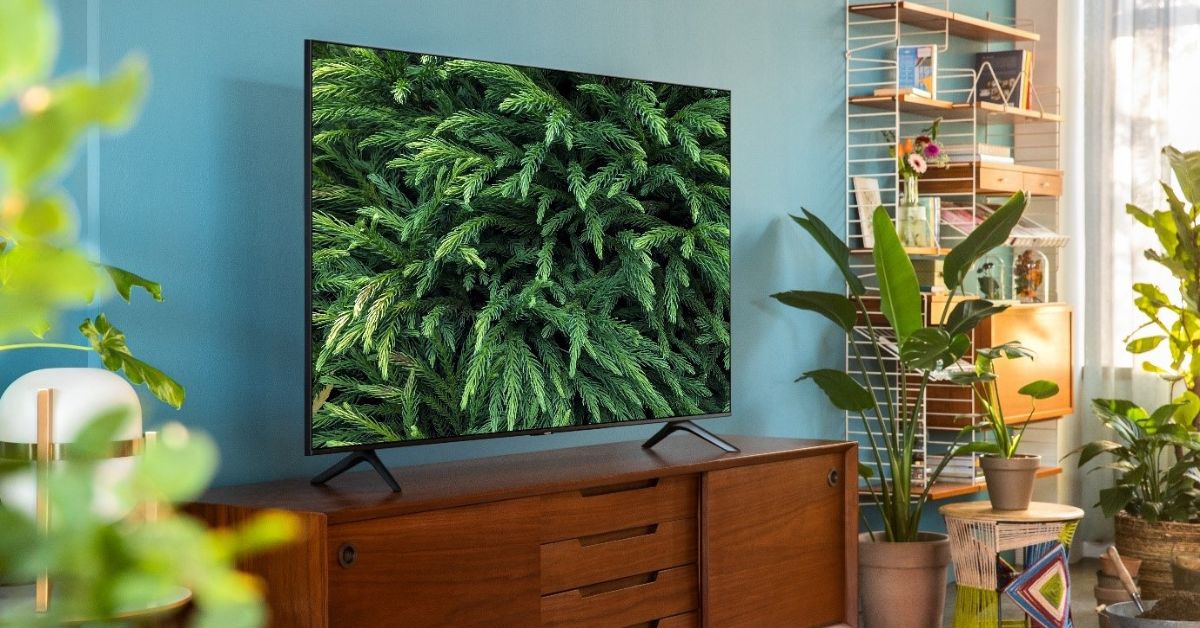
Top 11 ways to fix ‘Smart TV not downloading apps’

The app marketplace for Smart TVs has more to offer than just OTT and streaming apps. You can use apps like Kodi to catalogue your digital library of movies, songs, and TV shows, or something like AirScreen to cast your smartphone or laptop’s display on the large screen. But what if your Smart TV is not able to download apps? You can rest easy and let us take over from here. Today, we bring you the top 11 fixes for the ‘Smart TV not downloading apps’ problem.
Read Also: Asus Zenbook 14 OLED (UX3405) laptop with Intel Core Ultra 9 CPU launched
 Your Smart TV relies on home WiFi to download apps, stream content, and install other updates. If there’s something wrong with the Internet connection, these tasks will come to a halt. To confirm that the problem lies with the WiFi, try streaming content from an OTT app on your TV. If you’re unable to play it, the WiFi is at fault. To double-check, you can also try loading a webpage on your smartphone after connecting it to your home WiFi. To fix this issue, give your WiFi router a quick restart.
 Sometimes, an odd background glitch on your Smart TV can prevent it from downloading new apps. Luckily, it can be fixed by simply restarting your TV. You can use the remote or turn off the power outlet. Make sure the TV stays turned off for a few seconds before turning it back on. If you own an Android TV, you will find the restart option in the side menu.
It may not seem like the most obvious reason, but an outdated firmware or operating system can cause your TV to malfunction while downloading apps. Here’s how you can update it.
Step 1: Choose the Settings icon from the side menu or hit the settings button on the remote.
Step 2: Scroll down and select Support.
Step 3: Click on Software Update.
Step 4: Select Update Now.
If your TV is running out of storage space, it will fail to download any new apps. The only way you can fix this is by deleting some of the previously installed apps that you no longer use. Here’s how you can view the storage breakdown on your Smart TV.
Step 1: Select Settings from the side menu or hit the settings button on the remote.
Step 2: Scroll down and select Device Preferences.
Step 3: Hit Storage.
Step 4: Select Internal Shared Storage.
On the following screen, you will be able to view a complete breakdown of the storage allocation on your TV. Check the available storage to determine if it is causing the issue.
If the Play Store app on your Smart TV can’t download new apps, simply use your Android phone for the task. You need to be signed into both devices using the same Google account.
Step 1: Launch the Google Play Store app on your Android phone.
Step 2: Search for the app you want to download on your TV and open its page.
Step 3: Hit the arrow next to the install button.
Step 4: Select your Smart TV. Hit Install.
If the Google Play Store on your TV fails to work even after trying the fixes mentioned above, try sideloading the app on your device. ‘Sideloading’ refers to the process of downloading an app from third-party sources. Here’s how you can go about it.
Step 1: Go to Settings and enable Unkown sources for app installation.
Step 2: On your smartphone, install the app APK from a trusted third-party source.
Step 3: Use a wireless transfer app to send the APK to your TV.
Step 4: Open the APK from your TV’s internal storage and follow the onscreen instructions to install the app on the device.
If nothing else works, you can perform a factory settings reset on your TV. This will delete all your apps and data from the device.
Step 1: Go to TV Settings and select General.
Step 2: Scroll to the bottom and hit Reset.
Step 3: Enter the PIN to confirm the selection.
Step 1: Go to Settings and select All Settings.
Step 2: Click on Device Care.
Step 3: Switch to the Self Diagnosis tab.
Step 4: Click on Reset Smart Hub.
Step 5: Enter your TV’s PIN.
Sometimes, an odd background glitch on your Smart TV can prevent it from downloading new apps. Luckily, it can be fixed by simply restarting your TV. You can use the remote or turn off the power outlet. Make sure the TV stays turned off for a few seconds before turning it back on. If you own an Android TV, you will find the restart option in the side menu.
It may not seem like the most obvious reason, but an outdated firmware or operating system can cause your TV to malfunction while downloading apps. Here’s how you can update it.
Step 1: Choose the Settings icon from the side menu or hit the settings button on the remote.
Step 2: Scroll down and select Support.
Step 3: Click on Software Update.
Step 4: Select Update Now.
If your TV is running out of storage space, it will fail to download any new apps. The only way you can fix this is by deleting some of the previously installed apps that you no longer use. Here’s how you can view the storage breakdown on your Smart TV.
Step 1: Select Settings from the side menu or hit the settings button on the remote.
Step 2: Scroll down and select Device Preferences.
Step 3: Hit Storage.
Step 4: Select Internal Shared Storage.
On the following screen, you will be able to view a complete breakdown of the storage allocation on your TV. Check the available storage to determine if it is causing the issue.
If the Play Store app on your Smart TV can’t download new apps, simply use your Android phone for the task. You need to be signed into both devices using the same Google account.
Step 1: Launch the Google Play Store app on your Android phone.
Step 2: Search for the app you want to download on your TV and open its page.
Step 3: Hit the arrow next to the install button.
Step 4: Select your Smart TV. Hit Install.
If the Google Play Store on your TV fails to work even after trying the fixes mentioned above, try sideloading the app on your device. ‘Sideloading’ refers to the process of downloading an app from third-party sources. Here’s how you can go about it.
Step 1: Go to Settings and enable Unkown sources for app installation.
Step 2: On your smartphone, install the app APK from a trusted third-party source.
Step 3: Use a wireless transfer app to send the APK to your TV.
Step 4: Open the APK from your TV’s internal storage and follow the onscreen instructions to install the app on the device.
If nothing else works, you can perform a factory settings reset on your TV. This will delete all your apps and data from the device.
Step 1: Go to TV Settings and select General.
Step 2: Scroll to the bottom and hit Reset.
Step 3: Enter the PIN to confirm the selection.
Step 1: Go to Settings and select All Settings.
Step 2: Click on Device Care.
Step 3: Switch to the Self Diagnosis tab.
Step 4: Click on Reset Smart Hub.
Step 5: Enter your TV’s PIN.
Before you begin, try to figure out what’s causing the issue
A problem as general as your Smart TV not being able to download any new apps can be caused due to a plethora of reasons. Before you dive into fixing the issue, take a step back and try to figure out what’s causing it to occur. There are three likely culprits behind this situation – your WiFi connection, the Play Store app, or your Smart TV’s OS. Luckily, all three issues can be fixed easily without requiring professional help. With a bit of hit and trial, you can confirm the reason behind the malfunction. The easiest thing to cross off the list is the WiFi connection. If the WiFi is working on other connected devices, then it isn’t at fault. The Play Store app and Smart TV OS have their own troubleshooting methods which we will explain later in this article.Is your home WiFi working?
 Your Smart TV relies on home WiFi to download apps, stream content, and install other updates. If there’s something wrong with the Internet connection, these tasks will come to a halt. To confirm that the problem lies with the WiFi, try streaming content from an OTT app on your TV. If you’re unable to play it, the WiFi is at fault. To double-check, you can also try loading a webpage on your smartphone after connecting it to your home WiFi. To fix this issue, give your WiFi router a quick restart.
Restart your TV
 Sometimes, an odd background glitch on your Smart TV can prevent it from downloading new apps. Luckily, it can be fixed by simply restarting your TV. You can use the remote or turn off the power outlet. Make sure the TV stays turned off for a few seconds before turning it back on. If you own an Android TV, you will find the restart option in the side menu.
Update your TV’s OS
 It may not seem like the most obvious reason, but an outdated firmware or operating system can cause your TV to malfunction while downloading apps. Here’s how you can update it.
Step 1: Choose the Settings icon from the side menu or hit the settings button on the remote.
Step 2: Scroll down and select Support.
Step 3: Click on Software Update.
Step 4: Select Update Now.
It may not seem like the most obvious reason, but an outdated firmware or operating system can cause your TV to malfunction while downloading apps. Here’s how you can update it.
Step 1: Choose the Settings icon from the side menu or hit the settings button on the remote.
Step 2: Scroll down and select Support.
Step 3: Click on Software Update.
Step 4: Select Update Now.
Check your TV’s storage
 If your TV is running out of storage space, it will fail to download any new apps. The only way you can fix this is by deleting some of the previously installed apps that you no longer use. Here’s how you can view the storage breakdown on your Smart TV.
Step 1: Select Settings from the side menu or hit the settings button on the remote.
Step 2: Scroll down and select Device Preferences.
Step 3: Hit Storage.
Step 4: Select Internal Shared Storage.
On the following screen, you will be able to view a complete breakdown of the storage allocation on your TV. Check the available storage to determine if it is causing the issue.
If your TV is running out of storage space, it will fail to download any new apps. The only way you can fix this is by deleting some of the previously installed apps that you no longer use. Here’s how you can view the storage breakdown on your Smart TV.
Step 1: Select Settings from the side menu or hit the settings button on the remote.
Step 2: Scroll down and select Device Preferences.
Step 3: Hit Storage.
Step 4: Select Internal Shared Storage.
On the following screen, you will be able to view a complete breakdown of the storage allocation on your TV. Check the available storage to determine if it is causing the issue.
Install apps on your Smart TV using your Android phone
 If the Play Store app on your Smart TV can’t download new apps, simply use your Android phone for the task. You need to be signed into both devices using the same Google account.
Step 1: Launch the Google Play Store app on your Android phone.
Step 2: Search for the app you want to download on your TV and open its page.
Step 3: Hit the arrow next to the install button.
Step 4: Select your Smart TV. Hit Install.
If the Play Store app on your Smart TV can’t download new apps, simply use your Android phone for the task. You need to be signed into both devices using the same Google account.
Step 1: Launch the Google Play Store app on your Android phone.
Step 2: Search for the app you want to download on your TV and open its page.
Step 3: Hit the arrow next to the install button.
Step 4: Select your Smart TV. Hit Install.
Clear Google Play Store’s Cache
Step 1: Go to TV Settings and select Apps. Step 2: Select Google Play Store. Step 3: Scroll down and select Clear Cache.Disable the Google Play Store and then enable it
Since you can’t uninstall the Google Play Store on your TV, try disabling and then enabling it again. Step 1: Go to TV Settings and select Apps. Step 2: Select Google Play Store. Step 3: Scroll down and select Disable. Step 4: Enable the Play Store from the same screen after a couple of minutes.Uninstall updates for the Google Play Store
If a recent Play Store update caused this issue, you can easily uninstall it from the app settings. Here’s how. Step 1: Go to TV Settings and select Apps. Step 2: Select Google Play Store. Step 3: Select Uninstall Updates.Sideload the app on your TV
 If the Google Play Store on your TV fails to work even after trying the fixes mentioned above, try sideloading the app on your device. ‘Sideloading’ refers to the process of downloading an app from third-party sources. Here’s how you can go about it.
Step 1: Go to Settings and enable Unkown sources for app installation.
Step 2: On your smartphone, install the app APK from a trusted third-party source.
Step 3: Use a wireless transfer app to send the APK to your TV.
Step 4: Open the APK from your TV’s internal storage and follow the onscreen instructions to install the app on the device.
If the Google Play Store on your TV fails to work even after trying the fixes mentioned above, try sideloading the app on your device. ‘Sideloading’ refers to the process of downloading an app from third-party sources. Here’s how you can go about it.
Step 1: Go to Settings and enable Unkown sources for app installation.
Step 2: On your smartphone, install the app APK from a trusted third-party source.
Step 3: Use a wireless transfer app to send the APK to your TV.
Step 4: Open the APK from your TV’s internal storage and follow the onscreen instructions to install the app on the device.
Reset your TV to its factory settings
 If nothing else works, you can perform a factory settings reset on your TV. This will delete all your apps and data from the device.
Step 1: Go to TV Settings and select General.
Step 2: Scroll to the bottom and hit Reset.
Step 3: Enter the PIN to confirm the selection.
If nothing else works, you can perform a factory settings reset on your TV. This will delete all your apps and data from the device.
Step 1: Go to TV Settings and select General.
Step 2: Scroll to the bottom and hit Reset.
Step 3: Enter the PIN to confirm the selection.
Reset the Smart Hub (Samsung Smart TV)
 Step 1: Go to Settings and select All Settings.
Step 2: Click on Device Care.
Step 3: Switch to the Self Diagnosis tab.
Step 4: Click on Reset Smart Hub.
Step 5: Enter your TV’s PIN.
Step 1: Go to Settings and select All Settings.
Step 2: Click on Device Care.
Step 3: Switch to the Self Diagnosis tab.
Step 4: Click on Reset Smart Hub.
Step 5: Enter your TV’s PIN.
Frequently Asked Questions (FAQs)
Why isn’t my Smart TV downloading new apps?
If your Smart TV is unable to download an app, it could be due to a faulty internet connection, lack of optimum storage space, or a background glitch.Can I download an app on my Smart TV using my smartphone?
If you’re logged into both devices with the same Google Account, go to the app’s page on Google Play Store, tap the arrow icon next to the install button and select your TV.Can I clear the cache for any app on my TV?
Yes, you can clear the cache for any app on your Smart TV by going to Settings>Apps. Select the app and hit ‘Clear Cache’How do I reset my Samsung Smart TV’s Smart Hub?
Go to Settings>All Settings>Device Care>Self Diagnosis, click on Reset Smart Hub, and enter the PIN.How do I update my Smart TV?
Go to Settings>Support>Software Update and hit ‘Update Now’ to update your TV’s OS to its latest version. Read Also: How to Find, Download, and Set Latest Wallpapers on Apple Watch? Top 3 WaysConclusion
These are the top 11 ways to fix the ‘Smart TV not downloading apps issue’. While sideloading an app, always make sure you download the Smart TV version of its APK. A smartphone app will not work on your Android TV. Even if the TV can install it, the app will not be stable enough to function properly. If you found this article helpful, let us know in the comments!Redmi Note 13 5G Series availability details for India announced

Key Highlights
- The Redmi Note 13 5G Series was released in China in September.
- The upcoming lineup is scheduled to launch in India on January 4.
- It is likely to include three models: the Redmi Note 13, the Redmi Note 13 Pro, and Redmi Note 13 Pro+.