Garena Free Fire is a battle royale game with regular awards and tournaments to keep players interested. If you play Garena Free Fire, you should be aware of the redeem codes that are released on a daily basis. However, because the battle royale game is banned in India, players from other countries can use the Free Fire Redeem codes daily. If you’re unfamiliar with the Garena Free Fire redeem codes or don’t know how to get them, we’ve put together a step-by-step guide to help you redeem them. Check out Garena Free Fire Redeem Codes for 28 February 2024.
The Free Fire redeem codes are a great way to get free stuff. These are 12-digit codes that contain alphabets and numbers, as well as an expiration date and time. Because the Garena FF redeem codes cannot be used more than once, you should hurry to the redemption page to claim your free reward before someone else does. To get a free reward, all you have to do is go to reward.ff.garena.com/en, which is the official redemption page. Also, keep an eye on this space for daily updates on Garena Free Fire redemption codes and rewards.
The Krafton India team and Alchemist Games worked together to curate characters and elements inspired by Indian themes.
About three weeks have passed since the game’s first announcement and the pre-registration period began on February 5th.
BGMI developer Krafton has launched its new game called Garuda Saga. It is a roguelike mobile game, tailored exclusively for the Indian audience.
Anuj Sahani, Head of KRAFTON Incubator Program & Garuda Saga Lead, “Garuda Saga is a uniquely engaging game and tailoring it for the Indian audience has been an exhilarating adventure. With close collaboration between Alchemist Games and the Krafton India team, we’ve intricately woven the vibrant essence of India into every aspect of the game, from its storyline to its characters, truly bringing Garuda Saga to life. We look forward to delivering more unforgettable gaming experiences that captivate and inspire players throughout India.”
Krafton India and Alchemist Games have teamed up to introduce a new game in an effort to increase their market share in the nation. Krafton has announced the launch of its first India-themed game namely Garuda Saga. The game is now available to download and play on Android and iOS for Indian users.
About three weeks have passed since the game’s first announcement and the pre-registration period began on February 5th.
According to Krafton, its India team worked with Alchemist Games, a South Korean mobile game production company to curate characters and elements inspired by Indian themes. Players can customise their RPG experience in Garuda Saga to fit their own play style. Drawing inspiration from rich Indian themes, players assume the role of Garuda. Equipped with a reliable bow and unmatched speed, Garuda progresses through levels, conquering monsters, and acquiring new skills with each victory.
Kipum Jun, CEO, Alchemist Games said, “Collaborating with KRAFTON for Garuda Saga has been a journey of discovery and innovation. Garuda Saga’s charm lies in blend of Indian themes layered with fun gameplay mechanics. We look forward to the community experiencing the magic of Garuda Saga and to creating more groundbreaking games that resonate with Indian players.”
Nubia has launched a pocket-sized foldable design- Nubia Flip 5G.
It features a 6.9-inch 120Hz internal display.
It houses a 4310mAh battery with 33W charging support.
The handset has a 50MP AI dual camera.
The ZTE-owned smartphone brand Nubia has unveiled its first foldable- Nubia Flip 5G at the Mobile World Congress 2024. It is anticipated to compete alongside Samsung, Motorola, Oppo and Tecno’s foldable devices in the market. The newly launched clamshell design phone features a 120 Hz foldable OLED display. Qualcomm’s Snapdragon 7 Gen 1 powers the phone. The handset includes a dual rear camera setup led by a 50-megapixel sensor.
In This Article
Nubia Flip 5G pricing and sale details
The Nubia Flip 5G will retail for $599, or approximately Rs 50,000. The latest foldable phone will be available in two colour options- Black and Gold. Nubia hasn’t yet disclosed the new flip phone’s availability information, but it is likely to be released soon.
Nubia Flip 5G specifications
Nubia Flip 5G flaunts a 6.9-inch FHD+ AMOLED foldable display with 2790 x 1188 pixels of resolution. The primary display supports a 120Hz refresh rate. It also comes with a 1.43-inch AMOLED circular cover display with 466×466 pixels of resolution. Users won’t need to unfold their phones to access various apps thanks to the circular cover screen. It makes use of a dual-rail suspended hinge.
Under the hood, there is a Qualcomm Snapdragon 7 Gen 1 (4nm) Mobile Platform with Adreno 644 GPU. It includes up to 8GB RAM and 256GB UFS 3.1 storage. It operates on Android 13. For photos and videos, there is a dual rear camera setup that includes a 50-megapixel primary sensor and a 2-megapixel depth sensor with f/2.2 aperture along with an LED flash. It has an impressive 16-megapixel front-facing camera for selfies and video chats.
It has a 4,310mAh battery that can be charged at 33 watts. It comes with a side-mounted fingerprint sensor for authentication. In terms of connectivity, there is 5G SA/NSA, Dual 4G VoLTE, Wi-Fi 6 802.11 ax, Bluetooth 5.3, GPS/GLONASS, USB Type-C, and NFC.
Samsung’s compact offering in its flagship Galaxy S24 Series should be the go-to choice for users who want a one-handed usage experience without sacrificing the device’s performance. The ‘compact’ monicker is a bit of a stretch nowadays as even the Galaxy S24 flaunts a big 6.2-inch display and sports dimensions of 147mm x 70.6mm x 7.6mm. But, if you’re looking for a small flagship, this is as good as it gets. The India variant of the Samsung Galaxy S24 carries one key change under the hood. Instead of the Snapdragon 8 Gen 3 SoC as the Ultra variant, it is equipped with Samsung’s in-house Exynos 2400 chipset. Find out what this difference means for the Samsung Galaxy S24 in our review of the smartphone.
Inside the Samsung Galaxy S24 retail package, you get the smartphone, a SIM ejector, a USB Type-C cable, and a quick start guide. The smartphone is available in three colours – Amber Yellow, Cobalt Violet, and Onyx Black. Ordering the device directly from Samsung’s official website unlocks two more colour options – Sapphire Blue and Jade Green.
We used the Amber Yellow colour variant of the Samsung Galaxy S24 for this review. The very light shade of yellow with its pastel aesthetic feels a little boring on a smartphone that costs Rs 80,000. The same can be said about the other shades on offer.
The form factor of the Galaxy S24 remains mostly unchanged from last year’s S23 Series. The vertical layout for the individual camera cutouts is Samsung’s design language for the second year in a row. The flat edges of the aluminium frame lend it an iPhone-like feel. Unlike its ‘Ultra’ counterpart, this titanium-free frame rocks rounded corners and a polished finish.
The left edge of the aluminium frame houses the volume rocker keys and the power button. The SIM card slot, primary microphone, USB Type-C port, and primary speaker are positioned at the bottom edge. Up top lie the secondary microphone and speaker. A small punch-hole cutout at the centre of the display contains the selfie camera.
The 6.2-inch Dynamic LTPO AMOLED 2X display on the Galaxy S24 is the best in the business. The touch response offered by this 120Hz panel remains unmatched by its Android peers. With a compact form factor, this display is an absolute delight to use. Under direct sunlight, it can push its brightness to a staggering 2,600 nits.
Widevine L1 support means that you can consume high-definition content on this device across all the major streaming platforms. The colours produced on the screen are vivid and punchy and the images are incredibly detailed. We were particularly pleased by the intensity of the display and how quickly it adapted to the surrounding light. The stereo speaker setup does a good job of producing a balanced audio output.
Samsung Galaxy S24 is rated IP68 dust and water resistance. This rating is something we’ve come to expect from most flagships. The smartphone can handle being submerged up to 1.5m for 30 minutes. The front and back panels are protected by Gorilla Glass Victus 2 and can easily absorb light knocks.
Samsung Galaxy S24 review: Performance and Cameras
This year’s Indian variant of the Samsung Galaxy S24 is powered by the company’s in-house Exynos 2400 SoC instead of Qualcomm’s 2024 flagship Snapdragon 8 Gen 3 chipset. The latter is only available in the S24 Series sold in the USA, Canada, and China. In India, the S8G3 SoC only powers the Ultra variant of the Galaxy S24 (our review here).
The reputation of Exynos chipset is certainly not on par with their Snapdragon peers, something Samsung’s European users can easily attest to. However, on paper, the Exynos 2400 processor produces impressive results; scoring 2,085 points in the single-core test and 6,572 points in the multi-core test on Geekbench 6. In comparison, the Ultra variant scored 2,165 and 6,416 points respectively.
Benchmark results don’t always tell the full story. We ran a series of tasks on the Galaxy S24 and it handled them with ease. Routine tasks like video calling, photo editing, web browsing, and video recording, presented no problems. Even with multiple apps active in the background, the smartphone did not appear to be slugging even for a moment. When it comes to everyday tasks, the difference between the Exynos 2400 and Snapdragon 8 Gen 3 chipsets is unnoticeable.
The gaming performance of the Galaxy S24 is excellent, although not on par with the Ultra variant. The smartphone can play games like Call of Duty Mobile and Asphalt 9 at the highest settings. The vapour chamber does a good job of dissipating the heat and keeping the internal temperature down, but the back panel does tend to warm up after hitting 30-40 minutes of consistent gameplay. The smartphone also heats up while video recording for an extended period of time in outdoor conditions. In both situations, the heating was more noticeable around the camera array. This is something we did not experience in the Ultra variant.
Samsung’s suite of AI tools, dubbed Galaxy AI, has been grabbing a lot of headlines this year after the tech giant unveiled it at the grand ‘Unboxed’ event last month. The good news is that these tools are available across all three Galaxy S24 variants and will be rolled out for last year’s Galaxy S and Z series next month. We’ve discussed these features at length in our review of the S24 Ultra, so do give it a read!
While some features of the Galaxy AI may cater to a niche group of users, the entire package is far from a gimmick. Our favourite of the lot, Generative Photo Editor, lets users move the objects in a picture. The AI tool fills the empty spaces left behind by the displaced objects with relevant imagery that doesn’t seem out of place. You’d think this feature would be a hit or miss, but it is surprising how reliable it is. You can use this feature on downloaded images as well. Also, it needs to be said that the Ultra variant is slightly faster than the regular Galaxy S24 at generative photo editing.
The translation tool in Samsung Keyboard’s ‘Chat Assist’ features lets you auto-translate messages on any chat thread seamlessly. The live translator for cellular voice calls works smoothly too. The smartphone lets you mute the caller’s voice, so you only hear the translated message. There is a small lag despite the live translation, but you get used to it pretty quickly. Perhaps, the only ‘gimmick’ in the entire Galaxy AI suite is the ‘Writing Style’ tool, which lets you change the tone of your texts. It feels quite contrived at the moment, but we hope that is not the case in its future iterations.
Circle to Search and Generative AI Wallpapers are two features that we hope to see on more Android phones this year. The Pixel 8 Series already has the latter and will be getting Circle to Search pretty soon. If you’re familiar with Google Lens’ ‘Search Screen’ feature, then you already know everything about ‘Circle to Search’. The latter just makes the tool more accessible. Instead of summoning Google Assistant, you can simply long-press the home button (or the navigation handle) and search what’s on your screen.
Generative AI Wallpapers
The overall software experience offered by Android 14-based One UI 6 is clean and beautiful. Apart from Netflix and Facebook, there is no bloatware to be found in this device. If you end up buying this smartphone, we highly recommend using Samsung’s Good Lock app for a diverse range of personalisation options. This app isn’t natively installed in the device, you will have to download it from the Galaxy Store. Once installed, you get access to a good library of free and paid themes, along with personalisation options for the Always On Display, lock screen, Samsung Keyboard, navigation bar, and more.
Equipped with a 4,000 mAh battery pack, the Galaxy S24 offers a standard one-day power backup. While the Ultra variant lasts over a day, it has the advantage of accommodating a larger battery pack. During the review period, used the Samsung Galaxy S24 for instant messaging, video calling, browsing social media, emailing, watching videos, and even gaming. The smartphone left us with a respectable 20% charge at the end of each day. The battery performance tends to get better after using the device for a couple of days. On the downside, the peak wired charging speed is limited to 25W, which means it takes over an hour to fully charge the S24.
Moving on, the Galaxy S24’s camera performance is absolutely stellar, despite lacking the Ultra variant’s camera specs. Instead of the 200MP primary shooter found on the S24 Ultra, the S24 gets a 50MP sensor. The 12MP ultrawide and the 10MP 3x telephoto lenses remain the same, but as is tradition, the two lower variants of the Galaxy S Series miss out on the periscope telephoto lens.
In outdoor lighting conditions, the images taken with the 50MP primary shooter are packed with a lot of detail and finely processed to reproduce natural, vivid colours. We were stuck with a bit of an overcast sky this past week, but the S24 remained unfazed by the diffused lighting. We had no complaints about the colour richness and dynamic range in the images. In limited lighting, the Night Mode in the default camera app does a splendid job of brightening the subject, removing the grain, and injecting the appropriate colours in the images. We were particularly pleased with the colour tuning for the night sky.
Primary Shooter: Without Night Mode vs With Night Mode
The 12MP ultrawide camera produces solid images with a colour richness that is on par with the primary shooter. This camera even manages to capture distant reflections with their sharpness relatively intact. Something you can’t say about a lot of ultrawide cameras in this segment. It retains its rock-solid performance in limited lighting as well, where it relies on the Night Mode to smoothen the grain in the images.
Ultrawide ShotUltrawide Camera: Without Night Mode vs With Night Mode
The 10MP 3x telephoto lens can be summoned when you need to zoom into far-away objects. The 3x optical zoom is reliable and produces well-composed images with a good amount of detail. Even at 10x digital zoom, we were happy with the way the images were processed and smoothed out. However, you do tend to hit the point of diminishing returns pretty quickly.
1x vs 3x10x vs 30x
The 12MP selfie camera takes good pictures with popping colours. The camera app has some fun filters for you to use in case you don’t want to install a third-party app. This 12MP front-facing camera can record 4K videos at 30/60 fps. The main camera can record impressive 8K videos at 30fps.
As far as compact smartphones go, there is no reason why you should pick anything other than the Samsung Galaxy S24. It rocks one of the best display panels we’ve seen on an Android smartphone and offers a snappy performance across the board. The lack of Qualcomm’s Snapdragon 8 Gen 3 SoC sure hurts a little, but the Exynos 2400 chipset crushes whatever task you throw at it. The difference in performance between the two chipsets is very minute and barely noticeable to the casual eye. At Rs 80,000 the Samsung Galaxy S24 is a very good deal.
In the latter part of the year, Gorilla Glass protection will be incorporated into the Motorola smartphones.
The company also introduced Smart Connect which makes it simple for customers to pair Lenovo laptops with Motorola devices.
Lenovo-owned smartphone brand Motorola at MWC 2024, announced its new partnership with Corning. As per the deal, Gorilla Glass will feature on every Motorola smartphone that launches in the second half of 2024 and beyond. This will cover tablets and smartphones that come out this year. Additionally, the business launched Smart Connect, a piece of software that creates a single ecosystem connecting tablets, PCs, and cellphones.
Motorola said, “At Motorola, we’re dedicated to delivering cutting-edge technology, and ensuring it is accessible across all franchises. Today, to further our commitment to durability, we’re excited to announce that the entire 2024 portfolio of Motorola devices will feature Corning Gorilla Glass, starting in the second half of this year.”
This is thought to be the best glass protection available for current smartphone displays. Gorilla Glass was developed by Corning Incorporated and is already a feature of many Motorola smartphones. As per the smartphone maker including Gorilla Glass on a selection of Lenovo laptops and tablets, this relationship expands on Lenovo and Corning’s previous work together in the laptop and tablet markets.
Leading smartphone makers trust Corning Incorporated from all around for offering remarkable resistance to scratches and drops while maintaining sensitive touch sensitivity and immersive user experiences.
Motorola’s Head of Customer Experience, Ruben Castano said, “Consumers today continue to demand reliability and durability without compromising on sleek, modern design. By using Corning Gorilla Glass across all Motorola franchises, we aim to lead the industry by ensuring that every consumer has access to the durability and peace of mind that comes with this cutting-edge technology.”
Besides this Lenovo and Motorola have also introduced Smart Connect, a software solution that unifies digital ecosystems to create a multi-device experience. It connects essential devices like PCs, tablets, and phones with ease, preventing interruptions when switching between compatible devices. Instead of buying more devices with the same operating system to suit their demands, customers can seamlessly switch between tasks and maintain an uninterrupted workflow on their existing devices.
One of the most essential things you need in Minecraft is a Furnace. A furnace smelts objects like Iron Ore and Clay into useful items like Iron Ingots and Bricks. But, its most important purpose is to cook food and ensure your survival. You can use the furnace to cook raw meats. Apart from these important uses, a furnace can also be used as a light source on dark nights. Today, we bring you the best ways to make a Furnace in Minecraft.
Here are all the ingredients you need to make this item in Minecraft.
Crafting Table: Chop wood and turn it into planks in the crafting area. Use four planks to make a crafting table.
8 Cobblestones: First, make a pickaxe using two sticks and three planks in the Crafting Table. Use it to mine Cobblestone from stones in the mountainsides. To make a furnace, you will need 8 Cobblestones. Make sure the Cobblestones are not cracked or mossy.
Make a furnace in Minecraft
Step 1: Right-click on the Crafting Table to open it.
Step 2: Fill every square in the Crafting Table except the middle one with Cobblestones. You will require 8 Cobblestones for this.
Step 3: Once the Furnace appears in the results area, drag it to your inventory.
Make a Blast Furnace in Minecraft
Step 1: Open the Crafting Table.
Step 2: Drag 3 Iron Ingots and put them in the top row.
Step 3: Put the Furnace in the middle box on the second row.
Step 4: Place 2 Iron Ingots on either side of the Furnace in the second row.
Step 5: Place 3 Smooth Stones in the bottom row.
Step 6: Once the Blast Furnace appears in quick results, drag it to your inventory.
How to Smelt using a Furnace?
Now that you’ve made a Furnace, you can use it to smelt and cook things. It converts Iron Ore to Iron Ingots, Sand to Glass, Clay to Brick, Raw Food to Cooked Food, and more. Here’s how you can use it.
Step 1:Right-click the Furnace to open it.
Step 2: Add the item you wish to smelt or cook in the top box.
Step 3: You need fuel to smelt and cook things so add a fuel item in the bottom box. You can use items like Coal and Wood as fuel for the furnace.
Step 4: Make sure the furnace doesn’t run out of fuel while it is smelting objects. Add more fuel whenever necessary.
Step 5: Once the smelting process is complete, the final object will appear in the box on the right.
Frequently Asked Questions (FAQs)
How do I make a Furnace in Minecraft?
Stack 8 Cobblestones inside all the squares in the Crafting Table apart from the middle one. The Furnace will appear in the results area after a while.
How do I make a Potion of Weakness in Minecraft?
Open the Brewing Stand, add Blaze Powder to the box on the left, a water bottle in one of the boxes at the bottom, and Fermented Spider Eye in the topmost box. The Potion of Weakness will be ready in a few seconds.
What is the purpose of the Furnace in Minecraft?
The Furnace can be used to smelt and cook items in Minecraft. You can make Glass by smelting Sand, or convert Iron Ore to Iron Ingots, Clay to Brick, and more.
This is how you can make a Furnace in Minecraft. If you know any other way to go about this task, let us know in the comments! While you’re here, read this article to learn how to create a potion of weakness and a splash/lingering potion of weakness in Minecraft.
When it comes to video doorbells and home surveillance devices, Ring is one of the best in the game. The company has a diverse portfolio covering wired and battery-operated door cams. While some may not be a fan of a subscription model for their doorbells, Ring’s cutting-edge smart features like motion detection zones are hard to pass on. Today, we bring you the top 3 ways to reset your Ring doorbell.
While troubleshooting your Ring doorbell for a connectivity or functional problem, you should consider performing a factory reset. This restores your doorbell to the settings that it had out of the box. A factory reset is a rock-solid method for checking whether the problem you’re facing is hardware or software-related. If the issue persists after the reset, there’s not much you can do to reprogram it to normalcy.
When you factory reset your Ring doorbell, your user account is removed from the device. All of the device settings, including the saved WiFi password, will be erased from it. However, you can choose to keep your saved videos on your account. If you want to erase them too, select ‘Delete Events’ while performing the reset through the Ring app. Once the doorbell has been reset, the initial setup process will need to be carried out again.
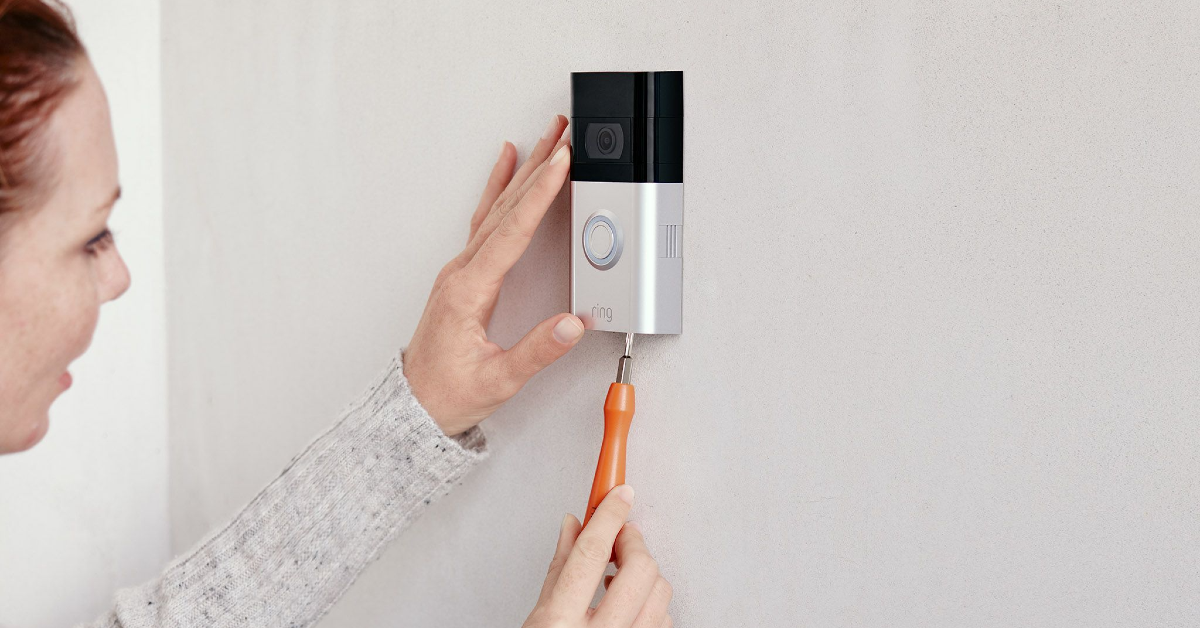
Reset an older Ring doorbell
Step 1: Remove the screws from the bottom of the doorbell using the screwdriver that was provided in the box. You can also use a T6 Torx-head screwdriver for this task.
Step 2: Remove the faceplate once the screws are undone.
Step 3: Flip the doorbell around and press the orange button at the back for 10-15 seconds.
Step 4: Release the button once the LED light around the camera starts flashing.
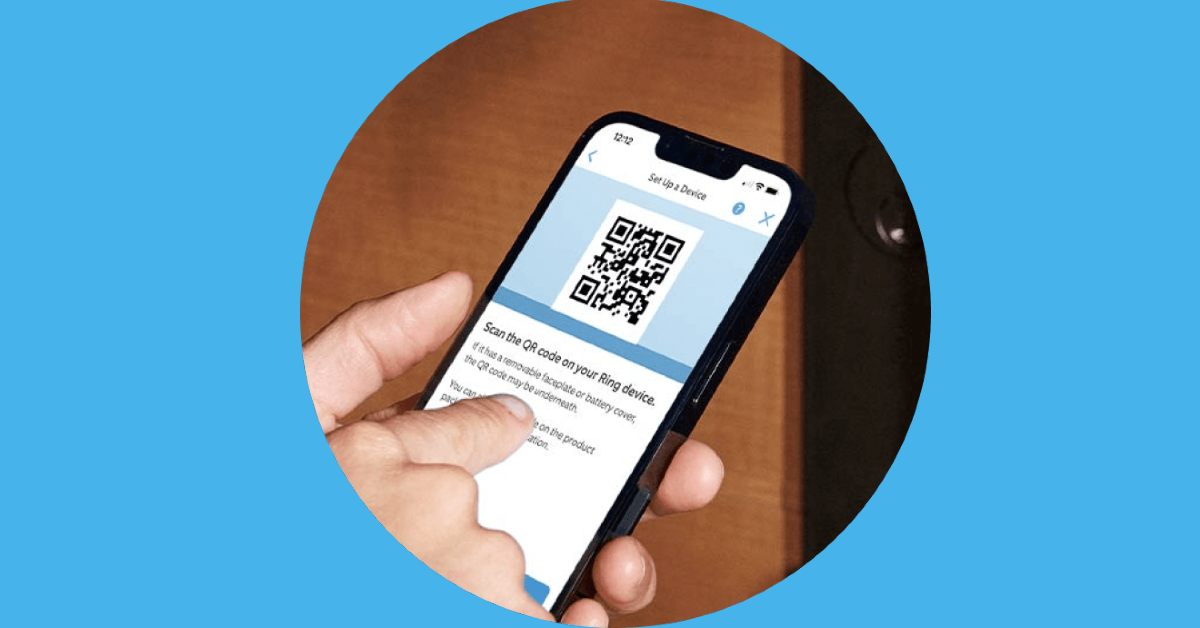
Step 5: To set up the doorbell again, scan the QR code on the device using the Ring app on your smartphone.
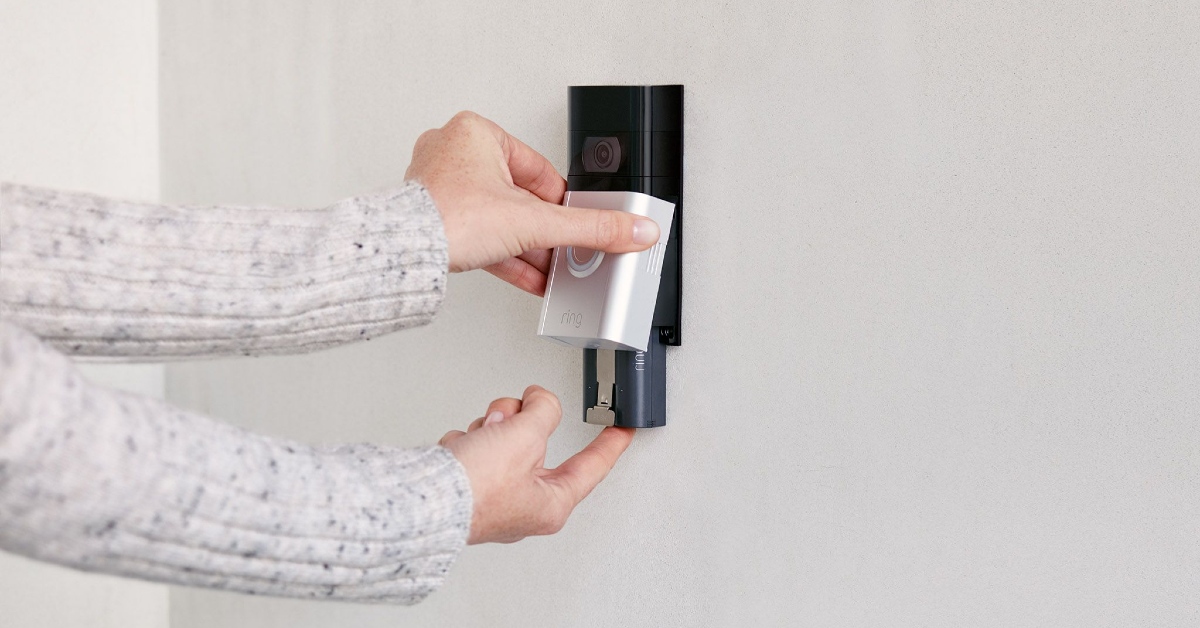
Reset a newer Ring doorbell
Step 1: Use a T15 Torx-head screwdriver to remove the screw at the bottom of the doorbell.
Step 2: Remove the faceplate.
Step 3: Locate the orange reset button in the front panel.
Step 4: Press and hold the reset button for 10-15 seconds.
Step 5: Once you see the LED flashing on the doorbell, it means that it has been reset and is now in setup mode. Use the Ring app to set it up.
Use the Ring app to reset the doorbell
Step 1:Launch the Ring app on your smartphone.
Step 2: Hit the menu icon at the top right corner of the screen.
Step 3: Tap on Devices and select your doorbell from the list.
Step 4: Tap on Device Settings.
Step 5: Go to General Settings.
Step 6: Select Remove This Device.
Frequently Asked Questions (FAQs)
How much does a Ring subscription cost?
The Ring Protect Basic plan costs $3.99/month, the Protect Plus plan is priced at $10/month while the Protect Pro plan fetches $20/month.
How much does a Ring doorbell cost?
The Wired Doorbell Pro from Ring costs $229.99, while the Elite Video Doorbell fetches $349.99. Ring also has a selection of entry-level video doorbells as well as battery-operated wireless video doorbells.
How do I reset my Ring doorbell?
Launch the Ring app, go to Menu>Devices>Your doorbell>Device Settings>General Settings and select ‘Remove This Device’.
These are the top 3 ways to reset your Ring doorbell. If you know of any other way to carry out this task, let us know in the comments! To pair your doorbell with your smartphone, scan the QR code at the back using the official Ring app. The doorbell relies on a home WiFi connection to function properly.
OnePlus Watch 2 has a dual-engine architecture that supports two operating systems.
Users of the Watch 2 can alternate between RTOS and WearOS 4.
It is stated to provide a battery life of up to 100 hours in Smart Mode and up to 12 days in Power Saving Mode.
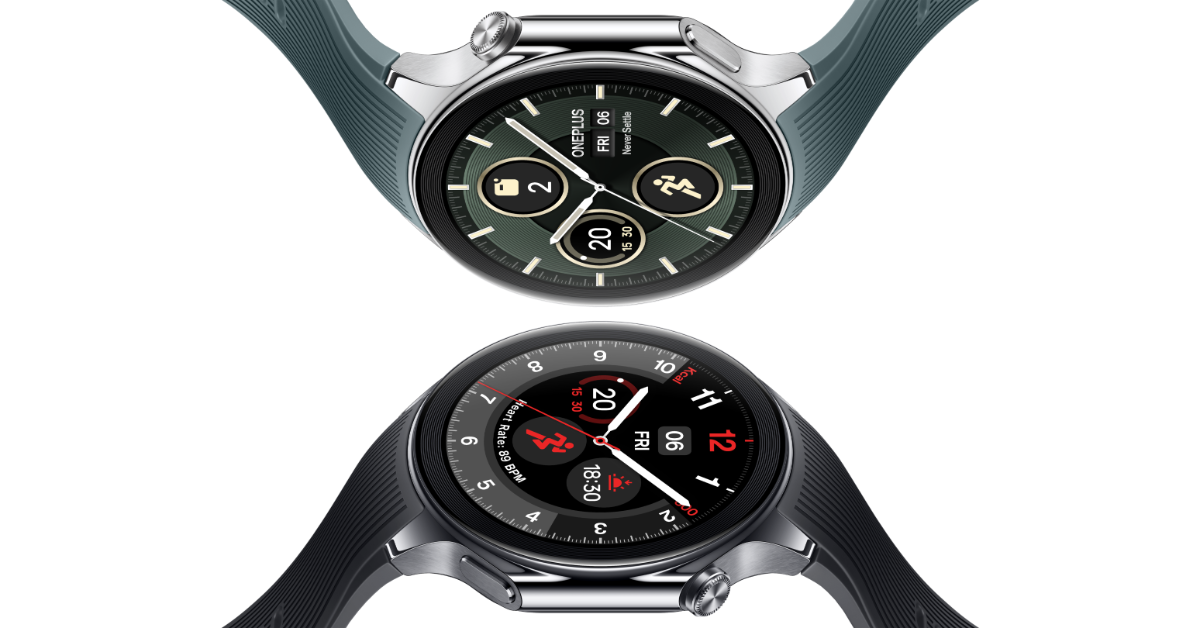
All the popular tech brands are exhibiting their most recent inventions and products. How is OnePlus able to fall behind in this case? Thus, the business unveiled its newest smartwatch- OnePlus Watch 2. The OnePlus Watch, the smartwatch’s predecessor, made its debut in 2021 and was replaced by this one three years later. Users of the OnePlus Watch 2 have the option to switch between WearOS 4 and RTOS on a dual-engine design as it has a dual-frequency GPS connection. The smartwatch is IP68 rated and boasts 5ATM technology so it can be taken inside water or for performing water sports. The 500mAh battery powers the OnePlus Watch 2.
In This Article
OnePlus Watch 2 price in India, availability
The OnePlus Watch 2 price in India has been set at Rs 24,999. The device will be available in two colour options- Black Steel and Radiant Steel. The wearable can be purchased via Amazon, Flipkart, Reliance, Croma and OnePlus Experience stores in the country. It is scheduled to go on sale on March 4 at noon via an open sale.
The OnePlus Watch 2 is available for purchase in the US for $299.99 (about Rs 24,862), in the EU for €329 (roughly Rs 29,577), and in the UK for £299 (roughly Rs 31,419).
Launch offers
Customers who use ICICI Bank and OneCard to purchase the OnePlus Watch 2 can receive an instant bank discount of Rs 2,000. Moreover, buyers can take advantage of no-cost EMI on the OnePlus Watch 2 with top banks from March 4–10 for up to 12 months, and from March 11–31 for 6 months. Flagship customers who link their device to Red Cable Club between February 26 and March 31 can receive an additional Rs 1000 discount through the RCC benefit section. The first three consumers to buy the OnePlus Watch 2 through the OnePlus Store App or OnePlus.in will also receive a free OnePlus Keyboard 81 Pro. As per the company’s limited number of customers who successfully purchase the OnePlus Watch 2 first via OnePlus.in or the OnePlus Store App will also get a Free Shoulder bag.
OnePlus Watch 2 comes with a rugged design featuring a round 1.43-inch AMOLED display with 466 x 466 pixels of resolution. Its High Brightness Mode (HBM) offers a peak brightness of 1000 nits and a 60Hz flash rate. The 2.5D sapphire crystal screen of the smart wearable is combined with a stainless steel body. The watch strap is secured with a stainless steel buckle and is composed of fluoro rubber. It meets MIL-STD-810H durability requirements and has a water resistance rating of 5ATM+IP68.
Note that this design aspect bears resemblance to the OnePlus 12‘s rear camera module.
Under the hood, the Qualcomm Snapdragon W5 and BES2700 power a Dual Engine Architecture. It works with Android handsets running Android 8.0 and GMS 23.45.23 or later with ease because of its operation on Google’s Wear OS 4. A 500mAh battery is used to power the smartwatch, which can last up to 100 hours. The watch can reportedly be charged from zero to 100 percent in 60 minutes using the device’s 7.5W VOOC fast charging capability.
In addition to more than 100 sports modes and more than 11 professional modes, the device has modes for cycling, walking, and running, among other physical activities. In addition, the watch has a pulse oximeter sensor, an optical heart rate monitor, and a sleep cycle and stress tracking feature. Acceleration, gyroscope, optical pulse oximeter, optical heart rate, light, geomagnetic, and barometer sensors are among the sensors on board. L1+L5 GPS, Bluetooth, Wi-Fi, and USB Type-C are all supported by the OnePlus Watch 2.
Garena Free Fire is a battle royale game with regular awards and tournaments to keep players interested. If you play Garena Free Fire, you should be aware of the redeem codes that are released on a daily basis. However, because the battle royale game is banned in India, players from other countries can use the Free Fire Redeem codes daily. If you’re unfamiliar with the Garena Free Fire redeem codes or don’t know how to get them, we’ve put together a step-by-step guide to help you redeem them. Check out Garena Free Fire Redeem Codes for 27 February 2024.
The Free Fire redeem codes are a great way to get free stuff. These are 12-digit codes that contain alphabets and numbers, as well as an expiration date and time. Because the Garena FF redeem codes cannot be used more than once, you should hurry to the redemption page to claim your free reward before someone else does. To get a free reward, all you have to do is go to reward.ff.garena.com/en, which is the official redemption page. Also, keep an eye on this space for daily updates on Garena Free Fire redemption codes and rewards.
Being a premium flagship device, the calling experience on an iPhone is impeccable. Even in a noisy environment, the smartphone does well to extract your voice from the surrounding noise and efficiently relay it to the call recipient. However, sometimes users complain about the call volume being extremely low. For a problem as general as this, the range of causes is quite wide. Let’s take a look at what’s causing the call volume on your iPhone to be so low and how you can fix the issue.
This problem can arise from one of three major areas. The hardware of your device, the network reception, and software issues. If there is something wrong with the earpiece on your iPhone, you will need to get it checked at an authorised repair centre. However, what you can do at home is clean the earpiece and see if it improves the call volume.
Software-related issues are generally trickier to nail down. Perhaps you are using an older iOS version on your iPhone, leading to a bug popping up. Or maybe your iPhone is failing to switch the audio output to the earpiece when your AirPods are still connected to the device. These issues can be fixed once the cause has been identified.
Lastly, problems with the network reception can also impact the call quality. If you are not receiving an optimum signal, the sound of the speaker can come across as muffled and shoddy. The fixes to this issue are out of your hands as well. At best, you can toggle the Airplane Mode on your device and hope for the network reception to improve.
Restart your iPhone
Sometimes an unexpected background glitch can cause the call volume on your iPhone to drop low. Luckily, these kinds of glitches can be fixed with a quick restart of the device. Press and hold the side key along with either volume key to access the power menu. Swipe the power slider across the screen to turn off your iPhone. After a few seconds, press and hold the side key to turn the iPhone back on.
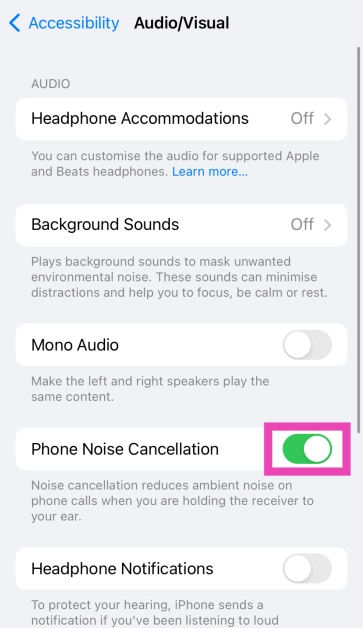
Turn off Noise Cancellation
The Noise Cancellation feature on your iPhone reduces the surrounding noise on phone calls, so you can hear the speaker clearly. Sometimes, this feature can go rogue and suppress the entire audio output. Here’s how you can turn it off.
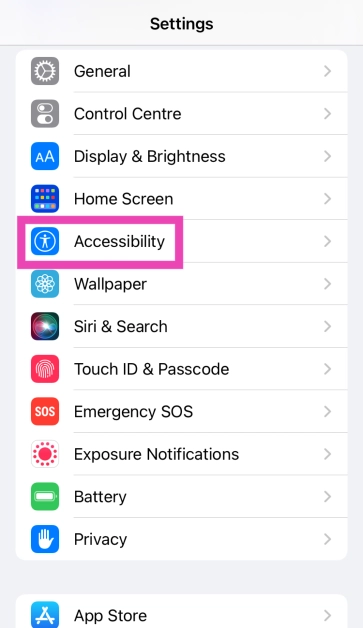
Step 1: Go to Settings.
Step 2: Tap on Accessibility.
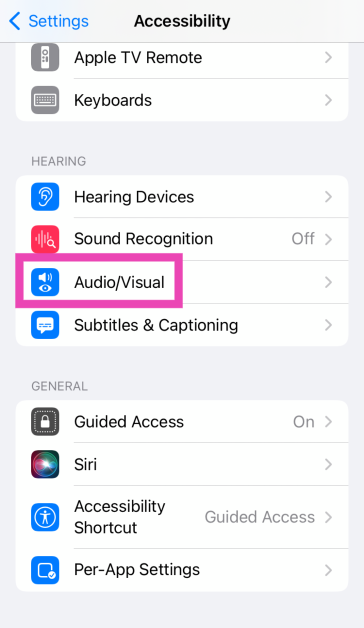
Step 3: Select Audio/Visual.
Step 4: Turn off the toggle switch for Phone Noise Cancellation.
Check the network coverage
If you’re in a location with poor network coverage, the call quality will go down. Not only will you hear muddled voices, but the volume will take a hit too. Move to a spot with optimum network coverage to improve the call quality.
Switch to your phone’s speaker
If you are connected to your AirPods, all audio output will be diverted to it. This could be the reason why you’re not able to hear the call on your iPhone’s earpiece. The fix is really simple. Tap on the speaker icon on the call screen and select your iPhone. If you want to attend the call on your phone’s loudspeaker, tap on ‘Speaker’. Disconnecting your AirPods from your iPhone automatically switches the channel of the audio output to your iPhone’s earpiece. To confirm that the audio output on the call is diverted to your iPhone’s speaker, swipe down from the top right corner of the status and check if there’s a triangle with concentric circles logo on the screen.
Remove the iPhone case
If you use a protective case or cover on your iPhone, it could be blocking the device’s earpiece. Typically, this issue only arises with knock-off iPhone covers that aren’t Apple-authorised. A poorly installed screen protector can also cause a similar problem. Take off the cover and the screen guard and check if the call volume has improved. While buying an iPhone case, always make sure it isn’t obstructing any of the essential components of the device, like the volume rocker, side key, microphone, and earpiece.
Clean the earpiece
Over a period of time, dust and grime can collect on your iPhone’s earpiece, leading to a lower call volume. To fix this, you need to give it a thorough clean. Use a small brush to gently unsettle the dust particles on the earpiece and lightly tap the iPhone against a hard surface to remove the grime. Carry out the same process for the speaker grille. This will vastly improve the calling experience on your smartphone.
Play a speaker cleaning tone
If cleaning the earpiece didn’t do the trick, try playing a speaker cleaning tone to unsettle the dirt particles. You can easily find these tones on YouTube. Operating at a high frequency, these tones move the speaker membrane at a fast pace, leading to the stubborn dirt particles getting dislodged without any physical intervention on your part. This trick also works for ejecting water particles out of the earpiece and speaker.
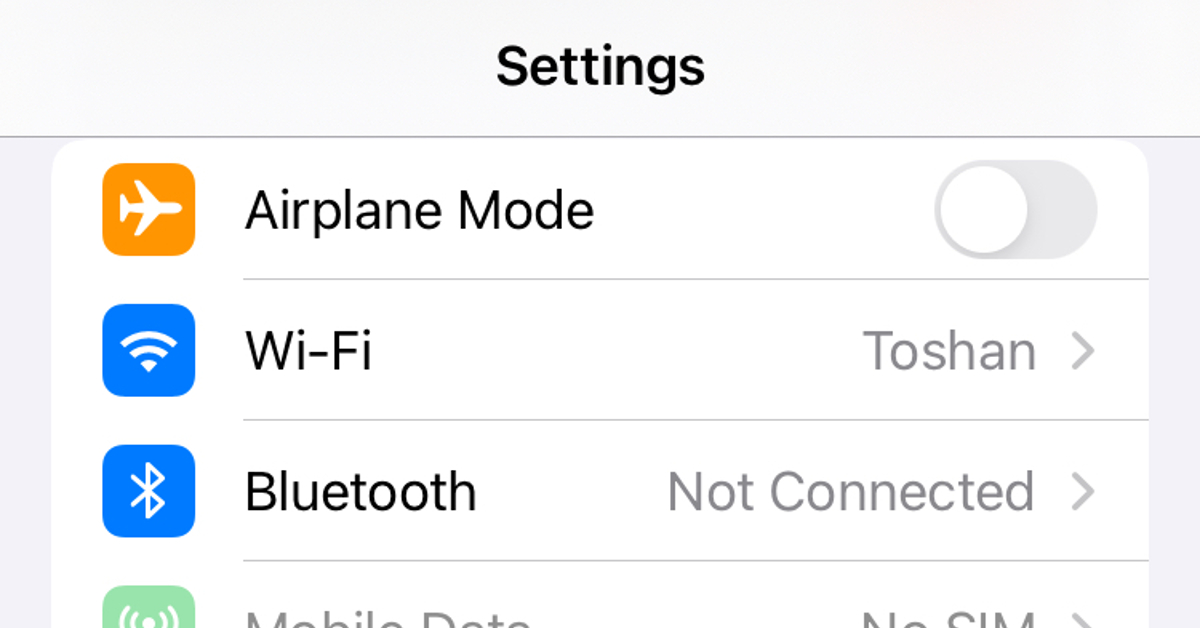
Toggle the Airplane Mode
Toggle the Airplane Mode on and off to refresh the cellular network. You can do this by going to settings and turning on the toggle switch next to Airplane Mode. Alternatively, you can swipe down from the top-right section of the status bar and tap the plane icon. Once Airplane Mode has been enabled, wait for 15-20 seconds and turn it off.
Update iOS
If the low call volume is caused by a software-related bug on your iPhone, updating it to the latest iOS version will help. Here’s how you can do it.
Step 1: Make sure your iPhone is connected to a WiFi network and plug in its charger.
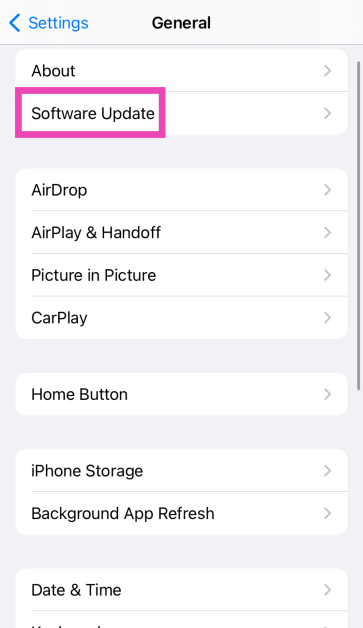
Step 2: Go to Settings and select General.
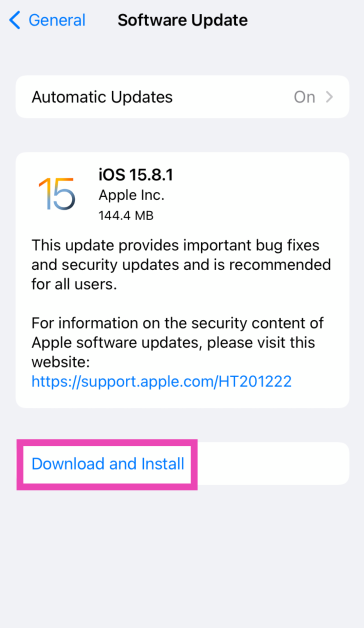
Step 3: Select Software Update.
Step 4: Tap on Download and Install.
Perform a factory reset
If nothing works, performing a factory reset will restore the settings that your iPhone came with out of the box. If there is no hardware issue with the device, a complete reset will fix the issue at hand. However, you will need to back up all your apps and personal data as a reset will clear everything from your iPhone.
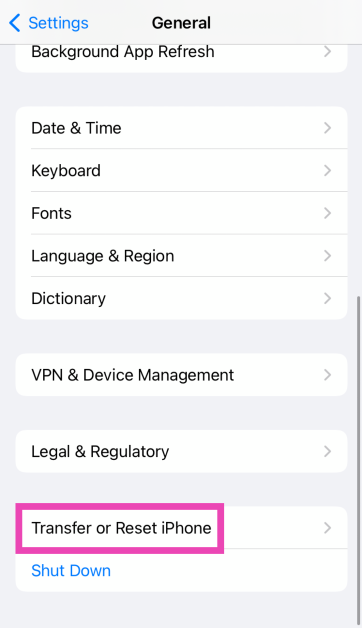
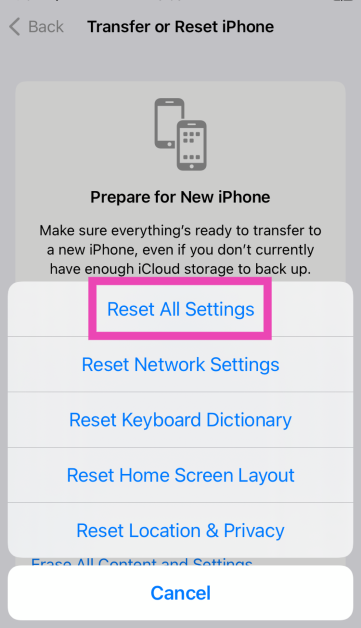
Step 1: Go to Settings and select General.
Step 2: Tap on Transfer or Reset Device.
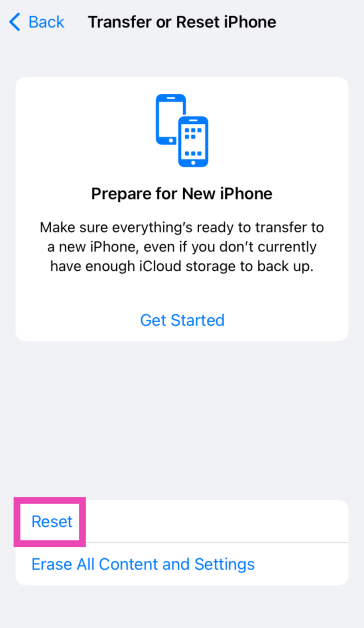
Step 3: Hit Reset.
Step 4: Select Reset All Settings.
Frequently Asked Questions (FAQs)
How do I turn off Phone Noise Cancellation on my iPhone?
Go to Settings>General>Accessibility>Audio/Visual and turn off the toggle switch for Phone Noise Cancellation.
Why is the call volume so low on my iPhone?
The call volume on your iPhone can drop low over a period of time due to the accumulation of dust and grime on the earpiece. Clean it with a brush to improve the volume.
Why can’t I hear the person calling me on my iPhone?
The lack of optimum network strength is the main reason behind poor call quality. If you’re unable to hear the caller, move to an area with better network coverage.
How do I clean my iPhone’s speaker?
Grab a toothbrush and dip the end of its bristles in isopropyl alcohol. Gently scrub it along the earpiece and the speaker to unsettle the dust and grime particles. Use a hair dryer to blow out the unsettled dirt.
How do I switch the audio output from my AirPods to my iPhone during a call?
Tap on the speaker icon on the call screen and select your iPhone from the list to switch the audio output.
These are the top 10 ways to fix the low call volume issue on your iPhone. If the problem is hardware-related, you will need to get your iPhone repaired from an Apple-authorised repair centre. Check out this article to learn how you can make an appointment at the Genius Bar or any other authorised service centre.
Samsung showcased the Galaxy Ring at the Mobile World Congress 2024.
MWC is currently being held in Barcelona.
Samsung Galaxy Ring which was first teased at the Galaxy S24 launch event last month has finally made its debut at MWC 2024, Barcelona. The device will rely heavily on the Samsung Health platform. In addition to this, the company also announced that it is expanding Galaxy AI features across the Samsung portfolio.
Samsung Galaxy Ring is being shown to the public for the first time at Mobile World Congress 2024. During its Galaxy Unpacked event, the firm showcased the ring in a silver colour option. While presenting the smart ring the company revealed that it will be available in three colour options.
TM Roh, President and Head of Mobile eXperience Business at Samsung Electronics, “Our latest Galaxy products and innovations unlock the power of mobile AI to empower users in their everyday lives to open up new possibilities. At MWC this year, we’re excited to showcase Galaxy AI across our portfolio, including the Galaxy S24 series, proving just how powerful these devices are in enabling a better, more intelligent and connected future.”
The company has displayed its intelligent health lineup at MWC. As per the company, it is said to provide more personalized and seamless health experiences with the transformative power of AI, across even more devices to users. Galaxy Ring, Samsung’s latest smart ring will make daily wellness easier and support smarter, better living through a more connected digital wellness platform called Samsung Health. The company withheld further information on the Galaxy Ring, including its specifics. But as far as we know, it last year filed for a patent on the gadget.
When it comes to measuring health data, the Galaxy Ring is anticipated to be more precise than its other wearables and smartphones. This is most likely since it fits more snugly than a watch, and stays considerably nearer and longer in the body.
It might have smart home controls, PPG tracking, and an ECG.
Samsung will also showcase upcoming features related to intelligent health. For instance, My Vitality Score offers personalized health insights based on multiple factors including Sleep, Activity, Heart Rate and Heart Rate Variability, while Booster Card helps make each day healthier by tracking predefined goals and delivering actionable insights. According to the company, before their general release later this year, visitors will be able to experience the advantages of these capabilities on a Galaxy Watch 6 series coupled with a Galaxy S24.
Xiaomi presented its new lineup of smart wearables- Xiaomi Watch S3, Watch 2, and Smart Band 8 Pro.
All the watches are pre-installed with Wear OS out-of-the-box.
Along with the brand new Xiaomi 14 Series the company at MWC 2024, Barcelona introduced its new smart wearables- Xiaomi Watch 2, Xiaomi Watch S3, and Xiaomi Smart Band 8 Pro. As per the company, all the devices will soon be made available to users. Checkout the details below:
In This Article
Xiaomi Watch S3, Watch 2, and Smart Band 8 Pro pricing
The Xiaomi Watch 2 is available for purchase for EUR 199, or about Rs 17,900. The Xiaomi Watch S3, on the other hand, will retail for EUR 149, or Rs 13,400.
There are two colour options available for the three Xiaomi smartwatch bodies: black and silver.
The Xiaomi Smart Band 8 Pro comes with a price tag of EUR 69 which is approximately Rs 6,200.
The models will soon be accessible in a few select regions after beginning to roll out in a few European marketplaces.
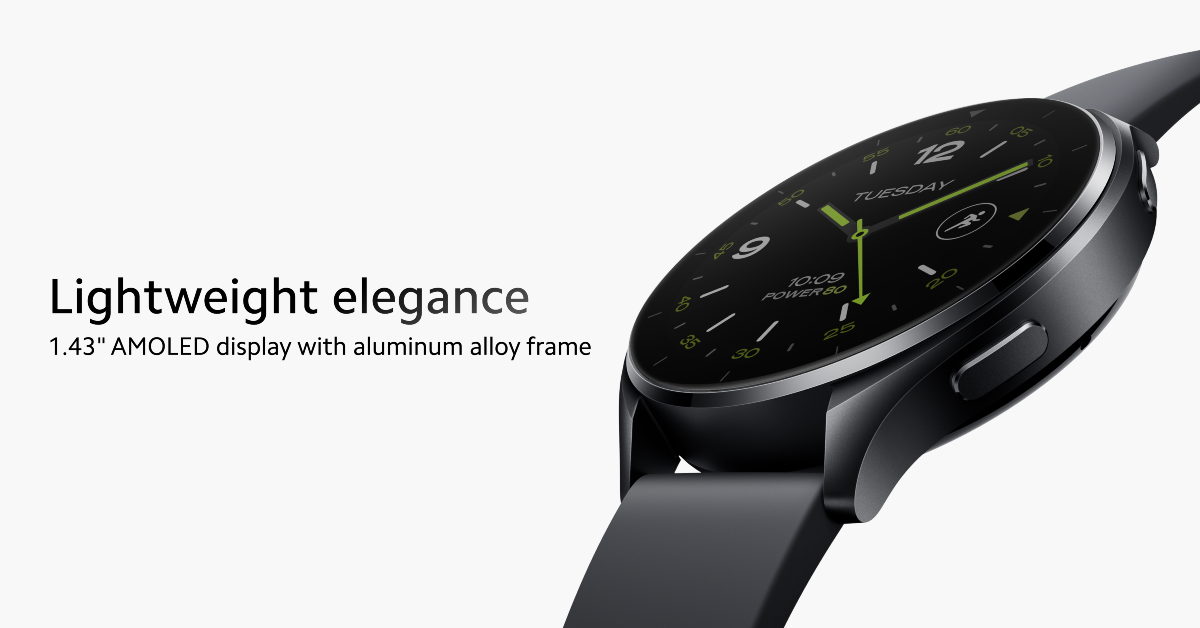
Xiaomi Watch 2 features a 1.43-inch AMOLED display with 466×466 pixels. The display comes with up to 600 nits of peak brightness. The device has replaceable traps that come in Pine Green TPU Strap, White Leather Strap and Recycled Braided Strap. The watch has an aluminium alloy build and is 5ATM water resistant. The smartwatch comes equipped with Qualcomm Snapdragon W5+ Gen 1 chipset with 2GB of RAM, and 32GB of onboard storage. It runs on Google’s WearOS.
The Xiaomi Watch 2 is equipped with over 160 sports modes, stress level monitoring, blood oxygen saturation, heart rate tracking, and more. In addition to more, it features a new theme for environmental protection and camera remote preview. With just one charge, the watch’s battery lasts for up to 65 hours.
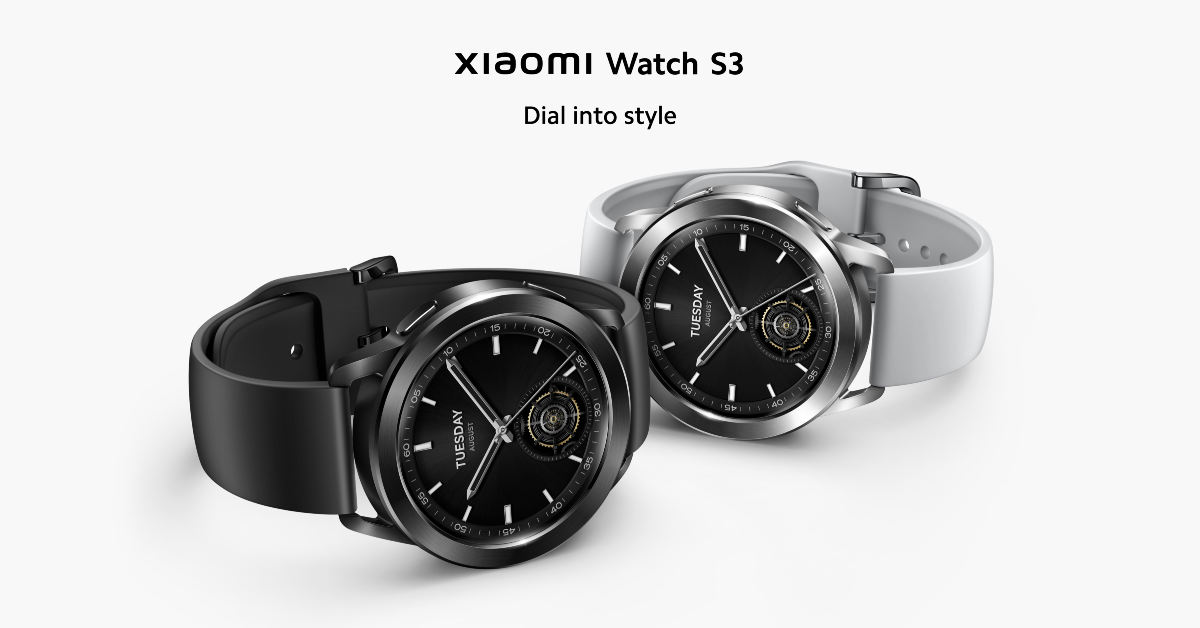
Xiaomi Watch S3 features
The Xiaomi Watch S3 flaunts a 1.43-inch circular AMOLED display with 466×466 pixels resolution. The display has 600 nits of peak brightness. The smartwatch is 5ATM water resistant. The 486mAh battery that comes with it has a 15-day battery life. Additionally, it supports fast charging, giving you up to two days of battery life in just five minutes. It is connected by Bluetooth 5.2 and supports NFC.
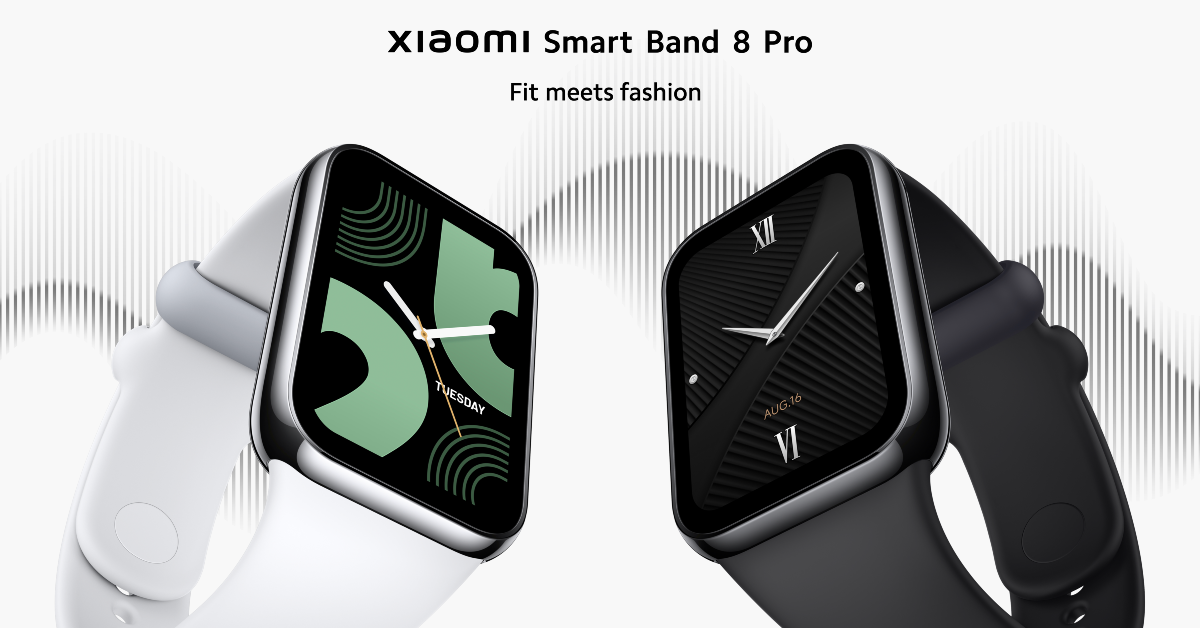
Xiaomi Smart Band 8 Pro features a 1.74-inch AMOLED display with 336 x 480 pixels resolution. The screen has a max brightness of 600 nits and is protected by Corning Gorilla Glass. There are more than 200 watch faces included. There are 150 sports modes available on smart bands. The 289mAh battery that comes with it should last for up to 14 days. In addition, the Smart Band 8 Pro has vital health indicators for blood oxygen levels, heart rate, sleep patterns, and menstruation.
Using a voice assistant can seem weird at first, but once you get used to it, there is nothing quite like it. If you don’t like depending on your smartphone for every little task, you can use an Amazon Echo speaker to set an alarm, play music, control home devices, answer phone calls, and more without mediating the tasks through a screen. Amazon Alexa is vital in carrying out these voice commands. Your Amazon Echo is as good as a normal speaker if Alexa stops working. So, here are the top 9 ways to fix the ‘Alexa is not responding’ issue on your Amazon Echo device.
Why is Alexa not responding on your Amazon Echo speaker?
The most likely reason why Alexa is not responding to your voice commands is the lack of internet connectivity. You need a reliable WiFi connection for Alexa to work. While shifting the location of the Echo device, it is important to take into account the strength of the WiFi signal in the new spot. A shoddy signal can cause several inconsistencies while trying to use the voice assistant. You can carry out an internet speed test in the new spot using your smartphone to judge the strength of the WiFi signal.
If internet connectivity is not the issue, it is possible that the device isn’t able to register your voice due to a lot of surrounding noise. Make sure your voice commands are loud and clear. A cyan-blue ring around the Echo speaker means that it is listening to your command. This ring only appears once the ‘Alexa’ wake word has been registered. If it doesn’t carry out your command after that, it means that the device doesn’t support the command or your voice did not reach it.
Restart your Amazon Echo Device
The first thing you should do while troubleshooting any problem is to restart the device. A quick restart fixes any minor glitches in the background and refreshes the device. The process to restart an Amazon Echo speaker is very simple. Simply turn off the power socket that it is connected to, wait for a few seconds, and then turn it back on. The speaker will take a few seconds to reboot. Once it is up and running, check if the Alexa issue has been resolved.
Make sure you’re using the original power adapter
Amazon insists that you use the power adapter that came with your Echo device. Substituting it with an off-brand 12V unit is bound to create issues. If you damaged the original adapter, look for the official Echo adapter on Amazon. It will cost more than other aftermarket replacements, but it will not throw any unwarranted problems your way.
Check your WiFi Connection
Your Amazon Echo speaker relies upon a WiFi connection to carry out the voice commands given to it. If there is an issue with the WiFi, the Alexa commands won’t register on the device. To make sure this is the case, use your smartphone or PC to connect to the WiFi. Load a webpage to check if the internet is working as intended. If the webpage fails to load, you will need to fix your WiFi connection for Alexa to respond to your voice commands.
Move the Echo Device Closer to the WiFi Router
For Alexa to work smoothly, it needs unfettered internet access. If your Echo device is placed far away from the WiFi router, it may not receive a healthy signal. Move the Echo device closer to the router to ensure better connectivity.
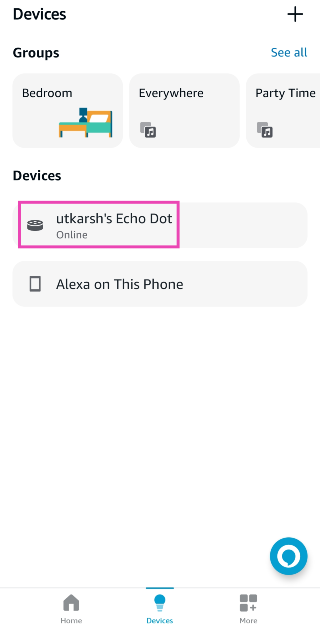
Ensure your Phone and Echo Device are on the Same WiFi Network
If you want to play music on your Echo device using your phone, you need to ensure they are on the same WiFi network first. This also applies to other tasks, including changing the device settings. If your smartphone is using mobile data, switch to your home WiFi network to communicate with Alexa.
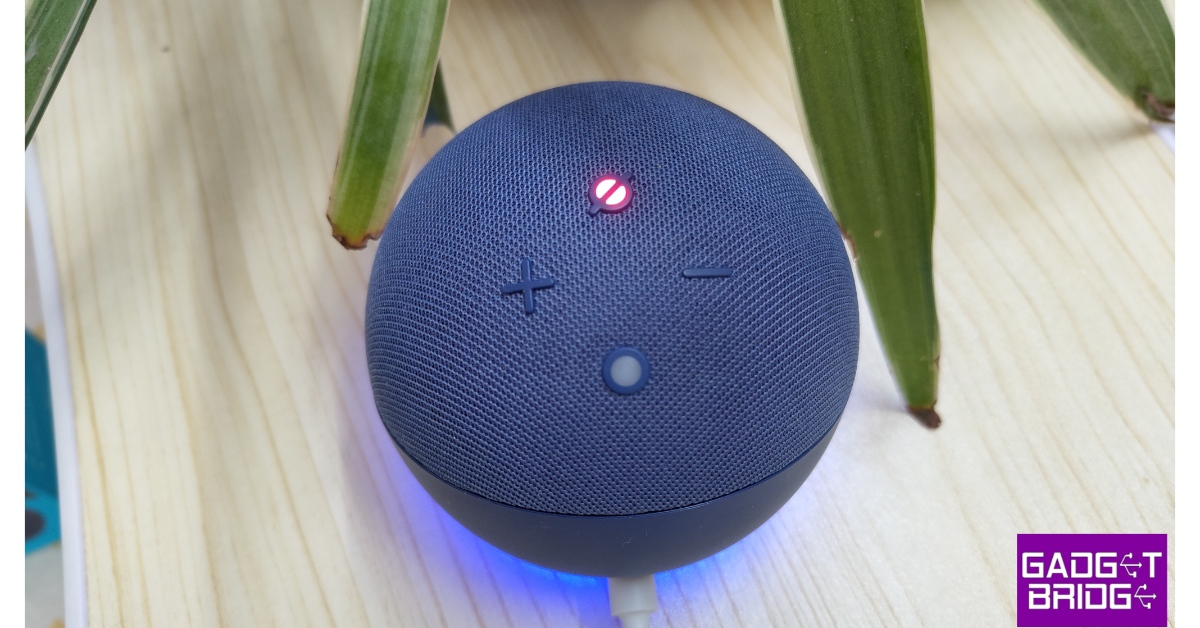
Unmute the Echo Device
Every Amazon Echo device has a dedicated mute button which turns off its microphone, rendering the voice commands moot. Once the Echo speaker is out on mute, the LED light around it turns red. If you notice this red light on the speaker, press the mute button again to turn on the microphone. Once that’s done, you will be able to use Alexa on the smart speaker again.
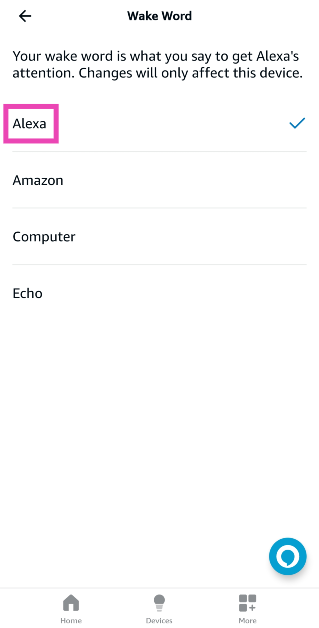
Did You Change the Wake Word?
Everyone knows that ‘Alexa’ is the iconic trigger word for Amazon devices. But did you know that you can change it to ‘Echo’, ‘Amazon’, or ‘Computer’ as well? By default, Echo devices are set to respond to ‘Alexa’. But your device might not be responding to it if you changed the Wake Word and forgot about it. Here’s how you can change it back to Alexa.
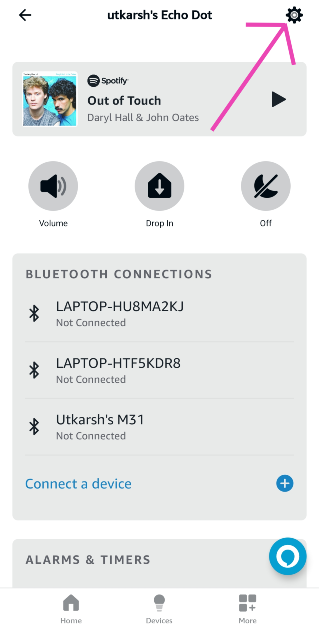
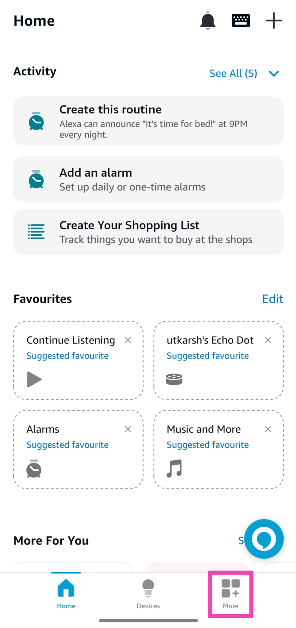
Step 4: Hit the Settings icon at the top right corner of the screen.
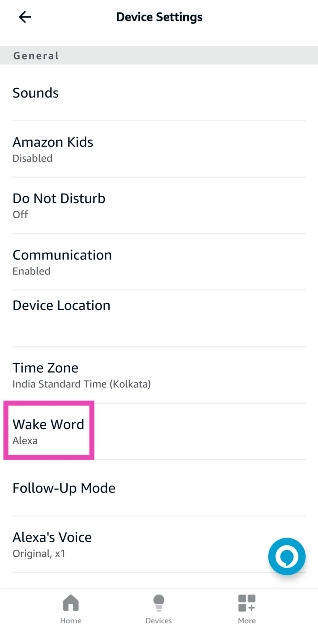
Step 5: Scroll down to the General section and select Wake Word.
Step 6: Tap on Alexa.
Review Voice History
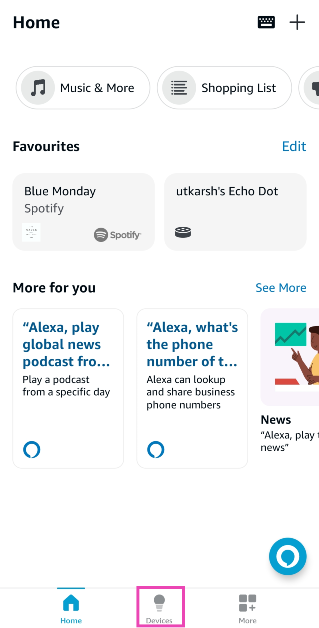
If Alexa isn’t responding to your voice commands, it is a good idea to check whether it is registering your intended command. Here’s how you can go about it.
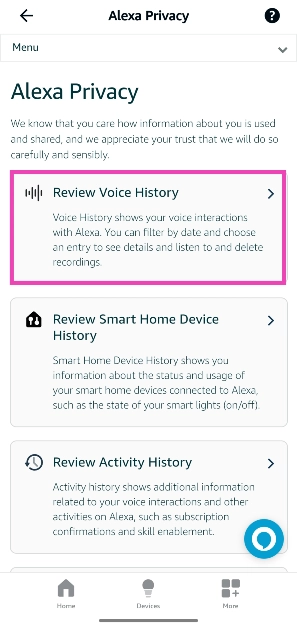
Step 3: Select Review Voice History to view recent voice commands.
Reset the Amazon Echo Speaker
If everything else fails, it may be a good idea to give your Echo Speaker a thorough reset. This will sign you out of your Amazon account and unpair the device from the WiFi and other connected devices. Here’s how you can do it.
Step 4: Hit the Settings icon at the top right corner of the screen.
Step 5: Scroll down and select Factory Reset.
You can also factory reset your 1st-gen Echo device by pressing the reset button with a paper clip for 8 seconds.
Frequently Asked Questions (FAQs)
How do I change the Wake Word on my Amazon Echo device?
Go to the Amazon Alexa app on your phone and select Device>Settings>Wake Word. Choose your preferred Wake Word and go back.
Why is my Amazon Echo Dot not responding to the Alexa command?
If your WiFi connection is not working, your Amazon Echo device will not respond to the Alexa voice commands.
What is the listening range of an Amazon Echo speaker?
Amazon Echo speakers can register voice commands within a range of 20-25 feet.
How do I view the voice command history on my Amazon Echo device?
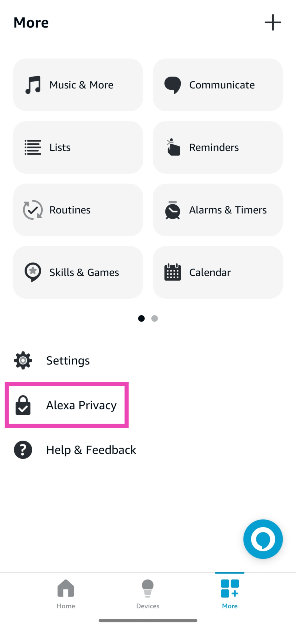
Launch the Amazon Alexa app and go to More>Alexa Privacy>Review Voice History.
Why can’t I play music on my Amazon Echo device using my phone?
If you want to play music on your Echo device using your phone, both devices need to be on the same WiFi network. If you’re using your Echo device as a Bluetooth speaker, make sure it is connected to your phone via Bluetooth.
These are the top 9 ways to fix the ‘Alexa not responding’ issue on your Amazon Echo speaker. While commanding the smart speaker, make sure you utter the Wake Word loudly and lucidly. It helps if there is no surrounding noise. If you know any other way to fix this problem, let us know in the comments!
Over the years, YouTube has evolved to become the biggest video-sharing platform on the Internet, hosting incredible creators and tons of engrossing content. As the platform has evolved, so has the storytelling. Creators on YouTube divide their videos into different chapters, making it easy for the viewer to follow the content. If there’s a particular part in the video that you want to share with your friends, you don’t need to make them navigate to it. By sharing a timestamped link, the YouTube video will start at a specific time decided by you. Here’s how you can do that.
Back when YouTube was still new to the scene and the word ‘content creator’ was still finding its meaning, the videos on the platform used to be short and succinct. Now, better infrastructure and incredible connection speeds allow creators to upload longer videos. While this is great if you want to watch a long-form video essay, it does come with its drawbacks.
If you want to watch a short video, wading through the annoying intros and ad reads can be very tedious. If you like the video and want to share it with a friend, you can save them the hassle of navigating to the part where the video starts. This is where timestamping comes in. Not only does it cut the clutter, but it is also a great tool to refer to certain parts of the video while tuning out the rest of the content.
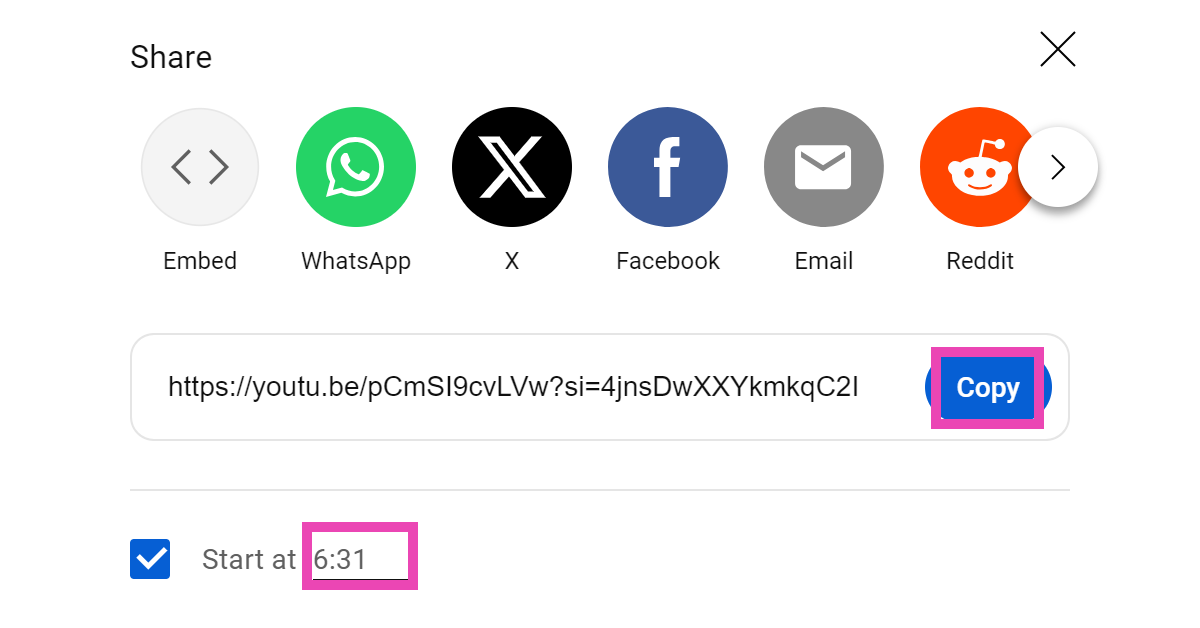
Share a YouTube Video at a Specific Start Time (PC)
Step 1: Open the YouTube video on your PC’s web browser.
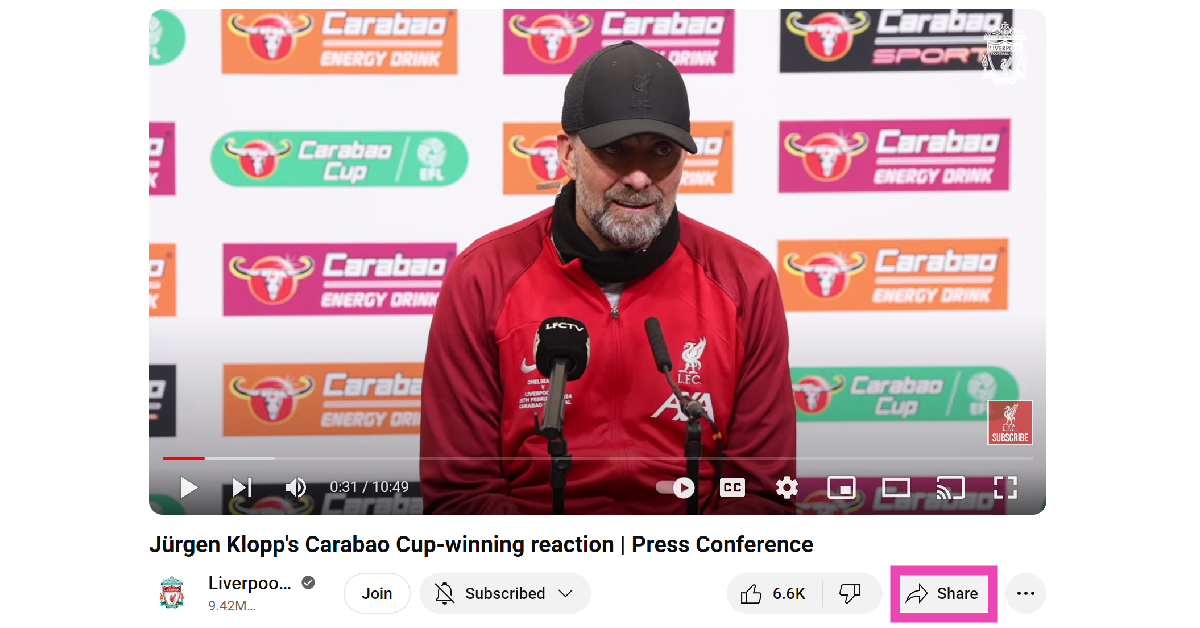
Step 2: Hit the Share button.
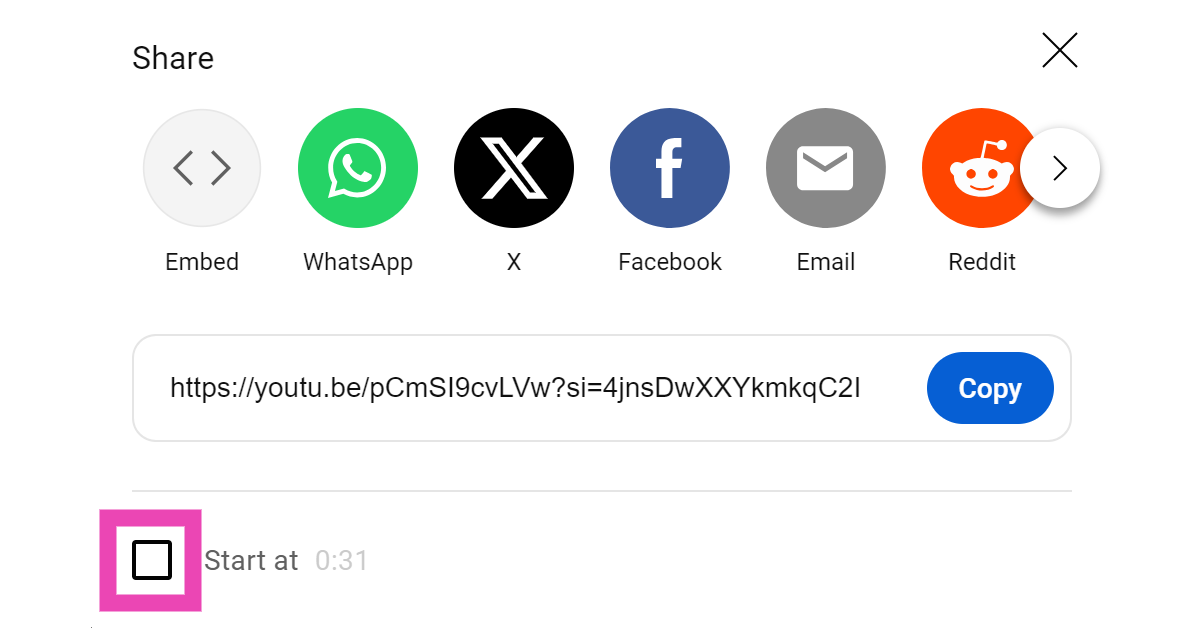
Step 3: Click the check box for ‘Start at’.
Step 4: Enter the timestamp.
Step 5: Click on the Copy button next to the video URL. You can also choose to directly share the video on the platform of your choice.
Step 6:Paste the link. Once someone clicks on the link, the video will start at the specified time.
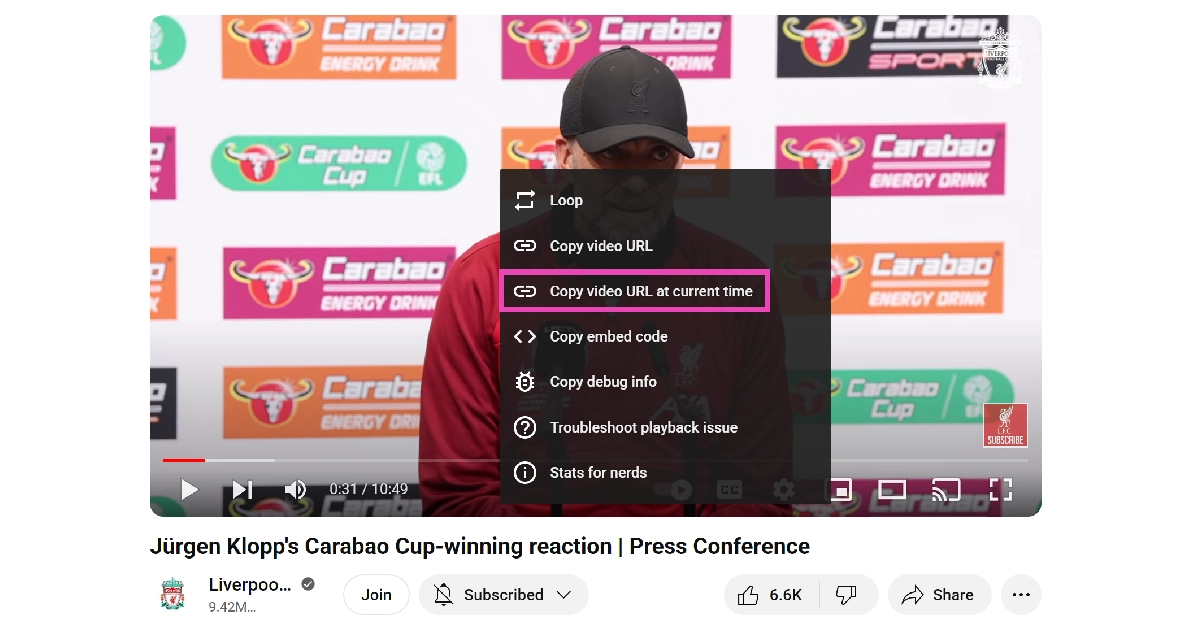
Use the video player options on a PC
Looking for a quicker way to share timestamped YouTube videos on your PC? Here’s one method.
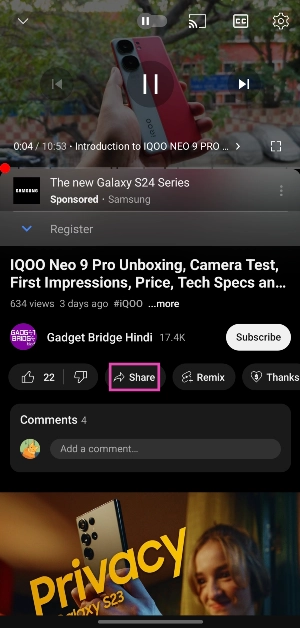
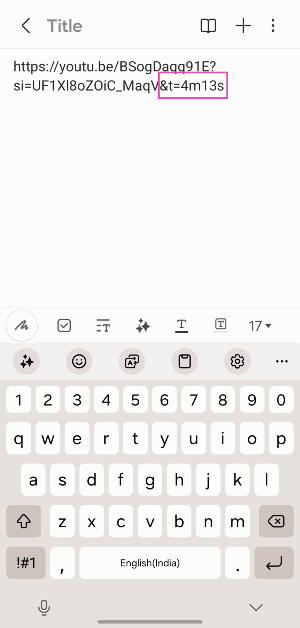
There is no direct way to share a timestamped video from the YouTube mobile app. However, there is one trick you can use to get around this roadblock.
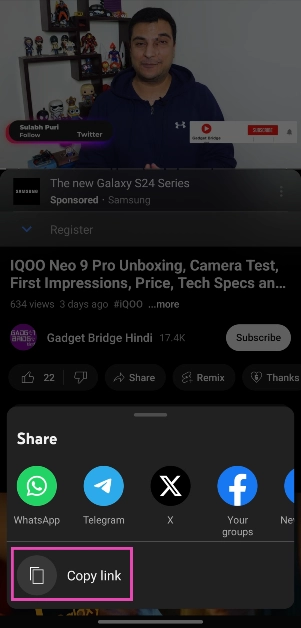
Step 1: Open the video in the YouTube app and hit the Share button.
Step 2: Tap on Copy Link.
Step 3: Open the Notes app on your phone and paste the link inside a new document.
Step 4: Add the time stamp at the end of the URL. There are two ways to go about this. Let’s say you want the video to start at 6 minutes and 30 seconds.
For unshortened links: add &t=6m30s.
For shortened links: add ?t=6m30s.
You can also add the timestamp in seconds. Instead of 6m30s, adding 390s is perfectly acceptable.
Step 5: Share the link. The person who clicks on the link will be taken to the timestamped part.
Use the desktop site for YouTube on mobile
Although the YouTube app for mobile does not have the option to share timestamped video links, you can still use the PC methods by requesting the desktop side on Chrome (or your preferred web browser). Launch Chrome and load the YouTube video you wish to share. Hit the ellipses and tap on ‘Desktop Site’. Once the desktop site opens up, use the first two methods in this list.
Frequently Asked Questions (FAQs)
Can you get a YouTube link with a timestamp?
To timestamp a YouTube video link, simply add ‘&t=’ or ‘?t=’ at the end of the URL followed by the specific time. For example, if you want the link to jump to 5 minutes and 17 seconds, add ‘&t=5m17s’.
How do you start a YouTube video at a specific time?
On PC, hit the ‘Share’ button for the video and tick the box for ‘Start at’. Mention the time at which you want the video to start and share it on the platform of your choice.
How much does a YouTube Premium subscription cost?
Individual subscription plans for YouTube Premium start at Rs 129/month. The Student plan costs Rs 79/month while the Family package costs Rs 189/month for up to 5 people.
These are the top 4 ways to share a YouTube link that starts the video at a specific time on PC and mobile. If you know of any other way to share timestamped YouTube videos, let us know in the comments! YouTube also allows users to leave timestamps in the comments.
There’s nothing quite like the satisfying tactile feedback from a high-end mechanical keyboard. While you can get a decent one for less than $50, if you’re looking for the most premium switches and exquisite frames on a keyboard, you will need to splurge some extra cash. For $200, you can even customise certain elements like the switch type, keycaps, plates, and more. So, without further ado, here are the top 7 mechanical keyboards under $200 that you can buy in the USA right now.
Logitech’s flagship MX Mechanical keyboard is one of the best in business. Logitech also offers a ‘mini’ version of this keyboard without the NUM pad. The MX Mechanical can be had in one of three switch types – Tactile Quiet, Clicky, and Linear. The backlit automatically turns on when your hands approach the keyboard. It is tuned to adapt to the surrounding light. The MX Mechanical Keyboard can be paired with up to 3 devices at one time. On a full charge, it can last up to 15 days. With backlighting turned off, this can be pushed to 10 months. The backlighting and other aspects of the keyboard can be customised using the Logi Options+ app. Check out our review here.
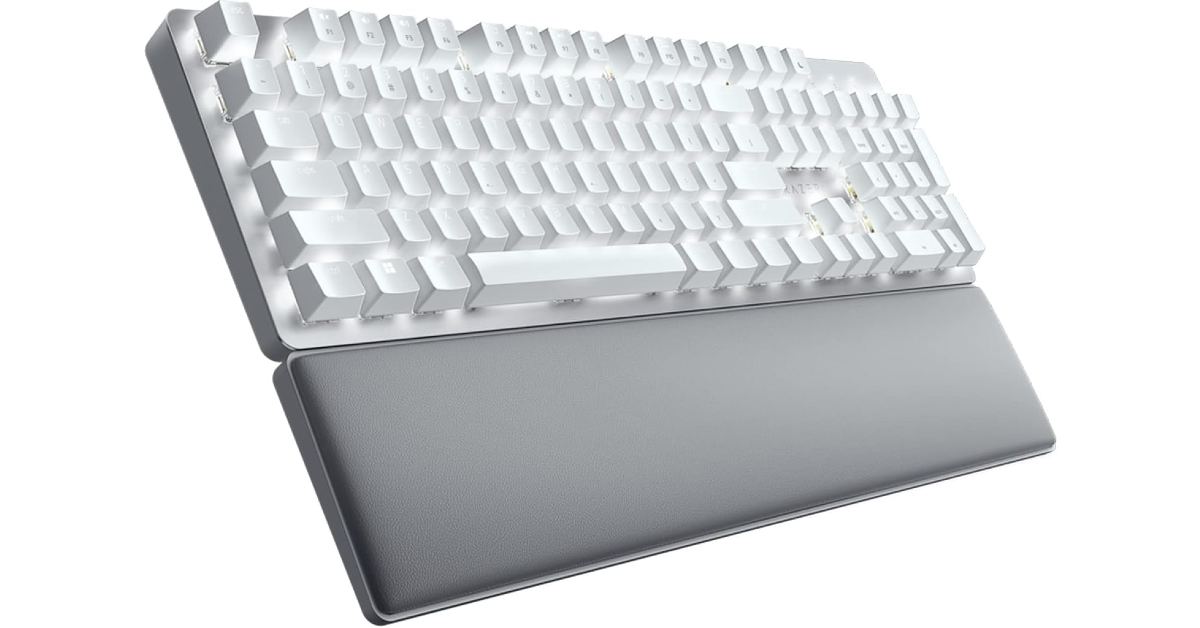
Built for maximising productivity, the Razer Pro Type Ultra features silent yellow mechanical switches that are perfect to be used in an office environment. Its ergonomic design, leatherette wrist rest, and a soft-touch coating on the keycaps bring a whole lot of ease and comfort to the typing experience. The Razer Pro Type Ultra has multi-connection which allows it to pair with a maximum of 4 devices at once. It can last up to 214 hours without backlighting turned on and up to 13 hours with the backlighting on full brightness. Certainly one of the best mechanical keyboards under $200 that you can buy in the USA right now.
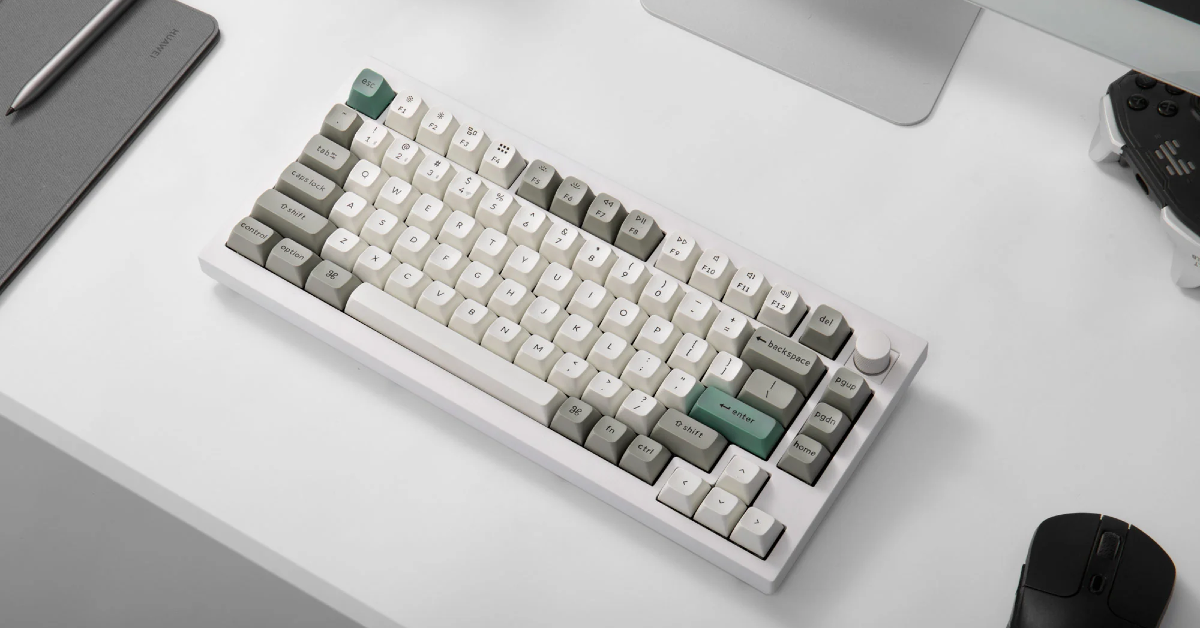
This full-metal custom mechanical keyboard supports a 2.4GHz wireless connection and a 1000Hz polling rate. The Keychron Q1 Max is available in two colour variants – Carbon Black and Shell White. There are three switch types on offer – Gateron Jupiter Red, Gateron Jupiter Brown, and Gateron Jupiter Banana. The double gasket design and PBT keycaps elevate the premium factor of this keyboard. With Bluetooth 5.1 support you can connect the Q1 Max to 3 devices at once. The RGB backlighting on this keyboard can be customised by the user. The Keychron Q1 Max may cost slightly more than $200, but it is worth the price.
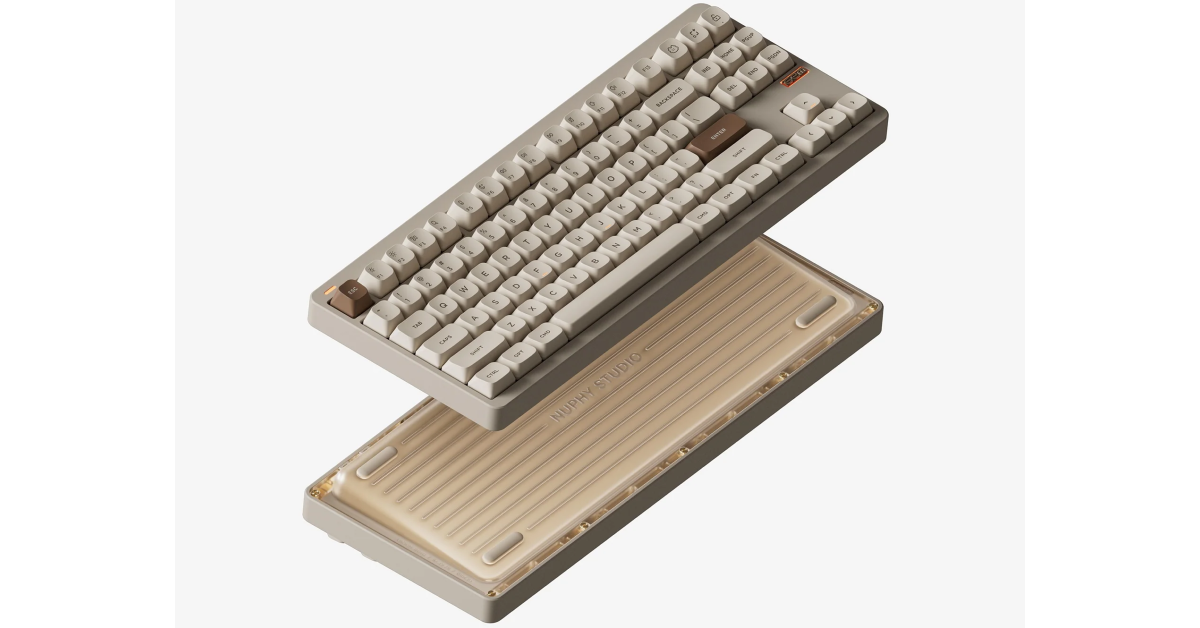
The wired version of Nuphy Gem80 fetches $149.95 and the wireless (Bluetooth) variant fetches $20 more. There are five colour options on offer – Cosmic Mocha, Mystic Indigo, Obsidian Black, Airy Lilac, and Inca Rose. The keyboard has a 1,000 Hz polling rate and QMK/VIA support. Its polished aluminium chassis gives it a premium, refined look. It comes with the Silicone Socket gasket mount preinstalled by default with the option to change it to Silicone Bean, Silicone Strip, and Screw & Silicone. Other aspects of the keyboard like the switch type, keycap, plates, and wrist rest can be customised as well.
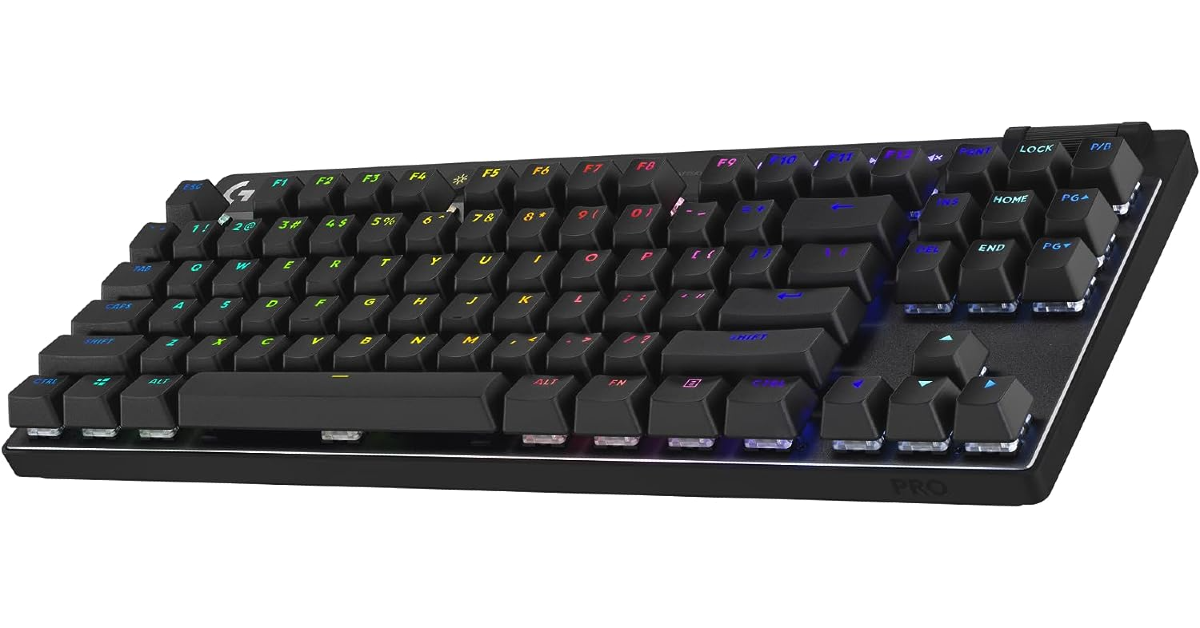
Priced just under $200, the Logitech Pro X TKL is one of the best gaming mechanical keyboards you can buy in the USA. This compact keyboard sports a tenkeyless design. Being a gaming keyboard, it features LIGHTSYNC RGB lighting which can be customised by the user. The Pro X can store multiple lighting profiles on the keyboard itself. A 1ms report rate makes it ideal for tournament gaming. The Pro X offers up to 50 hours of battery life on a single charge. Apart from a wireless connection, it can also be connected to your PC using a USB cable. A carrying case, USB LIGHTSPEED adapter, adapter extension, and a 6ft charging cable are provided in the box.
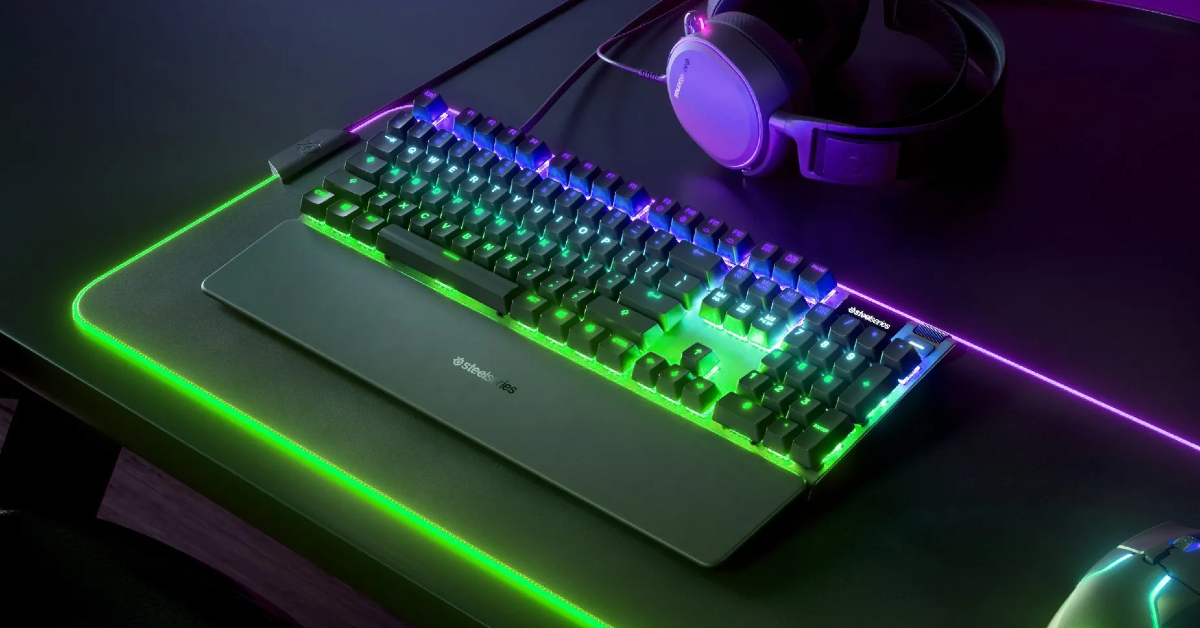
The SteelSeries Apex 7 is available with three switch options – Red, Blue, and Brown. All three switches have a 2.0mm actuation point and are durable up to 50 million keypresses. The OmniPoint switch, with an actuation point of 0.4mm, is available on the Apex Pro model. The Apex 7 has an integrated OLED smart display that notifies the user whenever they switch to a different profile or change a setting. The keyboard can store up to 5 profiles on board. The premium magnetic wrist rest brings a lot of comfort to the user during long gaming sessions.
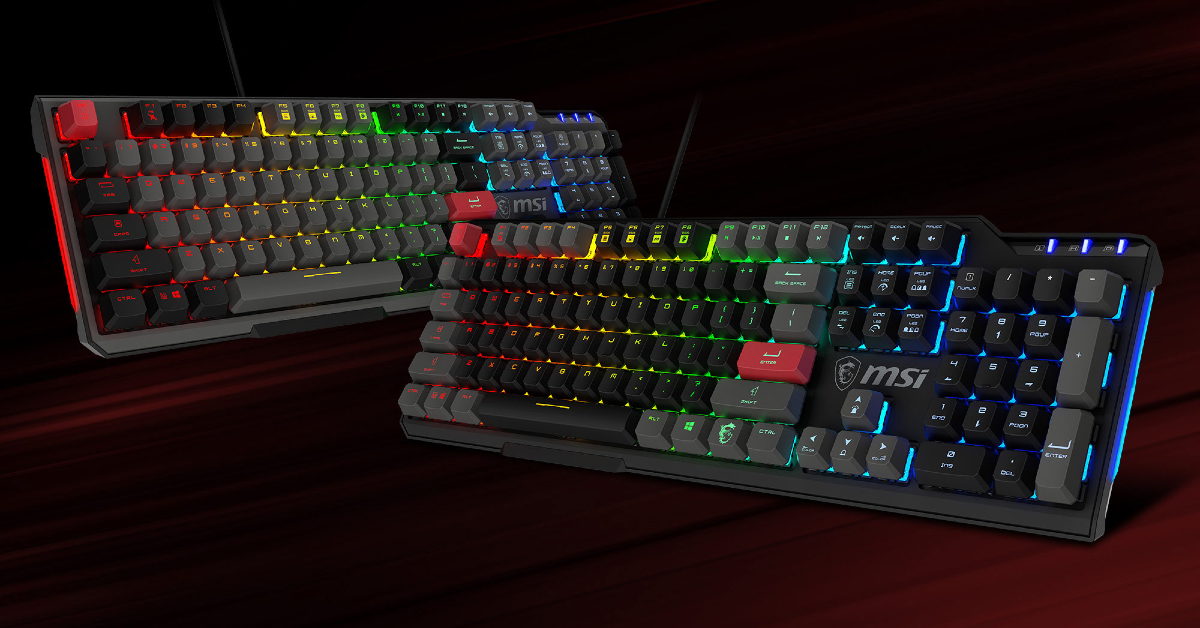
MSI Vigor GK41 Dusk
Price: $49 on MSI Store
Looking for something cheap and affordable? The MSI Vigor GK41 Dusk is your guy. It features Kailh Red Mechanical Switches and per-key RGB with additional lightbars. The keyboard can be adjusted to accommodate three resting angles – 0°, 3°, or 7°. The feedback offered by the mechanical keys is satisfying and precise. Users can store up to 3 profiles on the keyboard, using the MSI Center app. This app can also be used to customise the macro keys, adjust the settings, and control the RGB lighting pattern on the keyboard.
These are the top 7 mechanical keyboards under $200 that you can buy in the USA. If you think we missed out on a keyboard that deserves to be on this list, give it a shout-out in the comments! While you’re here, check out this article to learn how to clean your mechanical keyboard and fix a broken key.
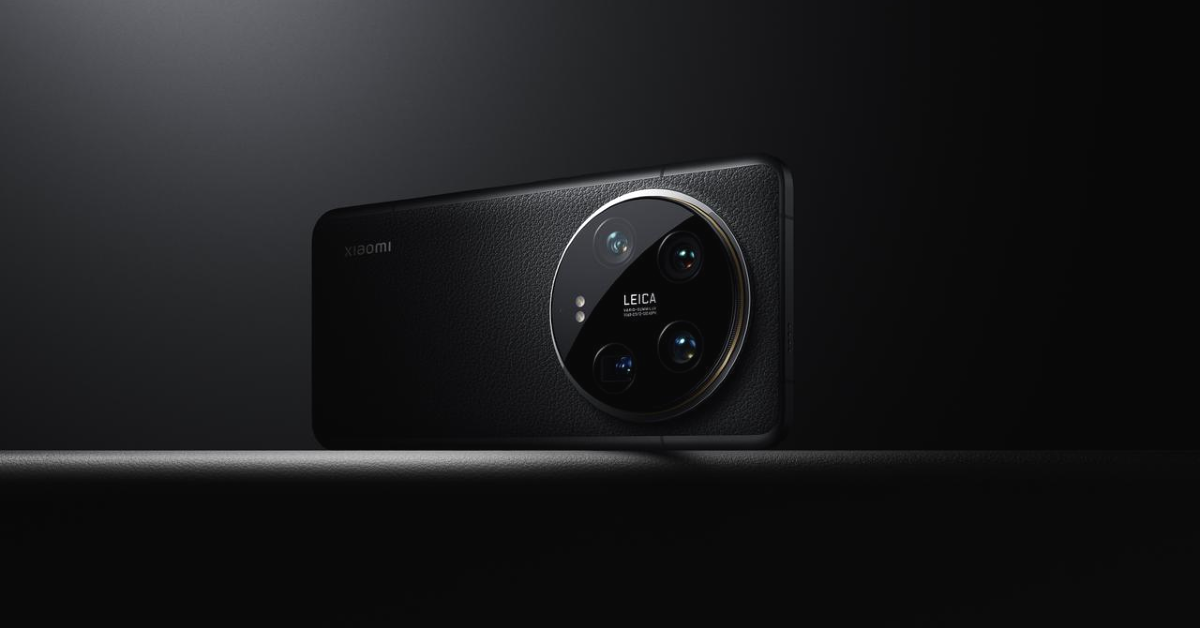
The lineup includes- Xiaomi 14 Ultra and Xiaomi 14.
Xiaomi is also scheduled to launch Xiaomi 14 on March 7 in India.
Chinese smartphone maker Xiaomi has officially launched its latest flagship smartphone series Xiaomi 14 series. The company showcased two smartphones under the lineup Xiaomi 14 and Xiaomi 14 Ultra at MWC 2024. Both the devices are powered by the Qualcomm Snapdragon 8 Gen 3 processor. The phones come with Leica optics. In India, the company will launch the regular variant on March 7.
In This Article
Xiaomi 14 Series price and availability
The Xiaomi 14 Ultra is offered in Black or White with 16GB RAM with 512GB of storage for EUR 1,499, or roughly Rs 1.3 lakh. It will be available in two colour options Black or White.
On the other hand, the pricing for the Xiaomi 14 begins at EUR 999, or around Rs 89,700. It will come in available in Black, White, and Jade Green colour options.
Xiaomi 14 Ultra specifications
Xiaomi 14 Ultra features a 6.73-inch QHD+ LTPO OLED display with 3200 x 1440 pixels of resolution. It has a Xiaomi Shield Glass Front with Xiaomi nano-tech vegan leather back. The screen has support for 120Hz refresh rate and 240Hz touch sampling rate. The display comes with HDR10+, Dolby Vision support and 3000 nits peak brightness. The device is powered by a Qualcomm Snapdragon 8 Gen 3 processor with up to 16GB LPDDR5x RAM and 1TB UFS 4.0 storage. It runs on a HyperOS interface with Android 14 out of the box.
For optics, the 14 Ultra features a quad-camera setup developed in coordination with German camera maker Leica. The setup includes a 50MP Sony LYT900 primary sensor, a 50MP Sony IMX858 telephoto zoom lens (Supports 10cm macro photography), a 50MP Sony IMX858 telephoto zoom lens (Supports 5cm macro photography) and a 50MP ultra wide-angle camera. For selfies, it flaunts a 32MP front-facing camera.
The Ultra is backed by a 5,300mAh battery with 90W wired charging and 80W wireless charging support. Regarding connectivity, there is 5G, Wi-Fi, Bluetooth, GPS, NFC, and a USB-C Type-C port.
Xiaomi 14 Specifications
Xiaomi 14 has a 6.36-inch 1.5K C8 LTPO OLED display with 1,200×2,670 pixels of resolution. It has an adaptive refresh rate ranging from 1Hz to 120Hz and up to 240Hz touch sampling rate. Moreover, the screen features 3,000 nits of peak brightness and HDR10+ support. It has a Corning Gorilla Glass Victus front and 3D curved glass back. It operates on Android 14-based HyperOS. Under the hood, there is a Qualcomm Snapdragon 8 Gen 3 chipset with Adreno GPU. It includes up to 16GB of RAM and 1TB of storage.
In terms of cameras, there is a triple rear camera setup that includes a 50MP Light Hunter 900 sensor with OIS, a 50MP telephoto camera (Supports 10cm macro photography) and a 50MP ultrawide camera. The selfie camera is the same as the Ultra variant.
In terms of battery, Xiaomi 14 includes a 4,610mAh capacity battery with 90W fast charging and 50W wireless charging support. For connectivity, there is 5G, Wi-Fi 7, NFC, Bluetooth 5.4, GPS, Galileo, GLONASS, Beidou, NavIC, and a USB Type-C port for charging
Garena Free Fire is a battle royale game with regular awards and tournaments to keep players interested. If you play Garena Free Fire, you should be aware of the redeem codes that are released on a daily basis. However, because the battle royale game is banned in India, players from other countries can use the Free Fire Redeem codes daily. If you’re unfamiliar with the Garena Free Fire redeem codes or don’t know how to get them, we’ve put together a step-by-step guide to help you redeem them. Check out Garena Free Fire Redeem Codes for 26 February 2024.
The Free Fire redeem codes are a great way to get free stuff. These are 12-digit codes that contain alphabets and numbers, as well as an expiration date and time. Because the Garena FF redeem codes cannot be used more than once, you should hurry to the redemption page to claim your free reward before someone else does. To get a free reward, all you have to do is go to reward.ff.garena.com/en, which is the official redemption page. Also, keep an eye on this space for daily updates on Garena Free Fire redemption codes and rewards.
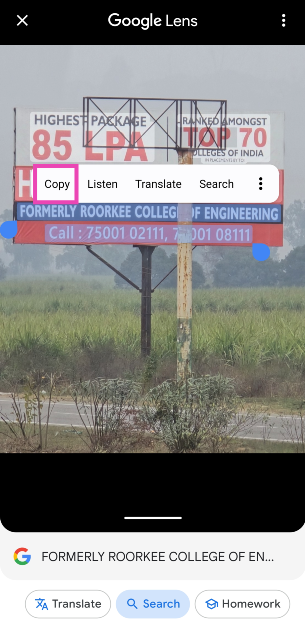
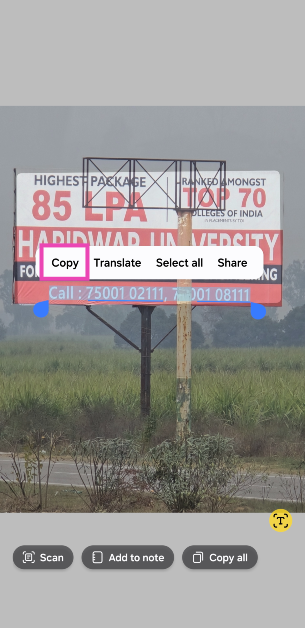
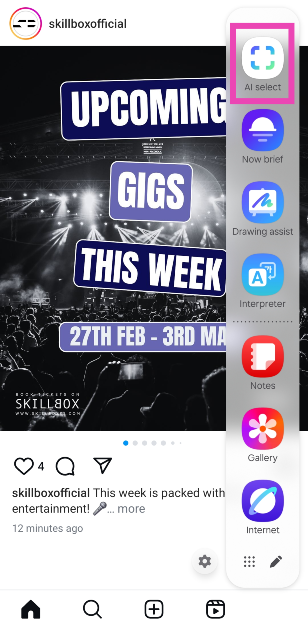
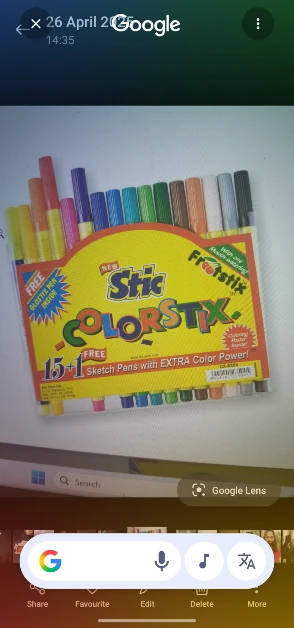
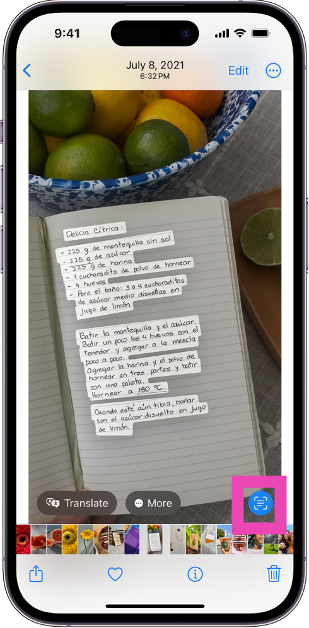
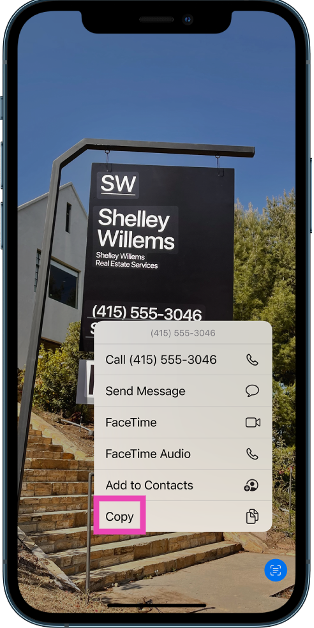
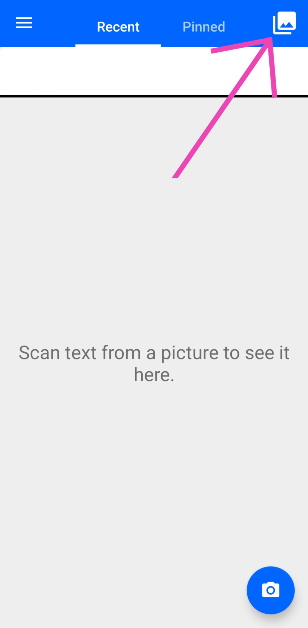
Have you ever taken a picture of a random billboard and wanted to call the number listed on it? In the past, you would switch back and forth between the dialer app and the picture a couple of times to enter the contact number. But now, the process is much simpler on iPhone as well as Android smartphones. Today, we bring you the top 7 ways to copy or extract text from images on Android and iPhone.
What if your Android phone doesn’t allow you to copy text?
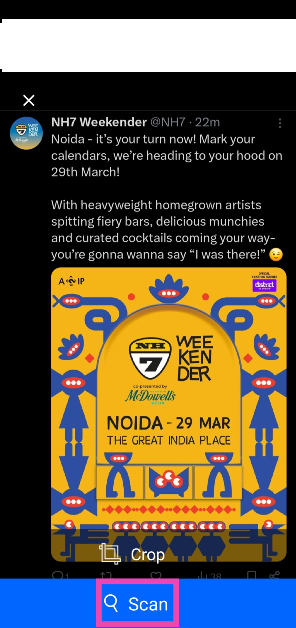
Not all Android phones are alike. Depending on the manufacturer, your smartphone’s native gallery app may or may not allow you to extract text from pictures. If you own a Samsung smartphone with the updated One UI OS, you will be able to copy text from any image in just a few taps. This text can be pasted into any text field using the clipboard.
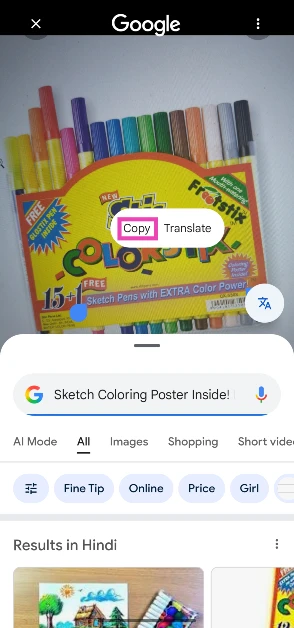
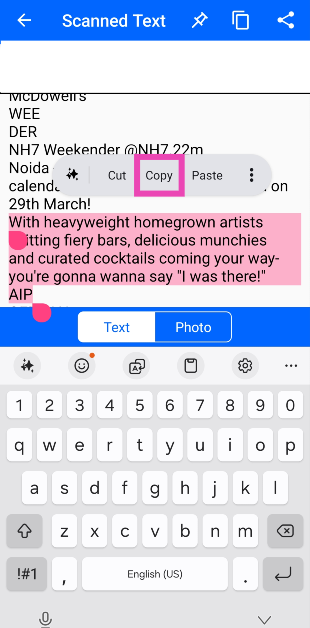
But what happens if your phone’s native gallery app does not have this feature? There’s no need to fret. The Google Photos app, which comes pre-installed in every Android smartphone, has this feature baked into it. Google Photos makes use of Google Lens to scan the text in the image and lets you copy it to the clipboard. Read along to learn the step-by-step process.
This is how you can copy or extract text from images on Android and iPhone. The copied text can be accessed in any text field using the clipboard. Simply long-press any text field and select ‘Paste’ from the pop-up menu. If you know of any other way to go about this task, let us know in the comments!
Garena Free Fire is a battle royale game with regular awards and tournaments to keep players interested. If you play Garena Free Fire, you should be aware of the redeem codes that are released on a daily basis. However, because the battle royale game is banned in India, players from other countries can use the Free Fire Redeem codes daily. If you’re unfamiliar with the Garena Free Fire redeem codes or don’t know how to get them, we’ve put together a step-by-step guide to help you redeem them. Check out Garena Free Fire Redeem Codes for 25 February 2024.
The Free Fire redeem codes are a great way to get free stuff. These are 12-digit codes that contain alphabets and numbers, as well as an expiration date and time. Because the Garena FF redeem codes cannot be used more than once, you should hurry to the redemption page to claim your free reward before someone else does. To get a free reward, all you have to do is go to reward.ff.garena.com/en, which is the official redemption page. Also, keep an eye on this space for daily updates on Garena Free Fire redemption codes and rewards.
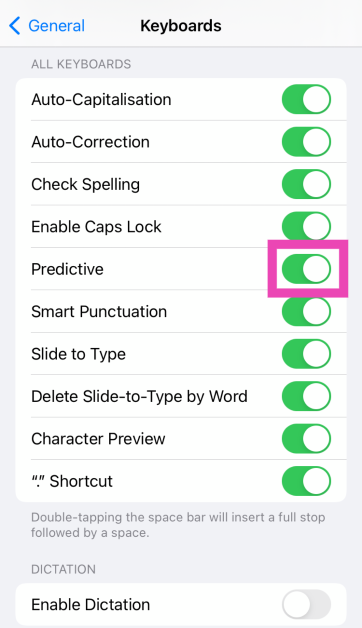
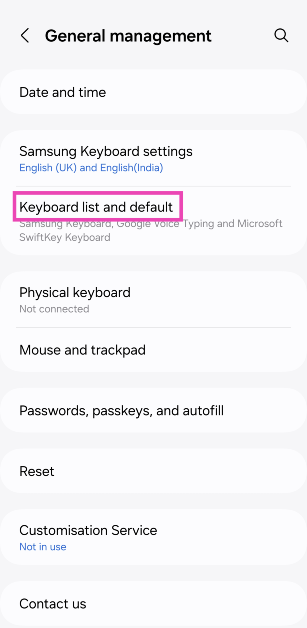
While predictive text is an extremely handy feature on modern smartphones, some users do not like that extra strip on top of their onscreen keyboards. Luckily, most Android keyboards allow you to turn off this feature. On iPhone, disabling word predictions is pretty straightforward too. Today, we bring you the top 4 ways to turn off predictive text on Android and iPhone.
As the name suggests, predictive text suggests words that you are most likely to type while texting. Once you type a word, predictive text will automatically come up with a suggestion. These suggestions appear in the topmost strip of the keyboard. You can tap on a word to use it in your sentence. If used correctly, it can increase your typing speed and bring a nice flow to the overall typing experience.
So, how does predictive text work? To explain it simply, your smartphone’s onscreen keyboard examines your typing pattern via machine learning and recognises the words you use the most. It uses language models to make sure its suggestions are grammatically sound and make sense in the sentence you are typing. If you accept a suggestion from your phone, it will assume that the word that it suggested is correct. This helps it come up with better suggestions in future.
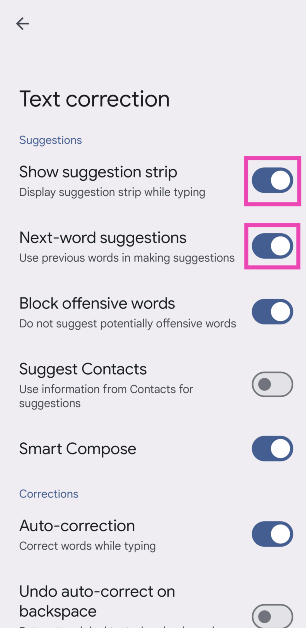
Turn off predictive text on Gboard (Android)
Step 1: Tap on a text field to trigger Gboard.
Step 2: Hit the cog wheel icon to access settings.
Step 3: Tap on Text correction.
Step 4: Turn off the toggle switch for Next-word suggestions.
Step 5: If you want to get rid of the suggestion bar altogether, turn off the toggle switch for ‘Show suggestion strip’.
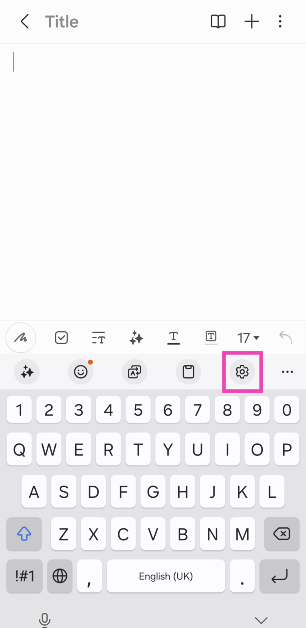
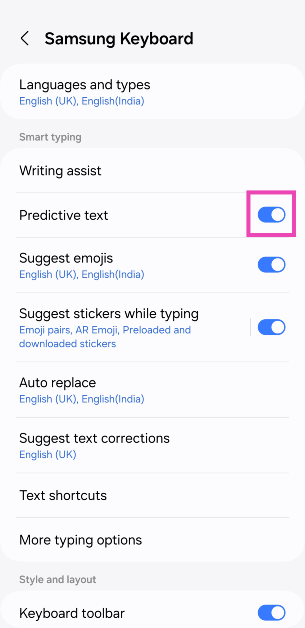
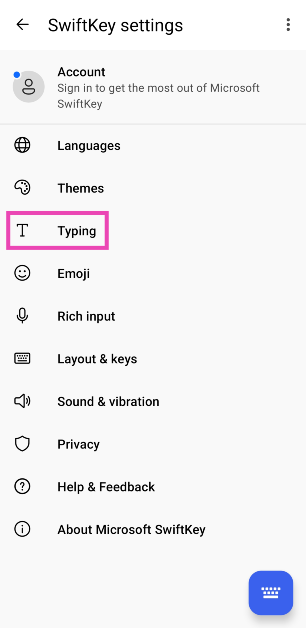
Turn off predictive text on Samsung Keyboard (Android)
Step 2: Hit the ellipses on the top right section of the keyboard.
Step 3: Select Settings.
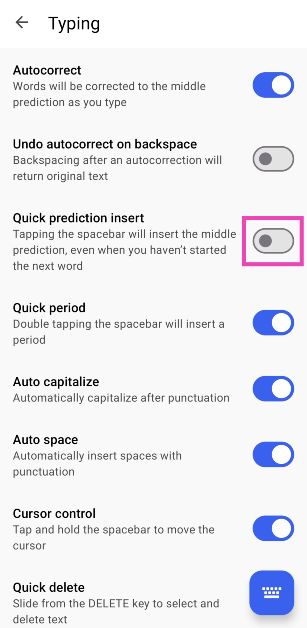
Step 4: Tap on Typing.
Step 5: Turn off the toggle switch for Quick prediction insert.
Turn off predictive text on an iPhone
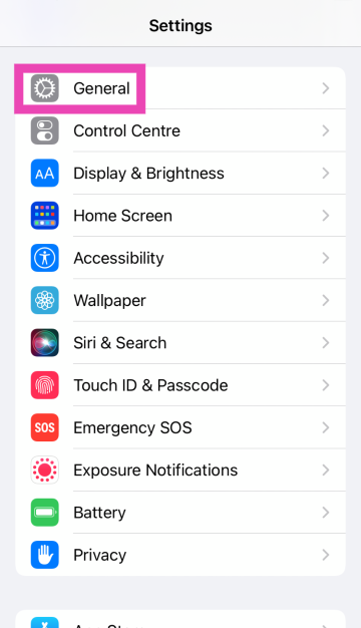
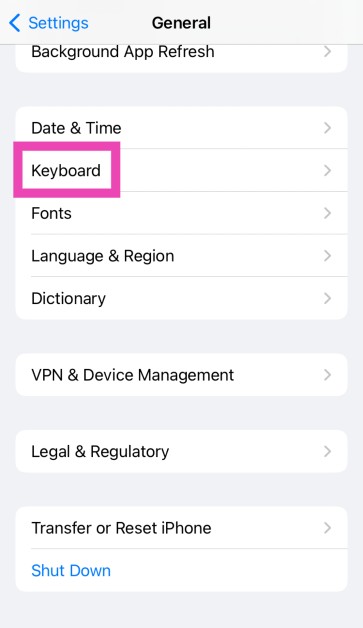
Step 1: Go to Settings and select General.
Step 2: Scroll down and tap on Keyboard.
Step 3: Turn off the toggle switch for Predictive.
Frequently Asked Questions (FAQs)
How do I turn off predictive text on Gboard (Android)?
Hit the Settings icon, go to Text correction, and turn off the toggle switch for ‘Next-word suggestions’.
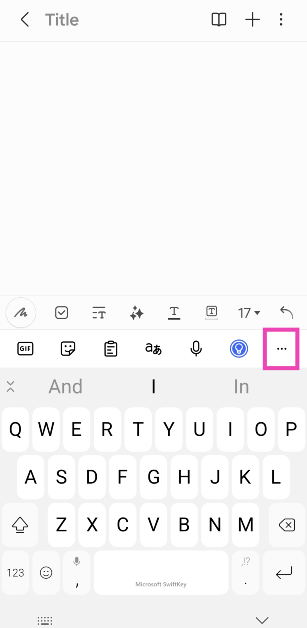
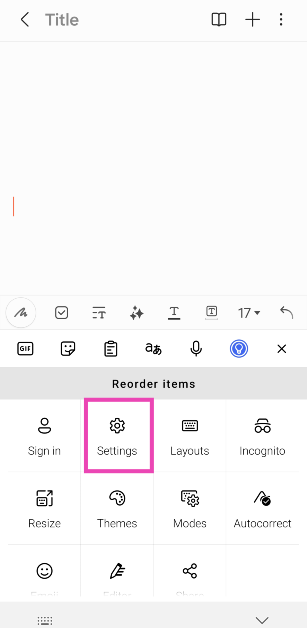
Is there a way to turn off predictive text on Microsoft SwiftKey?
Microsoft SwiftKey does not allow users to turn off text suggestions from the keyboard. At best, you can turn off the ‘Quick prediction text’ option from settings.
How do I turn off predictive text on an iPhone?
Go to Settings>General>Keyboard and turn off the toggle switch for ‘Predictive text’.
These are the top 4 ways to turn off predictive text on Android and iPhone. Check out this article to learn how you can use Galaxy AI features on your Samsung Keyboard. Which is your preferred keyboard for your smartphone? Let us know in the comments!
No one likes audio delays. Even a slight lag in audio output while watching a movie or playing a video game can completely ruin the experience. This issue is more prevalent in Bluetooth headphones and earbuds. Luckily, even the most basic, entry-level wireless headsets have a low-latency mode to manage this problem. But what if even that doesn’t work? Try these top 11 ways to fix Bluetooth audio delay on your Android smartphone.
Bluetooth headsets rely on a wireless signal from the source device to produce an audio output. By its very nature, some latency is bound to creep in. This issue is not prevalent in wired headphones. The audio latency in wired headphones is less than 10 milliseconds. This delay is minuscule and impossible to notice. However, wireless earbuds and headphones may have a latency of more than 100ms (even 300ms in some cases), creating a visible lag between the audio output and the visuals on the screen.
The Low Latency Mode in Bluetooth headsets does help in minimising this delay. But there are other factors at play here, too. These factors can be controlled to prevent the audio lag. If you use your Bluetooth headphones for gaming, you may want to check out what you can do to ensure a smooth, lag-free gaming experience.
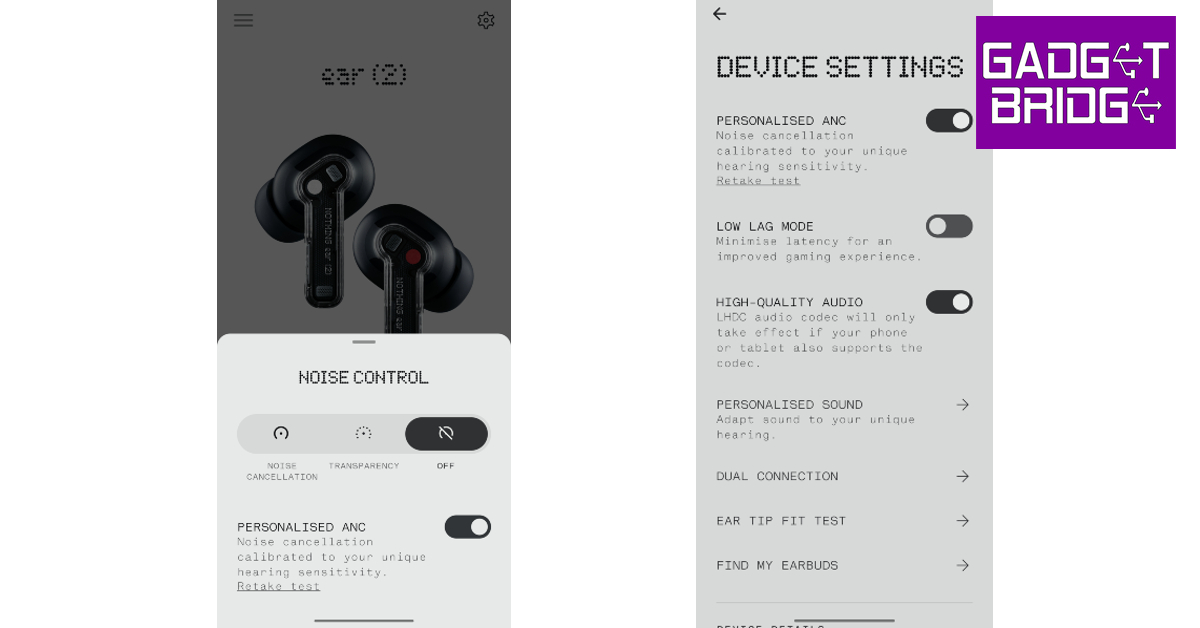
Turn on Low Latency Mode
Turning on the Low Latency Mode on your Bluetooth headphones or earbuds can help in fixing the audio delay. On some headphones, it may be called ‘Gaming Mode’ or ‘Low Lag Mode’. The process of turning on this mode is different for every headset. If you use a companion app for your earbuds, you will find this setting in the audio profile section. Some TWS devices allow users to turn on the Low Latency Mode directly from the earbuds. Check out the user manual to learn the dedicated controls.
Make sure your phone is within the functional range of the Bluetooth headset
One of the perks of using a Bluetooth headset is that you can keep your phone in one place and still listen to music while walking around the room. However, Bluetooth headsets and earbuds have a functional range of around 30 feet (10 metres). If you stray outside of this range, you may experience an audio delay. Make sure you are in the vicinity of the connected device to prevent this from happening.
Charge your Bluetooth headphones
When your TWS headset drops to a low charge level, its performance takes a hit. The intensity of the audio output diminishes significantly, and so does the strength of the audio signal. You may experience a slight audio delay in this situation. To fix it, simply charge your Bluetooth headphones. Once charged, the latency will likely be gone.
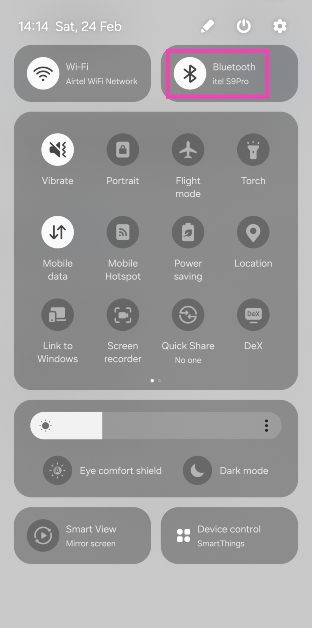
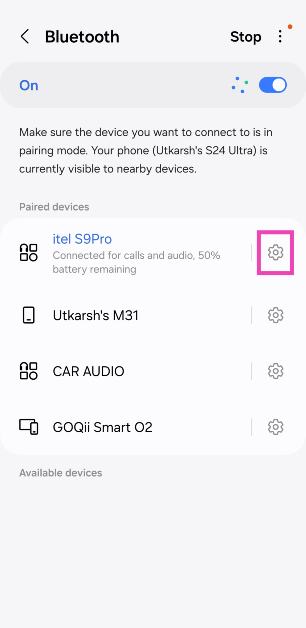
Re-pair your phone with your headphones
Step 1: Swipe down from the status bar and long-press the Bluetooth tile in the Quick Settings Menu.
Step 2: Hit the cog wheel icon next to the connected TWS.
Step 3: Hit Unpair.
Step 4: Put your TWS in pairing mode.
Step 5: Go to the previous page on your smartphone and re-pair the TWS.
Reduce the interference
If there’s a significant distance between your phone and the Bluetooth headphones, the wireless signals (Bluetooth and WiFi) from other devices in the vicinity can cause interference. These devices may include your laptop, TV, WiFi router, and more. Latency in audio output is one of the effects of interference. Disable the device that is causing interference to fix the Bluetooth audio delay. You can also bring your phone close to your Bluetooth headset to fix this problem.
Change the Bluetooth Codec
Modern Bluetooth headphones support multiple codecs. By default, your phone chooses the SBC audio codec. If you’re experiencing latency issues, switching to AAC, LDAC (Sony), or aptX codecs may help. You can change the audio codec from the companion app for your TWS or the device settings in the Bluetooth menu. If your headset doesn’t support multiple codecs, move on to the other fixes in this list to fix the Bluetooth audio delay.
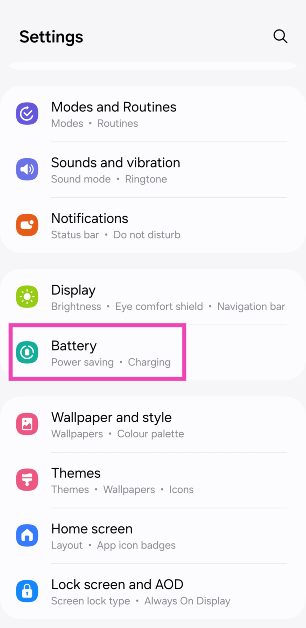
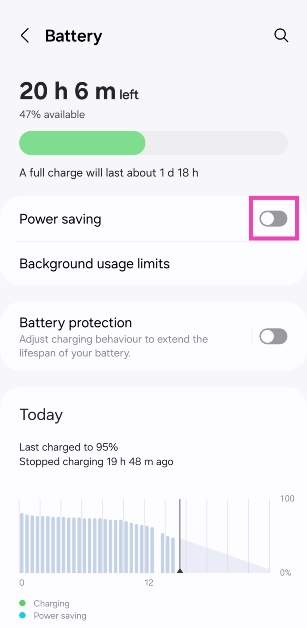
Disable Power Saving Mode on your smartphone
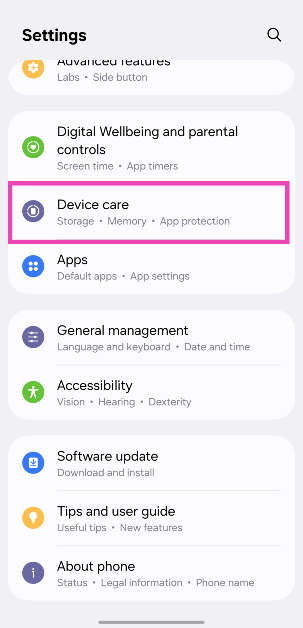
Android smartphones automatically enable the Power Saving Mode when they are running low on charge. This may affect your Bluetooth headset’s performance. Turn off the Power Saving Mode to fix the Bluetooth audio delay. Here’s how.
Step 1: Go to Settings and select Battery.
Step 2: Turn off the toggle switch for Power Saving.
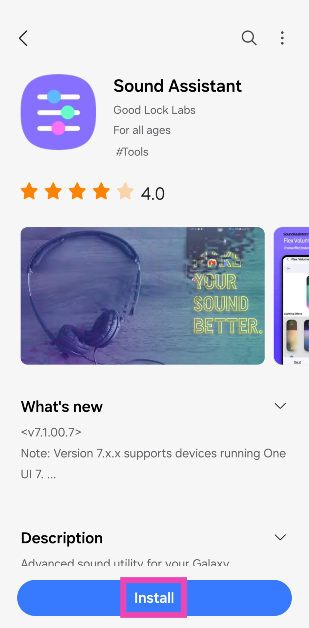
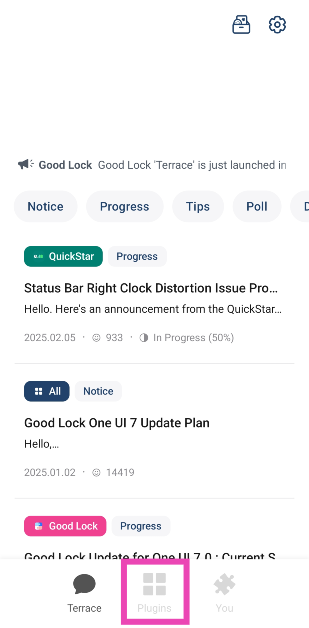
Use the Sound Assistant app (Samsung)
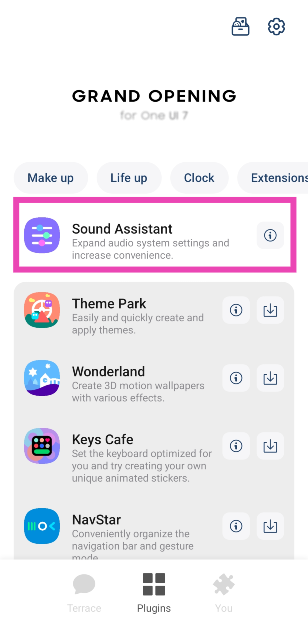
If you own a Samsung smartphone, use the Sound Assistant plugin for Good Lock to sync up the Bluetooth audio output and the visuals on the screen.
Step 2:Launch the Good Lock app on your phone and switch to the Plugins tab.
Step 3: Select Sound Assistant.
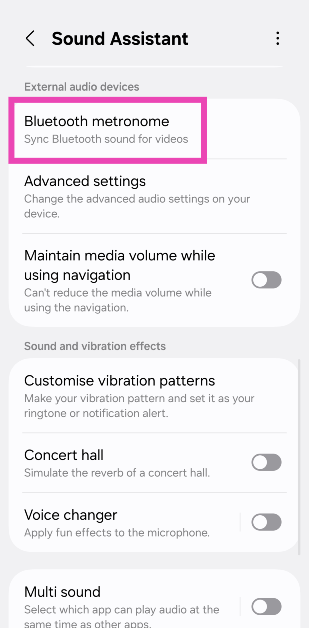
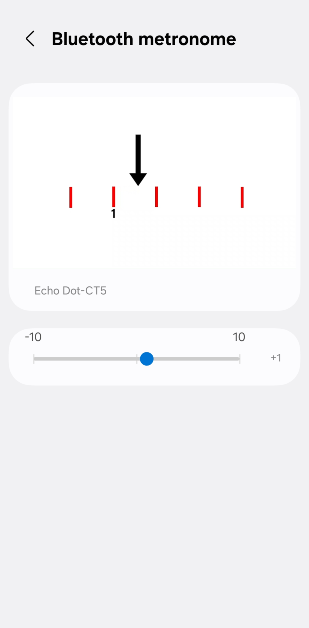
Step 4: Go to Bluetooth metronome.
Step 5: Use the slider to match the audio.
Clear the Bluetooth cache
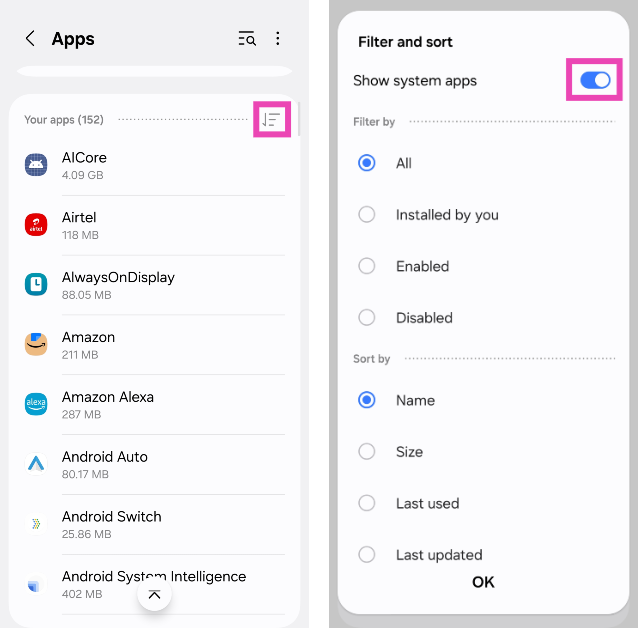
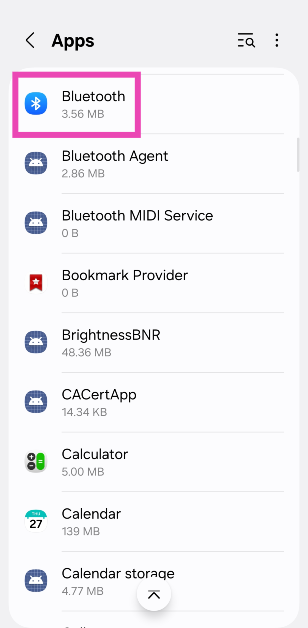
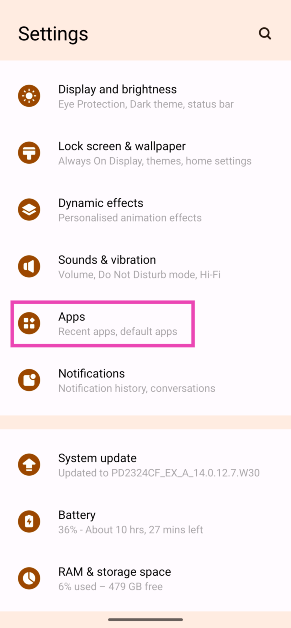
Step 1: Go to Settings and select Apps.
Step 2: Hit the filter icon and turn on the toggle switch next to Show system apps.
Step 3: Scroll down and select Bluetooth.
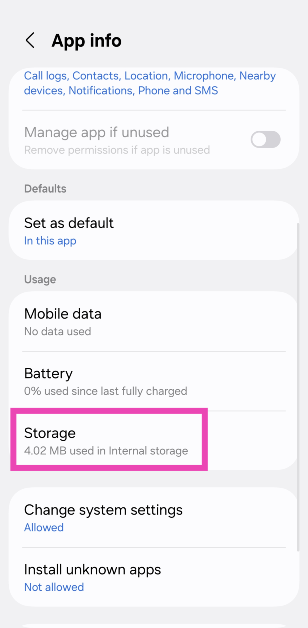
Step 4: Go to Storage.
Step 5: Select Clear cache.
Turn off HD/Lossless audio
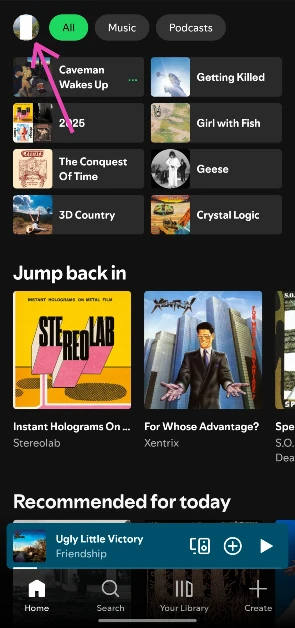
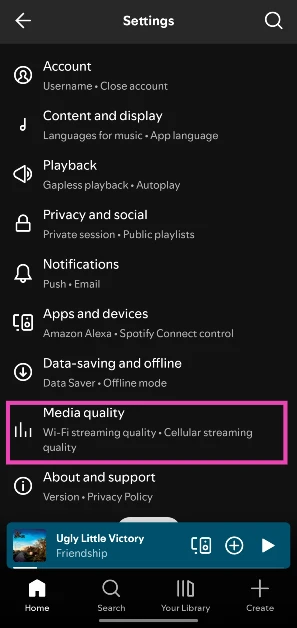
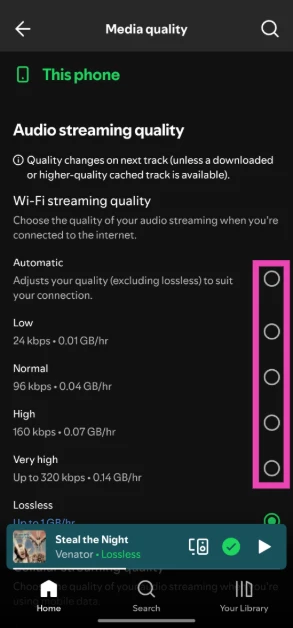
If you’re facing latency issues on a music streaming platform, try disabling HD/Lossless audio to see if it fixes the issue. Here’s how you can go about it on Spotify.
Step 2: Tap your profile picture in the top left corner of the screen.
Step 3: Select Settings and privacy.
Step 4: Go to Media quality.
Step 5: Select any option but lossless.
Update your TWS’s firmware
Updating your wireless earbuds’ firmware fixes any bug-related issues, including Bluetooth audio delay. The process to update the firmware is fairly simple. Launch the companion app for your earbuds and go to the ‘About’ section. Find the software info category and check for any firmware updates. Install the latest OTA update for your device.
Frequently Asked Questions (FAQs)
What is the ideal audio latency for gaming?
If your Bluetooth audio headset has a latency under 100ms, it should not create any delay while gaming. However, an audio latency between 20-50ms is considered ideal for gaming.
How do I update my wireless earbuds’ firmware?
You can update the firmware of your wireless earbuds by launching the companion app for your smartphone and navigating to the software info section. This is where you will find the pending OTA updates.
How do I decrease the audio lag on my Bluetooth headphones?
To fix the audio delay on your Bluetooth headphones, make sure they are charged and the low-latency mode is turned on. Additionally, make sure the power saving mode on your phone is disabled, and the two devices are within the functional range of each other.
How do I change the Bluetooth audio codec on my phone?
Go to Settings>Connections>Bluetooth, hit the gear icon next to the connected Bluetooth headset and select your preferred audio codec on the following page.
How do I fix glitchy audio on Android?
Restart your phone and re-pair it with the Bluetooth device to fix the glitches in the audio output.
These are the top 11 ways to fix the Bluetooth audio delay on your Android smartphone. Typically, this problem does not arise while using wired headphones. If you’re looking for a wireless gaming headset, always make sure that it offers low latency (<50ms). If you know of any other way to fix this issue, let us know in the comments!
Adding music to your Instagram Story gives it an edge and makes it more interesting to watch. Even the most basic pictures can be brought to life with a good background song. Instagram’s music sticker for Stories works great for the most part, but it isn’t immune to malfunctions. Today, we bring you the top 11 ways to fix the ‘Instagram Stories music not working’ issue on your smartphone.
Is there a way to add music to my Stories without using the Instagram sticker?
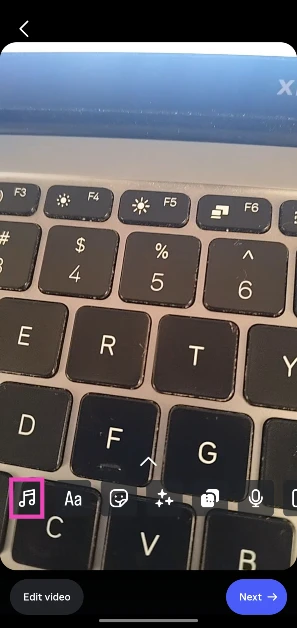
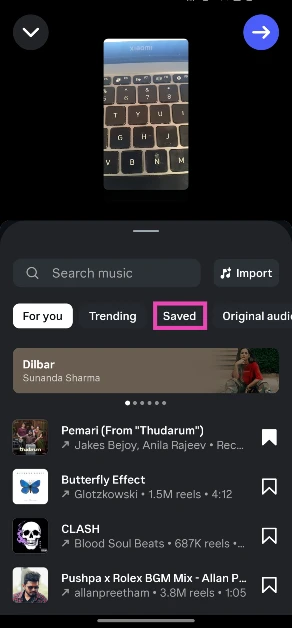
Instagram has a diverse music library for Stores, Reels, and posts. In the Story Creator, this music library can be accessed using the music sticker. However, if you’re looking for some niche or underground song, the chances of you finding it there are very slim. Luckily, there is a way you can still embed that song in your Story.
Instead of using Instagram’s Story Creator, you will need to install a video editing app on your phone. You will also need an MP3 file of the song to set it as the background music for your Story. In the photo editing app, use the ‘Add background music’ option to attach the song to the Story. You can also add the music on a separate track if you want greater editorial control. Once the song has been added to the video, you can upload it as a Story on Instagram. You can use this trick to upload your own music in your Story as well.
Switch your account type from Business to Personal or Creator
Due to copyright restrictions, Instagram does not allow Business accounts to use its music library for commercial use. Switch your account type to Personal or Creator to use music in your Stories. Here’s how.
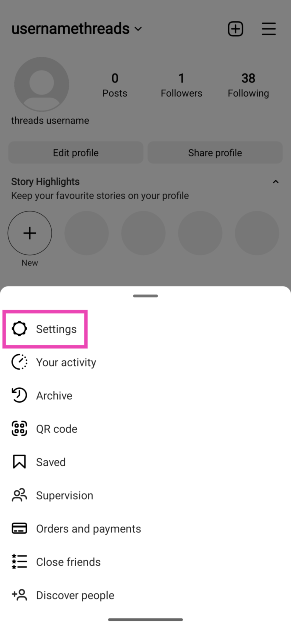
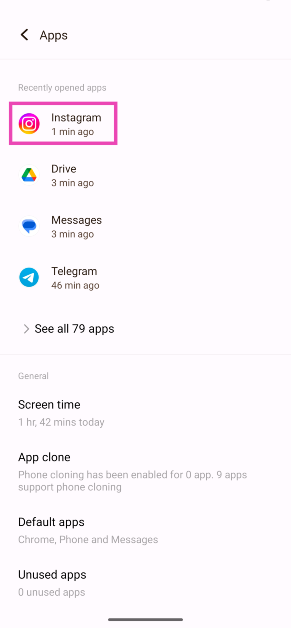
Step 1: Launch the Instagram app and hit your profile icon at the bottom right corner of the screen.
Step 2: Hit the hamburger menu icon at the top right corner of the screen.
Step 3: Select Settings and privacy.
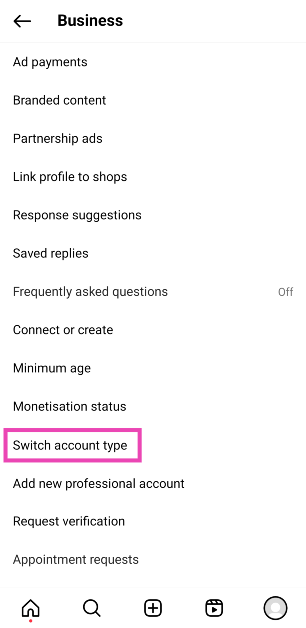
Step 4: Tap on Business tools and controls.
Step 5: Select Switch account type.
Step 6: Tap on Switch to personal/creator account.
Update the app
Instagram isn’t immune to bug-related problems. Luckily, developers are quick to pack these issues with an update. If you can access Instagram’s music library for your Stories or the music is always muted when you make a post, try updating the app as a quick fix. Go to the Google Play Store, search for Instagram, and open its page. Hit the ‘Update’ button and wait for your phone to download the update.
Log out and log in
Giving your Instagram account a quick refresh is not a bad idea if you can’t get the music library to work in the app. You can do this by logging out and then logging back in. Go to Profile>Menu>Settings and privacy, scroll all the way down, and hit ‘Log out’. Log back in using the correct account credentials.
Uninstall and reinstall the app
If the Instagram app on your phone is corrupted, deleting and reinstalling it may fix the issue. Long-press the Instagram app icon in the app drawer and select ‘Uninstall’. Alternatively, you can go to Settings>Apps>Instagram and hit ‘Uninstall’ in the bottom toolbar to remove the app from your phone. Once deleted, reinstall the app from the Google Play Store.
Save music from another Reel
If you’re unable to find a viral song in Instagram’s music library, you can simply pull it from another Reel. Here’s how.
Step 1: Open the Reel with the song.
Step 2: Tap the song title at the bottom of the page or hit the box icon in the bottom right corner of the screen. This will take you to the song’s page.
Step 3: Hit Save.
Step 4: Create your Reel and hit the music note icon.
Step 5: Switch to the Saved tab.
Step 6: Tap the song title.
Disable VPN
Are you using a VPN to access Instagram? Instagram’s music library may be geo-locked for some countries. If you are connected to a server from one of those countries, you will not be able to use music on your Instagram Stories. Disconnect the VPN or connect to another server and try again.
Clear Instagram’s cache
Step 1: Go to Settings and select Apps.
Step 2: Tap on Instagram.
Step 3: Select Storage and cache.
Step 4: Hit Clear Cache.
Restart your phone
It is possible that the issue lies with your smartphone, not your Instagram account. A quick restart can fix the background glitches causing this problem. Long-press the side button (or the side button + volume up key) to reveal the power menu. Select ‘Restart’ from the list.
Update your phone
Step 1: Go to Settings and select Software update.
Step 2: Tap on Download and install.
Step 3: Select Install now.
Use a different device
If you’re using an old Android smartphone, chances are that Instagram hasn’t rolled out its latest features on it yet. It is unlikely that new features like Instagram music stickers will be rolled out on your device if they aren’t available already. Log in to your Instagram on a relatively newer device to use the full spectrum of features, including background music for Instagram stories.
Check if Instagram is down
Can’t get Instagram to work at all? Maybe the app is experiencing a server outage. To confirm, go to Downdetector.in and search for Instagram. If you see a spike in recent user reports, it means that the app is currently down. The only thing you can do in this situation is wait until the servers are restored. Downdetector also lets you know if any specific features of the app are not working.
Frequently Asked Questions (FAQs)
Why am I not able to use music in my Instagram Stories?
Instagram prevents Business accounts from using copyrighted music in their Stories for commercial use. Switch to a Personal or Creator account to start using music again.
How can I add music to my Instagram Stories?
Upload a Story, then tap the sticker icon and select ‘Music’ to add a song.
How do I find trending songs for Instagram Reels?
Watch the trending Reels in your country and see which songs they are using by hitting the waveform box at the bottom right corner of the screen. The song title usually shows up at the bottom of the Reel as well.
How do I send music via Instagram DMs?
Go to your Instagram DMs, open a conversation, tap the sticker icon, select ‘Music’, enter the song title and tap on it to send it in the chat.
How do I add music to my Instagram profile?
Go to your Instagram profile, tap on ‘Edit profile’, and go to Add music to your profile>Pick a song for your profile. Search a song, select a 30-second segment from it, and hit the tick icon to add it to your profile.
These are the top 11 ways to fix the ‘Instagram Stories music not working’ on your smartphone. If the problem won’t go away, contact Instagram support and report the problem. If you know of any other way to fix this issue, let us know in the comments!
Garena Free Fire is a battle royale game with regular awards and tournaments to keep players interested. If you play Garena Free Fire, you should be aware of the redeem codes that are released on a daily basis. However, because the battle royale game is banned in India, players from other countries can use the Free Fire Redeem codes daily. If you’re unfamiliar with the Garena Free Fire redeem codes or don’t know how to get them, we’ve put together a step-by-step guide to help you redeem them. Check out Garena Free Fire Redeem Codes for 24 February 2024.
The Free Fire redeem codes are a great way to get free stuff. These are 12-digit codes that contain alphabets and numbers, as well as an expiration date and time. Because the Garena FF redeem codes cannot be used more than once, you should hurry to the redemption page to claim your free reward before someone else does. To get a free reward, all you have to do is go to reward.ff.garena.com/en, which is the official redemption page. Also, keep an eye on this space for daily updates on Garena Free Fire redemption codes and rewards.
One of the perks of using a Samsung Galaxy smartphone is the availability of the Samsung Keyboard alongside the ol’ trusted Gboard. While most Android users find it hard to imagine ever making the switch from Gboard, Samsung users swear by the native keyboard on their phones. With the release of the new Samsung Galaxy S24 Series, the tech giant introduced the Galaxy AI to their keyboard app as well. If the Samsung Keyboard is not working on your phone, try these 14 fixes.
Samsung’s Galaxy AI has rejuvenated the native keyboard app on select Galaxy smartphones with fun and helpful features. The most important of them all is ‘Chat Translate’, which you can trigger on any conversation thread on your device. Once enabled, this feature translates the conversation to any language of your choice. The translator tool in Samsung Keyboard is capable of auto-translating your messages to another language. The entire process is seamless and smooth.
Apart from translating your messages, Galaxy AI also performs a basic spell check and corrects the grammar of your messages before you hit send. This feature can also be accessed by tapping the Galaxy AI icon on the Samsung Keyboard. On top of that, you can use the AI to change the tone and style of your messages. You can read more about these new features in this article.
Set Samsung Keyboard as the default keyboard app
Step 1: Go to Settings and select General management.
Step 2: Select Keyboard list and default.
Step 3: Tap on Default keyboard and select Samsung Keyboard.
Restart your smartphone
If tapping on a text field doesn’t trigger the onscreen keyboard, a quick restart of your device can help fix the problem. Rebooting your phone resolves any minor background glitches that may be causing it to malfunction. Press and hold the side button on your Samsung smartphone and hit the ‘Restart’ sign on the screen. You can also access the power menu by swiping down from the status bar and tapping the power icon in the Quick Settings Menu.
Remove third-party keyboard apps
Sometimes, a third-party keyboard app may interfere with the functioning of your phone’s native keyboard. Uninstall the third-party keyboard and check if it resolves the issue. To do this, locate the keyboard’s app icon in the app drawer, long-press it, and select ‘Uninstall’.
Optimise your phone with Device Care
Step 1: Go to Settings and tap on Device care.
Step 2: Select Optimise now.
The background apps will be closed and the device’s settings will be optimised.
Restart your phone in Safe Mode
If an intrusive third-party app is causing your Samsung keyboard to malfunction, you will have to remove it from your device to resume normalcy. To confirm whether the issue with the keyboard is caused by a third-party app, restart your smartphone in Safe Mode. You can do this by going to the power menu, tapping and holding the power icon, and then selecting Safe Mode. If your keyboard is working fine in Safe Mode, it means that one of the third-party apps is at fault.
Disconnect your Bluetooth keyboard
Once you pair a Bluetooth keyboard with your smartphone, it keeps the onscreen keyboard from popping up whenever you select a text field. If you want to go back to using the onscreen keyboard on your Samsung smartphone, disconnect the Bluetooth keyboard. You can do this by swiping down from the status bar and long-pressing the Bluetooth tile in the Quick Settings Menu. Tap the name of the keyboard to disconnect it from your phone. Disabling the Bluetooth altogether works too.
Use the default home launcher
Do you use a third-party launcher to give your smartphone’s home screen a unique look? It may be the reason why the Samsung Keyboard is not working. Switch to the default home launcher and check if the issue has been resolved. Here’s how.
Step 1: Go to Settings and select Apps.
Step 2: Tap on Choose default apps.
Step 3: Tap on Home app.
Step 4: Select One UI Home.
Clear Samsung Keyboard’s cache
Step 1: Tap on a text field to trigger the Samsung Keyboard.
Step 2: Hit the cog wheel icon to access keyboard settings.
Step 2: Hit the cog wheel icon to access keyboard settings.
Step 3: Tap on Reset to default settings.
Step 4: Hit Reset keyboard settings.
Step 5:Confirm your selection in the pop-up box.
Remove and re-add your Samsung account
Step 1: Go to Settings and select Accounts and backup.
Step 2: Tap on Manage accounts and select your Samsung account.
Step 3: Tap on Remove account and confirm your selection in the pop-up box.
Step 4: Hit Sign out.
Step 5: Once you’ve been signed out, go to Settings and tap the Samsung option at the top of the screen to log back in.
Clear your phone’s internal storage
If your phone’s internal storage is full, it can keep the onscreen keyboard from working properly. Here’s how you can manage the storage.
Step 1: Go to Settings and select Device care.
Step 2: Tap on Storage.
Step 3: Empty the recycle bin and delete the unused apps, large files, and duplicate files.
Update OS
If a bug-related problem is the reason why the Samsung Keyboard is not working, a software update can fix it. Developers are quick to push these OTA updates to wipe out any unexpected bugs from the system. Here’s how you can go about it.
Step 1: Go to Settings, scroll down and select Software update.
Step 2: Tap on Download and install.
Step 3: Hit Install Now.
Reset all settings
If you customised a system setting recently and suspect it is causing the keyboard to malfunction, resetting it can help fix the issue. But what if you don’t remember which setting you changed? Luckily, your phone allows you to reset all settings at once. Here’s how.
Step 1: Go to Settings and select General Management.
Step 2: Tap on Reset.
Step 3: Select Reset all settings.
Frequently Asked Questions (FAQs)
How do I clear my Samsung Keyboard’s cache to fix it?
Tap a text field to trigger the Samsung Keyboard, tap the settings icon, and go to Reset to default settings>Clear cache.
How do I make Samsung Keyboard the default keyboard on my phone?
Go to Settings>General management>Keyboard list and default>Default keyboard and select Samsung Keyboard.
Is there a way to update the keyboard on my Android phone?
Your phone’s native keyboard gets updated when you update the OS. There is no isolated way to update the keyboard itself. Go to Settings>Software update to update the OS.
How do I enter Safe Mode on my Samsung phone?
Go to the power menu by pressing and holding the volume down and side keys. Long-press the power off icon until you see the Safe Mode icon. Tap this icon to restart your phone in Safe Mode.
How do I start Safe Mode while my Samsung phone is switched off?
Turn on your phone and long-press the Volume Down button when the Samsung logo appears on the screen. Keep holding the button until you see the ‘Safe Mode’ label in the bottom left corner of the screen.
These are the top 14 ways to fix the ‘Samsung Keyboard not working’ issue on your smartphone. Typically, a quick restart of your device and clearing the keyboard cache should address the common issues. If you know of any other fixes for this problem, let us know in the comments!
Sony India today announced the launch of a new portable party speaker in India. Sony SRS-XV500 has debuted in the country and has been specially tuned for India. The speaker is claimed to offer up to 25 hours of battery life. The device features ambient lighting that can be customised. Moreover, it is IPX4 rated (splashproof) with karaoke and guitar input along with echo and key control on the rear panel. Additionally, the party speaker includes two X-Balanced speaker units and two tweeters.
In This Article
Sony SRS-XV500 price in India, sale details
Sony SRS-XV500 has been launched in India at Rs 31,990. The party speaker will go on sale from February 24 via Sony retail stores (Sony Center and Sony Exclusive), the www.ShopatSC.com portal, major electronic stores, and other e-commerce websites in India.
Sony SRS-XV500 specifications
In terms of build, Sony’s recycled plastic is used in the body of the SRS-XV500. The ambient light feature of the SRS-XV500 contributes to the party mood. You can customise the illumination with the Fiestable mobile app. With an IPX4 water resistance rating, the SRS-XV500 can be carried outdoors and is safe to use even if a few raindrops fall. The speaker is easy to travel thanks to its integrated handle. Furthermore, the SRS-XV500’s ability to be positioned vertically or horizontally allows it to adapt to any setting. In addition to maximising speaker diaphragm size, the non-circular diaphragm boosts sound pressure for punchier, deeper bass, reduced distortion, and improved vocal clarity.
Sony SRS-XV500 features X-Balanced Speaker Units, which produce deep, punchy bass with less distortion and two tweeters that offer crisp vocals and a wider soundstage. You can easily insert a karaoke microphone. With a second input, you can increase the intensity of your performance by playing a guitar or doing a duet on a second microphone with a friend. There is individual mixing for both inputs. One can also customise the sound of the device with the Echo and Key Control located on the back panel.
The Sony SRS-XV500 portable party speaker has an easy-to-use touch panel to adjust your lighting, modes, and settings. With USB connectivity, you may plug in and listen to music. You can also use the SRS-XV500 to charge other devices, such as smartphones. The new SRS-XV500 is compatible with both Sony | Music Center and Fiestable apps. With Sony | Music Center, you can select playlists, and change lighting patterns and sound modes all from the dance floor. From a distance, you may control the centre’s lighting, sound, and playlist options. Fiestable gives you access to entertaining features like making a playlist, karaoke functions including Voice Changer and Echo, plus DJ control to add sound effects.


")


")