
How Computers Ensure Randomness in Online iGaming

In the dynamic world of online gambling, where chance intertwines with entertainment, the bedrock principle is fairness. Ensuring that players encounter random outcomes is not merely a goal but a fundamental necessity. Computers, armed with sophisticated technology, assume a pivotal role in guaranteeing the unpredictability essential for a trustworthy gaming environment.
Online gambling, a vibrant amalgamation of risk and reward, hinges on the concept of randomness. At its core, randomness safeguards fair play and upholds the integrity of the gaming experience. In this digital landscape, computers play a central role in striking a delicate balance. They utilize advanced algorithms to deliver outcomes that are not just unbiased but also unpredictable.
Why Local SEO Is So Important for Local Businesses

Local SEO is an outstanding technique that brings organic traffic to your website. It is used by the business to rank higher on the search engine. It is defined as the pulse of any business by the experts. You can only thrive your business with proper SEO.
Local SEO has an alternative name, map SEO. It helps small and medium-sized enterprises to grow in the industry. You grow your business in your local area, such as a small town or a metropolitan.
Here are the top 7 significant benefits of using the technique of local SEO for your business.
Boost Trafic for your Website
You cannot shine your business without optimizing your website as you need organic traffic for your business’ website, as research indicates that local information is the subject of 46% of all Google searches. You need to bring traffic to your website, whether you are running a big conglomerate or the owner of a small-scale business. If you have a website regarding the best online casino Australia real money, you have to show a great digital presence; local SEO lets you enhance your traffic. It invites your potential clients to visit your website and eventually come to see you in your physical appearance.Improve Conversion rate
Local SEO improves conversion rate as it drives your potential customers to your website. For instance, you own a tax law firm, so whenever people in your area search for a “Tax law firm near me”, your business would appear in the listing if you have optimised the local SEO. Local SEO is better for your sales as the majority of people want to find facilities in their local instead of visiting mega stores or multinational companies’ offices.Cost-Effective
One of the uttermost advantages of local SEO is cost-effectiveness; as you know, there is less advertising cost. You need a local targeted audience to flourish your business at a local level. So, small and medium businesses spend too much money on traditional methods of marketing such as banners, pamphlets, local TV advertisements, hoarding, etc. Despite all this, these methods are practical tools of marketing, but they are costly and influence the capital of the business. On the other hand, you can save a lot of money by optimizing your local SEO.Grow Your Business
Local SEO boosts search engine results, and its initiatives always focus on increasing organic traffic. The sale volume of your business increases as an outcome of local SEO. It is a critical success indicator that your business is rapidly growing in the local area as your sales and marketing prospects are increasing. If you want to grow your company in a local area, you need to spend resources and time on local SEO.Long-Lasting Effect
Local SEO has a longer-lasting effect than traditional marketing, such as displaying banners and distributing pamphlets in the area, as well as on-air advertisements on local channels. You waste your precious amount on old marketing strategies because they do not influence the customer’s mind. In the local SEO initiatives, you are doing one-time, but it has long-lasting effects as you will get long-lasting rankings. Read Also: How to Free Extract Subtitles from Videos in 2022Appearing in Google’s 3-Pack
This is a significant benefit of local SEO that you can appear in Google’s 3 pack. It is an outstanding advantage to appear in Google’s 3 pack. It simply means showing up on the first 3 results of local searches of a keyword. Local companies must appear on Google’s 3 pack to boost the sales of the business.Mobile Optimisation
It is a more convenient way for people to do online shopping by using mobile phones and tablets. Mostly, people are smartphone users; they feel convenient to search on their mobile and give online orders at the outlet of the local market. Local SEO optimize your website for mobile users, and it provides a navigation facility for your customers to reach their destination.Conclusion
We live in the digital world. In the age of Information Technology, the marketing strategy has been rapidly revolutionized. It is essential to show your online presence whether you are running a big company, a medium-scale company or an owner of a small shop. You need to optimise your local SEO to elevate your business as you know, everyone is familiar with Google and using smartphones.Top 6 ways to remove audio from an iPhone Video before sharing

Sharing videos from your iPhone is a seamless process across different social media and instant messaging apps. However, sometimes users can’t figure out how to remove the background sound before sharing the video. Sometimes, videos can have too much noise in the background, making users want to ditch the audio track entirely. Your iPhone makes this task very easy for you. In this article, we bring the top 6 ways to remove the audio from an iPhone video before sharing it.
Read Also: Qualcomm announced 15% faster Snapdragon 7 Gen 3 SoC mobile chipset for mid-range smartphones
 Step 1: Launch the Photos app on your iPhone and open the video you wish to edit.
Step 2: Hit the Edit option at the top right corner of the screen.
Step 3: Tap the speaker icon at the top left corner of the screen. Make sure it’s muted.
Step 4: Hit Done at the bottom right corner of the screen.
The audio will be removed from the video file.
Step 1: Launch the Photos app on your iPhone and open the video you wish to edit.
Step 2: Hit the Edit option at the top right corner of the screen.
Step 3: Tap the speaker icon at the top left corner of the screen. Make sure it’s muted.
Step 4: Hit Done at the bottom right corner of the screen.
The audio will be removed from the video file.
 Step 1: Launch the iMovie app on your iPhone and import the video by creating a new project.
Step 2: Hit the speaker icon at the bottom toolbar and drag the slider to the left until the video is muted.
Step 3: Hit Done at the top left corner of the screen.
Step 1: Launch WhatsApp on your iPhone and select the conversation thread where you want to send the video.
Step 2: Hit the attachment icon and select the video from your iPhone’s gallery.
Step 3: Tap the speaker icon in the preview window. This will remove the sound from the video.
Step 4: Hit Send.
Step 1: Launch the Instagram app and swipe left to access the creation window.
Step 2: Switch to the Story tab and select the video from which you want to remove the background audio.
Step 3: Tap the music note icon and select Volume Controls.
Step 4: Drag the Camera audio slider all the way down.
Step 5: Hit Done.
Step 6: Tap the arrow icon to download the video to your device.
Step 1: Launch the Facebook app on your iPhone and hit the Create story icon.
Step 2: Select the video from your iPhone’s gallery.
Step 3: Hit the Sound icon on the right and select Mute.
Step 4: Tap on Done at the top right corner of the screen.
Step 5: Hit Save to download the video on your iPhone.
Step 6: Select Share to Story to share the muted video on Facebook.
Step 1: Launch the iMovie app on your iPhone and import the video by creating a new project.
Step 2: Hit the speaker icon at the bottom toolbar and drag the slider to the left until the video is muted.
Step 3: Hit Done at the top left corner of the screen.
Step 1: Launch WhatsApp on your iPhone and select the conversation thread where you want to send the video.
Step 2: Hit the attachment icon and select the video from your iPhone’s gallery.
Step 3: Tap the speaker icon in the preview window. This will remove the sound from the video.
Step 4: Hit Send.
Step 1: Launch the Instagram app and swipe left to access the creation window.
Step 2: Switch to the Story tab and select the video from which you want to remove the background audio.
Step 3: Tap the music note icon and select Volume Controls.
Step 4: Drag the Camera audio slider all the way down.
Step 5: Hit Done.
Step 6: Tap the arrow icon to download the video to your device.
Step 1: Launch the Facebook app on your iPhone and hit the Create story icon.
Step 2: Select the video from your iPhone’s gallery.
Step 3: Hit the Sound icon on the right and select Mute.
Step 4: Tap on Done at the top right corner of the screen.
Step 5: Hit Save to download the video on your iPhone.
Step 6: Select Share to Story to share the muted video on Facebook.
Use the Photos app
 Step 1: Launch the Photos app on your iPhone and open the video you wish to edit.
Step 2: Hit the Edit option at the top right corner of the screen.
Step 3: Tap the speaker icon at the top left corner of the screen. Make sure it’s muted.
Step 4: Hit Done at the bottom right corner of the screen.
The audio will be removed from the video file.
Step 1: Launch the Photos app on your iPhone and open the video you wish to edit.
Step 2: Hit the Edit option at the top right corner of the screen.
Step 3: Tap the speaker icon at the top left corner of the screen. Make sure it’s muted.
Step 4: Hit Done at the bottom right corner of the screen.
The audio will be removed from the video file.
Use the iMovie app
 Step 1: Launch the iMovie app on your iPhone and import the video by creating a new project.
Step 2: Hit the speaker icon at the bottom toolbar and drag the slider to the left until the video is muted.
Step 3: Hit Done at the top left corner of the screen.
Step 1: Launch the iMovie app on your iPhone and import the video by creating a new project.
Step 2: Hit the speaker icon at the bottom toolbar and drag the slider to the left until the video is muted.
Step 3: Hit Done at the top left corner of the screen.
Remove audio from an iPhone video before sharing it on WhatsApp
 Step 1: Launch WhatsApp on your iPhone and select the conversation thread where you want to send the video.
Step 2: Hit the attachment icon and select the video from your iPhone’s gallery.
Step 3: Tap the speaker icon in the preview window. This will remove the sound from the video.
Step 4: Hit Send.
Step 1: Launch WhatsApp on your iPhone and select the conversation thread where you want to send the video.
Step 2: Hit the attachment icon and select the video from your iPhone’s gallery.
Step 3: Tap the speaker icon in the preview window. This will remove the sound from the video.
Step 4: Hit Send.
Remove audio from a video file before sharing it on Instagram
 Step 1: Launch the Instagram app and swipe left to access the creation window.
Step 2: Switch to the Story tab and select the video from which you want to remove the background audio.
Step 3: Tap the music note icon and select Volume Controls.
Step 4: Drag the Camera audio slider all the way down.
Step 5: Hit Done.
Step 6: Tap the arrow icon to download the video to your device.
Step 1: Launch the Instagram app and swipe left to access the creation window.
Step 2: Switch to the Story tab and select the video from which you want to remove the background audio.
Step 3: Tap the music note icon and select Volume Controls.
Step 4: Drag the Camera audio slider all the way down.
Step 5: Hit Done.
Step 6: Tap the arrow icon to download the video to your device.
Remove audio from a video file before sharing it on Facebook
 Step 1: Launch the Facebook app on your iPhone and hit the Create story icon.
Step 2: Select the video from your iPhone’s gallery.
Step 3: Hit the Sound icon on the right and select Mute.
Step 4: Tap on Done at the top right corner of the screen.
Step 5: Hit Save to download the video on your iPhone.
Step 6: Select Share to Story to share the muted video on Facebook.
Step 1: Launch the Facebook app on your iPhone and hit the Create story icon.
Step 2: Select the video from your iPhone’s gallery.
Step 3: Hit the Sound icon on the right and select Mute.
Step 4: Tap on Done at the top right corner of the screen.
Step 5: Hit Save to download the video on your iPhone.
Step 6: Select Share to Story to share the muted video on Facebook.
Use a third-party online tool
Step 1: Go to Clideo.com and select All tools. Step 2: Scroll down and select Mute Video. Step 3: Hit Choose file and upload the video from your iPhone’s storage. Step 4: Clideo will remove the background audio from the video file. Step 5: Hit Download to save the video to your iPhone.Frequently Asked Questions (FAQs)
How do I remove the sound from a video on my iPhone?
Open the video in the Photos app, hit the ‘Edit’ option at the top right corner of the screen, and tap the sound icon to mute it. Hit ‘Done’ to save the changes.How do I remove the audio from a video before sending it to someone on WhatsApp?
After you’ve selected the video in the WhatsApp conversation thread, simply hit the speaker icon right below the seek bar in the preview window. This will mute the video.How do I publish a Facebook story without the background sound?
To mute a video before uploading it as your Facebook story, simply hit the sound icon in the story creation window and select mute. Read Also: Logitech G Pro X Superlight 2 Review: For elite gamingConclusion
These are the top 6 ways to remove the audio from an iPhone video before sharing it with someone. Most instant messaging apps give you the option to remove the background sound in the video preview window itself. If you own a Google Pixel 8 series smartphone, you can use the native background audio eraser tool to suppress the distracting noises in any video. Read this article to learn how you can go about it.CMF Power 65W GaN Charger Review: The perfect power adapter for your journey

Back in September, Nothing released three new products under a new ‘CMF’ banner. An acronym for ‘Comfort, Material, Finish’, CMF is Nothing’s attempt at breaking into the highly popular budget segment for consumer tech products. And so far, they have done an excellent job. Last month, we reviewed the CMF Buds Pro and Watch Pro, both a far departure from Nothing’s see-through design philosophy. The matte black approach that the company has taken on these new products has paid off quite well. The third addition to the CMF catalogue is the Power 65W GaN charger. Priced at Rs 3,000, this power adapter seeks to deliver a better performance than your average silicon charger while also excelling in thermal management. We used this power brick for a week, here is our CMF Power 65W GaN Charger review.
Read Also: Logitech G Pro X Superlight 2 Review: For elite gaming
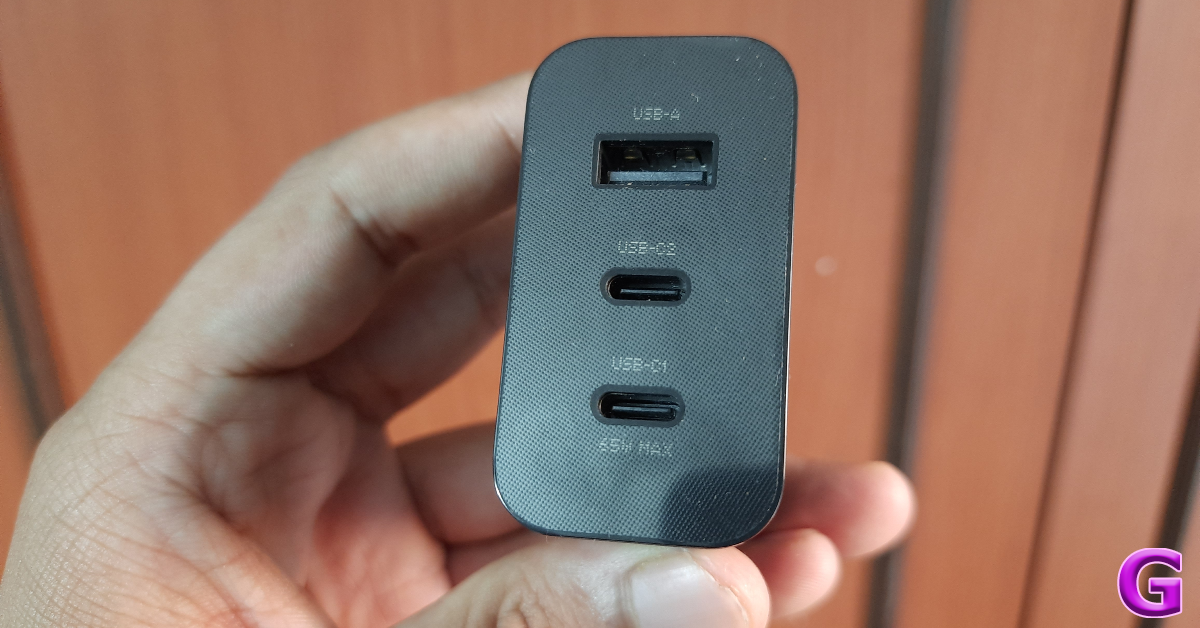
As far as design goes, the CMF Power 65W GaN charger looks no different than your regular power adapter. It isn’t the most compact GaN charger we’ve ever seen, but it is certainly more portable than other 65W silicon chargers. It weighs 150.7g and has dimensions of 56.6 x 55 x 30mm. The squarish plastic body of the adapter houses a USB Type-A and two Type-C ports at the back. These ports are arranged in a vertical orientation. The two-pin design makes the charger suitable for any wall outlet across the country.
This charger should present no problems when connected to a standard wall outlet. However, on certain extension boards, it may not sit well with other connected plugs. This charger requires some additional space that most extension boards don’t usually provide. This is a pretty standard problem across all power adapters, so we won’t hold it against CMF. On the bright side, the spacing between the three USB ports is adequate enough to plug in three cables at the same time.
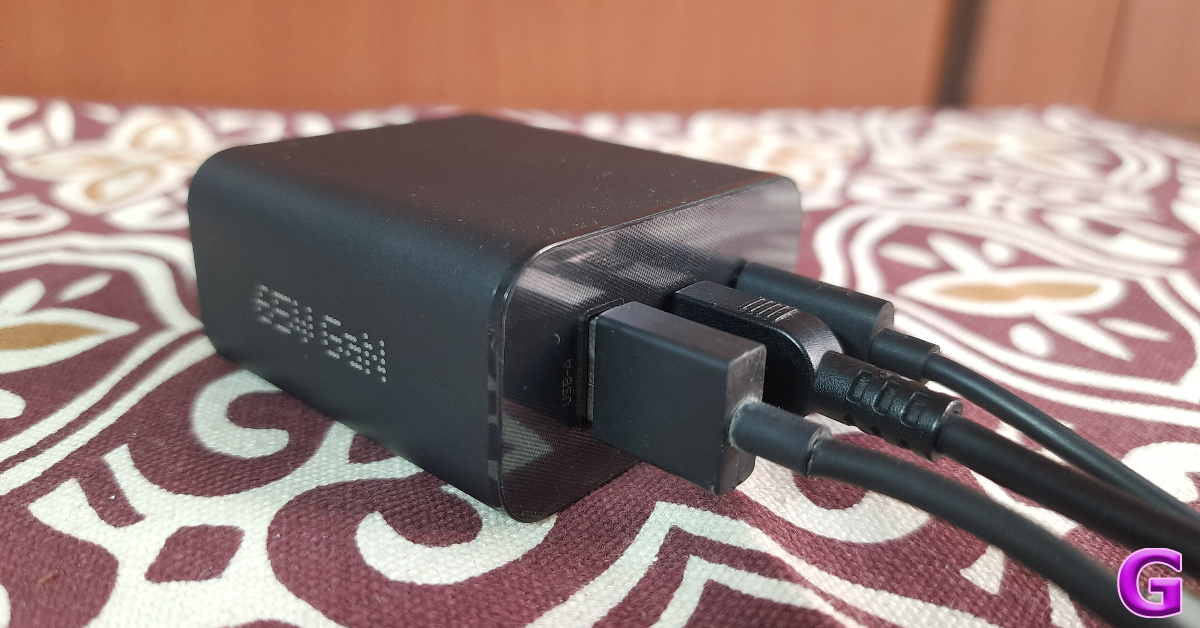
 We used this power adapter to charge smartphones, earbuds, neckbands, laptops and every other Type-C-driven gadget we could find. The charging rate for the USB Type-A port on this adapter has been capped at 36W while the two Type-C ports can hit the maximum 65W speed. The power adapter does a splendid job of thermal management when multiple cables are connected to it. We charged two smartphones using the Type-C ports on the adapter and it barely got warm. The heating was unnoticeable with only one port in use.
While using multiple ports on the adapter at the same time, the charging rates get divided in the following manner.
We used this power adapter to charge smartphones, earbuds, neckbands, laptops and every other Type-C-driven gadget we could find. The charging rate for the USB Type-A port on this adapter has been capped at 36W while the two Type-C ports can hit the maximum 65W speed. The power adapter does a splendid job of thermal management when multiple cables are connected to it. We charged two smartphones using the Type-C ports on the adapter and it barely got warm. The heating was unnoticeable with only one port in use.
While using multiple ports on the adapter at the same time, the charging rates get divided in the following manner.
CMF Power 65W GaN Charger review: Design
Inside the CMF GaN charger retail box, you get the power brick and a user manual. It would have been nice to have a charging cable included in the box, but that is not the case here. All three CMF products have a similar retail package with a very visible cutout for the device and a flip-open design. There are two colour options on offer – Dark Grey and Orange.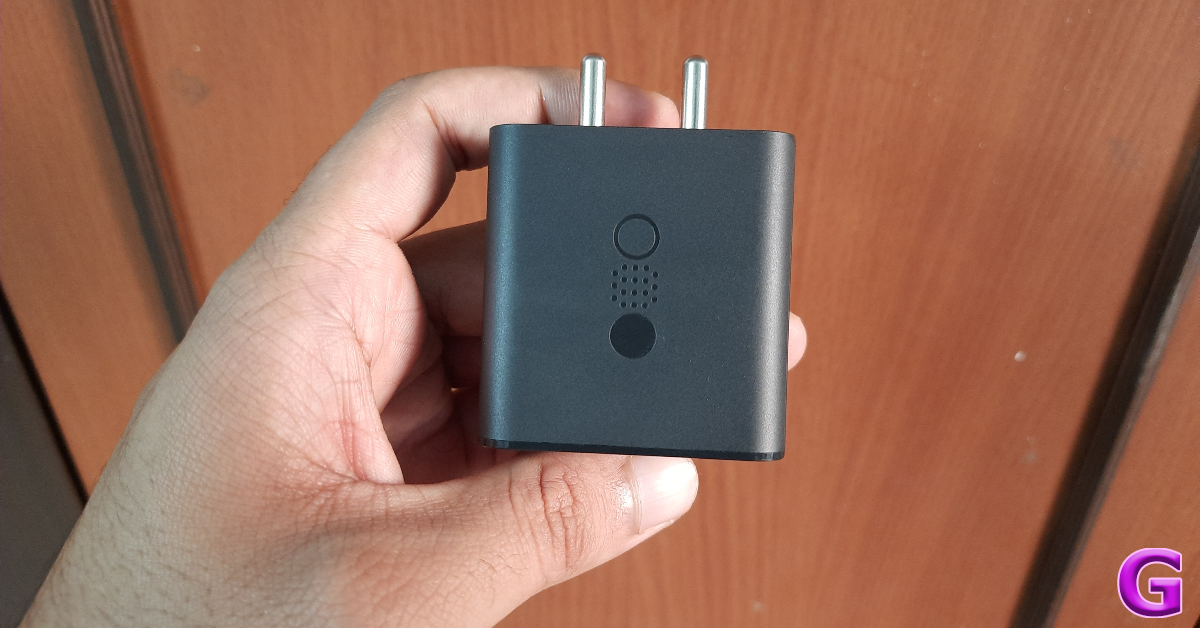 As far as design goes, the CMF Power 65W GaN charger looks no different than your regular power adapter. It isn’t the most compact GaN charger we’ve ever seen, but it is certainly more portable than other 65W silicon chargers. It weighs 150.7g and has dimensions of 56.6 x 55 x 30mm. The squarish plastic body of the adapter houses a USB Type-A and two Type-C ports at the back. These ports are arranged in a vertical orientation. The two-pin design makes the charger suitable for any wall outlet across the country.
 This charger should present no problems when connected to a standard wall outlet. However, on certain extension boards, it may not sit well with other connected plugs. This charger requires some additional space that most extension boards don’t usually provide. This is a pretty standard problem across all power adapters, so we won’t hold it against CMF. On the bright side, the spacing between the three USB ports is adequate enough to plug in three cables at the same time.
CMF Power 65W GaN Charger review: Performance
The CMF Power 65W GaN charger supports a diverse range of fast-charging protocols, including D3.0, QC4.0+/3.0/2.0, SCP, FCP, PPS, AFC, Apple 2.4A, Samsung 9V2A, and DCP enabled devices. You can even charge your laptop with this adapter, given it supports Type-C charging. The adapter also supports an input voltage of 200-240V, which makes it a great option if you plan on travelling abroad.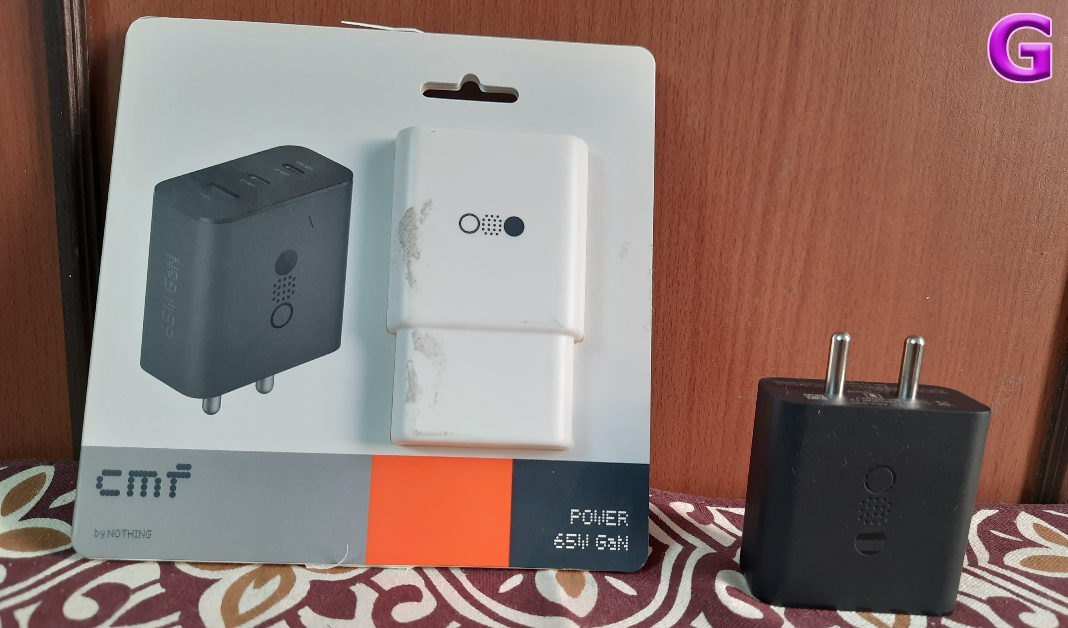 We used this power adapter to charge smartphones, earbuds, neckbands, laptops and every other Type-C-driven gadget we could find. The charging rate for the USB Type-A port on this adapter has been capped at 36W while the two Type-C ports can hit the maximum 65W speed. The power adapter does a splendid job of thermal management when multiple cables are connected to it. We charged two smartphones using the Type-C ports on the adapter and it barely got warm. The heating was unnoticeable with only one port in use.
 While using multiple ports on the adapter at the same time, the charging rates get divided in the following manner.
- USB C1+USB C2: 45.0W+20.0W
- USB C1+USB A: 45.0W+18.0W
- USB C2+USB A: Share 5.0V⎓3.0A(15.0W)
- USB C1+USB C2+USB A: 45.0W+15.0W
Verdict
The CMF Power 65W GaN charger is a versatile and robust adapter that would make a solid addition to your arsenal. Its compact design makes it very practical to travel with. The range of fast-charging protocols that this adapter can support is also noteworthy. If your laptop supports USB Type-C charging, then it makes a lot of sense to get this adapter. You can cut down on extra baggage by packing this adapter to take care of your laptop and smartphone’s charging needs.CMF Power 65W GaN Charger: Pros
- Supports most fast-charging protocols
- Can charge laptops
- Compact
CMF Power 65W GaN Charger: Cons
- USB cable not included in the box
How to disable Copilot on Windows 11? Top 3 ways

Microsoft has added its Copilot AI assistant to the latest Windows 11 (version 23H2 update). Copilot is powered by Chat GPT and can guide you through any difficulty you face on your PC while also taking care of creative and productive tasks. While some find AI bots very useful, some may be ideologically opposed to them. With the discussions surrounding data protection and privacy, these concerns are completely legitimate. In this article, we bring you the top 3 ways to disable Microsoft Copilot on your Windows 11 PC or laptop.
Read Also: Top 4 ways to use multiple WhatsApp accounts on the same phone (Android and iOS)
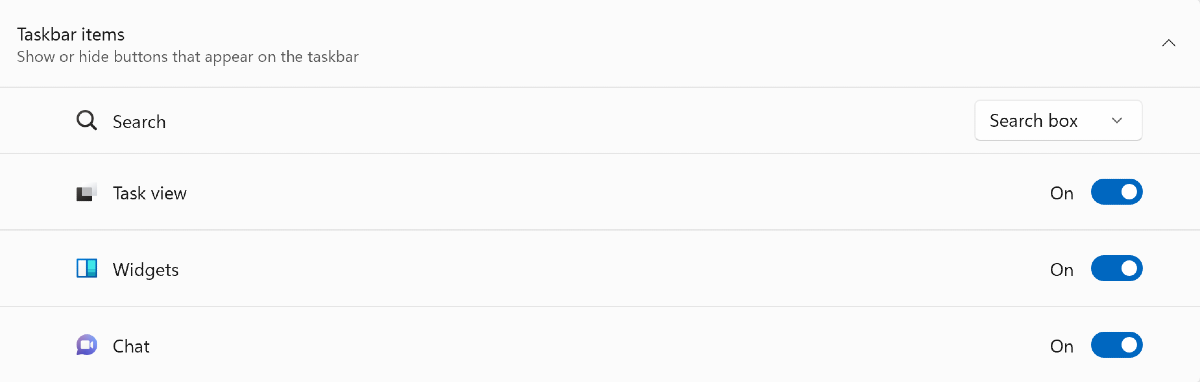
Step 3: Select Taskbar.
Step 4: Turn off the toggle switch for Copilot under ‘Taskbar items’.

Disable Copilot on Windows 11 using Settings
Step 1: Launch the Settings app on your Windows 11 PC or laptop. Step 2: Switch to the Personalisation tab.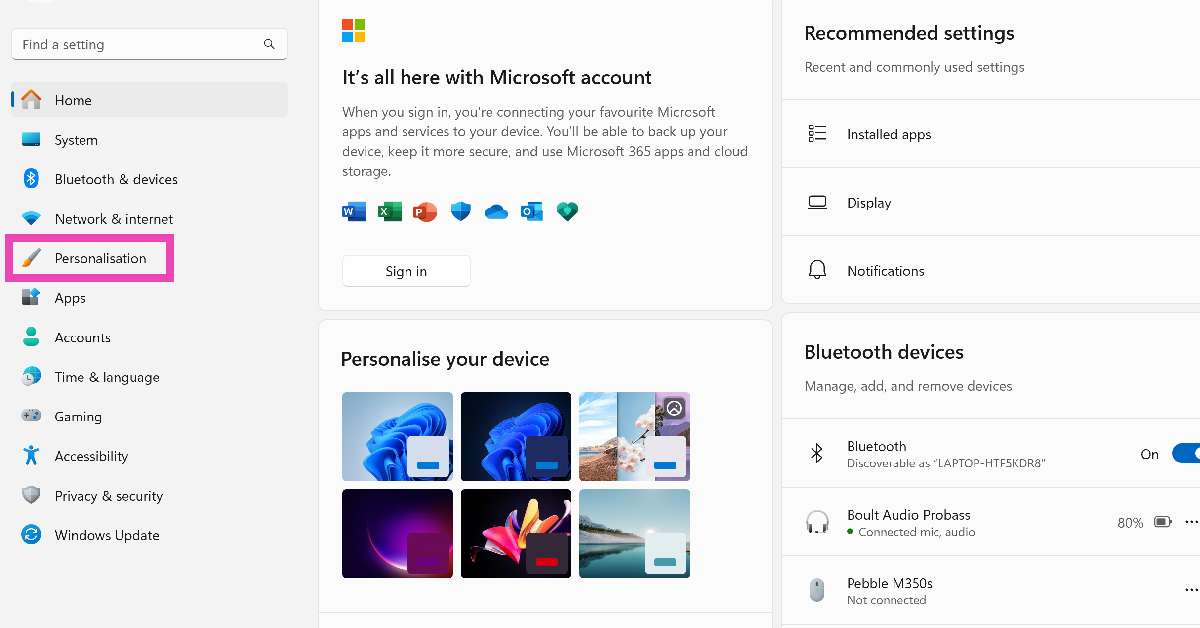 Step 3: Select Taskbar.
 Step 4: Turn off the toggle switch for Copilot under ‘Taskbar items’.
Disable Copilot from Group Policy
Step 1: Open Group Policy Editor from the Control Panel. You can also search for it by typing ‘gpedit’ in the search box on the taskbar. Step 2: Go to Configuration>Administrative Templates>Windows Components>Windows Copilot. Step 3: Select the ‘Turn off Windows Copilot’ setting. Step 4: Select Enabled. Step 5: Hit Apply, then click OK. Step 6: Restart your PC.Disable Windows Copilot through the Registry Editor
Step 1: Launch the Registry Editor app on your Windows 11 PC or laptop. Step 2: Navigate to HKEY_CURRENT_USER\Software\Policies\Microsoft\Windows. Step 3: Create a new key by right-clicking the Windows key and selecting New>Key. Step 4: Name the new key WindowsCopilot. Step 5: Create a new sub key by right-clicking WindowsCopilot and selecting New>DWORD (32-bit) Value. Name it TurnOffWindowsCopilot. Step 6: Double-click the TurnOffWindowsCopilot sub key and change its Value from 0 to 1. Step 7: Hit OK and restart your computer.Frequently Asked Questions (FAQs)
What is Microsoft Copilot?
Microsoft Copilot is an AI companion that is embedded into Windows 11. This AI tool has been made available on the most recent Windows 11 update. You can use Copilot to learn more about your PC or even to carry out more creative tasks like writing an essay.How do I get Copilot on my Windows 11 PC?
To get Microsoft Copilot on your Windows 11 PC, you need to update the OS to its latest version. Go to Settings>Windows Update and click on Download & install next to the 23H2 update.How do I turn off or disable Copilot on Windows 11?
Go to Settings>Personalisation and turn off the toggle switch for Copilot under Taskbar items. You can also disable Copilot via Group Policy and Registry Editor. Read Also: Google Photos latest update brings AI-powered features for better organisationConclusion
This is how you can disable Microsoft Copilot on Windows 11. If you don’t like Copilot at first, we’d suggest sticking with it for a while and finding out the different things it can do before canning it. If you’re not a big fan of Chat GPT or the products that it powers, check out our list of the 12 best Chat GPT alternatives out there right now.Did You Accidentally Delete Your Favourite Photos? Here’s How to Recover Them using Stellar Photo Recovery!

In an era dominated by digital photography, we capture and store countless images, documenting our lives and preserving cherished memories. However, no matter how careful we are, the loss of these digital treasures can occur unexpectedly. Fortunately, there’s a lifeline for those desperate moments: Stellar Photo Recovery, a powerful software tool designed to help you retrieve lost or deleted photos and videos. Today, we’ll explore how to use Stellar Photo Recovery, its exceptional features, and more of this invaluable tool.
The software will display a list of available drives and storage devices. Choose the drive or media from which you want to recover photos.
Click on the “Scan” button to initiate the scanning process.
Step 3: Scanning
Stellar Photo Recovery offers two scanning modes: Quick Scan and Deep Scan. Quick Scan is suitable for recently deleted files and provides faster results. Deep Scan is ideal for more complex data loss scenarios and can recover files from formatted or corrupted drives.
Select the appropriate scanning mode based on your needs and click “Start Scan.”
Step 4: Preview and Recovery
The software will analyse the selected drive and display a list of recoverable files. You can preview these files to ensure you’re recovering the right ones. Select the files you wish to recover and click the “Recover” button.
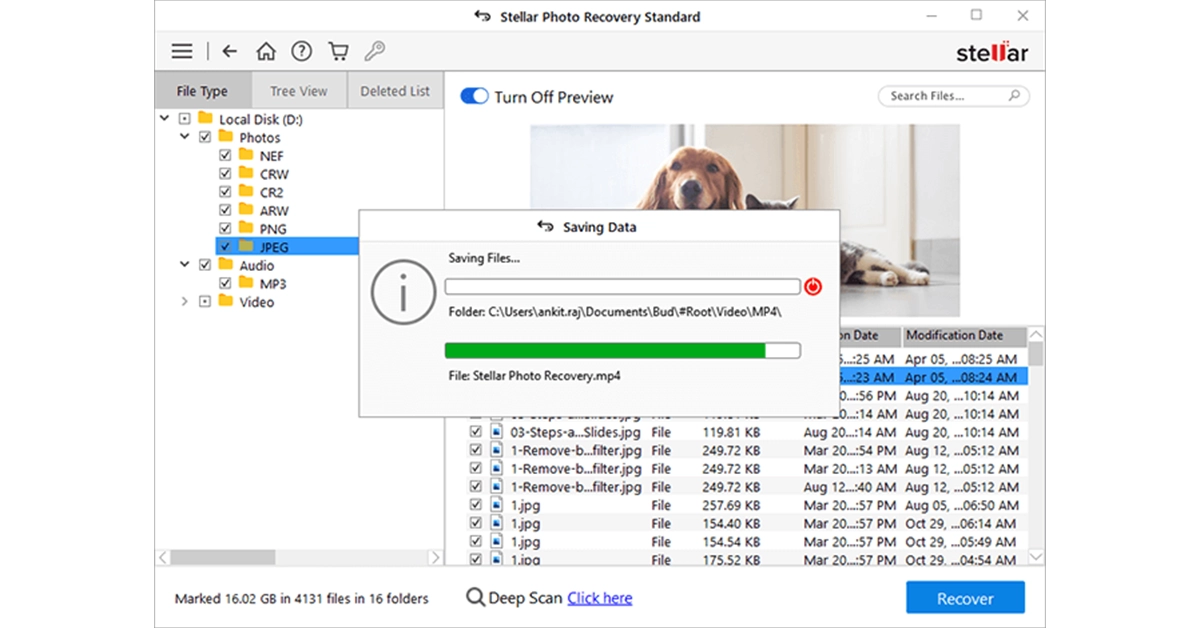
Choose a destination folder for the recovered files and start the recovery process.
That’s it! Stellar Photo Recovery is exceptionally user-friendly and effective, making it accessible to both beginners and experienced users.
Stellar Photo Recovery Pros:
User-Friendly Interface: Stellar Photo Recovery’s intuitive design makes it accessible to users of all skill levels.
Powerful Recovery: The software is highly effective in recovering lost or deleted photos and videos, even in complex data loss situations.
Wide Compatibility: Stellar Photo Recovery supports a wide range of image and video formats, ensuring compatibility with most media files.
Secure Recovery: It ensures the safety of your data, preventing any damage or overwriting during the recovery process.
Preview Feature: The ability to preview recoverable files allows for selective recovery, saving time and storage space.
Stellar Photo Recovery Cons:
Limited Operating System Support: The software primarily caters to Windows and Mac users, with limited Linux support.
Stellar Photo Recovery’s Great Features And Why We Love This Software
Stellar Photo Recovery comes packed with features that set it apart as a top-tier photo recovery tool:- Wide Format Support
- Secure Recovery
- Quick and Deep Scan Options
- Preview Before Recovery
- Filter and Sort Options
- Recovery from Various Storage Devices
How to Use Stellar Photo Recovery
Stellar Photo Recovery is renowned for its user-friendly interface and straightforward recovery process. Here’s a step-by-step guide on how to use it: Step 1: Installation Download and install Stellar Photo Recovery on your computer and launch the program. Step 2: Select the Drive or folder you want to scan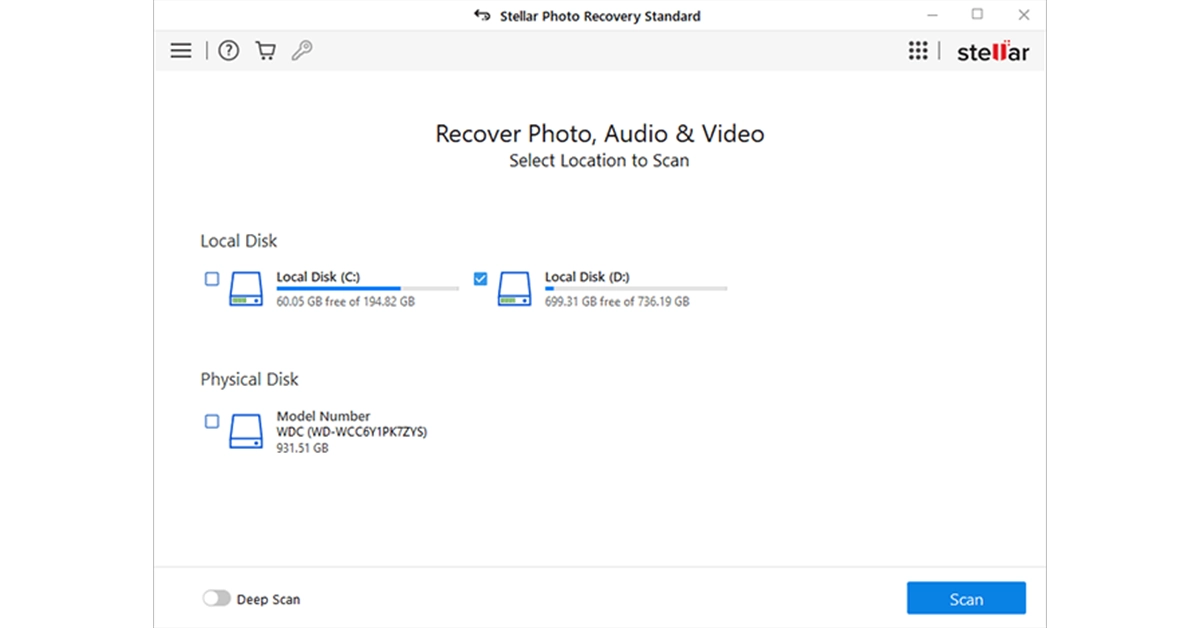 The software will display a list of available drives and storage devices. Choose the drive or media from which you want to recover photos.
Click on the “Scan” button to initiate the scanning process.
Step 3: Scanning
Stellar Photo Recovery offers two scanning modes: Quick Scan and Deep Scan. Quick Scan is suitable for recently deleted files and provides faster results. Deep Scan is ideal for more complex data loss scenarios and can recover files from formatted or corrupted drives.
Select the appropriate scanning mode based on your needs and click “Start Scan.”
Step 4: Preview and Recovery
The software will display a list of available drives and storage devices. Choose the drive or media from which you want to recover photos.
Click on the “Scan” button to initiate the scanning process.
Step 3: Scanning
Stellar Photo Recovery offers two scanning modes: Quick Scan and Deep Scan. Quick Scan is suitable for recently deleted files and provides faster results. Deep Scan is ideal for more complex data loss scenarios and can recover files from formatted or corrupted drives.
Select the appropriate scanning mode based on your needs and click “Start Scan.”
Step 4: Preview and Recovery
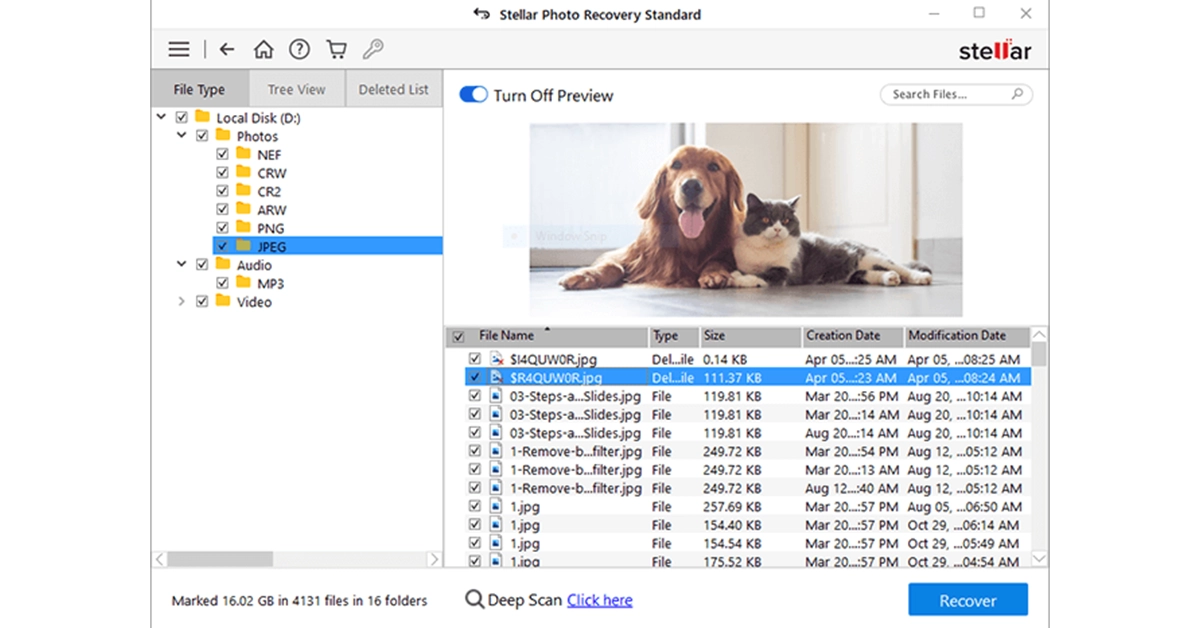 The software will analyse the selected drive and display a list of recoverable files. You can preview these files to ensure you’re recovering the right ones. Select the files you wish to recover and click the “Recover” button.
Choose a destination folder for the recovered files and start the recovery process.
The software will analyse the selected drive and display a list of recoverable files. You can preview these files to ensure you’re recovering the right ones. Select the files you wish to recover and click the “Recover” button.
Choose a destination folder for the recovered files and start the recovery process.
 That’s it! Stellar Photo Recovery is exceptionally user-friendly and effective, making it accessible to both beginners and experienced users.
Stellar Photo Recovery Pros:
User-Friendly Interface: Stellar Photo Recovery’s intuitive design makes it accessible to users of all skill levels.
Powerful Recovery: The software is highly effective in recovering lost or deleted photos and videos, even in complex data loss situations.
Wide Compatibility: Stellar Photo Recovery supports a wide range of image and video formats, ensuring compatibility with most media files.
Secure Recovery: It ensures the safety of your data, preventing any damage or overwriting during the recovery process.
Preview Feature: The ability to preview recoverable files allows for selective recovery, saving time and storage space.
Stellar Photo Recovery Cons:
Limited Operating System Support: The software primarily caters to Windows and Mac users, with limited Linux support.
That’s it! Stellar Photo Recovery is exceptionally user-friendly and effective, making it accessible to both beginners and experienced users.
Stellar Photo Recovery Pros:
User-Friendly Interface: Stellar Photo Recovery’s intuitive design makes it accessible to users of all skill levels.
Powerful Recovery: The software is highly effective in recovering lost or deleted photos and videos, even in complex data loss situations.
Wide Compatibility: Stellar Photo Recovery supports a wide range of image and video formats, ensuring compatibility with most media files.
Secure Recovery: It ensures the safety of your data, preventing any damage or overwriting during the recovery process.
Preview Feature: The ability to preview recoverable files allows for selective recovery, saving time and storage space.
Stellar Photo Recovery Cons:
Limited Operating System Support: The software primarily caters to Windows and Mac users, with limited Linux support.
FAQ
Is there a free trial version of Stellar Photo Recovery available? Yes, Stellar Photo Recovery offers a free trial version that allows you to scan your storage media and preview recoverable files. However, to actually recover and save the files, you’ll need to purchase the full version of the software starting at $49. Can Stellar Photo Recovery recover photos from a formatted hard drive? Yes, Stellar Photo Recovery is equipped with a “Deep Scan” mode that can recover photos and other media files from a formatted hard drive or other storage media. It’s designed to handle more complex data loss scenarios, including formatting. Is Stellar Photo Recovery available for Linux users? Stellar Photo Recovery primarily caters to Windows and Mac users. While there isn’t a dedicated Linux version, you may be able to use the software on Linux through compatibility layers or virtual machines, though the experienceConclusion
In conclusion, Stellar Photo Recovery is a robust and user-friendly solution for recovering lost or deleted photos and videos. With its wide format support, secure recovery process, and intuitive interface, it stands out as an essential tool for anyone dealing with digital image data loss. While it comes at a cost, its effectiveness and features make it a valuable investment in safeguarding your precious memories.How to use your iPhone as a magnifier?

Your iPhone can handle more tasks than you think. Apart from everyday tasks like checking your email and browsing the web, you can also use your iPhone to measure the distance between two objects and even use it as a magnifying glass. If you struggle with reading the fine print on product labels, this app will be a lifesaver! In this article, we show you how to access and use the magnifier app on your iPhone.
Read Also: How to delete your Threads profile without deleting your Instagram account?
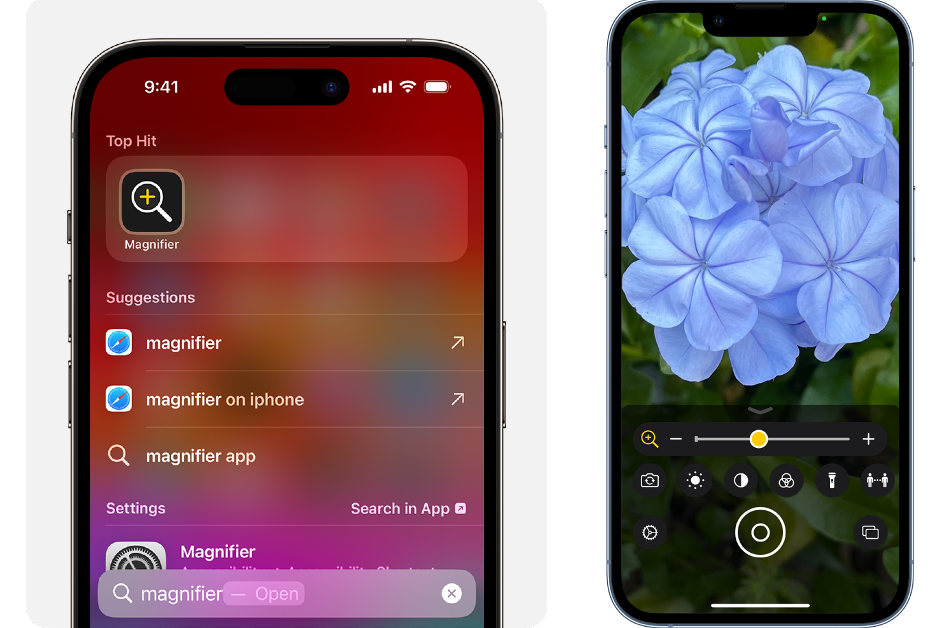
 There are a few ways you can access the Magnifier app on your iPhone. Here are a few of them.
 Launch the Magnifier app on your iPhone and point the camera towards the object or text you want to enlarge. Drag the zoom slider left and right to adjust it. Similarly, you can also adjust the brightness from its respective slider. You can also add more light to the frame by turning on the flashlight. When you’re happy with the frame, you can freeze it by tapping the circle icon and then save it to your image gallery. To freeze more frames, tap the multi-photo icon at the bottom right corner of the screen. Tap the plus icon to add more frames.
On the newer iPhone models, you can use Detection Mode on the Magnifier app to get descriptions of the objects around you. Tap the icon next to the flashlight to access Detection Mode. Tap the icon with two people on it to detect the people around you. Your iPhone will notify you when the people near you breach the acceptable social distance. Similarly, you can use the Magnifier app to detect doors, images, text, and labels.
Launch the Magnifier app on your iPhone and point the camera towards the object or text you want to enlarge. Drag the zoom slider left and right to adjust it. Similarly, you can also adjust the brightness from its respective slider. You can also add more light to the frame by turning on the flashlight. When you’re happy with the frame, you can freeze it by tapping the circle icon and then save it to your image gallery. To freeze more frames, tap the multi-photo icon at the bottom right corner of the screen. Tap the plus icon to add more frames.
On the newer iPhone models, you can use Detection Mode on the Magnifier app to get descriptions of the objects around you. Tap the icon next to the flashlight to access Detection Mode. Tap the icon with two people on it to detect the people around you. Your iPhone will notify you when the people near you breach the acceptable social distance. Similarly, you can use the Magnifier app to detect doors, images, text, and labels.
Open the Magnifier app on your iPhone
 There are a few ways you can access the Magnifier app on your iPhone. Here are a few of them.
- Swipe down to access the Control Center and tap the magnifying glass tile. If you don’t see the tile, go to Settings>Control Center and tap the green plus icon next to Magnifier.
- Swipe left on the home screen until you reach the app library. You will find the Magnifier app in the Utilities folder.
- Ask Siri to open the Magnifier app, then tap its icon on the screen.
- Use Accessibility settings to trigger the Magnifier app whenever you triple-tap the side button. On the new iPhone 15 Pro and Pro Max, you can also assign the Action button the task of opening the Magnifier app whenever you press it. Read this article to learn how you can do it.
Use the Magnifier app
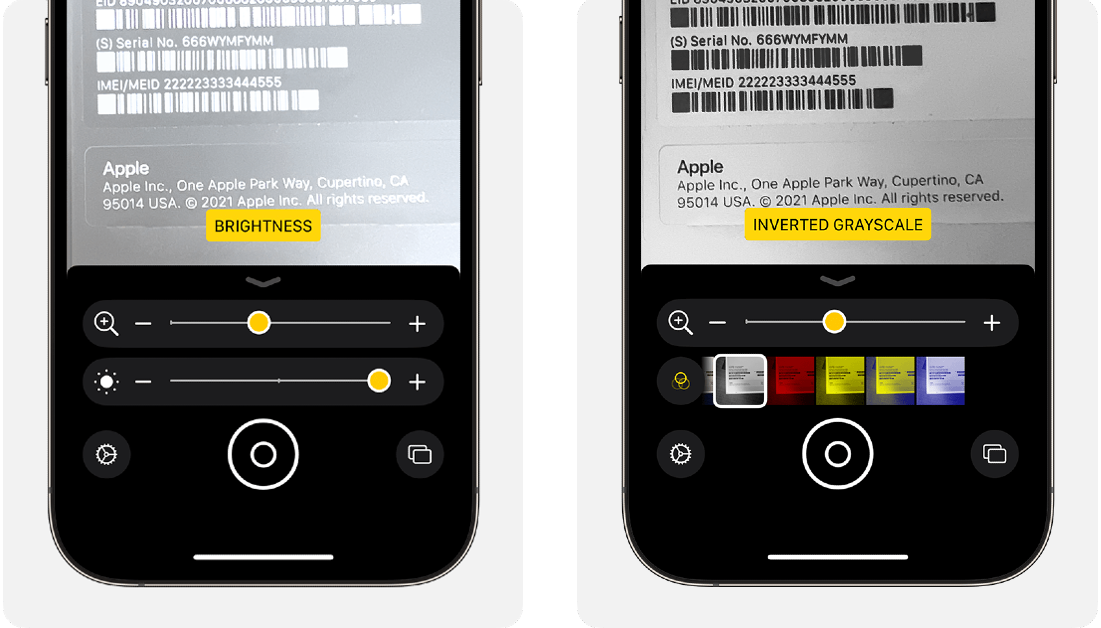 Launch the Magnifier app on your iPhone and point the camera towards the object or text you want to enlarge. Drag the zoom slider left and right to adjust it. Similarly, you can also adjust the brightness from its respective slider. You can also add more light to the frame by turning on the flashlight. When you’re happy with the frame, you can freeze it by tapping the circle icon and then save it to your image gallery. To freeze more frames, tap the multi-photo icon at the bottom right corner of the screen. Tap the plus icon to add more frames.
On the newer iPhone models, you can use Detection Mode on the Magnifier app to get descriptions of the objects around you. Tap the icon next to the flashlight to access Detection Mode. Tap the icon with two people on it to detect the people around you. Your iPhone will notify you when the people near you breach the acceptable social distance. Similarly, you can use the Magnifier app to detect doors, images, text, and labels.
Launch the Magnifier app on your iPhone and point the camera towards the object or text you want to enlarge. Drag the zoom slider left and right to adjust it. Similarly, you can also adjust the brightness from its respective slider. You can also add more light to the frame by turning on the flashlight. When you’re happy with the frame, you can freeze it by tapping the circle icon and then save it to your image gallery. To freeze more frames, tap the multi-photo icon at the bottom right corner of the screen. Tap the plus icon to add more frames.
On the newer iPhone models, you can use Detection Mode on the Magnifier app to get descriptions of the objects around you. Tap the icon next to the flashlight to access Detection Mode. Tap the icon with two people on it to detect the people around you. Your iPhone will notify you when the people near you breach the acceptable social distance. Similarly, you can use the Magnifier app to detect doors, images, text, and labels.
Frequently Asked Questions (FAQs)
Where can I access the Magnifier app on my iPhone?
You will find the Magnifier app in the Utilities folder in the app library. You can also open the app by tapping its tile on the Control Center. The new iPhone 15 Pro and Pro Max models have an Action button that can be used to trigger the app as well. Lastly, you can ask Siri to open the Magnifier app for you.What does the Magnifier app on iPhone do?
You can use the Magnifier app on your iPhone to zoom into objects or text and adjust their contrast and brightness. If you find fine print hard to read, this app will come in handy. For people with visual impairment, the Magnifier app can detect everyday objects in their surroundings.How do I trigger the Magnifier app using the Action button?
Go to Settings>Action Button and swipe through the options until you land on Magnifier. Read Also: Instagram announced new content creation tools and improved Reels insights for usersConclusion
This is how you can access and use the Magnifier app on your iPhone. The Magnifier app can work with rear and front cameras. If you’re using it in Detection Mode, you will need both sets of cameras to work fluidly. If the Control Center on your iPhone does not display the Magnifier tile, go to Settings>Control Center and tap the green plus icon next to the app. If you found this article helpful, let us know in the comments!Qualcomm announced 15% faster Snapdragon 7 Gen 3 SoC mobile chipset for mid-range smartphones

Key highlights
 It includes a 50 percent faster Adreno 720 GPU that supports OpenGL ES 3.2, OpenCL 2.0 FP and Vulkan 1.3 APIs. Hexagon NPU has fused the AI accelerator, with a Tensor accelerator. Vector eXtensions, scalar accelerator and support for INT4, INT8, and INT16 misc precision.
The Snapdragon 7 Gen 3 SoC is said to support 168Hz for WFHD+ and 120Hz for WQHD+ displays. Both the displays will have 4K @ 60 Hz support.
Also Read: Google Photos latest update brings AI-powered features for better organisation
For photography, the Qualcomm Snapdragon 7 Gen 3 SoC mobile chipset includes Spectra Triple ISP to support three cameras at once, with super-fast parallel processing and smooth zooming. It can capture images in up to 200 MP and record videos in 4K resolution. Other configurations consist of three 21 MP sensors, a 32+ 21 MP sensor, or a single 64 MP sensor for 30 FPS ZSL recording. The 200MP sensor is said to come with intelligent enhancements. Eliminate grainy discolouration for higher-res results with a new AI Remosaic feature, while AI Noise Reduction produces clearer, more vibrant images, even in dim environments. Plus, achieve crisp, HDR-quality footage to delight in every detail using AI Video Retouch.
In terms of connectivity and speed, the mid-range chipset has support for the latest Wi-Fi 6/6E and Bluetooth version 5.3 with the Qualcomm FastConnect 6700 Mobile Connectivity System. It is said to have download speeds up to 5 Gbps deliver unceasing mobile gaming, work-from-anywhere productivity, and more—thanks to the Snapdragon X63 5G Modem-RF System. It boasts 5G Dual-SIM Dual-Active (DSDA) allowing two 5G+5G or 5G+4G SIM cards.
In terms of availability Oppo, Vivo, ZTE, iQOO, Honor, OnePlus, Sony, Redmi, Realme, and more will include the latest chipset in its mid-range smartphones.
It includes a 50 percent faster Adreno 720 GPU that supports OpenGL ES 3.2, OpenCL 2.0 FP and Vulkan 1.3 APIs. Hexagon NPU has fused the AI accelerator, with a Tensor accelerator. Vector eXtensions, scalar accelerator and support for INT4, INT8, and INT16 misc precision.
The Snapdragon 7 Gen 3 SoC is said to support 168Hz for WFHD+ and 120Hz for WQHD+ displays. Both the displays will have 4K @ 60 Hz support.
Also Read: Google Photos latest update brings AI-powered features for better organisation
For photography, the Qualcomm Snapdragon 7 Gen 3 SoC mobile chipset includes Spectra Triple ISP to support three cameras at once, with super-fast parallel processing and smooth zooming. It can capture images in up to 200 MP and record videos in 4K resolution. Other configurations consist of three 21 MP sensors, a 32+ 21 MP sensor, or a single 64 MP sensor for 30 FPS ZSL recording. The 200MP sensor is said to come with intelligent enhancements. Eliminate grainy discolouration for higher-res results with a new AI Remosaic feature, while AI Noise Reduction produces clearer, more vibrant images, even in dim environments. Plus, achieve crisp, HDR-quality footage to delight in every detail using AI Video Retouch.
In terms of connectivity and speed, the mid-range chipset has support for the latest Wi-Fi 6/6E and Bluetooth version 5.3 with the Qualcomm FastConnect 6700 Mobile Connectivity System. It is said to have download speeds up to 5 Gbps deliver unceasing mobile gaming, work-from-anywhere productivity, and more—thanks to the Snapdragon X63 5G Modem-RF System. It boasts 5G Dual-SIM Dual-Active (DSDA) allowing two 5G+5G or 5G+4G SIM cards.
In terms of availability Oppo, Vivo, ZTE, iQOO, Honor, OnePlus, Sony, Redmi, Realme, and more will include the latest chipset in its mid-range smartphones.
- Honor and Vivo are the first two companies to use the Snapdragon 7 Gen 3 SoC mobile chipset
- Honor 100 launching next month is likely to include the chipset.
- The SoC is based on TSMC’s 4nm process.
- The processor is said to offer 60% improved AI performance.
 It includes a 50 percent faster Adreno 720 GPU that supports OpenGL ES 3.2, OpenCL 2.0 FP and Vulkan 1.3 APIs. Hexagon NPU has fused the AI accelerator, with a Tensor accelerator. Vector eXtensions, scalar accelerator and support for INT4, INT8, and INT16 misc precision.
The Snapdragon 7 Gen 3 SoC is said to support 168Hz for WFHD+ and 120Hz for WQHD+ displays. Both the displays will have 4K @ 60 Hz support.
Also Read: Google Photos latest update brings AI-powered features for better organisation
For photography, the Qualcomm Snapdragon 7 Gen 3 SoC mobile chipset includes Spectra Triple ISP to support three cameras at once, with super-fast parallel processing and smooth zooming. It can capture images in up to 200 MP and record videos in 4K resolution. Other configurations consist of three 21 MP sensors, a 32+ 21 MP sensor, or a single 64 MP sensor for 30 FPS ZSL recording. The 200MP sensor is said to come with intelligent enhancements. Eliminate grainy discolouration for higher-res results with a new AI Remosaic feature, while AI Noise Reduction produces clearer, more vibrant images, even in dim environments. Plus, achieve crisp, HDR-quality footage to delight in every detail using AI Video Retouch.
In terms of connectivity and speed, the mid-range chipset has support for the latest Wi-Fi 6/6E and Bluetooth version 5.3 with the Qualcomm FastConnect 6700 Mobile Connectivity System. It is said to have download speeds up to 5 Gbps deliver unceasing mobile gaming, work-from-anywhere productivity, and more—thanks to the Snapdragon X63 5G Modem-RF System. It boasts 5G Dual-SIM Dual-Active (DSDA) allowing two 5G+5G or 5G+4G SIM cards.
In terms of availability Oppo, Vivo, ZTE, iQOO, Honor, OnePlus, Sony, Redmi, Realme, and more will include the latest chipset in its mid-range smartphones.
It includes a 50 percent faster Adreno 720 GPU that supports OpenGL ES 3.2, OpenCL 2.0 FP and Vulkan 1.3 APIs. Hexagon NPU has fused the AI accelerator, with a Tensor accelerator. Vector eXtensions, scalar accelerator and support for INT4, INT8, and INT16 misc precision.
The Snapdragon 7 Gen 3 SoC is said to support 168Hz for WFHD+ and 120Hz for WQHD+ displays. Both the displays will have 4K @ 60 Hz support.
Also Read: Google Photos latest update brings AI-powered features for better organisation
For photography, the Qualcomm Snapdragon 7 Gen 3 SoC mobile chipset includes Spectra Triple ISP to support three cameras at once, with super-fast parallel processing and smooth zooming. It can capture images in up to 200 MP and record videos in 4K resolution. Other configurations consist of three 21 MP sensors, a 32+ 21 MP sensor, or a single 64 MP sensor for 30 FPS ZSL recording. The 200MP sensor is said to come with intelligent enhancements. Eliminate grainy discolouration for higher-res results with a new AI Remosaic feature, while AI Noise Reduction produces clearer, more vibrant images, even in dim environments. Plus, achieve crisp, HDR-quality footage to delight in every detail using AI Video Retouch.
In terms of connectivity and speed, the mid-range chipset has support for the latest Wi-Fi 6/6E and Bluetooth version 5.3 with the Qualcomm FastConnect 6700 Mobile Connectivity System. It is said to have download speeds up to 5 Gbps deliver unceasing mobile gaming, work-from-anywhere productivity, and more—thanks to the Snapdragon X63 5G Modem-RF System. It boasts 5G Dual-SIM Dual-Active (DSDA) allowing two 5G+5G or 5G+4G SIM cards.
In terms of availability Oppo, Vivo, ZTE, iQOO, Honor, OnePlus, Sony, Redmi, Realme, and more will include the latest chipset in its mid-range smartphones. Logitech G Pro X Superlight 2 Review: For elite gaming

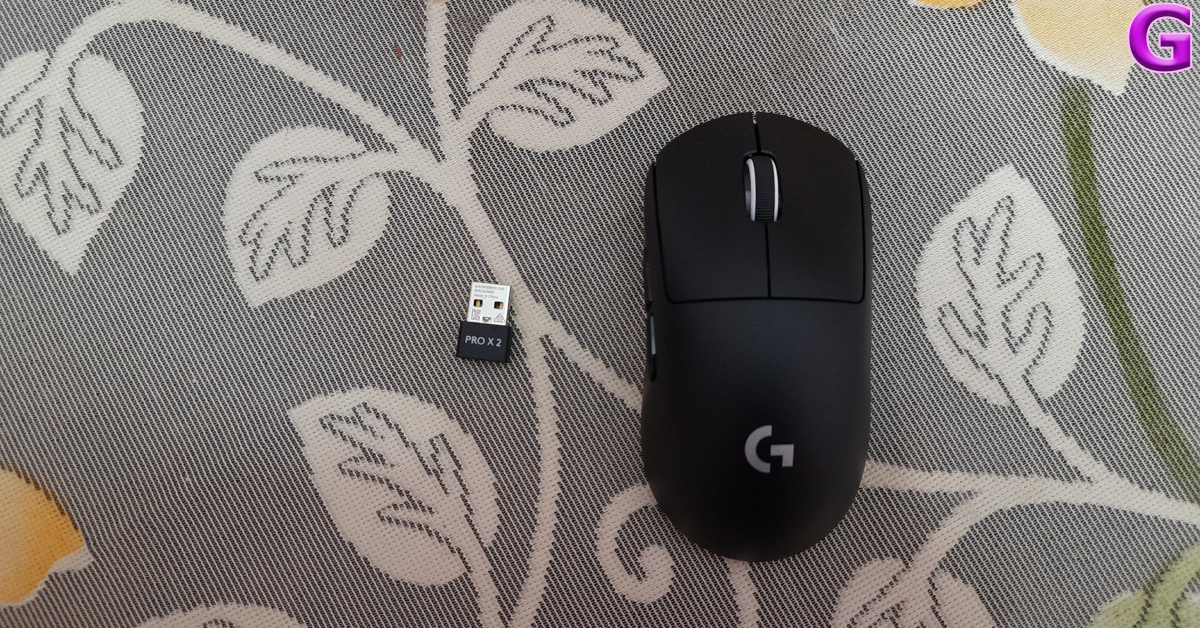
Last month, Logitech released the successor to its highly popular G Pro X Superlight gaming mouse. The Superlight 2 retains the signature design of its predecessor but gets some key upgrades under the hood. If you’re a serious gamer, you may want to check this one out. It is currently priced at Rs 16,995, so you should expect a mouse that is easily in the upper echelon of gaming peripherals. We’ve been using the Logitech G Pro X Superlight 2 for the last week, here is our in-depth review.
Read Also: Threads is testing hashtags like Tags on its platform to allow users to tag topics
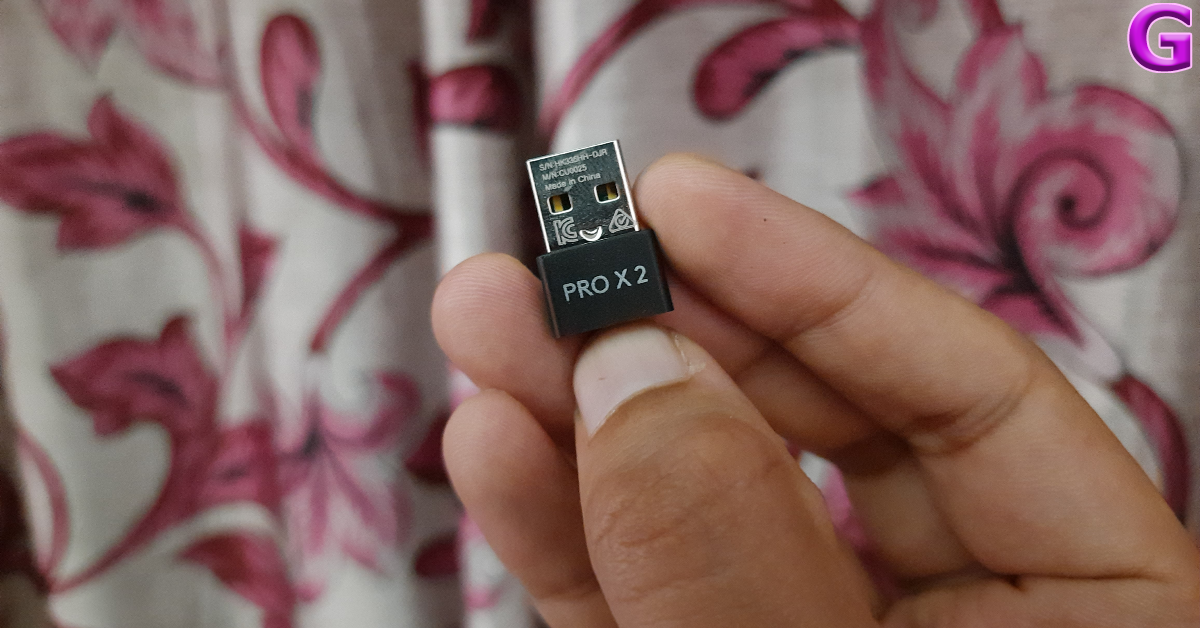
‘If it isn’t broken, don’t fix it’ is the approach towards design that Logitech has taken on the new G Pro X Superlight 2. One important addition to the Superlight 2 is the USB Type-C charging port. The previous iteration, which was released in 2020, had a micro USB port for charging, which was pretty obsolete even back then. New users won’t have to go through the trouble of keeping a micro USB cable just for their mouse.
Logitech has also cut 3 additional grams from the weight of the Superlight 2. The wireless gaming mouse now weighs 60 grams. The matte plastic used on the body of this mouse feels very high-end. The design of the mouse is ergonomic and suits all hand sizes. If you’re left-handed, you won’t have much trouble getting used to the Superlight 2. The two side buttons on the left side of the mouse are comfortably embedded in the body and can easily be reached with the thumb. The scroll wheel up top gets a rubber finish.
There are no RGB lights on this mouse. Logitech has other premium gaming mouse options that make use of RBG lighting. Users who prefer a simple, no-nonsense look will prefer the Superlight 2. Turning over the mouse, you will notice a new layout for the PTFE feet. The aperture door for the wireless receiver has a plastic finish but can be switched with one that has PTFE feet.
The biggest upgrade on the Logitech G Pro X Superlight 2 is the inclusion of Lightforce hybrid switches for the left-click and right-click buttons. We’ll get into the performance of these switches later, but they offer a brilliant tactile response and a great ‘clicky’ sound. Once we got our hands on the mouse, it was very hard to fight against the urge to fidget with the mouse. A big improvement over the mechanical switches found in the previous version. The Superlight 2 also makes use of the new Hero 2 sensor.
The Superlight 2 upholds the reputation established by its predecessor. The new Lightforce switches on this mouse are extremely quick and are said to be more durable than their mechanical counterparts. We did not experience any double-clicking issues on this mouse at all. The click latency is not noticeable at all, which is what you should expect from a mouse priced at Rs 17,000. The low weight of the device along with its PTFE feet came in very clutch while playing fast-paced FPS games. However, if you’re a casual gamer like us, this gaming mouse might seem a bit overkill.
Speaking of overkill specs, the Superlight 2 also gets the Hero 2 sensor. This sensor has a whopping 32,000 DPI, which is several times more than what you can ask for. The polling rate of 2,000 Hz is an improvement from the 1,000 Hz rate on the previous version. The Superlight 2 was able to track flawlessly on almost every surface we tested it on. We would still suggest using it with a mouse pad for gaming sessions. If you’re not gaming, it does a fine job as a productivity mouse too.
With the Logitech G Hub app, you can change the DPI, polling rate, and more while assigning customised functions to the side buttons. You can also change the switch settings for the left and right-click buttons using this software. One of our favourite features is the ability to import your customised settings from another mouse to this one. However, the lack of a dedicated button to control the DPI level does put a dampener on things.
Logitech claims a battery life of up to 95 hours on the Superlight 2, a stark improvement over its predecessor. Over a week of use, we were not able to completely discharge the battery of this gaming mouse. If you’re a heavy gamer, you will need to charge this mouse only once every two weeks. The battery life of the mouse can be checked from the G Hub app.
Read Also: YouTube brings new policies regarding AI content, will remove AI-generated content: More on this
Logitech G Pro X Superlight 2 review: Design
Inside the Superlight 2 retail box, you get the gaming mouse, a USB Lightspeed adapter, an adapter extension, a USB Type-C to Type-C charging cable, grip tape, an aperture door with PTFE foot, and some user documentation. Given the price of the mouse, we’d say these accessories were necessary along with the mouse. Logitech has also kept the packaging of the product quite eco-friendly.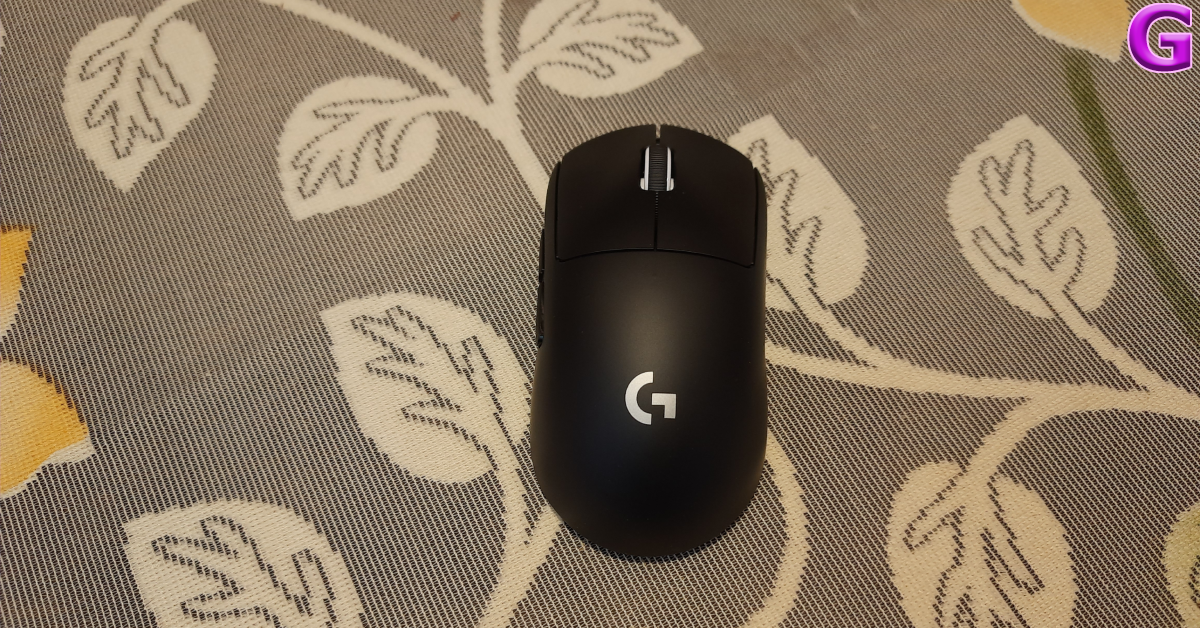 ‘If it isn’t broken, don’t fix it’ is the approach towards design that Logitech has taken on the new G Pro X Superlight 2. One important addition to the Superlight 2 is the USB Type-C charging port. The previous iteration, which was released in 2020, had a micro USB port for charging, which was pretty obsolete even back then. New users won’t have to go through the trouble of keeping a micro USB cable just for their mouse.
Logitech has also cut 3 additional grams from the weight of the Superlight 2. The wireless gaming mouse now weighs 60 grams. The matte plastic used on the body of this mouse feels very high-end. The design of the mouse is ergonomic and suits all hand sizes. If you’re left-handed, you won’t have much trouble getting used to the Superlight 2. The two side buttons on the left side of the mouse are comfortably embedded in the body and can easily be reached with the thumb. The scroll wheel up top gets a rubber finish.
‘If it isn’t broken, don’t fix it’ is the approach towards design that Logitech has taken on the new G Pro X Superlight 2. One important addition to the Superlight 2 is the USB Type-C charging port. The previous iteration, which was released in 2020, had a micro USB port for charging, which was pretty obsolete even back then. New users won’t have to go through the trouble of keeping a micro USB cable just for their mouse.
Logitech has also cut 3 additional grams from the weight of the Superlight 2. The wireless gaming mouse now weighs 60 grams. The matte plastic used on the body of this mouse feels very high-end. The design of the mouse is ergonomic and suits all hand sizes. If you’re left-handed, you won’t have much trouble getting used to the Superlight 2. The two side buttons on the left side of the mouse are comfortably embedded in the body and can easily be reached with the thumb. The scroll wheel up top gets a rubber finish.
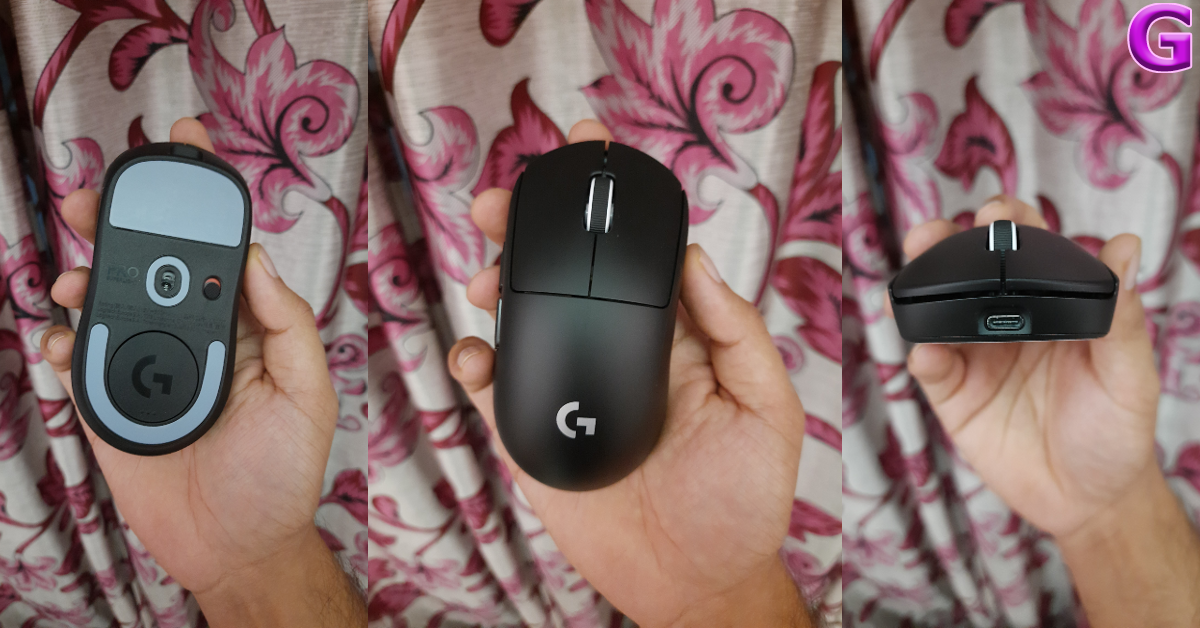 There are no RGB lights on this mouse. Logitech has other premium gaming mouse options that make use of RBG lighting. Users who prefer a simple, no-nonsense look will prefer the Superlight 2. Turning over the mouse, you will notice a new layout for the PTFE feet. The aperture door for the wireless receiver has a plastic finish but can be switched with one that has PTFE feet.
The biggest upgrade on the Logitech G Pro X Superlight 2 is the inclusion of Lightforce hybrid switches for the left-click and right-click buttons. We’ll get into the performance of these switches later, but they offer a brilliant tactile response and a great ‘clicky’ sound. Once we got our hands on the mouse, it was very hard to fight against the urge to fidget with the mouse. A big improvement over the mechanical switches found in the previous version. The Superlight 2 also makes use of the new Hero 2 sensor.
There are no RGB lights on this mouse. Logitech has other premium gaming mouse options that make use of RBG lighting. Users who prefer a simple, no-nonsense look will prefer the Superlight 2. Turning over the mouse, you will notice a new layout for the PTFE feet. The aperture door for the wireless receiver has a plastic finish but can be switched with one that has PTFE feet.
The biggest upgrade on the Logitech G Pro X Superlight 2 is the inclusion of Lightforce hybrid switches for the left-click and right-click buttons. We’ll get into the performance of these switches later, but they offer a brilliant tactile response and a great ‘clicky’ sound. Once we got our hands on the mouse, it was very hard to fight against the urge to fidget with the mouse. A big improvement over the mechanical switches found in the previous version. The Superlight 2 also makes use of the new Hero 2 sensor.
Logitech G Pro X Superlight 2 review: Performance
Connecting the Logitech G Pro X Superlight to a PC is a piece of cake. All you need to do is plug in the wireless receiver in your PC’s USB port and flick the power switch at the bottom of the mouse. That’s it! You are good to go. You don’t need any additional software to run the mouse on your computer, although you will need the Logitech G Hub app for greater customisation options. The Superlight 2 upholds the reputation established by its predecessor. The new Lightforce switches on this mouse are extremely quick and are said to be more durable than their mechanical counterparts. We did not experience any double-clicking issues on this mouse at all. The click latency is not noticeable at all, which is what you should expect from a mouse priced at Rs 17,000. The low weight of the device along with its PTFE feet came in very clutch while playing fast-paced FPS games. However, if you’re a casual gamer like us, this gaming mouse might seem a bit overkill.
 Speaking of overkill specs, the Superlight 2 also gets the Hero 2 sensor. This sensor has a whopping 32,000 DPI, which is several times more than what you can ask for. The polling rate of 2,000 Hz is an improvement from the 1,000 Hz rate on the previous version. The Superlight 2 was able to track flawlessly on almost every surface we tested it on. We would still suggest using it with a mouse pad for gaming sessions. If you’re not gaming, it does a fine job as a productivity mouse too.
 With the Logitech G Hub app, you can change the DPI, polling rate, and more while assigning customised functions to the side buttons. You can also change the switch settings for the left and right-click buttons using this software. One of our favourite features is the ability to import your customised settings from another mouse to this one. However, the lack of a dedicated button to control the DPI level does put a dampener on things.
Logitech claims a battery life of up to 95 hours on the Superlight 2, a stark improvement over its predecessor. Over a week of use, we were not able to completely discharge the battery of this gaming mouse. If you’re a heavy gamer, you will need to charge this mouse only once every two weeks. The battery life of the mouse can be checked from the G Hub app.
Read Also: YouTube brings new policies regarding AI content, will remove AI-generated content: More on this
With the Logitech G Hub app, you can change the DPI, polling rate, and more while assigning customised functions to the side buttons. You can also change the switch settings for the left and right-click buttons using this software. One of our favourite features is the ability to import your customised settings from another mouse to this one. However, the lack of a dedicated button to control the DPI level does put a dampener on things.
Logitech claims a battery life of up to 95 hours on the Superlight 2, a stark improvement over its predecessor. Over a week of use, we were not able to completely discharge the battery of this gaming mouse. If you’re a heavy gamer, you will need to charge this mouse only once every two weeks. The battery life of the mouse can be checked from the G Hub app.
Read Also: YouTube brings new policies regarding AI content, will remove AI-generated content: More on this
Verdict
The Logitech G Pro X Superlight 2 is a bit overkill for casual gamers. Pushing this mouse to its boundary is an impossible task for most gamers. However, if you’re a pro gamer who is looking to upgrade on every possible spec just to get that extra edge, this is the mouse for you. The 32,000 DPI Hero 2 sensor with a polling rate of 2,000 Hz works like an absolute charm. Is there anything we’d like to change on this mouse? A dedicated button for switching the DPI level would be nice, but not if it adds weight to the mouse.Logitech G Pro X Superlight 2: Pros
- Weighs just 60g
- New Lightforce Hybrid switches
- Smooth gliding
- Powerful sensor
Logitech G Pro X Superlight 2: Cons
- Pricey
Top 4 ways to use multiple WhatsApp accounts on the same phone (Android and iOS)
")
WhatsApp has been slowly rolling out its multi-account functionality across Android devices in a phased manner. You can now add another WhatsApp account on your phone, eliminating the need to rely on another phone or using the app cloner on your device. In this article, we bring you the top 4 ways to use multiple WhatsApp accounts on the same phone (Android and iOS).
Read Also: Threads is testing hashtags like Tags on its platform to allow users to tag topics
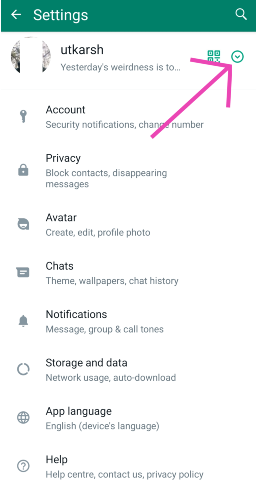
 Step 3: Go to Settings.
 Step 4: Hit the downward arrow icon next to your name.
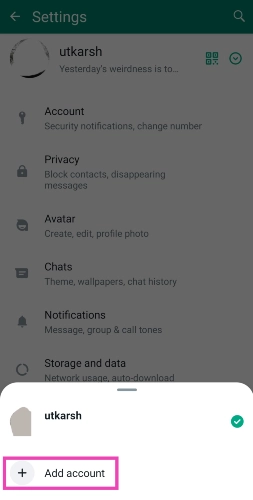
 Step 5: Tap on Add account.
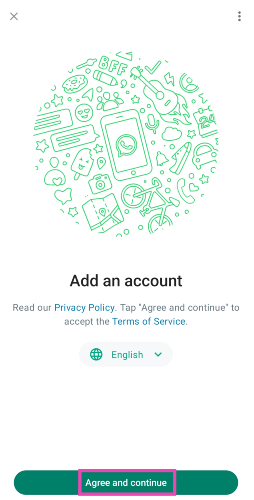
Step 6: Tap on Agree and continue.
Step 5: Tap on Add account.
Step 6: Tap on Agree and continue.
 Step 7: Enter the phone number registered with your secondary WhatsApp account.
Step 8: Follow the onscreen instructions to log into your account.
You can switch back and forth between the two accounts using the arrow icon next to your name. Instead of logging in with your phone number, you can also link your phone to your secondary WhatsApp account with a QR code.
Step 2: Scroll down and select Dual Messenger.
Step 3: Turn on the toggle switch for WhatsApp.
Step 7: Enter the phone number registered with your secondary WhatsApp account.
Step 8: Follow the onscreen instructions to log into your account.
You can switch back and forth between the two accounts using the arrow icon next to your name. Instead of logging in with your phone number, you can also link your phone to your secondary WhatsApp account with a QR code.
Step 2: Scroll down and select Dual Messenger.
Step 3: Turn on the toggle switch for WhatsApp.
 Step 4: Install a clone app for WhatsApp.
Step 5: Now, go to the app drawer and select the clone WhatsApp app. It will have a small orange sign on it as the distinguishing factor.
Step 6: Set up your account. This will require choosing a language and entering your phone number.
Step 7: Once you have registered your number, you will be able to use two WhatsApp accounts on your phone.
Step 4: Install a clone app for WhatsApp.
Step 5: Now, go to the app drawer and select the clone WhatsApp app. It will have a small orange sign on it as the distinguishing factor.
Step 6: Set up your account. This will require choosing a language and entering your phone number.
Step 7: Once you have registered your number, you will be able to use two WhatsApp accounts on your phone.
 Step 3: If you are already using WhatsApp on your iPhone, you will be prompted to use the same number for WhatsApp Business. Select Use a different number instead.
 Step 4: You will receive an OTP on the number you just registered. Enter it on the app.
Step 5: Tap on Done at the top-right corner of the screen.
Step 6: WhatsApp will give you the option to restore your chat history. If this is the first time you are registering this number on WhatsApp, you may not get this message.
Step 7: Set up your profile.
Step 8: In the business category, choose Not a business and select Done.
Step 9: Select Next. You will be prompted to add more details about your business. Choose Not now.
You can now use the WhatsApp Web portal similar to how you use it on a PC. Use your primary phone with the WhatsApp account to link your secondary device.
Step 3: Open WhatsApp on your primary smartphone and tap the ellipses at the top right corner of the screen. Select Linked Devices.
Step 4: Tap on Link a device and scan the QR code on your secondary smartphone or Android tablet.
Step 4: You will receive an OTP on the number you just registered. Enter it on the app.
Step 5: Tap on Done at the top-right corner of the screen.
Step 6: WhatsApp will give you the option to restore your chat history. If this is the first time you are registering this number on WhatsApp, you may not get this message.
Step 7: Set up your profile.
Step 8: In the business category, choose Not a business and select Done.
Step 9: Select Next. You will be prompted to add more details about your business. Choose Not now.
You can now use the WhatsApp Web portal similar to how you use it on a PC. Use your primary phone with the WhatsApp account to link your secondary device.
Step 3: Open WhatsApp on your primary smartphone and tap the ellipses at the top right corner of the screen. Select Linked Devices.
Step 4: Tap on Link a device and scan the QR code on your secondary smartphone or Android tablet.
Use WhatsApp’s new multi-account feature on Android
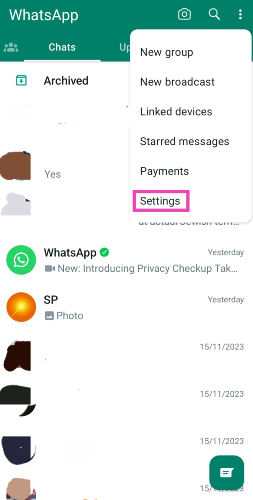
Step 1: Launch the WhatsApp app on your Android phone. Step 2: Hit the ellipses at the top right corner of the screen.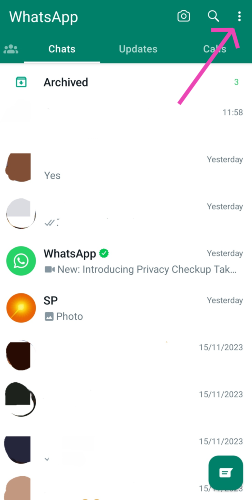 Step 3: Go to Settings.
 Step 4: Hit the downward arrow icon next to your name.
 Step 5: Tap on Add account.
 Step 6: Tap on Agree and continue.
 Step 7: Enter the phone number registered with your secondary WhatsApp account.
 Step 8: Follow the onscreen instructions to log into your account.
You can switch back and forth between the two accounts using the arrow icon next to your name. Instead of logging in with your phone number, you can also link your phone to your secondary WhatsApp account with a QR code.
Step 8: Follow the onscreen instructions to log into your account.
You can switch back and forth between the two accounts using the arrow icon next to your name. Instead of logging in with your phone number, you can also link your phone to your secondary WhatsApp account with a QR code.
Use Dual Messenger for Android
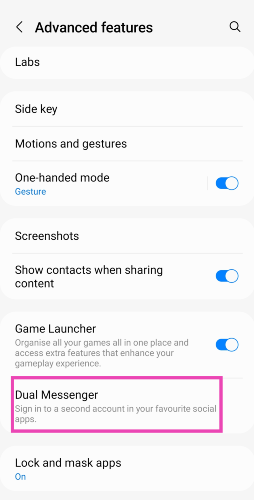
Most Android smartphone manufacturers offer a ‘dual messenger’ feature that lets you clone the instant messaging apps on your phone to run multiple accounts. Here’s how you can use it for WhatsApp. Step 1: Go to Settings and select Advanced Features.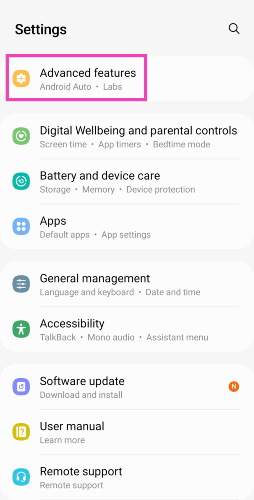 Step 2: Scroll down and select Dual Messenger.
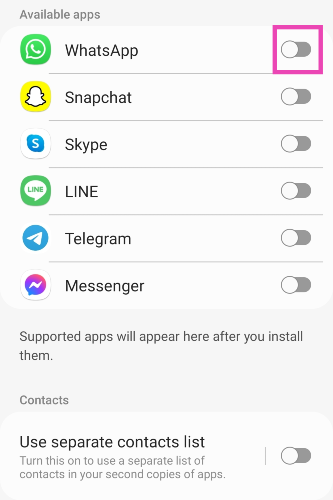
 Step 3: Turn on the toggle switch for WhatsApp.
 Step 4: Install a clone app for WhatsApp.
Step 5: Now, go to the app drawer and select the clone WhatsApp app. It will have a small orange sign on it as the distinguishing factor.
Step 6: Set up your account. This will require choosing a language and entering your phone number.
Step 7: Once you have registered your number, you will be able to use two WhatsApp accounts on your phone.
Step 4: Install a clone app for WhatsApp.
Step 5: Now, go to the app drawer and select the clone WhatsApp app. It will have a small orange sign on it as the distinguishing factor.
Step 6: Set up your account. This will require choosing a language and entering your phone number.
Step 7: Once you have registered your number, you will be able to use two WhatsApp accounts on your phone.
Use WhatsApp Business (Android and iOS)
As the name suggests, WhatsApp Business caters to third-party sellers and businesses, helping them communicate with their target audience. You don’t need to be a registered business in order to make an account on this app. You can use it to run another WhatsApp account on your phone. Here’s how you can use it on an iPhone. Step 1: Download and install WhatsApp Business from the App Store. Step 2: Launch WhatsApp Business and agree to the terms and conditions. Step 3: If you are already using WhatsApp on your iPhone, you will be prompted to use the same number for WhatsApp Business. Select Use a different number instead.
 Step 4: You will receive an OTP on the number you just registered. Enter it on the app.
Step 5: Tap on Done at the top-right corner of the screen.
Step 6: WhatsApp will give you the option to restore your chat history. If this is the first time you are registering this number on WhatsApp, you may not get this message.
Step 7: Set up your profile.
Step 8: In the business category, choose Not a business and select Done.
Step 9: Select Next. You will be prompted to add more details about your business. Choose Not now.
Step 4: You will receive an OTP on the number you just registered. Enter it on the app.
Step 5: Tap on Done at the top-right corner of the screen.
Step 6: WhatsApp will give you the option to restore your chat history. If this is the first time you are registering this number on WhatsApp, you may not get this message.
Step 7: Set up your profile.
Step 8: In the business category, choose Not a business and select Done.
Step 9: Select Next. You will be prompted to add more details about your business. Choose Not now.
Use WhatsApp Web to use multiple accounts on Android and iOS
Step 1: Open www.web.whatsapp.com on your phone or tablet’s web browser. Step 2: Tap the hamburger menu icon at the bottom right corner of the screen and select Desktop site.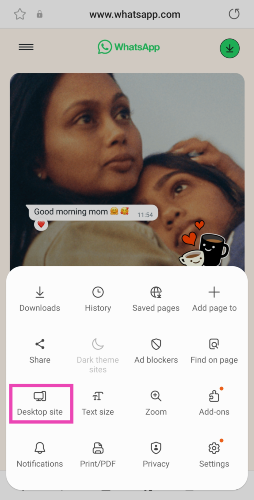 You can now use the WhatsApp Web portal similar to how you use it on a PC. Use your primary phone with the WhatsApp account to link your secondary device.
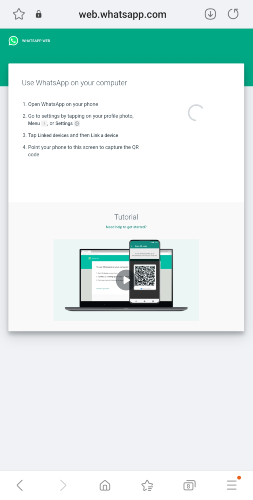
 Step 3: Open WhatsApp on your primary smartphone and tap the ellipses at the top right corner of the screen. Select Linked Devices.
Step 4: Tap on Link a device and scan the QR code on your secondary smartphone or Android tablet.
Step 3: Open WhatsApp on your primary smartphone and tap the ellipses at the top right corner of the screen. Select Linked Devices.
Step 4: Tap on Link a device and scan the QR code on your secondary smartphone or Android tablet.