iPhones are some of the most versatile smartphones around, largely because of the diverse range of tools embedded in the operating system. You don’t need to download a third-party app for the most basic tasks. For example, while most users flock to third-party apps and online tools to convert a picture to a PDF file, iPhone users can simply use any of the multiple native apps on their devices for this task. In this article, we bring you the top 6 native ways to convert a photo to a PDF file on an iPhone.Read Also:Top Ways to Open the Windows Snipping Tool With a Keyboard Shortcut
Which method should you use?
The option to convert a photo to PDF is integrated into a lot of first-party apps on your iPhone. You can use any of the following apps for this task:
Photos
Files
Notes
Books
If you’re not a fan of the native conversion mechanism, you can use a specialised third-party app to convert your images to PDF files. Apps like Photo to PDF Converter Scanner, Photos PDF: Scanner Converter, Image to PDF, and Photo to PDF Converter will get the job done in no time. If you don’t wish to install a third-party app, you can use an online converter like SmallPDF.
Use the Photos app
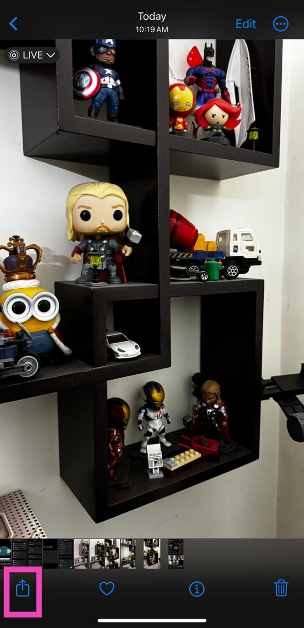
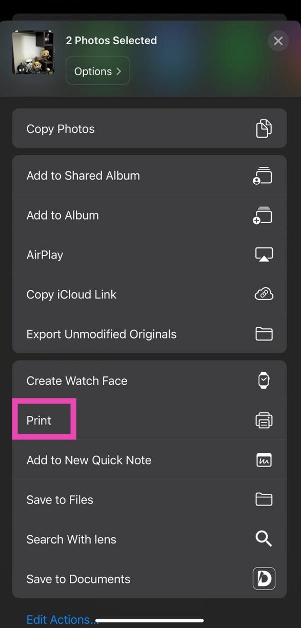
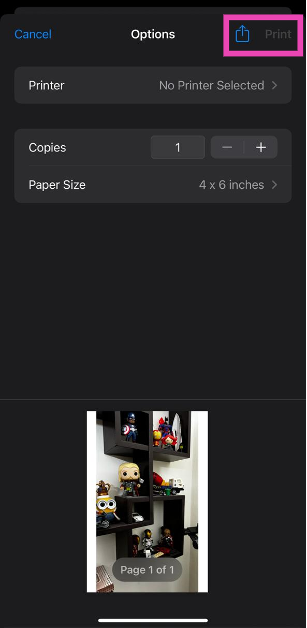
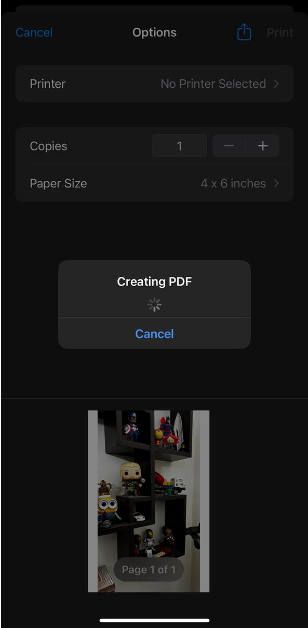
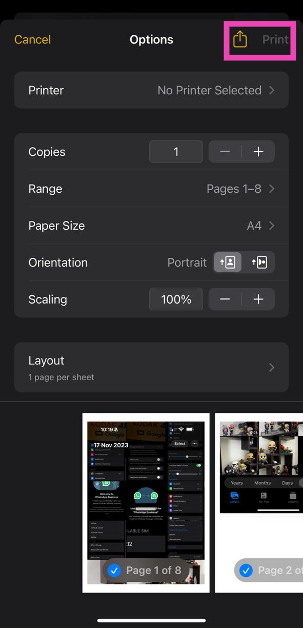
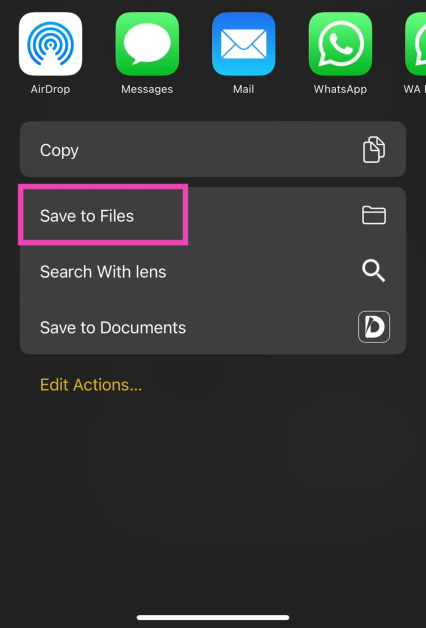
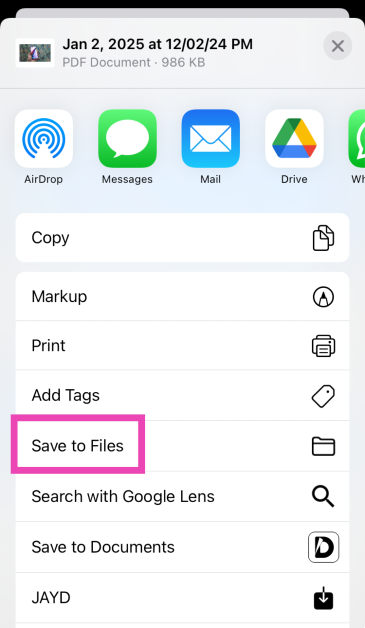
Step 1: Launch the Photos app on your iPhone and select the photo you want to convert to a PDF file.Step 2: Hit the Share icon at the bottom of the screen.Step 3: Tap on Print.Step 4: Hit Print at the top right corner of the screen.Step 5: Select Save to Files from the pop-up menu.The photo will be saved as a PDF copy on your iPhone.
Use the Files app
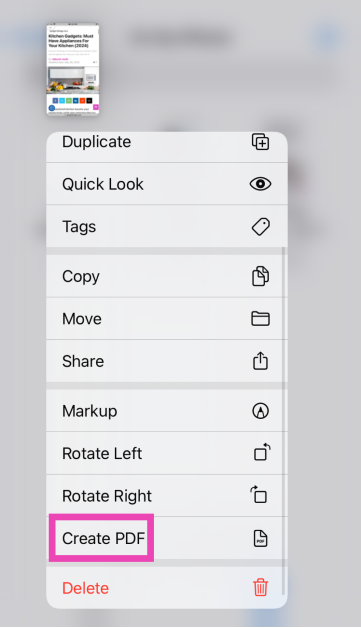
Step 1: Launch the Files app on your iPhone.Step 2: Locate the photo that you wish to convert to PDF.Step 3: Long press the picture and select Quick Actions.Step 4: Hit Create PDF.To convert a bunch of images to PDF at once, select them all, tap ‘More’ at the bottom-right corner of the screen, and select Create PDF.
Use the Notes app
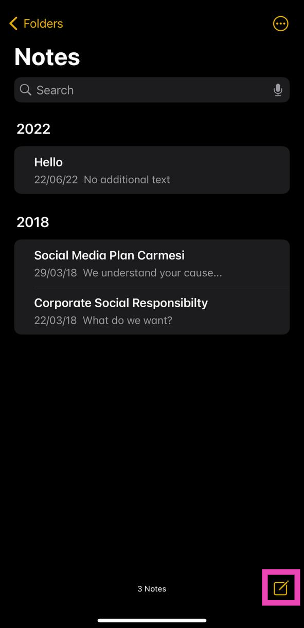
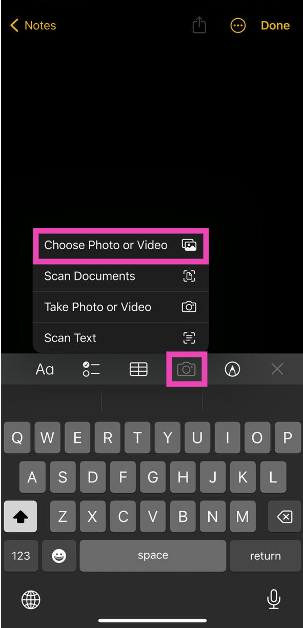
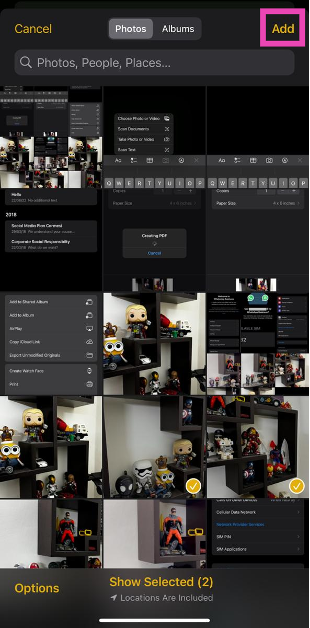
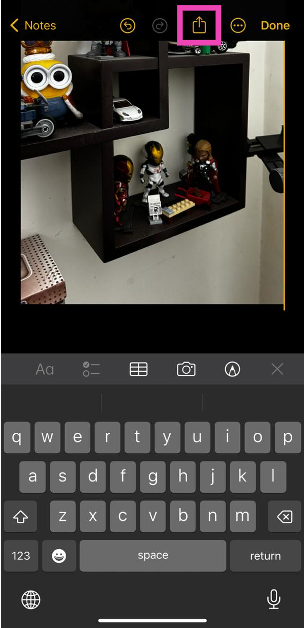
Step 1: Launch the Notes app on your iPhone.Step 2: Hit the pen icon at the bottom right corner of the screen.Step 3: Hit the camera icon and select Choose Photo or Video.Step 4: Select the photo(s) you want to convert to PDF and hit Add.Step 5: Tap the share icon at the top of the screen.Step 6: Hit Print.Step 7: Tap on the Print option at the top right corner of the screen and select Save to Files from the pop-up menu.
Use the Books app
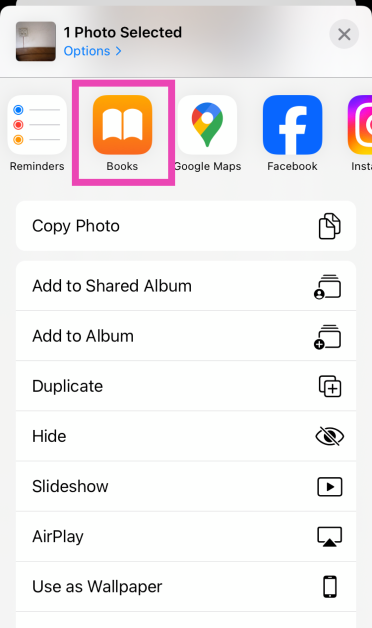
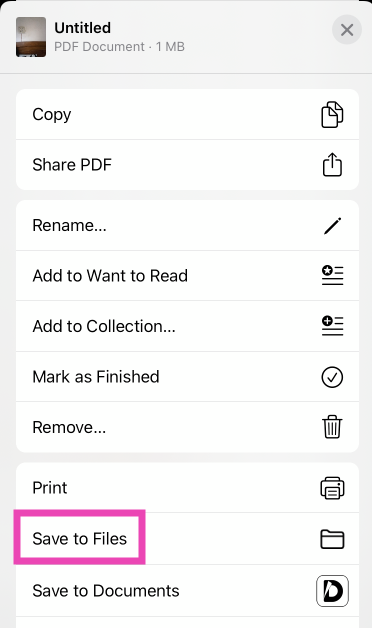
Step 1: Launch the Photos app on your iPhone and select the image(s) you want to convert to PDF.Step 2: Hit the Share icon at the bottom left corner of the screen and export the image(s) to the Books app.Step 3: Hit the ellipses on the exported image(s).Step 4: Select Save to Files.
Use the Shortcuts app
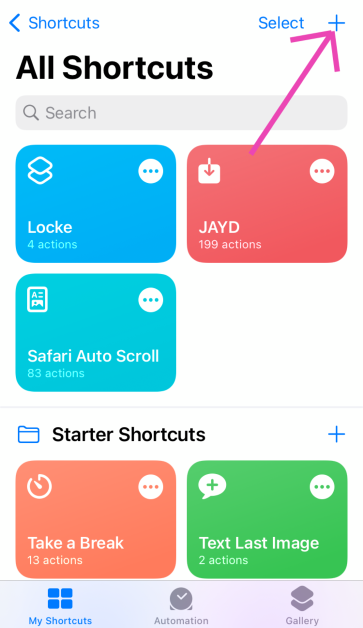
Step 1: Launch the Shortcuts app on your iPhone and tap the plus icon in the top right corner of the screen.
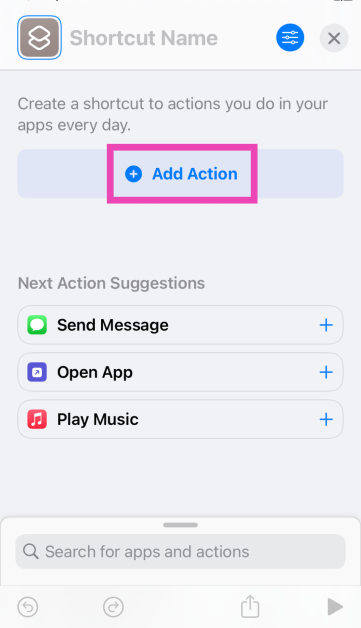
Step 2: Tap on Add Action.
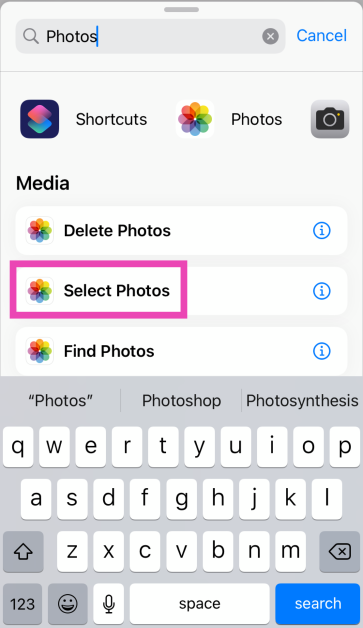
Step 3: Search for the Photos app and tap the Select Photos action.
Step 4: Turn on the toggle switch next to Select Multiple.
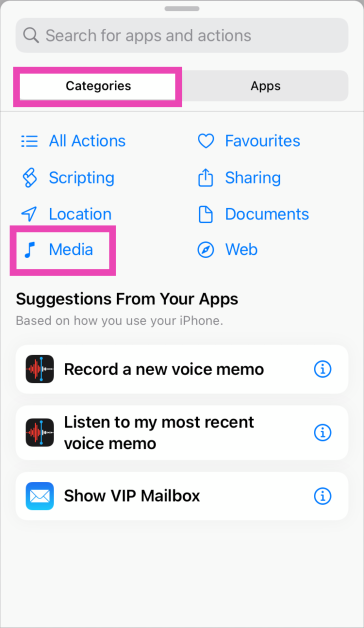
Step 5: Hit the Search bar at the bottom of the screen and select Categories.
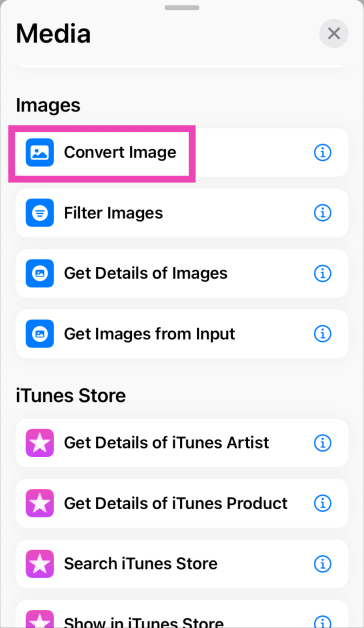
Step 6: Tap on Media and select Convert Image.
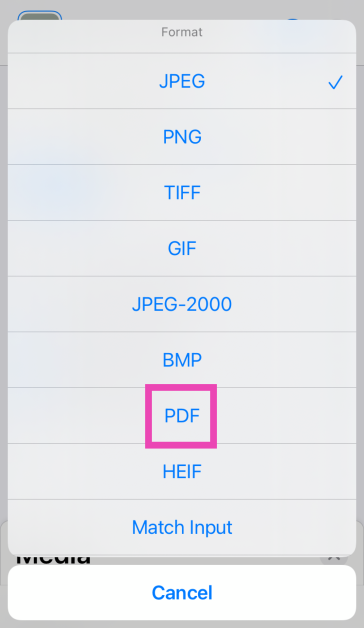
Step 7: Tap on JPEG and select PDF.
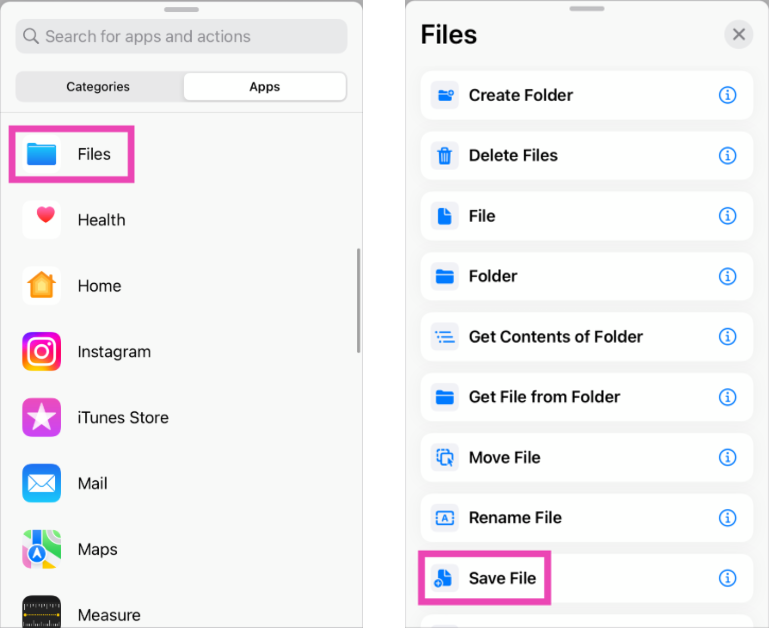
Step 8: Hit the Search bar at the bottom of the screen and select Apps.
Step 9: Tap on Files and select Save Files.
Step 10: Hit Done in the top right corner of the screen.
Step 11: When the Shortcut has been created, launch it and select the images you want to convert to PDF.
Use a third-party app
Step 1:Install the Photos to PDF Converter Scanner app from the App Store.
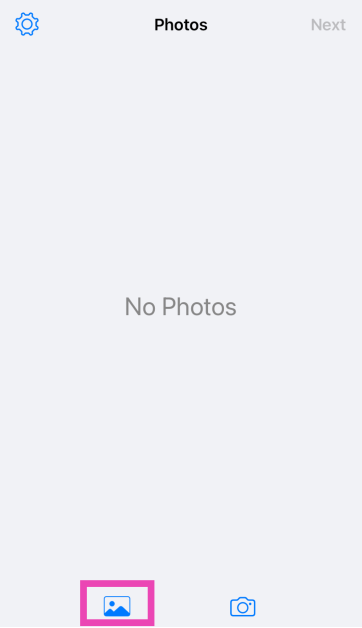
Step 2: Launch the app and hit the photo icon at the bottom of the screen.
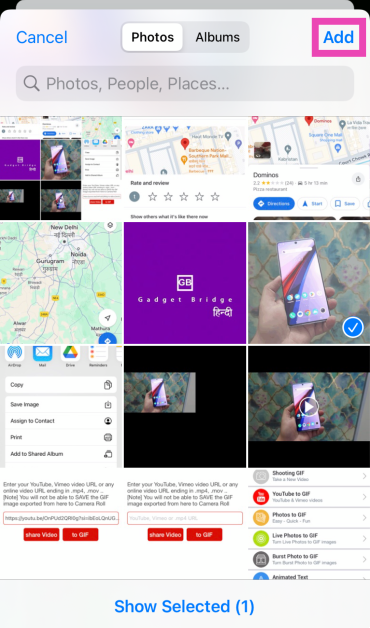
Step 3: Select an image and hit Add.
Step 4: Tap on Next.
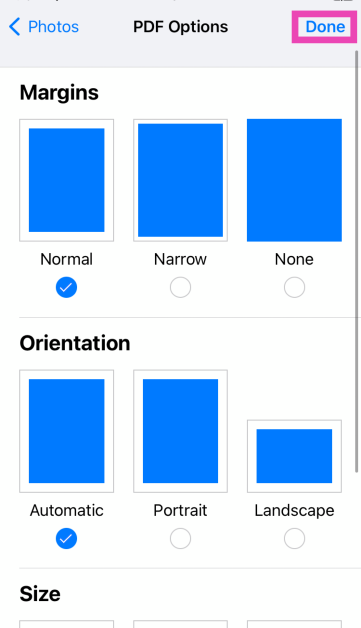
Step 5: Select the Margins, Orientation, and Size. Hit Done.
Step 6: Once the PDF has been created, select Save to Files.
Frequently Asked Questions (FAQs)
What is the easiest way to convert a picture to a PDF on my iPhone?
Select the picture in the Photos app, go to the Print option, then hit ‘Save to Files’. You can now access the picture as a PDF from the Files app on your iPhone.
How to convert a file to PDF on an iPhone?
Go to the Files app, select the file you wish to convert, tap the share icon, select ‘Print’, tap the print command, then hit the share icon again and save it on your phone.
What are some good online tools to convert an image to a PDF file?
Online tools like PDF24, AllConverter, and SmallPDF can convert an image to a PDF file within seconds. You can also use the file conversion tool on Adobe’s official website for this task.
Which app do I need to convert a photo to a PDF on my iPhone?
These are the top 6 ways to convert any photo to a PDF on your iPhone. Apart from these native methods, you can use online tools like PDF24 & SmallPDF or third-party apps like JPG to PDF & PDF Creator for this task. If you found this article helpful, let us know in the comments!
Microsoft Word offers a diverse range of tools and functions to edit and stylise your text. Sometimes, these tools can be a bit tricky to find. If you’ve ever made a checklist on Word, you’ll know what we are talking about. While bullet points are easy to access, searching for checkboxes can take some time and effort. Well, not anymore. In this article, we bring you 2 quick ways to add checkboxes to your Microsoft Word document.Read Also:Best 4 ways to check if your smartphone is e-SIM compatible
Add checkboxes to a Word Document from the Paragraph toolbar
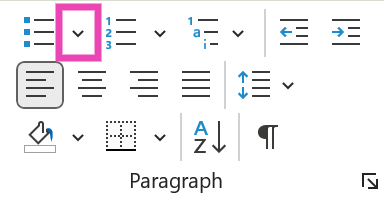
Step 1: OpenMicrosoft Word on your PC or laptop.Step 2: Hit the downward arrow next to the bullet points tile in the Paragraph section.Step 3: Click on Define New Bullet.Step 4: Click on Symbol.Step 5: Select the checkbox symbol and hit OK.Step 6: The checkbox symbol will appear on the document.
Use Developer Options
Step 1: Open a Word Document and click on File at the top left corner of the screen.Step 2: Click on Options at the bottom left corner of the screen.Step 3: Switch to the Customise Ribbon tab.Step 4: Click the checkbox for Developer in the Main Tabs list. Hit OK.Step 5: Move your cursor to the spot where you want to insert the checkbox.Step 6: Go to the Developer tab and click the checkbox in the Control section.
Frequently Asked Questions (FAQs)
How do I add checkboxes to my Microsoft Word document?
To make a checklist, simply hit the downward arrow icon next to the bullet points tile and go to Define New Bullet>Symbol>Checkbox.
Why can’t I tick boxes in Word?
To make a clickable checkbox in Word, go to File>Options>Customise Ribbon and click the Developer checkbox in the Main Tabs list. Once that’s done, move your cursor to the place where you want to add the checkbox, then go to the Developer tab and click the checkbox option in the Control section.
These are the top 2 ways to add checkboxes to any Microsoft Word document. Using the extended Symbols list, you can add other symbols like arrowheads, checkmarks, clockfaces, stars, and more. Know any other ways to add a checkbox to your Word document? We’d love to know in the comments!
A new “It’s a Match!” and animations give a new look to the online dating app.
Profile Quiz now lets users know about compatibility potential with potential matches.
Popular dating app, Tinder has announced the rollout of new features to attract Gen Z on its platform that care about authentic connections formed through shared interests and common causes. The dating app has introduced a new suite of profile and discovery features including Profile Prompts, Profile Quiz, Basic Info Tags, Enhanced Reporting, Rizz-first Redesign and Dark Mode. The new profile and discovery features are said to make finding an authentic and real partner online easy but fun.
Profile Prompts
The dating app, Tinder’s latest update has introduced a new feature- Profile Prompts. This feature allows users to choose and respond to prompts to let their matches discover more about them. This is said to unleash your personality and the three most popular prompts globally are: “The key to my heart is”, “The first item on my bucket list is”, and “Two truths and a lie”.
Profile Quiz
Profile Quiz is another feature that comes with the latest update on Tinder. The Profile quiz function lets you find compatibility potential with potential matches through a fun and enlightening quiz about yourself. One can share their quiz answers on their profile to give people a peek at your interests and preferences.Also Read:OnePlus AI Music Studio, a platform allowing users to compose music launched in India and globally
Basic Info Tags
In order to share important information about yourself with your potential matches like whether you have a pet or drinking habits, your zodiac sign and your love language one can now use Basic Info Tags.
Enhanced Reporting
In an effort to make the app safer, the online dating app now allows users to report specific profile elements for a more respectful experience.
Rizz-first Redesign
Tinder has updated its user interface with enhanced and updated animations, and a new “It’s a Match!” screen designed to keep the platform more engaging.
Dark Mode
Along with these updates, Tinder has also introduced a Dark Mode setting for users for late-night activity or discreet public matching.
Garena Free Fire is a battle royale game with regular awards and tournaments to keep players interested. If you play Garena Free Fire, you should be aware of the redeem codes that are released on a daily basis. However, because the battle royale game is banned in India, players from other countries can use the Free Fire Redeem codes daily. If you’re unfamiliar with the Garena Free Fire redeem codes or don’t know how to get them, we’ve put together a step-by-step guide to help you redeem them. Check out Garena Free Fire Redeem Codes for 22 November 2023.The Free Fire redeem codes are a great way to get free stuff. These are 12-digit codes that contain alphabets and numbers, as well as an expiration date and time. Because the Garena FF redeem codes cannot be used more than once, you should hurry to the redemption page to claim your free reward before someone else does. To get a free reward, all you have to do is go to reward.ff.garena.com/en, which is the official redemption page. Also, keep an eye on this space for daily updates on Garena Free Fire redemption codes and rewards.
Garena Free Fire Redeem Codes Today 22 November2023
In such a modern society where digital music prevails everywhere, listening to CDs seems to be an archaic thing for most of you now. But there are still some of you who desire to make a CD that is a collection of all your favourite songs for playing back. Also, you may want to burn a delicately designed CD as a gift for a person who is important to you. Confronted with such a demand, the very need for you, for example, is how to burn Apple music to CD. Don’t worry, this post will share with you the solutions to it specifically. Just take a seat and read along.
What You Need to Burn Apple Music to CD
Good tools are prerequisites to the successful execution of a job. So, first, you need to prepare the necessary tools on the list below so that it can go on wheels.
A Blank Recordable CD
This is indubitably needed because it is the storage media for saving converted Apple Music Songs.
A CD Drive
A CD drive is used to insert and read blank CDS. If your computer does not have a built-in CD drive, you can purchase an external CD burner and connect it to your computer via a USB cable. Alternatively, you can use a desktop computer with a CD burner.
A Music Burner
You should download the disc-burning application on Windows or Mac to burn the converted DRM-free MP3 Apple Music songs to a CD.
A Music Converter
Before you burn an Apple Music song to a CD, you need to use a certain music converter to remove DRM protection from Apple Music and convert Apple music to MP3 format or any other format the CD can recognize.
Preparations Before Buring Apple Music to CD
As mentioned before, Apple Music songs are encrypted with DRM. Therefore, before burning music onto a CD, the first and necessary step is to make sure the songs you want to burn are free of DRM. To remove the DRM, you will need a music converter.
After searching and trialling, MuConvert Apple Music Converter is discovered as the leading helper which is designed specially to adapt to your needs. It is an easy-to-use software program dedicated to removing DRM from Apple Music songs, and quickly downloading songs/playlists/albums/podcasts from Apple Music into high-quality MP3, WAV, M4A, and FLAC formats.
Highlighted Features of MuConvert Apple Music Converter
Get rid of DRM Protection: Easily remove DRM from Apple Music songs for you.
Multiple Output Formats: Download Apple Music to local MP3, M4A, WAV, and FLAC formats.
Best Audio Quality: Get your desired audio quality by adjusting the sample rate and the bit rate.
Fast Converting Speed: Convert Apple Music at a lightning-fast speed of up to 10X speed and batch download all your favourite Apple Music songs in one go.
Preserve ID3 tags: Song details like title, artist, album, genre, and album will be perfectly preserved throughout the conversion process to facilitate efficient management and organization of your music collection.
How to Remove DRM from Apple Music
Here are the steps on how to use MuConvert Apple Music Converter to remove DRM, and download Apple Music songs in MP3. For lossless quality, you can also download them in WAV.
STEP 1. Install MuConvert Apple Music Converter
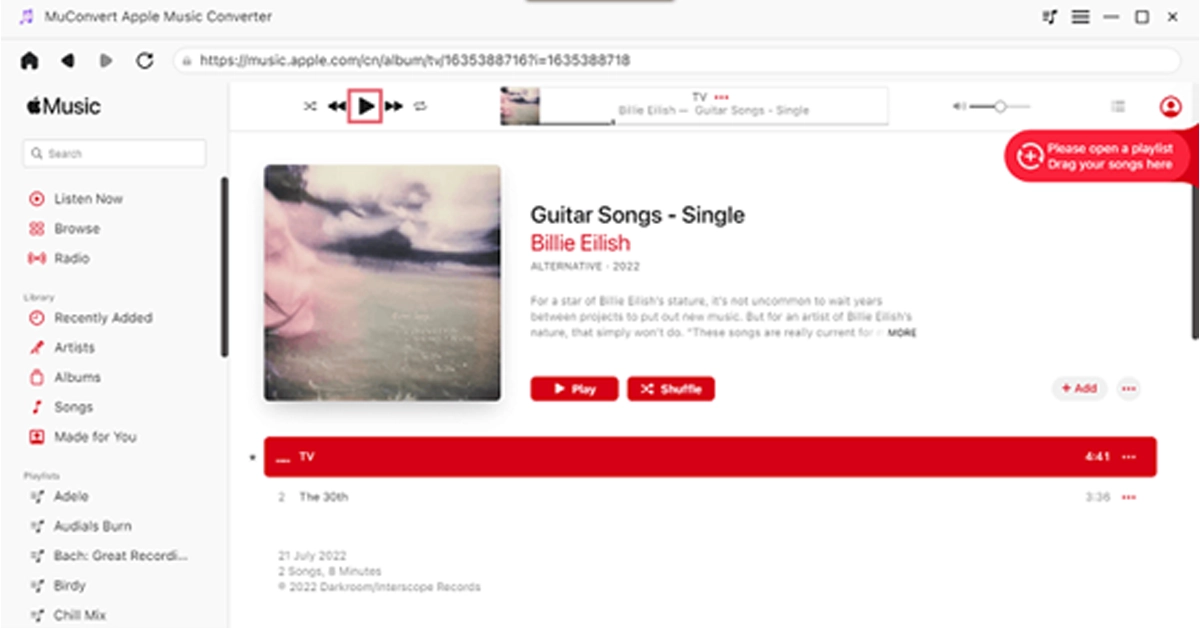
After downloading and installing MuConvert Apple Music Converter, launch it. Then enter the Apple Music web player and log in using your Apple ID.
STEP 2. Add Your Desired Song for Conversion
After logging in, go to the Apple Music web player and choose some songs to download. Simply drag any song, playlist, or album you like to the “+” button located on the right for conversion.
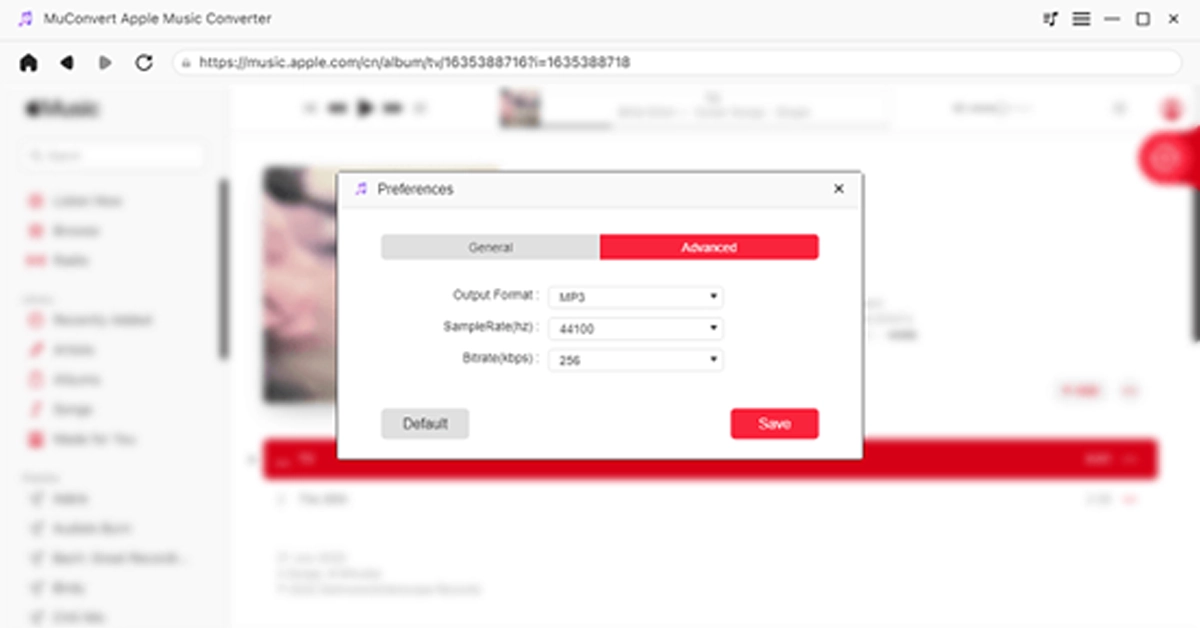
STEP 3. Customize Your Settings (Optional)
Navigate to the “Menu” and select “Preferences” to customize the “Advanced” settings. Within this window, you have the option to adjust the format, sample rate, and bitrate based on your preferences.
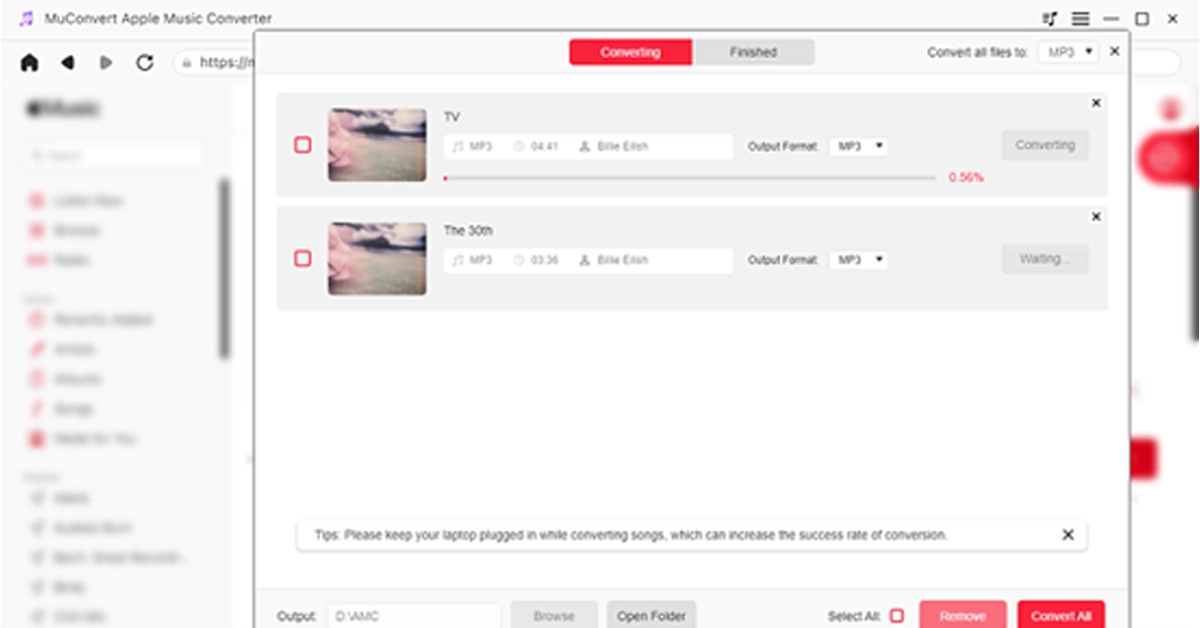
STEP 4. Remove DRM and Download Music to MP3
Now, go to “Convert all files to” in the top right corner and select “MP3” as the output format. Finally, click on the “Convert All” icon at the bottom, and MuConvert Apple Music Converter will remove the DRM from the Apple Music songs, and download all the Apple Music songs you’ve selected to MP3.
Now that you have all DRM-free Apple Music songs, the next step is to burn them into your CD. Keep reading for detailed steps.
Burn Apple Music to CD on Windows
For Windows users, Windows Media Player, a default legacy Apple Music to CD converter, is highly recommended for you to burn Apple Music to CD without additional software. It is easy to use and completely free. Follow the steps below to start burning Apple’s music to a CD.
Step 1. Insert a blank CD and then run Windows Media Player immediately.
Step 2. Choose the “Burn” tab located in the upper-right corner.
Step 3. In File Explorer, find the music files you want to burn. Drag them to the burn list.
Step 4. Click “Start Burn” to begin burning your music files to the CD. Wait for the process to finish before taking away the CD to avoid losing progress or sabotaging your efforts.
Burn Apple Music to CD on Mac
If you are a Mac user, iTunes is often the primary choice for you when it comes to burning Apple Music onto CDs. It can be utilized effortlessly without necessitating the search for an alternative CD burner. Now, let’s read about how to burn Apple Music to CD with iTunes. Note that a playlist needs to be established before burning.
Step 1. Open iTunes and create a new playlist by clicking on “File”-“New”-“New Playlist”. Proceed to name the playlist accordingly before dragging and dropping these converted Apple Music songs into the playlist.
Step 2. Please insert the blank CD into the CD drive. Subsequently, a prompt will appear stating “A CD or DVD has been inserted.” Click on “OK”.
Step 3. Right-click on the playlist and choose the option “File” followed by “Burn the Playlist to disc”.
Step 4. In the popped-up window, either select “Audio CD” or “MP3 CD”, and then click the “Burn” button at the bottom to start burning Apple Music songs to the disc.
Read Also:Qualcomm introduced Bluetooth aptX Lossless Audio feature
Final Words
By and large, this post mainly introduces you to how to burn Apple music to CDs easily as well as quickly. From the very tools you need to the specific procedures listed for reference, everything is to the most extent illustrated and covered to better help you solve your problems. It’s worth mentioning that the key to burning Apple Music songs to CD is removing the DRM and downloading them to your desired format via MuConvert Apple Music Converter. This music converter surely helps you a lot. Don’t hesitate anymore, download it now!
The Music Studio allow its user to create lyrics and compose music.
The users can share their compositions with a global audience.
To bridge the gap between technology and artists OnePlus has officially announced the launch of OnePlus AI Music Studio in India. The company’s most recent community-first innovation is available for both users in India and other international markets. The platform uses AI technology that enables users to create, develop, and unleash their musical skills. Ishita Grover, Director of Marketing at OnePlus India said, At OnePlus, we’re dedicated to fostering innovation and enabling our community to push boundaries. The OnePlus AI Music Studio embodies our commitment to empowering users to explore their creativity in unprecedented ways.”According to OnePlus, Music enthusiasts can explore their creative potential in an immersive setting at the OnePlus AI Music Studio. It provides a diverse range of genres, which include EDM, hip-hop, and rap to users to become independent composers.
In addition to this users can compose lyrics and easily blend them with AI-generated beats with the help of this OnePlus AI Music Studio. On the platform, users will be able to generate visually stunning interfaces, that result in captivating music videos that are instantly available at their fingertips.Also Read:Nothing Chat App with Blue Bubbles removed from Google Play Store after criticism“The OnePlus AI Music Studio isn’t just a tool; it’s an unparalleled fusion of technology and creativity, providing users the opportunity to unleash the artist within. It’s about giving our community the power to shape their musical journey,” added Ishita Grover.The OnePlus AI Music Studio allows users to share their compositions with a global audience, asking them to download and feature their works on many social media platforms. Moreover, the platform also offers means of acknowledgement by enabling users’ tracks to be voted to the top and potentially featured by OnePlus.
How to create music using the OnePlus AI Music Studio
After that enter the OTP shared to your registered mobile number.
Click on “Create Music” and select your preferred genre, mood and theme.
Click on Proceed Provide a prompt for the AI to create your lyrics. It could be anything general from “Under the stars” to something that’s personal to you.
Wait a couple of minutes for the AI to write your song, create your music and the music video.
Your Windows PC’s screenshot-taking chops have come a long way over the years. You no longer need to rely on the native screengrab function triggered by the PrtScn key. Instead, you can use the Windows Snipping Tool to take screenshots of more specific parts of the screen. Other than the Snipping Tool, you can also make use of the Xbox Game Bar to take screengrabs and screen recordings. In this article, we bring you the top ways to open the Windows Snipping Tool with a keyboard shortcut.Read Also:How Computers Ensure Randomness in Online iGaming
Here are the 2 most common keyboard shortcuts to open the Windows Snipping Tool
Windows Key + Shift + S: Pressing this key combination will trigger the Snipping tool into action. You will see a small toolbar appear at the top of the screen. You can choose the shape you want for the screenshot from this toolbar. To take a screenshot, simply click and drag the cursor along the screen.
PrtScn key: If your PC or laptop keyboard has a PrtScn key on the top row, you can press it to trigger the Windows Snipping Tool. In older versions of Microsoft Windows, pressing this key will take a screenshot of the entire screen, which can later be pasted on any photo editing tool.
What if the Windows Key + Shift + S keyboard shortcut does not trigger the Windows Snipping Tool?
Follow these steps to make sure your PC launches the Snipping Tool after hitting the Windows Key + Shift + S shortcut.Step 1: Go to C:\ProgramData\Microsoft\Windows\Start Menu\Programs\Accessories.Step 2: Right-click on Snipping Tool and select Properties.Step 3: Switch to the Shortcut tab.Step 4: Enter Windows Key + Shift + S in the Shortcut Key field.Step 5: Hit Apply and OK.
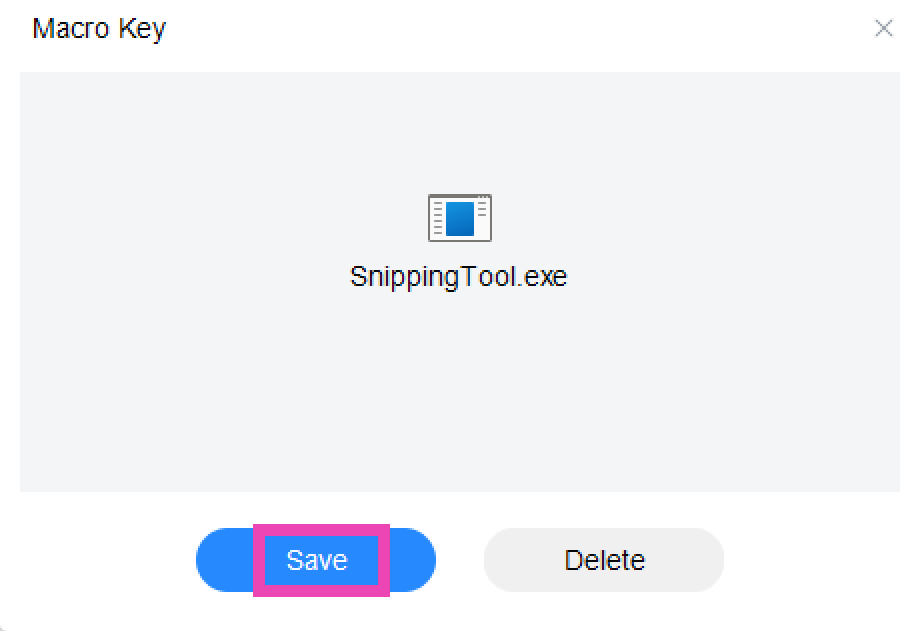
Bonus Tip: Use the Macro Key
If your PC or laptop keyboard has an extra macro key, you can program it to trigger the Windows Snipping Tool. Simply launch the Macro Key app and drag the Snipping Tool icon from C:\ProgramData\Microsoft\Windows\Start Menu\Programs\Accessories to the Macro Key app window. You can also click on ‘Add’ and navigate to the location of the Snipping Key tool. Once that’s done, you can launch the tool simply by pressing the macro key on your keyboard.
Frequently Asked Questions (FAQs)
Where can I find my Snipping Tool screenshots?
To find your Snipping Tool screenshots, go to Pictures>Screenshots.
What is the keyboard shortcut for Windows Snipping Tool?
The Windows Snipping Tool can be triggered by the ‘Windows Key + Shift + S’ key combination. You can also access it by pressing the PrtScn button on your keyboard.
These are the top ways to open the Windows Snipping Tool using a keyboard shortcut on your PC and laptop. If your device does not have the Snipping Tool, you can simply install it from the Microsoft Store. The Snip and Sketch app is no longer available for Windows 11 users. If you found this article helpful, let us know in the comments!
Over the years, the form factor of the SIM card has shrunk tremendously. Now, you don’t even need a physical SIM card to get network coverage on your smartphone. e-SIMs (short for embedded SIM) allow you to download a SIM card to a small chip inside your phone that is perfectly capable of receiving network coverage. While this is a nifty feature, it is not available on all smartphones yet. In this article, we bring you the top 4 ways to check if your smartphone is e-SIM compatible.Read Also:Why Local SEO Is So Important for Local Businesses
Benefits of using an eSIM
Compared to a traditional Nano SIM Card, an eSIM carries a lot of benefits. Here are some of them.
Convenience: eSIMs are purely digital. This means there is no need to swap the physical unit while changing devices. On top of that, you can activate an eSIM remotely instead of going to a store.
More SIM options on your phone: Most smartphones come with a dual SIM tray. With an eSIM, you can use up to 3 phone numbers on a device.
More secure: Since eSIMs cannot be pulled out of your smartphone, they are more secure than the traditional SIM cards. If your phone gets stolen, you can easily disable your eSIM on the device.
Convenient while travelling: If you’re travelling overseas, it is much easier to get an eSIM than a physical SIM card for your phone. You don’t need to constantly buy and throw physical SIM cards while travelling multiple countries.
More sustainable: Since eSIMs do not use plastic, they are good for the environment.
Check if your Android smartphone is e-SIM compatible
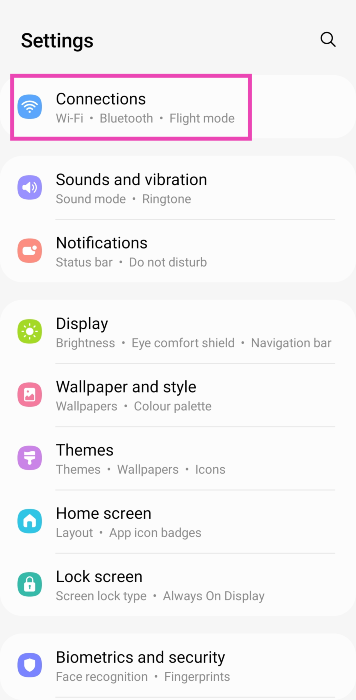
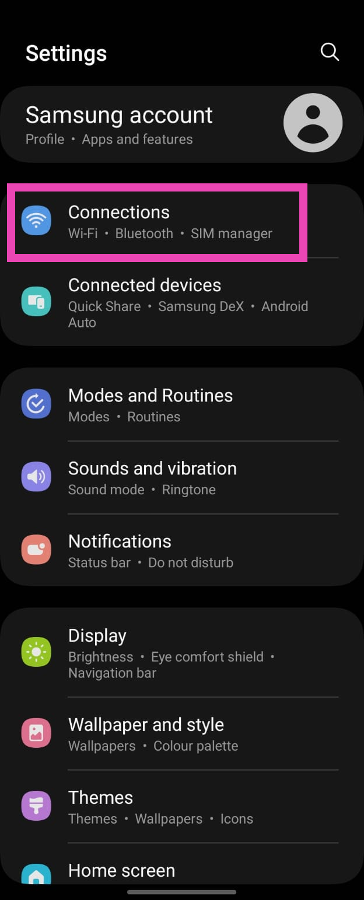
Step 1: Go to Settings and select Connections.Step 2: Tap on SIM card manager.Step 3: Look for the ‘Add e-SIM’ option. If you can’t find it, it means your Android phone lacks e-SIM support.
Use a dialer code to check if your Android smartphone is e-SIM compatible
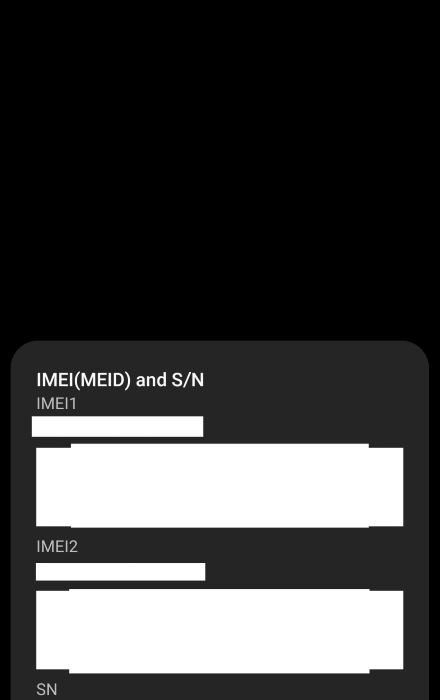
Step 1: Launch the Phone app on your Android phone and switch to the keypad.Step 2: Dial *#06#.If you see an EID (Embedded Identity Document) Number, it means your phone is e-SIM compatible.
Check your phone’s spec sheet
Go to your smartphone’s official page on its manufacturer’s website and take a look at its spec sheet to check if it supports an e-SIM. You will be able to find this information in the ‘Cellular Network’ section.
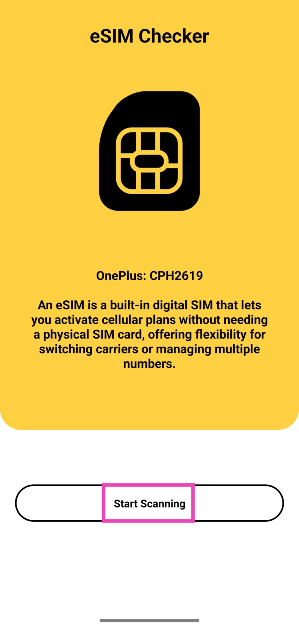
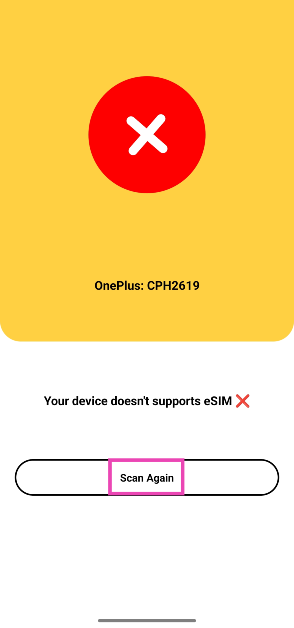
Use the eSIM checker app
Step 1:Install the eSIM Checker app from the Google Play Store.
Step 2:Launch the app and tap on Start Scanning.
Step 3: The app will list whether your phone supports e-SIM or not on the following page.
Check if your iPhone is e-SIM compatible
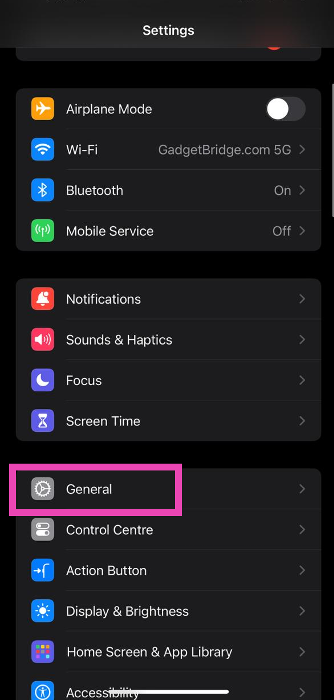
Step 1: Go to Settings and select General.Step 2: Tap on About.Step 3: Scroll down to Digital SIM.If you see an IMEI number next to Digital SIM, it means your iPhone supports e-SIM.
Check your iPhone’s cellular settings
Your iPhone’s cellular settings allow you to add an e-SIM to your device. If you don’t see the option to add an e-SIM it means your iPhone does not support it. Go to Settings>Cellular and look for the ‘Add e-SIM’ options to verify if this is the case.
Frequently Asked Questions (FAQs)
Can I convert my physical SIM to an e-SIM?
Yes, you can easily convert your physical SIM card to an e-SIM. The process varies among different network providers. Airtel users can use the Airtel Thanks app to upgrade to an e-SIM. Meanwhile, Vi users need to send an activation request to the network provider via SMS.
How long does it take to activate an e-SIM?
It can take anywhere between 2-4 hours to activate an e-SIM on your device.
What are the benefits of e-SIM?
An e-SIM allows you to carry an extra SIM card on your device, by freeing up a slot on the SIM tray. If you constantly switch your phones, you won’t need to pull out the SIM card every time you move to a different device. You can simply download your e-SIM on the other phone.
How do I know if e-SIM is activated on my phone?
Go to Settings>Connections>SIM card manager. This is where you can check if the e-SIM is activated on your smartphone.
These are the top 6 ways to check if your smartphone is e-SIM compatible. All iPhones from XR Series onwards support e-SIM, although their availability may depend upon your region. From the iPhone 14 Series onwards, Apple has completely ditched the physical SIM tray on all iPhones available in the US.
Now that most of India has received 5G coverage, more people are switching to 5G smartphones and tablets to access ultra-fast internet speeds. Most network providers are yet to roll out dedicated 5G plans, which means you can use 5G services while sticking with your 4G data plan. Most users often complain that their phone automatically drops down to a 4G network, even with 5G availability. In this article, we show you how to always get a 5G signal only on your Android phone.Read Also:Top 6 ways to remove audio from an iPhone Video before sharing
What does ‘5G only’ mean? Should set your phone to 5G only?
Your smartphone automatically switches between 5G and 4G bandwidths, depending on which signal is more readily available. This is the ideal setting for your device since you don’t need to worry about manually selecting a network every time you venture into a low-signal zone. Sometimes, Android smartphones tend to prefer a 4G network, even though the area has strong 5G coverage. In this scenario, you may want to lock the 5G network.
The downside of doing this is that you can run out of mobile data pretty quickly. Since the 5G network is ultra-fast, it is easy to breeze through the allocated data in no time. On the other hand, using the 4G network can help you with conserving your mobile data. However, if you have an unlimited 5G plan (currently offered by Jio and AirTel), feel free to lock the network to 5G.
Use device settings
Step 1: Go to Settings and select Connections.Step 2: Tap on Mobile networks.Step 3: Select Network mode.Step 4: Tap on 5G/LTE/3G/2G (auto connect).This method will ensure your phone automatically connects to a 5G network when it’s available. If your phone still drops down to a 4G network, use the following methods.
Use a dialer code to disable the LTE network
Step 1: Go to your phone’s dialer and type *#*#4636#*#*.Step 2: This will launch your phone’s testing menu. Select 5G/LTE Debugging Information.Step 3: Hit the ellipses at the top right corner of the screen.Step 4: To force your phone to use 5G all the time, tap on Disable LTE.This dialer code may not work on all Android smartphones. Use the third-party apps mentioned in this article if the dialer code does not work for you.
Use the dialer code to always get 5G signal on Android
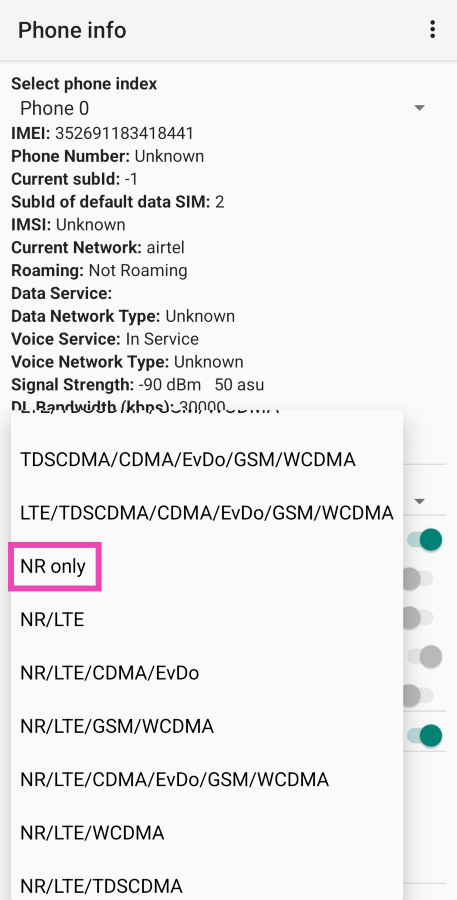
Step 1: Go to your phone’s dialer and type *#*#4636#*#*.Step 2: This will launch your phone’s testing menu. Select Phone information.Step 3: Tap on Set preferred network type.Step 4: Select NR Only.
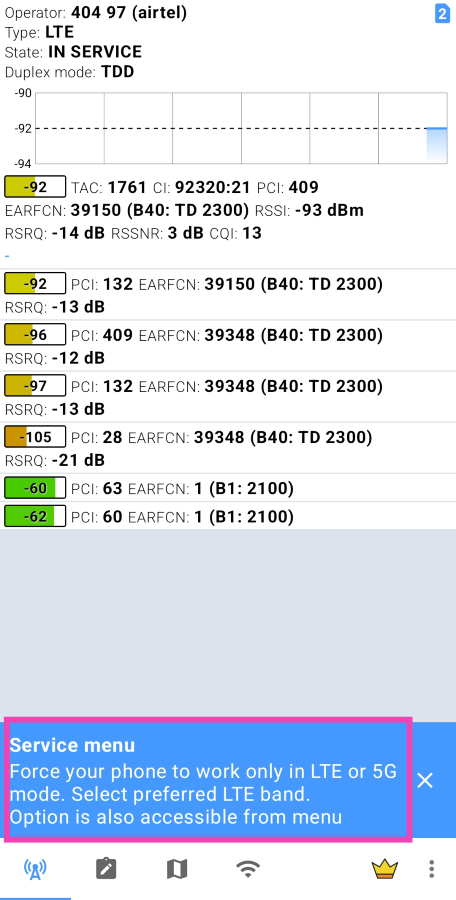
Use the Netmonitor app
Step 1: Install and launch the Netmonitor app on your phone.Step 2: Tap on the Service menu at the bottom of the screen.Step 3: Hit Phone info.Step 4: Tap on Set preferred network type.Step 5: Select NR Only.
Use the 5G Only app to always get 5G signal on Android
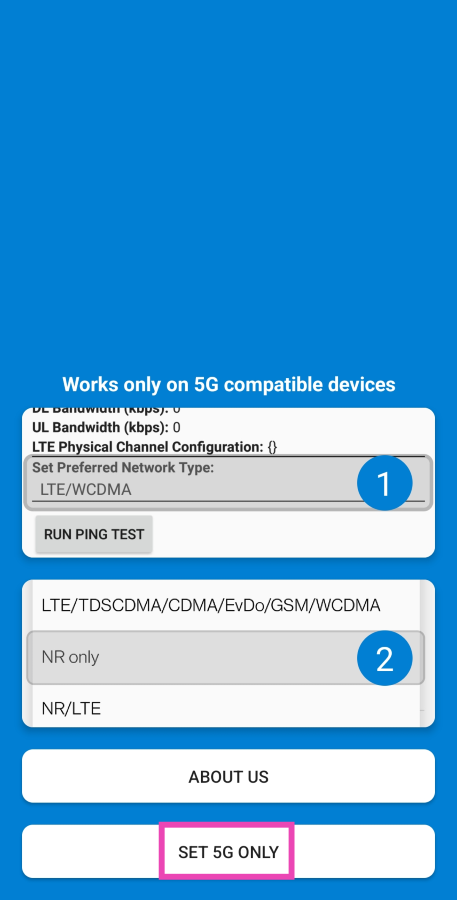
Step 1:Install and launch the 5G Only app on your phone.Step 2: Tap on Set 5G Only.Step 3: Tap on Set Preferred Network Type.Step 4: Select NR Only.
Use the 5G Switch app
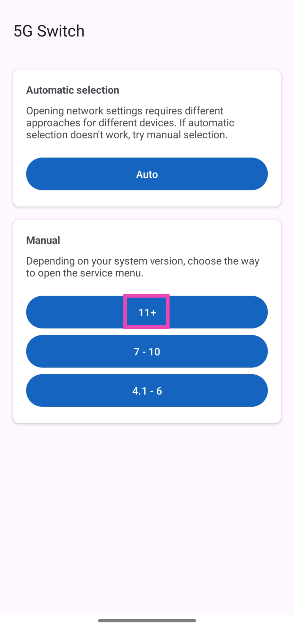
Step 1:Install the 5G Switch -Force 5G Only app on your phone from the Google Play Store.
Step 2:Launch the app and tap on Go.
Step 3: Select your phone’s Android OS version.
Step 4: Tap on Set preferred network type.
Step 5: Select NR Only.
Frequently Asked Questions (FAQs)
Why does my phone automatically switch to a 4G network?
Your phone can switch from a 5G to a 4G network due to several reasons. The most common reason behind this is the lack of 5G coverage in the area. Your phone also switches down to a 4G network when you are in a crowd and a lot of people are using the 5G network.
How do I always get a 5G signal on my Android phone?
Go to Settings>Connections>Mobile networks>Network Mode>5G only. You can also switch to a 5G network permanently by dialling *#*#4636#*#* and going to Phone information>Set preferred network type>NR Only.
Is there a third-party app I can use to switch to a 5G connection permanently?
Apps like Netmonitor, 5G Only, and 5G Switch – Force 5G Only help your phone stick to a 5G network at all times.
Is LTE better than 5G?
5G (NR) is significantly better than LTE since it has a low latency and uses high-frequency radio waves to deliver the signal at a faster rate. The NR bandwidth is wider than LTE too.
These are the top 6 ways to get a 5G signal only on your Android phone. The ‘device settings’ method may vary among different smartphone manufacturers. On OnePlus devices, you may have to turn off Smart 5G as well. Go to Settings>Mobile network>More settings and turn off the toggle switch for Smart 5G. If you found this article helpful, let us know in the comments!
The app has been removed from the Play Store due to privacy concerns.
The App supports RCS communication.
UK-based tech firm owned by Carl Pei recently launched the Nothing Chat App with Blue Bubble to bridge the communication gap created by iMessage for Apple devices. The application was listed on the Google Play Store for downloads on Phone 2 but has now been taken down from the platform due to privacy and security concerns. NothingNothing has removed the beta version of its messaging app Nothing Chats from the Google Play Store after many users expressed worries about the programme’s privacy and security since it was announced.Also Read:Qualcomm announced 15% faster Snapdragon 7 Gen 3 SoC mobile chipset for mid-range smartphonesNothing Chats app was launched last week with the goal of removing communication disconnects between Android and iOS devices. The app was made available for download only for Nothing Phone 2 users and allows users to receive and send text messages through iMessage. Android users when sending SMS to iOS users appear in a green bubble while iOS to iOS messages appear in a blue bubble. But with the arrival of the Nothing Chats app Phone 2 users were allowed to text or MMS to iOS users via the RCS protocol and it showed up in blue bubbles. But the company has now removed it from Google Play Store without mentioning the reason for the removal instead it said, “We’ve removed the Nothing Chats beta from the Play Store and will be delaying the launch until further notice to work with Sunbird to fix several bugs. We apologise for the delay and will do right by our users.”If Seen, the company has taken this step because it has to face a lot of criticism from the users for sending Apple ID data through HTTP instead of the safer HTTPS protocol.In order to use the iMessage one must first have to log in via their Apple ID using the Nothing Chats app that is said to log the user in using a Mac that is situated in a distant server. Note that Nothing Chats App is powered by Sunbird and when the messages, images and videos received through its system are unencrypted. Therefore the SMS or MMS sent or received through Sunbird’s system is public.


 Step 3: Tap on Print.
 Step 4: Hit Print at the top right corner of the screen.
 Step 5: Select Save to Files from the pop-up menu.
 The photo will be saved as a PDF copy on your iPhone.
 Step 3: Long press the picture and select Quick Actions.
Step 4: Hit Create PDF.
Step 3: Long press the picture and select Quick Actions.
Step 4: Hit Create PDF.
 To convert a bunch of images to PDF at once, select them all, tap ‘More’ at the bottom-right corner of the screen, and select Create PDF.
 Step 3: Hit the camera icon and select Choose Photo or Video.
 Step 4: Select the photo(s) you want to convert to PDF and hit Add.
 Step 5: Tap the share icon at the top of the screen.
 Step 6: Hit Print.
 Step 7: Tap on the Print option at the top right corner of the screen and select Save to Files from the pop-up menu.
 Step 3: Hit the ellipses on the exported image(s).
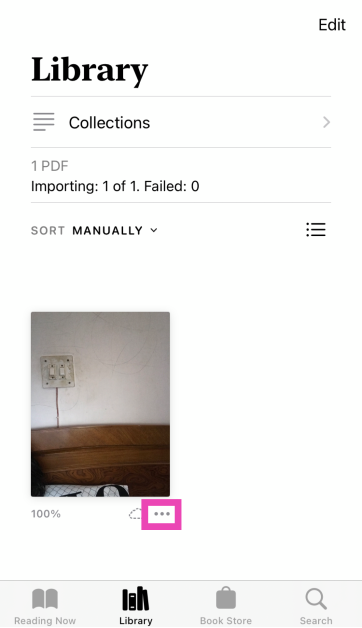 Step 4: Select Save to Files.
 Step 2: Tap on Add Action.
 Step 3: Search for the Photos app and tap the Select Photos action.
 Step 4: Turn on the toggle switch next to Select Multiple.
Step 5: Hit the Search bar at the bottom of the screen and select Categories.
Step 4: Turn on the toggle switch next to Select Multiple.
Step 5: Hit the Search bar at the bottom of the screen and select Categories.
 Step 6: Tap on Media and select Convert Image.
 Step 7: Tap on JPEG and select PDF.
 Step 8: Hit the Search bar at the bottom of the screen and select Apps.
 Step 9: Tap on Files and select Save Files.
 Step 10: Hit Done in the top right corner of the screen.
Step 11: When the Shortcut has been created, launch it and select the images you want to convert to PDF.
Step 10: Hit Done in the top right corner of the screen.
Step 11: When the Shortcut has been created, launch it and select the images you want to convert to PDF.
 Step 3: Select an image and hit Add.
 Step 4: Tap on Next.
 Step 5: Select the Margins, Orientation, and Size. Hit Done.
 Step 6: Once the PDF has been created, select Save to Files.

 Step 3:
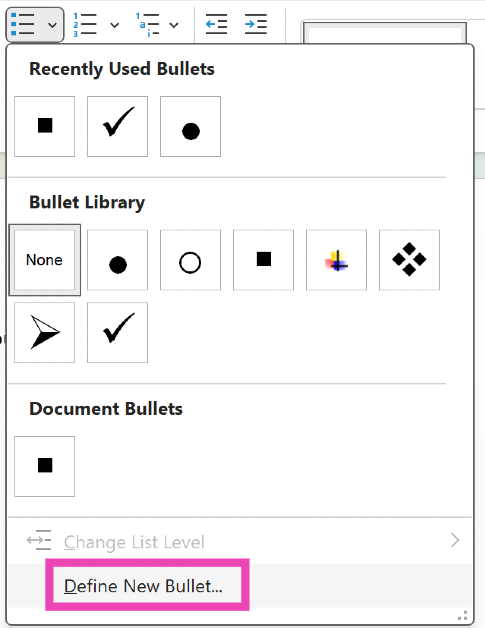 Step 4:
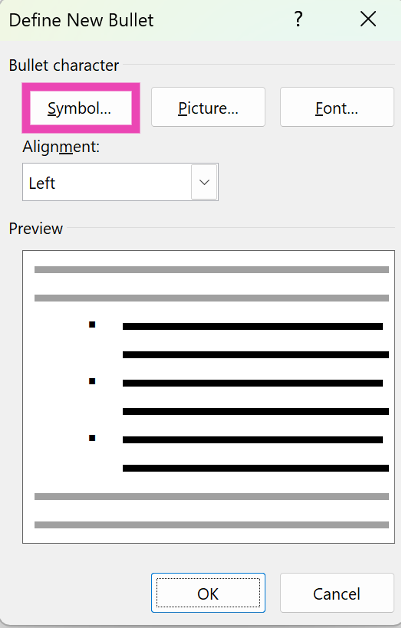 Step 5:
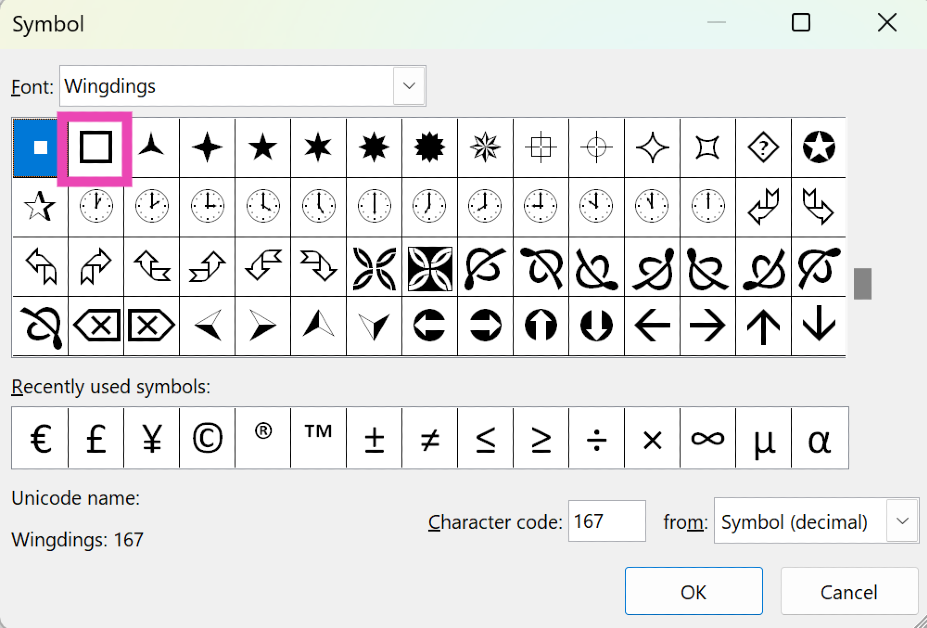 Step 6:
 Step 3:
 Step 4:
 Step 5:


")
 STEP 3. Customize Your Settings (Optional)
Navigate to the “Menu” and select “Preferences” to customize the “Advanced” settings. Within this window, you have the option to adjust the format, sample rate, and bitrate based on your preferences.
STEP 3. Customize Your Settings (Optional)
Navigate to the “Menu” and select “Preferences” to customize the “Advanced” settings. Within this window, you have the option to adjust the format, sample rate, and bitrate based on your preferences.
 STEP 4. Remove DRM and Download Music to MP3
Now, go to “Convert all files to” in the top right corner and select “MP3” as the output format. Finally, click on the “Convert All” icon at the bottom, and MuConvert Apple Music Converter will remove the DRM from the Apple Music songs, and download all the Apple Music songs you’ve selected to MP3.
STEP 4. Remove DRM and Download Music to MP3
Now, go to “Convert all files to” in the top right corner and select “MP3” as the output format. Finally, click on the “Convert All” icon at the bottom, and MuConvert Apple Music Converter will remove the DRM from the Apple Music songs, and download all the Apple Music songs you’ve selected to MP3.
 Now that you have all DRM-free Apple Music songs, the next step is to burn them into your CD. Keep reading for detailed steps.


 Step 2:
 Step 3:
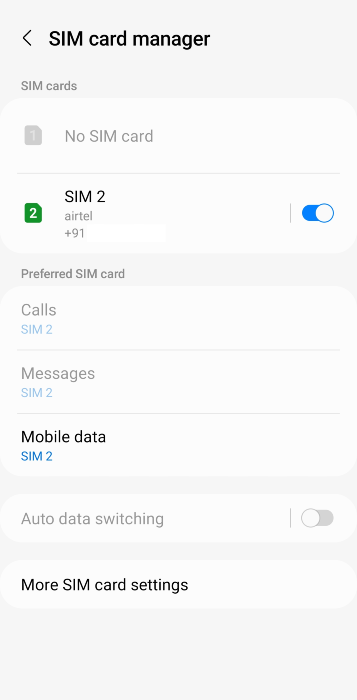
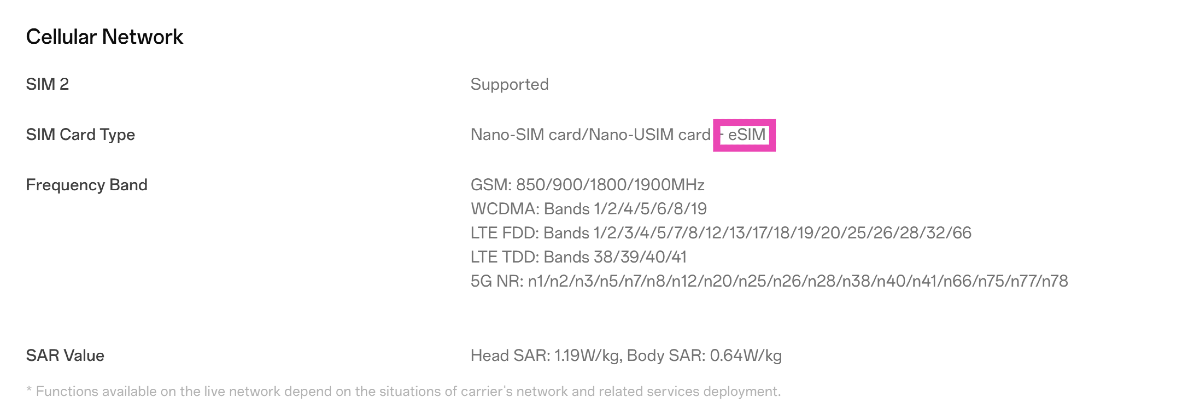 Go to your smartphone’s official page on its manufacturer’s website and take a look at its spec sheet to check if it supports an e-SIM. You will be able to find this information in the ‘Cellular Network’ section.
 Step 3: The app will list whether your phone supports e-SIM or not on the following page.
 Step 2:
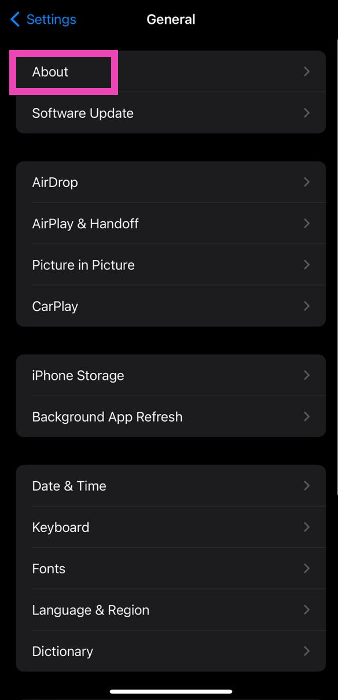 Step 3:
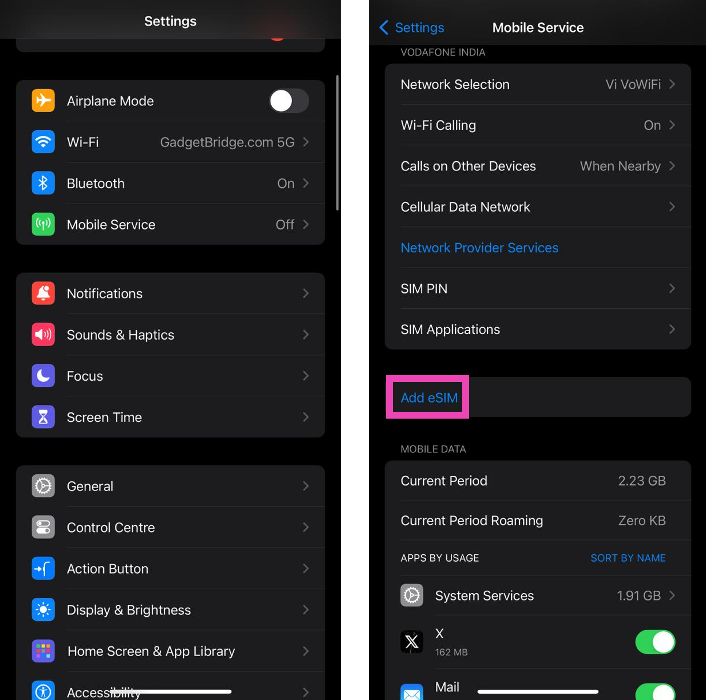

 Step 2:
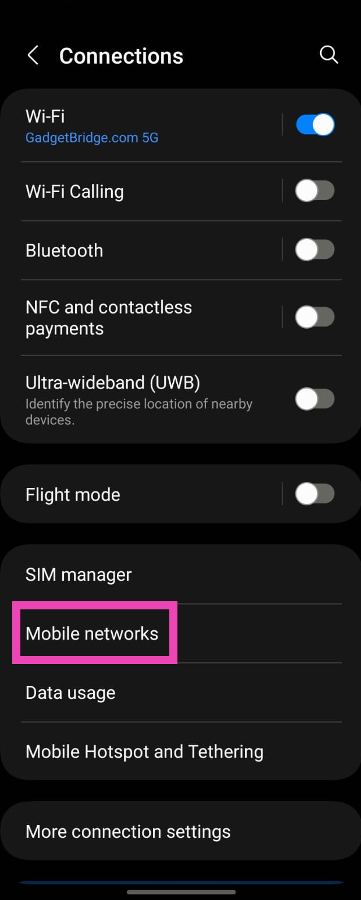 Step 3:
 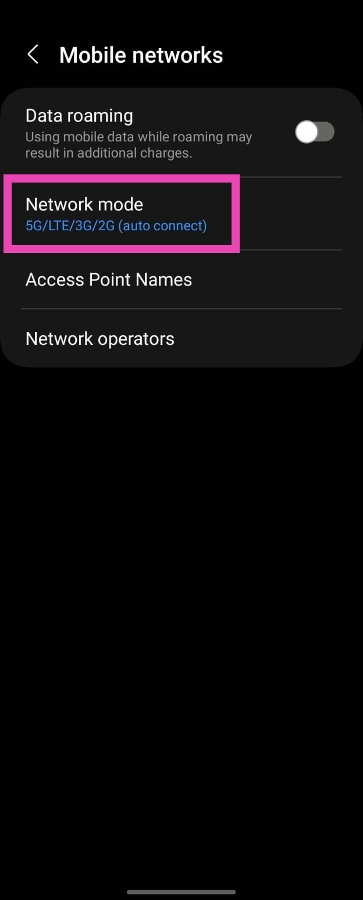 Step 4:
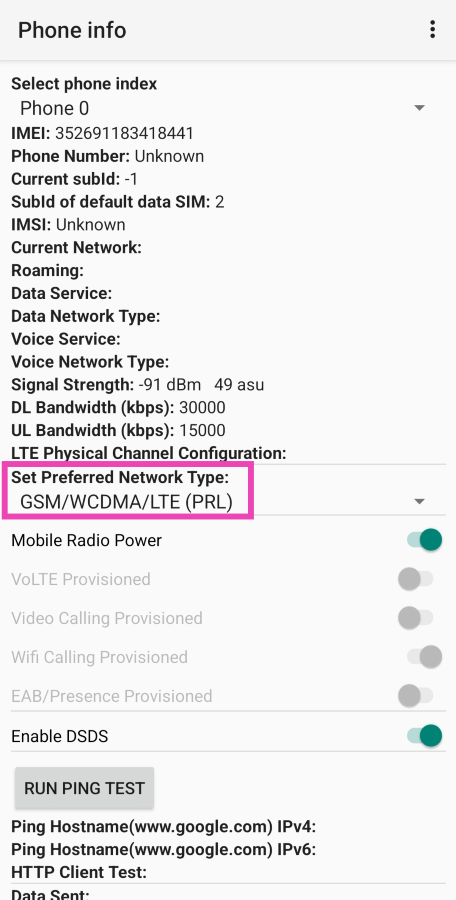 Step 4:
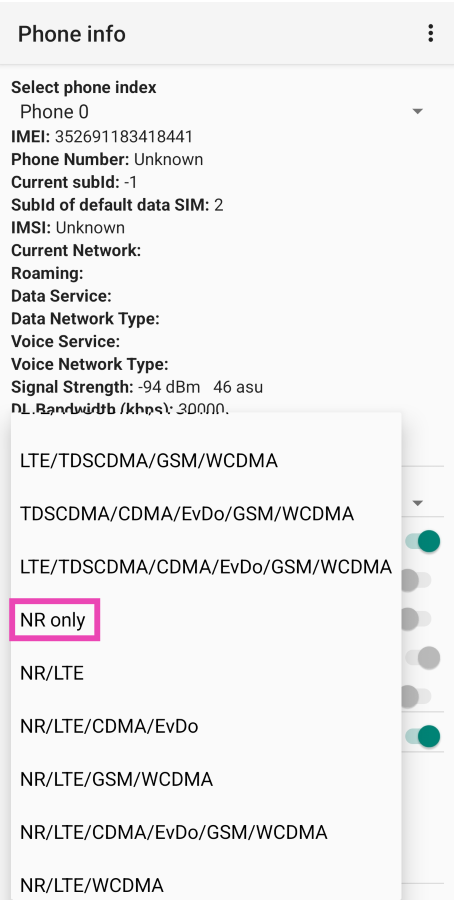
 Step 3:
 Step 4:
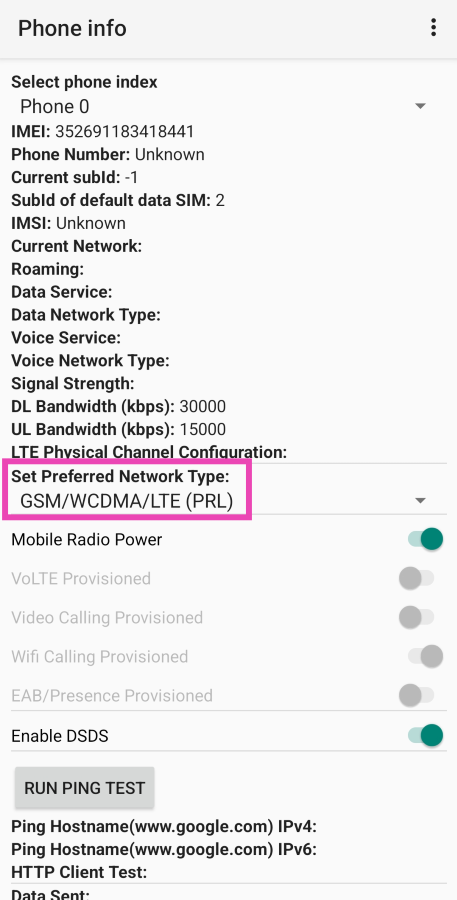
 Step 3:
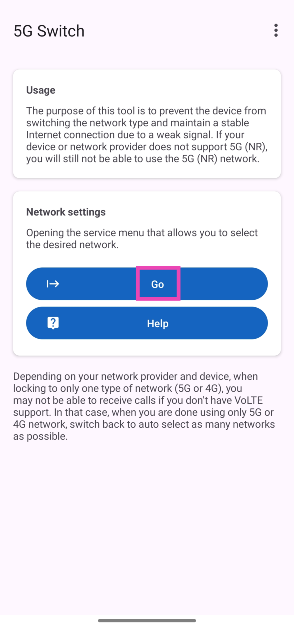 Step 3: Select your phone’s Android OS version.
 Step 4: Tap on Set preferred network type.
