Over the years foldable smartphones have slowly carved out a niche for themselves. If you are currently using a folding phone, you probably want to browse Facebook in its desktop avatar, given the enormous screen real estate offered by your device. If you’re connected to a WiFi network, you don’t even have to care about data usage. In this article, we bring you the top 3 ways to open Facebook’s desktop website on any phone.Read Also:Vivo X100 Pro and Vivo X100 powered by MediaTek Dimensity 9300 SoC launched
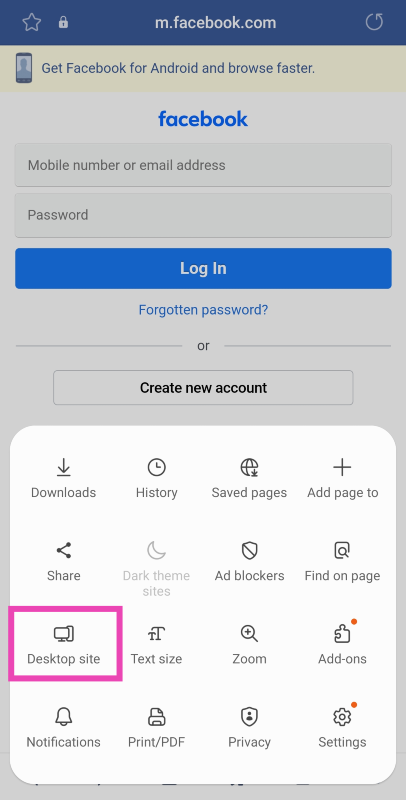
Open the Facebook Desktop Website on your native Android browser
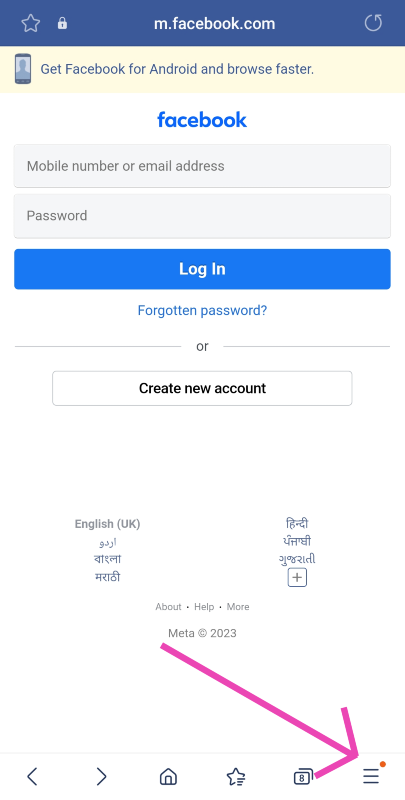
Step 1: Launch the native web browser on your Android phone.Step 2: Go to Facebook’s official website.Step 3: Hit the hamburger menu at the bottom right corner of the screen.Step 4: Select Desktop site.
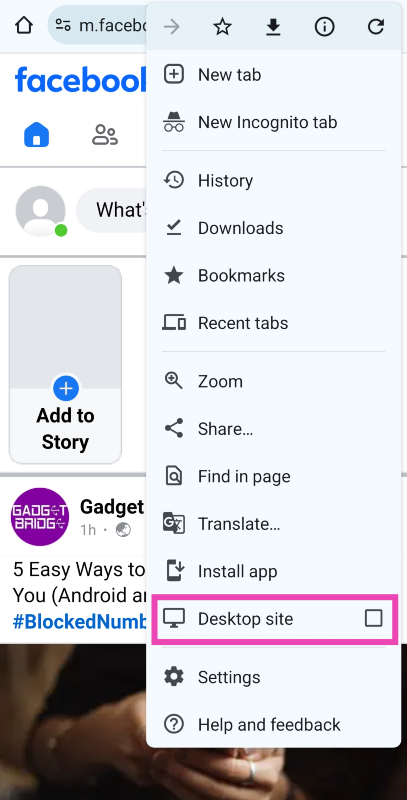
Open the Facebook Desktop Website on Google Chrome
Step 1:Launch Google Chrome on your smartphone.Step 2: Go to Facebook’s official website.Step 3: Hit the ellipses at the top right corner of the screen.Step 4: Select the check box for Desktop site.
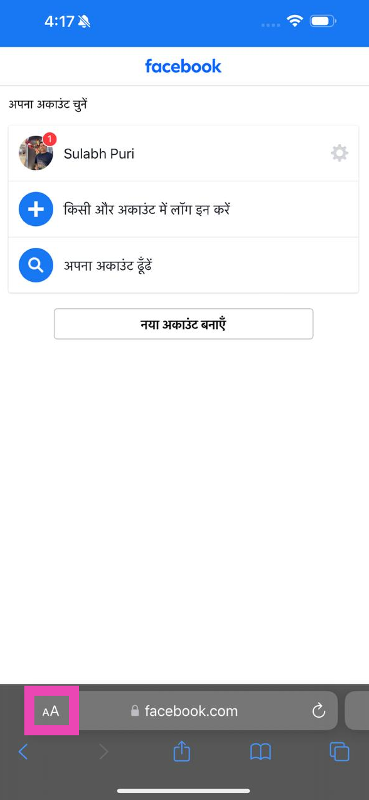
Open the Facebook Desktop Website on Safari
Step 1:Launch the Safari browser on your iPhone.Step 2: Go to Facebook’s official website.Step 3: Tap the aA icon next to the address bar.Step 4: Hit Request Desktop Website.
Frequently Asked Questions (FAQs)
How do I open the Facebook desktop website on my iPhone?
Go to the Safari web browser on your iPhone, navigate to Facebook, hit the aA icon at the bottom of the screen, and select ‘Request Desktop Website’. You can use this option for any website.
Does the desktop version of Facebook consume more mobile data?
Since Facebook’s desktop version does not compromise the website layout and other features for your smartphone, it ends up consuming more mobile data.
Is Facebook’s mobile site faster than the desktop version?
These are the top 3 ways to open Facebook’s desktop website on any phone. If you’re facing issues with hitting certain icons or tabs on the mobile version of Facebook, switching to the desktop site will help. The process to request the desktop website on the native browser app may vary among different smartphone manufacturers, but the feature is typically found in browser options.
Once someone blocks your phone number, you can’t contact them via phone calls or text messages. If you feel like the user accidentally blocked your number instead of someone else’s, you can contact them on social media platforms like Instagram and Facebook and ask them to fix the error. However, if you don’t use social media, here are the top 5 easy ways to call someone who blocked you (Android and iOS).Read Also:Vivo X100 Pro and Vivo X100 powered by MediaTek Dimensity 9300 SoC launched
Hide your Caller ID
On Android
Step 1: Launch the dialer app and tap the ellipses at the top right corner of the screen.Step 2: Select Settings.Step 3: Scroll down and select Supplementary Services.Step 4: Tap on Show your Caller ID.Step 5: Select Never.
On iOS
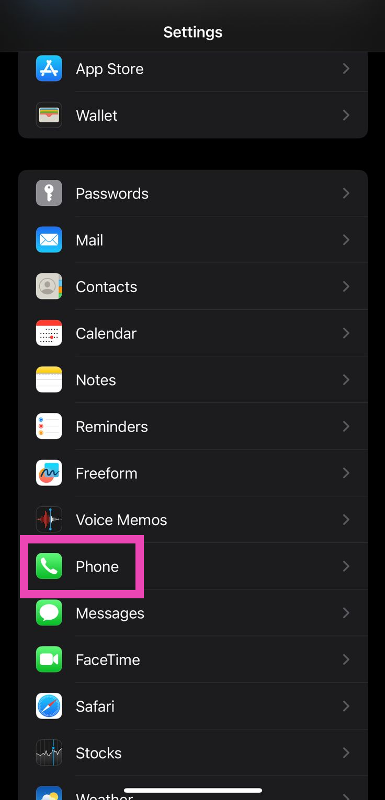
Step 1: Go to Settings and select Phone.Step 2: Tap on Show my Caller ID.Step 3: Turn off the toggle switch for Show my Caller ID.
Use *67 code to hide your Caller ID on iPhone (US Only)
iPhone users in the US can use a quick dial code to hide their Caller ID on a cellular call. Simply add *67 before the number you want to call if you don’t want the recipient to be able to see your name or phone number. Instead, their phone will display ‘Private Number’. Since your Caller ID is hidden, you will be able to get around the ban.
Use a different phone number
One of the simplest and most common ways to bypass a ‘block’ situation is using a secondary SIM card on your phone. Most modern smartphones can accommodate two SIM cards quite easily. Instead of using the primary phone number that has been blocked, hit ‘SIM 2’ while dialling the receiver.
Use a virtual number
If your secondary phone number has been blocked by the user as well, you can always get a burner number to contact them. Virtual phone numbers are often used to sign up for online services and apps where you don’t prefer using your primary number. This helps in cutting down a lot of spam. Once you get a virtual number you can also use it for calling, texting, and registering for instant messaging apps like WhatsApp. Check out our list of the top 10 apps for a temporary burner phone number.
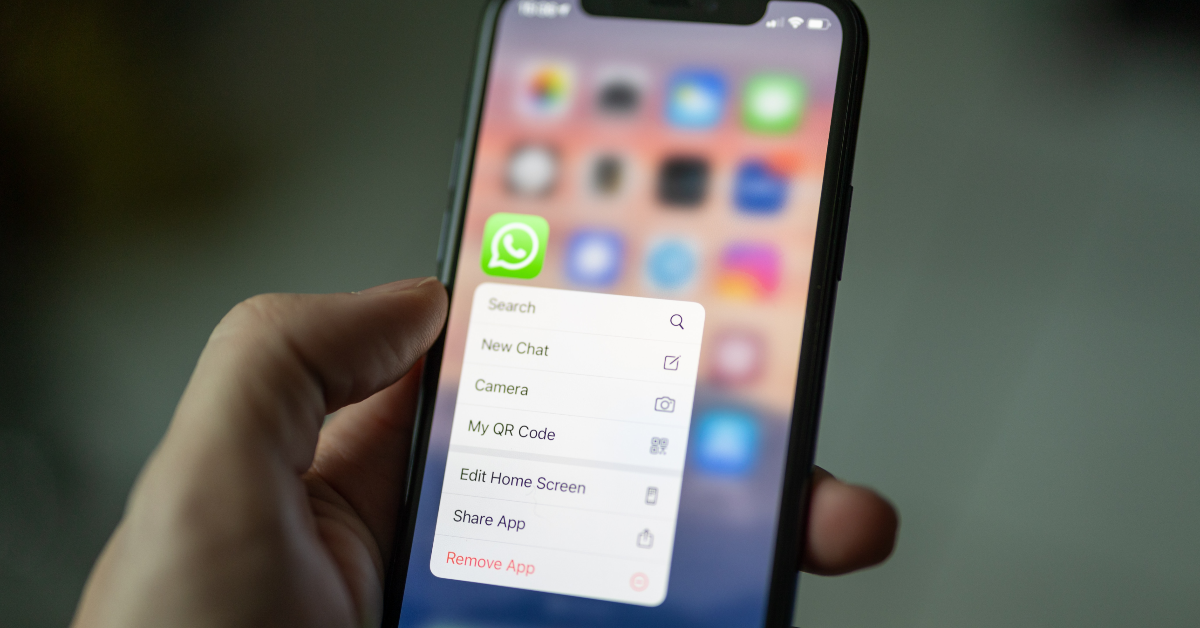
Call them on WhatsApp or Messenger
If the user has only blocked you from calling on a cellular network, you can still contact them on instant messaging apps like WhatsApp and Facebook Messenger. Simply search for the user on WhatsApp, open the conversation thread, and hit the call icon at the top right corner of the screen to initiate a voice call.
Frequently Asked Questions (FAQs)
How do I find out if someone has blocked my phone number?
If your number goes straight to voicemail after dialling the user, it is a strong sign that they have blocked your phone number. You may also receive notifications like ‘User is busy’ or ‘Number is out of service’ when you have been blocked.
How do I hide my Caller ID on my iPhone?
iPhone users from the USA can hide their Caller ID by adding *67 before dialling a particular number. Other users can go to Settings>Phone and turn off the toggle switch for Show my Caller ID to achieve the same result.
These are the top 5 ways to call someone who has blocked you (Android and iOS). Before you proceed with these methods, you should know that constantly contacting someone against their consent constitutes as harassment. If you have been blocked by someone, it is probably for a reason and bypassing that boundary will probably not help your case.
Message is the go-to texting and instant messaging service among Apple users. Once you sign into iMessage using your Apple ID, you don’t need to pay carrier charges for texts. You can even send media files without any hassle. However, users often report randomly getting signed out of the messaging service. In this article, we bring you the top 10 ways to fix the ‘iMessage signed out’ error on your iPhone.Read Also:Google Pixel 8 Pro Review: AI Features, Hit or Miss?
Why does iMessage keep signing me out?
Before we get into the fixes, let’s take a look at why you may be getting the ‘iMessage signed out’ error on your iPhone. This error could be caused by a plethora of reasons. Here are some of them.
Weak internet connection
Incorrect Apple ID
VPN-related issues
iMessage server outage
Incorrect date and time
Software glitches
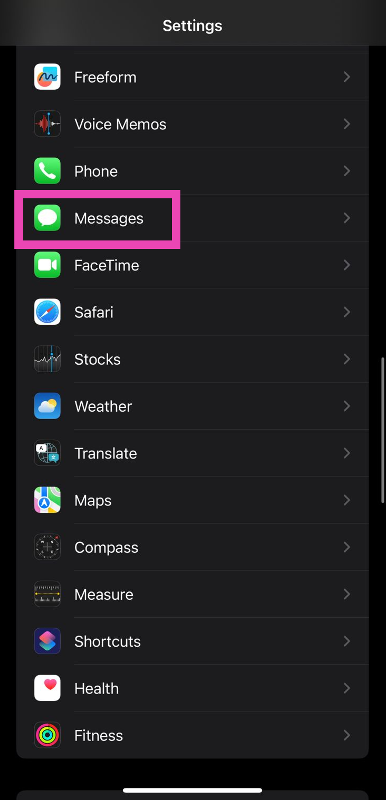
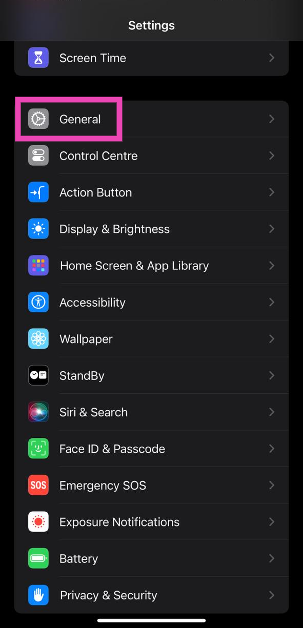
Turn off and restart iMessage
Step 1: Go to Settings and select Messages.Step 2: Turn off the toggle switch next to iMessage.Step 3: Turn the toggle switch back on.
Restart your iPhone
Restarting your iPhone can fix any background issues and software glitches that may be causing iMessage to malfunction. To restart your device, press and hold the side button along with either of the volume buttons. Once the power menu appears on the screen, drag the power slider to the right to turn off your iPhone. Press and hold the power key to turn it back on.
Check if you’re using the correct Apple ID for iMessage
Step 1: Go to Settings and select Messages.Step 2: Tap on Send & Receive.Step 3: Select ‘Use your Apple ID for iMessage’.Step 4: Select your Apple ID from the list.You can also sign out and sign back in to resolve any account-related issues.
Check your internet connection
The lack of a strong internet connection may prompt iMessage to display that you are not signed into your account. This typically happens when your iPhone has not had access to the internet for a long time. Refresh your phone’s mobile data or connect to a WiFi network to resolve this issue.
Reset iMessage Region
Step 1: Go to Settings and select Messages.Step 2: Tap on Send & Receive.Step 3: Tap on your Apple ID and select Change Location.Step 4: Tap on Region and set your current location.
Check iMessage servers
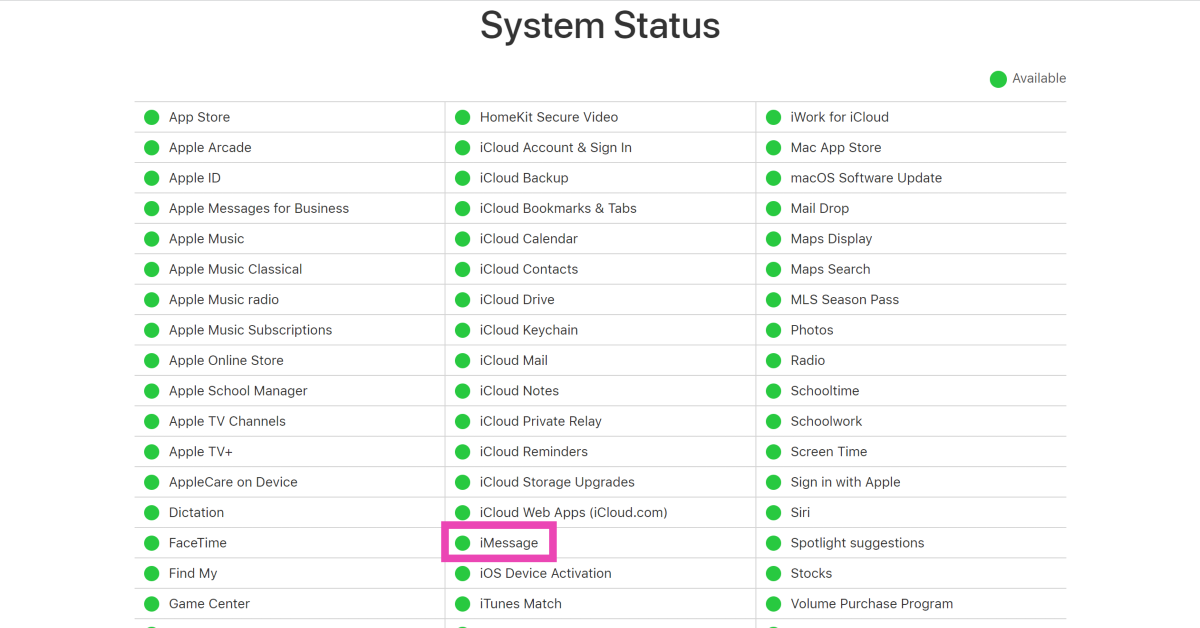
If you got signed out of iMessage and are unable to sign back in, it is likely because the iMessage servers are down. Luckily, Apple makes it very easy to track the server status of all its services. Simply go to the Apple System Status page and look for iMessage. If it does not have a green dot next to its name, it means it is experiencing a server outage. The only thing you can do in this situation is wait for the restoration of servers.
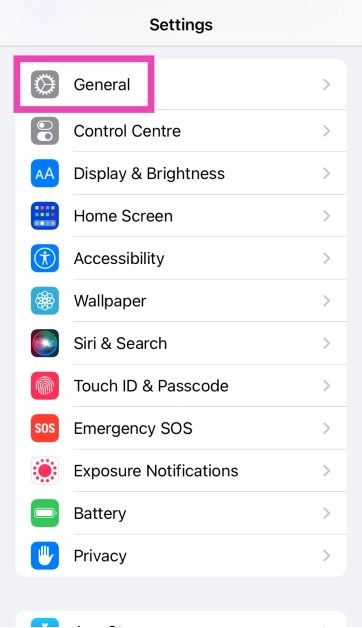
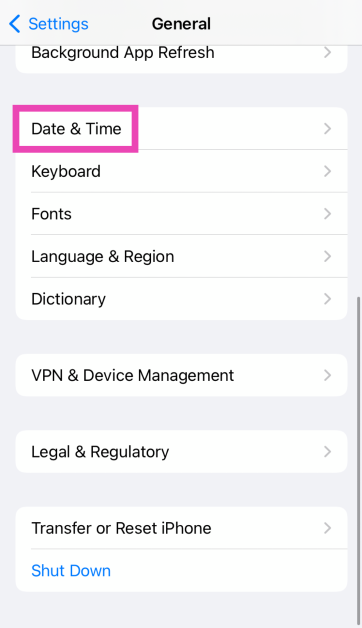
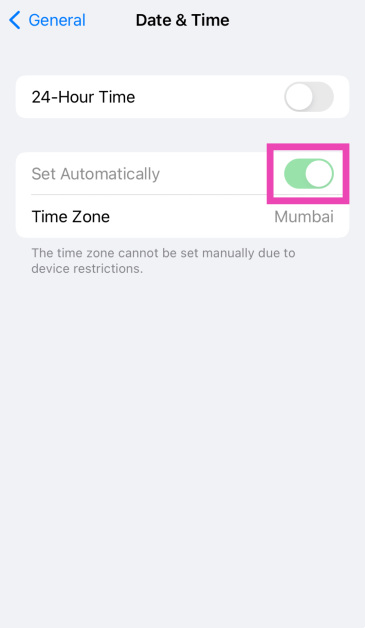
Check your iPhone’s data and time
Step 1: Go to Settings and select General.
Step 2: Tap on Date & Time.
Step 3: Turn on the toggle switch next to Set Automatically.
Disconnect VPN
VPN apps and services are known to cause issues with iMessage. iMessage requires certain network ports to function properly on your iPhone. A VPN can block these ports, rendering iMessage useless. If you’re connected to a VPN server, disconnect right away and refresh the iMessage app.
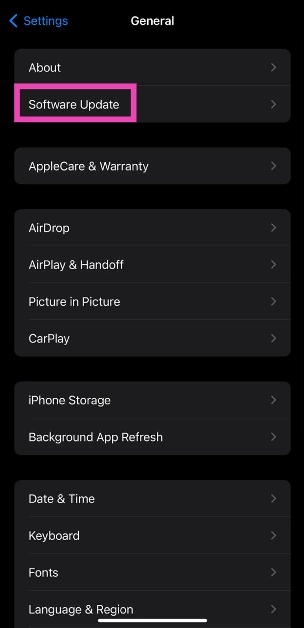
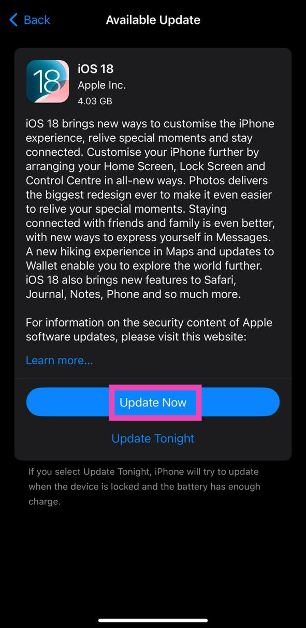
Update iOS
Step 1: Go to Settings and tap on General.
Step 2: Tap on Software Update.
Step 3: Hit Update Now.
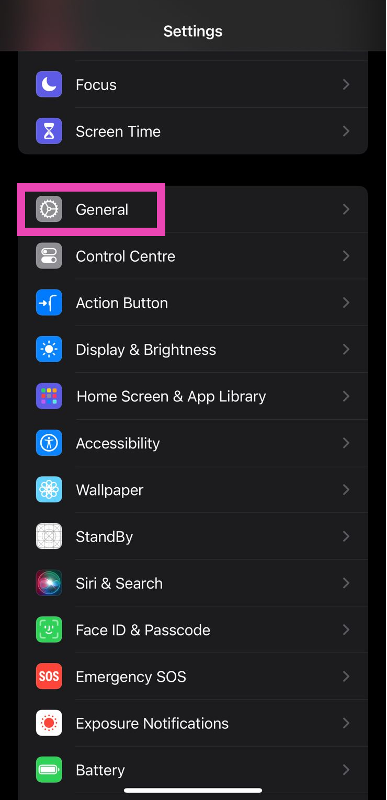
Reset Network Settings
Step 1: Go to Settings and select General.Step 2: Scroll down and select Transfer or Reset iPhone.Step 3: Hit Reset.Step 4: Select Reset Network Settings.Step 5: Enter your password.
Frequently Asked Questions (FAQs)
Why is my iPhone saying iMessage is signed out?
When iMessage cannot make contact with your Apple ID, it displays the ‘Signed out’ error. This could happen due to a plethora of reasons including bad connection, server issues, and more.
Why does my iPhone keep logging me out on iMessage?
You may be getting signed out of iMessage due to several reasons. Some of these include server outages, incorrect region, incorrect Apple ID, and other background issues.
How do I sign into iMessage using my Apple ID?
Go to Settings>Messages>Send & Receive>Use your Apple ID for iMessage and sign in using the proper credentials.
How do I fix iMessage on my iPhone?
Restarting your iPhone is a quick way to fix iMessage. You may also want to check your Apple ID and reboot iMessage to fix the service.
These are the top 10 ways to fix the ‘iMessage signed out’ error on your iPhone. If these fixes didn’t work for you, try contacting Apple support for more assistance. The problem is likely related to your Apple account. If you suspect someone is trying to sign into iMessage using your Apple ID, changing your password will help.
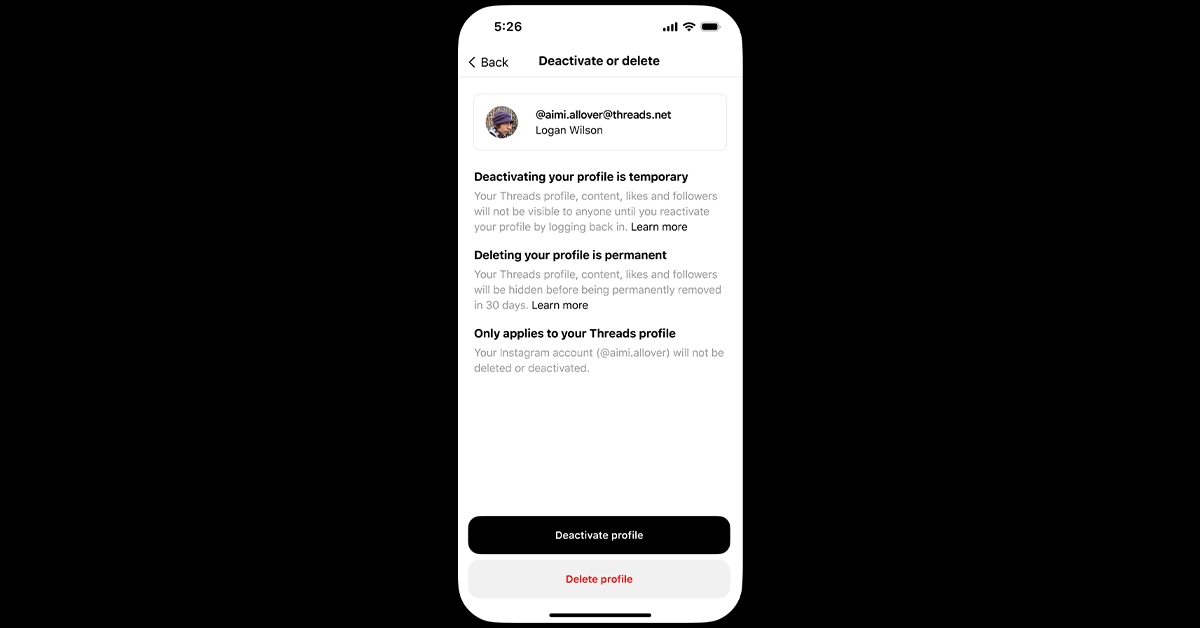
Meta has introduced the feature to delete your Threads profile without removing your Insta account.
Earlier users were able to disable their Threads profile temporarily.
Last month Meta rolled out edit features for Threads. Along with this it also brought Voice Threads functionality to the users. Just a few days back the company introduced the function to stop their Threads post being suggested to users on Instagram and Facebook. Now after receiving some backlash from users, it has now brought the ability to delete their Threads profile without deleting their Instagram account at the same time.Until now there was no other way to delete your profile on Threads without removing your Instagram account because Threads profiles are connected to individual Instagram accounts. Instead, users were only given the option to disable their Threads profile temporarily.Now you are allowed to delete your Threads Profile without risking your Instagram account. Yes, Meta has finally brought the ability to delete Threads profile without deleting your Instagram as both the profiles are linked together. Meta launched Threads in July this year to take on the microblogging platform Twitter. From the very beginning users have been asking for the ability to delete Threads profiles without also removing the associated Instagram account.The information was shared by Adam Mosseri, Instagram chief. To delete your Threads profile, visit Settings → Account → Delete or Deactivate Profile, then select delete.In addition to this, the social media’s head has also announced another feature allowing users to see Threads posts directly on Facebook and Instagram, to help expand your audience and grow your reach. He said, “We heard feedback that you want more control over the experience, so we’re rolling out a way to opt out of being featured outside Threads in Settings → Privacy.”The latest update lets users select whether or not they want to be shown on platforms other than Threads. The Privacy section of the Settings menu is where you may find this ability to opt-out.Recently Meta also rolled out a free-to-use Edit button on the platform. Threads users can edit their posts as many times as they like during the minute barrier. After the allotted timeframe one cannot edit their Thread post. The Voice Threads option is another tool that has also been added. The feature allows users to add a recorded audio message as a Threads post.
The iQoo 12 was launched in China last week alongside iQoo 12 Pro.
The smartphone comes with a 144Hz 6.78-inch 2K AMOLED E7 display.
It features a triple rear camera setup.
The device in India will be available via Amazon.
iQoo 12 is all set to make its debut in India next month after being released in China on November 7. According to the company it has scheduled the launch for December 12. The iQoo 12 Series launched in China include two models a Pro and a base model but as of now, the company has only set a vanilla model for release in the country. Ahead of the official launch, the company has created a dedicated microsite for the smartphone on Amazon.As soon as iQoo 12 is launched in India, it will be available for purchase via Amazon. The company has confirmed this by listing the phone on the e-commerce platform. To tease the availability and key specs of the handset a dedicated microsite has been created.iQoo 12
Price of iQoo 12
In China, iQoo 12 was made available in three colour options and a BMW Motorsport edition. The price of the smartphone there is set at:
12GB RAM with 256GB storage: CNY 3,999 (Rs 45,000)
16GB RAM with 512GB storage: CNY 4,299 (Rs 50,000)
The iQoo 12 Pro comes with a 6.78-inch 2K AMOLED E7 display with 1,440×3,200 pixels of resolution. The screen supports up to 144Hz refresh rate, HDR`0+ and 20:9 aspect ratio. The phone runs on OriginOS 4 on top of Android 14. It is powered by a 4nm Snapdragon 8 Gen 3 SoC processor.The triple rear camera setup includes a 1/1.3-inch 50-megapixel primary sensor (f/1.68 aperture), 64-megapixel periscope telephoto (f/2.57 aperture and 100X digital zoom) and 50-megapixel ultra wide-angle sensor (f/2.0 aperture). For selfies, the device features a 16-megapixel front-facing camera with f/2.45 aperture.iQoo 12 boasts a 5,000mAh battery, with 120W fast charging support. Also, there is an in-display fingerprint sensor for biometrics.
Garena Free Fire is a battle royale game with regular awards and tournaments to keep players interested. If you play Garena Free Fire, you should be aware of the redeem codes that are released on a daily basis. However, because the battle royale game is banned in India, players from other countries can use the Free Fire Redeem codes daily. If you’re unfamiliar with the Garena Free Fire redeem codes or don’t know how to get them, we’ve put together a step-by-step guide to help you redeem them. Check out Garena Free Fire Redeem Codes for 15 November 2023.The Free Fire redeem codes are a great way to get free stuff. These are 12-digit codes that contain alphabets and numbers, as well as an expiration date and time. Because the Garena FF redeem codes cannot be used more than once, you should hurry to the redemption page to claim your free reward before someone else does. To get a free reward, all you have to do is go to reward.ff.garena.com/en, which is the official redemption page. Also, keep an eye on this space for daily updates on Garena Free Fire redemption codes and rewards.
Garena Free Fire Redeem Codes Today 15 November2023
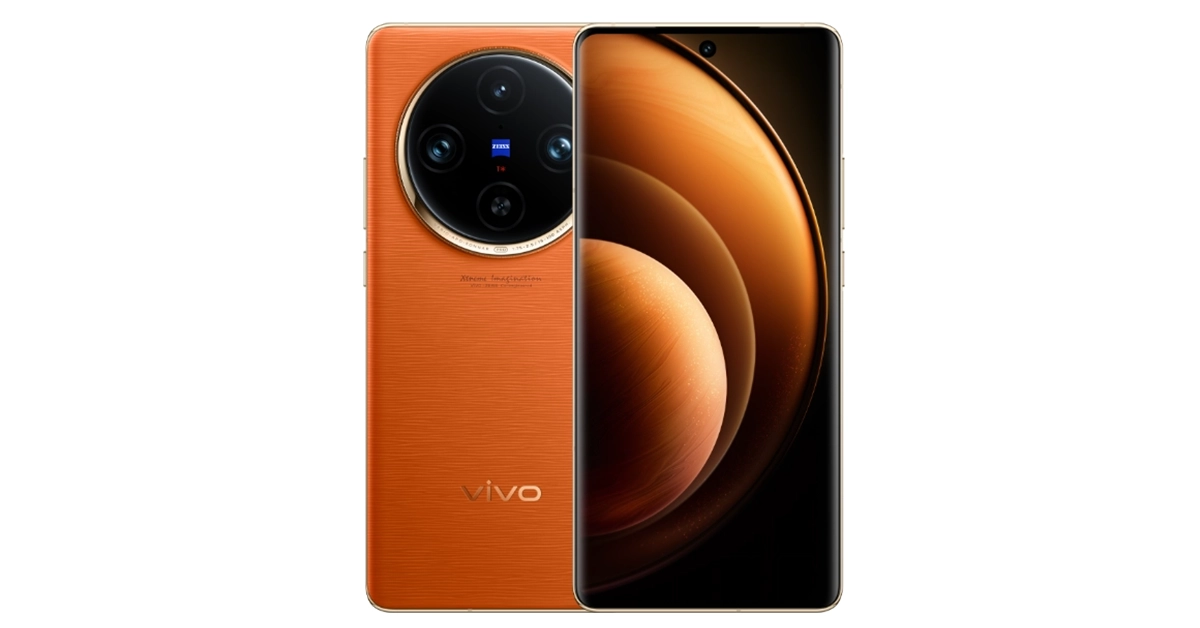
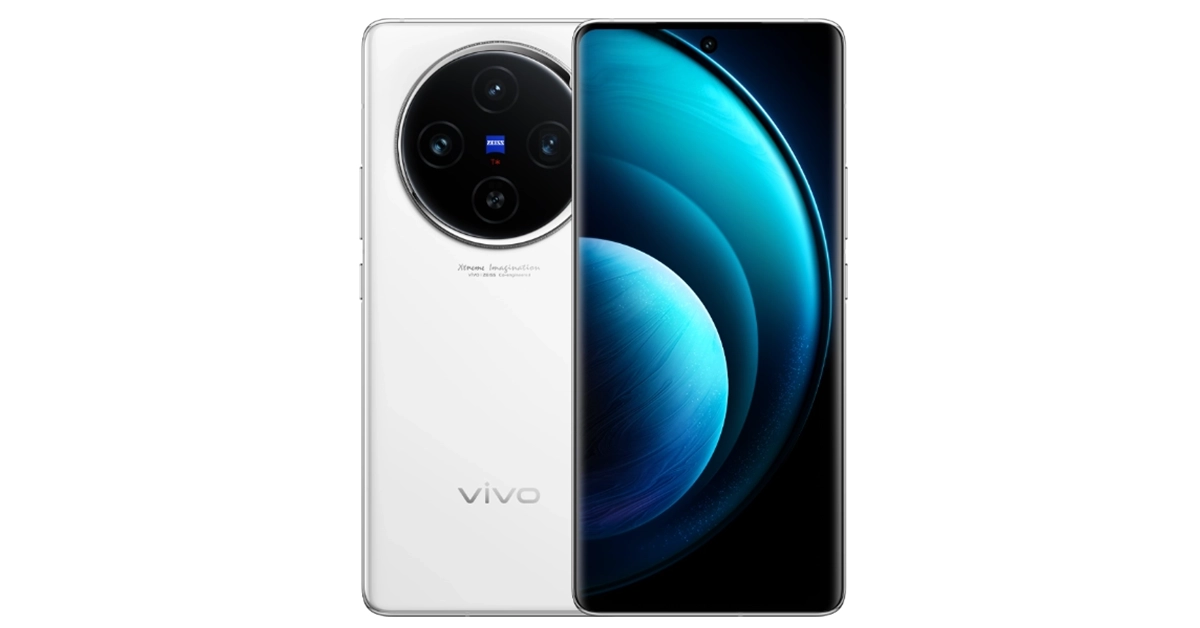
The Vivo X100 Pro and Vivo X100 features Zeiss optics.
The Pro model includes 120W fast charging support.
The X100 has 100W fast charging support.
Vivo has officially unveiled its flagship series Vivo X100 in China. The new line-up includes two smartphones- Vivo X100 Pro and Vivo X100. The devices are powered by MediaTek Dimensity 9300 SoC and run on OriginOS 4 with Android 14 out of the box. The device comes with a triple rear camera powered by Zeiss Optics. In addition to this, the phones come with up to 120W fast charging support.
Vivo X100 Pro, Vivo X100 pricing and availability
Vivo X100 Pro price:12GB RAM + 256GB storage: CNY 4,999 (Rs 56,500)16GB RAM + 256GB storage: CNY 5,299 (Rs 60,000)16GB RAM + 512GB storage: CNY 5,499 (Rs 62,000)16GB RAM + 1TB storage: CNY 5,999 (Rs 68,000)Vivo X100 price:12GB RAM + 256GB storage: CNY 3,999 (Rs 50,000)16GB RAM + 256GB storage: CNY 4,299 (Rs 48,000)16GB RAM + 512GB storage: CNY 4,599 (Rs 52,000)16GB RAM + 1TB storage: CNY 4,999 (Rs 56,000)16GB LPDDR5T RAM + 1TB storage: CNY 5,099 (Rs 58,000)Both smartphones are up for pre-orders and will shipped from November 21.Vivo X100 Pro
Vivo X100 Pro specifications
Vivo X100 Pro features a 6.78-inch AMOLED 8T LTPO curved display with 1,260 x 2,800 pixels of resolution. The screen supports a 120Hz refresh rate, 3000 nits of peak brightness, and 100 percent DCI-P3 colour gamut. The phone runs on OriginOS 4 with Android 14 out of the box. It comes equipped with MediaTek Dimensity 9300 SoC with Vivo V3 chip. The device comes with an IP68 rating for dust and water resistance.The triple rear camera setup with Zeiss optics includes:
50-megapixel Sony IMX989 1-inch type sensor with OIS (100x digital zoom)
50-megapixel ultra wide-angle sensor
50-megapixel Zeiss APO super-telephoto lens with OIS (4.3x optical zoom and 100x digital zoom)
The smartphone is highlighted with a 32-megapixel selfie camera.Vivo X100 Pro packs a 5,400mAh battery with 100W wired and 50W wireless charging support.For connectivity, there is: 5G, Wi-Fi 7, Bluetooth, NFC, GPS, NavIC, OTG, and a USB Type-C portSensors: in-display fingerprint sensor, IR sensor, accelerometer, ambient light sensor, proximity sensor, e-compass, gyroscope, flicker sensor and multispectral sensor.Vivo X100
The rollout timeline for One UI 6 will be rolled out to more devices.
The Android 14 update has already been released to the S23 series.
The rollout timeline has been released through the official community manager at Samsung Community forums.
Samsung rolled out One UI 6 update to Galaxy S23, Galaxy S23+ and Galaxy S23 Ultra. Now its flagship mobile phones have already received the Android 14 update the company is planning to release the software update to more devices in the coming days. The update brings features like new icons, labels, widgets, animations, the ability to create a lock screen and a new default font. The Quick panel now includes a new button layout that makes it easier to access the features frequently used.After rolling out stable One UI 6 with Android 14 to Samsung Galaxy S23 series smartphones. Samsung has revealed the schedule for the update’s rollout for devices that are compatible to receive the update. According to the official community manager at Samsung Community forums 30 Galaxy phones will receive the update in the next five weeks.Also Read:Meta collaborates with Amazon to allow shopping on Facebook and InstagramHere is the release timeline for the One UI 6.0 update: November
The Google Pixel 8 Pro has finally launched in India, and it has been our primary mobile phone for the past few weeks. The design of the phone looks similar to the previous iteration but has evolved. However, the internals of the smartphone have been improved. It is now being powered by the latest generation of the Tensor G3. Moreover, this time the Titan M2 security co-processor has been designed specifically to bring forth Google’s AI features. Regarding the camera, only the primary and selfie sensors have received an upgrade. With it, the rest of the Pixel phones this year are all about AI. So, here is our in-depth review of Google Pixel 8 Pro.
Google Pixel 8 Pro Review: Design and Display
As we mentioned above, it may not look like the Google Pixel 8 Pro has received any design changes, but the look and feel of the phone are different from last year’s Pixel 7 Pro. On good thing we need to point out is that the Pixel 8 Pro has been made out of recycled material. With its softer shapes and exquisite metal finishes, it now has a more refined appearance. The edges of the device are curved and rounded, unlike the flat corners of its predecessor. The curved edges make it incredibly comfortable to grasp. We have the Obsidian colour option for the review, but there is another colour variant that consumers can buy. The Pixel 8 Pro features a matte glass back and a temperature sensor that lets you quickly scan an object to get its temperature.The shiny texture on the Pixel from last year attracted fingerprints, so we had to constantly wipe it down with a cloth to keep it clean. But this is not the case this time. The Pixel 8 Pro has a matte glass finish. It appears to be amazing. A glossy, distinctive camera bar combined with a matte rear makes for the ideal combination. Also Read:OnePlus Open Review: It can really open up to youThe matte surface makes the camera module stand out. But when the dust accumulates around the camera module, it makes it look dirty. Because of the camera bump, the upper portion of the phone slants when placed on a level surface. But the good thing is that it is stable and does not wobble. For protection, Gorilla Glass Victus 2 is layered on both the front and the back.The right side of the frame has a power button and a volume rocker. The SIM tray is located on the opposite side (a single nano SIM card tray supports an e-sim and a physical SIM). There are two grilles: one is a speaker, and the other is a microphone. In between them, there is a USB Type-C port at the bottom. An antenna and a noise-cancelling microphone are given on top.The back of the phone is integrated with a new temperature sensor. It allows you to get the temperature of an object by scanning it.Coming to the display, the Google Pixel 8 Pro is highlighted with a 6.7-inch Super Actua display with 1,344 x 2,992 resolution. Additionally, it offers a 20:9 aspect ratio and an adaptive refresh rate between 1Hz and 120Hz. The maximum brightness of the LTPO OLED is 2,400 nits. Glass Victus 2 from Corning Gorilla Glass protects the front panel.The display on the phone supports 2K resolution. Note that the Pixel 8 Pro boasts the brightest smartphone screen at 2,400 nits. The screen is quite bright outside in the sun, too.The display looks stunning, and the bezels around the display are super slim and uniform. There is no noticeable chin at the bottom.The colour reproduction of the display is accurate, and the contrast and white balance are superb. The Pixel phone responds to touch inputs quickly.The 120 Hz refresh rate feature provides the display with smoothness and fluidity. Depending on the media being played, the phone’s adaptive refresh rate enables it to automatically switch between 30Hz and 120Hz. Furthermore, there were neither jitters nor stutters during our testing. We enjoyed watching content on OTT services like Netflix, Amazon Prime Video, and Big Boss on Jio Cinema with extreme excellence.The speakers are loud, and the sound quality is good. It is good enough for watching videos and listening to your favourite audio playlists.The fingerprint sensor is also placed perfectly on the flat display. Although it unlocks the iPhone quickly, the fingerprint sensor is not ultrasonic.
Google Pixel 8 Pro Review: Performance and Cameras
Moving on to the performance. Under the hood, there is a Tensor G3 SoC with a Titan M2 security coprocessor inside, as said.Surprisingly, this India variant is available with 12GB of RAM and 128GB of storage. At this price, one would hope for at least 256GB or 512GB storage, which other premium smartphones are sporting.Overall, the gaming experience was very decent. On it, we played everything from normal games to high-end titles. It can play the majority of demanding games, including Call of Duty: Mobile, BGMI, and Asphalt 9. Keep in mind that the phone slowed down a bit, and we encountered a temperature issue. Even though November has arrived and it’s currently pretty cold in Delhi, the device is still having a bit of a heating problem when used for a prolonged time. It is highly likely that the device will overheat if you reside in a warmer climate, such as Mumbai or Chennai. So people who do a lot of gaming, note that overheating will prevent you from getting a steady frame rate at the moment. Hopefully, the company will address this issue in its future software updates. Also Read:Apple iPhone 15 Pro Max Review: Max PerformanceThe Pixel 8 Pro excelled at doing daily tasks like listening to music, browsing social media, casual work, and binge-watching.Here you get a clean Android experience, so no additional or annoying apps except for Google services you will see on this device. The Pixel 8 Pro runs on Android 14 out of the box. The company has promised to provide seven years of OS upgrades and security updates. This phone also has the best software and a very user-friendly interface. In contrast to other customisation choices offered by other brands, the company provides Pixel-only features. Some are already here, and some might arrive later in the year. OK, now we will get to the camera details. So, to test the Pixel 8 Pro cameras, we clicked a lot of pictures in every scenario. Talking about the ultra-wide-angle lens. The ultra-wide images seem slightly dull, and the sharpness level is also not what we were expecting; this needs to be improved in the next updates.normal vs ultrawideNow Google has provided a 5x dedicated zoom lens that takes good images. But you begin to see a haziness in your photos as you go from a 5x zoom to a 10x or even a 30x (which is the case in some others too). So at 5x is what we recommend to shoot at. On to the pictures taken in low light. The images have less noise, and most of the time the camera was able to take good images. However, the pics taken indoors or where there is artificial lights are even better. However, we would have preferred a little bit more brightness in the low-light photographs. We are highlighting this because the low-light images lacked a few key details when you zoom in.portraitIn terms of videos, the Pixel 8 Pro has two modes: portrait and cinematic, both of which maximise the resolution to full HD. During the day, we observed that the video quality in various modes was okay, but in low light, there was a lot of noise.portraitsWe loved the selfies taken from the Pixel 8 Pro’s front-facing camera. The images are so close to natural, and if you follow all of our reviews, you already know how much we favour selfies that look natural. The photos have excellent HDR but aren’t very boosted. We were blown away by the quality of the selfie video as well as how well the microphone captured our voice, even when we were outdoors.Gadget Bridge Trick: Just take a normal image and then go to the edit option to apply the portrait filter. This works better than taking a dedicated portrait shot.Over that, the macro photographs are detailed and crisp.Ok, this time Google has focused on artificial intelligence (AI). The majority of the company’s services and apps are now AI-compatible. For example, generative AI is the foundation of Google Photos’ Magic Editor. The editing tool makes use of generative AI to make or create new images better. But this feature is time-consuming. Yes, editing a single image does take a very long time, but over time you will get used to it and the process will be faster. It did, however, make complex editing easier, even though it doesn’t always look realistic. So you might need to try a few times. With a few taps, you can now resize or rearrange your subject. With this, one can also change the sky’s hue and improve the background’s brightness and quality. Nevertheless, we believe that this is just the start, and we anticipate further developments for Magic Editor from Google.Other editing tools like Best Take, Audio Magic Editor, Magic Eraser, and Photo Unblur are some more of the Pixel-exclusive features built on AI technology from Google Research. The company did improve Magic Eraser on the Pixel 8 Pro, and thanks to generative AI, one can now remove larger distractions.Keep in mind that in order to use the editing tools, you must be online and have uploaded the image to Drive beforehand.The Pixel 8 Pro packs a 4,950mAh battery along with 27W wired fast and 12W wireless charging support. Please share your thoughts about the charging speed in the comments section, because we do feel super fast charging speed is expected at this price.You will need to buy the charger separately, as it is not included with the gadget box. Therefore, it took more than 1.5 hours for the battery to be fully charged using our old 25W charger.But if we talk about the battery backup, however, it was over 8 hours of continuous screen time, which is not bad at all. It could provide between six and seven hours of screen time, which included regular activities like gaming, videography using social media accounts, and viewing videos on YouTube and OTT services. Keep in mind that usage determines screen time, so depending on usage, your screen time may vary. Overall, with moderate daily use the smartphone can stay alive for a full workday.
Verdict
We were really surprised with Pixel’s camera performance this time. While major smartphone brands like Samsung and Apple are upping their game in photography, there were no major changes seen here. The colour reproduction is same as before, and the pictures could have been better. While the AI implementation gave us a mixed bag of feelings, the smartphone throttles a lot, so the performance drops after a few minutes of gaming is seen right now. But as said it should be taken care of in the next software update.Magic editing tools on this device allow you to remove or fix the position of your subject. You can also remove unwanted things from the background, or even the shadows and highlights, to give it a more realistic look. We would really like all these functions to be quicker and less time-consuming, as that is what we would expect from a flagship phone at Rs 1,06,999.Another change that is welcomed is the support for seven years of OS upgrades and security updates can be one big reason to switch to this new Pixel phone.
Garena Free Fire is a battle royale game with regular awards and tournaments to keep players interested. If you play Garena Free Fire, you should be aware of the redeem codes that are released on a daily basis. However, because the battle royale game is banned in India, players from other countries can use the Free Fire Redeem codes daily. If you’re unfamiliar with the Garena Free Fire redeem codes or don’t know how to get them, we’ve put together a step-by-step guide to help you redeem them. Check out Garena Free Fire Redeem Codes for 14 November 2023.The Free Fire redeem codes are a great way to get free stuff. These are 12-digit codes that contain alphabets and numbers, as well as an expiration date and time. Because the Garena FF redeem codes cannot be used more than once, you should hurry to the redemption page to claim your free reward before someone else does. To get a free reward, all you have to do is go to reward.ff.garena.com/en, which is the official redemption page. Also, keep an eye on this space for daily updates on Garena Free Fire redemption codes and rewards.
Garena Free Fire Redeem Codes Today 14 November2023


 Step 4: Select Desktop site.
 Step 4: Select the check box for Desktop site.
 Step 4: Hit Request Desktop Website.

")
 Step 2:
 Step 3:
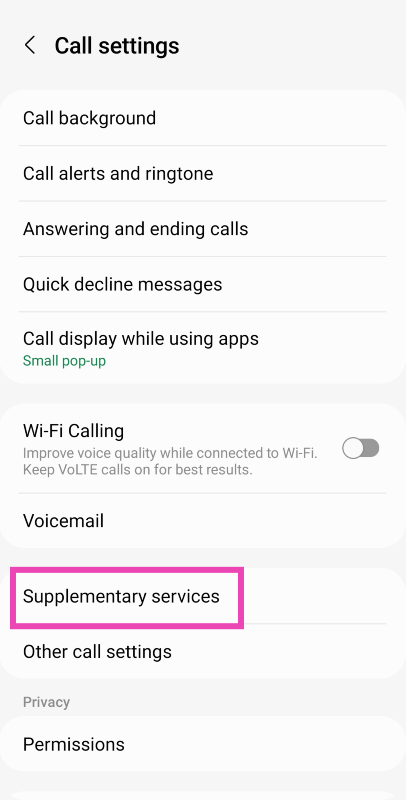 Step 4:
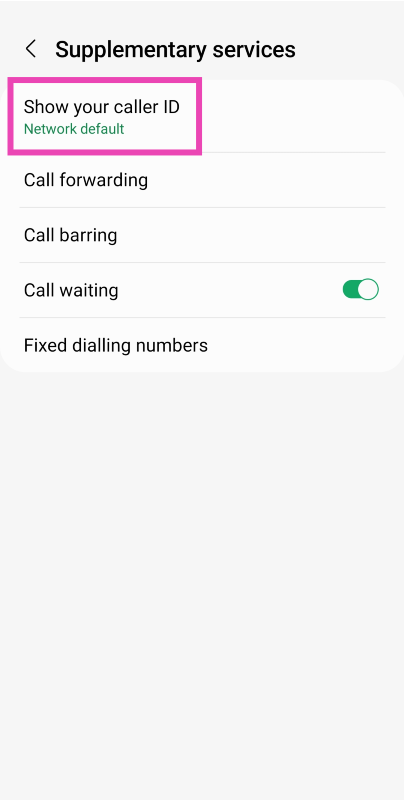 Step 5:
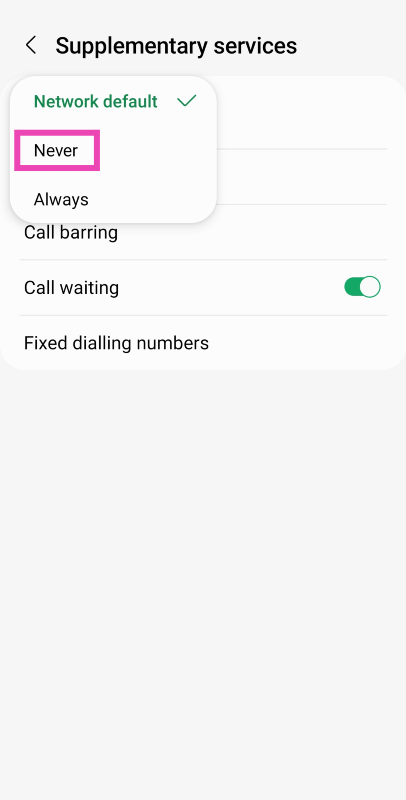
 Step 2:
 Step 3:
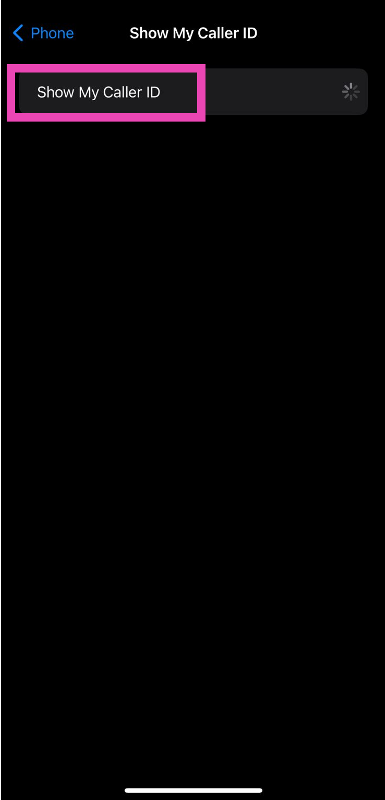


 Step 2:
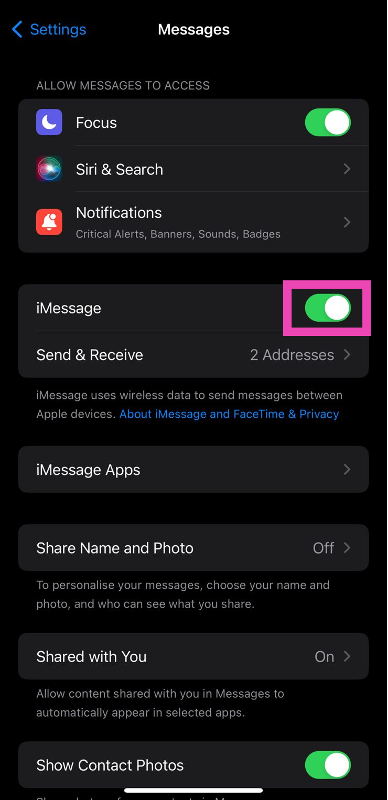 Step 3:
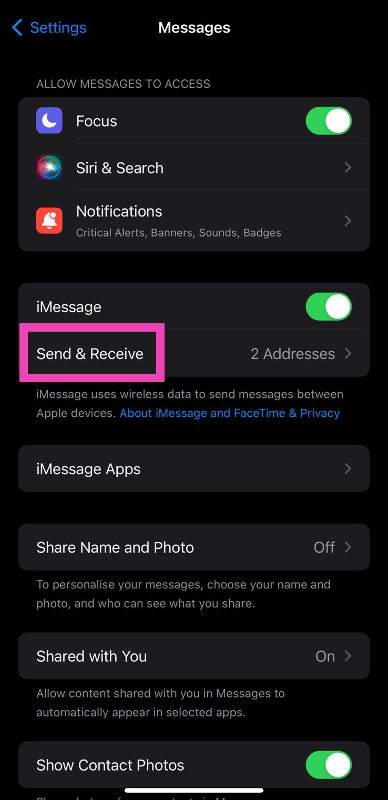 Step 3:
 The lack of a strong internet connection may prompt iMessage to display that you are not signed into your account. This typically happens when your iPhone has not had access to the internet for a long time. Refresh your phone’s mobile data or connect to a WiFi network to resolve this issue.
 Step 2: Tap on Date & Time.
 Step 3: Turn on the toggle switch next to Set Automatically.
 VPN apps and services are known to cause issues with iMessage. iMessage requires certain network ports to function properly on your iPhone. A VPN can block these ports, rendering iMessage useless. If you’re connected to a VPN server, disconnect right away and refresh the iMessage app.
 Step 2: Tap on Software Update.
 Step 3: Hit Update Now.
 Step 2:
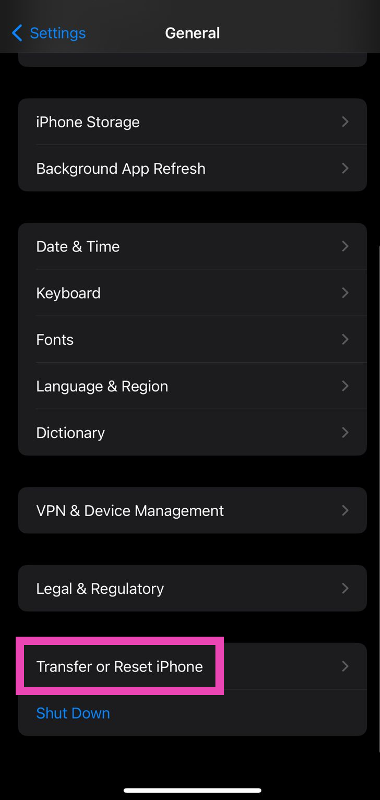 Step 3:
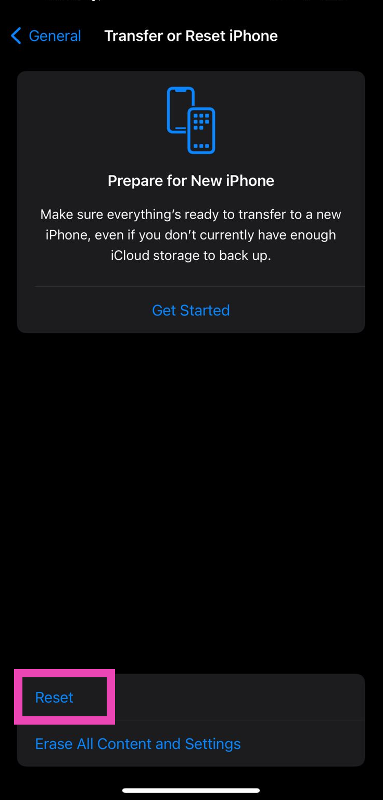 Step 4:
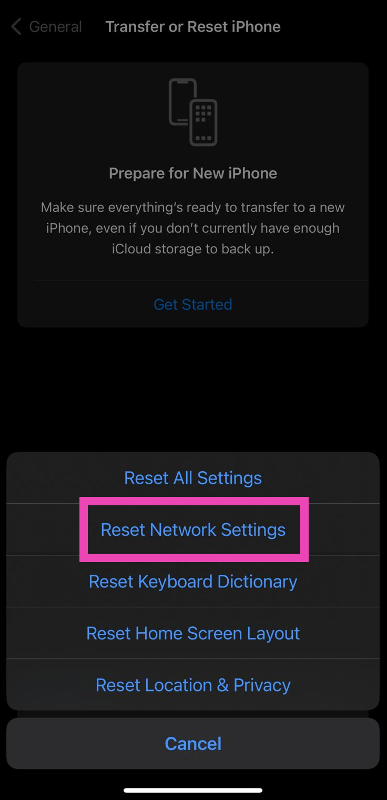 Step 5: