Samsung has released a new application called Impulse App that uses artificial intelligence (AI) and can help those with speech impairments. Impulse was created in partnership with the Speechcare & Stuttering Centre to enhance speech fluency using rhythmic wrist vibrations together with the Galaxy Watch6 smartwatch. The Samsung Galaxy Watch 6 series and Android smartphones can both use the Impulse app.
Samsung Electronics has announced the release of Impulse, an AI-based application designed to enhance the daily experiences of individuals with speech impairments, including stuttering. As per the company after it has done extensive investigation and analysis, Samsung and Cheil have created a common solution for thousands of different causes of speech pathologies. These causes were previously treated separately, but “rhythm therapy,” a proven speech therapy technique to create a subconscious compass in the brain that improves linguistic fluency.
Impulse has the support of A Sociedade Portuguesa de Terapia da Fala in Portugal and the Association of Speech Therapists of Spain. Impulse app is an application for Android phones and the range of Galaxy Watch6 smart watches and other compatible devices which uses an algorithm based on natural language processing to analyse and convert words into rhythmic vibrations. This creates a sensory pattern on the user’s wrist that functions as an invisible and silent assistant.
In accordance with the specifics of the patient’s condition, the smartwatch notifies the user of the tempo of each phoneme or word. The user knows their own speech rhythm, which allows them to avoid blocks in diction and facilitate fluency in their speech through this physical support through vibration.
Users will be able to complete questionnaires to provide all the details that will allow the solution to offer personalised assistance adapted to each case. After setting it up with this data, the user will turn on a haptic metronome, which will provide their wrists with a rhythmic basis and which will transform the vibration into neural impulses in the part of the brain that deals with speech.
More than 250 rhythm and tone exercises—whose difficulty increases as the user gains proficiency in speech control—will be available in the Impulse app. There will be four modes with three levels of exercises Boost your voice, Boost your rhythm, Boost your tone and Boost your speech that will allow you to practise words or phrases as well as the intonation required to support fluid speech in conversations.
The app will be available for free download in Spain from the Play Store for Android 10 and higher smartphones, and compatible Galaxy Watch6 smartwatches.
Garena Free Fire is a battle royale game with regular awards and tournaments to keep players interested. If you play Garena Free Fire, you should be aware of the redeem codes that are released on a daily basis. However, because the battle royale game is banned in India, players from other countries can use the Free Fire Redeem codes daily. If you’re unfamiliar with the Garena Free Fire redeem codes or don’t know how to get them, we’ve put together a step-by-step guide to help you redeem them. Check out Garena Free Fire Redeem Codes for 12 April 2024.
The Free Fire redeem codes are a great way to get free stuff. These are 12-digit codes that contain alphabets and numbers, as well as an expiration date and time. Because the Garena FF redeem codes cannot be used more than once, you should hurry to the redemption page to claim your free reward before someone else does. To get a free reward, all you have to do is go to reward.ff.garena.com/en, which is the official redemption page. Also, keep an eye on this space for daily updates on Garena Free Fire redemption codes and rewards.
Features 4K Upscaling and HDR10+ for vivid, detailed images.
Includes Multi Voice Assistant and IoT Hub for easy integration.
Comes with a SolarCell Remote that charges using indoor light.
Samsung has today introduced their new 2024 lineup of Crystal 4K TVs – the Crystal 4K Vivid, Crystal 4K Vision Pro, and Crystal 4K Vivid Pro series. With a starting price of INR 32,990, these new models are not only wallet-friendly but also come packed with features designed for an enhanced home entertainment experience.
In This Article
Advanced Technology for Supreme Viewing
Each model in the 2024 Crystal 4K TV series boasts impressive technologies such as 4K Upscaling, Crystal Processor 4K, and HDR10+, ensuring superior picture quality that brings content to life with vivid colors and stunning detail. The series is also equipped with the innovative SolarCell Remote, which can be charged using indoor light, eliminating the need for disposable batteries.
The 2024 lineup offers various sizes including 43-inch, 50-inch, 55-inch, 65-inch, and 75-inch models, catering to all living spaces. Samsung’s Senior Vice President, Mohandeep Singh, noted, “Today’s young consumers seek smart TVs that not only provide lifelike picture quality and immersive audio but also incorporate enhanced security features.” This series meets these demands with smart capabilities like Multi Voice Assistant, featuring Bixby and Amazon Alexa, and Q-Symphony for synchronized sound from the TV and soundbar for a richer audio experience.
Seamless Integration with Smart Homes
These TVs are more than just screens; they are a central hub for a smart, connected lifestyle. The built-in IoT Hub and Samsung TV Plus integrate seamlessly with your smart home setup, allowing you to manage and enjoy content effortlessly. OTS Lite enhances the auditory experience by providing 3D surround sound that tracks the action on the screen, making every viewing experience uniquely immersive.
Gaming and More
Gamers will appreciate features like Auto Game Mode and Motion Xcelerator, which optimize the TV for gaming with faster frame transitions and lower latency, providing a smoother and more responsive gameplay experience.
Samsung continues to push the boundaries of what’s possible with their TV technology. The SolarCell Remote is a testament to their commitment to sustainability, reducing waste and dependence on non-renewable resources.
Availability and Offers
The Crystal 4K Vivid series starts at just INR 32,990 and can be found on Samsung.com, Amazon.in, and Flipkart.com. The Crystal 4K Vision Pro series begins at INR 34,490, while the Crystal 4K Vivid Pro starts at INR 35,990, both available on Samsung.com and other major online platforms. With additional offers such as exciting cashback and No-cost EMI for up to 18 months, upgrading your home entertainment system has never been easier or more affordable.
A groundbreaking partnership between Google and OnePlus to bring the advanced Gemini 1.0 AI model to smartphones.
Introduction of AI Eraser, an innovative tool allowing users to effortlessly remove unwanted objects from images, showcasing the practical application of AI in enhancing mobile photography.
Beyond AI Eraser, the collaboration aims to incorporate a range of Google Cloud AI products into future smartphones, broadening the scope of AI utility in mobile devices.
In a new move, tech giants Google and OnePlus are set to transform the smartphone world with the introduction of Gemini, Google’s most advanced AI model, into mobile devices. This partnership marks a significant leap forward, promising to redefine how we interact with our smartphones. With over 10 million users already accessing generative AI models, and the first AI feature launched globally in April, the future of mobile technology is here, and it’s powered by AI.
The Dawn of a New Era: Gemini Models on Smartphones
Announced at Google Cloud Next ’24 and set to launch later this year, Gemini represents the pinnacle of mobile AI integration. OPPO and OnePlus, leaders in smartphone innovation, are at the forefront of bringing this technology to users worldwide. Nicole Zhang, General Manager of AI Product at OPPO and OnePlus, emphasizes the transformative potential of AI, stating, “Generative AI is a revolutionary technology… perfectly positioned to bring the benefits of AI to users all around the world.”
Four Pillars of Mobile AI
The integration of Gemini into smartphones is guided by four key principles:
Effective Resource Utilization: Maximizing the performance of mobile hardware to deliver efficient AI experiences.
Self-Learning Capabilities: Enabling smartphones to adapt and improve over time through AI.
Real-World Perception: Allowing devices to understand and interact with their surroundings.
Creative Empowerment: Providing users with tools to unleash their creativity through AI.
These principles ensure that the future of mobile AI is not just powerful, but also intuitive and seamlessly integrated into daily life.
Introducing AI Eraser: A Glimpse into the Future
One of the first AI-powered features to make its global debut is AI Eraser. This innovative tool, developed by OPPO and OnePlus, allows users to easily remove unwanted objects from images, transforming mobile photo editing. Powered by AndesGPT LLM, AI Eraser analyzes and replaces selected areas with a background that perfectly matches the surroundings, enabling users to achieve flawless images with minimal effort.
Beyond AI Eraser, OPPO and OnePlus are collaborating with Google to incorporate a suite of Cloud AI products into their smartphones. This partnership will enable a range of new capabilities, from summarizing news articles to generating social media content, making smartphones more versatile than ever.
If you don’t want your phone to distract you while you’re working but don’t want to miss an important message either, it is important you find a way to access that messaging app on your PC. Most instant messaging apps like WhatsApp and Telegram have efficient web portals and PC apps that let you access all the important features of the platforms. The same is the case with Snapchat. So, let’s take a look at the top 4 ways to use Snapchat on your Windows laptop or PC.
Ideally, using Snapchat’s web portal or Windows app on your laptop or PC should do the trick. However, the messenger’s web portal is only available for Google Chrome, Microsoft Edge, and Safari. If you’re a Firefox user, you will need to use the Snapchat app on your laptop or PC. Luckily, the app and web portal share the same interface and you won’t miss out on any features.
If you keep your phone and PC linked using Microsoft’s Phone Link, you don’t need to use Snapchat’s app or web portal. Simply access the app in the Phone Link interface on your PC. The catch is that only a few OEMs allow app accessibility for Phone Link. If you’re a Samsung or OnePlus user, you don’t have to worry about this.
Finally, if you’re an emulator person, then BlueStacks would be right up your alley. Android gamers have been using this option to enjoy mobile games on a bigger screen for years. This works for messaging apps as well.
Use Snapchat for Web
Snapchat has a convenient web portal which you can use to access your account. The only catch is that it only works on Google Chrome, Microsoft Edge, and Safari. Go to the official Snapchat website and click on ‘Login to chat’. This will redirect you to the login page where you will need to enter your username/email/phone number and password to access your Snapchat account. Unlike WhatsApp and Telegram, you cannot log into Snapchat’s web portal using a QR code.
Use the Snapchat app for PC
If you don’t use Chrome, Edge, or Safari, you can simply install Snapchat’s app on your PC from the Microsoft Store. Once installed, you will need to log into your account using your username, phone number, or registered email. Snapchat’s app for Windows is identical to its web portal.
Use BlueStacks
Using an Android emulator is another way you can use Snapchat on your PC. This was the go-to method for users to use the app on their laptops before Snapchat created its web portal and app for Windows. Bluestacks is one of the finest Android emulators around. Upon installing BlueStacks on your PC, you need to log in using your Google Account and install Snapchat from the Play Store. This app will mimic the Android design instead of using the web layout.
Use Link to Windows
Using the Link to Windows app, you access your phone’s apps and data on your PC or laptop. You will need to be logged into your Microsoft Account on your laptop and Link to Windows app for this to work. Open the Phone Link app on your PC/laptop and scan the QR code using the Link to Windows app on your phone. Once the two devices have been paired, you can access Snapchat on your PC. The only catch is that Phone Link can only access apps on Samsung, Asus, Oppo, OnePlus, and Honor devices.
Frequently Asked Questions (FAQs)
How do I use Snapchat on my PC?
You can access your Snapchat account on your PC using its web portal and Windows app.
Which web browsers support Snapchat’s web portal?
As of now, Snapchat for Web is only supported by Microsoft Edge, Google Chrome, and Safari.
Can I video call using Snapchat on my PC?
Yes, Snapchat’s web portal and PC app allow video calling.
These are the top 4 ways to use Snapchat on your Windows PC or laptop. You can also try mirroring your phone’s screen on your PC, although you will need to rely on your smartphone to control the app. If you know any other way to go about this task, let us know in the comments!
Krafton seems to be on a launch spree. The company recently launched two new titles: Garuda Saga and Bullet Echo. Now it is planning to introduce another new game- Dark and Darker Mobile in the country for which it released the teaser trailer. The teaser gives a glimpse of the dark, brooding world of medieval low fantasy.
The first teaser trailer for the new game “Dark and Darker Mobile,” which is being developed by KRAFTON’s creative studio Bluehole Studio, has been revealed. The trailer captures the distinct mediaeval low-fantasy ambience of the game. The company aims to launch the mobile game within this year.
The trailer, which was made public via the official Dark and Darker Mobile YouTube account, begins with an adventurer from the fighter class, armed with a sword and shield, entering a dungeon. The adventurer finds wealth and avoids dangers like monsters and traps, but in the end, he is defeated by a rogue class adventurer who ambushes him from behind with a dagger.
The teaser trailer gives viewers a glimpse into the core gameplay of Dark and Darker Mobile, themed around escape and set in a dark, brooding world of medieval low fantasy.
Dark and Darker Mobile includes elements of battle royale survival, dungeon crawler exploration, and other facets of the RPG genre’s evolution. Five classes are available for the creation of characters by adventurers: fighter, barbarian, rogue, ranger, or cleric. Every class has distinct active and passive skills; players can equip two active skills for use in dungeons, and as a character advances in level, they can equip an increasing number of passive abilities. In addition, every class has access to several kinds of armour and weaponry, providing a variety of gaming experiences based on the class selected.
There is a variety of dungeon content available in Dark and Darker Mobile. High-level dungeons are beyond regular dungeons and are only accessible by adventurers with advanced gear.
There’s also a PvE mode dungeon that’s styled after defense genres where stages must be cleared and a PvP-focused dungeon where adventurers can test their skills against one another.
Through battles with other adventures in dungeons, treasure boxes, and encounters with monsters, adventurers can find and obtain equipment and other stuff. These items and equipment can also be purchased from merchants, who offer quests to build rapport, sponsoring or selling higher-grade items and equipment. Gold and ores can be used to upgrade equipment, and adding new items to the collection can have a positive impact on a character’s appearance.
Through the sidekick system, players can recruit AI sidekicks or pets as allies. As they level up, sidekick characters can join groups of adventurers to enter multi-user dungeons and offer more powerful support. Utilising the pet system can grant enhancement effects when entering dungeons.
Taking a screenshot on your Android or iOS smartphone is an easy and intuitive process. On the other hand, there are a handful of methods you can employ on your PC to carry out the same task. Each method has its set of advantages and is suited for certain situations. So, let’s take a look at the top 8 ways to take a screenshot on a Windows 11 PC or laptop.
Since there are multiple ways to take a screenshot on your PC, you should know which one is best suited for the task at hand. If you need a screenshot for a presentation or other illustrational purposes, you might want to edit it a little before using it on your project. Using the Snipping Tool is your best option in this scenario. Once you take a screenshot using Snipping Tool, it opens up in the application’s native editor where you can mark or highlight the things you want.
If you’re more concerned with taking a quick screenshot of the entire screen, the Windows + PrtScn shortcut is for you. Using this key combination does not trigger the Snipping Tool editor nor does it ask you to select a portion of the screen. It immediately captures the entire screen and copies the image to the clipboard.
PC Gamers who are more familiar with Game Bar can use it to take screenshots or screen recordings of the gameplay. If you’re looking for more sharing and editing features, third-party apps like Screenshot Join and Screenshot+ are more up your alley.
Use the Snipping Tool
Using the Snipping Tool, you can either take a screenshot or record the screen on your Windows 11 PC or laptop. Here’s how.
Step 1: Search for Snipping Tool in the taskbar and launch the app.
Step 2: Select the camera icon from the toolbar.
Step 3: Hit New.
Step 4: Use the mouse/trackpad to select the area of the screen that you want to capture.
Step 5: Once the area has been selected, release your finger from the mouse/trackpad. The screenshot will appear in the Snipping Tool window where it can be edited and saved.
Use the Windows Key + Shift + S command
Launching the Snipping tool every time you want to take a screenshot can be quite cumbersome. To make things easier and more convenient, simply press Windows Key + Shift + S on the keyboard. This will launch the screenshot window without opening the Snipping Tool first. Drag the cursor along the screen to take a screenshot. Screenshots taken using this method are copied to the clipboard and saved in the Screenshots folder directly. They won’t open in the Snipping Tool window for editing.
Use the PrtScn key
Don’t want to remember the key combination mentioned above? Simply press the PrtScn button to trigger the Snipping Tool. You can enable this option by going to Start > Settings > Accessibility > Keyboard and turning on the toggle switch for the ‘Use the Print Screen button to open screen snipping’ option.
Now press the PrtScn key to launch the Snipping Tool. Once you have selected the area of the screen you want to capture, release the mouse/trackpad and the screenshot will be copied to the clipboard and shared in the Screenshots folder in your Windows 11 laptop/PC.
Use the Windows + PrtScn shortcut to capture the entire screen
The methods mentioned above make you select the part of the screen you want to capture. If you want to take a screenshot of the entire screen in one go, simply press the Windows + PrtScn keys on your keyboard. Once the screenshot is taken it gets copied to the clipboard but does not get stored in your PC’s storage. Make sure you paste the screenshot into some editing tool before taking another one.
Use Game Bar
The Game Bar on your Windows 11 PC or laptop is an essential tool for recording your gameplay and monitoring your PC’s performance while gaming. You can use this tool to take a screenshot of your computer any time you want. Simply press the Windows + G keys and hit the Capture button. In the following popup box, click on the camera icon to take a screenshot.
Use a third-party app
If you don’t want to use any native options offered by your Windows 11 PC or laptop for taking a screenshot, simply install a third-party app of your choice. Apps like Webpage Screenhsot Grabber, Screenshot Join, and Daily Screenshot offer exclusive editing and sharing features apart from the functionality of capturing the screen. You can find all these apps in the Microsoft Store.
Use the Surface Pen
If you own a Microsoft Surface, there are much easier ways to take a screenshot on it other than using the onscreen keyboard. The onscreen keyboard does not have the PrtScn to begin with, which makes it a bit of a dead end. To launch the Snipping Tool on your Surface, simply double-tap its back. You can then select an area on the screen to capture it.
Press the Microsoft Surface’s volume and power buttons
Another way to take a quick screenshot on Microsoft Surface is by pressing the volume up key and power button. This will capture the entire screen and save the image in the Screenshots folder.
Frequently Asked Questions (FAQs)
How do I capture a part of the screen on my Windows 11 laptop or PC?
Press the Windows + Shift + S keys on your keyboard to launch the Snipping Tool and select the portion of the screen you want to capture. Once you’re done, simply release the mouse or trackpad to take a screenshot.
How do I take a screenshot of the entire screen on my Windows 11 PC or laptop?
Press Windows + PrtScn on your keyboard to take a screenshot of the entire screen on your PC or laptop.
How do I take a screenshot on Microsoft Surface using the Surface Pen?
Double-tap the back of the Surface Pen to launch the Snipping Tool and take a screenshot.
These are the top 8 ways to take a screenshot on your Windows 11 PC or laptop. Which is your preferred method to take a screenshot on your computer? Let us know in the comments. While you’re here, check out this article to learn how to take a screenshot on an Android device in 6 different ways.
Fixing screen-related issues on your laptop can be a daunting task. Diagnosing the issue at hand can be particularly confusing if it pops up out of the blue. Windows users often report mysterious white dots appearing on certain parts of their laptop’s screen. If you’re facing a similar issue, you have landed on the right page. Let’s take a look at what’s causing this problem and how it can be fixed.
Why are white dots appearing on my laptop’s screen?
Random glitches on your laptop or PC’s screen can be very annoying. The ‘white dot’ issue is quite common and can arise due to a plethora of reasons. Here are some of them.
Dead pixels: When a pixel on the screen stops functioning, it sticks out like a sore thumb. It fails to replicate the colours displayed on the screen. A cluster of dead pixels can cause white spots on the display.
Water-related damage: If your laptop screen was recently exposed to water splashes, it may start to malfunction. Some water droplets can find their way behind the display and damage its hardware.
Hard impact: If your laptop or PC monitor takes a fall, it can damage the hardware of the screen, resulting in white spots or dead zones.
Wear and tear: Old devices tend to wear out after years of use. In this case, you will need to replace the worn-out parts or switch to a new device.
Clean the screen
White spots often appear on the screen due to the collection of dust and grime. To prevent this from happening, use a microfibre cloth to clean the display. A microfibre is less likely to scratch the surface and leave minute fibres on the screen. To remove the more stubborn dirt particles, dip the microfibre cloth in isopropyl alcohol before wiping the screen.
Fix the dead pixels
If the dead pixels on your laptop’s display are causing the white dots to pop up on the screen, you can fix them using JScreenFix. But before you do that, run a dead pixel test to make sure that is the case. Use this tool to run the test on your laptop. If you identify any dead pixels, go to this page and click on ‘Launch JScreenFix’. Drag the pixel fixer over the dead pixel and leave it running for 10 minutes to fix it.
Apply pressure on the screen
If the online tool mentioned above did not fix the dead pixels, applying a little pressure on them may help. Make sure your finger or palm is wrapped in a microfiber cloth before applying pressure on the screen. Do not exert a lot of pressure or you may end up damaging the display even further.
Reinstall display drivers
Outdated display drivers can cause malfunctions on the screen. As a blanket measure, uninstall the display drivers even if they are not out of date and then reinstall them. Here’s how.
Step 1: Go to Control Panel and select Device Manager.
Step 2: Click on the arrow next to Display adapters.
Step 3: Right-click on the driver and select Uninstall device.
Step 4: Follow the onscreen instructions.
Once the display drivers have been uninstalled, your PC or laptop will fall back to its native drivers. If you still notice the white spots on the screen, the issue is not being caused by the drivers. You can reinstall the updated drivers and move on to other fixes.
Enter BIOS
If you want to make sure that the white dot issue on your laptop’s screen is arising due to a software glitch, restart your device in BIOS. If you see the white dots on your screen while your laptop is in BIOS, it means the issue is hardware-related. To enter BIOS, restart your laptop and press Delete + F12 while it is booting. This key combination may differ among OEMs, so perform a quick Google search for your laptop model.
Connect your laptop to an external display
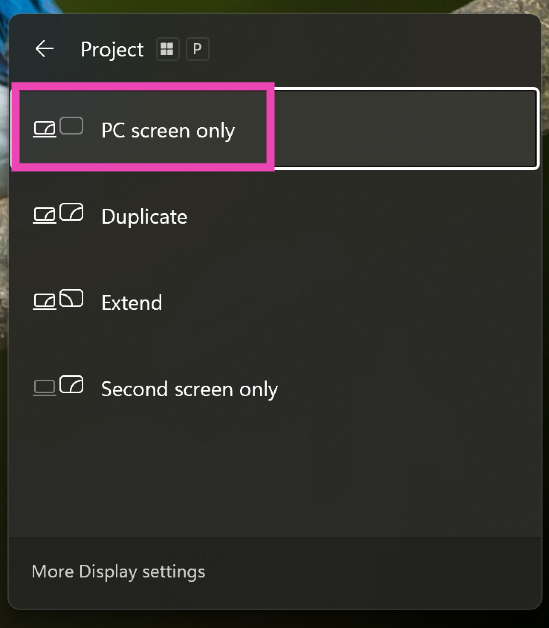
To confirm that this is a hardware issue that’s causing this problem, connect your laptop to an external display. Once connected, press Win + P to go to the projection menu. Choose ‘Duplicate’ or ‘Second screen only’. If the white dots do not appear on the external monitor, it means that something is wrong with your laptop screen’s hardware. Take it to an authorised service centre for further diagnosis.
Frequently Asked Questions (FAQs)
Why are white dots appearing on my laptop’s screen?
If you notice white dots on your laptop’s screen, it could be because of dead pixels, faulty display drivers, or hardware damage caused by pressure, hard impact, or moisture.
How do I check my laptop screen for dead pixels?
Use this tool to check your screen for dead pixels. These dead pixels can then be repaired using the JScreenFix tool.
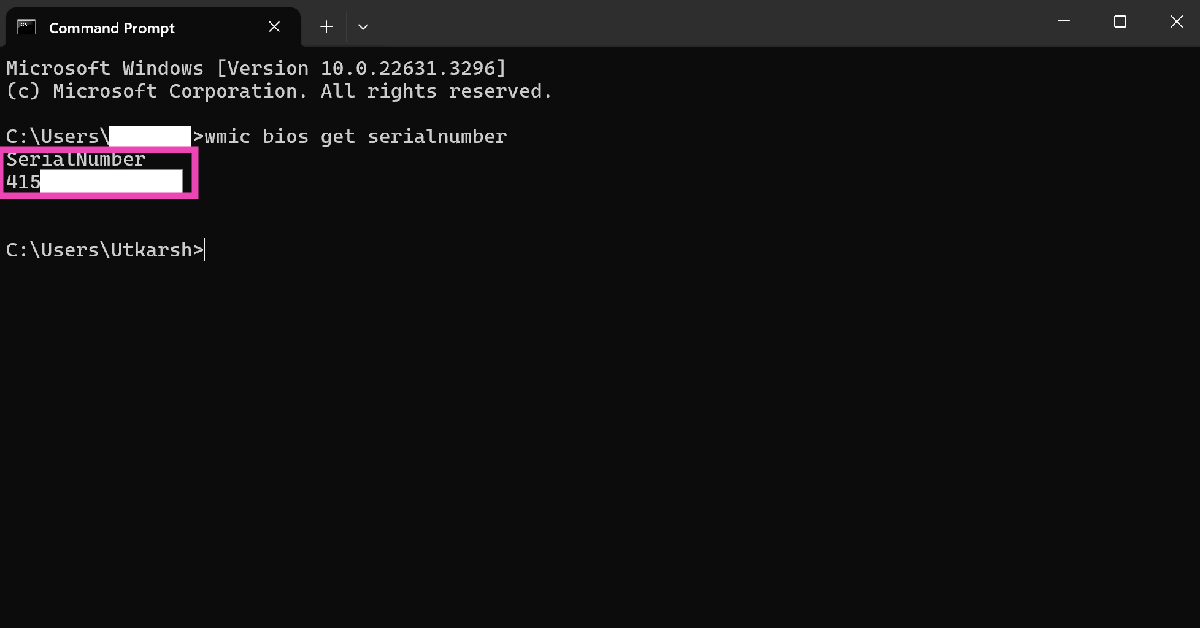
How do I check my laptop’s serial number?
If you are turning your laptop in for screen repair, you must provide its serial number to verify its warranty coverage. Go to Command Prompt and enter ‘wmic bios get serialnumber’ to find out its serial number.
How do I update the display driver of my PC?
Go to Control Panel>Device Manager, expand the ‘Display adaptors’ section, right-click on a driver, and hit ‘Update’.
Is it safe to wipe my PC’s display with isopropyl alcohol?
Yes, it is safe to clean your PC’s display with a microfibre cloth dipped in isopropyl alcohol.
These are the top 6 ways to fix the ‘white dots appearing on the screen’ issue on your laptop or PC. If you’re certain that it is a hardware-related issue, take your laptop to an authorised service centre for repairs. If you know of any other fixes to resolve this problem, let us know in the comments!
Using a passkey increases the security of your account.
They are less susceptible to security risks such as fraudulent, deceptive, or unauthorised attacks.
X aka Twitter announced the expansion of passkey support to iOS users globally. The feature was exclusive to iOS users in the US upon debut. Although the feature isn’t yet accessible on the website or its Android app. X introduced passkey support earlier this year that makes use of biometrics, PINs, and related mechanisms.
X formerly known as Twitter announced that Passkeys is now available as a login option for everyone globally on iOS. Note that this feature is only accessible to use when logging in on iOS.
Passkey makes it possible to log in to various devices more quickly and securely than using passwords. Since passkeys are created uniquely by your device for every account, they offer a higher level of security than traditional passwords and are less vulnerable to phishing attacks and unauthorised access.
After completing the setup process, you won’t need to remember or reset your password in order to access your account on many devices using your passkey. Public key cryptography from the WebAuthentication (or “WebAuthn”) standard is used to create a passkey.
Every account you register results in a distinct key pair—one public and one private—being generated by your device. As per the company, the device retains the private key, whereas X shares and stores the public key. To maintain the highest level of security and lessen the possibility of unwanted account access, X never receives access to your passkey.
After setting up Passkey on your device, you can choose to log in to your account with Passkey instead of entering a traditional password. Using the public key that is stored on your device, X will establish a secure connection and verify your identity.
In the last couple of months, we’ve seen a flurry of midrange smartphone releases in India. Priced just under Rs 50,000, some of these smartphones are termed ‘flagship killers’ due to their attractive pricing and flagship-grade performance. If you’re looking for a device that will last you a long time, this is the category you should be shopping in. So, without further ado, let’s take a look at the top 10 smartphones you can buy for under Rs 50,000 in India.
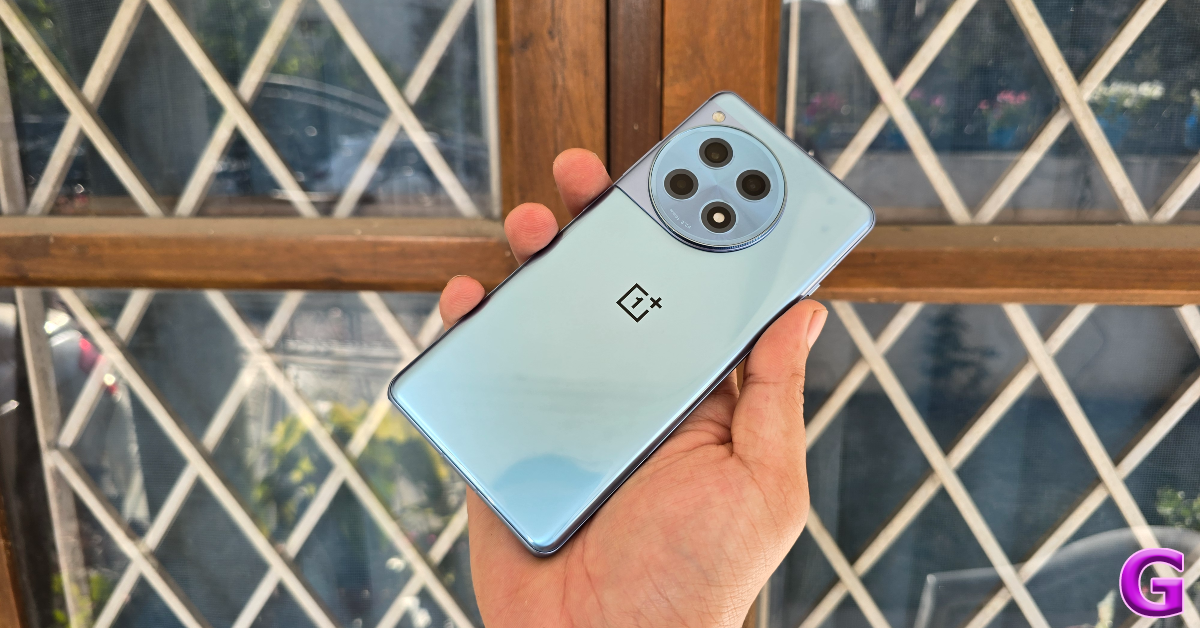
OnePlus 12R is one of the best smartphones you can buy for under Rs 50,000 in India. Prices for the 12R start at Rs 40,000 for the 8GB RAM + 12GB storage variant and go up to Rs 46,000 for the top-spec 16GB RAM + 256GB variant. Powering the smartphone is the Snapdragon 8 Gen 2 chipset which was found in last year’s flagship chipsets. OnePlus 12R mimics the flagship OnePlus 12 in design and form factor. Its rear camera array comprises a 50MP primary shooter, an 8MP ultrawide lens, and a 2MP macro sensor. Check out our full review of the smartphone.
Xiaomi’s most affordable variant in its ’14’ series rocks a 6.55-inch AMOLED display with a refresh rate of 120Hz and 3,000 nits of peak brightness. It is powered by the Snapdragon 8s Gen 3 and the OS duties are handled by Xiaomi’s next-gen HyperOS (Android 14). The triple camera array at the back comprises two 50MP sensors for the primary shooter and the telephoto lens along with a 12 lens for the ultrawide camera. Up front, the smartphone is equipped with two 32MP sensors for the wide and ultrawide selfie cameras. The 4,700 mAh battery pack on the device can be fully charged in 40 minutes with 67W fast charging support.
Vivo’s V Series is considered to be the midrange camera expert. The newest iteration in this series is priced at Rs 50,000 and features a triple rear camera setup comprising a primary shooter, ultrawide lens, and a telephoto camera. All three cameras have 50MP sensors. Powering the Vivo V40 Pro is the MediaTek Dimensity 9200+ SoC. The smartphone is rated IP68 for dust and water resistance. It can survive water immersion up to 1.5m for 30 minutes. The smartphone is packed with a 5,500mAh battery and supports 80W fast charging.
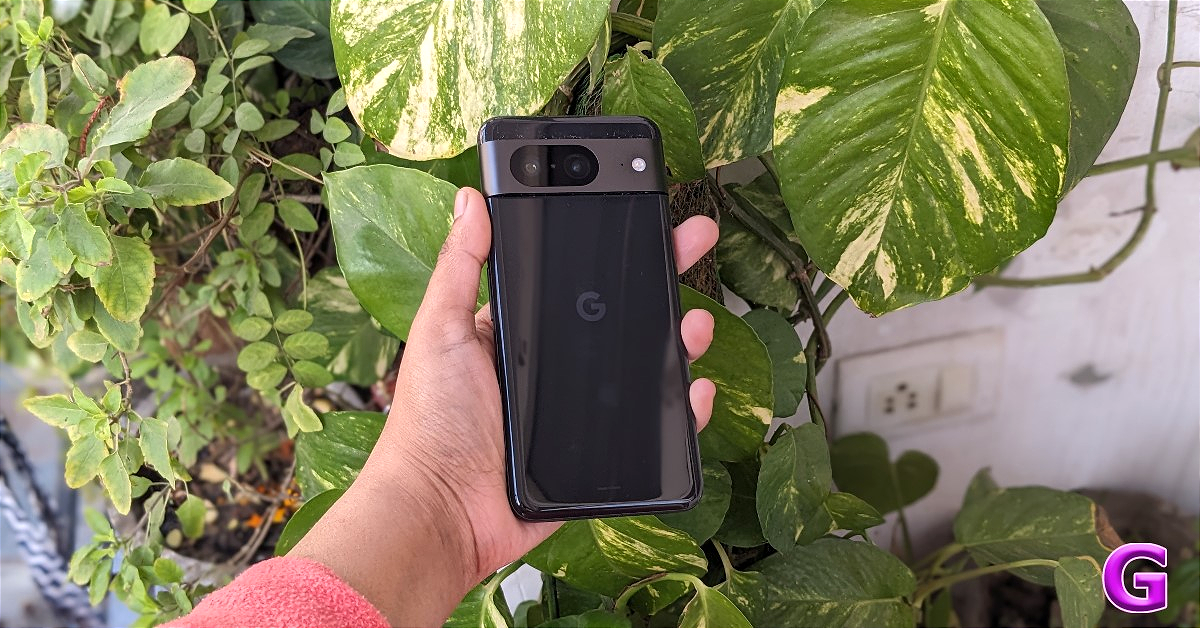
Last year’s Google Pixel 8 is currently available for Rs 38,999 on Flipkart, making it one of the best smartphones you can buy under Rs 50,000 in India. Its 256GB storage variant fetches Rs 43,000. The Pixel 8 is powered by Google’s in-house Tensor G3 processor and runs Android 14 out of the box. Google has promised up to 7 major OS upgrades for this smartphone. Known for its cameras, the Pixel 8 features a 50MP primary shooter and a 12MP ultrawide lens in its rear array. The punch-hole cutout on the display houses a 10.5MP selfie camera. Read our Google Pixel 8 review to learn more about the smartphone.
The newly launched midrange beast from OnePlus is one of the best smartphones you can buy under Rs 50,000. Prices for the OnePlus Nord 4 start at Rs 30,000 (8GB RAM + 128GB storage) and go up to Rs 36,000 for the top-spec variant. The smartphone flaunts an all-metal body with a unique horizontal camera array on the back panel. Under the hood, the Nord 4 packs the Snapdragon 7+ Gen 3 SoC. The rear camera module sports a 50MP primary shooter and an 8MP ultrawide lens. The 5,500mAh battery pack supports 100W charging. The smartphone takes 28 minutes to charge fully.
The newly launched Samsung Galaxy A55 is one of the best midrange smartphones you can buy right now. Powered by Samsung’s in-house Exynos 1480 chipset, the Galaxy A55 leaves more to be desired in the gaming aspect, but for everyday use, it is a rock-solid smartphone. The 6.6-inch Super AMOLED display offers a pleasant viewing experience and fluid touch response. The 50MP primary shooter, 12MP ultrawide lens, and 5MP macro sensor making up the rear camera array deliver a good performance as well. Read our full review here.
If you’re looking for a gaming smartphone, you should be all over the new iQOO Neo 9 Pro. Its powerful Snapdragon 8 Gen 2 chipset is only surpassed by its attractive pricing. The S8G2 SoC powered all the major flagship releases of 2023. The 144Hz 6.78-inch LTPO AMOLED display is ideal for gaming. Another thing we like about the Neo 9 Pro is that it does not have a futile macro lens to carry the three-camera gimmick. The two individual cutouts on the back panel house a 50MP primary shooter and an 8MP ultrawide lens. Check out our in-depth review here.
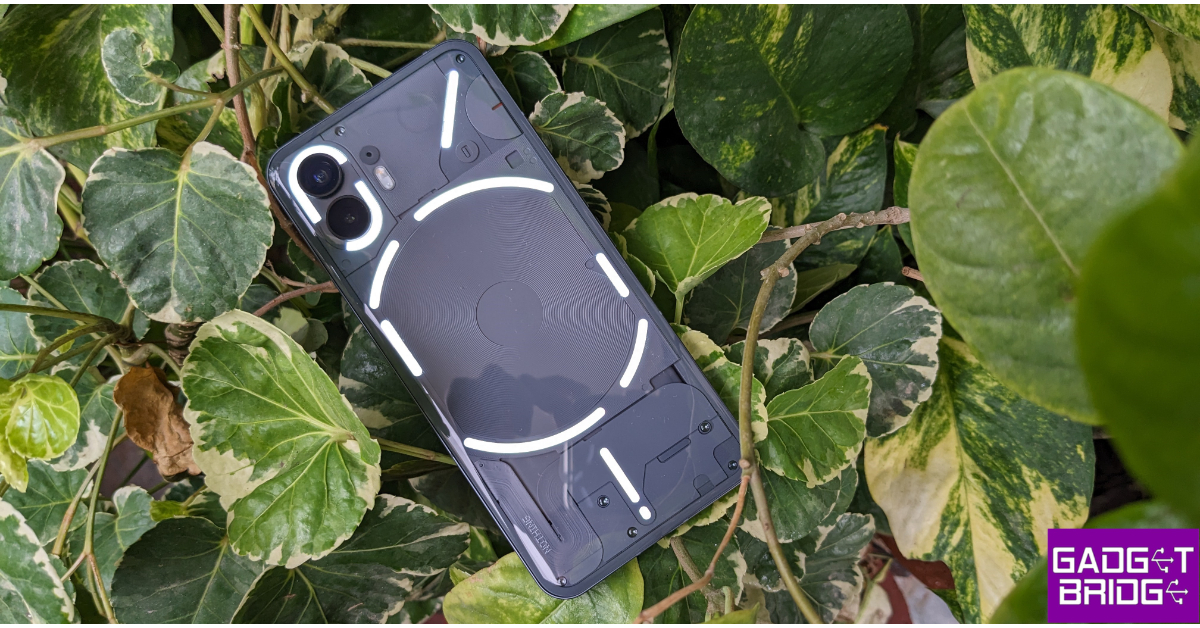
Last year’s Nothing Phone (2) stepped up its game with the powerful Snapdragon 8+ Gen 1 SoC and a more refined design. Nothing’s signature Glyphs are fragmented into different strips on the Phone (2) and serve a more functional purpose. You can assign important notifications from a particular app to the Glyph or track your Zomato order without needing to unlock your phone. The see-through back panel has also been carried forward to the Phone (2) and is now a part of the brand’s identity. You can read more about the smartphone in our review.
Prices for the new Oppo Reno 12 Pro start at Rs 37,000 (256GB) and go up to Rs 41,000 (512GB). The smartphone is powered by the MediaTek Dimensity 7300 SoC and flaunts a 6.7-inch AMOLED display with a refresh rate of 120Hz. The triple camera module on the smartphone comprises a 50MP primary shooter, a 50MP telephoto lens, and an 8MP ultrawide lens. The 50MP selfie camera can record 4K videos at 30fps. The Reno 12 Series also features an AI suite with features like AI Eraser 2.0, AI Speak, AI Studio, and more.
The iPhone SE (2022) is the most affordable iPhone you can currently buy from the official Apple Store. Its 64GB variant is priced at Rs 49,900 while the 256 variant fetches Rs 64,900. Based on specs and overall performance, every other smartphone mentioned in this list is a better bargain than the iPhone SE. However, if you’re only looking to buy an iPhone, then the 2022 SE is the cheapest one you can buy directly from Apple. Powered by the Apple A15 Bionic chipset, this smartphone can deliver a good performance but its thick bezels and single rear camera seem very dated. Read our in-depth review here.
Redmi’s midrange offering packs a lot of interesting specs. The Note 13 Pro+ is powered by the MediaTek Dimensity 7200 Ultra SoC. Its rear camera array features a 200MP primary shooter, an 8MP ultrawide lens, and a 3MP macro sensor. The 200MP primary lens can record 4K videos at 24 and 30 fps. Other impressive features of the Note 13 Pro+ include an IP68 rating for dust and water resistance and 120W fast charging. The smartphone also ships with a power adapter inside the box.
Last year’s OnePlus Nord 3 remains one of the best smartphones you can under Rs 50,000 this year. It is likely to retain this spot until OnePlus launches the Nord 4 in the coming months. This smartphone is powered by an impressive MediaTek Dimensity 9000 chipset. Its rear camera module rocks a 50MP primary shooter, an 8MP ultrawide lens, and a 2MP macro sensor. The 6.774-inch curved AMOLED display is the best you can get in this class. Read this article to check out our full review of the smartphone.
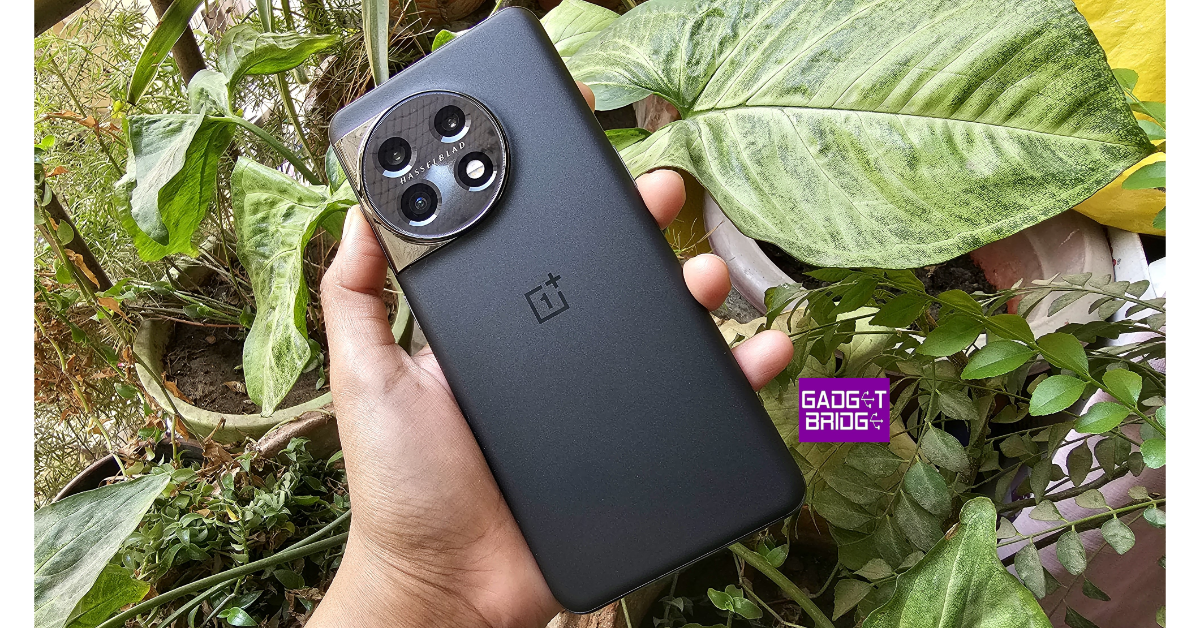
2023’s flagship OnePlus 11 is currently retailing for Rs 46,000. It is easily one of the best smartphones you can buy in this price range. After the lukewarm reception to the OnePlus 10, the brand upped its game and produced a rock-solid smartphone in the OnePlus 11. It is powered by the Snapdragon 8 Gen 2 SoC, which was last year’s flagship chipset. Camera duties on this smartphone are handled by a 50MP primary shooter, a 48MP ultrawide lens, and a 32MP telephoto sensor. With 100W charging support, this smartphone can be fully charged in under 25 minutes. Read our review of the smartphone here.
Arguably the best camera smartphone in its segment, the V30 Pro left a great impression on us when we reviewed the device. The 6.78-inch curved AMOLED display offers a great touch response and engaging viewing experience. Under the hood, the V30 Pro packs the MediaTek Dimensity 8200 SoC. The triple camera array at the back flaunts 3 50MP sensors for the primary shooter, ultrawide lens, and telephoto camera. The Zeiss camera tuning, which was previously only found on Vivo’s flagship X Series, has now been carried forward to the V Series as well.
Dubbed the ‘Portrait Expert’, the Oppo Reno11 Pro is one of the best smartphones you can buy for under Rs 40,000. It is powered by the MediaTek Dimensity 8200 SoC and comes with Android 14 out of the box. The rear camera module of the smartphone houses a 50MP primary shooter, a 32MP telephoto lens, and an 8MP ultrawide sensor. The 6.7-inch AMOLED display has a refresh rate of 120Hz and can reach a peak brightness of 950Hz. If you’re looking for a more affordable option, its non-Pro version is priced at Rs 28,000. You can read our review of the smartphone here.
These are the best smartphones you can buy under Rs 50,000 right now. Expect more upper-midrange smartphones from the likes of OnePlus, Xiaomi, and iQOO releasing in the coming months. If you think there’s a smartphone that deserves to be on this list, give it a shoutout in the comments!
The XPS 14 (9440), XPS 16 (9640), Alienware m16 R2, and the Inspiron 14 Plus (7440) are powered by Intel Core Ultra processors.
The newly launched AI-enabled portfolio will be available for purchase across Dell.com, Dell Exclusive Stores (DES), Amazon.in, large format retail, and multi-brand outlets.
Dell launched the XPS 14 and 16, Alienware m16 R2, and Inspiron 14 Plus as part of their newest line of AI-enabled consumer PCs in India. The AI machines are designed to improve computing experiences for professionals, creators, gamers, and students. They are powered by the newest Intel Core Ultra processors with integrated artificial intelligence (AI) for better performance and efficiency.
In This Article
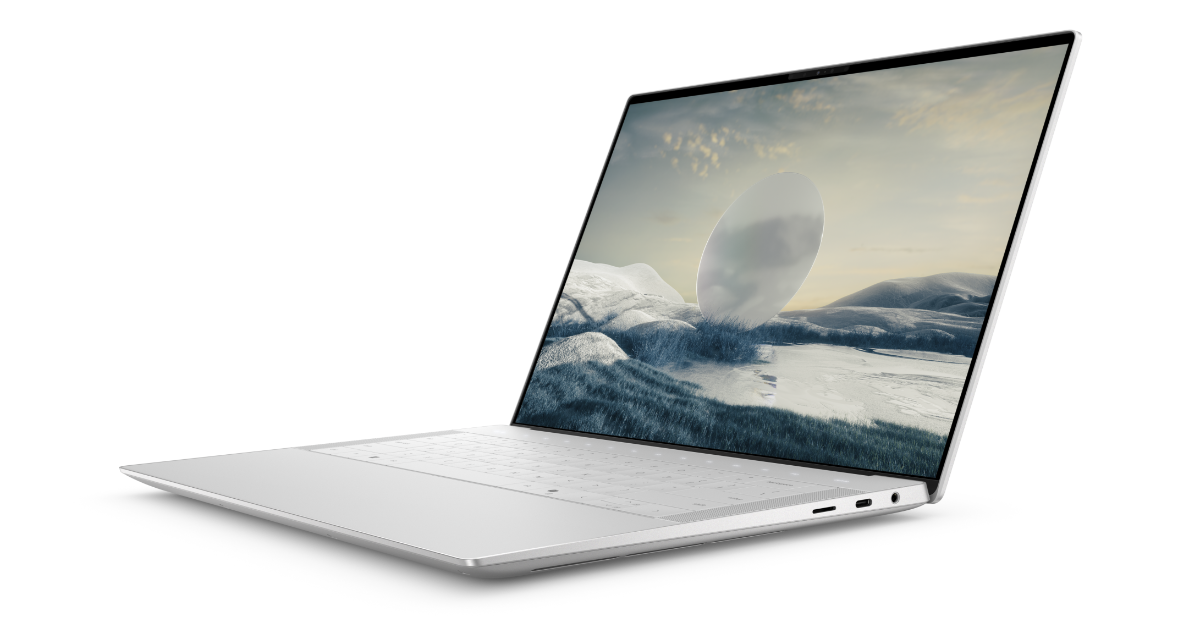
Dell XPS 14 (9440)
Dell XPS 14 (9440)
The XPS 14 (9440) boasts a 14.5-inch OLED touchscreen with 400 nits of brightness and 3.2K resolution. The screen offers a 176-degree field of vision, a 100% DCI-P3 colour gamut, and a 1,000,000:1 contrast ratio. Dolby Vision is supported, and the refresh rate of the display is configurable between 48 and 120 Hz. Corning Gorilla Glass Victus protection is present. You also receive Windows 11 Home software out of the box. There is a full-size backlit keyboard with 1mm key travel, a glass touchpad and a capacitive touch function row.
The XPS 14 (9440) is powered by an Intel Core Ultra 7 155H processor with NVIDIA GeForce RTX 4050 GPU/Intel Arc graphics. It comes with 1TB PCIe 4 SSD storage and 16 or 32GB LPDDR5x dual channel RAM. Dell XPS 14 69.5 WHr battery stored within. There is a 60W charger included with the Intel model and a 100W charger available with the NVIDIA model.
There are several connectivity options, including a microSD card reader, Bluetooth 5.3, Thunderbolt 4 (USB Type-C) with DisplayPort 2.1 and Power Delivery compatibility, Wi-Fi 6E, and a 3.5mm audio connector. The package also includes a USB-C to USB-A v3.0 & HDMI v2.0 adaptor.
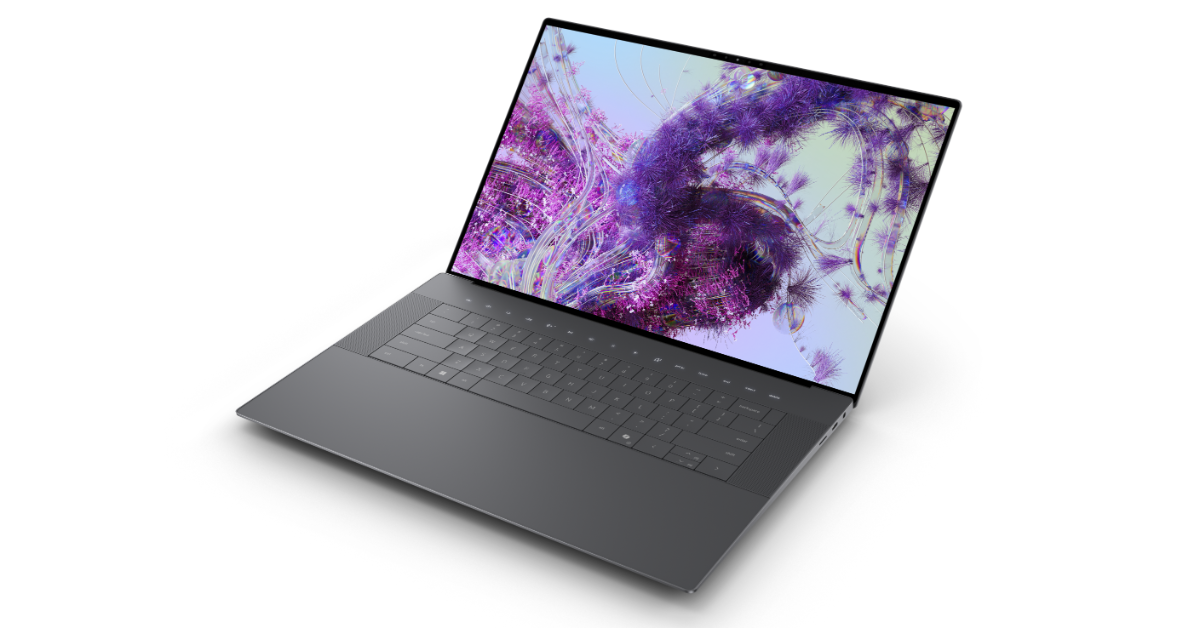
Dell XPS 16 (9640)
Dell XPS 16 (9640)
The XPS 16 (9640) features a 16.3-inch OLED touchscreen with 4K+ resolution. Dolby Vision compatibility and a variable refresh rate of 90 Hz are standard on the screen. 400 nits of brightness, 100% DCI-P3 colour gamut, 1,000,000:1 contrast ratio, and a 176° field of view are among its features. It includes a glass touchpad, capacitive touch function row, and full-size backlit keyboard with 1mm key travel.
An Intel Core Ultra 7 155H or Core Ultra 9 185H CPU combined with an NVIDIA GeForce RTX 4060 GPU is what the XPS 16 (9640) has to offer. It comes with 1TB PCIe 4 SSD storage and up to 32GB of LPDDR5x dual channel RAM.
It packs a 99.5WHr battery paired with a 130-watt USB-C charging.
Dell Inspiron 14 Plus (7440)
The Inspiron 14 Plus (7440)’s 14-inch LCD screen boasts a 2.2K resolution and 300-nit brightness. Additionally, it has a fingerprint reader that is compatible with Windows Hello. An Intel Core Ultra 7 155H CPU and Intel Arc GPU are available for purchase with the Inspiron 14 Plus (7440). It comes with 1TB of PCIe SSD storage and 16GB of LPDDR5x RAM. It uses Windows 11.
The laptop has two speakers, a touchpad, and a backlit keyboard.
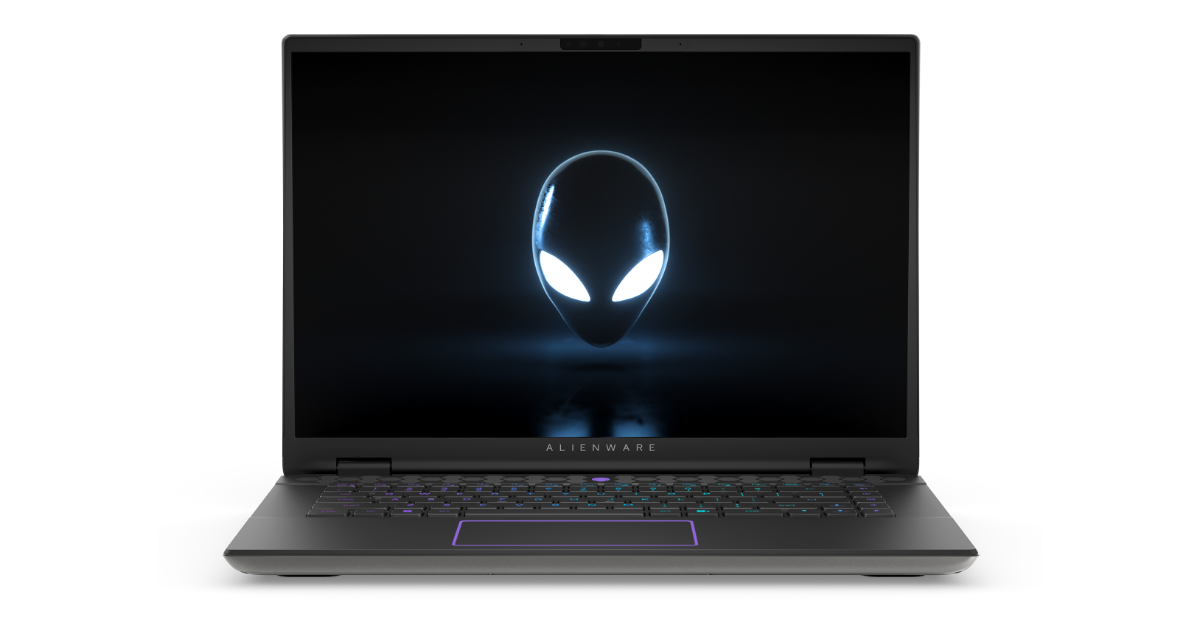
Alienware m16 R2
Alienware m16 R2
The 16-inch QHD+ LCD screen of the Alienware m16 R2 features a refresh rate of 240 Hz. The panel has 300 nits of brightness and supports AMD FreeSync and NVIDIA G-SYNC. It also has 100% sRGB compatibility and 3ms GTG reaction times.
The Alienware laptop comes equipped with an NVIDIA GeForce RTX 4050 GPU and an Intel Core Ultra 7 155H or Core Ultra 9 185H CPU. It contains 1TB PCIe SSD storage and 16GB or 32GB DDR5 RAM. A 90-watt-hour battery is supported by either 240-watt GaN or 280-watt conventional AC charging.
Pricing and availability
The XPS 16 (9640) starts at INR 2,99,990
● The XPS 14 (9440) starts at INR 1,99,990
● The Alienware m16 R2 starts at INR 1,49,999
● The Inspiron 14 Plus (7440) starts at INR 105,999
Priority Club members can enjoy priority online appointments and faster service at Xiaomi service centres.
There is also a 2-hour repair guarantee and a standby device provided.
Xiaomi has launched Xiaomi Priority Club as a major step towards keeping its promise to provide customers with an end-to-end premium experience. Priority Club was announced at the time of the Xiaomi 14 series launch and will now also include more products, including its high-end televisions. Xiaomi’s exclusive club will offer a host of benefits that enable a seamless ownership and service experience. It is said to provide exclusive premium services for its premium customers.
The Xiaomi Priority Club service is initially being made available to Xiaomi’s high-end handsets, which include the newly released Xiaomi 14 Series smartphones, the Xiaomi 14 Ultra and Xiaomi 14. The Mi 11 Ultra, Xiaomi 13 Pro, and Xiaomi 12 Pro will also be eligible for the perks. Additionally, owners of the Mi QLED TV 75, Xiaomi OLED Vision TV 55, and Xiaomi Smart TV X 65 are now eligible for the Xiaomi Priority Club service.
Benefits of Xiaomi Priority Club
The firm states that it will offer certain premium services, as well as priority complaint resolution, to customers who are Xiaomi Priority Club members. These services will be called “Membership Services”.
Members will be able to schedule the earliest appointment possible, within designated time windows, in order to obtain services for product repair and servicing, and new product installation and Members shall receive services on priority at select ASCs.
In addition to this Xiaomi’s exclusive club relieves members of the burden of maintenance by offering free pick-up and drop services for mobile repairs.
ASCs will work with Members to arrange for the pick-up and drop-off of the Select Mobile Phones to be repaired within twenty-four (24) hours of receiving the request, excluding Sundays and holidays.
Members will be able to submit a request on Xiaomi’s Mi Service Manager portal for the repair of mobile phones that have been purchased at an invoice value of more than Rs 10,000.
Executives from ASC will show up at Members’ locations to retrieve the Select Mobile Phone devices and return them after repairs have been performed. When the selected mobile phones are delivered and picked up, the ASC executives will take images of them. When picking up or receiving mobile phones, ASC officials will also give Members access to acknowledgement documentation. Note that the pick-up services are available only in limited areas.
Members will be able to get their Premium Smartphone Products fixed in a maximum of two (2) hours at specific ASCs. The Members must be given an alternative stand-by device for temporary use, if and when available if ASCs are unable to provide repair services for the Premium Smartphone Products within two (2) hours.
Members can also take advantage of the prompt callbacks from customer support and direct chat access to knowledgeable agents, bypassing automated systems for a more personalized and tailored experience.
Garena Free Fire is a battle royale game with regular awards and tournaments to keep players interested. If you play Garena Free Fire, you should be aware of the redeem codes that are released on a daily basis. However, because the battle royale game is banned in India, players from other countries can use the Free Fire Redeem codes daily. If you’re unfamiliar with the Garena Free Fire redeem codes or don’t know how to get them, we’ve put together a step-by-step guide to help you redeem them. Check out Garena Free Fire Redeem Codes for 10 April 2024.
The Free Fire redeem codes are a great way to get free stuff. These are 12-digit codes that contain alphabets and numbers, as well as an expiration date and time. Because the Garena FF redeem codes cannot be used more than once, you should hurry to the redemption page to claim your free reward before someone else does. To get a free reward, all you have to do is go to reward.ff.garena.com/en, which is the official redemption page. Also, keep an eye on this space for daily updates on Garena Free Fire redemption codes and rewards.
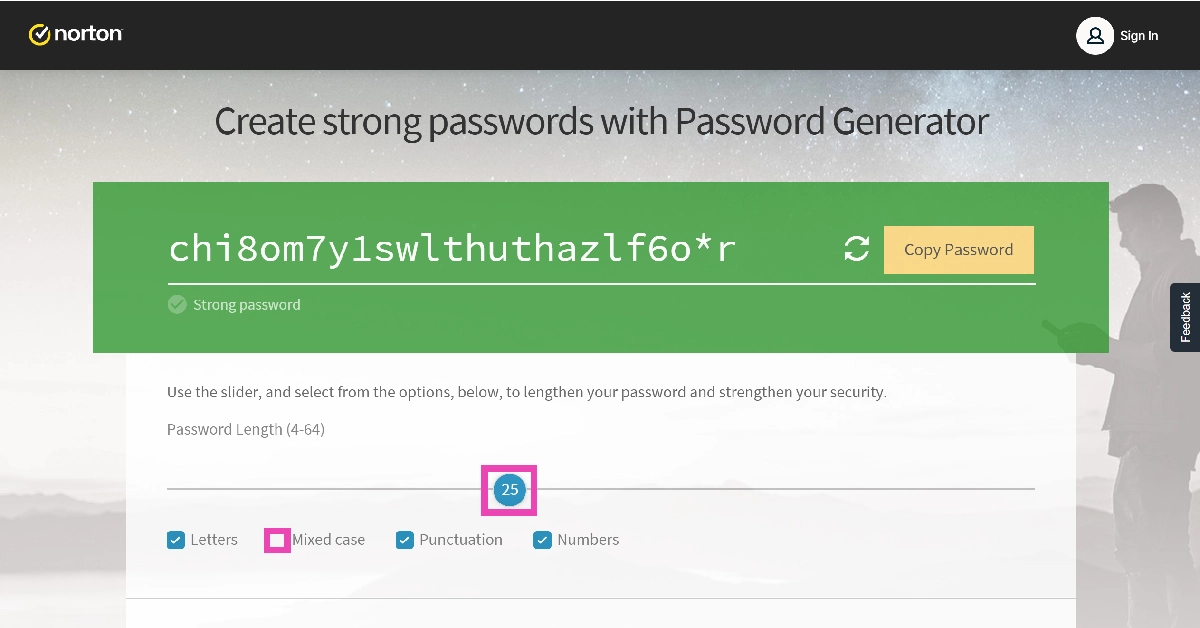
Creating a strong password is more important now than ever. If you carry out banking-related tasks online, it is essential that you secure all your accounts with impenetrable passwords. Most brute force attacks these days are good enough to penetrate accounts with weak passwords. It is also a good idea to use different passwords for different accounts and enable two-factor authentication in apps that support it. Check out how you can generate a strong password below.
Tips to keep in mind while creating a strong password
Make sure the password is more than 6 characters long: This is pretty standard advice, but important nonetheless. Smaller passwords are relatively easier to guess. Ideally, your password should be 12 characters long. This makes it hard to guess but easy to retain.
Never include personal information: Your personal information can be extracted from your social media profiles and used to guess your password. Using your name, nickname, or hobbies for your password is not a good idea. Always go for something random that cannot be found on your public profiles.
Add uppercase and lowercase letters, numbers, and special characters: Make sure the special characters and letters are interspersed randomly in your password. Do not use numbers that may correspond to your birthdate, birth year, or any significant anniversary.
Do not use words found in the dictionary: Professional hackers use advanced programs that guess thousands of words per minute to crack your password. If you include words from the dictionary, it becomes easier to land on your password using a series of correct word combinations. If you want to use a proper word instead of a random string, you can substitute some of the letters with numbers and special characters. For example, newdelhi245 can become N3Wd3Lh!245. Similarly, abhishek567 can become @b|-|!Sh3k567.
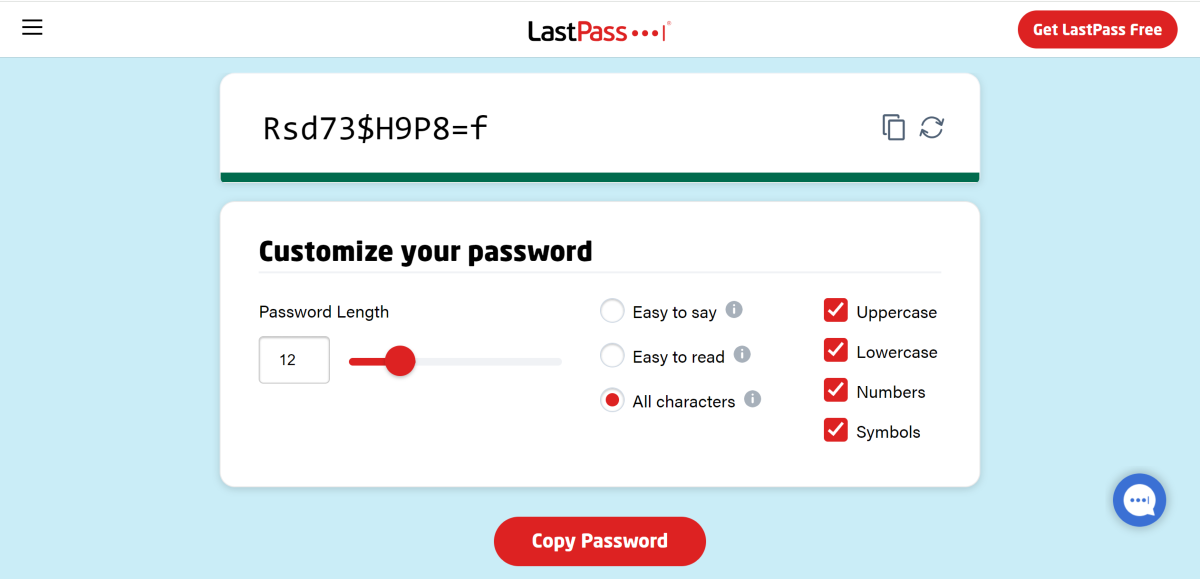
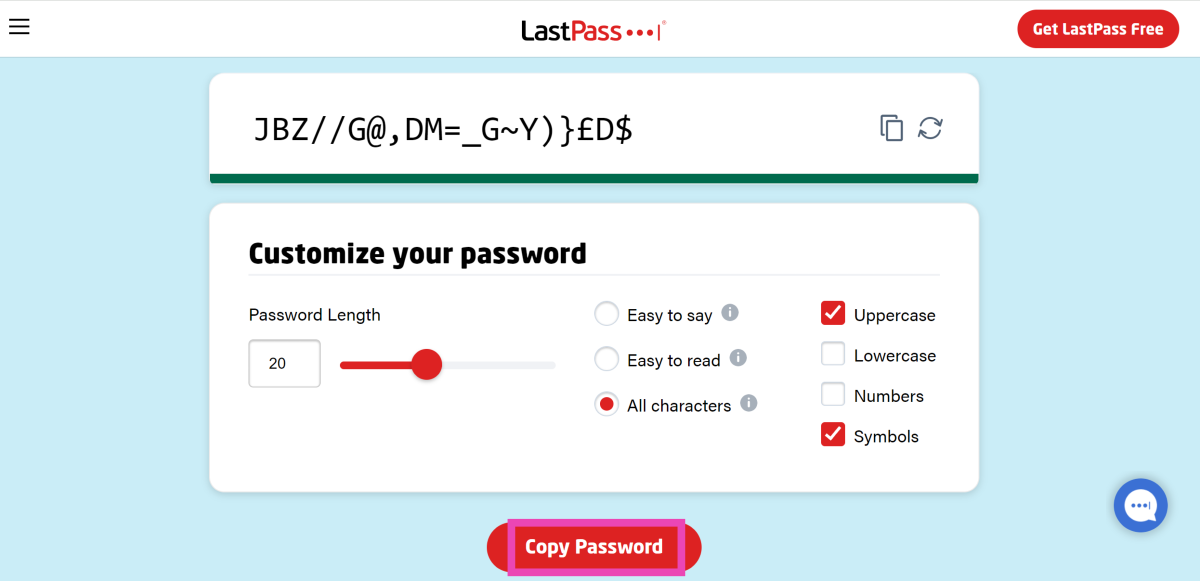
Use LastPass password generator
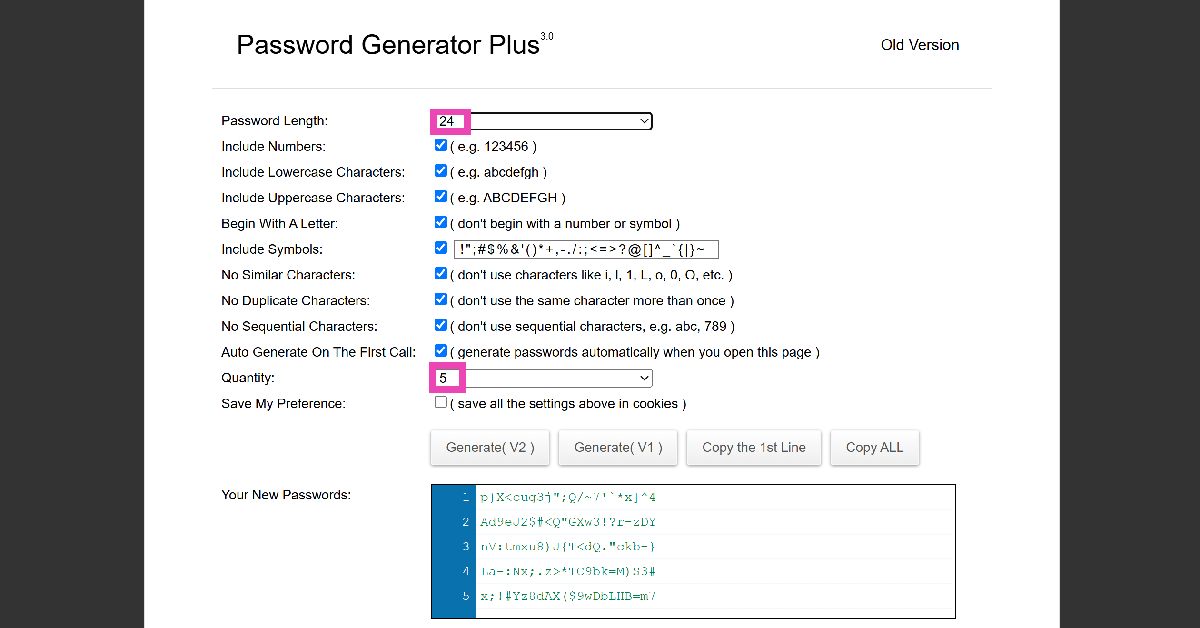
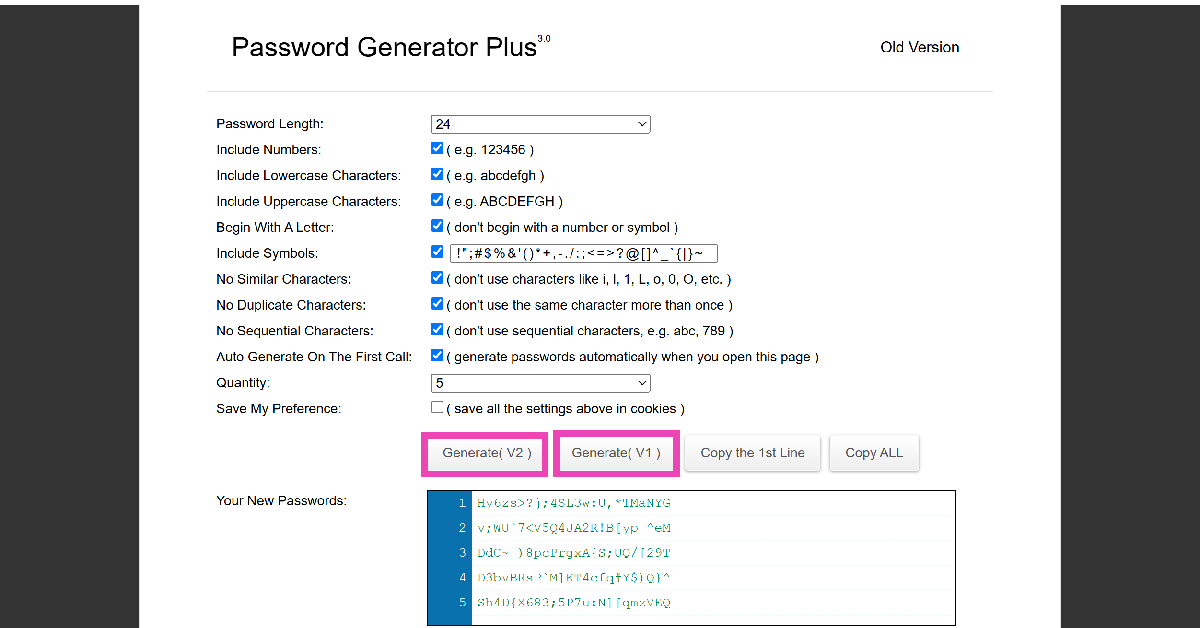
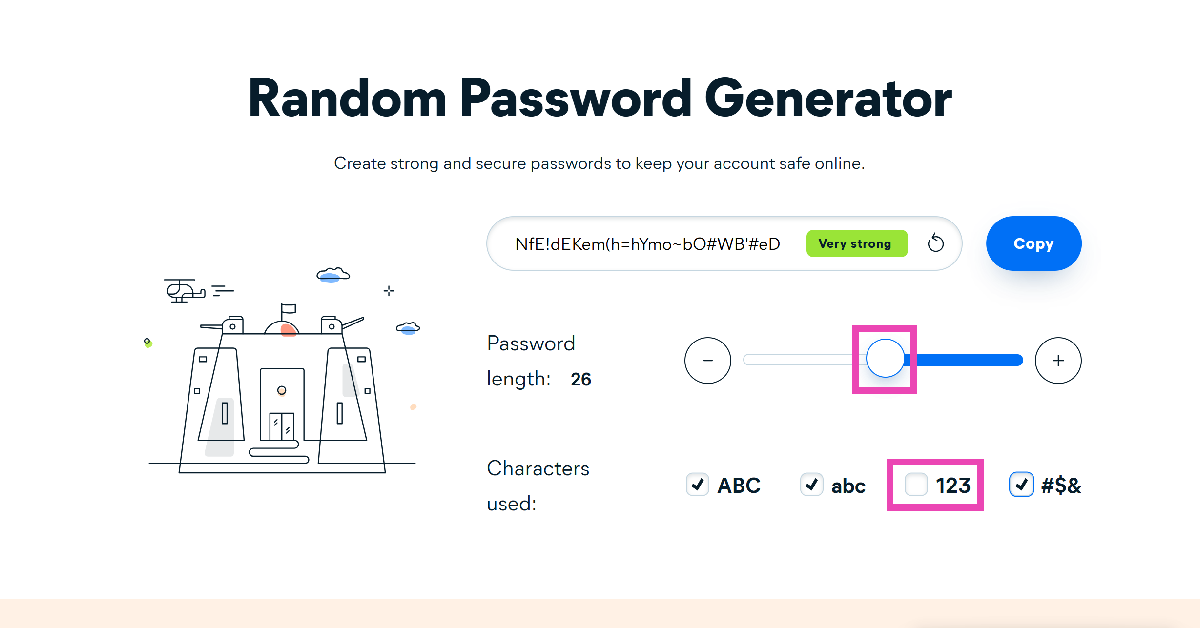
If you don’t want to go through the trouble of setting up a unique and strong password for every account you own, simply use a password generator. Most password manager apps have a password generator baked into them. Once the password is created, it gets saved in the app and can be used at any given time. If you don’t want to install an app on your smartphone, simply use an online tool to generate a password. Here’s how.
Step 3: LastPass will generate a random password for you. You can customise it further by increasing its length, making it easier to say or read, and adding or removing uppercase/lowercase letters, special characters, and numbers.
Step 4: Click on Copy Password to copy it to your clipboard.
Step 2: Select the password length and choose which attributes you want in your password. Lastly, select how many passwords you want the website to generate.
Step 3: Hit Generate (V2) or (V1) and copy your passwords from the box.
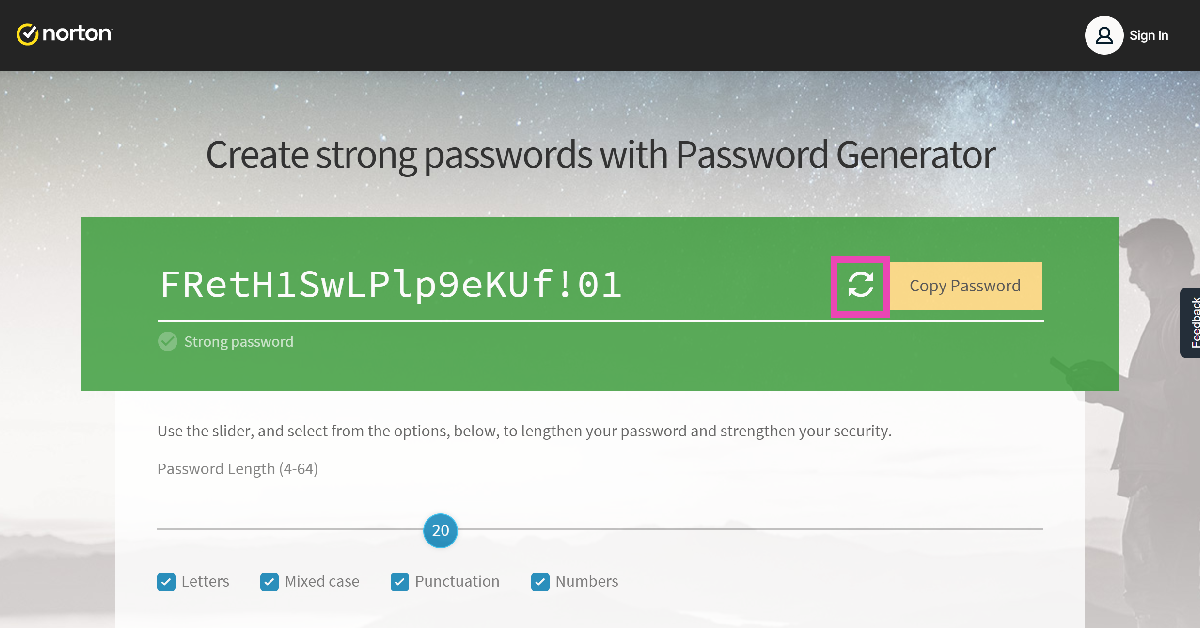
Step 2: A random password will appear on the screen. Copy it to your clipboard or hit the refresh icon to view a new one.
Step 3: Use the slider to change the length of the password and choose which characters you want in it.
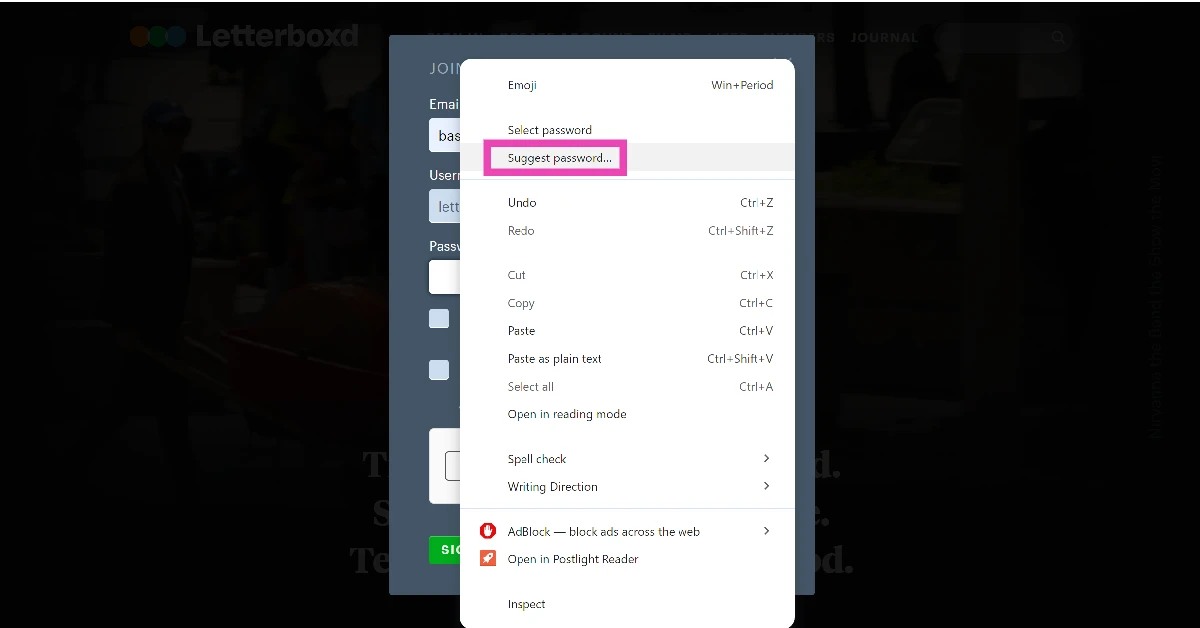
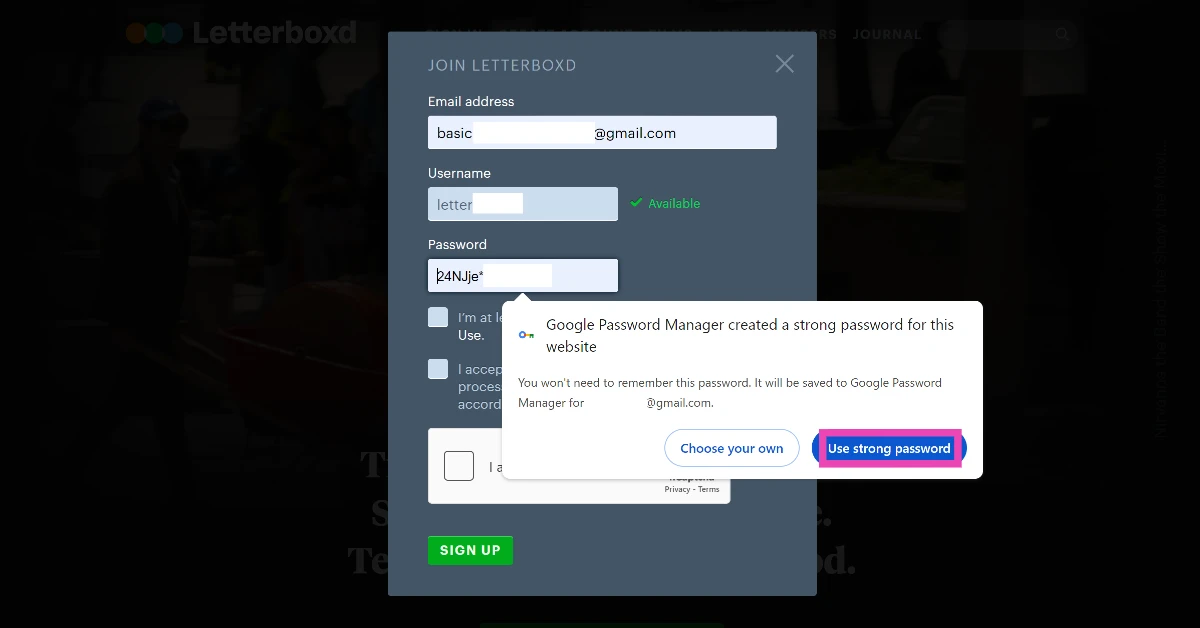
Use Google Password Manager
Step 1:LaunchGoogle Chrome and go to the website on which you want to create an account.
Step 2: Right-click on the Password field.
Step 3: Click on Suggest password.
Step 4: Click on Use strong password.
Frequently Asked Questions (FAQs)
What is an example of a strong password?
Random strings with uppercase and lowercase letters, special characters, and numbers make the best passwords. For example, 5$_r5JUoykf6f, &1rQR90870N\|, and jA)u2WsK<59$^ are strong passwords. Meanwhile, password123 is a weak password.
Which website can I use to generate a strong password?
LastPass, NordPass, Avast, 1Password, and Proton have some of the best password generators out there right now.
How do I create a strong password?
Go to LastPass, Avast, or Norton password generator and a strong password will appear on the screen. You can use the slider to change the length of the password and decide its attributes.
Where do I store my passwords?
You can use third-party apps like Bitwarden, 1Password, and Dashlane to store the passwords of all your online accounts.
What are some of the most common passwords?
‘123456’, ‘qwerty’, ‘password’, and ‘abc123’ are some of the most common passwords used by people. These passwords are easy to guess and should be avoided.
This is how you can create or generate strong passwords for your online accounts. While using a password generator, it is important that you use Google Password Manager or any other third-party app to store your passwords, since they can be hard to remember. Read this article for our top 5 password managers for iPhone.
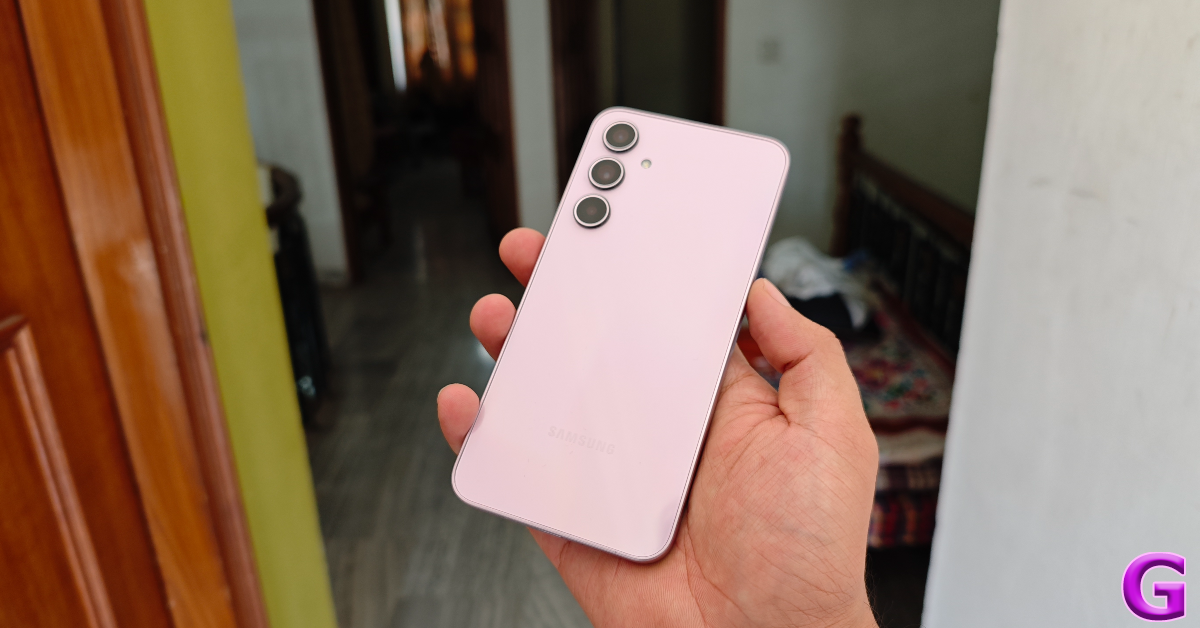
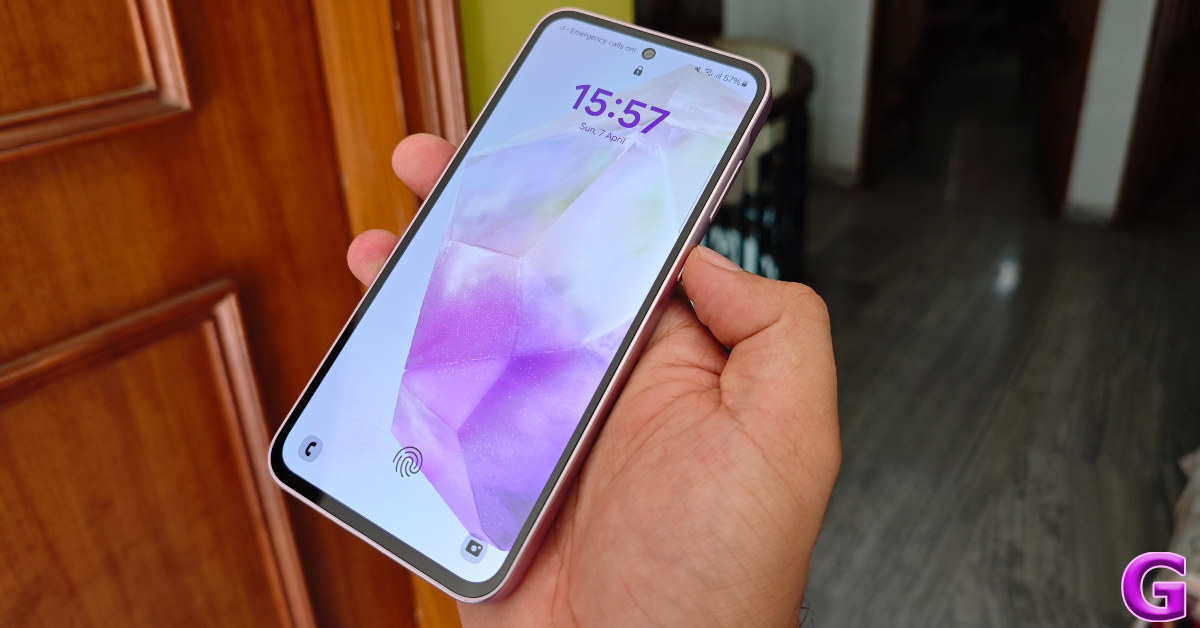
Last year, Samsung’s midrange offering in Galaxy A34 (our review here) was met with a lukewarm reception. This was largely because of the phone’s dated build and design. This year, Samsung has rectified these gaping flaws in the newly launched Galaxy A35 and produced a device that will undeniably attract a lot of attention in its price segment. Launched alongside the Galaxy A55 (our review here), the Galaxy A35 is currently priced at Rs 31,000. We have been using this smartphone for the last week. Here is our in-depth review of the Samsung Galaxy A35.
Here’s what you get inside Galaxy A35’s retail package:
Smartphone
USB Type-C to Type-C cable
SIM ejector tool
Quick Start Guide
Regional Lock Guide
The lack of a power adapter inside the box is disappointing, especially when you take into account that most buyers likely do not possess an adapter with a Type-C slot. Regarding the unboxing experience, Samsung is way behind OEMs like Xiaomi, OnePlus, and Vivo.
Unboxing assigned, the design and build of the Galaxy A35 have seen significant improvements this year. It is good to see that Samsung has ditched the plastic back for a glass panel. The frame remains plastic but has been trimmed to an acceptable size. Its matte-like texture offers a nice in-hand feel.
The design of the Samsung Galaxy A35 is identical to the Galaxy A55. The vertical camera layout for the rear cameras is something that has been a running theme across all Samsung smartphones since 2023. It is a safe choice on Samsung’s part, but it does rob the smartphones of individual flair and personality.
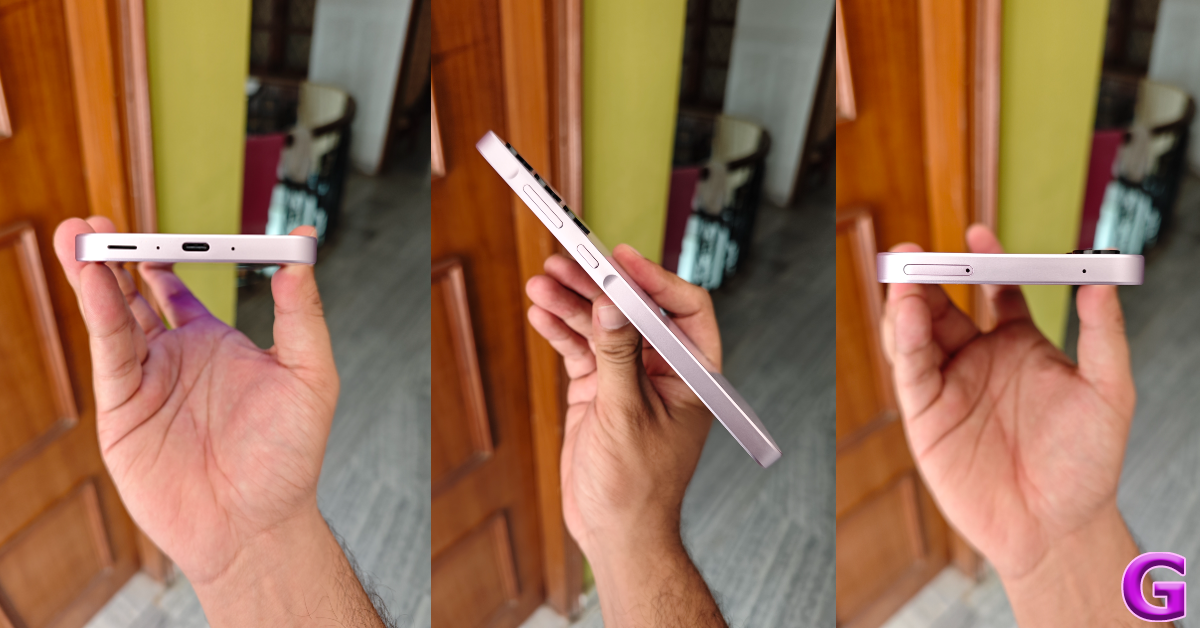
The right edge of the frame houses the volume rocker and the side button on a slightly raised surface, just like the A55. The USB slot, primary speaker, and two microphones are placed on the bottom edge. Up top, you get the hybrid SIM slot and the third microphone. The earpiece doubles up as the secondary speaker.
Samsung Galaxy A35’s display is identical to its predecessor. This 6.6-inch AMOLED display has a maximum refresh rate of 120Hz and can hit 1,000 nits of brightness under direct sunlight. The touch response of this AMOLED panel is very fluid and smooth. The punch hole cutout for the selfie camera replacing the waterdrop notch on the display is another big improvement on the A35. The bezels surrounding the display are still thick, though. Hopefully, Samsung will trim them down in the next iteration of the smartphone.
We used the Samsung Galaxy A35 as our primary media device during the review period, streaming content across different OTT apps like Netflix, Prime Video, and Disney+ Hotstar. The viewing experience was very enjoyable. The images produced by the display were vivid and filled with punchy colours. The stereo speaker produces a well-rounded output that sounds full. It could have been a little louder, but the distortion in sound is minimal when you reach the highest volume level.
The front panel on the Galaxy A35 offers Gorilla Glass Victus+ protection, an improvement over the Gorilla Glass 5 on its predecessor. The smartphone is rated IP67 for dust and water resistance. It can withstand being submerged up to 1m in water for 30 minutes.
Samsung Galaxy A35 Review: Performance and Cameras
Samsung Galaxy A54’s (our review here) Exynos 1380 SoC powers this year’s Galaxy A35. This 5nm chipset is an upgrade over the 6nm MediaTek Dimensity 1080 SoC on the Galaxy A34.
The Exynos chipset comes with its challenges but handles routine tasks easily. During the review period, we used the Samsung Galaxy A35 for video calling, instant messaging, media streaming, navigation, emailing, web browsing and other tasks. We did not experience any lags while performing these tasks. The LPDDR4X RAM and UFC 2.2 cut down on the app loading time and ensure that toggling multiple apps at once is a seamless process on the device. Having said that, it is about time that Samsung made the jump in RAM and storage standards in this price bracket.
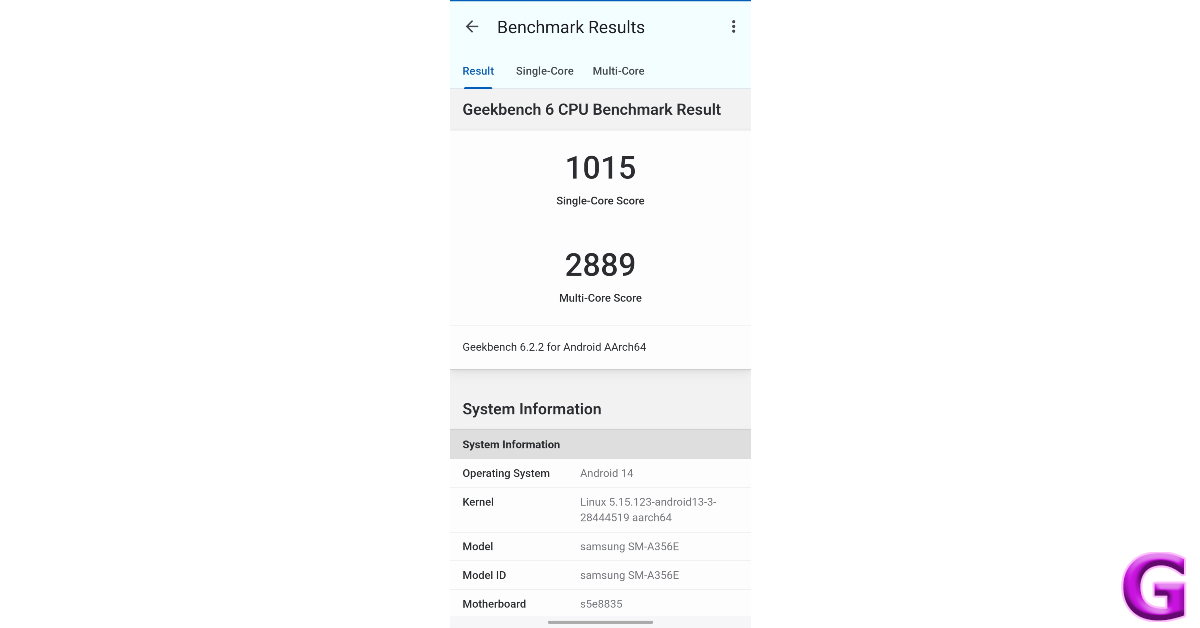
The gaming performance of the Galaxy A35 is bang average, which is something we’ve come to expect from Exynos-powered smartphones. It can play titles like Call of Duty Mobile and BGMI, but the frame rate is capped at 60fps. Playing Call of Duty Mobile in high graphics led to the smartphone warming up within 30 minutes. Throttling and frame drops became more frequent as the phone got warmer. On the Geekbench 6 app, the smartphone scored 1,015 points in the single-core test and 2,889 points in the multi-core test. This is a similar performance to last year’s Galaxy A54, which scored 1,010 and 2,761 points respectively.
One UI 6.1 delivers a very pleasant software experience on the Galaxy A35. The only drawback is that there is significant bloatware on the device. The Galaxy widget on the home screen exists solely to display ads. Thankfully, you can add useful stacks to this widget and get rid of the panel that displays the ads. Other bloatware apps on the device can also be deleted.
The overall software experience is very snappy and fun. One UI 6.1 is perfectly optimised and feels very quick. You also get a range of customisation options for the home screen, AOD, and lock screen. However, premium One UI features like Samsung DeX and Galaxy AI are held back on the A series. On the bright side, Samsung has promised 4 years of major OS upgrades and 5 years of security patches for this device.
Moving on, the battery performance on offer here is pretty average. The 5,000 mAh battery pack offers enough juice for the smartphone to last an entire day with a screen time of 6-7 hours. The smartphone supports 25W charging speed, which is significantly lower than its OnePlus and Xiaomi counterparts. It took up almost 90 minutes to fully charge the smartphone.
Samsung has upgraded the main camera sensor on the Galaxy A35 to a 50MP lens. The rest of the setup has been carried forward from the Galaxy A34. In outdoor daylight conditions, the main sensor captures detailed images that are packed with vivid colours. If you like Samsung’s photo processing skills, you will not be disappointed by this camera. The images are neither oversaturated nor are their colours boosted to a high degree.
The 8MP ultrawide camera does a fine job as well. The images taken using this camera are on the softer side, but we were impressed by their deep colours. There is no significant difference between the colour profiles of the two sensors. The 5MP macro lens produces bang-average results with mediocre colours. The smartphone could have greatly benefited from an entry-level telephoto lens.
Wide vs Ultrawide
In limited lighting conditions, the primary sensor does a good job of letting in a lot of light and correctly exposing the subject. The brightness level in the images is optimum even when the Night Mode isn’t turned on. However, the pictures taken at night are a little grainy. The Night Mode gets rid of the noise to a great extent. The grain is much more noticeable in images taken with the ultrawide camera, even with the Night Mode turned on.
Primary lens: Without Night Mode vs With Night ModeUltrawide lens: Without Night Mode vs With Night Mode
Portrait shots taken with the Galaxy A35 are colour-accurate but the smartphone struggles with edge detection. You will need to take a series of images in Portrait Mode to make sure you get the desired shot. The blur effect applied to the background needs to be stronger as well. The 13MP front-facing camera takes good selfies and does not do anything dramatic to the skin texture and skin tone. It can record 4K videos at 30 fps, similar to the primary camera at the back.
It is nice to see Samsung make the necessary changes to the Galaxy A35 and turn it into a real competitor in its price segment. Even though its overall design feels a bit ‘safe’, its form factor and build quality leave no room for complaints. The Exynos 1380 SoC under its hood is more than capable of handling everyday tasks. However, if you’re a serious gamer, you may want to consider other options. If you’re more interested in the camera performance, the Galaxy A35 will not disappoint you with its 50MP primary shooter and advanced photo processing chops. At Rs 31,000, this smartphone is a good buy.
Ultra-high contrast ratios and IPS Black Technology for stunning clarity.
Industry-leading 98% Display P3 wide color gamut coverage for precise hues.
Seamless Thunderbolt 3 connectivity for swift Mac workflows.
In today’s fast-paced world of design and content creation, having the right tools at your disposal can make all the difference. Enter the BenQ PD3225U, a 32-inch 4K UHD designer monitor meticulously crafted to meet the demands of Mac users. With its impressive array of features and seamless integration with Mac workflows, the PD3225U is set to revolutionize the way professionals approach graphic design and video editing tasks.
In This Article
Unrivaled Visual Clarity and Detail
At the heart of the PD3225U lies BenQ’s commitment to exceptional image quality. With ultra-high contrast ratios enhanced by IPS Black Technology, this monitor delivers stunning visual clarity and detail, making every pixel pop with lifelike precision. Whether you’re working on intricate graphic designs or editing high-resolution videos, the PD3225U ensures that every nuance is captured with unparalleled accuracy.
In the world of design, color accuracy is paramount. The PD3225U sets the standard with its unrivaled color accuracy, boasting an industry-leading 98% Display P3 wide color gamut coverage. Validated by stringent certifications from Calman, Pantone, and Pantone Skin Tone, this monitor ensures that every hue is reproduced with absolute fidelity. Say goodbye to guesswork and hello to true-to-life colors that jump off the screen.
Seamless Mac Compatibility
Designed with Mac users in mind, the PD3225U offers seamless Thunderbolt 3 integration, providing swift connectivity for Mac creative workflows. With Thunderbolt 3, you can enjoy single-cable video, data, and audio transfer, as well as 85W laptop charging, all without sacrificing performance. Whether you’re a seasoned Mac aficionado or a newcomer to the platform, the PD3225U streamlines your workflow for maximum efficiency.
Optimized Productivity and Comfort
In addition to its cutting-edge features, the PD3225U is packed with tailored enhancements to optimize productivity and comfort during extended usage periods. From adjustable ergonomics to eco-conscious construction utilizing 85% recycled plastics, every aspect of the PD3225U is designed with the user in mind. Experience unparalleled comfort and peace of mind as you immerse yourself in your creative endeavors.
As a testament to its commitment to excellence, BenQ is offering an exclusive one-year free Pantone Connect Premium subscription worth $90 with every PD3225U purchase. With Pantone Connect Premium, you gain access to a treasure trove of color resources and tools, empowering you to take your creativity to new heights. Don’t just imagine your vision—bring it to life with the PD3225U and Pantone Connect Premium.
Price and Availability
The BenQ PD3225U monitor is priced at Rs 99,990 and is available for purchase at BenQ India’s e-store, Amazon.in, and leading photography retail stores across India.
After releasing AI DJ in 2023, Spotify has added another AI-based feature to its platform. ‘AI Playlists’ is a fun way to curate a collection of songs by entering unique prompts. If you don’t want to put in the effort of going through your music catalogue and picking songs based on a vibe, you can simply get Spotify to do it. Not only does this tool curate interesting playlists, but it is also a great way to come across new music based on a particular vibe. So, without further ado, let’s take a look at how you can create AI playlists on Spotify.
As is the case with most AI-based tools, the results produced by Spotify’s AI playlists are only as good as the prompt. If you want a playlist that isn’t redundant or one-dimensional, make sure your prompt touches upon different kinds of moods and includes more than one attribute for the playlist. Apart from genres, your prompts can reference places, movie characters, colours, animals, and more. If you can put the emotion into words, you can even use an emoji in your prompt.
If you’re looking for a very specific type of sound, it is a good idea to narrow down your playlist using specific genres and/or decades of music. If you want to get creative with it, you can create playlists based on the music taste of imaginary characters. If you like the soundtrack of a particular movie or TV show, you can find similar songs that match that vibe using AI playlists.
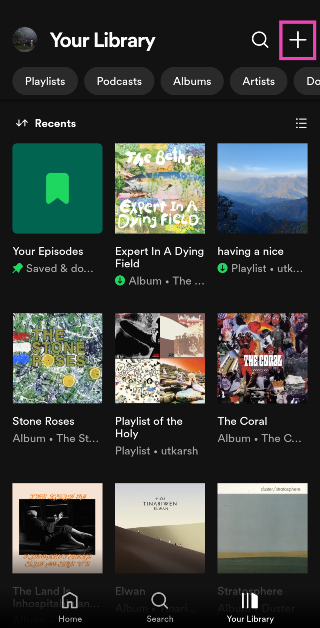
Create AI Playlists on Spotify
Step 1:Launch the Spotify app on your smartphone and switch to the Library tab.
Step 2: Tap the plus icon at the top right corner of the screen.
Step 3: Select AI Playlist.
Step 4: Enter a prompt. If you want a playlist that accurately represents your mood, be very specific with your prompts. Spotify also has preset prompts for you to choose from.
Step 5: Spotify will produce a playlist based on the prompt. You can edit the songs in this playlist or refine it further by entering a follow-up prompt.
Step 6: When you’re happy with the results, hit Create.
Step 5: Enter a prompt for the playlist using text or voice. Make sure it is detailed and touches on key aspects of the mood and sonic nature of the playlist.
Step 6: Your AI playlist will be generated in a few seconds.
Frequently Asked Questions (FAQs)
How do I create an AI playlist on Spotify?
Launch the app, go to Library, hit the plus icon, and select AI playlist. Enter a prompt for the playlist and hit ‘Create’ when you’re done editing the songs.
Can Spotify create a playlist based on any prompt?
Your prompts have to be music-related for Spotify to create a playlist. Since this is still a beta feature, it doesn’t create playlists based on prompts that are not related to music.
How do I create a Blend on Spotify?
Go to Spotify>Your Library, hit the plus icon, select Blend, hit ‘Invite’, and send the link to a friend.
Can YouTube Music create AI playlists?
Yes, you can create AI playlists on YouTube Music by going to Library>New>AI playlist.
This is how you can create AI playlists on Spotify. Spotify will roll out this feature for the rest of the work in a phased manner over the coming months. Make sure the Spotify app on your phone is updated to its latest version. If you have any questions about AI playlists, let us know in the comments! While you’re here, check out this article to learn how to find your Spotify daylist.
Consumers can avail of great discounts during the iQOO anniversary special sale starting April 9 till April 14.
The iQOO smartphones at discounted pricing will be available via the iQOO e-store and Amazon.in.
Buyers can save as much as Rs 25,000 on the purchase of iQOO 11 plus take advantage of amazing discounts on a few models, such as the iQOO 12 Desert Red version, iQOO Z9, iQOO Neo9 Pro, and iQOO Z7 Pro.
In celebration of reaching a significant milestone—its fourth anniversary—iQOO has announced special discount offers on its flagship, Neo and Z series smartphones. The iQOO’s anniversary special sale will begin today and will run till April 14.
During the iQOO anniversary special sale, the Vivo sub-brand will sell its most recent flagship device, the iQOO 12, for a lower price on Amazon India and its website. Price reductions for some iQOO Z and Neo series smartphones, including the iQOO 11, Z9, Z7 Pro, and Neo 9 Pro, are confirmed for this time frame.
The iQOO 12 Anniversary Edition Desert Red colour variation will retail for Rs 49,999 during the anniversary sale. This represents a reduction of Rs 3,000 off the Rs 52,999 actual pricing. On the other hand, iQOO 11 will have a discount of up to Rs 25,000. Therefore it will retail at Rs 41,999 instead of its original price of Rs 64,999.
During the iQOO’s anniversary special sale the iQOO Neo 9 Pro will now only cost Rs 32,999 instead of Rs 35,999. Whereas, iQOO Z9 will be available at a discounted price of Rs 17,999, Rs 2,000 down from its original price of Rs 19,999.
A further Rs 3,000 discount will be applied to the iQOO Z7 Pro, which will now only cost Rs 20,999 instead of Rs 23,999. In the same way, iQOO Neo 7 Pro—which was originally priced at Rs 34,999—will be more reasonably priced at Rs 29,999.
Garena Free Fire is a battle royale game with regular awards and tournaments to keep players interested. If you play Garena Free Fire, you should be aware of the redeem codes that are released on a daily basis. However, because the battle royale game is banned in India, players from other countries can use the Free Fire Redeem codes daily. If you’re unfamiliar with the Garena Free Fire redeem codes or don’t know how to get them, we’ve put together a step-by-step guide to help you redeem them. Check out Garena Free Fire Redeem Codes for 9 April 2024.
The Free Fire redeem codes are a great way to get free stuff. These are 12-digit codes that contain alphabets and numbers, as well as an expiration date and time. Because the Garena FF redeem codes cannot be used more than once, you should hurry to the redemption page to claim your free reward before someone else does. To get a free reward, all you have to do is go to reward.ff.garena.com/en, which is the official redemption page. Also, keep an eye on this space for daily updates on Garena Free Fire redemption codes and rewards.
If your routine tasks on your PC involve photo editing, working on spreadsheets, or writing articles and drafts, then you must know the Undo and Redo commands. While the former is very popular among Windows users, the latter is not used as often. What a lot of people don’t know is that most Windows applications allow you to carry out these commands multiple times. So, let’s take a look at the universal keyboard shortcuts for Undo and Redo.
The Undo command is pretty much a staple fixture in all Windows applications that let the user create a project. Whether you’re making a beat in Fruity Loops or typing the first draft of a screenplay in Microsoft Word, you can quickly erase any errors using the Undo command. Its keyboard shortcut is universal and it is very rare that an application assigns a different shortcut to it.
Meanwhile, the Redo command is a lot less common than Undo. You can find it in Google Docs and Microsoft Excel but some niche applications may not support it. Its keyboard shortcut is also not as common as Undo’s. However, if the application you are using supports this command, it can be a lifesaver. The keyboard shortcuts for both commands are very easy to incorporate into daily usage.
Keyboard Shortcuts for Undo and Redo
Undo: Ctrl + Z
This keyboard shortcut will reverse the action you have just made. If you press Ctrl + Z multiple times, it will keep undoing the series of actions you have taken. Ctrl + Z is a universal command, meaning it will work on every application on your PC or laptop. However, the app may choose to restrict how far back you can undo your actions.
Redo: Ctrl + Y
The universal keyboard shortcut for redo is Ctrl + Y. Once you press this key combination, the action you just undo’d will be restored. You can redo only as many times as you have undo’d. For example, if you hit undo after cropping a picture, using the key combination for redo will crop it again.
Frequently Asked Questions (FAQs)
What is the keyboard shortcut for Undo?
Pressing Ctrl + Z on your keyboard can undo your last action.
What is the keyboard shortcut for Redo?
Pressing Crtl + Y on your keyboard and bring back the action that you reversed.
How many times can you use the undo option on MS Excel?
Microsoft Excel allows you to undo your last 100 actions on the app.
These are the universal keyboard shortcuts for Undo and Redo. If these key combinations do not work on a particular app, let us know in the comments and we will suggest an easy workaround. Instead of using the keyboard shortcut, you can also access these options in the ‘Edit’ menu.
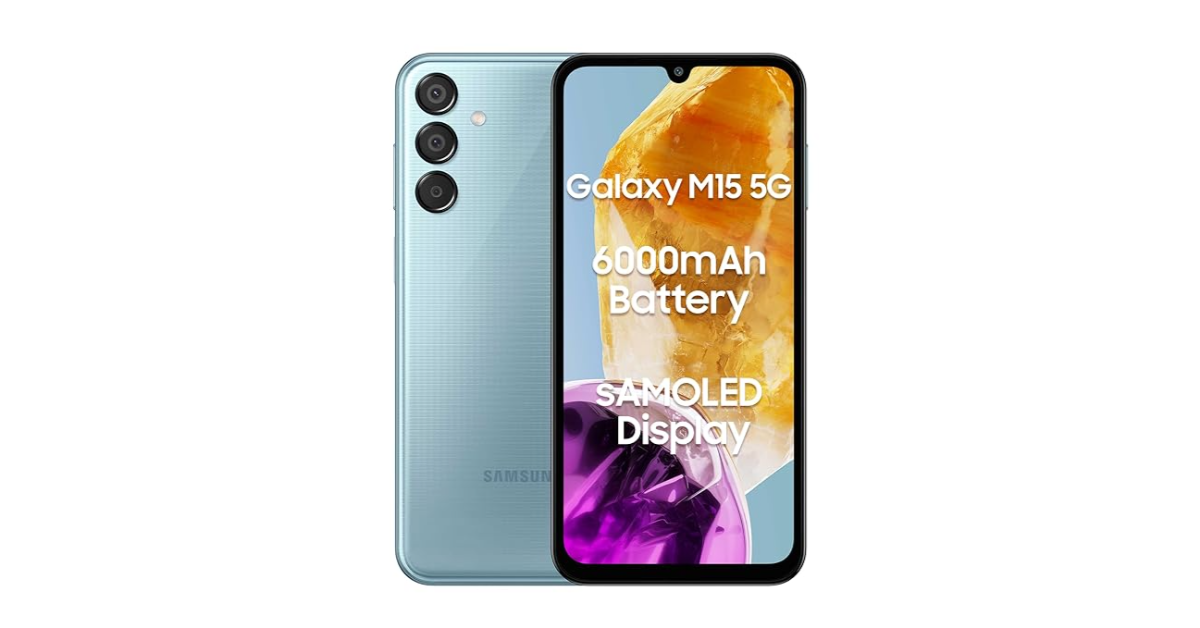
Samsung Galaxy M15 5G launched in India today alongside Samsung Galaxy M55 5G. The M15 5G succeeds the Galaxy M14 that was launched last year. features a 90Hz AMOLED display and a 50-megapixel triple rear camera setup. The phone is powered by MediaTek Dimensity 6100+ SoC and comes with a massive 6,000mAh battery.
In This Article
Samsung Galaxy M15 5G price in India, sale details
Samsung Galaxy M15 5G price in India is set at Rs 13,299 for the 4GB RAM with 128GB storage. The price of the 6GB RAM with 128GB storage is set at Rs 14,799. The phone will be available in three colourways- Blue Topaz, Celestial Blue, and Stone Grey. The device is not available for purchase via Amazon in the country.
Samsung Galaxy M15 5G specifications
The Samsung Galaxy M15 5G features a 6.5-inch full-HD+ Super AMOLED display with 1,080×2,340 pixels of resolution. The screen supports a refresh rate of 90Hz. Samsung equipped the Galaxy M15 5G with a 6,000mAh battery that supports 25W rapid charging. A single charge of the battery is supposed to last up to 21 hours for video playback and 128 hours for audio playback.
The phone runs on a One UI 6.1 based on Android 14. It has been announced that it will receive five years of security patches in addition to four generations of Android upgrades. It is powered by an octa-core MediaTek Dimensity 6100+ SoC with up to 6GB of RAM and 128GB of storage. There is a dedicated slot for a microSD card that can expand the storage up to 1TB.
For photos and videos, the Samsung Galaxy M15 5G features a triple rear camera setup that includes a 50-megapixel primary sensor, a 5-megapixel secondary lens and a 2-megapixel sensor. It boasts a 13-megapixel front camera for taking photos and video chats. In terms of connectivity, there is 5G, GPS, Glonass, Beidou, Galileo, QZSS, Wi-Fi 802.11 a/b/g/n/ac, Bluetooth 5.3, a 3.5mm audio jack and a USB Type-C port. There are several sensors on board, including a fingerprint sensor located on the side, a light sensor, a proximity sensor, an accelerometer, a gyroscope, and a geomagnetic sensor.
The company is promising to provide four years of software upgrades and five years of security fixes.
The phone is powered by Qualcomm Snapdragon 7 Gen 1 SoC.
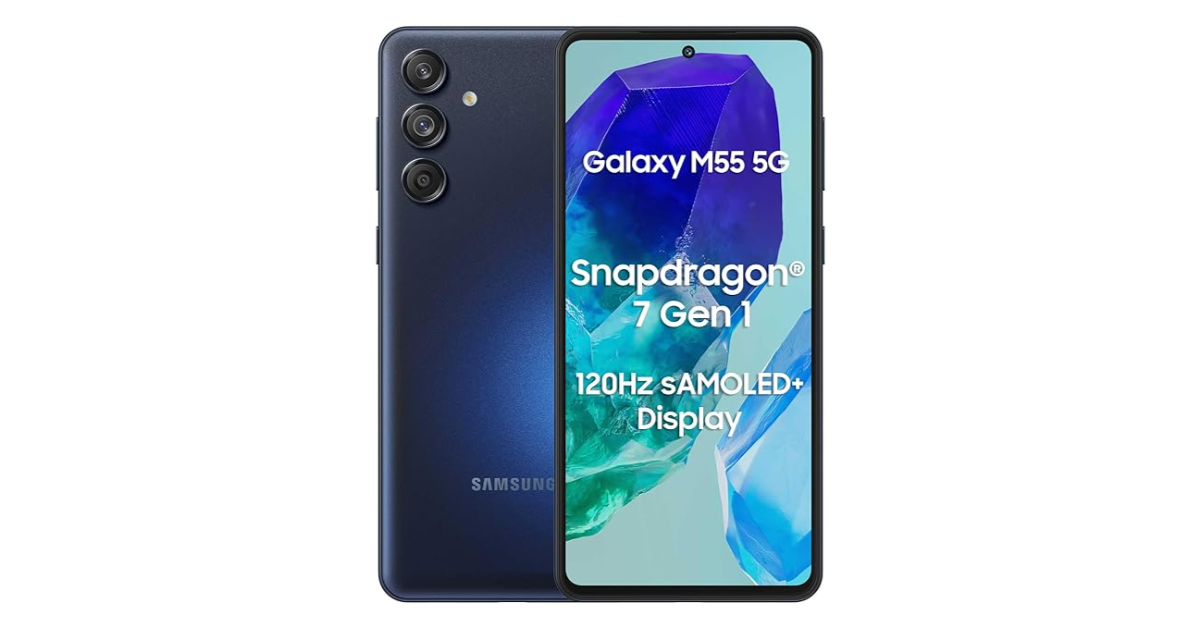
Samsung Galaxy M55 5G launched in India today. The smartphone is the successor of Galaxy M54 5G launched in India last year. Qualcomm Snapdragon 7 Gen 1 SoC powers the M55 5G. The phone has a triple-rear camera setup with a 50-megapixel sensor. The device runs on Android 14 out of the box. It comes with a 5,000mAh battery with support for 45W wired fast charging.
In This Article
Samsung Galaxy M55 5G price in India, sale details
Samsung Galaxy M55 5G price in India is set at Rs 26,999 for the base 8GB RAM with 128GB storage. The 8GB RAM with 256GB storage model comes with a price tag of Rs 29,999. Whereas the 12GB RAM with 256GB storage option is priced at Rs 32,999. The device will be available in two colour options Denim Black and Light Green. The phone can be purchased via the company’s official website and Amazon.
Samsung Galaxy M55 5G highlights a 6.7-inch full-HD+ Super AMOLED Plus display with 2,400 x 1,080 pixels of resolution. The panels support a refresh rate of 120Hz and have a peak brightness level of 1,000 nits. The phone operates on One UI 6.1 based on Android 14 out of the box. The company is promising to provide four years of software upgrades and five years of security fixes. Under the hood, there is a Snapdragon 7 Gen 1 SoC with up to 12GB of RAM and up to 256GB of storage.
For photography, there is a triple rear camera setup that includes a 50-megapixel primary sensor with optical image stabilisation paired with a wide-angle lens, an 8-megapixel sensor ultra-wide-angle lens and a 2-megapixel macro lens. For selfies, a 50-megapixel front-facing camera is provided.
The Galaxy M55 5G includes 5G, Wi-Fi, GPS, Bluetooth 5.2, NFC and USB Type-C for connectivity. There is a 5,000mAh battery with 45W wired fast charging support.
Your laptop has a unique string code assigned to it by its manufacturer. This unique code is called its ‘serial number’. This serial number differentiates your laptop unit from similar models. No two laptops can have the same serial number. This helps large organisations maintain an inventory of their devices. Here are the top 9 ways to find the serial number of your Windows laptop or MacBook.
You may be wondering why you even need to know your laptop or MacBook’s serial number. There are multiple answers to this question. Being a unique identification code, the serial number finds its use in many different situations.
Your device’s warranty is linked to its serial number. Once you turn in your laptop for repairs, the service centre uses its serial number to find out if it is still under warranty.
An organisation can maintain an inventory of all its laptops and PCs using their unique serial numbers.
You can check if any spare part you are looking for is compatible with your laptop.
While reselling the laptop, you can provide its serial number to the buyer to validate its authenticity.
In case your laptop gets lost, filing for the insurance claim will require producing the device’s serial number.
Step 2: Type wmic bios get serialnumber and hit Enter.
Your laptop’s serial number will be displayed on the screen.
Check the retail package
If you don’t have admin access on your device, try looking for the serial number on the stickers applied to the device or in the retail package. Look for any category or section labelled ‘Serial Number’ or ‘S/N’. Some manufacturers provide this information on a sticker inside the retail box and not on the laptop. Look closely for the string. If you can’t find it, move on to other methods.
Check the bills or the receipt
If you can’t find the serial number on your laptop’s stickers, look for it on the product bill/receipt or warranty info card. If your laptop came with a physical card for the warranty information, chances are you will find the serial number on it. While you’re at it, check the detailed invoice too.
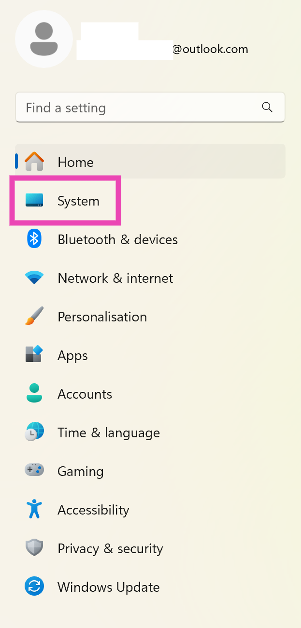
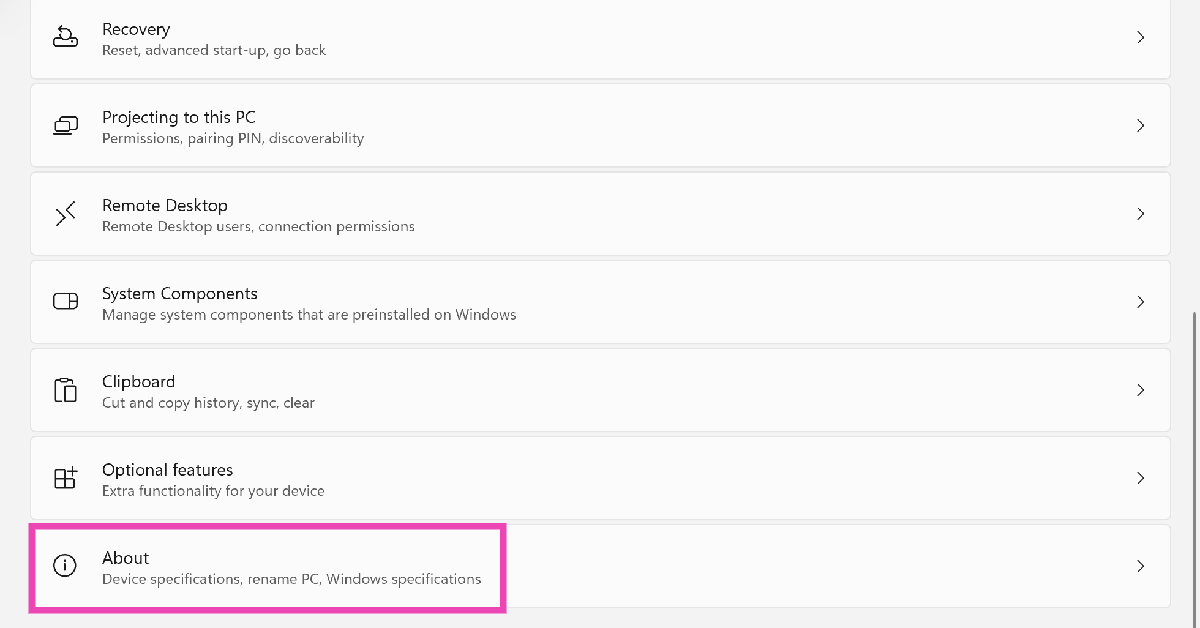
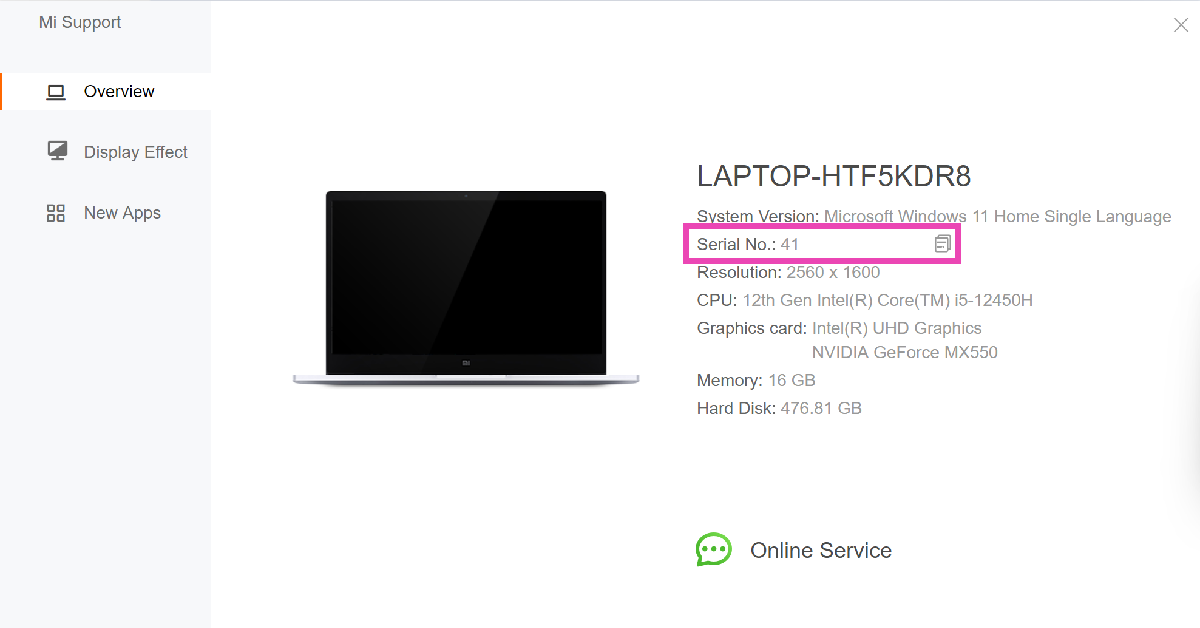
Find the serial number from device info
Step 1: Go to Settings and switch to the System tab.
Step 2: Scroll down and select About.
Step 3: Look for the Serial Number in the list of specifications.
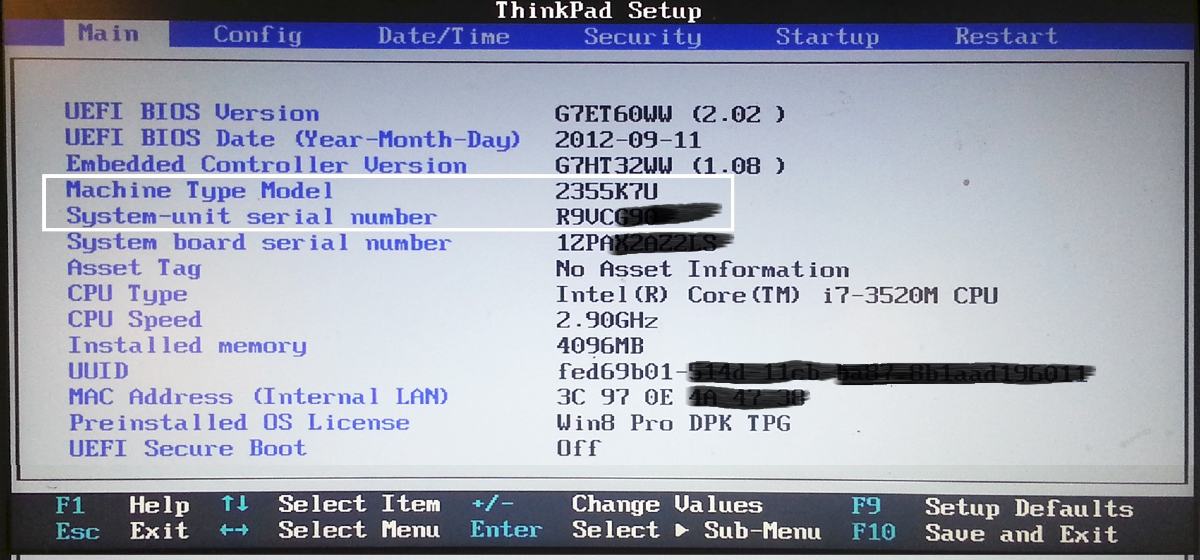
Step 1: Enter BIOS by going to Settings>System>Recovery and hitting Restart now next to Advanced startup.
Step 2: Once you’ve entered BIOS, go to the Main or Information tab.
Step 3: Find the serial number next to System Serial Number.
Use the OEM’s proprietary support app
Most OEMs have a proprietary support or companion app for their PCs and laptops. This app lets you control the essential components and features of your laptop while also specifying key information about the device. For example, Lenovo has the Vantage app, Xiaomi has the Mi Support app, and HP has MyHP and Support Assistant. Launch the proprietary app and look up your device’s serial number in the relevant section.
Find your MacBook’s Serial Number
If you want to find out your MacBook’s serial number, here is what you need to do.
Step 1: Hit the Apple logo in the top right corner of the screen.
Step 2: Click on About This Mac.
Step 3: Look for the Serial Number category in the pop-up box.
Step 2: Type the following command and hit Return:
ioreg -l | grep IOPlatformSerialNumber
Step 5: Your MacBook’s serial number will be listed next to ‘IOPlatformSerialNumber’.
Find your MacBook’s Serial Number from the System Information app
Step 1: Press and hold the Option key and select Apple menu>System Information.
Step 2: Select Hardware from the sidebar.
Step 3: The serial number will be listed under Hardware Overview on the right panel.
Frequently Asked Questions (FAQs)
How do I find my Windows laptop’s serial number?
Run Command Prompt on your device and enter ‘wmic bios get serialnumber’ to find out its serial number.
Can I find my laptop’s serial number from the BIOS?
Yes, your laptop’s serial number is listed on the Main and Information tabs in its BIOS.
How do I enter BIOS on my PC or laptop?
You can enter BIOS by going to Settings>System>Recovery and hitting ‘Restart now’ next to ‘Advanced startup’.
How do I find my MacBook’s serial number?
Click on the Apple logo at the top left corner of the screen and select ‘About This Mac’. You will find the serial number in the pop-up box.
What is the laptop serial number used for?
Your PC’s serial number is primarily used to verify that it is under warranty period, but it can also be used to find compatible parts for the device or track it in case it gets lost.
These are the top 9 ways to find your Windows laptop or MacBook’s serial number. If you want to get your device repaired from the authorised service centre but don’t have its serial number or warranty card, you can simply take the product invoice/bill along with it.
PC monitors are pretty straightforward to set up and use. All you need to do is plug them into a power source and connect them to your PC. When an error message pops up on the display monitor, things can get pretty confusing because the error could arise due to a plethora of reasons. If you’re facing a similar ‘no signal’ issue on your Acer monitor, here are some possible fixes.
Reasons behind the ‘no signal’ error message on your Acer PC
Before we move on to the fixes, here are some of the possible reasons behind this error.
Faulty connection between the PC and the monitor.
The monitor is receiving power, but the PC isn’t.
The cables connecting the PC and monitor are damaged.
You did not select the correct input source for your monitor.
Hardware damage to the monitor.
Graphic card drivers are out of date.
Now, let’s take a look at the fixes.
Check the cable
If you’re getting the ‘no signal’ error on your Acer monitor, the first thing you should do is check the cable connecting it to the computer. Make sure it is connected firmly to the monitor and the CPU. Inspect the cable for any tears. These tears can often give rise to a bunch of functional issues. Additionally, make sure the PC’s power cable is plugged in and turned on.
Select the correct input source
Some Acer monitors have multiple input ports (HDMI, VGA, DVI, DP, etc). Make sure your monitor is set to the correct input source for it to work. You can change the input source using the firmware settings of the monitor. Press the menu button on the menu’s frame and select the appropriate input source.
Check the graphics card
If your graphics card is not firmly connected to its slot, it could cause the monitor to display the ‘No Signal’ error. Power off your PC and remove all cables before opening the CPU case. Once the cabinet has been opened, remove the graphics card from its slot and wipe it gently with a clean microfibre cloth. Make sure the slot does not have dirt settled on it. Re-insert the graphics card, re-plug your PC, and restart it to check if the issue has been resolved.
Is your PC in Sleep Mode?
Your PC slips into Sleep Mode after a period of inactivity. This results in the monitor turning off due to a lack of input signal from the PC. To turn off Sleep Mode, simply move the mouse or press any key on the keyboard. You may need to re-enter the password if your PC has been in Sleep Mode for an extended period of time.
This should make your PC send the signal to your primary screen only.
Update the Graphics Card
Your monitor may not receive an input signal from the PC if the graphics driver is out of date. To fix this, download the driver update from the OEM’s official website. Once downloaded, go to Control Panel>Device Manager>Display Adapters and update the graphics card driver.
Check the monitor for hardware damage
Hardware damage can cause the ‘No Signal’ issue on your monitor. Inspect its frame and display for any signs of physical impact. If you notice some scuffs or cracks, it means your monitor sustained damage recently, most likely due to a fall. Furthermore check its cables and ports for any unexplained tweaks.
Connect to a different monitor
If your monitor’s hardware is damaged, you will need to take it to an authorised service centre for repair. To confirm if this is the case, connect another monitor to your PC. If it doesn’t throw the ‘No Signal’ error message your way, it means that your original monitor is damaged. If you encounter an issue with the secondary monitor as well, it means the fault lies with your PC. You can also run this experiment by connecting your monitor to another PC.
Frequently Asked Questions (FAQs)
What should I do if my Acer monitor is displaying a ‘no signal’ message?
Make sure the input source on your monitor is correct, check the cable connecting it to the PC for any physical damage and loose connections, and update the graphics driver.
Why is my Acer monitor displaying the ‘No Signal’ error message?
The ‘No Signal’ error message could arise due to a faulty cable connection, lack of power to the monitor, outdated graphics drivers, and hardware damage to the monitor.
How do I change the input source on my Acer monitor?
Press the menu button on the monitor’s frame and select ‘Input’. Choose the correct input source from the list, depending on the type of connection.
How do I reset my Acer monitor?
Access the On-Screen Display menu by pressing the dedicated button at the bottom or the side of the monitor, go to Settings>System, and select ‘Reset to Default’.
How do I update my PC’s graphics card driver?
Download the updated driver from the OEM’s website, then go to Control Panel>Device Manager>Display Adapters to update the graphics card driver.
These are the top 8 ways to fix the ‘no signal’ issue on your Acer monitor. Apart from these standard fixes, you can try performing a factory reset on the monitor. This will reset its settings to factory defaults and will get rid of any customisations that may be causing the problem. If you have any other fixes for this issue, let us know in the comments!
There will be a first solar eclipse on Monday, April 8, which is also known as Surya Grahan in India. The majestic solar event will be seen in different parts of the world but mainly in North America, including Mexico, the US, and Canada. After this, there won’t be another total solar eclipse in the same region for another 20 years.
This year’s first solar eclipse will be witnessed in various parts of the world on Monday. The first annular Solar Eclipse will not be visible in the rest of the world, albeit a few additional regions will be able to witness it to some extent. An annular solar eclipse is characterised by the appearance of a ring of fire in the sky. The sky will darken as if it were dawn or dusk.
Beginning at 11:07 AM PDT on the Pacific coast of Mexico, the eclipse will conclude at 5:16 PM NDT on the Atlantic shore of Newfoundland, Canada. Over a distance of 185 km, the total solar eclipse moves across North America, travelling through Mexico, across the United States from Texas to Maine, and out across Canada’s Atlantic coast. It will be visible in up to eighteen different US states. India would not be able to see the total solar eclipse as it will begin a couple of hours after the sun sets, at 9:12 PM IST. On April 9, the eclipse will go into totality at 10:08 PM IST and come to an end at 2:22 AM IST.
If you are located in one of the above-mentioned locations, then it will be visible with your own eyes. The most important thing to remember when witnessing a total solar eclipse is safety. Make sure you know when to wear specialised eye protection made for viewing solar radiation. We would caution you against using your naked eyes to view the event.
Consider donning protective sunglasses or dark glasses before venturing outside as the damaging UV rays could cause irreversible eye damage, potentially resulting in blindness. Make sure you use black polymer, welding glass, or aluminized Mylar before you watch the solar eclipse (shade number 14).
Now that you know that the 2024 Total Solar Eclipse will not be visible in all parts of the world, it can be watched virtually live through the eyes of NASA.
On April 8 at 5:00 p.m. GMT (10:30 p.m. IST), NASA will begin a live webcast that will last until 8:00 p.m. GMT (1:30 a.m. IST).
The live stream is accessible below.
The timeanddate.com will also broadcast the live stream of the total solar eclipse on its YouTube channel on April 8 beginning at 4:30 PM GMT (10:00 PM IST).
What is an annular solar eclipse?
For those who don’t know, a solar eclipse is a phenomenon that occurs when the Sun, Moon, and Earth are all in alignment. It is known as a partial or full solar eclipse when the Earth is completely covered in the shadow created by the Moon. However, during an annular solar eclipse, the moon crosses in front of the sun and obscures half or all of it from Earth’s perspective.


")


")
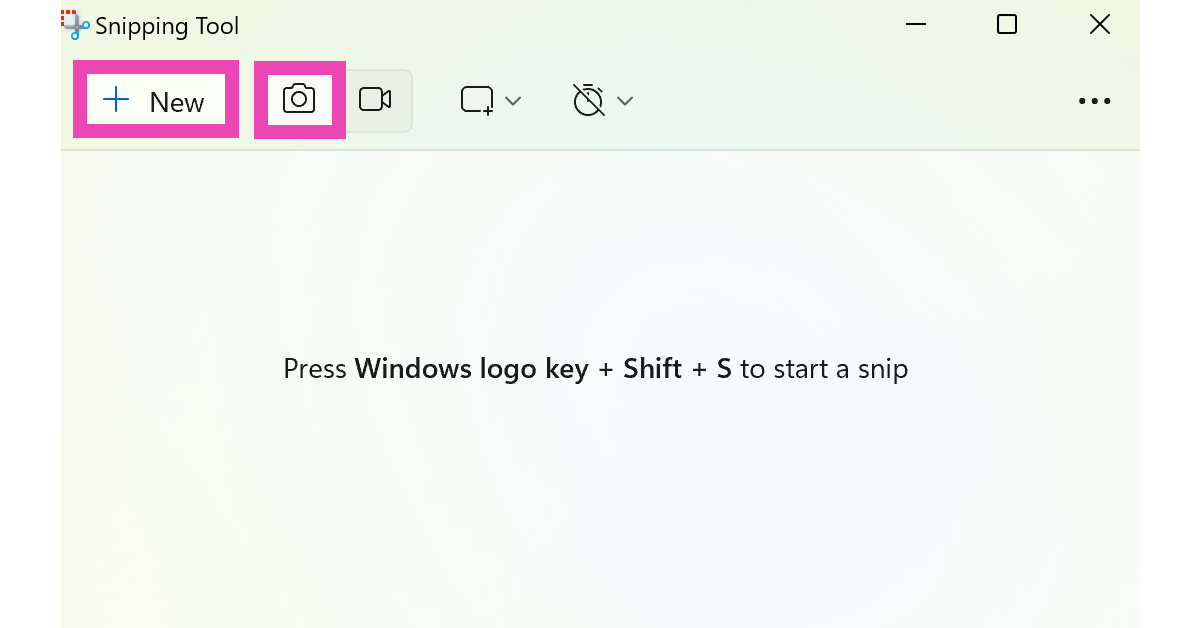


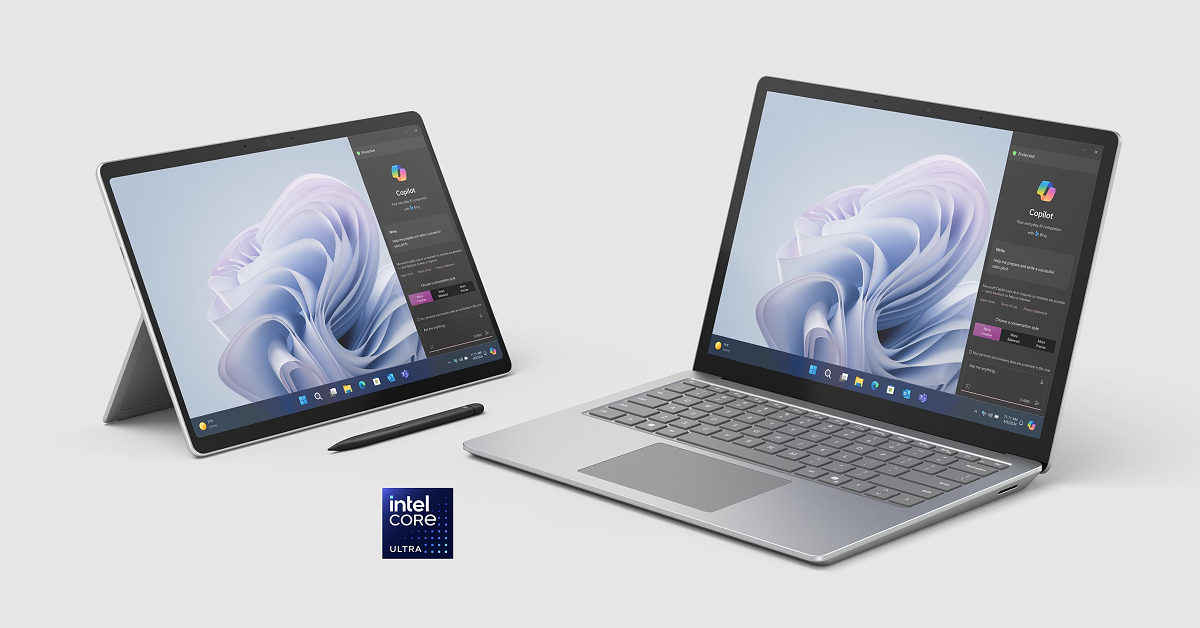

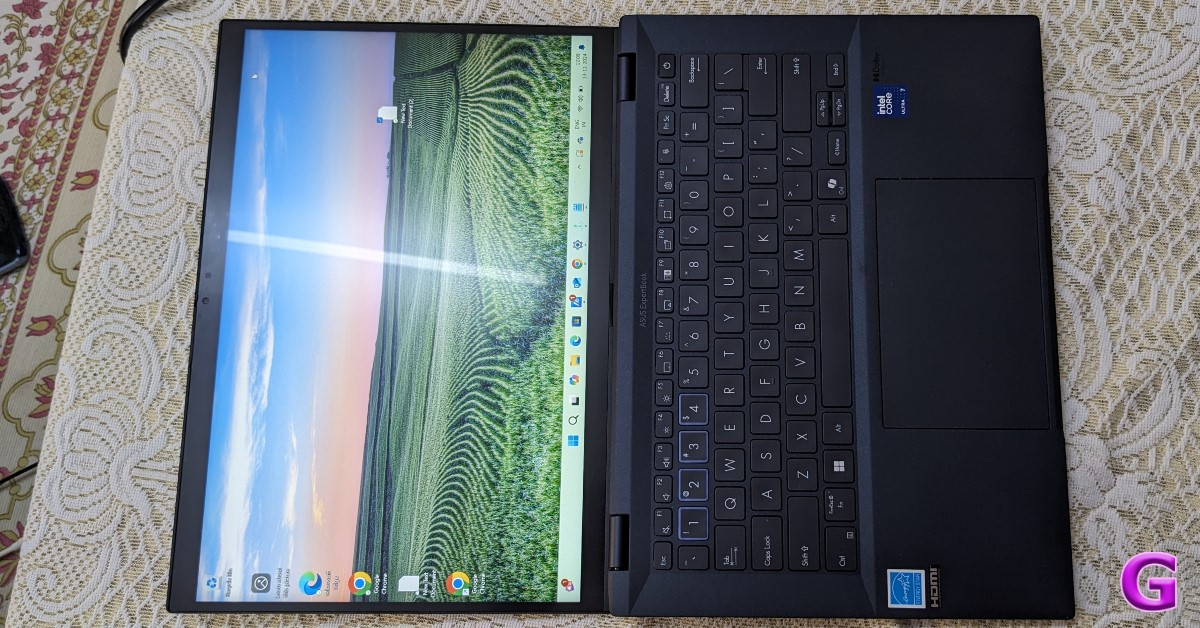

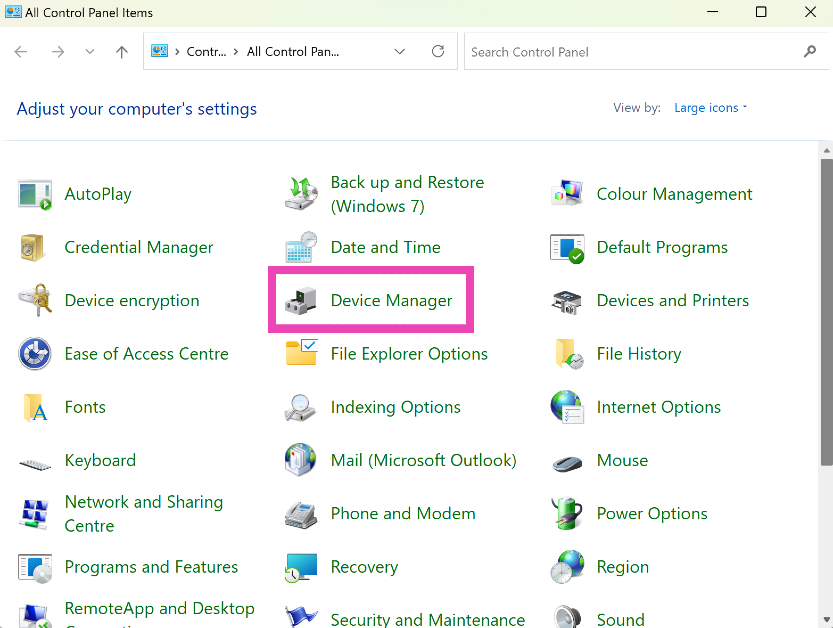
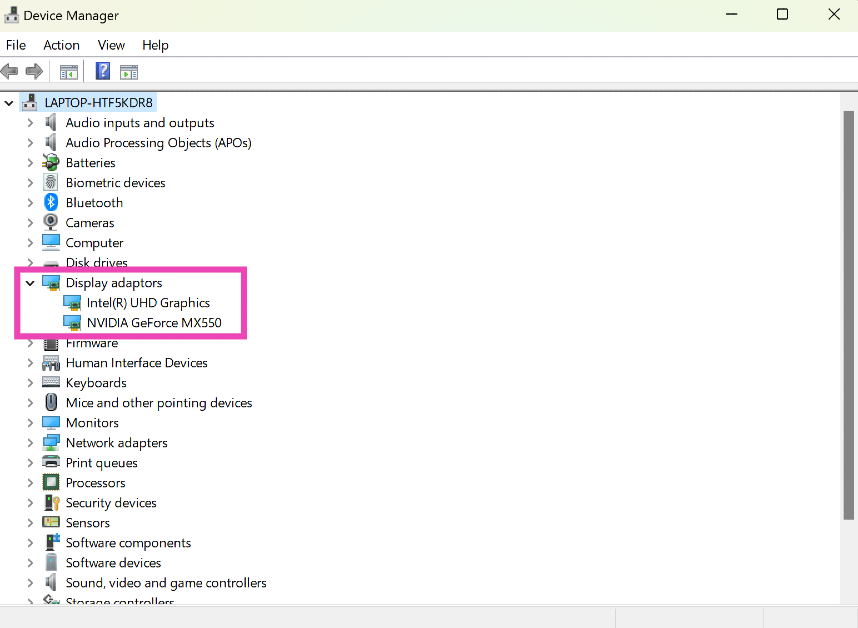
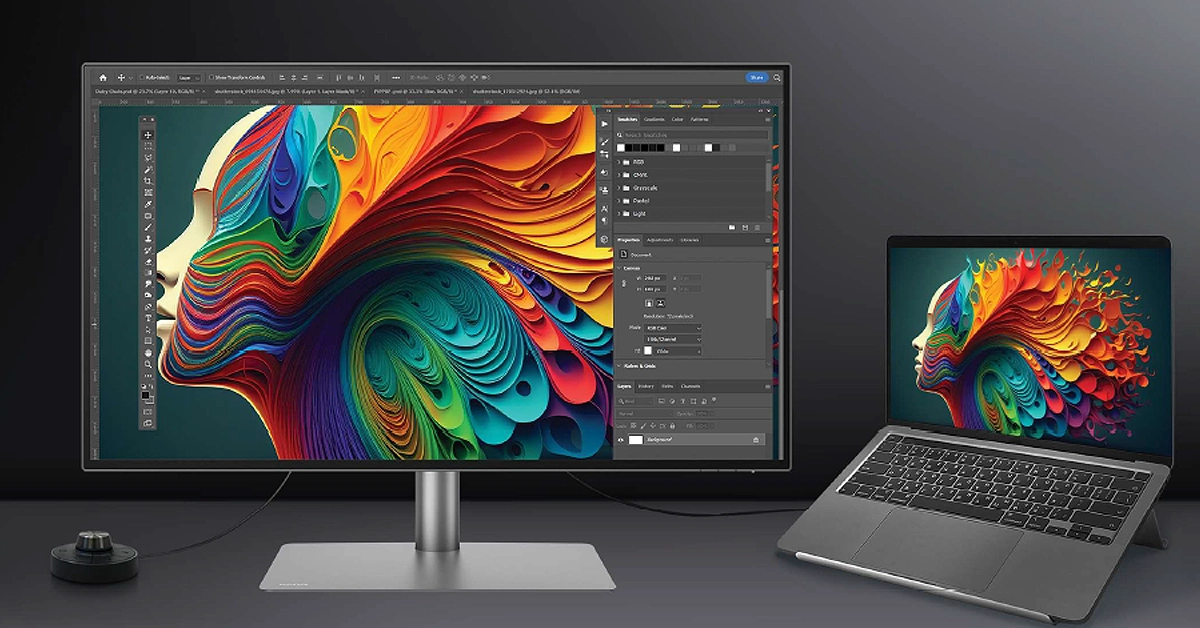

")