Samsung Galaxy S24 new 8GB RAM with 128GB storage model tipped to launch in India soon

Samsung Galaxy S24 debuted in India earlier this year. There are two RAM and storage options available. A tipster now claims that Samsung plans to release a third, less expensive version in India soon. The device is powered by Snapdragon 8 Gen 3 Mobile Platform for Galaxy. It is shipped with Android 14-based One UI 6.1.

An image displaying the cost of a new Samsung Galaxy S24 model with 8GB RAM and 128GB of onboard storage was posted by tipster Abhishek Yadav on X formerly known as Twitter. Although the formal announcement of this model is pending, the leaked image indicates that it will cost Rs 74,999.

The Samsung Galaxy S24 was launched in India earlier this year in two different configurations: 8GB RAM with 256GB storage and 8GB RAM with 512GB storage models are priced at Rs 79,999 and Rs 89,999, respectively. S24 is available in Amber Yellow, Cobalt Violet, Onyx, and Black colour options.

Also Read: HMD-branded smartphone arriving in India soon: Upcoming launch teased

The Samsung Galaxy S24 comes with a 6.2-inch FHD+ and 6.7-inch QHD+ Dynamic AMOLED 2X display with 120Hz refresh rate. The screen has a layer of Corning Gorilla Armor for protection. The Phone includes Samsung Knox, Knox Vault, and Passkeys. The device is powered by Exynos 2400 SoC. It runs on Android 14 with UI 6.1. The company will provide seven generations of OS upgrades and seven years of security updates.

The Galaxy S24 come with a triple rear camera setup that includes a 12MP Ultra-Wide Camera (F2.2, FOV 120˚), 50MP Wide Camera (OIS F1.8, FOV 85˚) and a 10MP Telephoto Camera (3x Optical Zoom, F2.4, FOV 36˚). All the models come with a 12MP selfie camera (F2.2, FOV 80˚).

The smartphone includes Live Translate, Interpreter, Chat Assist, Note Assist, Transcript Assist, and Circle to Search, powered by built-in AI features.

Also Read: Pixel 8a promotional video leaked, reveals AI features and software info

The Samsung Galaxy S24 has a 4,000mAh battery that supports Wireless PowerShare technology in addition to 25W wired and 15W wireless charging. In addition, it has IP68 dust and splash resistance and supports 5G, 4G LTE, Wi-Fi 6E, Bluetooth 5.3, Wi-Fi direct, and USB Type-C connectivity.

CMF Neckband Pro Review: Packs a solid punch

Launched alongside the Buds TWS (our review here), the CMF Neckband Pro brings a lush soundstage and premium features to the affordable headset category. Much like their Nothing counterparts, CMF’s products have an easily recognisable design language even though they don’t utilise the ‘transparent’ aesthetic. The minimal, no-nonsense route taken by CMF is something we like a lot. We’ve been using its newest neckband for almost a week. Here is our CMF Necband Pro review. This neckband is currently priced at Rs 2,000.

Read Also: HMD-branded smartphone arriving in India soon: Upcoming launch teased

CMF Neckband Pro review: Design

Here’s what you get inside the CMF Neckband Pro retail package:

  • Neckband
  • Extra ear tips
  • Safety Guide

The Neckband Pro is available in three colour variants – Orange, Dark Grey, and Light Grey. It follows the traditional neckband design language but gets rid of some things in favour of a ‘cleaner’ look. The two stems on either side of the neckband have flat top panels. The right stem houses the rotating dial on the top panel. The bottom panel contains the pairing button and the microphone. A small LED notification light lies on the side. Right next to this notification light is the USB Type-C charging port.

CMF Neckband Pro review: Design

The rotating dial takes care of all the media controls. Pressing it once plays/pauses the music and accepts incoming calls. A double press skips the track and declines any incoming call. Rotating the dial alters the media volume. Pressing and holding it toggles between ANC and transparency mode. These controls can be customised using the Nothing X app.

design

The neckband is made out of plastic, which makes it quite lightweight. The matte texture on the stems feels premium. The earbuds follow the traditional in-ear design and offer a comfortable fit. These earbuds magnetically lock together when they’re not in use.

design

CMF Neckband Pro has an IP55 rating, which means it can easily withstand exposure to minor splashes of water. Wearing the headphones while working out did not present any issues. We were expecting the glossy earbuds to pop out when things got sweaty, but we were surprised to see that the fit held up quite well.

CMF Neckband Pro: Performance

Pairing the Neckband Pro to a smartphone or PC is a seamless process. Pressing the setup button on the right stem for 3 seconds puts the headset in pairing mode. Once it has been paired, you can enable Google Fast Pair for easy access across all your devices. Neckband Pro also supports Bluetooth 5.3. Delivering the audio output are 13.6mm custom dynamic drivers with Ultra Bass 2.0 tech.

CMF Neckband Pro: Performance

The audio output produced by Neckband Pro is balanced and detailed. The mids and the highs get ample representation in the sound stage. If you like a thumping bass with your music, the neckband’s ‘Ultra Bass’ feature can be accessed from the Nothing X app. The additional dollop of bass does make the listening experience quite fun.

CMF Neckband Pro: Performance

The equaliser section in the Nothing X app lets you choose from multiple sound profiles. We were happy with the default ‘balanced’ profile as it was versatile enough to handle a range of genres. Spatial Audio is another handy addition to the neckband. It can be toggled from the Nothing X app as well.

nothing x app

For a neckband priced at Rs 2,000, you expect good noise cancellation and the CMF Neckband Pro does not disappoint in this regard. This headset can cancel up to 50dB of surrounding noise. We were satisfied with its quality and found ourselves using it a lot while travelling on public transport. You choose from 3 ANC levels or simply set it to ‘adaptive’ mode. The 5 microphones onboard the Neckband Pro do a great job of relaying high-quality audio on voice calls as well.

cmf app

Dual connection is another handy feature that we were happy to find on the Neckband Pro. You can connect the headset to 2 devices and switch between them using the setup button on the right stem. This process works seamlessly and you get used to it fairly quickly. The low-lag mode helps in reducing the latency of the neckband while gaming. You can locate your neckband around the room using the ‘Find my earbuds’ feature. The only catch is that they must be connected to your smartphone. By hitting the play button, you can trace the neckband using the shrill sound emitted from it.

CMF claims the 220mAh battery pack on the Neckband Pro can power it for 37 hours with the ANC turned off. With ANC turned on, the neckband can last 23 hours on a single charge. During the review period, we got around 30 hours of playtime out of the CMF Neckband Pro with frequent ANC use. It took us 40 minutes to fully charge the headset. A quick 10-minute charge can power it for 18 hours.

Read Also: Interviewed: Navajith Karkera On What Sonic Lamb Has In Store, Its Journey And How The Indian Government Helped Them

Verdict

If you’re a neckband loyalist who refuses to make the switch to a TWS product, CMF has got your back. The Neckband Pro is an excellent device that offers a comprehensive soundstage with a garnish of premium features. The headset’s ANC is the X-factor here, cancelling up to 50dB of surrounding sound without breaking a sweat. Neckband Pro’s performance on call is also better than your average TWS. It doesn’t get any better than this at Rs 2,000.

Neckband Pro: Pros

  • Good audio output
  • Clean design
  • Rotating dial
  • ANC

Neckband Pro: Cons

  • No USB Type-C cable inside the box

HMD-branded smartphone arriving in India soon: Upcoming launch teased

The first smartphones to carry the branding of the Finnish company, the HMD Pulse Series, was introduced last week in a few European markets. The lineup includes three devices: HMD Pulse Pro, HMD Pulse+ and HMD Pulse. The company has disclosed that its own-brand phones will be available in India as well.

HMD India stated that it will disclose the name of the first HMD-branded smartphone to be launched in the nation next week. There have been no additional announcements regarding the anticipated devices thus far. The recently released HMD Pulse phones are rumoured to be headed towards India.

HMD Pulse series specifications

HMD Pulse series features a 6.65-inch HD+ LCD screen with 720×1,612 pixels of resolution. The display supports a refresh rate of 90Hz and has a 600-nit peak brightness. Under the hood, there is a 12nm Unisoc T606 SoC with up to 6GB of RAM and up to 128GB of storage that can be further expanded up to 256GB via microSD card. The phones run on Android 14 out of the box.

In terms of optics, the HMD Pulse Pro boasts a 50-megapixel main sensor along with a 2-megapixel depth sensor. A 50-megapixel selfie camera is also included.

Also Read: Pixel 8a promotional video leaked, reveals AI features and software info

The HMD Pulse+ and HMD Pulse on the other hand have 50-megapixel primary cameras and a 13-megapixel camera. The devices have an 8-megapixel front-facing camera for taking selfies and video calling.

Also Read: HMD Global unveiled its new Pulse series with Android 14

The series is backed by a 5,000mAh battery. The HMD Pulse Pro can be charged at 20W and the remaining two models at 10W. The phones come with a side-mounted fingerprint scanner, including an e-compass, proximity, ambient light, and accelerometer. All three variants come with a 3.5mm headphone socket, a USB Type-C port, support for 4G LTE, Wi-Fi AC, Bluetooth 5.0, NFC, and GPS.

Interviewed: Navajith Karkera On What Sonic Lamb Has In Store, Its Journey And How The Indian Government Helped Them

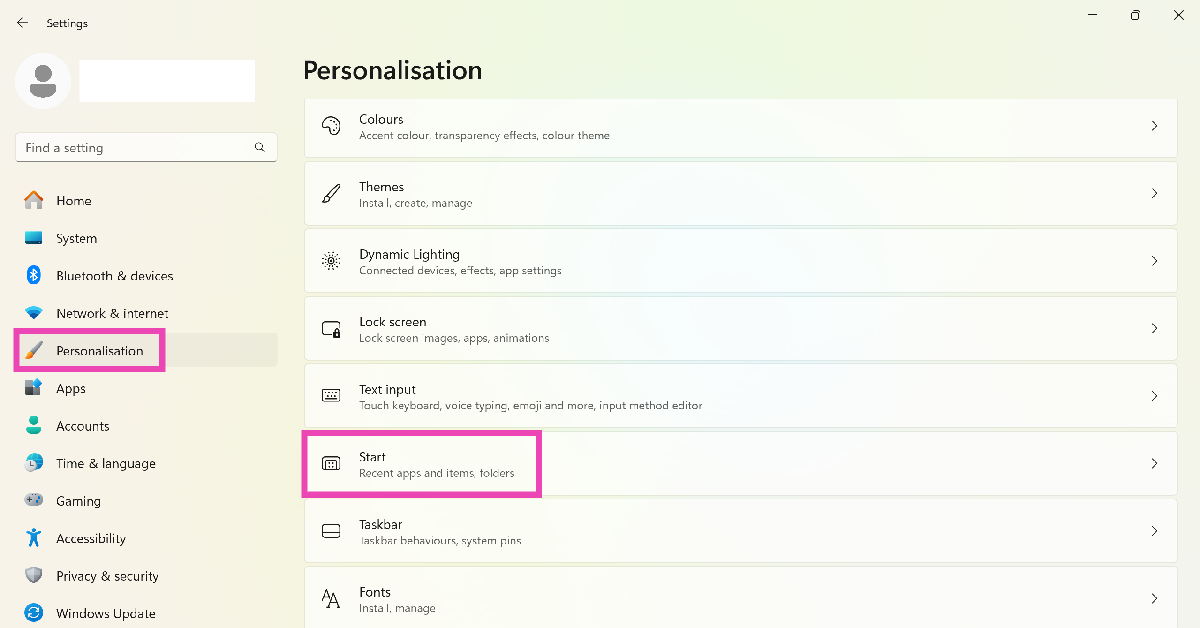
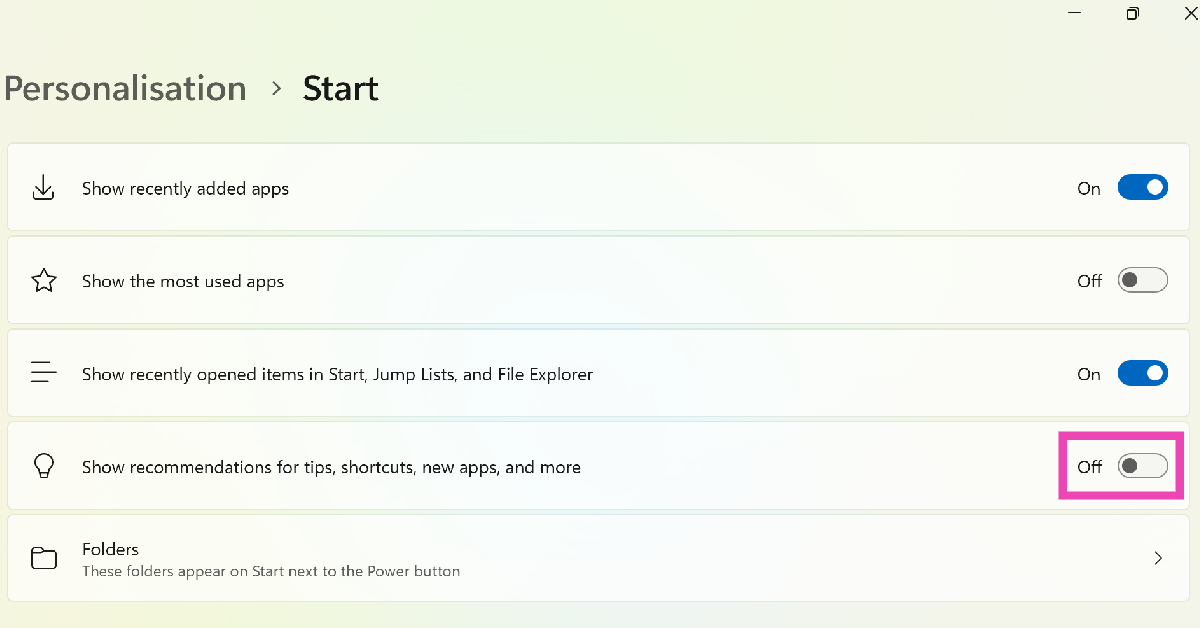
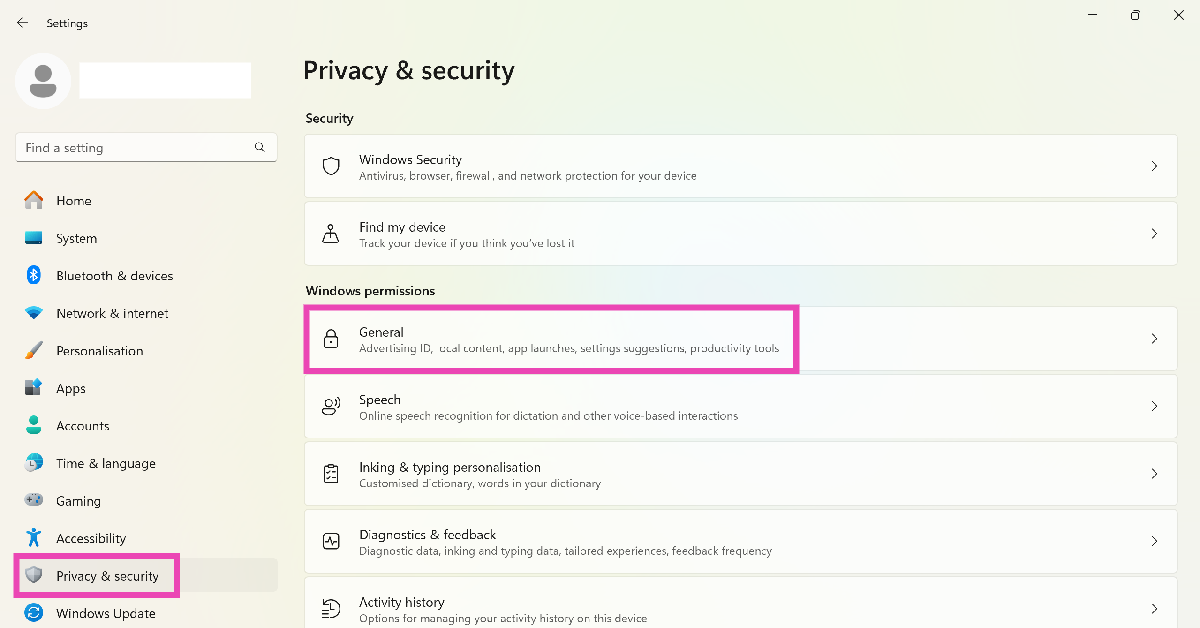
In the tranquil settings of Mangalore, Navajith Karkera, along with his colleague Jagath, embarked on a remarkable journey of innovation that sprouted from their college days at Sahyadri College of Engineering. Driven by a profound passion for creating and a supportive environment fostered by their college’s “Dreamers” team, they found themselves deeply engaged in national tech contests. Their curiosity about audio experiences was sparked during a project aimed at crafting a smart helmet for motorcyclists, which challenged them to deliver sound without distractions.

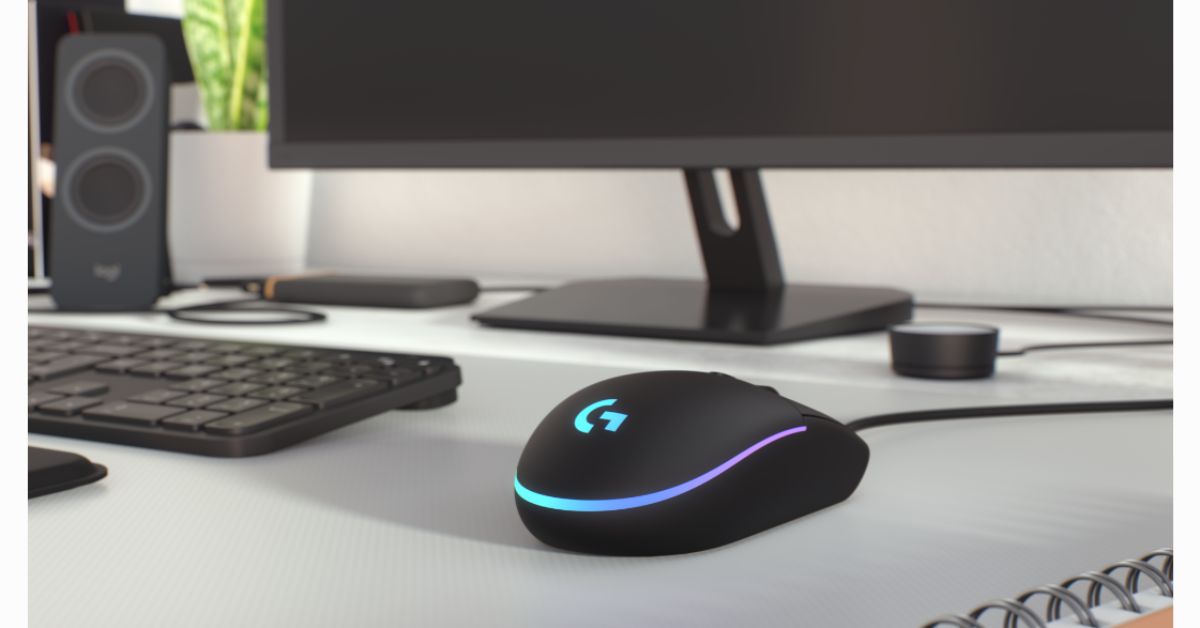
This exploration into how humans perceive sound led them to an ingenious breakthrough—developing audio technology that not only delivers sound through the air but also lets users feel it through their bodies. This groundbreaking discovery paved the way for the creation of Sonic Lamb, setting a new standard in the headphone industry by allowing a fully immersive audio experience that captivates both the ears and the body.

We recently got a chance to have a great conversation with Navajith Karkera about his entrepreneurial journey and what lies ahead for him and Sonic Lamb. Here is the full commentary.

What inspired the creation of Sonic Lamb?

I am from Mangalore, and Jagath hails from Madikeri. Our journey as makers began at Sahyadri College of Engineering in Mangalore, where we pursued our bachelor’s degrees. The passion for building things led us to actively participate in national tech and innovation contests organized by prestigious institutions like IITs and NITs.

Guided by the “Dreamers” team initiated by our college seniors, we found a supportive environment to work on innovative ideas and present them at national events. One of our significant projects was the development of a Smart helmet for motorcyclists, which earned us several victories in national innovation contests. Two remarkable moments stand out in our journey – the “Best Young Innovators” award in 2015 and a “Gold Award” in 2018.

During the project, we were challenged to reproduce sound for motorcyclists without distracting them. This led us to explore different ways humans experience sound, and our study revealed that while we hear sound when it comes to lower frequencies, we feel them rather than hear them. This discovery sparked our interest in finding a new way to address the challenge. We engineered audio drivers capable of delivering sound through the body, and the results were astonishing. This led us to experiment by integrating this technology into regular headphones – and we were amazed at the results.

Fuelled by our love for music and the desire for a more immersive audio experience, we created 3D-printed headphone prototypes for personal use. When we shared them with friends and family, their response encouraged us to revisit our invention.

After three years of dedicated research, development, and benchmarking, we developed an improved prototype that left us and fellow audio enthusiasts captivated.

As the word spread about our invention, we set up demo kiosks at high-footfall events, allowing people to experience our product and provide valuable feedback. The overwhelmingly positive response confirmed that we had something extraordinary on our hands, inspiring us to venture into building our own audio company.

From day one, our goal has been to create a seamless connection between people and sound, providing a high-fidelity and blissful audio experience like never before. Thus, the tagline for our first product was born – “Crafted for an Eargasmic Experience.”

Our mission has always been clear – to redefine the headphone experience and offer music lovers a new dimension in audio pleasure that traditional headphones couldn’t deliver.

As we embarked on this entrepreneurial journey, we realized that India had yet to make a mark in audio technology innovations or the production of audio products for the global market. This realization fueled our determination to create a world-class product designed, engineered, and proudly made in India for the world.

We are excited about the future of our company and the potential to make a real difference in how people experience sound. Together, we aim to push the boundaries of audio technology and leave a lasting impact on the Indian audio industry.

Read Also: Sonic Lamb Review: Audio immersion taken to the next level

How does Sonic Lamb redefine the audio experience?

We believe that over the past decade, the audio industry has shifted its focus away from its core value of improving audio quality and enhancing the overall listening experience. At Rapture Innovation Labs, we are committed to bringing the focus back to sound and its experience by redefining the very method of reproducing audio.

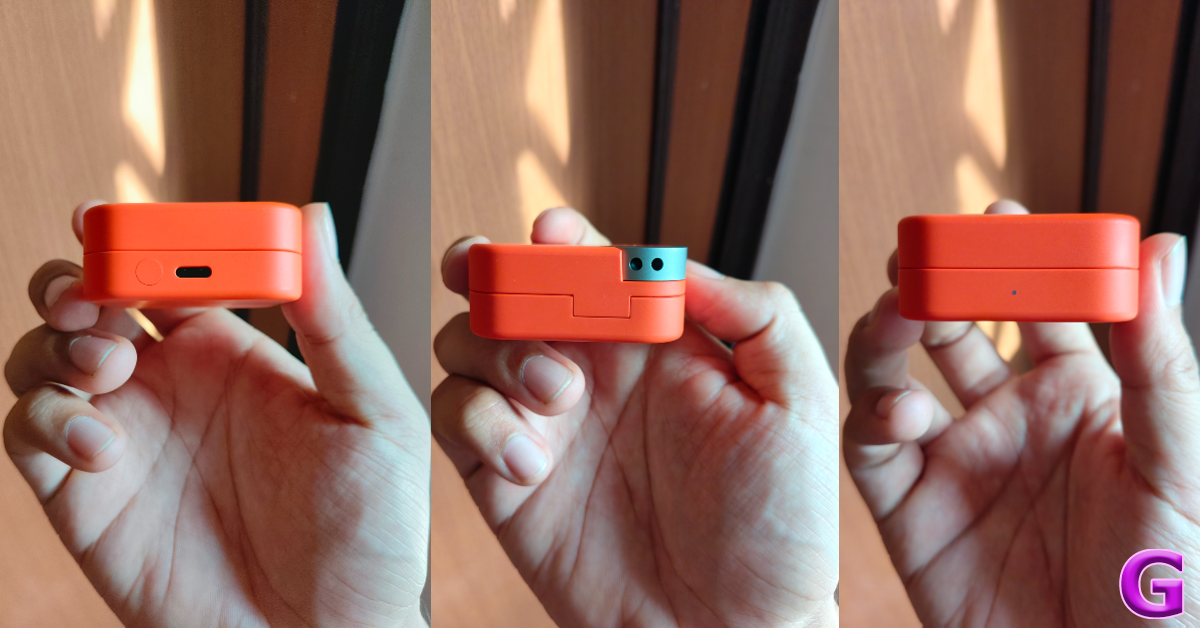
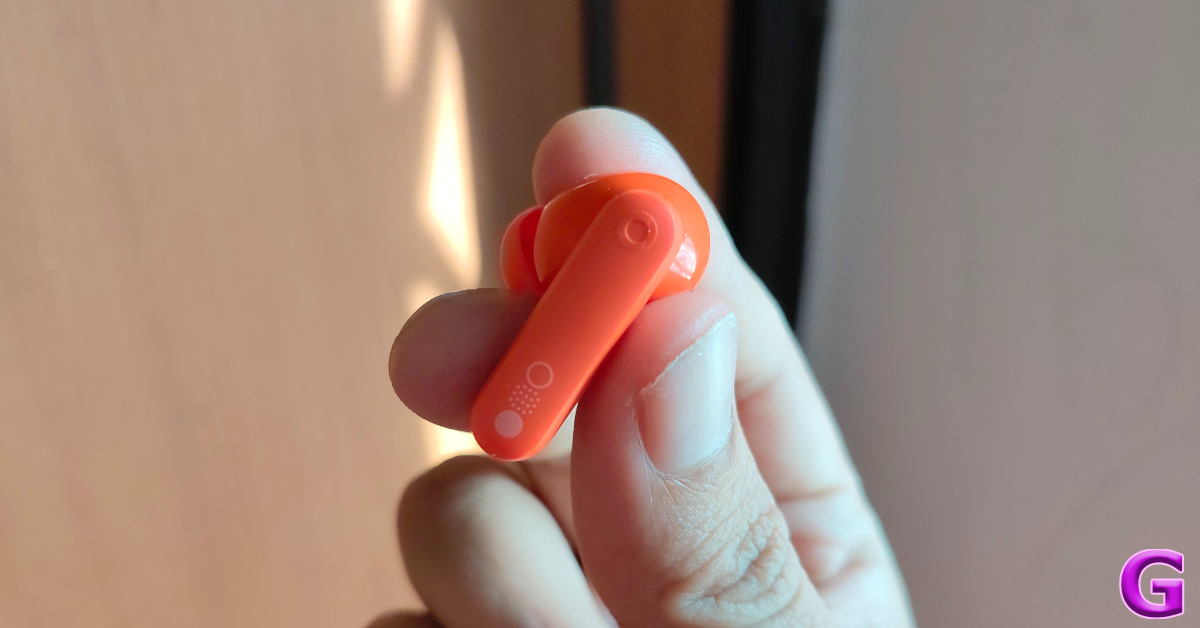
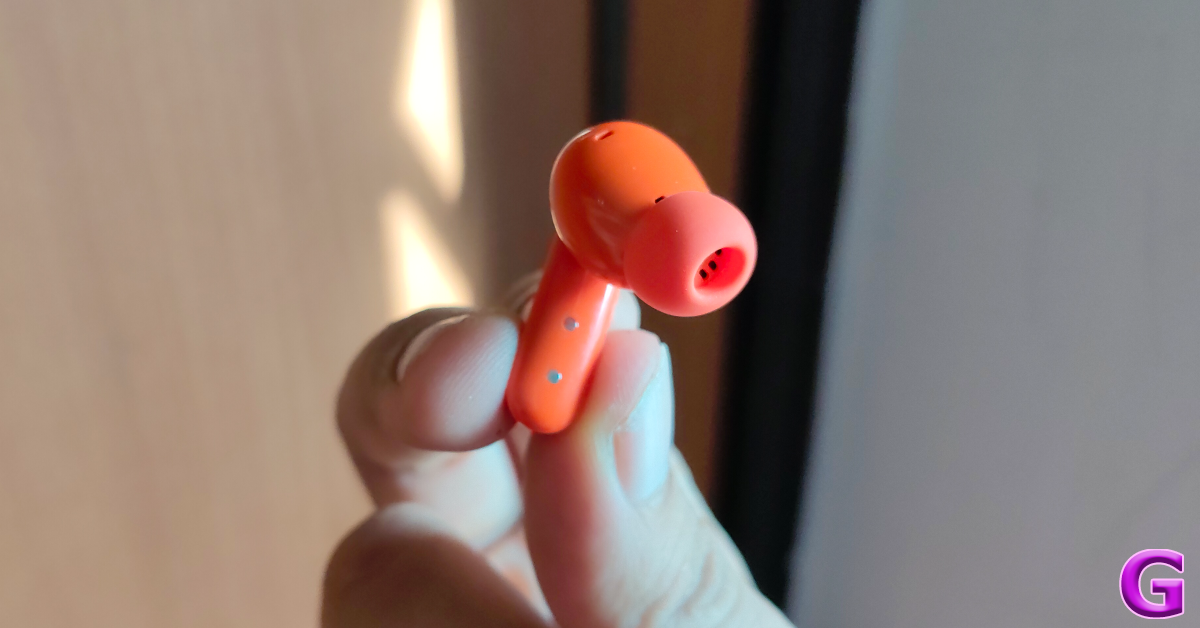
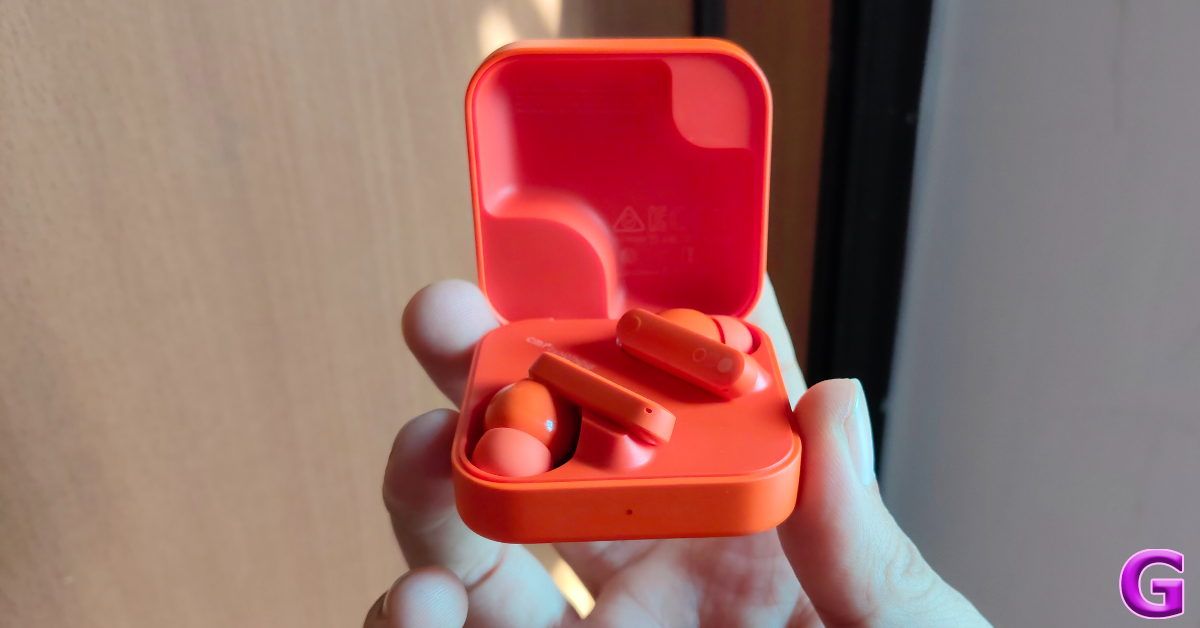
Our patented Hybrid Driver Acoustics technology utilizes a combination of air and body conduction, which incorporates our innovative Impulse driver to revolutionize the headphone audio experience.

It allows users to hear music through their ears and for the first time also feel it through their body (skin and bone) adding a new dimension to the headphone audio experience and making Sonic Lamb excel equally in clarity and bass response.

It emulates a full-range driver and subwoofer system in a headphone – A first of its kind. This makes Sonic Lamb deliver a powerful bass response and immersive audio experience.

For a personalized audio experience, Sonic Lamb comes equipped with a one-of-its-kind control dial called Multimode. Users can toggle through four different modes right at their fingertips to customize the sound profile based on music genre, preference, and activity. The companion smartphone app provides additional features for further personalization.

Could you explain the unique technology behind Sonic Lamb that sets it apart from traditional headphones?

Conventional headphones incorporate a single driver in each ear up to produce the entire sound spectrum of 20Hz to 20000Hz, unlike a loudspeaker which supports a separate driver for each audio band and a subwoofer unit for reproducing low frequencies to reproduce sound that we feel through our body which is missing on all headphones.

The challenge is to integrate a subwoofer for low-frequency (bass) while maintaining accurate reproduction of mid and high-frequency (vocals and instruments)

Our patented Hybrid driver technology uses a precision-tuned full-range dynamic driver along with our proprietary impulse driver to overcome the limitation and reproduce a true-to-the-ear, life-like and immersive sound

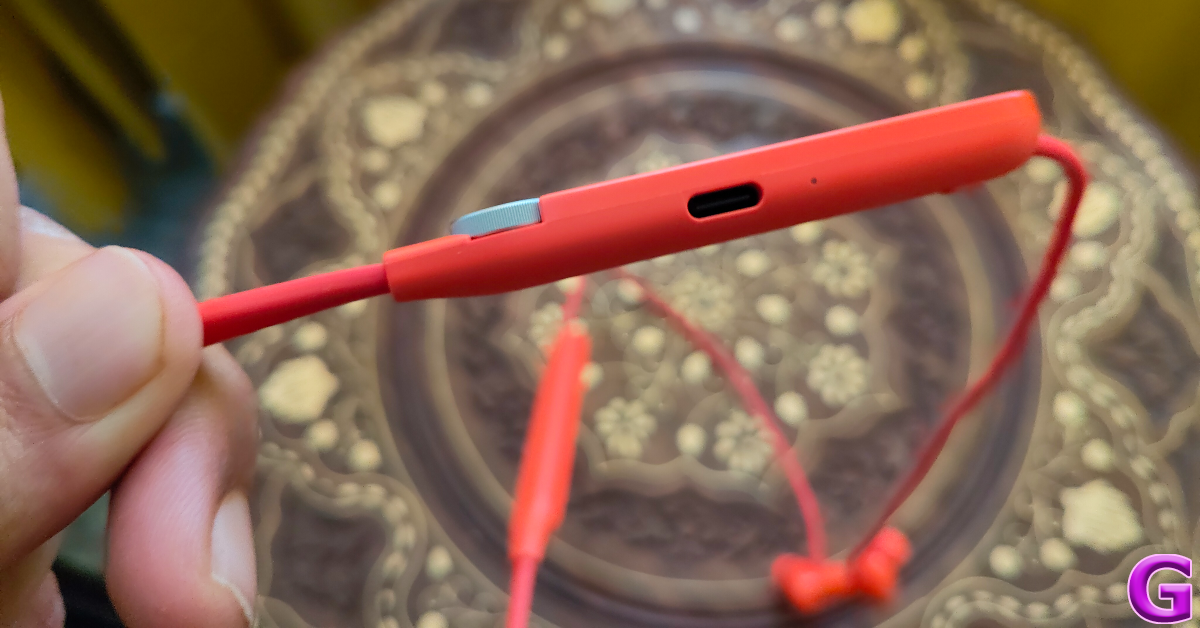
Unlike regular headphones that solely rely on air conduction to transmit sound waves to the ears, Sonic Lamb combines both body conductions. This innovative combination allows for a truly immersive audio experience where not only do you hear the sound, but you also feel it through your body.

Sonic Lamb offers high-fidelity audio with powerful bass that can be felt, providing a more dynamic and realistic sound experience.

Additionally, our headphones provide the flexibility of personalized sound based on music genre, user preferences, and specific activities. A high fidelity, fully immersive and personalized audio experience sets Sonic Lamb apart from traditional headphones in the market and we’re working on coupling this with great customer experience and after-sales support.

How have partnerships with programs like SoundTech contributed to Rapture’s growth and product development?

Rapture’s collaboration with SoundTech proved to be a game-changer for our growth and product development, especially in the Indian market, where access to cutting-edge audio technology and expertise can be limited.

Through the SoundTech partnership, we gained access to:

Testing equipment: World-class audio innovation centre equipped with the latest testing equipment for our headphones.

Advanced Development Tools: Tools specifically designed to fine-tune and optimise our headphone performance.

Invaluable Expertise: Mentorship from retired engineers from renowned premium audio companies, bringing their wealth of knowledge and experience to the table.

This partnership addressed a critical challenge for Rapture – the inability to validate product development efforts entirely within India. SoundTech provided the missing piece:

Validation and Feedback: The ability to rigorously test headphones against global standards and ensure they meet or exceed expectations.

Superior Sound Quality: Access to the latest advancements and expertise allowed Rapture to refine their headphones, delivering exceptional sound that surpassed existing market offerings.

In essence, the SoundTech partnership bridged the gap between Rapture’s potential and its ability to achieve it. They provided the resources and guidance to ensure Rapture’s headphones not only met global standards but also delivered superior sound quality.

Read Also: Sonic Lamb headphones launched in India

How does Rapture ensure its Indian-manufactured products meet global quality standards, particularly with testing at Soundhub in Struer?

We do not compromise on global quality despite manufacturing in India. Our partnership with SoundTech’s advanced audio innovation centre in Struer bridges the gap. This facility boasts cutting-edge testing equipment to ensure headphones meet rigorous global standards.  But it goes beyond just machines.

Rapture benefits from the expertise of Retired engineers from industry giants like Bang & Olufsen and Harman. This collaboration allows us to refine designs, verify our approach, and ultimately achieve superior sound quality, making our headphones a true contender in the global market.

How has support from government departments and investors influenced Rapture’s R&D efforts and product quality?

In the early stages, grants from the Government of India and the Government of Karnataka helped us a lot. These grants helped fund our R&D expenses – a crucial lifeline for any hardware startup. Building exceptional products takes time and money, and this support allowed us to focus on innovation without the constant pressure of immediate profitability.

The government programs didn’t just help with initial funding. This wasn’t limited to just R&D – it extended to prototyping and even patent filings.

This financial support was a major stepping stone for Rapture. It allowed us to not only develop our initial concepts but also refine them through prototyping, secure valuable collaborations, and protect our intellectual property. It’s a testament to the power of government initiatives in fostering a culture of innovation, and we’re incredibly grateful for their contribution to our journey.

How does Rapture gather and utilize customer feedback in its product development process?

At Rapture, we don’t just develop headphones, we craft experiences.  And those experiences are built with you, our valued listener, at the forefront.

From the initial spark of an idea, we involve our target audience. Through alpha and beta testing with prototypes, we get people’s feedback at every stage. It’s your honest opinions help us validate our designs and identify areas where we can push the boundaries even further.

Up until now, our sales strategy has involved direct selling, enabling us to maintain a direct dialogue with our customers, engaging with them and gathering feedback. However, as we expand our distribution channels, including making our products available on platforms like Amazon, we are encouraging customers to register their products. This registration provides customers with direct access to us, allowing them to receive regular product updates and upgrades, while also enabling us to gather relevant feedback.

Additionally, events provide us with another avenue to engage directly with customers and hear from them. We prioritize customer feedback and integrate it into our research and development process.

It’s through this ongoing talk with customers that we keep learning and growing, ensuring that every Rapture product not only delivers cutting-edge technology but also elevates your listening experience to new heights.

What upcoming products or advancements can we expect from Rapture Innovation Labs?

At Rapture, our focus is on providing a unique and premium audio experience driven by innovation and a vision to be the brand of choice globally for a blissful and immersive audio experience.

With our Hybrid Driver technology, we have identified various use cases for improved and immersive audio experience beyond consumer headphones which is on our product roadmap along with concepts of its implementation in loudspeakers and earbuds.

Top 2 Ways to Turn Off Wrist Detection on Apple Watch (2024)

Your Apple Watch works seamlessly because of its ability to know that it is tied around your wrist. When you’re wearing the watch, you don’t need to enter its passcode every time you want to see something on it. If you want the watch to function like this even when you’re not wearing it, you should disable Wrist Detection. Today, we bring you the top 2 ways to turn off Wrist Detection on an Apple Watch.

Read Also: How to Find and Delete Your Facebook Watch History? Top 2 Ways (2024)

What is Wrist Detection?

Your Apple Watch uses its sensors to determine whether it is tied around your wrist. If the watch is not able to detect your wrist, it will lock itself and hide the alerts, health metrics, and other information on the screen. You will need to enter the watch passcode to access its contents. This is an excellent way to ensure that no one else can access your Watch when you’re not wearing it.

If you frequently take your Watch off your wrist, you may not want to enter the passcode every time you want to use the watch. In this case, you can turn off Wrist Detection to ensure your watch doesn’t get locked if it is not on your wrist. There are a few tradeoffs you will have to make to turn off this feature. Without Wrist Detection, your Apple Watch isn’t able to measure health data like blood oxygen, respiratory rate, and heart rate in the background. Moreover, it will also turn off noise alerts and fall detection for your watch.

Turn off Wrist Detection on the Apple Watch

Step 1: Press the Digital Crown on your Apple Watch.

Step 2: Hit Settings.

Step 2: Hit Settings.

Step 3: Select Passcode.

Step 3: Select Passcode.

Step 4: Turn off the toggle switch for Wrist Detection.

Step 4: Turn off the toggle switch for Wrist Detection.

Step 5: Enter your Passcode and hit Turn Off.

Turn off Wrist Detection on the Watch app

Step 1: Launch the Watch app on your iPhone.

Step 2: Switch to the My Watch tab and select Passcode.

Step 2: Switch to the My Watch tab and select Passcode.

Step 3: Turn off the toggle switch for Wrist Detection.

Step 3: Turn off the toggle switch for Wrist Detection. Top 2 Ways to Turn Off Wrist or disable Detection on Apple Watch or watch app (2024)

Step 4: Confirm your selection in the popup box.

Step 4: Confirm your selection in the popup box. Top 2 Ways to Turn Off Wrist or disable Detection on Apple Watch or watch app (2024)

Frequently Asked Questions (FAQs)

What is Wrist Detection on the Apple Watch?

As the name suggests, Wrist Detection uses sensors on your Apple Watch to detect if it is tied around your wrist. When the Watch does not detect your wrist, it gets locked.

How do I turn off Wrist Detection on my Apple Watch?

Go to Settings>Passcode and turn off the toggle switch for Wrist Detection. Hit turn off.

Which features will stop working if I turn off Wrist Detection on my Apple Watch?

Disabling Wrist Detection suspends features like fall detection, sleep tracking, background blood oxygen measurement, noise alerts, and more.

Read Also: Pixel 8a promotional video leaked, reveals AI features and software info

Conclusion

These are the top 2 ways to turn off wrist detection on an Apple Watch. When Wrist Detection is disabled, you will have to enter your passcode every time you want to make a payment using Apple Pay on your watch. If you know any other way to turn off this feature, let us know in the comments!

How to Find and Delete Your Facebook Watch History? Top 2 Ways (2024)

0

Facebook keeps a complete record of your activity on the platform. You can review everything from search entries to your check-ins. While this makes it easier to fetch content you viewed in the past, it is a double-edged sword because of Facebook’s shady history of handling user data. If you’re not okay with the social media platform recording your watched videos, here are the top 2 ways to find and delete your Facebook Watch History.

Read Also: Top 2 Ways to Change App Icon Size on iPhone & iPad (2024)

When should you delete your Facebook Watch History?

If you’re not comfortable with Facebook keeping a record of your user activity, then keeping your watch history cleared at all times is a good idea. Facebook uses your watch history to suggest you similar content as well. For example, if you watch a knitting video, you will see other DIY videos pop up on your feed more frequently. If you’re not interested in knitting, you likely won’t be happy with the suggested content.

To fix this, you can delete the video from your watch history. This will reduce its influence on the suggested content algorithm. Another reason why you may want to delete video history is to keep your Facebook activity away from prying eyes. If someone gets access to your device, they can easily find out what you’ve been watching on the platform by visiting your ‘Activity log’.

Delete your Facebook Watch History on PC

Step 1: Launch your PC’s web browser and go to Facebook. Log into your Facebook profile.

Step 2: Click your profile icon at the top right corner of the screen.

Step 3: Select Settings & privacy.

Step 2: Hit the Profile icon at the top right corner of the screen and select Settings and privacy.

Step 4: Click on Activity log.

Step 4: Click on Activity log.

Step 5: Click on Videos you’ve watched.

Step 5: Click on Videos you’ve watched.

Step 6: Click on Clear Video Watch History and confirm your selection in the popup box.

Step 6: Click on Clear Video Watch History and confirm your selection in the popup box.

Step 7: Select ‘Live videos you’ve watched’ and clear it as well.

Delete your Facebook Watch History on Mobile

Step 1: Launch the Facebook app on your smartphone and go to your profile.

Step 2: Tap the ellipses.

Step 2: Tap the ellipses. How to Find and Delete Your Facebook Watch History? Top 2 Ways (2024)

Step 3: Select Activity log.

Step 3: Select Activity log.

Step 4: Swipe through the blue tiles and select Videos watched.

Step 4: Swipe through the blue tiles and select Videos watched. How to Find and Delete Your Facebook Watch History? Top 2 Ways (2024)

Step 5: Tap on Clear Video Watch History and confirm your selection.

Frequently Asked Questions (FAQs)

How do I delete my watched videos on Facebook?

Go to Profile>Ellipses>Activity log>Videos watched and select Clear Video Watch History.

How do I delete Facebook Watch History on PC?

Click the profile icon, then go to Settings & privacy>Activity log>Videos you’ve watched>Clear Video Watch History and confirm your selection in the popup box.

How do I fix Facebook’s video player if it isn’t working?

Update the Facebook app to its latest version and turn off the restrictions imposed by your phone’s data saver to fix the Facebook video player.

Read Also: Top 3 Ways to Rotate the Screen on iPhone (2024)

Conclusion

These are the top 2 ways to find and delete your Facebook watch history on the mobile app and PC. Using these methods you will be able to remove the entire record of the videos you’ve watched on the platform. You can choose to delete individual entries as well.

Pixel 8a promotional video leaked, reveals AI features and software info

Over the past few weeks, we have seen the upcoming Pixel 8a renders, specifications and pricing leaked on the internet. Although the company has not confirmed anything yet, a promotional video has recently surfaced in which the AI features of Pixel 8a have been shown.

Just a few weeks left before the Pixel 8a is expected to make its public debut at the yearly Google I/O conference, which gets underway on May 14. However, a promotional video showcasing the AI features of the phone has already been leaked. In association with MySmartPrice, tipster Steve Hemmerstoffer released a promotional film for the Pixel 8a, which reveals software support for the future Pixel 8a as well as additional Pixel-only features that have recently leaked online.

The leaked video indicates that the Pixel phone will also come with Circle to Search, offer live translation during voice calls and will come with Google’s Audio Magic Eraser feature, which uses artificial intelligence (AI) to eliminate unwanted background noise from recorded videos.

According to the video, the Pixel 8a will come with Google’s Best Take feature similar to the other Pixel 8 series phones. The function replaces faces in many group shots or burst photographs with those that have their eyes closed or display undesirable emotions.

Furthermore, the upcoming Pixel phone will reportedly have a Tensor G3 chip and receive seven years of security updates.

On the other hand leaked photos obtained by Android Headlines also reveal that the 8a will come equipped with an Audio Magic Eraser, Best Take, Call Assist, Circle to Search Support, and Google VPN support.

Online sightings of the rumoured  Pixel 8a price indicate that consumers may need to shell out a little more money to buy it. According to PassionateGeekz, the 128GB storage model of the Pixel 8a will cost CAD 708.99, or roughly Rs 42,830, in Canada, where the phone was listed by a store. The 256GB variation will cost CAD 792.99, or around Rs 47,900. The identity of the Canadian vendor who carried both  Pixel 8a models was withheld by the media. The price of the 8a could increase by much to Rs 2,000 in India this year.

The phone could come in the following colourways: Bay, Mint, Obsidian, and Porcelain, according to the rumour.

Garena Free Fire Redeem Codes Today 29 April 2024: Here is how to claim them

Garena Free Fire is a battle royale game with regular awards and tournaments to keep players interested. If you play Garena Free Fire, you should be aware of the redeem codes that are released on a daily basis. However, because the battle royale game is banned in India, players from other countries can use the Free Fire Redeem codes daily. If you’re unfamiliar with the Garena Free Fire redeem codes or don’t know how to get them, we’ve put together a step-by-step guide to help you redeem them. Check out Garena Free Fire Redeem Codes for 29 April 2024.

The Free Fire redeem codes are a great way to get free stuff. These are 12-digit codes that contain alphabets and numbers, as well as an expiration date and time. Because the Garena FF redeem codes cannot be used more than once, you should hurry to the redemption page to claim your free reward before someone else does. To get a free reward, all you have to do is go to reward.ff.garena.com/en, which is the official redemption page. Also, keep an eye on this space for daily updates on Garena Free Fire redemption codes and rewards.

Also Read: Sennheiser Accentum Plus wireless headphones with Hybrid Adaptive Noise Cancellation launched

Garena Free Fire Redeem Codes Today 29 April 2024

8Y3U2I6O4P7A9S

4D9F6G2H1J3K5L

6Q2W4E8R5T3Y7U

3X6F8H1Q5R9T2D

9J2K5L4O7I3U6Y

1S5G7C3W8E4R6T

5Z7X1C9V4B2N6M

3I1O8P6A7S4D5F

E8F4G0H6I2J7K3

L9M5N1O7P3Q8R4

P3Q9R5S1T7U2V8

W4X0Y6Z2A8B3C9

D5E1F7G3H9I4J0

K6L2M8N4O0P5Q1

U4V0W6X2Y8Z3A9

B1C7D3E9F5G0H6

I2J8K4L0M6N1O7

How to Get Free Fire Redeem Codes for Garena on 29 April 2024?

  • Visit the Garena Free Fire game’s official website at reward.ff.garena.com.
  • Use your Facebook, Google, VK, Apple ID, Huawei ID, or Twitter account to log in.
  • You’ll be taken to a valid redemption code (s)
  • Copy and paste the 12-digit redemption code into the text box.
  • On the screen, a dialogue box will appear.
  • ‘Ok’ should be selected.

For the latest gadget and tech news, and gadget reviews, follow us on TwitterFacebook and Instagram. For newest tech & gadget videos subscribe to our YouTube Channel. You can also stay up to date using the Gadget Bridge Android App. You can find the latest car and bike news here.

Top 2 Ways to Change App Icon Size on iPhone & iPad (2024)

0

In terms of home screen customisation, the iPhone lags behind its Android counterparts. While Android smartphones let you change the grid layout, app shape & size, colour palette, and more, the editing options on the iPhone could be much better. However, if you simply want larger app icons, you can do something about it. Today, we bring you the top 2 ways to change the app icon size on an iPhone and iPad.

Read Also: Top 3 Ways to Rotate the Screen on iPhone (2024)

Home screen customisation on iOS

There is no direct way to change the app icon size on your iPhone. If you want larger icons on the home screen, you will need to change the text size across the entire interface. This will be reflected within the apps as well. The good thing is that the iPhone does a good job of fitting the larger text size in its display. You won’t have to expand the text on different pages to read it in its entirety.

iPads, on the other hand, have a dedicated option to enlarge the app icon size. The only catch is that it cannot be applied to one individual app. Once you turn on this feature, all the apps on your home screen will appear larger. The size of the text will remain the same.

Change app icon size on iPhone

Step 1: Go to Settings.

Step 2: Tap on Display & Brightness.

Step 2: Tap on Display & Brightness.

Step 3: Select Display Zoom.

Step 3: Select Display Zoom. Top 2 Ways to Change App Icon Size on iPhone & iPad (2024)

Step 4: Tap the check box for Larger Text.

Step 4: Tap the check box for Larger Text. Top 2 Ways to Change App Icon Size on iPhone & iPad (2024)

Step 5: Hit Done.

Step 6: In the popup box, select Use Zoomed.

Once your iPhone restarts, the text on the interface and the app icons will be larger.

Change the app icon size on the iPad

Top 4 Simple Methods to Reverse Image Search on iPhone or iPad (2023) Top 2 Ways to Change App Icon Size on iPhone & iPad (2024)

Step 1: Go to Settings.

Step 2: Tap on Home Screen & Dock.

Step 3: Turn on the toggle switch for Use Large App Icons.

Frequently Asked Questions (FAQs)

Can I set a custom size for the app icons on my iPhone’s home screen?

While there is no way to enlarge the app icons on your iPhone, you can increase their size by using ‘Larger Text’ from Display & Brightness settings.

How do I change the app icon size on my iPad?

To increase the size of the app icons on your iPad, go to Settings>Home Screen & Dock and turn on the toggle switch for Use Large App Icons.

Can you change the default 4×5 grid on the iPhone home screen?

No, changing the grid pattern on your iPhone’s home screen is impossible.

Read Also: Top 2 Ways to Find and Download Your Facebook Messenger History (2024)

Conclusion

These are the top 2 ways to change the app icon size on an iPhone and iPad. On iPhones with Touch ID, select ‘Zommed’ instead of ‘Standard’ in Display Zoom settings. If you found this article helpful, let us know in the comments!

Top 3 Ways to Rotate the Screen on iPhone (2024)

0

Your iPhone is set to portrait orientation by default. Turning the phone sideways won’t do anything unless the portrait orientation lock is turned off. Even when the screen is set to auto-rotate, it can only be carried out in apps that support it. Some stubborn apps may only support the portrait orientation. Let’s take a quick look at the 3 ways to rotate the screen on an iPhone.

Read Also: Top 2 Ways to Find and Download Your Facebook Messenger History (2024)

Here’s why auto-rotate may not be working on your iPhone

If moving your iPhone sideways doesn’t rotate its display, it could be due to one of the following reasons.

  • Your iPhone is locked in portrait orientation.
  • The app you’re using does not support screen rotation.
  • Your iPhone’s display is zoomed in.
  • Your iPhone’s accelerometer is broken.

Rotate your iPhone’s Screen using the Control Centre

Step 1: Swipe down from the right side of the status bar to reveal the Control Centre.

Step 2: Tap the tile with the lock and arrow icon. This will turn off the portrait orientation lock. If this tile is already unselected, do not tap it.

Step 2: Tap the tile with the lock and arrow icon. This will turn off the portrait orientation lock. If this tile is already unselected, do not tap it.

Step 3: Go to an app that supports screen rotation (like YouTube).

Step 4: Turn your iPhone sideways. The screen will rotate accordingly.

Use Assistive Touch to Turn Off Portrait Orientation Lock

If you do not wish to use the Control Centre, you can use Assistive Touch to turn off the portrait orientation lock.

Step 1: Go to Settings and select Accessibility.

Step 1: Go to Settings and select Accessibility.

Step 2: Tap on Touch.

Step 2: Tap on Touch.

Step 3: Select Assistive Touch and turn on its toggle switch.

Step 3: Select Assistive Touch and turn on its toggle switch.

Step 4: Select Double Tap in the Custom Actions category.

Step 4: Select Double Tap in the Custom Actions category.

Step 5: Tap on Lock Rotation.

Step 5: Tap on Lock Rotation.

Now, you can double-tap the Assistive Touch ball to turn off the portrait orientation lock and move the iPhone sideways to rotate the screen.

Use Assistive Touch to Rotate your iPhone’s Screen

You can add a ‘Rotate screen’ option in the Assistive Touch menu. Here’s how.

Step 1: Go to Settings and select Accessibility.

Step 1: Go to Settings and select Accessibility.

Step 2: Tap on Touch.

Step 2: Tap on Touch.

Step 3: Select Assistive Touch and turn on its toggle switch.

Step 3: Select Assistive Touch and turn on its toggle switch. Top 3 Ways to Rotate the Screen on iPhone (2024)

Step 4: Select Customise Top Level Menu.

Step 4: Select Customise Top Level Menu. Top 3 Ways to Rotate the Screen on iPhone (2024)

Step 5: Hit the plus icon or select an existing action.

Step 5: Hit the plus icon or select an existing action. Top 3 Ways to Rotate the Screen on iPhone (2024)

Step 6: Select Rotate Screen and hit Done.

Step 6: Select Rotate Screen and hit Done. Top 3 Ways to Rotate the Screen on iPhone (2024)

Step 7: Tap the ball and select Rotate to rotate the screen to the left or right.

Frequently Asked Questions (FAQs)

How do I turn off the portrait orientation lock on my iPhone without using the Control Centre?

Go to Settings>Accessibility>Touch>Assistive Touch>Double Tap and select Lock Rotation. Now you can double tap the assistive ball any time to toggle the portrait orientation lock.

How do I rotate my iPhone’s screen without turning the device?

Go to Settings>Accessibility>Touch>Assistive Touch>Customise Top Level Menu, tap on an action and select Rotate Screen. Go to an app that supports screen rotation, tap on the assistive ball, and select Rotate. In the popup menu, choose whether you want to rotate the screen to the left or the right.

Why doesn’t my iPhone’s screen rotate when I turn it sideways?

If moving your iPhone to the side doesn’t rotate its screen even in supported apps, it could be because of a faulty accelerometer. Book an appointment at the Genius Bar or an Apple-authorised service centre to get it fixed.

Read Also: HMD Global unveiled its new Pulse series with Android 14

Conclusion

These are the top 3 ways to rotate the screen on your iPhone. If your iPhone’s accelerometer is broken, use the third step mentioned in this list to manually rotate its screen and set it to landscape mode. If you know any other method to go about this task, let us know in the comments!

Top 2 Ways to Find and Download Your Facebook Messenger History (2024)

0

One of the great things about Facebook is that it lets you download your data before deleting your account. This includes your messaging history as well. You can choose to download all your conversations or choose to save the messages from a specific time period. Similarly, you can download your posts, media, and more. Here are the top 2 ways to find and download your Facebook Messenger history.

Read Also: HMD Global unveiled its new Pulse series with Android 14

Finding old messages on Facebook

If you simply want to find old messages in Facebook Messenger without downloading them, there is an easy way to go about it. Using the search bar on the conversation page, you can search all your conversations for a particular keyword. If you’re looking for a particular message, you need to enter a word that is present in that message.

You can use this trick for individual conversations as well. Simply open a chat thread and hit the ‘Search in conversation’ option on your desktop. Unlike WhatsApp, Facebook doesn’t let you search for messages by date. While changing your device, make sure you enable the secure folder to preserve your message history.

Download Facebook Messenger History on Desktop

Step 1: Launch your PC’s web browser and log into Facebook.

Step 2: Hit the Profile icon at the top right corner of the screen and select Settings and privacy.

Step 2: Hit the Profile icon at the top right corner of the screen and select Settings and privacy.

Step 3: Click on Settings.

Step 3: Click on Settings.

Step 4: Open the Accounts Centre by clicking See more in its sidebar section.

Step 4: Open the Accounts Centre by clicking See more in its sidebar section.

Step 5: Click on Your information and permissions.

Step 5: Click on Your information and permissions.

Step 6: Select Download your information.

Step 6: Select Download your information.

Step 7: Click on Download or transfer information.

Step 7: Click on Download or transfer information.

Step 8: Select the account or profile from which you want to download the messages.

Step 8: Select the account or profile from which you want to download the images.

Step 9: Hit Next.

Step 10: In the following window, click on Specific types of information.

Step 10: In the following window, click on Specific types of information.

Step 11: Select Messages.

Step 11: Select Messages.

Step 12: Hit Next.

Step 13: If you want to download the messages locally to your device, select Download to device and hit Next.

Step 14: If you want to download the photos locally to your device, select Download to device and hit Next.

Step 14: Click on Date range and select All time. Select your preferred media quality as well.

Step 14: Click on Date range and select All time. Select your preferred media quality as well.

Step 15: Hit Create files.

Download Facebook Messenger History on Mobile

Step 1: Launch the Facebook app on your Android smartphone and hit your profile icon at the top right corner of the screen.

Step 1: Launch the Facebook app on your Android smartphone and hit your profile icon at the top right corner of the screen.

Step 2: Tap on Settings and privacy and go to Settings.

Step 2: Tap on Settings and privacy and go to Settings.

Step 3: Tap on See more in Accounts Centre.

Step 3: Tap on See more in Accounts Centre. Best Ways to Download All Your Photos From Facebook

Step 4: Select Your information and permissions.

Step 4: Select Your information and permissions. Best Ways to Download All Your Photos From Facebook

Step 6: Tap on Download your information.

Step 6: Tap on Download your information. Best Ways to Download All Your Photos From Facebook

Step 7: Tap on Download or transfer information.

Step 7: Tap on Download or transfer information. Best Ways to Download All Your Photos From Facebook Top 2 Ways to Find and Download Your Facebook Messenger History (2024)

Step 8: Select the account or profile from which you want to download the messages.

Step 8: Select the account or profile from which you want to download the images. Best Ways to Download All Your Photos From Facebook Top 2 Ways to Find and Download Your Facebook Messenger History (2024)

Step 9: Hit Next.

Step 10: On the following page, click on Specific types of information.

Step 10: On the following page, click on Specific types of information. Best Ways to Download All Your Photos From Facebook Top 2 Ways to Find and Download Your Facebook Messenger History (2024)

Step 11: Tap on Messages.

Step 11: Tap on Messages. Top 2 Ways to Find and Download Your Facebook Messenger History (2024)

Step 12: Hit Next.

Step 13: If you want to download the messages locally to your device, select Download to device and tap Next.

Step 14: If you want to download the photos locally to your device, select Download to device and tap Next. Best Ways to Download All Your Photos From Facebook Top 2 Ways to Find and Download Your Facebook Messenger History (2024)

Step 14: Tap on Date range and select All time. Select your preferred media quality as well.

Step 15: Tap on Create files.

Step 15: Tap on Create files. Top 2 Ways to Find and Download Your Facebook Messenger History (2024)

Frequently Asked Questions (FAQs)

Is Facebook Messenger end-to-end encrypted?

Your messages and calls on Facebook Messenger are protected by end-to-end encryption.

When did Facebook introduce end-to-end encryption for Messenger?

End-to-end encryption for Messenger was introduced in December 2023. 

Can I download my Facebook Messenger history?

You can download all your Facebook messages from the Account Centre.

Read Also: How to disable the ads in Windows 11 start menu?

Conclusion

These are the top 2 ways to find and download your Facebook Messenger history on a desktop and mobile. Read this article if you want to learn how to download all your pictures on Facebook. To access your Messenger chat history across multiple devices, enable chat history.

HMD Global unveiled its new Pulse series with Android 14

HMD Global has introduced three new smartphones in the market under its brand name for the first time. The HMD Pulse Pro was introduced on Wednesday along with the HMD Pulse+ and HMD Pulse. Unisoc T606 processors are included with all three HMD Pulse variants. A 5,000mAh battery powers the HMD Pulse series and features a 90Hz LCD screen. All three phones come pre-installed with Android 14.

HMD Pulse series price and sale details

HMD Pulse series contains three smartphones: HMD Pulse Pro, HMD Pulse+ and HMD Pulse. The price of all the three phones is mentioned below:

  • HMD Pulse Pro: EUR 180 (Rs 16,000)
  • HMD Pulse+: EUR 160 (Rs 14,240)
  • HMD Pulse: EUR 140 (Rs 12,460)

Also Read: OnePlus Watch 2 new Nordic Blue Edition launched

The Pulse Pro comes in Black Ocean, Glacier Green, and Twilight Purple colour options. The Pulse+ will be available in Apricot Crush, Glacier Green, and Midnight Blue variants and the Plus model is being offered in Atmos Blue, Dreamy Pink, and Meteor Black colourways.
The devices are currently up for sale in Europe and can be purchased via the company’s official website.

HMD Pulse series price and sale details
HMD Pulse Pro

HMD Pulse series specifications

HMD Pulse series features a 6.65-inch HD+ LCD screen with 720×1,612 pixels of resolution. The display supports a refresh rate of 90Hz and has a 600-nit peak brightness. Under the hood, there is a 12nm Unisoc T606 SoC with up to 6GB of RAM and up to 128GB of storage that can be further expanded up to 256GB via microSD card. The phones run on Android 14 out of the box.

Also Read: On Pixel 8 and Pixel 8 Pro, WhatsApp now supports face unlock, passkey support for iOS app also rolling out

In terms of optics, the HMD Pulse Pro boasts a 50-megapixel main sensor along with a 2-megapixel depth sensor. A 50-megapixel selfie camera is also included.

HMD Pulse series price and sale details
HMD Pulse+

The HMD Pulse+ and HMD Pulse on the other hand have 50-megapixel primary cameras and a 13-megapixel camera. The devices have an 8-megapixel front-facing camera for taking selfies and video calling.

HMD Pulse series price and sale details
HMD Pulse

The series is backed by a 5,000mAh battery. The HMD Pulse Pro can be charged at 20W and the remaining two models at 10W. The phones come with a side-mounted fingerprint scanner, including an e-compass, proximity, ambient light, and accelerometer. All three variants come with a 3.5mm headphone socket, a USB Type-C port, support for 4G LTE, Wi-Fi AC, Bluetooth 5.0, NFC, and GPS.

How to disable the ads in Windows 11 start menu?

0

The KB5036980 update for Windows 11 started rolling out for general users on Wednesday. As revealed by beta testers, Microsoft is pushing ads on the start menu in the latest Windows 11 update. Clicking on the Windows icon in the taskbar reveals a recommended apps section in the start menu. These recommendations are promoted content that redirects you to the Microsoft Store. If you’re not a fan of intrusive ads, here is how you can disable the personalised app recommendations on the Windows 11 start menu.

Read Also: CMF Buds Review: Amazing value for the price

Don’t see any ads? Here’s why

If you recently updated Windows 11 on your PC or laptop to the latest version, it is possible that you won’t encounter ads right away. Microsoft is rolling out the ‘recommended apps’ section in a phased manner. If you don’t see any ads right now, you may come across them later. However, you can still turn off the app recommendations regardless of whether the start menu on your PC is currently displaying that section.

Other than turning off the promoted app recommendations, you can also prevent Microsoft from using your ‘Advertising ID’ to push targeted ads on your device. Your Advertising ID is offered to third parties who may pay to display ads based on your likes and interests. This option can also be turned off from settings.

Disable Windows 11 start menu ads from personalisation settings

Step 1: Press Windows Key + I to go to settings.

Step 2: Switch to the Personalisation tab.

Step 3: Click on Start.

Step 3: Click on Start.

Step 4: Turn off the toggle switch for ‘Show recommendations for tips, shortcuts, new apps, and more’.

Step 4: Turn off the toggle switch for ‘Show recommendations for tips, shortcuts, new apps, and more’.

Turn off your Advertising ID

If you’re not comfortable with receiving targeted ads, you can keep Windows from sharing your Advertising ID with third parties. Here’s how.

Step 1: Go to Settings.

Step 2: Switch to the Privacy & security tab.

Step 3: Click on General.

Step 3: Click on General. How to disable the ads in Windows 11 start menu?

Step 4: Turn off the toggle switch for ‘Let apps show me personalised ads by using my advertising ID’.

Step 4: Turn off the toggle switch for ‘Let apps show me personalised ads by using my advertising ID’. How to disable the ads in Windows 11 start menu?

Frequently Asked Questions (FAQs)

How do I update Windows 11 to the latest version?

Go to Settings>Windows Update>Check for updates and hit ‘Download and install’.

How do I disable ads on the Windows 11 taskbar?

Go to Settings>Personalisation>Start and turn off the toggle switch for ‘Show recommendations for tips, shortcuts, new apps, and more’.

How do I disable targeted ads on my Windows PC?

Go to Settings>Privacy & security>General and turn off the toggle switch for ‘Let apps show me personalised ads by using my advertising ID’.

Read Also: On Pixel 8 and Pixel 8 Pro, WhatsApp now supports face unlock, passkey support for iOS app also rolling out

Conclusion

This is how you can turn off the ads on the start menu of your Windows 11 PC or laptop. If you don’t see ads after installing the newest update, it is because Windows is rolling them out in a phased manner. If you have any other questions, let us know in the comments!

On Pixel 8 and Pixel 8 Pro, WhatsApp now supports face unlock, passkey support for iOS app also rolling out

WhatsApp is now compatible with the Pixel 8 phones’ face unlock function. With this update Pixel 8 and Pixel 8 Pro users will be able to easily unlock their WhatsApp chats by looking at their phone’s front camera to open the app once they’ve set up face recognition. Biometric authentication is no longer required thanks to this functionality. Besides this, the instant messaging app rolled out passkey support for iPhone users. The Android version of WhatsApp already can log in without a password.

Meta has released WhatsApp’s stable version 2.24.8.85 the most recent app update for Pixel 8 and Pixel 8 Pro users. The latest WhatsApp update brings the face unlock feature to the latest Pixel phones, allowing users to open WhatsApp using the selfie camera eliminating the need for biometric authentication.

Following the update, when you run WhatsApp, a ring will appear around the front camera and a system face unlock sheet at the bottom of the screen. The application will return to prompting for the fingerprint sensor if it cannot identify the user’s face after a few seconds. Users have the option of entering their PIN as well.

Besides this WhatsApp announced that iPhone users can now log into their accounts using passcode, Face ID, and Touch ID as the Meta-owned instant messaging platform has released passkey support for iOS.

Also Read: OnePlus Watch 2 new Nordic Blue Edition launched

Note that WhatsApp passkey support for iOS is available on iOS 17 and beyond, according to an earlier report, even though the company did not specify which iOS versions it supported. This implies that individuals who have an iPhone XR model or above will be able to configure a passkey for their account.

Also Read: Apple MacBooks price in India slashed, here are the latest offers

Notably, the passkeys will be an alternative login authentication technique which is said to provide higher security than more conventional techniques like SMS codes. Also, it is more successful in thwarting phishing and related attacks. This results in the creation of two sets of keys, one of which is kept on Apple’s Keychain system and the other of which is kept by the user.

CMF Buds Review: Amazing value for the price

Nothing is on a roll, launching new audio products at a rapid pace. Last year, the London-based tech outfit released the ‘Buds Pro’ (check out our review here) under its new ‘CMF’ banner. Now, the company has added a more affordable TWS to the series. If you don’t want to splurge Rs 12,000 on Nothing’s latest flagship TWS, the CMF Buds are a worthy alternative. Features like ANC, dual device connection, and in-ear detection make the Rs 2,500 price tag quite attractive. But does the soundstage set it apart from the plethora of earbuds in this price category? Find out in our review of the CMF Buds.

Read Also: Top 5 Ways to Fix Vertical Lines on a Computer Screen (2024)

CMF Buds Review: Design

The unboxing experience of the CMF Buds is notably different from the Buds Pro. CMF has ditched the sleek cardboard box with large cutouts for a regular box with a flimsy plastic tray that houses the charging case (with earbuds inside) and the extra ear tips. There is a user guide inside the box as well, but the USB Type-C cable is nowhere to be found.

CMF Buds Review: Design

The charging case sports a square form factor with round corners, a sharp contrast to the hockey-puck design of the Buds Pro. There is a silver rotating dial in the top left corner. You can hook a lanyard to this dial. While it doesn’t serve any other functional purpose, it is fun to fidget with. The case and the earbuds are made out of plastic but the matte finish gives them a premium feel.

design

The charging case hinge is strong but makes a croaky sound every time you flip it open. There is a small notification light on the front edge while the right edge houses the USB Type-C port and the pairing button. The CMF branding is engraved on the lid.

The earbuds are locked magnetically into two individual cutouts inside the case. They rock a traditional in-ear design with glossy inner panels and a matte finish on the stems. A glossy ring highlights the touch-sensitive area on the stems. The CMF branding can be found on the two earbuds.

design

The lightweight design of the earbuds ensures that you don’t experience ear fatigue even after wearing them for multiple hours. The fit is snug and comfortable. There are two extra pairs of ear tips inside the box to accommodate varying ear sizes. The touch controls are tuned nicely and the chances of accidentally triggering them are very slim.

CMF Buds Review: Design

The earbuds are rated IP54 for dust and water resistance. This means they can handle minor water splashes with ease. We were happy with the sweat resistance after working out while wearing the earbuds. The fit remained secure despite the earbuds’ glossy inner panels.

CMF Buds Review: Performance

Delivering the audio output on the CMF Buds are two 12.4mm bio-fibre drivers. The TWS supports Ultra Bass 2.0 tech and also receives Direc Opteo tuning. There are two audio codecs on offer – SBC and AAC. There’s Bluetooth 5.3 on board along with BLE, SPP, HFP, A2DP, and AVRCP Bluetooth profiles. Google Fast Pair support ensures that once you’ve linked the earbuds to your Google account, you can seamlessly pair them with other devices.

CMF Buds Review: Design

Let’s talk about the most important aspect of the earbuds – the soundstage. By default, the CMF Buds produce the Dirac Opteo tuned output. You can change it using the equaliser in the Nothing X app. We didn’t feel the need to switch to any other tuning since Dirac brings a whole lot of personality to the soundstage. The output is undeniably bass-heavy but the mid and highs are also well represented in the mix. If you’re looking for a neutral soundstage, these earbuds are not for you.

performance

We played everything from post-punk to bubblegum pop on these earbuds and they did not disappoint. The enveloping bass made the listening experience quite fun. At the same time, it did not shroud the crunching guitar riffs and the subtle hits of the hi-hat in the background. Pushing the volume to the maximum level distorts the output a little. Staying within the 30-70% range yielded the most composed output. The ‘Ultra Bass’ option in the Nothing X app lets you choose from 5 levels of bass, but we kept this feature turned off because it felt overkill on an already bass-oriented soundstage.

CMF Buds Review: Performance

You can toggle between the noise cancellation and transparency modes using the Nothing X app and the touch controls, but there’s no option to set them to a certain level. To give credit to CMF, they’ve managed to execute ANC on these earbuds quite well. It isn’t just another feature to fill up the spec sheet. The earbuds can cancel up to 42dB of surrounding noise. This is just 3dB lower than the Buds Pro. We found ourselves using this feature a lot, especially while using public transport.

dual connection

The dual connection feature needs to be enabled from the Nothing X app. Every time you toggle this feature, the earbuds are rebooted. You can also choose which devices you want to pair with the earbuds at any given time. If you’re watching a movie on your laptop and get a call on your phone, you can easily answer it without having to go through the unpairing and pairing process. Strangely enough, playing any media on the second device does not automatically pause the media playing on the primary device.

You also get a low lag mode and in-ear detection with these earbuds. Both features work seamlessly and are excellent additions to the device. The call quality of the CMF Buds is also quite satisfactory, even though it struggles in a noisy outdoor environment.

Moving on, the earbuds are equipped with a 45mAh battery pack with an additional 460mAh inside the case. CMF claims that you can get 8 hours of playtime on the earbuds alone with ANC turned off and 35.5 hours of total battery life. With ANC or transparency mode in effect, this battery life is reduced to 5.6 hours and 24 hours. During the week-long review period, the CMF Buds ran out of charge only once. We used the earbuds for around 2-4 hours each day. While we did not keep ANC turned on at all times, we did use it consistently. It took us just over an hour to fully charge the case.

Read Also: OnePlus Nord CE 3 5G price reduced by Rs 2,000 in India

Verdict

If you enjoy a bass-heavy output, the CMF Buds is a very easy recommendation from us in this price category. Apart from a sublime audio output you get premium features like ANC, in-ear detection, dual connection, and low lag mode for just Rs 2,500. The design and build of the case is also something that CMF has put a lot of thought into. The rotating wheel is a nice touch. However, if you’re looking for a neutral-sounding pair of earbuds, this is not the TWS for you.

CMF Buds: Pros

  • Fun soundstage
  • Cool design
  • Great set of additional features

CMF Buds: Cons

  • Won’t appeal to audiophiles looking for a neutral soundstage
  • USB Type-C cable not present in the retail package

Top 11 Ways to Fix Vertical Lines on a Computer Screen

Weird glitches on the display are as concerning as they are annoying. PC users often report strange vertical lines appearing on their computer screens. These lines can be blue, orange, or even white. Things can get quite confusing if you can’t figure out what’s causing the monitor to behave like this. If you’re lucky, simply replacing the connection cables will do the trick. To fix more serious problems, you may have to take the monitor to an authorised service centre. Here are the top 11 fixes for the ‘vertical lines on a computer screen or monitor’ issue.

Read Also: OnePlus Watch 2 new Nordic Blue Edition launched

What is causing my computer screen to display vertical lines?

Weird glitches on the monitor can be hard to diagnose. If you notice vertical lines on your computer screen, it is likely because of a hardware issue. Oftentimes, faulty cables and an incorrect connection are the main culprits in situations like this. Although software glitches are not totally outside the realm of possibility, they are less likely to cause this issue.

If the problem is hardware-related, you will need to get the monitor repaired by a professional. However, software and connection-related problems can be fixed easily at home. If you have another monitor lying around, you can quickly connect it to your PC to determine where the fault lies. If the other monitor displays vertical lines as well, the problem lies with your PC.

Restart your PC

Top 10 Ways to Fix ‘Camera Not Working’ on Your Windows 11 PC or Laptop

Restarting your PC should be the first step you take while fixing the device. A quick restart resolves any minor background issues that may be causing the problem. Click on the Windows icon on the taskbar, hit the power icon, and select ‘Restart’. If the vertical lines do not vanish after restarting the PC, proceed to the other methods mentioned in this list.

Check the cables

Swiss company known for making computer accessories and devices, Logitech, launched its new gaming mouse in India. The company has introduced Logitech G102 LIGHTSYNC Gaming Mouse that comes with a classic design to deliver a gaming-grade performance which will be available online across the country.

Dysfunctional or poorly-fit cables can cause the monitor to display weird vertical lines. Closely inspect the cable for physical damage and loose connections. If you have an extra cable lying around, use it to connect the monitor to the CPU. This will confirm whether the wired connection is causing the display to malfunction. Additionally, make sure the connection ports are clean and free from dust or grime. If the vertical lines persist on the screen, move on to other fixes.

Use the monitor with another PC

Dell at CES 2026: Dell UltraSharp 52 Thunderbolt Hub and 32 4K QD-OLED Monitor launched

It is possible that the fault lies with the monitor hardware. To confirm whether this is the case, unplug it from your PC and use it with another computer. If it still displays the vertical lines, the issue is hardware-related. You will need to take your monitor to an authorised service centre for further diagnosis.

Check the power supply

Use a wall outlet to charge the Fitbit Versa

If your monitor relies on an external power supply, make sure it is firmly connected to a wall outlet. Inspect the power cable on both ends. Furthermore, make sure that the power outlet is delivering steady voltage. A shift in voltage can cause your monitor to glitch and flicker.

Change the screen resolution 

If you started noticing the vertical lines on your computer screen after changing its display resolution, revert it to the default setting. Here’s how.

Step 1: Go to Settings and select System.

Step 2: Select Display.

Step 2: Select Display. Top 7 Ways to Fix Horizontal Lines on a Computer Screen (2024)

Step 3: Click on the dropdown menu for display resolution.

Step 3: Click on Display resolution to access its drop-down menu. Top 7 Ways to Fix Horizontal Lines on a Computer Screen (2024)

Step 4: Select a fitting resolution from the list.

Step 4: Select a fitting resolution from the list.

Change the refresh rate

Step 1: Go to Settings and select System.

Step 2: Select Display.

Step 2: Select Display. Top 7 Ways to Fix Horizontal Lines on a Computer Screen (2024)

Step 3: Scroll down and click on Advanced display.

Step 3: Scroll down and click on Advanced display.

Step 4: Hit the dropdown menu next to Choose a refresh rate and set it to 60Hz.

Step 4: Hit the dropdown menu next to Choose a refresh rate and set it to 60Hz.

Run the DirectX diagnostic tool

Step 1: Press Windows + R to launch the Run command box.

Step 2: Type dxdiag and hit Enter.

Step 2: Type dxdiag and hit Enter.

Step 3: Switch to the Display tab to find out what’s causing the vertical lines on your monitor.

Step 3: Switch to the Display tab to find out what's causing the vertical lines on your monitor.

Update the graphics card

A corrupt or out-of-date graphics card can cause the monitor to glitch and display vertical lines. Here’s how you can update it.

Step 1: Go to Control Panel and select Device Manager.

Step 1: Go to Control Panel and select Device Manager.

Step 2: Click on Display Adapters.

Step 2: Click on Display Adapters.

Step 3: Right-click on the graphics card driver and select Update driver.

Step 3: Right-click on the graphics card driver and select Update driver. Top 7 Ways to Fix Horizontal Lines on a Computer Screen (2024)

Let your PC cool down

A rise in internal temperature can cause your computer’s screen to malfunction. Make sure that the fans in your PC’s CPU are functioning properly. If the fans are unable to bring down the temperature, shut down your PC until it cools down. Additionally, you can increase the speed of the internal fans using BIOS or SpeedFan.

Restart your PC in Safe Mode

If you suspect that a third-party software is causing the vertical lines on your computer’s screen, restart it in Safe Mode. Booting your PC in Safe Mode temporarily disables third-party apps and software while using only the essential drivers. If you don’t encounter the problem in Safe Mode, it means one of the third-party applications is responsible for it.

Update OS

If you’re working with an older operating system, some parts of your PC may start glitching out of the blue. This includes the computer monitor. Here’s how you can update the OS to stay on top of things.

Step 1: Go to Settings and select System.

Step 2: Click on Windows Update.

Step 2: Click on Windows Update. Top 7 Ways to Fix Horizontal Lines on a Computer Screen (2024)

Step 3: Select the Download and install option next to a pending update. If you don’t see a pending update, click on Check for updates.

Step 3: Select the Download and install option next to a pending update. If you don’t see a pending update, click on Check for updates. Top 7 Ways to Fix Horizontal Lines on a Computer Screen (2024)

Frequently Asked Questions (FAQs)

How do I get rid of the vertical lines on my computer screen?

Check the connection cable for any damage or loose fitting. Replace it if you notice anything wrong with it. Additionally, update the graphics card and restore the screen resolution to the default value.

How do I change my PC’s screen resolution?

Go to Settings>System>Display, hit the dropdown menu next to display resolution and select an entry from the list.

How do I change my PC monitor’s refresh rate?

Go to Settings>System>Display>Advanced display, hit the dropdown menu next to ‘Choose a refresh rate’, and make a selection.

How do I run a diagnostic test on my PC?

Press Windows + R, type dxdiag, and hit Enter to run the DirectX Diagnostic Test.

How do I update my PC’s OS?

Go to Settings>System>Windows Update and click on ‘Download and install’ next to the pending update.

Read Also: Apple MacBooks price in India slashed, here are the latest offers

Conclusion

These are the top 11 ways to fix the vertical lines on your computer screen or monitor. If these fixes worked out for you, let us know in the comments. If they didn’t, you should take the monitor to a professional repair centre for further diagnosis.

Garena Free Fire Redeem Codes Today 26 April 2024: Here is how to claim them

Garena Free Fire is a battle royale game with regular awards and tournaments to keep players interested. If you play Garena Free Fire, you should be aware of the redeem codes that are released on a daily basis. However, because the battle royale game is banned in India, players from other countries can use the Free Fire Redeem codes daily. If you’re unfamiliar with the Garena Free Fire redeem codes or don’t know how to get them, we’ve put together a step-by-step guide to help you redeem them. Check out Garena Free Fire Redeem Codes for 26 April 2024.

The Free Fire redeem codes are a great way to get free stuff. These are 12-digit codes that contain alphabets and numbers, as well as an expiration date and time. Because the Garena FF redeem codes cannot be used more than once, you should hurry to the redemption page to claim your free reward before someone else does. To get a free reward, all you have to do is go to reward.ff.garena.com/en, which is the official redemption page. Also, keep an eye on this space for daily updates on Garena Free Fire redemption codes and rewards.

Also Read: Sennheiser Accentum Plus wireless headphones with Hybrid Adaptive Noise Cancellation launched

Garena Free Fire Redeem Codes Today 26 April 2024


XZJZE25WEFJJ

6KWMFJVMQQYG

FFCMCPSEN5MX

FF11NJN5YS3E

NPYFATT3HGSQ

MCPW2D2WKWF2

ZZZ76NT3PDSH

P3Q9R5S1T7U2V8

W4X0Y6Z2A8B3C9

D5E1F7G3H9I4J0

K6L2M8N4O0P5Q1

U4V0W6X2Y8Z3A9

B1C7D3E9F5G0H6

I2J8K4L0M6N1O7

How to Get Free Fire Redeem Codes for Garena on 26 April 2024?

  • Visit the Garena Free Fire game’s official website at reward.ff.garena.com.
  • Use your Facebook, Google, VK, Apple ID, Huawei ID, or Twitter account to log in.
  • You’ll be taken to a valid redemption code (s)
  • Copy and paste the 12-digit redemption code into the text box.
  • On the screen, a dialogue box will appear.
  • ‘Ok’ should be selected.

For the latest gadget and tech news, and gadget reviews, follow us on TwitterFacebook and Instagram. For newest tech & gadget videos subscribe to our YouTube Channel. You can also stay up to date using the Gadget Bridge Android App. You can find the latest car and bike news here.

OnePlus Watch 2 new Nordic Blue Edition launched

OnePlus is now making its latest smartwatch OnePlus Watch 2 in a new colourway. The device was already available in two colour options and now a third colour for the smartwatch has been released in Europe. The smartwatch is IP68 rated and boasts 5ATM technology so it can be taken inside water or for performing water sports. The 500mAh battery powers the OnePlus Watch 2. The smart wearable comes with a dual-engine architecture that supports two operating systems: RTOS and WearOS 4.

OnePlus Watch 2 new Nordic Blue Edition launched

OnePlus Watch 2 Nordic Blue Edition price in India

The OnePlus Watch 2 was launched in two colour options- Black Steel and Radiant Steel in February this year. The company has now launched the Nordic Blue Edition for the smartwatch.

The price of the OnePlus Watch 2 Nordic Blue Edition is EUR 349, or approximately Rs 31,200, in a few European markets. The prices of the Black Steel and Radiant Steel hues are EUR 329, or around Rs 29,400. The company will be making the new variant available in Germany, the UK and other European markets.

Also Read: Apple MacBooks price in India slashed, here are the latest offers

OnePlus Watch 2 specifications

OnePlus Watch 2 features a round 1.43-inch AMOLED display with 466 x 466 pixels of resolution. Its High Brightness Mode (HBM) offers a peak brightness of 1000 nits and a 60Hz flash rate. The 2.5D sapphire crystal screen of the smart wearable is combined with a stainless steel body. The watch strap is secured with a stainless steel buckle and is composed of fluoro rubber. It meets MIL-STD-810H durability requirements and has a water resistance rating of 5ATM+IP68.

The Qualcomm Snapdragon W5 and BES2700 power a Dual Engine Architecture. It works with Android handsets running Android 8.0 and GMS 23.45.23 or later with ease because of its operation on Google’s Wear OS 4. A 500mAh battery is used to power the smartwatch, which can last up to 100 hours.

Also Read: OnePlus Nord CE 3 5G price reduced by Rs 2,000 in India

OnePlus Watch 2 new Nordic Blue Edition launched

Additionally over 100 sports modes and more than 11 professional modes, the device has modes for cycling, walking, and running, among other physical activities. In addition, the watch has a pulse oximeter sensor, an optical heart rate monitor, and a sleep cycle and stress tracking feature. Acceleration, gyroscope, optical pulse oximeter, optical heart rate, light, geomagnetic, and barometer sensors are among the sensors on board. L1+L5 GPS, Bluetooth, Wi-Fi, and USB Type-C are all supported by the OnePlus Watch 2.

Apple MacBooks price in India slashed, here are the latest offers

On Flipkart, the MacBook Air M2 and M3 have been discounted heavily. The Apple laptops are presently available at a significant reduction from their original price, which alone makes them an excellent option for anyone on a tight budget searching for a MacBook.

The MacBook Air M2 is now available on Flipkart with a flat discount of Rs 29,910 after experiencing a significant price drop. The starting price of the MacBook Air with M2 chip is Rs 89,990 on Flipkart right now. In contrast, this laptop with a 13.6-inch display model with 8GB RAM and 256GB SSD configuration originally retailed for Rs 1,19,900. And on the Apple store, it currently costs Rs 99,900. The SBI bank credit card comes with an extra discount offer of Rs 5,000, bringing the total cost down to Rs 84,990.

The design of the MacBook Air M2 is incredibly thin. It has a bright display with slim bezels. It is powered by the most recent and potent M2 processor from Apple, the same processor that powers the top-tier 13-inch MacBook Pro 2022 model. It features a 1080p camera for video conferencing. Additionally, there are two tweeters and two woofers between the keyboard. It supports Dolby Atmos in addition to its Spatial Audio technology.

Also Read: OnePlus Nord CE 3 5G price reduced by Rs 2,000 in India

Flipkart is presently giving a significant discount on the Apple MacBook Air M3 8GB, 256 GB variant with a 13-inch display in Space Grey now comes at a reduced price of Rs 1,10,890. Besides this, customers can get an additional instant discount of Rs 5,000 when they pay with an SBI credit card, bringing the final cost of the Apple MacBook Air M3 down to Rs 72,890. Furthermore, anyone who trades in an Apple MacBook Air M2 will receive a hefty exchange discount of Rs 33,000, bringing the effective price down to Rs 77,890. Just make sure your laptop is in good condition.

Also Read: Itel S24 with Dynamic Bar feature launched in India

Apple MacBook Air M3 is equipped with the newest M3 CPU. The 13-inch MacBook Air M3 model has 256GB of SSD storage and 8GB of unified memory. It includes a 1080p webcam, a Magic Keyboard with Touch ID and MagSafe 3 charging. It comes with two Thunderbolt 4/USB 4 connections along with compatibility for two external monitors.

OnePlus Nord CE 3 5G price reduced by Rs 2,000 in India

The price of the OnePlus Nord CE 3 5G has dropped yet again in India. If you are planning to buy a new 5G phone then this is the right time. The price drop comes after the OnePlus Nord CE 4 launch in the country. The device was launched in India last year and this is the second time it has received a price cut after November. The smartphone has an octa-core Qualcomm Snapdragon 782G SoC. It runs on Android 13 out of the box. The handset features an AMOLED display. It comes with a 50-megapixel triple rear camera setup.

The OnePlus Nord CE 3 5G was introduced in India with a starting price of  Rs 26,999 for the base 8GB RAM with a 128GB storage option. For the first time in November, the company reduced the price of the device by Rs 2,000. Before the recent price revision, it was selling at Rs 24,999. But now it is being sold at Rs 22,990 after the price cut. The device comes in two colour options Aqua Surge and Gray Shimmer. In terms of availability, the device with new price pricing will be available at Amazon and the company’s official website in the country.

After the Rs 2,009 price cut, customers may get the phone for Rs 20,990 after an instant discount on ICICI and HDFC Bank cards.

Also Read: Qubo InstaView with Video Doorbell Pro and portable Home Tab launched in India

OnePlus Nord CE 3 5G specifications

The OnePlus Nord CE 3 5G features a 6.7-inch fluid AMOLED display with 2412 x 1080 pixels resolution. The screen has a refresh rate of 120Hz, a P3 colour gamut, 10-bit Colour Depth and HDR10+. The phone is powered by a Qualcomm Snapdragon 782G SoC with Adreno 642L GPU. It operates on OxygenOS 13.1 on top of Android 13.

Also Read: Itel S24 with Dynamic Bar feature launched in India

For the photos and videos, the phone has a triple rear camera setup that includes a 50MP Sony IMX890 primary sensor, an 8MP ultra-wide angle lens and a 2MP macro sensor. There is a 16MP front-facing camera for selfies and video calling.

In addition to this, the smartphone boasts a 5,000mAh battery with 80W SuperVOOC charging support. There is 5G SA/ NSA, Dual 4G VoLTE, Wi-Fi 6, Bluetooth 5.3, GPS, NFC, and a USB Type-C port for connectivity.

Dell Technologies Introduces the Alienware x16 R2 in India

Key Highlights

  • The Alienware x16 R2 features the latest Intel Core Ultra CPU, enhancing AI efficiencies and boosting performance by up to 41% compared to previous models.
  • It incorporates advanced Cryo-tech cooling technology, including Vapor Chamber technology and quad-fans for optimal temperature management.
  • The laptop offers a 240Hz refresh rate display and Wi-Fi 7 for ultra-fast, smooth, and low-latency gaming experiences.

Dell Technologies has officially launched the Alienware x16 R2 in India. This cutting-edge laptop is a leap in computing technology and a design marvel, setting new benchmarks in gaming and creative performance. Here’s why the Alienware x16 R2 is attracting so much attention:

Unparalleled Performance with Intel Core Ultra CPU

The heart of the Alienware x16 R2 beats with the latest Intel Core Ultra CPU, specifically designed to boost AI efficiencies and elevate the user experience for gamers and creators alike. This new processor promises a significant performance uplift, with Dell claiming up to a 41% increase compared to previous models. Coupled with an impressive battery life that is 1.9 times better than its predecessors, the laptop ensures that users experience maximum efficiency without frequent recharging.

Read Also: Dell introduced AI-powered XPS, Alienware and Inspiron laptops in India

Advanced Cryo-tech Cooling Technology

Understanding the importance of keeping the system cool under pressure, Alienware has equipped the x16 R2 with the most sophisticated Cryo-tech thermal management system to date. This system includes Vapor Chamber technology and Element 31 thermal interface material applied across both the CPU and GPU. Adding quad-fans with ultra-thin blades helps maintain a perfect temperature balance, allowing for sustained performance even under heavy loads.

Alienware x16 R2 1

Future-Proof Design and Display

The Alienware x16 R2 boasts a robust full-metal chassis constructed from an anodized aluminum and magnesium alloy, ensuring both durability and a sleek profile. The futuristic Legend 3 design not only enhances its aesthetic appeal but also its functionality.

Regarding display, the laptop steps up the game with a 240Hz refresh rate screen, moving from the previous 165Hz. This upgrade facilitates smoother visuals, faster response times, and minimized motion blur, making it ideal for high-speed gaming and professional content creation. Additionally, the HDR FHD IR webcam introduces superior video quality for streaming and video calls, boosted by HDR technology for vivid, accurate colors.

Intelligent Connectivity with Wi-Fi 7

Connectivity is swift and stable thanks to the integration of Wi-Fi 7 technology, providing users with an ultra-fast, low-latency online experience. This is crucial for gamers who compete online, where every millisecond counts.

Read Also: Alienware Launch the m18 R2: Comes With GeForce RTX 4090 GPU

Alienware x16 R2: Pricing and Availability

The Alienware x16 R2 is now available across various platforms including Dell Exclusive Stores, Dell.com, Amazon.in, and other major retailers. It starts at an inclusive price of INR 286,990.

According to Pujan Chadha, Director of Product Marketing at Dell Technologies India, the Alienware x16 R2 is re-engineered for impressive performance inside and out, ensuring “gaming glory at every turn.”

This launch represents a significant step forward in the evolution of gaming laptops, melding superior performance with luxurious design elements. The Alienware x16 R2 is more than just a laptop; it’s a gateway to the future of gaming and creative excellence, crafted to meet the demands of tomorrow’s digital challenges.

Itel S24 with Dynamic Bar feature launched in India

Key Highlights

  • Itel S24 is the latest budget smartphone to be introduced in India under 10k.
  • The device comes with a virtual RAM expansion with Memory Fusion technology.
  • There is a dual rear camera setup that consists of a 108-megapixel Samsung HM6 ISOCELL sensor.

Itel S24, the latest budget smartphone has debuted in India, expanding the company’s S-Series. The device is powered by MediaTek Helio G91 SoC and runs on Itel OS 13 with Android 13. The device features a 90Hz display with a Dynamic Bar feature. It also packs a 5,000mAh battery and a 108-megapixel dual rear camera setup.

Itel S24 price in India, availability

Itel S24 price in India is set at Rs 9,999 for the 8GB RAM with 128GB storage variant. The budget smartphone will be available in two colour options: Dawn white and Starry Black. The newly released smartphone is presently available for purchase in India through Amazon. By the final week of April, it will be sold at retail outlets in the country. Customers may also receive a complimentary Itel 42 smartwatch valued at Rs 999 when they buy the smartphone.

Itel S24 price in India, availability

Itel S24 specifications, feature

Itel S24 comes with a 6.6-inch HD+ display with 720×1,612 pixels of resolution. The screen supports a refresh rate of 90Hz. The Dynamic Bar feature is also included which shows notifications such as battery charge information and incoming call alerts. Under the hood, there is MediaTek Helio G91 SoC paired with up to 8GB of RAM and 128GB of onboard storage. Similar to the latest Itel smartphones, the Itel S24 provides virtual RAM expansion with Memory Fusion technology.

Also Read: Qubo InstaView with Video Doorbell Pro and portable Home Tab launched in India

For the photos and videos Itel S24 comes with a dual rear camera setup that consists of a 108-megapixel Samsung HM6 ISOCELL sensor with an f/1.6 aperture with electronic image stabilisation (EIS) and QVGA depth sensor. For taking selfies and video calling there is an 8-megapixel camera sensor on the front.

The Itel S24 has a 5,000mAh battery that supports 18W fast charging. The phone contains a side-mounted fingerprint sensor for authentication in addition to dual DTS speakers. The phone has Wi-Fi, Bluetooth, GPS, 4G, and a USB Type-C port for connectivity.

Garena Free Fire Redeem Codes Today 25 April 2024: Here is how to claim them

Garena Free Fire is a battle royale game with regular awards and tournaments to keep players interested. If you play Garena Free Fire, you should be aware of the redeem codes that are released on a daily basis. However, because the battle royale game is banned in India, players from other countries can use the Free Fire Redeem codes daily. If you’re unfamiliar with the Garena Free Fire redeem codes or don’t know how to get them, we’ve put together a step-by-step guide to help you redeem them. Check out Garena Free Fire Redeem Codes for 25 April 2024.

The Free Fire redeem codes are a great way to get free stuff. These are 12-digit codes that contain alphabets and numbers, as well as an expiration date and time. Because the Garena FF redeem codes cannot be used more than once, you should hurry to the redemption page to claim your free reward before someone else does. To get a free reward, all you have to do is go to reward.ff.garena.com/en, which is the official redemption page. Also, keep an eye on this space for daily updates on Garena Free Fire redemption codes and rewards.

Also Read: Sennheiser Accentum Plus wireless headphones with Hybrid Adaptive Noise Cancellation launched

Garena Free Fire Redeem Codes Today 25 April 2024

F6UJHB49S1GVTEGR

F6HJXUYT2I1DRFRY

F9C8IU2Q2Q54E1FH

FFR3H6V9Z2J8FX4C

FM3FDDP1N9V2W7T6

FFC8H5E7Y0JDD4S1

FFX6DI2F3B7L8K9R

FYHR56YR56G5R6FT

FGJ487XE6GDRT9G3

FNYJ8X55GRTHY14G

FR6YHR67HY5TRY43

FH87KJHG19EMBRF3

FHY645TR2Q34GDR3

FHY5R6Y5R6GYDFCY

F98J1G4E8FE27ERA

FFD9W4Z1Q0O5DU3N

FFS5V8M1DDJ2P6A4

FH7DDR0T3F6DC2G9

FN4Y8Q6U5EDD61B3

FA1P0HX2K9D7L34Y

FT3O823G5V1M43I2

FFZ9B1O3QL6Q8M5K

FF4S7R9H2WF0DQ1P

FI8EQ5Y3N1TF6Q4A

FG2J9X4V6MF7QQP0

FQ1QK3R7CF9B8L5F

FO0U6AF4D5ZCD2G8

FE9B63J4L3CU0S7D

F13X4N6Q3R8WUU2H

FFY5U7S9P2I3UA0K

FZ7DH5R6HTG54C1V

FFL5D9Q81T7G2N0E

FFW8P4K1I7F3HY6S

FFB2M0A5U9O18R7F

FFE6C8G3X18N4S9H

FFU2V5T78J0I4Y3W

How to Get Free Fire Redeem Codes for Garena on 25 April 2024?

  • Visit the Garena Free Fire game’s official website at reward.ff.garena.com.
  • Use your Facebook, Google, VK, Apple ID, Huawei ID, or Twitter account to log in.
  • You’ll be taken to a valid redemption code (s)
  • Copy and paste the 12-digit redemption code into the text box.
  • On the screen, a dialogue box will appear.
  • ‘Ok’ should be selected.

For the latest gadget and tech news, and gadget reviews, follow us on TwitterFacebook and Instagram. For newest tech & gadget videos subscribe to our YouTube Channel. You can also stay up to date using the Gadget Bridge Android App. You can find the latest car and bike news here.

How To Convert PDF To Word, PPT, Excel, and Other Files

PDFs are a business staple for sharing sensitive documents. Think of final reports, contracts, or scanned images. But editing them is not so easy. Sometimes, you’ll need to edit PDF content, extract data, or share it with your team members. This is where PDF converters come in. Changing or exporting PDFs in an editable format lets you and others make edits and suggestions and track changes more easily.

So, how to convert PDF files to Word or other formats? In this guide, we’ll explain four methods to convert a PDF without losing the original format online and offline.

Part 1. How To Convert PDF Files to MS Office on Desktop?

Wondershare PDFelement is a comprehensive PDF solution that goes beyond simple conversion. Powered by AI, it offers an intuitive and user-friendly interface for managing all your PDF management tasks.

Here’s what makes it stand out from other PDF converters:

  • Batch Convert PDF: Save time by converting multiple PDFs to your desired format in one go. This point is ideal for handling large workloads or repetitive tasks.
  • OCR for Scanned PDFs: Working with scanned documents? PDFelement’s OCR feature can recognize 20+ languages and convert scanned PDF files accurately. This helps to easily search, edit, and reuse information within those documents.
  • Extensive File Format Support: Convert PDFs to and from over 20 file types. It includes all the essential MS Office formats (Word, Excel, PowerPoint). This flexibility ensures seamless integration with your existing workflow.
  • Cross-platform Compatibility: Access and manage your PDFs across devices. Work with desktop versions for Windows and macOS and a mobile app for iOS.
  • High-quality Retention: PDFelement prioritizes preserving the original formatting of your PDFs during conversion. Text, tables, and images remain intact and maintain high quality in the converted file. This ensures the accuracy and professionalism of your documents.

5 Steps To Convert a PDF to Word, Excel, or PPT Offline

Getting started is easy. You can register for a free account with PDFelement and convert up to 3 pages of a PDF to another format. Additionally, the free plan allows you to batch convert up to 3 PDF files (under 20 MB) to other formats.

Here’s a step-by-step guide to convert a PDF to Excel, PPT, or other document formats using PDFelement:

Step 1: Download and open the PDFelement app on your desktop.

Step 2: Select Convert PDF from the main interface and upload the PDF document from your local storage.

Step 3: A window will appear, allowing you to select the Output format from the dropdown list.

Step 4: Click Settings and adjust the output settings, such as OCR Recognition, then click OK.

Step 5: Specify the Output Folder, then click OK to continue. PDFelement will convert your PDF and display a message upon completion. You can then choose to open the converted document directly.

Advantages of Using a Desktop App To Convert a PDF

Desktop software like PDFelement offers several advantages over online PDF converters:

  • Offline Functionality: Work on your PDFs even without an internet connection. This is crucial for situations where you need to access or convert documents while traveling or in areas with limited internet access.
  • Enhanced Security: Maintain complete control over your sensitive documents. Desktop software keeps your files on your local device, minimizing potential security risks.
  • Faster Processing: Leverage your computer’s processing power for quicker conversions, especially for larger files. This translates to a more efficient workflow.

If you don’t have access to your desktop or prefer to do it online, explore a free online PDF converter below.

Part 2. How To Convert a PDF to Image Online for Free?

HiPDF offers a free, all-in-one AI-powered online PDF converter. It allows you to easily convert PDF files to Word, PowerPoint, Excel, JPG, RTF, and other formats. HiPDF works wonders on any device if you have a web browser. Mac, Windows, Linux – it doesn’t matter! And for those worried about security, HiPDF automatically deletes all uploaded files within 60 minutes after conversion.

4 Steps To Convert PDF Files to JPG Online

Follow these steps to convert PDF to Word for free using HiPDF:

Step 1: Visit HiPDF online and select Convert on the upper navigation pane.

Step 2: Scroll down and choose PDF to JPG in the Convert from PDF section.

Step 3: Click Choose File and upload the PDF document from your device.

Step 4: Select the image format and click Convert on the lower right side. Download the converted image file.

Advantages of Online PDF Converters

Online PDF Converter provides a quick and easy solution to convert PDF files without installing any software. It is generally free to use and can be accessed from any device with an internet connection.

Part 3. How To Convert PDF to Microsoft Word?

You can open and convert PDFs using Microsoft Word. This is useful for PDFs that consist primarily of text, such as business documents or reports. Also, it allows you to make changes to content directly in the familiar Word environment.

Steps To Open and Convert a PDF in Word

Using MS Word to convert PDF files to an editable format is easy. Here’s how:

Step 1: Open Microsoft Word, then go to File in the upper navigation pane and choose Open on the left.

Step 2: Locate the PDF you want to convert and select it.

Step 3: A pop-up window will inform you that Word will create a copy and convert the PDF content for editing. Click OK to proceed.

Keep in mind:

Opening a PDF in Word works best for simple documents. PDFs with fancy formatting or pictures might not look the same after conversion.

Part 4. What Is the Best Way To Convert PDF Files to Other Formats?

There’s no single “best” way to convert PDFs. The ideal method depends on your specific needs and priorities. Here are key factors to consider:

Accuracy and Formatting

Do you want to preserve the original layout and formatting as closely as possible in the converted document? This is very important for documents with complex layouts and tables. Paid software like PDFelement offers superior accuracy and format preservation.

Security and Privacy

Are you converting confidential documents? If so, consider using a secure method like a paid software program that offers file encryption and password protection. Free online converters may not have these security features.

Output Format

What file format do you need the converted document in? Word, Excel, PowerPoint, and image formats (JPG, PNG) are common options. Knowing the end goal helps you pick the most suitable PDF conversion method.

Scanned PDFs With Text (OCR)

Regular PDFs can be edited easily, but scanned documents (like pictures of pages) can’t. To make text in scanned PDFs editable, you need a tool with OCR, which stands for Optical Character Recognition. Free tools can do basic OCR, but paid ones might better make the text more accurate.

Convenience and Speed

Simple PDF conversion? Go for online PDF converters. It’s fast and easy. However, desktop software offers advanced features and faster speed for serious editing and bulk processing.

Conclusion

Given this knowledge, you may use specialized software or free web resources to convert PDFs; whichever method you choose will rely on the desired format and file size. Considering the rise of remote work, effective digital document management is essential.

For effortless PDF editing, conversion, and management, look at AI-powered solutions like PDFelement. This one-stop app can help you increase productivity.

Qubo InstaView with Video Doorbell Pro and portable Home Tab launched in India

Key Highlights

  • The Qubo InstaView has been introduced with Video Doorbell Pro and portable Home Tab launched in India.
  • The new video door phone comes with a wireless design and multiple connectivity options.
  • The doorbell phone offers a 3MP 2K resolution camera

Qubo has expanded its home security portfolio with the launch of a new video door phone in India. The brand introduced Qubo InstaView which comes with Qubo Video Doorbell Pro along with an all-new portable display unit – Qubo Home Tab.

An upgraded version of the Qubo Video Doorbell, the Qubo InstaView allows users to make video calls not just on their phone but also on the Home Tab, which can be positioned anywhere in the house or even outside. In comparison to traditional video door phones, which often come with a simple display unit installed on a wall next to the door, the indoor display unit’s unique portability makes it significantly superior and versatile.

Also Read: Here is everything about the newly launched Lava ProWatch Zn and Prowatch VN

Qubo InstaView with Video Doorbell Pro and portable Home Tab launched in India

The Video Doorbell Pro, a component of InstaView, includes a 3MP 2K resolution camera and a 2W echo-cancelling speaker. In terms of connectivity, there is dual-band Wi-Fi (2.4 GHz & 5 GHz), and it functions equally well in a variety of homes, including apartments, builder floors, and villas. It pairs easily with the Qubo Home Tab, which soon could serve as the main control panel for the entire house. Right now users can watch the video feed from their video doorbell on the Home Tab, talk to their visitors at the door and even unlock the door (through a Qubo Smart Door Lock) for them. It can also be used as a stylish Digital Photo Frame.

Also Read: Ray-Ban Meta smart glasses can now make video calls via WhatsApp and Messenger

The home security device has a wireless design offering placement flexibility throughout the home or outside. The new video door phone has 8GB of in-built storage for media, including photos. With mobile app control, users can view live feeds, receive alerts, and control doorbell functionalities remotely through the Qubo app on their smartphones.

Qubo InstaView with Video Doorbell Pro and portable Home Tab launched in India

Qubo InstaView price in India

The Qubo InstaView is priced at Rs 14,990. The new video door phone can be purchased via the brand’s website www.quboworld.com and will be soon available across major e-commerce marketplaces and offline retailers across the nation.