The Vivo T3x 5G has a full-HD+ screen with a refresh rate of 120 Hz.
The phone features an IP64-rated construction.
It comes pre-installed with Android 14.
A 6,000mAh battery can be charged at 44W quickly.
The Chinese smartphone brand Vivo has introduced a brand new phone – Vivo T3x 5G in India. The T3x runs on Funtouch OS 14 with Android 14 out of the box. The handset is capable of 44W fast charging and boasts a 6,000mAh battery. In addition to this, it is powered by the Snapdragon 6 Gen 1 SoC. The phone features a 120Hz full-HD+ display.
In This Article
Vivo T3x 5G price in India, sale details
Vivo T3x 5G has debuted in India with a price tag of Rs 13,499 for the 6GB RAM with 128GB storage option. There is another 8GB RAM with a 128GB storage option which comes with a price tag of Rs 16,499. The device will be available in two colourways- Celestial Green and Crimson Bliss. Vivo is discounting purchases made using HDFC bank and SBI cards by up to Rs 1,500.
The phone can be purchased via Vivo e-store, Flipkart and offline stores in the country.
Vivo T3x 5G specifications
Vivo T3x 5G comes equipped with a 4nm-based Snapdragon 6 Gen 1 SoC, and up to 8GB of LPDDR4X RAM. The built-in RAM can be increased to 8GB using the extended RAM 3.0 capability. Up to 1TB of microSD card expansion is possible for the inbuilt storage. The phone is powered by Funtouch OS 14, which is based on Android 14.
The new Vivo smartphone features a 6.72-inch full-HD LCD with 1,080×2,408 pixels of resolution. The display supports a refresh rate of 120Hz. It also comes with 1000 nits of peak brightness and 393 ppi pixel density.
The dual rear camera setup on the Vivo T3x 5G contains a 50-megapixel primary sensor with an f/1.8 aperture and a 2-megapixel secondary sensor with an f/2.4 aperture. It features an 8-megapixel sensor with an f/2.05 aperture for selfies and video calls.
Vivo T3x 5G has 5G, Wi-Fi, Bluetooth 5.1, GPS, OTG, Beidu, Glonass, and a USB Type-C connector as its connectivity options. There are several sensors on board, such as a side-mounted fingerprint sensor, a proximity sensor, a gyroscope, an e-compass, an accelerometer, an ambient light sensor, and a colour temperature sensor.
A 6,000mAh battery with 44W fast charging powers the phone. Additionally, the smartphone has IP64 water and dust protection. There are two stereo speakers on it.
Garena Free Fire is a battle royale game with regular awards and tournaments to keep players interested. If you play Garena Free Fire, you should be aware of the redeem codes that are released on a daily basis. However, because the battle royale game is banned in India, players from other countries can use the Free Fire Redeem codes daily. If you’re unfamiliar with the Garena Free Fire redeem codes or don’t know how to get them, we’ve put together a step-by-step guide to help you redeem them. Check out Garena Free Fire Redeem Codes for 18 April 2024.
The Free Fire redeem codes are a great way to get free stuff. These are 12-digit codes that contain alphabets and numbers, as well as an expiration date and time. Because the Garena FF redeem codes cannot be used more than once, you should hurry to the redemption page to claim your free reward before someone else does. To get a free reward, all you have to do is go to reward.ff.garena.com/en, which is the official redemption page. Also, keep an eye on this space for daily updates on Garena Free Fire redemption codes and rewards.
Do you need a high-quality & well-reputable thesis writing service? Want your paper to be written fast? If so, you would better be introduced to Thesisgeek writing company. This is an incredible thesis writing service that has already assisted thousands of students in reaching their study goals. Most of them received top scores, and scholarships, and got a degree. If you want to delegate your thesis writing routine to professionals, Thesisgeek is an ideal platform for you to do it. Find out more about it in this article – Thesisgeek.com: Fail-proof thesis writing service.
In This Article
Online Reputation
The first thing you should do before ordering a custom thesis is to surf the net and try to find any feedback about a specific company. For instance, you may have a look at online forums like Sitejabber or Trustpilot. If it comes to Sitejabber, you may find there are 60 positive reviews from Thesisgeek previous customers. Each of them rated the company with 5 out of 5 possible stars. It is a very cool result that makes Thesisgeek ranked 148th among other essay-writing sites on the forum.
Affordable prices
The pricing policy of Thesisgeek offers a wide variety of advantageous opportunities. You may order proofreading of 100 words for $3.32, editing of 100 words for $3.90, and writing of 100 words for $5.85. These prices are not the lowest ones in the market. However, all of them are affordable for every student. So even if you are on a tight budget, you can order a custom thesis from Thesisgeek. The high quality of your paper is worth investing finances in.
System of bonuses
The good news about Thesisgeek is that you can save lots of bucks if you become a loyal customer. It means that you need to order all your papers frequently from this company and get a bonus for it – a solid discount. How to get a discount? For each dollar you spend on the platform you earn 1 point. The more points you collect, the bigger the discount will be. To be more precise, if you collect 750 points, you will get 5% off. Suppose you earn 1500 points, your discount will be 10%. When you have 3000 points, you will get 15% off. Isn´t that tempting?
100% unique papers
All the theses crafted by Thesisgeek writers are written from scratch. It means that every single time a student orders a paper, the writer will conduct individual research and brainstorm unique ideas. So your custom thesis will easily pass such plagiarism checkers as Turnitin or Copyscape. Besides, you may ask for a plagiarism report each time you order a custom paper from Thesisgeek.
High-quality theses
It is worth mentioning that Thesisgeek not only crafts 100% genuine papers but the quality of each of them is high. You will not find any errors or typos there, even if you try because there are zero of them. Your custom thesis is promised to be extremely written well for you to receive the highest scores for it. As it was mentioned above, the writers conduct thorough research and bring the most valuable thoughts. Your professor will notice it & give you the highest scores, for sure.
60-day warranty
If you need guarantees, Thesisgeek gives you those guarantees. To be more precise, you have a 60-day grace period during which you may ask for a revision or receive all the money back if you dislike the quality of your paper. However, it must not happen. Statistics say that 98% of all the customers who have ever used Thesisgeek service were satisfied with the quality of their theses.
Team of experts
Thesisgeek team consists of a huge pool of professional writers, editors, & proofreaders. The hiring process is very strict: each of the candidates has to pass several complicated & witty tests to prove their knowledge in a specific study field, knowledge of English, and the presence of outstanding writing skills. Very few candidates pass all of these tests (only 2%). So if you are hesitant about whether your paper will be written by experts, you would better stop panicking and entrust your custom thesis to Thesisgeek writers.
Free revisions
All the revisions that you might be asked by your professor to do are free. You do not have to pay each time your paper is revised and you may ask for a revision an unlimited number of times. So if you cooperate with Thesisgeek, you will save a lot of money.
Confidentiality
Your data is safe & secure plus it remains confidential. No third party will get to know about the fact that you used Thesisgeek writing services. The company cares about its reputation and never sells your data to any similar company.
On-time delivery
The Thesisgeek team always delivers your custom papers on time. If you need your paper to be written ASAP, you may ask customer support to do it within 3 or fewer hours. Finally, you will receive it within the mentioned time frame. Whatever your due date is, you will receive the thesis on time.
24/7 customer support
So you have decided to buy a thesis from Thesisgeek? If so, you will only need to contact the customer support department. There is a live chat opportunity to contact them and specify the requirements. It will take you only a few minutes to place the order. The customer support is very polite & friendly. You will always get a prompt reply from them &premium-class assistance. Would you like to place the order right now?
Samsung introduces the world’s first glare-free OLED TV, enhancing visibility and color accuracy under any lighting conditions.
The new Neo QLED 8K features the advanced NQ8 AI Gen3 processor, dramatically improving neural processing for an unprecedented viewing experience.
The 2024 TV lineup integrates AI-driven solutions across all models, offering features like AI Upscaling Pro, AI Motion Enhancer Pro, and personalized smart home connectivity.
Samsung has introduced a groundbreaking lineup of AI TVs in India, featuring the Neo QLED 8K, Neo QLED 4K, and the world’s first glare-free OLED TV. This launch took place at the ‘Unbox & Discover’ event at the Samsung Opera House in Bengaluru on April 17, 2024.
In This Article
Breakthrough Technology and Enhanced Viewing Experience
Neo QLED 8K:Samsung‘s flagship Neo QLED 8K TV, equipped with the NQ8 AI Gen3 processor, stands at the forefront of television technology. This processor includes a Neural Processing Unit (NPU) that offers an eight-fold increase in neural network capacity — from 64 to 512. It enhances picture quality, ensuring ultra-crisp details regardless of the input source. The TV also features AI Picture Technology for superior clarity, AI Upscaling Pro to match the 8K display, and AI Motion Enhancer Pro for smooth motion in fast-paced scenes.
Neo QLED 4K: Powered by the NQ4 AI Gen2 Processor, the 2024 Neo QLED 4K models deliver stunning 4K visuals. They come with technologies such as Real Depth Enhancer Pro for enhanced contrast and Quantum Matrix Technology, ensuring that each scene is displayed with impeccable detail. These TVs also support Dolby Atmos for an immersive audio experience and are the first to boast a Pantone Validated display for exceptional color accuracy.
OLED TVs: Samsung has unveiled the first glare-free OLED TV, eliminating reflections while maintaining vibrant colors and deep blacks under any lighting conditions. Like the Neo QLED 4K, the OLED TVs are powered by the NQ4 AI Gen2 Processor and feature advanced technologies like OLED HDR Pro and Motion Xcelerator 144Hz for superior gaming performance.
These new Samsung TVs are designed to instantly connect with a smart ecosystem upon setup, integrating seamlessly with both Samsung devices and third-party IoT devices. Features such as Smart Mobile Connect turn smartphones into universal remotes for a connected home experience.
Samsung has also introduced localized Smart Experiences for Indian consumers, including Cloud Gaming Service, Samsung Education Hub, and Smart Yoga, all enhanced with AI capabilities to provide interactive and immersive experiences.
Exclusive Offers and Pricing
To celebrate the launch, Samsung is offering pre-order bonuses like free soundbars, The Freestyle projector, and the Music Frame, along with up to 20% cashback. Pricing starts at INR 319990 for the Neo QLED 8K, INR 139990 for the Neo QLED 4K, and INR 164990 for the OLED models.
This launch underscores Samsung’s commitment to innovating home entertainment with AI technology, aiming to enhance the consumer lifestyle and reinforce its market leadership in India.
Garena Free Fire is a battle royale game with regular awards and tournaments to keep players interested. If you play Garena Free Fire, you should be aware of the redeem codes that are released on a daily basis. However, because the battle royale game is banned in India, players from other countries can use the Free Fire Redeem codes daily. If you’re unfamiliar with the Garena Free Fire redeem codes or don’t know how to get them, we’ve put together a step-by-step guide to help you redeem them. Check out Garena Free Fire Redeem Codes for 17 April 2024.
The Free Fire redeem codes are a great way to get free stuff. These are 12-digit codes that contain alphabets and numbers, as well as an expiration date and time. Because the Garena FF redeem codes cannot be used more than once, you should hurry to the redemption page to claim your free reward before someone else does. To get a free reward, all you have to do is go to reward.ff.garena.com/en, which is the official redemption page. Also, keep an eye on this space for daily updates on Garena Free Fire redemption codes and rewards.
Most Android smartphones have a nifty hidden folder that lets you keep your personal apps away from prying eyes. This feature can be found in security and privacy settings on your device. While hiding apps is easy, figuring out how to access the hidden folder can be tricky if you did not pay attention to the setup wizard earlier. Today, we bring you the top 5 ways to find and access the hidden apps on your Android smartphone.
Android devices have had a hidden folder for years. One UI, MIUI, OxygenOS, and other Android skins have their own unique ways to hide and encrypt apps. This is why it is surprising that stock Android OS is trailing behind when it comes to privacy features. If you own a Google Pixel smartphone, your options are limited to using third-party app lockers and hidden folders. This may not seem like a big deal to some, but third-party app lockers are not as optimised as the native hidden folder. Using a third-party launcher for the sole purpose of hiding apps seems a bit excessive as well. On top of that, some launchers are laced with ads on their interface, which ruins the entire experience.
Find hidden apps on a Samsung phone (One UI)
Samsung smartphones do not have a dedicated hidden folder. You will need to unhide the app to access it again. Here’s how.
Step 1: Go to the app drawer and tap the ellipses at the top right corner of the screen.
Step 2: Tap on Settings.
Step 3: Go to Hide apps.
Step 4: Tap the minus sign on the app that you want to unhide.
Step 5: Hit Done.
The app can now be accessed from the app drawer.
Find hidden apps on a Xiaomi phone (MIUI and HyperOS)
Depending on the OS, Xiaomi phones offer different ways to access the hidden apps folder. The new HyperOS from Xiaomi lets you view the hidden apps folder by swiping two fingers in opposite directions on the home screen. On Xiaomi phones running MIUI, you can find this folder by swiping right twice on the first panel of the app drawer. Xiaomi allows users to protect the hidden folder with a password or biometric lock.
Find hidden apps on a Vivo or iQOO phone (Funtouch OS)
Finding hidden apps on a Vivo/iQOO phone is pretty easy. Swipe up on the home screen using two fingers to view the hidden folder. To access the apps, you will need to provide your ‘privacy password’.
Find hidden apps on OnePlus and Oppo phones (OxygenOS and ColorOS)
The hidden apps on OnePlus and Oppo smartphones can be accessed by entering the secret code in the dialer. This secret code is set up by the user at the time of using the app hiding feature for the first time. OnePlus and Oppo phones require the code to start and end with the # sign.
Find hidden apps on a Motorola smartphone
Motorola phones have a ‘Secure Folder’ that can be used to hide apps. You can access it by going to Settings>Security and privacy>More security and privacy and selecting ‘Secure folder’. Once you’ve verified yourself, you can access the apps in the folder. This folder appears in the app drawer, but you can make it invisible by enabling ‘Stealth mode’.
Frequently Asked Questions (FAQs)
How do I hide apps on a Google Pixel smartphone?
Since stock Android OS does not have a native feature to hide apps, you will need to rely on third-party launchers and tools (like Nova Launcher and Microsoft Launcher) to hide apps on your Google Pixel smartphone.
Do the hidden apps show up on the apps list in settings?
Apps that are stored in the smartphone’s native hidden folder do not show up in the apps list in device settings.
How do I access the hidden apps on a OnePlus smartphone?
To find the hidden apps on a OnePlus or Oppo smartphone, launch the dialer and enter the secret code.
These are the top 5 ways to find and access hidden apps on your Android smartphone. When an app is stored in a hidden folder, its notifications are blocked automatically. Some Android OEMs hide the app from the app switcher panel as well.
Taiwanese tech giant Asus today announced the launch of its new dual-screen laptop- Zenbook DUO in India. As the name suggests it comes with a dual-screen OLED design ideal for content creators, professionals and entertainment. It comes with up to an Intel Core Ultra 9 Processor, Advanced Cooling and Intel Evo certification. There are Harman-Kardon speakers with Dolby Atmos support.
In This Article
Asus Zenbook DUO specifications
With its dual 14-inch FHD+ OLED touchscreen displays, the ASUS Zenbook DUO enhances productivity with multi-screen functionality. The screen offers a 16:10 aspect ratio, a 0.2ms reaction time and a 60Hz refresh rate. It guarantees vivid, lifelike colours with a 100% DCI-P3 colour gamut and an amazing 1,000,000:1 contrast ratio. The display supports 500-nits peak brightness, Dolby Vision Display HDR True Black 500 certification, and Pantone validation.
While SGS Eye Care Display technology, certified by TUV Rheinland, prioritises eye comfort, Corning Gorilla Glass protection guarantees durability.
Easy gestures are supported by its OLED touch screen, including a six-finger swipe to summon the virtual keyboard and a three-finger tap to activate the virtual touchpad. App Switcher, App Navigator, Microphone Switcher, Control Centre, Sharing Mode, Brightness, and Motion Wallpaper are among the redesigned ScreenXpert features that put convenience at your fingertips.
Its built-in double-hinged kickstand enables several use modes, including dual-screen, sharing, laptop, and desktop modes. Also, there is a detachable, backlit full-size keyboard and touchpad with Bluetooth connectivity. With its sleek all-metal design, weighing just 1.35 kg (1.65kg with a keyboard) and measuring 14.6mm thin, it combines portability with durability, meeting MIL-STD 810H military standards.
The Asus Zenbook DUO is available in Intel Core Ultra 9 Processor 185H/ Intel Core Ultra 7 Processor 155H/Intel Core Ultra 5 Processor 125H options. Its advanced cooling system ensures effective heat dissipation by allowing the CPU and GPU to run at up to 35W combined TDP. Also, it is Intel Evo certified which is backed by up to 32GB of 7467MHz LPDDR5X RAM and a 1TB M.2 NVMe PCIe 4.0 SSD. It also includes MS Office 2021 and a 3-month membership to Adobe Creative Cloud, which improves productivity and creativity right out of the box.
Multiple connectivity choices are available, including two Thunderbolt 4 USB Type-C ports, USB 3.2 Gen 1 (Type-A), HDMI 2.1, and a 3.5mm combo audio jack. With the included pogo pins, the detachable keyboard securely fastens to the DUO for clamshell operation. For wireless connectivity, there is Bluetooth 5.3, Wi-Fi 6E, and ASUS Smart Connect. It provides the user with improved usefulness thanks to USB-PD rapid charging over Type-C and stylus input using the ASUS Pen 2.0 stylus on both screens.
The ASUS Zenbook DUO has stereo speakers with Dolby Atmos compatibility and Harman-Kardon sound. The Audio Booster enhances audio performance while the Smart AMP technology guarantees 350% louder output without distortion. There is ASUS AiSense Noise Cancelling Technology which offers two-way noise cancellation.
Asus Zenbook Duo price in India, sale details
Asus Zenbook Duo has been launched in India at a starting price of Rs 1,59,990(Intel Core Ultra 5 Processor 125H) and Rs 1,99,990 (Intel Core Ultra 7 Processor 155H). The laptop with Intel Core Ultra 9 Processor 185H comes in two variants priced at Rs 2,19,990 and Rs 2,39,990. The new Zenbook DUO will be available for sale on the e-commerce platforms, Amazon and Flipkart starting today.
LG Electronics India announced the launch of India’s first energy manager AC. The latest 2024 LG AC lineup includes a total of 77 new models. The new range’s standout feature, the Energy Manager, allows consumers to customize cooling options while preserving energy efficiency levels.
While announcing the 2024 LG AC lineup the company said it had record-breaking sales in Q1 by introducing its flagship feature range, which includes the Energy Manager and ArtCool Air Conditioners. This milestone comes alongside the order-based achievement of 1 Million ACs in a record time in 2024.
LG Electronics 77 new AC models are said to overcome obstacles like operating costs and energy efficiency. LG presents the AC Series ArtCool with a Black Mirror Finish, a new addition to the line that will add style to any area.
With the release of the Energy Manager feature, LG has made a major advancement in its dedication to sustainability and consumer empowerment. Using Wi-Fi connectivity, this innovative feature lets customers set their preferred periods of compressor usage to easily minimise energy consumption and maximise efficiency. With Energy Manager, consumers have more control over their energy usage, leading to significant savings on electricity bills without compromising on comfort.
Apart from Energy Manager and the Art Cool Black Mirror Finish series LG also introduced several other key features across its lineup, each designed to elevate the air conditioning experience. Diet Mode maintains ideal cooling efficiency and airflow while maintaining optimal cooling efficiency, and airflow and reduces power consumption by an impressive 81%. The feature manages electricity expenses while ensuring a comfortable indoor environment.
With Him Clean, maintaining clean and sanitary indoor air is simple. By automatically removing microorganisms from the air conditioner’s interior, this feature gives users peace of mind and hassle-free maintenance. Gold Fin+ coating, which provides defence against factors that cause corrosion and humidity. As per LG with enhanced corrosion resistance, the new Gold Fin+ feature prolongs the lifespan of the air conditioner, ensuring reliable performance and peace of mind for consumers.
With the addition of Low Gas Detection and Foul Smell Detection in 2024, LG ThinQ Care becomes even more intelligent. These additions enable the air conditioner to proactively detect and address potential issues, providing users with enhanced convenience and peace of mind.
The LG 2024 air conditioner lineup offers customers several options to suit their preferences and budget, with prices ranging from Rs 35,000 to Rs 60,000. The air conditioners will be sold on retail and e-commerce sites such as Flipkart, Amazon, LG.com, and LG retail locations.
Furthermore, to commemorate the introduction of the 2024 lineup and the unprecedented sales accomplishment, LG is providing a variety of incentives, such as cashback offers, financing options for consumers, and same-day installation services.
iQOO’s latest budget offering punches well above its weight. Launched last month, the iQOO Z9 5G is currently priced at Rs 20,000. The successor to last year’s iQOO Z7 5G (our review here), the Z9 is powered by the MediaTek Dimensity 7200 SoC. This chipset is a brilliant addition to a smartphone in this price bracket. While iQOO smartphones are known to be powerhouses, the Z9’s AMOLED display and 64MP primary shooter hold a lot of promise as well. So, the question remains – is this smartphone the complete package under Rs 20,000? We’ve been using it for the last week to find the answer. Here is our review of the iQOO Z9 5G.
Here’s what you get inside the iQOO Z9 5G retail box.
Smartphone
44W power adapter
USB Type-A to Type-C cable
Clear plastic case
Warranty Card
Quick Start Guide
There are two colour variants on offer – Brushed Green and Graphene Blue. The smartphone has a sleek form factor and a plastic build. The flat back panel gets a matte finish and a two-step island up top for the camera array. The flat plastic frame is curved around the corners. The Z9 offers a decent grip, despite its flat rails and back panel.
The volume rocker keys and the side button are placed on the right edge of the frame. The bottom edge houses the hybrid SIM slot, primary microphone, USB Type-C port, and the primary speaker grille. The secondary microphone is present on the top of the device. The earpiece also acts as a secondary speaker. Unlike the Z7, the Z9 does not have a 3.5mm headphone jack.
One of the highlights of this smartphone is its 6.67-inch AMOLED display. It offers a maximum refresh rate of 120Hz which is simply amazing for a smartphone in this price category. It can reach a peak brightness of 1,800 nits. We did not face any legibility issues while using the smartphone under direct sunlight. The bezels surrounding the display are thin but get ever so slightly thicker around the chin.
We used the iQOO Z9 5G as our primary media-viewing device during the review period. This included watching live sports on Disney+ Hotstar, catching live streams on Twitch, binging videos on YouTube, and viewing movies on Netflix. The AMOLED display did justice to the content and we were satisfied with the detail-packed pictures and vivid visuals on the screen. The output from the stereo speaker wasn’t as full as we would have liked, but it can reach a high volume level.
Like last year’s Z7, the Z9 has an IP54 rating for dust and water resistance. The smartphone can survive minor water splashes. The protection for the display has been upgraded to Dragontrail Star 2 Plus. The Z7 rocked Schott Xensation glass protection.
iQOO Z7 5G: Performance and Cameras
The MediaTek Dimensity 7200 SoC is a great processor to have on a smartphone priced under Rs 20,000. The Pro variant of iQOO Z7 (our review here), which was one of our favourite midrange smartphones of 2023, also rocked this chipset under its hood. The recently launched Nothing Phone (2a) (our review here) carries the Pro variant of this chipset. On the Geekbench 6 app, the iQOO Z9 5G scored 1,055 points in the single-core test and 2,682 points in the multicore test. In comparison, the Z7 Pro scored 1,196 and 2,657 points respectively.
The Z9 5G handles everyday tasks like video calling, emailing, navigation, web browsing, and media streaming with ease. Jitters and lags are very uncommon on this device. The touch response is good but the haptics are a little blunt. Even though the device has an LPDDR4X RAM, it is surprisingly good at multitasking.
Like all iQOO smartphones, the Z9 5G does not disappoint while gaming. For a smartphone priced under Rs 20,000, the gaming performance here is above average. Frame drops and stutters are uncommon while playing titles like Call of Duty Mobile and BGMI in average graphics. In low graphic settings, we were able to play COD Mobile at 120fps. The back panel gets slightly warm after 40 minutes of gaming. Once you hit the 1-hour mark, throttling issues due to overheating become more prevalent.
OS duties on the iQOO Z9 5G are handled by Funtouch 14. There is a fair amount of bloatware on the device, including the infamous ‘Hot Apps’ and ‘Hot Games’ ads masquerading as folders in the app drawer. Thankfully, they can be easily removed from the device. On top of the bloatware, the notification spam that Funtouch OS generates is also very dampening to the overall software experience. On the bright side, the personalisation options for the lock screen, AOD, and home screen are stacked and diverse.
The Z9 5G is equipped with a 5,000 mAh battery. The smartphone can easily last an entire day on a full charge. During the review period, our daily tasks on the iQOO Z9 5G included video calling, social media browsing, instant messaging, media streaming, and even a bit of gaming. With more conservative usage, you can push this smartphone’s battery life to one and a half days. The 44W power adapter provided in the box can fully charge the smartphone in just over an hour.
The rear camera array of the Z9 5G comprises a 50MP primary shooter and a 2MP depth sensor. The lack of an ultrawide camera in this array is a sore miss. Nevertheless, the primary lens produces a good performance on this device.
In daylight conditions, the 50MP wide camera captures detailed and sharp images with vibrant colours. The images are balanced and not overprocessed or unnecessarily boosted. We were happy with the dynamic range in the images as well. In our time with the smartphone, it did justice to the scene in front of it.
In limited lighting, this camera does a good job of letting in enough light to properly expose the subject and take bright shots. Turning on the Night Mode reduces the amount of grain on the images and adds a brightening effect. The colours assigned to the subject are accurate as well.
Portrait shots taken with the iQOO Z9 5G are well-focused. The smartphone does a good job of separating the subject from the background. It applies a background blur to the images as well, but we would have liked this effect to be more pronounced and intense.
Portrait Shots: 1x vs 2x
The front-facing 16MP camera takes good selfies. The smartphone does not brighten the skin tone in the processing phase. However, the skin texture feels a little smoothened in the final results. The resolution for video recordings is still limited to 1080p for the front camera. The rear camera can record 4K videos at 30fps.
For a smartphone priced at Rs 20,000, the iQOO Z9 5G produces an exemplary performance across the board. The 120Hz AMOLED panel is great for users who prioritise a great media-watching experience over everything else. The MediaTek Dimensity 7200 SoC pulls its weight while running games like COD Mobile and BGMI. We were pleased to see that the smartphone can run COD at 120fps. The 50MP primary camera delivers a good performance as well. The lack of an ultrawide camera is disappointing, but the Z9 5G is still one of the best smartphones in its price bracket.
The device is powered by a Qualcomm Snapdragon processor.
It has a 10-bit LTPO 3.0 AMOLED display.
The smartphone comes with a 5,000mAh battery that supports SuperVOOC fast charging.
The OnePlus 11 5G launched in India last year is now less expensive across the nation. The predecessor of the OnePlus 12 5G has received a price cut. It is equipped with a 100W SuperVOOC quick charging feature and is powered by the Qualcomm Snapdragon 8 Gen 2 SoC. OxygenOS 13 is pre-installed on top of Android 13 on the device.
In February 2023, the OnePlus 11 5G was introduced in India. In the nation, the model’s price has now dropped. It is currently listed at a reduced price of Rs 51,999 on the company’s official website in the country. The device was launched in India at Rs 56,999. Eternal Green and Titan Black are the two colour options for the smartphone.
Besides the price cut the buyers can receive an additional instant discount of Rs. 3,000 if the transaction is made through ICICI, HDFC Bank, or OneCard credit cards. The price can be further reduced by an extra Rs 5,000 exchange incentive. No-cost EMI option for a maximum of 12 months is also available to buyers.
The OnePlus 11 5G’s 6.7-inch Samsung LTPO 3.0 AMOLED display features a resolution of 1,440 x 3,216 pixels. The display has a 20.1:9 aspect ratio and a 120Hz adjustable refresh rate. At a maximum brightness of 1300 nits and a resolution of 525 ppi, the panel is capable of supporting always-on displays. The screen supports Dolby Vision and HDR codecs.
The phone has Android 13.0 running on it in addition to ColorOS 13.0. The handset includes an octa-core 4nm Snapdragon 8 Gen 2 SoC with an Adreno 740 GPU and up to 16GB of LPDDR5x RAM with up to 2456GB of UFS4.0 storage.
The OnePlus 11 5G (Review)comes with a triple rear camera setup that includes Sony’s optical image stabilisation (OIS) sensor with a 50-megapixel resolution (f/1.8 aperture), a 32-megapixel portrait sensor, the camera unit has a 48-megapixel Sony IMX58 ultra wide-angle sensor (f/2.2 aperture and 115-degree field of view). The device’s front features a 16-megapixel sensor (f/2.4 aperture) for selfies and video calls.
The OnePlus 11 5G has a 5,000mAh dual-cell battery. There is support for 100W SuperVOOC charging. The display includes a fingerprint reader as well. It has two speakers and supports Dolby Atmos.
The S800QT series features a stunning 4K QLED display and Dolby Vision Atmos for an unparalleled visual and audio experience.
Enhanced gaming with 120Hz DLG technology, 2GB RAM, and low latency ensures a smooth and immersive gaming experience.
Integrates seamlessly with Google, offering hands-free voice control and personalized content recommendations.
Haier Appliances India has introduced its newest innovation in home entertainment, the S800QT QLED Series. With advanced features like Dolby Vision Atmos and powered by Google, this series is poised to transform how consumers experience their favorite content.
In This Article
A Blend of Technology and Design
Available in four sizes (75-inch, 65-inch, 55-inch, and 43-inch), the Haier S800QT series boasts a 4K QLED display, offering vivid colors and detailed visuals that bring content to life. Price starting at Rs 38,990, these TVs are accessible through both online and offline channels, making them a versatile choice for a broad audience.
The series embodies Haier’s commitment to combining stylish design with cutting-edge technology. The elegant metal body not only enhances the aesthetic appeal but also complements any modern living space.
Dolby Vision Atmos is one of the standout features of the S800QT series, providing an immersive audio-visual experience that captures every detail in stunning clarity. Whether you’re watching a blockbuster movie or streaming a live sports event, the technology ensures a captivating viewing session.
Gaming and More
The series is also a boon for gamers, thanks to its low latency and high refresh rates. With 120Hz DLG technology and 2GB of RAM, it ensures smooth and responsive gameplay, making it ideal for fast-paced action games.
Smart Features Powered by Google
With Google integration, the S800QT series offers a vast range of apps and streaming services at your fingertips. Personalized recommendations based on viewing habits enhance the user experience, providing content that caters to personal preferences without extensive searches.
Hands-free voice control with far-field technology adds a layer of convenience, allowing users to change settings, search content, and more with simple voice commands.
Enhanced Picture Quality
The series also features MEMC (Motion Estimation, Motion Compensation), which provides exceptional clarity and detail, enhancing the overall viewing experience. The inclusion of micro-dimming technology further refines picture quality, ensuring deep contrasts and vibrant colors.
Every iPhone user should know how to lock apps on their device. Not only does it preserve your personal data while handing over your device to someone else, but it also makes sure your financial and private apps remain secure in case you lose your iPhone. Apps like WhatsApp have this feature baked into them. For those who don’t, use these 4 methods.
There are a few ways you can go about locking apps on your iPhone, but not every method is suited to your needs. There is only one native way to protect your apps using Face ID, but it only works for selected apps. You can use it to lock WhatsApp, but other messengers may not be covered by it. If you’re handing your iPhone to someone else and don’t want them accessing the contents of your device, you can use Guided Access. Guided Access pins one app to the screen and requires a Passcode/Face ID/Touch ID to go back to the home screen.
There are a few third-party app lockers available for iOS, but we do not recommend using them. Some of these tools only work after the iPhone has been jailbroken. Not only is this a security risk, but it also voids your device’s warranty. Other apps may push malware and invasive ads on your device, which is not a good tradeoff to make.
How to lock apps using Face ID
Step 1:Tap and hold the app you want to lock.
Step 2: Select Require Face ID from the pop-up menu.
Step 3:Confirm your selection in the pop-up box.
How to lock apps in iPhone using your Passcode
Step 1: Go to Settings and select Screen Time.
Step 2: Tap on Use Screen Time Passcode and set up a unique passcode to lock your apps.
Step 3: Tap on App Limits.
Step 4: Select Add Limit.
Step 5: Select the apps you wish to lock. Go through the categories to view the apps.
Step 6: Hit Next.
Step 7: Set the timer to 1 minute and tap on Add at the top right corner of the screen.
Your selected apps will be locked after 1 minute of activity. Once the activity limit is breached, you can unlock the app for periods of 15 minutes, an hour, or an entire day. The app will not ask you for the passcode within the selected usage window.
How to lock apps from settings
A better way to lock apps on your iPhone is by using Face ID. This method is available for selected apps only. Here’s how you can use it.
Step 1: Go to Settings and select Face ID & Passcode.
Step 2: In the ‘Use Face ID for’ section, select Other Apps.
Step 3: Turn on the toggle switch for the app you want to lock using Face ID.
How to lock apps using Guided Access
Step 1: Go to Settings and select Accessibility.
Step 2: Tap on Guided Access.
Step 3: Turn on its toggle switch. Tap on Passcode Settings.
Step 4: Tap on Set Guided Access Passcode and set up a passcode. You can also choose to use Face ID/Touch ID.
Step 5: Launch an app and triple-press the home button/side key to enable Guided Access.
To leave the current app, you will need to enter the Passcode/Touch ID/Face ID.
Frequently Asked Questions (FAQs)
How do I lock an app on my iPhone?
Long-press the app on the home screen and select ‘Require Face ID’ to lock it. Confirm your selection in the pop-up box.
How do I hide an app on my iPhone?
Long-press the app’s icon on the home page, tap on ‘Require Face ID’, and select ‘Hide and Require Face ID’.
How do I lock my iPhone apps using Face ID?
Go to Settings>Face ID and passcode>Other Apps and turn on the toggle switch for the app you want to lock.
How do I lock a note on my iPhone?
Go to Settings>Notes>Password and set up a password or use Touch ID/Face ID/Passcode. Launch the Notes app on your iPhone and select the note you wish to lock. Hit the ellipses and select ‘Lock’.
How do I pin an app to the iPhone’s screen?
You can use Guided Access to pin an app to the screen of your iPhone. Once enabled, you will need to provide your Passcode/Face ID/Touch ID to go back to the home screen.
These are the top 4 ways to lock or password-protect apps on an iPhone. To add an extra layer of security, turn on two-factor authentication for your social media and messaging apps. If you know any other way to lock apps on your device, let us know in the comments!
The Xiaomi Smarter Living 2024 event is almost here; it will happen in India on April 23. The products haven’t been confirmed yet, though. The firm has teased the release of four new items expected to be home appliances and personal technology products. According to a previous report, Xiaomi is preparing to introduce a self-cleaning vacuum cleaner, new TWS earphones with active noise cancellation (ANC), and a new Redmi Pad model in India. Nevertheless, no information regarding the anticipated devices was disclosed by the source.
Xiaomi will host the Smarter Living 2024 event soon in India. The upcoming tech event will be held on April 23 during which it will be launching four new items, but there was also mystery around the announcement. The company has also created a dedicated microsite that previews its upcoming products.
Rumour has it that the upcoming releases will consist of a tablet, a robot vacuum cleaner/mop, true wireless (TWS) earbuds, and a hairdryer. But detailed information is still hard to come by, which makes fans more eager.
The Redmi Pad Pro which was released in China recently is likely to be part of Xiaomi’s upcoming product portfolio. It features a 12.1-inch 2.5K LCD. The tablet runs on HyperOS and is powered by Snapdragon 7s Gen 2 SoC. The device features an 8-megapixel front and rear cameras.
The price of 6GB RAM with 128GB storage option costs CNY 1,499, or approximately Rs 17,300.
The Redmi Pad SE, which debuted in Europe in August 2023 is speculated to be coming to India. The device features an 11-inch full-HD+ LCD screen with 1900 x 1200 pixels of resolution. The tab runs on MIUI Pad 14, an Android 13-based OS. Under the hood, there is a Qualcomm Snapdragon 680 SoC, along with up to 8GB of LPDDR4X RAM and 128GB of eMMC 5.1 storage. It has an 8,000mAh battery that supports 10W wired USB Type-C charging.
The tablet’s price there starts at EUR 199 about Rs 18,000 for the 4GB RAM with 128GB variant.
Redmi Buds 5 Pro are thought to be the most likely TWS earbuds. The TWS is expected to come with 12.4mm dynamic drivers. The earbuds are likely to have up to 46dB of ANC assistance. Additionally, these are said to provide 38 hours of total battery life on a single charge.
Garena Free Fire is a battle royale game with regular awards and tournaments to keep players interested. If you play Garena Free Fire, you should be aware of the redeem codes that are released on a daily basis. However, because the battle royale game is banned in India, players from other countries can use the Free Fire Redeem codes daily. If you’re unfamiliar with the Garena Free Fire redeem codes or don’t know how to get them, we’ve put together a step-by-step guide to help you redeem them. Check out Garena Free Fire Redeem Codes for 16 April 2024.
The Free Fire redeem codes are a great way to get free stuff. These are 12-digit codes that contain alphabets and numbers, as well as an expiration date and time. Because the Garena FF redeem codes cannot be used more than once, you should hurry to the redemption page to claim your free reward before someone else does. To get a free reward, all you have to do is go to reward.ff.garena.com/en, which is the official redemption page. Also, keep an eye on this space for daily updates on Garena Free Fire redemption codes and rewards.
While buying a new smartphone, it is very important to consider its privacy features. Over the years, almost every major Android OEM has incorporated an app locker into its OS. You no longer need a third-party app locker to keep your personal documents and financial apps safe. If you want to password-protect the personal apps on your Android smartphone, it is a good idea to keep them locked. Here are three ways to go about it.
Even though an app locker is a basic feature in every major Android smartphone, it is not present in stock Android OS. This means Google Pixel users do not have a native way of password-protecting their apps. However, if you’re a Samsung, OnePlus, Xiaomi, or Oppo user, you don’t need to worry about this problem. Even manufacturers like Nothing and Motorola that rely mostly on stock Android OS for their smartphones have a custom app locker baked into their devices.
So, where does this leave Pixel users? While there is always an option to download a third-party app locker, the truth is that they aren’t very good. Most app lockers deplete the battery quickly and push intrusive ads on the device. A better workaround is using a ‘guest profile’ on your Pixel and limiting the apps that the guest can access on it. While handing your phone to someone else, quickly make the switch to the guest profile to protect your personal apps.
Lock apps on a Samsung smartphone (One UI)
Step 1: Go to Settings and select Security and privacy.
Step 2: Tap on More security settings.
Step 3: Select Secure Folder.
Step 4: Tap on Continue and sign in using your Samsung account.
Step 5: Grant Secure Folder the necessary permissions.
Step 6: Set up a locking mechanism – fingerprint, PIN, or password. Hit Next.
Step 7: Hit the plus icon to add an app.
Step 8: Once an app has been selected, hit Add.
Step 9: Tap the ellipses again and select Lock and exit.
Lock apps on a Xiaomi smartphone (MIUI/HyperOS)
Step 1: Go to Settings and select Apps.
Step 2: Tap on App lock.
Step 3: Set up a PIN, fingerprint, or password.
Step 4: Turn on the toggle switch for the app you want to lock.
Lock apps on a OnePlus/Oppo smartphone (OxygenOS/ColorOS)
Step 1: Go to Settings and select Security and privacy.
Step 2: Scroll down and tap on App Lock.
Step 3: Turn on the toggle switch for App Lock and set up a password.
Step 4: Turn on the toggle switch for the app you want to lock.
Frequently Asked Questions (FAQs)
How do I password-protect my apps on Android?
Every Android OEM has a different method of locking apps with a password. You will typically find this option in the ‘Security and privacy’ section in device settings.
How do I lock apps on a Xiaomi smartphone?
Go to Settings>Apps>App Lock, set up a password, and turn on the toggle switch for the app you want to lock.
Can I use the Secure Folder without a Samsung account?
Currently, there is no way to use the Secure Folder without a Samsung account.
This is how you can lock apps on any Android smartphone. You can also use third-party apps for this task, but that requires giving the home launcher permission to the app. If you know any other ways to password-protect your apps on Android, let us know in the comments!
The OnePlus co-founder Carl Pei’s UK-based tech venture has officially confirmed the introduction of its next iteration of Nothing Earbuds- Nothing Ear and Nothing Ear A. A few days before their formal release, purported images of Nothing Earbuds together with their costs and features made their way online. According to leaks, the devices will come with active noise cancellation (ANC) of up to 45 dB. In terms of design, the audio device will have a semi-transparent structure along with IP54 certification.
It is confirmed that Nothing Ear and Nothing Ear A will debut on April 18. Ahead of the official launch images, specifics, and costs for Nothing Ear and Ear A have been tipped by Ishan Agarwal. The Nothing Ear A is expected to cost EUR 99, or about Rs 8,000. On the contrary, it is anticipated that the Nothing Ear will cost EUR 149, or around Rs 13,000, at launch. “Hopefully it won’t go above ₹9,999,” the tipster said in its X post.
Nothing Ear (2) was launched in India at a price tag of Rs 9,999. The truly wireless stereo earphones come in two colours- White and Black.
Image Courtesy: Ishan Agarwal/X
Based on the images, it appears that the new earphones will have a semi-transparent design, just like their predecessors. Both the casing as well the stem will be semi-transparent.
The Nothing Ear is displayed in black and white colourways. Whereas Nothing Ear A is featured in black, white, and yellow hues.
The renderings display shows the company’s logo Nothing etched on the stem. Additionally, they appear to use identical red and white dots to denote the left and right sides.
The Nothing Ear A is claimed to provide dual connections and up to 45dB ANC. They are tipped to come with up to eight hours of battery life with ANC turned off. The earbuds are said to have dual connections and up to 45dB ANC.
Before the announcement, Nothing shared a teaser on its social media account, X which triggered talks on the release of the Nothing phone 3 or more accurately, Nothing Ear. A leaping frog is seen in the short video which is going to be the face of its mascot for Nothing TWS. Note that Nothing has used a Ladybug for Ear (1) and an Atlas Beetle for the Ear (2) as their mascots.
Reportedly, smartphone shipments worldwide rose 7.8% year over year to 289.4 million units. Apple’s smartphone shipments decreased by almost 10% in the first quarter of 2024 whereas Samsung overtook Apple with a 20.8% market share.
As per International Data Corporation (IDC) Worldwide Quarterly Mobile Phone Tracker preliminary data, global smartphone shipments rose 7.8% year over year to 289.4 million units in the first quarter of 2024 (1Q24).
According to Ryan Reith, group vice president of IDC’s Worldwide Mobility and Consumer Device Trackers smartphone recovery continues to move forward with market optimism slowly building among the top brands.
In the first quarter of 2023, Samsung successfully reclaimed its position as the top smartphone provider, even though Apple was able to take the top rank by the end of the year. The resurgence of Huawei in China, along with significant gains from Xiaomi, Transsion, OPPO/OnePlus, and Vivo, will probably have both OEMs looking for areas to expand and diversify, even if IDC still expects these two firms to hold their position at the top of the market.
He said, “As the recovery progresses, we’re likely to see the top companies gain share as the smaller brands struggle for positioning.”
Following a stellar quarter in which it surpassed Samsung to become the world’s top phone manufacturer, Apple saw a sharp decrease in sales with a 17.3% market share. Whereas, Xiaomi came in third place in the first quarter with a 14.1% market share.
“The smartphone market is emerging from the turbulence of the last two years both stronger and changed,” said Nabila Popal, research director with IDC’s Worldwide Tracker team. “Firstly, we continue to see growth in value and average selling prices (ASPs) as consumers opt for more expensive devices knowing they will hold onto their devices longer. Secondly, there is a shift in power among the Top 5 companies, which will likely continue as market players adjust their strategies in a post-recovery world. Xiaomi is coming back strong from the large declines experienced over the past two years and Transsion is becoming a stable presence in the Top 5 with aggressive growth in international markets. In contrast, while the Top 2 players both saw negative growth in the first quarter, it seems Samsung is in a stronger position overall than they were in recent quarters.”
Not only is WhatsApp the biggest instant messaging app in the world, but it is also one of the most versatile ones around. Its desktop app and web portal allow users to stay connected with their friends and family even if they don’t have their phones near them. All the essential functions of the messengers are preserved in its desktop avatar. However, sometimes users complain that they are unable to download videos on WhatsApp while using the app on their PCs. Let’s take a closer look at how you can go about this task.
Downloading videos on WhatsApp doesn’t have to be difficult. The messenger gives you the option to auto-download videos and save them on your device’s internal storage. You can even choose whether you want to download videos automatically only on a WiFi connection or while you’re using mobile data as well. Once that’s done, you can visit individual chats and choose whether you want the media from that conversation to appear in your device’s gallery.
If you’ve turned off auto-downloads within the app, you can always save each video manually. PC users often complain that the messenger’s desktop app and web portal do not have a download button. While WhatsApp for PC does have a download button, it only shows up when the video has been played all the way through.
Step 3: Open the conversation with the video you want to download.
Step 4: Click on the video to download it.
Step 5: Let the video play till the end.
Step 6: Hit the download button at the top right section of the screen.
Download a video on WhatsApp for Android/iOS
Step 1:Launch WhatsApp on your smartphone.
Step 2: Open the conversation with the video you wish to download.
Step 3: Hit the download button on the video.
Step 4: Open the video and hit the ellipses at the top right corner of the screen.
Step 5: Tap on Save.
Frequently Asked Questions (FAQs)
Why can’t I download videos on WhatsApp for PC?
WhatsApp’s desktop app and web portal only give you the option to download a video after it has been played all the way through at least once. Load the video and play it. Once the video is finished, the download icon will appear on the top right section of the screen.
Where can I find downloaded WhatsApp videos on my PC?
All the media downloaded from WhatsApp’s desktop app and web portal is saved in the Downloads folder on your PC. On your smartphone, the media is saved in the WhatsApp folder in the gallery.
How do I disable auto-download for videos in WhatsApp?
Launch WhatsApp on your smartphone, go to Settings>Storage and data, and deselect ‘Videos’ in all three categories (When using mobile data, When connected on WiFi, and When roaming).
This is how you can download videos on WhatsApp for desktop or PC. Once the video has been saved, you can find it in the Downloads folder on your PC. If you know any other way to download videos using the instant messenger, let us know in the comments!
Dim displays are a hassle to use. If your PC is positioned near a window, the natural light falling on the monitor makes it less legible. Enabling auto-brightness gives the display that extra push, but sometimes it may fall short. This is why while buying a monitor, you must consider its brightness capacity. If you’re struggling with a dim monitor, here are the top 6 ways you can increase its brightness beyond the maximum limit.
Is it possible to increase the monitor’s brightness beyond its maximum limit?
Screen brightness is dependent on the hardware you’re using. Some bright screen displays are designed to be kept in well-lit areas, which means they are bright enough to overcome the luminosity of their surroundings. Others may struggle to be legible. At the end of the day, brightness is a hardware attribute and you cannot use a software trick to push it more than the preset limit.
However, there are certain things you can do to make your display appear brighter than usual. Limiting the natural light in your room is one such trick. You can also enable the HDR on your display. Vivid images are brighter than normal ones. Even when the screen brightness level remains the same, HDR images will appear brighter. You can also turn off auto-brightness on your PC or laptop, so the monitor doesn’t go dim when the surrounding light is reduced.
Keeping your monitor at the highest brightness setting has its disadvantages. On OLED panels, it can cause ‘image retention’, which means the images on the screen tend to ‘burn in’ and stay there for a while. Higher brightness settings are also taxing on the battery and cause the monitor to warm up easily.
Increase Monitor’s Brightness from Settings
You must be familiar with the dedicated keys for adjusting the brightness of your PC monitor. Windows PCs also have a dedicated brightness bar that can be accessed from the taskbar. However, if you go to the device settings, you will be able to control a couple of other aspects as well. If your monitor keeps dimming down, you can turn off auto-brightness from settings. You can also keep your PC from changing the screen brightness based on the content. This will ensure that the monitor stays at the highest brightness level at all times.
Step 1: Press Windows Key + I to open settings.
Step 2: Switch to the System tab and click on Display.
Step 3: Drag the brightness bar to its maximum limit.
Step 4: Hit the downward arrow icon next to the bar and uncheck the box for Change brightness automatically when lighting changes.
Step 5: Turn off the toggle switch for Night Light.
Turn on HDR
Enabling on your monitor will make the images on the screen appear brighter and more vibrant. This method will only work on displays with HDR 10 support.
Step 1: Press Windows Key + I to open settings.
Step 2: Switch to the System tab and click on Display.
Step 3: Click on HDR.
Step 4: Turn on the toggle switch for HDR video streaming and Use HDR.
Adjust the brightness of an additional display
If you have two or more monitors connected to your PC, you can use their physical buttons to increase the brightness. Look for these buttons on the frame of the monitor. If you can’t find the dedicated buttons, press the menu button and go to brightness. This is where you’ll be able to push the display to its maximum brightness.
Calibrate your display’s colours
Calibrating the colours of your monitor can improve the vividness of the images, making them look brighter. Here’s how you can do it.
Step 1: Click on the search bar in the taskbar and search for Calibrate display color.
Step 2: Select the topmost search result.
Step 3: Hit Next.
Step 4: Follow the onscreen instructions to calibrate the display colours.
Disable Battery Saver
Once your PC or laptop’s battery goes below a certain level, it automatically turns on the Battery Saver to conserve the battery. This reduces the brightness of the display as well as cuts down other power-intensive functions. To bump up the brightness, turn off the Battery Saver. You can do this by clicking on the battery icon in the taskbar and deselecting the Battery Saver tile.
Use a third-party app: F.lux
F.lux is a great app that adjusts your display’s colour gradient to exert the least strain on your eyes. You can use this app to push your display to its maximum brightness limit and even use a colour profile that makes the display appear brighter.
Step 1: Install the F.lux app on your PC or laptop from the Microsoft Store.
Step 2: Use the brightness slider to push the display brightness to its maximum setting.
Step 3: You can also click the hamburger menu to change the colour setting.
Frequently Asked Questions (FAQs)
How do I set my monitor’s display to the maximum setting?
Go to Settings>Display and drag the brightness bar to its maximum limit. Turn off auto-brightness to make sure it stays at the highest level.
How do I turn on HDR on my monitor?
Go to Settings>Display>HDR and turn on the toggle switch for ‘Use HDR’.
How do I optimise my monitor’s colours?
Go to the Control Panel, select ‘Calibrate display colour’ and follow the onscreen instructions for colour calibration.
These are the top 6 ways to increase your monitor’s brightness beyond the maximum limit. For best results, limit the amount of natural light in the room for a brighter, more legible display. If you know any other ways to push your monitor’s brightness, let us know in the comments!
When you get a new Android phone, the setup wizard guides you through the initial setup process. Over the years, this process includes services that the users don’t typically want. Some smartphones also prompt users to download a bunch of bloatware apps while setting up the device. If you skip these steps, your phone displays the ‘Finish setting up your device’ notification. This notification is pretty stubborn and cannot be swiped from the screen. So, let’s look at the top 7 methods to remove or disable the Android Setup notification on your phone.
The process to remove the Android setup notification differs among different devices. The standard way to tackle this issue is by disabling the Android Setup app or turning off its notifications. However, some notifications may not let you do that. On certain OneUI, ColorOS, and stock Android smartphones, we were unable to find the option to disable the notifications for Android setup. However, these smartphones allowed us to disable the wizard.
On the other hand, MIUI/HyperOS smartphones did not offer the option to disable the setup wizard but did have the option to turn off its notifications. Either method is suitable to get rid of the stubborn setup notification on your device. If you can’t find the Setup app in your phone settings, you can simply go through the setup process and skip everything it prompts you to do. This will remove the notification as well.
Disable the Android Setup app
Step 1: Go to Settings and select Apps.
Step 2: Tap the options menu and select Show system apps.
Step 3: Select Android Setup from the list of apps.
Step 4: Hit Disable.
Force Stop the Android Setup app
Step 1: Go to Settings and select Apps.
Step 2: Tap the options menu and select Show system apps.
Step 3: Select Android Setup from the list of apps.
Step 4: Tap on Force Stop.
Turn off notifications for the Android Setup app
Step 1: Go to Settings and select Apps.
Step 2: Tap the ellipses at the top right corner of the screen and select Show all apps.
Step 3: Select Android Setup from the list of apps.
Step 4: Tap on Notifications.
Step 5: Turn off the toggle switch for Show notifications.
Finish the setup
Don’t want the Android setup notification on your phone? Simply finish the setup. The good thing is that you can skip the different steps in the process.
Step 1: Swipe down from the status bar and tap on the Android setup notification.
Step 2: Tap on Start.
Step 3: In the Transfer Data page, tap on Don’t copy.
Step 4: Tap on Skip at the top right corner of the screen on the Unlock method page.
Step 5: Tap on Continue setup.
Step 6: In the Google Assistant setup page, scroll down and hit Skip.
Step 7: Tap on Skip on the following page.
Step 8: Skip the option to add Google Wallet.
Step 9: On the final page, tap on No thanks.
Use ADB to remove the Android Setup notification
Step 1: Go to Settings and select About Phone.
Step 2: Tap on Software Information.
Step 3: Find the Build Number and tap on it 7 times. You will then enter Developer Mode.
Step 4: Go back to Settings and select Developer Options.
Step 5: In the Debugging section, turn on the toggle switch for USB Debugging.
Step 6: Connect your smartphone to your PC via a USB cable. A popup box will appear on your phone. Confirm that you want to allow USB Debugging.
Step 7: Download the official ADB driver package for your PC from this page.
Step 8: Extract the package to your preferred location. Press Shift + right-click and select Open PowerShell window here.
Step 9: In the PowerShell window, type adb shell pm disable-user –user0 com.google.android.setupwizard.
Step 11: Hit Enter.
Update all the apps on your phone
The Android Setup notification also pops up when there are pending updates for the apps on your phone. To fix this, simply update all the apps using the Google Play Store.
Step 2: Hit your profile picture in the top right corner of the screen.
Step 3: Tap on Manage apps and device.
Step 4: In the ‘Updates available’ section, select Update all.
Frequently Asked Questions (FAQs)
How do I remove the ‘Finish setting up your phone’ notification on my Android phone?
Go to Settings>Apps, select Android setup, and disable the app to remove its notification.
How do I remove notifications on my phone that won’t go away?
If a notification doesn’t go away, long press it, hit the settings icon, and disable the notifications for the app.
Do I need to log into my Google Account to use my Android phone?
While you can carry out the essential functions on your phone without a Google account, you will need it to download new apps from the Google Play Store and use Google’s suite of apps.
These are the top 7 ways to remove or disable the Android Setup notification that refuses to go away on your phone. If you know of any other ways to carry out this task, let us know in the comments! Check out this article to learn how to delete stubborn apps on your phone.
The Google Pixel 8a has yet to be officially announced by Google, however, it was seen on the Bluetooth Special Interest Group (SIG) certification page. Now more leaks regarding the Pixel phone surfaced on the web. Pixel 8a photos from all angles have leaked suggesting four colour options. Previous leaks suggest the phone may include improvements like a 120Hz display and Tensor G3 SoC. Additionally, compatibility with DisplayPort output might be included.
The Google Pixel 8a, which is the next generation of the Pixel 7a, is expected to make its debut at Google I/O 2024. Ahead of the official release renders of the upcoming handset have been released by Android Headlines suggesting all four colour options. As per the report, the phone may arrive in Bay, Mint, Obsidian and Porcelain colourways.
Image Courtesy: Android Headlines
In terms of design, rumour claims that the Pixel 8a will resemble the Pixel 8. The back panel is expected to feature a matte texture finish. The Google Pixel 8a is anticipated to include a 6.1-inch FHD+ 90Hz display. It will likely use the same Tensor G3 processor that debuted in the Pixel 8. Additionally, it may come equipped with a 4,500mAh battery. A 64-megapixel primary camera and a 13-megapixel ultrawide sensor should be included in terms of cameras.
Earlier, four model numbers G8HNN, GKV4X, G6GPR, and G576D believed to be Piel 8A were spotted listed on the Bluetooth SIG website. According to the listing, the phone will support Bluetooth 5.4 connectivity. The device was also seen on the US Federal Communications Commission (FCC) website.
Previous rumours suggested According to rumours, the Tensor G3 processor, which powers the Pixel 8 and Pixel 8 Pro, will also power the Pixel 8a. It is anticipated to include a 6.1-inch full-HD+ OLED display with 1,080×2,400 pixels of resolution. The screen may get 120Hz refresh rate support along with a peak HDR brightness of 1,400 nits.
It is likely to feature a dual rear camera setup that includes a 64-megapixel primary camera with optical image stabilisation (OIS) and a 13-megapixel ultra-wide angle lens. There are rumours that it has a 13-megapixel front-facing camera for taking selfies and video calling.
Buyers can now get the Samsung Galaxy A34 at a reduced price as the company has dropped its pricing by over Rs 6,000.
It comes with a 120Hz AMOLED display.
Samsung Galaxy A35 5G was released in India last month. A month after its release the company has slashed the price of Samsung Galaxy A34 5G, its predecessor. The device was launched in India last year. The company has reduced the price of the A34 by over Rs 6,000. The company is also offering additional bank discounts and other options. The handset comes with Android 13 pre-installed. It has an AMOLED screen that supports a 120Hz refresh rate, a 5,000mAh battery, and a triple rear camera configuration. Check out the details below.
Samsung Galaxy A34 5G comes in two variations: 8GB RAM with 128GB and 256GB storage. After the price drop the 128GB storage will be available at Rs 34,999 whereas the 256GB model now comes at a reduced price of Rs 26,499.
At the time of launch, the price of the 128GB storage was set at Rs 30,999 whereas the 256GB model came at Rs 32,999.
Discounts are also available from Samsung for large purchases and payments made with Samsung Axis bank credit cards. To further reduce the price, buyers can take advantage of exchange and other payment options. Additionally, the no-cost EMI options will be available starting at Rs 4,073 per month whereas the monthly cost of the standard EMI options is Rs 1,187.
Samsung Galaxy A34 5G specs and features
The Samsung Galaxy A34 5G features a 6.6-inch AMOLED Full HD+ display with a refresh rate of 120Hz. The device comes pre-installed with Android 13 and One UI 5.1. Software upgrades for four years and security updates for five years are promised by the company. An octa-core MediaTek Dimensity 1080 SoC with a 2.4GHz clock speed powers the phone.
The handset includes a triple-rear camera setup that includes a 48MP primary lens, an 8MP ultra-wide lens, and a 5MP macro sensor. A 13MP selfie camera is available on the gadget.
The smartphone features an IP67 certification for dust and water resistance and a 5,000mAh battery to power them.
Indian audio innovator BOULT recently launched their latest product, the Astra Neo TWS earbuds, designed specifically for gamers. These true wireless stereo earbuds are engineered to enhance the gaming experience by offering an impressive 70 hours of playback and an ultra-low latency of just 40 ms, tackling common gaming issues such as frequent charging and audio delays. We played with them for over 2 weeks and this is our in-depth BOULT Astra Neo Review.
In This Article
BOULT Astra Neo Review: Design
The BOULT Astra Neo has a distinct appearance compared to other standard earphones on the market. The company’s logo is engraved on the top lid. It has a unique look thanks to cutouts and a comfortable grip design. The case’s patterns provide a nice, secure grip that prevents slipping from your hand. A large LED indicator is on the front, and a USB charging connector is provided on the rear. For the price point, the quality of the plastic you will receive is excellent. In the dark, its visual components were breathtaking.
You will notice the earbuds tugged into their respective compartments as soon as you open the case. The earphones have also adopted the same textured comfort grip. These earphones come with an in-ear design that is good. Additionally, the earbuds’ LED lights will produce a breathing effect. The case LED indicator blinks for three seconds, then steadies and turns off. The stem is kept relatively short to keep the weight low.
We’re not particularly impressed by its magnetic grip, though. Although it is easy to open with one hand, this feature makes the whole thing feel a bit flimsy. The magnets are not as powerful as we had anticipated, particularly around the case. The casing opens up when you pick it up, and in the unlikely event, the earphones might slip out, which is extremely risky in our opinion. Although the hinges are well-made, the lid must be forced closed due to the weak magnets.
We would have appreciated softer ear tips, too. After about an hour of use, the slightly thick ear tips provided may begin to cause discomfort.
BOULT Astra Neo Review: Performance
The highly dependable Bluetooth Version 5.4, with a range of up to 10 metres, is accessible here. Here, you experience a solid connection without any distortion or frequency-related problems. 13mm dynamic drivers, and support for MSBC, SBC, and AAC codecs are also some of the top features of the Astra Neo.
At volumes above 70%, the earbuds exhibit noticeable distortion and audio leakage. However, bass enthusiasts will likely appreciate their sound profile. Despite these issues, the overall sound quality remains excellent, ensuring a satisfying listening experience.
Because these are meant for gamers, you get to see an exclusive gaming mode here. Tapping on the earbuds four times will quickly activate combat gaming mode. Furthermore, the gadget can synchronise audio and visuals if you’re watching films or sports.
The 40 ms low latency of the BOULT Astra Neo is helpful for gaming. While gaming, we had no audio lag. For incredibly clear calls, a quad mic configuration, environment noise cancellation, and AEC are available. We tested them outside, and even with a lot of background noise, they produced high-quality resonance.
Talking about touch controls, these earphones are very sensitive, for sure. The touch area (Multi-Functional Touch Panel) is located in the upper part of the earbuds handle. Control has been kept super easy here.
You can tap the MFB once to start or stop playing. Double-tap the right MFB to get to the Next Track; double-tap the left MFB to go to the Previous Track. Triple-tap the right MFB to turn up the volume, and triple-touch the left MFB to turn down the volume. Hold down the MFB button for three seconds to activate the voice assistant. By hitting the MFB twice, you can reject or end the call. hitting the MFB once will answer the call. Tap the MFB four times to enter the Game/Music Mode.
In addition to an ambient breathing light for gaming aesthetics, the casing features an LED indication that illuminates when it is attached to a charger. After the charging process is finished, the front LEDs breathe frequently until becoming steady. LEDs will blink three times to signal low battery life. Take a gap of 1 second and repeat this three times.
Regarding battery life, you can expect an astounding 70 hours of playback. On the other hand, it can operate for 100 minutes after just 10 minutes of quick charging. The duration needed to charge from 0% to 100% is about 60 minutes.
Verdict
As music enthusiasts, we’re always tuned in during our free time. The BOULT Astra Neo delivers exceptional sound quality. Switching to combat mode noticeably reduces latency, making these earbuds a perfect choice. For less than Rs 1,100, you get an aesthetically pleasing design combined with seamless gaming and a superb audio experience.
Garena Free Fire is a battle royale game with regular awards and tournaments to keep players interested. If you play Garena Free Fire, you should be aware of the redeem codes that are released on a daily basis. However, because the battle royale game is banned in India, players from other countries can use the Free Fire Redeem codes daily. If you’re unfamiliar with the Garena Free Fire redeem codes or don’t know how to get them, we’ve put together a step-by-step guide to help you redeem them. Check out Garena Free Fire Redeem Codes for 15 April 2024.
The Free Fire redeem codes are a great way to get free stuff. These are 12-digit codes that contain alphabets and numbers, as well as an expiration date and time. Because the Garena FF redeem codes cannot be used more than once, you should hurry to the redemption page to claim your free reward before someone else does. To get a free reward, all you have to do is go to reward.ff.garena.com/en, which is the official redemption page. Also, keep an eye on this space for daily updates on Garena Free Fire redemption codes and rewards.
While troubleshooting a problem on your smartphone, you may have seen the suggestion to restart your device in Safe Mode pop up. If you suspect that a problematic third-party app is the reason behind your phone’s glitchy behaviour, restarting the device in Safe Mode is a good way to put your doubts to rest. If the issue persists in Safe Mode, it means that the third-party app is not to blame. Once you’ve put your doubts to rest, you can reboot your phone normally and go back to looking for other fixes. In this article, we bring you the top 2 ways to exit or turn off Safe Mode on your Samsung phone.
Once you reboot your phone in Safe Mode, all the third-party apps on the device get disabled. You can still view their icons on the home screen and app drawer, but they will be greyed out. Tapping on the icon of a third-party app brings up the ‘App disabled’ message. Some OEM apps may also be temporarily disabled in this mode. In Samsung’s case, the Browser, SmartThings, Wallet, Notes, Calculator, Calendar, and other apps are disabled in this mode.
On the flip side, some third-party parts may not get disabled in Safe Mode. We tested out this mode on a Samsung Galaxy A55 (our review here) and observed that the Microsoft OneDrive app was still functional in Safe Mode. You can choose to download new apps while you’re in Safe Mode, but they won’t show up in the app library until you’ve rebooted your phone normally.
Turn off Safe Mode using the side button
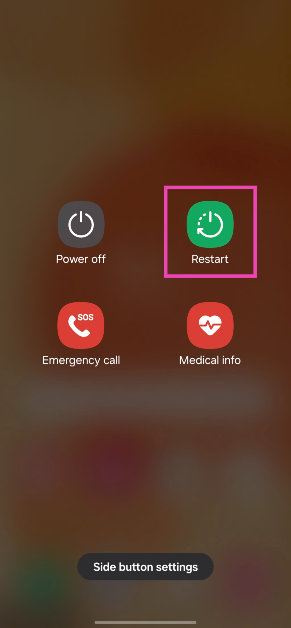
Step 1: Press and hold the side button on your Samsung phone. If this triggers Bixby, press and hold the side button and volume-down key simultaneously to access the power menu.
Step 2: In the power menu, tap on Restart.
Step 3: Tap on Restart again.
Your Samsung phone will reboot normally.
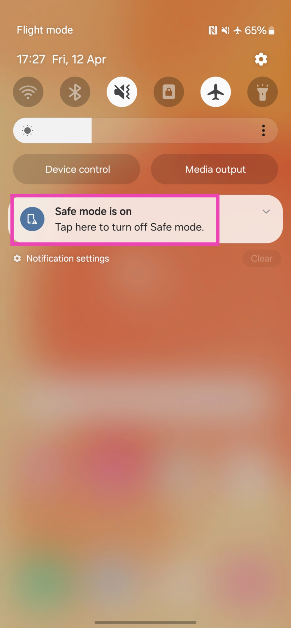
Turn off Safe Mode from the notification panel
Step 1: Swipe down from the status bar to reveal the notification shade.
Step 2: Tap on the ‘Safe Mode is on’ notification.
Step 3: In the following popup box, tap on Turn off.
Your Samsung phone will exit the Safe Mode and reboot normally.
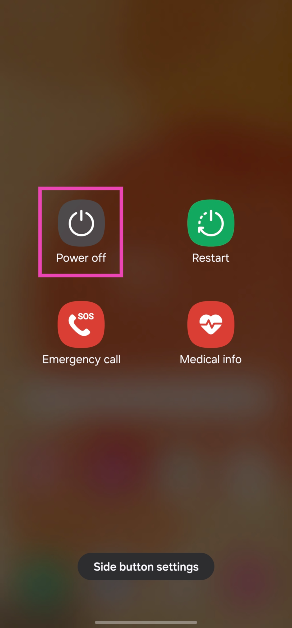
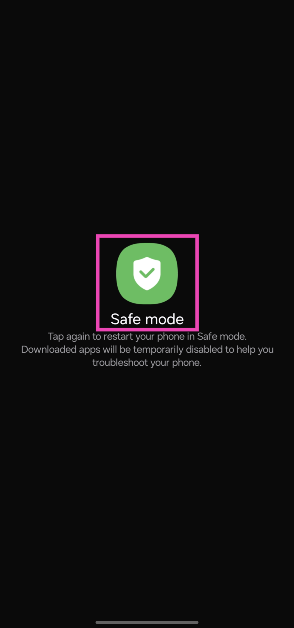
Bonus Tip: How to enter Safe Mode on a Samsung Phone?
Step 1: Long press the side button. If the side button is programmed to wake up Bixby, press and hold it along with the volume-down key to trigger the power menu.
Step 2: Tap and hold the Power off icon.
Step 3: Tap on Safe Mode.
Frequently Asked Questions (FAQs)
How do I turn off or exit Safe Mode on a Samsung phone?
To turn off Safe Mode on a Samsung phone, simply long-press the side button and hit ‘Restart’. You can also tap the Safe Mode notification and hit ‘Turn off’ to go back to normal usage.
What does Safe Mode do?
When you reboot your smartphone in Safe Mode, it disables all the third-party apps on the device. If you suspect a third-party app is causing your phone to malfunction, you can restart the device in Safe Mode to make sure that’s the case.
How do I enter Safe Mode?
To reboot your phone in Safe Mode, long-press the power button, then tap and hold the ‘Turn off’ icon and select Safe Mode.
These are the top two ways to exit or turn off Safe Mode in Samsung phones. By default, your phone is put on airplane mode when you restart it in Safe Mode. You can choose to turn off airplane mode to make calls and send texts while you’re in Safe Mode. On Samsung devices, some third-party apps like Microsoft OneDrive may be functional in Safe Mode as well.


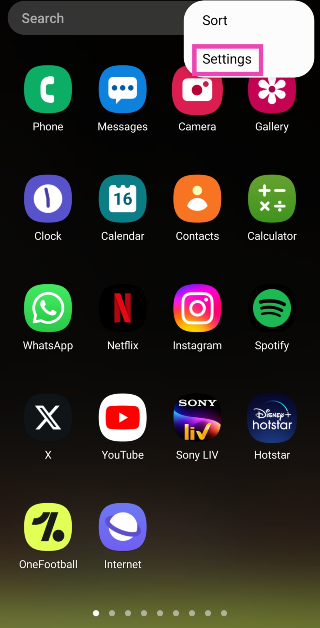
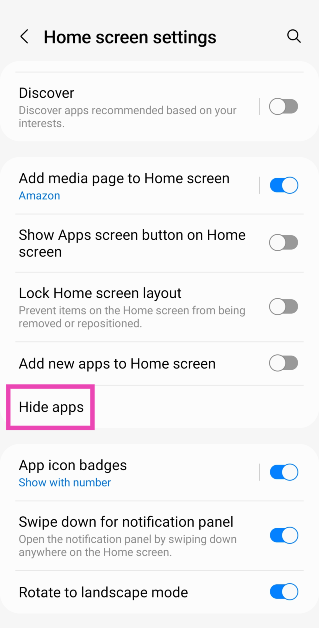
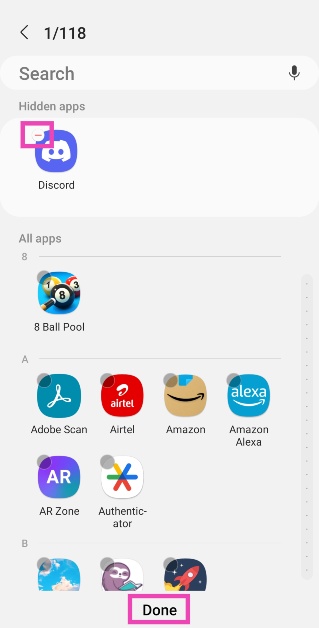
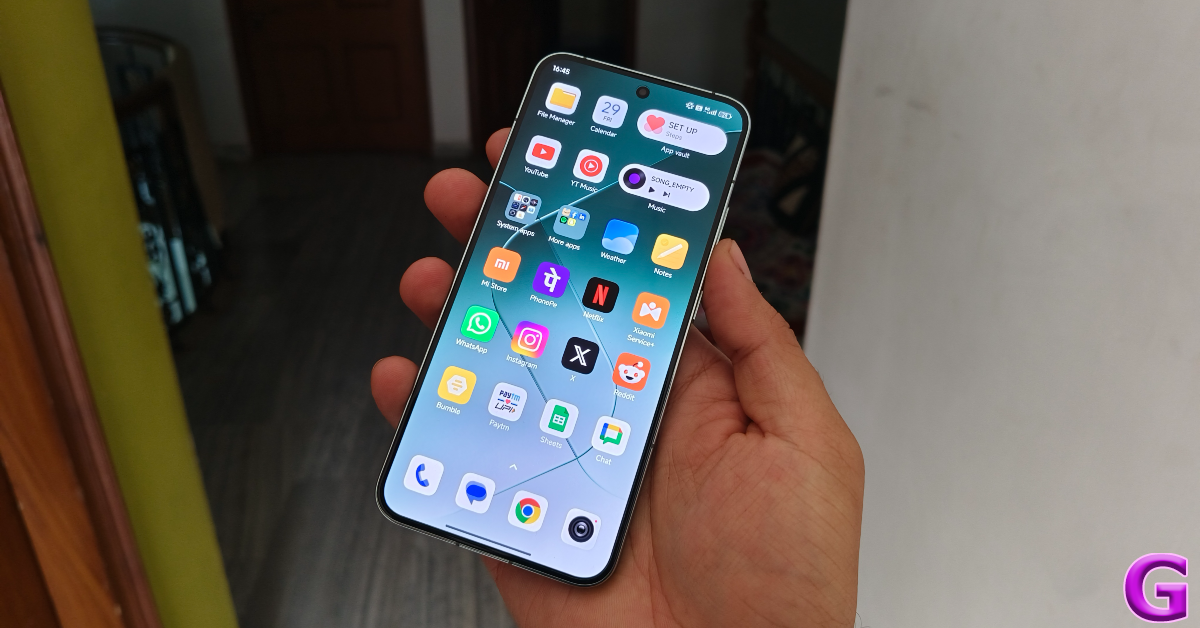
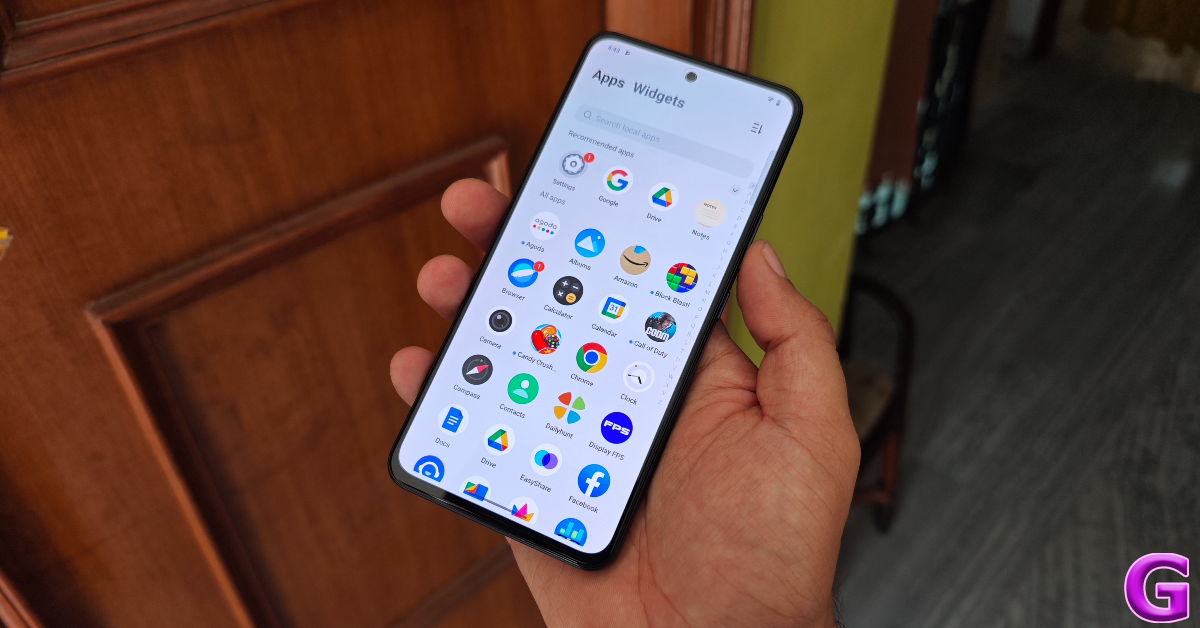
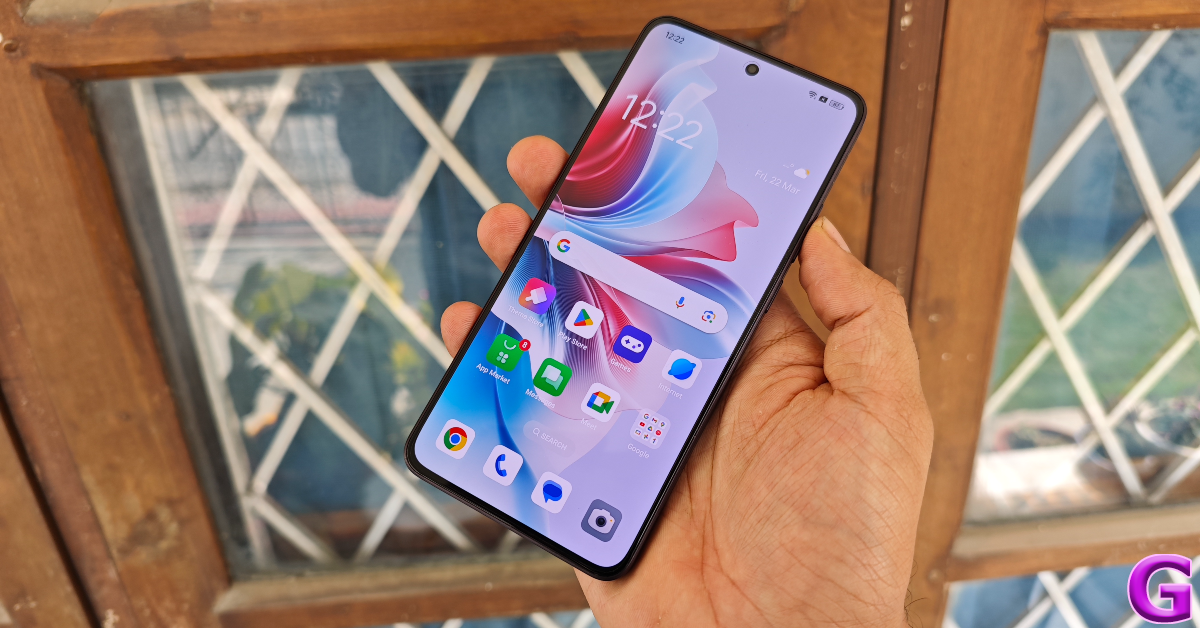
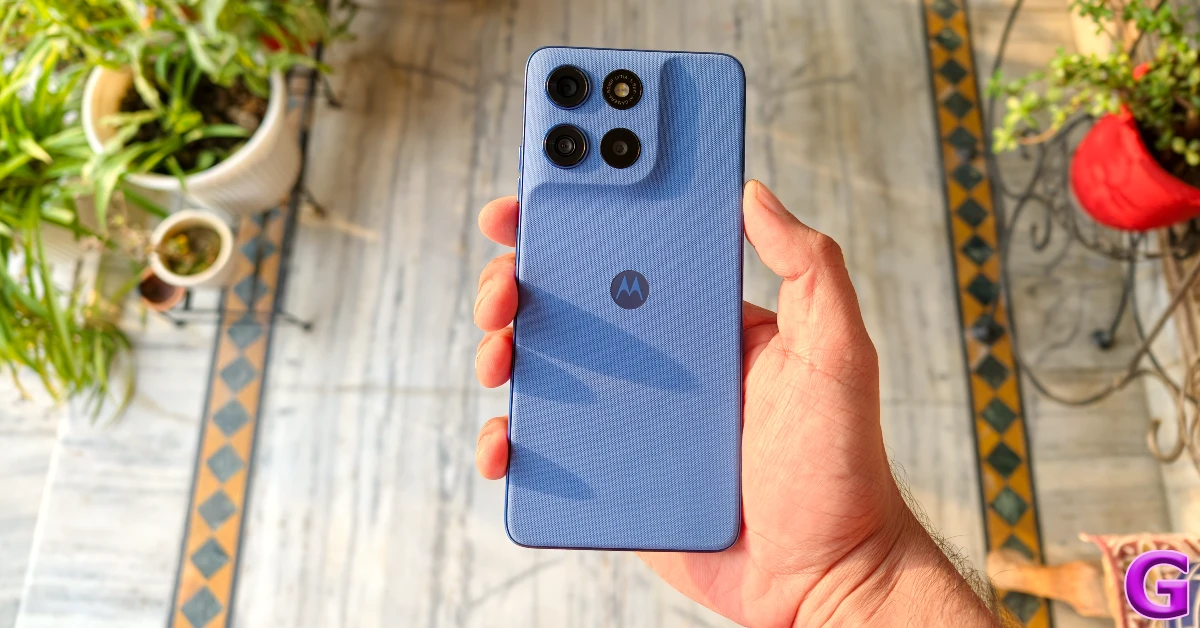

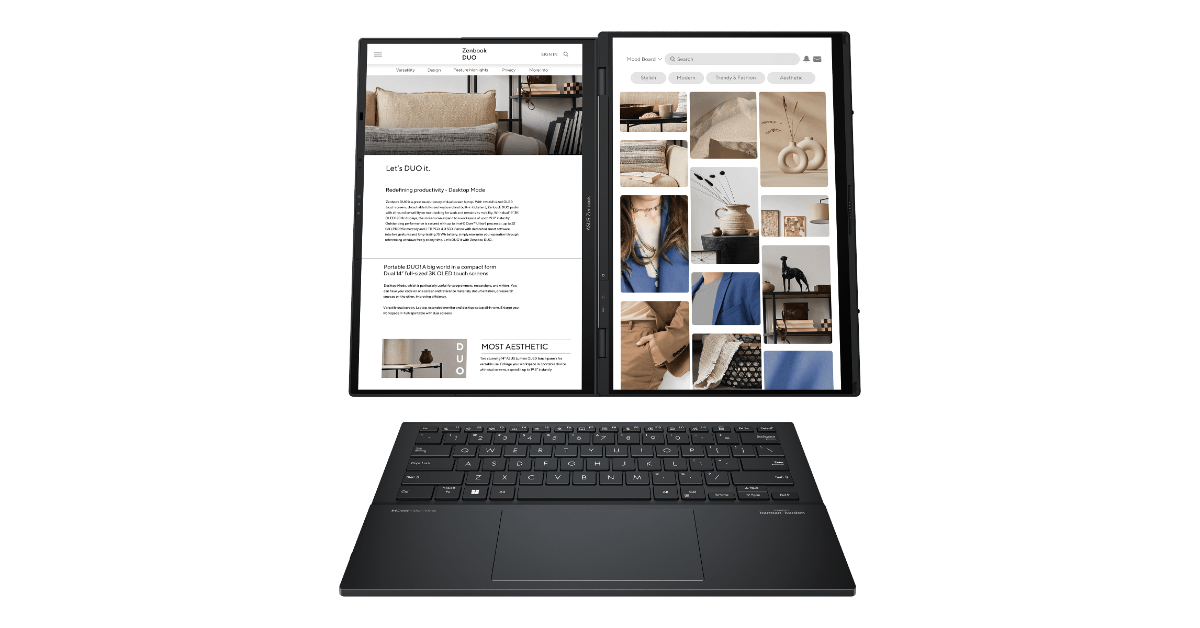

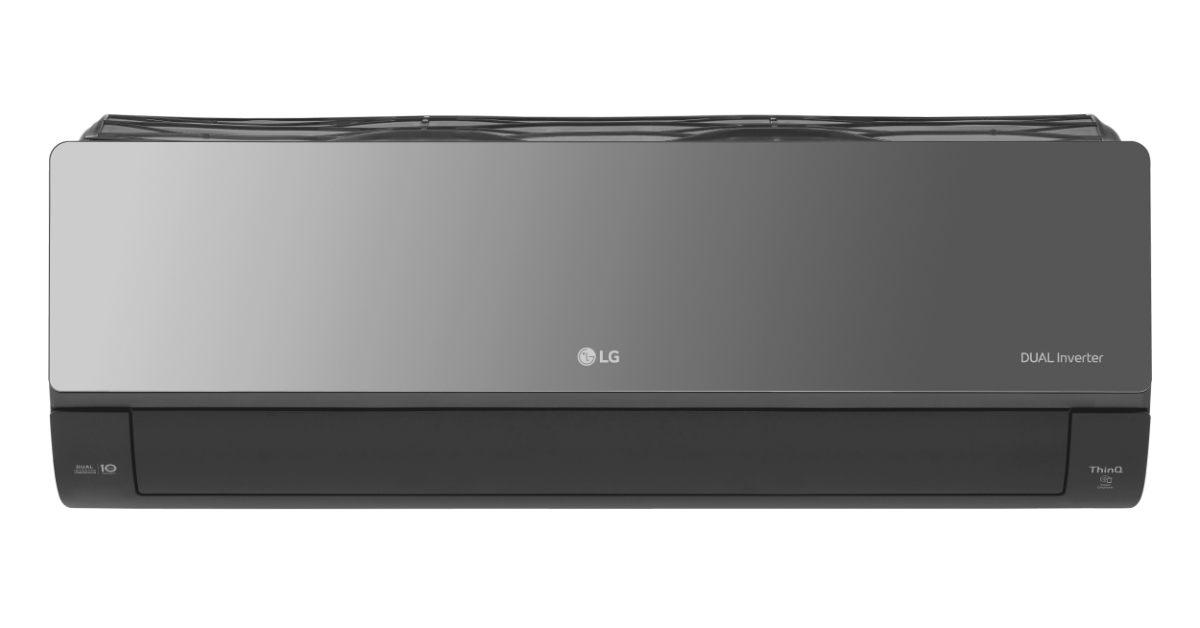


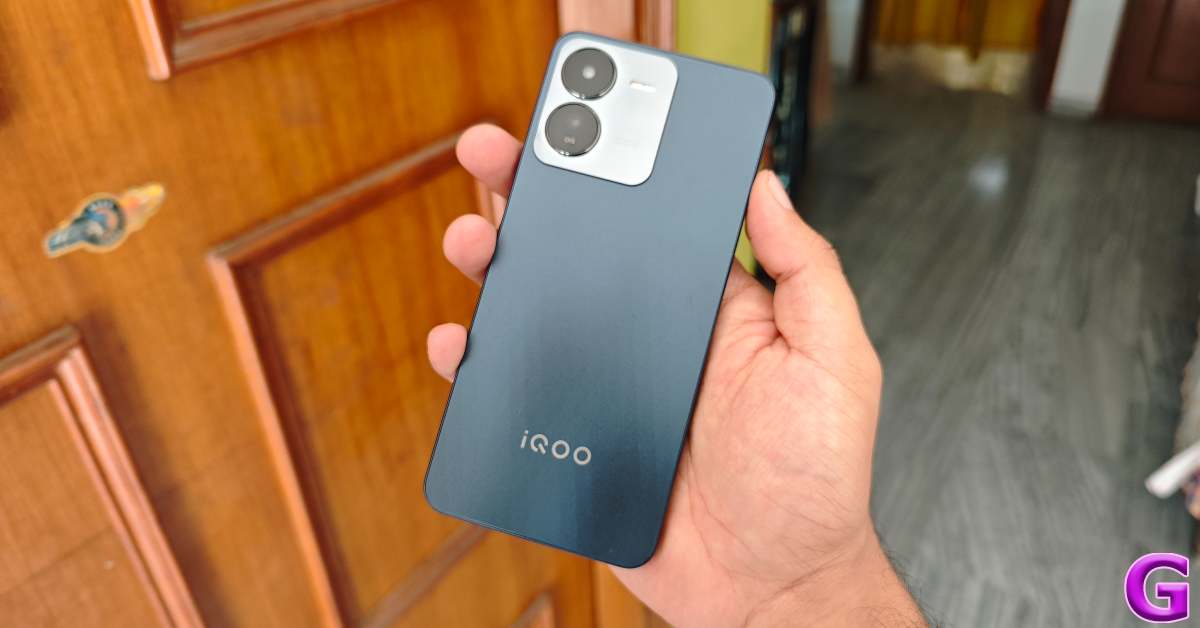
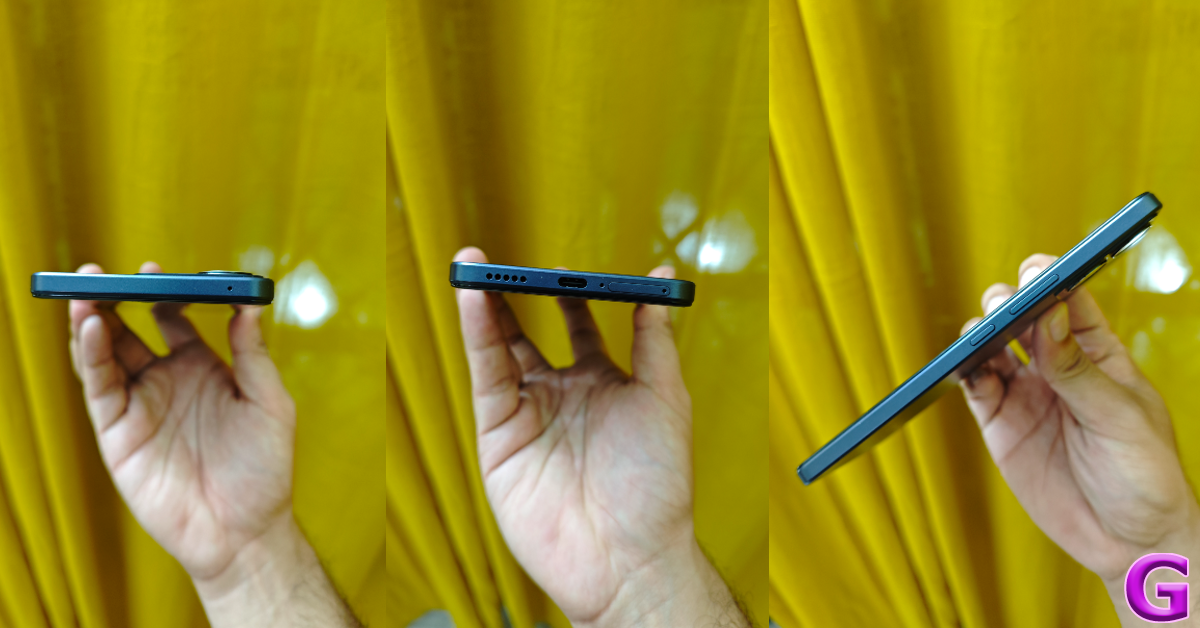
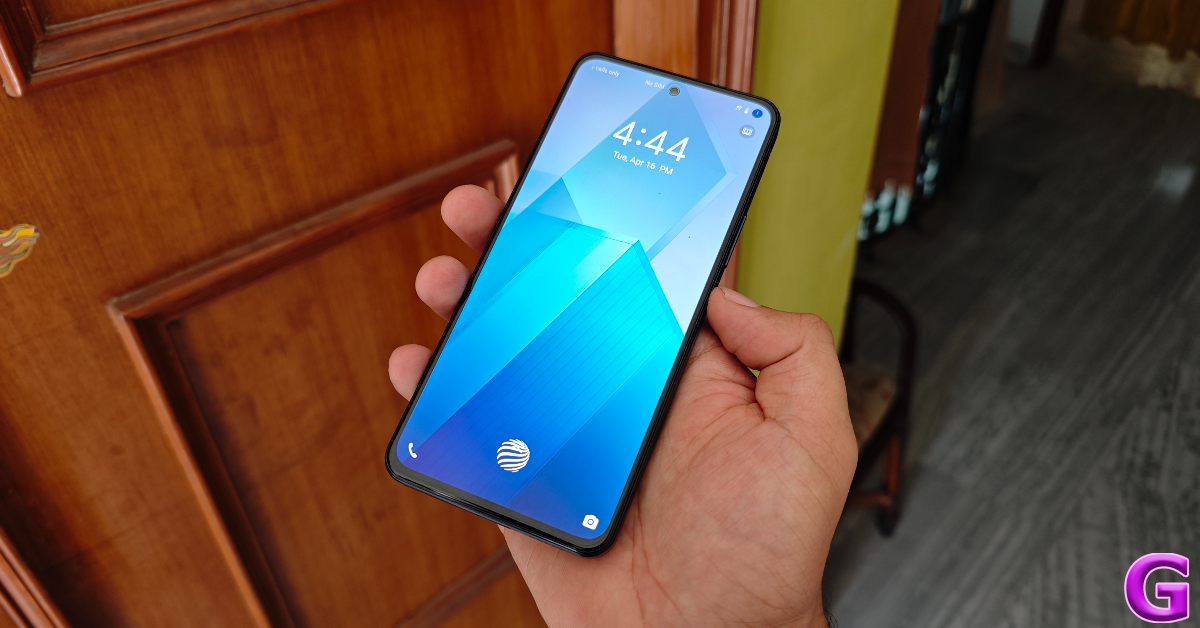
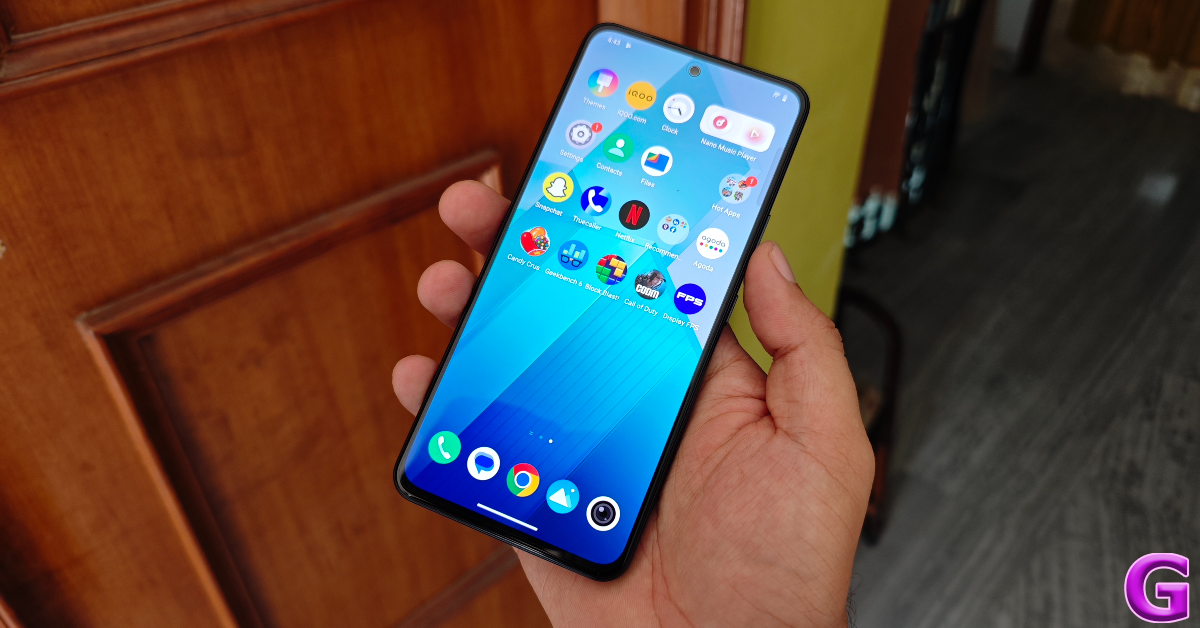
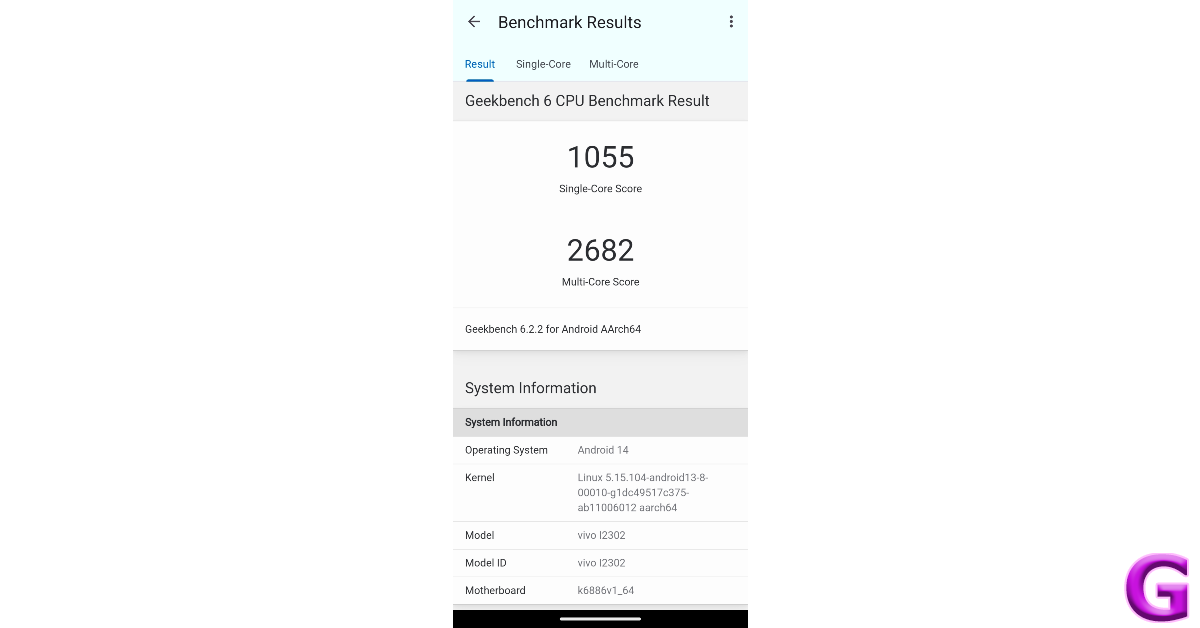


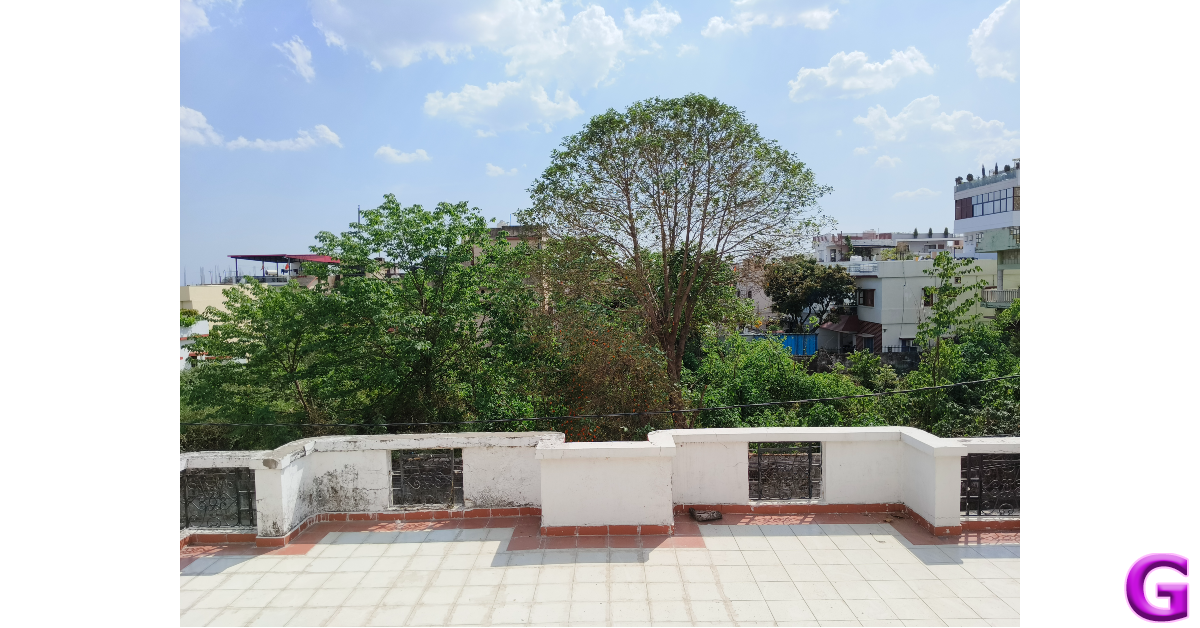


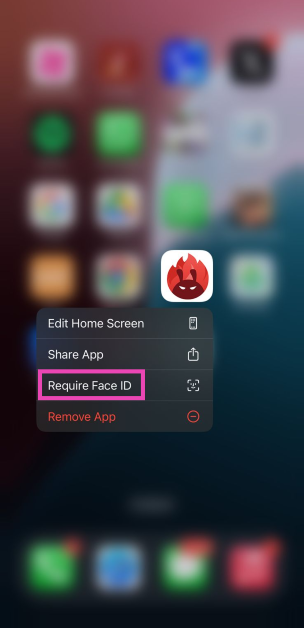
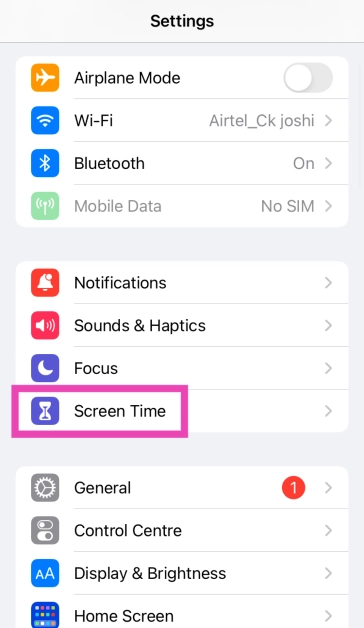
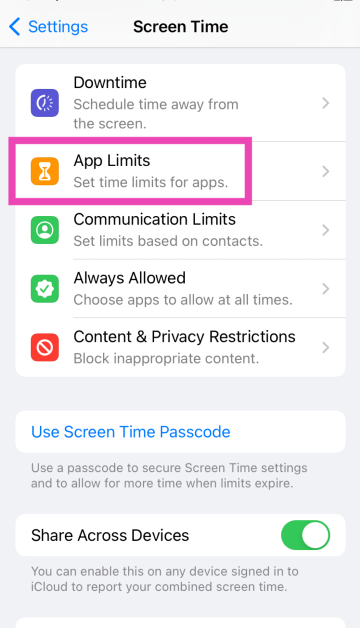
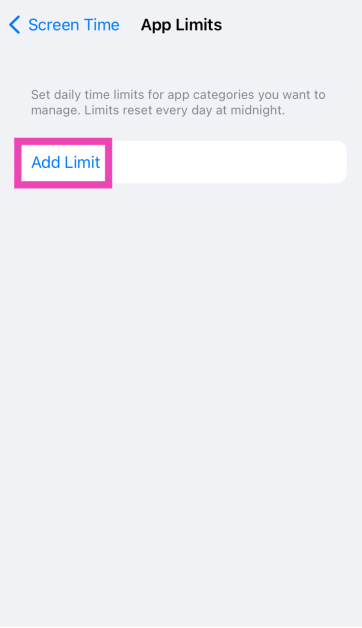
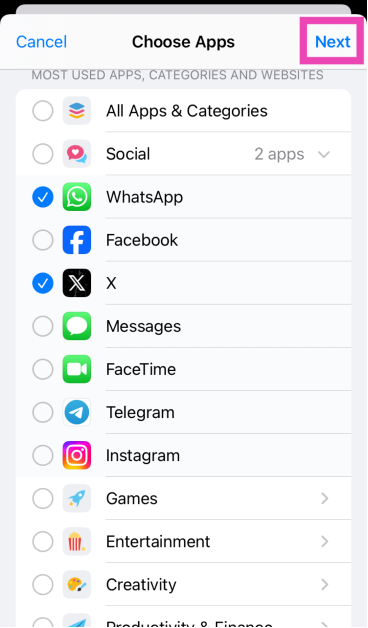
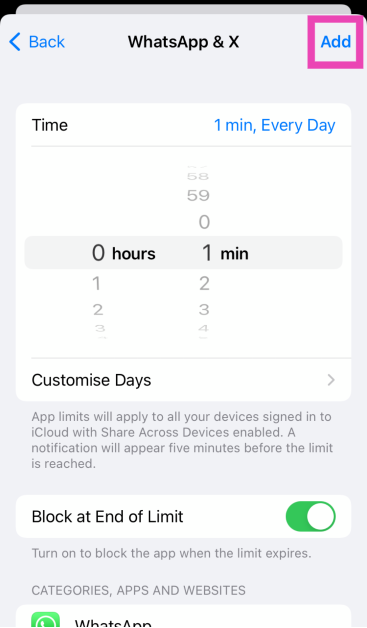
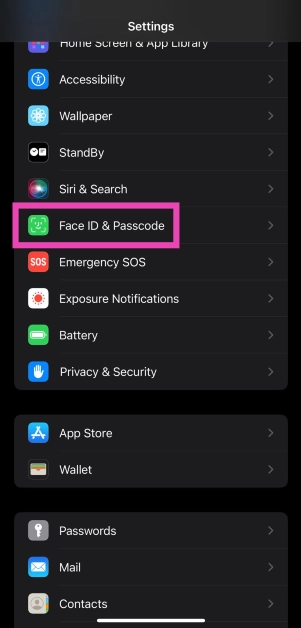
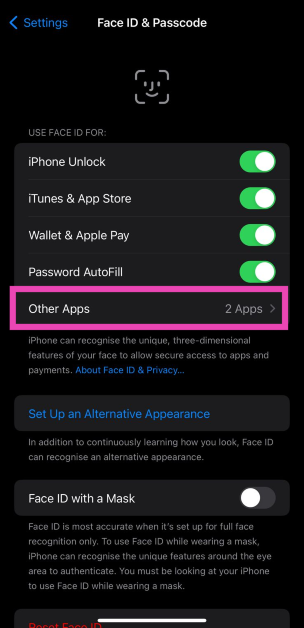

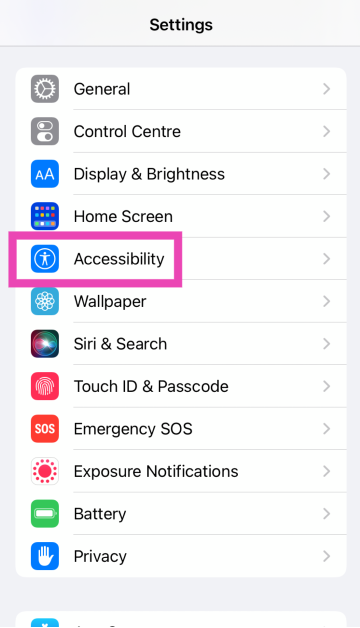
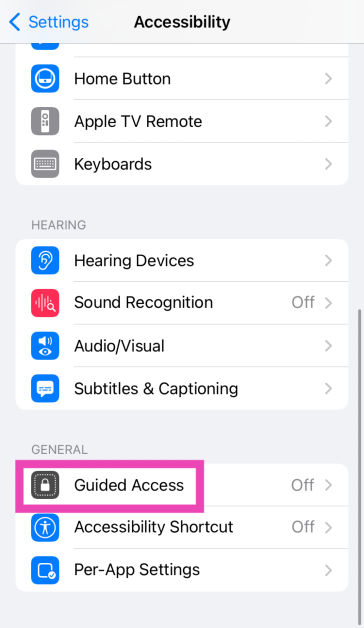
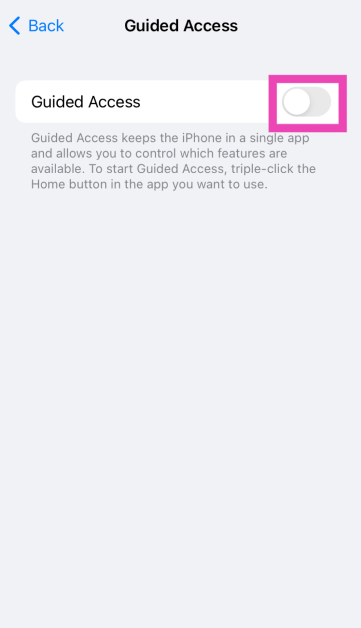


")
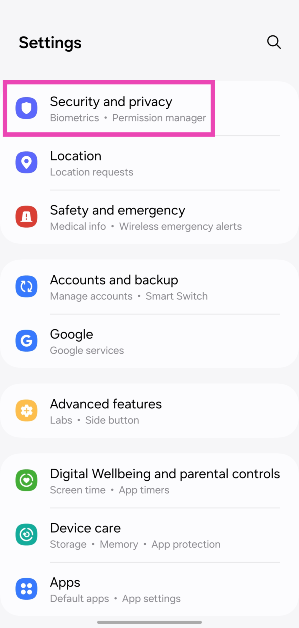
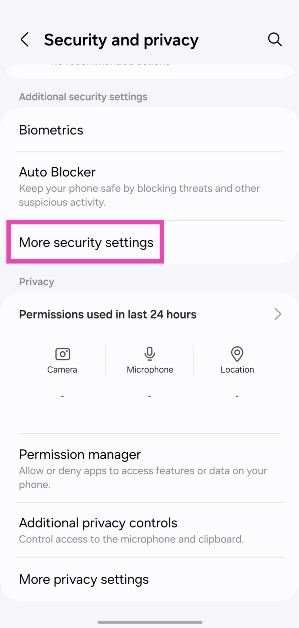
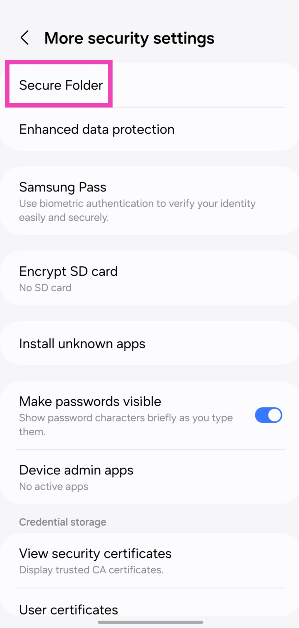
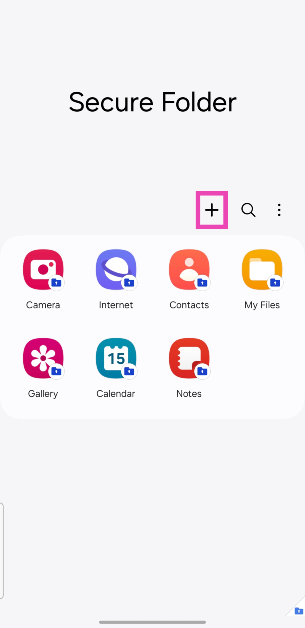
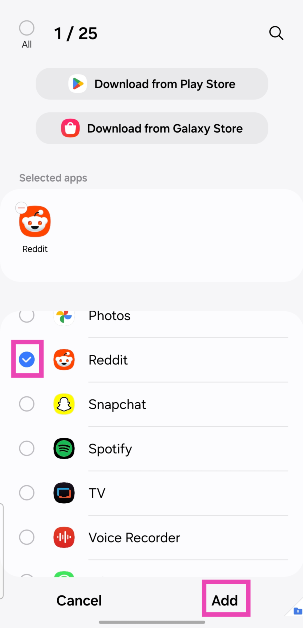
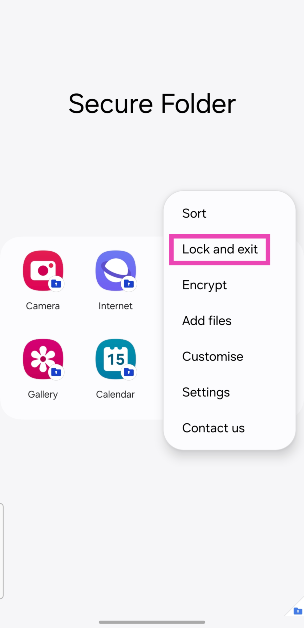
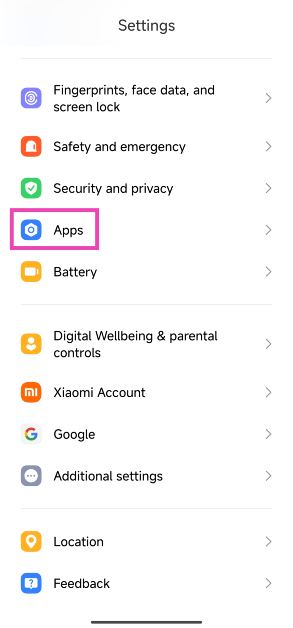
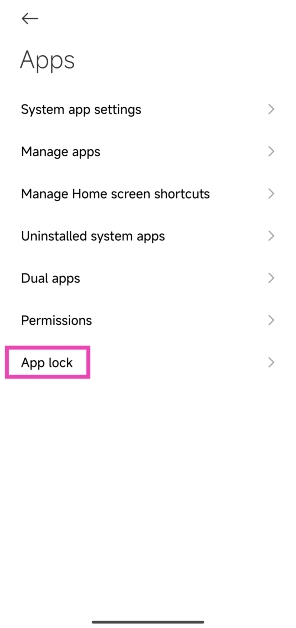
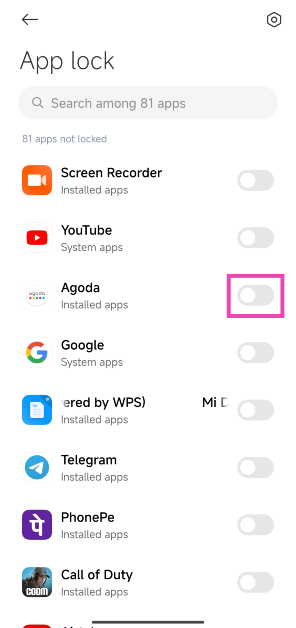
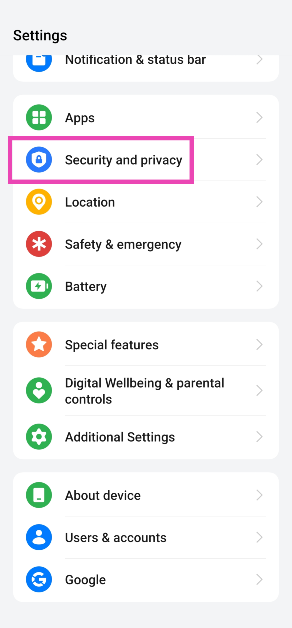

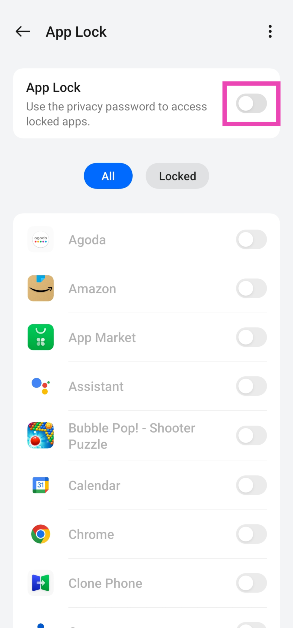
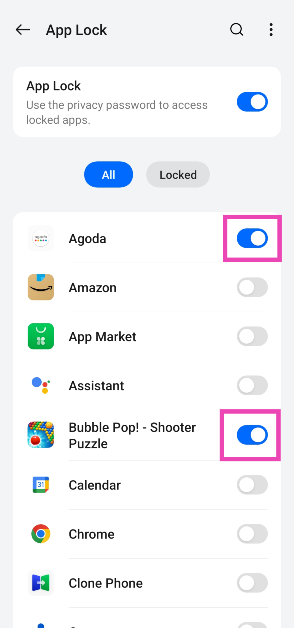

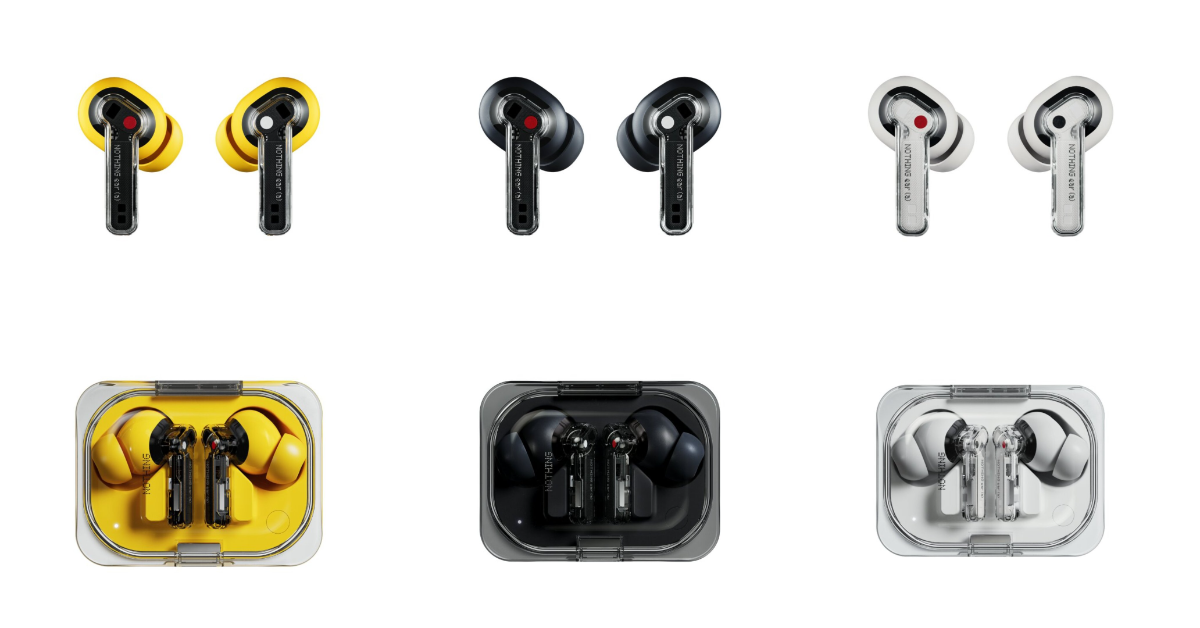

")
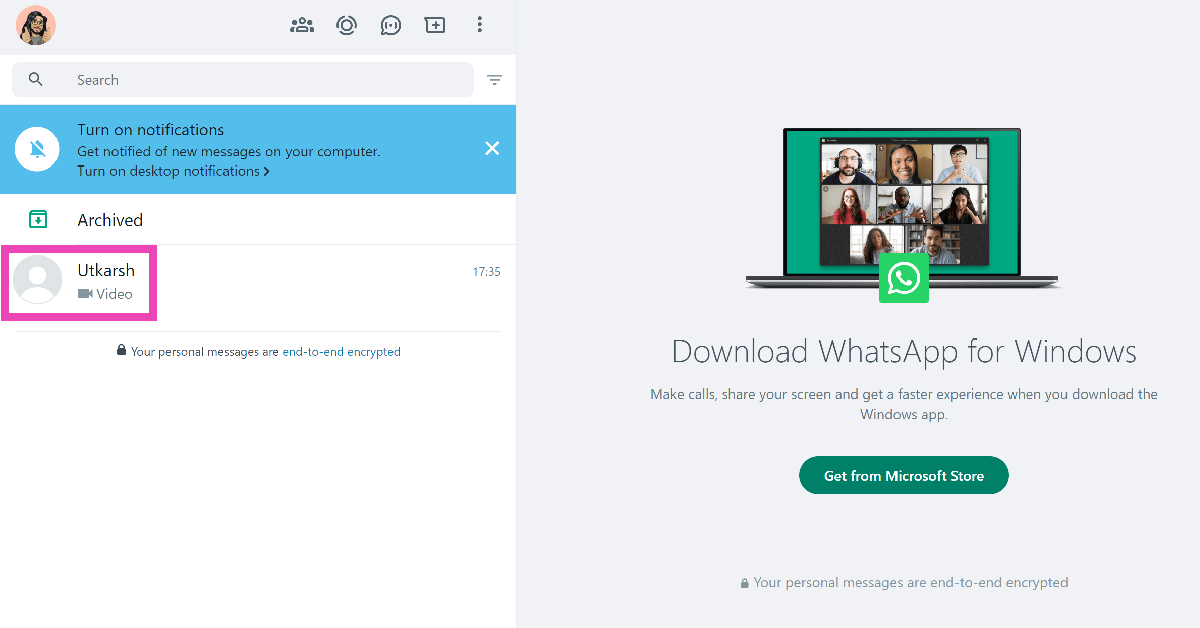
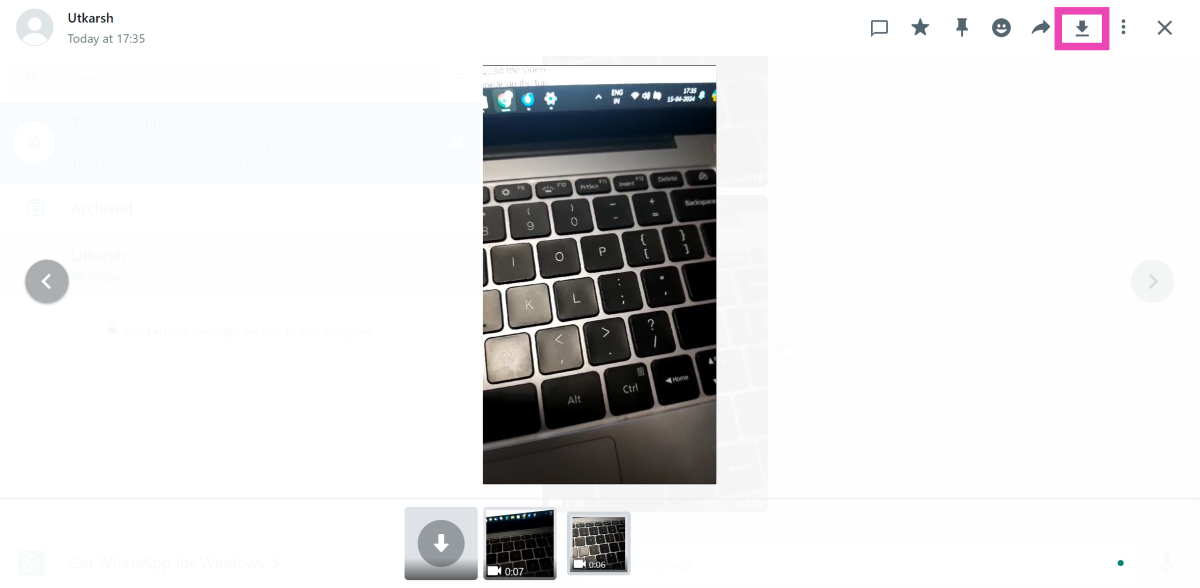
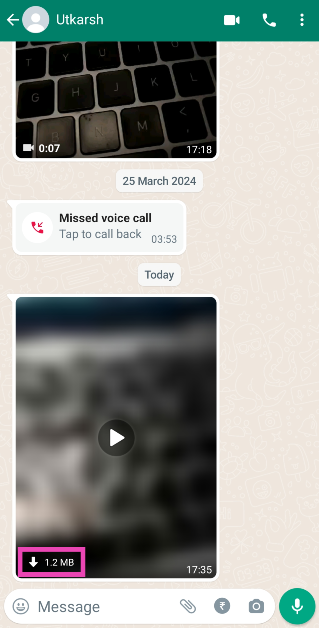
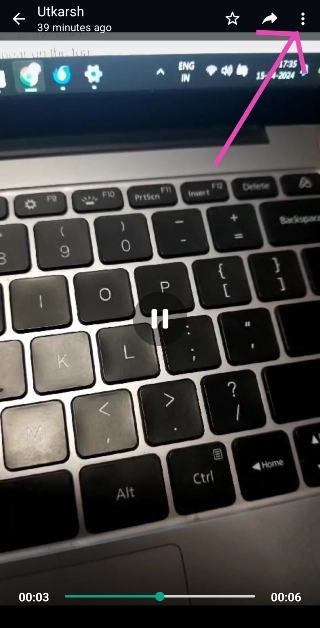
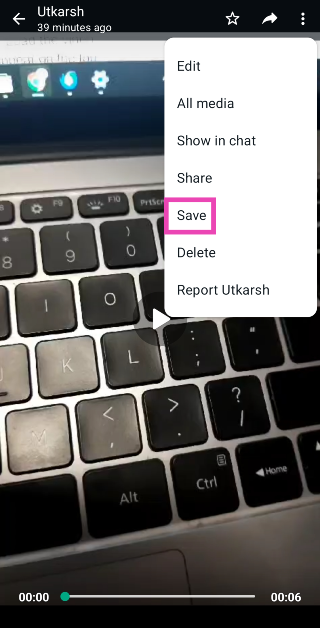
")
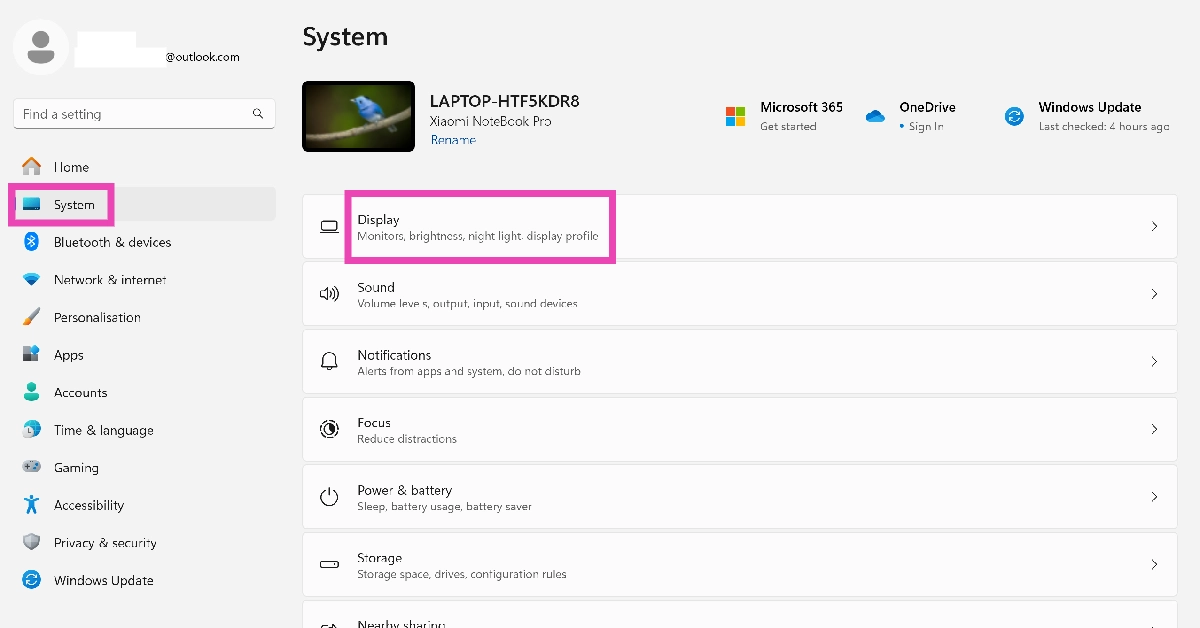
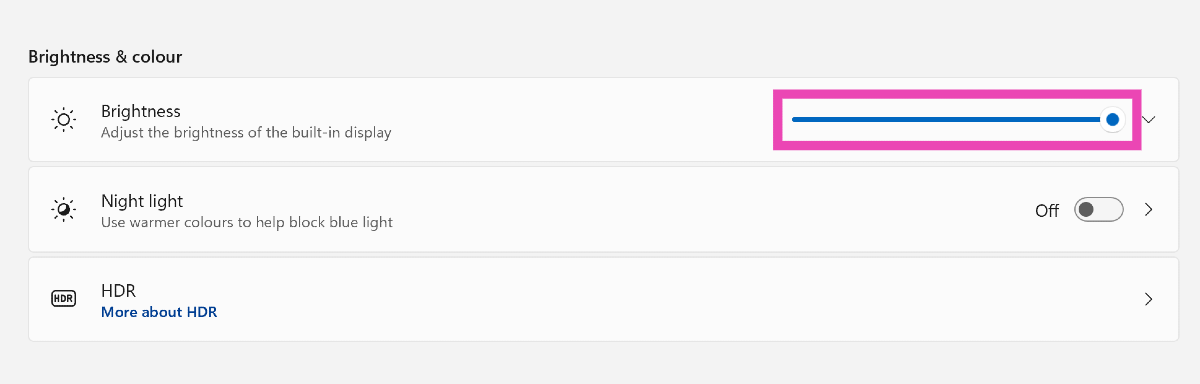
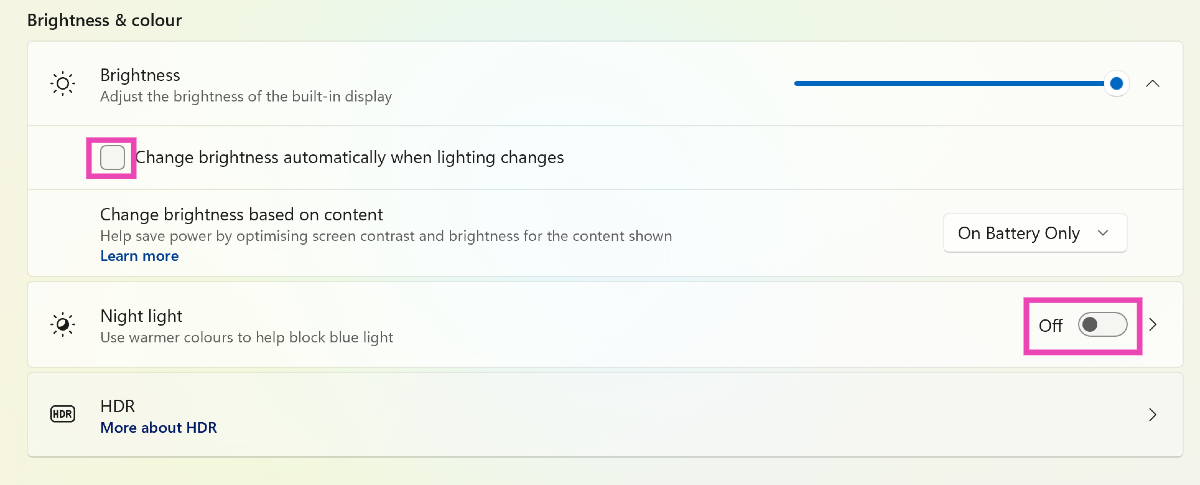
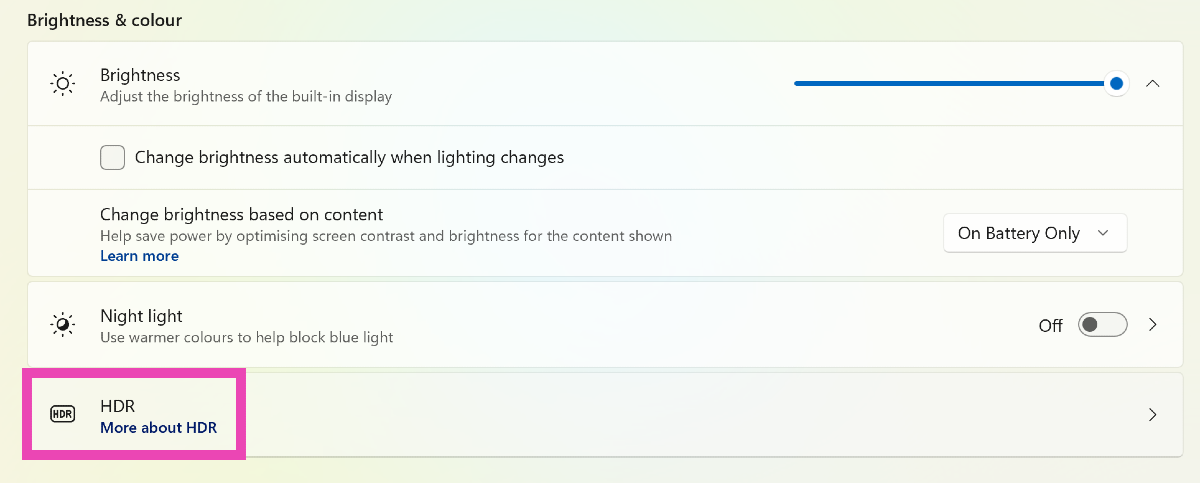
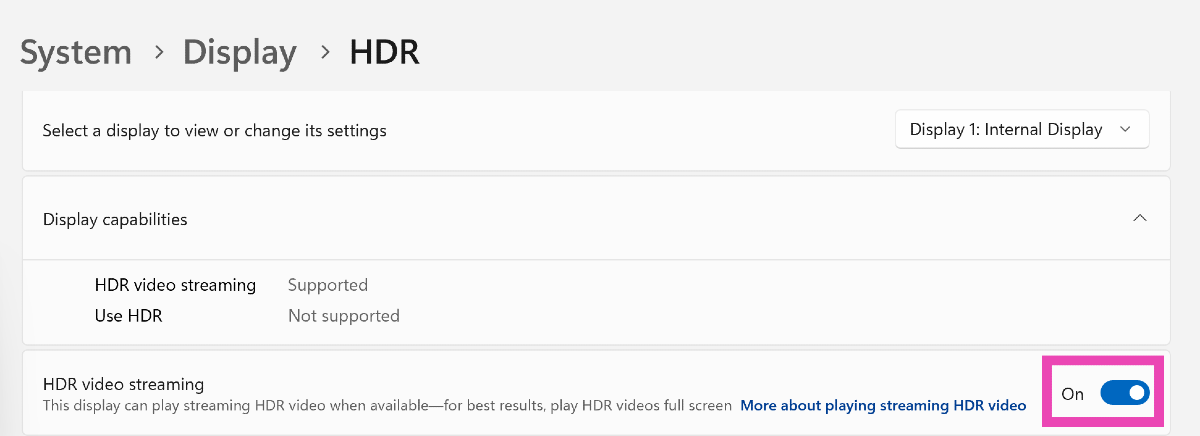
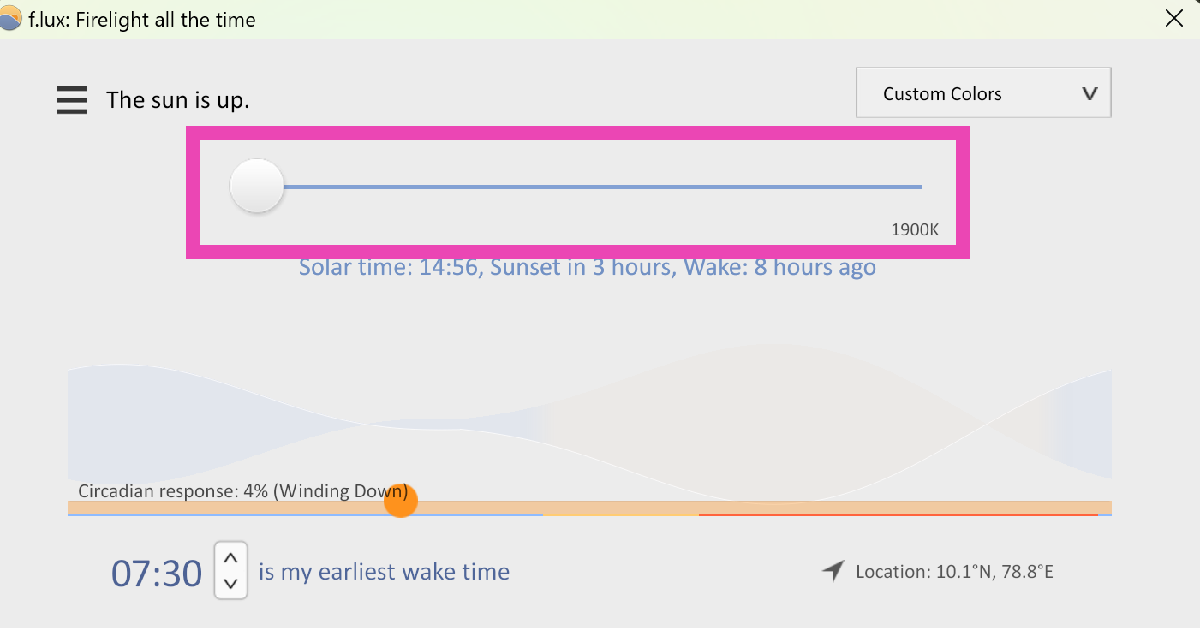
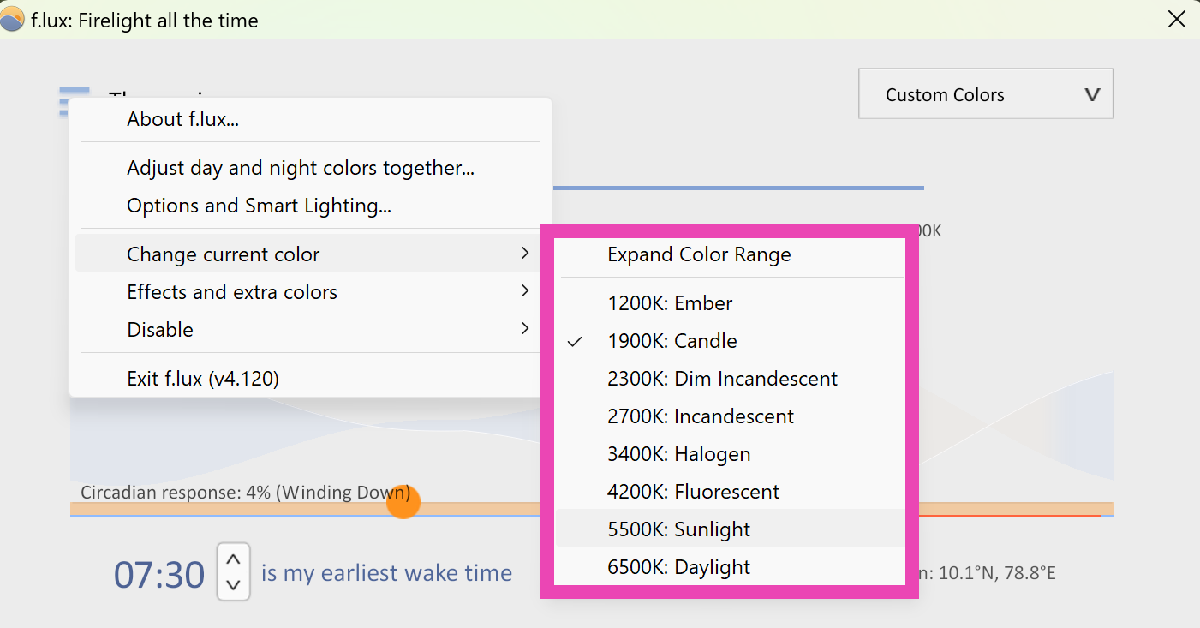
")

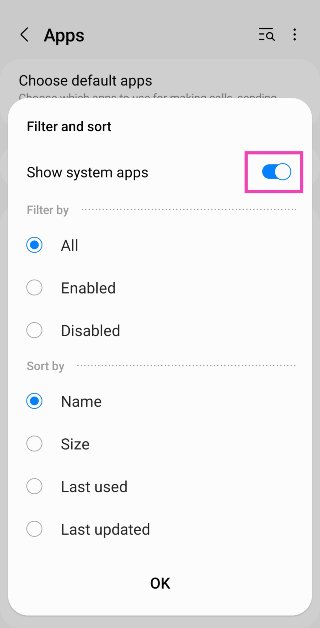
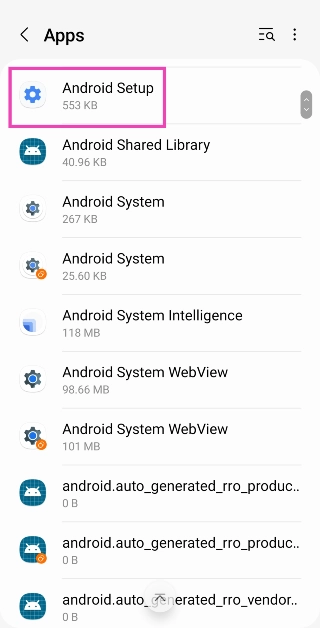
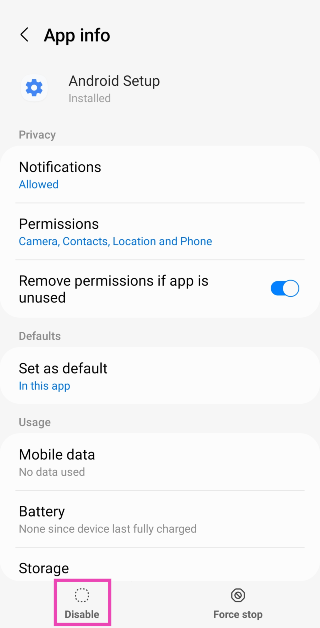
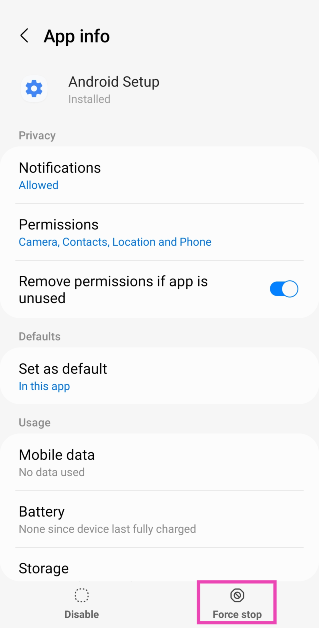
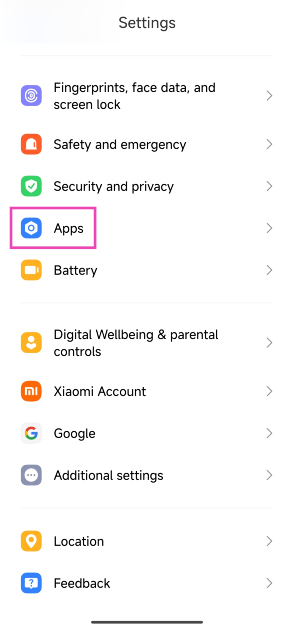

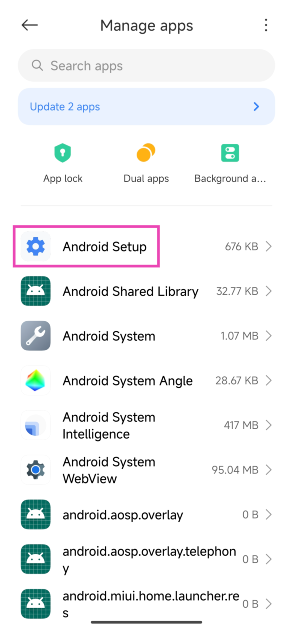
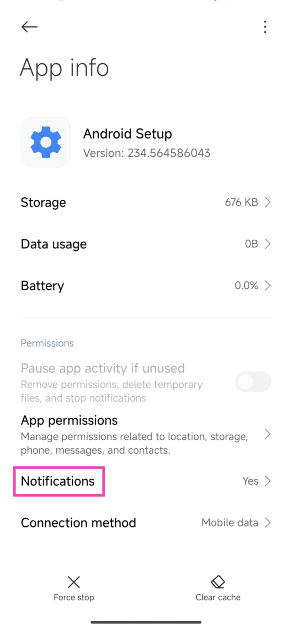
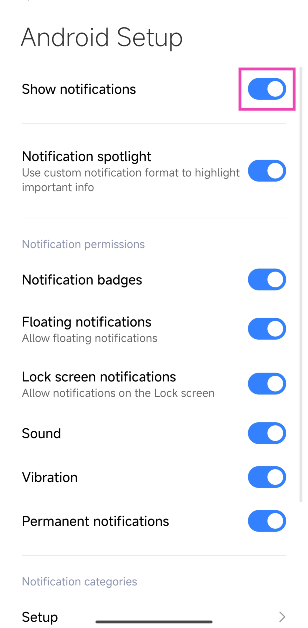

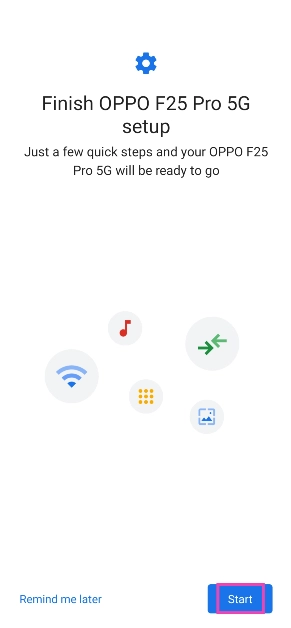
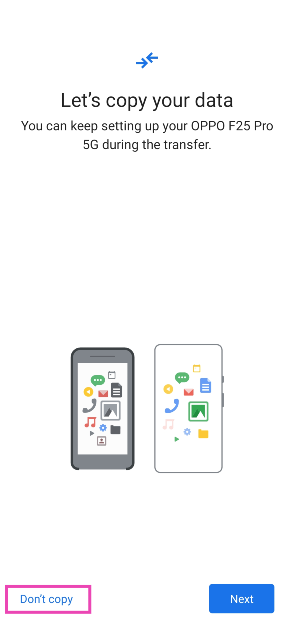

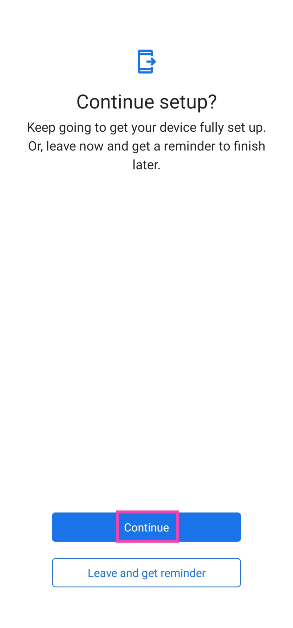


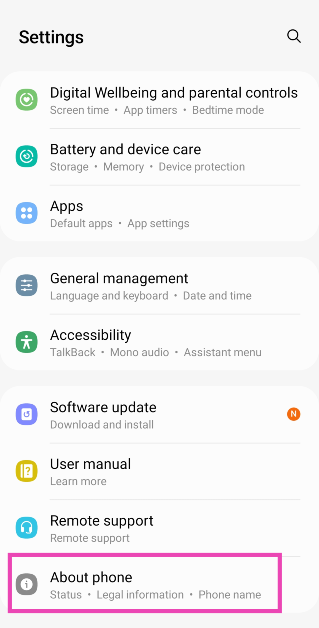
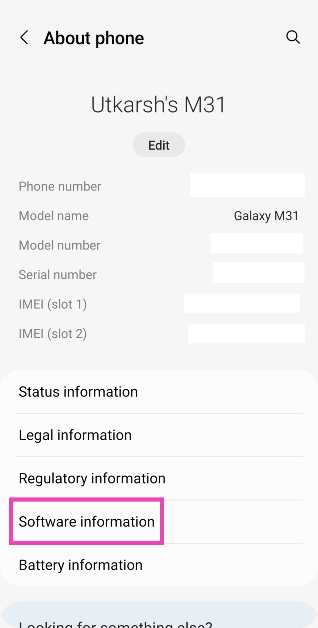
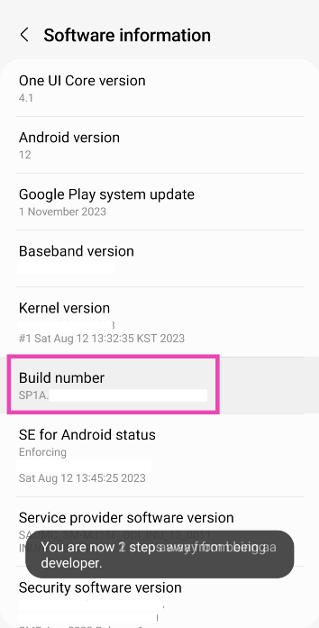
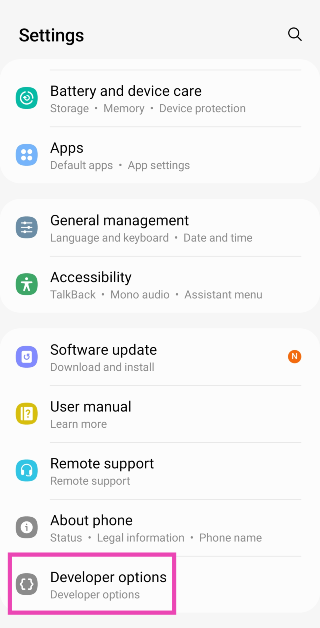
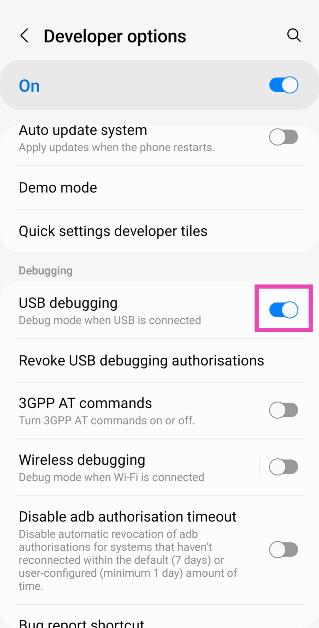


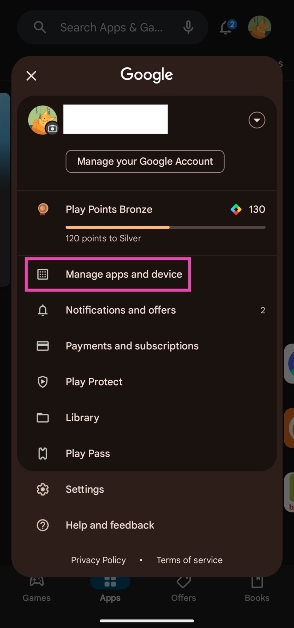
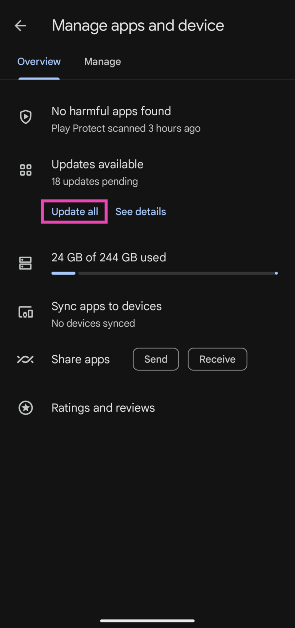


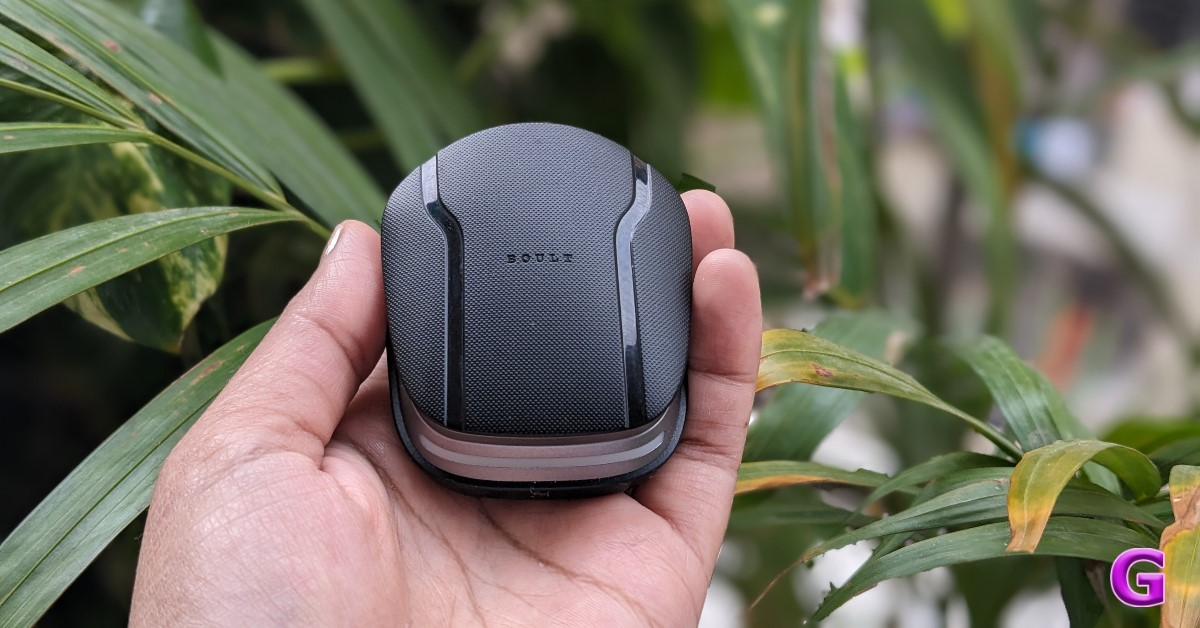
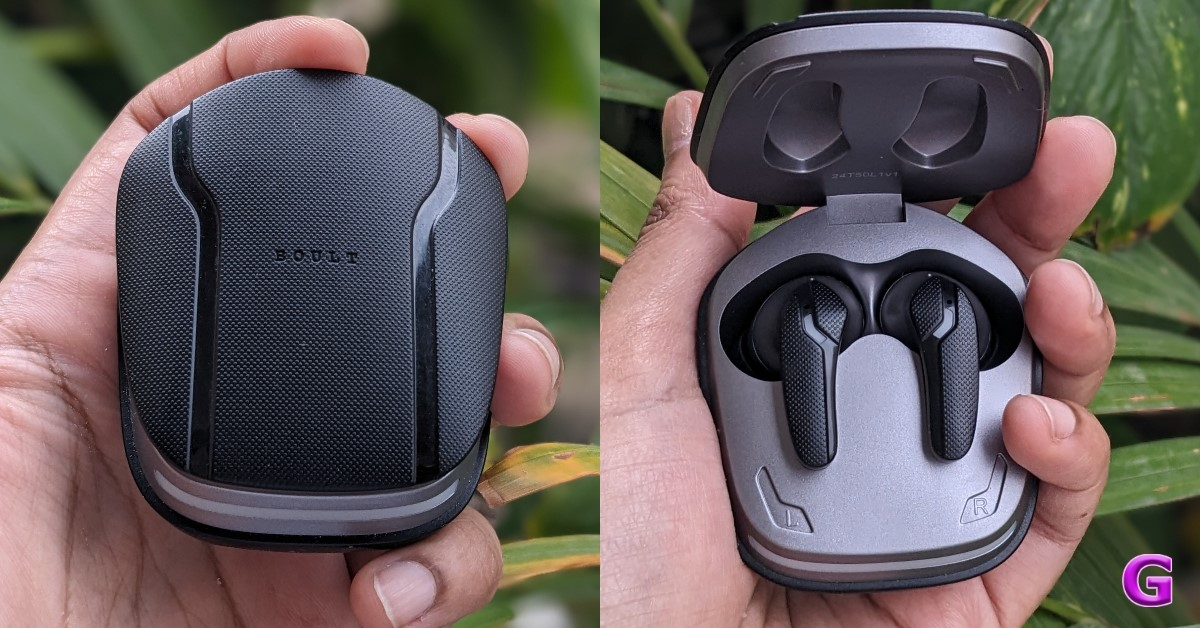
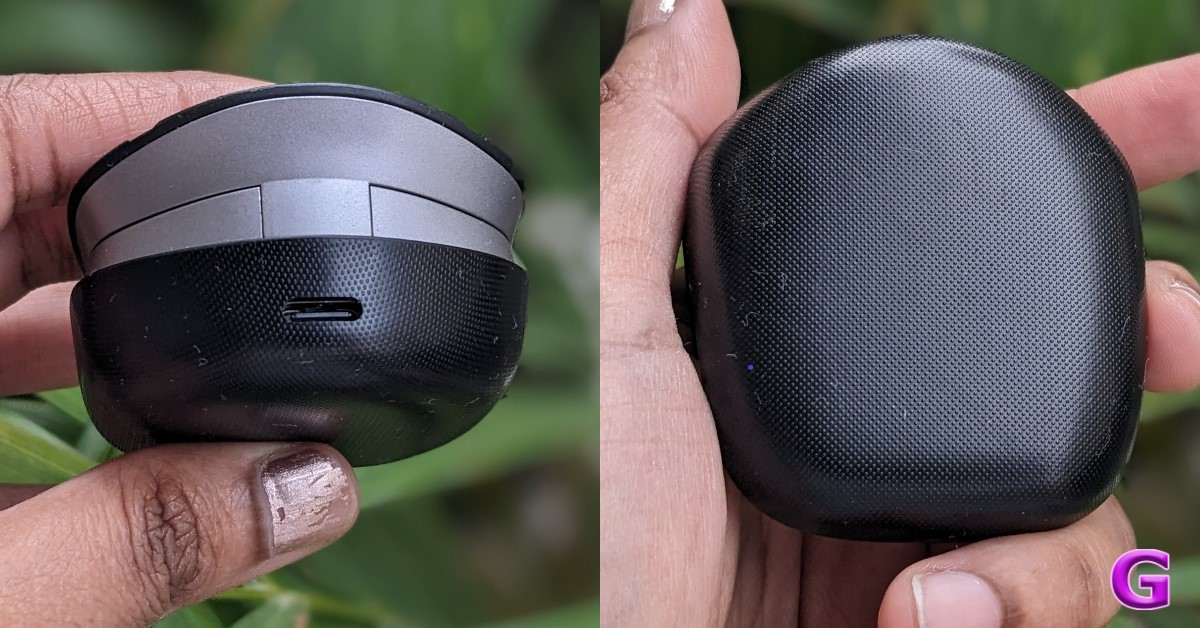
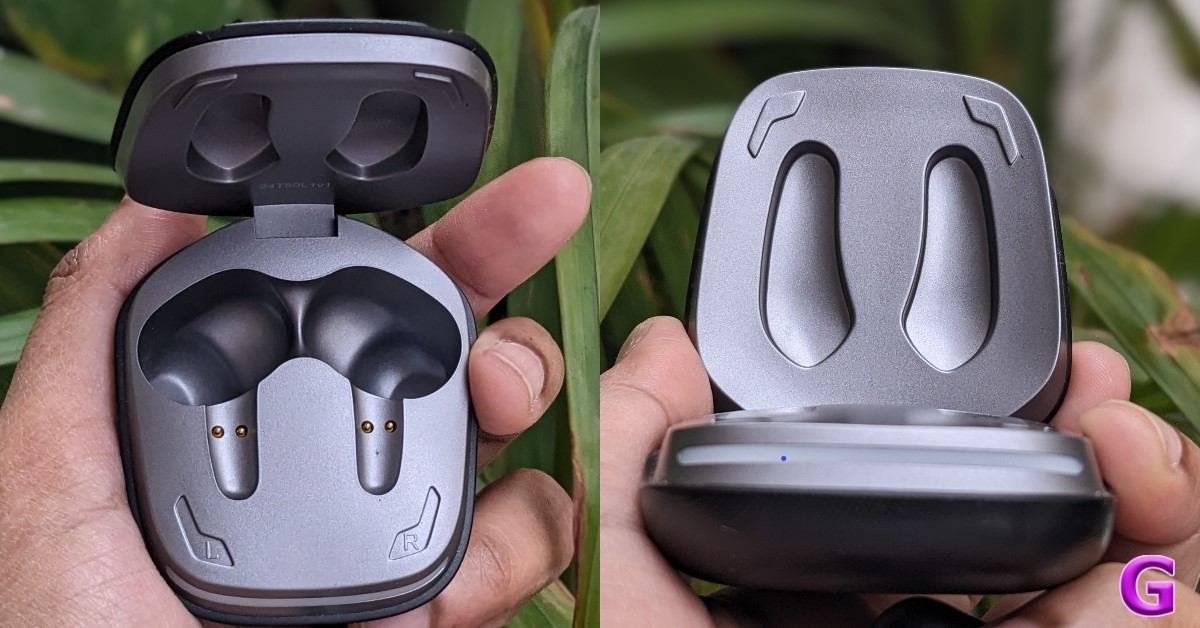

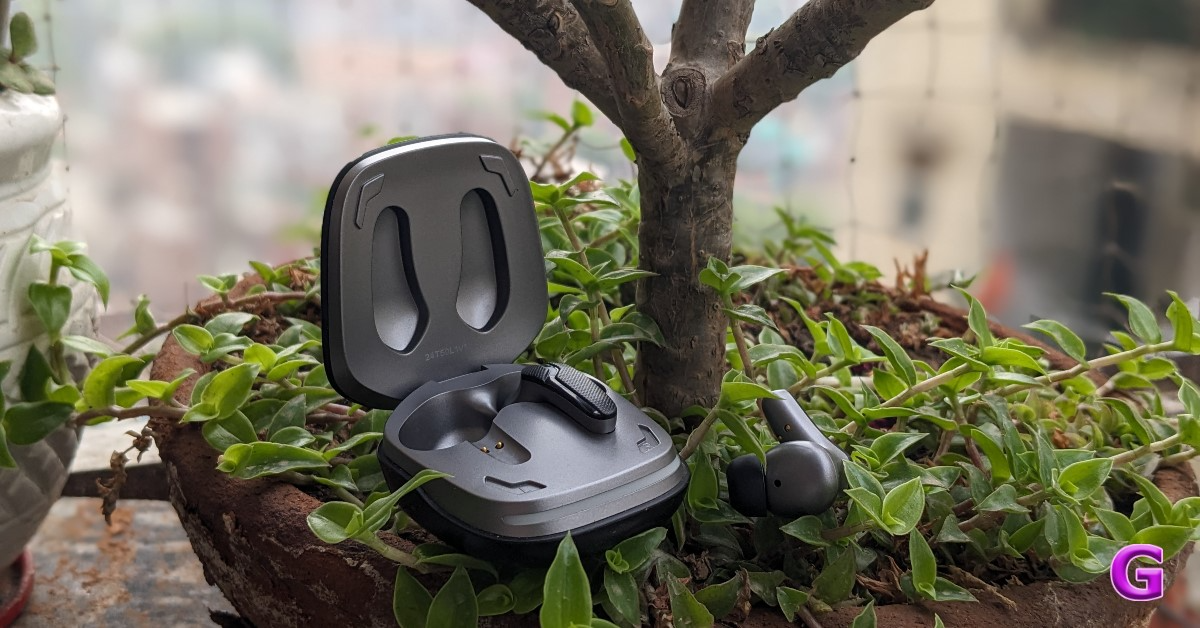

")