One of the key factors in determining the price of a smartphone is its internal storage space. Smartphone makers usually offer 64GB and 128GB variants of a device at an affordable price, while assigning a higher cost to the 512GB and 1TB storage variants. If you’re looking to buy a phone under a strict budget, you can go for a low storage variant while using some tricks to expand the space on your smartphone. In this article, we bring you the top 7 ways to add extra storage to your Android and iOS devices.Read Also:A Guide to Online Privacy: How to Keep Your Data Safe
Use a memory card
Unlike iPhones, most budget and midrange Android smartphones come with a dedicated microSD slot as a part of the hybrid SIM tray. You can access this slot by using a SIM ejector tool to pop out the SIM tray. Depending on the smartphone, you can add up to 1TB of extra storage using a memory card. Here is our list of the 5 best microSD cards with high capacity to increase the storage space on your smartphone.
Use an OTG adapter to plug in external storage
If your smartphone does not have a dedicated slot for a microSD card using an external storage device is one of the best ways you can add extra local storage on an Android or iOS device. Using a USB OTG (On-The-Go) adapter, you can link any external storage device to your iPhone or Android smartphone. The official Apple OTG adapter goes for Rs 2,900, but there are plenty of other affordable options around. The downside to using external storage via OTG is that you will have to rely on an extra piece of hardware and constantly transfer data back and forth between your smartphone and external storage. This is why we would suggest using cloud storage before turning to external storage.
Use Cloud Storage
Cloud storage services like iCloud and Google Drive provide an easy solution to the low storage issue on your smartphone. You can use these services to create backups of your personal data and free up some much-needed storage on your device. Filled up your assigned storage on Google Drive already? Try Dropbox and Microsoft OneDrive. The only downside? You can’t access your files on a cloud storage service without an internet connection.
Disable bloatware apps
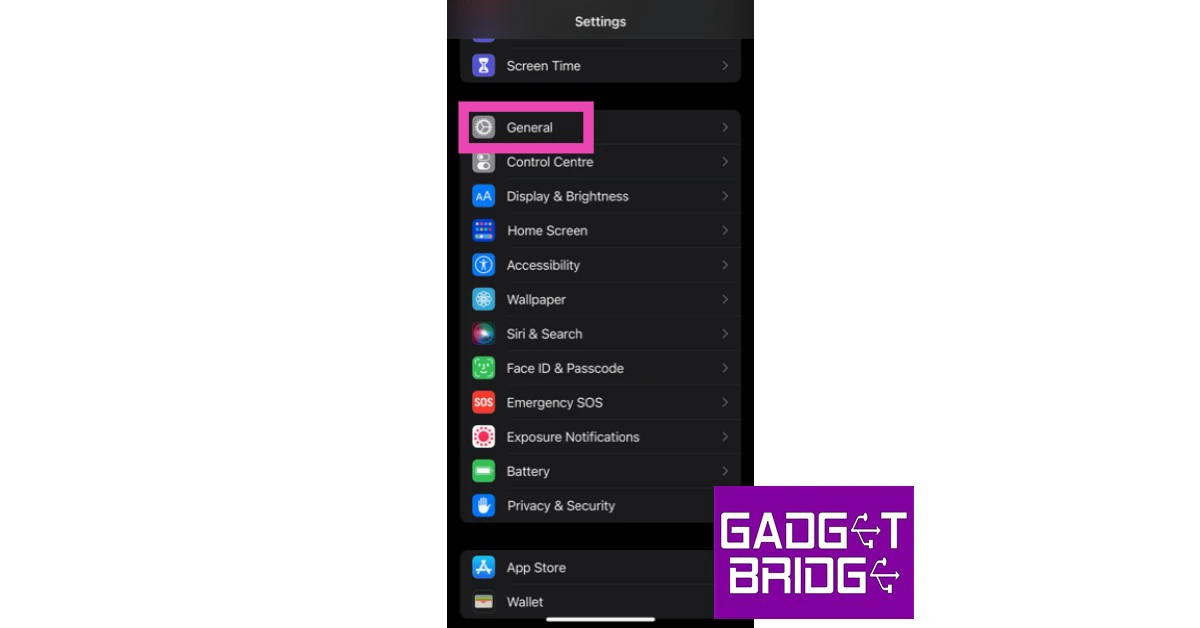
If you’ve ever taken a look at the storage space of a new phone, you’d have noticed that it is less than what was promised. This is because your phone’s OS occupies a good chunk of the internal storage space. Most smartphones also come with preinstalled bloatware apps that take up internal storage space. One of the first things you should do after buying a phone is to uninstall these apps from the device. This will free up some much-needed storage. To remove an app, go to Settings>Apps>Uninstall. Here is the full guide to deleting apps on your smartphone.
Clear cache
Your smartphone’s cached memory stores all kinds of temporary files for quick access. This increases the speed at which apps work and helps in quickly loading the pages on a web browser. Once you visit a page, your phone will save certain objects on it to the cache, just so it doesn’t have to download them when you revisit the page. Clearing the cache will significantly increase the internal storage of your device. There’s no centralised way to clear all cache on your device. You will need to delete it individually from every app. Here’s how.Step 1: Go to Settings>Apps.Step 2: Choose the App from which you want the cache cleared.Step 3: Click on Storage.Step 4: Click on ‘Clear cache’.The app cache will be cleared in a few seconds, depending on the size of the data stored.
Delete duplicate files
Step 1: Go to Settings and select ‘Battery and device care’.Step 2: Select Storage.Step 3: Scroll down and tap on ‘Duplicate Files’. This is where you will find all the duplicate files on your phone, including images.Step 4: Manually select the duplicate files and delete them.This will boost the internal storage on your smartphone.
Use Lite Apps
Social media apps take up a lot of storage space on your device and keep expanding over time. If you don’t use social media apps outside of the very basic functions, you can use their ‘Lite’ alternatives. Facebook, Messenger, and Instagram have the most popular ‘Lite’ apps that are used by millions of users. A ‘Lite’ app doesn’t occupy too much space on your device, giving you extra breathing space to manage your storage.Read Also:10 Best ways to Remove Photo Metadata (Windows, Mac, Android, & iOS)
Malware, or malicious software, is a piece of code, file, or software that can gain entry into your device and funnel your personal information to malicious entities. It can even plague your device with ads where they don’t need to be and drain the battery quicker than usual. Malware usually infects your system through apps or files downloaded from unverified and suspicious sources. In this article, we bring you the top 7 ways to remove malware from Android and iOS devices.Read Also:10 Best ways to Remove Photo Metadata (Windows, Mac, Android, & iOS)
Delete any suspicious apps
Malware creeps into your phone through apps downloaded from suspicious sources (usually outside the Google Play Store and App Store). Google’s app market heavily regulates the apps on its platform. Apps with expired or insufficient security certificates get taken down very quickly. Furthermore, Google Play Protect runs a final safety check on an app before it is downloaded to your device. Not all app markets employ these stringent safety measures, which leaves the door open for malware to gain access to your system. If you notice malware on your device, the first thing you should do is remove any suspicious apps you may have downloaded from shady sources. Removing the source app can remove malware on your Android or iOS device.
Here’s how you can remove an app on Android
Step 1: Go to Settings and select Apps.Step 2: Select the app your want to uninstall.Step 3: Select ‘Uninstall’ from the menu at the bottom of your screen.You can also tap and hold an app icon in the app drawer and select ‘Uninstall’ to remove it from your device.
Here’s how you can remove an app on iOS
To remove an app on your iPhone, simply touch and hold the app on the home screen and tap the ‘Remove App’ option. Select ‘Delete app’ to remove it from your iPhone. You can carry out the same process in the app library to remove any particular application from your iPhone.
Update the OS
With every iteration, your phone’s software is better equipped to handle malware and other malicious entities. Even a small security patch can get rid of the malware plaguing the previous version of the OS. Usually, malware is designed to target old versions of an OS which do not receive any security updates.
Update your Android device
To update your Android phone’s software, go to Settings>Software Update>Download and Install, and check for new updates. If you see any pending updates, download them on your device.
Update your iOS device
To update iOS to its latest version, go to Settings>General>Software Update and download the update. Once installed, restart your iPhone and check if the malware is infecting the system.
Perform a factory reset
A clean wipe of your device will get rid of all the data on it and restore it to the condition it came in when you purchased it. Performing a factory reset is a last-ditch effort which should only be reserved for when the malware has spread to other areas of your device. If uninstalling the source of malware doesn’t fix the issue, a factory reset should be your next move.
Here’s how you can perform a factory reset on an Android device
Step 1: Go to Settings, scroll down and select General management.Step 2: Tap on ‘Reset.’Step 3: Select ‘Factory data reset.’Step 4: Scroll down and tap on ‘Reset.’
Here’s how you can reset your iPhone
Step 1: Go to Settings and select General.Step 2: Scroll down and select ‘Transfer or Reset iPhone’.Step 3: Tap on ‘Reset’.Step 4: In the following window, select ‘Reset All Settings’.Step 5: Enter the Pin and confirm your selection.
Protect your smartphone with a security app
There are tons of security and anti-virus apps that will guard your smartphone against any harmful virus, malware, and other malicious entities. These apps perform routine checks on your device, scanning them for any suspicious files or activity. On top of that, a good security app also scans any file or app your download on your device from third-party sources. McAfee, Norton, and AVG are some antivirus and antimalware protection apps that you can download on your device right now to guard against any malicious activity.
Frequently asked questions
What is malware?
Malware (or ‘malicious software’) is a piece of software that is designed to harm your device and carry out malicious tasks like stealing your personal information or gaining unauthorised access to your system.
How do I remove malware from my phone?
The best way to remove malware from your phone is by deleting any suspicious apps that may have brought it in along with them. You can also perform a factory reset on your device if the malware has spread across the system.
How do I protect myself against malware?
The best way to avoid malware is by avoiding any suspicious third-party app stores and app markets. You can also download a security app like McAfee and AVG on your device to protect yourself against malware.Read Also:Best Way to Transfer Data from Android to iPhone After Setup
Conclusion
These are the top 7 ways to remove malware from an Android or iOS device. To avoid malware from infecting your device, make sure you don’t download apps from unverified or suspicious sources. Oftentimes, modded apps carry a lot of malware with them, which can plague your device with ads and funnel your personal information. For the latest gadget and tech news, and gadget reviews, follow us on Twitter, Facebook and Instagram. For newest tech & gadget videos subscribe to our YouTube Channel. You can also stay up to date using the Gadget Bridge Android App. You can find the latest car and bike news here.
If you’re in the market for a new smartphone, you’re probably looking for a device that can easily last you a day. When looking for phones with a long(er)-lasting battery life, it is easy to get caught up in battery capacity specs. After all, a big battery would mean a greater backup, right? Well, the answer isn’t so straightforward. While battery capacity plays a huge role in how long your phone lasts on a single charge, it is not the only determining factor.Samsung’s Galaxy M Series, known for its superior battery backup, offers smartphones with up to 6000mAh battery capacity. On the other hand, its flagship smartphone, Samsung Galaxy S23+, offers a similar (if not better) battery performance with a 4,700mAh unit. So, which factors determine the battery performance of a smartphone and why do phones with big batteries often offer average battery life? Let’s find out.Read Also:The 6 Best Laptops for College Students
Processors and internal hardware matter more than you think
A good processor is one of the big reasons why flagship smartphones offer a better battery life with a smaller battery unit. Every new crop of chipsets offers more efficiency and the ability to make better choices in order to increase the battery life of the device. Even small updates to the SoC can significantly increase the battery performance. Last year, Snapdragon 8+ Gen 1 was 30% more power efficient than the Snapdragon 8 Gen 1 SoC. 2023’s flagship SoC, Snapdragon 8 Gen 2 is already an improvement from the previous generation.The internal cooling system of a smartphone is another piece of hardware that plays a pivotal role in extending its battery life. Internal heating leads to a greater loss of energy, which means a lower battery backup. Smartphones like OnePlus 10T and Asus ROG Phone are able to maximize battery backup with their superior cooling systems.
Power-hungry displays lead to a greater battery drain
Your smartphone’s display is one of the biggest consumers of power on the device. Larger displays consume more power, which is generally balanced out by a bigger battery. A smartphone’s battery life is typically gauged by its ‘screen on time’ due to this very reason. The choice of a display panel can affect the battery life of a smartphone by a significant margin. Midrange and budget smartphones generally come with LCD displays, which are extremely power-hungry. In comparison, OLED displays consume less battery while producing better results. The display’s refresh rate is also a big factor in how quickly the battery gets drained. If you use your phone on the maximum refresh rate setting, you will notice that it runs out of power fairly quickly. A 120Hz refresh rate display will not last as long as a 90Hz or 60Hz display with the same screen-on time.
Is your phone’s software making smart choices?
The OS running on your device can boost the battery backup by killing off background apps and tasks, which would otherwise slowly drain the battery. A well-optimised software is able to make these smart choices. It is also a good idea to keep a check on your phone’s background tasks and record which apps use the most power.
5G connectivity can demand more from your phone
Users who have just made the switch to 5G can attest that high-speed connectivity comes at a price. While using a 5G network, your smartphone is capable of consuming up to 20% more power. Newer processors are able to tackle this issue, to the point that it is not an immediate concern. But if you’re looking to extend the battery life of your device, switching back to 4G will certainly help.Read Also:Sennheiser launches Profile USB Microphone in India, prices start at Rs 10,900
Canon has launched a new range of 16 advanced printers in India today, with prices starting at Rs 10,325. These printers will be new additions to the PIXMA, MAXIFY, and imageCLASS series. Canon’s new range of printers caters to diverse audiences across SOHOs, SMEs, Corporates, and Home consumers. Read Also:Sennheiser HD 660S2 headphones launched in India at Rs 54,990
Canon’s new range of printers comes with advanced security and encryption features
Canon’s PIXMA Series of printers is designed for home and SOHO (Small Office/Home Office) use. The newly launched PIXMA G1730, G1770, G2770, G2730, G3770, G3730, and G4770 are ideal for home usage, offering easy ink refilling and huge ink reservoirs. The PIXMA series produces high print yields, maximizing productivity and keeping operational costs affordable. PIXMA G1730, G2730, and G3730 now come with GI 71 ink bottles. For moderate usage, users can opt for low-cost ink refill bottles that deliver up to 3,900 black-n-white pages and 4,600 colour pages. For high printing capacity, users can opt for standard ink bottles that deliver up to 7,600 black-n-white pages and 8,100 colour pages. Canon GX4070The MAXIFY Series of printers are suited for small and medium businesses. These printers produce water-resistant printers and keep the cost of operation under budget. These printers also come with a refillable ink tank system to achieve maximum productivity.For a more corporate setup, Canon’s imageCLASS Series is designed to do all the heavy work. The newly launched imageCLASS LBP121dn, LBP122dw, MF271dn, MF272dw, MF274dn, and MF275dw improve productivity with their high-speed printing up to 29 pm, auto-duplex printing, and compact size. These printers use an all-in-one cartridge that can be replaced easily and results in lower downtime.Sharing his thoughts on the big announcement, Mr Manabu Yamazaki, President & CEO, Canon India said, “The fast-changing hybrid landscape across sectors have led to significant infrastructural transformations, fueled by advancements in technology. Taking cognizance of these evolving market requirements, we are excited to introduce 16 new state-of-the-art printers; which offer a perfect blend of modern technology and cost-efficiency for users, building on Canon’s long standing legacy of innovation and customer delight. With this portfolio expansion, we want to fortify the printing culture amongst users by providing them with solutions that add value to their work in this current hybrid working environment, hence giving them more reasons to print. We are confident that our new products will empower our customers in their business journey and thereby help us in clocking a 30% market share in the industry.”Read Also:Nothing Ear (2) launched at Rs 9,999, gets Dual ConnectionHere is the full price list of all the new 16 printers launched by Canon India. These printers will be made available on April 1.
Audio brand boAt has launched the new Nirvana Ion wireless earbuds at a special introductory price of Rs 1,999. Expect the price of the TWS to be bumped once the launch offer ends. With the launch of Nirvana Ion, boAt also kicked off its ‘Next Big Thing’ campaign which will see the audio brand giving the spotlight to up-and-coming personalities and influencers – Cyrus Khan, Ambika Nayak, Johanna Rodrigues, and Sabareesh S.Read Also:Nothing Ear (2) launched at Rs 9,999, gets Dual Connection
boAt Nirvana Ion: Specifications and more
boAt Nirvana Ion offers Crystal Bionic Sound powered by HiFi DSP. This improves sound optimisation and provides an immersive listening experience. The TWS comes with two EQ Modes – boAt Balanced Sound and boAt Signature Sound. The audio is delivered by 10mm dual drivers.The case of the Nirvana Ion is ergonomically compact and easy to carry around anywhere you go. The earbuds offer in-ear detection, which enables them to pause the music whenever they are pulled out of the ear. The Nirvana Ion was designed in-house at boAtlabs.boAt Nirvana Ion also employs ENx Technology which uses the Quad Mics on the earbuds to reduce the ambient noise and provide a crystal clear sound during voice calls. The earbuds are able to isolate your voice from the background noise during calls and are able to relay it efficiently. Apart from that, the boAt Nirvana Ion also sports a 60ms low latency mode for gaming.With a 70mAh battery on each earbud and an additional 600mAh in the charging case, the boAt Nirvana Ion is able to provide a total backup of 120 hours. On a full charge, the earbuds can last up to 24 hours. With ASAP charging and fast-charging USB Type-C, the Nirvana Ion can be fully charged in 2.5 hours. The TWS is rated IPX4 for dust and water resistance.Read Also:How to Add Shapes to PDF With and Without Adobe Acrobat?boAt Nirvana Ion can currently be purchased at an introductory price of Rs 1,999 from the official boAt website, Flipkart, Amazon, and Myntra. The TWS earbuds are also available at select physical retail stores – Vijay Sales, Croma, and Reliance Digital. boAt Nirvana Ion is available in two colours – Ivory White & Charcoal Black, and comes with a 1-year warranty.For the latest gadget and tech news, and gadget reviews, follow us on Twitter, Facebook and Instagram. For newest tech & gadget videos subscribe to our YouTube Channel. You can also stay up to date using the Gadget Bridge Android App. You can find the latest car and bike news here.
In today’s data-driven society, protecting your personal information is like wearing a helmet on a bike. Sure, you may not always need it, but when you do, it can save you from a lot of pain and frustration. As technology advances, so does the need to safeguard your online presence. Unfortunately, the digital sphere is rife with malicious threats and fraud attempts.
Why Online Privacy is Important
Protecting your online privacy is essential in today’s digital world, as hackers can exploit your personal information for some seriously shady activities, from identity theft to financial fraud, and even physical harm. Online privacy violations are unfortunately all too widespread. Do you remember the Facebook controversy from 2018 where an outside consultancy firm obtained the personal information of up to 50 million users? What about Target Corporation’s 2013 data breach, which exposed the banking information of around 40 million customers? These incidents highlight the importance of online privacy and the potential consequences of poor privacy practices.
Furthermore, with online betting and gaming becoming increasingly popular, protecting your privacy is particularly important when using these platforms. You typically have to provide extremely private information, like your name, address, and credit card information, especially in the case of online casinos, where you deal with financial data. Keeping those data secure will allow you to fully enjoy the excitement and fun of any digital experience while ensuring your peace of mind.
Tips for Protecting Your Online Privacy
The good news is, there are several steps you can take to protect your online privacy, 10 of which are outlined as follows:
Keep Secure Passwords. Keeping your online data secure requires a strong password, as weak or obvious passwords are easier to guess. Make sure your passwords are unique and enable two-factor authentication whenever possible.
Use Two-Factor Authentication. Two-factor authentication adds another layer of security by requiring another verification method in addition to your password, such as a code sent to your phone number or email address. Enabling two-factor authentication where possible is one of the easiest ways to protect your online privacy.
Use a Virtual Private Network (VPN). Several surveys have shown that people primarily use personal VPNs to enhance their online security. According to a Forbes report, around 80% of VPN users employ them for data protection purposes. With a VPN, your data is safe since it is encrypted and directed through secure servers. This makes it extremely difficult for hackers and other malicious individuals to access your sensitive information.
Install antivirus and anti-malware software. Antivirus software can protect personal data online by detecting and removing malicious software like viruses and malware. In addition to providing extra security features, antivirus software often includes firewalls and password managers. Read about GadgetBridge’s top anti-virus picks to choose the antivirus software best suited to your needs.
Use ad blockers and privacy extensions. Ad blockers are browser add-ons that help safeguard your private information by prohibiting trackers, adverts, and other invasive features. Ad blockers not only stop ads and pop-ups, but they also speed up web page loading times and enhance security when browsing. Additionally, there are numerous privacy-focused Chrome and Firefox extensions that help safeguard your data from being monitored or gathered without your consent.
Follow public Wi-Fi safety advice. Only use HTTPS websites when connected to public Wi-Fi, since these sites encrypt your data and help keep you safe online. Also, restrict your use of Airdrop and file sharing when in public, as they can leave your device vulnerable to hackers and malware. Lastly, avoid entering sensitive information, such as passwords or bank accounts, when using public Wi-Fi.
Control your social media privacy settings. When you control your privacy on social media, you can restrict who sees what you share publicly. You can effectively reduce the possibility of unauthorized access to your data by restricting the visibility of your profile, posts, and personal information.
Follow email safety tips. Keeping your email software up to date, avoiding using your email platform on public Wi-Fi networks, and reporting suspicious emails as spam, are crucial when protecting yourself and your data online.
Back up your data to a trusted device or cloud storage solution. Backing up your data can help protect you from data loss due to hardware failure, malware, and ransomware attacks. Additionally, you can restore earlier versions of your files and guarantee the availability of your important data whenever and wherever you require it.
Employ encrypted messaging and email services. With encryption, your messages are unreadable to external sources. Use encrypted messaging services like Signal and WhatsApp to safeguard your privacy and maintain the confidentiality of your messages. To enhance email security, many email service providers also offer encryption. For example, Gmail’s network-level encryption adds an additional layer of security to protect user data.
Additional Resources for Protecting Your Online Privacy
Protecting your online privacy is becoming increasingly important in today’s digital age. Fortunately, there are endless resources available to keep you well informed in taking steps to safeguard you and your personal information online. Digital Guardian has compiled a list of online resources that you can use to increase your online privacy and data protection. By adhering to the advice provided in this guide, as well as taking advantage of the numerous resources available to protect yourself, you can ensure that your online personal information is as secure as possible.
For the latest gadget and tech news, and gadget reviews, follow us on Twitter, Facebook and Instagram. For the newest tech & gadget videos subscribe to our YouTube Channel. You can also stay up to date using the Gadget Bridge Android App. You can find the latest car and bike news here.
When you click an image, your phone does more than just take a picture of the subject. While shooting a picture, your smartphone records additional data like your phone’s model number, date and time of clicking the photograph, exact coordinates of the location, and your camera’s configuration (aperture, shutter speed, etc.) while taking the photo. This group of data about the image is collectively referred to as ‘EXIF data’ or ‘metadata’. While sharing an image online, you are also sharing its metadata along with it. If you’re not comfortable with that, you can easily remove the metadata from an image before sharing it. In this article, we bring you the 10 best ways to remove photo metadata on Windows, Mac, Android, and iOS.Read Also:Interviewed: We talk to Anku Jain, Managing Director, MediaTek India, what the 2023 roadmap looks like
How to remove Photo Metadata on Android
While there is no native way to remove the EXIF data of an image on Android, you can use a third-party app to carry out the task. There are also a few additional ways you can prevent the camera app from tagging your location in the pictures you shoot.
Use the Photo EXIF Editor app
Step 1: Download and install the Photo EXIF Editor app from the Google Play Store.Step 2: Launch the app and select ‘Photos’.Step 3: Select the picture from which you want to remove the metadata.Step 4: Tap on the EXIF icon with a strikethrough across it. You will find it at the top right section of the screen.Step 5: Select the information you want to remove from the metadata of the image. If you simply want to remove the location tag, tap the check box next to ‘Geolocation’. If you want to remove all metadata, tap the check box at the top.Step 6: Tap on the save icon at the top right corner of the box to remove the photo metadata.
Remove location data before sharing an image
This is as close as it gets to a native way of removing photo metadata on your Android device. Before sharing an image with a contact, your Android smartphone gives you the option to remove the location tag from it. Here’s how you can share an image without the location data.Step 1: Open the image gallery on your phone and select the image you want to share.Step 2: Tap on the Share icon.Step 3: Tap on ‘Options’ next to ‘Location data included’.Step 4: Turn the toggle bar off for ‘Include location data’ and ‘Include all image and video data’.
Disable location tagging from the Camera app
Your Android phone may not let you remove the EXIF data from a photo, but if all you’re worried about is your location being recorded, you can easily disable location tagging from the camera app on your phone. Here’s how.Step 1: Launch the Camera app on your phone.Step 2: Open Settings. Step 3: Turn the toggle bar off for ‘Location tags’.
Remove the Camera app’s location permission
Removing the location permission from the Camera app is another way of preventing it from tagging your location on images. Here’s how you can do it.Step 1: Go to Settings and select Apps.Step 2: Select the Camera app and tap on ‘Permissions’.Step 3: Tap on ‘Location’.Step 4: Select ‘Don’t Allow’.
How to remove Photo Metadata on iOS
Like Android, iOS devices do not have a native way to remove photo metadata either. Here are some other ways to carry out the task.
Use the Exif Metadata app
Step 1: Download and install the Exif Metadata app on your iOS device.Step 2: Give the app the necessary storage permissions.Step 3: Select the image from which you want to remove the metadata.Step 4: Tap on ‘Edit’ at the top right corner of the screen.Step 5: Select ‘Remove Exif’ to clear all metadata from the image.
Remove location data before sharing an image
Step 1: Launch the Photos app and select the image you want to share.Step 2: Select the ‘share’ option.Step 3: In the following window, tap on ‘Options’ next to ‘Location included’.Step 4: Disable the toggle bar for ‘Location’ and ‘All photos data’.
Remove location permission for the Camera app
Step 1: Go to Settings and select ‘Privacy & Security’.Step 2: Tap on ‘Location Services’.Step 3: Select Camera.Step 4: Under the ‘Allow location access’ section, select ‘Never’.
How to remove Photo Metadata on Windows
Unlike Android and iOS, your Windows device offers an easy native way to remove metadata from your images. Here’s how you can go about it.Step 1: Select the image from which you want to remove the metadata and right-click on it.Step 2: Click on ‘Properties’.Step 3: Go to the Details tab and click on ‘Remove Properties and Personal Information’ at the bottom of the box.Step 4: You can choose to create a copy of the file without the metadata or simply remove the metadata from the original image.Step 5: Click on the properties you want to remove the image. To clear all metadata, click on ‘Select All’.Step 6: Click on ‘OK’. The metadata will be removed from the photo.
How to remove Image Metadata on Mac
Step 1: Open the image in Preview.Step 2: Click on Tools and select Show Inspector.Step 3: Click on the ‘i’ tab.Step 4: Go to the GPS tab and select ‘Remove Location Info’.
Remove Image Metadata using ImageOptim
As you can probably guess by now, you cannot remove the entire metadata of an image on Mac. You can only strip the image of its location info. In order to remove the entire metadata, you will need to use a third-party tool like ImageOptim. Step 1: Download ImageOptim for Mac from its official website. Step 2: Once installed, go to the app’s preferences and select the option to strip PNG and JPEG metadata. Step 3: Now, simply drag the image to the ImageOptim tool to remove its metadata.Read Also:How to Add Shapes to PDF With and Without Adobe Acrobat?
iPhone has always been a tempting purchase for millions and trillions of Apple lovers out there. These remain in pursuit of newer and even newer versions, getting them as soon as the company launched those. But one thing that most of them stuck with is how to transfer data to new iPhone.
Have you finished your iPhone setup without transferring data from Android to iPhone? No need to worry; there are ways by which you can transfer data from android to iPhone after setup, and we have explained them all in our comprehensive article on how to transfer data to a new iPhone. So, without further delays, let’s get into it!
Before Transfer Data Tips
Here are some before-transfer data tips that you must stick consider before looking for the answer to how to transfer photos from Android to iPhone after setup!
Ensure Your Devices has at Least 75% Charging.
Both your iPhone and Android must be charged over 75%. It’s natural for mobile devices to get heat up, draining up their charging quicker during data transfer.
Double-Check: How Much Data Are You Moving?
This is a must-thingy, as your iPhone might not have enough space to receive each and every transferred file. Therefore, organize your android data, analyze what’s crucial to be transferred, what you can place in the external drive, and what should be removed before you move to iOS after setup.
Connect to Stable and Secure Wi-Fi Connections
Most of the data transfer methods are wireless, so you will have to ensure that you are connecting your devices to a stable internet connection. This will free you from loads of hassle!
Best 4 Ways to Transfer Data from Android to iPhone After Setup
Let’s now hop onto the best four ways by which you can get answers to how to transfer photos from Android to iPhone after setup!
Method 1: How to Move Data from Android to iPhone After Setup via Move to iOS
Apple has developed an app, namely, Move to iOS, that’s used to move data from Android to iPhone after setup and even before that. Here is what you have to do to get your job done via Move to iOS:
Step 1: Erase your iPhone
Grab your iPhone, unlock it, and navigate to Settings.
Scroll down to the spot and click the Reset option.
Select Erase All Content and Settings, followed by selecting Erase Now.
Insert your device’s password and Apple ID password.
Wait for a while until the entire device is erased.
Step 2: Enable Move Data from Android
Power ON your iOS device and insert your SIM card.
Connect to a stable internet connection and go with the on-screen instruction, setting up your iPhone until the Apps & Data interface pops up.
From the Android option on Apps & Data interface, choose Move Data.
Download, install, and launch the Move to iOS on Android and hit Continue.
Agree to the Terms and Conditions and select Next.
Get a digital code on your iPhone by hitting Continue.
Enter the received code on your Android.
Select data to transfer and hit Next to successfully move to iOS after setup.
Note: To transfer from Android to iPhone after setup using Move to iOS, you have to erase your setup first. That’s the key factor for successfully answering the query can you transfer data from Android to iPhone after setup.
Method 2: How to Move Data from Android to iPhone After Setup via A Transfer Assistant
If, for any reason, the Move to iOS app isn’t working, you can always get help from a third-party transfer assistant. We suggest you try out Tenorshare iCareFone iTransGo! It’s the ultimate iOS setup assistant move data from Android. With it, you cannot only transfer data android to iPhone after setup but can also move data from iOS to Android, iOS to iOS, and Android to Android.
Following are some of the key features of Tenorshare iCareFone iTransGo. Let’s have a look!
Enables transferring data from Android to iPhone without reset
Allows switching from 8000+ android devices to iPhone
Lets the users selectively transfer data instead of a full restore
Compatible with the recently launched iOS16 and android 13
How to use Tenorshare iCareFone iTransGo?
Here is how you can use Tenorshare iCareFone iTransGo to move to iOS after setup:
Step 1: Connect Devices
Download and install the software from the original website. When done, launch it and connect it to both of your devices.
Step 2: Choose Data to Transfer
Proceed with selecting the data files that you wish to transfer from Android to iPhone after setup.
Step 3: Wait Until Done
Wait for a while, and that’s it! Your selected data has been transferred to your iPhone. Isn’t it too simple and convenient?
Method 3: How to Move Data from Android to iPhone After Setup via E-mail
The next convenient and free method to answer the query about can you transfer data from Android to iPhone after setup positively is via E-mail. Although it is a secure transfer method, its con can’t be overlooked. Its transfer speed is slow, and some users may find the process complicated. However, this is still the best means to transfer contacts, e-mails, and calendars.
Here is what you will have to do:
Navigate to your Android Settings and move to Account.
Proceed with enabling Gmail and the sync feature, followed by sync calendar and contacts.
Hit Sync Now to begin syncing contacts and calendars.
Now go to Settings > Mail > Add Account > Google mail on your iPhone.
Insert your Gmail account credentials and hit Next.
Enable Contacts and calendar and hit Save. That’s it! Your contacts and calendar must be synced to your iPhone by this last step.
Method 4: How to Move Data from Android to iPhone After Setup via iTunes
iTunes is another reliable means to sync your photos to your iPhone. Millions of iPhone users use it for transferring data from Android.
Note: You must first export your photos from Android to utilize iTunes to transfer data. Here is how you can export your images from an Android device using iTunes:
Connect your Android mobile to a computer.
Right when the AutoPlay window appears, click on it.
Hit Import photos and select the images you want to transfer. You can also customize the storage path if you desire.
Run the latest iTunes and proceed with syncing your photos with your iPhone. That’s it!
Benefit Tips
Let’s now have a look at some beneficial tips that will surely help you answer the query of how to transfer photos from Android to iPhone after setup.
How to Transfer Contacts from Android to iPhone Quickly?
Are you looking for a way to transfer contacts from Android to iPhone quickly without opting for the E-mail method? We suggest using Tenorshare iCareFone iTransGo. With it, you can transfer your contacts from one phone to another in a matter of a few seconds.
Can I Recover Android WhatsApp Messages without Backup?
Yes, you can conveniently do so with the Tenorshare UltData for Android! This amazing software aids you in recovering android WhatsApp messages without any root or backup. You can also use it to download and view WhatsApp backup from Google.
Can You Transfer Data from Android to iPhone without Resetting?
Yes, you can transfer data from Android to iPhone without resetting if you mistakenly performed the setup first. Although we have mentioned multiple ways to do so, the best one to rely on is the Tenorshare iCareFone iTransGo.
Summary
That was all about the methods you can opt for to answer the queries like can you transfer data from Android to iPhone, how to transfer data to a new iPhone, how to use the Move to iOS after setup, and more. If you have any problem, you can share it with us in the comments section below; we will come up with detailed answer guides as soon as possible. Stay blessed!
Be sure to check out Tenorshare and its range of valuable products, as these come in handy when one loses hope of fixing some common and even rare issues!
For the latest gadget and tech news, and gadget reviews, follow us on Twitter, Facebook and Instagram. For the newest tech & gadget videos subscribe to our YouTube Channel. You can also stay up to date using the Gadget Bridge Android App. You can find the latest car and bike news here.
Of course, the choice of laptops for college won’t magically make your obligations disappear. No laptop will ever write your papers for you, but you can use it to find an essay writer and say ‘write my paper’. Students do this all the time today. They go to a professional essay writing service they trust, order a paper, and submit it as their own. This is a way to meet a short deadline and ensure you get a high grade – without anyone knowing you didn’t write on your own.
While the laptop won’t write papers for you, if you choose one of the best college laptops based on your needs, there’s a lot you can benefit from. You can use it to study, communicate with friends, install apps and tools you need, and much more.
Now without any further ado, let’s take a look at the top options of the best laptop for college students.
1. MacBook Air M1
If you have a higher budget and would like to get optimal performance, this is our top choice for you. MacBook Air 2020 has an M1 integrated CPU, RAM of 8 or 16GB, and storage of up to 2TB.
The MacBook Air M1 is priced at around $1000. This price mixed with an amazing performance and a long battery life will give you a bang for your buck. It’s pin-drop silent because it doesn’t have a fan and is cheaper than the Pro version, not to mention lightweight and easily portable.
2. Acer Swift 5
In case you are more of a Windows fan, this is an excellent option for you. The Acer Swift 5 uses Intel Core i7-1260P CPU and has RAM 16GB. It’s lightweight, looks amazing, and its 1TB SSD is ultra-fast.
Acer Swift also has a long battery life and a reasonable price tag.
3. Apple MacBook Pro M2
The Apple MacBook Pro M2 costs more than the first option in this list but is richer in features and performance. It has an integrated CPU, 16GB RAM, and up to 2TB of storage.
If you are a gamer, the battery life (over 18 hours) and fast SSD make this an excellent choice. It also has a high-quality webcam and a very comfortable keyboard.
4. HP Spectre x360 13.5
Featuring a sturdy, yet elegant design, the HP Spectre laptop is one of the students’ favourites. It has 16GB RAM and uses 12th Gen Intel Core 17 CPU. This is a lightweight laptop with long battery life and an amazing 3:2 aspect ratio OLED touchscreen.
That’s not your only option, though. The touchpad is also very sleek and comfortable and the device has a nice selection of ports, which is a pro over the Apple products in this list. While it doesn’t have the same top-notch performance, it comes at a lower price, which is great for those on a limited budget.
5. Lenovo Legion 5i Pro
Lenovo has been one of the best software companies for a long time now, and their Legion 5i Pro is very popular with students who are also gamers. This device uses Intel Core i7-12700H CPU and has 16GB RAM. It is stylish, has a gorgeous display, and has fierce performance. While its camera is not the best, the Lenovo Legion 5i Pro has many ports and a decent battery life.
Gamers are real fans of this laptop because it’s not overly priced and yet, it has great thermal performance, a comfortable keyboard and touchpad, and a gorgeous display.
6. Asus Zenbook 14 OLED
If you are looking for a thin, light laptop with a more affordable price, this is a great option for you. The ASUS laptop has an Intel Core i5-1240P CPU and 256 GB SSD. The battery life is tested at 10.5 hours, so you can do a lot of work on it.
Compared to other ultrabooks that cost over a thousand, the Asus Zenbook can be found at a price between $700 and $800.
The newly launched iQOO Z7 5G has garnered the most single-day sales for any budget (Rs 15-20k) smartphone on Amazon in 2023. The Z7 is iQOO’s first India-exclusive smartphone. Launched on March 21, the iQOO Z7 is available in two variants – 6GB + 128GB and 8GB + 128GB. Buyers can also avail certain bank offers to bring the price down by Rs 1,500. The smartphone is available for purchase on Amazon and the iQOO e-store. Here’s the price list for iQOO Z7.Here’s what the full price list for iQOO Z7 looks like.
The iQOO Z7 offers a bunch of ‘first in segment’ features. These include a 64MP camera with OIS and a 1300-nits Super AMOLED display. The Z7 is also the slimmest smartphone in its price category, with a thickness of just 7.8mm. The smartphone comes in two colour options – Norway Blue and Pacific Night.Segment-defining specs aside, the iQOO Z7 is powered by the MediaTek Dimensity 920 5G SoC, which scored 486916 points on the AnTuTu Benchmark test. Extended RAM 3.0 is capable of boosting the Z7’s RAM capacity to 16GB. iQOO claims the Z7 can offer a lag-free usage experience with up to 27 apps running in the background. The smartphone is equipped with a 4,500 mAh battery and comes with 44W fast charging support. With fast charging enabled, the Z7 can juice up from 1-50% within 25 minutes.Apart from the 64MP primary shooter, the Z7 also gets a 2MP depth sensor in the rear camera module. The 64MP camera is capable of recording 4K videos at 30fps. Upfront, the 16MP selfie camera is housed in a waterdrop notch.“With every Z series launch, we have seen some remarkable milestones and once again we are truly overwhelmed with the unprecedented response by our consumers for the latest iQOO Z7 5G. This is a testament of the brand’s commitment to provide the best in class smartphone experience wrapped in segment’s best innovation for its performance-seeking consumers. This continued success for the smartphone validates our consumers’ trust in our products and services, making our smartphones a preferred choice for the consumers over competition in the segment. We aim to keep up to our consumers’ expectations with innovative products, exciting offers and provide them with unparalleled smartphone experiences” said Nipun Marya, CEO, iQOO India.Read Also:OnePlus 11R Review: Comeback season for OnePlusAs mentioned earlier, the iQOO Z7 can be purchased from Amazon.in and the iQOO e-store at a starting price of Rs 17,499 (after bank offers). The smartphone is made in India at Vivo’s facility in Greater Noida. In terms of customer support, iQOO currently has over 650 service centres across India.For the latest gadget and tech news, and gadget reviews, follow us on Twitter, Facebook and Instagram. For newest tech & gadget videos subscribe to our YouTube Channel. You can also stay up to date using the Gadget Bridge Android App. You can find the latest car and bike news here.


 Unlike iPhones, most budget and midrange Android smartphones come with a dedicated microSD slot as a part of the hybrid SIM tray. You can access this slot by using a SIM ejector tool to pop out the SIM tray. Depending on the smartphone, you can add up to 1TB of extra storage using a memory card. Here is our list of the 5 best microSD cards with high capacity to increase the storage space on your smartphone.
 If your smartphone does not have a dedicated slot for a microSD card using an external storage device is one of the best ways you can add extra local storage on an Android or iOS device. Using a USB OTG (On-The-Go) adapter, you can link any external storage device to your iPhone or Android smartphone. The official Apple OTG adapter goes for Rs 2,900, but there are plenty of other affordable options around.
The downside to using external storage via OTG is that you will have to rely on an extra piece of hardware and constantly transfer data back and forth between your smartphone and external storage. This is why we would suggest using cloud storage before turning to external storage.
If your smartphone does not have a dedicated slot for a microSD card using an external storage device is one of the best ways you can add extra local storage on an Android or iOS device. Using a USB OTG (On-The-Go) adapter, you can link any external storage device to your iPhone or Android smartphone. The official Apple OTG adapter goes for Rs 2,900, but there are plenty of other affordable options around.
The downside to using external storage via OTG is that you will have to rely on an extra piece of hardware and constantly transfer data back and forth between your smartphone and external storage. This is why we would suggest using cloud storage before turning to external storage.
 Cloud storage services like iCloud and Google Drive provide an easy solution to the low storage issue on your smartphone. You can use these services to create backups of your personal data and free up some much-needed storage on your device. Filled up your assigned storage on Google Drive already? Try Dropbox and Microsoft OneDrive. The only downside? You can’t access your files on a cloud storage service without an internet connection.
 If you’ve ever taken a look at the storage space of a new phone, you’d have noticed that it is less than what was promised. This is because your phone’s OS occupies a good chunk of the internal storage space. Most smartphones also come with preinstalled bloatware apps that take up internal storage space. One of the first things you should do after buying a phone is to uninstall these apps from the device. This will free up some much-needed storage. To remove an app, go to Settings>Apps>Uninstall. Here is the full guide to deleting apps on your smartphone.
 Step 2: Choose the App from which you want the cache cleared.
 Step 3: Click on Storage.
 Step 4: Click on ‘Clear cache’.
 The app cache will be cleared in a few seconds, depending on the size of the data stored.
 Step 2: Select Storage.
 Step 3: Scroll down and tap on ‘Duplicate Files’. This is where you will find all the duplicate files on your phone, including images.
 Step 4: Manually select the duplicate files and delete them.
This will boost the internal storage on your smartphone.
Step 4: Manually select the duplicate files and delete them.
This will boost the internal storage on your smartphone.

 Step 2:
 Step 3:


 Step 2:
  Step 3:
 Step 4:
 Step 2:
  Step 3:
 Step 4:
 Step 5:


")
 Step 3:
 Step 5:
 Step 6:
 Step 3:
 Step 4:

 Step 2:
  Step 3:
 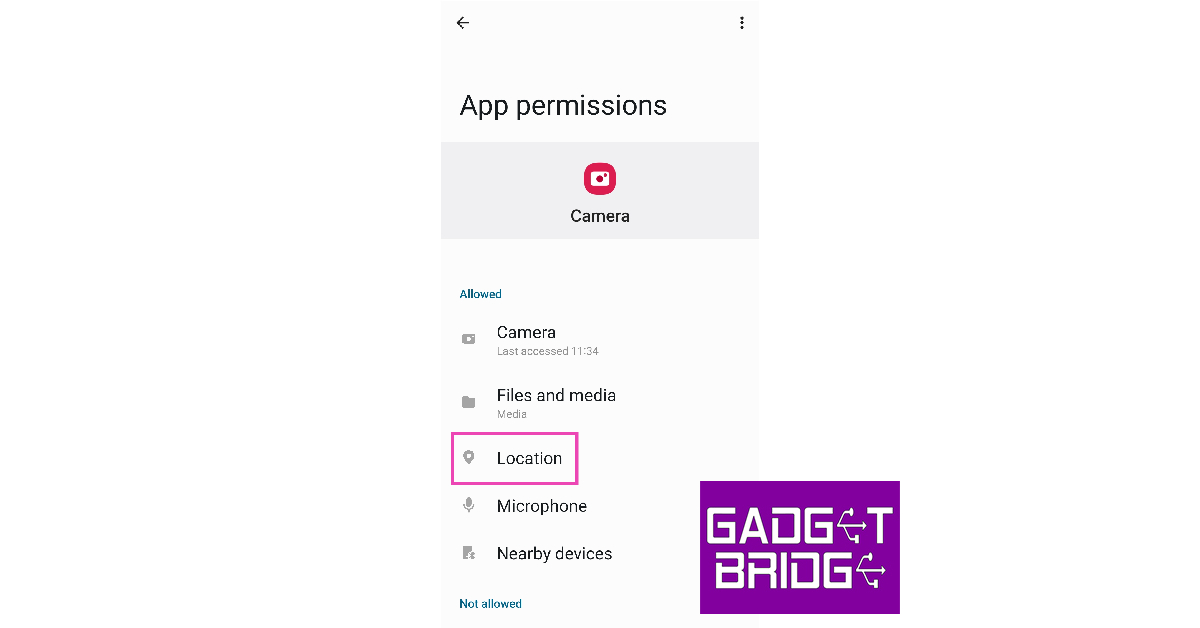 Step 4:
 Step 3:
 Step 5:
 Step 3:
 Step 4:
 Step 2:
 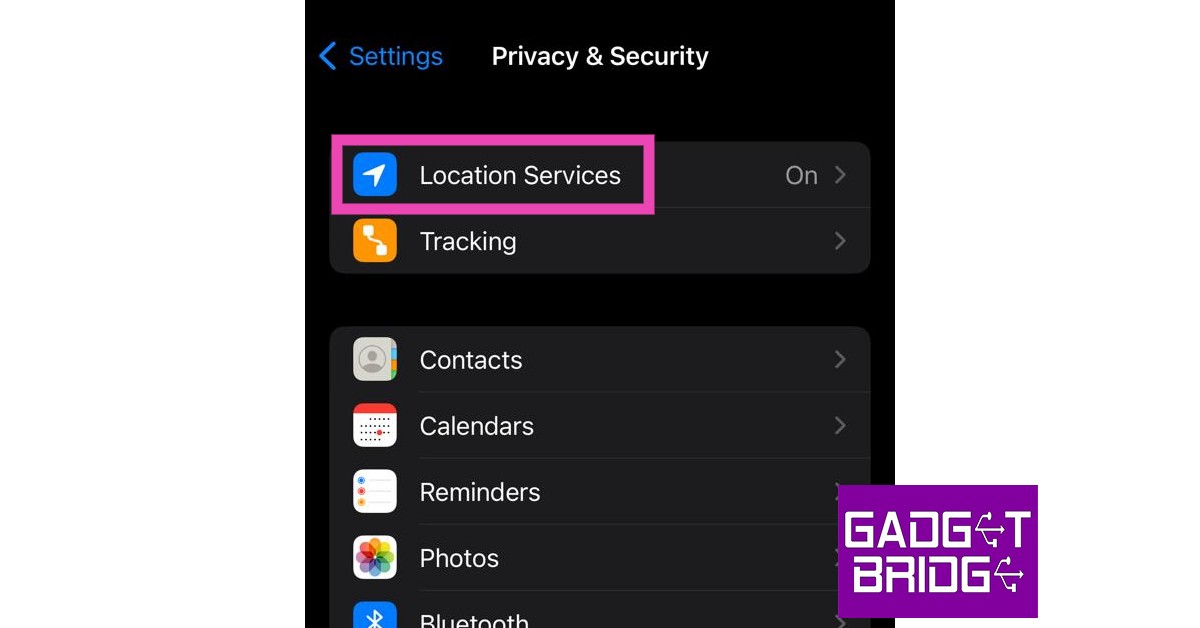 Step 3:
 Step 4:
 Step 3:
 Step 4:
 Step 6:
  Step 3:


 Benefit Tips