On the first day of its yearly developer conference, Google I/O showcased new capabilities for Android phones. Although the firm did not reveal any features of Android 15 at the presentation, the next operating system is anticipated to be released later this year. Nonetheless, the company did reveal new features enabled by artificial intelligence (AI) and an impending significant operational update in the second half of 2024.
Google unveiled new AI-powered features for Android devices, such as an update to Circle to Search that lets students use LearnLM technology to ask for homework assistance directly from their phones and tablets. Circle to Search will be able to assist in the resolution of even more challenging problems including graphs, diagrams, and symbolic formulas later this year.
As of now this feature is limited to select Samsung phones and Pixel devices and Google is planning to bring the experience to more devices. “we’re on track to double that by the end of the year”
Google is directly incorporating Gemini into Android. Later this year, with the introduction of Android 15 users will be able to use Gemini’s overlay on top of the app they are in to easily use Gemini in more ways. Users can ask questions relating to the image, video, or app that they are currently using.
For instance, you may click “Ask this video” to locate specific information in a YouTube video, or you can drag and drop created photos into Gmail, Google Messages, and other places.
Additionally, Gemini Nano will soon have full multimodal capabilities. Later this year, Google will launch its newest model, the Gemini Nano with Multimodality, in addition to the Pixel. This implies that in addition to processing text input, your phone will be able to understand more relevant information, such as spoken language, noises, and visuals. Gemini Nano’s multimodal capabilities will be added to TalkBack later this year. This will enable users who experience blindness or low vision to acquire fuller and more precise descriptions of what’s happening in an image. These descriptions come quickly and even function without a network connection because Gemini Nano is an on-device gadget.
To combat scam calls, Google is testing a new feature that leverages Gemini Nano to detect conversation patterns commonly associated with scams and deliver real-time alerts during a call. You will be alerted if a “bank representative” asks you to transfer money quickly, use a gift card to make a payment or provide personal information like passwords or card PINs —all of which are not normal demands from banks.
Google at its I/O 2024 conference introduced Gemini 1.5 Flash, a lighter-weight model built for scale. According to the company it is optimised for tasks where low latency and cost matter most. 1.5 Flash will be available in AI Studio and Vertex AI. Besides this, Google is also upgrading Gemini 1.5 Pro which is now being incorporated into several Google products, such as Workspace applications and Gemini Advanced.
The newest model in the Gemini family, 1.5 Flash, is also the fastest model provided by the API. It is said to be more cost-efficient to serve, optimised for high-volume, and optimised for large-scale, high-volume and high-frequency jobs. Compared to the 1.5 Pro, this model weighs less but is still capable of multimodal reasoning over large volumes of data. Gemini 1.5 Flash is Google’s smallest device-running model and is positioned between Gemini 1.5 Pro and Gemini 1.5 Nano.
Demis Hassabis, CEO of Google DeepMind said, “1.5 Flash excels at summarization, chat applications, image and video captioning, data extraction from long documents and tables, and more.”
1.5 Flash operates effectively for a variety of tasks, including summarization, chat applications, image and video captioning, data extraction from long documents and tables, and more due to 1.5 Pro’s “distillation” process, which transfers essential knowledge from a larger model to a smaller, more efficient model.
The Gemini 1.5 Flash isn’t intended for the public. Instead, developers can use Google-designed technology more quickly and less expensively to create their own AI products and services.
Apart from this Google has also improved 1.5 Pro ability to generate code, logical reasoning and planning, multi-turn conversation, and audio and image understanding through data and algorithmic advances. in addition to expanding its context window to 2 million tokens.
In addition to this 1.5 Pro can now carry out more intricate instructions, including ones that specify product-level behaviour involving role, format and style. As per the company, it has improved control over the model’s responses for specific use cases, like crafting the persona and response style of a chat agent or automating workflows through multiple function calls. Additionally, by configuring the system, users may now control how the model behaves.
As a result of Google’s addition of audio understanding to the Gemini API and Google AI Studio, 1.5 Pro is now able to comprehend both audio and images for videos that are submitted to Google AI Studio. Moreover, Gemini 1.5 Pro is also being incorporated into several Google products, such as Workspace applications and Gemini Advanced.
Garena Free Fire is a battle royale game with regular awards and tournaments to keep players interested. If you play Garena Free Fire, you should be aware of the redeem codes that are released on a daily basis. However, because the battle royale game is banned in India, players from other countries can use the Free Fire Redeem codes daily. If you’re unfamiliar with the Garena Free Fire redeem codes or don’t know how to get them, we’ve put together a step-by-step guide to help you redeem them. Check out Garena Free Fire Redeem Codes for 15 May 2024.
The Free Fire redeem codes are a great way to get free stuff. These are 12-digit codes that contain alphabets and numbers, as well as an expiration date and time. Because the Garena FF redeem codes cannot be used more than once, you should hurry to the redemption page to claim your free reward before someone else does. To get a free reward, all you have to do is go to reward.ff.garena.com/en, which is the official redemption page. Also, keep an eye on this space for daily updates on Garena Free Fire redemption codes and rewards.
Amazon is the biggest e-commerce platform in the world. One of the reasons why it has maintained its position at the top is its super helpful customer support service. Be it lost packages or account-related issues, Amazon’s customer service reps will help resolve your problem right away. Depending on your query, there are several ways you can contact them. Today, we bring you the top 3 ways to contact Amazon Customer Care.
There are several ways you can contact Amazon’s Customer Care service. But before you begin, you need to figure out whether your issue requires contacting customer support. If your query is related to an incoming order, you can track where it is instead of contacting a service rep. If you received the wrong order, you can simply place a request for its return using the Amazon app or website.
Contacting Amazon’s Customer Care service is warranted when you have exhausted the help options on the website. If you can’t find a solution to your query, a customer service rep will guide you through the process. You can also use the customer support page for Amazon account-related issues.
Amazon’s Customer Service Page
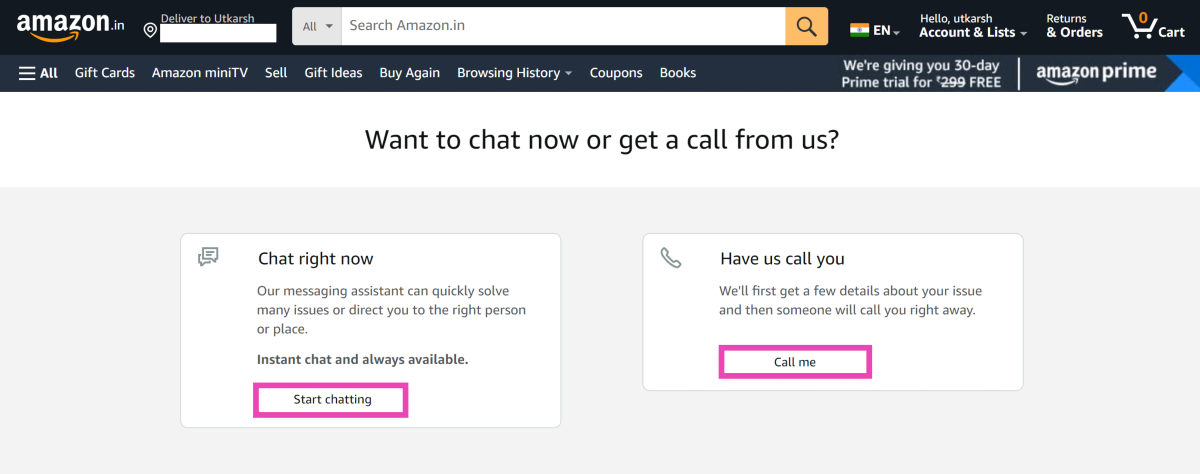
The easiest way to contact Amazon’s customer care service is by going to its Customer Support Page. Click on this link to land on the page or log into your Amazon account, click on your name in the homepage toolbar, and select ‘Contact Us’. There are two options to contact Amazon’s customer reps. You can either initiate a live chat or get them to call you. If you choose the latter option, you will need to answer some questions about your issue before Amazon contacts you via a phone call.
Try Amazon Helpline
If you can’t reach Amazon’s Customer Care service through their website, try their helpline instead. Here are a few numbers you can try.
1800 1200 9009 (India)
1800 3000 9009 (India)
1 888 280 4331 (USA)
Contact Amazon Support on X (formerly Twitter)
If you can’t get a hold of Amazon Customer Support on its website or by dialling its helpline, try posting your query on X (formerly Twitter). Make a post laying out your concern and tag the AmazonHelp handle in it. You will get an automated response at first, but Amazon’s customer service reps will contact you via direct messaging later. You can also try contacting Amazon on Facebook and Twitter.
Bonus Tip: How to Return an Order
If you simply want to return something you ordered from Amazon, you don’t need to contact the support staff. Simply follow these steps.
Step 1: Go to Amazon’s website, hover the cursor over your name and select Your Orders.
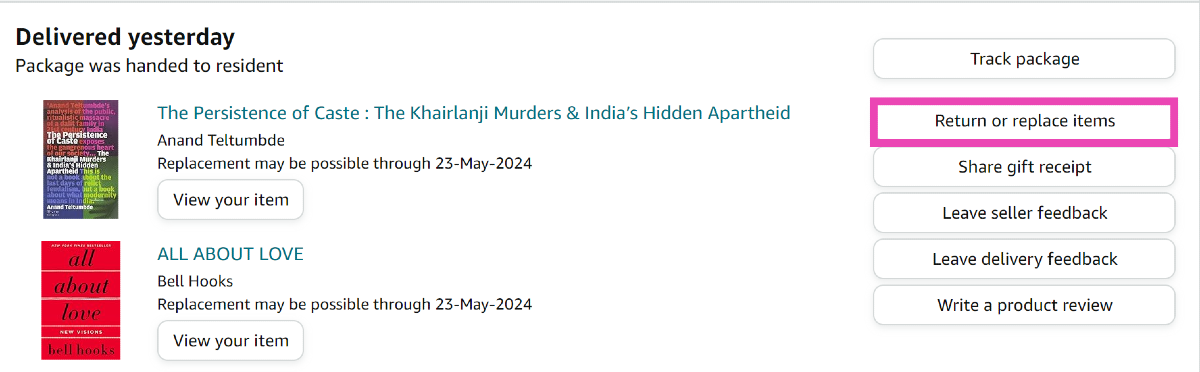
Step 2: Go to the order you wish to return and select Return or replace items.
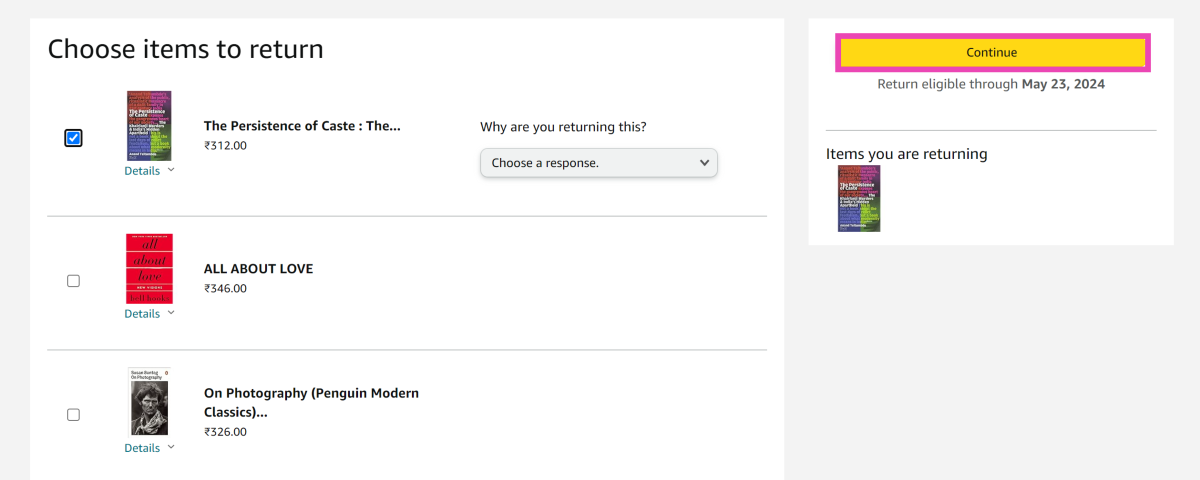
Step 3: The items that are eligible for return will appear on the screen. Click the checkbox for the item(s) you wish to return.
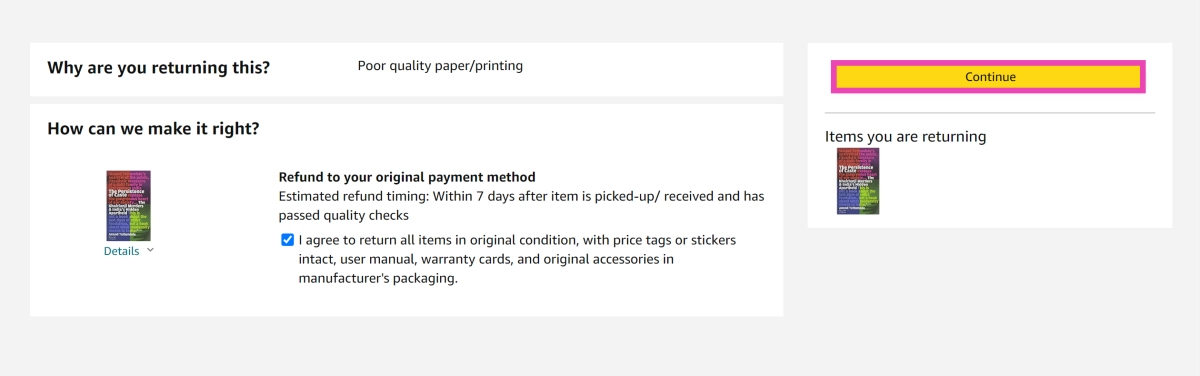
Step 4: Select the reason for return and hit Continue.
Step 5: Click the refund/replace option and hit Continue.
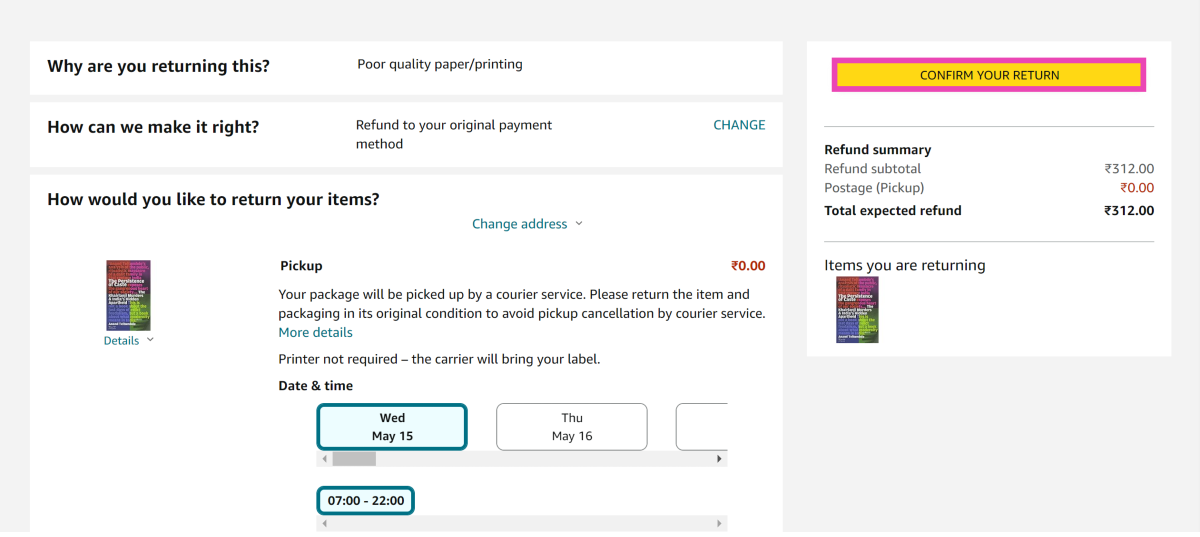
Step 6: Set a date and time for the pickup and select Confirm Your Return.
Frequently Asked Questions (FAQs)
How long until I can return my Amazon order?
Items shipped from Amazon can be returned within 30 days. However, this does not apply to all items. Click on ‘Return items’ next to an order to view which items are eligible for return.
Can I get a refund from Amazon after returning my order?
Depending on your order, you can either get a replacement or a full refund from Amazon. The refund amount is relayed via the method you used for the payment of the order. If paid via cash on delivery, the money will be refunded to your bank account or Amazon Pay balance.
What is Amazon’s customer helpline?
Amazon India’s customer helplines are 1800 1200 9009 and 1800 3000 9009. US customers can dial 1 888 280 4331 to reach Amazon Customer Support.
These are the top 3 ways to contact Amazon’s Customer Care service. Check out this article to learn how to track your Amazon order. If you have any other questions related to Amazon’s customer support, let us know in the comments!
Short-format videos have come to dominate most video-sharing platforms on the Internet. First introduced by Vine, this format was later perfected by TikTok. Instagram was also quick to jump on the bandwagon with Reels. YouTube, known for its long-form content, introduced micro videos in the form of ‘Shorts’ back in 2020. While Shorts are fun to consume, engaging in mindless scrolling can cause a slump in productivity. Today, we bring you the top 4 ways to disable YouTube Shorts on Android and PC.
There is no direct way to disable Shorts on YouTube. At best, you can hide the Shorts shelf on the YouTube website for 30 days. When the feature made its debut on YouTube, users were given an option to disable it from the app settings. Now that the micro-format has grown in popularity, the option to disable it has been removed from the app.
If you want to completely get rid of Shorts, you are left with third-party tools and other workarounds. On your PC, you can download a Chrome extension to block the short format videos. Android users can use an older version of the YouTube app that doesn’t have the Shorts feature. Since Google is cracking down on ‘modded’ apps for YouTube, using Vanced is not a viable option anymore.
Step 2: Scroll down until you come across the Shorts shelf.
Step 3: Hit the cross icon for Shorts.
Step 4: The Shorts shelf will be hidden for 30 days.
Use a browser extension
If you want a more permanent fix to this problem, install the Remove YouTube Shorts extension from the Chrome Webstore. Once installed, this extension gets rid of YouTube Shorts from the sidebar, feed, search results, and recommended videos. This will give you a much-needed boost in productivity.
Use an older version of the YouTube app on mobile
There is no native way to disable Shorts on the YouTube app for mobile. However, what you can do is use an older version of the YouTube app that doesn’t have Shorts. The last version of YouTube that did not have Shorts was v14.12.56.16. You can download this APK using APKMirror or any other third-party Android marketplace. Once the APK is downloaded, install it on your device. Additionally, go to the Google Play Store and turn off auto-updates for YouTube.
Uninstall YouTube Updates
You don’t need to sideload an older version of the YouTube app on your device if it initially had a version without Shorts in it. Here’s how you can restore that version.
Step 1: Go to YouTube’s page on the Google Play Store, tap the ellipses at the top right corner of the screen, and uncheck the box for Enable auto-updates.
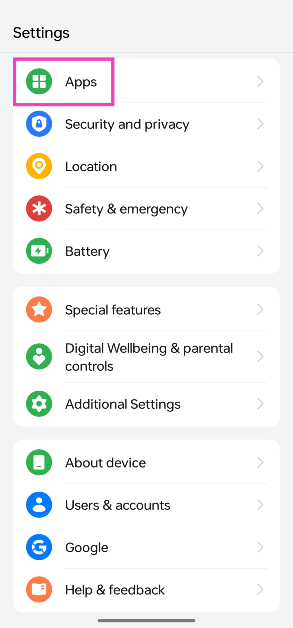
Step 2: Go to device settings and select Apps.
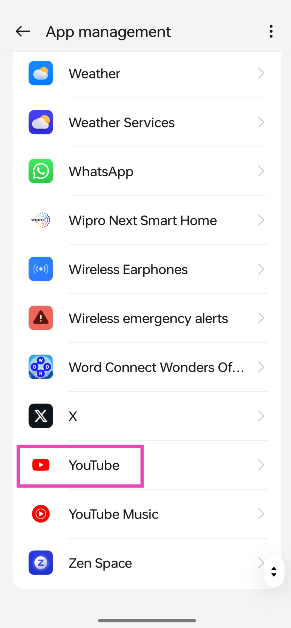
Step 3: Scroll down and select YouTube.
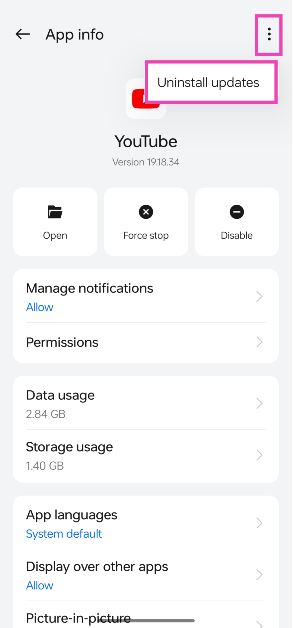
Step 4: Tap the ellipses at the top right corner of the screen.
Step 5: Select Uninstall updates.
Frequently Asked Questions (FAQs)
How do I disable YouTube Shorts on my PC?
Hit the cross icon on the Shorts shelf to disable it for 30 days. You can also use the Remove YouTube Shorts extension to completely block Shorts on the website.
How do I disable YouTube Shorts on Android?
There is no direct way to disable YouTube Shorts on Android. You can use an older version of YouTube that does not have Shorts in it.
How do I download YouTube Shorts on my device?
Use SSYouTubeDownloader to download a Short on your device.
These are the top 4 ways to disable YouTube Shorts on Android and PC. If you know any other way to go about this task, let us know in the comments! Check out this article to learn how to download a Short on your device.
Tata Play, which was formerly known as Tata Sky, has partnered with Amazon Prime to make its content available to DTH and Binge pack subscribers. Through new packs priced at Rs 199 per month, users of Tata Play Binge now take advantage of the features of Prime Lite with Tata Play in addition to six other OTT apps. Tata Play will offer a Prime Lite membership as part of its DTH & Binge bundles, which grants users access to Prime Video’s vast content collection as well as free limitless same-day delivery on over a million products and next-day delivery on over four million products on Amazon.
Harit Nagpal, Managing Director and CEO, of Tata Play, on this first-of-its-kind partnership, said, “While on the one hand, Tata Play’s robust content distribution network will help in expanding Amazon Prime’s outreach to newer audience segments, on the other, the addition of Prime Lite Membership with Tata Play will make Binge a more compelling proposition.”
According to the company, Customers of Tata Play DTH may now select from several packs, which start at Rs 199 per month and include Prime Lite and a selection of their preferred TV channels in addition to Tata Play. Added to that, Prime Lite with Tata Play and over thirty other well-known apps at different price points are available to Binge subscribers. Users can subscribe to six of the 33 OTT applications, including Prime Video, for Rs 199 per month, or they can subscribe to all 33 apps, including Prime Video, for Rs 349 per month.
With its new price plans, Tata Play Binge gives its users the flexibility to create custom OTT packs.
Consumers can enjoy the full selection of amazing shows and movies on Prime Video including highly popular Original series like Panchayat, Mirzapur, The Family Man, Dhootha, Inspector Rishi, Farzi, Dahaad, Made in Heaven, Indian Police Force, Suzhal – The Vortex, Dil Dosti Dilemma, Poacher, among others, blockbuster movies like Pathaan, Jailer, Ponniyin Selvan I & II, Rocky Aur Rani Kii Prem Kahaani, Tiger 3, Kantara, Mast Mein Rehne Ka, Maja Ma, Bawaal, Pippa, Captain Miller, Teri Baaton Mein Aisa Uljha Jiya, and many more, along with international series and movies like Fallout, Citadel, The Lord of The Rings: The Rings of Power, The Idea of You, The Boys, Jack Ryan, Reacher, to name a few. This is in addition to other Prime Lite benefits like free unlimited same-day delivery across 1M+ products and next-day delivery across 4M+ products, prime early access & exclusive deals and 5% cashback on Amazon Pay ICICI Bank Credit Card while shopping on Amazon.
Apart from the aforementioned plans, DTH customers have the option to enrol in an annual subscription to Amazon Prime via Tata Play DTH at a tempting limited-time introductory offer. This will allow them access to a plethora of benefits, including free shipping and shopping, Prime Video, Amazon Music, Prime Reading, Prime Gaming, and more, across five devices.
Amazon Prime and Tata Play – Plans & Benefits
DTH Packs and Prime Lite with Tata Play
Access Prime Video content on any 2 screens (mobile or TV)
Access to exclusive deals and free shipping on Amazon
Available as a bundle with linear TV packs
Price – Starting at Rs 199 per month
Prime Lite with Tata Play Binge
Access Prime Video content on any 2 screens (mobile or TV)
Access to exclusive deals and unlimited same-day and next-day delivery across millions of products
Select 6 OTT apps, including Prime Lite at Rs 199 per month, or enjoy all 33 apps, including Prime Lite, at Rs 349 per month
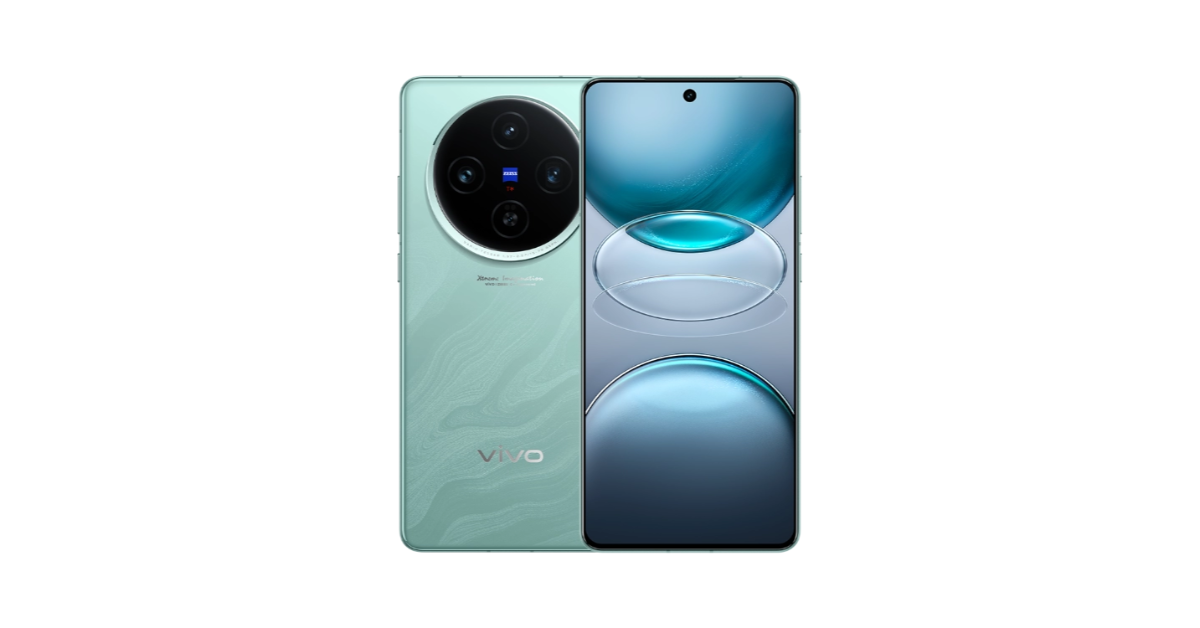
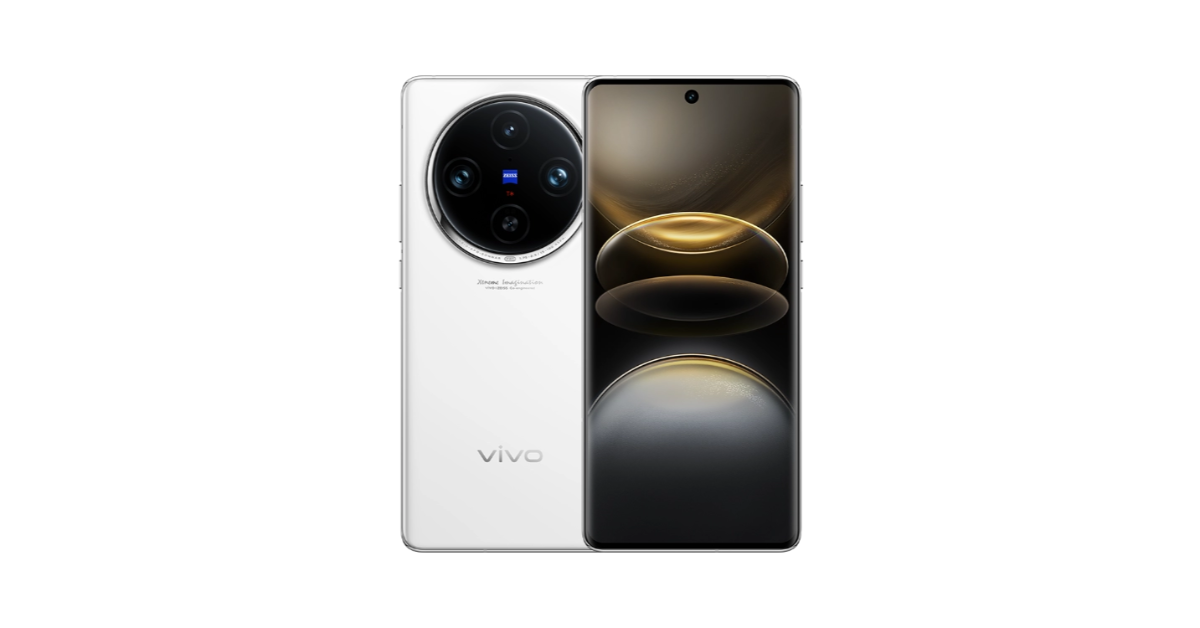
The Vivo X100 series has been expanded with the addition of two new handsets- Vivo X100s and Vivo X100s Pro. Vivo launched the X100 series in November last year which already includes Vivo X100 and Vivo X100 Pro. The newly arrived devices feature triple rear camera units. In addition to this, the newly launched phones are powered by MediaTek Dimensity 9300+ SoC.
In This Article
Pricing and sale details
Vivo X100s and Vivo X100s Pro were launched in China and are scheduled to go on sale from May 17. The devices will be available in white, green, grey and titanium colour options.
Both X100s and X100s Pro come equipped with MediaTek Dimensity 9300+ SoC with LPDDR5X RAM and UFS4.0 storage. For graphics, they are integrated with Arm Immortalis-G720 GPU. In terms of software, they run on OriginOS 4 with Android 14 out of the box. The phone flaunts a 6.78-inch AMOLED display with a 120Hz refresh rate with under-display fingerprint sensors.
Vivo X100s Pro
The handsets include a triple rear camera setup led by a 50-megapixel primary lens. X100s also includes a 64-megapixel telephoto sensor and a 50-megapixel ultra-wide-angle lens whereas X100s Pro has a 50-megapixel Zeiss APO telephoto lens; the rest of the main and ultra-wide sensors are the same as the X100s.
The X100s houses a 5,100mAh battery, on the other hand, the X100s Pro includes a 5,400mAh battery. Both the phones come with 100W fast charging support.
The Apple Music 100 Best Albums list features albums from various genres and eras, including contemporary and classic artists.
A dedicated microsite and Apple Music Radio specials provide in-depth analysis and exclusive content.
Each album will receive a custom award made from recycled Apple products.
Apple Music has launched its inaugural “100 Best Albums” list, highlighting some of the greatest records ever made. This list, curated by Apple Music’s team of experts and a select group of artists, songwriters, producers, and industry professionals, recognizes albums that have significantly influenced and shaped the music world.
In This Article
10-Day Countdown Begins
The 100 Best Albums are being revealed in a countdown format, with 10 albums announced each day for the next 10 days. The first set of albums, ranked 100-91, includes works from artists such as Solange, Tyler, The Creator, and George Michael. The complete list, along with exclusive content and dedicated Apple Music Radio episodes, is available on a new microsite at 100best.music.apple.com.
Music’s Impact Celebrated
Rachel Newman, Apple Music’s senior director of content and editorial, highlighted the importance of the project: “100 Best brings together all the things that make Apple Music the ultimate service for music lovers — human curation, an appreciation for the art of storytelling, and a deep love for music.”
Zane Lowe, Apple Music’s global creative director and lead anchor for Apple Music 1, noted the passion behind the selection process: “Selecting the 100 best albums was incredibly challenging, but it was a valuable opportunity to reflect on the music and albums that have had a significant impact.”
The first 10 albums revealed showcase a range of eras and genres. With seven albums from the 21st century, two from the 90s, and one from the 70s, the list includes contemporary artists like Tyler, The Creator, Robyn, Lorde, Travis Scott, and Solange, who have made notable contributions to modern music.
Here are the first 10 albums revealed:
100. Body Talk, Robyn
Hotel California, Eagles
ASTROWORLD, Travis Scott
Rage Against the Machine, Rage Against the Machine
Pure Heroine, Lorde
Confessions, Usher
Untrue, Burial
A Seat at the Table, Solange
Flower Boy, Tyler, The Creator
Listen Without Prejudice Vol. 1, George Michael
Discover, Learn, and Share
Listeners can explore the dedicated microsite for in-depth analysis of each album, archival interviews, and more. The site also allows fans to share their favorite albums with friends and on social media.
Apple Music Radio Specials
Apple Music Hits will feature a full 100 Best Albums Radio takeover, with round-the-clock specials and daily segments at 9 a.m. PT (noon ET). Exclusive content will be available on demand on Apple Music and Apple Podcasts. The countdown will culminate on May 22 with a special roundtable discussion featuring guest artists Nile Rodgers and Maggie Rogers, alongside Apple Music’s Zane Lowe and Ebro Darden. Lowe will also curate a special DJ mix featuring songs from all 100 Best Albums.
Each album on the list will receive a unique award made from recycled Apple products. The award, crafted from blasted anodized aluminum and polished PVD gold, features a design inspired by a vinyl LP record and is inscribed with the artist’s name, album title, and year of release.
Android smartphones have upped the ante when it comes to live transcription and speech-to-text capabilities. Google Pixel’s audio recorder app, known to be one of the best around, not only offers live transcription but also labels the different speakers in the recording. Samsung, with its latest Galaxy AI package, can accomplish the same feat. The voice typing feature on Gboard is something all Android smartphones can use. But what are the best speech-to-text converters outside of the Android bubble that one can use in 2024? Let’s take a look at some of them.
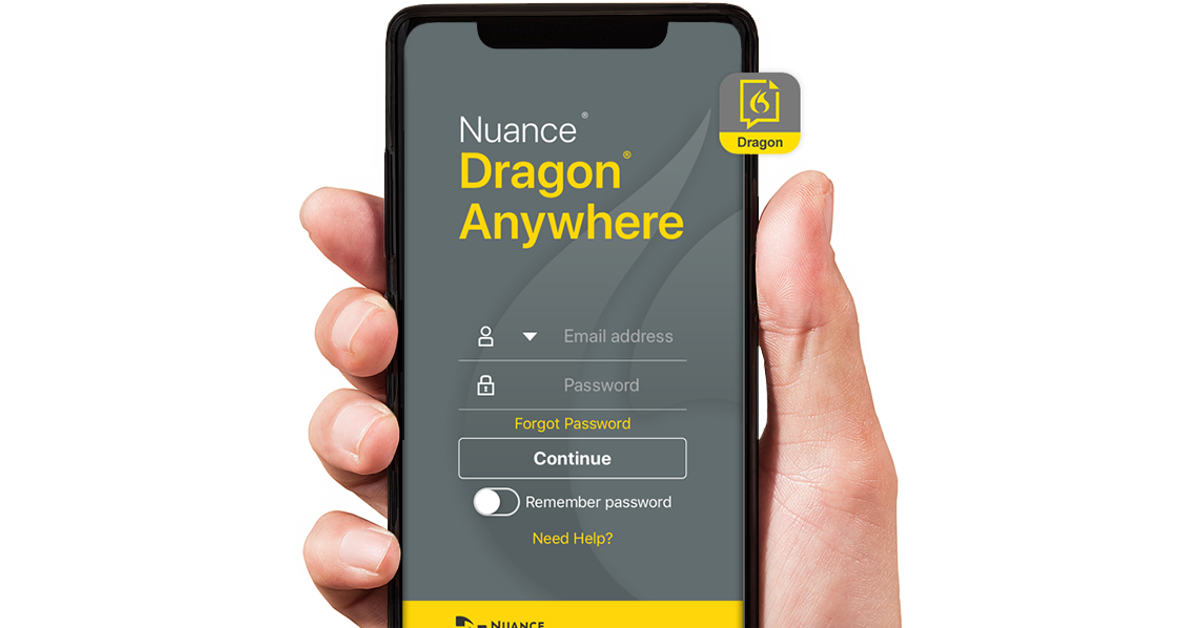
Dragon by Nuance is one of the best transcription tools you can use right now. Available for Windows, iOS, and Android platforms, Dragon can do it all. You can convert a voice note to text or dictate the words and let Dragon carry out live transcription. Its speech recognition is second to none. Dragon Anywhere, the mobile app, carefully adapts to the style of your speech and produces live transcription with surprising accuracy. If the app struggles to identify a word, you can always add it to its library. The only downside is that Dragon is not free to use. Its mobile app alone requires a $14.99 monthly subscription after the expiration of the free trial period.
Otter.ai
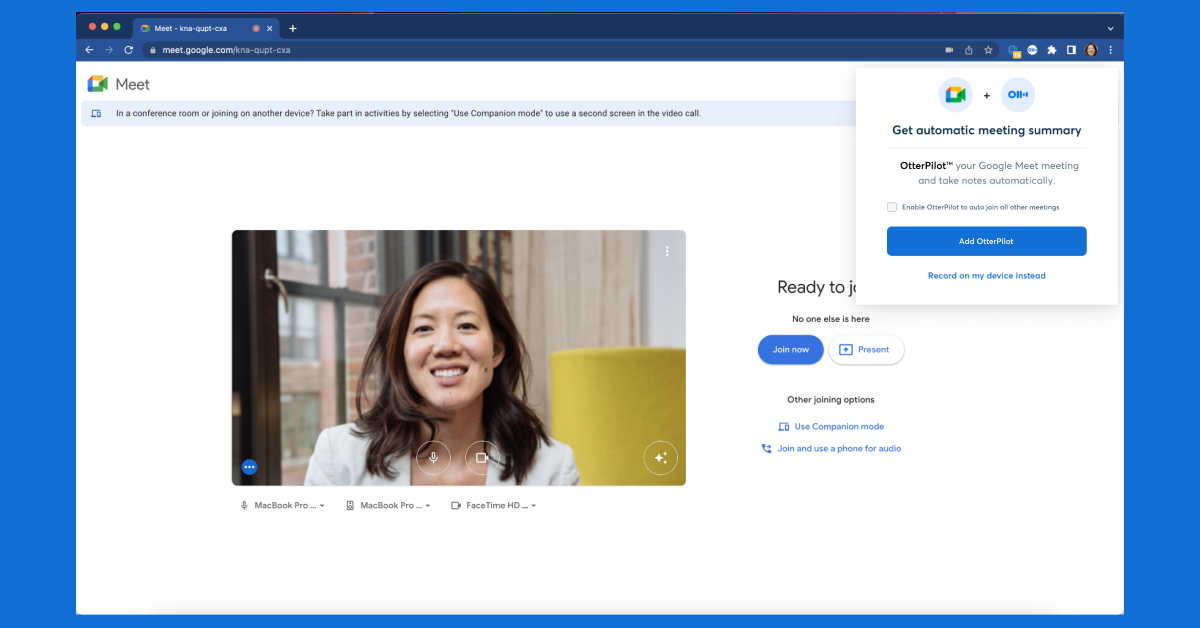
Otter.ai is one of the most versatile speech-to-text converters that works amazingly well with work-related tools like Google Meet, Microsoft Teams, Slack, Notion, and more. Otter also has a Chrome extension that can join your work meetings to record audio, write notes, transcribe speech, and share it with all the participants. The great thing is that it does all this for free. Its Business plan is suited for larger teams. Currently, Otter is offering a free 7-day trial period for its Business plan.
Speechmatics
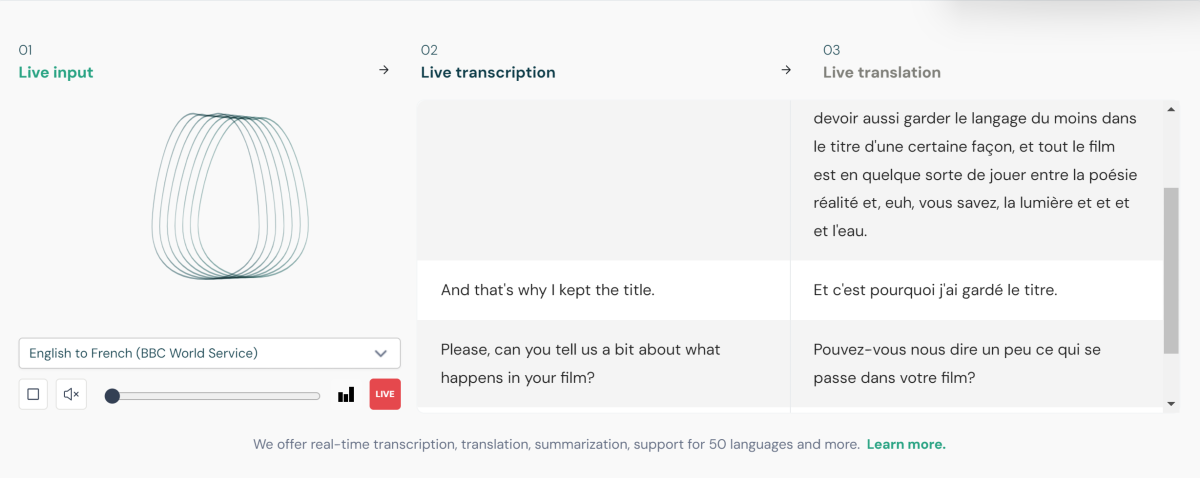
If you’ve got a large batch of files that need to be transcribed quickly, Speechmatics is one of the best options out there. You can use its basic package to transcribe 4 hours of real-time conversations and 4-hour batch files per month for free. Speechmatics supports 50 languages and has a real-time latency of less than 1 second. On top of that, this software can come with precise timestamps and divide the transcription into different chapters. You can also choose to summarise the text and go through it via the topic tags generated by the AI tool. You can also check out the paid plans on Speechmatics’ website.
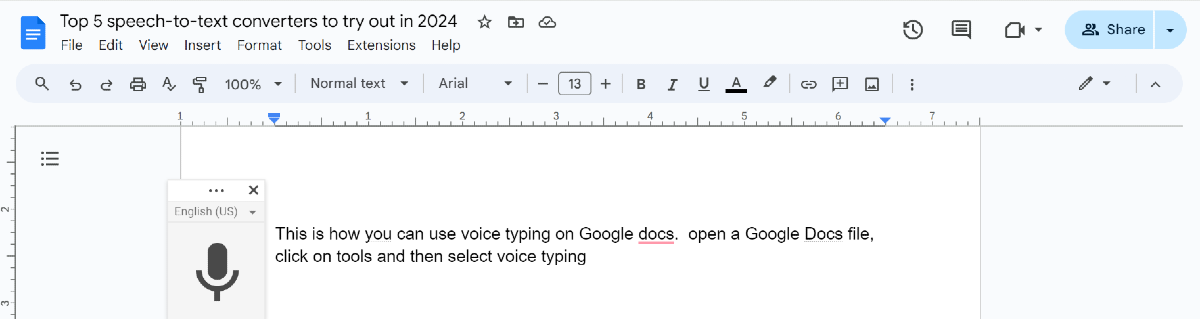
Voice Typing on Google Docs
If you don’t want to install a speech-to-text converter tool on your PC, you can simply use the native voice typing feature on Google Docs. This comes in very handy when you’re on the go and can’t find a stable spot to rest your laptop and type. Google Doc’s voice typing tool is not perfect, but it gets the job done. You will need to weed out the errors once you’re done dictating the text, but for a free tool, this is as good as it gets.
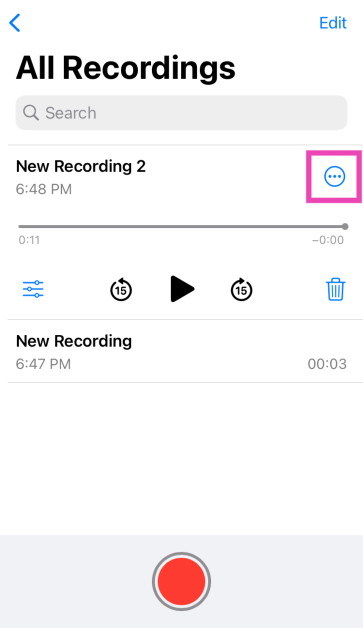
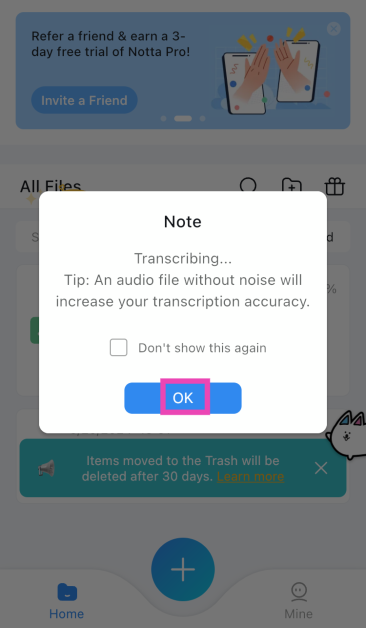
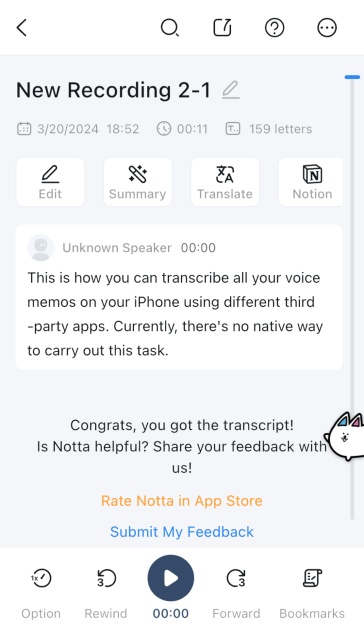
Notta app for iPhone
Apple Dictation is a great tool for transcribing messages in real time, but what if you want to convert a voice memo to a text file? Our favourite app for this task is Notta. Here’s how you can use it.
These are our picks for the top 5 speech-to-text converters for 2024. Apps like Dragon Anywhere and Notta require a paid subscription to work on your device, but if you need to take care of an urgent task you can always use their free trial package. Which transcription app is your favourite? Let us know in the comments!
OpenAI’s CEO, Sam Altman, has announced the launch of GPT-4o, an advanced version of the AI technology that powers ChatGPT. GPT-4o offers improved performance and efficiency and will be available to all users as OpenAI rolls it out globally. The technology will soon be offered to enterprise users.
GPT-4o provides GPT-4-level intelligence but is much faster and improves on its capabilities across text, voice, and vision. The company claims that GPT-4o understands and analyses the images better than any other model now in use. The quality and speed of GPT-4o’s language capabilities are enhanced to make advanced AI more widely available. More than 50 languages are now supported by ChatGPT for sign-up and login, user preferences, and other features. The “o” in GPT-4o stands for Omni. The GPT-4o can receive any combination of text, voice, and image as input and produce any combination of outputs in the same way. Its response time to audio inputs can be as quick as 232 milliseconds, with an average of 320 milliseconds; this is comparable to the average human response time. As per the company, it matches GPT-4 Turbo performance on text in English and code, with significant improvement on text in non-English languages, while also being much faster and 50% cheaper in the API.
Before GPT-4o, users were able to interact using ChatGPT with an average latency of 2.8 seconds (GPT-3.5) and 5.4 seconds (GPT-4). This was known as Voice Mode. It makes use of three models: GPT-3.5 or GPT-4 reads text, transcribes audio to text, and then transforms text back to audio. GPT-4, on the other hand, is unable to convey emotion, recognise tone, distinguish between many speakers, or perceive background noise. With GPT-4o, OpenAI claims to have trained a single new model end-to-end for text, vision, and audio, which means that the same neural network handles all inputs and outputs.
“We’ve evaluated GPT-4o according to our Preparedness Framework and in line with our voluntary commitments. Our evaluations of cybersecurity, CBRN, persuasion, and model autonomy show that GPT-4o does not score above Medium risk in any of these categories. This assessment involved running a suite of automated and human evaluations throughout the model training process. We tested both pre-safety-mitigation and post-safety-mitigation versions of the model, using custom fine-tuning and prompts, to better elicit model capabilities.”
The GPT-4o is now available to ChatGPT Plus and Team users, and Enterprise users will soon be able to access it as well. In addition to this OpenAI will also roll out to ChatGPT Free with usage limits today. Plus users will have a message limit that is up to 5x greater than free users, and Team and Enterprise users will have even higher limits. GPT-4o is currently available to developers via the API as a text and vision model.
When using GPT-4o, ChatGPT Free users will now have access to features such as experiencing GPT-4 level intelligence, getting responses(opens in a new window) from both the model and the web, analysing data(opens in a new window) and creating charts, Chat about photos you take, upload files(opens in a new window) for assistance summarising, writing or analysing, discover and use GPTs and the GPT Store and build a more helpful experience with Memory.
According to OpenAI, the number of messages that GPT-4o free users are able to send will be limited based on demand and usage. In addition to this, ChatGPT will automatically switch to GPT-3.5 so users can continue their conversations.
OpenAI has also launched a new ChatGPT desktop app for macOS, intended to work seamlessly with anything you do on your computer and is available to both free and premium users. You can ask ChatGPT a question right away by using the keyboard shortcut Option + Space. In addition, users will also be able to snap and share screenshots.
You may have heard the term ‘IP address’ thrown around a lot but what does it mean? To put it simply, an IP (Internet Protocol) address identifies your device to the network it is connected to and also the rest of the internet. Finding it is an easy process that doesn’t take much time. So, let’s take a look at how you can find the IP address of your iPhone and Android phone.
What is the difference between public and private IP addresses?
There are two major kinds of IP addresses – public and private. A public IP address is assigned to you by your Internet Service Provider. Every device connected to the network carries this address. You can find it through your router’s management portal or third-party apps like Find and All Router Admin.
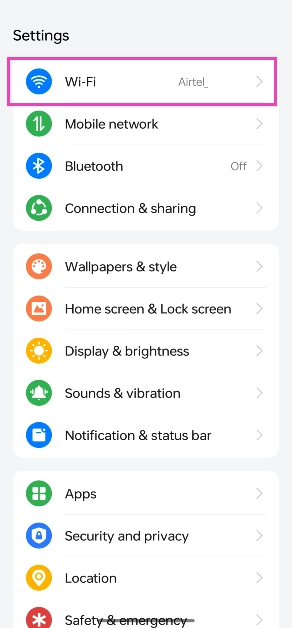
Meanwhile, a private IP address is assigned by the router to every device on the network. This address is not visible to the rest of the internet. It is simply a tool for the router to differentiate among the devices connected to it. You can find your device’s private IP address by going to Settings>WiFi.
Find your Android phone’s IP Address
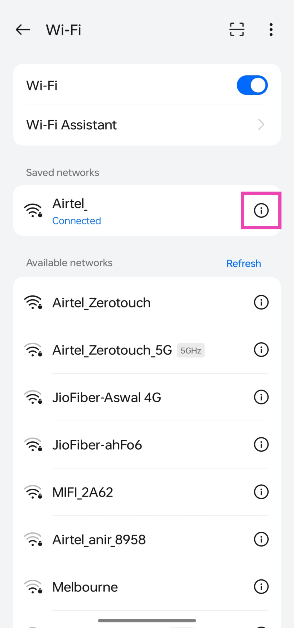
Step 1: Go to Settings and select WiFi.
Step 2: Tap on the ‘i’ icon next to the connected network.
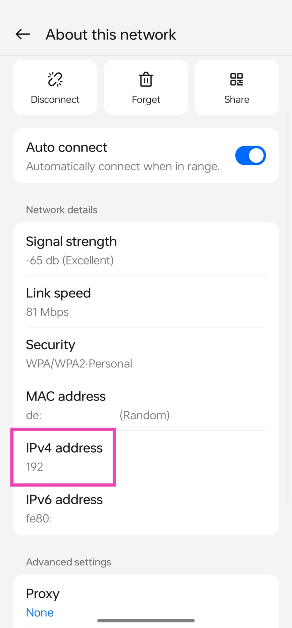
Step 3: Scroll down to view the IP address.
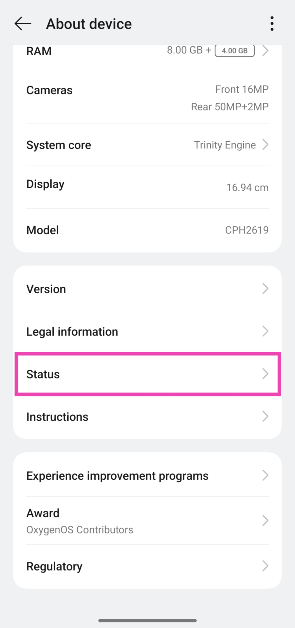
Find your Android phone’s IP Address from its About page
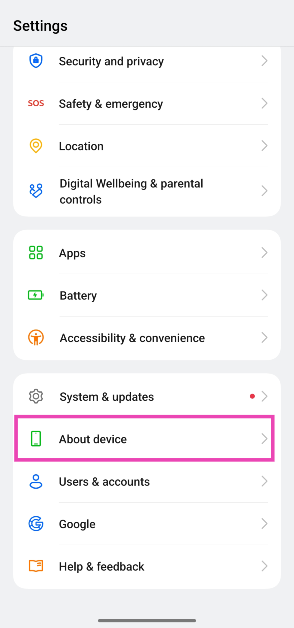
Step 1: Go to Settings and select About device.
Step 2: Tap on Status.
Step 3: Check the IP address field.
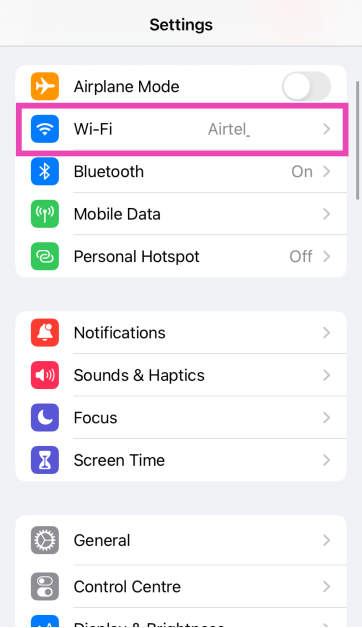
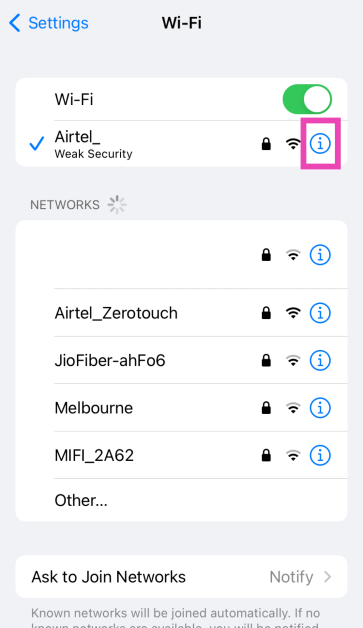
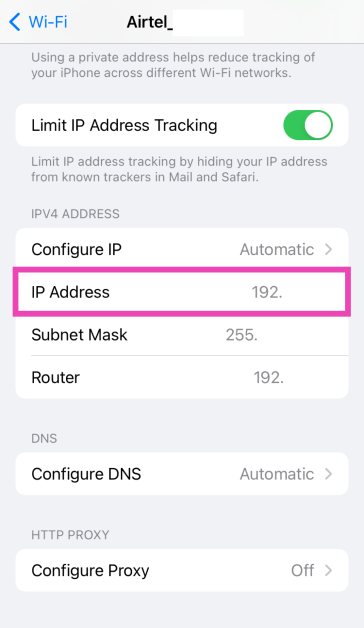
Find your iPhone’s IP Address
Step 1: Go to Settings and select WiFi.
Step 2: Tap on the ‘i’ icon next to the connected network.
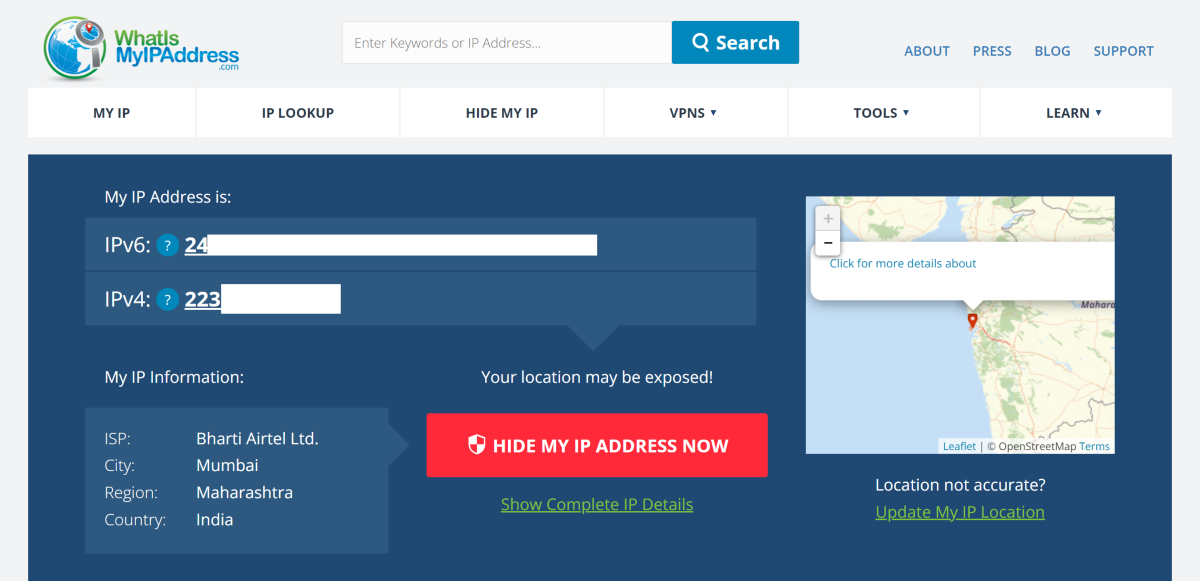
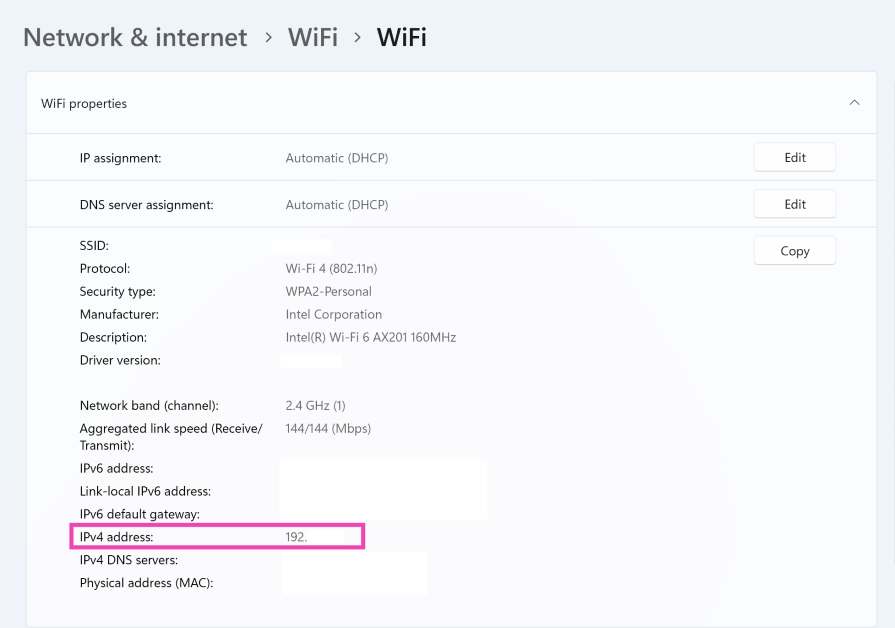
Step 3: Scroll down to the IPv4 category to view the IP address.
Step 2: Launch the app. Your Public IP address will be listed under Internet.
Find your public IP address
You can use third-party websites like WhatIsMyIP and WhatIsMyIPAddress to view the public IP address assigned to you by the Internet Service Provider. Nord VPN’s website also has a very handy tool that helps you immediately look up your public IP. The websites mentioned above can determine both types of IPs, IPv4 and IPv6. If you don’t wish to use a website, you can use third-party apps like Fing and All Router Admin for this task.
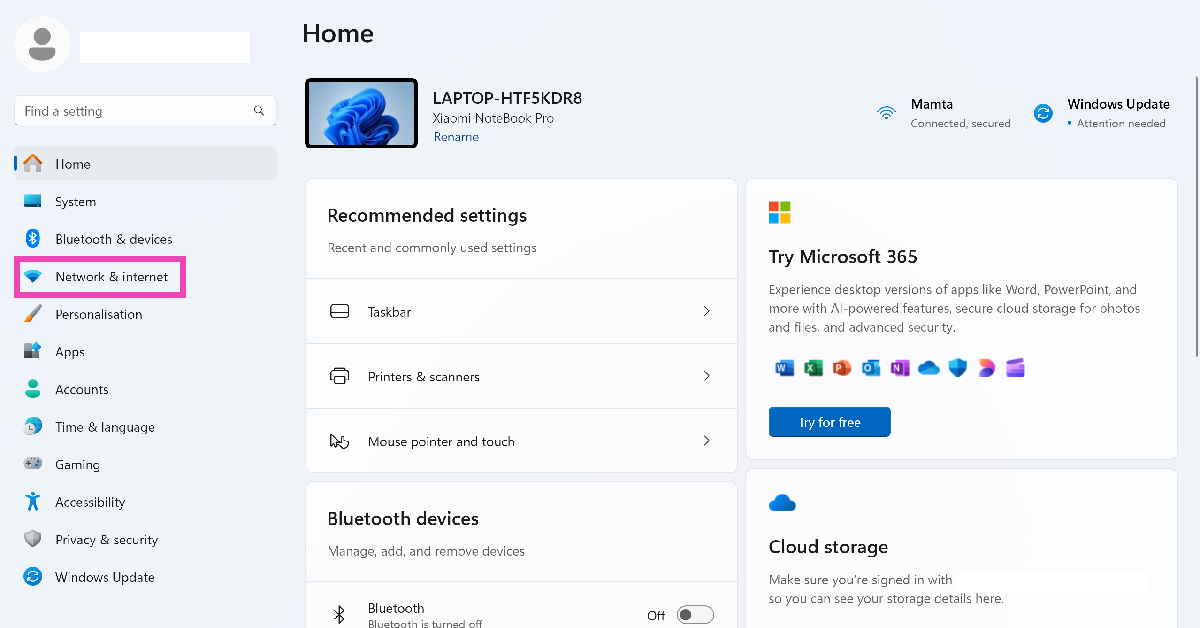
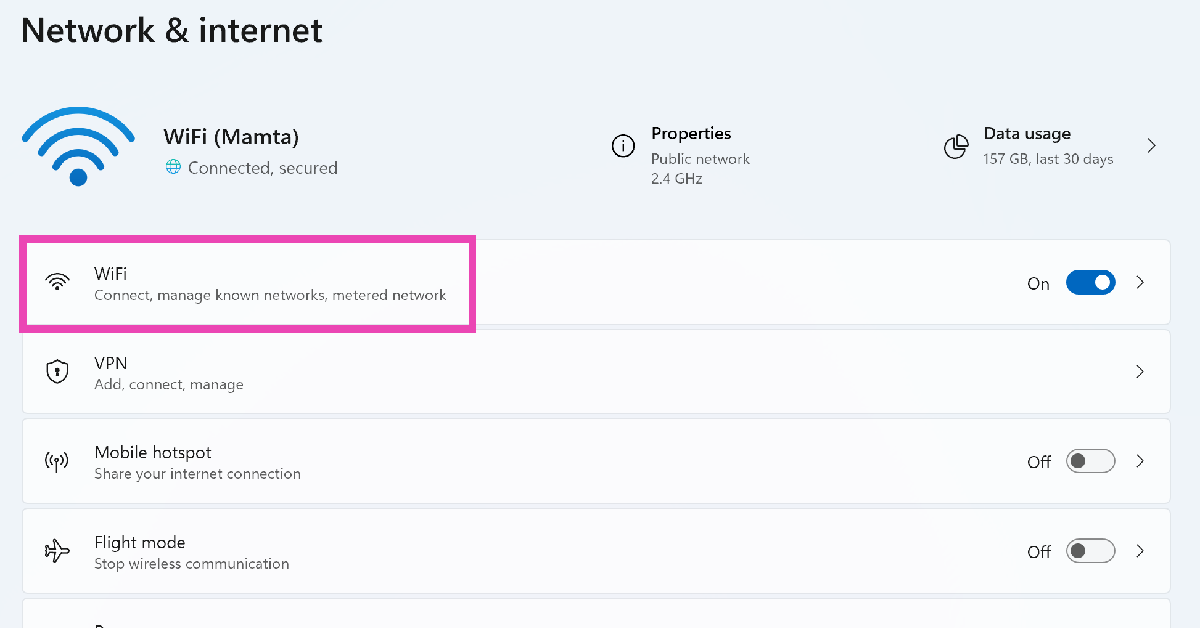
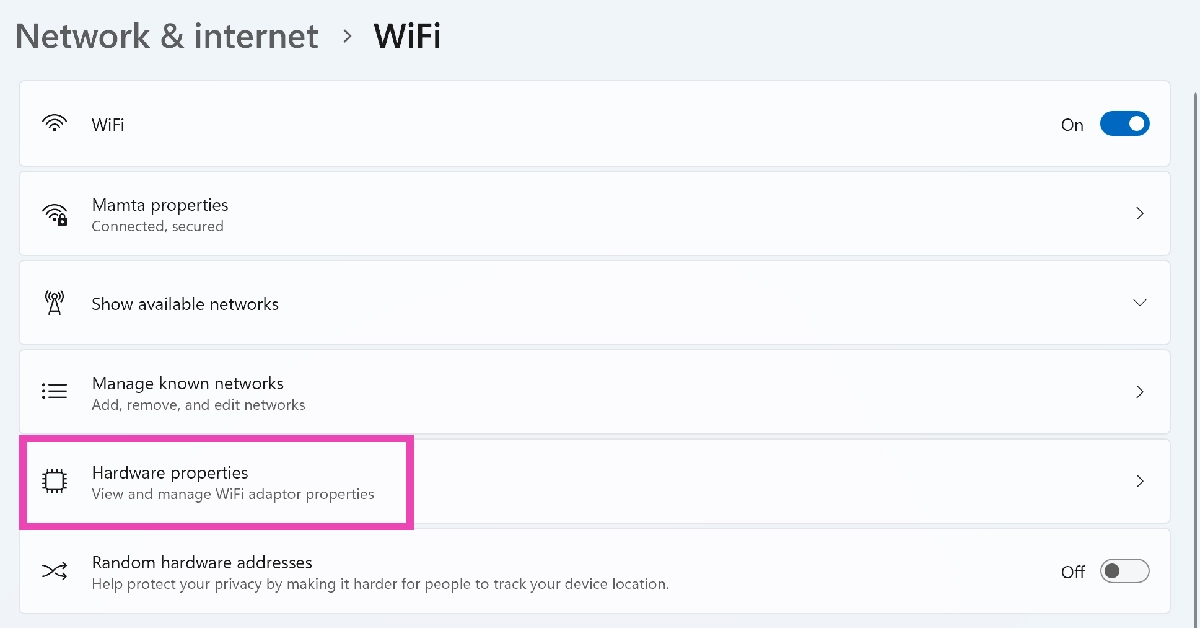
Bonus Tip: Find your Windows 11 PC or laptop’s IP address
Step 1: Go to Settings and click on Network & internet.
Step 2: Click on WiFi.
Step 3: Select Hardware properties.
Step 4: The IP address will be listed next to IPv4 address.
Frequently Asked Questions (FAQs)
What is the difference between IPv4 and IPv6?
IPv4 is an older Internet Protocol version based on 32 binary bits. As a result, it can only create 4.2 billion discrete IP addresses. Meanwhile, IPv6 is composed of 8 blocks of 4 hexadecimal digits, taking its capacity to 3.4 x 10^38 discrete addresses.
How do I find my PC’s IP address?
To find your Windows PC’s IP address, simply open Command Prompt and enter the ‘ipconfig’ command.
How do I find my Android phone’s IP address?
Go to Settings>About device>Status and scroll down to IP address to view it.
How do I find out my iPhone’s IP address?
Go to Settings>WiFi, hit the ‘i’ icon next to the connected network, and go to the IP address category to view it.
Can I find my IP address using my router?
Go to your router’s device management gateway and switch to the General Management tab to view its IP address.
These are the top 5 ways to find the IP address on Android and iPhone. Know any other ways to find the IP address of any device? Let us know in the comments. Check out this article to learn how to find the IP address of your printer.
LG Electronics is offering fantastic discounts on home appliances and entertainment devices like TVs, speakers, projectors, air conditioners, refrigerators, washing machines, microwaves, dishwashers, and water purifiers as part of its “Life’s Good Offer” celebration of its 27-year anniversary.
Hong Ju Jeon- MD, LG Electronics India said, “Today marks a significant milestone for us at LG Electronics. As we celebrate 27 years of innovation, we reflect on our journey of pushing boundaries, pioneering new technologies, and enhancing lives. We are immensely grateful to our customers for their trust and support, which have been the cornerstone of our success. Looking ahead, we remain dedicated to delivering excellence, enriching experiences, and making a positive impact in the world.”
The “Life’s Good Offer” is valid till June 11 or until stocks last. The offers are available at your nearest LG authorised retailer or visit LG’s official website for more details.
LG Electronics Life’s Good Offer is providing up to 27% cashback to customers on certain debit and credit card transactions. Furthermore, a few LG products may be purchased for as low as Rs 27. Shoppers have to pay Rs 27 as processing charges and the rest of the amount can be paid in easy EMIs on select products.
Furthermore, a number of washing machine and water purifier models come with fixed EMIs beginning at Rs 888. As per the company, deals are valid on specific Bajaj Finance cards as well as credit/debit cards.
Some of the water purifier models are eligible for free maintenance worth Rs 4200 as part of the LG Electronics Life’s Good Offer. Additionally, select split and window ACs boast a complimentary 5-year warranty on the PCB (Printed Circuit Board), guaranteeing reliable cooling. On the purchase of the LG InstaView Side by-Side Refrigerator (GL-X257ABSX) buyers will get a complimentary Rs 11,499 Mini Bar Refrigerator, which is ideal for keeping additional snacks or beverages.
For added peace of mind, a three-year guarantee is available on select LG TVs. When you buy certain LG TVs, you can get the LG Smart Cam for just Rs 999 (which used to be Rs 9,990). Lastly, when you buy an LG soundbar with a particular LG TV, you may save up to 30%
Google I/O 2024 is a crucial event for tech enthusiasts, where the company showcases its upcoming products, OS upgrades, AI advancements and more. The event also features announcements about new software tech. Here is what we can anticipate from this year’s Google I/O and how to watch the event live.
How to Watch Google I/O 2024 Live?
Google I/O 2024 is scheduled to take place in person and will be broadcast live on all of Google’s official platforms, showcasing Google’s latest developments in Android, Chrome, Google Assistant, AI, software updates, and potentially new hardware products. The company’s CEO, Sundar Pichai, and his core team are anticipated to make the major announcements during the tech event. The event will be live-streamed from Google’s Shoreline Amphitheatre in Mountain View, California— the traditional setting for the I/O conference. The keynote will begin at 10:00 am PT (10:30 pm IST) today. Google will broadcast the conference live to a global audience. The event will be live-streamed on Google’s social media channels, including the main keynote.
Note that there might be a cap on the number of people who can attend the developer session. Developers can register for the event at no cost in order to receive email updates regarding content.
What do we anticipate from Google I/O 2024?
The Pixel Fold, Google’s first-ever foldable phone and Pixel 7a debuted at the 2023 Google I/O event. Although there haven’t been any leaks or rumours about the Pixel Fold 2 yet, it’s anticipated to be released later this year. Whereas the Pixel 8a has already debuted last week. The company is expected to release the Pixel Fold 2, possibly with the Tensor G4 SoC, similar to its upcoming Pixel 9 Series counterparts. The 2024 I/O event will not see the announcement of the Pixel Tablet 2, while Google may unveil a teaser for the next generation of their tablet. Similarly, Google might not, however, unveil the Pixel Fold 2 smartphone at this year’s I/O conference, according to sources. Instead, there might be a teaser for the next foldable device which could be called the Pixel 9 Pro Fold and is anticipated to debut in September alongside the Pixel 9 series.
You can anticipate a lot of action on the OS front at Google I/O 2024. Right now the most recent iteration of Android is only accessible for testing on Pixel smartphones and is currently in beta and we can anticipate new features and the release date of Android 15. It is likely to include features like satellite connectivity, audio sharing, notification cooldown, app archiving, and partial screen sharing expected to enhance user privacy, productivity, and security.
At this year’s I/O, the company probably will showcase how it is going to integrate Gemini with its Android app suite which includes Gmail, Google Workspace, Chrome, Maps, and even more. Furthermore, Google plans to launch “Pixie,” a new virtual assistant that is exclusive to Pixel devices and is powered by Gemini AI. It’s expected that this assistant will have multimodal features, allowing customers to communicate with Pixie via speech, text, and maybe image input and might even eclipse Google Assistant.
Garena Free Fire is a battle royale game with regular awards and tournaments to keep players interested. If you play Garena Free Fire, you should be aware of the redeem codes that are released on a daily basis. However, because the battle royale game is banned in India, players from other countries can use the Free Fire Redeem codes daily. If you’re unfamiliar with the Garena Free Fire redeem codes or don’t know how to get them, we’ve put together a step-by-step guide to help you redeem them. Check out Garena Free Fire Redeem Codes for 14 May 2024.
The Free Fire redeem codes are a great way to get free stuff. These are 12-digit codes that contain alphabets and numbers, as well as an expiration date and time. Because the Garena FF redeem codes cannot be used more than once, you should hurry to the redemption page to claim your free reward before someone else does. To get a free reward, all you have to do is go to reward.ff.garena.com/en, which is the official redemption page. Also, keep an eye on this space for daily updates on Garena Free Fire redemption codes and rewards.
If you’re on vacation, finding free WiFi can be a challenging task. If your hotel does not offer free WiFi, you may have to venture out and look for publicly available networks to get internet access. Luckily, there are some ways that can help you get access to the internet no matter where you are. Today, we bring you the top 3 ways to find free WiFi networks around you.
Make sure your device is safe from malicious attacks when you’re on public WiFi
Using free public WiFi sounds like a great idea, but your device is always at threat of being attacked by malicious actors. When you’re on an unsecured network, hackers can push malware on your device. If you don’t safeguard your device, the network operators can also track your browsing activity. Some may collect your browsing data and sell it to third parties and advertisers.
You can safeguard your device’s privacy by masking its IP address using a VPN. Here are our picks for the best VPN services you can use right now. A good VPN encrypts the network and makes sure your IP address is safe. If you’re on a PC, make sure Windows Firewall is enabled. Never trust any random popup and never provide any sensitive information to it.
Find a public WiFi hotspot
You can access free WiFi at places like coffee shops, hotels, restaurants, college campuses and more. Some cities may have a free WiFi network around the city centre or major markets. The chances of your local public library offering free WiFi are also very high. If you are a library member, you can even use their public PCs to browse the internet. Other than that, chain stores and coffee shops are great spots to find free WiFi.
Use a third-party app
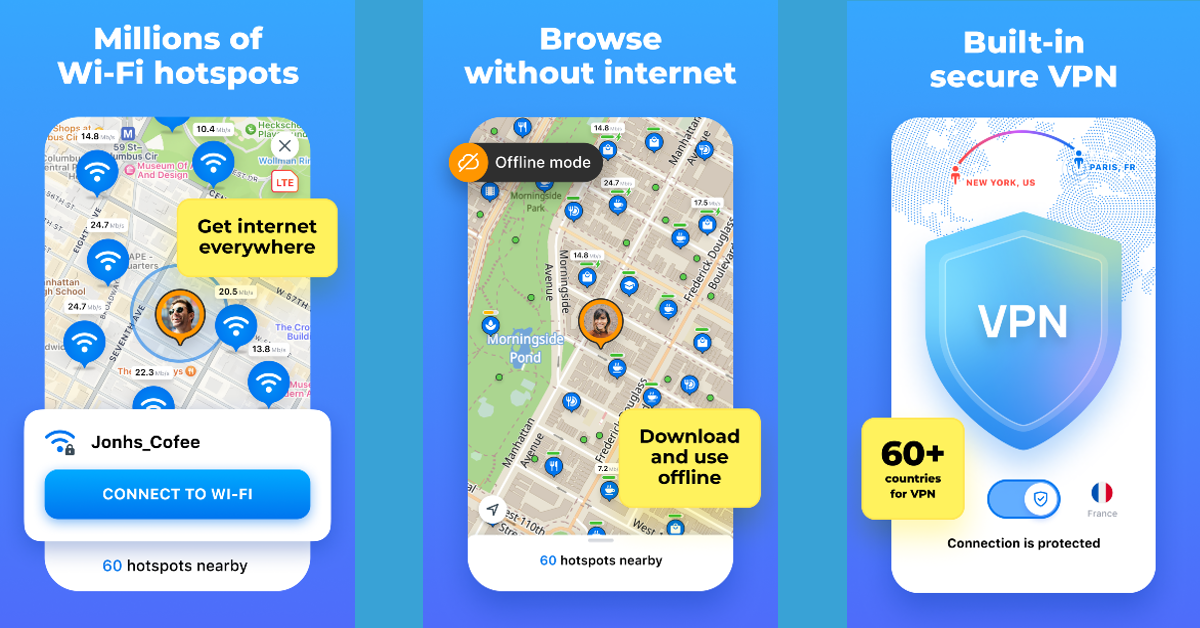
If you need help finding free public WiFi hotspots in your area, download the WiFi Map app. Its library contains more than 150 million public WiFi networks. Upon downloading the app, give it access to your phone’s location. Switch to the map tab to view public WiFi networks around you. You can swipe up from the bottom of the screen to view the list of results. Tap on a network to see its location on the map. WiFi Map also has a built-in VPN which ensures your anonymity whenever you connect to a network.
Enable internet tethering on your smartphone
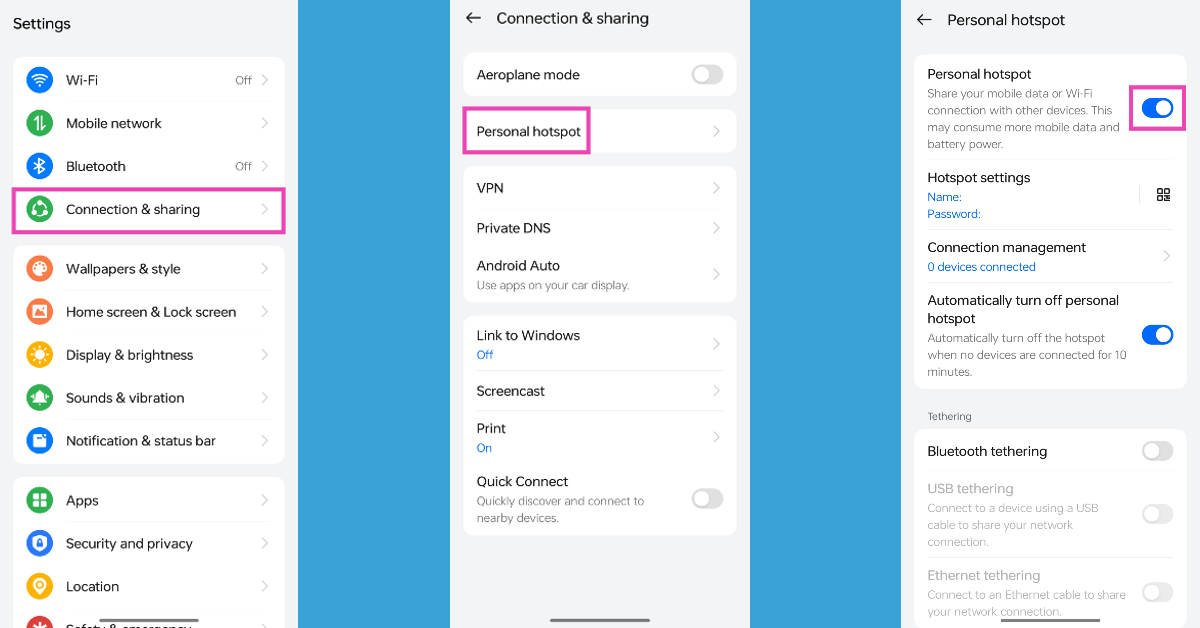
If your smartphone has access to mobile data, you can use it as a WiFi hotspot for your PC. Simply swipe down from the status bar and tap on the Personal Hotspot tile in the Quick Settings Menu. You can also enable internet tethering by going to Settings>Connections and turning on the toggle switch for Mobile Hotspot.
Frequently Asked Questions (FAQs)
How do I find free WiFi networks near me?
Use apps like WiFi Map, WiFi Finder, and Instabridge to find free WiFi networks near your location. You can also visit your local public library to access free WiFi.
How do I set up a data usage limit for my phone’s personal hotspot?
Go to Settings>Connection>Personal hotspot>Connection management and select ‘Data usage limit’. Manually enter the limit for your phone’s WiFi hotspot.
How do I share the WiFi password of the connected network?
To share the password of the WiFi network you are connected to, go to Settings>WiFi, tap on the network, hit ‘Share’ and scan the QR code using another phone.
These are the top 3 ways to find free WiFi networks around you. If you know any other ways to go about this task, let us know in the comments. While you’re here, read this article to learn how to find and view saved WiFi passwords on your smartphone.
On May 23, POCO India will unveil the POCO F6 5G smartphone in India. The smartphone is the successor to the POCO F5, which was released last year. While confirming the release date of its upcoming smartphone, the company has also revealed the design and key features of the phone. Key information about the phone has already been circulating in rumours suggesting it is a renamed Redmi Turbo 3, which debuted in China last month. Besides this, the device will only be available on Flipkart in India.
The POCO F6 5G, the company’s upcoming smartphone, will go on sale in India on May 23, as confirmed by Poco India. The launch event will begin at 4:30 p.m. IST. Along with sharing the launch details, Xiaomi’s spin-off also released the first images for its upcoming smartphone.
The POCO F6 5G’s back panel, which displays the camera unit layout, is seen in the teaser. Two cameras are positioned separately with slightly elevated circular modules and a flash unit that resembles a ring. A 50-megapixel camera with support for optical image stabilisation (OIS) is clearly visible on the back panel. The smartphone was recently discovered on certification websites from NBTC and SDPPI, revealing its model number, 24069PC12G. It was also listed on Geekbench last month. The Qualcomm Snapdragon 8s Gen 3 CPU is expected to power the device, based on the benchmark listing. There was 12GB of RAM listed in the benchmark for the POCO F6.
Additionally, the device’s Flipkart webpage has gone online, confirming the device’s exclusive availability on the e-commerce platform.
The upcoming POCO smartphone is likely to be a rebranded version of the Redmi Turbo 3, which debuted in China last month. Both devices share a lot of similarities in terms of design. The Redmi Turbo 3 and the Poco F6 5G possess an identical back camera module layout design. The Redmi Turbo 3 boasts a dual rear camera set consisting of a 50-megapixel Sony LYT-600 sensor with OIS and an 8-megapixel ultra-wide-angle camera. There is a 20-megapixel front camera for taking photos and video chats.
The OnePlus Nord CE 4 Lite has been spotted on several regulatory websites, including BIS, suggesting an imminent launch.
The upcoming phone has also appeared on the Geekbench site.
A recent report suggests that it has also been spotted listed on IMDA, Singapore’s regulatory website.
The OnePlus Nord CE 4 Lite is expected to be launched soon, with details surfacing online. The phone will succeed the OnePlus Nord CE 3 Lite, launched in April 2023. The device has been spotted on the Bureau of Indian Standards (BIS) and Geekbench websites and has been observed on the IMDA website, Singapore’s regulatory body.
The Nord CE 4 Lite, OnePlus’s newest low-cost smartphone, will soon be available in India. The company has not officially confirmed the device’s release, although it has lately been seen on Singapore’s regulatory agency, IMDA. According to the IMDA regulatory website, a OnePlus model with the model number CPH2621 is listed under the OnePlus Nord CE 4 Lite 5G moniker.
Prior to this, the Nord CE 4 Lite also appeared on Geekbench and the Bureau of Indian Standards (BIS) websites with the same model number. According to the phone’s Geekbench listing, it will include a Snapdragon 7+ Gen 3 CPU paired with 12GB of RAM. A previous source suggested that the Nord CE 4 Lite will be powered by a Snapdragon 6 Gen 1 SoC.
It might run Android 14 out of the box. Furthermore, it would also include a 6.67-inch 120Hz full-HD+ AMOLED screen. For the optics, it is slated to come with a dual rear camera setup that includes a 50-megapixel primary sensor and a 16-megapixel front camera for selfies. The tipster went on to say that the Nord CE 4 Lite will be a repackaged Oppo A3 that hasn’t been released yet and will cost less than Rs 20,000.
Note that the OnePlus Nord CE 3 Lite 5G was launched in India in April 2023 at a starting price of Rs 19,999 for the 8GB RAM with 128GB storage option. Whereas the 8GB RAM with 256GB storage option was priced at Rs 21,999.
Mivi is a relatively new player in the TWS segment but it has taken no time to create a solid portfolio of products. Predominantly operating in the entry-level TWS category, the Indian tech outfit is known for offering a bang for your buck. Its latest release, the DuoPods i7 claims to deliver just that. We have been using this TWS for the last week, primarily for music and media consumption along with video calling and even a bit of gaming. Here is our in-depth review of the Mivi DuoPods i7.
Here’s what you get inside the DuoPods i7 retail box:
Charging case with wireless earbuds inside
Two pairs of extra ear tips
USB Type-A to Type-C charging cable
User documentation
The TWS is available in seven colour options – Blue, White, Black, Orange, Green, and Purple. We used the green colour variant of this review. The oval charging case is made entirely out of plastic and has a transparent lid. This lid is prone to scratches. After a week of use, our review unit collected a significant amount of scratches.
The hinge of the case is strong and the lid can be lifted easily using a single finger. The USB charging port is positioned right below the hinge. The case does not roll off when placed on a flat surface. Despite getting scratched up, it can survive rugged use.
There are four miniature LED notification lights in the inner panel of the charging case. This array acts as a battery indicator for the case. You can see these lights through the transparent lid. The wireless earbuds are magnetically locked into their respective cutouts, but a harsh jerk can dislodge them from their native position.
The earbuds follow the traditional in-ear design language. They fit nicely into the ear and offer a decent level of passive noise cancellation. The tapering stem attached to the earbuds is something we really like about this design. This stem is broad at the top, allowing you to adjust the buds without accidentally triggering the touch controls. The glossy panel covering the stem contributes to the aesthetic value of the product.
The Mivi DuoPods i7 rock an IPX4 rating for dust and water protection. We wore the earbuds while working out and were pleased to see the fit remained snug even in sweaty conditions. The performance was unfazed by excessive sweat too.
Mivi DuoPods i7 Review: Performance
Producing the audio output on the DuoPods i7 are 13mm hi-fidelity drivers. The earbuds support Bluetooth 5.3 and AAC codec. While there is no pairing button in the charging case, the earbuds automatically enter pairing mode when you pull them out of their respective cutouts. Connecting them to your device is a seamless process that doesn’t take more than a few seconds.
If you enjoy a bass-centric soundstage, you’re going to love what Mivi DuoPods i7 has to offer. The audio output is enveloped by a blanket of bass, adding something extra to every thump. The bass notes stand out in the mix. The mid and high frequencies are crisp and well represented in the soundstage but they come with a heavy dollop of bass on the side. Since Mivi does not have a companion app for its TWS products yet, this is the only sound profile you can access on the DuoPods i7. What surprised us about the DuoPods i7 is how loud it can get. The audio output suffers very little distortion at the maximum volume level.
Neutral-sounding wireless earbuds are a rarity in this price range, but if you don’t want the soundstage to be dominated by the bass, there are better options for you. The DuoPods i7 are specially engineered to produce a thumping output. We suggest going through Mivi’s catalogue and checking out other close-to-neutral TWS products.
The calling experience on the DuoPods i7 is passable, but it has all the shortcomings we expect from a TWS in this price range. In an indoor setting, the AI ENC tech does well to curb the surrounding noise and relay clear audio over phone calls, but the call quality takes a hit in outdoor conditions.
There is a handy low-latency mode on this TWS as well. It can be enabled by tapping the left earbud three times. We would have liked more accessible controls, but there is no way to remap the touch gestures on the earbuds as they do not have a companion app yet. However, once enabled, the low-latency mode worked well to minimise the audio lag while gaming and watching videos.
Mivi claims a combined battery life of 55 hours on the DuoPods i7, with the earbuds lasting 8.5 hours on a single charge. During the review period, we used the Mivi DuoPods i7 for 4-5 hours every day and it lasted just over a week. With a USB Type-C charger, you can get 500 minutes of playtime with just a 10-minute charge.
If you’re a basshead, the Mivi DuoPods i7 are worth the Rs 1,500 price tag. We have yet to try a pair of wireless earbuds with more powerful bass than the DuoPods i7 in this category. Despite the boosted bass, the audio output has a crispness to it. As far as the listening experience goes, the DuoPods i7 is on the money. It is only dragged down by the lack of a companion app. We would have liked the option to choose from different sound profiles and remap the touch controls on the earbuds.
The customisation options on the iPhone’s home screen are very limited, but it has all the essential features. If you don’t want an app to appear on the home screen, you can either hide the entire page or remove the app with ease. Once the app has been removed it can always be restored with ease. Today, we bring you the top 5 ways to add an app back to the home screen on an iPhone.
Why can’t I find an app on my iPhone’s home screen?
If you can’t find an app on your iPhone’s home screen, it could be due to one of the following reasons.
You accidentally dropped the app into a folder on the home screen
The app was removed from the home screen
The app was accidentally deleted
The home screen page containing the app is hidden
The app has been restricted, and as a result, isn’t visible on the screen
The app was not installed correctly
Move an app from a folder to the home screen
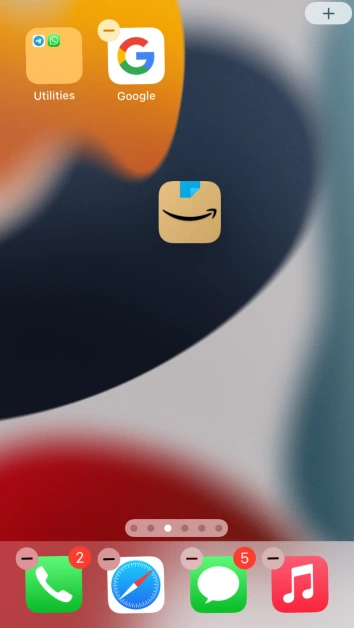
Step 1: Go to the folder’s home screen page and long-press any empty spot.
Step 2: Once your phone goes into screen editing mode, tap on the folder to view the apps within it.
Step 3:Drag the app you want to add to the home screen out of the folder.
Step 4:Drop the app on the screen.
Add an app to the home screen from the App Library
Step 1: Go to the App Library by swiping left on the last home screen page.
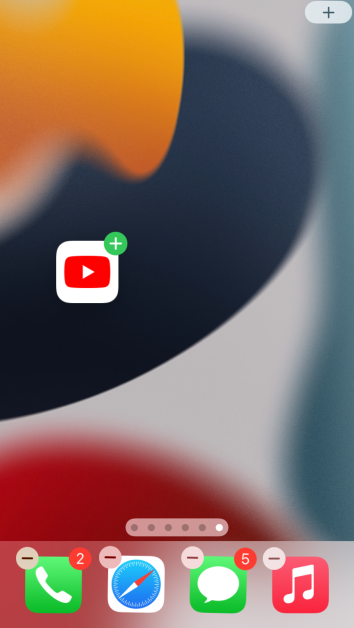
Step 2:Long-press and drag the app you want to add to the screen.
Step 3:Drop the app on the home screen page of your choice.
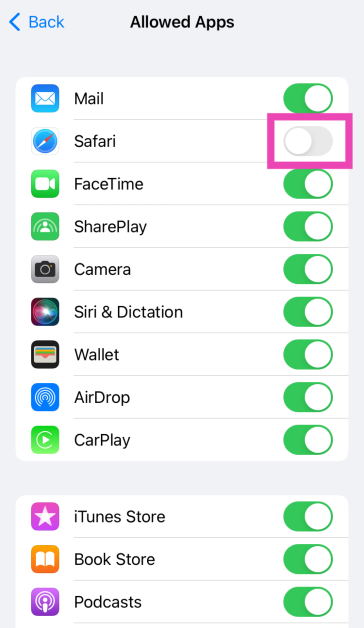
Unrestrict the app
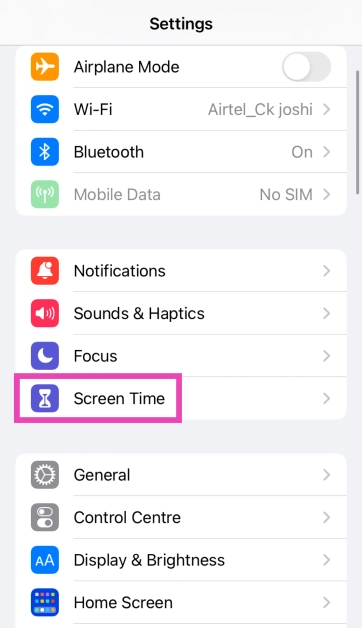
Step 1: Go to Settings and select Screen Time.
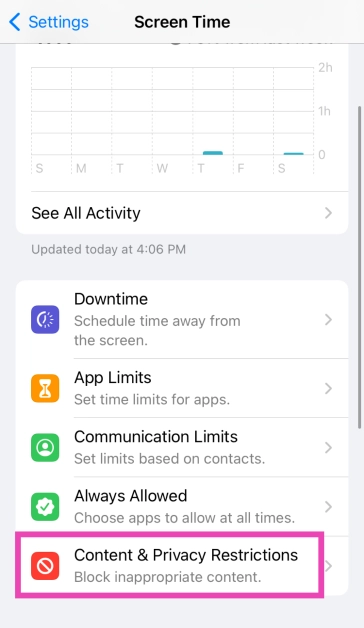
Step 2: Tap on Content & Privacy Restrictions.
Step 3: Enter the Screen Timecode.
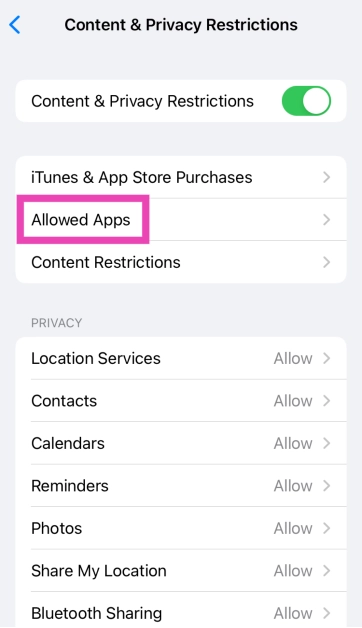
Step 4: Tap on Allowed Apps.
Step 5: Turn on the toggle switch for the restricted app.
Unhide a home screen page
If you hid a home screen page but can’t figure out how to unhide it, simply follow these steps.
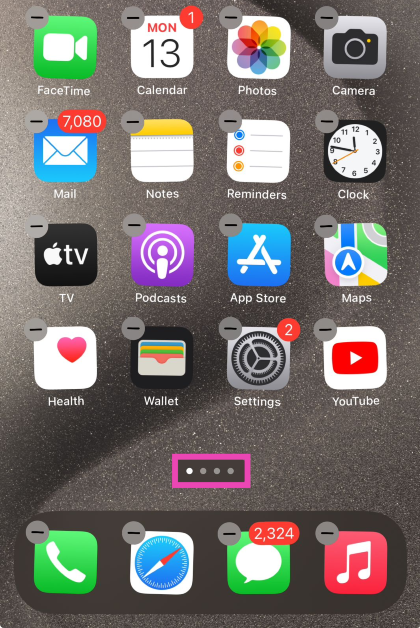
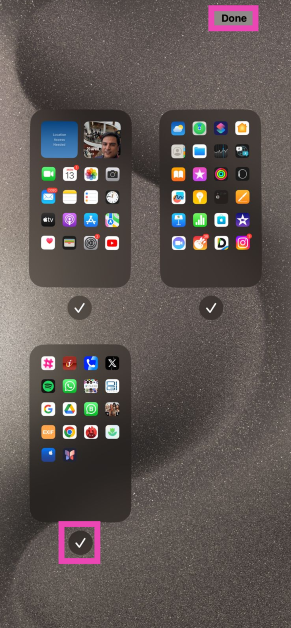
Step 1: Go to any home screen page and long-press an empty spot to access the editor.
Step 2: Tap the dots near the bottom of the page.
Step 3:Check the circle under the page you want to unhide.
Step 4: Hit Done at the top right corner of the screen.
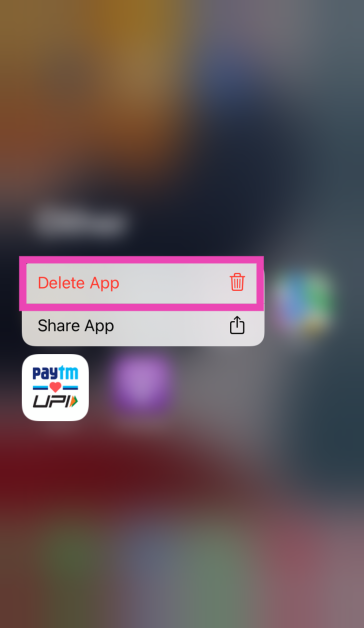
Uninstall and reinstall the app
Step 1: Go to the App Library and long-press the app you want to add to the screen.
Step 2: In the popup menu, tap on Delete App.
Step 3: Go to the App Store and reinstall the app. Once installed, it will appear on the home screen.
Restore the home screen
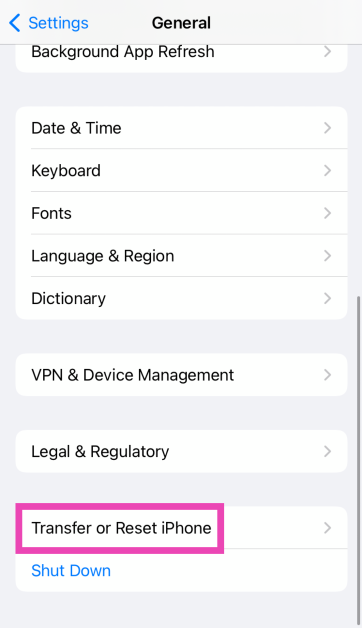
Step 1: Go to Settings and select General.
Step 2: Scroll down and select Transfer or Reset iPhone.
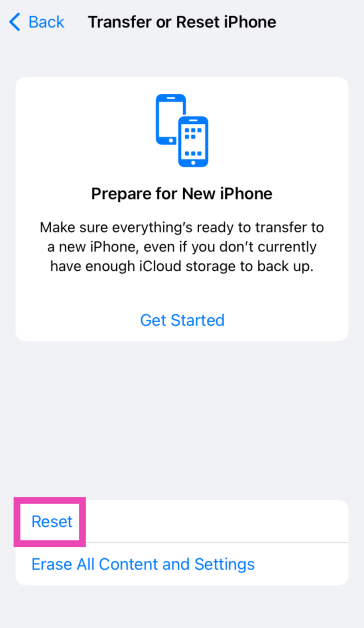
Step 3: Tap on Reset.
Step 4: Select Restore Home Screen Layout.
Step 5: Tap on Reset Home Screen.
The home screen will be restored to the layout it had out of the box.
Frequently Asked Questions (FAQs)
How do I unhide a home screen page on an iPhone?
Long-press an empty spot in the home screen, tap the dots at the bottom of the page, uncheck the circle under the home screen you wish to unhide, and hit ‘Done’.
How do I create a folder on my iPhone’s home screen?
Simply drag an app and drop it on another app to create a folder. You can add other apps to the folder by dropping them in it.
How do I restore my iPhone’s home screen to its default layout?
Go to Settings>General>Transfer or Reset iPhone>Reset>Restore Home Screen Layout and select ‘Reset Home Screen’.
These are the top 5 ways to add an app back to the home screen of an iPhone. If an app mysteriously goes missing from the home screen, you can use these steps to restore it. Can’t find the App Store on your iPhone? Read this article to learn how to get it back.
The HMD-branded smartphone was previously teased to launch in India. The company is expected to release the HMD Arrow soon, a phone that is just a rebranded HMD Pulse. The exact launch date is yet to be revealed. Apart from the name of its upcoming phone, no additional information has been shared so far.
A few weeks ago HMD India stated that it would disclose the name of the first HMD-branded smartphone to be launched in the nation. The first smartphone to carry the branding of the Finnish company will be called HMD Arrow in India.
India, thank you for naming HMD's first smartphone — the all-new HMD Arrow. 🏹📱
— Rajasthan Royals (@rajasthanroyals) May 11, 2024
According to HMD India, its followers submitted this name during a contest #HMDNameOurSmartphone it ran on X previously known as Twitter. Note that the company is planning to release the phone in other markets under different names. According to reports, the company will release the Pulse as the HMD Vibe in the US.
HMD Pulse is available in the European market at a starting price of EUR 140 (Rs 12,460). There it is offered in Atmos Blue, Dreamy Pink, and Meteor Black colourways.
HMD Arrow Specifications Expected
HMD Arrow is likely to feature a 6.65-inch HD+ LCD screen with 720×1,612 pixels of resolution. The display is expected to come with a refresh rate of 90Hz and has a 600-nit peak brightness. The upcoming smartphone by HMD may also equip a 12nm Unisoc T606 SoC with up to 6GB of RAM and up to 128GB of storage that can be further expanded up to 256GB via microSD card. The phone is expected to operate on Android 14 out of the box.
For the photos and videos, the HMD Arrow could feature a dual rear camera setup that may include a 50-megapixel primary camera and a 13-megapixel camera. The device is said to have an 8-megapixel front-facing camera for taking selfies and video calling.
HMD Arrow may also pack a 5,000mAh battery with 10W charging support. The handset is stated to come with a side-mounted fingerprint scanner, including an e-compass, proximity, ambient light, and accelerometer. Additionally, there will be a 3.5mm headphone socket, a USB Type-C port, support for 4G LTE, Wi-Fi AC, Bluetooth 5.0, NFC, and GPS for connectivity.
Google Chrome has addressed a zero-day security flaw affecting a Chrome component that renders web content on a user’s screen, ensuring safety for Chrome users on all desktop platforms. Users must update their browsers to stay secure.
As per Google’s latest blog post, a security patch for desktop versions of Google Chrome has been released. The latest updates have been rolled out to fix a high-severity security bug in the recent stable version of Chrome.
According to the search engine behemoth, an attacker can use this vulnerability to gain control of a user’s computer when they visit a maliciously constructed website. By doing so, they would be able to access and manage the system remotely or retrieve data. It is said to impact a component of Chrome that produces web content on the user’s screen.
The Stable channel has been updated to 124.0.6367.201/.202 for Mac and Windows and 124.0.6367.201 for Linux which will roll out over the coming days/weeks. A full list of changes in this build is available in the Log.
The Extended Stable channel has been updated to 124.0.6367.201 for Mac and Windows which will roll out over the coming days/weeks.
The company reports that it has fixed a previously unreported free vulnerability (CVE-2024-4671) that affects Chrome’s Visuals component and was discovered by an unnamed outside researcher.
In India, Nothing Ear was introduced alongside the less expensive Nothing Ear (a). The latter has already been put to the test; if you haven’t read the review yet, do read the Nothing Ear (a) review here to know how the two TWS differ. With a slightly higher price point, the Nothing Ear is more akin to a premium category TWS. The gadget has a transparent design that has become a trademark for the company. Good Bluetooth connectivity and active noise cancellation (ANC) are supported by Nothing’s new true wireless earphones. With that, up to 40.5 hours of battery life are promised for the Nothing Ear. Additionally, it supports in-ear detection features and dual connectivity, and unlike the Ear (a), these have wireless charging support.
In This Article
Nothing Ear Review: Design
The Nothing Ear 1’s distinctive and original style still looks great on the Nothing Ear, even though it isn’t as untried as it was on the Nothing Ear 2 (Review).
It appears that Nothing is also aware of how easily plastic may scratch, therefore it’s a nice thing that they provide a protective film on top of the case. However, the plastic will eventually turn yellow and dull, and the one we used has already developed numerous scratches. A similar film is provided on the Nothing Ear (a) as well. Thus, to prevent scratches, it will be ideal if you leave this clear film on.
Also, we got the black colour variant for the review, though the device is available in white as well. The black one is slightly darker and more translucent, complementing the tone of the black earphones, than the clear, transparent case of the white ones. Though entirely made of polycarbonate, the construction seems quite high-end. With a black tone, the top plate is also darker. It takes some getting used to, but you can open the lid with just one hand.
On the side are a pairing/reset button and a USB Type-C port.
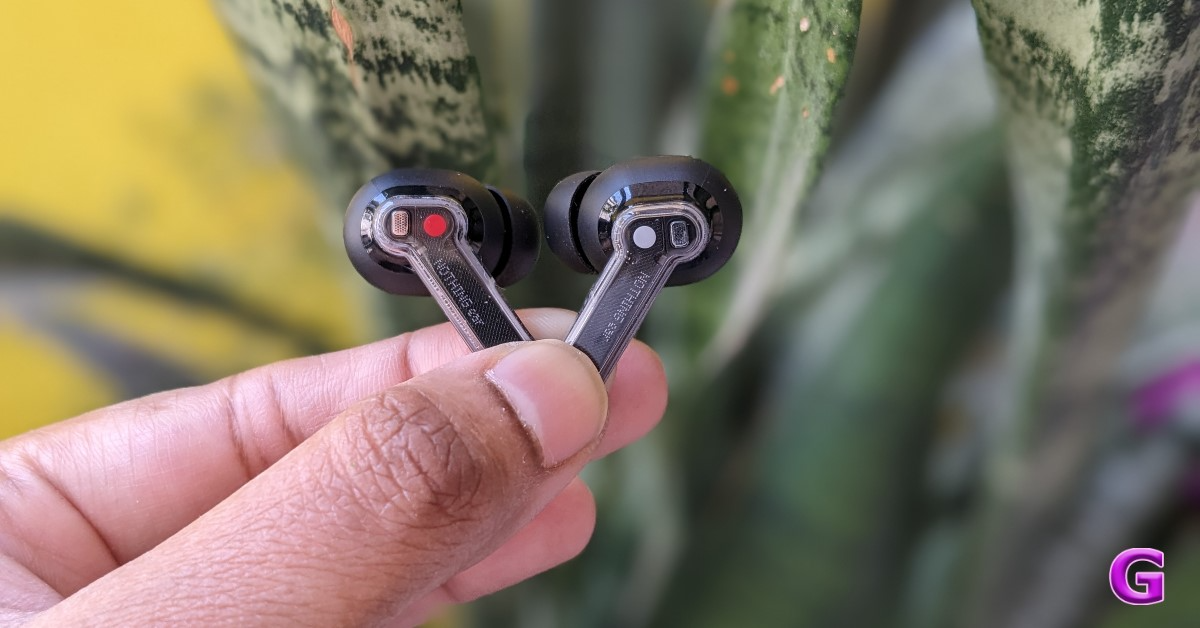
This new TWS looks a lot like the previous one at first sight, with the name “NOTHING ear” inscribed on each earpiece stem being the sole feature that sets them apart. Indeed, this year the corporation decided to adopt the new naming scheme and embrace the moniker Ear rather than Ear 3. The earphones feature a bud design with a short, translucent stem that makes a big impression. The microphones for phone calls and noise cancellation are also visible inside.
The charging case has an IP55 rating, while the Nothing Ear earbuds have an IP54 rating for dust and splash resistance. Therefore, a few splashes and sweat should be okay; saying that, avoid immersing them entirely in water.
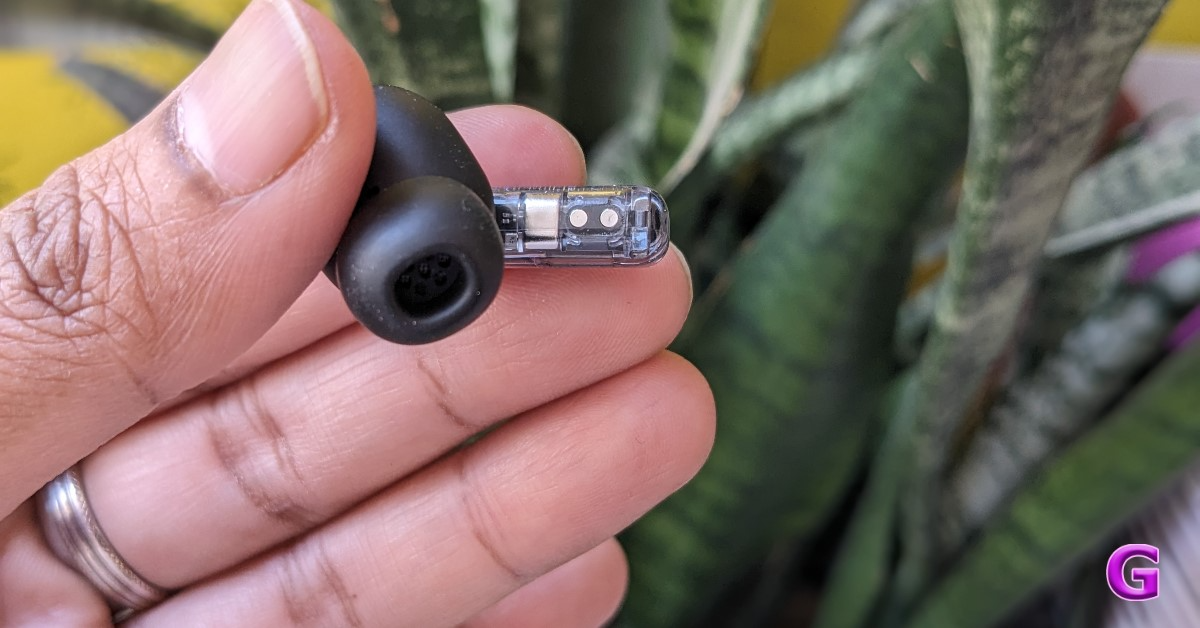
Most of the passive sound is blocked by the Nothing Ear buds. Additionally, it is quite light and comfy, and wearing it for extended periods won’t cause any issues. We tried to shake our heads, and we assure you they won’t come off either. Just be sure you have the appropriate silicone tip size, as it can drastically impact fit and sound quality.
Nothing Ear Review: Performance
Nothing Ear has Bluetooth 5.3, which offers more reliable connectivity. These can pair with two devices simultaneously because they have multipoint connectivity. Additionally, these earbuds support Microsoft Swift Pair and Google Fast Pair and have an in-ear detection feature.
All you have to do is lift the lid, and your device will initiate pairing. To begin using it right away, click to pair. The pairing procedure, which takes only a few seconds to complete, requires you to download the Nothing X app.
There are 11 mm dynamic drivers on Nothing Ear. To compare, the Ear (a) has PMI and TPU diaphragms, whilst the Nothing Ear uses ceramic ones. The Ear earphones are also compatible with LDHC 5.0, AAC, SBC, and LDAC codecs.
They too support up to 45 dB ANC and include a transparency mode. With the Nothing X application users can personalise the sound, see how much battery life each bud and case has left, and select equalisers to tweak the sounds. There are four presets available on the equaliser: Voice, More Bass, More Treble, and Balanced are available. Now there are two more options added: Simple and Advanced.
Using the Advanced option, you can adjust the sound frequency et al by moving the band sliders up and down. Moreover, you can also tap to manually enter a specific value to adjust the sound.
Unlike Nothing Ear (a), there is also an option for sound personalisation to fine-tune your hearing pattern to achieve the ideal sound quality. Wear these earphones to set it up. It will then perform a few sound checks to adjust the audio to your liking. At first, this might not seem like a big deal, but when a personal sound profile is enabled, the audio quality is significantly improved. It’s truly next level.
The earphones come with ANC, which helps eliminate background noise. We haven’t noticed much difference between the Nothing Ear and Ear (a) ANC. The ANC turns on automatically when you wear these earbuds. You also have a noise control option with ANC, which allows you to disable the feature. To ensure that you don’t miss any important announcements or conversations, there is also a Transparency Mode that lets background sound seep in. It’s really easy to hear the background noise when this mode is turned on. Using it while in flight is not advised at all since it will just amplify engine noise and buzz. It is, however, ideal for usage when you are outside and want to be aware of the traffic around you or at a busy airport. For example, if you are out for a run or a walk, this is the ideal time to utilise it.
The Noise Cancellation option provides you with presets: Adaptive, High, Mid or Low. The Adaptive option modifies itself automatically according to the surroundings. Depending on the noise levels outside, this changes the amount of noise cancellation. It significantly increases battery life.
Additionally, these earbuds have in-ear detection which means that when you get them out, the music stops, and when you put them back in, it resumes again. You can also turn off the feature in the Nothing app settings.
Dual pairing is another useful function; having this capability is indeed a blessing. The ability to pair two devices simultaneously is incredibly useful, especially when you are viewing a movie on your laptop and your phone rings. It works so effectively that you can resume watching your movie on the laptop once the call ends and the connection switches back to the laptop.
With that, for gaming or watching movies, there is a Low Lag mode that can be toggled from the app. There are no delays at all, and the audio synchronises well.
Regarding the earbuds’ sound quality, they are incredibly loud and distortion-free, even when played at maximum volume. You receive a richer, more expansive sound with 11mm dynamic drivers that use ceramic diaphragms. You receive excellent clarity when it comes to vocals and instrument separation. The bass is tuned pretty well. All in all, the audio experience was quite well-balanced. Something you can spend hours wearing and listening to.
We also made calls with them, and there was no lag or echo in the audio, which was crisp and clear. It completely blocks out a lot of background noise and is incredibly clear both indoors and outside.
In addition, these earbuds provide pinch control for playing and pausing music, switching between tracks, accepting and rejecting calls, toggling noise cancellation, and transparency mode. Double-pinch and hold to adjust the volume. We think the swipe gesture was a much better way to adjust the volume, and it doesn’t feel very cumbersome.
The charging case has 500mAh battery, while the Nothing Ear earbuds have 46mAh batteries each. When ANC is turned off, the device is said to have a maximum battery life of 40.5 hours when used with the charging case and 8.5 hours while using the buds alone. When activated, ANC has a maximum delivery time of 24 hours with the case and 5.2 hours for just buds. What’s more, it has wireless charging capabilities.
Verdict
The Nothing Ear casing and buds remain mostly unchanged compared to the Nothing Ear 2. The Nothing Ear is packed with all the premium features that you can think of. There is ANC onboard, app compatibility, dual device connectivity, equaliser control, low latency mode, wireless charging, and much more. Everything you’re looking for in premium wireless earphones is included in Nothing Ear. With superb audio accuracy, these are one of the best earbuds to recommend for less than Rs 12,000.
Garena Free Fire is a battle royale game with regular awards and tournaments to keep players interested. If you play Garena Free Fire, you should be aware of the redeem codes that are released on a daily basis. However, because the battle royale game is banned in India, players from other countries can use the Free Fire Redeem codes daily. If you’re unfamiliar with the Garena Free Fire redeem codes or don’t know how to get them, we’ve put together a step-by-step guide to help you redeem them. Check out Garena Free Fire Redeem Codes for 13 May 2024.
The Free Fire redeem codes are a great way to get free stuff. These are 12-digit codes that contain alphabets and numbers, as well as an expiration date and time. Because the Garena FF redeem codes cannot be used more than once, you should hurry to the redemption page to claim your free reward before someone else does. To get a free reward, all you have to do is go to reward.ff.garena.com/en, which is the official redemption page. Also, keep an eye on this space for daily updates on Garena Free Fire redemption codes and rewards.
Removing a picture you like while mass deleting images from your phone’s gallery is a mistake that we’ve committed before. Luckily, your Android smartphone does not permanently delete images and files right away. Once you hit the delete button, the files are moved to the Recycle bin, where they stay for a certain duration before being permanently removed. Today, we bring you the best 6 ways to find the Recycle bin or the trash folder on an Android device.
Android smartphones do not have a central Recycle bin for all files. The destination of the deleted files depends on their format and the app they are stored. For example, deleted pictures and videos get transferred to the trash folder in the gallery app, while deleted PDFs and voice notes can be accessed from the bin in the native file explorer.
If you delete an image using Google Photos, it can only be accessed in that app’s bin. You won’t find it in your native gallery app’s trash folder. This also applies in the opposite scenario. Files transferred to the Recycle bin stay there for 30 days before they are permanently deleted.
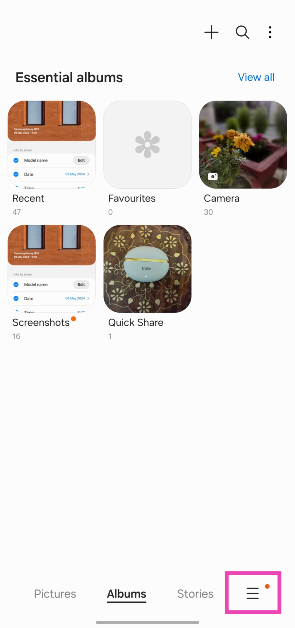
Find the Recycle Bin or Trash folder on the native gallery app
Step 2: Tap on the hamburger menu at the bottom right corner of the screen.
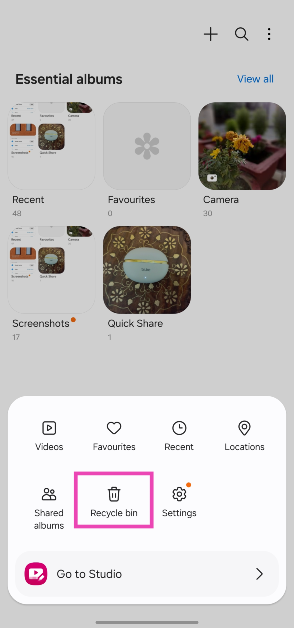
Step 3: Tap on Recycle Bin.
Step 4: This is where you will find your recently deleted images. Tap on the ellipses and select Empty to clear the folder.
Note: These steps apply to Samsung smartphones (OneUI). If you own a smartphone from a different OEM, launch its native gallery app and search its settings or options menu for the trash folder
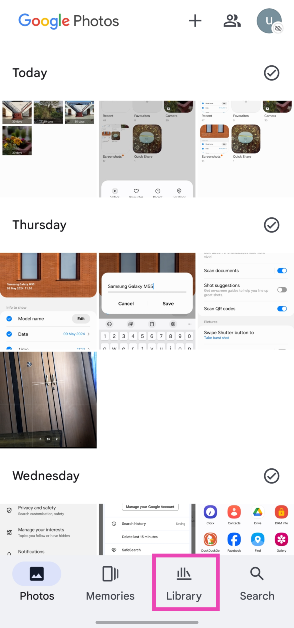
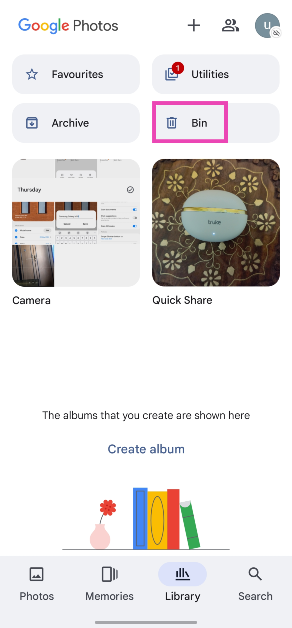
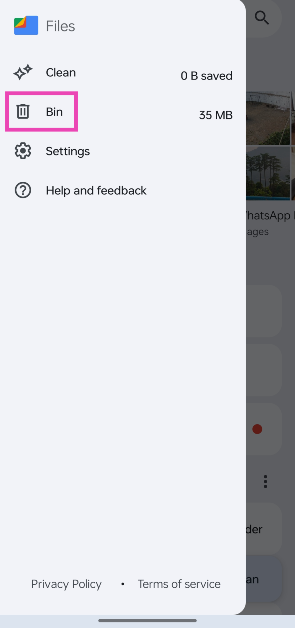
Step 2: Tap on the hamburger menu at the top right corner of the screen.
Step 3: Select Bin.
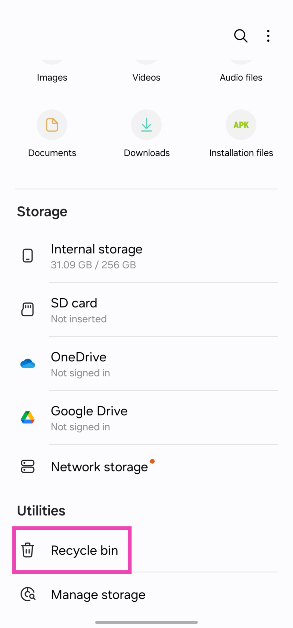
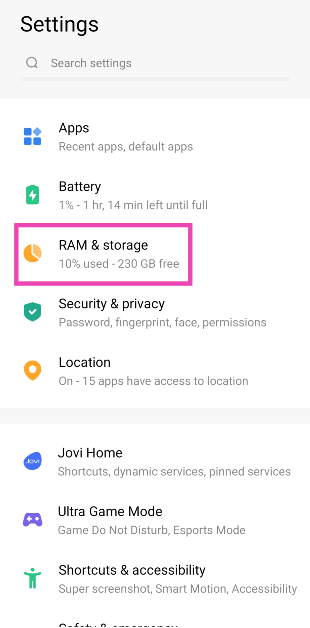
Find the Recycle bin or Trash folder in Settings
Step 1: Go to Settings and tap on RAM & storage.
Step 2: Tap on Trash.
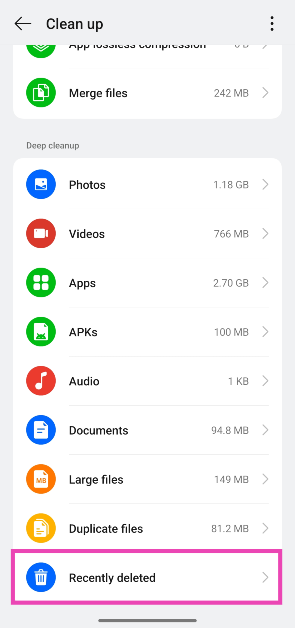
Find the Recycle bin or Trash folder in Phone Manager
Step 1:Launch the Phone Manager app on your phone.
Step 2: Tap on Clean up Storage.
Step 3: Scroll down and tap on Recently deleted.
Frequently Asked Questions (FAQs)
Where do deleted files go in Android?
Recently deleted files can be recovered from the Recycle bin in your Android phone’s native file explorer app.
How long do images last in the Recycle bin?
When you delete an image, it gets moved to the Recycle bin where it is stored for 30 days before being permanently deleted.
Where is the Recycle bin on Google Files?
Hit the hamburger menu icon at the top right corner of the screen to access the Recycle bin on Google Files.
How do I clean up my phone’s storage?
Go to the Phone Manager app on your phone and tap on ‘Clean up Storage’ to get rid of bulky items like cache junk, installation packages, duplicate files, and more.
Can I clear my Android phone’s Recycle bin in one place?
Go to Settings>RAM & storage>Trash to find all your deleted items in one place. You can empty this folder to clear the deleted items at once.
These are the top 6 ways to find the Recycle bin or trash folder on an Android smartphone. While you’re here, read this article to learn how to recover permanently deleted files, images, and videos from your Android phone.
Even though WhatsApp is the largest instant messaging platform in the world, iMessage still remains the primary communication medium for iPhone users. Apple’s in-house messaging service can do it all – from sending pictures to sharing locations. However, it is not impervious to errors. If you are unable to download pictures using iMessage on your iPhone, check out these 10 fixes.
If you are unable to download pictures and videos from iMessage, it could be due to one of the following reasons.
Your internet connection is faulty
The iPhone is running out of storage space
Your Apple ID is malfunctioning
iMessage servers are down
Background software issues
You are using an outdated iOS version
Disable and re-enable iMessage
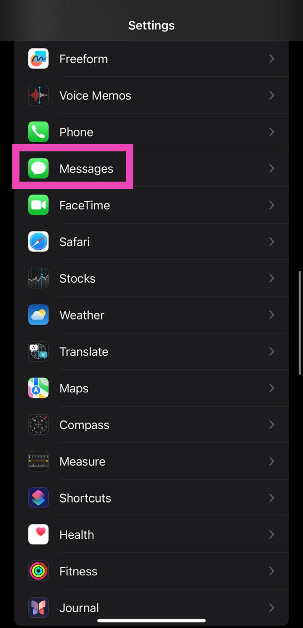
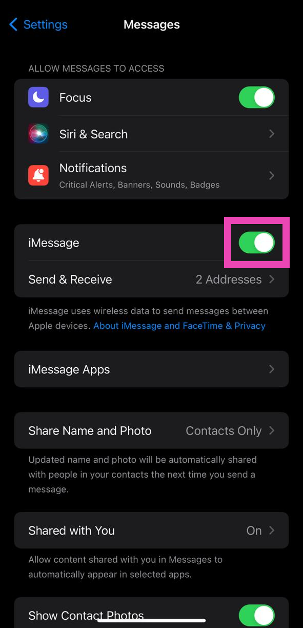
Step 1: Go to Settings and select Messages.
Step 2: Turn off the toggle switch next to iMessage.
Step 3: Turn the toggle switch back on.
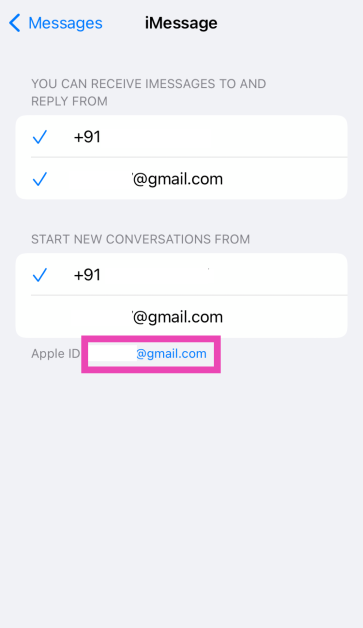
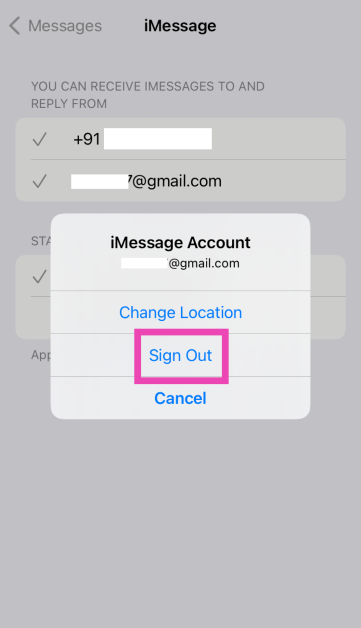
Sign out of iMessage and then sign in
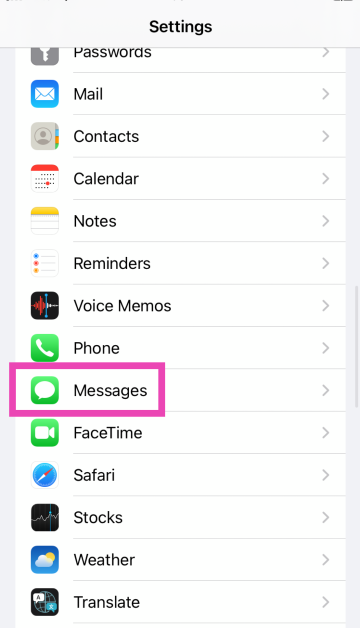
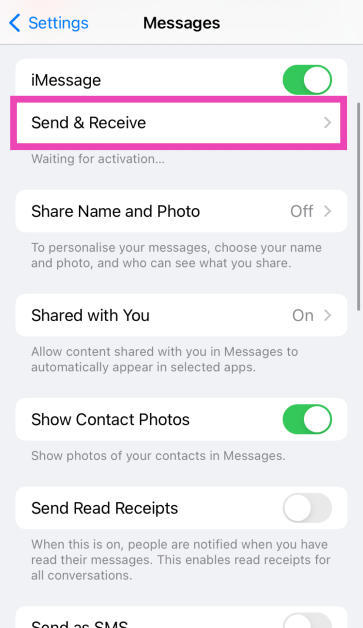
Step 1: Go to Settings and select Messages.
Step 2: Tap on Send & Receive.
Step 3: Tap on your Apple ID.
Step 4: Hit Sign Out.
Now, sign into iMessage again using your Apple ID.
Check your internet connection
If you’re on a weak WiFi network, the images and videos will take a lot of time to download on iMessage. If the WiFi isn’t working, the media won’t download at all. Switch to mobile data or a different WiFi connection to download the images. Perform an internet speed test to check if the network you are connected to is facing any issues.
Check your iPhone’s internal storage
If your iPhone is running out of storage space, it may not download new media from any app, including iMessage. To fix this, go to Settings>General>iPhone Storage and delete the apps you don’t use. You can also remove large files from your phone to free up storage space.
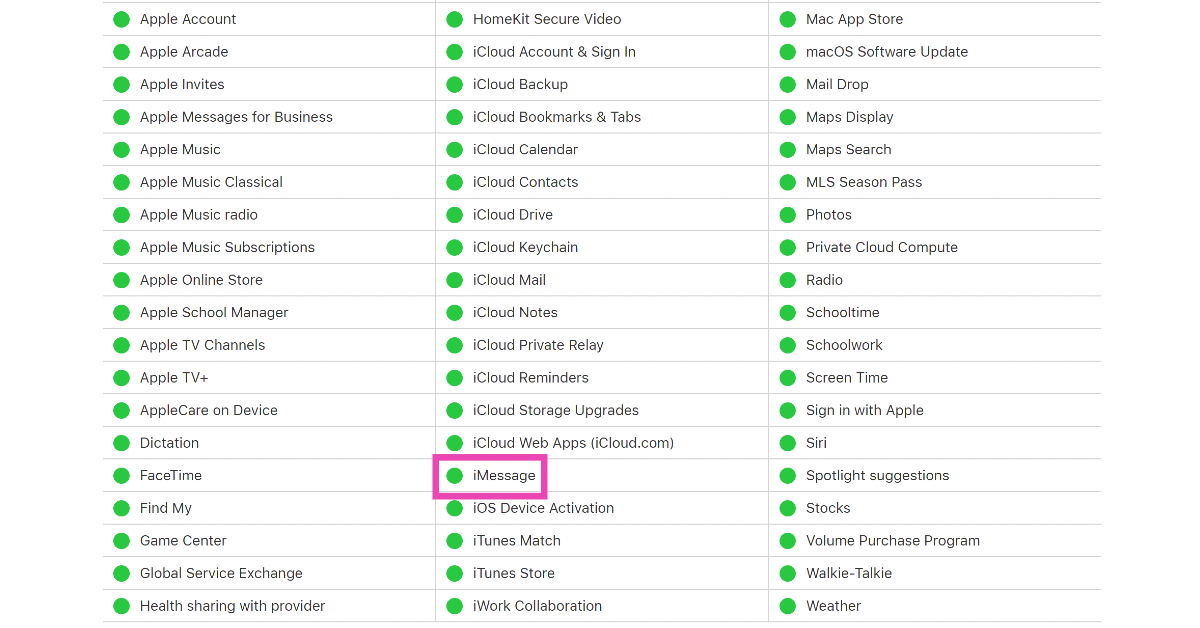
Check if iMessage is down
It is possible that the problem lies with Apple’s servers and not your iPhone or internet connection. Apple’s iMessage service is not a stranger to server outages. To check if iMessages’ servers are down, go to Apple’s System Status page. If there is a red dot next to iMessage, it means that its servers are not functional at the moment.
Update the Messages app
If you’re using an old version of the Messages app, chances are that a bug may be causing the problem with sending images. Most likely, this bug has been resolved in the latest version of the app. Go to the App Store, tap your profile picture, scroll down to Messages, and hit ‘Update’ next to it.
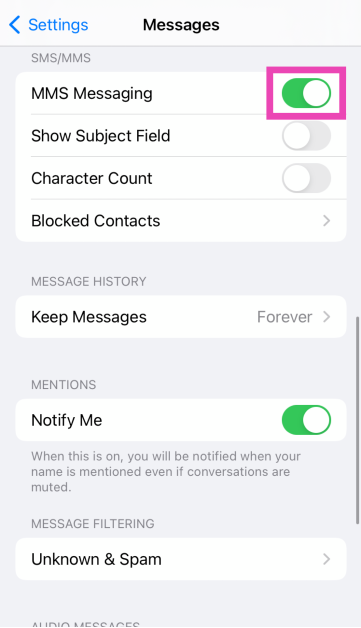
Toggle MMS on your iPhone
Media files are sent as an MMS. Turn off and turn on MMS on your iPhone to refresh it.
Step 1: Go to Settings and select Messages.
Step 2: Scroll down and turn off the toggle switch for MMS Messaging. Wait for a few seconds and then turn it back on.
Restart your iPhone
If a background software issue is preventing iMessage from downloading pictures, a quick restart will fix it. To restart your iPhone, press and hold the side button along with any volume key. Drag the power slider across the screen. After a few seconds, press and hold the side button to restart the device.
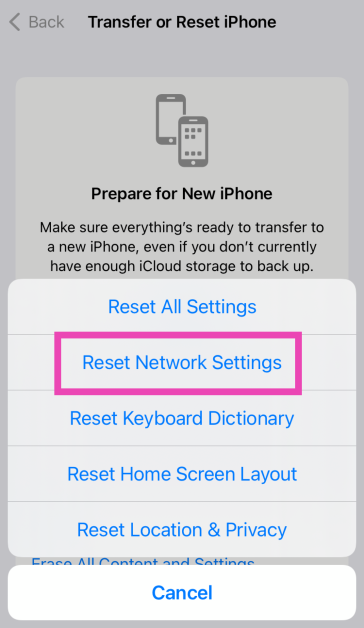
Reset Network Settings
Step 1: Go to Settings and select General.
Step 2: Tap on Transfer or Reset Device.
Step 3: Hit Reset.
Step 4: Select Reset Network Settings.
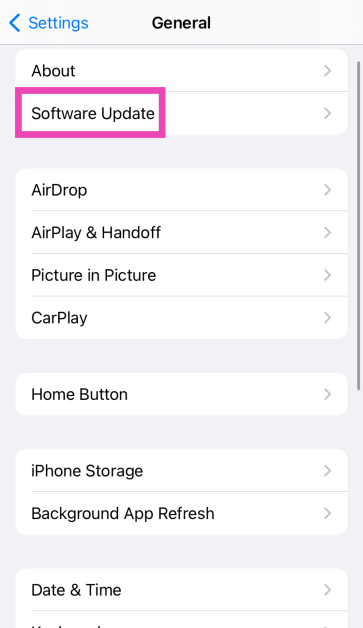
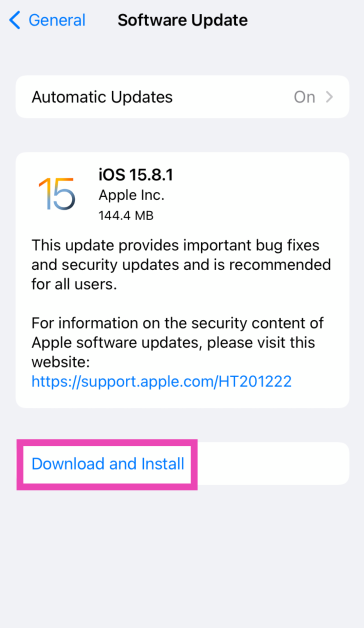
Update iOS
Step 1: Make sure your iPhone is connected to a WiFi network and plug in its charger.
Step 2: Go to Settings and select General.
Step 3: Select Software Update.
Step 4: Tap on Download and Install.
Frequently Asked Questions (FAQs)
How do I disable iMessage on my iPhone?
Go to Settings>Messages and turn off the toggle switch next to iMessage to disable it.
How do I sign out of iMessage on my iPhone?
Go to Settings>Messages>Send and Receive, tap on your Apple ID and hit Sign Out.
How do I filter unknown senders on my iPhone?
If you don’t want to receive text from unknown numbers, go to Settings>Messages>Unknown and Spam and turn on the toggle switch for ‘Filter Unknown Senders’.
How do I check if iMessage is down?
Go to the Apple System Status page and scroll down to iMessage. If there’s a red dot next to it, it means that its servers are down.
How do I update the Messages app on my iPhone?
Launch the App Store on your iPhone, tap your profile picture in the top-right corner of the screen, scroll down to Messages, and hit ‘Update’.
These are the top 10 ways to fix the ‘iMessage not downloading pictures’ issue on your iPhone. If these methods don’t work out, try performing a factory reset on your iPhone. While you’re here, check out this article to learn how to leave group chats on an iPhone.


")
")