Facebook is one of the most versatile social media platforms around, with support for 112 languages. The option to change the language is tucked away in account settings, so changing it accidentally is not a common occurrence. If you find yourself stuck with a language you can’t recognise, changing it from settings can be a very confusing task. If you follow these steps closely, you can set it back to your preferred language. Here are the top 3 ways to change the language on Facebook back to English.
By default, the Facebook app is set to the language of your device. If you don’t remember changing the language within the app, your home page is undecipherable likely due to your smartphone’s language settings. If you own an Android smartphone, go to Settings>General Settings>Language and Region and set the language to English.
iPhone users can change the device language as well as the Facebook app’s language in particular from device settings. If you’re on PC, you can change your Facebook account’s language from the website.
Change the language back to English on Facebook (PC)
Step 2: Click on your profile icon at the top right corner of the screen and click on the cog wheel icon.
Step 3: Select the cog wheel icon again.
Step 4: In the Preferences section on the sidebar, select Language and region. If you’re confused with the language, this should be the sixth entry in the list.
Step 5: Click the box next to Account language. This is the first entry in the list.
Step 6: Select English.
Change the language back to English on Facebook (Mobile)
Step 1:Launch the Facebook app on your smartphone.
Step 2: Tap your profile icon at the top right corner of the screen.
Step 3: Hit the cog wheel icon for Settings and privacy. Select the first entry on the list (Settings).
Step 4: Select Language and region. If your app is set to another language, this is the eighth entry on the list.
Step 5: Select the first two categories and set the language to English.
Change the language for Facebook to English (iPhone)
Step 1: Go to Settings and select Facebook.
Step 2: Tap on Language.
Step 3: Select English.
Frequently Asked Questions (FAQs)
How do I change the language on Facebook?
Go to Settings and privacy>Settings>Language and region, click on ‘Account language’, and select your preferred language.
How do I change the language on Facebook using my smartphone?
The Facebook app follows the language of your device. Go to your smartphone’s language settings to change the language on Facebook.
How do I change Facebook’s language to English on an iPhone?
Go to Settings>Facebook>Language and select English from the list.
These are the top 3 ways to change the language on Facebook back to English. On smartphones, the Facebook app follows the device language. If you know of any other ways to carry out this task, let us know in the comments!
Homegrown electronics brand Lava has introduced new smartwatches in India. The company launched Lava Prowatch ZN and Prowatch VN which come with corning gorilla glass 3 protection. The device has a Zinc Alloy body featuring an AMOLED touchscreen display. Both fitness trackers are integrated with PPG sensors for accurate Heart rate, blood oxygen saturation level (SpO2) and activity tracking. It is IP68 water-resistant as well.
In This Article
Lava Prowatch ZN and Prowatch VN price in India
Lava Prowatch ZN will be available in India with a price tag of Rs 2,599. Whereas, Lava Prowatch VN is priced at Rs 1,999. The Prowatch ZN and VN will be available for purchase on Amazon, Lava E-store and Lava Retail Network starting from 26th April, 12 PM.
Both ZN and VN series come with a 2-year warranty and customers can avail it from 700+ Lava service centres near them.
Product
MRP
Special Launch Price
Sale Date
Availability
Prowatch ZN (Silicon Strap)
Rs 4,999/-
Rs 2,599/-
April 26th 2024, 12 PM
Amazon
Lava E-Store
Lava Retail Network
Prowatch ZN (Metal Strap) includes Silicon Strap in the box
Rs 5,999/-
Rs 2,999/-
Prowatch VN (Silicon Strap)
Rs 3,999/-
Rs 1,999/-
Lava Prowatch ZN specifications and features
The 1.43-inch circular, brilliant AMOLED touchscreen display of the Lava Prowatch ZN boasts a resolution of 466×466 pixels. Longevity is ensured by the zinc alloy body and Gorilla Glass 3 coating. There is a working rotating crown on the circular watch dial as well. There are two versions of the Prowatch ZN available: Dragonglass Black and Valyrian Grey. Silicone and Metal Straps are included with both versions. For convenience of use, the metal strap version comes with an extra silicone strap in the box. The metal strap is tested for 2 years of corrosion resistance. A silicone strap with a 65-degree bend provides the ideal balance of flexibility and durability. It has a Realtek chipset powering it.
The device offers health stats, more than 110 sports modes, 150 watch faces, smart notifications, and fast charging which gives a complete sleep quality analysis, stress, and activity levels. Users may easily access information and control functions with its built-in voice assistant—all while keeping their hands free. In-built games also give the device a little entertainment value and accommodate a range of user preferences. According to the claims, the smartwatch may last up to seven days with regular use. It also offers quick replies and phone-free listening via BT calling. It also has an IP68 water resistance designation, so you may use it without worrying.
Lava Prowatch VN specifications and features
Another offering from the firm is the Lava Prowatch VN, which has a 1.96-inch TFT 2.5D Curved display with 320×386 resolution and 500 nits of brightness. It has a scroll button that makes navigating menus simple. The watch comes in a variety of vivid colour options, such as Moore Black, Gull Grey, and Delft Blue, and provides over 150 watch faces.
With over 115 built-in sports modes and a voice assistant for hands-free help, this device offers extensive fitness tracking. Concerning dust and water resistance, it has an IP67 rating. Furthermore, you can easily check your well-being thanks to key health monitoring tools including a heart rate sensor, SPO2 tracker, stress level tracker, and sleep tracker. Extra features like built-in games, a calculator, and a rapid reply functionality make your day more convenient and enjoyable.
JioTV is an excellent resource for watching live TV programming across channels like Colors, Set, Zee, Aaj Tak, India TV, Sony Ten, and more. The only catch is that the JioTV app is only available for Android and iOS platforms. PC users are limited to using JioTV on their web browsers. Android TV users do not have access to the JioTV app either. The good news is that there are a couple of workarounds to this issue. Read along to find out how you can install the JioTV app on your desktop, laptop, or TV.
If you simply want to watch JioTV content on your desktop or TV without downloading any third-party app, your best option is screen mirroring. You can mirror your smartphone’s display on your TV wirelessly with ease. Read this article for a step-by-step walkthrough.
Screen mirroring comes with latency issues. To get rid of any unwanted lags, make sure the two devices are connected using an HDMI cable. You can play content from the JioTV website on your laptop and connect it to your TV using an HDMI cable. On your TV, select HDMI as the input source to watch the live programming. PC users can either install the web app for JioTV or use BlueStacks to simulate the Android environment.
Install JioTV on a desktop or laptop (Microsoft Edge)
Step 1: Launch the Microsoft Edge browser on your PC or laptop and go to the official JioTV website.
Step 2: Hit the ellipses at the top right corner of the screen.
Step 3: Hover the cursor on Apps and select Install JioTV.
Step 4: Hit Install.
Step 5: In the popup window, select the checkboxes for Pin to Start, Pin to taskbar, and Create a Desktop shortcut.
The web app for JioTV will be installed on your desktop or laptop. When you click on the app, it will open the JioTV webpage in a focused window. You can access it from the taskbar, start menu, or desktop.
Install the JioTV web app on your desktop or laptop (Google Chrome)
Step 1: Launch Google Chrome on your PC and go to the JioTV website.
Step 2: Hit the ellipses in the top right corner of the screen.
Step 3: Go to Cast, save, and share and click on Install JioTV.
Step 4: Hit Install.
Shortcut to install the JioTV web app on your PC using Google Chrome
Step 1: Launch Google Chrome on your PC and go to the JioTV website.
Step 2: Click the monitor and arrow icon in the address bar.
This is how you can install the JioTV app on your desktop, laptop or TV. If you don’t want to go the Kodi route, you can simply connect your laptop to your TV using an HDMI cable and mirror its display while playing content from JioTV on your web browser. If you know any other workarounds to this issue, let us know in the comments!
One of the best things about Minecraft is that you can name the pets you have tamed in the game. Be it a parrot, wolf, fox, or cat, you can assign a custom name to your pet using a name tag. If you’re a new player, you may not know where to look for this item. So, here are the top 3 ways to find a name tag in Minecraft.
As we mentioned earlier, you can use a name tag to assign a custom name to your pets and in-game mobs. When you name a pet using a name tag, it hovers over its head all the time. One of the advantages of using a name tag is that keeps the mob from despawning. Here’s how you can use it.
Step 1: Make an anvil.
Step 2:Right-click on the anvil to access its interface.
Step 3: Place the anvil in the left slot.
Step 4: Type the name in the ‘Repair & Name’ field.
Step 5: Pick up the custom name tag from the right slot.
Chest Loot
One of the easiest ways to find a name tag in Minecraft is by looting a treasure. You can find treasure chests in a dungeon, mineshaft, abandoned city, or a woodland mansion. When you come across a treasure chest, open it to reveal its items. You can find multiple name tags inside a chest.
Fishing
You can procure a name tag in Minecraft by fishing. Before you begin, you will need to make a fishing rod.
Step 1: Make a fishing rod.
Step 2: Go to a body of water.
Step 3:Cast the fishing rod.
Step 4: Wait until you catch a name tag.
To improve your chances of catching a name tag, you can use the Luck of the Sea enchantment on your fishing rod.
Trading
If you’re not lucky with fishing or treasure chests, you can exchange your emeralds for name tags. In order to make this trade, you need to find a master-level librarian in a village.
Step 1: Go to a village.
Step 2: Find a master-level librarian at a library. If you can’t find a library in a village, place a lectern in a house. Seeing the lectern, a villager will turn it into a library.
Step 3: If the librarian isn’t master level yet, make a few trades to get them to that level.
Step 4: You can now trade emeralds for name tags.
Frequently Asked Questions (FAQs)
Where can I find a name tag in Minecraft?
Name tags can be found in treasure chests, or you can fish and trade for them.
Where can I go fishing in Minecraft?
Any body of water in Minecraft can be used for fishing, as long as you have a fishing rod. To improve your chances of catching a name tag, use the Luck of the Sea enchantment on your fishing rod.
How do I trade for a name tag in Minecraft?
You can trade emeralds for name tags with a master-level librarian only.
These are the top 3 ways to find name tags in Minecraft. Read this article to learn how to make a potion of weakness and this one to make a furnace in Minecraft. If you know any other ways to find a name tag, let us know in the comments!
With an upgrade, Meta has enabled video calls over WhatsApp on its Ray-Ban Meta smart glasses. To further enhance the usefulness of the glasses, Meta is also incorporating new functionality, such as updates to Meta AI. The company is also adding new styles designed to fit more face shapes for the smart glasses.
From now onwards it will be possible for users to make video calls using the well-known messaging applications Messenger and WhatsApp on their Ray-Ban smart glasses. In addition, the firm has also enabled Meta AI with Vision, so you can ask your glasses about what you’re seeing and get helpful information.
While announcing the update Meta said, “Our second-generation smart glasses, in partnership with EssilorLuxottica, have been flying off the shelves — they’re selling out faster than we can make them. And just in time for sunglasses season, we’re expanding the Ray-Ban Meta smart glasses collection with new styles designed to fit more face shapes so you can find the perfect pair. We’re also adding new features, including updates to Meta AI, to make the glasses even more useful.”
This update is being rolled out gradually and will arrive soon on your smart glasses. Additionally, Meta AI, an intelligent assistant has been upgraded allowing users to create and connect with the people and things in the US and Canada. With the help of voice commands, you may operate the glasses and even obtain real-time information because of Meta AI.
Meta is also releasing a multimodal AI update in the US and Canada in beta, so you can ask your glasses about what you’re seeing, and they’ll give you smart, helpful answers or suggestions.
New designs of Ray-Ban Meta smart glasses are being added to the collection by Meta. Its new Skyler frames feature a cat eye design inspired by the iconic jet-set style, designed to suit smaller faces. The company has also brought a new low bridge option for our Headliner frames. This would be helpful if your glasses tend to slide down your nose, sit too low on your face or press on your cheeks.
According to the company, buyers can make the glasses uniquely yours by mixing and matching hundreds of custom frame and lens combinations available on the Ray-Ban Remix platform at ray-ban.com. Pre-orders for Skyler and the new Headliner low bridge fit are currently being accepted on ray-ban.com and meta.com. Fifteen countries—including the US, Canada, Australia, and most of Europe—have these new styles accessible.
The company has also introduced the first limited-edition Ray-Ban Meta smart glasses in an exclusive Scuderia Ferrari colourway for Miami 2024 that will be available from April 24.
There are a few ways you can go about limiting the visibility of your pictures on Facebook. Deleting them seems like a hard measure when you can simply change their audience from visibility settings. If you’re set on mass-deleting pictures, there’s some bad news. Facebook doesn’t let you delete multiple photos at once. However, you can delete entire albums in one go. Let’s take a look at how you can go about this task.
If you’re thinking of deleting your profile or removing all your pictures from Facebook, it is a good idea to download them to your device first. If you have been on Facebook for a long time, you might want to preserve the pictures you have uploaded on the platform as they may not be saved anywhere else. The process of downloading all your data from Facebook is easy, but it can take some time.
Go to ‘Accounts Centre’ and select Your information and permissions>Download your information. On the following page, click on ‘Download or transfer information’ and select the target Facebook profile. You can also choose to download messages, posts, polls, events, and more. Once you have made your choice, you can choose to save the data on your device or another destination.
These are the top 5 ways to delete photos on Facebook. Read this article to learn how to download all your photos from Facebook before deleting them. If you know any other ways to go about this task, let us know in the comments!
Lenovo today introduced its first creator laptop in India with Intel Core Ultra 9 processors- Lenovo IdeaPad Pro 5i. The first Intel Evo Edition laptop by Lenovo has a 120Hz 2.8K OLED display. It comes with TÜV Eyesafe certification and supports Dolby Atmos for an immersive sound experience. It also meets MIL-STD-810H military-grade standards.
In This Article
Lenovo IdeaPad Pro 5i price in India, sale details
Lenovo IdeaPad Pro 5i has launched in India at a starting price of Rs 1,09,990. The laptop will be available in a single Artic Grey colour option. The device can be purchased starting today via lenovo.com, Lenovo Exclusive stores, leading e-commerce websites, and other offline retail stores.
Customers can also benefit from post-purchase services like free repair with Accidental Damage Protection. Lenovo has introduced a limited-time offer where buyers can avail of a 5% cashback of up to Rs 10k on all CTO orders.
Lenovo IdeaPad Pro 5i features a 14-inch 2.8K OLED screen. The display supports a 120Hz refresh rate and comes with a peak brightness covering 100% of the DCI-P3 spectrum and TÜV Eyesafe certification for low blue light emission. Additionally, it offers an immersive surround sound experience with Dolby Atmos.
Under the chassis, there is an Intel Core Ultra 9 185H processor. The laptop supports up to 1TB of storage and a maximum memory capacity of 32GB RAM. These requirements allow for seamless multitasking, faster video rendering, and fluid content editing. With 115W TDP of cooling power artists can unleash their creativity without having to worry about overheating.
The device packs an 84Wh battery which ensures up to 11.5 hours of runtime on a single charge. It will be shipped with Rapid Charge Express for a 3-hour backup in just 15 minutes.
Lenovo‘s AI Engine optimises the user experience with Smart Power adjusting processing power to optimise battery life according to running programs, enhancing intelligence and creating an engaging and dynamic content creation environment.
Tech giant Apple has officially announced the date for its upcoming event. Without making it clear what it is announcing, Apple has invited the media to a special event that will take place on May 7. The company is anticipated to introduce a new lineup of iPads at the upcoming event. Rumours suggest that an OLED iPad Pro is likely to arrive.
Apple has confirmed a “special Apple Event” that is set for May 7th at 7 AM PT (7.30 PM IST). The invitation features the catchy phrase “Let Loose” and a visual of an Apple Pencil, which allude to the upcoming release of new iPad models because the firm hasn’t released a new iPad since late 2022.
Previous speculations claimed Apple was going to introduce it through a “press release” rather than an event. But Apple has now officially said that there will be a virtual event.
It is anticipated that a 13-inch iPad Pro and a new 11-inch iPad Pro will be released together. In terms of display size, the 13-inch iPad Pro would be the largest iPad model ever released by Apple. There might be variants with relocated, horizontal front-facing cameras. Rumour has it that an OLED display will be included in both iPad Pro models. The switch to OLED will increase the brightness and improve the viewing experience of iPads, which currently use mini LED panels.
There are rumours that the next iPad Pro models will include glossy and matte screen options along with smaller bezels.
In addition to the standard 10.9-inch display sizes, the next iPad Air lineup may have a 12.9-inch display size. Mini LED displays might be included with both models.
It is anticipated that the M3 chipset would power the tablets and could offer MagSafe wireless charging. Expectations also include a revised Magic Keyboard. It may also feature a bigger trackpad and an aluminium construction. In addition to this new Apple Pencil could also be tagged along.
In addition, it’s expected that this year’s iPad Air models will feature a landscape-oriented camera, which, in contrast to earlier versions, will enable users to record video calls while the iPad is in a horizontal position.
Garena Free Fire is a battle royale game with regular awards and tournaments to keep players interested. If you play Garena Free Fire, you should be aware of the redeem codes that are released on a daily basis. However, because the battle royale game is banned in India, players from other countries can use the Free Fire Redeem codes daily. If you’re unfamiliar with the Garena Free Fire redeem codes or don’t know how to get them, we’ve put together a step-by-step guide to help you redeem them. Check out Garena Free Fire Redeem Codes for 24 April 2024.
The Free Fire redeem codes are a great way to get free stuff. These are 12-digit codes that contain alphabets and numbers, as well as an expiration date and time. Because the Garena FF redeem codes cannot be used more than once, you should hurry to the redemption page to claim your free reward before someone else does. To get a free reward, all you have to do is go to reward.ff.garena.com/en, which is the official redemption page. Also, keep an eye on this space for daily updates on Garena Free Fire redemption codes and rewards.
Vu Televisions today announced the launch of Vu Cinema TV 2024 Edition in India. The new range of televisions comes in two sizes 43-inches and 55-inches. The Vu TV features an IPS panel with TruMotion. They sport a 50-watt Side Tube speaker and Dolby Audio and switch off subtitles. Additionally, they include Airplay and 2-way Bluetooth.
In This Article
Vu Cinema TV 2024 price in India and availability
The Vu Cinema TV 2024 price starts at Rs 25,999 for the 43-inch model and Rs 34,999 for the 55-inch variant. The new TV lineup will be available in the Middle East (UAE, Qatar, Bahrain) and Africa. Here in India, it can be purchased via Flipkart and other retailers.
Vu Cinema TV 2024 features
Vu Cinema TV 2024 will be available in two different sizes: 43-inches and 55-inches. It features a 4K IPS display with TruMotion and enhanced brightness reaching up to 400 nits. It boasts Side Tube Speakers that offer a power output of 50W and Dolby Audio support. It runs on webOS and is equipped with 1000+ apps, including major ones like Netflix, Prime Video, and YouTube, as well as a large selection of Indian content. On the Vu Cinema TV 2024, you can easily browse all of your entertainment options by using voice search and buttons specifically for streaming apps. It has a special remote hotkey labelled “MOVIES” which when pressed brings all movie content from various platforms onto one screen.
The Vu Cinema TV 2024 supports Apple AirPlay which makes it simple for owners of iOS smartphones to stream content straight to a large screen from their phones. You can stream your preferred music from your mobile device to the TV’s speakers thanks to two-way Bluetooth.
Ms. Devita Saraf – Founder, and CEO of Vu Televisions said, “The Vu Cinema TV completely redefined the Indian television industry by giving consumers a true cinema theatre experience in their homes with theatrical picture and sound quality while saving money on expensive tickets and snacks! A fan-favourite since its launch in January 2020, this television has received multiple awards and has an average of 4.5/5 stars on e-commerce platforms for customer satisfaction. The Vu Voice Remote has a Cinema mode and Cricket mode – to enhance picture and sound quality based on the movie and to get 100% ball visibility for the IPL and upcoming T20 World Cup. With all the latest movies coming on OTT within a month of theatre release, the Vu Cinema TV is a complete entertainer for a home theatre experience every day!”
If you’re an old-school texter, you will be delighted to know that you don’t have to rely on your phone to send someone a text message. Not only can use Google Messages on your desktop, but you can also send a text message via email. This comes in handy when you need to send an urgent text but don’t have access to your phone. If the recipient replies to your message, you can access it in your email inbox.
While sending text messages through emails is possible, not every network provider supports this service. There are a couple of things you need to know before you take on this task.
It goes without saying, but you should know the recipient’s phone number before sending them a text. Along with the phone number, you must know the SMS gateway of their service provider. If you don’t know the service provider that they use, simply go to FreeCarrierLookup.com and enter the recipient’s phone number.
Once you’ve found the network provider, perform a Google search to know its corresponding SMS gateway. For example, Verizon’s SMS gateway is vtext.com. For AT&T, use txt.att.net. All text messages should be limited to 140 characters. If you’re sending a picture as a text, you need to know the MMS gateway.
Use SMS gateway to send a text via email
Step 1: Log into your email service and click on Compose.
Step 2: In the recipient address field, enter the recipient’s phone number followed by the SMS gateway of their service provider. For example, the SMS gateway for Verizon is vtext.com. For AT&T, the gateway is txt.att.net. If the recipient number is ‘7778889990’, enter 7778889990@vtext.com in the recipient address field.
Step 3: Enter your message in the email body.
Step 4: Make sure your text is under 140 characters. If you are attaching an image with the text, use the MMS gateway.
Step 5: Hit Send.
Bonus Tip: How to use Google Messages on your PC
You can save yourself the hassle of sending a text via email by simply using Google Messages on your PC. Here’s how.
Step 2: Hit the profile icon at the top right corner of the screen and select Device Pairing.
Step 3: On your PC, go to messages.google.com/web and log in using your Google Account.
Step 4: Hit Continue.
Step 5: Open the Messages app on your phone again and match the emojis on the two devices.
Frequently Asked Questions (FAQs)
How do I send a text via email?
In the email composition window, enter the recipient’s phone number followed by their network provider’s SMS gateway in the ‘recipient’s email’ field. For example, if the recipient is a Verizon user, enter [phone number]@vtext.com. Type your text in the email body and hit Send.
Do I get charged for sending a text message via email?
You can send texts via email absolutely free of cost.
Can I send a picture to someone as a text via email?
If you’re sending a picture as a text via email, make sure you send it to the MMS gateway of the recipient’s service provider. For example, if the recipient is an AT&T user, send the image to [phone number]@mms.att.net.
This is how you can send a text to anyone via email. Using Google Messages’ web portal for desktop, you can access all your texts on your PC and connect with your friends even if you don’t have your smartphone on you.
The midrange smartphone segment in India is full of exciting offerings from OEMs across the board. Earlier this month, we reviewed the Nothing Phone (2a) which impressed us with its unique design and smooth OS. The new Nord CE4 from OnePlus is the closest competitor to the Phone (2a) in this price category. OnePlus has gone back to the drawing board with this one, making key changes to the design, processor, and battery. We used the smartphone as our daily driver for a week to investigate whether these changes were worth shelling out Rs 25,000 for. Here is our in-depth review of the OnePlus Nord CE4.
Here’s what you get inside the OnePlus Nord CE4 retail box:
Smartphone
100W power adapter
USB Type-A to Type-C cable
Plastic case
SIM ejector
Stickers
Red Cable Club card
Quick Guide
Safety Guide
There are 2 colour variants on offer – Celadon Marble and Dark Chrome. The former rocks a marble-like finish on the polycarbonate back panel, something we’ve seen on flagship OnePlus smartphones before. The two cameras are housed inside individual cutouts in a two-step panel. The LED flash gets a cutout of its own and completes the traffic light layout of the array. We can’t help but notice its similarities with Samsung’s Galaxy Z Fold series.
The plastic rails of the Nord CE4 house the volume rocker keys and side button on the right edge. The bottom rail accommodates the hybrid SIM tray, primary microphone, USB Type-C port, and the primary speaker grille. Up top lie the secondary speaker, IR blaster, and secondary microphone. The left edge of the frame has been left keyless. As is the case with Nord CE smartphones, there is no alert slider to be found.
Moving on, OnePlus has retained the 6.7-inch Fluid AMOLED display on the Nord CE4. This display has a 120Hz refresh rate and supports HDR10+. It can reach a peak brightness of 1,100 nits while watching HDR content. The HBM brightness is capped at 900 nits. It is not the brightest display in this price range, but it gets the job done under direct sunlight. The touch response is quite satisfactory and the under-display fingerprint scanner is snappy. Being an ‘Aqua Touch’ display, you can use it with moist fingers.
Content-watching experience on the OnePlus Nord CE4 is top-notch as well. We used the smartphone to watch HD content across major OTT platforms like Netflix, Prime Video, and Disney+ Hotstar. The punchy colours, deep blacks, and balanced contrast elevated the overall experience. The stereo speakers produce a good audio output which doesn’t leave you scrambling to find your headphones every time you play a video.
The Nord CE4 is rated IP54 for dust and water resistance. This is a standard rating for smartphones in this segment. OnePlus also claims that this smartphone can survive a 1.5-metre drop on a marble surface.
OnePlus Nord CE4 5G Review: Performance and Cameras
OnePlus Nord CE4 rocks the Snapdragon 7 Gen 3 SoC under its hood. It is available in two storage variants – 128GB and 256GB. Both variants have an 8GB RAM. On the Geekbench 6 app, the smartphone scored 1,125 points in the single-core test and 2,889 points in the multi-core test. In comparison, the Phone (2a) scored 1,121 and 2,589 points respectively.
We were quite happy with the general performance of the OnePlus Nord CE4 during the review period. The device did not stutter once while loading an app and was able to handle multiple background tasks with ease. Being our daily driver, we were reliant on the smartphone for making calls, sending emails, browsing social media, and playing media daily. The lack of jitters and lags ensured a fluid and snappy experience while using the phone.
We played titles like Call of Duty Mobile and BGMI on the Nord CE4 and were satisfied with the performance. While it is not a dedicated gaming smartphone, the Nord CE4 manages the internal temperature well and presents a seamless gaming experience at 60fps. However, we did notice the odd frame drop once the phone heated up after an hour of gaming.
Handling the OS duties on the OnePlus Nord CE4 is the Android 14-based Oxygen OS 14. There is some bloatware on this device, although not as much as Xiaomi/Poco and Vivo smartphones in this category. What we like about Oxygen OS is its vibrant aesthetic. The translucent background of the app drawer is another thing that adds to the OS’ unique aesthetic. You can also customise the app icons, quick setting tiles, fingerprint scanner, and other parts of the interface.
OnePlus is one of the few OEMs that offer an IR blaster on its midrange smartphones. The native IR blaster app works ridiculously well and lets you control your household appliances from your smartphone. This is quite an underrated feature and something that will always get brownie points from us. OnePlus is also ahead of the curve when it comes to privacy features like System Cloner, Private Safe, App Lock, and Hidden Folder.
OnePlus has promised only 2 major OS upgrades along with 3 years of security patches on this smartphone. Nothing less than 3 years of major OS support is disappointing even by midrange standards.
One of the biggest highlights of the Nord CE4 is its 5,500 mAh battery. This battery pack can easily power your smartphone for a day and a half. We used the OnePlus Nord CE4 for video calling, media playback, recording videos, browsing social media, and even a bit of gaming during the review period. If you’re more conservative with your usage, you can go two days without charging this phone. Using the 100W charger provided in the box, we were able to fully charge the smartphone in just under 40 minutes.
Let’s talk about the camera performance of the Nord CE4. The rear camera array comprises a 50MP primary shooter and an 8MP ultrawide lens. The IMX890 sensor on the primary camera has been replaced with the LYT-600 sensor. The ultrawide and selfie cameras remain the same. It is also nice to see OnePlus ditching the gimmicky 2MP macro sensor, but there is no option to take macro shots using the primary or ultrawide lens.
If you’re familiar with signature OnePlus shots, then you know what to expect on the Nord CE4. Pictures taken in daylight conditions have balanced colours and flaunt a good dynamic range. We like that the colours aren’t too boosted and the subject isn’t oversharpened. The only minor complaint we have is that the camera could have done a better job of exposing the sky. The Night Mode kicks in automatically in limited lighting conditions and does a good job of brightening the subject and reducing the noise in the images.
Images taken with the ultrawide lens are noticeably softer but it does a good job of replicating the colours produced by the primary shooter. We were satisfied with how this camera performed in limited lighting as well. The images have a fair bit of grain but the Night Mode does a good job of brightening the subject.
Ultrawide LensNight Mode: Primary Shooter vs Ultrawide Lens
Portrait shots taken with the Nord CE4 are well-focussed. The smartphone does a good job of separating the subject from the background but the intensity of the blur effect leaves a lot more to be desired. The front-facing 16MP camera takes good selfies without messing with the skin tone and texture. This selfie camera can record 1080p videos at 30 fps while the primary camera can shoot 4K videos at the same frame rate.
The OnePlus Nord CE4 packs all the essential things you can demand from a smartphone in this price range. It has an attractive design, a gritty processor, a refined OS, decent cameras, and an amazing battery life. The 100W fast charging support is the best you can get in this segment. It is also one of the few smartphones to have an IR blaster. If you’re looking for a reliable smartphone for everyday use, you can’t go wrong with the Nord CE4.
Xiaomi at its Smarter Living 2024 event presented a range of home appliances including wearable and Tablets in India. The Redmi Pad SE, Redmi Buds 5A, Xiaomi Robot Vacuum S10, and Xiaomi Handheld Garment Steamer were all unveiled by the firm. We’ve already written a special post about the Redmi Pad SE. This is a full specification description for the remaining items.
In This Article
Xiaomi Handheld Garment Steamer
With the release of the Xiaomi Handheld Garment Steamer, which retails for Rs 2,299, Xiaomi enters a new product category. Pre-booking starts on Amazon and Flipkart from April 29. Early Access starts on mi.com on April 29.
This steamer comes with a stylish white design. Its lightweight and folding form provides portability, making it an ideal travel companion. Weighing only 775 grams, it has tiny dimensions. The 160ml detachable water tank makes it simple to replenish the Xiaomi Handheld Garment Steamer.
Its thermostatic aluminium die-casting dual-heat ironing plate distributes heat evenly for reliable steaming on a range of textiles. With its strong 1300W continuous steam capacity, the Xiaomi Handheld Garment Steamer ensures efficient wrinkle removal and keeps your clothes looking nice and tidy. Steaming is easy to accomplish quickly and efficiently with a 26-second preheating time.
With a steam rate of 16–24 g/min, the Xiaomi Handheld Garment Steamer provides a convenient steam mode for wrinkle-free results. It also has a dry ironing mode that lets users iron clothes without using steam; this is great for shaping dry clothes, getting rid of creases, and drying wet ones.
The Xiaomi Robot Vacuum Cleaner S10 will cost Rs 19,999, including an extra INR 1,000 off with credit cards and credit card EMI from SBI and HDFC banks. It will be on sale on May 6 at mi.com, Amazon.in, Flipkart, and other Xiaomi retail partners. On April 29, pre-booking will begin on Amazon and Flipkart. Beginning on April 29, mi.com offers Early Access.
The Xiaomi Robot Vacuum S10 is equipped with advanced laser navigation technology. It has an 8-metre scanning range and it quickly scans 360° and carefully maps your home surroundings for effective navigation around obstructions. Its advanced laser distance sensor, which has a 360-degree detection range, does precise positioning and accurate distance measurements. While multiple sensors recognize complex environments, minimising collisions or getting stuck.
With a maximum suction power of 4000Pa, the Robot Vacuum S10 offers effective dirt removal. It can adjust to different cleaning demands with its four adjustable suction settings (Silent, Standard, Strong, and Turbo). There is a 300ml dust box for dirt collection and a floating roller brush increases the effectiveness of dirt removal. Floor stains are successfully removed by using two mopping pathways: zigzag and Y-shaped.
The Xiaomi Home app provides custom map functions and scheduled cleanup options for maximum efficiency. Users can easily generate precise maps, customise cleaning schedules, and designate specific cleaning areas. Furthermore, the S10 is compatible with Over-the-Air (OTA) upgrades and integrates flawlessly with Google Assistant or Amazon Alexa.
The Redmi Buds 5A launched in India at Rs 1,499. It will be available in two colour options Bass Black and Timeless White. It can be purchased via mi.com, Mi Homes, and Reliance Stores beginning on April 29.
The Redmi Buds 5A comes equipped with strong 12 mm dynamic drivers and 25dB Active Noise Cancellation. Transparency Mode is available on the audio device. AI Environmental Noise Cancellation (ENC) for calls allows users to communicate crystal clear even in noisy settings. The Xiaomi Earbuds App allows users to adjust the settings to suit their preferences.
With ANC off, you can play for up to 30 hours total, and with ANC on, you can play for up to 23 hours. With just ten minutes of charge, the TWS can play for 90 minutes. The Redmi Buds 5A are waterproof and durable, with an IPX4 rating.
Xiaomi hosted the Smarter Living 2024 event in India today, showcasing the Redmi Pad SE along with an array of home appliances and a wearable. In August 2023, the Redmi Pad SE made its debut in a few European markets. The Indian version of the tablet retains the same design as the European model. It has an 11-inch full-HD+ LCD screen certified by TÜV Rheinland for reduced blue light emissions, and it can refresh at up to 90 Hz. The Qualcomm Snapdragon 680 SoC powers the tablet. Up to 14 hours of video playback or 219 hours of Music playback are claimed to be possible with this tab’s battery life.
In This Article
Redmi Pad SE price in India, sale details
The Redmi Pad SE has been launched in India in three colours — green, grey and lavender. The tablet is priced at Rs 12,999 for the 4GB RAM with 128GB storage option. There is another 6GB RAM with 128GB storage which costs Rs 13,999 and the 8GB RAM with 128GB storage model at Rs 14,999. Starting on April 24, users may purchase the tablet through Amazon, Flipkart, and Xiaomi retail locations in the country.
Redmi Pad SE comes equipped with Qualcomm’s 6nm Snapdragon 680 Mobile Platform paired with Qualcomm Adreno for graphics. It supports LPDDR4X RAM and eMMC 5.1 storage and is available in three variations: 4GB+128GB / 6GB+128GB / 8GB+128GB. The Redmi tablet supports expandable storage of up to 1TB via microSD card. It runs on MIUI Pad 14 based on Android 13.
The device comes with an Aluminum alloy unibody design featuring an 11-inch full-HD+ LCD screen with 1,900 x 1,200 pixels of resolution. The display supports up to 90Hz refresh rate and TÜV Rheinland low blue light certification. In addition to this, it has a touch sampling rate of up to 180Hz, 400 nits of peak brightness and 84.4% screen-to-body ratio. It offers multi-tasking with its split screen and floating windows features.
In terms of optics, there is an 8MP rear camera with f/2.0, 1.12μm pixel size which supports video recording up to 1080P@30fps. For selfies and video calling, the tablet comes with a 5MP front camera f/2.2, 1.12μm pixel size.
The Redmi Pad SE is backed by an 8,000mAh battery which supports 10W charging. It delivers a battery life of up to 14 hours of video playback time or up to 219 hours of music playback time and has a standby battery life of up to 43 days. There is a quad speaker system on the tab which is Dolby Atmos supported.
Along with an AI face unlock the gadget also includes a Virtual ambient light sensor, an Accelerometer and a Hall sensor. For connectivity, there is Wi-Fi: 2.4GHz | 5GHz, Bluetooth 5.0, USB Type-C port and a 3.5mm headphone jack.
Apple’s AirPods should be your go-to TWS if you’re an iPhone user. Not only do they offer a superior soundstage and listening experience, but they also pair seamlessly with your iPhone without any hassle. It is uncommon for AirPods to malfunction out of the blue, but it is not entirely impossible. If you’re facing a similar issue, you’ve landed on the right page. Here are the top 11 ways to fix your AirPods if they won’t connect to your iPhone or go into Pairing Mode.
Before we dive into the fixes, let’s take a quick look at what may be causing your AirPods to malfunction.
Your AirPods aren’t within their functional range.
Your AirPods are out of battery.
Software issues on your iPhone.
Faulty Bluetooth connection.
Accumulation of dust and grime on the charging case is keeping the AirPods from working.
You are using an older iOS version on your iPhone.
Your AirPods’ hardware is damaged.
Make sure the AirPods are within the functional range
If the distance between your iPhone and AirPods is beyond 15 meters, the earbuds will disconnect from the smartphone. Bring the AirPods closer to your iPhone to restore the connection. When the two devices are farther apart, the quality of the connection also takes a hit. The connection strength is also determined by interference from other devices and the number of obstacles in the way.
Charge the AirPods
Your AirPods may not be connecting to your iPhone because they are out of charge. Place the earbuds in the case and connect it to a lightning cable or place it on a wireless charging pad. Wait until the notification light turns green. Once charged, connect the AirPods to your iPhone.
Toggle the Bluetooth Off and On
It is possible that your iPhone’s Bluetooth connection is the culprit behind this issue. Luckily, a quick reset can fix it. Simply go to the Control Centre and tap the Bluetooth tile to turn it off. Wait for a few seconds and then tap it again to turn it back on. You can go to Settings>Bluetooth and do the same by toggling the switch off and on.
Clear your AirPods
Dust and grime can accumulate on your AirPods and their charging case, keeping them from working properly. Use a clean, dry microfiber cloth or Q-tip to clean the charging case and the earbuds. Do not use a damp cloth to clean the case, as it can damage the charging port.
Restart your iPhone
Background software issues on your iPhone may be the reason why it can’t pair with your AirPods. These issues can be resolved with a quick restart of the device. Press one of the volume keys along with the side button to access the power menu. Drag the power slider across the screen to turn off your iPhone. Wait for a few seconds, then long-press the side button to restart the device.
Forget the device
Removing the AirPods as a saved device on your iPhone and pairing it again can restore normal functioning. Go to Settings>Bluetooth and tap the info icon next to your AirPods. Select ‘Forget This Device’. Now, press the setup button on your AirPods to put them in pairing mode and connect them to your iPhone.
Update your iPhone
Step 1: Make sure your iPhone is connected to a WiFi network and plug in its charger.
Step 2: Go to Settings and select General.
Step 3: Select Software Update.
Step 4: Tap on Download and Install.
Reset the AirPods
If your AirPods won’t connect to your iPhone even after using the fixes mentioned above, it is time to reset them to their factory settings. Here’s how.
Step 1: Place your AirPods in the charging case.
Step 2: Close the lid of the case and wait for 30 seconds.
Step 3: Open the lid and press the setup button on the back of the case for 15 seconds.
Step 4: Release the button when the notification light turns amber and then white.
Check your connection using another pair of AirPods
If you suspect that your AirPods are not going into pairing mode due to hardware damage, try connecting another pair of AirPods to your iPhone. If they connect seamlessly, your iPhone is not at fault. Take your AirPods to an authorised service centre to get them fixed.
Use your AirPods on another iPhone
To confirm whether the fault lies with your iPhone, connect your AirPods to another smartphone. If you don’t witness any pairing or connection issues, then your iPhone is to blame. You can try resetting your iPhone to fix this issue. If a factory reset isn’t able to restore normalcy, you will need to take your iPhone to an authorised service centre for further diagnosis.
Reset your iPhone
If you can’t get your AirPods to connect to your iPhone even after resetting them, you can try performing a factory reset of your iPhone as a last-ditch measure. This will clear all the data on your device and restore it to out-of-the-box settings.
Step 1: Go to Settings and select General.
Step 2: Tap on Transfer or Reset Device.
Step 3: Hit Reset.
Step 4: Select Reset All Settings.
Frequently Asked Questions (FAQs)
Why won’t my AirPods connect to my iPhone?
The lack of charge, outdated software, accumulation of dirt, and glitchy software are some of the reasons why your AirPods won’t connect to your iPhone.
How do I reset my AirPods?
Place your AirPods in the charging case, close the lid for 30 seconds, open the lids and press the setup button for 15 seconds to reset them.
How do I check the battery level of my AirPods?
Open the lid of the charging case with the AirPods inside and hold it close to your iPhone. Wait for a few seconds to see the battery level. Alternatively, you can use the battery widget to view the charge level of your AirPods while you’re using them.
How do I remove my AirPods from my iPhone?
Go to Settings>Bluetooth, tap the info icon next to your AirPods, and select ‘Forget This Device’.
These are the top 11 ways to fix the ‘AirPods won’t connect or go into Pairing Mode’ issue. If these fixes don’t work out, make an appointment at the Apple Store for further diagnosis. Read this article to learn how to fix microphone-related issues on your AirPods.
The new Philips Signature Series Airfryer (HD9867/90) has been launched in India.
The new air fryer comes with Smart Sensing Technology.
This feature automatically adjusts cooking time and temperature for a variety of ingredients.
Enjoy food cooked 1.5 times faster than a conventional oven with no preheating required.
With the introduction of the new Philips Signature Series Airfryer (HD9867/90), Philips has expanded the range of its kitchen appliances. Smart Sensing Technology is included with the product for maximum taste and minimum fat. Chef Ranveer Brar, a renowned chef, is said to have sponsored this unique signature series.
Mr. Gulbahar Taurani, CEO and MD, Versuni India Home Solutions Ltd, commented on the launch, “Being true to our legacy, the Signature Series Airfryer is a leap forward in cooking technology. Its intuitive Smart Sensing technology ensures that home cooks achieve consistent results, whether they are beginners or seasoned chefs. With Chef Ranveer Brar endorsing this appliance, it is not just a cooking appliance, it’s a Chef at home. We’re proud to introduce this innovative product, which embodies our commitment to providing consumers with cutting-edge solutions that enhance their cooking experiences and elevate the standards of home cooking.”
In This Article
Philips Signature Series Airfryer HD9867/90 price in India, sale details
Philips Signature Series Airfryer HD9867/90 has launched in India with a price tag of Rs 39,995. The device will be available for purchase on the official Philips Domestic Appliances website.
The business claims that the Philips Airfryer Signature Series, which offers unparalleled convenience and culinary innovation, will transform people’s attitudes towards healthy cooking. This Airfryer is designed to make every meal an unforgettable experience with its advanced features and intuitive design. Users can Fry, bake, grill, roast, and even reheat.
With its industry-first Smart Sensing technology, the Philips Signature Series Airfryer HD9867/90 automatically modifies temperature and cooking time. This Airfryer removes uncertainty and ensures culinary perfection with every meal by using its Smart Chef Programmes to intelligently adjust to the unique needs of various foods. With Rapid Air Technology the device circulates hot air 7 times faster for crispy on the outside, tender on the inside perfection, while using 90% less fat.
The Fat Removal Technology on the Philips Signature Series Airfryer HD9867/90 separates and captures excess fat for healthier meals. The XXL capacity allows for cooking a chicken or a family-sized portion of 1.4 kg of fries with ease.
Garena Free Fire is a battle royale game with regular awards and tournaments to keep players interested. If you play Garena Free Fire, you should be aware of the redeem codes that are released on a daily basis. However, because the battle royale game is banned in India, players from other countries can use the Free Fire Redeem codes daily. If you’re unfamiliar with the Garena Free Fire redeem codes or don’t know how to get them, we’ve put together a step-by-step guide to help you redeem them. Check out Garena Free Fire Redeem Codes for 23 April 2024.
The Free Fire redeem codes are a great way to get free stuff. These are 12-digit codes that contain alphabets and numbers, as well as an expiration date and time. Because the Garena FF redeem codes cannot be used more than once, you should hurry to the redemption page to claim your free reward before someone else does. To get a free reward, all you have to do is go to reward.ff.garena.com/en, which is the official redemption page. Also, keep an eye on this space for daily updates on Garena Free Fire redemption codes and rewards.
“Hey, I am trying to switch WhatsApp from Android to iPhone 15, but I am unable to complete the process. I am currently using Move to iOS application, does anyone know how to fix this issue?’’
Just like the above user, if you are also trying to transfer WhatsApp from Android to your new iPhone using the move to iOS app, then you are doing something wrong. The app doesn’t work for all devices, and also you have to reset your iPhone before transferring the data, which is the biggest disadvantage of using this method. So, how to transfer WhatsApp from Android to iPhone without factory reset? In this article, we will share with you some of the top and most authentic ways to transfer your data without resetting your device.
In This Article
Is There Any Way to Transfer WhatsApp from Android to iPhone without Erasing Data?
Yes, of course, there is an authentic way to transfer WhatsApp from Android to iPhone without erasing data. We are talking about iToolab WatsGo – WhatsApp Transfer, Backup & Restore, which doesn’t ask you to reset your iPhone. The app is easy to use and comes with lots of wonderful features. Let’s discuss its key features.
Direct Way to Transfer WhatsApp without Factory Reset iPhone
You can transfer WhatsApp data from Android to iPhone without the need for a factory reset. That means you don’t have to worry about data loss anymore.
Transfer WhatsApp across Multiple Platforms: From Android to iPhone, iPhone to Android, Android to Android, iPhone to iPhone
Do you want to move WhatsApp data from Android to iPhone? This tool is for you as it allows transferring WhatsApp data across various platforms, including Android to iPhone, iPhone to Android, Android to Android, and iPhone to iPhone.
Transfer WhatsApp Smoothly
It allows a smooth data transferring process, ensuring that you can easily migrate your WhatsApp data without facing any technical issues or complications.
Easily Transfer WhatsApp Data from Years Ago
It enables you to transfer WhatsApp data from years ago, ensuring that you don’t miss your old conversations and media files.
Support WhatsApp/WhatsApp Business/GBWhatsApp Transfer
Whether users are using WhatsApp, WhatsApp Business, or GBWhatsApp, this tool can effectively transfer data from these different versions of the messaging app.
More than 6000 Android devices are well supported: Samsung, Huawei, OPPO, Pixel, Oneplus, Xiaomi, Realme, HTC, Lenovo, etc
It supports over 6000 Android devices, including popular brands like Samsung, Huawei, OPPO, Pixel, OnePlus, Xiaomi, Realme, HTC, Lenovo, and more. This broad compatibility ensures that you can transfer your WhatsApp data from any device you want.
Any iPhone Model will be Compatible
It is compatible with all iPhone models and the latest iOS versions
So, these were the main features of iToolab WatsGo. Now, continue reading the article, as we will guide you on how to use this app.
Part 2. How to Transfer WhatsApp from Android to iPhone without Factory Reset?
If you want to migrate WhatsApp from Android to iPhone, here are a few simple steps which you can follow to move data without factory reset.
Step 1. Begin the process by downloading and installing iToolab WatsGo on your computer. Ensure that you download the version compatible with your operating system. From the dashboard, choose the “WhatsApp Transfer” option.
Step 2. Connect both your Android device and iPhone to your computer using USB cables. Once you’ve selected the transfer option, the tool will start scanning both devices for WhatsApp data. After scanning, it will display the WhatsApp data found on your Android device.
Step 3. Choose the data that you want to transfer and turn on the encrypted backup option. You can check the instructions on the screen.
Step 4. Open your iPhone device and verify your new WhatsApp account. iToolab Watsgo will then begin transferring the selected WhatsApp data from your Android device to your iPhone. The transfer process may take some time, depending on the amount of data being transferred.
Step 5. Soon, you should be able to see all the transferred conversations, media, and attachments on your new iPhone.
Part 3. What Should I Do If My WhatsApp Backup is Too Large to Transfer?
For some reason, if your WhatsApp backup is large and you still want to transfer it to your new iPhone, we suggest reducing your backup size or backing up to your PC using a third-party app. Below, we have explained both ways for you.
Way 1. Reduce WhatsApp Backup Size
Reducing the size of your WhatsApp backup can help free up storage space on your device and make the backup process easier. To do that, we recommend deleting unnecessary conversations, clearing your chat history, managing your media downloads, removing large media files, and checking your backup settings.
Way 2. Backup WhatsApp to PC: Recommend iToolab WatsGo
You can also use iToolab WatsGo application for managing your WhatsApp data. This tool allows you to move your backup file to the PC. All you have to do is choose the data that you want to backup and it will create the backup files for you. You can easily store these files on your computer and transfer them anywhere you want.
Part 4. Can I Transfer iPhone WhatsApp to Android?
Currently, WhatsApp has brought out the official ways to transfer WhatsApp data from iPhone to Android with limitations. However, only some third-party tools, such as iToolab WatsGo, can be used to transfer WhatsApp from iPhone to Android without any restrictions. To do that, you must have:
Either a Samsung Android, Google Pixel, or a device having Android 12 or above
Make sure the Samsung Smart Switch app version 3.7.22.1 or above is installed on your new device. Moreover, you must have Google’s Data Restore Tool already installed on Google Pixel and devices with Android 12 or above.
You must have WhatsApp iOS version 2.21.160.17 or above on your old device
Ensure to have WhatsApp Android version 2.21.16.20 or above on your new device after the transfer is done
Don’t forget about the USB-C to Lightning cable or equivalent adapters
Your WhatsApp number should be the same on both devices
If transferring to Google Pixel or non-Samsung Android 12, the device should be set to factory reset settings
Conclusion
That’s all, folks! By following the above methods, you can effortlessly shift WhatsApp from Android to iPhone. Moveover, you can use iToolab WatsGo – WhatsApp Transfer, Backup & Restore for seamlessly transferring, this software is easy-to-use and transfer your data within minutes. Plus, it is compatible with all the latest Android and iPhone devices.
Virtual reality (VR) gaming has revolutionised the way we experience digital entertainment. It transports players into immersive worlds where they can interact with environments and characters in ways never before possible. To fully embrace this futuristic gaming experience, having the right tech gadgets is crucial.
The VR industry is fast flourishing covering a wide range of activities which include online gaming, virtual tours and learning platforms. In the field of virtual casinos and gambling, VR technology provides a lively and realistic casino environment where people can get involved in games and with other people at the same time they play. Online VR purchases are also increasing at the speed of light, giving customers the possibility to ‘test’ in real-time wearing and buying various products in virtual stores. Websites nowadays often settle for blended VR applications to power up the user experience very much, from virtual conferences and vehicles up to the storyline interactivity and social platforms, or the newest casino onlineshowcasing the great number of prospects of VR in different online activities.
Let’s explore some of the best gadgets on the market that elevate the online VR gaming experience to new heights.
In This Article
1. VR Headsets
The most important thing about any VR gaming rig is a really good virtual reality headset. Devices centring on the Oculus Quest 2 or the HTC Vive Cosmos come with stunning visuals, and precise tracking, and are also extremely comfortable. Modelled on the technology-based sensors and the latest optics the headset gives your every game a movielike impression, you cannot tell the difference between a real and a virtual world anymore.
2. VR Controllers
The VR headset coupled with easy-to-use (intuitive) controllers will heighten the gameplay allure. Write an individualised sentence attention grabber that is captivating for a reading audience of a media-saturated society interested in the topic of the harmful effects of social media on mental well-being. Even though interfaces such as the HTC Vive Knuckles or the PlayStation VR Move controllers enable sophisticated gestures and actions, the users still need to be precise regarding VR object interaction.
3. Gaming PCs and Consoles
This gaming hardware such as a powerful PC is mandatory for quality VR experiences. Professional game consoles with strong graphics cards, including NVIDIA RTX devices, guarantee smooth visuals and high-quality images, as a result of which the user’s game virtual reality experience is provided with a maximum dose of enjoyment. Players that are a group of console gamers can choose from the likes of PlayStation 5 or Xbox Series X as they add VR game support with compatible gear.
4. VR-Compatible Games
Without a pool of gaming titles with immersive VR experiences, no one will be willing to strap themselves into a headset. Titles like “Half-Life: Wearing the Helmets in the World of the “Half-Life: Alyx”,” “Beat Saber”, “Resident Evil 7: Biohazard VR”, and “Star Wars: Squadrons” are not the same games that offer gameplay experiences that are very different ranging from action-packed games to games in which storytelling is very immersive and suitable for different kinds of game.
Future by the Numbers
In the last few years, the VR industry has experienced rapid growth, and such a fact is quite evident by the figures of its massive penetration and fiscal turnover. Seventy billion dollars in length, the global VR gaming market in the year 2023 was the fuel for an online virtual gaming platform that gained a lot of speed. Some major firms like the Facebook-owned Oculus, the HTC Vive, and Sony’s PlayStation VR have spent a great amount of money on the development of VR technology, this has made the technology easier to access and more refined.
VR has not been less adopted by the internet gambling industry, with users reporting to increasingly prefer its online casinos and virtual betting platforms. The gambling online market achieved an astonishing $66.7 billion worldwide before 2022, with an anticipation of soaring profits in future. Moreover, some statistics are significant such as gambling online casinos earnings in the US in 2022 which reached $1.1 billion and VR headset sale figures that surpassed 16 million units across the globe.
Conclusion
The arena of virtual games has gained a tremendous amount of popularity, NBA 2K and FIFA are among the few exclusive titles that provide virtual soccer and basketball experiences. Sporting platforms, like Betway and 888sport, or the newest casino online create the virtual environment for betting on these sporting events which include soccer, horse racing, and motorsports among others. In different sites like PokerStars VR, players can participate in virtual poker tournaments, making use of virtual reality in basketball court-like casino environments. VR eSports tournaments held on the SteamVR platforms have some of the best-known games including “Beat Saber,” Pavlov VR” and “Echo Arena” where players play for money awards and recognition. Besides these, these contests also provide avenues for eSports betting and so engage the journey of online gamers with thrill and fun.
Be it countless different galaxies, battling zombies or learning rhythm-based stuff, the best VR hardware and software secure ways to make the game a pure magic transferring you to virtual digital worlds which simply make sense on this planet.
Blocking users on Facebook is a very handy way to deal with cyber harassment. If you’re being bothered by unwanted comments and tag mentions, blocking the user is one of the best things you can do. Once someone has been blocked, you can review your actions and unblock them by visiting your block list. If you don’t remember who you have blocked on Facebook, then going through your block list to check it out is a good idea. Here’s how you can do that.
How to tell if you’ve been blocked by someone on Facebook?
Viewing the people you’ve blocked on Facebook is easy. But before we get to that, let’s talk about the signs you need to look out for to decide if you’ve been blocked by someone. As you may know already, Facebook doesn’t send notifications to users who have been blocked by someone.
If a user is no longer in your friend list and you can’t find their profile on Facebook, they have either deleted their profile or blocked you on the platform. The latter is likelier if you cannot get through to them on Messenger either. To confirm that you’ve been blocked, ask a mutual friend to check if they can view the profile of the person in question. If the answer is yes, you have certainly been blocked by the user.
Check who you have blocked on Facebook (Mobile)
Step 1:Launch the Facebook app on your smartphone.
Step 2: Tap your profile icon at the top right corner of the screen.
Step 3: Tap on Settings and privacy and select Settings.
Step 4: Scroll down to Audience and visibility and select Blocking.
On the following page, you will be able to see the users you have blocked on Facebook. To remove a user from the block list, hit the ‘Unblock’ option next to their profile.
These are the top 2 ways to check who you have blocked on Facebook. Once you block someone on Facebook, they won’t be able to add you as a friend, see your posts, tag you, or send you a message. Read this article to learn how to block or unblock someone on Facebook.
Sony India today introduced Bravia Theatre Quad, its latest audio system. The speaker comes with Sound Field Optimisation, IMAX Enhanced, and Dolby Atmos compatibility, along with 360 Spatial Sound Mapping capabilities. The sound Field Optimisation automatically adjusts audio for optimal performance. It also offers voice control and streaming options with Alexa, Airplay2 and Spotify.
The premium design of Sony’s new Bravia Theatre Quad is said to complement your living room decor and enhance your at-home moviegoing experience. This product’s eco-conscious design incorporates recycled materials to improve sound quality and incorporate accessibility features. The Bravia Theatre Quad’s fabric is made from recycled PET bottles.
An optional wireless subwoofer is available for the Bravia Theatre Quad to improve your audio experience with rich, punchy bass. The subwoofer has been expertly incorporated into the system which is said to create a resonant soundstage that enhances the cinematic experience. As per the company, for deeper bass, consider adding two optional subwoofers to your home theatre system. Include a 300W deep bass wireless subwoofer powered by a 180mm driver and passive radiator (SA-SW5). Alternatively, choose the SA-SW3 wireless subwoofer, which has a 160mm driver and produces 200W of sound from a small bass reflex subwoofer.
Four wireless speakers are included with the Sony Bravia Theatre Quad, and they can all be mounted on a wall or a table. Furthermore, one control box with HDMI (eARC) and optical connectivity options is included. To watch your favourite films, just connect your TV via optical or HDMI cables.
The speaker system features Bluetooth connectivity, allowing users to stream music wirelessly from their smartphones or tablets. It can also be integrated with popular streaming platforms and voice assistants, including Alexa, Airplay2, and Spotify. With the Bravia Connect App users can easily manage Bravia Theatre Quad’s settings from their smartphones or tablets for a tailored audio experience.
Compliant with both Dolby Atmos and IMAX Enhanced, the Bravia Theatre Quad offers an unmatched home theatre experience. In the Bravia Theatre Quad, Voice Zoom3 deftly adjusts dialogue clarity to guarantee crystal-clear speech even in stressful circumstances or noisy surroundings. Voice Zoom3 improves the overall viewing experience by making every word clear and sharp. Audio from the Bravia Theatre Quad is seamlessly integrated with compatible Bravia TVs thanks to Bravia Acoustic Centre Sync. By synchronising audio output to create a seamless audio-visual environment and draw viewers into the action on screen, this feature improves the overall cinematic experience.
The Bravia Theatre Quad’s Sound Field Optimisation adjusts the audio settings to deliver the best sound experience regardless of room size or shape by automatically measuring the relative height and position of each speaker, the acoustic characteristics of the room, and the listener’s position. Based on this information, it creates multiple phantom speakers and analyses the acoustic characteristics of the space and the listener’s position.
Sony Bravia Theatre Quad price in India and availability
Sony Bravia Theatre Quad has been launched in India with a price tag of Rs 1,99,990. It is currently up for sale via Sony retail stores (Sony Center and Sony Exclusive), www.ShopatSC.com portal, major electronic stores and other e-commerce websites in the country
Your iPhone does not let you change the intensity of haptic feedback, but you can select a custom vibration pattern for different alerts. If you want more control over the haptics, you can even create a new vibration pattern. When your iPhone is in silent mode, you can turn on the vibration for different alerts so you don’t miss any important notifications. Today, we bring you the top 2 ways to change the vibration settings on your iPhone.
If your smartphone is in silent mode most of the time, a good haptic motor is very important. The haptic feedback on iPhones is top-notch. You can set up different vibration patterns for ringtones, text tones, voicemails, and other alerts so you don’t have to pick up the phone to check whether you’re receiving a call, a text, or a random notification.
Apart from setting different vibration patterns, you can also create new ones on your iPhone. Tapping the screen once on the pattern creation page triggers the vibration motor to send feedback. You can extend this feedback by tapping and holding the screen. By repeatedly tapping the screen you can create fun vibration patterns on your iPhone.
Change the vibration pattern on an iPhone
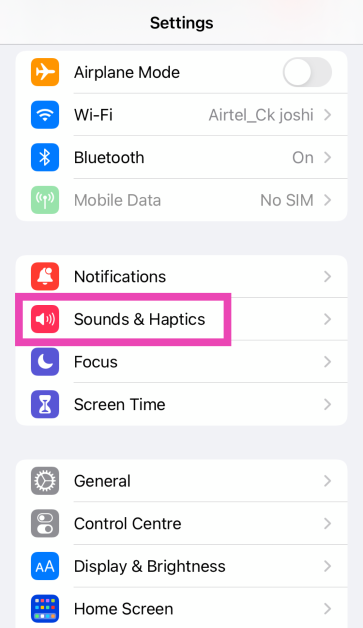
Step 1: Go to Settings and select Sound & Haptics.
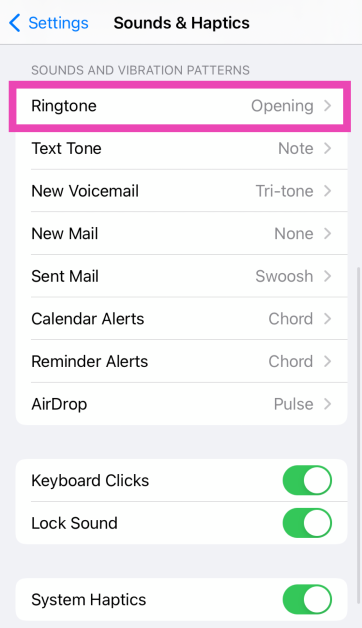
Step 2: Select the alert tone for which you want to change the vibrational pattern.
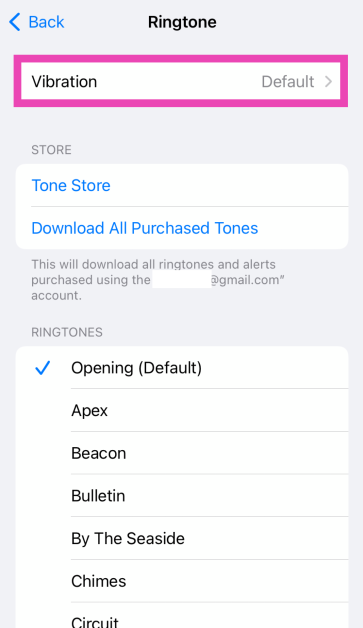
Step 3: Tap on Vibration.
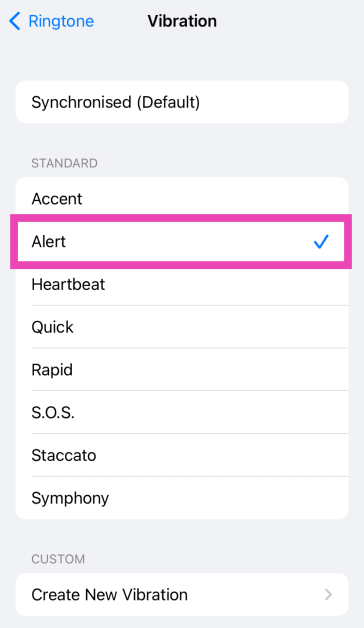
Step 4: Select a vibration pattern from the list.
Your changes will be saved.
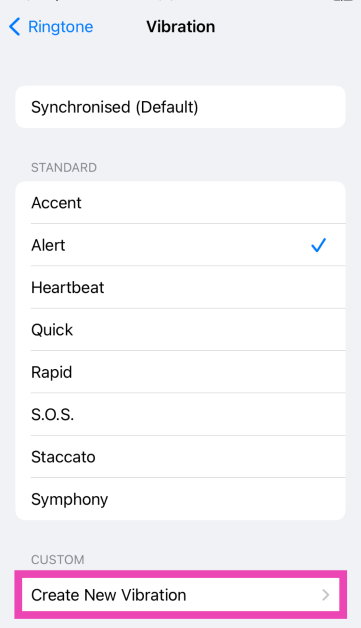
Create a custom vibration pattern on an iPhone
Step 1: Go to Settings and select Sound & Haptics.
Step 2: Select the alert tone for which you want to create a custom vibrational pattern.
Step 3: Tap on Vibration.
Step 4: Select Create New Vibration.
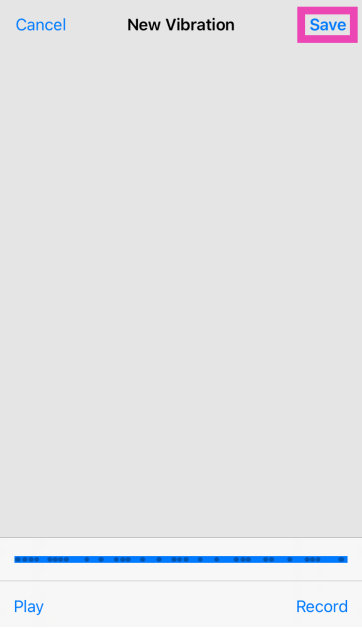
Step 5:Tap the screen to create a vibration pattern. Hit Stop when you’re done.
Step 6: Preview the pattern by hitting Play and hit Save.
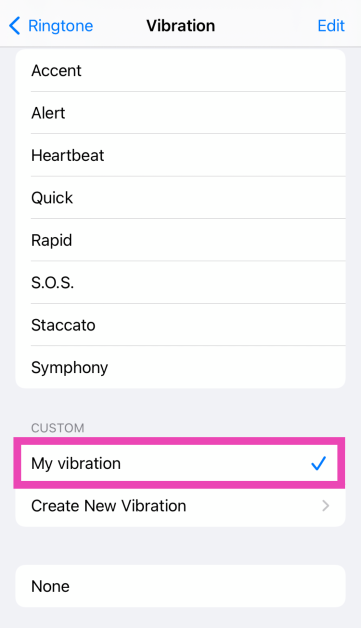
Step 7: Go to the previous page and select the vibration you have just created.
Frequently Asked Questions (FAQs)
How do I change the vibration pattern on my iPhone?
Go to Settings>Sound & Haptics>Ringtone>Vibration, and pick a new pattern.
How do I create a new vibration pattern on my iPhone?
Go to Settings>Sound & Haptics>Ringtone>Vibration>Create New Vibration and tap the screen to create a new pattern. When you’re done, hit Save.
How do I turn on vibrations in silent mode on my iPhone?
Go to Settings>Sound & Haptics and turn on the toggle switch for Vibrate on Silent.
These are the top 2 ways to change the vibration setting on an iPhone. There is no native way to alter the intensity of the haptic feedback on your iPhone, but you can turn it off entirely by selecting ‘None’ in the vibration menu.
The Pixel 8a would cost in India between Rs 1,000 and Rs 2,000 more
Artificial intelligence (AI)-related technologies are also anticipated to be included.
Google Pixel 8a has been leaked several times in the past however the company hasn’t made an official announcement about it yet. More leaks about the Pixel phone have now appeared online. Previously it was seen on the Bluetooth Special Interest Group (SIG) certification page and then four possible colours for the phone were suggested by leaked images. Before its release, the price of the Google Pixel 8a has been leaked. Keep on reading to learn more.
Google Pixel 8a is expected to be unveiled by the company at its yearly Google I/O 2024 event next month. Details of the alleged smartphone have been leaked multiple times in recent weeks. Online sightings of the rumoured Pixel 8a price indicate that consumers may need to shell out a little more money to buy it. According to PassionateGeekz, the 128GB storage model of the Pixel 8a will cost CAD 708.99, or roughly Rs 42,830, in Canada, where the phone was listed by a store. The 256GB variation will cost CAD 792.99, or around Rs 47,900. The identity of the Canadian vendor who carried both Pixel 8a models was withheld by the media. The price of the Pixel 8a could increase by much to Rs 2,000 in India this year.
Renders of the forthcoming phone, indicating all four colour variants, have been made public by Android Headlines ahead of its official release. The phone could come in the following colourways: Bay, Mint, Obsidian, and Porcelain, according to the rumour.
In terms of design, rumour claims that the Pixel 8a will resemble the Pixel 8. The back panel is expected to feature a matte texture finish. The Google Pixel 8a is anticipated to include a 6.1-inch FHD+ 90Hz display. It will likely use the same Tensor G3 processor that debuted in the Pixel 8. Additionally, it may come equipped with a 4,500mAh battery. A 64-megapixel primary camera and a 13-megapixel ultrawide sensor should be included in terms of cameras. According to earlier reports, the Pixel 8a will be powered by the same
Tensor G3 chipset that powers the Pixel 8 and Pixel 8 Pro. A 6.1-inch full-HD+ OLED display with a resolution of 1,080 x 2,400 pixels is expected to be part of it. The panel could support a refresh rate of 120 Hz and have a maximum HDR brightness of 1,400 nits. It is probably going to include two cameras on the back: a 13-megapixel ultra-wide angle lens and a 64-megapixel primary camera with optical image stabilisation (OIS). It is rumoured to have a 13-megapixel front-facing camera for recording videos and capturing selfies.
Some AI (artificial intelligence)-related capabilities are also anticipated for the Pixel 8a.
For a lot of users, setting up a wallpaper for their desktops isn’t a random choice. If you like to put an effort into the way your desktop looks, you probably want to view it all the time. The good news is that you can make the windows on your screen see-through to view the desktop. Today, we bring you the top 5 ways to make windows transparent in a Windows 10/11 PC or laptop.
Your Windows 10/11 PC has a native transparency effect which can be customised using personalisation settings. This effect uses the main colours of your desktop wallpaper to create a background effect for the window panels. These colours can also be used to accentuate the taskbar, start menu, and title bars. The transparency effect is turned on by default for window panels. To apply it to the taskbar and start menu as well, go to Settings>Personalisation>Colours and turn on the relevant toggle switches. You can also choose any colour of your choice for the transparency effect.
Even though it is called a ‘transparency’ effect, it does not make the window panels entirely see-through. If you want to get rid of the opacity of the windows on the screen, you will need to install third-party software for your PC or laptop. Here are some of our favourites.
Step 3: Switch to the Settings tab and take note of the keyboard shortcut for transparency. By default, this shortcut is Ctrl + Alt + O, but you can change it to something else.
Step 4: Use the slider next to the keyboard shortcut to adjust the transparency level.
Step 5: Press the keyboard shortcut to make any window transparent on your PC or laptop.
Glass2k
The ol’ reliable Glass2k software still remains one of the best ways to make windows transparent on your Windows 10 or 11 PC. This software has been around since the days of Windows XP but works fine on Windows 10/11 as well. After installing Glass2k on your PC, access its settings from the taskbar. Using the settings menu, you can create a keyboard shortcut to make your windows transparent. The software lets you decide the transparency level as well. You can go back to opaque windows any time by right-clicking on Glass2k’s icon in the taskbar and selecting ‘Exit’.
One of the simplest tools to make windows transparent on your Windows 10/11 PC or laptop is Vitrite. You can download this tool for free from Softonic. Once installed, Vitrite lets you choose from 9 transparency levels. Press Ctrl + Shift + (any number from 1 to 9) to make a window transparent. Level 1 offers the most transparency while Level 9 is almost opaque. To remove the transparency effect, press Ctrl + Shift + 0. Vitrite also lets you pin a window on top of other windows.
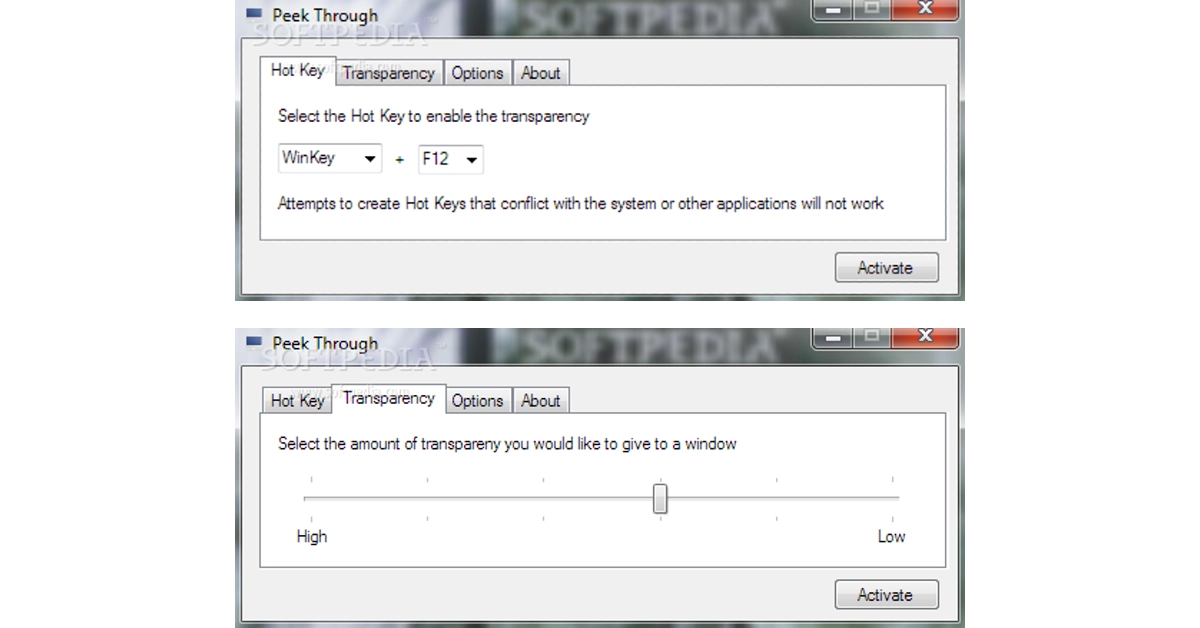
Peek Through is another great tool to make windows transparent on your Windows 10/11 PC or laptop. You can download this software for free from Softpedia. Upon launching Peek Through, the software asks you to set up a hotkey for the transparency effect. You can use this hotkey at any given time to apply the transparency effect to a window. Use the ‘Transparency’ tab to set a level for the effect. You can also set this software to run on startup.
The TranslucentTB app on the Microsoft Store is an easy solution to make your taskbar see-through. When you run the app, it makes the taskbar transparent automatically. Despite its transparency, the taskbar lucidly displays all the icons and minimised apps. The great thing about this app is that it runs automatically when you start your PC. This means that you are always greeted with a transparent taskbar.
Is there a native way to make windows transparent on a Windows 10/11 PC or laptop?
There is no native way to make the windows transparent on your PC. However, you can use tools like WindowTop, Glass2k, and Peek Through for this task.
What is the transparency effect on Windows?
Windows’ transparency effect uses the primary colours of the wallpaper to create a colourful background for the start menu, taskbar, windows, and title bars.
What is the keyboard shortcut for transparent windows on WindowTop?
The default keyboard shortcut for transparent windows on WindowTop is Ctrl + Alt + O.
Can I make the taskbar transparent on my Windows PC?
There is no native way to make the taskbar transparent on your Windows PC. You can use the TranslucentTB app to carry out this task.
How do I hide the Search bar on the taskbar?
Go to Settings>Personalisation>Taskbar, click the dropdown menu next to ‘Search’ and select ‘Hide’.
These are the top 5 ways to make windows transparent in a Windows 10/11 PC or laptop. If there is any other tool you like to use for this effect, let us know in the comments! The tools we have mentioned in this list are either free to use or offer a free trial version.
Boult Audio, a homegrown consumer technology brand, has a great selection of TWS earbuds. We just reviewed the new Boult Z40 Ultra earphones and were rather pleased with the audio quality considering the cost. They provide 10mm drivers with BoomX Technology, feature low-latency gaming mode with a maximum latency of 45ms, and deliver up to 32dB of active noise cancellation (ANC). They also include dual pairing capabilities and an IPX5 designation for water resistance. They are providing a lot at this price, but the important question is how well they work. After using them for more than a month, this is our review.
In This Article
Boult Z40 Ultra Review: Design
The case features a dual glossy and matte appearance and is entirely composed of high-quality plastic. It features horizontally positioned LEDs that light up in green to indicate the amount of battery life left, as well as the Boult logo on the front. The Z40 Ultra has a metallic rim and a premium finish.
You should have no problem putting the tiny, pebble-shaped charging case into your pocket while not in use. The earbuds’ plastic casing is resilient enough to withstand unintentional falls. The buds and case are of nice quality, however, handle them carefully as they are somewhat slippery.
The Boult Z40 Ultra charging case is built without buttons. The glossy side attracts a lot of scratches. While the matte finish helps cover up any scratches. For charging the case, there is a USB-C port at the bottom. In the package, Boult includes a USB-C cable.
The budget-friendly earphones have four colour options: Black, Beige, Blue, and Brown. The colour option we have for testing is black.
As you can see, the earbuds are firmly planted into the respective slots on the left and right. The earbuds’ housing contains magnets that hold them in place.
The earbuds are shaped like a stem and fit well in the ear canal. They come with silicone ear tips that slide right into the canal. For a snug fit, these come with an additional pair of ear tips. Furthermore, it features a dusty mauve flat touch panel for music control and playback pause. The earphones are quite light and cosy to wear for long periods.
However the earbuds are not very comfortable to wear while you sleep, and if you use them for a long time, you might get pain and irritation in your ears. The device’s IPX5 classification protects it from water splashes, so you can use it anytime, even in the gym or when working out in the rain.
BoomX-enabled 10mm drivers are included with the Z40 Ultra. The snug fit provides excellent noise cancellation when conversing on the phone or enjoying music. You may personalise your audio experience using 3EQ modes- HIFI, Rock, and Bass settings. The user can adjust the volume on their mobile as there are no options for volume control on the earbuds.
This one allows for the full range of frequencies to be heard without the need for further effort, unlike most others where the bass is too high and the treble, mids, and volume automatically diminish. The whole listening experience is outstanding. Moreover, the loudness is accurately adjusted, neither too high nor too low.
Even though these aren’t made solely for gaming, we tested them to see if they work well for gaming. With its ultra-low 45ms latency and Combat Gaming Mode, the Z40 Ultra gives you an edge over others. There was not much audio lag when playing intensive games like Call of Duty. However, latency is not an issue with light games.
By eliminating background noise during calls, Boult Z40 Ultra’s 32 dB active noise cancellation technology in the Zen Quad Mic ENC offers crystal-clear calls even in the noisiest of settings. The Z40 Ultra has a four-mic setup that makes it easy to capture the words you speak. According to Boult, AI technology is integrated into these buds.
AI-driven intelligent speech processing is incorporated into the company’s Sonic Core Dynamics solution for optimal noise cancellation and low power consumption. Prism Voice PLC is another AI tool that guarantees lag-free chats, immersive game interaction, and improved call quality for smooth virtual meetings.
Bluetooth connectivity is really good. The Boult Z40 Ultra headphones support Bluetooth 5.3 and have a wireless range of roughly 10 metres. But perform flawlessly within a 20 to 24-foot radius when there are obstructions. You may easily switch between two devices with a single swipe thanks to Dual Device Pairing’s ease.
According to Boult, a single charge of the Z40 Ultra can provide up to 100 hours of playback time. To guarantee that the user can always carry the earphones while travelling, it also features a Type-C connector for fast charging. For longer use without the need for frequent recharging, the 100-hour playtime makes it perfect for everyday commuting or long journeys.
Verdict
The ANC offered at this price range is sufficient to judge Boult Z40 Ultra’s performance, and the answer is that it functions and isn’t a gimmick. However, the battery will run out faster with the ANC. They successfully filter out outside noises with 32dB Active Noise Cancellation, resulting in a rich audio experience.
Packed with a stylish design, the Boult Audio Z40 Ultra Truly Wireless Earbuds offer an amazing range of features. If you’re on a tight budget and want a high-quality product in this price range, just go for it.

")
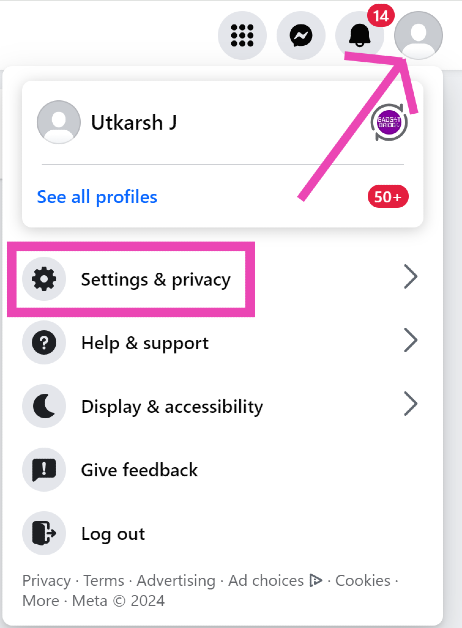
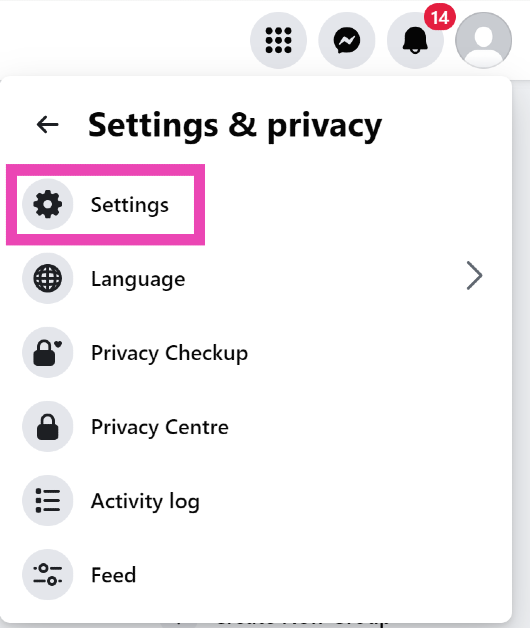
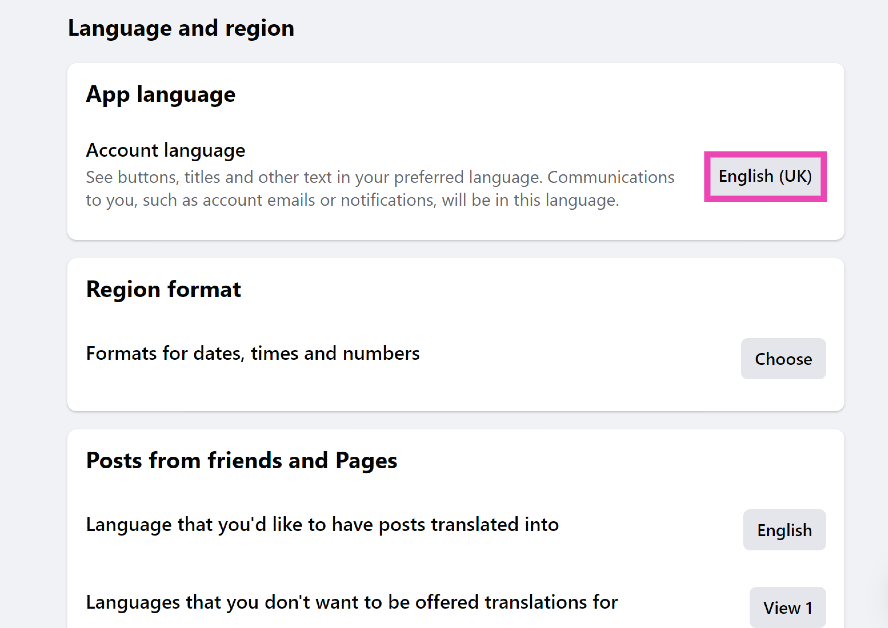
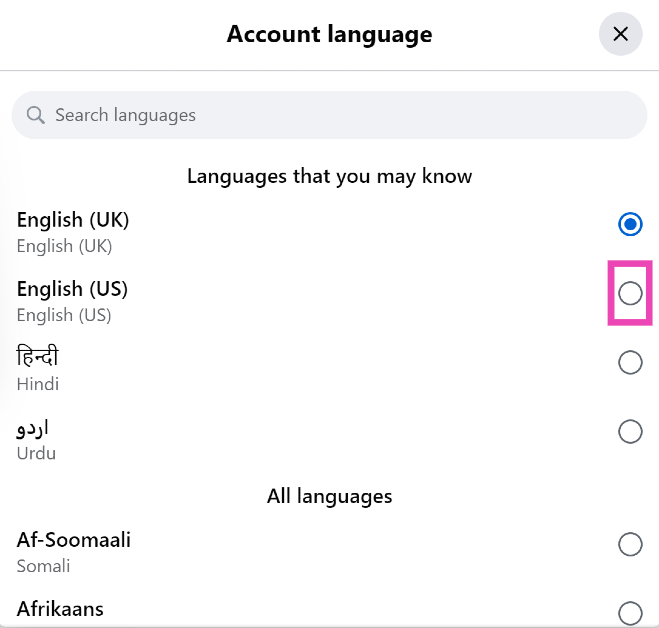

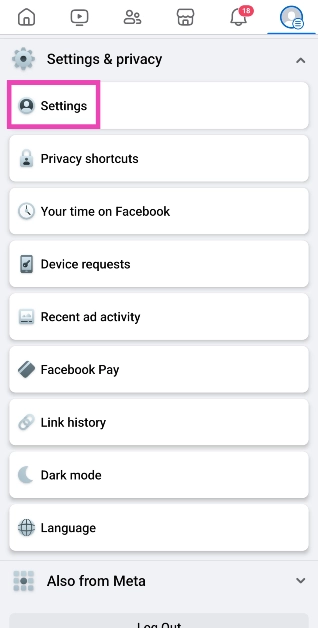
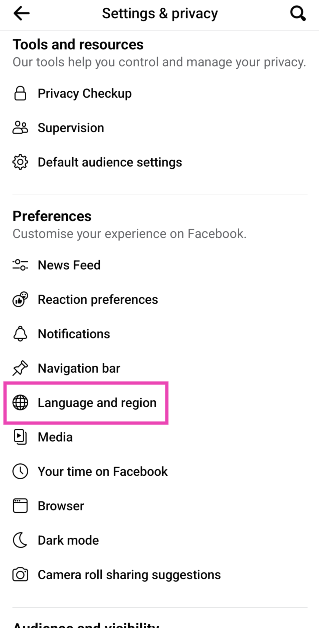


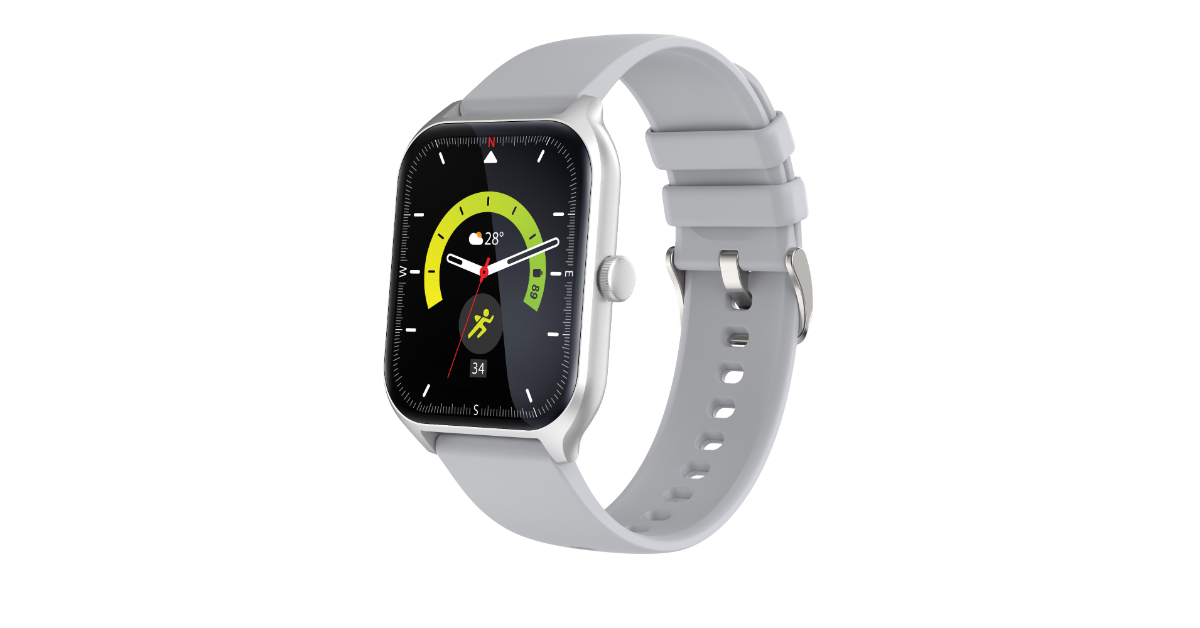

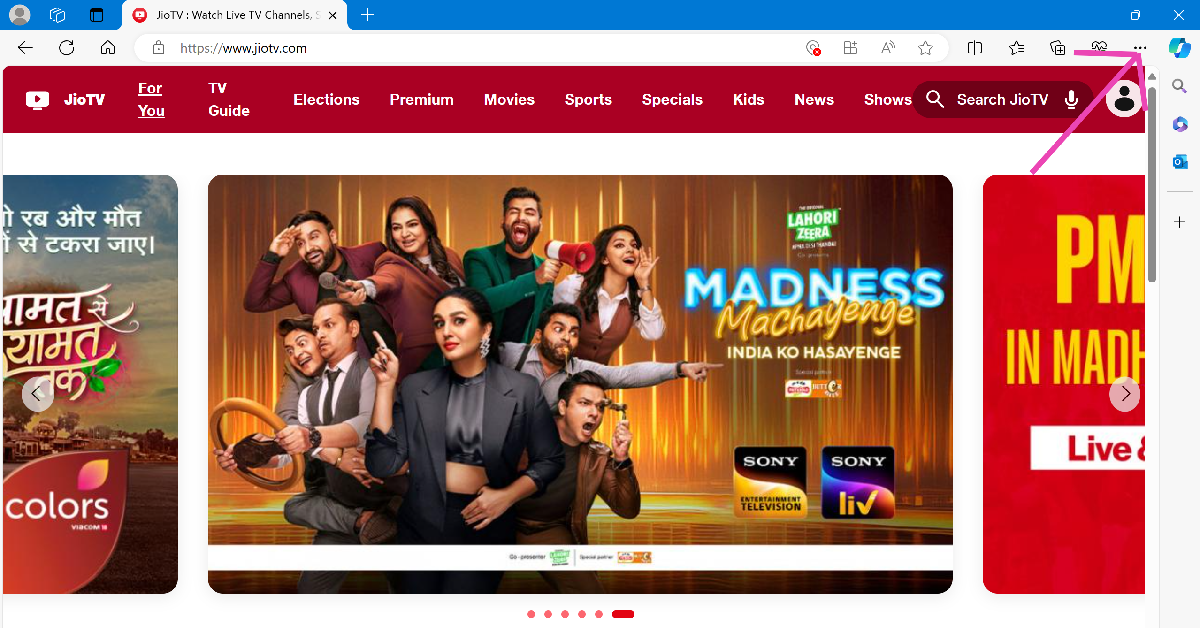
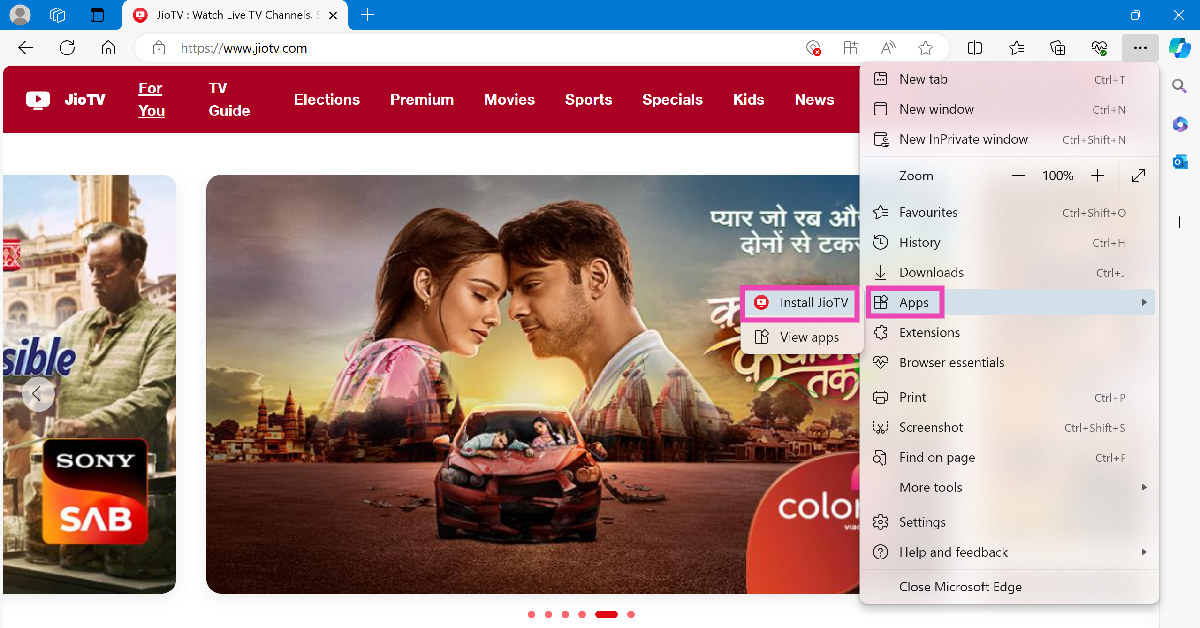
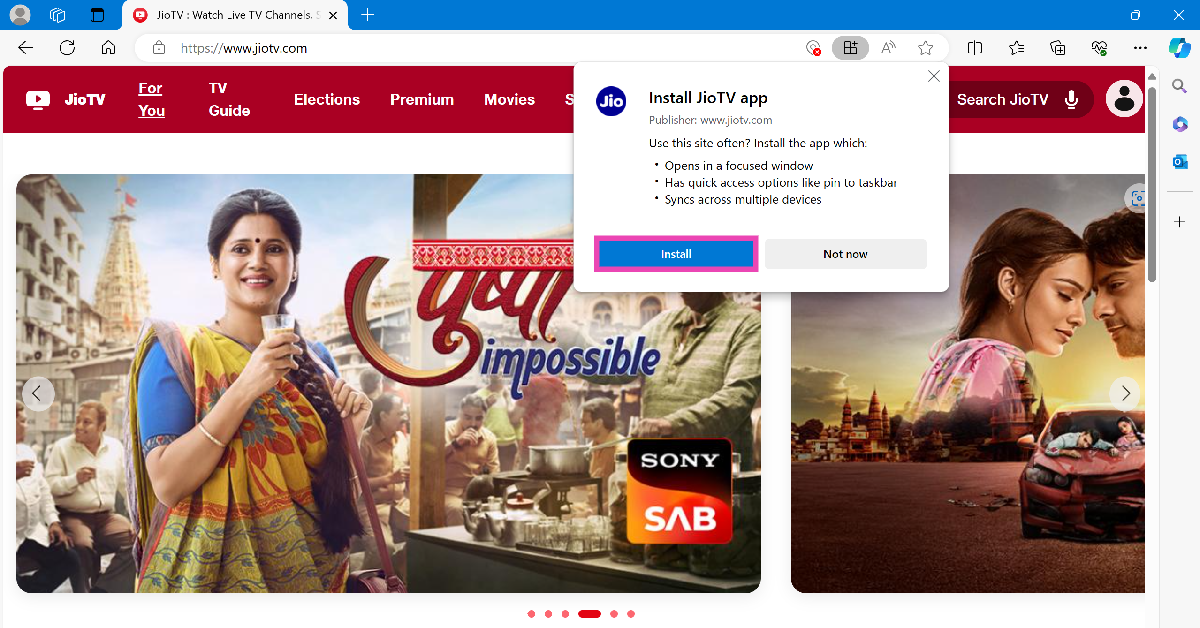
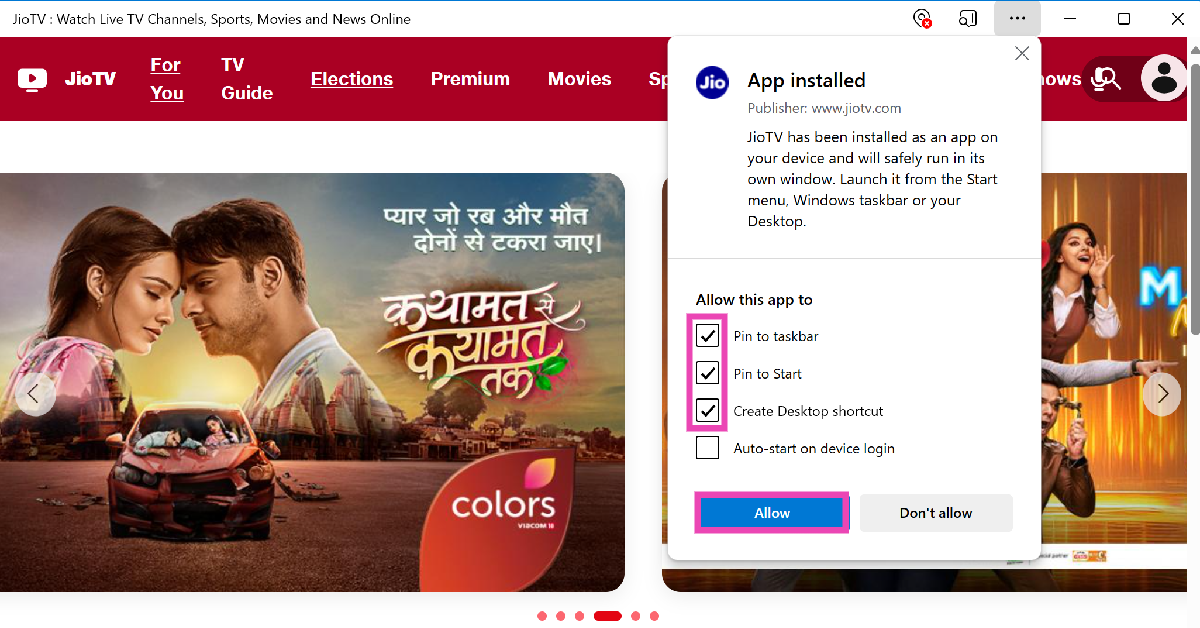
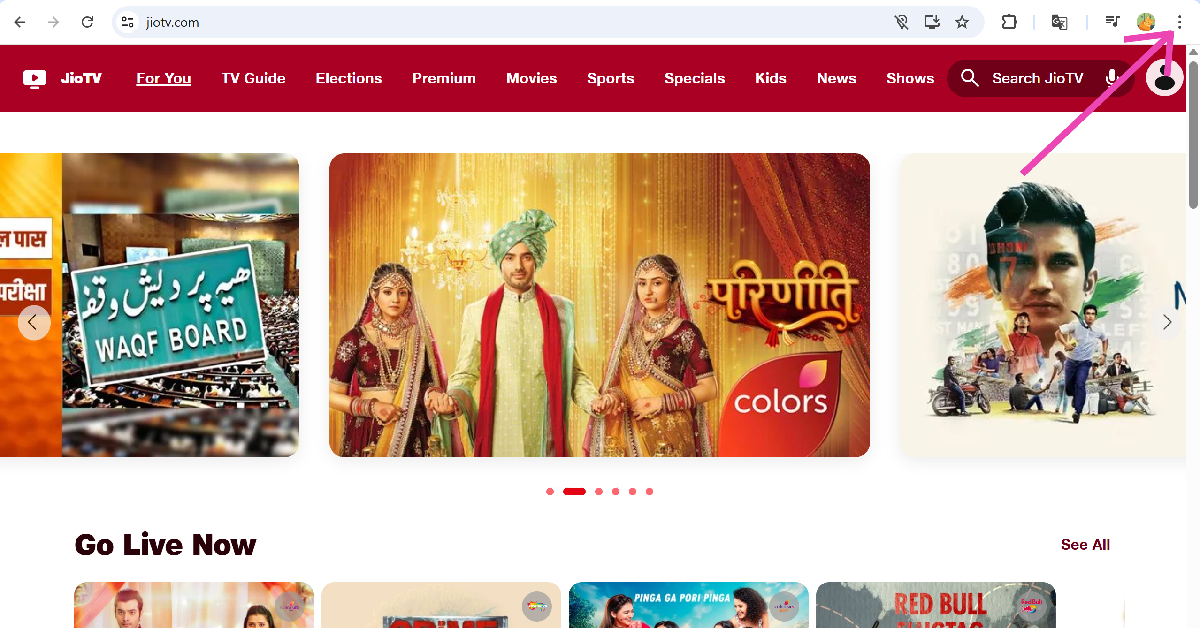
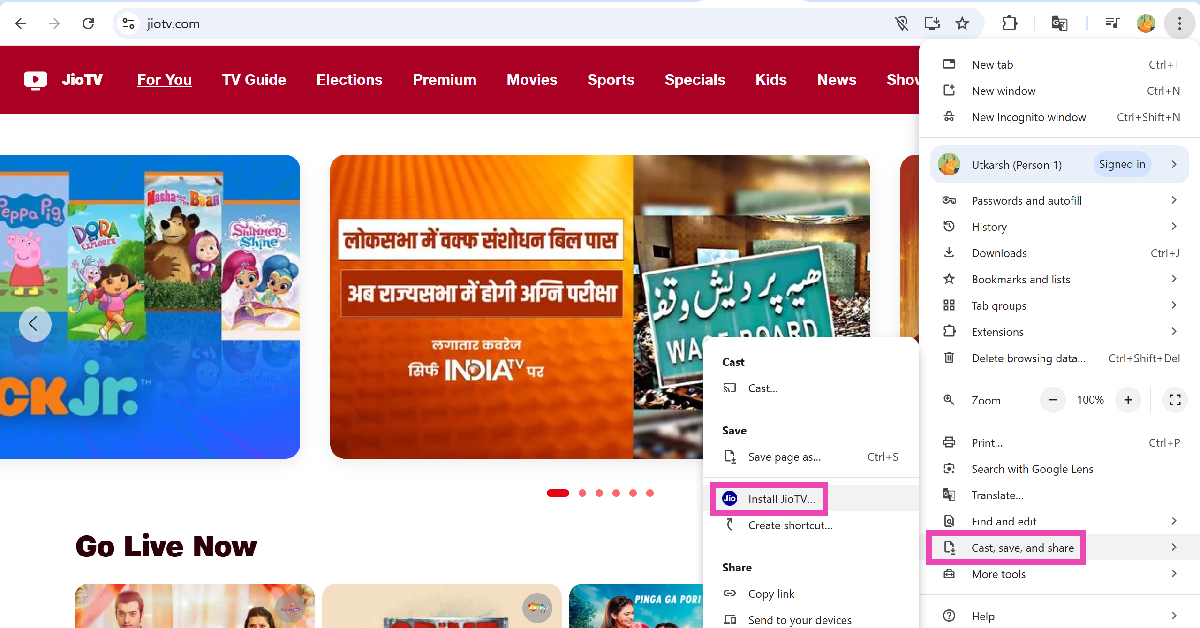
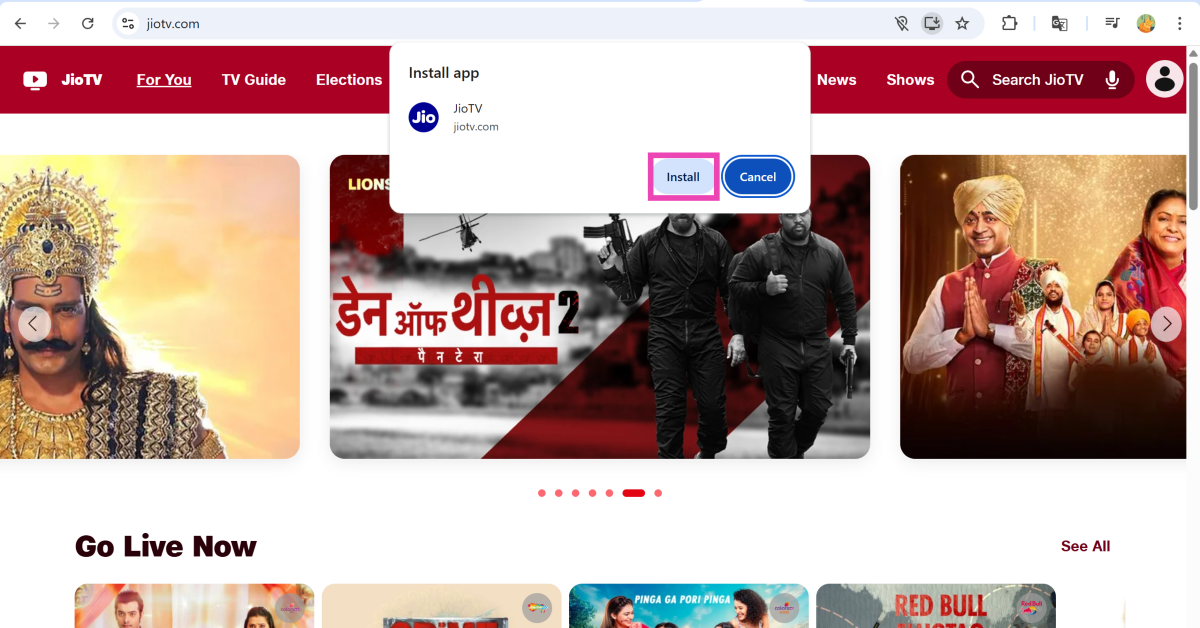
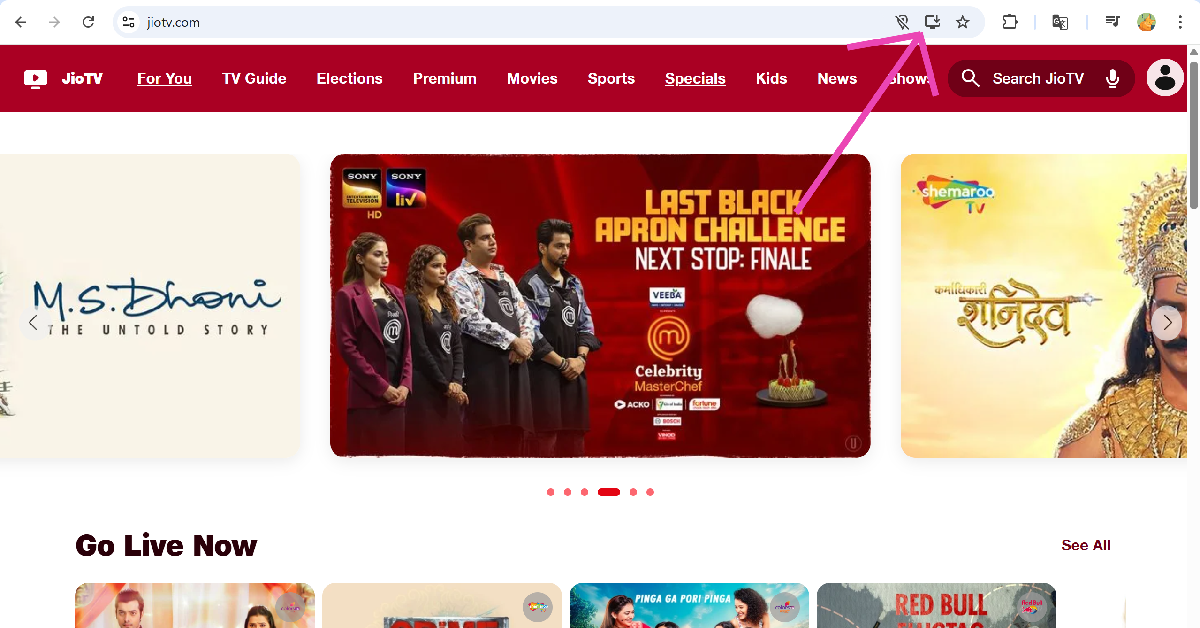
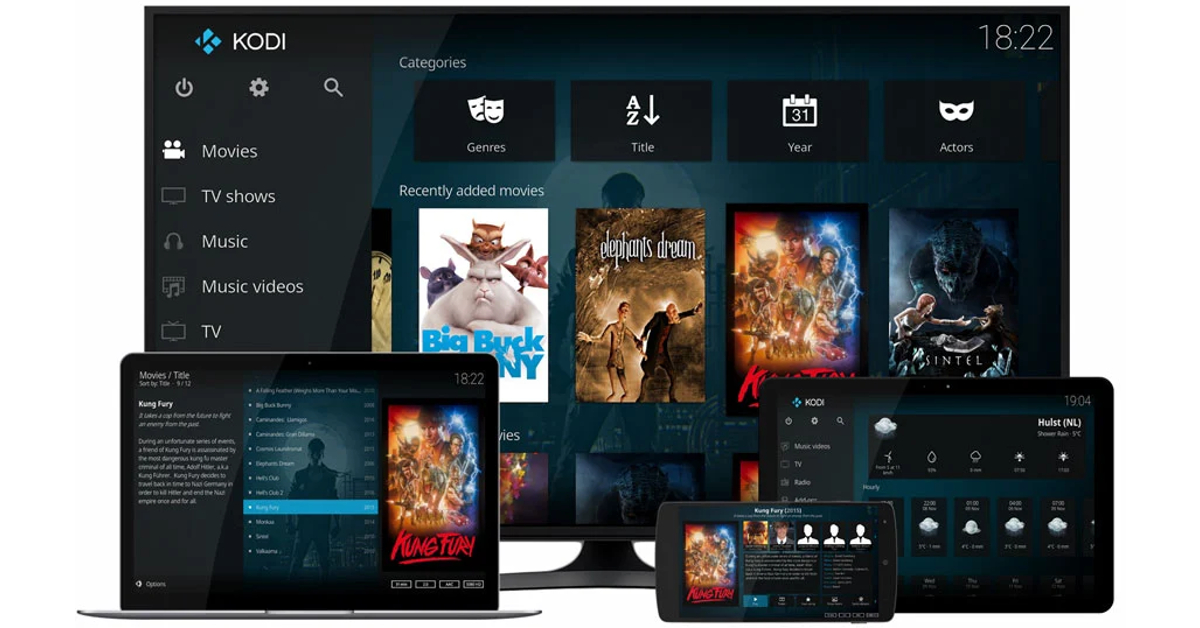
")


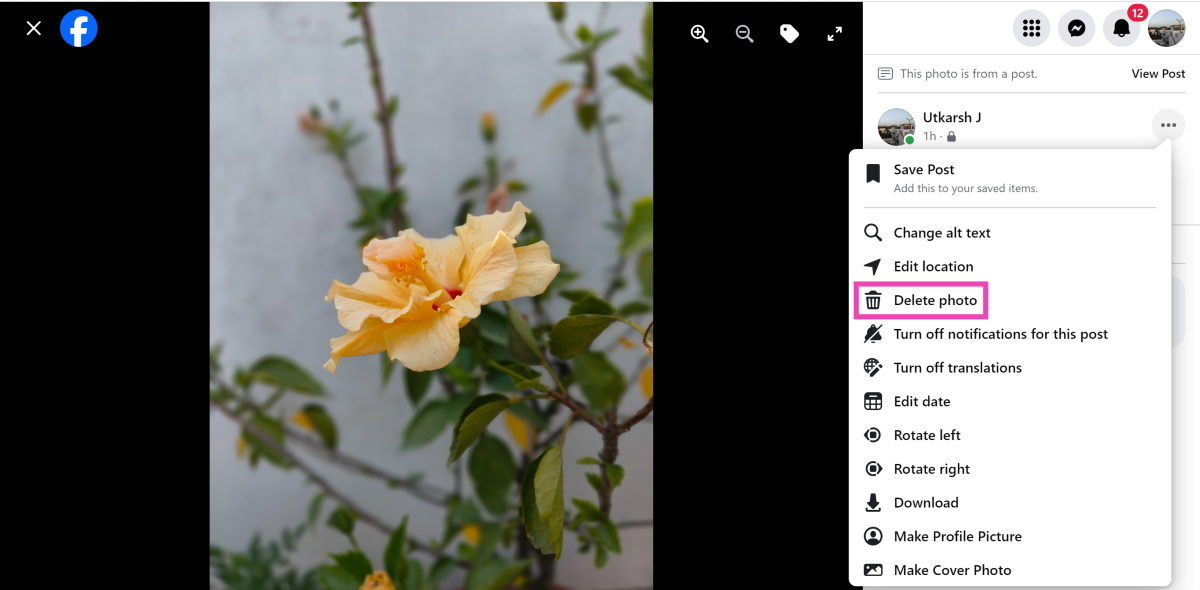
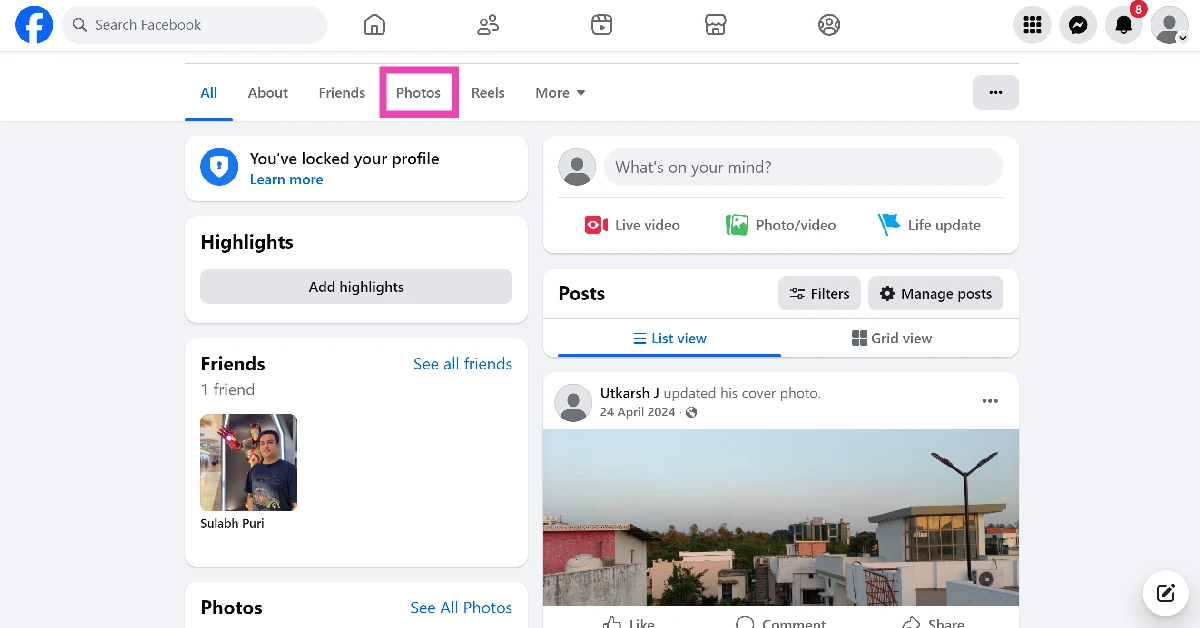
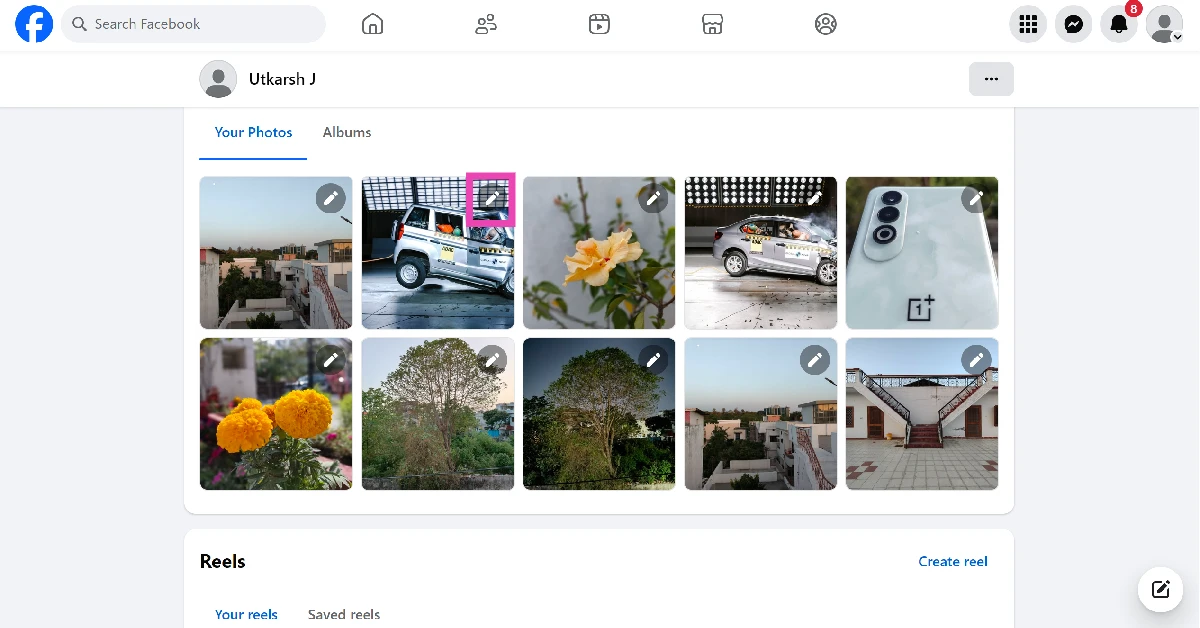
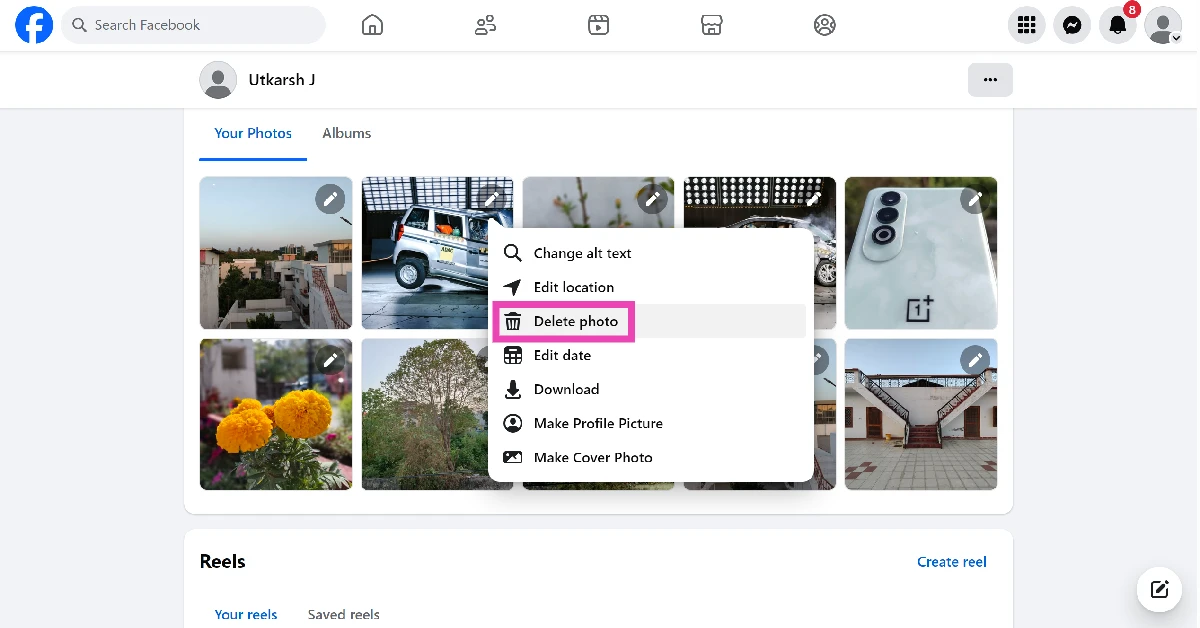
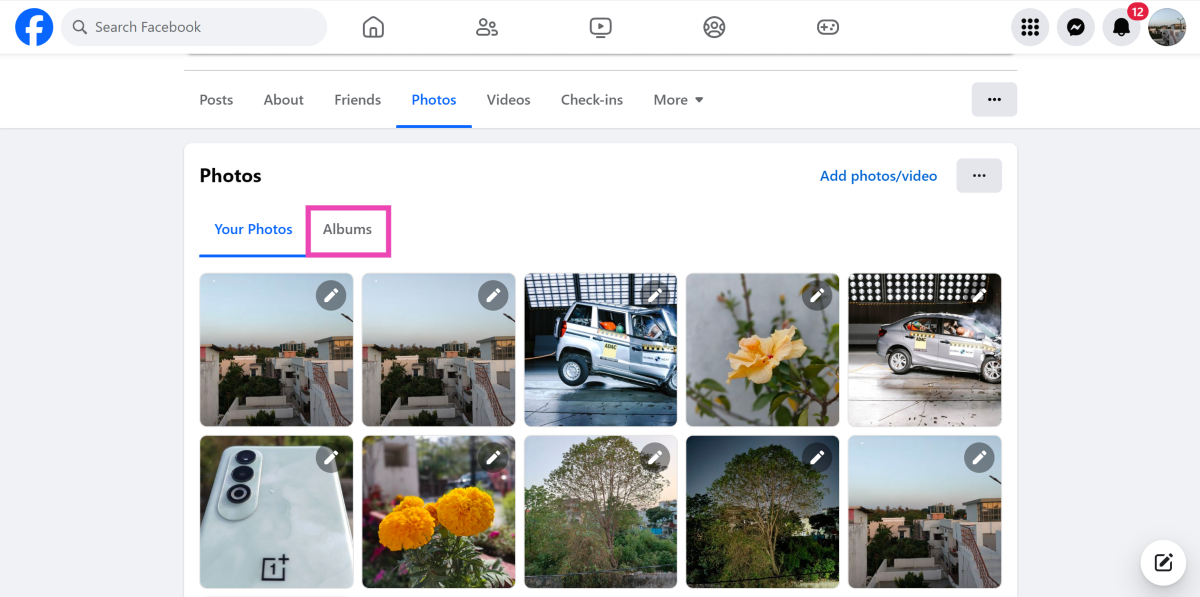
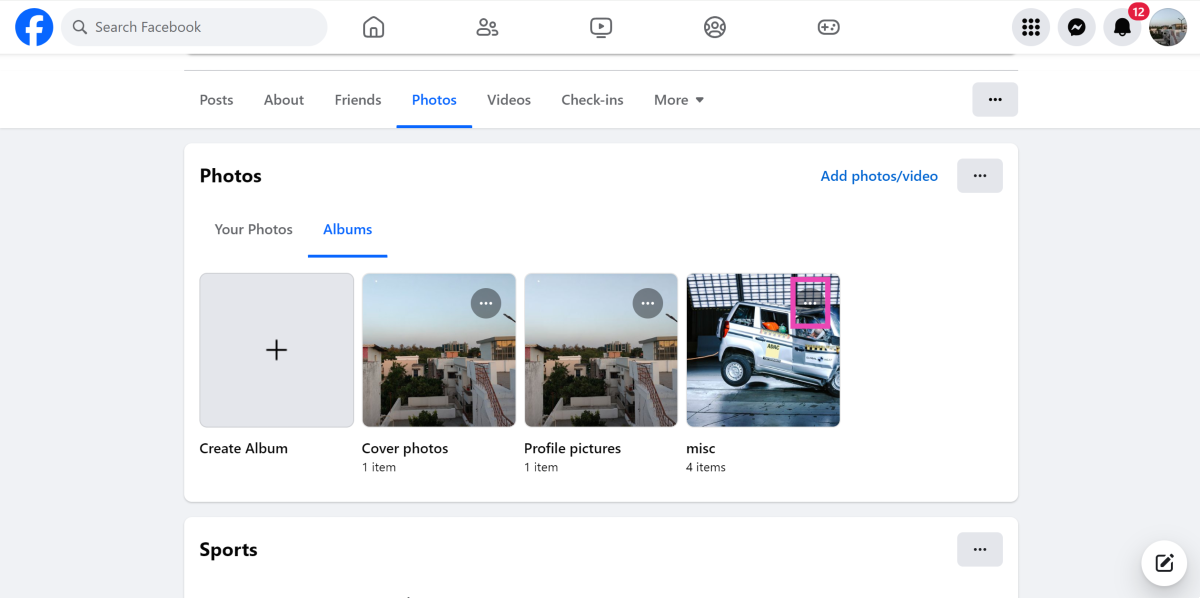
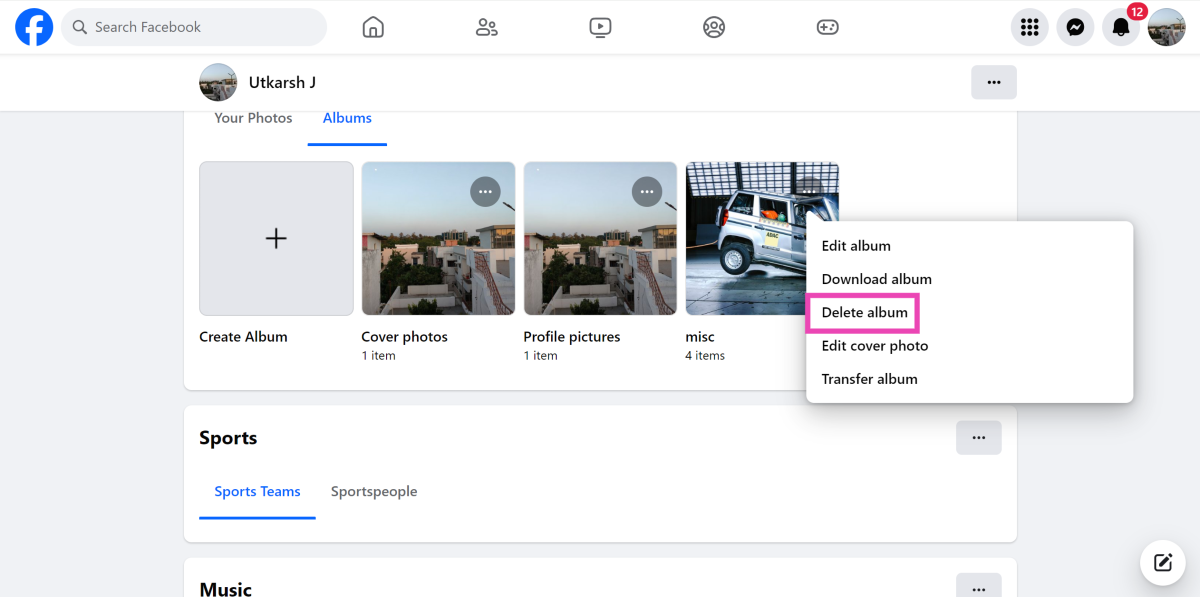
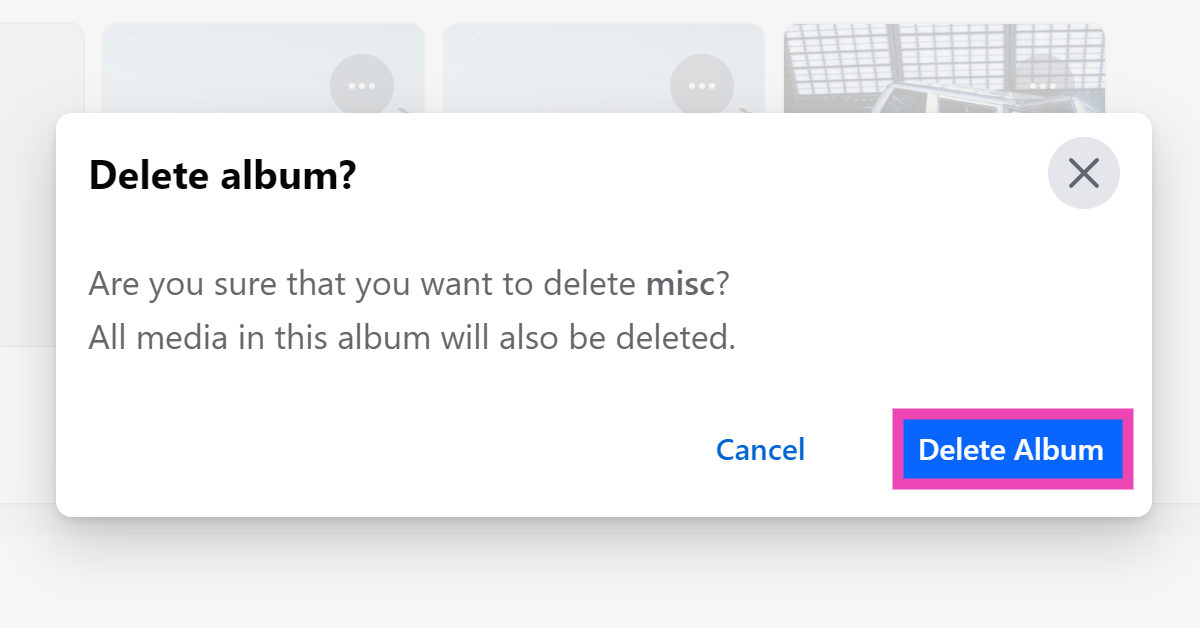
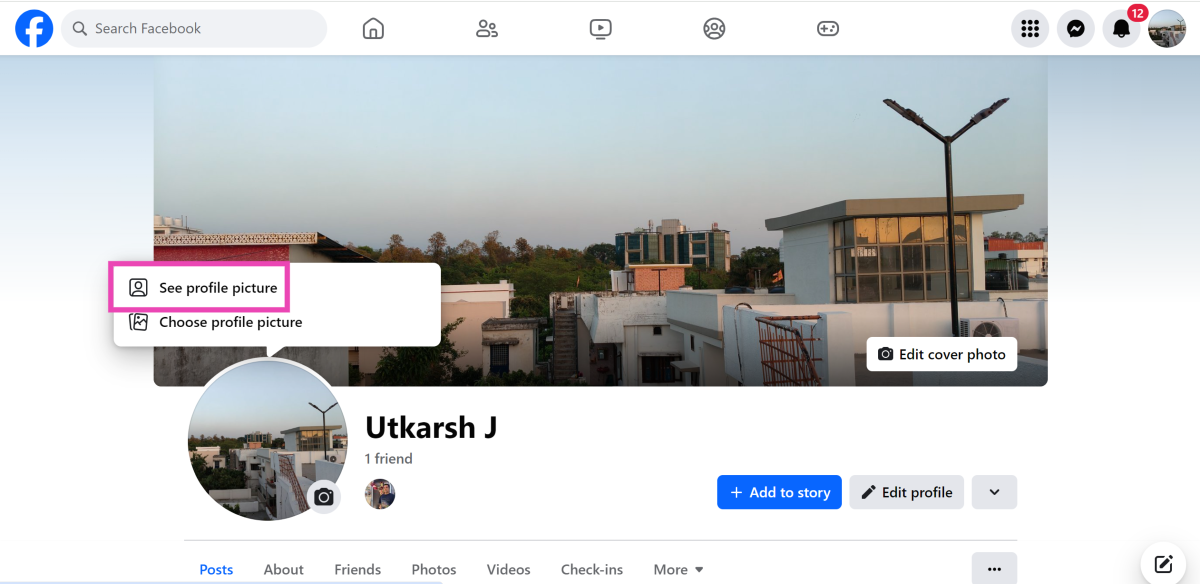
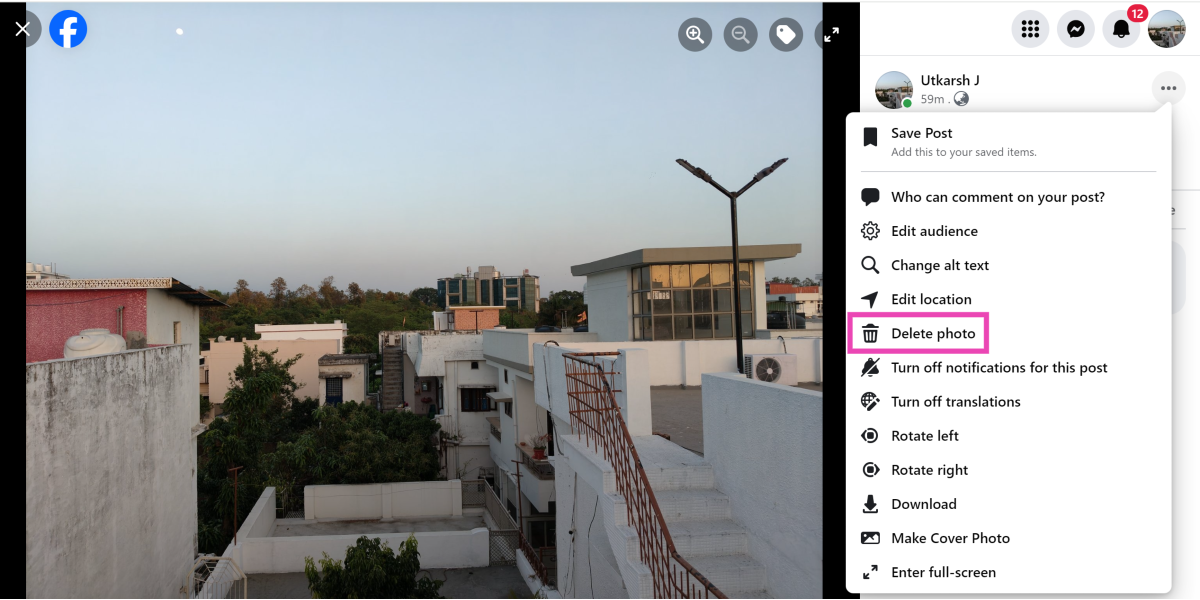
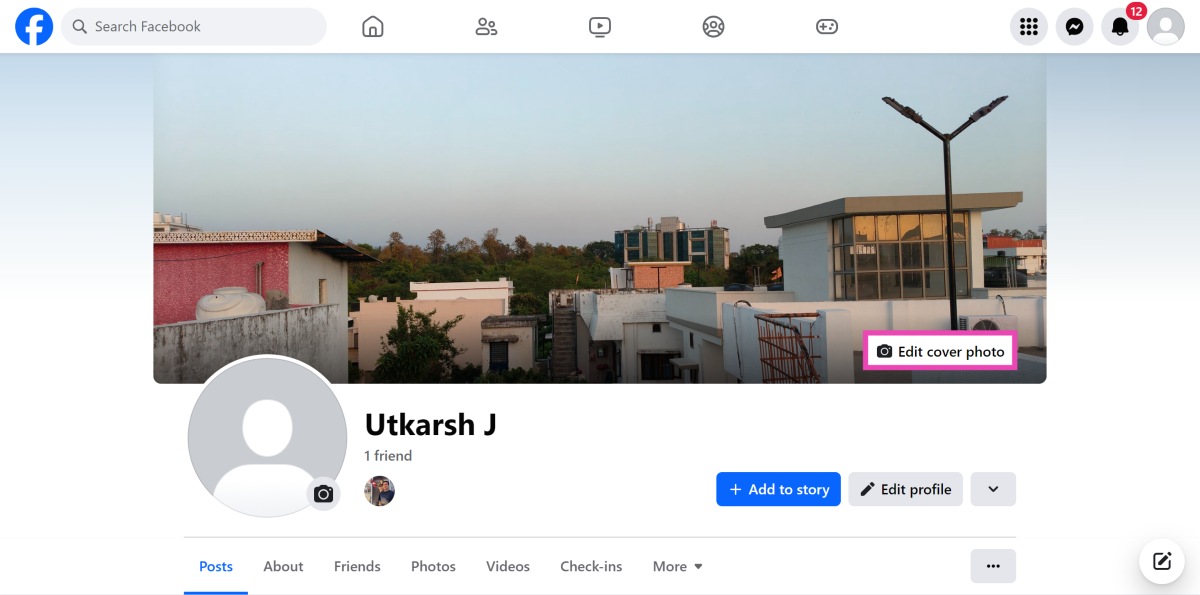
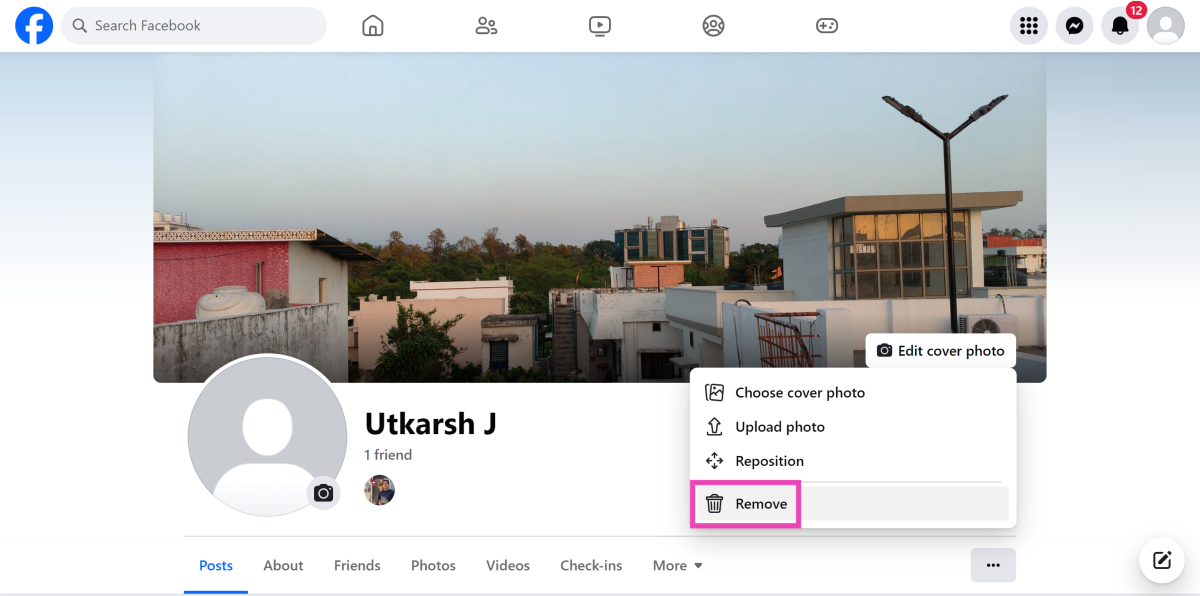


")
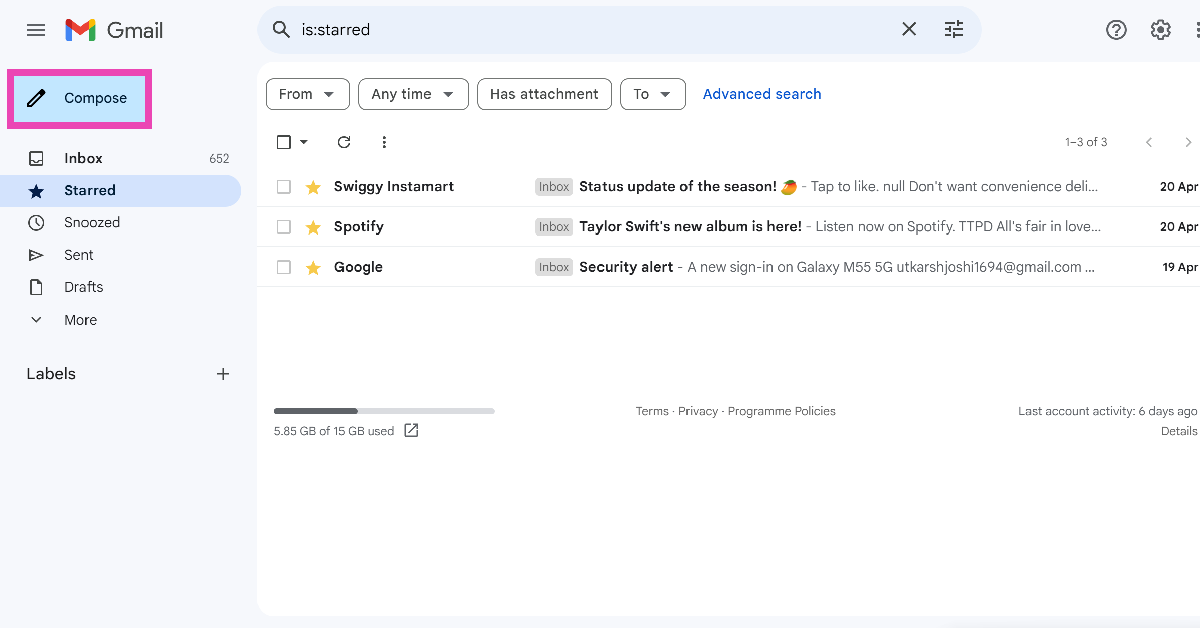
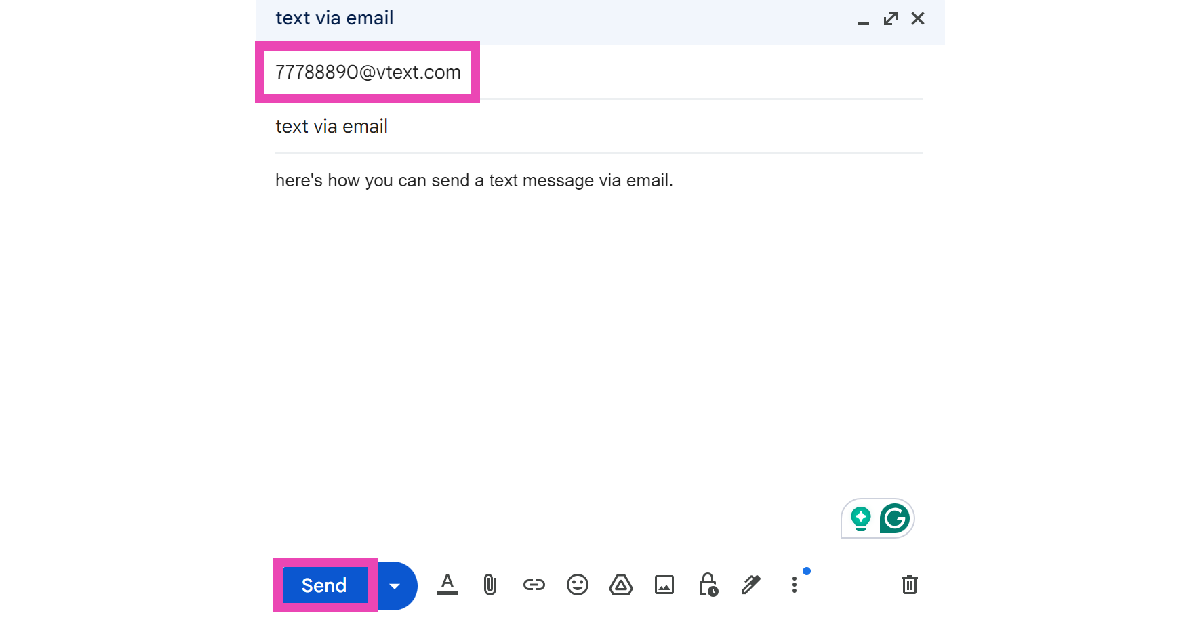
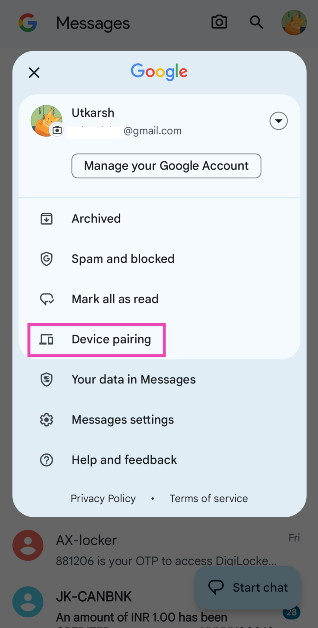
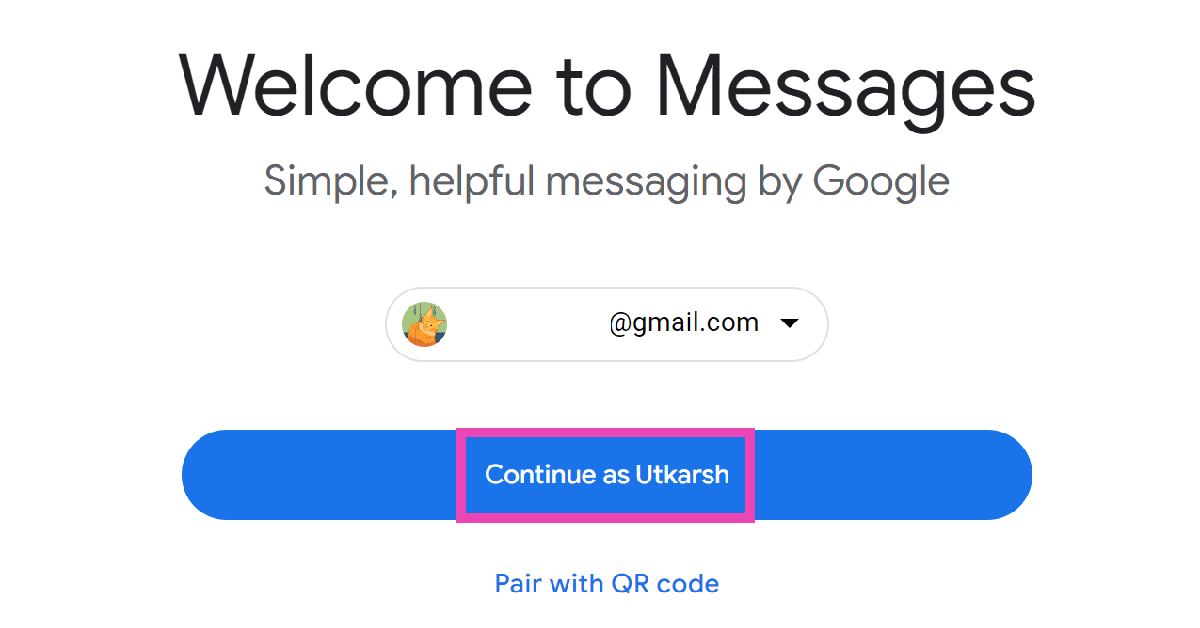


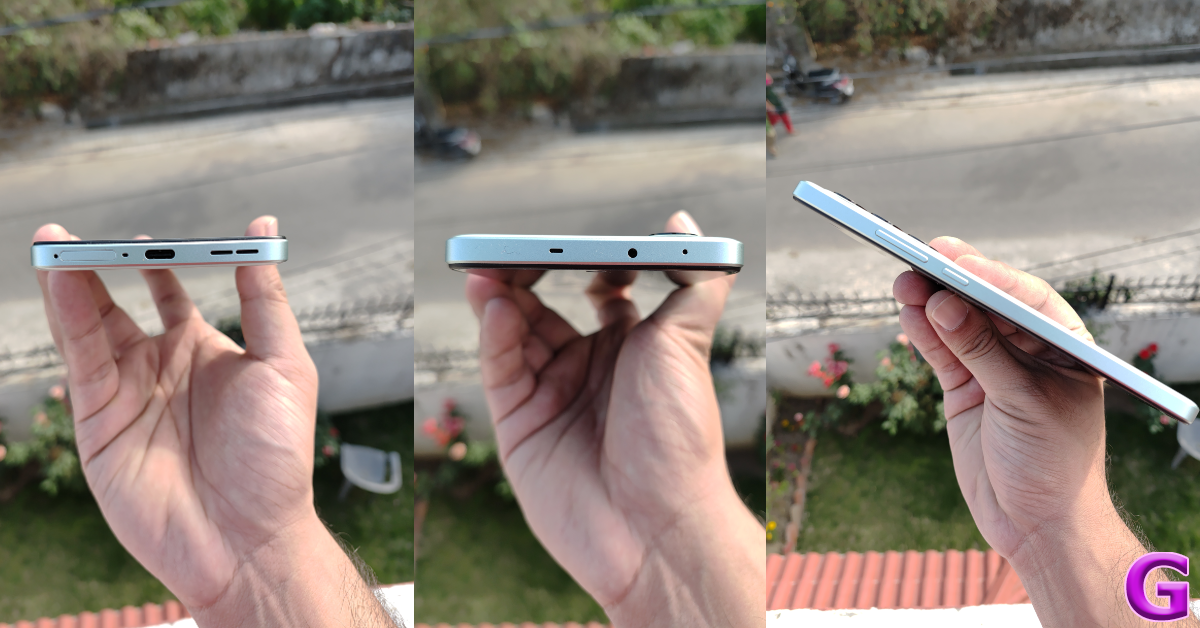
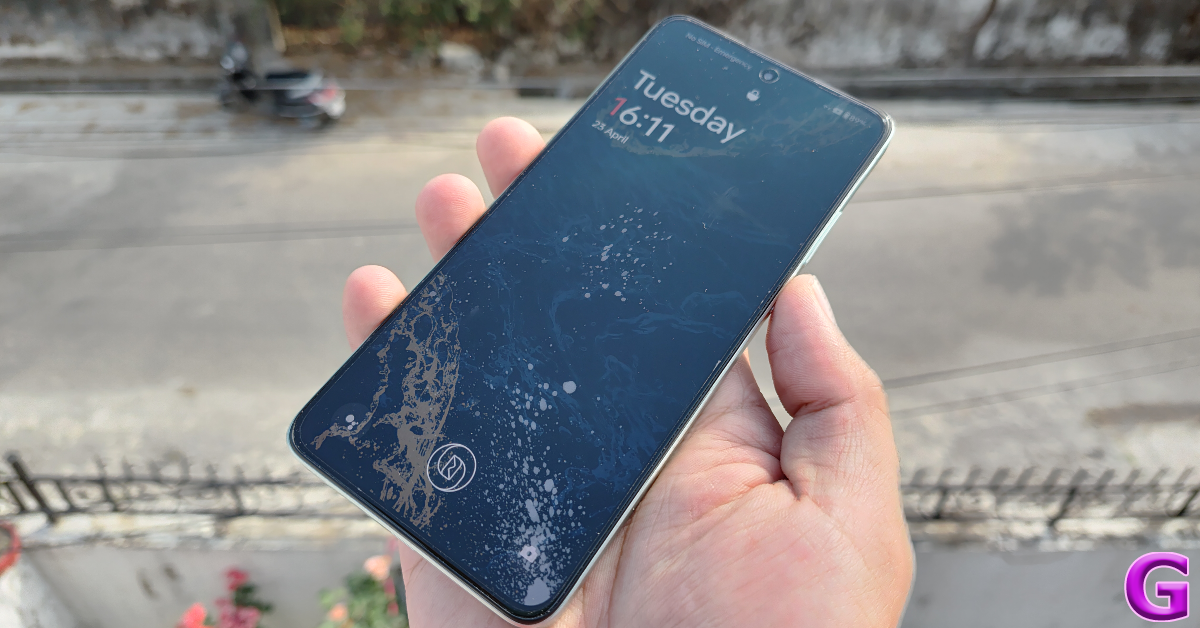
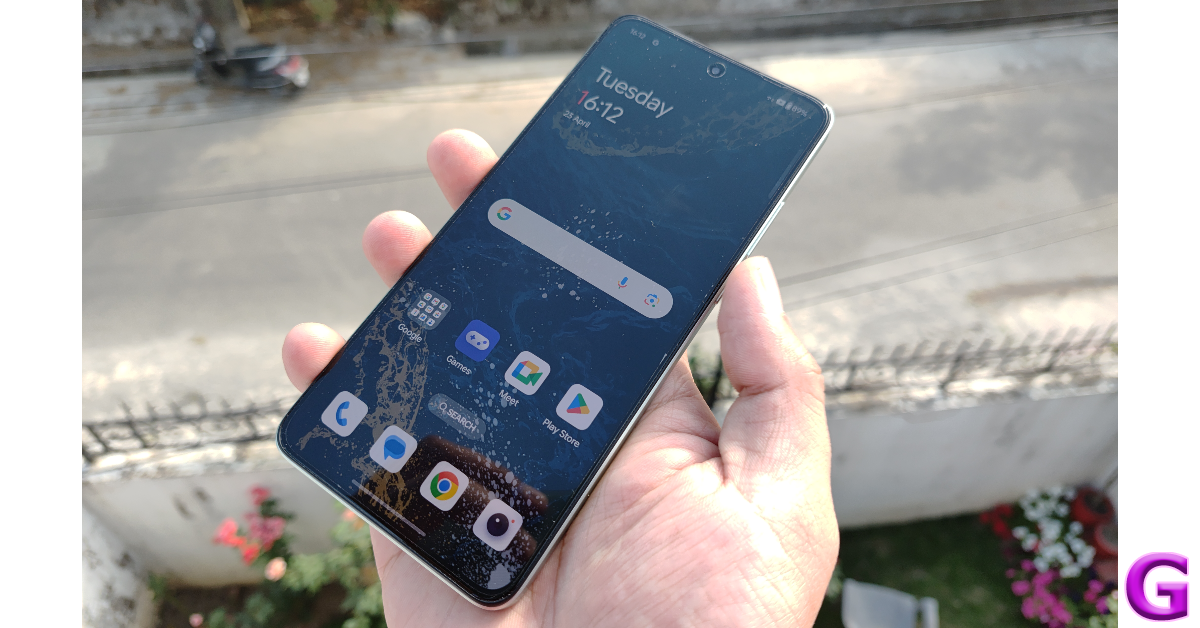

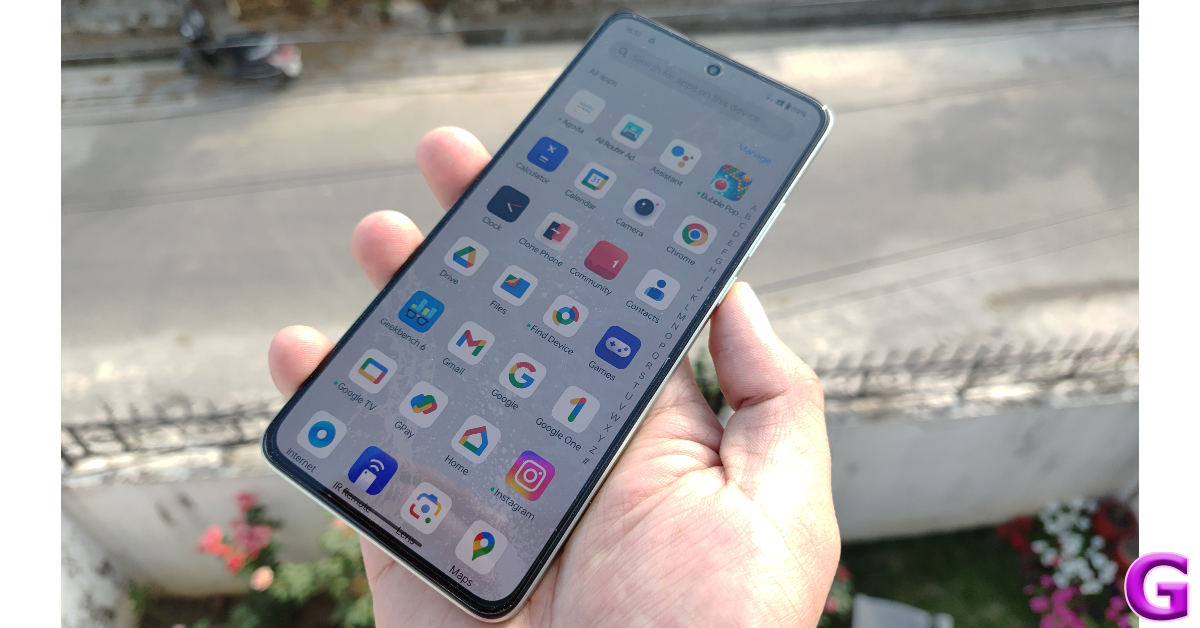
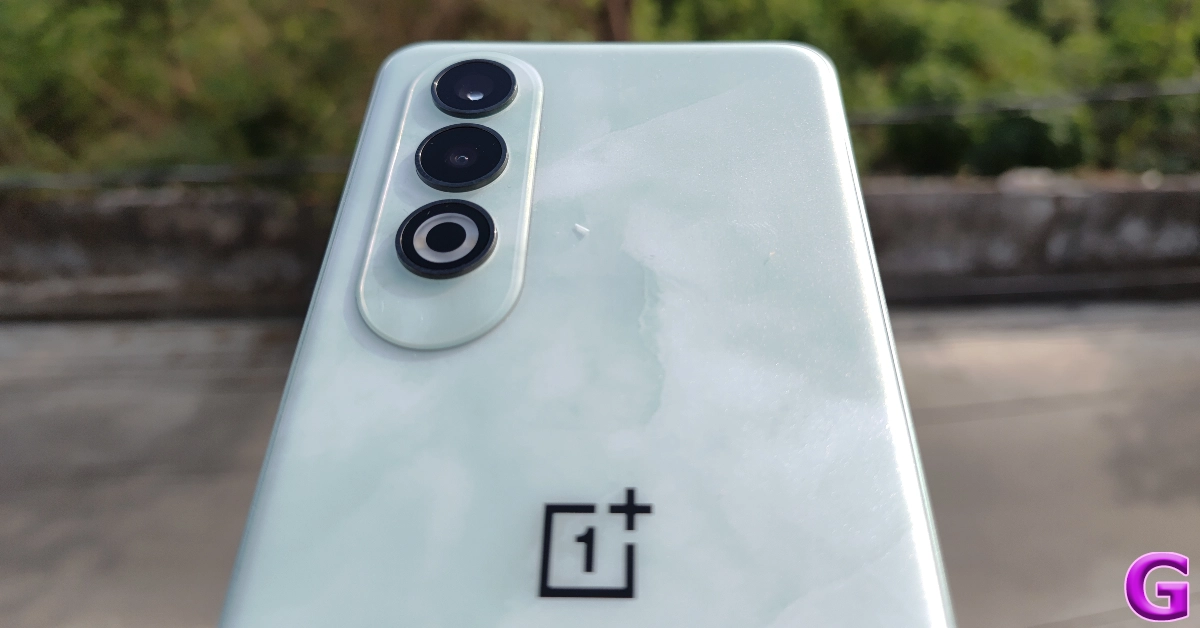


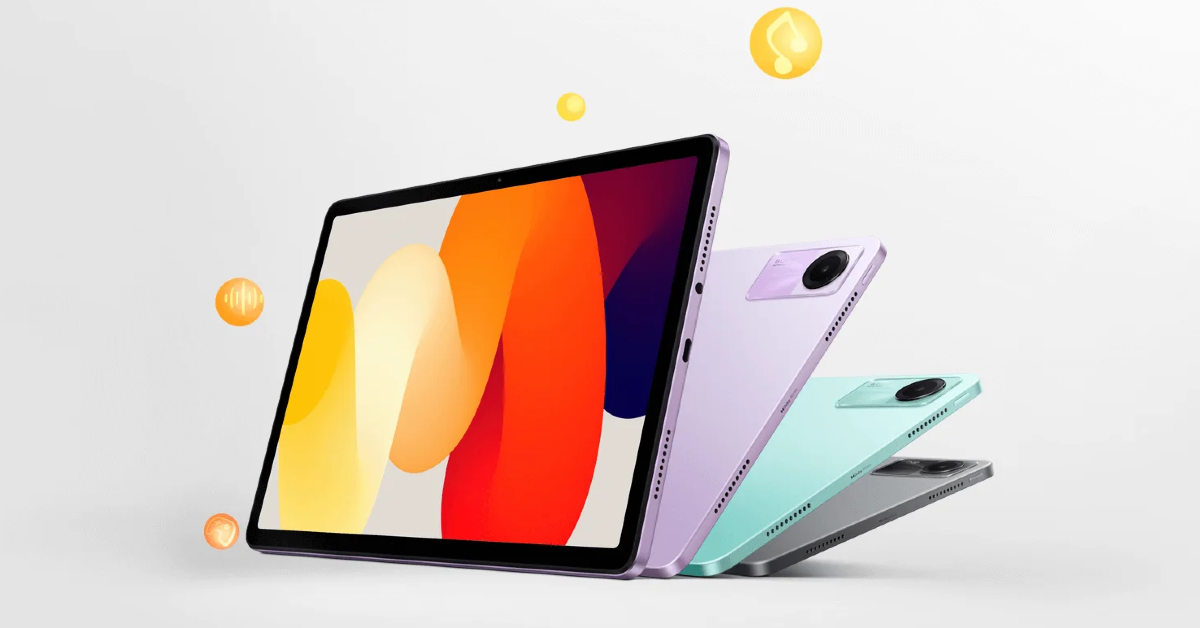


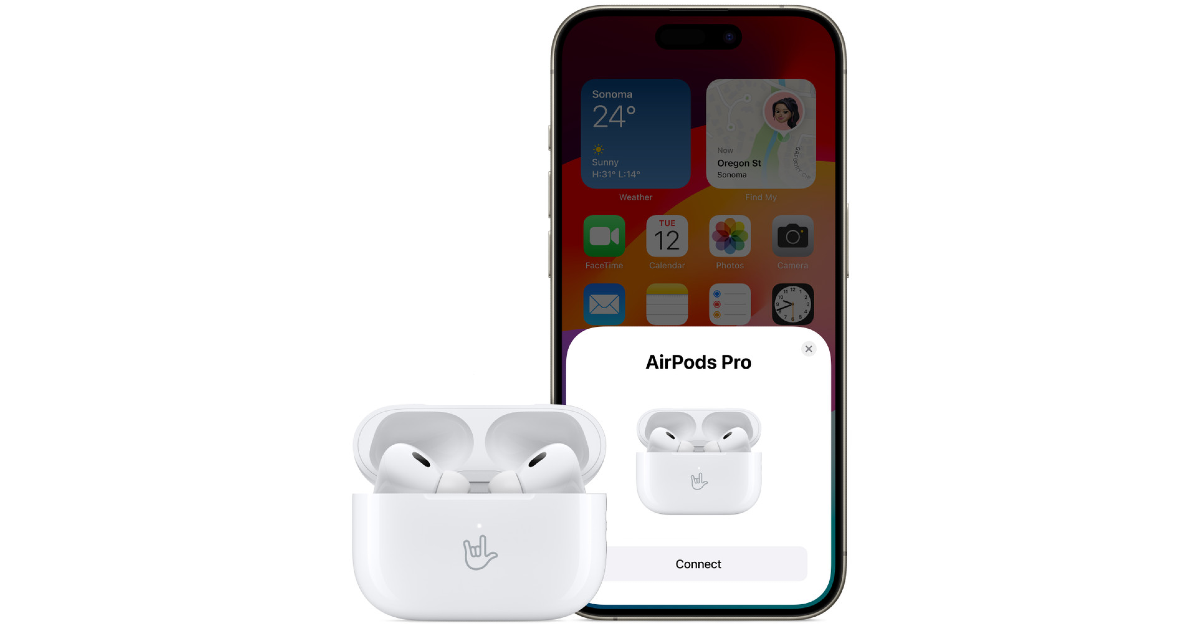

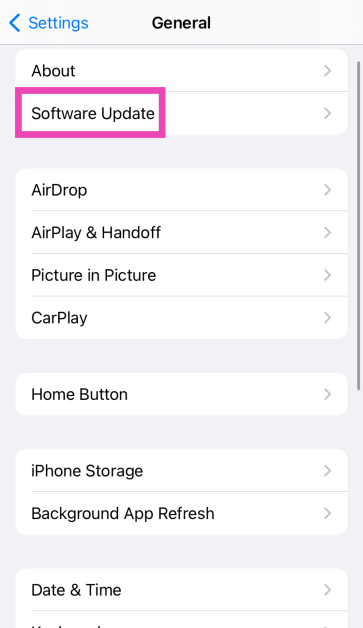
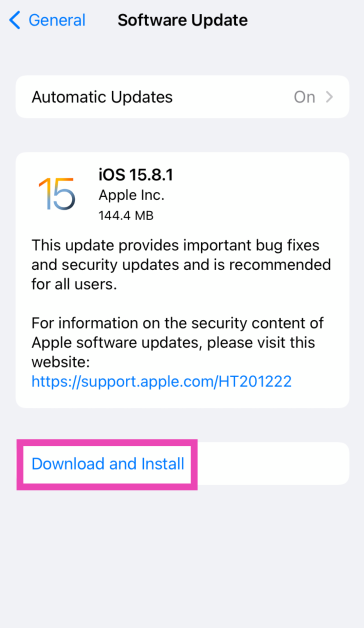


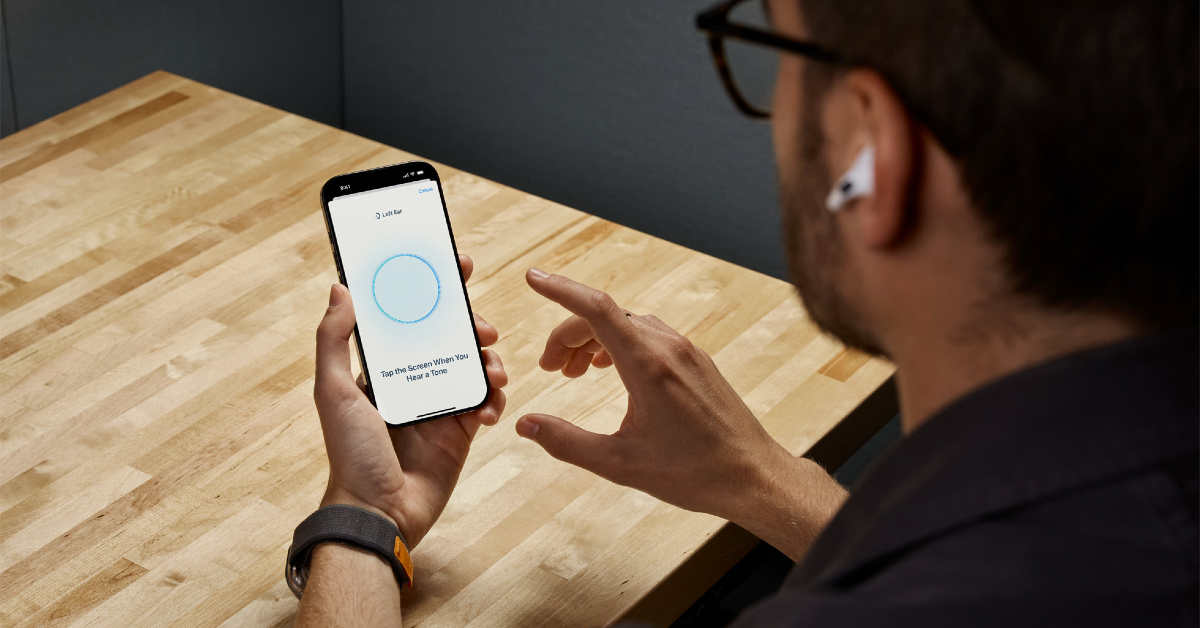
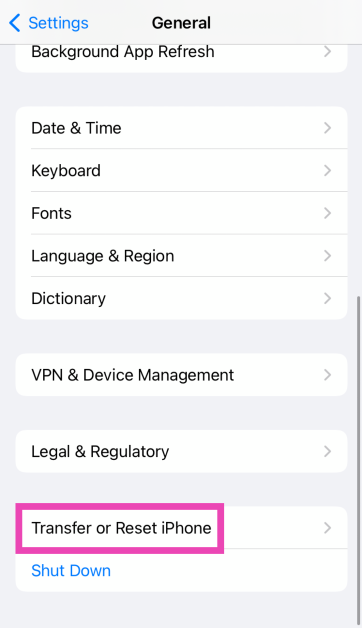
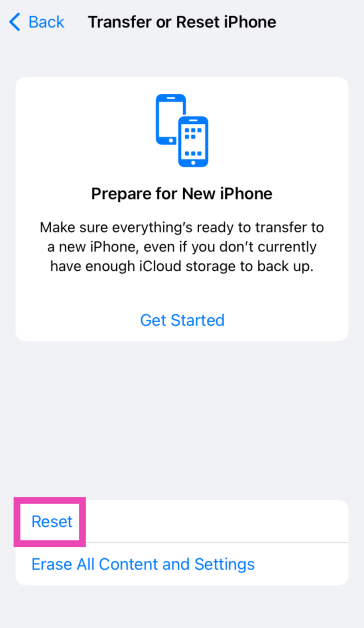
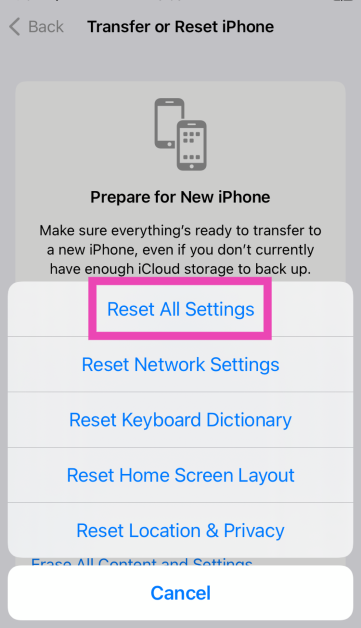


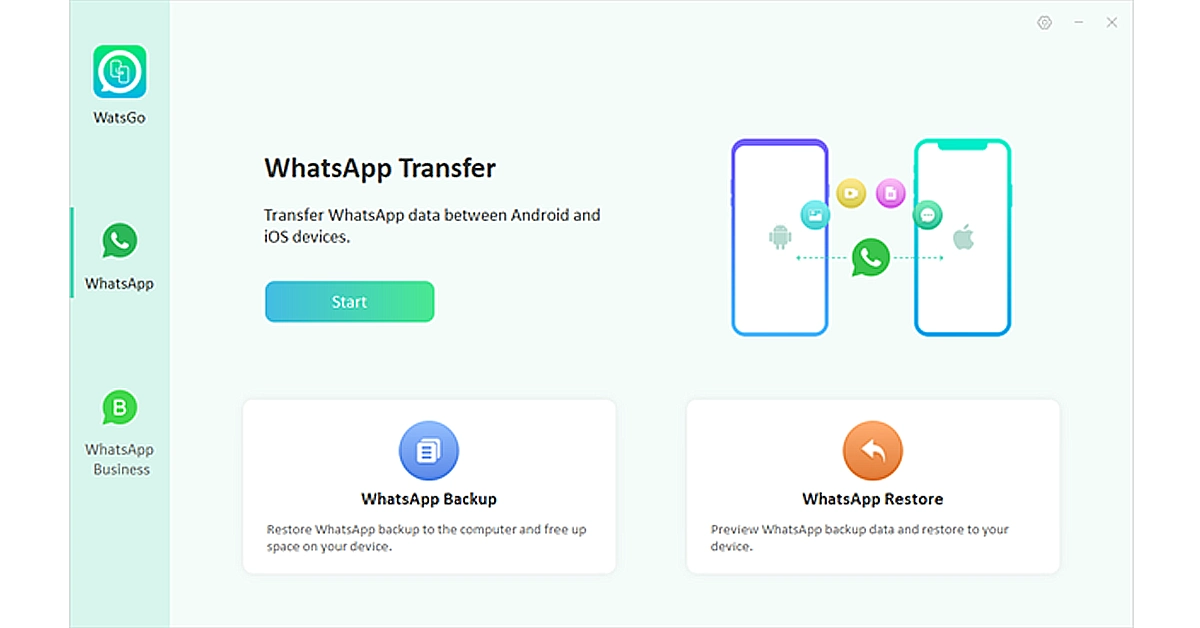

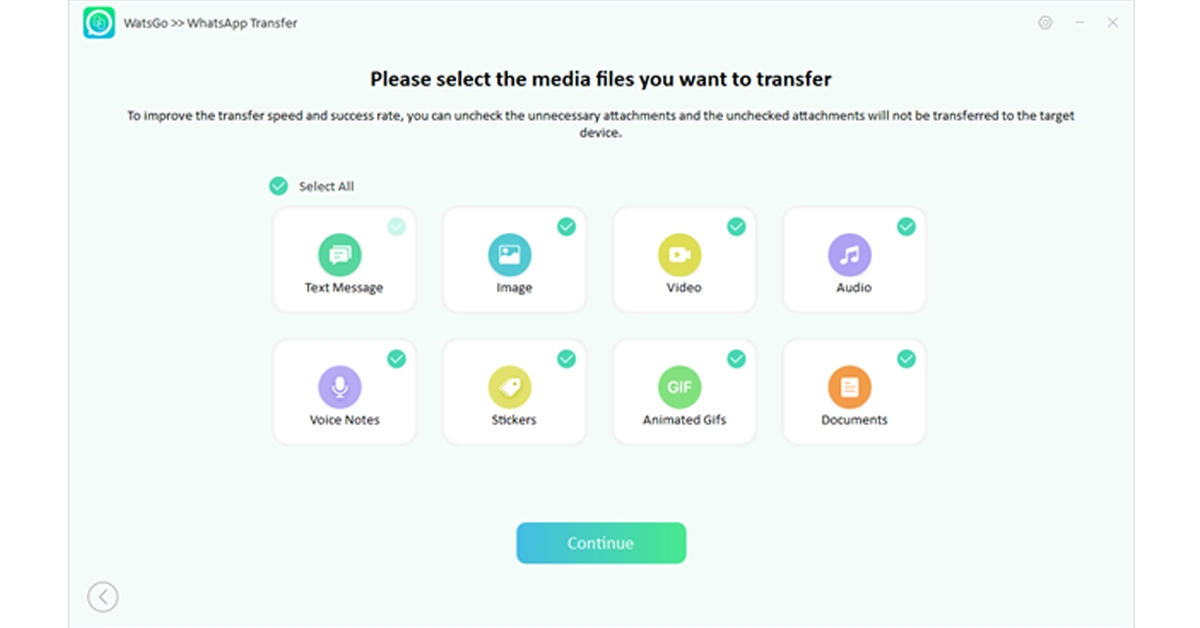
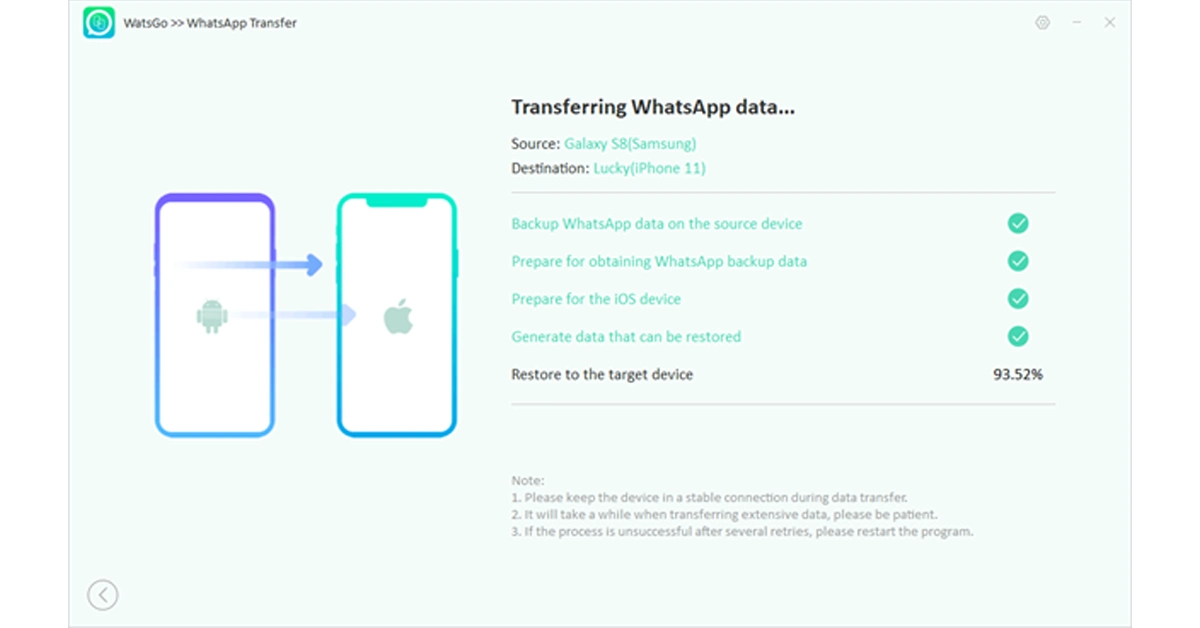


")
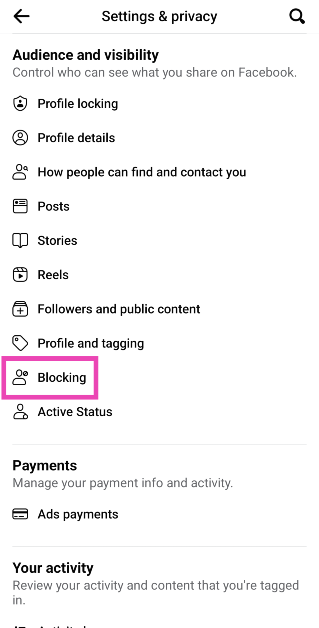

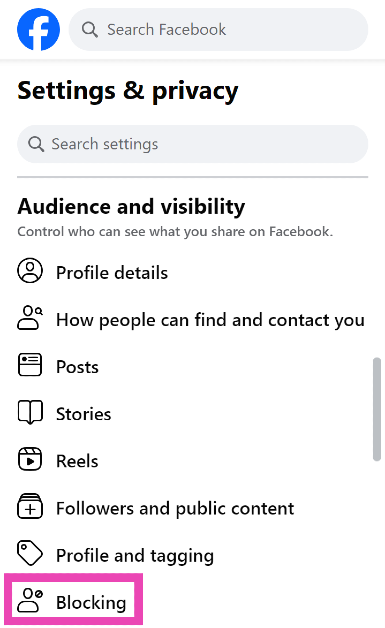

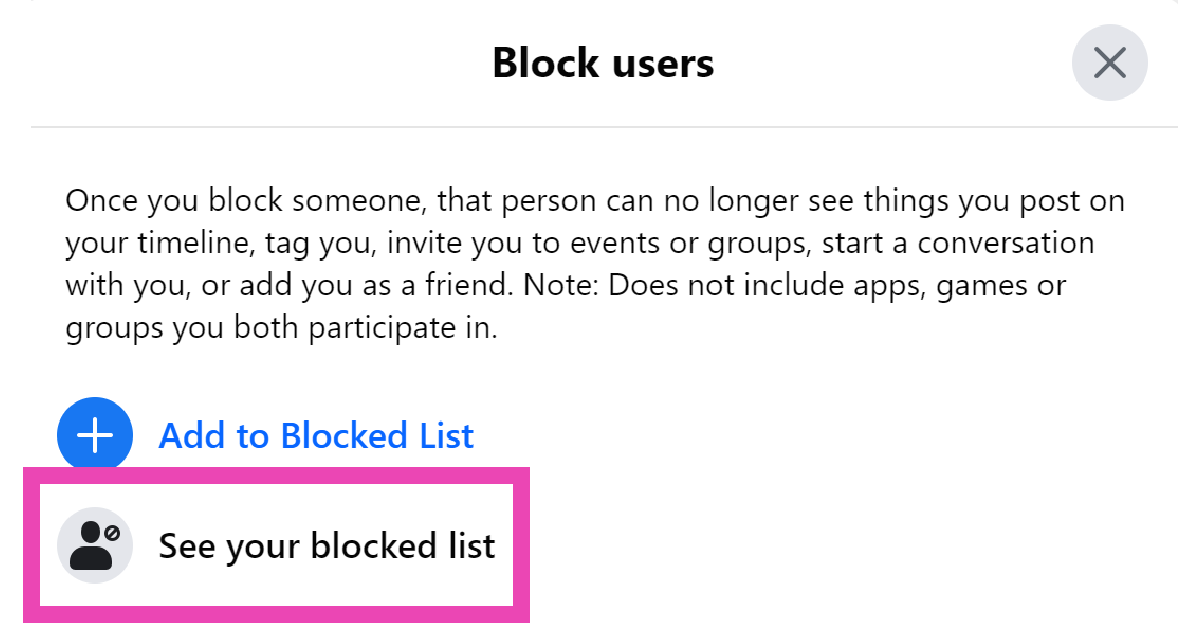


")