Xiaomi has been manufacturing televisions in India for several years. Every year, they up the ante and release something that blows the competition away, and in 2022, they appear to be on a mission to be even bigger number one in the category. The latest product to emerge from their Indian factories is the Redmi Smart TV X43, which we put through its paces. This is what we could make of Xiaomi‘s new-age TV.
In This Article
Redmi Smart TV X43 review: Design
Xiaomi like the rest of the pack has also become more earth-conscious. They are using less and less plastics and more eco-friendly containers for their devices. Unpacking and setting up the Redmi Smart TV X43 is child’s play, yes there are some large plastics still present on the TV that you need to remove, but it has become less than before.
So let’s get into it and talk about the form factor. The Redmi Smart TV X43 is a brilliant looking TV that has a 43-inch, almost edge to edge, display. The bezel is super thin and it almost merges with the wall behind it. The Redmi branding can be seen under it and the indicator light is now white, not the usual red. This can be controlled to stay off/on via the settings menu.
The TV can easily be wall-mounted or kept on a table using the supplied V legs. At the back, you will find a lot of connectivity ports. These include three HDMI, USB, headphones that are side-mounted and downward-facing AV, Ethernet and Optical ports. The physical power off button is placed behind the LED indicator at the bottom.
The remote has also seen an upgrade. Well, it is still sleek, but with the Netflix and Prime video buttons, you will also get dedicated Disney+ Hotstar and Apps keys. These are good additions as people do watch a lot of Disney+ Hotstar, and geeks like us want to quickly get to the apps section instead of jogging through the menu.
Redmi Smart TV X43 review: Performance
The Redmi Smart TV X43 is a significant upgrade. There are a lot of good things happening in it. But first, let’s quickly get the tech specs out of the way. This smart TV has a 64-bit quad-core A55 CPU, Mali G52 MP2 GPU, 2 GB RAM (out of which 1.5 is available) and 16GB of internal storage for apps. 4K works at 60Hz refresh rate and what you essentially get is a better looking Android 10 driven system.
Thanks to this configuration, the scrolling and OS fluidity has become much better. Also, the users have the option to either use the Redmi PatchWall 4, which has good features and gives you a lot of personal recommendations. In case you like the vanilla Android 10 TV OS look, you can always go back to it at a press of a button. You do get pre-loaded apps like Netflix, Prime Video and Disney+Hotstar on the TV and more can easily be downloaded from the Play Store.
With it, there are a few other good free apps available too, like Live TV, which will stream news channels like Republic TV and ABP. If you want more you can always download the Zee5 app that has almost all the News Channels.
Now let’s talk about its main USP, the 4K HDR 10+ driven display. The Redmi Smart TV X43 also has Dolby Vision and Hybrid Log Gamma, which makes everything look very realistic and life-like. We loved every bit of this smart display. The colours are very vivid, blacks are super deep, and everything from sports to fast-paced action movies look super great on it. We played a lot of Netflix, Prime Video and YouTube content on it and Redmi Smart TV X43 never gave us a chance to bicker or find fault. As we said, it floored us.
And the experience becomes even better thanks to the 30W (15W x 2) downward-firing speakers with Dolby Audio. They are exceptionally loud and are great for bedrooms and large living rooms. We always kept the sound under 25 and from 12-14 feet, every word was audible. With that the remote also has a dedicated Google Assistant button, so you can voice command your TV to open or search for shows and movies. 9 out of 10 times the feature worked perfectly.
The Redmi Smart TV X43 supports dual-band Wi-Fi and Ethernet in case you want wired connectivity. We ran 100% of the review through Wi-Fi and the internet router was in another room 35 feet away and not once did we see a buffering signal. We even connected a wired USB Mouse to the TV and immediately it recognised it and a mouse pointer appeared on the TV screen. A mouse makes the browsing experience much better.
Another advantage of the Redmi Smart TV X43 is that its remote is Bluetooth 5 compatible. As a result, if you want to address the TV with the remote, you don’t need to point it at it. Simply press the buttons, and the TV will respond. Speaking of which, it is a simple remote with a circular dial for next, previous, up, and down. The middle section/button is used to execute or enter.
It works well in most situations, but when browsing a website, a remote with air mouse capabilities is preferable, so we used the wired mouse. However, this is not a disadvantage because 99 percent of people would rather watch TV shows than browse the internet, which it is perfect at. Oh, just in case you are wondering where the mute button is? Double press the reduce volume button on the remote and it will mute the Redmi Smart TV X43.
Verdict
We were able to search for any OTT show using voice command on PatchWall 4’s home screen. We liked it because it cut down on our search time, as we didn’t have to go to an app, then search, then go to another, and so on. When turned on, this TV consumes less than 100W of power. So, is it worthwhile to purchase the Redmi Smart TV X43 for Rs 28,999? That is a resounding yes. This TV has everything you could want in a budget-friendly 4K TV. If you prefer a larger screen, the same TV is also available in 50, 55, and 65-inch sizes (at extra cost). Overall, this is a promising start for Redmi TVs in India in 2022.
Redmi Smart TV X43 Pros
Excellent 4K display
Not expensive
Exceptional audio quality
With the kind of busy lives people have these days, keeping a track of which application on your smartphone is up-to-date and which one is not is out of the question. You blindly rely on your smartphone doing all that work for you, don’t you? But surely at some point in your life, it may have happened that while using one of the apps, you are notified in the middle of your session that the app needs an update. In fact, there have been some cases around where some people are facing this problem of apps not updating on the latest Android 11 OS. The worst-case scenario is that the app doesn’t support its older version after a certain period. Hence, you are left with no choice but to take out time to update the app. Frustrating, isn’t it? Now imagine what will happen if your OS stops updating all the apps altogether. How dreadful a scenario would that be? We, therefore, bring to you our top 5 solutions on how to fix the issue of apps not updating on Android 11. After all, does time and tide wait for anyone?
In This Article
Check The Network Permissions of Play Store
The very first thing you need to do is make sure that the Google Play Store has all the necessary network permissions to function to its full potential. If you have high-speed Wi-Fi connectivity at your place, then installing application updates over Wi-Fi is preferable, since it saves your data expenses. But in any other case, it is advisable to enable Auto-update for apps option over any network. This can be done in the following manner:Step 1: Open the Google Play Store app and click on your Google Profile icon on the top right corner of the interface.Step 2: Click on the Settings option.Step 3: Click on Auto-update apps.Step 4: Select the Over any network option, as shown below, and then click on Done.Read also: How to update the Google Play Store app?
Check Your Internal Storage
The second solution for fixing the issue of apps not updating on Android 11 is checking your internal storage. If your device’s storage is full, it may cause a hindrance in downloading updates for the apps. You can check the storage of your smartphone in the following manner:Step 1: Open the Settings app and click on Battery and device care.Step 2: Click on the Storage option.Step 3: In the Storage window, you can see detailed metrics on how much storage of your phone has been utilized, how much is left, where most of the internal storage is getting used, and more. You can accordingly clear some storage of your smartphone, and then try updating the applications via the Play Store.
Clear Cache From Google Play Store
Google Play Store also stores cache like other applications, which may get corrupted, causing trouble. Hence, clearing cache is always a good idea. You can clear the cache of the Google Play Store on your Android device in the following manner:Step 1: Open the Settings app and click on the Apps option.Step 2: Click on Google Play Store.Step 3: Click on Storage.Step 4: Click on Clear Cache, as highlighted below.
Sign Out and Sign In Your Google Account
Sometimes signing out from your Google account and then signing back in also helps fix certain bugs which may have crept in, making your life miserable. You can also try removing your Google account and then adding it back to your device. You can remove and add back your account in the following manner:Step 1: Open the Settings app and click on Accounts and backup.Step 2: Click on Manage accounts.Step 3: Select the Google account that you want to remove.Step 4: Click on Remove, as highlighted below.Step 5: To add your account, repeat steps 1 to 3 above. Then click on the Add account button at the bottom of the list within the Manage accounts window. Read also: Apple iOS 14.5 will block app updates that take fingerprint information for profiling and user-tracking
Reset Your Device To Factory Settings
Of course, when nothing works, the only option that remains is to reset your device to factory settings. But before you head onto that option, make sure that you have a full backup of your Android device. Otherwise, you may lose crucial data which you won’t be able to recover after the process. You can reset your device to factory settings in the following manner: Step 1: Go to Settings > Accounts and backup option.Step 2: Click on the Reset option, as highlighted below.So those were our top 5 solutions on how to fix the issue of apps not updating on Android 11. If you know of any other method to fix application updates on Android 11, do let us know in the comments section below. For the latest gadget and tech news, and gadget reviews, follow us on Twitter, Facebook and Instagram. For newest tech & gadget videos subscribe to our YouTube Channel. You can also stay up to date using the Gadget Bridge Android App. You can find the latestcar and bike news here.
Last month, the iQoo 9 and iQoo 9 Pro were unveiled at an event in China. Both the new smartphones are set to make their debut in the Indian market today. The gadget is powered by a Snapdragon 8 Gen 1 SoC. In addition, they have OLED displays. Along with these phones, the business expects to release the iQoo 9 SE. Because the devices have been listed on Amazon, they will likewise be sold there.
In This Article
How to watch iQoo 9 series launch live in India
Due to the increasing number of Omicron cases in India, the iQoo 9 series India launch event will be held online. The new smartphone series will be unveiled at 12 p.m. IST. The iQoo 9 series launch ceremony will be broadcast live on the company’s YouTube account and other social media outlets. You may watch the launch event live right now on our website by clicking on the link below.
iQoo 9 series price in India expected
The expected price of the iQoo 9 series in India has surfaced online ahead of the official announcement. According to reports, the retail box price of the iQoo 9 Pro 5G top-end variant is Rs 74,990, however it is expected to cost between Rs 55,000 and Rs 58,000. The basic iQoo 9 is projected to cost between Rs 43,000 and Rs 47,000, while the iQoo 9 SE is predicted to cost between Rs 35,000 and Rs 40,000. The Vivo sub-smartphone series will be available on Amazon.
iQoo 9 series specifications
The Indian versions of these gadgets are said to have different specifications from the Chinese variants. The iQoo 9 Pro will be powered by a Snapdragon 8 Gen 1 SoC, according to the company. The combination of enhanced LPDDR5 memory and UFS 3.1 flash storage boosts performance even more. Both the vanilla and Pro models will support 120W FlashCharge, according to the company. The iQoo 7 Series, for example, enabled 66W FlashCharge last year. The 120W quick charging capability is designed to charge the battery from 0% to 50% in 6 minutes.The iQOO 9 series will also have the latest gaming features such as a Dual X-Axis Linear Motor for the greatest haptics experience and an Advanced Liquid Cooling System. The flagship phone will also have a Gimbal Camera for a more professional photographic experience.The iQoo 9 India variant is expected to ship with Android 12 and a 6.56-inch AMOLED display with a refresh rate of 120Hz. In addition, the phone might include a triple-camera arrangement on the back, including a 48-megapixel main camera. It is also said to have an intelligent display chip.The iQoo 9 Pro, on the other hand, is said to boast a 6.78-inch AMOLED screen. A triple back camera configuration with a 50-megapixel main sensor is also available. The iQoo 9 Pro’s battery capacity is stated to be 4,700mAh.
For the latest gadget and tech news, and gadget reviews, follow us on Twitter, Facebook and Instagram. For newest tech & gadget videos subscribe to our YouTube Channel. You can also stay up to date using the Gadget Bridge Android App. You can find the latest car and bike news here.
23 February 2022 Amazon Quiz has gone live on its platform. The quiz timings are 12 AM to 11:59 PM. The Amazon App users can participate in the quiz daily and all they have to do is submit correct answers to the questions asked on the e-commerce platform. Today’s participants can get a chance to win Rs 1,000 Amazon Pay Balance.Amazon brings a fresh questionnaire that contains 5 questions daily. These questions are based on current affairs and general knowledge. The quiz can be played from 8 AM to 11:59 PM and the contestants need to answer correctly to enter into a lucky draw.Only one person is declared as a winner and the results will be announced at the end of every month. And to make sure that you give correct answers to all the 5 questions Gadget Bridge everyday updates all the answers to the Amazon Quiz. Do check out 28 January 2022 Amazon Quiz Answers to win Rs 1,000 Amazon pay Balance.
In This Article
23 February 2022 Amazon Quiz Answers
Question 1: Which film won the Best Film (Drama) award at the Golden Globes 2022?
Answer: The Power of the Dog
Question 2: Which city has the world’s longest metro network?
Answer: Shanghai
Question 3: Kazhuveli Wetland was recently declared as the 16th Bird Sanctuary of which state?
Answer: Tamil Nadu
Question 4: This is the famous Jacques Cartier bridge in which city?
Answer: Montreal
Question 5: Which national park of India is known to have the highest population of this animal?
The Benq Mobiuz EX3210U gaming display was released in India. It is a 32-inch immersive gaming monitor that supports 4K@120Hz through HDMI 2.1 on the newest consoles and 4K@144Hz via DisplayPort 1.4 for PC gaming. There are two 2W speakers and a 5W subwoofer and has an AMD FreeSync Premium Pro technology for decreased latency and stutter.The Mobiuz EX3210U has a 31.5-inch IPS display panel, 4K UHD resolution, 144Hz refresh rate, 1ms response time, VESA Display HDR 600, and a colour gamut of 98 percent DCI-P3. It is BenQ’s first gaming display with HDMI 2.1, this is the first 32 inches 4K monitor with a full HDMI bandwidth of 48 Gbps to be unveiled in India.The HDRi technology, which combines smart HDR with automatic brightness and contrast changes, results in a vastly improved HDR experience with intelligent brightness and contrast management, resulting in a more natural, less stressful HDR experience. In addition to the 144Hz refresh rate support, the display has a 1ms reaction time for smooth gaming images and decreased input latency. By syncing the GPU output with the monitor refresh rate, AMD FreeSync Premium Pro technology offers a smooth tear-free gaming experience devoid of lag and stutter.Moreover, the Benq Mobiuz EX3210U gaming display has a Light tuner, which accentuates details, makes shadows more realistic, and makes the picture more colourful. The colour vibrance function allows you to modify the colour gradations until the colours really stand out. The purpose of Black eQualizer is to brighten darker regions without overexposing brighter parts.The Mobiuz EX3210U comes with built-in 2.1 channel speakers, which are a mix of two 2W speakers and a 5W subwoofer The Bongiovi DPS technology always listens to the material and pulls out the best optimum sound in each given setting during gameplay.There are 5 audio presets for a better audio experience as per the desired use case such as when playing games (FPS, Racing, Sports), Watching Movies/Sit-coms (Cinema), Listening to Music, Concerts (Pop/Live).The display is compatible with PC, PlayStation 5, and Xbox Series X gaming. With the Dual HDMI 2.1 connecting option, the user receives 4K resolution viewing paired with 120 FPS on the PS5 and Xbox Series X. The DisplayPort 1.4 interface offers 4K resolution at 144 FPS for the finest PC gaming experience. Aside from these, the EX3210U has four USB 3.0 ports and a Headphone Jack for connecting to compatible peripherals.
Those of you who use the Truecaller app would already know how useful the app is. It displays the identity of the caller so that you can filter the calls, which you want to pick up. One of its most handy features is that it also is able to identify and warn you of fraudulent and spam calls, ensuring your security while saving you valuable time. Today, we have provided below a step-by-step guide on how to remove your name and number from Truecaller on Android.Now, if you are using the Truecaller app, you won’t be able to remove your number from it. But instead, you would have to deactivate your Truecaller account. In case you don’t use the Truecaller application, you might have to download and log into it in order to remove your details from its databases. You can also change your name and number if you want. Read also: Truecaller Version 12 announced: Brings Video Caller ID, call record and moreTo Deactivate Your Truecaller AccountStep 1: Click on the Profile icon on the top left corner within your Truecaller Android interface as shown below.Step 2: Click on the Setting option from the list.Step 3: Click on the Privacy Center option within the Settings list as shown below. Step 4: Click on the Deactivate option. Step 5: Click Yes to confirm deactivating your Truecaller account, which will remove your details including your name and number from its databases. Read also: Top 10 Apps To Download In Your New Samsung Galaxy S22 UltraTo Change Your Name and Number on TruecallerStep 1: Click on the Profile icon on the top left corner of the Truecaller interface on your Android, as done in Step 1 before. Then click on the edit icon displayed on the right of your name and phone number, as highlighted below.Step 2: Change your name in the First Name and Last Name fields and change your number in the Phone Number field, as shown below, and then click on the Save button to save changes. This will change your existing name and phone number on your Truecaller account, and you can continue using its services ahead of.You can download the app from here.In this way, you can remove your name and phone number from Truecaller on Android. In case you want to keep receiving the caller ID and spam notification services from Truecaller, but want to remove just your details from the app, we are afraid that’s not possible as of now. You still would have to deactivate your account entirely for the same, which you can do in just 5 simple steps as provided above.If there is any other way to remove your name and number from the Truecaller app that we missed, let us know in the comments section below. For the latest gadget and tech news, and gadget reviews, follow us on Twitter, Facebook and Instagram. For newest tech & gadget videos subscribe to our YouTube Channel. You can also stay up to date using the Gadget Bridge Android App. You can find the latestcar and bike news here.
In India, WhatsApp has a large user base of around 400 million people. As a result, the company has launched a dedicated centre/hub to outline the policies and processes it takes to ensure user safety in India dubbed as ‘Safety in India’. It is available as a standalone portal and highlights the advantages of employing end-to-end encryption and provides information on capabilities like two-step authentication and the option to add a security layer to safeguard WhatsApp communications using fingerprint or face recognition.“WhatsApp has made significant product changes to help enhance security and privacy. Besides continuous product innovations, over the years we have also consistently invested in state-of-the-art technology, artificial intelligence, data scientists, experts, and in processes, to support user safety” the help centre states.The ‘Safety in India’ resource centre contains subjects related to internet safety, privacy, and security. It contains information regarding end-to-end encryption, which is touted as a feature that helps safeguard a user’s messages, photographs, videos, voice messages and others.The resource hub also emphasises Touch ID or Face ID which offers its users the ability to add another layer of security to their accounts. In addition to this, it also highlights forward limits and additional limits to limit forwarding messaging and circulation of fake news through the platform.It further explains Block and reports a simple way for users to block accounts and make reports to WhatsApp if they encounter problematic messages. Whereas the Message level reporting will allow users to report accounts to WhatsApp by flagging a specific message. Users simply need to long-press a message to either report or block a user.Other privacy features like disappearing messages, view one, flash calls, admin controls, and end to end encrypted backup have been explained on the ‘Safety in India’ resource hub.To prevent abuse in India, WhatsApp has built specific Indian processes. A grievance officer has been appointed who can be contacted if a user has a concern about their experience and is unable to report it through other channels. In addition to this WhatsApp regularly releases its monthly report in India that highlights steps taken by us to ensure user safety on WhatsApp.The Meta owned instant messaging app states that it has zero tolerance for child sexual abuse material (CSAM) and other sexual abuse material.Also in order to address misinformation, the company also does fact-check which the app and according to WhatsApp in India 10 fact-checking organisations (as of February 2022) help to provide users with the service of verifying information through a WhatsApp bot. They are enabled through the WhatsApp API-platform solution and are accredited by the International Fact-Checking Network. IFCN’s bot is free of cost service. Users can save +1 (727) 2912606 as a contact number and text,”Hi” to get a message or information validated. Alternatively, our users can click http://poy.nu/ifcnbot to access a global directory of fact-checking organisations.The ‘Safety in India by WhatsApp’ also recommends carefully scrutinising messages that request sensitive information, money or other assistance, even if those messages initially appear to have been sent from known contacts. In such circumstances, it is best to verify that the message was in fact sent from someone known (for example, calling the contact who is the apparent sender and asking them if they’ve sent the request).Furthermore, the resource hub also gave clarifications on chat leaks. According to the app, end-to-end encryption technology used by WhatsApp helps to keep conversations private between a sender and a receiver for all personal messages in transit within WhatsApp to help protect against WhatsApp and third parties from reading them. In addition to this, it does not store messages once they are delivered or transaction logs of such delivered messages. Undelivered messages are deleted from our servers after 30 days.
For the latest gadget and tech news, and gadget reviews, follow us on Twitter, Facebook and Instagram. For newest tech & gadget videos subscribe to our YouTube Channel. You can also stay up to date using the Gadget Bridge Android App. You can find the latest car and bike news here.
Adding your display picture in an application like Truecaller would be your personal decision. Your profile display picture confirms your identity even further, after your name and phone number. It is a window through which the world can have a sneak peek at your personality. And how you want yourself to be perceived is something totally in your hands. It is super easy to add, change or remove your display picture in the Truecaller application. It can be done within just a couple of clicks and you’ll be set. Here is a step-by-step guide demonstrated pictorially for the same:Step 1: Click on the Profile icon on the top left corner within your Truecaller Android interface as shown below.Read also: Truecaller Version 12 announced: Brings Video Caller ID, call record and moreStep 2: Click on the Setup Image/Video Caller ID icon on top of your name and phone number, as highlighted below. This will take you to the edit profile page. Step 3: Click on the Setup Image/Video Caller ID icon again, which now falls in the centre on top of the page, as highlighted below.Step 4: The Add photo box appears providing you with 3 options (as shown below). You can either click your photo in real-time (via the Take a photo option), choose one from your gallery, (via the Select from Gallery option) or you can choose to remove your photo altogether (via the Remove current photo option). All you need to do now is set your display picture by selecting the appropriate option, and your profile picture will be set accordingly. You can download the app from here.In this way, you can add, change or remove your display picture in Truecaller on Android. Wasn’t it easy? You may feel like adding a glimpse of your personality to your Truecaller profile at times. At other times, you may instead feel like protecting your identity rather. With these 4 simple steps, you can say goodbye to all your dilemmas. Read also: Top 10 Apps To Download In Your New Samsung Galaxy S22 UltraIf there is any other way to change or remove your display picture on Truecaller that you know of, do write to us in the comments section below. For the latest gadget and tech news, and gadget reviews, follow us on Twitter, Facebook and Instagram. For newest tech & gadget videos subscribe to our YouTube Channel. You can also stay up to date using the Gadget Bridge Android App. You can find the latestcar and bike news here.
The Homegrown Indian Appliance brand Daiwa has announced the launch of its new range of HD Smart TVs in India. The new lineup includes two 32-inch(D32SM9 and D32SM9A) and two 39-inch(D40HDR9L and D40HDR9LA) HD Ready Smart TVs. All four televisions are powered by Cloud TV Voice Assistance.To improve the user experience, the Daiwa HD Ready Smart TVs have their own user-friendly UI – ‘The BIGWALL’ – as well as a collection of TV applications, worldwide content, and other features. On the home screen, the UI also presents the most recent and popular material, as well as smart suggestions, which can be further refined with the Content Discovery Engine to access content from across the applications directly from the homepage. The new Smart TVs have a slew of popular streaming applications such as Disney+, Hotstar, Zee5, SonyLiv, Sun NXT, and others. All Daiwa Smart TVs will have the Official Amazon Prime Video app, which will give a wealth of entertainment options to enhance the user experience. The TVs will also be able to access Netflix, YouTube, and other services, as well as receive OTA updates.In addition to this, the Daiwa HD Ready Smart TVs have a slew of popular streaming apps such as Disney+, Hotstar, Zee5, and SonyLiv. The Smart TVs will be equipped with a new streamlined Smart remote that has dedicated buttons for Prime Video, Disney+ Hotstar, Zee5, and Movie Box. Smart TVs with Cloud TV Voice Assistance provide a voice remote with an in-built microphone, allowing users to control the TV with their voice.The new Smart TVs include a rich HD Ready Display with a 1366×768-pixel resolution, an A+ Grade Panel, Quantum Luminit Technology, and 16.7 million colours. The TVs have Cinema Mode, which enhances each image by reproducing colours to create a theatre-like experience. The 32-inch Smart TVs include 20W Stereo Surround Speakers, while the 39 inch Smart TVs include Surround Sound Box speakers, providing a comprehensive entertainment experience.The TVs have 1 GB of RAM and 8 GB of ROM and are powered by the Android 9.0 operating system and the A-53 Quad Core Processor. There are two HDMI and two USB ports, as well as Wi-Fi, Ethernet, and Optical Output. Customers may also buy an external Bluetooth dongle from the firm to connect their Bluetooth-enabled gadgets, such as soundbars, to the TV.
Price and availability
The price of the 32-inch(D32SM9 and D32SM9A) models are priced at Rs 11,990 and Rs 12,490 respectively. On the other hand the 39-inch(D40HDR9L and D40HDR9LA) HD Ready Smart TVs costs Rs 17,990 and 18,490 respectively. Both TV lines come with a one-year warranty with an additional one-year warranty on the panels. The TVs can be purchased on the company website www.daiwa.in and leading retail stores in India.
For the latest gadget and tech news, and gadget reviews, follow us on Twitter, Facebook and Instagram. For newest tech & gadget videos subscribe to our YouTube Channel. You can also stay up to date using the Gadget Bridge Android App. You can find the latest car and bike news here.
Samsung Galaxy Tab S8 series has just landed in India and it is the company’s most recent flagship tablet line. If you’re thinking about buying a new tablet but aren’t sure which one will meet all of your needs, we’ve compared the Samsung Galaxy Tab S8 and Samsung Galaxy Tab S7 FE to see how the two Android tablets compare.
Samsung Galaxy Tab S8: Dual-camera setup on the rear, with a 13MP primary sensor and a 6MP ultra-wide lens.Samsung Galaxy Tab S7 FE: 8-megapixel camera sensor
In terms of design, both tablets appear to be comparable. However, the S8 features a fingerprint sensor on the side, whilst the S7 FE does not, instead opting for face unlock. Although the Tab S8 has a smaller screen, it refreshes at 120Hz, whilst the FE has a 12-inch display but offers a 90Hz refresh rate. The S8 is equipped with the Qualcomm Snapdragon 8 Gen 1 processor, which is the same as the one found in the S22 Series. In comparison, Qualcomm Snapdragon 778G powers the S7 FE. Also, the S8 is available in a variety of configurations, but the FE is only available in a single RAM and storage variant.In terms of battery capacity, the S7 FE has a massive 10,090mAh battery, but the S8 has an 8,000mAh battery. In terms of software, the S8 outperforms the FE since it runs Android 12, whereas the competition ships Android 11. The flagship’s cameras The Tab S8 is also superior in terms of audio; both include AKG tuned stereo speakers, but the S8 has a quad setup, whilst the S7 FE relies on a twin setup.Generally speaking, the Galaxy Tab S8 gets the upper hand over the S7 FE since it outperforms it in every category, including processor, display, audio, camera, and software. With these specifications, it can easily handle intensive games and multitasking. We understand that it is pretty costly, but if you are willing to spend Rs 42,000 on a mid-range tablet, why not pay more and get a flagship tablet?
For the latest gadget and tech news, and gadget reviews, follow us on Twitter, Facebook and Instagram. For newest tech & gadget videos subscribe to our YouTube Channel. You can also stay up to date using the Gadget Bridge Android App. You can find the latest car and bike news here.


 The TV can easily be wall-mounted or kept on a table using the supplied V legs. At the back, you will find a lot of connectivity ports. These include three HDMI, USB, headphones that are side-mounted and downward-facing AV, Ethernet and Optical ports. The physical power off button is placed behind the LED indicator at the bottom.
 The remote has also seen an upgrade. Well, it is still sleek, but with the Netflix and Prime video buttons, you will also get dedicated Disney+ Hotstar and Apps keys. These are good additions as people do watch a lot of Disney+ Hotstar, and geeks like us want to quickly get to the apps section instead of jogging through the menu.


 Step 2:
 Step 3:
 Step 4:
 Read also:
  Step 2:
 Step 3:
 Step 2:
  Step 3:
 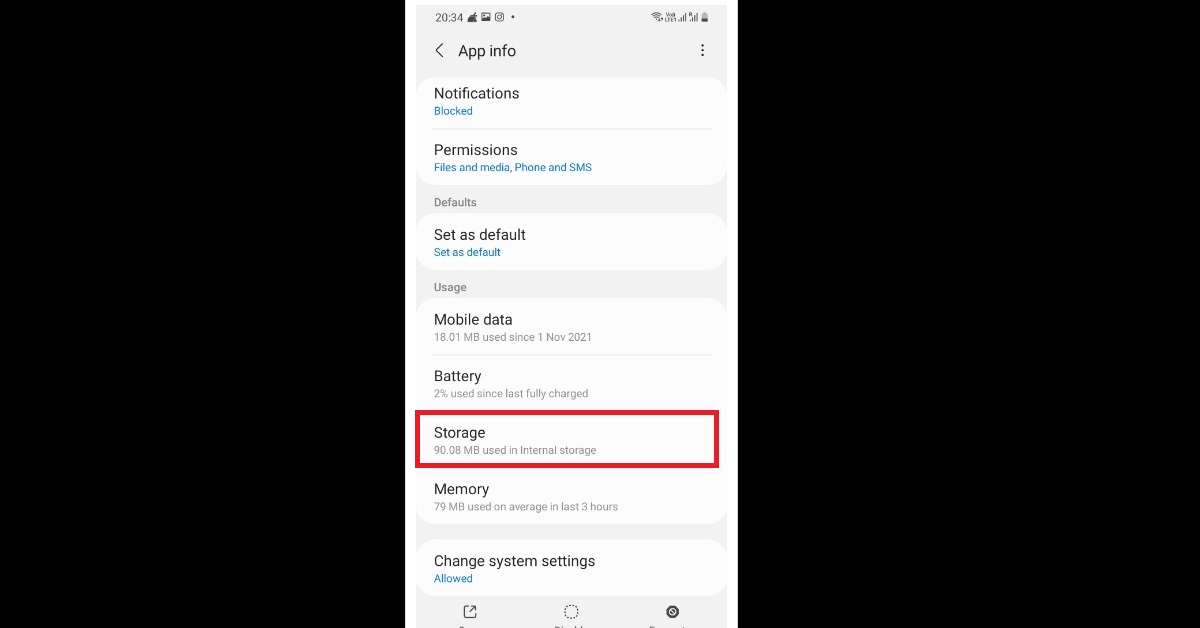 Step 4:
 Step 2:
  Step 3:
  Step 4:
 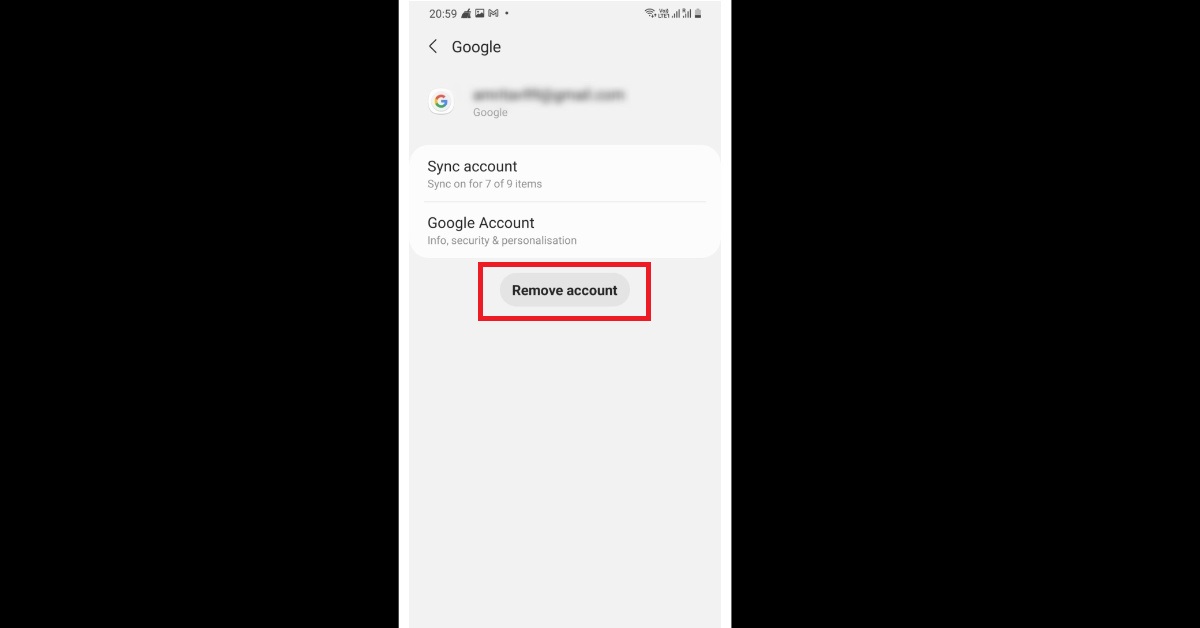 Step 5:
  Read also:
  Step 2:


 Step 2:
  Step 3:
  Step 4:
  Step 5:
  Read also:
  Step 2:


 Step 3:
  Step 4:


