Google Maps is undoubtedly the best navigation and web mapping platform around, and for good reason too. If you’ve got the app on your phone, you can never truly be lost. With just one tap, you can see where you are – down to the exact coordinates. Going to unknown places is also not a hassle, all you need to do is enter your destination and the app will guide you there. But what if you need to find the postal address of a place to send mail? Google Maps can help you with that as well. Today, we bring you the top 2 ways to find the postal address of any location on Google Maps.Read Also:[Working] Top 2 ways to copy and merge YouTube playlists? (2024)
Things to keep in mind while looking up the address of a location on Google Maps
If you’re looking for the address of a residential location, always drop the pin within the territory of the building on the map and not at the border or the road.
Double-check the location by using street view.
If you’re looking up the address of a business or a vendor, search for their contact number on the public listing. Call the number to find out the correct address.
The address of some places may not be listed on the app. Other places may have an incomplete address. Check the address of places near the location to get a faint idea.
Find the postal address of any place or location using Google Maps on a PC
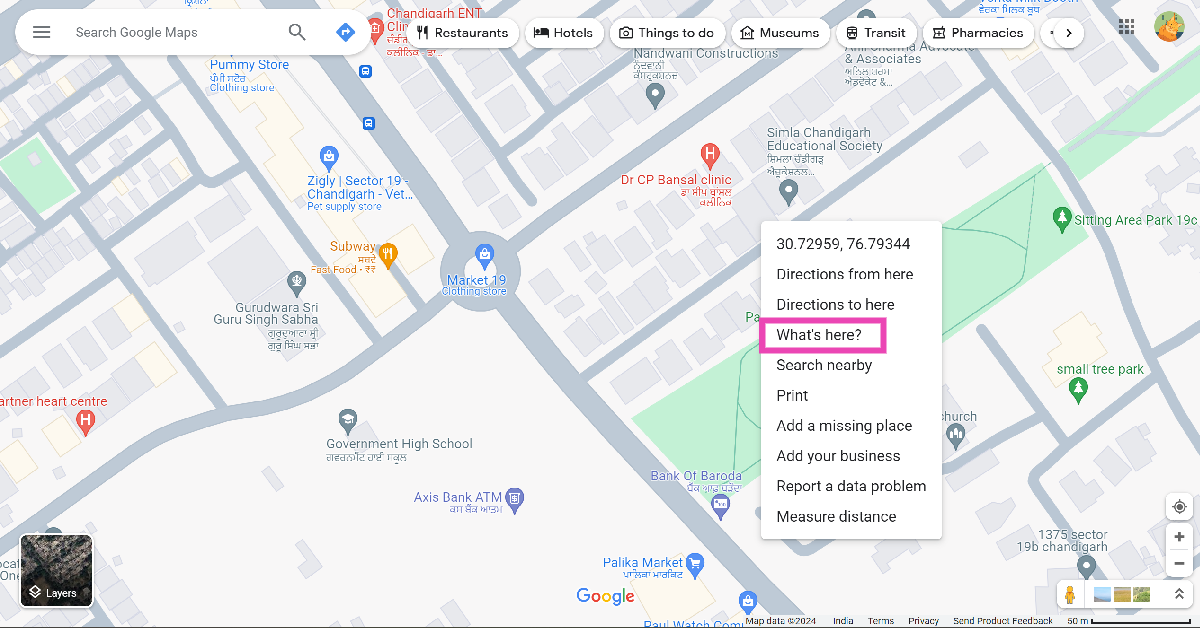
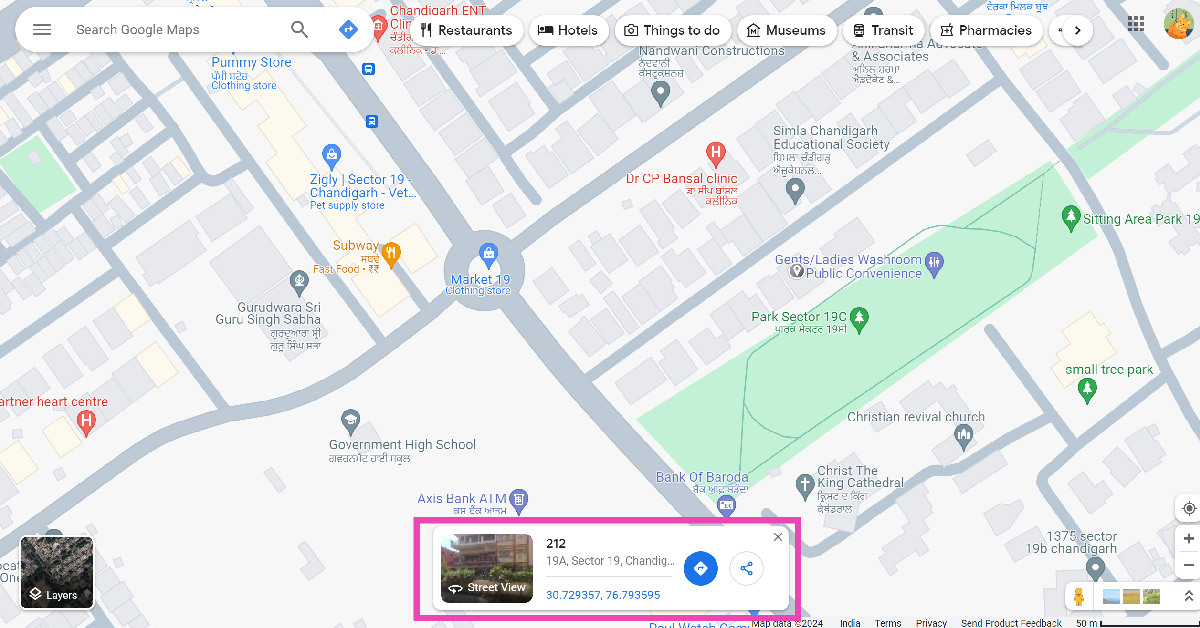
Step 1: OpenGoogle Maps on your PC’s web browser and go to the location in question.Step 2: Right-click on the location and click on ‘What’s here?’Step 3: The postal address of the location will pop up in a small box at the bottom of the screen.Step 4: Click on the box to view the full address of the location along with its Street View images.
Find the postal address of any location using the Google Maps app
Step 1: Launch the Google Maps app on your smartphone.Step 2: Navigate to the location in question.Step 3: Drop a pin on the location.Step 4: Slide up the results page.Step 5: The address will be mentioned in the header of the page. For the full address, switch to the Overview tab.
Frequently Asked Questions (FAQs)
How do I find my current location on Google Maps?
Launch the Google Maps app on your phone and hit the Recentre (aim) button at the bottom left section of the screen. The blue dot on the map denotes your current location.
Is it possible to find the exact address of a location on Google Maps?
To find the exact address of a location on Google Maps, drop a pin on it and swipe up on the screen to see the details related to it. The full address of the location will be listed under the Overview tab.
These are the top 2 easy ways to find the postal address of any location on Google Maps. Pulling up the full details about the location will also give you the postal code of the area. If you have any questions about this issue, let us know in the comments!
Smartphones and GPS have completely eliminated the need for asking strangers for directions. If you suspect you’re lost, simply enter your destination on the map and your smartphone will guide you there. The same goes for finding public restrooms near you. If you’re in an unfamiliar place and feel nature calling, all you need to do is whip out your phone and choose your pick from the facilities near your location. Today, we bring you the top 5 ways to find public restrooms near your current location on iPhone and Android.Read Also:[Working] Top 2 ways to copy and merge YouTube playlists? (2024)
Do you need a third-party app to find restrooms near you?
The simple answer is no. You don’t even need to launch any app on your phone to find a nearby toilet. You can use your device’s voice assistant (Siri or Google Assistant) to pull up all the results and list them on the map. Google Maps has the most exhaustive list of public facilities, covering almost every location near you. If you can’t find a restroom, you may want to broaden your search and look for hotels and public lodging. Upon request, they may let you use their restroom facilities.Looking up restrooms online can be a bit like playing roulette. Even though most listings have the appropriate rating next to them, they may not have what you’re looking for. For example, some users may require the toilet to be wheelchair accessible and offer a handicap stall. Others may need to use a toilet for its diaper changing station. If your needs are more specific, there are some great third-party apps that you can use. More on that later.
Use Google Maps to find public restrooms near you
Step 1:Launch the Google Maps app on your smartphone.Step 2: Tap the search bar and enter ‘public restrooms’ as your query.Step 3: All the public restrooms near you will be marked on the map.Step 4: Hit View list to check out the names and other details of all the restrooms near you.Step 5: Tap on a restroom to select it and check out its reviews, ratings, and images.
Use Apple Maps on your iPhone to find public restrooms near you
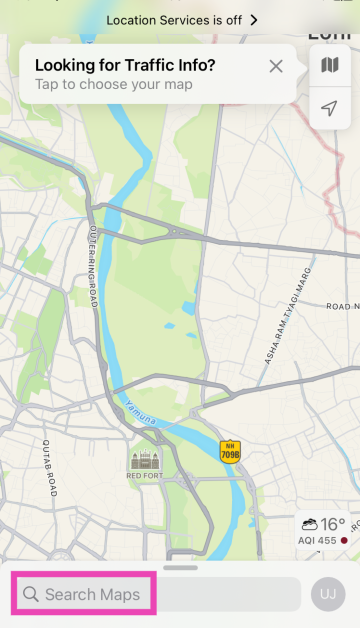
Step 1:Launch the Maps app on your iPhone.Step 2: Tap on the search bar and enter ‘Restrooms’.Step 3: Select Restrooms (Search Nearby).Step 4: All the restrooms near you will be marked on the map.Step 5: Pull up the list to go through all the results.
Use Google Assistant or Siri on your Android phone or iPhone
If you’re in a bit of a hurry, instead of going through the map app on your phone, you can simply call the services of the voice assistant. Android users can use Google Assistant by simply saying “Hey Google, find public restrooms near me”. Similarly, iPhone users can trigger Siri by asking “Hey Siri, find public restrooms near me”. The voice assistants will pull up the results on Google Maps and Apple Maps respectively.
Perform a Google Search
Don’t want to use the Voice Assistant? Perform a simple Google search instead. Simply search for ‘Public restrooms near me’ and give the web browser access to your current location. Google will present the results along with the option to search for directions and look up the reviews.
Use a third-party app
Apps like Toilet Finder and Flush can help you easily locate public restrooms near you. These apps have hundreds of thousands of public and private restrooms in their libraries, with proper user reviews and additional features. These apps can let you know whether the toilet has a handicap stall or a diaper changing station. If a restroom is pay-to-use, the fee will be mentioned in the app.
Frequently Asked Questions (FAQs)
How do I find public restrooms near me?
Use Google Maps or Apple Maps to perform a quick search for public restrooms near you. You can also use your phone’s voice assistant or perform a simple Google search.
How do I find out if a public restroom near me has a handicap stall?
Use third-party apps like Flush and Toilet Finder to know if the restrooms near you are equipped with amenities like a handicap stall and diaper changing station.
These are the top 5 ways to find public restrooms near your current location on iPhone and Android (2024). Make sure the location services on your phone are turned on before trying these methods. If you know any other way to look up public restrooms around your location, let us know in the comments!
Having a call recording warning play out as soon as you hit the record button on a call can be very counterproductive. When someone is recording a phone call, they are most likely trying to be discreet in order to the get most information out of the other person on record. An announcement that the call is being recorded can completely obliterate this task and even ward off the person from whom you’re trying to get the necessary information. If you want to ditch the call recording warning and announcements on your Android phone, check out these 7 super easy methods.Read Also:Oppo Reno 11 Series with HyperTone Image Engine launched in India
Why can’t I record a call without the warning announcement?
Most Android phones these days ship with the Google Phone app as their default dialer. While this doesn’t seem like a big deal, it comes with one big catch. Google’s default dialer app notifies the other person on the call whenever you hit the record button. This is rightfully a dealbreaker for a lot of people. The good news is that the workaround is just as easy. Instead of the Google Phone app, use the native dialer app on your phone.Complications arise when you’re using a smartphone that runs the stock Android, leaving you with no other options but the Google Phone app. Sometimes, the call you want to record may be happening over a VoIP or messaging app like WhatsApp or Telegram. Since your phone’s dialer is not involved in those situations, you’re going to have to explore other options. Luckily, we have got you covered for every conceivable situation.
Use TTSLexx to record calls without warning or announcement on the Google Phone app
Step 1:Install the TTSLexx app from Google Play Store.
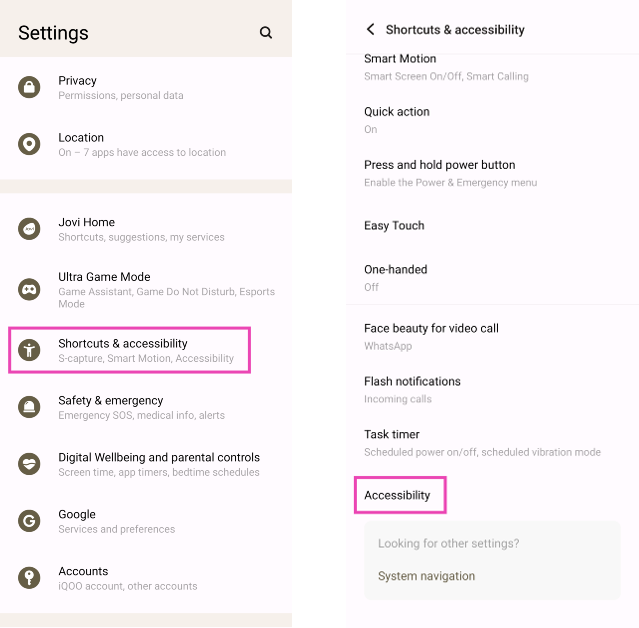
Step 2: Go to Settings and select Shorcuts and Accessibility>Accessiblity.
Step 3: Tap on Text-to-speech output.
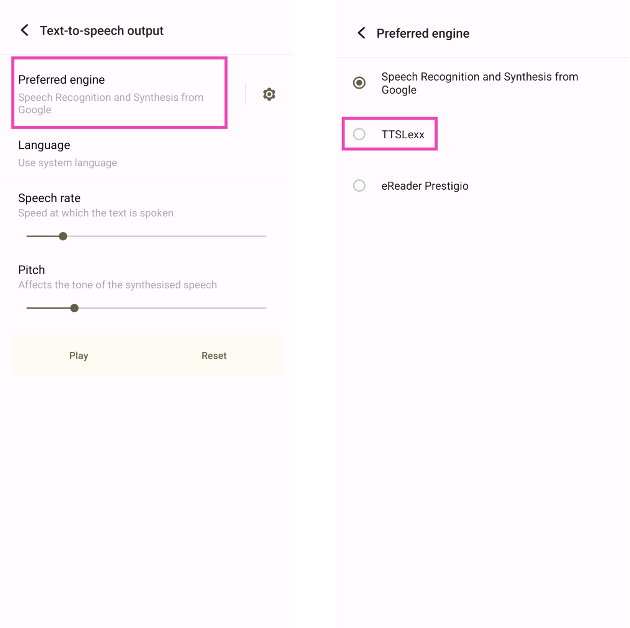
Step 4: Tap on Preferred Engine and select TTSLexx. Save the changes.
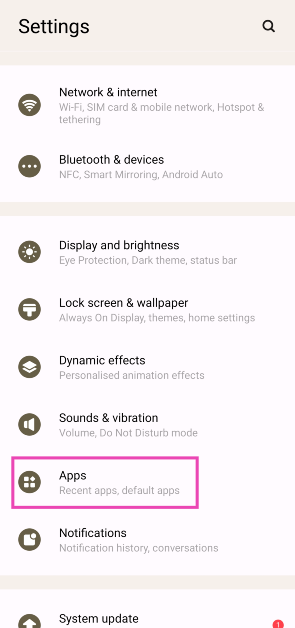
Step 5: Go back to Settings and select Apps.
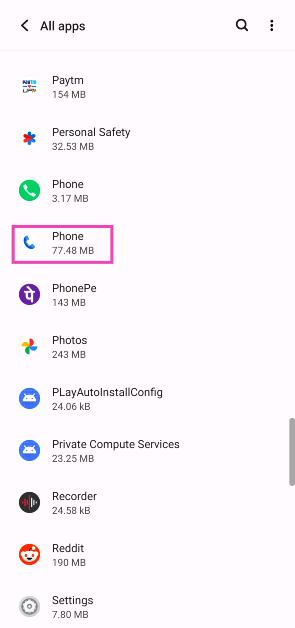
Step 6: Scroll down to Google Phone and select it.
Step 7: Go to Storage and select Clear Data and Clear Cache.
Step 8:Restart your phone.
Use the OEM’s dialer app to record calls without warning or announcement on Android
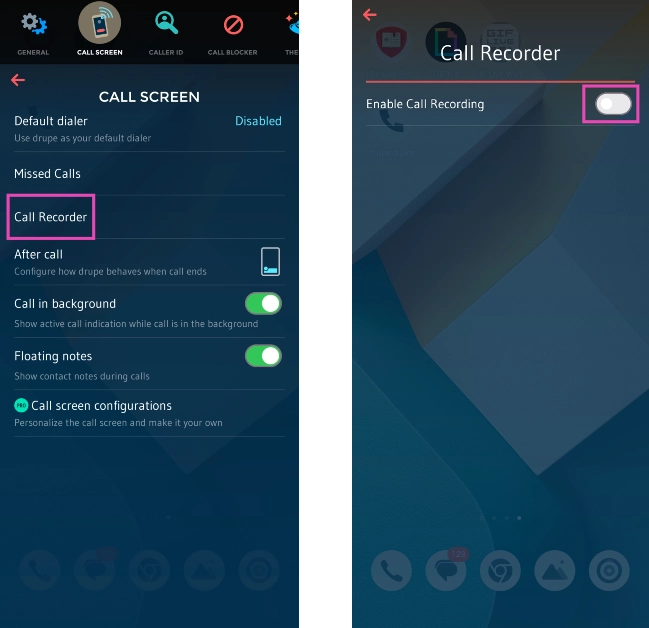
Certain smartphone manufacturers like Oppo, OnePlus, iQOO, and Vivo provide their own phone dialer app alongside the one from Google. Since the call recording warning is only announced on Google’s Phone app, you can use the native one to skip them. Once you launch the auto dialer app, set it as the default phone app. When the call is connected, hit the record button.
Use TrueCaller to disable call recording warning or announcement
TrueCaller offers a call recording feature that doesn’t place a warning when you hit ‘Record’. Here’s how you can use it.Step 1:LaunchTrueCaller on your device.Step 2: Go to Settings and turn on the toggle switch for Call Recording.Step 3:Initiate and call and wait for the receiver to pick it up.Step 4: Hit the Record button. The caller will be put on hold for 3 seconds, after which the recording will start.
Use a third-party dialer app
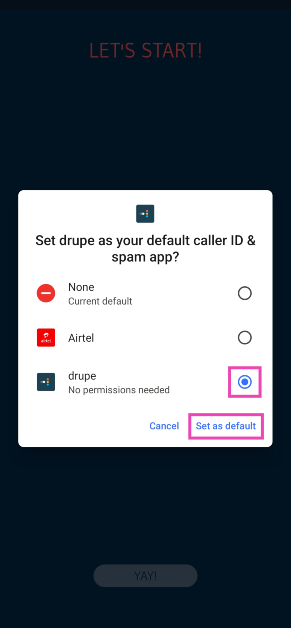
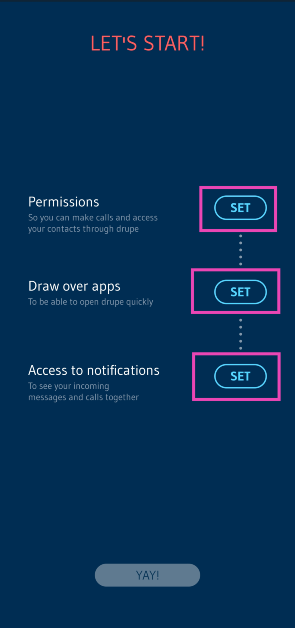
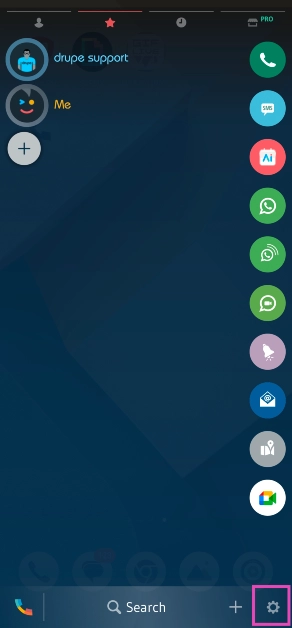
There are several dialer apps on the Google Play Store that can record your calls without notifying the person on the other line. Drupe is one of the best dialers around for this task. Here’s how you can use it.Step 1:Download and installdrupe from the Google Play Store.Step 2: Make drupe your default phone app.Step 3:Launch the dialer and give it the necessary permissions.Step 4: Go to drupe’s settings and select Call Screen.Step 5: Turn on the toggle switch for Enable Call Recording.Step 6:Dial a number and wait for the receiver to pick up the call.Step 7: Hit the Record button.
Use a third-party app to record WhatsApp calls on your Android phone
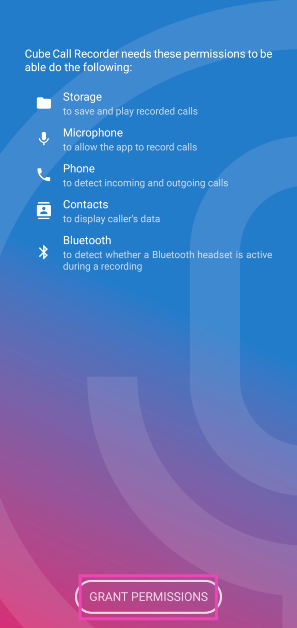
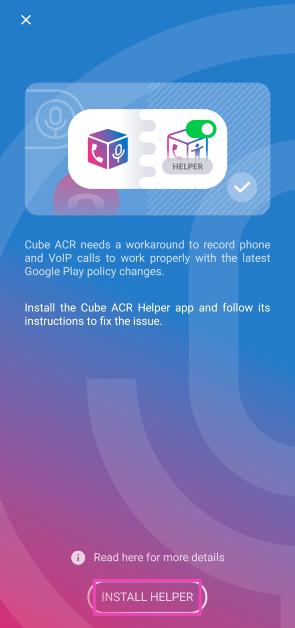
All the methods we’ve mentioned so far only work for cellular calling. But what if you want to record a call on WhatsApp? You’re going to need a dedicated call recording app. Cube ACR is one such app. Here’s how you can use it. Step 1:Install the Cube ACR app from the Google Play Store.Step 2:Launch the app and give it the necessary permissions.Step 3: You will be prompted to install the Cube ACR Helper app. Hit Install Helper.Step 4: Give the Cube ACR Helper app the necessary permissions.Step 5: Once the app has been set up, Cube ACR will automatically record all your calls as soon as the other person picks up. The recordings can be viewed within the app.
Record your phone’s screen
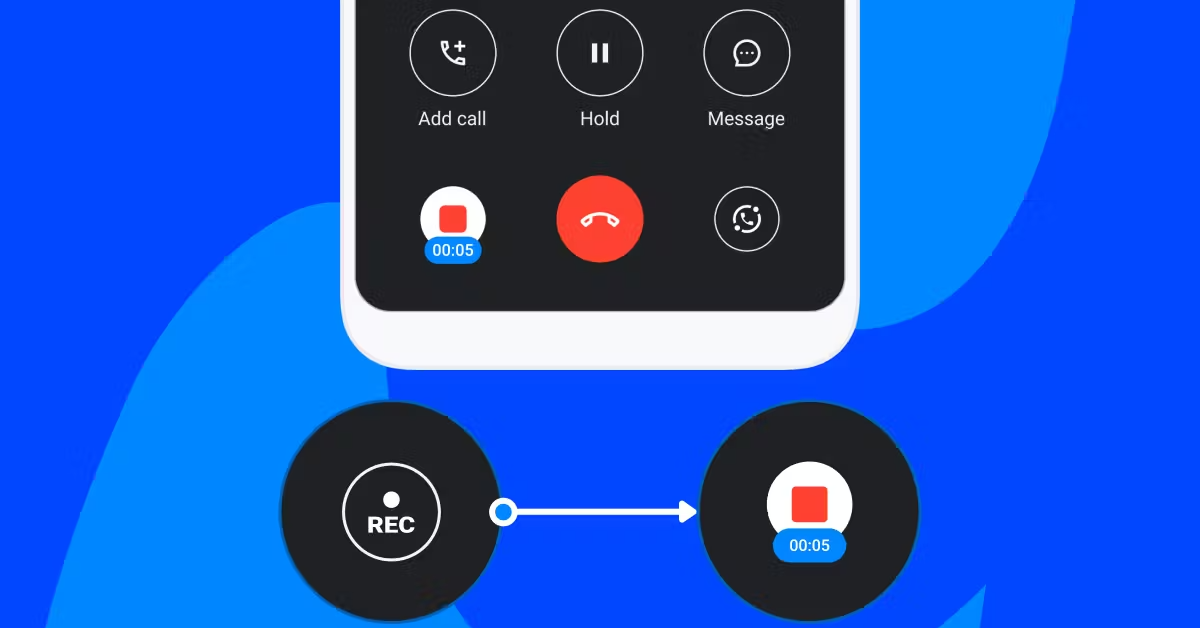
Your phone’s native screen recorder can also record your calls. It does not place any recording announcement or warning. Since the screen recorder is able to draw audio from your device, it can easily record any call. Select its tile from the Quick Start Menu and make sure it is recording your device’s screen. Now, place the call you want to record. Once you’re done, hit the ‘Stop’ button.
Use another phone
If these methods don’t work for you, simply put your call on loudspeaker and use another phone to record it. This rudimentary method is perfect for when the native dialer app on your phone does not have a call recording feature and you don’t want to install a third-party app. The quality of the recording will not be as good as the other ones, but it will be passable.
Frequently Asked Questions (FAQs)
How do I disable call recording announcements on Android?
Use your smartphone’s native dialer app instead of Google Phone to disable the call recording warning announcement on Android. A third-party dialer like druke works as well.
How do I record a WhatsApp call on my Android phone?
WhatsApp calls can be recorded by using a dedicated call recording app like Cube ACR. This app works for other IM apps as well.
Where can I find my call recordings?
Use the File Manager to find all your recorded calls in the ‘Call Recordings’ folder in your phone’s internal storage. Some OEMs may have the option to access them within the Phone app itself.Read Also:Poco C65 Review: Does it check all the boxes?
Conclusion
These are the top 7 ways to record calls on your Android phone without a warning or announcement. Once you’ve recorded a call, you can use an online tool to remove the background noise on the recording and even generate its transcript. If you know any other way to remove the warning message while recording a call, let us know in the comments!
Google Photos is a great tool to store and back up your images across all your devices. If you use one account for Google Photos, you can access all your pictures anywhere. You can share an album with other people, lock sensitive images, and archive old media. If someone wants to see photos from a particular event, you can easily share a link to the album with them. Strangely enough, Google Photos does not offer the option to embed images and albums into your website and emails. But we know a couple of tricks you can use to get around this issue. Read along to find out.Read Also:Poco C65 Review: Does it check all the boxes?
Why you should consider embedding pictures instead of attaching them
If you want your email or website to keep the attention of the reader, eye-catching images are what you need. Of course, you can always attach an image with your email, but the reader likely won’t go back and forth between the images and the body of the email while reading it. A much better idea is to embed the images in the relevant parts of the email. For example, if your email is regarding an event, you can post its flyer in the middle of the text, so the reader gets a visual grasp on the topic at hand.To increase the readability of your email, make sure the dimensions of the image are appropriate and do not require scrolling the page. If your image exceeds the file limit imposed by Gmail, you can always compress it to a smaller size. Adding a caption and alt text to the image goes a long way too. In case the reader isn’t able to load the image, the alt text will do a good job of relaying the nature of the picture.
Embed a Google Photos album on your website
Step 1: Go to Google Photos on your PC and select the album that you want to embed.Step 2: Hit the share icon at the top of the screen.Step 3: Click on Create Link.Step 4:Copy the generated link.Step 5:Generate an embed code for the album using an online tool.Step 6: If you want, you can make changes to the dimensions of the images and the way the images are displayed on the album.Step 7:Copy the embed code.Step 8: Now, go to your website/blog’s dashboard and click on Add media.Step 9: Click on Insert Embed Code.Step 10: Click on Insert Into Post.
Embed Google Photos in your email
Step 1: Log into your Gmail account and click on Compose.Step 2: Click on the Photos icon in the compose window.Step 3: Select the photos that you want to embed.Step 4: Select Inline.Step 5: Click on Insert.
Frequently Asked Questions (FAQs)
How do I embed Google Photos into my website?
Copy the link to the photo/album, generate its embed code, and paste the HTML link into your website to embed the media.
Is it possible to embed a picture into my email?
Gmail users can embed pictures from their Google Photos account into their email. Simply click on the photos icon in the email composition window and select the picture from Google Photos’ library. Instead of ‘Add as an attachment’ click on ‘Inline’ to embed them.
I can’t embed pictures into my email due to the file size limit. What should I do?
These are the top 2 ways to embed Google Photos into your website and emails. Embedding images into your emails is great if the picture is relevant to the text next to it. It works best for referential purposes. However, if you simply want to send someone a picture, you should send it as an attachment. If you know any other way to embed images into your website and emails, let us know in the comments!
Nothing Phone 2 was launched last year at a starting price of Rs 44,999.
The device will be discounted during the upcoming Flipkart Republic Day Sale.
In addition to this, the CMF Power 5W GaN charger will also be sold at a discounted price.
Just ahead of Flipkart’s Republic Day Sale, Nothing has announced great offers on Phone 2. The company will be offering up to Rs 1,000 off on its latest smartphone. In addition to this, the firm has also revealed additional offers, including a bank discount on the purchase of the device. Flipkart will kick off the Republic Day Sale on January 14. During the sale period, major smartphone brands will be offering exciting deals on their products. Just before the annual sale begins, Nothing has revealed deals and discount offers for Flipkart customers on Nothing Phone 2, which can only be availed of during the sale period.The company announced Nothing Phone 2 in India last year in July. It was made available in three RAM and storage configurations. The company will be offering up to Rs 10,000 off on all its products during the upcoming Flipkart Republic Day sale. According to the company, 12GB of RAM with a 256GB storage option will be available for just Rs 34,999. As of now, the device is listed at Rs 44,999 on the e-commerce platform. The offer price will be available only during the sale.Also Read:Oppo Reno 11 Series with HyperTone Image Engine launched in IndiaSimilarly, other variants are also expected to get a temporary price cut.Aside from this, the CMF Power 5W GaN charger, which was launched at Rs 2,999, will be offered at a discounted price of Rs 1,999 during the annual sale.Additionally, the company has also announced an additional bank offer to entice customers. There will be up to Rs 2,000 off if the purchase is made using ICICI bank cards. Moreover, Nothing will also offer an extra exchange discount of up to Rs 3,000.Also Read: Samsung now offering a Rs 2,000 discount on Galaxy A05sNote that the Nothing Phone 2, launched in July last year, received a price cut in December. The price of the phone has been reduced by Rs 5,000. The 8GB RAM with 128GB storage variant was launched at Rs 44,999 and is currently listed at Rs 39,999 after a price cut. Similarly, the 12GB RAM with 256GB storage and the 12GB RAM with 512GB storage options are available at Rs 44,999 and Rs 49,999, respectively. Both variants were earlier introduced at Rs 49,999 and Rs 54,999, respectively.
Garena Free Fire is a battle royale game with regular awards and tournaments to keep players interested. If you play Garena Free Fire, you should be aware of the redeem codes that are released on a daily basis. However, because the battle royale game is banned in India, players from other countries can use the Free Fire Redeem codes daily. If you’re unfamiliar with the Garena Free Fire redeem codes or don’t know how to get them, we’ve put together a step-by-step guide to help you redeem them. Check out Garena Free Fire Redeem Codes for 13 January 2024.The Free Fire redeem codes are a great way to get free stuff. These are 12-digit codes that contain alphabets and numbers, as well as an expiration date and time. Because the Garena FF redeem codes cannot be used more than once, you should hurry to the redemption page to claim your free reward before someone else does. To get a free reward, all you have to do is go to reward.ff.garena.com/en, which is the official redemption page. Also, keep an eye on this space for daily updates on Garena Free Fire redemption codes and rewards.
Garena Free Fire Redeem Codes Today 13 January 2024
Have you ever come across a YouTube playlist and felt that it was missing some good tunes? Or maybe you were going through a lecture series and noticed it didn’t cover some essential topics. Since not everyone can add to a playlist, the only way to make it comprehensive is by copying its content to a new playlist created by you and then adding new videos to it. Earlier, YouTube used to have a very handy feature to copy a playlist Strangely enough, that option is no longer available. But there are still a couple of workarounds that will help you accomplish this task. Here are the top 2 ways to copy and merge YouTube playlists.Read Also:Oppo Reno 11, Oppo Reno 11 Pro India launch today: Expected pricing and specs
Which method should you use?
Let’s be honest, if you’re looking up a playlist on YouTube, it is most likely a music one. The platform pre-dates streaming services like Spotify and Apple Music, which means there are an endless number of playlists to browse through. If you want to transfer an existing music playlist to your account, use YouTube Music. If you’re a YouTube Premium subscriber, this method is even more suited to you.There are a couple of online tools you can use for this task as well. But it involves giving the third-party tool access to your Google account. If you’re not cool with that, stick to the first method. However, a third-party tool makes it easy to merge playlists and select the content you want. Check out both the methods down below and see which one you like more!
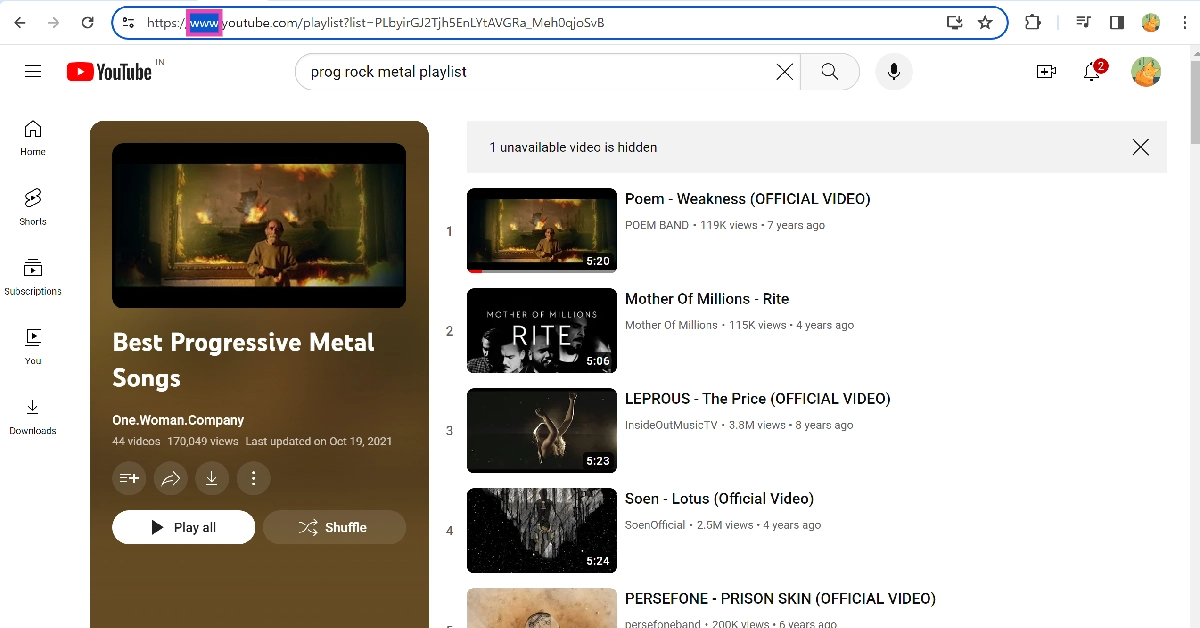
Use the YouTube Music hack to copy and merge YouTube playlists
Step 1: Open the YouTube Playlist that you want to copy or merge.Step 2: Click the address bar and swap out ‘www’ for ‘music’. For example, if the URL of the playlist is www.youtube.com/abc, change it to music.youtube.com/abc.Step 3: The playlist will open in YouTube Music.Step 4: Hit the ellipses.Step 5: Select Save to playlist.Step 6: Make a new playlist if you want to copy the contents or the current playlist. If you want to merge it with another playlist, select it from the list.
Use an online tool to copy and merge YouTube playlists
Step 1: Go to the YouTube Playlist Copier tool by Digital Inspiration.Step 2:Login using your Google account.Step 3: Enter the URL of the playlist you wish to copy.Step 4: Click on Fetch YouTube Playlist.Step 5: Select Create a new playlist to copy the contents of the playlist you selected. Click on Add to an existing playlist to merge it.Step 6: Hit the checkbox next to the videos you do not want to merge or copy.Step 7: Select Create Playlist/Copy Playlist.Step 8:Sign out when you’re done.
Frequently Asked Questions (FAQs)
Is there a way to copy and merge YouTube playlists?
You can either use an online tool to copy/merge a YouTube playlist or swap the ‘www’ in its URL with ‘music’. This will open the playlist in YouTube Music where it can be added to a new or existing playlist.
How do I add collaborators to my playlist on YouTube?
To add collaborators to a playlist, hit the ellipses next to it and select Edit. Turn on the toggle switch for ‘Collaborators can add videos to this playlist’. Now copy the link in the dialogue box and share it with the collaborators.
How do I transfer my Spotify playlist to YouTube Music?
These are the top 2 ways to copy and merge YouTube playlists. If you face any trouble loading the playlist in the merging tool, copy its URL using the share button and not the address box on the browser. Refresh the page and try again. If you know any other way to carry out this task, let us know in the comments!
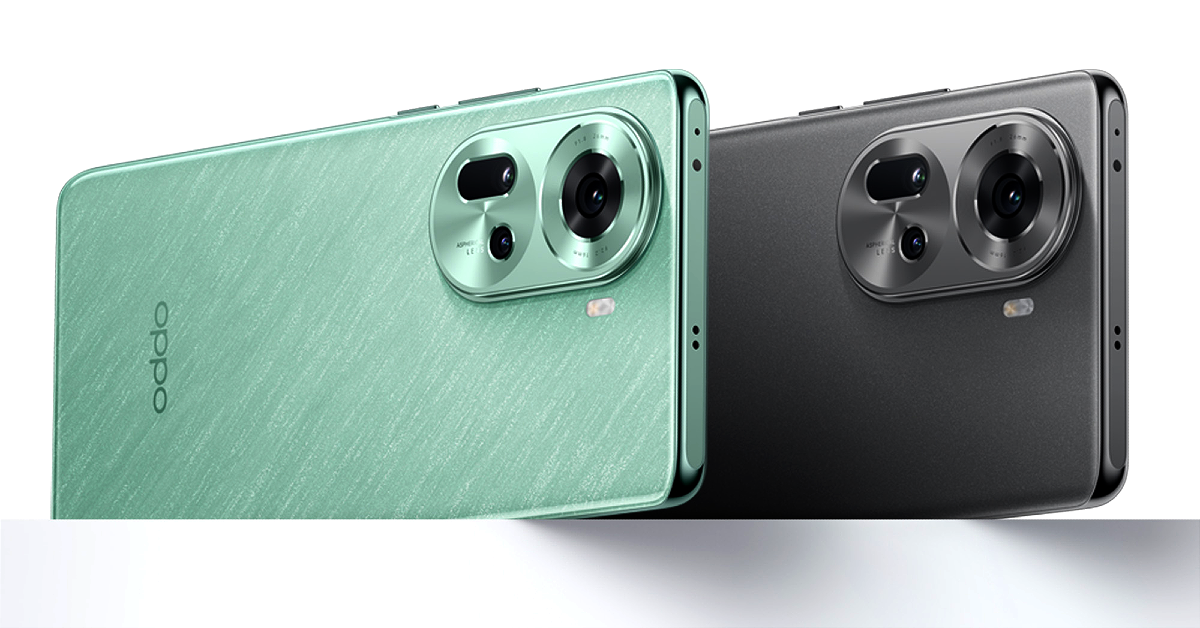
In India, Oppo Reno 11 Series is powered by Mediatek processors.
The series includes two smartphones, the Oppo Reno 11 Pro 5G and the Reno 11 5G.
Both the phones come pre-installed with ColorOS 14.
Oppo has officially unveiled its new camera smartphone series, the Oppo Reno 11 Series, in India today. The company has introduced the Oppo Reno 11 Pro 5G and Reno 11 5G. Unlike its Chinese equivalent, the Indian model of the Reno 11 comes with a MediaTek Dimensity 7050 SoC. Whereas, MediaTek Dimensity 8200 SoC powers the Pro model. A 5,000mAh battery is packed inside the vanilla model, and a 4,600mAh battery is equipped by the Pro model in India. In addition to this, both phones feature a 6.7-inch AMOLED display with a 120Hz dynamic refresh rate.
Oppo Reno 11 Series price in India, sale details
The price of the Oppo Reno 11 Pro 5G is set at Rs 39,999 for the 12GB RAM with 256GB storage option. Whereas the Oppo Reno 11 5G will come with a price tag of Rs 29,999 for the 8GB RAM with 128GB storage option and Rs 31,999 for the 12GB RAM with 256GB storage option. The vanilla variant will be available in two colour options: Pearl White and Rock Grey. On the other hand, the Pro Varaint is being offered in Rock Grey and Wave Green colour options.Also Read:Samsung now offering a Rs 2,000 discount on Galaxy A05sCustomers can avail of the following offers on the first sale of the OPPO Reno11 Pro 5G:
Customers can enjoy a cashback of up to INR 4,000 on Flipkart, OPPO e-Store, and mainline retailers with leading bank cards like SBI Cards, ICICI Bank, One Card, IDFC First Bank, and Bank of Baroda credit cards, coupled with no-cost EMI for up to 9 months.
Customers will have the option to decide on an EMI installment and tenure at their convenience.
Additionally, customers can enjoy the benefits of zero-down payment and low-down payment schemes from leading financiers like Bajaj Finserv, TVS Credit, Home Credit, HDB Financial Services, and IDFC First Bank.
Loyal OPPO customers can avail of an exchange and loyalty bonus of up to INR 4,000 online and offline.
Customers can opt to pay through UPI and avail of an instant 7.5% cashback on the purchase of Reno11 Pro 5G.
Buy the Reno11 Pro 5G and get the OPPO Enco Air2 Pro for just INR 2,999.
The Reno 11 Pro 5G is scheduled to go on sale in India on January 18. Whereas the Reno 11 5G will be available for purchase on January 25. The devices will be available on Flipkart, the OPPO e-Store, and across mainline retail outlets.Oppo Reno 11 Pro
Oppo Reno 11 Pro specifications
Oppo Reno 11 Pro features a 6.74-inch 1.5K OLED curved display with 1,240×2,772 pixels of resolution. The device supports up to 120 Hz refresh rate, up to 240 Hz touch sampling rate, 450 ppi pixel density, and 1,600 nits of peak brightness. It operates on Android 14-based ColorOS 14.The device is powered by an octa-core MediaTek Dimensity 8200 SoC with LPDDR5x RAM and UFS 3.1 storage.Also Read:CES 2024: Intel 14th Gen mobile processors including the new HX-Series for Gaming announcedThe Oppo Reno 11 Pro comes with a 32-megapixel RGBW Sony IMX709 front-facing camera for selfies. There is a triple rear camera setup, which includes a 50-megapixel primary Sony IMX890 sensor with OIS, a 32-megapixel telephoto lens, and an 8-megapixel ultra-wide camera.The Reno 11 Series features OPPO’s cutting-edge HyperTone Image Engine, which uses deep pixel fusion to process lossless photos in the RAW domain. As a result, images are rendered with sharp details, accurate colours, and an extended dynamic range for a perfect balance between light and shadows.The smartphone sports a 4,600mAh battery with 80W SuperVOOC support.The handset includes 5G, 4G LTE, Wi-Fi 6, Bluetooth 5.3, GPS/A-GPS, NFC, OTG, and a USB Type-C port for connectivity. Also, there is an under-display fingerprint sensor and other sensors, including an accelerometer, geomagnetic sensor, light sensor, under-screen proximity sensor, gravity sensor, colour temperature sensor, IR control, and gyroscope.Oppo Reno 11
Oppo Reno 11 specifications
The Oppo Reno 11 comes with a 6.70-inch OLED curved display with 1,080×2,412 pixels of resolution. The screen supports an adaptive refresh rate (1Hz to 120Hz), 394 ppi pixel density, and 950 nits peak brightness.Under the hood, there is a MediaTek Dimensity 7050 SoC with LPDDR5x RAM and UFS 4.0 storage. The device features a triple rear camera setup that includes a 50-megapixel Sony LYT600 sensor (26mm focal length and OIS), a 32-megapixel telephoto lens, and an 8-megapixel ultra-wide camera.The Oppo Reno 11 is backed by a 5,000mAh battery that comes with 67W SuperVOOC support.
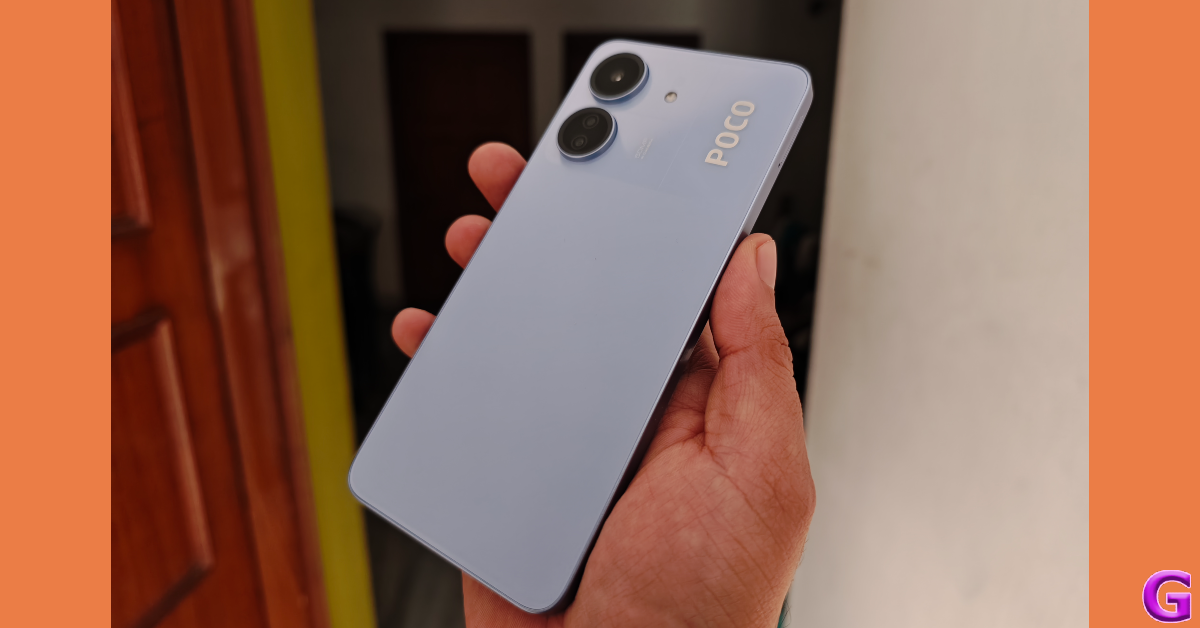
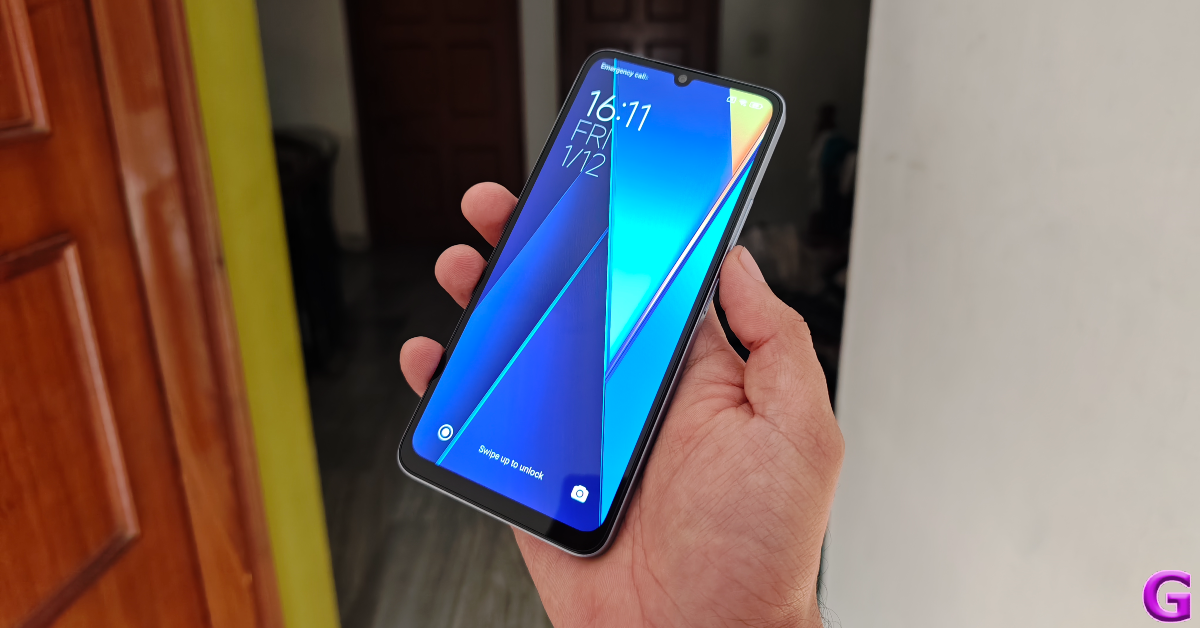
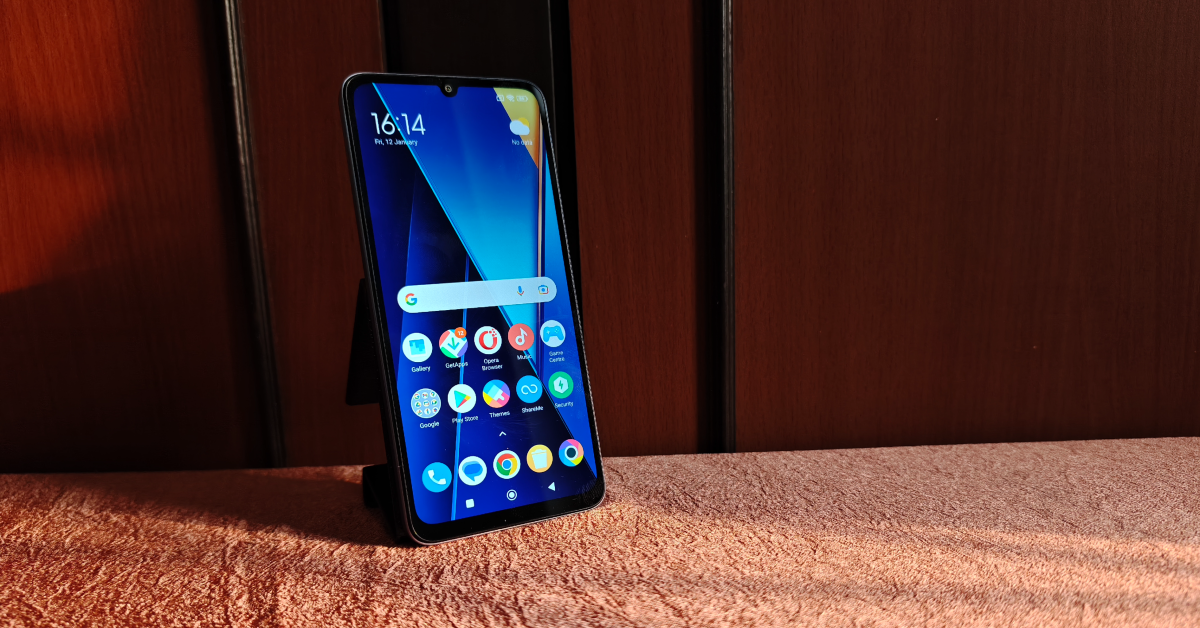
Poco’s affordable C Series got a new addition to its lineup last year. The Poco C65 made its India debut last month at a starting price of Rs 8,499 (4GB RAM + 128GB storage). The 6GB RAM + 128GB storage variant costs Rs 9,499 while the 8GB RAM + 256GB storage variant fetches Rs 10,999. These prices place the smartphone very close to the M6 5G (which we reviewed earlier) in Poco’s India catalogue. If you’re thinking the Poco C65 looks similar to the Redmi 13C, you’d be correct. The C65 is essentially a rebadged version of its Redmi counterpart. We used the smartphone for a week and put it through rigorous testing. Check out our Poco C65 review to see how it fared.Read Also:CES 2024: Intel 14th Gen mobile processors including the new HX-Series for Gaming announced
Poco C65 review: Design and Display
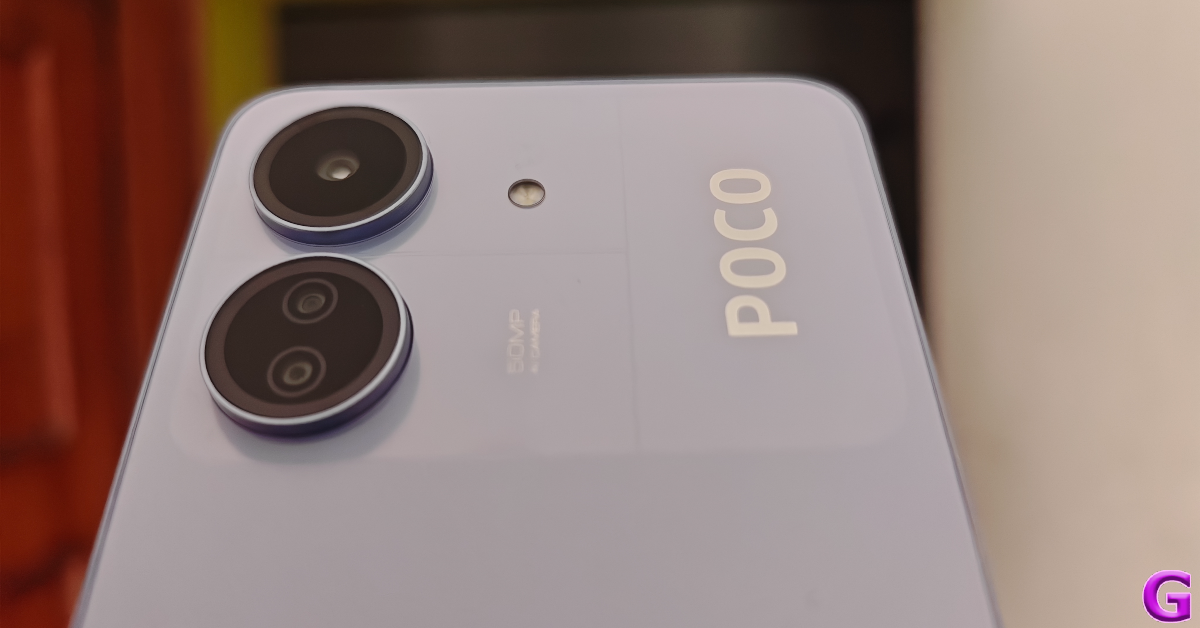
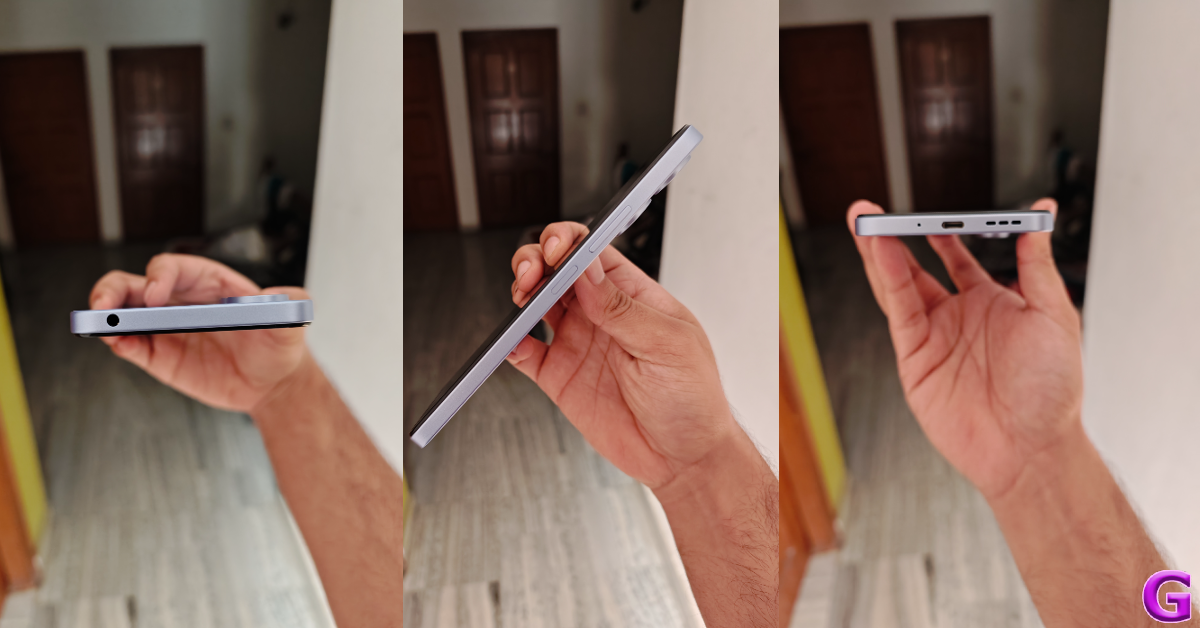
Inside the signature yellow Poco box, you get the smartphone, a 10W power adapter, a USB Type-C charging cable, a SIM ejector tool, and a quick start guide. There is no plastic cover for the smartphone inside the retail package neither does it come with a protective covering for the screen. The smartphone is available in two colour variants – Pastel Blue and Matte Black.Poco has stuck to the wide form factor on the C65. Its back panel and frame are made entirely out of plastic, which is pretty much the norm in this price segment. We are pretty happy with the quality of materials used on the smartphone. The plastic back panel does not feel flimsy, which often is the case with a lot of budget phones. It has a matte finish to it and does not attract any fingerprints or smudges. The top section of the back panel gets a glossy finish and houses the camera cutouts.The two camera cutouts contain three rear lenses. The primary shooter is placed in the upper housing while the auxiliary lens and macro sensor are positioned in the bottom unit. A small LED flash is placed on the right side of the cutouts and further along the right, you will find the Poco branding.The right side of the plastic frame houses the volume rocker keys and the side button. The side button also doubles up as a fingerprint scanner. The bottom edge gets the microphone, USB port, and the speaker grille. The hybrid SIM slot is positioned on the left edge of the frame, which is otherwise keyless. Up top, you get the 3.5mm headphone jack. No stereo speaker or IR blaster for the C65. The selfie camera on the display is housed in a waterdrop notch.The 6.74-inch IPS LCD is one of the biggest highlights of this smartphone. This 90Hz display is great for content watching. The smartphone’s wide form factor makes it even more pleasant to watch videos on it. With Widevine L1 support, you can access HD content across most major streaming platforms. The 720 x 1660p resolution of the display is optimum in this price range and it does justice to the HD content that is played on it. We were satisfied with the viewing angles as well. The images produced on the screen were contrasty, vivid, and packed with a good amount of detail.
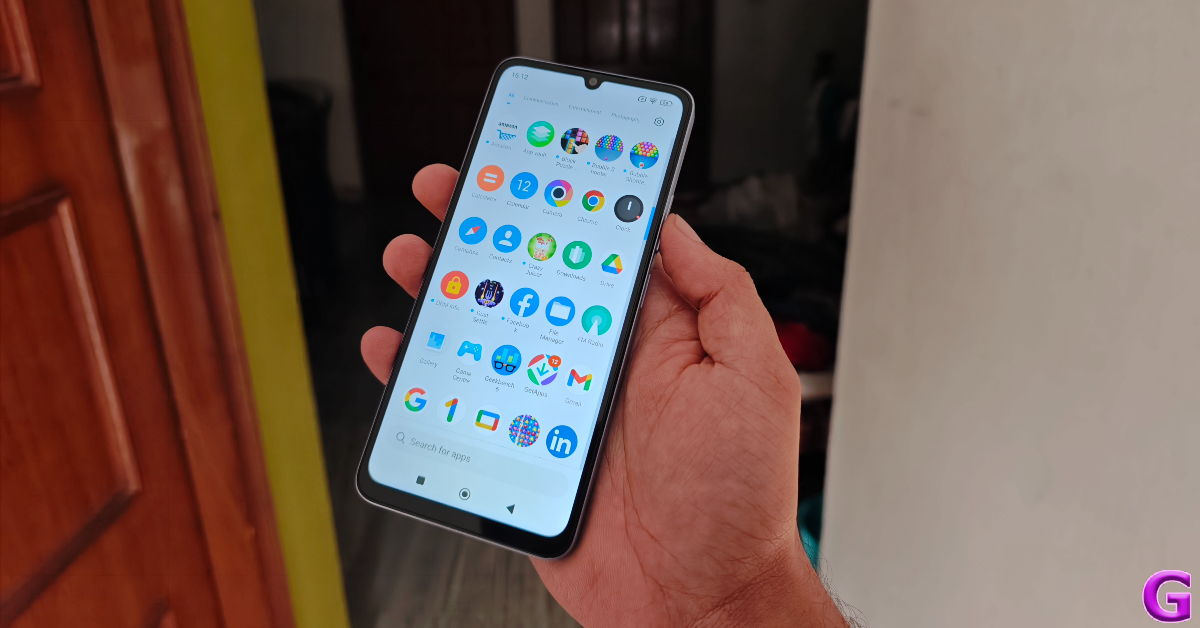
Poco C65 review: Performance and Cameras
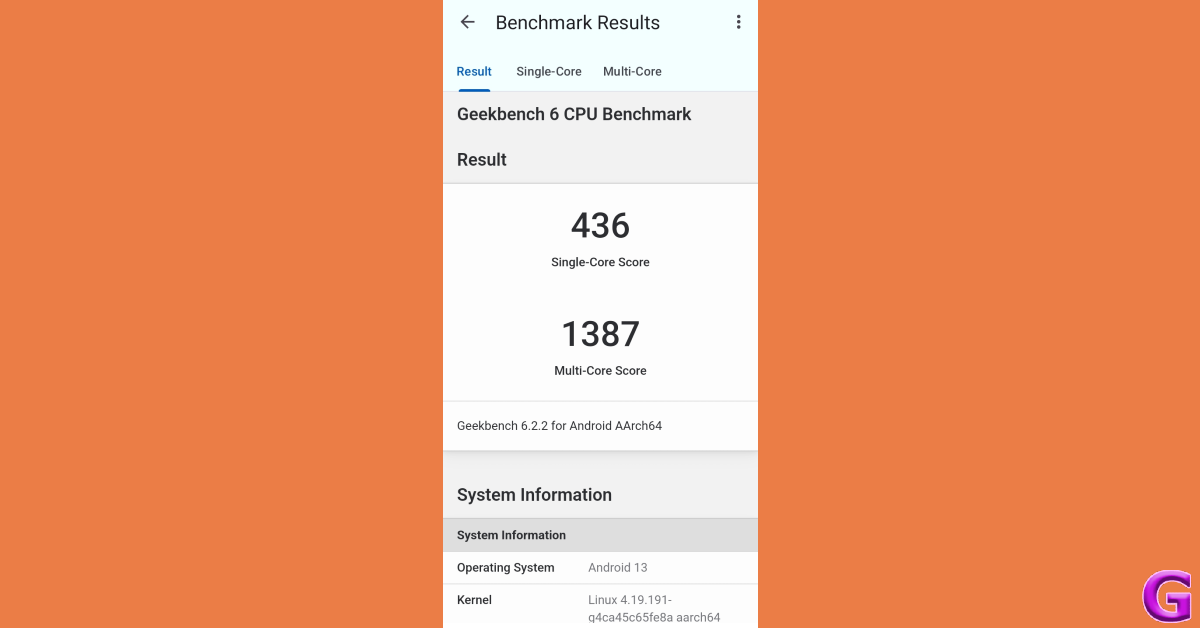
Powering this nifty little device is the MediaTek Helio G85 SoC. We aren’t big fans of the Helio chipsets, but they find their way into a lot of budget and entry-level smartphones. The Helio G85 is a three-year-old processor which does not support 5G connectivity. And there lies our biggest issue with the smartphone. For lightning-fast internet connectivity, Poco’s M6 smartphones make a much better option, albeit costing a small premium.The general performance of the Poco C65 is well above average. The display provides a decent touch response, making browsing through apps and switching between tasks effortless and breezy. 600 nits of peak brightness fares well outdoors, even under direct sunlight. During the review period, we used the Poco C65 to check emails, attend video calls and meetings, browse the web, play videos across different streaming platforms, navigation, instant messaging, and even a bit of gaming. We were pleased to see that the smartphone handled these tasks pretty well. In the Geekbench 6 benchmark test, the C65 returned a single-core score of 436 points and a multi-core score of 1,387 points.We played Free Fire Max and Call of Duty Mobile on the Poco C65. The gameplay lacked fluidity and the touch response was less than ideal. The single speaker on the smartphone isn’t able to replicate the proper audio needed to elevate the gaming experience either. While holding the phone in landscape orientation, it is pretty easy to muffle the speaker grille with the palm. The phone did not overheat even after 40 minutes of gameplay, but it must be noted that we were testing the device in the thick of the winter season.OS duties on the Poco C65 are handled by Android 13-based MIUI 14. Xiaomi’s OS skin for Poco looks pretty neat on the device. We like the categorisation of the app drawer into different genres, the colour-coded app arrangement, and the range of home screen customisations. Our favourite part of using this OS is the seamless way in which it executes the hidden folder feature. To access all your hidden apps, all you need to do is swipe right twice on the app drawer and enter the password. The only downside of this OS is the tremendous volume of bloatware it ships with. We highly recommend taking the time to delete every bloatware app from the device and managing the pesky notifications.The 5,000 mAh battery pack easily powers the smartphone for an entire day. We were even able to push the battery backup to a day and a half with more conservative usage. Using the device as our daily driver, we were clocking a daily Screen On Time of 5-6 hours on the Poco C65 during the review period. The smartphone supports 18W fast charging but ships with a 10W power adapter, which is weird. This 10W adapter takes 2 hours and 30 minutes to fully charge the device. Spending some extra cash on an 18W adapter would make your experience much better.In terms of camera performance, the Poco C65 puts up a decent display. The primary 50MP shooter takes good shots in outdoor daylight conditions. The colours are tuned nicely although they don’t truly ‘pop’. The contrast and HDR on the pictures is satisfactory as well. We took a couple of shots indoors and were happy with the results. The camera does a good job of lighting up the subject and capturing all the important details. However, when you zoom in by 2x, the lack of details and ‘softness’ in the final images becomes discernible.Indoor ShotWe took some shots in limited lighting with the Night Mode turned on and were satisfied with the result. This is not to say that the pictures were ideal by any means, but for a smartphone priced under Rs 10,000, the Poco C65 did well to manage the grain in the images. The pictures still had some softness to them, but the biggest compliment we can give to the camera is that you won’t completely ignore it when you have to take a picture at night.Night ModeIn Portrait Mode, the camera does a good job of separating the subject from the background. This is where the 0.08MP auxiliary lens comes into play. It gathers important data related to depth and helps the main sensor to take good portrait shots. The application of the blur effect is a little off, but the overall portrait shots were good. The 2MP macro lens, however, is something we could do without, since the final results lacked the colour richness we are used to.Portrait ModeThe 8MP selfie camera up front takes good shots in optimum lighting. It also does a decent job on video calls. The artificial skin brightening and smoothening effects have been kept to a minimum by default, which we like. The front and rear cameras can record 1080p videos at 30fps.Read Also:Poco X6 Pro powered by MediaTek Dimensity 8300 Ultra SoC launched in India, Poco X6 tagged along
Verdict
The Poco C65 is a decent smartphone that can give you tremendous mileage as a daily driver. The Rs 8,500 price tag looks great considering the device’s physical quality, form factor, display, and camera performance. However, the biggest miss on this smartphone is the lack of 5G connectivity. If that is something you consider essential on a device, we would suggest having a look at the Poco M6 and M6 Pro 5G (check out the review here).
From online payments to restaurant menus, QR codes are everywhere. When these codes first arrived on the scene, you had to install a third-party app to read them. Now, your smartphone can perform that task natively in more ways than one. Certain apps (like PayTM, Google Pay, etc.) do not rely on your phone’s native camera app to read a payment code. These apps typically have a scanner built inside them. But what if you come across a QR code in the wild? Don’t worry, we’ve got you covered. Here are the top 7 ways to scan QR codes with Google.Read Also:Top 12 Gadgets from CES 2024
Before you begin, decide which method is best for you
There are multiple ways you can use to scan a QR code using Google on your Android smartphone. While all of these methods use Google Lens, some may be more suited to your situation than others. The most significant deciding factor is if the QR code is saved in your phone’s gallery or pasted on a physical surface. While both situations can be resolved with Google Lens, the process is slightly different.QR codes in your phone’s storage can easily be read by Google Lens. The Google Photos app has a very helpful ‘Lens’ plug-in that will help you read them. If you don’t use Google Photos as your default gallery app, the regular Google app can also help you with all things QR. If the QR code is not stored in your phone, you can scan it using Google Lens or your phone’s native camera app. If you’re working on your PC, Google Chrome offers a handy option to scan a code using Google Lens.
Scan QR Codes using Google Lens
Step 1:Launch the Google app on your Android smartphone.Step 2: Hit the lens icon next to the search bar.Step 3:Point the camera towards the QR code.Step 4: Tap the link that pops up on the screen to open it.
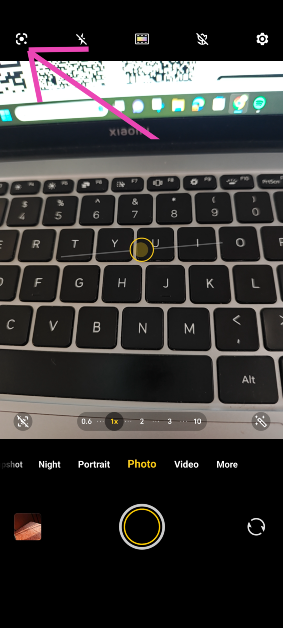
Use the native camera app
The native camera app on your Android smartphone is integrated with Google Lens support. Here’s how you can use it.Step 1:Launch the native camera app on your smartphone.Step 2: Hit the Google Lens icon at the top left corner of the screen.Step 3:Point the camera towards the QR code.Step 4: Tap on the link that pops up to open it.
Use the ‘Scan’ tile in the Quick Settings Menu
Step 1: Swipe down from the status bar to reveal the Quick Settings Menu.Step 2: Tap the ‘Scan’ tile. On some phones, this tile may be called ‘QR Scan’.Step 3: Google Lens will launch on your phone. Point the camera towards the QR code you wish to scan.Step 4:Tap the link that pops up on the screen to open it.Read Also:How to connect an iPhone or Android phone to a Mercedes vehicle?
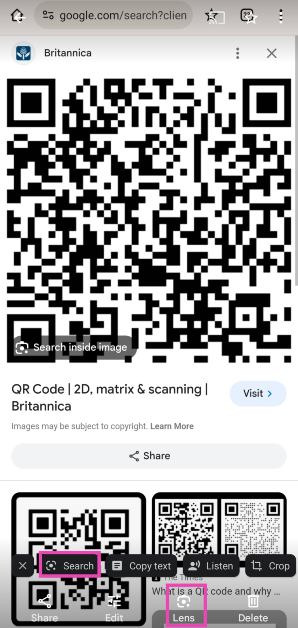
Scan an image saved in your phone’s gallery using Google Lens
Step 1:Launch the Google app on your Android smartphone.Step 2: Hit the lens icon next to the search bar.Step 3: Tap on the image preview icon at the bottom left section of the screen.Step 4: This will open your phone’s gallery. Select the image containing the QR code.Step 5: Google Lens will scan the QR code and present the result.
Use the Google Photos app to scan a QR Code in your phone’s gallery
Step 1:Launch the Google Photos app on your Android smartphone.Step 2: Open the image containing the QR code.Step 3: Tap on Lens in the bottom menu. Alternatively, you can select Search from the popup toolbar.Step 4: Google Lens will scan the QR code and display the result.
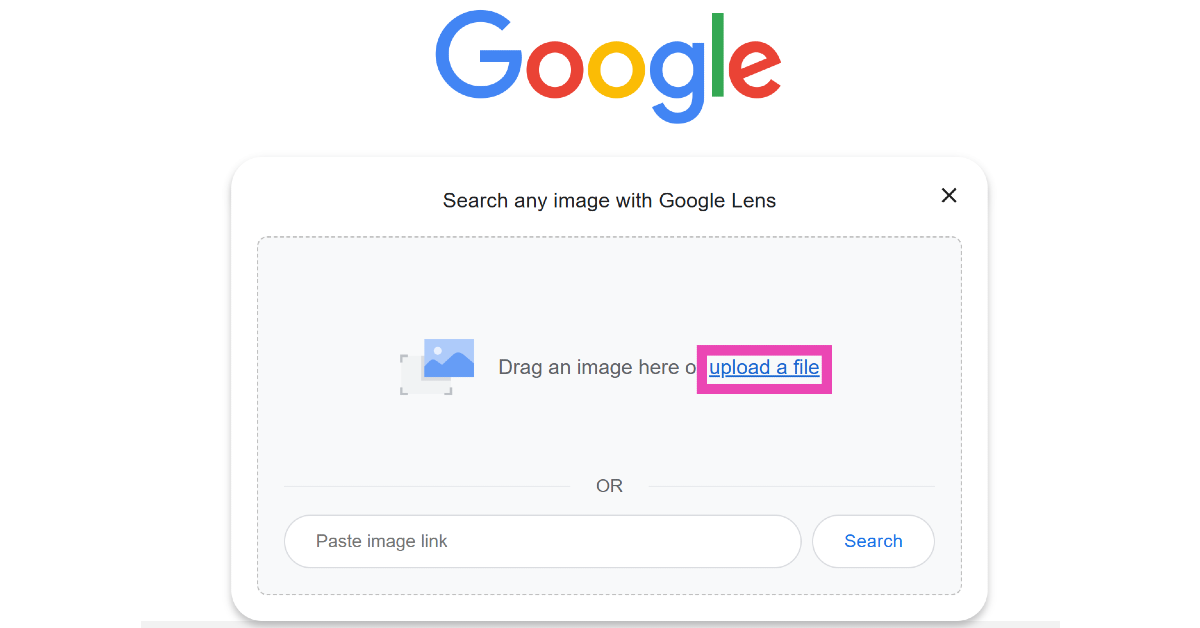
Use Google Lens on your PC
Step 1: Make sure the QR code is saved as an image on your PC.
Step 2: Go to Google’s homepage and click the Lens icon.
Step 3: Click on Upload a file and upload the QR code image from your PC’s internal storage.
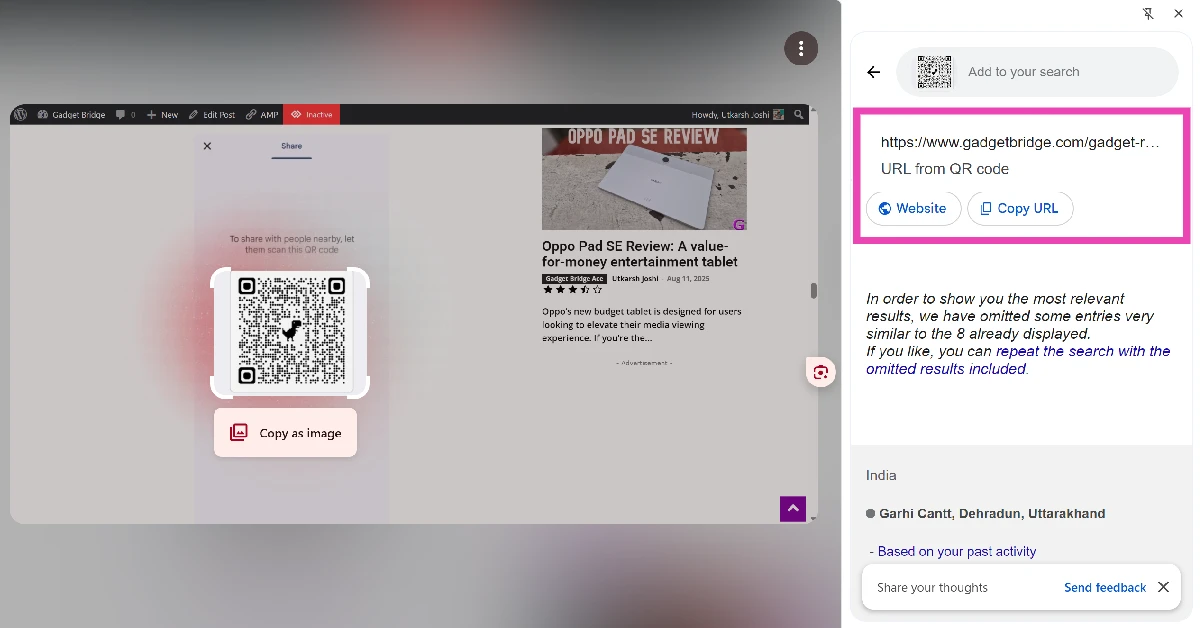
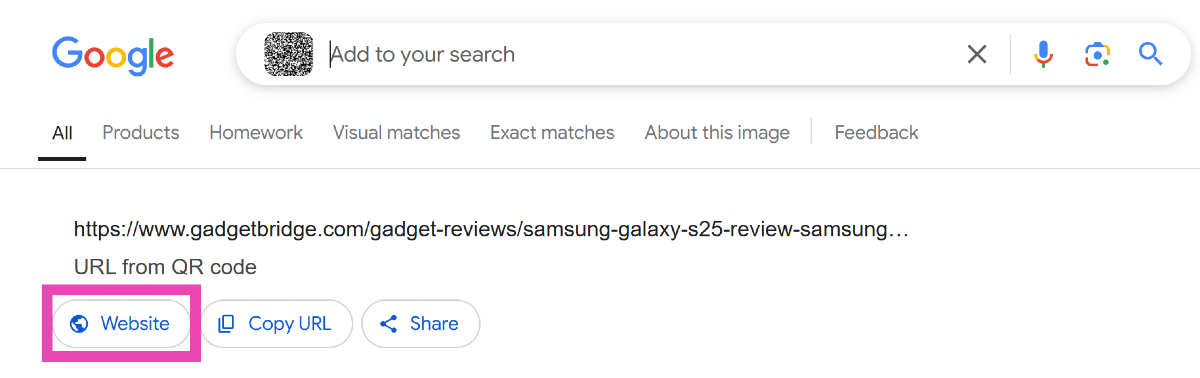
Step 4: Google Lens will scan the code for you. Click on Website to go to the link embedded in the QR code.
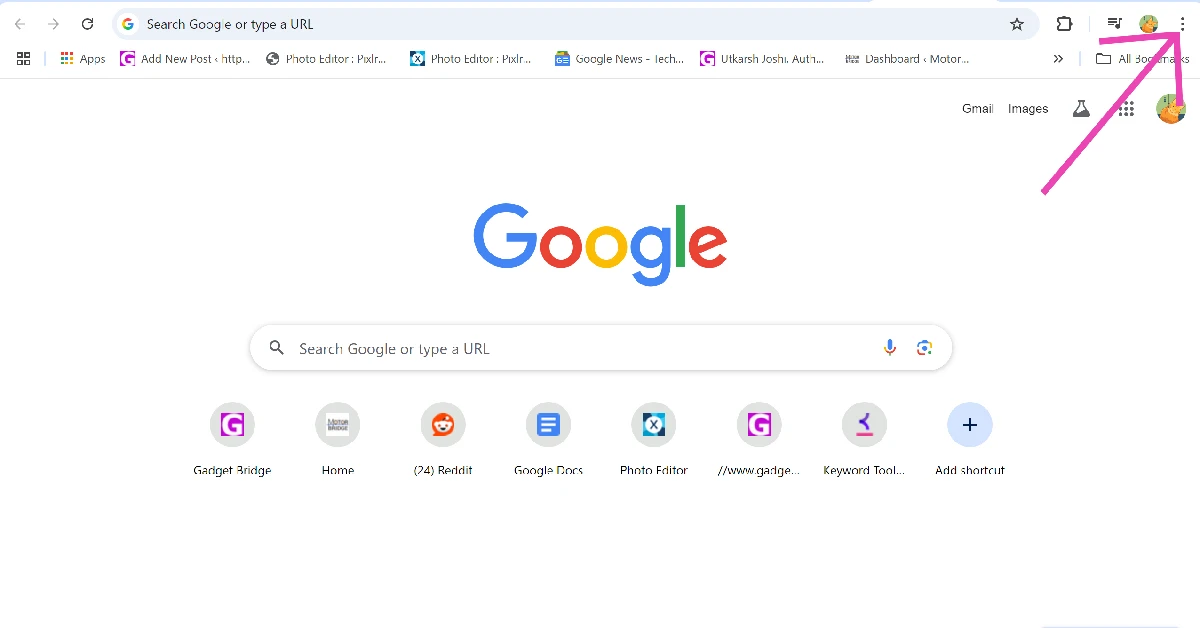
Add the Google Lens shortcut to Chrome
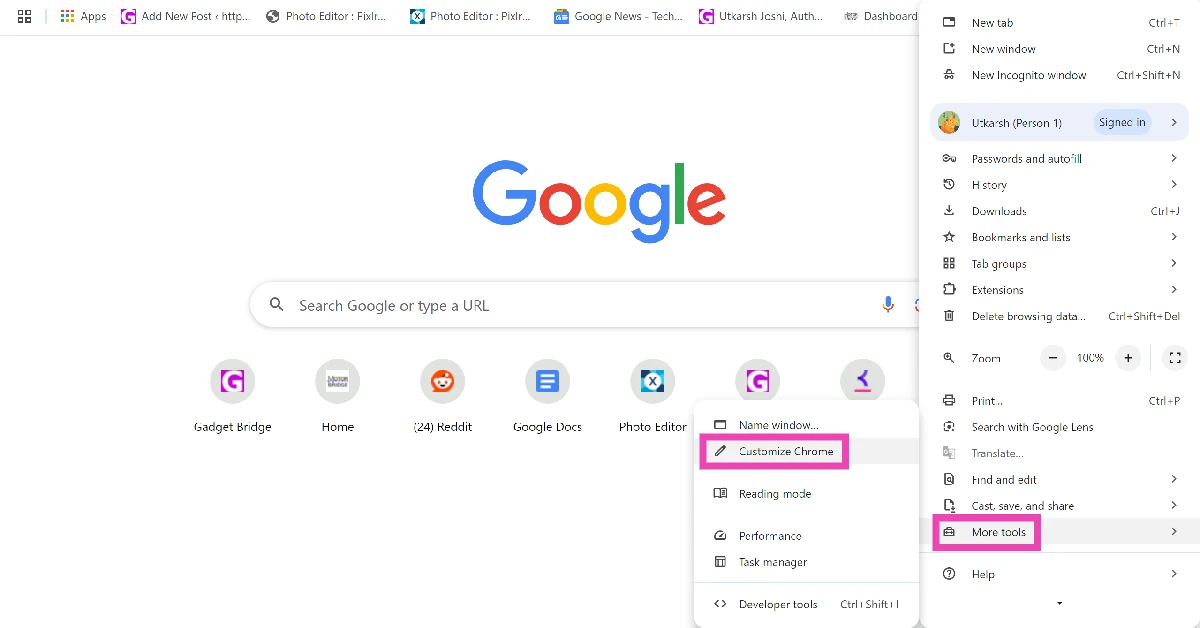
Step 1:Launch Google Chrome on your PC and click the ellipses at the top right corner of the screen.
Step 2: Go to More Tools and select Customize Chrome.
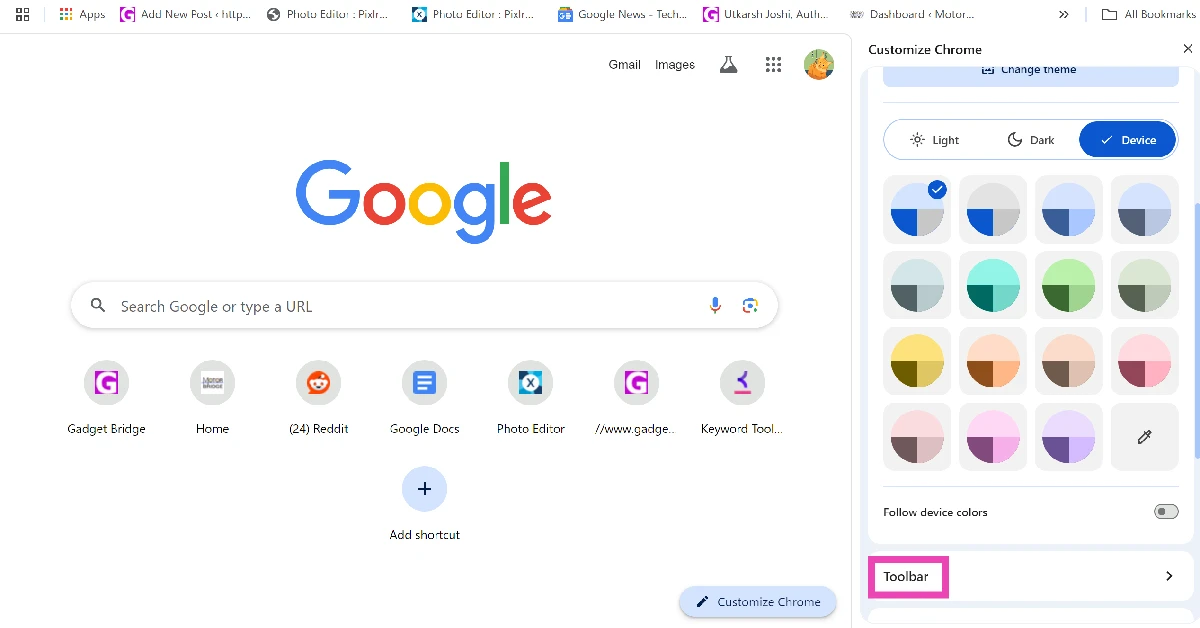
Step 3: Scroll down and click on Toolbar.
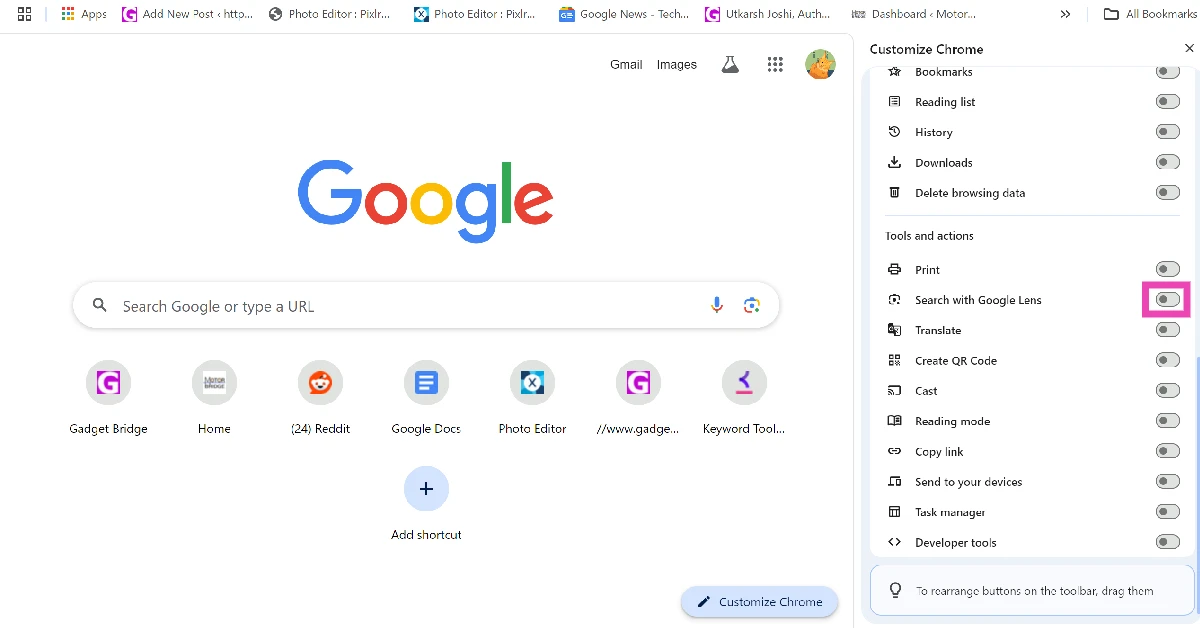
Step 4: Turn on the toggle switch next to Search with Google Lens.
Step 5: Go the web page containing the QR code.
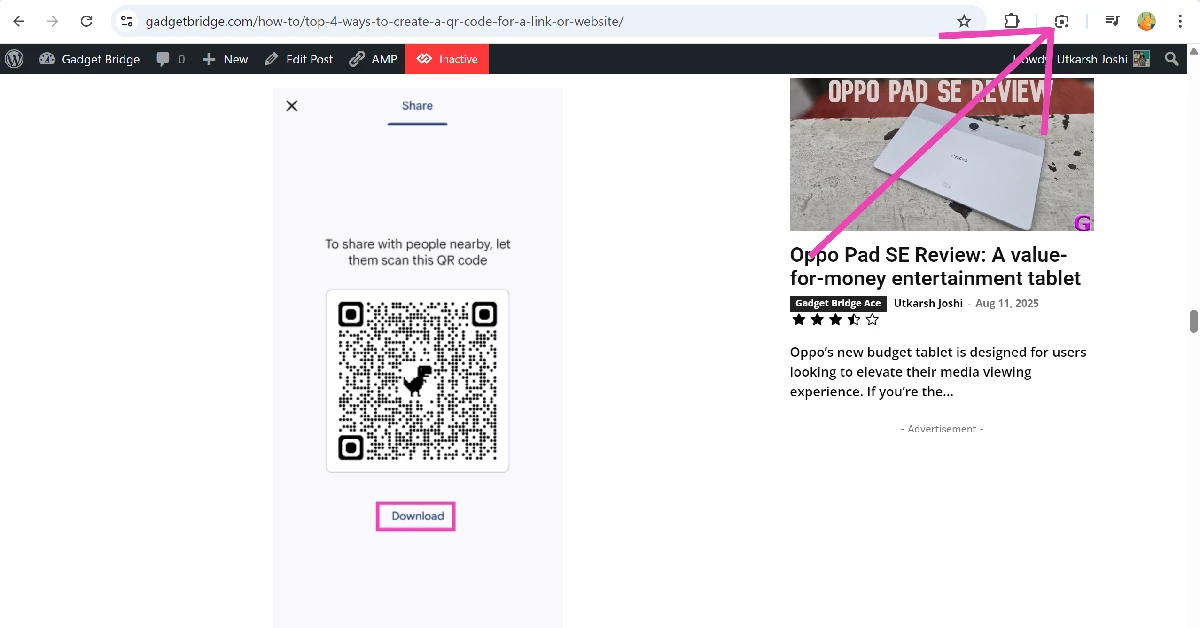
Step 6: Click the Google Lens icon next to the address bar.
Step 7: Use the cursor to select the QR code.
Step 8: The data encoded in the QR code will be displayed in the sidebar.
Frequently Asked Questions (FAQs)
How do I scan a QR code on my Android phone using Google?
Launch the Google app and tap the lens icon to scan any QR code. Point your camera towards the code and tap on the result that pops up on the screen.
How do I scan a QR code on my laptop?
Launch the camera app on your laptop and go to Settings>Related Settings>Try out new experimental features. Restart the camera app and switch to the ‘barcode’ tab to scan a QR code.
How do I scan a QR code stored in my phone’s gallery?
To scan a QR code that is stored in your phone’s gallery, open it in Google Photos and hit the Lens option at the bottom of the screen.
Can I scan a QR code using Google Lens on my PC?
Yes, you can use Google Lens on your PC to scan a code. Go to Google’s homepage, click the Lens icon, and upload the code from your PC’s internal memory. In the search results page, click on ‘Website’ to land on the page embedded in the code.
How do I scan a QR code using my PC or laptop’s webcam?
These are the top 7 ways to scan QR codes on your Android smartphone using Google. If you don’t want to go the Google route, you can use third-party apps like QR Code Scanner and QR & Barcode Reader. If you know any other way to go about this task, let us know in the comments!

")
 Step 3: The postal address of the location will pop up in a small box at the bottom of the screen.
 Step 4: Click on the box to view the full address of the location along with its Street View images.

 Step 3: Drop a pin on the location.
 Step 4: Slide up the results page.
 Step 5: The address will be mentioned in the header of the page. For the full address, switch to the Overview tab.
")
 Step 3:
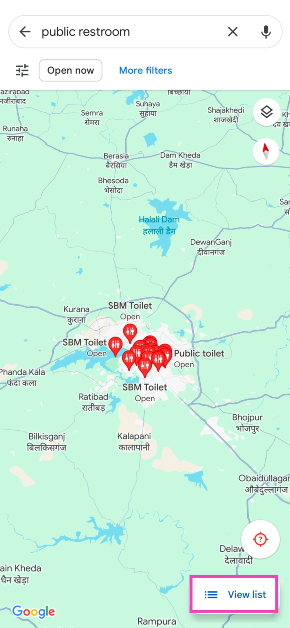 Step 4:
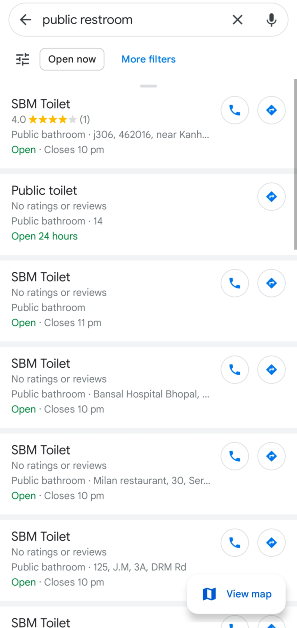
 Step 3:
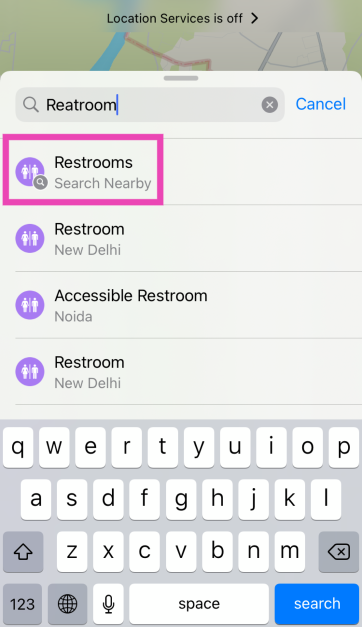 Step 4:
 Step 5:

 Step 3: Tap on Text-to-speech output.
 Step 4: Tap on Preferred Engine and select TTSLexx. Save the changes.
 Step 5: Go back to Settings and select Apps.
 Step 6: Scroll down to Google Phone and select it.
 Step 7: Go to Storage and select Clear Data and Clear Cache.
Step 8: Restart your phone.
Step 7: Go to Storage and select Clear Data and Clear Cache.
Step 8: Restart your phone.

 Step 3:
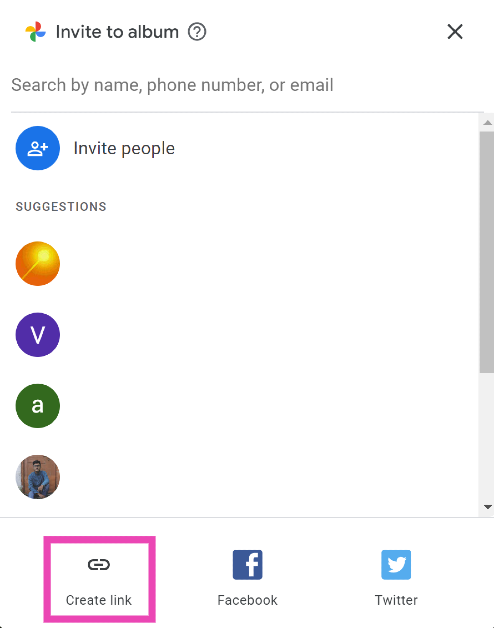 Step 4: Copy
 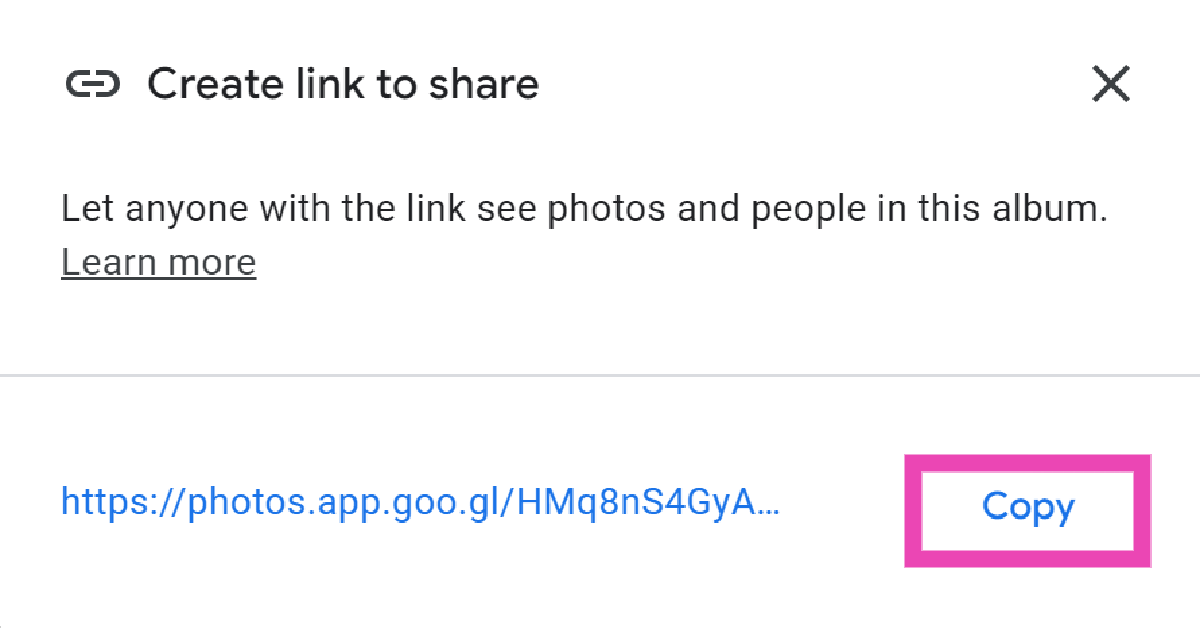 Step 5: Generate
 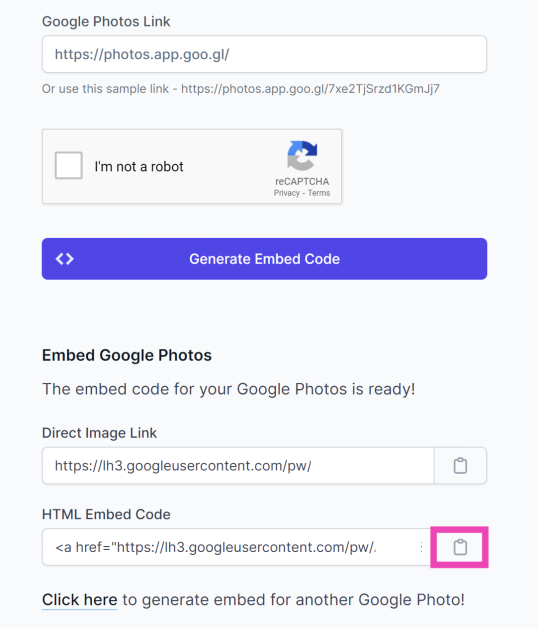 Step 8:
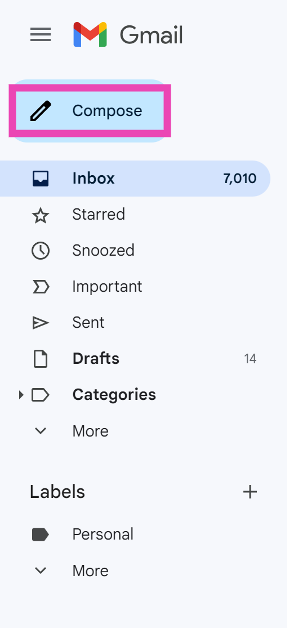 Step 2:
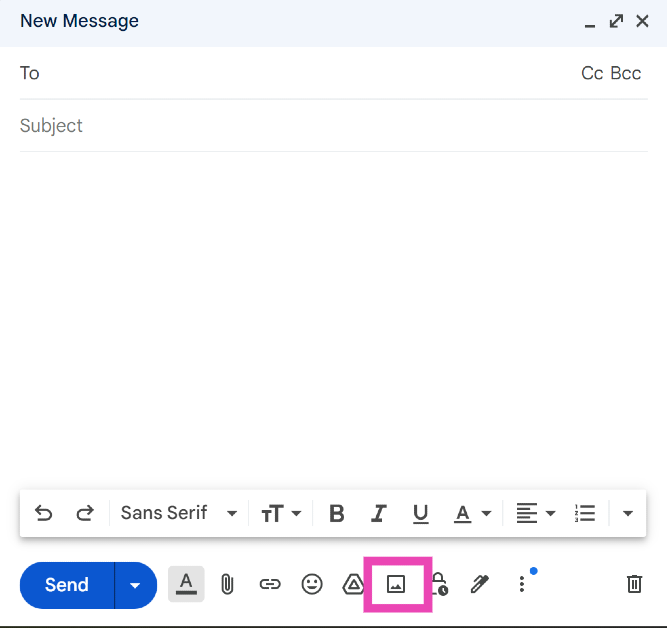 Step 3:
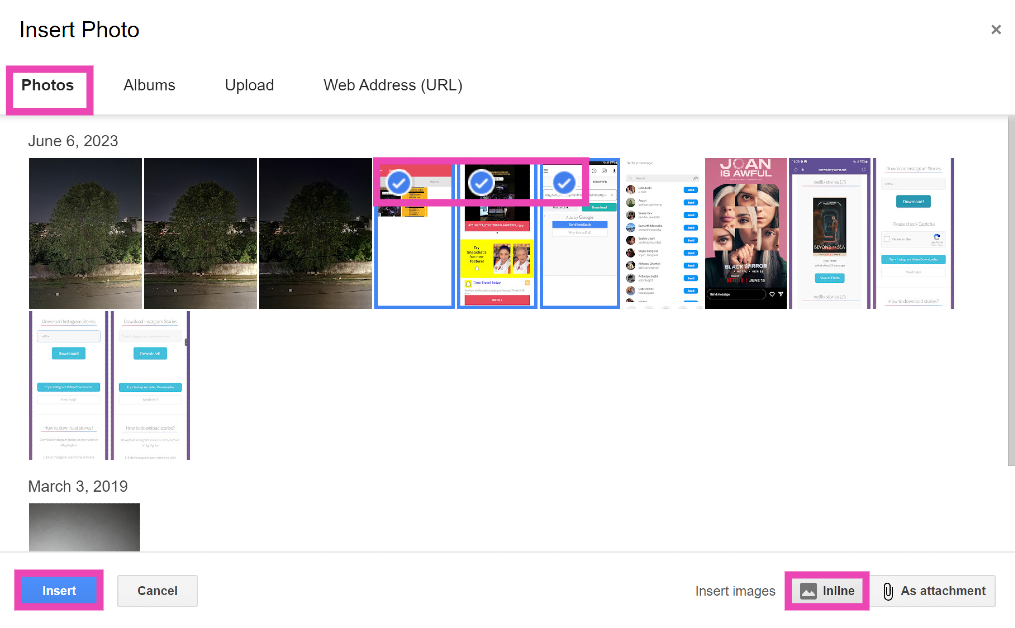 Step 5:

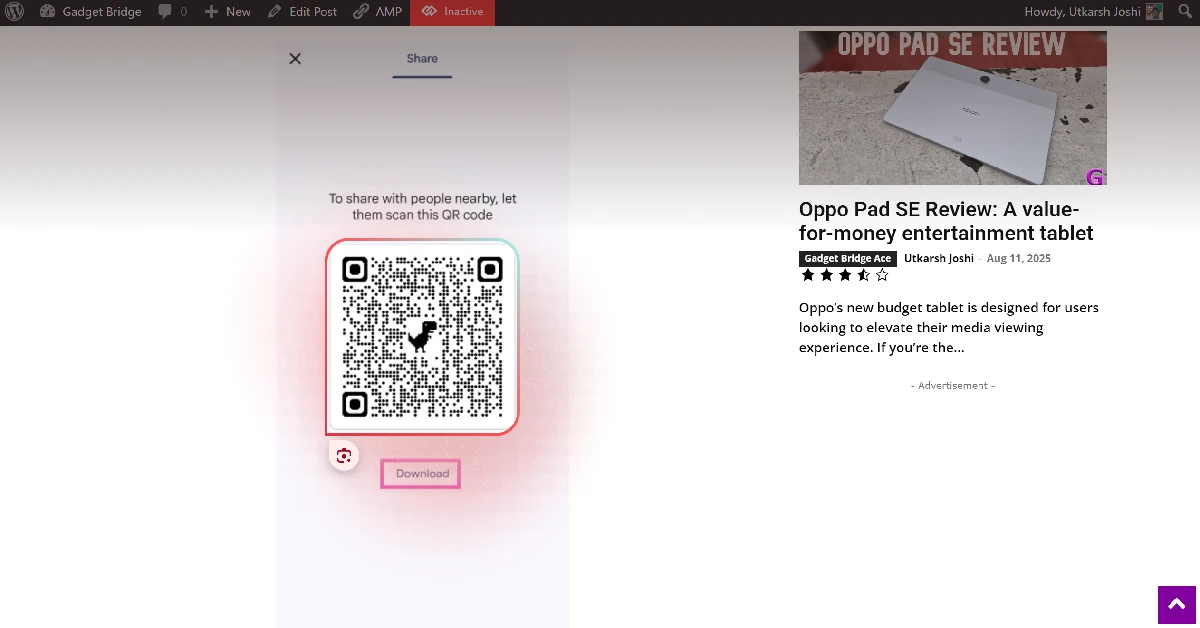
![[Working] Top 2 ways to copy and merge YouTube playlists? (2024)](https://www.gadgetbridge.com/wp-content/uploads/2024/01/youtube-768x402.webp "[Working] Top 2 ways to copy and merge YouTube playlists? (2024)")
 Step 3:
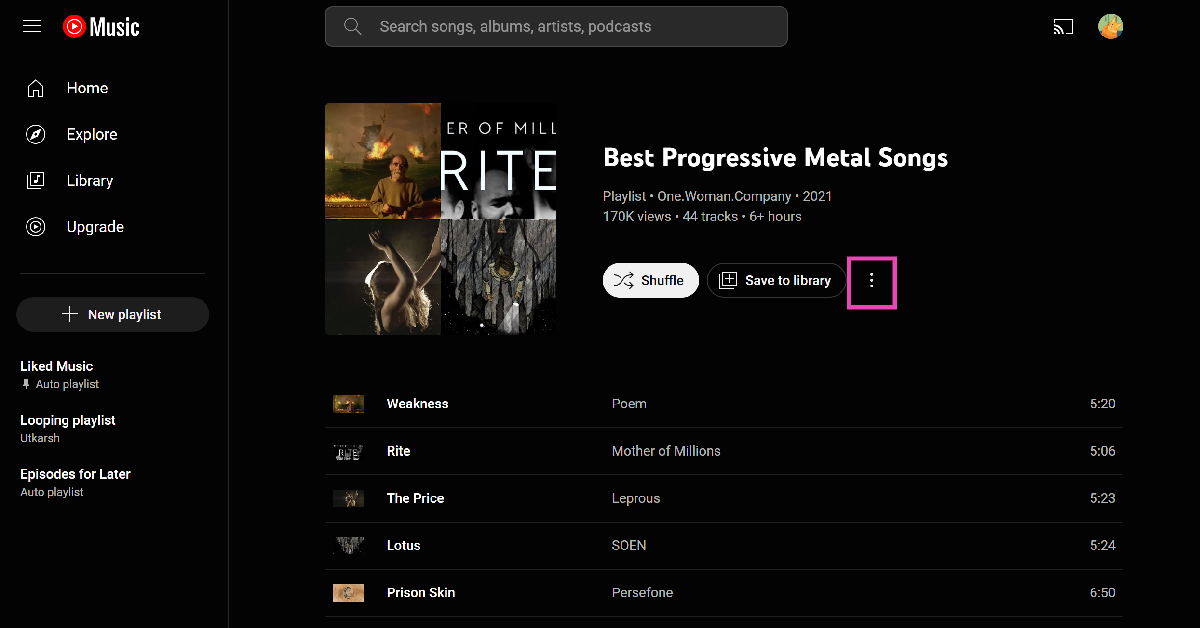 Step 5:
 Step 6:
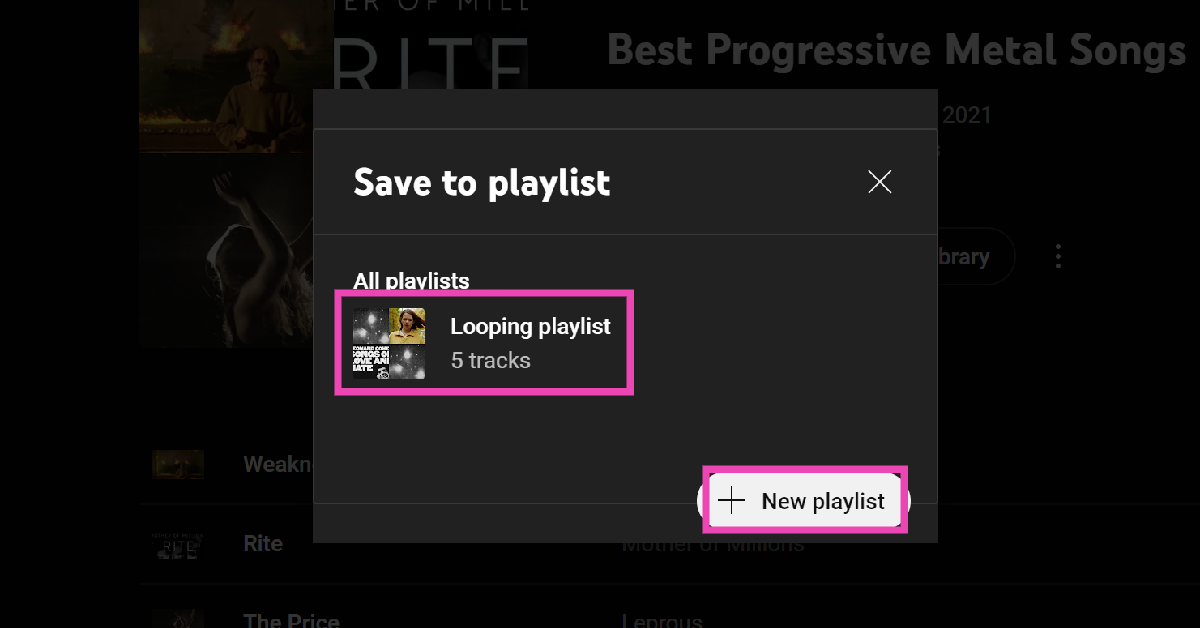
 Step 3:
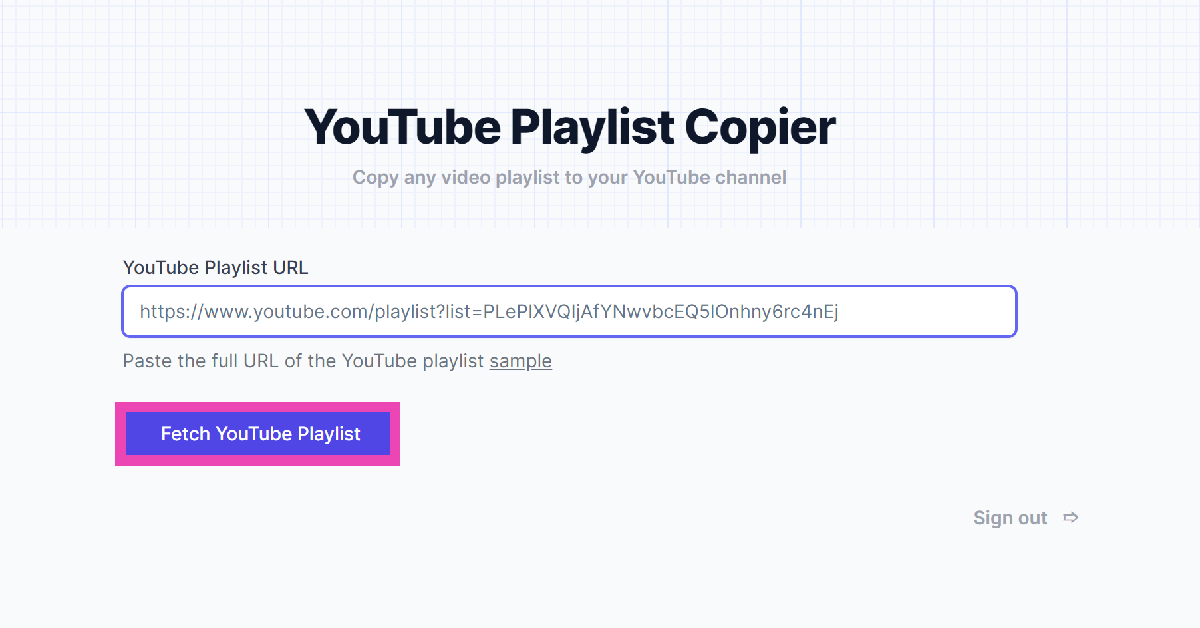 Step 4:
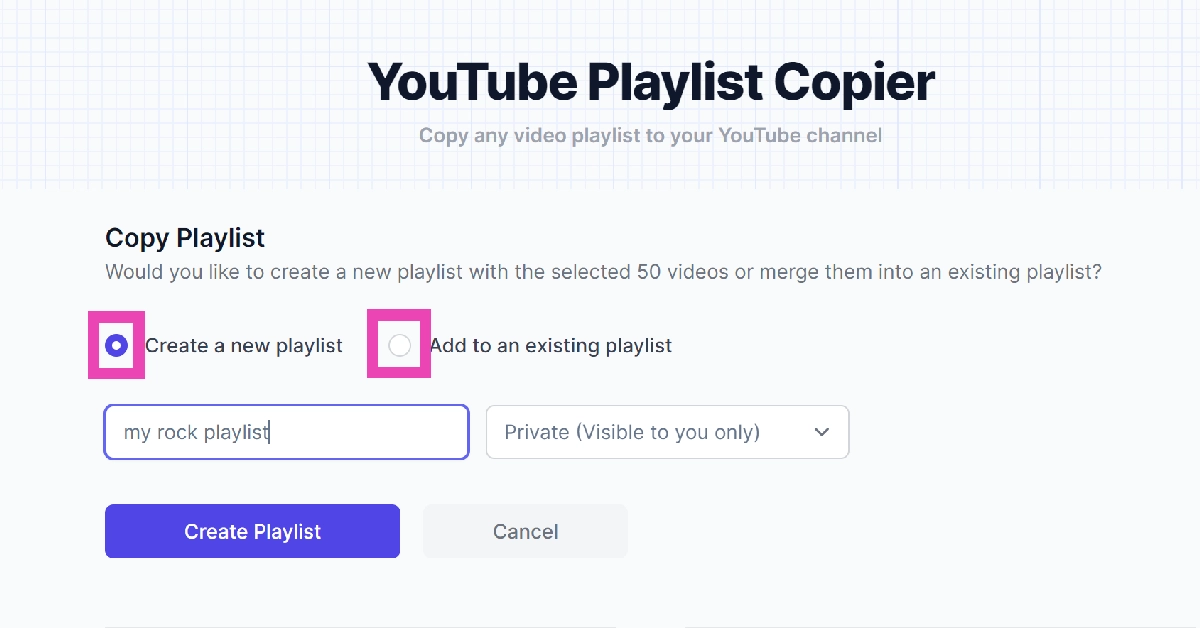 Step 6:
 Step 7:
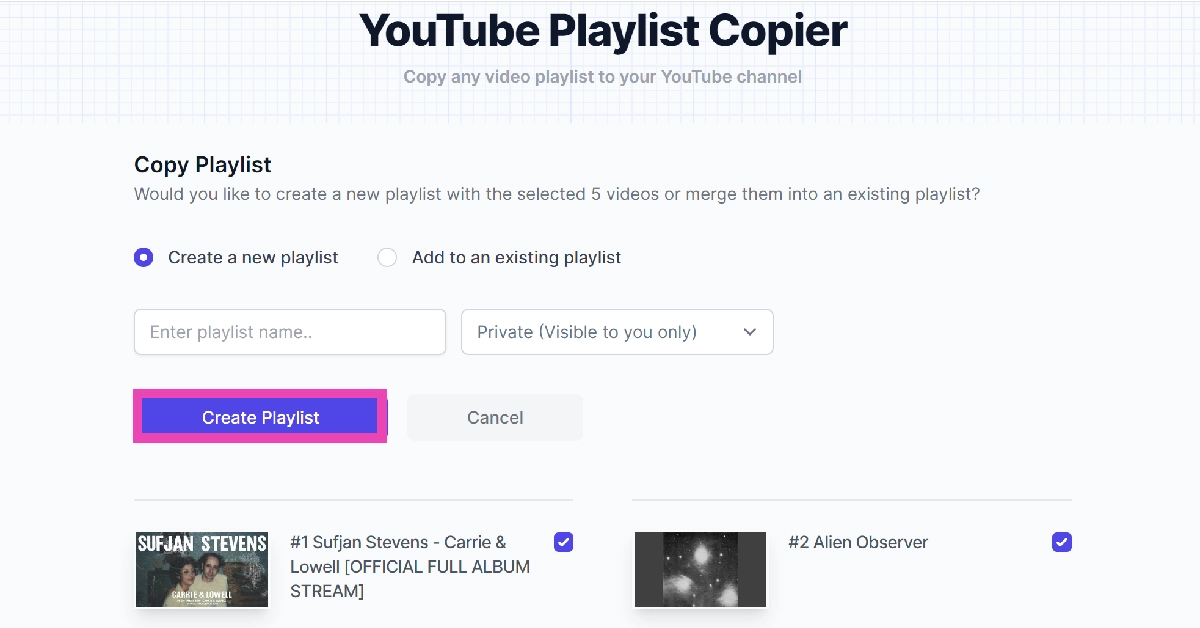 Step 8: Sign out


 Step 3: Point
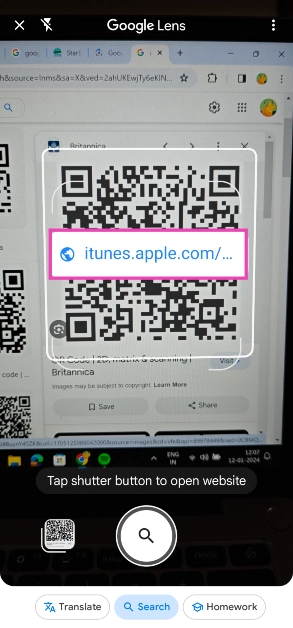
 Step 3: Point
 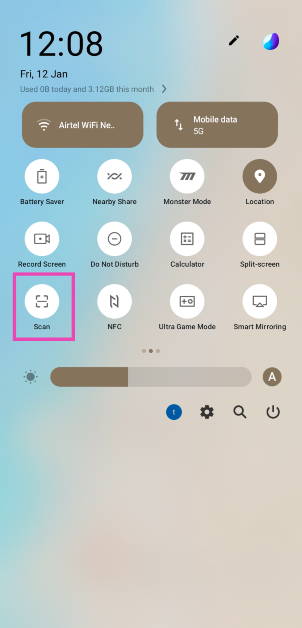 Step 3:
 Step 4:
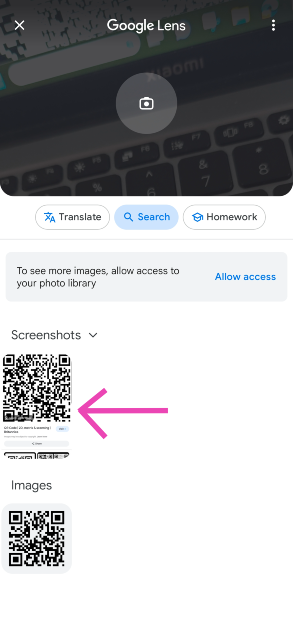 Step 5:
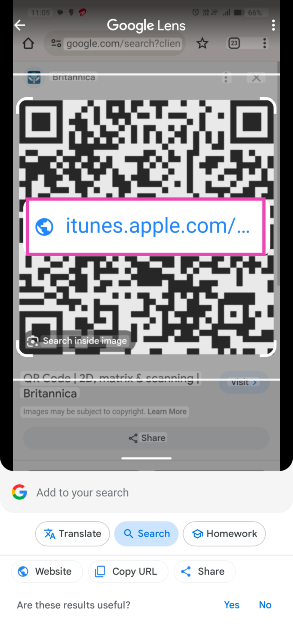
 Step 4:
 Step 3: Click on Upload a file and upload the QR code image from your PC’s internal storage.
 Step 4: Google Lens will scan the code for you. Click on Website to go to the link embedded in the QR code.
 Step 2: Go to More Tools and select Customize Chrome.
 Step 3: Scroll down and click on Toolbar.
 Step 4: Turn on the toggle switch next to Search with Google Lens.
 Step 5: Go the web page containing the QR code.
Step 6: Click the Google Lens icon next to the address bar.
Step 5: Go the web page containing the QR code.
Step 6: Click the Google Lens icon next to the address bar.
 Step 7: Use the cursor to select the QR code.
 Step 8: The data encoded in the QR code will be displayed in the sidebar.