Asus TUF gaming F15 laptop review: 11 Gen Intel CPU with RTX 2050 under 60K, worth buying?

While the Asus TUF gaming F15 FX506HF has been available in the international market for quite some time, it has finally arrived in India. We are aware that a high-quality gaming laptop costs a lot in India. You all arrived at the appropriate time and right place since this time we’ll be evaluating a min-budget-friendly gaming laptop with good to great features. We have the TUF gaming F15 laptop with RTX 2050 powered by an 11th Gen Intel processor. Yes, it is 2 generations old, but it can very well be a good initial gaming laptop for you. This is their newest TUF gaming laptop model for 2023 in India. Because of its specs, we were really excited. The performance, though, is impressive. It features an FHD 144Hz display and an Intel Core i5-11400H 11th Gen processor with Optimus NVIDIA GeForce RTX 2050 GPU. So is this the most powerful gaming laptop under 60K? Let’s find this out in this Asus TUF gaming F15 laptop review.

Asus TUF gaming F15 laptop review: Design and Display

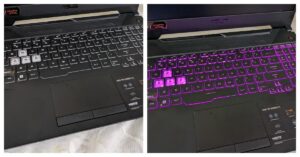
Let’s first examine the design before moving on to the performance. The simple appearance of the Asus TUF gaming F15 laptop is appealing. The TUF logo is embossed on the top, while the vents are designed like a honeycomb at the bottom. The rest of the chassis is made entirely of plastic, but the lid feels like it has a faux aluminium finish. Asus TUF gaming F15 laptop review: Design and Display It is a large and hefty laptop, but as it is a TUF model, it does not fall short in terms of durability. In addition to its military-grade ruggedness, its hinge, lid, and keyboard deck are all sturdy. A series of LED indicators with the TUF gaming branding above it can also be seen. These indications can be seen even when the lid is closed. The lid is simple to open with one hand. Another good feature is the keyboard deck’s smooth matte texture, which deters fingerprints. The vents on the keyboard deck’s top are for cool air intake, and the vents on the right side are for hot air outflow. This laptop has two more vents on the back for cooling. review of Asus TUF gaming F15 laptop Asus TUF gaming F15 laptop review: Design and Display You receive a full-sized RGB keyboard that includes the numpad and the alphabet. The keyboard’s lighting options are now controlled by the Aura button. In addition, the keyboard is really smooth, and we have written many articles on it, including this one, without experiencing any problems. Asus TUF gaming F15 laptop review: Design and Display You also get a rather sizable trackpad that supports all of the Windows motions. The main drawback is how quickly it smudges, giving the laptop a grimy appearance. However, while using movements like pinch-zoom, two-finger scrolling, and three-finger flicking, the touchpad responded quickly and precisely. A charging port, Ethernet, HDMI, two USB C thunderbolt connectors, a USB port, and a 3.5mm headphone jack are all included in the Asus TUF gaming F15 laptop. Another USB 3.1 port is located on the opposite side. Through the Thunderbolt port, an external display can be connected. review of Asus TUF gaming F15 laptop Describing the display, the 15.6-inch FHD Anti-glare display on the Asus TUF gaming F15 laptop has a resolution of 1,920 x 1,080 pixels. 16:9 aspect ratio and 144Hz refresh rate are also supported. Additionally, the screen is 250 nits bright, which might seem low for some, but you are not going to take it out in the sun, so mostly it is fine. The Adaptive-Sync technology from VESA is also there. review of Asus TUF gaming F15 laptop

Asus TUF gaming F15 laptop review: Performance

The 11th Gen Intel Core i5-11400H Processor, 2.7 GHz (12M Cache, up to 4.5 GHz, 6 Cores), is what powers our TUF F15 unit. It has a 4GB Optimus NVIDIA GeForce RTX 2050 Laptop GPU installed. The 512GB PCIe 3.0 NVMe M.2 SSD can be expanded using two PCIe slots, and the 16GB DDR4 RAM can be increased to 32GB using two DDR4 SO-DIMM slots. In India, this configuration costs about Rs 66,000, but after bank and credit card discounts you can get it for under Rs 60,000 (currently). Daily tasks can be easily handled using the laptop. On it, we viewed a lot of multimedia content with no lag or other issues. Our test results for the TUF gaming F15 laptop’s overall performance in Geekbench were: CPU Benchmark
  • Single-Core Score: 434
  • Multi-Core Score: 2132
GPU Benchmark
  • OpenCL Score: 40320
The machine is capable of carrying out daily tasks, video editing, coding, and app development. Keep in mind that the GPU lacks the capability to perform tasks linked to 3D modelling, making it essentially unsuitable for tasks related to architecture or high power apps. Any ordinary daily chores we threw at the Asus TUF gaming F15 laptop it easily handled. For two weeks, we used the laptop exclusively for work and gaming purposes. Numerous hours were spent online each day, as well as utilising Google Docs and Word for writing, editing photos, checking emails frequently, and playing background music. There were absolutely no problems performing all these tasks at once. The laptop was our primary work and gaming device for two weeks. Even with more than 30 tabs open on Chrome, we were able to pick up exactly where we left off. The bottom panel warmed up after a while, but that is to be expected when using the laptop throughout the day. We typically test the majority of the games to obtain the greatest performance and a high frame rate. Due to the 144Hz display, the gameplay was really fluid. There was no screen tearing or anything else. More graphically demanding games could only be played at mid-lower settings, yet it handled games like CS: GO, Call of Duty, and GTA V reasonably well. review of Asus TUF gaming F15 laptop The colour reproduction on the display appears good, and the contrast isn’t too poor either. The viewing angle is likewise pretty pleasant, with a reduction in saturation and brightness levels only noticeable at extreme angles. The display of the TUF F15 isn’t the best we have seen in the segment, but it’s adequate for pleasant outside use (just not directly under the sun). If you can locate some sort of shade, though, it can be used just fine. The faster refresh rate is beneficial for everyday use as well as gaming. The 144Hz refresh rate makes the animations appear smooth. Since it is an anti-glare display, there are no reflections visible on the screen. Since the display doesn’t get particularly bright — as we already mentioned — and our room receives a lot of direct sunshine, it can occasionally feel a little dull during the day. The laptop’s speakers don’t provide terrific sound and aren’t very good. When watching videos, one needs to utilise headphones or connect a speaker because the level is so low. The speaker is even less loud than the speaker of a smartphone. Which is very strange coming from Asus. Even after experimenting with several equaliser presets in the volume settings, we were unable to settle on a pleasant audio experience. review of Asus TUF gaming F15 laptop A typical 720p HD web camera is located on top of the TUF F15 as expected. Despite not being particularly remarkable or spectacular, this is more than adequate for participating in casual video conversations. There isn’t a privacy shutter either. Let’s finally discuss its battery life. A 48Wh battery is included with the Asus TUF gaming F15 laptop. Under our normal usage, which included online browsing and article writing, this system managed about two to two and a half hours of screen time.

Verdict

Overall, there is no doubt that this laptop can easily handle even the most demanding games on medium or lower settings. The TUF F15 would have been great for binge-watching if only its down-firing speakers were a little bit better! You will receive a full-sized chiclet keyboard with everything, including a dedicated Numpad. Additionally, the WASD keys receive a unique transparent flare that distinguishes them from the other keys. The display also doesn’t seem to be very bright. The price of the Asus TUF gaming F15 laptop is Rs 66,990 on both Amazon and the company’s website. And as said, after bank discounts you can get it for less than Rs 60K. But, yes there is a but, this is a machine that is dated and to some, it might not be appealing. Nevertheless, if you are looking for a good-budget gaming laptop, this just might be it.

 Asus TUF gaming F15 laptop pros

  • Budget-friendly
  • Can handle most of the games
  • RGB keyboard

 Asus TUF gaming F15 laptop cons

  • The display isn’t bright
  • Speaker volume is too low
  • No privacy shutter for the webcam
For the latest gadget and tech news, and gadget reviews, follow us on TwitterFacebook and Instagram. For newest tech & gadget videos subscribe to our YouTube Channel. You can also stay up to date using the Gadget Bridge Android App. You can find the latest car and bike news here.

BGMI redeem codes for 10 July 2023, claim and receive rewards and benefits

After being banned for nearly ten months, Battleground Mobile India, aka BGMI, is officially available again in India. BGMI fans are looking for ways to improve their game experience and one such method is the usage of redemption codes, which offers a variety of rewards and advantages using BGMI redeem codes players can gain access to new skins, outfits, loot crates, weapons and free UC and diamonds. As mentioned earlier, these codes give users the chance to earn unique rewards and gain extra benefits while playing the game. This includes GUN SKINS (M4, AKM, M416, AWM, M24, UZI, KAR98K), free character voucher, Andy, Carlo, Sara, Victor character for free, free Anna Character on completing the mission and UC or Royal Pass Discount. So here we have gathered a list of the most recent BGMI redeem codes as of 10 July 2023. Also, redeem these codes asap as these are only valid for a limited duration.

BGMI Redeem Codes for 10 July 2023

KARZBZYTR JJCZCDZJ9U UKUZBZGWF SIWEST4YLXR TIFZBHZK4A GPHZDBTFZM24U RNUZBZ9QQ BMTCZBZMFS DKJU5LMBPY BBKTZEZET3 PGHZDBTFZ95U SD16Z66XHH

How to get free Redeem Codes for BGMI on 10 July 2023?

  • Launch BGMI on your device.
  • Then select the Redeem Code option from the main menu.
  • Next, click on the Redeem code tab.
  • A new window will open, requesting the redemption code.
  • Now enter your BGMI code.
  • Confirm and click on the “Redeem” tab.
  • If your redeem code is valid then you will get a message confirming that your rewards were successfully redeemed.
(Note that these codes are case-sensitive, so be sure to type them correctly to prevent any errors.) For the latest gadget and tech news, and gadget reviews, follow us on TwitterFacebook and Instagram. For newest tech & gadget videos subscribe to our YouTube Channel. You can also stay up to date using the Gadget Bridge Android App. You can find the latest car and bike news here.

Garena Free Fire Redeem Codes Today 10 July 2023: Here is how to claim them

Garena Free Fire is a battle royale game with regular awards and tournaments to keep players interested. If you play Garena Free Fire, you should be aware of the redeem codes that are released on a daily basis. However, because the battle royale game is banned in India, players from other countries can use the Free Fire Redeem codes daily. If you’re unfamiliar with the Garena Free Fire redeem codes or don’t know how to get them, we’ve put together a step-by-step guide to help you redeem them. Check out Garena Free Fire Redeem Codes for 10 July 2023. The Free Fire redeem codes are a great way to get free stuff. These are 12-digit codes that contain alphabets and numbers, as well as an expiration date and time. Because the Garena FF redeem codes cannot be used more than once, you should hurry to the redemption page to claim your free reward before someone else does. To get a free reward, all you have to do is go to reward.ff.garena.com/en, which is the official redemption page. Also, keep an eye on this space for daily updates on Garena Free Fire redemption codes and rewards.

Garena Free Fire Redeem Codes Today 10 July 2023

  • UVX9PYZV54AC
  • BR43FMAPYEZZ
  • 8F3QZKNTLWBZ
  • WEYVGQC3CT8Q
  • HNC95435FAGJ
  • J3ZKQ57Z2P2P
  • GCNVA2PDRGRZ
  • MCPW3D28VZD6
  • ZZZ76NT3PDSH
  • EYH2W3XK8UPG
  • NPYFATT3HGSQ
  • 4ST1ZTBE2RP9
  • X99TK56XDJ4X
  • MCPW2D1U3XA3
  • FFCMCPSEN5MX
  • MCPW2D2WKWF2
  • B3G7A22TWDR7X
  • 6KWMFJVMQQYG
  • FF7MUY4ME6SC
  • FFCMCPSGC9XZ

How to Get Free Fire Redeem Codes for Garena on 10 July 2023?

  • Visit the Garena Free Fire game’s official website at reward.ff.garena.com.
  • Use your Facebook, Google, VK, Apple ID, Huawei ID, or Twitter account to log in.
  • You’ll be taken to a valid redemption code (s)
  • Copy and paste the 12-digit redemption code into the text box.
  • On the screen, a dialogue box will appear.
  • ‘Ok’ should be selected.
For the latest gadget and tech news, and gadget reviews, follow us on TwitterFacebook and Instagram. For newest tech & gadget videos subscribe to our YouTube Channel. You can also stay up to date using the Gadget Bridge Android App. You can find the latest car and bike news here.

How to Mirror and Control Your Android Phone from Ubuntu?

0
While most screen mirroring apps do a good job of casting your phone’s display on a bigger screen, not many of them let you control your phone from another device. If you mirror your phone on a TV, you cannot use the remote controller to navigate through different apps. You still have to rely on your phone for that. PCs, on the other hand, offer more control options. Previously, we talked about how you can control your phone using a Windows PC. Now, let’s take a look at how you can mirror and control your Android phone from an Ubuntu (Linux) desktop. Read Also: Top 7 Ways to Take a Screenshot on Mac, Windows, iPhone, & Android

Here’s how you can mirror and control your Android phone from an Ubuntu (Linux) PC

Step 1: Download Scrpy for Linux from Github. Next, you need to enable USB debugging on your Android phone. Here’s how. Step 2: Go to Settings and select About Phone. Step 1: Go to Settings and select About Phone. how to fix can't delete apps on android. how to delete pre-installed apps on android Step 3: Select ‘Software Information’. Step 2: Select ‘Software Information’. how to fix can't delete apps on android. how to remove an app that wont uninstall. how to delete pre-installed apps on android Step 4: Tap on ‘Build Number’ 7 times to enter Developer Mode. Step 3: Tap on ‘Build Number’ 7 times to enter Developer Mode. how to fix can't delete apps on android Step 5: Go back to Settings, scroll all the way down, and select ‘Developer options’. Step 4: Go back to Settings, scroll all the way down, and select ‘Developer options’. how to fix can't delete apps on android. how to delete pre-installed apps on android Step 6: Scroll down to the Debugging section and turn the toggle bar on for ‘USB debugging’. Step 5: Scroll down to the Debugging section and turn the toggle bar on for ‘USB debugging’. how to fix can't delete apps on android. how to delete pre-installed apps on android Step 7: Connect your Android phone to the Ubuntu desktop using a USB cable. Step 8: Launch Terminal using Ctrl + Alt + T key combination. Step 9: Type scrcpy and hit Enter. Step 10: Your Android phone will ask you to allow USB debugging. Select ‘OK’. Your Android phone’s display will be mirrored on your Ubuntu PC and can be controlled from there.

Frequently Asked Questions (FAQs)

How do I mirror my Android phone’s display on Ubuntu?

You can mirror your phone’s display on an Ubuntu PC using the Scrcpy tool.

How to control an Android phone from Ubuntu?

The Scrcpy tool for Ubuntu lets you mirror and control your Android phone from your Ubuntu PC.

Does Ubuntu have Miracast?

Yes, Ubuntu supports Miracast wireless displays. Read Also: How to change the username of your Threads account?

Conclusion

This is how you can mirror and control your Android phone from an Ubuntu (Linux) PC. Once you’re able to view your smartphone’s display on your PC, you can use the keyboard and mouse to control it. This is a great way to play Android games on your PC without using an Android emulator For the latest gadget and tech news, and gadget reviews, follow us on Twitter, Facebook and Instagram. For newest tech & gadget videos subscribe to our YouTube Channel. You can also stay up to date using the Gadget Bridge Android App. You can find the latest car and bike news here.

Top 5 Ways to Find Hidden Apps on an iPhone

Hiding apps on your iPhone serves a lot of purposes. Firstly, it is a great way of keeping your personal and financial apps away from prying eyes. It also comes in quite handy for people who want to break their social media addiction but also don’t want to uninstall all the apps on their phones. Hiding an app can deter you from constantly opening it on your phone. While you may know how to hide an app, it is also important that you know how to search for it and unhide it. In this article, we bring you the top 5 ways to find hidden apps on your iPhone. Read Also: Top 7 Ways to Take a Screenshot on Mac, Windows, iPhone, & Android

Perform a search using Spotlight

Perform a search using Spotlight The Spotlight tab on iOS devices can access hidden apps as well and bring them up in search results whenever they are requested. To perform an app search on your iPhone using Spotlight, simply swipe down from the middle of the home screen. Enter the name of the app in the search bar. Spotlight will display the app even if it is hidden from the home screen.

Reset Home Screen Layout

Restoring your iPhone’s home screen to its original layout unhides all the apps that you may have stashed away. Here’s how you can go about it. Step 1: Go to Settings and select General. Step 1: Go to Settings and select General. how to fix iphone dictation not working on ios 16. whatsapp call not ringing when iphone is locked. 10 Easy Ways to Fix ‘Call Failed’ Error on iPhone (2023) Step 2: Select ‘Transfer or Reset iPhone’. Step 2: Scroll down and select ‘Transfer or Reset iPhone’. 10 Easy Ways to Fix ‘Call Failed’ Error on iPhone (2023) Step 3: Tap on ‘Home Screen Layout’. Step 3: Tap on ‘Home Screen Layout’.

Unhide a home screen

iOS also gives you the option to hide an entire home screen on your iPhone. If you notice multiple apps missing from your iPhone, you may have accidentally hidden an entire home screen. Here’s how you can unhide it. Step 1: Long press any empty spot on the home screen until the icons begin jiggling. Step 2: Tap the ellipses at the bottom of the screen. Step 3: Go through the home screens and look for a checkmark at the bottom of the screen card. Step 4: If a home screen does not have a checkmark on its card, it means that it is hidden. Tap the circle to unhide it. Step 4: If a home screen does not have a checkmark on its card, it means that it is hidden. Tap the circle to unhide it. Step 5: Select ‘Done’.

Unhide apps using the App Library

Step 1: Go to the home screen and scroll all the way to the right. Step 1: Go to the home screen and scroll all the way to the right. How to hide and unhide apps on an iPhone Step 2: Search for the app in the search bar. If you have prevented the app from showing up in search results, go ahead and change that setting. Step 3: Once the app shows up in search results, long press it and drag it to the left. The app will be moved to the home screen. Once the app shows up in search results, long press it and drag it to the left. How to hide and unhide apps on an iPhone Step 4: Adjust the app’s position on the home screen by pressing and dragging it. Tap ‘Done’ once you’re done. Alternatively, you can press and hold anywhere on the home screen and tap the minus icon on the app. How to hide and unhide apps on an iPhone

Use Siri

If you can’t find a hidden app on your iPhone, you can simply ask Siri to launch it for you. All you need to say is ‘Hey Siri, launch [app name]’ and the voice assistant will open the app on your iPhone. It’s a simple trick but it works.

Frequently Asked Questions (FAQs)

How do I unhide an app on my iPhone?

To unhide an app on an iPhone simply search for it in Spotlight or App Library, press and hold its icon, and drag it back to the home screen.

How do I unhide a home screen on my iPhone?

To unhide an entire home screen on your iPhone, long press an empty spot on the home screen and press an empty circle on the thumbnail for the hidden screen.

How do I reset the home screen layout on an iPhone?

To reset the home screen layout on an iPhone go to Settings>General>Reset and select Home Screen Layout. Read Also: 10 Easy Ways to Fix ‘Call Failed’ Error on iPhone (2023)

Conclusion

This is how you can unhide and find hidden apps on your iPhone. If you don’t want a hidden app to show up as a search result, go to Settings>Siri & Search>App>On Home Screen and switch off the toggle bar for ‘Show app in search results’. This will prevent Spotlight, Siri, and App Library from searching the app. For the latest gadget and tech news, and gadget reviews, follow us on Twitter, Facebook and Instagram. For newest tech & gadget videos subscribe to our YouTube Channel. You can also stay up to date using the Gadget Bridge Android App. You can find the latest car and bike news here.

How to Use an Android Device to Write Raspberry Pi SD Cards?

0
Raspberry Pi is an affordable and portable (fits inside your pocket!) computer that can connect to any monitor, keyboard, and mouse and carry out basic computing tasks. You can browse the web, make a Word file, play a video, and more. Since it is a compact device, you need an SD card to boot the Raspberry Pi OS. Typically, you need a PC to create a bootable SD card, but it is possible to do that with an Android phone as well. In this article, we show you how to use an Android device to write Raspberry Pi SD cards. Read Also: How to change the username of your Threads account?

Here’s how you can write a Raspberry Pi SD card using an Android device

Step 1: Install Pi SD Card Imager app on your Android smartphone. Step 2: Place the micro SD card in its dedicated slot. Most Android smartphones have a hybrid SIM tray that doubles as a micro SD card slot as well. If your smartphone does not support expandable memory, you will need an external card reader for this task. The card reader can be connected to your smartphone using an OTG adapter. Step 3: Launch the Pi SD Card Imager app. Step 4: Tap the ellipses at the top right corner of the screen. Step 4: Tap the ellipses at the top right corner of the screen. Step 5: Tap on ‘Choose OS’. Step 5: Tap on ‘Choose OS’. Step 6: Select the checkbox for Pi 4 at the top of the screen. Step 7: Select Raspberry Pi OS (32-bit) (3.2 GB) to download all the Raspberry Pi OS installation files on your Android phone. Step 7: Select Raspberry Pi OS (32-bit) (3.2 GB) to download all the Raspberry Pi OS installation files on your Android phone. Step 8: Tap the ellipses at the top right corner of the screen again and select ‘Choose SD or USB’. Select your SD card drive from the list. Step 8: Tap the ellipses at the top right corner of the screen again and select ‘Choose SD or USB’. Select your SD card drive from the list. Step 9: Select the checkbox for ‘Enable SSH for remote login (raspbian)’. Step 10: Select ‘Write to SD’. This will take a few minutes. Step 10: Select ‘Write to SD’. This will take a few minutes.  Step 11: Pull out the micro SD card once the writing process is over. Insert it into the Raspberry Pi. Step 12: Boot the Raspberry Pi.

Frequently Asked Questions (FAQs)

How to install Raspberry Pi OS on an SD card using an Android phone?

You need the Pi SD Card Imager app to install Raspberry Pi OS on an SD card. Once you run the app, it will download all the installation files and write them on the card.

How to make a bootable Raspberry Pi SD card?

Making a bootable Raspberry Pi SD card typically requires a PC, but you can do it with your Android phone as well, using the Pi SD Card Imager app.

How do I use an SD card on my Android phone if it doesn’t have a micro SD slot?

If your Android phone does not have a micro SD card slot, you can connect it to an external card reader using an OTG adapter. Read Also: Samsung Galaxy M34 5G with 6,000mAh battery launched in India

Conclusion

This is how you can use an Android device to write Raspberry Pi SD cards. While there are several apps you can use to install Raspberry Pi OS on an SD card, we suggest going with Pi SD Card Imager. If you found this article helpful, let us know in the comments! For the latest gadget and tech news, and gadget reviews, follow us on Twitter, Facebook and Instagram. For newest tech & gadget videos subscribe to our YouTube Channel. You can also stay up to date using the Gadget Bridge Android App. You can find the latest car and bike news here.

How to Connect a PS3 Controller to an Android Phone?

Playing games with a PS3 controller is one of the most fun things you can do on your Android phone. The are a couple of ways you can go about pairing the two devices together. You can choose to connect them wirelessly, which takes some time and effort, or go the easier route and connect them with an OTG cable. In this article, we show you the two ways you can connect a PS3 controller to an Android phone. Read Also: Samsung Galaxy M34 5G with 6,000mAh battery launched in India

Use the Sixaxis Controller app

Use the Sixaxis Controller app. How to Connect a PS3 Controller to an Android Phone? The common method of connecting your PS3 controller to an Android phone is through the Sixaxis app. The only catch is that you will need to root your Android phone to use this app. Don’t know how to root your phone? Check out this article for the full guide.  Step 1: Before you begin, you should check whether the app is compatible with your phone. Install the Sixaxis Compatibility Checker app to find out if your phone is compatible with the app. Step 2: Install the Sixaxis Controller app on your phone. Step 3: Connect your PS3 controller to your Android phone using a USB cable. Step 4: Tap the Start icon on the Sixaxis Controller app. Step 5: Tap on ‘Pair’. Step 6: Make sure your Android phone and PS3 controller’s Bluetooth address match. Step 7: Now, tap ‘Pair’ in the pop-up box. Step 8: Once the app says ‘Master address updated’ unplug your PS3 controller. Step 9: Turn on the controller. It will form a Bluetooth connection with your Android phone.

Use an OTG adapter

What Is USB OTG? 5 great ways to use It on Android devices If you don’t want to root your Android phone, you can still connect it to your PS3 controller using an OTG adapter. Simply plug the cable into the USB port of your phone. Pull out your controller, and plug it into the USB Type-A port of the OTG adapter. Once the connection has been established, you can use your PS3 controller to play games on your Android phone.

Frequently Asked Questions (FAQs)

How do I wirelessly connect my PS3 controller to my Android phone?

You will need the Sixaxis app to wirelessly connect your PS3 controller to your Android phone. Sixaxis demands root access to your device.

How do I connect my PS3 controller to my Android phone without rooting it?

The simplest way to connect your PS3 controller to your Android phone is by using an OTG cable.

Can I play games on my Android phone using my PS3 controller?

Once your controller and phone are paired, you can use it to play games on your phone. Go to input methods in the in-game menu and select your controller before playing the game. Read Also: Viewsonic VP-16 OLED monitor launched in India

Conclusion 

These are the two ways to connect a PlayStation 3 controller to an Android phone. If you don’t mind a wired connection, we’d suggest using an OTG cable since it does not require you to root your device. However, if you don’t want to settle for anything less than a wireless connection, you will need to root your Android phone. For the latest gadget and tech news, and gadget reviews, follow us on Twitter, Facebook and Instagram. For newest tech & gadget videos subscribe to our YouTube Channel. You can also stay up to date using the Gadget Bridge Android App. You can find the latest car and bike news here.

BGMI redeem codes for 8 July 2023, claim and receive rewards and benefits

After being banned for nearly ten months, Battleground Mobile India, aka BGMI, is officially available again in India. BGMI fans are looking for ways to improve their game experience and one such method is the usage of redemption codes, which offers a variety of rewards and advantages using BGMI redeem codes players can gain access to new skins, outfits, loot crates, weapons and free UC and diamonds. As mentioned earlier, these codes give users the chance to earn unique rewards and gain extra benefits while playing the game. This includes GUN SKINS (M4, AKM, M416, AWM, M24, UZI, KAR98K), free character voucher, Andy, Carlo, Sara, Victor character for free, free Anna Character on completing the mission and UC or Royal Pass Discount. So here we have gathered a list of the most recent BGMI redeem codes as of 8 July 2023. Also, redeem these codes asap as these are only valid for a limited duration.

BGMI Redeem Codes for 8 July 2023

JJCZCDZJ9U – Golden Pan UKUZBZGWF – Free Fireworks TIFZBHZK4A – Free Outfit RNUZBZ9QQ – AKM Glacier Skin TQIZBZ76F – Vehicle Skin 5FG10D33 – Falcon and Free Emotes GPHZDBTFZM24U – UMP9 Skin KARZBZYTR – Free Outfit PGHZDBTFZ95U – M416 Skin R89FPLM9S – Companion TQIZBz76F – 3 Free Motorcycle BMTFZBZQNC – Free Drifter Set SD14G84FCC – Free Skin for KAR98 Sniper Gun RNUZBZ9QQ – AKM Glacier Skin BMTCZBZMFS – Pretty in Pink set and Pretty in Pink Headpiece 5FG10D33 – Outfit for Free

How to get free Redeem Codes for BGMI on 8 July 2023?

  • Launch BGMI on your device.
  • Then select the Redeem Code option from the main menu.
  • Next, click on the Redeem code tab.
  • A new window will open, requesting the redemption code.
  • Now enter your BGMI code.
  • Confirm and click on the “Redeem” tab.
  • If your redeem code is valid then you will get a message confirming that your rewards were successfully redeemed.
(Note that these codes are case-sensitive, so be sure to type them correctly to prevent any errors.) For the latest gadget and tech news, and gadget reviews, follow us on TwitterFacebook and Instagram. For newest tech & gadget videos subscribe to our YouTube Channel. You can also stay up to date using the Gadget Bridge Android App. You can find the latest car and bike news here.

Garena Free Fire Redeem Codes Today 8 July 2023: Here is how to claim them

Garena Free Fire is a battle royale game with regular awards and tournaments to keep players interested. If you play Garena Free Fire, you should be aware of the redeem codes that are released on a daily basis. However, because the battle royale game is banned in India, players from other countries can use the Free Fire Redeem codes daily. If you’re unfamiliar with the Garena Free Fire redeem codes or don’t know how to get them, we’ve put together a step-by-step guide to help you redeem them. Check out Garena Free Fire Redeem Codes for 8 July 2023. The Free Fire redeem codes are a great way to get free stuff. These are 12-digit codes that contain alphabets and numbers, as well as an expiration date and time. Because the Garena FF redeem codes cannot be used more than once, you should hurry to the redemption page to claim your free reward before someone else does. To get a free reward, all you have to do is go to reward.ff.garena.com/en, which is the official redemption page. Also, keep an eye on this space for daily updates on Garena Free Fire redemption codes and rewards.

Garena Free Fire Redeem Codes Today 8 July 2023

J3ZKQ57Z2P2P FFICJGW9NKYT XUW3FNK7AV8N B3G7A22TWDR7X 31BBMSL7AK8G 8F3QZKNTLWBZ WEYVGQC3CT8Q GCNVA2PDRGRZ FF7MUY4ME6SC 4ST1ZTBE2RP9 X99TK56XDJ4X FFCMCPSJ99S3 MCPW3D28VZD6 GCNVA2PDRGRZ 4ST1ZTBE2RP9 FFCMCPSUYUY7E EYH2W3XK8UPG UVX9PYZV54AC ZZZ76NT3PDSH XZJZE25WEFJJ V427K98RUCHZ B3G7A22TWDR7X 6KWMFJVMQQYG 31BBMSL7AK8G J3ZKQ57Z2P2P

How to Get Free Fire Redeem Codes for Garena on 8 July 2023?

  • Visit the Garena Free Fire game’s official website at reward.ff.garena.com.
  • Use your Facebook, Google, VK, Apple ID, Huawei ID, or Twitter account to log in.
  • You’ll be taken to a valid redemption code (s)
  • Copy and paste the 12-digit redemption code into the text box.
  • On the screen, a dialogue box will appear.
  • ‘Ok’ should be selected.
For the latest gadget and tech news, and gadget reviews, follow us on TwitterFacebook and Instagram. For newest tech & gadget videos subscribe to our YouTube Channel. You can also stay up to date using the Gadget Bridge Android App. You can find the latest car and bike news here.

Top 7 Ways to Take a Screenshot on Mac, Windows, iPhone, & Android

0
Screenshots are an easy way to record the information on the screen and share it with your contacts. Once you get your hands on a new device, you should know how to capture its screen. While you may be familiar with the standard way of taking a screenshot, there are a few other tricks you can use as well. In this article, we bring you the top 7 ways to take a screenshot on a Mac, Windows PC or laptop, iPhone, and Android smartphone. Read Also: How to join Threads without linking your Instagram account?

Take a screenshot on Mac

There are a few ways you can go about taking a screenshot on an Apple Mac. In order to capture the entire screen, press Shift + command + 3. To capture a portion of the screen, press Shift + command + 4. Drag the crosshair to select the area you want to capture. Once the release the mouse/trackpad, your Mac will take a screenshot of the selected area.

Take a screenshot on Windows

Here are some of the different ways you can take a screenshot on your Windows PC or laptop.

Use the PrtScn key

PrintScreen Key Pressing the ‘PrtScn’ (print screen) key is the quickest way to take a screenshot on your Windows PC and laptop. On systems running Windows 11, it will trigger the screenshot control bar. You can simply select the area of the screen that you want in the screenshot. The image will be saved as soon as you release the cursor. Devices running Windows 10 or older will simply copy the screenshot on the clipboard when the prtsc key is pressed. You can paste the screenshot on any photo editor using the Ctrl + V key combination.

Snipping Tool

Use the Snipping Tool Windows’ native Snipping Tool app comes in very handy while taking screenshots. Simply search ‘Snipping Tool’ in the Windows search bar and once you’ve opened the app, select ‘New’. Select the area on the screen you want to capture. Once you’ve selected the area, the Snipping Tool will open the screenshot on a preview window where you can further edit it.

Take a screenshot on your iPhone

Here are some easy ways to take a screenshot on an iPhone.

Use the key combination

The most common way to take a screenshot on an iPhone is by pressing the Volume Up button + Side Key. This works on iPhones with Face ID. On older iPhones with a dedicated home button, press the top key + home button to take a screenshot.

Use Back Tap

Want to take a screenshot by simply tapping your iPhone’s back two times? Follow these steps. Step 1: Go to Settings and select Accessibility. how to turn on flashlight on iphone without unlocking Step 2: Select Touch and tap on ‘Back tap’. Step 3: After you’ve turned on the toggle bar for Back Tap, choose the appropriate trigger. We suggest a double-tap trigger as it is much easier to use. Step 4: Choose ‘Screenshot’ as the action for the trigger you have selected. Step 4: Choose ‘Screenshot’ as the action for the trigger you have selected.

Take a screenshot on Android

Here are some of the ways to take a screenshot on an Android smartphone.

Use the key combination

iQOO Z7 5G review: Design and Display . screenshot gesture android To take a quick screenshot on your Android smartphone, simply press the Volume Down + Power keys together. If you’re using an old Android device with a dedicated home button, press Power Key + Home Button to take a screenshot. Make sure you press both buttons at the same time to take a screenshot. Pressing either button even a tiny bit earlier will not capture the screenshot.

Use the screenshot option from Quick Settings

Take a screenshot using the Quick Settings Menu. screenshot gesture android If your Volume keys aren’t working, you can take a screenshot from the Quick Settings menu on your Android phone or tablet. Simply swipe down from the status bar and tap on ‘Screenshot’. Once you press on the tile, your smartphone will capture the screen you are on after rolling up the quick settings menu.

Frequently Asked Questions (FAQs)

How do I take a screenshot on iPhone?

Press the Volume Down key + Side key to take a screenshot on your iPhone.

How do I take a screenshot on my Android phone?

To take a screenshot on your Android phone, press the Volume Down key + Power key at the same time.

How do I take a screenshot on my Windows PC or laptop?

To take a screenshot on your Windows device, simply press the PrtScn key on your keyboard and drag the cursor over the area you want to capture. Read Also: Spotify is completely removing Apple’s App Store payments from its platform

Conclusion

This is how you can take a screenshot on a Mac, Windows PC or laptop, iPhone, and Android phone. You can instantly edit your screenshot using Markup on an iPhone. Android phones also have an easily accessible editor that lets you crop, highlight, and add text to the screenshot. On a laptop, however, you will need to use a dedicated photo editor to make changes to a screenshot. For the latest gadget and tech news, and gadget reviews, follow us on Twitter, Facebook and Instagram. For newest tech & gadget videos subscribe to our YouTube Channel. You can also stay up to date using the Gadget Bridge Android App. You can find the latest car and bike news here.