Top 4 ways to Unlock Locked Android Phone without Losing Data

1
Even though you may use your fingerprint to unlock your phone, most smartphones demand a PIN, pattern, or alphanumeric code as the primary password. It is easy to forget your phone’s PIN if you haven’t entered it for a while. It is precisely due to this reason that most smartphones make you enter your PIN at least once a day even if you have fingerprint unlock turned on. Even after all these extra measures it is possible to forget your phone’s unlock PIN. In this article, we bring you the top 4 ways to unlock locked Android phones without losing your personal data. Read Also: Sony WH-CH720N headphones with up to 50 hours of battery life launched in India

Unlock your Samsung phone without losing your data

If you own a Samsung smartphone, there is a native way to unlock the lockscreen without factory resetting your device. Samsung’s Find My Mobile service lets you remotely unlock your smartphone without needing the device password. Here’s a step-by-step breakdown of the process. This method only works if Find My Mobile and Remote Unlock are enabled on your Samsung smartphone. You can turn it on by going to Settings>Samsung Account>Find My Mobile and turning the toggle bar on for Remote Unlock. Step 1: Go to https://findmymobile.samsung.com/ and sign in using your Samsung Account. Step 2: Select your Samsung smartphone from the left panel. Step 2: Select your Samsung smartphone from the left panel. 
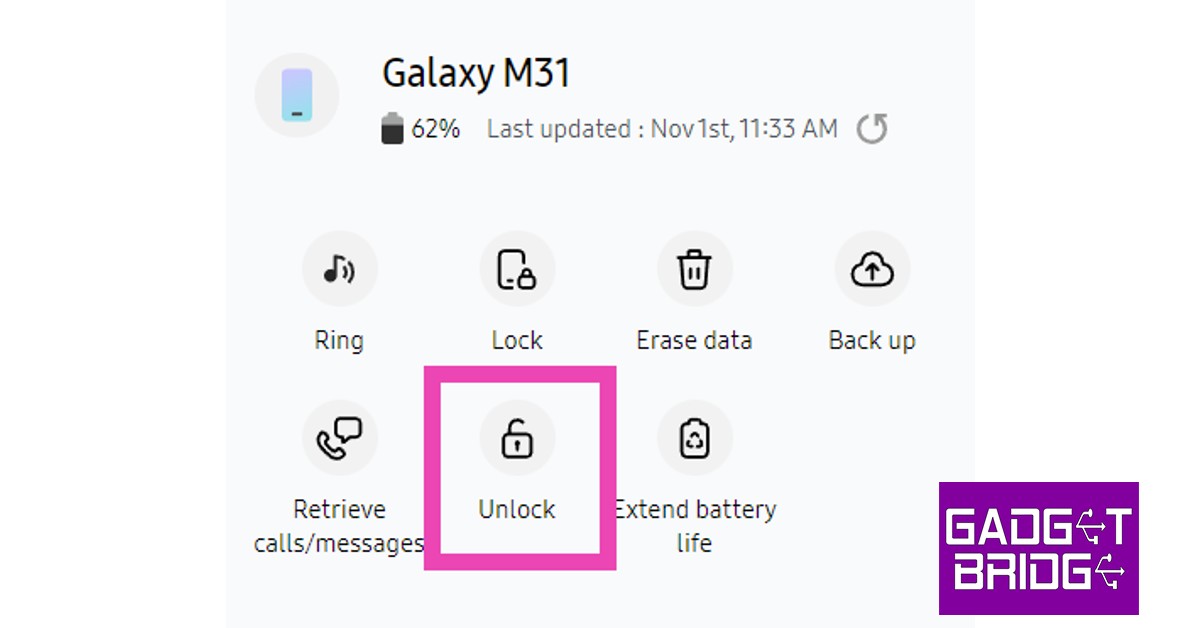
Step 3: Click on the ‘Unlock’ icon on the right panel. You will be made to re-enter your Samsung password. After that, your smartphone’s screen will be unlocked. All the screen lock information including password, pin, and biometrics will be deleted from your phone after using this feature. Click on the ‘Unlock’ icon on the right panel.

Remotely unlock your Android phone using Google’s Find My Device

Apart from tracking your smartphone, Google’s Find My Device service can also remotely unlock your Android phone for you without wiping the data on it. First, you need to go to Settings>Google and turn on Find My Device. Then go to Settings>Biometrics and Security>Other security settings>Device admin apps and turn the toggle bar on for Find My Device. Here’s how you can remotely unlock your smartphone using Google’s Find My Device. Step 1: Go to https://www.google.com/android/find and select your Samsung smartphone from the left panel. Step 2: Select Secure Device from the left panel. You can also set up a recovery message if you want. Step 2: Select Secure Device from the left panel. You can also set up a recovery message if you want. Step 3: Find my device will lock your smartphone’s screen. Step 3: Find my device will lock your smartphone’s screen. how to unlock samsung phone without password Step 4: Follow the on-screen instructions to set up a new temporary password to unlock your device.  Step 5: Once your phone is unlocked, disable the temporary password from Settings.

Unlock your Android phone using ADB

Some Android phones may get unlocked using ADB (Android Debug Bridge). First, you need to download and install the SDK toolkit on your PC. You can download it from the official Android website here. Next, you need to enable USB debugging from developer options on your Android smartphone. Read this article to find out how to enable USB debugging. Follow the steps below to unlock your phone using ADB. Step 1: Connect your smartphone to your PC using a USB cable. Step 2: Launch Command Prompt in the ADB installation path. Step 3: Type this command ‘adb shell rm /data/system/gesture.key’ and hit Enter. Step 4: Wait for the process to finish and restart your phone.

How to unlock a locked Android phone using DroidKit?

Use can use a third-party tool like DroidKit to unlock your smartphone in case you forget the lockscreen pattern or pin. DroidKit works for fingerprint unlock and Face ID as well. The only downside is that you will lose all the data on your phone after this process. If you periodically back up your data on your Google Account, you can easily recover your data after unlocking your phone. Here’s how you can unlock your Android phone using DroidKit. Step 1: Download and Install DroidKit on your PC. Step 2: Launch DroidKit on your PC and connect your Android phone via a USB cable. Step 3: Select ‘Screen Unlocker’ from DroidKit’s homepage. Start DroidKit on Your Device. how to unlock a locked android phone without losing data Step 4: In the following window, click on ‘Start’. Connect Your Phone. how to unlock a locked android phone without losing data Step 5: Follow the onscreen instructions to remove the lockscreen password. Start Unlocking the Phone. how to unlock a locked android phone without losing data Step 6: Once the process is finished, your Android phone will be unlocked. Phone Unlock Process Completed

Frequently Asked Questions

Is it possible to unlock an Android phone without losing data?

Yes, Google’s Find My Device and Samsung’s Find my Mobile make it possible to remotely unlock your Android phone without losing all your data.

How do I unlock my phone if I forgot the password?

Use Google’s Find My Device or Samsung’s Find My Mobile to unlock your Android phone if you forgot the password. You can also use the DroidKit tool on your PC to unlock your phone. Read Also: Amazfit GTR Mini with 120+ sports modes launched in India

Conclusion

This is how you can unlock a locked Android phone without losing the data. Some smartphones may allow you to enter a backup PIN or password if you forgot your phone’s primary password. This feature is usually found in older phones and newer devices may not have it. For the latest gadget and tech news, and gadget reviews, follow us on Twitter, Facebook and Instagram. For newest tech & gadget videos subscribe to our YouTube Channel. You can also stay up to date using the Gadget Bridge Android App. You can find the latest car and bike news here.

Samsung Galaxy F14 5G confirmed to launch in India on March 24

After updating its A-Series in India, Samsung is all set to bring another new smartphone under its F-Series. The company officially confirmed that Samsung Galaxy F14 5G will launch later this month. The release is scheduled to take place on March 24. Apart from confirming the launch date, the firm has also revealed that the upcoming handset will run on Android 13 and will be powered by a 5nm processor. In addition to this, the smartphone packs a 6,000mAh battery. Samsung Galaxy F14 5G is set to launch in India on March 24. Along with confirming the launch date the device has also been listed on Flipkart to confirm its availability. According to the company the phone will launch on the specified day at 12 noon. The dedicated Flipkart microsite also reveals some of the key specs of the upcoming smartphone. The company has confirmed that the Samsung Galaxy F14 5G will be powered by Exynos 1330 5nm chipset. It will be driven by a 6,000mAh battery. In addition, this phone will feature a 6.6-inch Full HD+ display. There will be two colour options for the phone according to the listing. Also Read: Qualcomm Snapdragon 7+ Gen 2 chipset for mid-range smartphones launched Moreover, the handset will run on One UI 5 based on Android 13. The company is promising to provide two generations of OS Upgrades and up to 4 years of security updates For added security, the smartphone supports Secure Folder powered by Samsung Knox. The pricing of the smartphone is yet to be revealed however the company has hinted that “these power-packed features will be available at affordable price.” According to leaks, the phone is likely to be priced at around 15K in the country. Besides this, the Samsung Galaxy F14 5G was spotted listed on Geekbench with model number SM-E146B. It has scored 811 points in single-core testing while in multi-core testing it has scored 2,120 points. The listing suggests the Exynos 1330, which has six cores set at 2.00GHz and a maximum clock speed of 2.40GHz. For the latest gadget and tech news, and gadget reviews, follow us on TwitterFacebook and Instagram. For newest tech & gadget videos subscribe to our YouTube Channel. You can also stay up to date using the Gadget Bridge Android App. You can find the latest car and bike news here.

Amazon Quiz Answers Today 18 March 2023: Participate to win Rs 500

18 March 2023 Amazon Quiz has gone live on its platform. The quiz timings are 12 AM to 11:59 PM. The Amazon App users can participate in the quiz daily and all they have to do is submit correct answers to the questions asked on the e-commerce platform. Today’s participants can get a chance to win Rs 500 Amazon Pay Balance. Amazon brings a fresh questionnaire that contains 5 questions daily. These questions are based on current affairs and general knowledge. The quiz can be played from 8 AM to 11:59 PM and the contestants need to answer correctly to enter into a lucky draw. Only one person is declared as a winner and the results will be announced at the end of every month. And to make sure that you give correct answers to all the 5 questions Gadget Bridge everyday updates all the answers to the Amazon Quiz. Do check out 18 March 2023 Amazon Quiz Answers to win a Rs 500 Amazon pay Balance. Amazon Quiz Today Prize – Rs 500 Amazon Pay Balance Quiz Date – 18 March 2023 Daily Timing – 12 AM to 11:59 PM Winner Announcement – Today 12 PM

Amazon Quiz Answers Today 18 March 2023

Question 1: Which series does actor Samantha Ruth Prabhu feature in the Indian adaptation of? Answer: Citadel Question 2: In February 2023, who became the fifth Indian cricketer to score a century in all 3 formats of international cricket? Answer: Shubman Gill Question 3: Which country held a nighttime military parade to celebrate the 75th anniversary of its army? Answer: North Korea Question 4: Where do these birds make their nests? Answer: Burrows Question 5: In greek Mythology, which hero quested for the golden fur of this animal? Answer: Jason

How To Play Amazon Quiz

Only app users are eligible to play the Amazon quiz every morning from 12 AM to 11:59 PM. The quiz is not available on the desktop. For those who are unaware of how to play the Amazon quiz below are the steps, you can follow to take the quiz.
  • Firstly download the Amazon app from Google Play Store or App Store
  • Now fill in the required information through the Sign Up option.
  • You need to log in to the Amazon app and scroll down on the home screen to find the Amazon Quiz banner.
  • Tap on the Amazon Quiz banner and tap on the Start button to start the Quiz.
  • Now you will get 5 questions and you need to answer them correctly. One wrong answer will eliminate you from the Quiz.
  • After answering all the questions correctly you are now eligible for a Lucky Draw.
  • The winner’s name will be announced today at 12 PM.
For the latest gadget and tech news, and gadget reviews, follow us on TwitterFacebook and Instagram. For newest tech & gadget videos subscribe to our YouTube Channel. You can also stay up to date using the Gadget Bridge Android App. You can find the latest car and bike news here.

Qualcomm Snapdragon 7+ Gen 2 chipset for mid-range smartphones launched

Qualcomm today announced the launch of Snapdragon 7+ Gen 2 SoC. The latest processor is the successor of the Snapdragon 7 Gen 1 which is for mid-range smartphones. It can support a 200MP camera and improved dynamic low-light photography. In addition to this, the SoC comes with AI-enhanced experiences and high-speed 5G and Wi-Fi connectivity. The Qualcomm Snapdragon 7+ Gen 2 SoC offers a clock speed of up to 2.91GHz with over 50% improved performance. Whereas the Qualcomm Adreno GPU provides 2x improved performance. According to the company, the latest chipset’s efficiency has been increased by up to 13%. While the entire mobile platform comes integrated with on-device AI. Also Read: Nokia C12 budget smartphone’s first sale goes live in India For gaming, the Snapdragon 7+ Gen 2 SoC is supported by Snapdragon Elite Gaming features like Auto Variable Rate Shading (VRS). It has been optimised by rendering content in focus at full resolution and the scene’s background at a lower resolution. Moreover, Volumetric Rendering significantly boosts the realism of particle-based game sceneries like smoke and fog. Qualcomm aptX and Snapdragon Sound on the chipset offer lag-free gaming audio and lossless music streaming. Qualcomm Snapdragon 7+ Gen 2 chipset for mid-range smartphones launched The integrated Qualcomm AI Engine delivers AI-enhanced experiences for optimal efficiency and has over 2x improved AI performance with 40% better performance per Watt than its predecessor. Moreover, the Qualcomm Sensing Hub, with a dedicated AI processor powers contextually aware use cases such as user activity recognition and acoustic scene detection. Snapdragon 7+ Gen 2 allows AI Super Resolution to intelligently upscale game scenes or photos for superior visual quality from a low-resolution image (1080p to 4K). Snapdragon 7+ Gen 2 highlights an 18-bit Triple ISP offering better low-light photography. According to the company, it can snap 30 images and merge the best parts into one shot for brighter, clearer, more colourful photos after dark. It can capture over 4,000x more camera data for an extreme dynamic range with vivid colour and clarity. In addition to this, the new chipset supports up to 200MP photo capture and staggered HDR video capture with triple exposure from two cameras simultaneously. In addition to this, the Snapdragon X62 5G Modem-RF System on the 7+ Gen 2 is capable of offering download speeds of up to 4.4 Gbps. It is power efficient too supporting more networks, frequencies, and bandwidths globally. The new Qualcomm chipset supports 5G/4G Dual-Sim Dual Active (DSDA) so consumers can utilise two SIMs when travelling or to separate their work and personal communications. With the integration of Qualcomm FastConnect 6900 Mobile Connectivity System, you get extremely responsive Wi-Fi—at up to 3.6 Gbps. In terms of availability, Snapdragon 7+ Gen 2 SoC by Qualcomm will soon be powering mid-range smartphones like Redmi and Realme. According to the company the chipset with the commercial devices is expected to be launched this month. For the latest gadget and tech news, and gadget reviews, follow us on TwitterFacebook and Instagram. For newest tech & gadget videos subscribe to our YouTube Channel. You can also stay up to date using the Gadget Bridge Android App. You can find the latest car and bike news here.

How to Connect your Android Device to a PC with a USB Cable?

0
Connecting your Android device to a PC is something every smartphone user to know. Instead of backing up your data on cloud storage, you can easily create local backups on your PC by transferring your data with the help of a USB cable. Enabling USB debugging also unlocks a bunch of advanced functions for your smartphone while it is connected to a PC. In this article, we show you how to connect your Android device to a PC with a USB cable and enable USB debugging. Read Also: Sony WH-CH720N headphones with up to 50 hours of battery life launched in India

Here’s how you can connect your Android device to a PC using a USB cable

Step 1: Find the mini-USB port on your Android device. Typically, this port is located at the bottom of your smartphone. Find the mini-USB port on your Android device. Step 2: Connect the Type C end of the USB cable to your smartphone’s USB port.  Step 3: Find the USB port on your PC and connect it to the other end of the USB cable. Step 3: Find the USB port on your PC and connect it to the other end of the USB cable. how to connect android device to a pc using usb cable Step 4: Your PC will recognise your Android device and display its drive. Step 5: Unlock your Android device in order to view its contents on your PC.

How to enable USB debugging?

Enabling USB debugging on your Android smartphone allows you to carry out more advanced tasks when it is connected to a PC running the Android Software Developer Kit (SDK). You don’t need to enable USB debugging for basic tasks like the transfer of data or USB tethering. However, if you want to uninstall an entire package of apps, recover deleted data, or mirror your smartphone’s display on your PC, you will need to enable USB debugging. Since it is not something an average Android user would usually be interested in, USB debugging is tucked away in developer options. Here’s how you can enable it. Step 1: Go to Settings and select About Phone. Step 1: Go to Settings and select About Phone. how to fix can't delete apps on android. how to delete pre-installed apps on android Step 2: Select ‘Software Information’. Step 2: Select ‘Software Information’. how to fix can't delete apps on android. how to remove an app that wont uninstall. how to enable usb debugging Step 3: Tap on ‘Build Number’ 7 times to enter Developer Mode. Step 3: Tap on ‘Build Number’ 7 times to enter Developer Mode. how to connect android device to a pc using usb cable Step 4: Go back to Settings, scroll all the way down, and select ‘Developer options’. Step 4: Go back to Settings, scroll all the way down, and select ‘Developer options’. how to fix can't delete apps on android. how to enable usb debugging Step 5: Scroll down to the Debugging section and turn the toggle bar on for ‘USB debugging’. Step 5: Scroll down to the Debugging section and turn the toggle bar on for ‘USB debugging’. how to enable usb debugging Read Also: Amazfit GTR Mini with 120+ sports modes launched in India

Conclusion

This is how you can connect your Android device to a PC and enable USB debugging. In order to ensure a stable connection, make sure your USB cable is not damaged. Once connected, unlock your Android device if you want to see its contents on your PC. You won’t be able to access the device’s internal storage as long as it is locked. For the latest gadget and tech news, and gadget reviews, follow us on Twitter, Facebook and Instagram. For newest tech & gadget videos subscribe to our YouTube Channel. You can also stay up to date using the Gadget Bridge Android App. You can find the latest car and bike news here.

Top 4 ways to rate & review apps in the Google Play Store

0
Rating and reviewing apps is a great way to report your experience with the app and help other users in determining whether a particular app is meant for them. Most developers welcome favourable ratings as it makes their apps rank higher in search results. If you have any issue with an app, leaving a review will get the developers’ attention. Here are the top 4 ways you can rate and review apps in the Google Play Store. Read Also: Fire Boltt Invincible Plus Bluetooth calling smartwatch launched in India

Rate apps on Google Play Store on your Android device

You can easily rate apps on Google Play Store from your Android smartphone. Here’s how you can go about it. Step 1: Launch the Google Play Store app on your Android smartphone.  Step 2: Search the app you want to rate. Step 3: Open the app’s page and scroll down to ‘Ratings and reviews’. Step 4: This is where you can rate and review the app. Give the app a star rating or tap on ‘Write a review’ to describe your experience with the app. Give the app a star rating or tap on ‘Write a review’ to describe your experience with the app. Step 5: You can also choose to answer some questions regarding the app. Tap on ‘Post’ at the top right corner of the screen to submit your rating. Tap on ‘Post’ at the top right corner of the screen to submit your rating.

Rate apps on Google Play Store on your PC

If you don’t have access to your smartphone, you can also rate and review apps on Google Play Store’s website using your PC. Here’s how. Step 1: Visit Google Play Store’s website on your PC. Step 1: Visit Google Play Store’s website on your PC. Step 2: Search for the app your want to review.  Step 3: Scroll down to ‘Rate this app’ and leave a star rating.  Step 3: Scroll down to ‘Rate this app’ and leave a star rating.  Step 4: Click on ‘Write a review’ to describe your experience with the app. This part is optional. Step 4: Click on ‘Write a review’ to describe your experience with the app. This part is optional. how to rate and review apps on google play store

Give a rating from within the app

Some apps send you reminders to rate them on Play Store. Once you receive a popup reminder, simply click on ‘Rate Now’ and you will be redirected to the app’s page on Google Play Store. Some apps may also let you give a rating from within the app without opening the Play Store. For more information, visit the app’s ‘Help & feedback’ section.

How to edit a review

If you would like to update the review or rating you left for an app in the past, you can easily edit it from Google Play Store. Here’s how. Step 1: Simply visit the app page on Play Store and scroll down to the ‘Your review’ section.  Step 2: Tap on ‘Edit your review’ to update your rating or review. Step 2: Tap on ‘Edit your review’ to update your rating or review. how to rate and review apps on google play store Step 3: Update the rating or review and tap on ‘Post’ at the top right corner of the screen to submit it. Step 3: Update the rating or review and tap on ‘Post’ at the top right corner of the screen to submit it. how to rate and review apps on google play store

Frequently Asked Questions

Why can’t I leave a review on Google Play Store?

Google Play Store only lets you review currently installed and previously downloaded apps on your device. If you were a part of the beta program for the app, you will not be able to review it. Enterprise accounts cannot rate or review apps on the Play Store.

Does Google Play Store remove negative reviews?

Developers cannot directly remove any negative reviews for their apps. They can report fake reviews to Google, which can then take them down from the app’s page on Play Store.

Can other people see my Play Store reviews?

Yes, all reviews on Play Store are public and can be seen by other users. Read Also: Samsung Galaxy A54 5G and Galaxy A34 5G with 5,000mAh battery launched in India

Conclusion

These are the top 4 ways you can rate and review apps in the Google Play Store. Once you leave a review for an app on Play Store, the developers of the app will be able to view your device information like model number and OS version. Your country and region will also be made available to the developers. You cannot leave a review without signing in with a Google Account. For the latest gadget and tech news, and gadget reviews, follow us on Twitter, Facebook and Instagram. For newest tech & gadget videos subscribe to our YouTube Channel. You can also stay up to date using the Gadget Bridge Android App. You can find the latest car and bike news here.

Nokia C12 budget smartphone’s first sale goes live in India

Nokia C12 was launched in India earlier this week. The company today announced the first sale of the smartphone in the country. The device features a 6.3-inch HD+ display and is powered by an octa-core Unisoc 9863A1 processor. The handset also includes a 3,000mAh battery and has a single 8-megapixel rear camera. The phone includes the RAM expansion feature and runs on Android 12 Go Edition.

Nokia C12 price in India, sale details

Nokia C12 has gone on sale for the first time in India. The phone can be purchased at a limited period introductory price of Rs 5,999 for the single 2GB RAM with 64GB storage option. The device is offered in three colour options of Charcoal, Dark Cyan, and Light Mint. It is available for purchase via Amazon in the country.

Nokia C12 specifications, features

Nokia C12 features a 6.3-inch HD+ display with an aspect ratio of 20:9. The device is IP52 rated for splash and dust resistance. The phone runs on Android 12 Go Edition and comes with two years of quarterly security updates. The budget smartphone is powered by an octa-core Unisoc 9863A1 SoC with 2 gigabytes of RAM and 64 gigabytes of internal storage. The built-in RAM can be expanded utilising unused internal storage by up to 4GB. The internal storage can be expanded via microSD up to 256GB. The Nokia C12 includes a single 8-megapixel camera sensor with autofocus and an LED flash on the back. For selfies and video calls the phone has a 5-megapixel front-facing camera. The camera unit is capable of using time-lapse photography, portrait mode, auto HDR, and night mode. The Night and Portrait modes are enabled for both the front and the rear camera. The budget phone also houses a removable 3,000mAh battery that comes with 5W rapid charging. The battery is claimed to last for a whole day on a single charge. The smartphone includes Wi-Fi 802.11 b/g/nc, Bluetooth 5.2, FM radio, a micro-USB connector, and a 3.5mm headphone jack as choices for connectivity. In addition to this, there is an accelerometer, ambient light sensor, and proximity sensor. For the latest gadget and tech news, and gadget reviews, follow us on TwitterFacebook and Instagram. For newest tech & gadget videos subscribe to our YouTube Channel. You can also stay up to date using the Gadget Bridge Android App. You can find the latest car and bike news here.

Itel P40 with a 6,000mAh battery launched in India, priced at Rs 7,699

The Chinese smartphone company, Itel, owned by Transsion Holding has announced the launch of the latest budget smartphone in the Indian market. Itel P40 is the newly launched phone priced below 8K. The pocket-friendly smartphone comes with a massive 6,000mAh battery. It also includes an HD+ IPS display with a waterdrop-style notch to house a selfie camera. The handset operates on Android 12 Go Edition and is powered by an SC9863A chipset. Additionally, there is a dual rear camera setup.

Itel P40 price in India and sale details

The price of the Itel P40 has been set at Rs 7,699 in India. The phone is available in 3 colour options: Force Black, Dreamy Blue and Luxurious Gold. Sale details are yet to be announced by the company however the phone can be seen listed on Itel’s official website in the country. The firm is also offering a free one-time screen replacement offer and 12-month warranty on the purchase of the phone. Itel P40 price in India and sale details

Itel P40 specifications

In terms of specifications, the Itel P40 features a 6.6-inch HD+ IPS display having 720 x 1,612 pixels of resolution and a 120Hz touch sampling rate. The smartphone runs on Android 12 Go Edition. The phone is powered by an octa-core Unisoc SC9863A SoC coupled with 4GB of RAM. It also comes with Memory Fusion Technology that allows the user to increase their RAM up to 7GB. The handset offers 64GB of internal storage which can be further expanded up to 512GB using a microSD card. Also Read: Sony WH-CH720N headphones with up to 50 hours of battery life launched in India In terms of optics, the Itel P40 features a dual rear camera setup which includes a 13-megapixel primary sensor and a QVGA camera with dual LED flash. In addition to this, the 5-megapixel selfie camera is housed inside a waterdrop-style notch on the display. Itel P40 is backed by a 6,000mAH battery which comes with 18W fast charging support. There is a fingerprint sensor and a face unlock too. Commenting on the launch, CEO, itel India, Mr. Arijeet Talapatra, said, “At itel, we believe in the transformative power of technology that positively impacts millions across India by offering the best products at the best value. Our commitment to high-performance devices at a competitive cost is reflected through our latest offering, the itel P40. P40 is the first smartphone in its segment to feature an unparalleled 6000mAh battery, perfect combination of cutting-edge technology and aesthetically pleasing design to provide a truly revolutionary experience for first-time smartphone users.” He added, “In today’s world, entry-level smartphone users expect devices that can handle their non-stop usage and high video consumption. A high-capacity battery is a necessary feature to keep them connected and powered throughout the day. And matched with affordability, P40 becomes the best offering for our consumers. Our vision to empower every Indian with the power of technology doesn’t end with the launch of the itel P40. We will continue to work tirelessly to ensure that our products and services are accessible and affordable to people from all walks of life so they can fully embrace the digital age and realise their aspirations.” For the latest gadget and tech news, and gadget reviews, follow us on TwitterFacebook and Instagram. For newest tech & gadget videos subscribe to our YouTube Channel. You can also stay up to date using the Gadget Bridge Android App. You can find the latest car and bike news here.

How to install mSpy on target Android in 2023?

0
If you just got your kid their first smartphone, you probably want to ensure they are only exposed to appropriate content on the Internet. There are several apps that help you maintain parental control over your kids’ devices. Apart from content scanning, mSpy also lets you keep a check on your kids’ location at all times using their smartphones. Here’s how you can install the mSpy app on a target Android phone in 2023. Read Also: Fire Boltt Invincible Plus Bluetooth calling smartwatch launched in India

Here’s how you can install mSpy on a target Android device

Step 1: Visit the mSpy website and select the Android subscription package. You can carry out the purchase on your device, you don’t need the target device for this step. You will need to create an mSpy account first. Visit the mSpy website and select a subscription package for Android. how to install mspy on target phone Step 2: Disable Play Protect on the target device. To do this, launch the Google Play Store on the target device and tap on the profile icon at the top right corner of the screen. Disable Play Protect on the target device. Step 3: Select ‘Play Protect’ and tap on the Settings icon at the top right corner of the screen. Select ‘Play Protect’ and tap on the Settings icon at the top right corner of the screen. Step 4: Turn off the toggle bar for ‘Scan apps with Play Protect’ and ‘Improve harmful app detection’. Turn off the toggle bar for ‘Scan apps with Play Protect’ and ‘Improve harmful app detection’. Step 5: Launch Google Chrome on the target device and paste the mSpy link provided to you. Step 6: Download the mSpy app from the website. Step 7: Install the apk on the target device and enter the registration code that was emailed to you. Step 8: Now, head over to the mSpy control panel on your device to track the target device. Read Also: Samsung Galaxy A54 5G and Galaxy A34 5G with 5,000mAh battery launched in India

Conclusion

This is how you can install the mSpy app on a target Android phone in 2023. If you’re looking for a Life360 alternative, read our article here. There are several other parental control apps you can use to keep a check on your kids’ location and online activity. Net Nanny, Qustodio, and Google Family Link are some of them. Read our article here to know more. For the latest gadget and tech news, and gadget reviews, follow us on Twitter, Facebook and Instagram. For newest tech & gadget videos subscribe to our YouTube Channel. You can also stay up to date using the Gadget Bridge Android App. You can find the latest car and bike news here.

Sony WH-CH720N headphones with up to 50 hours of battery life launched in India

Sony India has introduced its lightest wireless Noise-cancelling headphones- WH-CH720N in India. The device comes with Sony’s Integrated Processor V1 and Dual Noise Sensor technology to provide noise cancelling. In addition to this, the headphones offer 50 hours of battery life and support Digital Sound Enhancement Engine (DSEE). There is a Multipoint connection for easy connectivity between devices.

Sony WH-CH720N price and sale details

Sony WH-CH720N headphones have been launched in India at Rs 9,990. The device is now available for purchase across Sony retail stores (Sony Center and Sony Exclusive), www.ShopatSC.com portal, major electronic stores, and other e-commerce websites in India from today onwards. Sony WH-CH720N price and sale details

Sony WH-CH720N specs and features

Sony WH-CH720N are lightweight over-ear headphones for all-day wearing comfort. Ergonomically designed, these headphones are made up of synthetic leather and urethane materials combined with optimum ear pad structure and dimensions. They feature Sony’s advanced noise cancelling feature thanks to the Integrated Processor V1 chip and Dual Noise Sensor technology. For a better listening experience, the Integrated Processor V1 cancels out the external sound with a low processing delay. There is an adjustable Ambient Sound mode and Adaptive Sound control feature on the headset. Also Read: Amazfit GTR Mini with 120+ sports modes launched in India With Digital Sound Enhancement Engine (DSEE) Sony WH-CH720N offers natural vocals, crystal clear sound, and balanced tuning. DSEE restores high-frequency elements to produce high-quality sound that’s closer to the original recording. Whereas beamforming microphones with Precise Voice Pickup technology pick up your voice more clearly and accurately for better call quality. The headphones also include Wind Noise Reduction Structure around the microphones that reduces background noise when on a call. The WH-CH720N features a Multipoint connection, easy button operation, and can be controlled with your voice. The WH-CH720N offers a battery life of up to 35 hours with Noise Cancelling and 50 hours without Noise Cancelling with quick charging. According to the company, just a 3-minute charge would give up to 1 hour of playback. For the latest gadget and tech news, and gadget reviews, follow us on TwitterFacebook and Instagram. For newest tech & gadget videos subscribe to our YouTube Channel. You can also stay up to date using the Gadget Bridge Android App. You can find the latest car and bike news here.