Home services platform Urban Company has announced the launch of a new range of smart RO water purifiers under the sub-brand Native. Two models Urban Company Native M1 and Native M2 have been introduced. As per the company both the water filters come with superior filters and ‘rapid reverse rinse’ technology, so you don’t need filter changes or servicing for 2 years. In addition to this, the UC is offering a 2-year ‘zero-cost’ comprehensive warranty covering all filters, and membranes along with spare parts.Also Read:Spotify is disabling some features for free users in India
In This Article
Urban Company Native M1 and Native M2 Price and Availability
The Urban Company Native M2 Water Purifier has been launched at an introductory price of Rs 17,499. On the other hand, the Native M1 will be available at a launch price of Rs 13,499. The Urban Company smart RO can be purchased via the company’s app and website as well as on Amazon. Additionally, it will also be selling offline on Croma stores soon.
Urban Company Native M1 and Native M2 water purifier features
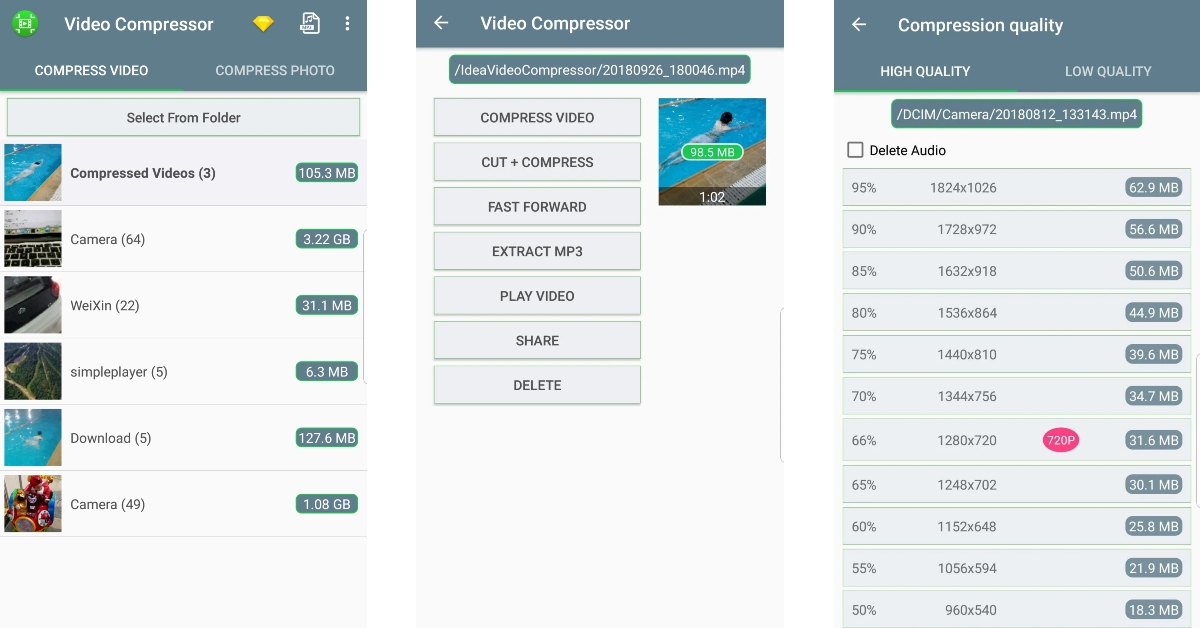
Urban Company Native Water Purifier can give 12000 litres of pure water without needing their filters changed. Also, there is no need for servicing for 2 years. The Native M1 and Native M2 are equipped with ‘rapid reverse rinse’ technology, and multi-micron filter surfaces that increase the longevity of smart RO for two years.The Urban Company Native M2 comes with an IoT feature that allows users to keep a tab on TDS levels in real time along with water consumption and filter life status. This can be easily monitored on the UC app. In addition to this, the water filters are provided with a ‘zero-cost’ warranty that includes filters, membranes and all other spare parts for the two-year period.The Urban Company RO have a tank with a capacity of 8 litres. Both the water filters have the latest design. The M2 offers a mirror design with a brushed metal finish. It sports 3 preset dispensing modes and a breathing LED indicator that displays IoT pairing status. On the other hand, the Native M1 boasts 9 stages of filtration (RO + UV + UF + MTDS Minerals and Alkaline Filters) that is capable of eliminating 99.99% impurities including chemical contaminants like metal ions, chromium, lead, and sodium and reducing arsenic, radium, fluoride, sulphate, magnesium, amongst others. Whereas Native M2 has 10 stages of filtration, with all the stages of the M1 device + copper-charged filters.
For the latest gadget and tech news, and gadget reviews, follow us on Twitter, Facebook and Instagram. For newest tech & gadget videos subscribe to our YouTube Channel. You can also stay up to date using the Gadget Bridge Android App. You can find the latest car and bike news here.
Reverse wireless charging may not be a feature that you use every day, but it can come in handy on certain occasions. If your smartwatch runs out of charge and you don’t have access to its charger, you can simply place it on your smartphone’s back panel to juice it up. Power sharing capabilities of most devices are limited to 4-5W, which means charging another device can be a slow process. But in times of emergency, it can make all the difference. Oftentimes, users believe that if their phone supports wireless charging, it must be able to share its battery wirelessly with other devices too. This is certainly not true, as the latter is a feature found only on midrange and premium devices. In this article, we bring you the top 3 ways to check if your smartphone supports reverse wireless charging.Read Also:Top 3 Ways to Automatically Upload Photos to Google Photos on Android
In This Article
Use device settings to check if your smartphone supports reverse wireless charging
Step 1: Go to Settings and select Battery and device care.Step 2: Tap on Battery.Step 3: If your smartphone supports reverse wireless charging, this page will have an option to enable it. On Samsung phones, this option is called Wireless Power Sharing.
Check the smartphone manufacturer’s website
Your smartphone’s product page on its manufacturer’s website contains all the information regarding its specs. Go through these specifications to check if your device supports reverse charging. If your phone is a few years old, it may not be listed on the manufacturer’s website. In this case, move on to the next method.
Check your smartphone’s Amazon page
If you can’t find any information regarding wireless power sharing on your smartphone manufacturer’s website, give its Amazon product page a shot. Go to Amazon’s official webpage and search for your phone. Its product page will list detailed specifications about the device. Browse these specs for reverse wireless charging.
Frequently Asked Questions (FAQs)
What is reverse wireless charging?
As the name suggests, reverse wireless charging allows you to wirelessly charge another device using your smartphone. This can be done by placing the device on your smartphone’s back panel and turning on wireless power sharing.
Does the iPhone 15 have reverse wireless charging?
While the recent iPhones support wireless charging, they do not have the reverse wireless charging feature yet.
How do I turn on wireless power sharing on my smartphone?
These are the top 3 ways to check if your smartphone supports reverse wireless charging. If it doesn’t there is another way you can share its battery with another device. Simply use an OTG adapter or a Type-C to Type-C USB cable to connect your smartphone to the device you want to charge. The charge will flow from the device with the higher battery level to the one with the low battery.For the latest gadget and tech news, and gadget reviews, follow us on Twitter, Facebook and Instagram. For newest tech & gadget videos subscribe to our YouTube Channel. You can also stay up to date using the Gadget Bridge Android App. You can find the latest car and bike news here.
Oppo is all set to launch a new foldable phone in India today. After launching in China in August this year Oppo Find N3 Flip will hit the India shore today. The device comes with a completely new design compared to the Samsung Galaxy Flip 5. The upcoming flip phone features a vertically positioned cover display and a round camera module beside it. The phone has a 3.26-inch cover and a 6.80-inch primary AMOLED screen. A MediaTek Dimensity 9200 SoC will power the clamshell design phone.
In This Article
How the watch the Oppo Find N3 Flip launch event livestream
Oppo Find N3 Flip is scheduled to debut in India today. The company will be hosting a dedicated launch event to present the device. The launch live stream will start at 7 PM via the company’s official YouTube channel as well as via its official social media channels. However you can also watch the launch event live here on our website, we are embedding a link below.
Oppo Find N3 Flip is highlighted with an AMOLED primary display measuring 6.80 inches with a 120Hz refresh rate. There is a 3.26-inch vertical cover display, like its predecessor. The handset is powered by an octa-core MediaTek Dimensity 9200 SoC that powers the clamshell-style foldable phone along with up to 512GB of internal storage and 12GB of RAM.The Find N3 Flip features a circular camera set-up beside its outer display that includes a triple rear camera arrangement. The camera system consists of a 32-megapixel telephoto sensor, an 8-megapixel ultra-wide-angle sensor, and a 50-megapixel Sony IMX890 main lens with OIS capability. The phone includes a 32-megapixel front camera for taking selfies and making video calls.The clamshell design phone has a side-mounted fingerprint scanner. A gyroscope and an ambient light sensor are also present. The Oppo Find N3 Flip has 5G, Wi-Fi, Bluetooth, and NFC connectivity options. The phone sports a 4,300mAh battery with 44W wired charging support. For the latest gadget and tech news, and gadget reviews, follow us on Twitter, Facebook and Instagram. For newest tech & gadget videos subscribe to our YouTube Channel. You can also stay up to date using the Gadget Bridge Android App. You can find the latest car and bike news here.
If you use a lot of apps on your Android phone, automatic updates can eat up a lot of mobile and WiFi data. This is why some users prefer selectively updating the apps that they use the most. Google Play Store makes it easy to pick and choose the apps you want to update at any given time. In this article, we bring you the top 3 ways to manually update apps on your Android phone and tablet.Read Also:Global PC shipments fell 7.6% YoY in Q3 2023: Report
In This Article
Update Android apps manually from the Google Play Store
Step 1:Launch the Google Play Store app on your Android phone or tablet.Step 2: Tap your profile icon at the top right corner of the screen.Step 3: Select Manage apps and device.Step 4: Tap on See details under Updates available.Step 5: Hit the Update button next to the app you want to update.
Manually update a single app on Android
Step 1:Launch the Google Play Store app on your Android phone or tablet.Step 2:Search for the app you want to update.Step 3: Open the app’s page.Step 4: Hit Update.
Use a third-party app marketplace
If you are reluctant to use the Google Play Store on your Android device, you can always check out third-party marketplaces like APKMirror, Softonic, and F-Droid for the latest versions of your favourite apps. One of the advantages of using third-party marketplaces is that they also let you download older versions of the apps. This cannot be done on the Google Play Store. Before you install the downloaded APK on your Android device, make sure to allow installations from unknown sources in device settings.
Frequently Asked Questions (FAQs)
How do I update all my apps at once?
To update all the apps on your Android phone at once, go to Google Play Store>Manage apps and device and select Update all.
How do I turn on auto-updates for just one app on my Android device?
If you want to turn on automatic updates for a particular app on Android, go to the app’s page on Google Play Store, hit the ellipses on the top right corner of the screen and select the check box for auto-updates.
What are some of the most trusted websites for third-party app downloads on Android?
Garena Free Fire is a battle royale game with regular awards and tournaments to keep players interested. If you play Garena Free Fire, you should be aware of the redeem codes that are released on a daily basis. However, because the battle royale game is banned in India, players from other countries can use the Free Fire Redeem codes daily. If you’re unfamiliar with the Garena Free Fire redeem codes or don’t know how to get them, we’ve put together a step-by-step guide to help you redeem them. Check out Garena Free Fire Redeem Codes for 12 October 2023.The Free Fire redeem codes are a great way to get free stuff. These are 12-digit codes that contain alphabets and numbers, as well as an expiration date and time. Because the Garena FF redeem codes cannot be used more than once, you should hurry to the redemption page to claim your free reward before someone else does. To get a free reward, all you have to do is go to reward.ff.garena.com/en, which is the official redemption page. Also, keep an eye on this space for daily updates on Garena Free Fire redemption codes and rewards.
In This Article
Garena Free Fire Redeem Codes Today 12 October2023
Oppo Find N3 Flip is set to launch in India on October 12. Ahead of the official announcement the price of the clamshell design phone has been leaked. The Flip phone has a 3.26-inch cover and a 6.80-inch primary AMOLED screen. The device is powered by MediaTek Dimensity 9200 SoC. It comes with a circular camera module.The price of the Oppo Find N3 Flip in India has been leaked just one day ahead of the official announcement. As per a tipster price of the upcoming flip phone will start at Rs 94,999 for the 12GB RAM with 256GB storage option. The tipster claims that after the discount the device will be available at Rs 89,622.
Oppo Find N3 Flip specifications
Oppo Find N3 Flip features an AMOLED primary display measuring 6.80 inches with a 120Hz refresh rate. There is a 3.26-inch vertical cover display, like its predecessor. The handset is powered by an octa-core MediaTek Dimensity 9200 SoC that powers the clamshell-style foldable phone along with up to 512GB of internal storage and 12GB of RAM.The Find N3 Flip has a circular camera set-up beside its outer display that includes a triple rear camera arrangement. The camera system consists of a 32-megapixel telephoto sensor, an 8-megapixel ultra-wide-angle sensor, and a 50-megapixel Sony IMX890 main lens with OIS capability. The phone includes a 32-megapixel front camera for taking selfies and making video calls.The Find N3 Flip has a side-mounted fingerprint scanner. A gyroscope and an ambient light sensor are also present. The Oppo Find N3 Flip has 5G, Wi-Fi, Bluetooth, and NFC connectivity options. The phone sports a 4,300mAh battery with 44W wired charging support.The company will be hosting a dedicated launch event tomorrow that will be live-streamed at 7 PM in the evening. Interested ones can join the webcast on YouTube or via the company’s official social media channels in the country.
For the latest gadget and tech news, and gadget reviews, follow us on Twitter, Facebook and Instagram. For newest tech & gadget videos subscribe to our YouTube Channel. You can also stay up to date using the Gadget Bridge Android App. You can find the latest car and bike news here.
The Amazon Great India Festival is live. It is currently offering huge discounts on smartphones from brands like Samsung, OnePlus, Xiaomi, iQOO, Tecno, and many more. Check out some of the top deals now available for camera smartphones under Rs 20,000 during Amazon’s Great Indian Festival Sale.
In This Article
Here is a list of the camera smartphones under Rs 20,000 if you’re on the lookout for a phone with outstanding camera features during the Great India Festival Sale on Amazon.
OnePlus Nord CE 3 Lite
On Amazon, the OnePlus Nord CE 3 Lite is available at a starting price of Rs 19,999 for the 8GB RAM with 128GB storage option during the ongoing Great India Festival Sale. The smartphone features a triple rear camera setup that includes a 108-megapixel Samsung HM6 sensor with an f/1.75 aperture and EIS support. It also consists of a 2-megapixel macro lens and another 2-megapixel depth sensor. There is a 16-megapixel front-facing camera for selfies. The Nord CE 3 Lite is fuelled by an octa-core Snapdragon 695 SoC with Adreno 619 GPU for graphics. It is highlighted with a 6.72-inch full-HD+ LCD display with 1,080×2,400 pixels of resolution. The phone packs a 5,000mAh battery that supports 67W SuperVOOC fast charging.
Samsung Galaxy M34 5G
Samsung Galaxy M34 5G on the other hand is listed at Rs 15,999 for the 6GB RAM with 128GB storage model. The smartphone features a Full HD+ 6.5-inch display. The device runs OneUI 5.1, an Android 13-based operating system. The 5G phone is powered by Exynos 1280 SoC with a Mali-G68 MP4 GPU. It has a triple rear camera setup that includes a 50-megapixel primary sensor, a 2-megapixel macro sensor and an 8-megapixel ultra-wide angle camera. For selfies, there is a 13-megapixel sensor front-facing camera. A 6,000mAh battery powers the device.
Redmi Note 12 5G
Redmi Note 12 5G is currently made available at Rs 17,499 for the 6GB RAM with 128GB storage on Amazon. It features a 6.67-inch display with a 120Hz refresh rate. The phone operates on MIUI 13 based on Android 12 and is powered by Qualcomm Snapdragon 4 Gen 1 octa-core SoC. The Note 12 5G comes with a 48-megapixel primary sensor and a 2-megapixel depth sensor. There is an 8-megapixel front camera for selfies. It also houses a 5,000mAh battery that comes with 33W fast charging support.
Vivo Y27
Vivo Y27 is listed at Rs 14,999 on Amazon for the 6GB RAM with 128GB storage. The phone has a 6.64-inch FHD+ LCD Sunlight display. It runs on FunTouch OS 13 which is based on the Android 13 operating system. Under the hood, there is MediaTek Helio G85 chipset and its Extended RAM 3.0 functionality.The smartphone comes with a dual rear camera setup that includes a 50 MP primary camera and a 2 MP bokeh camera. It has a variety of camera functions, including Bokeh Flare Portrait, Super Night Mode, and Super Night Selfie Mode. It has an 8 MP front camera with the Aura Screen Light function for selfies, ensuring sharp, high-resolution selfies in any setting. It includes a 5000mAh battery and a quick 44W FlashCharge.Vivo T2 5G
Vivo T2 5G
Vivo T2 5G can be bought at Rs 17,999 for 6GB RAM with 128GB storage on Amazon. The device includes a 6.38-inch AMOLED display with 1,080×2,400 pixels of resolution. The smartphone is powered by a Snapdragon 695 SoC. dual rear camera setup that includes a 64-megapixel primary sensor with f/1.79 aperture and a 2-megapixel bokeh sensor with f/2.4 aperture. In addition to this, there is a 16-megapixel sensor with f/2.0 aperture. It further includes a 4500mAh battery, with 44W fast charging support.
iQoo Z7s 5G
iQOO Z7s 5G is currently selling at Rs 17,999 for the 8GB RAM with 128GB storage on Amazon. The handset is highlighted with a 6.38-inch full-HD+ display. Funtouch OS 13 on top of Android 13 operates the phone. Under the hood is an octa-core Qualcomm Snapdragon 695 5G SoC and Adreno 619L GPU.The 5G smartphone features a dual rear camera setup a 64-megapixel primary sensor and a 2-megapixel sensor. In addition to this, there is a 16-megapixel front-facing camera for taking selfies. The phone has a 4,500mAh battery and support for 44W wired Flash Charging.
Tecno Pova 5 Pro 5G
Last on the list is Tecno Pova 5 Pro 5G which is currently up for sale at Rs 15,999 for the 8GB RAM storage option. This smartphone features a 6.78-inch full-HD+ display. The device is powered by MediaTek Dimensity 6080 5G SoC and Mali-G57 MC2 GPU. The smartphone comes pre-installed with HiOS 13.1, an Android 13-based operating system. It has a dual rear camera setup that includes a 50-megapixel main sensor and a secondary AI camera. It further sports a 16-megapixel front-facing camera. The phone also boasts a 5,000mAh battery.Amazon is also offering Easy financing options from reputable partner institutions like SBI Bank; 10% Instant Discount on SBI Credit and Debit Cards & EMI Transactions, Free EMI on Credit and Debit Cards, Exciting Offers from Other Top Credit/Debit Cards, and Much More
For the latest gadget and tech news, and gadget reviews, follow us on Twitter, Facebook and Instagram. For newest tech & gadget videos subscribe to our YouTube Channel. You can also stay up to date using the Gadget Bridge Android App. You can find the latest car and bike news here.
Backing up the pictures and videos on your device to a cloud server is a great way to make sure you don’t lose them in case your phone stops working or gets stolen. Android’s stock gallery app, Google Photos, makes it incredibly easy to backup all your media on Google’s cloud server. The process is seamless and doesn’t take much time. In this article, we bring you the top 3 ways to automatically upload photos to Google Photos on Android.Read Also:Nokia G42 5G new variant now available in India
In This Article
Automatically upload or backup photos to Google Photos on Android
Step 1:Launch the Google Photos app on your Android smartphone.Step 2: Hit the profile icon at the top right corner of the screen.Step 3: Tap on Turn on backup.Step 4: In the popup box, select Turn on backup.Google Photos will automatically start backing up the pictures in your gallery to the cloud. Any new pictures you take on your phone will be backed up on Google Photos.
Another method to automatically upload or backup photos to Google Photos on Android
Step 1: Launch the Google Photos app on your Android smartphone.Step 2: Hit the profile icon at the top right corner of the screen.Step 3: Tap on Photos settings.Step 4: Select Backup.Step 5: Turn on the toggle switch for Backup.
Turn on automatic backup for Google Photos using device settings
Step 1: Go to Settings and select System.Step 2: Tap on Backup & restore.Step 3: Tap on Back up data under the Google server section.Step 4: Tap on Photos & videos.Step 5: Turn on the toggle switch for Backup.
Frequently Asked Questions (FAQs)
Where does my phone back up my photos and videos?
You can choose to back up your photos and videos on Google Photos or your smartphone manufacturer’s native cloud service.
How much cloud storage does Google Photos offer?
Every Google Account gets 15GB of free cloud storage. This storage spans different services like Google Photos, Gmail, Google Drive, and more.
How do I turn on automatic backup for pictures on my Android device?
Go to Google Photos and tap the profile icon at the top right corner of the screen, tap on Turn on backup to enable automatic backup and syncing of pictures on your Android device.Read Also:Truke Clarity Five TWS Review: Great sound quality
Conclusion
This is how you can automatically upload or backup photos to Google Photos on Android. Since Google offers only 15GB of storage space per account, it is nearly not enough to backup all your pictures. Luckily, smartphone manufacturers like Samsung, Vivo, OnePlus, and more offer their own cloud storage as well. Check out your device’s settings to know more.For the latest gadget and tech news, and gadget reviews, follow us on Twitter, Facebook and Instagram. For newest tech & gadget videos subscribe to our YouTube Channel. You can also stay up to date using the Gadget Bridge Android App. You can find the latest car and bike news here.
Even though they share the same bite-sized form, Instagram Stories and Reels could not be more different. Stories are personal and meant to be shared with your friends while Reels are shared to a wider audience across the app (if your profile is public). Once you post a Reel, it shows up in your followers’ feed. Meanwhile, a Story can only be accessed from the home page header. Recently, Instagram quietly added the option to share your Story as a Reel. In this article, we bring you the best ways to create Reels from Instagram Stories.Read Also:Truke Clarity Five TWS Review: Great sound quality
In This Article
Create Reels from Instagram Stories
Instagram now lets you create Reels directly from Story Highlights. Here’s how you can go about it.Step 1: Tap on your Story and hit the Highlight icon at the bottom of the screen. Add the Story to a Highlight compilation.Step 2: Open the Highlight.Step 3: Tap on Create.Step 4: Add a song to your Reel from Instagram’s recommended list. You can also choose to skip this step.Step 5: Edit your Reel on the following page. Hit the blue arrow icon when you’re done.Step 6: Write a caption and add a thumbnail for your Reel. You can also tag other people and control other visibility settings from this page. Hit Next.Step 7: Hit Share.
Another way to post your Instagram Story as a Reel
Step 1: Open your Instagram Story and tap the ellipses at the bottom right corner of the screen.Step 2: Tap on Save video. The video will be saved to your Camera Roll.Step 3:Swipe right from your homepage and switch to the Reel tab.Step 4: Tap the Gallery icon at the bottom left corner of the screen and upload the Story you just saved on your device.Step 5: On the following page, edit the video and add text, music, stickers, or filters to it. You can also add location to your Reel. Hit Next when you’re done.Step 6: Add a caption and edit the Reel cover. Hit Share.Your Instagram Story will be shared as a Reel.
Bonus Tip: How to add an Instagram Reel to your Story
Step 1: Launch the Instagram app and open the Reel you want to share as a Story.Step 2: Tap the Share icon.Step 3: Select Add reel to your story.
Frequently Asked Questions (FAQs)
What is the time limit for Instagram Reels?
Instagram Reels have a time limit of up to 90 seconds. In comparison, an Instagram Story has a time limit of 60 seconds.
How do I share an Instagram Story as a Reel?
Post the Instagram Story as a Highlight on your profile, then open the Highlight and hit the Create option at the bottom of the screen.
How do I download an Instagram Reel on my phone without using a third-party app?
Unfortunately, Spotify is making changes to its free service in India. From now onwards the free users of the Audio Streaming app will not be able to access a few features. Now those features will only be accessible to Premium users in the country. After imposing a cap following features will not be accessible.Now users who have not subscribed to Spotify premium subscription will no longer to able to avail benefits of other features of the free services. The Application is now limiting the users to play songs in any order, or repeating songs/or on a loop and tapping back to the previous song. However, the users will still be able to access to the artists, albums and playlists they like with song recommendations mixed in.Also Read: Global PC shipments fell 7.6% YoY in Q3 2023: ReportAll of these features have been available to free users since its launch. But now after imposing a limit, the company says these restrictions were being put to make the free experience more uniform across the globe.A pop-up has started to show up on the Spotify app for those who are not paying a subscription. There three of the above-listed features have been locked and will now only be unlocked if you opt for the premium service. So now the users have the choice to pay and benefit. The Spotify Premium subscription in India starts at Rs 119. After you have opted for the paid service you will get access to on-demand and ad-free music listening, offline music downloads, and quality music streaming.It should be noted that for several months, we at Gadget Bridge were also unable to access the option that allowed us to choose a specific section of a song, or to play our playlist in the order that it was organised.
Spotify Premium offer a total of four plans:
Mini Play starts at Rs 7 per day where only one account on mobile is accessible. Users have access to Ad-free music listening on mobile, Group Sessions and Download 30 songs on 1 mobile device.Whereas the only Individual Plan/monthly starts at Rs 119. Along with access to Ad-free music listening and Group Sessions, you will also be able to download 10k songs/device on 5 devices.Duo Plan as the name suggest allow two accounts to access the Spotify Premium Service starting at Rs 149 per month. This is suitable for couples having access for Ad-free music listening, Group Sessions and downloading 10k songs/device, on 5 devices per account.Lastly, the Family pack starts at Rs 179 per month where 6 family members can be added. This plan offers all the basic features but provide the functionality to block explicit music.
For the latest gadget and tech news, and gadget reviews, follow us on Twitter, Facebook and Instagram. For newest tech & gadget videos subscribe to our YouTube Channel. You can also stay up to date using the Gadget Bridge Android App. You can find the latest car and bike news here.
According to research by IDC Tracker, global PC shipments show a decline again in the third quarter of 2023 despite signs of market improvement. The shipment is down by 7.6% year over year with 68.2 million PCs shipped.The preliminary results from the International Data Corporation (IDC) Worldwide Quarterly Personal Computing Device Tracker show demand and the global economy are still weak. Shipments, however, rose in each of the previous two quarters, decreasing the yearly decline and proving that the market is no longer at the bottom of the trough.Also Read:Nokia G42 5G new variant now available in IndiaIn the past few months PC inventory has also become less substantial and is now close to healthy levels in most channels. As per the analyst the consumer and business sectors are experiencing downward pricing pressure that is anticipated to stay around.Image Courtesy: IDCThe top 5 vendors saw double-digit decreases throughout the quarter but Apple’s huge loss was caused by challenging YoY comparisons as the company recovered from a COVID-related production halt during the third quarter of 2022. On the other hand, HP’s growth was mostly the result of inventory returning to normal.But this not going to last long as the PC sector is still recovering slowly. Reportedly the device refresh cycle and end of support for Windows 10 will help drive sales in the second half of 2024 and beyond. Unfortunately, the PC industry will continue to suffer meanwhile. As per Jitesh Ubrani, research manager for IDC’s Mobility and Consumer Device Trackers, “The slowness in the industry is giving the supply chain an opportunity to explore procurement and production options outside China and this will likely remain a key issue going forward, second only to the advancement of AI within PCs.”Image Courtesy: IDC“While the Generative AI could be a watershed moment for the PC industry,” said Linn Huang, research vice president, of Devices & Displays at IDC. “While use cases have yet to be fully articulated, interest in the category is already strong. AI PCs promise organizations the ability to personalize the user experience at a deeper level all while being able to preserve data privacy and sovereignty. As more of these devices launch next year, we expect a significant boost to overall selling prices.”
For the latest gadget and tech news, and gadget reviews, follow us on Twitter, Facebook and Instagram. For newest tech & gadget videos subscribe to our YouTube Channel. You can also stay up to date using the Gadget Bridge Android App. You can find the latest car and bike news here.
Garena Free Fire is a battle royale game with regular awards and tournaments to keep players interested. If you play Garena Free Fire, you should be aware of the redeem codes that are released on a daily basis. However, because the battle royale game is banned in India, players from other countries can use the Free Fire Redeem codes daily. If you’re unfamiliar with the Garena Free Fire redeem codes or don’t know how to get them, we’ve put together a step-by-step guide to help you redeem them. Check out Garena Free Fire Redeem Codes for 11 October 2023.The Free Fire redeem codes are a great way to get free stuff. These are 12-digit codes that contain alphabets and numbers, as well as an expiration date and time. Because the Garena FF redeem codes cannot be used more than once, you should hurry to the redemption page to claim your free reward before someone else does. To get a free reward, all you have to do is go to reward.ff.garena.com/en, which is the official redemption page. Also, keep an eye on this space for daily updates on Garena Free Fire redemption codes and rewards.
In This Article
Garena Free Fire Redeem Codes Today 11 October2023
Updating soon…
How to Get Free Fire Redeem Codes for Garena on 11 October2023?
Performing a factory reset on your mobile device is essential before selling it to a third party. A factory reset clears all your personal data and logs you out of all your accounts on the device. If you forgot to take this important measure, there is a way you can individually log out of all social media platforms on the device. Today, we bring you the top 6 ways to remove devices connected to your Instagram account on mobile and PC.Read Also:Top 4 Ways to Watch Instagram Reels on Windows PC Without Logging in
In This Article
Remove Connected Devices on Instagram using the mobile app
Step 1: Launch the Instagram app on your smartphone and tap the profile icon at the bottom right corner of the screen.Step 2: Hit the hamburger menu icon at the top right corner of the screen.Step 3: Select Settings and privacy.Step 4: Tap on Accounts Centre.Step 5: Select Password and security.Step 6: Tap on Where you’re logged in.Step 7: Select your account.Step 8: Scroll down and tap on Select devices to log out.Step 9: Tap on the connected device(s) you want to remove from your Instagram account.Step 10: Select Log out.
Remove Connected Devices on Instagram using its PC website
Step 1: Launch your PC’s web browser and log into Instagram’s website using your account credentials.Step 2: Click on the More option on the left and select Settings.Step 3: Select See more in Accounts Centre.Step 4: Switch to the Passwords and security tab and click on Where you’re logged in.Step 5: Select your account.Step 6: Click on Select devices to log out.Step 7: Click on the device(s) you want to remove from your Instagram account and hit Log out.
Remove Connected Devices on Instagram using the mobile website
Step 1:Launch your preferred web browser app on your smartphone and go to the Instagram website. Log into your Instagram account.Step 2: Tap the profile icon at the bottom right corner of the screen.Step 3: Hit the gear icon at the top left corner of the screen.Step 4: Tap on See more in Accounts Centre.Step 5: Select Password and security.Step 6: Tap on Where you’re logged in.Step 7: Select your account.Step 8: Scroll down and tap on Select devices to log out.Step 9: Tap on the connected device(s) you want to remove from your Instagram account.Step 10: Select Log out.
Remove all Connected Devices to your Instagram account by changing its password
Step 1:Launch the Instagram app on your smartphone and tap the profile icon at the bottom right corner of the screen.Step 2: Hit the hamburger menu icon at the top right corner of the screen.Step 3: Select Settings and privacy.Step 4: Tap on Accounts Centre.Step 5: Select Password and security.Step 6: Tap on Change password.Step 7: Select your account.Step 8: Type your current password, then enter a new password and retype it. Tap on Change Password when you’re done.You will be logged out of Instagram across all devices.
Change your Instagram password on PC
Step 1:Launch your PC’s web browser and log into Instagram’s website using your account credentials.Step 2: Click on the More option on the left and select Settings.Step 3: Select See more in Accounts Centre.Step 4: Switch to the Passwords and security tab and click on Change password.Step 5: Select your account.Step 6: Type your current password, then enter a new password and retype it. Tap on Change Password when you’re done.
Change your Instagram password on the mobile website
Step 1:Launch your preferred web browser app on your smartphone and go to the Instagram website. Log into your Instagram account.Step 2: Tap the profile icon at the bottom right corner of the screen.Step 3: Hit the gear icon at the top left corner of the screen.Step 4: Tap on See more in Accounts Centre.Step 5: Select Password and security.Step 6: Tap on Change password.Step 7: Select your account.Step 8: Type your current password, then enter a new password and retype it. Tap on Change Password when you’re done.
Frequently Asked Questions (FAQs)
How do I find out if someone else is using my account?
If someone else has gained unauthorised access to your Instagram account, their device will show up in the list of connected devices to your account. Go to Instagram>Profile>Menu>Settings and privacy>Accouts Centre>Passwords and security>Where you’re logged in to find out which devices are connected to your Instagram account. If you do not recognise a particular device, it may belong to someone who has somehow gained access to your account. You can remove this device by tapping on Select devices to log out.
How do I log out of Instagram on all my devices at once?
To remove all devices connected to your Instagram account at once, simply go to Instagram>Profile>Menu>Settings and privacy>Accouts Centre>Passwords and security>Where you’re logged in, tap on Select devices to log out, hit Select all, and then tap on Log out. You can also log out of all connected devices at once by changing your Instagram password.
How do I set up a login alert on Instagram?
To make sure you’re notified every time you log into Instagram on another device, go to Instagram>Profile>Menu>Settings and privacy>Accouts Centre>Passwords and security>Login alerts and select in-app or email alerts.Read Also:Samsung Galaxy S23 FE Review: The flagship killer of the year?
HMD Global launched the Nokia G42 5G in India last month. Then the phone was introduced in a single configuration. Today the company has announced a new RAM and storage model for the smartphone. The smartphone is powered by Qualcomm Snapdragon 480+ SoC. It has a triple back camera setup, with a 50-megapixel primary sensor. The device also includes a 6.56-inch HD+ LCD screen.
In This Article
Nokia G42 5G new variant price in India, sale details
Nokia G42 5G is now being made available in a 16GB RAM with 256GB storage option. The new variant of the phone is priced at Rs 16,999. The device is already available in 6GB RAM with 128GB storage option for Rs 12,599. The phone is being offered in three colour options of So Grey, So Purple and So Pink.Also Read:Truke Clarity Five TWS Review: Great sound qualityThe device can be purchased via retail stores, Amazon and Nokia.com.
Nokia G42 5G specifications
Nokia G42 5G has a 6.56-inch HD+ LCD screen with a resolution of 720 x 1,612 pixels. The display can offer a peak brightness of 560 nits at a refresh rate of 90Hz. Corning Gorilla Glass 3 is also used to protect the front panel.The Nokia G42 5G runs Android 13 and the company is promising to offer two years of Android OS upgrades and three years of monthly security patches. The phone is powered by octa-core Snapdragon 480+ SoC, along with up to 16GB of RAM and 256GB of internal storage. Virtual RAM expansion up to 11GB is possible.For the photos and videos the device comes with a triple back camera system of the Nokia G42 5G includes a 50-megapixel primary sensor and two 2-megapixel sensors. The front of the device has an 8-megapixel sensor for selfies and video calls.A 5,000mAh battery with 20W wired fast charging capabilities is also included in the Nokia G42 5G. The phone’s construction is IP52-rated for resistance to water and dust. The Nokia G42 5G has Wi-Fi 802.11 a/b/g/n/ac/ax, Bluetooth 5.1, GPS, a USB Type-C port, and 5G connectivity options. It has an e-compass, proximity sensor, ambient light sensor, and accelerometer. Lastly, a side-mounted fingerprint sensor is also present for authentication.
For the latest gadget and tech news, and gadget reviews, follow us on Twitter, Facebook and Instagram. For newest tech & gadget videos subscribe to our YouTube Channel. You can also stay up to date using the Gadget Bridge Android App. You can find the latest car and bike news here.
In India, Truke recently debuted its new Truke Clarity Five TWS earphones. The cost of the item is less than Rs 1,500. The device comes with features like 6-Mic Advanced Environmental Noise Cancellation, dual connectivity, IPX5 water protection, 13 mm Titanium speakers, an 80-hour playback capacity, and more at this price. We have been using them for about a week and here is our Truke Clarity Five Review, let’s dive straight in.
In This Article
Truke Clarity Five TWS Review: Design
Taking a closer look at the construction and design, it reveals that the Truke Clarity Five has a unique case with a half-glossy, half-matt surface. The device is small, light, and portable. Its design, which is like a pebble, makes it easy to hold in hand and fits wonderfully in the pocket. The case weighs about 38 grams, which is with the earbuds inside that are 4g each. The lid bears the Truke logo. It will attract some fingerprints and smudges on the shell and upper glossy portion of the earbuds, however can be quickly wiped too. Right in the middle, there is an LED light, while the bottom has a USB port to charge the case. The entire charging casing is constructed of plastic.The lid can be easily opened with one hand and is not overly light. The earbuds are within it, safely tucked into their assigned left and right slots. The case includes magnets inside it to hold the earphones in place.The buds have small stems that have LED indicators and the company’s logo is engraved on them. Although the earbuds are exceptionally light and comfy to use, we occasionally felt a little uncomfortable for extended listening sessions. The earbuds come with two additional sets of interchangeable silicone ear tips, too.Each of the earbuds has a total of three microphones for improved call quality and noise cancellation. Since the earbuds have an IPX5 rating, they should be fine with light splashes and sweat, but avoid entirely submerging them in water while swimming or engaging in any other water sports. Additionally, bear in mind that the casing lacks an IP certification, so keep it dry and secure.Over that, it includes Bluetooth 5.3, the most recent version, for more consistent connectivity. Then Dual-Pairing Technology onboard allows you to open the lid and you will see a pairing pop-up on your Android phone click to pair. The dual connectivity allows you to easily switch between a smartphone and a laptop.Regarding comfort and fit, we can mark that they were quite well-snugged and effectively blocked the majority of passive sound. They are also incredibly light and pleasant to wear but not for extended periods of time, as said. We shook our heads to see if they fell off. We can confirm that they can fall off but make sure you have the correct size silicone tips because it will significantly affect how they fit and, eventually, how they sound.
Truke Clarity Five TWS Review: Performance
Speaking of sound quality, they are decent loud. The 13mm titanium speaker drivers produce clear sound with a medium bass. With the help of three preset EQ modes—Bass Boost, Movie Mode, and Dynamic Audio—you may adjust the sound to your preferences. If you are a bass head you can boost the bass from the preset. Similarly, when watching movies you can enable the movie mode to hear the dialogue clearly. Environmental noise cancellation (ENC) is also provided via the six microphones on the earbuds, allowing for noise-free calls.Additionally, for gaming, the earbuds support 35ms Ultra-Low Latency. However, we found some lags, so if you’re primarily searching for gaming purposes, we won’t suggest them.Talking about the battery performance Truke Clarity Five comes with a 500mAh battery that is claimed to provide 80 hours of playback time. Each earbud has a 40mAh battery. In our testing, the device was able to provide 3 days of playback as we particularly used them for 4 to five hours daily at 70 per cent volume but this can be stretched more depending on your usage. With the case, the battery is said to last for 80 hours.
Verdict
While playing games, we did notice a very tiny delay, but you can still play; nevertheless, when watching films and videos, the vocals synchronised flawlessly. There was absolutely no delay. The battery life is also excellent, allowing us to listen to music nonstop for hours. You can’t really complain about the pricing with the sound quality and ANC alone being so good for just Rs 1,699. Therefore, they are highly recommended.
While iOS users have had the option to use Dark Mode on Snapchat for several users, Android users are just starting to get the feature on their devices. Snapchat is rolling out dark mode for the Android platform in a phased manner. This means that a lot of users may not get access to it for a few more weeks (or even months). Can’t wait any longer? In this article, we bring you the top 4 ways to get dark mode in Snapchat on Android and iOS.Read Also:Top 7 Methods to Check If Your Phone Supports Wireless Charging
In This Article
Turn on Dark Mode for Snapchat on iOS
Step 1:Launch the Snapchat app on your iPhone or iPad.Step 2: Tap your profile icon at the top right corner of the screen.Step 3: Hit the gear icon at the top right corner of the screen to open Settings.Step 4: Scroll down and select App Appearance.Step 5: Tap on Always Dark. If you want to toggle Snapchat’s dark mode using your iPhone’s settings, select Match System.
Turn on Dark Mode for Snapchat using system settings on iOS
Step 1: Using the steps mentioned above, select Match System in Snapchat’s dark mode menu.Step 2: Go to your iPhone’s Settings and select Display & Brightness.Step 3: Tap on Dark to enable Dark Mode. This change will be applied across your iPhone’s interface, including the Snapchat app.
Turn on Dark Mode for Snapchat on Android
Step 1:Launch the Snapchat app on your Android smartphone.Step 2: Tap your profile icon at the top right corner of the screen.Step 3: Hit the gear icon at the top right corner of the screen to open Settings.Step 4: Scroll down and select App Appearance.Step 5: Tap on Always Dark.
Force Dark Mode on Snapchat using Developer Settings on Android
Since Snapchat’s Dark Mode feature is still rolling out for Android devices, a lot of users are still not able to access it on their phones. Luckily, there is a workaround to this situation. Your phone’s developer settings allow you to force dark mode on any app on your device, including Snapchat. However, it will require downloading an older version of Snapchat on your phone using a third-party app marketplace. Here’s how you can go about it.Step 1: Enable Developer Mode on your Android phone by tapping on its build number 7 times. Read this article to learn the step-by-step process.Step 2: Go to Settings and scroll all the way to the bottom to access Developer Options.Step 3: Scroll down to ‘Hardware accelerated rendering’ and turn on the toggle switch for Force Dark mode.Step 4:Uninstall Snapchat from your device and download an older version from a third-party marketplace.Step 5:Launch the Google Play Store app and go to Snapchat’s app page.Step 6: Tap the ellipses at the top right corner of the app and untick the checkbox for Enable auto-update.Step 7:Launch the older version of the Snapchat on your device. It will adhere to your system’s dark mode.
Frequently Asked Questions (FAQs)
Does Snapchat offer Dark Mode on Android?
Snapchat is still rolling out the dark mode feature for its Android users. Since the roll-out is taking place in phases, a lot of users do not have access to the feature yet. If Snapchat supports dark mode on your device, go to Profile>Settings>App Appearance>Always Dark to enable it.
How do I enable Dark Mode on Snapchat if the Android app doesn’t support it?
You can force the Snapchat app to adhere to your system’s dark mode using your phone’s developer settings. Once the developer mode has been enabled on your device, go to developer settings and turn on the toggle switch for Force Dark mode. Make sure you are using an older version of Snapchat for the change to take effect.
What is the advantage of using Dark Mode on my smartphone?
Using Dark Mode on your mobile device not only extends its battery life but also exerts less stress on your eyes by cutting out the blue light emitted by the screen. This comes in very useful when there’s limited lighting around you and your phone is the brightest source of light.Read Also:Samsung SSD T9 with up to 2,000 MB/s transfer speed launched in India
Conclusion
These are the top 4 ways to get dark mode in Snapchat on Android and iOS. Make sure the Snapchat app is updated to its latest version on your Android phone in order to access the latest features added to the platform. If you are using an older version of the app, you may not be able to access Dark Mode even when it has been rolled out for your device.For the latest gadget and tech news, and gadget reviews, follow us on Twitter, Facebook and Instagram. For newest tech & gadget videos subscribe to our YouTube Channel. You can also stay up to date using the Gadget Bridge Android App. You can find the latest car and bike news here.
Amazon Great Indian Festival 2023 sale is currently live. The e-commerce platform is offering amazing deals and offers on smartphones, laptops, Televisions, Echo devices, smartwatches, earphones and other electronic appliances. However, smartphones are the biggest attraction. If you are shopping during this festive season Amazon has some great offers including Bank offers, exchange offers and no-cost EMIs. So if you are planning to buy a new 5G smartphone now is the best time to do so. Check out some of the best 5G smartphone deals below Rs 20,000 in this article.
In This Article
Amazon Great Indian Festival 2023: Best 5G smartphone deals under Rs 20,000
Galaxy A14 5G
Samsung Galaxy A14 5G
Samsung Galaxy A14 5G on Amazon is currently listed at Rs 17,999 for the 6GB RAM with 128GB storage option. A 6.6-inch full-HD+ PLS LCD screen is featured on the Samsung Galaxy A14 5G. The mobile phone is powered by an octa-core Snapdragon 695 CPU. There is a triple rear camera set-up that includes a 50-megapixel primary camera, a 2-megapixel macro camera, and a 2-megapixel depth sensor. A 13-megapixel front-facing selfie camera is also included.
Oppo A78 5G
The Oppo A78 5G is currently listed at Rs 18,999 on Amazon for the 8GB RAM with 128GB storage model. This Oppo smartphone is equipped with a 7nm MediaTek Dimensity 700 SoC. The mobile phone features a 6.56-inch HD+ IPS LCD screen. It runs on ColorOS 13 on top of Android 13. The dual rear camera set-up on the phone includes a 50-megapixel primary camera with an f/1.8 aperture and a 2-megapixel sensor with an f/2.4 aperture. It also has a front-facing 8-megapixel camera with an f/2.0 aperture. A 5,000mAh battery that supports 33W SuperVOOC fast charging powers the Oppo A78 5G.
iQOO Z7s 5G
iQOO Z7s 5G is the next in the list which is currently selling at Rs 17,999 for the 8GB RAM with 128GB storage on Amazon. The handset is highlighted with a 6.38-inch full-HD+ display. Funtouch OS 13 on top of Android 13 operates the phone. Under the hood is an octa-core Qualcomm Snapdragon 695 5G SoC and Adreno 619L GPU.The 5G smartphone features a dual rear camera setup a 64-megapixel primary sensor and a 2-megapixel sensor. In addition to this, there is a 16-megapixel front-facing camera for taking selfies. The phone has a 4,500mAh battery and support for 44W wired Flash Charging.
Samsung Galaxy M34 5G
The Samsung Galaxy M34 5G is available with a starting price of Rs 15,999 for 6GB RAM with 128GB storage options. The smartphone features a Full HD+ 6.5-inch display. The device runs OneUI 5.1, an Android 13-based operating system. The 5G phone is powered by Exynos 1280 SoC with a Mali-G68 MP4 GPU. It has a triple rear camera setup that includes a 50-megapixel primary sensor, a 2-megapixel macro sensor and an 8-megapixel ultra-wide angle camera. For selfies, there is a 13-megapixel sensor front-facing camera. A 6,000mAh battery powers the device.
OnePlus Nord CE 3 Lite 5G
OnePlus Nord CE 3 Lite comes with a starting price of Rs 19,999 for the 8GB RAM with 128GB storage option on Amazon. Whereas the 8GB RAM with 256GB storage option is priced at Rs 21,999. The device features a 6.72-inch full-HD+ LCD. An octa-core Snapdragon 695 SoC with an Adreno 619 GPU are under its hood. This 5G smartphone has a triple rear camera system that includes a 108-megapixel Samsung HM6 sensor with an f/1.75 aperture and EIS capability. A second 2-megapixel depth sensor and a 2-megapixel macro lens are also included. For taking selfies, there is a 16-megapixel front-facing camera.
For the latest gadget and tech news, and gadget reviews, follow us on Twitter, Facebook and Instagram. For newest tech & gadget videos subscribe to our YouTube Channel. You can also stay up to date using the Gadget Bridge Android App. You can find the latest car and bike news here.
Instagram’s bite-sized video content has become the website’s primary driver in just three years of being introduced to the platform. Instagram boasts thousands of original content creators who post Reels to the platform every day and develop new trends that make their way into other platforms as well. While mobile devices are more suited for watching Reels, you can view them on your PC as well. In this article, we bring you the top 4 ways to watch Instagram Reels on a Windows PC without logging into your Instagram account.Read Also:Samsung SSD T9 with up to 2,000 MB/s transfer speed launched in India
In This Article
Watch Reels on Instagram’s Website
Instagram’s website for PC allows you to view posts and watch Reels without logging into your account. Content posted on public profiles can also be viewed by users who haven’t signed up to the platform. To view Reels from a particular account, add its username to the Instagram URL and hit ‘Enter’. For example, if you want to view the Reels posted by Netflix, type https://www.instagram.com/netflix/ in the URL box and hit Enter. Once you land on the profile, switch to the Reels tab to view all the Reels posted by the account in one place.
Use Imginn to watch Instagram Reels on your PC without logging in
The only downside to using the official Instagram website without an account is that it doesn’t let view all the posts on a profile. To get around this issue, use a third-party app like Imginn. Here’s how you can watch Instagram Reels using Imginn.Step 1: Go to https://imginn.io/.Step 2: Enter the Instagram username of the profile you want to view in the Instagram Profile Viewer box.Step 3: Click on the Captcha checkbox and hit Search.Step 4: The Instagram profile will be displayed in a popup window. Switch to the Reels tab to view all the Reels that the account has posted in one place.
Use Igram.world to watch Instagram Reels without an account
Igram.world is another third-party website that lets you view and download Reels from any public Instagram account. Here’s how you can go about it.Step 1: Go to https://igram.world/reels-downloader.Step 2: Enter the Instagram username in the search box.Step 3: Hit Enter.Step 4: Browse through the Reels posted by the account and hit the Download button under the ones you want to save on your device.
Use GreatFon
Step 1: Go to https://greatfon.com/.Step 2: Enter the Instagram username, location, or hashtag you want to browse in the search box.Step 3: Hit Enter.Step 4: Select the profile from the results.Step 5: Switch to the Reels tab.Step 6: Click on the Reel you want to watch.
Frequently Asked Questions (FAQs)
Is it possible to view Instagram Reels on a PC without making an account?
Watching Instagram Reels on a PC without an account is possible, but it comes with some restrictions. Firstly, you will only be able to view Reels posted by a public account. Secondly, you won’t be able to interact with the content that the user has posted. To view Reels from a public Instagram profile, simply add its username to the Instagram URL in your URL’s address box and hit Enter. Upon landing on the profile, click on the Reels tab to view all the videos in one place.
How do I view all the posts made by an Instagram profile without making an account?
The only limitation of using the official Instagram website is that it lets you view only a certain number of posts without an account. To view all the content posted by a profile, use third-party websites like Imginn and Igram.world.
Does Instagram have an app for PCs?
To download the Instagram app for your PC, simply go to the official Instagram website and hit the computer icon in the address bar. You can also download the Instagram app for your PC from the Microsoft Store.Read Also:Top 7 Free Apps to Compress Videos on Android
Conclusion
This is how you can watch and download Instagram Reels on a Windows PC without logging into your account. Apart from viewing Reels from a particular account, you can also use websites like Imginn and Igram.world to download them. These websites let you view and download posts, videos, and active stories from any public Instagram account. Got another way to view Instagram Reels without an account? Let us know in the comments!For the latest gadget and tech news, and gadget reviews, follow us on Twitter, Facebook and Instagram. For newest tech & gadget videos subscribe to our YouTube Channel. You can also stay up to date using the Gadget Bridge Android App. You can find the latest car and bike news here.
After skipping the Galaxy S22 series, Samsung has brought back the ‘Fan Edition’ smartphone for the Galaxy S23. Offering flagship-level specs at relatively affordable pricing, the Fan Edition smartphones are hugely popular among users looking for the highest value they can get for their buck. This year’s Samsung Galaxy S23 FE is priced at Rs 59,999. HDFC Bank’s credit/debit card holders can avail an instant discount of Rs 10,000 on the smartphone. The smartphone gets some important updates over the S21 FE, but does it justify its price tag? Let’s find out in our Samsung Galaxy S23 FE review.Read Also:iPhone 15 Pro Max Vs iPhone 14 Pro Max: Specs compared
In This Article
Samsung Galaxy S23 FE review: Design and Display
The Samsung Galaxy S23 FE ships in a compact black box, much like the flagship Galaxy S23 lineup. Inside, you get the smartphone, a USB Type-C charging cable, a SIM ejector tool, a regional lock guide, and a quick start guide. There is no power adapter inside the retail box, which is a trend that has also seeped down to the Galaxy A, M, and F series.Samsung Galaxy S23 FE gets a glass back (Corning Gorilla Glass 5) which is a significant upgrade from the plastic panel on the S21 FE. For a smartphone priced at Rs 60,000 in 2023, anything less would be a compromise. There are three colour options on offer – Mint, Graphite, and Purple. We got the Mint variant for this review. The pastel colour theme works very well for the smartphone, even though some may find it a bit pale. If that’s the case with you, the Graphite and Purple variants would be more up your alley.The vertical camera array has been the common theme for all Samsung smartphones this year, from the flagship S series to the M, F, and A series. This universal design language robs individual smartphones of their unique personality. Since Samsung’s Fan Editions are based on the flagship S Series lineup from their respective year, a new design for them is out of the question. The Galaxy S23 FE gets aluminium rings around the camera bumps. If you compare the back panel of the S23 FE with the regular S23, you’ll be hard-pressed to find any differences apart from their size.The chunky aluminium frame on the Samsung Galaxy S23 FE is similar to the one we saw on the Galaxy A54 a few months ago. This frame has a matte finish in contrast to the glossy back panel. A sleeker frame would have massively amped up the ‘premium’ factor of the smartphone and brought it closer to the flagship segment. The right side of this frame houses the volume rocker and the power/Bixby key. The USB Type-C port, primary microphone, and speaker grille are positioned at the bottom edge. The left side of the frame is left bottomless while the SIM card slot and the secondary microphone lie at the top edge. The smartphone’s earpiece doubles up as a stereo speaker.As you’d expect with a Samsung offering, the Galaxy S23 FE’s display is one of the best in its segment. It gets a 6.4-inch Dynamic AMOLED 2X unit with a 120Hz refresh rate. This display can reach a peak brightness of 1,450 nits under direct sunlight, which is an improvement over the Galaxy S21 FE. In comparison, the entry-level Galaxy S23 can reach 1,750 nits. The touch response and fluidity of this display are as good as its flagship counterpart. Scrolling through the interface and switching between different apps is a seamless experience. The display registers even the faintest of touches and its touch response rate is unmatched in this price segment.Consuming Full HD content on this display is a very enjoyable experience. The videos pack a lot of detail and are tuned to perfect in terms of contrast and dynamic range. The 1,080 x 2,340p resolution is not the highest we’ve seen in this segment, but the image optimisation on this display does not make you feel like you’re missing out on anything. Surprisingly, there is no HDR support for Netflix on this smartphone. This is certainly not ideal, but it wasn’t a dealbreaker for us.The only complaint we have is with the thickness of the bezels surrounding the display. Samsung loyalists will know what we’re talking about as this issue is prevalent across every series bar the flagship S23 lineup. The bezels on the Samsung Galaxy S23 FE get thicker around the chin, which is certainly not ideal given the smartphone’s price tag and costs it some brownie points in our review.On the bright side, the smartphone gets an IP68 rating for dust and water resistance. While we didn’t dunk the device in a glass of water, it was unfazed by minor splashes and light rainfall. Samsung claims that the S23 FE is water resistant up to 1.5 metres for 30 minutes.
Samsung Galaxy S23 FE review: Performance and Cameras
The Galaxy S23 FE gets Samsung’s in-house Exynos 2200 SoC inside it. While this 4nm process chipset is an upgrade over the Exynos 2100 on the S21 FE and the Exynos 1380 on Samsung’s 2023 midranger, Galaxy A54, it has some pretty significant flaws. And yes, they are directly related to the smartphone’s thermal management.On paper, the Samsung Galaxy S23 FE performs decently, scoring 1,379 points on the single-core test and 3,606 points on the multi-core test on the Geekbench 6 app. However, in everyday use, the smartphone runs a little warm even while carrying out the most basic of tasks. We noticed the temperature of the phone rose after taking a few photographs under direct sunlight. The device warmed up even more drastically while recording 8K resolution videos. Heating issues aside, we did not come across any unwanted lags or stutters while using the smartphone. Routine tasks like web browsing, media playback, instant messaging, and video calling were handled with expertise.There is some bad news for gamers, however. The thermal management issues become even more prominent while playing games like BGMI and Call of Duty Mobile. It takes around 10-15 minutes of gameplay for the smartphone to warm up. Not something you’d expect of a device in this price range. While we didn’t experience any major stuttering or frame drops during gameplay, the fluidity and seamlessness we were expecting were not delivered by the smartphone.OS duties on the S23 FE are handled by Android 13 and One UI 5.1. There is a hint of bloatware in the form of Netflix, Facebook, Spotify, and a bunch of Microsoft apps. The good news is that the smartphone gets flagship-exclusive features like Samsung DeX and Knox security. On top of that, you also get privacy features like Secure Folder and Private Share. One UI also offers some cool video call effects, which allow users to change their background to a monochromatic colour, blur, or a different image on WhatsApp, Google Meet, and Facebook calls. Samsung promises 4 years of major OS upgrades and 5 years of security upgrades that are only surpassed by Google on the newest Pixel 8 series.Samsung Galaxy S23 FE offers a pretty standard one-day battery cover. After a day of moderate to heavy usage, we were left with a 15-18% charge. With 25W charging support, the 4,500mAh battery takes just under an hour to fully charge.The camera performance of the Samsung Galaxy S23 FE blows almost every smartphone in this category out of the water, as you’ll find out in this review. This is largely due to the updated 50MP main sensor which is also found on the flagship Galaxy S23. Images taken in outdoor conditions using the primary shooter were tuned to perfection. They displayed an excellent dynamic range, balanced contrast, and vibrant colours without coming across as too overprocessed. We were pleased with the way the sky was exposed in the images. Objects in the background were captured with an adequate level of detail.The 12MP ultrawide camera surprised us with the way it retained the colour composition within the images. While the pictures feel a bit softer, they do not appear washed out at all. The same cannot be said about most of the smartphones in this price segment. You can rely on the Galaxy S23 FE’s ultrawide lens to take solid shots under ideal daylight conditions. The 8MP telephoto lens is a good addition to the smartphone’s camera array. The 3X optical zoom produces good results. Even with 5X zoom, there is no significant drop in image quality.Ultrawide ShotUltrawide ShotThe Samsung Galaxy S23 FE continues its stellar camera performance in limited lighting conditions as well. The handy night mode gets rid of the grain in the images and does a great job of artificially lighting up the subject. The camera app also has a Portrait Mode which takes great shots of the subject up close. The camera can intelligently separate the subject from the background and apply the optimum level of blur.Without Night Mode vs Night ModeAnother significant upgrade to the S23 FE’s camera is the ability to record videos in 8K. While the camera may warm up if you’re shooting in 8K under direct sunlight, the result is absolutely worth it. The smartphone can also record 4K videos at 30fps. The 10MP selfie camera up front takes good quality selfie shots without overcorrecting the skin tone and texture. It is capable of recording 4K videos at 30fps as well.Indoor Ultrawide ShotZoom: 1x vs 3x vs 5xRead Also:OnePlus offering huge discount on OnePlus 11 5G Series during Amazon and Flipkart Sale
Conclusion
Samsung Galaxy S23 FE has all the makings of a flagship killer. It rocks one of the best display units in the segment while delivering the camera performance that matches the Galaxy S23 flagship. The only letdown is the Exynos 2200 SoC, which falls a little short in managing the smartphone’s heat levels. Having said that, if you’re not interested in power-intensive tasks like photo editing or gaming, the Samsung Galaxy S23 FE’s design, display, and camera performance may sway you in its favour.
Samsung Galaxy Tab S9 FE and Galaxy Tab S9 FE+ were launched in India last week. Today the company introduced more affordable tablets namely Samsung Galaxy Tab A9 and Galaxy Tab A9+ in the country. The device is a successor to the Galaxy Tab A8 that was released in the country last month. The newly arrived tablets are powered by MediaTek and Snapdragon chipset respectively. However, they have the same battery capacity.
In This Article
Samsung Galaxy Tab A9, Galaxy Tab A9+ price in India, sale details
The Samsung Galaxy Tab A9 has been introduced with a price tag of Rs 12,999 for the 4GB RAM with 64GB storage Wi-Fi only variant. Whereas the Wi-Fi + 5G variant with similar storage is priced at Rs 15,999. On the other hand, the Galaxy Tab A9+ 8GB RAM with 128GB storage Wifi only variant comes with a price tag of Rs 20,999. The price of Wi-Fi + 5G is yet to be announced. Both models are available in three colour options of Dark Blue, Grey, and Silver.Also Read:Samsung SSD T9 with up to 2,000 MB/s transfer speed launched in IndiaThe Samsung Tablets can be purchased via Amazon in the country. SBI credit card holders are eligible to get an instant discount of up to Rs 5,000 on the purchase of the tablet.
Samsung Galaxy Tab A9 comes with an 8.7-inch LCD WQXGA display with 800×1,340 pixels of resolution. There is 60Hz refresh rate support. The device is powered by MediaTek Helio G99 SoC and runs on Android 13 with OneUI 5.1.1.There is a single 8-megapixel rear camera with autofocus on the tablet for photos and videos. It includes a 2-megapixel front-facing camera for selfies and video calling. The dual speaker set up on the Tab is powered by AKG which comes with Dolby Atmos support.On the other hand, the Samsung Galaxy Tab A9+ is highlighted with a bigger 11-inch WQXGA LCD display with 1,200 x 1,920 pixels of resolution. The screen has 90Hz refresh rate support. The Tab runs on OneUI 5.1.1 with Android 13. An octa-core Snapdragon 695 SoC by Qualcomm powers the tablet. The internal storage on the Samsung Tab can be expanded using a microSD card.The rear camera on the Galaxy Tab A9+ is similar to its sibling. However, there is a 5-megapixel front camera for selfies on the device. This tab includes a total of four speaker set up by AKG that supports surround sound. Both the tablet boasts a 5,100mAh battery. Also, there is 5G, Wi-Fi, Bluetooth, and USB Typse-C port for connectivity.For the latest gadget and tech news, and gadget reviews, follow us on Twitter, Facebook and Instagram. For newest tech & gadget videos subscribe to our YouTube Channel. You can also stay up to date using the Gadget Bridge Android App. You can find the latest car and bike news here.
Garena Free Fire is a battle royale game with regular awards and tournaments to keep players interested. If you play Garena Free Fire, you should be aware of the redeem codes that are released on a daily basis. However, because the battle royale game is banned in India, players from other countries can use the Free Fire Redeem codes daily. If you’re unfamiliar with the Garena Free Fire redeem codes or don’t know how to get them, we’ve put together a step-by-step guide to help you redeem them. Check out Garena Free Fire Redeem Codes for 10 October 2023.The Free Fire redeem codes are a great way to get free stuff. These are 12-digit codes that contain alphabets and numbers, as well as an expiration date and time. Because the Garena FF redeem codes cannot be used more than once, you should hurry to the redemption page to claim your free reward before someone else does. To get a free reward, all you have to do is go to reward.ff.garena.com/en, which is the official redemption page. Also, keep an eye on this space for daily updates on Garena Free Fire redemption codes and rewards.
In This Article
Garena Free Fire Redeem Codes Today 10 October2023
Updating soon…
How to Get Free Fire Redeem Codes for Garena on 10 October2023?
Wireless charging for smartphones has been around for a long time but it is mostly offered with flagship and upper midrange devices. If you didn’t look into your phone’s battery specifications at the time of buying it, you might be wondering if it can be charged wirelessly. While it may not deliver charging speeds as fast as wired charging, wireless charging has its own advantages. If you spend most of your time at your work desk, a wireless charger may be a good investment. You can say goodbye to wires and easily charge your phone while it rests on your desk. In this article, we bring you the top 8 methods to check if your phone supports wireless charging.Read Also:OnePlus offering huge discount on OnePlus 11 5G Series during Amazon and Flipkart Sale
In This Article
Can’t get wireless charging to work?
If you’re certain that your smartphone supports wireless charging, but you can’t get it to work, try these quick fixes.
Remove your phone’s case/cover: Some phone cases/covers are not compatible with wireless chargers. This is particularly true for metal and thick plastic covers. Either remove your phone’s cover or use a silicone/TPU case to charge the device wirelessly.
Place the phone correctly on the charging pad: Make sure your phone’s wireless charging coil aligns perfectly with the wireless charging pad. If the placement is off, your phone won’t charge.
Enable fast wireless charging: If your phone is trickle charging while it’s placed on a wireless charging pad, go to Settings>Battery and enable fast wireless charging.
Wait for phone to cool down: Overheating is quite common while charging your phone wirelessly. Once the internal temperature of your device rises above a certain point, it automatically shuts off the charging mechanism. Wait for your phone to cool down and try again.
Use a different charger: It is possible that the fault lies with your wireless charger. Only use authentic accessories that are compatible with your device.
Check your phone’s battery settings
The simplest way of checking whether your phone supports wireless charging or not is by visiting its battery settings. Here’s how you can do it on a Samsung smartphone.Step 1: Go to Settings and select Battery and device care.Step 2: Tap on Battery.Step 3: Select More battery settings.Step 4: If there is an option for Fast wireless charging, it means your smartphone supports wireless charging.
Check the phone’s user manual
If you still have your smartphone’s retail box, dig through it and find the device’s user manual. The user manual may contain instructions on how to use a wireless charger with your device, confirming that it supports the feature. You can try scanning the retail box for details related to wireless charging.
Check the manufacturer’s website
If you don’t have your smartphone’s retail box within reach, you can simply check the manufacturer’s website for the device’s spec sheet. Once you land on your smartphone’s product page, scan its specifications to check for wireless charging. If it isn’t mentioned in the battery or charging section, it is unlikely that your phone supports wireless charging.
Check the smartphone’s Amazon page
If the smartphone manufacturer’s website does not give you any clue about its wireless charging specs, check its Amazon page. If the smartphone supports wireless charging, it will be mentioned in the ‘About this item’ section or the extended spec sheet at the bottom of the page.
Use the Wireless Charging Checker app by Widget7
Another quick way to confirm whether your phone supports wireless charging or not is by using the Wireless Charging Checker app by Widget7. This no-nonsense app lists your device’s model name, product code, and other details on the home page. Tap on Check Wireless Charging to know the results.
Check the Wireless Power Consortium website
The Wireless Power Consortium (WPC) is a group of major tech conglomerates working towards the goal of global adoption of its wireless charging interfaces. Some of the members of WPC include Apple, Qualcomm, Samsung, MediaTek, and Google. You can check whether your smartphone utilises WPC’s wireless charging interface by searching for your device on their website. Go to https://www.wirelesspowerconsortium.com/ and click on the search bar to check whether your phone is in their database.
Check the Qi Inside website
Qi is a wireless charging standard that is used on a lot of smartphones. Go to the Qi Inside website to check if your phone supports wireless charging. Click the name of your smartphone’s manufacturer and look for your model in the list. You can also scroll the page for the long list of all smartphone models that support Qi wireless charging.
Got a wireless charger nearby? Connect it to your smartphone
This seems like a no-brainer option but some users may be hesitant to try it since wireless chargers rely on magnetic induction for powering a device. If you have a wireless charger nearby, you can place your phone on it to check whether it supports wireless charging. Your smartphone will not be harmed if it doesn’t have wireless charging support.
Frequently Asked Questions (FAQs)
Does my phone support wireless charging?
Go to your phone’s settings and check the battery section for wireless charging support. You can also check the manufacturer’s website or the device’s Amazon page for all specs related to battery and charging. If it doesn’t mention wireless charging then it most likely doesn’t support it. To be absolutely sure, install the Wireless Charging Checker app by Widget7 on your device and run a quick check.
How long does it take to wirelessly charge a smartphone?
A 10-15W wireless charger takes up to 3 hours to charge a regular smartphone with a 5,000mAh battery.
Is wireless charging faster than wired charging?
No, wireless charging is not faster than wired charging. Every smartphone that supports wireless charging can be charged faster using a power adapter and a USB cable.
How do I turn on wireless charging?
Wireless charging is enabled on your smartphone by default. All you need to do is place the device on a wireless charging pad.
These are the top 8 ways you can check if your phone supports wireless charging. If you own a budget Android smartphone, chances are it does not have wireless charging support since this feature is only found in midrange and flagship devices. If you found this article useful, let us know in the comments!
Samsung today announced the launch of a new solid-state drive (SSD) namely the Samsung SSD T9 in India. The device will be available in three storage variants with a price starting at Rs 12,799. The Samsung SSD offers a transfer speed of up to 2000MBps. In addition to this, it comes with Samsung Magician Software 8.0 and is compatible with Windows and macOS operating systems.Puneet Sethi, Vice President, of Consumer Electronics Enterprise Business, Samsung India said, “In a high-resolution content landscape, the T9 is the answer for professionals seeking solutions for challenges such as data management, transferring large files, and durability and performance issues. Samsung’s Portable SSD T9 empowers modern content creators by addressing those data challenges and providing memory solutions that enhance their creative aspirations.”The Samsung SSD T9 has a sleek and credit-card-sized design with a rugged build. The T9’s rubber exterior ensures a comfortable grip and guards against low-temperature burns. It comes with a five-year limited warranty and is resistant to drops from heights of up to three meters.The portable solid-state drive (SSD) includes Samsung’s Dynamic Thermal Guard technology that efficiently mitigates performance dips caused by overheating, ensuring consistent and speedy transfer rates. In addition to this, it complies with the international safety standard IEC 62368-1.The Samsung SSD T9 boasts a lightning-fast USB 3.2 Gen 2×2 interface. It is claimed to offer up to 2,000 MB/s read/write speeds. The SSD comes in three different capacities – 1TB, 2TB and 4TB. It also has Samsung Magician software offering features such as performance benchmarks, security functions, firmware updates and real-time health status checks. The software is capable of solving any field issues that might occur. As per the company with the latest 8.0 version released in September 2023, all Samsung software such as Data migration, PSSD software and Card authentication tool will be integrated to the Magician software and the OS support range will be expanded, for Windows, Mac and Android user convenience.There is USB Type C-to-C and USB Type C-to-A cables provided with the device offering cross-platform compatibility that extends to Windows, macOS, smartphones, tablets, gaming consoles, and premium cameras. It can be directly connected to an 8K or 12K high-resolution camera for seamless use.
There is no denying that iPhones in India are significantly more expensive than those from other nations. As a result, Apple fans in India eagerly wait for the festive sale, when Amazon and Flipkart offer amazing discounts and deals on iPhones. You are aware that now is the ideal moment to purchase an iPhone from a previous generation. Deals are so good that choosing between the iPhone 14, iPhone 13, and iPhone 12 can be difficult. However, we have you covered. We have listed the best festive deals on iPhones for you in each price range.
In This Article
iPhone 14
iPhone 14 is currently available at Rs 56,999 on Flipkart. iPhone 14 is not selling on Amazon. Before the festive sale began the phone was selling at Rs 69,990 but now there is a massive price reduction. After applying bank offers the price can further come down by Rs 5,000. The e-commerce platform is offering a great exchange discount which will reduce the price of the phone to Rs 41,150.Also Read:iPhone 15 Pro Max Vs iPhone 14 Pro Max: Specs compared
iPhone 13
On the other hand, the iPhone 13 is discounted on Flipkart and Amazon. But Amazon has the best deal to offer. The iPhone 13 is available at Rs 48,999 which is comparatively much cheaper than what Flipkart is offering. On Flipkart, the device is available at Rs 51,999. Additional bank offers and exchange options will bring down the price significantly.
iPhone 12
on Flipkart iPhone 12 is currently selling at Rs 40,999 while Amazon has not listed the phone on its site. After applying bank offers and exchange discounts the price of this model can be brought to Rs 25,000.
Still confused about which iPhone to buy?
You already know which iPhone offers the best deal, but you’re not sure which to choose. However, you should also be aware of which iPhone offers the most software updates before making a purchase. In our opinion, the iPhone 13 is the greatest option, but the iPhone 14 is the more sensible choice. You will receive one more year of software updates. Additionally, the iPhone 14 has a higher resale value than the iPhone 13. There is therefore no doubt that the iPhone 14 is the best iPhone to purchase over the festive season. However, the iPhone 12 is a terrific alternative if you are a first-time iPhone user and on a tight budget.
For the latest gadget and tech news, and gadget reviews, follow us on Twitter, Facebook and Instagram. For newest tech & gadget videos subscribe to our YouTube Channel. You can also stay up to date using the Gadget Bridge Android App. You can find the latest car and bike news here.
If you like recording 4K videos using your smartphone, you must be aware of the tremendous amount of space they occupy on your phone’s storage. For those who can’t expand their phone’s storage using a memory card, choosing which videos to keep on the device can be quite a conundrum. Luckily, there are tons of compression apps that resize the videos on your phone to an appropriate limit without compromising their quality. In this article, we bring you our picks for the top 7 free apps to compress videos on Android.Read Also:Oppo Find N3 Flip India launch to take place on October 12Follow these steps to compress videos using a third-party Android appThese are the basic steps that you will have to follow in order to compress videos using any of the Android mentioned in this list.Step 1:Launch the video compression app of your choice.Step 2: Select a video from your device’s gallery.Step 3: Select the resolution for the final video.Step 4: The app will take a few minutes to compress and resize the video.Step 5: The compressed video will be saved in your device’s gallery. You can preview the video within the app itself.Step 6: Hit Share to send the video to your contacts directly from the app. You can also choose to delete the video if it doesn’t meet your quality requirements.Now that you’ve learnt how to compress a video, let us take a look at the best Android apps for the task.
In This Article
Video Compressor Panda Resizer
Download from Google Play StoreOne of the reasons why Panda Resizer grabs the top spot in this list is because of its accessibility and ease of use. If you don’t want to select a custom resolution for the final video, Panda Resizer has multiple presets that will compress it to a size that suits apps like Facebook, Instagram, YouTube, WhatsApp, Telegram, WeChat, and more. Once a file has been compressed, you can play it alongside the original video to see if there are any changes to the final product. Subscribing to a premium membership gives you ad-free access to the app and lets you compress multiple videos at once.
Video Dieter 2 – trim & edit
Download from Google Play StoreWith over a million downloads and a rating of 4.2 stars on the Play Store, the Video Dieter 2 is one of the best video compressor apps for Android. Video Dieter 2 keeps things simple and gets rid of all the bells and whistles that may confuse the average user. You can set the resolution of the output video and easily view its file size and playtime. This app also allows you to resize a video by trimming it. You can also set background music to the video and convert it to a time-lapse or a slo-mo video.
ShrinkVid
Download from Google Play StoreShrinkVid does a great job of compressing videos while maintaining their original quality. This app supports compression for all major video formats like MOV, MP4, FLV, MKV, AVI, 3GP, etc. Another good reason to use ShrinkVid is that it carries out the entire compression process on your device, without outsourcing the video to the cloud. You can choose a custom resolution for the output video or select a preset option that will resize the video according to the chosen platform’s size limit.
Compress Video: Downsize Video
Download from Google Play StoreApart from compressing and resizing your videos to a chosen resolution, the Compress Video app also lets you trim and crop unwanted parts of the video, convert it to an audio file, and apply time-lapse and slo-mo effects. The app is well-equipped to compress multiple videos at once. Once the video is compressed to a desirable file size, you can share it to any platform directly from the app. Compress Video also offers a very handy ‘Fit to Email’ preset that automatically adjusts the size of the video to that of an email attachment.
Video Compressor & Video Cutter
Download from Google Play StoreThe Video Compressor & Video Cutter app has over 10 million downloads on the Google Play Store and a rating of 4.1 stars from over 100K reviews. Needless to say, this app is one of the best video compression tools around. While compressing a video, you can select a resolution for the output video. The corresponding file size is mentioned next to every resolution. Apart from basic compression tasks, you can convert the video to an MP3 audio file or cut the audio from the compressed video file altogether.
Video Compressor – Reduce Size
Download from Google Play StoreThe Video Compressor – Reduce Size makes it to our list because of the exhaustive range of features that it offers. Apart from lossless compression, you can also convert the format of the video, convert it to a GIF or MP3 file, and carry out other basic editing tasks like cropping, looping, flipping, rotating, accelerating, and more. Once the video has been compressed to your desired size, it can be directly shared from the app itself.
Videos & Movies Compressor
Download from Google Play StoreThe Videos & Movies Compressor app shrinks your selected videos to a more desirable size without losing the video quality. The process to compress the video is the same as the other apps on this list: select a video from your device’s gallery, set the resolution for the output video and hit the compress button. What we like about this app is that it can compress an entire movie or TV episode with ease. If you like to save movies offline on your device, this app will help you save a lot of storage space.Read Also:Samsung Galaxy SmartTag2 with new Lost Mode and improved features announced


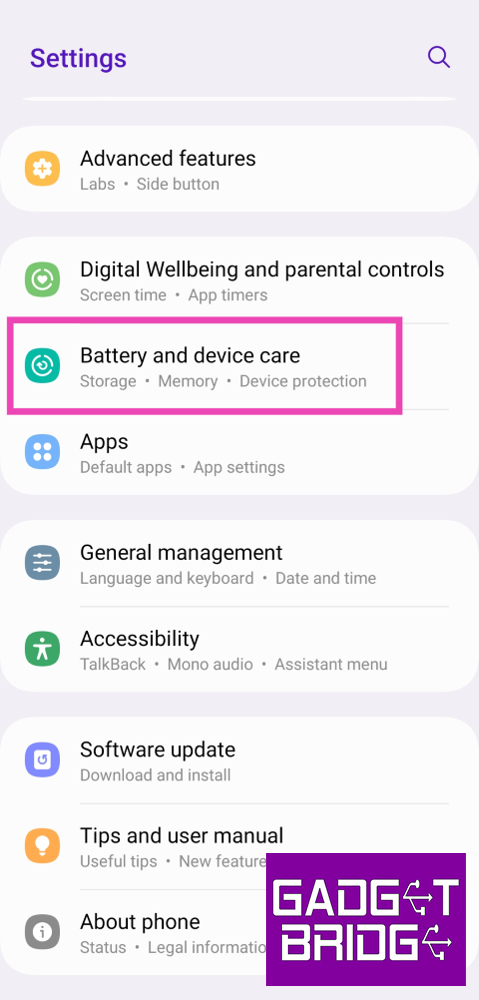 Step 2:
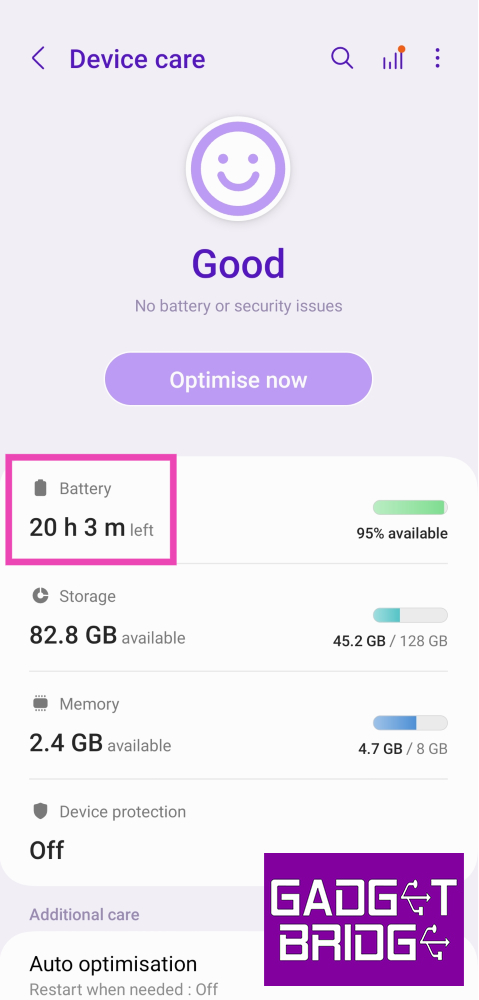 Step 3:
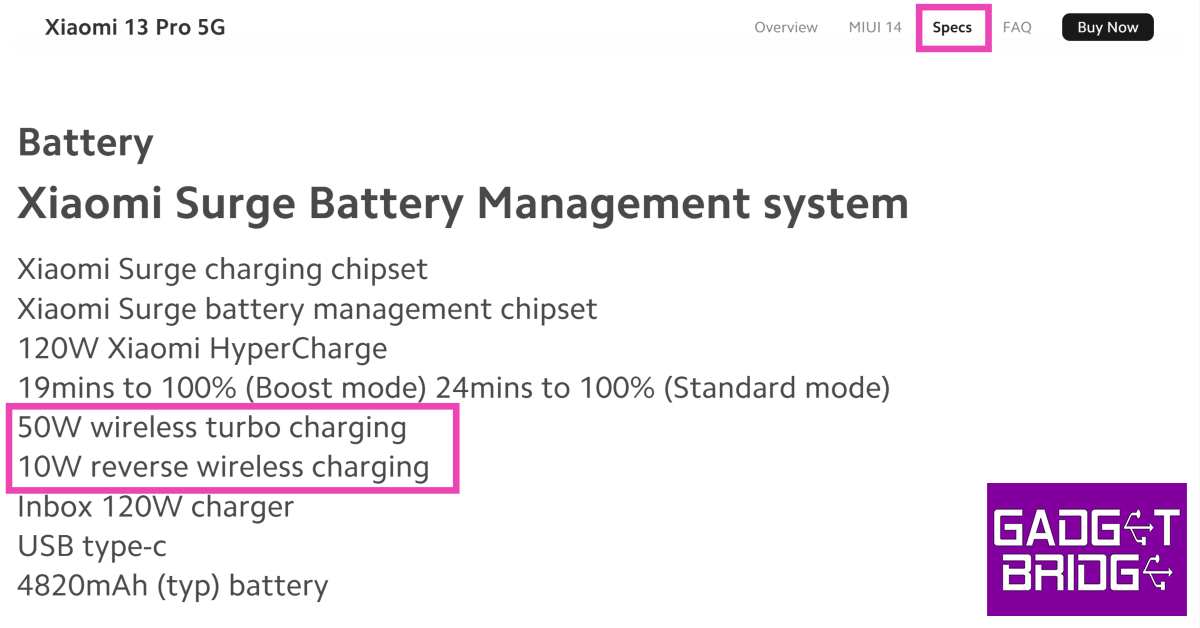
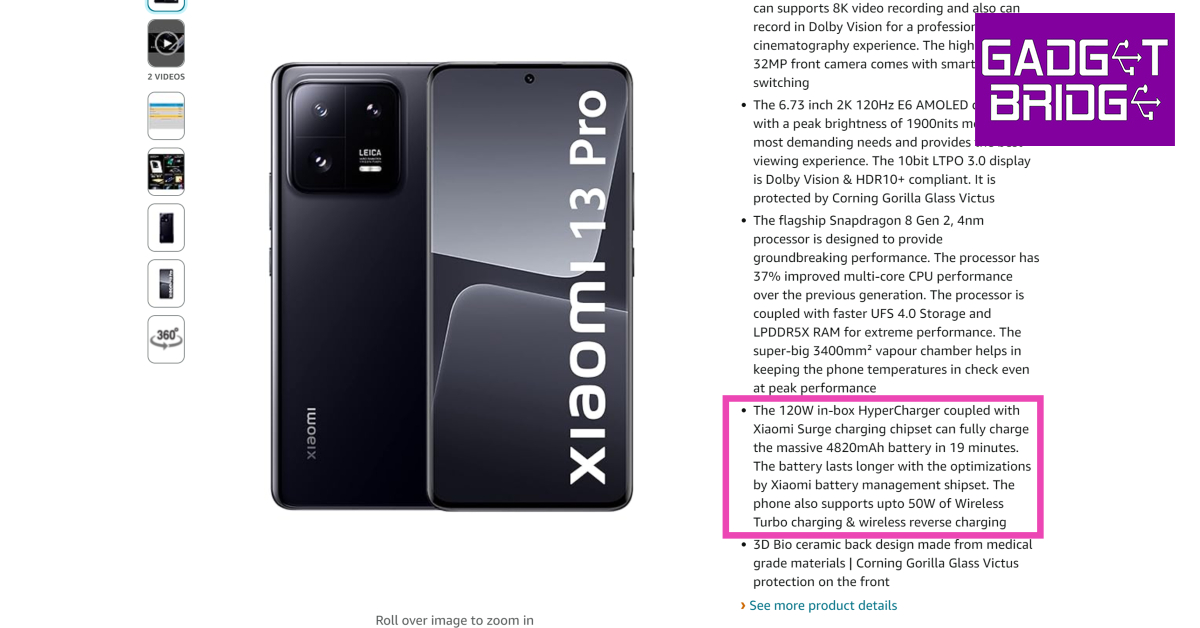


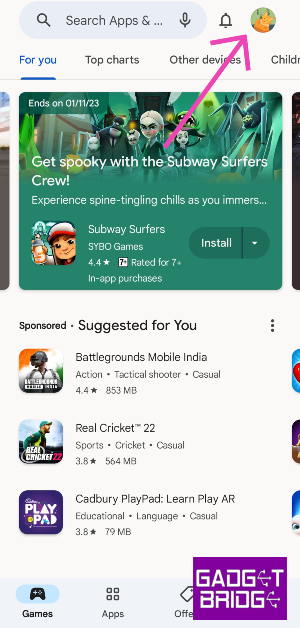 Step 3:
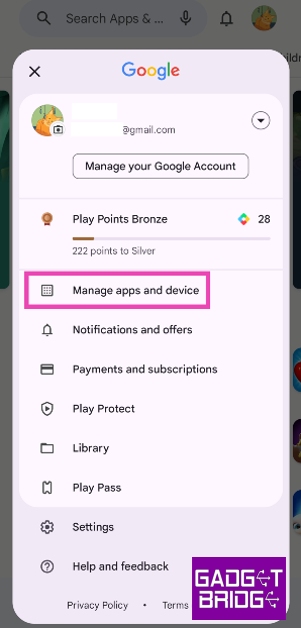 Step 4:
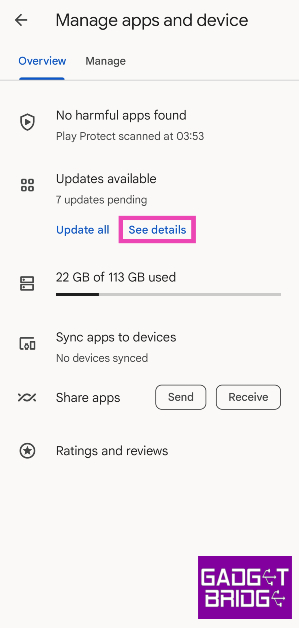 Step 5:
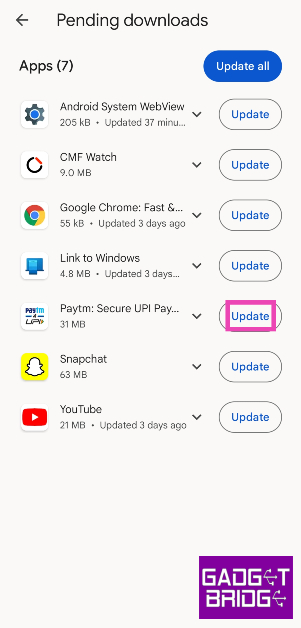
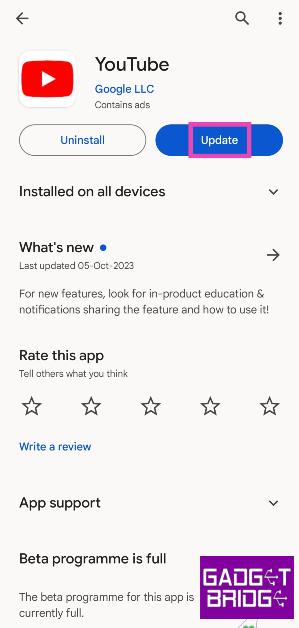 Step 4:


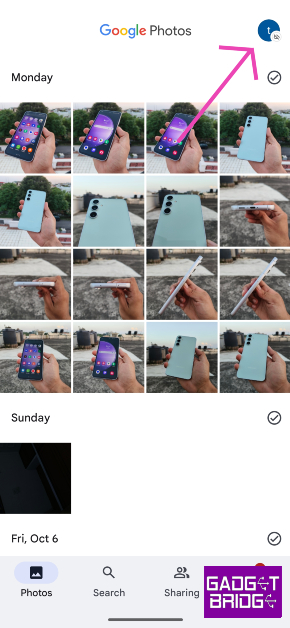 Step 3:
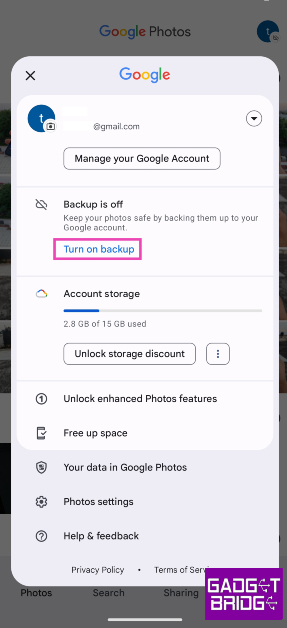 Step 4:
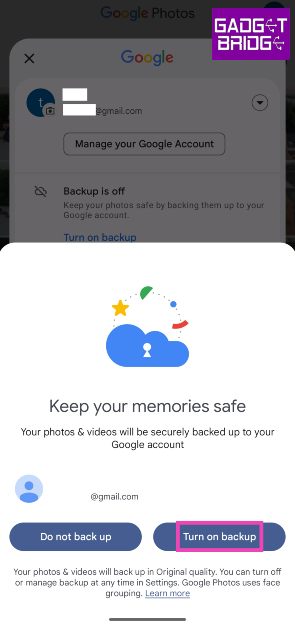
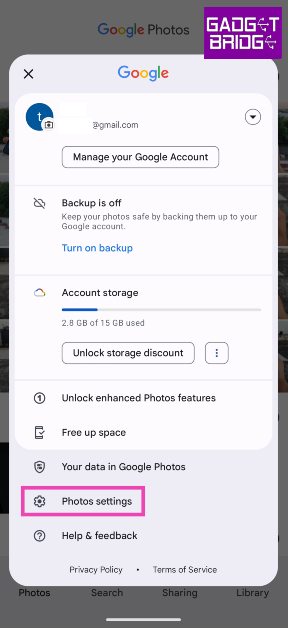 Step 4:
 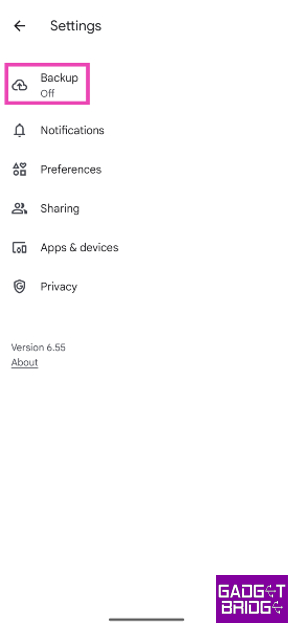 Step 5:
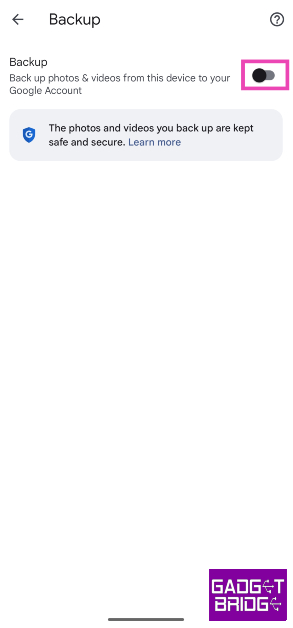
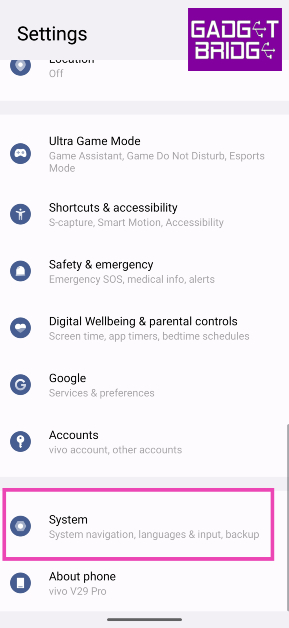 Step 2:
 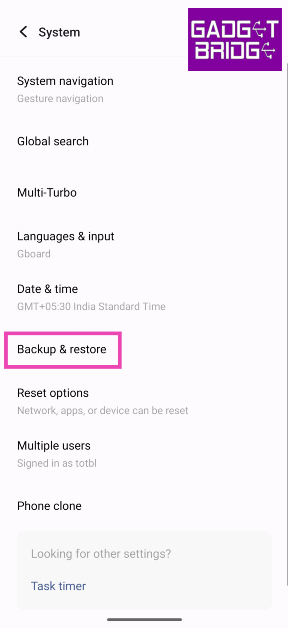 Step 3:
 Step 4:
 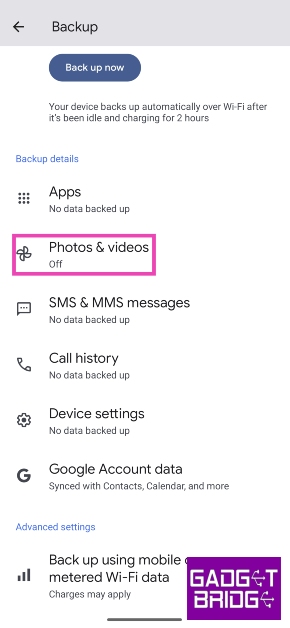 Step 5:
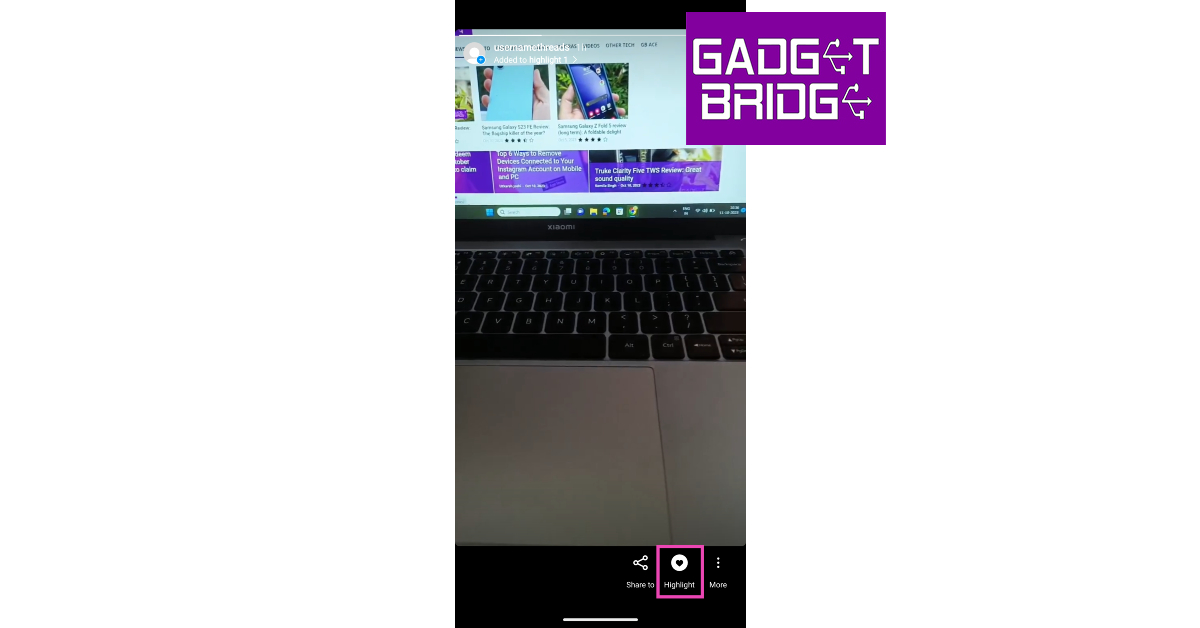 Step 2:
 Step 3:
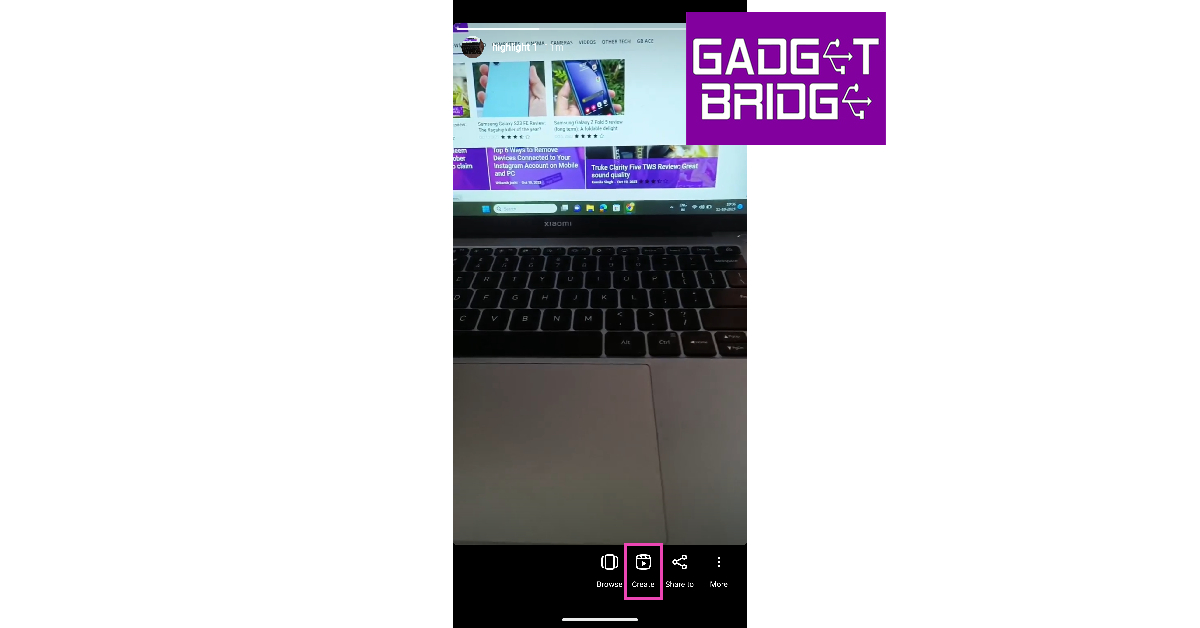 Step 4:
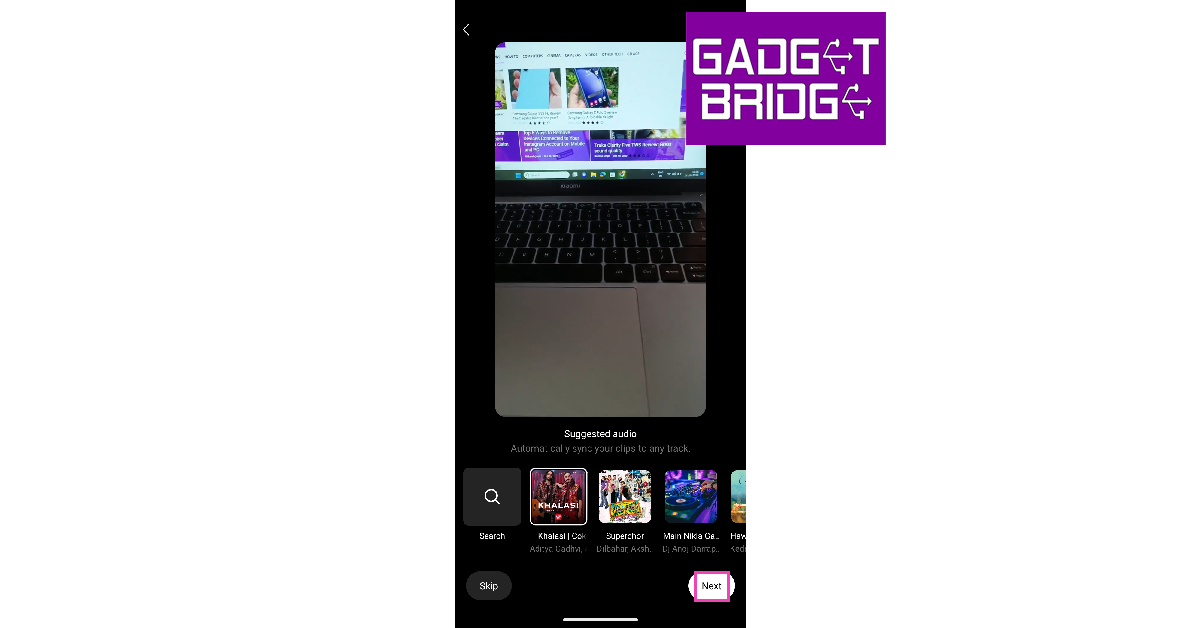 Step 5:
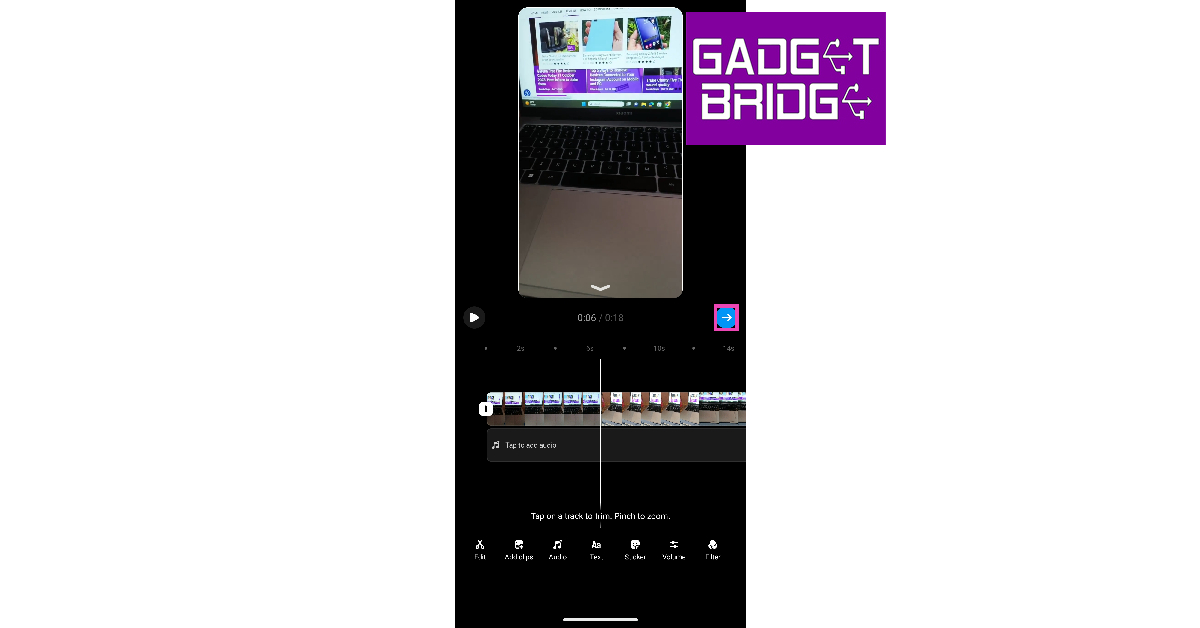 Step 6:
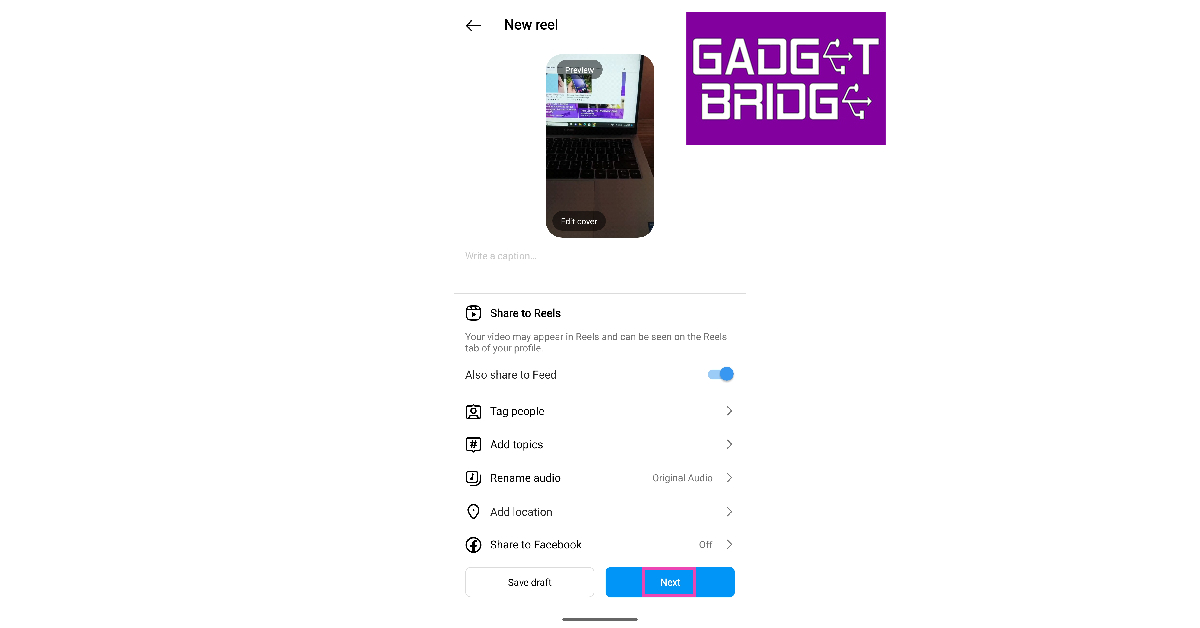 Step 7:
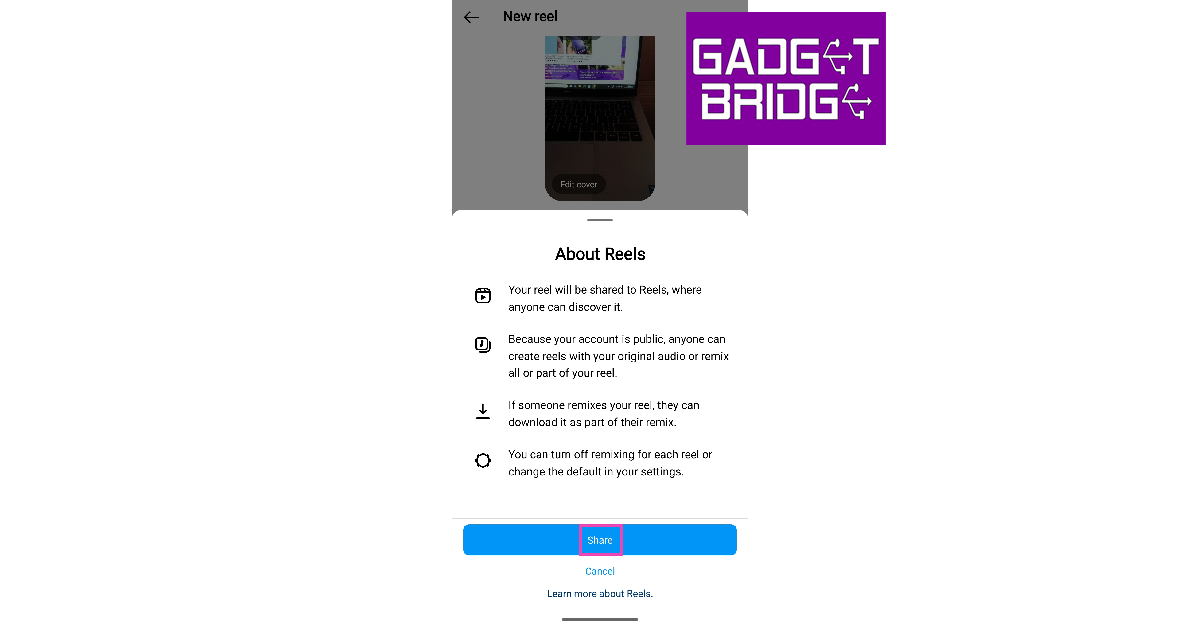
 Step 3: Swipe right
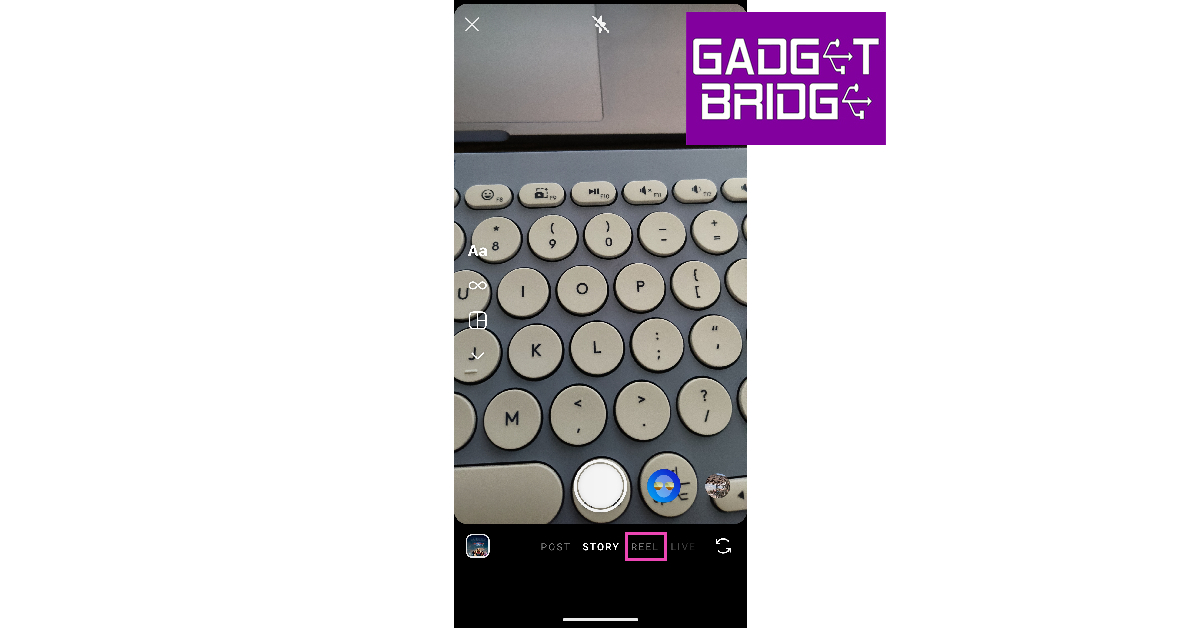 Step 4:
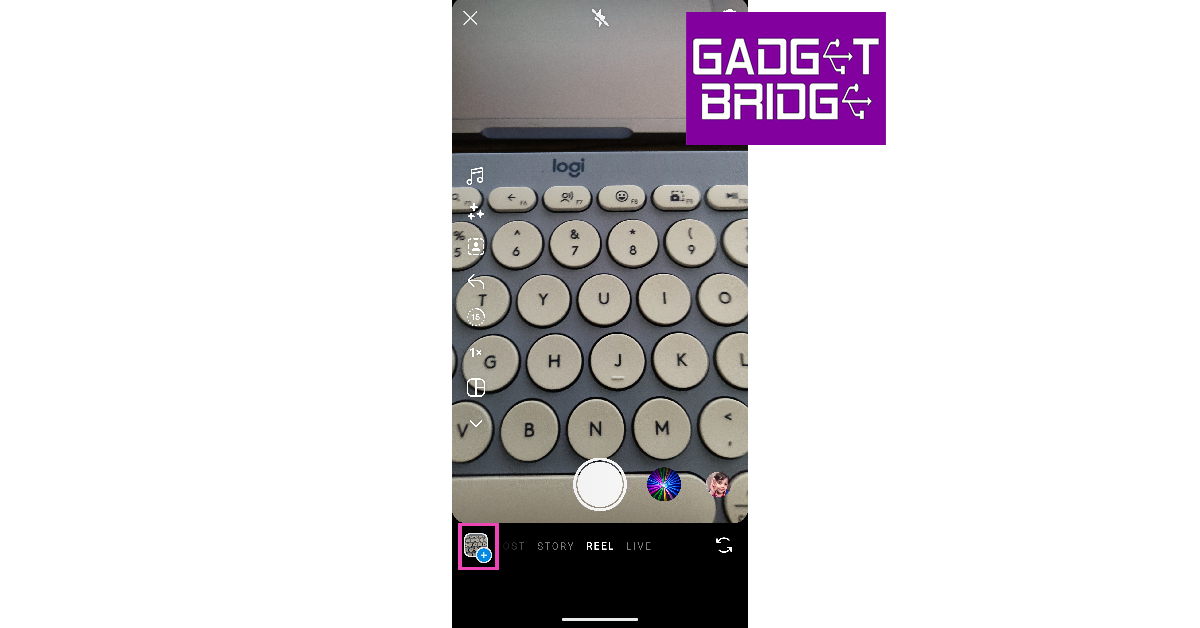 Step 5:
 Step 6:
 Step 3:


 Step 2:
 Step 3:
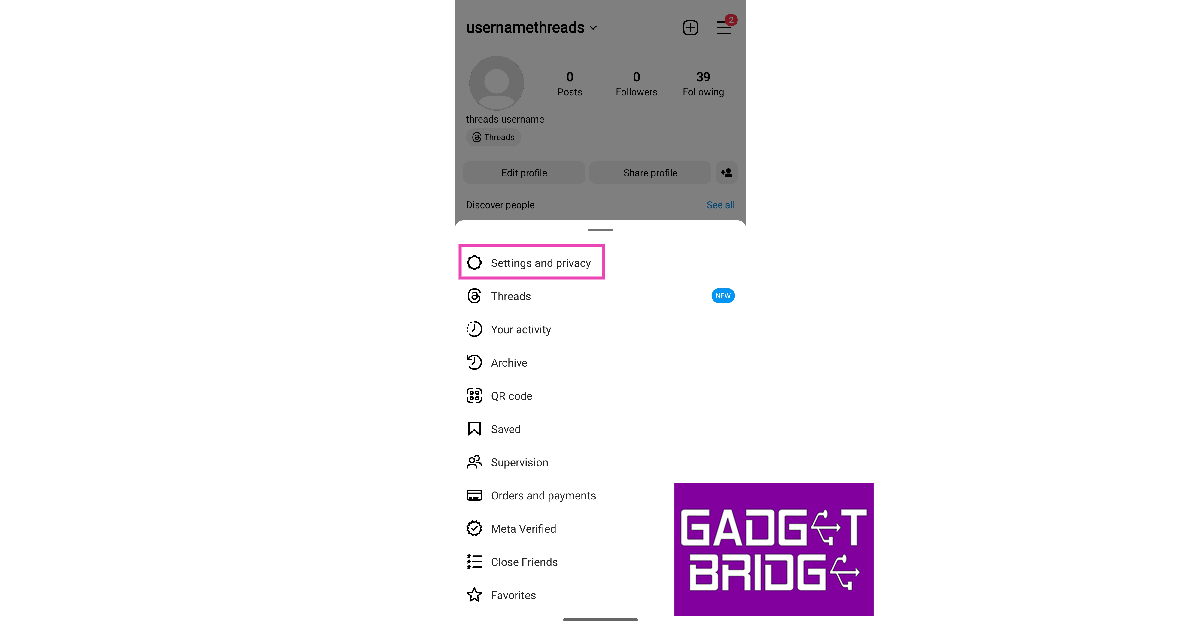 Step 4:
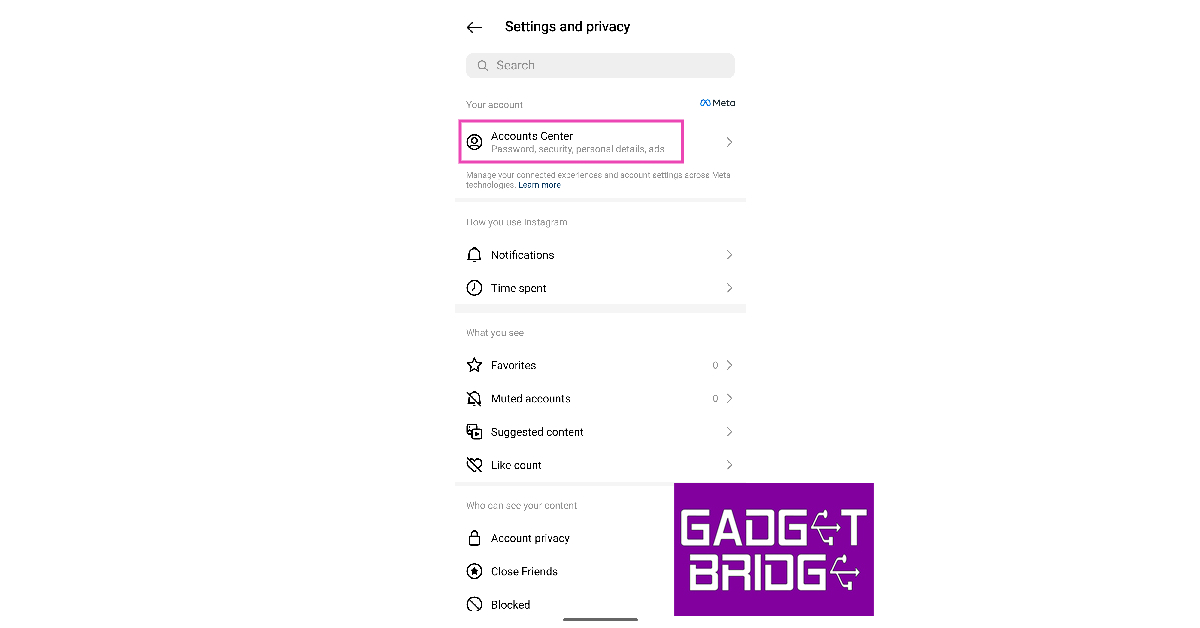 Step 5:
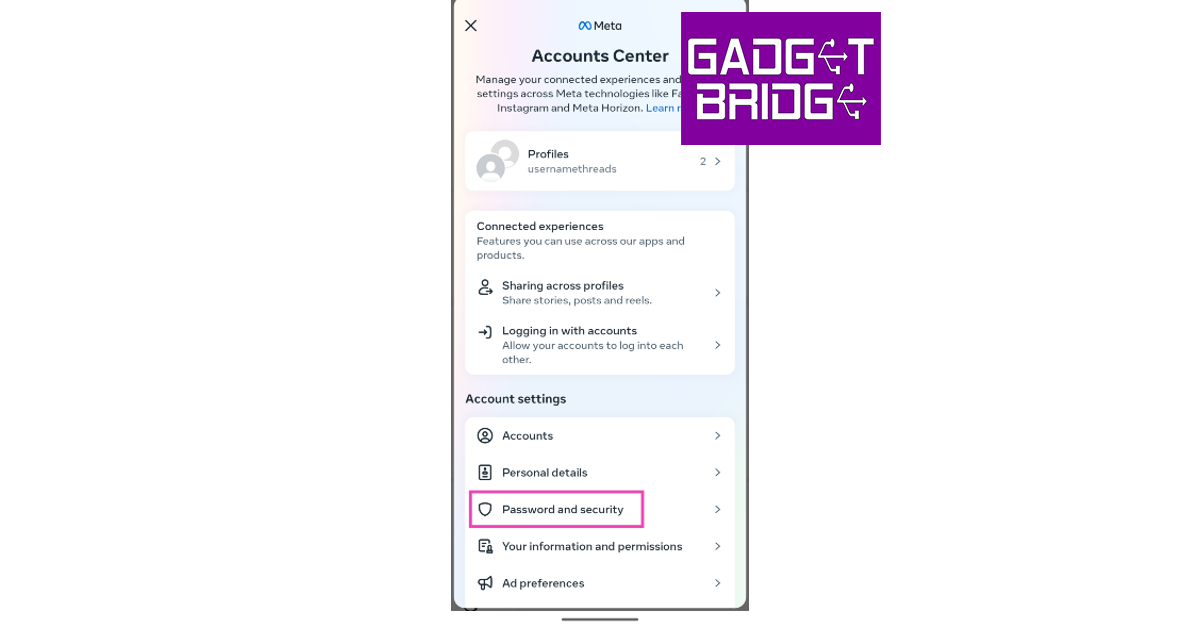 Step 6:
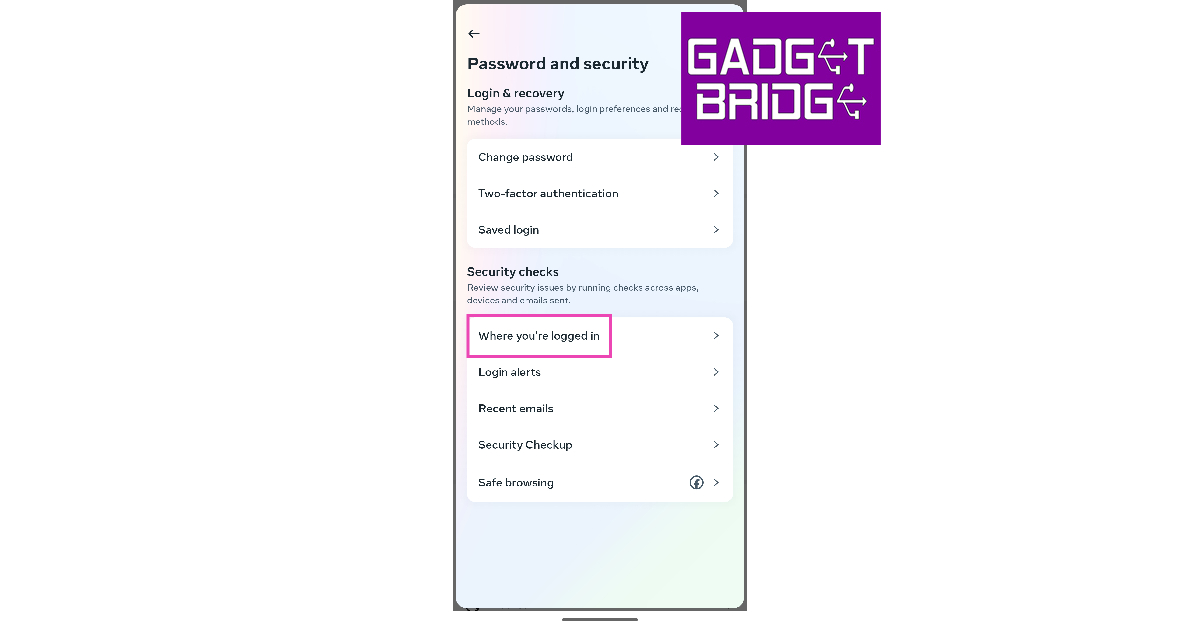 Step 7:
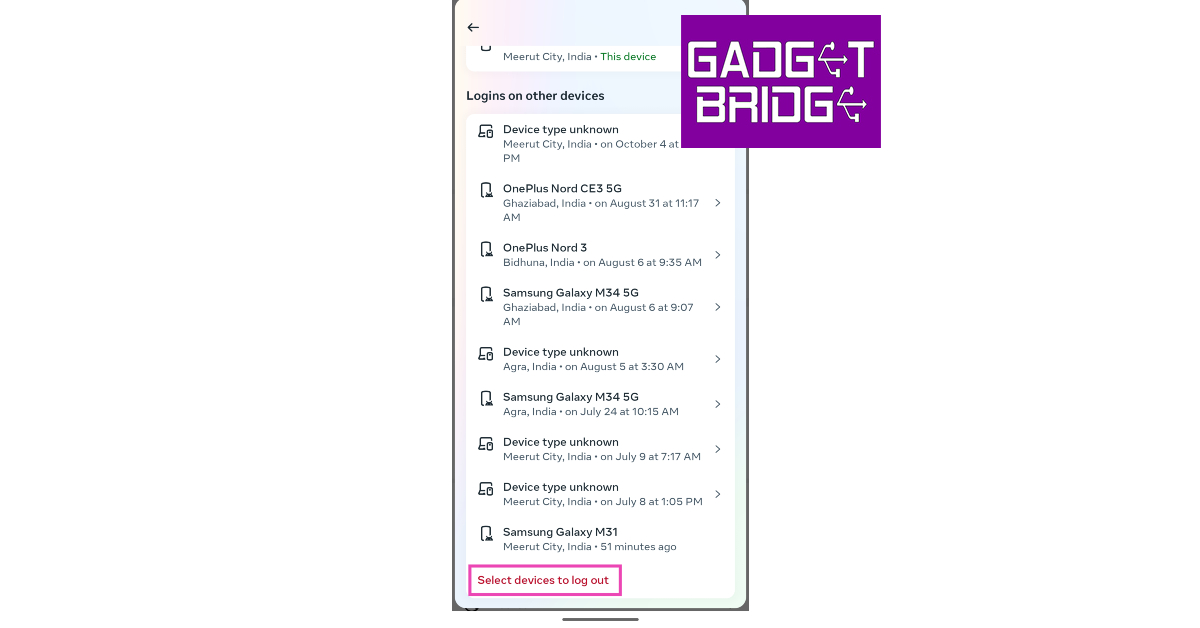 Step 9:
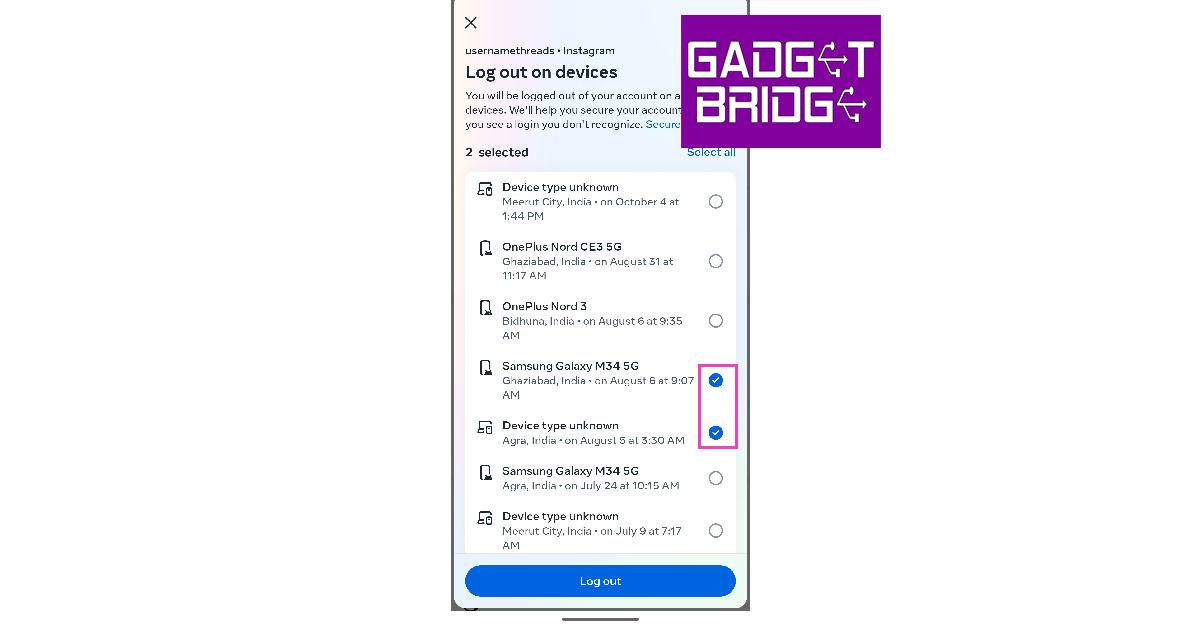 Step 10:
 Step 3:
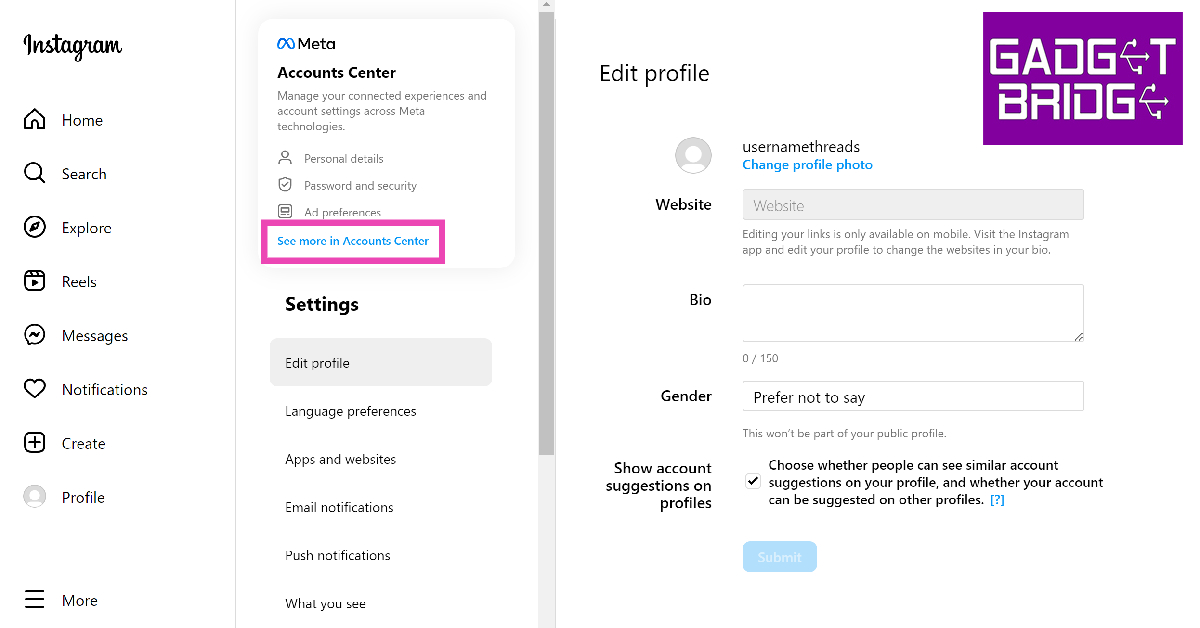 Step 4:
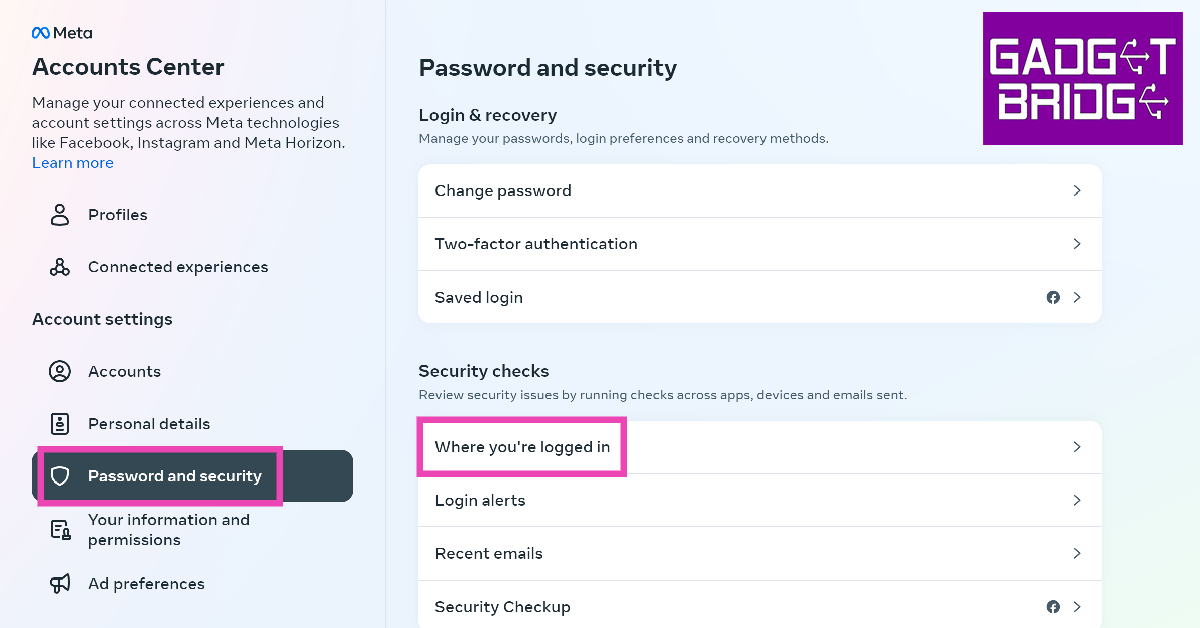 Step 5:
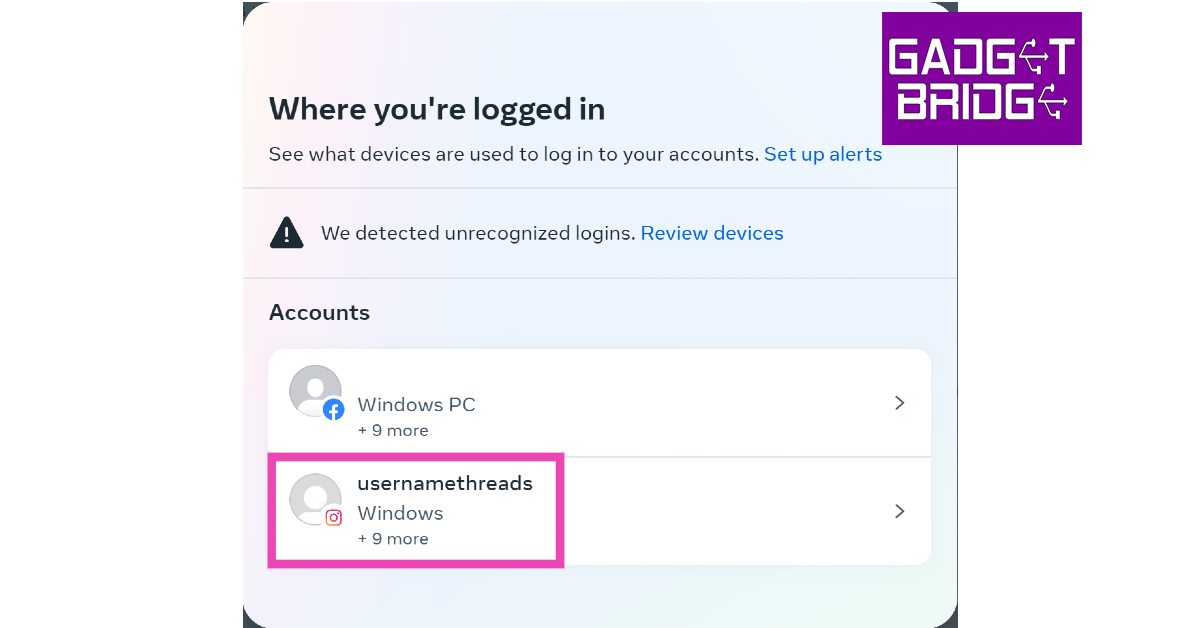 Step 6:
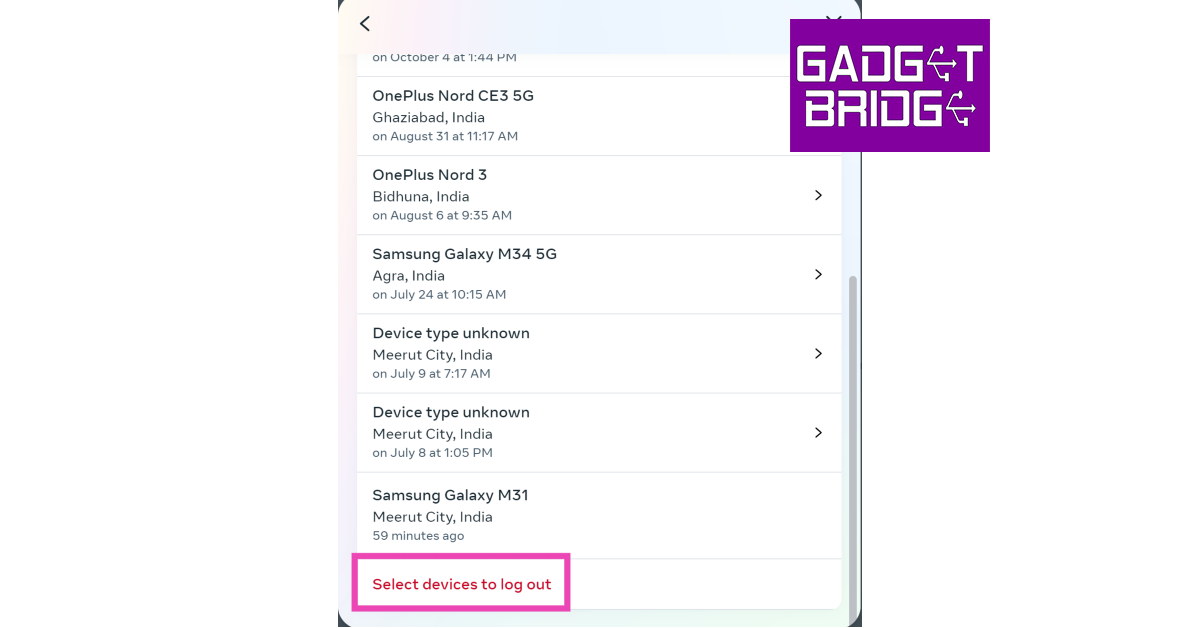 Step 7:
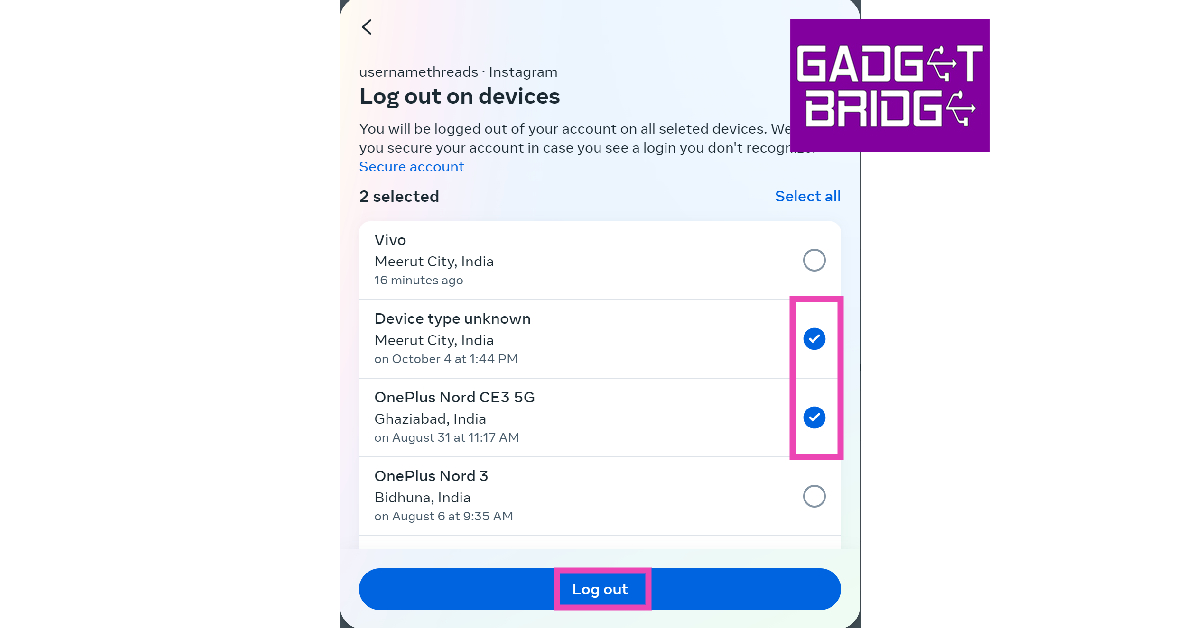
 Step 3:
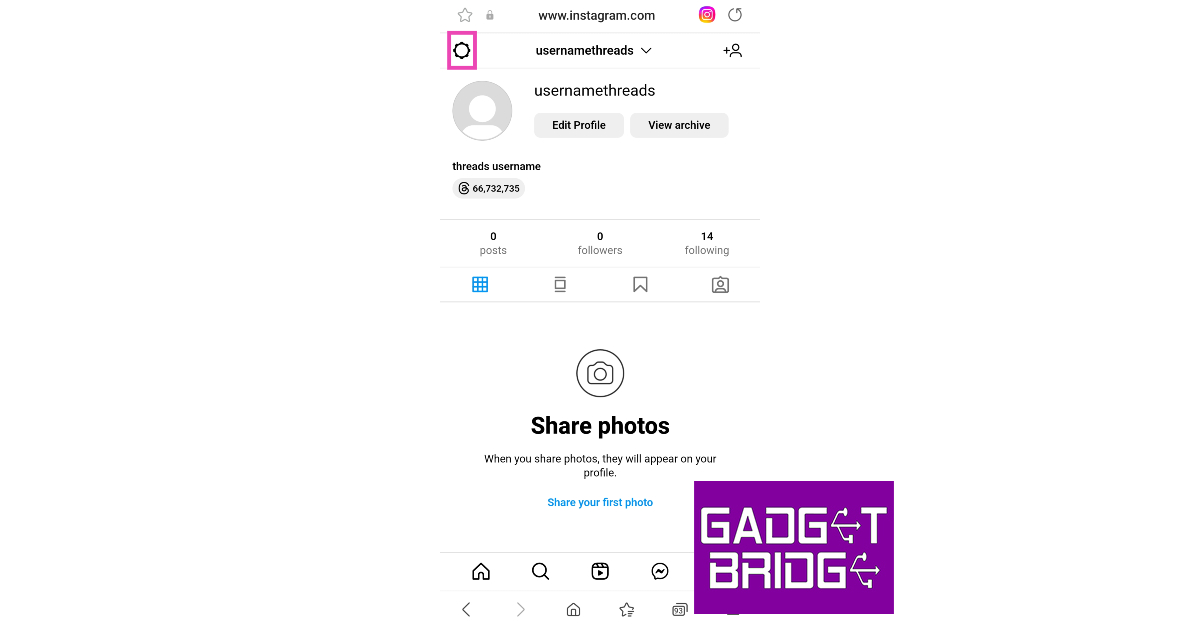 Step 4:
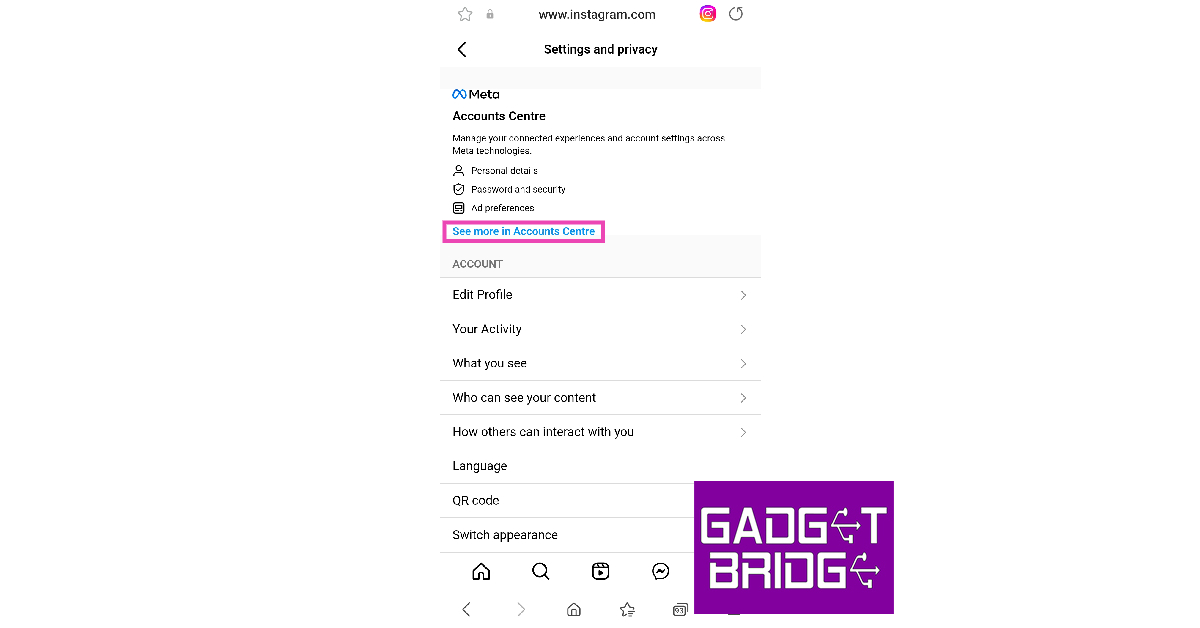 Step 5:
 Step 6:
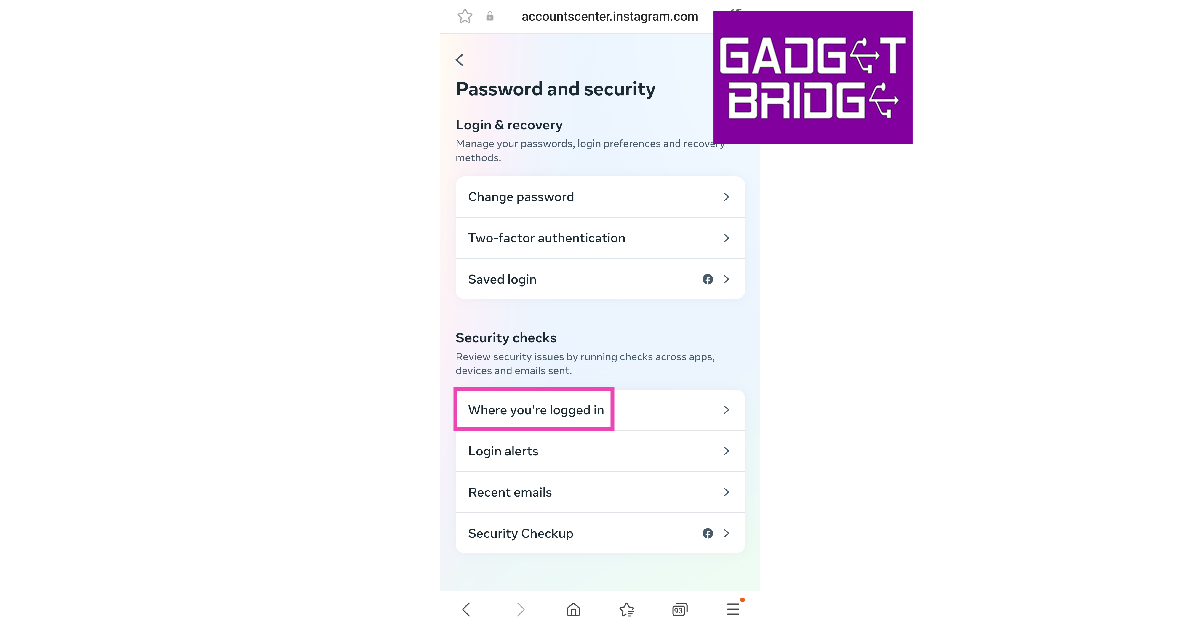 Step 7:
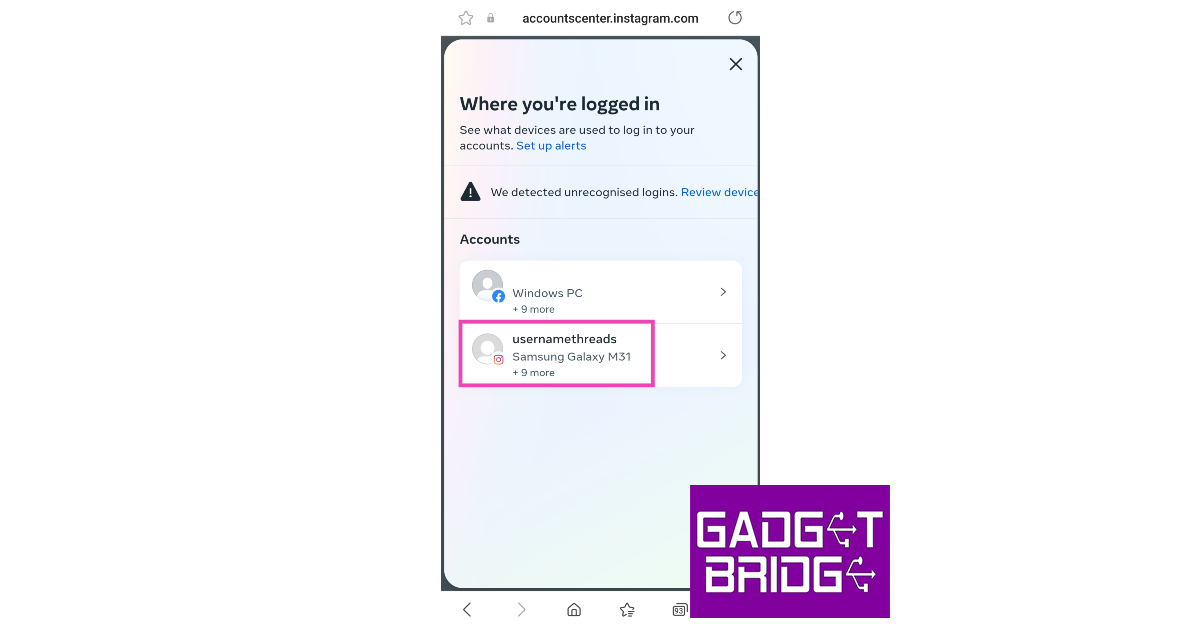 Step 8:
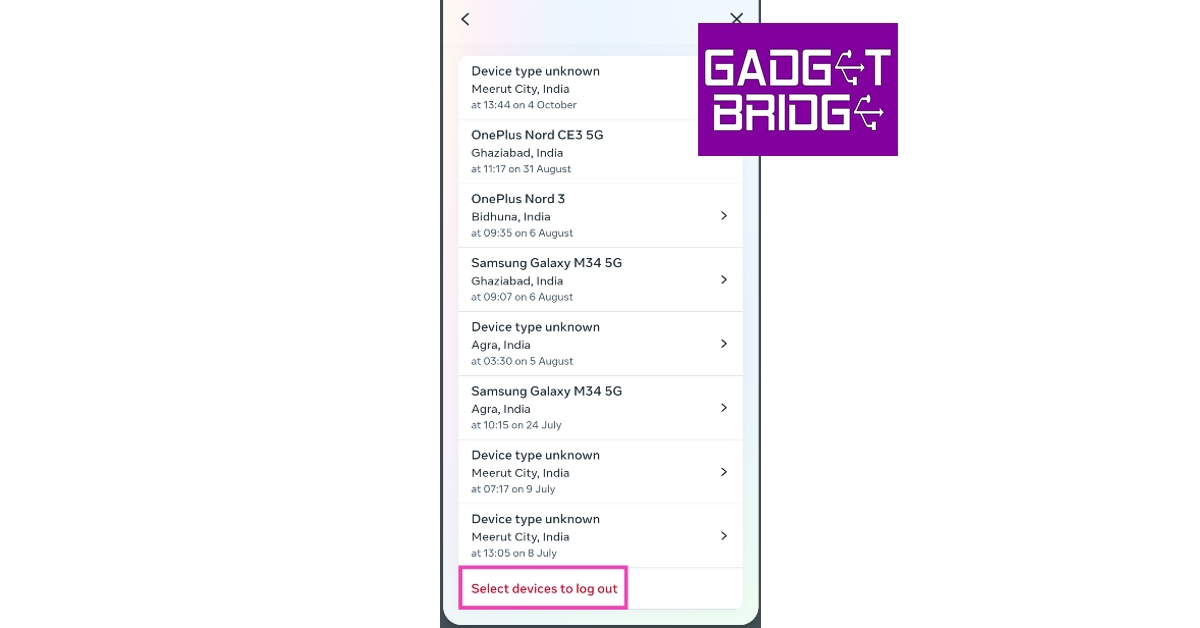 Step 9:
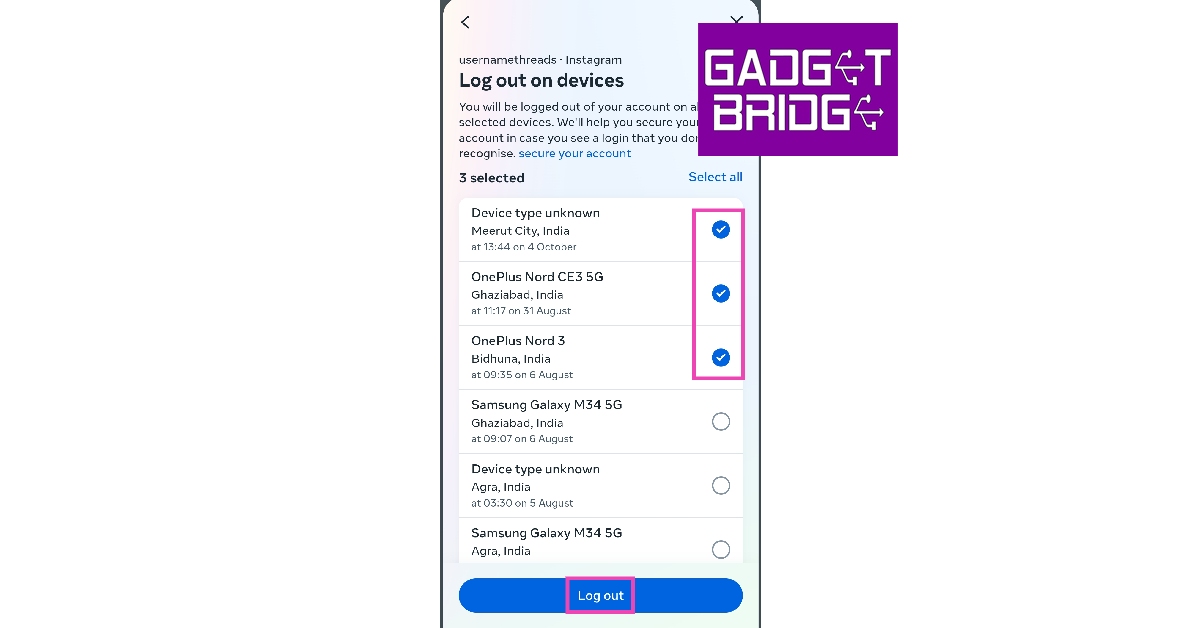 Step 10:
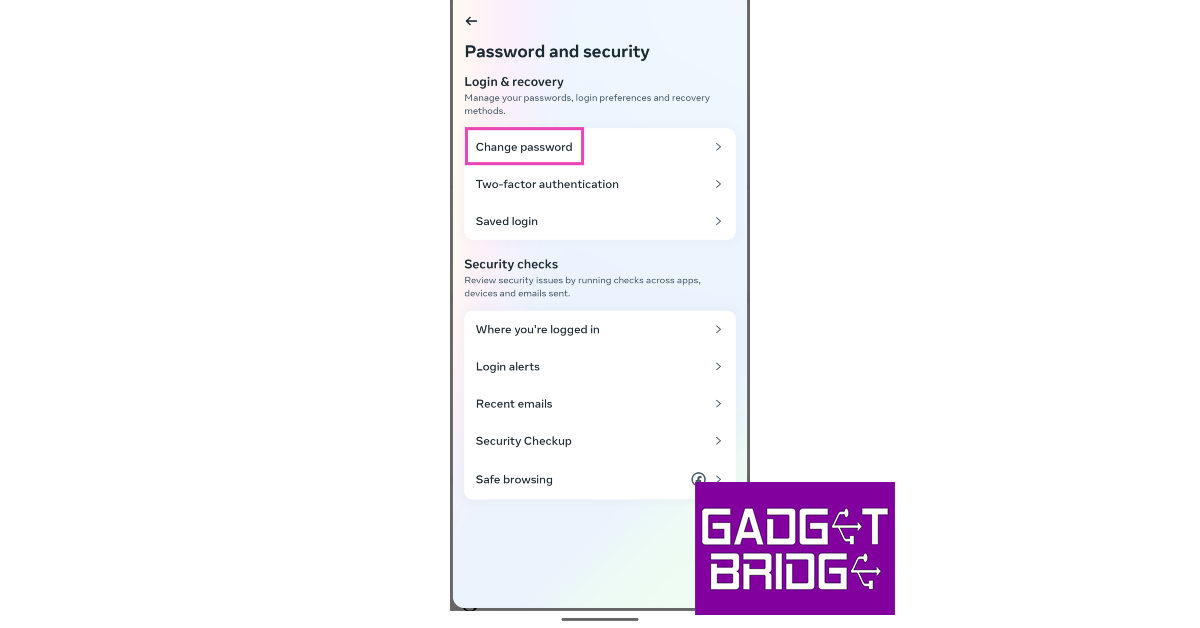 Step 7:
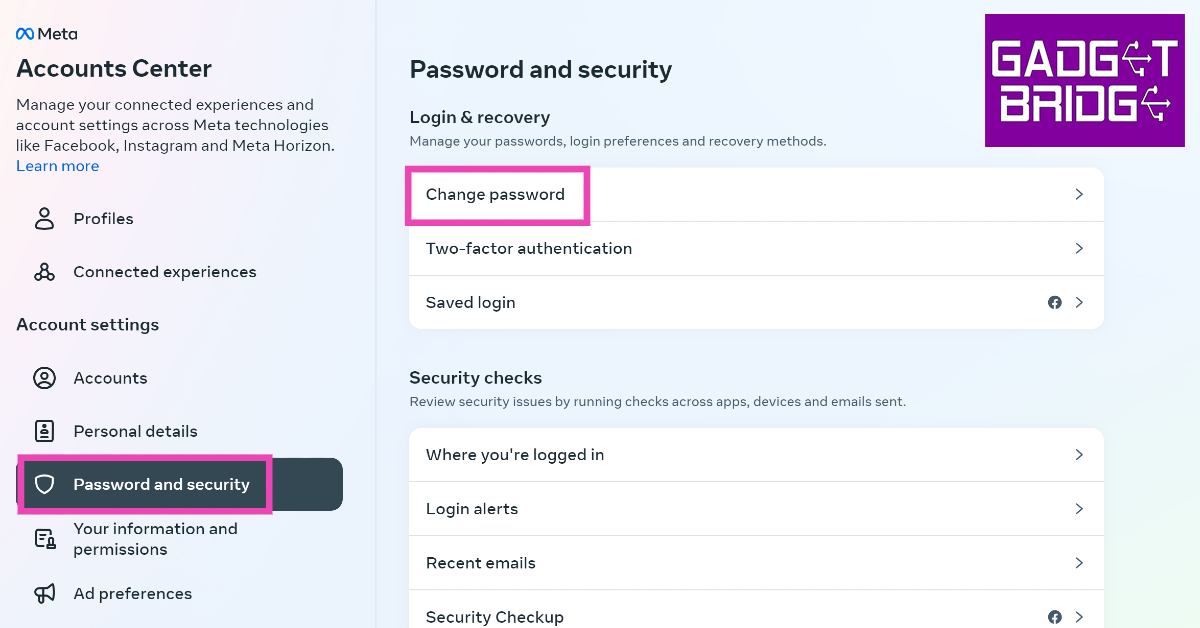 Step 5:
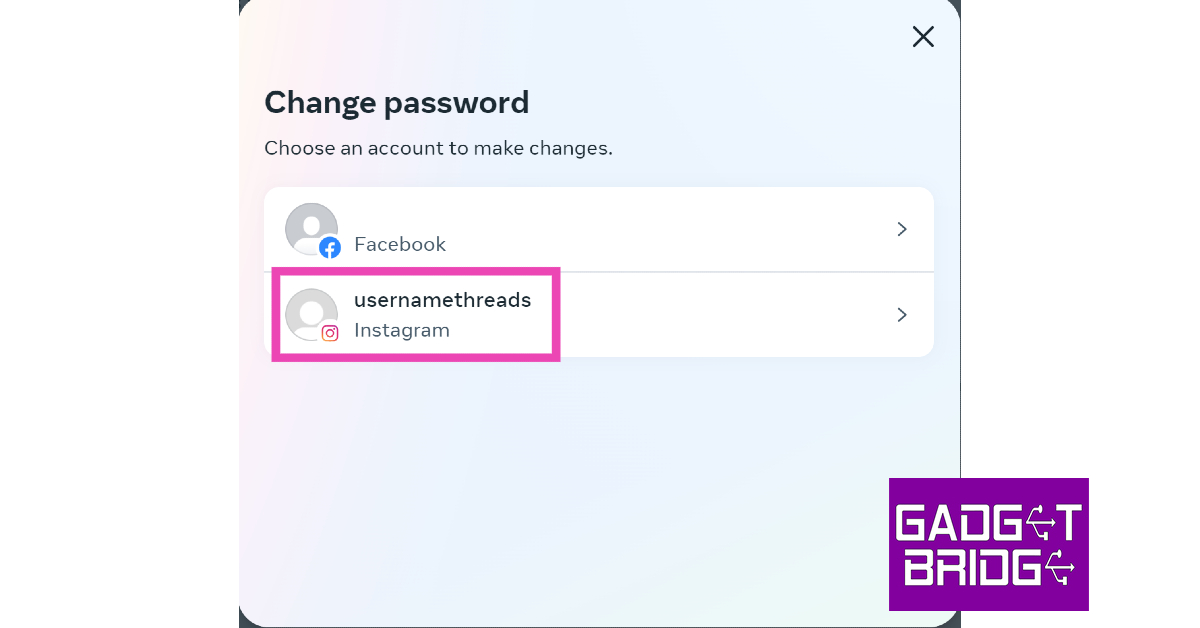 Step 6:
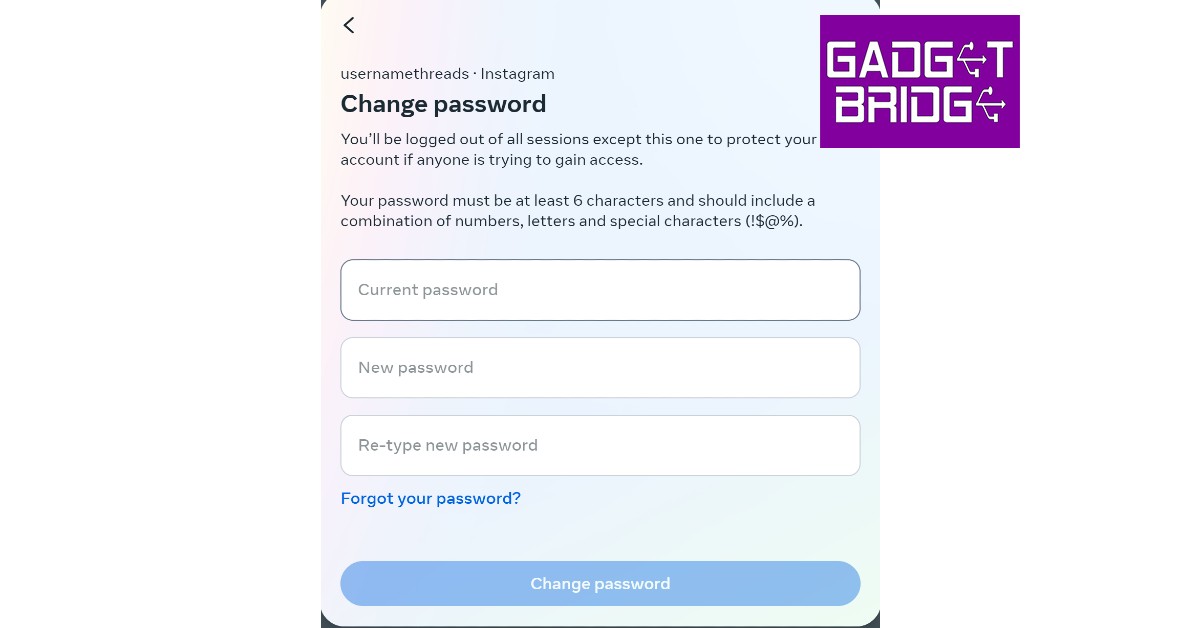
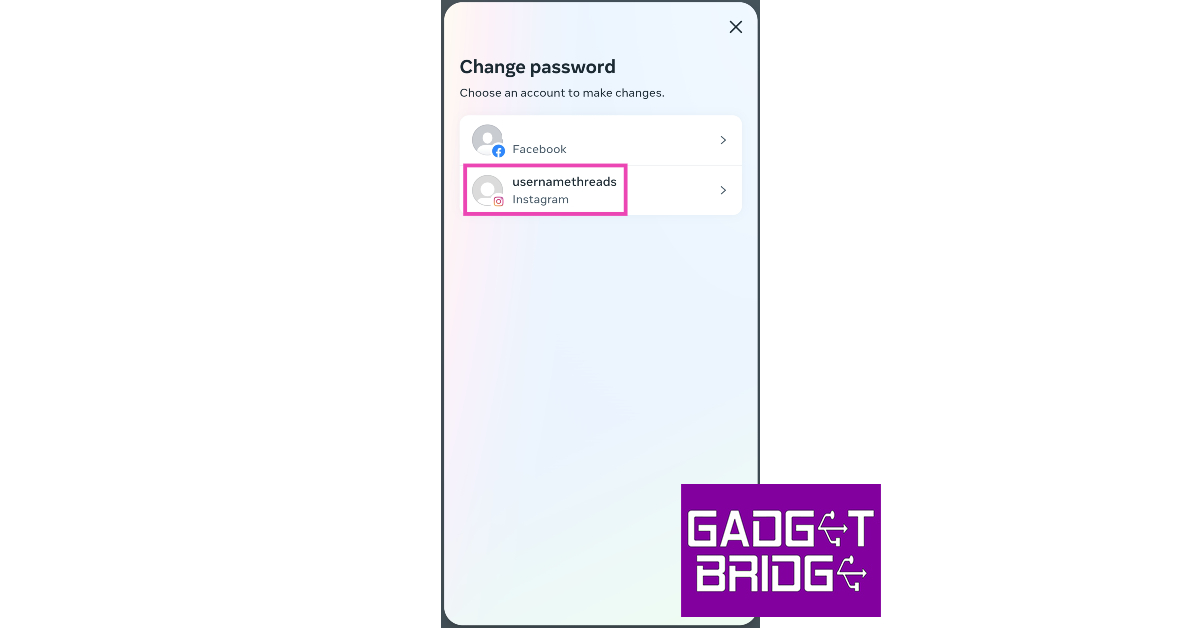 Step 8:
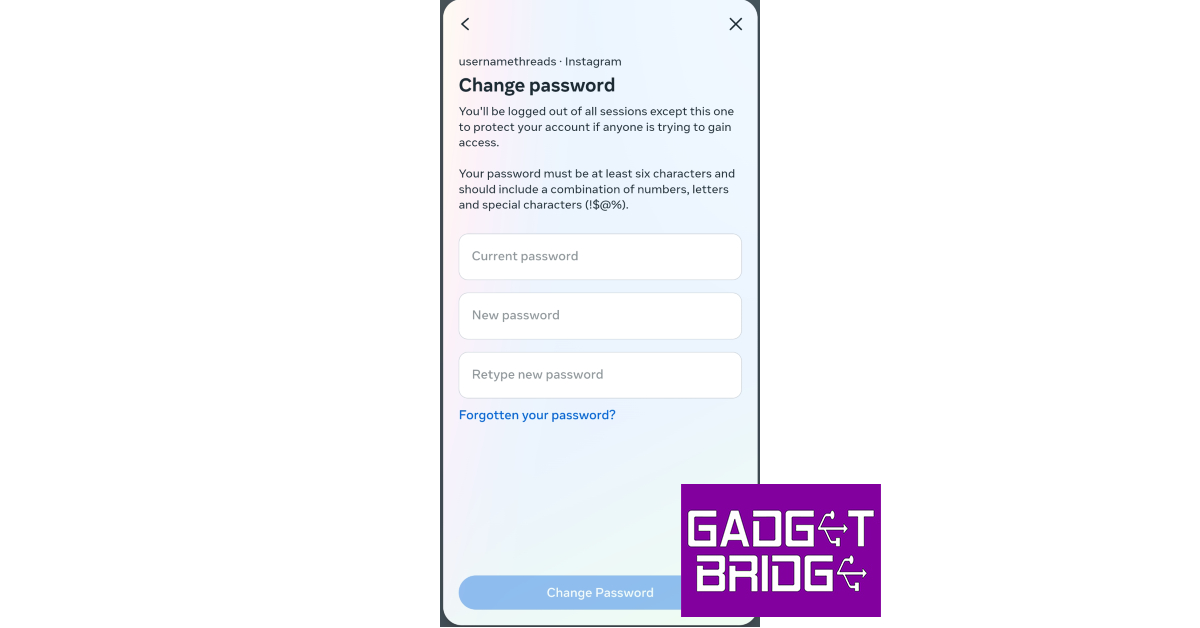


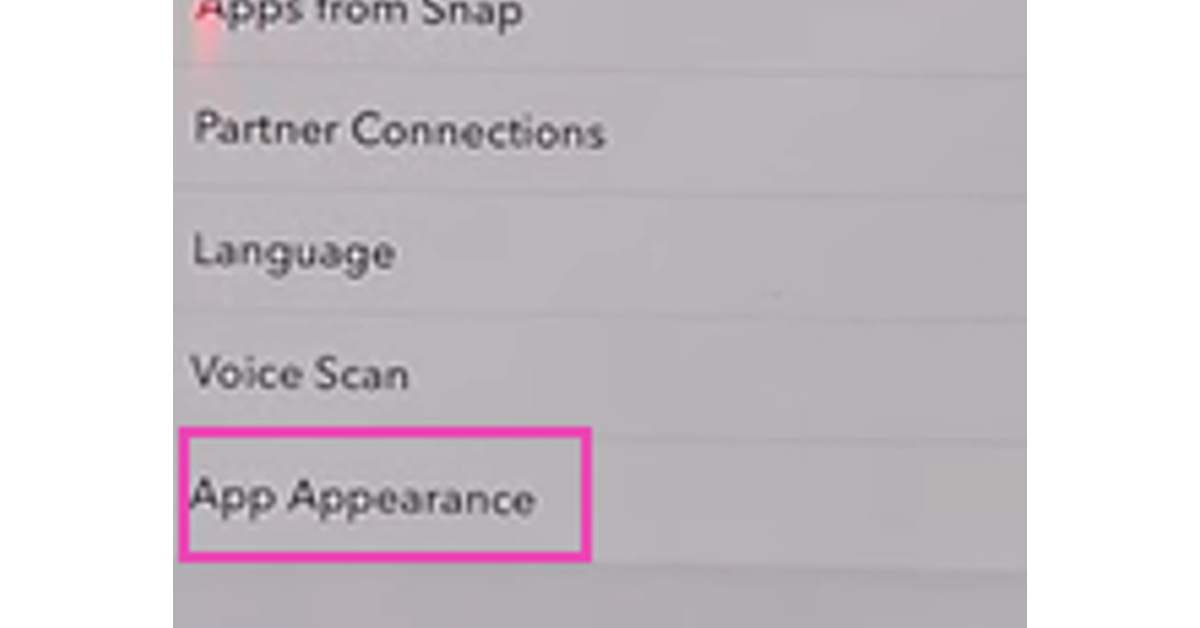 Step 5:
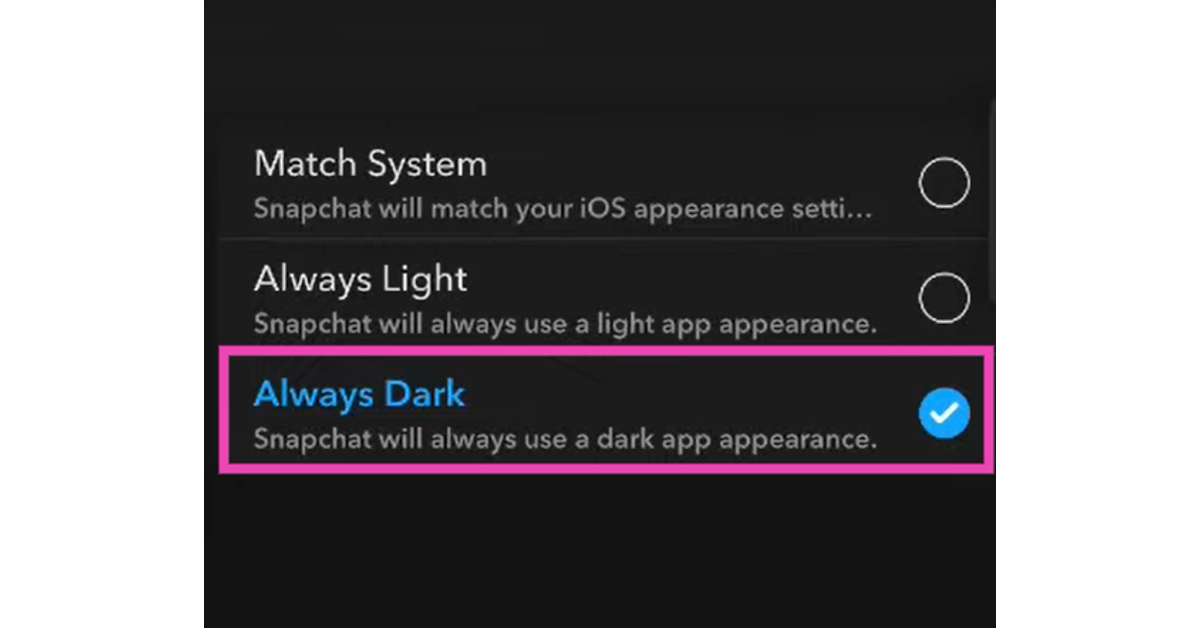
 Step 3:
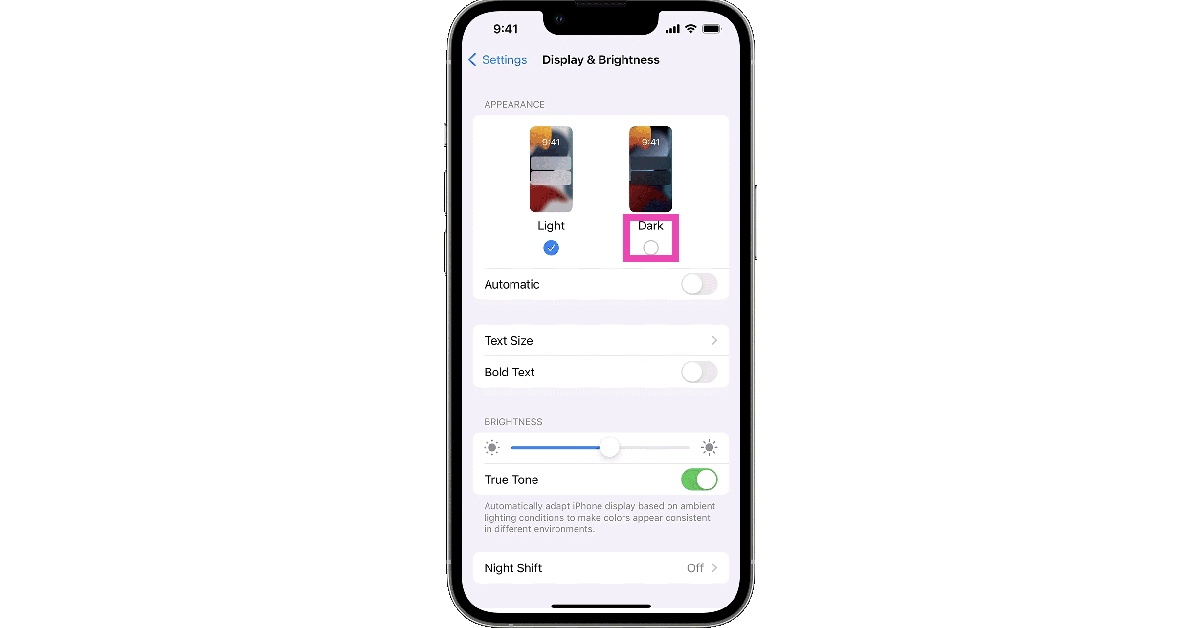
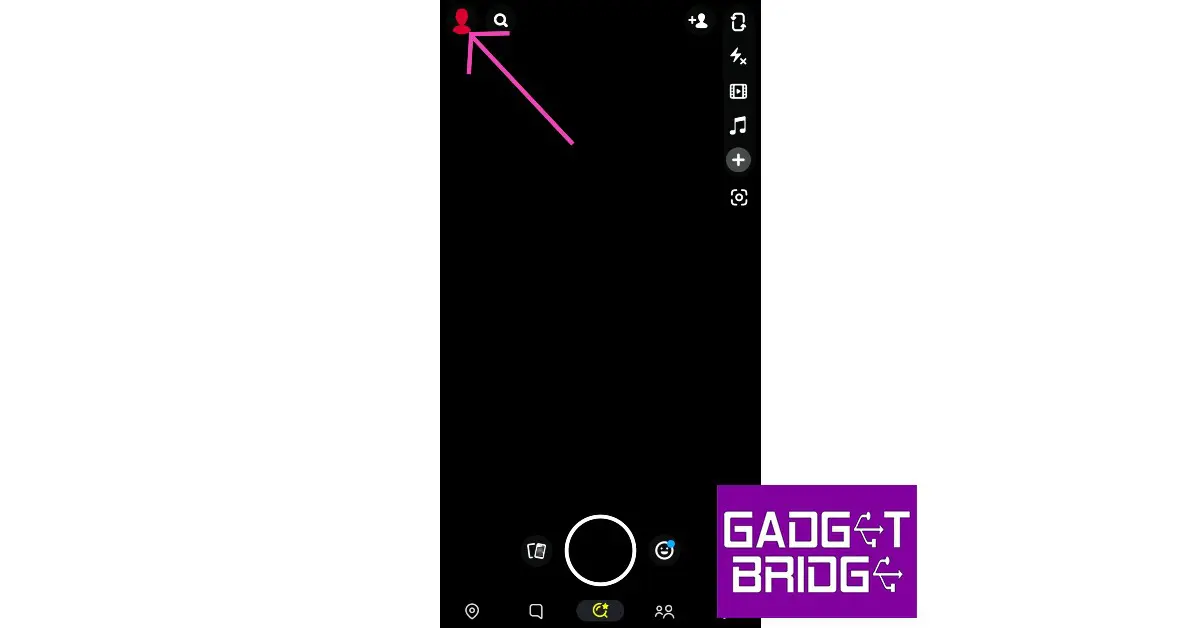 Step 3:
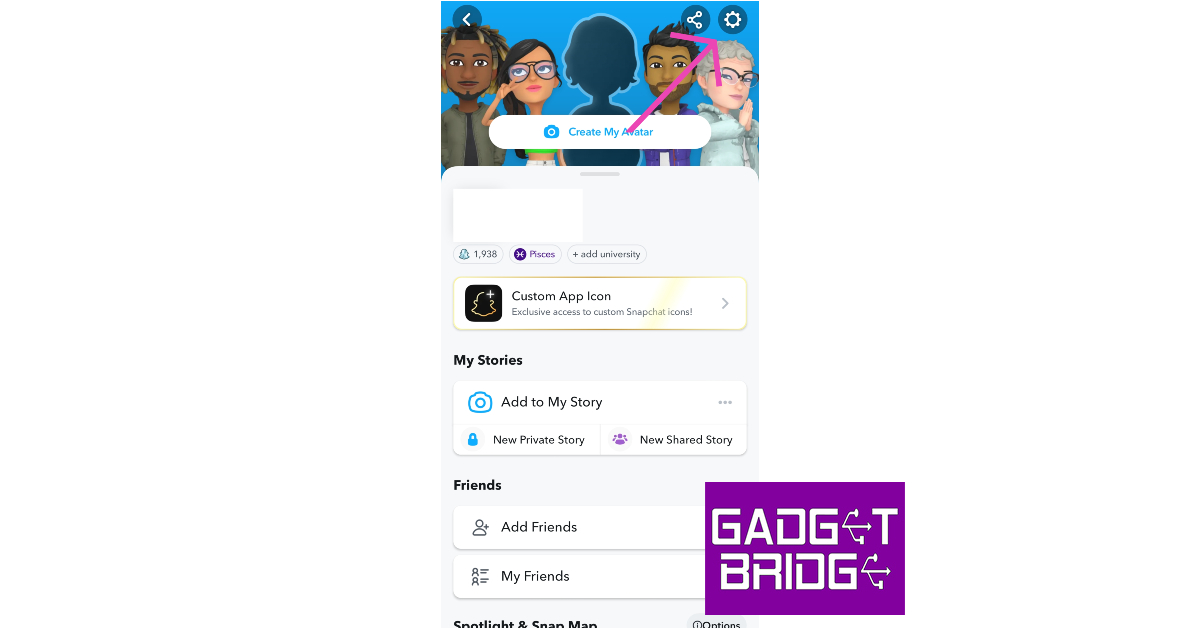 Step 4:
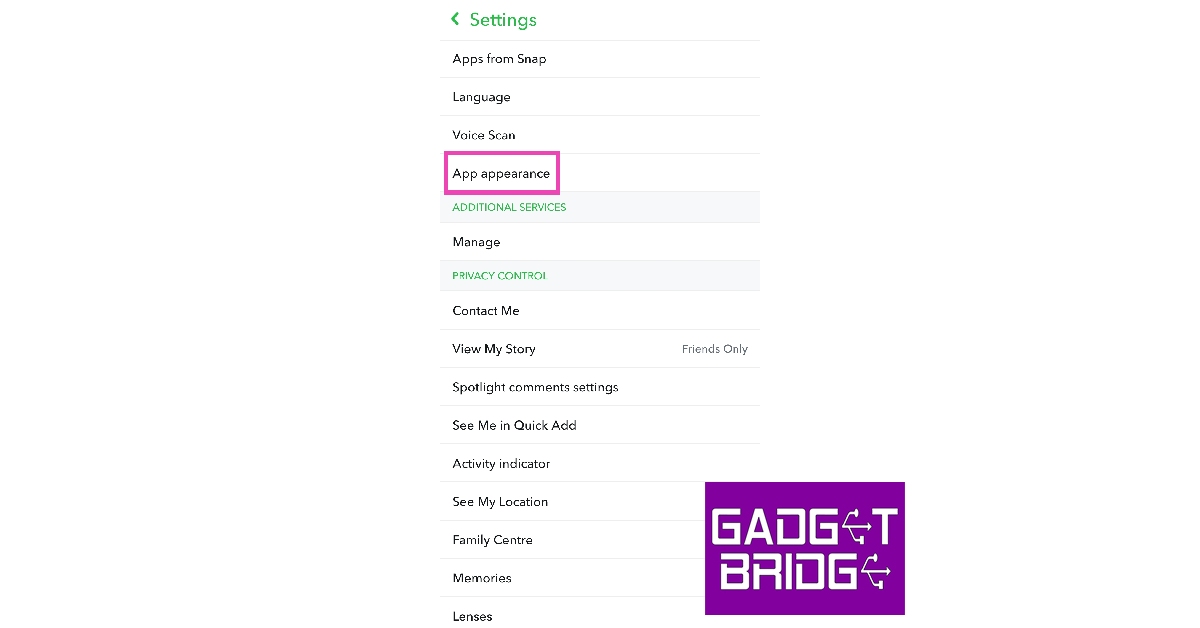 Step 5:
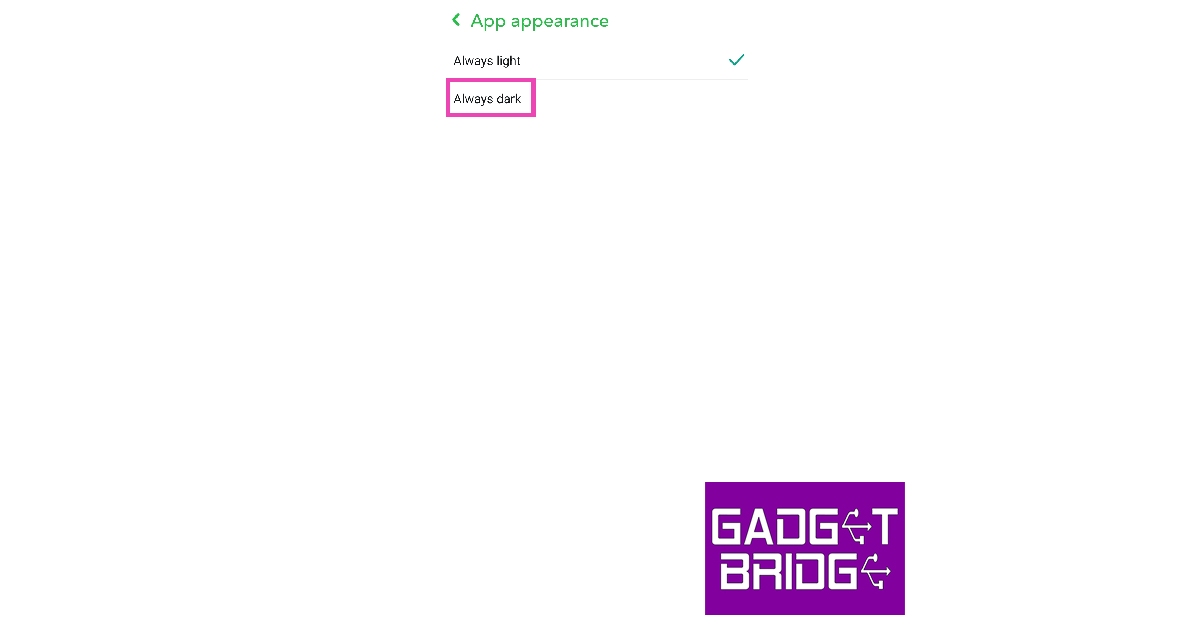
 Step 2:
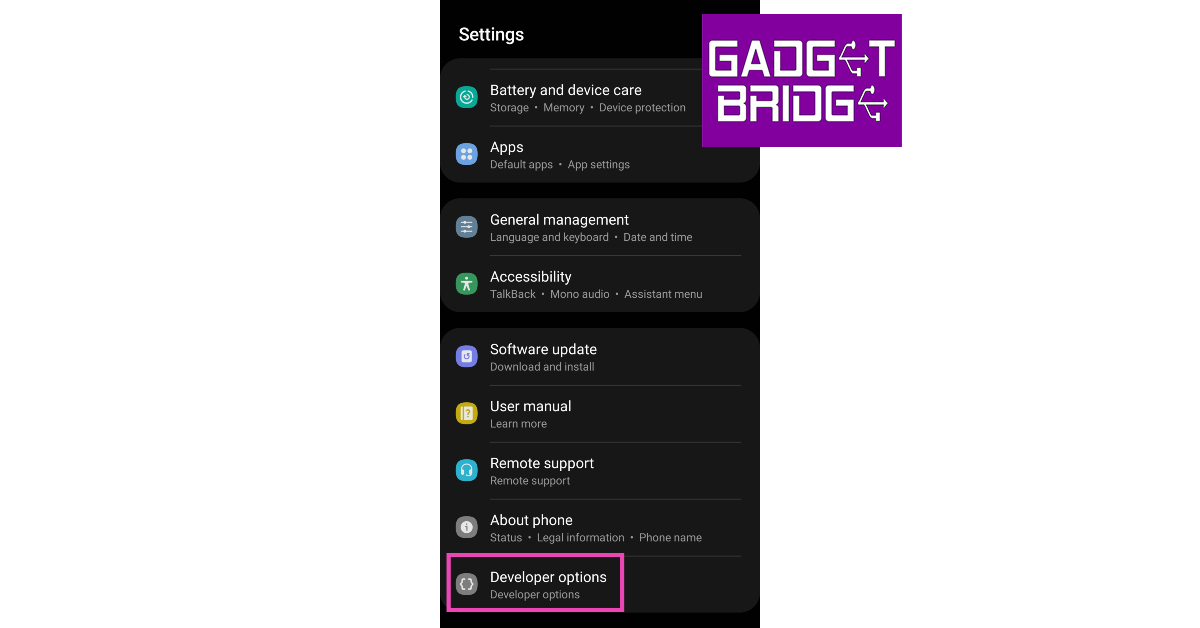 Step 3:
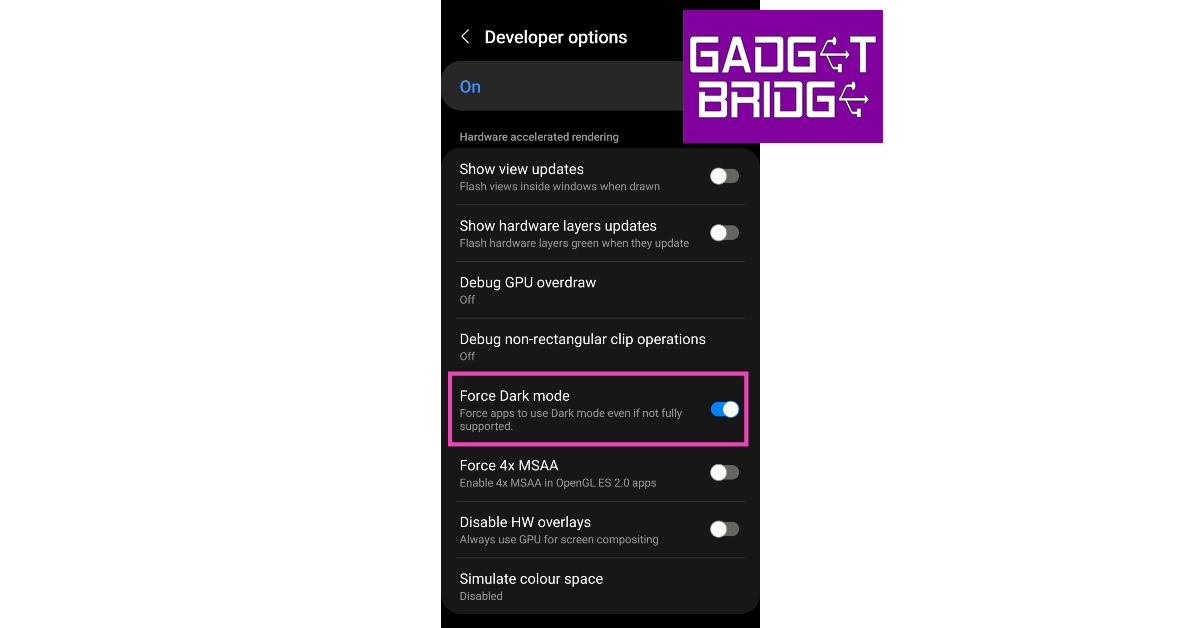 Step 4: Uninstall
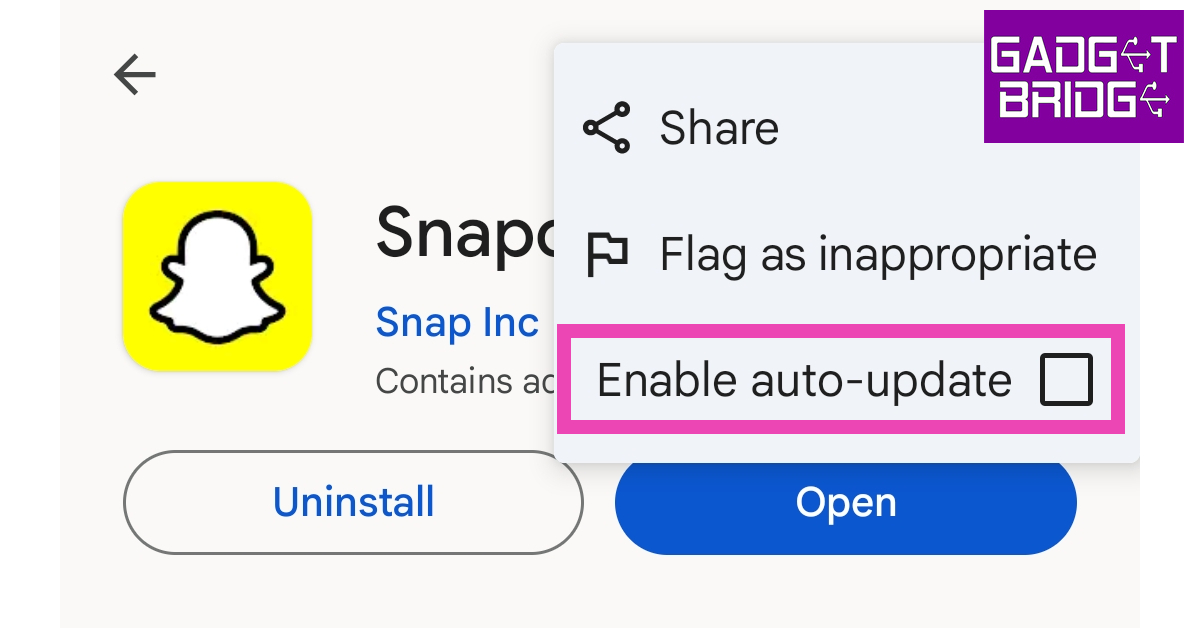 Step 7: Launch


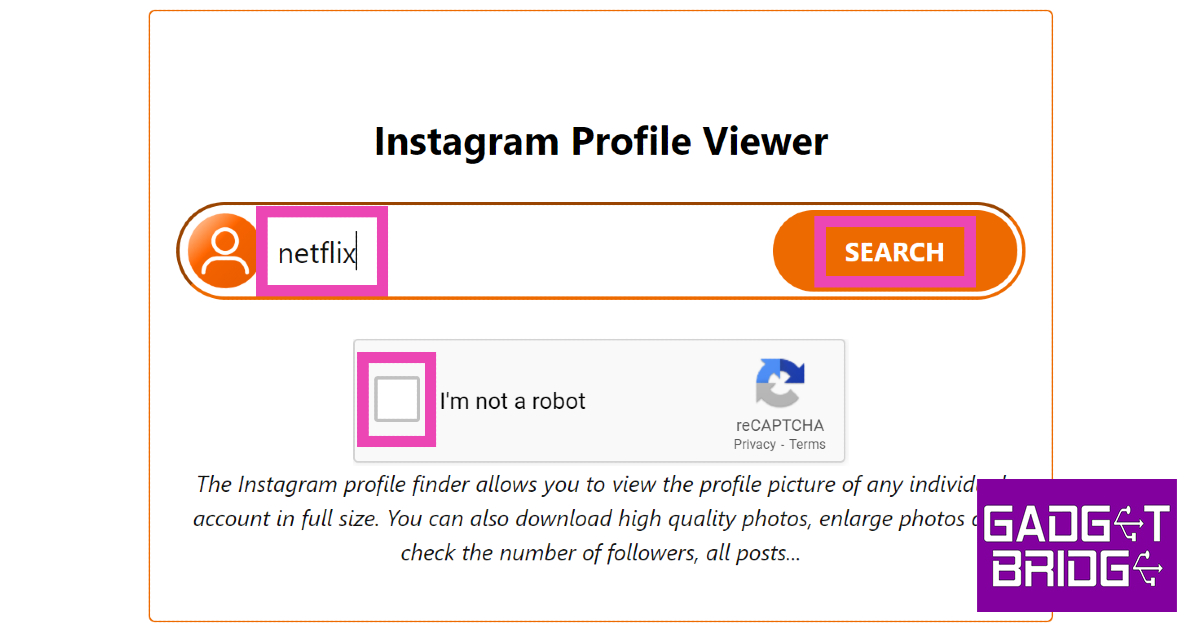 Step 3:
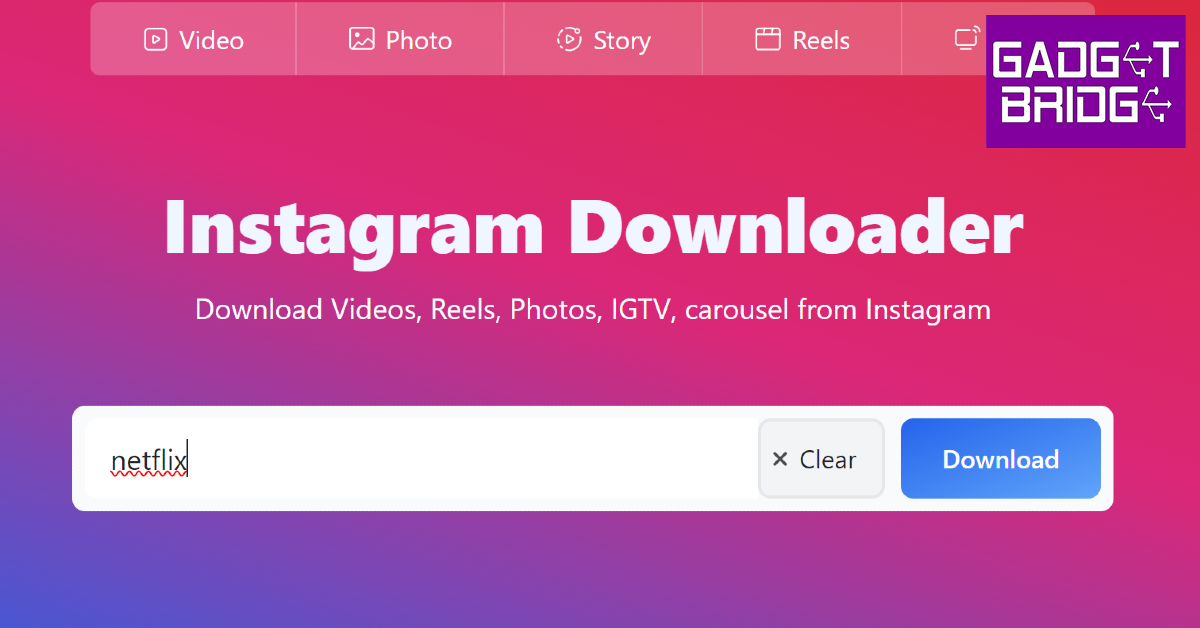 Step 3:
 Step 3:
 Step 5:
 Step 6:
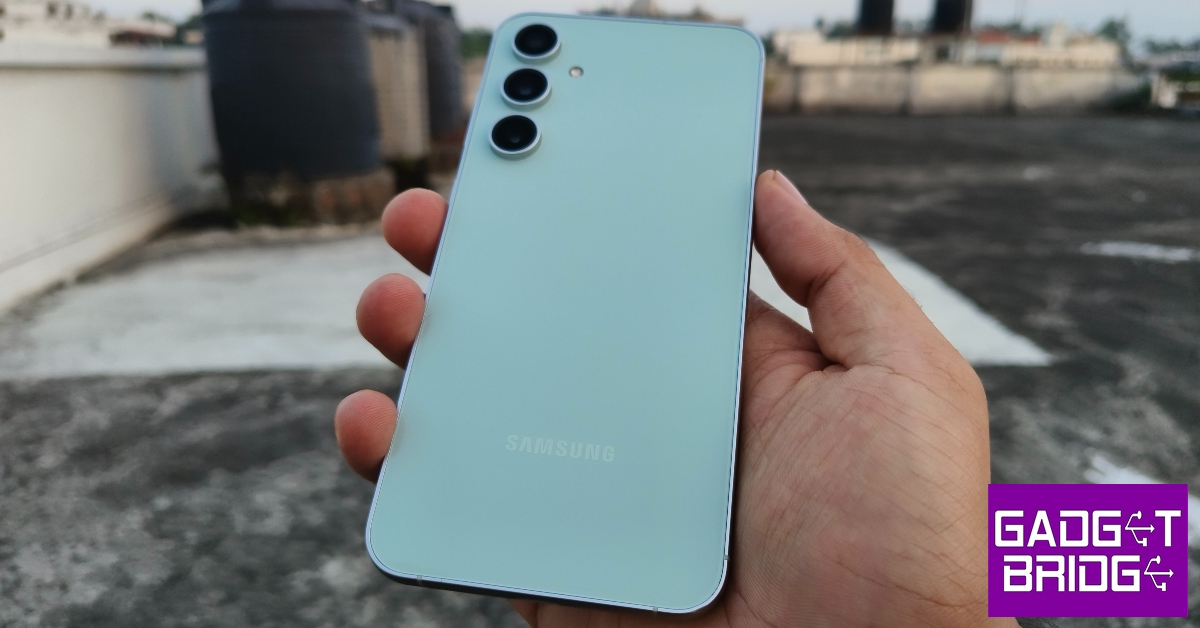
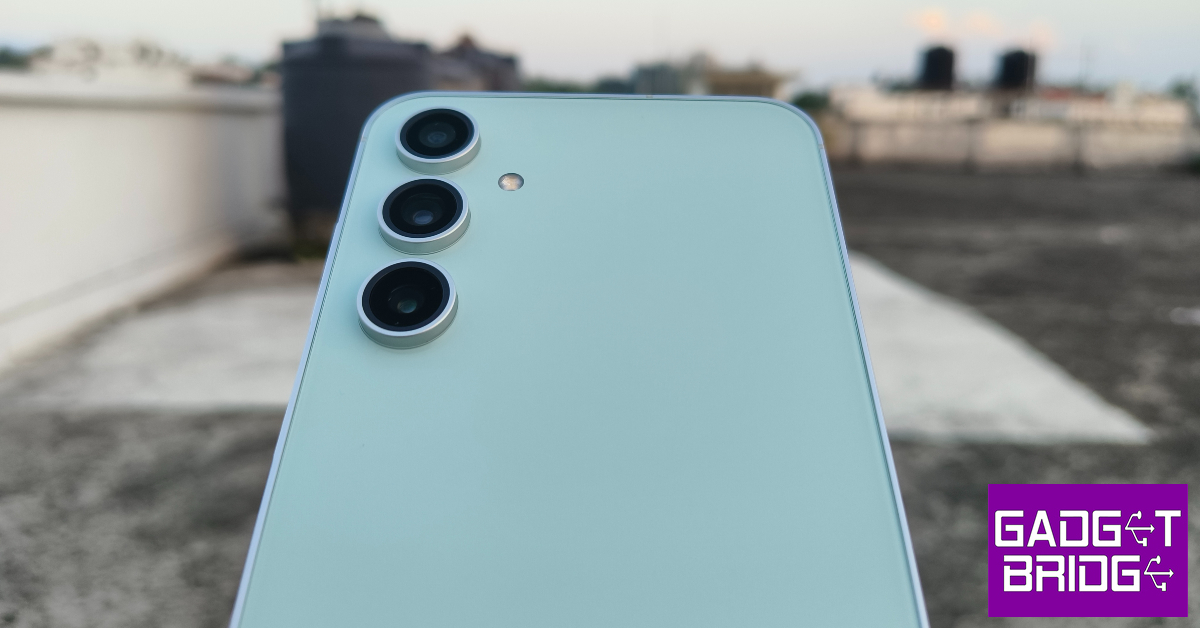
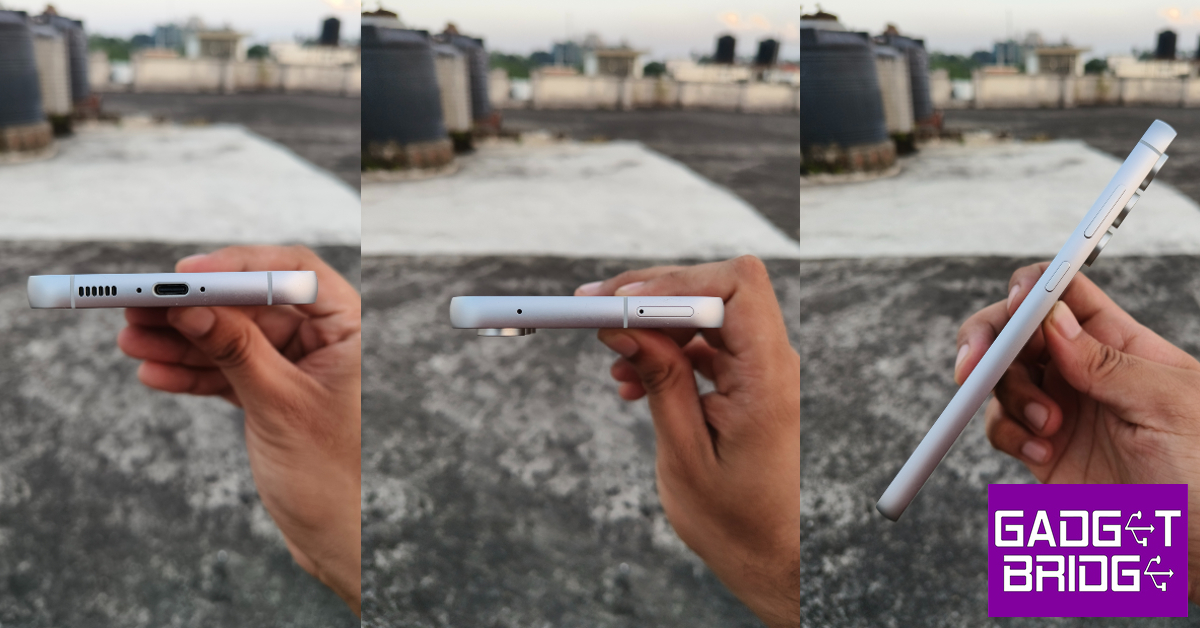
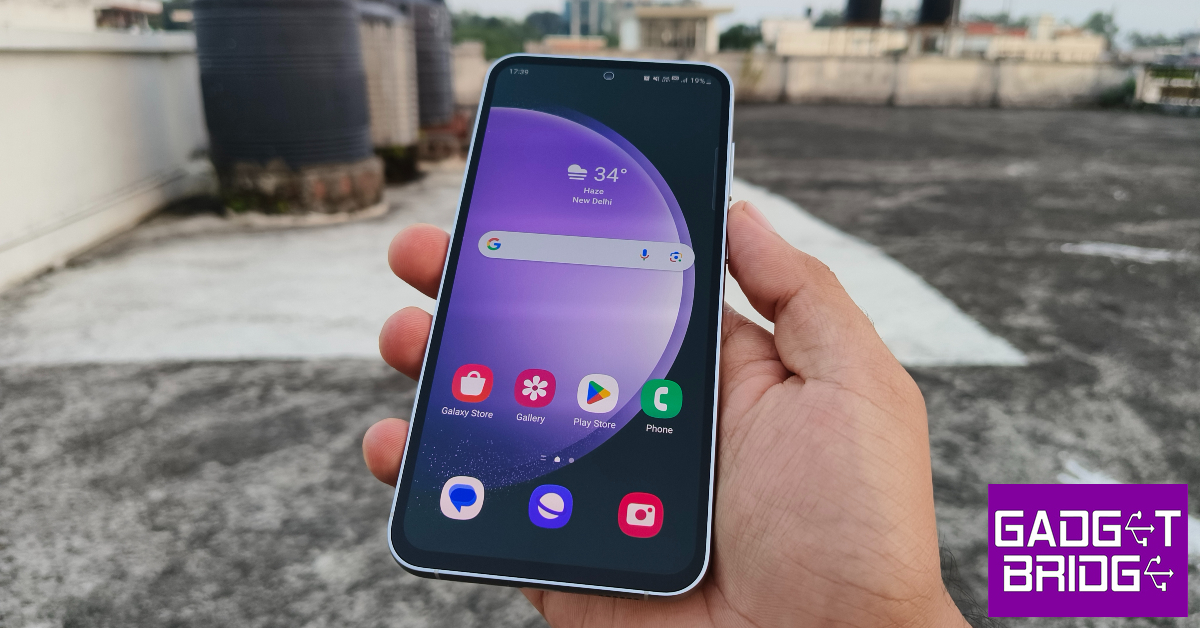

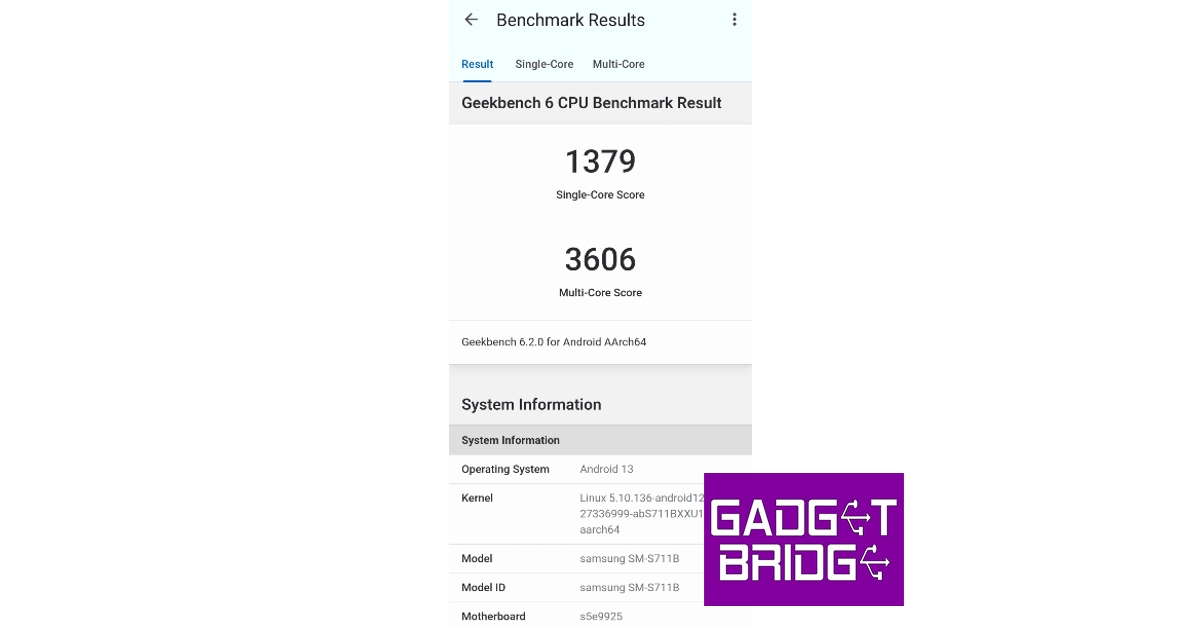


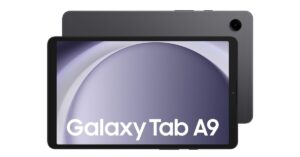


 Step 2:
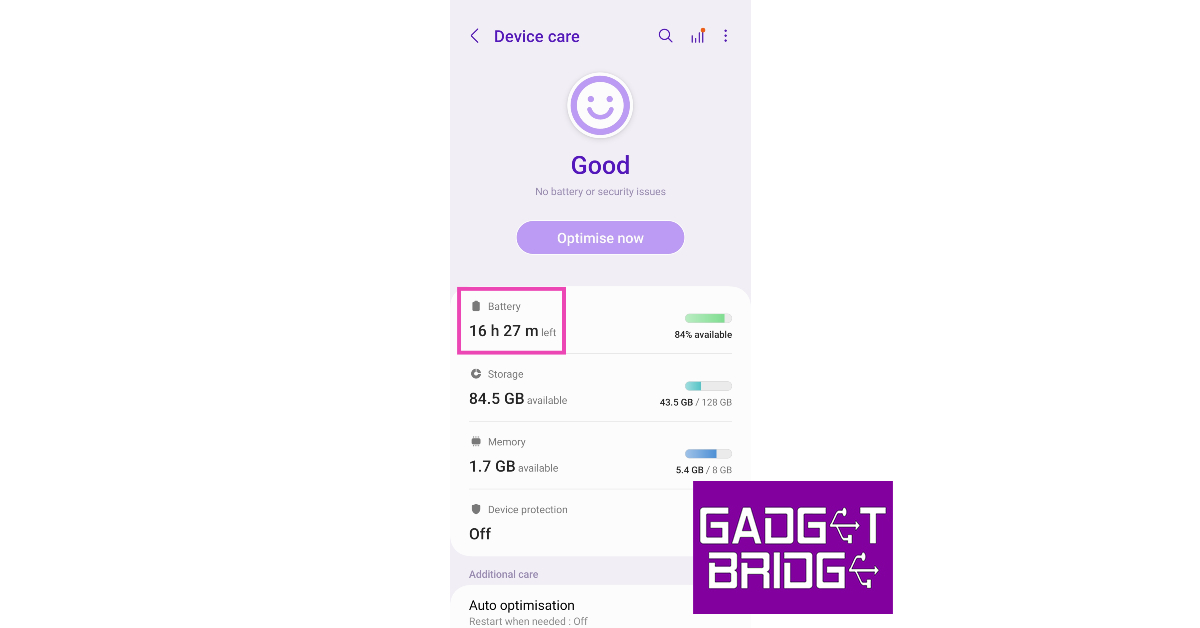 Step 3:
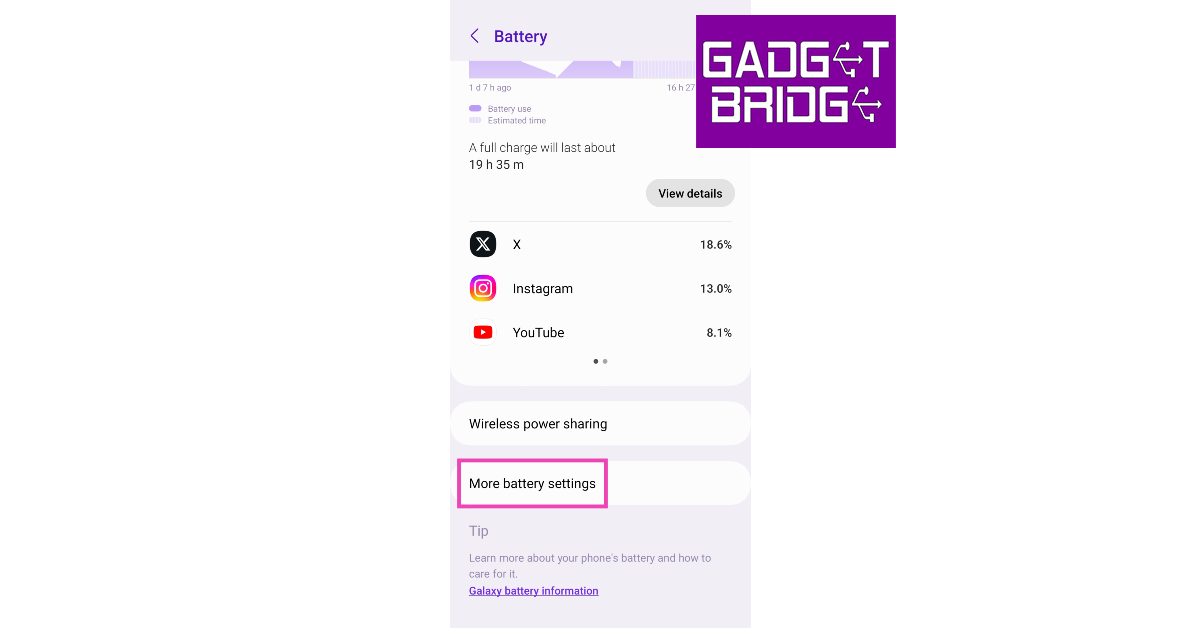 Step 4:
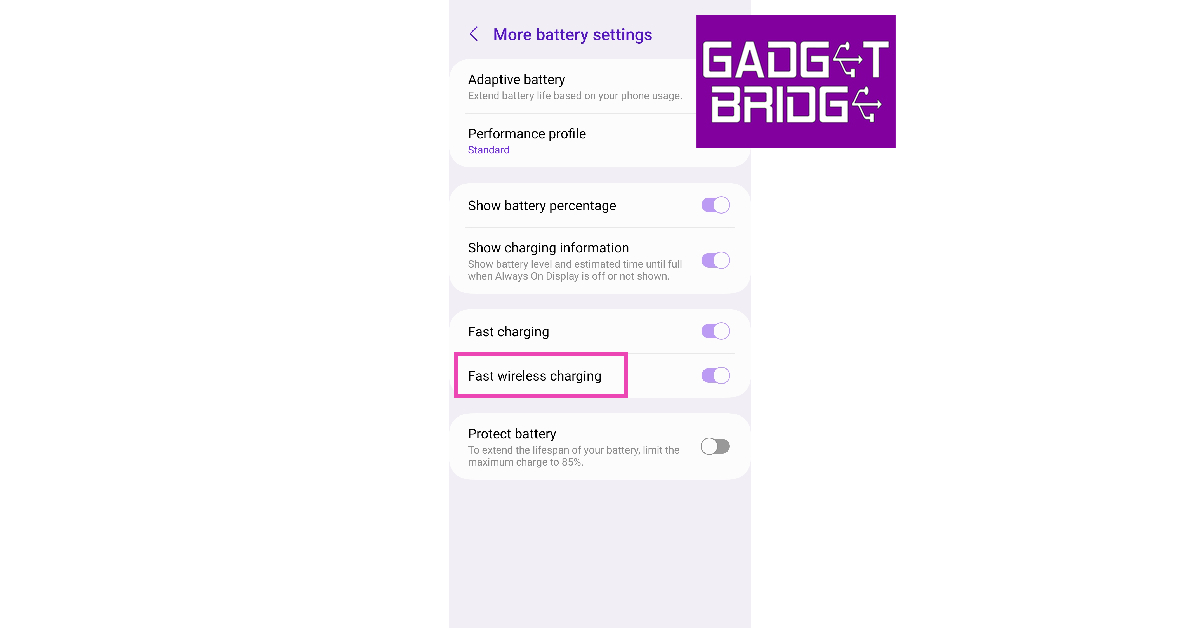
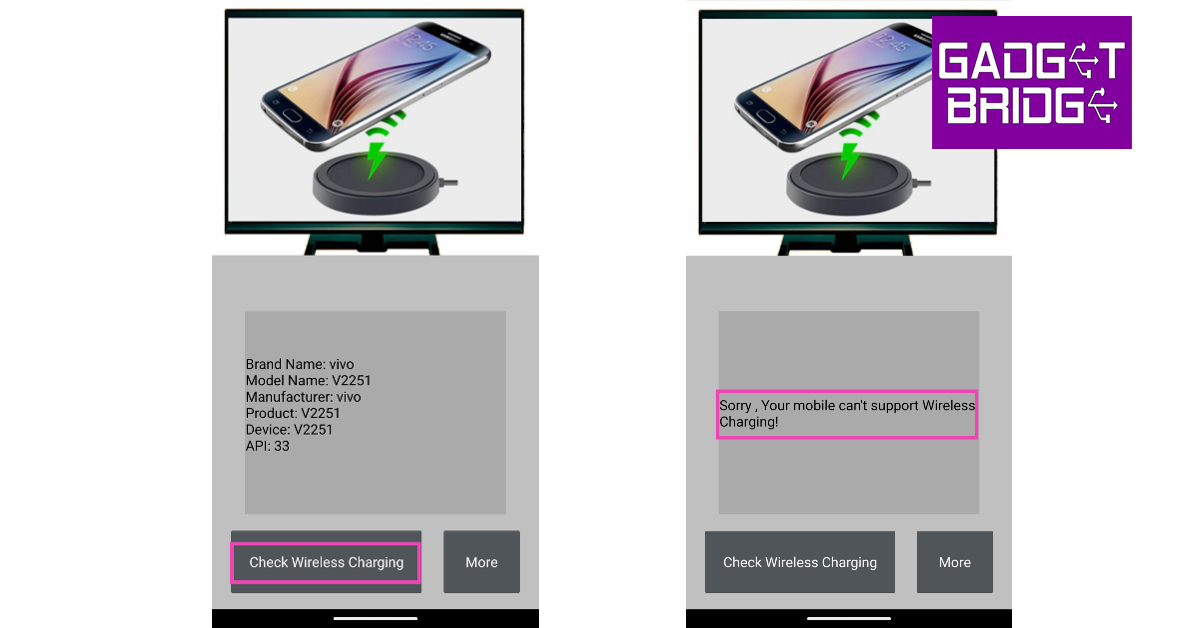
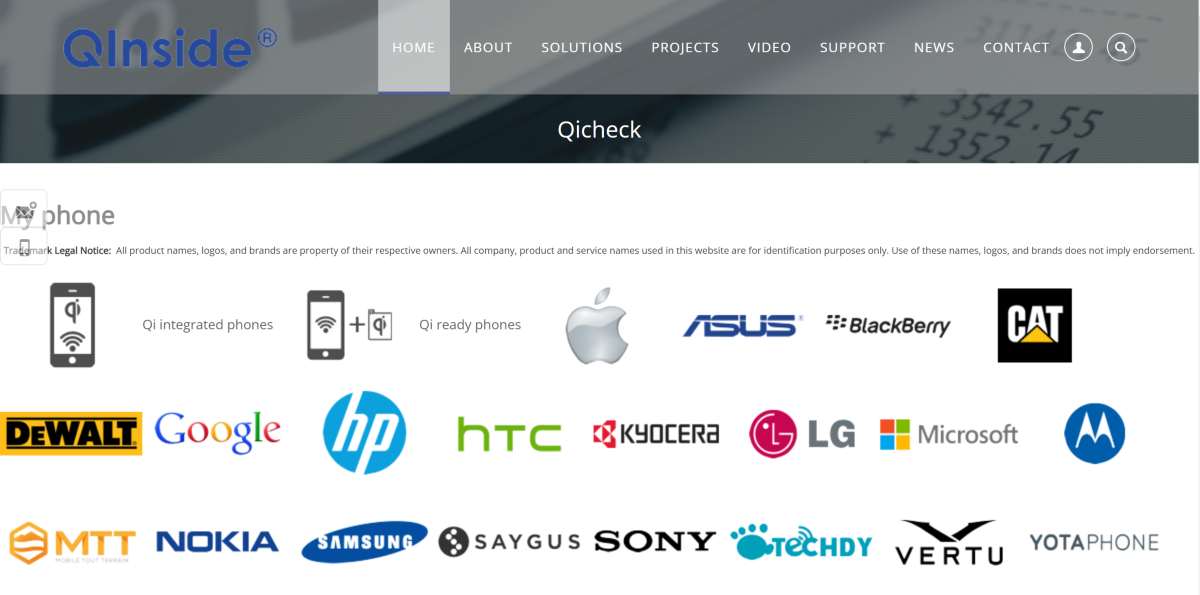 Qi is a wireless charging standard that is used on a lot of smartphones. Go to the
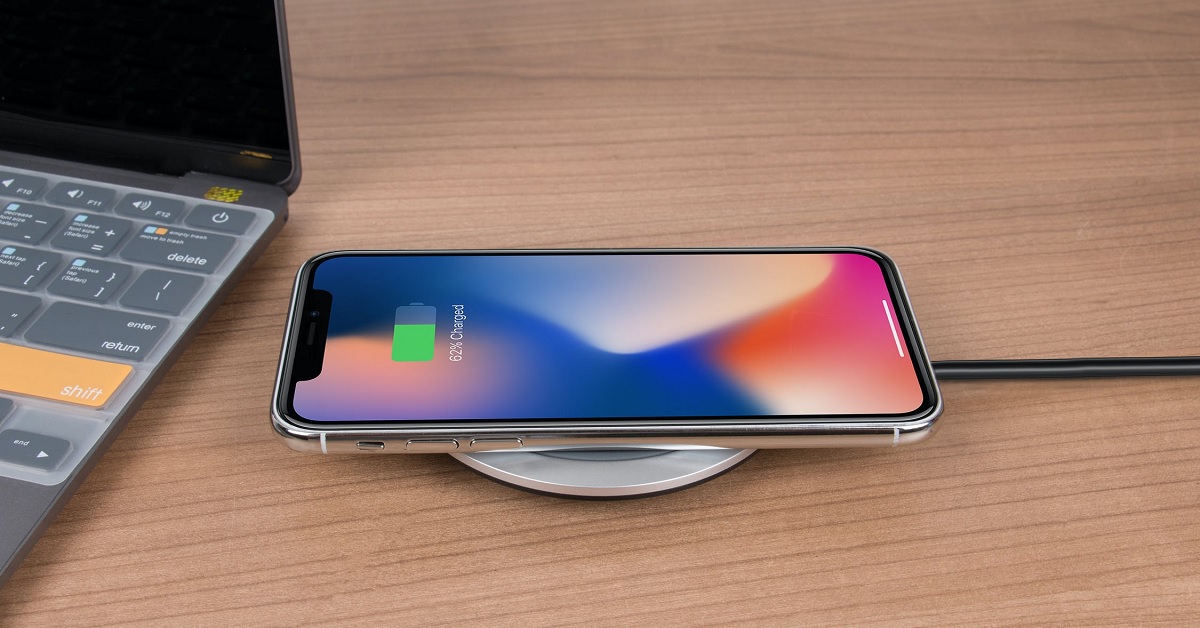


 Step 3:
 Step 4:
 Step 5:
 Step 6: