In This Article
Boult Crown R Pro review: Design
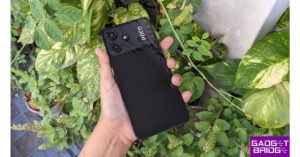
For a company that started out with audio products, Boult has taken no time to perfect the styling and design of its smartwatches. The Crown R Pro does not look out of place even when you compare it with wearables above its price range. The star of the show is the 1.43-inch AMOLED display that can reach a peak brightness of 600 nits. The touch response here is ideal and not the stuttering mess we often experience in other smartwatches in this price category.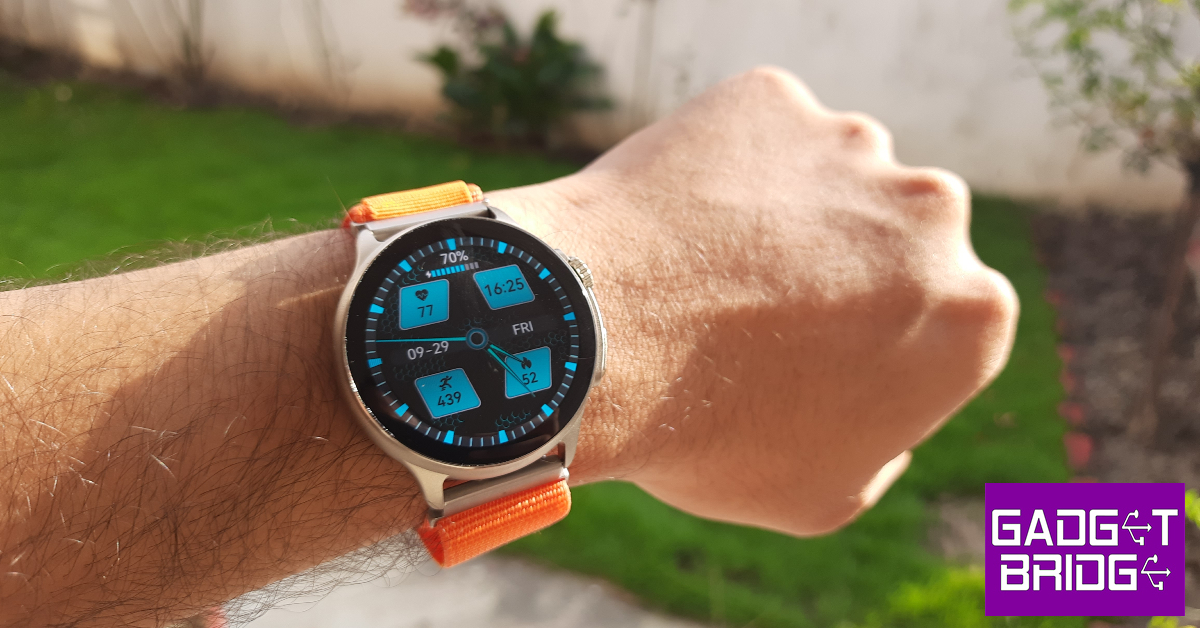 Encasing this display is a zinc alloy shell that houses a crown and an action button on the right side. Right in the middle of the two control buttons lies the solitary microphone. The left side of the frame is completely buttonless. This zinc alloy shell feels quite sturdy and capable of taking a knock. For something that’s made out of a metal alloy, it is quite lightweight. The shell’s texture is not glossy at all, which we really like. The rotating crown reminds us of the Apple Watch Ultra. The feedback that it delivers is very satisfying and makes it very hard to not fidget with it.
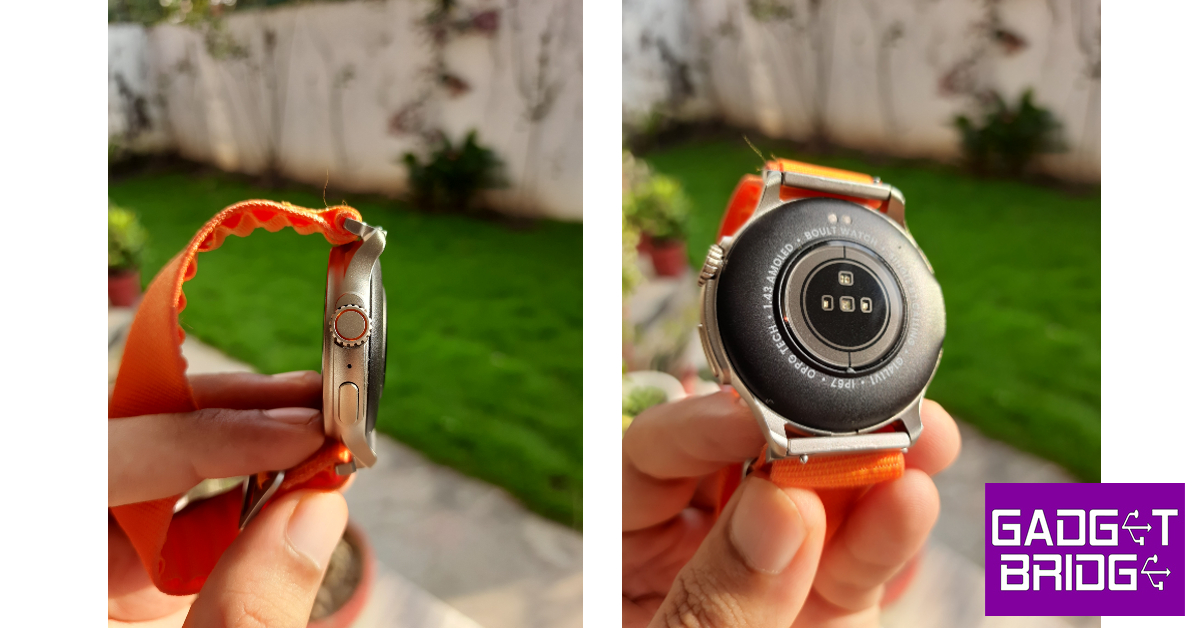 Another highlight of the smartwatch is its watch band options. While we don’t mind silicone straps on most smartwatches, they can cause sweatiness and skin irritation after a certain point. This is why Boult’s choice of going with the nylon strap earns them extra points from us. Even during sweaty workouts, this strap functions like a charm and does not cause any irritation or unnecessary strain. Boult also has a metallic strap option for more casual users.
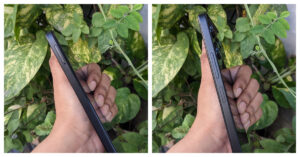
 On the other side of the dial, you will find the health monitors right at the centre and two slots for the magnetic charging pin charger. There’s a small speaker on the right side of the base for audio calls and listening to music. The smartwatch is rated IP67 and is water resistant up to 1m for 30 minutes. This means that sweaty workouts and light rainfall will not damage the smartwatch in any capacity but it is certainly not meant for swimming.
Boult Crown R Pro review: Performance
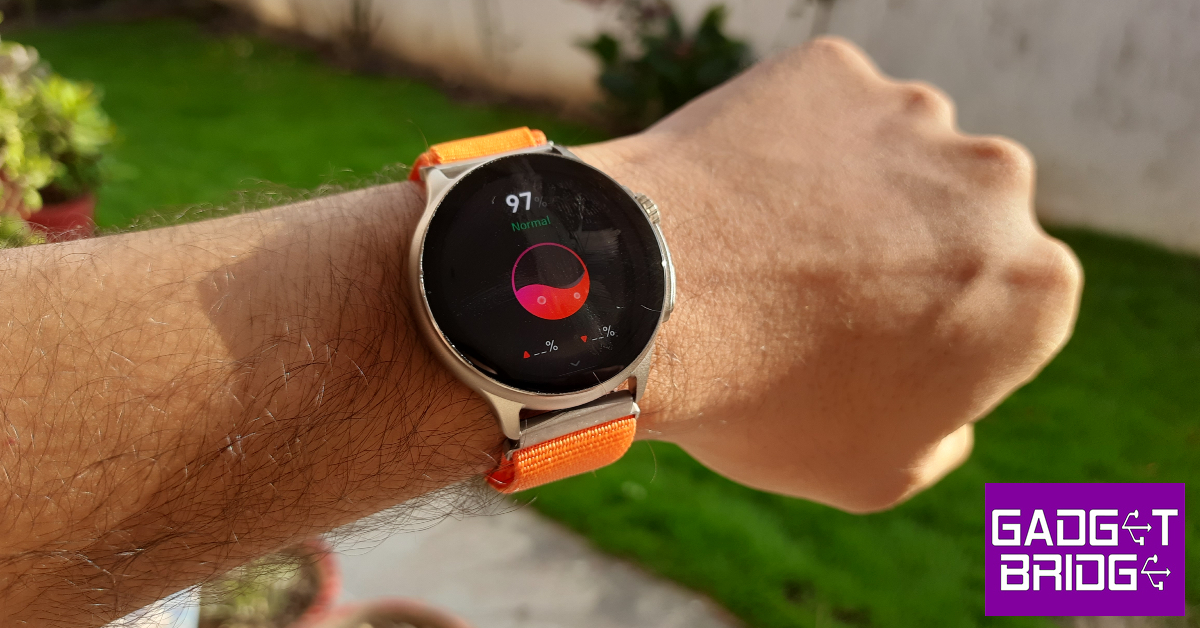
Setting the great design and styling aside, the Boult Crown R Pro is a health and fitness tracker at its heart. The smartwatch can measure the blood oxygen level and heart rate up to medical-grade accuracy. Every once in a while the readings were slightly off, but these cases were the exception rather than the norm.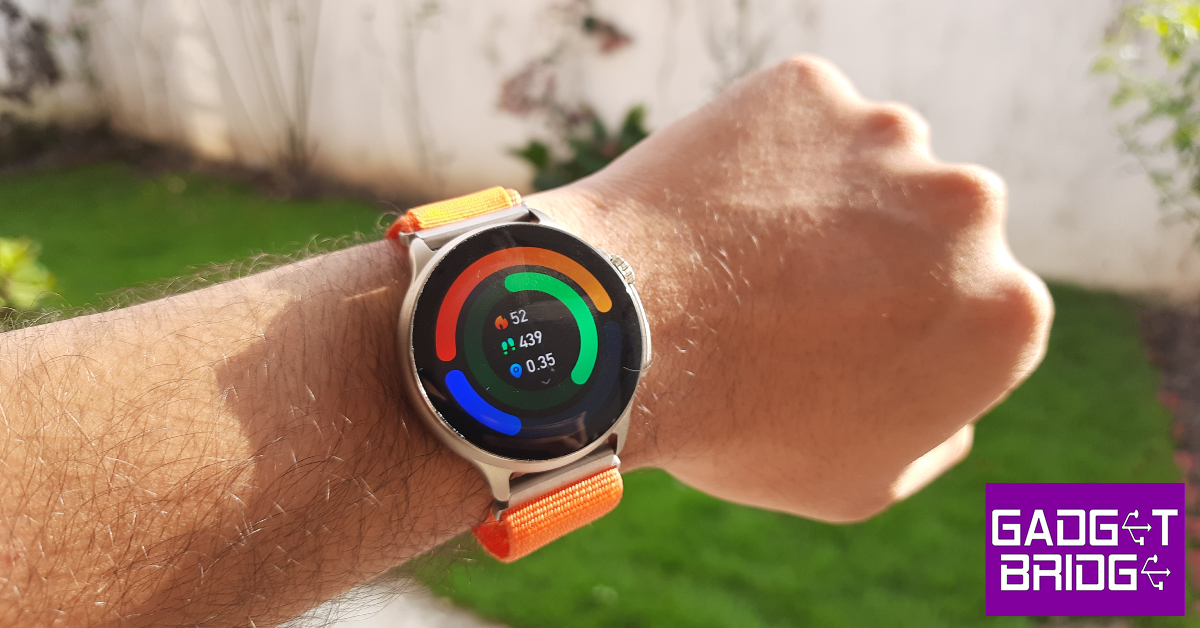 The step counter on this smartwatch works phenomenally as well. The Crown R Pro did a good job of counting the steps and calculating the total distance travelled. While tracking hikes and runs, the smartwatch also calculates your heart rate, calories burnt, and steps walked per minute. We don’t trust the calorie count of any smartwatch, but the heart rate and step counter on this smartwatch were consistent with other premium smartwatches (we used the Samsung Galaxy Watch 6 Classic for comparison).
 The Boult Crown R Pro can track more than 120 exercises, workouts, sports, and other routines. However, you can’t access all of these sport modes at once on the smartwatch. You need to use the BoultTrack app to load your desired exercise on the watch. At a given time, the smartwatch only holds just over 20 workout and sport routines on the device.
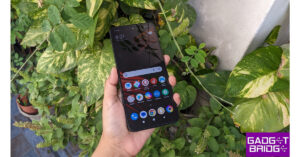
The BoultTrack app could use some work, but it gets the basics right. Since the Crown R Pro does not have an in-built GPS, this app can be used to chart your hikes, walks, and runs on the map. The homepage displays your daily goal progress along with the sleep breakdown, last recorded heart rate, and the last recorded SpO2 reading. If you need to change your smartwatch’s dial face, you can explore your options in the app’s Dial Library. We found most of the watch faces to be quite tacky and over the top, but there were a few that we really enjoyed.
The Boult Crown R Pro can track more than 120 exercises, workouts, sports, and other routines. However, you can’t access all of these sport modes at once on the smartwatch. You need to use the BoultTrack app to load your desired exercise on the watch. At a given time, the smartwatch only holds just over 20 workout and sport routines on the device.
The BoultTrack app could use some work, but it gets the basics right. Since the Crown R Pro does not have an in-built GPS, this app can be used to chart your hikes, walks, and runs on the map. The homepage displays your daily goal progress along with the sleep breakdown, last recorded heart rate, and the last recorded SpO2 reading. If you need to change your smartwatch’s dial face, you can explore your options in the app’s Dial Library. We found most of the watch faces to be quite tacky and over the top, but there were a few that we really enjoyed.
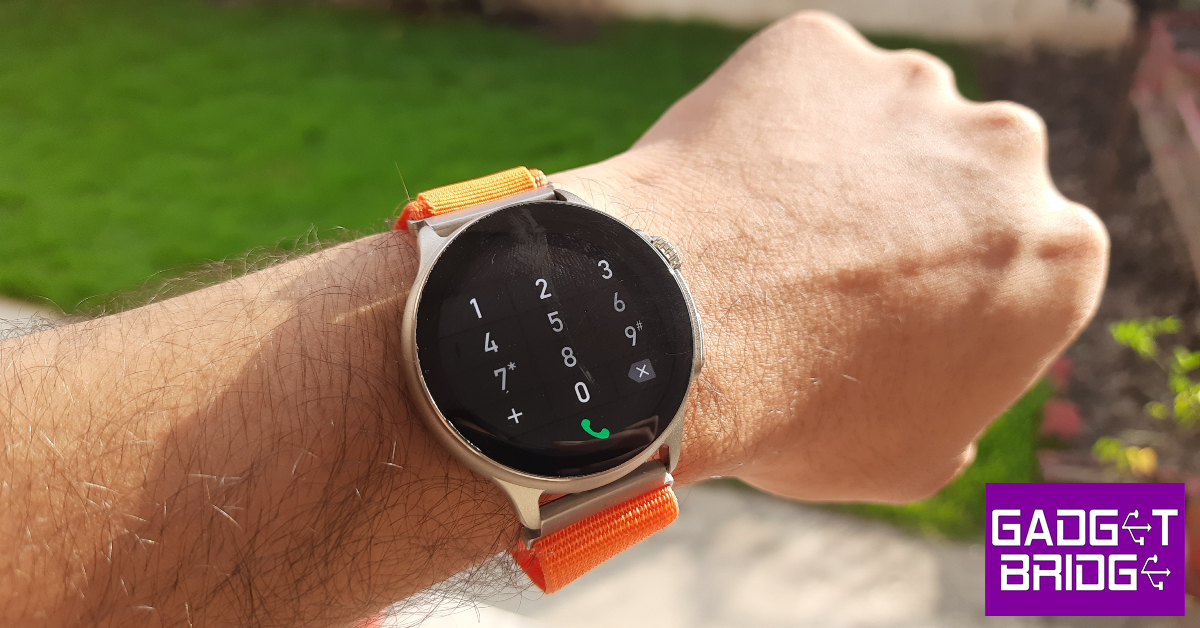
 Apart from being a health and fitness tracker, the Boult Crown R Pro is also a Bluetooth-calling smartwatch. When it is connected to your phone, the watch can be used to make and receive audio calls with ease. The sound and microphone quality is beyond satisfactory. In an indoor setting, you don’t need to put the watch close to your mouth to be audible on the other end. The speaker on the right side of the watch does a good job of relaying the speaker’s audio, but a little boost to the low end would have been nicer. This speaker can also be used to play music on your watch, but the sound quality on all smartwatches in general isn’t comprehensive enough to enjoy listening to music.
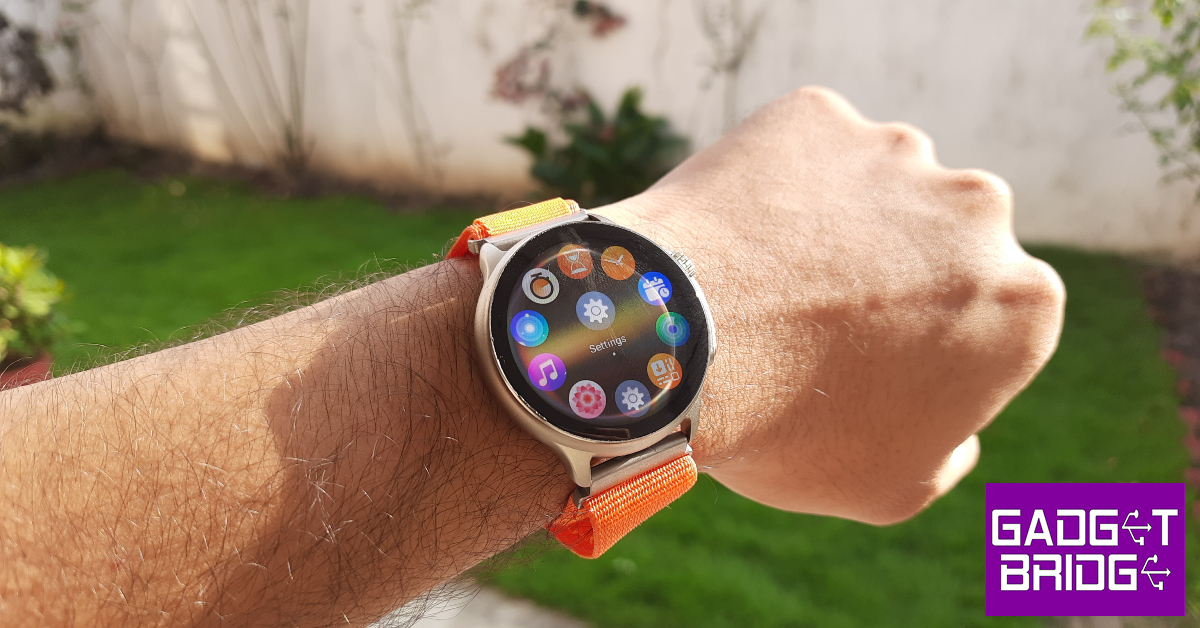
 The Boult Crown R Pro’s OS is a bit of a mixbag. While it is colourful and very easy to navigate, it could use a little tuning. The biggest gripe we have is with the functionality of the rotating crown. While we like that it can quickly toggle between the watch faces without needing to browse to a specific panel, its controlling chops in other places are very limited. For example, rotating the crown while you’re on the music panel does nothing. We expected it to alter the volume but it isn’t programmed to do that. You can use the crown to switch among different watch functions, but pressing the crown button takes you back to the home page. If you want to select a particular function, you need to tap on its icon on the display.
 Apart from the inconsistencies with the crown button, there were a few other random things that caught our attention. The Boult Crown R Pro surprisingly lacks adaptive brightness for the display. Once you set the brightness to a particular intensity, it cannot adapt according to the surrounding light. The battery indicator only displays the charge in multiples of ten. Hopefully, Boult can fix these issues with an update. Other than these minor kinks, the OS does a good job of getting the most out of the hardware at hand.
Talking about the battery life, the Boult Crown R Pro can last up to 5 days on a single charge if you are a conservative user. We kept the Always on Display turned on at all times and tracked our workouts on a regular basis, which gave us a battery coverage of 3 days. Boult claims the Crown R Pro can be fully charged in 90 minutes, which we found to be consistent while testing the watch in the review period.
Read Also: Itel S23+ with 3D curved AMOLED display launched in India
Apart from the inconsistencies with the crown button, there were a few other random things that caught our attention. The Boult Crown R Pro surprisingly lacks adaptive brightness for the display. Once you set the brightness to a particular intensity, it cannot adapt according to the surrounding light. The battery indicator only displays the charge in multiples of ten. Hopefully, Boult can fix these issues with an update. Other than these minor kinks, the OS does a good job of getting the most out of the hardware at hand.
Talking about the battery life, the Boult Crown R Pro can last up to 5 days on a single charge if you are a conservative user. We kept the Always on Display turned on at all times and tracked our workouts on a regular basis, which gave us a battery coverage of 3 days. Boult claims the Crown R Pro can be fully charged in 90 minutes, which we found to be consistent while testing the watch in the review period.
Read Also: Itel S23+ with 3D curved AMOLED display launched in India
Verdict
The Boult Crown R Pro gives you the best of both worlds. It is an efficient health and fitness tracker that does not compromise on style. There are a lot of things to like about this smartwatch. The 1.43-inch AMOLED display is smooth and highly responsive to even the lightest of gestures. The nylon and metallic watch band options are perfect for switching between work and play. The calling and other traditional ‘smartwatch’ features leave no room for complaints either. The OS could have been tuned better, but the issues can be easily patched with an update.Boult Crown R Pro: Pros
- Excellent display
- Comfortable nylon watch band
- Very satisfying clicky feedback on the crown button
- Good health and fitness tracker
Bould Crown R Pro: Cons
- The OS does not fully tap into the crown button’s potential


 If your Apple Watch isn’t charging at a rapid pace, it could be due to physical damage to the charger. Check the charging puck and the wire connected to it for any damage. If the wire has frayed ends, the charging speed will fall drastically. Replace the damaged part with Apple-authorised accessories to restore the charging speed and make your smartwatch charge past 80%.

 Step 1:
 If the methods mentioned above don’t work out for you, take your Apple Watch to an authorised service centre. It is possible that the issue is hardware-related. You can


 Step 3:
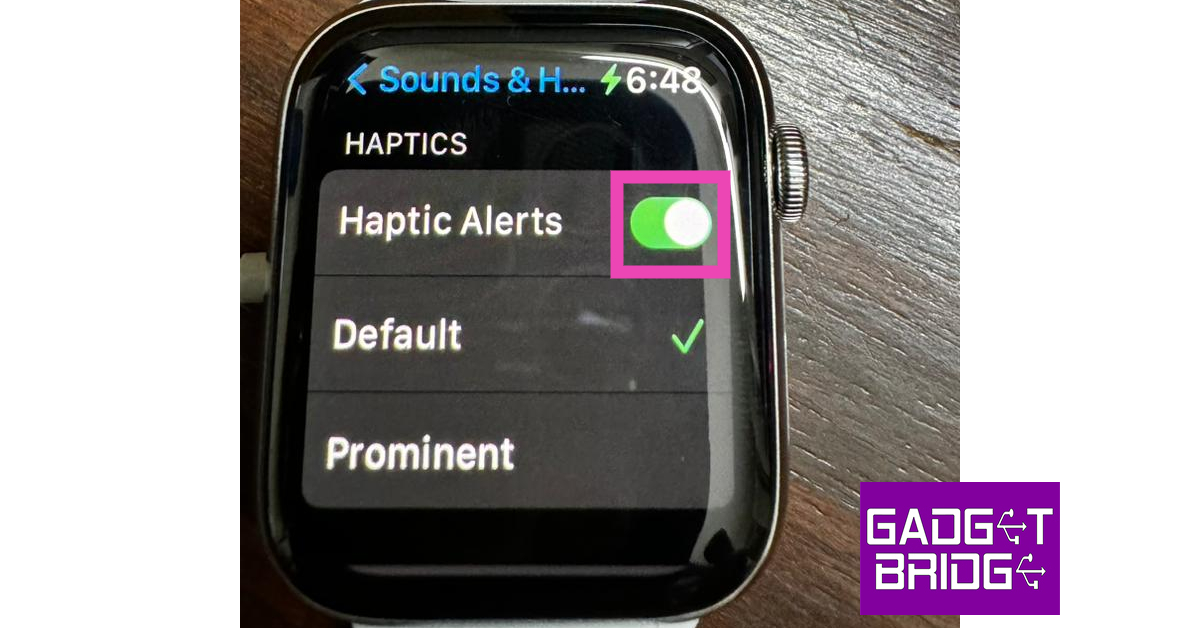
 Step 3:
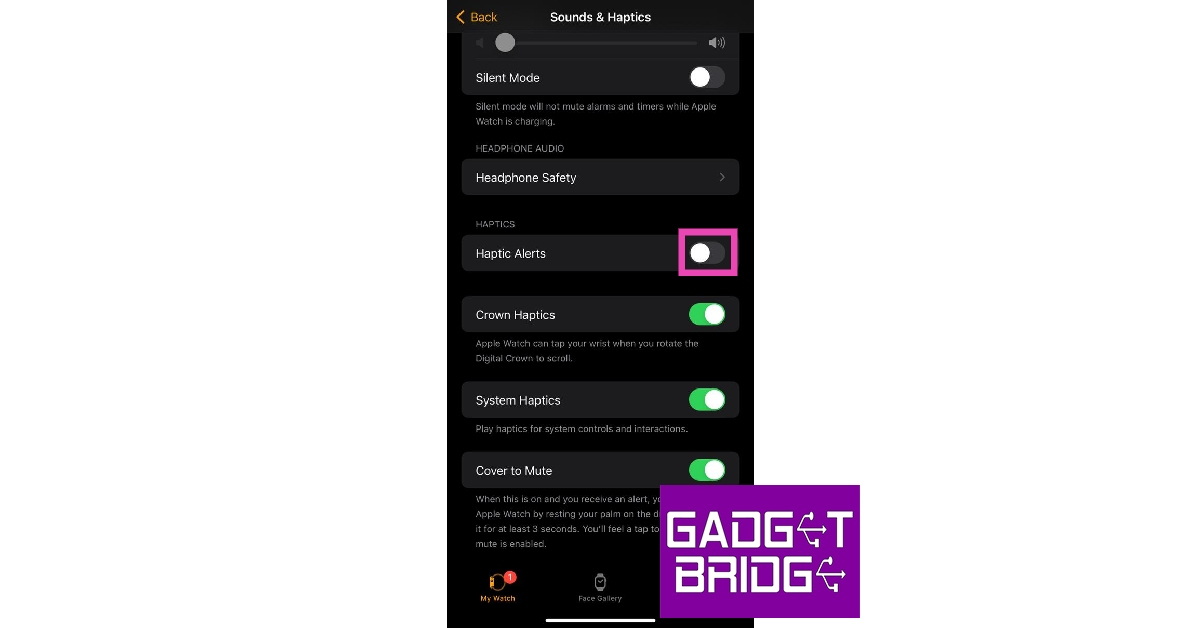

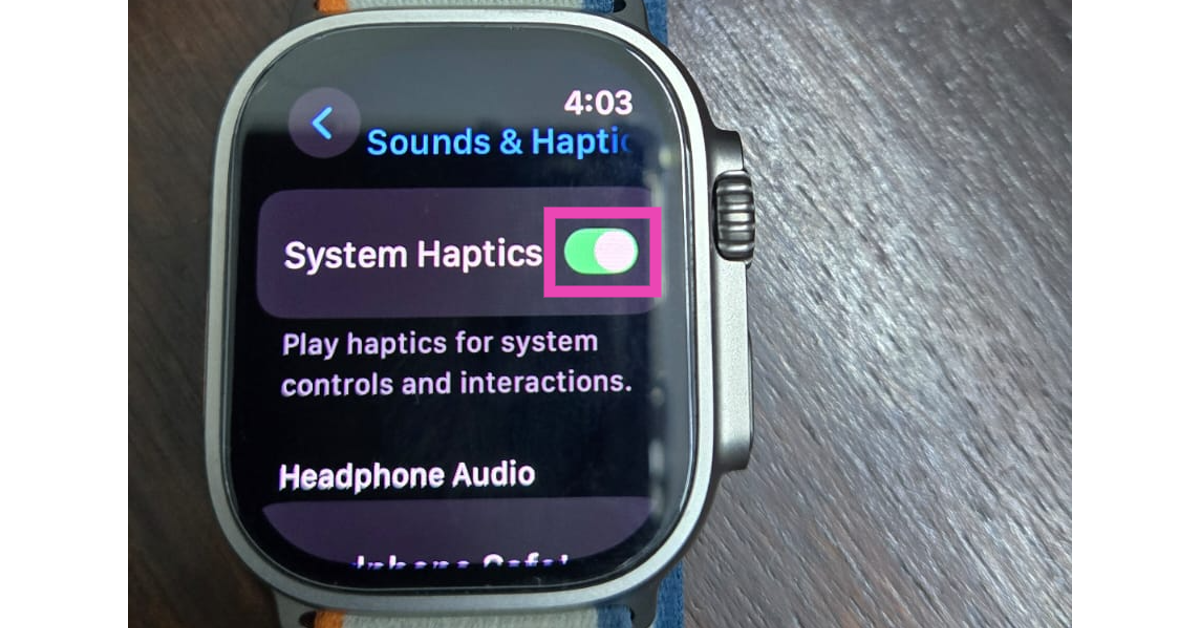
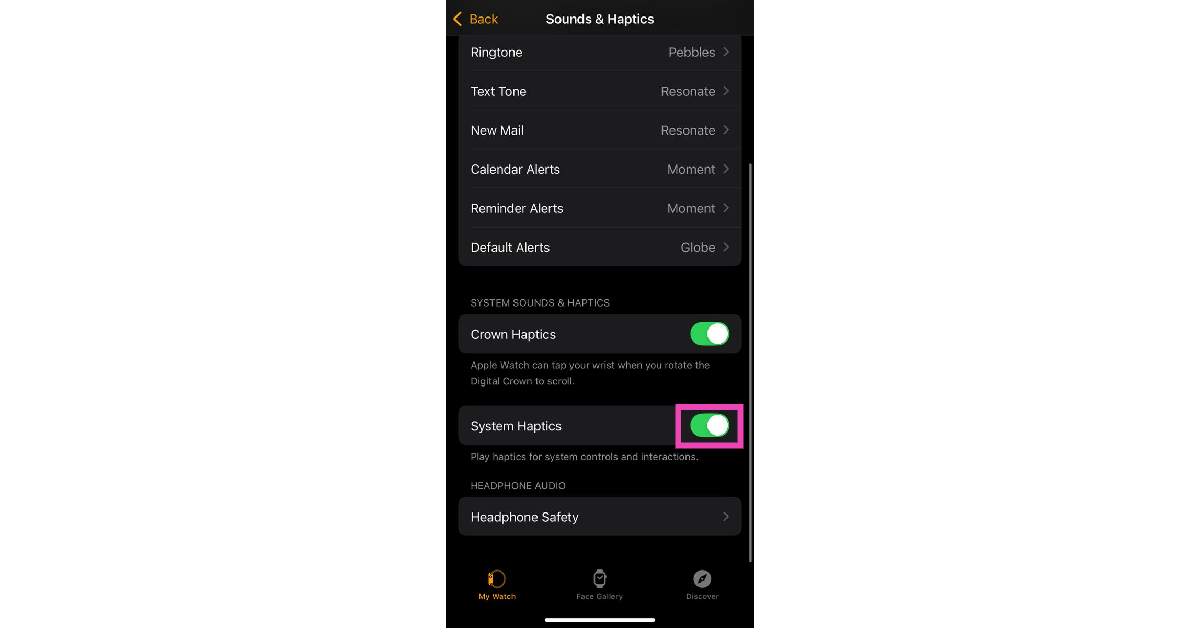
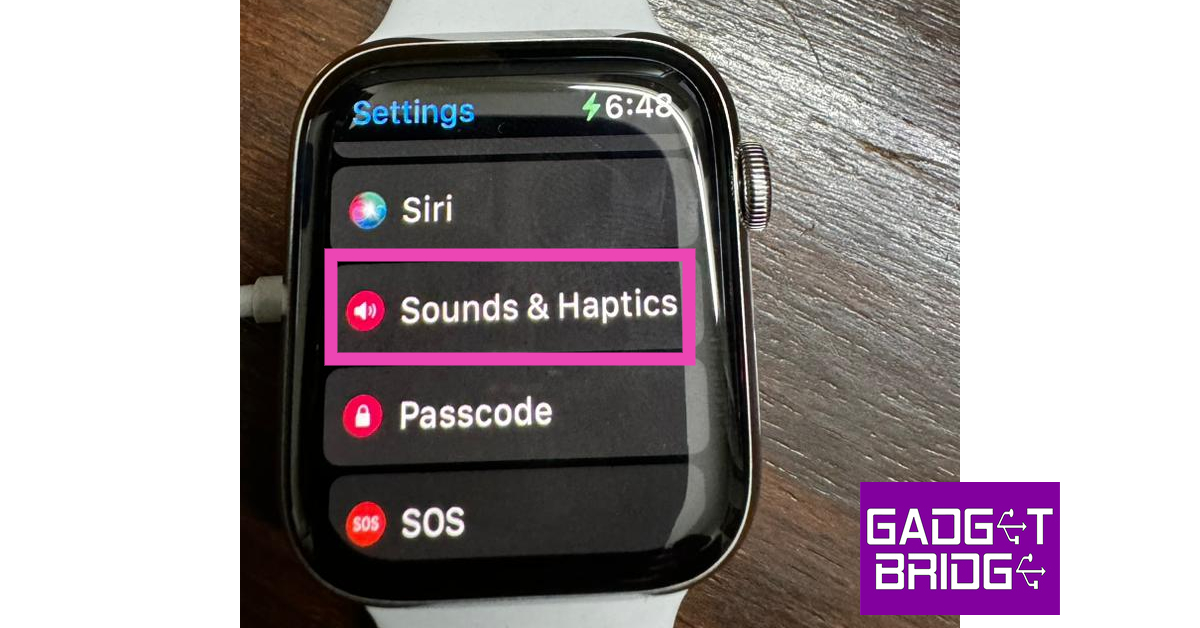
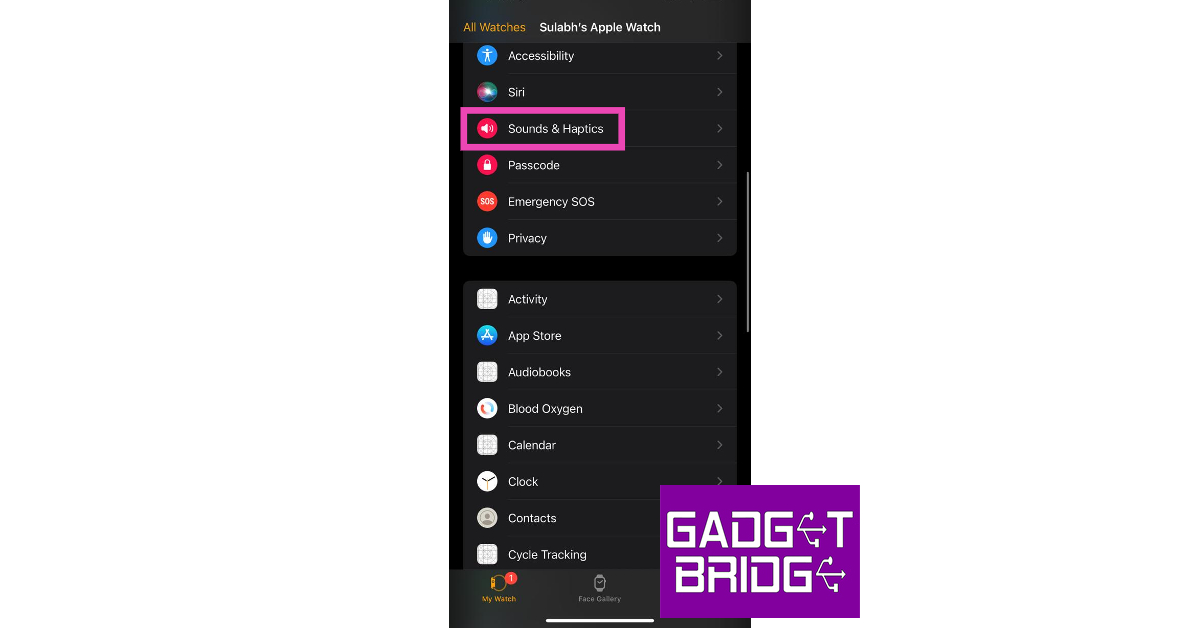
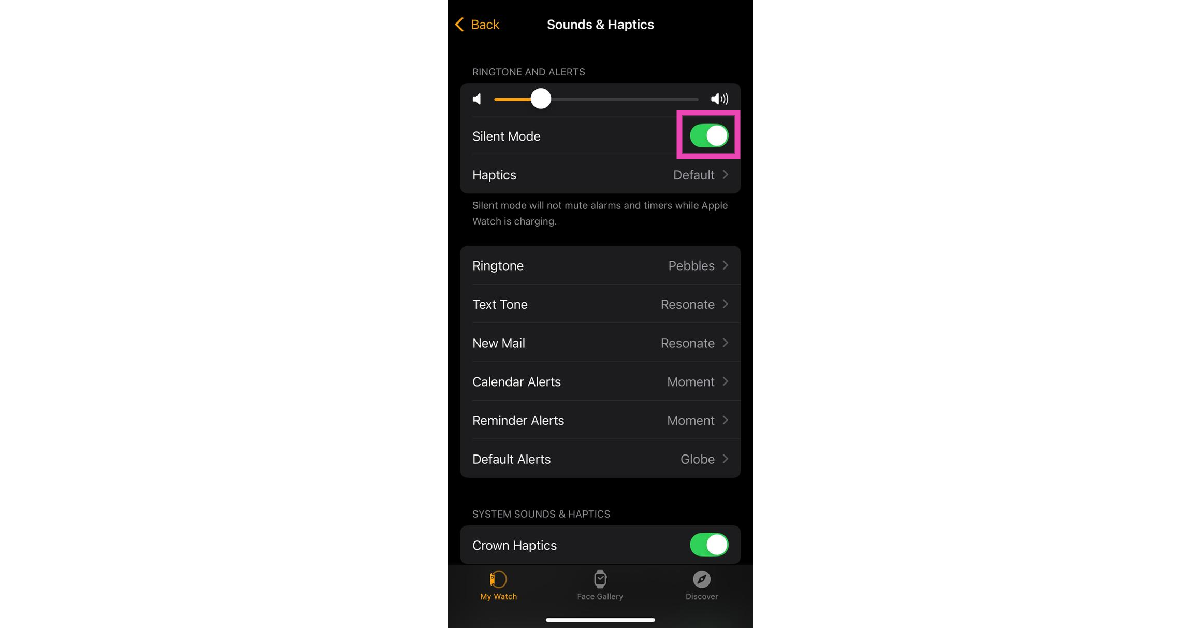
 Alternatively, you can go to Settings>Sound & Haptics and turn on the toggle switch next to Silent Mode.
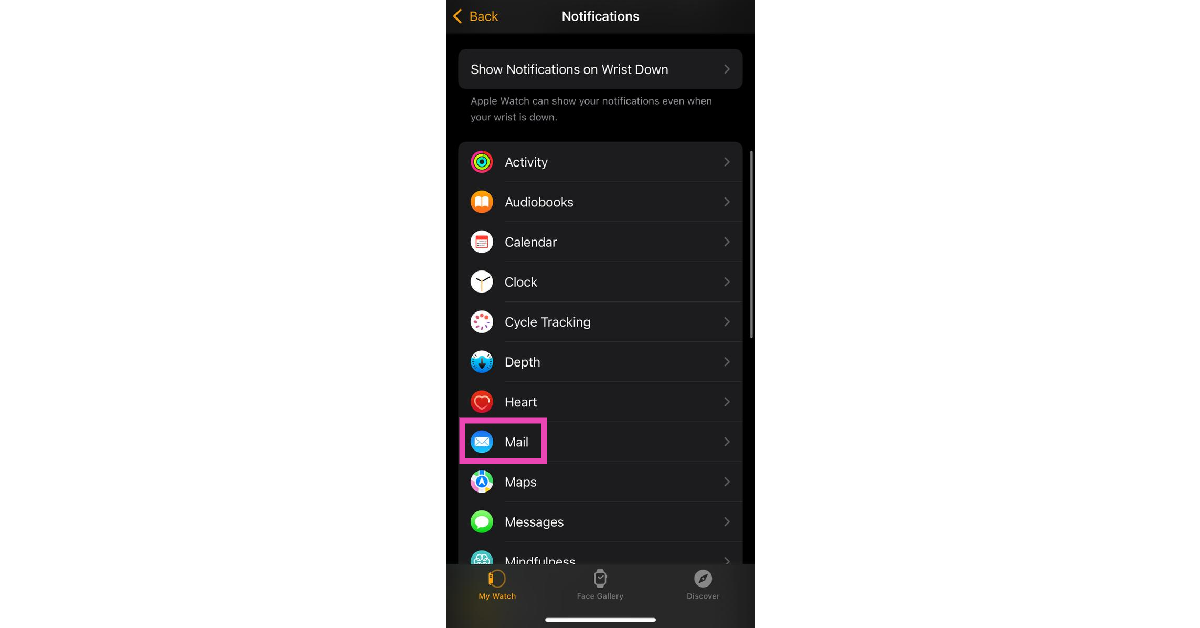
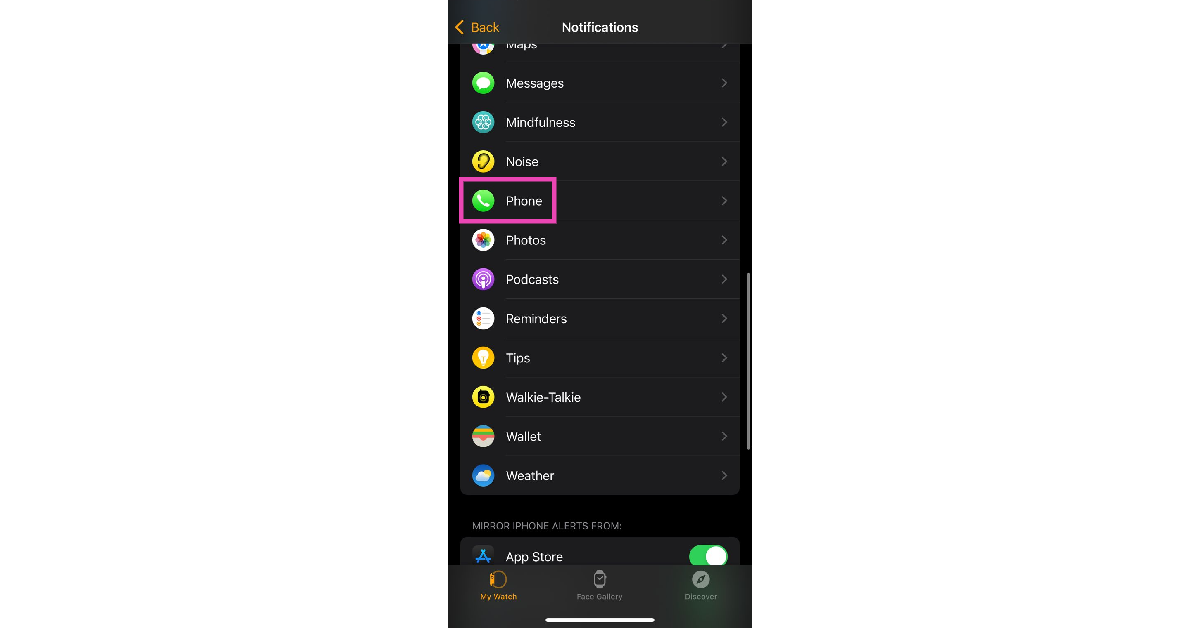
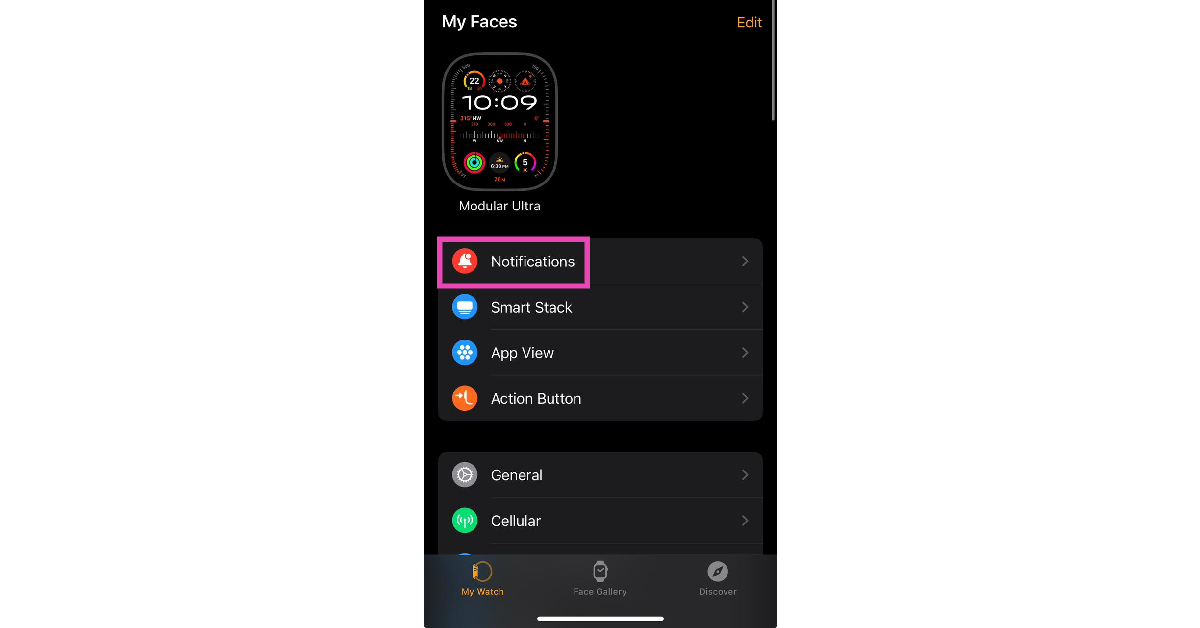 Step 3: Select an app.
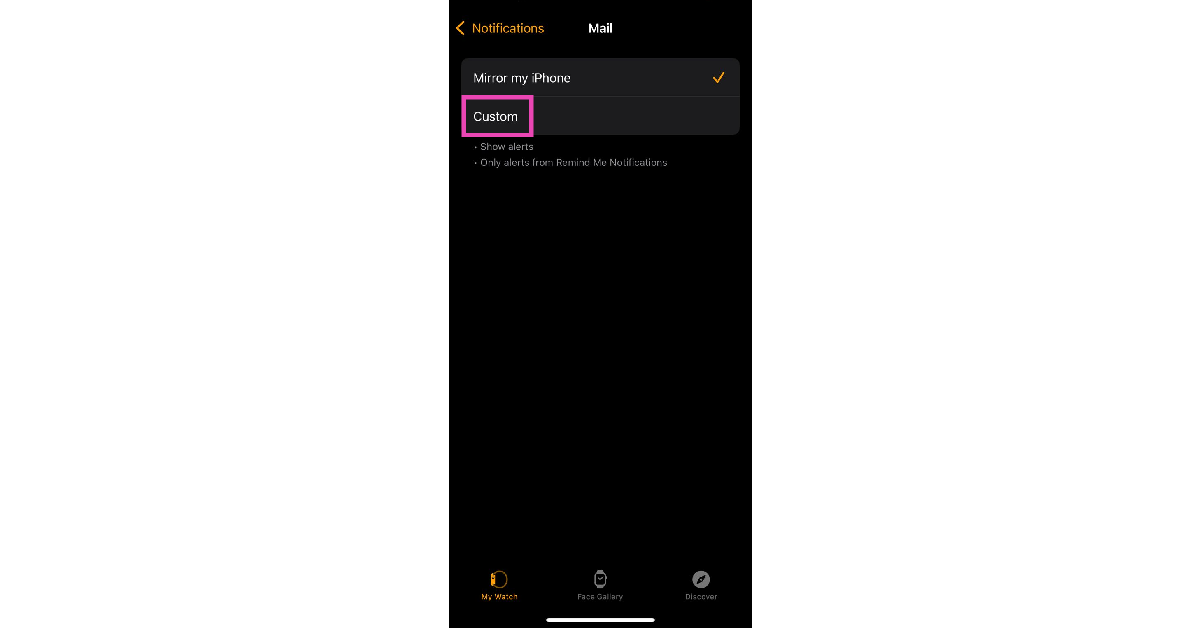
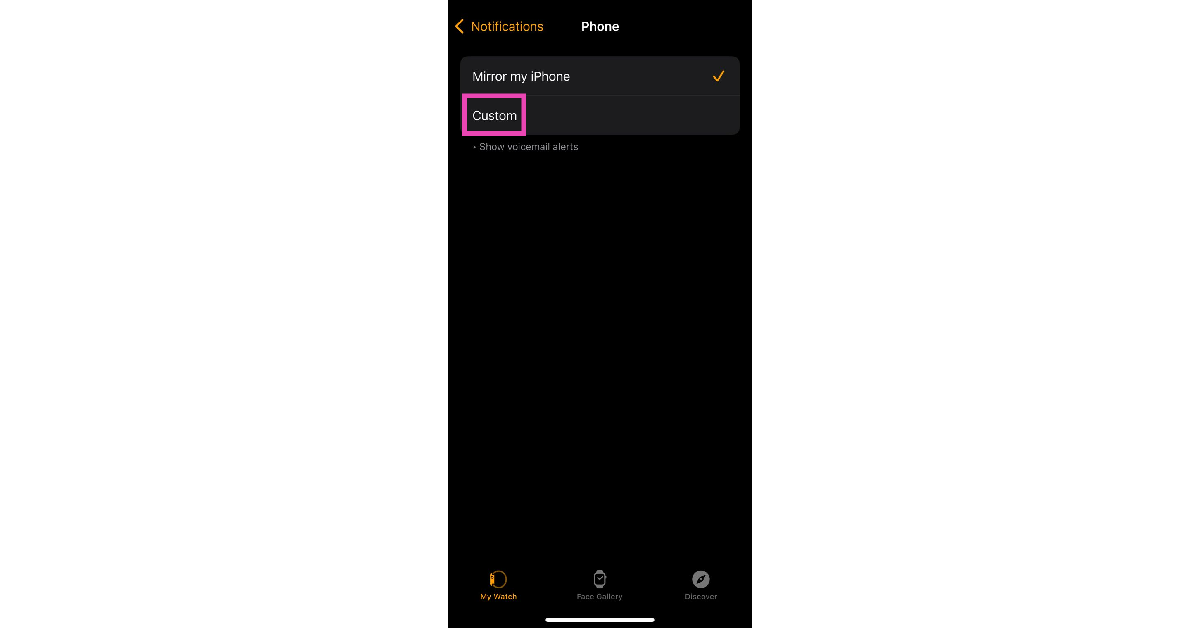
 Step 4: Tap on Custom.
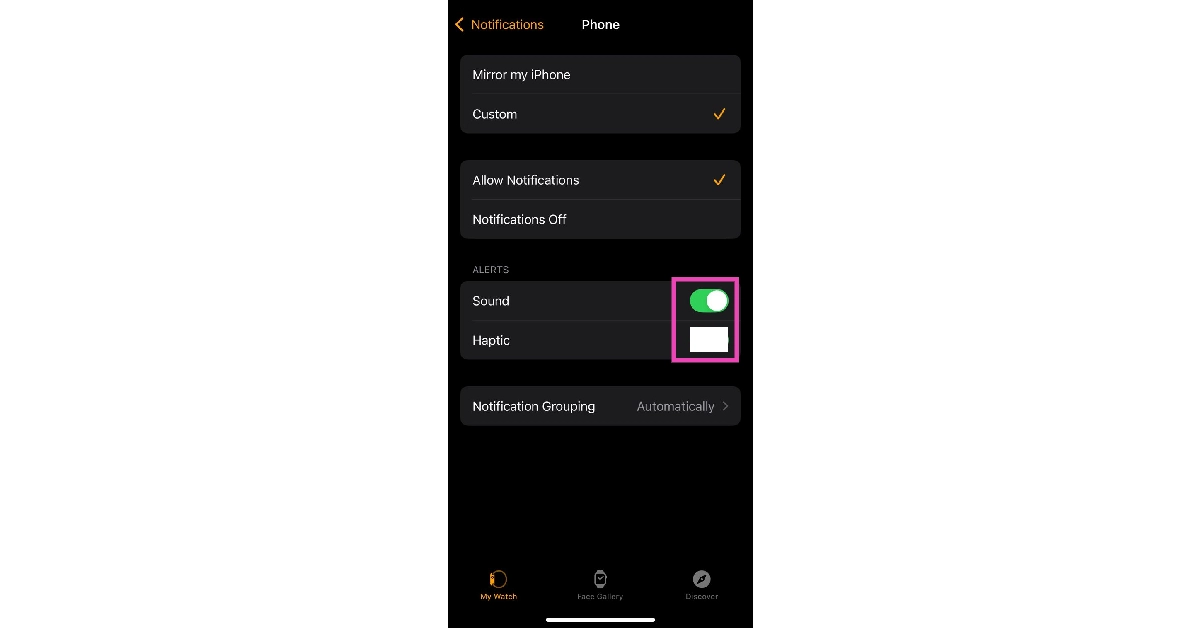
 Step 5: Make sure there’s a tick next to Allow Notifications.
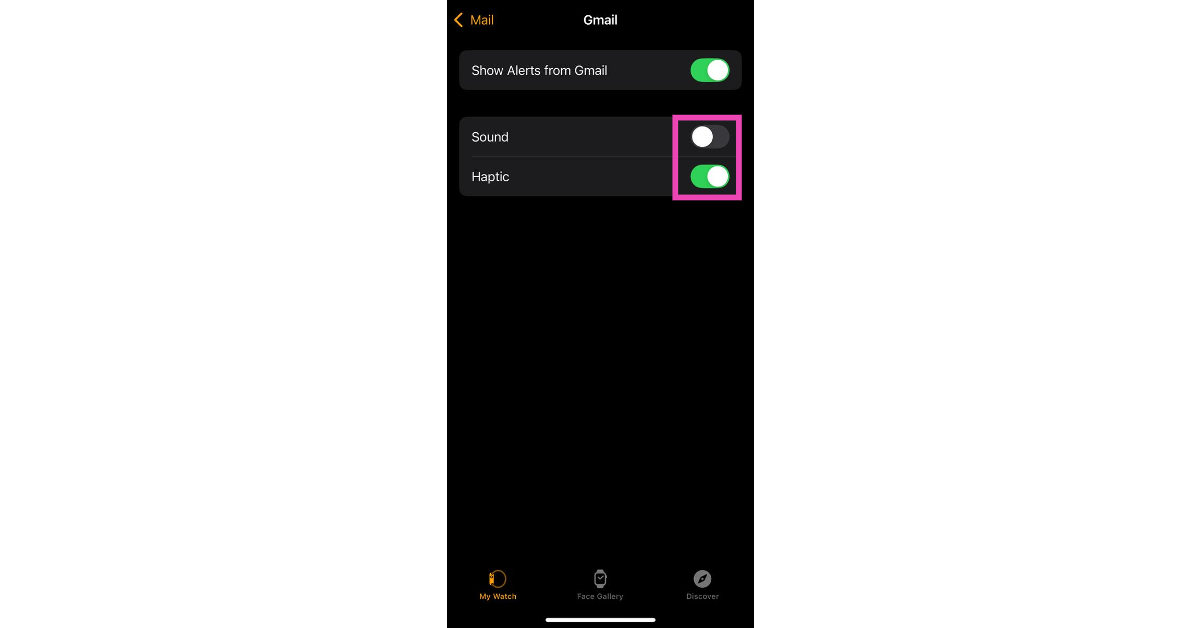
Step 6: Scroll down and turn on the toggle switch next to Haptic.
Step 5: Make sure there’s a tick next to Allow Notifications.
Step 6: Scroll down and turn on the toggle switch next to Haptic.
 Step 4: Tap on Custom.
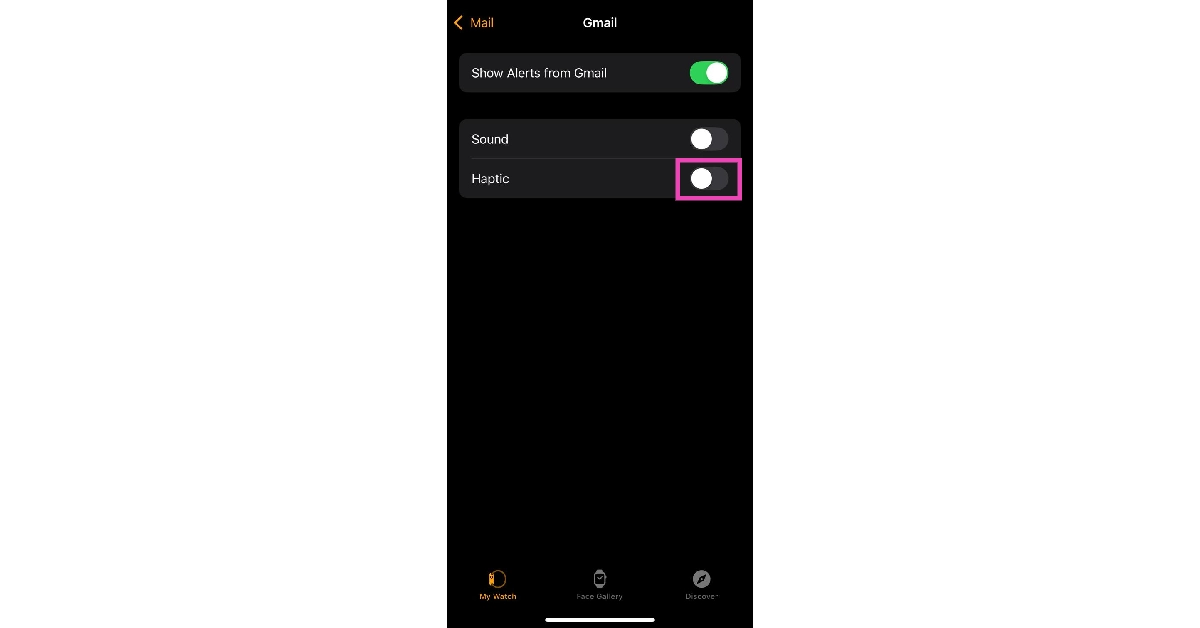
 Step 5: Turn on the toggle switch next to Sound and turn off the toggle switch next to Haptic.
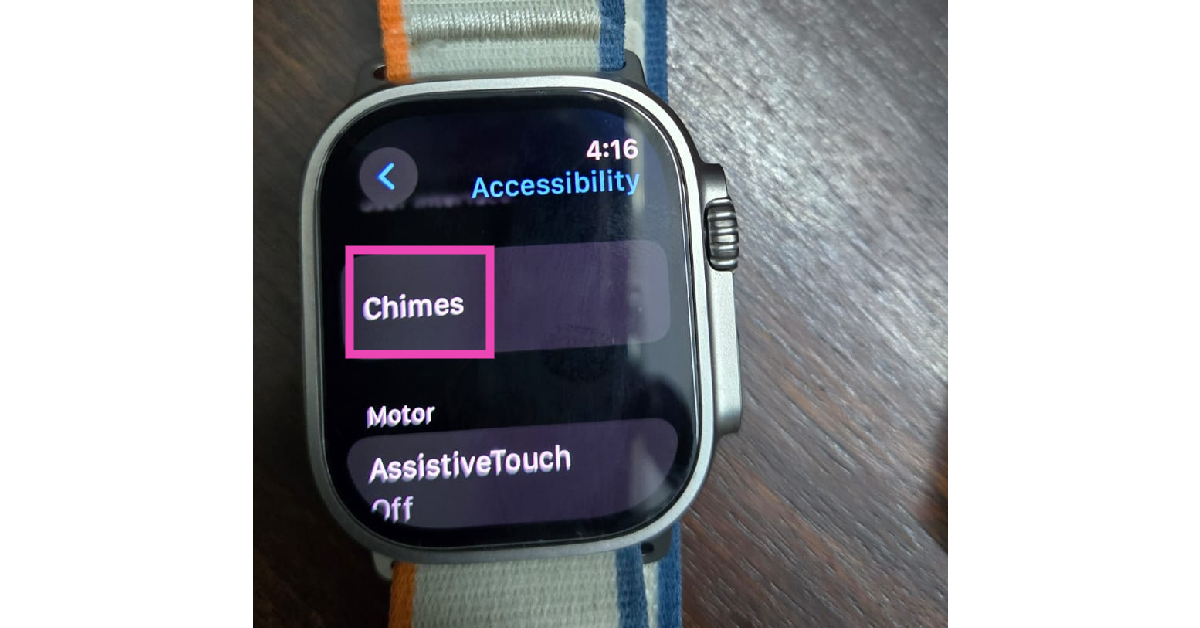
 Step 2: Tap on Chimes.
 Step 3: Turn on the toggle switch next to Chimes.
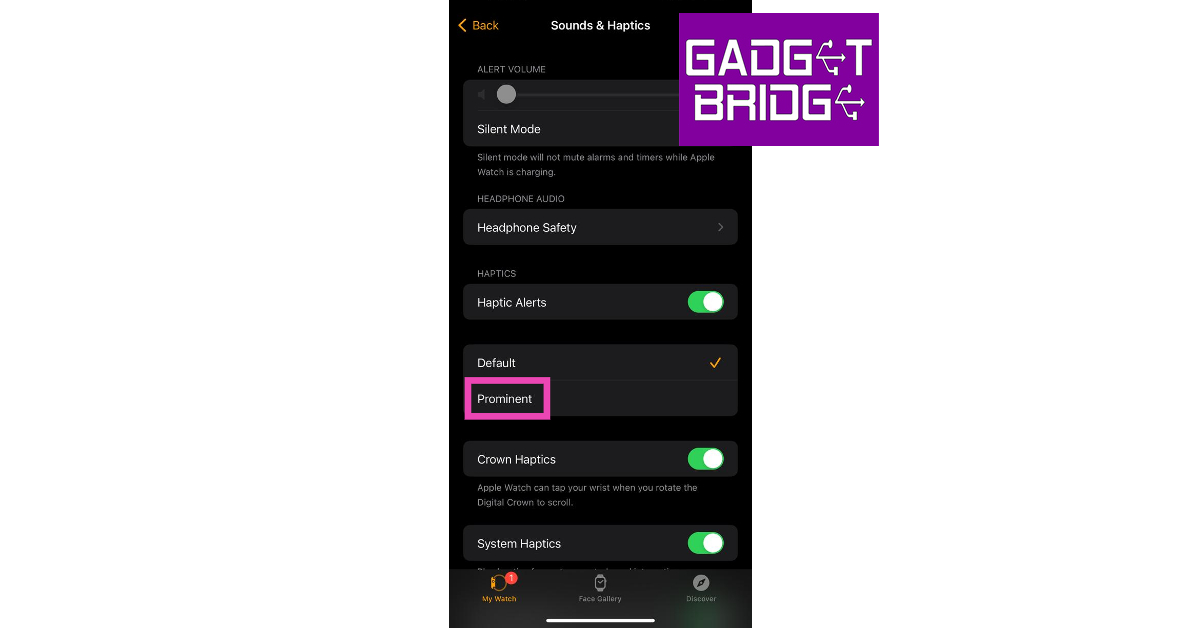
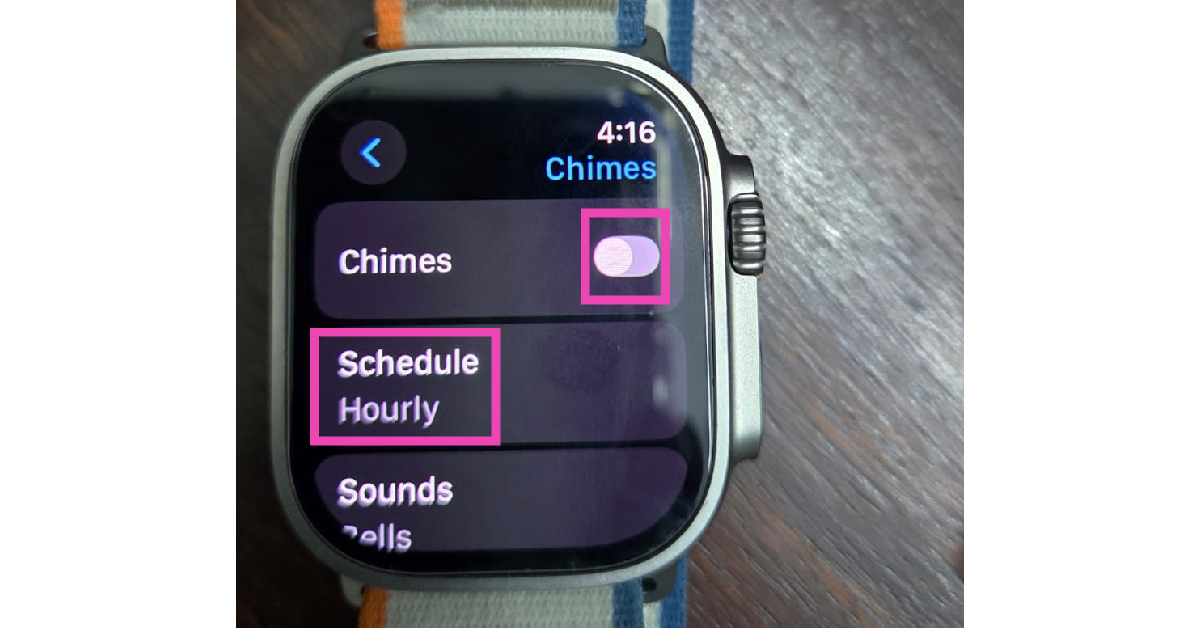 Step 4: Tap on Schedule.
Step 5: Set the frequency for vibrational alerts.
Step 4: Tap on Schedule.
Step 5: Set the frequency for vibrational alerts.


 Step 2:
 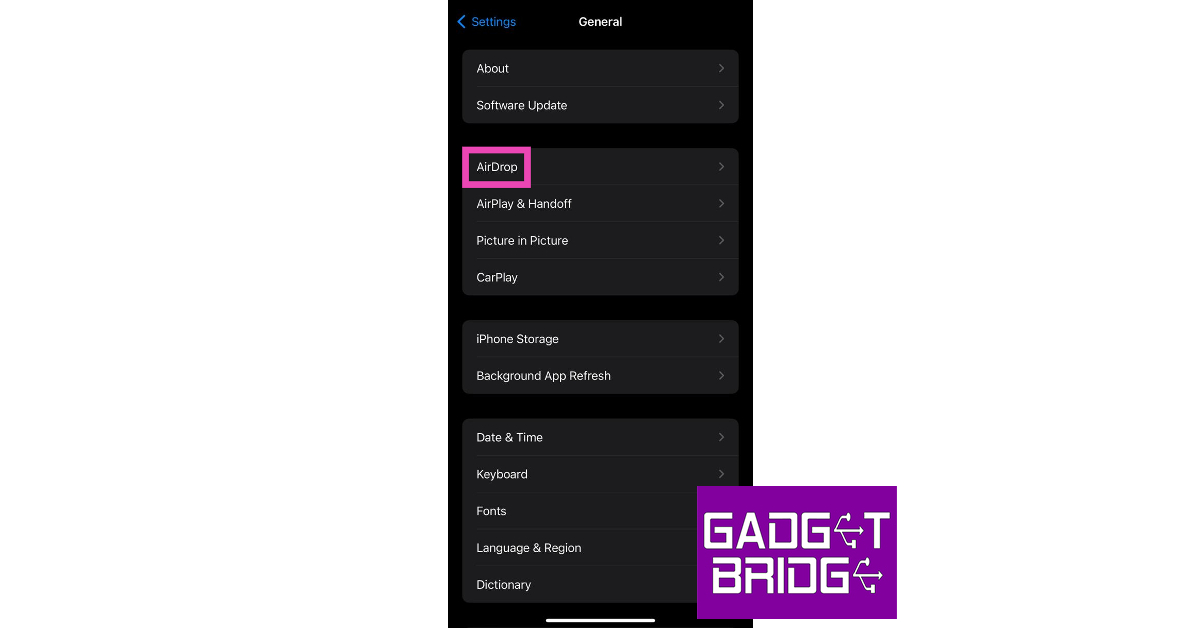 Step 3:
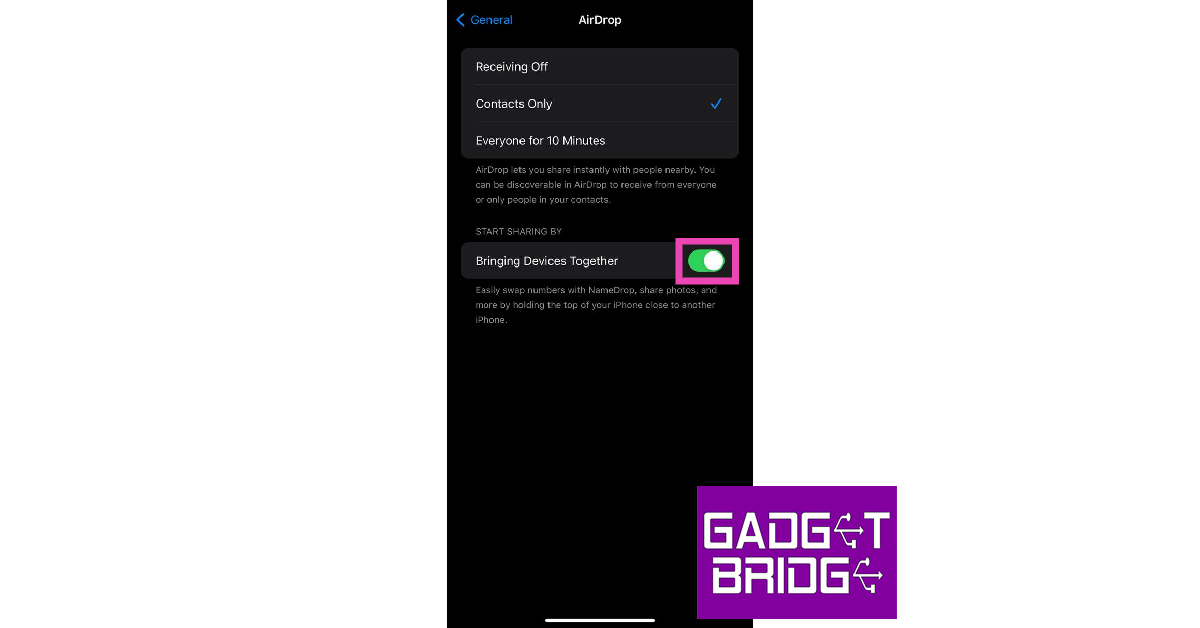


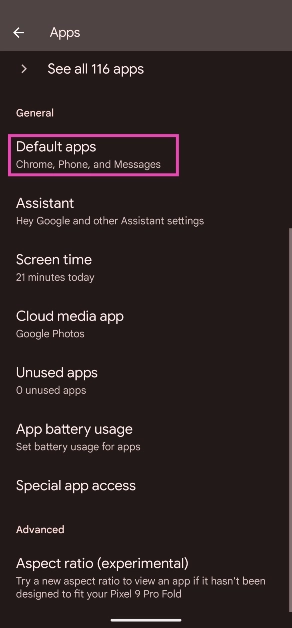
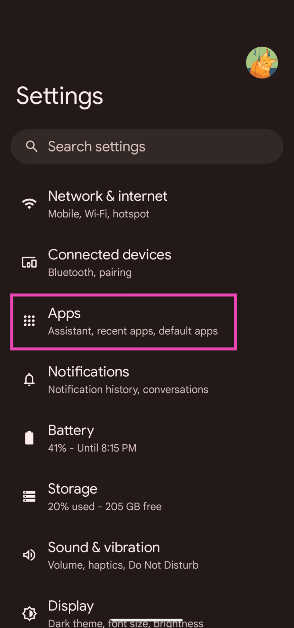 Step 2: Select Default apps.
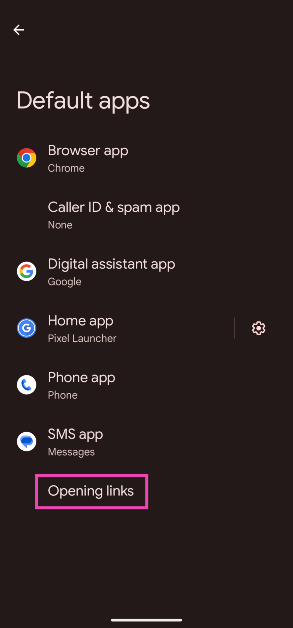
 Step 3: Tap on Opening links.
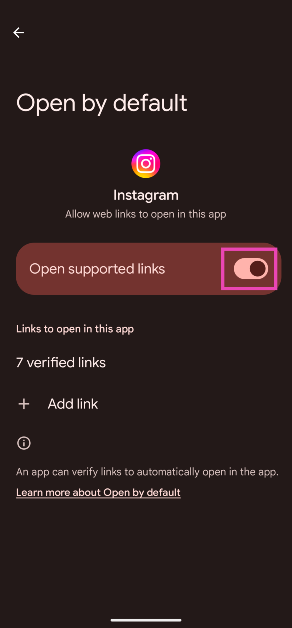
 Step 4: Scroll down and select Instagram.
Step 5: Turn off the toggle switch next to Open supported links.
Step 4: Scroll down and select Instagram.
Step 5: Turn off the toggle switch next to Open supported links.
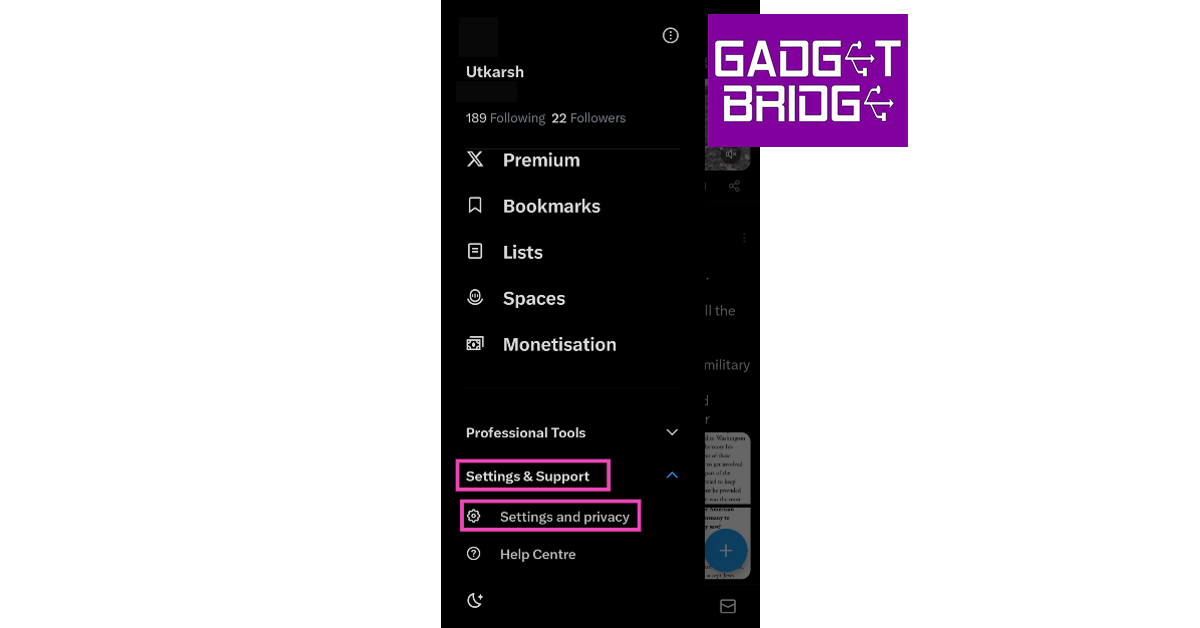
 Step 2:
 Step 3:
 Step 4:


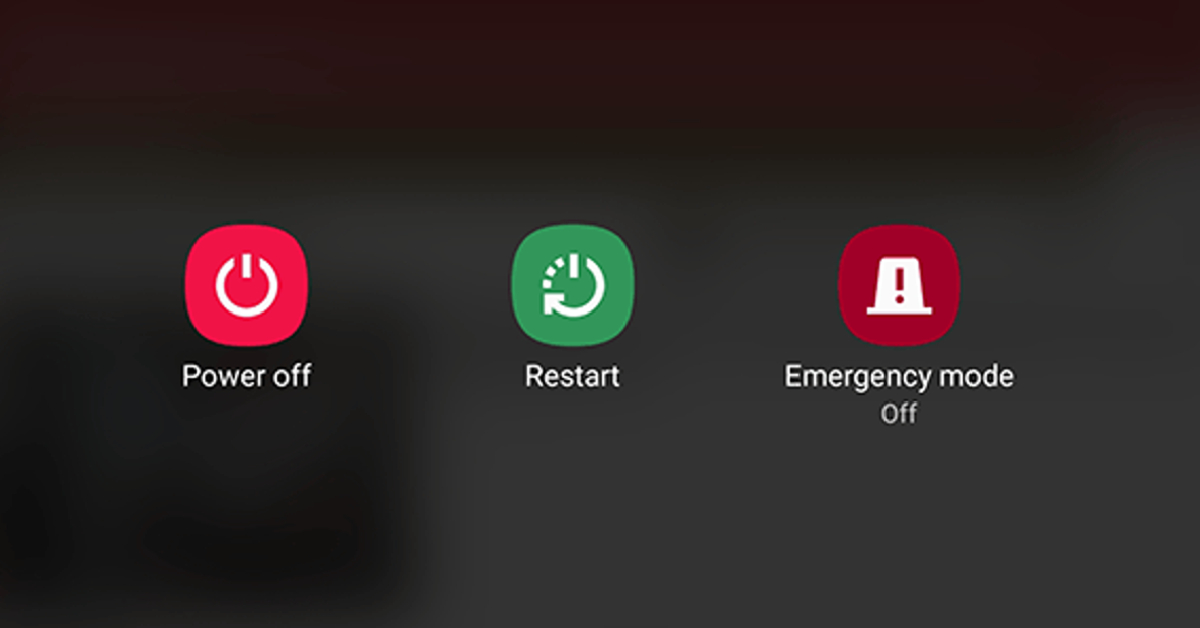 If the fixes mentioned above did not work for you, it is possible that the issue lies with your phone. Software glitches are all too common on smartphones. Luckily, they can be resolved with a quick restart. Press the side button along with the volume-up key to access the power menu. Hit ‘Restart’. Once your phone has rebooted, tap the link again to check if it redirects you to the correct post or Reel.

 account on Android, iOS, and PC?")
 Step 4:
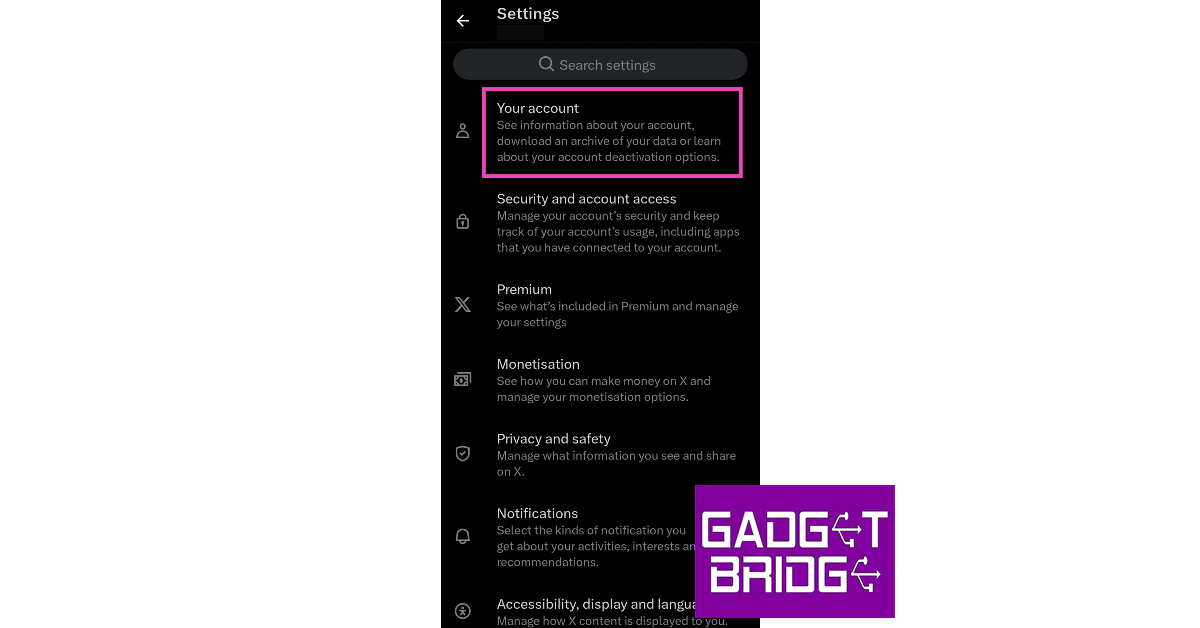 Step 5:
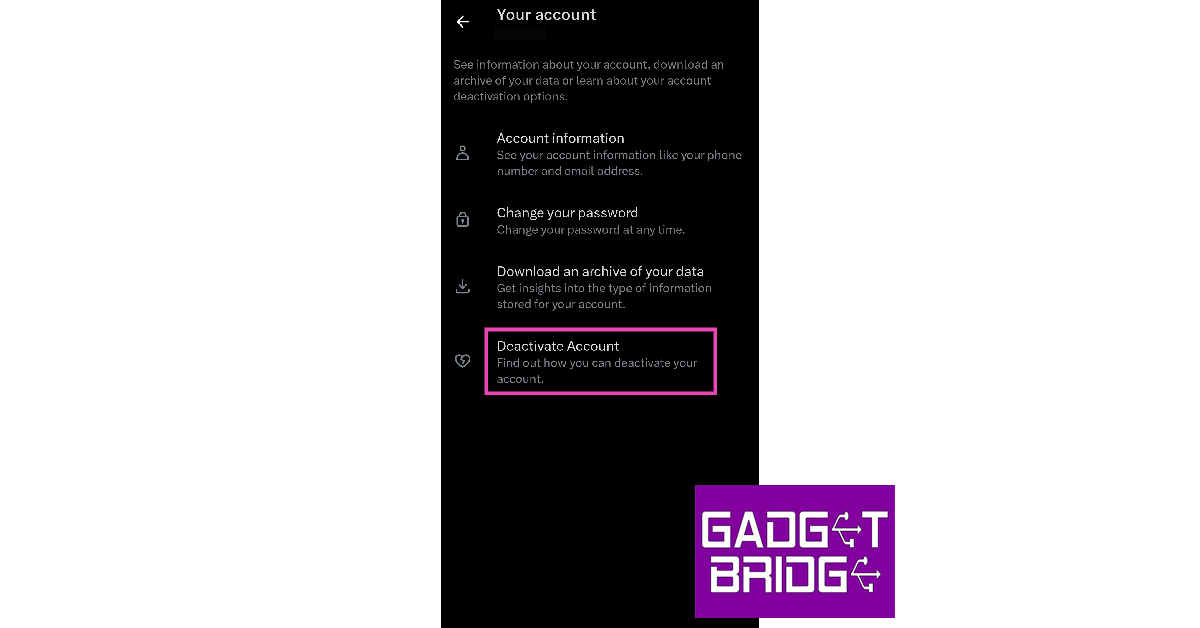 Step 6:
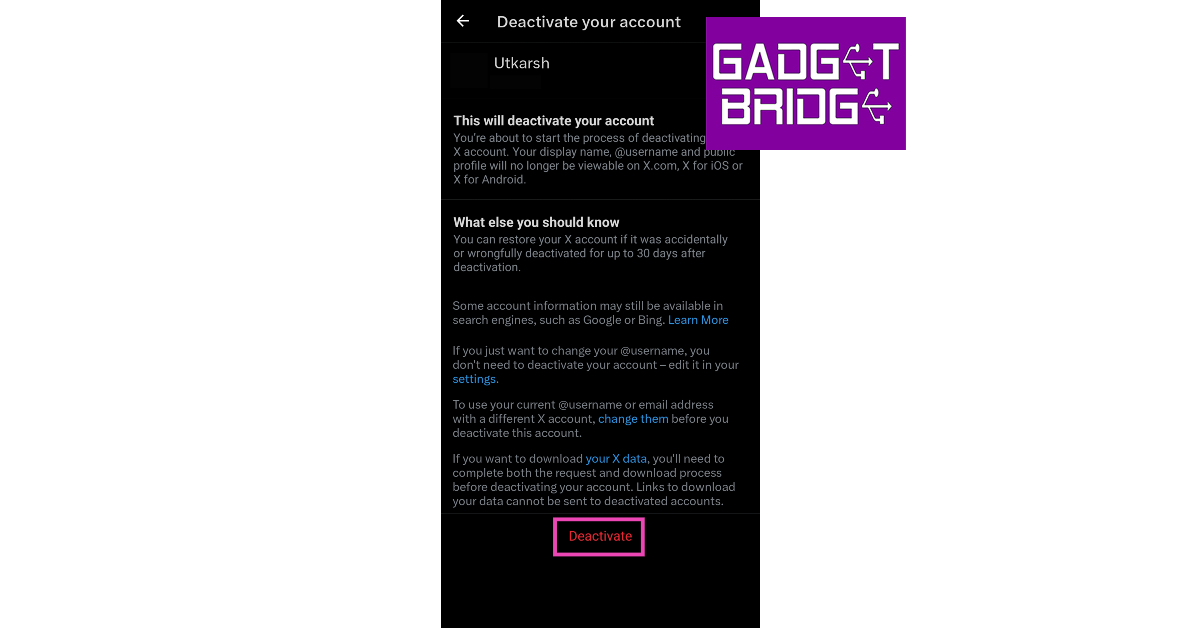 Step 7:
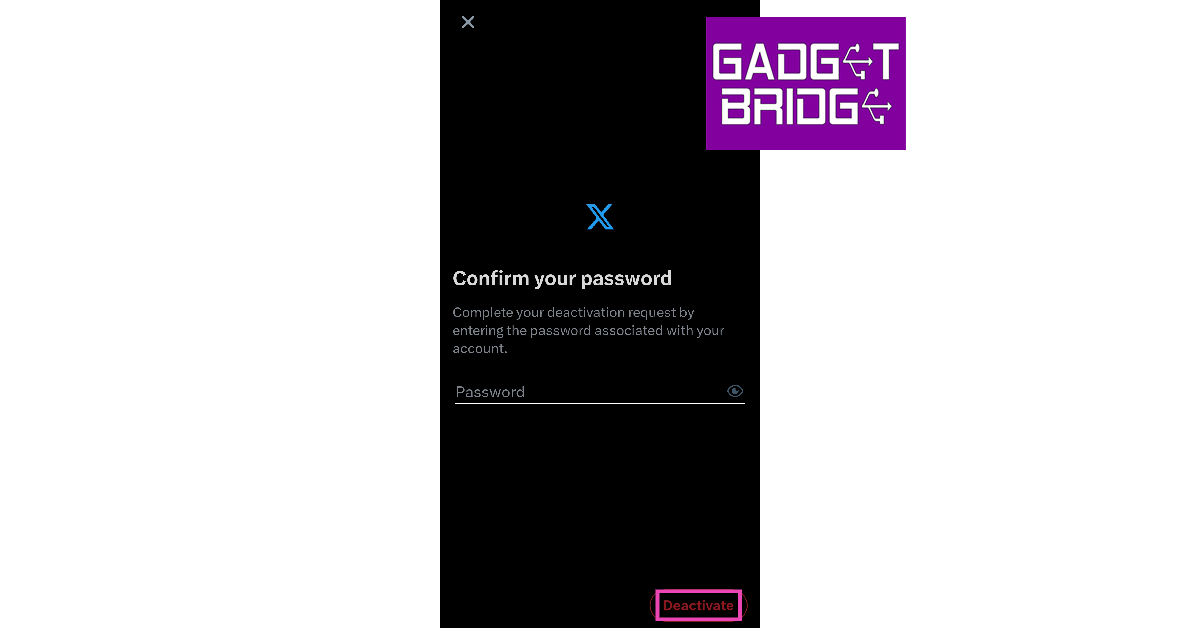
 Step 3:
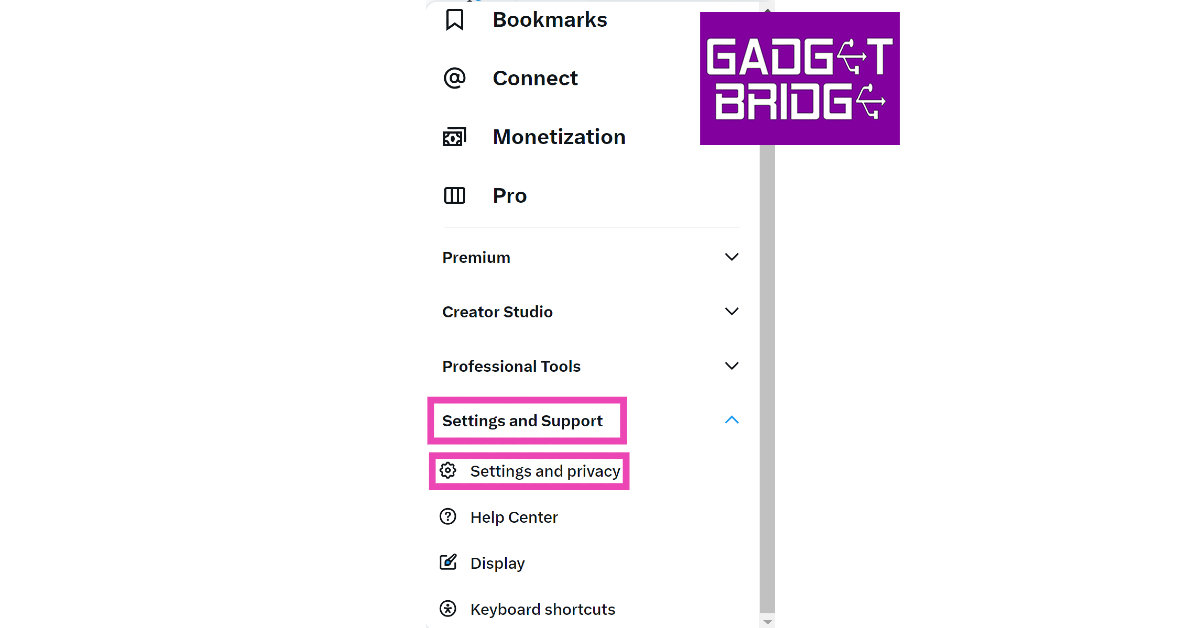 Step 4:
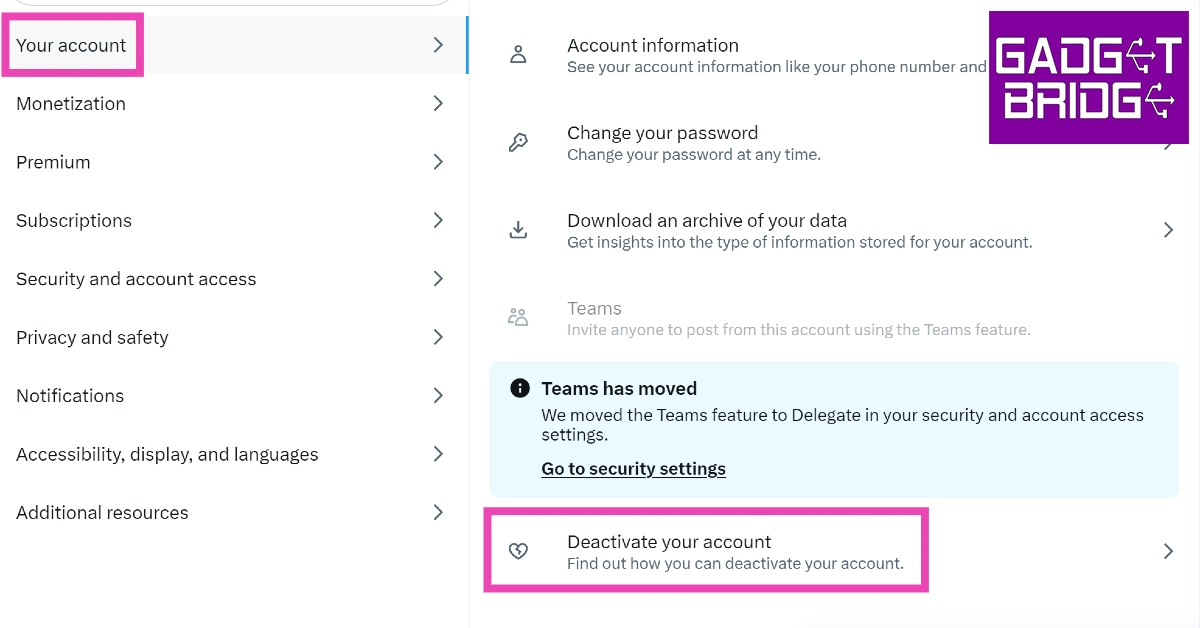 Step 5:
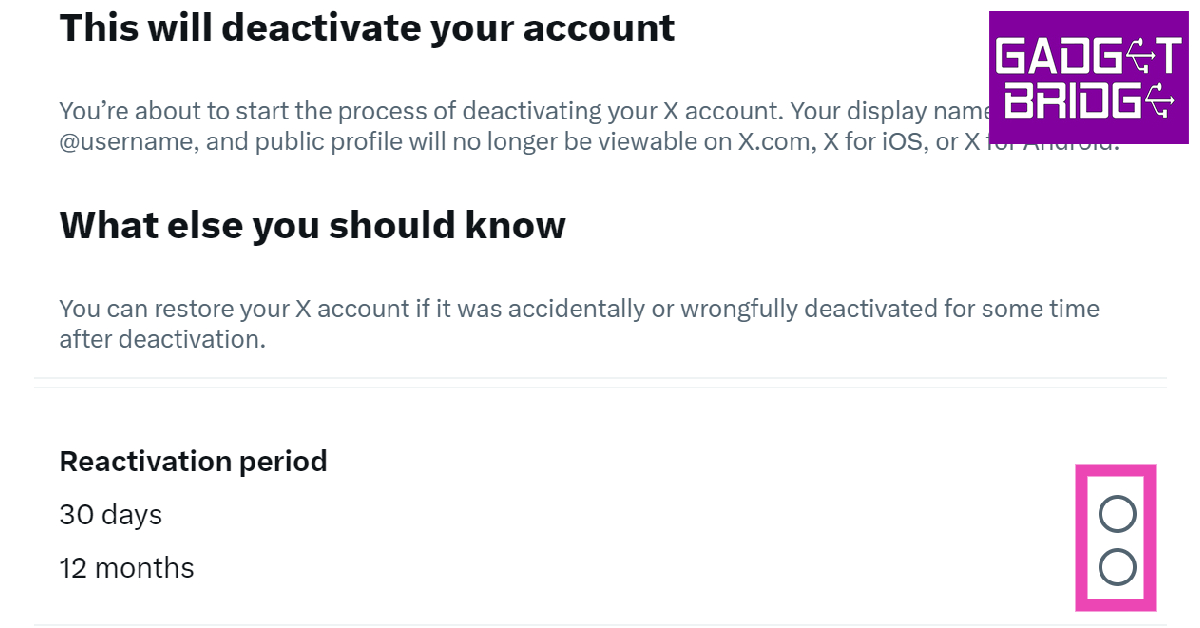 Step 6:
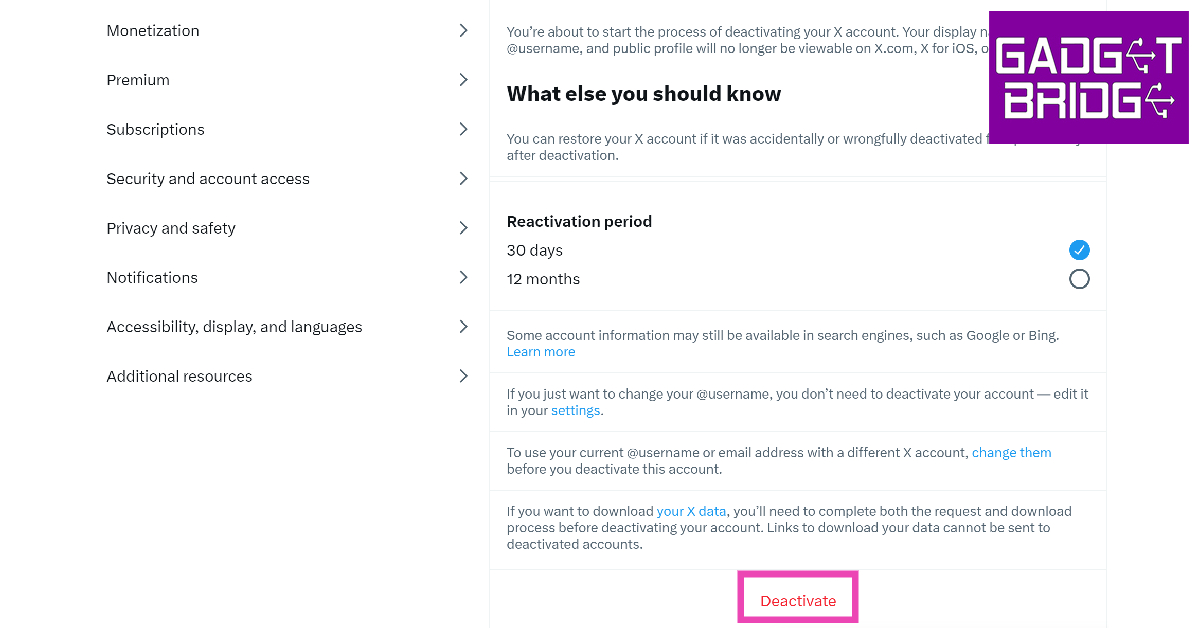 Step 7: