Garena Free Fire is a battle royale game with regular awards and tournaments to keep players interested. If you play Garena Free Fire, you should be aware of the redeem codes that are released on a daily basis. However, because the battle royale game is banned in India, players from other countries can use the Free Fire Redeem codes daily. If you’re unfamiliar with the Garena Free Fire redeem codes or don’t know how to get them, we’ve put together a step-by-step guide to help you redeem them. Check out Garena Free Fire Redeem Codes for 12 December 2023.
The Free Fire redeem codes are a great way to get free stuff. These are 12-digit codes that contain alphabets and numbers, as well as an expiration date and time. Because the Garena FF redeem codes cannot be used more than once, you should hurry to the redemption page to claim your free reward before someone else does. To get a free reward, all you have to do is go to reward.ff.garena.com/en, which is the official redemption page. Also, keep an eye on this space for daily updates on Garena Free Fire redemption codes and rewards.
In This Article
Garena Free Fire Redeem Codes Today 12 December 2023
XUW3FNK7AV8N
FFICJGW9NKYT
PCNF5CQBAJLK
FDYGTH6R567UE56K
FYH6JY8UKY7JYGFH
F6TYJHUT67YJU56U
FVYHFT6HYJT67LYP
F6T78KJHGSERFF87
FRJNTR67UH675Y4E
FICJGW9NKYT
XUW3FNK7AV8N
FOGFUYJN67UR6OBI
FV7CYTGDRTUNMJEK
FYHR6YGJHNYYJ7TC
F6Y6FHRTJ67YHR57
PCNF5CQBAJLK
FKY89OLKJFH56GRG
FUTYJT5I78OI78F2
FUKTY7UJIE56RYHI
FBVFTYJHR67UY4IT
FYHJTY7UKJT678U4
FKJIT67UWEYHT4H4
FGJUHMFT7UJTFYHS
How to Get Free Fire Redeem Codes for Garena on 12 December 2023?
Apple’s Safari browser is the default app to access the web across all its devices. Until iOS 14, you could not change the default browser on your iPhone. Thankfully, that is no longer the case. If you’re a Chrome loyalist or want to preserve your privacy with DuckDuckGo, you can now set either of them as the default choice. Want to know how? Let us walk you through the top 2 ways to change the default web browser on your iPhone or iPad.
Why you should change the default web browser on your iPhone
Safari is a perfectly good web browser that offers super quick access to the Internet and well-rounded privacy features. Being Apple’s proprietary web browser, Safari pays special attention to your privacy and security while you’re browsing the web. However, if you use a Windows PC or laptop, Google Chrome may be the better choice for you.
This is because of Chrome’s remarkable syncing features. Once you log into Chrome on your iPhone, you will be able to access your bookmarks, history, saved passwords, autofill data, and more. If you’re reading an article on your laptop and need to leave your desk, you can simply send the webpage to the Chrome app on your iPhone and continue reading it on the go. Apart from that, you can save a lot of time with immediate access to autofill data and all your saved passwords on Chrome.
Change the default web browser app on your iPhone or iPad
Step 1: Go to Settings.
Step 2: Scroll down and select the web browser that you want to set as the default browser on your iPhone.
Step 3: Tap on Default Browser App.
Step 4: Select your preferred browser from the list.
Set Google Chrome as the default web browser on your iPhone or iPad
Safari is the default web browser on an iPhone and all other Apple products. This is because Apple owns Safari and therefore it is the default browser across all its devices.
Can I change Safari as the default browser on my iPhone and iPad?
Yes, you can change Safari as the default browser on your iPhone/iPad by going to Settings>Safari>Default Browser App and selecting the browser app you want as the default choice.
Which web browser should I use for maximum privacy?
DuckDuckGo is a great web browser to maintain your privacy and limit third-party access to your data.
This is how you can change the default web browser on your iPhone and iPad. Apple’s MacOS also allows you to change the default web browser on your device. Simply hit the Apple logo at the top left corner of the screen, select System Preferences and go to General>Default web browser to make your selection. Which web browser do you prefer using on your iPhone? Let us know in the comments!
Android users must be familiar with the process of ‘force quitting’ an app when it starts malfunctioning. Interestingly, iPhones do not have a dedicated ‘force quit’ option, but you can still shut down an app and restart it later. This process works a bit differently on iPhones with Face ID and the ones with a home button. So, let’s take a quick look at the best ways to force quit apps on your iPhone and iPad.
While Android devices have a dedicated ‘force quit’ option for every app on the device settings, on an iPhone, you can do the same by simply closing the app from the app switcher. But how often should you do it? A lot of people believe that closing the apps that you aren’t actively using preserves the battery on your iPhone and makes it faster. But this couldn’t be further from the truth.
Your iPhone does a good job of optimising the apps running in the background in order to reduce the time required to load them. This process doesn’t utilise a lot of RAM either. Apps that haven’t been opened in a long time get allotted significantly less RAM space compared to the apps you use regularly. So, when should you force quit an app on your iPhone?
Shutting down an app should be your go-to response when it starts malfunctioning. If you can’t get the app to work as intended, quickly restarting it will fix the problem most of the time. If it keeps hanging, shutting it down is the only way you can fix the problem. Even though leaving apps open in the background does no harm, it is suggested that you close the apps that you don’t intend to use regularly. Apps like Doordash and Ola still have location access when they are running in the background. If you aren’t actively using them, it is better to shut them down.
Force quit apps on an iPhone or iPad with Face ID
Step 1:Swipe up from the bottom of the screen and hold the gesture. The app switcher on your iPhone will pop up immediately.
Step 2:Navigate to the thumbnail of the app that you want to close.
Step 3:Swipe up on the thumbnail to close the app.
Force quit apps on an iPhone or iPad with a home button
Step 1:Press the home button twice to access the app switcher.
Step 2:Navigate to the thumbnail of the app that you want to close.
Step 3:Swipe up on the preview card to close the app.
Frequently Asked Questions (FAQs)
How do I close multiple apps at once on my iPhone?
Swipe up from the bottom of the screen and hold the gesture to access the app switcher. To close multiple apps at once, simply swipe up on the apps using different fingers. You can close up to 5 apps at once.
This is how you can force quit apps on an iPhone. To do the same on an Android device, go to Settings>Apps, select the app in question, and hit ‘Force Quit’ from the bottom of the screen. This will pause any background activity for the app until you reopen it from the app drawer. If you know any other method to force quit apps on an iPhone, let us know in the comments!
Endefo Enfit NEO and Enfit NEO PRO come with an Always On Display.
They also feature a rotating crown.
The device supports Bluetooth calling.
Dubai-based lifestyle brand Endefo has announced the launch of two new smartwatches in India. The company has introduced Enfit NEO and Enfit NEO PRO. Both the smartwatches feature a FHD display with 600 nits of screen brightness. The smart wearable also comes with a rotating crown and supports the Always on Display feature. The device includes more than 135 sports modes and over 200 watch faces.
In This Article
Endefo Enfit NEO and Enfit NEO PRO price in India and sale details
Endefo Enfit NEO Smartwatch is priced at Rs 6999 however the device will be available at a discounted price of Rs 1999. On the other hand, Enfit NEO PRO Smart Watch is launched at Rs 7999 and will be available at a discounted price of Rs 2499. As per the company, the smartwatches will be available for customers at 2000+ retail stores including Sangeetha Mobiles, Supreme Paradise, Lot Mo, Nandilath Digital, Ideal Home Appliances, Easy Store, Gulf Own Digital, Image Mobiles, and Computers.
Endefo Enfit NEO and Enfit NEO PRO specifications
Endefo Enfit NEO features a 1.9-inch FHD screen with 600 nits of screen brightness. It has a wide selection of over 200 watch faces giving a personal touch.
It comes with a Bluetooth Calling feature that allows users to make and receive calls from their wrist. It allows users to easily track and analyse their workouts with the over 135 sports modes. Besides this, the smartwatch offers health-related features like blood pressure, blood oxygen monitoring, and a live heart rate monitor. Additional features include camera control, multiple language support, dual-screen functionality, voice assistant, and multiple UI modes.
Endefo Enfit NEO PRO is highlighted with a 2.01-inch FHD screen and a rotating crown. Besides this, the smartwatch features are similar to that of its sibling Enfit NEO.
Mr. Aneef Tas, CEO of Endefo said “We’re excited to present the latest additions to our smartwatch collection, the ‘Enfit NEO’ and Enfit NEO Pro. These watches reflect our commitment to offering affordable and modern fitness and lifestyle devices for our youthful customers who appreciate both style and technology. We believe customers will find the features of the Enfit NEO enjoyable, all while being budget-friendly. As the year ends, we will plan more launches and sales for our customers, as we continue to focus on providing top-notch technology through Endefo”.
The smartphone is powered by MediaTek Helio G85 SoC.
Poco C65 launched globally earlier in November. The smartphone which is a successor to Poco C55 is all set to hit India shores soon, the company has confirmed. The device will come with a 50-megapixel dual camera setup. it will also feature an HD+ display with a 90Hz refresh rate. The phone is powered by MediaTek Helio G85 SoC. In addition to this, it packs a 5,000mAh battery.
Poco took to microblogging platform X to confirm about the India availability of Poco C65. As per the post on X, the smartphone’s launch will take place in India on December 15 at 12 noon. In addition to revealing the launch date the company also showcased the lilac colour option of the mobile phone.
In terms of availability, the handset will be sold through Flipkart in the country.
Poco C65 specifications, features
Poco C65 was launched globally last month. It features a 6.74-inch HD+ display, with 1,600 x 720 pixels of resolution. It has an aspect ratio. Also, the phone supports a refresh rate of 90Hz. The display gets Corning Gorilla Glass protection. The budget smartphone is shipped with MIUI 14 for Poco on top of Android 13. It is powered by MediaTek Helio G85 SoC paired with an ARM Mali-G52 2EEMC2 GPU.
For photos and videos, the Poco C65 sports a dual rear camera setup that includes a 50-megapixel primary sensor with an aperture of f/1.8. Additionally, it includes a 2-megapixel macro sensor with an aperture of f/2.4. The waterdrop notch at the centre of the display plays house to an 8-megapixel sensor with an aperture of f/2.0.
In terms of connectivity, there is 4G VoLTE, Wi-Fi, Bluetooth 5.1, GPS, GLONASS, a 3.5mm audio jack and support for FM radio. The Poco phone comes equipped with a 5,000mAh battery that supports 18W wired fast charging via a micro USB port. A side-mounted fingerprint sensor is given to unlock the device.
iPhone 14 Plus was launched at a starting price of Rs 89,990.
The device is getting a massive temporary price cut during the ongoing Flipkart Big year-end sale.
iPhone 14 Plus pricing has been cut down massively on Flipkart. Currently, the device is available at an exciting price of Rs 31,749. So this is the right time if you are looking to buy an iPhone and Flipkart is the place to find the best offer on the iPhone 14 Plus.
Flipkart’s Big year-end sale is on and will be live till December 16. During the sale period, the home-grown e-commerce platform is offering the greatest deals on smartphones. iPhone 14 Plus originally sold for Rs 79,990. The iPhone 14 Plus is listed at a reduced price of Rs 64,999 during the sale. The price of the handset has now been reduced to as low as Rs 31,749. Flipkart is offering a massive discount of Rs 35,250.
The buyers can also take advantage of an additional exchange discount in addition to this. Customers can save up to Rs 50,299 on an iPhone or their previous smartphone. Additionally, customers of Kotak, RBL, or SBI credit cards will receive 10% off.
The iPhone 14 Plus was launched in India in three different configurations. The 128GB of storage costs Rs 79,900 in India. The price of 256GB and 512GB storage capacities are available for Rs 89,900 and Rs 1,09,900. It comes in five different colour options – Red, Midnight, Starlight, Blue and Purple.
Apple iPhone 14 Plus is endowed with a 6.7-inch Super Retina XDR OLED screen which offers a wide colour gamut, HDR, and 1200 nits of brightness. The device’s display has a pixel density of 460 ppi and supports a 60Hz refresh rate. The screen is protected by a tough Ceramic Shield front cover that is water and dust-resistant.
For optics, the dual rear camera setup includes the iPhone 14 Plus: a primary 12MP wide-angle sensor with a bigger f/1.5 aperture, sensor-shift OIS, and a secondary 12MP ultra-wide-angle sensor. The Ultra Wide camera provides a distinctive viewpoint for broader views and enhances low-light images using a Photonic Engine. For selfies and video calls, the front camera has a 12MP sensor with autofocus.
The iPhone 14 Plus has Face ID and is built to IP68 standards for water and dust protection. Under the hood, there is an Apple A15 Bionic SoC and up to 512GB of internal storage. The device runs on iOS 16.
The rigidity of Apple’s ecosystem does not allow for fluid and seamless file sharing with Android devices. iPhones have AirDrop and Android devices have Nearby Share, but cross-platform sharing still requires jumping through some hoops. Hoping for any resolution in the near future would be wishful thinking. But, for the time being, here are the top 4 ways to send pictures from Android to iPhone.
Sending pictures from Android to iPhone: Which method is the best for you?
There are numerous ways to share images across different platforms. Your choice of method should depend upon the volume of images you are sending, the quality of images sent to the other device, the speed of transfer, and ease of access. Here’s how you can decide which method is best for you.
For high-quality image transfer: For a majority of users, restoring the image quality is the biggest priority while transferring them between two devices. This rules out using third-party messengers. While you can still use online cloud storage for the task, it can take a fair bit of time if you are transferring an entire batch of images. Not to mention, it will take time to download all the images on the iPhone as well. To cut down on time, use a WiFi transfer interface like Xender, Send Anywhere, or Feem to send pictures from your Android phone to an iPhone. You will be able to send dozens of images without any compression within seconds.
For social media uploads: If you only need to send a couple of images to your friend, primarily for posting on social media, using a third-party messenger is the best option you have. Since social media platforms compress images anyway, a slight loss in quality while transferring them won’t hurt. Luckily, most instant messaging apps allow HD image sharing. No other method can match the accessibility provided by IM apps.
For transferring all the images on your device: If you’re permanently switching to an iPhone, it is best you use the ‘Move to iOS’ app on your Android phone to transfer all your images. Apart from images, this app can also transfer your WhatsApp chats, apps, files, and other data. The only catch is that it can only be used while setting up your iPhone.
Use WhatsApp (Or any other instant messenger)
The easiest, most accessible way to send pictures from an Android phone to an iPhone is via WhatsApp or any other instant messaging app. The Meta-owned instant messaging app recently incorporated HD image sharing in its platform. However, this feature is not turned on by default. You will need to tap the HD icon at the top of the image preview page. Even though HD images on WhatsApp demand a higher storage space, they still go through some compression in the process. This isn’t a significant issue if your main purpose is to upload the images on social media platforms.
Use Google Drive
One of the glaring problems of sharing images via IM apps is image compression. To bypass this issue use a cloud storage service instead. Google Drive is the most accessible online storage service to use if you’re an Android user. Since you already have a Google account, simply launch the Drive app from the Google folder in your device and start uploading the images you want to transfer. Once you’re done, share the folder with the iPhone user. If the iPhone belongs to you, simply install the Google Drive app from the App Store and log in using your Google account. All your shared images will be there, without any loss in quality.
Use Feem
Feem is a great file-sharing interface that works 50 times faster than Bluetooth-sharing. The best part of using Feem is that you don’t have to rely on an active internet connection to send pictures from an Android phone to an iPhone. Once both devices are connected to a common WiFi network, Feem will send images and files at a blazing speed. Don’t have access to WiFi? Feem also works on a mobile hotspot!
Use the Move to iOS app
The methods mentioned above work great for sending a batch of pictures from an Android phone to an iPhone. But what if you are switching to an iPhone permanently and want to restore all your images on the new device? Well, the iPhone gives you a native option when you’re setting it up. However, the catch is that it only works when you’re setting up the device. Meaning, that once you skip this option and start using your iPhone, you won’t be able to access it again unless you factory reset your device.
The process is pretty simple. In the Apps & Data page, select Move Data from Android. Enter the code in the Move to iOS app on your Android phone. Select photos from the list of content that you want to transfer. The images will be transferred from your Android phone to your iPhone over a WiFi hotspot.
Frequently Asked Questions (FAQs)
How do I send a picture from an Android phone to an iPhone?
You can send pictures from Android to iPhone through a messaging app, online cloud service, or a WiFi transfer interface.
How do I send an image over 16MP on WhatsApp?
Since WhatsApp uses native compression to send images, the image size will be reduced to an acceptable level. However, if you don’t want this, you can send the image as a document. WhatsApp lets you send files up to 2GB in size.
How do I transfer all my images from an Android phone to my new iPhone?
If you’re switching to an iPhone, you can transfer all your apps, data, and images from the ‘Apps & Data’ page. This will require downloading the Move to iOS app on your Android phone.
These are the top 4 ways to send pictures from an Android phone to an iPhone. This process isn’t as tiresome and convoluted as it used to be, now that cloud-sharing services are super accessible to the average smartphone user. Even if you don’t want to use Google Drive, platforms like Dropbox, OneDrive, and Koofr can facilitate seamless sharing across platforms.
Many believe that tech products have stagnated over the last few years, looking more alike with every passing iteration. While this may be true for smartphones and wearables, there is a wide range of whacky devices out there that bring a whole lot of personality to the table. If you’re looking for a fun device that can be incorporated into your daily routine, you’ve landed on the right page. So, without further ado, here are the top 9 funky gadgets you can buy right now.
The super-immersive Meta Quest 3 VR headset is one the best in its genre right now. Its incredible application support revolutionises the way you interact with real-world objects. You can play a video game on your coffee table or overlay a screen wherever you want to watch videos or play video games. The virtual and physical worlds align and blend seamlessly with the Meta Quest 3, a real testament to how far virtual reality headsets have progressed over the years. The Touch Plus controllers included with the Quest 3 offer intuitive controls for gaming along with haptic feedback.
If we’re talking about devices that go over the board to be excessive, nothing comes close to LG’s newest StanByMe Go Suitcase TV. Nestled inside a hard-sided briefcase, the StanByMe Go is a completely wireless TV that you can carry along wherever you go. The touchscreen display can also be controlled by a remote control or voice commands. A 3-hour battery life makes it ideal to watch movies or catch that unmissable game no matter where you are. You can also orient the 27-inch screen vertically in portrait mode. This is as funky as a gadget can get in 2023.
The Fujifilm Instax Mini 12 polaroid camera is available in 5 colour variants – Mint Green, Blossom Pink, Clay White, Lilac Purple, and Pastel Blue. This funky gadget is ultra-portable, with dimensions of 6.7 x 10.4 x 12.2 cm. It comes with an integrated flash which helps in taking bright images in limited lighting and a selfie mirror next to the lens. The shutter speed and flash brightness on the Instax Mini 12 are automatically adjustable. Taking closeups with this camera is super easy, all you need to do is twist the lens twice to activate the Close-up mode.
On its latest iteration, Samsung’s flagship flip phone rocks a sizeable 3.4-inch Super AMOLED cover display. In its unfolded form, the Flip 5 sports a 6.7-inch Dynamic AMOLED display with HDR10+ support and a refresh rate of 120Hz. The smartphone is powered by the latest Snapdragon 8 Gen 2 SoC that delivers a top-shelf performance as usual on the device. Talking about the cameras, the Flip 5 gets 12MP wide and ultrawide sensors along with a 10MP selfie camera. If you’re looking for a funky gadget, the Flip 5 is as good as it gets for smartphones. Read our full review here.
The WOpet Automatic SmartFeeder is certainly a pricey buy, but it can accomplish a range of tasks that make it easier to leave your pet alone at home. With a 7-litre storage capacity, this smart feeder can hold up to 10 days’ worth of meals for dogs (28 days for cats). You can set up and change the feeding scheduling remotely using the dedicated app. The feeder can also play up to 10 customised voice commands, which can be used to call your pet when it’s mealtime. The integrated camera on the device has a 120-degree wide angle view which allows you to communicate with your pet in real time.
The Belkin Boostcharge Magnetic Wireless Power Bank is one of our favourite smartphone accessories around. It can hold up to 5,000 mAh of charge and magnetically attaches itself to the back of your iPhone. Its compact design ensures that the rear cameras are never blocked. The Boostcharge power bank can wirelessly charge your iPhone at a maximum speed of 7.5W. With wired charging, this speed gets bumped up to 10W. The power bank also has a foldable stand attachment which allows you to place your iPhone on any flat surface while streaming or taking video calls. One of the underrated features of this accessory is pass-through charging, which means you can charge your phone while the power bank is getting charged.
Smart wearable and fitness enthusiasts will like the new boAt Smart Ring. This ring is made of premium ceramic and metal and offers a range of health monitoring and activity tracking functions. The smart touch controls on this ring can be used to control music playback, change tracks, click pictures, and navigate apps. For those who don’t like wearing a smartwatch all the time, this smart ring is an ideal replacement. You can use it to track your sleeping pattern, monitor your heart rate, check your body temperature and SpO2 level, and track a diverse range of physical activities.
The Smart Hybrid Pillow from The Sleep Company utilises the ‘smartGRID’ technology with a unique honeycomb structure to provide a super breathable and cool cushion for your head while you sleep. The high-quality TPE material keeps allergies at bay, providing a comfortable, deep sleep. The pillow has a size of 61cm x 41cm. With over a thousand air channels, you will never find ourself flipping the pillow over to access its ‘cool’ side.
This UV Sterilizer Box can be used to sanitize objects that get used on a daily basis and accumulate a lot of germs in the process. You can pop in your smartphone, jewellery, watch, or keys, and clean them in just 3 minutes. The box blasts powerful UV light at the object placed within it, effectively killing 99.9% of the germs and bacteria. It also has built-in aromatherapy chambers that release relaxing smells, wiping out any unwanted odour from the device.
These are the top 9 funky gadgets you can buy online right now. All of these devices can be bought online from their respective e-retail outlets. This list covers a range of genres and price points. If there is a device that’s way ‘out there’ and deserves a spot on the list, let us know in the comments!
OnePlus 12 will launch globally alongside OnePlus 12R.
OnePlus 12R is a gaming smartphone.
It will succeed the OnePlus 11R.
Earlier, we were just speculating based on leaks and reports as to when the OnePlus 12 will finally be launched globally. Last week the company confirmed that it could launch its latest flagship in January 2024 but a company’s executive has revealed the official launch date. More than that a new smartphone is also likely to be tagged along. Keep reading for more details.
OnePlus 12 launched in China last week. It is now all set to be presented globally. OnePlus Benelux’s Country Manager, Alexander Vanderhaeghe at the Never Settle community event in Antwerp has revealed that the OnePlus 12 global launch will officially launch in Europe and the rest of the world on January 23. He further disclosed that OnePlus 12R will also make its debut alongside the flagship smartphone. For those who are unaware, the OnePlus R-Series phone is aimed at gamers. It will succeed the OnePlus 11R that was launched last year.
OnePlus 12 specifications
The OnePlus 12 was launched in China last week on Tuesday. It is highlighted with a 6.82-inch quad-HD+ LTPO OLED screen. The display has an adaptive refresh rate ranging between 1Hz and 120Hz. The screen supports 4,500 nits of screen brightness. The device is IP65 rated for dust and water resistance.
At its heart, there is Qualcomm’s 4nm Snapdragon 8 Gen 3 SoC. The device is offered with up to 24GB of LPDDR5X RAM and up to 1TB of UFS 4 inbuilt storage. The phone is endowed with a Hasselblad branded triple rear camera with a Sony LYT-808 sensor with a 50-megapixel primary camera (OIS, and f/1.6 aperture), a 64-megapixel telephoto secondary lens (OIS, 3X optical zoom and f/2.6 aperture) and a 48-megapixel ultra-wide-angle lens (114-degree field-of-view). Lastly, there is a 32-megapixel front-facing camera (f/2.4 aperture) for taking selfies and video calling.
The handset houses a 5,400mAh battery with 100W SuperVOOC wired, 50W wireless and 10W reverse wireless charging support.
The series includes two models- Vivo X100 and Vivo X100 Pro.
Both the devices are powered by MediaTek Dimensity 9300 SoC.
The smartphones runs on OriginOS 4 with Android 14.
Vivo is now ready to present its latest flagship Vivo X100 Series to the world. The company has announced the global launch date of its camera-focused smartphone series. To recall, the lineup was first introduced in China last month. The series included two models Vivo X100 and Vivo X100 Pro. Both smartphones come with Zeiss optics and are powered by MediaTek Dimensity 9300 SoC. In addition to this, they operate on OriginOS 4 with Android 14. Additionally, the devices support up to 120W fast charging.
Vivo does not want to keep its fans waiting, which is why it is going to bring its latest premium smartphone series to the global market soon. The company has officially set the Vivo x100 Series global launch date for December 14. The lineup will bring two devices Vivo X100 and Vivo X100 Pro. Global debut also indicates that the India launch is also expected. However, the company has not yet specifically named or hinted at the India launch.
Vivo X100 Series debuted in China in November and the pricing at which it arrived starts at CNY 3,999 (Rs 50,000) and goes up to CNY 5,999 (Rs 68,000). There are four models for Vivo 100 Pro whereas the X100 is made available in five variants with up to 16GB LPDDR5T RAM + 1TB storage.
All the models with their respective pricing are listed here.
Both Vivo X100 and Vivo X100 Pro share a lot of similarities. The display software and processors are the same. They feature a 6.78-inch AMOLED 8T LTPO curved display with a 120Hz refresh rate and 3000 nits of peak brightness. The devices run on OriginOS 4 with Android 14 out of the box. They are powered by MediaTek Dimensity 9300 SoC with Vivo V3 chip.
Both the handsets are highlighted with a triple-camera setup powered by Zeiss optics. Vivo X100 Pro includes a 50-megapixel Sony IMX989 1-inch type sensor with OIS (100x digital zoom), a 50-megapixel ultra wide-angle sensor and a 50-megapixel Zeiss APO super-telephoto lens with OIS (4.3x optical zoom and 100x digital zoom).
On the other hand, the vanilla model includes a Sony IMX920 VCS bionic 50-megapixel primary sensor with OIS, a 50-megapixel ultra-wide-angle lens and a 64-megapixel Zeiss super-telephoto lens (100x clear zoom).
Both smartphones come with a 32-megapixel selfie camera.
Garena Free Fire is a battle royale game with regular awards and tournaments to keep players interested. If you play Garena Free Fire, you should be aware of the redeem codes that are released on a daily basis. However, because the battle royale game is banned in India, players from other countries can use the Free Fire Redeem codes daily. If you’re unfamiliar with the Garena Free Fire redeem codes or don’t know how to get them, we’ve put together a step-by-step guide to help you redeem them. Check out Garena Free Fire Redeem Codes for 11 December 2023.
The Free Fire redeem codes are a great way to get free stuff. These are 12-digit codes that contain alphabets and numbers, as well as an expiration date and time. Because the Garena FF redeem codes cannot be used more than once, you should hurry to the redemption page to claim your free reward before someone else does. To get a free reward, all you have to do is go to reward.ff.garena.com/en, which is the official redemption page. Also, keep an eye on this space for daily updates on Garena Free Fire redemption codes and rewards.
In This Article
Garena Free Fire Redeem Codes Today 11 December 2023
B3G7A22TWDR7X
4ST1ZTBE2RP9
J3ZKQ57Z2P2P
8F3QZKNTLWBZ
X99TK56XDJ4X
WEYVGQC3CT8Q
GCNVA2PDRGRZ
MHM5D8ZQZP22
3IBBMSL7AK8G
FF7MUY4ME6SC
How to Get Free Fire Redeem Codes for Garena on 11 December 2023?
The default colour for the battery indicator on iPhones is green. The colour green signifies that the battery level on your device is optimum and everything is working as intended. A yellow icon means that the Low Power Mode is currently active on your device. This mode typically kicks in when the battery level drops to 20%. But, it stays on until the battery reaches 80%. If the battery icon on your iPhone turns yellow out of the blue, you must have turned it on by accident. So, let’s take a quick look at how you can turn it off.
What does the Yellow Battery Icon mean on an iPhone?
When your iPhone’s battery level drops down to 20%, you may have noticed its battery icon turn yellow. This doesn’t just signify that your phone is running out of charge, it also means that the device’s system has activated Low Power Mode.
When Low Power Mode is activated, your iPhone makes a decision to prioritise the most important tasks to preserve the battery life. If you don’t have access to a charger, the Low Mode Mode can keep your iPhone alive for a significant amount of time. It does this by cutting down on some tasks and drawing back the power from some functions. Here are all the features that get affected in this mode.
5G disabled (except when you’re streaming videos) on iPhone 12 and 13.
Auto-lock gets reduced to 30 seconds.
Display brightness gets reduced.
The display refresh rate drops down to 60Hz.
Some visual effects are dialled down.
iCloud syncing for photos is paused.
Automatic downloads are paused.
Your emails are fetched at a slower rate.
Background apps are refreshed at a slower rate.
If you don’t want your iPhone to reduce its performance when its battery dips to 20%, you can always turn off low power mode. Here’s how.
Turn off Low Power Mode from Settings to ‘fix’ the yellow battery icon on your iPhone
Step 1: Go to Settings and select Battery.
Step 2: Turn off the toggle switch for Low Power Mode.
Charge your iPhone
As we mentioned earlier, the Low Power Mode on your iPhone shuts off when the device reaches an 80% charge. If you’re running low on battery, it is a good idea to not have all the functions of your iPhone running at full blast, as it would deplete the leftover very quickly. If you have access to a charger, plug it into your device and wait for it to reach an 80% charge level.
Add the Low Power Mode to tile to the Control Center
If you don’t want to visit the device settings every time you want to toggle the Low Power Mode, you can simply add its tile to the Control Center. Here’s how.
Step 1: Go to Settings and select Control Center.
Step 2: Hit the green plus sign next to Low Power Mode. The tile will be added to the Control Center.
Step 3:Swipe down from the status bar and tap the Low Power Mode tile to turn it off.
Use Siri to turn off Low Power Mode
If you don’t want to add the Low Power Mode tile to the Control Center or turn it from device settings, you can get Siri to do it. Simply say ‘Hey Siri, turn off Low Power Mode’ and the voice assistant will switch your phone’s battery usage to its normal settings.
Frequently Asked Questions (FAQs)
Why is my iPhone’s battery icon yellow?
Your iPhone’s battery icon turns yellow when it is set to Low Power Mode. This mode kicks in automatically when your iPhone’s battery goes down to 20%. Once your iPhone is in Low Power Mode, its performance will be reduced to increase the battery life.
When does the Low Power Mode go away?
The Low Power Mode on your iPhone is automatically disabled when the device is charged to 80%. You can also disable it from Battery settings.
How do I check my iPhone’s battery health?
To check your iPhone’s battery health, go to Settings>Battery and tap on Battery Health & Charging.
Can I use my iPhone in Low Power Mode?
You can carry out routine tasks on your iPhone when it is in Low Power Mode. However, certain functions like 5G reception, high brightness, background app refresh, and more will be curtailed.
Does the iPhone receive phone calls in Low Power Mode?
Yes, basic cellular functions like calling and messaging remain unaffected in Low Power Mode.
This is how you can fix the yellow battery icon on your iPhone. The Low Power Mode only preserves your iPhone’s battery life in the short term, but if you want it to last longer, you should take a look at your general usage. Practices like overcharging the battery, subjecting the device to extreme temperatures, and using counterfeit chargers aren’t good for the battery. Read this article to learn how you can improve your iPhone’s battery life.
Garena Free Fire is a battle royale game with regular awards and tournaments to keep players interested. If you play Garena Free Fire, you should be aware of the redeem codes that are released daily. However, because the battle royale game is banned in India, players from other countries can use the Free Fire Redeem codes daily. If you’re unfamiliar with the Garena Free Fire redeem codes or don’t know how to get them, we’ve put together a step-by-step guide to help you redeem them. Check out Garena Free Fire Redeem Codes for 10 December 2023.
The Free Fire redeem codes are a great way to get free stuff. These are 12-digit codes that contain alphabets and numbers, as well as an expiration date and time. Because the Garena FF redeem codes cannot be used more than once, you should hurry to the redemption page to claim your free reward before someone else does. To get a free reward, all you have to do is go to reward.ff.garena.com/en, which is the official redemption page. Also, keep an eye on this space for daily updates on Garena Free Fire redemption codes and rewards.
In This Article
Garena Free Fire Redeem Codes Today 10 December 2023
FFCMCPSEN5MX
FF11NJN5YS3E
ZZZ76NT3PDSH
FF10617KGUF9
NPYFATT3HGSQ
XZJZE25WEFJJ
FFCMCPSJ99S3
EYH2W3XK8UPG
UVX9PYZV54AC
V427K98RUCHZ
FFCMCPSUYUY7E
6KWMFJVMQQYG
MCPW2D2WKWF2
MCPW3D28VZD6
VNY3MQWNKEGU
FFIC33NTEUKA
ZZATXB24QES8
U8S47JGJH5MG
HNC95435FAGJ
MCPW2D1U3XA3
BR43FMAPYEZZ
FFCMCPSGC9XZ
How to Get Free Fire Redeem Codes for Garena on 10 December 2023?
Setting an alarm on a smartphone is one of the easiest things you can do. However, if you’re new to using smartphones, this can be a confusing task. Most smartphones do not have a separate alarm app. The alarm functionality is usually integrated into the native clock app. You can access the clock settings from its widget or directly from its app in your phone’s app drawer. If you own a Samsung smartphone, here is how you can set an alarm on it.
Features and limitations of the native alarm clock on a Samsung phone
If you want to set up a standard, no-nonsense alarm that wakes you up at the pre-set time, the native alarm clock on your smartphone should do the job. One of the things we like about Samsung’s alarm clock is that it lets you decide how many times you can hit the Snooze button. If you’re very liberal with the snooze button, you can allow yourself one snooze hit per alarm. You can also set a custom interval for snoozing.
The standard alarm clock works perfectly fine, but there are a lot of other interesting options out there for you. For instance, the ‘Sleep as Android’ alarm app also tracks your sleeping pattern and wakes you up at the optimal sleeping phase so you wake up feeling refreshed. You can also use this app to set up a puzzle that turns off the alarm. If you struggle with waking up, you can also use a QR code as the key to turning off the alarm clock. For this, you’ll need to print out a QR code and place it somewhere far away from your bed. This will ensure that you walk up to the QR code every morning in order to turn off the alarm.
Use the native clock app to set an alarm on a Samsung smartphone
Step 2: Tap the Alarm tab at the bottom of the screen. Typically, the clock app should open on the alarm page by default.
Step 3: Tap the + icon on the right side of the screen.
Step 4: Set a time for the alarm. You can do this by swiping up and down on the hour and minute dials.
Step 5: Select the days on which you want the alarm to ring.
Step 6: Give the alarm a name. This is entirely optional.
Step 7: Set the Alarm sound, Vibration pattern, and Snooze window & frequency.
Step 8: Hit Save.
Use a third-party app: Sleep as Android
Sleep as Android is one of our favourite alarm apps for Android devices. Here’s how you can use it to set an alarm on your Samsung smartphone.
Step 1:Download and install the Sleep as Android app from the Google Play Store.
Step 2:Launch the app on your device.
Step 3: Tap on Set alarm.
Step 4: Hit the clock icon at the top right corner of the screen.
Step 5: Set a time for the alarm using the dial.
Step 6: Hit Set.
Step 7: Select the days on which you want the alarm to ring. You can also select its frequency from the drop-down menu.
Step 8: Sleep as Android is a smart alarm app. You can use the ‘Smart period’ feature to wake you up at an optimal sleep phase so you wake up feeling refreshed. You can set a window for Smart Period.
Step 9: Tap on Captcha if you want Sleep as Android to make you solve a puzzle to turn off the alarm.
Step 10: Hit Save once you’re done.
Frequently Asked Questions (FAQs)
Will the alarm on my Samsung smartphone ring if the device is turned off?
No, your Samsung smartphone needs to be switched on for the alarm to ring.
How do I set a puzzle on my alarm clock?
Native alarm clock apps do not have the option to turn them off by solving a puzzle. Third-party apps like Puzzle Alarm Clock and Sleep as Android have this feature.
How do I set an alarm on my Samsung smartphone?
Go to Clock>Alarm and hit the plus sign on the screen to create a new alarm. Set the time, frequency, sound, and vibration pattern. Hit ‘Save’ once you’re done.
This is how you can set an alarm on your Samsung smartphone. When the alarm rings, you will need to swipe up the ringer at the bottom of the screen to turn it off. Samsung phones also allow you to set the snooze period while the alarm is ringing. You can set up how many snoozes you are allowed on the alarm creation page. If you found this article helpful, let us know in the comments!
There are two ways to unlock your iPhone – Passcode and Face ID. While passcodes are the old-school and reliable method to unlock the device, the majority of users prefer Face ID because of its seamless operation and ease of use. Sometimes, your iPhone may throw ‘A Problem Was Detected With the TrueDepth Camera’ error message while you’re trying to unlock it. Some users may wonder what a TrueDepth Camera even is. If you’re caught in the same confusion, this article will address your queries and suggest some possible fixes.
When you see the ‘problem detected with the TrueDepth camera’ error message on your iPhone, you might wonder what the TrueDepth camera even is. Well, the answer is quite simple. The TrueDepth Camera is a collective term used for the front camera, infrared camera, dot projector and other proximity sensors. These components are located on the notch of your iPhone’s display. The newer iPhones house them in the ‘Dynamic Island’.
As you can guess by now, the TrueDepth Camera maps a 3D image of your face using thousands of dot particles. The 3D scan is matched with the image of your face captured by the front camera to verify your identity. This is the mechanism behind the Face ID on your iPhone. The TrueDepth Camera is also the reason why someone cannot unlock your iPhone simply by putting up your picture in front of the lock screen. Apart from Face ID, the TrueDepth Camera is also used for Memojis and Portrait Mode.
Wipe the camera area
The first thing you should do when you come across any error related to the TrueDepth camera is wipe the front camera panel with a clean microfibre cloth. Oftentimes, dirt and dust particles collect on the sensors and the dot projector, causing a failure to read your face accurately. The TrueDepth camera relies on the infrared dots to create a 3D map of your face. Any smudges or dirt on the sensor can cause it to malfunction. A quick wipe should solve this problem.
Remove any screen protection
Incorrectly installed tempered glass or other forms of screen protection can mess with the functioning of the TrueDepth camera. If the glass is hindering the camera cutout, it can cause unnecessary glare. Your phone may not be able to map your face correctly, leading to the TrueDepth camera error. Take off the screen protector and install it correctly. Make sure you only use Apple-authorised products to protect your iPhone’s display.
Restart your iPhone
So, you’ve wiped the front camera panel and removed the screen protector but the problem still won’t go away? It is likely that your hardware isn’t at fall. Software glitches are quite common on mobile devices and your iPhone is no exception. Luckily, these glitches can be quickly resolved by restarting your phone. Press and hold the side button and any volume key to reveal the power menu on your iPhone. Use the power slider to turn off your device. Wait for a few seconds and use the side key to restart your device.
Update your iPhone
If the problem lies with your iPhone’s software, it can be quickly fixed by updating your device. Here’s how you can go about it.
Step 1: Make sure your iPhone is connected to a WiFi network and plug in its charger.
Step 2: Go to Settings and select General.
Step 3: Select Software Update.
Step 4: Tap on Download and Install.
Reset Face ID
Step 1: Go to Settings and select Face ID and Passcode.
Step 2: Tap on Reset Face ID.
Step 3: Go back to Face ID and Passcode.
Step 4: Hit Set up Face ID.
Step 5:Register your Face ID again.
Reset all settings
Step 1: Go to Settings and select General.
Step 2: Tap on Transfer or Reset iPhone.
Step 3: Hit Reset.
Step 4: Select Reset All Settings. Enter the passcode to confirm your decision.
Factory reset your iPhone
Resetting your iPhone to its factory settings restores its OS to out-of-the-box condition. However, it erases all the content on your phone along with your personal data.
Step 1: Go to Settings and select General.
Step 2: Tap on Transfer or Reset iPhone.
Step 3: Hit Erase All Content And Settings.
Step 4: Tap on Continue and enter the passcode to reset your iPhone to its factory settings.
Frequently Asked Questions (FAQs)
Can I have 2 Face IDs on my iPhone?
Yes, you can have a maximum of 2 different Face IDs on your iPhone.
Why is the Face ID on my iPhone not working?
If you can’t unlock your iPhone using Face ID, clean the front camera panel and make sure there is nothing obstructing your face.
How does Face ID work?
Using the TrueDepth Camera, your iPhone is able to render a 3D scan of your face and judge that it is actually you who is trying to unlock the phone instead of someone holding up your picture.
What causes problems with the TrueDepth camera on the iPhone?
The TrueDepth camera on your iPhone can malfunction due to the collection of dust and grime on the notch/Dynamic Island, faulty screen protector, and background software issues.
How to clean the TrueDepth camera?
Use a clean microfibre cloth to clean the notch/Dynamic Island on your iPhone. This will provide better visibility to the TrueDepth camera.
These are the top 5 ways to fix ‘A Problem was Detected with the TrueDepth Camera’ issue on your iPhone. If these fixes do not work for you, take your iPhone to an Apple Repair Centre for further diagnosis. Make sure your personal data is backed up before checking your phone in for repair.
Installing Windows on your PC using a bootable USB drive is something that you should know how to do. The process is fairly simple to grasp, but if you hit a snag, it can get confusing to diagnose the problem. Most users often get the ‘No Device Drivers Were Found’ error while installing Windows 10/11. If you’ve hit the same error too, there is no need to panic. These fixes will resolve the error in no time.
What could be causing the ‘No Device Drivers Were Found’ error to pop up while installing Windows 10/11 on your PC?
As you can probably guess, this error pops up when Windows fails to find the driver package during the installation process. This is very unusual because the installation media typically contains all the necessary drivers required for the installation of the OS on your PC. If you get this error it could be due to either one of these reasons:
The driver package in the installation media is corrupted.
The installation media file is corrupted.
Windows cannot verify the authenticity of the driver package.
The drivers are outdated and not supported by Windows anymore.
Step 4: Continue installing the Windows OS on your PC.
Manually download the drivers from the manufacturer’s website
If the Windows Installation Media on your USB drive does not contain the appropriate drivers, you will need to download them from the manufacturer’s website. Sometimes, a corrupt driver package may lead to the ‘no device drivers were found’ error showing up during the installation process. To fix this, simply download the SATA AHCI controller drivers from the OEM’s website. You will need another PC to do this. Once you have downloaded the driver package, plug the USB drive into the computer again until you reach the error window. In the error window, select Load Driver, followed by Browse. Locate the recently downloaded driver package and install it on the PC.
Reinstall Windows Installation Media
If there’s something wrong with the Windows Installation Media on your USB drive, reinstall it from the official Microsoft website. First, download the Windows Installation Assistant, followed by the Windows Installation Media and Windows Disk Image (ISO). Now, plug in the USB drive to your computer and launch mediacreationtool.exe that you installed on the PC. Select ‘Create installation media for another PC’ and choose your USB drive as the target storage. When the installation process is complete, use the USB drive to boot Windows on another PC.
Reset Motherboard Settings
Step 1:Restart your PC and enter BIOS using its assigned key. This varies among different manufacturers so Google which key leads to BIOS for your PC. Del, F2, or F10 should do the job.
Step 2: Go to Exit and select Load Setup Defaults/Load Optimal Defaults.
Step 3:Confirm your selection in the following popup box.
Step 4:Save your changes and exit BIOS.
Plug the USB drive into a different port
If you’ve tried all the fixes mentioned above and are still getting the ‘no device drivers were found’ error while installing Windows 10 or 11 on your PC, it is possible that the fault may lie with the USB port that your drive is plugged into. Make sure that you plug it into a USB 2.0 port and not a USB 3.0 port. Once that’s done, start the installation process all over again.
Frequently Asked Questions (FAQs)
Why am I getting the ‘No Drivers Were Found Error’ while installing Windows 10/11 on my PC?
This error usually pops up when the driver package on your Windows Installation Media is missing or corrupted. It could also be due to a faulty ISO file for the OS or a dysfunctional USB port.
How do I fix the ‘No Drivers Were Found’ error?
To fix this error, you need to install a new driver package from your PC manufacturer’s official website. If the Windows ISO file is at fault, install a new one from Microsoft’s website.
How do I download Windows 10/11 ISO legally?
Microsoft allows users to download the ISO image legally for free from its official website. Go to this page to download Windows 10 ISO and read this article to learn how to install it on your PC.
These are the top 5 ways to fix the ‘No Device Drivers Were Found’ error while installing Windows 10 or 11 on your device. Check out this article to find out how you can update the audio drivers on your PC. This article lets you know how to install the WiFi driver on your device. If you know any more ways to fix this error, let us know in the comments!
Garena Free Fire is a battle royale game with regular awards and tournaments to keep players interested. If you play Garena Free Fire, you should be aware of the redeem codes that are released on a daily basis. However, because the battle royale game is banned in India, players from other countries can use the Free Fire Redeem codes daily. If you’re unfamiliar with the Garena Free Fire redeem codes or don’t know how to get them, we’ve put together a step-by-step guide to help you redeem them. Check out Garena Free Fire Redeem Codes for 9 December 2023.
The Free Fire redeem codes are a great way to get free stuff. These are 12-digit codes that contain alphabets and numbers, as well as an expiration date and time. Because the Garena FF redeem codes cannot be used more than once, you should hurry to the redemption page to claim your free reward before someone else does. To get a free reward, all you have to do is go to reward.ff.garena.com/en, which is the official redemption page. Also, keep an eye on this space for daily updates on Garena Free Fire redemption codes and rewards.
In This Article
Garena Free Fire Redeem Codes Today 9 December 2023
66QSZD5ZEMHH
O8YOP7BZ150T
MCPW3D28VZD6
XZJZE25WEFJJ
NPYFATT3HGSQ
MCPW2D2WKWF2
MCPW2D1U3XA3
BH212GDTALRU5RW
FFCMCPSJ99S3
4SZC6U8W60EDZ6UH
UVX9PYZV54AC
Q1RC5NPZ2C2F
V427K98RUCHZ
How to Get Free Fire Redeem Codes for Garena on 9 December 2023?
Like most social media platforms, Facebook doesn’t notify users when they get blocked by another user. This is probably for the good, as a notification about the action may result in increased harassment. However, it can be puzzling when you notice a change in your friend list and can’t figure out if the person has blocked you or simply deactivated their profile. So, here are the top 5 ways to tell if someone has blocked you on Facebook.
If you suspect someone has blocked you on Facebook, the first thing you should do is check whether they are still in your friend list. Once you block someone on Facebook, they are automatically removed from your friend list. This is also the case when you are on the receiving end of the action. However, someone mysteriously vanishing from your friend list is not a tell-tale sign of them blocking you on the platform. It could also be because they deactivated or deleted their Facebook profile. Move on to the other signs on this list to know for sure.
Perform a quick search of their username
So, you noticed that someone’s missing from your friend list. What do you do next? Instead of jumping to conclusions, perform a quick search of their profile name or username. Better yet, go to their Facebook profile’s URL, if possible. If it returns the ‘content isn’t available’ message, it is an ominous sign that you have been blocked. To confirm if this is the case, log out of your Facebook account and visit their profile URL again. If you’re able to view their profile, your main account has certainly been blocked by the user.
Try sending them a message on Facebook messenger
Once someone blocks you on Facebook, your access to contacting them is cut off for good. This means that the messages you send to them on Messenger will not be delivered. To make sure that the person has blocked you on Facebook, send them a message on Messenger. If it fails to send or returns an error, the person has blocked your profile.
Try to tag them in a post
If you try to tag the person who blocked you on Facebook, their profile simply won’t show up in the post. This is a quick method you can use to verify if your account has been blocked by another user. Click the status box, press ‘@’ and start typing the name of the person. If their profile does not show up as a prompt, it means they have blocked you on Facebook.
Ask a mutual friend for help
How will Facebook implement the new step?
If you have a mutual friend with the person who you think has blocked you on Facebook, verifying their action may get a little easier. Simply ask the mutual friend if they are able to contact the person and view their profile on the platform. If you are not able to do the same thing, you have certainly been blocked by the user.
Try finding a mutual friend who has regular interactions with the person. Go to a recent post and check if the mutual friend has tagged them on it. If their profile name is greyed out instead of showing up as a hyperlink, it is certain that they have blocked you on Facebook.
Frequently Asked Questions (FAQs)
How do I know for sure that someone has blocked me on Facebook?
Search for the person’s profile on Facebook. If it doesn’t show up in your search results, ask a friend to do the same. If the friend can see their profile, it means the user in question has blocked you on the platform.
Can I contact someone if they unfriended me on Facebook?
Yes, you can still contact someone even if they unfriended you on Facebook. You can send them another request or interact with their public posts. However, this won’t be possible if they have blocked you.
If I block someone on Facebook, do they get blocked on Messenger as well?
Yes, blocking someone’s Facebook profile blocks them on Messenger as well. The user will not be able to send you any messages henceforth.
These are the top 5 ways to tell if someone has blocked you on Facebook. You can view your own block list by going to Settings & privacy>Settings>Blocking>Block users. Once you unblock someone on Facebook, you will need to add them as a friend again to re-establish contact with them.
Infinix Smart 8 HD smartphone comes with a 13MP dual AI camera and 8MP selfie camera.
It is powered by a UniSOC T606 processor.
The smartphone operates on Android 13 Go with XOS 13.
The Chinese smartphone brand Infinix today officially introduced the Infinix Smart 8 HD smartphone in India. The device features a textured back panel in four colour variants. There is a camera module with Ring Flash on the back and a side-mounted fingerprint sensor. The magic ring feature on the device is said to improve user interaction. It also comes with a 90Hz HD+ display and is powered by an octa-core Unisoc T606 SoC.
In This Article
Infinix Smart 8 HD price in India and availability
Infinix Smart 8 HD price in India has been set at Rs 5,669. The phone comes in a single 3GB RAM with a 64GB storage option. The budget smartphone is available in Crystal Green, Shiny Gold, and Timber Black colour options. According to the company, the device is scheduled to go on sale from December 13 via Flipkart and offline channels in the country. Interested buyers will get a 10 percent instant discount on Axis Bank cards.
Infinix Smart 8 HD specifications, features
Infinix Smart 8 HD comes with a 6.6-inch HD+ display with 720×1,612 pixels of resolution. The screen supports a 90Hz refresh rate and up to 500 nits of peak brightness. The display has a dynamic notch feature, known as the Magic Ring that shows Face Unlock, Background Call, Charging Animation, Charge Completion Reminder, and Low Battery Reminder. It features a timber texture finish back panel available in four appealing colour variants with a camera module with a Ring Flash and a colour-matched frame.
The Smart 8HD runs on Android 13 Go with the latest XOS 13 version. The smartphone is powered by a UniSOC T606 processor with up to 6GB RAM and 64GB of internal storage (expandable up to 2TB with a microSD card). The device also comes with UFS 2.2 fast storage.
The Infinix Smart 8 HD includes a dual rear camera setup with a 13-megapixel primary sensor and an AI lens. There is an 8-megapixel front-facing camera with LED flash for selfies and video calling.
For biometrics, the budget smartphone incorporates a face unlock function and a side-mounted fingerprint sensor. The handset comes equipped with a 5000mAh battery.
The Acer Nitro V 16 (ANV16-41) features a 165Hz display.
The gaming laptop has a dual-fan cooling system.
The device has over 500 popular games and applications, including blockbuster games such as Cyberpunk 2077 and Alan Wake 2.
Acer has introduced a new Nitro V 16 (ANV16-41) gaming laptop. The laptop is powered by the latest AMD Ryzen 8040 Series processors with Ryzen AI technology. In addition to this GeForce RTX 40 Series Laptop GPUs with DLSS 3.5 are given for graphics and is said to provide improved performance, long-lasting battery life, and AI-powered technologies.
In This Article
Acer Nitro V 16 (ANV16-41) price and sale details
Nitro V 16 (ANV16-41) gaming laptop will come with a starting price of $999.99 which translates to Rs 83,375 in North America from March 2024. The machine will be available in EMEA in April 2024, starting at EUR 1199 which converts to Rs 1,07,550.
Acer Nitro V 16 (ANV16-41) specifications
Acer Nitro V 16 (ANV16-41) features 16-inch WQXGA or WUXGA display options with a 165 Hz refresh rate, 3 ms response time, and 16:10 aspect ratio. The gaming laptop is incorporated with Windows 11 out of the box. Under the chassis, there is AMD Ryzen 8040 series processor up to Zen 4-based AMD Ryzen 7 8845HS CPU paired with up to NVIDIA GeForce RTX 4060 Laptop GPUs and DLSS 3.5 technology. It supports over 500 popular games and applications, including blockbuster games such as Cyberpunk 2077 and Alan Wake 2. It comes with up to 32 GB of DRR55600 RAM and up to 2 TB of PCIe Gen 4 SSD storage.
Acer Nitro V 16 gaming laptop also has a dual fan cooling system, the Nitro V 16 is well-equipped to take on heavy gameplay and data transfers. Also, the machine has a suite of AI-enabled features that can also be maximized when streaming or video chatting with the webcam’s AI-supported Acer PurifiedView and Acer PurifiedVoice 2.0 featuring three microphones with AI noise reduction technology.
In terms of audio, the laptop features DTS X: Ultra-tuned speakers. Also to monitor the device’s performance and temperature there is a NitroSense utility app with one click of the dedicated NitroSense key.
For connectivity, there is a USB 4 Type C, two USB 3 ports (one which allows for offline charging), an HDMI port, a microSD card reader, and compatibility with Wi-Fi 6E. Lastly, the laptop also comes with one month of Xbox Game Pass so users can enjoy the latest titles with fellow gamers on PC.
The world’s biggest photo-sharing platform is all about being seen. Instagram is a great way to connect with people and let them know what you have going on in your life. The ephemeral story section is a perfect place to keep people updated on everyday things that you don’t demand a post of their own. Instagram Stories are also a great place to share funny Reels, videos, and memes made by other creators. Unlike your Instagram posts, you can always see who viewed your Instagram Story. Here are 4 ways you can go about it.
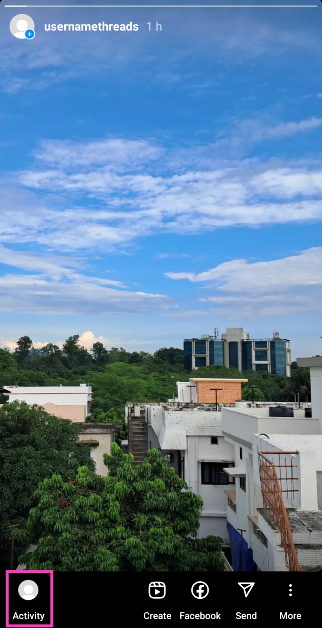
Step 1:Launch the Instagram app on your Android smartphone.
Step 2: Tap on Your story at the top left corner of the screen.
Step 3: Tap on Activity at the bottom left corner of the screen.
This is where you will be able to see the view count on the story and the people who have viewed it.
See who viewed your Instagram Story (iPhone)
The iPhone app for Instagram is very similar to the Android one. You can use the method mentioned above on your iPhone as well. So, let’s take a look at another way you can see who viewed your Story.
See who viewed your Instagram Stories 24 hours after posting them
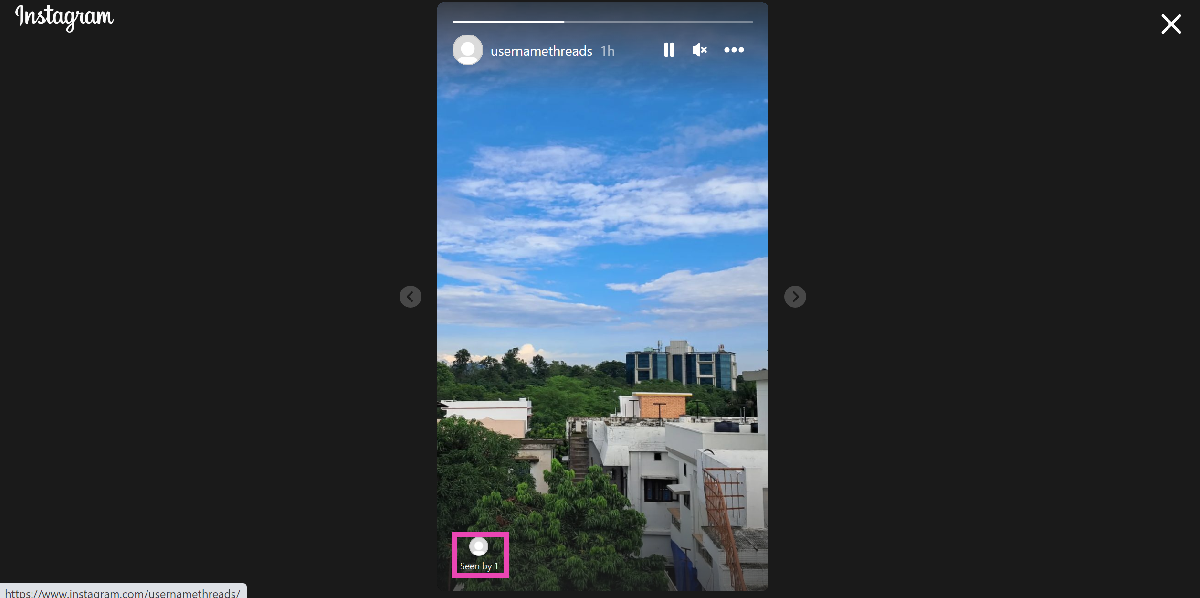
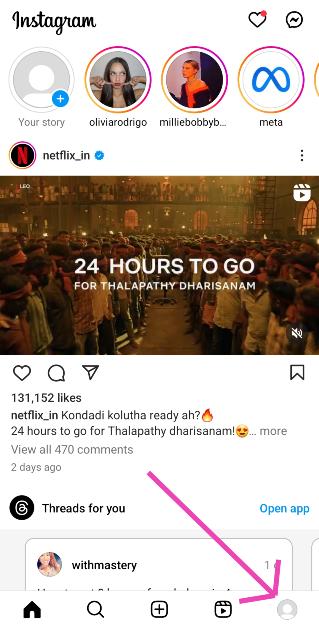
Your Instagram Story expires 24 hours after being posted. If you’re on vacation and don’t have the time to be on Instagram as often, you may miss out on seeing who viewed your story. Luckily, there is a way you can still check your story viewers. Here’s how.
Step 2: Tap your profile icon at the bottom right corner of the screen.
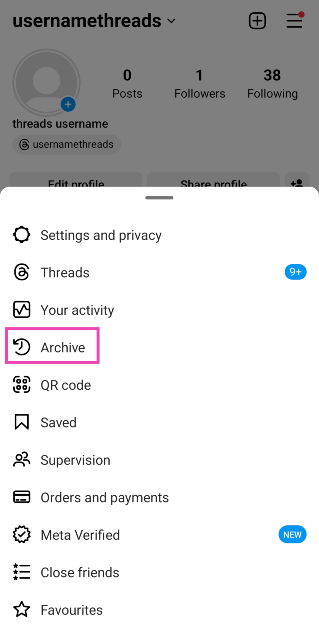
Step 3: Hit the hamburger menu at the top right corner of the screen.
Step 4: Select Archive.
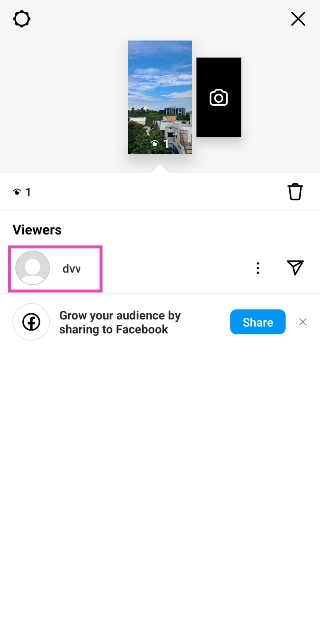
Step 5:Open the Story for which you want to see the view count.
Step 6: Tap on Activity.
This is where you can see who viewed your Story.
Note: Instagram archives your Story for 48 hours. If more time has lapsed since you posted the story, it will be gone forever.
How do I view someone’s story without showing up in their viewers list?
Unlike WhatsApp, Instagram does not let you view someone’s story inconspicuously, even though both are owned by Meta. Every time you view a story on Instagram, your profile will end up on the viewer’s list. Certain apps falsely claim to get around this situation by letting you peep stories while staying anonymous. Make sure you don’t fall prey to these claims as these apps may push malware on your device.
So, is there a way to view someone’s story without them knowing about it? Well, you can always make a throwaway account, but that only works if the poster’s profile is public. If not, you’re at a dead end. Or, are you? There are a couple of workarounds, but they come with certain limitations. These methods only work for the first and the last story that the person has uploaded in their carousel. Let’s a quick look.
There are a bunch of ways you can view someone’s Instagram Story. The most direct way is by tapping on their profile icon in the story bar on your Insta home page. You can also visit their profile to see what they have posted on their story. When you’re scrolling through your Instagram feed, you may have noticed a preview section full of stories from the people you follow. These previews always display the first story posted by the user. Tapping on it will count as a view, but merely glancing at them while you’re on your feed will go unnoticed.
Another way you can stay incognito while watching stories is by pressing and dragging a story to move on to the one posted by the next user in the list. The only catch is to not drag it all the way so that it doesn’t completely load on your device. If that happens, you will end up on the viewer list. If you wanna check out the last story posted by the user, load the story posted by the person on their right and drag the screen to the right.
Frequently Asked Questions (FAQs)
How do I see my Story’s viewers list 24 hours after posting it?
Go to your Instagram profile, hit the hamburger menu at the top right corner of the screen, select Archive, and load the story of your choice. Swipe up to see the viewers.
Why does the view count on my Instagram Story not match the number of viewers?
This is because Instagram counts every replay as a view count. If someone plays your story multiple times, it will add to the views but their name will only show up once.
How do I view someone’s Instagram Story without showing up in the viewer list?
Scroll down on your home feed until reach the Story preview section. This may take some time. The preview thumbnail will always be the first story posted by the user.
These are the top 4 ways to see who viewed your Instagram Stories on an iPhone, Android phone, and Windows PC. If you know any other way to see the view count, let us know in the comments! If you use a Business profile for Instagram, you will also get Story Analytics next to the view count.
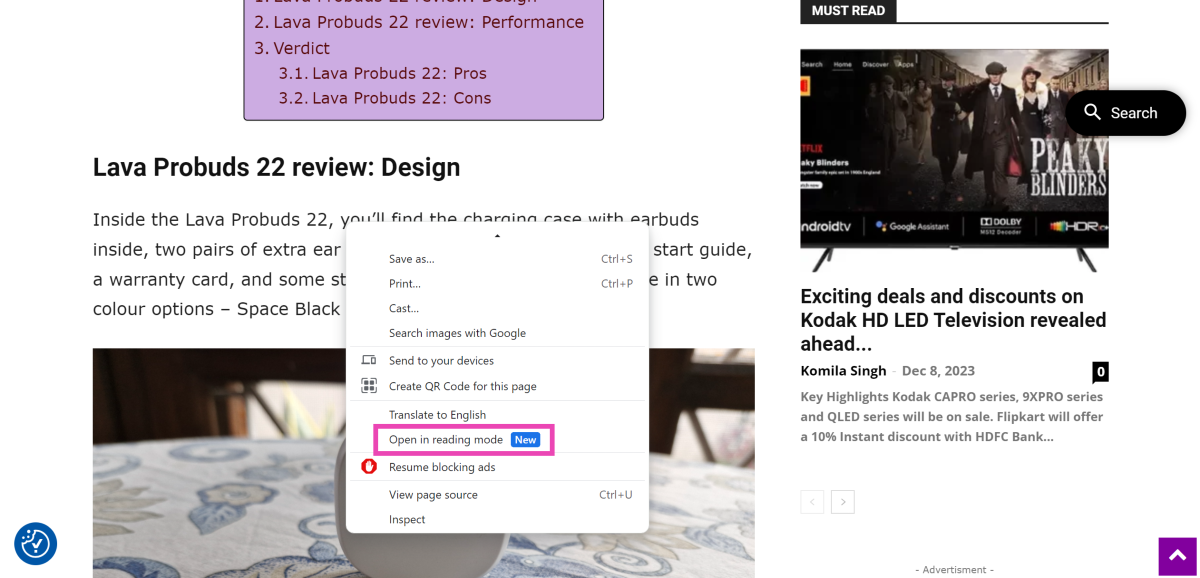
If you’re someone who primarily consumes news online, you must be aware of how annoying constant popup ads can be. The constant distraction of having to deal with popups, tuning out certain plug-ins, and blocking intrusive ads can mar the reading experience. Luckily, there are a bunch of reading tools you can use to get rid of these distractions. And now, Google has stepped into a ring and added a helpful ‘Reading Mode’ to the Chrome browser. If you’re not sure where to find it, here’s your complete guide to enabling and using Reading Mode on Chrome like a pro.
Can’t find Reading Mode on Google Chrome? Here’s how you can enable it
If your Google Chrome version does not have the Reading Mode turned on by default, here is how you can enable it.
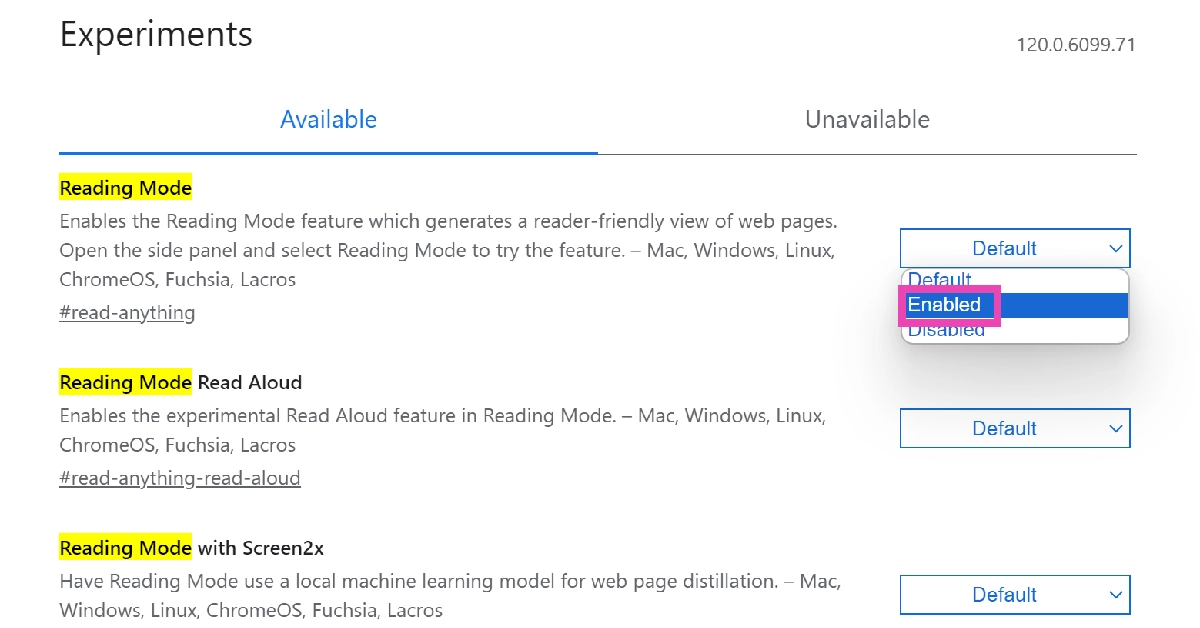
Step 1:Launch Google Chrome on your PC.
Step 2: Type chrome://flags in the address bar and hit Enter. This will take you to Chrome’s Experimental Features page.
Step 3: Type Reading Mode in the search bar and hit Enter.
Step 4: Click on the drop-down menu for Reading Mode and select Enabled.
How to use Reading Mode?
So, you’ve enabled Reading Mode on Chrome. Now what? Well, the process is pretty simple. But before you begin, you need to take care of a couple of things.
Make sure there are no pop-up ads on the web page you’re trying to read. If there are any, clear them.
The webpage should not be locked behind a paywall. Chrome’s Reading Mode will not be able to bypass it. Make sure you are subscribed to the publication or use these methods to read the article for free.
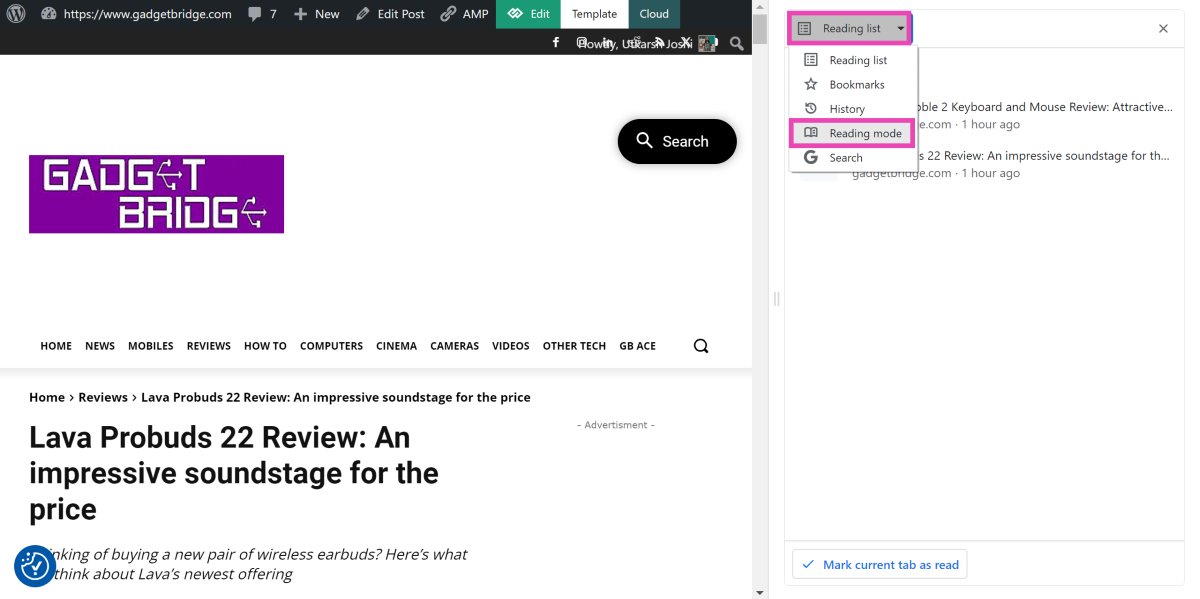
Now that you’ve got these hurdles out of the way, simply click on the Side Panel icon at the top right section of the Chrome window to access Reading Mode. Typically, it should open up as the default option. If it doesn’t, simply click on the drop-down menu and select Reading Mode. Another way you can access this mode is by right-clicking anywhere on the article and selecting Open in reading mode. That’s it!
Check out these tips to get the most out of Reading Mode
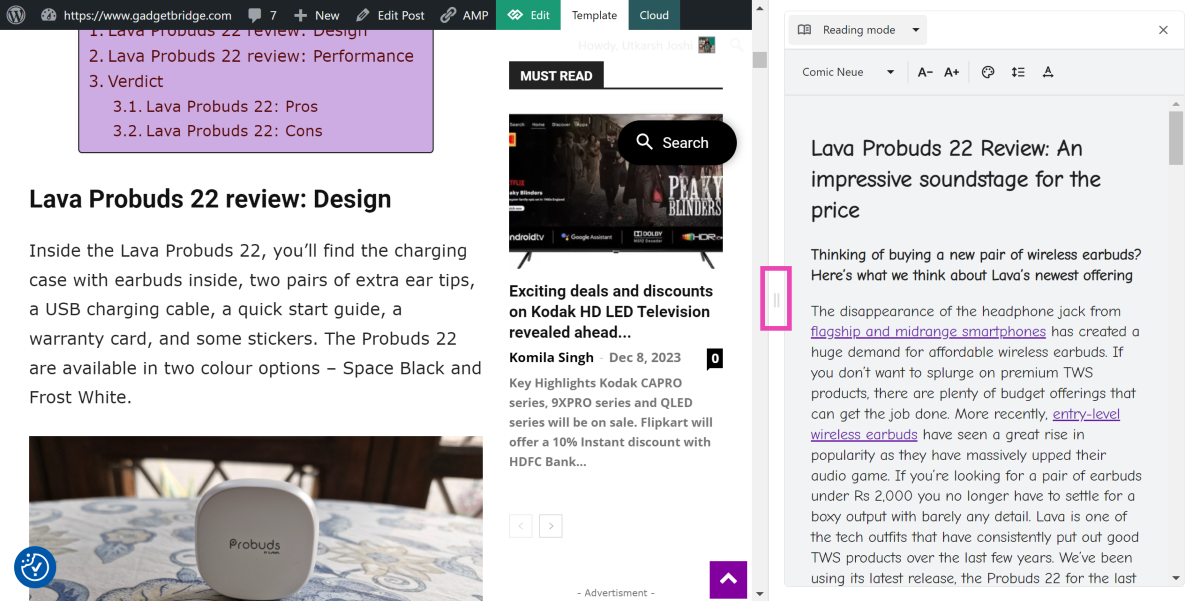
Once you open an article on reading mode, the first thing you should do is adjust the width of the panel. Drag the panel from its left border and move it towards the left to expand its size. This will allow the article to take centre stage on your screen while the webpage is pushed to the side. If you switch to a different tab and open a different article, it will automatically load on the reading panel.
Chrome’s reading mode also gives a lot more control over how the text looks on the screen. You can change the font of the text from the drop-down menu at the top left section of the panel. At the time of writing this article, there are 7 fonts to choose from – Poppins, Sans-serif, Serif, Comic Neue, Lexend Deca, EB Garamond, and STIX Two Text.
Right next to this drop-down menu, you will find the option to change the size of the text. The colour plate icon lets you choose the background colour for the reading panel. There are five options on offer – Default, Light, Dark, Yellow, and Blue. Finally, you can use the last two icons to select the level of spacing between the lines and the individual letters.
Another thing that Chrome gets right with its Reading Mode feature is its integration with Reading List, Bookmarks, and Search History. You can use the Reading List option to load an article you’ve been meaning to read, then switch to the Reading Mode tab for easy, distraction-free reading. You can also use the side panel to carry out Google searches. If you bookmarked a page instead of saving it to your reading list, you can still access it from this side panel.
Frequently Asked Questions (FAQs)
Does Google Chrome’s Reading Mode display images?
No, Google Chrome’s Reading Mode does not display images yet. You can check out other reading companions like Postlight Reader for Chrome if you want the images displayed along with the text.
Does the Reading Mode on Chrome bypass paywalled articles?
No, Chrome’s reading mode does not give you free access to articles locked behind a paywall.
I can’t find Reading Mode on Chrome. What do I do?
Type chrome://flags in the address bar, hit Enter, search for Reading Mode, and select Enable from the drop-down menu.
This is how you can enable and use Reading Mode like a pro in Google Chrome. Since this feature is still in its early stages, it lacks image support and text to speech on it. As time goes on, it is expected that Google will expand upon its list of attributes and it will look more like a comprehensive reading tool.
Kodak CAPRO series, 9XPRO series and QLED series will be on sale.
Flipkart will offer a 10% Instant discount with HDFC Bank Credit cards.
Flipkart’s Big Year End Sale will start soon and before the sale begins SPPL has announced huge discounts and offers on the Kodak HD LED Television. The Flipkart Sale will run for 9 days with early access on December 8. During the sale period, customers can enjoy exciting deals on Kodak HD LED TVs.
According to the company, recently launched, 8 new TV models in the Kodak CAPRO series, 9XPRO series and QLED series will be part of Flipkart’s Big Year End Sale. During the 9-day-long sale, Flipkart will provide a 10% instant discount with HDFC Bank credit cards. In addition to this, it will also offer credit up to 1 Lakh along with no-cost EMIs.
During the Flipkart Big Year End Sale KODAK QLED televisions will be available in three screen sizes—50, 55, and 65 inches—and will start at Rs 23,999. On the other hand, KODAK 75-inch 4K QLED TV (75MT5044) will be offered at a starting price of Rs 94,999. The KODAK CA PRO range of televisions will come with a starting price of Rs 26,999. KODAK 9XPRO TVs is a premium TV series powered by Android 11 will be available at a starting price of Rs 9,999.
Sharing his excitement for Christmas and New Year, Mr. Avneet Singh Marwah, Director and CEO, Super Plastronics Pvt Ltd, a Kodak brand Licensee said, “The advent of winters brings the joy of festivities in our lives. With Christmas and New year round the corner, we are delighted to announce exciting deals for the Flipkart Big Year End Sale. The kind of trust and love that the brand has received is truly mesmerising. We promise our customers that we are going to bring a lot of surprises for next year including the launch of our one-of-a-kind manufacturing facility in Hapur. We are determined to make India a manufacturing hub with more investments in the future.”
Here are the prices of KODAK TVs during the sales-
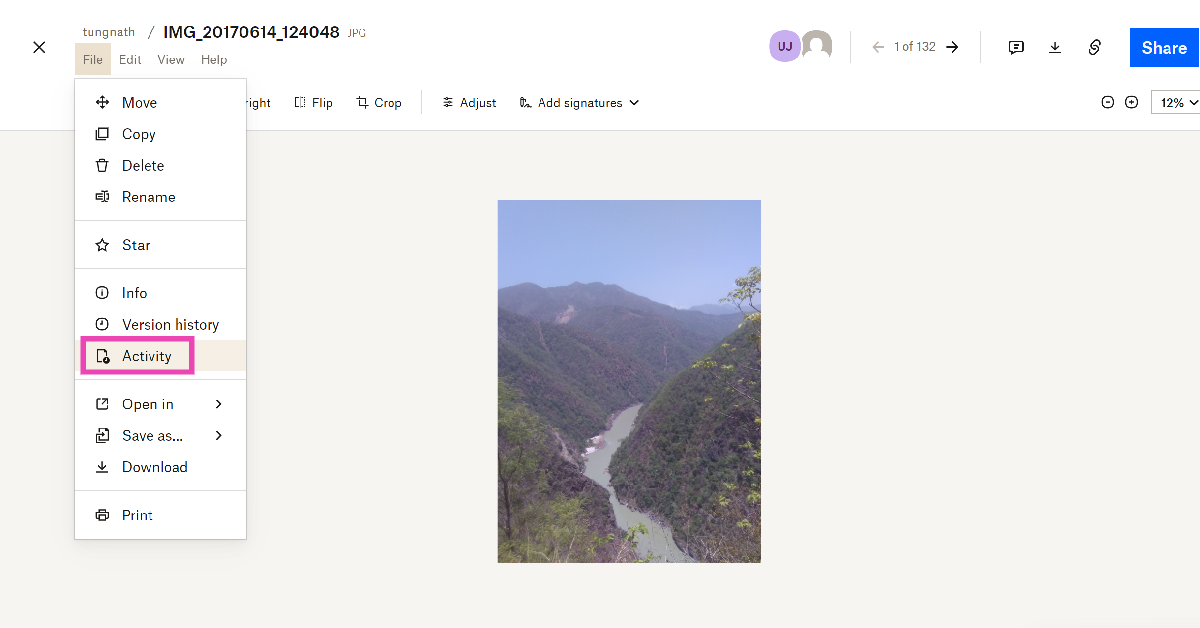
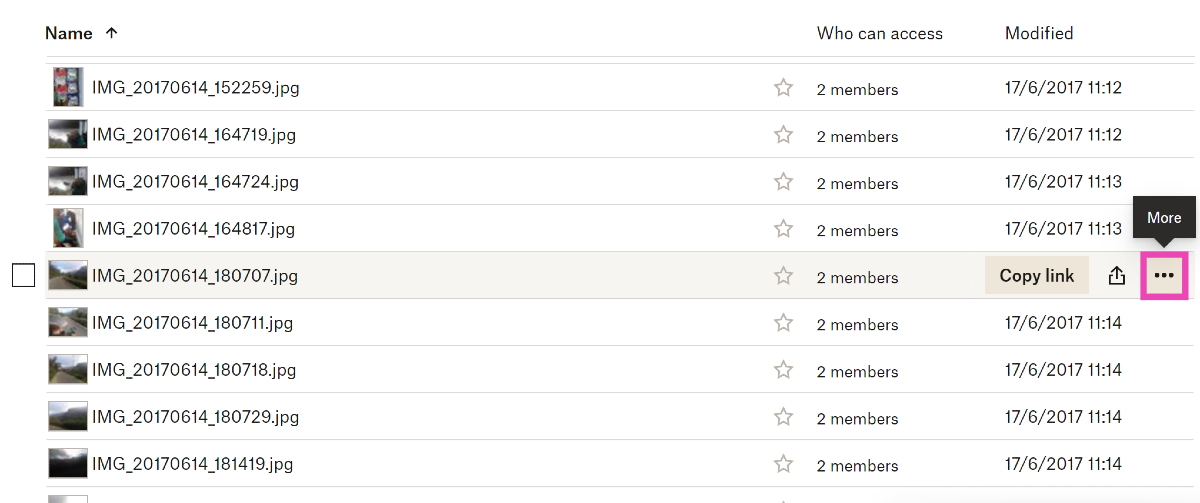
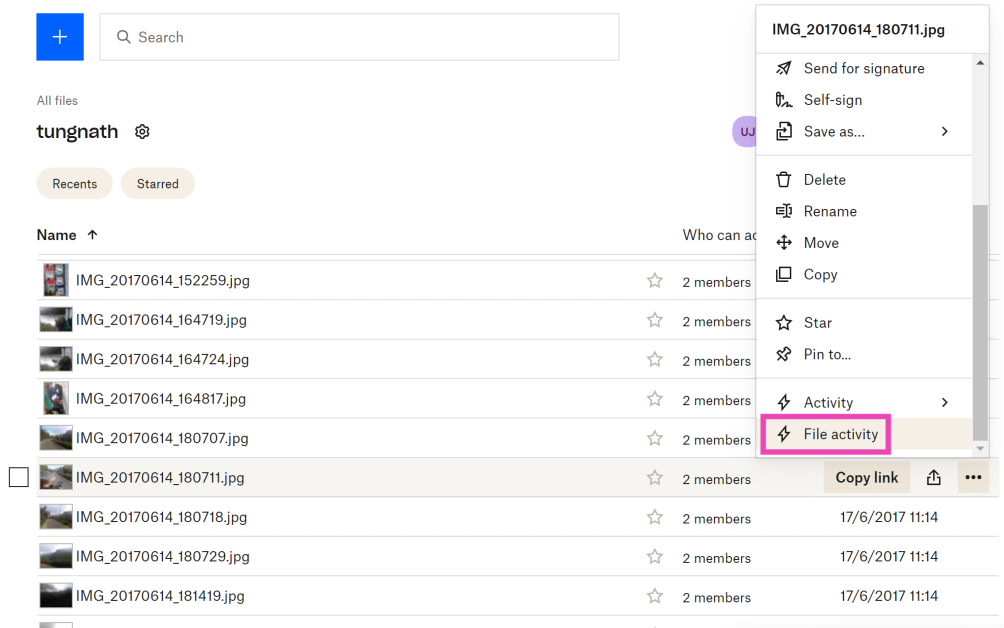
Dropbox is one of the biggest cloud-sharing services around. When you sign up for Dropbox, you get 2.5GB of free storage. When you cross this limit, you need to pay for a premium subscription package that adds more storage to your account. Apart from cloud sharing, one of the reasons why you may want to use Dropbox is its helpful fringe features. For instance, you can view your entire account history or just the history of edits you made on a particular file. Like what you read? Here’s how you can view Dropbox File Activity and Event Logs.
What is the purpose of Dropbox File Activity and Event Logs?
Even though they may not seem like a big deal to casual users, Dropbox’s file activity and event logs hold a great deal of significance to users who carry out collaborative tasks on the platform. The ‘Activity’ tab for any file or folder helps you review any changes that have been made to them. It also lets you know which member carried out the changes. Using the ‘Filter’ options, you can check when the file was added, viewed, moved, renamed, edited, and more.
Your ‘Event Log’ on Dropbox is a complete account of all your actions on the website. You can view when you added a particular file, made edits to it, or commented on it. Your event log spans your entire account and not just a particular file. All the entries are listed chronologically and can be sorted by date or event type. If you think something fishy is going on with your account, you can always check the event logs to confirm your suspicions.
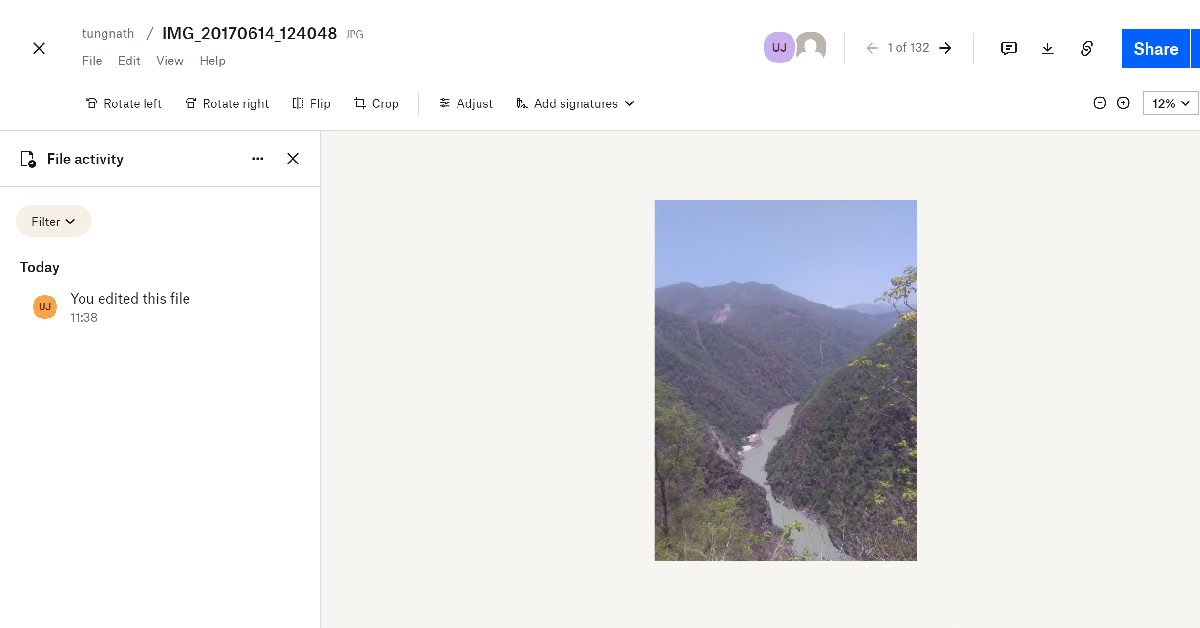
The Activity panel will open on the left. This is where you will be able to see the actions taken on the file throughout its history. It also lets you know when the file was shared, who has access to it, and who made changes to it.
View Dropbox file activity without opening the file
You will be able to view your Dropbox account history. You can view the event log for a particular folder using the menu on the right. You can also set a particular date to view the events from that particular day.
Frequently Asked Questions (FAQs)
How is Dropbox file activity different from the event log?
Dropbox file activity gives you a total account of the changes made to a particular file or folder. These changes may be made by you or other editors. The event log, on the other hand, is a chronological account of your activity on Dropbox.
Where do I view the activity log for a particular file?
Open the file and go to File>Activity to view its activity log or history.
This is how you can view Dropbox file activity and event logs. If you suspect someone has gained unauthorised access to your Dropbox account, you can view your account logs to check if they have carried out any activity on the account. To gain back access to your account, go to Security settings and delete all the devices that are logged into your account. Furthermore, turn on two-step authentication to make sure this doesn’t happen in future.
The company showcased energy storage solutions and product concepts in Dubai.
Acer has joined the RE100 initiative and committed to sourcing 100% renewable electricity by 2035.
Acer has officially announced its “Conscious Technology” vision for technology that is created and developed concerning the future. In addition to this it also provided updates on its ongoing climate efforts along with two new energy storage solutions and a climate exhibition featuring technology and the public was also given access to product concepts.
Acer joined the RE100 initiative and has pledged to source 100% renewable electricity by 2035. It further committed to attain net-zero emissions by 2050. The company aims to increase positive impacts on the environment through collaborative efforts; 60% of its critical suppliers have committed to RE100 or set science-based carbon reduction targets (SBT).
According to the company it aims to make use of 20-30% post-consumer recycled plastic in its computers and monitors by 2025, for which 17% use was achieved in 2022. In addition to this Acer also discussed a number of its initiatives including its Vero line of products made with a high percentage of recycled materials. Another programme the Project Humanity initiative educates and unites its employees around the world to take greener actions. While, the Earthion platform further unites its supply chain partners, including their employees, to address environmental challenges through innovative and integrated solutions.
Among the projects under Earthion are using biofuel to reduce Acer’s Sea logistics emissions with biofuel and researching sustainable packaging materials with manufacturing partners.
The firm further revealed that it is growing its footprint in the energy storage market as part of its net-zero commitment by offering solutions across the supply chain, from household to industrial use, manufacturing to application, and front-of to behind-the-meter solutions to contribute to the energy transition. Acer has also expanded its range by introducing new energy storage solutions through its investment in battery cell technologies.
Conscious Technology for a Brighter Tomorrow Exhibition also highlights Acer’s continuous efforts to combat climate change technology designed and made with consideration for the future. The company presented goods and services categorised under four lifestyle concepts.
Concept for Working – An on-demand subscription service to Acer’s vast product portfolio with subscription package upgrades, services, and repairs that can be made available with the click of a button. Customers can actively become part of a system that stretches the life of a digital device, lessening the use of new resources.
Concept for Learning – Computer hardware and software that help schools reduce their carbon footprint. Students can learn in a climate-positive environment using refurbished laptops along with tools to enable conscious use.
Concept for Moving – A network of mobility stations with charging hubs, nimble e-bikes, and e-scooters available to ease journeys, along with tools such as data-informed urban planning and prediction of micro-mobility infrastructure, helping to increase transportation access for more people and support infrastructure planning within smart cities.
Concept for Living – A hyper-compatible system with a mobile app that enables the use of both existing and new smart appliances to make homes more climate resilient. The app lets users manage their energy consumption more efficiently and increases visibility on the energy distribution of appliances.


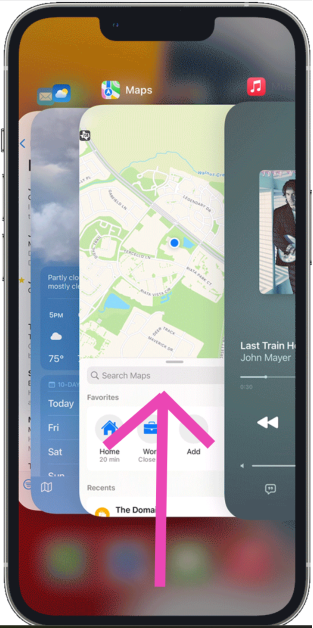
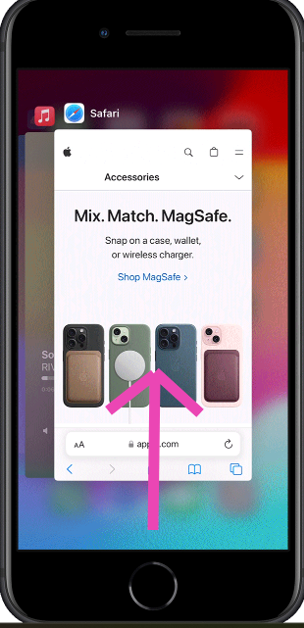


")


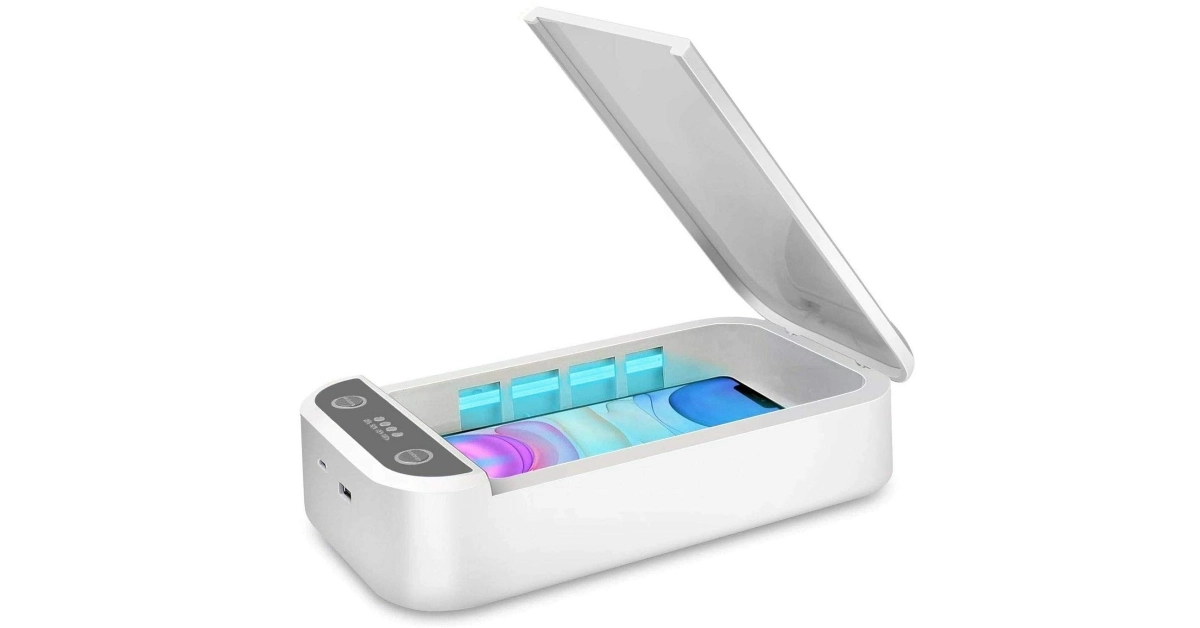


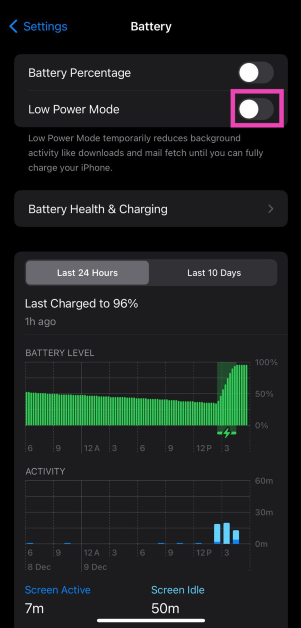
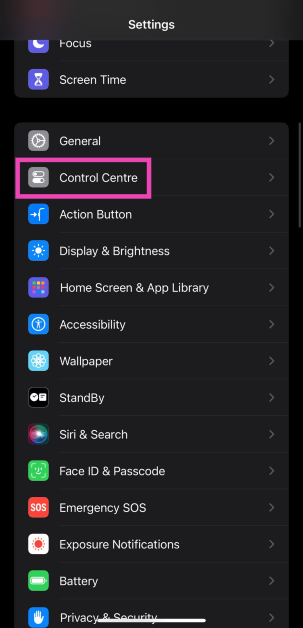
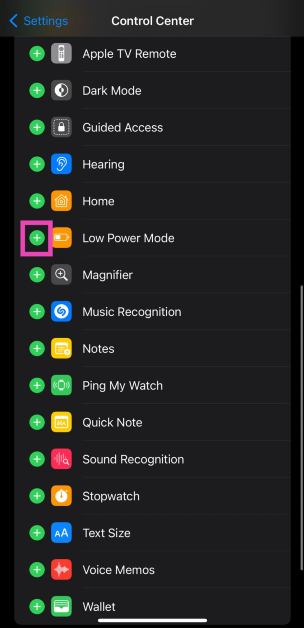


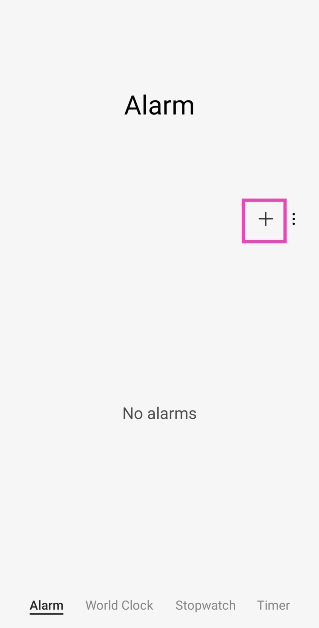
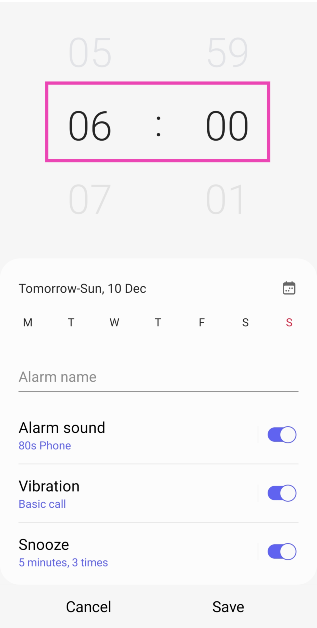

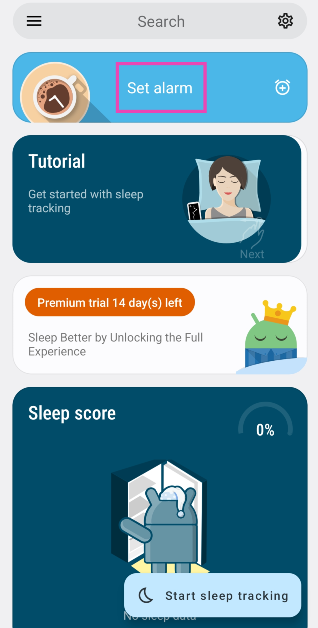
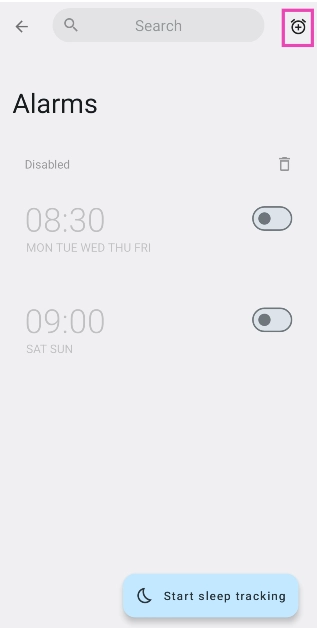
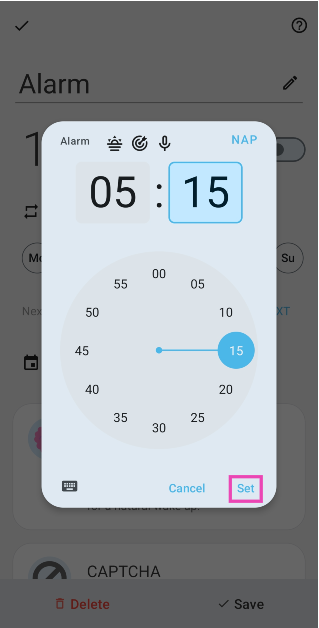
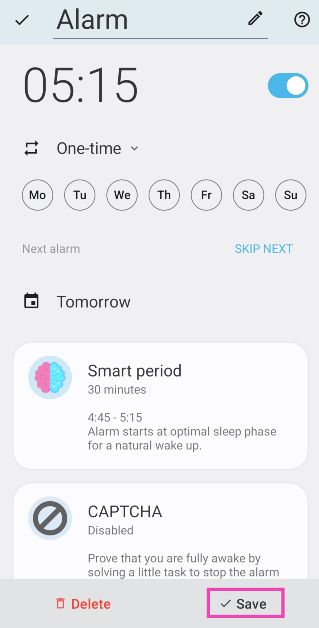
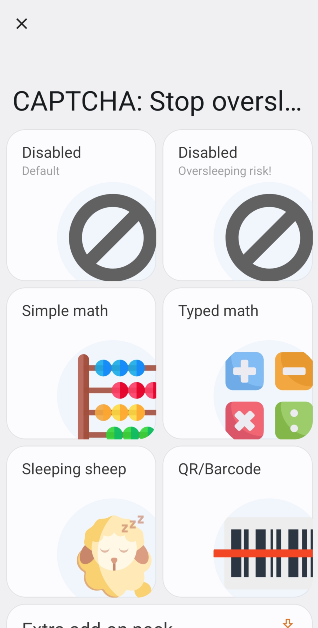


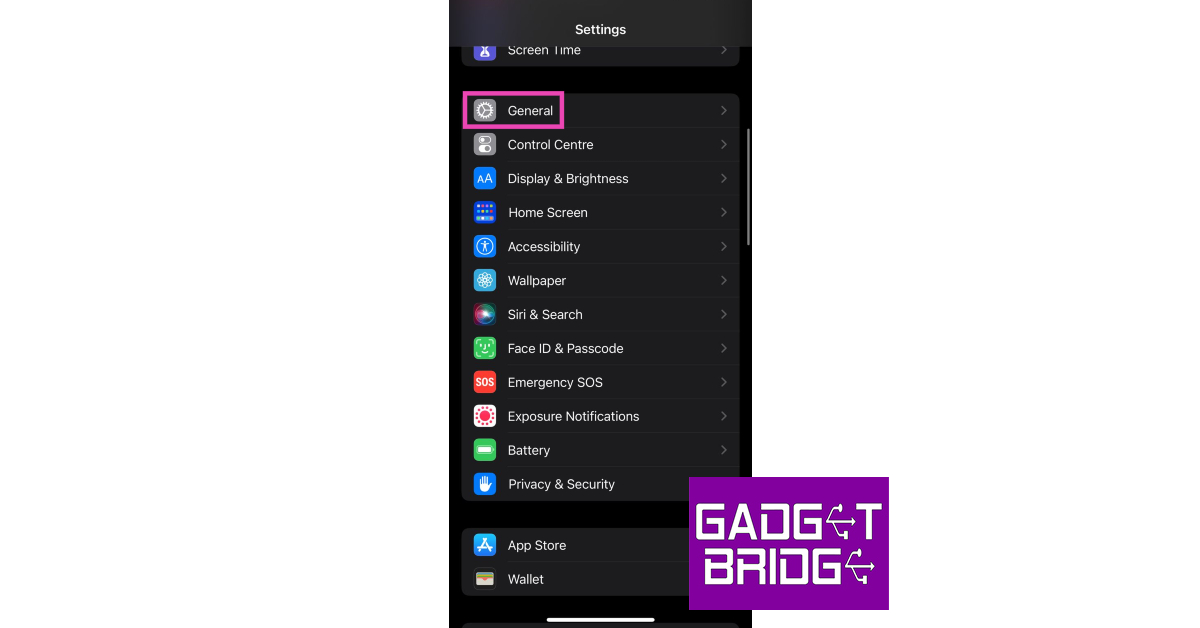


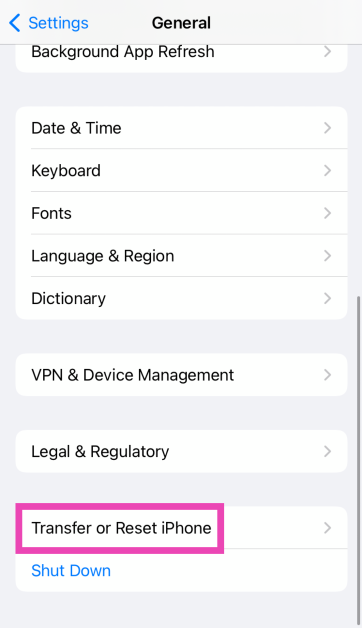
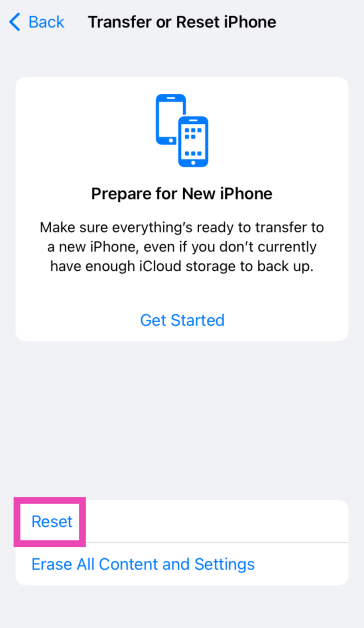
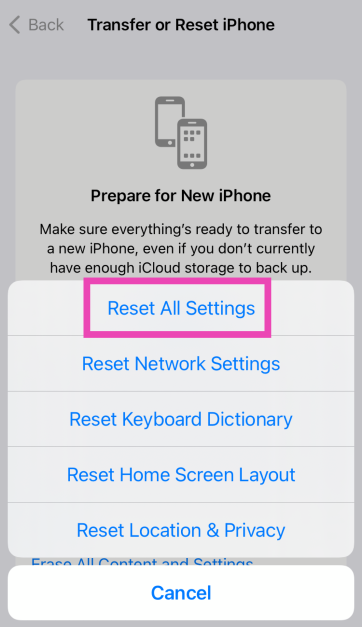
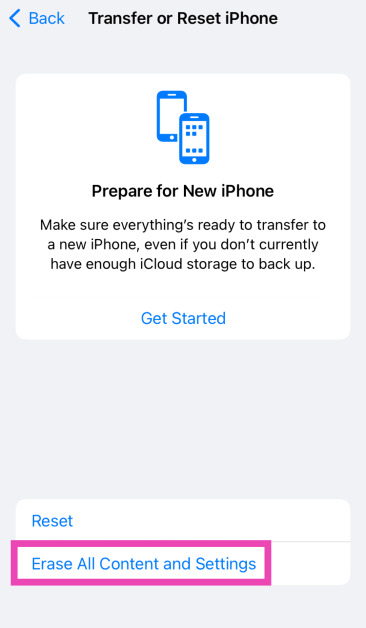
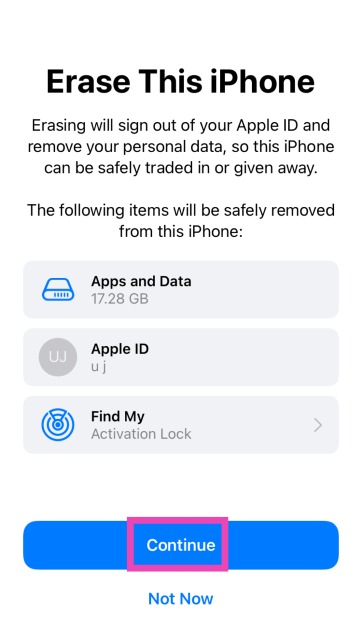


 gaming laptop powered by up to Zen 4-based AMD Ryzen 7 8845HS CPU launched")

")