The Legion Tower 5i is powered by Intel Core i9-13900F.
Intel Core i5-13400F powers Lenovo LOQ Tower.
PC manufacturing brand Lenovo has announced the launch of new gaming desktop PCs in India. The company has introduced Legion Tower 5i and LOQ Tower with AI features. In addition to this, the company has also released a gaming monitor and gaming mouse- Lenovo Legion R27fc monitor and Legion M600s wireless gaming mouse.
Legion Tower 5i and LOQ Tower, Lenovo Legion R27fc monitor and Legion M600s wireless gaming mouse pricing in India
The Legion Tower 5i has been launched with a price tag of Rs 2,19,990 whereas the LOQ Tower will be available at Rs 79,990 in India. On the other hand, the price of the Lenovo Legion R27fc gaming monitor is set at Rs 18,999. The Legion M600s gaming mouse will sell for Rs 5,799.
In terms of availability, the gaming lineup can be purchased via Lenovo.com, Lenovo Exclusive Stores, Amazon.in, and other offline retail stores in the country.
The Legion Tower 5i draws its power from Intel Core i9-13900F paired with NVIDIA GeForce RTX 4070 Ti for graphics. On the other hand, Lenovo LOQ Tower is powered by Intel Core i5-13400F coupled with NVIDIA GeForce RTX 3050 graphics card. They come with up to 64GB DDR5 RAM and up to 32GB DDR4 RAM, respectively with 1TB SSD M.2 2280. On the software front, there is Windows 11 and 3 months of access to Xbox Game Pass Ultimate free.
Both desktops come integrated with Lenovo Vantage offering customisation and adjustment options for better performance via an all-in-one suite of tools that includes overclocking controls, AI performance tuning, and a real-time performance dashboard.
The gaming machines are shipped with Lenovo Premium Care and Accidental Damage Protection services, that can be availed while purchasing the device. With Premium Care, new users receive personalised hardware and software assistance from expert technicians, ensuring prompt and efficient resolutions to any technical issues that may arise.
Lenovo Legion R27fc monitor and Legion M600s wireless gaming mouse features
The Lenovo Legion R27fc is a 27-inch monitor featuring a VA FHD, Curved display. The screen supports a refresh rate of 280Hz and a 99% sRGB colour gamut. The monitor has a 3-side NearEdgeless design that boasts two 3W speakers to provide immersive audio, completing the overall gaming experience. It has a 0.5ms MPRT.
On the other hand, the Lenovo Legion M600s Wireless Gaming Mouse has a Pixart 3370 sensor offering 19,000 DPI, 400 IPS, and 40g of acceleration. The device takes two hours to charge which provides 70 hours of battery life (lights off). Whereas a 10-minute quick charge provides 10 additional hours. In addition to this, there are sub-1ms lossless wireless via 2.4GHz, low-latency Bluetooth, or wired USB-C.
AMOLED displays are the go-to choice for smartphone manufacturers when it comes to their flagship offerings. With individual pixels lighting up the screen, AMOLED displays pack a lot of detail. You can immediately tell the difference between an AMOLED and LCD display by taking a look at how either display produces a black image. The AMOLED display brings out the deeper, richer shades of black. One of the biggest pet peeves among smartphone users is a greenish tinge that their phone’s screen often develops. So, let’s take a look at the top 8 ways to fix the ‘phone screen turning green’ issue.
Before you jump into the fixes, it is important to assess the kind of problem you’re dealing with. A green tint or hue is vastly different from a green line across the display. While the former is considered somewhat normal under certain conditions, the latter is definitely a serious issue. OnePlus phones are the most notorious for springing the mysterious green line on the display. Luckily, the company announced a lifetime screen warranty and upgrade deal for users dealing with this issue earlier this year.
If your problem is related to a green tint or hue rather than a green line, you may be able to salvage the situation at home without needing to take your phone to the authorised repair centre, assuming the problem is caused by a software issue. If your phone’s hardware is at fault, there is nothing that can be done other than depositing the device with the company for repair.
Smartphones with AMOLED displays often cast a green tint on the screen. This is usually the case when the phone’s display is set to low brightness. The difference in current reaching the pixels covering the darker spots on the screen may cause them to emit a greenish hue. If the entire display appears green to you, it may be due to bad calibration.
Restart your phone to keep the screen from turning green
If the green tinting on your phone’s screen is caused by a background glitch in the software, a simple reboot should fix it. Restarting your phone is the first step you should take while fixing any issue. Press and hold the side key and select ‘Restart’ from the power options. If long pressing the side key triggers the voice assistant on your device, press and hold the volume up key and side key simultaneously. You can also access the power menu by tapping the power icon from the notification shade.
It is possible that a recently installed third-party app could be causing your phone’s screen to malfunction. To make sure this is the case, restart your mode in Safe Mode. When your phone is running in this mode, all the third-party apps on it are briefly disabled. If you’re able to see a green tint in Safe Mode as well, it means that third-party apps are not the culprit behind the issue. However, if your phone works normally, you will need to delete the recently installed apps one by one until you figure out which one is causing the problem.
Switch to Light Mode
Step 1: Go to Settings and select Display & brightness.
Step 2: Tap on Light mode.
Turn off the blue light filter
Android phones have a blue light filter which adds a warmer shade to the display and reduces the stress it exerts on the eyes. Sometimes, this filter can malfunction and create a green tint on the screen. Turn off the blue light filter from the Quick Settings Menu by tapping the ‘Eye Comfort’ tile.
Update your phone’s OS
It is possible that the green screen issue is being caused by a software bug. Luckily, smartphone manufacturers are quick to fix such bugs with an OTA update. Here is how you can update your phone’s OS.
Step 1: Go to Settings and select Software update.
Step 2: Tap on Download and install.
Step 3: Select Install now.
Use a third-party app to calibrate your phone’s display
If you notice the green tint covering the entire screen, it could be due to a poorly calibrated display. You can recalibrate it using a third-party app like Display Calibration by RedPi Apps. Once you launch the app, hit the Calibrate button. The app will calibrate the tint and shade values on your display and restore balance to it.
Colour-correct your phone’s display
Step 1: Go to Settings and tap on Accessibility & convenience.
Step 2: Select Accessibility.
Step 3: Switch to the Vision tab.
Step 4: Tap on Colour vision enhancement.
Step 5: Turn on the toggle switch.
Step 6: Choose your preferred colour filter.
Factory reset your device
If everything else fails, you can perform a factory reset on your device as a last-ditch measure. Make sure you back up all your personal data on the device before resetting it. Here’s how the factory reset process goes.
Step 1: Go to Settings, scroll down and select General management.
Step 2: Tap on Reset.
Step 3: Select Factory data reset.
Step 4: Scroll down and tap on Reset.
Frequently Asked Questions (FAQs)
What should I do to fix or remove the green tint on my phone’s screen?
To remove the green tint on your phone’s screen, update the device and restart it. Make sure the display is calibrated and no third-party apps are causing the problem to occur. If you suspect the issue is related to the hardware, take your phone to a professional repair centre.
Is my smartphone’s display covered under its warranty?
If your smartphone’s display is malfunctioning due to some intrinsic reason, it will be covered by the warranty. However, if it was damaged due to accidental impact, the warranty will not cover it.
Why am I seeing a green tint on my phone’s display?
Green tinting is more common on AMOLED displays, especially when the screen brightness is very low. Every pixel in an AMOLED display has a current passing through it. In low brightness, the minuscule differences in current create a slightly green hue on the screen.
Why is my phone’s screen green?
Hardware damage, dimly lit surroundings, incorrect colour settings, and software glitches can turn your phone’s screen green.
Is green tint normal on AMOLED displays?
AMOLED displays often develop a green or purple tint when you lower the phone’s brightness in dark mode. This is completely normal and not a defect.
These are the top 8 ways to fix the ‘phone screen turning green issue’. A slightly greenish hue in ultra-low brightness settings (typically between 15-20%) is considered normal for AMOLED displays. Even if you calibrate the display, the tint may not go away. The real problem arises when the hue spreads over the entire screen and not just the super dark parts. In this scenario, you should assess whether the problem is caused by a software malfunction or a hardware issue. If it’s the latter, take your phone to a professional repair centre.
The Arcade to add Tamagotchi Adventure Kingdom will be launched by Bandai Namco.
The games will be added to Apple Arcade on January 4.
As 2023 draws to a close, tech giant Apple has officially announced that more games will be added to its game streaming service- Apple Arcade. The company has revealed three new titles are coming to the library. Check out the three titles that are scheduled to be added.
Launched in 2019, Apple Arcade is a paid game streaming service that works with all devices, including the iPhone and iPad. If you have a subscription to Apple Arcade then from January 4 you will be able to access three new gaming titles on the platform. According to the company, Tamagotchi Adventure Kingdom will be launched by Bandai Namco. On the same day Cornsweeper by wubttr and Blackjack by MobilityWare+ by MobilityWare will be released for Apple Arcade.
In addition to three new games Apple will also bring major updates to popular titles, all ad-free with no in-app purchases. While making the announcement the company said, “As we head into 2024, we look forward to another incredible year of uninterrupted fun — starting with three new games and major updates to popular titles, all ad-free with no in-app purchases. In January, Arcade players can embark on an epic, wholesome, and nostalgic adventure in Tamagotchi Adventure Kingdom; get caught up in Cornsweeper, a chill and whimsical reimagining of the beloved logic puzzle game Minesweeper; and go all-in in Blackjack by MobilityWare+. Please let us know if you’re interested in early access to Tamagotchi Adventure Kingdom.”
Gamers can experience a virtual friend franchise as the Tamagotchi Adventure Kingdom debuts on Apple Arcade. You can join a character named Mametchi to bring peace back to the Tamagotchi world after an unexplained disturbance in the kingdom. Players will be able to explore quirky landscapes, interact with nearly 300 adorable Tamagotchi characters, and build their cosy wilderness camp.
On the other hand, Cornsweeper is developed by Jamaican solo developer wbuttr. The game is inspired by Wbuttr’s Jamaican cultural heritage. It includes features localization in Jamaican Patois (the local dialect). A meditative mind-sweep-em-up, players pop delicious popcorn and avoid explosions, all set to a relaxing and original lo-fi-inspired soundtrack with some reggae infusions.
Blackjack by MobilityWare+ is another gaming title by MobilityWare+ that will be accessible on Apple Arcade from January 4. It is a traditional game of blackjack mastering its intricacies. It includes options like splitting and doubling down beside the standard choices of Hit or Stand. Players can choose their table as they travel from iconic locations such as London to Barcelona — each offering a unique gaming atmosphere — as they climb up the Leaderboards and showcase their skills. One can also take advantage of other features like a table run progression system, allowing players to earn coveted “Titles” and unlock new tables.
The ecosystem divide between iOS and Android certainly has its disappointing moments. Perhaps, the most disappointing thing is the lack of a universal app for texting and video calling between the two platforms. iMessage and Facetime are pretty much the norm for Apple users, but if you want to contact someone who uses an Android device, you will need to look for other options. In this article, we bring you the best “other options” out there. Here is our list of the 7 best free apps to video chat between an iPhone and an Android phone in 2024.
While downloading a new app for the sole purpose of video calling, there are certain factors you need to take into account. The context of your conversations plays a big role in determining the app you should use. For casual conversations among family and friends, apps like WhatsApp, Messenger, and Instagram fit the bill perfectly. Their accessibility and already established popularity already make them the front runners for video calling. On top of that, fun features like live effects and face filters significantly elevate the video-calling experience.
Apps like Google Meet, Zoom, and Microsoft Teams are suited for more formal settings. These apps are perfect for hosting virtual meetings, online classes, and web seminars. The ability to host a large number of people and helpful features like screen sharing, whiteboards, audio transcripts, call recording, and more, make these apps ideal for meetings and conferences.
Lastly, another thing you should consider is the app’s privacy and security features. The good news is that most of the popular messengers offer end-to-end encryption for video calls. This is a standard feature on all of the apps mentioned in this list. Meaning, you don’t need to purchase a premium subscription to secure your calls.
WhatsApp
Immensely popular on both platforms, WhatsApp manages to bridge the ecosystem divide perfectly. This year, the Meta-owned instant messenger added ‘screen sharing’ to its arsenal, allowing users to display their phone or desktop’s screen on a video call. The new landscape orientation makes it easier to view presentations on the video call while holding your phone horizontally. Another thing we like about video calling on WhatsApp is its picture-in-picture mode, which contracts the recipient’s video feed into a small box, so you can browse your phone with ease. If either recipient does not have WhatsApp, they can still join a call created using a ‘call link’.
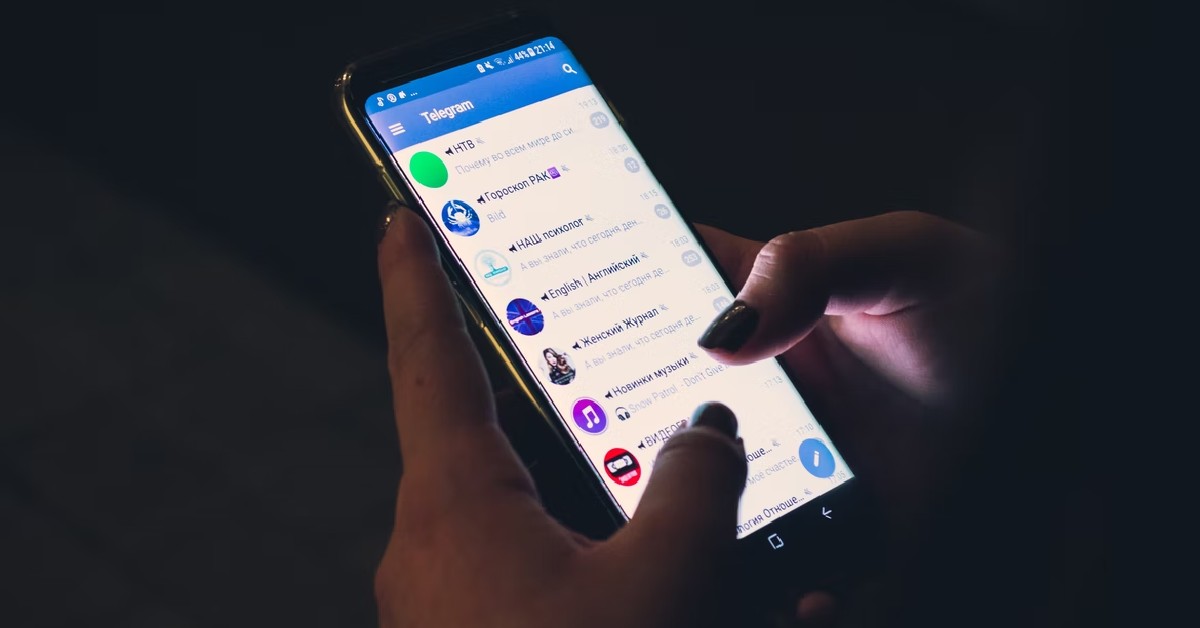
Telegram
Telegram is the closest instant messaging app that comes close to matching WhatsApp’s popularity. One of the better aspects of using Telegram is that you don’t need to share your phone number with the recipient to call them. While the app does require your phone number at the time of registration, it can later be substituted for a username as your profile’s identifier. Video calling on Telegram is a smooth and secure process, especially with end-to-end encryption onboard. Like WhatsApp, you can also share your phone’s screen with the recipient on a video call.
Facebook Messenger
Facebook Messenger is a great way to overcome platform barriers and get talking easily. If you’re on Facebook, you’re probably already used to having Messenger as your primary messaging app. Apart from standard video calling features, Messenger also has a ‘Watch Together’ option that lets you watch Facebook videos with your friends. You can also make the call more fun, by using live face filters, stickers, and more.
Instagram
Instagram may be new to the video calling game, but it gets the basics right and brings a lot of flair to the table. Like Facebook, you can use effects and face filters on a video call on Instagram. The call window shrinks in size when you go back to your feed, allowing you to browse the app while also staying on call. Apart from mutual followers, you can initiate a video call with anyone you have a DM thread with. If someone’s DM is sitting in the ‘Requests’ folder, they won’t be able to call you.
Discord
Intended primarily for online gaming communities, Discord has also found its way into other online niches, clubs, and communities, and has grown tremendously in size over the years. If you’re looking for a platform where you can watch a movie with a group of friends, Discord is the name that should come up first. The call stability on Discord is one of our favourite aspects of the entire experience. Since the platform is designed to host video calls with a large number of participants, you don’t need to worry about your call dropping out of the blue.
Google Meet
Google Meet is the ideal app for hosting virtual meetings, online classes, seminars, and more. Once a meeting is created, participants can join using the meeting code. Google Meet allows you to record a meeting, blur your background (or change it entirely), or apply a live face filter. Features like screen sharing and whiteboard are crucial when it comes to recreating the environment of a physical meeting or classroom online. The Google Meet app comes pre-installed on most Android phones as a part of the Google package. iPhone users will need to install it from the App Store and log in using their Google Account.
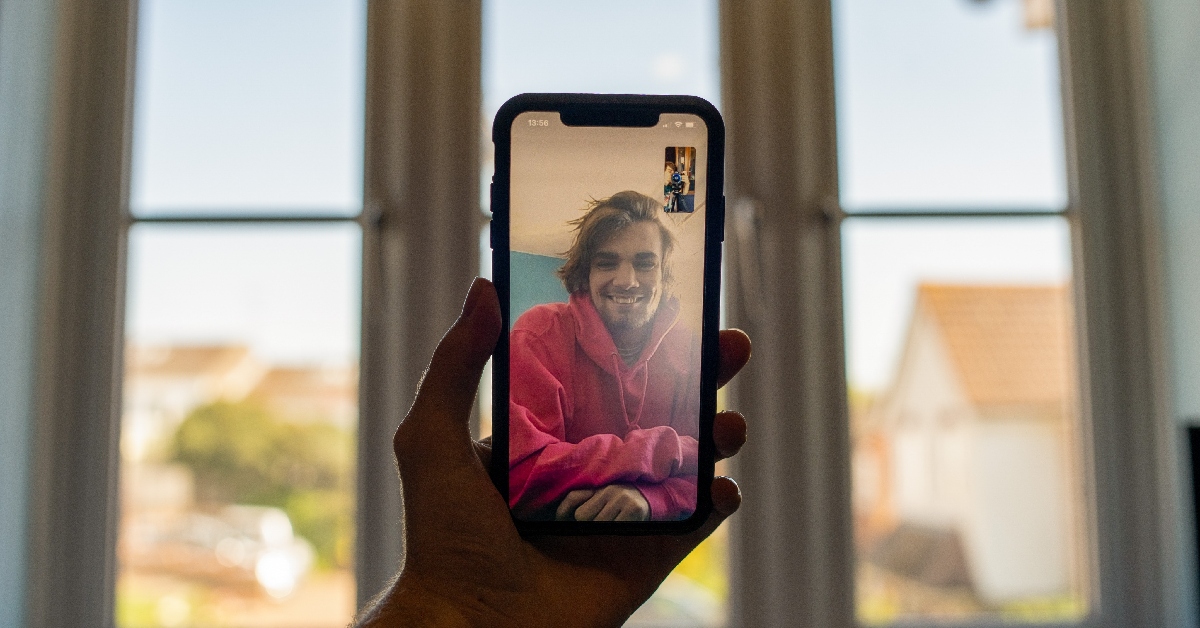
Facetime
Ending this list is a rather surprising entry because it may be the reason why you looked up this article in the first place. Facetime operates within Apple’s ecosystem, which means it isn’t available on the Google Play Store. You’d think that it is impossible for a video call to take place between an iPhone and an Android phone on Facetime, but that is not the case. Calls created using Facetime’s ‘call link’ allow Windows and Android users to join in as well, albeit with limited functions. Once an Android user clicks on a Facetime link, the call opens up on a webpage and they are put in a waiting room until the call creator lets them in. Once they’re in, they can perform basic functions like mute/unmute, camera on/off, camera toggle, and fullscreen toggle.
Frequently Asks Questions (FAQs)
Which is the best app to video chat between an iPhone and an Android phone?
WhatsApp, Facebook Messenger, Telegram, and Discord are all great apps to video chat between an iPhone and an Android phone. If you want to host an online meeting with several participants, apps like Zoom and Google Meet would be more up your alley.
Does Facetime work on Android phones?
No, there is no option to install and use Facetime on Android phones. However, Android users can join a call created with Facetime using a ‘call link’.
Which video-calling app should I use to watch Netflix with friends?
Apps like Discord, Scener, and Teleparty let you host Netflix viewing parties with your friends over a video call.
These are the 7 best free apps to video chat between an iPhone and an Android phone in 2024. While video calling is a free feature on all of these apps, some (like Discord and Telegram) may require a premium subscription to unlock higher-end features. If you manage a large server on Discord, getting a Nitro subscription may be a good idea. Read this article to know if it is the ideal choice for you.
Motorola Razr 40, and Motorola Razr 40 Ultra were launched in India in July.
The Razr 40 comes with a Snapdragon 7 Gen 1 SoC.
The Ultra Model is powered by Snapdragon 8+ Gen 1 SoC
If you are looking to buy a small and compact phone then now is the right time. Motorola has revised the pricing of its latest foldable phones in India. Motorola Razr 40, and Razr 40 Ultra were introduced in India in July this year. Now the clamshell foldable phones are getting a price cut of Rs 10,000. The Razr 40 has a small 1.5-inch cover screen compared to the Razr 40 Ultra’s 3.6-inch outer display. Both phones are powered by Qualcomm processors. In addition to this, they support up to 33W fast charging.
Motorola Razr 40, and Razr 40 Ultra have become more affordable. Both flip phones are now available at a discount. The company has announced a price reduction of Rs 10,000 on both devices.
After the price cut Motorola Razr 40 is now available with a price tag of Rs 49,99 for the 8GB RAM with 256GB storage. Conversely, the Motorola Razr 40 Ultra price in India is not set at Rs 79,999 for the 8GB RAM with 256GB storage.
Note that since their launch in July, there has been no price change. The Razr 40 was launched at Rs 59,999 while the Razr 40 Ultra was introduced with a price tag of Rs 89,999. Viva Magenta and Infinite Black are the colour options available for the Ultra model. Razr 40 comes in three colour options of Sage Green, Summer Lilac, and Vanilla Cream.
In addition to this, customers can also get an instant discount of Rs 7,000 on the Ultra Model and Rs 5,000 on the Razr 40 during the ongoing Moto Days sale which is live till December 24.
Motorola Razr 40 and Motorola Razr 40 Ultra Specifications
The Motorola Razr 40 and Motorola Razr 40 Ultra are powered by Snapdragon 7 Gen 1 and Snapdragon 8+ Gen 1 processors respectively.
The Motorola Razr 40 features a 64-megapixel primary sensor and a 12-megapixel ultra wide-angle camera. Whereas Razr 40 Ultra includes a 13-megapixel secondary ultra-wide-angle camera and a 12-megapixel primary sensor. However both the devices sport a 32-megapixel front-facing camera for selfies.
There is a 3,800mAh and a 4,200mAh battery on the Motorola Razr 40 and Motorola Razr 40 Ultra, respectively.
Garena Free Fire is a battle royale game with regular awards and tournaments to keep players interested. If you play Garena Free Fire, you should be aware of the redeem codes that are released on a daily basis. However, because the battle royale game is banned in India, players from other countries can use the Free Fire Redeem codes daily. If you’re unfamiliar with the Garena Free Fire redeem codes or don’t know how to get them, we’ve put together a step-by-step guide to help you redeem them. Check out Garena Free Fire Redeem Codes for 20 December 2023.
The Free Fire redeem codes are a great way to get free stuff. These are 12-digit codes that contain alphabets and numbers, as well as an expiration date and time. Because the Garena FF redeem codes cannot be used more than once, you should hurry to the redemption page to claim your free reward before someone else does. To get a free reward, all you have to do is go to reward.ff.garena.com/en, which is the official redemption page. Also, keep an eye on this space for daily updates on Garena Free Fire redemption codes and rewards.
Garena Free Fire Redeem Codes Today 20 December 2023
FDYGTH6R567UE56K
FUKTY7UJIE56RYHI
FUTYJT51780178F2
F6T78KJHGSERFF87
FYHJTY7UKJT678U4
FKY89OLKJFH56GRG
FBVFTYJHR67UY4IT
F6TYJHUT67YJU56U
FVYHFT6HYJT67LYP
How to Get Free Fire Redeem Codes for Garena on 20 December 2023?
Netflix’s tremendous success over the years is not only a result of the diverse range of content it offers but also its availability across platforms and regions. You can log into multiple devices using your Netflix account and even enjoy watching content on the go with the streaming giant’s mobile apps. One strange exclusion to this list is Apple’s MacBook range. While you can watch Netflix on your MacBook, you are limited to the web version of the platform. If you’re hell-bent on getting the app, here are the best 2 ways to download and install Netflix on your MacBook.
Installing Netflix on MacBook: What are your options?
If you’re reading this article, you’ve probably realised that there is no official way to download the Netflix app for MacBook. The reason behind this bizarre decision remains a mystery. Many people believe that this is due to the streaming giant’s direct rivalry with Apple TV. Earlier, Netflix killed support for AirPlay, lending more credence to this theory. Netflix still maintains this was done due to ‘technical limitations’.
There are still some interesting caveats that you can take advantage of to get Netflix on your Apple laptop. If you own a MacBook that runs macOS Big Sur 11.2.3 or earlier, you can sideload the iOS version of Netflix from the App Store. The only catch is that this method may not work for long, since the app developers are constantly phasing out old versions of apps.
Intel-based MacBook users also have the option of installing Netflix from the Microsoft Store after installing the Windows OS using Boot Camp Assistant. But this method may seem excessive to folks who don’t want to install an entire OS just for one app. If you’re looking for simple and routine methods to install Netflix on your MacBook, keep reading along.
Install the Netflix web app using Google Chrome
Since you can’t install the official Netflix app on your MacBook, your next best option is to create an app icon for its website on your laptop’s home screen. Clicking on this shortcut will take you to the website. Here’s how you can do it.
Step 1:Launch the Chrome browser on your MacBook and go to the official Netflix website.
Step 2: Hit the ellipses at the top right corner of the screen.
Step 3: Take your cursor to More Tools and select Create Shortcut.
Step 4: Give the web app a name and hit Create.
Step 5: Go back to the home screen. You will find the icon for the web app on the dock.
Install the Netflix web app using Microsoft Edge
Step 1:Launch Microsoft Edge on your MacBook and go to the official Netflix website.
Step 2: Click on the ellipses at the top right corner of the screen.
Step 3: Move the cursor to Apps and click on Install This Site as an App.
Step 4: Give the web app a name and click on Create.
The web app can accessed from the dock on the home screen.
Use PlayCover to run Netflix on your MacBook
PlayCover is a brilliant open-source app to run iOS apps and games on your MacBook. Here’s how you can use it to install Netflix.
Step 2: Move the downloaded file to the Applications folder and install it on your MacBook.
Step 3: Download the decrypted IPA version of Netflix using ARM Converter or Decrypt.
Step 4:Launch PlayCover and click on Import IPA.
Step 5:Select the file you just downloaded.
Step 6: PlayCover will install Netflix on your MacBook.
Frequently Asked Questions (FAQs)
Is there a way to download and install Netflix on my MacBook?
While there is no official way to download the Netflix app on a MacBook, you can install a web app (a home screen shortcut to the website) for the OTT using Google Chrome and Microsoft Edge.
Can I install the iOS version of the Netflix app on my MacBook?
MacBooks running macOS Big Sur 11.2.3 or older can install the iOS Netflix app from the App Store. You can also use PlayCover to install the smartphone app for Netflix on your laptop.
Can I use AirPlay to watch Netflix on my MacBook?
Earlier this year, Netflix pulled its support for AirPlay. This means you cannot use it to mirror the Netflix content from your iPhone or iPad to your TV.
These are the top 3 ways to download and install the Netflix app on your MacBook. Since there is virtually no difference between Netflix’s website and computer app, you won’t be missing out on anything by creating its web app on your Mac. If you are familiar with any other methods of running Netflix on your MacBook, let us know in the comments!
A lot of smartphones are going to be released in India with the upcoming New Year, but first, Amazon has numerous deals for its customers to take advantage of. It is currently offering great deals and offers on smartphones across various brands like Apple, Samsung, Xiaomi, iQoo OnePlus, and more. Many handsets are currently listed at a reduced price. We have already shared a listicle of discounted smartphones that are available between Rs 25,000 and 50,000 price point. Now we have made a list of discounted smartphones priced between Rs 11000 and Rs 20000.
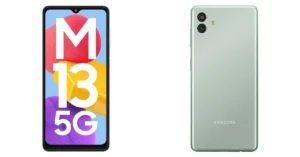
Samsung Galaxy M13 5G- Rs 11,990
The Samsung Galaxy M13 5G has a 6.5-inch HD+ display with a refresh rate of 90Hz, Gorilla Glass 3 protection and a 400 nit brightness. The device runs on One UI 4 based on Android 12.0 and is powered by a MediaTek Dimensity 700 SoC. The Samsung Galaxy M13 5G has a dual rear camera arrangement with a 50-megapixel primary sensor and a 2-megapixel secondary sensor for pictures and videos. For taking selfies and making video calls, there is a 5-megapixel front camera. The smartphone has a 5,000mAh battery that can be charged at 15W.
Samsung Galaxy M14 5G- Rs 12,490
The Samsung Galaxy M14 5G is shipped with One UI 5 based on top of Android 13 out of the box. Under the hood, there is an Exynos 1330 octa-core SoC paired with Mali G68 GPU for graphics. The phone will come in two different configurations: 4GB RAM with 128GB storage and 6GB RAM with a 128GB storage model. The features a 6.6-inch Full HD+ PLS LCD display with 2408 x 1080 pixels of resolution. Samsung Galaxy M14 5G sports a triple rear camera setup that includes a 50-megapixel main sensor with an f/1.8 aperture. It also consists of a 2-megapixel depth sensor and a 2-megapixel macro sensor. For taking selfies and video calls the handset comes with a 13-megapixel front-facing camera.
The smartphone houses a 6000mAh battery with 25W fast charging support.
Redmi 12 5G- Rs 13,499
The Redmi 12 5G has a 6.79-inch full-HD+ display. Under its hood, there is a Qualcomm Snapdragon 4 Gen 2 chipset with up to 8GB of RAM and 256GB of onboard storage. It operates on MIUI 14 with Android 13 out of the box. The mobile phone sports a dual rear camera setup consisting of a 50-megapixel primary and a 2-megapixel macro lens. It also sports an 8-megapixel selfies sensor. Moreover, the 5G phone comes with a 5,000mAh battery with 18W charging support.
Samsung Galaxy M34 5G- Rs 16,499
The Samsung Galaxy M34 comes with a Full HD+ 6.5-inch display with a refresh rate of 120 Hz. The device runs OneUI 5.1, an Android 13-based operating system with Exynos 1280 SoC and a Mali-G68 MP4 GPU, up to 8GB of RAM, and 128GB of internal storage. The triple rear cameras on the Samsung Galaxy M34 include a 50-megapixel primary sensor with optical image stabilisation (OIS). A 2-megapixel macro sensor and an 8-megapixel ultra-wide angle camera are also included. A 13-megapixel sensor is located at the front of the device for selfies and video calls.
A 6,000mAh battery powers the device and is said to last up to two days on a single charge.
OnePlus Nord CE 3 Lite 5G- Rs 19,999
The OnePlus Nord CE 3 Lite 5G comes with a 6.72-inch full-HD+ LCD display with 1,080×2,400 pixels of resolution. The screen has a dynamic refresh rate of 120Hz and 240Hz touch sample rate. It has a peak brightness of 680 nits, a 91.4 percent screen-to-body ratio, a 20:9 aspect ratio, and a 391ppi pixel density. In addition to this, the screen is protected with Corning Gorilla Glass Victus.
The phone runs on OxygenOS 13.1 on top of Android 13 out of the box. OnePlus Nord CE 3 Lite 5G is powered by an octa-core Snapdragon 695 SoC with Adreno 619 GPU for graphics. For the photos and videos, the Nord CE 3 Lite 5G features a triple rear camera setup that includes a 108-megapixel Samsung HM6 sensor with an f/1.75 aperture and EIS support. It includes a 2-megapixel macro lens and another 2-megapixel depth sensor. There is a 16-megapixel front-facing camera for selfies. The phone packs a 5,000mAh battery that supports 67W SuperVOOC fast charging.
OnePlus’s ‘Smooth Beyond Belief’ launch event will be held at Pragati Maidan on January 23.
The company will launch OnePlus 12 and OnePlus 12R at the event.
OnePlus is all geared out for its upcoming launch event in India. The company has scheduled the launch of its flagship OnePlus 12 Series in the country on January 23. At the same event, the firm also confirmed introducing the OnePlus 12R for the first time. In a new development, the company announced the ‘Smooth Beyond Belief’ launch event ticket sale schedule today.
The OnePlus 12 Series will debut in India on January 23. The lineup will include two devices- the OnePlus 12 and OnePlus 12R. The company has today revealed that its upcoming launch event namely ‘Smooth Beyond Belief’ will take place at Pragati Maidan, New Delhi. As per OnePlus, this will “give its Indian community an exclusive opportunity to be among the first individuals globally, to experience the latest line of flagship products.”
Besides presenting the series, tech enthusiasts will have the exclusive opportunity to experience both the OnePlus 12 and the OnePlus 12R.
How to buy tickets for the OnePlus 12 Series launch event?
OnePlus 12 Series launch event ‘Smooth Beyond Belief’ will launch on January 23 at Pragati Maidan, New Delhi. The gates will open at 5.50 PM IST. Interested ones can watch and experience the tech show live as for the first time it will be open for its fans. The community tickets for the ‘Smooth Beyond Belief’ launch event will commence on 3rd January 2024. Those willing to attend the event can get the event tickets via PayTM Insider and OnePlus.in. Moreover, RCC members can purchase the tickets at 50% off on OnePlus.in.
The information is scarce but OnePlus will reveal more information regarding ticket pricing and categories later on.
What to expect at the OnePlus’s ‘Smooth Beyond Belief’ launch event?
As per the company, the ‘Smooth Beyond Belief’ event will showcase the “central tenet of all OnePlus technology – fast and smooth, focusing on an ensemble of OnePlus flagship products that elevate user experience.”
The attendees will be the first to experience the OnePlus 12 series at the experience zones at the venue.
The 2024 lineup of LG soundbars comes with support for Dolby Atmos and DTS:X technology.
The S95TR boasts five up-firing channels.
It has the industry’s first centre, up-firing speaker.
Electronics giant LG has introduced its 2024 lineup of Soundbars. The company has brought three new soundbar models: S95TR, SG10TY and S70TY. The audio devices are claimed to provide an improved theatre-like experience through immersive sound, versatile LG TV integration and enhanced features. The soundbars support Dolby Atmos, driven by the advanced technology of DTS: X.
While announcing the 2024 series of LG soundbars Lee Jeong-Seok, head of LG Home Entertainment Company’s audio business said, “LG has always been committed to delivering unmatched audio-visual experiences with superior quality, all to bring a better life to our valued customers. We remain dedicated to providing immersive home entertainment experiences through LG’s premium soundbar products, ensuring our customers enjoy the very best with further enhanced surround sound optimised for LG OLED TVs and LG QNED TVs.”
LG Soundbar S95TR is the company’s flagship model consisting of 15 channels to provide an amazing 810W of output with a surround sound experience. It has five up-firing channels, including the industry’s first centre up-firing speaker that produces 3D audio with improved clarity and a larger soundstage.
The angle of the centre up-firing speaker guarantees a flawless audio-visual experience with exact elevation to the level of the TV screen. The LG Soundbar S95TR features improved tweeters for clear and precise audio in addition to a passive radiator to enhance bass tones and better overall balance between the soundbar and subwoofer.
The LG soundbar SG10TY can be paired with LG’s premium OLED TVs with WOW Orchestra, WOW Interface, and WOWCAST, which enhances the viewing experience. WOWCAST allows wireless home entertainment without any visible wires between the screen and the soundbar when paired with an LG premium OLED TV and the SG10TY model. This allows users to enjoy their favourite songs on music streaming services like Tidal Connect and Spotify Connect.
Additionally, LG will release the S70TY soundbar model ideal for LG QNED TVs. It has a compact design and has the industry’s first centre up-firing speaker that is claimed to provide crystal clear audio. The angled design ensures that the audio and visuals are in harmony with the level of the TV screen. The soundbar comes with a dedicated bracket that allows users to arrange the soundbar right underneath the QNED TV. With the bracket, the S70TY soundbar can be wall-mounted at different heights or locations.
Earlier this year, Snapchat introduced its AI chatbot for Snapchat+ subscribers. The chatbot was later rolled out for non-subscribers as well. The overall reception to My AI has been quite lukewarm, as many Snapchat users don’t find it to be quite helpful. The allegations of accessing users’ current location, didn’t help My AI’s popularity either. The chatbot is an average tool to kill some time at best and a potential threat to your privacy at worst. Did we mention that it can view all your Snapchat Stories by default? If you’re dont with My AI, here are the top 5 ways to remove it on Snapchat.
Simply put, My AI cannot be deleted from Snapchat. At best, Snapchat+ subscribers can unpin it from the ‘Chats’ section of the app or remove their conversation with the chatbot altogether. If the ‘out of sight, out of mind’ approach doesn’t work for you, you can clear the data from your past conversations with the AI as well.
Regular Snapchat users will be disappointed to know that they cannot unpin or remove My AI from the ‘Chat’ tab. The chatbot will be the first thing you see when you swipe right from the camera page. Another alarming thing about My AI is that it can view your Snapchat Story. If you’re very particular about your data, this may bother you. Luckily, My AI’s access to your story can be removed from ‘Privacy Settings’ on its profile page. You don’t need to be a Snapchat+ subscriber to do this. Non-subscribers can also clear their past conversational data with My AI. However, if you’ve @mentioned My AI in other conversations, you will need to delete them manually.
If you want to keep the chatbot around but don’t want it as the first conversation in your chat tab, follow these steps to unpin it.
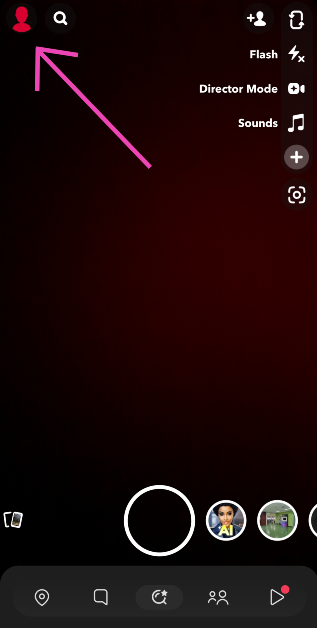
Step 1: Launch the Snapchat app on your device and tap your Bitmoji at the top left corner of the screen.
Step 2: Hit the Snapchat+ banner on your profile.
Step 3: Turn off the toggle switch next to My AI. The AI chatbot will be unpinned from your chat tab.
Unpin My AI using the popup menu
Step 1:Launch the Snapchat app on your device and swipe right to access the chat page.
Step 2:Long press the My AI chat.
Step 3: Hit Chat Settings and select Unpin Conversation.
Not a Snapchat+ subscriber? Clear your My AI data
If you’re not a Snapchat+ subscriber, you can still clear the data from your past conversations with My AI. Here’s how.
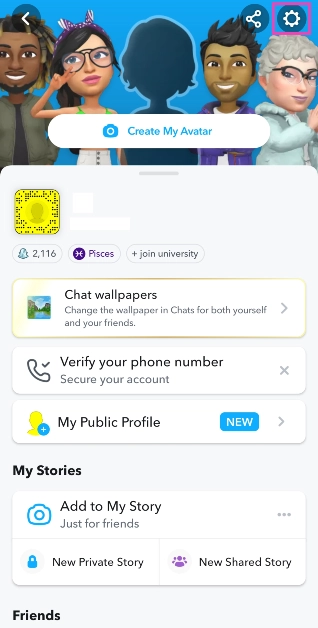
Step 1:Launch the Snapchat app on your phone and tap your Bitmoji at the top left corner of the screen.
Step 2: Hit the gear icon at the top right corner of the screen to access Settings.
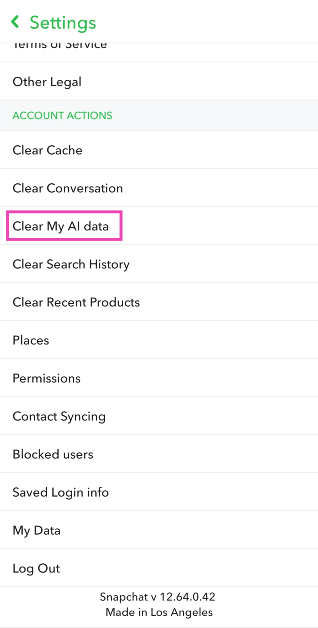
Step 3: Scroll down and select Clear My AI Data.
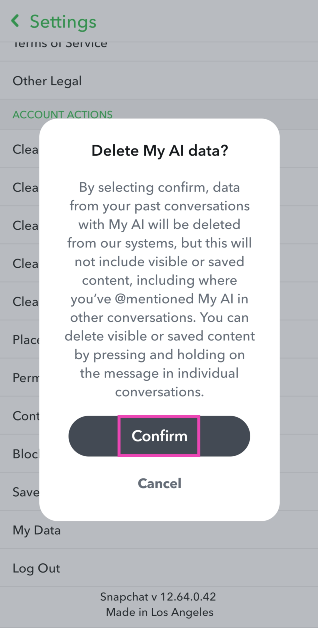
Step 4:Confirm your selection in the popup box.
Frequently Asked Questions (FAQs)
How do I remove My AI on Snapchat?
My AI cannot be permanently deleted on Snapchat. However, if you’re a Snapchat+ subscriber, you can remove it from the chat tab by long-pressing it and selecting Chat Settings>Clear from Chat Feed.
How do I remove My AI from Snapchat if I don’t have a Snapchat+ subscription?
If you’re not a Snapchat+ subscriber, you can clear your conversational data with My AI by going to Settings>Clear My AI Data.
Is Snapchat’s My AI bot a risk to my privacy?
Since it cannot be removed from your account, My AI is ever-present on your profile. Your conversations with the chatbot are retained and used to suggest personalised ads, which many see as a risk to privacy.
These are the top 5 ways to remove My AI on Snapchat. If you want to be sure that the chatbot doesn’t have access to your location, you can remove the ‘location’ permission from Snapchat altogether. Go to Settings>Apps>Snapchat and tap on the app’s permission list. If you see ‘Location’ in the list, tap on it to rescind it. Snapchat claims that the chatbot does not collect new location data. If the app doesn’t have access to your location, My AI will not be able to give you location-based results.
WhatsApp offers a bunch of customisation options for status updates. You can change the background colour and text font, and even add stickers, emojis, and GIFs to your updates. Oftentimes, WhatsApp users wonder whether a blank status can be uploaded to their profiles. While there is no native way to go about it, there are a couple of tricks that can help you accomplish this task. Let’s take a look at the top 5 ways to set a blank status or ‘About’ section on WhatsApp.
Why you should set a blank status or ‘About’ on WhatsApp
On the surface, setting a blank status update on WhatsApp may seem meaningless, but it has some very niche uses. You can use the blank status update as a page breaker for multiple statuses. If that isn’t of much use to you, you can use it to prank your friends. Posting a blank update is fairly easy and shouldn’t take much time.
A blank ‘About’ section is something a lot of WhatsApp users often enquire about. Initially, the ‘About’ section used to be your WhatsApp Status before the messaging platform introduced Instagram-like Stories. Your ‘About’ is a quick way of letting people know what you’re up to. If you’re in a bad network zone and unable to receive WhatsApp messages right away, you can set an appropriate update for it.
Strangely, there is no way to leave the ‘About’ section blank. You can set its visibility to ‘Nobody’, but the update will be visible to you all the time. That is unless you use the trick we’ve mentioned later in this article!
Set a Blank Status on WhatsApp
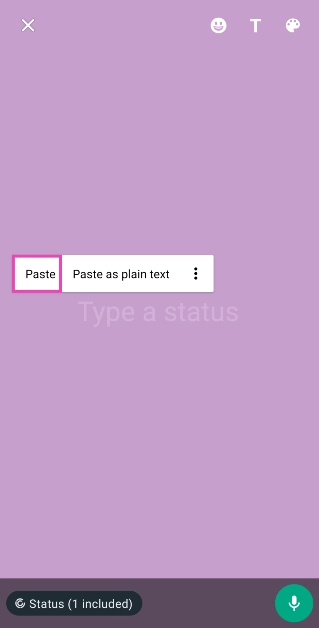
Step 1: Search Google for the empty character. Copy it to your clipboard. Or simply copy it from here ‘⠀’. Make sure you don’t copy the quotes.
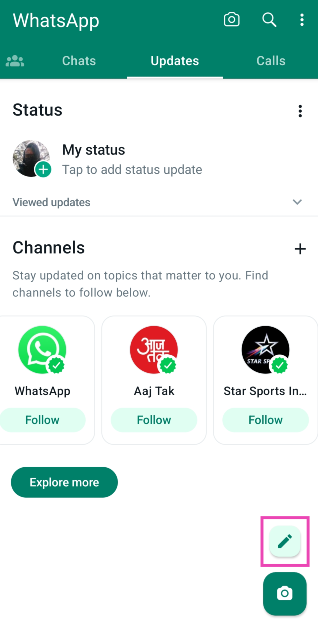
Step 2: Launch WhatsApp on your device and switch to the Updates tab.
Step 3: Tap on the pencil icon at the bottom right corner of the screen.
Step 4: Select a background colour by tapping the paint board icon at the top right corner of the screen.
Step 5:Paste the empty character from your clipboard into the text field.
Step 6: Hit the Send icon.
Step 7: The blank status will be uploaded to your WhatsApp profile.
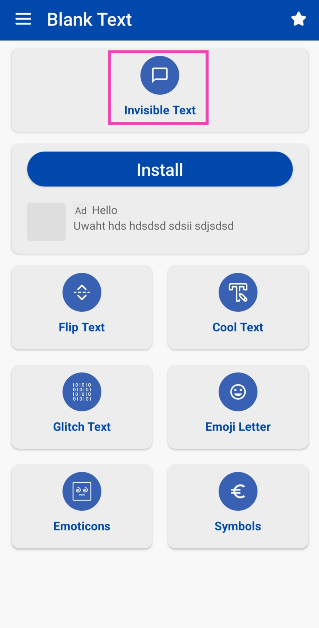
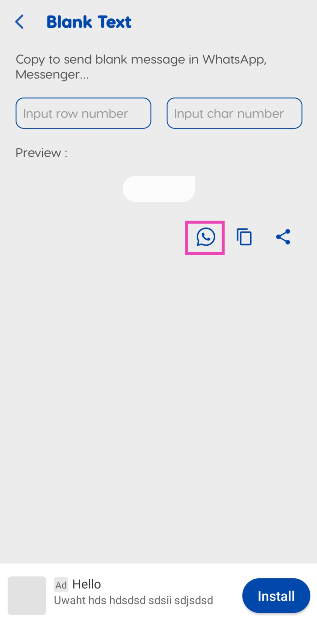
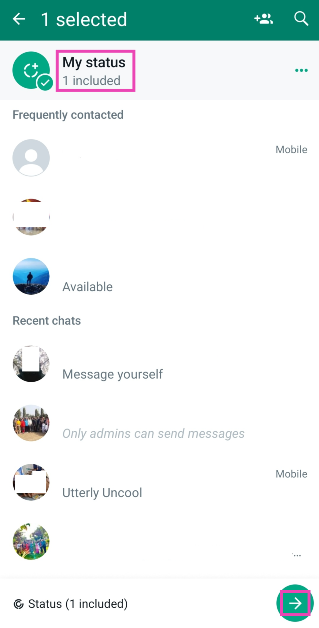
Use a third-party app to post a blank status update on WhatsApp
Step 4: Select My Status and hit the Arrow key at the bottom right corner of the screen.
Step 5: Tap the Send icon at the bottom right corner of the screen to post a blank status.
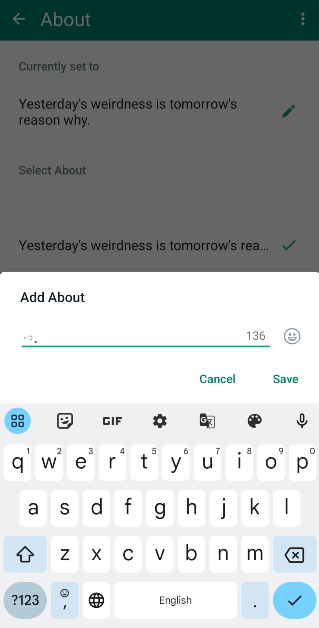
Set a Blank ‘About’ section on WhatsApp
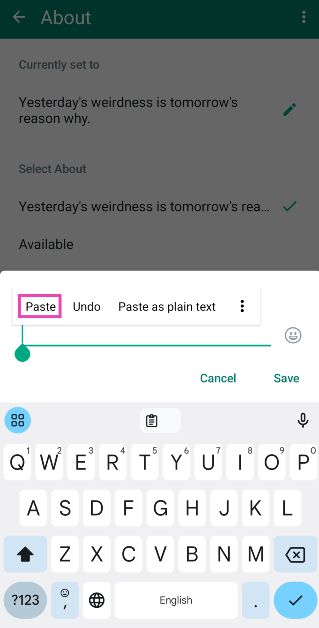
Step 1:Copy the blank character to your clipboard (⠀).
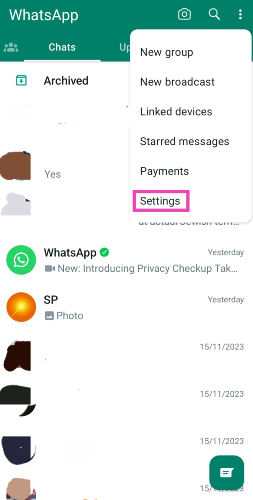
Step 2: Launch WhatsApp on your phone. Hit the ellipses at the top right corner of the screen and select Settings.
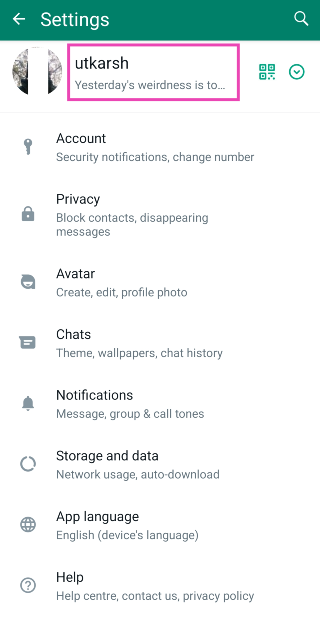
Step 3: Tap on your profile name at the top of the screen.
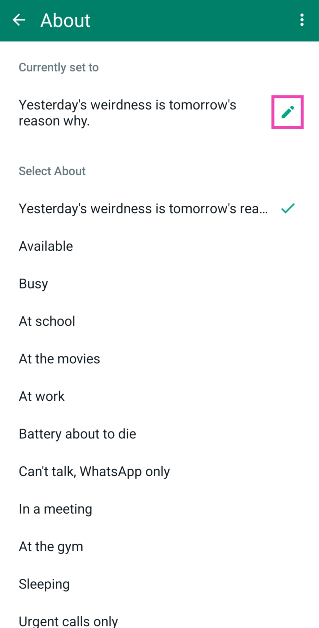
Step 4: Hit the pencil icon next to About.
Step 5: Hit the pencil icon again.
Step 6:Paste the blank character and hit Save.
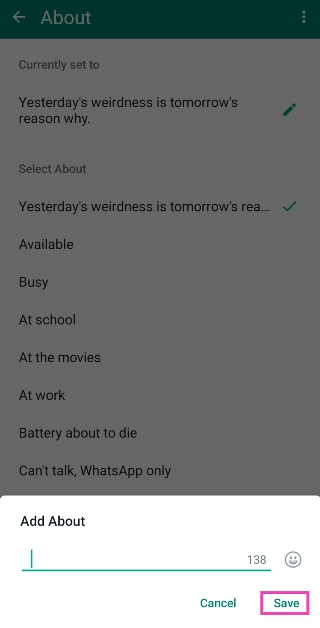
Use the ⇨ ຸ symbols to post a blank ‘About’ on WhatsApp
Step 1: Launch WhatsApp on your phone. Hit the ellipses at the top right corner of the screen and select Settings.
Step 2: Tap on your profile name at the top of the screen.
Step 3: Hit the pencil icon next to About.
Step 4: Hit the pencil icon again.
Step 5: Paste the ⇨ ຸ symbols on the text field.
Step 6: Delete the arrow symbol and hit Save.
Your WhatsApp ‘About’ will be set to blank.
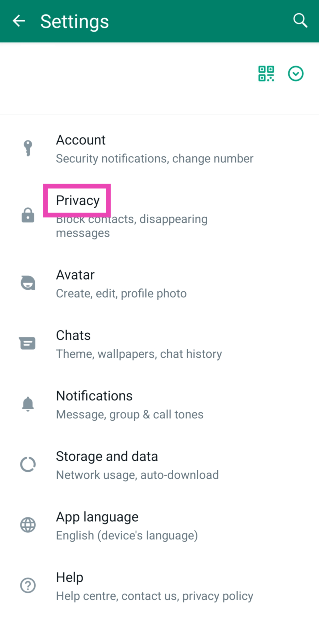
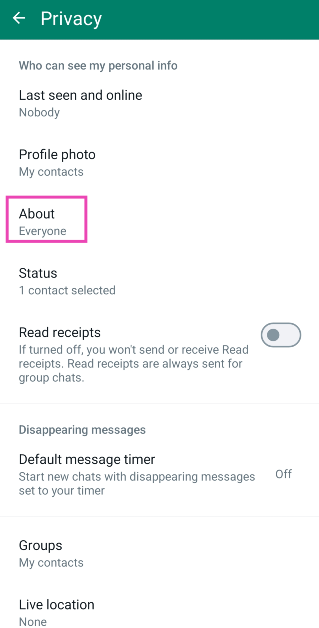
Set a Blank ‘About’ section by changing the privacy settings
Step 1: Launch WhatsApp on your phone. Hit the ellipses at the top right corner of the screen and select Settings.
Step 2: Tap on Privacy.
Step 3: Select About.
Step 4: Tap on Nobody.
Now that nobody can see your WhatsApp ‘About’, it will appear as a blank field for everyone.
Frequently Asked Questions (FAQs)
How do I send a blank message on WhatsApp?
Open your conversation with the person, paste ⇨ ຸ in the message box, erase the arrow symbol, and hit Send. A blank message will be sent to the recipient.
How do I set a blank status on WhatsApp?
To set a blank status on WhatsApp, copy the empty space character to your clipboard (⠀), paste it into the new status page, and hit Send.
How do I keep my WhatsApp About section empty?
You can either post the empty space character in the About section or go to Settings>Privacy>About and select Nobody to make sure it isn’t visible to anyone.
These are the top 5 ways to set a blank status or ‘About’ section on WhatsApp. After posting the blank status update on WhatsApp, you can also forward it to Facebook. You can find that option after hitting the ellipses at the top right corner of the status update. To send a blank message on WhatsApp, you will need to use the ⇨ ຸ characters. Once you’ve pasted them in the text box, delete the arrow and hit Send. The empty space character does not work for messages. If you know any other way to put up a blank status, let us know in the comments!
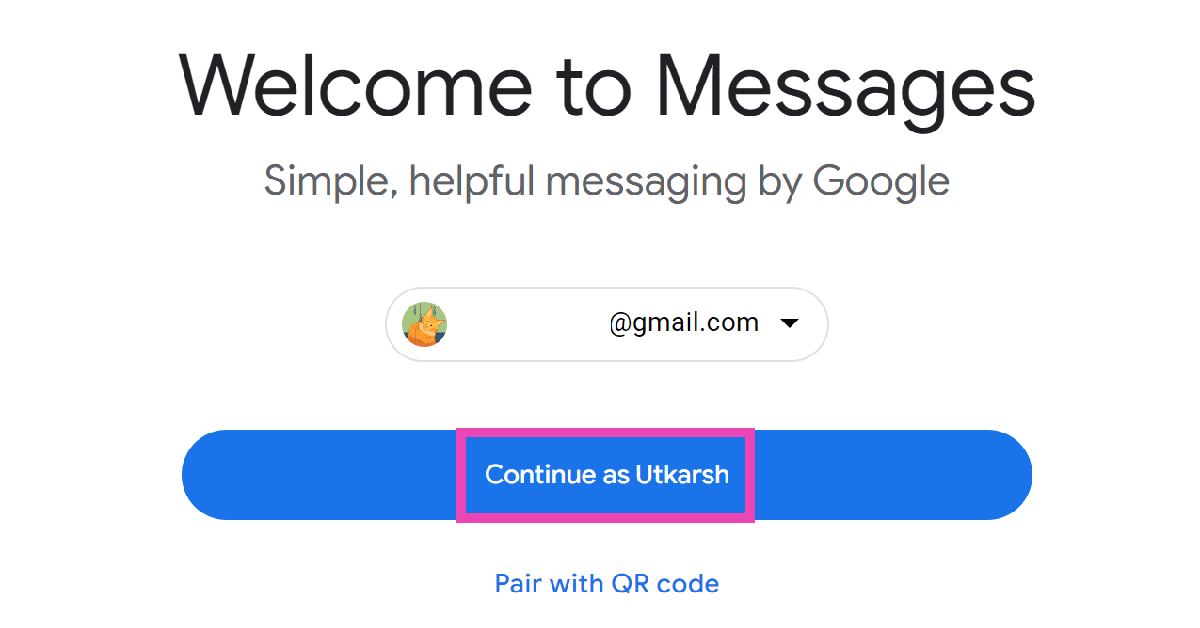
Over the last few weeks, Google Messages has received some nifty updates. Most of these updates are a part of Messages’ 1 billion RCS users celebrations. However, there’s one new feature that Google recently added to its messaging app which will appeal to a lot of users. You can now access your Google Messages account on other devices, simply by logging in using your Google Account. Since your Google Account is now linked to your Messages app, this process does not require a QR Code (although the option is still available).
For any messaging app to survive in modern times, multi-device pairing is a non-negotiable feature. While Google Messages certainly ticks that box, there are a couple of things that still need a bit of improvement. But before we get there, it’d only be fair to mention what Google Messages gets right.
With the ability to link your Google Account to the Messages app, the process of pairing other devices has gotten a lot smoother. You don’t need to scan a QR code to access your texts anymore. Simply log in using your Google Account on Messages’ web portal, select the emoji that you see on your smartphone and you’re good to go!
This year, WhatsApp upped its device pairing game as well, allowing users to link a maximum of 6 devices to their account at one time. While you can link multiple devices to Google Messages, you can only use it on one computer at any given time. For the app’s web portal to work, you need your smartphone to be active. Messages for Web does not have RCS support yet. Standard carrier charges for SMS will still apply when you send a text using Messages for Web.
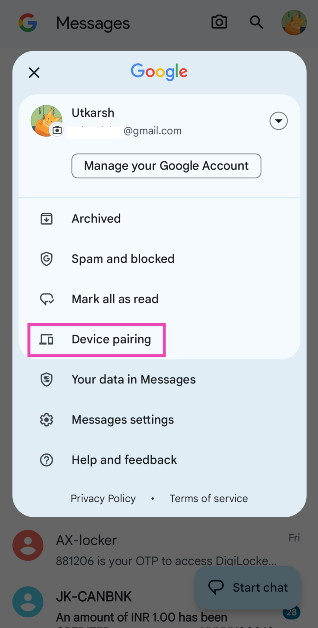
Access Google Messages on other devices
Step 1:Launch the Google Messages app on your phone.
Step 2: Hit the profile icon at the top right corner of the screen and select Device Pairing.
This is how you can access and run Google Messages on your PC and other devices using a Google Account. Check out this article, to learn how you create and send Photomojis on the Messages app. If you use WhatsApp as your primary messaging app, you can link up to 6 devices with your account. Read this article to know how you can go about it. Apart from multi-device connectivity, WhatsApp also allows users to link multiple accounts to one device.
The Amazon year-end deals are currently live on the platform.
Customers can buy smartphones from popular brands like Apple and OnePlus.
The smartphone deals are for a limited period.
As the year is about to end, Amazon has brought some amazing smartphone deals for its customers. It is the right time to purchase a device for yourself. If you have been planning to purchase a new smartphone, then Amazon has a slew of offers on models from different smartphone brands. We have compiled a list of smartphones that are discounted on Amazon between Rs 25,000 and Rs 53,999. Check out the list over here:
Note that this is likely to be a limited offer so we don’t know how long these deals will be available on the e-commerce platform, so we recommend you grab the deals now.
Oneplus Nord CE 3 5G – Rs 24,999
OnePlus Nord CE 3 5G was launched in India in July this year. But now the device is on sale at Rs 24,999 on Amazon. The OnePlus Nord CE 3 5G (Review)features a 6.7-inch fluid AMOLED display with 2,412 x 1,080 pixels resolution. The screen has a refresh rate of 120Hz, a P3 colour gamut, 10-bit Colour Depth and HDR10+. The phone is powered by a Qualcomm Snapdragon 782G SoC with Adreno 642L GPU.
It operates on OxygenOS 13.1 on top of Android 13. For the photos and videos, the phone has a triple rear camera setup that includes a 50MP Sony IMX890 primary sensor, an 8MP ultra-wide angle lens and a 2MP macro sensor. There is a 16MP front-facing camera for selfies and video calling.
In addition to this, the smartphone boasts a 5,000mAh battery with 80W SuperVOOC charging support.
iQoo Z7 Pro 5G- Rs 23,999
iQoo Z7 Pro 5G is currently available for Rs 23,999 on Amazon. iQoo Z7 Pro 5G comes with a 6.78-inch full-HD+ AMOLED display with 2400 x 1080 pixels of resolution and supports a 120Hz refresh rate. The handset runs on FuntouchOS 13 with Android 13. Under the hood, there is an octa-core 4nm MediaTek Dimensity 7200 SoC with Mali-G610 MC4 GPU. iQoo Z7 Pro 5G features a dual rear camera setup that includes a 64-megapixel Samsung GW3 primary sensor, a 2-megapixel depth sensor and a 16-megapixel front-facing sensor for taking selfies and video calling. The 4,600mAh battery in the iQoo Z7 Pro (Review)supports 66W wired fast charging.
iQoo Neo 7 Pro 5G- Rs 32,999
The iQoo Neo 7 Pro 5G is now listed at Rs 32,999 on Amazon. The smartphone has a 6.78-inch full-HD+ AMOLED screen with 1,080×2,400 pixels of resolution and supports a 120Hz refresh rate and a 300Hz touch sampling rate. It is powered by a Snapdragon 8+ Gen 1 chip and operates on Funtouch OS 13 on top of Android 13. The handset has a triple rear camera setup that includes a 50-megapixel primary Samsung GN5 sensor, an 8-megapixel ultra-wide-angle camera and a 2-megapixel macro camera. The iQoo Neo 7 Pro 5G (Review) further includes a 16-megapixel front-facing camera with an f/2.45 aperture for taking selfies and video calling. The iQoo Neo 7 Pro boasts a 5,000mAh battery with 120W Flash Charge support.
OnePlus 11R 5G- Rs 39,999
OnePlus 11R 5G can now be bought for Rs 39,999 on Amazon. This gaming-focused smartphone is powered by the Snapdragon 8+ Gen 1 5G chipset. The device features a 6.74-inch Full-HD+ curved AMOLED display that is notable for its 2772 x 1240 pixel resolution. The dynamic adaptive refresh rate of the screen varies between 40Hz and 120Hz.
The OnePlus 11R (Review)has triple back cameras, one of which has a 50MP Sony IMX890 primary sensor, a 4 cm macro camera with a 120-degree ultra-wide lens and an 8 MP ultra wide-angle sensor. The 16MP front camera is located in a notch at the top of the display. The OnePlus 11R’s 5,000mAh battery supports 100W SUPERVOOC flash rapid charging.
iPhone 13- Rs 52,999
The iPhone 13 was launched in India two years ago and is now up for sale at just Rs 52,999. iPhone 13 features a 6.1-inch Super Retina XDR display. The device is powered by the company’s A15 Bionic chipset. The iPhone 13 has a diagonal rear camera design consisting of a 12-megapixel dual rear camera setup with 4K Dolby Vision HDR support. In addition to this, there is a 12-megapixel TrueDepth selfie camera on the front. The handset is IP68-rated.
Garena Free Fire is a battle royale game with regular awards and tournaments to keep players interested. If you play Garena Free Fire, you should be aware of the redeem codes that are released on a daily basis. However, because the battle royale game is banned in India, players from other countries can use the Free Fire Redeem codes daily. If you’re unfamiliar with the Garena Free Fire redeem codes or don’t know how to get them, we’ve put together a step-by-step guide to help you redeem them. Check out Garena Free Fire Redeem Codes for 19 December 2023.
The Free Fire redeem codes are a great way to get free stuff. These are 12-digit codes that contain alphabets and numbers, as well as an expiration date and time. Because the Garena FF redeem codes cannot be used more than once, you should hurry to the redemption page to claim your free reward before someone else does. To get a free reward, all you have to do is go to reward.ff.garena.com/en, which is the official redemption page. Also, keep an eye on this space for daily updates on Garena Free Fire redemption codes and rewards.
Garena Free Fire Redeem Codes Today 19 December 2023
FBH3JUF7Y6T5RFD
FSHHEDFBUWYE4T6
FOYIH8U7YTG8DBE
FKIY8OIR76UJT6H
FNDMEO4956UYHTG
FNMKOID8S7W6T3F
FG4HN5KT6LYU0PO
FLKDLO98UAY64QE
FFI8UYHGBNRG8UY
FTGFSBEN45K6YU8
FUJHYT6G7UJ6TUB
FTCHGFRT6YJ675B
FYHVNDMEKL5O6Y7
FINJUJT67HYH644
FtFTGVBHNJ4FRUGT
FHYJKYI9IERJ56Y
FTNMKVI87SYTGE3
F45NJ6YO9IO09UK
FIA765QRED2CFVG
FDTHYR56U6UY44Y
FGBDENKIR8GU7YH
FNDMRKL5O69IUJH
FTHBFT6UHSENJR5
FYTJT67UKJTU8IN
How to Get Free Fire Redeem Codes for Garena on 19 December 2023?
Vivo’s sub-brand iQoo recently launched iQoo 12 in India. It is the first smartphone brand to adopt and bring Qualcomm’s Snapdragon 8 Gen 3 chipset-powered device to the country. The new smartphone is more advanced as it has received a major upgrade in design, internals and cameras. And to know how much better this year’s phone is compared to last year’s smartphone, we have compared iQoo 12 and iQoo 11 side by side. If you are planning to buy a feature-packed phone which also promises good gaming performance then you must read this comparison.
iQoo 12: Triple rear camera setup that includes a 1/1.3-inch 50-megapixel primary sensor (f/1.68 aperture), a 64-megapixel periscope telephoto (f/2.57 aperture and 100X digital zoom) and a 50-megapixel ultra wide-angle sensor (f/2.0 aperture)
iQoo 11: Triple rear camera set up includes 50MP Samsung GN5 primary sensor, a 13MP portrait sensor, and an 8MP ultra-wide sensor
The iQOO 12 has undergone a significant design update, featuring flat sides and a new camera module. The device is now slimmer and lighter than its predecessor. Both the gaming smartphones have a 6.78-inch AMOLED display the only difference is the make the new gen. iQoo 12 comes with a 1.5K AMOLED display whereas the iQoo 11 adopts a Samsung E6 AMOLED display. However, both screen supports a refresh rate of 144Hz. The device is powered by a Snapdragon 8 Gen 3 processor with 3.3GHz peak clock speed and Adreno 750 GPU. The smartphone also comes equipped with a self-developed Q1 chip, promising efficient gaming performance.
In terms of optics, iQoo 12 cameras have also been refreshed featuring a bigger and better sensor. The telephoto offers 100X zoom instead of the previous 20X. Note that there was a portrait sensor on the iQoo 11 which has been replaced by the telephoto camera. The ultrawide camera has also been upgraded, there is a 50MP ultrawide camera with an f/2.0 aperture as opposed to the previous 8-megapixel.
Both phones pack a 5,000mAh battery which supports 120W fast charging.
iQ00 12 has received a significant upgrade this time. Also, there is hardly any price difference both the new and the older generation, so iQoo 12 is the clear winner.
Vivo X100 and Vivo X100 Pro will be powered by MediaTek Dimensity 9300 SoC.
It will feature an 8T LTPO display.
The devices will include a triple rear camera setup with Zeiss optics.
Vivoo X100 series has been launched globally and now the company has started teasing its India launch as well. A dedicated microsite is now live in the country indicating imminent launch. The upcoming series includes two smartphones: Vivo X100 and Vivo X100 Pro. Both smartphones are powered by the MediaTek Dimensity 9300 SoC. The pro model comes with the latest V3 imaging chip while the vanilla model settles for the previous-gen V3 chip. In addition to this, the devices operate on OriginOS 4 with Android 14.
Vivo took to X to confirm its upcoming launch in India. As per the company, Vivo X100 Series will launch in India soon. A dedicated landing page has been created to tease the products which include Vivo X100 and Vivo X100 Pro. The microsite highlights the key specs of the upcoming smartphone however the company has not yet disclosed the exact date of the India launch. Rumours suggest that the India launch could take place next month in January 2024.
Vivo X100 Series specifications
Both the Vivo X100 and the Vivo X100 Pro have a lot in common. The display software and processors are the same. They feature a 6.78-inch AMOLED 8T LTPO curved display with a 120Hz refresh rate and 3000 nits of peak brightness. The devices run on OriginOS 4 with Android 14 out of the box. They are powered by a MediaTek Dimensity 9300 SoC with a Vivo V3 chip.
Both handsets are highlighted with a triple-camera setup powered by Zeiss optics. The Vivo X100 Pro includes a 50-megapixel Sony IMX989 1-inch type sensor with OIS (100x digital zoom), a 50-megapixel ultra-wide-angle sensor, and a 50-megapixel Zeiss APO super-telephoto lens with OIS (4.3x optical zoom and 100x digital zoom).
On the other hand, the vanilla model includes a Sony IMX920 VCS bionic 50-megapixel primary sensor with OIS, a 50-megapixel ultra-wide-angle lens, and a 64-megapixel Zeiss super-telephoto lens (100x clear zoom).
Both smartphones come with a 32-megapixel selfie camera.
Vivo X100 and X100 Pro pricing and availability details
The price of the X100 starts at HK$5,998, which converts to Rs 63,917 for the 12GB RAM with 256GB storage. On the other hand, the price of the X100 Pro with 16GB of RAM and 512GB of storage is set at HK$7,998, which is around Rs 85,224.
Users of Apple Watch are advised by Apple not to use any counterfeit or uncertified charger.
It recommends customers use only Made by Apple and MFi-certified chargers.
To preserve the lifespan of their product Apple has warned its users against using non-certified chargers to charge their Apple Watch. The company is advising its customers to always use official or Apple MFi-certified chargers only.
According to Apple, users are recommended to charge their Watch exclusively using original Apple products or chargers that bear the Made for Apple watermark. Note that the chargers have undergone Apple MFi certification.
Apple via its support page said, “Apple recommends charging your Apple Watch only with chargers made by Apple or chargers that have completed Apple MFi certification and use the Made for Apple Watch badge. If you use a counterfeit or uncertified charger, you could experience slow charging, repeated chimes, and reduced battery lifespan. Learn how to identify chargers made by Apple and MFi certified chargers.”
The use of fake or unauthorised chargers may result in frequent slow charging, repeated chimes, and reduced battery lifespan.
How to identify which are original Apple chargers:
Original Apple chargers are white while some Apple Watch chargers have text written and contain regulatory markings. Note that, fake or uncertified chargers might have different colours, text, or other designs on the surface of the charging connector.
To find out which chargers are MFi approved and which ones are made by Apple have the following model numbers appear on the cable:
One can also identify the manufacturer of the charger using a Mac. All you have to do is:
Connect your Apple Watch charging cable to your Mac.
On your Mac, choose Apple menu > System Settings, then click General in the sidebar.
Tap About on the right.
Then click System Report.
Click USB.
Select your watch charger to view details.
Locate the manufacturer. Watch chargers made by Apple list Apple Inc. as the manufacturer.
To find third-party chargers that have completed MFi certification first carefully check the charger’s packaging and the charger itself. Note that all authorised Apple CHargers have the Made for Apple Watch logo on the packaging
Nothing 2a is said to make its debut at MWC 2024 tech event.
The smartphone will be a toned-down variant of Nothing Phone 2.
It is said to come with a fresh design.
Nothing’s upcoming phone has become a top discussion these days. And why not, after all the company has launched innovations in the market for its fans. Nothing Phone 2a is rumoured to be the company’s next product however neither the phone nor its name has been officially confirmed. The device recently appeared online and now a leak has teased the key details about the device including the design. In addition to this, both the price and the launch schedule have been leaked.
Be it a smartphone, earphones or smartwatch, people are hopeful that the company will come up with something new. Recently the information about the company’s participation in the upcoming biggest tech show MWC 2024 was shared and since then its upcoming phone believed to be Nothing Phone 2a came into discussion. Sources have revealed that this time the firm is going to bring an affordable device. Please note that the company does not share anything yet as to what its next product will be. Now, a PVT unit leak of this rumoured phone has revealed the key specs and suggested the phone’s potential design. Some day ago a leaked information, information about a third phone that appeared online was initially believed to be the Nothing Phone 2a. As per rumours, the device is expected to be a less expensive, scaled-down version of the Nothing Phone 2.
A tipster revealed the leaked photos of a Production Validation Test (PVT) unit that appears to have a revised rear panel. The device which is believed to be Nothing 2a is seen featuring a rather unusual design. It has a horizontal camera module positioned in the middle near the top of the back panel. We have seen that other toned-down variants of flagship devices from companies like Samsung, Google, Vivo and more have identical designs. There are only changes in its internals.
Nothing Phone 2a would likely receive a revised Glyph Interface in addition to an updated back panel. The alleged Nothing Phone 2a appears in the photographs with a hole-punch display in the middle. For the screen, the company might include a 120Hz OLED display. A MediaTek Dimensity 7200 SoC with 8GB of RAM and 128GB of internal storage is speculated to power the phone. For the software, it may come pre-installed with Nothing OS 2.5, which is based on Android 14.
In terms of cameras, the Phone 2a is probably going to come with a 50-megapixel dual rear camera setup.
Samsung Mobile Android versions 11, 12, 13, and 14 are affected.
Multiple vulnerabilities have been spotted in Apple products like iPhone, iPad, Mac, Apple TV, Apple Watch and Safari Web browser.
The Government of India has issued security warnings for millions of Samsung Galaxy phones and Apple iPhones, that point out several vulnerabilities, affecting both older and newer models. The device’s security weaknesses are that cyber attackers can change the clock, send commands, view private AR Emoji files, snoop around files, steal confidential data, take control of the phone, or even take over the system.
The security advisory has been issued by the Indian Computer Emergency Response Team (CERT-In) requesting users to update their operating system or firmware due to multiple vulnerabilities allowing attackers to bypass security restrictions.
Vulnerabilities in Samsung products
According to an advisory note, multiple vulnerabilities have been reported in Samsung products that will enable a cybercriminal to bypass implemented security restrictions, access sensitive information and execute arbitrary code on the targeted system. Samsung Mobile Android versions 11, 12, 13, and 14 are affected.
CERT says that the vulnerabilities exist due to improper access control flaws in KnoxCustomManager Service and SmartManagerCN component, integer overflow vulnerabilities in the face pre-processing library; improper authorisation verification vulnerabilities in AR Emoji, improper exception management vulnerabilities in Knox Guard, various out-of-bounds write vulnerabilities in the bootloader, HDCP in HAL, libIfaaca and libsavsac. so components, improper size check vulnerability in softsimd, improper input validation vulnerability in Smart-Clip and implicit intent hijacking vulnerability in contacts.
It has been observed that if these vulnerabilities are successfully exploited, an attacker may be able to trigger heap overflow and stack-based buffer overflow, access device SIM PIN, send broadcast with elevated privilege, read sandbox data of AR Emoji, bypass Knox Guard lock via changing system time, access arbitrary files, gain access to sensitive information, and run arbitrary code and compromise the targeted system.
CERT-In said, “Multiple vulnerabilities have been reported in Apple products which could allow an attacker to access sensitive information, execute arbitrary code, bypass security restrictions, cause denial of service (DoS) conditions, bypass authentication, gain elevated privileges, and perform spoofing attacks on the targeted systems.”
According to CERT software that is worst affected are: iOS and iPadOS versions before 17.2 and 16.7.3, macOS Sonoma versions before 14.2, macOS Ventura versions before 13.6.3, macOS Monterey versions before 12.7.2, tvOS versions before 17.2, watchOS versions before 10.2, and Safari versions before 17.2.
Garena Free Fire is a battle royale game with regular awards and tournaments to keep players interested. If you play Garena Free Fire, you should be aware of the redeem codes that are released on a daily basis. However, because the battle royale game is banned in India, players from other countries can use the Free Fire Redeem codes daily. If you’re unfamiliar with the Garena Free Fire redeem codes or don’t know how to get them, we’ve put together a step-by-step guide to help you redeem them. Check out Garena Free Fire Redeem Codes for 18 December 2023.
The Free Fire redeem codes are a great way to get free stuff. These are 12-digit codes that contain alphabets and numbers, as well as an expiration date and time. Because the Garena FF redeem codes cannot be used more than once, you should hurry to the redemption page to claim your free reward before someone else does. To get a free reward, all you have to do is go to reward.ff.garena.com/en, which is the official redemption page. Also, keep an eye on this space for daily updates on Garena Free Fire redemption codes and rewards.
Garena Free Fire Redeem Codes Today 18 December 2023
FFDBGQWPNHJX
V44ZZ5YY7CBS
XFW4Z6Q882WY
4TPQRDQJHVP4
FFAC2YXE6RF2
FFCMCPSBN9CU
FFBBCVQZ4MWA
HFNSJ6W74Z48
2FG94YCW9VMV
HHNAT6VKQ9R7
TDK4JWN6RD6
WD2ATK3ZEA55
E2F86ZREMK49
How to Get Free Fire Redeem Codes for Garena on 18 December 2023?
Most Android users prefer instant messaging apps like WhatsApp and Telegram for texting their friends, which is why they don’t pay much attention to the spam that gradually builds on in the native messaging app. While the popularity of SMS has certainly declined, it is still the only way to receive OTPs on your phone. If your text inbox is flooded with OTPs, here are 2 quick ways to delete them automatically on your Android phone.
Is auto-deleting OTPs enough to remove spam on your device?
Deleting the messages containing OTPs is one way to tackle the ever-present spam in your default messaging app, but it isn’t the answer to all your problems. Spam comes in money forms and clearing OTPs will only help so much. But there are a couple of other things you can do to manage your inbox.
If you’re a Samsung user, you can turn on Caller ID and spam protection for calls and messages. You can find this feature on the settings page of the native messaging app. Furthermore, you can also divide your messages into different categories so you can completely bypass the primary inbox and go straight to the category where you have received a new message. Lastly, manually blocking every number that sends you spam also helps a lot in the long run.
Use Google Messages to automatically delete OTPs on Android
Step 1:Install the Google Messages app and set it as the default texting app on your phone.
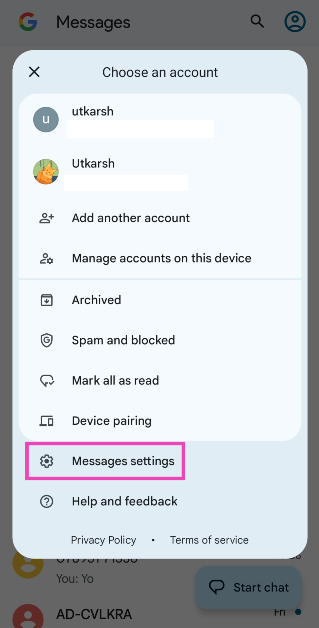
Step 2: Tap your profile icon at the top right corner of the screen.
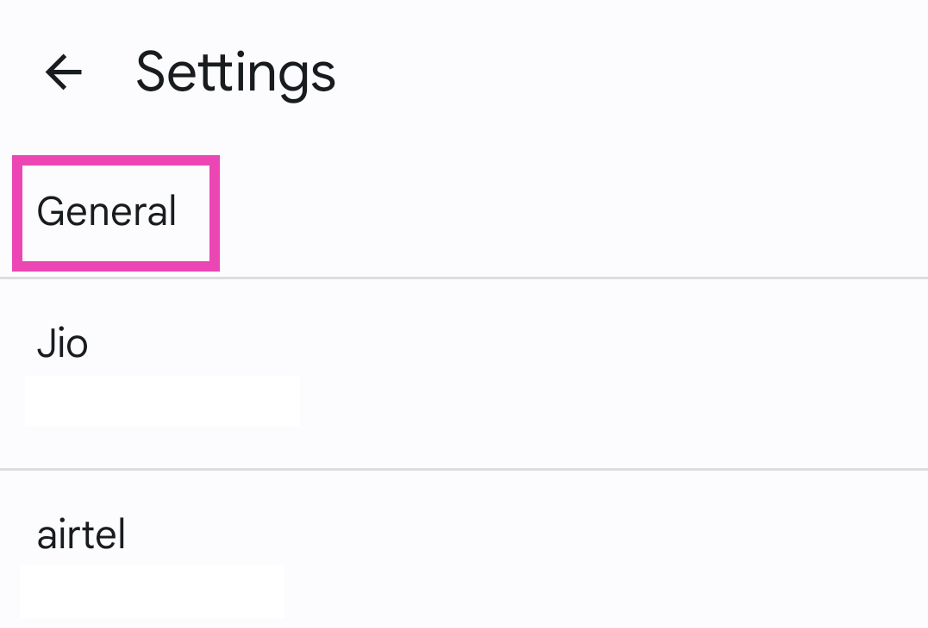
Step 3: Select Messages settings.
Step 4: Tap on General.
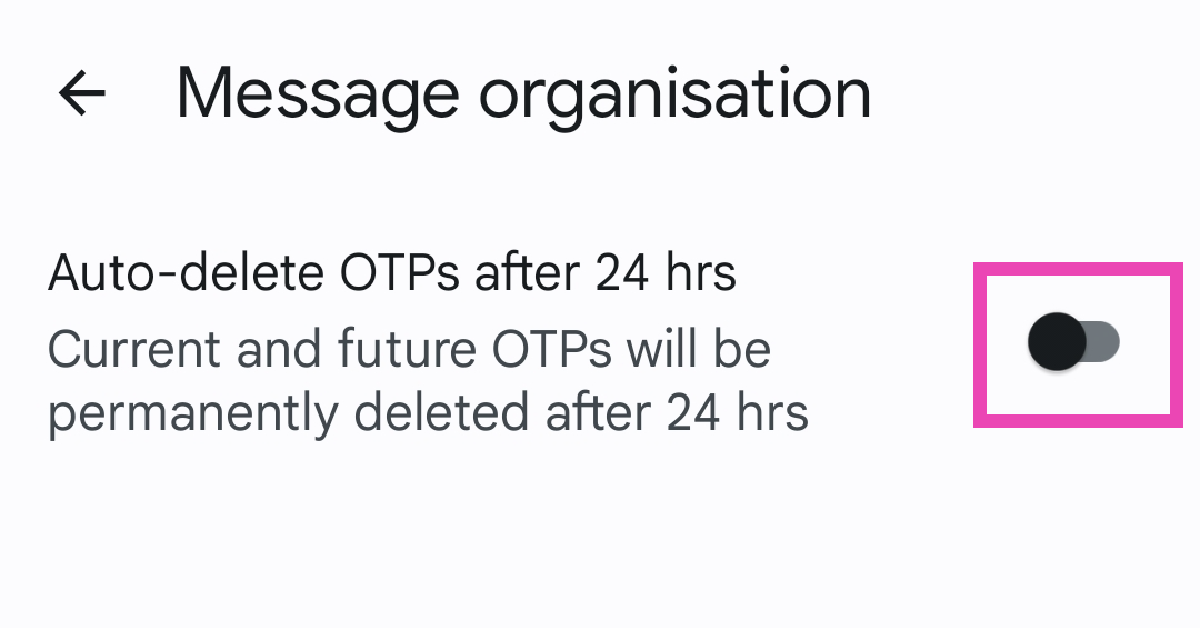
Step 5: Scroll down and select Message organisation.
Step 6: Turn on the toggle switch for Auto-Delete OTPs after 24 hours.
Your current and future OTPs will be deleted after 24 hours.
These are the top 2 ways to automatically delete OTPs on your Android phone. To organise your message inbox better, go to Settings and turn on ‘Conversation categories’. You can add as many categories as you want. Once you create a category, you get to decide which conversation threads go inside it. You can create categories for friends, family, colleagues, classmates, etc.
Garena Free Fire is a battle royale game with regular awards and tournaments to keep players interested. If you play Garena Free Fire, you should be aware of the redeem codes that are released on a daily basis. However, because the battle royale game is banned in India, players from other countries can use the Free Fire Redeem codes daily. If you’re unfamiliar with the Garena Free Fire redeem codes or don’t know how to get them, we’ve put together a step-by-step guide to help you redeem them. Check out Garena Free Fire Redeem Codes for 17 December 2023.
The Free Fire redeem codes are a great way to get free stuff. These are 12-digit codes that contain alphabets and numbers, as well as an expiration date and time. Because the Garena FF redeem codes cannot be used more than once, you should hurry to the redemption page to claim your free reward before someone else does. To get a free reward, all you have to do is go to reward.ff.garena.com/en, which is the official redemption page. Also, keep an eye on this space for daily updates on Garena Free Fire redemption codes and rewards.
Garena Free Fire Redeem Codes Today 17 December 2023
FKY89OLKJFH56GRG
FUTYJT5I78OI78F2
FUKTY7UJIE56RYHI
FBVFTYJHR67UY4IT
FYHJTY7UKJT678U4
FYH6JY8UKY7JYGFH
F6U7ITKJGYUJF6YU
FVYHFT6HYJT67LYP
FKJIT67UWEYHT4H4
FR4HII9FT5SDQ2HS
FOGFUYJN67UR6OBI
FV7CYTGDRTUNMJEK
FYHJMKRT76HYR56C
F6Y6FHRTJ67YHR57
FTDRU7HY5R6FEDG3
FTGBHDTRYHB56GRK
FDYHGBNE5RDTGE87
FRJNTR67UH675Y4E
How to Get Free Fire Redeem Codes for Garena on 17 December 2023?
The Vivo X100 and Vivo X100 Pro will launch in India next month.
Both smartphones include a V3 imaging chip.
They are powered by the MediaTek Dimensity 9300 SoC.
The Vivo X100 and Vivo X100 Pro have been launched globally. The series is being made available across the world after it was initially launched in China. The devices are currently available in Europe and Southeast Asian countries. It will soon hit Indian shores. The lineup comes with Zeiss optics, as it is a camera-focused smartphone series. Additionally, both phones are powered by the MediaTek Dimensity 9300 SoC and run on OriginOS 4 with Android 14.
Vivo X100 and X100 Pro pricing and availability details
The company has not yet revealed the pricing of both the Vivo X100 and X100 Pro smartphones. Though the price of the Hong Kong has been revealed, the price of the X100 starts at HK$5,998, which converts to Rs 63,917 for the 12GB RAM with 256GB storage. On the other hand, the price of the X100 Pro with 16GB of RAM and 512GB of storage is set at HK$7,998, which is around Rs 85,224.
Note that the Vivo X100 Series will launch in India in January 2024.
The Vivo X100 Series debuted in China in November, and the pricing at which it arrived starts at CNY 3,999 (Rs 50,000) and goes up to CNY 5,999 (Rs 68,000). There are four models for the Vivo 100 Pro, whereas the X100 is made available in five variants with up to 16GB of LPDDR5T RAM and 1TB of storage.
Vivo X100 Series specifications
Both the Vivo X100 and the Vivo X100 Pro share a lot of similarities. The display software and processors are the same. They feature a 6.78-inch AMOLED 8T LTPO curved display with a 120Hz refresh rate and 3000 nits of peak brightness. The devices run on OriginOS 4 with Android 14 out of the box. They are powered by a MediaTek Dimensity 9300 SoC with a Vivo V3 chip.
Both handsets are highlighted with a triple-camera setup powered by Zeiss optics.
The Vivo X100 Pro includes a 50-megapixel Sony IMX989 1-inch type sensor with OIS (100x digital zoom), a 50-megapixel ultra-wide-angle sensor, and a 50-megapixel Zeiss APO super-telephoto lens with OIS (4.3x optical zoom and 100x digital zoom).
On the other hand, the vanilla model includes a Sony IMX920 VCS bionic 50-megapixel primary sensor with OIS, a 50-megapixel ultra-wide-angle lens, and a 64-megapixel Zeiss super-telephoto lens (100x clear zoom).
Both smartphones come with a 32-megapixel selfie camera.
Android and iOS are not radically different from each other, but there are certain aspects where one has an added advantage over the other. When it comes to adding watermarks to your pictures, Android devices are ahead of the curve compared to their iOS counterparts. Perhaps, in future iOS versions, Apple will add the feature to the iPhone as well. But as of now, here are 4 ways you can go about this task.
Add a watermark to your pictures to make sure you are always credited
If you post your art or photography on the Internet, it is bound to get reposted somewhere. While common Internet etiquette dictates that one must credit the person behind the artwork, it rarely ever gets followed. The best thing you can do before uploading your work on the Internet is add a watermark to it. This ensures that you get the proper credit if the picture ever attains virality.
Your smartphone is well-equipped to automatically add a basic watermark to every picture you take using its camera. However, if you’re looking for more extravagant designs or already have a logo for your work, you will need a third-party app to stitch it to your pictures. While designing a watermark, make sure you add your social media handles so people know where to reach you.
Add a watermark to your pictures on Android
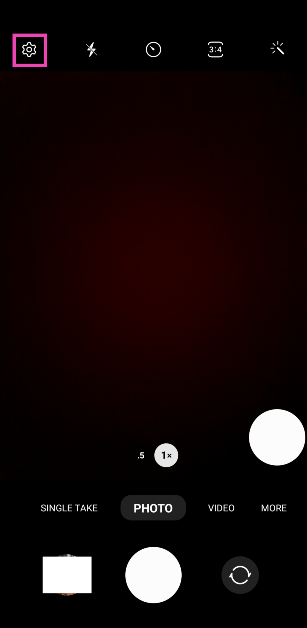
Step 1: Launch the Camera app on your Android smartphone.
Step 2: Hit the gear icon at the top left corner of the screen.
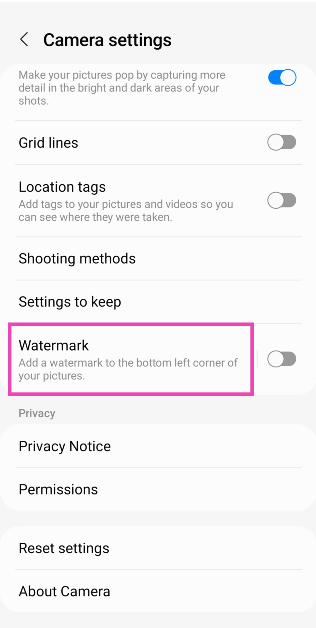
Step 3: Scroll down and select Watermark.
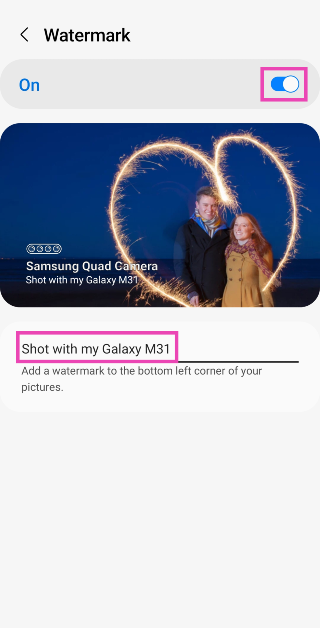
Step 4: Turn on the toggle switch at the top of the page.
Step 5: Add the text that you want to watermark on your pictures.
Step 6: Go back to the Camera app and start taking pictures.
Add a watermark to your pictures on iOS
The native camera app on iPhone does not have the feature to add a watermark to your photos automatically. You can get around this roadblock by uploading your watermark as a signature on Markup and using it wherever necessary. Here’s how you can go about it.
Step 1: Launch the Photos app and open the picture to which you want to add a watermark.
Step 2: Hit Edit.
Step 3: Select the Markup icon at the top right corner of the screen.
Step 4: Tap the plus icon at the bottom right corner of the screen.
Step 5: Tap on Signature and select Add or Remove Signature.
Step 6: Scribble your name, logo, or sign that you want as the watermark.
Step 7: Hit Done.
Step 8: Place the watermark on the picture and hit Done.
The watermark will also be saved in Markup’s ‘Signature’ section. Whenever you want to add it to a picture, just open Markup and select signature.
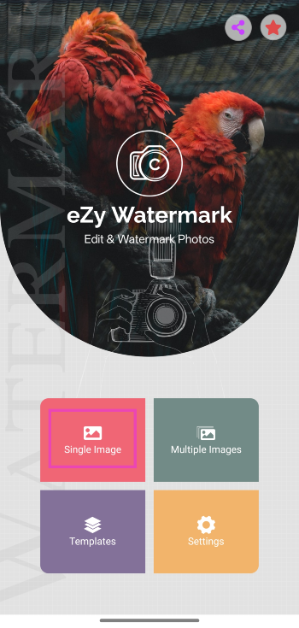
Your smartphone may be able to add a watermark to your pictures natively, but a dedicated third-party app pays more attention to the design, layout, and appeal of your logo. If you’re looking for something more than just plain text as the watermark, you will need to download an app for it. The eZy Watermark Photos Lite app by Whizpool is one of the best ones around and is available on both platforms. This app has over 150 text fonts to choose from. You can also import your logo from your device’s storage and use eZy to place it on an entire batch of images.
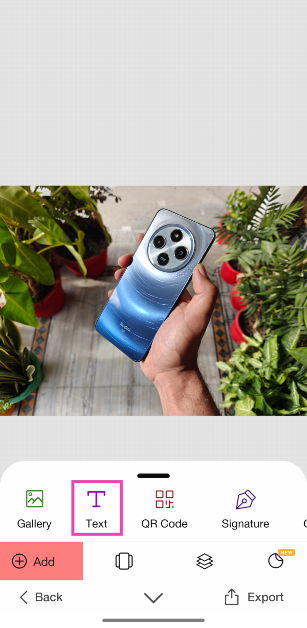
Step 1:Download and install the eZy Watermark Photos Lite app by Whizpool on your phone.
Step 2:Launch the app and select whether you want to watermark a single photo or a bunch of images.
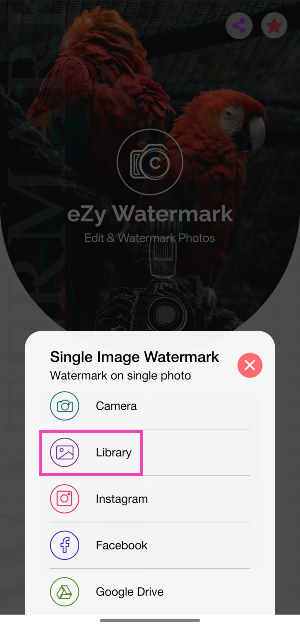
Step 3: Tap on Library to import an image from your phone’s gallery. You can also import pictures from Instagram, Facebook, Google Drive, and more.
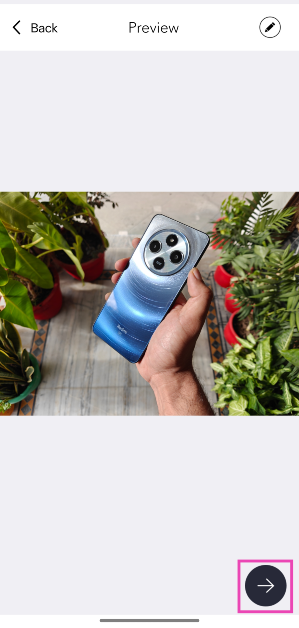
Step 4: Hit the arrow icon in the bottom right corner of the screen.
Step 5: Select the kind of watermark you want to add to the image. For this example, we’ve chosen Text.
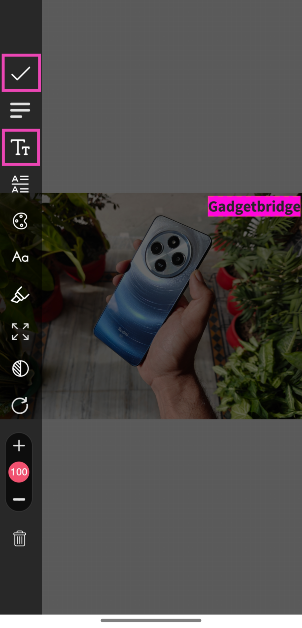
Step 6: Hit the Tticon in the sidebar and type the word(s) you want on the watermark. Use the sidebar options to change its font, size, opacity, colour, and more. Drag the watermark on the image to change to change its position. Hit the tick icon when you’re done.
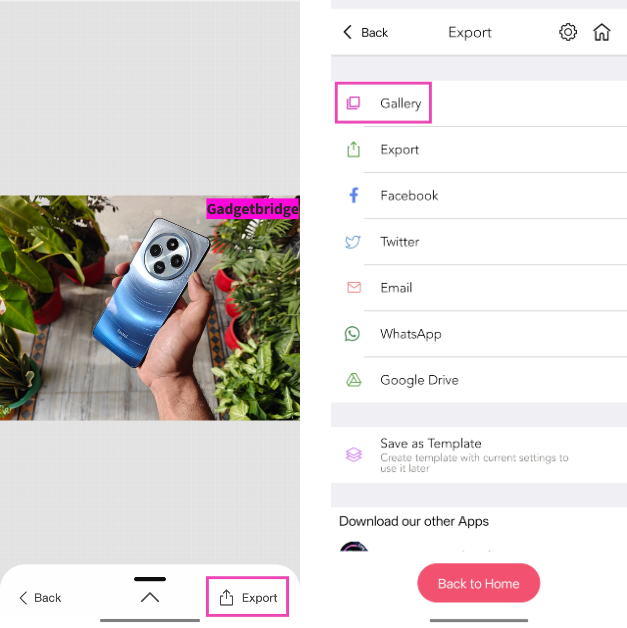
Step 7: Hit Export and select Gallery. Give eZy Watermark Photos Lite permission to access your phone’s gallery.
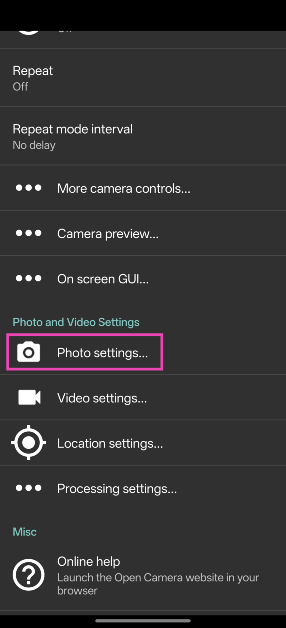
Use the Open Camera app
Third-party camera apps offer a diverse range of watermarking options. Let’s take a look at how you can add one using Open Camera.
Step 1:Download and install the Open Camera app on your phone.
Step 2: Launch the Open Camera app and hit the cog wheel icon in the top right corner of the screen.
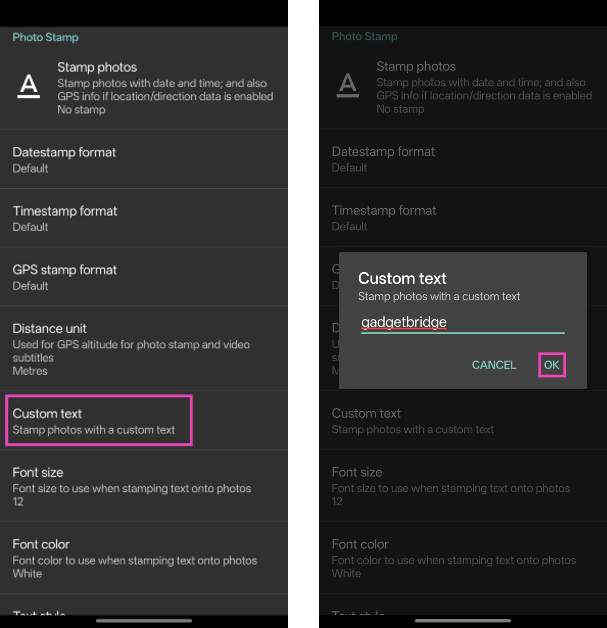
Step 3: Tap on Photo settings.
Step 4: Scroll down and tap on Custom text.
Step 5: Enter the text for the watermark. You can also change the font size, colour, and style.
Frequently Asked Questions (FAQs)
Is there a way to automatically add a watermark to the pictures I take using the iPhone’s camera?
iOS does not allow users to automatically add watermarks to their images. What you can do is use Markup to add your watermark as a signature.
How do I add a watermark to my pictures on Android?
Go to Camera>Settings>Watermark, turn on the toggle switch, and enter the text you want for the watermark.
How do I view the metadata of an image on Android?
To view the metadata of an image on Android, open it using your phone’s native gallery app, hit the ellipses, and select Details.
How do I add a watermark to a picture I’ve already taken on Android?
Use the eZy Watermark Photos Lite app to watermark images in your phone’s gallery. You can also import pictures from Instagram, Facebook, Google Drive, and more.
How do I add a timestamp to my pictures?
Use the Open Camera app to timestamp the images you take using your phone. Go the app’s photo settings and enable ‘Stamp photos’.
These are the top 4 ways to add a watermark to your pictures on Android and iOS. Check out this article to view our list of the best watermark apps around. If you don’t want to use a third-party app, you can simply add your logo to any picture using your phone’s native photo editor. You can access it by tapping the ‘edit’ option after opening the image in your phone’s photo gallery.


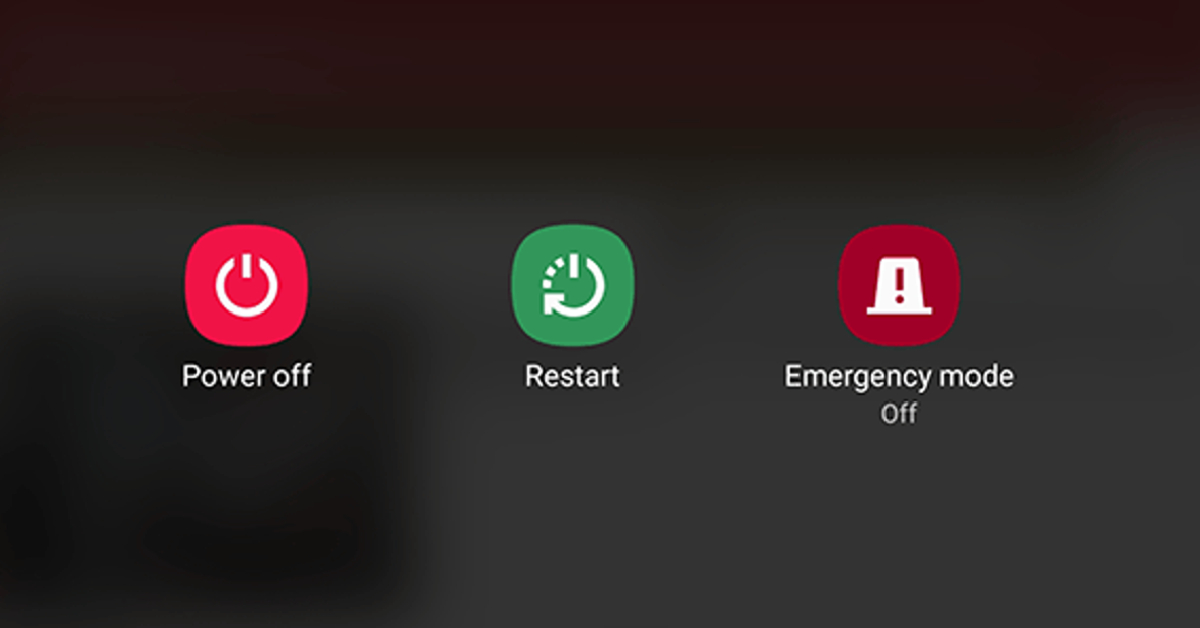
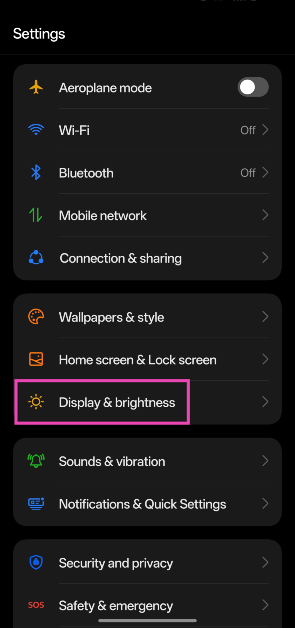
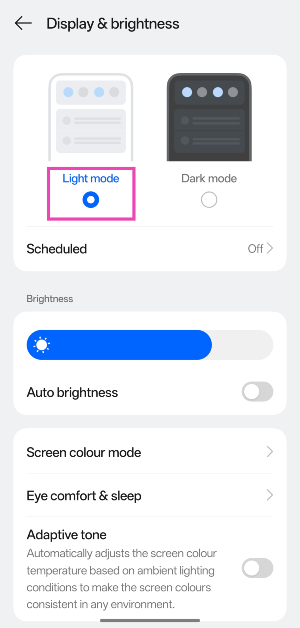
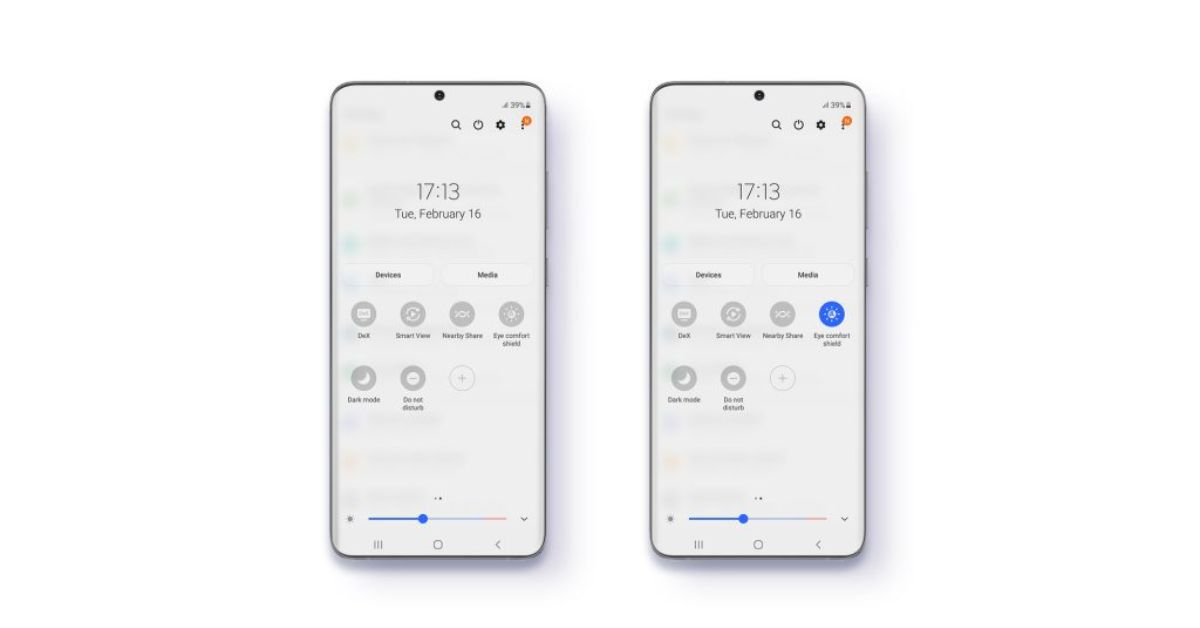
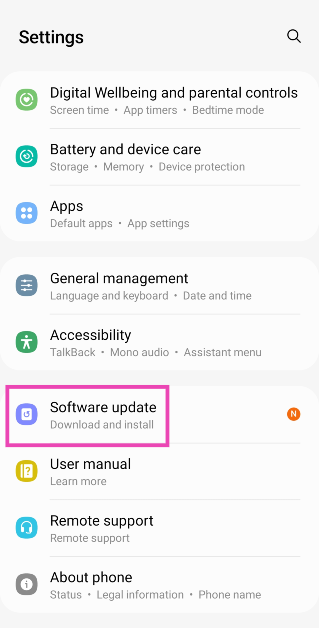
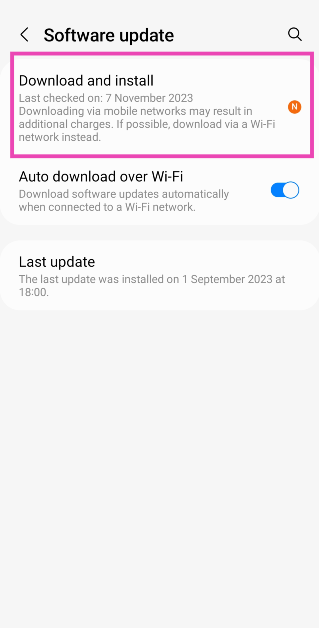
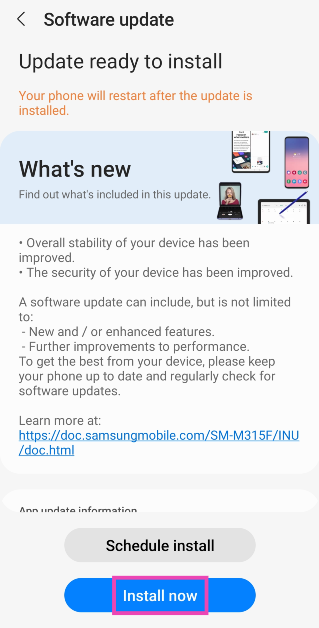
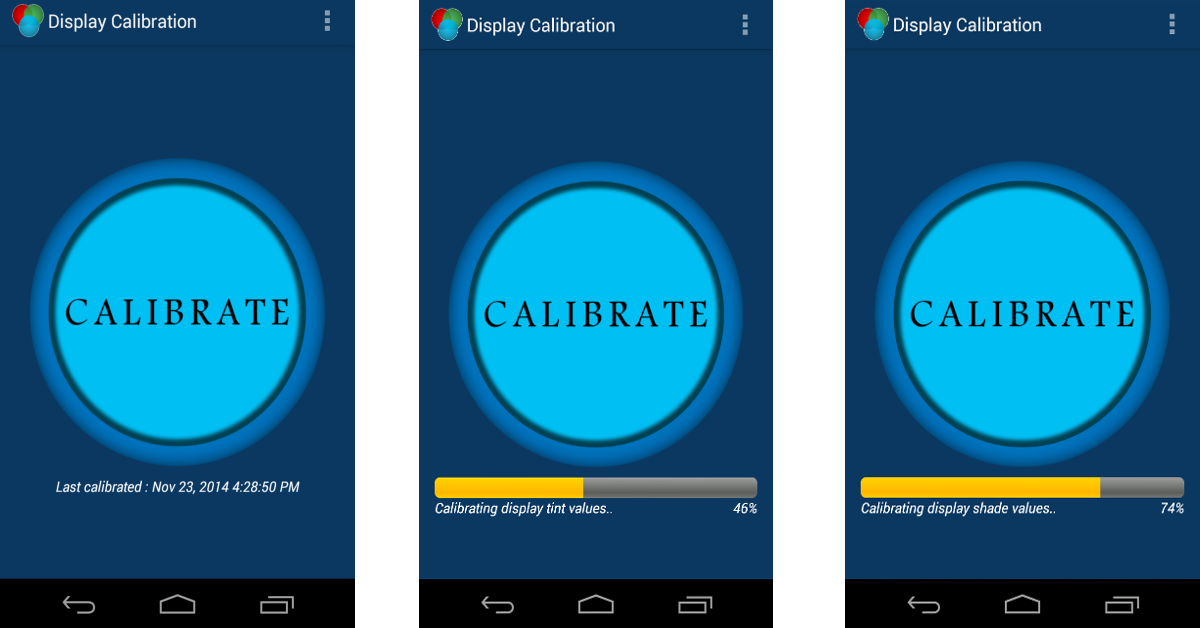
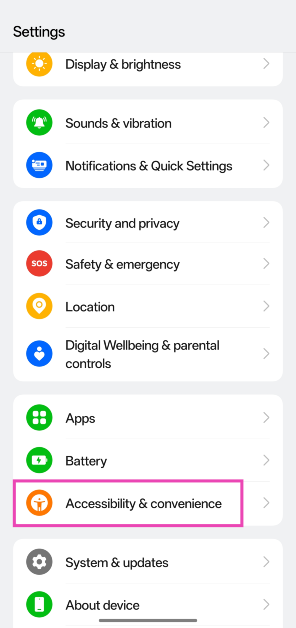
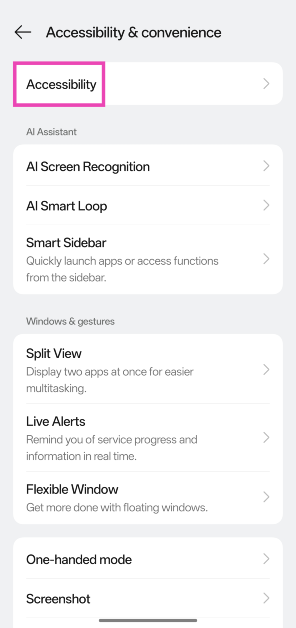
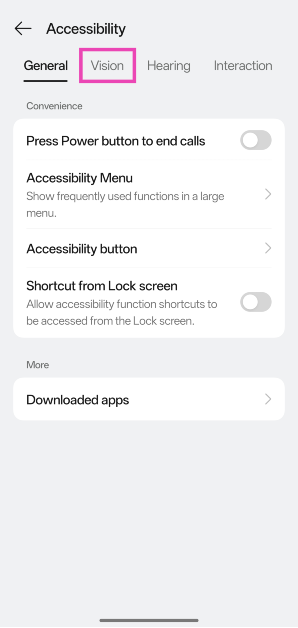
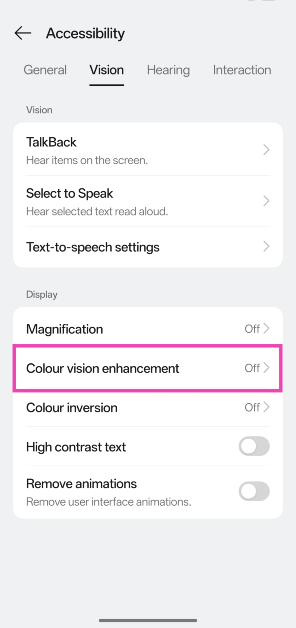
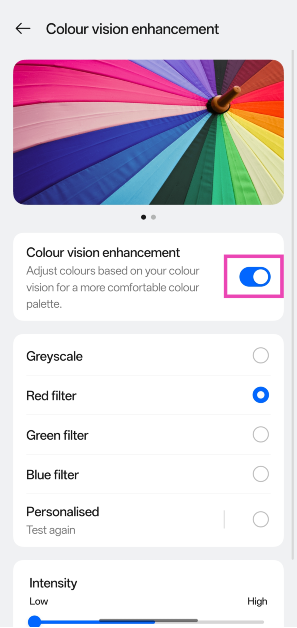
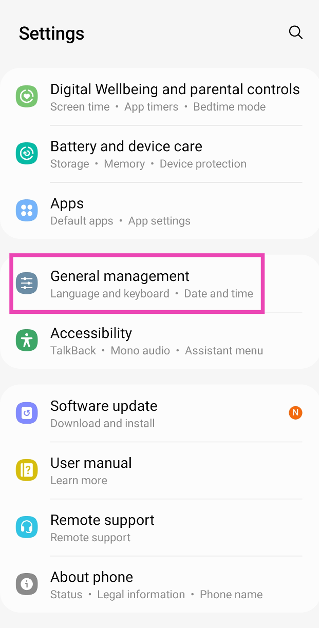


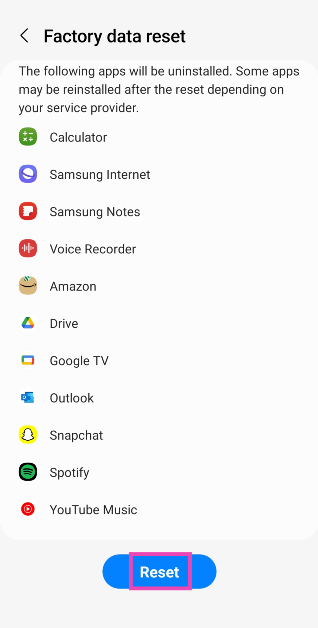

")