HMD Global today announced the launch of the Nokia C32 in the Indian market today. The newly launched smartphone falls under the budget category. The device is shipped with Android 13 out of the box and is powered by an octa-core chipset. In addition to this, it is backed by a 5,000mAh battery that is claimed to last for 3 days. Also, the phone comes with a side-mounted fingerprint sensor.
Nokia C32 price in India and sale details
The Nokia C32 price in India has been set at Rs 8,999 for the 4GB RAM with 64GB storage option. The price of the 4GB RAM with a 128GB storage model is set at Rs 9,499. The newly launched budget smartphone comes in Beach Pink, Charcoal, and Mint colour options.The device is now up for sale via Nokia’s official website in the country. The company is also offering a no-cost EMI offer starting from Rs 1,584/month for up to 6 months.
Nokia C32 specifications
In terms of specifications, the Nokia C32 features a 6.55-inch 2.5D display. The screen comes with 1600 x 700 pixels of resolution and has an aspect ratio of 20:9. The chipset name is not specified. It is powered by an octa-core chipset with a clock speed of up to 1.6 GHz. The phone comes with 4GB of RAM which can be expanded virtually to up to 7GB using unused storage. In addition to this, the device is available with up to 128GB of internal storage. Moreover, the phone operates on Android 13 and the company promises two years of quarterly security updates.The dual rear camera setup on Nokia C32 comes with an LED flash. The camera unit includes an AI-powered 50-megapixel primary sensor and a secondary 2-megapixel sensor. The phone comes with an 8-megapixel front-facing camera for taking selfies and video calling.Nokia C32 houses a 5,000mAh battery and supports 10W wired charging. As per the firm, the battery can easily last for up to 3 days once charged completely. For connectivity, there is Bluetooth v5.2, Wi-Fi, GPS, USB Type-C port and a 3.5mm audio jack.There is a side-mounted fingerprint sensor for authentication which also doubles up as a power button.
For the latest gadget and tech news, and gadget reviews, follow us on Twitter, Facebook and Instagram. For newest tech & gadget videos subscribe to our YouTube Channel. You can also stay up to date using the Gadget Bridge Android App. You can find the latest car and bike news here.
If you constantly need to cover your phone’s screen while using it under the sun, the display may have a problem. While most smartphones are legible under direct sunlight, some outdated displays may struggle to keep up with outdoor lighting. Luckily, there are a few ways to get around this issue. In this article, we bring you the top 7 easy methods to increase brightness beyond maximum on Android smartphones.Read Also:WhatsApp Editing feature is now rolling out to users
Perform a diagnostic test for the light sensor
Your smartphone’s light sensor detects ambient light and triggers your smartphone to change its brightness according to the intensity of the surrounding light. If this sensor is broken, your phone may not hit peak brightness outdoors. You can run a diagnostic test for this sensor using a dialer code. Samsung users can access this test by dialling *#08*#. This code may differ for other manufacturers. Once you dial the code, you will be presented with a diagnostic tool menu. Tap on Sensors and then select Light Sensor. Subject your phone to different intensities of ambient light to check if the sensor is working.
Turn on Extra Brightness
Sometimes your phone’s highest brightness level may not be enough to counter the direct sunlight that falls on it. To get around this issue, some smartphone manufacturers let users boost the brightness by a bit, which makes the phone usable in outdoor light. Samsung calls this ‘Extra Brightness’. Here’s how you can enable it.Step 1: Go to Settings and select Display.Step 2: Make sure Adaptive Brightness is turned off.Step 3: Switch on the toggle bar for Extra Brightness.
Turn on Sunlight Mode
Like Samsung’s Extra Brightness, Xiaomi smartphones have a Sunlight Mode to boost the brightness of the display and improve its legibility in bright daylight. Here’s how you can enable it.Step 1: Go to Settings and select Display.Step 2: Tap on ‘Brightness Level’ and turn off Automatic Brightness.Step 3: Switch on the toggle bar for Sunlight Mode.Note: Boosting your phone’s brightness more than the maximum level can drain the battery much faster. Always ensure that you are using Extra Brightness and Sunlight Mode only for a short duration of time.
Turn off Adaptive Brightness
Adaptive Brightness is turned on by default on most Android smartphones. As the name suggests, it alters the brightness of your phone’s display depending on the surrounding light. This means that under direct sunlight the display will be at its brightest. Conversely, the display will automatically dim itself at night. Walking in and out of rooms can change your phone’s brightness, which some may find annoying. If you want your phone’s display to be bright at all times, simply turn off Adaptive Brightness. Here’s how.Step 1: Go to Settings and select Display.Step 2: Switch off the toggle bar for Adaptive Brightness.You can also swipe down from the status bar and tap the ellipses next to the brightness level to toggle Adaptive Brightness. Once you’ve switched it off, drag the brightness level to the maximum to use your phone at its brightest setting.
Use the CF.lumen app
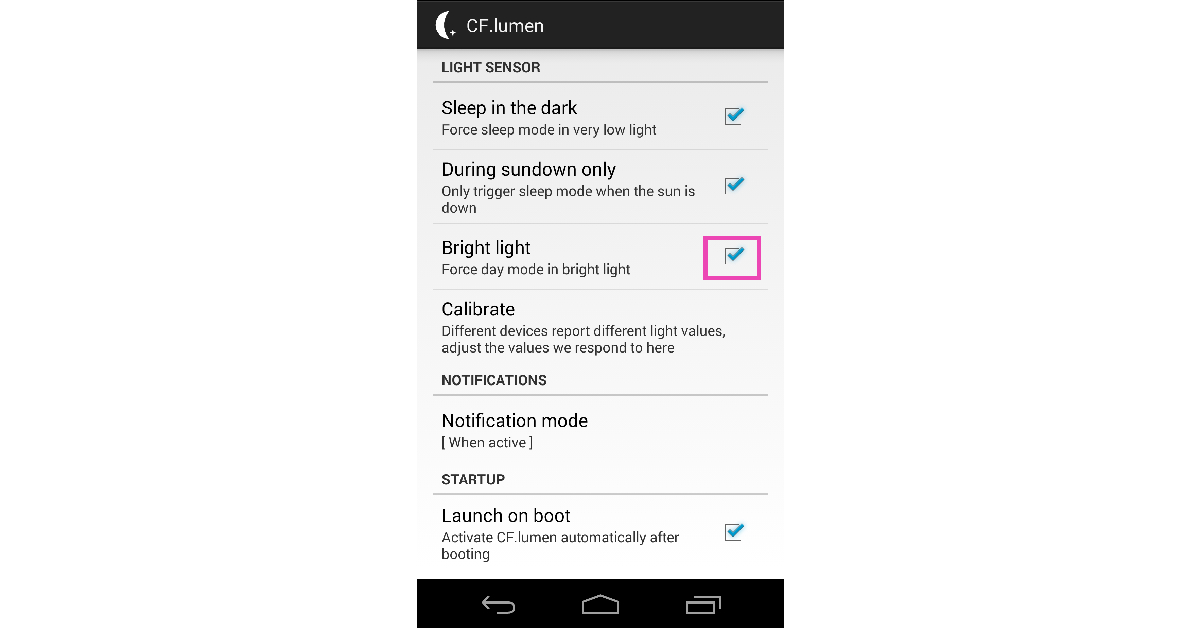
CF.lumen is a great display management app for Android. It changes the colour temperature of the screen to suit the surrounding conditions, thereby reducing the strain on your eyes. One of the features that CF.lumen provides is the ability to lock your phone in day mode in bright light. Install the app on your smartphone and select the check box next to ‘Bright light’ under Light Sensor settings. This will increase the brightness on your Android phone.
Turn off Power Saving Mode
When your phone’s battery hits a certain threshold (usually 15% on most devices), it automatically activates the Power Saving mode. This mode conserves your phone’s battery by cutting down on excessive power consumption. This means the display brightness takes a hit as well. To restore the brightness level, you can either manually increase the brightness level from the slider in the quick settings menu or simply turn off the Power Saving mode.
Expose your phone to bright light
You may have noticed that your phone automatically becomes super bright when you pull it out in bright sunlight. If you check your phone’s specs, you will notice that there are two figures for brightness. While one is the figure for regular brightness level under ordinary conditions, the other figure denotes ‘peak brightness’. Your phone achieves ‘peak brightness’ only when it is subjected to hard external lighting. You can trigger this by taking out your phone under direct sunlight or putting it under a table lamp. The brightness will slowly fall down to its normal level once your phone is no longer subjected to the light.
Turn off light filters
Some smartphones have a blue light filter for the display that makes the colour tone of the screen warm and easy on the eyes. While your display can achieve maximum brightness with these filters on, turning them off can restore the cool colour temperature which many associate with natural brightness. On Samsung smartphones, swipe down from the status bar and disable ‘Eye comfort shield’ from the quick settings menu.
Stream content in HDR
HDR content is more detailed and gives off a ‘brighter’ feel than regular video content. If your smartphone supports HDR content, you can easily spot the difference. To enable HDR in YouTube videos tap the gear icon in the media player and select ‘Quality’. Go to the ‘Advanced’ section and select an HDR format.
Frequently Asked Questions
How can I increase the brightness of my phone above maximum?
Go to Settings>Display and turn off the toggle bar for Adaptive Brightness. Now manually slide the brightness bar to the maximum level. To boost the brightness even further, take your phone out under direct sunlight.
How do I force maximum brightness on Android?
To increase the maximum brightness on Android, turn on Extra Brightness mode or Sunlight Mode from the display settings.
Why is my phone’s brightness so low?
If Adaptive Brightness is turned on on your device, it can lower the brightness of the display when you are in a dimly lit room. Your phone’s brightness may also take a hit when it gets too warm.Read Also:MagEZ Slider 2: The Best 3-in-1 Wireless Charger from PITAKA
Motorola has finally launched Motorola Edge 40 in India. The device has already debuted alongside the Pro variant in some other markets earlier this month before arriving in the country. The newly launched Motorola phone is powered by MediaTek Dimensity 8020 SoC. It also features a pOLED display with 144Hz refresh rate support. In addition to this, the phone includes a dual rear camera setup and a 4,400mAh battery. The smartphone is IP68 rated for water and dust resistance.
Motorola Edge 40 price in India and sale details
Motorola Edge 40 has debuted in India today. The device comes in a single 8GB RAM with a 256GB storage option priced at Rs 29,999. The smartphone will come in three colour options of Eclipse Black, Lunar Blue, and Nebula Green. It is scheduled to go on sale from May 30 however you can pre-book the phone via Flipkart from today onwards.
Motorola Edge 40 specifications
Motorola Edge 40 comes with a 6.55-inch full-HD+ curved pOLED display with 2400 x 1080 pixels of resolution. The 3D glass panel has 144Hz refresh rate support and offers 1200 nits of peak brightness. The phone runs on Android 13 out of the box. The company is claimed to provide 2 years of OS updates and three years of security updates. Under the hood, there is an octa-core MediaTek Dimensity 8020 5G SoC coupled with 8GB of LPDDR4x RAM and 256GB of USF 3.1 internal storage.For the photos and videos, there is a dual rear camera setup which includes a 50-megapixel main sensor with optical image stabilisation (OIS) support and a 13-megapixel sensor with an ultrawide sensor for macro vision. Motorola Edge 40 also features a 32-megapixel front camera for taking selfies and video calling.The Motorola Edge 40 houses a 4,400mAh cell with 68W TurboPower wired charging and 15W wireless charging support. In terms of connectivity, there is WiFi 6, Bluetooth v5.2, GPS and a USB Type-C port for charging. In addition to this, the screen has an in-display fingerprint sensor and anti-fingerprint coating.The green and black colour options of the phone have a vegan leather finish on the rear whereas the blue model has a matte finish.
For the latest gadget and tech news, and gadget reviews, follow us on Twitter, Facebook and Instagram. For newest tech & gadget videos subscribe to our YouTube Channel. You can also stay up to date using the Gadget Bridge Android App. You can find the latest car and bike news here.
Came across a funny meme on Facebook and want to save it to your phone? Instead of taking a screenshot, you can download the file directly to your device. The images that you download from Facebook are of much better quality than the screenshot. In this article, we bring you the top 4 ways to download pictures from Facebook to your Android phone.Read Also:MagEZ Slider 2: The Best 3-in-1 Wireless Charger from PITAKA
Save pictures from the Facebook app
Step 1: Launch the Facebook app on your Android smartphone.Step 2: Open the photo you want to save.Step 3: Tap the ellipses (three dots) at the top right corner of the screen.Step 4: Select ‘Save to phone’.The picture will be saved on your Android device.
Save pictures from the Facebook website
Step 1: Launch Facebook’s website on your phone’s web browser.Step 2: Open the picture you want to save.Step 3: Tap the ellipses (three dots) at the top right corner of the screen.Step 4: Select ‘Save’.The picture will be saved on your Android smartphone.
Download a picture using Facebook’s desktop website
Step 1: Open Facebook on your PC’s web browser.Step 2: Open the image you want to save.Step 3: Click on the ellipses next to the profile name.Step 4: Hit ‘Download’.Step 5: Once the image has been downloaded to your PC, you can transfer it to your smartphone using Nearby Show. Here’s how you can use Nearby Share to wirelessly transfer files between your phone and PC.
Save a picture using Facebook’s desktop website
Step 1: Open Facebook on your PC’s web browser.Step 2: Open the image you want to save.Step 3: Right-click on the picture and select ‘Save image as’.Step 4: Select a destination folder for the image on your PC and give the picture a name.Step 5: Use Nearby Share to transfer the image from your PC to your smartphone.
Frequently Asked Questions
Can you download photos from Facebook?
Facebook’s website and app allow you to download the pictures on the platform directly to your device. You can also choose to download all pictures on your profile while you are extracting your profile information.
Why can’t I save pictures from Facebook?
If you are unable to save pictures from Facebook to your Android smartphone, go to Settings>Apps>Facebook>Permissions and allow media access.
These are the top 4 ways you can download any picture from Facebook to your Android phone. All pictures downloaded from Facebook are stored in your phone’s gallery in a folder named ‘Facebook’. You can copy and move the images to other folders. If you want to download all your Facebook photos at once, you can do so while downloading your Facebook Profile Information from Settings.For the latest gadget and tech news, and gadget reviews, follow us on Twitter, Facebook and Instagram. For newest tech & gadget videos subscribe to our YouTube Channel. You can also stay up to date using the Gadget Bridge Android App. You can find the latest car and bike news here.
Right now there are plenty of options for Smart door locks available in India. Some of them come with customisation options and allow access through fingerprints, passwords, voice commands, and of course physical keys. With Bluetooth and Wi-Fi connectivity, you can remotely update features and passwords. These are the best smart door locks you can buy right now for under Rs 10,000.The list of smart door locks below is based on features and functionalities available in India, which can not only help you keep your home secure but also make an eye-catching fashion statement for your guests while staying within your budget.
Best smart door locks under Rs 10,000
QUBO Smart Door Lock Essential
Qubo a brand by Hero Group has a wide range of products for home security such as smart door locks, CCTV cameras and more. The QUBO Smart Door Lock Essential is one such dependable home security system. It is available in different variants and colour options. This is the most basic one and its price starts at Rs 9,990 and goes up to Rs 19,849 for the ultra variant.It offers 5-way password system features: Unlock using Fingerprint, Passcode, Bluetooth Mobile APP, RFID Access card or Emergency keys.. The device is made up of Alloy steel and aluminium. It can register up to 50 fingerprints and you get 2 RFID Access Cards. The QUBO Smart Door Lock Essential comes with Two-Layer Authentication: Add Double Security that requires a combination of 2 access methods to unlock your door. It is apt for single wooden doors with a thickness of 3.2 CM and above.Available at Amazon
LAVNA Smart Door Lock LA28
LAVNA Smart Door Lock LA28 is another product which is priced at Rs 8,169 and comes in two variants. It has Fingerprint, PIN, OTP, RFID Card and Manual Key Access ideal for single Wooden Doors. It can register up to 100 fingerprints, RFID cards and PINs in a smart lock. It has a touch keypad and you can use random numbers before or after the original pin in the presence of strangers.Available at Amazon
Yale YDME 50 Pro Smart Door Lock
The Yale YDME 50 Pro, Smart Door Lock comes with free installation service. Its price starts at Rs 9,699 and goes up to Rs 15,034 as it is available in three variants. It has multiple multiple options to access the lock- RFID Card, Pin Code and Key Override. Ideal for single wooden doors with thicknesses between 35 mm to 65 mm the Yale smart door lock can be installed on both left and right-handed doors. It also allows the user to enter any random number combinations and yet be successfully identified as long as the user enters the true password repeatedly.Available at Amazon
QUBO Smart Rim Lock
This QUBO Smart Rim Lock is quite affordable and is ideal for double doors. Available in two variants the price starts at Rs 5,990 and goes up to Rs 9,990. It has three options for authentication: Passcode, RFID Access card & Bluetooth Mobile App. You get 2 RFID access cards and use a pin code with decoy digits to keep your code spy safe. It also comes with Voice Guidance for convenient access along with a Silent mode option. The Smart door lock is compatible with wooden doors of 30mm to 50 mm thickness.Available at Amazon
Godrej Advantis Rimtronic RF (PIN+RFID) Digital Lock 3000
Another smart door lock suitable for double doors, the Godrej Advantis Rimtronic RF (PIN+RFID) Digital Lock 3000 is priced at Rs 8,338. This lock is capable to lock and unlock using RFID or a Password. It has an adjustable 7-level volume with a mute function. This door lock comes with a safety button which when switched on, the door cannot be opened from outside by RFID or password.Available at Amazon
For the latest gadget and tech news, and gadget reviews, follow us on Twitter, Facebook and Instagram. For newest tech & gadget videos subscribe to our YouTube Channel. You can also stay up to date using the Gadget Bridge Android App. You can find the latest car and bike news here.
Ever since the pandemic happened the demand for good vacuum cleaners has gone up. And if it does the work on its own then it is the cherry on top. Xiaomi is no stranger to robot vacuum cleaners and the latest to enter India from the brand is Xiaomi Robot Vacuum Mop 2i. We spent a lot of time with the new-age vacuum cleaner to know its ins and outs. This is the Xiaomi Robot Vacuum Mop 2i review you must read before buying any robot vacuum cleaner.
Xiaomi Robot Vacuum Mop 2i review: Design
Out of the box, the Xiaomi Robot Vacuum Mop 2i looks like any other robot vacuum cleaner in the market with subtle differences. To begin with, this one is dressed in white, while others have darker colours on them. White in our view will get dirty over time and will show the stains. Don’t get us wrong, white looks spectacular but does get grimy rather quickly.
You will find the bumper upfront of the Xiaomi Robot Vacuum Mop 2i, which has sensors all around it. Above and bottom, too. On the top, you will get a power button, a home button and a camera that will map the whole house or area, which it needs to clean. Behind this is a flat panel that can be easily lifted. This hides the dust container (with 450ml capacity) that can be easily removed, cleaned and reinstalled.
Underneath there is a powerful 2,200Pa suction motor vent that can pick up the tiniest dust particles with ease. Here you will also get a sweeper that pushes the dirt toward the suction vent and located at the bottom back is the wet mop. You can fill it with water (up to 270ml) and it will wet mop the area as well.
With it comes a charging station that can be placed up against any wall near a power outlet and the Xiaomi Robot Vacuum Mop 2i will go back to it on its own, to charge.
Read Also:Xiaomi Smart TV X Pro Series, Smart Air Purifier 4 Series and Robot Vacuu
Xiaomi Robot Vacuum Mop 2i review: Performance
To make the Xiaomi Robot Vacuum Mop 2i vacuum work you will need to install the Mi Home app on your smartphone. For the first time make sure the mobile device and the Vacuum Cleaner are being connected to the same Wi-Fi network as that is needed for the initial setup. It takes 2-5 minutes to complete this setup and if the robot mop is charged fully you are ready to make it work for you.
For the first time, the Xiaomi Robot Vacuum Mop 2i takes 1-3 hours, depending on the home size, to map it out completely while cleaning it. It uses an advance zig-zag motion, which enables it to clean better. This means instead of going all over the place it goes in one direction then turns around and comes back in the other direction. Making sure it does not leave any dirty spots behind.
Once the Xiaomi Robot Vacuum Mop 2i has mapped your house, the next time it will take much lesser time to clean the house as it knows where the walls and obstacles are. For it to work best, make sure there are not too many objects left on the floor.
The Xiaomi Robot Vacuum Mop 2i is a great cleaner, not only it removes the dust it wet wipes the floor too. You can also control the amount of water that it uses. Over that the slim design is great to go under and clean hard-to-reach places. Once it is done or if it feels there is less battery, it will come back to the charging station on its own to charge fully. In case an area is left before recharging, it will go back to it to clean after fully charging.
Talking about its battery life, the Xiaomi Robot Vacuum Mop 2i has a 2,600mAh battery and the company claims it can last for 100 mins. In our tests, we got almost 90 minutes of clean time from it, which is not bad at all. It took the Xiaomi Robot Vacuum Mop 2i to clean 140 square yards area in under that much time.
Read Also: Top Smart Gadgets for Smart Homes
Verdict
The Xiaomi Robot Vacuum Mop 2i has 25 sensors with gyroscope to navigate it through your house. It has an anti-fall detection sensor too, so if it approaches a ledge or staircase it will not proceed and will turn around. For walls, it has a front collision bumper that enables it to detect and go back or around objects. Over that, you can also schedule clean-ups using the app. At Rs 18,999 this mop is a great investment, that is not very loud and will clean your home in no time.
Xiaomi Robot Vacuum Mop 2i Pros
Good suction
Wet mop function
90 minutes of clean time is good
Good News? WhatsApp is now allowing its users to edit WhatsApp messages. The Message editing feature is only applicable to text messages for up to 15 minutes after they are sent. Until now this feature was under development and is now being rolled out to all the users globally.Previously WhatsApp users only have the option to option to delete their text messages on WhatsApp in case of a typo or simply change their mind. Now the instant chatting app owned by Meta is rolling out an edit option. So now you have two options either to delete a wrong message or to edit a typo on a text message. Both these features are really helpful to users as one will save you from sending a text to the wrong contact and the newest one will save you time from deleting and re-writing an entire text again.Is it for all? Yes, the WhatsApp edit text message feature is being released to all users across the globe this includes the Android and iOS app, as well as the Web interface.The best part is one can edit messages on WhatsApp as soon as they realise they have made a typo or sent the wrong one. You will only have up to 15 minutes after the message is sent so that no one can edit the text after a set time limit therefore you are safe from any fraud.
How to edit a text to make corrections without deleting an entire message?
To edit a WhatsApp text all you need to do is long press and hold on a text message after you have sent it. A menu with the option to ‘edit’ will appear and you will be able to make your corrections. However, an edited tag will be shown soon after you have edited the message. In addition to this, a timestamp will also appear. The best part, the receiver will know you have made the correction to the text message but they will never know what corrections have been done as they don’t have access to the editing history.As with all personal messages, media and calls, your messages and the edits you make are protected by end-to-end encryption.While announcing the feature WhatsApp said, “From correcting a simple misspelling to adding extra context to a message, we’re excited to bring you more control over your chats. All you need to do is long-press on a sent message and choose ‘Edit’ from the menu for up to fifteen minutes after.”For the latest gadget and tech news, and gadget reviews, follow us on Twitter, Facebook and Instagram. For newest tech & gadget videos subscribe to our YouTube Channel. You can also stay up to date using the Gadget Bridge Android App. You can find the latest car and bike news here.
Garena Free Fire is a battle royale game with regular awards and tournaments to keep players interested. If you play Garena Free Fire, you should be aware of the redeem codes that are released on a daily basis. However, because the battle royale game is banned in India, players from other countries can use the Free Fire Redeem codes daily. If you’re unfamiliar with the Garena Free Fire redeem codes or don’t know how to get them, we’ve put together a step-by-step guide to help you redeem them. Check out Garena Free Fire Redeem Codes for 23 May 2023.The Free Fire redeem codes are a great way to get free stuff. These are 12-digit codes that contain alphabets and numbers, as well as an expiration date and time. Because the Garena FF redeem codes cannot be used more than once, you should hurry to the redemption page to claim your free reward before someone else does. To get a free reward, all you have to do is go to reward.ff.garena.com/en, which is the official redemption page. Also, keep an eye on this space for daily updates on Garena Free Fire redemption codes and rewards.
23 May 2023 Amazon Quiz has gone live on its platform. The quiz timings are 12 AM to 11:59 PM. The Amazon App users can participate in the quiz daily and all they have to do is submit correct answers to the questions asked on the e-commerce platform. Today’s participants can get a chance to win Rs 5,000 Amazon Pay Balance.By participating in the Amazon Quiz the participants can win Amazon Pay Balance ranging from Rs 1,000 to Rs 50,000 every day while sitting at home. To win the participants must answer five questions correctly that are based on current events and general knowledge. One wrong answer can eliminate you from the quiz. The results will be announced at the end of the month. Today’s question will let you win Rs 5,000 Amazon Pay Balance. Check below for today’s Amazon quiz answers.Amazon Quiz Today Prize – Rs 5,000 Amazon Pay BalanceQuiz Date – 23 May 2023Daily Timing – 12 AM to 11:59 PMWinner Announcement – Today 12 PM
Amazon Quiz Answers Today 23 May 2023
Question 1: The 151-day-long Bharat Jodo Yatra by the Congress ended in which city?
Answer: Srinagar
Question 2: In 2023, who broke the record for the most Grammy wins of all time, with 32 awards over the years?
Answer: Beyonce
Question 3: Being developed in India by ADE, how do we better know the Tactical Airborne Platform for Aerial Surveillance?
Answer: Tapas
Question 4: According to Mythology, this bird helped the foundation of which modern metropolis?
Answer: Mexico City
Question 5: This bird was prized and revered in which medieval culture?
Answer: Aztec
How To Play Amazon Quiz
Only app users are eligible to play the Amazon quiz every morning from 12 AM to 11:59 PM. The quiz is not available on the desktop. For those who are unaware of how to play the Amazon quiz below are the steps, you can follow to take the quiz.
Firstly download the Amazon app from Google Play Store or App Store
Now fill in the required information through the Sign Up option.
You need to log in to the Amazon app and scroll down on the home screen to find the Amazon Quiz banner.
Tap on the Amazon Quiz banner and tap on the Start button to start the Quiz.
Now you will get 5 questions and you need to answer them correctly. One wrong answer will eliminate you from the Quiz.
After answering all the questions correctly you are now eligible for a Lucky Draw.
The winner’s name will be announced today at 12 PM.
There are different types of 3-in-1 wireless chargers. Some come in a rectangular structure that lays flat on the desk, which usually takes some space, and you can’t pick your phone up without interrupting charging. Some chargers work as a phone stand, but often they are heavy and not ideal for travel.
Is there a 3-in-1 wireless charger that takes little space, works as a phone stand, and can be used to travel? Well, PITAKA’s MagEZ Slider 2 could be the best you could get so far.
Extremely Compact
With a compact triangle structure, the MagEZ Slider 2 is about the size of a mug, taking little space on your desk. That said, it’s powerful enough to charge the iPhone, AirPods, and Apple Watch at the same time.
Just one cable and one small charger. That’s all you need to charge your Apple essentials. You don’t have to frequently plug and unplug or pull the cable over the desk. The wireless charger not only saves you time but helps keep your desk tidy.
Works As A Magnetic Phone Stand
The MagEZ Slider 2 has no projecting bracket, but it can function as a phone stand. Simply snap your phone to the charger to get a comfortable 45-degree viewing screen. The charger can magnetically hold your iPhone in portrait mode for quick message glancing or landscape mode for hands-free video streaming.
Charge On the Go
As mentioned before, the MagEZ Slider 2 is very small, so you can take it with you when travelling. But the 3-in-1 wireless charger also works in another way to charge your devices on the go.
With a detachable MagSafe power bank, you can charge your iPhone while on the go to get through the day. Just slide the power bank (4000mAh) out, snap it to the back of your phone, and enjoy 7.5W fast and stable wireless charging.
The MFi-certified Apple Watch charger can be unplugged too. It can charge any Apple Watch model at 5W. And with a universal USB-C connector, you can plug it into your laptop’s or iPad’s USB port to charge your watch.
Many people who own a 3-in-1 wireless charger still feel the need to have a portable charger for their iPhone, which they rely so much on and their Apple Watch, which doesn’t last long. And the MagEZ Slider 2 is the ideal solution.
Could Be Stress-relief
Another feature that makes the MagEZ Slider 2 so unique is that it has a 360-degree carousel design, allowing you to spin it to access your devices. Moreover, spinning could help with your stress. Many people fiddle with something out of habit when they get bored or stressed. So the MagEZ Slider could come in handy. If you want to put the charger at a fixed angle, press the little button on the side to disable the spinning.
Additionally, the charger makes this clock-ticking sound when it spins, which may also help calm your emotions.
To summarize, the MagEZ Slider 2 is a compact, versatile 3-in-1 wireless charger for iPhone, AirPods, and Apple Watch. It can work as a magnetic phone stand at your desk. Its detachable mobile power bank and Apple Watch charger make charging on the go convenient. Also, it spins like one of those stress-relief toys.
For the latest gadget and tech news, and gadget reviews, follow us on Twitter, Facebook and Instagram. For newest tech & gadget videos subscribe to our YouTube Channel. You can also stay up to date using the Gadget Bridge Android App. You can find the latest car and bike news here.


 Step 2:
 CF.lumen is a great display management app for Android. It changes the colour temperature of the screen to suit the surrounding conditions, thereby reducing the strain on your eyes. One of the features that CF.lumen provides is the ability to lock your phone in day mode in bright light. Install the app on your smartphone and select the check box next to ‘Bright light’ under Light Sensor settings. This will increase the brightness on your Android phone.


 Step 4:
 Step 4:
 Step 4:
 Step 5:
 Step 4:
 Step 5:


 You will find the bumper upfront of the Xiaomi Robot Vacuum Mop 2i, which has sensors all around it. Above and bottom, too. On the top, you will get a power button, a home button and a camera that will map the whole house or area, which it needs to clean. Behind this is a flat panel that can be easily lifted. This hides the dust container (with 450ml capacity) that can be easily removed, cleaned and reinstalled.

 Underneath there is a powerful 2,200Pa suction motor vent that can pick up the tiniest dust particles with ease. Here you will also get a sweeper that pushes the dirt toward the suction vent and located at the bottom back is the wet mop. You can fill it with water (up to 270ml) and it will wet mop the area as well.
 With it comes a charging station that can be placed up against any wall near a power outlet and the Xiaomi Robot Vacuum Mop 2i will go back to it on its own, to charge.
Read Also:
With it comes a charging station that can be placed up against any wall near a power outlet and the Xiaomi Robot Vacuum Mop 2i will go back to it on its own, to charge.
Read Also: 


 The MagEZ Slider 2 has no projecting bracket, but it can function as a phone stand. Simply snap your phone to the charger to get a comfortable 45-degree viewing screen. The charger can magnetically hold your iPhone in portrait mode for quick message glancing or landscape mode for hands-free video streaming.
 As mentioned before, the MagEZ Slider 2 is very small, so you can take it with you when travelling. But the 3-in-1 wireless charger also works in another way to charge your devices on the go.
With a detachable MagSafe power bank, you can charge your iPhone while on the go to get through the day. Just slide the power bank (4000mAh) out, snap it to the back of your phone, and enjoy 7.5W fast and stable wireless charging.
As mentioned before, the MagEZ Slider 2 is very small, so you can take it with you when travelling. But the 3-in-1 wireless charger also works in another way to charge your devices on the go.
With a detachable MagSafe power bank, you can charge your iPhone while on the go to get through the day. Just slide the power bank (4000mAh) out, snap it to the back of your phone, and enjoy 7.5W fast and stable wireless charging.
 The MFi-certified Apple Watch charger can be unplugged too. It can charge any Apple Watch model at 5W. And with a universal USB-C connector, you can plug it into your laptop’s or iPad’s USB port to charge your watch.
Many people who own a 3-in-1 wireless charger still feel the need to have a portable charger for their iPhone, which they rely so much on and their Apple Watch, which doesn’t last long. And the MagEZ Slider 2 is the ideal solution.
The MFi-certified Apple Watch charger can be unplugged too. It can charge any Apple Watch model at 5W. And with a universal USB-C connector, you can plug it into your laptop’s or iPad’s USB port to charge your watch.
Many people who own a 3-in-1 wireless charger still feel the need to have a portable charger for their iPhone, which they rely so much on and their Apple Watch, which doesn’t last long. And the MagEZ Slider 2 is the ideal solution.
 Another feature that makes the MagEZ Slider 2 so unique is that it has a 360-degree carousel design, allowing you to spin it to access your devices. Moreover, spinning could help with your stress. Many people fiddle with something out of habit when they get bored or stressed. So the MagEZ Slider could come in handy. If you want to put the charger at a fixed angle, press the little button on the side to disable the spinning.
Additionally, the charger makes this clock-ticking sound when it spins, which may also help calm your emotions.
To summarize, the MagEZ Slider 2 is a compact, versatile 3-in-1 wireless charger for iPhone, AirPods, and Apple Watch. It can work as a magnetic phone stand at your desk. Its detachable mobile power bank and Apple Watch charger make charging on the go convenient. Also, it spins like one of those stress-relief toys.
For the latest
Another feature that makes the MagEZ Slider 2 so unique is that it has a 360-degree carousel design, allowing you to spin it to access your devices. Moreover, spinning could help with your stress. Many people fiddle with something out of habit when they get bored or stressed. So the MagEZ Slider could come in handy. If you want to put the charger at a fixed angle, press the little button on the side to disable the spinning.
Additionally, the charger makes this clock-ticking sound when it spins, which may also help calm your emotions.
To summarize, the MagEZ Slider 2 is a compact, versatile 3-in-1 wireless charger for iPhone, AirPods, and Apple Watch. It can work as a magnetic phone stand at your desk. Its detachable mobile power bank and Apple Watch charger make charging on the go convenient. Also, it spins like one of those stress-relief toys.
For the latest