Online poker has reached a new height of popularity these days. Since it provides convenience and accessibility to players across the world, more and more players are joining this digital platform. However, just like any online activity involving money, players need to exercise caution and implement smart safety practices. There are lots of scams online that are waiting to trap new players. Plus, players can get carried away when playing this card game. So, here are some important safety tips that players can use to be safe when playing poker online.
Use Unique and Complex Passwords
One of the first lines of defence is creating strong passwords that are unique for each poker site. Avoid using simple passwords based on dictionary words, names, birthdays, or patterns like “123456”. Ideal passwords are 12-14 characters long, with a mix of random letters, numbers, and symbols. Consider using a password manager app to generate and store complex passwords. Enable two-factor authentication as an added layer of security.
Limit Personal Information Shared
When signing up on poker sites, provide only necessary personal details like name, email, and contact number. Avoid sharing sensitive information like government IDs, social security numbers, or financial documents unless absolutely mandatory for legal compliance. Be wary of random requests for personal data. Check the authenticity and security of payment options before entering your credit card or bank details.
Use E-Wallet Services for Transactions
When you want to play
poker hands at an online poker platform, you should use e-wallets as a payment option. Linking poker site accounts directly to bank accounts or cards can expose your financial information. For deposits and withdrawals, use intermediary e-wallet services like PayPal, Neteller, or Skrill. This adds a layer of separation between gambling transactions and personal accounts. Keep a limit on the e-wallet balance to contain losses.
Install Antivirus and Firewall Software
Reputable antivirus software like Norton or McAfee and a firewall are essential to guard against viruses, malware, and cyberattacks aimed at stealing personal data. Schedule regular scans to detect threats. Keep software updated and enable auto-updates. On mobile, only use official poker apps from Google Play Store or Apple App Store. Avoid sideloading risky third-party apps. Plus, check the website name carefully as scammers tweak a few alphabets to pose as a reputable site.
Be Wary of Suspicious Links and Downloads
Exercise caution before clicking on links or downloading attachments sent via chat on poker sites. These could direct to phishing sites or contain malware. Verify the sender’s identity before engaging. Check the URL for misspellings or odd domains. Scan files using antivirus software before opening. When in doubt, delete immediately. Fraudsters lure players with exciting bonuses and promotional offers. One should check all terms and conditions and the genuineness of the bonuses before hitting that sign-up button.
Activate VPN Protection
Activating a Virtual Private Network (VPN) encrypts your internet traffic and masks your IP address and location. Use VPNs when playing on
mobile phones. This prevents snooping on your online activities and blocks geo-restricted poker sites. VPNs also provide malware and phishing protection. Look for premium VPNs that do not store user logs or activity data. There are lots of free VPN services, but we suggest using the premium to get assured protection.
Avoid Public Wi-Fi for Poker Apps
Public Wi-Fi hotspots like cafes are extremely risky for playing poker apps or accessing accounts. Avoid logging in or making transactions, as the connection is unsecured and prone to eavesdropping or man-in-the-middle attacks. Never access sensitive information or online platforms, including monetary transactions, on such unsecured networks. Only play poker on reputable private Wi-Fi or secure cellular data.
Monitor Your Credit Reports
Routinely check credit reports from Equifax, Experian, and TransUnion for any unrecognized accounts or transactions related to identity theft. Place a credit freeze if needed. Immediately report unauthorized activity or accounts opened in your name. Additionally, keep checking your poker account for suspicious withdrawals.
Research the Reputation of Poker Sites
Only create accounts and play on regulated online poker sites with transparent ownership, licensing, and responsible gambling policies. Research sites on forums for red flags. Registered sites display licensing details on their home pages. Be wary of brand-new sites with no reputation – these have higher risks. This doesn’t mean that new poker sites are reputable. However, one should do detailed research and read real customer reviews and YouTube
videos before wagering real money.
Gamble Responsibly Within Your Budget
Never play with rent or grocery money in hopes of winning big. Only use discretionary income that would not severely impact your life if lost completely. Set a strict budget for poker spending and loss limits. Take regular breaks, and do not chase losses irrationally. Seek help if gambling becomes unhealthy.
Online poker offers an addictive rush but also requires players to implement prudent safety measures. From strong passwords to protected internet connections and gambling budgeting, various steps can help minimize the risks involved. Being informed is key – diligently follow these tips here for a secure, responsible, and enjoyable online poker experience.
For the latest
gadget and tech news, and
gadget reviews, follow us on
Twitter,
Facebook and
Instagram. For newest
tech & gadget videos subscribe to our
YouTube Channel. You can also stay up to date using the
Gadget Bridge Android App. You can find the latest
car and bike news here.


 Step 1: Unlock your Apple Watch and launch the Settings app.
Step 2: Tap on Display & Brightness.
Step 3: Select Always On.
Step 4: Turn off the toggle switch to disable Always On Display.
Step 1: Unlock your Apple Watch and launch the Settings app.
Step 2: Tap on Display & Brightness.
Step 3: Select Always On.
Step 4: Turn off the toggle switch to disable Always On Display.
 Step 1: Launch the Apple Watch app on your iPhone.
Step 2: Tap on Display & Brightness.
Step 3: Select Always On.
Step 4: Turn off the toggle switch to disable Always On Display.
Step 1: Launch the Apple Watch app on your iPhone.
Step 2: Tap on Display & Brightness.
Step 3: Select Always On.
Step 4: Turn off the toggle switch to disable Always On Display.

 Step 3:
 Step 4:
 Step 1: Launch
  to begin on October 8: Festive Sale details inside")


 Review: Clean listening experience")


 Step 3:
 Step 4:
 Step 5:
 Step 6:
 Step 3:
 Step 5:
 Step 6:
 Step 7:
  Step 8:
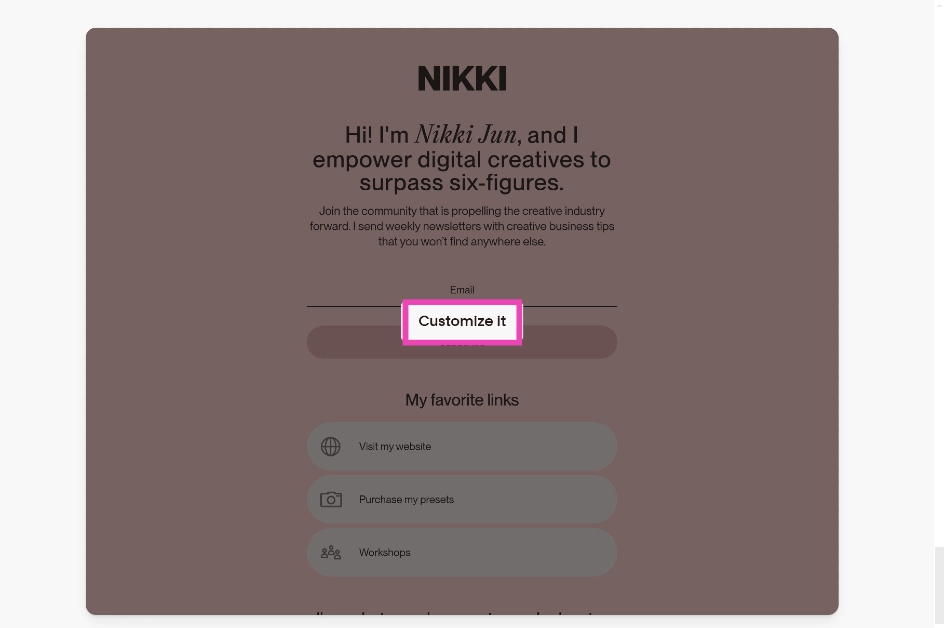
 Step 3: Select a card template that suits your preferences and click on Customise it.
 Step 4: Add your logo, name, description, links, and other details to the card. You can also customise the design and colour theme of the card.
 Step 5: Check the mobile and web previews of the card.
Step 6: Hit Share once you’re done.
Step 5: Check the mobile and web previews of the card.
Step 6: Hit Share once you’re done.
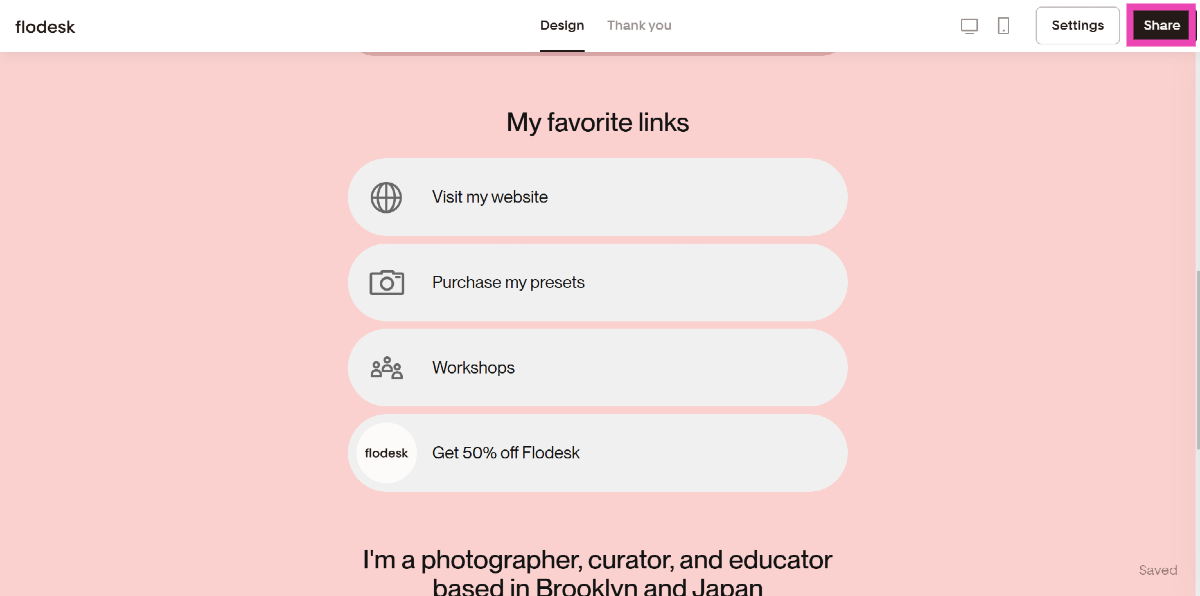 Step 7: Copy the link in the box and paste it into your Instagram bio.

 Step 6:


 If your Apple Watch isn’t charging at a rapid pace, it could be due to physical damage to the charger. Check the charging puck and the wire connected to it for any damage. If the wire has frayed ends, the charging speed will fall drastically. Replace the damaged part with Apple-authorised accessories to restore the charging speed and make your smartwatch charge past 80%.
 Step 1:
 If the methods mentioned above don’t work out for you, take your Apple Watch to an authorised service centre. It is possible that the issue is hardware-related. You can


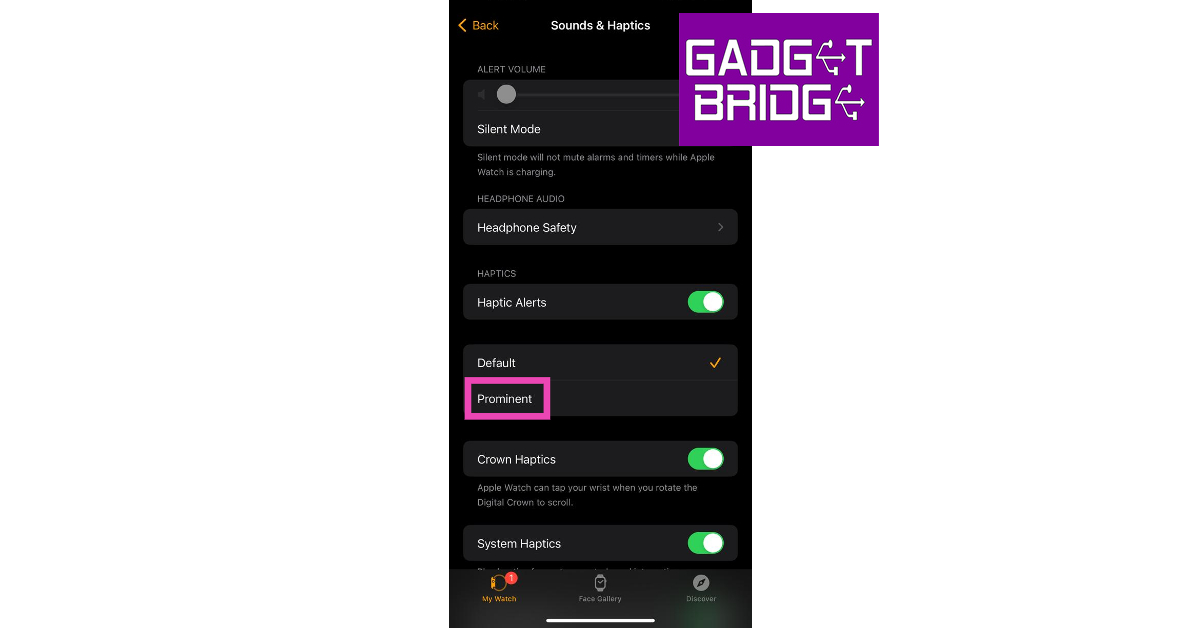
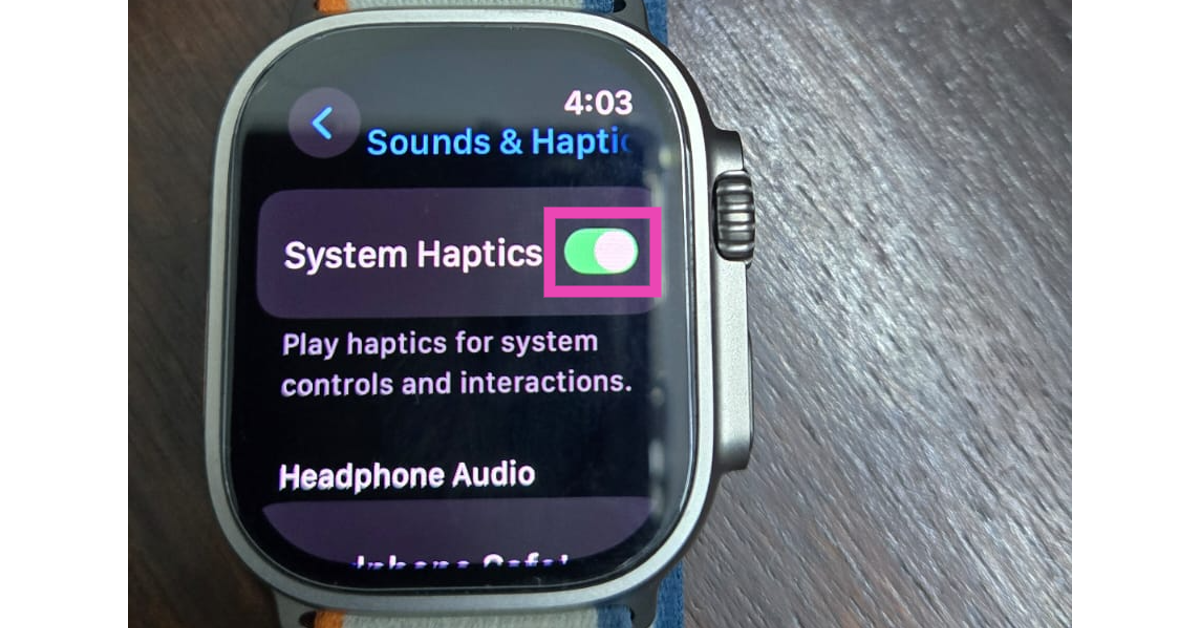
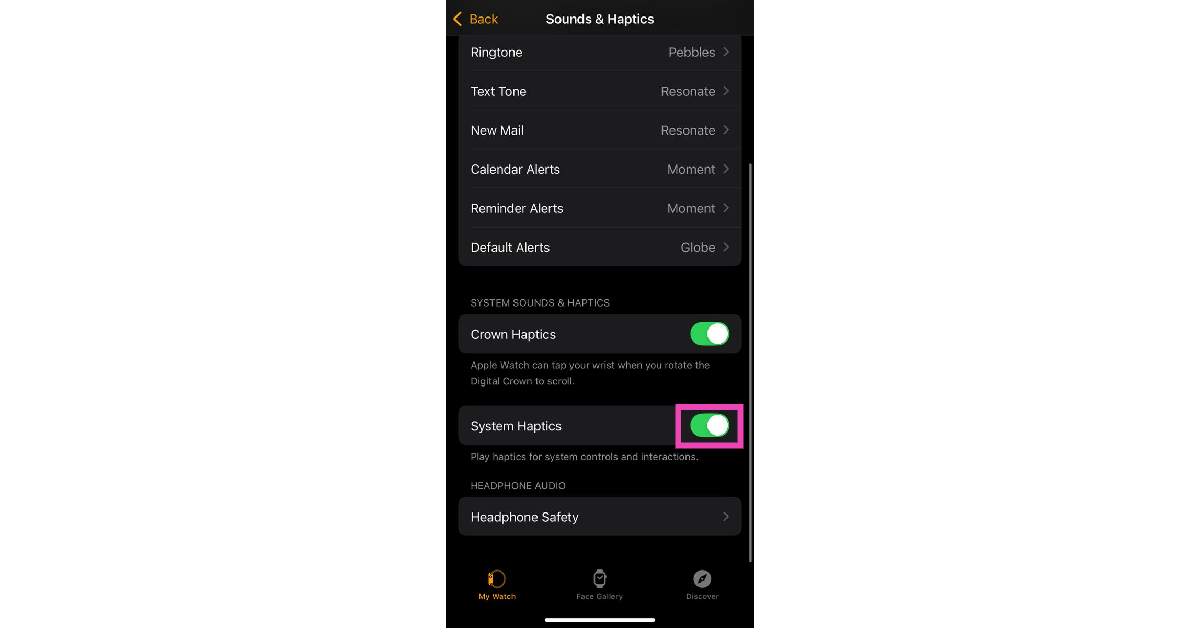
 Step 3:
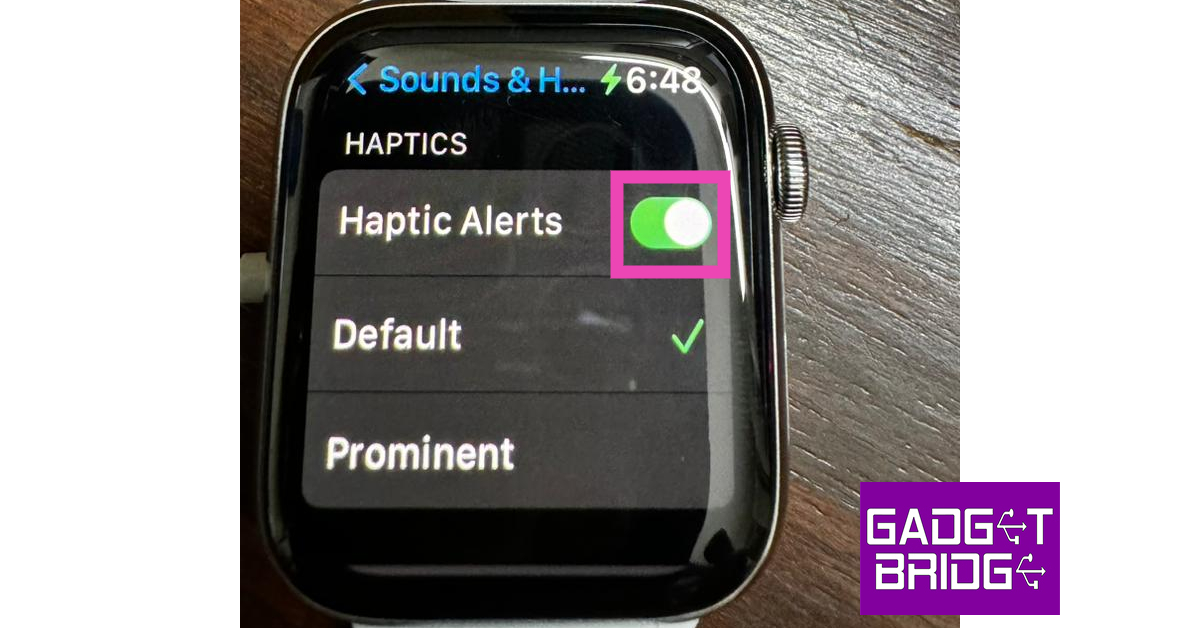
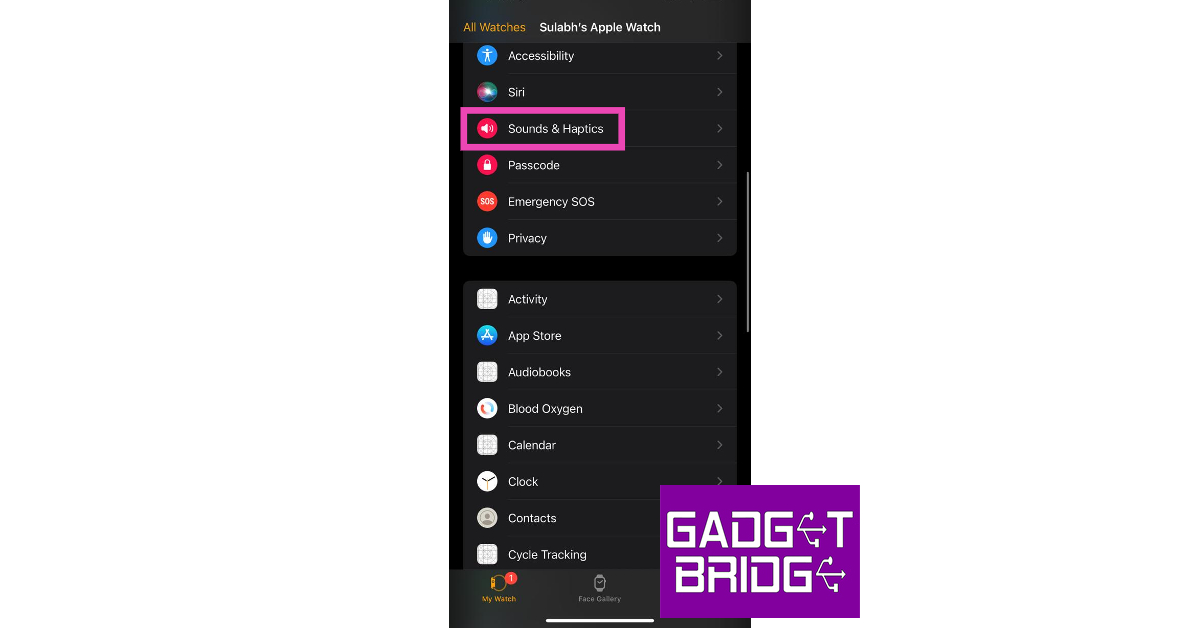 Step 3:

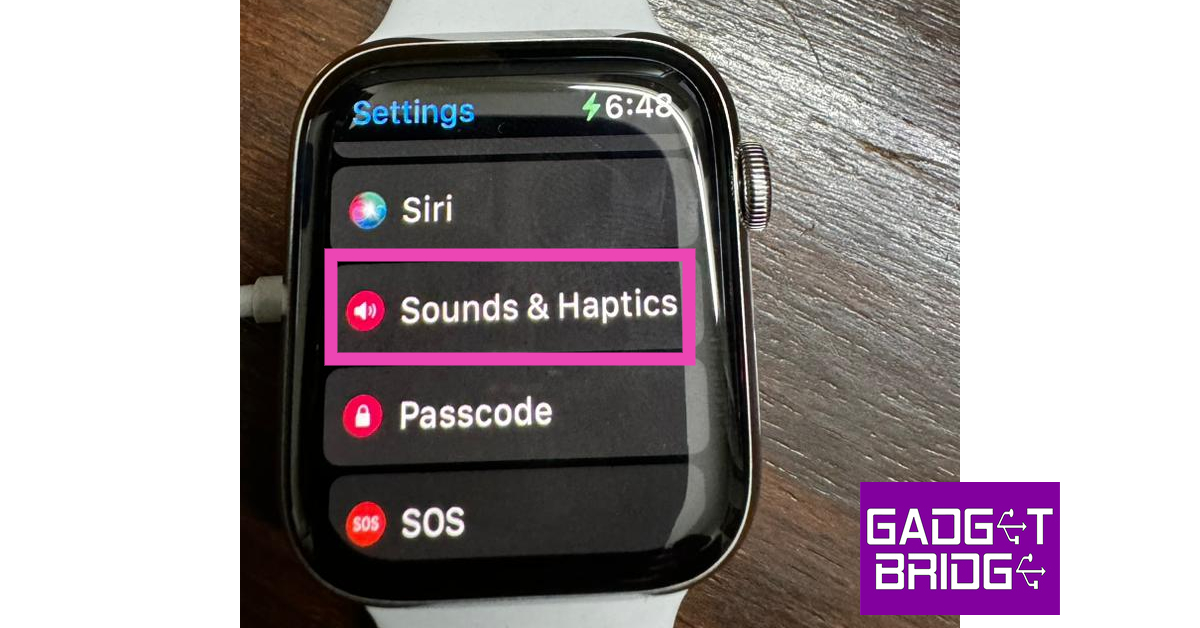
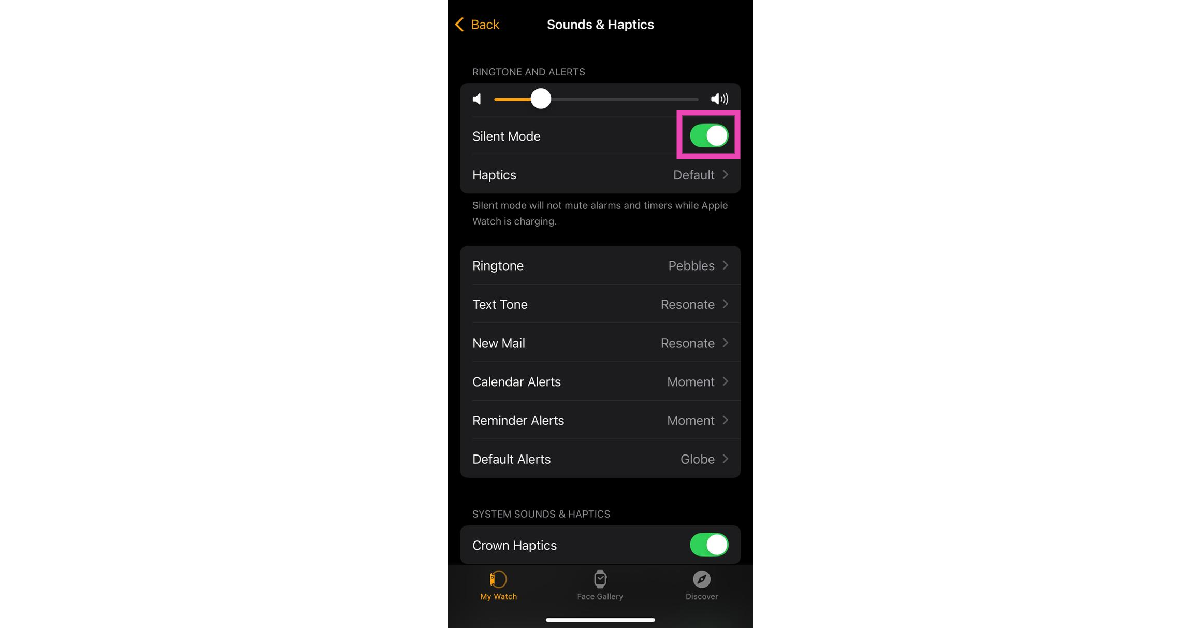
 Alternatively, you can go to Settings>Sound & Haptics and turn on the toggle switch next to Silent Mode.
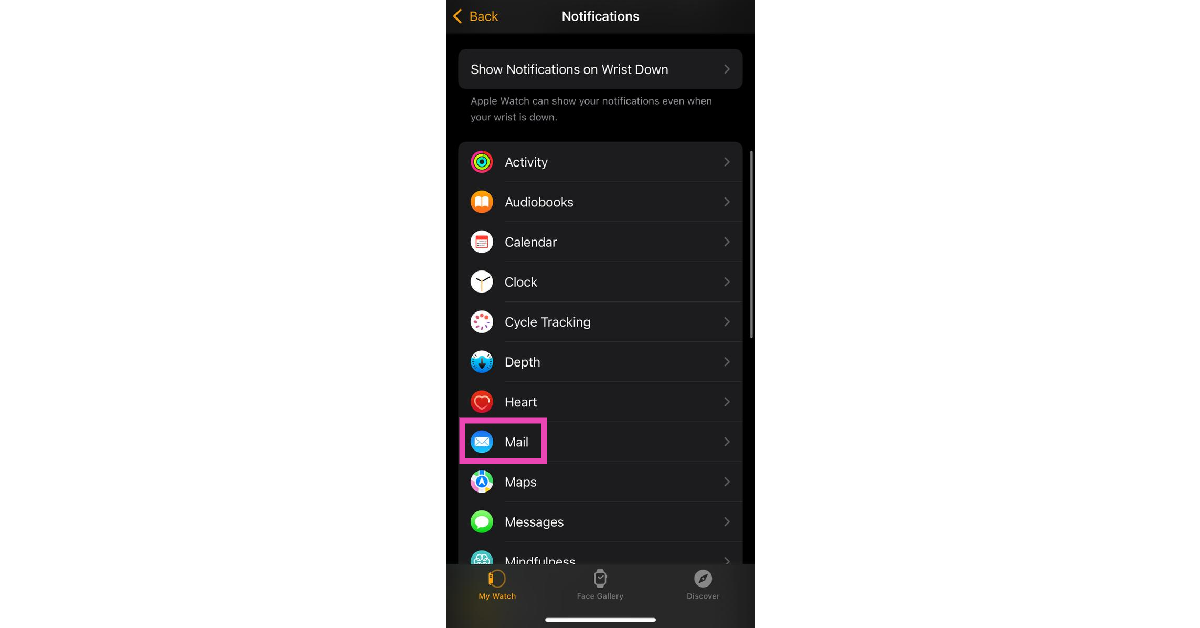
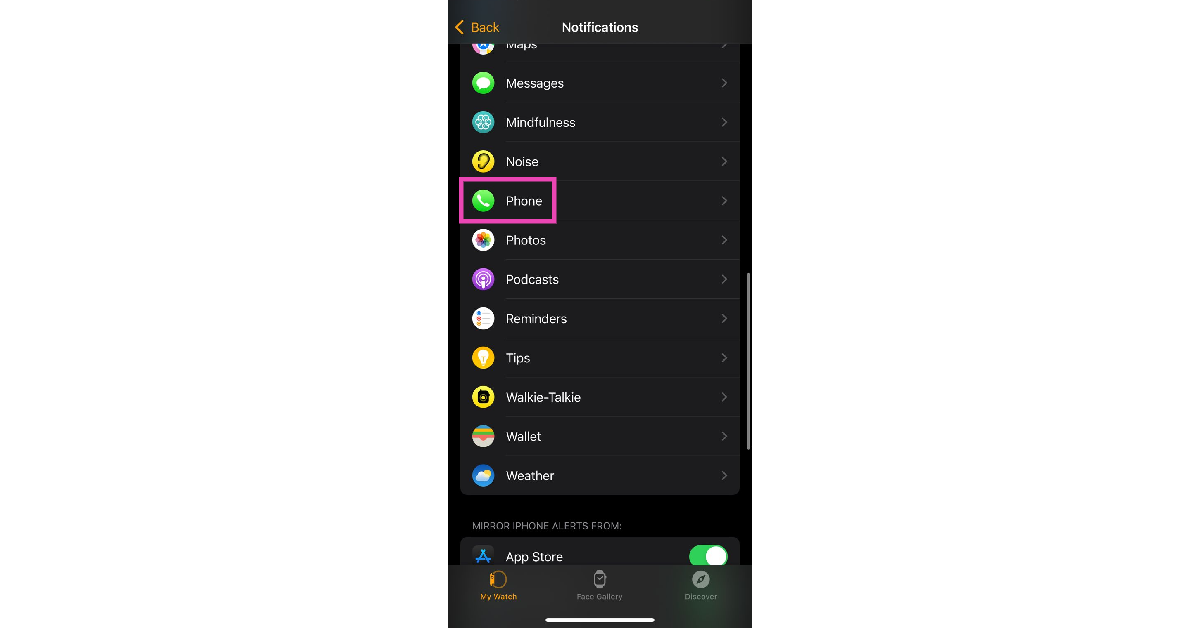
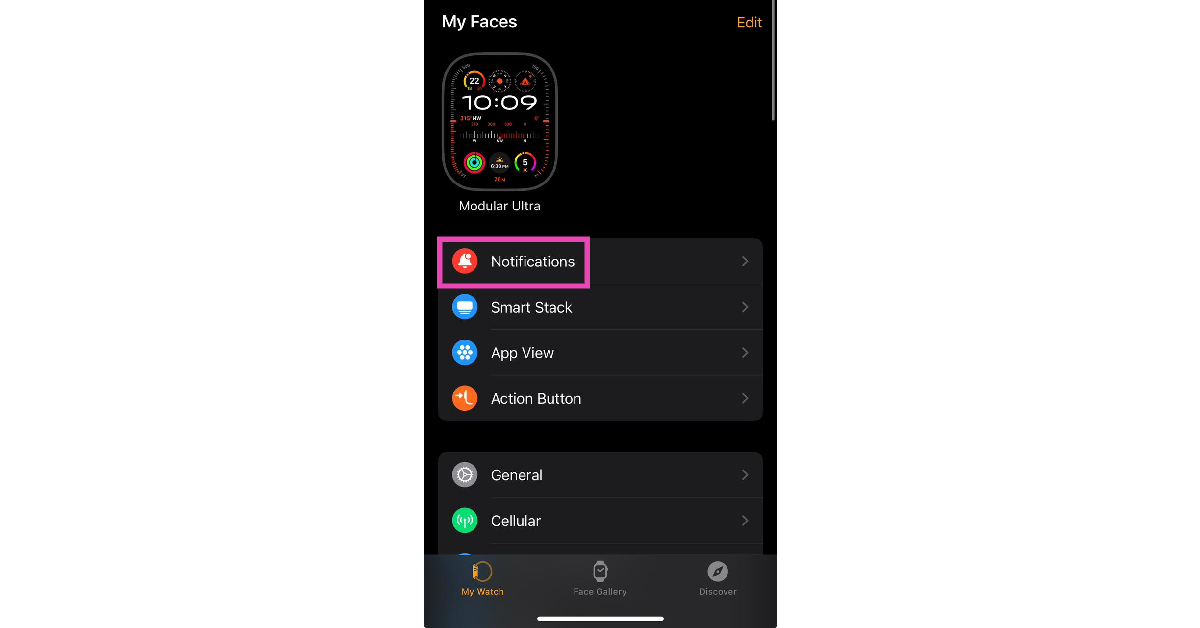 Step 3: Select an app.
 Step 4: Tap on Custom.
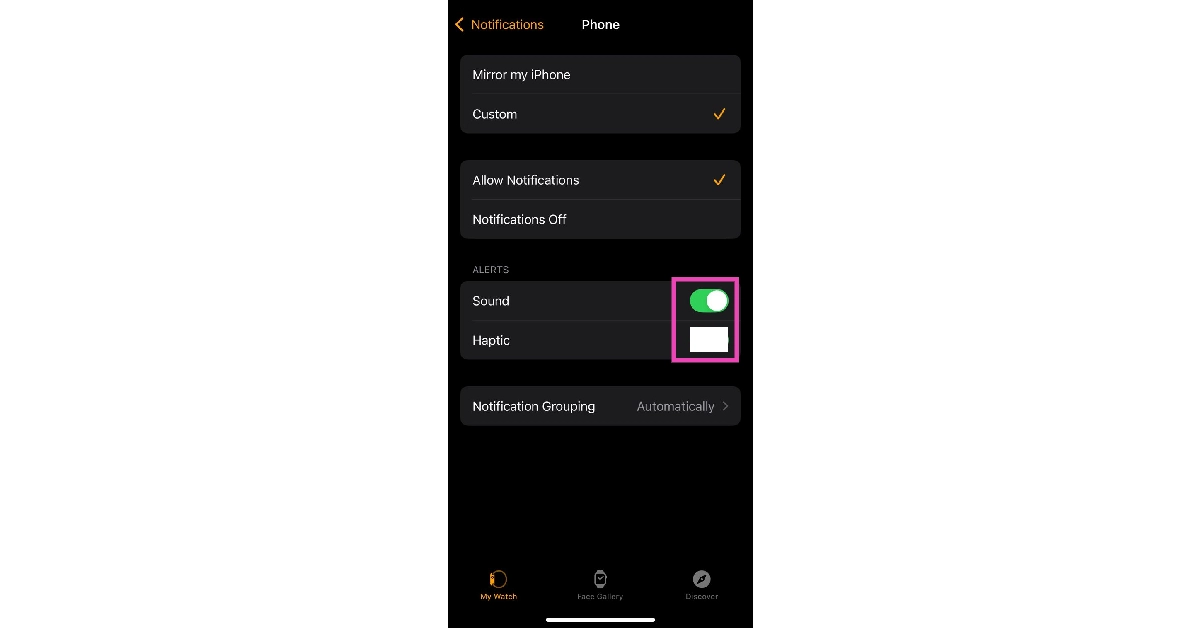
 Step 5: Make sure there’s a tick next to Allow Notifications.
Step 6: Scroll down and turn on the toggle switch next to Haptic.
Step 5: Make sure there’s a tick next to Allow Notifications.
Step 6: Scroll down and turn on the toggle switch next to Haptic.

 Step 4: Tap on Custom.
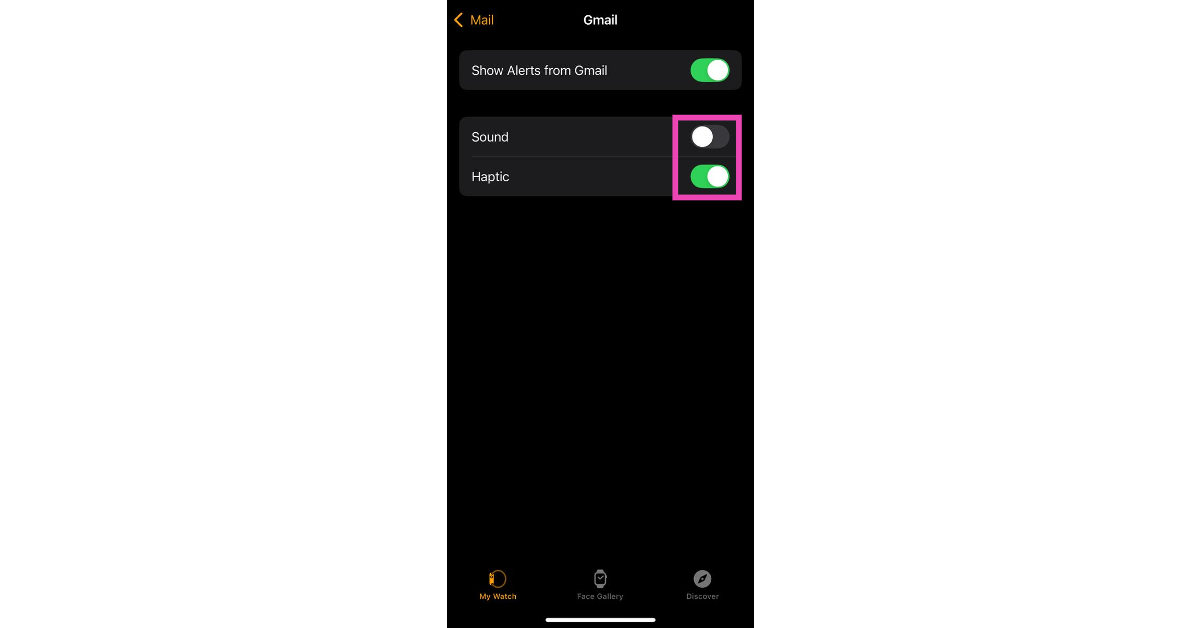
 Step 5: Turn on the toggle switch next to Sound and turn off the toggle switch next to Haptic.
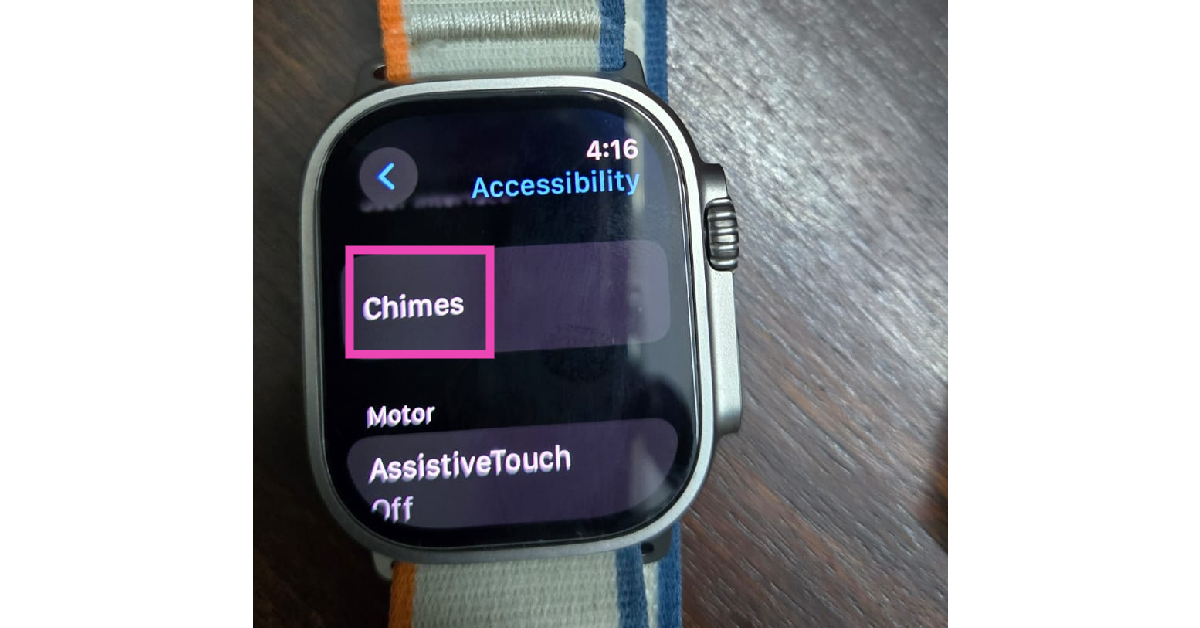
 Step 2: Tap on Chimes.
 Step 3: Turn on the toggle switch next to Chimes.
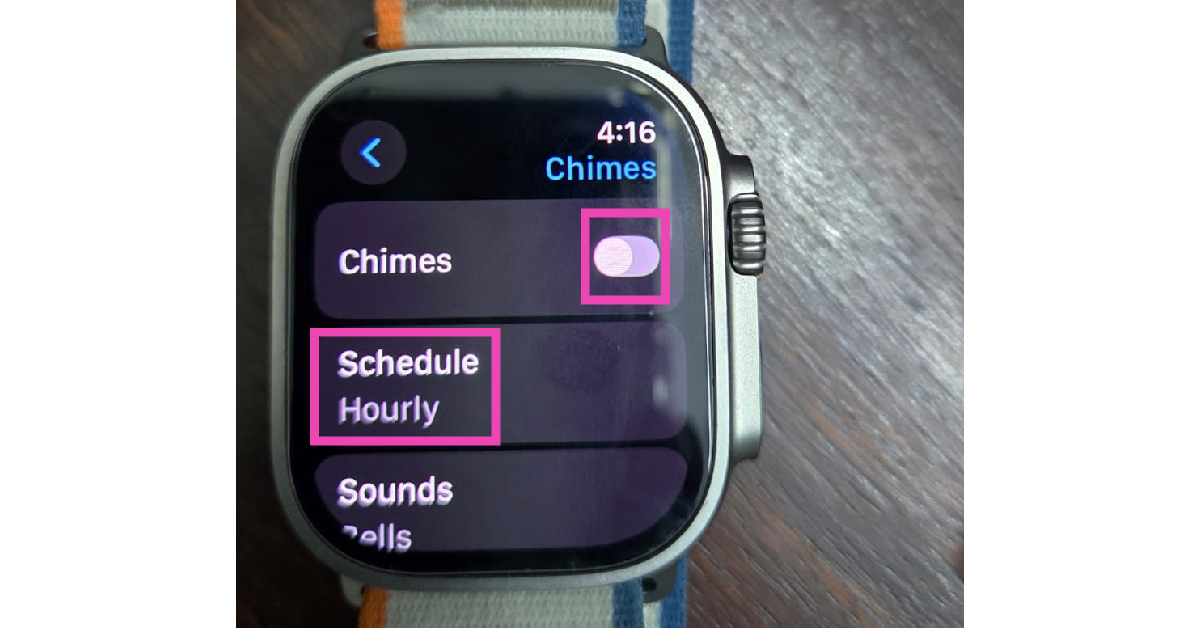 Step 4: Tap on Schedule.
Step 5: Set the frequency for vibrational alerts.
Step 4: Tap on Schedule.
Step 5: Set the frequency for vibrational alerts.


 Step 2:
  Step 3: