Grand Theft Auto: The Trilogy – The Definitive Edition has been made available on Netflix for iOS and Android platforms.
There will be a total of three games.
These games will be available for free to the Netflix subscribers.
Gamers, Rockstar Games has good news for you. Grand Theft Auto: The Trilogy – The Definitive Edition is currently playable on Netflix. The game developer has officially revealed that a total of three great games are included in this bundle. They can be easily played on both iOS and Android mobile platforms. The games are available to all Netflix subscribers without charge.
Rockstar Games has officially announced that Grand Theft Auto: The Trilogy – The Definitive Edition is now available for Netflix Members to enjoy as part of their subscription, and also now available on iOS and Android devices.
The mobile version of GTA will include three classic games Grand Theft Auto III, Grand Theft Auto: Vice City, and Grand Theft Auto: San Andreas.
As per the company, all the three classic games are accessible to all the Netflix subscribers. In addition to this users who do not have a Netflix subscription can also play games on their devices. However, they have to purchase the games through the App Store or Play Store.
Rockstar Games says, “These mobile versions of the genre-defining classics Grand Theft Auto III, Grand Theft Auto: Vice City, and Grand Theft Auto: San Andreas are all available to be purchased individually and feature additional improvements, including a new Classic Lighting mode that restores the look and feel of the sky in the original games.”
Note that Grand Theft Auto: The Trilogy – The Definitive Edition is also playable on other platforms like PlayStation 5, PlayStation 4, Xbox Series X|S, Xbox One, Nintendo Switch, and PC via the Rockstar Games Launcher, Steam, and Epic Games store.
Besides this Rockstar Games also released the first trailer of GTA 6. Grand Auto Theft 6 will be officially released in 2025. It will come to PlayStation 5 computer entertainment systems and Xbox Series X|S games and entertainment systems in 2025. Note that Grand Auto Theft 6 aka GTA 6 is a successor of GTA 5 which was introduced in the year 2013. It’s been a decade since GTA 5 was released.
Any smart device is no good without apps. This includes your Smart TV. Over the years, the app marketplace for Smart TVs has grown tremendously. Not only can you download every streaming and OTT app under the sun, but you can also enjoy apps related to fitness, gaming, and lifestyle on your large-screen TV. The process for installing apps on your Smart TV is exactly the same as your smartphone. Simply launch the Play Store and browse your way through the sea of apps. But what if your TV does not have the app marketplace? You don’t need to worry, because in this article we show you how to install the Google Play Store on your Smart TV.
Why can’t I find the Google Play Store on my Smart TV?
So, you just purchased a Smart TV but can’t find the Google Play Store on it? You might want to check the operating system running inside it. It is very rare for an Android TV to not come pre-installed with the Play Store. Some Smart TV and streaming box manufacturers have their own operating systems. For example, Samsung has Tizen OS, LG has WebOS, and Amazon has Fire TV. These operating systems have their own app marketplaces.
Google Play Store is one of the largest app marketplaces, not just for smartphones but for Smart TVs as well. Even though it isn’t pre-installed on non-Android TVs, some devices may still be able to run it, albeit in a limited capacity. This can be done via a process called ‘sideloading’. Read along to learn how you can go about it.
Install Google Play Store on your Smart TV
Step 1: Hit the menu button on your TV remote and go to Settings.
Step 2: Go to Security and Restrictions.
Step 3: Enable Unknown sources for app installation.
Step 4: On your PC, download the APK for the Google Play Store (Smart TV). Make sure you download this APK from a trusted source.
Step 5:Transfer the APK to a USB drive and plug it into your TV.
Step 6: On your TV, switch to the external storage tab.
Step 7:Open the APK file and follow the installation process.
The Google Play Store app will be installed on your Smart TV.
Frequently Asked Questions (FAQs)
Can I install the Google Play Store on non-Android TVs?
No, you can install the Google Play Store only on TVs that run Android OS. For example, Samsung Smart TVs that run Tizen OS will not be able to use the Play Store.
Why is my Smart TV not downloading any apps?
If your Smart TV is unable to download any apps, check the WiFi connection and restart the device. Also, make sure that your TV has enough storage to download new apps.
How do I install the Google Play Store on my Android TV?
If you don’t have Google Play Store on your Android TV, you will need to sideload it by downloading an APK and transferring it to your TV using a USB drive.
This is how you can install the Google Play Store on your Smart TV. Once it has been installed on your device, you can use it to browse and download a diverse range of apps on your TV. If your Smart TV does not run Android OS, we’d suggest getting an Android-enabled set-top box or streaming device.
Only videos recorded from the front camera are allowed to be posted.
The video notes are 2 seconds long.
Meta-owned photo and reels sharing platform Instagram is upgrading. Its parent company has brought a slew of new features for improved user experience on its platform. The company is now enabling its users to share Video Notes. The social media platform brought Notes to Instagram last year which allowed you to post text or emojis as your status. But from now onwards you would be able to post a two-second looping video Notes. The feature works similar to how you share status on WhatsApp.
Previously Instagram only allowed its users to add music, text or emoticons to Notes. But now the social media platform has brought Video Notes to its platform as an extension of its Status updates feature akin to WhatsApp. The Instagram users will be able to share a two-second looping video notes with their Close Friends list or with other users who follow them in common.
Now you all might be wondering what was the need to add a video feature in Notes when we can already do it on the Stories. Of course, you can share video stories on Instagram, But in Video Notes you are allowed to share a video of 2 seconds duration which is a very short duration. For text Notes, one is also allowed to enter a note of up to 60 characters. In addition to this, you are only allowed to post Video Notes taken from your front/selfie camera. Also, it is necessary the selfies video should have been recorded from the app’s camera app.
Note: You cannot upload a video from the phone’s camera gallery.
To add a Video Notes one must first open their DM. Then at the top of your Chats list, tap your profile picture. After that tap Note… and enter a note, music or add a video with the front-facing camera.
To add a video tap your profile picture and then tap the blue button at the bottom to begin recording your video. Videos can only be 2 seconds long. After that select to share your note with followers that you follow back or your close friends. Lastly, tap Share in the top right to share your note. One can also delete their Notes by tapping on it, then tapping Delete note. Just like any other Notes, the status will be visible to you and others at the top of the inbox for up to 24 hours. After this time, your note will no longer be visible on Instagram. Moreover others can also reply to your Note just like Instagram Stories and WhatsApp Status. This will initiate a chat between you and them only. Others cannot see who’s viewed or replied to your note.
Besides this Instagram is also said to be working on a new privacy tool that will allow users to control who can see the Likes they have on posts and reels.
Garena Free Fire is a battle royale game with regular awards and tournaments to keep players interested. If you play Garena Free Fire, you should be aware of the redeem codes that are released on a daily basis. However, because the battle royale game is banned in India, players from other countries can use the Free Fire Redeem codes daily. If you’re unfamiliar with the Garena Free Fire redeem codes or don’t know how to get them, we’ve put together a step-by-step guide to help you redeem them. Check out Garena Free Fire Redeem Codes for 15 December 2023.
The Free Fire redeem codes are a great way to get free stuff. These are 12-digit codes that contain alphabets and numbers, as well as an expiration date and time. Because the Garena FF redeem codes cannot be used more than once, you should hurry to the redemption page to claim your free reward before someone else does. To get a free reward, all you have to do is go to reward.ff.garena.com/en, which is the official redemption page. Also, keep an eye on this space for daily updates on Garena Free Fire redemption codes and rewards.
In This Article
Garena Free Fire Redeem Codes Today 15 December 2023
NPYFATT3HGSQ
XZJZE25WEFJJ
6KWMFJVMQQY
GMCPW2D2WKWF2
HNC95435FAGJ
MCPW2D1U3XA3
BR43FMAPYEZZ
FFCMCPSJ99S3
EYH2W3XK8UPG
UVX9PYZV54AC
FF11NJN5YS3E
FFCMCPSEN5MX
FFICJGW9NKYT
FFAC2YXE6RF2
FF9MJ31CXKRG
FFCO8BS5JW2D
ZZZ76NT3PDSH
FF10617KGUF9
FFCMCPSGC9XZ
MCPW3D28VZD6
V427K98RUCHZ
FFCMCPSUYUY7E
How to Get Free Fire Redeem Codes for Garena on 15 December 2023?
MWC 2024 will be held between February 27 and February 29.
Nothing is rumoured to launch Nothing Phone (2a) or the Nothing Phone (3).
Well, the London-based tech company Nothing will surely launch a new smartphone in the market soon. And what better place than MWC to showcase your new products? MWC 2024 is just a few months away and Nothing has already been announced that its next event will be hosted there. If speculations are to be believed, this time Nothing Phone 3 will arrive in the market before its scheduled time.
Nothing has started sending out Media Invites for its upcoming tech event. Viaa community post Rapid Zapper revealed that the Carl Pei-owned tech firm has confirmed that it will host its next event at MWC 2024. According to the community post the ‘Nothing to See’ event will be hosted on February 27 at the Mobile World Congress (MWC).
For those who are unaware, the MWC 2024 will take place in Barcelona from February 26 to February 29. What it will showcase is a secret but rumours suggest Nothing Phone (2a) or Nothing Phone (3). Previously in 2022, Carl Pei showcased the Nothing Phone (1) prototype during the MWC 2022 tech event.
Recently Nothing Phone (2a) has been spotted on the BIS website indicating an imminent launch. It will be a toned-down variant of Nothing Phone (2) priced affordably. Thus the company has not yet confirmed, but a recent leak indicated a new phone is coming. However, it is speculated that the rumoured Nothing smartphone would be the affordable Nothing Phone (2a). The alleged phone has been spotted on the Bureau of Indian Standards (BIS) website. The device went on the Indian regulatory list with the model number A142.
The report further shared that the listing also mentions a battery that may be different in size from the one found in the existing and previous models and goes by the model number NT03.
Speculations further suggest that the upcoming smartphone could use a mid-range MediaTek Dimensity or a Qualcomm processor. Moreover, it could feature a 6.7-inch AMOLED display.
Pinned Messages allow users to pin a particular message to the top of the chat.
The feature works for both individual and group chats.
Also one can pin any type of message (including text, emojis and polls).
Additionally, users are permitted to pin one chat at a time though.
Popular instant messenger WhatsApp keeps on rolling out new WhatsApp features in order to make sure that it stays useful for its users. WhatsApp has added a new feature called Pinned Messages for individual chats and group conversations. The latest update arrives on the mobile versions of the app. The feature will allow users to pin a particular message to the top of individual or group chats by highlighting it. But one cannot keep a chat pinned forever, for a maximum of 30 days, a message can be pinned in the chat.
The Pinned Messages feature was announced through a post on X. The new feature will allow users to pin messages in chats, as a result, it will be easier to track down very important messages during the conversation giving fast access to old or important text in the chats. As of now, users are allowed to pin anything including files, videos, polls, photos, emojis, and text messages in individual or group chats. Also, the Pinned Messages can be unpinned at any moment. To pin a message one needs to long press ca chat and select Pin from the drop-down list.
As we mentioned text messages can be pinned for a limited duration. WhatsApp right now allows users to pin a chat for 24 hours, 7 days and 30 days. Note that in group chats only Admins have the authority whether to allow other participants to Pin messages or keep it limited to admins only.
WhatsApp is also making efforts to make its platform more safe for its users. Recently it rolled out the Secret Code feature to add another level of security to chats. The WhatsApp feature allows users to set a unique password that is different from a phone lock code. So when you set a password your chats will be hidden and inside a Locked Chats folder from the chat list. It can easily be done by a long press and one does not need to go through the chat settings to enable the secret code feature.
Garena Free Fire is a battle royale game with regular awards and tournaments to keep players interested. If you play Garena Free Fire, you should be aware of the redeem codes that are released on a daily basis. However, because the battle royale game is banned in India, players from other countries can use the Free Fire Redeem codes daily. If you’re unfamiliar with the Garena Free Fire redeem codes or don’t know how to get them, we’ve put together a step-by-step guide to help you redeem them. Check out Garena Free Fire Redeem Codes for 14 December 2023.
The Free Fire redeem codes are a great way to get free stuff. These are 12-digit codes that contain alphabets and numbers, as well as an expiration date and time. Because the Garena FF redeem codes cannot be used more than once, you should hurry to the redemption page to claim your free reward before someone else does. To get a free reward, all you have to do is go to reward.ff.garena.com/en, which is the official redemption page. Also, keep an eye on this space for daily updates on Garena Free Fire redemption codes and rewards.
In This Article
Garena Free Fire Redeem Codes Today 14 December 2023
VNY3MQWNKEGU
FFIC33NTEUKA
FFCMCPSBN9CU
FFBBCVQZ4MWA
ZZATXB24QES8
U8S47JGJH5MG
FFAC2YXE6RF2
How to Get Free Fire Redeem Codes for Garena on 14 December 2023?
Losing your smartphone is not only a financial setback but it also increases the risk of your personal data falling into malicious hands. If someone finds your phone and is successful in unlocking it, they can easily access your banking and financial apps. To reduce the chances of someone finding your phone, it is better to act quickly and get there before them. Luckily, modern smartphones are very easy to find. Today, we bring you the top 2 ways to track a Samsung phone when it is switched off.
Lost your phone? Here are all the possible ways to track it down
If you lost your Android phone, there are a couple of ways to track down its location and retrieve it. These methods work best when your phone is switched on and has Internet access. However, if it is turned off, you can still view the location it was in just before it died. Given your phone hasn’t moved since then, you can easily go to its last recorded location and retrieve it. As you can imagine, things get tricky if your phone is stolen and then turned off.
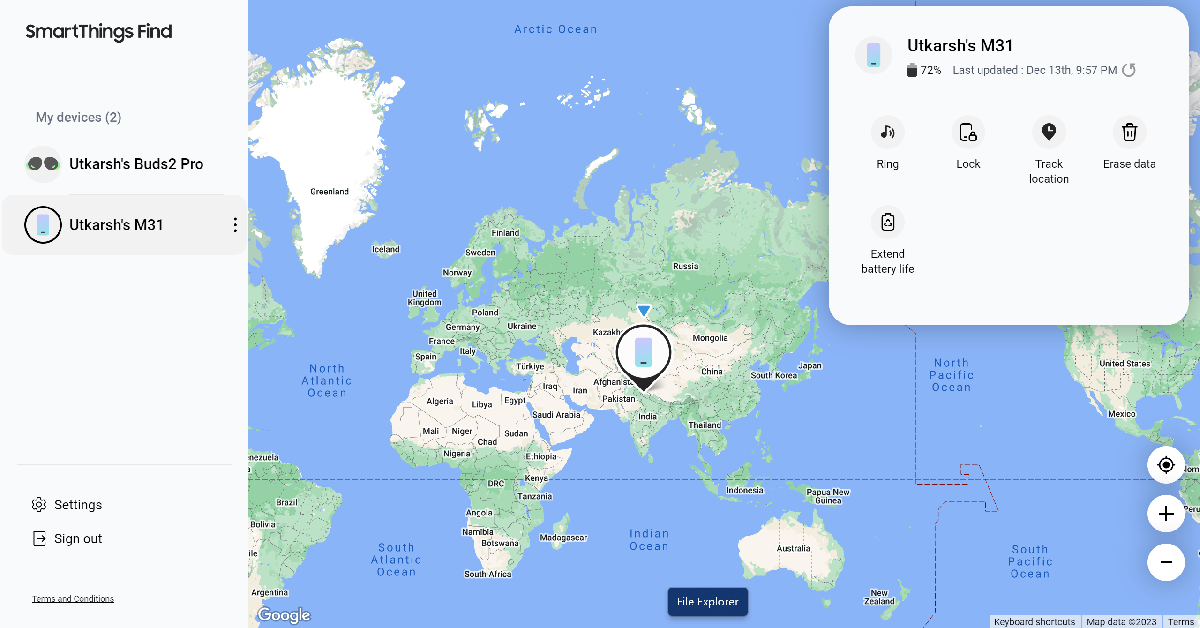
Samsung has its own ‘SmartThings Find’ service to locate lost smartphones, tablets, earbuds, and other Samsung devices. You need to use your registered email address to log into your Samsung account for it to work. Similarly, Google’s Find My Device works for all Android phones, including Samsung devices. Both of these services are very accurate and can display the exact location of the lost device on the map.
You can also use your phone’s IMEI number to track it. This requires submitting a police report for the lost phone and requesting the authorities to track it. Your phone’s network provider relies on the IMEI number to make contact with the device. When it finally makes contact, the authorities can triangulate its position using the nearest cell tower. It may seem obvious by now, but this method will not work when your phone is switched off.
Use SmartThings Find to track your lost Samsung phone when it is switched off
Samsung’s ‘Find My Mobile’ service is now ‘SmartThings Find’. In order to use this feature, it must be enabled on your phone beforehand. Here’s how you can use it to find your lost Samsung phone.
On your Samsung smartphone
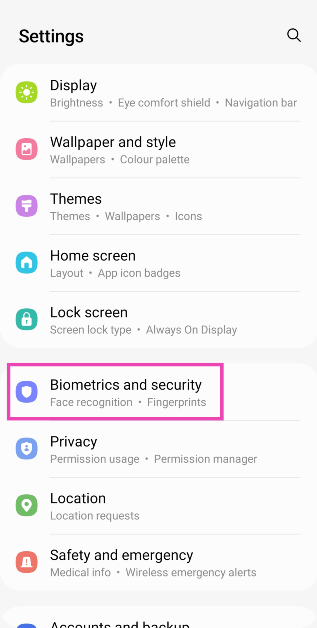
Step 1: Go to Settings and select Biometrics and Security.
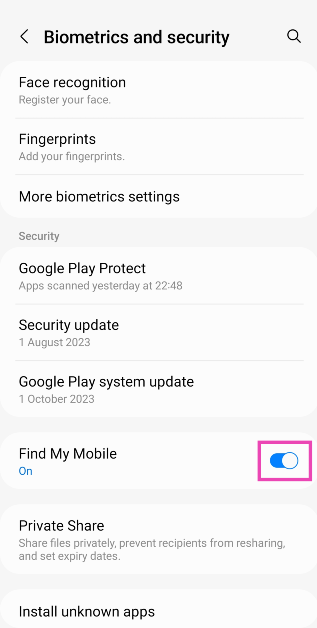
Step 2: Scroll down and turn on the toggle switch for Find My Mobile.
On your PC
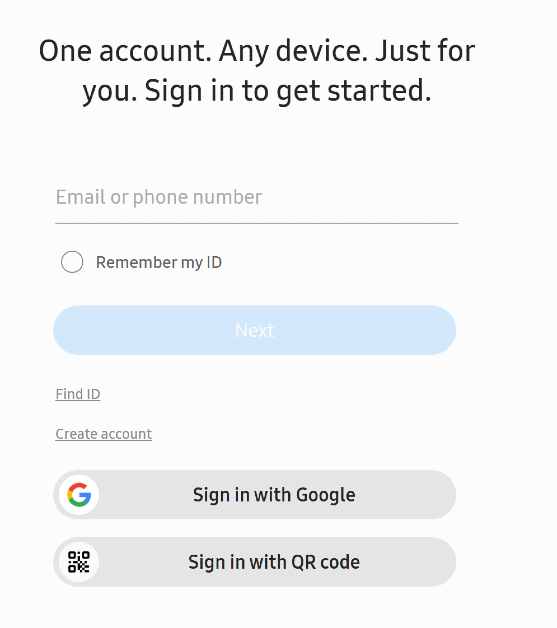
Step 1: Go to the SmartThings Find page and log in using your phone number or the registered email.
Step 2: Once you’re logged in, you will be able to see your device’s current location on the map. The box on the top right corner of the screen displays the remaining battery life on your device. If your phone is switched off, you will be able to see its last recorded location.
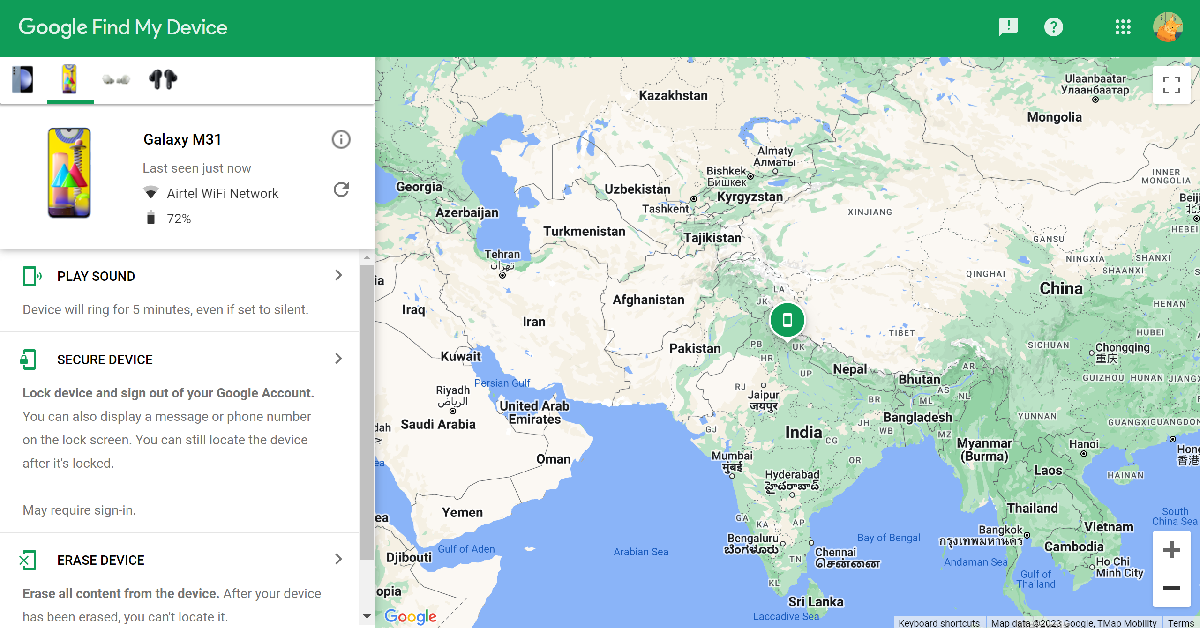
Use Google’s Find My Device
Google also has its own ‘Find My Device’ feature that can help you track your lost phone. Similar to SmartThings Find, Find My Device also displays the last recorded location of your phone in case it is turned off.
Step 2: Select your Samsung phone from the side menu.
Step 3: Find My Device will establish contact with your phone and show its current location on the map.
Frequently Asked Questions (FAQs)
Can I still track my phone if it is switched off?
You can track your Android phone even if it is switched off. Using Google’s Find My Device service, you can view its last recorded location before it died.
How do I track my Samsung phone if it is switched off?
You can use Google’s Find My Device to find your lost Samsung phone or even Samsung’s very own SmartThings Find. The latter even gives you the option to extend your lost phone’s battery life by remotely putting it in power-saving mode.
Can I track a phone that is turned off using its IMEI number?
Tracking using IMEI numbers only works through cell tower triangulation when the device makes or picks up a call. This makes it impossible to track when it is switched off.
These are the top 2 ways to track your Samsung phone if it is switched off. If you’re unable to track down your phone, Google’s Find My Device and Samsung’s SmartThings Find allow you to wipe all your personal data on it. Check out this article to learn how you can remotely log out of your Google Account on any Android device.
WhatsApp Messenger is the top free iPhone app on the App Store.
DSLR is the top paid iPhone app for iPhones.
Apple has announced this year’s most popular apps and games on Apple App Store in India. As per the tech giant, the best apps and games of 2023 have been selected by the App Store Editorial team for their ability to provide users with meaningful experiences and inspire cultural change.
Apple today revealed the winners of 2023 best apps and games in India, with year-end charts localised for users in more than 35 countries and regions. The 2023 charts are currently listed with year-end charts localised for users in more than 35 countries and regions. App Store’s Today tab includes the top free and paid apps and games, as well as the top Apple Arcade games. Furthermore, users can also discover the 2023 App Store Award winners.
“The App Store is the world’s safest and most vibrant app marketplace, recommending the best apps and games to its more than 650 million weekly visitors. With helpfully curated content from the App Store’s team of global editors, the Today, Apps, and Games tabs remain a daily destination for users to discover in-app events, original stories, in-depth interviews, tips and collections through easy-to-browse sections, and personalised content based on their interests,” while announcing the winners Apple said.
The gaming landscape for smartphones right now is better than ever before. Most gaming titles that do well on PC and consoles eventually find their way to the mobile platform. This is especially true for FPS and battle royale games like Fortnite, PUBG, COD, and more. As much as people enjoy the cutting-edge gameplay and detailed graphics on these titles, those who grew up in the 90s have a special place in their hearts for Super Nintendo games. If you’re wondering if there’s any way to play those games on your iPhone, you have come to the right place. So get ready to scratch the itch of nostalgia as we walk you through the process of installing and playing SNES Emulator on your iPhone.
How is it possible to play SNES games on an iPhone?
If you’ve ever browsed the App Store for retro games, you may have come across some cheap knock-offs or complete remakes of the titles for a new mobile platform. Either option isn’t able to recreate the feeling of the SNES console. But, there is one other option that may take some time but eventually delivers – an SNES emulator.
You may be wondering what an emulator even is. To put it in a nutshell, an emulator is an app or software that renders the environment of another device or hardware. For example, if you want to run an Android app on your PC, you need to download the Bluestacks emulator which creates an Android simulation on your PC. Similarly, to play SNES games on your iPhone, you need an SNES emulator. These emulators aren’t available on the App Store, so you will need to sideload them.
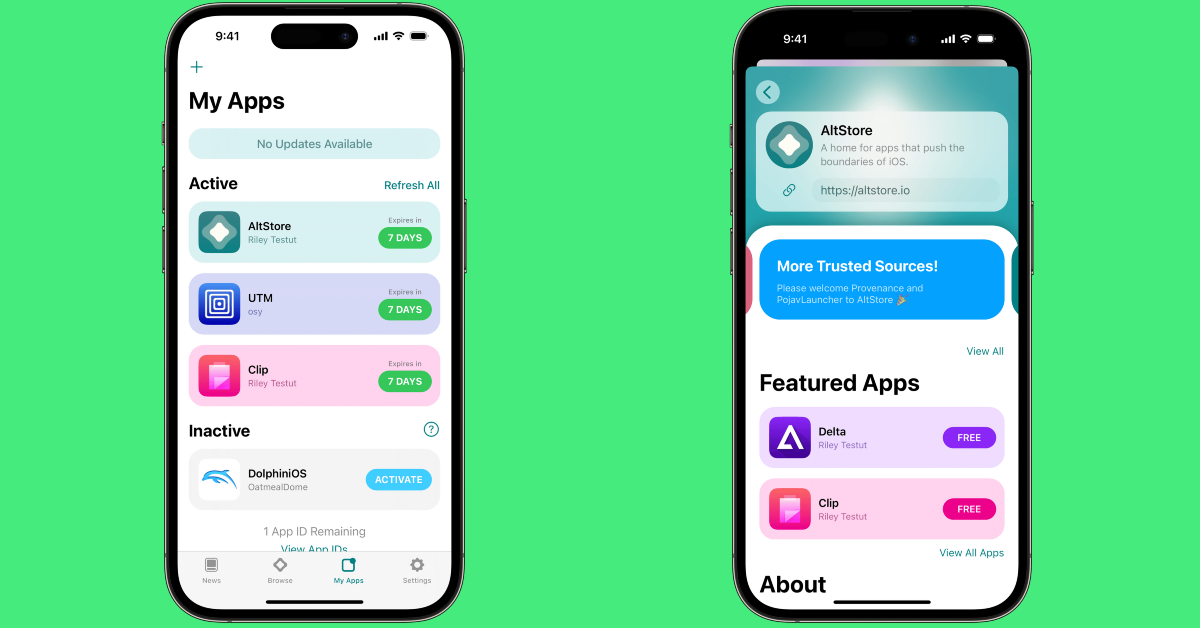
Install AltStore
Since the App Store does not allow emulators in its app market, you will need to download them using a different method. Luckily, you can do that without jailbreaking your device. All you need to do is install AltStore. This will require using a PC or a Mac.
Step 1: Connect your iPhone to your Mac using a USB cable.
Step 3: Click on Get AltStore and download the macOS version of the AltServer.
Step 4: Unlock your iPhone and hit the Finder option in the top menu on your Mac.
Step 5: Select your iPhone in the side menu.
Step 6: Select Show this iPhone when on WiFi.
Step 7: Click the AltServer icon in the menu.
Step 8: Go to Install AltStore and select your iPhone.
Step 9:Sign in using your Apple ID and hit Install.
Step 10: Go to Settings on your iPhone and select General.
Step 11: Tap on Profiles & Device Management and select Trust [Your Apple ID].
Install Delta using AltStore
Now that AltStore is installed on your iPhone, use it to download the Delta emulator. Here’s how.
Step 1: Before you begin, turn on the Developer Mode on your iPhone. Go to Settings>Privacy & Security>Developer Mode and turn on its toggle switch.
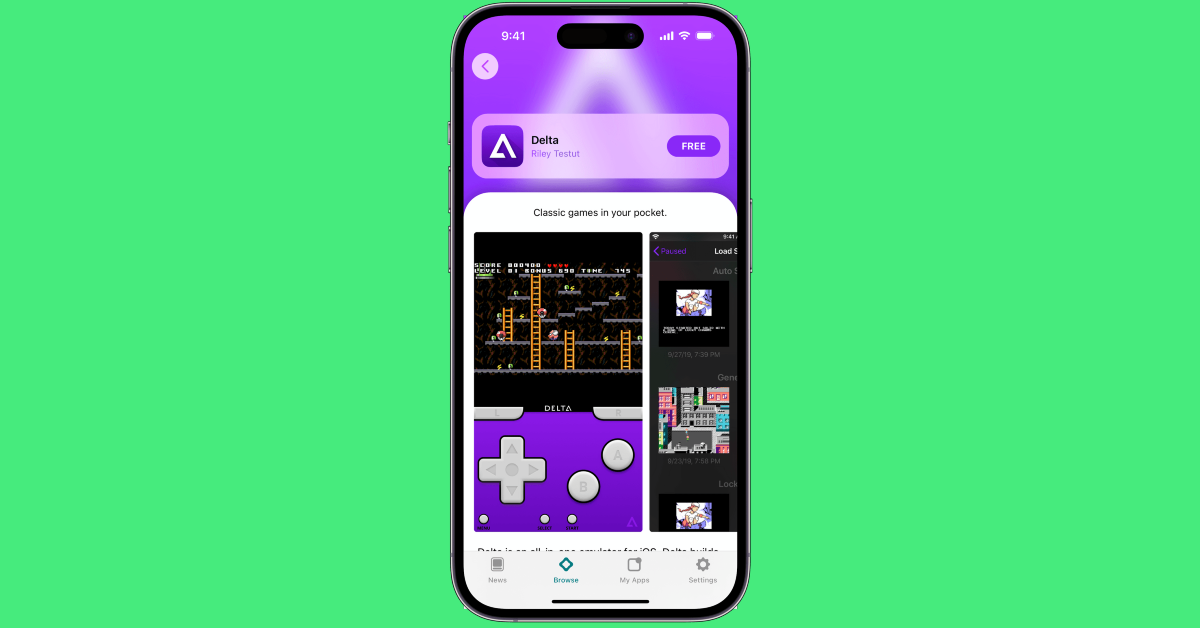
Step 2: Launch AltStore and select Delta.
Step 3: Hit Install.
Download a ROM to play an SNES game on your iPhone
Once the Delta emulator is installed on your iPhone, the hard part is over. Now, all you need to do is download the ROM for the game you want to play. Think of ROM as the equivalent of the physical disk you used to insert on your SNES to play a game. You can easily find the ROM for any SNES game on the Internet, but you should know that this clearly falls under piracy. Once you have downloaded the ROM file, here is how you can load it on Delta.
Step 1: Launch the Delta emulator on your iPhone and hit the plus icon at the top right corner of the screen.
Step 2: Select Files.
Step 3: Browse to the downloads folder containing the ROM file.
Step 4: Tap on the ROM to load it on the emulator.
Step 5: Wait for a few seconds for the game to load.
Frequently Asked Questions (FAQs)
Can I play SNES games on my iPhone?
Yes, your iPhone is capable of running SNES games, but only with the help of an emulator. Delta emulator is the best one for this task and can be sideloaded on your iPhone using the AltStore.
Is it illegal to install an emulator on my iPhone?
While the App Store does not allow any emulator apps on its platform, it is still not illegal to install one on your iPhone. However, downloading a ROM file for a game is certainly illegal as it falls under piracy.
Does installing an SNES Emulator on my iPhone require jailbreaking the device?
No, you don’t need to jailbreak your iPhone to install an SNES Emulator. You can sideload it on your device using AltStore. You will need a Mac or PC for this.
This is how can install and play the SNES emulator on your iPhone. You can also change the skin of the controller and remap the keys once the emulator has been installed on your phone. Check out this list for our list of the top 7 Game Boy Emulators for iPhone. What is your favourite emulator to use on your iPhone? Let us know in the comments!
Xiaomi will host its next tech event in January 2024.
The company has announced to bring the Redmi Note 13 5G series.
The latest Redmi Note Series includes three devices- Redmi Note 13, Redmi Note 13 Pro, and Redmi Note 13 Pro+.
Xiaomi today officially announced the India launch date for the Redmi Note 13 5G Series. The company recently announced that its latest series will be introduced in the country in January. The upcoming lineup may include all three devices- Redmi Note 13, Redmi Note 13 Pro, and Redmi Note 13 Pro+. Snapdragon 7s Gen 2 SoC powers the Redmi Note 13. The Redmi Note 13 and Redmi Note 13 Pro+ are powered by MediaTek Dimensity SoC. Redmi Note 13 5G series launched in India in its home country China in September. Now
Xiaomi has scheduled the launch of its latest smartphone series Redmi Note 13 5G in India on January 4, 2024. The company has not yet revealed how many smartphones will be released but it is likely to launch all three phones- Redmi Note 13, Redmi Note 13 Pro, and Redmi Note 13 Pro+. The company has also created a dedicated launch event page ahead of the launch. Additionally, the Notify Me button is also live on the dedicated page. Redmi Note 13 Series specifications
Redmi Note 13 comes with a 6.67-inch AMOLED display with a refresh rate of 120Hz. The phone comes integrated with Android 13-based MIUI 14 and is powered by MediaTek Dimensity 6080 SoC.
It has a dual rear camera setup that includes a 100MP main sensor and a 2MP macro sensor. Note that all three phones feature a 16MP selfie camera. The smartphone houses a 5,000mAh battery and comes with 33W wired fast charging support.
The Note 13 Pro is highlighted with a 6.67-inch 1.5K full-HD+ AMOLED screen with 120Hz refresh rate. The phone is powered by Qualcomm Snapdragon 7s Gen 2 and runs MIUI 14 OS. There is a triple rear camera setup on the phone that includes a 200MP main sensor, an 8MP ultra-wide angle lens, and a 2MP macro lens. The device is backed by a 5,100mAh battery with 67W fast charging support.
Redmi Note 13 Pro+ has the same display as the Pro model and it is powered by MediaTek Dimensity 7200 Ultra SoC. The device has a 5,000mAh battery that supports 120W fast charging.
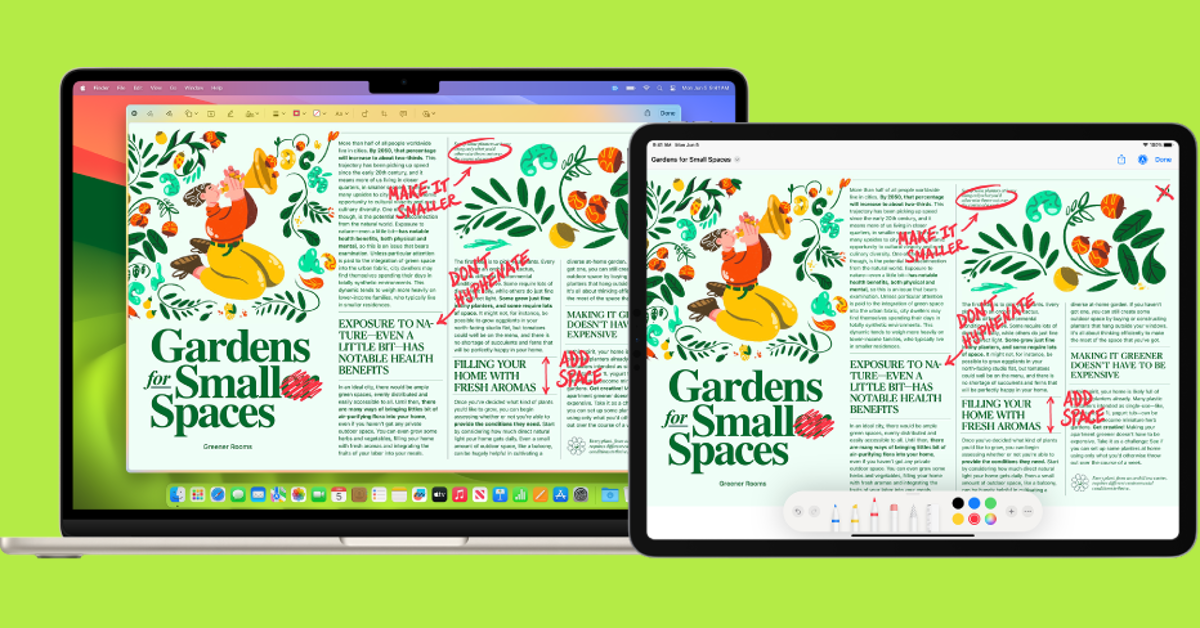
It is no secret that everyone enjoys additional screen real estate. It is also no secret that an additional monitor for your Mac or PC can cost a lot. But here’s the good news – if you have an iPad lying around, you may not need to purchase an additional display. Sure, the iPad isn’t as massive as a separate monitor but it can make a significant contribution to your primary display. So, here are the top 3 ways to use your iPad as a second monitor or display for your Mac or Windows PC.
There are three major native ways of linking your iPad to your Mac – Sidecar, Universal Control, and Stage Manager. Each method carries its own purpose and advantages. Let’s take a brief look at all of them.
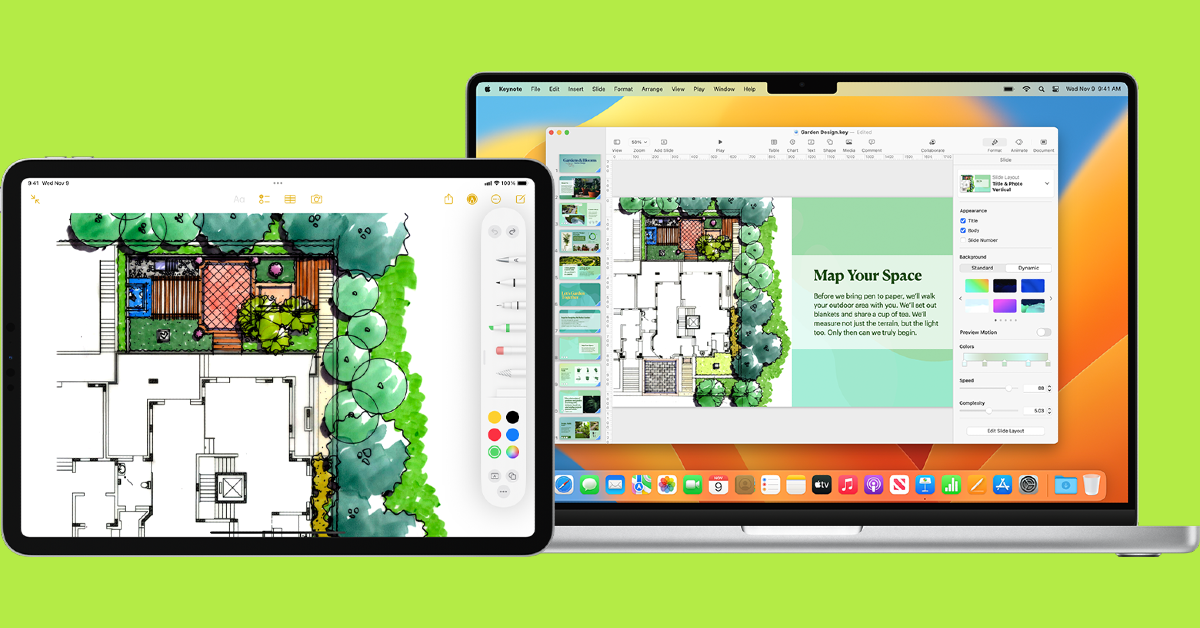
Sidecar: If you want to extend your Mac’s display to your iPad, Sidecar is the function you are looking for. This will allow you to move a window from your Mac to your iPad by simply dragging it with your cursor. There are a bunch of accessibility options you can use on the sidebar of your iPad as well. Need to sign a quick document? Simply drag the window to your iPad and use your Apple Pencil for the task. You can drag the document back to your Mac if you want to continue using it on a bigger screen.
Universal Control: This feature allows you to use your Mac’s mouse, trackpad, and keyboard on your iPad as well. If you simply wanna transfer files back and forth between the two devices, this is the function that you should be using. Once Universal Control is turned on, you drag a picture or file from your Mac and simply drop it on any open conversation on your iPad to transfer it. It’s that easy.
Stage Manager: What if you want to use your iPad on a bigger screen? Stage Manager not only allows you multitasking options, but it also supports adding another display to your iPad. You can resize the windows however you want and move any app to an external display. The only catch is that your iPad is still the primary device.
Use Sidecar to use your iPad as a second monitor or display for your Mac
Before you begin, make sure you are logged into both devices with the same Apple ID and that WiFi, Bluetooth, and Handoff are turned on. You can also choose to connect the two devices with a USB cable for a wired connection.
Step 1: On your Mac, hit the Apple menu at the top right corner of the screen and select System Settings/Preferences.
Step 2: Select Displays from the sidebar.
Step 3: Hit the plus icon on the right and select your iPad.
Step 4: Once your Mac is connected to your iPad, you will notice the Sidecar menu appear on the top menu.
Step 5: Click on the Sidecar option and select ‘Use as a separate display’. You can also choose to mirror your Mac’s display on the iPad.
Step 6: Now go to Displays in System Settings on your Mac to choose where you want the sidebar on your iPad to appear. This depends on whether your iPad is placed on the left or right side of the Mac. You can also choose to enable Apple Pencil controls for your iPad in this window.
Use Universal Control
Step 1: On your Mac, click on the Apple menu at the top right corner of the screen and select System Settings/Preferences.
Step 2: Click on Displays.
Step 3: Click the Advanced button at the bottom of the screen.
Step 4: Turn on ‘Allow your pointer and keyboard to move between any nearby Mac or iPad’.
Step 5: On your iPad, open the Settings app.
Step 6: Select General.
Step 7: Tap on Airplay & Handoff.
Step 8: Enable Cursor and Keyboard.
Step 9:Place your Mac and iPad next to each other. Move your mouse or trackpad towards the edge of the screen that is next to the iPad.
Step 10: Once the cursor moves past your Mac, it will start to appear on your iPad. Move the cursor all the way through to enable Universal Control.
If you can’t move the cursor to your iPad, go to Apple menu>System Preferences>Displays>Arrange on your Mac to sort it out.
Use a third-party app to use your iPad as a second display or monitor for your Windows PC
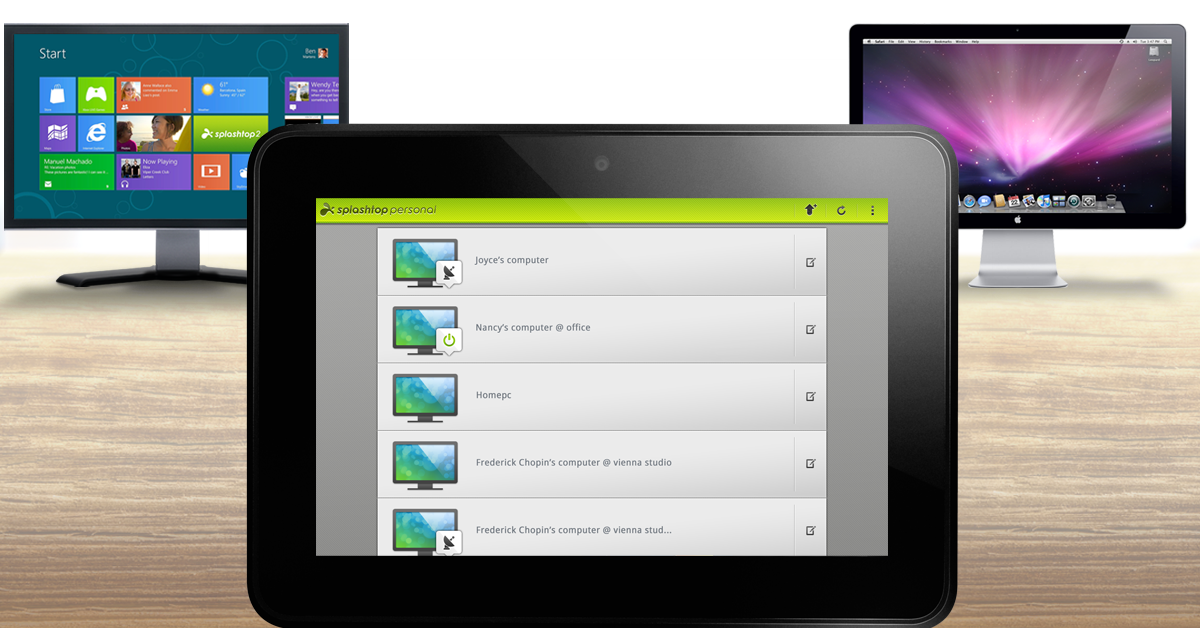
Sidecar and Universal Control are excellent features to use your iPad as a second screen for your computer, but the only catch is that they only work on Apple devices. If you own a Windows PC or laptop, you will have to rely on third-party apps for the same task. Duet Display, Splashtop, and iDisplay are some of our favourite apps to bridge the Apple and Windows divide. These apps cut down the latency issues to a minimum, offering seamless connectivity between the two devices.
Once you have installed the iPad app and desktop agent, you need to connect the two devices to a common WiFi network. You can also choose to connect the iPad and your Windows PC/laptop using a USB cable. Your PC will automatically pop up in the display app installed on your iPad. Tap on it to connect the two devices.
Frequently Asked Questions (FAQs)
Can I wirelessly use my iPad as a second monitor or display for my Mac?
Yes, Apple’s ‘Sidecar’ feature allows you to extend your Mac’s display to your iPad. On your Mac, go to System Preferences>Display>Plus icon and select your iPad. From the Sidecar options, select that you want to use your iPad as a second display.
How do I control my iPad with my MacBook’s keyboard and trackpad?
To drag and drop files between your Mac and iPad, you will need to turn on Universal Control. Once that’s done, you can freely control both devices with a common mouse, trackpad, and keyboard and even transfer files by simply dragging and dropping them.
How do I use my iPad as a second display for my Windows PC?
You will need to install a third-party app like Splashtop, Duet Display, or iDisplay to use your iPad as a second display for your Windows PC.
This is how you can use your iPad as a second monitor or display for your Mac or Windows PC. Sidecar and Universal Control are great options for digital artists and graphic designers who prefer using an Apple Pencil for their drawings but also want a bigger display. By connecting your iPad and Mac, you can have the best of both worlds. Read this article to find out how you can use your Android tablet as a second display.
Flipkart is offering a Rs 10,901 flat discount on iPhone 14.
The device originally sold for Rs 69,999 in India.
Are you considering switching from your outdated Android smartphone to an iPhone? Do it because this is the right time. Because huge discounts are available on smartphones during Flipkart Sale. Apart from this, there are very good deals going on, on iPhones where they are available at their lowest pricing after the festive sale in India ended. The e-commerce platform is offering a flat discount of Rs 10,901 on iPhone 14. Moreover, there are bank discounts and EMI options available on the purchase of the phone. So hurry up because the Flipkart sale is going to end soon and this offer is available for a limited duration. Let’s know how you can purchase the iPhone 14 at its best price.
Flipkart Big Year End Sale is currently live. The sale will end on December 16. Right now Apple iPhone 14 is available at mind-blowing prices and deals as part of Flipkart’s Big Year End Sale. The e-commerce company has listed the iPhone 14 at a discounted price of Rs 58,999 which is Rs 10,901 down from its original price. Before the sale, the device was available at Rs 69,900. Note that after Diwali and Festive Sales, this is the best time to buy a new iPhone. The homegrown e-commerce platform is offering additional bank offers. There will be a 10% discount on HDFC Bank credit card.
To further reduce the cost, the customers exchange their old smartphones to avail of up to Rs 34,500 discounts. This will further bring down its further cost to Rs 18,600. However, the additional exchange discount depends on the model and condition of your old device.
On the other hand, a similar offer is available on iPhone 14 Plus as well. Flipkart is offering a massive discount on the purchase of the device. The device is currently listed at a discounted price of Rs 67,999. The buyers can also take advantage of an additional exchange discount in addition to this. Customers can save up to Rs 34,500 on an iPhone or their previous smartphone. Additionally, customers of Kotak, RBL, or SBI credit cards will receive 10% off.
Your Google Account is the key that unlocks all the services and features on your smartphone. If you need to download an app, you will need a Google Account to sign into the Play Store. Want to create a backup on Google Drive? Your Google Account will come in handy again. Since your account is linked to so many services, it becomes vital to safeguard it with security measures like passkeys and two-factor authentication. But what happens when your device gets lost or stolen? Singing out of the account is your only option. So, here are the top 3 ways to remotely log out of your Google Account on an Android phone.
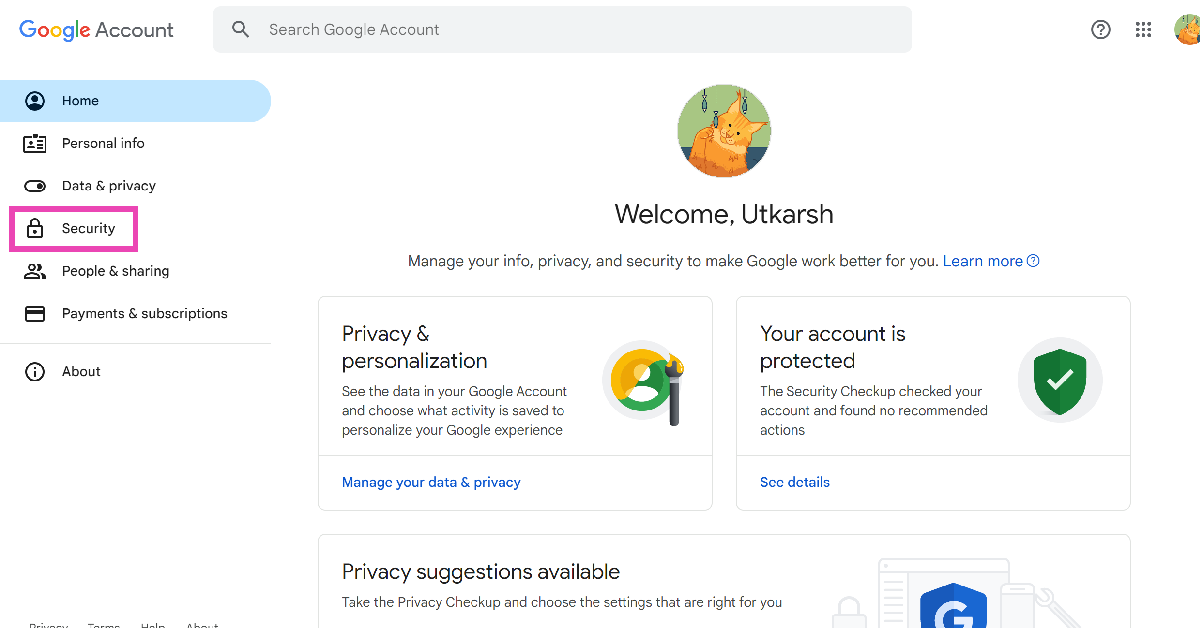
Remotely log out of your Google Account on your Android phone using Google’s Security Page
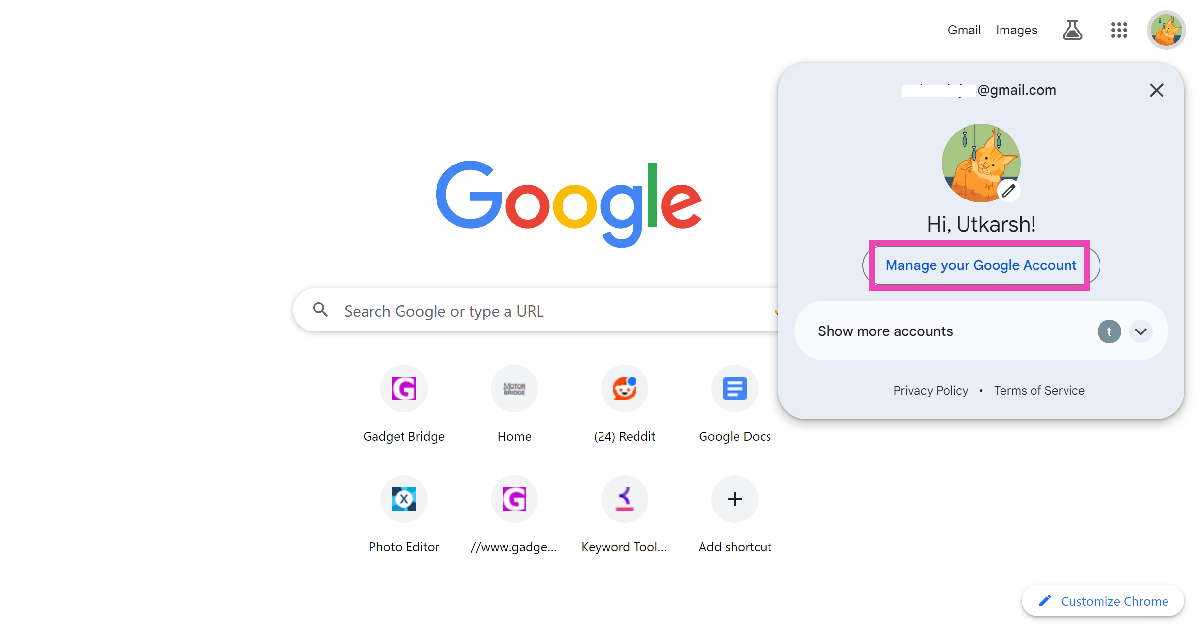
Step 1: On your PC, go to Google’s home page and click your profile picture at the top right corner of the screen.
Step 2: Select Manage Your Google Account.
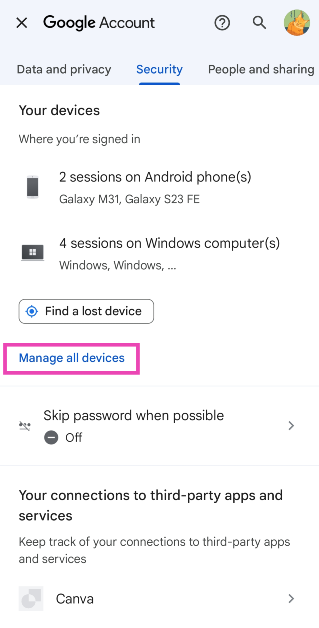
Step 3: Switch to the Security tab.
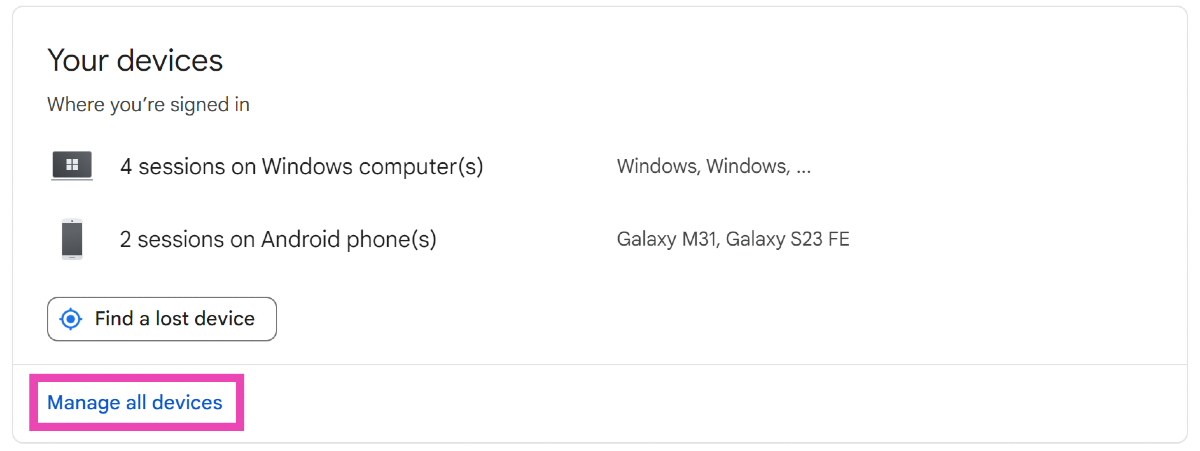
Step 4: Scroll down and select Manage all devices under Your devices.
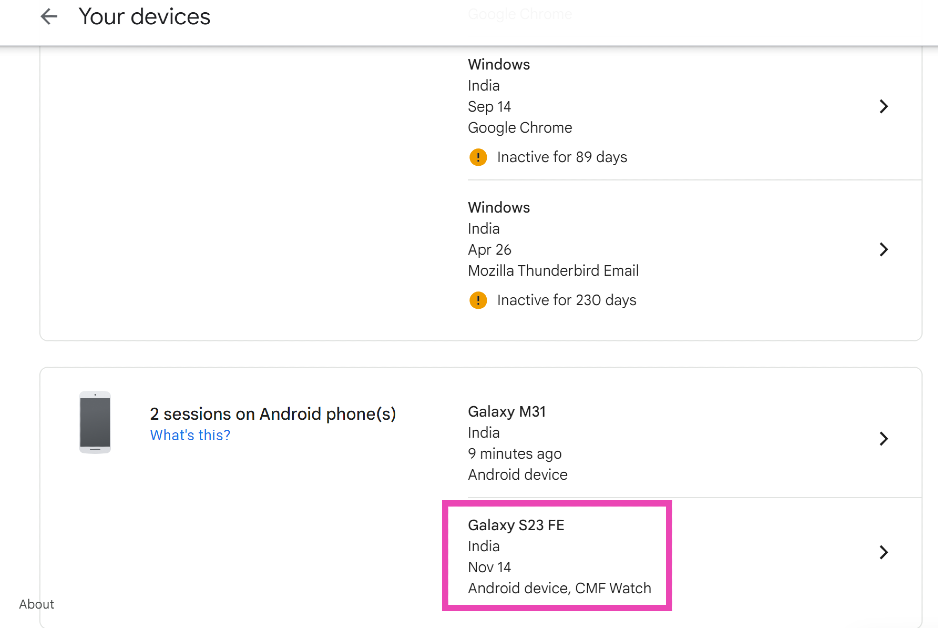
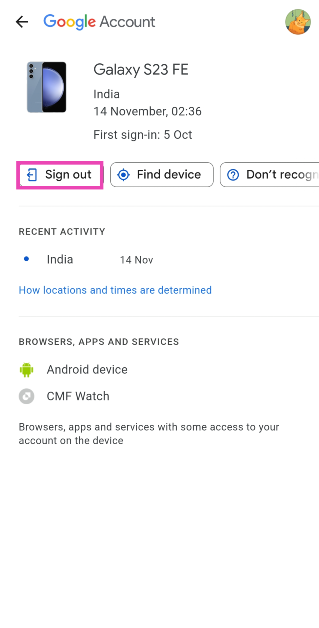
Step 5: Scroll down and select the Android phone.
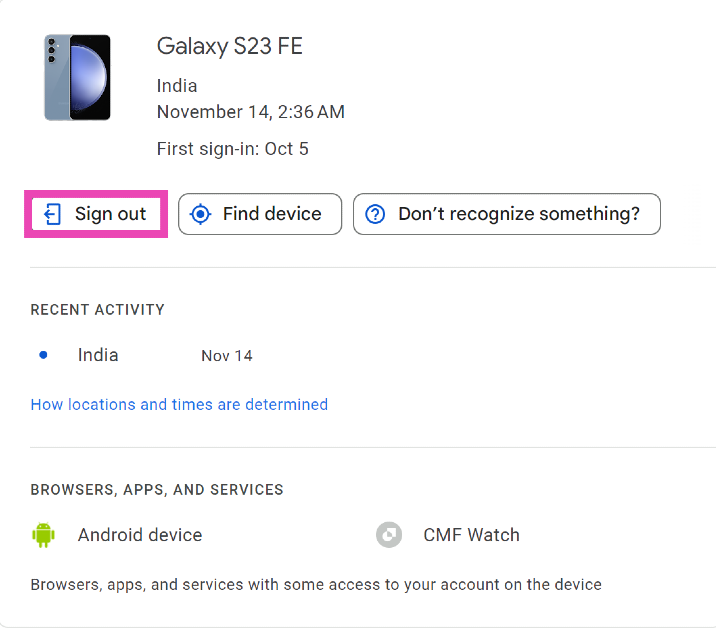
Step 6: Click on Sign Out.
Use Find My Device
Find My Device is Google’s service for tracking down lost or stolen smartphones. You can also use it to log out of your phone and clear all the data on it. Here’s how.
Step 2: Select the Android phone from the side menu.
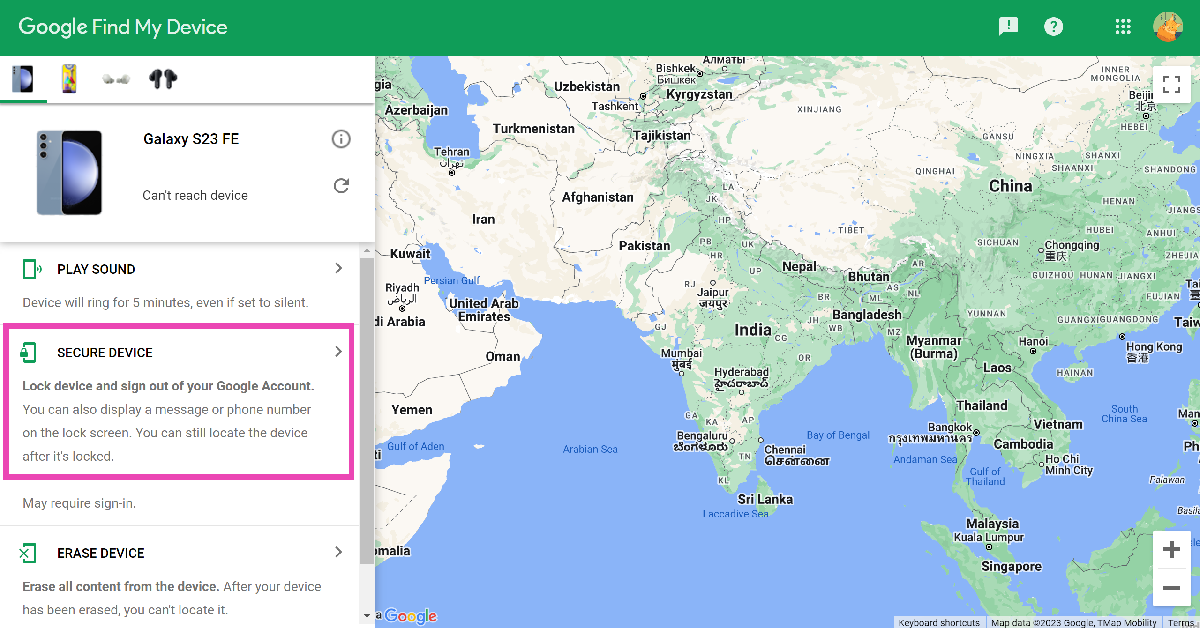
Step 3: Hit Secure Device to log out of your Google Account on the Android phone.
Remotely log out of your Google Account on your Android phone using another phone
If you are signed into two Android phones with the same Google account, you can use one device to sign out of your account on the other. Here’s how.
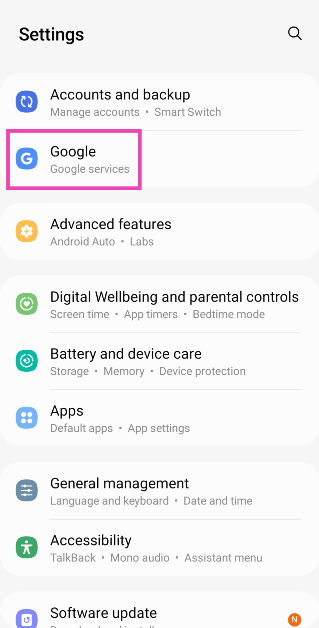
Step 1: Go to Settings and select Google.
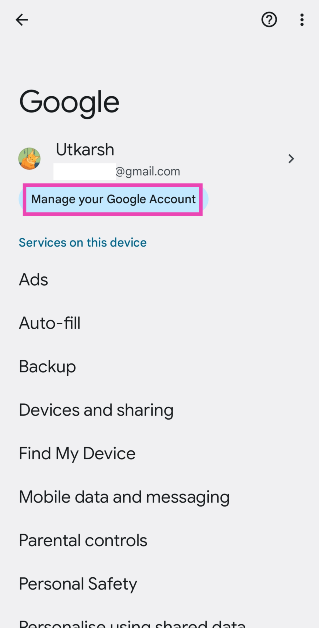
Step 2: Tap on Manage your Google Account.
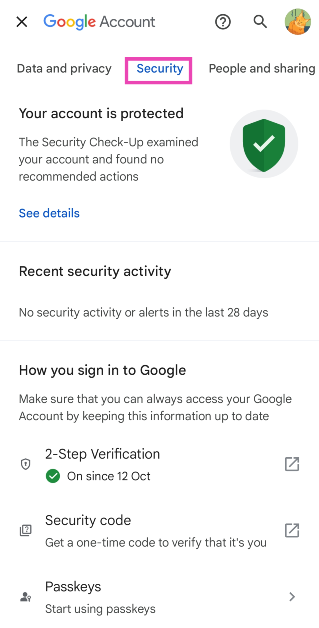
Step 3: Switch to the Security tab.
Step 4: Scroll down and select Manage all devices.
Step 5: Tap on the Android phone from which you want to log out.
Step 6: Hit Sign Out.
Lost your smartphone? Here’s what you should do after remotely logging out of your Google Account
Now that you have signed out of your Google Account on your Android phone, there are a couple more things you should do to secure your device. Apart from offering a remote sign-out option, Google’s Find My Device service also lets you erase all the data from your phone. If you regularly back up the data on your device, you should certainly use this option. If you don’t expect to retrieve your device, erasing your data on it is the perfect way to ensure it doesn’t fall into malicious hands.
If your banking info is saved in your phone, there are a bunch of things you can do to ensure no malicious activity takes place on your account. First, call your bank and request them to disable all your cards. Next, call your network provider and ask them to put a hold on communications to your number. Your bank OTPs will not be able to reach your number once the network reception has been shut down.
Lastly, go to your local police station and file a report for your missing phone. You can also request them to track your phone using its IMEI number. In some cases, you may have to file a police report first, because some network providers may require it in order to shut down the services to your phone.
Frequently Asked Questions (FAQs)
How do I sign out of my Android phone if it gets stolen?
If your phone gets stolen, log into your Google account on your PC, click your profile picture and select Manage your Google Account. Then, go to Security>Manage all devices and sign out of your Android phone.
How do I track my Android phone if it gets stolen?
If your Android phone gets lost or stolen, go to Google’s Find My Device page and sign into your account to track your device. You will be able to see its live location as long as it is turned on and has access to the Internet. In case it shuts down or loses Internet access, you will be able to see its last recorded location.
How do I remotely log out of my Google Account on my Android phone?
If you want to sign out of your Google Account on your Android phone, go to Settings>Accounts and backup>Manage accounts, select your Google account, and hit Remove.
These are the top 3 ways to remotely log out of your Google Account on your Android phone. To bump up the security of your Android device, use passkeys and two-factor authentication for all your personal and financial apps. If you know any other way to remotely log out of your Google account, let us know in the comments!
The Vivo X-series models Vivo X100 and Vivo X100 Pro.
The devices are powered by MediaTek Dimensity 9300 SoC.
Additionally, the devices support up to 120W fast charging.
Vivo has already confirmed the global launch of the Vivo 100X series for this month. But according to reports the upcoming smartphone series is likely to launch in India a little late. The lineup will bring two devices Vivo X100 and Vivo X100 Pro both featuring Zeiss optics. The devices are powered by MediaTek Dimensity 9300 SoC and run on OriginOS 4 with Android 14.
Most of the smartphone brands have scheduled their flagship launches for the new year. Similarly, Vivo is also expected to launch its next flagship series in India next month. As per a report, the company will release Vivo X100 Series in India in January 2024. Note that both Vivo X100 and X100 Pro were spotted listed on the Bluetooth SIG website. The global debut of the handsets is set for December 14.
The reason for the delay in launch is that the upcoming series will be India exclusive in which special photography features will be given keeping in mind the Indian market. Both Vivo phones are said to include a feature that captures the radiance of sunlight during sunset and rise. The phones are expected to use an algorithm that helps in capturing the depth and colour accuracy of the sunrise and sunset, instead of AI.
Vivo X100 Series launched in China in November and the pricing at which it arrived starts at CNY 3,999 (Rs 50,000) and goes up to CNY 5,999 (Rs 68,000). There are four models for Vivo 100 Pro whereas the X100 is made available in five variants with up to 16GB LPDDR5T RAM + 1TB storage.
Vivo X100 Series specifications
Both the display, software and processors are the same on the Vivo X100 and Vivo X100 Pro. They feature a 6.78-inch AMOLED 8T LTPO curved display with a 120Hz refresh rate and 3000 nits of peak brightness. The devices run on OriginOS 4 with Android 14 out of the box. They are powered by MediaTek Dimensity 9300 SoC with Vivo V3 chip.
Both the handsets are highlighted with a triple-camera setup powered by Zeiss optics. Vivo X100 Pro includes a 50-megapixel Sony IMX989 1-inch type sensor with OIS (100x digital zoom), a 50-megapixel ultra wide-angle sensor and a 50-megapixel Zeiss APO super-telephoto lens with OIS (4.3x optical zoom and 100x digital zoom).
On the other hand, the vanilla model includes a Sony IMX920 VCS bionic 50-megapixel primary sensor with OIS, a 50-megapixel ultra-wide-angle lens and a 64-megapixel Zeiss super-telephoto lens (100x clear zoom).
Garena Free Fire is a battle royale game with regular awards and tournaments to keep players interested. If you play Garena Free Fire, you should be aware of the redeem codes that are released on a daily basis. However, because the battle royale game is banned in India, players from other countries can use the Free Fire Redeem codes daily. If you’re unfamiliar with the Garena Free Fire redeem codes or don’t know how to get them, we’ve put together a step-by-step guide to help you redeem them. Check out Garena Free Fire Redeem Codes for 13 December 2023.
The Free Fire redeem codes are a great way to get free stuff. These are 12-digit codes that contain alphabets and numbers, as well as an expiration date and time. Because the Garena FF redeem codes cannot be used more than once, you should hurry to the redemption page to claim your free reward before someone else does. To get a free reward, all you have to do is go to reward.ff.garena.com/en, which is the official redemption page. Also, keep an eye on this space for daily updates on Garena Free Fire redemption codes and rewards.
In This Article
Garena Free Fire Redeem Codes Today 13 December 2023
WD2ATK3ZEA55
E2F86ZREMK49
HFNSJ6W74Z48
2FG94YCW9VMV
MCPTFNXZF4TA
FF11HHGCGK3B
FF11WFNPP956
FF10GCGXRNHY
8F3QZKNTLWBZ
FF10617KGUF9
HHNAT6VKQ9R7
TDK4JWN6RD6
FFDBGQWPNHJX
V44ZZ5YY7CBS
XFW4Z6Q882WY
4TPQRDQJHVP4
FF119MB3PFA5
W0JJAFV3TU5E
SARG886AV5GR
FF1164XNJZ2V
B6IYCTNH4PV3
X99TK56XDJ4X
ZYPPXWRWIAHD
YXY3EGTLHGJX
FF11DAKX4WHV
WLSGJXS5KFYR
FF11NJN5YS3E
ZRJAPH294KV5
Y6ACLK7KUD1N
How to Get Free Fire Redeem Codes for Garena on 13 December 2023?
You would think that changing the volume of an alarm on your iPhone is an easy task, but that isn’t the case. The option to alter the alarm volume is missing from the ‘Alarm’ tab in the Clock app. This may throw some users for a loop. If you are a heavy sleeper, setting the alarm volume at the highest possible setting must be crucial for you. So, how do you go about this task? Let’s take a look at how you can adjust the volume of an alarm on an iPhone.
Step 7: Use the toggle switch for Snooze to turn it on for this particular alarm.
Step 8: Once you’re done, hit Save at the top right corner of the screen.
Adjust the volume of an alarm on your iPhone
Step 1: Go to Settings.
Step 2: Select Sound and Haptics.
Step 3: Drag the slider under Ringtone and Alert Volume to change the intensity of the alarm sound. Dragging the slider to the left will decrease the volume while dragging it to the right will increase it. Your iPhone will play a sample tone to give you an idea of the volume at every level.
Step 4: Turn on the toggle switch for Change with Buttons to alter the alarm volume using the volume rocker keys.
Can’t hear your alarm sound? Make sure you’ve set the right tone
Step 1: Launch the Clock app on your iPhone.
Step 2: Switch to the Alarm tab.
Step 3: Tap the Edit option at the top left corner of the screen.
Step 4: Select the alarm in question.
Step 5: Tap on Sound and select a tone from the list. If you do not have any tone for the alarm, it will vibrate without making any sound.
Frequently Asked Questions (FAQs)
How do I set an alarm on my iPhone?
Open the Clock app on your iPhone, switch to the Alarm tab, and hit the plus icon at the top right corner of the screen to set an alarm.
Where is the option to adjust the volume of an alarm on an iPhone?
If you want to adjust the volume of an alarm on your iPhone, you will need to go to Settings>Sound and Haptics and drag the slider under Ringtone and Alert Volume. If you want to change the volume using the volume rocker keys, turn on the toggle switch for Change with Buttons.
If my iPhone is connected to my AirPods will the alarm ring through my phone?
If your iPhone is paired to your AirPods or wired headphones, the alarm will ring on the audio accessory as well as the phone.
This is how you can adjust the alarm volume on your iPhone. For ease of access, turn on the ‘Change with Buttons’ option in the Sound and Haptics settings to control the ringer volume with the volume rocker keys. You can also use a third-party alarm app on your iPhone. Do you have a favourite? Let us know in the comments!
Samsung Galaxy S22 was launched in India last year.
The device originally cost Rs 64,999.
Flipkart is providing additional bank discounts on the smartphone.
Flipkart Year End Sale for 2023 is currently on and will run till December 16. During the sale, lots of Android smartphones including iPhones are getting massive discounts. As a part of the sale, the Samsung Galaxy S22 which was introduced in India last year is also seeing a price drop. The e-commerce platform is offering fabulous deals on the purchase of the device.
Samsung Galaxy S22 was launched last year with a starting price of Rs 72,999. A few months ago the handset received a massive price cut of Rs 8,000. The price came down to Rs 64,999 for the base variant. But now its price has been lowered again thanks to the Flipkart Year End Sale. The price of the Android phone has been lowered by Rs 33,000. It is now selling for Rs 39,999.
The e-commerce platform is also offering an additional Rs 2,000 off of Credit and Debit Card Transactions.
Samsung Galaxy S22 specifications
The Samsung Galaxy S22 (Review) is highlighted with a 6.1-inch full-HD+ Dynamic AMOLED 2X display with an adaptive refresh rate 120Hz refresh rate that can be lowered to 10Hz. The display has been protected with Gorilla Glass Victus+ and an Armor Aluminium chassis. The smartphone runs on Android 12 and One UI 4.1. Under its hoof, there is an octa-core Snapdragon 8 Gen 1 SoC and 8GB of RAM, with up to 256GB of internal storage.
The Galaxy S22 features a triple rear camera system for optics. The camera module is equipped with a 50MP main Dual Pixel wide-angle sensor, an f/1.8 aperture, and autofocus. There is also a 12MP ultra-wide-angle camera with an f/2.2 aperture and a 120-degree field of view, as well as a 10MP telephoto lens with an f/2.4 aperture (3x optical zoom and OIS). There is also a 10MP selfie camera with an f/2.2 aperture (80 degrees of FoV).
The Galaxy S22 is backed by a 3,700mAh, and it supports 25W fast charging, 15W wireless charging, and Wireless PowerShare for reverse wireless charging.
The iQoo 12 5G runs on OriginOS 4 on top of Android 14.
The company is promising to provide years of OS updates and 4 years of security updates.
iQoo 12 5G houses a 5,000mAh battery that supports 120W fast charging.
Finally, iQoo 12 5G has debuted in India today. The device is the first smartphone to come to India featuring Qualcomm’s latest flagship chipset- Snapdragon 8 Gen 3. The device operates on Android 14 OS. It further includes a 144Hz AMOLED display.
In This Article
iQoo 12 5G specifications
A 6.78-inch 1.5K AMOLED display with 1,260×2,800 pixels of resolution is the main highlight of the phone. The screen comes with an adaptive refresh rate of 144Hz and a 20:9 aspect ratio. Moreover, the screen has 2160Hz PWM dimming and a peak brightness of up to 3000 nits support. In addition to this, the display comes with HDR10+ support. The device runs on OriginOS 4 on top of Android 14. The company is promising 3 years of OS updates and 4 years of security updates. At its heart, there is Qualcomm’s 4nmSnapdragon 8 Gen 3 SoC processor.
iQoo 12
iQoo 12 5G features a triple rear camera setup that includes a 1/1.3-inch 50-megapixel primary sensor (f/1.68 aperture). Thecamera system further includes a 64-megapixel periscope telephoto (f/2.57 aperture and 100X digital zoom) and a 50-megapixel ultra wide-angle sensor (f/2.0 aperture). For selfies, the device features a 16-megapixel front-facing camera with f/2.45 aperture.
iQoo 12 5G houses a 5,000mAh battery, with120W fast charging support. Also, there is an in-display fingerprint sensor for biometrics. The smartphone also includes an accelerometer, ambient light sensor, e-compass, gyroscope, and proximity sensor. In terms of connectivity, there is 5G, Wi-Fi 7, Bluetooth 5.4, USB OTG, NFC, Beidou, USB Type-C port, GPS, GLONASS and GALILEO.
For gaming, there is a 6010 mm² ultra-large VC vapor chamber to keep thermals in check. Also, it includes 11 temperature sensors and is equipped with a Q1 Self-developed chip.
iQoo 12 5G price in India and availability details
iQoo 12 5G has been launched in India in two colour variants Legend and Alpha. The price of the gaming phone starts at Rs 52,999 for the 12GB RAM with 256GB storage option and the 16GB RAM with 512GB internal storage options comes with a price tag of Rs 57,999.
In terms of availability, priority pass holders can get their hands on iQoo’s latest smartphone from December 13 a day before the actual sale begins that is December 14. The phone can be available via the company’s officialwebsite as well as viaAmazon in the country.
The new variant of Itel A05s comes with changed internals.
Itel A05s was launched in India in October this year. At the time of the launch, the company introduced the 2GB RAM with 32GB storage. Now the company has launched another 4GB RAM with 64GB variety. The latest model comes with modifications. The handset packs a 4,000mAh battery and is powered by a 1.6GHz UNISOC Octa-Core processor. Note that the smartphone now includes a single 8-megapixel rear camera. The phone features a 6.6-inch HD+ display.
In This Article
Itel A05s price in India, availability
The price of Itel A05s 4GB RAM with 64GB storage variant is priced at Rs 6,099. The phone will come in several colour options of Crystal Blue, Glorious Orange, Meadow Green and Nebula Black.
In October the company introduced the 4GB RAM with 64GB storage variant priced at Rs 6,499.
Itel A05s specifications
Itel A05s features a 6.6-inch HD+ display with 1600 x 720 pixels of resolution. The screen supports a refresh rate of 60Hz and 120Hz touch sampling rate. In addition to this, the display has 270PPI. Under its hood, there is a 1.6GHz Octa-Core Unisoc processor with 4GB RAM (comes with 4GB RAM expansion feature) and 64GB storage. The internal storage can be expanded up to 1TB using a microSD card. In addition to this, the handset runs on Android 13 Go Edition.
For the photos and videos, Itel A05s feature an 8-megapixel rear camera set up with an LED flash. For selfies and video calling the phone has a 5-megapixel front-facing camera with f/2.0 aperture.
Itel A05s is backed by a 4000mAh battery with a 5W charger. For connectivity, there is Dual 4G, VoLTE, Wi-Fi 802.11 b/g/n, Bluetooth, GPS + GLONASS, and a 3.5mm jack. The mobile phone includes a fingerprint sensor and face unlock for authentication.
If you haven’t used your iPhone or Mac in a long time, it is pretty easy to forget your Apple ID. Maybe you used to own an iPhone and then switched to Android for a while. If you’re planning on using an iPhone again, having access to your old Apple ID will save you a lot of time. If you are an active iPhone user and want to use your Apple ID on another device, finding it on your phone is pretty easy. So, let’s take a quick look at the best ways to find your Apple ID on an iPhone, iPad, Mac, or PC.
When you set up an Apple device for the first time, you are asked to create an Apple ID. You can do it by registering your email address with Apple. Your unique Apple ID is your gateway to Apple’s services like iCloud, FaceTime, iMessage, Apple Music, and more. If you use more than one Apple product, having one Apple ID for all of them brings a seamlessness and continuity to the entire experience.
Perhaps the most important aspect of having an Apple ID is the ability to track your lost iPhone. As soon as you notice your iPhone is missing, log into iCloud on another device using your Apple ID and track the whereabouts of your lost phone. This is why you should always know what your Apple ID is.
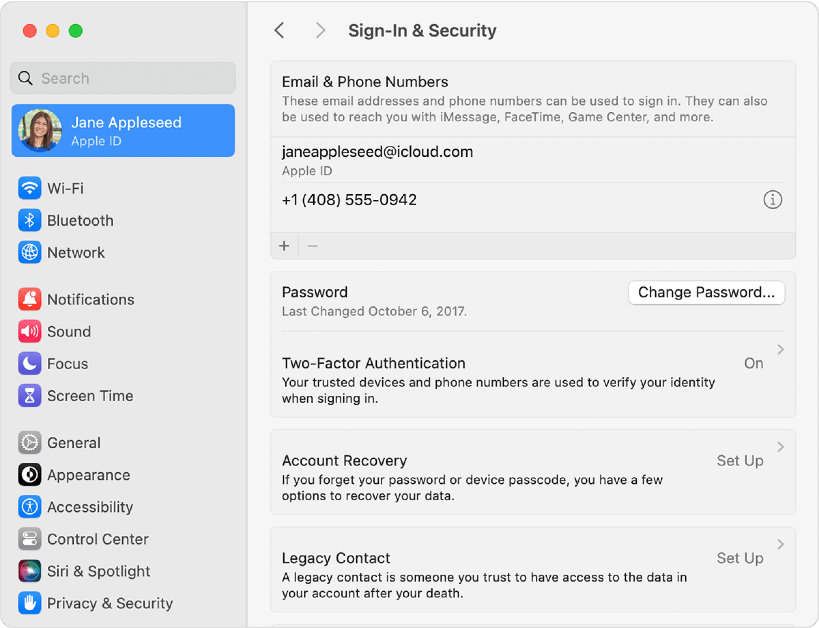
Find your Apple ID on your iPhone or iPad
Step 1: Open Settings on your iPhone.
Step 2: Tap your name. You can find it at the top of the screen.
Step 3: Look for your Apple ID right below your name and profile picture.
Find your Apple ID on a Mac or PC
Mac
Step 1: Hit the Apple logo at the top left corner of the screen.
Step 2: Select System Preferences.
Step 3: Click on Apple ID.
Step 4: You will find your Apple ID under your name and profile picture.
In macOS Ventura or later, go to Apple menu>System settings, click on your name, and then click on Sign-in and Security. You will find your Apple ID under ‘Emails & Phone Numbers’.
PC
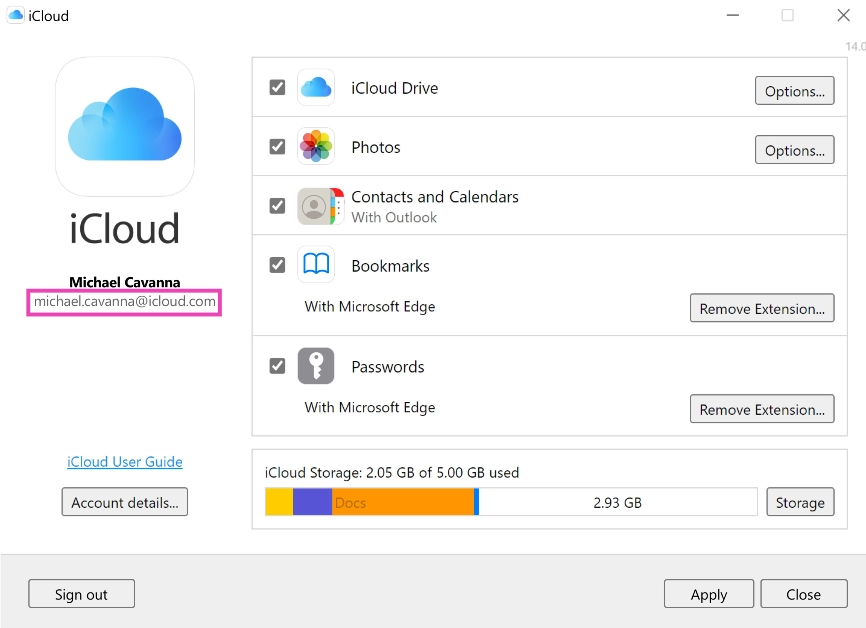
Open the iCloud app for Windows. You will find your Apple ID under your name in the left section of the page.
How to find your Apple ID if you’ve forgotten it?
If you have access to your iPhone or Apple device, finding the registered Apple ID is not a big deal. However, if you lose your device or perform a factory reset on it, you will need your Apple ID to restore your data. But what happens if you forget it? Well, there is still some hope. Go to iforgot.apple.com and enter your first name, last name, and your registered email address. Now, the last part may require a fair bit of hit and trial. If you don’t remember which email address you used for your Apple ID, go through all of them until you find a match. To regain access to your account you will be asked a few security questions and an authentication code may be sent to your recovery email address (if you had provided it at the time of creating your Apple ID).
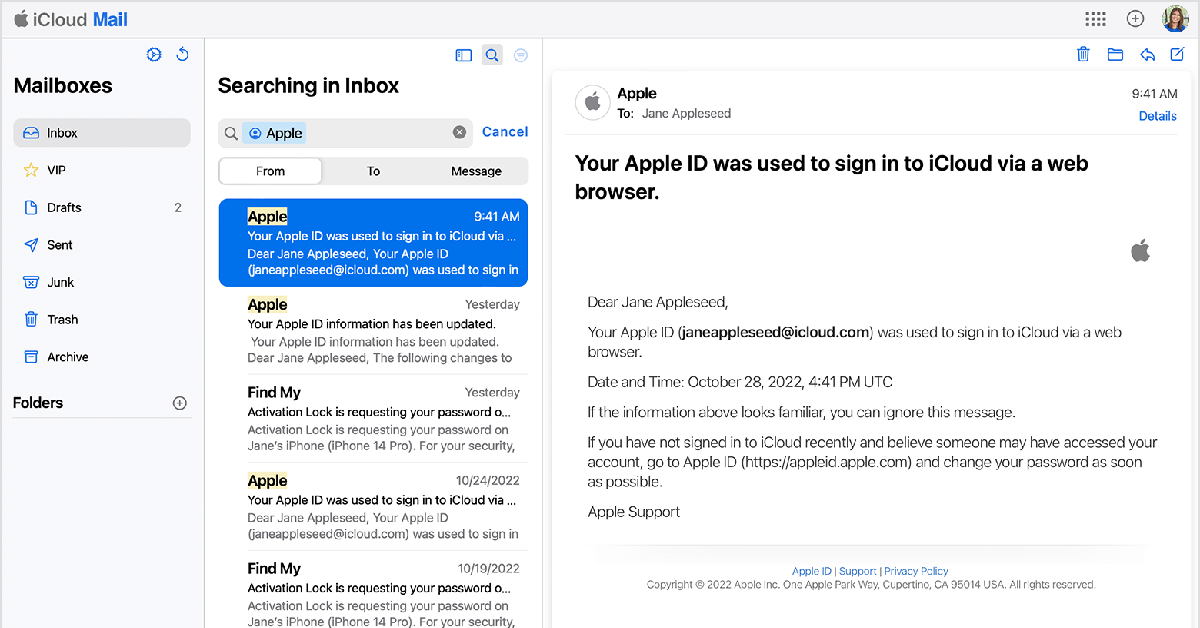
If you can’t access the iForgot page, simply go through all your email accounts and search for any emails sent from Apple. You get an email from Apple every time you create an Apple ID. Once you find this email, you will know which email address is associated with your Apple ID. This will make the task of restoring your account much easier.
If you have forgotten your password, go to the Apple password recovery page, enter your registered Apple ID or phone number, and the captcha provided on the screen. The link to reset your password will be sent to your email.
Frequently Asked Questions (FAQs)
How do I find my Apple ID on my iPhone?
Go to Settings, tap on your name at the top, and look below your profile picture for your Apple ID.
How do I find my Apple ID if I don’t remember it?
If you don’t remember your Apple ID, go through all your email inboxes and look for official emails from Apple. The one that contains the email notifying you about the creation of your Apple ID is your registered email.
How do I reset my Apple ID password?
Go to the Apple Password Recovery page, enter your email address and the provided captcha. You will get a link to reset the password in your email inbox.
This is how you can find your Apple ID on your iPhone, iPad, Mac, and PC. To maintain total control over your Apple ID, make sure to provide a recovery email address. This will come in quite handy in case you forget your registered email or password and want to gain access to your account. If you found this article helpful, let us know in the comments!
Passcodes are easy to forget, especially when you use a different one for every device you have. Your Apple Watch makes the unlocking process easy by offering features like Simple Passcode, Wrist Detection, and Unlock with iPhone. Even with all these neat features, it is not uncommon to forget your Apple Watch passcode, more so when it’s different to the one on your iPhone. So, what happens next? Check out these two ways to reset your forgotten Apple Watch passcode.
Your Apple Watch passcode can be changed from the device itself. Simply go to Settings>Passcode on the Apple Watch to change it. The same process can be carried out on the Watch app on your iPhone. However, if you forgot the passcode and want to reset it, the process may be a bit complicated.
For starters, your Apple Watch does not give you the option to reset its passcode. You can either change the passcode or disable it. Both options require entering your current passcode. If you’ve forgotten your password, the only choice you are left with is resetting your Apple Watch, restoring the most recent backup, and setting up a new passcode.
Reset your Apple Watch Passcode using your iPhone
Before you begin, make sure your Apple Watch is near your iPhone.
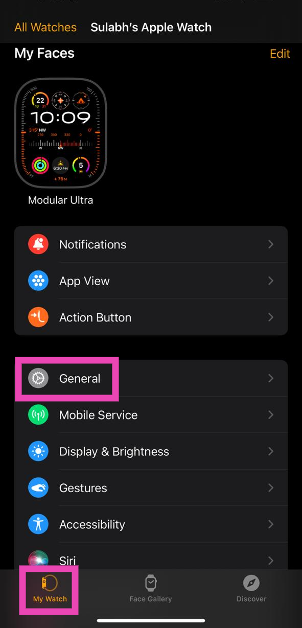
Step 1: Launch the Apple Watch app on your iPhone and switch to the My Watch tab.
Step 2: Tap on General.
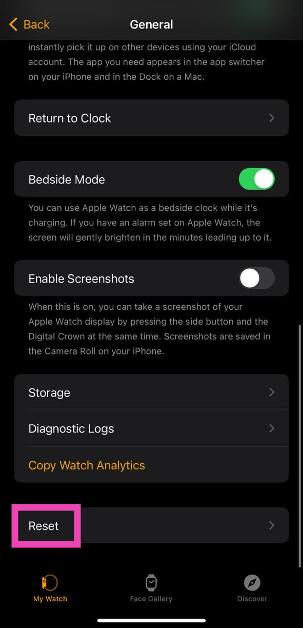
Step 3: Select Reset.
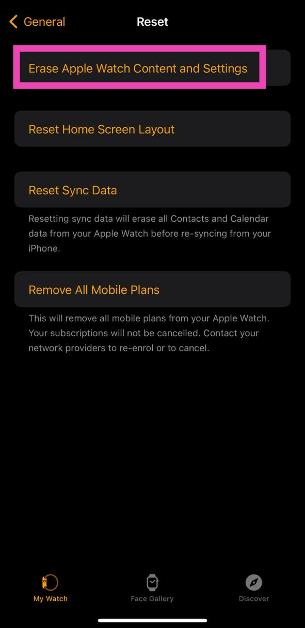
Step 4: Select Erase Apple Watch Content and Settings.
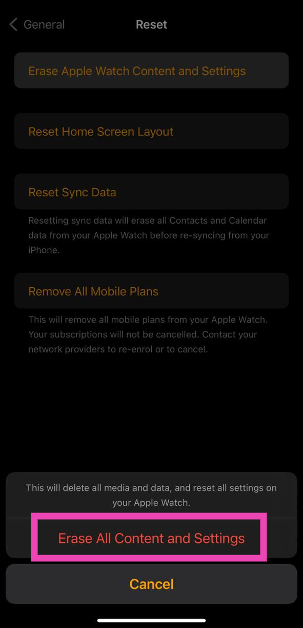
Step 5:Confirm your selection in the popup box.
Step 6: Enter your Apple ID password to verify your identity.
Once the reset process is over, set up the Apple Watch again and restore your content using a backup. When asked, set up a new passcode.
Step 2: Press and hold the side button until you see the power icon at the top right corner of the screen.
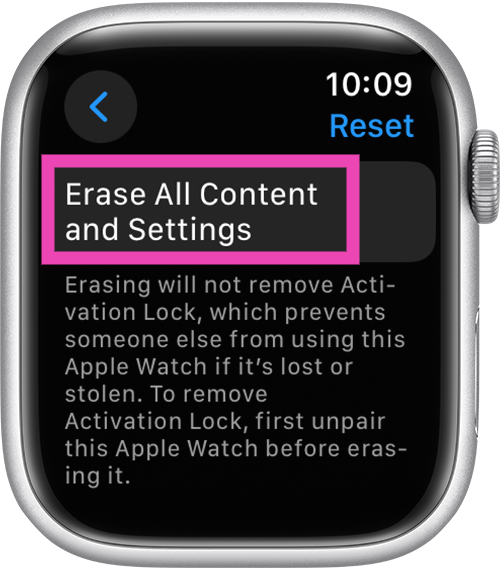
Step 3: Press and hold the Digital Crown until you see Erase all content and settings.
Step 4: Hit Reset and confirm your selection.
Your Apple Watch will reset itself in a few minutes. To set it up again, you will need to enter your Apple ID and password. When asked, enter a new passcode for the Watch.
Bonus Tip: Turn off your Apple Watch Passcode
Use your Apple Watch
Step 1: On your Apple Watch go to Settings.
Step 2: Select Passcode.
Step 3: Hit Turn Passcode Off.
Step 4: Select Turn Off.
Use your iPhone
Step 1:Launch the Watch app on your iPhone.
Step 2: Switch to the My Watch tab.
Step 3: Scroll down and hit Passcode.
Step 4: Select Turn Passcode Off.
Step 5: Hit Turn Off.
Frequently Asked Questions (FAQs)
How do I reset my Apple Watch passcode if I don’t have my iPhone?
Press and hold the side button on your Apple Watch until you see the power icon at the top right corner of the screen. Then, press and hold the Digital Crown until you see ‘Erase all content and settings’. Hit Reset to reset your Apple Watch. Now set up your Watch again and restore your backup.
How do I reset my Apple Watch passcode using the Watch app on my iPhone?
Launch the Watch app on your iPhone, go to My Watch>General>Reset>Erase Apple Watch Content and Settings and confirm your selection in the popup box. Enter your Apple ID to authenticate the action. Set up the Watch again and restore your backup. You will be able to enter a new passcode.
How do I turn off my Apple Watch passcode?
On your Apple Watch, go to Settings>Turn Passcode Off and hit Turn Off. On the Watch app on your iPhone, go to My Watch>Passcode>Turn Passcode Off and hit Turn Off.
These are the best ways to reset your Apple Watch passcode. Make sure you create a complete backup of all your personal data on the Watch before performing a complete reset of it. You can also use ‘Simple Passcode’ to unlock your Apple Watch with a 4-digit PIN. If you know of any other method, let us know in the comments!
The Infinix INBOOK Y2 Plus laptop has already been launched in Bangladesh.
It features a sleek design.
The device comes with a Metal body.
Chinese tech company Infinix is all set to launch a new budget laptop in India soon. The company has announced to introduce the Infinix INBOOK Y2 Plus laptop in the country but the company is yet to reveal the launch date. According to the firm, the upcoming laptop will feature a sleek design with premium features. For those who are unaware, the Infinix INBOOK Y2 Plus is headed to India after landing in Bangladesh.
Infinix is gearing up to launch its next budget laptop Infinix INBOOK Y2 Plus in India. The company has revealed that the device is expected to be priced under 30K. It will carry a sleek and lightweight design. Infinix has further revealed that the machine has a thin and light metal body with a “rugged brush metal design that adds a touch of sophistication.” Not just that Infinix INBOOK Y2 Plus is stated to come with an ultra-narrow bezel providing an immersive viewing experience with maximised screen space. There will be a backlit Keyboard, making it convenient for users to work in low-light environments. Moreover, the forthcoming budget laptop from Infinix will be made available in three colour options: Silver, Grey, and Blue.
As we mentioned before Infinix INBOOK Y2 Plus has already launched in Bangladesh so we are quite aware of its specification. As far as pricing is concerned, it will be revealed at the time of launch only.
However, in Bangladesh, the laptop is priced for 56,990 BDT which translates to Rs 43,000 for the 8GB RAM, and 512GB SSD variant.
The Infinix INBOOK Y2 Plus is powered by Intel Core i5 11th Gen processor and runs on Windows 12 Home edition. The laptop features a 5.6-inch IPS display with a resolution of 1920×1080 pixels.
In addition to this, there is a backlit keybeast with a multi-touch trackpad. Besides this, an FHD camera with Dual-Star light has been provided for making video calls.
Apart from this INBOOK Y2 Plus comes with dual speakers with 2W sound output. In terms of connectivity, there is Wi-Fi – IEEE 802.11a/b/g/n/ac, Bluetooth v5.1, one USB-C port, USB 3.0 ports, HDMI 1.4, an SD card slot, a 13.5mm jack.
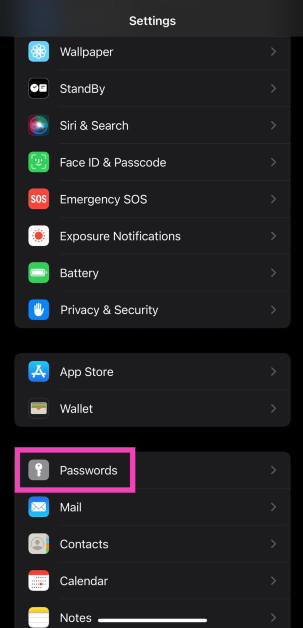
To stay on top of online security, it is recommended that you use a different password for every account you use. Given how many apps and services an average person uses these days, remembering every unique password is a hard ask. Luckily, your iPhone’s password manager remembers them for you. If you don’t fancy the native password manager on your iPhone, you can always use a third-party app to do the job. Typically, the password manager auto-fills it wherever necessary, but if you’re curious, you can always look up your saved passwords in just a few simple steps. So, here are the top 2 ways to find saved passwords on your iPhone and our top 5 password managers for your iPhone in 2023.
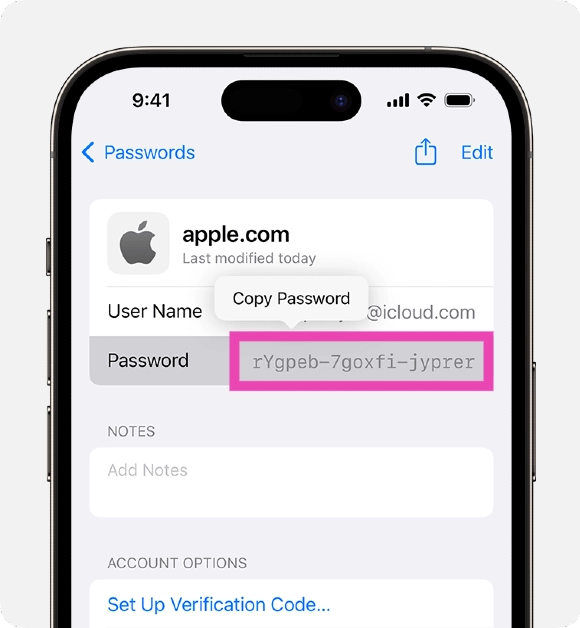
Step 2: Verify your identity using Face ID or device passcode.
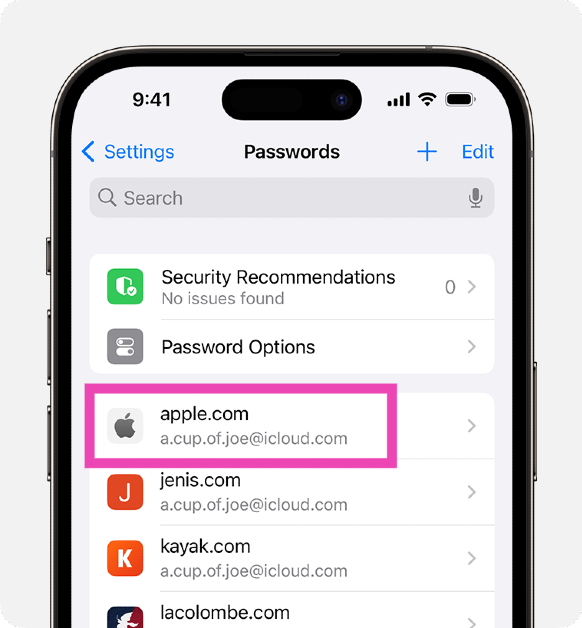
Step 3: Select the website or app for which you want to view the password or passkey.
Step 4: On the following page, you can change the password or delete it entirely.
Use Siri to find saved passwords on your iPhone
If you don’t want to navigate your way through settings, ask Siri for a particular password. For example, if you want to know your Facebook password, simply say “Hey Siri, what is my Facebook password?” After verifying your identity, Siri will display your password on the screen. You can try this for all the saved passwords on your iPhone.
Best Password Managers for iPhone in 2023
The native password manager on your iPhone gets the basics right, but if you want your password-managing app to go the extra mile, check out our recommendations below.
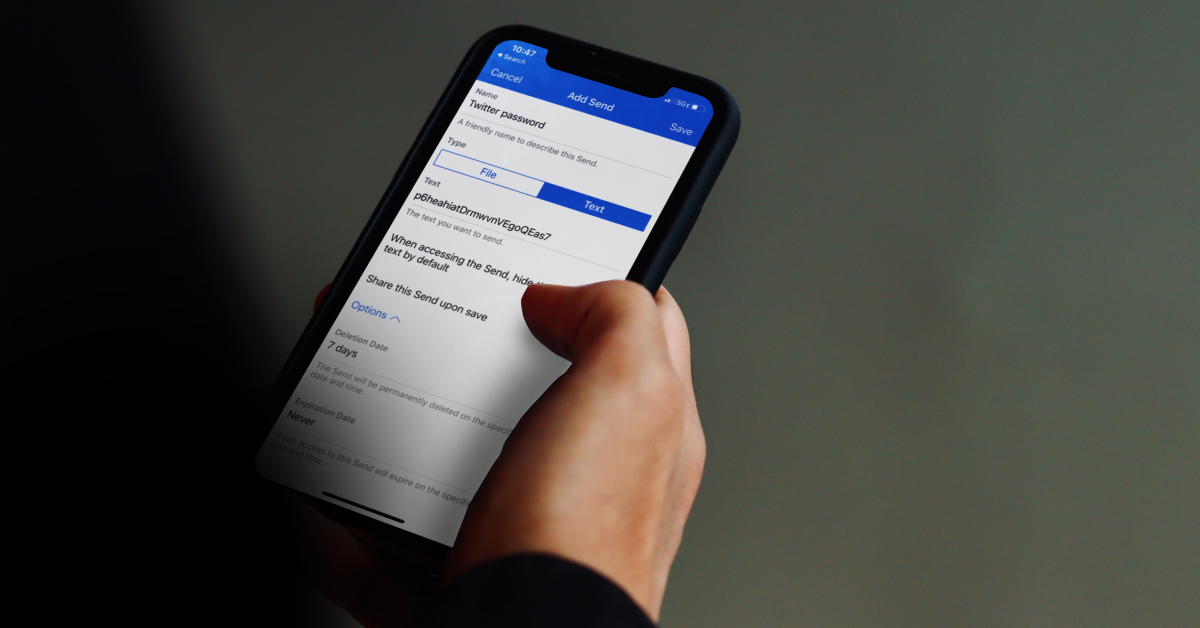
Bitwarden lets you store unlimited passwords on your iPhone and syncs them across all your devices. If you forgot your iPhone at home, you can use Bitwarden to access all your passwords on your work PC. Not only does it store your passwords, but it also helps you create new ones. You can generate a strong string for your password using Bitwarden and never have to remember it again. The app will autofill the password in the appropriate spots. All your passwords on this app are secured by end-to-end encryption (AES-256 bit, salted hashtag, and PBKDF2 SHA-256).
NordPass saves your passwords, credit card info, WiFi passwords, alarm codes, and more. You can add a password to NordPass with just one tap right when you’re logging into your account. You can even save your card details on the app and autofill them in the relevant places while checking out your e-cart. One of our favourite features of NordPass is password sharing with other users. If you want to share your Netflix password with your friends and family, you can allow them access to it using NordPass. This access can be revoked at any time. Another thing that we like about this password manager is that it assesses your existing passwords and lets you know how strong they are. If you are using the same password for multiple accounts, NordPass will prompt you to generate new ones.
1Password is one of the most comprehensive password-managing apps for iPhone. Not only does it save your passwords, but it also secures your Notes, WiFi connection, Social Security Number, Passport, Driver’s License, and more. Once you save a password on 1Password, you can access it across all your devices. Access to this app is guarded by Face ID and biometrics. If you want to share a password with your friends and family, 1Password creates a special vault that can be shared with anyone.
Dashlane is one of the most popular password managers around, used by over 15 million users and 20,000+ businesses. Apart from regular storing and autofill functions, Dashlane also notifies you when your password is affected by a data breach or a hack. Its Dark Web Monitoring feature lets you know if your data is on the dark web. Dashlane employs state-of-the-art encryption to protect your passwords and autofill data. Certainly, one of the best password managers for your iPhone that you can download right now.
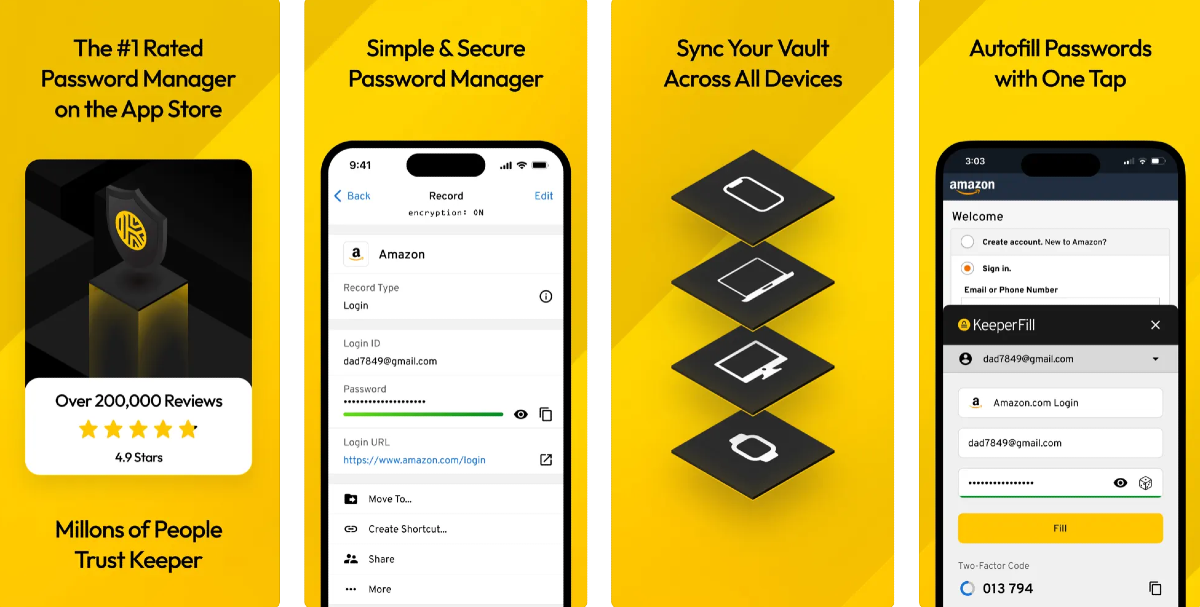
Generate strong passwords, save preexisting passwords, and secure them with world-class encryption on Keeper. Used by millions of people across the world, Keeper is a very simple password manager that offers a few additional vital features that separate it from the competition. ‘One-Time Share’ is one of them. Using this feature you can share any password with family or friends that don’t have a Keeper account. Other than saving passwords, Keeper can also generate Two-Factor Authentication codes for all your accounts. The ‘BreachWatch’ function monitors the Dark Web and alerts you if your data is ever found on it.
Frequently Asked Questions (FAQs)
How do I find a saved password on my iPhone?
Go to Settings>Passwords and verify your identity using Face ID. Now, tap the website or app for which you want to see the password.
What are some good password managers for iPhones?
Keeper, Bitwarden, 1Password, Dashlane, and NordPass are some of the best password managers for iPhones in 2023.
How do I change a password in my iPhone’s password manager?
Once you have selected a website or app in the password manager, simply hit Edit at the top right corner of the screen to save a new password.
This is how you can find your saved passwords on your iPhone. Once you change a password in your iPhone’s password manager, it doesn’t change it for the account itself. Once you autofill the password while logging in, you will be denied access to your account. To change the login credentials, you will need to access your account settings within the website or app. If you found this article, useful, let us know in the comments!
iQoo 12 5G will launch in India today in the evening.
It will feature a 144Hz AMOLED display.
It also will come preinstalled with OriginOS 4 on top of Android 14.
iQoo 12 5G is all set to make its India debut today. Before launching in India the device was introduced in China last month. There the company introduced two models iQoo 12 and iQoo 12 Pro. But today the company has announced to introduced the former one. It comes with some notable features like Qualcomm’s latest flagship chipset Snapdragon 8 Gen 3 and an OLED screen that supports a 144Hz refresh rate for smooth high-end gaming performance. However, we know the specs of the upcoming smartphone but India price details will be revealed at the time of the launch event. But the price of the smartphone has already leaked ahead of the launch. To know about it keep on reading.
In This Article
How to watch the iQoo 12 5G launch Livestream?
iQoo 12 5G will launch in India today. The livestream will begin at 5 PM IST via the company’s official YouTube Channel. The launch event will also be webcast through the company’s social media channels including X. Interested ones can also catch the event live on our website, as we have embedded a link below.
iQoo 12 5G price in India expected and specifications
iQoo 12 5G is tipped to be made available in two variants 12GB and 16GB RAM. The 12GB RAM with 256GB storage is said to come at Rs 52,999 whereas the price of 16GB RAM with 512GB storage will be set at Rs 57,999. The device will be available for purchase via Amazon in the country.
The iQoo 12 5G comes with a 6.78-inch 1.5K AMOLED display with 1,260×2,800 pixels of resolution. The screen supports a 144Hz refresh rate, HDR10+ and a 20:9 aspect ratio. The device runs on OriginOS 4 on Android 14 and is powered by a 4nm Snapdragon 8 Gen 3 SoC processor.
iQoo 12
The smartphone has a triple rear camera setup that includes a 1/1.3-inch 50-megapixel primary sensor (f/1.68 aperture), 64-megapixel periscope telephoto (f/2.57 aperture and 100X digital zoom) and 50-megapixel ultra wide-angle sensor (f/2.0 aperture). For selfies, the device features a 16-megapixel front-facing camera with f/2.45 aperture.
iQoo 12 5G is backed by a 5,000mAh battery, with 120W fast charging support. Also, there is an in-display fingerprint sensor for biometrics.


")