Apple rolled out iOS 16 with the launch of the new iPhone 14 series last year. While iOS 16 grabbed the headlines for Always On Display and lock screen customisations, there were a lot of features that went under the radar. Some of these were a long time coming and others pleasantly surprised us with their practicality and ease of use. So, without further ado, here are the top 10 hidden features in iOS 16 that you should check out right now!
Earlier, you needed a third-party tool to remove the background from your images. Now, on iOS 16 you can do that with just one tap. Simply open the image on the Photos app and long-press on the object your want to isolate. Your iPhone’s software will recognise the edges of the object and extract it from the image, allowing you to paste it anywhere. You can easily create stickers and emoticons using this trick. Need to quickly save the extracted object? Simply paste it on a Note and edit it later.
Keep your Notes password protected
Talking about Notes, iOS 16 now lets you secure them with your iPhone’s pin. If you store all your passwords and login credentials in your Notes folder, now you won’t have to worry about someone accessing them without authorisation. All you need to do is launch the Notes app on your iPhone, tap the ellipses (three dots) at the top right corner of the screen, and select ‘Lock’.
New improved Dictation
For a lot of people, the Dictation function on iPhone comes in clutch when they need to send an important text while also focusing on the road while driving. Dictation allows speech-to-text functionality for your iPhone, which greatly improves its ease of accessibility. In iOS 16 you can use Dictation while you’re typing on your phone. This wasn’t possible in the previous versions of iOS 16, as Dictation would halt as soon as you touched the screen.
Metric conversions made easy
iOS 16 instantly recognises any measurement units and allows you to instantly convert them to the unit of your choice without leaving the app. While texting on iMessage, all units of measurement are underlined in the chat thread. Simply tap the figure and you will get the option to convert it into the unit of your choice. While typing a text, press and hold the unit and tap on the arrow at the end of the popup menu to convert it into the unit of your choice. If you find a foreign currency mentioned in a menu, all you need to do is point the camera at it and tap on the scan icon on the screen. This will allow you to convert it into your desired currency.
Translate any language
The Live Text feature on iOS 16 doesn’t just convert measurements and currencies, it can even translate a language! This will come in handy when you’re travelling abroad and having trouble understanding the menus or city maps. Simply point your camera at the text, tap on the scan icon on the screen, and translate it into your desired language. You can also translate the text on saved images using Live Text. The translations may not be 100% accurate but they will be helpful in getting the basic message across.
See the battery percentage in the status bar
This may be the tiniest of upgrades but it is certainly one of the most useful ones. Previous iOS versions did not display the battery percentage in the status bar itself, making you swipe down to view the amount of charge left on your iPhone. iOS 16 displays the battery percentage in the battery icon at the top right corner of the screen. To activate this feature, go to Settings>Battery and turn the toggle bar on for Battery Percentage.
Merge Duplicate Images
We’ve talked about this feature in the past, but it is too good to not mention it in this list. If you take multiple images at once and pick the best of the lot, deleting the additional images can be a daunting chore. Now, you can let your phone take care of it. iOS 16 intelligently selects the best images out of the bunch and eliminates the rest. To merge duplicate images, go to Photos>Albums>Duplicates and select Merge. Earlier, you would need a third-party app to do this task.
Schedule Mails and Undo send ones
Another handy feature that you will be using a lot on iOS 16 is scheduling your emails. After you’re done writing an email in the Mail app, simply press and hold the arrow icon and select ‘Send later’. Accidentally sent the email to the wrong person? Now you can undo it within seconds. To activate this feature, go to Settings>Mail and select ‘Undo Send Delay’ to set the time limit to undo send emails.
Send screenshots without saving them
Screenshots may not take a significant portion of the storage space, but they make your image gallery look like a mess. Most of the time, you only take a screenshot to send to a friend. Now you can do this without having to save the screenshot on your phone. Simply tap on the preview popup upon taking a screenshot and select ‘Copy and Delete’. Paste the screenshot in the conversion thread and send it to your friend without saving it to your phone.
Prevent the side button from ending the call
Do you accidentally hang up on people by pressing the side key? Now you can avoid this problem. Go to Settings>Accessibility>Touch and turn the toggle bar on for Prevent Lock to End Call. Now you won’t have to worry about accidentally pressing the side key while you’re on a call.
These are the top 10 hidden features in iOS 16 that you need to check out right now. The best part of these features is that they eliminate the need for any third-party app and bring a lot of convenience to the software experience on your iPhone. Which is your favourite feature on iOS 16? Let us know in the comments!
If you’re looking for an added layer of security for the contents of your phone, you should look into securing important files and apps with a password. In case your phone gets lost or stolen, you won’t have to worry about personal documents like your Driver’s License, Aadhar Card, and PAN card from getting into the hands of malicious entities. In this article, we show you how to add a password to any file or app on Android.
Step 1: Launch the Files app by Google on your smartphone. If you do not have this app on your phone, download it from Google Play Store.
Step 2: In the ‘Browse’ tab, select ‘Safe folder’.
Step 3: Choose a lock for your files. You can either add a pin or a pattern lock.
Step 4: Go to the file or document you want to secure and tap the ellipses (three dots) next to it.
Step 5: Select ‘Move to safe folder’.
Step 6: Enter the pin or pattern you just created.
Your file will be moved to the safe folder and can only be accessed when you enter the pin or pattern. You will need to move the file out of the secure folder to open it.
How to password-protect any app on Android
Step 1: Launch the S Secure app on your smartphone. This is one of Samsung’s native apps. If you use any other Android device, check if the manufacturer offers a Secure Folder for apps.
Step 2: You can also access this feature by opening Settings and selecting ‘Advanced Features’.
Step 3: Tap on ‘Lock and mask apps’.
Step 4: Select ‘Locked apps’.
Step 5: Add the app your want to protect with a password.
Step 6: Hit back when you’re done. Your changes will be saved.
Step 7: Tap the password-protected app. You will need to enter your pin, password, or pattern to access it.
This is how you can add a password to any file or app on an Android smartphone. Use these methods to password-protect any file or app on Android. Files by Google and Samsung’s S Secure folder are as close to ‘native features’ as it gets. Some smartphones may require downloading these apps from the Google Play Store. There are several other third-party file lockers like Norton App Lock and Folder Lock that can carry out the same tasks.
Google plans to make Magic Eraser available to all Google One subscribers on both Android and iOS. Also, new HDR video effects and custom collage designs are being made available along with other cutting-edge editing options. Orders from the print store are shipped for free to Google One subscribers.
The AI-powered Magic Eraser feature was only available on the Pixel 6 and Pixel 7. The firm just declared that users of Google One would soon be able to use Magic Eraser on any device. Also, it will be free to use for anyone with a Pixel 5a or earlier without the need for a Google One subscription. In addition to this, the company is also making more latest editing tools like exclusive collage styles and HDR video effects available for Pixel users with no need for a Google One subscription for free.
Magic eraser
Magic Eraser can quickly and easily remove photo distractions like photobombers and power lines by identifying them in your images and detecting them. Other items can be circled or painted over with the Magic Eraser to make them disappear. Moreover, Camouflage in Magic Eraser allows you to adjust the colour of items in your shot so they organically blend in with the background, allowing you to concentrate on what is really important.
In order to capture every detail, you can already utilise the HDR effect on images to balance out dark foregrounds and bright backgrounds (or vice versa). You may now improve the brightness and contrast throughout your films by using the HDR effect.
New collage editor designs
Google is making a few tweaks to the collage editor in Google Photos to give users even more options when creating collages. The collage editor now allows all Google Photos users to apply Styles to a single shot. Second, there will be a variety of additional Styles available in the collage editor for Google One subscribers and Pixel users, giving you more options when creating your collages.
Free shipping on print orders
In the United States, Canada, the European Union, and the United Kingdom, Google One members can get free shipping on orders from the print store as of right now.
Availability
All Pixel users and Google One subscribers on all plans are now able to access these capabilities in Google Photos. Starting in early March, if you’re not already a Google One subscriber, you can sign up for a free trial on Google Photos to test out these capabilities.
We don’t have to tell you how annoying bloatware on your smartphone can be. From occupying a significant chunk of storage to spamming notifications, bloatware apps on your device can turn out to be a real nuisance. While getting rid of these apps is the first thing most users carry out on their new smartphones, sometimes it can be trickier than you think. In this article, we show you how to fix the ‘Can’t Delete Apps’ issue on Android smartphones and tablets.
Certain apps on your phone cannot be uninstalled. Apps like Google Play Store are essential to the working of your device; deleting them would defeat the purpose of a smartphone. Generally, the ‘Google Services’ apps are quite challenging to get rid of. While most bloatware can be completely uninstalled from a device, some apps like Facebook may be stubborn and refuse to be deleted. However, there is a way of disabling them.
Step 1: Go to Settings and select Apps.
Step 2: Select the app you want to disable.
Step 3: Select Disable from the bottom menu.
The app will be disabled on your device and you won’t see it on the app drawer anymore.
Uninstall apps using the Google Play Store
If you can’t find the option to disable or delete an app on your Android smartphone’s settings menu, try using the Google Play Store before moving on to other fixes. This method will work for bloatware apps but not for native apps like Calculator, Phone, Contacts, etc. Launch the Google Play Store, go to your profile, select ‘Manage apps and device’, switch to the ‘Manage’ tab, select the apps you wish to uninstall, and hit the trash icon at the top right corner of the screen. We found this method to work for Google’s suite of apps.
Revoke admin privileges from the app
Some apps require admin privileges in order to carry out their tasks effectively. Most antivirus and mobile tracking apps fall into this category. If you want to uninstall these apps, you will need to revoke their admin status first. Here’s how you can go about it.
Step 1: Go to Settings and select Biometrics and Security.
Step 2: Scroll down and tap on Other Security Settings.
Step 3: Select Device admin apps.
Step 4: Turn the toggle bar off for the app you want to uninstall. This will revoke the app’s adminprivileges.
Step 5: Hit the back button and go to Apps.
Step 6: Scroll down and select the app you want to uninstall.
Use ADB to delete apps
This method may require some effort but it will remove the stubborn apps that refuse to be deleted even after trying the two methods mentioned above. Here’s how you can remove them using ADB.
Step 1: Go to Settings and select About Phone.
Step 2: Select Software Information.
Step 3: Tap on Build Number 7 times to enter Developer Mode.
Step 4: Go back to Settings, scroll all the way down, and select Developer options.
Step 5: Scroll down to the Debugging section and turn the toggle bar on for USB debugging.
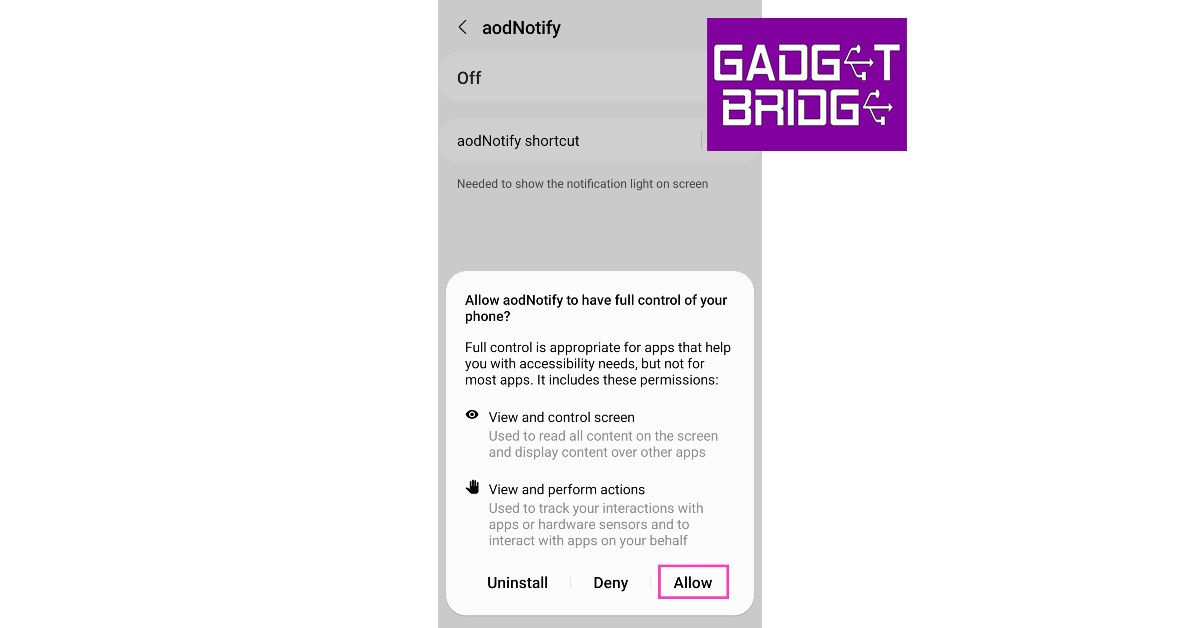
Step 6: Connect your smartphone to your PC and allow USB debugging from the popup that shows up on your phone.
Step 7: Here’s where the important part begins. First, you will need to download the official ADB driver for your PC. You can download it from this page.
Step 8: Extract the package, press Shift + right-click anywhere on the screen and select Open PowerShell Window here.
Step 9: In the following Window, type ./adb uninstall followed by a space and the name of the package. If you don’t know the name of the app package, use the ‘App Inspector’ app to find it. The apps from that package will be successfully removed from your device.
Frequently Asked Questions (FAQs)
Why can’t I uninstall some apps from my phone?
Most midrange and affordable phones come with pre-installed bloatware apps. Some of these apps cannot be removed from the device.
How do I delete the apps that cannot be uninstalled from my phone?
If an app cannot be deleted from your phone, you can choose to disable it. If you wish to completely get rid of the app, download ADB on your PC, connect your phone, run Powershell, and use the ./adb uninstall + [package name] command.
How do I mass delete apps from my phone?
Go to the Google Play Store, select your profile, tap on ‘Manage apps and device’, switch to the ‘Manage’ tab, select the apps you wish to delete, and tap the trash icon at the top right corner of the screen.
These are the top 4 ways to fix the ‘Can’t Delete Apps’ issue on Android smartphones and tablets. These three fixes cover all kinds of apps and don’t require rooting your phone or performing a jailbreak. While disabling may not get rid of the app entirely, using the ADB tool will surely take care of it.
The introduction of AI-DJ has been announced by Spotify. Users will be able to get automatically generated playlists based on their listening interests, tastes, and history thanks to a recently introduced artificial intelligence-powered functionality.
“We’re building on that innovation by harnessing the power of AI in an entirely new way. And today, we’re excited to share that we’re taking our personalization to a whole new level with DJ,” the company said via blog post.
An AI-DJ capability will soon be available on Spotify. According to the company, the feature is presently accessible on Spotify‘s beta apps for iOS and Android. The DJ is a customised AI companion that is so familiar with you and your musical preferences that it can choose the music to play for you. This feature will give a carefully selected playlist of music combined with commentary about the songs and artists we believe you’ll enjoy in a beautifully realistic voice.
It will look back at some of your old favourites and sort through the newest music, perhaps even bringing up a song you haven’t heard in a while. Then it will go over potential interests and present a stream of songs selected especially for you. Also, the lineup is continually updated based on your feedback.
If you’re not feeling it, just hit the DJ button, and it will switch things up, the business claims. The DJ’s selections get better the more you listen and let him or her know what you enjoy (and don’t like!).
“To create the DJ we reimagined the way users listen on Spotify. The DJ knows you and your music taste so well that it will scan the latest releases we know you’ll like, or take you back to that nostalgic playlist you had on repeat last year. Never before has listening felt so completely personal to each and every user.”
Spotify collaborated with Xavier “X” Jernigan, its Head of Cultural Partnerships, to develop the voice model for the DJ. The Get Up, Spotify’s inaugural (and personalised) morning programme, included X as one of the hosts. His persona and voice connected with its listeners, building a devoted audience for the podcast. His voice serves as the DJ’s initial prototype.
Availability
For Spotify Premium subscribers in the United States and Canada, Spotify AI DJ is presently available in English.
Where to find the Spotify AI DJ?
On your iOS or Android smartphone, open the Spotify mobile app and go to your Music Feed on Home.
On the DJ card, press Play.
The DJ will play a selection of music and provide a brief analysis of the songs and artists chosen just for you.
To change the genre, artist, or mood, simply click the DJ button in the bottom right corner of the screen.
Garena Free Fire is a battle royale game with regular awards and tournaments to keep players interested. If you play Garena Free Fire, you should be aware of the redeem codes that are released on a daily basis. However, because the battle royale game is banned in India, players from other countries can use the Free Fire Redeem codes daily. If you’re unfamiliar with the Garena Free Fire redeem codes or don’t know how to get them, we’ve put together a step-by-step guide to help you redeem them. Check out Garena Free Fire Redeem Codes for 24 February 2023.
The Free Fire redeem codes are a great way to get free stuff. These are 12-digit codes that contain alphabets and numbers, as well as an expiration date and time. Because the Garena FF redeem codes cannot be used more than once, you should hurry to the redemption page to claim your free reward before someone else does. To get a free reward, all you have to do is go to reward.ff.garena.com/en, which is the official redemption page. Also, keep an eye on this space for daily updates on Garena Free Fire redemption codes and rewards.
Garena Free Fire Redeem Codes Today 24 February 2023
XFW4Z6Q882WY
2FG94YCW9VMV
FFDBGQWPNHJX
V44ZZ5YY7CBS
4TPQRDQJHVP4
VNY3MQWNKEGU
FFIC33NTEUKA
TDK4JWN6RD6
HFNSJ6W74Z48
WD2ATK3ZEA55
E2F86ZREMK49
FFBBCVQZ4MWA
FFCMCPSBN9CU
FFAC2YXE6RF2
HHNAR6VKQ9R7
ZZATXB24QES8
U8S47JGJH5MG
How to Get Free Fire Redeem Codes for Garena on 24 February 2023?
24 February 2023 Amazon Quiz has gone live on its platform. The quiz timings are 12 AM to 11:59 PM. The Amazon App users can participate in the quiz daily and all they have to do is submit correct answers to the questions asked on the e-commerce platform. Today’s participants can get a chance to win Rs 5,000 Amazon Pay Balance.
By participating in the Amazon Quiz the participants can win Amazon Pay Balance ranging from Rs 1,000 to Rs 50,000 every day while sitting at home. To win the participants must answer five questions correctly that are based on current events and general knowledge. One wrong answer can eliminate you from the quiz. The results will be announced at the end of the month. Today’s question will let you win Rs 5,000 Amazon Pay Balance. Check below for today’s Amazon quiz answers.
Question 1:Bhairon Singh Rathore is a war hero from which of these battles?
Answer: Battle of Longewala
Question 2: Sundaresh Menon sat on the Supreme Court of India bench headed by CJI D Y Chandrachud. He is the chief justice of which country?
Answer: Singapore
Question 3: Which famous author referred to Shah Rukh Khan as “a great actor, legend, and king” in a tweet?
Answer: Paulo Coelho
Question 4: Where was this bird first seen in the Americas
Answer: Barbados
Question 5: Which species of this animal is found in the mainland USA?
Answer: Jackson’s
How To Play Amazon Quiz
Only app users are eligible to play the Amazon quiz every morning from 12 AM to 11:59 PM. The quiz is not available on the desktop. For those who are unaware of how to play the Amazon quiz below are the steps, you can follow to take the quiz.
Firstly download the Amazon app from Google Play Store or App Store
Now fill in the required information through the Sign Up option.
You need to log in to the Amazon app and scroll down on the home screen to find the Amazon Quiz banner.
Tap on the Amazon Quiz banner and tap on the Start button to start the Quiz.
Now you will get 5 questions and you need to answer them correctly. One wrong answer will eliminate you from the Quiz.
After answering all the questions correctly you are now eligible for a Lucky Draw.
The winner’s name will be announced today at 12 PM.
Earlier this month, the Samsung Galaxy S23 Series was introduced both globally and in India. The Gadget Bridge crew has therefore been using the Samsung Galaxy S23 Ultra since the day it was first introduced. While we have reviewed other products in the interim, this phone has been our main phone for the entire time. We are finally prepared to share with you our final, long-term review of the device after using it for a significant number of days. So, we will be sharing all of our Samsung Galaxy S23 Ultra experiences here.
Samsung Galaxy S23 Ultra Review: Design and Display
The recently announced Samsung Galaxy S23 Ultra has the same appearance as its predecessor. It has a distinctive look that is quite similar to that of the previous generation but is jam-packed with modifications, improvements, and new functions. To lessen the device’s influence on the environment, recycled materials were used in its construction and design, including internal parts.
According to the company recycled plastic was used for the upper and lower speaker modules as well as the inside cover of the S Pen, and recycled aluminium for the SIM tray, side keys, and volume keys. Even though it is a huge device, this phone is stunning in appearance, and we must commend it for not feeling uncomfortable to hold despite its size. But, based on our own observations, we can tell that this is most definitely a two-handed device for those with small hands.
Ladies out there should be aware that your jeans pocket probably won’t fit this Samsung Galaxy S23 Ultra. Not blaming Samsung, but this is so frustrating that women’s clothes still lack functional pockets. Okay, this is a little out of topic but yes here I am advocating for larger pockets in women’s clothes. Hence, if you don’t like big phones, you should probably consider the Galaxy S23 plus, which offers a more-or-less comparable experience and a rather small form factor.
All the time we used this phone, we never used a cover or a screen protector. It’s impressive that there isn’t a single scratch on the back. You can clearly see that it is in excellent condition. The front, however, has some scuffs, but nothing significant. Nonetheless, we strongly suggest that you put a decent case and screen protector on this device.
But, the one issue we have with the S23 Ultra’s design is how quickly the dust accumulates on the camera array and how challenging it is to clean, particularly around the corners. The company should be commended for paying attention to details like the power button and volume rockers, which give excellent tactile feedback. We also appreciated how the frame and the back of the phone blended together smoothly.
The first product with Corning Gorilla Glass Victus 2 is the S23 Ultra. With an average of 22% pre-consumer recycled content, the new layering provides durability for looooong use. With Vitus 2, the device’s front and rear are both shielded. Significantly, the sides of the metal frame on the Samsung Galaxy S23 Ultra are now flat rather than curved. The phone is now comfortable to hold thanks to the enhanced design. There is a slight bend to the edge, mostly for One UI edge functionality and a more fluid swiping experience.
The back panel, however, has a matte appearance. Although the camera design has been slightly updated, the rear panel still feels and looks similar to the previous version. The very same floating camera setup is provided, but each lens has chrome rings around it. It has an IP68 rating for resistance to water and dust.
We must acknowledge how stunning the S23 Ultra’s display is. It features one of the brightest screens on any smartphone right now, in addition to having exceptionally thin bezels. Its most distinctive feature is the 6.1-inch full-HD+ Dynamic AMOLED 2X display. In gaming mode, the display is rated to produce a 240Hz touch sampling rate and has a dynamic refresh rate of 1-120Hz, which can tumble to 48Hz.
There is a feature called Vision Booster, commonly referred to as extra brightness mode, for greater visibility outdoors. Under direct sunlight, it raises the screen’s brightness, colour, and contrast levels for better readability. There is also an extra-dim setting that lessens eye strain, especially for those of us who are regretful of using our smartphones during the night while curled up under the blankets.
The display on this phone is arguably the best one we’ve used so far. Thus, the colour and contrast levels on this display are excellent. Our favourite smartphone screen for watching entertainment is in fact this one. Because of the screen’s outstanding touch sensitivity and haptic feedback, even using it has been wonderful. Because of this, typing and unlocking the phone provide you with wonderfully refined vibrating feedback, greatly improving our experience with the S23 Ultra. The fingerprint sensor is incredibly quick, precise, and trustworthy.
Here, a fantastic screen is combined with an outstanding set of stereo speakers. They are balanced, sharp, clear, and loud. We had a wonderful time watching content on OTT platforms and, in particular, listening to music on Spotify, as we previously mentioned.
The Galaxy S23 Ultra also supports the S-Pen. It’s really responsive and comfortable to use the S-Pen. To be honest, we don’t use the S-Pen all that much, but if you’re an artist or an art fan, you’ll definitely love its incredibly low input latency and precise tracking ability.
We definitely give this phone a thumbs up because it is really nicely made and designed overall.
Samsung Galaxy S23 Ultra Review: Performance and Camera
Let’s now discuss how it performed. We haven’t really had anything to gripe about this one either. For performing routine daily duties, the device operates flawlessly, and using it to play games has been enjoyable.
The Qualcomm Snapdragon 8 Gen 2 platform for Galaxy is the name Samsung has given to its customised version of the Qualcomm Snapdragon 8 Gen 2 SoC used in the Galaxy S23 series. The processor has been very effectively incorporated, and other phones using the original chip have previously been tested, but the S23 Ultra aims to maintain a cooler temperature. Most significantly, it cools off considerably quickly.
The S23 Ultra’s gaming performance is also simply astounding. The most demanding games may be played at their optimal settings with a little stutter, however, you may experience some heating after around 30 minutes. Other less demanding games, like Call of Duty, run smoothly without lagging and the temperatures stay under control.
Now that we’ve got that out of the way, let’s talk about the software. One UI is one of the best Android skins available, so we have nothing but wonderful things to say about it. Its ease of use and navigation is something we appreciate. Furthermore finely optimised, the 120Hz refresh rate makes the phone quick and fluid.
Users are better secured for a longer period of time thanks to the Galaxy S23 series’ inclusion of four generations of OS upgrades and five years of security updates. The most recent version of Samsung One UI, version 5.1, was also published while we were discussing the software upgrade and it brought some minor visual modifications to the user interface.
In addition to other things, we were really pleased with the camera’s performance. Its aspects of photography and videography impressed us. A 200-megapixel primary wide camera with an 85-degree field of view and an f/1.8 aperture is the primary camera on the back of the Samsung Galaxy S23 Ultra.
There are three more cameras: a 12-megapixel ultra-wide camera with a 120-degree field of view and an f/2.2 aperture, a 10-megapixel telephoto lens with an f/2.4 aperture and a 3-x optical zoom, and a third 10-megapixel telephoto sensor (10x optical zoom). A 12-megapixel selfie camera with an 80-degree field of vision and an f/2.2 aperture is located up front.
The primary camera on the device produces top-notch pictures. You get a fantastic dynamic, but the colour appears to be a little enhanced. So, you will enjoy the photographs on it if you favour a more rich, more bright look. A 200-megapixel sensor known as the ISOCELL HP2 has been added to the Samsung Galaxy S23 Ultra’s primary camera system. With pixel binning, which will merge 16 pixels into one, you will be shooting at a resolution of about 12 megapixels.
Nevertheless, you can choose to either use 50 megapixels or the full 200-megapixel resolution if you’d like. As we zoom in 100x, you can see a lot more detail.
Normal vs portrait(lowlight)
It captures excellent images in low light thanks to its excellent ability to preserve shadow and highlight details. Images taken indoors are clear, finely detailed, and noise-free. Also, we don’t often use flash unless it is absolutely necessary in certain circumstances.
daylight/lowlight with flash
We’d like to point out that when we take images of moving subjects, there sometimes seems to be some shutter lag. Our pet was in the shot, and since they are seldom ever still, the pictures are generally blurry. This is an important point for those of us who enjoy taking pictures of children and their pets.
Also, it features a superb ultra-wide camera, and it performs excellently all around. It has good shadow details and contrast ratio. The ultra-wide camera generated detailed photographs in low light.
It does have autofocus, so you can use it to focus closely for macro images, and we thought it did a fantastic job. Notably, the S23 Ultra has two zoom cameras, one with a zoom range of about 3x and the other with a zoom range of 10x incorporating periscope technology. We found that a 10x zoom produces a crisper image.
Now that the S23 Ultra can zoom out 30x, it is really beneficial if you need to zoom in on a distant sign. The text can be seen well in these sample photos. Although we personally don’t use this feature very often, you can use it to take images of the moon. It can even stretch up to 100x.
portrait
The S23 Ultra also performs well for portraits. Here, it also offers a 3x optical zoom option, which in our opinion results in a far more appealing portrait. Yet we observed that our skin looked a little soft. Some of you might even enjoy that. Moreover, S23 Ultra offers foreground blur in pictures, although the outcomes are not to our taste. The edge detection and background blur are flawless.
Daytime (normal/portrait)Selfie lowlight
Speaking of selfies, S23 Ultra was able to preserve the image quality and colour of our skin. You may also use a wider field of view here. It features a night mode for low-light selfies, however, it is quite challenging to keep your hands steady. Although you get a crisp image, using flash tends to over brighten everything.
selfie portrait
Let’s go on to videography right now. Samsung has also improved its video capabilities. As a result, you get superb dynamic range in favourable lighting when recording at 4K@30fps. It’s wonderful to see that Samsung now supports HDR10+ across all of its cameras. When you wish to export HDR video from the S23 Ultra, you do have the choice to convert that to SDR (standard dynamic range) video. The video becomes quite noisy when shot in low light. Low light autofocus is not as effective as it is in bright light.
Samsung devices now sport 8K video, which is excellent and offers a tonne of information, especially if you wish to zoom in. Samsung features a super steady mode that produces excellent stabilisation performance. Moreover, 4K portrait video is available and performs a respectable job in general. Yet, blacks have a more blue tint than true black. While the stabilisation and dynamic range of selfie videos are both outstanding.
The camera of the Samsung Galaxy S23 Ultra is superb, and using them shouldn’t be an issue. Although the device still suffers shutter slowness, the advantages include an expanded zoom and an overall good Ultra Wide camera. The videos feature better 8K and high dynamic range and sharpness. Nice stabilisation all in all, and improved cinematic mode.
Finally, the S23 Ultra has good battery life. With our usage, the battery’s endurance is not very outstanding. The battery lasted the entire day for us and had about 35 percent charge left when we went to bed.
Verdict
The Samsung Galaxy S23 Ultra (starting at Rs 1,24,999) is a very well-built phone, offering the best display experience, performance and cameras. We have been quite happy with the camera performance among other things. Although its photography and videography capabilities are pretty excellent, there are still a few areas of its cameras that we wished have been better. For example, we discovered that the shutter speed on the S23 ultra was a little slower in portrait and ultra-wide modes. So, there is a potential that a photograph of a moving subject will turn out blurry.
We have had a wonderful experience using the Galaxy S23 Ultra as our daily driver for weeks. There are a few minor details that we critiqued in our review, but they are all insignificant details that you are most likely to overlook anyhow. This is also your only trustworthy choice if you want a high-end phone with a stylus that works with it, unless you prefer a smaller phone, then Galaxy S23+ is a great option as well.
Apple announced on Wednesday that it has given Apple Watch units to researchers from around the world to aid in the exploration of new areas in heart health. According to the research, a typical, healthy adult’s heart beats more than 100,000 times in a single day. A picture that is largely unseen starts to take shape beat by beat and day by day.
Apple provides consumers with an ongoing, active view of their health with its heart health features, which include high and low heart rate notifications, Cardio Fitness, irregular rhythm notifications, the ECG app, and AFib History.
According to Apple, researchers, clinicians, and developers have discovered cutting-edge new methods to investigate, track, and treat a wide spectrum of diseases since Apple debuted ResearchKit and CareKit in 2015.
Apple started the Investigator Support Program to encourage research that will ultimately lead to widespread health improvements. Through this programme, Apple offers researchers Apple Watch devices, enabling them to make significant advancements in health research, including the understanding of the heart from a scientific perspective.
Apple is highlighting the innovative work being done by health professionals all over the world who are utilising Apple Watch to study the heart in a way that has never been done before.
The company has disclosed that Dr. Claudia Toro and Associate Professor Rachel Conyers are senior paediatric oncologists from Melbourne, Australia. Together, they are examining the potential effects of treatment on cardiac rhythm and attempting to come up with creative strategies to intervene.
“I read about the Apple Heart Study and I thought this could be important for paediatrics,” said Dr. Conyers. “We used to think of cardiac toxicity as something that happened 10 years after treatment. But now we know that new cancer therapies (like specific inhibitors or immune therapy) can cause arrhythmias within 48 hours of medication — so there’s a big gap in terms of what we know about the toxicities at the moment.”
To further understand how wildfire smoke affects heart health, Dr. Cheong at Texas A&M University and Drs. Brian Kim and Marco Perez at Stanford Medicine will start providing Apple Watches to firefighters the first week of next month. Up to 200 firemen from Texas and California who work in the wildland fire season (spring and summer respectively) will participate in the study.
The study will use Apple Watch to track data on activity, sleep, blood oxygenation, heart rate and rhythm, and more. Also, firefighters will wear an air quality monitor and complete surveys about their sleep, activities, and illnesses brought on by wildfire smoke.
The anticipated prevalence of atrial fibrillation (AFib) in the European Union is predicted to quadruple by 2060, according to epidemiology experts in the region. AFib is a common heart arrhythmia that, if untreated, can have catastrophic consequences, including an increased risk of stroke or heart failure.
Dr. Sebastiaan Blok, director of eHealth at the Cardiology Centres of the Netherlands, and his colleagues are researching strategies to identify AFib sooner at the Amsterdam University Medical Centers. As part of a wider project named HartWacht, the first reimbursable eHealth idea, the researchers have created a randomised controlled study.
They intend to include more than 300 patients who are above 65 and meet the AFib risk criterion in their trial. The intervention group, which makes up half of the participants, will wear Apple Watch for at least 12 hours per day.
Participants are required to take an ECG as part of the study’s protocol once every three weeks or as soon as any symptoms appear. The researchers will get in touch with the participant and give them instructions on how to take an ECG and share the results if they receive a notification of an abnormal rhythm.
HP Omen 17 (2023) was launched in India as the company’s latest gaming laptop. The device is powered by a 13th Gen Intel i9 Core processor and the NVIDIA GeForce RTX 4080 Laptop GPU. The new HP Omen laptop comes with QHD (Quad HD) 240hz display and is supported by OMEN Tempest Cooling Technology for desktop-caliber gaming.
HP Omen 17 (2023) gaming laptop price in India and sale details
The HP Omen 17 (2023) gaming laptop comes with a starting price of Rs 2,69,990. The device will be available in a single Shadow Black colour option. It can be purchased via Omen Playground Stores, HP world stores & HP online store in the country.
HP Omen 17 (2023) gaming laptop specifications
HP Omen 17 (2023) gaming laptop features a 17.3-inch screen and up to a QHD (Quad HD) 240hz display. The screen offers 100% sRGB colours, a 3ms reaction time, and 300 nits of brightness.
The device is powered by 13th Gen Intel i9 Core processor and comes integrated with the NVIDIA GeForce RTX 4080 Laptop GPU. The HP Omen 17 has 1TB of PCIe NVMe SSD storage and 32GB of LDDR5 RAM as standard equipment. The NVIDIA GeForce RTX 40 Series laptop GPUs, built with the incredibly efficient NVIDIA Ada Lovelace architecture, enables lifelike virtual worlds with complete ray tracing and deliver a quantum leap in performance with AI-powered DLSS 3. It runs Windows 11 Home out of the box. Moreover, the Max-Q suite of technologies enhances system efficiency by optimising power, battery life, and acoustics.
OMEN Tempest Cooling Technology is used in the laptop to provide desktop-quality gaming. The OMEN 17 also has OMEN Gaming Hub, a one-stop location to improve a gamer’s performance. With integrated dual array digital microphones and temporal noise reduction, the HP Wide Vision 720p HD camera. Bang & Olufsen’s dual speakers significantly improve the experience.
The device consists of one Thunderbolt 4 port, one DisplayPort 1.4 port, two USB Type-A ports, a mini DisplayPort port, one RJ-45, one AC smart pin, one headphone/microphone combination port, and an SD media card reader. Other connectivity choices include Wi-Fi 6E and Bluetooth version 5.2. The HP OMEN 17 laptop comes with a full-size 4-zone RGB backlit keyboard. It also houses an 83Wh battery that supports a 330W adaptor.
In India, Lenovo has unveiled a brand-new ThinkBook Plus Gen 3 laptop with two displays. The laptop was presented at the CES 2022 last year. A 17.3-inch screen serves as the laptop’s primary display, while a second 8-inch screen is located right next to the touchpad. A digital pen is included in the package to assist users in creating on the secondary screen. Also, the ThinkBook Plus Gen 3 laptop from Lenovo provides a CO2 offset service that enables buyers to conveniently offset carbon emissions for the brand-new item at the time of purchase.
Lenovo ThinkBook Plus Gen 3 specifications
The 17.3-inch ultra-wide touch support display on the Lenovo ThinkBook Plus Gen 3 has a resolution of 3072 x 1440 pixels. It provides a 3K resolution, a 120Hz refresh rate, and a 21:10 aspect ratio. Touch functionality is also supported on the secondary 8-inch HD display with a resolution of 800 x 1280 pixels which is right next to the touchpad.
It is powered by a 12th-generation Intel Core i7-12700H processor with a 1TB SSD M.2 2280 PCIe 4.0×4 NVMe storage drive, and 16GB Soldered LPDDR5 Memory. The laptop comes integrated with Intel Iris Xe Graphics. The laptop comes pre-installed with Windows 11 Pro
The Lenovo ThinkBook Plus Gen 3 also boasts dual speakers with 2W output and Dolby Atmos compatibility. Lenovo makes it clear that the audio is from Harman and Kardon. There are three ports available: a USB-C port with charging capabilities, two USB-A connections, and an HDMI port.
A camera privacy shutter and compatibility for Windows Hello with an IR camera are provided for security. The laptop has a built-in 69Wh battery that, according to the MobileMark battery test, may last up to 6.5 hours.
It includes a digital pen that is allegedly the first stylus to support Pantone digital colour, allowing colour capturing using ColorKing and giving the user a variety of presentation and design options. Additionally, the laptop provides a CO2 Offset Service that enables buyers to seamlessly offset carbon emissions for their brand-new item at the time of purchase.
Lenovo ThinkBook Plus Gen 3 price in India and sale details
One shade of grey is the only one available for the ThinkBook Plus Gen 3. The device is priced at Rs 1,94,990 upwards. The laptop is available for purchase through Lenovo’s official offline and online channels.
Ashish Sikka, Director – Commercial 4P Strategy, Lenovo India said, “Lenovo is equipping businesses with cutting-edge devices for more fluid and flexible working environments. We as a company strongly believe in constant innovation and our ThinkBook portfolio is specifically designed to suit the evolving needs of small and medium businesses. The latest ThinkBooks are built with premium materials, are committed to ensuring security, and feature sophisticated and sustainable designs customised for the next generation of fearless business owners.”
Garena Free Fire is a battle royale game with regular awards and tournaments to keep players interested. If you play Garena Free Fire, you should be aware of the redeem codes that are released on a daily basis. However, because the battle royale game is banned in India, players from other countries can use the Free Fire Redeem codes daily. If you’re unfamiliar with the Garena Free Fire redeem codes or don’t know how to get them, we’ve put together a step-by-step guide to help you redeem them. Check out Garena Free Fire Redeem Codes for 23 February 2023.
The Free Fire redeem codes are a great way to get free stuff. These are 12-digit codes that contain alphabets and numbers, as well as an expiration date and time. Because the Garena FF redeem codes cannot be used more than once, you should hurry to the redemption page to claim your free reward before someone else does. To get a free reward, all you have to do is go to reward.ff.garena.com/en, which is the official redemption page. Also, keep an eye on this space for daily updates on Garena Free Fire redemption codes and rewards.
Garena Free Fire Redeem Codes Today 23 February 2023
ZZATXB24QES8
U8S47JGJH5MG
GCNVA2PDRGRZ
J3ZKQ57Z2P2P
FFICJGW9NKYT
XUW3FNK7AV8N
B3G7A22TWDR7X
FFICJGW9NKYT
XUW3FNK7AV8N
VNY3MQWNKEGU
FFIC33NTEUKA
FF7MUY4ME6SC
4ST1ZTBE2RP9
X99TK56XDJ4X
FFCMCPSJ99S3
How to Get Free Fire Redeem Codes for Garena on 23 February 2023?
23 February 2023 Amazon Quiz has gone live on its platform. The quiz timings are 12 AM to 11:59 PM. The Amazon App users can participate in the quiz daily and all they have to do is submit correct answers to the questions asked on the e-commerce platform. Today’s participants can get a chance to win Rs 1,250 Amazon Pay Balance.
By participating in the Amazon Quiz the participants can win Amazon Pay Balance ranging from Rs 1,000 to Rs 50,000 every day while sitting at home. To win the participants must answer five questions correctly that are based on current events and general knowledge. One wrong answer can eliminate you from the quiz. The results will be announced at the end of the month. Today’s question will let you win Rs 1,250 Amazon Pay Balance. Check below for today’s Amazon quiz answers.
Question 1: Which Indian had the honour to unveil the 2022 FIFA World Cup?
Answer: Deepika Padukone
Question 2: Natasha Colin Kim Fah Lee Fokas created the Guinness World record for making the largest what?
Answer: Wearable cake dress
Question 3: Who once called India ‘beautiful chaos’ mentioning his trip there when he was 20 years old?
Answer: DJ Diplo
Question 4: What was the name of the Egyptian goddess represented by this animal?
Answer: Heqet
Question 5: This bird was an important symbol of which empire?
Answer: Roman Empire
How To Play Amazon Quiz
Only app users are eligible to play the Amazon quiz every morning from 12 AM to 11:59 PM. The quiz is not available on the desktop. For those who are unaware of how to play the Amazon quiz below are the steps, you can follow to take the quiz.
Firstly download the Amazon app from Google Play Store or App Store
Now fill in the required information through the Sign Up option.
You need to log in to the Amazon app and scroll down on the home screen to find the Amazon Quiz banner.
Tap on the Amazon Quiz banner and tap on the Start button to start the Quiz.
Now you will get 5 questions and you need to answer them correctly. One wrong answer will eliminate you from the Quiz.
After answering all the questions correctly you are now eligible for a Lucky Draw.
The winner’s name will be announced today at 12 PM.
In a diverse nation like India, it can get tricky to keep a track of all the national holidays and festivals. On top of that, every state has its own public holidays as well. For people that use Gregorian calendar apps, keeping a track of Indian holidays can be a bit complicated. However, there are several apps that will do it for you. In this article, we bring you the top 5 apps to keep track of festivals in India.
The Indian Holiday Calendar app gives you the complete list of Indian holidays and festivals including bank holidays, national and state holidays, stock market holidays, and festivals of all Indian religions and local regions. You can look up the holidays on the calendar or browse them through different categories. This app also sends you notifications about upcoming holidays and lets you add reminders for any date.
2023 Calendar Business Planner
The 2023 Calendar Business Planner app developed by Bharat Calendars provides a comprehensive list of Indian festivals and holidays. You will also find public holidays of other countries on this app. Apart from that, you can sync this calendar with Google Calendar and Outlook Calendar, choose different themes, schedule appointments, set up reminders, and carry out a whole bunch of customisations.
India Calendar
The India Calendar app features Indian-gazetted public holidays and festivals along with other important dates. This app also allows you to look up the Hindi calendar. Other than that, you can set up reminders, sync with Google Calendar, use the date calculator, and leave notes and entries with absolute ease.
Calendar 2023 with Holidays
The Calendar 2023 with Holidays app gives you the option to view the Gregorian calendar or the Hindu calendar. All the major holidays and festivals are listed at the bottom of every month. You can also read festival-related information on the app itself. You can swipe through the months or access all the holidays on one page. This app is easy to use and is equipped with all the basic functions you expect from a calendar app.
2023 Calendar
If you’re looking for an app that has an exhaustive list of Indian festivals along with added information about them, the 2023 Calendar app is a good place to start. This app contains all public holidays, festivals, and fasting details. The Hindu calendar on this app lists the exact fasting times along with the relevant information. You will also be able to find Islamic holidays along with the Ramzan calendar on this app.
These are our picks for the top 5 apps to keep a track of festivals and holidays in India. Most of the apps on this list will give you a comprehensive list of national, state, regional, and religious holidays without needing to add any extra information. If you are already accustomed to Google Calendar, most apps on this list also offer an easy syncing process to save your time.
The Dimensity, Filogic, Genio, Kompanio, and Pentonic product and technology portfolios, as well as a number of fresh 5G outside mobile demos, will be highlighted by MediaTek at MWC 2023. Together with showing MediaTek-powered products from some of the top businesses in the world, MediaTek will also demonstrate its satellite communications platform. Demos of devices and technologies include innovations in mobile, satellite, smart TV, Wi-Fi 7, IoT, and 5G.
Joe Chen, President of MediaTek said, “Our diverse technology portfolio underscores how we’re well-positioned to address the latest trends like bringing 5G and satellite connectivity to a wide range of devices and to deliver advancements in the latest technology. We’ll also have some of the latest MediaTek-powered devices to highlight how we are delivering incredible experiences in every product category.”
The company shared that smartphones and other devices can now use MediaTek’s 5G Non-Terrestrial Network (NTN) solution, which is based on 3GPP standards. Visitors to the MWC can examine some of the newest gadgets running MediaTek’s NTN solutions at the company’s booth. Moreover, MediaTek will give a first-look demonstration of its newest New Radio NTN (NR-NTN) technology.
According to MediaTek, it will demonstrate its cutting-edge Access Traffic Steering, Switching, and Splitting (ATSSS) technology as one example. Using a MediaTek Dimensity 9200 flagship chipset, MediaTek and Deutsche Telekom recently completed the first proof of concept test for the ATSSS 3GPP Release 16 (R16) standard in the globe. By switching from cellular 5G to Wi-Fi and vice versa, the ATSSS changeover functionality helps ensure stable voice and video call quality as the first major use case implemented in a lab configuration. The technology enables quick, cost-effective improvements to user experience and network performance across both current cellular access networks and Wi-Fi access points.
In collaboration with Ericsson, MediaTek will also showcase 5G mmWave beam technology to enhance connection performance and reliability. Together with that, MediaTek will demonstrate its 5G UltraSave for mmWave with Keysight 5G Network Emulation Solutions and describe how its technology optimises hardware and software design to prolong battery life during high-speed data transfer for a variety of 5G-enabled devices.
MediaTek will showcase at MWC how its Dimensity 9200 chipset elevates leading smartphones. In the demos, MediaTek’s hardware tracing support, Intelligent Display Sync 3.0, which dynamically adjusts refresh rate, and Intelligent Picture Semantic Segmentation, which enhances image quality with multi-person segmentation and multi-layer colour management, are all included. The Vivo X90 and X90 Pro, MediaTek’s most recent flagship handsets powered by the Dimensity 9200, will also be on exhibit at the event.
The OPPO Find N2 Flip and Tecno PHANTOM V Fold, both powered by the MediaTek Dimensity 9000+; the OnePlus Pad and Lenovo Tab Extreme, both with the MediaTek Dimensity 9000 flagship chipset built in; and the MediaTek Dimensity 9000 are just a few of the devices in each category that MediaTek will be showcasing at MWC.
The new Dimensity 7200 is also being introduced at MWC as part of the MediaTek 7000 Dimensity Series. The processor is constructed using TSMC’s second-generation 4nm technology, includes an Arm Mali G610 GPU, two Arm Cortex-A715 cores, six Cortex-A510 cores, an integrated AI Processor Unit, and two Arm Cortex-A715 cores, each with a maximum operating speed of 2.8GHz. The chipset supports 200MP and 4K HDR cameras with MediaTek’s Imagiq 765 and 14-bit HDR ISP. Up to 4.7Gbps downlink, as well as 2CC Carrier Aggregation and Dual 5G SIM with dual VoNR, are supported by the built-in R16 Sub-6GHz 5G modem.
The business will display a whole ecosystem of gadgets running on MediaTek’s cutting-edge Wi-Fi 7/6E/6 Filogic technologies.
Nothing is officially releasing Nothing OS 1.5, which runs on Android 13 for the Nothing Phone 1. This is the company’s most significant upgrade yet. The most recent version includes new exciting custom capabilities, app improvements, visual upgrades, privacy advancements, system performance and general bug fixes.
Nothing Phone 1 is getting its first significant Android OS update. The business has announced the release of Nothing OS 1.5 for the device, which includes a number of improvements and a few unique features developed together by Google With the most recent version, users will have access to lock screen shortcut customizations, additional Glyph ringtones and more.
A new Nothing Weather app will be included with the Nothing OS 1.5 upgrade. The built-in camera app’s user interface will also be updated. According to the company, apps are allegedly going to load up to 50% faster with the upgrade.
Nothing OS 1.5 has expanded customization possibilities and gives users access to a new Glyph sound bundle with more ringtones and notification sounds. Users get access to brand-new Material You colour schemes that are based on the wallpaper. The update also includes the capability for customising the shortcuts on the lock screen. Create shortcuts for the camera, torch, device controls, and wallet.
With the updated network Quick Settings panel in Nothing OS 1.5, it is now also possible to quickly switch data usage while using two SIM cards. Added QR code scanner in the camera app and Quick Settings.
The update also includes multi-language functionality, which enables different languages for certain apps. Receive clipboard access alerts. Text that has been copied shows up on the screen’s bottom corner’s clipboard. As a result, you can edit the content directly before pasting. To conserve battery, close running background programmes immediately from the notification centre.
Media controls also get a new look. Puts album artwork on full display with a wider set of music controls. One can now easily adjust individual volume sliders without unlocking the screen (e.g. music vs ringtone). Using Google Game Dashboard Screenshots, screen recording, FPS display, and Do Not Disturb are all supported. Whereas Live caption on Nothing Phone 1 detects speech on your device and automatically generates captions.
In order to keep the Nothing Phone 1 working smoothly, new self-repair functionality is added. This feature is said to erase outdated system dumps and unnecessary cache.
Billions of people use Gmail regularly and if there’s one thing that truly unites their emailing experience, it’s spam. No matter how hard you try, it is virtually impossible to dodge spam mail. If left unattended, spam mail can make it hard to browse through your inbox. Luckily, there are a few steps you can take to minimise the spam on your email account. In this article, we bring you the top 5 ways to deal with spam emails on Gmail.
If you receive an unusual amount of spam from certain senders, you can individually block their email addresses and report them to Gmail. Here’s how you can do that.
Step 1: Open Gmail on your web browser.
Step 2: Open the spam mail.
Step 3: Click on the ellipses at the top right corner of the mail, next to the date and time.
Step 4: Click on ‘Block <sender name>’. Report spam as well.
You will not receive any emails from the sender anymore.
Unsubscribe from promotional mail
If you signed up for a service using your Gmail account and have been receiving unnecessary promotional mail ever since, there is a quick way to put an end to it. All you need to do is open the email and click on the ‘Unsubscribe’ option next to the sender’s email address. Confirm your selection in the following pop-up box and you will be successfully unsubscribed from their promotional mailing list.
Use Gmail filters
Gmail offers a range of filters that can help you sort through your emails and make sure you filter out the spam before it even reaches your primary inbox. To filter emails, click on the filter icon next to the search bar. Enter the email address you want to filter emails from. Additionally, you can add certain keywords and the emails that contain them will be filtered from your inbox. You can store the filtered emails in an archived folder if you want to have a look at them later.
Use your email address to organise incoming mail
If you don’t have a throwaway email to sign up for services, you can use your primary email to filter out promotional emails and newsletters and organise your inbox. All you need to do is add a plus sign after your Gmail username and add the name of the website while signing up for a service.
For example, if you are signing up for Swiggy, fill in your username as username+swiggy@gmail.com. Since the service does not register anything after the plus sign, the emails will be directed to your Gmail account but they will contain the +swiggy identifier in your inbox. Now, you can easily search username+swiggy@gmail.com in your inbox to filter out all emails from Swiggy. These can be deleted all at once.
This trick also comes in handy when you use one email address for work and social activities. You can classify every mail by its activity. Simply type in username+gym@gmail.com when signing up for a gym, username+news@gmail.com when subscribing to a news service, or username+socialmedia@gmail.com when making an account on a social media platform. This will make it easier to manage your inbox.
Use a third-party tool
There are several third-party tools available online that scan your inbox to filter out spam. While this may be really convenient, it also means exposing your emails to a third party. However, the open-sourced script ‘Gmail Unsubscribe’ is as privacy friendly as it gets. Gmail Unsubscribe neither collects your data nor sells it to any entities.
These are the top 5 easy ways to deal with spam emails on Gmail. You can also create a throwaway Gmail account and use it to sign up for any websites or services to cut down the spam on your main account. How do you minimise the spam on your Gmail account? Let us know in the comments!
A working Bluetooth connection is one of the most essential parts of your iPhone these days. All the major accessories – from AirPods to Apple Watch – rely on a stable Bluetooth connection for their intended use. Any minor problem with your iPhone’s Bluetooth can render those accessories useless. In this article, we bring you the top 10 ways to fix Bluetooth issues on iPhone 13 and iPhone 14.
If the Bluetooth on your iPhone 13 or iPhone 14 crashed all of a sudden or unexpectedly started malfunctioning, try restarting it first before jumping into major fixes. You can toggle the Bluetooth on and off from the Control Centre or restart it from Settings. Here’s how.
Step 1: Go to Settings and select Bluetooth.
Step 2: Turn the toggle bar next to Bluetooth off and then on.
Unpair the device and pair it again
If you’re experiencing any functional issues with the Bluetooth accessory, simply unpair it with your iPhone and then re-pair it. Go to Settings>Bluetooth, choose the device, and hit disconnect. Now, scan for nearby devices and connect to the Bluetooth accessory again.
Restart your iPhone
A quick restart takes care of all the background issues and software glitches that may be keeping your iPhone from functioning properly. If restarting your phone’s Bluetooth doesn’t work, try restarting your phone instead. This should be the first step in resolving any functional issue on your phone. To restart your iPhone, simply press one of the volume buttons along with the side key until the power slider appears on the screen. Drag the power slider to the right to turn off your iPhone. Power the phone back on by pressing and holding the side key.
Reset the Bluetooth accessory
If the issue still persists after restarting your iPhone, try resetting the Bluetooth accessory. Most TWS products have a pairing button that can also be used to reset the device. On AirPods, this button lies right below the hinge. Press and hold this button for around 15 seconds or until the notification light blinks multiple times. Once the device has been reset, you will need to pair it with your iPhone again.
Forget the Device
If you’re having trouble with a previously connected device, forget the device and pair it again. In order to do this, go to the Bluetooth menu in Settings and select the device that’s giving you issues. Tap on ‘Forget this device’ and try pairing it again with your iPhone. You will be asked to match the pin like the first time you paired the device.
Pair the Bluetooth device with another iPhone
If you want to make sure whether the issue lies with your iPhone or the Bluetooth accessory, pair the device with another iPhone. If the device connects without any hassle, your iPhone is the one at fault. if you face the same issues connecting the device, you don’t need to focus on your iPhone but the device itself.
Reset Network Settings
Resetting the network settings on your iPhone restores all connections to their default settings. Any devices paired to your Bluetooth and WiFi will be deleted and you will need to pair them again. Any customised settings will also be set to default. Here’s how you can reset network settings on your iPhone.
Step 1: Go to Settings and select General.
Step 2: Scroll down and select Transfer or reset iPhone.
Step 3: Select Reset followed by Reset Network Settings.
Update your Bluetooth device’s firmware
Like your smartphone’s OS, the firmware of your Bluetooth headphones also receives periodic updates from the manufacturer. Apple AirPods automatically install any pending firmware updates as soon as they connect to your iPhone. This is not the case with other TWS products. To update the firmware of your TWS go to its support app (the one you use to customise the controls) and look for the update in the settings.
Update iOS Version
If the Bluetooth on your iPhone isn’t working due to a software bug, it will quickly be fixed in the next software update. It is highly likely that the update has already been published and is waiting to be downloaded to your phone. To update iOS to its latest version, go to Settings>General>Software Update and download the update.
Reset your iPhone to Factory Settings
You can try performing a factory settings reset on your iPhone to fix the Bluetooth issue. Before you proceed, make sure you back up all your personal data on the device as you will lose it in the process. Here’s how you can restore your iPhone 13 or 14 to its factory settings.
Step 1: Go to Settings and select General.
Step 2: Scroll down and select Transfer or Reset iPhone.
Step 3: Tap on Reset.
Step 4: In the following window, select Reset All Settings.
Step 5: Enter the PIN and confirm your selection.
Frequently Asked Questions (FAQs)
How do I fix the functional issues with my AirPods?
If you’re facing functional issues like lags, stuttering, and inconsistent volume levels, simply disconnect your AirPods and pair them with your iPhone again.
Why won’t my iPhone scan my Bluetooth accessory?
If your iPhone does not recognise your TWS, simply reset the device by pressing and holding the pairing button.
How do I update my TWS’ firmware?
To perform a firmware update, launch your TWS’ mobile app and check the settings for firmware details.
These are the top 10 ways to fix any Bluetooth issues on your iPhone 13 or iPhone 14. If the problem still persists after trying these methods, it is likely a hardware-related issue. Take your iPhone to an Apple-authorised service centre for further diagnosis.
At a time when smartphone prices keep soaring to new heights every year, many users prefer buying a refurbished phone over a new one. If bought from a reputable seller, refurbished phones can be just as good as new ones. Some even come with a warranty period. A lot of users may even find it hard to differentiate between a new phone and a refurbished unit. While this may be good news if you purchased the latter, it can be slightly disconcerting for new phone buyers. After all, there are a lot of shady sellers out there. Luckily, there are several ways you can check if your iPhone or Android smartphone is refurbished or brand new. Here are the 8 best ways to go about it.
Refurbished iPhones are far too common these days. Apple retails refurbished iPhones in its own online store. If you find the regular iPhone to be too pricey, you can get a pretty good deal on a refurbished one. Apple even changes the battery and the outer shell and makes sure all broken parts are either fixed or replaced before retailing a refurbished iPhone. On top of that, you even get a warranty of 1 year. Other sellers may not offer a warranty on the iPhone, but usually ask for a lower price than the official Apple Store. Here is our list of the best places to buy a refurbished iPhone.
Check the Model Number of the iPhone
Wondering whether your iPhone is refurbished or not? It is actually quite easy to find that out. All you need to do is look at the model number of your iPhone. Here’s how you can do that.
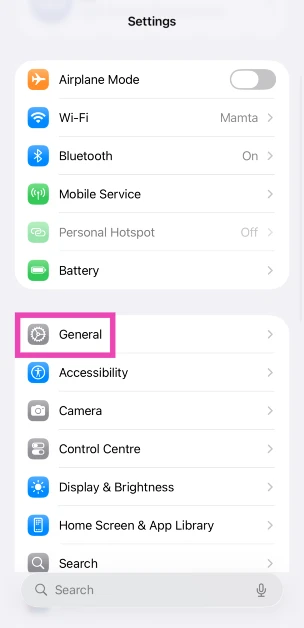
Step 1: Go to Settings.
Step 2: Select General.
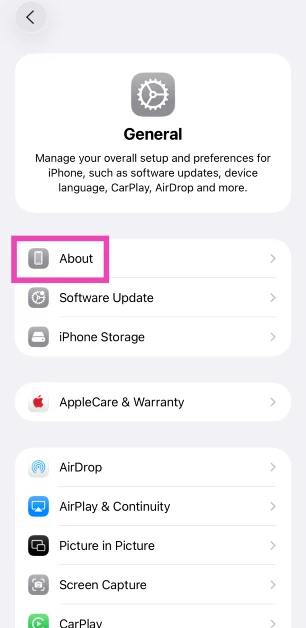
Step 3: Select About.
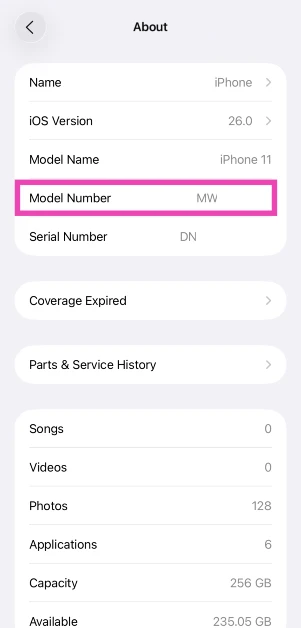
Step 4: Check the first letter of the Model Number.
If it starts with M, your iPhone is brand new.
If it starts with F, your iPhone is a refurbished unit provided by Apple or a third-party seller.
If it starts with P, your iPhone is a personalised unit with an engraving.
If it starts with N, your iPhone was issued as a replacement unit by Apple for a faulty iPhone.
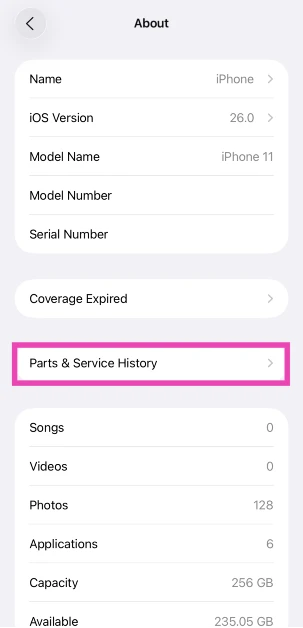
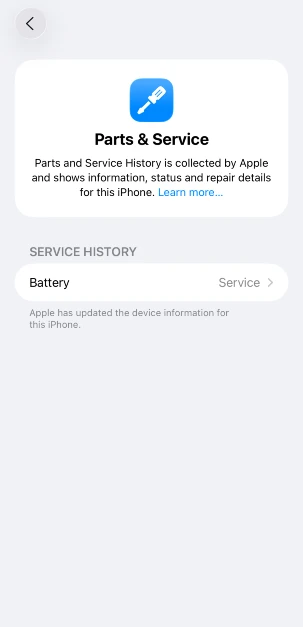
Check Parts & Service History
Your iPhone keeps a record of refurbished, repaired, and serviced parts. If you want to confirm that your iPhone is refurbished, simply check this record. Here’s how.
Step 1: Go to Settings and select General.
Step 2: Tap on About.
Step 3: Select Parts & Service History.
Step 4: The refurbished and serviced items will be listed on the following page.
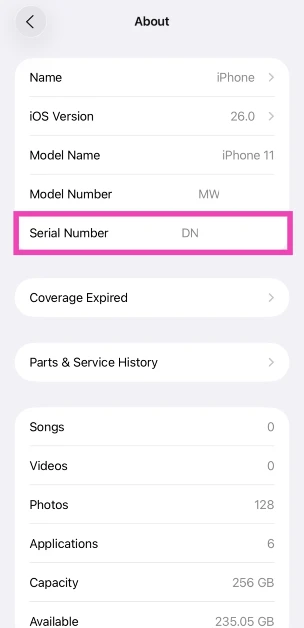
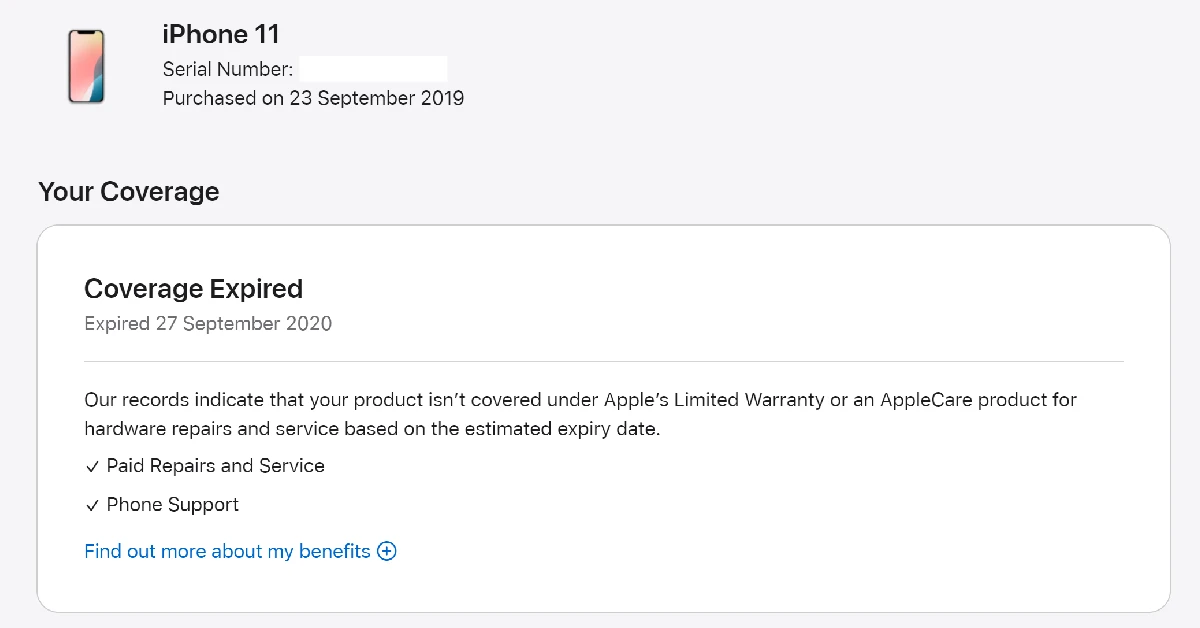
Check your iPhone’s Serial Number
Step 1: Go to Settings and select General.
Step 2: Tap on About and navigate to the Serial Number.
Step 3: Note down the serial number of your device.
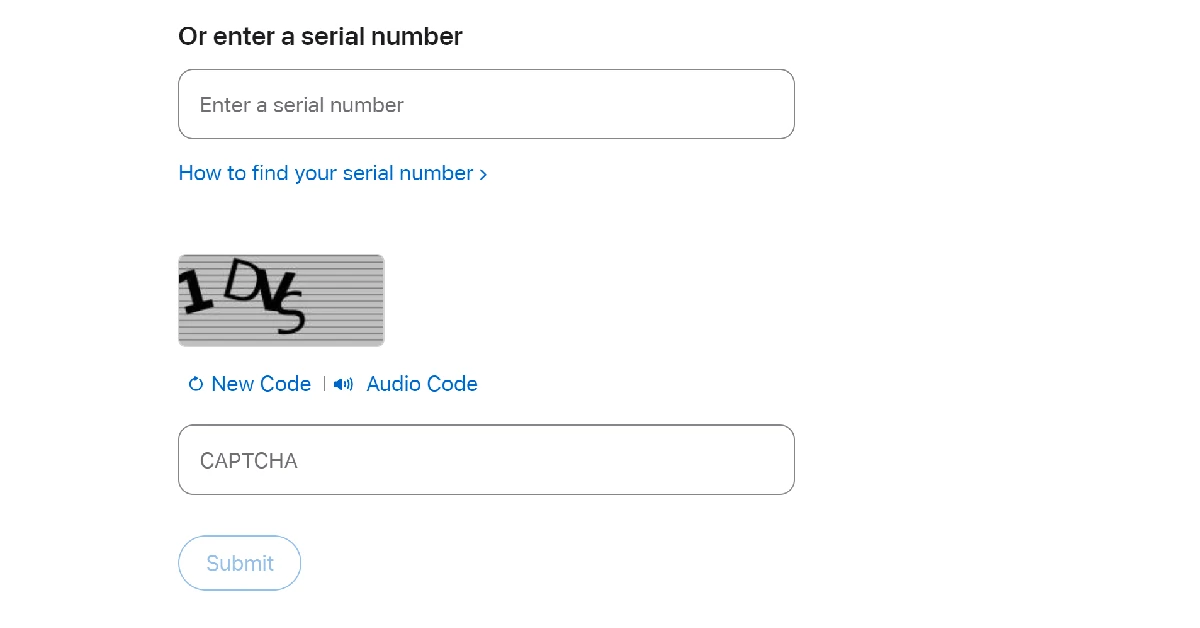
Step 5: Enter your iPhone’s serial number and the on-screen CAPTCHA.
Step 6: Hit Submit.
Step 7: If the website says your iPhone has not yet been activated, your device is brand new.
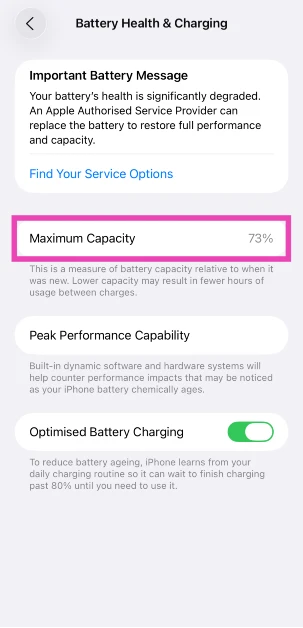
Check the Battery Health
Most retailers, including official Apple retail outlets, change the battery packs of refurbished iPhones before selling them. However, in some cases, that might not be the case. To confirm whether your iPhone is a new model or a refurbished unit, check its battery health. A new iPhone or a refurbished unit with a new battery pack will always have a 100% battery capacity. However, refurbished units with old battery packs will have a significantly lower battery capacity.
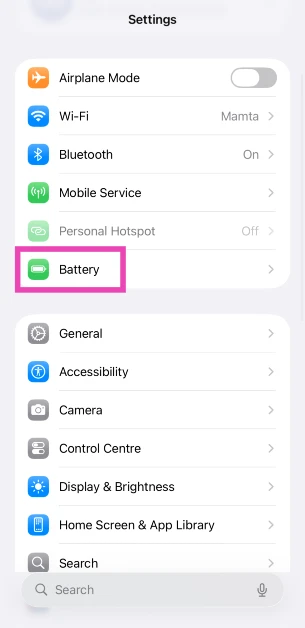
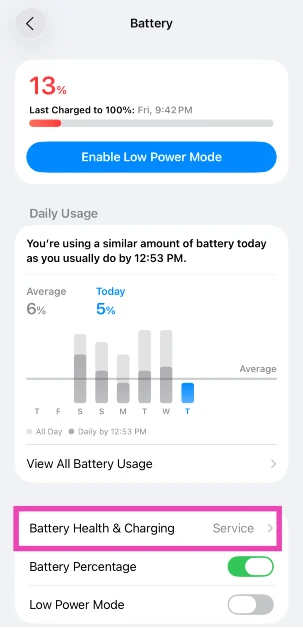
Step 1: Go to Settings and select Battery.
Step 2: Tap on BatteryHealth & Charging.
Step 3: Check the Maximum Capacity field.
How to check if your Android phone is refurbished
There are a couple of ways to find out if your Android smartphone is refurbished or brand new. Older smartphones display their RTN information upon dialling a code. Newer smartphones typically do not have this feature. Here are some methods that will cover every Android phone.
Use a dial code
This is one of the best methods to check if your Android smartphone is refurbished or not.
Step 1: Open the dialer app on your phone.
Step 2: Dial ##786# (##RTN#) on the keypad. If this code doesn’t work, dial ##786#*#.
Step 3: Scroll down and check the Reconditioned Status. If it says Yes, your phone is a refurbished unit. If it says no, your phone is brand new.
Use a third-party app
Newer Android smartphones make it harder to check if they are refurbished or not. However, there are certain third-party apps that will do it for you. Samsung users can download the Phone INFO+ app to check the refurbishment status of their device. This is a paid app, which isn’t ideal, but it gets the job done. Launch the app and tap the hamburger menu on the left. Select ‘Refurbishment Check’ and the app will let you know if your device is refurbished or brand new.
Check the IMEI number
If you purchased your phone from a shady seller and are now afraid they may have slipped you a stolen phone under the guise of a new one, you can easily find out its status by checking the IMEI number. Go to the About Phone section in the Settings app to find the IMEI number of your phone. Here are some easy ways to find the IMEI number of your smartphone. Now, go to imei.info and check if your device has any history of being stolen. If nothing shows up, your phone is likely brand new.
Make sure the IMEI number is consistent
There are several ways to go about checking the IMEI number of your Android phone. When a phone gets refurbished, the seller may flash its IMEI, leading to inconsistencies in the numbers listed on the device packaging and the device itself. Use the method mentioned above to find out the IMEI number of your phone from the device settings. Next, dial *#06# to check the IMEI number. Finally, check if these two numbers match the number listed on the retail package.
Should you buy a refurbished phone?
If you don’t want to splurge a lot of money on a flagship smartphone, buying a refurbished unit is the right move. Premium smartphones offer anywhere between 5 to 7 major OS upgrades, depending on the manufacturer. If you’re buying a refurbished model that’s only a couple of years old, you can still get a lot of mileage out of it. The dropoff in performance isn’t super big.
Apart from the year of production and remaining software coverage, you should also do a basic hardware check while buying a refurbished smartphone. This means running an app like TestM or Phone Doctor to get an assessment of the core hardware of the device. You should also manually check the cameras, display, and speakers of the phone. This is why we recommend buying refurbished smartphones from physical retailers rather than online outlets.
Frequently Asked Questions (FAQs)
How do I find out if my iPhone is brand new or refurbished?
Go to Settings>About and find out your device’s model number. If it begins with an F, it means your iPhone is refurbished.
How do I check if my Android smartphone is refurbished?
Dial ##786# on your phone’s dialer to check its reconditioned status.
How do I check my iPhone’s parts and service history?
Go to Settings>General>About, and tap on ‘Parts & Service history’.
How do I check my iPhone’s battery capacity?
Go to Settings>Battery>Battery Health & Charging, and check the ‘Maximum Capacity’ field.
Which is the best place to buy a refurbished iPhone?
Apple’s official refurbished outlet is the best place to buy a refurbished iPhone since it will be equipped with a new battery and body casing. Apple also offers a 1-year warranty on refurbished iPhones.
This is how you can check if your iPhone or Android smartphone is refurbished or brand new. While buying a smartphone, make sure you check the date of manufacturing of the device. If a long time has elapsed since the date of manufacture, it is possible that the phone may be refurbished. To avoid this, always buy electronic goods from reputable sellers only.
Infinix has announced the launch of a brand-new laptop in the affordable category- Infinix Y1 Plus. The laptop is aimed at college students and budding professionals. The device features a 15.6-inch Color Rich Anti-Glare FHD Display and it comes with a 50Whr capacity. The Infinix laptop has Windows 11 Home pre-installed.
Infinix InBook Y1 Plus price and sale details
Infinix Y1 Plus has been launched in India with a price tag of Rs 29,990 for the base 8GB RAM with a 256GB storage option. While the 8GB RAM with 512GB storage option is priced at Rs 32,990. The device will be available in three colour options of Blue, Silver and Green. You can purchase it via the e-commerce website Flipkart from February 24 in the country.
Infinix InBook Y1 Plus specifications
The 15.6-inch Infinix InBook Y1 Plus has thin side bezels and a full-HD resolution display. The screen of the laptop also supports 86 percent of the sRGB colour gamut and has a brightness of 250 nits. The 2-megapixel web camera of the Infinix InBook Y1 Plus has dual LED fill lighting. Moreover, the Infinix InBook Y1 Plus has an AG glass touchpad with multi-touch gesture capabilities. The laptop has two stereo speakers that can emit 2W of sound.
Windows 11 Home is pre-installed. An Intel Core i3 processor, 8 GB of RAM, and up to 512 GB of storage power the laptop. Around 1.76 kilograms is what Infinix claims it weighs.
The laptop comes with two USB-C ports, dual USB 3.0 ports, an HDMI 1.4 port, a specific SD Card slot, and a 3.5mm audio port for connectivity. It has a 50Whr battery unit and supports 65W fast charging over USB Type-C, which can, according to the manufacturer, recharge the battery by 75% in an hour. According to the battery’s specifications, it can play videos for up to 9–10 hours.
Garena Free Fire is a battle royale game with regular awards and tournaments to keep players interested. If you play Garena Free Fire, you should be aware of the redeem codes that are released on a daily basis. However, because the battle royale game is banned in India, players from other countries can use the Free Fire Redeem codes daily. If you’re unfamiliar with the Garena Free Fire redeem codes or don’t know how to get them, we’ve put together a step-by-step guide to help you redeem them. Check out Garena Free Fire Redeem Codes for 22 February 2023.
The Free Fire redeem codes are a great way to get free stuff. These are 12-digit codes that contain alphabets and numbers, as well as an expiration date and time. Because the Garena FF redeem codes cannot be used more than once, you should hurry to the redemption page to claim your free reward before someone else does. To get a free reward, all you have to do is go to reward.ff.garena.com/en, which is the official redemption page. Also, keep an eye on this space for daily updates on Garena Free Fire redemption codes and rewards.
Garena Free Fire Redeem Codes Today 22 February 2023
Updating soon
How to Get Free Fire Redeem Codes for Garena on 22 February 2023?
Amazon hosts a Quiz session for its customers daily. Its app platform brings a quiz on a daily basis, which begins at 12 AM and ends at 11:59 PM daily. The participants stand a chance to win cash prizes on a daily basis. Today’s 22 February 2023 Amazon Quiz will let you win Rs 500 Amazon Pay Balance.
By participating in the Amazon Quiz the participants can win Amazon Pay Balance ranging from Rs 1,000 to Rs 50,000 every day while sitting at home. To win the participants must answer five questions correctly that are based on current events and general knowledge. One wrong answer can eliminate you from the quiz. The results will be announced at the end of the month. Today’s question will let you win Rs 500 Amazon Pay Balance. Check below for today’s Amazon quiz answers.
Question 1: The UN has recognized which Indian govt. initiative as one of the top 10 World Restoration Flagships to revive the natural world?
Answer: Namami Gange
Question 2: Who is the first footballer to win two world cup golden balls?
Answer: Lionel Messi
Question 3: In the upcoming movie ‘Ant-Man and the Wasp: Quantumania’ , Jonathan Majors plays the role of which supervillain?
Answer: Kang the Conqueror
Question 4: Which continent does this owl not visit?
Answer: Australia
Question 5: The chariot of which Norse goddess was pulled by this animal?
Answer: Freya
How To Play Amazon Quiz
Only app users are eligible to play the Amazon quiz every morning from 12 AM to 11:59 PM. The quiz is not available on the desktop. For those who are unaware of how to play the Amazon quiz below are the steps, you can follow to take the quiz.
Firstly download the Amazon app from Google Play Store or App Store
Now fill in the required information through the Sign Up option.
You need to log in to the Amazon app and scroll down on the home screen to find the Amazon Quiz banner.
Tap on the Amazon Quiz banner and tap on the Start button to start the Quiz.
Now you will get 5 questions and you need to answer them correctly. One wrong answer will eliminate you from the Quiz.
After answering all the questions correctly you are now eligible for a Lucky Draw.
The winner’s name will be announced today at 12 PM.
If you forgot your iPhone passcode, don’t get frustrated. You can remove the passcode and reset your device if you know the right methods. You can do everything on your own without any expertise. We are going to share the top 4 methods on how to unlock iPhone if you forgot password/passcode. Follow the simple steps and unlock your device without any hassle.
Bonus Tips If You Forgot iPhone Passcode
If you are using iOS 15.2 or later, you can reset your device from the built-in function. After entering the wrong passcode multiple times, you will see the option on the screen.
If you do not have a computer, you can use the iCloud method. It can also work from a smartphone.
If you can create a backup of your device, you must do it. iTunes can do it if the device has been synced before.
Try to reset the device using iTunes or iCloud. But if these methods do not work or you want a simple solution, try Tenorshare 4uKey.
Forgot Your iPhone Passcode? Solved!
People use passcodes to ensure the privacy of their data on their iPhones. But these can be problematic if you forget them. You cannot reopen the device without a passcode or change the passcode through any method. The only solution is resetting the device, and in this case, you lose all your data.
How to reset iPhone passcode? We are going to introduce a few methods you can try to unlock your device and reset it. But all these methods have some conditions, such as Apple ID/password, syncing of the device, etc. If you want a quick solution, you can use Tenorshare 4uKey. It can remove the passcode without any prerequisites.
Option 1: How to Unlock iPhone via iCloud When You Forgot Your Password
iCloud is the quickest option to unlock your device if you don’t remember the passcode. It does the job without any hassle, but it removes all your data. Your device is reset from iCloud, and all your data is erased. However, if you have a backup in iTunes or any other storage, you can restore it back. The best thing about this method is that you can reset your device remotely, which means it can also work if your device is not nearby; there is no need to connect it.
Note: To use this method, you should know the Apple ID and password.
Step 1: Go to the iCloud website. Enter your credentials to log into your account.
Step 2: Click on Find iPhone application. It will show you all the devices connected to the Apple ID. Click All Devices and select your device. You will see three options. Click Erase iPhone. Confirm by entering the password.
Option 2: Unlock iPhone without Passcode or Face ID via iPhone Unlocker
How to unlock iPhone when you forgot password? The best way to unlock an iPhone without passcode or Face ID is by using a reliable iPhone unlocker. You can use Tenorshare 4uKey. It is an all-in-one iPhone unlocker that can unlock the passcode, Touch ID, Face ID, screen time passcode, MDM profile, and activation screen. The best part is that it works in every case and does not require anything. Just plug in your device and follow a few simple steps to get rid of the lock.
Step 1: Download the software from the official site and install it on your computer.
Step 2: Launch the software. On the main screen, you will have multiple options. Click Start to unlock the passcode.
Step 3: Connect your device to the computer and click Next. If your device is not recognized, you can follow the on-screen instructions to put the device in DFU or Recovery mode.
Step 4: 4uKey will find suitable firmware for the device. Select the location and click Download.
Step 5: After downloading, click Start the Remove. 4uKey will start removing the passcode. Within a few minutes, your passcode will be removed.
Option 3: Unlock iPhone without Passcode or Face ID Using iTunes
What to do if you forgot your iPhone password?iTunes can be used to unlock the device without a passcode. It can help you reset your device, so the data will be erased. But if there is any backup you made in iTunes, you can restore it without any problem.
But keep in mind that iTunes will not recognize your device when it is unlocked, but if you have synced the device to the computer before, then it can work.
Step 1: Connect your device to the computer and open iTunes.
Step 2: If iTunes recognizes your device and doesn’t ask for a passcode, you can proceed. You can also create a recent backup if you want to save all your data.
Step 3: Click on Restore iPhone. You will see a popup. Click Restore to confirm. The process will take a few minutes to restore your device.
Option 4: How to Reset Your iPhone Using Recovery Mode When You Forgot Your Password
If you have not synced your device to the computer, iTunes or Finder will not recognize it. It will ask you to enter the passcode on the device and trust the computer. It is not possible in your case because you don’t remember the passcode.
The only solution is to put the device in recovery mode and then use iTunes or Finder to reset it. It will also erase all your data from the device.
Step 1: Make sure your device is not connected to the computer. Turn off the device.
Step 2: Now, put the device in recovery mode by pressing the following buttons. Press the button according to the model of your device and hold it.
iPhone 8 and later: Side Button
iPhone 7: Volume Down Button
Others: Home Button
Step 3: While holding the button, connect the device to the computer. When you see the recovery mode on the screen, leave the button.
Step 4: Open Finder or iTunes and click on your device. You will see a popup. Click on the Restore button. Wait for a few minutes, and the passcode of your device will be removed.
Final Words
You can unlock or reset your iPhone if you forgot iPhone passcode. We have shared some of the easy solutions you can try. You can choose the best one according to your situation. All these solutions have some prerequisites, but if you want to quickly reset your device and get 100% results, use Tenorshare 4uKey. It does the job with perfection and removes all kinds of locks from iPhones.
Over the years, smartphone manufacturers have made some decisions that haven’t gone down too well with consumers. The removal of the LED notification light from the front display is one of them. While the LED light was helpful in letting us know about any pending messages or charge status, it didn’t fit into the scheme of things when smartphones started ditching the extra bezels for a larger display. And to be fair, the Always On Display does a good job of displaying all the important notifications without needing to unlock your phone. For the nostalgia-ridden folks, there is a workaround that will restore the notification light on your phone. In this article, we show you how to enable and use the LED notification light on Samsung Galaxy S22, S22+, and S22 Ultra.
Your Samsung Galaxy S22 may not have an LED notification light, but the aodNotify app turns the border of the punch-hole camera at the front into a notification indicator. This notification light will serve as an indicator for low battery, charging status, and other app notifications. You can also use this app to simulate an LED notification dot on the status bar of your phone or light up the edges as a notification alert. This app not only works for Samsung Galaxy S22 but also for other Android smartphones. Here’s how you can set it up.
Step 1: Download and install the aodNotify app on your Samsung Galaxy S22 or any other Android smartphone.
Step 2: Select the apps you want to be notified about.
Step 3: Give aodNotify notification access on your phone.
Step 4: Choose whether you want the notification light to be always on or only pop up when there’s a pending notification on your phone.
Step 5: Finally, allow aodNotify to draw over other apps.
Once you’ve set up the app, you can choose the position of the notification indicator along with the thickness, colour, and animation. If you choose to keep the indicator running at all times, it may drain the battery slightly faster.
Read Also:
Final Words
This is how you can enable and use an LED notification light on Samsung Galaxy S22, S22+, and S22 Ultra. While your Samsung Galaxy S22 may not come with a dedicated LED notification light, you can program the rear flash and front display edges to light up every time you receive a notification. Go to Settings>Notifications>Notification pop-up style> Edge Lighting Style to make the edges of the display light up upon receiving a notification. Go to Settings>Notification>Flash Notifications to program the flash to blink every time a notification pops up on your phone.
Poco has officially announced a new budget smartphone Poco C55 in the Indian market today. The device comes with a 6.71-inch HD+ screen with a waterdrop design notch and a fingerprint reader located on the back. The phone has a 50-megapixel dual back camera arrangement and a 5-megapixel front-facing camera. In addition to this, the phone is powered by a MediaTek Helio G85 Processor and has a 5,000mAh battery.
Poco C55 price in India and sale details
The 4GB RAM with 64GB storage Poco C55 price in India is set at Rs 9,499. Whereas the price of the 6GB RAM with 128GB storage model costs Rs. 10,999. Starting on February 28, customers may purchase the smartphone through Flipkart and the company’s website. The device will come in three colour options of Cool Blue, Forest Green, and Power Black.
Also, the firm has stated that the Poco C55 would be offered for a special “first day” price of Rs 8,499 and Rs 9,9999 for the 4GB and 6GB RAM options. These costs include promotions for HDFC Bank, SBI Bank, and ICICI Bank users.
A 6.71-inch HD+ LCD screen with a resolution of 720×1,650 pixels is featured on the Poco C55. The screen has a maximum brightness of 534 nits, a refresh rate of 60 hertz, and a touch sampling rate of 120 hertz. A MediaTek Helio G85 CPU with up to 6GB of Memory powers the device. The phone is powered by MIUI 13. It features an internal storage capacity of up to 64GB, which can be increased to up to 1TB using a MicroSD card slot.
The Poco C55 has a 50-megapixel primary camera with an f/1.8 aperture lens as well as an unidentified secondary camera. Moreover, the phone has a 5-megapixel front-facing camera for selfies and video calls.
Wi-Fi, 4G, Bluetooth 5.1, GPS, and a Micro-USB port are available as connectivity choices. It has a rear-mounted fingerprint scanner, a virtual proximity sensor, and an accelerometer. A 5,000mAh battery within the device supports 10W charging. Moreover, the smartphone has an IP52 grade for water and dust protection.


")


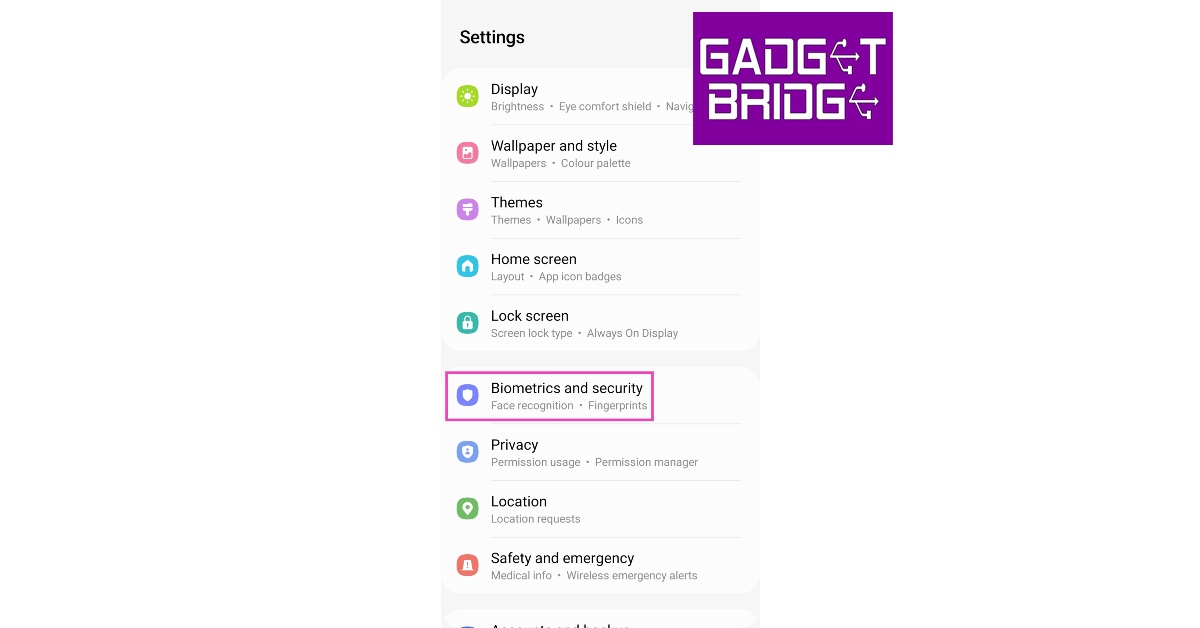


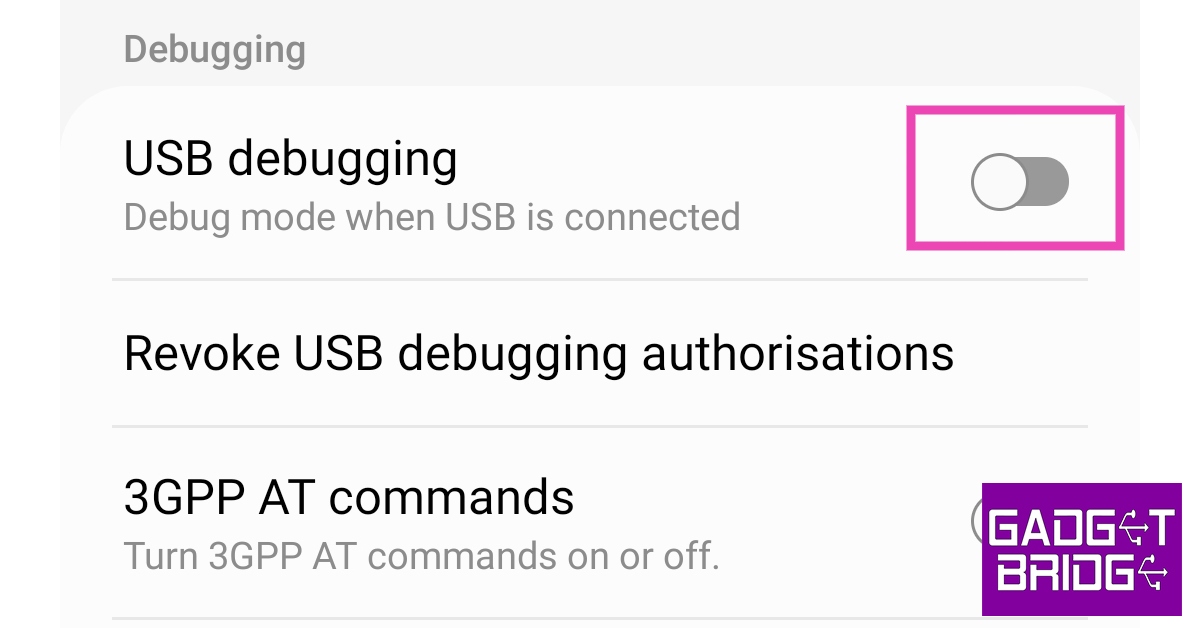


 laptop with 13th Gen Intel i9 Core processor launched in India")


")