Do you want to know how to easily bypass Samsung FRP? Well, this is the article for you! By following the steps outlined in this article, you’ll be able to easily bypass Samsung FRP and access your phone or tablet without any problems. With this method, you’ll be able to perform all of your necessary tasks without worrying about your device’s security. So if you’re looking to know how to bypass google lock on Samsung, check out the steps outlined in this article!
Part 1:When would we need to Bypass Samsung FRP?
Samsung FRP is the most common type of passcode in Samsung phones. The main purpose of it is to protect the phone from unauthorized access and tampering. If you want to bypass Samsung FRP Lock, you need an expert who knows what he is doing. Otherwise, it will be difficult for you because it requires much technical knowledge and skill.
There could be a lot of scenarios when we need to FRP bypass Samsung. For example, you should get a new phone or tablet if you don’t want the current passcode or if your device has been lost/stolen and you need access to it as soon as possible. In these cases, bypassing Samsung FRP is the best way to go because it saves time and hassle.
Some other reasons why we might need to FRP bypass Samsung are:
When upgrading from an older model of Galaxy phone/tablet with Sammy’s Advanced Security features enabled (like Knox), which require a four-digit pin as part of the standard Android security settings
When you’ve forgotten your device’s original passwords and need to unlock it immediately
If your phone or tablet has been damaged and needs a factory reset for you to restore it to its default settings
Part 2: Is it possible to do Samsung FRP Bypass Instantly?
It could be a lot of trouble if you want to Bypass Samsung FRP Instantly because it is not as easy as one might think. Most people who try this fail and must go through the process again from scratch. This is because bypassing Samsung FRP requires access to special firmware files, which are usually hidden in a very complicated way. But it is possible to Bypass Samsung Google Verification on Samsung if you have the right knowledge and know where to look. We will share an easy and step-by-step bypass guide for you to follow should you need it.
Part 3: How do I do Samsung FRP Bypass easily?
To bypass Samsung FRP, you can use 4uKey for Android, which was developed by the popular 3rd party firm Tenorshare. It takes a very short time for 4uKey for Android to implement this procedure, and the lock can be bypassed in just a few minutes with just a few clicks.
This is why you should use Tenorshare 4uKey for Android to remove Google lock from Samsung devices. 4uKey has the following advantages;
A complete removal of the Samsung Google FRP lock is possible with the program.
There will be no limitations to what you can do with your smartphone.
Samsung Galaxy S21, S20, S10+, and J7 (Android 6-11) are among the compatible Samsung mobile models.
It can also remove Android lock screen pins, patterns, and fingerprints and bypass the Samsung FRP
The following steps will explain how to bypass the Samsung FRP lock using Tenorshare 4uKey. Read them carefully:
Step1: The first thing you need to do is to download and install 4uKey for Android on your computer. On the main screen of the program, select the “Remove Google Lock (FRP)” tab on the right-hand side, and then you will be able to install the software and unlock the locked Samsung smartphone.
Step2: In order to proceed, you will need to choose the Samsung OS version and click “Start”.
Step3: To proceed, click “Send Notification” after verifying the info you chose and connecting the device to Wi-Fi.
Note: Wait for your device to receive the notification after that. Make sure the USB cable is not disconnected during the process.Step4: Once it has been successfully received, tap on “View” and jump to the browser to begin setting up your Samsung device. Complete all program steps and set a new pin.
Step5: According to your operation, the entire procedure will take about five minutes. After restarting your Samsung mobile, the Google account will be successfully removed.
Bonus Giveaway: Tenorshare Christmas Special Sales TO Warm December
Christmas is just around the corner, and to help you get in the spirit, Tenorshare Special Christmas Sale is launched now. Users can avail of exciting discounts on Tenorshare 4uKey and other software too. Hurry up and make the most of this opportunity! There is a treat for everyone!
Part 4: Any other benefits After Removing the Samsung FRP Lock?
If you compare the methods of removing the Samsung FRP lock, then Tenorshare 4uKey for Android is definitely the easiest and most user-friendly program to delete a Google Account from a Samsung mobile. Apart from this, it also provides various other benefits. Some of them are:
Time-Saving: A big advantage of 4uKey for Android is that it saves your time. In order to remove a Samsung FRP lock, you don’t need to root or flash any custom firmware. All you need is the software and a USB cable. This makes the whole process much easier and faster.
Security: Another great benefit of Tenorshare 4uKey for Android is that it keeps your device secure. The software doesn’t damage your Samsung mobile, leaving any traces on the device or its internal storage. You can use the phone once you have removed the Samsung FRP lock.
Easy Installation: One of the best things about Tenorshare Samsung FRP Bypass Software is that it is very easy to install. Once you have downloaded and installed it, you must follow a few simple steps and your Samsung mobile will be unlocked. There is no need to mess around with complicated settings or codes.
Rich Functions: Tenorshare FRP Unlock Tool has a rich set of functions that make it the perfect tool for removing Samsung FRP lock. It can unlock all types of locks, including Samsung FRP locks. Additionally, the software has various other features that make it an ideal choice for users.
Compatibility: 4uKey for Android is compatible with all modern Samsung mobile devices. It can be used to unlock all models of Galaxy Note, S4, S5, and many other Samsung phones.
Bottom Line
If you are looking for an easy and user-friendly way to remove a Samsung FRP lock, then Tenorshare Samsung FRP bypass tool is definitely the program for you. We all know that it can be a hassle trying to remove a Samsung FRP lock by ourselves, but this software makes the process much easier. It also has other great features that make it an ideal choice for users, bypassing any Android screen lock without passwords. So, if you have a phone that is locked with a Samsung FRP lock, then we recommend that you try out Tenorshare 4uKey for Android.
For the latest gadget and tech news, and gadget reviews, follow us on Twitter, Facebook and Instagram. For newest tech & gadget videos subscribe to our YouTube Channel. You can also stay up to date using the Gadget Bridge Android App. You can find the latest car and bike news here.
Tecno Phantom X2 5G has officially debuted in India today. The smartphone is powered by MediaTek Dimensity 9000 SoC. The device features a 120Hz curved AMOLED display and also has three rear cameras, the primary of which is a 64-megapixel sensor with optical image stabilisation (OIS).
Tecno Phantom X2 5G price in India and availability details
The Tecno Phantom X2 5G has been launched in India with a price tag of Rs 39,999. But after the discount, the device will be available for Rs 39,999. In Moonlight Silver and Stardust Grey, Tecno has released the Phantom X2 5G.On Amazon, you can pre-order the device; it will be available for purchase on January 9th.The device recently made its debut in the UAE before going on sale in India. The Phantom X2 is priced at SAR 2699, or roughly Rs 59,200, in the UAE for the 8GB RAM and 256GB storage version.Also Read:Redmi Note 12 Pro 5G confirmed to launch in India on January 5
Tecno Phantom X2 5G specifications
The 6.8-inch full-HD+ curved AMOLED display on the Tecno Phantom X2 5G has a 360HZ touch sampling rate and a screen resolution of 1080 x 2400 pixels. The screen refreshes at a rate of 120Hz. Additionally, the display supports the P3 Wide colour gamut and has Corning Gorilla Glass Victus protection and TUV SUD certification. It is powered by the Android 12-based operating system HiOS 12. It is powered by the MediaTek Dimensity 9000 SoC, 8GB of RAM, and 256GB of inbuilt UFS3.1 storage.It also includes a vapour chamber cooling mechanism and a secure in-display fingerprint sensor. It is powered by a 5,160mAh battery with 45W fast charging capabilities. Additionally, the phone has a compass, a proximity sensor, a three-axis accelerometer, a six-axis gyroscope, and an ambient light sensor.Also Read:Redmi Note 11 Pro+ gets a price reduction of up to Rs 2,000The triple rear camera setup on the Tecno Phantom X2 5G consists of a 64-megapixel primary camera with optical image stabilisation (OIS), a 13-megapixel secondary sensor, and a 2-megapixel sensor. For selfies and video calls, a 32-megapixel camera is available.Bluetooth 5.3, GPS, OTG, NFC, and a USB Type-C connector are among the connectivity choices. Wi-Fi 2.4 GHz, 5 GHz, and Wi-Fi 6 are also available.
For the latest gadget and tech news, and gadget reviews, follow us on Twitter, Facebook and Instagram. For newest tech & gadget videos subscribe to our YouTube Channel. You can also stay up to date using the Gadget Bridge Android App. You can find the latest car and bike news here.
Xiaomi’s sub-brand Redmi has officially confirmed that the Redmi Note 12 Pro+ 5G will feature a 50MP Sony IMX766 sensor just ahead of its official India launch. It has been announced that the Redmi Note 12 5G series will debut on January 5 in India. Redmi’s newest Note series is anticipated to launch in India with the Redmi Note 12 5G, Redmi Note 12 Pro 5G, and Redmi Note 12 Pro+ 5G.The company took to Twitter to announce the 50-megapixel Sony IMX766 primary camera sensor and optical image stabilisation (OIS) capabilities of the Redmi Note 12 Pro 5G smartphone. Alvin Tse, the general manager of Xiaomi India, posted some sample photos taken with the Redmi Note 12 Pro 5G. Sumit Sonal, another business official and General Manager, Marketing, at Xiaomi India, also used Twitter to discuss the Redmi Note 12 Pro 5G smartphone’s photography features in-depth. This smartphone will be available in India in the coming days. Sumit Sonal also provided sample screenshots to support the company’s claims that the smartphone’s 50-megapixel Sony IMX766 primary camera sensor helps to collect more light, resulting in a more detailed and superior photo.Previously, it was anticipated that the Note 12 Pro+ would be sold in India under the name Xiaomi 12i HyperCharge.The Note 12 Pro+’s 6.67-inch full-HD OLED display has a refresh rate of up to 120Hz. The screen offers a 900 nits maximum brightness and a 240 Hz touch sampling rate. Dolby Vision and HDR10+ are supported by the monitor. An octa-core 6nm MediaTek Dimensity 1080 SoC, up to 12GB LPDDR4X RAM, and a Mali-G68 GPU are included in the Note 12 Pro+. It has MIUI 13 pre-installed, which is an Android 12 operating system.Three rear cameras on the Note 12 Pro+ have a 200-megapixel primary sensor with OIS. Also featured are an 8-megapixel ultra wide-angle camera and a 2-megapixel macro lens. For selfies, the phone has a 16-megapixel front-facing camera sensor.The 5,000mAh battery inside the brand-new Redmi Pro+ smartphone supports 120W quick charging.
For the latest gadget and tech news, and gadget reviews, follow us on Twitter, Facebook and Instagram. For newest tech & gadget videos subscribe to our YouTube Channel. You can also stay up to date using the Gadget Bridge Android App. You can find the latest car and bike news here.
Creating a new Gmail account is a pretty easy task and doesn’t take a lot of time. If you’re intent on using the Internet, you will need to create an email account at some point, and Gmail is one of the best email clients out there. In this article, we show you how to create a new Gmail account in 2023 and also bring you 5 hidden tips, tricks, and features that will make your Gmail experience considerably easier as a beginner. Read Also:Top 3 ways to get YouTube Premium membership for 4 months for free
Here’s how you can create a Gmail account in 2023
Step 1: Go to www.mail.google.com and select ‘Create Account.’Step 2: Google will ask you who you are making the account for. If you are creating an account for your child, you can enable parental controls on the account. Step 3: Enter the first and last name along with a unique email account name and a password.Step 4: Click on ‘Next’ once all the details have been filled in.Step 5: Google will prompt you to link your phone number with your email account. Enter your number and fill in the OTP you receive to confirm it.Step 6: Fill in your birthdate and gender and hit ‘Next’.Step 7: Your Gmail account will be created. Go through the Terms & Conditions and then click on ‘I Agree’. Following that, you will be able to use your account.
Here are 5 hidden Gmail tips, tricks and features you should know about
These tips and tricks will greatly improve your Gmail experience. We’ve picked the best tricks that are easy to incorporate in everyday use and also help a great deal while using Gmail.
Increase the Undo time limit
Gmail gives you 5 seconds to take back an email you’ve just sent. For a lot of users, a 5-second window isn’t enough to make the call. Luckily, you can extend this window to 10, 20, or even 30 seconds. Simply click on the Settings icon at the top right corner of the screen and go to Settings>General. Scroll down to the ‘Undo Send’ section and select your desired time window.
Confidential Mode
Need to ensure that your email has an added layer of privacy? Click on the lock icon at the bottom of the mail toolbar. Using Gmail’s confidential mode, you can set an expiry period for the emails you send. All emails will be automatically deleted past the expiry date. All emails sent using confidential mode cannot be forwarded, copied, printed, or downloaded. On top of that, the recipient will need a passcode (sent through SMS or email) to access the confidential mail.
Use your email address to organise incoming mail
Everyone hates unnecessary newsletters from all the websites they signed up for using their Gmail account. Deleting those emails one by one can be really tiring. However, now you can filter all those emails at once. While signing up for a website or online service simply add a plus sign after your Gmail username and add the name of the service.For example, if you are signing up for Swiggy, fill in your username as username+swiggy@gmail.com. Since the service does not register anything after the plus sign, the emails will be directed to your Gmail account but they will contain the +swiggy identifier in your inbox. Now, you can easily search username+swiggy@gmail.com in your inbox to filter out all emails from Swiggy. These can be deleted all at once.This trick also comes in handy when you use one email address for work and social activities. You can classify every mail by its activity. Simply type in username+gym@gmail.com when signing up for a gym, username+news@gmail.com when subscribing to a news service, or username+socialmedia@gmail.com when making an account on a social media platform. This will make it easier to manage your inbox.
Mute email threads
If a particular email thread keeps pinging continuously and is becoming an annoyance, you can easily mute it by clicking on the ellipses and selecting More>Mute. This will move that email thread to the archives and you won’t be bothered by the constant updates.
Schedule emails
This tip will come in particularly handy for people that work in different time zones than their colleagues. Need to send an email in the early hours of the day? Schedule it instead. Simply click on the arrow button next to the send icon after composing the mail and select ‘Schedule Send’. Type in the date and time for when you want the email to be sent. Read Also: Redmi K60 likely to debut in other countries as Poco F5 Pro
One of the annoying aspects of owning a TWS is that they are really easy to misplace. The earbuds and the charging case can easily slide into places where it becomes extremely hard to find them. However, if you own the Google Pixel Buds Pro, there is an easy solution to this problem. In this article, we bring you 2 easy ways to find your misplaced or lost Google Pixel Buds Pro.Read Also: Top 3 ways to get YouTube Premium membership for 4 months for free
Find your Pixel Buds Pro by ringing them
Step 1: Go to Settings and select Bluetooth.Step 2: Tap the Settings icon next to the paired Pixel Buds. If you don’t use a Pixel smartphone, download the Google Pixel Buds app.Step 3: Select ‘Find device’.Step 4: If your Pixel Buds are connected to your smartphone, you can ring them from this screen. Tap on ‘Ring left’ to ring the left earbud or ‘Right right’ to ring the right earbud. You can also choose to ring both earbuds at once. Step 5: The buds will ring for 20 seconds. Locate the source of the sound and you will find your Pixel Buds Pro. To stop the ringing sound, flip the lid open and shut. If your buds are outside the case, put them back in to stop the sound.
How to find the last paired location of your Pixel Buds Pro
If your Pixel Buds Pro aren’t connected to your smartphone and you’re worried you may have misplaced them outside your house, finding out the last paired location may help you figure out where you lost them. Here’s how you can do that.Step 1: Go to Settings and select Bluetooth.Step 2: Tap the Settings icon next to the paired Pixel Buds. If you don’t use a Pixel smartphone, download the Google Pixel Buds app.Step 3: Select ‘Find device’.Step 4: If your Pixel Buds Pro are not connected to your smartphone, tap on ‘Last known location’.Step 5: Select Pixel Buds Pro to find their last paired location. Read Also:Redmi K60 likely to debut in other countries as Poco F5 Pro
In India, 5G capability is still not available to Google Pixel phone owners. The company however did not provide any timeframe but according to a new Google update, the over-the-air (OTA) upgrade enabling 5G functionality on Pixel devices could begin to roll out by Q1 of 2023. Currently, the nation’s 5G network services are provided by Airtel and Jio. They began the launch in a few key locations before eventually expanding to additional cities all over the nation.Google confirmed that it will release the upgrade that will enable 5G connectivity for Pixel 6a, Pixel 7, and Pixel 7 Pro smartphones in India in the first quarter of 2023. The update that would allow 5G connectivity on the Pixel 6a, Pixel 7, and Pixel 7 Pro devices will be released between January 2023 and March 2023, the firm said, though it did not provide a more precise release date. The tech giant in a statement said, “We have been actively working with Indian carriers on the various requirements that go into provisioning 5G and look forward to rolling this out for Pixel 7, Pixel 7 Pro and Pixel 6a in Q1 2023.”Also Read:Pixel 7 Pro Review: Why you should get the phoneIt’s important to note that Google is one of the few smartphone businesses left that hasn’t launched support for 5G connection in India. It has been about three months since 5G services were launched in the nation by Airtel and Jio. The wait is still ongoing for Pixel users even though the majority of Android and iPhone handsets can now utilise Airtel and Jio 5G in the nation. However, just after the 5G service was launched Google announced that it was collaborating with Indian telecom service providers to release an upgrade that would enable 5G connectivity on its Pixel handsets soon.Also Read:Google Pixel 7 review: Is this an all-rounder phone?On their 5G-enabled smartphones, brands like Samsung, Oppo, Vivo and OnePlus have already made 5G networking capabilities available in India. More recently, Apple released an over-the-air (OTA) update for the iPhone 12 series, iPhone 13 series, iPhone 14 series, and the iPhone SE 2022 that enabled 5G connectivity.
For the latest gadget and tech news, and gadget reviews, follow us on Twitter, Facebook and Instagram. For newest tech & gadget videos subscribe to our YouTube Channel. You can also stay up to date using the Gadget Bridge Android App. You can find the latest car and bike news here.
An ‘Instagram Collaboration’ is a great way for two profiles to share a post together with their followers. Once two people collaborate on Instagram, the post shows up on their followers’ feeds with both their usernames in the header. This is similar to tagging, with the only difference being that the post is accessible to both sets of followers. As interesting as this feature may sound, it may be a bit tricky to pull off at times. In this article, we bring you the top 7 easy methods to fix the ‘can’t accept Instagram collab invite’ issue.Read Also: Top 3 ways to get YouTube Premium membership for 4 months for free
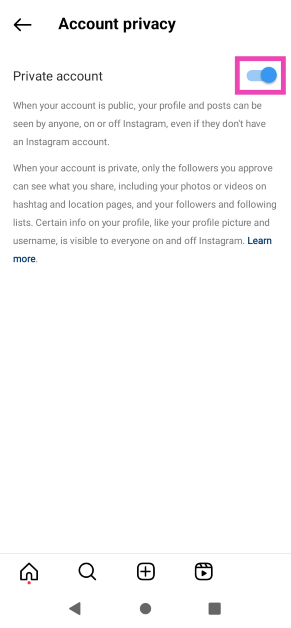
Make your Instagram account public
Private accounts can only collaborate with profiles that follow them. If your profile is private and the collaborator does not follow you, make your profile public. Here’s how.
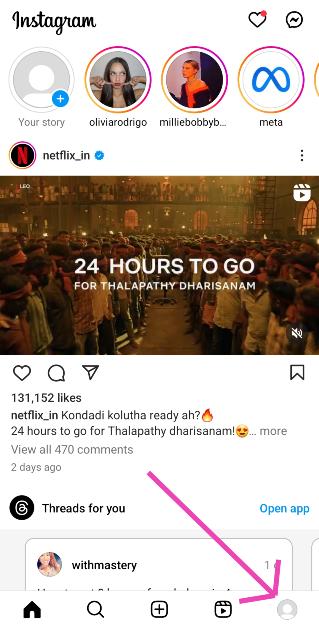
Step 1:Launch the Instagram app and tap your profile picture at the bottom right corner of the screen.
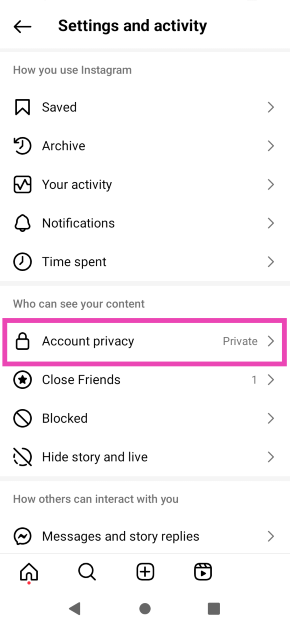
Step 2: Hit the hamburger menu at the top right corner of the screen and select Account privacy.
Step 3: Turn off the toggle switch for Private account.
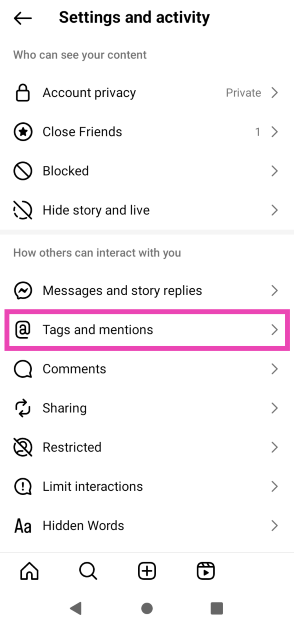
Change tagging settings
Step 1:Launch the Instagram app and tap your profile picture at the bottom right corner of the screen.
Step 2: Hit the hamburger menu at the top right corner of the screen and select Tags and mentions.
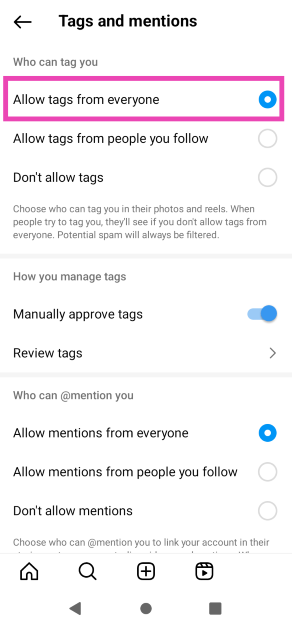
Step 3: Select Allow tags from everyone.
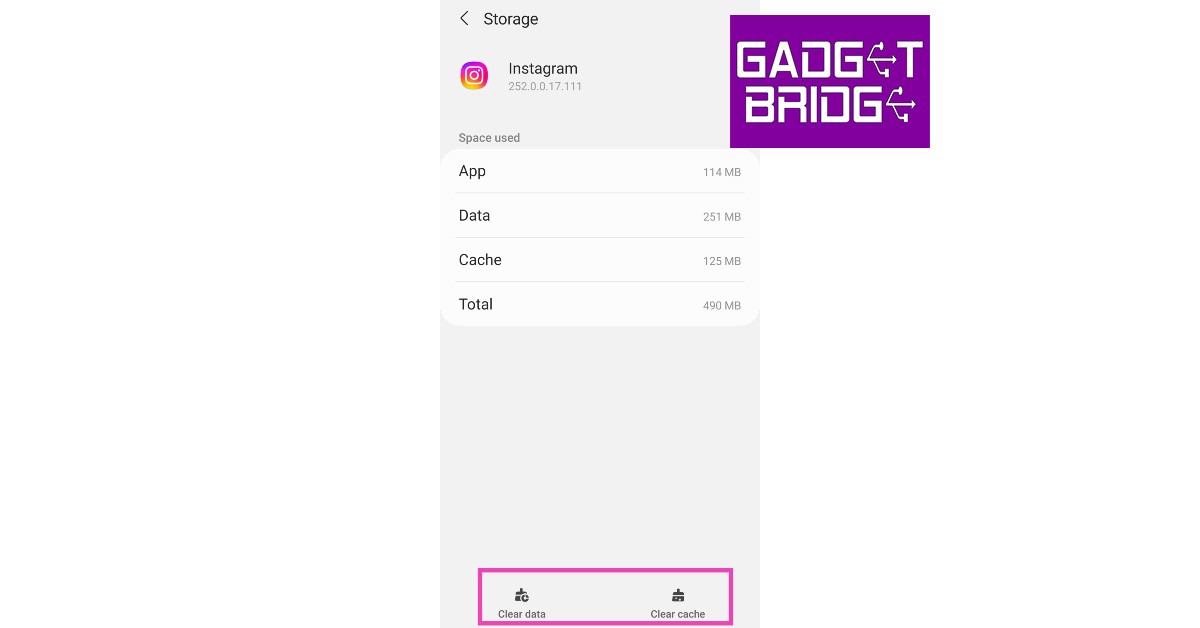
Clear app cache
If you haven’t cleared Instagram’s app cache in a while, chances are that a corrupted temporary file may be keeping the essential functions from working correctly. Here’s how you can quickly clear the app cache. Step 1: Go to Settings and select Apps.Step 2: Scroll down and select Instagram.Step 3: Select Storage.Step 4: Tap on Clear cache.
Find the Collab invite on the activity page
If you can’t find the collab invite in your DMs, look for it on the activity page. Your activity page is also where you receive the notifications. Launch the Instagram app and tap on the heart icon at the bottom menu. Browse your notifications for the collab invite. Once you see the notification, tap on it and select the ‘Review’ option. In the following dialogue box, select ‘Accept’. If this method doesn’t work either, make sure you are following the person who sent you the collab invite.
Log out and log back in
If the issue is account-related, logging out of Instagram and then logging back in will fix it. Go to your profile, hit the hamburger menu, scroll down and select the logout option. Once you’re logged out, use your account credentials to log back in.
Update the Instagram app
Since collaborations on Instagram are a recent feature, the app version you are using may not support it. Go to the Google Play Store and search for the Instagram app to see if there is any pending update. Tap on the ‘Update’ icon to install the latest version of Instagram.
Use Instagram on a desktop or another phone to accept the collab invite
If nothing works, chances are the issue lies with your smartphone and not Instagram. You can either use the desktop version of Instagram on a web browser or simply log in to the app on another phone. Once you’ve accepted the collab invite, you can log out and go back to using Instagram on your smartphone.
Frequently Asked Questions (FAQs)
Why am I not able to collaborate with other accounts on Instagram?
If your account is set to private, you cannot collaborate with accounts that do not follow you on Instagram.
How do I make my Instagram account public?
Go to your profile, hit the hamburger menu, select ‘Account privacy’, and turn off the toggle switch for ‘Private profile’.
These are the top 4 easy methods to fix the ‘can’t accept Instagram collab invite’ issue on your smartphone. If none of the above fixes work for you, it may be because of a bug that will likely get patched in the next update. In this case, go to Settings from your profile and report the issue to Instagram.
According to Elon Musk, Twitter users shall be allowed to side-swipe through messages, trends, topics, lists, and so much more. He has also mentioned that the platform will likely see numerous significant UI updates in January. Twitter has unveiled a new View Count tool for tweets that allows users to view a tweet’s exact view count in a manner akin to how it displays on videos. All customers can now enjoy the new feature that Musk promised to deliver earlier this month. Additionally, Twitter Blue subscribers now have the option to upload movies that are up to 60 minutes long. The video’s quality after release will likewise change due to the new capacity.In a post, Elon Musk said that the microblogging platform Twitter will get a new side swipe functionality in January. “New Twitter navigation coming in Jan that allows swiping to side to switch between recommended & followed tweets, trends, topics, etc. Until then, tap stars icon on upper right of home screen to switch,” he tweeted.According to this feature, users will be able to quickly access lists, trends, and lists of recommended and followed tweets.Additionally, Musk claims that Twitter AI continues to advance as several UI updates are coming from January. His Tweet reads, “That and several major UI improvements coming in Jan.”Also Read:The global rollout of the Twitter View Count for Tweets has begunThe new View Count feature will allow users to see the actual view count for their tweets. Elon Musk tweeted to announce the launch of the feature. According to Elon Musk’s tweet, users will be able to use the View Count tool to determine how many times a tweet has been viewed. Now, users may access the feature through web, iOS, and Android apps. Not just the account owner, but everyone can see how many times a tweet has been viewed. The feature is currently supported by apps for iOS and Android. It is also accessible on the web. Currently, only recently posted tweets will show the view count; older tweets will not.A 60-minute video in 1080p definition will be made available for sharing online for Twitter Blue subscribers. Through its Twitter Blue page, the microblogging site made the change public. Members of Twitter Blue were previously limited to uploading movies that were up to 10 minutes long and 512MB in size. According to the business, customers can now submit videos that are 60 minutes long. However, the video shouldn’t be larger than 2GB. Twitter mobile apps for iOS and Android do not have this capability.
For the latest gadget and tech news, and gadget reviews, follow us on Twitter, Facebook and Instagram. For newest tech & gadget videos subscribe to our YouTube Channel. You can also stay up to date using the Gadget Bridge Android App. You can find the latest car and bike news here.
Garena Free Fire is a battle royale game with regular awards and tournaments to keep players interested. If you play Garena Free Fire, you should be aware of the redeem codes that are released on a daily basis. However, because the battle royale game is banned in India, players from other countries can use the Free Fire Redeem codes daily. If you’re unfamiliar with the Garena Free Fire redeem codes or don’t know how to get them, we’ve put together a step-by-step guide to help you redeem them. Check out Garena Free Fire Redeem Codes for 2 January 2023.The Free Fire redeem codes are a great way to get free stuff. These are 12-digit codes that contain alphabets and numbers, as well as an expiration date and time. Because the Garena FF redeem codes cannot be used more than once, you should hurry to the redemption page to claim your free reward before someone else does. To get a free reward, all you have to do is go to reward.ff.garena.com/en, which is the official redemption page. Also, keep an eye on this space for daily updates on Garena Free Fire redemption codes and rewards.
Garena Free Fire Redeem Codes Today 2 January 2023
FF1164XNJZ2V
FF11HHGCGK3B
W0JJAFV3TU5E
FF10617KGUF9
B6IYCTNH4PV3
FF11WFNPP956
SARG886AV5GR
FF11DAKX4WHV
MCPTFNXZF4TA
8F3QZKNTLWBZ
FF10GCGXRNHY
ZRJAPH294KV5
Y6ACLK7KUD1N
YXY3EGTLHGJX
FF11NJN5YS3E
How to Get Free Fire Redeem Codes for Garena on 2 January 2023?
2 January 2023 Amazon Quiz has gone live. Customers from different parts of the country are participating in the daily quiz. The quiz begins from 12 AM to 11:59 PM. Those participating in the quiz can win exciting prizes by answering all the questions correctly. Today participants have a chance to win a Rs 500 Amazon Pay Balance.Amazon quiz brings an opportunity for its customers to win Amazon Pay Balance ranging from Rs 1,000 to Rs 50,000. The Quiz can be played from 12 AM to 11:59 PM. The e-commerce platform brings a fresh quiz on a daily basis which consists of five questions related to general knowledge and current affairs. The participants need to answer all the questions correctly and their names will be selected for a lucky draw. The winner will be announced at the end of the month.One wrong answer could eliminate you from the quiz. If you manage to answer all the questions correctly you can stand a chance to win a Rs 500 Amazon Pay Balance today. Only app users are eligible to participate in the Quiz. Check Out 2 January 2023 Amazon Quiz Answers.Amazon Quiz Today Prize – Rs 500 Amazon Pay BalanceQuiz Date – 2 January 2023Daily Timing – 12 AM to 11:59 PMWinner Announcement – Today 12 PM
Amazon Quiz Answers Today 2 January 2023
Question 1: What is the fastest land animal?
Answer: CheetahQuestion 2: February gets its name from the word ‘februa’, from which language was it derived from?
Answer: Latin
Question 3: The theme for World Wildlife Day 2022 was ‘Recovering key species for _____ restoration’. (Fill in the blank)
Answer: EcosystemQuestion 4: Who successfully built and flew the world’s first Aeroplane?Answer: The Wright BrothersQuestion 5: Where are the Giza Pyramids located in?Answer: Egypt
How To Play Amazon Quiz
Only app users are eligible to play the Amazon quiz every morning from 12 AM to 11:59 PM. The quiz is not available on the desktop. For those who are unaware of how to play the Amazon quiz below are the steps, you can follow to take the quiz.
Firstly download the Amazon app from Google Play Store or App Store
Now fill in the required information through the Sign Up option.
You need to log in to the Amazon app and scroll down on the home screen to find the Amazon Quiz banner.
Tap on the Amazon Quiz banner and tap on the Start button to start the Quiz.
Now you will get 5 questions and you need to answer them correctly. One wrong answer will eliminate you from the Quiz.
After answering all the questions correctly you are now eligible for a Lucky Draw.
The winner’s name will be announced today at 12 PM.


 Step 2: In order to proceed, you will need to choose the Samsung OS version and click “Start”.
 Step 3: To proceed, click “Send Notification” after verifying the info you chose and connecting the device to Wi-Fi.
 Note: Wait for your device to receive the notification after that. Make sure the USB cable is not disconnected during the process.
 Step 4: Once it has been successfully received, tap on “View” and jump to the browser to begin setting up your Samsung device. Complete all program steps and set a new pin.
 Step 5: According to your operation, the entire procedure will take about five minutes. After restarting your Samsung mobile, the Google account will be successfully removed.
 Bonus Giveaway: Tenorshare Christmas Special Sales TO Warm December
Christmas is just around the corner, and to help you get in the spirit, Tenorshare Special Christmas Sale is launched now. Users can avail of exciting discounts on Tenorshare 4uKey and other software too. Hurry up and make the most of this opportunity! There is a treat for everyone!
Bonus Giveaway: Tenorshare Christmas Special Sales TO Warm December
Christmas is just around the corner, and to help you get in the spirit, Tenorshare Special Christmas Sale is launched now. Users can avail of exciting discounts on Tenorshare 4uKey and other software too. Hurry up and make the most of this opportunity! There is a treat for everyone!


 Step 2:
 Step 4:
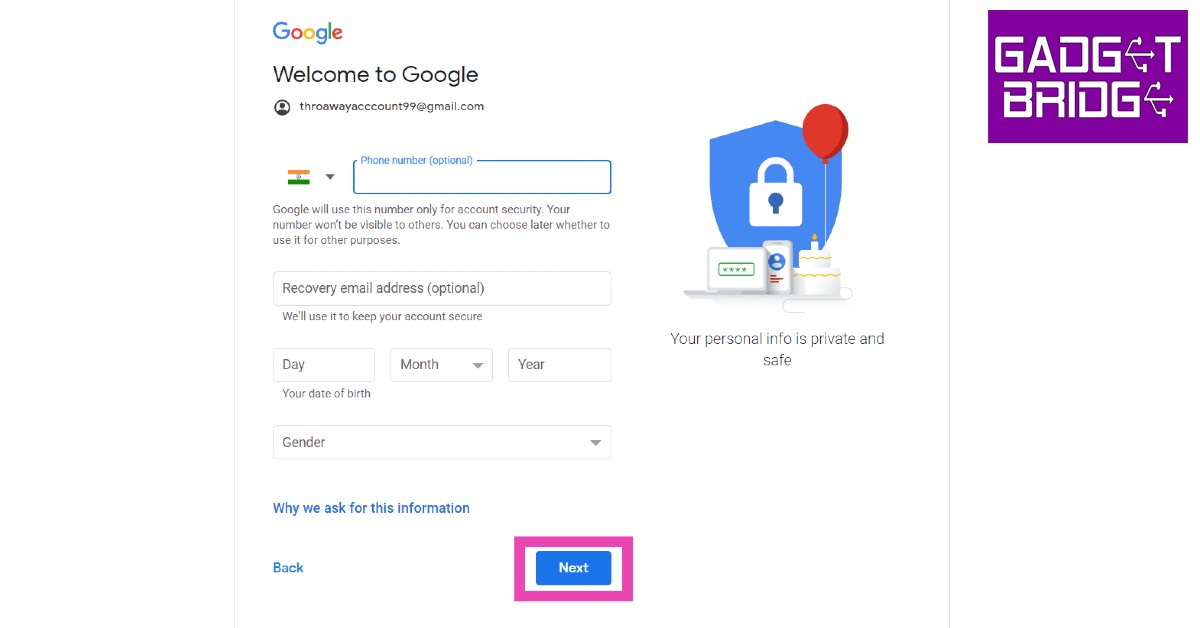 Step 7:
")

")
 Step 2: Hit the hamburger menu at the top right corner of the screen and select Account privacy.
 Step 3: Turn off the toggle switch for Private account.
 Step 3: Select Allow tags from everyone.
 Step 2:
 Step 3:
 Step 4: