One of the important announcements made by Google at I/O 2024 was the introduction of AI Overview in search results. Google Search is the company’s flagship product and dominates its peers by a considerable margin. However, integrating AI with Google search results has not yielded the immediate success that the company was hoping for. Since the launch of AI Overview, users across the internet have been quick to point out its gaping flaws, which largely range from presenting biased results to straight-up misinformation. If you want the plain ol’ Google Search experience back, here’s how you can disable AI Overview. Read Also:How to use ‘Hum to Search’ to find a song on YouTube Music?
Is there a direct way to disable AI Overview?
To put it simply, no. Google, like other tech outfits, has gone all in on AI and is looking to fundamentally change how users get access to information on the internet. However, the search engine has added a helpful ‘web’ filter that removes AI-generated answers as well as videos and images from search results. Applying this filter displays text-based web results only.If you don’t want to manually apply this filter every time you perform a Google Search, you can add it as a ‘site search’ entry in Chrome. This will automatically apply this filter every time you search for something using the browser’s address bar. Other web browsers like Microsoft Edge and Firefox also offer similar options.
Use the Web filter
Step 1: Go to the Google homepage and enter a search query.Step 2: On the results page, click on More.Step 3: Select Web.Google will filter the text-based web results and remove AI overviews, videos, and other content from the page.
Apply the Web filter to your searches by default
Selecting the web filter every time you search for something is cumbersome. Use this workaround to apply the filter by default on all your searches.Step 1: Launch Google Chrome and go to Settings.Step 2: Select the Search engine tab in the sidebar.Step 3: Click on Manage search enginesand site search.Step 4: Click on Add.Step 5: Give the site search entry a name. We prefer Gooogle with one extra O. Enter a trigger word for the shortcut in the second text field.Step 6: In the ‘URL with %s in place of query’ enter https://www.google.com/search?q=%s&udm=14. Hit Add.Step 7: Hit the ellipses next to the site search entry and select Make default.Now, every time you search for a query, the results will be parsed through the web filter.
Filter AI Overview results from your search using the ‘-AI’ keyword
Adding ‘-AI’ (without the quotes) at the end of your searches filters AI Overview from the results. This method is suitable for users who don’t want to disable AI Overview entirely, but need organic results for some searches.
Get rid of AI Overview in individual searches
If you don’t want to get rid of AI Overview altogether, but simply want to disable it for specific searches, we have the perfect trick for you. When you search a query on Google, add ‘&udm=14’ at the end of the link to the search results. The following page will be completely free of AI Overview.
Use ‘Bye Bye, Google AI’
The ‘Bye Bye, Google AI’ Chrome extension gets rid of AI Overviews, Discussions, and Ads. Use this link to download it from the Chrome Web Store. Once installed, it gives you a list of items you might want to block. AI Overview is selected by default. The list also includes Sponsored Links, Shopping Blocks, People Also Ask, People Also Search For, and more.
Frequently Asked Questions (FAQs)
Are Google AI Overview results reliable?
Since its launch, the AI Overview has displayed incorrect and malicious results for some queries. Google is manually weeding out the incorrect results to refine the feature.
Can I turn off AI Overview in Google Search?
While there is no direct way to turn off AI Overview in Google Search, you can apply the ‘Web’ filter automatically on all your queries by using the ‘Site search feature’ in Chrome.
How do I get rid of AI Overview in search results?
Add ‘&udm=14’ at the end of the search results URL to get rid of AI Overview.
Is there an extension that disables AI Overview in Google?
The ‘Bye Bye, Google AI’ extension gets rid of AI Overview, Discussions, and Ads from your Google search results.
This is how you can disable AI Overview in Google Search. As mentioned earlier, using the web filter weeds out videos and images from search results as well. What do you think of AI integration in web searches? Let us know in the comments!
Google started testing the ‘Hum to Search’ feature for YouTube Music back in March. The tech giant has now started rolling out this feature on its music streaming app. ‘Hum to Search’ is similar to the ‘Search song’ option in Google Assistant. The idea is simple – you hum the rhythm or melody of a song, and Google will find matching results. So, let’s take a quick look at how you can use ‘Hum to Search’ to find a song on YouTube Music.Read Also:How to Perform a Safety Check on Google Chrome? (2024)
How is ‘Hum to Search’ different from ‘Search song’ in Google Assistant?
If you’re an Android user, you must be familiar with the ‘Search Song’ feature in Google Assistant. This feature can be accessed in the Google app for Android or by triggering the Google Assistant. Unlike YouTube Music, Google’s ‘Song Search’ feature brings up multiple results that match your query. Each result displays its match percentage. Clicking on a result opens its Google search page.On the other hand, YouTube Music brings up one accurate match for your query. This result can be opened in the YouTube Music app itself. You can add it to your playlist or download it for offline listening. Since Google is rolling out this feature in a phased manner, it may not be available for your device yet. Keep an eye out for it on the search page.
Use Hum to Search on YouTube Music
Step 1:Launch the YouTube Music app on your smartphone.Step 2: Hit the search icon at the top right corner of the screen.Step 3: Tap the wavelength symbol at the top right corner of the screen.Step 4: Hum the song for 20-30 seconds.Step 5: Google’s AI algorithm will look up the song that matches the melody. The song title, along with the artist name, album name, and release year, will appear on the screen.Step 6: You can choose to play the song or add it to your playlist. If this is not the song you were looking for, tap the waveform symbol at the bottom of the screen to perform another search.
Frequently Asked Questions (FAQs)
Where is the Hum to Search feature in YouTube Music?
Launch the YouTube Music app, tap the search icon, and then hit the waveform symbol. Hum the song for 20-30 seconds. Google will present the match on the following page.
How do I search for a song by humming it on my phone?
Launch the Google app, tap the microphone icon, and hit ‘Search song’ at the bottom of the screen to search for a song by humming its melody.
How do I create an AI playlist on YouTube Music?
Go to YouTube Music>Library>New>AI playlist, type your prompt, and hit Enter.
How do I delete my YouTube Music history?
Launch the YouTube Music app, tap your profile picture, go to ‘Manage watch history’, and tap on Delete>Delete all time.
This is how you can use ‘Hum to Search’ to find any song on YouTube Music. If you don’t use YouTube Music, you can check out this feature on Google Assistant. Third-party apps like Shazam and SoundHound also offer this feature. If you have any questions related to searching songs on your phone, let us know in the comments!
Maintaining your security on the internet can be an arduous task. Creating and routinely updating strong passwords, keeping the browser updated, clearing cookies, and using secure connections are some of the things you should do to ensure online safety. To help keep track of things, Google has introduced a ‘safety check’ for Chrome. Let’s take a look at what Safety Check is and how you can perform it on Google Chrome.Read Also:Top 10 apps to download first on your new iPad Pro 2024
What is Safety Check on Google Chrome?
Think of Safety Check as a privacy and security dashboard for Google Chrome. It can be accessed from the browser’s settings. Safety Check keeps track of these vital elements of online security:
The Google Chrome version you’re using
Reused passwords
Safe browsing settings
Permissions granted to abusive and unused sites
Sites that send too many notifications
If there is any lapse in security, Safety Check will flag that issue and let you know on the dashboard itself. Of course, there are more steps you can take to strengthen your browser’s security, but this is a good entry point into the exercise.
Perform a Safety Check on Google Chrome (PC)
Step 1: Launch Google Chrome on your PC and hit the ellipses at the top right corner of the screen.Step 2: Select Settings.Step 3: Switch to the Privacy and security tab.Step 4: Click on Go to Safety Check.Step 5: This is where you will be able to see the safety specs at a glance. Click on a security or privacy function to fix it.
Perform a Safety Check on Google Chrome (Android)
Step 1:LaunchGoogle Chrome on your Android phone.
Step 2: Hit the ellipses in the top right corner of the screen.
Step 3: Go to Settings.
Step 4: Tap on Safety check.
Step 5: Google Chrome will run a safety check. The problematic issues will be flagged. Tap on a flagged issue to view how it can be corrected.
Perform a Safety Check on Google Chrome (iOS)
Step 1:LaunchGoogle Chrome on your iPhone.
Step 2: Tap the ellipses in the bottom right corner of the screen.
Step 3: Tap on Settings.
Step 4: Scroll down and select Safety Check.
Step 5: Tap on Check Now.
Step 6: Google Chrome will run a safety check, and the problematic issues will be flagged. Tap on an issue to view how it can be corrected.
Frequently Asked Questions (FAQs)
How do I update Google Chrome?
Launch Google Chrome on your PC and hit the red icon at the top right corner of the screen to download the pending update. Once downloaded, restart Chrome.
How do I access Reading Mode on Chrome?
To enable Reading Mode in Google Chrome, right-click on any website and select ‘Open in reading mode’ from the list of options.
How do I view my saved passwords on Google Chrome?
To view your saved passwords on Chrome, hit the ellipses at the top right corner of the screen, hover the cursor over ‘Passwords and autofill’ and select ‘Google Password Manager’.
How do I run a safety check on Chrome for PC?
Launch Chrome on your PC, go to Settings>Autofill and passwords, and click on ‘Go to Safety check’.
How do I run a safety check on the Chrome app on my Android phone?
This is how you can perform a basic safety check on Google Chrome. To maintain your anonymity on the internet, it is suggested that you use a VPN. Here are our picks for the best VPN apps around. If you have any other privacy suggestions, let us know in the comments!
Launched earlier this month, the new iPad Pro is powered by the M4 chipset and is available in 11 and 13-inch sizes. Its large screen and support for Apple Pencil is what makes it the choice of many digital artists and content creators. To harness the power of the iPad’s specs and hardware, you need intelligent apps. The great thing is that, unlike its Android counterparts, the iPad has a diverse library of apps that are designed keeping its large screen in mind. So, without further ado, here are the top 10 apps you should download first on your new iPad Pro 2024.Read Also:Vivo X Fold 3 Pro India launch confirmed to take place on June 6
Procreate
Download from the App StoreProcreate is unanimously considered by artists to be the best drawing app for iPad. Its versatile and exhaustive list of tools caters to different forms of art like drawing, sketching, watercolour painting, oil painting, and more. You can find hundreds of handmade brushes on this app with over 100 customisable options for every brush. You can design your own custom brush using Brush Studio. However, what really cements Procreate’s position as the best digital art app is its intuitive interface which works seamlessly with Apple Pencil and brings a whole new level of accessibility to casual and professional artists alike.
Notability
Download from the App StoreIf you’re interested in taking notes on your iPad, Notability is a must-have app for the device. With Notability, you can write down notes with the help of the Apple Pencil, supplement them with audio, and even draw sketches. The app lets you import PDFs and annotate them as well. If you use your iPad as your primary note-taking device, Notability will help you organise the notes with customisable subjects and dividers. The precision and responsiveness of this app are second to none.
GoodNotes 6
Download from the App StoreGoodNotes is one of the most popular digital notebook apps for iPad. What we like about this app is that it supports input from the keyboard as well as the Apple Pencil. You can have both kinds of input on one note. The customisation options offered by this app are also impressive. Not only can you change the style of pen but also the paper template with options like Ruled Paper, Blank Paper, Cornell Paper, and more to choose from. Another cool thing about GoodNotes is that it syncs your notes across all your devices using iCloud.
Adobe Illustrator
Download from the App StoreAdobe Illustrator is one of the best iPad Pro apps for designers and graphic artists. Its precision tools let you design logos, panels, and illustrative art with incredible accuracy. You can create vector lines, shapes, type, gradients, and effects with ease. There are over 18,000 fonts and 20+ colour books to choose from. On top of that, you can check out the tutorials and guides that are specially meant for creators. If you’re into designing posters and flyers rather than sketching and drawing, you will like Adobe Illustrator more than Procreate.
forScore
Download from the App StoreA famous app among musicians, forScore displays sheet music on your iPad. You can import music sheets from iCloud or use content providers like Musicnotes.com. forScore organises your library meticulously and makes it easy to search for any piece of music. While performing, you can prop your iPad up on a stand and use forScore in any orientation you prefer. You can connect a Bluetooth page turner if you don’t want to rely on touching the screen to change the page while playing music.
GoodLinks
Download from the App StoreIf you’re always running out of time to watch things sent to you by friends, use the GoodLinks app. Essentially a bookmarking app, GoodLinks saves links for later and syncs them across all your devices. The best part is that you don’t need to create an account. The app offers a clean reading experience with its built-in e-reader which gets rid of the clutter and ads from the saved articles. If your saved content gets too overwhelming, you can organise it with relevant tags.
Paprika
Download from the App StoreThe iPad is very useful in the kitchen, mostly because of its large screen which makes following recipes very easy. The Paprika app for iPad compiles all your recipes in one place, helps you create grocery lists, and plan your meals. Apart from downloading recipes from online sources, you can also add your own. You can save your favourite meal plans in the app and reuse them whenever necessary. Paprika also tracks your pantry items and makes it easy to view which ingredient you are running out of while shopping for groceries.
Adobe Lightroom
Download from the App StoreFor all things related to photo editing, download the Adobe Lightroom app on your new iPad Pro. This AI-powered photo editing app is very accessible to beginners who may not be familiar with the exhaustive list of tools on offer. Lightroom has one-tap presets for filters for pictures, videos, and reels. With ‘Generative Remove’ you can harness the power of AI to remove unwanted objects from your pictures. On top of that, you can fix the lighting, exposure, contrast, and other elements with effective tools. Adobe Lightroom lets you edit and export images in HDR.
YouTube
Download from the App StoreThis may seem like a no-brainer but YouTube should certainly be one of the first apps you download on your new iPad Pro. The biggest video-sharing platform in the world, YouTube prides itself on having the largest number of content creators. Its recent bite-sized video format, Shorts, is steadily gaining popularity, going up against the giants in TikTok and Instagram Reels. You can choose to get rid of the ads on the platform by buying a Premium subscription. This premium subscription also unlocks an ad-free YouTube Music experience.
Asphalt 9
Download from the App StoreAll that screen real estate on your new iPad Pro can be put to good use by playing the breathtaking Asphalt 9. This game has an incredible collection of cars from the major automakers in the world. Asphalt lets you customise your ride and upgrade its stats as you progress further in the game. There are 185 racing tracks for you to choose from in 17 real-world locations. The game supports single-player and multiplayer modes, with the option to create clubs as well.Read Also:Best 5 Ways to Run Diagnostics on Windows (2024)
Conclusion
These are the top 10 apps you should download first on your new iPad Pro 2024. Most of the apps mentioned in this list are free to install. Some apps, like GoodLinks, demand a fee while others, like YouTube, offer premium subscriptions. Let us know which apps you love using on your iPad in the comments!
Garena Free Fire is a battle royale game with regular awards and tournaments to keep players interested. If you play Garena Free Fire, you should be aware of the redeem codes that are released on a daily basis. However, because the battle royale game is banned in India, players from other countries can use the Free Fire Redeem codes daily. If you’re unfamiliar with the Garena Free Fire redeem codes or don’t know how to get them, we’ve put together a step-by-step guide to help you redeem them. Check out Garena Free Fire Redeem Codes for 25 May 2024.The Free Fire redeem codes are a great way to get free stuff. These are 12-digit codes that contain alphabets and numbers, as well as an expiration date and time. Because the Garena FF redeem codes cannot be used more than once, you should hurry to the redemption page to claim your free reward before someone else does. To get a free reward, all you have to do is go to reward.ff.garena.com/en, which is the official redemption page. Also, keep an eye on this space for daily updates on Garena Free Fire redemption codes and rewards.Also Read: Sennheiser Accentum Plus wireless headphones with Hybrid Adaptive Noise Cancellation launched
If you’re facing trouble with a certain component or function on your Windows PC, you can run a list of checks on it to diagnose the issue. Some of these tools are built into the system while others need to be downloaded from a third-party source. Before taking your PC to the authorised repair centre, you should run these checks to figure out what is wrong with the device. Here are the best 5 ways to run diagnostics on your Windows 10 or 11 PC.Read Also:Vivo V30e Review: The best camera phone under Rs 30,000?
Before you begin
Windows PCs have a very versatile troubleshooter that can diagnose and suggest fixes for components like the keyboard, camera, and Bluetooth, to apps like the Windows Media Player. This troubleshooter can be found in the device settings. You can set the troubleshooter to run automatically every time your PC runs into a problem.Apart from the troubleshooter, Windows 10/11 also has a diagnostic tool for the RAM. The native Performance Monitor tool does exactly what its name suggests. If you suspect that your PC’s general performance has started lagging, this tool will come in handy. If you notice a drop in the battery performance, you can check out the detailed stats using Command Prompt.
Use the Troubleshooter
Step 1: Go to Settings and switch to the System tab.Step 2: Scroll down and click on Troubleshoot.Step 3: Click on Other trouble-shooters.Step 4: Hit Run next to the component you’re having trouble with.
Check your PC’s RAM
If you’re facing trouble with your PC’s RAM, you can run the Memory Diagnostic Tool to find out what’s wrong with it. Here’s how.Step 1: Press Windows + R to launch the Run box.Step 2: Type mdsched.exe and hit Enter.Step 3: You will be asked to restart your PC. Go through with the request.Step 4: Windows will perform a RAM test on your PC. You will be able to see the results when your PC starts up again.Step 5: If Windows does not automatically load the results, right-click on the Start icon and select Event Viewer.Step 6: Expand the Windows Logs section in the side menu and select System.Step 7: Open the MemoryDiagnostic file.
Performance Monitor
The Windows Performance Monitor is a great tool to view real-time stats related to your PC’s performance and resources. Here’s how you can use it.Step 1: Click the search box on the taskbar and type Performance Monitor. Open the app from the search results.Step 2: You will be able to view the real-time system summary (memory usage, network usage, disk usage) on the first page itself.Step 3: Use Reliability Monitor to check the history of critical events.Step 4: Click on Resource Monitor to check how system resources are being utilised.
Check the Battery Performance
A lot of people don’t know this but you can check your Windows PC and laptop’s battery health using Command Prompt. Here’s how.Step 1: Click on the search bar at the bottom toolbar and search for Command Prompt.Step 2: Right-click on the Command Prompt icon and select Run as Administrator.Step 3: Type the following command and hit Enter.
powercfg /batteryreport
Step 4: Your laptop’s battery report will be saved to the System32 folder in the C drive. Locate the report and open it.Step 5: Check the original and current battery capacity under the Installed Batteries section.
Use a third-party tool for the hard drive (CrystalDiskInfo)
If you suspect there’s something wrong with your PC’s hard drive, use the CrystalDiskInfo tool to run a diagnostic check. You can download this tool from the CrystalMark website. Once installed, launch the application and run its SMART test. SMART stands for Self-Monitoring, Analysis, and Reporting Technology. This test will check for faults in the hard drive’s spin-up time, seek time performance, seek error rate, and more.
Frequently Asked Questions (FAQs)
Does Windows 11 have a tool to check the RAM health?
Run the Memory Diagnostics Tool on Windows 11 to view your PC’s RAM health. You can search for this tool on the taskbar or trigger it by entering mdsched.exe in the command box.
How do I troubleshoot an issue on my Windows PC?
Go to Settings>System>Troubleshoot>Other trouble-shooters and click ‘Run’ next to the component you’re facing issues with.
Which is the best software to run a diagnostic check on my PC’s hard drive?
These are the best 5 ways to run diagnostics on Windows 10 or 11. To stay on top of things and get the most out of your PC, use maintenance tools like CCleaner, Advanced SystemCare, and Total PC Cleaner. If you know any other important diagnostic tools, let us know in the comments!
Popular audio brand Boat has announced the launch of its brand new Nirvana Nebula and Zenith TWS series in India. Both the premium true wireless earbuds come with Dolby Audio. The Nirvana Zenith supports ANC up to 50dB whereas Nirvana Nebula has ANC up to 35dB. The earphones are claimed to provide up to 50 hours of battery life.
Boat Nirvana Nebula and Boat Nirvana Zenith price in India and sale details
Boat Nirvana Nebula and Boat Nirvana Zenith specs, features
The Boat Nirvana Nebula and Zenith features Chrome and Rose Gold glass design. They come equipped with 11mm Deep Bass Drivers and the boAt Signature Sound along with Dolby Audio support. The devices support Active Noise Cancellation (ANC) technology, offering up to 35dB and 50dB respectively. With the help of HiFi Audio, a dual-core processor, and sophisticated Bluetooth v5.3, the Nirvana series produces sound with unmatched intensity, clarity, and precision. Google Fast Pair ensures uninterrupted audio passion sharing by making pairing and switching between devices simple. The audio devices have 6X Mics and AI ENx Technology.Boat Nirvana ZenithAlso Read:Vivo X Fold 3 Pro India launch confirmed to take place on June 6Since every ear is different, boAt’s Adaptive EQ powered by Mimi customises the Nirvana series’ sound to fit your particular hearing profile, providing a customised audio experience.Additionally, the Nirvana Nebula and Zenith TWS have an IPX5 rating for water and sweat resistance. They also deliver up to 50 hours of battery life. An hour of music playback can be obtained with just five minutes of charging.
Acer has released its first Copilot+ PC, the Swift 14 AI laptop, in conjunction with Microsoft and Qualcomm Technologies. This gadget, powered by the Snapdragon X Elite and Snapdragon X Plus platforms, includes one of the world’s fastest NPUs for laptops, allowing for on-device AI processing. It supports next-generation AI capabilities in Windows 11, such as Recall, Cocreator, Live Captions, Windows Studio Effects, and Auto Super Resolution.
Acer Swift 14 AI specifications
The Acer Swift 14 AI offers Snapdragon X Elite X1E-78-100 and Snapdragon X Plus X1P-64-100 processor options with Qualcomm Adreno GPU. The machine is available with up to 1TB PCIe Gen4 NVMe storage along with up to 32GB of dual-channel LPDDR5x RAM. The laptop operates on Windows 11. It features a 14.5-inch WQXGA IPS touch display with 2,560 x 1,600 pixels of resolution. The panel has a refresh rate of 120Hz and supports 100% sRGB color gamut. It is available with edge-to-edge touchscreen options and comes with TÜV Rheinland Eyesafe Certification 2.0 to help minimise the effects of harmful blue light without sacrificing colour accuracy.Also, there is a 1440p QHD IR webcam with a triple microphone array and privacy shutter that supports Acer’s suite of AI-boosted conferencing tools in Acer PurifiedView 2.0 and Acer PurifiedVoice 2.0. Acer QuickPanel, which automatically appears when the device’s webcam or microphone is turned on, makes it possible to quickly calibrate them. Users can access a library of AI functions on the device through the Experience Zone and AcerSense app for device management by using a dedicated key.Also Read:Acer Swift 14 AI Copilot+ PC with Snapdragon X Elite and Snapdragon X Plus platforms launchedWindows Hello, which allows for safe and quick biometric and facial recognition login, is pre-installed on this Copilot+ PC. With speeds of up to 5.8 Gbps and minimal network latency of less than 2 ms, the device also features Wi-Fi 7 and BluetoothTM 5.4 connectivity. For further versatility, a variety of generous port alternatives are available, including two USB Type-C and two USB 3.2 Type-A ports.AI capabilities include Recall, Cocreator, Live Captions, Windows Studio Effects, and Auto Super Resolution. Recall allows users to easily find everything they’ve seen on their PC by simply stating what information they remember. With an explorable timeline, users can simply scroll back in time to access previously used apps, documents, or messages. Live Captions with Live Translations provides automatic spoken captions and real-time translations of any live or pre-recorded video from 44 languages to English.Also Read:Vivo X Fold 3 Pro India launch confirmed to take place on June 6On the other hand, Visual or textual suggestions can now be utilised to co-create AI writings and images on the device using Cocreator. To give gamers the images they want without sacrificing performance, Auto Super Resolution instantly boosts a game’s graphical resolution and frame rate. Windows Studio Effects automatically adjusts lighting and muffles background noise during video calls. Additionally, it can be used to quickly activate three artistic filters on any video platform.
Acer Swift 14 AI Pricing and Availability
The Acer Swift 14 AI (SF14-11) will be available in North America in July, starting at USD 1,099, and in EMEA in June, starting at EUR 1,499.
The Vivo X Fold 3 Pro India launch date is set for June 6, marking the company’s first foldable offering in India. The book-style foldable smartphone first launched in China in March, runs on Qualcomm’s Snapdragon 8 Gen 3 SoC. The book-style foldable includes Zeiss-branded cameras. It features an 8-inch inner foldable screen and a 5,700mAh battery. The Chinese edition runs Android 14 with OriginOS 4 and happens to come with Funtouch OS in India. The phone features an 8.03-inch 2K AMOLED display and a 6.53-inch AMOLED external display. The Vivo X Fold 3 Pro is expected to compete against the Galaxy Z Fold 5 and the OnePlus Open.Vivo has officially announced the India launch date for Vivo X Fold 3 Pro. The upcoming foldable smartphone is scheduled to debut in the country on June 6. The device has also been listed on Flipkart which revealed the key highlights the key details of the smartphone.The Vivo X Fold 3 Pro debuted in China in March of last year. The Indian variant of the Vivo X Fold X Fold 3 Pro may have similar specs to the international version.In China, the X Fold 3 Pro costs CNY 9,999 (Rs 1,16,000) for 16GB RAM and 512GB storage.Also Read:The Delhi High Court has issued guidelines on the sale of used and refurbished HDDs in IndiaThe foldable phone sports an 8.03-inch primary 2K resolution E7 AMOLED display, a 6.53-inch AMOLED cover display, and a carbon fibre hinge. It comes preloaded with OriginOS 4, which is based on Android 14. The Snapdragon 8 Gen 3 SoC has a Vivo V3 photography chip. It includes up to 16GB of LPDDR5X RAM and up to 1TB of UFS4.0 storage.Also Read:Poco F6 5G with 1.5K OLED display and Snapdragon 8s Gen 3 SoC launched in IndiaThe X Fold 3 Pro features a triple camera arrangement for images and videos, including a 50-megapixel primary sensor and a 32-megapixel sensor on the outer and primary screens for selfies. The phone has a 5,700mAh battery with 100W wired and 50W wireless charging capabilities.
Vivo added a new entry-level variant to its midrange V30 lineup earlier this month. The Vivo V30e separates itself from the rest of the lineup with its unique design but seeks to replicate the camera performance of the higher variants. Vivo has made some tradeoffs to keep the price in check, something we were eager to check when this smartphone crossed our desks. Now that we’ve been using the V30e as our daily driver for the last week, we can assess whether it pulls ahead of its peers in this price category. Here is our in-depth Vivo V30e review.Read Also:How to create a custom route on Google Maps? (2024)
Vivo V30e Review: Design and Display
Here’s what you get inside the Vivo V30e retail box:
Smartphone
44W power adapter
USB Type-A to Type-C cable
Clear plastic case
SIM ejector
Quick Start Guide
Warranty Guide
There are two colour options on offer – Silk Blue and Velvet Red. We used the latter for this review.There is a stark difference in the design of the V30e compared to the rest of the lineup. The back panel features a dual matte and gloss finish. The glossy strip running along the right side of the panel has a criss-cross pattern. The round camera cutout is a stark departure from the sleek, rectangular camera panel of the V30 and V30 Pro. It reminds us of Vivo’s X series smartphones of yesteryears. Despite these changes, the V30e has a slim form factor.The plastic frame houses the volume rocker and side button on its right edge and the SIM tray, primary microphone, USB port, and speaker grille on the bottom edge. Up top lies the secondary microphone. The V30e does not have a stereo speaker, nor does it use the earpiece as the secondary speaker. The left edge of the frame is completely keyless.The Vivo V30e sports the familiar 6.78-inch curved AMOLED display. This panel can hit a maximum refresh rate of 120Hz and its peak brightness has been capped at 1,300 nits. The other two V30 variants can reach a peak brightness of 2,800 nits while watching HDR content. The touch response on the V30e is smooth and the under-display fingerprint scanner is quite snappy.We used the Vivo V30e as our primary media-watching device throughout the review period. Even though the Netflix app does not have HDR capabilities on this device, the viewing experience was very good. We streamed media on major OTT platforms like Prime Video, Disney+ Hotstar, Netflix, and Sony Liv and were happy with the detailed, vibrant images presented on the screen. The lack of a stereo audio output is certainly not ideal, but the primary speaker can reach a high level of volume.Interestingly, the V30e has an IP64 rating, which is a slight upgrade from the IP54-rated V30 and V30 Pro. The smartphone was unfazed by water splashes when we used it in the rain. Water resistance against major dips still remains an issue for Vivo’s midrange offerings.
Vivo V30e Review: Performance and Cameras
Powering the Vivo V30e is the Snapdragon 6 Gen 1 SoC. There are two storage variants on offer – 128GB and 256GB. The latter fetches Rs 30,000. Both variants come with 8GB of RAM. On the Geekbench 6 test, the V30e scored 935 points in the single-core test and 2,720 points in the multi-core test. Meanwhile, the V30 Pro scored 1,155 and 3,384 points respectively.The V30e handles everyday tasks with expertise. We did not experience any jitters or lags while loading multiple apps at once. Tasks like video calling, instant messaging, social media browsing, and media streaming were completed without any staggering issues.Overall, the Snapdragon 6 Gen 1 is a decent chipset, but it falls slightly short when it comes to gaming. We played titles like Call of Duty Mobile and BGMI on the V30e. Our gameplay was marred by the odd frame drop and inconvenient lag. On the bright side, the smartphone did well to keep its internal temperature in check even though we used it during peak summer. The back panel got slightly warm after 30 minutes of gameplay, but we were able to continue the gaming session for another 30 minutes without any significant drop in performance.Moving on, the OS duties on the Vivo V30e are handled by Android 14 out of the box. Vivo’s Funtouch 14 OS is still a mixed bag. We like it for its diverse range of customisation options; you can apply attractive effects to the charging animation, fingerprint scanner, screen lock, and even the weather and music apps. We also like the dynamic wallpapers that change their appearance as you get closer to your step goal. The privacy options for hiding and locking apps are quite handy as well. The default gallery app has a hidden folder too.The downside of Funtouch OS is the bloatware and ads that come along with it. The V-Appstore and Browser apps routinely push ads disguised as notifications. The native browser app pushing fullscreen ads in its interface ensured that we switched to Chrome right away. While you can delete the bloatware from the device and limit the spam notifications, the out-of-the-box software experience does not make a good impression.The 5,500mAh battery pack on the V30e is larger than the rest of the lineup. The smartphone easily lasts a full day on a full charge. During the week-long review period, our daily tasks on the Vivo V30e included video calling, social media browsing, instant messaging, photography, and gaming. After a day of heavy use, we were left with a 20-30% charge on the device. With more conservative usage, you can push its battery life to 1.5-2 days. The smartphone supports 44W charging and can be fully charged in under 90 minutes.The camera performance is the strongest suite of Vivo’s V Series smartphones, and the V30e does not disappoint in this regard. The rear camera array on this smartphone comprises a 50MP Sony IMX882 primary sensor and an 8MP ultrawide lens. We like that Vivo has not included a depth or macro sensor for the ‘third lens’ gimmick. The circular Aura Light in the rear camera dial also doubles as the flash.Pictures taken with the 50MP primary shooter live up to the V Series’ reputation. The images are vibrant and pack punchy colours. Even though it lacks Zeiss tuning like its Pro variant, the camera performance of the two smartphones is not too different. In outdoor conditions with optimum daylight, the V30e produces excellent pictures with good dynamic range and sharpness.Primary lens vs Ultrawide lensUltrawide lensThe 8MP ultrawide lens produces good results as well, but there is a visible shift in the colour profile. Images taken with this sensor appear softer and a little washed. It is a good standalone lens but it fades in comparison to the primary shooter. This is pretty common for smartphones in this price range.Without Night Mode vs Night ModeWe were surprised by the V30e’s performance in limited lighting as this is one aspect where smartphones in this category often fail to impress. The V30e, however, crushed the results, thereby proving to be a versatile camera smartphone. We particularly liked the accuracy of the colour tone that it assigned to the subject in limited lighting. Turning on the Night Mode smoothens the images but it tends to over-brighten the subject in some situations.Portrait ShotsPortrait shots taken with the Vivo V30e are sharp and focused. The smartphone does a good job of separating the subject from the background. You also get all the portrait styles and filters that Vivo is known for. The Aura Light plays a pivotal role in filling the shadows and illuminating the subject while taking portrait shots in limited lighting. The front-facing 50MP camera takes vibrant selfies and can record 4K videos.Read Also:Poco F6 5G with 1.5K OLED display and Snapdragon 8s Gen 3 SoC launched in India
Conclusion
In our opinion, the Vivo V30e is the best camera smartphone you can buy under Rs 30,000. It lives up to the V Series reputation by producing vibrant images in all kinds of lighting conditions. The slim form factor and curved display of the smartphone are incredible assets that are rarely seen in this price range. The Snapdragon 6 Gen 1 SoC is a good processor for everyday use, but if you’re interested in full-throttle gaming, there may be better options for you.
If you’re embarking on a road trip with your friends, you probably want to hit a lot of places on the way instead of simply driving directly to your location. If you’re not familiar with the route, it can be easy to lose your way. Luckily, you can customise your route on Google Maps and ensure that you’re always on the right path. The good thing is that you can save the customised map offline and not have to rely on internet access to use it. Let’s take a look at how you can create a custom route on Google Maps and access it on your phone.Read Also:The Delhi High Court has issued guidelines on the sale of used and refurbished HDDs in India
Can you create a custom route on Google Maps for Android?
Google’s special My Maps tool can be accessed on Android, but it is not possible to create a new map or edit an existing one on your smartphone. If you simply want to add a few stops on the way to your destination, the regular navigation feature on Google Maps is well-equipped to handle that.My Maps can be created and edited on a PC only. They can be saved offline and shared with other users. You can also embed a ‘My Map’ on your website. The diverse customisation options on My Maps allow you to mark specific locations, change the route, add text, videos, images, and more.
Create a custom route on Google Maps (PC)
Step 1: Go to Google Maps and click on Saved in the sidebar.Step 2: Switch to the Maps tab and click on Create Map.Step 3: Click on Untitled map and give your map a name and description.Step 4: Click on the Add directions icon below the search bar.Step 5: Select the mode of transportation.Step 6: Enter your departure point in Box A and destination in Box B.Step 7: The default route will be displayed on the map. Click on any spot on the route and drag it to your preferred location to change it.Step 8: You can also click on Add Destination in the layer box and add a location to your map.Step 9: Use the toolbar below the search bar to add lines and shapes to your map.
Access your custom map on your smartphone
Step 1:Launch the Google Maps app on your smartphone.Step 2: Switch to the Saved tabs.Step 3: Tap on Maps.Step 4: Select the map you just created.
Frequently Asked Questions (FAQs)
How do I create a custom map on Google Maps?
Open Google Maps on your PC, go to Saved>Maps>Create Map, enter the departure and destination points, and then drag the route to your preferred location.
Can I create a custom map on Google Maps for Android?
Google does not offer the option to create a custom map on My Maps for Android yet.
This is how you can create a custom map on Google Maps. You can share the link to the custom map with your friends or embed it on your website. As of now, there is no way to create a custom map on Android, but you can access it on your phone once you have created it using Google Maps on your PC.
Guidelines regarding the sale of refurbished and used hard disk drives (HDDs) have been established by the Delhi High Court. According to HC’s directions, the original manufacturer’s name must be prominently displayed on the packaging, without misleading customers into believing they are purchasing the real product. The court issued the directives while handling a series of lawsuits brought by Seagate Technology LLC and Western Digital Technologies Inc. against several companies selling reconditioned HDDs.The Delhi High Court has released directions on the resale of refurbished and used hard drives (HDDs). The court mandated that packaging have to clearly state the name of the original manufacturer while preventing deceiving the consumer into believing they are purchasing the original product. The device must clearly say that there is no warranty or service from the manufacturer, according to a mandate from the court.Also Read:Poco F6 5G with 1.5K OLED display and Snapdragon 8s Gen 3 SoC launched in IndiaWhen selling refurbished HDDs, companies should adhere to the guidelines on brochures, manuals, websites, e-commerce listings, and advertisements. The directives were issued by the court in the midst of addressing several lawsuits that Western Digital Technologies Inc. and Seagate Technology LLC had filed against various companies that sold refurbished hard drives.While used equipment is sold and destroyed worldwide, consignments of these end-of-life HDDs are repaired by various entities and sold to customers, according to Seagate and Western Digital. They also claimed that their HDDs remain functioning after a certain amount of time but become unusable.According to what was said, various importers bring end-of-life HDDs into India, where they are resold to refurbishers who take off any branding such as Seagate or Western Digital. Then they clean and repackage the HDDs under their own brands, and offer them for sale as refurbished goods with an extended two-year warranty. These refurbished HDDs are said to be used for either assembled desktops or surveillance cameras.“Seagate and WD allege that these end-of-life HDDs could not be sold as refurbished products since the removal of their brand name from the product amounted to impairment, which was not permitted as per Sections 30(3) and 30(4) of the Trade Marks Act, 1999 (“Trade Marks Act”).”Plaintiffs’ counsel further claimed that the products were unique in that the Printed Circuit Board (“PCB”) colour and the silver plates on the HDDs were shaped differently. As a result, even in the absence of the manufacturer’s label, an industry insider could easily identify the manufacturer of the HDDs.However, according to the Delhi High Court, Seagate and Western Digital were unable to produce any documentation that would have required them to follow any rules for the importation of used HDDs and equipment into India.Also Read:AI Audio: Nothing rolls out ChatGPT integration across all Nothing and CMF by Nothing audio productsNote that these suits were filed by Seagate Technology LLC (“Seagate”) andWestern Digital Technologies Inc. (“WD”) against Daichi International (“Daichi”), Consistent Infosystems Pvt. Ltd.(“Consistent”), Geonix International Pvt. Ltd. (“Geonix”) and Cubicor Information Systems Pvt. Ltd. (“Cubicor”).Directions issued by the Delhi High Court for the sale of used Hard Disk Drives:(i)Packaging to identify the source of the product: Packaging inwhich the refurbished product is sold, will clearly indicate that theHDD is manufactured by the concerned plaintiffs (Seagate or WDas the case may be). This may be displayed in a manner not todeceive the customer that the sale itself is of the original Seagateor WD i.e. it should be clear, but not dominating the packaging.(ii) Reference to the original manufacturer is to be made throughtheir word mark and not the device mark: Reference to theplaintiffs should be through their word marks as in “Seagate” or“WD”, as the case may be. Defendant shall not use plaintiffs’logos, in order to not cause any deception to the consumer.(iii) Packaging must specify that there is no original manufacturer’swarranty: A clear statement must be made to the effect that thereis no manufacturers’ warranty or service by (Seagate or WD, asthe case may be) on this product.(iv) Packaging must specify that the product is “Used andRefurbished’: A prominent statement on the front of packaging tothe effect that the product is “Used and Refurbished” by theconcerned defendants (Consistent or Geonix or Daichi, as the casemay be)(v) Statement as to extended warranty by the Refurbisher: A clearand prominent message that the warranty or service of specifiedyears is being provided by the concerned defendants (Consistentor Geonix or Daichi, as the case may be), along with customercare details and contacts.(vi) Packaging must reflect an accurate description of the features:An accurate, truthful, precise description of features and purposeof the refurbished product, without any misleading, half-truth,deceptive, ambiguous statements (which could potentially mis-CS(COMM) 67/2024 and other connected matters 64 of 65inform the consumer as to the features of the product and thepurposes for which it could be used).(vii) All of the above should also be complied with by the defendantson promotional literature, website, e-commerce listings,brochures and manuals.
Garena Free Fire is a battle royale game with regular awards and tournaments to keep players interested. If you play Garena Free Fire, you should be aware of the redeem codes that are released on a daily basis. However, because the battle royale game is banned in India, players from other countries can use the Free Fire Redeem codes daily. If you’re unfamiliar with the Garena Free Fire redeem codes or don’t know how to get them, we’ve put together a step-by-step guide to help you redeem them. Check out Garena Free Fire Redeem Codes for 24 May 2024.The Free Fire redeem codes are a great way to get free stuff. These are 12-digit codes that contain alphabets and numbers, as well as an expiration date and time. Because the Garena FF redeem codes cannot be used more than once, you should hurry to the redemption page to claim your free reward before someone else does. To get a free reward, all you have to do is go to reward.ff.garena.com/en, which is the official redemption page. Also, keep an eye on this space for daily updates on Garena Free Fire redemption codes and rewards.Also Read: Sennheiser Accentum Plus wireless headphones with Hybrid Adaptive Noise Cancellation launched
Xiaomi’s spin-off Poco has updated its portfolio with the launch of a brand-new smartphone in India. Poco F6 5G powered by Qualcomm’s Snapdragon 8s Gen 3 SoC is the latest offering by the company. The phone comes with a 1.5K OLED display which supports a refresh rate of 120Hz. Moreover, it features a 50-megapixel dual rear camera setup and a 20-megapixel OV20B front camera. The smartphone also sports a 5,000mAh battery with 90W fast charging support.
Poco F6 5G price in India, sale details
Poco F6 5G price in India starts at Rs 29,999 for the 8GB RAM with 256GB storage. Whereas the price of 12GB RAM with 256GB storage is set at Rs 31,999 and the top of the line 12GB RAM with 512GB internal storage option comes with a price tag of Rs 33,999. The phone comes in two colours Black and Titanium.The device will be available for purchase via Flipkart in the country starting May 29.Also Read:Vivo Y200 Pro 5G with Snapdragon 695 SoC launched in India
Poco F6 5G specifications
In terms of specs, Poco F6 5G is equipped with the Qualcomm Snapdragon 8s Gen 3 SoC with up to 12GB of LPPDDR5x RAM and up to 512GB UFS 4.0 storage. The phone is shipped with HyperOS with Android 14 and is promised to come with 3 years of software updates and 4 years of security fixes.The handset is highlighted with a 6.67-inch 1.5K AMOLED display with 1,220×2,712 pixels of resolution. The panel comes with support for a 120Hz refresh rate and 446 ppi pixel density. The screen also offers 2,400 nits peak brightness along with HDR10+, Dolby Vision, and Widevine L1 support. It also includes Corning Gorilla Glass Victus protection.Also Read:AI Audio: Nothing rolls out ChatGPT integration across all Nothing and CMF by Nothing audio products Poco F6 5G features a dual rear camera setup that includes a 50-megapixel 1/1.9-inch Sony IMX882 sensor with OIS and EIS support and an 8-megapixel Sony IMX355 ultra-wide angle camera. There is a 20-megapixel OV20B front-facing camera for taking selfies and video calling.
The smartphone is backed by a 5,000mAh battery with support for 90W fast charging. For thermal control, Poco’s Iceloop cooling technology is integrated into the phone. The hybrid dual stereo speakers on the Poco F6 5G are certified for Hi-Res and enable Dolby Atmos. Its construction is splash- and dust-resistant, rated IP64. It features face unlock in addition to having an in-display fingerprint sensor for authentication.
Garena Free Fire is a battle royale game with regular awards and tournaments to keep players interested. If you play Garena Free Fire, you should be aware of the redeem codes that are released on a daily basis. However, because the battle royale game is banned in India, players from other countries can use the Free Fire Redeem codes daily. If you’re unfamiliar with the Garena Free Fire redeem codes or don’t know how to get them, we’ve put together a step-by-step guide to help you redeem them. Check out Garena Free Fire Redeem Codes for 23 May 2024.The Free Fire redeem codes are a great way to get free stuff. These are 12-digit codes that contain alphabets and numbers, as well as an expiration date and time. Because the Garena FF redeem codes cannot be used more than once, you should hurry to the redemption page to claim your free reward before someone else does. To get a free reward, all you have to do is go to reward.ff.garena.com/en, which is the official redemption page. Also, keep an eye on this space for daily updates on Garena Free Fire redemption codes and rewards.Also Read: Sennheiser Accentum Plus wireless headphones with Hybrid Adaptive Noise Cancellation launched
Scheduling text messages on your phone is a very handy feature that can be used in a diverse set of situations. You can schedule greetings for birthdays and anniversaries and never have to worry about missing an important date again. If you’ve got friends and family in different time zones across the globe, you can schedule texts to remind them of certain things at the appropriate time. Today, we bring you the top 5 ways to schedule a text message on your Android smartphone.Read Also:Nothing rolls out ChatGPT integration across all Nothing and CMF by Nothing audio products
Is there a native way to schedule text messages on Android?
The Google Messages app which is the native messaging app on stock Android phones has the option to schedule text messages. However, it is possible that your Android OEM may not have this option in its default messaging app. You can always set Google Messages as the default texting app to use this feature.Major instant messaging apps like Telegram and Signal let users schedule text messages for a later date. Surprisingly, WhatsApp does not have this feature yet. If you’re an iPhone user, you can indirectly schedule a text on WhatsApp using the Shortcuts app. Android users have to rely on WhatsApp Business or third-party apps like Skedit and Auto Text for the same task.
Use Google Messages to schedule a text message on your Android smartphone
Step 1:Launch the Google Messages app on your phone.Step 2: Select a contact.Step 3: Type the message.Step 4: Hit the plus icon at the bottom left corner of the screen.Step 5: Tap on Schedule Send.Step 6: Tap on Pick date and time.Step 7: Select a date and hit Next.Step 8: Select the time of delivery and hit Next.Step 9: Finally, hit Save.The text will be scheduled and sent on the selected date and time.
Schedule a text message on your Samsung phone
Step 1:Launch the native Messages app on your Samsung smartphone.
Step 2:Type the message you want to send.
Step 3: Hit the plus icon in the bottom left corner of the screen.
Step 4: Hit the ellipses and tap on Schedule messages.
Step 5: Set the date and time. Hit Done.
Step 6: Tap the Send icon.
Step 7: The message will appear in the chat, but it won’t be delivered until the scheduled time. Tap the clock icon next to the message to edit the message, delete it, or send it right away.
Schedule messages on Telegram
Step 1:Launch the Telegram app on your phone and open a conversation.
Step 2: Type a message and long-press the send icon.
Step 3: Tap on Schedule message.
Step 4: Set the date and time and hit Send.
Schedule Instagram DMs
Step 1:Launch the Instagram app on your phone and swipe left to go to DMs.
Step 2: Tap on a conversation to open it.
Step 3: Tap the text box at the bottom of the screen and type your message.
Step 4: Long-press the Send button.
Step 5: Set the delivery date and time by swiping up and down on the digits.
Step 6: Tap on Send on [Scheduled Date and Time].
Step 7: To view the scheduled message, tap the ‘1 scheduled message’ indicator right above the text box.
Step 8:Long-press the message to send it immediately or delete it.
Use a third-party app (Auto Text)
Step 1:Download and install the Auto Text app on your Android smartphone.Step 2:Launch the app and hit the plus icon at the bottom of the screen.Step 3: Select SMS.Step 4: Enter the recipient’s number and the text in their respective fields.Step 5: Tap on Set date and time.Step 6: Select the date and time.Step 7: Hit the tick icon at the top right corner of the screen.
Frequently Asked Questions (FAQs)
Can I schedule a text message on my Android smartphone?
Yes, you can schedule a text message on your Android phone using the Google Messages app. Simply type the message, then hit the plus icon and select ‘Schedule Send’.
How do I schedule messages on my Samsung phone?
Go to the Messages app on your Samsung phone, open a conversation, tap the plus icon in the bottom left corner of the screen, and select ‘Schedule Message’. Set the date and time, type your message, and hit Send.
Can I schedule a text message on WhatsApp?
WhatsApp does not offer the option to schedule a text message natively. However, you can use third-party apps like Auto Text for the task.
Can I schedule messages on Instagram?
Yes, you can schedule Instagram DMs. Open a conversation, type a message, and long-press the send button to set its delivery date & time.
These are the top 5 ways to schedule a text message on an Android smartphone. While WhatsApp does not offer an option to schedule messages yet, Telegram is ahead of the curve and offers that feature to its non-premium subscribers as well. If you want to schedule texts on WhatsApp, we’d suggest steering clear of modded apps like GB WhatsApp and using third-party apps like Auto Text instead.
Nothing has rolled out an update that integrates OpenAI’s AI chatbot ChatGPT with its entire audio devices lineup, including CMF earphones. The integration is available via the Nothing X app on Google Play Store and Apple’s App Store. The ChatGPT integration is already present in Nothing Ear and Ear A. Note that only phones paired with Nothing will be able to use ChatGPT features on Nothing audio devices. This feature allows users to interact directly with ChatGPT through a simple pinch gesture, enabling instant access to information and functionalitiesThe entire lineup of audio devices from London-based technology startup Nothing now has access to its industry-first ChatGPT integration. All the users of Nothing and CMF audio devices may now pinch-to-speak to ChatGPT straight from any Nothing and CMF by Nothing audio product coupled with Nothing phones.Additionally, users can take advantage of OpenAI’s capabilities through the integration as it has started to roll out GPT-4o, its most recent flagship AI model.The company in its announcement said, “Our ChatGPT integration is now available across all Nothing and CMF by Nothing audio products. Giving you on-the-go access to the world’s most popular consumer AI tool via your Nothing smartphone. Update the Nothing X app today to get started.”Also Read:Vivo Y200 Pro 5G with Snapdragon 695 SoC launched in IndiaThrough an update to the Nothing X app, the integration was made available to Ear (1), Ear (stick), Ear (2), CMF Buds, CMF Neckband Pro, and CMF Buds Pro. According to the company the update was released ahead of the originally targeted early June timeline.Note that OpenAI’s AI chatbot ChatGPT was introduced on Nothing Ear and Ear (a) in mid-April for the first time. The Nothing Ear is priced at INR 11,999, with sales beginning on April 29, while the Nothing Ear (a) is set at INR 7,999.Also read:Noise rolling out Luna AI to its smart rings, becomes first to bring AI to smart ringsUsers can launch the AI chatbot ChatGPT on a Nothing or CMF audio device by pinching the earphone stem. After it is turned on, users can ask questions and OpenAI’s AI chatbot will answer in the same manner, users can ask a variety of questions. Nothing is rolling out the update via the Nothing X app on both Google Play Store and Apple’s App Store.
boAt is one of the most familiar names in the consumer audio segment in India. The audio tech outfit has an impressive portfolio of affordable TWS products that cater to audiophiles and gamers alike. The newly launched boAt Airdopes 800 seeks to bring the best of both worlds with its 10mm titanium drivers and ultra-low latency of 50ms. Priced at Rs 1,799, the Airdopes 800 is one of the more affordable TWS products around. We have been using the earbuds for the last three days. Here is our review of the boAt Airdopes 800.Read Also:Vivo Y200 Pro 5G with Snapdragon 695 SoC launched in India
boAt Airdopes 800 Review: Design
Here’s what you get inside the boAt Airdopes 800 retail package:
Charging case with earbuds inside
Extra ear tips
USB Type-A to Type-C charging cable
Warranty Card
Smart Guide
Stickers
There are four colour variants on offer: Interstellar Black, Interstellar Blue, Interstellar Green, and Interstellar White. The Airdopes 800 is not the most compact TWS we’ve seen in this price range. The charging case has a briefcase-like design and is easy to open with just one finger. However, it makes its presence felt when placed inside a pocket. Since it is made out of plastic, it does not have a lot of weight, but we preferred keeping it in our bag instead of pockets due to its relatively larger size.The quality of the material used on this device is impeccable. The plastic does not feel flimsy at all and the matte-like finish keeps it from accumulating smudges and fingerprints. The hinge feels strong and has a very snappy response. The top lid has a character line running through the middle in the shape of a wave. The boAt and ‘Dolby Atmos’ branding can be found on either side of this line.The indentation on the front side of the lid ensures you can open the charging case with just one finger. Right below this indentation is the LED notification light. On the right side of the case lies the USB Type-C charging port.The wireless earbuds are nestled inside glossy cutouts in the charging case. The rest of the inner panel has a matte texture. The pairing button sits plush between the two cutouts. There are some similarities in the design of the earbuds and the charging case. The wave-shaped character line can be found on the outer panel of the two earbuds. Each earbud has a notification light and two mics as well. The in-ear design of the earbuds facilitates a comfortable and fatigue-free fit.The stems on the two earbuds are longer than the standard size. We like this because it gives the user a larger gripping surface to adjust the earbuds, thereby reducing the accidental triggers caused by touching the control section. The touch controls on the earbuds work smoothly and can be customised using the boAt Hearables app (more on that later).The two earbuds are rated IPX5 for dust and water resistance. We wore them while working and are happy to report that they hold up well. We did not face any issues with the fit when things got sweaty and the performance of the earbuds remained unfazed.
boAt Airdopes 800 Review: Performance
Relaying the audio output on the boAt Airdopes 800 are two high-fidelity 10mm titanium drivers. The Airdopes 800 is also the first TWS in India to be powered by Dolby Atmos. With Bluetooth 5.3 onboard, connecting the TWS to a smartphone or PC is as easy as it gets.The soundstage of boAt Airdopes 800 is heavily dominated by the bass. This is pretty standard for wireless earbuds in this price range. However, despite the blanket of bass, the Airdopes 800 impressed us with the clarity of audio output. Even in higher volumes, the audio did not suffer from distortion. The mid and high frequencies did not feel like they were shrouded by the bass and the overall listening experience was quite rich. If you like a bass-driven sound, you will certainly enjoy the Airdopes 800.The boAt Hearables app offers a decent set of features to customise the audio output. To begin with, you can set up an Adaptive EQ that creates a unique Hearing ID for you and tailors the audio to your needs. On top of that, there are five equalier presets to choose from – Balanced, Pop, Rock, Jazz, and Club. The Hearables app does not offer the option to customise the equaliser yet.There are two profiles for Dolby Audio as well – Natural and Movie. Initially, the app wasn’t able to switch between the two profiles, but the issue was fixed with a firmware update. The Hearables app lets you customise the touch controls for the two earbuds as well. The only thing we don’t like about boAt’s companion app is that it requires the user to sign up using their email.The Airdopes 800 can reach a low latency rate of 50ms, making it ideal for gaming. We played titles like Call of Duty Mobile and BGMI while wearing the Airdopes and were pleased by the lack of any noticeable audio lag. The crispness of the audio enhanced the gaming experience. Even the sound of faint footsteps, which doesn’t get relayed as well through smartphone speakers, was delivered expertly by the Airdopes 800.The calling experience offered by the boAt Airdopes 800 struggles with the clarity issues plaguing this segment. In an indoor setting, the earbuds do a good job of extracting the voice of the speaker from the surrounding noise and relaying it to the recipient. However, in outdoor conditions, the call quality takes a significant hit. On the bright side, the Airdopes 800 TWS offers a multi-point connection, which is a nice feature to have in this price range. You can connect the TWS to two devices simultaneously and seamlessly switch between them.The charging case packs a 400mAh battery unit and either earbud holds 35mAh of charge. boAt claims a total of 40 hours of playtime at a 40% volume level. With fast charging on board, the TWS can provide 100 minutes of playback after a 5-minute charge.Read Also:How to disable Copilot and Recall on Windows 11?
Verdict
We’ve reviewed a lot of entry-level and affordable TWS over the years, but the boAt Airdopes 800 stands out because of its lush audio output and clean design. Sure, the charging case could have been more compact, but its build quality is superior to its peers. The bass-driven audio output is far from neutral but it is immensely enjoyable. Dolby Atmos support plays its part in creating a strong soundstage. The presence of multi-point connectivity squeezes the maximum value out of the Rs 1,799 price tag.
Vivo Y200 Pro 5G has debuted in India. The newly arrived Vivo phone features a 3D curved display with a 120Hz refresh rate. It is powered by Qualcomm Snapdragon 695 SoC and runs on Funtouch OS 14. The device comes with a 64-megapixel dual rear camera setup. It also packs a 5,000mAh battery with 44W fast charging support. Moreover, it has an IP54 rating for dust and splash resistance.
Vivo Y200 Pro 5G specifications
Vivo Y200 Pro 5G is highlighted with a 6.78-inch full-HD+ AMOLED screen with 2,400 x 1,80 pixels of resolution. The display has support for 120Hz and a peak brightness of 1300 nits. The smartphone also sports an in-display fingerprint sensor for authentication. The phone operates on Funtouch OS 14 based on Android 14 out of the box.The new Vivo smartphone features a dual rear camera setup that includes a 64-megapixel primary sensor with optical image stabilisation (OIS) and a 2-megapixel depth sensor. For taking selfies and video calling the handset has a 16-megapixel front-facing camera.The device houses a 5,000mAh battery with 44W wired fast charging support. In terms of connectivity, there is 5G, dual-band Wi-Fi (2.4 GHz, 5 GHz), Bluetooth 5.1, GPS, OTG, and a USB Type-C port for charging.Also Read:Noise rolling out Luna AI to its smart rings, becomes first to bring AI to smart rings
Vivo Y200 Pro 5G price in India, sale details
Vivo Y200 Pro 5G has launched in India in a single 8GB RAM with 128GB storage priced at Rs 24,999. The phone comes in two colourways: Silk Black and Silk Green. It can be purchased via the company’s official website in the country, Flipkart and select retail outlets in the country.Additionally, Vivo is offering users of Federal Bank, IndusInd Bank, SBI Card, and IDFC First Bank cards or gateways an instant Rs 2,500 cashback. Customers may also buy the phone with extra features like V-Shield protection and a 6-month extended warranty for an EMI of Rs 45 per day.
At its annual developer conference on Monday, Microsoft announced new features for its upcoming Windows 11 devices. The new Copilot+ PCs powered by Snapdragon X Elite will be equipped with a new feature called ‘Recall’ along with Cocreator and Live Captions. The Neural Processing Unit on the Copilot+ PCs will handle the bulk of the AI processing. This NPU will work in conjunction with Azure Cloud. While the new features sound great, they may not be everyone’s cup of tea. Today, we bring you the best ways to disable Copilot and Recall on your Windows 11 PC or laptop.Read Also:Noise rolling out Luna AI to its smart rings, becomes first to bring AI to smart rings
What is Recall?
Microsoft’s latest ‘Recall’ feature in its Copilot+ PCs helps the user search for their past activity on their Windows PC. By taking screenshots every few seconds, Recall records your activity across all the apps on your PC and lets you access it whenever you want. If you accidentally close your web browser but can’t remember the tabs that were open, Recall can bring it back with ease.You may be wondering what it means for user privacy and security. While Microsoft ensures that all the snapshots are saved on the device, there are still some gaping privacy flaws that cannot be overlooked. If you share your PC with a friend or family, this would mean multiple users can access your past activity. The same applies when you use a public PC. Recall can also read your password, card details, and other things that aren’t covered by DRM. Even though Recall runs on the device and does not use cloud computing, these privacy concerns are still very much valid. So, let’s take a look at how you can deactivate it altogether on your PC.
Disable Recall on your Windows 11 PC
Step 1: Go to Settings and switch to the Privacy & security tab.Step 2: Click on Recall & snapshots.Step 3: Turn off the toggle switch for Save snapshots.
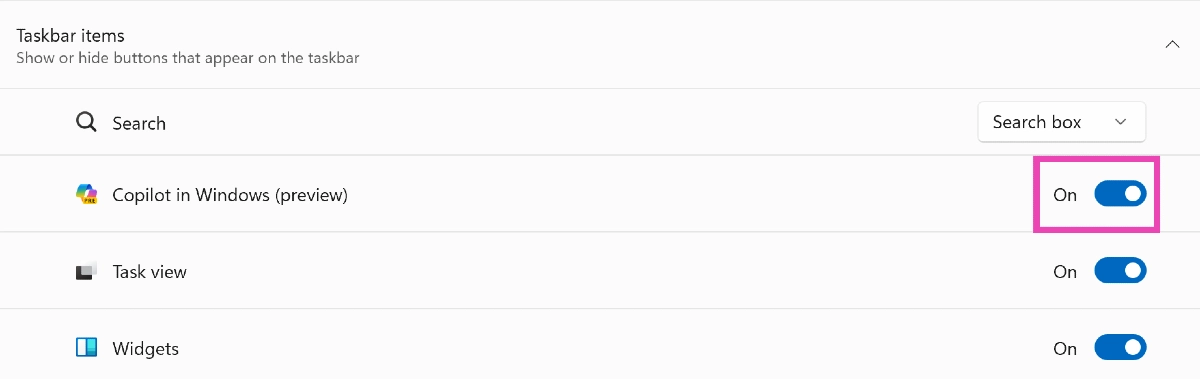
Disable Copilot on your Windows 11 PC from Settings
Step 1: Launch the Settings app on your Windows 11 PC or laptop.Step 2: Switch to the Personalisation tab.Step 3: Select Taskbar.Step 4: Turn off the toggle switch for Copilot under ‘Taskbar items’.
Disable Copilot from Group Policy
Step 1: Open Group Policy Editor from the Control Panel. You can also search for it by typing ‘gpedit’ in the search box on the taskbar.Step 2: Go to Configuration>Administrative Templates>Windows Components>Windows Copilot.Step 3: Select the ‘Turn off Windows Copilot’ setting.Step 4: Select Enabled.Step 5: Hit Apply, then click OK.Step 6:Restart your PC.
Frequently Asked Questions (FAQs)
How do I turn off Copilot on Windows 11?
Go to Settings>Personalisation>Taskbar and turn off the toggle switch for Taskbar.
How do I turn off Recall on Windows 11?
To turn off Recall, go to Settings>Privacy & security>Recall & snapshots and turn off the toggle switch for ‘Save snapshots’.
Is Recall an on-device feature on Windows 11 PCs and laptops?
This is how you can disable Copilot and Recall on your Windows 11 PC or laptop. You can temporarily pause Recall by clicking on its icon in the taskbar and selecting ‘Pause until tomorrow’. If you have any other questions, let us know in the comments!
Indian smart wearable brand Noise has introduced Artificial Intelligence (AI) Luna AI to its Luna Ring smart wearable. The device was launched last year and with the integration, the company has become the first wearable global brand to bring AI to smart rings. Users of the Luna smart ring are assigned a personal wellness coach by the Luna AI.The AI-powered Luna Ring will share in-depth insights and customised recommendations for a more intuitive, personalised experience such as Ask Anything, Body Insights as well as Personal Coach and Nutritionist.Luna Smart Ring users will be able to interact with the Luna AI to receive prompt responses to their queries, including your average heart rate variability and tailored suggestions derived from your fitness data. They can also learn more about the signals and rhythms of their body to enhance their health and well-being e.g. understand why you feel tired despite sleeping well with Luna AI’s personalised recommendations. They will also get customised training routines and nutrition recommendations from Luna AI, tailored to their fitness goals and hyper-personalised using your bio-markers.As of now Luna AI is being rolled out in beta and will be available to all users over the next 1-2 weeks.Also Read:Lenovo Yoga Slim 7x and ThinkPad T14s Gen 6 Copilot+ PCs with Snapdragon X Elite launchedCommenting on the announcement, Amit Khatri, Co-Founder, Noise said, “We are excited to bring the first-ever AI integration to smart rings, globally. Smart rings were recently introduced as the latest form factors, and AI’s role is proving to be a game changer in unlocking their full potential. This step marks yet another significant milestone in elevating the experience of smart wearables. By pioneering this advancement, we are reshaping the landscape of smart rings and empowering users to take charge of their well-being. This move underscores our dedication to pushing the boundaries of what’s possible in the smart wearables industry, fostering collective growth and meaningful innovation.”The Luna smart ring comes with a 3mm slim design, fighter-jet grade titanium body, and diamond-like coating that resists corrosion and scratches making it a sturdy construction. The device has a hypoallergenic inner shell as well as a pointing edge on the outside shell for guided wearing.Also Read:Sony BRAVIA 2 series with Google TV powered by X1 4K Processor and Live Colour technology launched in IndiaIt features PPC, Skin Temperature, and 3-axis accelerometer sensors measuring physiological signals. It uses in-built algorithms to deliver accurate results. Furthermore, the personalised nudges use tailor-made insights and alerts to help make real-time transformative choices.
Sony BRAVIA 2 Series, featuring 4K Ultra HD LED display technology and integrated with Google TV has officially launched in the Indian market. The series offers two distinct versions: the S25 variant, which delivers unparalleled gaming capabilities, and the S20, which prioritises other outstanding features without gaming enhancements. Both the Sony TV come with X1 4K Processor and Live Colour technology as well as Dolby audio and clear phase technology provide immersive sound for movies, sports, and music.
Sony BRAVIA 2 series specs, features
The Sony BRAVIA 2 series TV flaunts a minimalist design with a narrow bezel, maximising screen size and minimising bezel for better focus. It’s a TV designed for immersive sound whether positioned on a stand or mounted on a wall. The slimline stand matches the TV, and a small remote control with six hot keys allows easy access to favourite services. The voice-enabled remote features built-in microphones and Google Assistant for convenient navigation and quick playback. The BRAVIA 2 series, featuring improved X-Protection PRO technology, offers superior dust and humidity protection and passes Sony’s lightning tests, ensuring your TV remains safe from lightning strikes and power surges.Besides this Sony’s new BRAVIA 2 series comes in two models S20 and S24 available. It is equipped with X1 4K Processor and Live Colour technology, providing stunning colours, contrast, and fine details in screen sizes 43inch, 50inch, 55inch and 65inch screen sizes, ensuring clear 4K resolution.Also Read:Vivobook S 15, Asus’s first Copilot+ PC with Snapdragon X Elite announcedIn addition to this, the Sony BRAVIA 2 4K televisions offer stunning 4K images, upscaled from 2K and Full HD using 4K X-Reality PRO and Motionflow XR technology.In terms of audio, there is an open baffle down-firing twin speakers with 20-watt powerful Dolby audio, providing clear, natural sound suitable for movies, sports, and music. According to Sony, the Clear Phase precisely analyses the speaker’s frequency response, identifying and removing any peaks or dips for pure, natural audio with smooth, even reproduction of all frequencies.When it comes to gaming it uses ALLM in HDMI 2.1 to automatically switch to low latency mode for smoother gameplay. This optimises HDR settings during the PS5 console’s initial setup therefore, high contrast and responsiveness in high-intensity games is ensured. The TV will automatically switch into the Game mode to minimise input lag and make the action more responsive. When watching movies on PlayStation5 consoles, it switches back to standard mode to focus on picture processing for more expressive scenes.Also Read:Lenovo Yoga Slim 7x and ThinkPad T14s Gen 6 Copilot+ PCs with Snapdragon X Elite launchedThe Television lineup provides streaming of over 10,000 apps, 700,000 movies, TV episodes, and live TV. Google TV organises content from various apps and subscriptions, allowing users to easily search, bookmark shows, and add them to their watchlist. Additionally, it comes with support for Apple Home Kit and AirPlay for seamless content streaming.
Garena Free Fire is a battle royale game with regular awards and tournaments to keep players interested. If you play Garena Free Fire, you should be aware of the redeem codes that are released on a daily basis. However, because the battle royale game is banned in India, players from other countries can use the Free Fire Redeem codes daily. If you’re unfamiliar with the Garena Free Fire redeem codes or don’t know how to get them, we’ve put together a step-by-step guide to help you redeem them. Check out Garena Free Fire Redeem Codes for 22 May 2024.The Free Fire redeem codes are a great way to get free stuff. These are 12-digit codes that contain alphabets and numbers, as well as an expiration date and time. Because the Garena FF redeem codes cannot be used more than once, you should hurry to the redemption page to claim your free reward before someone else does. To get a free reward, all you have to do is go to reward.ff.garena.com/en, which is the official redemption page. Also, keep an eye on this space for daily updates on Garena Free Fire redemption codes and rewards.Also Read: Sennheiser Accentum Plus wireless headphones with Hybrid Adaptive Noise Cancellation launched
Garena Free Fire Redeem Codes Today 22 May 2024
A4X6H5K3L7G2C9VJ
F1D5G7K3C9X2H4LJ
P7G2R4K6H9V1X8JC
Y3W7V8B2K5C1QFDN
T2J6X9L7G8D4C3BK
C5T8G6V2K1J7H4DF
UX7JG9D0H2Z3R8FV
YB4KT6N1W7M5CQXF
W1Y5G7V3B4C6H2FK
Z6R7G5K3H9V1J4CN
E9D8C5G7V2J3K6BH
X2C7K4G8V6H9J3NF
D3Z9VX7C1JHFRWPG
Q6B7N5Z0H4RKPT2W
V9J6SF7DM2G3N8KH
M9Q5H7V2C3B8J1FN
L3G8H4C6V9J2B7KF
K7L4G2N9C3V5J6BD
B2N7D8G5H9J1K6CV
R8V6J3C5G2H9K7ND
How to Get Free Fire Redeem Codes for Garena on 22 May 2024?
The Chinese tech brand Lenovo today officially unleashed its first next-generation Copilot+ PCs powered by Snapdragon X Elite- Lenovo Yoga Slim 7x and Lenovo ThinkPad T14s Gen 6. These laptops offer enhanced productivity, creativity, and security, combining intelligent software-powered local processing of tasks. The Lenovo Yoga Slim 7x is portable and powerful, with a 14.5 inch 3KPure Sight OLED touch panel, FHD MIPI IR Webcam, four Voice ID microphones, and a premium suite keyboard. Whereas Lenovo ThinkPad T14s Gen 6 is Lenovo’s first commercial next-generation Copilot+ PC is aimed at business users.
Lenovo Yoga Slim 7x and ThinkPad T14s Gen 6 specifications
Lenovo Yoga Slim 7xThe Lenovo Yoga Slim 7x features a 14.5-inch PureSight OLED touch panel with 3K resolution. The display offers 90 Hz refresh rate support along with 1000 nits peak brightness with both 100% sRGB and P3 color gamut support as well as TUV Rheinland Low Blue Light support. It also features an FHD MIPI IR Webcam and four Voice ID microphones for better video calls. Under the chassis, there is Qualcomm’s Snapdragon X Elite processor with Adreno GPU along with Up to 32 GB LPDDR5 and Up to 1TB PCIe Gen 4 storage.Lenovo Yoga Slim 7xIt comes pre-installed with Windows 11 out of the box. Every dish key on the Premium Suite keyboard has 1.5mm of key travel. Better typing comfort and feel are provided by the new Yoga coating, which has longer-lasting anti-oil qualities. The up to 135x80mm trackpad allows for greater precision when using the device when on the go. The Yoga Slim 7x also qualifies for Lenovo Premium Care service which provides personalised hardware and software assistance from expert technicians with fast repairs when needed.Lenovo ThinkPad T14s Gen 6The ThinkPad T14s Gen 6 is the company’s first commercial next-generation Copilot+ PC with AI capabilities. The machine is highlighted with a 14-inch 2.8K OLED touch display with 400 nits, 100% DCI-P3, Dolby Vision, HDR True Black 500 and EyeSafe. The device features an advanced Snapdragon X Elite processor, integrated Adreno GPU, and on-device AI engine. It is said to offer superior performance and efficiency for Windows business laptops, enhancing productivity and facilitating seamless creation processes. The ThinkPad T14s Gen 6 also features a 45 TOPS NPU for on-device AI capabilities, facilitating seamless integration across Microsoft 365 applications. It comes with Up to 64 GB LPRRD5X memory and Up to 1TB PCIe Gen 4 storage.Also Read:Vivobook S 15, Asus’s first Copilot+ PC with Snapdragon X Elite announcedThe ThinkPad T14s Gen 6 houses an FHD+IR MIPI camera featuring a physical camera shutter for privacy along with a Fingerprint Reader on Power Button.Lenovo, Qualcomm Technologies, and Microsoft have partnered with DynamoAI to create over 100 enterprise software applications for Windows powered by Snapdragon. These apps are said to focus on device management, collaboration, productivity, and chip-to-cloud security. The ThinkPad T14s Gen 6 offers robust ThinkShield security features, enabling organisations to manage risks and protect privacy in the AI era.Lenovo ThinkPad T14s Gen 6Lenovo’s new laptops, powered by Qualcomm’s Snapdragon X Elite processor, offer top-tier PC performance with AI NPU processing up to 45 trillion operations per second. Microsoft’s Copilot+ enhancements enable offline Large Language Model (LLM) capabilities, while Lenovo’s Yoga Slim 7x and ThinkPad T14s Gen 6 provide a modern, simplified user experience that makes working both online and offline simple.
Lenovo Yoga Slim 7x and ThinkPad T14s Gen 6 pricing and availability
Both Lenovo Yoga Slim 7x and ThinkPad T14s Gen 6 will be available in the US starting June 2024. The former comes in a Cosmic Blue colour variant whereas the latter will be available in Eclipse Black colourways.In terms of pricing the Lenovo Yoga Slim 7x price will start at $1,199. On the other hand, the Lenovo ThinkPad T14s Gen 6 will be available at a starting price of $1,699.
Asus has officially unveiled its new generation of AI laptops- Vivobook S 15 (S5507). The latest laptop, which is the first Copilot+ PC from the firm, is powered by the Snapdragon X Elite and comes with a number of special ASUS AI apps to enhance both work and play for users. It also has Windows AI features.
Asus Vivobook S 15 (S5507) price, sale details
Asus Vivobook S 15 (S5507) price will begin at USD 1299 for the 16GB+1TB varaint whereas the 32GB+1TB model will cost USD 139. It is scheduled to go on sale from June 18 however it is currently available for preorders via the company’s website and select retailers.
Asus Vivobook S 15 (S5507) specs, features
Asus Vivobook S 15 (S5507) comes equipped with Qualcomm’s latest Snapdragon X Elite is the world’s fastest laptop NPU with 45 Neural TOPS, for the latest Windows AI tools and with exclusive ASUS AI apps. The laptop comes with up to 32GB of LPDDR5X RAM and up to 1 TB PCIe 4.0 SSD storage.Also Read:Announced: HP laptops to start with two prefixes – Omni and EliteThe ASUS Copilot+ PC has a 15.6-inch 3K 120 Hz ASUS Lumina OLED display with 2880 x 1620 pixels of resolution. It has a 3-sided NanoEdge 89% screen-to-body ratio, 0.2 ms response time, 100% DCI-P3 color gamut, VESA DisplayHDR True Black 600 certified, and average Delta-E < 1, 600 nits peak brightness. It also offers TÜV Rheinland-certified low blue-light levels for enhanced eye care, and the display itself is protected by our exclusive ASUS OLED Care system to significantly reduce the risk of burn-in.The laptop has a Harman Kardon-certified audio system with immersive, multi-dimensional Dolby Atmos sound support. Additionally, there is a customisable single-zone RGB backlight (deleted Windows dynamic lighting wording)ASUS ErgoSense keyboard with Copilot key and emoji hotkey. The device has a dedicated Copilot key that enables Windows AI-powered tools. Furthermore, there is a large smart touchpad with gesture controls to operate various tasks, from adjusting audio to optimising screen brightness or managing video playback.ASUS AiSense IR camera and Windows Studio Effects are two examples of next-generation AI-powered improvements. Adaptive Dimming, which lowers the screen when the user looks away, and Adaptive Lock, which locks the laptop when the user walks away and unlocks it when they return, are made possible by the camera’s presence-detection capabilities to handle all digital assets, using AI assistance to sort, edit, manage, and export captured raw files.Also Read:Vivo X Fold 3 Pro India launch confirmed, listed on FlipkartFurthermore, the ASUS Vivobook S 15 is the first gadget to use StoryCube, a proprietary AI app from the business. Moreover, Cocreator enables users to turn sketches into completed artwork, while Live Captions provides precise real-time captions. The ASUS Vivobook S 15 incorporates cutting-edge features like Windows Studio Effects, which improves lighting and noise reduction during portrait video callsThe Asus Vivobook S 15 has all the necessary ports including Wi-Fi 7, USB4 ports, USB 3.2 Gen 1 Type-A ports, HDMI 2.1, microSD card reader and an audio combo jack.


 Step 3: Select Web.
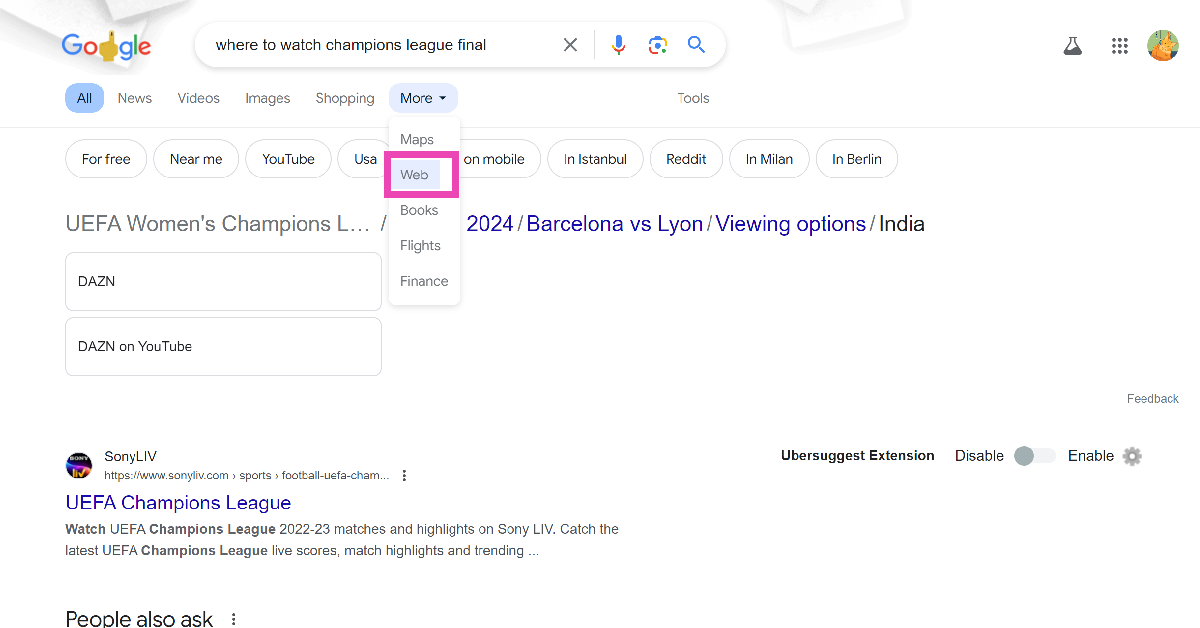 Google will filter the text-based web results and remove AI overviews, videos, and other content from the page.
 Step 2: Select the Search engine tab in the sidebar.
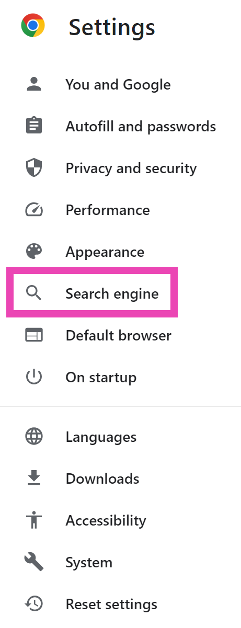 Step 3: Click on Manage search engines and site search.
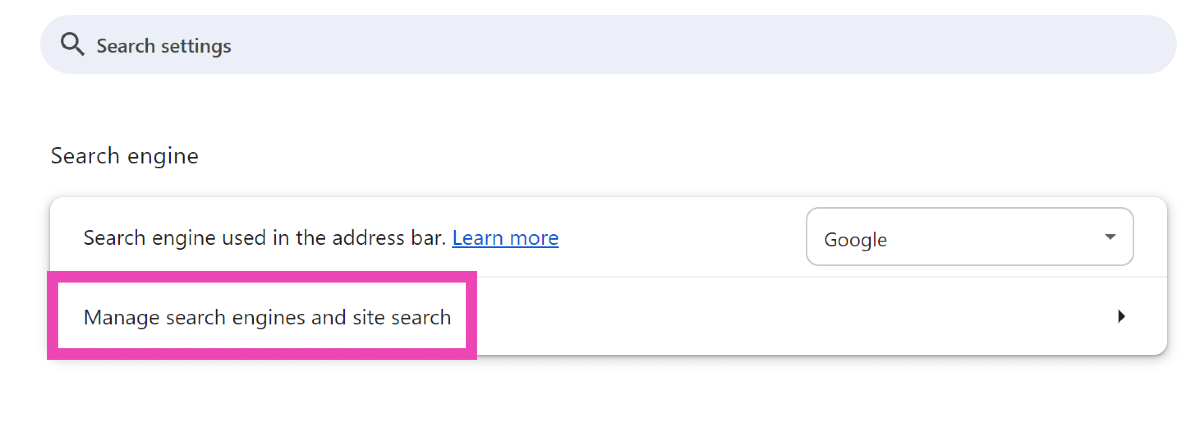 Step 4: Click on Add.
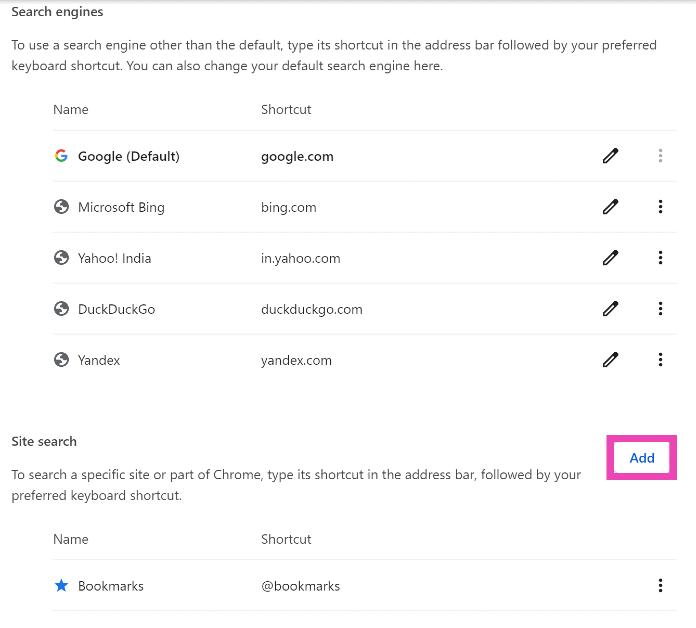 Step 5: Give the site search entry a name. We prefer Gooogle with one extra O. Enter a trigger word for the shortcut in the second text field.
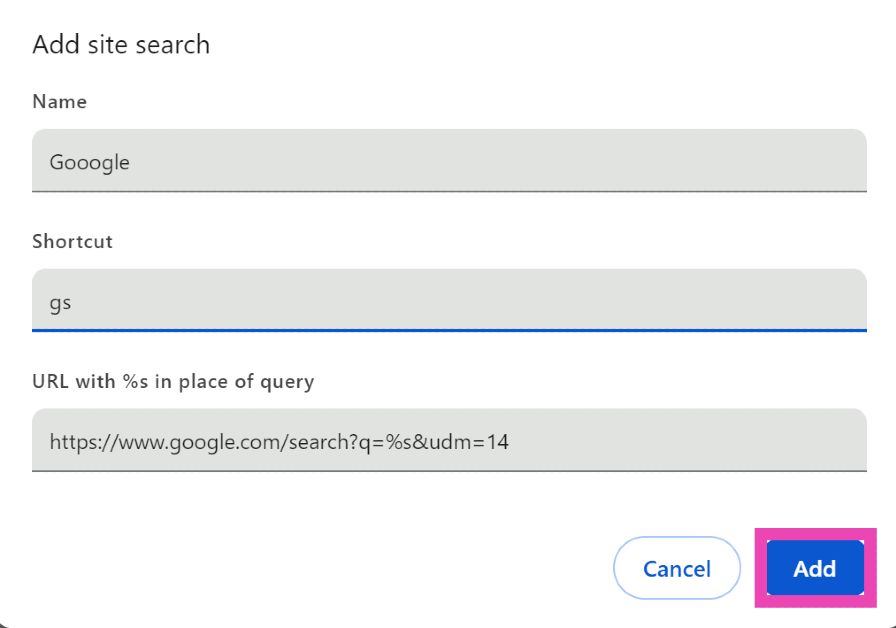 Step 6: In the ‘URL with %s in place of query’ enter https://www.google.com/search?q=%s&udm=14. Hit Add.
Step 7: Hit the ellipses next to the site search entry and select Make default.
Step 6: In the ‘URL with %s in place of query’ enter https://www.google.com/search?q=%s&udm=14. Hit Add.
Step 7: Hit the ellipses next to the site search entry and select Make default.
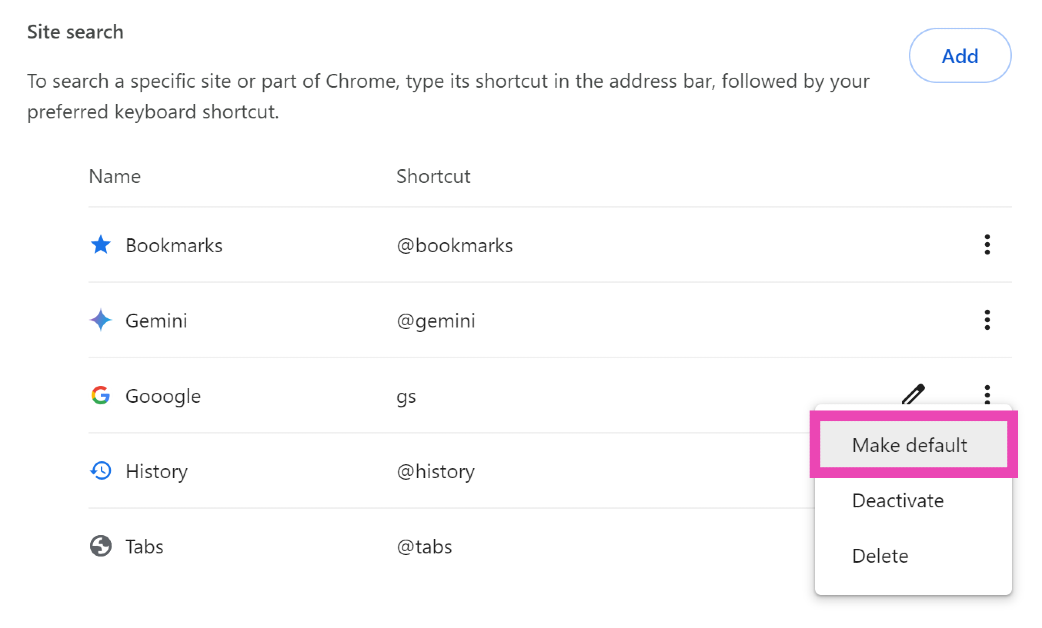 Now, every time you search for a query, the results will be parsed through the web filter.
 Adding ‘-AI’ (without the quotes) at the end of your searches filters AI Overview from the results. This method is suitable for users who don’t want to disable AI Overview entirely, but need organic results for some searches.
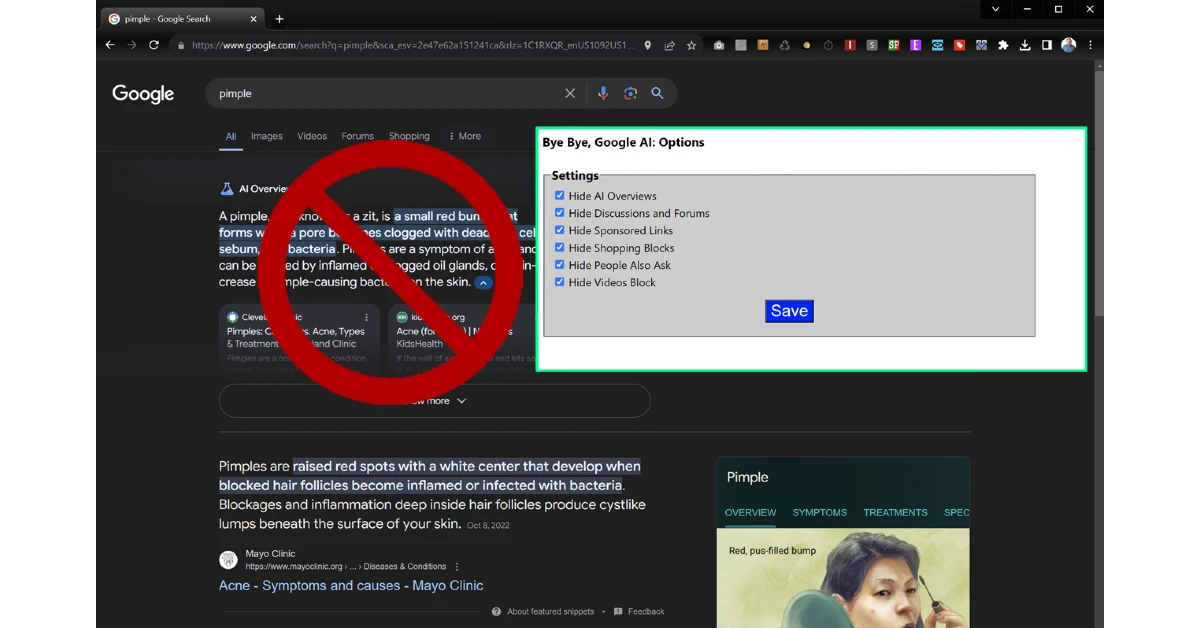 The ‘Bye Bye, Google AI’ Chrome extension gets rid of AI Overviews, Discussions, and Ads. Use this link to download it from the Chrome Web Store. Once installed, it gives you a list of items you might want to block. AI Overview is selected by default. The list also includes Sponsored Links, Shopping Blocks, People Also Ask, People Also Search For, and more.

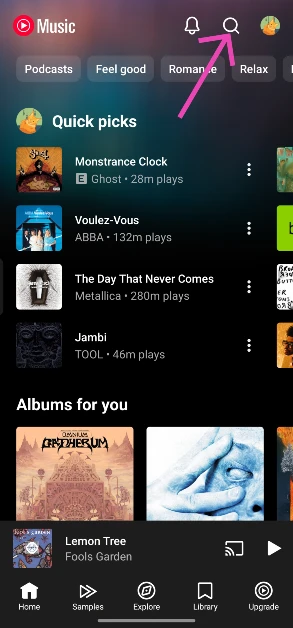 Step 3:
 Step 4:
 Step 5:
 Step 6:
")
 Step 2:
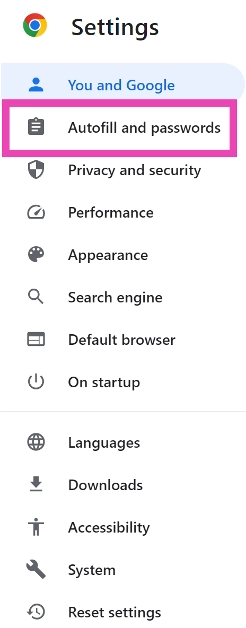 Step 4:
 Step 5:
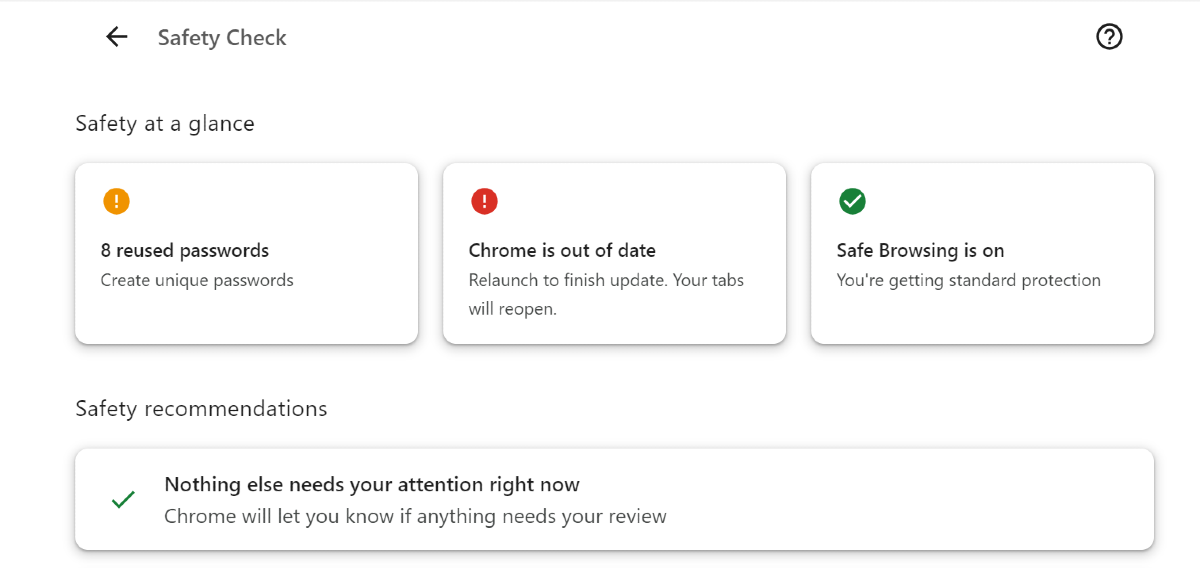
 Step 3: Go to Settings.
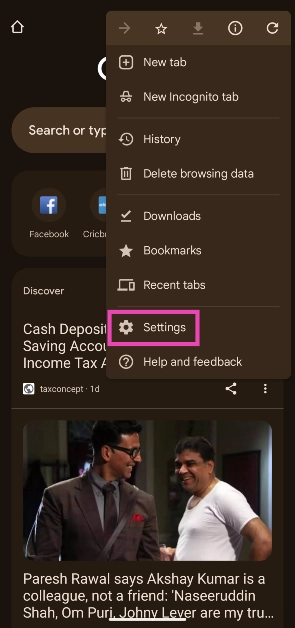 Step 4: Tap on Safety check.
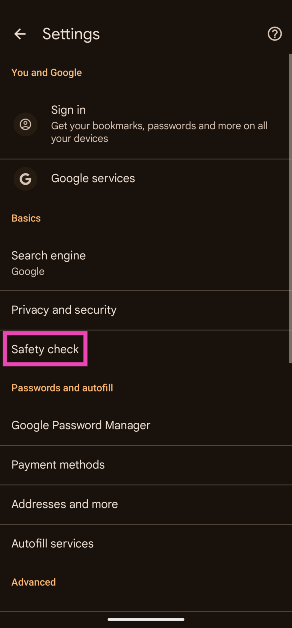 Step 5: Google Chrome will run a safety check. The problematic issues will be flagged. Tap on a flagged issue to view how it can be corrected.
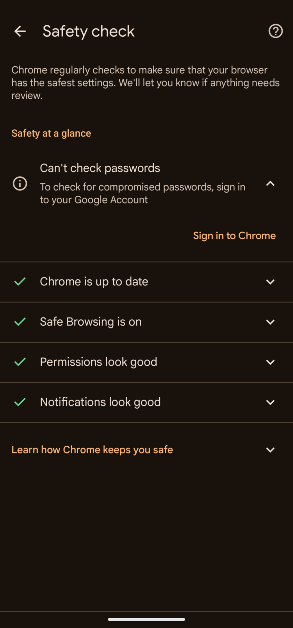
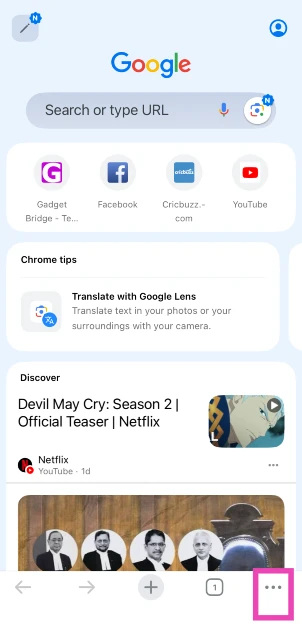 Step 3: Tap on Settings.
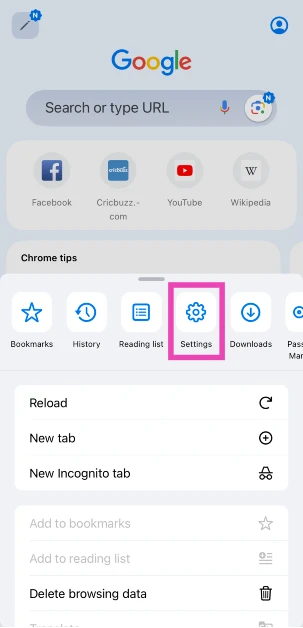 Step 4: Scroll down and select Safety Check.
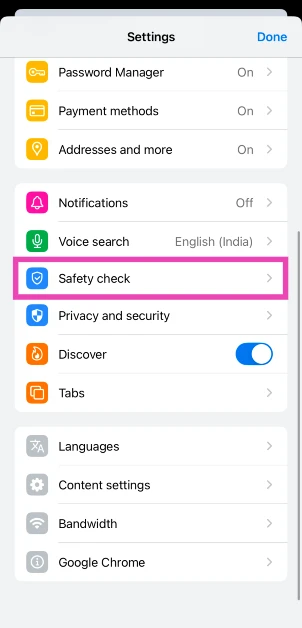 Step 5: Tap on Check Now.
 Step 6: Google Chrome will run a safety check, and the problematic issues will be flagged. Tap on an issue to view how it can be corrected.


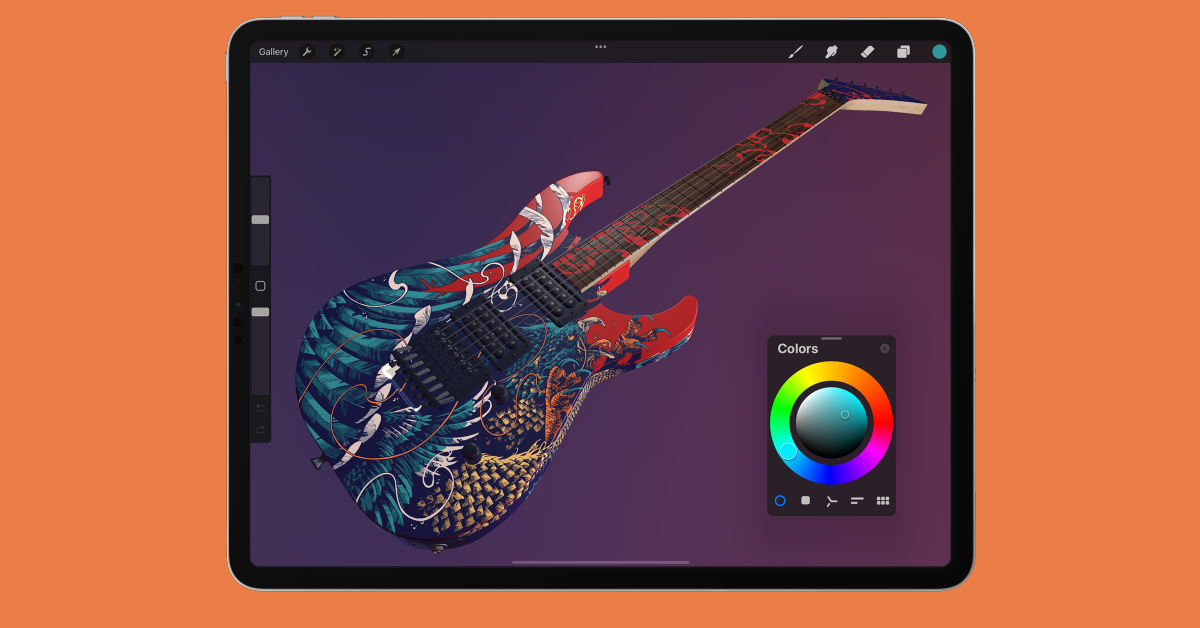
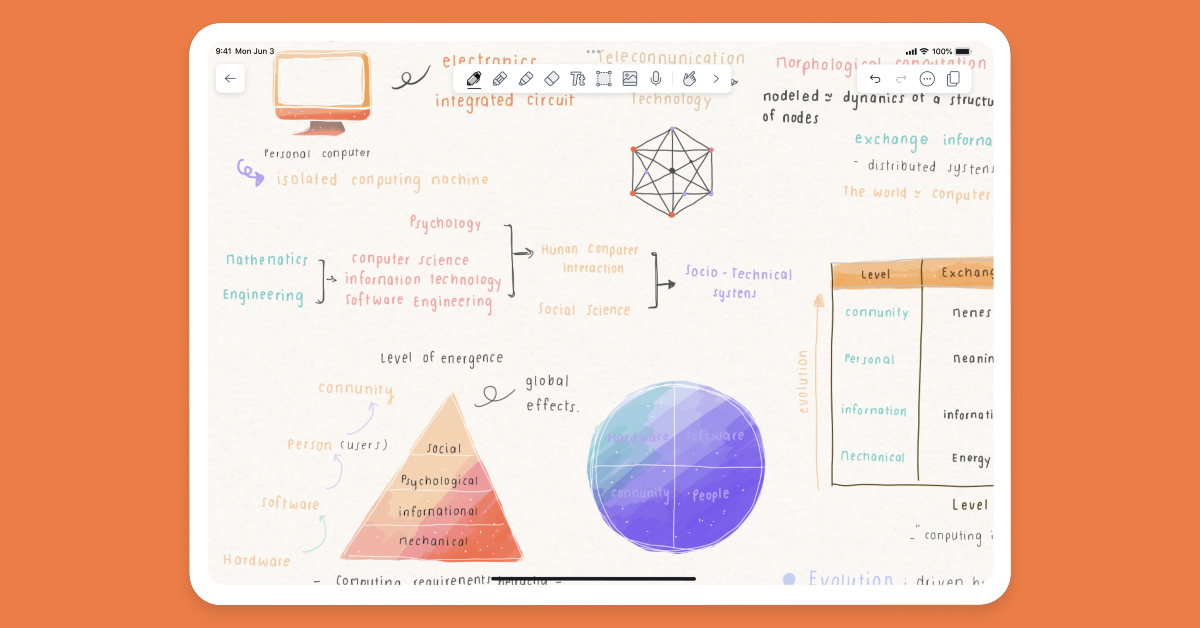
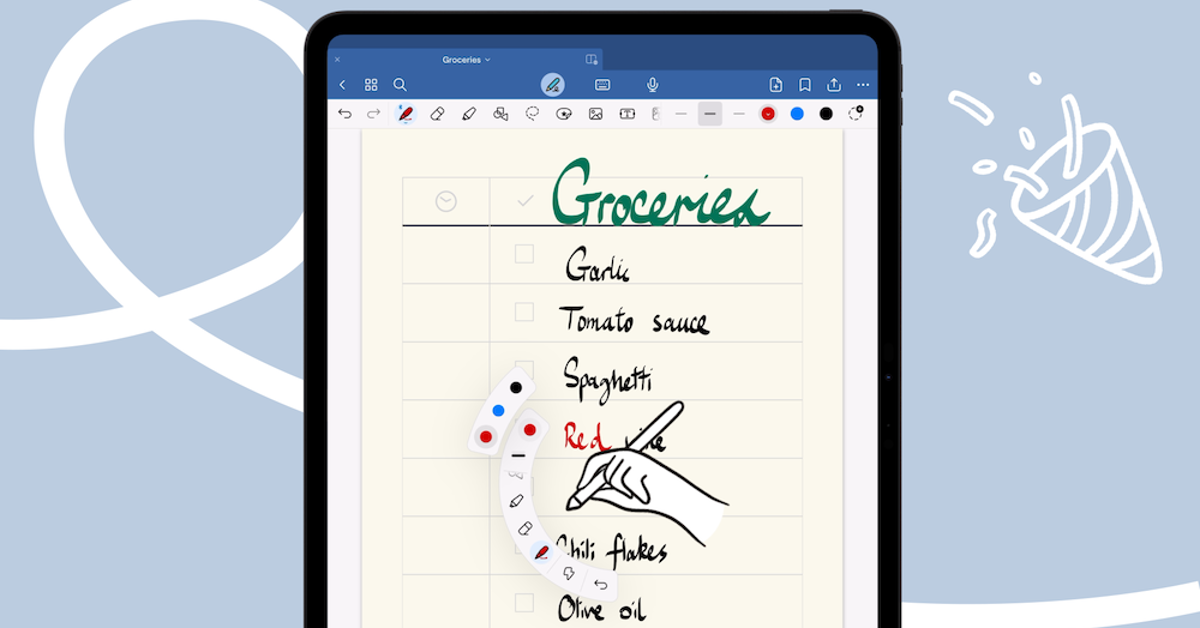

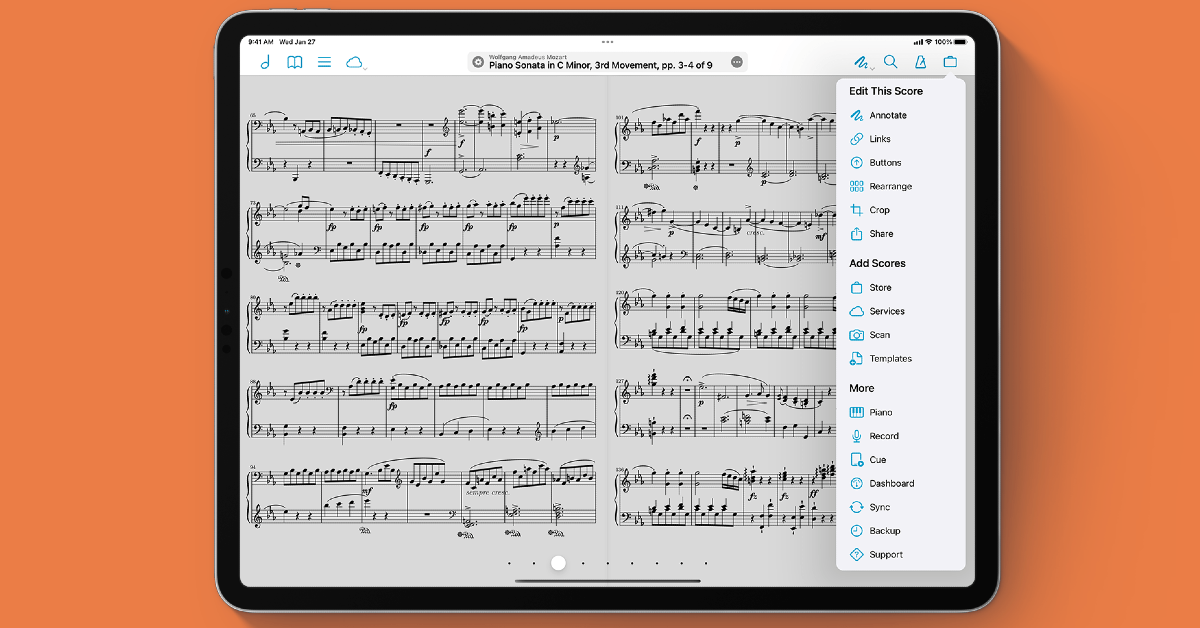
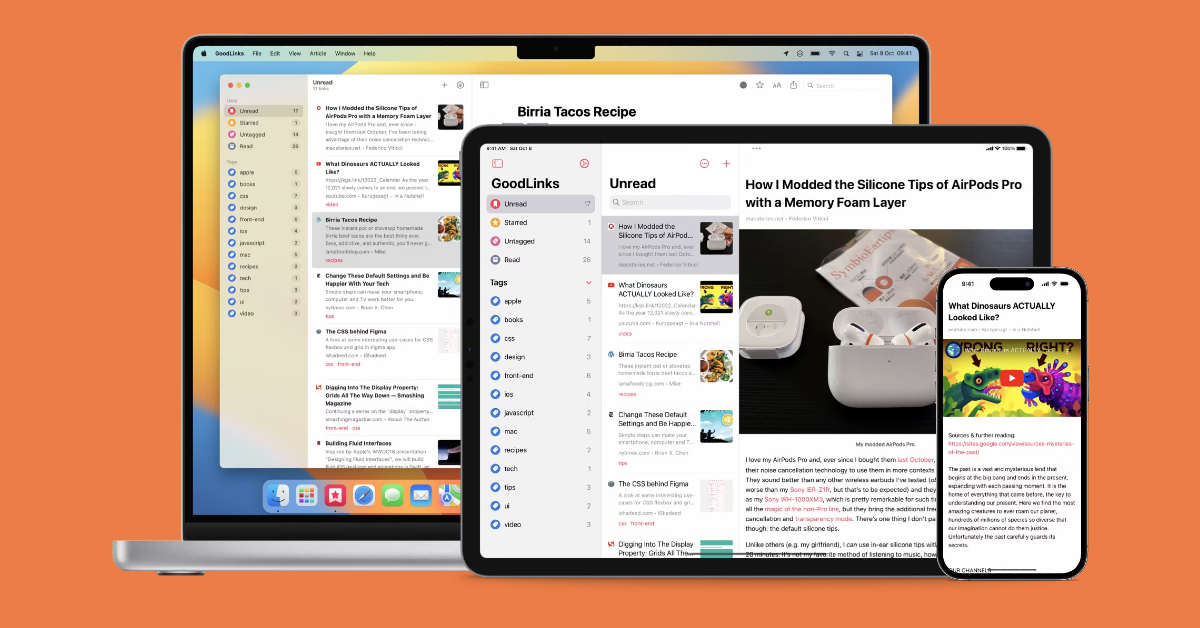
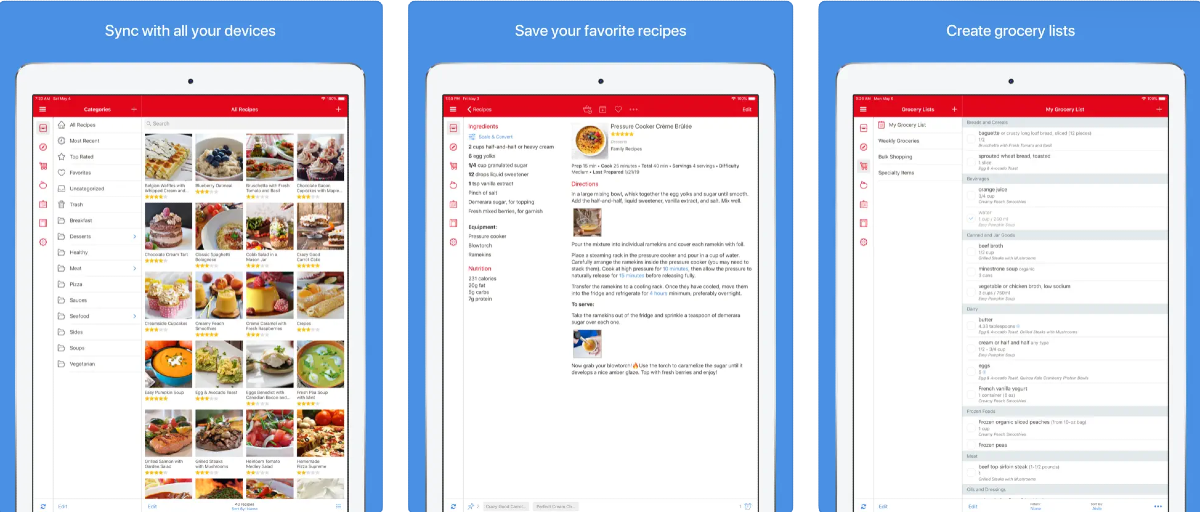


")
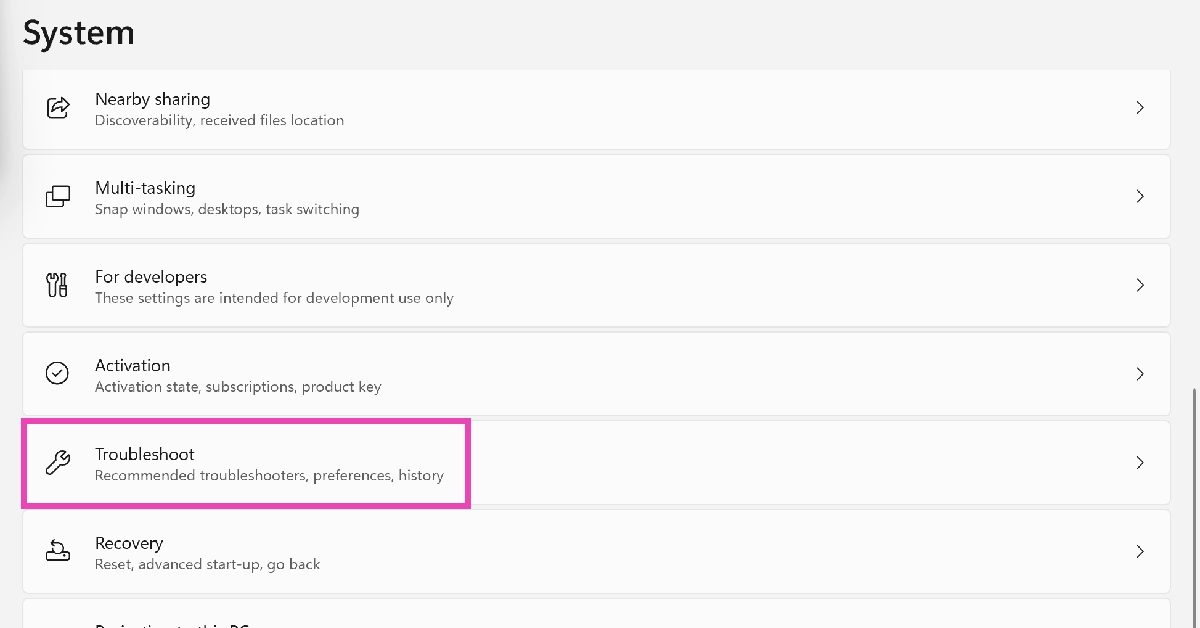
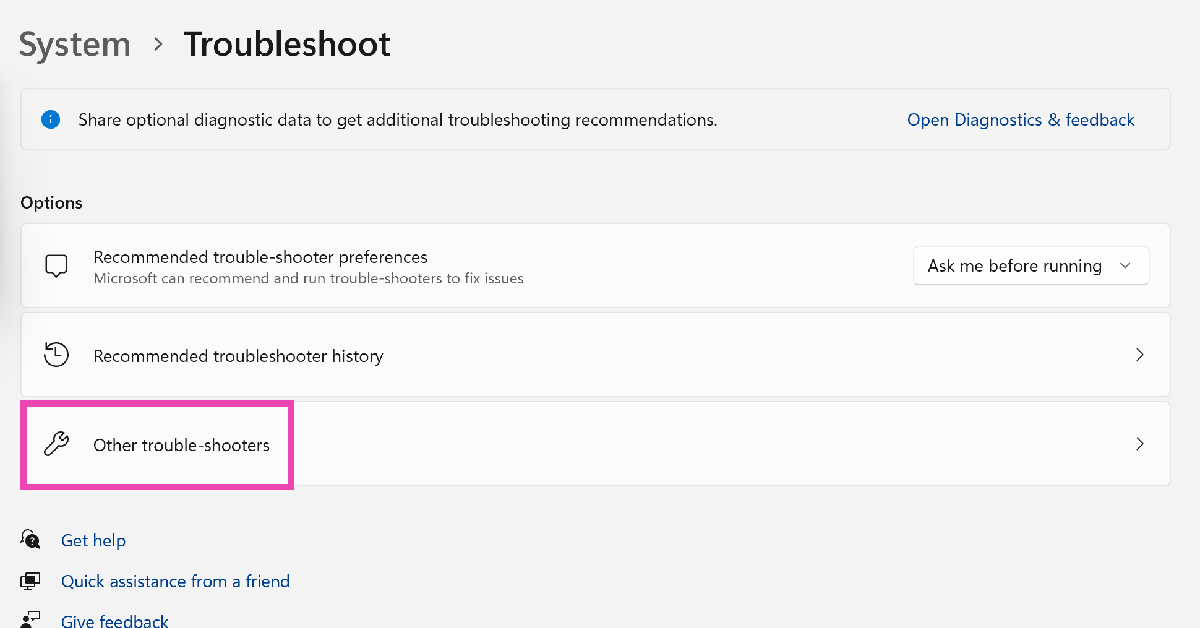
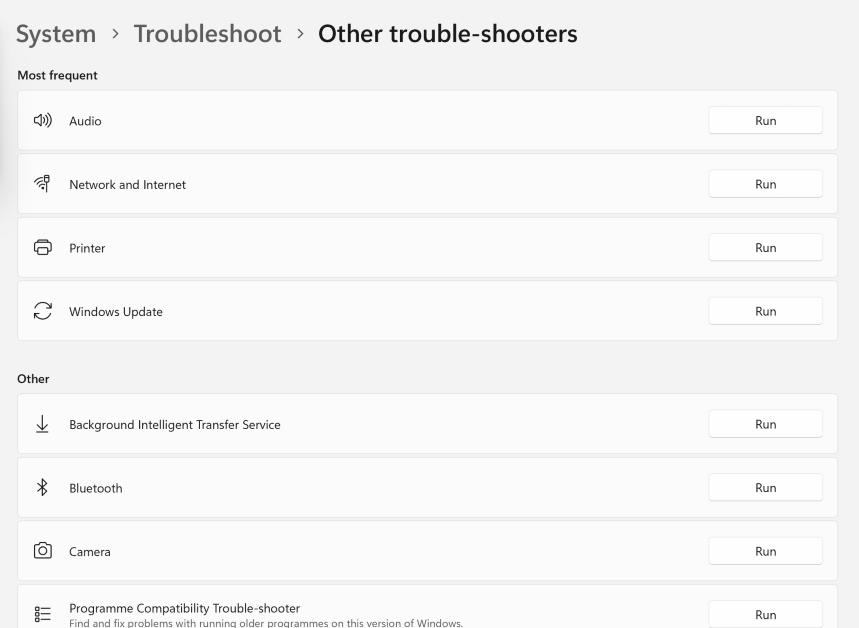


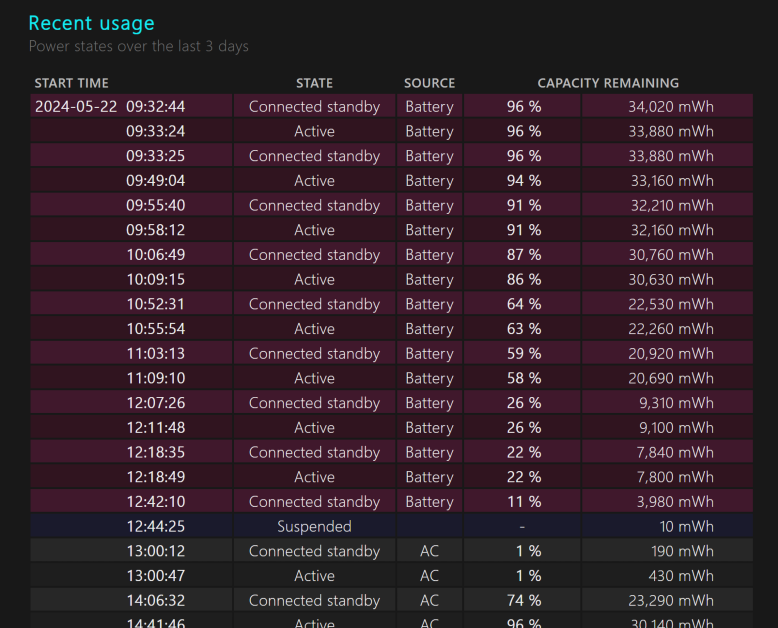


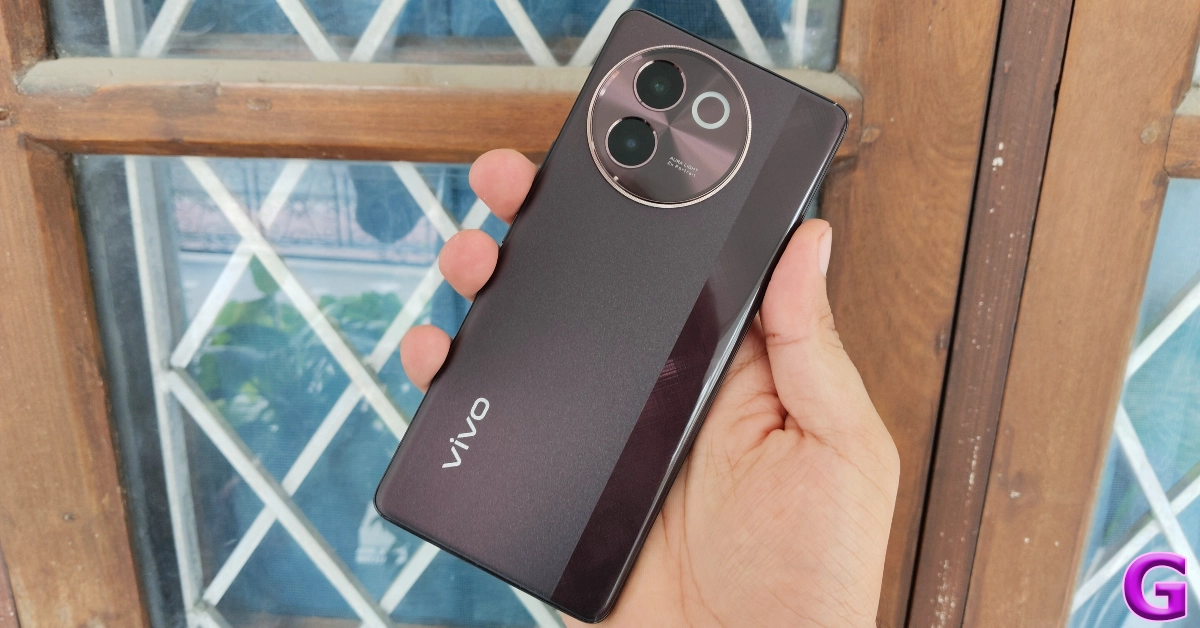
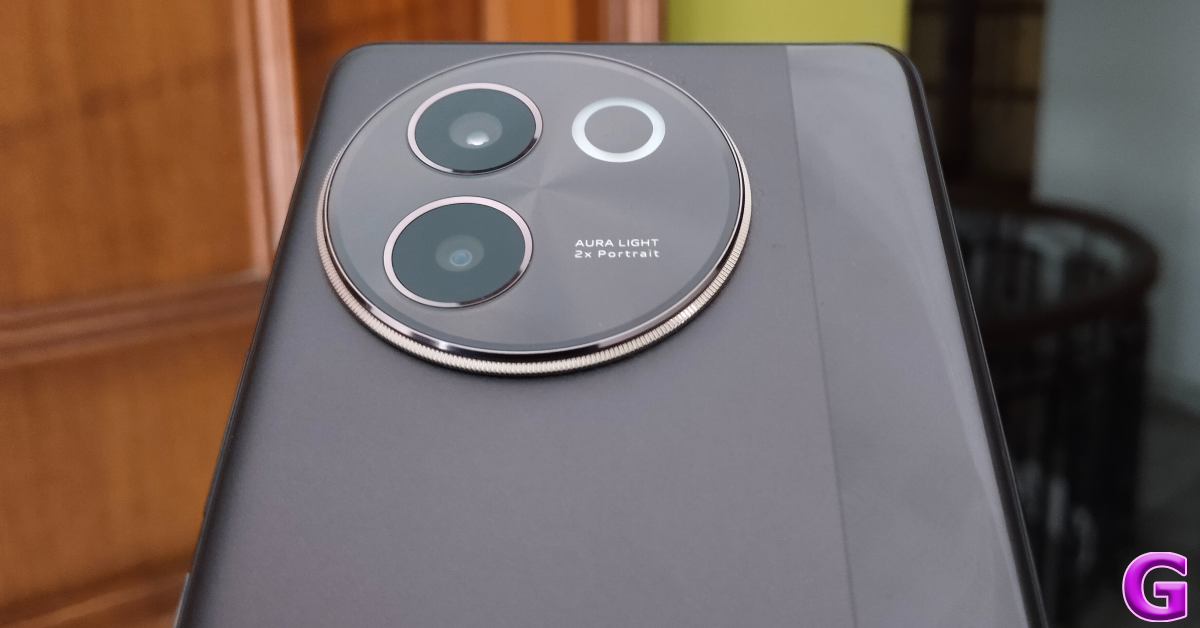
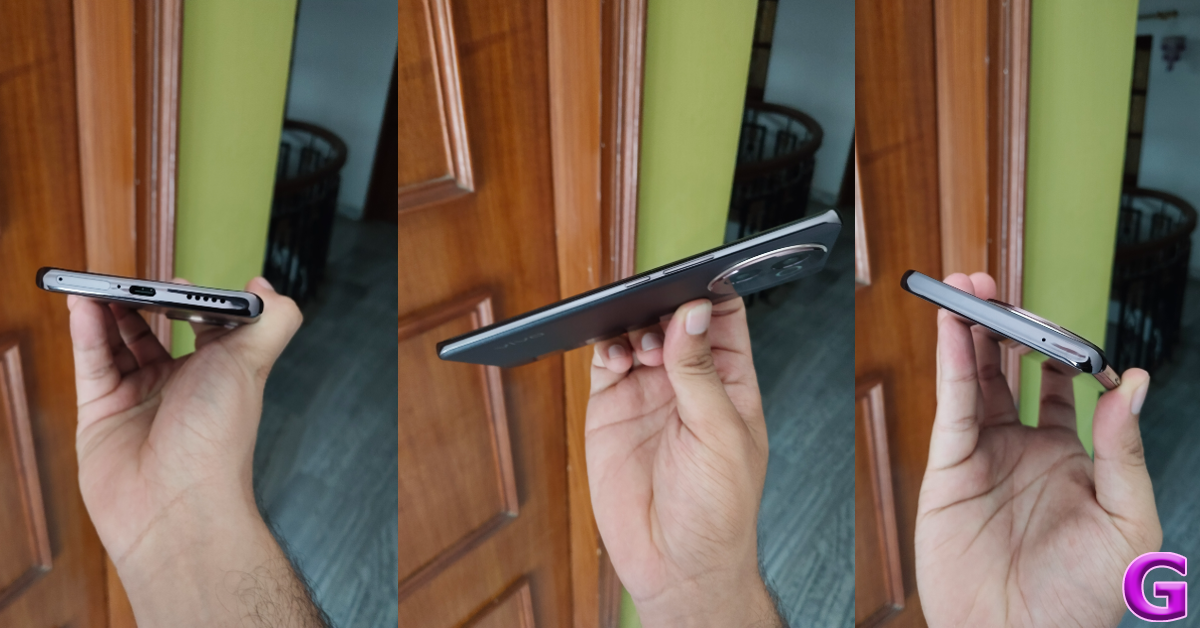
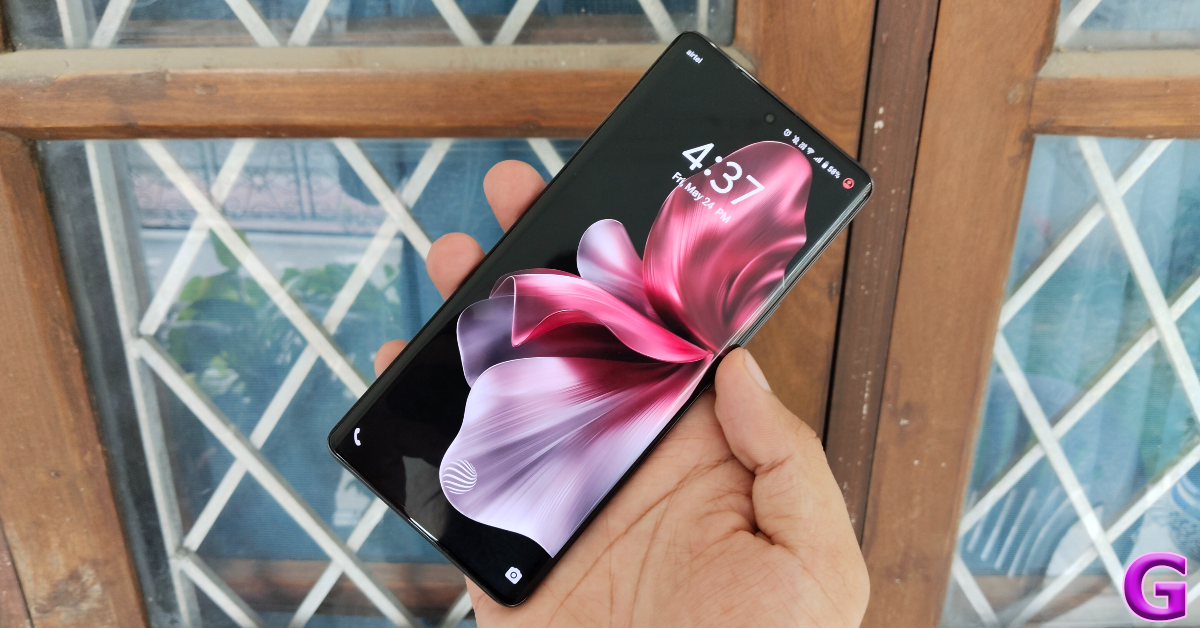


")
 Step 2:
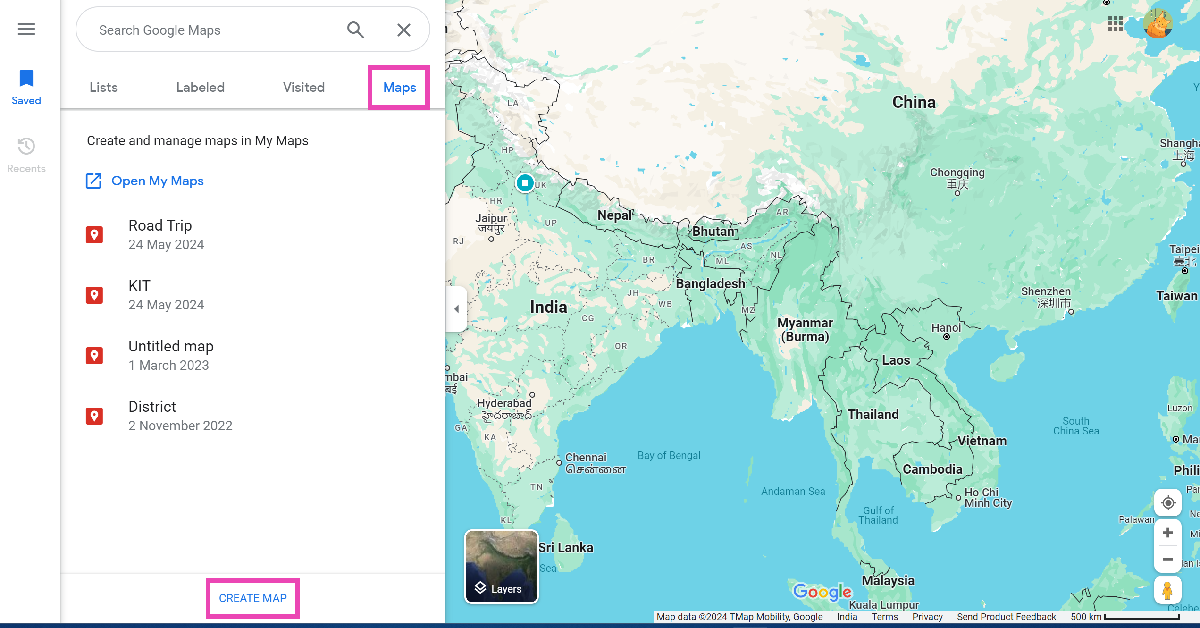 Step 3:
  Step 4:
 Step 5:
 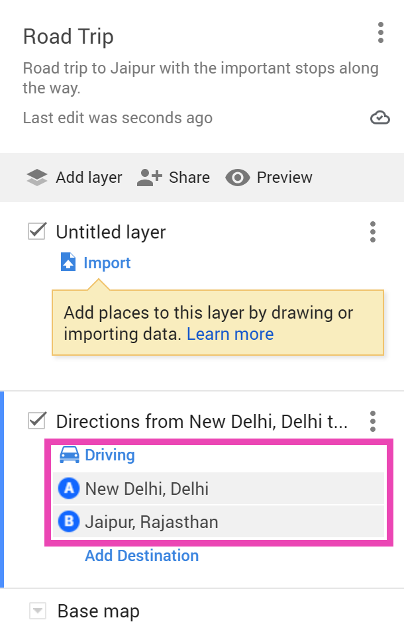 Step 6:
 Step 8:
 Step 9:
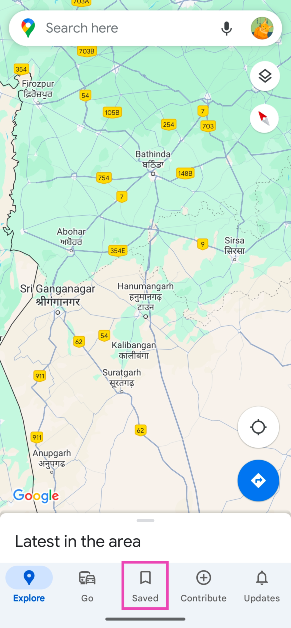 Step 3:
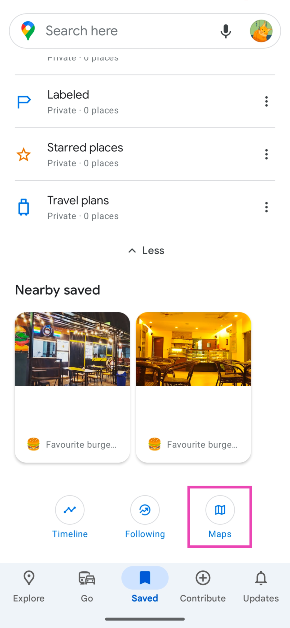 Step 4: Select


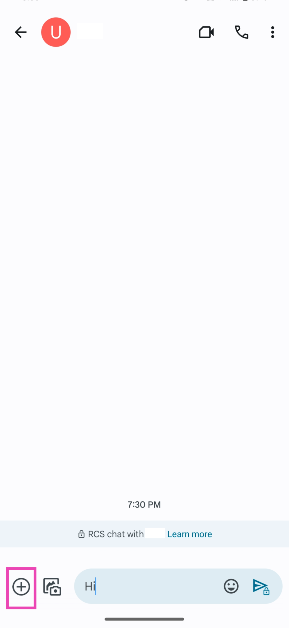 Step 5:
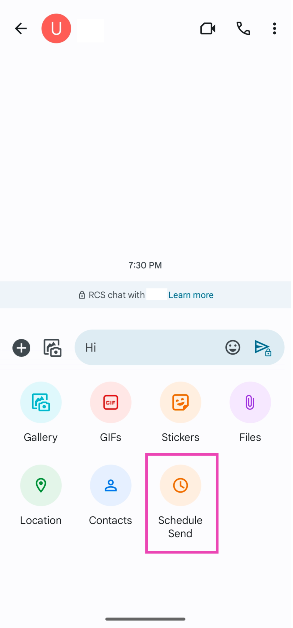 Step 6:
 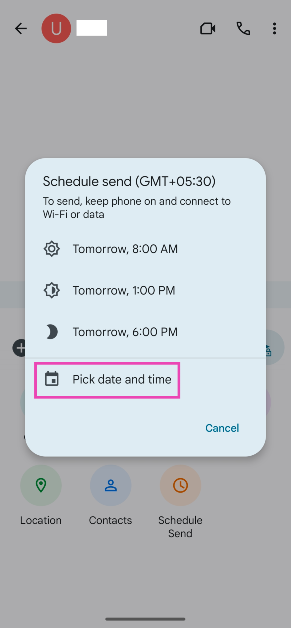 Step 7:
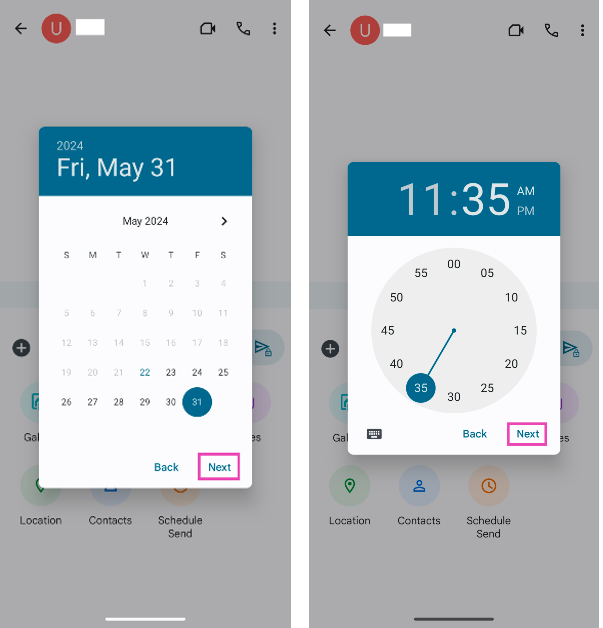 Step 8:
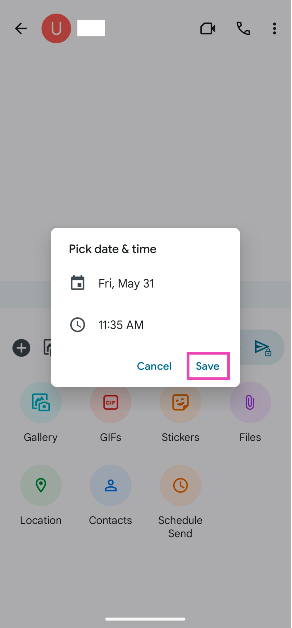
 Step 1: Launch the native
 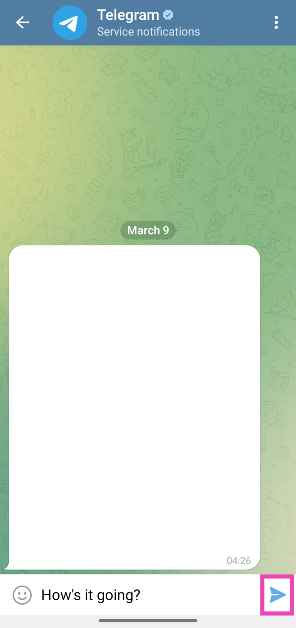 Step 3: Tap on Schedule message.
 Step 4: Set the date and time and hit Send.

 Step 5: Set the delivery date and time by swiping up and down on the digits.
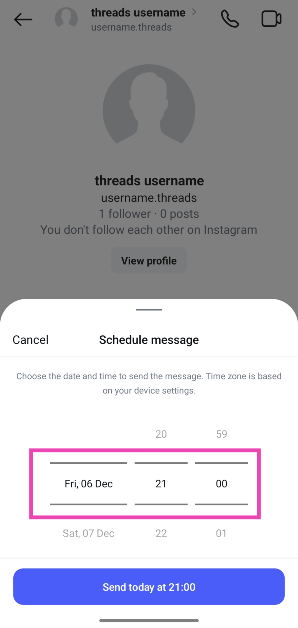 Step 6: Tap on Send on [Scheduled Date and Time].
![Step 6: Tap on Send on [Scheduled Date and Time]. How to schedule messages on Instagram?](https://www.gadgetbridge.com/wp-content/uploads/2024/12/scms3.webp) Step 7: To view the scheduled message, tap the ‘1 scheduled message’ indicator right above the text box.
Step 7: To view the scheduled message, tap the ‘1 scheduled message’ indicator right above the text box.
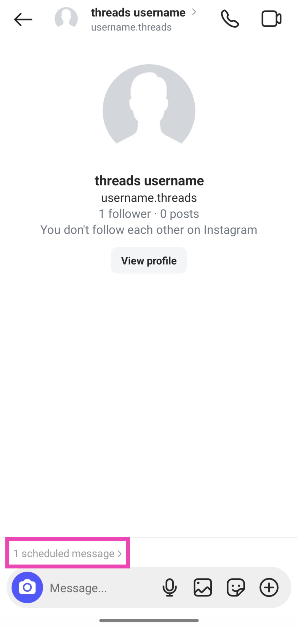 Step 8: Long-press the message to send it immediately or delete it.
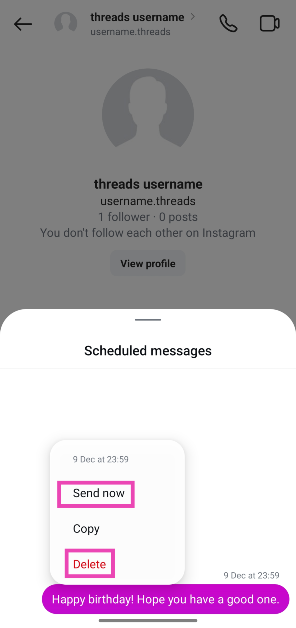
 Step 3:
 Step 4:
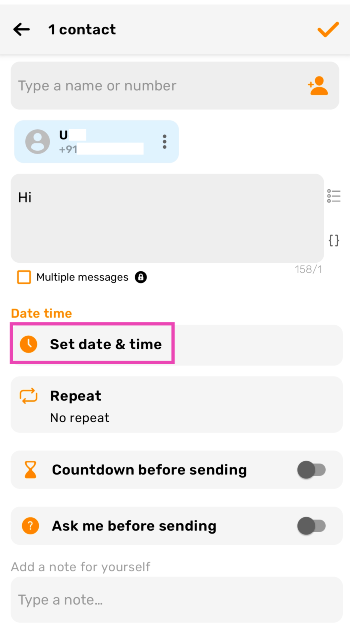 Step 6:
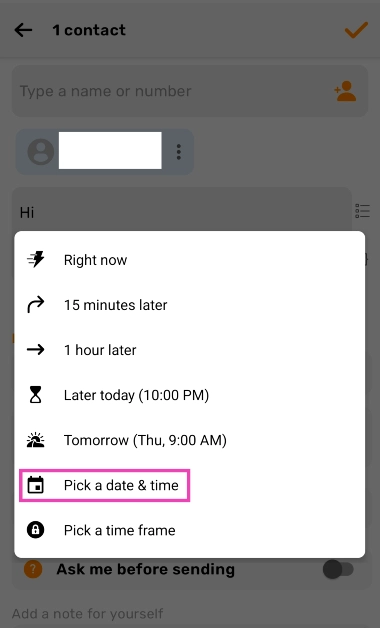 Step 7:
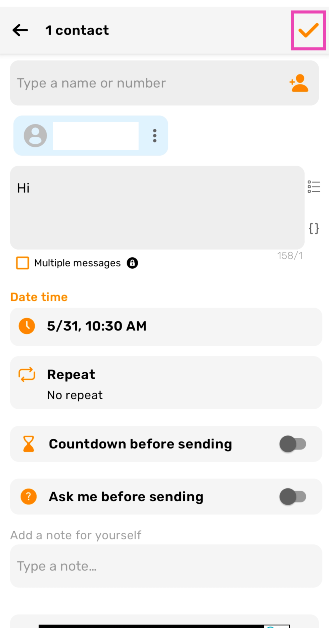


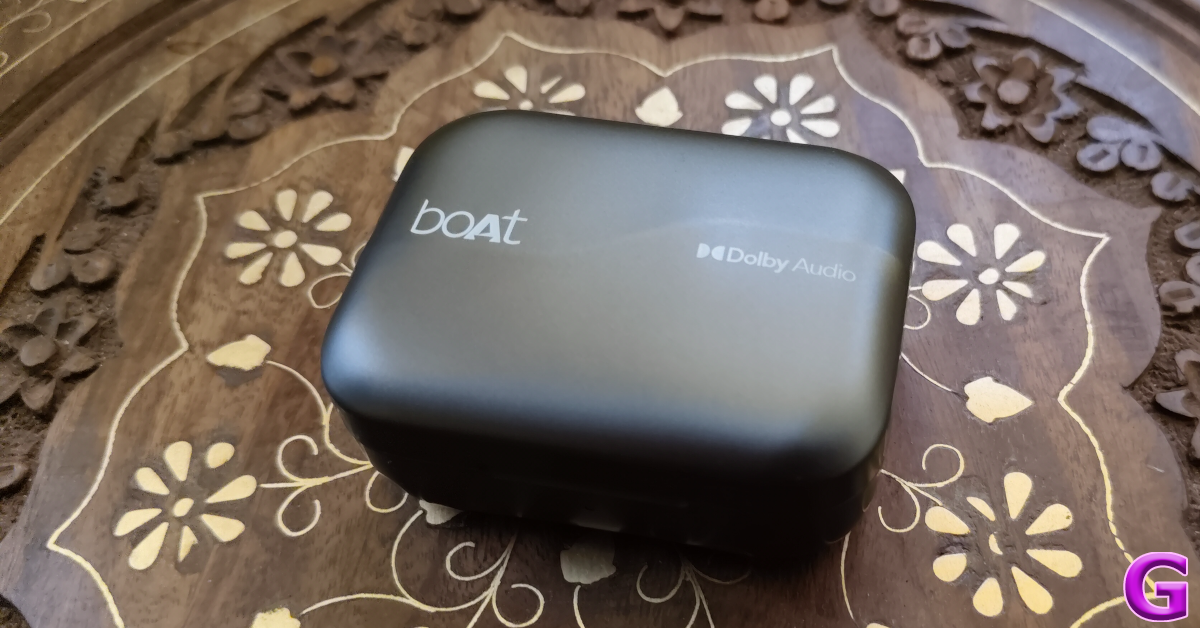


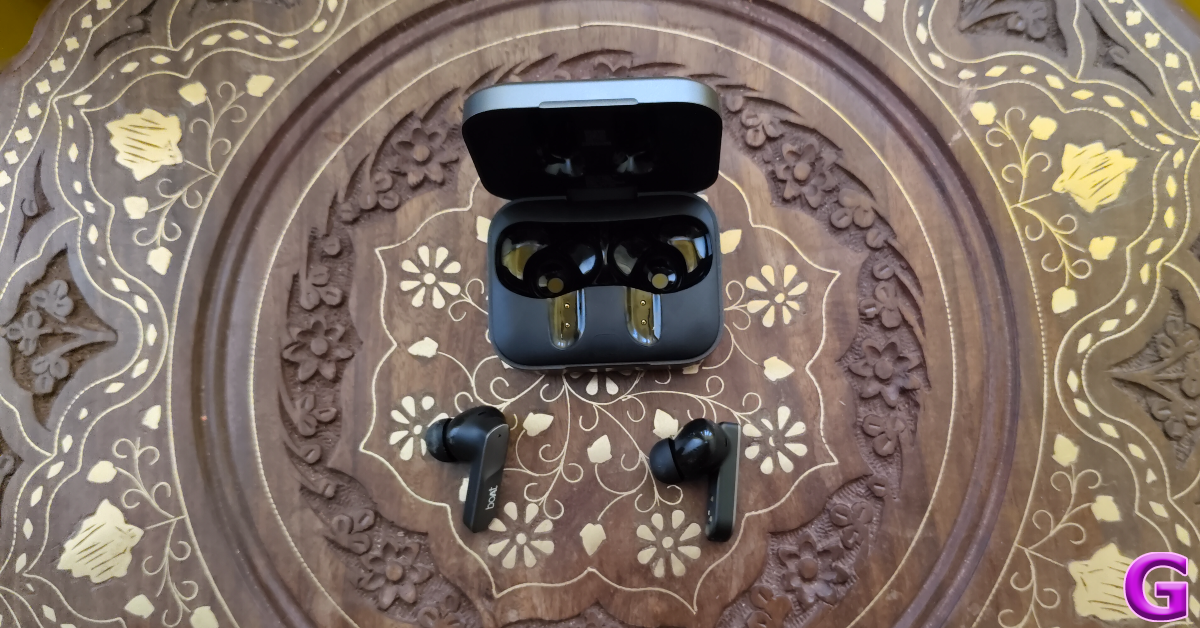

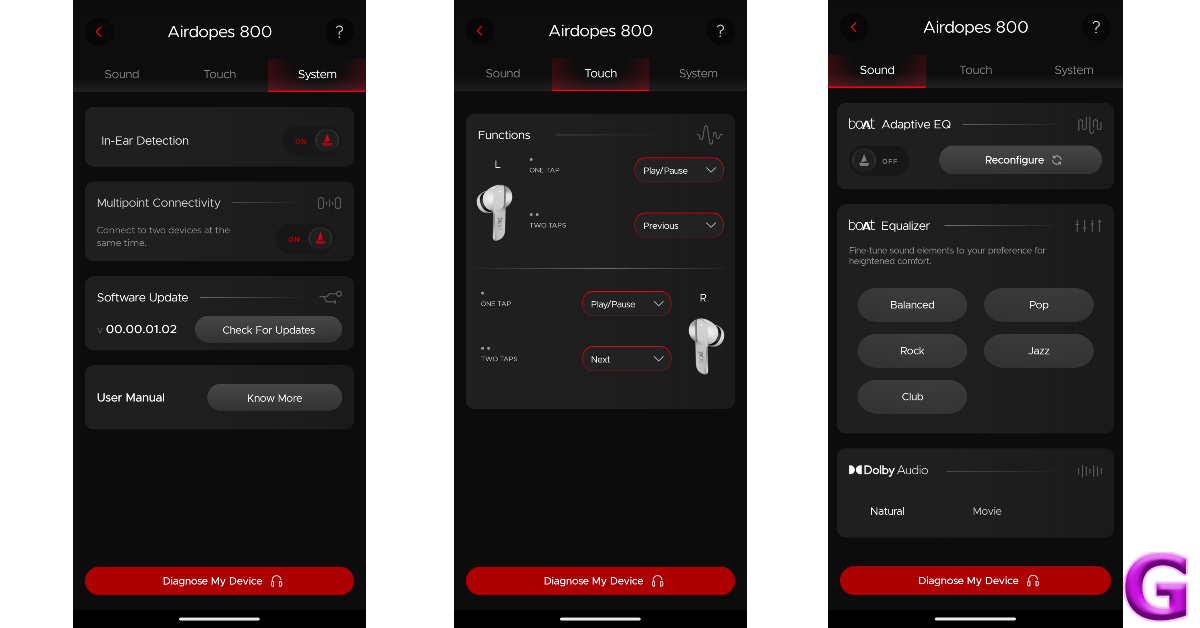


 Step 1:
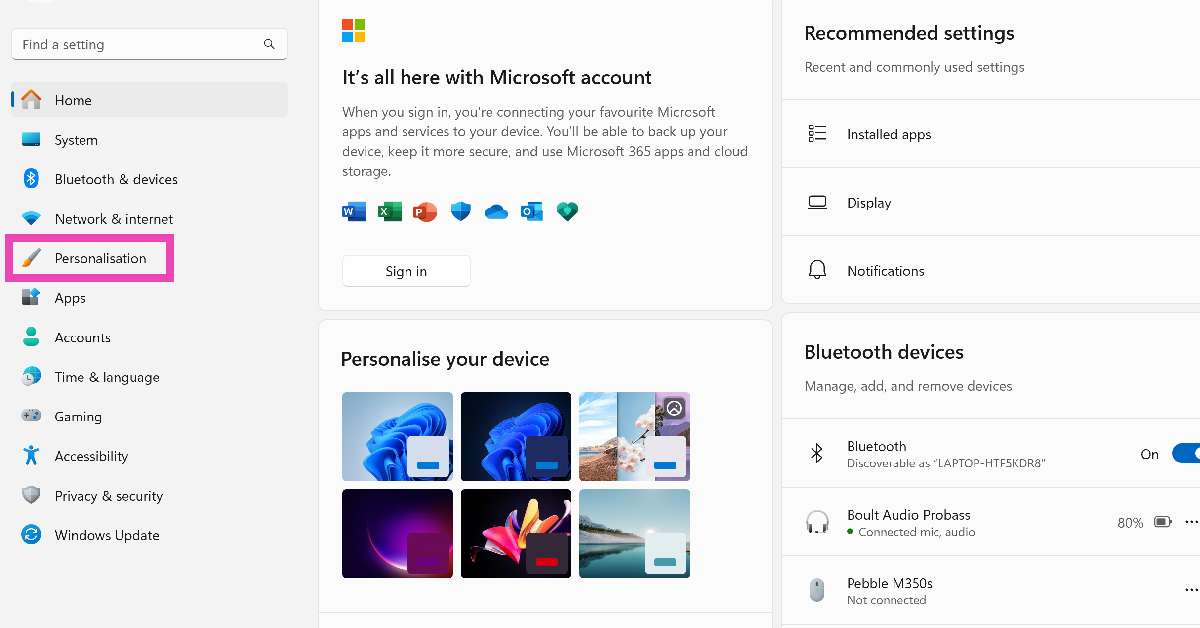 Step 3:
 Step 4: