Tecno Spark 20 will launch in India on January 30.
The smartphone will come in four colour options.
The smartphone has a 32-megapixel selfie camera.
Tecno is all set to launch a new smartphone in India. Tecno Spark 20 is scheduled to debut in India tomorrow. The device will be on sale via Amazon in the country. The device is listed on the e-commerce platform which also highlights the key specs of the upcoming phone. Just ahead of the release, the company has also revealed the RAM and storage option of the phone as well as the camera specifications.The Tecno Spark 20 India launch will take place tomorrow, January 30. The device has been listed on Amazon to confirm its availability post-launch. But before the phone gets officially released the company has revealed that the device will come in 8GB of RAM and 256GB of internal storage. The device will also support RAM expansion of 8GB. The internal storage can be expanded using a microSD card to up to 1TB.Additionally, the triple rear camera setup will be led by a 50-megapixel primary sensor. Also, there will be a 32-megapixel front-facing camera for taking selfies.Also Read:WhatsApp chat backups have started to occupy Google Drive storageTecno Spark 20 will also include a complimentary OTT Play premium subscription valued at Rs 5604.Besides Amazon, the device will go on sale via nearby retail outlets as well.Previously the Amazon landing page revealed that the Tecno Spark 20 will be priced under Rs 10,499. Also, the device will be available in Cyber White, Gravity Black, Magic Skin Blue, and Neon Gold colour options. The phone will come with a 90Hz LCD screen featuring a Dynamic Port that will display notifications and animations. The handset is confirmed to be powered by MediaTek Helio G85 chipset.Also Read:Akai 4K QLED Google TV series with Quantum Dot technology launched in IndiaIt will also include stereo speakers with DTS audio and has an IP53 rating for dust and splash resistance.
Whether working from home or the office, a WiFi router UPS is one such gadget that is really important to us at the time of a power cut. Indeed, a UPS is a crucial component for a WiFi router since it allows users to continue using the network even in the event of an electricity outage, which happens frequently in India. We got an Oakter Mini UPS, a portable tiny UPS that connects to your Wi-Fi router and offers backup power in the event of an outage. After using it for around a month, this is our full review of the Oakter Mini UPS-12V.
In This Article
Oakter Mini UPS-12V Review: Design
For the past few months, there have been frequent power outages around our household. Although there is a power backup option, but our work gets interrupted after a long outage. The WiFi router has to be reconnected after being disconnected due to the power outage, which takes roughly four to five minutes. When you have a class or a meeting online, for example, it can be really frustrating at times and lead to blunders during the meeting. Oakter Mini UPS for WiFi router is a new product for individuals who depend on continuous internet access. For those looking for a reliable power backup solution for their modems and routers, it is an absolute necessity. Also Read:D-Link EXO AX AX5400 (DIR-X5460) Router Review: An unstoppable force!From its appearance, the Oakter Mini UPS-12v resembles a tiny power bank. It is small and portable and can also be carried along. You don’t need to worry about your Wi-Fi socket because two different types of plugs are available here. You do not need to purchase an adapter separately, the firm has not included one with the UPS. The mini UPS has a power rating of 12V. In terms of build quality, it appears to be average. Vents are located on one side of the UPS. A power switch, an LED indicator, a power input port, and a power output cord are located on the opposite side.
Oakter Mini UPS-12V Review: Performance
Since Oakter MiniUPS is pre-charged and ready to use immediately out of the box, there is no need for a first charge.Setting up Oakter Mini UPS is quite simple, quick, and hassle-free. The LED indication will show that the power supply is adequate when you plug the device into the power socket.Oakter MiniUPS is available in 9v and 12v options. It supports 9v DC and 12v DC routers of all major brands like D-Link, TP-Link, Airtel, Jio Fiber, etc.It works just similar to any other power backup option. Not only its job is to maintain a steady internet connection in the event of a power outage, but Oakter MiniUPS also has the ability to power small gadgets like biometric systems, CCTV cameras, smartphones, and set-top boxes. Mini UPS can establish a connection with your modem and WiFi router. Your router will operate solely on battery power in the case of a power outage. Additionally, a Mini UPS can guard your router from fluctuations or spikes in power. As per the company, the Oakter Mini UPS delivers an uninterruptible power supply that may provide you with up to 4 hours of battery backup in the event of a power outage. It packs a 2,000 mAh battery, which should be able to provide that many hours.In our tests, it operated for three hours during an extremely long power failure, and depending on the router make, it may operate for longer.
Verdict
Officially, working remotely is the new standard. The requirement for this new standard is uninterrupted internet connectivity. Also Read:D-Link EXO AX AX5400 (DIR-X5460) Router Review: An unstoppable force!At such a point, a UPS router becomes useful. Power outages are becoming a common issue across the nation, so it’s essential to have a power backup for your WiFi router—like Oakter MiniUPS, which retails for Rs 1,290. Its backup duration is good for our needs and we don’t have to worry about power cuts anymore and the internet going off with it.There is no complicated installation procedure to begin using the device. All you need to do is plug the device in and get going!
If you’re travelling to a place with low network reception, getting your daily YouTube fix can be challenging. If you don’t want to put up with terrible buffering speed, you can download your favourite videos directly to your smartphone’s internal storage. This may be a violation of YouTube’s content policy, but as long as you are using the downloaded videos for personal viewing purposes, you will not get in trouble. So, without further ado, here are the top 8 ways to download YouTube videos on your Android smartphone.Read Also:How to use Circle to Search on Android phones that don’t have it yet?
In This Article
Which method is the best for you?
There are several ways you can go about downloading a YouTube video on your Android phone. Here are the two major ones that can accomplish the task in no time.
Using an app that specialises in downloading YouTube videos
Using an online tool
Due to Google’s strict copyright and content policy, it is very hard to find an app on the Play Store that downloads YouTube videos to your device. Your only option remains to download the app from other marketplaces. If you don’t trust other platforms with app downloads, you are left with the option to use an online tool.Websites like SSYouTube and Paste Download offer efficient tools to download videos from any platform across the internet. Not only do you not need to download an app, but the whole process takes less than a few minutes. If you’re looking for other methods, scroll to the end of the article to find out how you can download a YouTube video using Telegram.
Use AZ Video Donwloader
Step 1:Download the AZ Video Downloader from the Google Play Store.Step 2:Launch the app and switch to the browser tab.Step 3: Search the YouTube video you wish to download.Step 4: Open the video and tap the red download button.Step 5: Select Free Download. Watch a couple of ads to download the video.Once the video has been downloaded, you can access it from your phone’s gallery.Pros
Available on the Google Play Store
Accessible to the average user
Cons
Risks losing the download feature so as to remain in the Play Store
Use NewPipe
Like AZ Video Downloader, there are several other third-party apps you can use to download YouTube videos on your Android phone. Due to YouTube’s content policy, these apps are not available on the Google Play Store. However, you can either sideload them on your phone or use your OEM’s marketplace to install them. NewPipe is one of the better apps for downloading videos. Here’s how you can use it.Step 1:Launch Newpipe and search for the video you want to download.Step 2: Play the video and hit the download button.Step 3: Select the resolution and tap on OKAY.Pros
Reliable
Quick downloads
Cons
Needs to be sideloaded
Use YTDLnis
Step 1: Go to https://ytdlnis.org/ and hit Download.
Step 2: Download the stable APK from the website and install it on your phone.
Step 3:Launch the app and paste the link to the YouTube video you wish to install in the text box.
Step 4: Hit Download.
Step 5: The video will pop up in the Downloads tab when it is downloaded.
Pros
Fast downloads
Reliable
Cons
Requires downloading the app
Use SSYouTube Downloader
If you don’t wish to download an app, there are plenty of third-party online tools you can use to download a YouTube video on your Android phone. Our favourite tool is SSYouTube. Here’s how you can use it.Step 1:Play the video on YouTube and hit the Share button.Step 2: Tap on Copy link.Step 3: Go to SSYouTube Downloader.Step 4:Paste the link in the download box.Step 5: Hit Download next to the resolution of your choice.Pros
Ads aren’t obtrusive
Reliable downloads
Cons
Not available as an app
Use SaveFrom.net
Step 1:Go to https://en1.savefrom.net/2ol/.
Step 2: Enter the link to the video and hit the arrow icon.
Step 3: Select the video format and resolution. Hit Download.
Step 4: The video will be saved on your device.
Pros
Easy process to download videos
Available as an app
Cons
Downloads may take time
Use PasteDownload
PasteDownload is another light online tool that can be used to download YouTube videos. The process of downloading videos remains the same. Copy the link to the YouTube video you wish to download and paste it into the download box on the website. Select a format and resolution from the list of options. The video will be downloaded to your device’s gallery.Pros
Quick downloads
Works for a wide range of platforms
Cons
Contains ads
Save videos within the YouTube app
While the methods mentioned above effortlessly download YouTube videos directly to your Android phone’s gallery, they are in violation of YouTube’s content policy. The most legitimate way to download videos on YouTube is by saving them within the app. You will need a YouTube Premium subscription to use this feature. While some content creators may allow non-premium subscribers to download their videos, YouTube restricts the video quality of the video to 360p. Premium users can save the videos in HD resolutions as well. The saved videos can be accessed from the ‘Downloads’ folder in the app.Pros
Legitimate way to download YouTube videos
Can download HD videos
Cons
Requires a YouTube Premium membership
Use a Telegram Bot
Step 1:Launch the Telegram app and search for @y2mate_api_bot.Step 2: Tap on the bot and hit Start.Step 3: Copy the link of the YouTube video you wish to download.Step 4:Send the link in the chat.Step 5: Select a resolution and format from the list of options.Step 6: The video will be downloaded and sent to you in the chat. Open it and select Save to Gallery.Pros
Does not require installing a third-party tool
Great for in-app sharing
Cons
Not ideal for users who don’t have Telegram
Frequently Asked Questions (FAQs)
How do I download YouTube videos on my Android videos for free?
Online tools like SSYouTube and Paste Download can be used to download YouTube videos on your phone for free. You can also use third-party apps like AZ Video Downloader and Newpipe.
Is there an app to download YouTube videos on Android?
Google Play Store restricts apps that allow users to download YouTube videos. However, you can sideload apps like TubeMate and NewPipe to download the videos on your phone.
Which is the best online tool to download YouTube videos on my phone?
SSYouTube Downloader and SaveFrom are 2 of the best online tools to download YouTube videos on PC and smartphone.
How much does a YouTube Premium Subscription cost in India?
The standard YouTube Premium subscription is priced at Rs 129 per month. The family plan costs Rs 189 per month for 5 members while the student package costs Rs 89 per month.
These are the top 8 ways to download YouTube videos on your Android smartphone. The AZ Downloader app can be downloaded from the Google Play Store, but due to the platform’s stringent copyright policy, it may get taken down in the future. If you can’t find the app in the Google Play Store, look for it on your OEM’s app marketplace or a third-party website like APKMirror.
One of the biggest watchmakers in India, Titan, also has a niche smartwatch catalogue with some interesting products. Although its sub-brand Fastrack is the more active player in the smartwatch category, Titan’s smartwatches do not compromise on the ‘premium’ factor while covering all the health and fitness tracking bases. Launched in November 2023, the new Titan Traveller is currently priced at Rs 12,995. Its ‘FitVerse’ feature is something we’ve been looking forward to trying ever since the watch was announced. So, after using the Titan Traveller for 10 days, here is our in-depth review of the smartwatch.Read Also:How to update your FASTag KYC details online before the January 31 deadline?
In This Article
Titan Traveller Smartwatch Review: Design and Display
Titan Traveller’s retail box packs the smartwatch, a leather strap, a plastic strap, a magnetic charger, a quick start guide, a welcome card, and warranty registration. The model we received was shipped with brown (leather) and pink (silicone) watch straps.The design of the Titan Traveller is pretty standard as far as smartwatches go. The aluminium case has dimensions of 45.66mm x 37.54mm x 11.42mm. There is just one crown button on the right edge of the case. Turning the watch around, you will find the sensors for heart rate and SpO2 measurement. A small microphone and speaker grille are also placed on the bottom panel.The 1.78-inch AMOLED display is covered by thick bezels on four sides. The good thing is that these bezels are uniform. The display is bright and colourful, presenting no issues while operating in bright outdoor conditions. The touch response is snappy and fun. With Panda Glass protection onboard, it can easily withstand a good knock. The only letdown is that it does not have adaptive brightness. Both the straps provided with the smartwatch are comfortable to wear and offer a snug fit. The silicone strap is meant to be worn during intense workouts, hikes, and other physical activities. If you want to wear the watch casually, the default leather strap should be your choice.An IP68 rating for dust and water resistance means that you can swim while wearing the smartwatch. Splashing around in the water will not damage the smartwatch, but it is not suited for deep diving.
Titan Traveller Smartwatch Review: Performance
We used the Titan Traveller smartwatch for a plethora of exercises as well as sleep tracking during the review period. Pairing the watch with our Android smartphone was a very smooth experience. The start-up process required installing the Titan Smart World app on your device. Before we move on to the smartwatch’s performance, it is worth mentioning that Titan Smart World is one of the best smartwatch companion apps we have seen in a while. Its user-friendly interface and accessible layout have been designed tastefully.The smartwatch’s interface is very easy to get used to. Swiping left on the home screen reveals all the health and fitness widgets. A bottom swipe gives you access to all your notifications. Swiping up brings up the quick settings panel. Once you have paired your phone with the smartwatch, you can easily make and accept calls. The audio quality is good enough to not create any hassle while calling.Our only issue with the software is that it doesn’t make full use of the crown button on the watch. This crown may as well be the home button. Turning this crown does not perform any action watch. At the very least, it could have been used to scroll through the menu and the general interface. When you’re deep in the smartwatch’s settings, you have to rely on swipe gestures to go to the previous page. Pressing the crown will always take you to the home screen. Hopefully, Titan can add more functionality to this button in a future update.The health and fitness tracking on this smartwatch is precise and reliable. You can turn on the background heart rate monitoring and get notified when it crosses a certain level. The watch also gathers a lot of sleep data while you’re snoozing. However, our favourite feature of the watch has to be the FitVerse. It takes a while to set up the FitVerse on the watch, but it is a complete game changer.The FitVerse essentially gamifies the fitness aspect of the watch. Your avatar competes against the ‘AI Runcoach’ in the sport of your choice. You can compete in an outdoor race with the AI Runcoach or see how you fare in an indoor walk. The two avatars along with the running background can be customised in the Titan Smart World app. Even though Titan is the only company to offer this feature, we can see other brands incorporating something similar as AI integration becomes the norm on smart wearables.As you go about your daily exercises, the smartwatch assigns you certain points. These points determine your rank in the community leaderboards. As of now, there are two leaderboards, one global and the other specific to your city. This feature feels like it is in its rudimentary stages, we’d like to see Titan build upon it in future.Moving on to the battery performance, we got a solid 3-4 days out of the smartwatch on a full charge. We primarily used the smartwatch for tracking hikes, heart rate and SpO2 measurements, Bluetooth calling, and sleep tracking. On standby, the watch can easily last for 3 to 4 weeks. However, if you use the Always On Display and background health tracking, the battery life will drop by a significant factor.Read Also:Top 5 Ways to Fix the ‘Disabled Accounts Can’t Be Contacted On Instagram’ Error?
Verdict
So, the question remains – is the Titan Traveller worth the Rs 12,995 price tag? Well, if you’re dead set on an Android smartwatch that runs Google’s Wear OS, you should look elsewhere. If that isn’t something you are looking for, then the Titan Traveller is a great smartwatch that nails all the basics. Its clean OS and interactive app design are aesthetically pleasing. The star of the show is the Fitverse, which makes you compete against an AI coach, effectively gamifying the fitness experience and getting you to work out more often. The lack of scrolling functionality on the crown feels a little weird, but you get used to it after a while.
Titan Traveller Smartwatch: Pros
Bright AMOLED display
Comes with an additional strap
Good battery life
Built-in GPS
Fitverse makes working out more fun
Titan Traveller Smartwatch: Cons
No adaptive brightness
The crown button is not integrated well into the OS
If you want your smartphone to look a certain way and stand apart from the rest, customising the home screen is one way to go about it. Not only does it bring a lot of flair to your device, but you can even adjust the positioning of the apps to suit your general usage. Sometimes, users report that they can’t find an app on the home screen. This does not mean the app is no longer on your phone. It could be an issue related to its icon on the home screen. Today, we bring you the top 11 ways to fix missing app icons on Android phones.Read Also:Top 5 Ways to Fix the ‘Disabled Accounts Can’t Be Contacted On Instagram’ Error?
In This Article
Why can’t I find certain app icons on my Android phone’s home screen?
Before you begin, you need to know that your phone’s home screen and the app drawer are two different things. The home screen is the panel you see when you unlock your device. You can add multiple pages to the home screen and customise it to look a certain way. You can change the orientation of the apps on this screen. Once you remove an app from the home screen, it doesn’t get uninstalled from your device.The app drawer contains all the apps on your phone. You can access the app drawer by swiping up from the home screen. The only apps that don’t appear here are the ones that you’ve hidden from the system. Other than that, any app you can’t spot on the home screen can be found in the app drawer.There are several reasons why you can’t find an app icon on the home screen. Mostly, it’s because you accidentally removed the icon, dropped it inside a folder, or deleted the app entirely. But sometimes, the problem may be deeper than that. Let’s take a look at the common fixes.
Check if you deleted the app
The most common reason behind app icons going missing on Android smartphones is accidental deletion. A quick check will let you know if the app is still installed on your smartphone. Go to the Google Play Store and search for the app. If it says ‘Open’ or ‘Update’ on the app’s page, it means the app is still installed on your phone. If it says ‘Install’ it means the app was removed from your device. Install it again to bring back the app icon to your home screen.
Check the folders on your home screen
If the app isn’t deleted but you still can’t locate its icon on your phone’s home screen, it’s time to scan more thoroughly. It is possible you accidentally dropped it into one of the app folders. If you drag an icon and drop it on another one, your phone’s OS automatically forms a folder. Go through every folder on the screen to look for the missing app icon.
Add the app icon from the app drawer
If the app icon is removed from the home screen, it doesn’t delete the app. You can still find it in the app drawer. Press and hold the app icon in the app drawer and drop it on the home screen to restore it. You can also drop it inside a folder. The great part is that you can add as many icons for one app on the home screen as you want.
Automatically add newly installed apps to the home screen
Step 1:Long-press any empty spot on your phone’s home screen and select More or Settings.
Step 2: Tap on Home Screen.
Step 3: Turn on the toggle switch next to Add new apps to Home Screen.
Check if the app is hidden
Hidden apps don’t appear in the home screen or the app drawer. Every Android skin has its way of hiding an app. Here’s how you can check for hidden apps on Samsung’s One UI.Step 1: Go to Settings and select Home screen.Step 2: Tap on Hide apps.Step 3: The apps that have been hidden will appear in the top row. Tap the app that you want to unhide.Step 4: Hit Done.
Restore the app
If you can’t find a system app on the home screen, you may have disabled it. Here’s how you can enable it.Step 1: Go to Settings and select Apps.Step 2: Scroll down to the app you are looking for and tap on it.Step 3: Hit Enable at the bottom of the screen.
Turn off the Game Launcher
Can’t find a particular game on your phone? Most Android smartphones offer a special ‘Game launcher’ which creates a new portal for all the installed games on the device. The gaming apps are removed from the home screen. Turn off the Game launcher to get them back.Step 1: Go to Settings and select Advanced features.Step 2: Turn off the toggle switch for Game Launcher.
Switch to system app icons
One of the unique things about Android OS is that it lets you change how app icons look on your phone’s screen. You can pick a colour theme for the icons or draw the colours from your phone’s wallpaper. If you don’t want to use the native icon pack, there are third-party themes you can apply to your phone as well. One of the downsides of using icon packs is that they make the apps look similar. If you’re used to traditional icons, it will become harder to spot a particular app until you get used to the new theme. A third-party app icon pack may hide an app if it can’t change its icon. Here’s how you can disable it.Step 1:Long-press on your phone’s home screen.Step 2: Tap on Colour and style.Step 3: Scroll down and turn off the toggle switch for ‘Apply colour to icons’.
Reset app icon settings
Step 1: Go to Settings.
Step 2: Tap on Home screen, lock screen, & wallpaper.
Step 3: Tap on Icons.
Step 4: Hit Reset.
Clear your phone launcher’s cache
Your Android phone’s default launcher app can sometimes be responsible for the app icons going missing from the home screen. Clearing its cache will help fix this issue. This fix also works for third-party launchers.Step 1: Go to Settings and select Apps.Step 2: Select the default home screen launcher app.Step 3: Tap on Storage.Step 4: Select Clear cache.
Change the default launcher app
If you use a third-party launcher app for your Android smartphone, it can sometimes malfunction and hide app icons. To fix this, switch to the native launcher app.Step 1: Go to Settings and select Apps.Step 2: Tap on Choose default apps.Step 3: Tap on Home app.Step 4: Select the native launcher.
Frequently Asked Questions (FAQs)
How do I restore a missing app icon on my Android phone’s home screen?
Make sure you didn’t accidentally delete the app or move it inside a folder on the home screen. If that isn’t the case, go to hidden apps and unhide the app. If the app isn’t hidden, your phone’s launcher app may be causing trouble.
Is there any fix to the missing app icons issue on Android?
If the icons to newly installed apps don’t show up on the home screen of your phone, long-press any empty spot on the home screen, tap on More/Settings, then go to Home Screen, and turn on the toggle switch next to ‘Add new apps to Home Screen’.
Why have my app icons disappeared?
If you installed a custom home screen launcher like Niagara or Nova, it could lead to the app icons disappearing from the home screen.
How do I restore an app icon’s colour to its system default?
Go to Settings>Lock screen and wallpaper>Colour and style and turn off the toggle switch for ‘Apply colour to icons’.
This is how you can fix and restore missing app icons from your Android phone’s home screen. As a last-ditch measure, you can also try resetting your smartphone to its factory settings. However, this method will erase all your personal data from the device. If you know any other way to fix this problem, let us know in the comments!
WhatsApp backups on Android will soon start counting toward your Google Account cloud storage limit.
Google offers 15GB of free storage to all Google Accounts.
The changes have been implemented in the Beta version of the app.
If you have been using WhatsApp’s beta version for Android then your chat backup has begun taking up space in Google Drive. Soon this change will be implemented for all the users in the future update.Chat backups have begun taking up storage space for Android users of the WhatsApp beta, regardless of whether they are using Google’s cloud storage service at no cost or for a fee.Google last year announced that it would put an end to the free WhatsApp storage backups on Google Drive. WhatsApp users either have to manually store their chat history on their Android device or have to pay for additional storage in Google Drive.WhatsApp beta for Android users has already started to see how much storage space is backed up in their Google account. In its announcement Google last year noted that the upcoming change will first start rolling out to WhatsApp Beta users starting in December 2023, then gradually to all WhatsApp users on Android starting in early 2024.Note that all Google accounts come with a meagre 15GB of free cloud storage. However, eventually, this amount of storage won’t be sufficient to hold all of your smartphone’s data because WhatsApp chats and media backups eat up space on Google accounts.However, as long as there is space in your Google Account storage you will be able to backup WhatsApp storage or have to remove things you don’t need to free up space on your storage so that backups may continue. Users can also delete items directly from WhatsApp. Keep in mind that removing items from WhatsApp also removes them from your cloud storage, which lowers the amount of space needed for your subsequent backup.Also Read:Akai 4K QLED Google TV series with Quantum Dot technology launched in IndiaIf you choose to enable WhatsApp backups on Android, personal Google Accounts come with 15GB of storage at no charge – 3X more than most mobile platforms – that’s shared across Google Drive, Gmail, and Google Photos.According to WhatsApp, it will start notifying users 30 days before this change happens with a banner in WhatsApp Settings > Chats > Chat backup. Also one can still transfer your chats between Android devices using WhatsApp Chat Transfer if you don’t want to back up chats to your Google Account.Also Read:3 new generative AI features coming to Chrome to improve organisationWhen your account storage is full, you will see the following message:“Back up your chats and media to your Google account’s storage. You can restore them on a new phone after you download WhatsApp on it.”
Garena Free Fire is a battle royale game with regular awards and tournaments to keep players interested. If you play Garena Free Fire, you should be aware of the redeem codes that are released on a daily basis. However, because the battle royale game is banned in India, players from other countries can use the Free Fire Redeem codes daily. If you’re unfamiliar with the Garena Free Fire redeem codes or don’t know how to get them, we’ve put together a step-by-step guide to help you redeem them. Check out Garena Free Fire Redeem Codes for 29 January 2024.The Free Fire redeem codes are a great way to get free stuff. These are 12-digit codes that contain alphabets and numbers, as well as an expiration date and time. Because the Garena FF redeem codes cannot be used more than once, you should hurry to the redemption page to claim your free reward before someone else does. To get a free reward, all you have to do is go to reward.ff.garena.com/en, which is the official redemption page. Also, keep an eye on this space for daily updates on Garena Free Fire redemption codes and rewards.
In This Article
Garena Free Fire Redeem Codes Today 29 January 2024
Google’s newest ‘Circle to Search’ made its debut on the Samsung Galaxy S24 Series earlier this month. This new feature harnesses the power of AI and adds a visual and interactive element to the way you search for things. Available only on premium Android smartphones, Circle to Search will launch on January 31. It is unlikely that this feature will ever be rolled out for older midrange and budget Android phones. If you’re excited to use this feature, there is one way you can get a feel of how it works. Check out how you can use Circle to Search on any Android phone.Read Also:Google Pixel 8 and Pixel 8 Pro now available in a new Mint colour
In This Article
What is Google’s Circle to Search?
Google’s newest Circle to Search feature elevates the game to a whole new level. Typically, finding something on Google does not take a lot of effort. All you need to do is enter a few keywords and you’ll land on the desired result in no time. But what if you know very little about the thing you’re searching for? It could be anything from a random symbol on a webpage to a piece of clothing someone is wearing in a YouTube video. The Circle to Search feature fixes this situation.If you ever come across something you want to know more about, simply long-press the home button or gesture bar and circle the area containing the object or text. Google will produce the relevant results immediately. For more precise results, add to the query by typing something about the object. For example, if you circle the image of a smartphone, you can add ‘where to buy’ to find the e-stores that stock the device.Google’s Circle to Search feature is only available for the Samsung Galaxy S24 Series and Google Pixel 8 Series right now. The Galaxy S23 series will get this feature via an OTA update later this year. However, if you own a midrange to budget smartphone, it is unlikely that it will be made available for your device. Luckily, there’s another feature you can use that mimics Circle to Search.
Use Circle to Search on any Android phone
Step 1: Go to the page that contains the object you want to search.Step 2: Press and hold the side key to trigger the Google Assistant. If the side key opens up the power menu, say ‘Okay Google’ to launch the voice assistant.Step 3: Tap on Search screen.Step 4: Google Lens will scan the page for searchable objects. Crop the window around a particular entry to search for it.Step 5: The search results will be published on the following page.
Frequently Asked Questions (FAQs)
How do I use the Circle to Search feature on an Android smartphone?
Press and hold the home button or gesture bar and circle the object you want to search. If your phone doesn’t have Circle to Search, trigger the Google Assistant and tap on ‘Search screen’.
Which Android smartphone will get the Circle to Search feature?
As of now, only the Samsung Galaxy S24 series and Google Pixel 8 series are confirmed to get the Circle to Search feature. The Galaxy S23 series and Galaxy Z 5 series are expected to get the feature soon.
This is how you can use Google’s Circle to Search feature on Android smartphones that don’t have it yet. While Google Assistant’s ‘search screen’ may not let you draw a line over an object, you can crop the search window around it. However, the option to add a text query along with the image is only available on Circle to Search.
The National Highways Authority of India has set January 31 as the deadline to update your FASTag KYC (Know Your Customer) details. Failure to update details within the deadline period will lead to the termination of your FASTag account. NHAI says this policy is being brought in to limit one FASTag account to one car. Similarly, one car cannot have more than one FASTag account. If that is the case with you, update the KYC for the most recent account. Don’t know how you go about the process? Here is how you can update your FASTag KYC details online and offline.Read Also:7 Easy Ways to Sign Out of Amazon on All Devices (Laptop, PC, Android and iPhone)
In This Article
Before you begin, check your FASTag KYC status
If you remember completing the KYC process for FASTag earlier, you can check its current status from the official IHMCL website. This will make it clear whether you need to update your KYC details before the January 31 deadline.Step 1: Go to https://fastag.ihmcl.com/.Step 2: Click on Login and enter your registered mobile number and password.Step 3: Enter the CAPTCHA and the OTP (One Time Password) sent to your number.Step 4: Go to the My Profile section on the dashboard.This is where you can see your KYC status.
Which documents do I need to update my FASTag KYC?
You need the following documents to update or complete your FASTag KYC.
Vehicle Registration Certificate (RC)
Identity Proof (Aadhar Card, Passport, Driving license, PAN Card, or NREGA Job Card signed by a government official)
Step 1: Go to https://fastag.ihmcl.com/.Step 2:Login using your mobile number.Step 3: Select My Profile from the Dashboard.Step 4: Click on the KYC tab.Step 5: Select Customer Type.Step 6: Upload your profile picture and the identity/address proof.Step 7: Fill out all the details in the relevant fields.Step 8: Tick the message declaring the validity of the documents.Step 9: Hit Submit.
How to update your FASTag KYC offline
If the online process isn’t working out for you, you can simply walk into the bank that issued you the FASTag and carry out the process offline. Ask for the Customer Relationship form and fill out the necessary details. Make sure you are carrying copies of the required documents as well. If you have multiple FASTag accounts, update the KYC for the most recent one. You can seek the help of the Relationship Manager at the bank to walk you through the process. Once the form has been submitted and your documents have been verified by the bank, the KYC will be updated within 4 working days. You will be alerted by an email and SMS from your bank.
Frequently Asked Questions (FAQ)
When is the last date for the completion of FASTag KYC?
The National Highway Association of India (NHAI) has set January 31 as the deadline for the FASTag KYC completion.
How do I check if my FASTag KYC is updated?
Go to https://fastag.ihmcl.com/, log in using your mobile number, click on My Profile, and check the KYC update status from the Dashboard.
How do I update my FASTag KYC?
Go to https://fastag.ihmcl.com/, log in using your mobile number, then go to My Profile>KYC>Customer type and upload all the necessary documents. Fill out the details in the form and hit ‘Submit’. You can also carry out this process offline at the bank that issued you the FASTag.Read Also:How to Use the PS5 Controller on a PS4?
Conclusion
This is how you can complete and update your FASTag KYC. Following January 31, only one FASTag account can be linked to a vehicle and vice-versa. In case there are multiple FASTags linked to your car, you need to update the KYC for the most recent ones. The older ones will be terminated after the deadline.
Once someone deletes their Instagram profile, their name is erased from the conversation thread in your DMs. You can always tell which user they are by going through your message history. When the person reactivates their profile, it takes Instagram a few days to display their username across the app. Your messages to the user may not be able to go through right away. If you see the ‘Disabled accounts can’t be contacted on Instagram’ error, try these 8 fixes.Read Also:AMD Radeon RX 7600 XT graphics card announced
In This Article
Why won’t my messages go through on Instagram?
As we mentioned earlier, sometimes it takes Instagram a few days to restore messaging on a recently reactivated profile. However, you may be able to restore communication sooner, depending on the nature of the situation. The biggest culprit behind this problem is the user’s profile cache. You can fix this by clearing or refreshing it by blocking and unblocking the user’s account. If that doesn’t work, unfollowing and restricting them is also an option.If the profile actions don’t work, it could be the message cache that’s acting up. You can fix this by deleting your conversation with the user, but this means deleting all your messages and media history with the person. If the user’s profile has been handed a ban due to a violation of content policy, there’s nothing you can do other than wait for the ban period to end before sending a message.
Block and Unblock the Instagram Account
If you aren’t able to send a DM to a friend on Instagram, blocking and unblocking them should fix the problem. Here’s how you can do it.Step 1: Go to your friend’s Instagram profile.Step 2: Hit the ellipses at the top right corner of the screen.Step 3: Tap on Block.Step 4: Once the profile is blocked, hit the Unblock button on the same page. You can also unblock the user from the ‘Settings and privacy’ page on Instagram’s menu.Step 5: Swipe down from the top of the screen to refresh the page. This will make the content on their page visible again.
Restrict and Unrestrict the user’s Instagram profile
If blocking and unblocking the profile doesn’t work, you should give the restrict feature a shot. Check out this article to learn what it does.Step 1: Go to the person’s Instagram profileand tap the ellipses at the top of the screen.Step 2: Tap on Restrict.Step 3: Now, ask the person to send you a message on Instagram.Step 4: The message will land in the ‘Requests’ folder in your DMs.Step 5: Open the message and hit Unrestrict. You can also unrestrict the user from their profile options.
Unfollow and Follow the user
Another thing you can do to fix the ‘Disabled Accounts Cannot be Contacted on Instagram’ error is to unfollow and follow the user’s account.Step 1: Go to the user’s Instagram profile and tap on Following.Step 2: Tap on Unfollow.Step 3: Hit the Follow button.
Delete your conversation with the user
If you are unable to send messages to your friend even after using the methods mentioned above, you may have to delete the conversation thread and start a new one. This is not the ideal fix because you will lose your message history with the user, but it will help you resolve the problem. To delete a message thread, long press it and select ‘Delete’.
Clear Instagram’s cache
Temporary files in Instagram’s cache can go corrupt and cause the app to behave weirdly. Here’s how you can clear the cache and restore normal behaviour.
Step 1: Go to Settings and select Apps.
Step 2: Tap on Instagram.
Step 3: Select Storage and cache.
Step 4: Hit Clear Cache.
Update the app
An older version of the app may struggle with sending a DM to a person who has just reactivated their Instagram profile. Make sure your Instagram app is updated to the latest version to prevent this from happening. Go to the Google Play Store and search for Instagram. Tap on the app’s page and hit the Update button. You can also turn on automatic updates for Instagram by tapping the ellipses button at the top right corner of the screen and selecting ‘Enable auto-updates’.
Delete and reinstall the app
If the fixes mentioned above did not work out for you, delete the Instagram app on your phone and reinstall it using the Google Play Store/App Store. Deleting and reinstalling the app eliminates the bugs and resets the cache. Long-press the Instagram app icon on your phone’s home page and select Uninstall/Remove. Go to the Google Play Store/App Store, search for Instagram, and download the app on your device.
Log out of Instagram and log back in
It is probable that the issue you’re facing is related to your account. To resolve it, log out of Instagram and then log back in. Go to your profile, hit the hamburger menu, scroll all the way down and hit ‘Log out’. If you’re logged in with multiple accounts, log out of all of them. Log in using your main account only.
Frequently Asked Questions (FAQs)
Why am I getting the ‘Disabled accounts can’t be contacted on Instagram’ error?
This error generally pops up when you are trying to send a direct message to someone who just reactivated their profile on Instagram.
I can’t send a DM to my friend who recently reactivated their Instagram profile. What should I do?
Make sure your app is updated and try unfollowing/following, blocking/unblocking, restricting/unrestricting the user. If this doesn’t work, you will need to delete your messages with the user and try again.
Why can’t I message a disabled account on Instagram?
An Instagram account shows up as ‘disabled’ when it has been deleted by the user or suspended by Instagram for violating the Terms of Service. As a result, you cannot interact with the account until it is restored.
How do you contact Instagram about a disabled account?
If your account has been disabled by Instagram, send an email to support@instagram.com. If you’re unable to contact a previously disabled account which has now been restored, go to your profile, tap the hamburger menu, and select Help>Report a problem.
These are the top 8 ways to fix the ‘Disabled accounts can’t be contacted on Instagram’ error. Typically, it takes Instagram some time to fully rejuvenate an account after it is brought back from deactivation. If you don’t want to delete your message history with the user, the better option would be to wait for a few days until you are able to message again. If you know of any other method to fix this problem, let us know in the comments!
WhatsApp introduced the screen-sharing feature on its platform last year. The inclusion of this feature brings it on par with apps like Google Meet, Microsoft Teams, and Zoom. You can share your phone’s screen on a video call on WhatsApp if you ever need to show someone a document, picture, or any content on your phone. Want someone’s input on a dress you’re about to order? Simply share your device’s screen and pull up your e-cart on the web browser. Here’s how you can go about it.Read Also:Akai 4K QLED Google TV series with Quantum Dot technology launched in India
In This Article
Before you begin
WhatsApp’s screen-sharing feature is end-to-end encrypted, which means only you and the call participant(s) can view your phone’s feed. Once your phone’s feed is displayed on the video call, you need to be extra careful about displaying private information like usernames, passwords, banking info, and personal documents. WhatsApp does not censor any content on your phone’s screen while it is being shared.On a desktop, you can choose whether you want to share your PC’s entire screen or just one specific app. This feature comes in handy when you want to share a presentation but don’t want the participants to view the new notes you’ve prepared in an adjacent window. You can simply choose to share the Powerpoint/Google Slides windows and not worry about anything else popping up on the screen.
Share your phone’s screen on WhatsApp
Step 1:Launch WhatsApp on your smartphone and initiate a video call with a person or a group.Step 2: Hit the screen share icon at the bottom of the screen.Step 3:Confirm your selection in the popup box.Step 4: Your phone’s screen will now be shared with other participants in the video call.Step 5: Tap on Stop sharing to end screen sharing without terminating the call.
Frequently Asked Questions (FAQs)
Can I share my phone’s screen over an audio call on WhatsApp?
While you can share your phone and desktop screen on WhatsApp, switching to Netflix and other OTT platforms will cut off the app’s audio.
Where is the screen-sharing button on WhatsApp?
The screen sharing button appears at the bottom tool while you’re connected on a video call. On Android, it is represented by a phone icon with an arrow protruding from its screen. On iOS, tap the screen icon with a person in front of it to share your device’s screen.Read Also:3 new generative AI features coming to Chrome to improve organisation
Conclusion
This is how you can share your phone’s screen on a WhatsApp call. Screen-sharing, like video calls, is end-to-end encrypted on the platform. Your phone’s footage is not recorded by WhatsApp and no one outside of the call can access it. If you can’t find the screen-sharing button, make sure your app is updated. If the call participants cannot view your phone’s feed, they should switch to the latest version of the app as well.
Garena Free Fire is a battle royale game with regular awards and tournaments to keep players interested. If you play Garena Free Fire, you should be aware of the redeem codes that are released on a daily basis. However, because the battle royale game is banned in India, players from other countries can use the Free Fire Redeem codes daily. If you’re unfamiliar with the Garena Free Fire redeem codes or don’t know how to get them, we’ve put together a step-by-step guide to help you redeem them. Check out Garena Free Fire Redeem Codes for 27 January 2024.The Free Fire redeem codes are a great way to get free stuff. These are 12-digit codes that contain alphabets and numbers, as well as an expiration date and time. Because the Garena FF redeem codes cannot be used more than once, you should hurry to the redemption page to claim your free reward before someone else does. To get a free reward, all you have to do is go to reward.ff.garena.com/en, which is the official redemption page. Also, keep an eye on this space for daily updates on Garena Free Fire redemption codes and rewards.
In This Article
Garena Free Fire Redeem Codes Today 27 January 2024
Pixel 8 Series was announced in October last year.
Google has now introduced the Mint colour option for both Pixel 8 and Pixel 8 Pro.
The Pixel 8 is already available in Obsidian, Hazel and Rose colour options.
The Pro variant comes in Obsidian, Porcelain and Bay colour options.
Google Pixel 8 and Pixel 8 Pro can now be purchased in a fresh new colour option. After teasing the new variant for a week the company today introduced the Mint colour option for the Google Pixel 8 Series. Both the models were previously launched in three colourways last year in October.The new mint colour option for Google Pixel 8 and Pixel 8 Pro has been launched. But this new colour option for the Pixel 8 Series will come in a 128GB storage variety. Note that the new colourway for both models is only available in the US. In India, the Mint colour option will be available for the regular Pixel 8 model only.The new variant is currently up for sale in the country via Flipkart. There will be no price change for the new model. The device also comes in three more shades Hazel, Obsidian and Rose.The price of Pixel 8 in India starts at Rs 75,999 for the base 8GB RAM with 128GB storage and Rs 82,999 for the 8GB RAM and 256GB memory.
Google Pixel 8 Series specifications
Google Pixel 8 and Pixel 8 Pro are powered by Google Tensor G3 SoC with Titan M2 security coprocessor. They run on Android 14 with Pixel-exclusive features onboard.Also Read:Akai 4K QLED Google TV series with Quantum Dot technology launched in IndiaThe Google Pixel 8 (Review)comes with a 6.2-inch FHD+ Actua display with 1080 x 2400 pixels of resolution. The OLED screen has an Adaptive refresh rate ranging between 60Hz and 120Hz and supports 2,000 nits of peak brightness. Whereas Pixel 8 Pro features a 6.7-inch Super Actua display with 1344 x 2992 resolution and an Adaptive refresh rate ranging from 1Hz to 120Hz and 20:9 aspect The LTPO OLED features a peak brightness of 2,400 nits. The screen is protected with Corning Gorilla Glass Victus 2. There is a temperature sensor on the back of the Pro model.Both smartphones have the same 10.5-megapixel Dual PD sensor for selfies. But the pro varaint supports autofocus. The Pixel 8 and Pixel 8 Pro (Review) features a primary 50MP Octa PD sensor with f/1.68 aperture. The secondary camera on the vanilla variant is a 12 MP ultrawide camera with an auto-focus. The pro model includes a 48 MP Quad PD ultrawide camera with autofocus. The Pro’s camera system also includes a third 48 MP Quad PD telephoto lens with 5x optical zoom.Also Read:3 new generative AI features coming to Chrome to improve organisationThe Google Pixel 8 boasts a 4,485mAh battery with 24W wired and 12W wireless fast charging support. On the other hand, the Pixel 8 Pro is fuelled by a 4,950mAh battery.
Garena Free Fire is a battle royale game with regular awards and tournaments to keep players interested. If you play Garena Free Fire, you should be aware of the redeem codes that are released on a daily basis. However, because the battle royale game is banned in India, players from other countries can use the Free Fire Redeem codes daily. If you’re unfamiliar with the Garena Free Fire redeem codes or don’t know how to get them, we’ve put together a step-by-step guide to help you redeem them. Check out Garena Free Fire Redeem Codes for 26 January 2024.The Free Fire redeem codes are a great way to get free stuff. These are 12-digit codes that contain alphabets and numbers, as well as an expiration date and time. Because the Garena FF redeem codes cannot be used more than once, you should hurry to the redemption page to claim your free reward before someone else does. To get a free reward, all you have to do is go to reward.ff.garena.com/en, which is the official redemption page. Also, keep an eye on this space for daily updates on Garena Free Fire redemption codes and rewards.
In This Article
Garena Free Fire Redeem Codes Today 26 January 2024
Amazon’s ecosystem has grown significantly over the years. What started off with the Kindle, slowly expanded to Echo speakers, streaming sticks, and even a giant OTT platform. You need an Amazon account to use these products and services, including the e-commerce platform. Over a period of time, it can get challenging to keep track of which devices you are logged into. So, here are the top 7 ways to sign out of your Amazon account across all devices.Read Also:Poco X6 Pro Review: A step ahead in its category
In This Article
Which method should you use?
Available across every major platform, Amazon offers several ways to remotely sign out across all your devices. If your account has been compromised, you can sign out of all devices at once and change your password right away. To further boost the security of your account, you can use paskeys or 2-step verification.If you are logged into a lot of devices or using your Amazon account for several different home products and services, you should consider using this option as it takes just a few clicks to remotely sign out out of all devices at once. Another way you can go about this task is by simply changing your account password.However, if you want to sign out of a particular device, you will need to ‘Deregister’ it from your account. Use this method for your Kindle and Amazon Echo speakers. This process can be carried out on the Amazon app on your smartphone as well as the website.
Sign out of Amazon on all devices (Android and iOS)
Step 1: Launch the Amazon app on your smartphone.Step 2: Switch to the You tab.Step 3: Scroll down to the bottom and tap See All next to Your Account.Step 4: Under Account Settings, tap on Devices.Step 5: Switch to the Devices tab.Step 6: Tap the device you want to log out of.Step 7: Hit Deregister.Step 8: Confirm your selection in the popup box.
Sign out of Amazon on all devices (Laptop)
Step 1: Go to the Amazon website and sign in using your Amazon account.Step 2: Click on the All option at the top right corner of the screen.Step 3: Scroll down and select Your Account.Step 4: Under Digital content and devices, select Devices.Step 5: Switch to the devices tab.Step 6: Select the device you want to remove.Step 7: Click on Deregister.Step 8: Confirm your selection in the popup box.
Sign out of Amazon on all devices by reporting your account as compromised (Laptop)
Step 1: Go to the Amazon website.Step 2: Move the cursor to Accounts & Lists and select Your Account.Step 3: Click on Login & security.Step 4: Scroll down and click on Start next to ‘Compromised account?’Step 5: Scroll down and select Sign-out of everything.
Sign out of Amazon on all devices by changing your password (Laptop)
Step 1: Go to the Amazon website.Step 2: Move the cursor to Accounts & Lists and select Your Account.Step 3: Click on Login & security.Step 4: Hit Edit next to Password.Step 5: Enter your password.Step 6: Enter the OTP sent to your mobile number and email.Step 7: Enter the new password and save your changes.
Sign out of Amazon on all devices by adding 2-Step Verification (Android and iOS)
Step 1: Launch the Amazon app on your smartphone.Step 2: Switch to the You tab and select Your Account.Step 3: Tap on Login and security.
Step 4: Hit Turn on next to 2-step verification.Step 5: Enter your phone number to enable 2SV via OTP or use an authenticator app.
Simply log out of Amazon on your smartphone
Step 1: Launch the Amazon app on your smartphone.Step 2: Switch to the Menu tab and tap on Settings.Step 3: Select Sign Out.
Simply Log out of Amazon on your laptop
Step 1: Go to the Amazon website.Step 2: Move the cursor to Accounts & Lists.Step 3: Select Sign out from the drop-down menu.
Frequently Asked Questions (FAQs)
How do I sign out of Amazon on all devices using my laptop?
Go to the Amazon website and select Your Account from Accounts & Lists. Click on Login & security>Compromised account>Sign-out of everything.
How do I sign out of my Kindle remotely?
Launch the Amazon app on your smartphone, go to You>Your Account>Account Settings>Content and Devices, select your Kindle and hit Deregister.
How do I enable two-factor authentication for Amazon?
These are the top 7 easy ways to sign out of Amazon on all devices. If you want to bump up the security of your Amazon account, use passkeys instead of passwords. This will allow you to log into your account using biometrics and face authentication. If you know any other way to sign out of Amazon across all your devices, let us know in the comments!
The Akai 4K QLED Google TV series offers 4 models.
The Television supports Dolby Vision and Atmos.
Hong Kong-based electronics brand Akai has announced the launch of a new 4K QLED Google TV series in India. The latest TV lineup includes 43, 50, 55, and 65-inch screen sizes. The TV panel has a bezel-less design and is powered by Quantum Dot technology. In addition to this, all the models come with a meta cabinet for durability.While announcing the Akai 4K QLED Google TV series, Mr Anurag Sharma, Director AKAI India said “At the heart of our QLED TV is our commitment to deliver an experience that is quintessentially Akai. The TV is a perfect blend of legacy and luxury, offering a visual feast that goes beyond expectations. We feel the new 4K QLED series is uniquely brilliant and Akai India has been a constant companion in the evolution of home entertainment for close to a decade. It has been our constant endeavour to evolve and bring the best of the world to Indian households.”Akai’s new 4K QLED Google TV Series is being made available in 109cm (43), 127cm (50), 140cm (55), and 165cm (65) screen sizes. All the models include slim, sleek and bezel-less designs with 4K resolution (3840 x 2160). There is a metal cabinet that will contribute to the TV’s longevity and overall performance. Along with HDR HLG support for dynamic contrast, the Akai Television has Dolby Vision and Atmos delivering a rich, immersive experience that enhances the overall viewing pleasure. Powered by Quantum Dot technology the Akai 4K QLED Google TV series produces vivid and true-to-life colours and enhanced brightness.Also Read: AMD Radeon RX 7600 XT graphics card announcedAlong with voice commands the Television can also be controlled through a remote to effectively switch between channels and settings.In terms of connectivity Akai’s new 4K QLED Google TV Series comes with three HDMI 2.0 ports to connect set-top box, Blu-Ray players and gaming consoles, along with two USB 3.0 ports to connect hard drives and other USB devices.Customers may easily cast content to the QLED unit from their mobile phones and other connected devices for convenient viewing on any device.Also Read:3 new generative AI features coming to Chrome to improve organisation
Akai 4K QLED Google TV price in India, availability
The Akai 4K QLED Google TV series price in India starts at Rs 24,999 for the 43-inch models. The price of the 50-inch, 55-inch and 65-inch models is set at Rs 28,990, Rs 35,990 and Rs 51,990 respectively. It can be purchased via Reliance Digital.
The new Chrome update will allow users to organise their tabs with Tab Organizer.
Customise Chrome feature will help users change themes and create them with AI.
Google is rolling out a new update for Chrome that brings three new generative AI features that will make web browsing and organisation much easier. The features will be available to Chrome on Macs and Windows PCs over the next few days.The company via blog post said, “Over the last few years, we’ve brought the latest machine learning and AI technologies into Chrome to make searching the web easier, safer and more accessible. We started with improving practical, everyday tasks, like helping you add real-time captions to videos, better detect malicious sites, manage permission prompts and generate the key points of a webpage. Starting with today’s release of Chrome (M121), we’re introducing experimental generative AI features to make it even easier and more efficient to browse — all while keeping your experience personalized to you.”Based on the tabs you have open, Tab Organiser allows Chrome to automatically recommend and create tab groups. This can be helpful if you’re using Chrome to multitask on multiple projects at once like planning a trip, researching a topic and shopping.To use this feature, right-click on a tab and select “Organize Similar Tabs” or click the drop-down arrow to the left of your tabs.Chrome will even suggest names and emojis for these new groups so they can be easily located when needed.Google introduced generative AI wallpapers with Android 14 and Pixel 8 series last year. Similarly, it has now introduced the text-to-image diffusion model to Chrome. This will allow you to personalise your web browser. You can easily create custom themes based on a subject, mood, visual style and colour that you choose. To get started, visit the “Customize Chrome” side panel, click “Change theme” and then “Create with AI.”“For example, maybe you’re enamoured with the “aurora borealis” and want to see it in an “animated” style with a “serene” mood. Just select those options to see what Chrome comes up with. For more inspiration, check out this collection of the Chrome team’s favourite theme creations,” Google stated.In addition to this users can also customize Chrome with photos they have uploaded or themes from our collections in the Chrome Web Store, including ones commissioned from a growing community of artists.Also Read:AMD Radeon RX 7600 XT graphics card announcedGoogle will also bring another experimental AI-powered feature in the Chrome update that will help users write a review for a restaurant, craft a friendly RSVP for a party or make a formal inquiry about an apartment rental on the web.To get started, right-click a text box or field on any site you visit in Chrome and select “Help me write.” Type in a few words, and our AI will kickstart your writing process.Also Read:LG’s QNED 83 Series with Quantum Dot and NanoCell technologies launched in IndiaThe new features will be available in Chrome on Macs and Windows PCs over the next few days, starting in the U.S. Just sign into Chrome, select “Settings” from the three-dot menu and navigate to the “Experimental AI” page. Because these features are early public experiments, they’ll be disabled for enterprise and educational accounts for now.
The AMD Radeon RX 7600 XT supports next-generation DisplayPort 2.1 and HDMI 2.1a-based displays.
The graphics card is designed for gamers that like 1080p or 1440p resolution.
In addition to this, AMD also released AMD Software: Adrenalin Edition 24.1.1.
The new driver features AMD Fluid Motion Frames Technology, which boosts FPS up to 97%.
AMD has launched a new graphics card that can handle demanding games and content creation well. The newest card in AMD’s lineup, the Radeon RX 7600 XT, is aimed in the same price range as the NVIDIA RTX 4060 Ti. With integrated HYPR-RX profiles and AFMF technology, the newest graphics card can generate frames for any DX11 or DX12 game. Based on the AMD RDNA 3 architecture, the RX 7600 XT employs specialised ray tracing accelerators along with AI technologies to produce what AMD claims to be the greatest performance possible at 1080p.The Radeon RX 7600 XT graphics card is a specialised ray tracing accelerator with 16GB of VRAM, powerful AMD RDNA 3 compute units, and cutting-edge AI technology. It also lets users maximise their creativity with tasks related to AI and content creation.As per the company, the Radeon RX 7600 XT include: up to 1.9X faster gaming and ray tracing performance than the popular NVIDIA GeForce RTX 2060 in select titles at 1080p. Moreover, the AMD Fluid Motion Frames (AFMF) frame generation technology boosts FPS with the Adrenalin Edition driver. Whereas AMD HYPR-RX technology optimises and manages the simultaneous interoperation of AMD Fluid Motion Frames, AMD Radeon Super Resolution, and AMD Radeon Boost technologies.Also Read:Asus Zenbook 14 OLED with AI-powered Core Ultra 7 processors launched in IndiaThe encode/decode media engine opens up new multimedia experiences with full AV1 encode/decode support, wide colour gamut and high-dynamic range enhancements. Support for next-generation DisplayPort 2.1 and HDMI 2.1a-based displays is also possible with the new AMD Radiance Display Engine.AMD also made available AMD Software: Adrenalin Edition 24.1.1 featuring AMD Fluid Motion Frames Technology, which boosts FPS up to 97% for a smoother gaming experience by adding frame generation technology to any DirectX 11 and 12 game. It also released new Video Upscaling technology, text detection support for 4K streaming using Content Adaptive ML, enhanced encode quality for AV1, HEVC, AVC, and OBS, and more.Also Read:LG’s QNED 83 Series with Quantum Dot and NanoCell technologies launched in India
AMD Radeon RX 7600 XT Availability
According to AMD, the Radeon RX 7600 XT is currently available at AMD board partners, including Acer, ASRock, ASUS, Gigabyte, PowerColor, Sapphire and XFX, with a SEP of $329 USD.
Garena Free Fire is a battle royale game with regular awards and tournaments to keep players interested. If you play Garena Free Fire, you should be aware of the redeem codes that are released on a daily basis. However, because the battle royale game is banned in India, players from other countries can use the Free Fire Redeem codes daily. If you’re unfamiliar with the Garena Free Fire redeem codes or don’t know how to get them, we’ve put together a step-by-step guide to help you redeem them. Check out Garena Free Fire Redeem Codes for 25 January 2024.The Free Fire redeem codes are a great way to get free stuff. These are 12-digit codes that contain alphabets and numbers, as well as an expiration date and time. Because the Garena FF redeem codes cannot be used more than once, you should hurry to the redemption page to claim your free reward before someone else does. To get a free reward, all you have to do is go to reward.ff.garena.com/en, which is the official redemption page. Also, keep an eye on this space for daily updates on Garena Free Fire redemption codes and rewards.
In This Article
Garena Free Fire Redeem Codes Today 25 January 2024
The LG QNED 83 TVs come in two different screen sizes- 55-inch and 65-inch.
Both variants support Dolby Vision and Dolby Atmos.
The new Television comes with AI Super Upscaling and Local Dimming.
LG QNED 83 Series has made its India debut. The company’s latest television series is powered by the Quantum Dot and NanoCell technologies. The Televisions in this range have a 120hz refresh rate and include Dolby Vision & Atmos support. Moreover, it is equipped with α7 AI 4K Gen6 AI Processor and also provides access to Netflix, Apple TV+, Disney+ Hotstar, and Prime Video.LG QNED 83 TVs that were introduced earlier this month at CES 2024 have now reached the Indian market. The new Television series includes two models 55-inch (55QNED83SRA) and 65-inch (65QNED83SRA) screen sizes. Both the models come with α7 4K Gen6 AI Processor. This chipset supports Virtual 5.1.2 channel output and aids in the AI Picture Pro and AI Sound Pro features.LG QNED 83 55The televisions are good for gaming as they support a refresh rate of 120Hz in addition to AMD Freesync compatibility. There are other gaming features like Game Dashboard & Optimizer and VRR for smooth gameplay.LG QNED 83 Series comes with a combined strength of NanoCell and Quantum Dot technology to produce remarkably accurate and deeper colours in 4K resolution. Also with smart dimming technology and deep-learning algorithms, the Television reduces the halo effect and produces images that are crisper and more lifelike.LG QNED 83 65The new Television series runs on all-new webOS which provides access to a variety of content from popular streaming services like Netflix, Apple TV+, Disney+ Hotstar, and Prime Video.Also Read:ViewSonic launched “Designed for Xbox” projectors in IndiaThe Multi-View feature of the LG QNED 83 Series allows screens from two different sources to be displayed simultaneously in side-by-side, picture-in-picture, or double-input modes. Additional features include Quick Cards, Picture Wizard, User Profiles, ThinQ AI, and compatibility with voice assistants like Google Assistant, Amazon Alexa, and Apple Airplay2.Also Read:Lenovo Legion 9i with 13th Gen Intel Core i9 CPU launched in India
LG QNED 83 Series TV price in India and availability
LG QNED 83 Series TV offer two models, the 55-inch variant with model number 55QNED83SRA is priced at Rs 1,59,990. Whereas the 65-inch variant with model number 65QNED83SRA costs Rs 2,19,990. Both models can be purchased via LG’s website, LG Showrooms, and Partner Retailers such as Croma, Reliance Digital, and other e-commerce platforms in the country.
Sony isn’t too keen on backwards compatibility, especially when it comes to its PlayStation series. If you have an old PS4 lying around, you can officially only use the ‘DualShock’ PS4 controller on it. If you’ve upgraded to the PS5, the PS4’s DualShock controller will work fine on the new console, but only for PS4 gaming titles. But, if you’re looking to use the PS5 controller on a PS4, you will have to explore other options. Here are some of them.Read Also:Top 5 Ways to Download YouTube Shorts on Android (2024)
In This Article
Is it possible to use the PS5 Dual Sense controller on a PS4 console?
Sony does not offer a native way to connect the PlayStation 5 controller to a PS4 console. If you plug the controller into the console using a USB cable, it will start charging but won’t be able to control the device. Luckily, there are a couple of workarounds to this problem. You may already be aware of the Remote Play app which bridges the divide between the controller and console from two different generations.While the Remote Play app is free to use, it requires a PC or the PS5 console as the intermediary between your Dual Sense controller and the PS4. On top of that, it generates some latency between the two devices. If you don’t want to use the app, you will have to crack open your wallet and spend some money on a Bluetooth adapter. While buying an adapter, you need to make sure that it offers support for Dual Sense and PS4. It does not matter whether it is compatible with the PS5 console.
Use your PS5 Controller on a PS4 with the Remote Play app
Step 1:Connect your PS5 controller to the PS5 console/PC.Step 2:Launch the Remote Play app on your PS5/PC.Step 3: Select PS4 as the console you want to connect to.Step 4: Follow the onscreen instructions to connect the PS5 controller to your PS4.
Use an adapter
If you don’t want to use the Remote Play app, you can purchase an adapter for a wired/wireless connection between your PS4 console and PS5 controller. The Titan Two and Mayflash Magic-S Pro 2 are good choices.Step 1: Plug the adapter into the PS4 console.Step 2: Press the pairing button on the adapter until the LED starts blinking. This denotes that the adapter is in pairing mode.Step 3: Put your PS5 Dual Sense controller in pairing mode by pressing the Play Station button and Create button simultaneously.Step 4: Once they are paired, you will be able to use your PS5 controller on your PS4.
Frequently Asked Questions (FAQs)
Can I connect my PS5 controller to a PS4?
You can connect a PlayStation 5 controller to a PS4 using the Remote Play app or a Bluetooth adapter.
How much does a Bluetooth adapter for a PS4 cost?
The Mayflash Magic-S Pro 2 is a decent Bluetooth adapter priced at $23.99. It offers support for PS4, Switch, macOS, Windows, Raspberry Pi, Xbox Series X & S Controller, Xbox One Bluetooth, PS5 Controller and more.
Is my PS4 controller compatible with a PS5 console?
These are the top 2 ways to connect your PlayStation 5 controller to a PS4 console. If you don’t want to be bugged by any latency issues, you will need to splurge some money on a Bluetooth adapter. You should know that you will not be able to feel the Dual Sense controller’s haptic feedback when it is connected to a PS4.
Xiaomi’s subsidiary brand, Poco, is relatively new in the Indian market but has consistently produced a series of good products. Primarily operating in the lower midrange segment, Poco’s X Series goes up against the likes of OnePlus’ Nord Series, Samsung’s A Series, and its parent company Xiaomi’s Note series. The newly launched Poco X6 Pro is currently priced at Rs 27,000. Its non-Pro variant fetches Rs 22,000. Both variants arrived at our desk earlier this month and we have been using them since then. For the last week, the Poco X6 Pro has remained our daily driver – here is our review of the smartphone.Read Also:OnePlus Buds 3 with 10.4mm driver unit launched in India
In This Article
Poco X6 Pro review: Design and Display
The unboxing experience of the Poco X6 Pro is pretty standard as far as mid-rangers go. Inside the box, you get the smartphone, a 67W power adapter, a USB Type-A to Type-C cable, a black plastic case, a SIM ejector tool, and a quick start guide. 2024 seems to be the year when OEMs across the board are replacing the clear plastic case with an opaque black one.Poco’s Pro variant in its 2024 X6 Series has made small yet significant changes to its design. The two-step camera panel at the back now covers the entire width of the smartphone. In its previous iteration, this glossy panel was aligned to the left, with the dual-tone colouring covering the remaining area. This is still the case in the non-Pro variant this year.Even though the X6 Pro has a plastic back, it almost feels like glass. This ‘glasstic’ material does elevate the in-hand feel of the device but is a fingerprint magnet. Picking up the phone for a couple of minutes will surely leave some prints on the back. The vegan leather back on the yellow colour variant does not present this issue. Smudges aside, we like the overall design of the smartphone. The three cameras and the LED flash get individual cutouts which are aligned in a square pattern.The back panel curves slightly into the flat plastic frame. The left edge of the frame houses the volume rocker and power keys. At the bottom, you get the SIM tray, microphone, USB Type-C port, and the primary speaker grille. Up top lie the secondary microphone, IR blaster, and stereo speaker. The left edge is completely keyless. Unlike its previous iteration (our review here), there is no 3.5mm headphone jack on the X6 Pro, but you can still get it on the non-Pro variant.Moving on, Poco X6 Pro’s display is undoubtedly its biggest attribute. This 6.67-inch AMOLED panel has a 1,220 x 2,712p resolution and a 120Hz refresh rate. On top of that, it gets HDR10+ support and Widevine L1 certification. Reaching an impressive peak brightness of 1,800 nits, this display remains perfectly legible under direct sunlight. Surrounding the display are very slim bezels that get a smidge thicker around the chin. If you don’t pay close attention to the bezels (which is quite easy, given their size), they appear uniform.The touch response offered by the X6 Pro’s display is very close to the flagship level. Swiping through pages, switching apps, navigating the phone’s interface, and other activities provide a very fluid experience. The X6 Pro is also the first Poco smartphone to get an in-display fingerprint scanner. It is one of the fastest scanners we have used in any segment, and it is nice to see Poco nail such a vital part of the display in its first attempt.We watched a variety of content across different OTT and streaming apps. The HDR quality is good and the images produced on the screen are rich in colour. The stereo speakers can go loud without sounding distorted. Although the audio output could have improved on its low end, it doesn’t sound tinny or hollow. We did not feel the need to put on headphones while watching movies on the X6 Pro.An IP54 rating ensures that the smartphone can handle minor water splashes and exposure to minimal dust. Pulling a smartphone out while it’s raining will not damage its internals, but a dip in the water may lead to a different outcome.
Poco X6 Pro review: Performance and Cameras
Powering the Poco X6 Pro is the MediaTek Dimensity 8300 Ultra SoC. There are two RAM and storage variants on offer — 8GB + 256GB and 12GB + 512GB. The LPDDR5X RAM and UFS 4.0 storage are integral to the device’s speedy functioning. On the Geekbench 6 app, the smartphone scored 1,445 points in the single-core test and 4,506 points in the multi-core test. The non-Pro variant powered by the Snapdragon 7s Gen 2 SoC scored 1,022 and 2,995 points respectively.One of the things that make the X6 Pro stand apart in its segments is its speediness. The smartphone takes no time to load apps and switch between them. While working on the phone, we always felt like it was a step ahead of us. This isn’t something we can say for other smartphones in this price bracket. The X6 Pro crushes basic tasks like instant messaging, video calling, photo editing, web browsing, and others. Even with multiple apps occupying the RAM, the smartphone remains unfazed.A similar performance is replicated while gaming on the device. The brilliant touch response pays dividends while playing games like Call of Duty Mobile and BGMI. The 5,000mm2 stainless steel vapour changer plays its part in maintaining the internal temperature to an optimum level. Even with high graphic settings and maximum frame rate, the smartphone does not create any jitters or unwanted lags while gaming.Poco X6 Pro is one of the first smartphones in India to ship with the Xiaomi HyperOS. Its non-Pro sibling gets MIUI 14 OS out of the box, which can be upgraded to HyperOS. While there isn’t much that separates the two Android 14-based skins, we do like the overall feel of the HyperOS. The quick settings panel extends to the bottom of the display upon swiping down from the status bar. The tiles are text-free, which makes them aesthetically appealing, but it takes a few days to get used to them. It looks eerily similar to the iPhone’s Control Centre, but that isn’t a bad thing at all.The OS also offers a new ‘MiSans’ font along with a bunch of lock screen and wallpaper customisation options. You can choose from a bunch of styles for the lock screen and customise them even further by adding a signature and applying the depth effect. This is also inspired by the lock screen effects in iOS. Overall the software experience on the X6 Pro is quite pleasing, once you get past the bloatware.The 5,000 mAh battery was able to power it for an entire day. During the review period, we used the Poco X6 Pro for calling, texting, binge-watching TV shows, and gaming. At the end of each day, we were left with a 15-20% charge. This is pretty standard as far as most mid-range smartphones go. The 67W power adapter provided in the box can fully charge the smartphone in 45 minutes.Cameras are not Poco X6 Pro’s strongest suit, but it does not disappoint. The rear camera array consists of a 64MP primary shooter, an 8MP ultrawide lens, and a 2MP macro sensor. In daylight conditions, the primary camera takes good images that are rich in colour and pack a lot of detail. The images are well-processed, featuring adequate dynamic range with sharp and well-exposed shadows.The primary camera surprised us in low-light conditions, making use of clever photoprocessing to produce good results. The camera manages to expose and brighten the subject nicely, while the noise level is suppressed to an optimum degree. With the Night Mode turned on, the images come out a little sharpened and some colour correction is applied to the final result.Without Night Mode v With Night ModeUltrawide lens: Without Night Mode v With Night ModePictures taken with the ultrawide lens are on the softer side but manage to produce deep colours and a decent dynamic range. Even in low light conditions, the ultrawide camera puts up a good performance. The camera app has a Portrait Mode that does a good job of separating the subject from the background but is a little restrained while applying the blur effect. The 2MP macro lens is there if you want to take close-up images, but we were not happy with the flat colours produced by it.Ultrawide lensUltrawide lensThe 16MP selfie camera takes good images with a warm colour palette. It does not overcorrect the skin tone but does smoothen the texture a little. This camera can 1080p videos at 30/60fps. Meanwhile, the rear camera can record 4K videos at 30 fps with HDR and 30/24 fps without HDR.Portrait ModeRead Also:Itel Roar 75 Review: Are they worth buying?
Verdict
In the under Rs 30,000 category, the Poco X6 Pro would be our pick of the lot. Its brilliant AMOLED display beats almost every device in this segment. The MediaTek Dimensity 8300 Ultra chipset is an efficient performer, delivering blazing-fast speeds across the board. If you want to try a bit of gaming, the X6 Pro can handle high graphics and deliver lag-free gameplay. The camera performance is pretty standard and certainly not on par with the more ‘camera-focused’ smartphones in this category, but as an overall package, the Poco X6 Pro is up there with the best.
Asus Zenbook 14 OLED is offered in touch and non-touch OLED screen options.
The laptop comes integrated with a Dual Neutral Compute Engine, a Dedicated low-power AI Engine and Broad SW support.
Also, it has an FHD 3DNR IR camera with ambient light and colour sensor.
Taiwanese tech brand Asus officially unveiled its new laptop powered by Intel Core Ultra 7 CPU. The company introduced the Asus Zenbook 14 OLED (UX3405) featuring a 3K OLED touch display which supports a 120Hz refresh rate. There is another OLED non-touch display option with a standard 60Hz refersh rate. The new laptop comes with a full-HD IR Webcam with ambient light and colour sensor. Along with an AI processor it is integrated with Intel Arc graphics.
In This Article
Asus Zenbook 14 OLED (UX3405) price in India and sale details
Asus Zenbook 14 OLED (UX3405) comes in two display options- 14-inch 3KOLED touch display with 1,800×2,880 pixels of resolution. The screen supports a refresh rate of 120Hz, 100 percent coverage of the DCI-P3 colour gamut, 550 nits of peak brightness and DisplayHDR True Black 600 certification. In addition to this, the panel has a 16:10 aspect ratio and 87 percent screen-to-body ratio. On the other hand, the 14-inch full-HD OLED non-touch display has 1,200X1,920 pixel of resolution, 600-nit peak brightness and a refresh rate of 60Hz.In terms of software, there is Windows 11 preinstalled. Under the chassis, there are Intel Core Ultra 7 155-H processor or Intel Core Ultra 5 125-H processor. Along with the AI-powered Core Ultra 7 processor, there is Intel Arc graphics with up to 32GB of LPDDR5x onboard RAM and you will get up to 1TB of PCIe NVMe M.2 SSD storage. Also Read:Lenovo Legion 9i with 13th Gen Intel Core i9 CPU launched in IndiaThe Zenbook 14 OLED laptop features an FHD IR camera with a physical shutter (supports face login), and a quiet ASUS ErgoSense keyboard. It packs a 75 Wh battery which supports up to 20% more charging cycles. It is claimed to provide up to 15 hours of unplugged operation. It comes with 2 built-in Harman Kardon speakers with Dolby Atmos. Additionally, there is a built-in array microphone with Cortana and Alexa voice-recognition support.
ViewSonic X1-4K and X2-4K LED Projectors offer 2,900 Lumens of enhanced brightness.
These are claimed to provide a 30,000-hour-long lifespan.
The X1-4K is designed to be mounted on the ceiling whereas the X2-4K can be set up on a table.
ViewSonic has unveiled the world’s first “Designed for Xbox” projectors- X1-4K and X2-4K LED in India today. Both X1-4K and X2-4K LED projectors provide 4K UHD visuals on a large screen of 100 inches. They come with Harman Kardon speakers. The projectors are designed to make gaming more exciting and realistic.
In This Article
ViewSonic X1-4K and X2-4K LED Projectors price in India and availability
ViewSonic X1-4K projector comes with a price tag of Rs 2,99,000. On the other hand, the short throw X2-4K LED Projector projector is priced at Rs 3,25,000. There is no information on when the projectors will go on sale in the country.
ViewSonic X1-4K and X2-4K LED Projectors features
With its standard throw ratio, the X1-4K is mainly meant to be installed in ceilings so that it saves floor space. Whereas the short throw X2-4K can project a wide 100″ display from just 1.5 metres away when placed on a coffee table.ViewSonic X1-4K ProjectorBoth ViewSonic X1-4K and X2-4K LED Projectors have been designed for Xbox games and are black and green, echoing the design of the Xbox Series X. As per the company the projectos are compatible with Xbox’s CEC (consumer electronics control), which means that when the console is started, the projector is turned on simultaneously. Additionally, as soon as the console is connected via HDMI 2, the projector automatically switches to gaming mode.ViewSonic X2-4K LED ProjectorBoth the devices have 4.2ms Ultra-Fast Input and 240Hz refresh rate for smooth gameplay. The projectors are integrated with Texas Instruments 0.65″ DMD chip to provide a high native contrast ratio and better colours and details. Not only do they offer 4J HDR resolution but are equipped with Harman Kardon speakers.Also Read:Lenovo Legion 9i with 13th Gen Intel Core i9 CPU launched in IndiaThe 3rd generation LED technology on the X1-4K and X2-4K LED provides 2,900 Lumens of enhanced brightness. They also come with low maintenance with a 30,000-hour-long lifespan. The projectors have received TÜV SÜD’s Low Blue Light certification.Furthermore, because of their four corner adjustment and horizontal/vertical keystone features, the projectors don’t need to be positioned in the centre during setup.
The laptop includes a Lenovo LA-2 AI chip allowing auto-adjusting power for peak FPS.
Additionally, there is an AI-tuned triple-fan air system boasting 6,333 individual vents
Lenovo has officially introduced its 13th Gen Intel Core i9-series powered Lenovo Legion 9i laptop in India. The machine also includes up to Nvidia GeForce RTX 4090 graphics and Windows 11 Home is pre-installed on it. The device features a 16-inch display with a 3.2K resolution and a refresh rate of up to 165 Hz. The laptop comes with a self-contained liquid-cooling system and a forged carbon A-cover.
In This Article
Lenovo Legion 9i price in India, sale details
Lenovo Legion 9i has been launched with a starting price of Rs 4,49,990. The laptop can be purchased via Lenovo.com, Lenovo Exclusive Stores, leading e-commerce websites, and other offline retail stores across the country.
Lenovo Legion 9i specifications
Lenovo Legion 9i features a 16-inch 3.2K Mini LED display with 2,000×3,200 pixels of resolution. The display panel offers a 94% screen-to-body ratio and a variable refresh rate of up to 165Hz, with vibrant DCI-P3 and sRGB colour fidelity with the pre-installed X-Rite software. The screen comes with a 3ms response time and 1200nits of peak brightness. It also supports Dolby Vision and is DisplayHDR 1000 certified.The laptop is armed with a 13th Gen Intel Core i9-13980HX processor, up to an NVIDIA GeForce RTX 4090 Laptop GPU. It also comes with 32GB of overclocked 6400Mhz DDR5 Dual Channel RAM and 2TB of SSD M.2 storage.The Lenovo Legion 9i is integrated with liquid cooling, co-engineered with Cooler Master, and tackles scorching VRAM under extreme gaming loads, kicking in at 84°C for instant chill. Additionally, there is an AI-tuned triple-fan air system boasting 6,333 individual vents, keeping all components ice-cool even during intense gaming and content creation.
Also Read: OnePlus Buds 3 with 10.4mm driver unit launched in IndiaFurthermore, there is a dedicated Lenovo LA-2 AI chip allowing auto-adjusting power for peak FPS through its Smart FPS feature, while synchronizing Legion Spectrum RGB throughout, from the keyboard’s per-key TrueStrike illumination.Also Read:Itel Roar 75 Review: Are they worth buying?The device also features a 1080p webcam with an electronic e-shutter for privacy. It boasts a 99.99Whr battery. Additionally, it comes with Windows 11 as well as 3 months of access to Xbox Game Pass Ultimate and Legion Arena consolidates games from multiple platforms and acts like a ‘gaming hub’. Optional Lenovo Premium Care support is also available for people who want access to advanced technical support with at-your-doorstep support and preventative PC health checks.


 Oakter Mini UPS for WiFi router is a new product for individuals who depend on continuous internet access. For those looking for a reliable power backup solution for their modems and routers, it is an absolute necessity.
Also Read: D-Link EXO AX AX5400 (DIR-X5460) Router Review: An unstoppable force!
From its appearance, the Oakter Mini UPS-12v resembles a tiny power bank. It is small and portable and can also be carried along.
Oakter Mini UPS for WiFi router is a new product for individuals who depend on continuous internet access. For those looking for a reliable power backup solution for their modems and routers, it is an absolute necessity.
Also Read: D-Link EXO AX AX5400 (DIR-X5460) Router Review: An unstoppable force!
From its appearance, the Oakter Mini UPS-12v resembles a tiny power bank. It is small and portable and can also be carried along.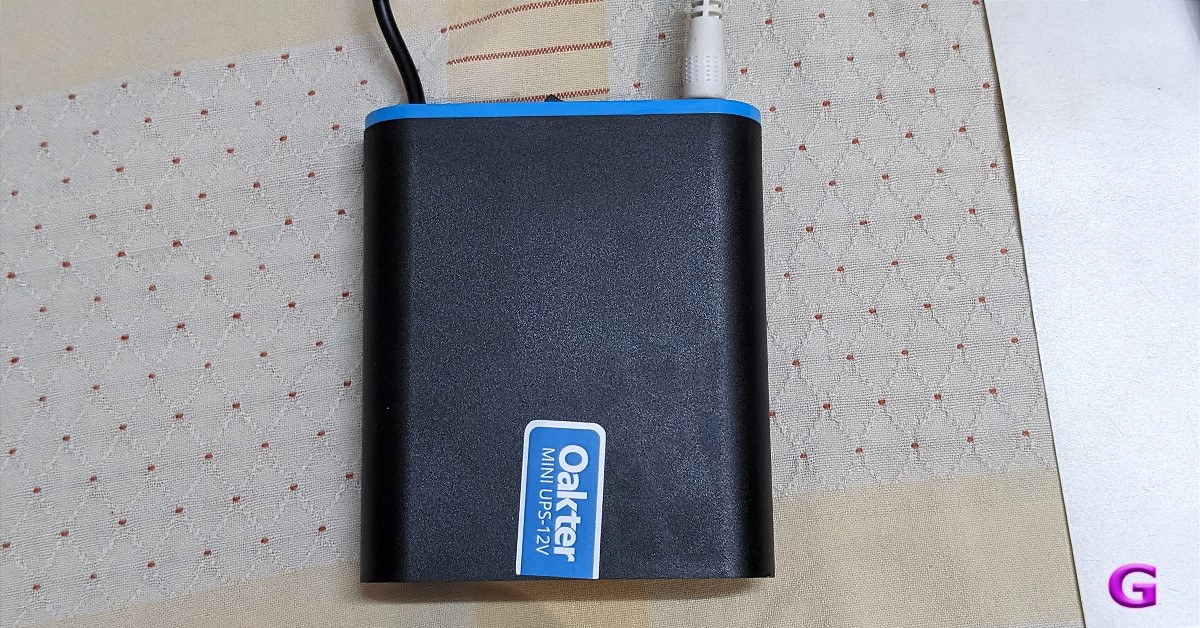
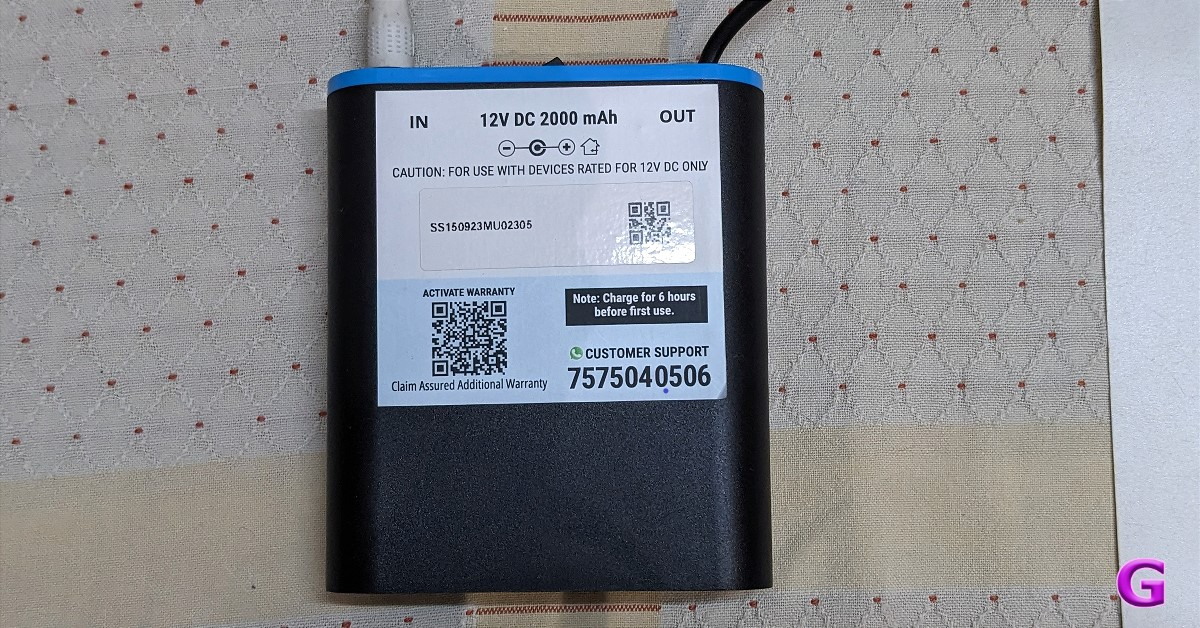 You don’t need to worry about your Wi-Fi socket because two different types of plugs are available here. You do not need to purchase an adapter separately, the firm has not included one with the UPS. The mini UPS has a power rating of 12V.
In terms of build quality, it appears to be average. Vents are located on one side of the UPS. A power switch, an LED indicator, a power input port, and a power output cord are located on the opposite side.
You don’t need to worry about your Wi-Fi socket because two different types of plugs are available here. You do not need to purchase an adapter separately, the firm has not included one with the UPS. The mini UPS has a power rating of 12V.
In terms of build quality, it appears to be average. Vents are located on one side of the UPS. A power switch, an LED indicator, a power input port, and a power output cord are located on the opposite side.
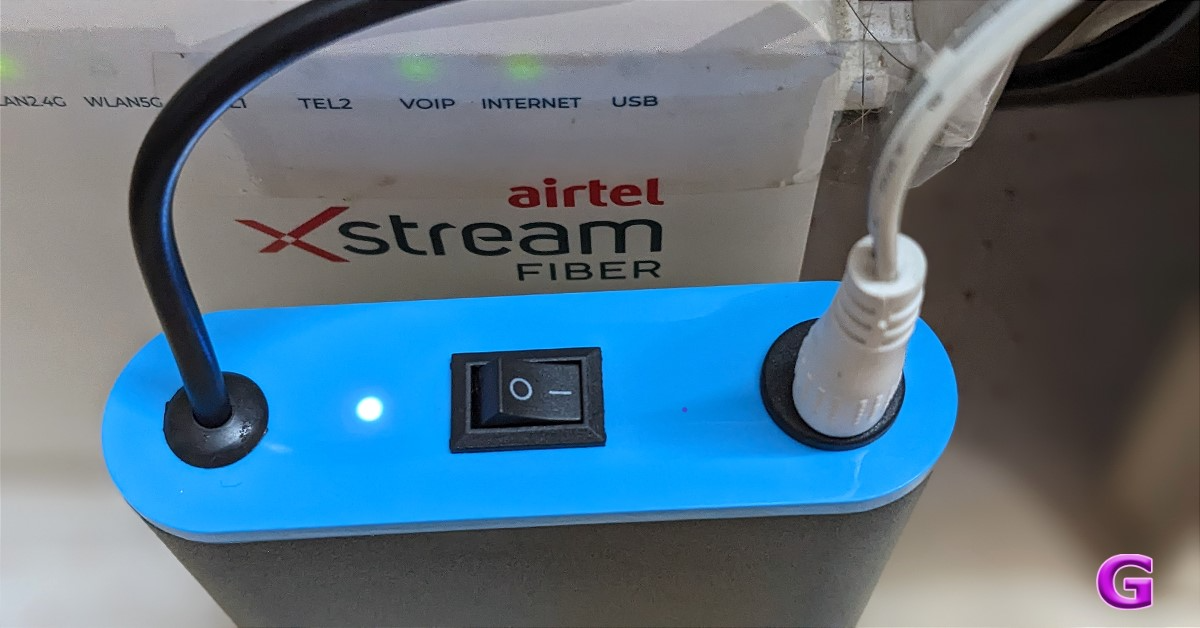 Setting up Oakter Mini UPS is quite simple, quick, and hassle-free. The LED indication will show that the power supply is adequate when you plug the device into the power socket.
Oakter MiniUPS is available in 9v and 12v options. It supports 9v DC and 12v DC routers of all major brands like D-Link, TP-Link, Airtel, Jio Fiber, etc.
It works just similar to any other power backup option. Not only its job is to maintain a steady internet connection in the event of a power outage, but Oakter MiniUPS also has the ability to power small gadgets like biometric systems, CCTV cameras, smartphones, and set-top boxes.
Setting up Oakter Mini UPS is quite simple, quick, and hassle-free. The LED indication will show that the power supply is adequate when you plug the device into the power socket.
Oakter MiniUPS is available in 9v and 12v options. It supports 9v DC and 12v DC routers of all major brands like D-Link, TP-Link, Airtel, Jio Fiber, etc.
It works just similar to any other power backup option. Not only its job is to maintain a steady internet connection in the event of a power outage, but Oakter MiniUPS also has the ability to power small gadgets like biometric systems, CCTV cameras, smartphones, and set-top boxes.
 Mini UPS can establish a connection with your modem and WiFi router. Your router will operate solely on battery power in the case of a power outage. Additionally, a Mini UPS can guard your router from fluctuations or spikes in power.
As per the company, the Oakter Mini UPS delivers an uninterruptible power supply that may provide you with up to 4 hours of battery backup in the event of a power outage. It packs a 2,000 mAh battery, which should be able to provide that many hours.
In our tests, it operated for three hours during an extremely long power failure, and depending on the router make, it may operate for longer.
Mini UPS can establish a connection with your modem and WiFi router. Your router will operate solely on battery power in the case of a power outage. Additionally, a Mini UPS can guard your router from fluctuations or spikes in power.
As per the company, the Oakter Mini UPS delivers an uninterruptible power supply that may provide you with up to 4 hours of battery backup in the event of a power outage. It packs a 2,000 mAh battery, which should be able to provide that many hours.
In our tests, it operated for three hours during an extremely long power failure, and depending on the router make, it may operate for longer.
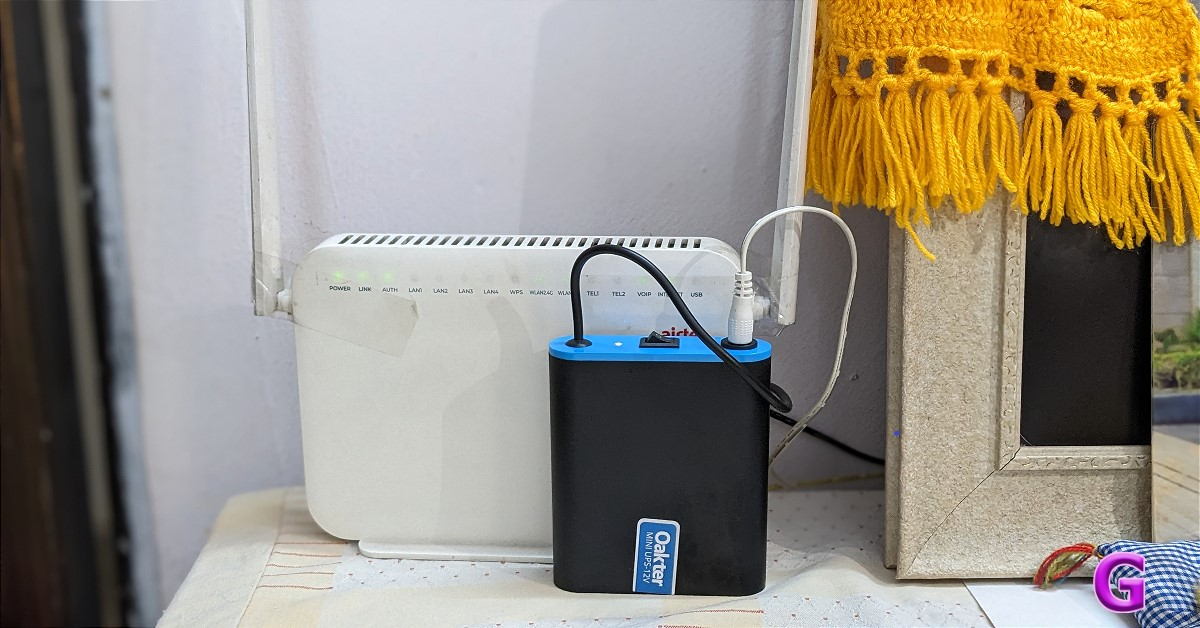

 Step 3: Search the YouTube video you wish to download.
Step 4: Open the video and tap the red download button.
Step 3: Search the YouTube video you wish to download.
Step 4: Open the video and tap the red download button.
 Once the video has been downloaded, you can access it from your phone’s gallery.
Pros
Once the video has been downloaded, you can access it from your phone’s gallery.
Pros
 Step 2: Play the video and hit the download button.
 Step 3: Select the resolution and tap on OKAY.
 Step 2: Download the stable APK from the website and install it on your phone.
 Step 3: Launch the app and paste the link to the YouTube video you wish to install in the text box.
 Step 4: Hit Download.
 Pros
Pros
 Step 2: Tap on the bot and hit Start.
 Step 6: The video will be downloaded and sent to you in the chat. Open it and select Save to Gallery.
 Pros
Pros
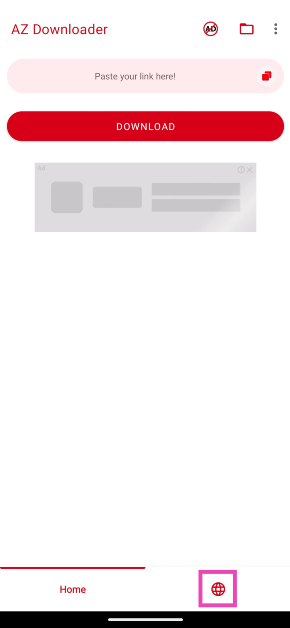 Step 3: Search the YouTube video you wish to download.
Step 4: Open the video and tap the red download button.
Step 3: Search the YouTube video you wish to download.
Step 4: Open the video and tap the red download button.
 Step 5: Select Free Download. Watch a couple of ads to download the video.
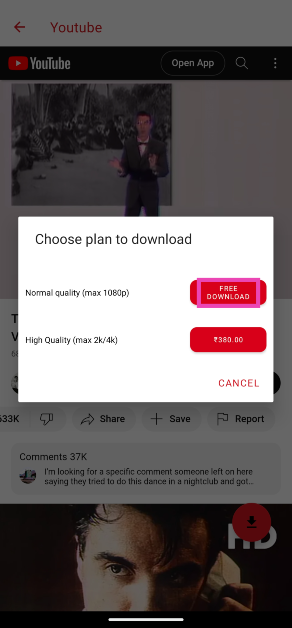 Once the video has been downloaded, you can access it from your phone’s gallery.
Pros
Once the video has been downloaded, you can access it from your phone’s gallery.
Pros
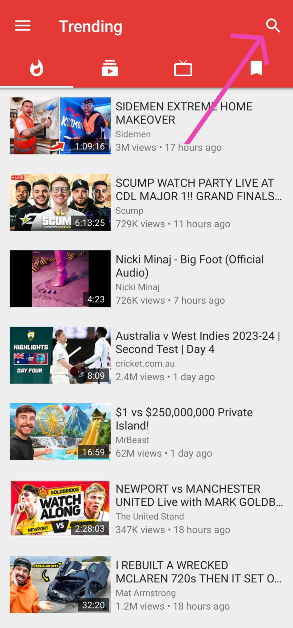 Step 2: Play the video and hit the download button.
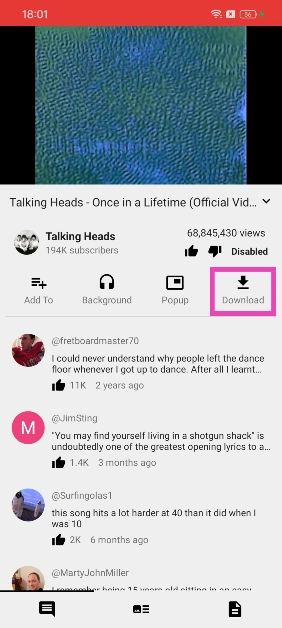 Step 3: Select the resolution and tap on OKAY.
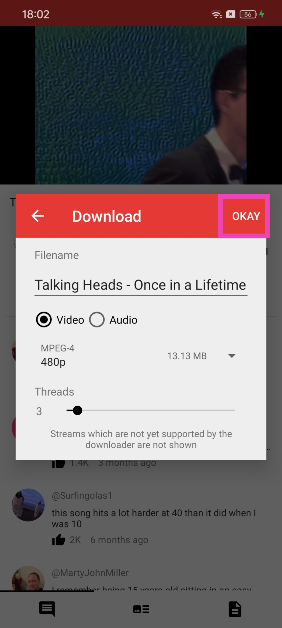 Pros
Pros
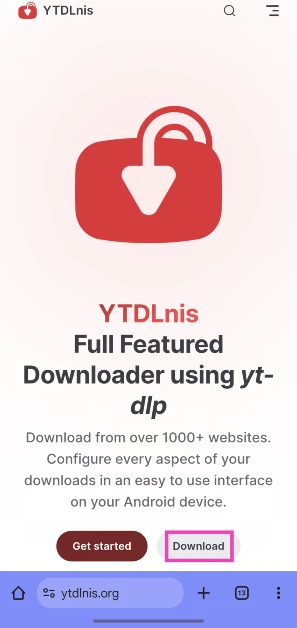 Step 2: Download the stable APK from the website and install it on your phone.
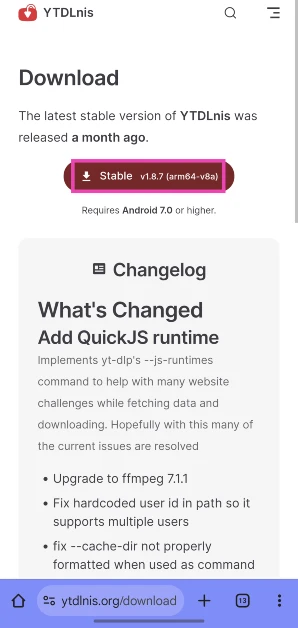 Step 3: Launch the app and paste the link to the YouTube video you wish to install in the text box.
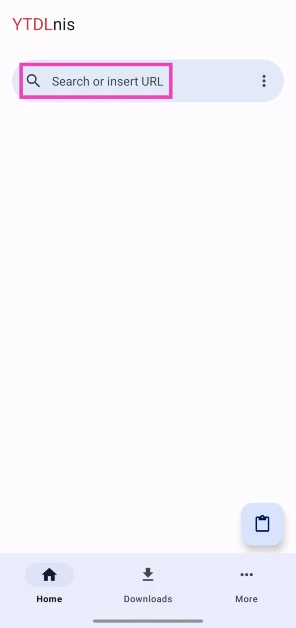 Step 4: Hit Download.
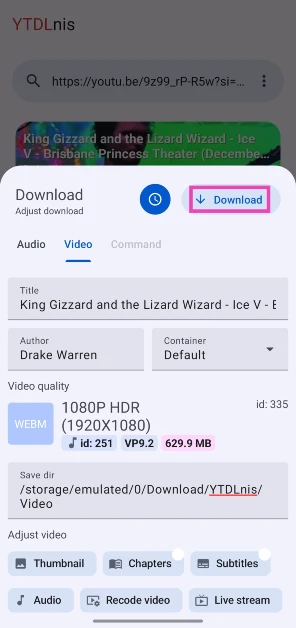 Step 5: The video will pop up in the Downloads tab when it is downloaded.
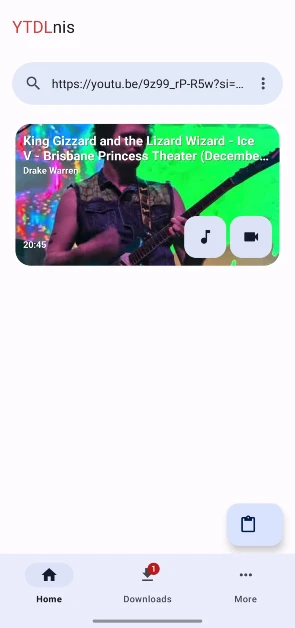 Pros
Pros
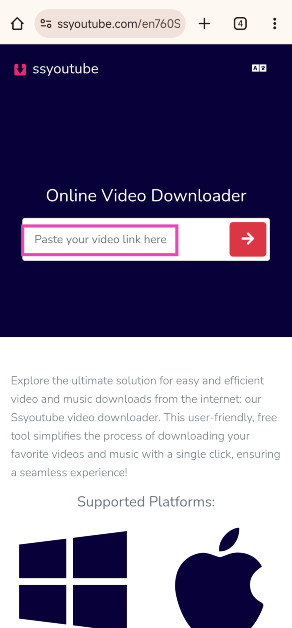 Step 5: Hit Download next to the resolution of your choice.
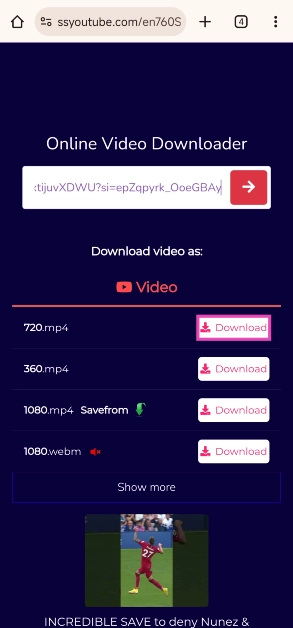 Pros
Pros
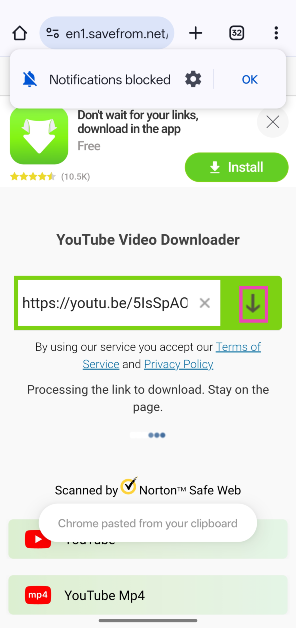 Step 3: Select the video format and resolution. Hit Download.
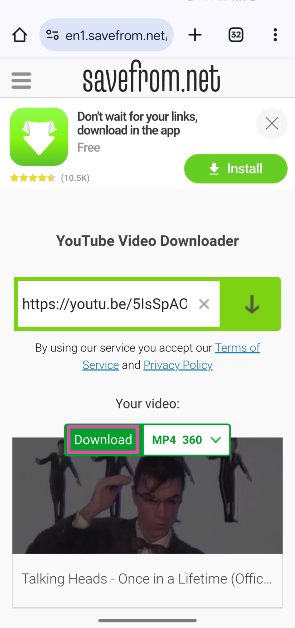 Step 4: The video will be saved on your device.
Pros
Step 4: The video will be saved on your device.
Pros
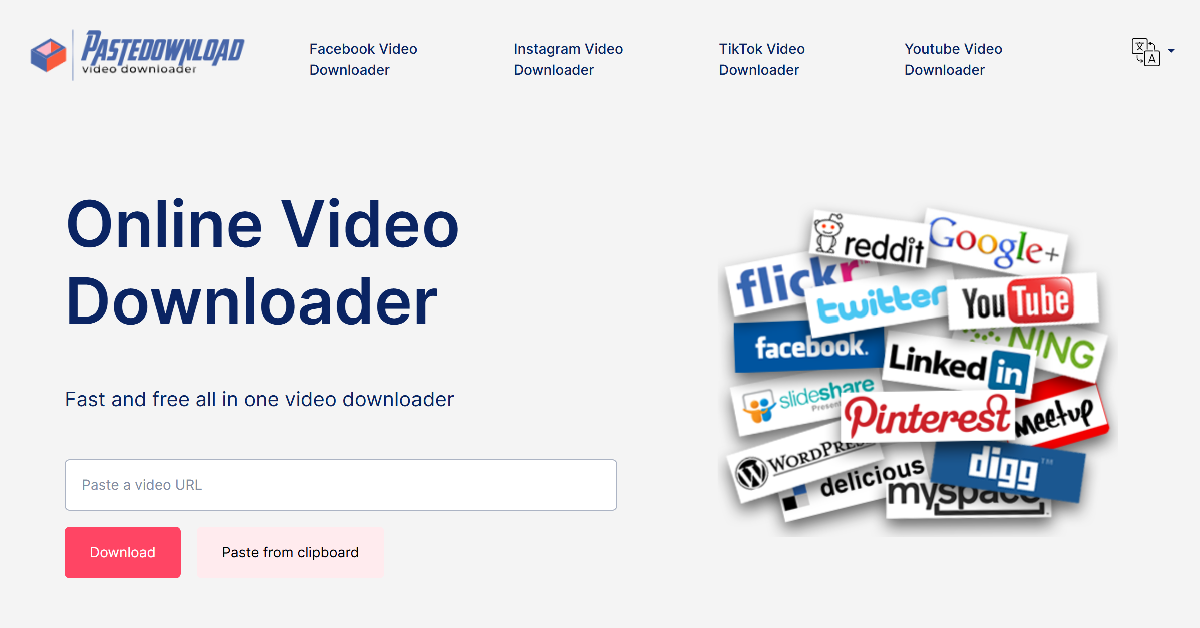 PasteDownload is another light online tool that can be used to download YouTube videos. The process of downloading videos remains the same. Copy the link to the YouTube video you wish to download and paste it into the download box on the website. Select a format and resolution from the list of options. The video will be downloaded to your device’s gallery.
Pros
PasteDownload is another light online tool that can be used to download YouTube videos. The process of downloading videos remains the same. Copy the link to the YouTube video you wish to download and paste it into the download box on the website. Select a format and resolution from the list of options. The video will be downloaded to your device’s gallery.
Pros
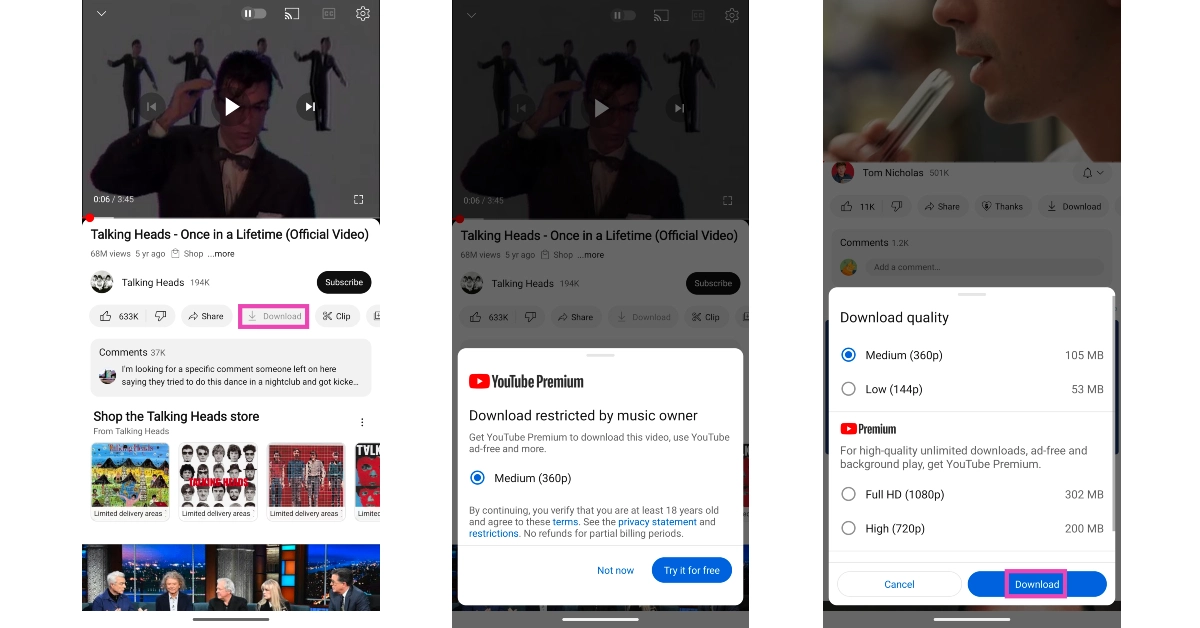 While the methods mentioned above effortlessly download YouTube videos directly to your Android phone’s gallery, they are in violation of YouTube’s content policy. The most legitimate way to download videos on YouTube is by saving them within the app. You will need a YouTube Premium subscription to use this feature. While some content creators may allow non-premium subscribers to download their videos, YouTube restricts the video quality of the video to 360p. Premium users can save the videos in HD resolutions as well. The saved videos can be accessed from the ‘Downloads’ folder in the app.
Pros
While the methods mentioned above effortlessly download YouTube videos directly to your Android phone’s gallery, they are in violation of YouTube’s content policy. The most legitimate way to download videos on YouTube is by saving them within the app. You will need a YouTube Premium subscription to use this feature. While some content creators may allow non-premium subscribers to download their videos, YouTube restricts the video quality of the video to 360p. Premium users can save the videos in HD resolutions as well. The saved videos can be accessed from the ‘Downloads’ folder in the app.
Pros
 Step 2: Tap on the bot and hit Start.
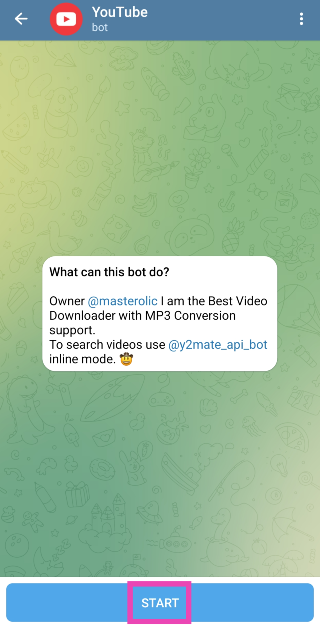 Step 3: Copy the link of the YouTube video you wish to download.
Step 4: Send the link in the chat.
Step 5: Select a resolution and format from the list of options.
Step 3: Copy the link of the YouTube video you wish to download.
Step 4: Send the link in the chat.
Step 5: Select a resolution and format from the list of options.
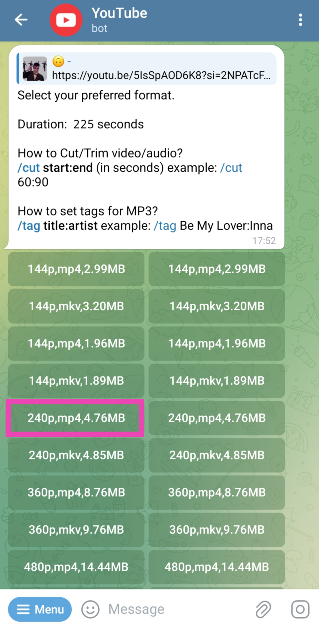 Step 6: The video will be downloaded and sent to you in the chat. Open it and select Save to Gallery.
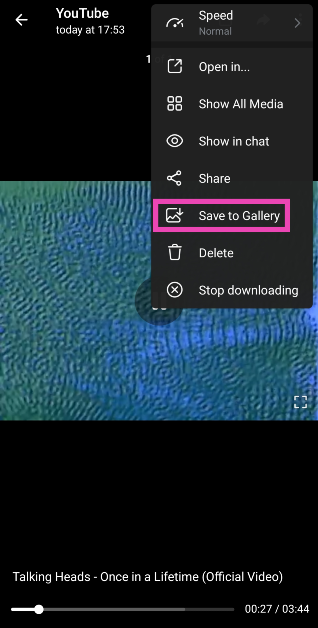 Pros
Pros

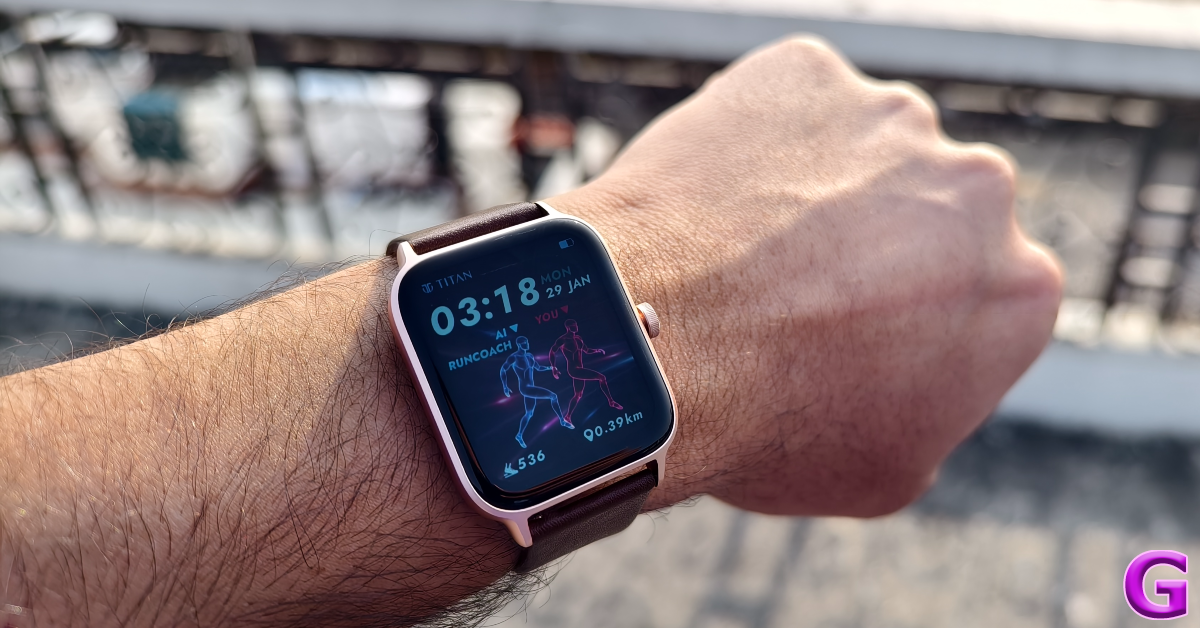 The design of the Titan Traveller is pretty standard as far as smartwatches go. The aluminium case has dimensions of 45.66mm x 37.54mm x 11.42mm. There is just one crown button on the right edge of the case. Turning the watch around, you will find the sensors for heart rate and SpO2 measurement. A small microphone and speaker grille are also placed on the bottom panel.
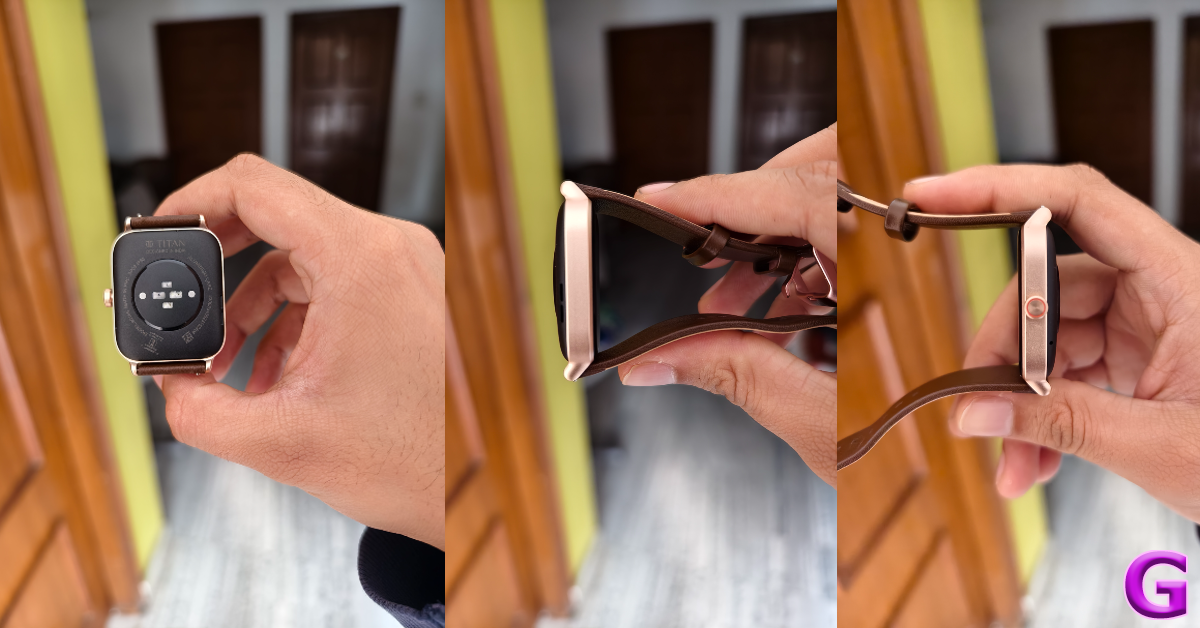 The 1.78-inch AMOLED display is covered by thick bezels on four sides. The good thing is that these bezels are uniform. The display is bright and colourful, presenting no issues while operating in bright outdoor conditions. The touch response is snappy and fun. With Panda Glass protection onboard, it can easily withstand a good knock. The only letdown is that it does not have adaptive brightness. Both the straps provided with the smartwatch are comfortable to wear and offer a snug fit. The silicone strap is meant to be worn during intense workouts, hikes, and other physical activities. If you want to wear the watch casually, the default leather strap should be your choice.
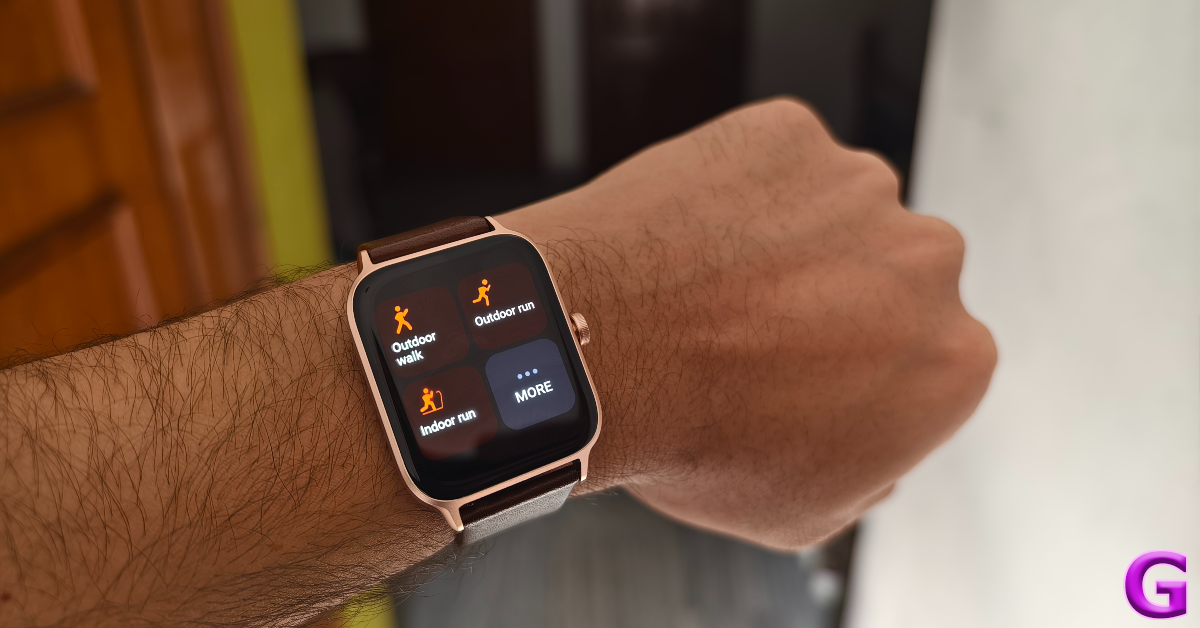 An IP68 rating for dust and water resistance means that you can swim while wearing the smartwatch. Splashing around in the water will not damage the smartwatch, but it is not suited for deep diving.
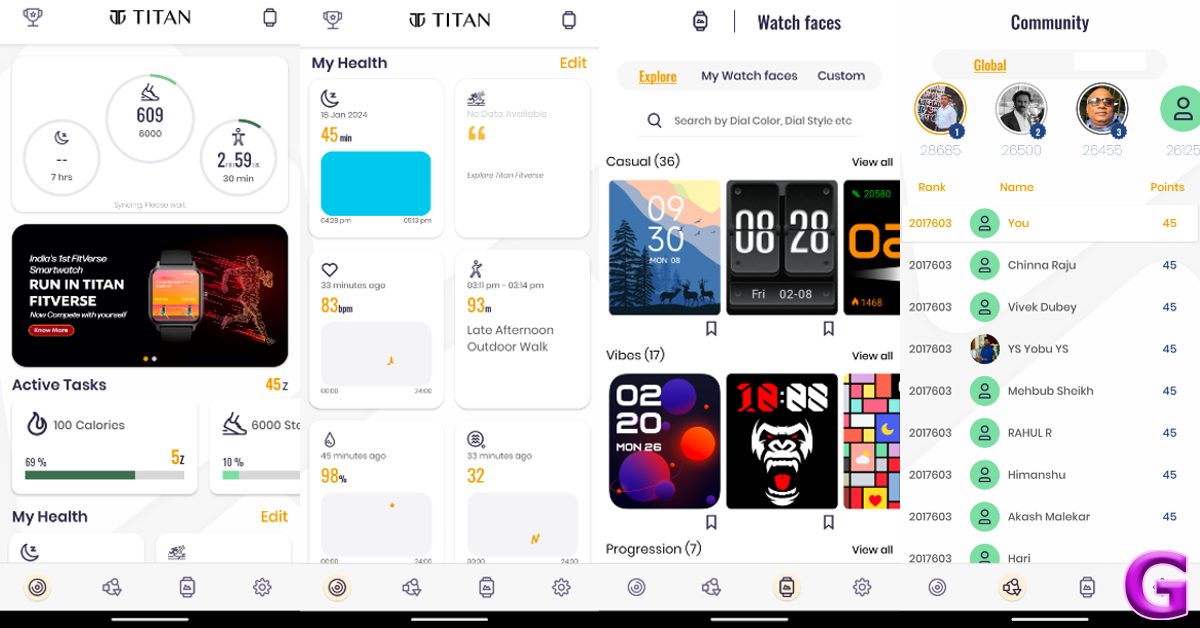 The smartwatch’s interface is very easy to get used to. Swiping left on the home screen reveals all the health and fitness widgets. A bottom swipe gives you access to all your notifications. Swiping up brings up the quick settings panel. Once you have paired your phone with the smartwatch, you can easily make and accept calls. The audio quality is good enough to not create any hassle while calling.
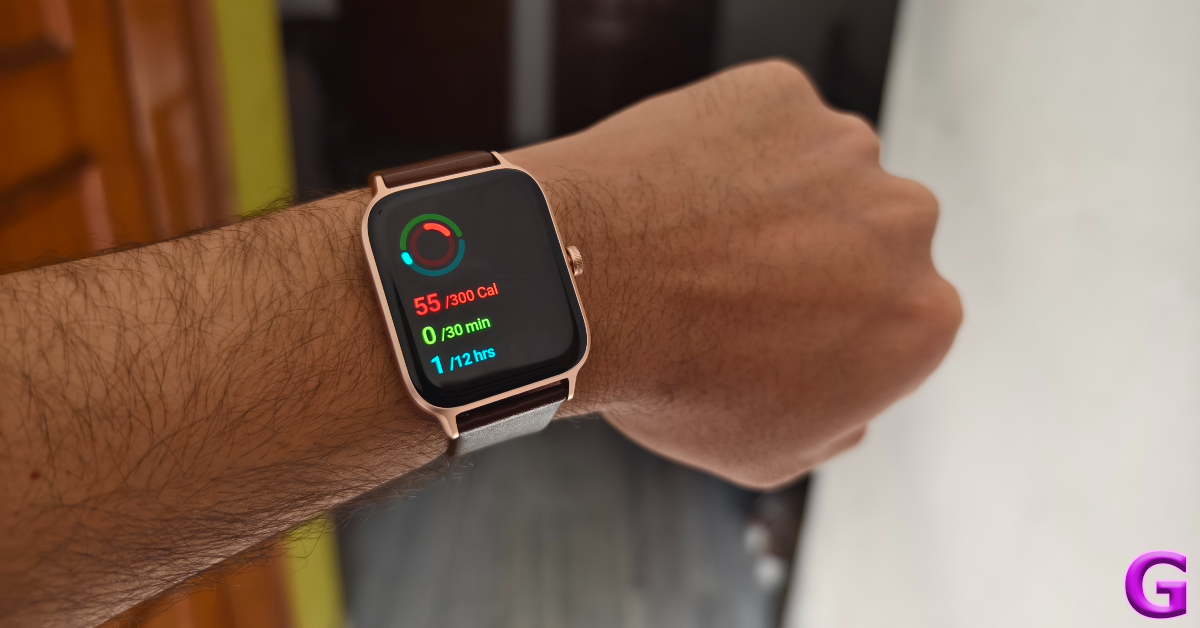 Our only issue with the software is that it doesn’t make full use of the crown button on the watch. This crown may as well be the home button. Turning this crown does not perform any action watch. At the very least, it could have been used to scroll through the menu and the general interface. When you’re deep in the smartwatch’s settings, you have to rely on swipe gestures to go to the previous page. Pressing the crown will always take you to the home screen. Hopefully, Titan can add more functionality to this button in a future update.
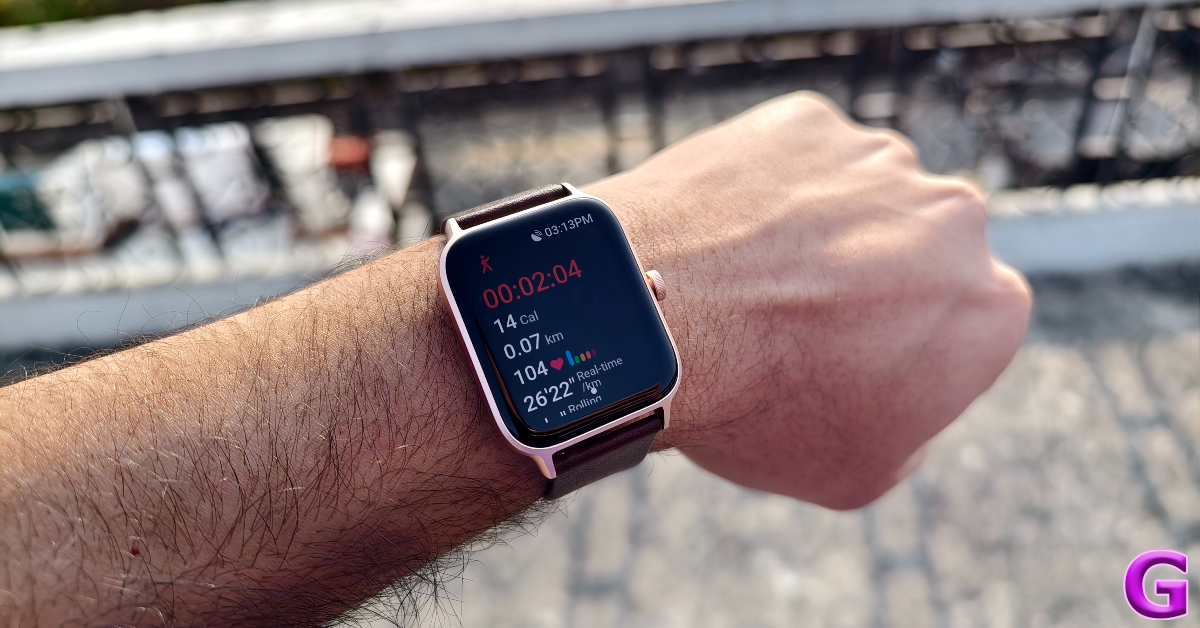 The health and fitness tracking on this smartwatch is precise and reliable. You can turn on the background heart rate monitoring and get notified when it crosses a certain level. The watch also gathers a lot of sleep data while you’re snoozing. However, our favourite feature of the watch has to be the FitVerse. It takes a while to set up the FitVerse on the watch, but it is a complete game changer.
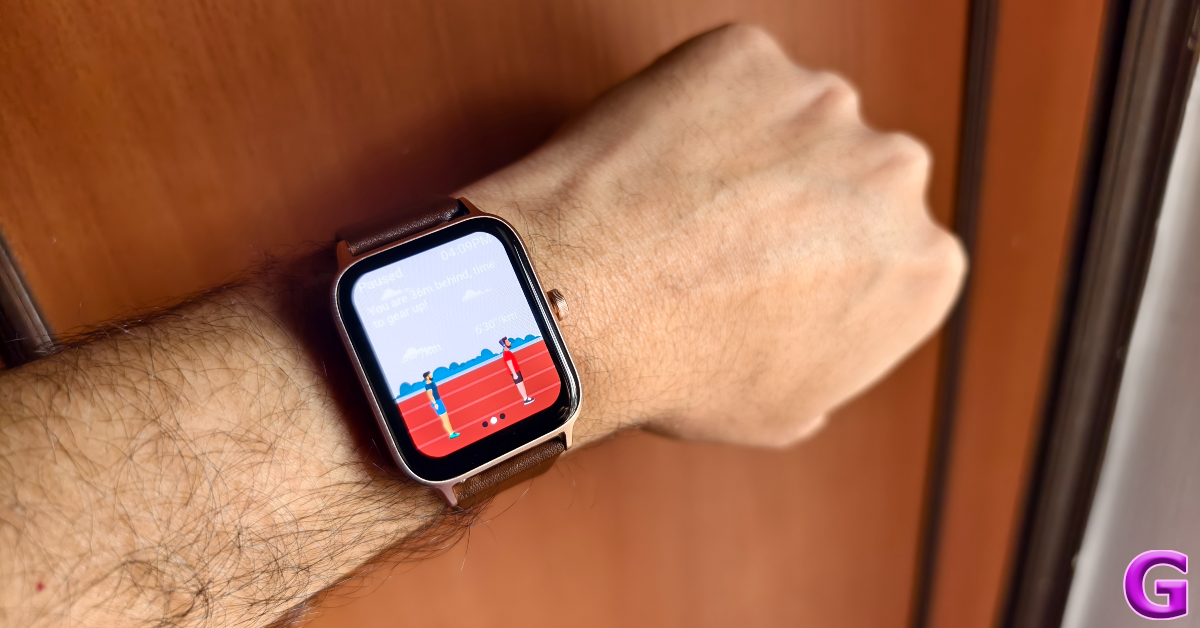 The FitVerse essentially gamifies the fitness aspect of the watch. Your avatar competes against the ‘AI Runcoach’ in the sport of your choice. You can compete in an outdoor race with the AI Runcoach or see how you fare in an indoor walk. The two avatars along with the running background can be customised in the Titan Smart World app. Even though Titan is the only company to offer this feature, we can see other brands incorporating something similar as AI integration becomes the norm on smart wearables.
As you go about your daily exercises, the smartwatch assigns you certain points. These points determine your rank in the community leaderboards. As of now, there are two leaderboards, one global and the other specific to your city. This feature feels like it is in its rudimentary stages, we’d like to see Titan build upon it in future.
The FitVerse essentially gamifies the fitness aspect of the watch. Your avatar competes against the ‘AI Runcoach’ in the sport of your choice. You can compete in an outdoor race with the AI Runcoach or see how you fare in an indoor walk. The two avatars along with the running background can be customised in the Titan Smart World app. Even though Titan is the only company to offer this feature, we can see other brands incorporating something similar as AI integration becomes the norm on smart wearables.
As you go about your daily exercises, the smartwatch assigns you certain points. These points determine your rank in the community leaderboards. As of now, there are two leaderboards, one global and the other specific to your city. This feature feels like it is in its rudimentary stages, we’d like to see Titan build upon it in future.
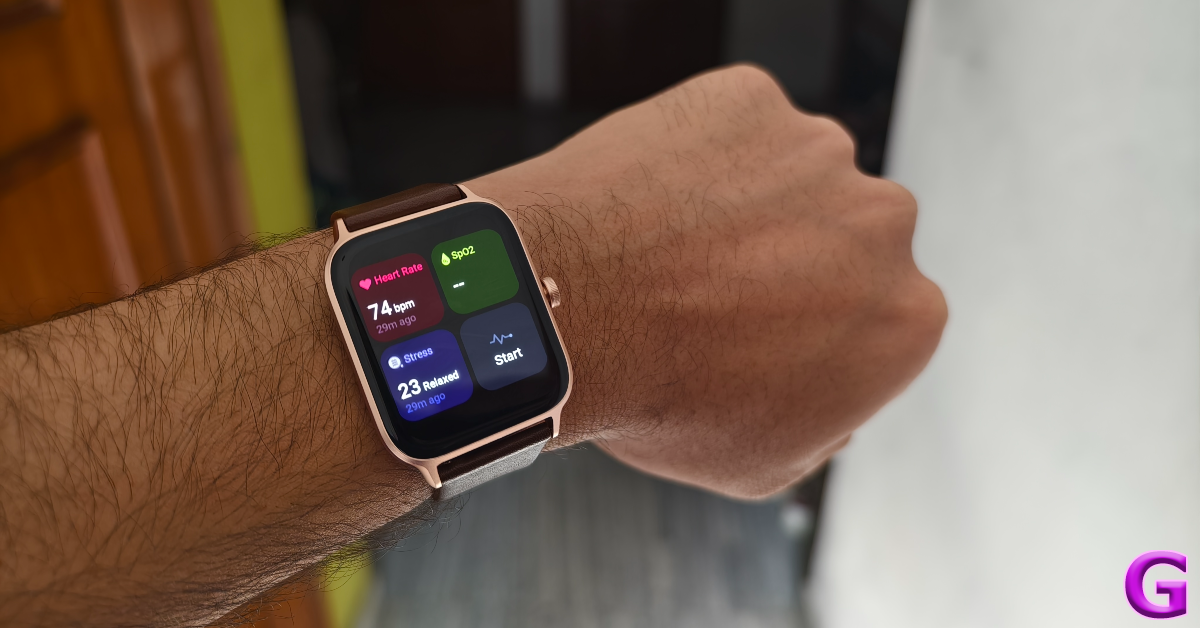 Moving on to the battery performance, we got a solid 3-4 days out of the smartwatch on a full charge. We primarily used the smartwatch for tracking hikes, heart rate and SpO2 measurements, Bluetooth calling, and sleep tracking. On standby, the watch can easily last for 3 to 4 weeks. However, if you use the Always On Display and background health tracking, the battery life will drop by a significant factor.
Read Also: Top 5 Ways to Fix the ‘Disabled Accounts Can’t Be Contacted On Instagram’ Error?
Moving on to the battery performance, we got a solid 3-4 days out of the smartwatch on a full charge. We primarily used the smartwatch for tracking hikes, heart rate and SpO2 measurements, Bluetooth calling, and sleep tracking. On standby, the watch can easily last for 3 to 4 weeks. However, if you use the Always On Display and background health tracking, the battery life will drop by a significant factor.
Read Also: Top 5 Ways to Fix the ‘Disabled Accounts Can’t Be Contacted On Instagram’ Error?

 Step 2: Tap on Home Screen.
 Step 3: Scroll down and turn off the toggle switch for ‘Apply colour to icons’.
 Step 4: Hit Reset.
 Step 3: Tap on Home app.
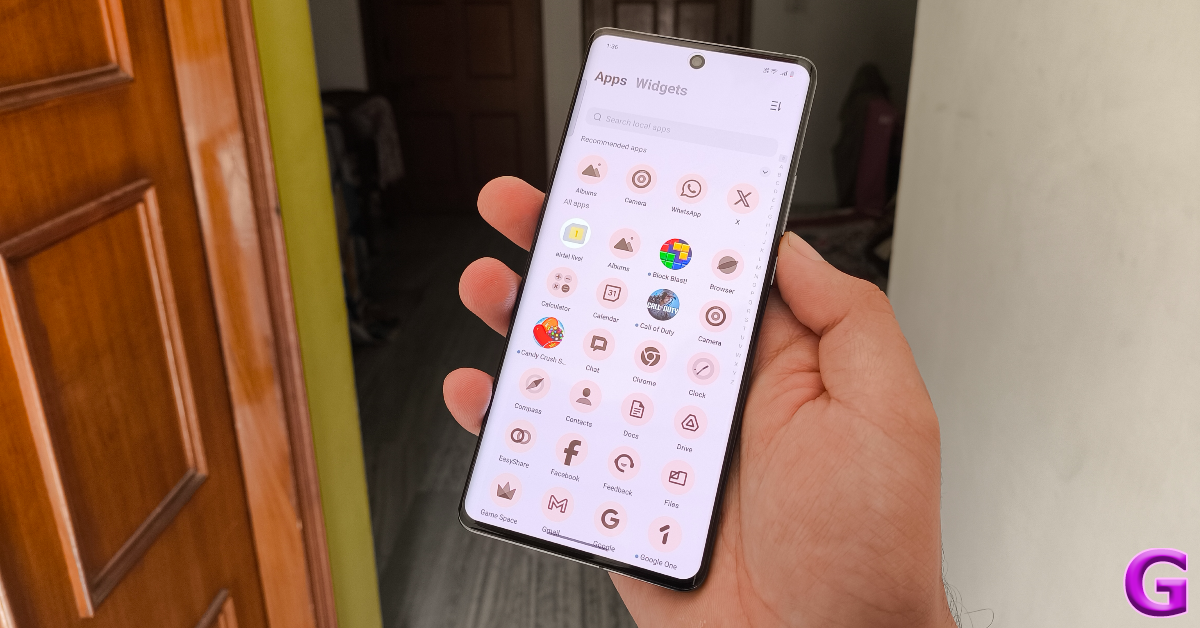 The most common reason behind app icons going missing on Android smartphones is accidental deletion. A quick check will let you know if the app is still installed on your smartphone. Go to the Google Play Store and search for the app. If it says ‘Open’ or ‘Update’ on the app’s page, it means the app is still installed on your phone. If it says ‘Install’ it means the app was removed from your device. Install it again to bring back the app icon to your home screen.
 If the app isn’t deleted but you still can’t locate its icon on your phone’s home screen, it’s time to scan more thoroughly. It is possible you accidentally dropped it into one of the app folders. If you drag an icon and drop it on another one, your phone’s OS automatically forms a folder. Go through every folder on the screen to look for the missing app icon.
 If the app icon is removed from the home screen, it doesn’t delete the app. You can still find it in the app drawer. Press and hold the app icon in the app drawer and drop it on the home screen to restore it. You can also drop it inside a folder. The great part is that you can add as many icons for one app on the home screen as you want.
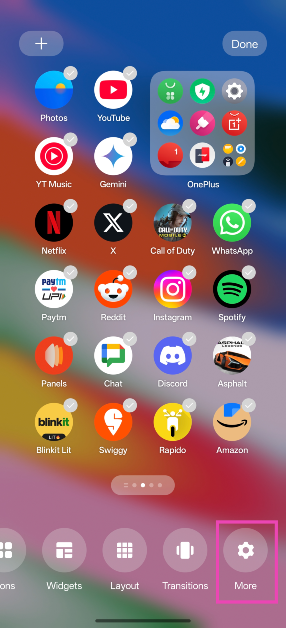 Step 2: Tap on Home Screen.
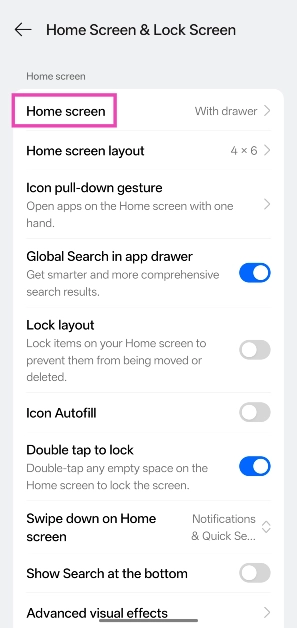 Step 3: Turn on the toggle switch next to Add new apps to Home Screen.
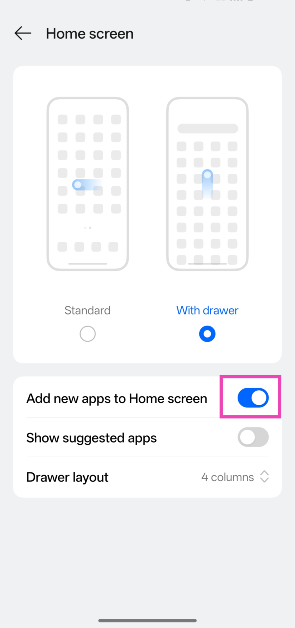
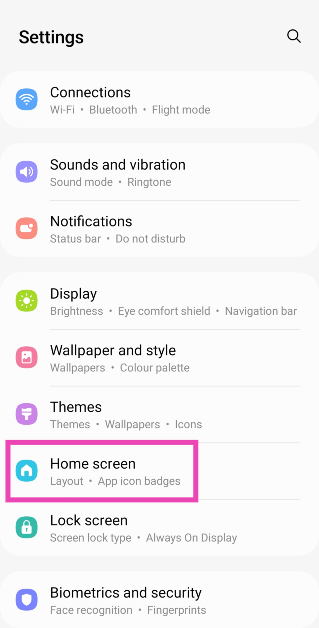 Step 2: Tap on Hide apps.
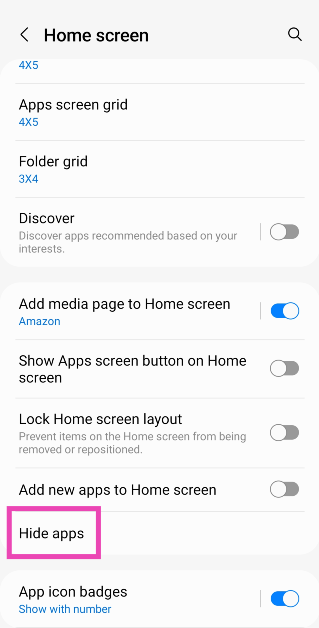 Step 3: The apps that have been hidden will appear in the top row. Tap the app that you want to unhide.
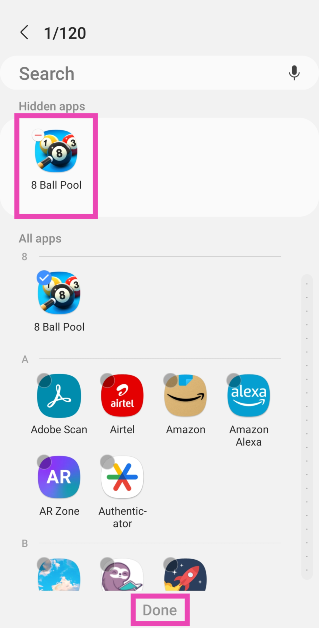 Step 4: Hit Done.
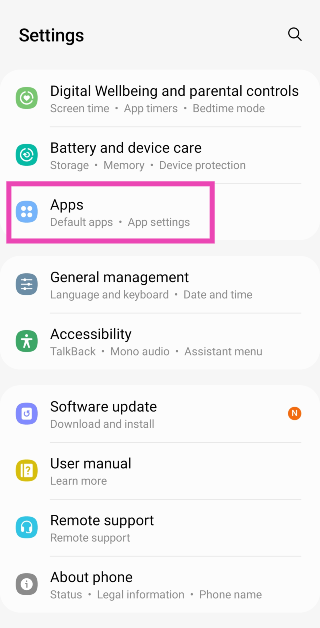 Step 2: Scroll down to the app you are looking for and tap on it.
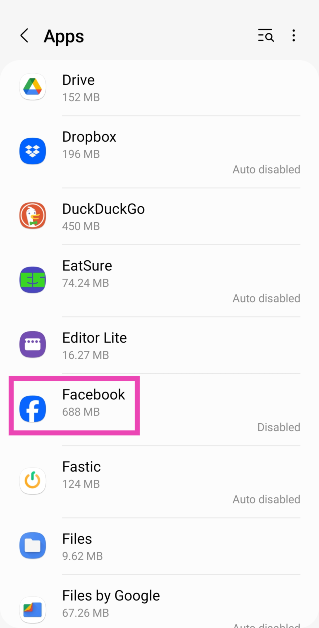 Step 3: Hit Enable at the bottom of the screen.
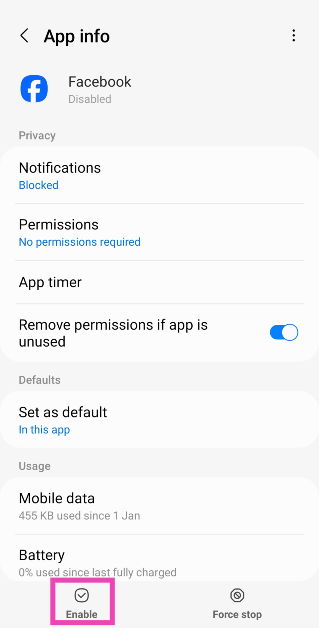
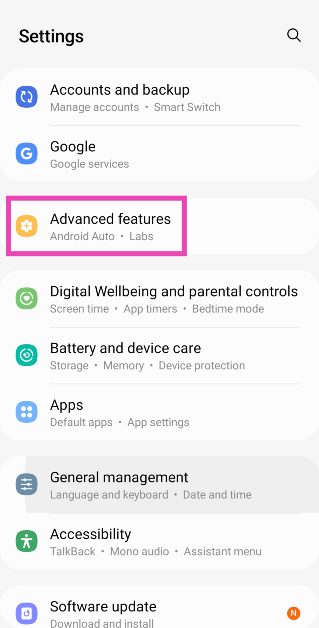 Step 2: Turn off the toggle switch for Game Launcher.
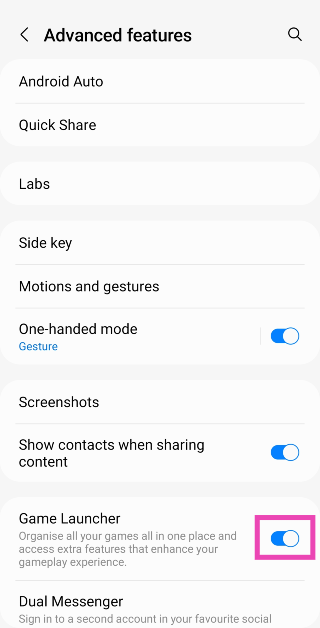
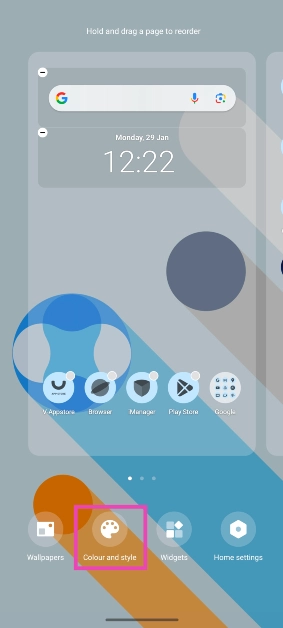 Step 3: Scroll down and turn off the toggle switch for ‘Apply colour to icons’.

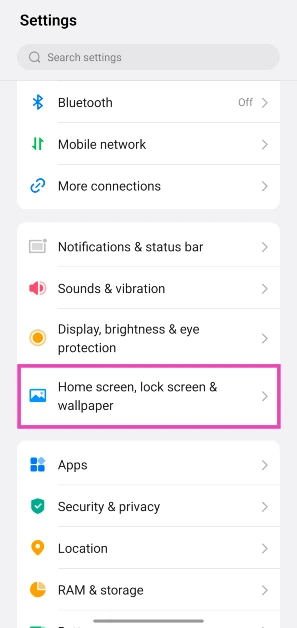 Step 3: Tap on Icons.
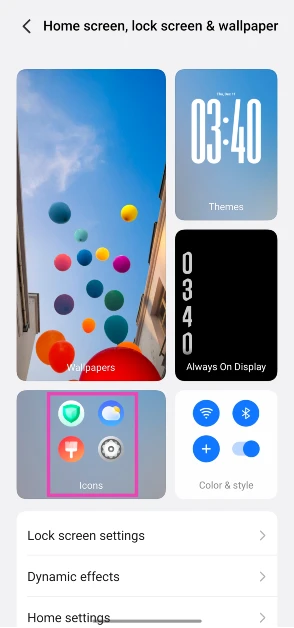 Step 4: Hit Reset.
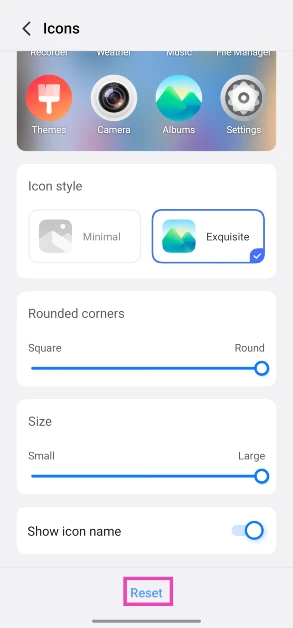
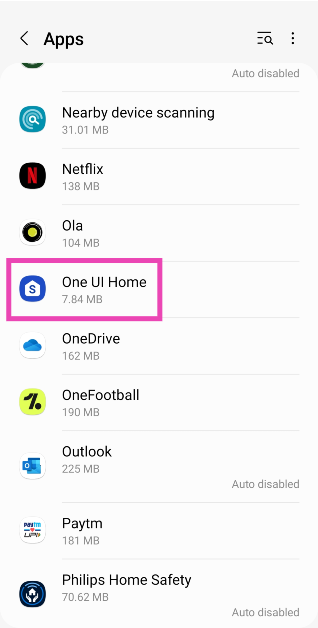 Step 3: Tap on Storage.
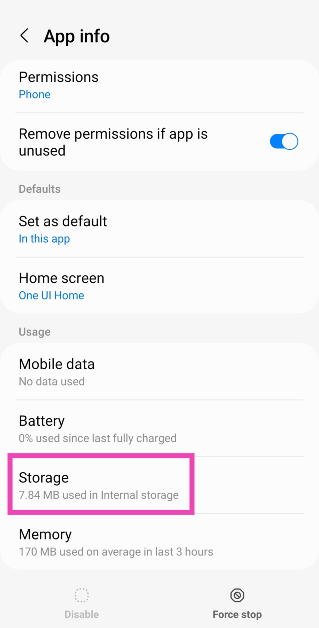 Step 4: Select Clear cache.

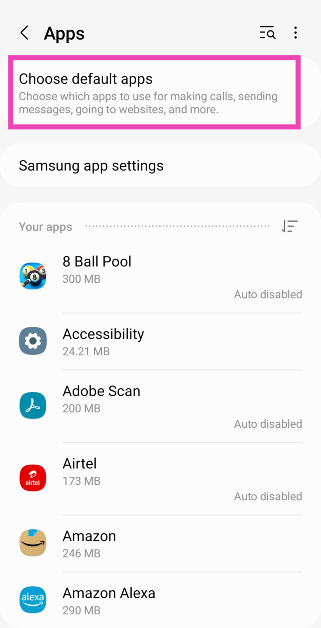 Step 3: Tap on Home app.
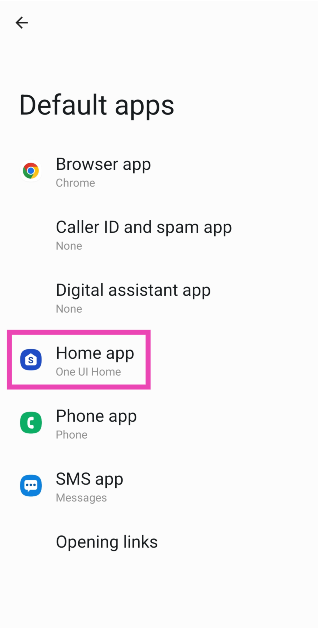 Step 4: Select the native launcher.
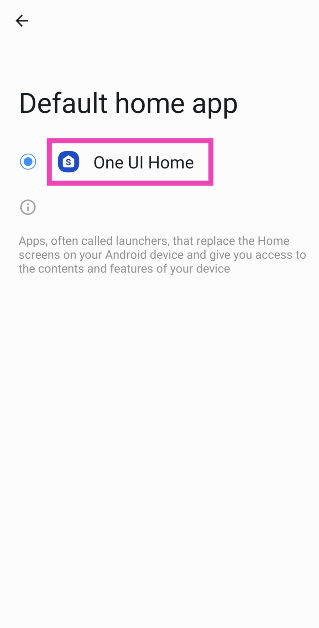


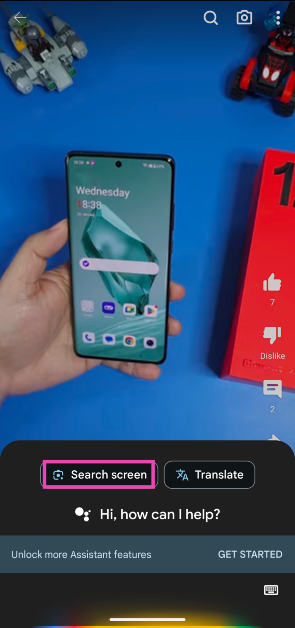 Step 4: Google Lens will scan the page for searchable objects. Crop the window around a particular entry to search for it.
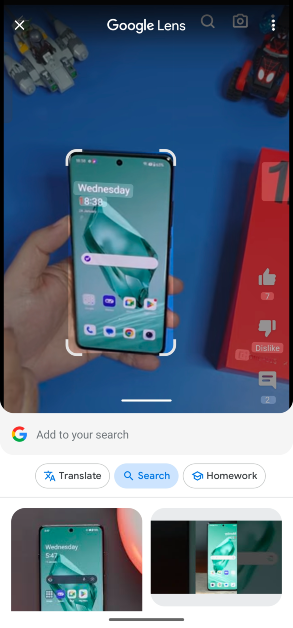 Step 5: The search results will be published on the following page.
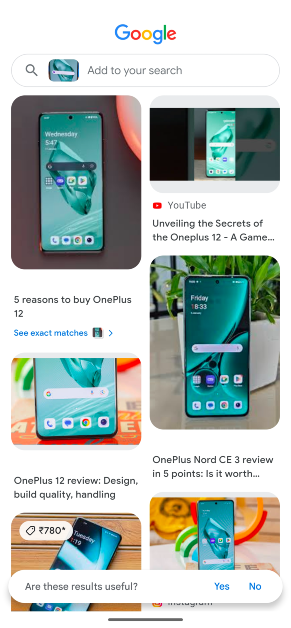

 If you remember completing the KYC process for FASTag earlier, you can check its current status from the official IHMCL website. This will make it clear whether you need to update your KYC details before the January 31 deadline.
Step 1: Go to https://fastag.ihmcl.com/.
Step 2: Click on Login and enter your registered mobile number and password.
Step 3: Enter the CAPTCHA and the OTP (One Time Password) sent to your number.
Step 4: Go to the My Profile section on the dashboard.
This is where you can see your KYC status.
If you remember completing the KYC process for FASTag earlier, you can check its current status from the official IHMCL website. This will make it clear whether you need to update your KYC details before the January 31 deadline.
Step 1: Go to https://fastag.ihmcl.com/.
Step 2: Click on Login and enter your registered mobile number and password.
Step 3: Enter the CAPTCHA and the OTP (One Time Password) sent to your number.
Step 4: Go to the My Profile section on the dashboard.
This is where you can see your KYC status.
 Step 1: Go to https://fastag.ihmcl.com/.
Step 2: Login using your mobile number.
Step 3: Select My Profile from the Dashboard.
Step 4: Click on the KYC tab.
Step 5: Select Customer Type.
Step 6: Upload your profile picture and the identity/address proof.
Step 7: Fill out all the details in the relevant fields.
Step 8: Tick the message declaring the validity of the documents.
Step 9: Hit Submit.
Step 1: Go to https://fastag.ihmcl.com/.
Step 2: Login using your mobile number.
Step 3: Select My Profile from the Dashboard.
Step 4: Click on the KYC tab.
Step 5: Select Customer Type.
Step 6: Upload your profile picture and the identity/address proof.
Step 7: Fill out all the details in the relevant fields.
Step 8: Tick the message declaring the validity of the documents.
Step 9: Hit Submit.

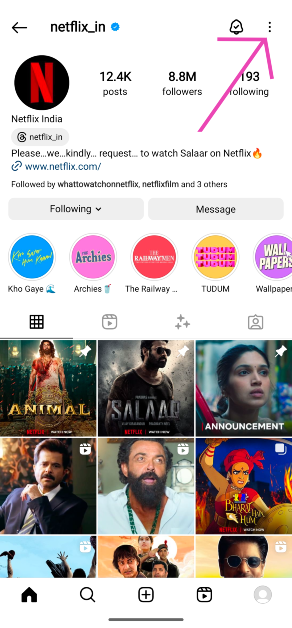 Step 3: Tap on Block.
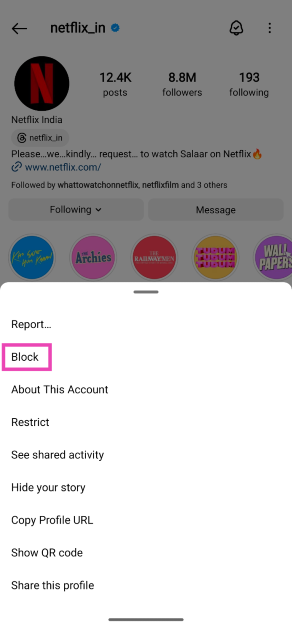 Step 4: Once the profile is blocked, hit the Unblock button on the same page. You can also unblock the user from the ‘Settings and privacy’ page on Instagram’s menu.
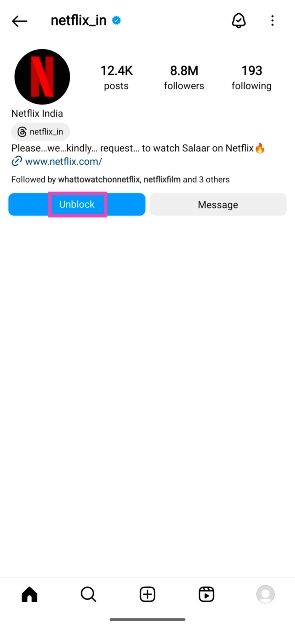 Step 5: Swipe down from the top of the screen to refresh the page. This will make the content on their page visible again.
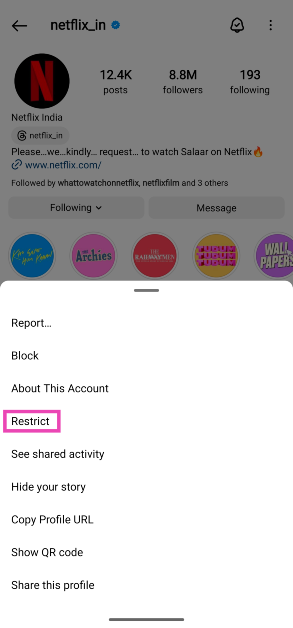 Step 3: Now, ask the person to send you a message on Instagram.
Step 4: The message will land in the ‘Requests’ folder in your DMs.
Step 5: Open the message and hit Unrestrict. You can also unrestrict the user from their profile options.
Step 3: Now, ask the person to send you a message on Instagram.
Step 4: The message will land in the ‘Requests’ folder in your DMs.
Step 5: Open the message and hit Unrestrict. You can also unrestrict the user from their profile options.
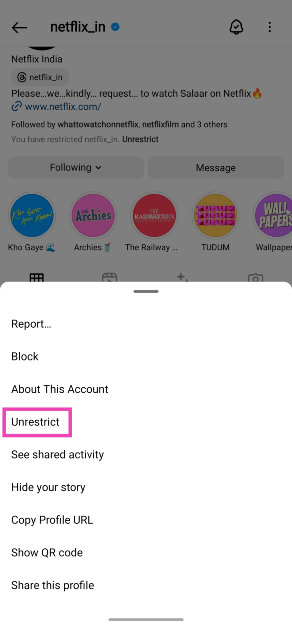
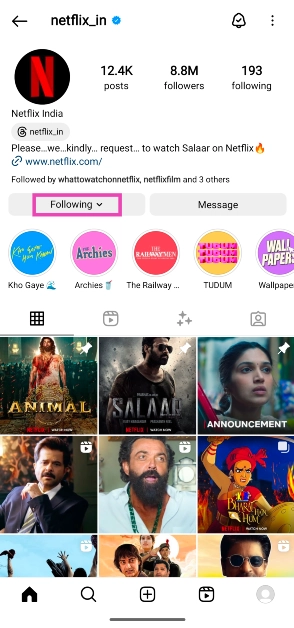 Step 2: Tap on Unfollow.
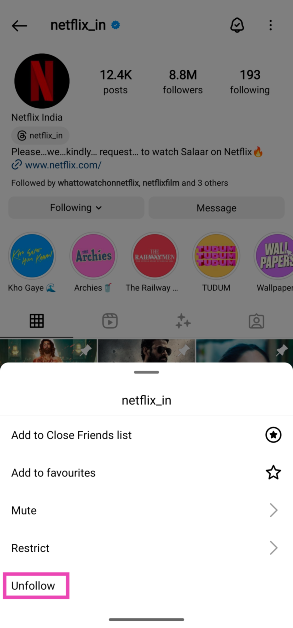 Step 3: Hit the Follow button.
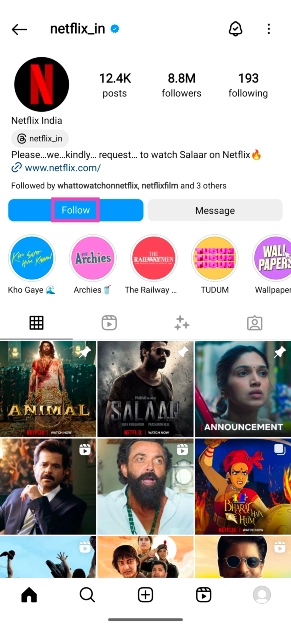
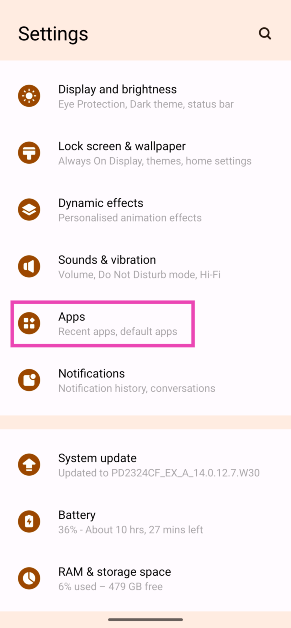 Step 2: Tap on Instagram.
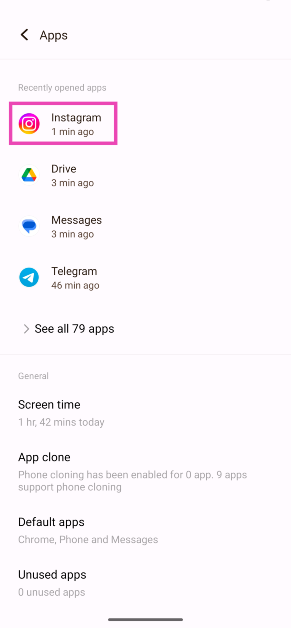 Step 3: Select Storage and cache.
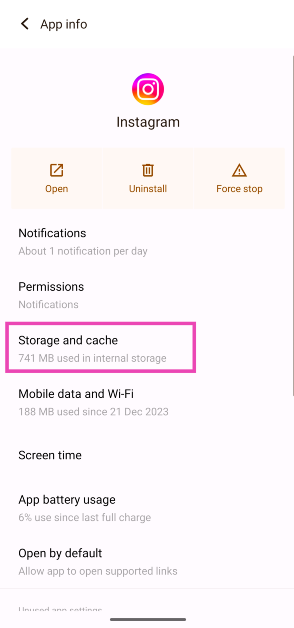 Step 4: Hit Clear Cache.
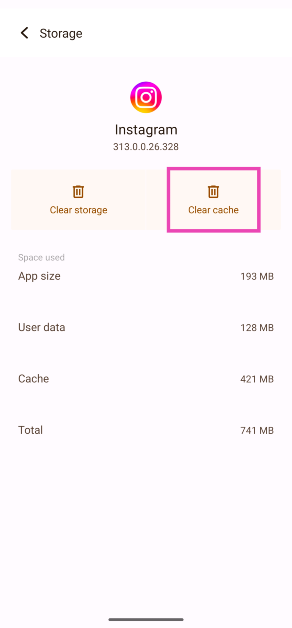
 An older version of the app may struggle with sending a DM to a person who has just reactivated their Instagram profile. Make sure your Instagram app is updated to the latest version to prevent this from happening. Go to the Google Play Store and search for Instagram. Tap on the app’s page and hit the Update button. You can also turn on automatic updates for Instagram by tapping the ellipses button at the top right corner of the screen and selecting ‘Enable auto-updates’.
 If the fixes mentioned above did not work out for you, delete the Instagram app on your phone and reinstall it using the Google Play Store/App Store. Deleting and reinstalling the app eliminates the bugs and resets the cache. Long-press the Instagram app icon on your phone’s home page and select Uninstall/Remove. Go to the Google Play Store/App Store, search for Instagram, and download the app on your device.
 It is probable that the issue you’re facing is related to your account. To resolve it, log out of Instagram and then log back in. Go to your profile, hit the hamburger menu, scroll all the way down and hit ‘Log out’. If you’re logged in with multiple accounts, log out of all of them. Log in using your main account only.

 Step 4: Your phone’s screen will now be shared with other participants in the video call.
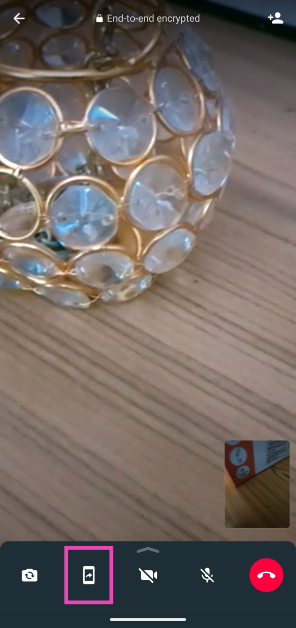 Step 3: Confirm your selection in the popup box.
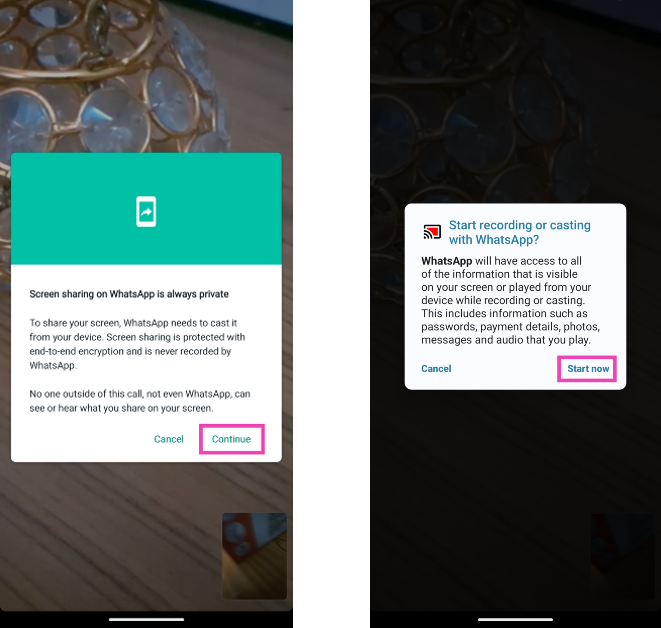 Step 4: Your phone’s screen will now be shared with other participants in the video call.
 Step 5: Tap on Stop sharing to end screen sharing without terminating the call.


 The new variant is currently up for sale in the country via Flipkart. There will be no price change for the new model. The device also comes in three more shades Hazel, Obsidian and Rose.
The price of Pixel 8 in India starts at Rs 75,999 for the base 8GB RAM with 128GB storage and Rs 82,999 for the 8GB RAM and 256GB memory.
The new variant is currently up for sale in the country via Flipkart. There will be no price change for the new model. The device also comes in three more shades Hazel, Obsidian and Rose.
The price of Pixel 8 in India starts at Rs 75,999 for the base 8GB RAM with 128GB storage and Rs 82,999 for the 8GB RAM and 256GB memory.
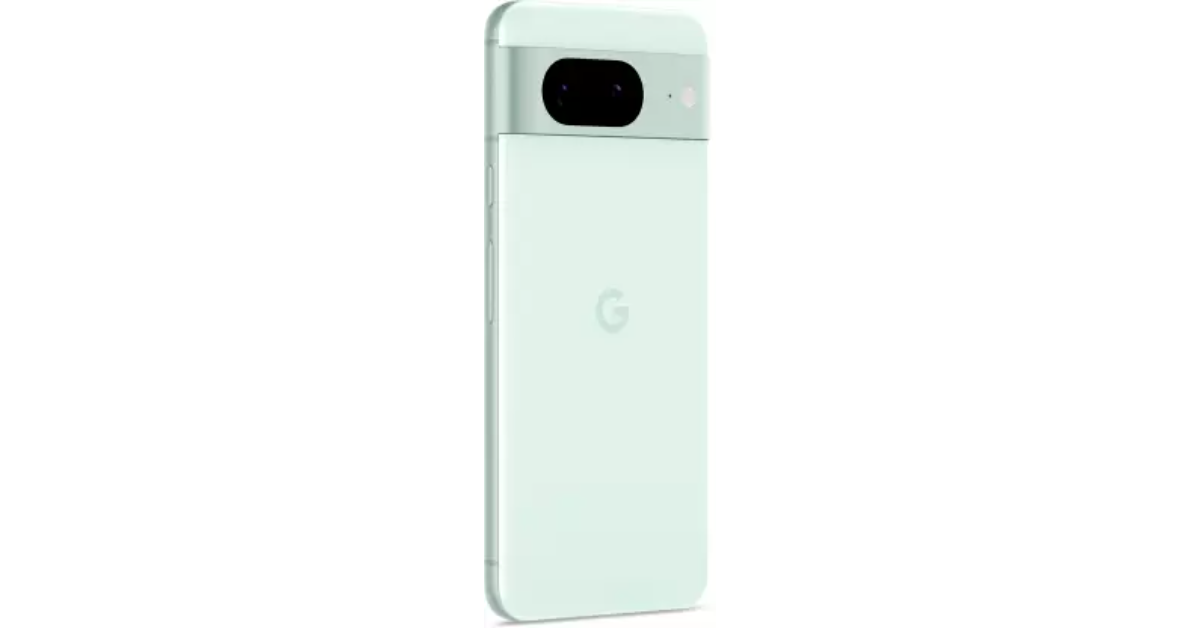

")
 Step 6: Tap the device you want to log out of.
Step 7: Hit Deregister.
Step 6: Tap the device you want to log out of.
Step 7: Hit Deregister.
 Step 4: Under Digital content and devices, select Devices.
 Step 5: Switch to the devices tab.
Step 6: Select the device you want to remove.
Step 5: Switch to the devices tab.
Step 6: Select the device you want to remove.
 Step 7: Click on Deregister.
 Step 8: Confirm your selection in the popup box.
 Step 4: Scroll down and click on Start next to ‘Compromised account?’
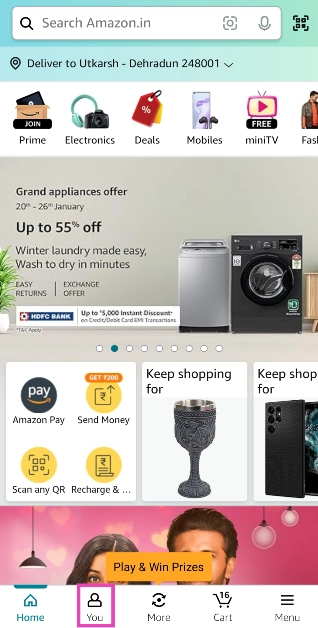 Step 3: Scroll down to the bottom and tap See All next to Your Account.
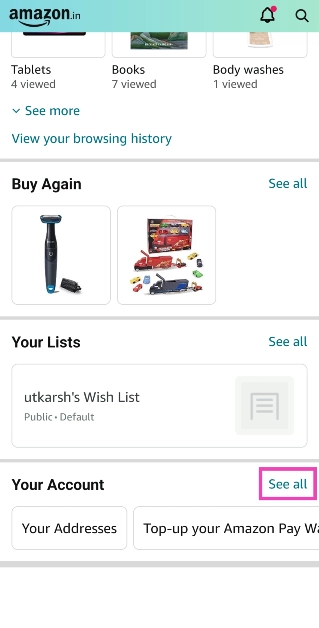 Step 4: Under Account Settings, tap on Devices.
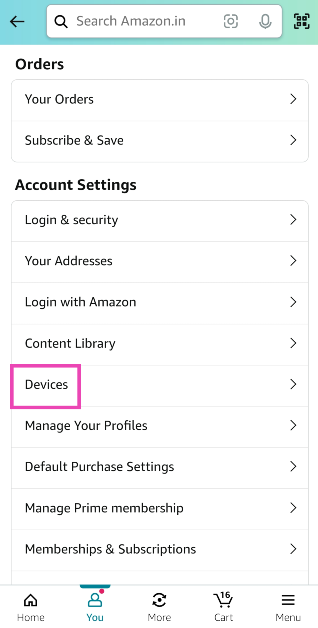 Step 5: Switch to the Devices tab.
 Step 6: Tap the device you want to log out of.
Step 7: Hit Deregister.
Step 6: Tap the device you want to log out of.
Step 7: Hit Deregister.
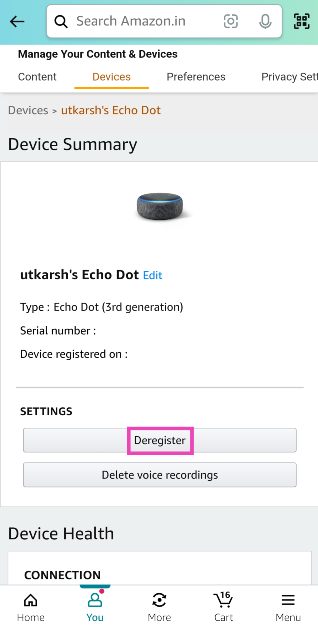 Step 8: Confirm your selection in the popup box.
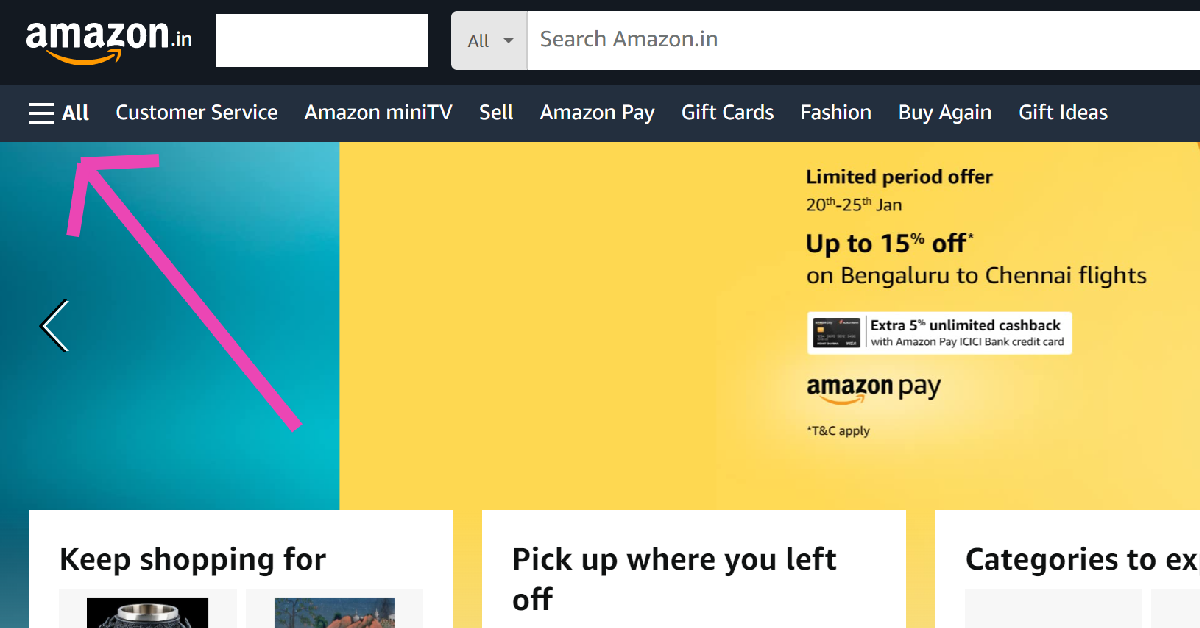 Step 3: Scroll down and select Your Account.
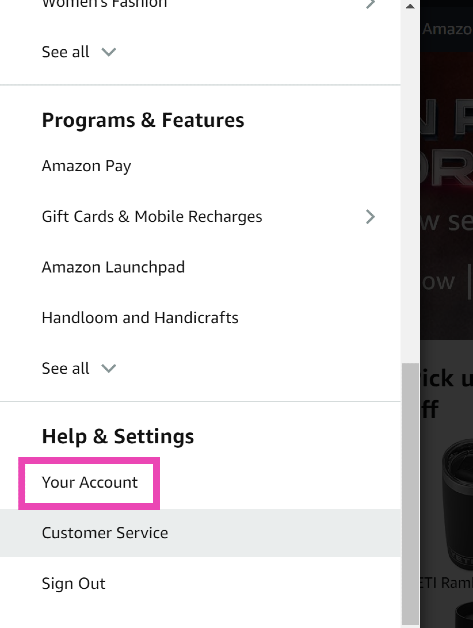 Step 4: Under Digital content and devices, select Devices.
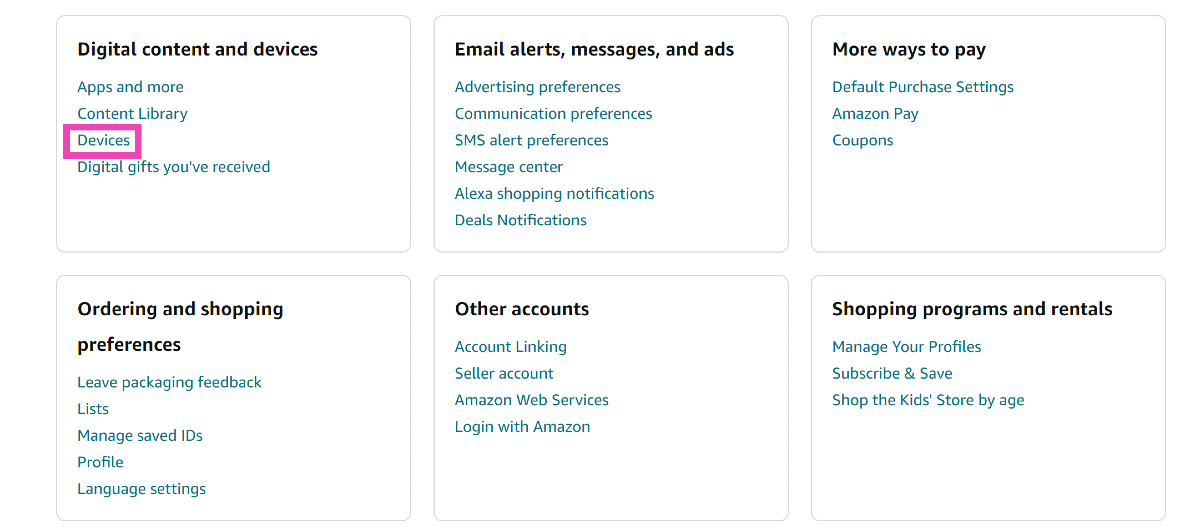 Step 5: Switch to the devices tab.
Step 6: Select the device you want to remove.
Step 5: Switch to the devices tab.
Step 6: Select the device you want to remove.
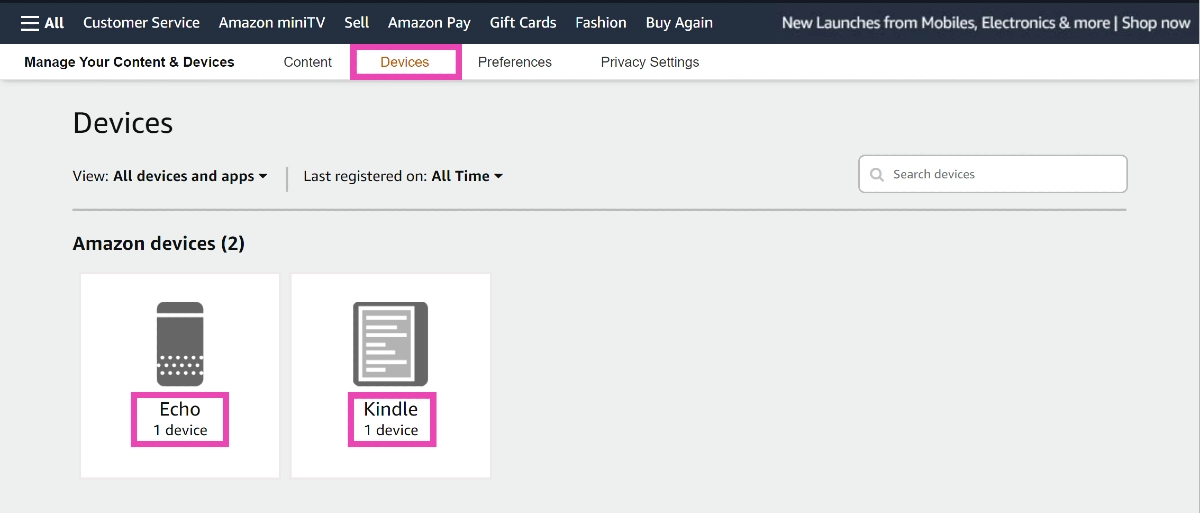 Step 7: Click on Deregister.
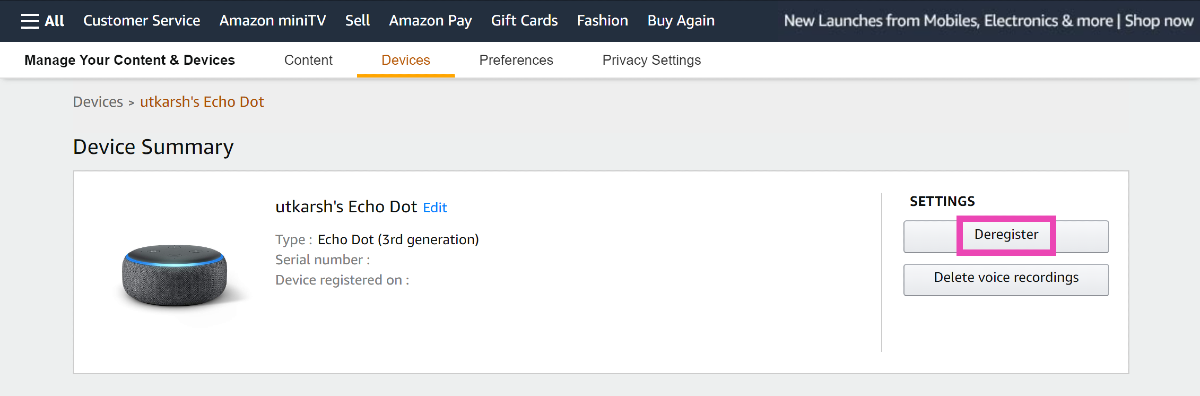 Step 8: Confirm your selection in the popup box.
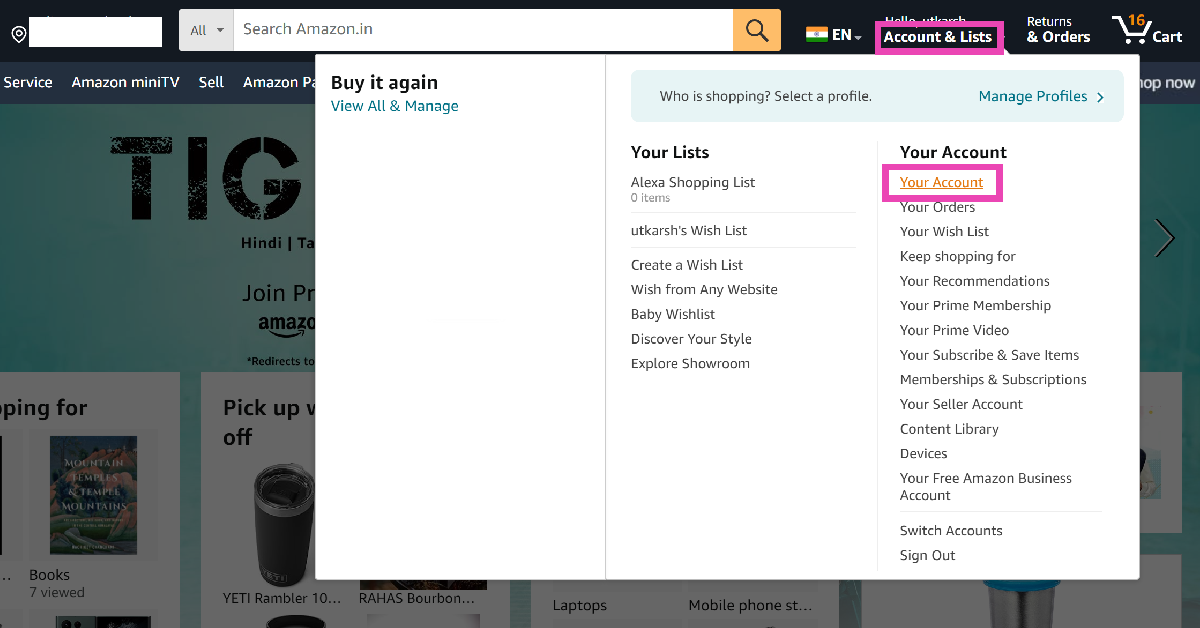 Step 3: Click on Login & security.
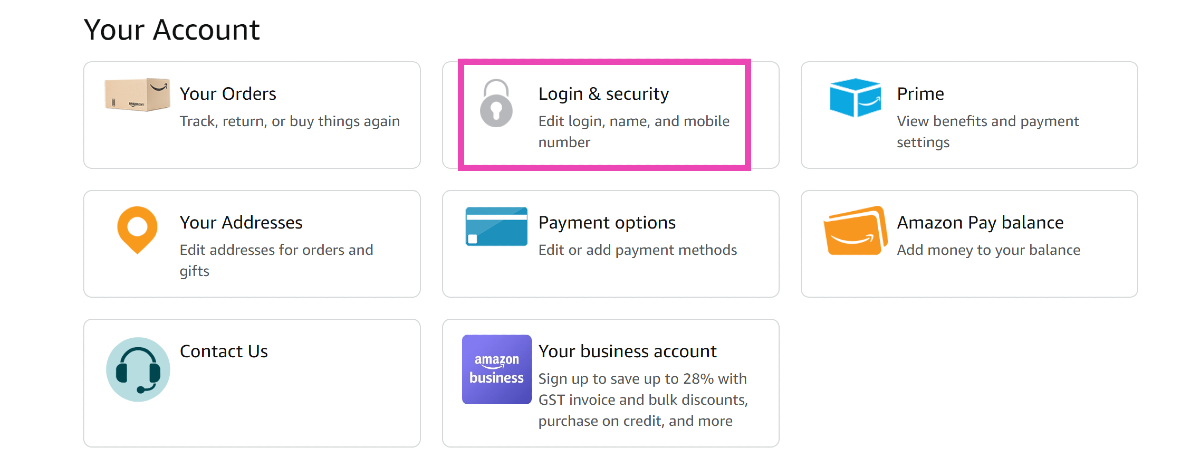 Step 4: Scroll down and click on Start next to ‘Compromised account?’
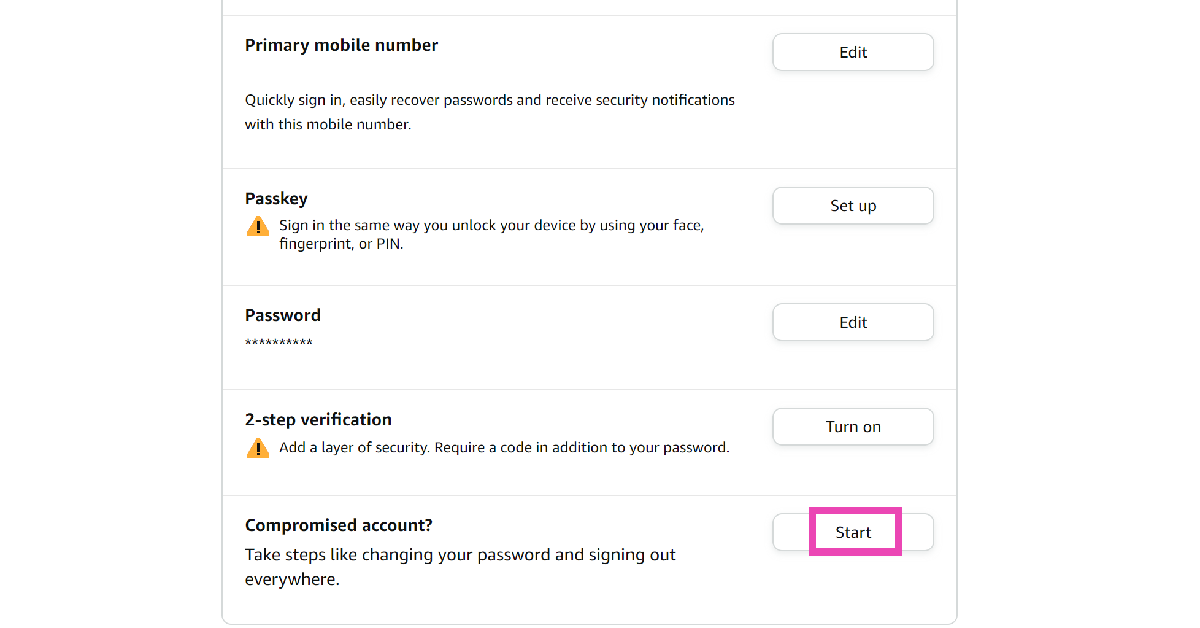 Step 5: Scroll down and select Sign-out of everything.
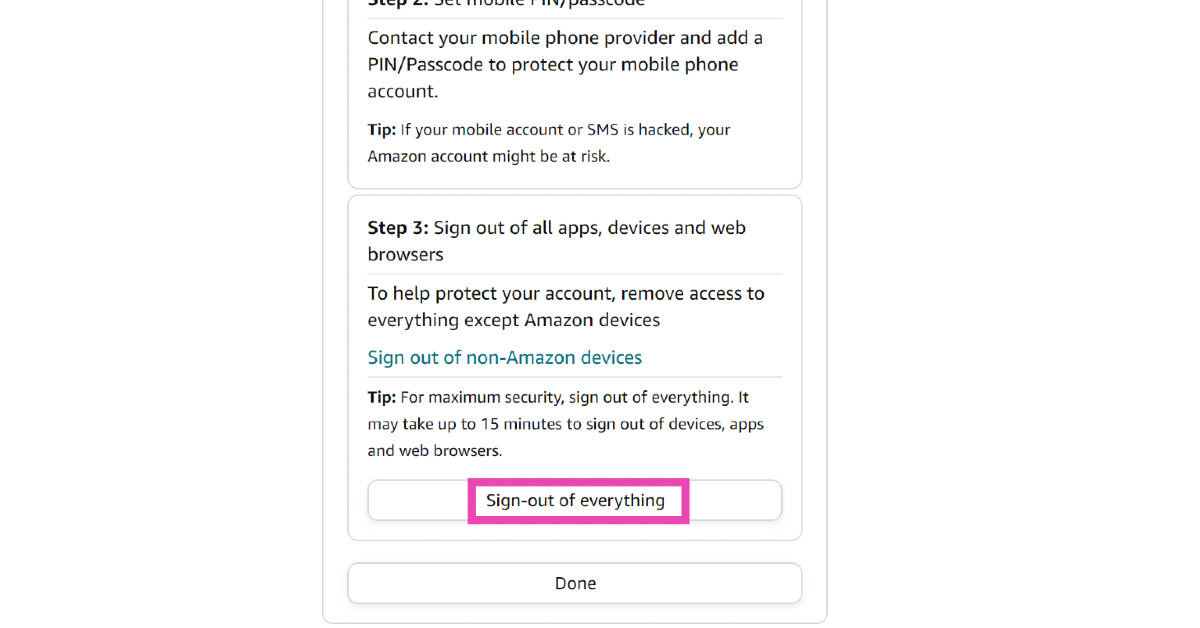
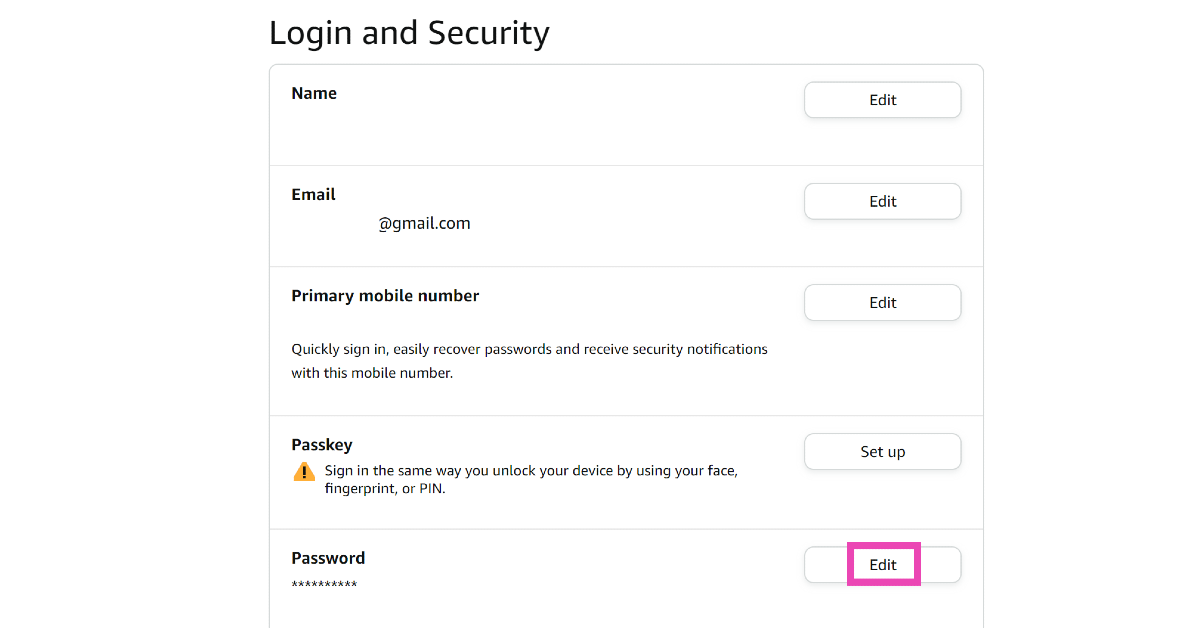 Step 5: Enter your password.
Step 6: Enter the OTP sent to your mobile number and email.
Step 7: Enter the new password and save your changes.
Step 5: Enter your password.
Step 6: Enter the OTP sent to your mobile number and email.
Step 7: Enter the new password and save your changes.
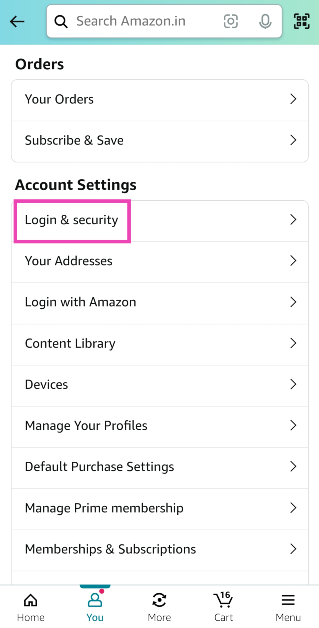 Step 4: Hit Turn on next to 2-step verification.
 Step 5: Enter your phone number to enable 2SV via OTP or use an authenticator app.
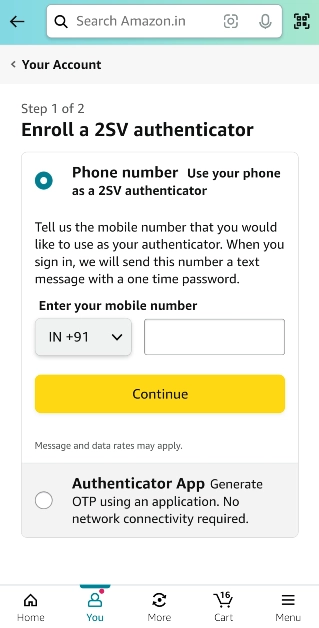
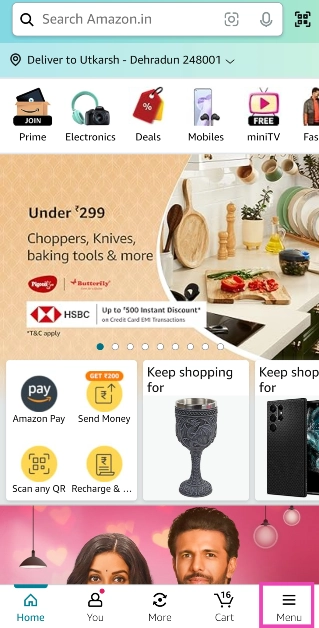 Step 3: Select Sign Out.
 Step 3: Select Sign out from the drop-down menu.
 Akai’s new 4K QLED Google TV Series is being made available in 109cm (43), 127cm (50), 140cm (55), and 165cm (65) screen sizes. All the models include slim, sleek and bezel-less designs with 4K resolution (3840 x 2160). There is a metal cabinet that will contribute to the TV’s longevity and overall performance. Along with HDR HLG support for dynamic contrast, the Akai Television has Dolby Vision and Atmos delivering a rich, immersive experience that enhances the overall viewing pleasure. Powered by Quantum Dot technology the Akai 4K QLED Google TV series produces vivid and true-to-life colours and enhanced brightness.
Also Read: AMD Radeon RX 7600 XT graphics card announced
Along with voice commands the Television can also be controlled through a remote to effectively switch between channels and settings.
In terms of connectivity Akai’s new 4K QLED Google TV Series comes with three HDMI 2.0 ports to connect set-top box, Blu-Ray players and gaming consoles, along with two USB 3.0 ports to connect hard drives and other USB devices.
Customers may easily cast content to the QLED unit from their mobile phones and other connected devices for convenient viewing on any device.
Also Read: 3 new generative AI features coming to Chrome to improve organisation
Akai’s new 4K QLED Google TV Series is being made available in 109cm (43), 127cm (50), 140cm (55), and 165cm (65) screen sizes. All the models include slim, sleek and bezel-less designs with 4K resolution (3840 x 2160). There is a metal cabinet that will contribute to the TV’s longevity and overall performance. Along with HDR HLG support for dynamic contrast, the Akai Television has Dolby Vision and Atmos delivering a rich, immersive experience that enhances the overall viewing pleasure. Powered by Quantum Dot technology the Akai 4K QLED Google TV series produces vivid and true-to-life colours and enhanced brightness.
Also Read: AMD Radeon RX 7600 XT graphics card announced
Along with voice commands the Television can also be controlled through a remote to effectively switch between channels and settings.
In terms of connectivity Akai’s new 4K QLED Google TV Series comes with three HDMI 2.0 ports to connect set-top box, Blu-Ray players and gaming consoles, along with two USB 3.0 ports to connect hard drives and other USB devices.
Customers may easily cast content to the QLED unit from their mobile phones and other connected devices for convenient viewing on any device.
Also Read: 3 new generative AI features coming to Chrome to improve organisation

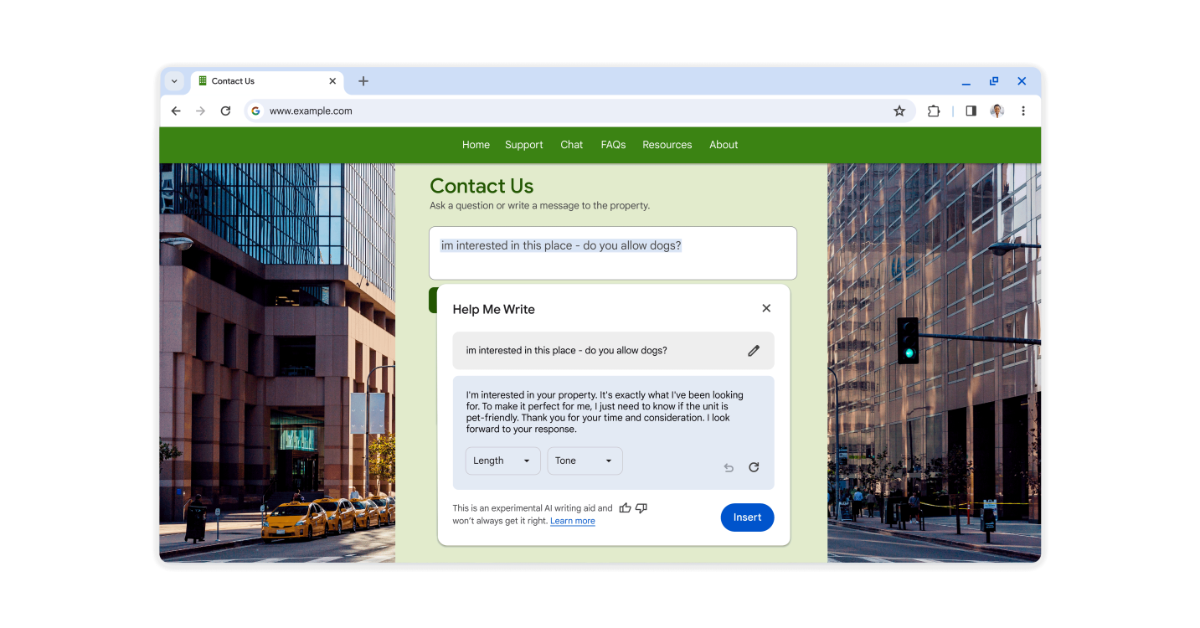 To get started, right-click a text box or field on any site you visit in Chrome and select “Help me write.” Type in a few words, and our AI will kickstart your writing process.
Also Read: LG’s QNED 83 Series with Quantum Dot and NanoCell technologies launched in India
The new features will be available in Chrome on Macs and Windows PCs over the next few days, starting in the U.S. Just sign into Chrome, select “Settings” from the three-dot menu and navigate to the “Experimental AI” page. Because these features are early public experiments, they’ll be disabled for enterprise and educational accounts for now.
To get started, right-click a text box or field on any site you visit in Chrome and select “Help me write.” Type in a few words, and our AI will kickstart your writing process.
Also Read: LG’s QNED 83 Series with Quantum Dot and NanoCell technologies launched in India
The new features will be available in Chrome on Macs and Windows PCs over the next few days, starting in the U.S. Just sign into Chrome, select “Settings” from the three-dot menu and navigate to the “Experimental AI” page. Because these features are early public experiments, they’ll be disabled for enterprise and educational accounts for now. 


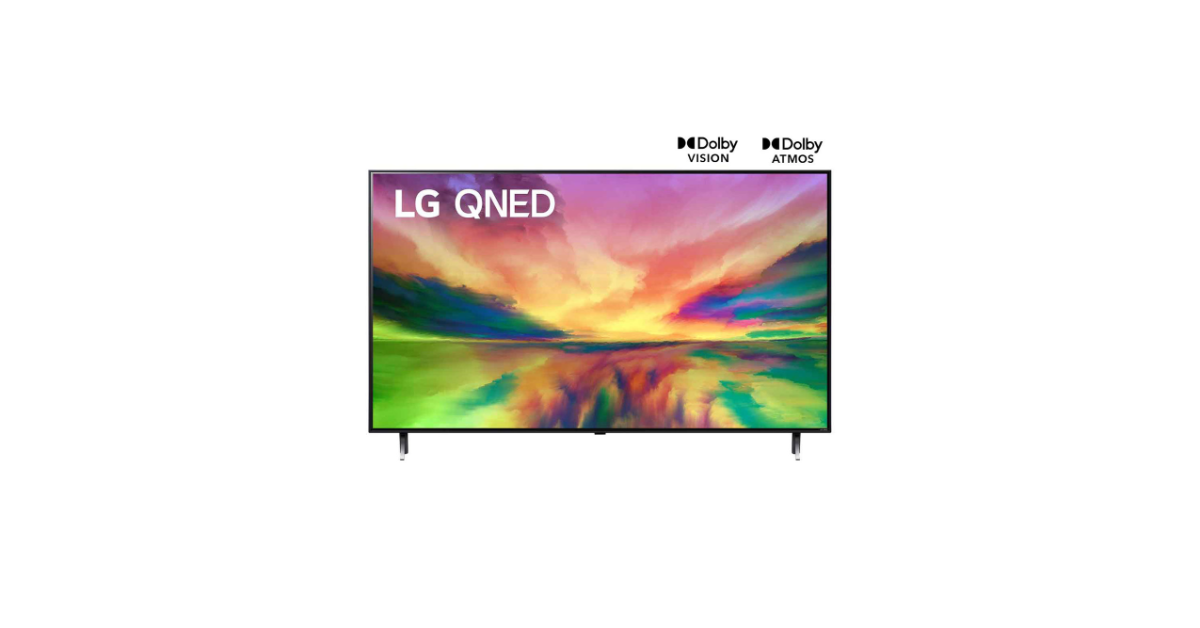


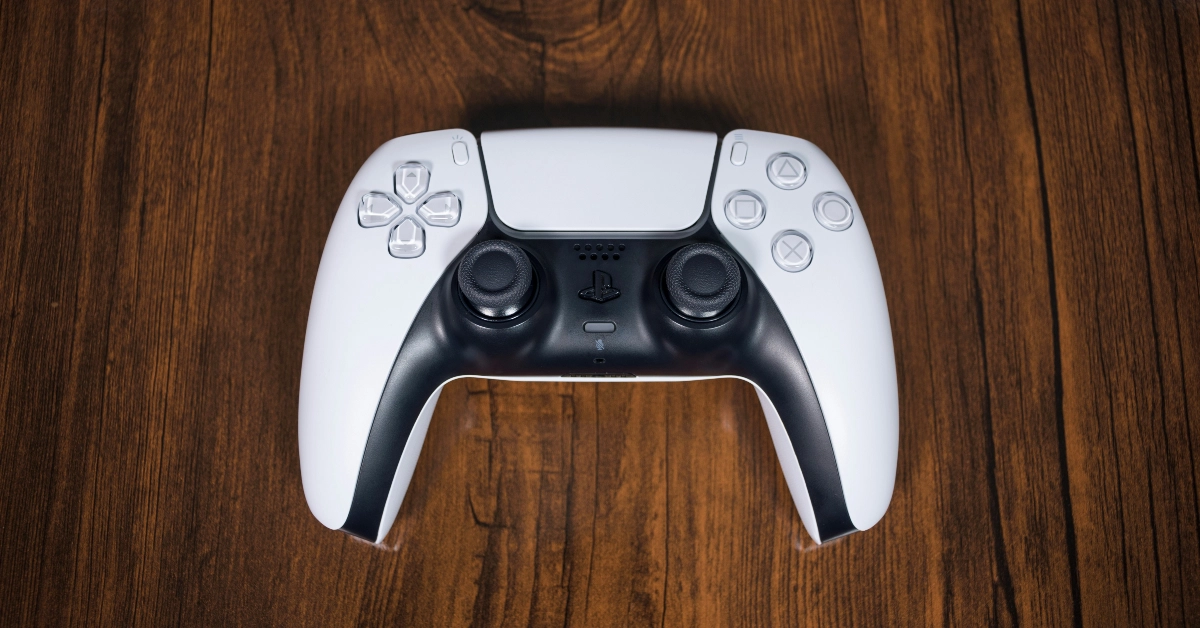 Step 1: Connect your PS5 controller to the PS5 console/PC.
Step 2: Launch the Remote Play app on your PS5/PC.
Step 3: Select PS4 as the console you want to connect to.
Step 4: Follow the onscreen instructions to connect the PS5 controller to your PS4.
Step 1: Connect your PS5 controller to the PS5 console/PC.
Step 2: Launch the Remote Play app on your PS5/PC.
Step 3: Select PS4 as the console you want to connect to.
Step 4: Follow the onscreen instructions to connect the PS5 controller to your PS4.
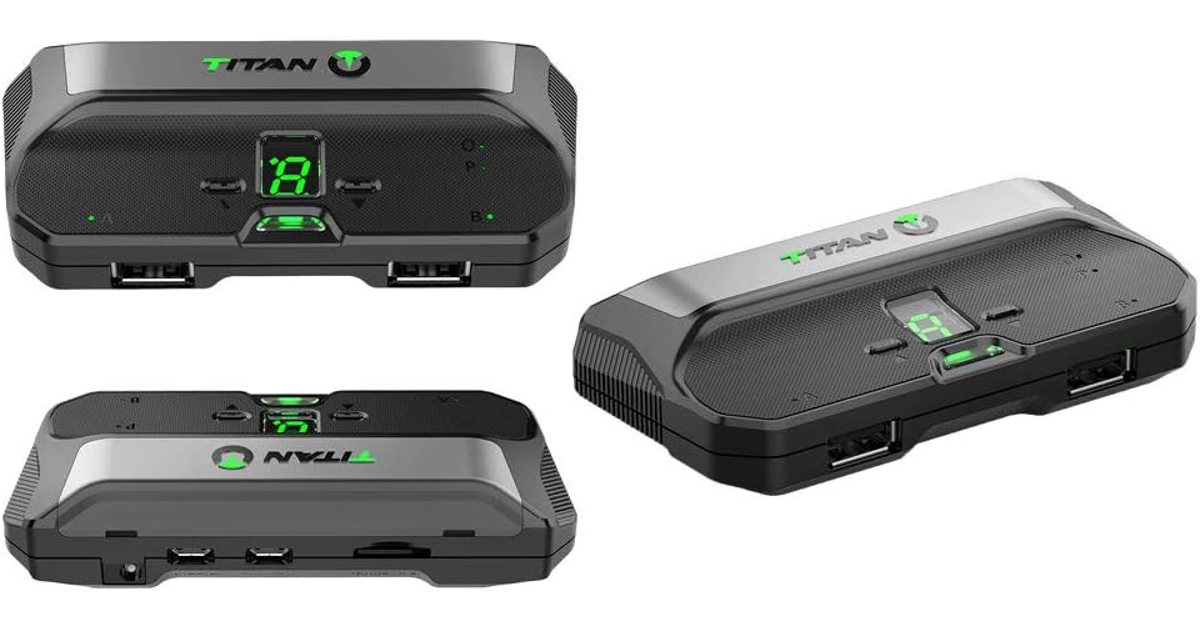 If you don’t want to use the Remote Play app, you can purchase an adapter for a wired/wireless connection between your PS4 console and PS5 controller. The Titan Two and Mayflash Magic-S Pro 2 are good choices.
Step 1: Plug the adapter into the PS4 console.
Step 2: Press the pairing button on the adapter until the LED starts blinking. This denotes that the adapter is in pairing mode.
Step 3: Put your PS5 Dual Sense controller in pairing mode by pressing the Play Station button and Create button simultaneously.
Step 4: Once they are paired, you will be able to use your PS5 controller on your PS4.
If you don’t want to use the Remote Play app, you can purchase an adapter for a wired/wireless connection between your PS4 console and PS5 controller. The Titan Two and Mayflash Magic-S Pro 2 are good choices.
Step 1: Plug the adapter into the PS4 console.
Step 2: Press the pairing button on the adapter until the LED starts blinking. This denotes that the adapter is in pairing mode.
Step 3: Put your PS5 Dual Sense controller in pairing mode by pressing the Play Station button and Create button simultaneously.
Step 4: Once they are paired, you will be able to use your PS5 controller on your PS4.

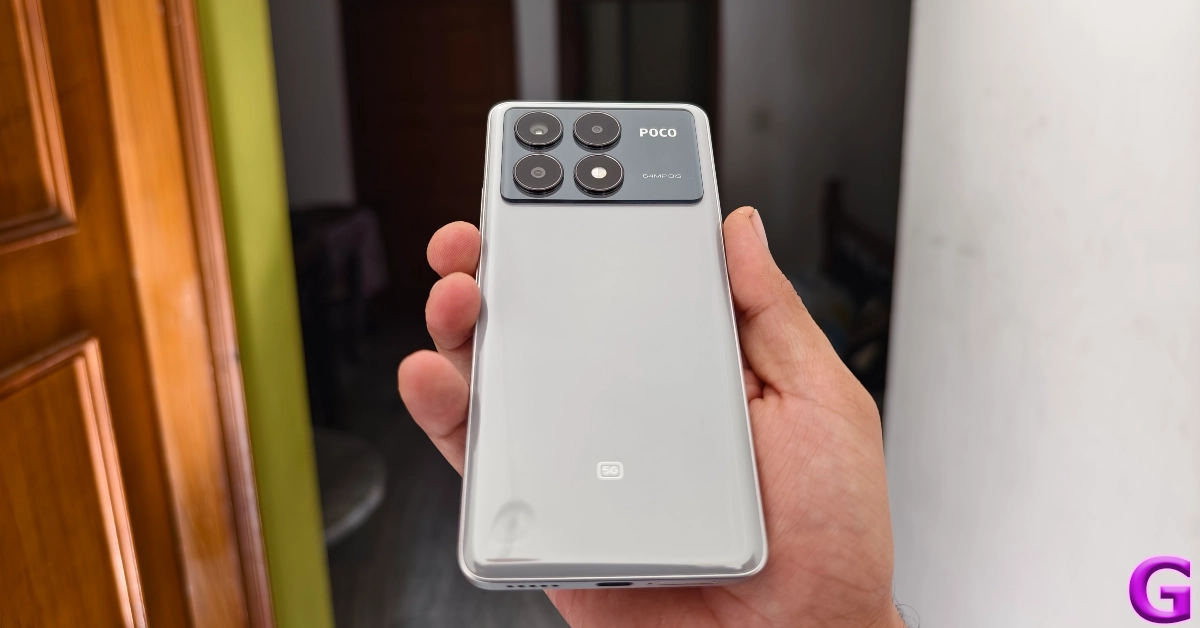 Poco’s Pro variant in its 2024 X6 Series has made small yet significant changes to its design. The two-step camera panel at the back now covers the entire width of the smartphone. In its previous iteration, this glossy panel was aligned to the left, with the dual-tone colouring covering the remaining area. This is still the case in the non-Pro variant this year.
Even though the X6 Pro has a plastic back, it almost feels like glass. This ‘glasstic’ material does elevate the in-hand feel of the device but is a fingerprint magnet. Picking up the phone for a couple of minutes will surely leave some prints on the back. The vegan leather back on the yellow colour variant does not present this issue. Smudges aside, we like the overall design of the smartphone. The three cameras and the LED flash get individual cutouts which are aligned in a square pattern.
Poco’s Pro variant in its 2024 X6 Series has made small yet significant changes to its design. The two-step camera panel at the back now covers the entire width of the smartphone. In its previous iteration, this glossy panel was aligned to the left, with the dual-tone colouring covering the remaining area. This is still the case in the non-Pro variant this year.
Even though the X6 Pro has a plastic back, it almost feels like glass. This ‘glasstic’ material does elevate the in-hand feel of the device but is a fingerprint magnet. Picking up the phone for a couple of minutes will surely leave some prints on the back. The vegan leather back on the yellow colour variant does not present this issue. Smudges aside, we like the overall design of the smartphone. The three cameras and the LED flash get individual cutouts which are aligned in a square pattern.
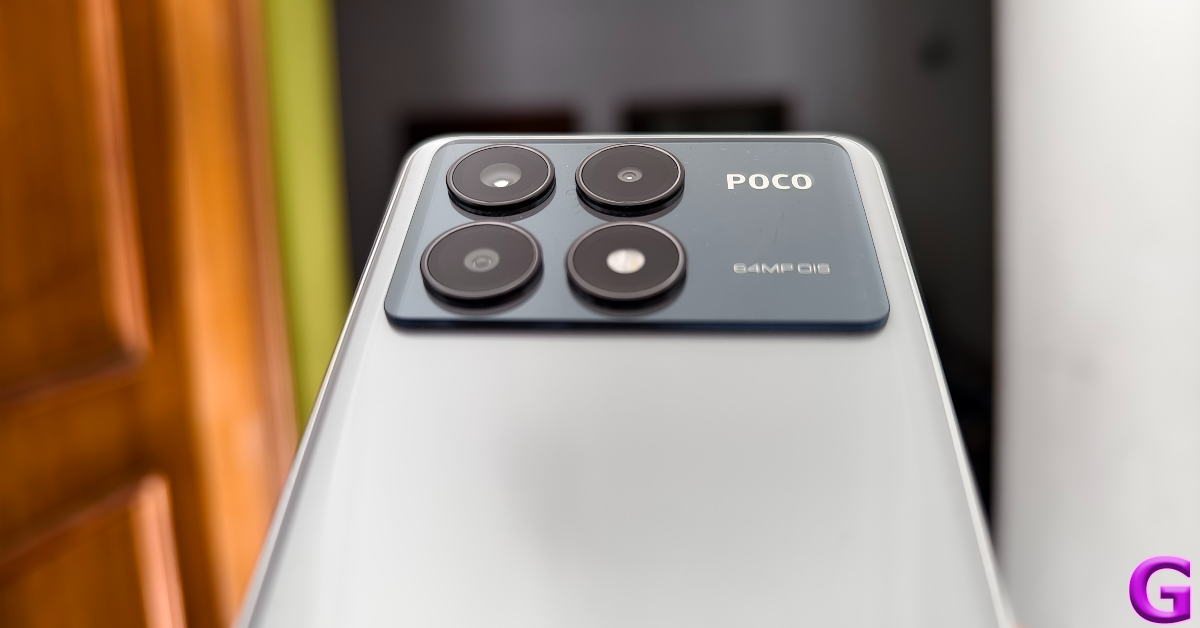 The back panel curves slightly into the flat plastic frame. The left edge of the frame houses the volume rocker and power keys. At the bottom, you get the SIM tray, microphone, USB Type-C port, and the primary speaker grille. Up top lie the secondary microphone, IR blaster, and stereo speaker. The left edge is completely keyless. Unlike its previous iteration (our review here), there is no 3.5mm headphone jack on the X6 Pro, but you can still get it on the non-Pro variant.
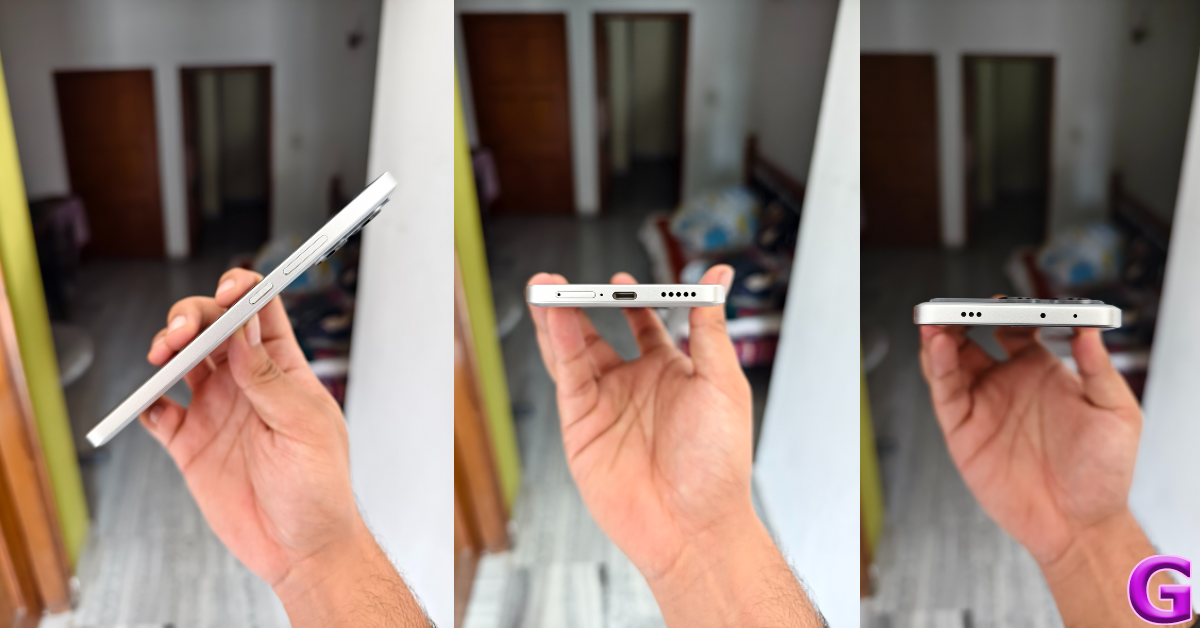 Moving on, Poco X6 Pro’s display is undoubtedly its biggest attribute. This 6.67-inch AMOLED panel has a 1,220 x 2,712p resolution and a 120Hz refresh rate. On top of that, it gets HDR10+ support and Widevine L1 certification. Reaching an impressive peak brightness of 1,800 nits, this display remains perfectly legible under direct sunlight. Surrounding the display are very slim bezels that get a smidge thicker around the chin. If you don’t pay close attention to the bezels (which is quite easy, given their size), they appear uniform.
 The touch response offered by the X6 Pro’s display is very close to the flagship level. Swiping through pages, switching apps, navigating the phone’s interface, and other activities provide a very fluid experience. The X6 Pro is also the first Poco smartphone to get an in-display fingerprint scanner. It is one of the fastest scanners we have used in any segment, and it is nice to see Poco nail such a vital part of the display in its first attempt.
We watched a variety of content across different OTT and streaming apps. The HDR quality is good and the images produced on the screen are rich in colour. The stereo speakers can go loud without sounding distorted. Although the audio output could have improved on its low end, it doesn’t sound tinny or hollow. We did not feel the need to put on headphones while watching movies on the X6 Pro.
The touch response offered by the X6 Pro’s display is very close to the flagship level. Swiping through pages, switching apps, navigating the phone’s interface, and other activities provide a very fluid experience. The X6 Pro is also the first Poco smartphone to get an in-display fingerprint scanner. It is one of the fastest scanners we have used in any segment, and it is nice to see Poco nail such a vital part of the display in its first attempt.
We watched a variety of content across different OTT and streaming apps. The HDR quality is good and the images produced on the screen are rich in colour. The stereo speakers can go loud without sounding distorted. Although the audio output could have improved on its low end, it doesn’t sound tinny or hollow. We did not feel the need to put on headphones while watching movies on the X6 Pro.
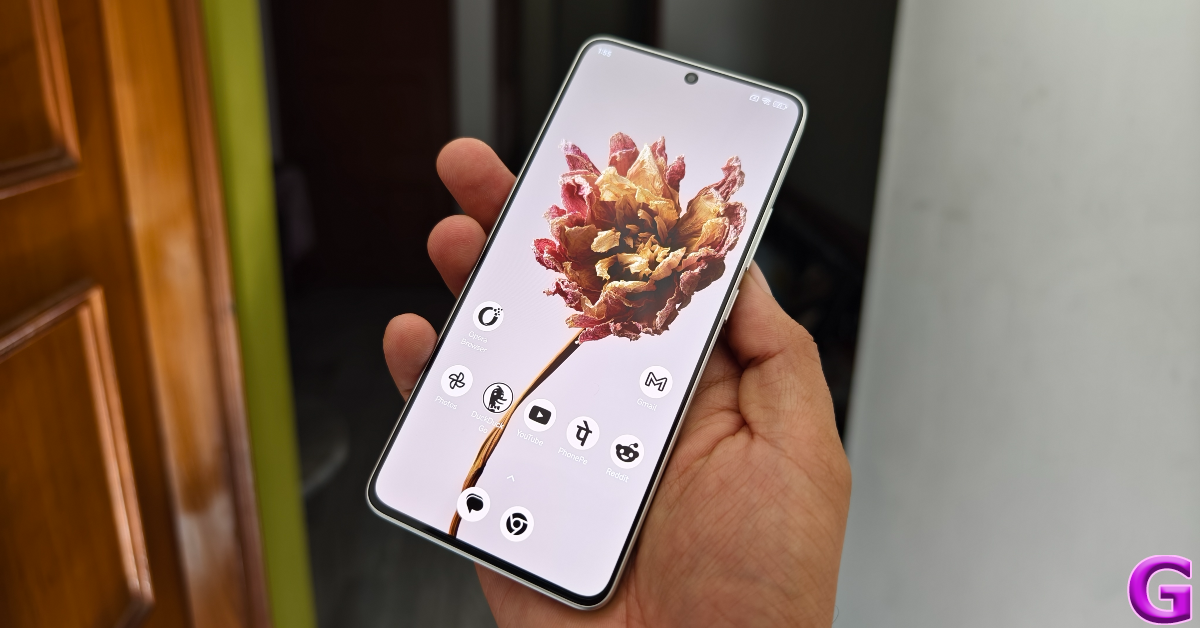 An IP54 rating ensures that the smartphone can handle minor water splashes and exposure to minimal dust. Pulling a smartphone out while it’s raining will not damage its internals, but a dip in the water may lead to a different outcome.
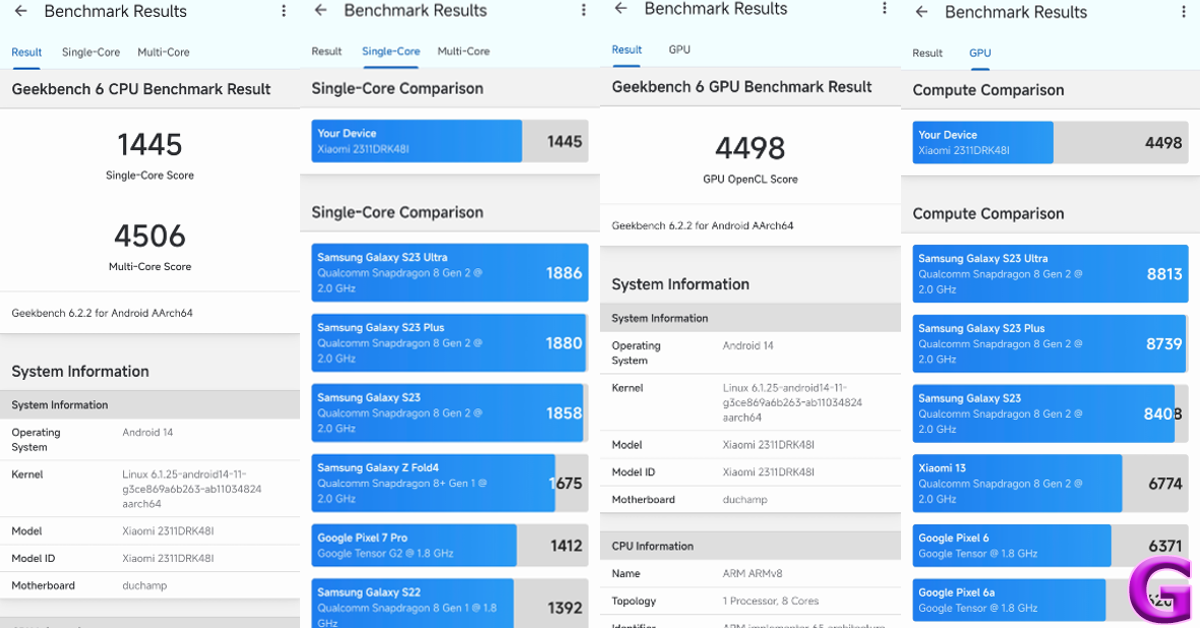 One of the things that make the X6 Pro stand apart in its segments is its speediness. The smartphone takes no time to load apps and switch between them. While working on the phone, we always felt like it was a step ahead of us. This isn’t something we can say for other smartphones in this price bracket. The X6 Pro crushes basic tasks like instant messaging, video calling, photo editing, web browsing, and others. Even with multiple apps occupying the RAM, the smartphone remains unfazed.
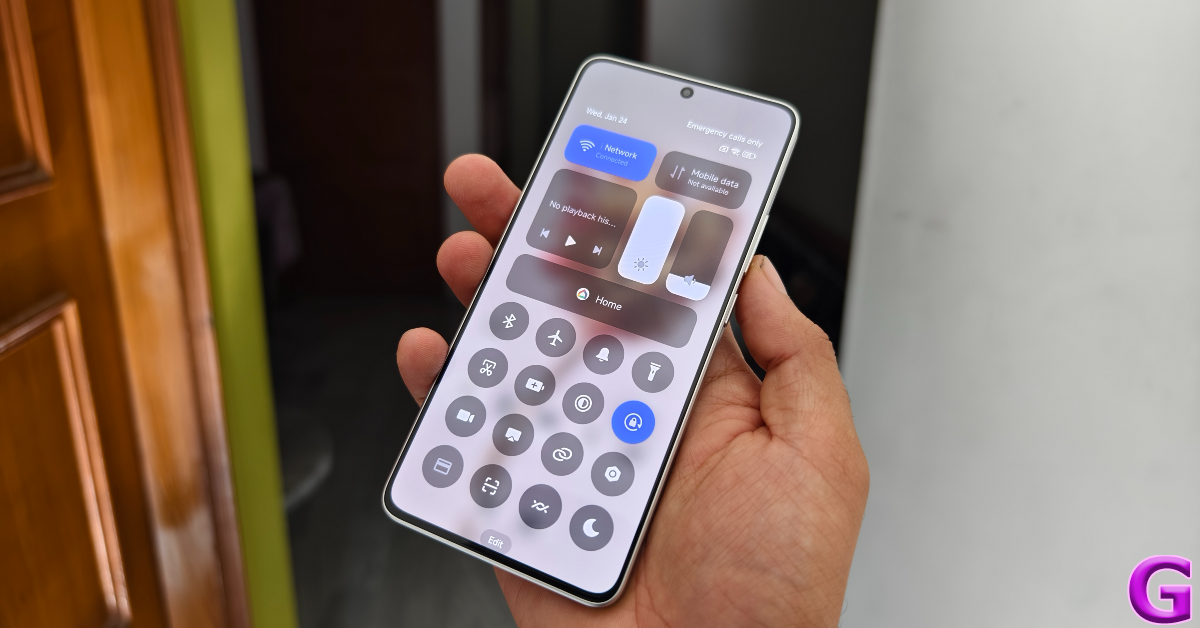 A similar performance is replicated while gaming on the device. The brilliant touch response pays dividends while playing games like Call of Duty Mobile and BGMI. The 5,000mm2 stainless steel vapour changer plays its part in maintaining the internal temperature to an optimum level. Even with high graphic settings and maximum frame rate, the smartphone does not create any jitters or unwanted lags while gaming.
Poco X6 Pro is one of the first smartphones in India to ship with the Xiaomi HyperOS. Its non-Pro sibling gets MIUI 14 OS out of the box, which can be upgraded to HyperOS. While there isn’t much that separates the two Android 14-based skins, we do like the overall feel of the HyperOS. The quick settings panel extends to the bottom of the display upon swiping down from the status bar. The tiles are text-free, which makes them aesthetically appealing, but it takes a few days to get used to them. It looks eerily similar to the iPhone’s Control Centre, but that isn’t a bad thing at all.
A similar performance is replicated while gaming on the device. The brilliant touch response pays dividends while playing games like Call of Duty Mobile and BGMI. The 5,000mm2 stainless steel vapour changer plays its part in maintaining the internal temperature to an optimum level. Even with high graphic settings and maximum frame rate, the smartphone does not create any jitters or unwanted lags while gaming.
Poco X6 Pro is one of the first smartphones in India to ship with the Xiaomi HyperOS. Its non-Pro sibling gets MIUI 14 OS out of the box, which can be upgraded to HyperOS. While there isn’t much that separates the two Android 14-based skins, we do like the overall feel of the HyperOS. The quick settings panel extends to the bottom of the display upon swiping down from the status bar. The tiles are text-free, which makes them aesthetically appealing, but it takes a few days to get used to them. It looks eerily similar to the iPhone’s Control Centre, but that isn’t a bad thing at all.
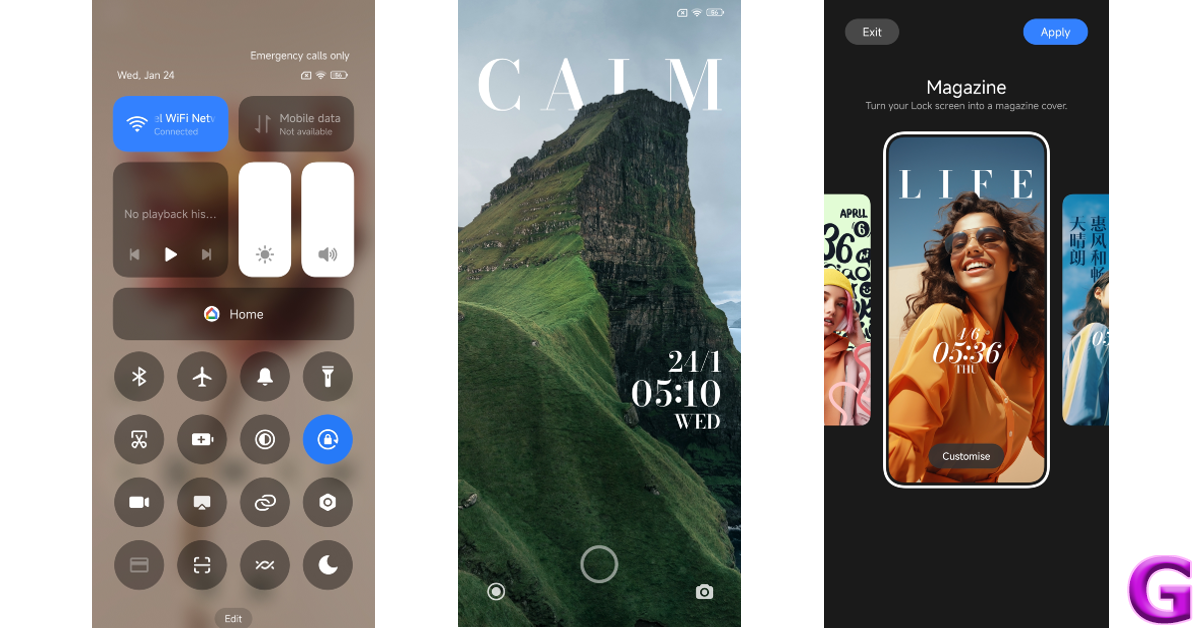 The OS also offers a new ‘MiSans’ font along with a bunch of lock screen and wallpaper customisation options. You can choose from a bunch of styles for the lock screen and customise them even further by adding a signature and applying the depth effect. This is also inspired by the lock screen effects in iOS. Overall the software experience on the X6 Pro is quite pleasing, once you get past the bloatware.
The 5,000 mAh battery was able to power it for an entire day. During the review period, we used the Poco X6 Pro for calling, texting, binge-watching TV shows, and gaming. At the end of each day, we were left with a 15-20% charge. This is pretty standard as far as most mid-range smartphones go. The 67W power adapter provided in the box can fully charge the smartphone in 45 minutes.
The OS also offers a new ‘MiSans’ font along with a bunch of lock screen and wallpaper customisation options. You can choose from a bunch of styles for the lock screen and customise them even further by adding a signature and applying the depth effect. This is also inspired by the lock screen effects in iOS. Overall the software experience on the X6 Pro is quite pleasing, once you get past the bloatware.
The 5,000 mAh battery was able to power it for an entire day. During the review period, we used the Poco X6 Pro for calling, texting, binge-watching TV shows, and gaming. At the end of each day, we were left with a 15-20% charge. This is pretty standard as far as most mid-range smartphones go. The 67W power adapter provided in the box can fully charge the smartphone in 45 minutes.
 Cameras are not Poco X6 Pro’s strongest suit, but it does not disappoint. The rear camera array consists of a 64MP primary shooter, an 8MP ultrawide lens, and a 2MP macro sensor. In daylight conditions, the primary camera takes good images that are rich in colour and pack a lot of detail. The images are well-processed, featuring adequate dynamic range with sharp and well-exposed shadows.
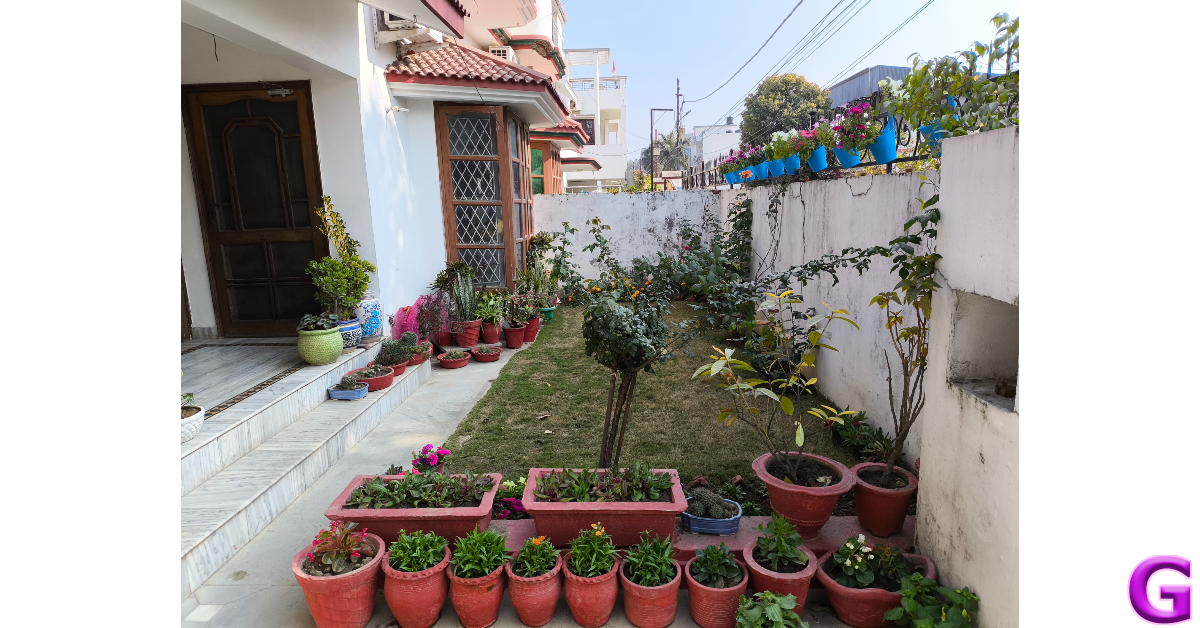
 The primary camera surprised us in low-light conditions, making use of clever photoprocessing to produce good results. The camera manages to expose and brighten the subject nicely, while the noise level is suppressed to an optimum degree. With the Night Mode turned on, the images come out a little sharpened and some colour correction is applied to the final result.

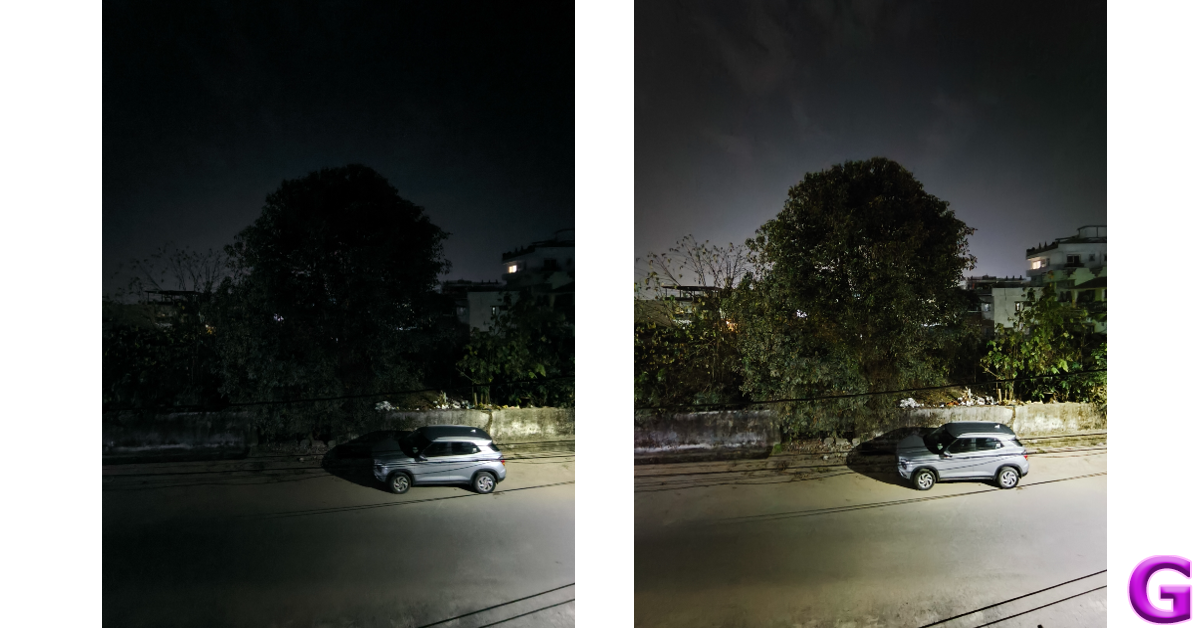
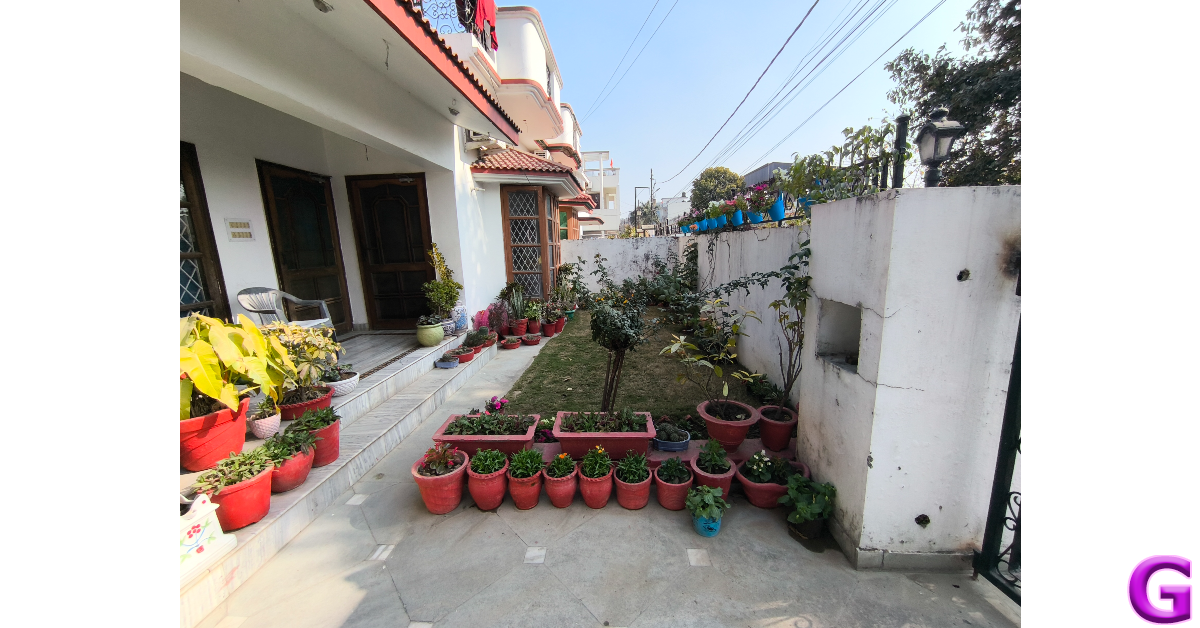
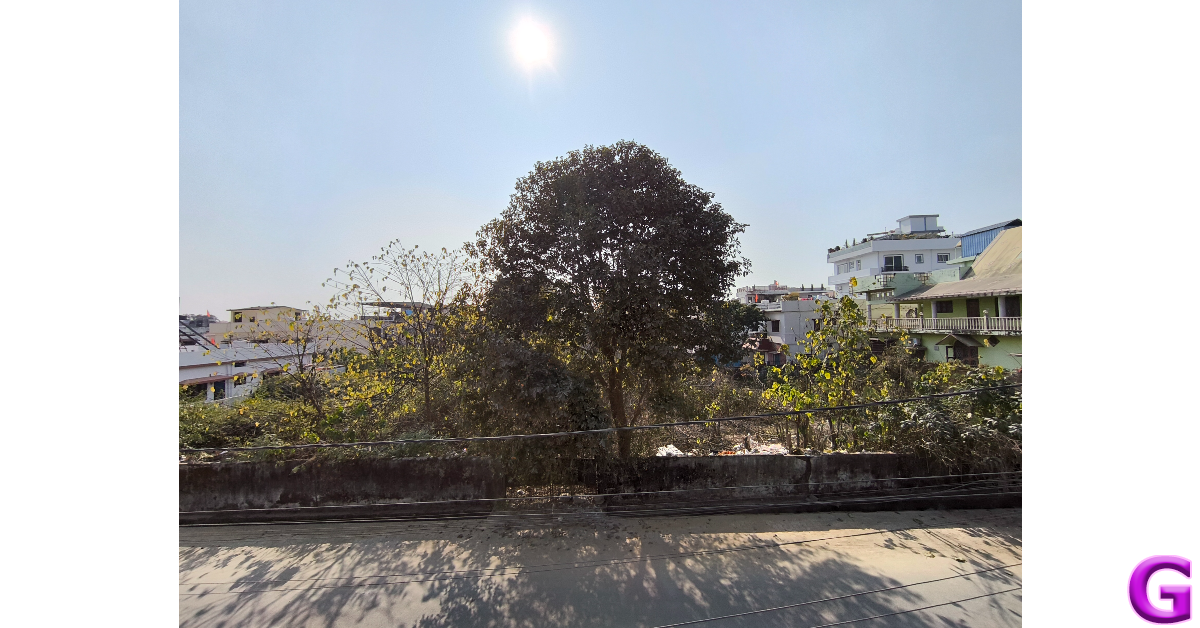


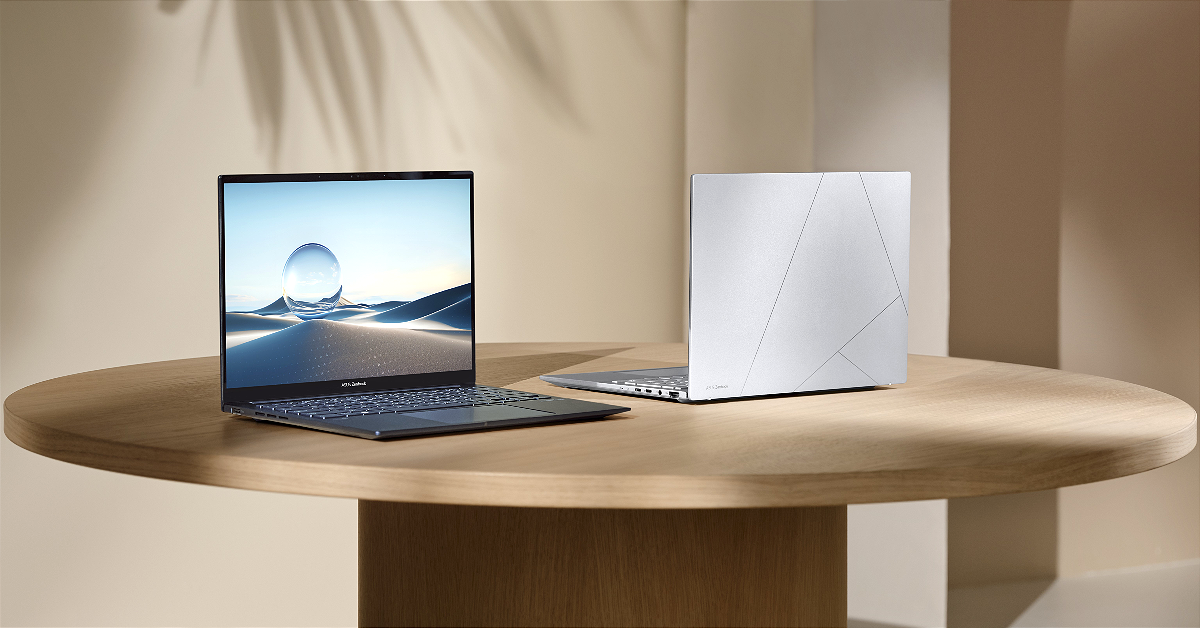

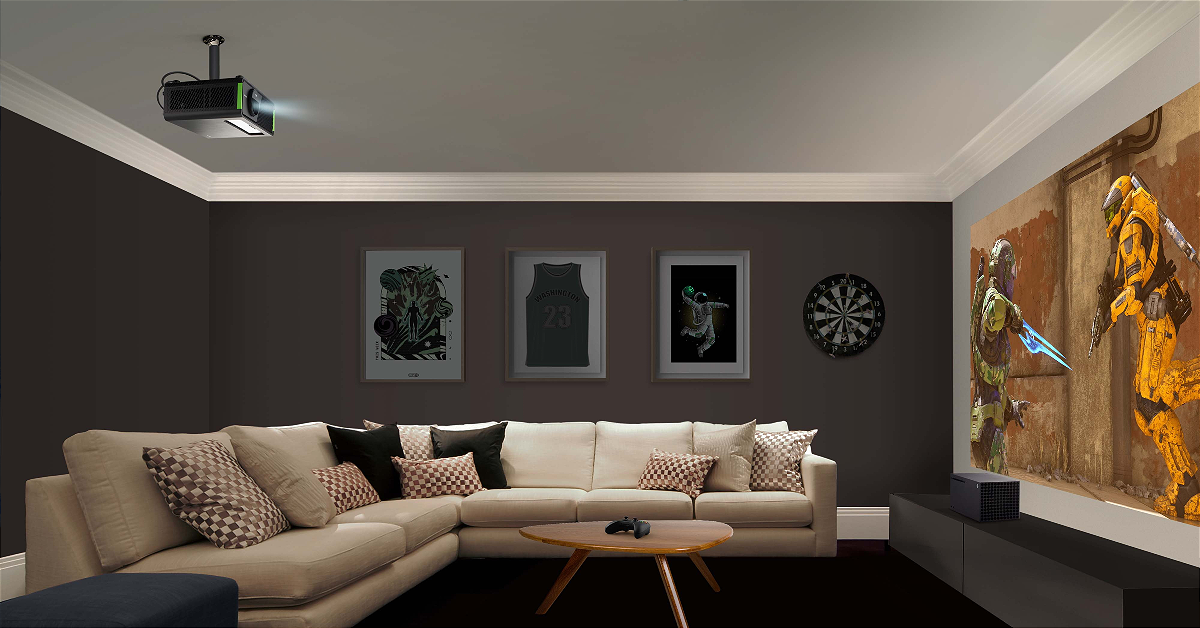


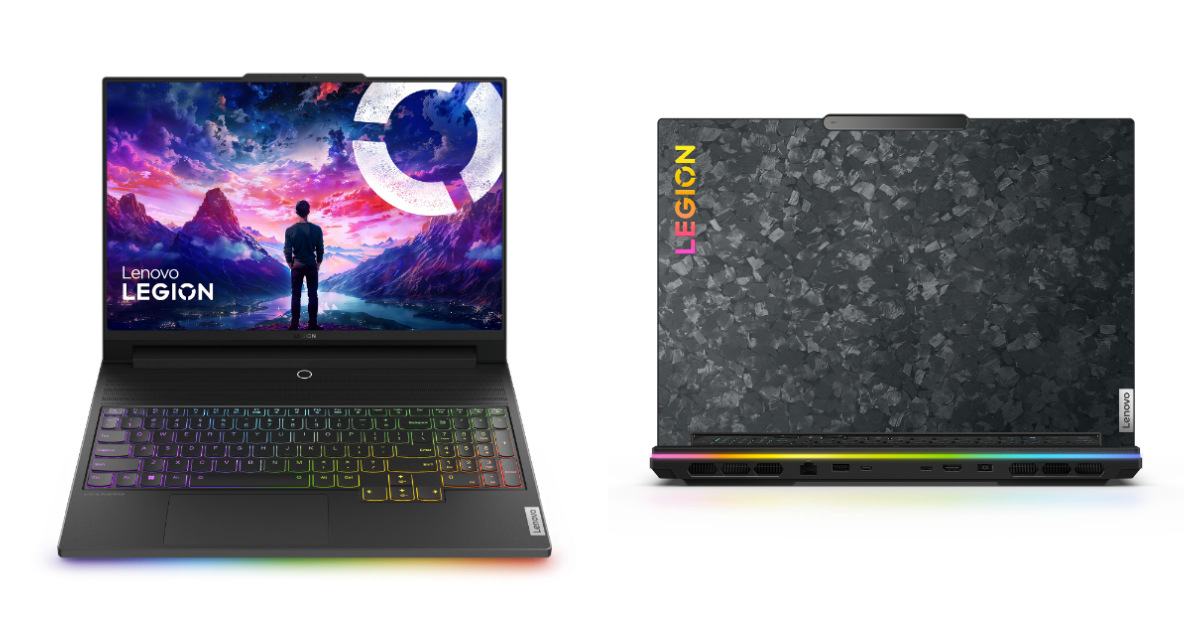 The laptop is armed with a 13th Gen Intel Core i9-13980HX processor, up to an NVIDIA GeForce RTX 4090 Laptop GPU. It also comes with 32GB of overclocked 6400Mhz DDR5 Dual Channel RAM and 2TB of SSD M.2 storage.
The Lenovo Legion 9i is integrated with liquid cooling, co-engineered with Cooler Master, and tackles scorching VRAM under extreme gaming loads, kicking in at 84°C for instant chill. Additionally, there is an AI-tuned triple-fan air system boasting 6,333 individual vents, keeping all components ice-cool even during intense gaming and content creation.
Also Read: OnePlus Buds 3 with 10.4mm driver unit launched in India
Furthermore, there is a dedicated Lenovo LA-2 AI chip allowing auto-adjusting power for peak FPS through its Smart FPS feature, while synchronizing Legion Spectrum RGB throughout, from the keyboard’s per-key TrueStrike illumination.
Also Read: Itel Roar 75 Review: Are they worth buying?
The device also features a 1080p webcam with an electronic e-shutter for privacy. It boasts a 99.99Whr battery. Additionally, it comes with Windows 11 as well as 3 months of access to Xbox Game Pass Ultimate and Legion Arena consolidates games from multiple platforms and acts like a ‘gaming hub’. Optional Lenovo Premium Care support is also available for people who want access to advanced technical support with at-your-doorstep support and preventative PC health checks.
The laptop is armed with a 13th Gen Intel Core i9-13980HX processor, up to an NVIDIA GeForce RTX 4090 Laptop GPU. It also comes with 32GB of overclocked 6400Mhz DDR5 Dual Channel RAM and 2TB of SSD M.2 storage.
The Lenovo Legion 9i is integrated with liquid cooling, co-engineered with Cooler Master, and tackles scorching VRAM under extreme gaming loads, kicking in at 84°C for instant chill. Additionally, there is an AI-tuned triple-fan air system boasting 6,333 individual vents, keeping all components ice-cool even during intense gaming and content creation.
Also Read: OnePlus Buds 3 with 10.4mm driver unit launched in India
Furthermore, there is a dedicated Lenovo LA-2 AI chip allowing auto-adjusting power for peak FPS through its Smart FPS feature, while synchronizing Legion Spectrum RGB throughout, from the keyboard’s per-key TrueStrike illumination.
Also Read: Itel Roar 75 Review: Are they worth buying?
The device also features a 1080p webcam with an electronic e-shutter for privacy. It boasts a 99.99Whr battery. Additionally, it comes with Windows 11 as well as 3 months of access to Xbox Game Pass Ultimate and Legion Arena consolidates games from multiple platforms and acts like a ‘gaming hub’. Optional Lenovo Premium Care support is also available for people who want access to advanced technical support with at-your-doorstep support and preventative PC health checks.