- Angry Birds: Showdown is one of the first titles up for testing.
- Playables on YouTube are accessible to a small section of Paid users.
- YouTube Playables is still under Beta testing phase until March 28, 2024.
Playables on YouTube now available for Premium users

Key highlights
Garena Free Fire Redeem Codes Today 27 November 2023: Here is how to claim them

Garena Free Fire is a battle royale game with regular awards and tournaments to keep players interested. If you play Garena Free Fire, you should be aware of the redeem codes that are released on a daily basis. However, because the battle royale game is banned in India, players from other countries can use the Free Fire Redeem codes daily. If you’re unfamiliar with the Garena Free Fire redeem codes or don’t know how to get them, we’ve put together a step-by-step guide to help you redeem them. Check out Garena Free Fire Redeem Codes for 27 November 2023.
The Free Fire redeem codes are a great way to get free stuff. These are 12-digit codes that contain alphabets and numbers, as well as an expiration date and time. Because the Garena FF redeem codes cannot be used more than once, you should hurry to the redemption page to claim your free reward before someone else does. To get a free reward, all you have to do is go to reward.ff.garena.com/en, which is the official redemption page. Also, keep an eye on this space for daily updates on Garena Free Fire redemption codes and rewards.
In This Article
Garena Free Fire Redeem Codes Today 27 November 2023
HFNSJ6W74Z48 2FG94YCW9VMV FFDBGQWPNHJX V44ZZ5YY7CBS FFAC2YXE6RF2 FFCMCPSBN9CU FFBBCVQZ4MWA VDE324BHY67J 98U7Y65TGBNH VCF432WER4CC NVB777NMJ90O CZX432WER4DF BCVGTY65R4ER BCV543ASD43ED MNJ900OLIK89 XDR542FR54VG HHNAT6VKQ9R7 TDK4JWN6RD6 XFW4Z6Q882WY ASF654RTY78U 123NHY78IKM8 OPL098IKMJ76 VZC544ERT56G 4TPQRDQJHVP4 WD2ATK3ZEA55 E2F86ZREMK49How to Get Free Fire Redeem Codes for Garena on 27 November 2023?
- Visit the Garena Free Fire game’s official website at reward.ff.garena.com.
- Use your Facebook, Google, VK, Apple ID, Huawei ID, or Twitter account to log in.
- You’ll be taken to a valid redemption code (s)
- Copy and paste the 12-digit redemption code into the text box.
- On the screen, a dialogue box will appear.
- ‘Ok’ should be selected.
Top 6 ways to download a video from X (formerly Twitter)
")
Twitter may have started off as a micro-blogging website, but it has coalesced into a social media giant that hosts all kinds of content across different formats. Now known as X, the platform is a hotbed for viral videos and original creators who exclusively post on there. If you’re an X user, you must have come across a video that you wanted to share with your friends who aren’t on the platform. Sending a link might not always work since X frequently asks users to create an account to access the content. To fix this conundrum, check out these 6 quick methods to download a video from X/Twitter.
Read Also: Best 3 ways to get free Minecoins on Minecraft?
 Step 4: Select Download video.
 The video will be saved to your device.

 Step 4: Click on Copy Link.
 Step 5: Go back to the third-party tool and paste the link into the ‘Tweet URL’ box.
Step 6: Click on Load Videos.
Step 5: Go back to the third-party tool and paste the link into the ‘Tweet URL’ box.
Step 6: Click on Load Videos.
 Step 7: Select the resolution you want for the video.
 The video will be downloaded to your device.

 Step 4: Select Copy Link.
 Step 5: Launch the Download Twitter Videos – GIF app. The link you copied from Twitter will automatically get posted in the Your Link box. If not, post it manually.
Step 6: Select your preferred resolution and hit Download.
Step 5: Launch the Download Twitter Videos – GIF app. The link you copied from Twitter will automatically get posted in the Your Link box. If not, post it manually.
Step 6: Select your preferred resolution and hit Download.
 Step 4: Hit Download.
 Step 5: Select your preferred resolution and hit Download again.

In This Article
What kind of tool do you need to download videos from X/Twitter?
If you are a Twitter Blue/X Premium subscriber, you can natively download videos from the app itself. You don’t need a third-party app or online tool to do the job for you. However, there is one small catch that you need to know about. X/Twitter users who publish videos on the platform can decide whether other users can download their videos. If they have turned off this functionality, even Blue/Premium subscribers will not be able to save their videos. This will bring you back to relying upon third-party tools. You should also know that the native download feature is not yet available for PCs. When it comes to using third-party apps to download X/Twitter videos, we recommend the Seal Downloader. This app is accessible to the average user and gets the job done in a few simple steps. Unlike other third-party apps, Seal Downloader does not have any annoying popups or redirects. Its layout is integrated with some ads, but the overall design is quite clean. You also get the option to choose the video resolution. Apart from X/Twitter, this app works for every major social media platform.Download videos from X (formerly Twitter) using the app itself
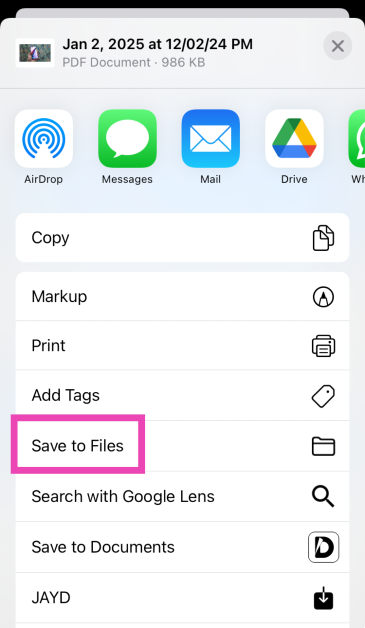
The option to natively download videos on Twitter is exclusive to Blue subscribers only. However, not all videos on the platform may be available for download. Video publishers get to decide whether other users on the app can download the video to their devices. Step 1: Launch the X app on your smartphone and select the video you want to download. Step 2: Make sure the video is in full screen. Step 3: Hit the ellipses at the top-right corner of the screen. Step 4: Select Download video.
 The video will be saved to your device.
Another way to download a video from the X app itself
There is another way to download a video from X without playing it in fullscreen. While there is nothing wrong with this method, sometimes users may not want to play videos especially if they’re out in public and don’t have their headphones on them. Luckily, X allows you to save a video without playing it. Here’s how. Step 1: Launch the X app on your phone and load the post containing the video. Step 2: Long-press the video until a set of options pop up on the screen. Step 3 Hit Download video.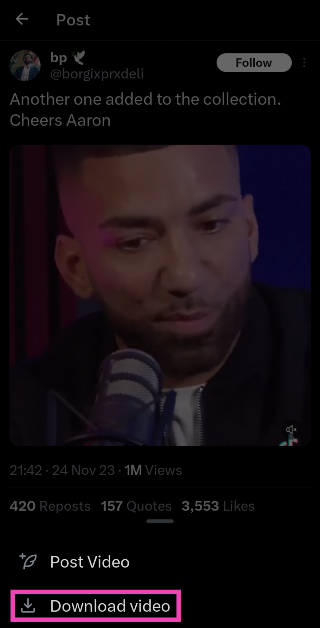
Use a third-party tool
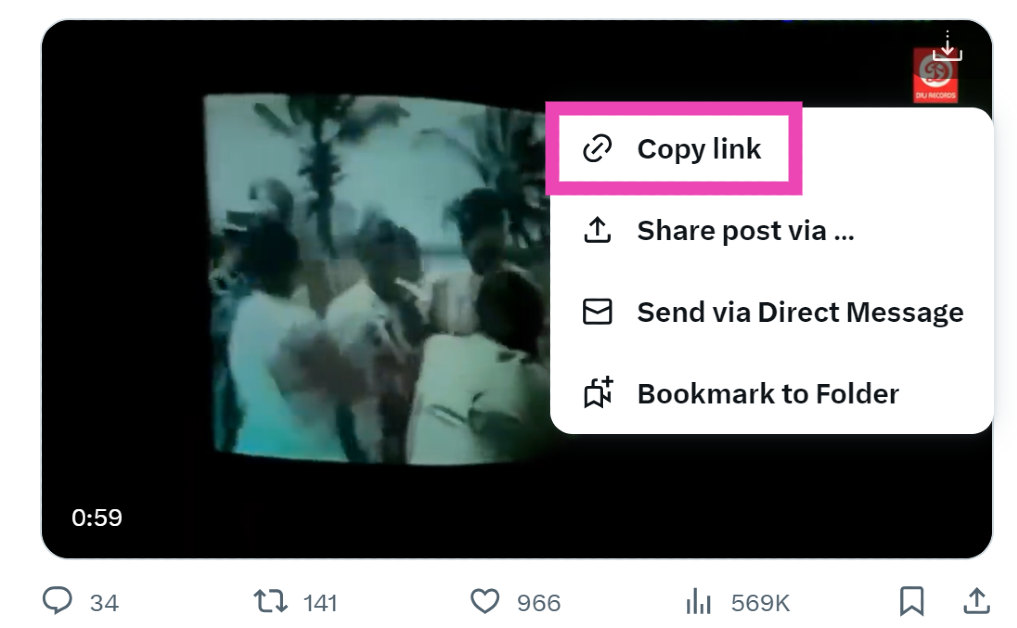
Since there is no way to natively download Twitter videos on a PC (even for Twitter Blue subscribers), you will need to take the help of a third-party tool. Here’s how you can go about it using the Twitter Vid tool. Step 1: On your PC, go to https://twittervid.com/. Step 2: Open Twitter in another tab and go to the video you want to download. Step 3: Hit the Share icon at the bottom of the post. Step 4: Click on Copy Link.
 Step 5: Go back to the third-party tool and paste the link into the ‘Tweet URL’ box.
Step 6: Click on Load Videos.
Step 5: Go back to the third-party tool and paste the link into the ‘Tweet URL’ box.
Step 6: Click on Load Videos.
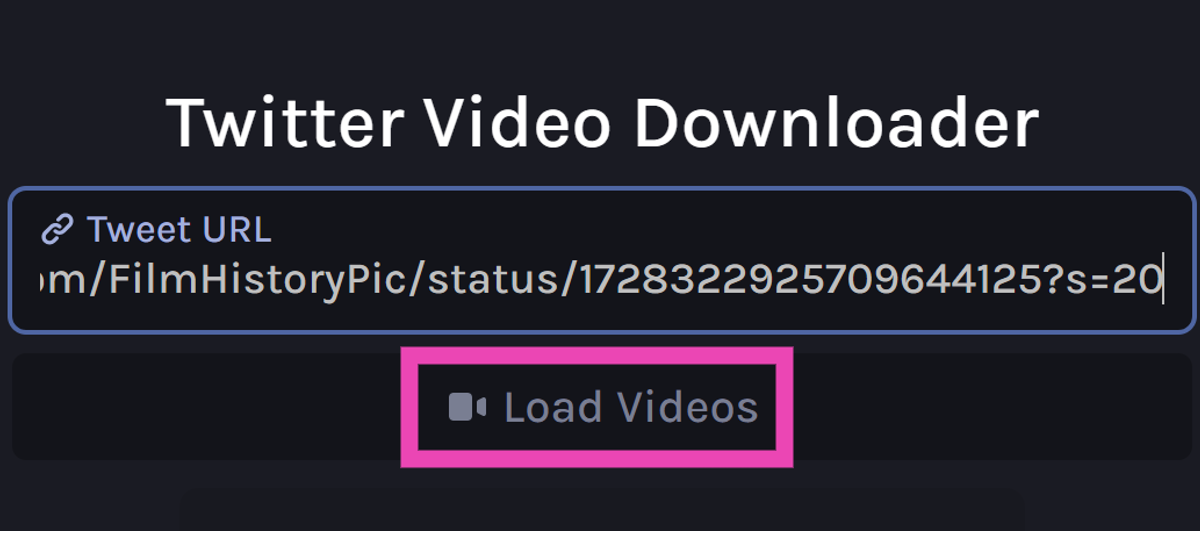 Step 7: Select the resolution you want for the video.
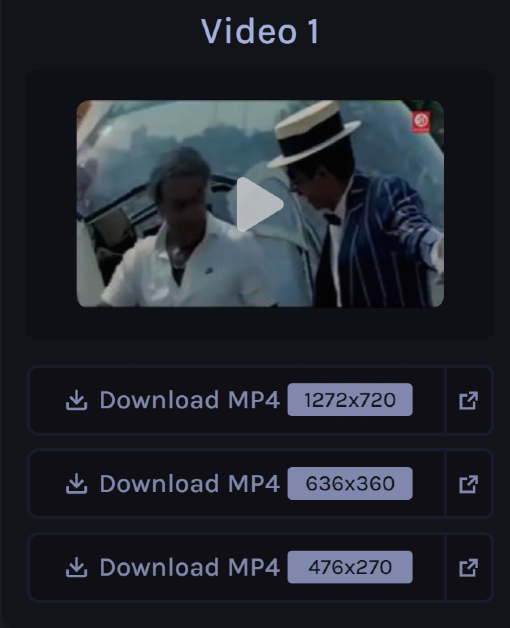 The video will be downloaded to your device.
Use a Chrome Extension to download videos from X
If you regularly download Twitter videos on your PC, switching to a third-party tool every single time can be rather laborious. A Chrome extension would be more suited for you. Twitter Vid (the third-party tool we mentioned earlier also has a very handy extension that you can use to download any video on the micro-blogging platform. Step 1: On your PC, go to https://twittervid.com/. Step 2: Click on Chrome Extension at the top of the screen. This will redirect you to the Chrome Webstore. Step 3: Select Add to Chrome. Step 4: Hit the Download icon at the top right corner of any video to save it on your device.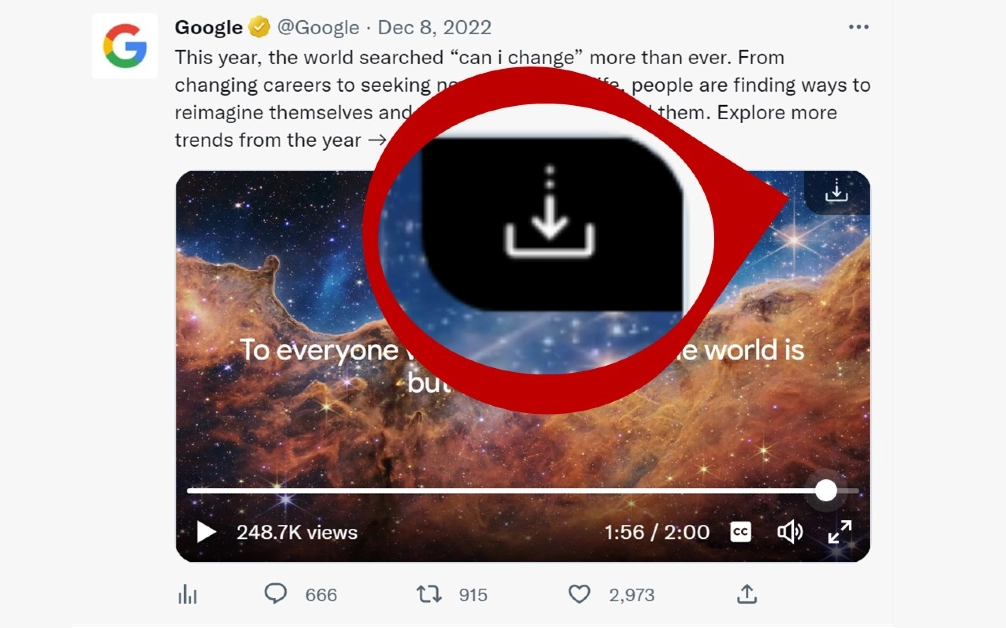
Use Download Twitter Videos – GIF app
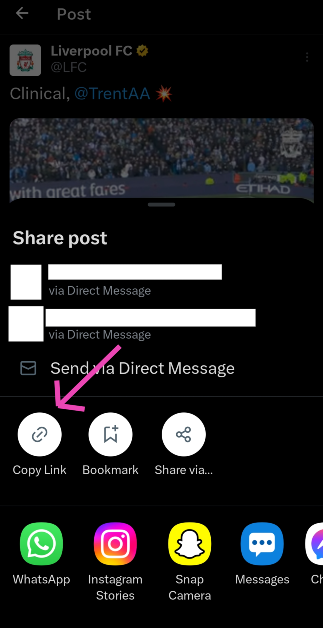
Twitter users who aren’t Blue subscribers can download videos from the social media platform on their smartphones using a third-party app. Simply follow these steps. Step 1: Download and install the Download Twitter Videos – GIF app on your phone. Step 2: Launch Twitter and load the post containing the video you want to download. Step 3: Hit the Share icon at the bottom of the post.
 Step 4: Select Copy Link.
 Step 5: Launch the Download Twitter Videos – GIF app. The link you copied from Twitter will automatically get posted in the Your Link box. If not, post it manually.
Step 6: Select your preferred resolution and hit Download.
Step 5: Launch the Download Twitter Videos – GIF app. The link you copied from Twitter will automatically get posted in the Your Link box. If not, post it manually.
Step 6: Select your preferred resolution and hit Download.
Use the Seal Downloader app
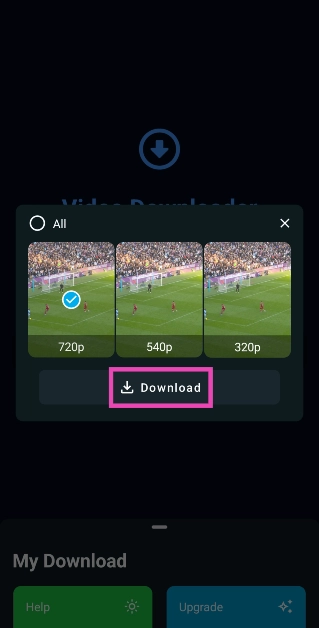
Step 1: Download the Seal Downloader app from the Google Play Store. Step 2: Go to the Twitter post with the video and copy its link. Step 3: Launch the Seal Downloader on your phone and paste the video link in the box.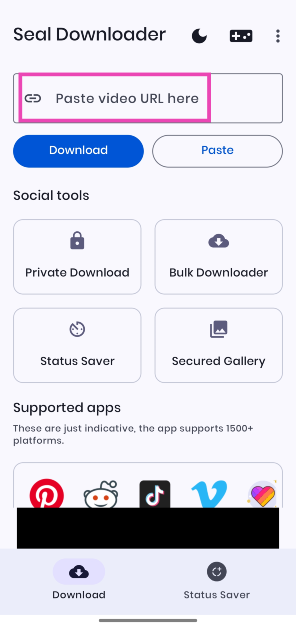 Step 4: Hit Download.
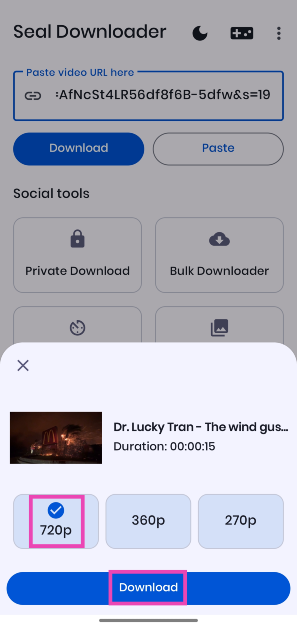
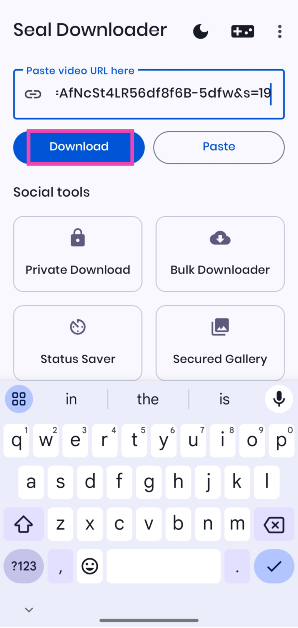 Step 5: Select your preferred resolution and hit Download again.
Frequently Asked Questions (FAQs)
Why am I unable to download a video on X even after subscribing to Twitter Blue?
Even if you are subscribed to Twitter Blue, you won’t be able to download all the videos on the platform. While uploading a video, X users get to decide whether it can be downloaded by other users on the app.What is the video time and file size limit for Twitter Blue subscribers?
Twitter Blue or X Premium can upload videos up to 3 hours long. The maximum file size allowed is 8GB.How much does a Twitter Blue or X Premium subscription cost?
In India, a basic monthly subscription to X costs Rs 243.75 while the premium tier subscription costs Rs 650. A Premium+ subscription costs Rs 1,300 per month.Does X/Twitter let you download videos?
Only Premium subscribers can download videos natively on X/Twitter. Regular users have to rely on third-party apps and extensions for the task.How do I download X/Twitter videos on my phone?
Install the Seal Downloader app on your phone from the Google Play Store. Paste the video link in the text box and hit ‘Download’. Select a resolution and hit ‘Download’ again. Read Also: Price reveal: Samsung Galaxy A05 will be available in India at this pricingConclusion
These are the top 6 ways to download a video from X (formerly Twitter). While looking for third-party tools online, always avoid the ones that ask for your Twitter login credentials. These websites are typically operated by hackers and scam artists. You don’t need to provide your password to any website in order to download a video from X.Garena Free Fire Redeem Codes Today 26 November 2023: Here is how to claim them

Garena Free Fire is a battle royale game with regular awards and tournaments to keep players interested. If you play Garena Free Fire, you should be aware of the redeem codes that are released on a daily basis. However, because the battle royale game is banned in India, players from other countries can use the Free Fire Redeem codes daily. If you’re unfamiliar with the Garena Free Fire redeem codes or don’t know how to get them, we’ve put together a step-by-step guide to help you redeem them. Check out Garena Free Fire Redeem Codes for 26 November 2023.
The Free Fire redeem codes are a great way to get free stuff. These are 12-digit codes that contain alphabets and numbers, as well as an expiration date and time. Because the Garena FF redeem codes cannot be used more than once, you should hurry to the redemption page to claim your free reward before someone else does. To get a free reward, all you have to do is go to reward.ff.garena.com/en, which is the official redemption page. Also, keep an eye on this space for daily updates on Garena Free Fire redemption codes and rewards.
Garena Free Fire Redeem Codes Today 26 November 2023
- 8F3QZKNTLWBZ
- WEYVGQC3CT8Q
- GCNVA2PDRGRZ
- MHM5D8ZQZP22
- 3IBBMSL7AK8G
- 4ST1ZTBE2RP9
- J3ZKQ57Z2P2P
- FF7MUY4ME6SC
- X99TK56XDJ4X
- B3G7A22TWDR7X
- Visit the Garena Free Fire game’s official website at reward.ff.garena.com.
- Use your Facebook, Google, VK, Apple ID, Huawei ID, or Twitter account to log in.
- You’ll be taken to a valid redemption code (s)
- Copy and paste the 12-digit redemption code into the text box.
- On the screen, a dialogue box will appear.
- ‘Ok’ should be selected.
4 Easy Ways To Create a Word Cloud in Microsoft Word

While reviewing a document, you may want to check the frequency of certain words to eliminate any redundancies. This is a very common concern for speechwriters and even regular folks who are about to deliver a presentation. One of the best ways to check whether your speech has any overly recurring words is by generating a word cloud for the text. The best part is that you don’t need to download any additional software for this. Most people don’t know this, but Microsoft Word has an entire library of plug-ins that can help you with all sorts of editing and graphic-designing tasks. So today, we bring you 4 easy ways to create a Word Cloud in Microsoft Word.
Read Also: Price reveal: Samsung Galaxy A05 will be available in India at this pricing
 Step 4: Search for Word Cloud and hit Enter.
Step 5: Select the Pro Word Cloud add-in.
Step 4: Search for Word Cloud and hit Enter.
Step 5: Select the Pro Word Cloud add-in.
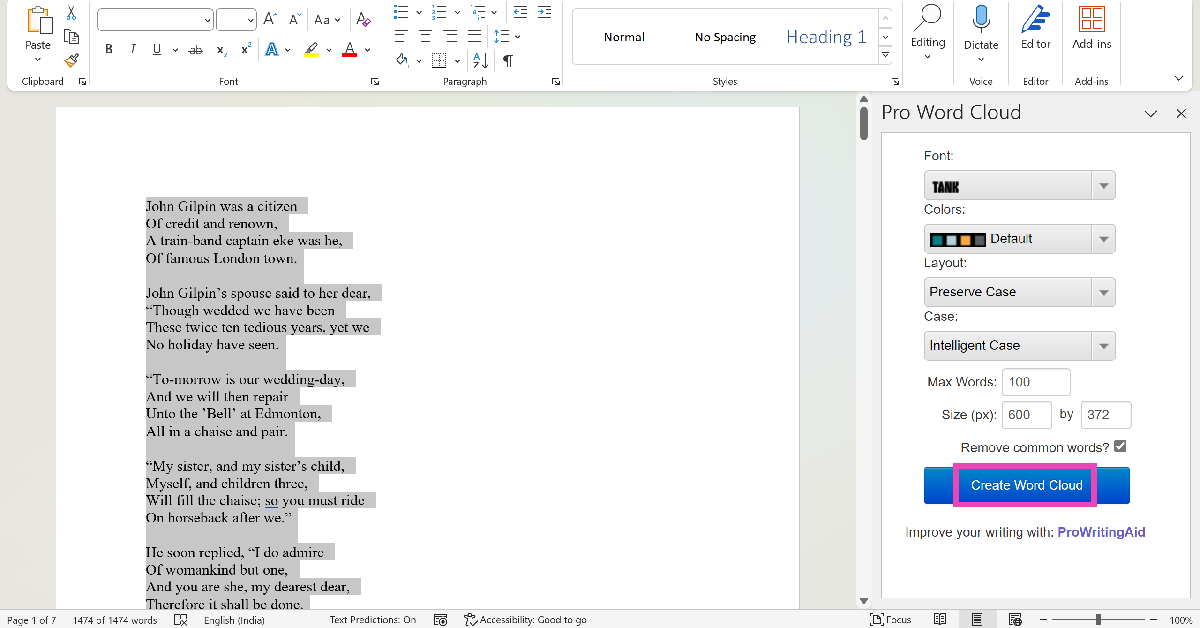
 Step 6: Select the font, colours, layout, and case in the Word Cloud panel.
Step 7: Highlight the part of the document for which you want to create the word cloud.
Step 8: Hit Create Word Cloud.
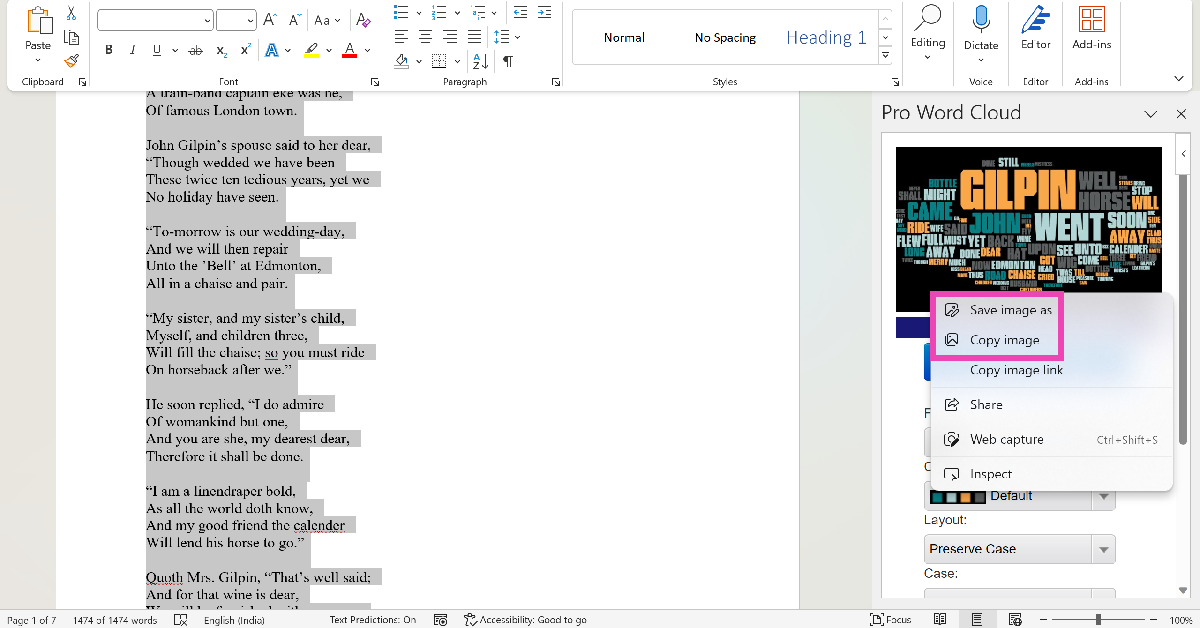
Step 9: Right-click the image to copy it to the clipboard. You can now paste it into the document. You can also choose to save the image to your PC.
Step 6: Select the font, colours, layout, and case in the Word Cloud panel.
Step 7: Highlight the part of the document for which you want to create the word cloud.
Step 8: Hit Create Word Cloud.
Step 9: Right-click the image to copy it to the clipboard. You can now paste it into the document. You can also choose to save the image to your PC.
 Step 3: Hit Create word cloud.
Step 4: Once the word cloud has been created, hit the Save button under the image to download it on your device.
Step 3: Hit Create word cloud.
Step 4: Once the word cloud has been created, hit the Save button under the image to download it on your device.
 Step 3: Paste the text in the box and choose the font and background colour from the Options panel.
 Step 4: Scroll down to view the word cloud.
Step 3: Click on Browse and upload the Word document.
Step 4: Right-click on the word cloud image to save it.
Step 4: Scroll down to view the word cloud.
Step 3: Click on Browse and upload the Word document.
Step 4: Right-click on the word cloud image to save it.
In This Article
Why should you create a Word Cloud for your Microsoft Word document?
Eye-catching images that portray an analysis of the text instantly make your Word document more engaging. Including a word cloud for the text is a great way to let the reader know what they are getting into. Since it is a summation of all the significant words used in the document, a word cloud reflects the ideas, concepts, and themes that your work touches upon. The idea is simple, the size of the word is directly proportional to its frequency in the document. You want the biggest word in the cloud to reflect the main theme of the document. This word is typically placed in the centre of the cloud and catches the attention of the reader immediately.Here are some tips you should keep in mind before creating a Word Cloud
The key to creating a Word Cloud that gets the point across effectively is its readability. The clustered words should follow a colour coding scheme that makes them stand apart from each other. This ensures that the reader spends enough time on each word and doesn’t just glance at them before moving on. The background colour of the image should always complement the cluster of words. Choose the font for the words very wisely. A flowery and intricate font is more suitable for designing greeting cards and wallpapers, but if the Word Cloud is an addendum to your text document, you need something easier to read.Create a Word Cloud in Microsoft Word
Step 1: Open the Microsoft Word document for which you want to create a Word cloud. Step 2: In the Home tab, select Add-ins. Step 3: Click on Get Add-ins. Step 4: Search for Word Cloud and hit Enter.
Step 5: Select the Pro Word Cloud add-in.
Step 4: Search for Word Cloud and hit Enter.
Step 5: Select the Pro Word Cloud add-in.
 Step 6: Select the font, colours, layout, and case in the Word Cloud panel.
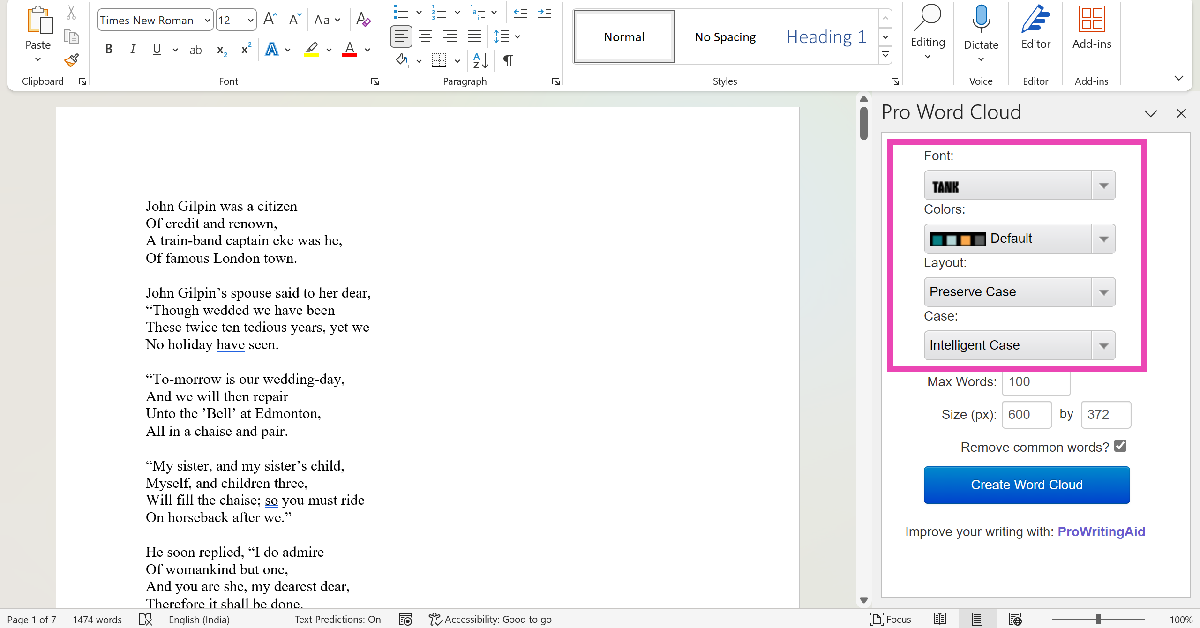 Step 7: Highlight the part of the document for which you want to create the word cloud.
Step 8: Hit Create Word Cloud.
Step 7: Highlight the part of the document for which you want to create the word cloud.
Step 8: Hit Create Word Cloud.
 Step 9: Right-click the image to copy it to the clipboard. You can now paste it into the document. You can also choose to save the image to your PC.
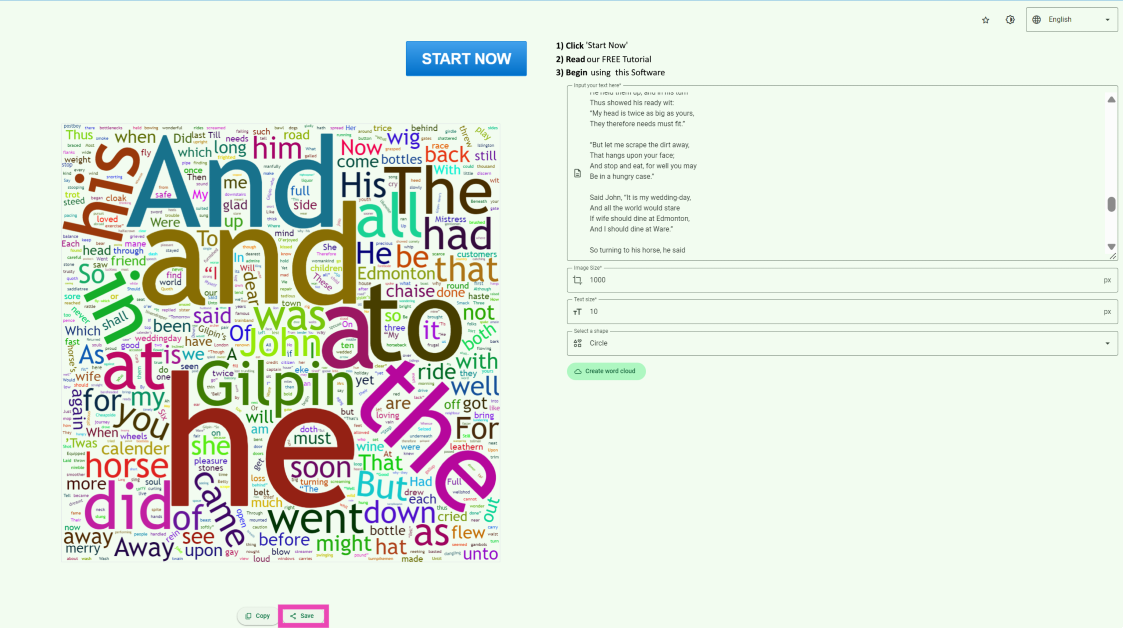
Use the Word Cloud Generator app
Step 1: Download the Word Cloud Generator app from the Microsoft Store. Step 2: Paste your text in the word box and select the image size, text size, and shape.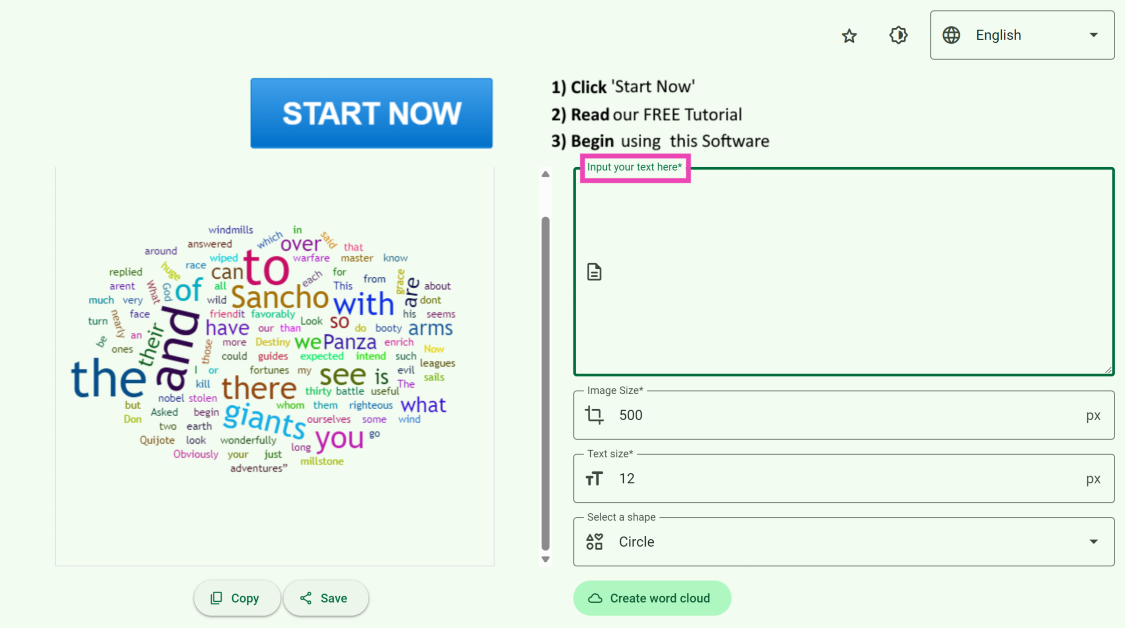 Step 3: Hit Create word cloud.
 Step 4: Once the word cloud has been created, hit the Save button under the image to download it on your device.
Use a third-party tool (Free Word Cloud Generator)
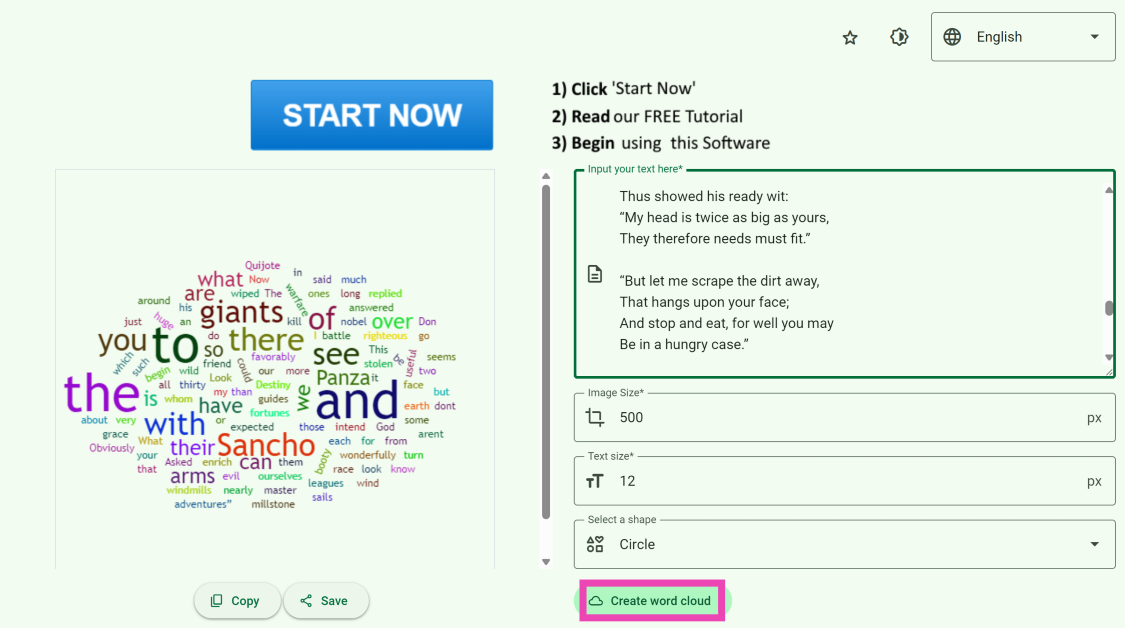
Step 1: Go to https://www.freewordcloudgenerator.com/. Step 2: Click on Free Word Cloud Generator at the top of the screen. Step 3: Paste the text in the box and choose the font and background colour from the Options panel.
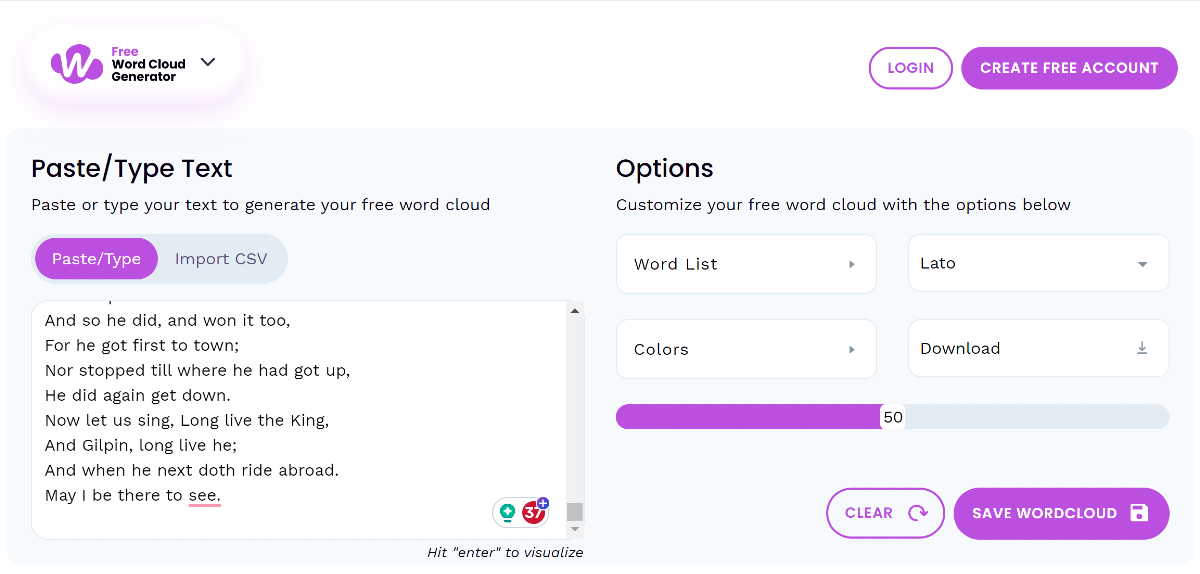 Step 4: Scroll down to view the word cloud.

Use WordClouds.com
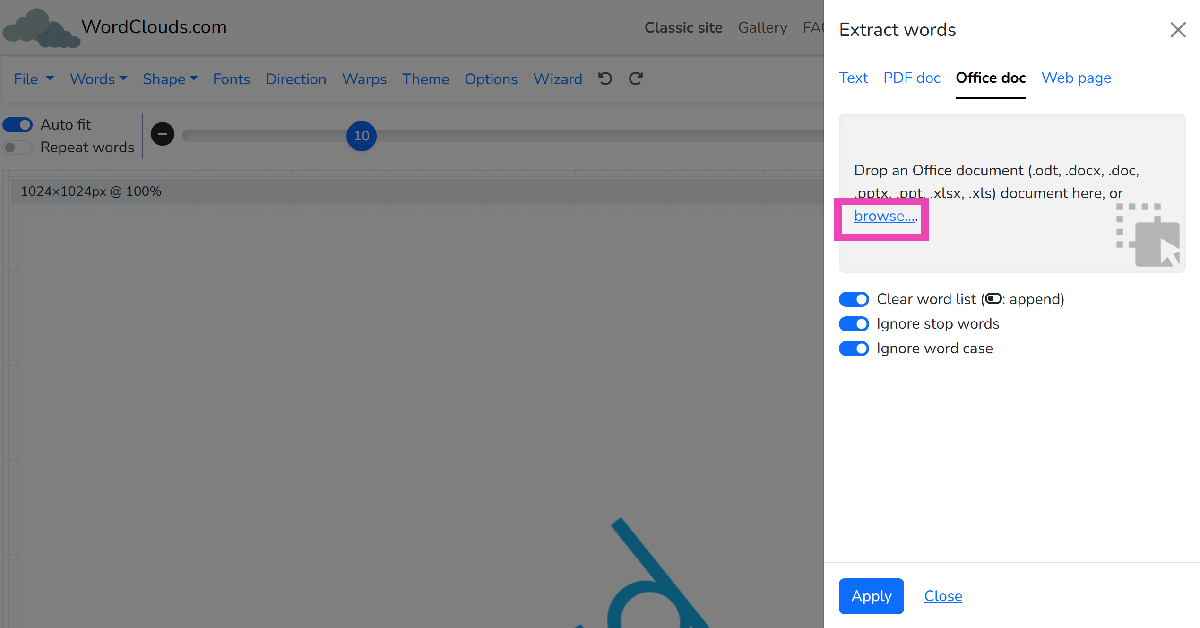
Step 1: Go to https://www.wordclouds.com/. Step 2: Click on Words and select Extract words from Office document. You can also choose to paste text from the clipboard.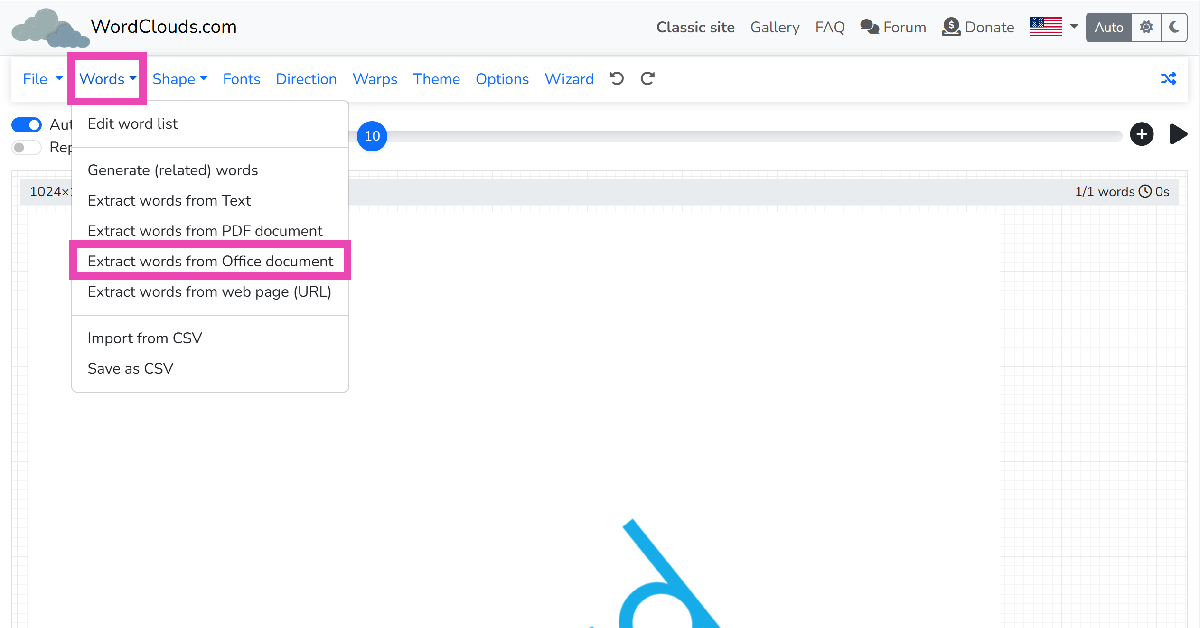 Step 3: Click on Browse and upload the Word document.
 Step 4: Right-click on the word cloud image to save it.

Frequently Asked Questions (FAQs)
Is there a way to generate a word cloud for the text in a Microsoft Word document?
Click on Add-ins in the Home tab and select the Pro Word Cloud tool. Highlight the text in the document and hit Create Word Cloud.How do I create a word cloud online?
Use the Free Word Cloud generator to create a Word Cloud image for any text online. All you need to do is paste the text in the box, select the colours and font, and scroll down to view the image.How do I create a word cloud on my phone?
This Word Cloud app for Android can generate stunning graphical images for any text you enter. The best part is that you can select the shape and background for the word cloud images as well.Is there an app to create a word cloud?
The Word Cloud Generator app for Windows can be downloaded from the Microsoft Store to create attention-grabbing word cloud images on your PC.What is the best word cloud generator?
Wordart, WordClouds, TagCrows, and AhaSlides are some of the best word cloud generators around. Read Also: 45% of serious gamers in India are earning above 6 lakh per annum: ReportConclusion
This is how you can create a word cloud in Microsoft Word. To make sure the word cloud is an appropriate representation of the text, make sure you remove common words like ‘a’, ‘an’, ‘the’, and more. Most Word add-ins and third-party tools should have this filter. If you don’t like the MS Word plug-in, check out the different tools online. These tools are specially designed for more creative tasks like creating greeting cards, posters, flyers, and more.Best 4 Ways to Detect AI-Generated Deepfake Videos

AI tools and services have been all the rage on the Internet recently. You can use AI to remove the noise from your audio recordings, create beautiful edits of the images in your phone, write essays, find new recipes, and do a whole lot of other tasks. On the flip side, malicious entities employ AI tools to create fake videos in order to spread disinformation or harass people. In this article, we bring you the best 4 ways to detect AI-generated deepfake videos on the Internet.
Read Also: 45% of serious gamers in India are earning above 6 lakh per annum: Report
The vast majority of deepfake videos involve superimposing someone’s face on another person. This makes your task easier since you only need to focus on the face to catch any inconsistencies or glitches. Poorly produced deepfake videos can be spotted with ease, as the subject’s lip movement does not align with what they are saying. Other videos may require you to focus more carefully to catch any weird twitches, facial movements, incorrect face shadows, and other cues. One big tell of a deepfake video is that the lighting on the subject’s face is inconsistent with the rest of their body.
If you frequently watch videos on YouTube, you must be familiar with duplicitous advertisements that employ deepfake videos of popular talk shows to sell you a counterfeit product. The scam artists that produce such videos replicate the background of the TV show or podcast on the advertisement and superimpose the face of the host on the person talking into the microphone. The easiest way to detect these AI-generated deepfake videos is by paying attention to the voice of the speaker. If it doesn’t match the speaker’s actual voice, then you are most likely watching a fake video. If the voice is a perfect match but the audio is choppy, it is most likely edited.
If you feel what’s going on in the video is out of character for the person, always check the source of the video. Deepfake videos find virality very quickly and it can be tough to find out where they originated from. If the source of the video is a random account with no credentials or proximity to the subject, the video could be a deepfake. Your next action should be to search for the video on the Internet and check if any major news outlet has verified its legitimacy.
This method may not work all the time, but you should know about it nevertheless. Since most deepfake videos involve superimposing things on existing footage, a simple reverse image search should bring up the source of the original video. Take as many screenshots of the video as you can and perform a reverse image search on Google to find its source. Read this article to learn other methods for reverse-searching a video.
In This Article
Pay close attention to the facial movements
 The vast majority of deepfake videos involve superimposing someone’s face on another person. This makes your task easier since you only need to focus on the face to catch any inconsistencies or glitches. Poorly produced deepfake videos can be spotted with ease, as the subject’s lip movement does not align with what they are saying. Other videos may require you to focus more carefully to catch any weird twitches, facial movements, incorrect face shadows, and other cues. One big tell of a deepfake video is that the lighting on the subject’s face is inconsistent with the rest of their body.
Look out for weird cuts and choppy audio
 If you frequently watch videos on YouTube, you must be familiar with duplicitous advertisements that employ deepfake videos of popular talk shows to sell you a counterfeit product. The scam artists that produce such videos replicate the background of the TV show or podcast on the advertisement and superimpose the face of the host on the person talking into the microphone. The easiest way to detect these AI-generated deepfake videos is by paying attention to the voice of the speaker. If it doesn’t match the speaker’s actual voice, then you are most likely watching a fake video. If the voice is a perfect match but the audio is choppy, it is most likely edited.
Check the source
 If you feel what’s going on in the video is out of character for the person, always check the source of the video. Deepfake videos find virality very quickly and it can be tough to find out where they originated from. If the source of the video is a random account with no credentials or proximity to the subject, the video could be a deepfake. Your next action should be to search for the video on the Internet and check if any major news outlet has verified its legitimacy.
Perform a reverse image search
 This method may not work all the time, but you should know about it nevertheless. Since most deepfake videos involve superimposing things on existing footage, a simple reverse image search should bring up the source of the original video. Take as many screenshots of the video as you can and perform a reverse image search on Google to find its source. Read this article to learn other methods for reverse-searching a video.
Frequently Asked Questions (FAQs)
How do I find out that a video is deepfake?
Look out for any weird facial movements, fallacies in lip movement, inconsistent lighting, and flawed audio. If the video you are watching shows any of these signs, it is likely that it is a deepfake.How do I find the source of a video?
Take several screenshots of different frames in the video and then reverse image search them on Google to find the source of the video.Is it illegal to make deepfake videos?
Making deepfake videos can attract legal action if they are disseminated for the purpose of harassment, inciting violence or hate, defamation, and other illegal activities. Read Also: Top 3 ways to contact Apple Support to get help for Apple devicesConclusion
These are the 4 best ways to detect AI-generated deepfake videos on the Internet. If you’re a Twitter user, always look out for Community Notes under videos that seem to be deepfakes. Once you verify that a video is deepfake, it is a good idea to leave a comment letting other users know as well.How to check who viewed your Instagram Highlights (2023)
")
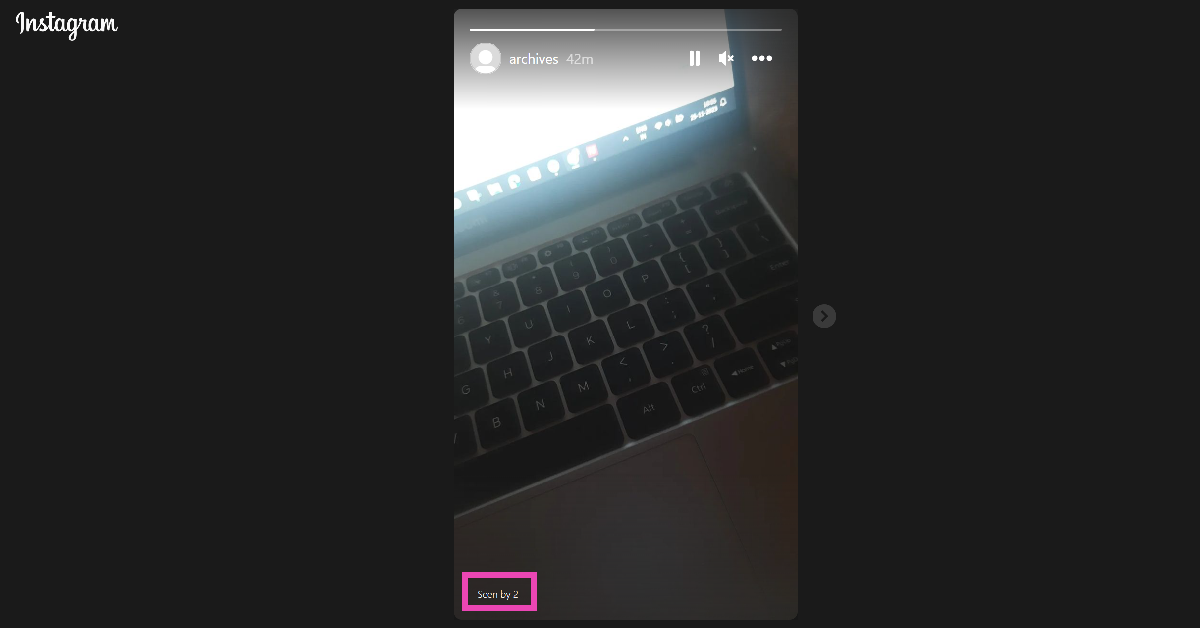
Instagram Highlights are a great way to archive the Stories that you post on the app. Since the Stories disappear from your profile after 24 hours, Instagram came up with the option of Highlights that lets you preserve your favourite moments. Like Stories, Highlights also has a view counter. In this article, we show you how to check who viewed your Instagram Highlights on your smartphone or PC in 2023.
Read Also: How to download Instagram Reels without using a third-party app?
Step 2: Tap on a Highlight.
 Step 3: Swipe up on the screen or tap on Activity at the bottom left corner of the screen.
This is where you can see the names of everyone who has viewed your Instagram Highlight.
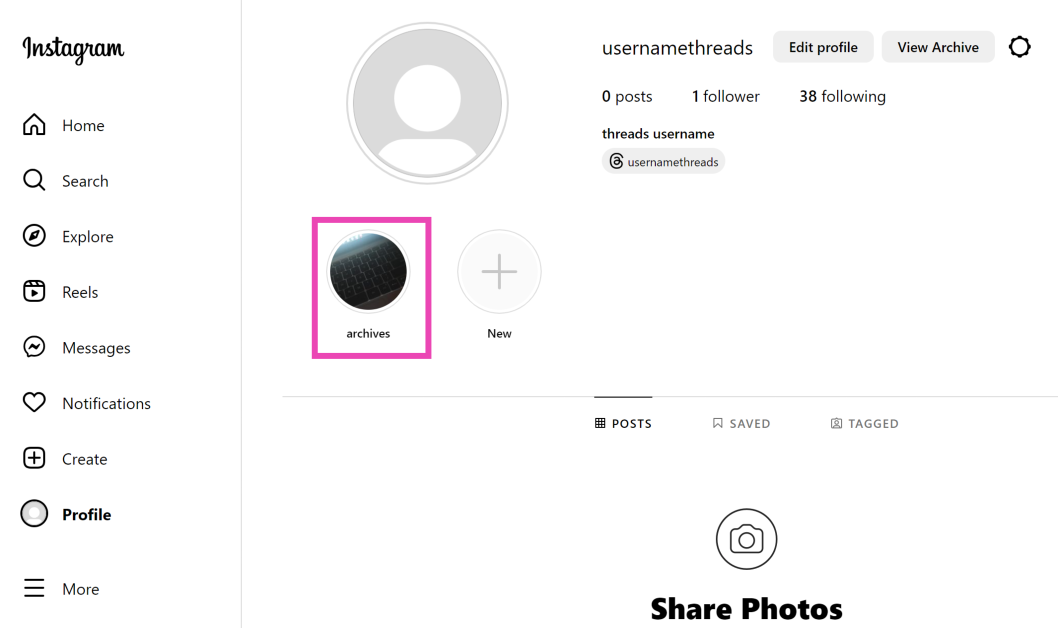
Step 3: Click on a Highlight.
Step 3: Swipe up on the screen or tap on Activity at the bottom left corner of the screen.
This is where you can see the names of everyone who has viewed your Instagram Highlight.
Step 3: Click on a Highlight.
 Step 4: Click on the view counter at the bottom left corner of the screen.
In the following popup box, you will be able to see who viewed your Instagram Highlight.
Step 4: Click on the view counter at the bottom left corner of the screen.
In the following popup box, you will be able to see who viewed your Instagram Highlight.

In This Article
Check who viewed your Instagram Highlights on your smartphone
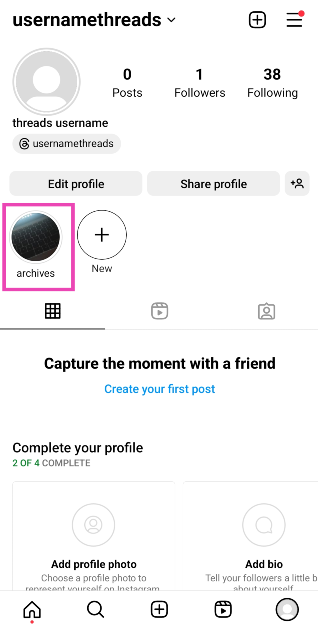
Step 1: Launch the Instagram app on your phone and tap on your profile picture at the bottom right corner of the screen. Step 2: Tap on a Highlight.
 Step 3: Swipe up on the screen or tap on Activity at the bottom left corner of the screen.
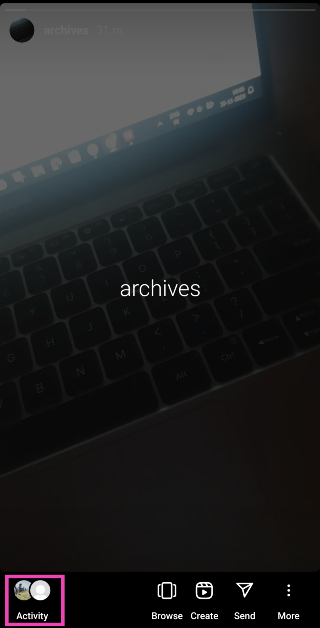 This is where you can see the names of everyone who has viewed your Instagram Highlight.

Check who viewed your Instagram Highlights on a PC
Step 1: Go to the official Instagram website and log in using the proper credentials. Step 2: In the side menu, click on Profile.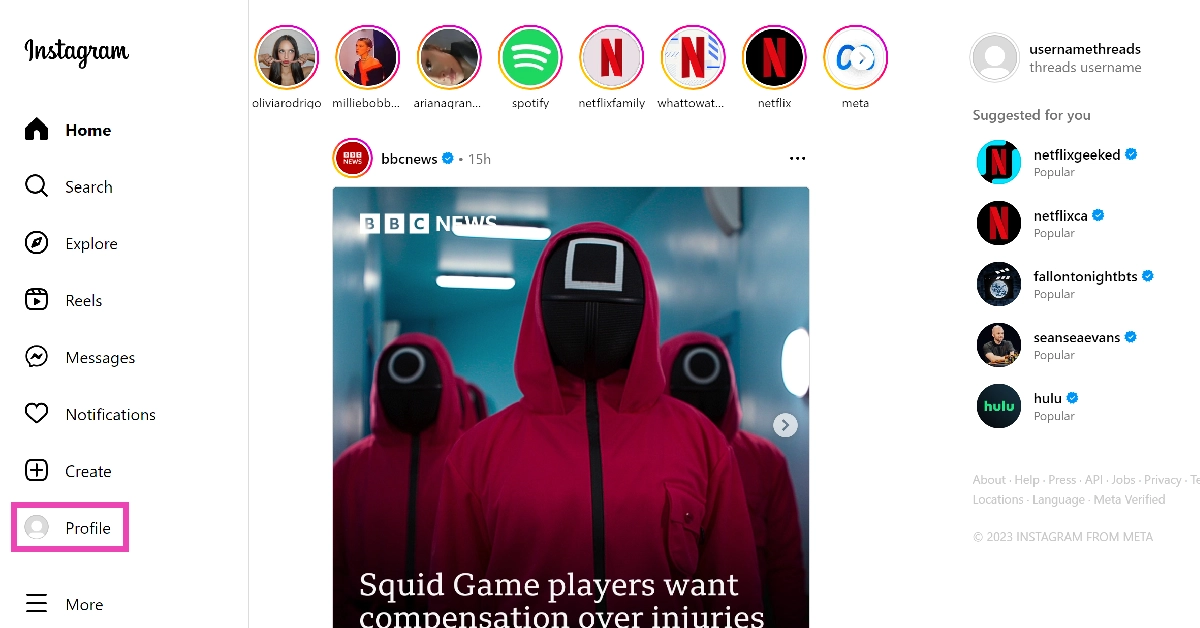 Step 3: Click on a Highlight.
 Step 4: Click on the view counter at the bottom left corner of the screen.
 In the following popup box, you will be able to see who viewed your Instagram Highlight.

Frequently Asked Questions (FAQs)
Why did the views on my Instagram Highlight disappear?
Your Instagram Highlights display the view count for the last two days only. This means you will only be able to check who has viewed the Highlight within the last 48 hours.Can I see how many times a Story or Highlight was viewed by one person?
No. The view count on your Stories and Highlights only shows who viewed your post, not how many times they viewed it.How do I keep a person from viewing my Highlight again?
If you want to hide a Highlight from someone, simply tap the ellipses next to their name in the viewers’ list and select Hide your story. Read Also: How to remove a friend on Snapchat without them knowing?Conclusion
This is how you can check who viewed your Instagram Highlights on a smartphone or PC in 2023. Since Highlights don’t display a cumulative count, the only way you can keep a record of all the people who viewed the post is by taking screenshots of the view count every 48 hours. There is no way to view someone’s Story or Highlight without being seen.Garena Free Fire Redeem Codes Today 25 November 2023: Here is how to claim them

Garena Free Fire is a battle royale game with regular awards and tournaments to keep players interested. If you play Garena Free Fire, you should be aware of the redeem codes that are released on a daily basis. However, because the battle royale game is banned in India, players from other countries can use the Free Fire Redeem codes daily. If you’re unfamiliar with the Garena Free Fire redeem codes or don’t know how to get them, we’ve put together a step-by-step guide to help you redeem them. Check out Garena Free Fire Redeem Codes for 25 November 2023.
The Free Fire redeem codes are a great way to get free stuff. These are 12-digit codes that contain alphabets and numbers, as well as an expiration date and time. Because the Garena FF redeem codes cannot be used more than once, you should hurry to the redemption page to claim your free reward before someone else does. To get a free reward, all you have to do is go to reward.ff.garena.com/en, which is the official redemption page. Also, keep an eye on this space for daily updates on Garena Free Fire redemption codes and rewards.
In This Article
Garena Free Fire Redeem Codes Today 25 November 2023
6U5WSRTBMGDS QERTG56YUPKH OP8HVMNGRDAE ZFIXDVTSLSC GHTARTYUOI76 DINDNOFNJDND6H GGHHENKOPT56 JGFHFGHBGYG341 AWTULLOIVG6H MKHGVRAW34RTHow to Get Free Fire Redeem Codes for Garena on 25 November 2023?
- Visit the Garena Free Fire game’s official website at reward.ff.garena.com.
- Use your Facebook, Google, VK, Apple ID, Huawei ID, or Twitter account to log in.
- You’ll be taken to a valid redemption code (s)
- Copy and paste the 12-digit redemption code into the text box.
- On the screen, a dialogue box will appear.
- ‘Ok’ should be selected.
Best 3 ways to get free Minecoins on Minecraft?

Minecraft is one of the most popular games on the Internet, played by people across all age groups. Minecraft is best enjoyed by using in-game items like skin packs, character packs, ammo, and more. Purchasing these objects requires spending Minecraft’s in-game currency called Minecoins. As you can guess already, you need to spend real money to get Minecoins. If you don’t want to loosen your wallet, here are the best 3 ways to get free Minecoins on Minecraft.
Read Also: How to remove a friend on Snapchat without them knowing?
As the name suggests, Google Opinion Rewards credits your account with a small reward every time you share your opinion on a particular subject. Once you install the app, you are given one survey a week. These surveys may be based on your recent travel history. Once you share your opinion and complete the survey, the app pays out Play Store credits. These Play Store credits can be used to purchase Minecoins. The only catch is that it may take some time to accumulate enough credits to buy a Minecoin bundle.
If you play Minecraft on an Xbox or PC, you need to check out Microsoft Rewards. Sign into your Microsoft account and visit your Rewards Dashboard to view the activities you can do to accumulate more points. These activities typically include searching the web with Bing on Microsoft Edge, using the search box on your Windows 10/11 PC or laptop, using Cortana, and more. Once you collect enough points, you can exchange them for an Xbox gift card. Xbox gift cards can then be used to buy Minecoin bundles.
In This Article
Use Google Opinion Rewards
 As the name suggests, Google Opinion Rewards credits your account with a small reward every time you share your opinion on a particular subject. Once you install the app, you are given one survey a week. These surveys may be based on your recent travel history. Once you share your opinion and complete the survey, the app pays out Play Store credits. These Play Store credits can be used to purchase Minecoins. The only catch is that it may take some time to accumulate enough credits to buy a Minecoin bundle.
Take online surveys
Since the credits earned via Google Opinion Rewards are quite minimal, it is better to take as many online surveys as you can in order to accumulate credits at a faster rate. Some services pay out with gift cards that can be used to purchase Minecoins on Minecraft. Pawns.app, Swagbucks, and LifePoints are some of the best services that you can use to get free credits and gift cards.Use Microsoft Rewards
 If you play Minecraft on an Xbox or PC, you need to check out Microsoft Rewards. Sign into your Microsoft account and visit your Rewards Dashboard to view the activities you can do to accumulate more points. These activities typically include searching the web with Bing on Microsoft Edge, using the search box on your Windows 10/11 PC or laptop, using Cortana, and more. Once you collect enough points, you can exchange them for an Xbox gift card. Xbox gift cards can then be used to buy Minecoin bundles.
Frequently Asked Questions (FAQs)
What is the cheapest Minecoin gift card I can buy online?
On Amazon, the cheapest Minecoin gift card costs Rs 1,000 and gets you 1,720 Minecoins.How do I buy Minecoins on Minecraft?
To buy Minecoins on Minecraft, go to the Marketplace, click the plus icon next to the Minecoin counter, and select one of the bundle packages. Make the payment using one of the accepted modes. Once the payment is successful, the Minecoins will be credited to your account.Is there a way to get free Minecoins on Minecraft?
The best way to get free Minecoins on Minecraft is by using Google Opinion Rewards and Microsoft Rewards. The former pays out free Play Store credits that can be used to buy Minecoins while you can exchange the points gained by the latter to get a free Xbox gift card. Read Also: HP Pavilion Plus 14 2023 laptop review: Your go-to laptopConclusion
These are the top 3 ways to get free Minecoins on Minecraft. Since free Minecoins are highly sought after online, malicious entities and scam artists are always on the prowl to trick people. A good rule of thumb is to not give out your personal information to any service or vendor that claims to provide free Minecoins. Using third-party Minecraft mods is also very risky and can get your account banned permanently.Price reveal: Samsung Galaxy A05 will be available in India at this pricing

Key Highlights
Also Read: 45% of serious gamers in India are earning above 6 lakh per annum: Report
- Samsung Galaxy A05 is powered by MediaTek Helio G85 SoC.
- The smartphone packs a 5,000mAh battery with 25W wired fast charging.
- It is available in three colour options.
In This Article
Samsung Galaxy A05 price in India, availability details
As we mentioned earlier Samsung is yet to announce the availability and pricing of Samsung Galaxy A05 price in India. But just before it was listed on Samsung India’s website the smartphone got listed on Croma’s website. The price of the phone is set at Rs 12,499 for the 4GB RAM with 64GB storage option. There is another 6GB RAM with a 128GB storage option priced at Rs 14,999. The handset is available in three colour options of Black, Light Green, and Silver. Also Read: 45% of serious gamers in India are earning above 6 lakh per annum: Report
Samsung Galaxy A05 specifications
Samsung Galaxy A05 runs on Android 13-based OneUI 5.1 on top. Under its hood, there is a MediaTek Helio G85 SoC coupled with Mali G52 GPU. The smartphone supports LPDDR4X RAM and eMMC 5.1 storage which can be expanded up to 1TB using a microSD card. The mobile phone features a 6.7-inch HD+ PLS LCD display with 1,600 x 720 pixels of resolution. The device supports a 60Hz refresh rate. Samsung Galaxy A05 is highlighted with a dual rear camera setup that includes a 50-megapixel primary sensor and a 2-megapixel depth sensor. For selfies, there is an 8-megapixel front-facing camera. The newly arrived phone packs a 5,000mAh battery and comes with 25W wired fast charging support. For connectivity, there is 4G, WiFi 802.11, Bluetooth 5.3, USB 2.0, GPS, GLONASS, a USB Type-C port and a 3.5mm jack. In addition to this, the smartphone includes a side-mounted fingerprint scanner for phone unlock.45% of serious gamers in India are earning above 6 lakh per annum: Report

Key highlights
- The HP India Gaming Landscape Study 2023 has revealed that the 3000 players in 15 Indian cities were part of the survey.
- 40% of parents participating in the study admitted that their perception of gaming has turned positive in the last few years.
Top 3 ways to contact Apple Support to get help for Apple devices

While buying a smartphone (or any other tech product for that matter), one significant thing you should keep in mind is the customer support provided by the manufacturer. Apple, being one of the biggest tech companies around, is known for its swift customer service and reliable assistance. You can simply take your iPhone to a Genius Bar and get it fixed without any hassle. But if there is no Apple Store near you, you will have to rely on Apple-authorised service centres. In this article, we bring you the top 3 ways to contact Apple Support to get help for Apple devices.
Read Also: Oppo Reno 11 Series with curved AMOLED displays launched
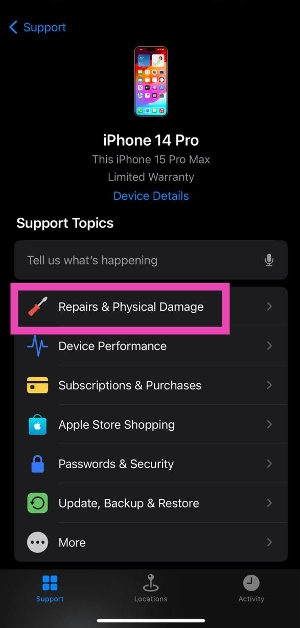
 Step 4: Select the option that fits the problem you are facing. If you’re reaching out to Apple to repair a damaged device, hit Repairs & Physical Damage.
 Step 5: Tap on Find Authorised Locations to search Apple service centres and Genius Bars near you.
Step 6: Tap on Message or Call to contact Apple Support.
The official Apple Support website provides a similar experience as the Support app. You can select your device and select the kind of issue you are facing with it. You will be given the option of searching for nearby Apple-authorised service centres and Genius Bars where you can book an appointment. You can also track the repair status of a device that is currently being repaired by Apple.
Step 5: Tap on Find Authorised Locations to search Apple service centres and Genius Bars near you.
Step 6: Tap on Message or Call to contact Apple Support.
The official Apple Support website provides a similar experience as the Support app. You can select your device and select the kind of issue you are facing with it. You will be given the option of searching for nearby Apple-authorised service centres and Genius Bars where you can book an appointment. You can also track the repair status of a device that is currently being repaired by Apple.
In This Article
Use the Apple Support app
The easiest way to seek assistance from Apple is by using the Support app on your iPhone. iOS17 users may need to install this app from the App Store. Devices running iOS16 and below should have this app in the ‘Utilities’ folder. Step 1: Go to the App Library on your iPhone and tap the Utilities folder. Step 2: Launch the Support app. Step 3: The home page of the app will display the device you’re currently using. If you want to seek help for another device registered to your Apple account, tap on Products at the top left corner of the screen.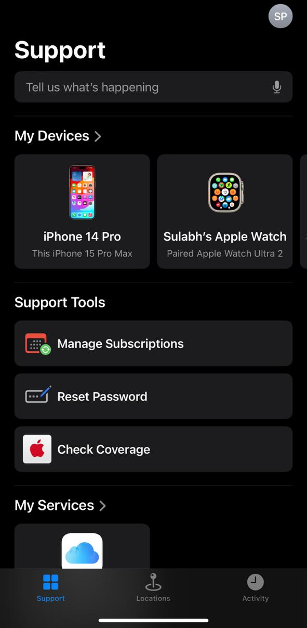 Step 4: Select the option that fits the problem you are facing. If you’re reaching out to Apple to repair a damaged device, hit Repairs & Physical Damage.
 Step 5: Tap on Find Authorised Locations to search Apple service centres and Genius Bars near you.
Step 6: Tap on Message or Call to contact Apple Support.
Step 5: Tap on Find Authorised Locations to search Apple service centres and Genius Bars near you.
Step 6: Tap on Message or Call to contact Apple Support.
Dial a helpline
Instead of using the Support app, you can simply dial one of Apple’s official helplines to reach out to the Support staff. Depending on your issue, dial one of these helpline numbers. 1-800-275-2273: For general issues related to your device. 1-800-800-2775: For help related to Educational Devices. 1-877-204-3930: For help with issues related to Apple’s accessibility tools. 1-877-233-8552: For help with Apple Cash. 1-866-752-7753: For Enterprise customers.Use the Apple Support website
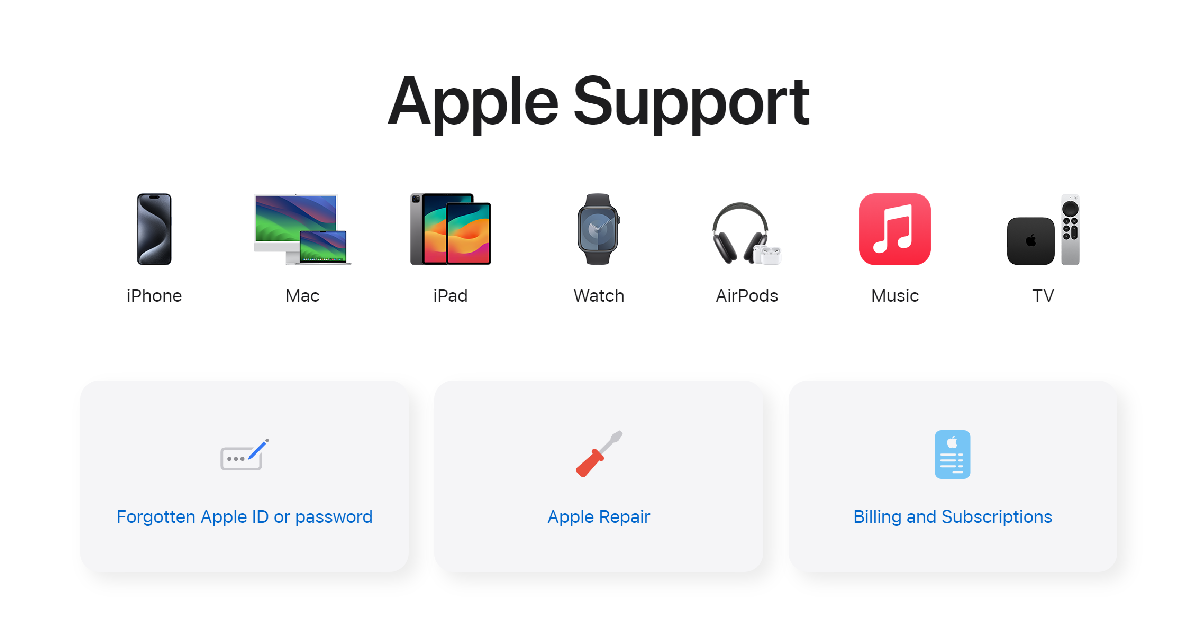 The official Apple Support website provides a similar experience as the Support app. You can select your device and select the kind of issue you are facing with it. You will be given the option of searching for nearby Apple-authorised service centres and Genius Bars where you can book an appointment. You can also track the repair status of a device that is currently being repaired by Apple.
Frequently Asked Questions (FAQs)
Can I visit the Apple Store without an appointment to get my iPhone fixed?
Yes, you can visit the Genius Bar at your nearby Apple Store without a prior appointment. However, you may have to wait in a queue if there are people already at the store. People with appointments are given priority at the Genius Bar.How much does an AppleCare+ package cost for an iPhone?
The cost of an AppleCare+ package is different for every Apple device. The Pro Models of the iPhone 15 series demand a premium of Rs 20,900 for AppleCare+ coverage. Meanwhile, it costs Rs 17,900 for non-Pro iPhone 15 models. Read this article to find out if you need AppleCare+ for your device.How do I contact Apple Support from my phone?
Launch the Support app, select your device and the issue you’re facing, and then scroll down to view the contact options. You can either chat with the support staff on iMessage or call them. Read Also: Anyone can now download Instagram Reels, the download option will be enabled by defaultConclusion
These are the top 3 ways to contact Apple Support to get help for Apple devices. If your iPhone is damaged and you can’t open the Support app on it, dialling the helpline or using the Apple Support website are your best choices. Once you deposit your iPhone for repair, you can choose to issue a temporary unit for the time your device is being repaired.How to download Instagram Reels without using a third-party app?

Back in June, Instagram added the option to natively download Reels from the app for US users only. Now, this feature is available to all users across the world. This is a vital addition to the platform as it increases the dissemination of the content produced on the app to other places on the Internet. Earlier, users had to rely on third-party apps for the same task. In this article, we show you how to download Instagram Reels on your smartphone without using a third-party app or tool.
Read Also: 2 Quick Ways to Change or Update the Time on a Fitbit (2023)
Step 3: Hit the Download button at the bottom of the screen.
The Reel will be downloaded to your device. Go to the Gallery app and open the ‘Instagram’ folder to view it. Downloaded Reels cannot be used for commercial purposes.
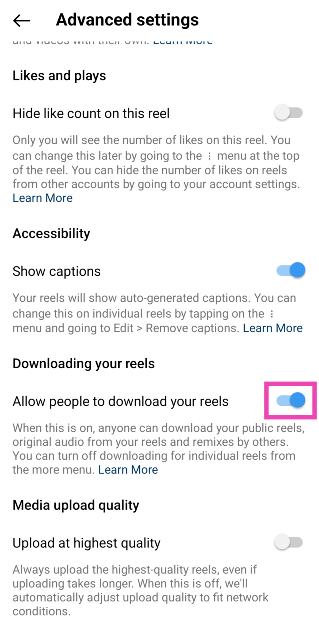
Step 4: Turn off the toggle switch for ‘Allow people to download your Reels’.
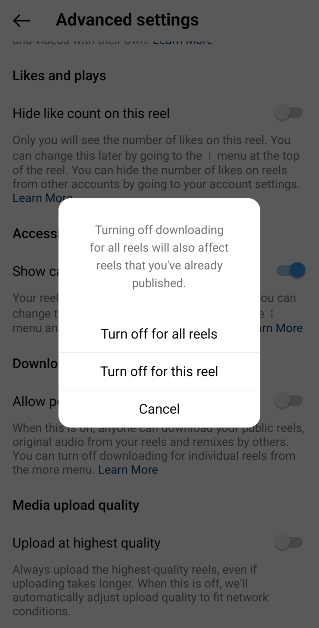
Step 5: Select whether you don’t want people to download the Reel you just created or all of your Reels in general.
In This Article
Download Instagram Reels without using a third-party app
Step 1: Launch the Instagram app on your phone and play the Reel you wish to download. Step 2: Hit the Share icon at the bottom right section of the screen. Step 3: Hit the Download button at the bottom of the screen.
 The Reel will be downloaded to your device. Go to the Gallery app and open the ‘Instagram’ folder to view it. Downloaded Reels cannot be used for commercial purposes.
Prevent people from downloading your Reels
Step 1: Launch the Instagram app on your phone and create a Reel. Step 2: Once you have created and edited the Reel, head over to the sharing page. Step 3: Select Advanced Settings.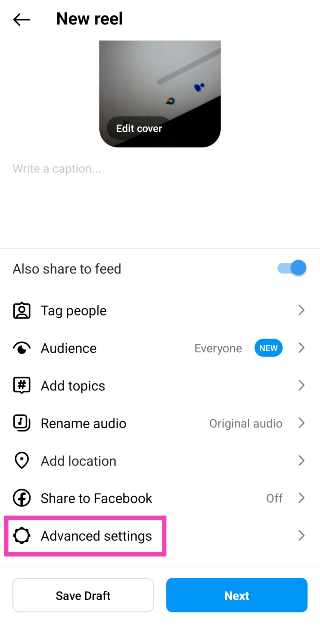 Step 4: Turn off the toggle switch for ‘Allow people to download your Reels’.
 Step 5: Select whether you don’t want people to download the Reel you just created or all of your Reels in general.
Frequently Asked Questions (FAQs)
How do I download an Instagram Reel to my smartphone?
Open the Reel, hit the Share icon, and select Download. The Reel will be saved to the ‘Instagram’ folder on your device’s media gallery.How do I download Reels on my PC?
Since Instagram’s web portal does not have a native feature to download Reels yet, you will need to rely on third-party online tools to save them to your PC. SaveInsta, iGram, and IGdownloader are some good third-party tools to download Reels.How do I make sure no one downloads my Reels?
If you don’t want other people to download your Reels, set your profile to private or go to Advanced Settings in the Reel sharing page and turn off the toggle switch for ‘Allow people to download your Reels’. Read Also: Sunbird temporarily shutting down, removed from Play StoreConclusion
This is how you can download Instagram Reels without using a third-party app. If an account is set to private, the Reels that they post on their profile cannot be downloaded by other people. Once you download a Reel, it will be watermarked by the creator’s Instagram handle. If you don’t want a watermark on the downloaded video, you will need to use a third-party app or tool.How to remove a friend on Snapchat without them knowing?

Primarily known for ephemeral messaging, there are a couple of other things about Snapchat that typically fly under the radar but are quite helpful to regular users. Once you remove someone on Snapchat, it completely cuts their access to you. There’s no such thing as a ‘Requests’ folder where the unwanted messages keep piling up. However, unfriending someone discreetly on Snapchat can be quite the task. In this article, we bring you two ways to remove a friend on Snapchat without them knowing.
Read Also: Top 5 ways to download free music on iPhone (2023)
Step 4: Hit Block.
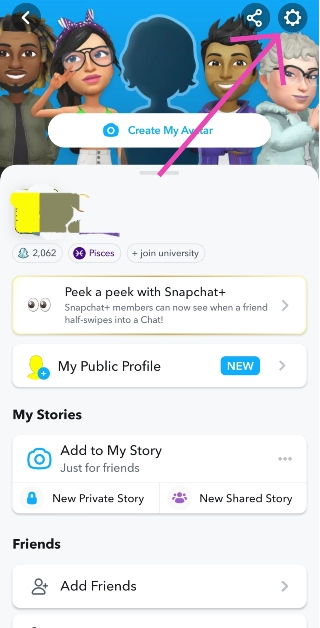
 Step 5: Go back to the chats tab and tap your Bitmoji at the top left corner of the screen.
Step 6: Hit the gear icon at the top right corner of the screen.
Step 7: Scroll down and select Blocked.
Step 8: Hit the cross icon to unblock your friend.
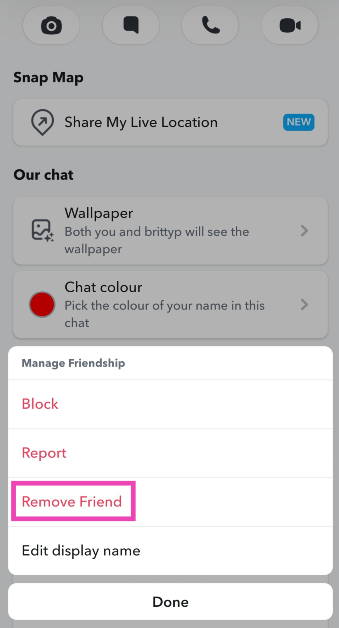
Step 3: Hit the ellipses at the top right corner of the screen and select Manage Friendship.
Step 4: Hit Remove Friend.
Step 5: Go back to the chats tab and tap your Bitmoji at the top left corner of the screen.
Step 6: Hit the gear icon at the top right corner of the screen.
Step 7: Scroll down and select Blocked.
Step 8: Hit the cross icon to unblock your friend.
Step 3: Hit the ellipses at the top right corner of the screen and select Manage Friendship.
Step 4: Hit Remove Friend.

In This Article
Soft block them
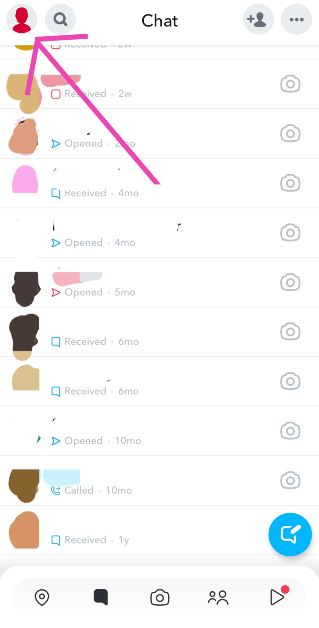
Soft blocking someone quietly removes them from your friend list and does not notify or alert them. If you’re wondering what soft-blocking is, it’s when you block someone and then immediately unblock them, effectively removing them as a friend. Here’s how you can go about it. Step 1: Launch the Snapchat app and switch to the chats tab. Step 2: Tap on the Bitmoji of the friend you want to remove. Step 3: Hit the ellipses at the top right corner of the screen and select Manage Friendship.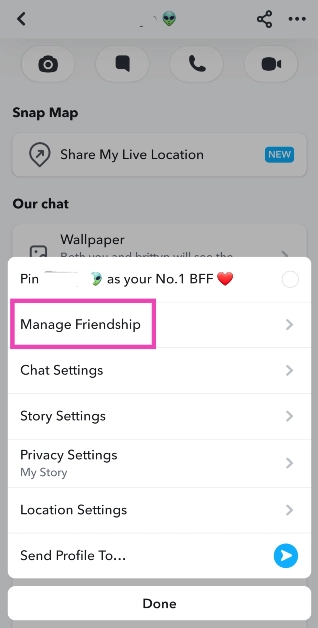 Step 4: Hit Block.
 Step 5: Go back to the chats tab and tap your Bitmoji at the top left corner of the screen.
 Step 6: Hit the gear icon at the top right corner of the screen.
 Step 7: Scroll down and select Blocked.
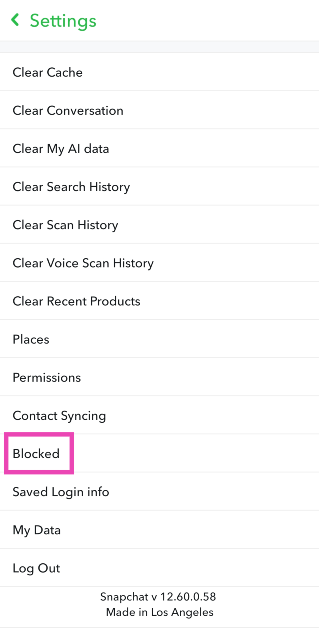 Step 8: Hit the cross icon to unblock your friend.

Remove a friend on Snapchat using the default option
If you’re certain that your chats show up further down the page on your friend’s phone, removing them the traditional way can work out for you. If they don’t scroll down to your profile, they will not notice that you have removed them as a friend. Since Snapchat doesn’t send a notification every time someone gets removed from a friend list, you don’t have to worry about them finding out right away. Here’s how you can remove a friend on Snapchat. Step 1: Launch the Snapchat app and switch to the chats tab. Step 2: Tap on the Bitmoji of the friend you want to remove.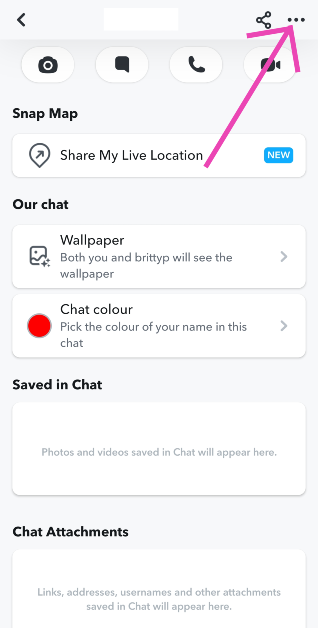 Step 3: Hit the ellipses at the top right corner of the screen and select Manage Friendship.
Step 4: Hit Remove Friend.
Step 3: Hit the ellipses at the top right corner of the screen and select Manage Friendship.
Step 4: Hit Remove Friend.
Frequently Asked Questions (FAQs)
Does Snapchat notify you when someone removes you as a friend?
No, Snapchat does not notify you when you get removed as a friend, but it is easy to tell if you know where to look. Contacts who have deleted you on Snapchat show up in your chats tab with a cross sign on the conversation thread instead of a camera.How do I remove someone on Snapchat without them knowing?
The best way to do this is by soft-blocking the contact. This way, you will be quietly removed from their list and they won’t be able to contact you.Does Snapchat have a friend limit?
Yes, you can add a maximum of 5,000 friends on Snapchat. Read Also: Top 4 ways to update Safari on iPhone and MacConclusion
These are the top 2 ways to unfriend or remove someone on Snapchat without them knowing. Once you remove someone on Snapchat, their messages won’t get delivered to you unless you re-add them. If your profile is set to private, they won’t be able to see your Stories either. You can change this in the privacy settings.HP Pavilion Plus 14 2023 laptop review: Your go-to laptop

Nowadays, a lot of us count on laptops for work, play, entertainment and creation, as a result, we always prefer sleek, lightweight laptops. It should be compact so that it fits more easily in a small bag while providing all the abilities needed for productivity. In India, HP has unveiled their HP Pavilion Plus 2023 laptop lineup. The HP Pavilion Plus 14, which is available in two versions, was sent to us for review and has now become our main workstation. The latest 13th-generation Intel core processors with Intel Iris X Graphics are included with this HP laptop. Furthermore, the notebook is equipped with an IMAX-enhanced display. Let’s find out how the HP Pavilion Plus 14 2023 performed in this review.
As we said, this laptop is made entirely of recyclable materials. The company has used Ocean-bound plastic in a speaker enclosure(s) and bezel for keyboard keycaps and scissors containing post-consumer recycled plastic, too. Recycled metal is used in the cover, keyboard frame, base, sideband, hinge cap(s), and keyboard supporting plate. Also, all of the other competitive brands use recyclable and environmentally friendly materials as part of their sustainable approach, so why should HP be behind?
Also Read: HP Victus 16 2023 review: Perfect for work and gaming
You know almost all HP laptops come with minimalist no-nonsense design. Though the LED lighting and other design characteristics may seem sporty and appealing to gamers, nothing matches to its elegant yet meek style.
By the way, all the brands are taking a sustainable approach where they are using recyclable and eco-friendly materials.
Just like all the other HP laptops the company’s branding is done on the front cover. You get all the necessary ports on this machine. There is Thunderbolt 4 with USB Type-C, another USB Type-C port, two USB Type-A ports, an HDMI-out and a headphone/microphone combo on the sides.
To allow more efficient cooling and keep the laptop from overheating, the rubber feet at the bottom elevate the laptop off a level surface higher than usual.
Over that, the notebook sports HP Dual Speakers HP Audio Boost, and custom tuning by the experts at B&O, which allows you to enjoy rich and natural audio.
 The new Pavilion Plus 14 comes with a 14-inch IMAX enhanced 2.8K OLED display with 2,880 x 1,800 pixels of resolution. The display has a 16:10 aspect ratio along with 88% screen-to-body ratio. Also, the screen of the laptop supports an adaptive refresh rate ranging from 48-120Hz.
Furthermore, the machine comes with 400 nits (SDR) and 500 nits (HDR) brightness. The screen isn’t as bright as we would have liked it to be for this price. Also, it is an OLED screen that has 100 percent DCI-P3 that supports anti-glare tech.
The display is Eyesafe certified and it meets TÜV low blue light requirements, which saves the user’s eyes from harmful blue light without sacrificing colour accuracy to lessen eyestrain from prolonged use. The OLED panel displays brighter colours and a deeper black.
The display has a contemporary appearance since the side bezels are very slim.
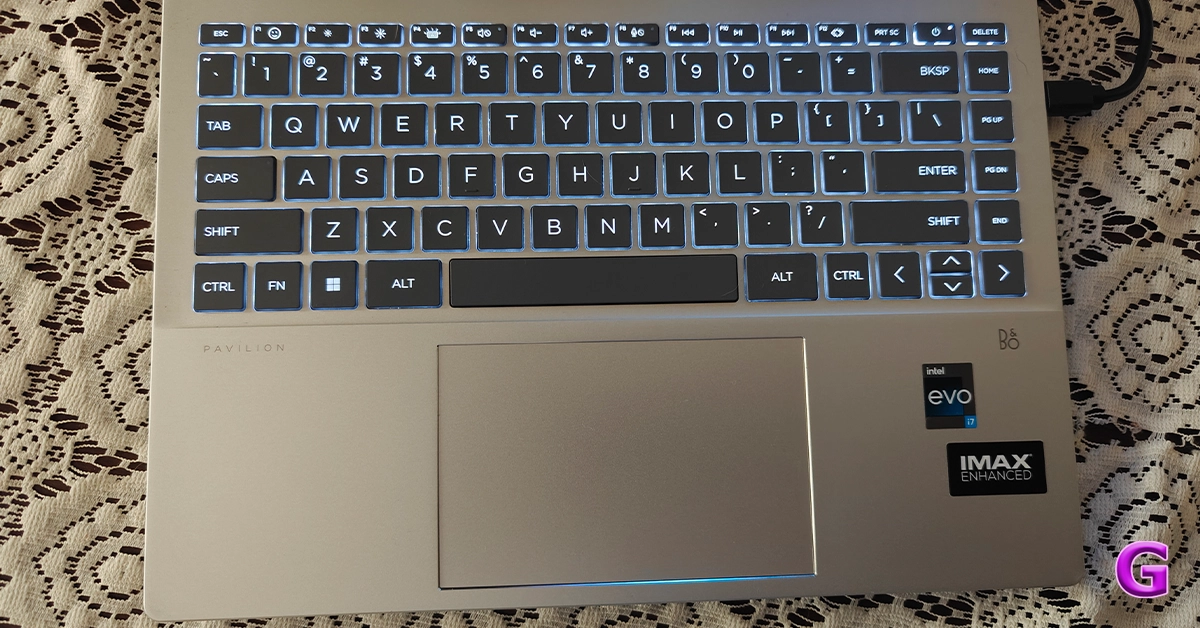
When you lift the lid or cover of the laptop you get a full-size keyboard which comes with back lighting. The colour of the entire keyboard is light grey.
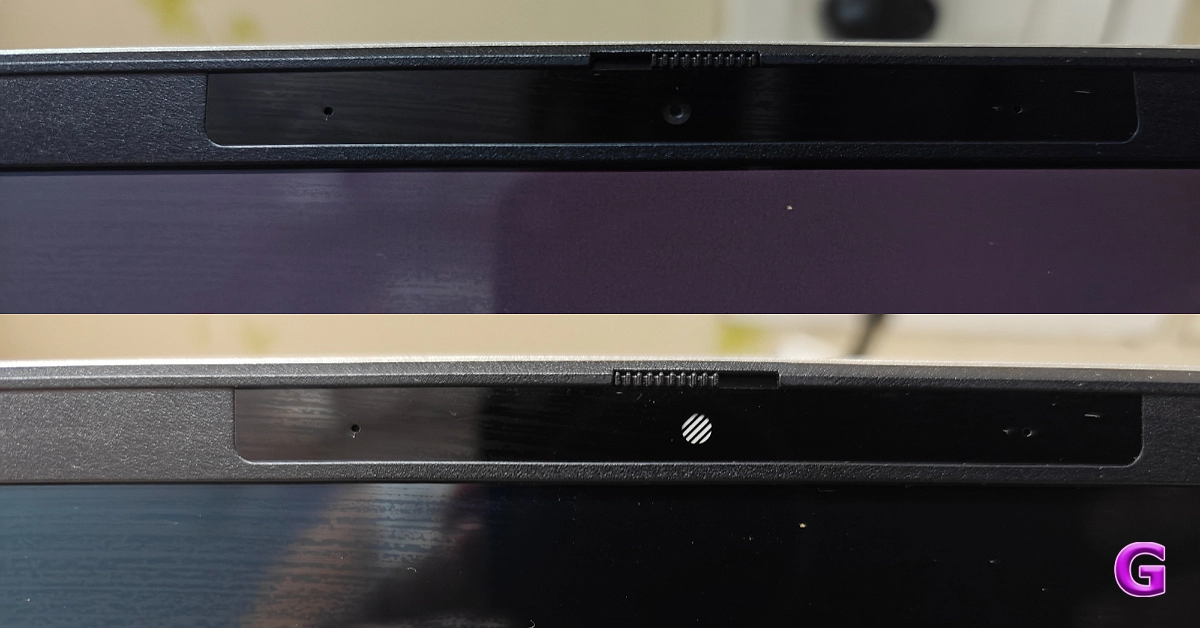
For video chats, there is a 5-megapixel webcam with privacy-enhancing mic mute buttons and a shutter for the camera.
Together with the Intel Iris Xe Graphics card, the 13th-generation processor makes multitasking a breeze. We worked on several documents without any issues. This configuration will be more than sufficient for your daily usage, which includes opening of over 25 Chrome tabs and performing additional tasks like online meetings.
We also did not encounter any unusual fan noises or issues with the heating system.
The display is good for office use as well as for people who view a lot of OTT content. During our testing, the colours appeared vibrant and sharp, which makes them ideal for multimedia consumption. The resolution is decent, too.
Also Read: Apple MacBook Air 15-inch Review: We Apple-solutely Love It!
The screen brightness is enough for indoor use only. The colour accuracy is also fairly good. As said, the display has TÜV certification, so even if you use it for extended periods of time, your eyes won’t be harmed and you won’t feel any strain in your eyes or headaches.
Additionally, the two speakers are among the best that we have ever heard. The loudness and sound quality, both are excellent.
The excellent travel distance between the keys provides pleasant tactile feedback. With it, the size of the trackpad is suitable for comfortable use. Note that the keyboard is smaller because it does not include a number keypad.
Zoom meetings and connecting with friends and family are made possible by the 5MP infrared camera. The webcam comes with an 88-degree field of view. Along with the camera, there is a dual-array microphone. You will not only appear very clear but also be heard well, thanks to the temporal noise reduction. The company has also taken care of user privacy, the top-mounted camera shutter on the system can be manually opened and closed.
When it comes to connectivity, there is Wi-Fi 6E with a wireless card for speed. The Bluetooth here is the 5.3 version.
Users get Windows 11 out of the box. It’s excellent that Microsoft Office comes pre-installed and includes Word, Excel, and other important programs for productivity. The company is providing a 30-day trial of the McAfee Antivirus, too.
When it comes to the battery, the HP Pavilion Plus 14 has a 4-cell, 68Wh battery. The 65W USB Type-C power adapter is included in the packaging. The device provides about 7-8 hours of battery life. This means you may use it for nearly the entire workday (in one charge cycle) if you charge it fully in the morning.
The new Pavilion Plus 14 comes with a 14-inch IMAX enhanced 2.8K OLED display with 2,880 x 1,800 pixels of resolution. The display has a 16:10 aspect ratio along with 88% screen-to-body ratio. Also, the screen of the laptop supports an adaptive refresh rate ranging from 48-120Hz.
Furthermore, the machine comes with 400 nits (SDR) and 500 nits (HDR) brightness. The screen isn’t as bright as we would have liked it to be for this price. Also, it is an OLED screen that has 100 percent DCI-P3 that supports anti-glare tech.
The display is Eyesafe certified and it meets TÜV low blue light requirements, which saves the user’s eyes from harmful blue light without sacrificing colour accuracy to lessen eyestrain from prolonged use. The OLED panel displays brighter colours and a deeper black.
The display has a contemporary appearance since the side bezels are very slim.
When you lift the lid or cover of the laptop you get a full-size keyboard which comes with back lighting. The colour of the entire keyboard is light grey.
For video chats, there is a 5-megapixel webcam with privacy-enhancing mic mute buttons and a shutter for the camera.
Together with the Intel Iris Xe Graphics card, the 13th-generation processor makes multitasking a breeze. We worked on several documents without any issues. This configuration will be more than sufficient for your daily usage, which includes opening of over 25 Chrome tabs and performing additional tasks like online meetings.
We also did not encounter any unusual fan noises or issues with the heating system.
The display is good for office use as well as for people who view a lot of OTT content. During our testing, the colours appeared vibrant and sharp, which makes them ideal for multimedia consumption. The resolution is decent, too.
Also Read: Apple MacBook Air 15-inch Review: We Apple-solutely Love It!
The screen brightness is enough for indoor use only. The colour accuracy is also fairly good. As said, the display has TÜV certification, so even if you use it for extended periods of time, your eyes won’t be harmed and you won’t feel any strain in your eyes or headaches.
Additionally, the two speakers are among the best that we have ever heard. The loudness and sound quality, both are excellent.
The excellent travel distance between the keys provides pleasant tactile feedback. With it, the size of the trackpad is suitable for comfortable use. Note that the keyboard is smaller because it does not include a number keypad.
Zoom meetings and connecting with friends and family are made possible by the 5MP infrared camera. The webcam comes with an 88-degree field of view. Along with the camera, there is a dual-array microphone. You will not only appear very clear but also be heard well, thanks to the temporal noise reduction. The company has also taken care of user privacy, the top-mounted camera shutter on the system can be manually opened and closed.
When it comes to connectivity, there is Wi-Fi 6E with a wireless card for speed. The Bluetooth here is the 5.3 version.
Users get Windows 11 out of the box. It’s excellent that Microsoft Office comes pre-installed and includes Word, Excel, and other important programs for productivity. The company is providing a 30-day trial of the McAfee Antivirus, too.
When it comes to the battery, the HP Pavilion Plus 14 has a 4-cell, 68Wh battery. The 65W USB Type-C power adapter is included in the packaging. The device provides about 7-8 hours of battery life. This means you may use it for nearly the entire workday (in one charge cycle) if you charge it fully in the morning.
In This Article
HP Pavilion Plus 14 2023 review: Design and display
First off, the Pavilion Plus 14’s construction and design make it incredibly small and manageable, making it perfect for carrying to work, home, or on trips. At 17.5 mm thin, the laptop weighs 1.4 kg. For the A/C/D covers, post-industry and post-consumer recycled metal were used in its construction. Since it is lightweight, has a premium appearance, and is built strong, you shouldn’t have any issues at all carrying it for the entire day. As we said, this laptop is made entirely of recyclable materials. The company has used Ocean-bound plastic in a speaker enclosure(s) and bezel for keyboard keycaps and scissors containing post-consumer recycled plastic, too. Recycled metal is used in the cover, keyboard frame, base, sideband, hinge cap(s), and keyboard supporting plate. Also, all of the other competitive brands use recyclable and environmentally friendly materials as part of their sustainable approach, so why should HP be behind?
Also Read: HP Victus 16 2023 review: Perfect for work and gaming
You know almost all HP laptops come with minimalist no-nonsense design. Though the LED lighting and other design characteristics may seem sporty and appealing to gamers, nothing matches to its elegant yet meek style.
By the way, all the brands are taking a sustainable approach where they are using recyclable and eco-friendly materials.
As we said, this laptop is made entirely of recyclable materials. The company has used Ocean-bound plastic in a speaker enclosure(s) and bezel for keyboard keycaps and scissors containing post-consumer recycled plastic, too. Recycled metal is used in the cover, keyboard frame, base, sideband, hinge cap(s), and keyboard supporting plate. Also, all of the other competitive brands use recyclable and environmentally friendly materials as part of their sustainable approach, so why should HP be behind?
Also Read: HP Victus 16 2023 review: Perfect for work and gaming
You know almost all HP laptops come with minimalist no-nonsense design. Though the LED lighting and other design characteristics may seem sporty and appealing to gamers, nothing matches to its elegant yet meek style.
By the way, all the brands are taking a sustainable approach where they are using recyclable and eco-friendly materials.
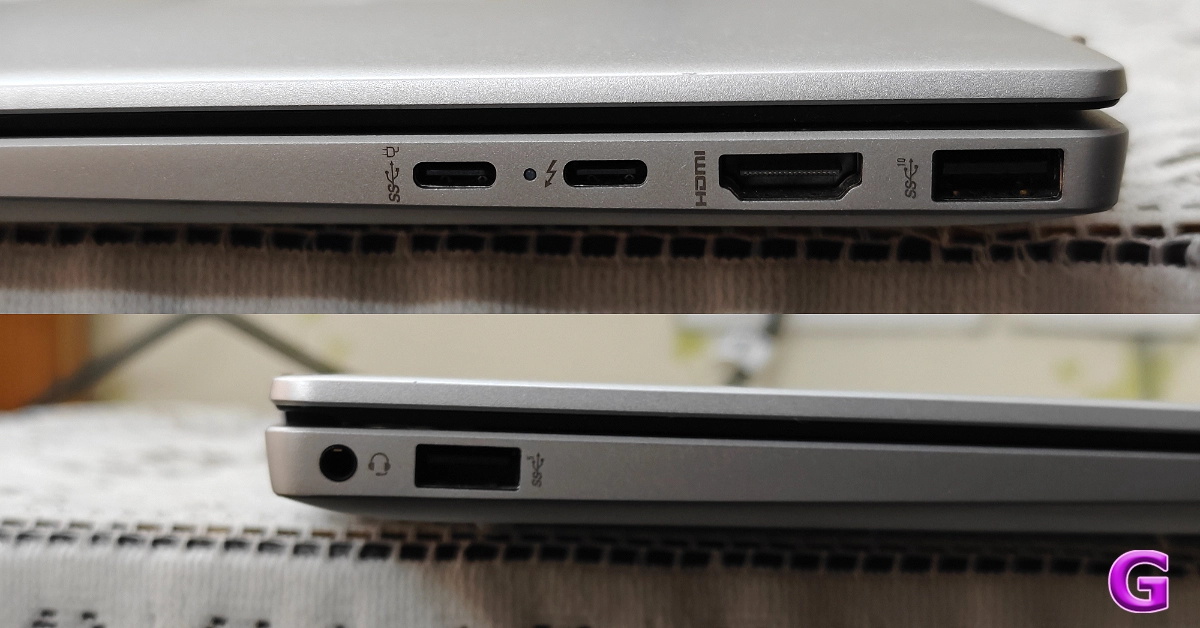 Just like all the other HP laptops the company’s branding is done on the front cover. You get all the necessary ports on this machine. There is Thunderbolt 4 with USB Type-C, another USB Type-C port, two USB Type-A ports, an HDMI-out and a headphone/microphone combo on the sides.
To allow more efficient cooling and keep the laptop from overheating, the rubber feet at the bottom elevate the laptop off a level surface higher than usual.
Just like all the other HP laptops the company’s branding is done on the front cover. You get all the necessary ports on this machine. There is Thunderbolt 4 with USB Type-C, another USB Type-C port, two USB Type-A ports, an HDMI-out and a headphone/microphone combo on the sides.
To allow more efficient cooling and keep the laptop from overheating, the rubber feet at the bottom elevate the laptop off a level surface higher than usual.
 Over that, the notebook sports HP Dual Speakers HP Audio Boost, and custom tuning by the experts at B&O, which allows you to enjoy rich and natural audio.
 The new Pavilion Plus 14 comes with a 14-inch IMAX enhanced 2.8K OLED display with 2,880 x 1,800 pixels of resolution. The display has a 16:10 aspect ratio along with 88% screen-to-body ratio. Also, the screen of the laptop supports an adaptive refresh rate ranging from 48-120Hz.
Furthermore, the machine comes with 400 nits (SDR) and 500 nits (HDR) brightness. The screen isn’t as bright as we would have liked it to be for this price. Also, it is an OLED screen that has 100 percent DCI-P3 that supports anti-glare tech.
The display is Eyesafe certified and it meets TÜV low blue light requirements, which saves the user’s eyes from harmful blue light without sacrificing colour accuracy to lessen eyestrain from prolonged use. The OLED panel displays brighter colours and a deeper black.
The display has a contemporary appearance since the side bezels are very slim.
The new Pavilion Plus 14 comes with a 14-inch IMAX enhanced 2.8K OLED display with 2,880 x 1,800 pixels of resolution. The display has a 16:10 aspect ratio along with 88% screen-to-body ratio. Also, the screen of the laptop supports an adaptive refresh rate ranging from 48-120Hz.
Furthermore, the machine comes with 400 nits (SDR) and 500 nits (HDR) brightness. The screen isn’t as bright as we would have liked it to be for this price. Also, it is an OLED screen that has 100 percent DCI-P3 that supports anti-glare tech.
The display is Eyesafe certified and it meets TÜV low blue light requirements, which saves the user’s eyes from harmful blue light without sacrificing colour accuracy to lessen eyestrain from prolonged use. The OLED panel displays brighter colours and a deeper black.
The display has a contemporary appearance since the side bezels are very slim.
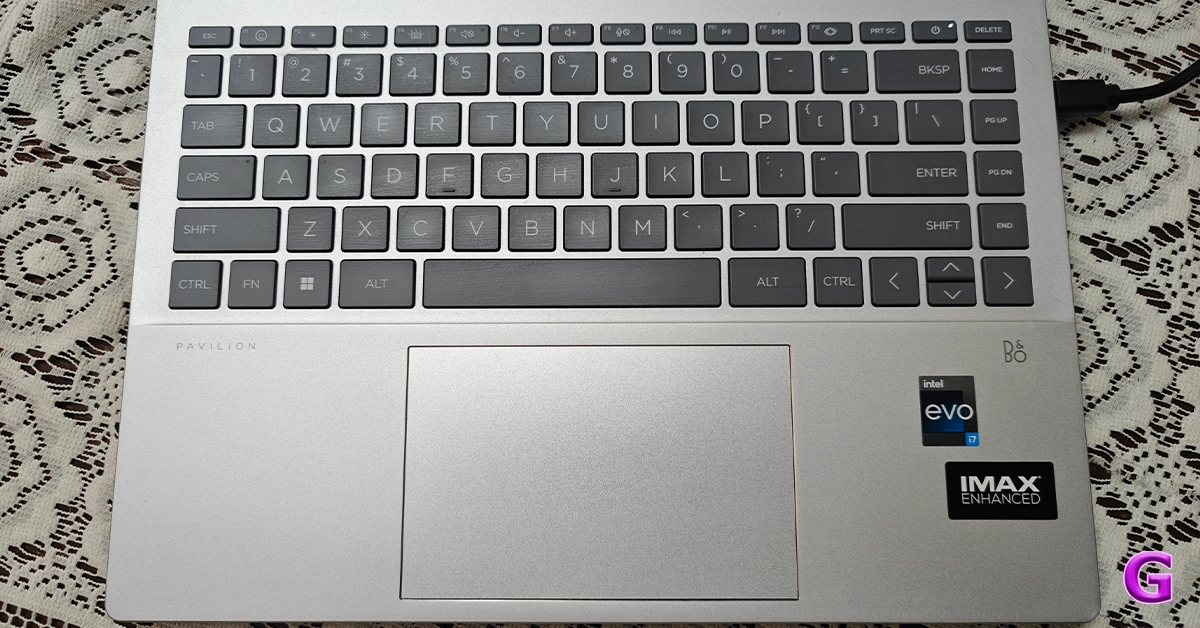 When you lift the lid or cover of the laptop you get a full-size keyboard which comes with back lighting. The colour of the entire keyboard is light grey.
For video chats, there is a 5-megapixel webcam with privacy-enhancing mic mute buttons and a shutter for the camera.
When you lift the lid or cover of the laptop you get a full-size keyboard which comes with back lighting. The colour of the entire keyboard is light grey.
For video chats, there is a 5-megapixel webcam with privacy-enhancing mic mute buttons and a shutter for the camera.
HP Pavilion Plus 14: Performance
Now coming to the performance, the HP Pavilion Plus 14 laptop is equipped with a 13th Generation Intel Core i7 – 1355U CPU, which has 10 cores and 12 threads and can run at up to 5.0 GHz clock speed thanks to the Intel Turbo Boost Technology. Additionally, the processor has 12 MB of L3 cache. About storage and RAM, you will receive a 1TB SSD hard drive along with 16GB LPDDR5 RAM. In addition to this, the firm is offering 25 GB of Dropbox storage, which is applicable for 1 year from the date of registration.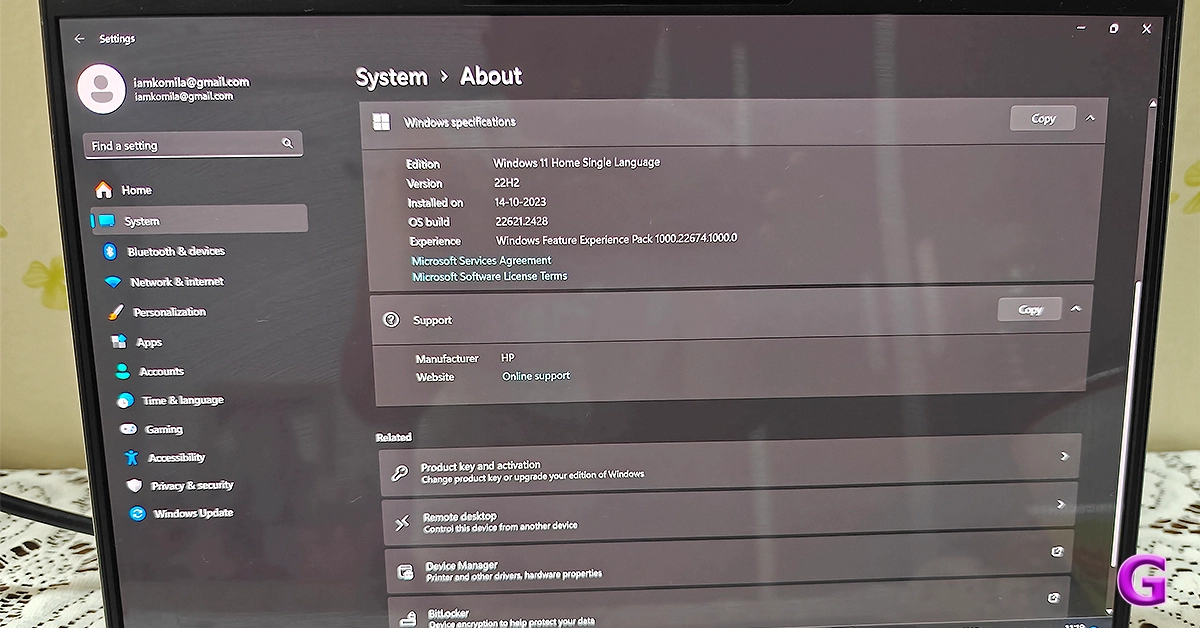 Together with the Intel Iris Xe Graphics card, the 13th-generation processor makes multitasking a breeze. We worked on several documents without any issues. This configuration will be more than sufficient for your daily usage, which includes opening of over 25 Chrome tabs and performing additional tasks like online meetings.
We also did not encounter any unusual fan noises or issues with the heating system.
The display is good for office use as well as for people who view a lot of OTT content. During our testing, the colours appeared vibrant and sharp, which makes them ideal for multimedia consumption. The resolution is decent, too.
Also Read: Apple MacBook Air 15-inch Review: We Apple-solutely Love It!
The screen brightness is enough for indoor use only. The colour accuracy is also fairly good. As said, the display has TÜV certification, so even if you use it for extended periods of time, your eyes won’t be harmed and you won’t feel any strain in your eyes or headaches.
Additionally, the two speakers are among the best that we have ever heard. The loudness and sound quality, both are excellent.
Together with the Intel Iris Xe Graphics card, the 13th-generation processor makes multitasking a breeze. We worked on several documents without any issues. This configuration will be more than sufficient for your daily usage, which includes opening of over 25 Chrome tabs and performing additional tasks like online meetings.
We also did not encounter any unusual fan noises or issues with the heating system.
The display is good for office use as well as for people who view a lot of OTT content. During our testing, the colours appeared vibrant and sharp, which makes them ideal for multimedia consumption. The resolution is decent, too.
Also Read: Apple MacBook Air 15-inch Review: We Apple-solutely Love It!
The screen brightness is enough for indoor use only. The colour accuracy is also fairly good. As said, the display has TÜV certification, so even if you use it for extended periods of time, your eyes won’t be harmed and you won’t feel any strain in your eyes or headaches.
Additionally, the two speakers are among the best that we have ever heard. The loudness and sound quality, both are excellent.
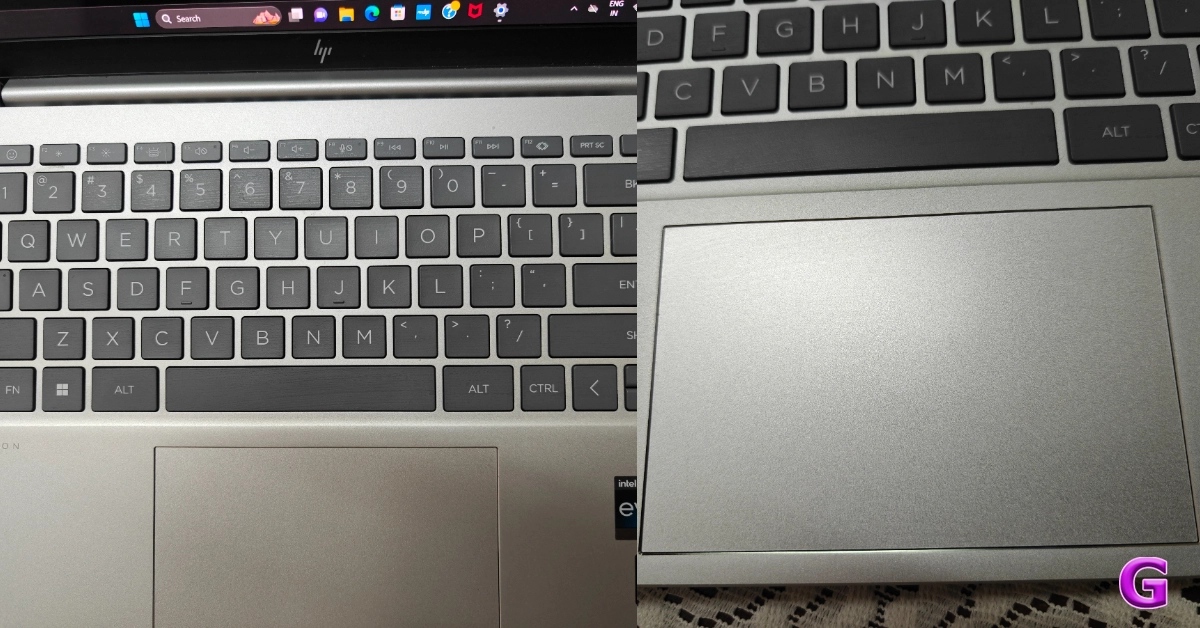 The excellent travel distance between the keys provides pleasant tactile feedback. With it, the size of the trackpad is suitable for comfortable use. Note that the keyboard is smaller because it does not include a number keypad.
 Zoom meetings and connecting with friends and family are made possible by the 5MP infrared camera. The webcam comes with an 88-degree field of view. Along with the camera, there is a dual-array microphone. You will not only appear very clear but also be heard well, thanks to the temporal noise reduction. The company has also taken care of user privacy, the top-mounted camera shutter on the system can be manually opened and closed.
 When it comes to connectivity, there is Wi-Fi 6E with a wireless card for speed. The Bluetooth here is the 5.3 version.
Users get Windows 11 out of the box. It’s excellent that Microsoft Office comes pre-installed and includes Word, Excel, and other important programs for productivity. The company is providing a 30-day trial of the McAfee Antivirus, too.
When it comes to the battery, the HP Pavilion Plus 14 has a 4-cell, 68Wh battery. The 65W USB Type-C power adapter is included in the packaging. The device provides about 7-8 hours of battery life. This means you may use it for nearly the entire workday (in one charge cycle) if you charge it fully in the morning.
When it comes to connectivity, there is Wi-Fi 6E with a wireless card for speed. The Bluetooth here is the 5.3 version.
Users get Windows 11 out of the box. It’s excellent that Microsoft Office comes pre-installed and includes Word, Excel, and other important programs for productivity. The company is providing a 30-day trial of the McAfee Antivirus, too.
When it comes to the battery, the HP Pavilion Plus 14 has a 4-cell, 68Wh battery. The 65W USB Type-C power adapter is included in the packaging. The device provides about 7-8 hours of battery life. This means you may use it for nearly the entire workday (in one charge cycle) if you charge it fully in the morning.
Verdict
The thin and light HP Pavilion Plus 14 laptop comes with a gorgeous all-metal chassis design. With that said its display is of good resolution. It also has an excellent battery life. If you’re looking to purchase a laptop for multimedia consumption, the HP Pavilion Plus 14 is a fantastic option. You should give this laptop some serious thought if you need a laptop that can handle demanding work, writing, taking Zoom calls, and multimedia consumption. Its battery life is also very good. Not just that the notebook is sturdy as well as good-looking. In terms of cost, it begins at about Rs 99,999. However, if you buy the machine via the company’s official website you can save a lot of money since there are numerous deals available. Buy HereGarena Free Fire Redeem Codes Today 24 November 2023: Here is how to claim them

Garena Free Fire is a battle royale game with regular awards and tournaments to keep players interested. If you play Garena Free Fire, you should be aware of the redeem codes that are released on a daily basis. However, because the battle royale game is banned in India, players from other countries can use the Free Fire Redeem codes daily. If you’re unfamiliar with the Garena Free Fire redeem codes or don’t know how to get them, we’ve put together a step-by-step guide to help you redeem them. Check out Garena Free Fire Redeem Codes for 24 November 2023.
The Free Fire redeem codes are a great way to get free stuff. These are 12-digit codes that contain alphabets and numbers, as well as an expiration date and time. Because the Garena FF redeem codes cannot be used more than once, you should hurry to the redemption page to claim your free reward before someone else does. To get a free reward, all you have to do is go to reward.ff.garena.com/en, which is the official redemption page. Also, keep an eye on this space for daily updates on Garena Free Fire redemption codes and rewards.
In This Article
Garena Free Fire Redeem Codes Today 24 November 2023
FFCMCPSUYUY7E XZJZE25WEFJJ BR43FMAPYEZZ MCPW2D1U3XA3 MCPW3D28VZD6 V427K98RUCHZ FFCMCPSJ99S3 FFCMCPSEN5MX HNC95435FAGJ 6KWMFJVMQQYG MCPW2D2WKWF2 NPYFATT3HGSQ UVX9PYZV54AC EYH2W3XK8UPG FFCMCPSGC9XZ ZZZ76NT3PDSHHow to Get Free Fire Redeem Codes for Garena on 24 November 2023?
- Visit the Garena Free Fire game’s official website at reward.ff.garena.com.
- Use your Facebook, Google, VK, Apple ID, Huawei ID, or Twitter account to log in.
- You’ll be taken to a valid redemption code (s)
- Copy and paste the 12-digit redemption code into the text box.
- On the screen, a dialogue box will appear.
- ‘Ok’ should be selected.
Oppo Reno 11 Series with curved AMOLED displays launched

Key highlights

 The device is powered by an octa-core Snapdragon 8+ Gen 1 SoC with LPDDR5x RAM (can be virtually expanded up to 24GB)and UFS 3.1 storage. It operates on Android 14-based ColorOS 14. The handset includes 5G, 4G LTE, Wi-Fi 6, Bluetooth 5.3, GPS/ A-GPS, NFC, OTG, and a USB Type-C port for connectivity. Also, there is an under-display fingerprint sensor and other sensors including an accelerometer, geomagnetic sensor, light sensor, under-screen proximity sensor, gravity sensor, colour temperature sensor, IR control, and gyroscope. The smartphone sports a 4,700mAh battery with 80W Super Flash Charge support.
The Oppo Reno 11 Pro comes with a 32-megapixel RGBW Sony IMX709 front-facing camera for selfies. There is a triple rear camera setup which includes:
The device is powered by an octa-core Snapdragon 8+ Gen 1 SoC with LPDDR5x RAM (can be virtually expanded up to 24GB)and UFS 3.1 storage. It operates on Android 14-based ColorOS 14. The handset includes 5G, 4G LTE, Wi-Fi 6, Bluetooth 5.3, GPS/ A-GPS, NFC, OTG, and a USB Type-C port for connectivity. Also, there is an under-display fingerprint sensor and other sensors including an accelerometer, geomagnetic sensor, light sensor, under-screen proximity sensor, gravity sensor, colour temperature sensor, IR control, and gyroscope. The smartphone sports a 4,700mAh battery with 80W Super Flash Charge support.
The Oppo Reno 11 Pro comes with a 32-megapixel RGBW Sony IMX709 front-facing camera for selfies. There is a triple rear camera setup which includes:
- The series includes Oppo Reno 11 Pro and Oppo Reno 11.
- Both the phones feature a 50-megapixel triple rear cameras
- The Pro variant is powered by Snapdragon 8+ Gen 1 SoC.
- The vanilla model is equipped with MediaTek Dimensity 8200 SoC.

In This Article
Oppo Reno 11 Pro, Oppo Reno 11 price and availability
Oppo Reno 11 Pro Price- 12GB RAM + 256GB storage- CNY 3,499 (approx Rs 41,000)
- 12GB RAM + 512GB storage- CNY 3,799 (approx Rs 44,000)
- 8GB RAM + 256GB storage- CNY 2,499 (approx Rs 29,000)
- 12GB RAM + 256GB storage- CNY 2,799 (approx Rs 31,000)
- 12GB RAM + 512GB storage- CNY 2,999 (approx Rs 35,000)
Oppo Reno 11 Pro specifications
The 6.74-inch 1.5K OLED curved display with 1,240×2,772 pixels of resolution on the Oppo Reno 11 Pro features the following:- Up to 120Hz refresh rate
- Up to 240Hz touch sampling rate
- 450ppi pixel density
- 1,600 nits of peak brightness
 The device is powered by an octa-core Snapdragon 8+ Gen 1 SoC with LPDDR5x RAM (can be virtually expanded up to 24GB)and UFS 3.1 storage. It operates on Android 14-based ColorOS 14. The handset includes 5G, 4G LTE, Wi-Fi 6, Bluetooth 5.3, GPS/ A-GPS, NFC, OTG, and a USB Type-C port for connectivity. Also, there is an under-display fingerprint sensor and other sensors including an accelerometer, geomagnetic sensor, light sensor, under-screen proximity sensor, gravity sensor, colour temperature sensor, IR control, and gyroscope. The smartphone sports a 4,700mAh battery with 80W Super Flash Charge support.
The Oppo Reno 11 Pro comes with a 32-megapixel RGBW Sony IMX709 front-facing camera for selfies. There is a triple rear camera setup which includes:
The device is powered by an octa-core Snapdragon 8+ Gen 1 SoC with LPDDR5x RAM (can be virtually expanded up to 24GB)and UFS 3.1 storage. It operates on Android 14-based ColorOS 14. The handset includes 5G, 4G LTE, Wi-Fi 6, Bluetooth 5.3, GPS/ A-GPS, NFC, OTG, and a USB Type-C port for connectivity. Also, there is an under-display fingerprint sensor and other sensors including an accelerometer, geomagnetic sensor, light sensor, under-screen proximity sensor, gravity sensor, colour temperature sensor, IR control, and gyroscope. The smartphone sports a 4,700mAh battery with 80W Super Flash Charge support.
The Oppo Reno 11 Pro comes with a 32-megapixel RGBW Sony IMX709 front-facing camera for selfies. There is a triple rear camera setup which includes:
- 50-megapixel primary Sony IMX890 sensor with OIS
- 32-megapixel telephoto lens
- 8-megapixel ultra-wide camera
Oppo Reno 11 specifications
The Oppo Reno 11 features a 6.70-inch OLED curved display with 1,080×2,412 pixels of resolution. The screen also comes with the following:- Supports an adaptive refresh rate (1Hz to 120Hz)
- 394ppi pixel density
- 950nits peak brightness
- 50-megapixel Sony LYT600 sensor (26mm focal length and OIS)
- 32-megapixel telephoto lens
- 8-megapixel ultra-wide camera
Anyone can now download Instagram Reels, the download option will be enabled by default

Key Highlights
- Users can now download Reels published by public accounts on Instagram thanks to a new functionality that Meta has now enabled for everyone.
- Instagram CEO Adam Mosseri made the announcement about the latest feature.
- The downloaded reels can be further shared to other platforms like WhatsApp.
Garena Free Fire Redeem Codes Today 23 November 2023: Here is how to claim them

Garena Free Fire is a battle royale game with regular awards and tournaments to keep players interested. If you play Garena Free Fire, you should be aware of the redeem codes that are released on a daily basis. However, because the battle royale game is banned in India, players from other countries can use the Free Fire Redeem codes daily. If you’re unfamiliar with the Garena Free Fire redeem codes or don’t know how to get them, we’ve put together a step-by-step guide to help you redeem them. Check out Garena Free Fire Redeem Codes for 23 November 2023.
The Free Fire redeem codes are a great way to get free stuff. These are 12-digit codes that contain alphabets and numbers, as well as an expiration date and time. Because the Garena FF redeem codes cannot be used more than once, you should hurry to the redemption page to claim your free reward before someone else does. To get a free reward, all you have to do is go to reward.ff.garena.com/en, which is the official redemption page. Also, keep an eye on this space for daily updates on Garena Free Fire redemption codes and rewards.
In This Article
Garena Free Fire Redeem Codes Today 23 November 2023
FLOVI8C7DYETG4B FN6MY7LJPNO9BIU FV7YFHDN4M56LYP FU0HLKBVCPYO987 FSY6TGF3BNRMFCI FU7Y6T5SRFRWVB4 FN5TKYLHROVMKLS FGDEN4M5KVLYHI7 FDYHR6Y7UR674U3 FBVYHDNEK46O5IT FUGYHVBCXMSOUE4 FOE497MURKT6LOBI FV7CYTGDBWNMJEK FL5O9YHD87BYVTCHow to Get Free Fire Redeem Codes for Garena on 23 November 2023?
- Visit the Garena Free Fire game’s official website at reward.ff.garena.com.
- Use your Facebook, Google, VK, Apple ID, Huawei ID, or Twitter account to log in.
- You’ll be taken to a valid redemption code (s)
- Copy and paste the 12-digit redemption code into the text box.
- On the screen, a dialogue box will appear.
- ‘Ok’ should be selected.
Top 5 ways to download free music on iPhone (2023)
")
If you’re not subscribed to any of the music streaming giants, downloading free music on your phone can be quite a challenging task. Certain online libraries offer free downloads, but they may not always have what you are looking for. So how do you go about saving all your favourite tunes on your phone? Today, we bring you the top 5 ways to download free music on your iPhone.
Read Also: Top 4 ways to convert a photo to PDF on iPhone
The Internet Archive is an incredible online repository of free books, movies, music, software, and more. There are over 14 million audio recordings that can be downloaded from the website for free. This even includes popular and contemporary artists. If you like listening to live music, you can also find bootleg recordings of concerts on the Internet Archive. The only catch is that music downloaded from this website cannot be used for commercial purposes. However, if your goal is to simply listen to music, TIA is one of the best free resources out there.
 Audiomack is one of the best apps to download music for commercial and recreational purposes. If you’re looking for a moody background number for your vlog, Audiomack is where you should go. You can even find popular artists like Bad Bunny, Diplo, NBA Youngboy, and others on Audiomack. Once you play a song on the app, you can easily download it from the player itself.
You can download music from YouTube without requiring a subscription to YouTube Premium. This usually requires a good amount of hit and trial since most channels restrict the downloads on their uploads. Thankfully, you can find several videos of the same song on YouTube. Once you download the song, you can access it from the Downloads folder on YouTube.
Soundcloud is one of the best online platforms for up-and-coming artists to showcase their work. You can also find a lot of popular artists on Soundcloud. If the artist allows downloads, you can save their music on your iPhone for free. Like YouTube, this also requires a lot of hit and trial. The best part is that you don’t need to register to Soundcloud to download a song.
Audiomack is one of the best apps to download music for commercial and recreational purposes. If you’re looking for a moody background number for your vlog, Audiomack is where you should go. You can even find popular artists like Bad Bunny, Diplo, NBA Youngboy, and others on Audiomack. Once you play a song on the app, you can easily download it from the player itself.
You can download music from YouTube without requiring a subscription to YouTube Premium. This usually requires a good amount of hit and trial since most channels restrict the downloads on their uploads. Thankfully, you can find several videos of the same song on YouTube. Once you download the song, you can access it from the Downloads folder on YouTube.
Soundcloud is one of the best online platforms for up-and-coming artists to showcase their work. You can also find a lot of popular artists on Soundcloud. If the artist allows downloads, you can save their music on your iPhone for free. Like YouTube, this also requires a lot of hit and trial. The best part is that you don’t need to register to Soundcloud to download a song.
 If you’re a classical music enthusiast, head over to Musopen to download free recordings and sheet music on your device. Musopen has a very friendly interface that is easy to follow and navigate. You can browse and download music from composers like Bach, Mozart, Beethoven, Chopin, and more for free. If you’re honing your craft as a musician, you will also like the educational content present on the website.
In This Article
The Internet Archive
 The Internet Archive is an incredible online repository of free books, movies, music, software, and more. There are over 14 million audio recordings that can be downloaded from the website for free. This even includes popular and contemporary artists. If you like listening to live music, you can also find bootleg recordings of concerts on the Internet Archive. The only catch is that music downloaded from this website cannot be used for commercial purposes. However, if your goal is to simply listen to music, TIA is one of the best free resources out there.
Audiomack
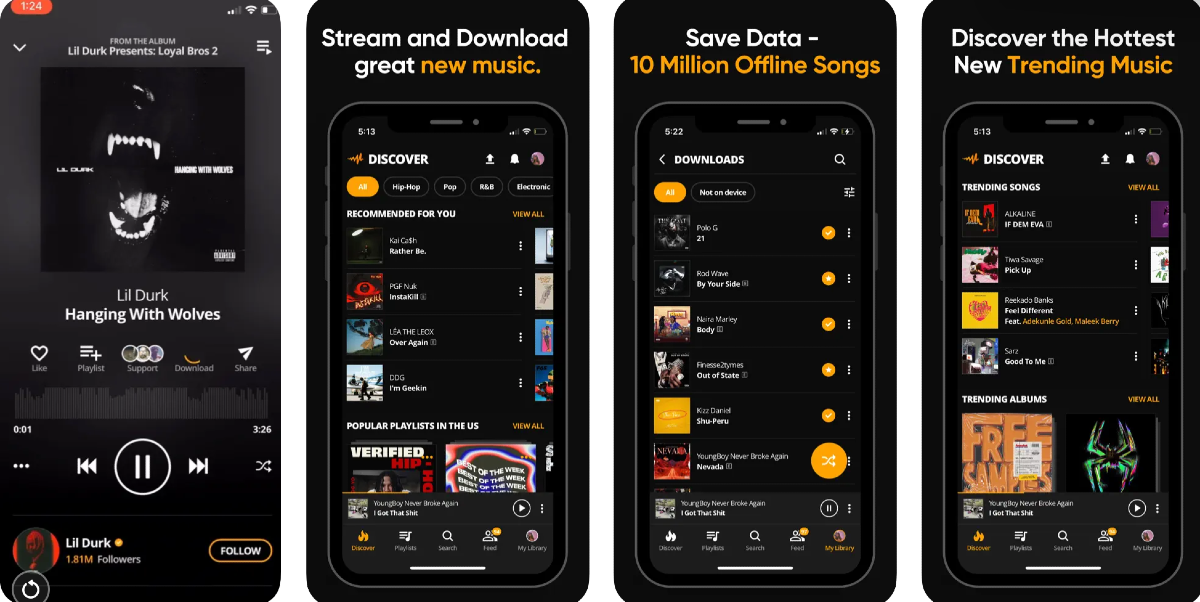 Audiomack is one of the best apps to download music for commercial and recreational purposes. If you’re looking for a moody background number for your vlog, Audiomack is where you should go. You can even find popular artists like Bad Bunny, Diplo, NBA Youngboy, and others on Audiomack. Once you play a song on the app, you can easily download it from the player itself.
YouTube
 You can download music from YouTube without requiring a subscription to YouTube Premium. This usually requires a good amount of hit and trial since most channels restrict the downloads on their uploads. Thankfully, you can find several videos of the same song on YouTube. Once you download the song, you can access it from the Downloads folder on YouTube.
Soundcloud
 Soundcloud is one of the best online platforms for up-and-coming artists to showcase their work. You can also find a lot of popular artists on Soundcloud. If the artist allows downloads, you can save their music on your iPhone for free. Like YouTube, this also requires a lot of hit and trial. The best part is that you don’t need to register to Soundcloud to download a song.
Musopen
 If you’re a classical music enthusiast, head over to Musopen to download free recordings and sheet music on your device. Musopen has a very friendly interface that is easy to follow and navigate. You can browse and download music from composers like Bach, Mozart, Beethoven, Chopin, and more for free. If you’re honing your craft as a musician, you will also like the educational content present on the website.
Frequently Asked Questions (FAQs)
Where can I download free music on my iPhone?
The Internet Archive is an exhaustive online library that consists of millions of audio recordings from popular artists, both classic and contemporary. Other than that you can also use services like Audiomack and Jamendo to download free music.Does YouTube allow free downloads?
You can download music for free on YouTube with a Premium subscription. However, some channels and creators allow non-premium subscribers to download their videos for free too.Where can I find royalty-free music for my vlog?
Services like TuneTank, Jamendo, and Soundstripe offer royalty-free music for vlogs, movies, podcasts, and more. Even YouTube has a royalty-free audio library that lets you select music for your videos. Read Also: Top 2 Ways to Add Checkboxes to Word DocumentConclusion
These are the top 5 ways to download free music on your iPhone. You can also use third-party tools to download YouTube videos as MP3s on your device. Know any music services that allow free downloads on their platform? We’d love to know in the comments!Top 4 ways to update Safari on iPhone and Mac

You must already be familiar with the role that an updated OS plays in keeping your device secure. Malware, ransomware, and other kinds of malicious viruses are rampant on the internet, and it is essential that your device is well-equipped to protect you against them. Your web browser plays an important part in this as well. Like your device’s OS, the web browser also receives routine security patches from its developers. In this article, we bring you the top 4 ways to update the Safari browser on your iPhone and Mac.
Read Also: OnePlus AI Music Studio, a platform allowing users to compose music launched in India and globally
 Step 3: Make sure your Account page is refreshed. You can do this by pulling down the top of the page and then releasing it.
Step 4: Scroll down to Safari and hit the Update button next to it.
Step 3: Make sure your Account page is refreshed. You can do this by pulling down the top of the page and then releasing it.
Step 4: Scroll down to Safari and hit the Update button next to it.
 Step 2: Turn on the toggle switch for App Updates. In the Cellular Data section, turn off the toggle switch for Automatic Downloads.

In This Article
Update Safari on iPhone using the App Store
Step 1: Long press the App Store icon on your iPhone’s home screen. Step 2: Hit the Updates option. Step 3: Make sure your Account page is refreshed. You can do this by pulling down the top of the page and then releasing it.
Step 4: Scroll down to Safari and hit the Update button next to it.
Step 3: Make sure your Account page is refreshed. You can do this by pulling down the top of the page and then releasing it.
Step 4: Scroll down to Safari and hit the Update button next to it.

Turn on automatic updates
If you don’t want to manually update the Safari app on your iPhone, simply turn on automatic updates for all apps. Your apps will only update when you are connected to a WiFi network. Step 1: Go to Settings and select App Store. Step 2: Turn on the toggle switch for App Updates. In the Cellular Data section, turn off the toggle switch for Automatic Downloads.

Update the Safari browser on your Mac
Step 1: Open the App Store on your Mac. Step 2: Hit the Updates option at the top of the screen. Step 3: This is where you’ll find the list of apps on your device with a pending update. Step 4: Scroll down to Safari and hit the Update button next to it.Update Safari on your Mac by updating the macOS
Once you update macOS to its latest version, it also updates the native apps like Safari on your device. Here’s how you can go about it. Step 1: Hit the Apple logo at the top left corner of the screen and select System Preferences. Step 2: Click on System Updates. Step 3: Your device will check for any new updates. Step 4: Once it shows a new update, click on Upgrade Now.Frequently Asked Questions (FAQs)
How do I update the Safari browser on my Mac?
To update the Safari browser on your Mac, simply head over to the App Store and switch to the Updates tab. This is where you’ll find the list of apps with pending updates. If Safari is on the list, click the Update button next to it.How do I turn on automatic updates for the apps on my iPhone?
Go to Settings>App Store and turn on the toggle switch for App Updates. Your smartphone will automatically download the latest versions of the apps installed in it.Why should I update the Safari browser on my iPhone?
New versions of web browsers contain important security updates that guard your device against malicious entities. Read Also: Top Ways to Open the Windows Snipping Tool With a Keyboard ShortcutConclusion
These are the top 4 ways to update Safari on your iPhone and Mac. If you’re thinking of turning on automatic updates, make sure it is under the precondition that your device is connected to a WiFi network. Updating apps over a cellular connection can eat up a significant portion of your mobile data.2 Quick Ways to Change or Update the Time on a Fitbit (2023)
")
Once you set up your Fitbit device it relies on your smartphone for the accurate date and time. Sometimes, it may malfunction and display the incorrect time even when there doesn’t seem to be anything wrong with your smartphone. Instead of resetting and re-linking your Fitbit to your phone, you can manually set the correct time. In this article, we bring you 2 quick ways to change or update the time on a Fitbit.
Read Also: Tinder brings a slew of new features and a fresh look for Gen Z users: Here is what’s new
Step 1: Launch the Fitbit app on your smartphone and switch to the Today tab.
Step 2: Tap your profile picture.
Step 3: Select Advanced Settings.
Step 4: To manually change the time, turn off the toggle switch for Automatic time zone.
Step 5: Select your time zone manually.
Step 6: Sync your Fitbit device.
Step 1: Go to the official Fitbit website and log into your account.
Step 2: Hit the gear icon at the top right corner of the screen and select Settings.
Step 3: Switch to the Personal Info tab.
Step 4: Choose your timezone in the Advanced Settings section.
Step 5: Hit Submit.
In This Article
Change the time on your Fitbit using the mobile app
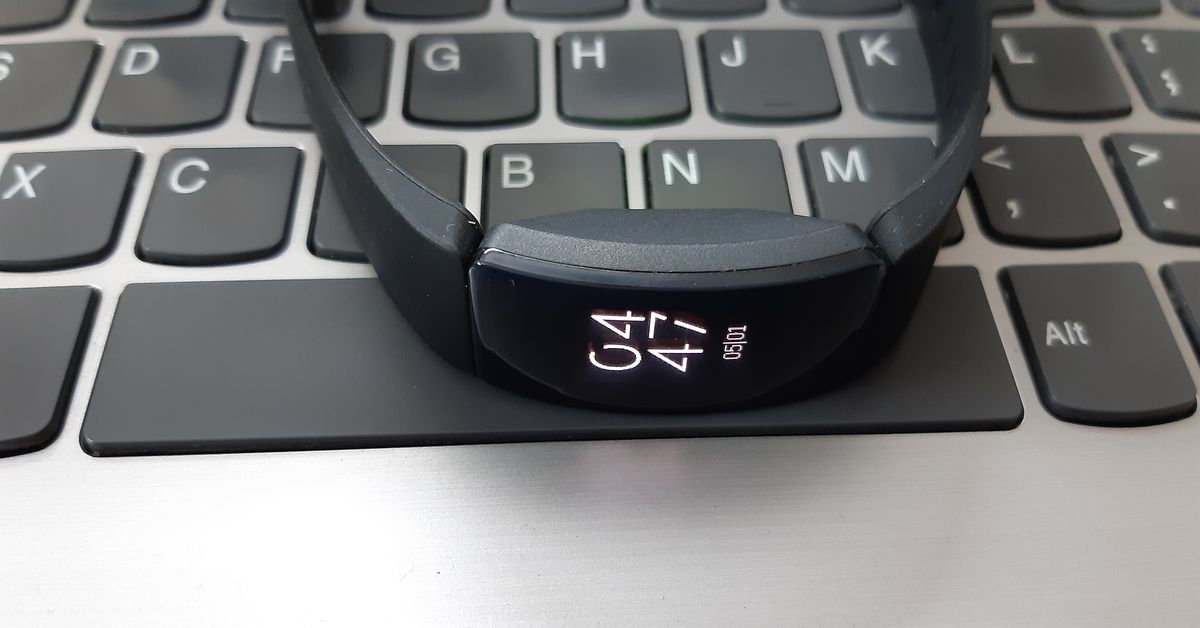 Step 1: Launch the Fitbit app on your smartphone and switch to the Today tab.
Step 2: Tap your profile picture.
Step 3: Select Advanced Settings.
Step 4: To manually change the time, turn off the toggle switch for Automatic time zone.
Step 5: Select your time zone manually.
Step 6: Sync your Fitbit device.
Step 1: Launch the Fitbit app on your smartphone and switch to the Today tab.
Step 2: Tap your profile picture.
Step 3: Select Advanced Settings.
Step 4: To manually change the time, turn off the toggle switch for Automatic time zone.
Step 5: Select your time zone manually.
Step 6: Sync your Fitbit device.
Change the time on your Fitbit using the official website
 Step 1: Go to the official Fitbit website and log into your account.
Step 2: Hit the gear icon at the top right corner of the screen and select Settings.
Step 3: Switch to the Personal Info tab.
Step 4: Choose your timezone in the Advanced Settings section.
Step 5: Hit Submit.
Step 1: Go to the official Fitbit website and log into your account.
Step 2: Hit the gear icon at the top right corner of the screen and select Settings.
Step 3: Switch to the Personal Info tab.
Step 4: Choose your timezone in the Advanced Settings section.
Step 5: Hit Submit.
Frequently Asked Questions (FAQs)
How do I change the time on my Fitbit?
Launch the Fitbit app and go to Today>Profile>Advanced Settings and manually select your time zone after turning off the toggle switch for Automatic time zone.How much does the cheapest Fitbit cost?
Fitbit Inspire 2 is the cheapest fitness tracker from the brand, priced at Rs 7,999.Who owns Fitbit?
Fitbit was acquired by Google in 2021. By 2025, all Fitbit users will require a Google Account to use its services. Read Also: How to Burn Apple Music to CD (Easily & Quickly)?Conclusion
These are the 2 quick ways to change or update the time on your Fitbit device. While you’re here check out our reviews of the Fitbit Sense 2 and Fitbit Versa 4 smartwatches. If you’re looking to buy a smartwatch to track your fitness and health metrics, check out our list of the best smartwatches around!Sunbird temporarily shutting down, removed from Play Store

Key Highlights
- Sunbird is an iMessage-compatible app for Android.
- The company is temporarily shutting down due to security issues.
- Sunbird partnered with Nothing and released the Nothing Chats App, which was also removed from the Play Store for the same reasons.
Samsung Galaxy S24 Ultra bags BIS certification, India launch imminent

Key highlights
- The Samsung Galaxy S24 series may include- Galaxy S24, Galaxy S24+, and Galaxy S24 Ultra.
- Galaxy S24 Ultra is said to be powered by Snapdragon 8 Gen 3 SoC.
- The device will feature a triple rear camera setup.
Top 6 ways to convert a photo to PDF on iPhone

iPhones are some of the most versatile smartphones around, largely because of the diverse range of tools embedded in the operating system. You don’t need to download a third-party app for the most basic tasks. For example, while most users flock to third-party apps and online tools to convert a picture to a PDF file, iPhone users can simply use any of the multiple native apps on their devices for this task. In this article, we bring you the top 6 native ways to convert a photo to a PDF file on an iPhone.
Read Also: Top Ways to Open the Windows Snipping Tool With a Keyboard Shortcut
Step 3: Tap on Print.
Step 4: Hit Print at the top right corner of the screen.
Step 5: Select Save to Files from the pop-up menu.
 The photo will be saved as a PDF copy on your iPhone.
 Step 3: Long press the picture and select Quick Actions.
Step 4: Hit Create PDF.
Step 3: Long press the picture and select Quick Actions.
Step 4: Hit Create PDF.
 To convert a bunch of images to PDF at once, select them all, tap ‘More’ at the bottom-right corner of the screen, and select Create PDF.
Step 3: Hit the camera icon and select Choose Photo or Video.
To convert a bunch of images to PDF at once, select them all, tap ‘More’ at the bottom-right corner of the screen, and select Create PDF.
Step 3: Hit the camera icon and select Choose Photo or Video.
 Step 4: Select the photo(s) you want to convert to PDF and hit Add.
 Step 5: Tap the share icon at the top of the screen.
 Step 6: Hit Print.
Step 7: Tap on the Print option at the top right corner of the screen and select Save to Files from the pop-up menu.
Step 6: Hit Print.
Step 7: Tap on the Print option at the top right corner of the screen and select Save to Files from the pop-up menu.

 Step 3: Hit the ellipses on the exported image(s).
 Step 4: Select Save to Files.
 Step 2: Tap on Add Action.
Step 3: Search for the Photos app and tap the Select Photos action.
Step 4: Turn on the toggle switch next to Select Multiple.
Step 5: Hit the Search bar at the bottom of the screen and select Categories.
Step 2: Tap on Add Action.
Step 3: Search for the Photos app and tap the Select Photos action.
Step 4: Turn on the toggle switch next to Select Multiple.
Step 5: Hit the Search bar at the bottom of the screen and select Categories.
 Step 6: Tap on Media and select Convert Image.
Step 7: Tap on JPEG and select PDF.
Step 8: Hit the Search bar at the bottom of the screen and select Apps.
Step 6: Tap on Media and select Convert Image.
Step 7: Tap on JPEG and select PDF.
Step 8: Hit the Search bar at the bottom of the screen and select Apps.
 Step 9: Tap on Files and select Save Files.
 Step 10: Hit Done in the top right corner of the screen.
Step 11: When the Shortcut has been created, launch it and select the images you want to convert to PDF.
Step 3: Select an image and hit Add.
Step 10: Hit Done in the top right corner of the screen.
Step 11: When the Shortcut has been created, launch it and select the images you want to convert to PDF.
Step 3: Select an image and hit Add.
 Step 4: Tap on Next.
Step 5: Select the Margins, Orientation, and Size. Hit Done.
Step 6: Once the PDF has been created, select Save to Files.
Step 4: Tap on Next.
Step 5: Select the Margins, Orientation, and Size. Hit Done.
Step 6: Once the PDF has been created, select Save to Files.

In This Article
Which method should you use?
The option to convert a photo to PDF is integrated into a lot of first-party apps on your iPhone. You can use any of the following apps for this task:- Photos
- Files
- Notes
- Books
Use the Photos app
Step 1: Launch the Photos app on your iPhone and select the photo you want to convert to a PDF file. Step 2: Hit the Share icon at the bottom of the screen.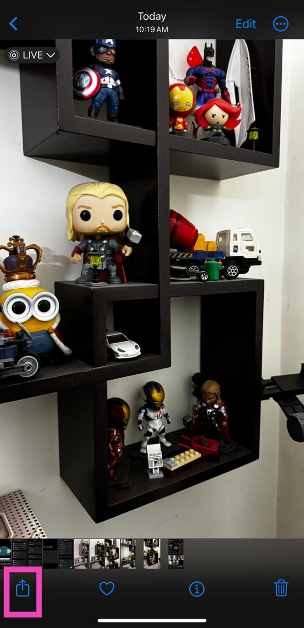 Step 3: Tap on Print.
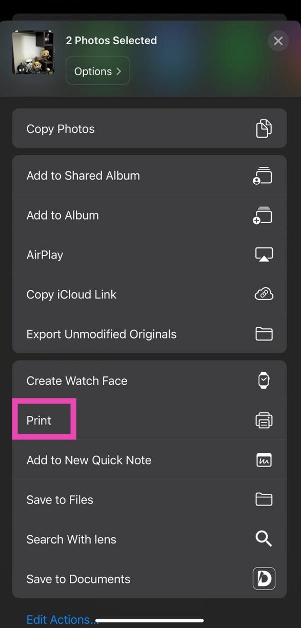 Step 4: Hit Print at the top right corner of the screen.
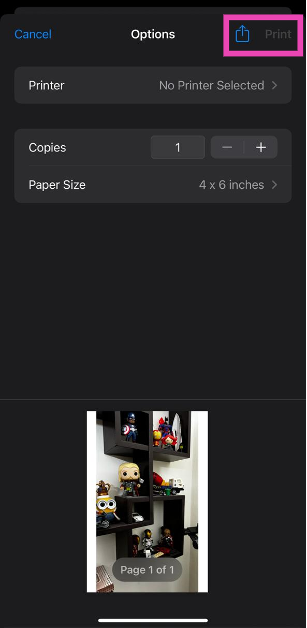 Step 5: Select Save to Files from the pop-up menu.
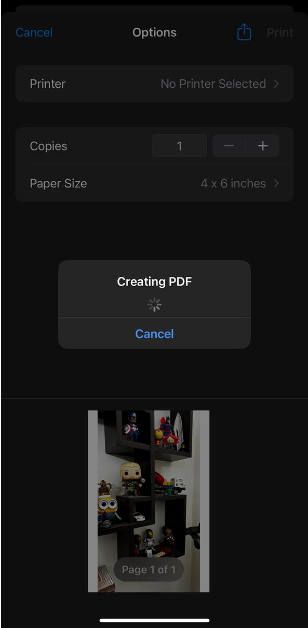 The photo will be saved as a PDF copy on your iPhone.
Use the Files app
Step 1: Launch the Files app on your iPhone. Step 2: Locate the photo that you wish to convert to PDF. Step 3: Long press the picture and select Quick Actions.
Step 4: Hit Create PDF.
Step 3: Long press the picture and select Quick Actions.
Step 4: Hit Create PDF.
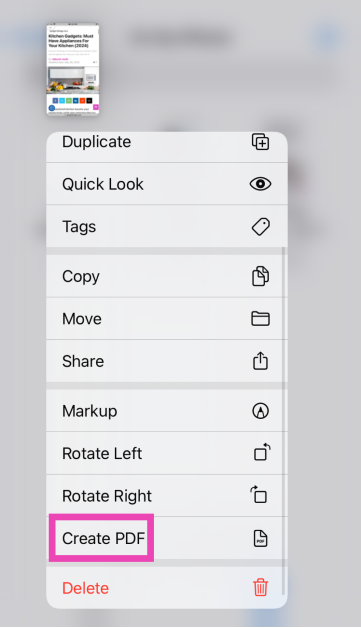 To convert a bunch of images to PDF at once, select them all, tap ‘More’ at the bottom-right corner of the screen, and select Create PDF.
Use the Notes app
Step 1: Launch the Notes app on your iPhone. Step 2: Hit the pen icon at the bottom right corner of the screen.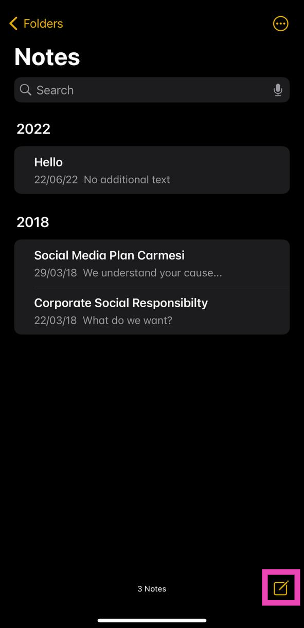 Step 3: Hit the camera icon and select Choose Photo or Video.
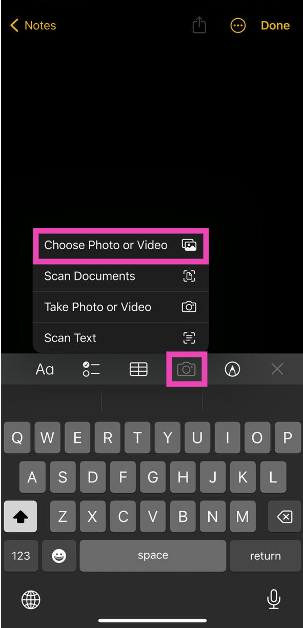 Step 4: Select the photo(s) you want to convert to PDF and hit Add.
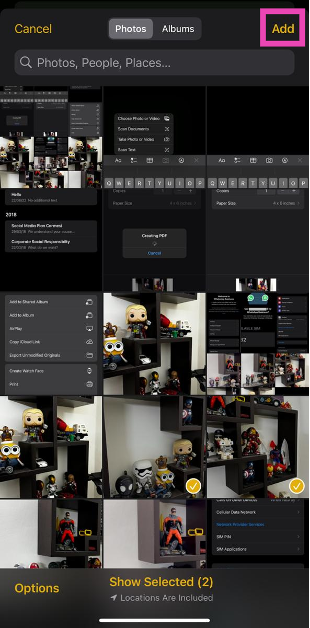 Step 5: Tap the share icon at the top of the screen.
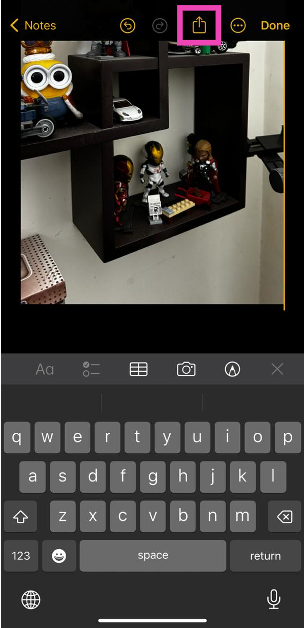 Step 6: Hit Print.
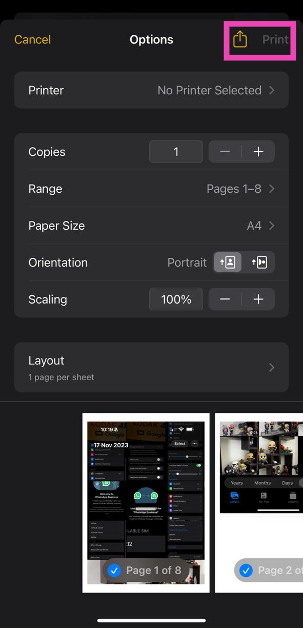 Step 7: Tap on the Print option at the top right corner of the screen and select Save to Files from the pop-up menu.
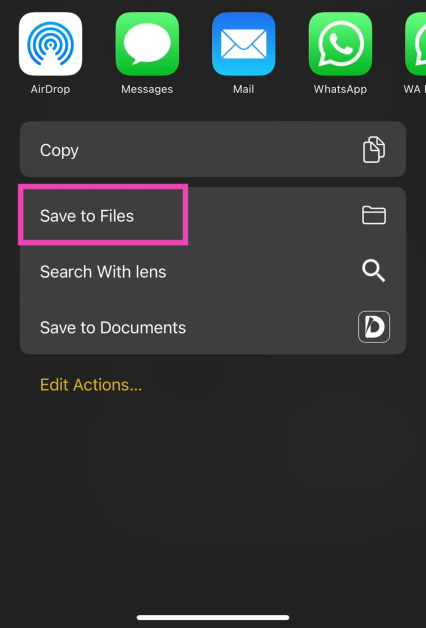
Use the Books app
Step 1: Launch the Photos app on your iPhone and select the image(s) you want to convert to PDF. Step 2: Hit the Share icon at the bottom left corner of the screen and export the image(s) to the Books app.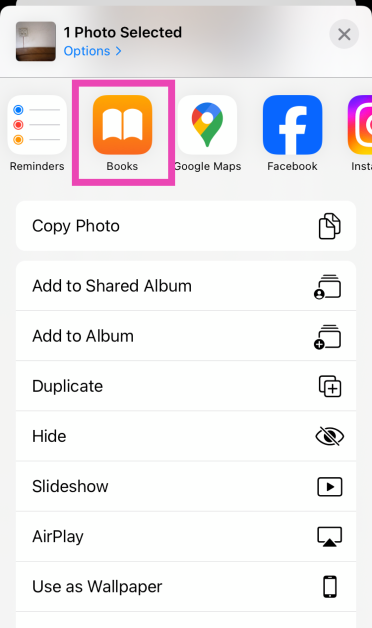 Step 3: Hit the ellipses on the exported image(s).
 Step 4: Select Save to Files.
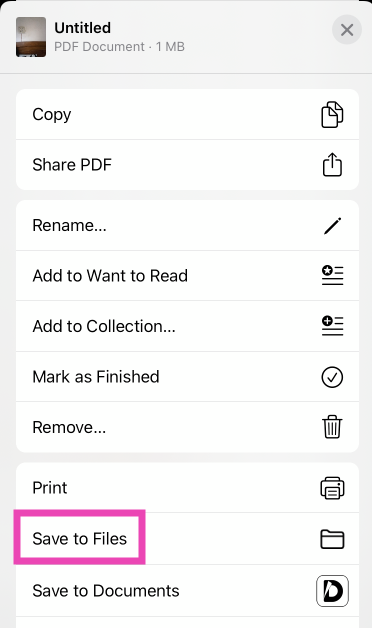
Use the Shortcuts app
Step 1: Launch the Shortcuts app on your iPhone and tap the plus icon in the top right corner of the screen.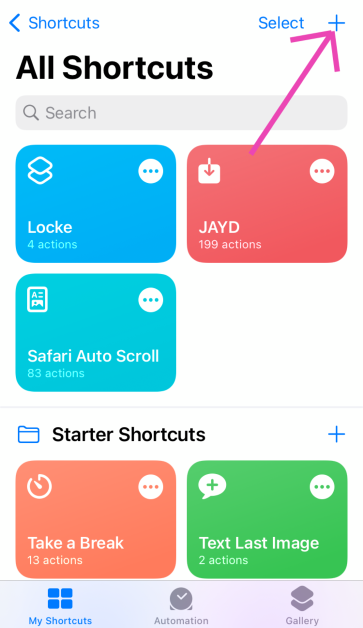 Step 2: Tap on Add Action.
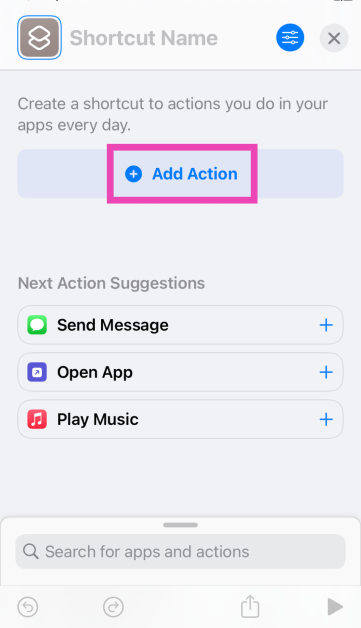 Step 3: Search for the Photos app and tap the Select Photos action.
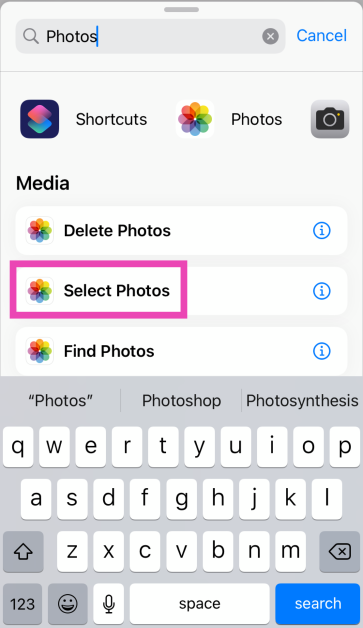 Step 4: Turn on the toggle switch next to Select Multiple.
Step 5: Hit the Search bar at the bottom of the screen and select Categories.
Step 4: Turn on the toggle switch next to Select Multiple.
Step 5: Hit the Search bar at the bottom of the screen and select Categories.
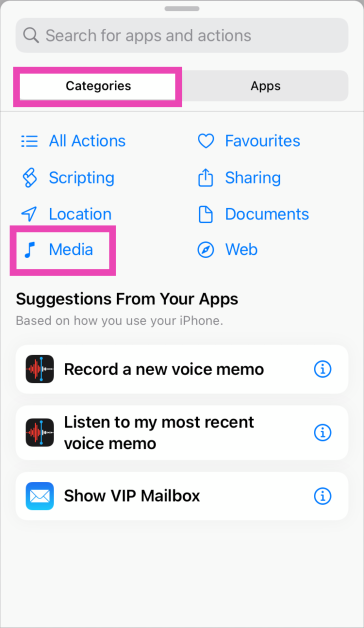 Step 6: Tap on Media and select Convert Image.
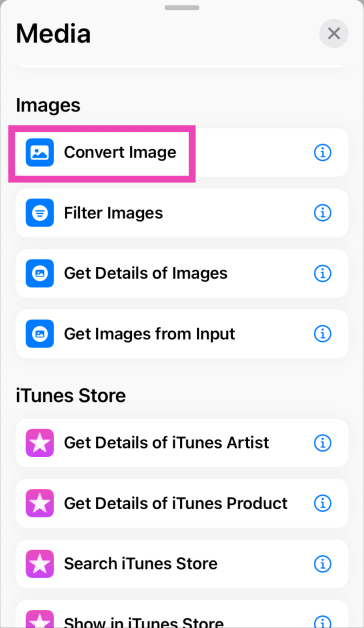 Step 7: Tap on JPEG and select PDF.
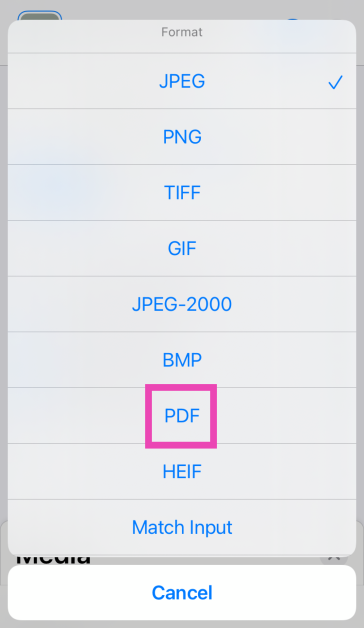 Step 8: Hit the Search bar at the bottom of the screen and select Apps.
 Step 9: Tap on Files and select Save Files.
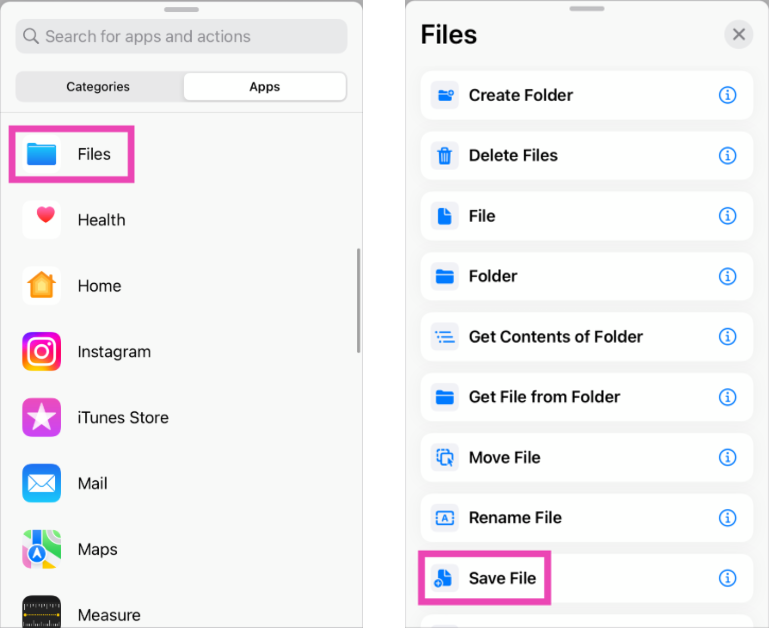 Step 10: Hit Done in the top right corner of the screen.
Step 11: When the Shortcut has been created, launch it and select the images you want to convert to PDF.
Step 10: Hit Done in the top right corner of the screen.
Step 11: When the Shortcut has been created, launch it and select the images you want to convert to PDF.
Use a third-party app
Step 1: Install the Photos to PDF Converter Scanner app from the App Store. Step 2: Launch the app and hit the photo icon at the bottom of the screen. Step 3: Select an image and hit Add.
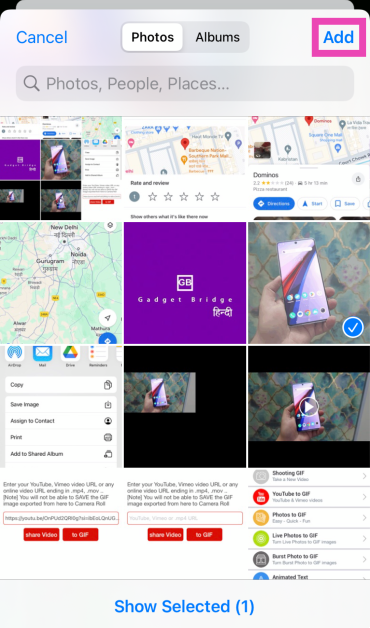 Step 4: Tap on Next.
 Step 5: Select the Margins, Orientation, and Size. Hit Done.
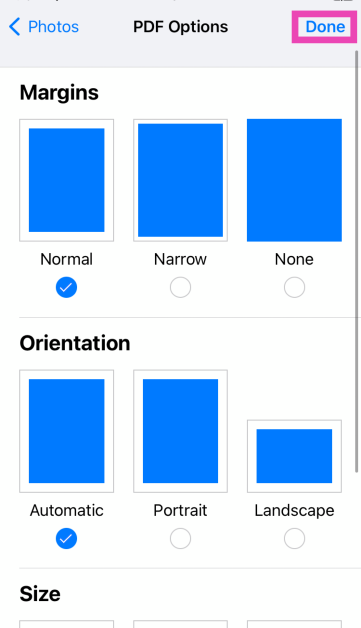 Step 6: Once the PDF has been created, select Save to Files.