Oppo has finally unveiled its new foldable phone- Oppo Find N3. The new smartphone is successor to Find N2 which was launched last year. The phone has an AMOLED display on the outside and the inside. Both screens support a 120Hz refresh rate. Under the hood, there is a Snapdragon 8 Gen 2 processor. The foldable phone has a total of five cameras three on the rear and two for selfies.
In This Article
Oppo Find N3 specifications
The Oppo Find N3 features a 6.31-inch 2K AMOLED cover display with 1,116×2,484 pixels of resolution. The screen supports a refresh rate of 120HZ along with 431ppi pixel density. It also boasts a 7.82-inch 2K LTPO 3.0 AMOLED screen with 2,268 x 2,440 pixels of resolution. The primary display supports a 120Hz dynamic refresh rate and 240Hz touch response rate. The AMOLED display has a peak brightness of 2,800Hz and a 426ppi pixel density. The front panel comes with Ultra-Thin Glass (UTG).
The Oppo Find N3 operates on ColorOS 13 on top of Android 13. At its heart, there is an octa-core Snapdragon 8 Gen 2 SoC with an Adreno 740 GPU for graphics. The device is offered with 16GB of LPDDR5X RAM and 512GB of UFS 4.0 storage.
The foldable phone by Oppo includes a triple rear camera setup powered by Hasselblad. The circular camera module includes a 48-megapixel Sony LYTIA-T808 1/1.43-inch sensor with OIS and EIS, a 64-megapixel OmniVision OV64B lens with 3X optical zoom and a 48-megapixel Sony IMX581 lens. The company provided a 20-megapixel sensor on the primary display and a 32-megapixel lens on the outer display for taking selfies and video calling.
The Oppo Find N3 sports a 4,805mAh battery that supports 67W SuperVOOC 2.0 fast charging. In addition to this, the handset includes a tri-state alert slider and a side-mounted fingerprint sensor. Also, there is an under-screen colour temperature sensor along with an ambient light sensor, an accelerometer, a gyroscope, a hall sensor, a proximity sensor and a geomagnetic sensor.
For connectivity, there is a USB Type-C port, 5G, 4G LTE, Wi-Fi 7, Bluetooth 5.3, GPS/ A-GPS, NFC, Beidou, GPS, GLONASS, Galileo and QZSS.
Samsung has officially announced the launch of a new smartphone in the Indian market. The company has introduced Samsung Galaxy A05s in the country. The handset is powered by a Snapdragon 680 SoC and runs on Android 13 with OneUI. The 4G phone features a 6.7-inch full-HD+ LCD display. Moreover, the smartphone packs a 5,000mAh battery.
In This Article
Samsung Galaxy A05s price in India, sale details
Samsung Galaxy A05s has been launched in India with a price tag of Rs 17,499 for the lone 6GB RAM with 128GB storage option. However, the device is currently available at Rs 14,999. In addition to this SBI Bank credit card EMI transactions will get Rs 1,000 instant discount to the customers. The smartphone is offered in three colour options of Black, Light Green, and Light Violet. The phone can be purchased via the company’s website in the country.
Samsung Galaxy A05s specifications
The Samsung Galaxy A05s is powered by an octa-core Snapdragon 680 SoC with 6GB RAM and a 128GB storage option. The storage can be expanded up to 1TB using a microSD card. The device has an Adreno 610 GPU for graphics. The device comes with One UI 5.1 with Android 13 out-of-the-box.
Also Read:OnePlus Open India launch today: How to watch the live stream
The smartphone features a 6.7-inch full-HD+ PLS LCD with 1,080×2,4000 pixels of resolution. The bezels on the sides are slim while the chin is noticeable.
For photos and videos, the device comes with a triple rear camera set up positioned vertically at the left corner along with a circular LED flash unit. The camera setup includes a 50-megapixel primary shooter with an f/1.8 aperture. Furthermore, the system includes a secondary 2-megapixel macro lens with an f/2.4 aperture and a tertiary 2-megapixel depth sensor with an f/2.4 aperture. For selfies, the smartphone features a 13-megapixel front-facing camera with f/2.0 aperture housed inside a centre-aligned waterdrop notch.
The Samsung Galaxy A05s comes equipped with a 5,000mAh battery with 25W charging support. In terms of connectivity, the phone includes a 3.5mm audio jack, 4G LTE, dual-band Wi-Fi, Bluetooth 5.1, GPS, and a USB Type-C port. Along with a fingerprint sensor the handset includes an accelerometer, light sensor and proximity sensor.
One of the main reasons why Google Chrome is the go-to browser for most people is the comprehensive support it provides for extensions. The Chrome Webstore is a goldmine for useful extensions that can make your routine tasks easier and provide a boost to your productivity. Unfortunately, Google Chrome’s Android app does not offer extension support yet. But that doesn’t mean you can’t use browser extensions on your smartphone. In this article, we bring you the top 3 ways to use Google Chrome extensions on your Android phone.Read Also:YouTube app keeps crashing on your iPhone? Here are 9 easy fixes
In This Article
Use Yandex Browser
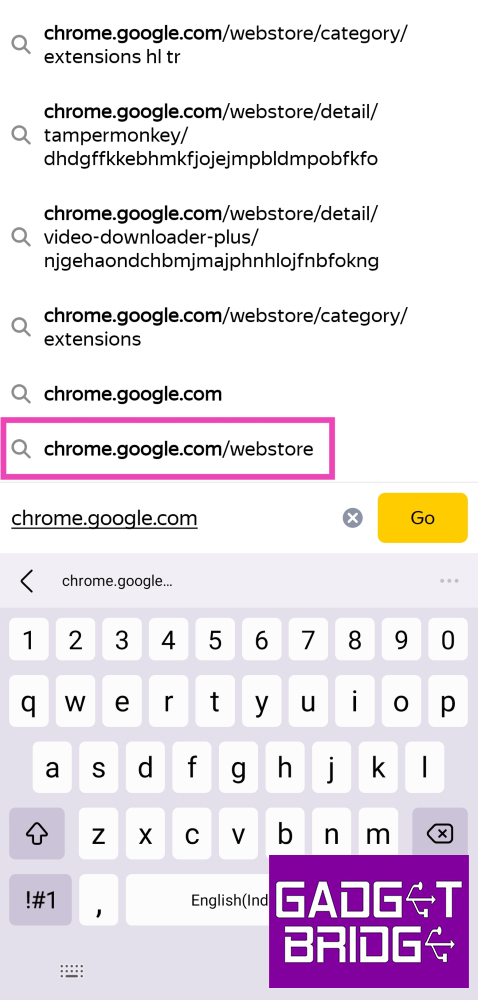
Step 1:Install Yandex Browser on your Android phone from the Google Play Store.Step 2:Launch the web browser and type https://chrome.google.com/webstore in the address bar. Hit Enter.Step 3:Search for the extension you want to add to the browser.Step 4: Open the extension’s page and select Add to Chrome. Confirm your selection in the popup box.Step 5: Tap the hamburger menu at the bottom right corner of the screen and select Extensions to view all your installed extensions and enable them.
Install Kiwi Browser to use Google Chrome extensions on Android
Step 1:Install Kiwi Browser on your device.Step 2: Launch the browser and tap the ellipses at the top right corner of the screen.Step 3: Select Extensions.Step 4: Turn on the toggle switch for Developer Mode and tap on ‘+(from store)’.Step 5:Search for the extension you want to install on the browser.Step 6: Select Add to Chrome on the extension’s webstore page.Step 7: You can enable or remove your installed extensions from the Extensions tab.
Use Firefox
Step 1:Install Firefox on your device from the Google Play Store.Step 2: Tap on the ellipses at the top right corner of the screen and select Add-ons.Step 3: Go through the list of extensions (add-ons) and tap the plus icon next to the ones you want to install.Firefox has a limited number of add-ons for Android. For more options, stick to Kiwi and Yandex.
Frequently Asked Questions (FAQs)
Can I use Google Chrome extensions on my Android phone?
While Google Chrome does not allow extension support for its mobile apps yet, you can use Chromium-based browsers like Kiwi and Yandex for the same task. Mozilla Firefox also has add-on support, although there are only a few add-ons to choose from.
How do I use Google Chrome extensions on my Android phone?
Install Kiwi or Yandex browser on your phone, then go to chrome.google.com/webstore. Search and install the extension of your choice from the Chrome Webstore.
Do Kiwi and Yandex browsers support all PC extensions?
These are the top 3 ways to use Google Chrome extensions on Android. Kiwi and Yandex are Chromium-based browsers, which means they can run Google Chrome extensions on their respective mobile apps.Make sure you also check out our list of the best productivity extensions for Google Chrome. Is there a Chrome extension that you can’t function without? We’d love to hear from you in the comments.For the latest gadget and tech news, and gadget reviews, follow us on Twitter, Facebook and Instagram. For newest tech & gadget videos subscribe to our YouTube Channel. You can also stay up to date using the Gadget Bridge Android App. You can find the latest car and bike news here.
OnePlus’s first foldable- OnePlus Open will debut in India today. The specifications and design information of the device have been made public in part due to business disclosures, but primarily due to leaks of certain features. The upcoming foldable will feature OnePlus’ iconic alert slider. The hinge of the upcoming phone would be composed of high-quality material while the teasers showed off a typical OnePlus design.
In This Article
How to watch the OnePlus Open India launch event live?
OnePlus Open India launch event will held today. According to the company the launch event will be hosted in Mumbai. The keynote will begin at 7.30 PM and will be livestreamed through the official YouTube channel. The event will also be live-streamed on OnePlus’s official media channels. The company has also created a dedicated Event Page to webcast the event. You can also watch the event live on our website, we have embedded the link below.
OnePlus Open specifications expected
OnePlus Open has been teased several times days before the official launch. While numerous leaks have revealed details about the foldable phone’s form factor features as well as colour options. But just ahead of the launch full camera specifications of the device surfaced on the internet that goes in line with what OnePlus has revealed.We are already aware that OnePlus Open will be featuring a triple rear camera set up but a tipster has revealed that the camera module will consist of below mentioned sensors:Rear camera:
– Primary 48MP Sony LYTIA-T808 sensor (1/1.43”, f/1.7) with OIS– Secondary 48MP Ultra-Wide lens (1/2”, f/2.2)– Third 64MP Telephoto with OIS, 3X optical (145mm, f/2.6)For selfie:
– 20MP (inner)– 32MP (outer)Note that OnePlus Open will be the first to use new Sony LYTIA sensor. The company has also confirmed that its upcoming foldable phone will feature Sony LYTIA-T808 sensor equipped with Sony’s Dual-layer Transistor Pixel technology.Furthermore, it has been leaked that for the inner display, the company may use an LTPO 3.0, 7.82-inch fluid AMOLED display. Also with 2,800 nits of peak brightness, the front panel will get Dolby Vision support. According to the tipster OnePlus will call it a ProXDR. In addition to this the display on the inside will fast and smooth because of the 120Hz refresh rate support.Leaks also suggest that the OnePlus Open will feature a 6.31-inch 2K AMOLED cover display. The outer screen will support a refresh rate of 120Hz along with 2,800 nits of peak brightness. For robustness, the company may use Ceramic Guard protection which is equivalent to Ceramic Shield screen protection which Apple uses on it iPhones.
OnePlus has confirmed that it foldable will include several third-party apps. OnePlus has made sure that the pre-installed apps are compatible with the foldable design for better user experience.
Garena Free Fire is a battle royale game with regular awards and tournaments to keep players interested. If you play Garena Free Fire, you should be aware of the redeem codes that are released on a daily basis. However, because the battle royale game is banned in India, players from other countries can use the Free Fire Redeem codes daily. If you’re unfamiliar with the Garena Free Fire redeem codes or don’t know how to get them, we’ve put together a step-by-step guide to help you redeem them. Check out Garena Free Fire Redeem Codes for 19 October 2023.The Free Fire redeem codes are a great way to get free stuff. These are 12-digit codes that contain alphabets and numbers, as well as an expiration date and time. Because the Garena FF redeem codes cannot be used more than once, you should hurry to the redemption page to claim your free reward before someone else does. To get a free reward, all you have to do is go to reward.ff.garena.com/en, which is the official redemption page. Also, keep an eye on this space for daily updates on Garena Free Fire redemption codes and rewards.
In This Article
Garena Free Fire Redeem Codes Today 19 October2023
Updating…
How to Get Free Fire Redeem Codes for Garena on 19 October2023?
Winters have arrived in India and soon the air quality here specifically in Northern India will start to worsen. If you are looking to buy a new air purifier Dyson’s latest air purifier equipped with upgraded filtration has launched in India. The Dyson Purifier Big+Quiet is touted to deliver double the airflow compared to previous Dyson purifiers. It comes with a new airflow delivery system- Cone Aerodynamics. It has an improved three-phase filtration system that can capture up to 99.95% of ultrafine particles.
In This Article
Dyson Purifier Big+Quiet price in India and sale details
Dyson Purifier Big+Quiet as the name suggests is the company’s most quietest yet powerful purifier. It produces just 56 decibels of noise. It is capable of purifying the air in spaces as large as 1000 sq.ft. It utilises Cone Aerodynamics which is a new airflow delivery system that offers more than double the airflow of previous models. It delivers a 10-meter projection at angles of 0 degrees, 25 degrees or 50 degrees depending on user preference.The Dyson Air purifier can capture VOCs, NO2 and ozone in the air produced by tobacco smoke, household cleaning products, building materials, and outdoor air pollution. It has a fully sealed filtration system to HEPA H-13 which locks the air pollutants in the filter. The HEPA H13-grade particle filter is made of 21 meters of borosilicate microfibres pleated 459 times. Also, it can capture 99.95% of particle pollutants, including dust and allergens as small as 0.1 microns, and lasts up to two years. It also captures benzene and household odours.The Dyson Purifier Big+Quiet has an array of integrated sensors monitoring particle and gas levels, allowing users to monitor indoor air quality through the live results on the LCD screen and in the MyDyson app. Dyson algorithm which cross-checks data every second, to analyse the air and automatically react to environmental changes to purify.
For the latest gadget and tech news, and gadget reviews, follow us on Twitter, Facebook and Instagram. For newest tech & gadget videos subscribe to our YouTube Channel. You can also stay up to date using the Gadget Bridge Android App. You can find the latest car and bike news here.
OnePlus Pad Go was launched in India earlier this month. Now the company has announced that the device will go on open sale on October 20 in the country. So if you are planning to buy the device the open sale will be accessible through the company’s official website as well as the e-commerce platform Amazon. Also, it is an affordable version of the OnePlus Pad which debuted a few months ago. The Pad Go comes with an 11.35-inch 2.4K display with 90Hz refresh rate support. It is powered by MediaTek Helio G99 octa-core SoC and includes a 13-megapixel rear camera with electronic image stabilisation (EIS) support.OnePlus Pad Go is scheduled to go on open sale in India on October 20. The Sale will begin at 12 noon through Amazon and the company’s website. Both the Wi-Fi and the LTE variants of the OnePlus Pad Go will go on sale in the Indian market. To recall, OnePlus Pad Go was launched in India with a starting price of Rs 19,999 for the base 18GB RAM with 128GB storage Wifi model. The LTE model of the tablet comes in two configurations 18GB RAM with 128GB storage and 8GB RAM with 256GB storage priced at Rs 21,999 and Rs 23,999.The OnePlus Pad Go will be available across Amazon, Flipkart, Oneplus.in, OnePlus Store App, OnePlus Experience Stores, Reliance, Croma and other key offline partner outlets.The CICI Bank & OneCard cards users can avail of an upto INR 2,000 off if purchased via OnePlus Pad Go in OnePlus Experience Stores, OnePlus.in & offline partner stores.Customers can also avail additional INR 1000 special price coupon discount on Oneplus.in. on 8 + 128GB WIFI variant. Amazon users can also get up to INR 2,000 Instant Bank Discount using SBI cards. Whereas on Flipkart buyers can avail an upto Rs 2,000 Instant Bank Discount using ICICI Bank cards.Students will receive Rs 2,000 off on 8GB+128GB WIFI and Rs 1,000 off on 8GB+128GB LTE and 8GB+256GB LTE models.RCC members are eligible to get benefits up to INR 1500 on the purchase of OnePlus Pad Go on OnePlus.in.
OnePlus Pad Go specifications
OnePlus Pad Go comes with an 11.35-inch 2.4K LCD display with 2408 x 1720 pixels of resolution. The panel has a 90Hz refresh rate, a 7.5 aspect ratio and a touch sampling rate of 180Hz. Moreover, the screen has a pixel density of 220ppi and a peak brightness of 400nits. The display comes with TuV Rheinland blue-light filter protection along with Dolby Vision and HDR10+ support.OnePlus Pad Go runs on Android 13-based OxygenOS 13.1. The tablet is powered by MediaTek Helio G99 octa-core SoC with Mali-G57 MP2 GPU. It will be available in Wi-Fi and LTE variants with up to 8GB LPDDR4X RAM with 256GB UFS 2.2 storage options.There is a single 13-megapixel rear camera lens with electronic image stabilisation (EIS) support on the back of the tablet along with up to 4K30 fps video recording. An 8-megapixel front-facing camera with up to 1080p 30fps video recording support is there for selfies.The OnePlus Pad Go includes an 8,000mAh with 33W SuperVOOC charging support. As per the company it provides up to 514 hours of standby time and 40 hours of music playback.
For the latest gadget and tech news, and gadget reviews, follow us on Twitter, Facebook and Instagram. For newest tech & gadget videos subscribe to our YouTube Channel. You can also stay up to date using the Gadget Bridge Android App. You can find the latest car and bike news here.
Over the years, YouTube has not only evolved to host a variety of content, but it also boasts one of the most accessible and fastest apps to watch video content on the Internet. The YouTube app for Android and iOS is perfectly optimised for the mobile platform and its video player does not take a long time to buffer the videos you want to watch. App crashes and other malfunctions are extremely rare for YouTube and can be easily fixed. In this article, we bring you the top 9 fixes for the ‘YouTube app keeps crashing’ issue on your iPhone.Read Also:How to Access Your Home WiFi Router Remotely? Top best ways
In This Article
Restart your iPhone
A quick restart resolves the background issues that may be causing the YouTube app to malfunction. Press and hold the side key along with either volume key until the power slider appears on the screen. Drag the slider to the right to turn off your iPhone. Once the device has shut down, press and hold the side key to turn it on again.
Restart the app
Another quick way of fixing this issue is by closing and re-launching the YouTube app on your iPhone. Swipe up from the bottom of the screen and hold until you can access the App Switcher. Navigate to the YouTube card and swipe it up to close the app. Now, go to your iPhone’s home page and launch the YouTube app.
Check your iPhone’s storage to keep YouTube app from crashing
One of the most common reasons behind constant app crashes is the lack of internal storage. Apps need a certain amount of breathing space to run smoothly. If your phone’s storage is filled to the brim, it may cause certain apps to malfunction. To fix this, go to Settings>General>iPhone Storage and delete the files you don’t use.
Check your network reception
A weak internet connection can cause the YouTube app to crash on your iPhone. Check the network connection on the status bar to determine its strength. Perform an internet speed test to gauge if it is enough for YouTube to function. App crashes due to a faulty connection are rare but not improbable.
Update the YouTube app
If you’re using an old version of the YouTube app, it may be the reason why it keeps randomly crashing. Old app versions contain bugs that are creased out in future updates. On top of that, super old versions of apps are routinely phased out by developers, which means they no longer be functional. To update the YouTube app on your iPhone, go to the App Store, search for YouTube, and hit the Update option on the app’s page.
Turn on Background App Refresh
Turning on Background App Refresh ensures that the YouTube app stays updated and carries out its necessary functional tasks when you are not actively using it. It can be turned off after the app stabilises and does not crash at random.Step 1: Go to Settings and select YouTube.Step 2: Turn on the toggle switch for Background App Refresh.
Delete and Re-install the app
Another way to keep the YouTube app from crashing on your iPhone is by deleting it from the device and then re-installing it. To delete YouTube from your iPhone, press and hold its icon on the home screen and select ‘Delete App’ from the popup menu. Confirm your selection in the following dialogue box. Reinstall the app from its page on the App Store.
Update iOS
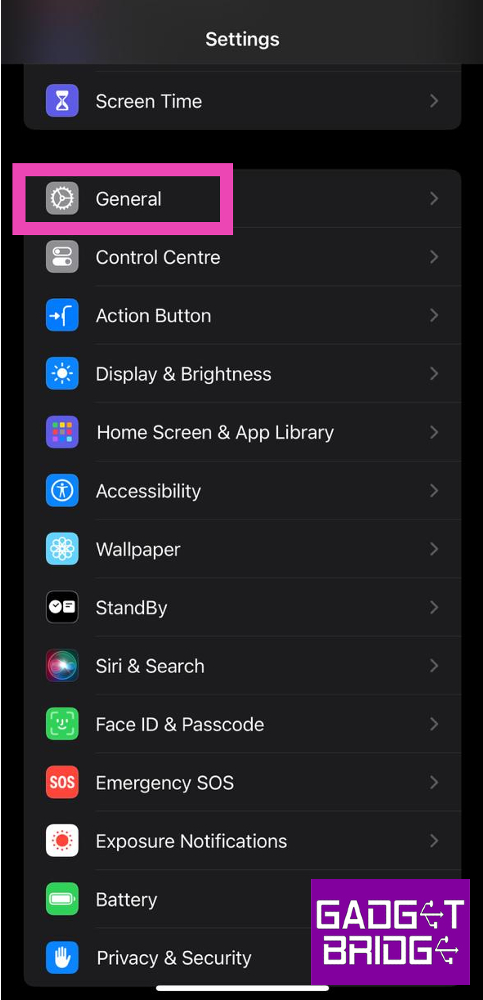
Step 1: Make sure your iPhone is connected to a WiFi network and plug in its charger.Step 2: Go to Settings and select General.Step 3: Select Software Update.Step 4: Tap on Download and Install.
Reset Network Settings
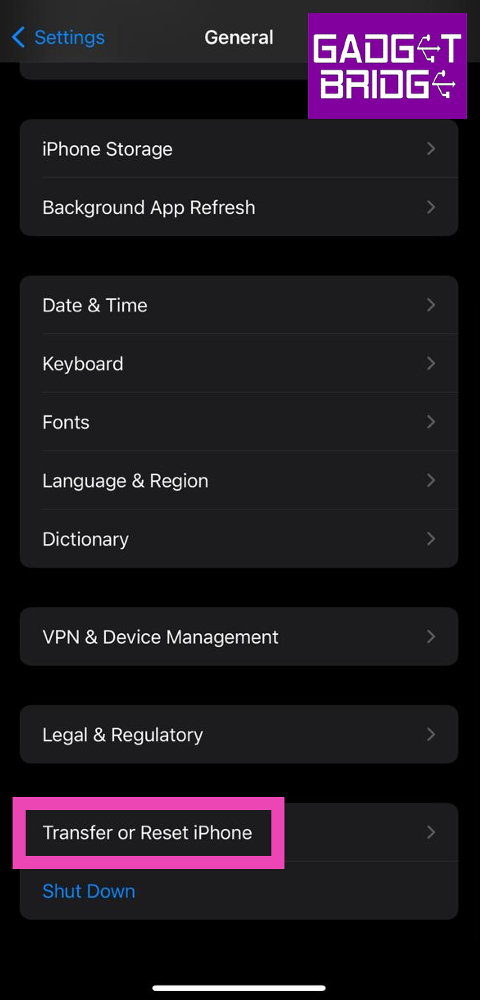
Step 1: Go to Settings and select General.Step 2: Scroll down and select Transfer or reset iPhone.Step 3: Select Reset followed by Reset Network Settings.
Frequently Asked Questions (FAQs)
Why does the YouTube app keep crashing on my iPhone?
Software-related issues, background glitches, bugs in the app, and lack of storage space are some of the common reasons behind app crashes on an iPhone.
How do I stop YouTube from crashing on my iPhone?
Make sure there’s enough storage space on your iPhone, update the app by deleting and reinstalling it, and restart your phone to fix this issue.
Can a faulty network cause the YouTube app to malfunction?
Watch and Stream Bigg Boss Season 17 online for free
Bigg Boss Season 17 can be streamed online on Jio Cinema for free. Viewers can catch all the daily episodes on the Jio Cinema mobile app and website. On top of that, the streaming platform also has a live feed that broadcasts footage from the Bigg Boss house throughout the day. This 24-hour feed can be accessed from Jio Cinema’s home page. To watch daily episodes of the reality show, switch to the TV shows tab on the Jio Cinema app and website, and search for Bigg Boss.Apart from the latest seasons, the Jio Cinema app contains all the episodes of Bigg Boss from Season 4 onwards. As of now, three episodes of the 17th season have been aired on Colors TV and can be watched on Jio Cinema. New episodes are added to the platform as soon as the broadcast ends on TV. This year’s contestants include Munawar Faruqui, Ankita Lokhande, Vicky Jain, Sana Raees Khan, and other celebrities and influencers across the spectrum.Users do not need to subscribe to the Jio Cinema app in order to watch Bigg Boss for free. Currently, the premium subscription to Jio Cinema costs Rs 999 per year and unlocks all the Hollywood content on the platform. Premium subscribers can enjoy an ad-free experience while watching Bigg Boss. Meanwhile, those without a subscription will have to endure some ads throughout the 24-hour livestream and daily episodes.Read Also:Best smartwatch deals to look out for under Rs 5,000 on Amazon
HP today introduced a new range of Pavilion Plus laptops in India. The series includes Pavilion Plus 16 and Pavilion Plus 14 laptops. They are powered by the latest 13th Gen Intel Core processors and up to NVIDIA RTX 3050 graphics. In addition to this, they have an IMAX-enhanced display for a superior viewing experience. They are equipped with HP Presence 2.0 for smart AI features plus a 5MP IR camera with a manual camera shutter enhances privacy and security in the hybrid world.
In This Article
HP Pavilion Plus 16 and Pavilion Plus 14 price in India
The HP Pavilion Plus 16 comes with a 16-inch WQXGA IPS display with 2560 x 1600 pixels of resolution. The screen supports a refresh rate of 120Hz. It has a screen-to-body ratio of 89.74% and a peak brightness of 400 nits. The HP laptop runs on Windows Home 11 and is powered by a 13th Gen Intel Core i7-13700H processor with up to Nvidia GeForce RTX 3050 graphics. The machine is available with 16 GB LPDDR5x RAM, up to 1TB PCIe Gen4 NVMe TLC M.2 SSD storage and 1TB PCIe Gen4 NVMe TLC M.2 SSD storage.The HP Pavilion Plus 16 comes equipped with a 68Wh battery. It has Wi-Fi 6E AX211 (2×2) and Bluetooth 5.3 for wireless connectivity along with Thunderbolt 4 with USB Type-C, port, 1 USB Type-C port, two USB Type-A ports, a 3.5mm audio jack, an AC smart pin, an HDMI 2.1 port for connectivity.
HP Pavilion Plus 14 specifications
HP Pavilion Plus 14 features a 14-inch IMAX enhanced 2.8K OLED display with 2880 x 1800 pixels of resolution. The screen has a 16:10 aspect ratio along with 88% screen-to-body ratio. It supports up to 120Hz refresh rate and 400nits (SDR) and 500 (HDR) brightness. The laptop comes pre-installed with Windows 11 Home Edition. Under the hood, there is a 13th gen Intel Core i7 1355U processor/ up to an AMD Ryzen 7 7840H processor with Intel Iris Xe graphics. It comes with up to 16 GB LPDDR5x RAM and 1 TB PCIe NVMe M.2 SSD.The HP Pavilion Plus 14 is fuelled by a 68Wh battery that supports fast charging. The device comes with a manual camera shutter along with Windows Hello for added privacy.
For the latest gadget and tech news, and gadget reviews, follow us on Twitter, Facebook and Instagram. For newest tech & gadget videos subscribe to our YouTube Channel. You can also stay up to date using the Gadget Bridge Android App. You can find the latest car and bike news here.
Google Maps is one of the most important apps on your phone. You can never be truly lost if you know how to use this app. While the app is simple to use, all the symbols and signs on the map can be hard to decipher at times. It doesn’t help that new signs are constantly added to the app. To make things easier, here is the meaning behind all the major icons and symbols on Google Maps.Read Also:Best smartwatch deals to look out for under Rs 5,000 on Amazon
In This Article
Map Page Icons
Target icon: The icon shaped like an aim or a target is the Recentre button that takes you to your current location as soon as it is pressed.Blue icon with an arrow: This icon is placed right below the target icon. Tapping this icon takes you to the journey page, where you can find the route by setting your current location and destination.Compass icon: This is pretty self-explanatory. The red end of the compass points towards the North. Tapping on this compass realigns the map in the proper direction.Layer icon: This icon is placed above the compass icon on the map page. Tapping it lets you change the style of the map. If you want to access Google Street View or Satellite View, this is the button you should hit.
Journey Icons
Yellow road: State and national highways are represented with a yellow road on the map.Colour-coded road passage: A blue passage on the map represents that there is minimal traffic on that stretch of the road. Meanwhile, an orange passage means there’s mild traffic on the road and a red passage symbolises stagnant traffic.Red car icon: When you see this icon, it means that there has been a crash or a collision on the road.Exclamation Mark: This icon means that the road ahead is closed.Shovel sign: This icon comes up when the road ahead is under construction.Red icon with a minus sign: This means that the road ahead is closed.Two arrows: Tap this icon to see the bird’s eye view of the route to your destination.Loudspeaker icon: This icon can be used to mute the voice directions.Magnifying glass icon: Searches locations along the route.Plus icon in a chat bubble: This button can be used to add a report about a collision, congestion, roadwork, or any other event along the way.Recentre: This button takes you to your current location.
Icons and Symbols for places on Google Maps
Yellow pin with a star: All your saved locations on the map will be marked by this pin.Fork and Knife pin: This pin marks any restaurant or eatery in the area. Tap on the pin to learn more about the restaurant. You can even set it as a destination. Man sleeping on bed pin: This pin is used to mark all the hotels, motels, and hostels on the map. Tap on this pin to get to know all the details about the hotel including availability, price, etc.Academic cap pin: This pin is used for schools, colleges, and other places of learning.Gas pump pin: This pin marks all the petrol pumps on the map.Shopping bag pin: Marks the convenience stores, grocery stores, and shopping malls on the map.Shopping cart pin: Used for denoting local markets on the map.H pin: Hospitals and medical clinics.Places like banks, tourist spots, post offices, parks, sports stadiums, and other places have their exclusive pins too.
Frequently Asked Questions (FAQs)
How do I use navigation on Google Maps to find a route to my desired destination?
Launch the Google Maps app on your phone and tap the blue icon with a right arrow to set your current location and destination. Once that’s done, tap Start to begin navigation.
How do I report a car crash on Google Maps?
To report a car crash on Google Maps, tap the chat bubble icon with a plus icon and select ‘Crash’.
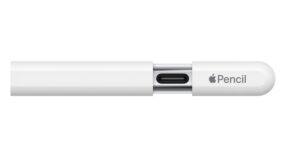
Apple has officially announced the launch of an affordable version of Apple Pencil but limited features. Now what’s new about this stylus is that it comes with a USB-C port for charging. Also, it is specially designed for students to take notes on their iPads. It has no pressure sensitivity or double tap to change tools as these features are specifically for artists or designers. Also, it lacks wireless pairing and free engraving. It still attaches magnetically to your iPad but cannot charge wirelessly.
The new Apple Pencil is an affordable variant of Apple Pencil (2nd gen). The device is even cheaper than Apple Pencil (1st gen). It works with all iPad models that have a USB-C port. The device is attached magnetically to the iPad thanks to the flat edge. However, it cannot be charged wirelessly unlike the upper variant of the Stylus. So one needs to pair and charge it to the iPad using a USB cable by sliding the cap on the top. The new Apple Pencil also has a matte finish. According to the company, the device when magnetically attached to an iPad for storage, enters into a sleep state to preserve battery life.It can be used for note-taking, sketching, annotating, journaling, and more but cannot be used by artists or designers. That’s because it lacks some important features like pressure sensitivity or double tap-to-change tools. It also works with iPadOS features like Scribble, and Quick Note, and when collaborating with others in Freeform. Users can sketch and illustrate with even greater precision when used with M2 models of iPad Pro, the new Apple Pencil supports hover.The newly launched Apple Pencil is also compatible with iPad (10th generation) and can also be paired with all iPad models that have a USB-C port, including iPad Pro, iPad Air, and iPad mini. For the latest gadget and tech news, and gadget reviews, follow us on Twitter, Facebook and Instagram. For newest tech & gadget videos subscribe to our YouTube Channel. You can also stay up to date using the Gadget Bridge Android App. You can find the latest car and bike news here.
Garena Free Fire is a battle royale game with regular awards and tournaments to keep players interested. If you play Garena Free Fire, you should be aware of the redeem codes that are released on a daily basis. However, because the battle royale game is banned in India, players from other countries can use the Free Fire Redeem codes daily. If you’re unfamiliar with the Garena Free Fire redeem codes or don’t know how to get them, we’ve put together a step-by-step guide to help you redeem them. Check out Garena Free Fire Redeem Codes for 18 October 2023.The Free Fire redeem codes are a great way to get free stuff. These are 12-digit codes that contain alphabets and numbers, as well as an expiration date and time. Because the Garena FF redeem codes cannot be used more than once, you should hurry to the redemption page to claim your free reward before someone else does. To get a free reward, all you have to do is go to reward.ff.garena.com/en, which is the official redemption page. Also, keep an eye on this space for daily updates on Garena Free Fire redemption codes and rewards.
In This Article
Garena Free Fire Redeem Codes Today 18 October2023
updating soon…
How to Get Free Fire Redeem Codes for Garena on 18 October2023?
One of the most underrated features of your home WiFi router is remote management. This function allows you to access the router no matter where you are. You don’t need to be connected to the home network to change the router’s password or monitor who is actively using the network. If you’ve got elderly parents at home who don’t know how to navigate their way around the router’s settings, this feature will come in extremely handy. So, without further ado, here are the best ways to access your home WiFi router remotely.Read Also:How to Create a Link for PDF with SwifDoo PDF?
In This Article
Turn on Remote Management on your WiFi Router’s gateway
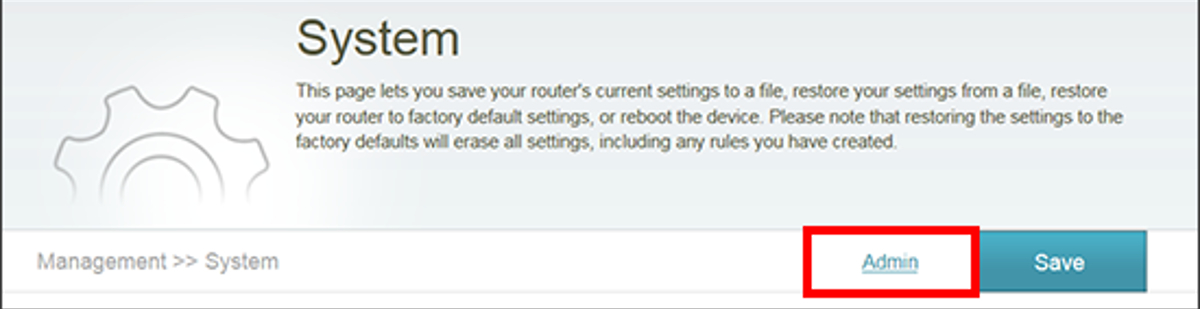
Step 1: Type http://192.168.1.1/ on your web browser and hit Enter to access your WiFi router‘s gateway page.Step 2:Log in using the valid credentials.Step 3: Go to the Management tab and click on System Admin. Then select Admin.Step 4: Turn on the toggle switch for Enable Remote Management.Step 5: Note your Remote Admin Port Number.Step 6: Hit Save.Step 7:Launch the web browser on another device that is not connected to your WiFi.Step 8: Enter the IP address of your router followed by ‘:Remote Admin Port number’ and hit Enter. For example, if your IP address is 192.168.1.254 and the Management Port number is 8080, type 192.168.1.254:8080 in the address bar and hit Enter.Make sure your Management Port number and login credentials are unique so no one else can log into your WiFi network.
Use Dynamic DNS to access your WiFi router remotely
Step 1:Log in to your WiFi router’s gateway using the proper credentials.Step 2: In the Application section, select DDNS. The placement of the DDNS page may vary among different router gateways.Step 3: Click on Enable DDNS and set it up by entering the ISP, Domain name, username, and password.Step 4:Enter the domain name on another device that isn’t connected to your WiFi network to manage your router.
Frequently Asked Questions (FAQs)
Is it possible to manage my WiFi router even if I am not connected to the network?
After enabling Remote Management on your WiFi router’s gateway page, enter its IP address in the web browser followed by ‘:’ and the Remote Admin Port number.
Oppo has officially revealed the Oppo Festive Offer on its platform ahead of Diwali. Customers will get exciting discounts on its smartphones including till November 19. According to the company, those purchasing devices during the sale period will automatically qualify for a bumper Diwali raffle and other incredible prizes.Oppo has announced ‘OPPO Festive Offer’ from October 16 to November 19 in India. The company will be offering discounts up to Rs 6000 on its smartphones with a 10% instant discount. As per Oppo buyers can save up to Rs 13000 on IoT products. In addition to this, there will be up to 83 percent off on accessories.Oppo Reno 10, Oppo A18, Oppo A38, Oppo A58 and Oppo A78 are some of the smartphones that will be part of the festive deals.
Also Read:Best smartwatch deals to look out for under Rs 5,000 on AmazonAs mentioned earlier those making purchases during the Oppo Festive Offer Sale will be eligible for a special Diwali raffle and win exciting prizes.Oppo customers have the chance to win 5 cash prizes of Rs 10 lakh each. The grand prize of Rs 10 lakhs will be credited to the winner’s account after verification, with applicable TDS deductions according to IT Act regulations.Also, two lucky winners can win 2 motorbikes. Oppo will also be giving away 9 tickets to the ICC semi-final or final match.There are also chances to win 10 gold coins and 5 Oppo Pads. Consumers can also win 500+ coupons, ranging from Rs 50 to Rs 100. 100 reward points on every purchase, which can be used in the OPPO Store.Note that the names of all winners will be announced on the My OPPO app. Lucky winners will be notified through email. Physical rewards will be delivered to the provided customer addresses.How to Qualify for the Campaign?To participate, simply follow the steps below:
Great Indian Festival sale on Amazon is currently live. Smartwatches and other products are heavily discounted on the e-commerce platform. So this is the right time to upgrade your smartwatch. So that you don’t miss out on these excellent deals we have listed down a few smartwatch offers under Rs 5,000 that you may keep an eye out for during the festive sale on Amazon
In This Article
Here are the top deals on smartwatches available.
OnePlus Nord Watch
The original cost of the OnePlus Nord Watch in India is set at Rs 4,999. But at Amazon during the Great Indian Festival Sale, the device can be purchased for Rs 3,999. It comes in Deep Blue and Midnight Black colour variants.The OnePlus Nord Watch features a 1.78-inch HD AMOLED touchscreen display which supports a 60Hz refresh rate and a maximum brightness of 500 nits. It runs on RTOS and is powered by an SF32LB555V4O6 chipset. The smartwatch comes with 105 sports modes and includes heart rate and stress monitoring, as well as measuring SpO2 and sleep. The GPS functionality is embedded into the smartwatch. The device has a 230mAh battery which is said to last up to 10 days and a standby time of up to 30 days. Additionally, it is compatible with both Android smartphones and iPhone models running iOS 11 and later, as well as Android 6 on Android devices.
Redmi Watch 3 Active
Redmi Watch 3 Active was launched at Rs 2,999 but on Amazon, it can be purchased at Rs 2,599. The company offers it in two colour options – Platinum Grey and Charcoal Black and Olive Green strap.The Redmi Watch 3 Active comes with a 1.83-inch LCD screen and 450-nit screen brightness. The device is 5ATM water resistant. It includes over 100 sports modes. Apart from this, it includes blood oxygen level sensors, heart rate monitors, and sleep-tracking technology. There is a 289mAh battery on the watch which is said to last up to 12 days with moderate use and up to 8 days under heavy use. It can be paired with Android 6.0 and iOS 12 mobile devices. Additionally, the Redmi watch can store up to 10 contacts and allows users to view recent call logs with up to 20 entries.
Redmi Watch 2 Lite
Redmi Watch 2 Lite arrived in India with a price tag of Rs 4,999. But currently, it is selling at Rs 1,799 during the Amazon Great Indian Festival Sale. It is offered in Ivory, Black, and Blue colour variants.The Redmi Watch 2 Lite comes with a 1.55-inch TFT display with a maximum brightness of 450 nits. There are 100 fitness modes on the smartwatch. It is only compatible with Android devices. Also, the watch is water-resistant up to 50 metres and supports snorkelling, diving, and rafting.Also Read:Samsung Galaxy Z Flip 5 is now available in a new shade: The price of the new colour variantThe Redmi watch includes built-in GPS tracking. There is a blood oxygen saturation level (SpO2) scanner, 24-hour heart rate monitoring, sleep and stress monitoring, and other features.The Redmi Watch 2 Lite sports a 262mAh battery that is touted to last for 14 hours with continuous GPS-enabled and up to 10 days when turned off.
Amazfit Bip 3 Pro
Amazfit Bip 3 Pro is now selling at Rs 3,999 on Amazon.The Amazfit Bip 3 Pro comes with a 1.69-inch TFT display with 2.5D tempered glass with anti-fingerprint coating protection. The smartwatch includes 0 sports modes including indoor and outdoor workouts. The smart wearable supports GPS tracking. It includes all the health-related features such as heart rate monitoring, blood oxygen saturation (SpO2) monitoring, stress and sleep tracking, breathing exercises, and female health tracking. The 280mAh battery on the watch is claimed to offer up to 14 days of battery life on a single charge. It is compatible with iOS and Android.
CrossBeats Ignite Surge
The CrossBeats Ignite Surge is priced at Rs 3,499 but currently, it is available at Rs 2,999 on Amazon. There are three colour options for the watch Black, Gold and Silver.CrossBeats Ignite Surge includes a 1.8-inch edge-to-edge AMOLED display with 1,000 nits of screen brightness. It comes with more than 00 interchangeable watch faces. The smartwatch is compatible with iOS and Android devices. There are 25 training modes and AI health monitoring on the smartwatch. It comes with a 300mAh battery that provides up to five days of battery life. For the latest gadget and tech news, and gadget reviews, follow us on Twitter, Facebook and Instagram. For newest tech & gadget videos subscribe to our YouTube Channel. You can also stay up to date using the Gadget Bridge Android App. You can find the latest car and bike news here.
Passkey authentication is quickly becoming the norm for app security. Back in June, Google rolled out passkey support for the wider audience, allowing users to log into their Google Account using their fingerprint, lock screen PIN, or face unlock. Passkeys save the trouble of remembering multiple passwords for the different apps and services you use on your device. Since passkeys are stored on your device itself, they are harder to reach for hackers. WhatsApp is the most recent platform to adopt passkey support. In this article, we show you how to create and disable a passkey on WhatsApp.Read Also:Vivo Y200 confirmed to launch in India on October 23
In This Article
Create a passkey on WhatsApp
Step 1:Launch the WhatsApp app on your device and tap the ellipses at the top right corner of the screen.Step 2: Tap on Settings.Step 3: Select Account.Step 4: Tap on Passkeys.Step 5: Select Create a Passkey.Step 6: Choose what kind of passkey you want to create. You can set up a PIN, fingerprint, or face unlock. You can set up the same PIN as your phone’s lock screen or choose a different code.If you already use fingerprint or face unlock for your phone’s lock screen, you won’t have to set them up again for the passkey.Step 7: To disable a passkey on WhatsApp, simply go back to Passkeys in Account settings and hit Revoke.
Frequently Asked Questions (FAQs)
What is a passkey on WhatsApp?
A passkey allows you to access your WhatsApp account using your fingerprint, face unlock, or lock screen PIN.
How is a passkey different from an app lock?
An app lock is specific to the app on your phone, meanwhile, a passkey is a security feature for your account. If you log into WhatsApp on another device, you will need to authenticate it using your passkey.
The much-awaited Counter-Strike 2 is finally here and it can easily be deemed an instant success. If you haven’t dived into the game yet, it’s best to do so with a dedicated gaming mouse that can handle the demands of intense FPS gaming. For new gamers, an expensive gaming accessory may be out of the question. So, today we bring you the top 5 gaming mice under $50 for playing Counter-Strike 2.Read Also:Best Flip Phones in India (2023) to buy this festive season
In This Article
SteelSeries Rival 3
Price: $39.99 on SteelSeries.comSteelSeries Rival 3 is one of the best gaming mice under $50 that you can buy for playing Counter-Strike 2 right now. This gaming mouse gets a ‘TrueMove’ sensor that has an adaptable sensitivity within a range of 200 to 8,500 CPI. The Rival 3 weighs just 77g and has an ergonomic design that doesn’t strain your hand or arm during extended gaming sessions. You can save the polling rate, keybinds, and up to 5 CPIs directly on the mouse.
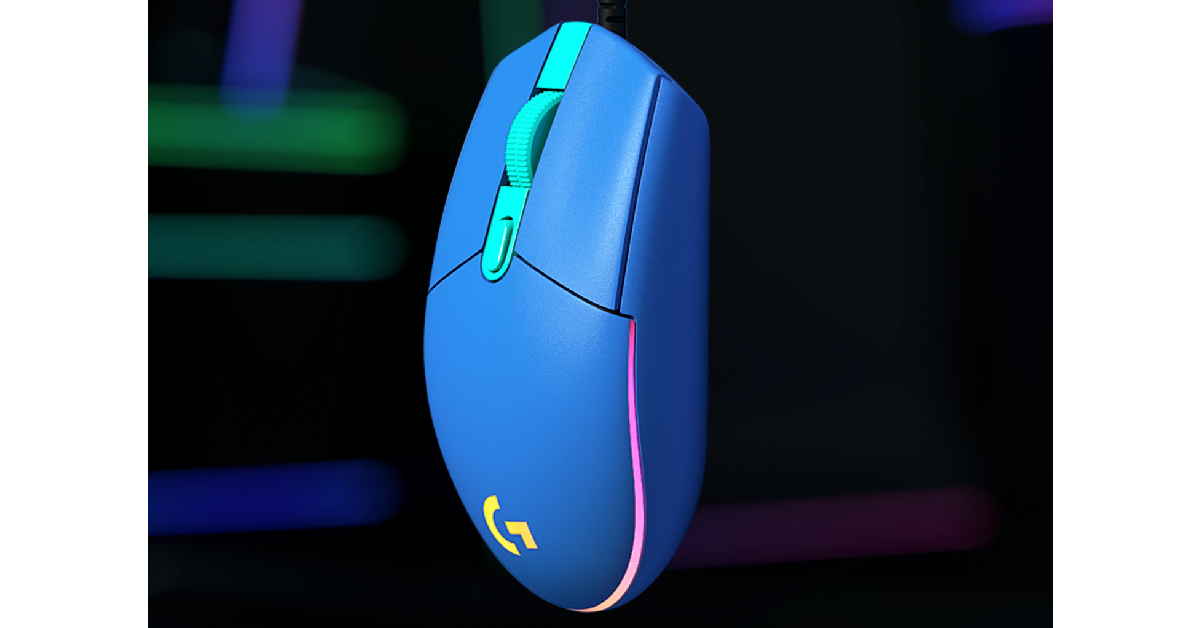
Logitech G203 Lightsync
Price: $29.99 on Logitechg.comIf you’re looking for a complete gaming mouse under $30, the Logitech G203 Lightsync is an excellent choice. It gets 6 customisable buttons, an adaptable resolution of up to 8,000 DPI, onboard memory to save your customisations on the device itself, and clean RGB lighting bordering the mouse. Logitech also offers a 2-year limited hardware warranty on this mouse.
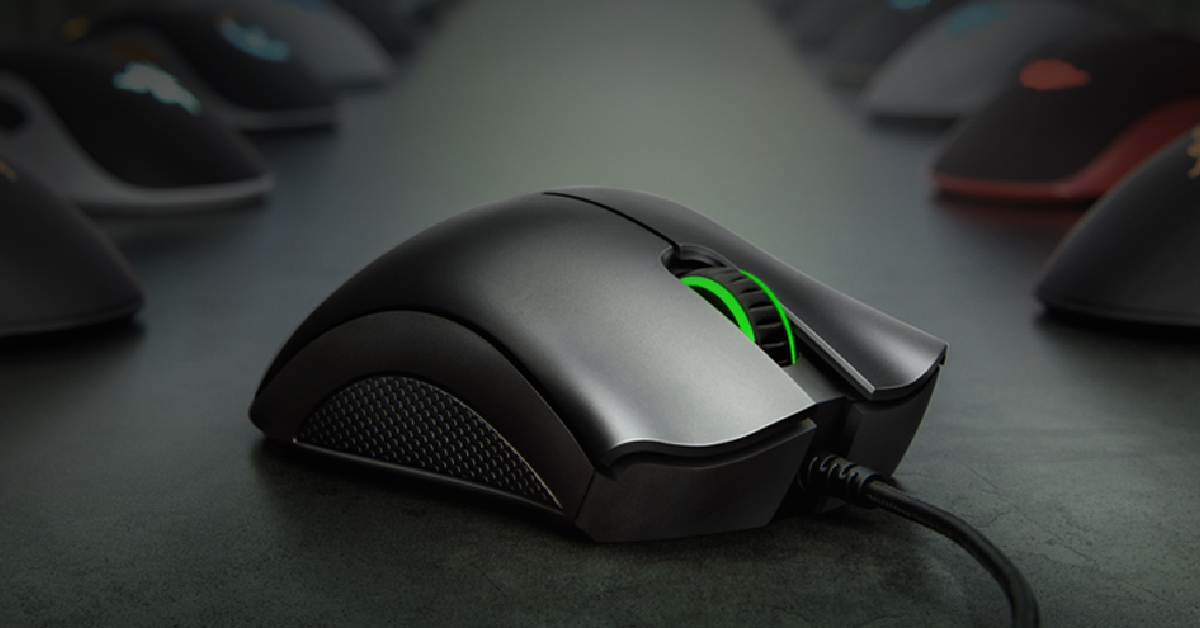
Razer DeathAdder Essential
Price: $24.58 on AmazonThe Razer DeathAdder Essential gaming mouse has a 6,400 DPI gaming sensor, an ergonomic design, and 5 programmable buttons. The DPI can be adjusted using one of the dedicated keys on the mouse. The durable mechanical switches on this device are tested to support up to 10 million clicks. Razer also offers a 2-year warranty on these switches. In true DeathAdder fashion, this gaming mouse gets minimal RGB lighting that doesn’t look too gaudy.
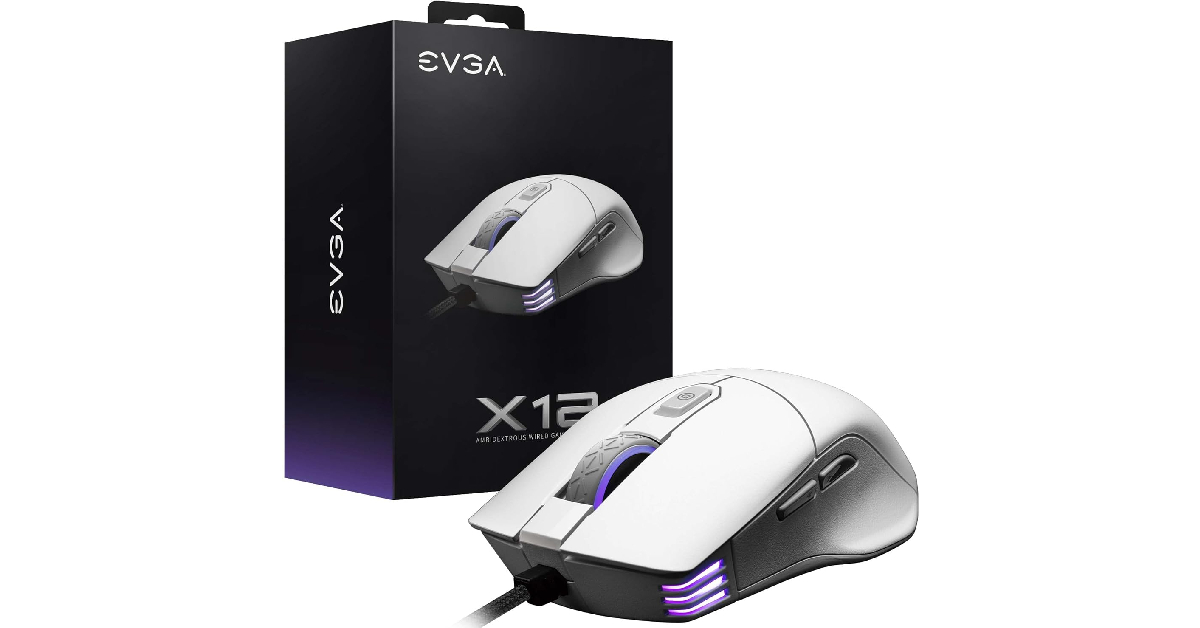
EVGA X12
Price: $19.99 on AmazonThe EVGA X12 may just be one of the best-looking gaming mice in this price range. It gets a LOD (Lift Off Distance) sensor along with a Pixart 3389 optical sensor. It has a maximum sensitivity of 16K DPI, a tracking speed of 400 IPS, an 8000 Hz polling rate, and 50g acceleration. There are 8 programmable buttons on this mouse and it can store up to 5 profiles on the device itself. The 3-zone RGB lighting on the mouse can also be customised using the Unleash RGB software.
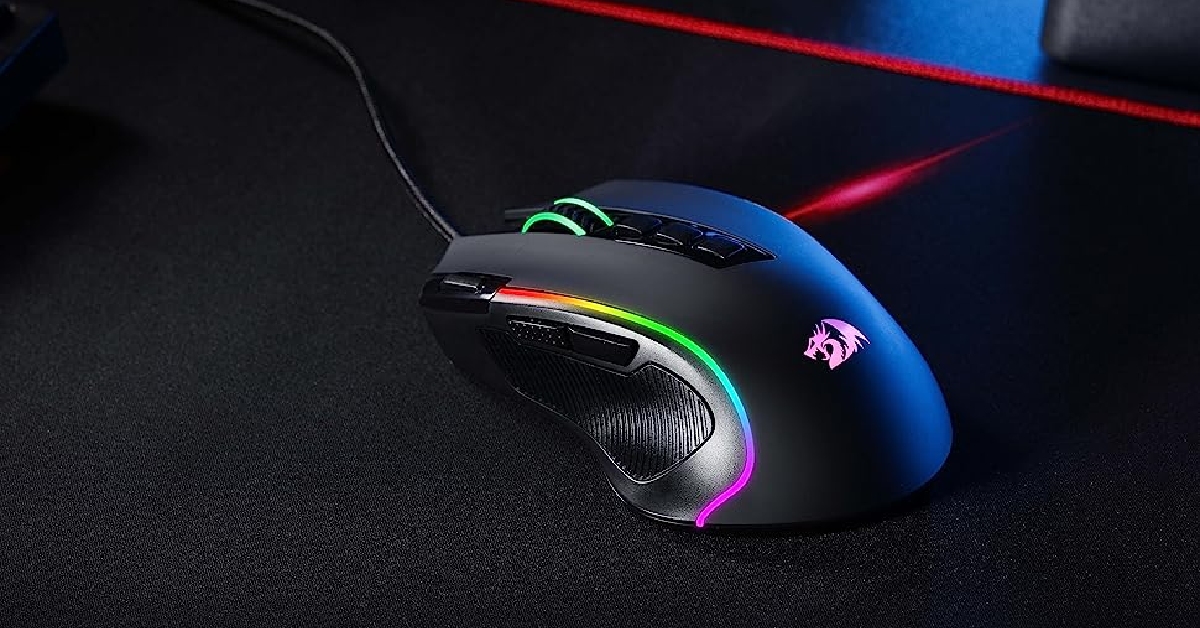
Redragon M612 Predator
Price: $13.99 on AmazonThe Redragon M612 Predator is one of the most affordable gaming mice you can buy right now for playing Counter-Strike 2. It gets 5 adjustable DPI levels – 500, 1,000, 2,000, 3,000, and 4,000. The 11 buttons on this mouse are all customisable. One of the best features of this mouse is its ergonomic design and the skin-friendly finish with satisfying texture on the left side for the thumb. The RGB lighting on this mouse has 5 backlit modes for different situations.Read Also:CMF Watch Pro Review: A ‘Nothing’ special rather than nothing special
The South Korean brand Samsung has introduced its new Flip phone in a new colour variant. Samsung Galaxy Z Flip 5 was introduced in India two months ago. At the time of the launch, four colours were introduced but a new colour has been added to the collection. The new Yellow shade for Galaxy Z Flip 5 is now available with the existing Cream, Graphite, Mint, and Lavender colour variants.
In This Article
Samsung Galaxy Z Flip 5 new colour variant price in India
The Samsung Galaxy Z Flip 5 has been released in a new Yellow colour variant. The device was earlier available in four different colour options — Cream, Graphite, Mint, and Lavender. The price of the new shade remains the same as the previous ones.The Samsung Galaxy Z Flip 5 is available in two distinct configurations: 8GB RAM with 256GB storage and 8GB RAM with 512GB storage. Both versions are priced at Rs 99,999 and Rs 109,999 in India, respectively.Also Read:Best Flip Phones in India (2023) to buy this festive season The company will be offering 5% off (Rs 5200 Cart discount) when you buy a Flipsuit case with Galaxy Z Flip5. In addition to this, there will be a Rs 7000 Instant bank discount along with Samsung Assured Buyback included free of cost with your purchase. Also, there will be an upgrade bonus of Rs 7,000 on the Flip phone.
Samsung Galaxy Z Flip 5 specifications
Samsung Galaxy Z Flip 5 has a 6.7-inch FHD+ Dynamic AMOLED 2X Infinity Flex primary display along with a 3.4-inch Super AMOLED cover screen. The new Flex Window is 3.78 times larger than the previous version and includes a variety of both old and new capabilities. The device operates on Android 13 with OneUI 5.The Galaxy Z Flip 5 is powered by the Snapdragon 8 Gen 2 Mobile Platform for Galaxy and 8GB of RAM. With two storage options, the Z Flip 5 has an internal storage capacity of up to 512GB. The storage capacity cannot be increased using MicroSD cards.There is a dual rear camera setup on the Flip Phone that includes a 12-megapixel ultra-wide primary sensor and a 12-megapixel wide-angle camera. A 10-megapixel selfie camera for selfies is featured on the front of the foldable display of the Galaxy Z Flip 5.The foldable device packs a 3,700mAh battery with 25W rapid charging.
For the latest gadget and tech news, and gadget reviews, follow us on Twitter, Facebook and Instagram. For newest tech & gadget videos subscribe to our YouTube Channel. You can also stay up to date using the Gadget Bridge Android App. You can find the latest car and bike news here.
Competitive gaming, often known as esports, has become a worldwide phenomenon, attracting players and viewers from all over the world. Having the correct gadgets can make a major difference in this highly competitive arena. The correct equipment, whether it’s a lightning-fast mouse, a responsive keyboard, or top-tier headphones, may offer gamers the advantage they need. With huge alternative markets like bitcoin betting at Cloudbet, there are plenty of reasons to get that competitive edge, and gadgets can help to bridge the gap here.
We’ll look at some of the greatest gadgets for competitive gaming and help evolve your game.
In This Article
Gaming Mice
A high-performance gaming mouse is a must-have accessory for any competitive player. The precision and speed it provides can make or break a game in crucial moments. A mouse with a high DPI (dots per inch) sensor for precise tracking, programmable buttons for rapid operations, and a pleasant ergonomic design to prevent discomfort during lengthy gaming sessions are all desirable.
There are diminishing returns to be aware of as some popular brands step into the obscene price category, but there are some fantastic options that can be found on a reasonable budget.
Gaming Keyboard
For competitive gaming, a responsive and accurate gaming keyboard is essential. Many gamers prefer mechanical keyboards due to their tactile feedback and faster response times. Look for anti-ghosting (the ability to press several keys at the same time), configurable RGB illumination, and a comfortable layout.
Most importantly the keyboard has to stand up to a lot of punishment, a huge number of keystrokes and remain accurate. It’s certainly worth spending a little more here for a quality product that will last.
Gaming Headset
A good gaming headset is necessary for clear communication with teammates as well as an immersive gaming experience. For successful communication during intense gaming sessions, look for headphones with outstanding sound quality, a comfortable fit, noise cancellation, and a good microphone.
Depending on the game you play, a solid gaming headset could be your most valuable purchase with games like Valorant and Counter-Strike having sound as one of their most important aspects.
Gaming Monitor
Because the monitor serves as a window into the gaming environment, having a high-performance gaming monitor is essential for competitive play. Look for a monitor with a high refresh rate (144Hz or greater) for better pictures, a low input lag for less latency, and a fast response time to eliminate motion blur.
The monitor is often considered to be one of the most substantial upgrades any player can make, going from 60hz to 144hz cannot be understated in terms of how it impacts game performance, just remember to change your settings to enable the higher refresh rate!
Gaming Mouse Pad
A high-quality gaming mouse pad is often ignored, but it can make or break your gaming experience. It creates a smooth surface for precise mouse movements and can lengthen the life of your mouse feet.
A properly designed mouse mat will also help with mouse tracking, can impact things like lift height for the mouse, and just give space to move around. These are often much cheaper when it comes to making a change, so can be a fantastic place to start when comfort is the upgrade in mind.
Investing in the appropriate competitive gaming gear can drastically improve your performance and overall gaming experience. Whether it’s increasing precision with a high-performance mouse or increasing comfort with a high-quality gaming chair, the correct equipment can provide you with the competitive edge you need to excel in the fascinating world of competitive gaming.
For the latest gadget and tech news, and gadget reviews, follow us on Twitter, Facebook and Instagram. For the newest tech & gadget videos subscribe to our YouTube Channel. You can also stay up to date using the Gadget Bridge Android App. You can find the latest car and bike news here.
Today, PDFs are used in every organization due to their simplicity and compatibility. Sharing important information through PDFs is easier since they open with almost any device. However, the problem arises when you have a large amount of information and need to share it with multiple users in a busy workplace, as social platforms limit a specific file size.
But you need not fret. You can share your PDF documents as direct links without attachments.
Wonder how?
This post discusses all the details of creating a link for local and online PDFs on Windows computers without hassle in a short time to make your work easier. Stick around to learn the quick process.
In This Article
Why Need to Create a URL for a PDF?
While you have the PDF file on your device, creating its URL (.pdf) is still necessary to make it accessible and downloadable for anyone with the link. Several other reasons include:
#1. Share with multiple users: URL saves time and effort to share PDF files and documents with multiple users. Simply create a link and share it with everyone simultaneously.
#2. Overcome file restrictions: Email and social media platforms generally impose restrictions and limits on large file sizes. But by creating a URL link, you can share it across multiple platforms without worries about file size restrictions.
#3. Easy sharing: Sharing large-sized PDF files is challenging. However, creating a link makes sharing easier and more convenient through online platforms for more extensive accessibility.
How to Make a URL Link for a PDF File or Document on Windows?
SwifDoo PDF is a compact, lightweight, powerful, fast PDF creator and editor that lets you perform all PDF-related functions. You can even create a link to a PDF within your file or document using the versatile PDF software.
Create a Local PDF Link
Check the quick steps to create a link to a local PDF within the PDF document.
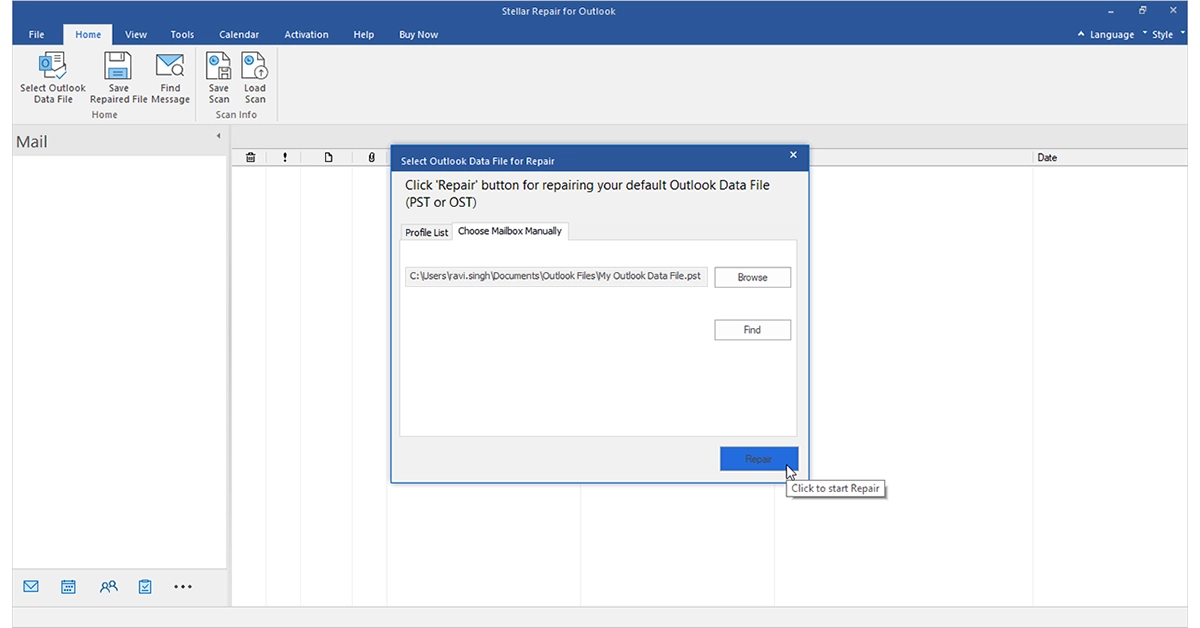
Step 1: Install SwifDoo PDF software for free and open the PDF file for which you want to create a link. Either tap the Open button or drag and drop the desired PDF file into the software to open and access it.
Step 2: Tap Edit in the top menu bar and select the Link tab. Then click the Add or Edit link option from the drop-down menu.
Step 3: Draw a rectangle where you must create a URL, and a dialogue box for Add Links will appear.
Step 4: Choose Open a File at the bottom and browse your PC to select the target PDF. Click OK to create a link to your selected PDF document.
This way, you can not only add a link to a PDF but also create a link to a particular page in your PDF document. In fact, the SwifDoo PDF software also lets you link a PDF to multiple other file types and web pages and enables you to edit or delete the links at any time.
Create an Online PDF Link
SwifDoo PDF also lets you create a link to an online published PDF. Here’s how.
Step 1: Download and open the SwifDoo PDF app and open the PDF you want to create a URL for.
Step 2: Click Edit and select Link. Choose the Add or Edit link option.
Step 3: Draw an area where you want to add the link using your cursor and tap the Open a Web option.
Step 4: Type and enter the PDF link address or URL and click OK.
That’s it. Following the abovementioned process, you can create a link to open an online downloadable PDF document. Besides adding, the software also lets you remove links from PDFs.
After creating a link to the desired PDF file, select where the link is added, and the linked PDF will automatically open. Now, you can easily edit it despite the link being created on a PDF file stored on your system or the web.
Edit PDF Link
Here’s how to modify or edit a link with the SwifDoo PDF.
Step 1: Click the Edit option in the top menu bar and tap Link. Select the Add or Edit link option.
Step 2: Right-click the link to be modified and click Edit Link. Step 3: Change or remove the link as per your requirements.
Create a Link to a Specific PDF Page
Check out how to create a link to a specific PDF page than the whole PDF file/document.
Step 1: Tap the Go to a Page View option or Go to a Certain Page option in the link-adding dialogue.
Step 2: Type a page number. Alternatively, scroll to determine the specific page to be linked.
You can also use the SwifDoo PDF’s PDF to HTML converter feature to convert a PDF into an HTML file to share and open.
What else can SwifDoo PDF do for you?
SwifDoo PDF is the ultimate PDF file solution that performs all PDF functions from creation to editing. Instead, you can use its free templates to make greeting cards, add attachments, and add images, stickers, GIFs, and text to your PDF document.
Suppose you have a piece of critical information but in some other file type like Word, Excel, etc. In that case, the software also lets you convert PDF and vice versa with original formatting to add password protection and secure it from unauthorized access.
SwifDoo PDF software is an all-in-one PDF creator and editor for Windows users to view, edit, annotate, compress, merge, translate, add hyperlinks, and digitally sign a document. You can crop PDF pages, insert text boxes, search for a word, and replace everything in your PDF.
Final words
PDF is a widely used format to share documents due to its versatility, compatibility, and flexibility. You can easily upload your file to the website and easily share large amounts of information with unlimited users at once. We have already shared the necessary steps to create a link with SwifDoo PDF for easy sharing. Download and use SwifDoo PDF, as it is a secure and reliable PDF creator that guarantees your PDF security without data leaks. It lets you open your files in a flash and perform the necessary tasks as required.
For the latest gadget and tech news, and gadget reviews, follow us on Twitter, Facebook and Instagram. For newest tech & gadget videos subscribe to our YouTube Channel. You can also stay up to date using the Gadget Bridge Android App. You can find the latest car and bike news here.
Garena Free Fire is a battle royale game with regular awards and tournaments to keep players interested. If you play Garena Free Fire, you should be aware of the redeem codes that are released on a daily basis. However, because the battle royale game is banned in India, players from other countries can use the Free Fire Redeem codes daily. If you’re unfamiliar with the Garena Free Fire redeem codes or don’t know how to get them, we’ve put together a step-by-step guide to help you redeem them. Check out Garena Free Fire Redeem Codes for 17 October 2023.The Free Fire redeem codes are a great way to get free stuff. These are 12-digit codes that contain alphabets and numbers, as well as an expiration date and time. Because the Garena FF redeem codes cannot be used more than once, you should hurry to the redemption page to claim your free reward before someone else does. To get a free reward, all you have to do is go to reward.ff.garena.com/en, which is the official redemption page. Also, keep an eye on this space for daily updates on Garena Free Fire redemption codes and rewards.
In This Article
Garena Free Fire Redeem Codes Today 17 October2023
updating soon
How to Get Free Fire Redeem Codes for Garena on 17 October2023?
Ever since Facebook (Meta Inc) acquired Instagram, the two platforms have come together to facilitate the seamless sharing of content. After linking the two profiles, you can easily log into Instagram using your Facebook account. Any post, story, or reel you upload on Instagram can also be shared automatically to your Facebook profile. If you’re facing issues with sharing, it may be due to one of several possible reasons. In this article, we bring you 5 easy fixes to the ‘Instagram not sharing to Facebook’ issue.Read Also:Top 4 ways to clear app and browser cache on iOS
In This Article
Are your Instagram and Facebook profiles linked?
Sharing between Instagram and Facebook is only possible when the profiles are linked. Sometimes, the two profiles may disconnect from each other when you change the password to one of them. In this case, you will need to re-link your Facebook to your Instagram. Here’s how you can check whether your Instagram and Facebook profiles are connected.Step 1: Launch the Instagram app and tap on your profile picture at the bottom right corner of the screen.Step 2: Tap on the hamburger menu icon at the top right corner of the screen.Step 3: Select Settings and privacy.Step 4: Tap on Accounts Center.Step 5: Select Accounts.Step 6: Check if your Facebook account is displayed on the page. If it is not, re-link it to your Instagram profile.
Turn on automatic sharing for your Instagram content
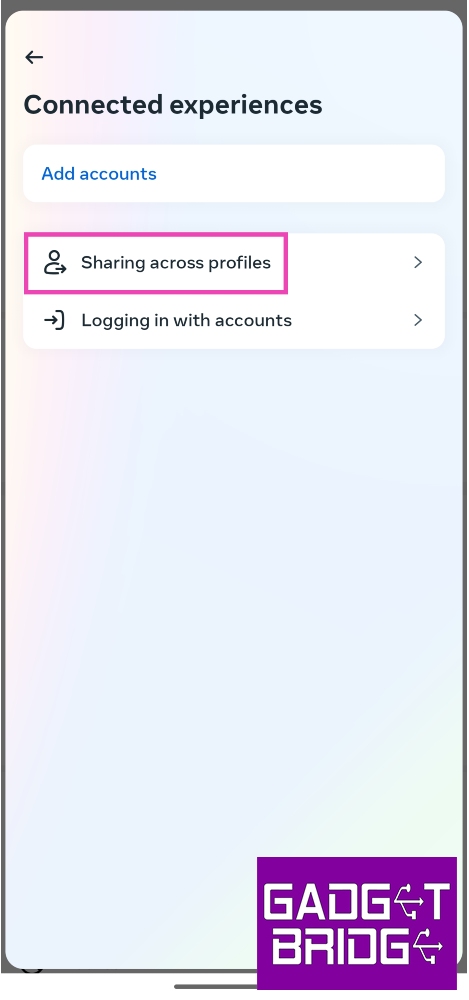
Step 1: Launch the Instagram app and tap on your profile picture at the bottom right corner of the screen.Step 2: Tap on the hamburger menu icon at the top right corner of the screen.Step 3: Select Settings and privacy.Step 4: Tap on Accounts Center.Step 5: Select Connected experiences.Step 6: Tap on Sharing across profiles.Step 7: Select your Instagram profile.Step 8: Turn on the toggle switches for Instagram story, posts, and reels.
Clear Instagram and Facebook’s app cache
Step 1: Go to Settings and select Apps.Step 2: Select Instagram.Step 3: Tap on Storage.Step 4: Select Clear cache.Follow the same process for Facebook as well.
Log out and log in to Instagram
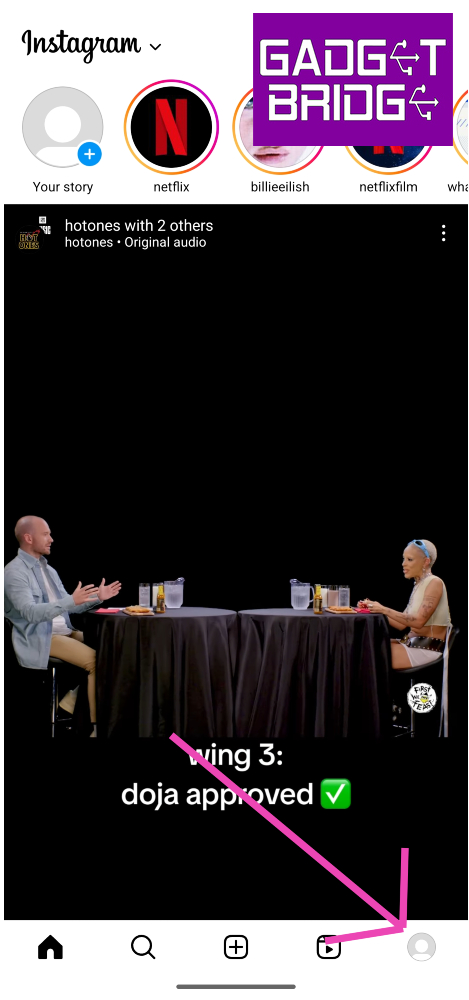
If you aren’t able to share your Instagram content on Facebook, it could be an account-related issue. Simply log out of Instagram and log back in to solve this problem. Here’s how.Step 1: Launch the Instagram app and tap on your profile picture at the bottom right corner of the screen.Step 2: Tap on the hamburger menu icon at the top right corner of the screen.Step 3: Select Settings and privacy.Step 4: Scroll all the way down and select Log out [profile handle].
Unlink and Re-link your Facebook account to your Instagram profile to facilitate sharing
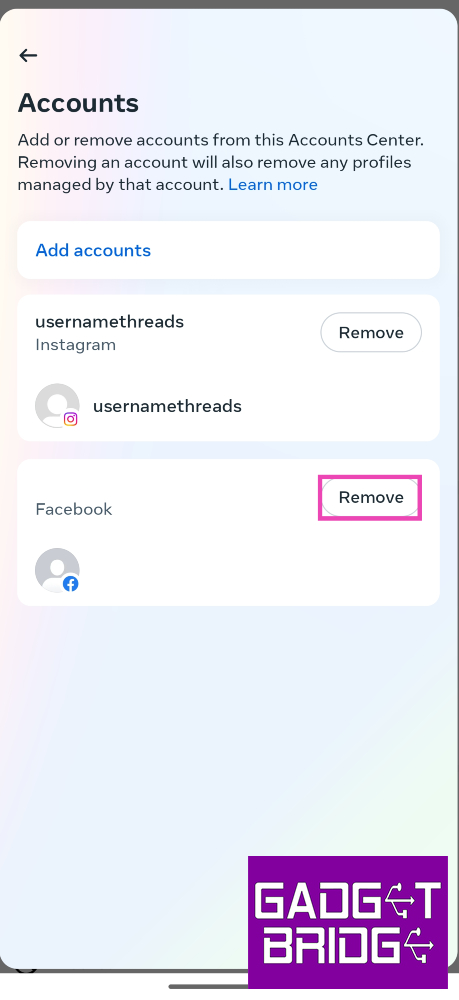
Step 1: Launch the Instagram app and tap on your profile picture at the bottom right corner of the screen.Step 2: Tap on the hamburger menu icon at the top right corner of the screen.Step 3: Select Settings and privacy.Step 4: Tap on Accounts Center.Step 5: Select Accounts.Step 6: Tap the Remove button next to your Facebook account.Step 7: Finally, select Add accounts and re-add your Facebook account.
Frequently Asked Questions (FAQs)
How do I link my Facebook account to my Instagram profile?
On the Instagram app, go to Profile>Menu>Settings and privacy>Accounts Center>Accounts and add your Facebook account using the proper credentials.
Can I log into my Facebook account using my Instagram profile?
You can log into your Instagram profile using your Facebook account but not vice versa.
Why are my Instagram posts not being automatically shared on Facebook?
To enable automatic sharing between Instagram and Facebook, go to Profile>Menu>Settings and privacy>Accounts Center>Connected experiences>Sharing across profiles. Select your Instagram profile and turn on the toggle switches for story, posts, and reels.Read Also:Top 10 Ways to Fix YouTube App Crashing or Not Working On Android
Vivo Y200 renders, design, specs and features are doing rounds on the web. The launch date for the said phone was not known but today it now has a launch date. The Chinese smartphone brand today announced that Vivo Y200 will make its India debut on October 23. The device’s colour option and design renders were leaked recently.Vivo today officially announced that its upcoming phone Vivo Y200 is set for a launch in India on October 23. The device is a predecessor of the Y100 that was launched last year. The company has not yet revealed the specs or its pricing. But the teaser image suggests the phone to arrive in two shades.Also Read: Best Flip Phones in India (2023) to buy this festive season Vivo Y200 is likely to come with a price tag of Rs 24,000 for the 8GB RAM with 128GB storage option.According to a report the Vivo Y200 is likely to come in two colour options of Desert Gold and Jungle Green. As we mentioned earlier the leaked design renders of the phone suggest an Aura Light feature which is basically a small ring light. Along with this, there is a dual rear camera setup and an LED flashlight.The alleged phone is said to have rounded corners and flat edges. The leaked renders also suggest a volume rocker and power button on the right side of the frame. Coming to the front, the panel has a punch-hole camera placed at the top centre.Previously the handset was rumoured to come with a 6.67-inch full-HD+ AMOLED display with 2,400 x 1,080 pixels of resolution. The upcoming phone may also include a Qualcomm Snapdragon 4 Gen 1 SoC and operate on Funtouch OS with Android 13 on top.In addition to this speculations also suggests a 64-megapixel primary sensor with OIS and a secondary 2-megapixel sensor. For selfies, it may also include a 16-megapixel front-facing camera.Moreover, the upcoming phone is likely to pack a 4,800mAh battery with 44W wired fast charging support.
For the latest gadget and tech news, and gadget reviews, follow us on Twitter, Facebook and Instagram. For newest tech & gadget videos subscribe to our YouTube Channel. You can also stay up to date using the Gadget Bridge Android App. You can find the latest car and bike news here.
Are you looking for a smartphone with a more compact form factor? Then you should look for Flip Phones, which are essentially foldable, and do come with that capability. When opened, they expand into a full-sized display and fold to fit in your pocket. As of now, the majority of the brands, including Samsung, Motorola, Xiaomi, Oppo, Vivo, and Tecno have foldable devices and soon, OnePlus, are jumping on board. Note that Apple the company behind the iPhone, the king of smartphones, has yet to enter the foldable phone market. So if you are looking to buy a new foldable phone here is a list of Flip Phones available in India.The festive sale is live on all the e-commerce platforms including Amazon and Flipkart in the country. Smartphone brands like Xiaomi, Vivo, Samsung, and Oppo are also hosting their individual sales on their platform. So this is the best time to buy a Flip Phone in India. If you are looking for one then here is a list of Flip Phones in India you can look out for this festive season.
In This Article
Samsung Galaxy Z Flip 5
Samsung Galaxy Z Flip 5 (Review)is the first Flip phone on the list which you can absolutely go for without giving a second thought. It features a 6.7-inch FHD+ Dynamic AMOLED 2X Infinity Flex Display and a 3.4-inch Super AMOLED cover screen. The primary panel supports a 120Hz refresh rate and the external display has a refresh rate of 60Hz. The device comes with an IPX8 grade for water resistance.This Flip phone comes with a dual rear camera unit with a 12-megapixel ultra-wide main sensor and a 12-megapixel wide-angle camera. The Galaxy Z Flip 5 boasts a 10-megapixel selfie camera on the front of the folding display for selfies.In addition to this, the phone boasts a 3,700mAh battery that supports 25W quick charging.The new Flex Window offers a variety of both old and new capabilities and is now 3.78 times bigger than the previous iteration. It offers greater customization choices, including informative and graphical clocks that can match the face design of a user’s Galaxy Watch 6 series, as well as stylish frames. The device runs on OneUI 5.1.1 on top of Android 13.Samsung Galaxy Z Flip 5 is available in two different configurations 8GB RAM with 256GB storage and 8GB RAM with 512GB storage. The price of both variants in India is set at Rs 99,999 and Rs 109,999, respectively.
Oppo Find N3 Flip
Oppo Find N3 Flip features a 6.80-inch AMOLED primary display with a dynamic refresh rate that ranges between 1Hz to 120Hz. There is a 3.26-inch cover display vertically positioned. The device is powered by an octa-core MediaTek Dimensity 9200 SoC along with 256GB of UFS 4.0 internal storage and 12GB of LPDDR5X RAM. The device comes with colorOS 13 out of the box. The company is promising 4 years of major OS updates and 5 years of security patches.For photos and videos, there is a triple rear camera that includes a 32-megapixel telephoto sensor, an 8-megapixel ultra-wide-angle sensor, and a 50-megapixel Sony IMX890 main lens with OIS feature. The Flip Phone also sports a 32-megapixel front camera for taking selfies and making video calls.It packs a 4,300mAh battery with 44W supervooc wired charging support.The Oppo Find N3 Flip comes in a single 12GB RAM with 256GB storage option priced at Rs 94,999.
Tecno Phantom V Flip
Tecno Phantom V Flip features a 6.9-inch LTPO AMOLED primary screen with a 144Hz refresh rate. There is a 1.32-inch outer display. The device is powered by MediaTek Dimensity 8050 with 8GB RAM and 256GB storage. For photos and videos, the device includes a 64-megapixel primary camera and a 13-megapixel ultrawide camera. For selfies, it includes a 32-megapixel front-facing shooter.The Flip Phone by Tecno boasts a 4,000mAh battery that comes with 45W fast charging support. Also, this device is not IP-certified.The device comes with a price tag of Rs 49,999.
Motorola Razr 40 and Motorola Razr 40 Ultra
Motorola Razr 40, and Motorola Razr 40 Ultra features 6.9-inch foldable pOLED screens with a refresh rate of 165Hz. The Motorola Razr 40 Ultra model has a larger 1.5-inch cover display whereas the Razr 40 has a 3.6-inch pOLED outer screen. Both the devices are IP52 rated.The Motorola Razr 40 and Motorola Razr 40 Ultra are powered by Snapdragon 7 Gen 1 and Snapdragon 8+ Gen 1 processors respectively.The Motorola Razr 40 features a 64-megapixel primary sensor and a 12-megapixel ultra wide-angle camera. Whereas Razr 40 Ultra includes a 13-megapixel secondary ultra-wide-angle camera and a 12-megapixel primary sensor. However both the devices sport a 32-megapixel front-facing camera for selfies.There is a 3,800mAh and a 4,200mAh battery on the Motorola Razr 40 and Motorola Razr 40 Ultra, respectively.The Motorola Razr 40 Ultra comes with a price tag of Rs 89,999 for the 8GB RAM with 256GB storage model. On the other hand, Razr 40 price is set at Rs 59,999. For the latest gadget and tech news, and gadget reviews, follow us on Twitter, Facebook and Instagram. For newest tech & gadget videos subscribe to our YouTube Channel. You can also stay up to date using the Gadget Bridge Android App. You can find the latest car and bike news here.


 The Oppo Find N3 operates on ColorOS 13 on top of Android 13. At its heart, there is an octa-core Snapdragon 8 Gen 2 SoC with an Adreno 740 GPU for graphics. The device is offered with 16GB of LPDDR5X RAM and 512GB of UFS 4.0 storage.
The foldable phone by Oppo includes a triple rear camera setup powered by Hasselblad. The circular camera module includes a 48-megapixel Sony LYTIA-T808 1/1.43-inch sensor with OIS and EIS, a 64-megapixel OmniVision OV64B lens with 3X optical zoom and a 48-megapixel Sony IMX581 lens. The company provided a 20-megapixel sensor on the primary display and a 32-megapixel lens on the outer display for taking selfies and video calling.
The Oppo Find N3 sports a 4,805mAh battery that supports 67W SuperVOOC 2.0 fast charging. In addition to this, the handset includes a tri-state alert slider and a side-mounted fingerprint sensor. Also, there is an under-screen colour temperature sensor along with an ambient light sensor, an accelerometer, a gyroscope, a hall sensor, a proximity sensor and a geomagnetic sensor.
For connectivity, there is a USB Type-C port, 5G, 4G LTE, Wi-Fi 7, Bluetooth 5.3, GPS/ A-GPS, NFC, Beidou, GPS, GLONASS, Galileo and QZSS.
The Oppo Find N3 operates on ColorOS 13 on top of Android 13. At its heart, there is an octa-core Snapdragon 8 Gen 2 SoC with an Adreno 740 GPU for graphics. The device is offered with 16GB of LPDDR5X RAM and 512GB of UFS 4.0 storage.
The foldable phone by Oppo includes a triple rear camera setup powered by Hasselblad. The circular camera module includes a 48-megapixel Sony LYTIA-T808 1/1.43-inch sensor with OIS and EIS, a 64-megapixel OmniVision OV64B lens with 3X optical zoom and a 48-megapixel Sony IMX581 lens. The company provided a 20-megapixel sensor on the primary display and a 32-megapixel lens on the outer display for taking selfies and video calling.
The Oppo Find N3 sports a 4,805mAh battery that supports 67W SuperVOOC 2.0 fast charging. In addition to this, the handset includes a tri-state alert slider and a side-mounted fingerprint sensor. Also, there is an under-screen colour temperature sensor along with an ambient light sensor, an accelerometer, a gyroscope, a hall sensor, a proximity sensor and a geomagnetic sensor.
For connectivity, there is a USB Type-C port, 5G, 4G LTE, Wi-Fi 7, Bluetooth 5.3, GPS/ A-GPS, NFC, Beidou, GPS, GLONASS, Galileo and QZSS.


 Step 3: Search
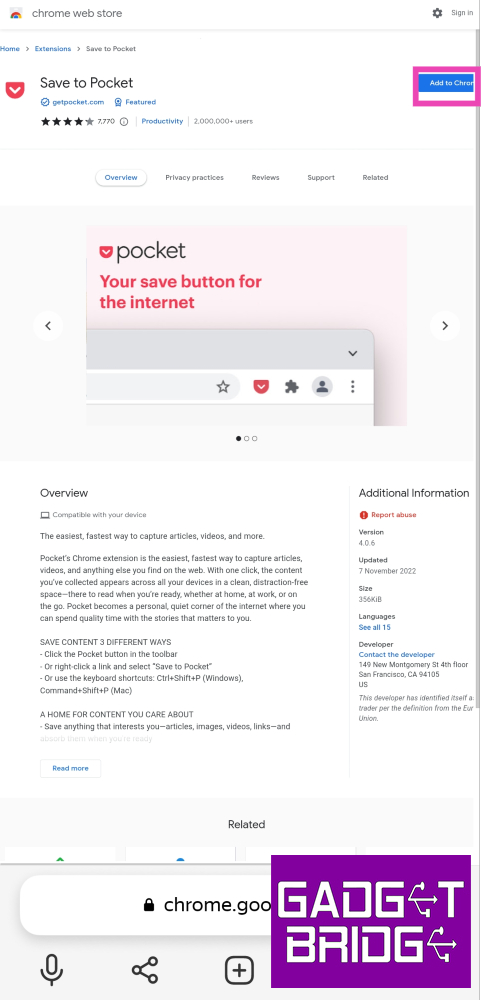 Step 5:
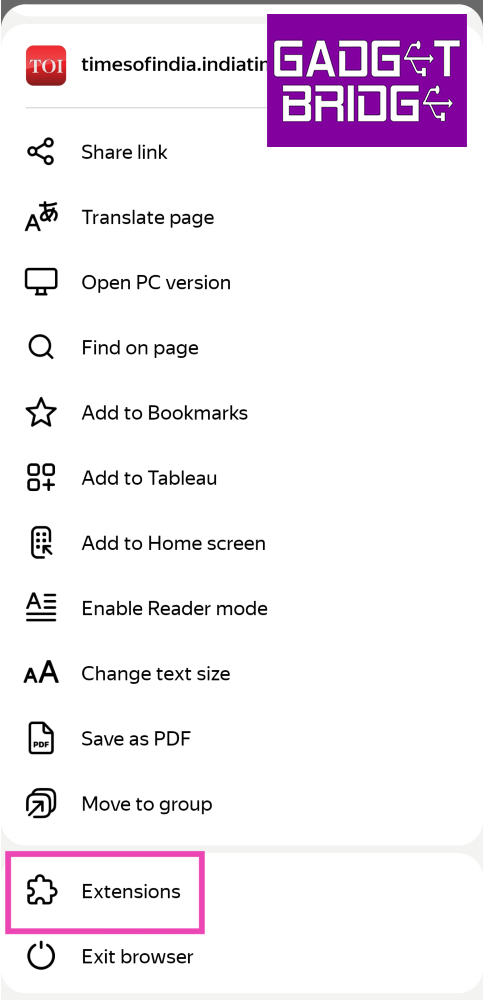
 Step 3:
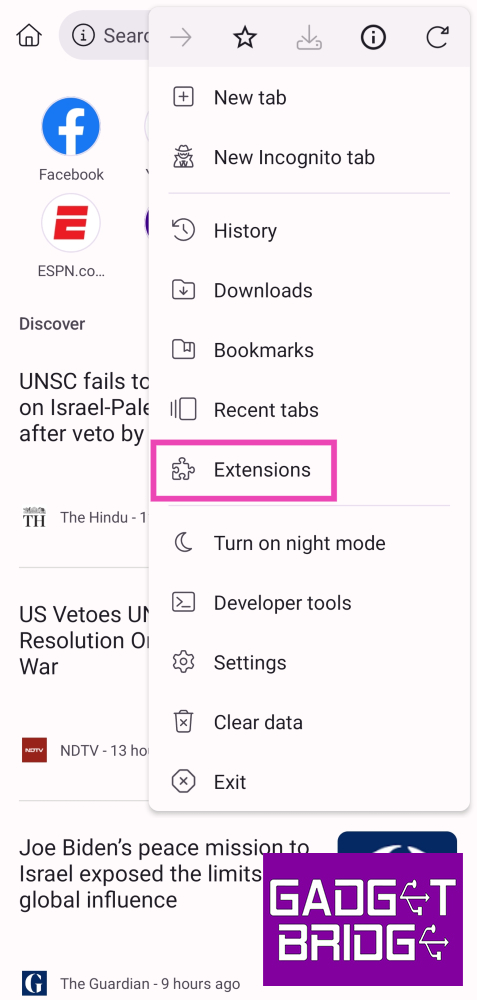 Step 4:
 Step 5: Search
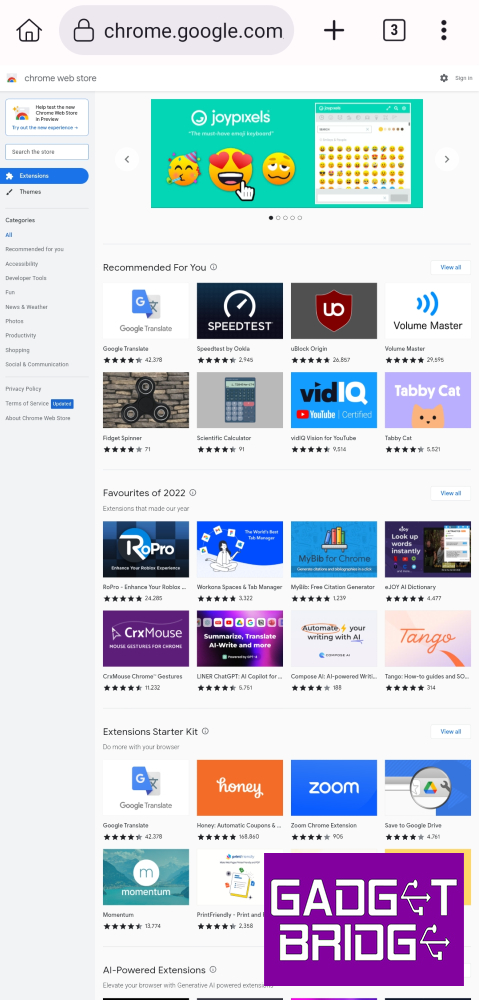 Step 6:
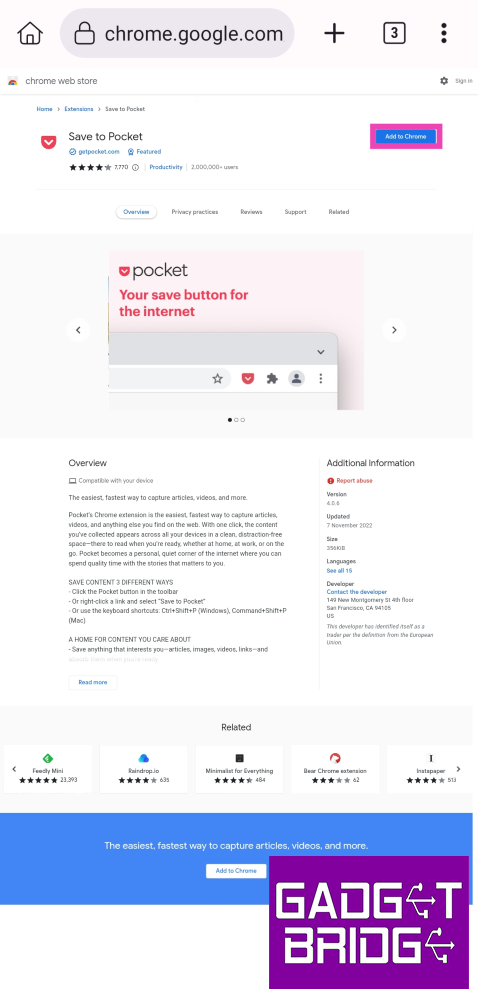 Step 7:
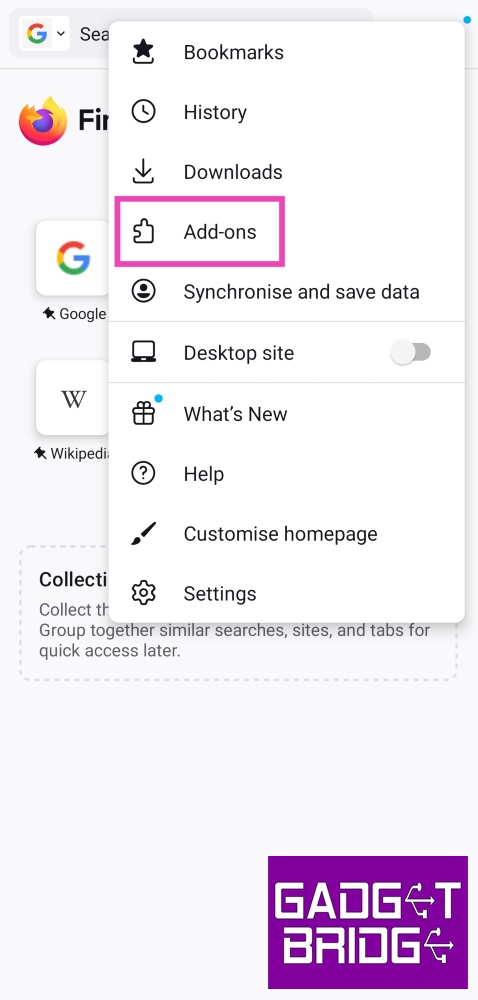 Step 3:
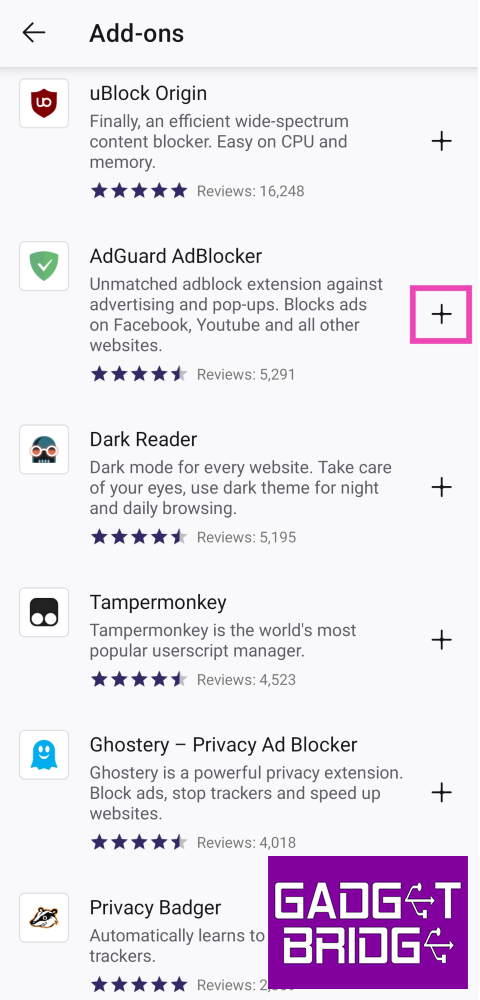


 Step 2:
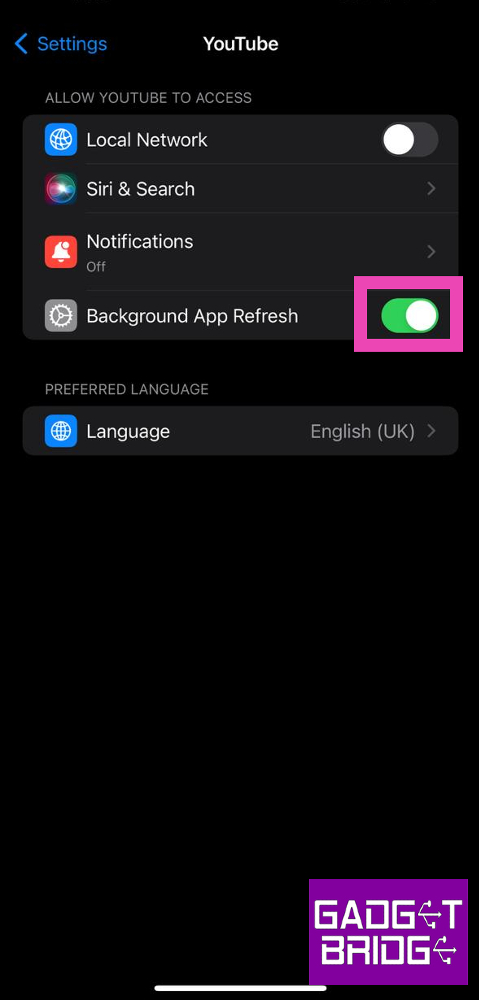
 Step 3:
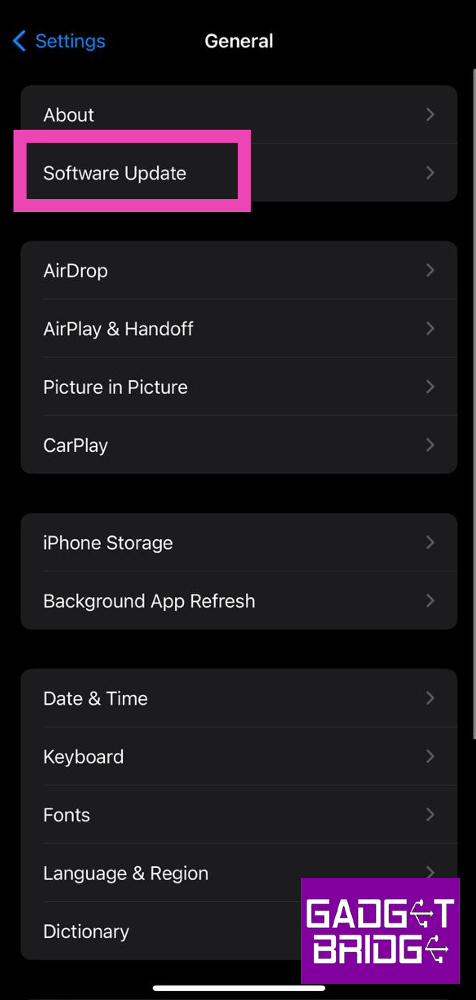 Step 4:
 Step 3:
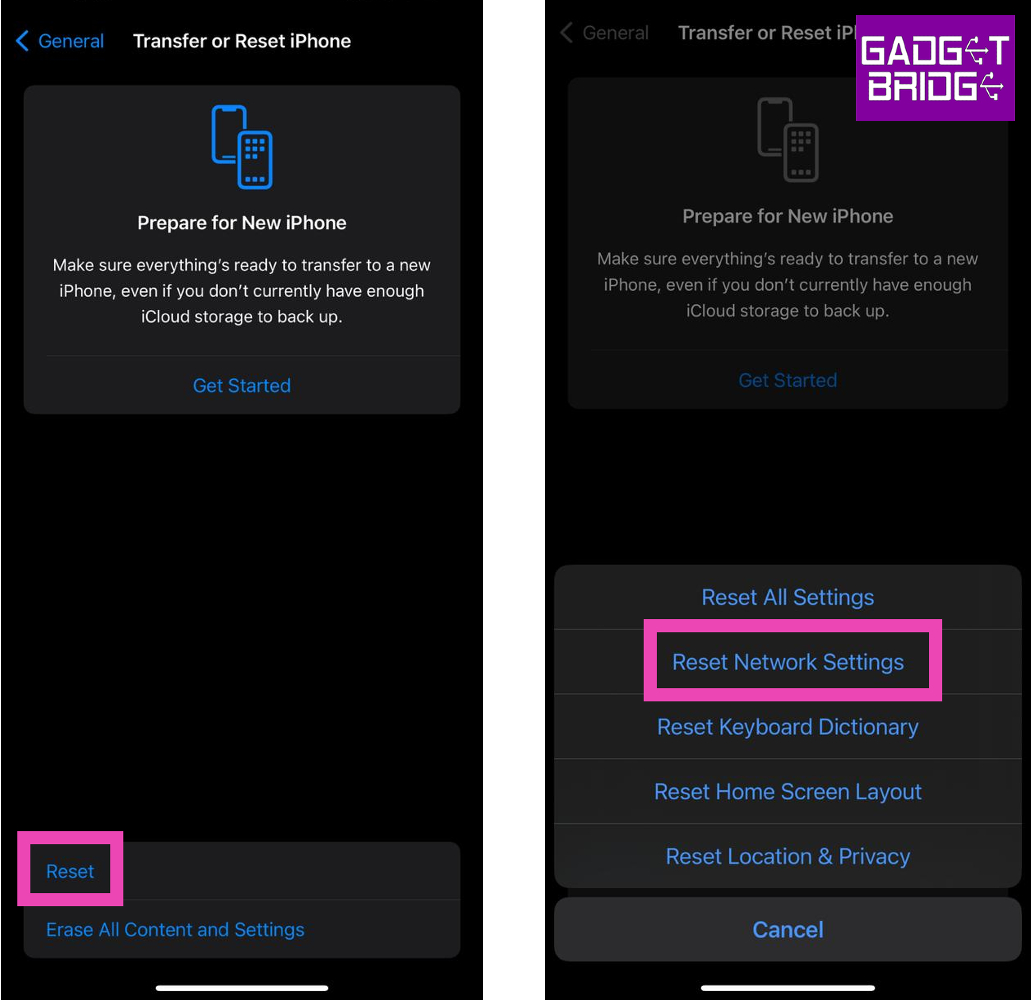


 Also Read:
 Target icon:
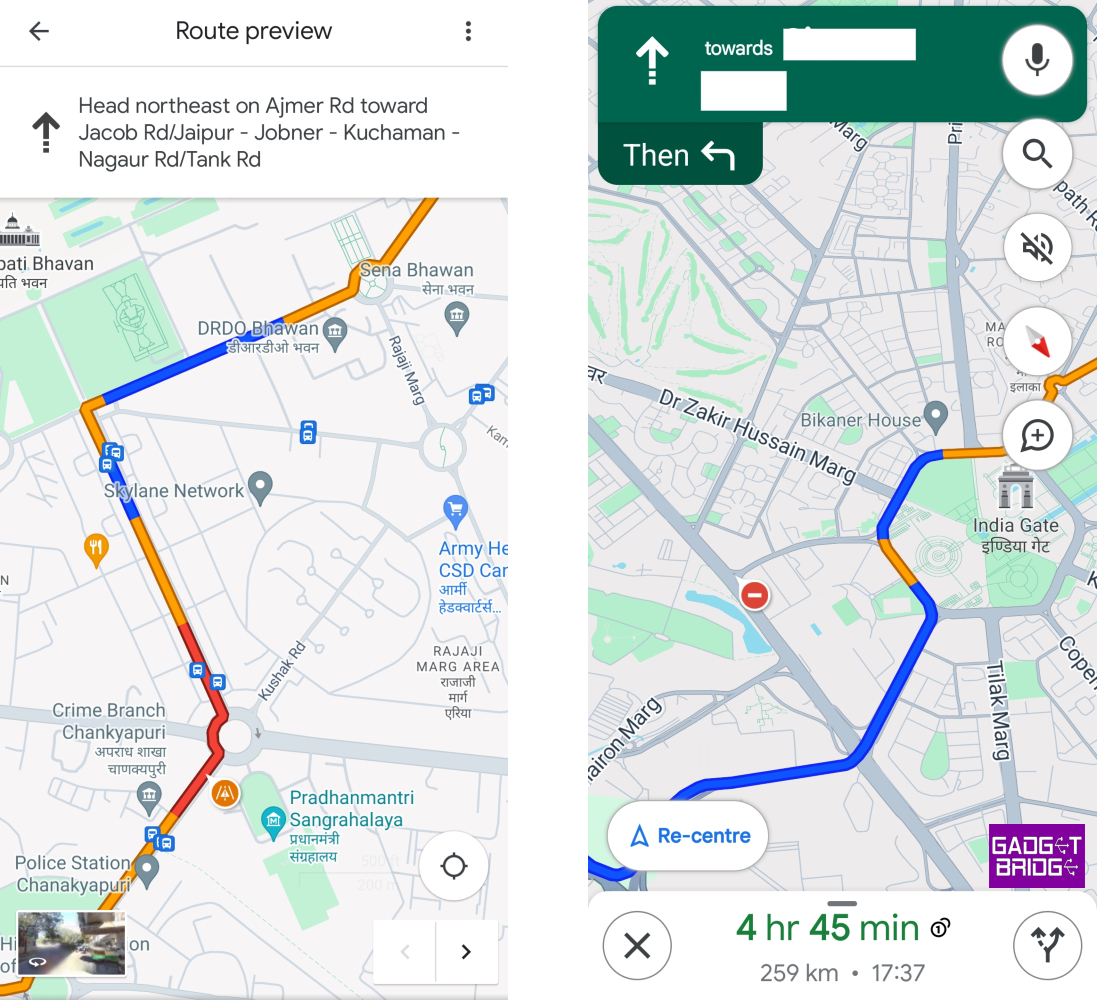 Yellow road:
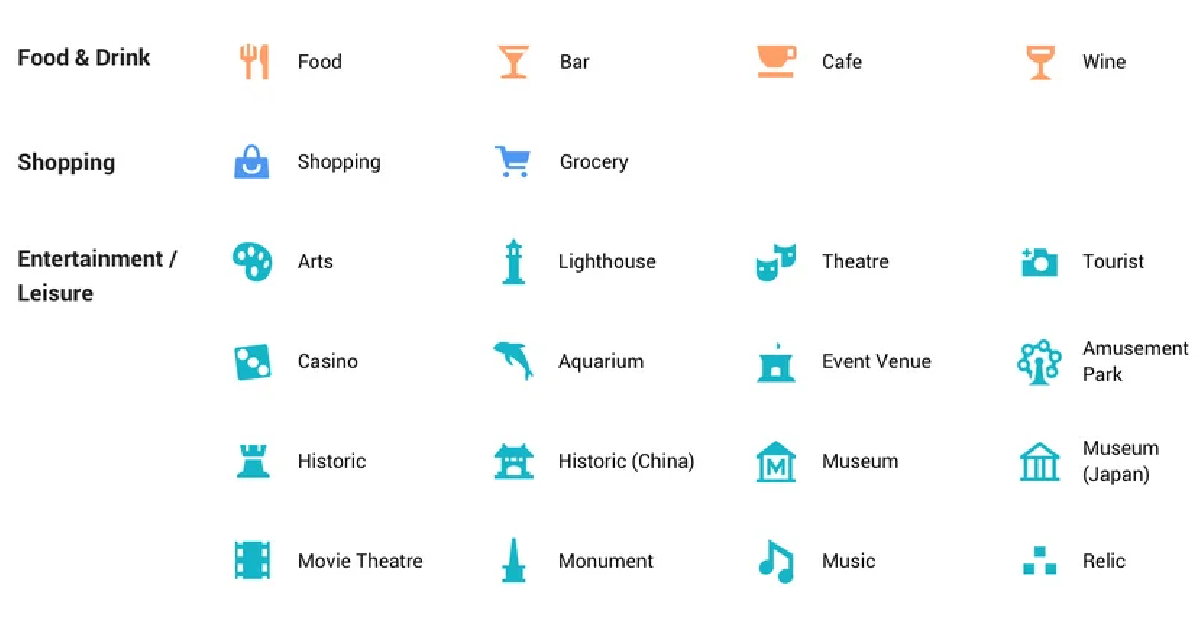 Yellow pin with a star:
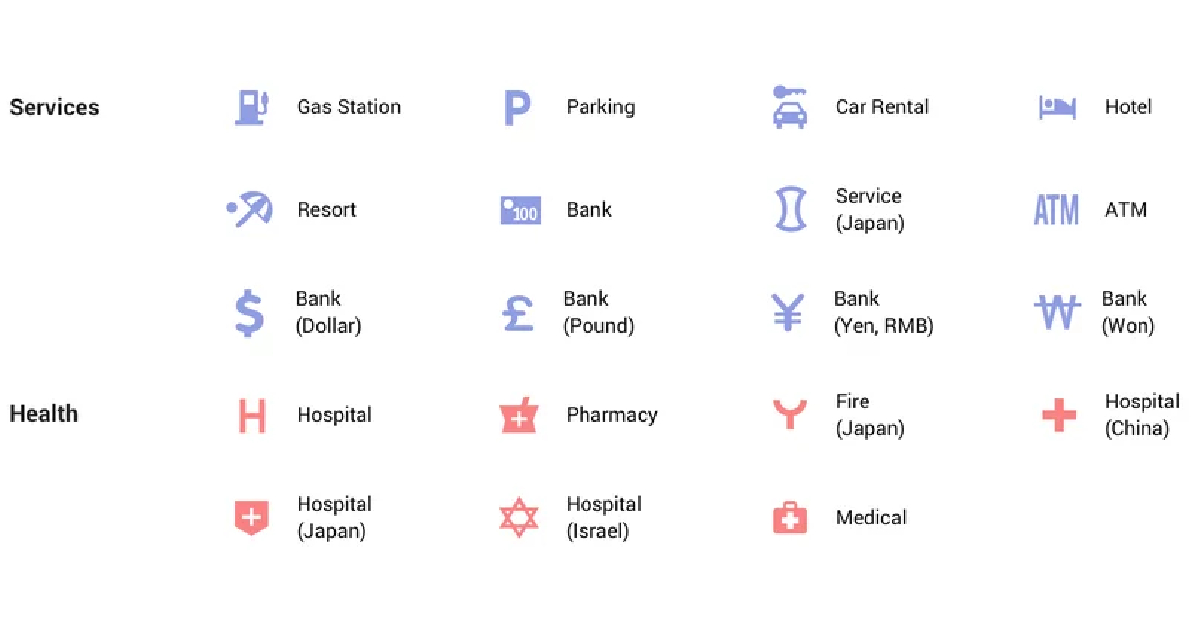 Man sleeping on bed pin:
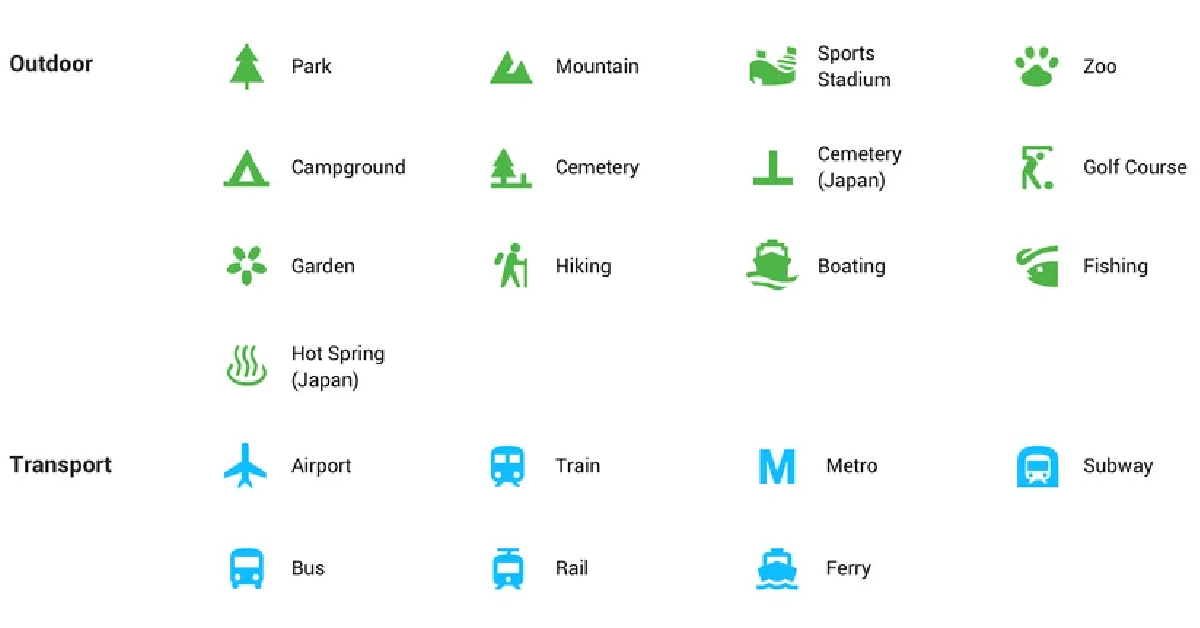 Gas pump pin:
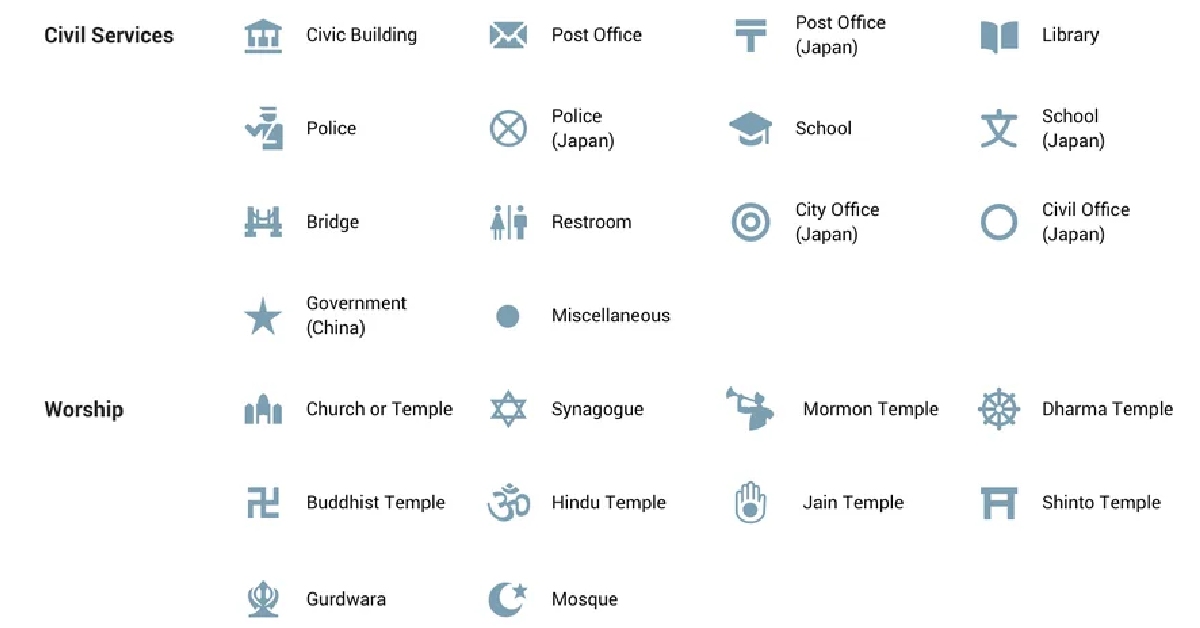 Shopping cart pin:
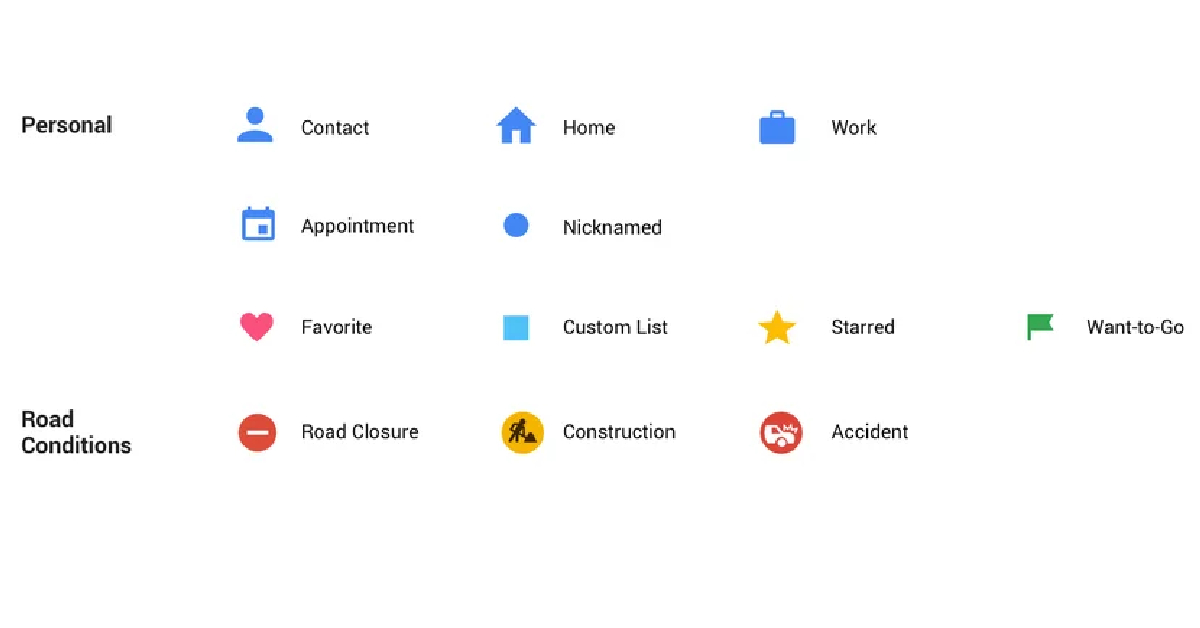


 Step 4:
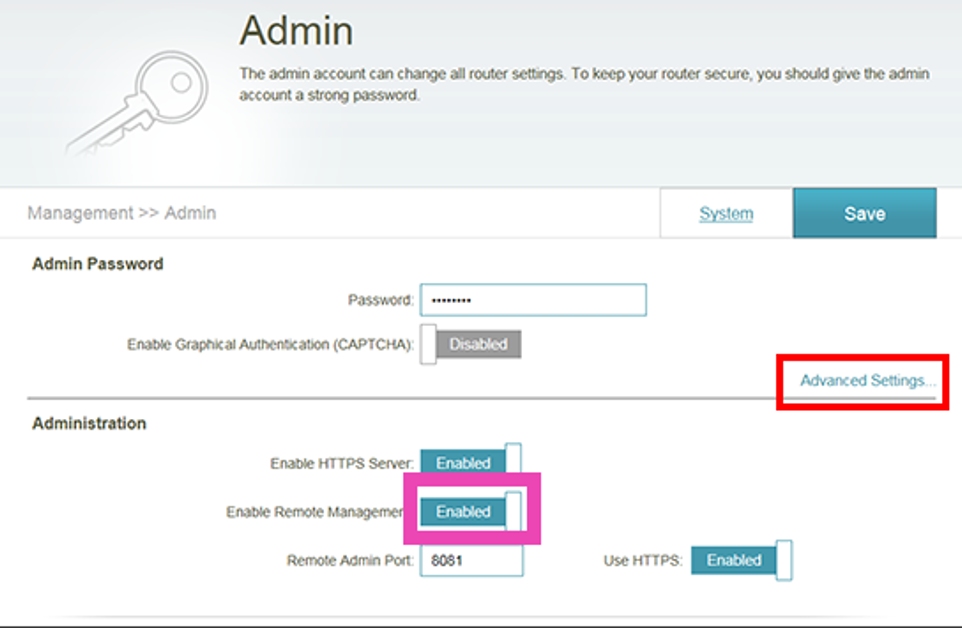 Step 5:
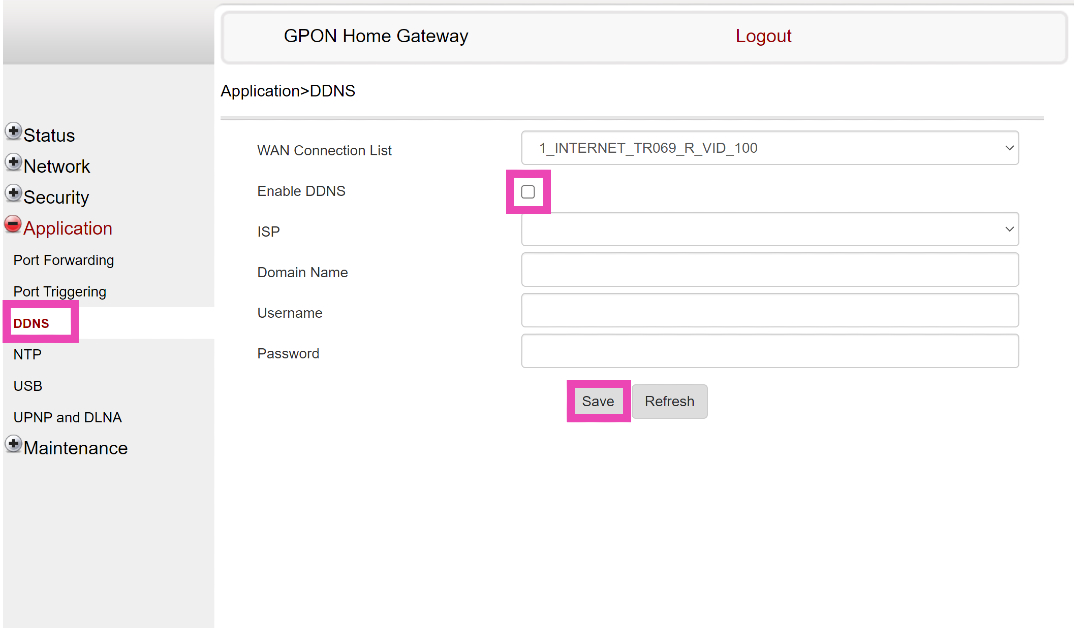 Step 4: Enter


 Step 1: Launch
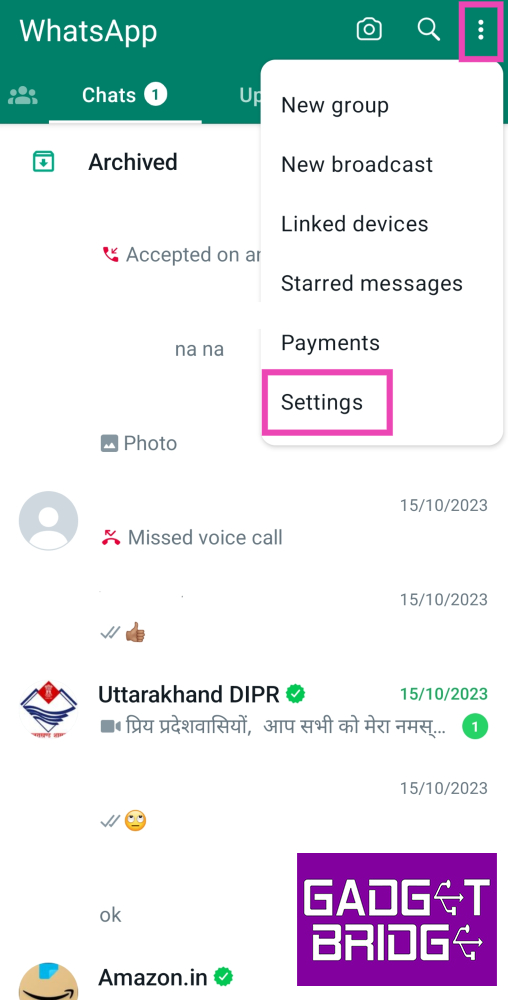 Step 3:
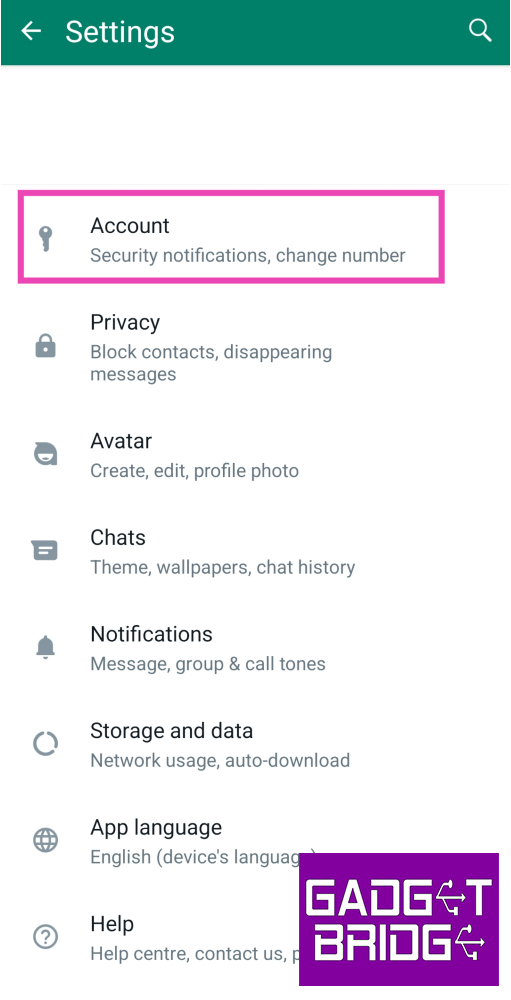 Step 4:


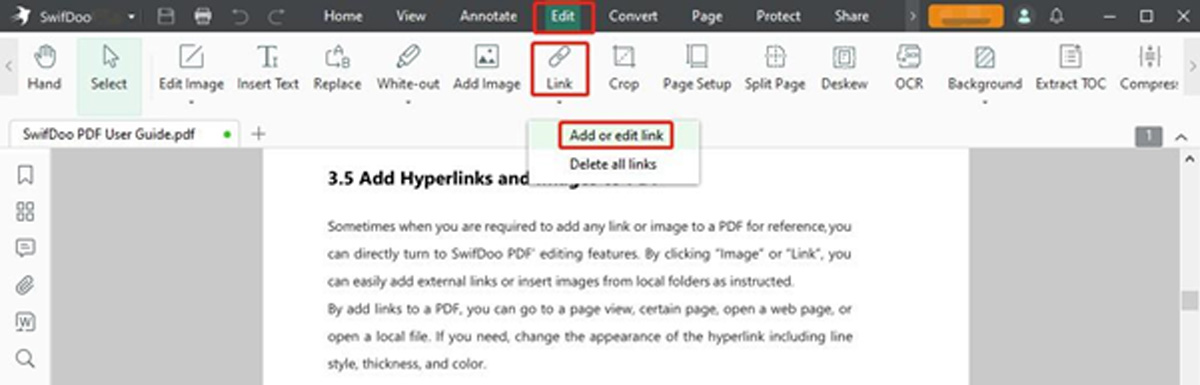 Step 3: Draw a rectangle where you must create a URL, and a dialogue box for Add Links will appear.
 Step 4: Choose Open a File at the bottom and browse your PC to select the target PDF. Click OK to create a link to your selected PDF document.
This way, you can not only add a link to a PDF but also create a link to a particular page in your PDF document. In fact, the SwifDoo PDF software also lets you link a PDF to multiple other file types and web pages and enables you to edit or delete the links at any time.
Step 4: Choose Open a File at the bottom and browse your PC to select the target PDF. Click OK to create a link to your selected PDF document.
This way, you can not only add a link to a PDF but also create a link to a particular page in your PDF document. In fact, the SwifDoo PDF software also lets you link a PDF to multiple other file types and web pages and enables you to edit or delete the links at any time.
 Step 2: Click Edit and select Link. Choose the Add or Edit link option.
Step 3: Draw an area where you want to add the link using your cursor and tap the Open a Web option.
Step 4: Type and enter the PDF link address or URL and click OK.
That’s it. Following the abovementioned process, you can create a link to open an online downloadable PDF document. Besides adding, the software also lets you remove links from PDFs.
After creating a link to the desired PDF file, select where the link is added, and the linked PDF will automatically open. Now, you can easily edit it despite the link being created on a PDF file stored on your system or the web.
Step 2: Click Edit and select Link. Choose the Add or Edit link option.
Step 3: Draw an area where you want to add the link using your cursor and tap the Open a Web option.
Step 4: Type and enter the PDF link address or URL and click OK.
That’s it. Following the abovementioned process, you can create a link to open an online downloadable PDF document. Besides adding, the software also lets you remove links from PDFs.
After creating a link to the desired PDF file, select where the link is added, and the linked PDF will automatically open. Now, you can easily edit it despite the link being created on a PDF file stored on your system or the web.
 Step 2: Right-click the link to be modified and click Edit Link.
Step 3: Change or remove the link as per your requirements.
Step 2: Right-click the link to be modified and click Edit Link.
Step 3: Change or remove the link as per your requirements.
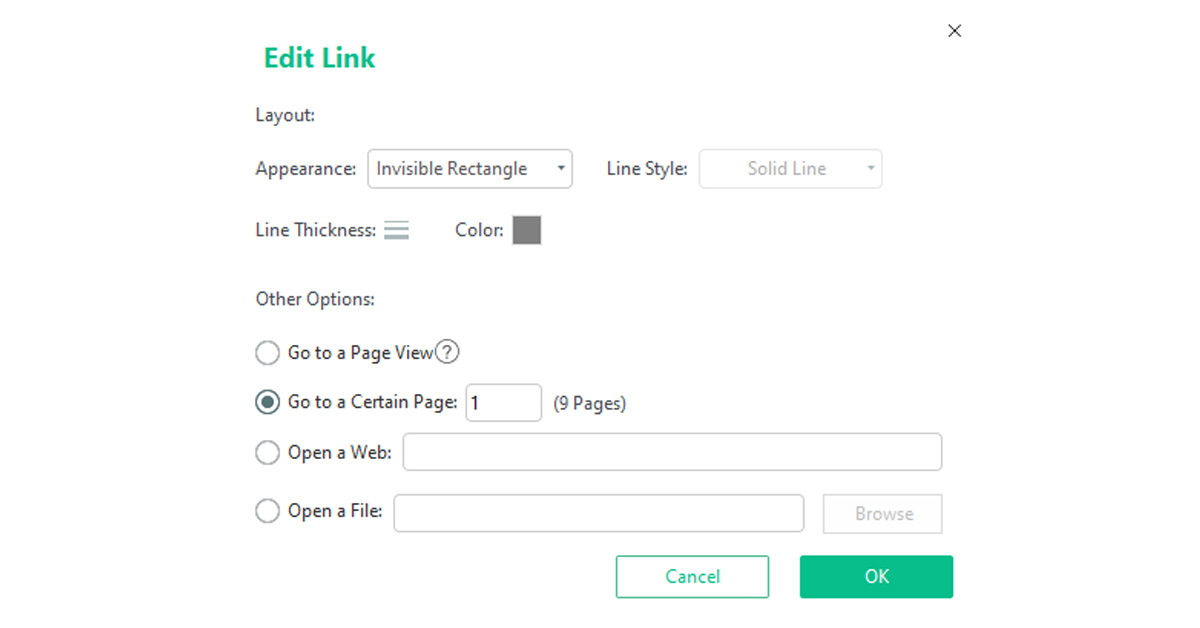 Step 2: Type a page number. Alternatively, scroll to determine the specific page to be linked.
You can also use the SwifDoo PDF’s PDF to HTML converter feature to convert a PDF into an HTML file to share and open.
Step 2: Type a page number. Alternatively, scroll to determine the specific page to be linked.
You can also use the SwifDoo PDF’s PDF to HTML converter feature to convert a PDF into an HTML file to share and open.


 Step 2:
 Step 3:
 Step 4:
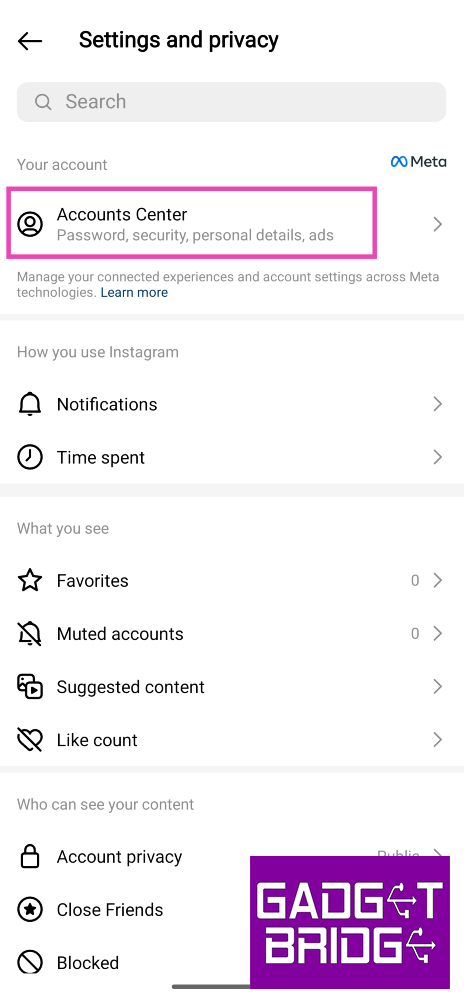 Step 5:
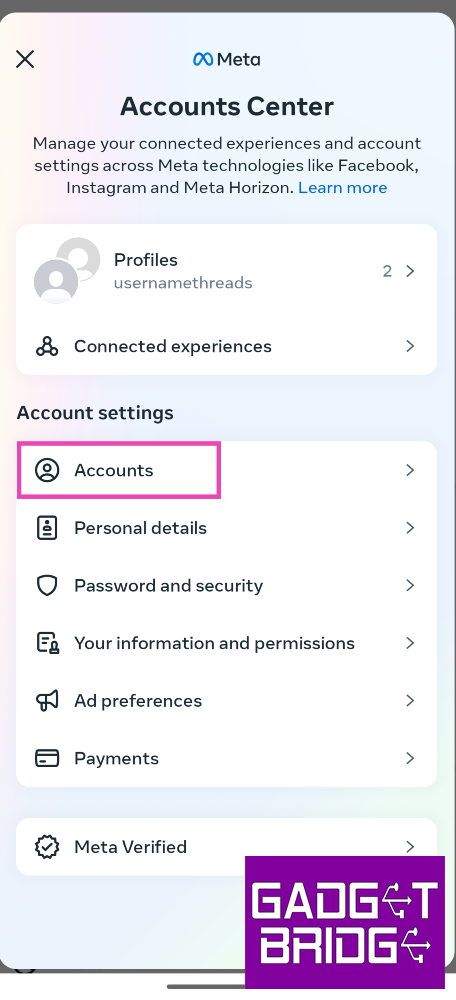 Step 6:
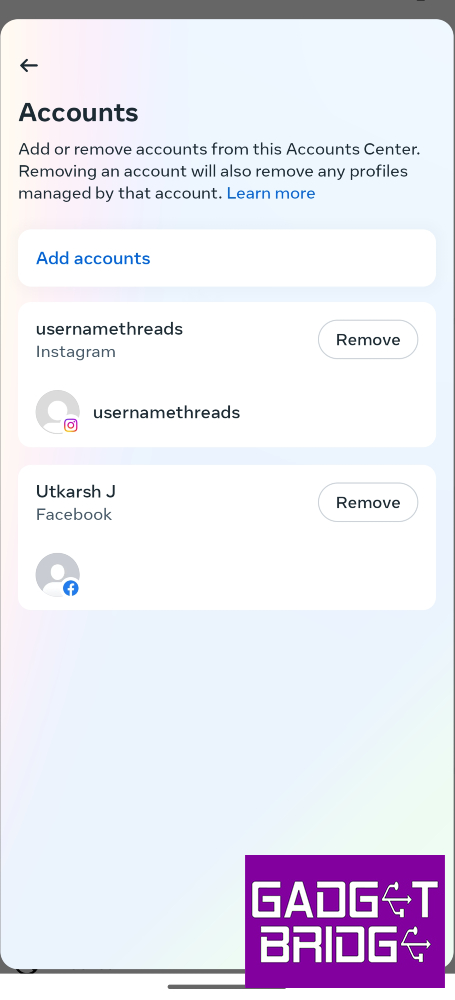
 Step 7:
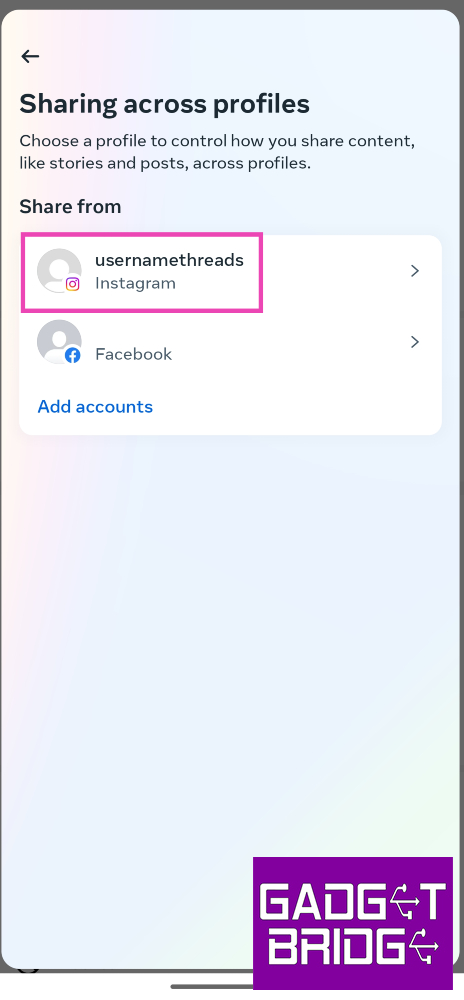 Step 8:
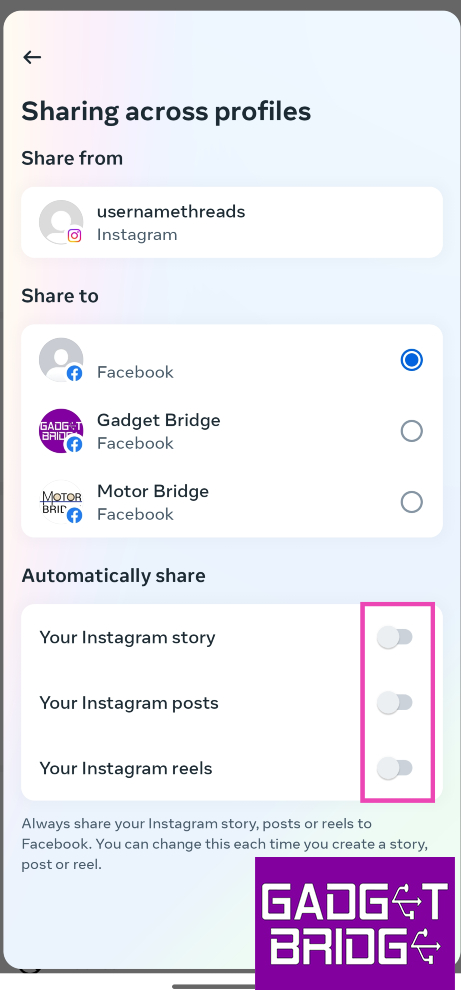
 Step 2:
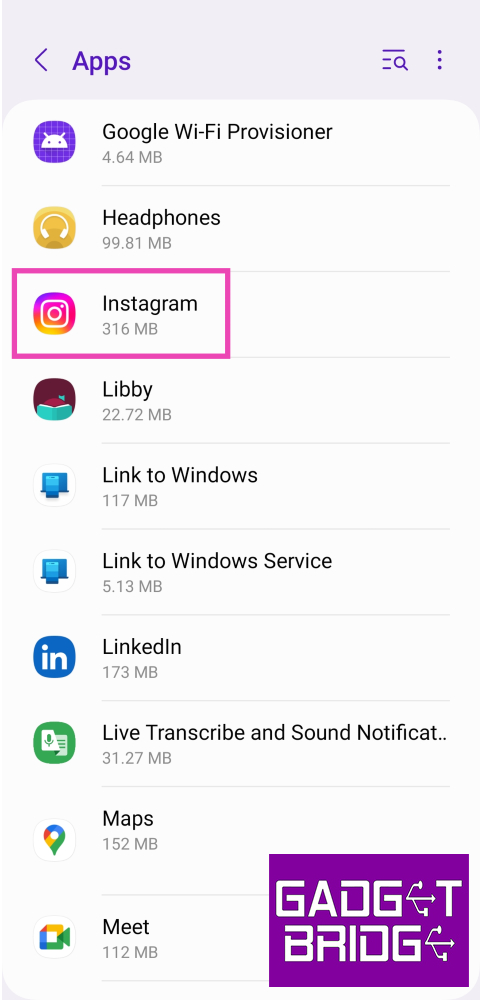 Step 3:
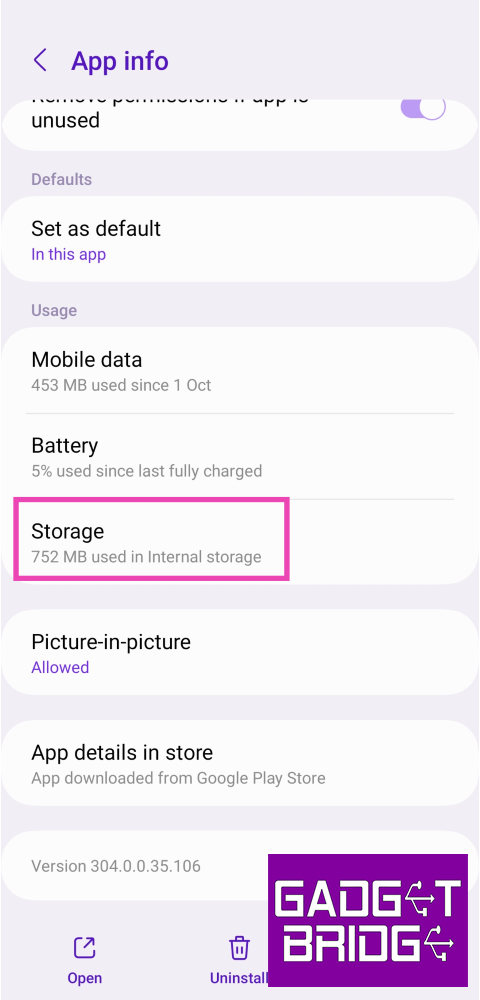 Step 4:
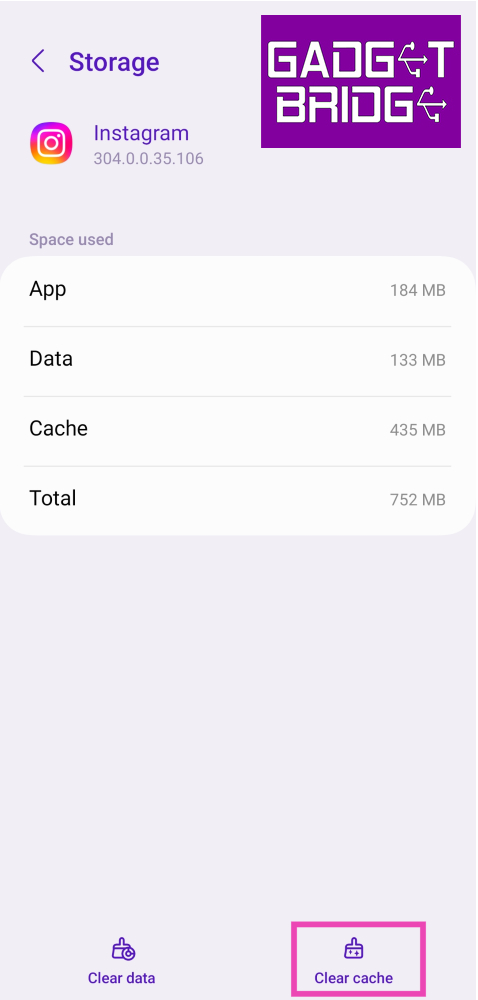
![Step 4: Scroll all the way down and select Log out [profile handle]. Instagram not sharing to Facebook? Try these 5 easy fixes](https://www.gadgetbridge.com/wp-content/uploads/2023/10/infb11.jpg)
 Step 7:
 to buy this festive season")