Amazon Quiz for 14 June 2023 has gone live on the company’s mobile platform. The daily quiz contest brings an opportunity for Amazon users to win exciting prizes. In today’s Amazon Quiz the participants have the chance to win Rs 2,500 Amazon Pay Balance. All they have to do is answer all the questions correctly.A fresh question is posted on the Amazon app daily which consists of five simple questions based on general knowledge and current events. The quiz can be played on the Amazon App from 12 AM to 11:59 PM. You have to answer all the questions correctly. Then the participants will be shortlisted for a lucky draw. The result of the lucky draw will be announced at the end of the month. The participants can win Amazon Pay Balance to up to Rs 50,000. Check out the 14 June 2023 Amazon Quiz question and their answers to win Rs 2,500 Amazon Pay Balance.Amazon Quiz Today Prize – Rs 2,500 Amazon Pay BalanceQuiz Date – 14 June 2023Daily Timing – 12 AM to 11:59 PMWinner Announcement – Today 12 PM
In This Article
Amazon Quiz Answers Today 14 June 2023
Question 1: India provided a one billion dollar credit line to which of these countries for one year for essential imports?Answer- Sri LankaQuestion 2: D’YAVOL X is a clothing line launched by which celebrity child?Answer- Aryan KhanQuestion 3: Who represented India at the Coronation of King Charles and Queen Camilla at Westminster Abbey?Answer- Jagdeep DhankharQuestion 4: This clothing company is originally from which country?Answer- SwedenQuestion 5: From which ancient culture did this bird get the name ‘Halcyon’ from?Answer- Greece
How To Play Amazon Quiz
Only app users are eligible to play the Amazon quiz every morning from 12 AM to 11:59 PM. The quiz is not available on the desktop. For those who are unaware of how to play the Amazon quiz below are the steps, you can follow to take the quiz.
Firstly download the Amazon app from Google Play Store or App Store
Now fill in the required information through the Sign Up option.
You need to log in to the Amazon app and scroll down on the home screen to find the Amazon Quiz banner.
Tap on the Amazon Quiz banner and tap on the Start button to start the Quiz.
Now you will get 5 questions and you need to answer them correctly. One wrong answer will eliminate you from the Quiz.
After answering all the questions correctly you are now eligible for a Lucky Draw.
The winner’s name will be announced today at 12 PM.
Not many people know this but you can turn down the colour saturation of your smartphone’s display and turn it completely black-and-white. Ever since Android introduced ‘Digital Wellbeing’ in its ecosystem, it has been pushing towards better digital habits. With your phone set on Grayscale Mode, you are less likely to use it. This greatly helps people who can’t help but constantly check their phones. In this article, we bring you the 3 best ways to set your iPhone or Android phone’s display to black and white (grayscale mode).Read Also:6 best ways to clear your browsing history on your iPhone or Android mobile
In This Article
Set your iPhone to Black and White (Grayscale)
Step 1: Go to Settings and select Accessibility.Step 2: Select ‘Display and Text Size’.Step 3: Tap on Colour Filters.Step 4: Turn on the toggle switch and select ‘Greyscale’.
Set your Android phone to Black and White (Grayscale) from developer settings
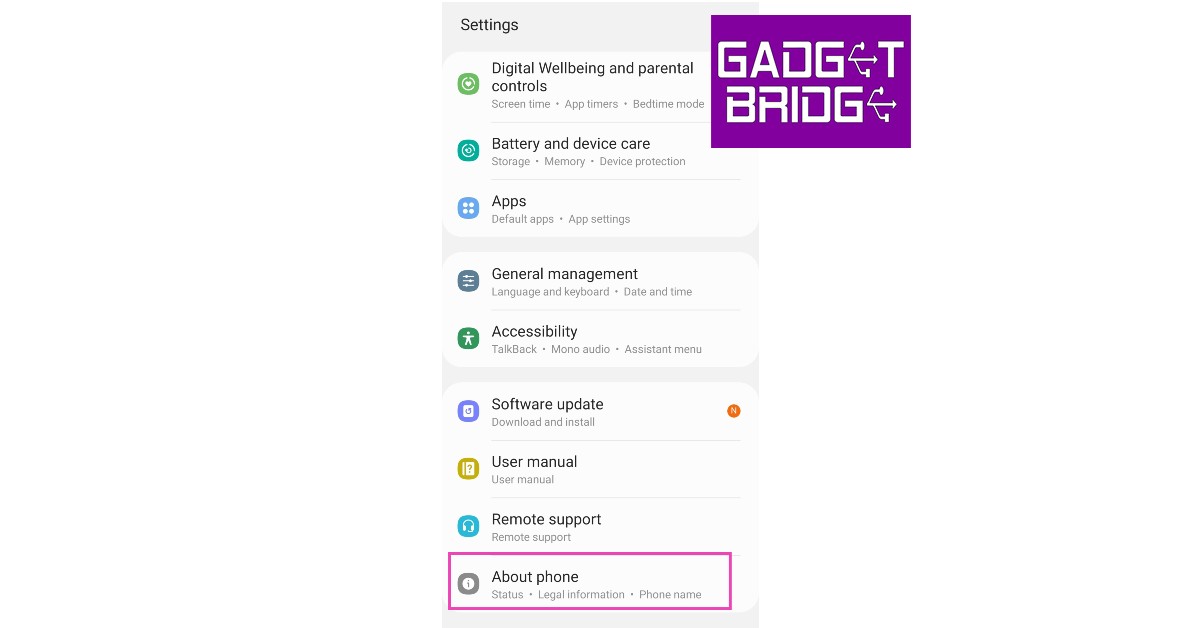
Step 1: Launch Settings and select About Phone.Step 2: Select ‘Software Information’ and tap on Build Number seven times to enter Developer Mode.Step 3: Go to the previous page, scroll down to the bottom, and select ‘Developer Options’.Step 4: Tap on ‘Simulate Colour Space’ and select ‘Monochromacy’.
Turn on Grayscale Mode on Android using Digital Wellbeing
Android smartphones come with a ‘Digital Wellbeing’ feature that seeks to reduce your screen time and break the habit of checking your phone all the time. The ‘Bedtime Mode’ offered by Digital Wellbeing sets your device to grayscale mode and mutes all sound alerts except the alarm. You can turn it on by going to Settings>Digital Wellbeing and Parental Controls>Bedtime Mode.
Frequently Asked Questions
What is the benefit of Grayscale Mode?
Setting your phone on Grayscale Mode reduces the stress on your eyes and limits your screen time. If you spend too much time on your phone, having a black-and-white screen will limit your usage.
How do I set my iPhone to Grayscale?
To turn your iPhone’s display black-and-white, go to Settings>Accessibility>Display and Text Size>Colour Filters and select Greyscale.
These are the 3 best ways to set your iPhone or Android phone’s display to black and white (grayscale mode). If your phone keeps you up till late hours of the night, enabling greyscale mode can help a lot. You’re less likely to check your phone constantly when the screen is undersaturated. The lack of colours means less eye and brain stimulation, which leads to a better quality of sleep.For the latest gadget and tech news, and gadget reviews, follow us on Twitter, Facebook and Instagram. For newest tech & gadget videos subscribe to our YouTube Channel. You can also stay up to date using the Gadget Bridge Android App. You can find the latest car and bike news here.
Impenetrable security should be a non-negotiable attribute on every modern smartphone, but unfortunately, it is a luxury that comes with splurging extra on a premium device. While Apple and Samsung’s flagships may be built like digital forts, the more affordable smartphones are fairly easy to break into. If you’re worried your device may be compromised, there are some tell-tale signs to look for, in order to confirm your suspicion. You can read more about them here. Once you’re sure of the presence of stalkerware apps on your device, you have your task cut out for you. In this article, we bring you the 6 best ways to find and remove stalkerware and spyware apps from your smartphone.Read Also:Top 7 ways to fix a corrupted Android SD card
In This Article
Find Stalkerware apps on your device
Check permission access for individual apps
If an app installed on your device is spying on you, it will require location, camera, and microphone access at the very least. Go to Settings>Apps>Permission Manager and go through all the permissions individually. If you notice an app with more permissions than it requires, uninstall it from your device. It is possible that the app might be infected with stalkerware.
Check device admin access
Spyware and stalkerware apps need admin access on your device to carry out their intended purpose. The third-party apps you download from Play Store or App Store very rarely ask for this access. Go to Settings>Apps>Options>Special Access>Device Admin Apps and see which apps have access to admin settings. If you notice an unusual app that shouldn’t be there, remove it from your device. Stalkerware apps may also be disguised as something innocuous as ‘Clock’ or ‘Calculator’. These kinds of apps have no business seeking admin access and must be removed immediately.
Check battery, storage, and internet data
Since stalkerware apps are constantly running in the background, they utilise a significant portion of your smartphone’s battery. An average stalkerware app gets access to your location data, files, messaging, & other personal information and relays it to the entity that installed it on your phone. In doing so, the app takes up a noticeable portion of storage on your device and relies upon your mobile data/WiFi connection to transmit the data from your phone.Go through your phone’s battery and storage status and look for any unusual activity. At the same time, check the data usage for any bump in numbers. If you find an app with increased battery, storage, and data usage, uninstall it from your device.
Remove Stalkerware apps from your device
Perform a factory reset
A factory reset wipes all the data from your device and restores it to the condition it was in when you took it out of the box. If you are sure that your smartphone contains spyware or stalkerware apps, a complete factory reset will remove them from the device. This method comes in handy when you can’t locate the spy apps on your phone. To factory reset your smartphone, go to Settings>General Management>Reset.
Update your phone’s OS
Stalkerware apps exploit the vulnerabilities in your phone’s software to carry out unsanctioned tasks and spy on your activity. Most manufacturers offer multiple years of security patches for their devices to fix this issue. Always make sure that your phone is updated at all times. Not only does it make it harder for spyware to do its job, but it also keeps harmful malware out of your phone. Once you install a new security update, it will patch any known issues, thereby disabling the functioning of any stalkerware apps.
Scan your phone using an anti-Spyware tool
There are several third-party tools and anti-spyware apps that specialise in scanning your phone for malicious apps that pose a risk to your privacy. Kaspersky, McAfee, Avira, and many other anti-virus apps are equipped with tools to detect and remove spyware from your device. Make sure you run regular checks to find and remove stalkerware on your smartphone.
Frequently Asked Questions
Which app detects stalkerware?
Most antivirus apps like Avast, Avira, Kaspersky etc. are equipped to detect stalkerware apps as well.
How do I know if I have stalkerware?
If you notice your battery and internet data draining faster than usual, it is possible you may have a stalkerware app on your phone.
Mark your Calendars, Nothing Phone 2 will be debuting in India and globally on July 11. After months of tease, the company has only finally revealed the exact time of the launch. The business made a social media announcement about its planned launch event. The product will be only offered on Flipkart across the nation. Phone 2 will be powered by Qualcomm’s Snapdragon SoC and run on the Nothing OS, and like its predecessor, it will include a transparent back.
In This Article
Nothing Phone 2 launch details
According to the London-based tech company owned by Carl Pei, the debut of the Nothing Phone 2 is scheduled for July 11. After the company’s triumphant introduction of the Nothing Phone 1 last year, it will now release its second smartphone. Flipkart will also serve as an official retail partner for sales in India. At 4 pm BST, which is 8:30 PM IST, the device will be introduced in London via a virtual event that will be streamed live on the company’s official social media platforms, the event page, and YouTube.Note that in addition to other markets where the Phone 1 was offered, the phone will also make its debut in the US.
Nothing Phone 2 details
As of now, the business has disclosed that the Phone 2 would have a carbon footprint that is 53.45 kg, nearly 5 kg less than the Phone (1), according to SGS_SA certification. The battery capacity of the Phone 2 has also been verified to be 4,700mAh, 200mAh larger than the 4,500mAh capacity of the Phone 1. A notable improvement over the Qualcomm Snapdragon 778G+ in the Phone 1 is the octa-core Qualcomm Snapdragon 8+ Gen 1 SoC that will power the upcoming phone.The company previously revealed that the screen size of the Nothing Phone 2 will be 0.15 inches larger than that of its predecessor. The gadget most likely has a 6.7-inch display. Note that the 6.55-inch FHD+ display on the Nothing Phone 1 was a feature. The company also confirmed that it will offer 3 years of Android upgrades and 4 years of security patches for the Nothing Phone 2.
For the latest gadget and tech news, and gadget reviews, follow us on Twitter, Facebook and Instagram. For the newest tech & gadget videos subscribe to our YouTube Channel. You can also stay up to date using the Gadget Bridge Android App. You can find the latest car and bike news here.
When it comes to fixing a malfunction on your Android or Google TV, your choices are very limited. Most of the time, a simple restart is all it takes to fix the issue you’re facing. Other times, you may have to take extreme measures and perform a complete factory reset. You should reserve the latter for times when you’ve tried every other possible solution. If you don’t know how to go about the process, we’ve got you covered. In this article, we bring you the 4 best ways to restart and reset an Android TV or Google TV.Read Also:JioTag launched, a less expensive alternative to Apple’s Airtag
In This Article
Restart using the TV menu
Step 1: Use the remote to click the gear icon on your TV’s home screen. On some TVs, you may have to press the home icon.Step 2: Scroll down and select ‘Device Preferences’.Step 3: Click on ‘About’.Step 4: Select ‘Restart’.Some TVs have the Restart option in the ‘Quick Settings’ panel for easier access.
Factory Reset your Android TV or Google TV
If restarting your TV does not fix the issue you’re facing, you can try performing a factory reset. A factory reset restores your TV’s settings to the factory default. In other words, your TV’s software will return to how it was out of the box. This means you will lose all your customised settings, apps, data, login information, wireless network settings, and more.Step 1: Use the remote to click the gear icon on your TV’s home screen.Step 2: Scroll down and select ‘Device Preferences’.Step 3: Scroll down all the way to the bottom and select ‘Reset’.Step 4: Click on ‘Factory Data Reset’.Step 5: Select ‘Erase Everything’ and confirm your selection.
Perform a hard reset on your Android TV or Google TV
Sometimes, your Android TV can get stuck on a particular screen and refuse to function. You can try switching off the power and turning the TV back on, but if the issue still persists after that, it’s time to hard reset your TV. A hard reset is the same as a factory reset. The only difference is that you’re using physical buttons to force your device into resetting, instead of using the software. Here’s how you can go about it. This process will require two people.Step 1: Unplug your TV’s power cord from the wall socket.Step 2: Press and hold the power button on the TV (not the remote).Step 3: Keep holding the power button and plug the power cord into the wall socket. This step will require another person.Step 4: Turn on the switch and keep holding the power button until the TV’s LED light turns white. If this doesn’t happen within 30 seconds, repeat the process.Step 5: Release the button when the LED turns white. Your TV will perform a factory reset and will reboot after some time.For TV’s with 3 buttons, follow this process but hold the Power + Volume Down button (on the TV, not the remote) instead of just the power button. Refer to your TV’s user manual for the appropriate key combination before trying this step. You can also perform a Google search for your TV’s model to find out the key combination for a hard reset.
Perform a hard reset from Recovery Mode
You can enter the Recovery Mode to perform a hard reset of your TV. Here’s how.Step 1: Unplug the TV’s power cord from the wall socket.Step 2: Press the ‘OK’ and ‘Back’ buttons on the remote and the power button on your TV simultaneously. This key combination may vary depending on the model. Refer to your TV’s user manual or perform a Google search to know the combination for your TV.Step 3: Keep pressing the buttons and plug the power cord back into the wall socket. You will need another person for this step.Step 4: Keep pressing the buttons for another 30 seconds. Once you enter the Recovery Mode on your TV, release the buttons.Step 5: Use the navigation buttons on your remote to select ‘Wipe data/factory reset’.
Frequently Asked Questions
How do I factory reset my TV?
To factory reset your TV, simply click on the Quick Settings Menu and select ‘Reset’ from Device Preferences.
How long does an Android TV factory reset take?
A complete factory reset of an Android TV can take a few minutes, depending on the data stored on the device.
Redmi Buds 4 Active has officially debuted in India today. The truly wireless stereo (TWS) earbuds have been launched alongside Xiaomi Tab 6. The audio device comes with Google Fast Pair functionality. In addition to this, there are Bass Pro drivers along with support for environmental noise cancellation.
In This Article
Redmi Buds 4 Active price in India, sale details
Redmi Buds 4 Active price in India has been set at Rs 1,399. The TWS will be offered at an introductory price of Rs 1,199. The device will come in two colour options of Air White and Bass Black. It is scheduled to go on sale from June 23 via mi.com, Amazon, and Xiaomi retail stores.
Redmi Buds 4 Active TWS Earbuds specifications
12mm Bass Pro drivers are used in the Redmi Buds 4 Active TWS Earbuds to produce dynamic audio and strong bass. The touch-control capability on the earbuds also enables users to effortlessly connect to and disconnect from calls and manage music playback. The earbuds have an IPX4 grade for sweat and water resistance, making them excellent gym and outdoor companions. The Buds 4 Active also allow apps, giving customers a more customised earbud experience.Additionally, it includes Environmental Noise Cancellation (ENC) technology and powerful microphones for distortion-free hearing even in noisy surroundings. The newest Bluetooth 5.3 technology, which offers improved connectivity, increased range, and quicker transmission speeds, is also included in the Redmi Buds 4 Active TWS Earbuds.Additionally, it supports Google Fast Pair, which enables quick connections to all of its devices, including computers, tablets, and smartphones. As per the company, customers may easily pair their earbuds and enter the mesmerising world of sound with a one-tap setup.Additionally, the TWS has a Low Latency Mode for incredibly precise and immersive gaming. The Buds 4 Active, according to the manufacturer, have a 30-hour battery life and fast charging capabilities that enable up to a 90-minute runtime after just a 10-minute charge.
For the latest gadget and tech news, and gadget reviews, follow us on Twitter, Facebook and Instagram. For newest tech & gadget videos subscribe to our YouTube Channel. You can also stay up to date using the Gadget Bridge Android App. You can find the latest car and bike news here.
Regularly clearing the browsing history on your smartphone is the first step towards maintaining your online privacy. Almost every browser maintains a log of the websites you have visited on it. There is no centralised way of clearing your history, you will have to visit each browser individually to delete it. In this article, we bring you the 6 best ways to clear your browsing history on iPhone or Android mobile.Read Also:Best ways to type the Peso sign ₱ on iPhone, Android, and Word
In This Article
Clear browsing history on Android
Step 1: Launch your smartphone’s default web browser.Step 2: Tap the ellipses or hamburger menu.Step 3: Select Settings.Step 4: Tap on ‘Personal browsing data’.Step 5: Select ‘Delete browsing data’.Step 6: Tap on ‘Delete data’.
Clear browsing history on Chrome
Step 1: Launch Google Chrome on your smartphone.Step 2: Tap the ellipses on the top right corner of the screen.Step 3: Select ‘History’.Step 4: Tap the cross icon next to a website entry to delete it from your browsing history.Step 5: To delete all of your browsing history, tap on ‘Clear browsing data’.Step 6: Set the time range to ‘All time’ and select ‘Clear data’.
Clear browsing history on a Samsung device
Step 1: Go to Settings and select Apps.Step 2: Select ‘Samsung app settings’.Step 3: Select ‘Samsung Internet’.Step 4: Tap on ‘Personal browsing data’.Step 5: Select ‘Delete browsing data’.Step 6: Tap on ‘Delete data’.
Clear browsing history on DuckDuckGo
Being a privacy-centric browser, DuckDuckGo does not store your browsing history in one place. However, you can delete your data and all open tabs in one go. Here’s how.Step 1: Launch DuckDuckGo on your smartphone.Step 2: Tap the fire icon next to the address bar.Step 3: Select ‘Clear all tabs and data’.
Clear browsing history on iPhone
Step 1: Go to Settings and select Safari.Step 2: Select ‘Clear History and Website data’.Step 3: Tap on ‘Clear History and Data’.
Clear browsing history on Safari
Step 1: Launch the Safari app and tap the Bookmarks icon.Step 2: Tap the history icon.Step 3: Tap on ‘Clear’.Step 4: Select ‘All time’.
Frequently Asked Questions
How do I clear all browsing history?
To clear all browsing history go to Chrome>Options>History>Clear browsing data>Clear data. On Safari go to Bookmarks>History>Clear>All time.
Who can see my browsing history?
Tracking cookies can access your browsing history to suggest products based on your web activity.
These are the 6 best ways to clear browsing history on your iPhone or Android mobile. Apart from clearing browsing history, it is also a good idea to regularly clear cookies and web cache as well. While some cookies may be important, most of them monitor your web activity to suggest you relevant ads. Read this article to learn how to clear cookies on your Android smartphone. iPhone users can read this article to find out how to clear all cookies on their devices.For the latest gadget and tech news, and gadget reviews, follow us on Twitter, Facebook and Instagram. For newest tech & gadget videos subscribe to our YouTube Channel. You can also stay up to date using the Gadget Bridge Android App. You can find the latest car and bike news here.
Xiaomi today announced the launch of its new tablet in the Indian market. The company has introduced Xiaomi Pad 6 in the country. The Xiaomi Tablet is Snapdragon 870 SoC. It also features Dolby Vision-certified display. In addition to this, the device includes 4 speakers with Dolby Atmos support and comes with Xiaomi Smart Pen second generation.
In This Article
Xiaomi Pad 6 price in India, sale details
Xiaomi Pad 6 sale starts on June 21 in India. There will be two variants available in the country 6GB RAM with 128GB storage and 8GB RAM with 256GB storage options priced at Rs 26,999 and Rs 28,999. However, the company will be offering the tablet at an introductory price of Rs 23,999 and Rs 25,999. It can be purchased via mi.com, Amazon and Xiaomi retail outlets in the nation.
Xiaomi Smart Pen, Keyboard and Case will be sold separately. The S Pen is priced at Rs 5,999 whereas the keyboard and case will come with a price tag of Rs 4,999 and Rs 1,499.
Xiaomi Pad 6 specifications
A Dolby Vision-certified 11-inch 2.8K IPS LCD screen with a resolution of 1,800×2,880 pixels is available on the Xiaomi Pad 6. The screen supports refresh rates of up to 144Hz (30Hz, 48Hz, 50Hz, 60Hz, 90Hz, 120Hz, and 144Hz depending on the playing content). Additionally, it features a peak brightness of up to 550 nits and a pixel density of 309ppi.
A Snapdragon 870 SoC drives the gadget, which also has up to 256GB of UFS 3.1 storage and 8GB of LPDDR5 RAM. Additionally, a Keyboard and a second-generation Xiaomi Smart Pen are supported by the tablet.
The Xiaomi tablet has two cameras: a front-facing 8-megapixel camera with a 105-degree field of view and a 13-megapixel back camera. Additionally, the tablet has an 8,840mAh battery that supports 33W cable charging and takes 100 minutes to fully recharge. Wi-Fi 6, Bluetooth 5.3, and a USB Type-C connection are also included for connectivity. The gadget has a gyroscope, accelerometer, ambient light sensor, and hall sensor among its sensors.
For the latest gadget and tech news, and gadget reviews, follow us on Twitter, Facebook and Instagram. For newest tech & gadget videos subscribe to our YouTube Channel. You can also stay up to date using the Gadget Bridge Android App. You can find the latest car and bike news here.
Xiaomi is all set to host a new launch event today in India to introduce two new products under its sub-brand Redmi. Today Xiaomi Pad 6 and Redmi Buds 4 Active will be officially announced. The new Tablet will be powered by a Snapdragon 870 SoC with support for Xiaomi Smart Pen second generation. In addition to this, the device will run Android 13 with MIUI 14 out of the box. On the other hand, Redmi Buds 4 Active will come with Google Fast Pair support and ENC.Xiaomi will be introducing its highly anticipated new products in India. Xiaomi Pad 6 and Redmi Buds 4 Active are set to launch today at 12 PM. You can catch the launch live from your home along with the rest of the country on Xiaomi India’s official YouTube channel, social media platforms, and Mi.com.
In This Article
Xiaomi Pad 6 specifications, price expected
Xiaomi Pad 6’s specifications are expected to be similar to that of the model launched in China in April this year. The device here is teased to come in two colour variants. The company has confirmed that the Tablet will be powered by a Snapdragon 870 SoC with support for Xiaomi Smart Pen second generation. In addition to this, it will also feature Dolby Vision-certified display. Moreover, the Xiaomi Tab 6 will come with Dolby Atmos-supported speakers. The gadget is said to be 6.55mm thin and weighs 490 grams.The pricing of the Xiaomi Tab 6 has not been revealed but it was introduced in China in April this year with a starting price of CNY which translates to Rs 22,000. There the tab is available in three colour options of Black, Gold, and Far Mountain Blue.
Redmi Buds 4 Active specifications, price expected
As per the listing, the Redmi Buds 4 Active will feature a stem design with a pebble-shaped charging case. It will come in a Black colour variant. The truly wireless stereo (TWS) earbud is said to include Google Fast Pair functionality. In addition to this, there will be Bass Pro drivers along with support for environmental noise cancellation.
For the latest gadget and tech news, and gadget reviews, follow us on Twitter, Facebook and Instagram. For newest tech & gadget videos subscribe to our YouTube Channel. You can also stay up to date using the Gadget Bridge Android App. You can find the latest car and bike news here.
After being banned for nearly ten months, Battleground Mobile India, aka BGMI, is officially available again in India. BGMI fans are looking for ways to improve their game experience and one such method is the usage of redemption codes, which offers a variety of rewards and advantages using BGMI redeem codes players can gain access to new skins, outfits, loot crates, weapons and free UC and diamonds.As mentioned earlier, these codes give users the chance to earn unique rewards and gain extra benefits while playing the game. This includes GUN SKINS (M4, AKM, M416, AWM, M24, UZI, KAR98K), free character voucher, Andy, Carlo, Sara, Victor character for free, free Anna Character on completing the mission and UC or Royal Pass Discount. So here we have gathered a list of the most recent BGMI redeem codes as of 13 June 2023. Also, redeem these codes asap as these are only valid for a limited duration.
In This Article
BGMI Redeem Codes for 13 June 2023
PGHZDBTFZ95U – M416 Skin
R89FPLM9S – Companion
BMTCZBZMFS – Pretty in Pink set and Pretty in Pink Headpiece
Garena Free Fire is a battle royale game with regular awards and tournaments to keep players interested. If you play Garena Free Fire, you should be aware of the redeem codes that are released on a daily basis. However, because the battle royale game is banned in India, players from other countries can use the Free Fire Redeem codes daily. If you’re unfamiliar with the Garena Free Fire redeem codes or don’t know how to get them, we’ve put together a step-by-step guide to help you redeem them. Check out Garena Free Fire Redeem Codes for 13 June 2023.The Free Fire redeem codes are a great way to get free stuff. These are 12-digit codes that contain alphabets and numbers, as well as an expiration date and time. Because the Garena FF redeem codes cannot be used more than once, you should hurry to the redemption page to claim your free reward before someone else does. To get a free reward, all you have to do is go to reward.ff.garena.com/en, which is the official redemption page. Also, keep an eye on this space for daily updates on Garena Free Fire redemption codes and rewards.
13 June 2023 Amazon Quiz has gone live on its mobile app platform. The quiz can be played from 12 AM to 11:59. All you need to do is just answer five easy questions that the e-commerce website puts before you. Today you can stand a chance to win Rs 2,500 Amazon Pay Balance.Every day Amazon posts a new questionnaire that consists of five simple questions about general knowledge and current events. To enter a lucky draw, participants must correctly answer the questions. One incorrect answer will result in your elimination from the quiz. Each month, only one person will be declared the winner and the results will be announced at the end of the month. Amazon customers who submit correct answers can win an Amazon Pay Balance worth up to Rs 50,000. To ensure that you answer all five questions correctly, Gadget Bridge updates all of the correct answers on a daily basis. Take a look at today’s answers:Amazon Quiz Today Prize – Rs 2,500 Amazon Pay BalanceQuiz Date – 13 June 2023Daily Timing – 12 AM to 11:59 PMWinner Announcement – Today 12 PM
In This Article
Amazon Quiz Answers Today 13 June 2023
Question 1: India provided a one billion dollar credit line to which of these countries for one year for essential imports?
Answer: Sri Lanka
Question 2: D’YAVOL X is clothing line launched by which celebrity child?
Answer: Aryan Khan
Question 3: Who represented India at the Coronation of King Charles and Queen Camilla at Westminster Abbey?
Answer: Jagdeep Dhankhar
Question 4: This clothing company is originally from which country?
Answer: Sweden
Question 5: From which ancient culture did this bird get the name ‘Halcyon’ from?
Answer: Greece
How To Play Amazon Quiz
Only app users are eligible to play the Amazon quiz every morning from 12 AM to 11:59 PM. The quiz is not available on the desktop. For those who are unaware of how to play the Amazon quiz below are the steps, you can follow to take the quiz.
Firstly download the Amazon app from Google Play Store or App Store
Now fill in the required information through the Sign Up option.
You need to log in to the Amazon app and scroll down on the home screen to find the Amazon Quiz banner.
Tap on the Amazon Quiz banner and tap on the Start button to start the Quiz.
Now you will get 5 questions and you need to answer them correctly. One wrong answer will eliminate you from the Quiz.
After answering all the questions correctly you are now eligible for a Lucky Draw.
The winner’s name will be announced today at 12 PM.
If you use the English keyboard on your smartphone, you don’t get access to a lot of foreign currency signs on your device. Generally, the default currency sign that appears on your keyboard is representative of the region you set on your device while setting it up for the first time. You can access other currency signs by changing the region on your smartphone, but it can be quite an arduous task for something that needs to be accessible within a couple of taps. Luckily, there are a couple of ways you can get around it. In this article, we show you how to type the Peso sign ₱ on iPhone, Android, and Microsoft Word.Read Also:3 Easy Ways To Upload Music On Audiomack
In This Article
How to type the Peso sign on Android
Step 1: Launch the default keyboard on your Android phone.Step 2: Tap the num key to access the number pad and symbol list.Step 3: Long press the Pound/Dollar key to reveal other currencies.Step 4: Glide your finger towards the Peso sign, then release it.Step 5: The Peso sign will appear on the text box.
How to type the Peso sign on iPhone
The Peso sign does not appear in the list of currencies when you long-press the Dollar sign on the iPhone keyboard. To fix this, you need to add Filipino as a language on your keyboard. Here’s how you can do that.Step 1: Go to Settings and select General.Step 2: Tap on Keyboard and select Keyboards.Step 3: Tap on ‘Add new keyboard’ and select ‘Filipino’.
How to type the Peso sign on Microsoft Word
Since the Peso sign is incorporated into Unicode, you can easily type it on Microsoft Word. All you need to do is type 20b1 and then press Alt + X. The Peso sign will appear on the screen. You can also press Alt + 8369 to type the Peso sign on Word.
Frequently Asked Questions
How do I get the Peso sign on my keyboard?
To type the Peso sign on Android, simply long-press the Dollar sign on the keyboard, glide your finger towards the Peso sign and then release it. The Peso sign will appear on the screen.
How do you type the Peso sign in Word?
To type the Peso sign in Word, simply type 20b1 and press Alt + X.
How do I type the Peso sign on an iPhone?
To type the Peso sign on an iPhone, you need to add Filipino to the list of languages on your keyboard from General Settings. Once that is done, the Peso sign will appear as soon as you long-press the dollar sign on your keyboard.Read Also:Top 7 ways to fix a corrupted Android SD card
Conclusion
These are the best ways to type the Peso sign ₱ on Android, iPhone, and Microsoft Word. If you want to add other currency signs to your keyboard, simply add the relevant languages spoken in those nations to the keyboard from your device’s settings. If you found this article helpful, let us know in the comments!For the latest gadget and tech news, and gadget reviews, follow us on Twitter, Facebook and Instagram. For newest tech & gadget videos subscribe to our YouTube Channel. You can also stay up to date using the Gadget Bridge Android App. You can find the latest car and bike news here.
Xiaomi Pad 6 is all set to launch in India tomorrow. Ahead of the official release, the company has reduced the price of the Xiaomi Pad 5 in the country. The company has dropped the price of the tablet by Rs 1,000. In addition to this Xiaomi is offering discounts on its online store in the country. The Xiaomi tablet comes with a 2.5K+ display. It has a screen size of 10.95 which also supports a refresh rate of 120Hz. In addition to this, the device is powered by an octa-core Qualcomm Snapdragon 860 SoC. To recall, the tablet was released in India in the month of April last year.
In This Article
Xiaomi Pad 5 new price and offer details
Prior to the June 13 launch of the Xiaomi Pad 6, the price of the Xiaomi Pad 5 in India has been reduced by Rs 1000. As per the listing, the 6Gb RAM with 128GB storage option is priced at Rs 25,999. Whereas the price of the 256 storage model is reduced to Rs 28,499.Additionally, Xiaomi is offering discounts on its online store. Buyers will be able to benefit from smartphone exchange discounts on certain models. The specific exchange discounts are only based on the phone’s model and functional state. Additionally, ICICI credit card transactions qualify for a Rs 2,000 instant bank discount.
Xiaomi Pad 5 specifications
The tablet is powered by MIUI 13 on top of Android 12. Featuring a 10.95-inch 2.5K+ display is the Xiaomi Pad 5. The screen offers a refresh rate of 120Hz and has a 16:10 aspect ratio. The display also supports Dolby Vision, the DCI-P3 colour gamut, and a maximum brightness of 650 nits. The Qualcomm Snapdragon 860 SoC, along with 6GB of LPDDR4X RAM and up to 256GB of UFS 3.1 storage, powers the Xiaomi tablet.The Xiaomi Pad 5 also features dual microphones and noise cancellation. It boasts quad speakers with Dolby Atmos and Hi-Res Audio support.The gadget has an 8-megapixel front camera and a 13-megapixel rear camera sensor. An 8,720mAh battery with 33W fast charging capabilities is included with the Xiaomi Pad 5.For the latest gadget and tech news, and gadget reviews, follow us on Twitter, Facebook and Instagram. For newest tech & gadget videos subscribe to our YouTube Channel. You can also stay up to date using the Gadget Bridge Android App. You can find the latest car and bike news here.
Vivo has slashed the price of Vivo Y35 in India by Rs 500. The smartphone was launched in India last year. The smartphone is powered by Snapdragon 680 processor along with an extended RAM feature. It includes a 5000mAh battery and 44W flash charge support. In addition to this, there is a 50MP primary camera with Electronic Image Stabilization (EIS).
In This Article
Vivo Y35 New price and offers
Vivo Y35 was launched in India last year with a price tag of Rs 18,499 for a single 8GB RAM with 128GB of internal storage. The smartphone comes in two colour options of Agate Black and Dawn Gold. The phone was earlier available at Rs 17,499 but now it is being made available at Rs 16,999. The phone is seeing a price drop of Rs 500. The new effective price will be applicable starting today on the vivo India e-store and across all partner retail stores.Consumers can also receive an additional cashback of up to Rs 1,000 using ICICI, SBI, Yes Bank, Federal Bank, AU Small Finance, and IDFC First Bank. Buyers are also eligible to receive other benefits such as V-Shield Protection Plans.
Vivo Y35 specifications
Vivo Y35 features a 6.58-inch full-HD+ LCD screen with 1,080×2,408 pixels of resolution. The screen has a 90Hz refresh rate. The phone operates on Funtouch OS 12-based Android 12. Under the hood, there is a Qualcomm Snapdragon 680 SoC with 8GB of RAM and 128GB of internal storage. The device also has an Extended RAM function that allows up to 8GB of RAM to be borrowed from storage for a total of 16GB of RAM. While the internal storage can be expanded up to 1TB using a microSD card.The Vivo Y35 comes with a triple-back camera configuration that includes a 50-megapixel primary sensor with f/1.8 aperture. Both the 2-megapixel macro and 2-megapixel bokeh sensors have f/2.4 aperture. The handset includes a 16-megapixel front-facing camera with an f/2.0 aperture for taking selfies and video calling. The smartphone also includes a variety of functions to improve the camera, including Super Night Camera mode, Multi Style Portrait mode, Rear Camera Bokeh Flare Portrait, and others for a smooth photographic experience.The Y35 has Wi-Fi, Bluetooth v5, GPS, Glonass, OTG, FM radio, and a USB Type-C connector as connectivity options. An accelerometer, ambient light sensor, e-compass, gyroscope, and proximity sensor are among the sensors on board. For phone unlock the device has a fingerprint sensor and Face Wake functionality. The device boasts a 5000mAh battery combined with 44W flash charging. Additionally, the Y35 includes Multi Turbo and Ultra Game Mode, which guarantee a luxurious sensory experience for immersive gaming.
For the latest gadget and tech news, and gadget reviews, follow us on Twitter, Facebook and Instagram. For newest tech & gadget videos subscribe to our YouTube Channel. You can also stay up to date using the Gadget Bridge Android App. You can find the latest car and bike news here.
Android and Apple ecosystems very rarely work together seamlessly. Even transferring WhatsApp messages between the two platforms used to be a chore until very recently. If you’re a long-time Android user that just made the switch to an iPhone, you’re probably looking for the best way to transfer your data to your new Apple device. Luckily, the native method using the Move to iOS app makes this process pretty easy. In this article, we show you how to transfer data from an Android phone to an iPhone using Apple Move.Read Also:High Tech Surveillance Gadgets That Protect the Gaming Operators
In This Article
Things to remember before you begin
Make sure the WiFi on both devices is turned on.
Both smartphones must be plugged into a charger.
Your iPhone must have enough storage to copy all the data.
To move your Chrome bookmarks, make sure you are using the latest version of the web browser on your Android device.
Here’s how you can transfer your data using Move to iOS
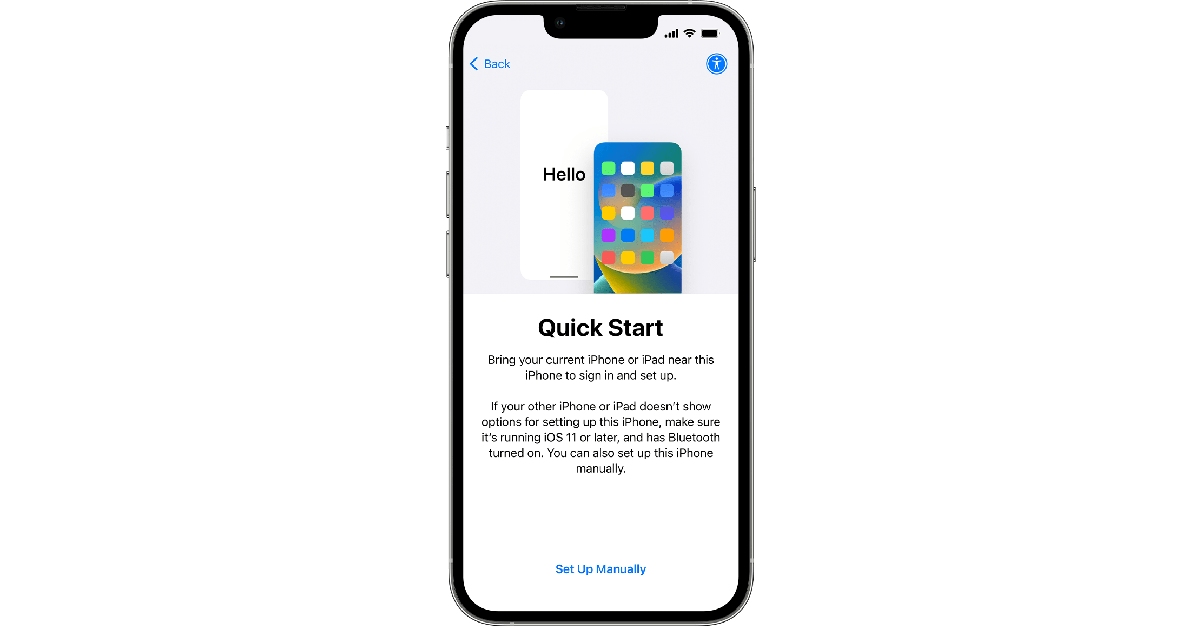
Step 1: Turn on your iPhone and go through the setup process until your reach the ‘Apps & Data’ page.Step 2: Select ‘Move Data from Android’.Step 3: Launch the ‘Move to iOS’ app on your Android smartphone.Step 4: Tap ‘Continue’ on your iPhone. After a few seconds, your iPhone will display a code.Step 5: Enter the code on your Android smartphone.Step 6: Your iPhone will now create a temporary WiFi network using its hotspot. Join this network on your Android device.Step 7: Choose the content you want to transfer. This includes your contacts, messages, photos and videos, files, settings, WhatsApp messages, calendar entries, bookmarks, and more. Do not disturb the transfer process until it finishes on your iPhone.Step 8: After the content has been transferred, tap ‘Finish’ on your Android smartphone and ‘Continue’ on your iPhone.Step 9: Follow the on-screen instructions to finish the process on your iPhone.
Frequently Asked Questions
Can I use the Move to iOS app after setup?
The Move to iOS app only works while you’re setting up your iPhone for the first time. If you skipped the process at the time of setting up your iPhone, you will have to transfer the content manually. You can also factory reset your phone to set it up again using Move to iOS, but that will erase all your existing data.
Does Move to iOS transfer all my apps?
Move to iOS transfers all the free apps from your Android phone that are also available for free on the App Store.
Does Move to iOS transfer all my data?
Move to iOS transfers the majority of your personal data from your Android phone to an iPhone. However, certain data like books, music, and PDF files will need to be transferred manually.Read Also:How to download and install Chrome OS Flex?
Jio has announced the launch of a new Bluetooth tracker in India. Similar to Apple’s Airtag the JioTag also lets you locate and find your lost items. However, the device is a lot cheaper than Apple’s Bluetooth tracker and offers similar features as that of Apple AirTag. In addition to this, it comes with a Community Find feature. It can be used to find a phone and locate lost items.
In This Article
JioTag price in India, sale details
JioTag costs Rs 2199, however, the current launch deal price is Rs 749. The device comes in a single white colour variant. As per the listing, the Bluetooth tracker by Jio will be available via the company’s official website in the country. It is available with both cash on delivery and prepaid payments. In addition to this, the company offers an additional battery and a lanyard cable with the JioTag which is sold separately with the Apple AirTag.
JioTag specifications
You can use JioTag to locate your smartphone. Double tapping your connected JioTag will ring your phone, even if it is on silent. In addition to your phone, it may be attached to your wallet, baggage, keys, and other items so that your phone will warn you when you leave something behind or are lost. The Bluetooth tracker also provides the precise position of your item’s most recent disconnect. Even at the site of the last disconnect, if you are still unable to locate your JioTagged possession the Jio Community locate network will hunt for and report back the location of your missing JioTagged item after users mark their JioTag as lost on the JioThings app.The device is powered by a replaceable CR2032 and features Bluetooth 5.1. The Jio tag measures 3.82×3.82×0.72 cm and weighs 9.5 grams. If offers up to 1 year of battery life and has a range of up to 20 meters indoors and up to 50 meters outdoors (Direct line of sight) For the latest gadget and tech news, and gadget reviews, follow us on Twitter, Facebook and Instagram. For newest tech & gadget videos subscribe to our YouTube Channel. You can also stay up to date using the Gadget Bridge Android App. You can find the latest car and bike news here.
Audiomack is one of the more popular music streaming platforms on the Internet. Its influence is comparable to Soundcloud, which makes it a very attractive platform for new and amateur musicians. Audiomack is one of the best platforms to attract more ears to your music and create a dedicated audience. Apart from music, creators use Audiomack to post their podcast episodes as well. If you’re new to the whole music streaming scene, figuring out how to upload your content can be a confusing task. Don’t worry because we’ve got you covered. In this article, we bring you the 3 easy ways to upload music on Audiomack.Read Also:Best Redmi 5G smartphones under Rs 25,000
In This Article
How to upload music on Audiomack using the Android Creator app
Step 1: Install the Audiomack Creator app on your smartphone.Step 2: Tap the upload icon at the bottom of the dashboard.Step 3: Select the upload type. If you want to upload a single track, tap on ‘Song’. If you want to upload songs, select ‘Album/EP’. If you want to upload a podcast, select ‘Non-Musical’.Step 4: Tap the plus icon to upload an audio file. Audiomack supports uploads in the following formats: MP3, WAV, AIFF, OGG, FLAC, and M4A. The size limit for one audio file is 250MB.Step 5: Fill out all the track details once the song is uploaded. You can also select an artwork for the song/album/EP.Step 6: You can choose to release the song immediately or schedule it for later. If you want to go for the latter option, select Schedule/Premiere Access and set the release date and time.Step 7: Hit ‘Finish’.
How to upload a song on Audiomack from your desktop
Step 1: Launch the official Audiomack website on your desktop’s web browser and click the upload icon at the top-right corner of the screen.Step 2: Select the upload type and hit ‘Next’.Step 3: Select the song file from your desktop. You can also drag and drop the file on the upload screen.Step 4: Enter the metadata for the song. This includes the song title, artist name, feature list, genre, producers, and more.Step 5: Choose the release date or publish the song immediately. Hit ‘Finish’ once you’re done.
How to upload a song on Audiomack using a mobile browser
Audiomack’s mobile website is well-optimised to carry out basic tasks. The process to upload a song on mobile is almost the same as the one on a desktop. Here’s how can go about it.Step 1: Launch the official Audiomack website on your smartphone’s web browser.Step 2: Tap on the ‘My Library’ icon at the bottom right corner of the screen.Step 3: Tap on the gear icon.Step 4: Select ‘Upload’.Step 5: Select an upload type and hit ‘Next’.Step 6: Select the song you want to upload from your device’s internal storage.Step 7: Enter the metadata for the song.Step 8: Set a release date or select ‘publish immediately’.Step 9: Hit ‘Finish’.
Frequently Asked Questions
How do I upload music on Audiomack?
To upload your music on Audiomack, launch the Audiomack creator app or website and select ‘Upload’. Choose the file you want to upload from your device’s storage, fill in the metadata, and publish the song.
These are the 3 easiest ways to upload music on Audiomack. Instead of uploading individual files, you can upload an entire album at once. Make sure that the individual file size does not exceed 250MB. To maximise your reach and increase the odds of the audience listening to your music, fill in all the track details and post artwork for the song/album.For the latest gadget and tech news, and gadget reviews, follow us on Twitter, Facebook and Instagram. For newest tech & gadget videos subscribe to our YouTube Channel. You can also stay up to date using the Gadget Bridge Android App. You can find the latest car and bike news here.
While expandable storage may be missing from some premium devices, most budget and midrange smartphones still come with a slot for an external micro SD card. If you don’t want to splurge extra cash for a higher storage variant, you can easily use a memory card with your device. However, memory cards are known to malfunction from time to time. Then what do you do? Fret not, we are here to help. Today, we bring you the top 8 ways to fix a corrupted Android SD card or memory card.Read Also:How to use a Passkey for your Google Account?
In This Article
Make sure the SD card is in the right slot
Earlier, smartphones used to have a dedicated slot for micro SD cards. Hybrid SIM card slots were introduced more recently, allowing users to place their SIM cards and micro SD card on a single tray. This may be a neat idea, but it may leave some people confused. If your Android smartphone cannot recognise the SD card, pull out the hybrid SIM tray and inspect the positioning of the SIM and SD card. Look for the appropriate sign on the tray before inserting the SD card.
Clean the micro SD card
If the memory card has been lying around on a shelf or in a drawer, make sure you give it a quick wipe before inserting it into your phone. Dust and dirt particles can keep the SD card from functioning properly. Your smartphone may not be able to detect the card. On the flip side, make sure the SD card tray is clean as well. Pull the tray out and blow some air on it to release the dust particles. Give it a quick wipe and you’re good to go.
Inspect the SD card for physical damage
SD cards are prone to wear out after prolonged usage. This issue is more common when you use the same card on multiple devices. If your SD card is damaged, your device will not be able to read or detect it. Pull out the card and closely inspect it for damage. Use it on another device to check if it works.
Use a card reader
Maybe the problem lies with your phone’s SD card slot and not the card itself. The only way of knowing for sure is by using an external card reader. Plug the card reader into the USB Type-C port of your device. Push the card into the external reader and see if you can access its contents on your phone. When you use the card reader, your micro SD card will show up as drive storage on your phone.
Unlock the card
Some SD cards come with a physical lock switch. Once a card is locked, you cannot write or delete any data from it. If you’re having an issue with copying or erasing files from your Android phone’s extended storage, pull out the card and unlock it using the physical switch located on the side of the SD card.
Format the memory card
The most common reason why memory cards stop functioning is data corruption. If your memory card is corrupted, you may experience several kinds of issues with it – ranging from detection issues to slow performance. Data corruption is caused when a file isn’t completely transferred to the card. This may happen because you pulled out the card before the transfer was completed. The only way to fix a corrupted memory card is by formatting it. To format the SD card go to Settings>Battery and device care>Storage and tap on the ellipses at the top right corner of the screen to access Advanced Settings. Tap on the SD card and select ‘Format’.
Use the chkdsk command
You will need to connect your SD card to your laptop or PC for this method. Pull out the card from your phone and use a card reader or your PC’s dedicated memory card slot to insert the SD card. Once that’s done, follow these steps.
Step 1: Right-click the Windows icon on the taskbar and select Terminal (Admin).
Step 2: Enter the following command:
chkdsk [disk name assigned to SD card]: /x /r
Step 3: Once the process has finished, safely remove the SD card from your PC and insert it into your phone.
Update your smartphone’s OS
If your phone’s OS cannot detect the micro SD due to some bug or other issue, it will be resolved with a quick update. Go to Settings>Software Update to look for pending updates. If there is an available update, download and install it on your device.
Frequently Asked Questions
How do I fix a corrupted SD card?
To fix a corrupted SD card, you need to format it. Go to Settings>Battery and device care>Storage>Advanced Settings and select Format.
Why is my SD card not working on my Android phone?
If your Android phone is not detecting the SD card, give the card and the hybrid slot a quick wipe and make sure there aren’t any dust particles on them. Inspect the SD card closely for any physical damage.
How do I fix an undetected SD card on Android?
If your Android phone cannot detect the SD card, use an external card reader. Plug the card reader into the USB Type-C port on your device. If your SD card works fine with the card reader, it means that your phone’s card slot is faulty.Read Also:5 Best Ways to Sign Out of Google Play Store on an Android Device
Conclusion
These are the top 8 ways to fix a corrupted Android SD card or memory card. If these fixes don’t work for you, you will need to figure out whether the fault lies with the SD card or its slot in your phone. If the phone’s slot is at fault, you will need to take it to the authorised service centre for repair. If you have any questions, let us know in the comments!
Samsung Galaxy S22 was launched in India last year. The price of the smartphone has now been lowered by up to Rs 8,000. The device was introduced in India at a starting price of Rs 72,999 which has now come down to Rs 64,999 for the base variant. The smartphone features a 120Hz Dynamic AMOLED 2X display. Under the hood, there is an octa-core Snapdragon 8 Gen 1 SoC that runs on Android 12 with One UI 4.1 on top out of the box.
In This Article
Samsung Galaxy S22 new price and details
The Samsung Galaxy S22 was made available in two configurations with 8GB RAM and 128GB/512GB storage for Rs 72,999 and Rs 76,999, respectively. But now the phone’s price has fallen by Rs 8,000 in India. The 128GB RAM variant will be accessible at Rs 64,999 whereas the 512GB option is now available at Rs 72,999.Samsung mobile users on their exchange can receive a bonus of Rs 7,000. As a result, the model now costs Rs 57,999. The company will also be offering a bank cashback offer of Rs 3,000 which brings the cost of the base variant down to Rs 54,999.
Samsung Galaxy S22 specifications
The Samsung Galaxy S22 (Review)comes with a 6.1-inch full-HD+ Dynamic AMOLED 2X display with a 120Hz refresh rate that can be lowered to 10Hz. The screen has been protected with Gorilla Glass Victus+ and an Armor Aluminium chassis. The smartphone comes pre-installed with Android 12 and One UI 4.1, and it’s powered by an octa-core Snapdragon 8 Gen 1 SoC and 8GB of RAM, with up to 256GB of internal storage.The Galaxy S22 features a triple rear camera system for optics. The camera module is equipped with a 50MP main Dual Pixel wide-angle sensor, an f/1.8 aperture, and autofocus. There is also a 12MP ultra-wide-angle camera with an f/2.2 aperture and a 120-degree field of view, as well as a 10MP telephoto lens with an f/2.4 aperture (3x optical zoom and OIS). There is also a 10MP selfie camera with an f/2.2 aperture (80 degrees of FoV).The battery capacity of the Galaxy S22 is 3,700mAh, and it supports 25W fast charging, 15W wireless charging, and Wireless PowerShare for reverse wireless charging. For the latest gadget and tech news, and gadget reviews, follow us on Twitter, Facebook and Instagram. For newest tech & gadget videos subscribe to our YouTube Channel. You can also stay up to date using the Gadget Bridge Android App. You can find the latest car and bike news here.
The nature of the casino environment, where countless people mingle and large sums of money change hands, demands the best quality security. Brick-and-mortar casinos are home to some of the world’s most advanced surveillance systems. Let’s take you behind the scenes to reveal the high-tech world of security that keeps these businesses and their patrons safe.
In This Article
Eye in the Sky
In extravagant establishments where fortunes are acquired and lost in the blink of an eye, it takes more than an army of highly trained personnel to secure a casino. This is where video surveillance tech – the Eye in the Sky – comes in handy, giving casinos a recap of events anywhere and anytime. Camera resolution improvement and hardware changes over the years make this tech a casino’s most crucial security tool.
The smoke-coloured orbs that make up the Eye in the Sky do more than keep a watchful eye on every inch of the casino floor. They support extensive functionalities like:
Automated video analytics: real-time tracking and automatic detection of events, behaviours, and objects provide valuable security insights.
Enhanced meta-tagging: improves structured references that sort and identify attributes of the collected information the metadata describes.
Predictive awareness methods: predictive models identify valuable data patterns to predict the outcome of events.
Data compression: collected data is encoded, restructured, and otherwise modified to reduce its size for better storage techniques.
RFID
Radio Frequency Identification is the most commonly used security measure against theft and fraud. This technology is embedded in cards and chips, allowing the casino to track them at all times. This ensures that no chips or cards leave the casino floor or are counterfeited without detection.
Angel Eyes
Angle Eyes is an extension of the RFID anti-fraud system that detects attempts to cheat or steal. Thanks to Angel Eyes, games that were previously easy to deceive are now cheat-proof. For instance, in blackjack, this technology allows the dealer to monitor a deck for cards that do not belong. It tracks RFID strips on the cards, and any added by a player is flagged and removed. Also, the tech identifies shaved chips in roulette and notifies the dealer.
Biometric Recognition Software
Casino video cameras have specialized integrated software for facial recognition, one of the most powerful tools in any establishment’s security arsenal. This surveillance tech scans the face of anyone that enters the casino and compares them to a database of criminals and potential threats. This allows security personnel to remove such troublemakers before they can cause any disturbances.
Fingerprint recognition also strengthens the effectiveness of casino biometric security measures. Many establishments use sophisticated vaults and safes to store mountains of cash on-site. They are equipped with biometric scanners that grant access to authorized parties only.
Keeping money safe is only half the battle. Casinos are also responsible for the security of patrons once they retire to their accommodations. For this reason, rooms are usually fitted with smart locks and access control systems that often use fingerprint, keycard, and player club card sensors to unlock.
NORA
Non-Obvious Relationship Awareness software is a valuable surveillance tool that identifies unusual cheating tactics where a game operator and player work together to defraud a casino. This advanced tech identifies any association between parties, such as a shared address, phone number, or employment. That way, personnel can keep a closer eye on them.
Encryption Protocols
Data encryption may seem like a security feature limited to online casinos. In most cases, state-of-the-art SSL and TCL encryption protocols are all it takes to keep an online casino safe. However, according to online-casinos-nj.com, online casinos in NJ use additional safety measures in the form of username/password combinations, account verification systems, and geolocation tracking technology
For land-based establishments, this is but one essential piece of a robust security ecosystem.
With any advanced virtual technology comes the potential for misuse or abuse. Land-based casinos ensure that the data collected isn’t used for nefarious purposes or open to vulnerable hacking attempts with encryption and firewalls to prevent cyber attacks.
AI
Casinos use advanced artificial intelligence algorithms that analyze video footage and other security data in real-time. AI effectively detects anomalies and potential threats that slip through security personnel’s cracks, alerting the casino to act immediately.
With the advancement of AI, some casinos have also adapted tech surveillance solutions to improve their business models. Brainchip – a California-based company – has successfully modelled Game Outcome Technology with spiking neuron adaptive processors that learn independently like a human brain. Using snap vision technology, Game Outcome automatically identifies dealer errors, game rules, played hands, winning hands, and payout amounts. This data is then used to help the casino with operational efficiency, labour costs, and targeted incentives to get patrons to play more.
In Brief
There is a limit to how much surveillance and security humans can provide in casinos because the traffic and activities are too much to handle. However, by harnessing the power of modern technology, from video surveillance to AI, the security of these establishments continues to improve dramatically. This allows casino operators to go beyond their core purpose of securing business operations and provide intriguing gambling experiences in a safe environment.
For the latest gadget and tech news, and gadget reviews, follow us on Twitter, Facebook and Instagram. For the newest tech & gadget videos subscribe to our YouTube Channel. You can also stay up to date using the Gadget Bridge Android App. You can find the latest car and bike news here.
Garena Free Fire is a battle royale game with regular awards and tournaments to keep players interested. If you play Garena Free Fire, you should be aware of the redeem codes that are released on a daily basis. However, because the battle royale game is banned in India, players from other countries can use the Free Fire Redeem codes daily. If you’re unfamiliar with the Garena Free Fire redeem codes or don’t know how to get them, we’ve put together a step-by-step guide to help you redeem them. Check out Garena Free Fire Redeem Codes for 12 June 2023.The Free Fire redeem codes are a great way to get free stuff. These are 12-digit codes that contain alphabets and numbers, as well as an expiration date and time. Because the Garena FF redeem codes cannot be used more than once, you should hurry to the redemption page to claim your free reward before someone else does. To get a free reward, all you have to do is go to reward.ff.garena.com/en, which is the official redemption page. Also, keep an eye on this space for daily updates on Garena Free Fire redemption codes and rewards.
Have you participated in the Amazon Quiz today? If not then participate in the 12 June 2023 Amazon Quiz as it has already gone live on the app. The daily quiz can be played from 12 AM to 11:59 every day on the mobile app platform. Today e-commerce is giving the chance to win Rs 5,000 Amazon Pay Balance.Every day Amazon brings a fresh quiz for its customers. By participating in the quiz the participants can win an Amazon Pay Balance of up to Rs 50,000. The quiz can only be played on the mobile app as it is not available for the desktop platform. The quiz contains five easy questions and you have to answer all the questions correctly. The participants will then be shortlisted for a lucky draw to select a winner. Whereas the results are declared at the end of the month. Check out today’s Amazon quiz answers to win Rs 5,000.Amazon Quiz Today Prize – Rs 5,000 Amazon Pay BalanceQuiz Date – 12 June 2023Daily Timing – 12 AM to 11:59 PMWinner Announcement – Today 12 PM
In This Article
Amazon Quiz Answers Today 12 June 2023
Question 1: Which Indian actor has been appointed as the global ambassador of luxury fashion brand Gucci?Answer: Alia BhattQuestion 2: Which country topped the 2023 World Press Freedom Index?Answer: NorwayQuestion 3: Inflection, a company co-founded by Reid Hoffman, just launched their “personal AI” chatbot named what?Answer: PiQuestion 4: These animals are mostly found in which country?Answer: PeruQuestion 5: Who is the artist of this exhibit?Answer: Jeff Koons
How To Play Amazon Quiz
Only app users are eligible to play the Amazon quiz every morning from 12 AM to 11:59 PM. The quiz is not available on the desktop. For those who are unaware of how to play the Amazon quiz below are the steps, you can follow to take the quiz.
Firstly download the Amazon app from Google Play Store or App Store
Now fill in the required information through the Sign Up option.
You need to log in to the Amazon app and scroll down on the home screen to find the Amazon Quiz banner.
Tap on the Amazon Quiz banner and tap on the Start button to start the Quiz.
Now you will get 5 questions and you need to answer them correctly. One wrong answer will eliminate you from the Quiz.
After answering all the questions correctly you are now eligible for a Lucky Draw.
The winner’s name will be announced today at 12 PM.
iQOO India CEO, Nipun Maurya has confirmed that iQOO Neo 7 Pro 5G will launch in India on July 4. iQOO India confirmed that the smartphone will be sold exclusively through Amazon. The ‘Pro’ variant will be a successor to iQOO Neo 7 5G (review), which launched in February at Rs 29,999. iQOO hasn’t revealed any specs of the upcoming smartphone. However, since the Neo 7 Pro is reported to be the rebadged version of the China-specific Neo 7 Racing, some specs are expected to make it on the global variant.Read Also:Samsung Galaxy F54 Review: A rock-solid smartphone with impressive cameras
iQOO Neo 7 Pro 5G: Expected specs, price, and more
The biggest upgrade on the Pro variant of iQOO Neo 7 will be the Snapdragon 8+ Gen 1 SoC. The current version employs MediaTek Dimensity 8200 SoC under the hood. Snapdragon 8+ Gen 1 came out towards the end of 2022 and put up impressive benchmark numbers along with improved thermal management.iQOO Neo 7 5GThe iQOO Neo 7 Pro 5G will get a 6.78-inch AMOLED display with a 120Hz refresh rate and 1500 nits of peak brightness. This display will support HDR10+ as well. The camera panel at the back gets an upgrade as well. The Pro variant will feature an 8MP ultrawide lens instead of the 2MP depth sensor on the regular variant. It will also get a 50MP primary camera with OIS. The 2MP macro lens will be retained from the regular version. Up front, the Neo 7 Pro will feature a 16MP selfie camera housed in a punch-hole cutout.As expected, the OS duties on iQOO Neo 7 Pro will be handled by Android 13 with Funtouch 13 skinned on top of it. The smartphone will get a 5,000mAh battery with 120W fast charging support. When powered by a fast charger, the smartphone can reach 50% charge in under 10 minutes and fully juice up within 25 minutes.iQOO Neo 7 5GThere won’t be any significant changes in terms of design. The smartphone will retain the signature Neo series look. The rear cameras will be housed in a square camera island and the shimmering back panel will change colours on exposure to sunlight. A glass back panel seems unlikely on iQOO Neo 7 Pro.Read Also:How to download and install Chrome OS Flex?More details are to be awaited as we get closer to the launch date. The smartphone is expected to cost around Rs 35,000 in India. iQOO may also offer some additional bank discounts to bring the introductory price down. In this price range, iQOO Neo 7 Pro will rival the likes of Samsung Galaxy A54, OnePlus 10R, Vivo V27, and more. The smartphone will be sold exclusively through Amazon.For the latest gadget and tech news, and gadget reviews, follow us on Twitter, Facebook and Instagram. For newest tech & gadget videos subscribe to our YouTube Channel. You can also stay up to date using the Gadget Bridge Android App. You can find the latest car and bike news here.
The thing about having a safe password is that it is often very complicated which makes it very hard to remember. Sure, you can use a password manager, but there’s always a looming fear of your passwords getting hacked from the app. Google has finally come up with a solution that no longer requires you to remember your password. You can easily log into your Google Account by using your phone’s lock screen password (or other biometric methods). In this article, we show you how to set up and use Passkey for your Google Account.Read Also:Samsung Galaxy F54 Review: A rock-solid smartphone with impressive cameras
In This Article
Set up Google Passkey on your Android smartphone
Step 1: Go to Settings and select Google.Step 2: Select ‘Manage your Google Account’.Step 3: Switch to the Security tab and select Passkeys.Step 4: Enter your password to confirm your identity.Step 5: Tap on ‘Use Passkeys’.Step 6: Select ‘Done’ in the following window.You will now be able to sign in to your Google Account by using the fingerprint scanner, face recognition, or screen lock pattern/PIN/password on your phone.
Sign into your Google Account using your Passkey
Step 1: Open the Google Account page on another device.Step 2: Type your username and proceed.Step 3: You will be prompted to use your passkey to confirm it’s you. Hit ‘Continue’.Step 4: Choose your smartphone from the list.Step 5: You will receive a notification on your smartphone. Make sure your smartphone is close to the device you are using to log into your Google Account.Step 6: Tap on the notification and use the fingerprint scanner, face recognition, screen lock/pattern/PIN/password to log in.
Frequently Asked Questions
How do I get a Google Passkey?
You can create a Google Passkey by accessing your Google Account on a desktop or your smartphone and tapping on ‘Passkeys’ in the Security tab.
How do I turn off Google Passkey?
To remove a specific passkey go to Google>Manage Account>Security>Passkey and hit the cross icon next to the Passkey you want to remove. To turn off Google Passkey altogether, scroll down further in the Security tab and turn the toggle bar off for ‘Skip password when possible’.
This is how you can set up a Passkey on your Android smartphone for your Google Account. A Passkey is more reliable and safer than a traditional password and much more convenient than two-factor authentication. Other than your Google Account, you can currently use passkeys for services like PayPal and Shopify. More services will soon roll out passkeys for their platforms as Google think they are ‘the beginning of the end of the password’.For the latest gadget and tech news, and gadget reviews, follow us on Twitter, Facebook and Instagram. For newest tech & gadget videos subscribe to our YouTube Channel. You can also stay up to date using the Gadget Bridge Android App. You can find the latest car and bike news here.


 Step 2:
 Step 3:
 Step 4:
 Step 2:
 Step 3:
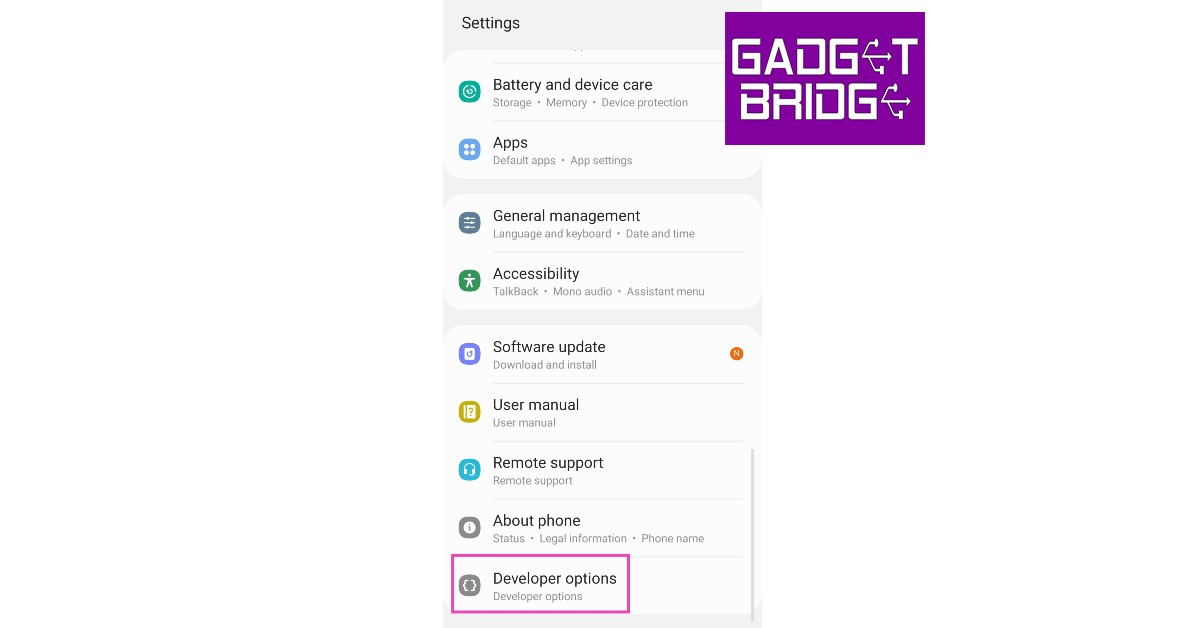 Step 4:


 Step 1:


 Step 3:
 Step 4:
 Step 5:
 Step 6:
 Step 3:
 Step 4:
 Step 6:
 Step 2:
 Step 3:
 Step 4:
 Step 3:
 Step 3:
 Step 2:
 Step 3:
 Step 4:


 Step 3:
 Step 4:
 Step 5:
 Step 2:
 Step 3:


 Step 2:
  Step 3:
 Step 6:


 Step 4:
 Step 5:
 Step 6:
 Step 7:
 Step 2:
 Step 3:
 Step 4:
 Step 5:
 Step 3:
 Step 4:
 Step 5:
 Step 6:
 Step 7:
 Step 8:
")


 Casino video cameras have specialized integrated software for facial recognition, one of the most powerful tools in any establishment’s security arsenal. This surveillance tech scans the face of anyone that enters the casino and compares them to a database of criminals and potential threats. This allows security personnel to remove such troublemakers before they can cause any disturbances.
Fingerprint recognition also strengthens the effectiveness of casino biometric security measures. Many establishments use sophisticated vaults and safes to store mountains of cash on-site. They are equipped with biometric scanners that grant access to authorized parties only.
Keeping money safe is only half the battle. Casinos are also responsible for the security of patrons once they retire to their accommodations. For this reason, rooms are usually fitted with smart locks and access control systems that often use fingerprint, keycard, and player club card sensors to unlock.
Casino video cameras have specialized integrated software for facial recognition, one of the most powerful tools in any establishment’s security arsenal. This surveillance tech scans the face of anyone that enters the casino and compares them to a database of criminals and potential threats. This allows security personnel to remove such troublemakers before they can cause any disturbances.
Fingerprint recognition also strengthens the effectiveness of casino biometric security measures. Many establishments use sophisticated vaults and safes to store mountains of cash on-site. They are equipped with biometric scanners that grant access to authorized parties only.
Keeping money safe is only half the battle. Casinos are also responsible for the security of patrons once they retire to their accommodations. For this reason, rooms are usually fitted with smart locks and access control systems that often use fingerprint, keycard, and player club card sensors to unlock.


 Step 2:
 Step 3:
 Step 4:
 Step 5:
 Step 6:
 Step 4:
 Step 5: