Google Pixel 8 Series was launched in India four months ago.
The company introduced both the devices in three colour options.
Both smartphones are equipped with Tensor G3 SoC.
Google Pixel 8 Series is all set to come in a new colour option. Google has officially teased the new shade which will join the previously released three colour option. Pixel 8 Series was launched in India in October last year. The device is powered by in-house Tensor G3 SoC and runs on Android 13 out of the box. In addition to this, the Pixel phone features a 120Hz display and includes pixel-exclusive features powered by AI.
This week Google will release a new shade for the Google Pixel 8 series. Google hinted at the Minty Fresh colour option for the existing lineup. According to the tech giant, the new Minty Fresh colour option for the Pixel 8 series will be available on January 25. In terms of price, there will be no change, the new colour price might be in line with that of the existing models.
The Pixel 8 is already available in three colours Obsidian, Hazel and Rose. Whereas the Pixel 8 Pro comes in Obsidian, Porcelain and Bay colour options.
Pixel 8 Series specifications
The Google Pixel 8 features a 6.2-inch FHD+ Actua display with 1080 x 2400 pixels of resolution. The OLED screen has an Adaptive refresh rate ranging between 60Hz and 120Hz and supports 2,000 nits of peak brightness.
On the other hand, the Pixel 8 Pro comes with a 6.7-inch Super Actua display with 1344 x 2992 resolution and an Adaptive refresh rate ranging from 1Hz to 120Hz and 20:9 aspect The LTPO OLED features a peak brightness of 2,400 nits. The screen is protected with Corning Gorilla Glass Victus 2. There is a temperature sensor on the back of the Pro model. The devices are powered by Google Tensor G3 SoC with Titan M2 security coprocessor.
They come pre-loaded with Android 14 with Pixel-exclusive features onboard. For photos and videos, the Pixel 8 Series includes a similar 10.5-megapixel Dual PD sensor on the front panel for taking selfies. The selfie camera on the Pixel 8 has a fixed focus while the Pixel 8 Pro has an autofocus.
The Pixel 8 and Pixel 8 Pro are highlighted with a primary 50MP Octa PD sensor with f/1.68 aperture. The secondary camera on the vanilla variant is a 12 MP ultrawide camera with an auto-focus. The pro model includes a 48 MP Quad PD ultrawide camera with autofocus. The Pro’s camera system also includes a third 48 MP Quad PD telephoto lens with 5x optical zoom.
The Google Pixel 8 is backed by a 4,485mAh battery with 24W wired and 12W wireless fast charging support. On the other hand, the Pixel 8 Pro boasts a 4,950mAh battery.
Modern Android smartphones have completely ditched the physical menu buttons and are completely reliant on the touchscreen to handle every task. Android OS’ neat tricks and features make you get the most out of the screen’s real estate. However, one area where smartphones still need some improvement is accidental touch protection. Even when your phone’s screen is locked, it can sometimes accidentally trigger the camera or the dialer when it’s inside your pocket. Accidental touches while watching videos are annoying as well. Here are the top 6 ways to disable the touchscreen of your Android phone.
When should I disable my Android phone’s touchscreen?
Disabling the touchscreen may seem like a weird request at first, but it has its uses. If you own a smartphone with a curved display, you must be familiar with the accidental touches that occur while watching videos on the device. Disabling the touchscreen helps eliminate these accidental triggers.
You may also want to disable the touchscreen when you’re listening to music and don’t want to accidentally skip any track. However, one of the most underrated uses of this feature is when you are handing over your phone to someone else. One of our biggest pet peeves is when someone snoops around your phone when you hand it to them to look at an image. Disabling the touchscreen display takes away this power from them.
Pin an app on the screen
If you’re handing your phone over to someone else and don’t want them snooping around, you can pin an app on the screen instead of disabling the entire touchscreen display. This will allow the person to browse within the app, but they won’t be able to access anything outside of it. Here’s how you can enable app pinning.
Step 1: Go to Settings and select Biometrics and security.
Step 2: Tap on Other security settings.
Step 3: Turn on the toggle switch for Pin windows.
Step 4:Open the app that you want to pin to the screen.
Step 5: Go to Recent apps and tap the app’s icon.
Step 6: Select Pin this app.
Step 7: To unpin the app, press and hold the back and recent buttons. You will be asked for your lock screen PIN.
Use the display lock button
Most of the popular OTT apps like Netflix, Hotstar, Prime Video, etc. have a display lock button that disables the touchscreen while playing the media. This eliminates accidental touches and allows you to focus on the video. To enable this option, look for the lock icon in the media player. To unlock the screen, hit the lock icon again.
Use a third-party app to disable the touchscreen display
If a streaming app does not have a native display lock button, you can always use a third-party app to achieve the same result. The Disable Touch Screen app by Firefly-Team works seamlessly on OTT apps like Sony Liv, Netflix, Hotstar, and others. You can also use it for streaming platforms like Twitch and YouTube. Once the app is installed, launch it and hit the start button. Then go to the app you wish to pin and hit the lock button.
Use Touch Lock
Step 1:Download the Touch Lock app from the Google Play Store.
Step 2:Launch Touch Lock and allow it to display over other apps.
Step 3: Go back to Touch Lock and hit the settings icon.
Step 4: Select whether you want to lock the entire screen or a part of it.
Step 5: Go back and tap on Show.
Step 6: Go to the app or screen that you wish to lock.
Step 7: Hit the lock icon.
Step 8: Your phone’s touchscreen will be disabled. To enable the touchscreen, double-tap the display and then double-tap the lock icon.
Use Accessibility settings
Step 1: Go to Settings and select Accessibility.
Step 2: Tap on Interaction and Dexterity.
Step 3: Go to Interaction Control and enable it.
Step 4: Launch an app and press the side + volume up buttons to lock the display.
Step 5: Press the side + volume up buttons again to enable the display.
Turn on Accidental Touch Protection
Don’t want to trigger your smartphone while it’s inside your pocket? Turn on Accidental Touch Protection. On some smartphones, this may be called Pocket Mode.
Step 1: Go to Settings and select Display.
Step 2: Turn on the toggle switch for Accidental Touch Protection.
Frequently Asked Questions (FAQs)
Is there a way to disable my Android smartphone’s touchscreen display?
You can disable your smartphone’s touchscreen within certain apps to eliminate accidental touches. OTT apps like Netflix, Hotstar, Prime Video, and others offer the lock button which disables the touchscreen while playing the content.
How do I turn off the touchscreen on Android?
Download the Touch Lock app, allow it to display over other apps, hit ‘Show’, then go to the page you want to lock and tap the lock icon.
How do I stop accidental touches on my Android phone?
Go to Settings>Display and turn off the toggle switch next to ‘Accidental Touch Protection’.
How do I pin an app on my Android phone?
Go to Settings>Biometrics and security>Other security settings and turn on the toggle switch for Pin windows. Now, go to the app switcher and tap the icon of the app that you want to pin. Select ‘Pin this app’ from the list.
Is there a third-party app to disable my phone’s touchscreen?
Use apps like Disable Touch Screen (Firefly-Team) and Touch Protector to pin any app on the screen.
These are the top 6 ways to disable the touchscreen on your Android smartphone. If you want to boost the touchscreen sensitivity of your device, go to Settings>Display and turn on the toggle switch for ‘Touch sensitivity’. Use this feature when you apply a new screen protector to your display and don’t want to lose its response rate.
The new OnePlus 12 is set to launch later today. The flagship smartphone from the Chinese manufacturer will be powered by the new Snapdragon 8 Gen 3 SoC, bringing it on par with the latest releases from Samsung and iQOO. The internet has been abuzz with rumours and leaks about the latest OnePlus flagship. The newest leak suggests that the smartphone will be launched at a starting price of Rs 65,000. If you’re thinking of making the OnePlus 12 your next smartphone purchase, here are the top 12 apps you should download on it first.
Adobe Lightroom is one of the best photo and video editing apps you can download on your new OnePlus 12. Bringing a new level of accessibility to the average user, Adobe Lightroom has tons of one-touch active filters along with handy tools like retouch, blur, object remover, and more. Seasoned users can use the Lightroom app to edit the exposure, highlights, shadows, contrast, and more using sliders. The app gives you full control over how the photo or video looks, by allowing you to change the hue, colour saturation, luminance, and more. Content creators will enjoy the Reel Maker available on the app!
If you don’t want to focus on the intricate elements of photo editing but want an app that will take care of them for you instead, download Prisma. This editing app uses fun filters to transform your images into something that belongs in an art gallery. There are more than 500 filters in Prisma’s art gallery which cover different painting styles and art periods. To keep things fresh, the app releases a new filter every day. Once the filters have been applied to your photos, you can tweak minor elements like exposure, sharpness, contrast, and more.
IFTTT is one of our favourite automation apps which you should definitely download on your new OnePlus 12. Once you’ve mapped out your daily routine, you can use IFTTT to program your smartphone and other smart devices to behave accordingly. The app offers thousands of pre-built automation, but you can always create one that is tailored to your needs. For example, you can use IFTTT to automatically turn off all the lights in your house and play your commute playlist on Spotify as soon as you get out of your house and into your car.
Not a fan of Google Messages or your OEM’s stock SMS app? You should try Textra. This app lets you customise your texting experience with over 180 design themes, multiple bubble types and colours, fonts, text sizes, screen modes, and more. One of our favourite things about the app is that it lets you choose which emoji pack you want to use. If you’re an Android user with iPhone users as friends, you can simply switch to the iOS emoji pack. Textra also supports Reactions (or Tapbacks) received from iOS devices. Instead of seeing a message notifying you about the reaction, you will see the emoji reaction.
Libby unlocks millions of free ebooks and audiobooks with just your public library card. Once you have signed up for the app, you can explore book catalogues across different libraries and dive into your favourite genres. You will save an incredible amount of money using Libby. The app has a great ebook reader that lets you adjust the text size, background colour, book design, and more. The audiobook reader is equipped with basic controls like speed up/slow down, sleep timer, bookmarks, and more.
Here’s a fun app for your OnePlus 12 that will help you kill a lot of free time. With over 100 million downloads and 50 million active users, StarMaker is one of the most popular karaoke apps around. The app is loaded with millions of songs across genres like pop, hip-hop, folk, rock, and more. In true karaoke fashion, it provides backing music with rolling lyrics, but it doesn’t stop at that. You can record the songs and edit the recording using professional filters. You can then share your recording across different social media platforms.
Podcasts and music streaming are the norm these days, but they do not match up to the fun of tuning into a radio station and being treated to a variety of music artists. TuneIn Radio seeks to recreate that experience with over 100,000 global stations. You can listen to your local radio station or tune into an exclusive channel that plays a certain genre of music. TuneIn Radio also features comprehensive sports content including live commentary from all the popular leagues like the NFL, MLB, NHL, and more.
Microsoft is all aboard the AI revolution, bringing Bing AI integration into its most popular services. Our favourite implementation of this AI integration has to be on the SwiftKey keyboard. By making the chatbot accessible on the keyboard itself, Microsoft has completely changed the game. Now, you don’t need to leave the chat window to search for something on the web. You can just get Bing AI to do it. Don’t know how to respond to a text you received from a friend or colleague? Simply ask Bing AI for possible replies and change their tone using an appropriate filter from the keyboard.
Bitwarden lies in the upper echelon of password-storing apps, making it a very easy recommendation for your new OnePlus 12. You can save a password either manually on the app or with a quick tap whenever you log into your account. Bitwarden’s autofill feature makes sure you never have to type your password again. This is crucial because using the app’s password generator, you can set a long string as your password. Without needing to remember what it is, you can get Bitwarden to autofill it for you across all your devices, whenever you want. All passwords stored in Bitwarden are end-to-end encrypted and can only be accessed by you.
Using machine learning and large language models, ChatGPT has completely changed the AI chatbot game. It took some time for ChatGPT to get an Android app of its own (after some terrible knock-offs and underwhelming offshoots), but now that it’s here it is incredibly fun to use. You can choose to have a conversation with the chatbot or make it write a piece of code for you. You can get the chatbot to perform creative tasks like writing an essay or poem (in any style you fancy) or seek its help in everyday tasks like coming up with a recipe from the list of ingredients in your fridge.
This smart alarm clock tracks your sleep across the night and wakes you up gently when you are in the light sleep stage. A harsh alarm tone that wakes you up abruptly can put you in a bad mood right away. Sleep as Android is similar to being woken up with a gentle cerebral hug. To make sure you don’t go back to sleep, you can set a puzzle to turn off the alarm clock. The app is compatible with IFTTT, Smartlight, Google Fit, and other fitness and smart apps.
If you like listening to podcasts at work or during your commute, you should give Pocket Casts a try. This podcast player makes it easy to skip ads and skip forward with just a few taps. It also has a very handy sleep timer that shuts the app after a certain period of inactivity. If you are a speed listener, you can use this app to control the playback speed and trim all the pauses and silent periods from the podcast. Lastly, Pocket Casts implements the Material design philosophy which makes it very easy on the eyes.
These are the top 12 apps you should download first on your new OnePlus 12. The smartphone will go on sale next week, on January 30. Expect introductory bank offers and early bird deals on the device. Which apps would you download first on your new OnePlus 12? Let us know in the comments!
Today OnePlus will be hosting a ‘Smooth Beyond Belief’ launch event.
At the OnePlus launch event today, the company will introduce the OnePlus 12 Series.
Alongside the OnePlus 12 and OnePlus 12R, the OnePlus Buds 3 TWS earphone will also make their debut.
Chinese brand OnePlus is all set to launch a bunch of new devices today at its Smooth Beyond Belief event. The company will update its flagship series in India, including two phones OnePlus 12 and OnePlus 12R. Apart from this, the firm will also introduce the OnePlus Bud 3, its premium TWS earphones. The devices will not only launch in India but it will be their global debut as well. OnePlus launch event will be held in New Delhi at Pragati Maidan.
How to watch OnePlus’s ‘Smooth Beyond Belief’ launch event
The ‘Smooth Beyond Belief’, a OnePlus launch event will be held today at the Pragati Maidan in New Delhi. The event is scheduled to begin at 7:30 PM IST. If you don’t have the invite or are not available in India you can experience the launch event virtually. The company will be streaming it live on their official YouTube Channel and across all their social media channels.
We have also embedded the link below so you can watch the event on our website.
OnePlus 12, OnePlus 12R, OnePlus Buds 3 price in India expected
Before the official release, almost all of the relevant information about the new OnePlus 12 and OnePlus 12R was leaked online. In fact, before the official announcement, the anticipated price of the phones has already been revealed.
The OnePlus 12 price in India is tipped to start at Rs 64,999 for the 12GB RAM variant. Whereas the 16GB RAM model is likely to launch at Rs 69,999. The device will likely go on sale in the country from January 30.
The OnePlus 12R is said to be priced at Rs 39,999 for the 128GB storage option and Rs 41,999 for the 256GB internal memory model. OnePlus 12R’s first sale in India is expected to begin in February.
The price of the OnePlus Buds 3 has also been tipped ahead of the January 23 launch. The audio device is likely to come with a price tag of Rs 10,499.
The gadgets will be available for purchase on OnePlus.in, Amazon, and retail stores across the country as soon as they are officially released.
The OnePlus 12 features a 6.82-inch quad-HD+ LTPO OLED screen. The display has an adaptive refresh rate ranging between 1Hz and 120Hz. The screen supports 4,500 nits of screen brightness. The device is IP65-rated for dust and water resistance. The Qualcomm’s 4nm Snapdragon 8 Gen 3 SoC powers the phone. The device is offered with up to 24GB of LPDDR5X RAM and up to 1TB of UFS 4 inbuilt storage. The phone is endowed with a Hasselblad-branded triple rear camera with a Sony LYT-808 sensor, a 50-megapixel primary camera (OIS and f/1.6 aperture), a 64-megapixel telephoto secondary lens (OIS, 3X optical zoom, and f/2.6 aperture), and a 48-megapixel ultra-wide-angle lens (114-degree field-of-view). Lastly, there is a 32-megapixel front-facing camera (f/2.4 aperture) for taking selfies and video calling.
The handset houses a 5,400mAh battery with 100W SuperVOOC wired, 50W wireless, and 10W reverse wireless charging support.
OnePlus 12R is targeted at gamers and is a successor of the OnePlus 11R. The device will be available in two colour options Cool Blue and Iron Gray. The Cool Blue has a glossy finish with a light, fresh appearance, while Iron Gray has a matte feel to give a sophisticated and strong feeling. The gaming smartphone will also feature a similar coloured matte metal frame giving a more premium feel. OnePlus 12R has the iconic OnePlus Alert Slider located in its new home on the left of the phone.
OnePlus has officially revealed that the OnePlus Buds 3 will offer 44 hours of playback time. With a quick charge of 10 minutes, it will deliver 7 hours of battery life. Apart from this, the device will be offered in two colour options- Metallic Grey and Splendid Blue. The specs of the OnePlus Buds 3 India model is expected to be similar to Chinese variants.
Garena Free Fire is a battle royale game with regular awards and tournaments to keep players interested. If you play Garena Free Fire, you should be aware of the redeem codes that are released on a daily basis. However, because the battle royale game is banned in India, players from other countries can use the Free Fire Redeem codes daily. If you’re unfamiliar with the Garena Free Fire redeem codes or don’t know how to get them, we’ve put together a step-by-step guide to help you redeem them. Check out Garena Free Fire Redeem Codes for 23 January 2024.
The Free Fire redeem codes are a great way to get free stuff. These are 12-digit codes that contain alphabets and numbers, as well as an expiration date and time. Because the Garena FF redeem codes cannot be used more than once, you should hurry to the redemption page to claim your free reward before someone else does. To get a free reward, all you have to do is go to reward.ff.garena.com/en, which is the official redemption page. Also, keep an eye on this space for daily updates on Garena Free Fire redemption codes and rewards.
Garena Free Fire Redeem Codes Today 23 January 2024
F3BERNFJUCYTSRAF
F5DCV3B4N5JIG8U7
FYTGDSBWE4576JYH
FKI765ATRQFD2V3E
FFSJEURYFH6GBDNE
FJI4U5HYTNFJKC8U
F5M6NMYKHGIO867U
FYTGFVAQ2U34Y6TR
F6HGGFBCNJ3NRTGR
F7YTGE45NTJKIGUJ
FHNSJUA65RQ2FDCV
FURF76T5RFSVWBN3
F4J5TGY6TGSBN34J
How to Get Free Fire Redeem Codes for Garena on 23 January 2024?
Perhaps you have been enjoying playing your favorite videos on your device then suddenly you cannot access or play them. When you try to open with your video player, you get an error message on the screen like “Windows player cannot play the file. The player might not support the file type or might not support the codec that was used to compress the file”.
While you can receive different error messages depending on your video player, just know that your video file is corrupted and you need to fix it. If you are in this mayhem, the best remedy is to recover these video files. However, this is not always an easy task especially if you are an amateur.
Fortunately, this article walks you through a complete guide on how to recover unplayable and inaccessible videos without dropping a sweat.
Can you recover Unplayable and Inaccessible Videos?
Yes, it is possible to recover inaccessible and unplayable videos on your device. The ease and efficacy depend on the recovery method of your choice. Traditional recovery methods are complicated and offer little chance of success. Their success often depends on the extent of video or storage damage. The higher the damages the lower the success rates.
On the other hand, using dedicated tools is a game-changer because it often guarantees success and is less complicated. They provide plenty of features to allow you to tackle various video/data recovery needs without hiring an expert. However, your choice of tool can make or break your video recovery experience. Therefore, if you select the right video recovery tool, you can recover your inaccessible and unplayable videos without much effort.
How to recover Unplayable and Inaccessible Videos without software
There are several ways you can recover unplayable or inaccessible videos without software. While these options can prove useful, they are often complicated and don’t guarantee success. Some of the possible options to recover unplayable and inaccessible videos without software include:
Way 1. Use VLC
While VLC is a media player, it comes with other tools to fix media file problems. However, it doesn’t provide comprehensive tools to solve several media file issues. With VLC, you cannot solve the video inaccessible issue. The following steps show how to fix an unplayable video on VLC.
Step 1. Open VLC on your computer and navigate to Media>Convert/Save. Upload the unplayable video then hit the “Convert/Save” button.
Step 2. In the next screen, choose a destination folder and tap the “Start” button. Proceed to Tools>Preferences.
Step 3. In the subsequent Preferences window, choose the “Always Fix” option beside the “Damaged or Incomplete AVI”. Finally, hit “Save” to save your repair file.
Play the file to see whether it is repaired or not.
Way 2. Contact Video Recovery Professionals
If you are stuck and cannot fix the unplayable or inaccessible video issues, then try a video recovery specialist near you. While these specialists have experience, they will probably charge you a lot and prove costly. Furthermore, some specialists are not as experienced as they purport. They might mess up with your device and end up having a series of issues to fix.
Suggested: Easily recover Unplayable and Inaccessible Videos free
Traditional methods of recovering unplayable and inaccessible videos are limited and you cannot bank on them. Therefore, using a dedicated video recovery tool is the most reliable option for all video/data recovery needs. Well, there are several video recovery tools in the market yet finding a tool that meets your needs within your budget is a hard nut to crack. Fortunately, Wondershare Recoverit ticks all the boxes. This amazing video recovery tool lets you recover unplayable and inaccessible videos with ease and speed for free.
Wondershare Recoverit provides an enhanced video recovery feature that offers specially developed data collection algorithms and technologies for video recovery. These enhanced capabilities let you do more and recover video data that other solutions can’t recognize, optimize, or extract. Therefore, you can use it to recover those videos that still can’t play even after you try to restore them by yourself.
Unlike other tools, Wondershare Recoverit Enhanced Video Recovery can search and recover inconsistent video fragments and restore them with enhanced video quality! The beauty of Wondershare Recoverit Enhanced Video Recovery is that it supports the recovery of myriads of video formats, is easy to use, is compatible with popular systems, and boosts amazing recovery success.
Key Features of Wondershare Recoverit
Recover over 1000 different types and formats of data files.
Recover files from over 2000 storage locations.
Data recovery from over 500 data loss scenarios including virus attacks, disk damage, accidental deletion, and system crashes among others.
Recover data from a crashed computer by creating a bootable USB drive.
Recover all types of video resolutions including Ultra HD, 4K, and 8K videos.
Recover surveillance and car camera video.
Provides two repair modes to fix corrupted, truncated, or broken videos to meet different user needs and repair quality.
Recover corrupted videos remotely from NAS storage devices.
How to Recover Unplayable and Inaccessible Video using Wondershare Recoverit Enhanced Video Recovery
Recovering inaccessible or unplayable video with Wondershare Recoverit is easy and can be done by anyone as illustrated below.
Step 1. First, download Wondershare Recoverit for free and install it on your computer. Once installed, launch it to access the primary interface. On the left pane of your main window, select the “Enhanced Recovery” option. Proceed and choose the recovery drive from the list displayed.
Step 2. Once you choose the desired disk, Wondershare Recoverit will ask you to select the video format. You can select more than one video format and click the “Start” button to allow the program to initiate the deep scan process.
Step 3. When the deep scan is completed, you should see the list of video files recovered. You can click the “Preview” button to confirm whether your unplayable or inaccessible videos have been recovered.
Step 4. Finally, select these videos and hit the “Recover” button. This will open a new window on your computer to allow you to save the recovered files. Make sure you choose a convenient and safe location.
Bonus tips to avoid Inaccessible or Unplayable Video Situations
While it is easy to recover unplayable or inaccessible videos with dedicated software like Wondershare Recoverit Enhanced Video Recovery, it is also important to prevent cases of inaccessible or unplayable videos if possible. Some of the practical tips include:
Install a good antivirus on your device to avoid cases of malware attacks on your videos.
Update your operating system regularly to have the latest security patches.
Keep your external storage devices appropriately to avoid physical damage or exposure to extreme conditions.
Always backup your videos so that you can easily retrieve them in case the primary storage location is corrupted.
Ensure your PC or device is always running under optimal conditions.
Avoid interrupting operations on your storage or PC because it can tamper with your files.
Conclusion
Unplayable and inaccessible videos can be quite annoying. While there are several traditional ways to recover these videos, using Wondershare Recoverit Enhanced Video Recovery gives you a platform to solve virtually all video/data recovery issues without spending much. Download Wondershare Recoverit today and seamlessly transform how you recover unplayable and inaccessible videos on your device.
Safari is one of the best mobile web browsers around, but it is not immune to weird malfunctions. Users often report being unable to access a website even with a working internet connection. This can get pretty annoying quickly, especially if you can’t figure out the reason behind it. Luckily, there are a few methods you can use right away to restore the optimum web browsing experience. Today, we bring you the top 8 methods to fix the ‘Safari cannot open the page because the address is invalid’ issue on your iPhone.
Why is Safari displaying the ‘Cannot Open the Page Because the Address is Invalid’ error?
Even though the error message is pretty self-explanatory, it can pop up due to several reasons. The most obvious of them all is an incorrect URL entered by the user. This is the easiest to fix as well. All you need to do is tap on the address bar and closely examine the URL for any errors or typos.
But what happens if you continue facing this error even after entering the correct URL? First, you need to ensure that the error message is not a website popup. A lot of dodgy websites (this mostly includes piracy platforms) are littered with malicious popups that are meant to push malware and ransomware on your device. These popups may be disguised as error messages to get you to click on them and extract further information about your device.
If you’re certain that the error message is genuine and not a popup, there could be a couple of reasons triggering it on your iPhone. The most common reason behind this issue is a faulty internet connection. Other reasons may include software bugs, corrupted cache, and unresponsive servers. Here are some fixes.
Restart your iPhone
If a background software issue is causing the webpage to not load properly, it can be fixed with a quick restart. Press and hold the side key along with either volume button to reveal the power menu. Drag the power slider across the screen to turn it off. Wait for 30 seconds after the iPhone has switched off and long-press the side key to turn it on.
Refresh the page
If the Safari browser on your iPhone is unable to load a page and throws the ‘Address is invalid’ error your way, simply hit ‘Refresh’. It is entirely possible that a lapse in the internet connection caused Safari to run into that error. Refreshing the page can fix that. Make sure you have typed the correct URL before hitting refresh.
Clear Safari’s cache and cookies
Step 1: Go to Settings and select Safari.
Step 2: Scroll down and tap on Clear History and Website Data.
Step 3:Confirm your selection in the popup box.
Check the internet connection
If you are trying to load a webpage without being connected to the internet, you will get the ‘Safari cannot open a page because the address is invalid’ error on your device. The same applies when you are connected to the internet, but the signal strength is not up to the mark. Switch to a better network and try again. If you do not have access to another connection, move to a spot where your device is able to receive a stronger signal.
Change the DNS
Step 1: Go to Settings and tap on WiFi.
Step 2: Hit the i icon next to the connected WiFi network.
Step 3: Tap on Configure DNS.
Step 4: Select Manual.
Step 5: Tap on Add Server.
Step 6: Enter the address of your preferred server.
Use Private Browsing
The Private Browsing tab in Safari can circumvent local cache and DNS issues. If you’re having trouble loading a web page on the browser, switch to the private tab to resolve the issue. Tap the Tabs icon in the bottom right corner of the screen and switch to the Private tab. Once you’re in Private mode, open a new tab and load the web page again.
Check if the website’s servers are down
If the problem still persists after checking the URL and internet connection, it would be a good idea to check whether the website’s servers are down. Go to Downdetector.in and enter the name of the website that isn’t loading in Safari. If you see a spike in user reports, it means the website is currently experiencing a server outage. The only thing you can do in this scenario is wait for the servers to be restored again.
Update iOS
Step 1: Make sure your iPhone is connected to a WiFi network and plug in its charger.
Step 2: Go to Settings and select General.
Step 3: Select Software Update.
Step 4: Tap on Download and Install.
Frequently Asked Questions (FAQs)
Why am I seeing the ‘Safari cannot open a page because the address is invalid’ error on my iPhone, and how can I fix it?
You may come across this error when you enter the wrong URL or if you are not connected to the internet. Anytime Safari isn’t able to make contact with the website’s servers, it displays this message.
How do I check if a website is experiencing a server outage?
Go to DownDetector.in, enter the name of the website, and check recent user reports to see if other people are experiencing a server outage as well.
Why does Safari keep saying that the address is invalid?
If you entered the incorrect URL, Safari will display the ‘Address is Incorrect’ error. This error also comes up when there’s a fault with your internet connection or DNS.
Why can’t Safari open a specific address?
If you’re having trouble going to a specific website on Safari, it could be because the website’s servers are down or it is restricted on your network.
How do I clear Safari’s cache?
Go to Settings>Safari and tap on Clear History and Website Data to clear the browser’s cache.
These are the top 8 ways to fix the ‘Safari cannot open a page because the address is invalid’ error on your iPhone. Force-quitting and restarting the Safari web browser can also resolve this problem in certain situations. If you know any other way to fix this issue, let us know in the comments!
Samsung Galaxy S24 series includes Galaxy S24, Galaxy S24+, and Galaxy S24 Ultra.
The Ultra variant in India is powered by the Snapdragon 8 Gen 3 Mobile Platform for Galaxy.
Whereas S24 and S24+ come with an Exynos 2400 SoC.
Last week Samsung introduced an AI-powered Galaxy S24 Series. Five days after its release the new flagship lineup has amassed 2.5 lakh pre-orders. Samsung has announced Indian pricing for the Samsung Galaxy S24, Galaxy S24+, and Galaxy S24 Ultra. The phone runs on Android 14-based One UI 6.1. Moreover, the phone comes with a dynamic AMOLED 2X display with support for up to 120Hz refresh rate.
Samsung revealed today that record pre-orders for its recently released flagship Galaxy S24 series have been placed. The series was officially announced 5 days ago. The pre-booking window went live three days ago on January 18, and over 250,000 buyers in India had placed orders. When Samsung Galaxy S23 was launched last year the company managed to obtain 250,000 pre-bookings during the course of three weeks in India.
Raju Pullan, Senior Vice President, MX Business, Samsung India, said, “Galaxy S24 series, powered by Galaxy AI, ushers in a new era of mobile revolution and puts the power of AI in the hands of consumers to open up new possibilities. With Galaxy S24, consumers can transcend the barriers of communication and maximise their productivity and creativity to empower their everyday lives. The huge success of the Galaxy S24 series demonstrates that Indian consumers are early adopters of new technology. I would like to thank our consumers for their overwhelming response to the Galaxy S24 series.”
Samsung Galaxy S24, Galaxy S24+ and Galaxy S24 Ultra price in India
The Galaxy S24 Ultra is available in India in three different configurations. The price of the 12GB RAM + 1TB storage is set at Rs 1,59,999, 12GB RAM + 512GB storage comes with a price tag of Rs 1,39,999 and the 12GB RAM + 256GB storage costs Rs 1,29,999.
The Galaxy S24+ will be available in two different variants. The 12GB RAM + 512GB storage is made available at Rs 1,09,999 and the 12GB of RAM and 256GB storage has been priced at Rs 99,999.
Lastly, the Galaxy S24 has been launched at Rs 89,999 for the 8GB RAM + 512GB storage and 8GB RAM + 256GB storage at Rs 79,999.
Colour options for:
Galaxy S24: Amber Yellow, Cobalt Violet, Onyx, and Black Galaxy S24 Plus: Cobalt Violet, Onyx Black Galaxy S24 Ultra: Titanium Gray, Titanium Violet, Titanium Black and Titanium Gray
Samsung Galaxy S24 Series specifications
The Samsung Galaxy S24 Ultra features a 6.8-inch QHD+ Dynamic AMOLED 2X Display with a Super Smooth 120Hz refresh rate (1~120Hz), 2,600nit peak brightness, and a Vision booster. The screen is protected with Corning Gorilla Armor. Whereas the Galaxy S24 and S24+ come with 6.2-inch FHD+ and 6.7-inch QHD+ Dynamic AMOLED 2X displays, respectively.
The smartphones come equipped with a tweaked version of the Snapdragon 8 Gen 3 SoC, which Samsung is calling the Snapdragon 8 Gen 3 Mobile Platform for Galaxy. In India, only the Ultra Variant comes with a Qualcomm processor, whereas the other two models house an Exynos 2400 SoC. The smartphone will be shipped with Android 14 with UI 6.1. The company will provide seven generations of OS upgrades and seven years of security updates.
Galaxy S24 Ultra has a quad rear camera setup that includes a 12MP Ultra-Wide Camera (F2.2 aperture, FOV-120˚), 200MP Wide Camera (OIS, F1.7 Aperture, and FOV-85˚), 50MP Telephoto Camera (5x Optical Zoom, OIS, F3.4 aperture, and FOV of 22˚) and a 10MP Telephoto Camera (3x Optical Zoom, OIS, F2.4 aperture, and FOV 36˚).
On the other hand, the Galaxy S24 and Galaxy S24+ have the same triple rear camera setup that includes a 12MP Ultra-Wide Camera (F2.2, FOV 120˚), 50MP Wide Camera (OIS F1.8, FOV 85˚) and a 10MP Telephoto Camera (3x Optical Zoom, F2.4, FOV 36˚). All the models come with a 12MP selfie camera (F2.2, FOV 80˚).
For connectivity, there is 5G, 4G LTE, Wi-Fi 7, Wi-Fi Direct, Bluetooth 5.3 and a USB Type-C port. The S24 Ultra, S24+, and S24 boast a 5,000mAh, 4,900mAh, and 4,000mAh battery, respectively.
The Galaxy S24 Ultra comes with a S Pen stylus. In addition to this, all the variables include Samsung Knox, Knox Vault, and Passkeys.
Besides this, all the phones in the Galaxy S24 Series come pre-loaded with Live Translate, Note Assist, and Circle to Search, powered by built-in AI features.
WhatsApp is currently testing a new feature where users will be able to share files with people nearby.
In the future, beta testers will be able to trial a new feature that makes it simple to share files with someone nearby.
The upcoming feature will guarantee confidentiality and anonymity during all file sharing.
A new feature for sharing files with individuals nearby is being developed by WhatsApp. The new function would enable users to exchange files with contacts nearby. The feature will make sharing files across WhatsApp users easier and will be similar to Android’s Nearby Share.
According to a report by WAbetaInfo, File transfers via Bluetooth are possible with WhatsApp for Android’s most recent beta version (2.24.2.17). It offers a quicker and more useful option by allowing users to trade files up to 2GB in size. The functionality is expected to be released to all the users in a later version.
Image Courtesy: WABetaInfo
As per the shared screenshot beta testers have the ability to share files with someone nearby. The screenshot further illustrates that to share a file one needs to shake the device to generate a share request, maintaining a controlled approach to file exchanges. The sharing will also be end-to-end encrypted when done on an unidentified network and outside of a WhatsApp chat.
We think that it is a safer way to share a file with someone in close proximity because your phone number is never disclosed to non-contacts, guaranteeing confidentiality and anonymity.
WhatsApp’s new file-sharing feature with others nearby is in the developmental phase and we are not sure when it will be available to all the users. But it is expected to arrive in a future update of the app.
The affordable mini projector segment is filled with numerous products with similar specs, making the task of choosing one quite overwhelming. We recently got our hands on the Clokowe T08, which is a portable LED projector that caters to your entertainment needs. Priced at $100, it seeks to offer the most bang for your buck. On paper, it gets the basics right. It can deliver 720p footage, supports all the major casting standards, comes with a remote control, and offers automatic keystone correction. We used it for a week to watch movies, TV, and live sports. Here is our in-depth review of the Clokowe T08 LED mini projector.
Inside the Clokowe T08 retail package, you will find the mini projector, a remote control, a power cable, an HDMI cable, a user manual, and a quick start guide. The remote control needs 2 AAA batteries to function. These batteries have not been provided in the box.
The T08 mini projector has dimensions of 4.69 x 5.28 x 8.6 inches. Its tube-like design makes it easy to tuck away in your luggage or backpack while travelling. The circular platform uses two hinges to hold the device. Adjusting the position of the projector requires no effort whatsoever. The front and rear ends of the projector are covered with a mesh grille. The area surrounding the lens up front is used as an air inlet. The fan at the rear expels the warm air out of the device. Even when it is running at full force, the sound created by this fan does not amount to a distraction.
The rear panel of the projector houses the power button, an HDMI port, a 3.5mm headphone port, a USB port, and the power input. There are no media controls on the projector. The only way to control the playback is through the remote. A 3W speaker is integrated into the device, and you can also pair it with your home speaker via a 3.5mm headphone jack (not included in the box) or a Bluetooth connection. There is a scroll wheel up top to focus the image on the screen.
Once propped up on a flat surface, the Clokowe T08 mini projector can be rotated up to 180 degrees. Automatic keystone correction ensures that you always get a rectangular picture on the screen. If you’re feeling adventurous, you can even point the projector to the ceiling. The build of the device is all plastic but it does not feel flimsy at all. Weighing just over 500 grams, you can easily carry it around with you. Even though we didn’t test it for any falls, the device can take a few knocks.
Clokowe T08 Mini Projector review: Performance
Setting up the Clokowe T08 is as easy as it gets. Since it does not have an internal battery pack, it requires an external power source. Once the power cable has been plugged in, you need to press and hold the power button for 3 seconds to start the projector.
There are three ways you can go about connecting the projector to your device. The easiest is an HDMI connection using the cable provided in the box. If your device does not have an HDMI port, you can wirelessly cast its display using Miracast (Android), AirPlay (iOS), or DLNA (Windows). Lastly, you can connect a USB drive directly to the projector and play the content within it.
Screen mirroring from your Android/iOS/Windows device requires connecting the projector to your home WiFi network first. The Bluetooth connection only supports audio output and not video input. The projector’s interface is simple and accessible, making it easy for the user to connect their device and carry out the basic functions.
The Clokowe T08 offers a maximum projection display size of 200 inches, but while reviewing the device, we found a 100-inch display size to be ideal. The picture quality loses some detail when you push the display size to 200 inches. Once you have placed the projector at an optimum display from the screen, you can use its manual scroll wheel to focus the image.
The native resolution on offer here is 720p. While it is a far cry from 4K resolution, we were happy with the image quality, especially when you take the price of the projector into account.
The colour richness and contrast levels produced by the projector were very good. We did notice a little blurriness around the edges, but it did not prove to be a distraction while watching videos. We were quite surprised by the lack of any perceptible latency. After playing a couple of Call of Duty Mobile sessions, were happy with how the T08 performed.
The 3W speaker on the projector is certainly not up to the task, but given it is a portable projector, we can let this one slide. The audio output is coarse and low in intensity. Luckily, you can connect your headphones or speakers using a 3.5mm audio jack or a wireless Bluetooth connection. It goes without saying, but you need to create a pitch-dark environment to enjoy the footage projected by this device. The image brightness isn’t powerful enough to overcome the daylight seeping in through a window.
As we mentioned earlier, the Clokowe T08 offers automatic keystone correction, which means no matter the angle of the projector, it will cast a perfect rectangle display on the screen. You can also manually control the keystone from the device settings. The projector settings also let you change the aspect ratio and offer multiple projection modes.
At $100, the Clokowe T08 Mini Projector is a good buy. While it may not cast a 4K display, it is ideal to watch live sports, TV, and movies in your living room. Its portability is another factor that works in its favour. You can easily carry this device around with you, without it being a hassle. Its compact size also ensures that you don’t have to keep it in one room of the house. The connection settings let you wirelessly cast your phone or laptop’s display on the screen while using a Bluetooth connection to use your headphones or speaker system as the audio output. A brighter display would have been ideal, but if you are able to manage the lighting conditions in your room, it won’t be an issue.
Even though every OEM has its own app marketplace, Google Play Store still remains the best source of apps on the Android platform. Google’s official marketplace does a great job of weeding out malicious apps and ensuring every app has the proper security certificate. On top of that, it is very easy to use as well. Sometimes, users report that they are unable to download new apps from the platform because their current apps are getting updated. If the app updates are stuck on ‘pending’, try these 11 fixes to get the queue moving.
This problem generally arises when you manually update all the apps on your device at once. If automatic updates are turned on, your device will automatically download the latest version of the apps as soon as they are published by the developer. However, if you are downloading all the updates at once, the apps will be put in a queue and updated one by one.
If you notice that the app updates are stuck on pending and the queue hasn’t moved in a long time, you may need to take some quick measures. The most likely reason behind this issue is the lack of a steady internet connection. Other than that, the lack of storage on your device can also pause the app updates. Even though your phone isn’t downloading a new app, it needs a little breathing space to update the old ones. The new versions of the apps may also be larger in size, requiring some additional space in your phone’s internal memory.
Check current updates
When you choose to update multiple apps at once, they get put in a queue. The queued apps are labelled as ‘pending’. Here’s how you can view the list of apps being updated on your device.
Step 1:Launch the Google Play Store and tap your profile picture in the top right corner of the screen.
If your smartphone is running low on storage, it will not be able to download new apps or updates. Instead, the updates will get stuck on pending. Delete some of the large files on your device to make space for the updated apps. Here’s how.
Step 1: Go to Settings and select Battery and device care.
Step 2: Tap on Storage.
Step 3: Go through the large files on your device and delete the ones you no longer use.
Make sure you are connected to the internet
Your smartphone relies on an internet connection to download and update apps. If your network isn’t up to the task, the app updates will get stuck on pending. Switch to a better network connection and try again. To test the strength of your current connection, you can perform a speed test online. It is preferable to use a WiFi connection for updating apps, as the downloads can consume a lot of mobile data.
Remove your Google account and re-add it
If the issue is related to your account, removing and re-adding can fix it. Here’s how you can go about it.
Step 1: Go to Settings and select Accounts and backup.
Step 2: Tap on Manage accounts.
Step 3: Select your Google account.
Step 4: Tap on Remove account.
Step 5:Launch the Google Play Store app.
Step 6: Hit Sign in.
Step 7: Enter your Google account credentials and log in.
Clear the app updates and try again
If you want to download a particular app right away, but the pending updates are getting in the way, clear all of them and download the app first. Here’s how.
Step 1:Launch the Google Play Store and hit your profile icon at the top right corner of the screen.
Step 2: Tap on Manage apps and device.
Step 3: Tap on Updating apps/See details.
Step 4: Select Cancel all or hit the cross sign next to the update you want to cancel.
Update Google Play Store
Step 1:Launch the Google Play Store and tap your profile picture in the top right corner of the screen.
Step 2: Tap on Settings.
Step 3: Tap on About.
Step 4: Hit Update Play Store.
Turn off VPN
Sometimes, using a VPN to download and update apps can create unexpected issues. Apps that are geo-locked may not get updated if you are connected to a VPN server in a different location. This may cause the update to get stuck on pending. To fix this, launch the VPN app and hit ‘Disconnect’. Once the update is downloaded, connect the VPN again.
Make sure the time and date on your phone are correct
Google Play Store relies on accurate time and date information to carry out its functions. Here’s how you can ensure that the time and date on your smartphone are correct at all times.
Step 1: Go to Settings and select General management.
Step 2: Tap on Date and time.
Step 3: Turn on the toggle switch for Automatic date and time.
Update your phone
Step 1: Go to Settings and select Software update.
Step 2: Tap on Download and install.
Step 3: Select Install now.
Check if the Google Play Store is down
If none of the fixes mentioned above worked for you, it is highly probable that the Play Store is experiencing a server outage. Go to the Google Play Status Dashboard to confirm whether that is the case. While it does not mention the Play Store, you can get an idea of its server status by checking other Play services.
Frequently Asked Questions (FAQs)
How do I update a single app on my phone?
Launch the Google Play Store, go to Manage apps and device>Update apps and hit the Update option next to the app of your choice. You can also go to the app’s page on the Play Store and update it from there.
How do I disable automatic updates for a particular app?
To disable updates for an app, go to its Play Store page, hit the ellipses at the top right corner of the screen, and uncheck the box for ‘Enable auto-updates’.
Why are my apps stuck on pending?
When you update multiple apps at once, they are put in a queue and get updated one by one. The queued apps display the ‘pending’ tag.
How to fix an app stuck on pending?
To fix apps that are stuck on pending, go to the ‘updating apps’ list in the Play Store and hit the cross icon next to all the apps except the one you want to update.
How do I go back to using an older version of a particular app?
Go to Settings>Apps, select the app, hit the ellipses at the top right corner, and select ‘Uninstall updates’.
These are the top 11 ways to fix the ‘app updates stuck on pending’ issue on the Google Play Store. A quick restart of your smartphone can help resolve this issue as well. If you know of any other ways to fix this issue, let us know in the comments!
The OnePlus 12 Series will include two smartphones: the flagship OnePlus 12 and the gaming phone OnePlus 12R.
The company will also introduce the OnePlus Buds 3 at tomorrow’s event.
The launch event will be held at Pragati Maidan.
OnePlus 12 got accidently listed on Amazon recently therefore revealing the price. Along with the OnePlus 12 India price, availability details, sale date and offer information have leaked this time. The OnePlus 12 Series is scheduled to launch in India on January 23 at Pragati Maidan, Delhi. The upcoming smartphone series will include two devices: the OnePlus 12 and the OnePlus 12R.
According to tipster Abhishek Yadav, the OnePlus 12 will launch in India at a starting price of Rs 64,999 for the 12GB RAM variant. Whereas the 16GB RAM model is likely to launch at Rs 69,999. The tipster further revealed that the OnePlus 12 will go on sale in the country from January 30. On the other hand, OnePlus 12R’s first sale in India is expected to begin in February.
Another tipster Ishan Agarwal has shared information regarding early bird offers for the OnePlus 12 and OnePlus 12R in India. According to him, on the purchase of both the smartphones OnePlus 12 and OnePlus 12R the company will be offering an Exchange bonus, Bank discount, Gift for the first 1K orders, Up to 50% off on the Protection Plan, No-cost EMI and Rs 3,000 off on the OnePlus Pad. He further revealed that the firm will provide 4 years of Android OS upgrades.
According to the report, the OnePlus 12R will be priced at Rs 39,999 for the 128GB storage option and Rs 41,999 for the 256GB internal memory model. The price of the OnePlus Buds 3 has also been tipped ahead of the January 23 launch. The audio device is likely to come with a price tag of Rs 10,499.
The report states that both the devices will go on sale from January 27.
The OnePlus 12 features a 6.82-inch quad-HD+ LTPO OLED screen. The display has an adaptive refresh rate ranging between 1Hz and 120Hz. The screen supports 4,500 nits of screen brightness. The device is IP65-rated for dust and water resistance.
The Qualcomm’s 4nm Snapdragon 8 Gen 3 SoC powers the phone. The device is offered with up to 24GB of LPDDR5X RAM and up to 1TB of UFS 4 inbuilt storage. The phone is endowed with a Hasselblad-branded triple rear camera with a Sony LYT-808 sensor, a 50-megapixel primary camera (OIS and f/1.6 aperture), a 64-megapixel telephoto secondary lens (OIS, 3X optical zoom, and f/2.6 aperture), and a 48-megapixel ultra-wide-angle lens (114-degree field-of-view). Lastly, there is a 32-megapixel front-facing camera (f/2.4 aperture) for taking selfies and video calling.
The handset houses a 5,400mAh battery with 100W SuperVOOC wired, 50W wireless, and 10W reverse wireless charging support.
Garena Free Fire is a battle royale game with regular awards and tournaments to keep players interested. If you play Garena Free Fire, you should be aware of the redeem codes that are released on a daily basis. However, because the battle royale game is banned in India, players from other countries can use the Free Fire Redeem codes daily. If you’re unfamiliar with the Garena Free Fire redeem codes or don’t know how to get them, we’ve put together a step-by-step guide to help you redeem them. Check out Garena Free Fire Redeem Codes for 22 January 2024.
The Free Fire redeem codes are a great way to get free stuff. These are 12-digit codes that contain alphabets and numbers, as well as an expiration date and time. Because the Garena FF redeem codes cannot be used more than once, you should hurry to the redemption page to claim your free reward before someone else does. To get a free reward, all you have to do is go to reward.ff.garena.com/en, which is the official redemption page. Also, keep an eye on this space for daily updates on Garena Free Fire redemption codes and rewards.
Garena Free Fire Redeem Codes Today 22 January 2024
J3ZKQ57Z2P2
P8F3QZKNTLWBZ
WEYVGQC3CT8Q
GCNVA2PDRGRZ
3IBBMSL7AK8G
B3G7A22TWDR7X
MHM5D8ZQZP22
FF7MUY4ME6SC
4ST1ZTBE2RP9
X99TK56XDJ4X
How to Get Free Fire Redeem Codes for Garena on 22 January 2024?
The device includes a 6.56-inch HD+ IPS LCD screen.
The display supports a 90Hz refresh rate.
Vivo has introduced a new smartphone in the market. The company has introduced Vivo G2 in China. The device is powered by a MediaTek Dimensity 6020 processor. It boasts a 5,000mAh battery offering 15W charging support. The phone runs on OriginOS 3 with Android 13 out of the box. In addition to this, it features a 90Hz 6.56-inch LCD screen.
Vivo G2 price and availability details
Vivo G2 has been launched in China at a starting price of CNY 1,199 approx Rs 14,000 for the 4GB RAM with 128GB storage, CNY 1,499 approx Rs 17,500 for the 6GB RAM with 128GB storage and CNY 1,599 approx Rs 18,700 for the 8GB RAM with 128GB storage option. Lastly, there is an 8GB RAM with 25GB storage model which costs CNY 1,899 approx. Rs 22,200.
The device comes in a single Black colour option. Although its availability in India and other areas is unknown at this time, the device is expected to arrive in India with a different name.
Vivo G2 specifications
Vivo G2 comes with a 6.56-inch HD+ IPS LCD screen with 720×1,612 pixels of resolution. The display has a refresh rate of 90 Hz and offers an 89.67 per cent screen-to-body ratio. The phone operates on Android 13 with OriginOS 3 skin. Under the hood, there is a 7nm Dimensity 6020 chipset with up to 8GB of LPDDR4x RAM and up to 256GB UFS2.2 storage.
Vivo G2 is backed by a 5,000mAh battery with 15W charging support. For photos and videos, a dual camera setup is provided at the back of the phone led by a 13-megapixel sensor with an f/2.2 aperture. In terms of selfies and video calling there is a 5-megapixel sensor provided on the front with an f/2.8 aperture.
Mobile gaming has transformed a lot over the years. Remember old games like Snake and Tetris that came installed on your phone? They were pretty basic, with no quality graphics. Now, mobile games are much more advanced and complex. Why is this?
Manufacturers have improved two things as time has progressed: hardware and software. Today’s handheld devices have powerful processors. These power our games and make them run smoothly.
This growth that has been witnessed in the past years can be attributed to how common mobile devices have become in our lives. Back in the old days, they were expensive and infrequently seen. But now, they are easily affordable and everyone has access to one at all times.
This is a major part of the charm of mobile gaming. The level of accessibility and convenience it provides is unmatched. But that’s far from all. According to experts, mobile gaming can have positive effects, especially on developing children from enabling socialization to improving memory and hand-eye coordination.
If we observe a few figures, mobile games made up nearly half the total video gaming income in 2022. Not to mention, the expected total value of mobile gaming is $272 billion by 2030. The mobile gaming market is speculated to keep growing. The fact that more people are getting into it every day gives game devs the motivation to push the hardware to its limit.
How Current Gaming Combines Two Realities
In recent times, since mobile gaming has expanded, upward trends have also been evident in other areas that can be linked to mobile gaming. One of these areas is online casinos which became popular amid the growth of technology and AI. They offer games a unique experience in the sense that they gain access to a live casino environment straight from their mobile screen. This blends the digital and physical aspects of the gaming world, allowing gamers to play unrestricted.
If you’ve ever visited a live casino you know that you have to use real bucks to play. But in the case of online casinos, you can use the more attractive option of cryptocurrencies like the highly popular Bitcoin as well. While this gives you better anonymity and faster transaction speeds, the option of using physical money remains open should you prefer that.
Whatever choice you make, the prizes you receive will be in the form of real, tangible money. So, playing at an online casino for real money is just like the actual experience of a live casino. As evident, gaming on mobiles through online casinos has integrated the physical values of our world like money into the digital games we enjoy.
The Golden 5G Network
The introduction of the new 5G connectivity is the latest development in the networking realm. This leap is huge and promises an equally incredible jump in mobile gaming.
5G networks have very low latency. This means the response times and speeds are great, reaching a maximum of 20 Gbps. To put this in perspective, it’s about four times faster than the 4G network.
The improved timings associated with 5G mean that you’ll be able to gain quicker access to your favorite online games. Your mobile will be able to pick up the game server and connect to it much quicker. If you’ve played online games before you’ll be aware of how significant this is in contributing to the overall gaming experience.
Handheld Trends
Some would argue that the term handheld gaming falls within the bounds of mobile gaming. They share the same characteristics as mobiles namely being portable and allowing you access to a large library of games from varying genres.
While handheld development has been going on for quite some while, it reached a new height when Valve announced its Steam Deck. This compact, yet powerful device is capable of pushing out a great adventure.
After the Steam Deck, other manufacturers followed suit and now we have multiple handheld models like the ASUS ROG Ally and the Lenovo Legion GO. Make no mistake, these are fully functioning PCs with the ability to play Android and iOS games while allowing you to go online as well.
Cloud Gaming in the Mobile World
Cloud gaming is another area of the gaming industry that has been receiving recognition lately. This feature allows you to play games from a cloud provider’s system from virtually any device you own, including your mobile phone.
This service is mostly available on a monthly subscription basis but the costs are significantly lower than building a PC or buying a console. Additionally, you’ll get access to an even larger library of games to play on your smartphone.
To name some cloud gaming services, we have Nvidia’s GeForce Now and Netboom, both of which you can install on your phone. Reports suggest the cloud gaming world could expand almost 34% within four years.
Final Thoughts
Considering the vast use of mobile devices today, the fact that mobile gaming is the top choice of gaming isn’t a shock to anyone.
The power packed into a small form factor combined with the vast number of titles available to enjoy is something unmatchable. As development continues, new tech will be brought into the mobile gaming department and it will surely surge further.
Garena Free Fire is a battle royale game with regular awards and tournaments to keep players interested. If you play Garena Free Fire, you should be aware of the redeem codes that are released on a daily basis. However, because the battle royale game is banned in India, players from other countries can use the Free Fire Redeem codes daily. If you’re unfamiliar with the Garena Free Fire redeem codes or don’t know how to get them, we’ve put together a step-by-step guide to help you redeem them. Check out Garena Free Fire Redeem Codes for 21 January 2024.
The Free Fire redeem codes are a great way to get free stuff. These are 12-digit codes that contain alphabets and numbers, as well as an expiration date and time. Because the Garena FF redeem codes cannot be used more than once, you should hurry to the redemption page to claim your free reward before someone else does. To get a free reward, all you have to do is go to reward.ff.garena.com/en, which is the official redemption page. Also, keep an eye on this space for daily updates on Garena Free Fire redemption codes and rewards.
Garena Free Fire Redeem Codes Today 21 January 2024
FYHFTY6KJ8IT67K
FIUYSGY6H67T5KY
FLUOIHMGKFO5ITK
FYMUYTYHF6YG7FQ
FNJEKR5IUTGMK8U
FEFTHY66T7U57YH
FFI8U76TARB3NM4
FKRIUYHBDN8KR58
FTUJHNGMFOIU5J6
FFGBYHRDTFGY5MK
FYHFR6TY7UY5GYJ
FBLHRT6YHFTYR6Y
FBHWEURF7Y6TGBD
FYUJTI67UJ45EO9
How to Get Free Fire Redeem Codes for Garena on 21 January 2024?
The Samsung Galaxy XCover 7 can withstand severe weather or similar hazards.
The device has also received BIS certification.
The smartphone’s screen is responsive when used while wearing gloves.
Samsung will soon launch the Galaxy XCover 7 in India. The company has not officially revealed it, but the device support page going live in the country suggests the upcoming launch. The Galaxy XCover 7 is an upgraded variant of the Galaxy XCover 6 Pro. It comes with an IP68-certified build and military-grade (MIL-STD-810H) durability. In addition to this, the new XCover Phone features Gorilla Glass Victus protection on the front panel and a 50-megapixel camera on its rear.
Reportedly, Samsung will launch its next smartphone, the Galaxy XCover 7, in India soon. The device has been listed on the device support page in the country, suggesting an imminent launch.
In November last year, the phone was also spotted listed with a model number on the BIS certification site in the country. However, the phone was announced on January 10 in Korea and is confirmed to go on sale later this month.
Samsung Galaxy XCover 7 specifications
The Samsung Galaxy XCover 7 features a 6.6-inch full-HD+ TFT display with 1,080 x 2,408 pixels of resolution. The screen supports a refresh rate of 60 Hz and comes with Corning Gorilla Glass Victus+ layering. The device, which is IP68 rated for water and dust resistance and includes military-grade (MIL-STD-810H) is designed to be shock-resistant to drops of up to 1.5m.
The phone runs on Android 14 out of the box. Under its hood, there is a 6nm octa-core, believed to be a MediaTek Dimensity 6100+ SoC with 6GB of RAM and 128GB of internal storage that can be expanded up to 1TB via a microSD card.
For photos and videos, the Samsung Galaxy XCover 7 is highlighted with a single 50-megapixel camera with an f/1.8 aperture. In terms of selfies, there is a 5-megapixel front-facing camera. The smartphone includes a customisable XCover key to enable shortcuts and improved productivity, as well as barcode scanning with Knox Capture. In addition to this, the speakers get Dolby Atmos audio support.
For connectivity, there is a USB Type-C port with Pogo pin connectors, 5G, GPS, GLONASS, Galileo, BeiDou, QZSS, and a 3.5mm audio jack. The sensors on the phone include an accelerometer, proximity sensor, geomagnetic sensor, gyro sensor, and proximity sensor. The device displays also allow for adjustments to touch sensitivity, making them easy to use for workers wearing gloves. As per the company it has been extensively tested for use with sanitizers.
The Apple Vision Pro is a 3D camera which runs on visionOS.
Users can also access content from Apple TV+, other streaming services, and 3D movies as well as play Apple Arcade games.
Apple Vision Pro made its debut at the Worldwide Developer Conference 2023 (WWDC 2023) event. Apple’s first Mixed Reality Headset will hit the stores on February 2 and is currently up for pre-orders. It was introduced at a starting price of $3,499 (approx Rs 2,88,700).
Pre-booking windows for Apple’s first spatial computer Vision Pro is now open. The Mixed Reality Headset will go on sale on February 2 across Apple Stores in the US. At first, we knew it would be available in a single 256GB variant. After it went up for pre-orders on the details page we found out that there are more storage models for the Vision Pro than just one.
As per the pre-order page, the headset will now come in the following models:
256GB of storage- $3,499
512GB of storage- $3,699
1TB of storage- $3,899
Note that before you place your pre-order for this device you need measurements for the headband and light seal and for that, you must use an iPad or iPhone with Face ID. Afterwards, you can add one of two kinds of Zeiss optical inserts, based on your vision. Zeiss insets costs:
Readers inserts cost $99
Prescription inserts cost $149
According to the information, all models are available with a year of financing through monthly Apple Card instalments.
Additionally, the Vision Pro’s AppleCare+ will cost $499. Upon taking this, the customer is eligible for “Express Replacement Service,” limitless repairs for accidental damage protection, and round-the-clock priority access to Apple professionals. To guide Apple Vision Pro users Apple has also brought a guided tour which is a nearly ten-minute video.
Apple Vision Pro comes with a single piece of laminated glass that has been three-dimensionally manufactured and gets into an aluminium alloy frame that curves to fit your face. It has a Light Seal that softly flexes so it matches your face. The headband is stretchable with padding. One can also adjust Vision Pro to fit your head using the Fit Dial.
The Vision Pro’s external battery provides up to 2 hours of use and all-day use when plugged in. The Speakers produce rich Spatial Audio while keeping you aware of your surroundings while being close to your ears. The Apple Vision Pro features a custom micro‑OLED display system with 23 million pixels. To provide personalised sound and allow you to hear your surroundings, dual-driver audio pods are placed next to each ear. Vision Pro uses audio ray tracing to examine the acoustic characteristics of your room, including the actual materials. You can see the surroundings thanks to a pair of high-resolution cameras that transfer more than one billion pixels per second to the displays.
It operates on VisionOS which supports amazing spatial experiences and is built on the framework of macOS, iOS, and iPadOS. It can be controlled with your eyes, hands, and voice. Simply glance at an element, tap your fingers collectively to select it, and then type using the on-screen keyboard or voice recognition.
iPhone 16 Pro and iPhone 16 Pro Max are likely to feature upgraded ultra-wide-angle sensors and a telephoto lens.
All the models in the upcoming series will also include Capture Button.
The physical capture button is rumoured to have a force touch sensor for pressure and touch controls.
There are still many months left before the launch of the iPhone 16 series, but the news related to it is much discussed these days. Reportedly the alleged iPhone 16 Pro and 16 Pro Max may get a Capture button. You must now be aware of the true purpose of the capture button. But as per the latest report, the Capture button will feature on all the models of the iPhone 16 series. To know more information related to this, read the full news.
Sometime ago renders related to iPhone 16 Pro and 16 Pro Max featuring a new capture button surfaced on the internet. But a new report suggests that this dedicated camera button will not only be limited to the Pro variants of the series but across the entire iPhone 16 lineup. It will be located on the lower side of the frame on the right of the upcoming iPhone series. This will enable instantaneous photo and video capturing.
Besides just capturing images it will also get more additional features. The physical capture button is rumoured to have a force touch sensor for pressure and touch controls. The new information is that it will allow users to half-press to focus and full-press to take a picture or begin filming a video. This might make taking pictures feel more like using a digital camera.
Furthermore, it is speculated to include gesture controls like swipe for zoom adjustment. It will enable users to swipe left and right to zoom in and out on the button.
Besides this, iPhone 16 Pro and iPhone 16 Pro Max are likely to feature upgraded ultra-wide-angle sensors and a telephoto lens. A 48-megapixel sensor is likely to be upgraded from a 12-megapixel sensor. Additionally, the iPhone 16 Pro is expected to come with a tetraprism telephoto camera setup similar to that of the Phone 15 Pro Max.
The triple rear camera unit on the Phone 15 Pro Max includes a 48-megapixel main camera (f/1.78 and OIS) and a 12-megapixel telephoto camera with periscope lens (f/2.8 aperture, 5x optical zoom and OIS) and 2-megapixel ultra-wide angle lens (f/2.2 aperture and 120-degree field-of-view)
Recently Samsung introduced its latest Galaxy S24 Series. The three available models are the Galaxy S24, Galaxy S24+, and Galaxy S24 Ultra. The Ultra is the elite one in the lineup therefore it is the subject of our comparison and will always face off against the Pro Max edition of the iPhone. To determine which device is best, we put it up against the iPhone 15 Pro Max. So, let’s compare each feature of the Samsung Galaxy S24 Ultra and the iPhone 15 Pro Max one by one.
iPhone 15 Pro Max: 6.7-inch Super Retina XDR display with AOD and ProMotion technology
Processor
Samsung Galaxy S24 Ultra: Qualcomm Snapdragon 8 Gen 3 SoC
iPhone 15 Pro Max: An octa-core A17 Pro chip
Rear camera(s)
Samsung Galaxy S24 Ultra: Quad rear camera setup includes a 12MP Ultra-Wide Camera (F2.2 aperture, FOV-120˚), 200MP Wide Camera (OIS, F1.7 Aperture, and FOV-85˚), 50MP Telephoto Camera (5x Optical Zoom, OIS, F3.4 aperture, and FOV of 22˚) and a 10MP Telephoto Camera (3x Optical Zoom, OIS, F2.4 aperture, and FOV 36˚).
iPhone 15 Pro Max: The triple rear camera unit includes a 48-megapixel main camera (f/1.78 and OIS) and a 12-megapixel telephoto camera with periscope lens (f/2.8 aperture, 5x optical zoom and OIS) and 2-megapixel ultra-wide angle lens (f/2.2 aperture and 120-degree field-of-view)
Selfie camera
Samsung Galaxy S24 Ultra: 12MP selfie camera (F2.2, FOV 80˚)
iPhone 15 Pro Max: 12-megapixel TrueDepth camera with an f/1.9 aperture
Starting with the form factor, both models have a distinct design that stands out. The Galaxy S24 Ultra and iPhone 15 Pro Max feature titanium alloy frames however S24 Ultra has the biggest display. Additionally, it is wide and thick and on the heavier side, well it is designed in such a way as to carry an S Pen Stylus.
The processors on both devices are incredible one of the fastest available in the market and can handle any task gracefully you throw at even high-end gaming. By the way, the Samsung Galaxy S24 Ultra includes Qualcomm’s Snapdragon 8 Gen 3 processor, whereas the iPhone 15 Pro Max comes with an A17 Pro Bionic chip.
There is a difference in the camera setup on both the phones but the biggest upgrade on the Samsung S24 Ultra is that has a new 50MP Telephoto Camera with 5x Optical Zoom and 10x zoom lossless whereas the iPhone 15 Pro Max has a 12-megapixel telephoto camera with periscope lens supporting 5X optical zoom. Samsung’s phone offers improved Nightography which is more advanced thanks to Galaxy AI which not only helps in noise reduction but also offers more stabilised videography.
The device has more AI capabilities and other features like Circle to Search and more. The Galaxy S24 Ultra has a bigger battery capacity of 5,000mAh whereas the iPhone 15 Pro Max comes with a 4,422 mAh battery. However, bigger batteries do not lead to longer endurance. In terms of charging speed, the Ultra supports 45W fast charging whereas the iPhone comes with 25W charging support. The charging speed of the iPhone is quite slow compared to the Galaxy S24 Ultra. Though you do not get a charger with both the devices one needs to buy them separately.
It’s hard to choose between two more evenly matched competitors, even if they are both legitimately high-end devices. One has several advantages over the other.
Garena Free Fire is a battle royale game with regular awards and tournaments to keep players interested. If you play Garena Free Fire, you should be aware of the redeem codes that are released on a daily basis. However, because the battle royale game is banned in India, players from other countries can use the Free Fire Redeem codes daily. If you’re unfamiliar with the Garena Free Fire redeem codes or don’t know how to get them, we’ve put together a step-by-step guide to help you redeem them. Check out Garena Free Fire Redeem Codes for 20 January 2024.
The Free Fire redeem codes are a great way to get free stuff. These are 12-digit codes that contain alphabets and numbers, as well as an expiration date and time. Because the Garena FF redeem codes cannot be used more than once, you should hurry to the redemption page to claim your free reward before someone else does. To get a free reward, all you have to do is go to reward.ff.garena.com/en, which is the official redemption page. Also, keep an eye on this space for daily updates on Garena Free Fire redemption codes and rewards.
Garena Free Fire Redeem Codes Today 20 January 2024
F7U4GGJVI8CY6TG
FGBW3REGFBI7345
FJ8FG7BSJUWYT3R
FZ7YTA5Q4RED2C3
FVBERFJUVYTSRFW
FVE4RH5TJUGVYCT
FGSWBH3J4KR5IT6
FYUGHVNCD5JSUEY
F4TG5BTNGKOIUYG
FAYQ765TRF4VBRN
FFEVDBHUA7Q6TGH
FERTY9IHKBOV98U
How to Get Free Fire Redeem Codes for Garena on 20 January 2024?
Everyone is expected to know their phone number, but it takes a long time to memorise it. If you just got a new number, the first thing you should do is save it under your name on your phone. Forgot to do that? You don’t want to be left scrambling whenever someone asks you for your number. Luckily, your phone already knows your number and can present it whenever necessary. Here are the top 6 ways to find your phone number on an Android phone.
I know what you’re thinking. Isn’t calling someone the easiest way to know your number? Well, you aren’t wrong. But what if you’re all out of talk time and need to know your number in order to top up the balance? Or maybe it is the middle of the night and you don’t want to disturb someone by calling them.
The good news is that there are a bunch of ways you can use to accomplish this task. Every method has its advantages and caters to specific situations. Every network provider these days has a proprietary app that lets you recharge your balance and do a bunch of other stuff. This app displays your number as soon as you log in. If you don’t have enough mobile data to launch the app, you can use a USSD code to check your number. Not getting enough reception in your phone to dial the code successfully? Just visit your phone’s settings to know your digits.
Find your phone number from your Android phone’s settings
Step 1: Go to Settings and select Connections.
Step 2: Tap on SIM card manager.
Step 3: This is where you’ll your SIM 1 and SIM 2 phone numbers.
Use a USSD code
Every network provider has a unique USSD code that lets you view your talk time and data balance. Once you dial this code, the resulting popup box contains all the major details related to your number. You can even recharge your number and view offers associated with it. At the top of this popup box, you will find your phone number. Here are the USSD codes from major network providers to view your number.
Airtel: *121#
Jio: *1#, *2#, or call 1299 to get a message with your number in it
Vi: *199#
Use the network provider’s official app
You can also find your phone number using the official app of your network provider. This app can also be used to recharge your phone, buy a data pack, and manage your account. Here’s what you need to do to find out your phone number. Airtel users have the Airtel Thanks app, while Jio subscribers can use MyJio to find their phone number. Upon launching the app, go to your profile to view your phone number.
Step 2: Hit your profile picture in the top right corner of the screen.
Step 3: Tap on Your info.
Step 4: Your phone number will be displayed under Contact Info.
Check your profile card (Samsung)
Step 1:Launch the Contacts app on your Samsung phone.
Step 2: Tap your name at the top of the screen.
Step 3: Your phone number will be listed under This phone.
Frequently Asked Questions (FAQs)
How do I find my phone number on my Android phone?
Go to Settings>Connections>SIM card manager on your Android phone to find your phone number. You can also use your network provider’s USSD code or official app to find your number.
How do I block my phone number (SIM)?
You can put in a request to block your phone number using your network provider’s official app. If you’ve lost your phone, visit the website portal instead. You can also visit the network provider’s physical store with the relevant documents to block the number linked to your lost or stolen phone.
Where can I see my phone number?
If you use the Google Contacts app on your phone, launch it and tap your profile picture. Go to ‘Contacts settings’ and select ‘Your info’ to view your number.
How do I find my phone number on my Samsung phone?
Launch the native Samsung Contacts app and tap your name at the top of the screen to view your number.
How do I find my phone number on my iPhone?
Your phone number is the first one listed in the Contacts app on your iPhone. You can also go to Settings>Phone and look it up in the ‘My Number’ section.
These are the top 6 ways to find your phone number on an Android phone. If you use WhatsApp, you can also find your phone number in profile settings or the groups that you participate in. Other than that, you can simply give your friend a ring and see your number displayed on their phone. Know any other way to find your number? Let us know in the comments!
The OnePlus Buds 3 will launch in India on January 23.
The TWS earphones will debut alongside OnePlus 12 and OnePlus 12R.
The company has revealed the battery life and charging specs of the TWS earphones before the official launch.
OnePlus Buds 3 is all set to launch in India on January 23 alongside OnePlus 12 and OnePlus 12R. Before India’s launch the true wireless earphones were launched in China earlier this month. However, it is anticipated that the India variant’s specs will be comparable to those of the Chinese version. But the company has revealed the battery and charging speed of the upcoming TWS.
OnePlus has scheduled a launch event in India to unveil the OnePlus 12 series in India and globally on January 23. The upcoming series will include two smartphones-OnePlus 12 and OnePlus 12R. Alongside, the firm will also introduce the OnePlus Buds 3 on the same day. Just before the launch, the firm began to disclose the specs of the TWS.
The company has confirmed that the OnePlus Buds 3 will offer 44 hours of playback time. With a quick charge of 10 minutes, it will deliver 7 hours of battery life. Apart from this, the device will be offered in two colour options- Metallic Grey and Splendid Blue.
When it comes to pricing the OnePlus Buds 3 launched in China earlier this year at CNY 499 which is approximately Rs 5,800, in China, the company is offering the phone in Clear Sea Blue and Space Grey colour options.
OnePlus Buds 3 specifications expected
As we mentioned, the specs of the OnePlus Buds 3 India model is expected to be similar to Chinese variants.
The wireless earbuds feature a 10.4mm driver. The device supports active noise cancellation (ANC) with three modes – mild, moderate, and depth. There is a transparency mode that keeps the user aware of their surroundings. It offers 94ms low latency and comes with game sound effects that can be customised as per liking. In addition to this, it has three microphones and supports LHDC 5.0 Hi-Res audio output alongside AAC and SBC Bluetooth codec.
The OnePlus Buds 3 houses a 58mAh battery. The charging case boasts a 520mAh battery and a USB Type-C port. The TWS earbuds are claimed to play for up to 6.5 hours and up to 28 hours with the case (ANC on). When ANC is turned off the wireless earphone offers up to 10 hours of playback time and runs up to 44 hours with the charging case.
Vivo is one of the few smartphone manufacturers that release their flagship series towards the end of the year. Its powerful X Series sets the bar for camera performance, throwing the gauntlet to the smartphones that follow it in the following year. Such is the case with the newly released Vivo X100 Pro as well. Launched globally in December 2023, Vivo’s flagship arrived in India earlier this month (priced at Rs 89,999). Excited to check out the exemplary cameras, we used the smartphone as our daily driver for a week. Here is our in-depth review of the Vivo X100 Pro.
Here’s what you get inside the X100 Pro’s retail package.
Smartphone
Body-coloured silicon cover
USB Type-C to Type-C cable
120W power adapter (the smartphone supports 100W wired charging)
SIM ejector tool
Warranty card
Quick start guide
The circular camera cutout that made its debut in the Vivo X80 Pro has been perfected on the X100 Pro. Instead of being aligned to the left of the back panel, it is now positioned centrally. The Zeiss branding which was previously found on the side of the camera panel is now positioned within it. A stainless steel ring with a ridged perimeter forms the frame of the two-step cutout, giving the smartphone its distinct ‘camera’ look. This feels like the final form of the camera design, after two steady years of evolution.
We used the Asteroid Black colour variant of the Vivo X100 Pro for this review. The smartphone is also available in Startail Blue and Sunset Orange shades. The matte black finish on our model made it a bit slippery, but on the bright side, there were no fingerprints to be found on the glass back panel. The smartphone weighs 225g, which is pretty standard for flagship devices, but if you’re making the switch from a midrange or budget phone, you will clearly feel the difference.
The aluminium frame has curved edges to accommodate the curved AMOLED display. The volume rocker keys and the power button are positioned on the right edge while the IR blaster and secondary microphone make their way to the top of the phone. The bottom edge houses the SIM tray, primary microphone, USB Type-C port, and speaker grille. The left edge has been left keyless.
Vivo X100 Pro’s 6.78-inch LTPO curved AMOLED display offers a maximum refresh rate of 120Hz and a peak brightness of 3,000 nits. Needless to say, the smartphone is perfectly legible under direct sunlight. The refresh rate is set to ‘Smart Switch’ (adaptable) by default, but you can lock it at 60Hz or 120Hz from device settings. While you’re there, you can also select the ideal colour profile for yourself and regulate the colour temperature of the screen.
Scrolling and navigation on this 120Hz AMOLED display is as smooth as it can get. The display is only slightly curved towards the edges, so the accidental touches are kept to a minimum. We are not super fond of curved panels, but we really enjoyed our time with this one. The overall touch reception is quite snappy. Even the slightest flicks get registered with ease. The bezels around the display have been kept to a minimum, giving you more screen real estate. Up top, the selfie camera lies inside a punch-hole cutout. The under-display optical scanner is positioned a bit lower than we would have liked and isn’t the fastest one around, but it does a good job on the device.
Watching HD movies and videos on this 1,260 x 2,800p display proved to be a remarkable experience. The deep blacks are astonishing and the contrasting vivid colours are punchy and fun. The curved nature of the display does not diminish the viewing angles in any way. You can hold the smartphone in any posture and still get well-composed images that truly ‘pop’. While binge-watching videos, the top-heavy nature of the smartphone can make it fatiguing to hold, but you can easily prop it against a solid surface.
Vivo X100 Pro is rated IP68 for water and dust resistance. This means it can easily survive water splashes and even small dips. Vivo claims the smartphone can remain unscathed after submerging to 1.5m for up to 30 minutes.
Vivo X100 Pro review: Performance and Cameras
The X100 Pro is the first smartphone in India to be powered by the MediaTek Dimensity 9300 SoC. This chipset is a direct rival to Qualcomm’s Snapdragon 8 Gen 3. Interestingly, the latter is found in iQOO 12 (read our review here), which happens to be Vivo’s subsidiary brand. Accompanying the Dimensity 9300 SoC is Vivo’s V3 chip which pulls its weight in photoprocessing and gaming duties. The smartphone is available in a single 16GB RAM + 512GB storage variant.
As soon as we got the Vivo X100 Pro for review, we transferred all our apps to the smartphone and loaded a dozen of them to check its RAM performance. The device did not take any time to load the apps after a period of inactivity. We were able to pick things up right where we left off. Basic tasks like instant messaging, web browsing, video calling, navigation, and media playback present no problems whatsoever. Since this is a camera smartphone, we tried editing the videos we shot on it and were delighted to see how easily it crushed every task.
Vivo X100 Pro is not a gaming smartphone. But when you’re paying Rs 90,000 for a device, you expect a high standard on every front. With that in mind, we played titles like Call of Duty Mobile, Genshin Impact, and Asphalt 9 on the device. Even after an hour of gaming, the internal temperature of the smartphone did not rise to a point where we had to put it down to cool off. The surrounding temperature is also a contributing factor here (we are in the thick of winter, after all), but all things considered, the X100 Pro does a good job of thermal management. The V3 chip is a nice addition to the smartphone, as it does its part in bringing smoothness to the gameplay and handling demanding graphics.
In the Geekbench 6 CPU benchmark, the Vivo X100 Pro scored 2,199 points in the single-core test and 7,301 points in the multi-core test. In comparison, the iQOO 12, powered by the Snapdragon 8 Gen 3 SoC, scored 2,219 and 6,696 points respectively.
Moving on to the software, the Android 14-based Functouch 14 OS does a good job on Vivo’s flagship smartphone. We like the extensive set of Dynamic Effects that the Funtouch OS provides for screen transitions, phone unlock, fingerprint icon, charging, USB insertion, and ambient light notifications. The smartphone also has a ‘Simple Mode’, that covers the home screen with tiles for all the essential functions and increases the font size. The bloatware has been kept to a minimum, but it still isn’t a good look on a smartphone that costs Rs 90,000.
Supplying the smartphone with its juice is a 5,400 mAh Li-Ion battery pack. This battery pack is composed of 2 individual cells. A battery capacity of 5,400 mAh is new for flagships, but Vivo X100 Pro is still a one-day phone. This isn’t a complaint by any means, as we got a steady 6-7 hours of screen time out of it until it hit the 20% threshold. On more conservative usage, we were able to push the screen time to more than 10 hours. Vivo ships a 120W charging brick with the X100 Pro even though its wired charging support is capped at 100W. It took a little over half an hour to fully charge the smartphone.
Let’s talk about what the Vivo X100 Pro does best – cameras and photography. The massive camera cutout at the back of the smartphone houses three 50MP sensors for the wide, ultrawide, and floating telephoto lenses. On the left side of the panel lies the Zeiss 1-inch main camera which gets the Sony IMX989 sensor. The ultrawide camera is positioned at the top while the Zeiss APO floating telephoto camera is placed to its right. The new generation of Zeiss T* coating reduces reflectance from the lenses and brings new clarity to the images.
The 1-inch primary shooter is an absolute delight to use. In daylight conditions, the camera captures accurate colours and the V3 chip does a solid job of processing the images. Most of the shots we captured were taken in overcast conditions (you can thank the January winter for that) and the smartphone did well to expose the sky perfectly. The colours were tuned perfectly, doing justice to the scene in front of us.
We were happy with the dynamic range produced in the images. The shadows were detailed and the dimly lit parts of the scene were processed without being overblown by artificial brightness. This is largely due to the 1-inch sensor which captures a lot of light and doesn’t rely too heavily on photoprocessing. A similar performance is replicated in limited lighting, where the Vivo X100 Pro performs brilliantly even without the Night Mode turned on. We were surprised by the sharpness of images taken at night and the way the natural colour of objects was produced in the resulting images.
Ultrawide shot
Photos taken with the 50MP ultrawide sensor are sharp, well-composed, and pack a good amount of details. If you’re tired of most ultrawide sensors taking ‘soft’ pictures, you may want to switch to the X100 Pro. Even at night, this sensor produces great results, with accurate colours and incredible detail. The autofocus skills of this camera are also on point. We wish it could cover a wider field of view, but we would take detailed images over that any day.
Ultrawide shot
The 50MP floating telephoto camera rounds off an already great camera module in style. It offers 4.3x optical zoom and 100mm equivalent focal length. This range comes in very handy while taking portrait shots from a distance. At 4.3x native zoom, the X100 Pro expertly manages to create the ideal depth effect and apply the appropriate background blur. There is a nice separation between the subject and the background as well. Zooming in further to distant objects produces good results, albeit with the help of smart photo processing. To test the limits of the periscope telephoto lens, we zoomed it at a board roughly 300 metres away. Even in foggy conditions, the camera did a stellar job of producing legible results.
4.3x optical zoom with the telephoto lens1x vs 4.3x
Being a camera-centric smartphone, Vivo X100 Pro’s camera app offers a plethora of shooting options. To begin with, you get to choose from 3 shooting profiles – Vivid, Textured, and Zeiss Natural. The Astrophotography Mode is nestled away in the adjacent page along with Zeiss’ landscape and architecture mode. In portrait mode, the camera lets you choose from 5 focal lengths – 24mm, 35mm, 50mm, 85mm, and 100mm. You also get a bunch of bokeh flares and portrait effects for your shots. Super Macro mode is one of the underrated features of the camera setup. The textures we were able to capture in this mode were amazing.
10x vs 63x35mm portrait vs 100mm portrait
Up front, the 32MP selfie camera does a good job of capturing the appropriate amount of details. It doesn’t mess with the skin tones or textures too much, but there are manual controls which let you control the smoothness of the photos. The downside of this camera is that it can only record 1080p videos. Meanwhile, the main rear sensor can shoot 8K videos at 30fps. The ultrawide and telephoto lens can shoot 4K & 1080p videos at 30 and 60fps.
Some more portrait shots4.3x optical zoom with the telephoto lens
With the X100 Pro, Vivo has produced one of the best camera smartphones in the flagship category. Of course, there are many more releases yet to come this year, but we can easily see this smartphone holding its own even among the more premium flagships. While camera performance is consistently good across the board, the portrait shots taken with the primary and telephoto lenses are some of the best we’ve seen on any smartphone. Photography chops aside, the smartphone justifies its Rs 90,000 price tag with its high-octane chipset. The supreme benchmark figures are backed up with a rock-solid performance day in and day out. During the week-long review period, the Vivo X100 Pro did not produce a single hiccup. Lastly, the unique camera cutout and glass back bring a lot of flair to the device, making it a very easy device to recommend.
The gaming earphones come with a latency rate of less than 30 milliseconds.
The device provides an immersive gaming experience for PC, mobile, and console gameplay.
Popular audio brand Sony has officially announced the launch of new gaming TWS earbuds in India. Sony Inzone Buds truly wireless stereo earphones that have been introduced today have an in-ear design equipped with 8.4mm drivers. Moreover, wireless gaming earphones support active noise cancellation (ANC). As these were designed with gaming in mind, they come with a latency rate of less than 30 milliseconds. The audio device is claimed to provide up to 12 hours of battery life.
Sony Inzone Buds price in India and availability
The Sony Inzone Buds price in India is set at Rs 17,990. The TWS earbuds will be available for purchase via Sony retail stores (Sony Center and Sony Exclusive), the www.ShopatSC.com portal, major electronic stores, and other e-commerce websites in the country starting January 22. The earphones will come in two colour options- Black and White.
Sony Inzone Buds specs, features
Sony Inzone Buds have been created in collaboration with the famous esports team Fnatic. The gaming earbuds feature 8.4mm drivers and come with active noise cancellation and personalised spatial sound. The device is said to provide the industry’s longest battery life, up to 12 hours on a single charge and 12 hours with a case. It is powered by a low-consumption L1 processor. A quick 5-minute charge delivers up to an hour of playtime.
Sony Inzone Buds support 2.4 GHz wireless connections through a USB Type-C dongle, ensuring low-latency connectivity for gaming. It has a latency rate of less than 30 milliseconds. Additionally, they are compatible with Bluetooth LE audio using the codec LC3. Note that traditional Bluetooth codecs, including SBC, AAC, aptX, and LDAC, are not supported. In addition to this, there is an AI-assisted microphone that ensures clear communication during gaming. It also comes integrated with an advanced AI DNN algorithm crafted from over 500 million voice samples. This technology distinguishes and amplifies the user’s voice as a result of enhanced in-game communication, allowing gamers to be heard with exceptional clarity, and contributing to an immersive and engaging gaming experience.
For better control, the TWS has customisable tap functions. This allows players to access vital controls with a simple touch, like adjusting in-game volume, managing music playback, or activating personalised settings through the INZONE Hub.


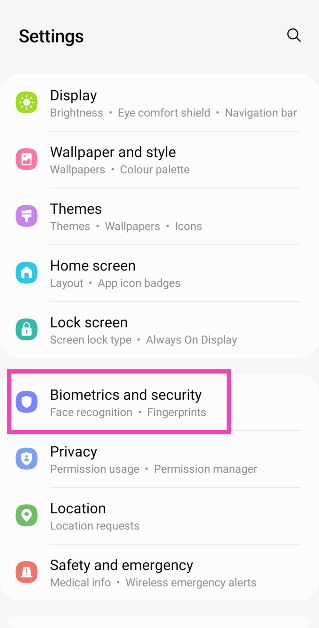
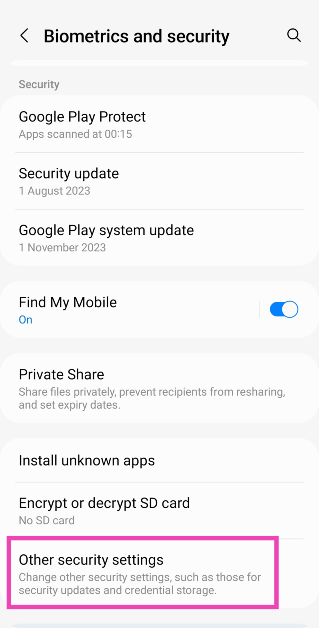
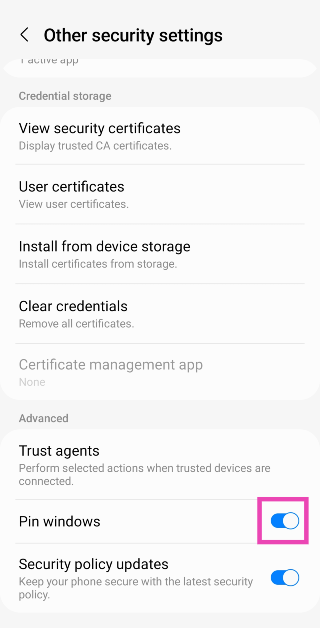
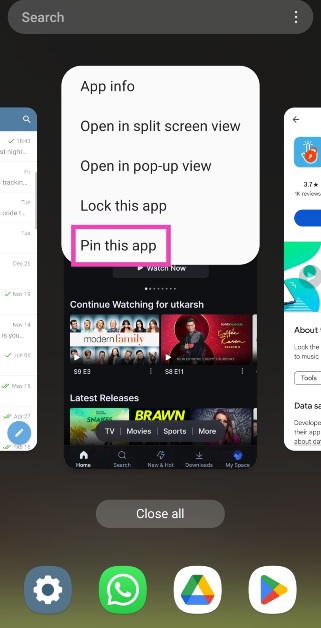
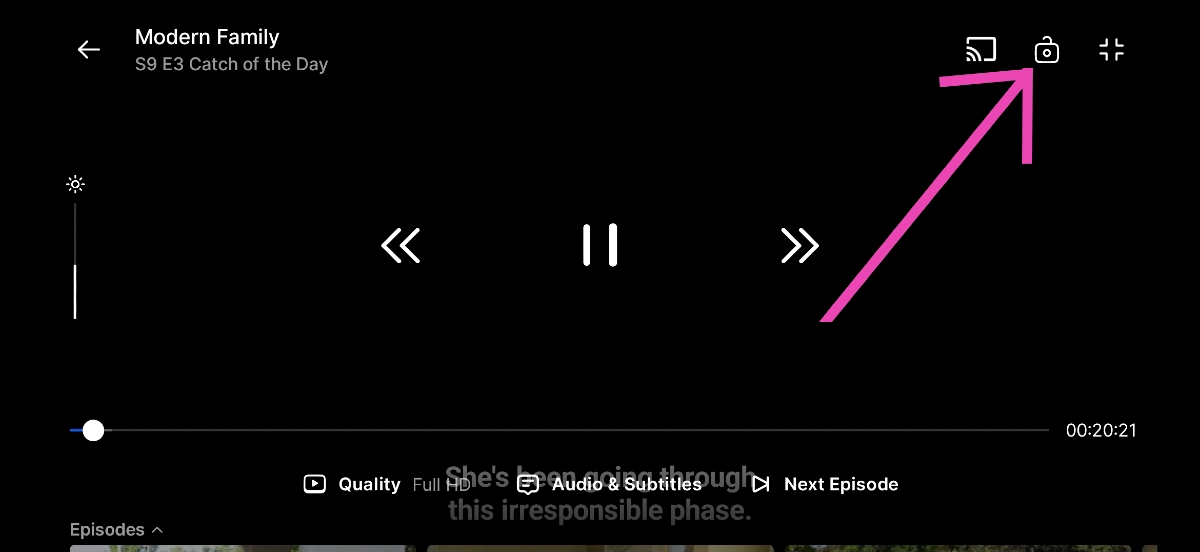
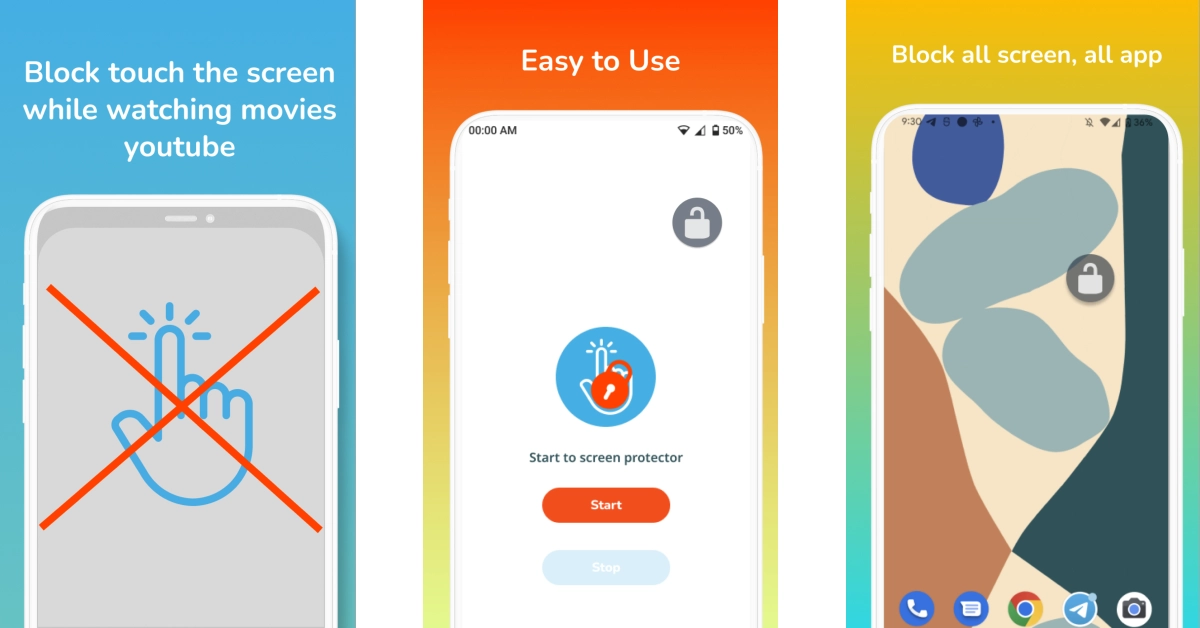
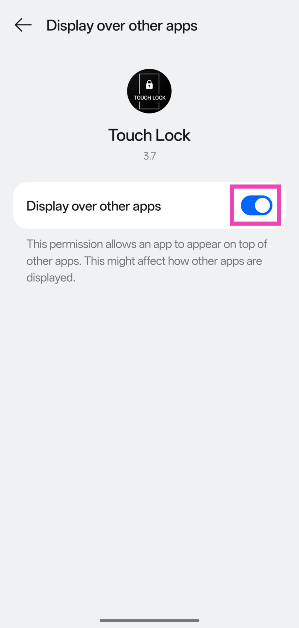
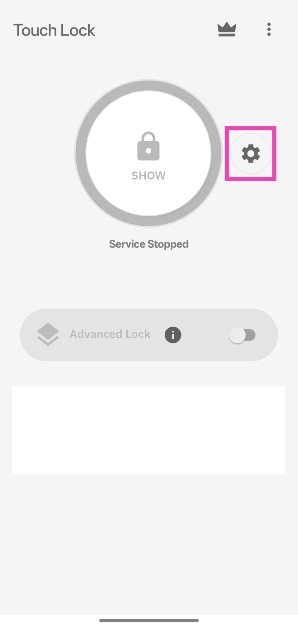
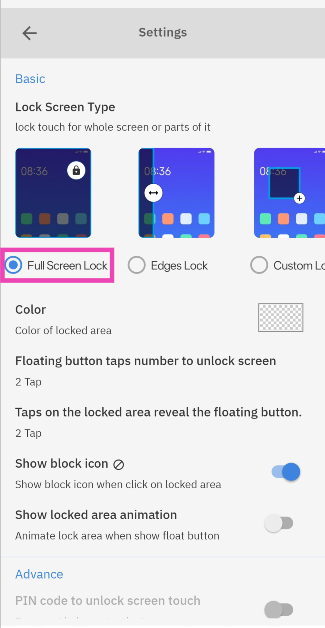


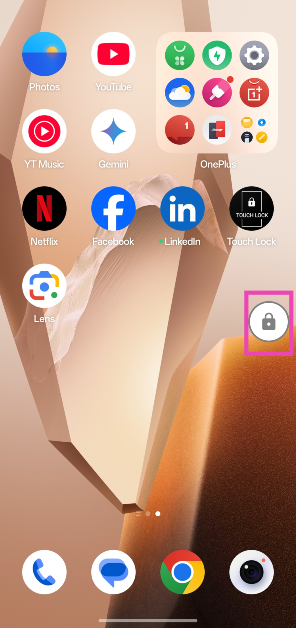

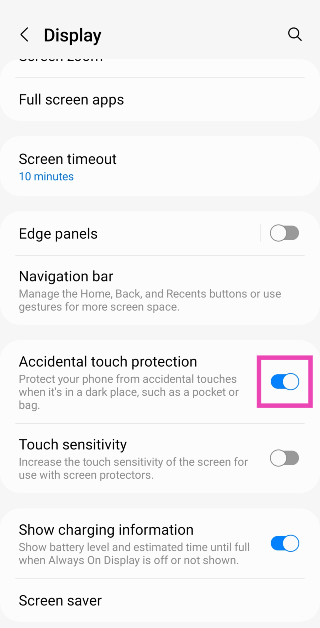

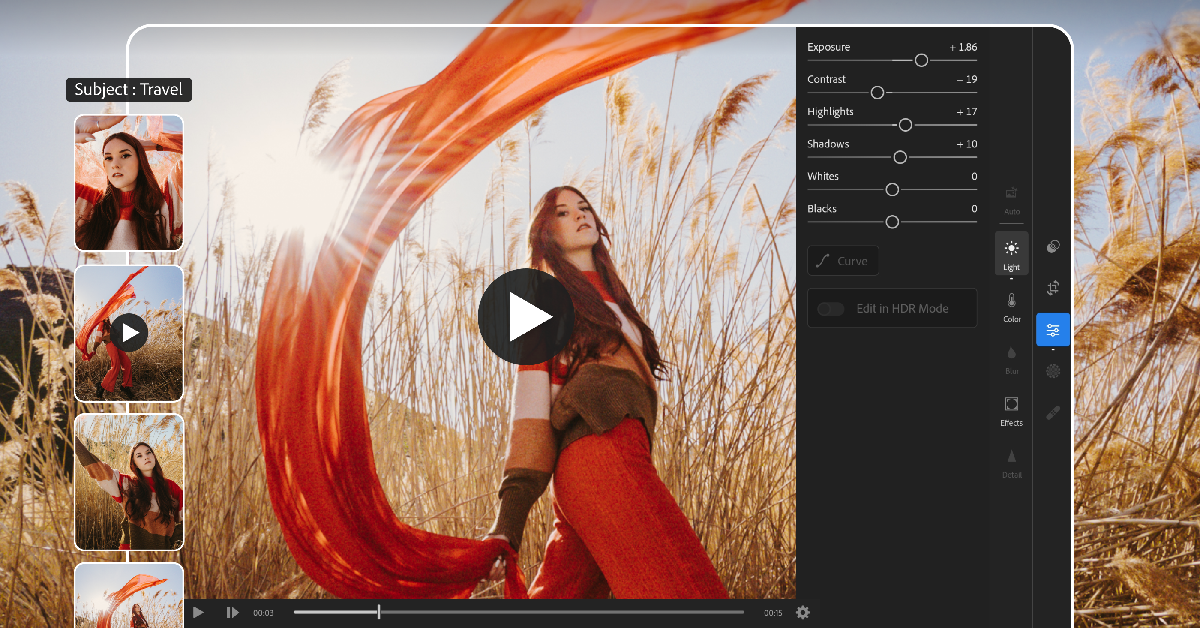
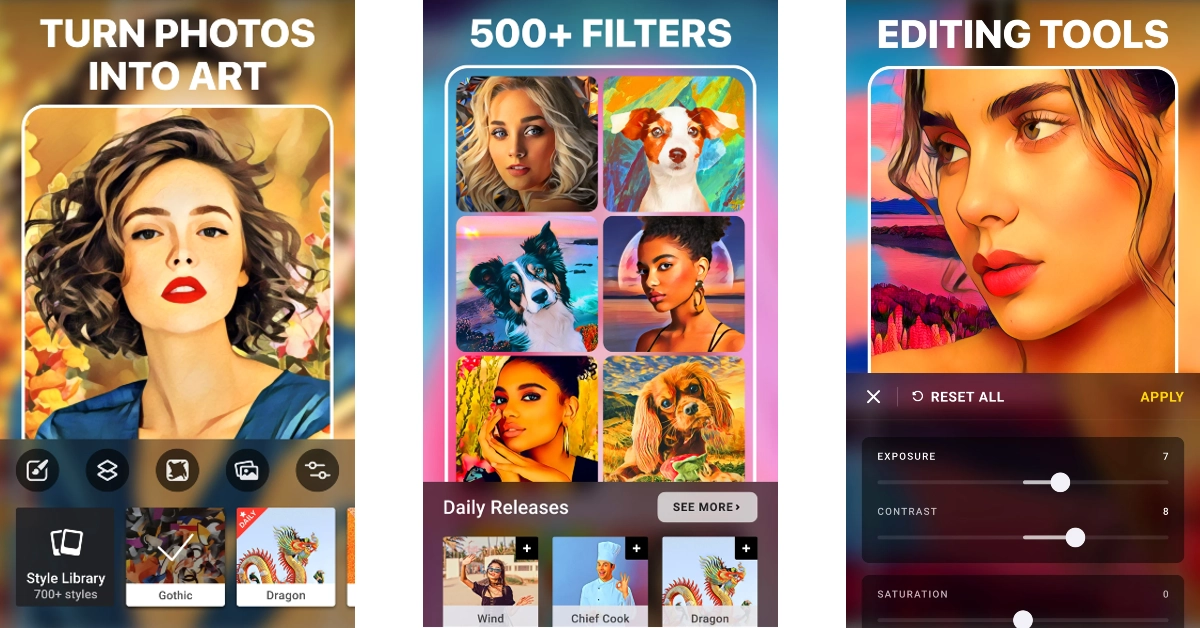

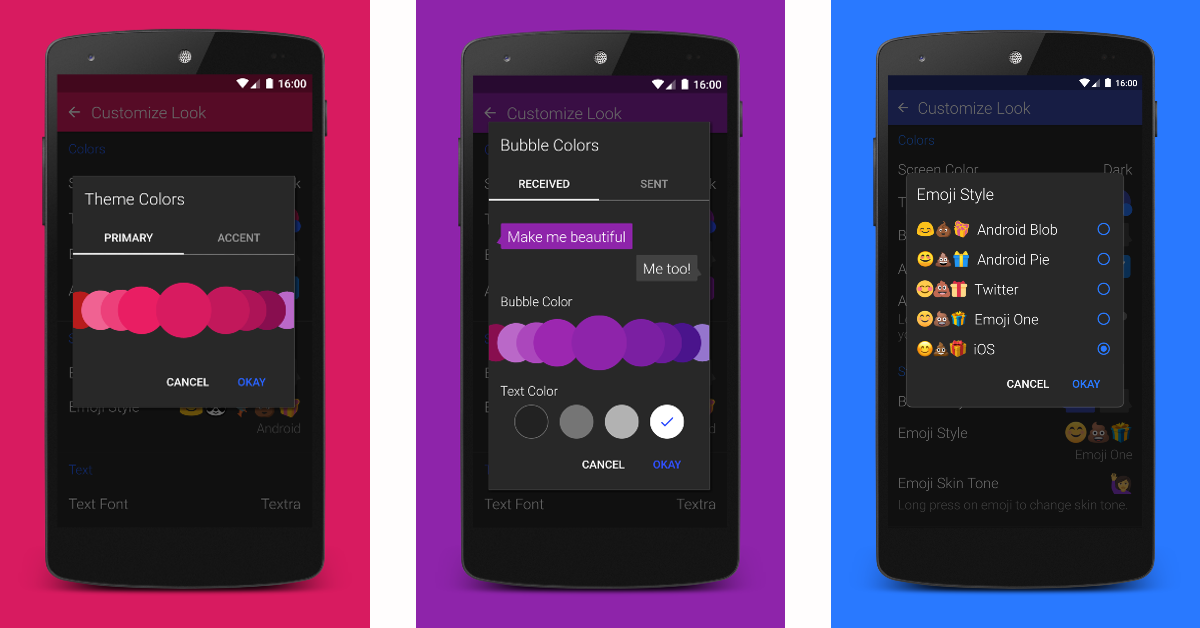
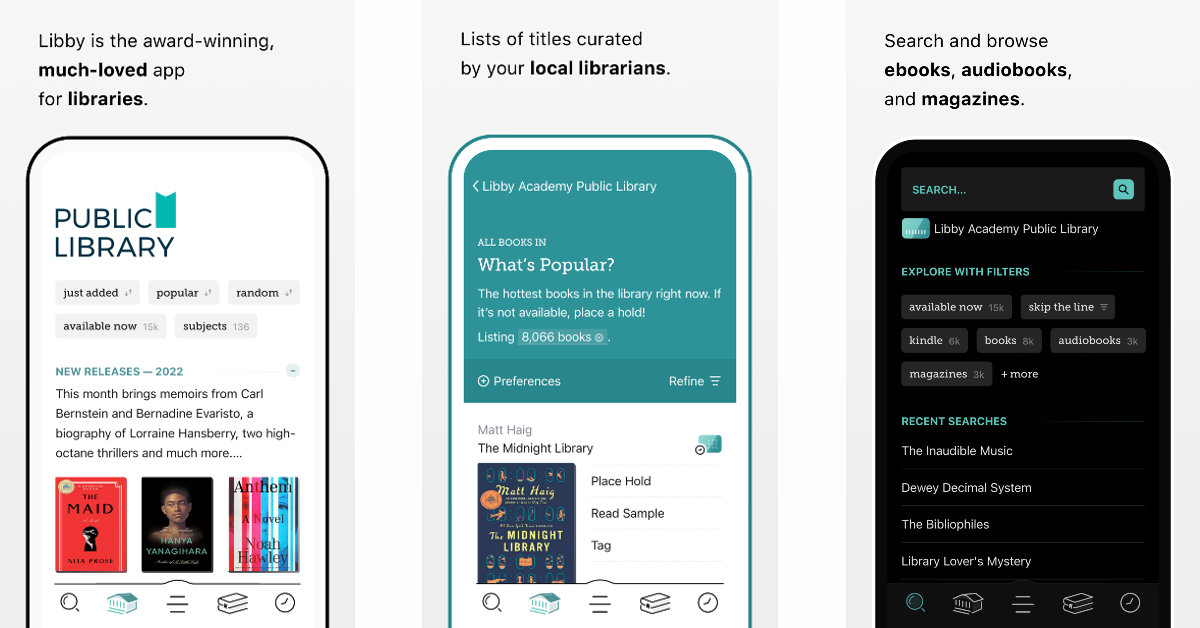
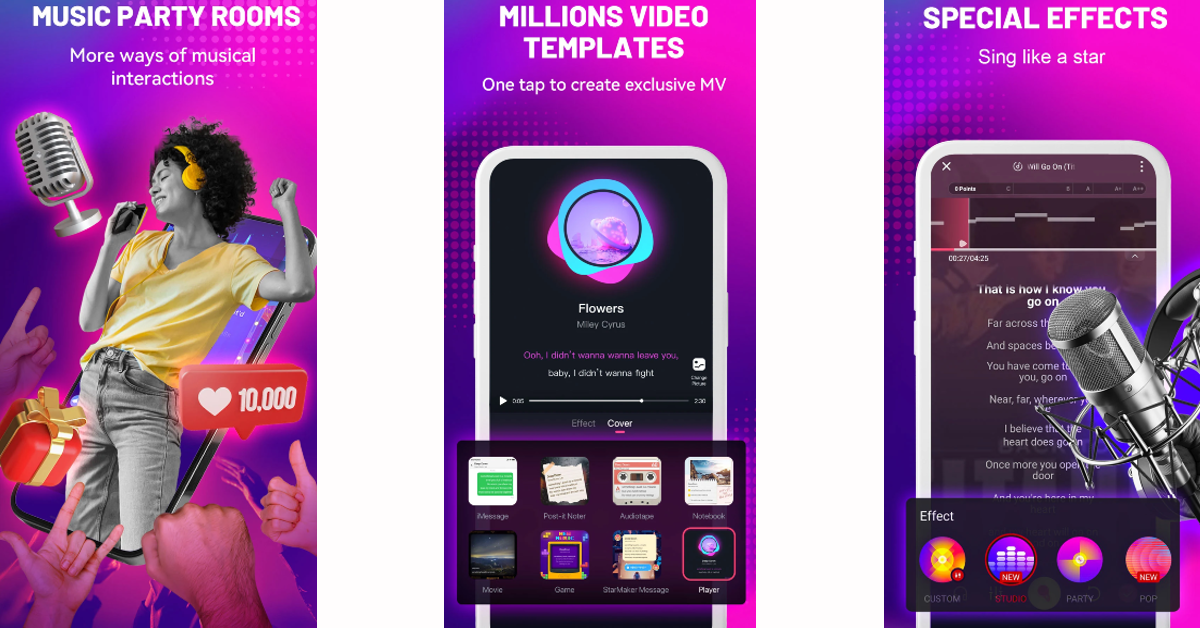
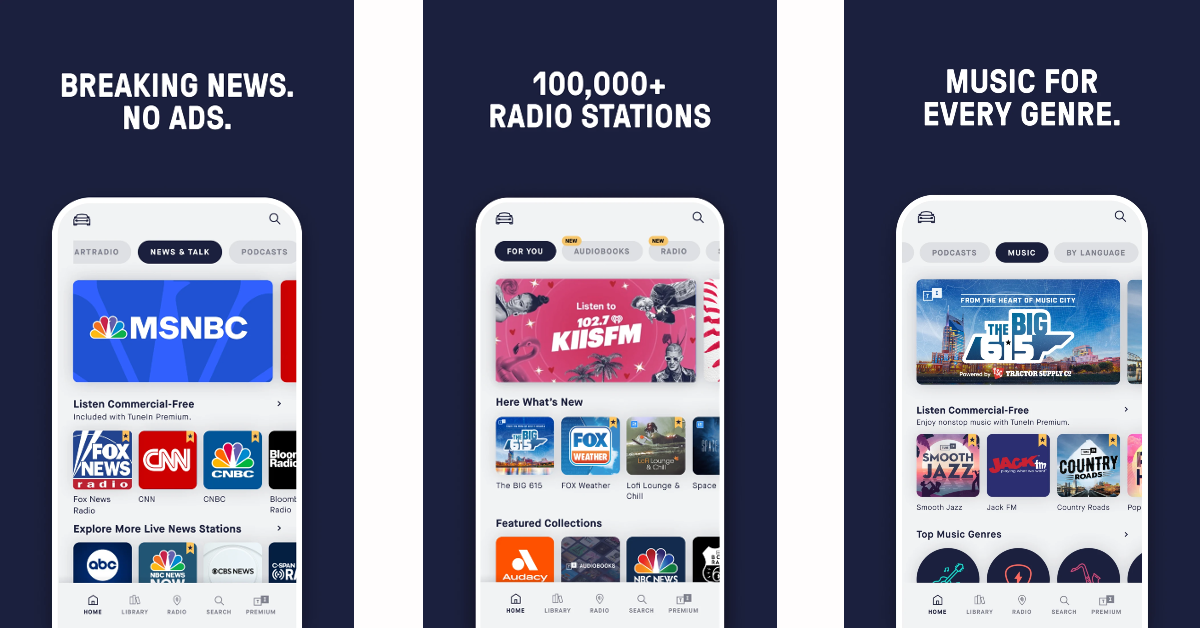
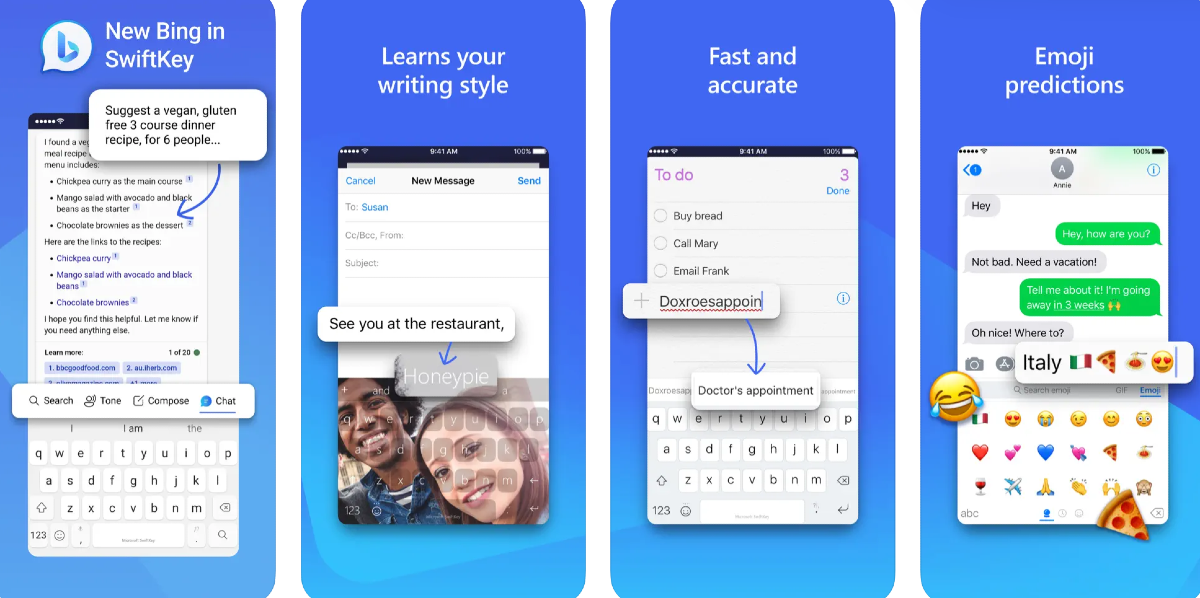
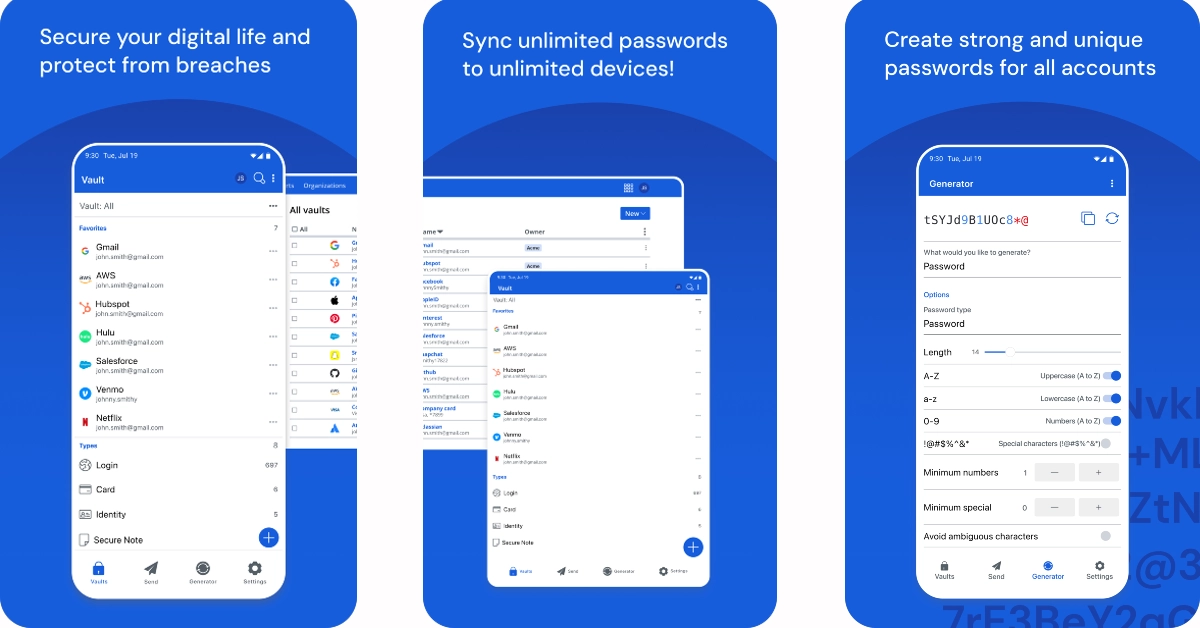

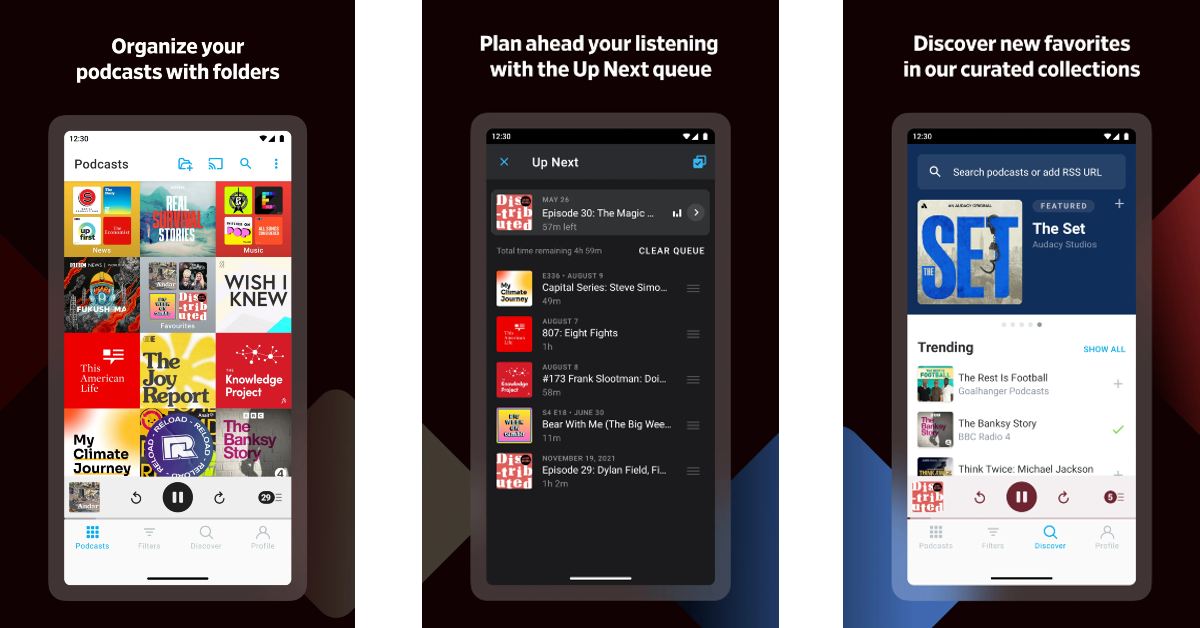

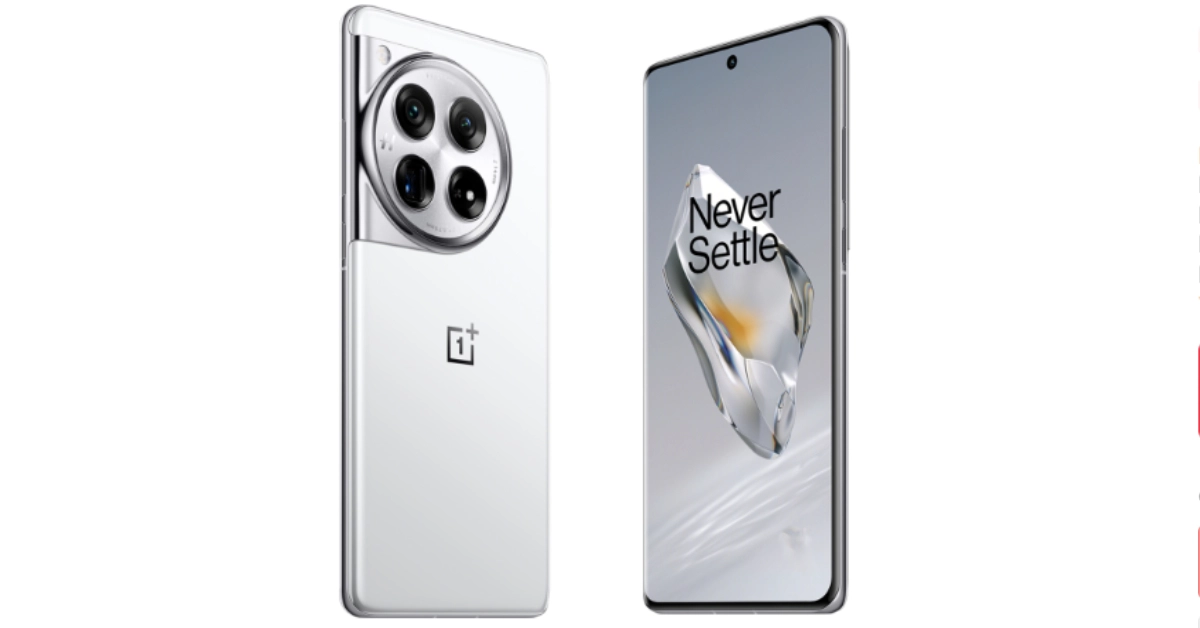


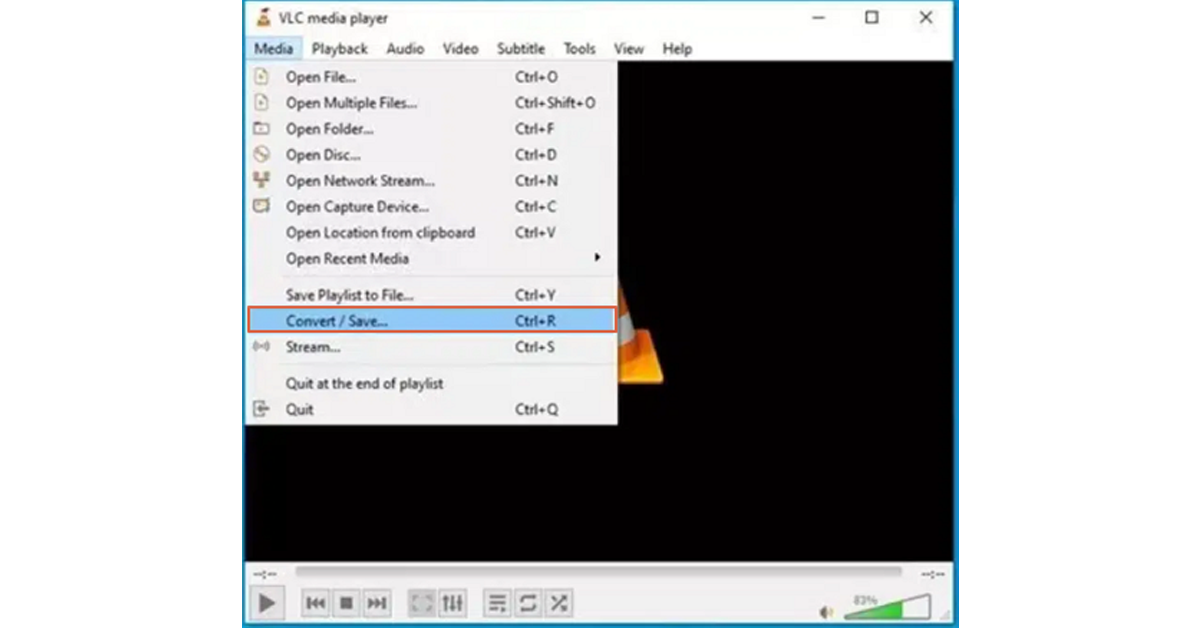
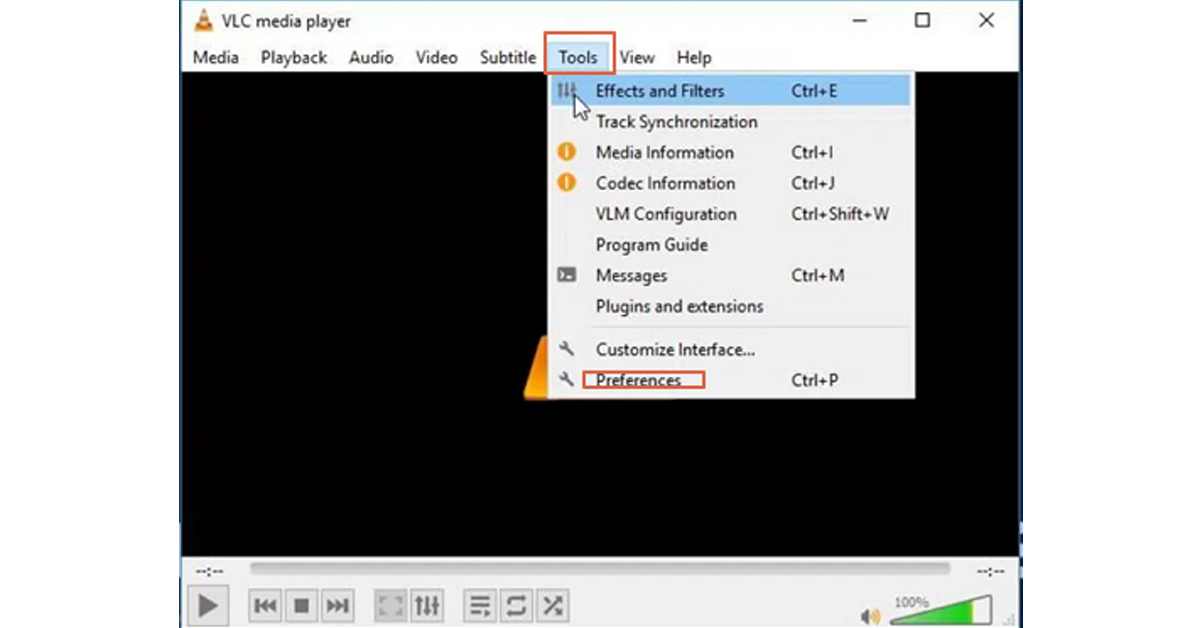
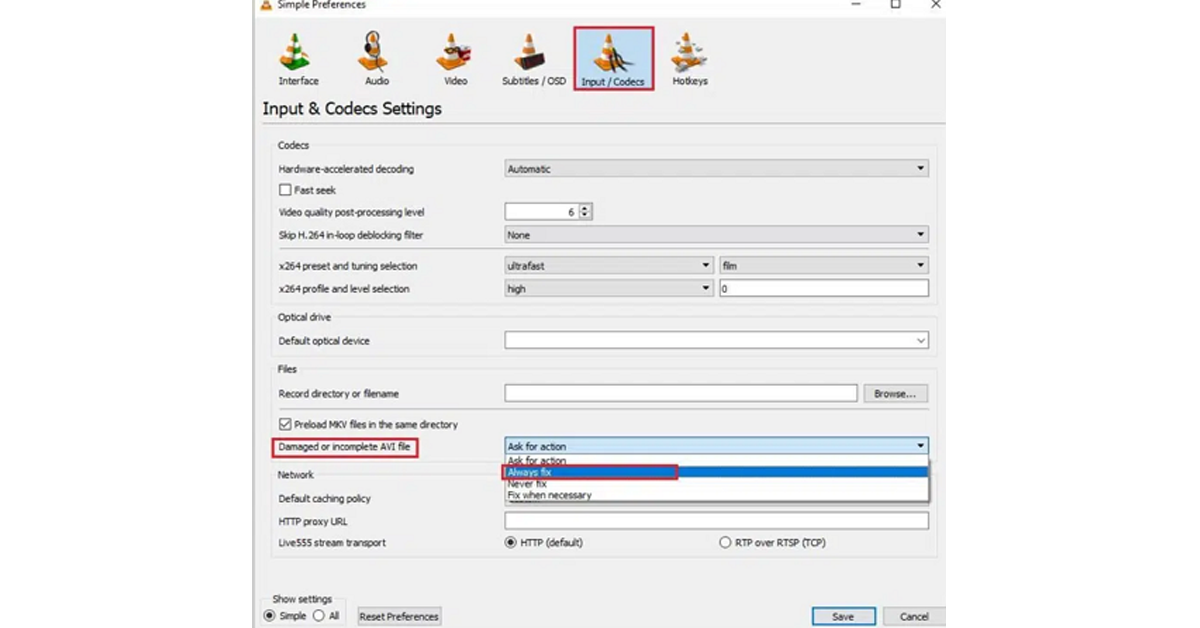

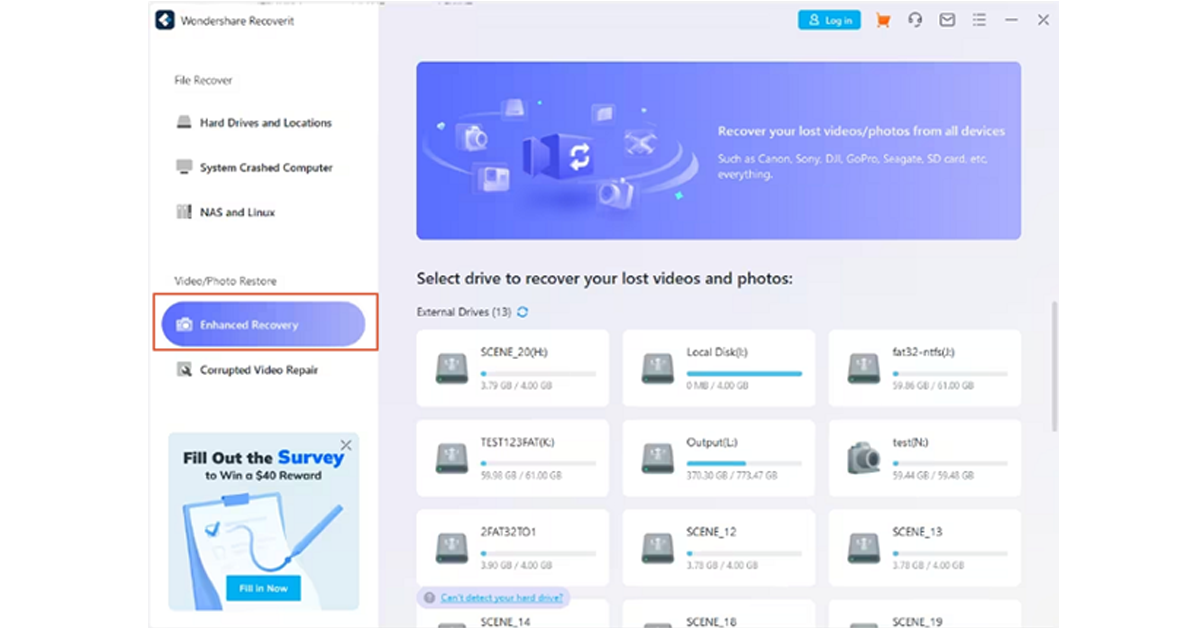
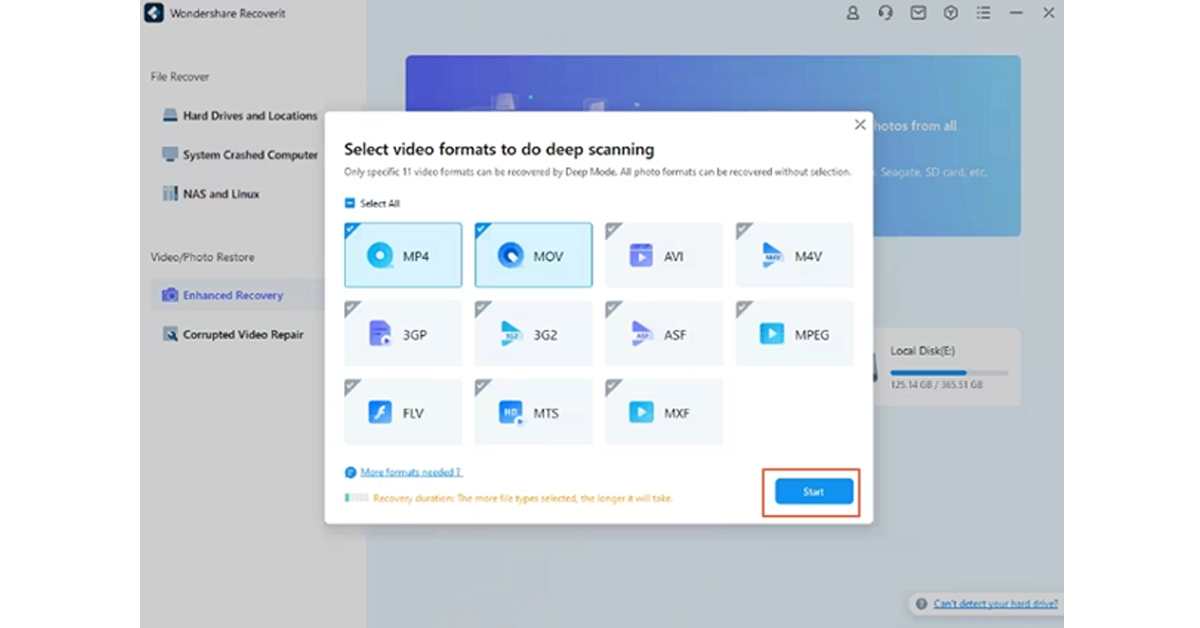
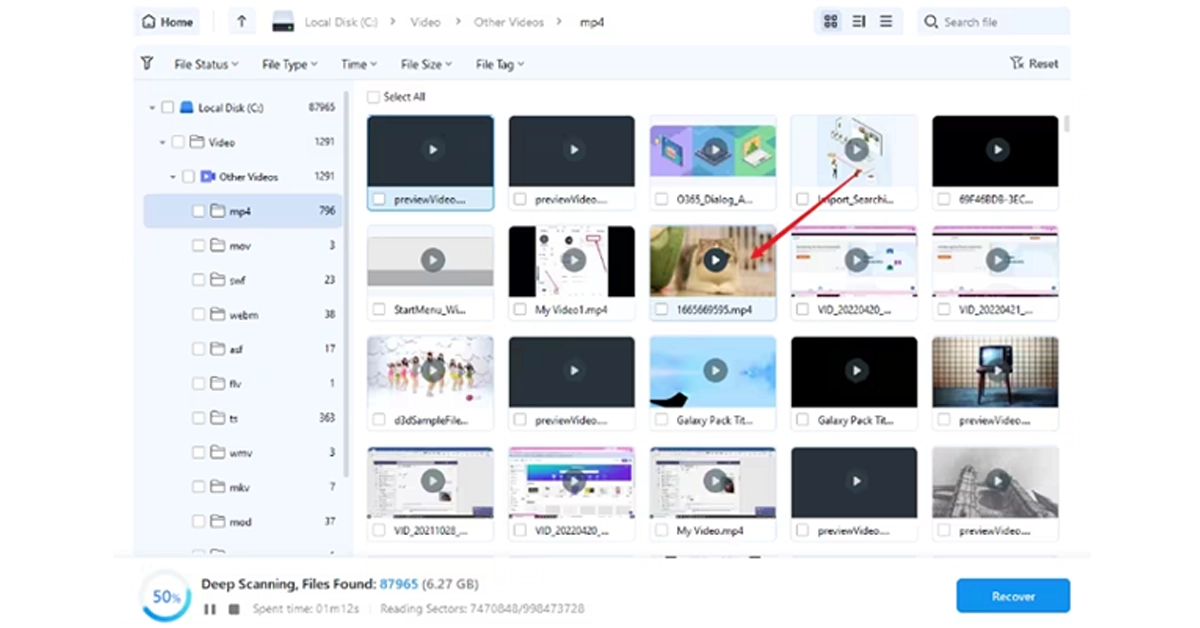

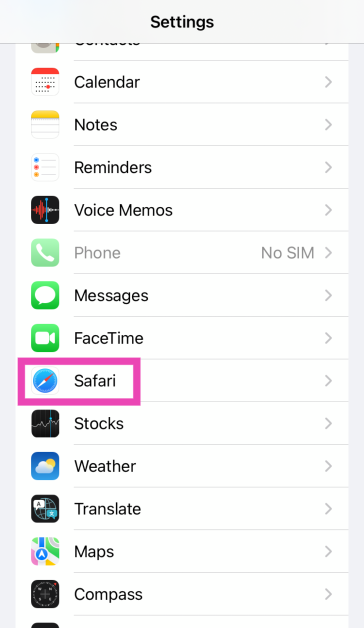

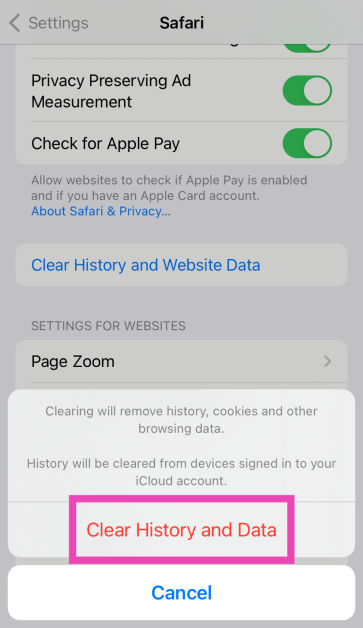
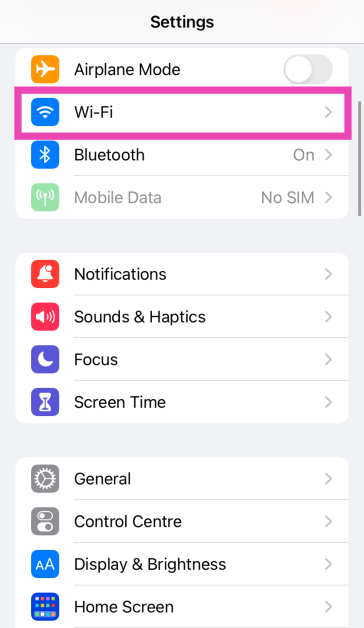
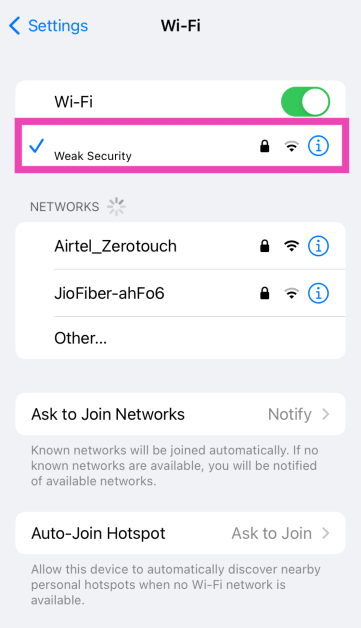
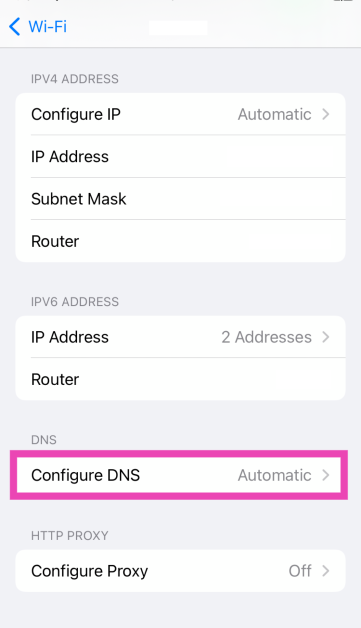
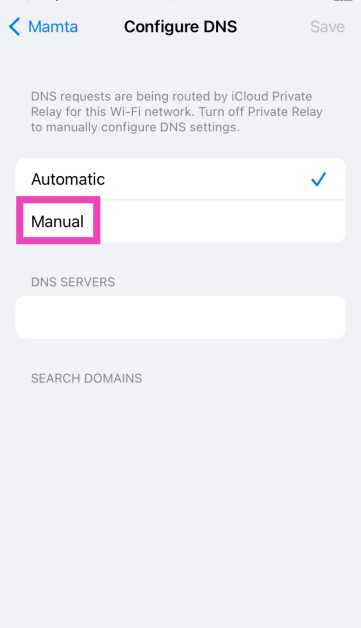
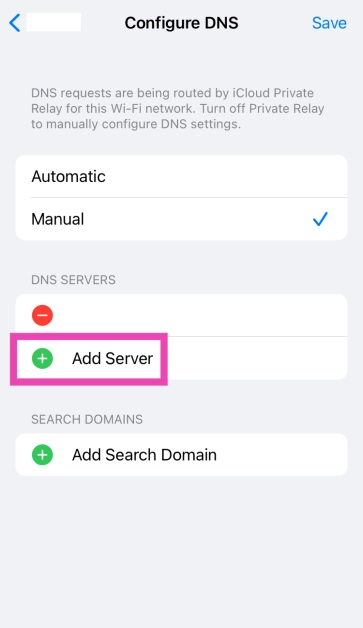
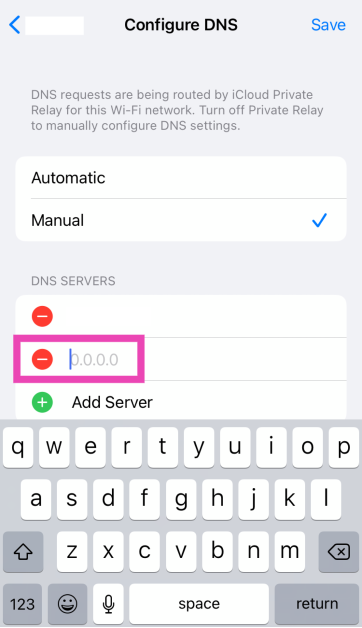
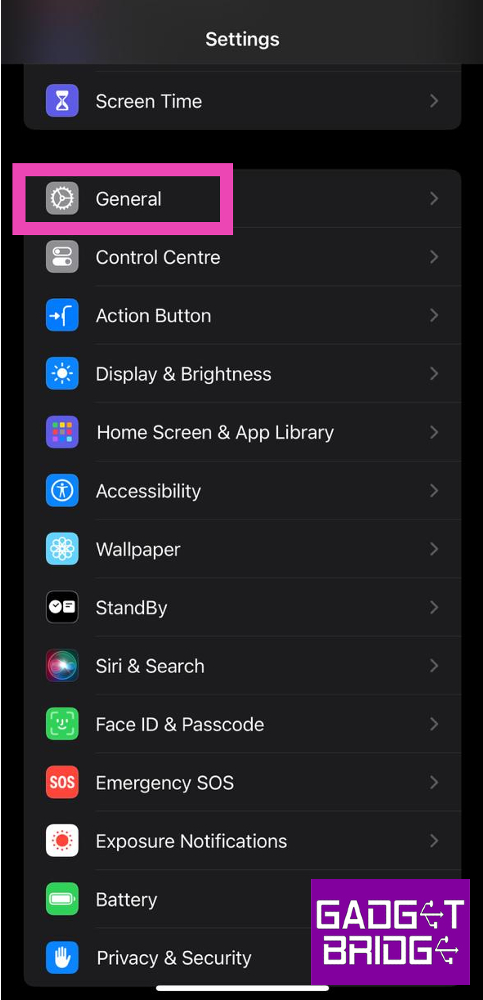
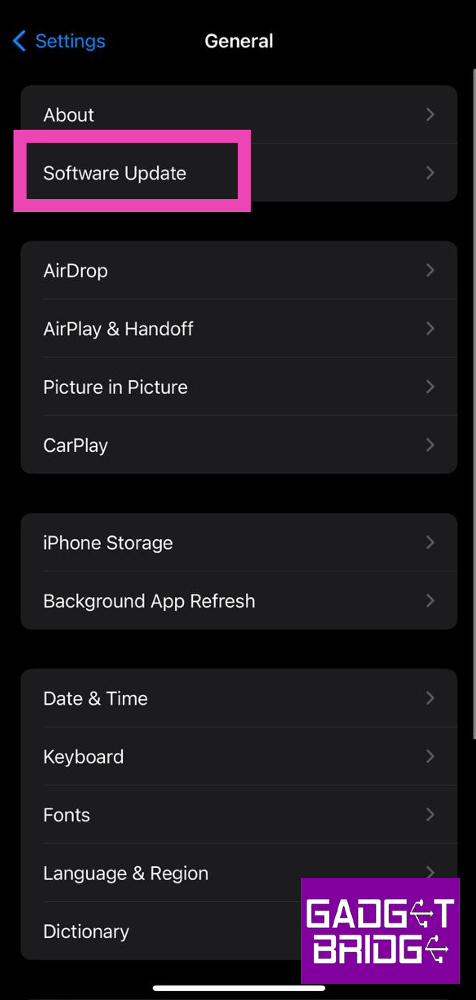


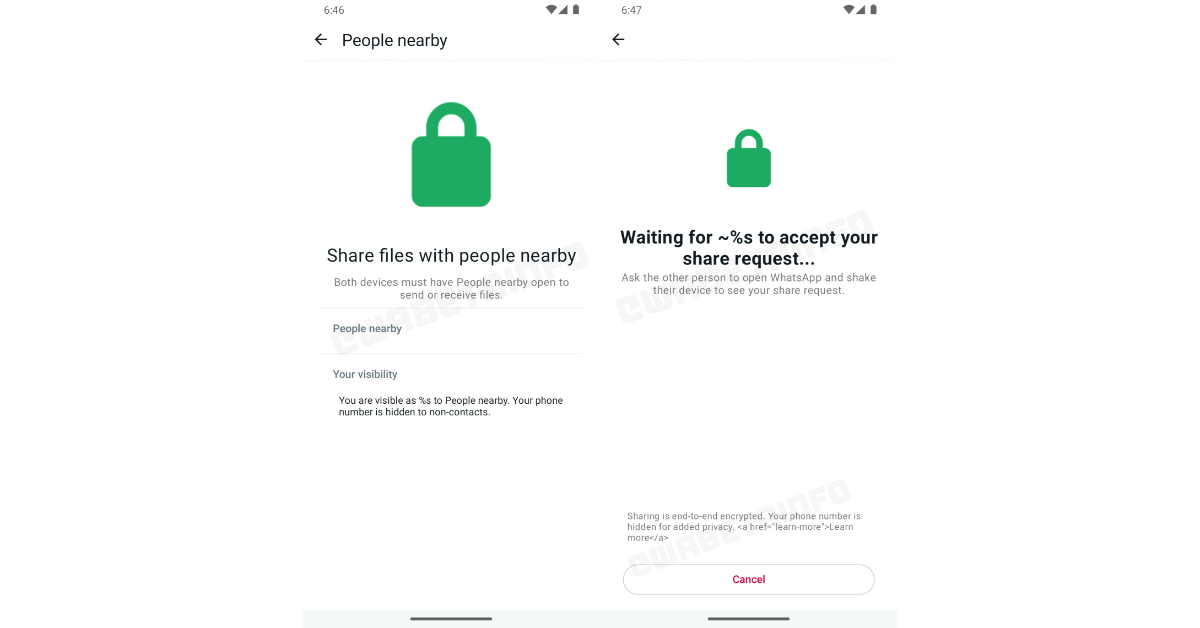


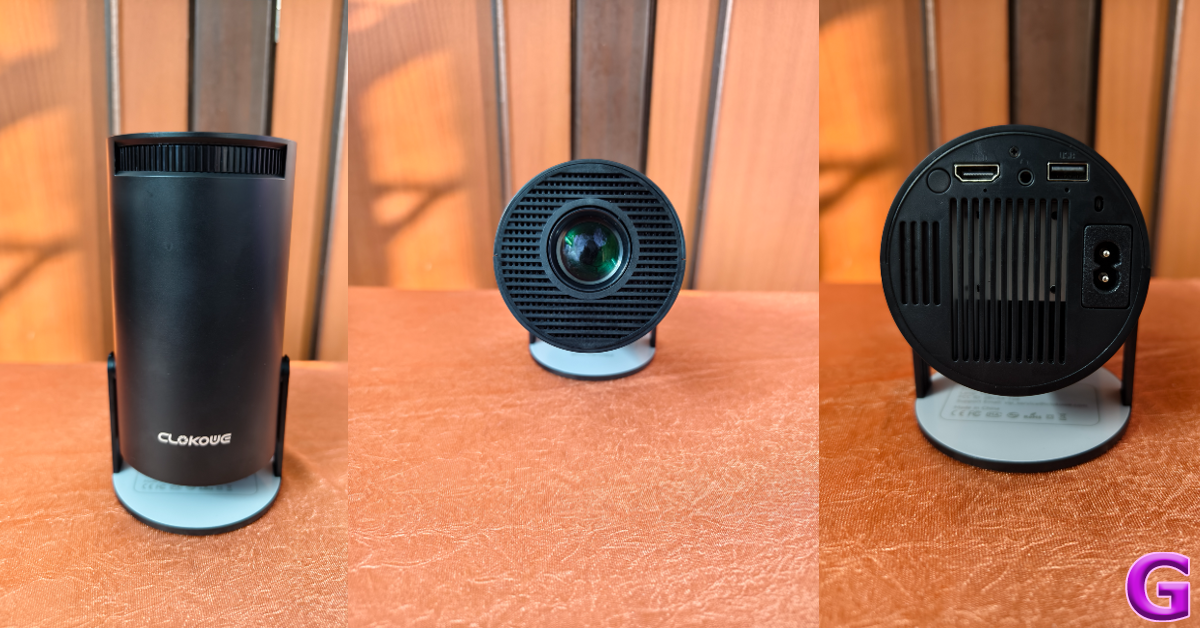
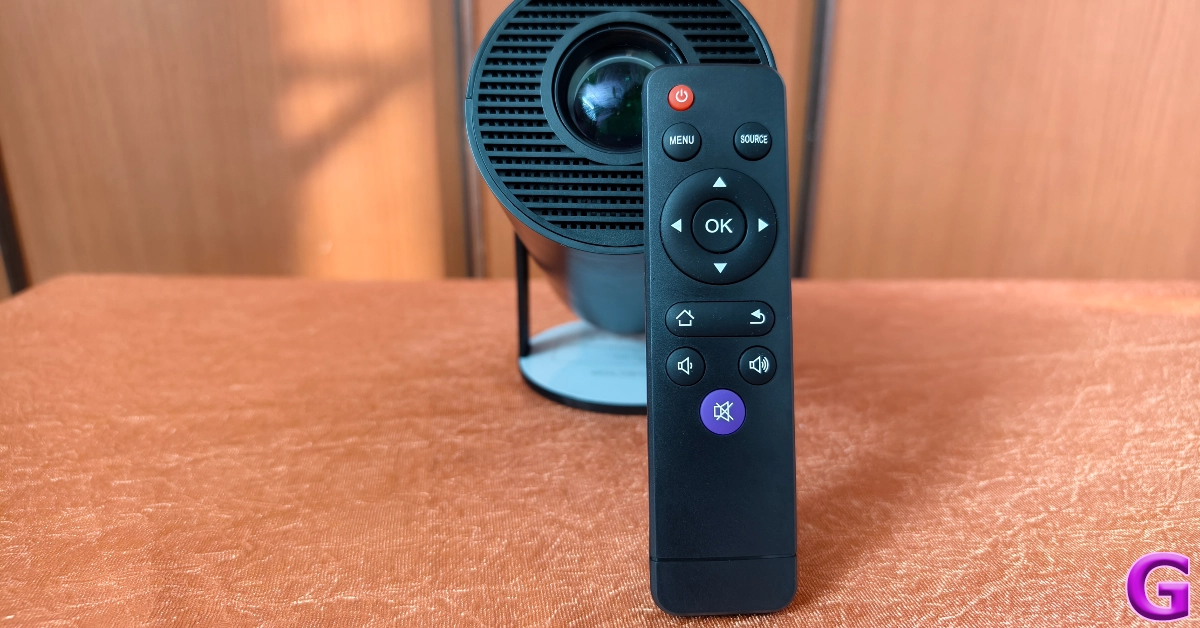
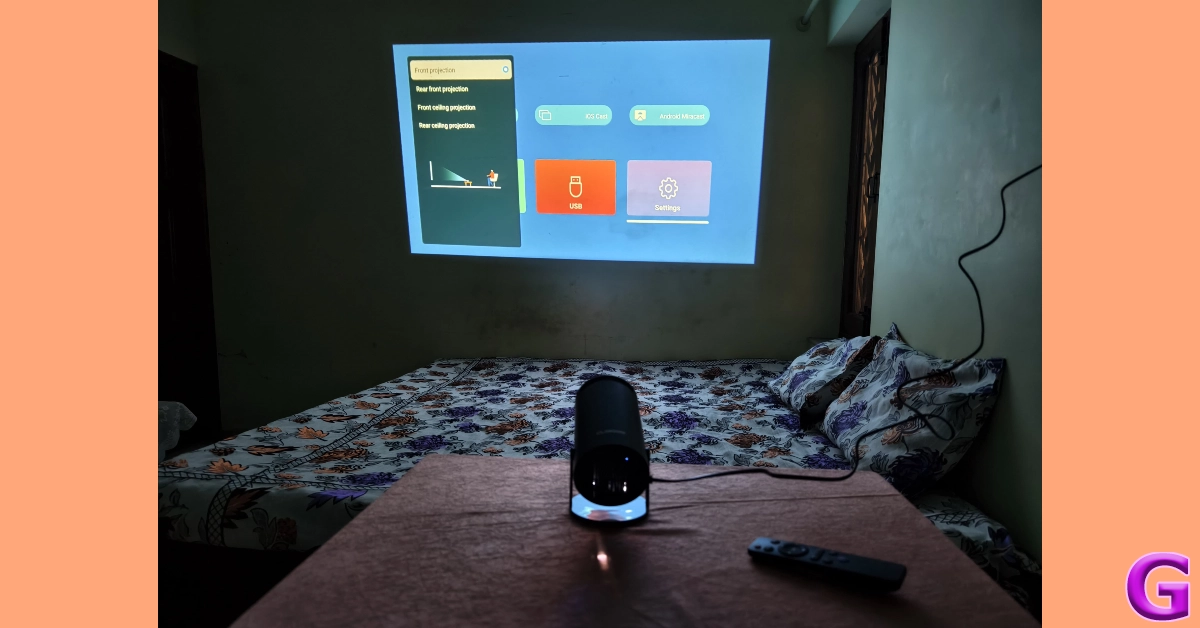
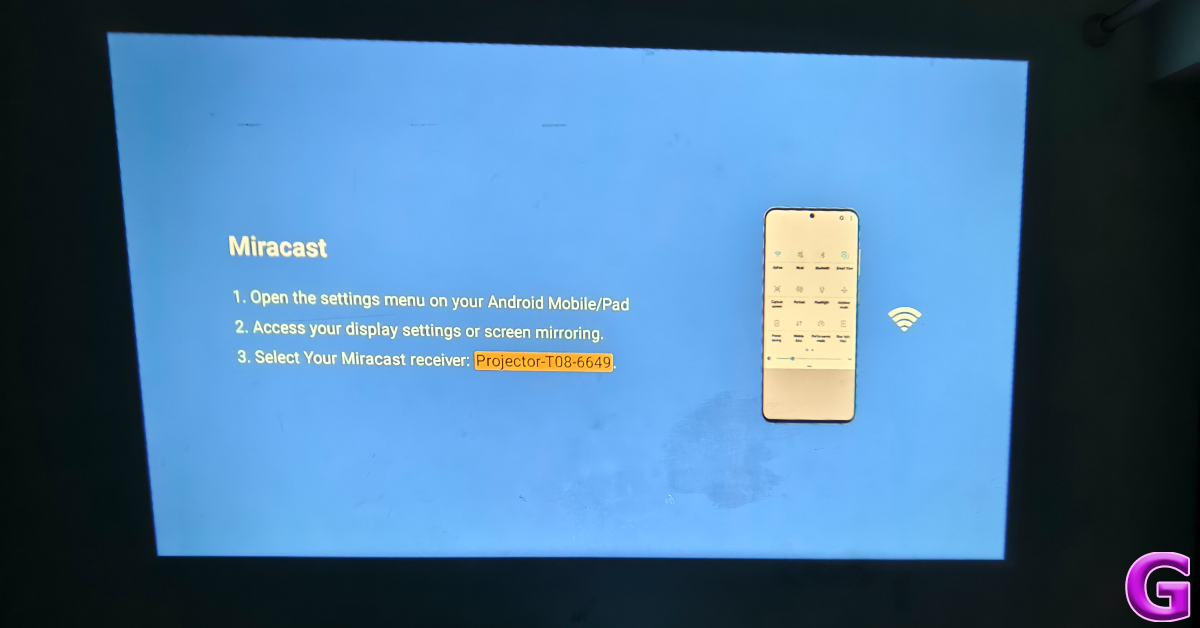


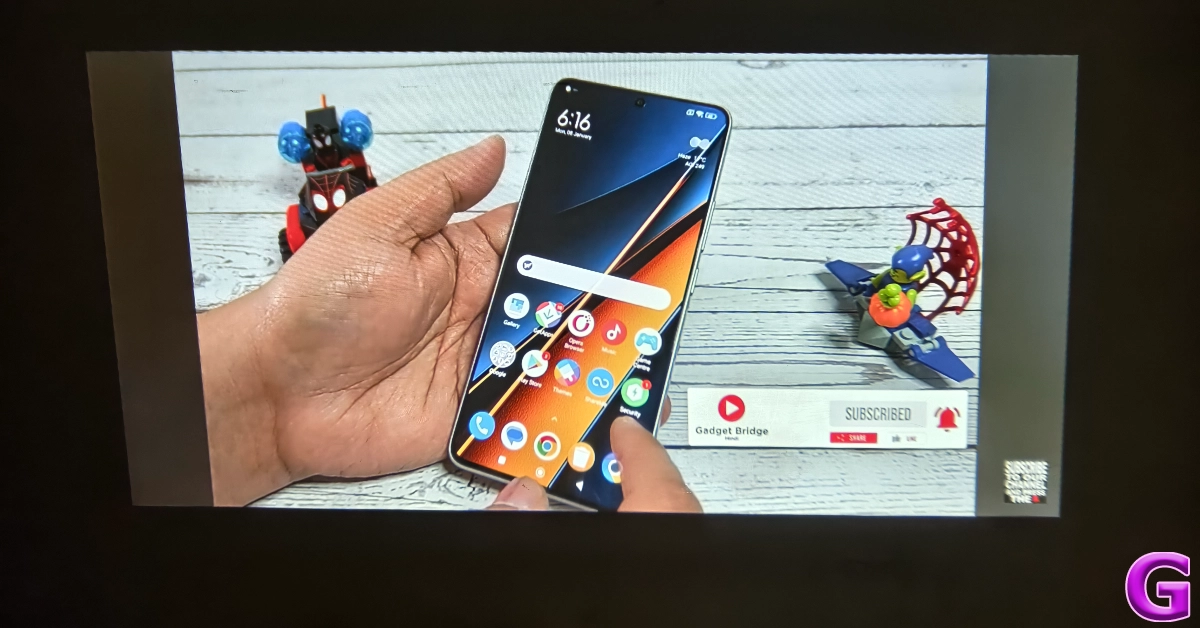

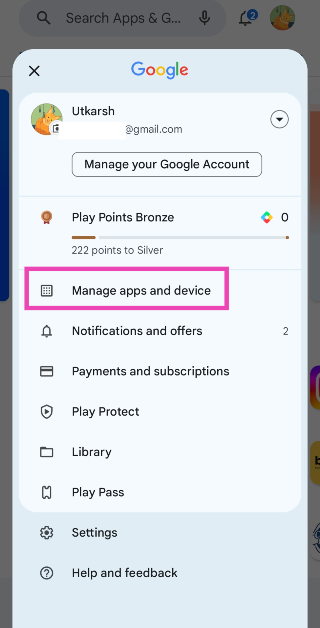
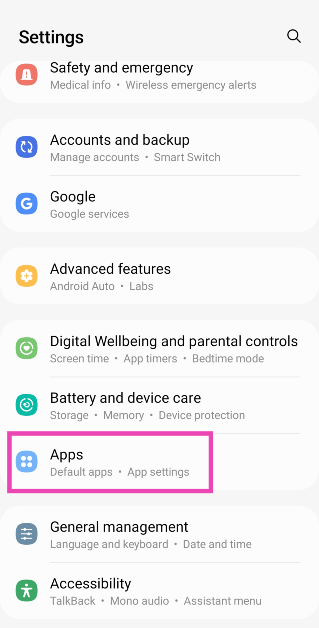
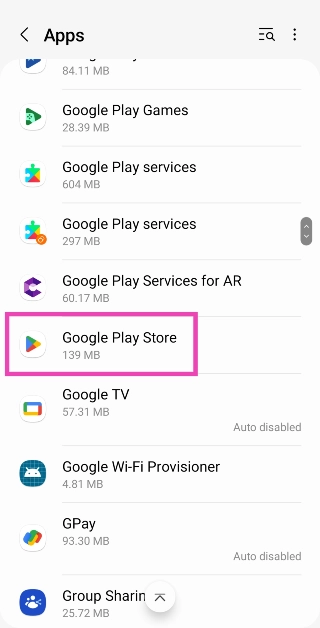
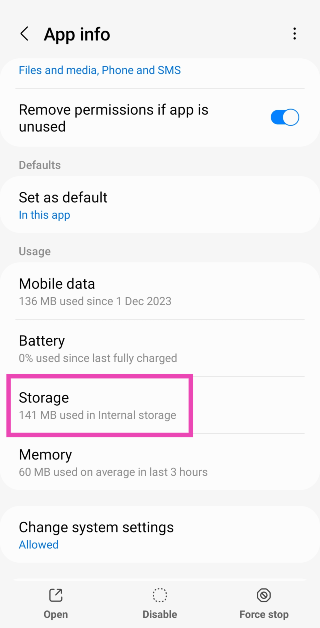
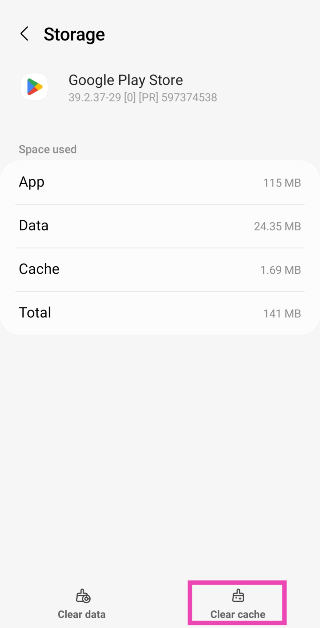
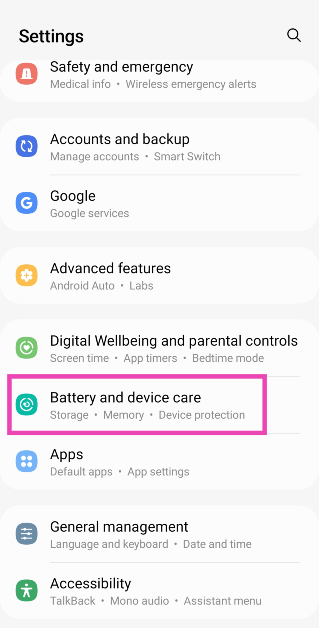
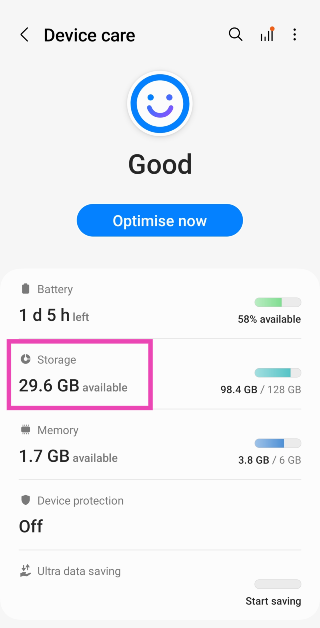
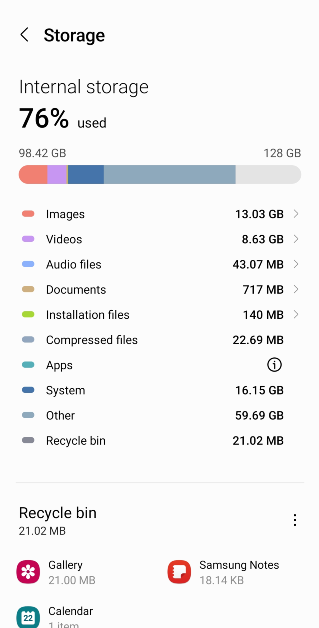
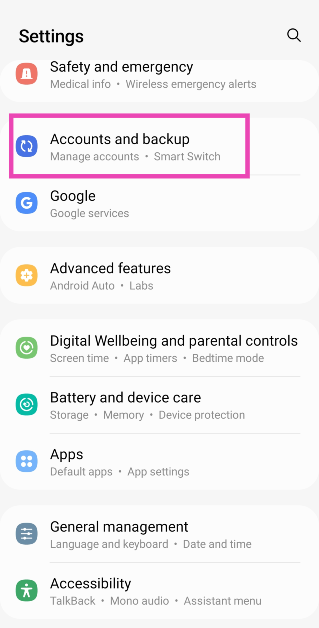
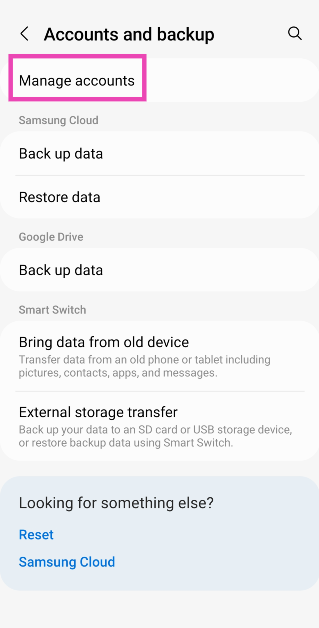

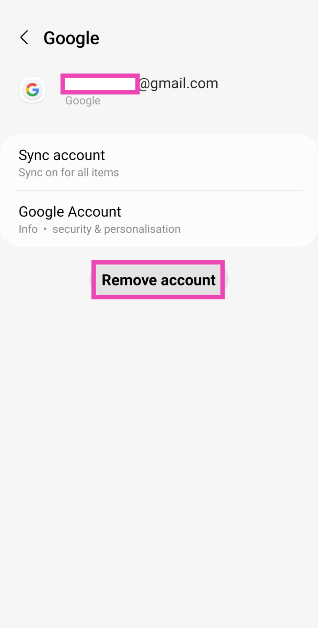
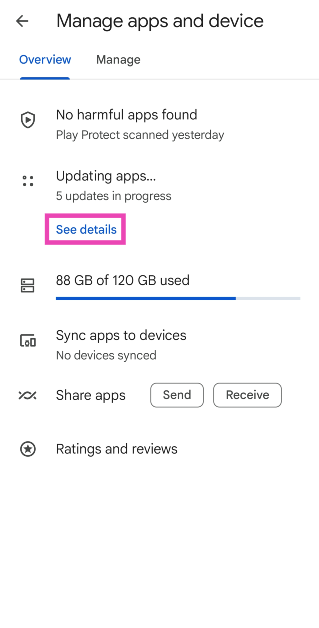

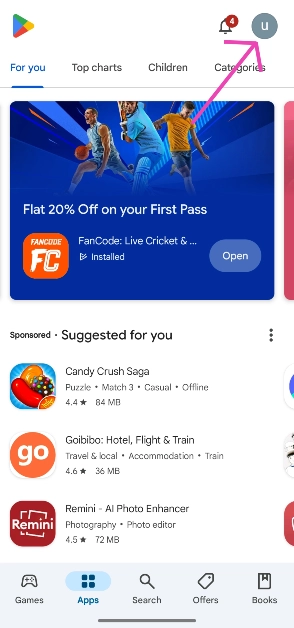
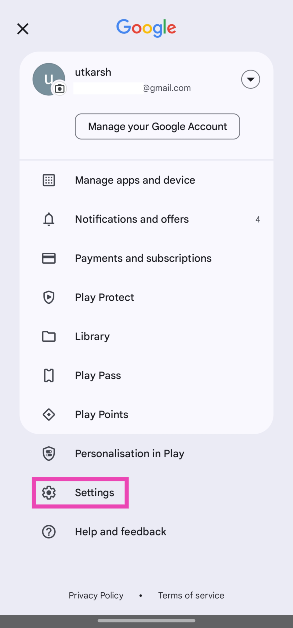
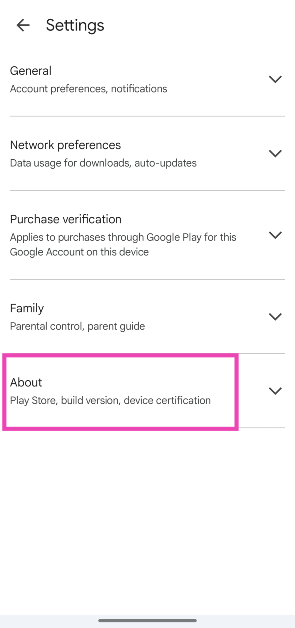
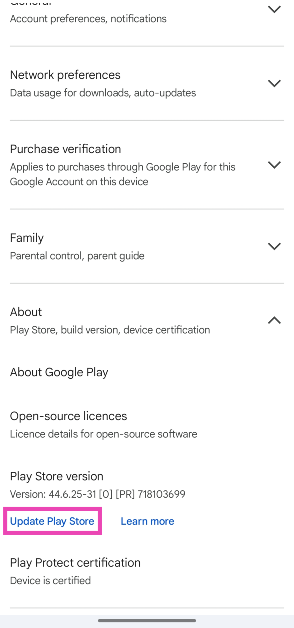
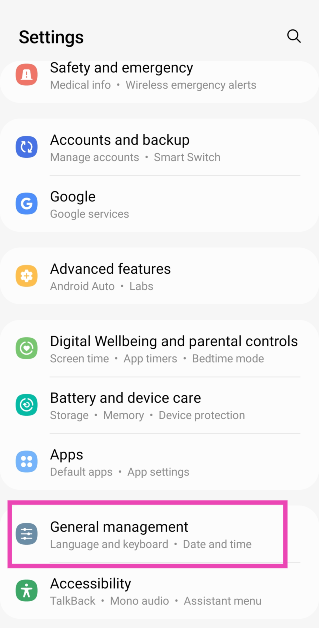
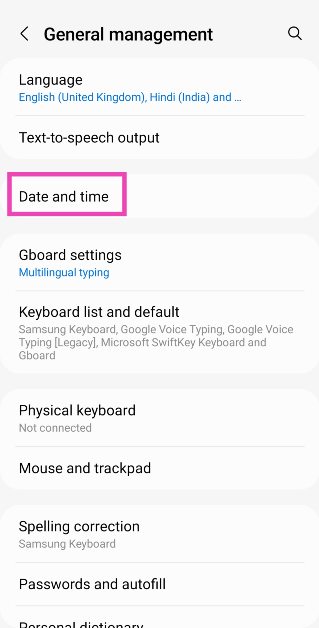

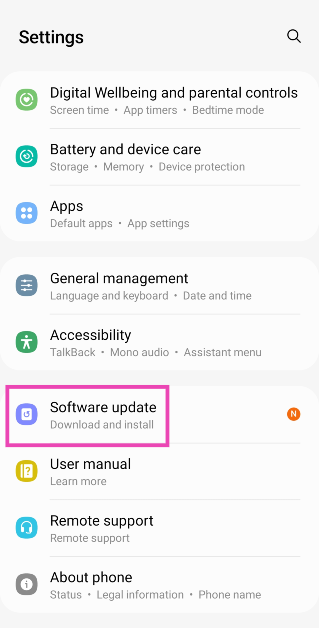
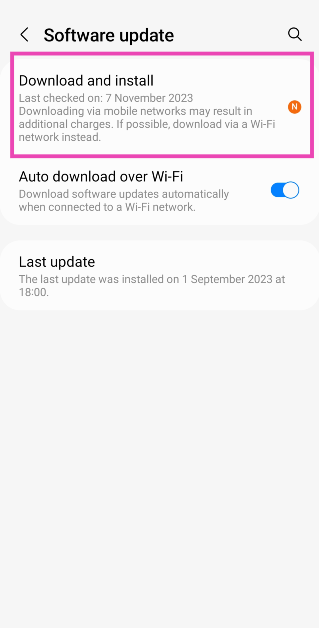
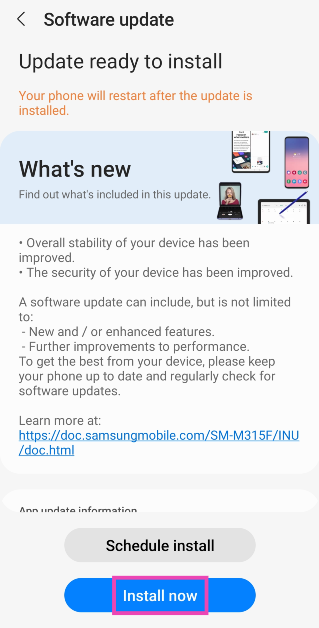
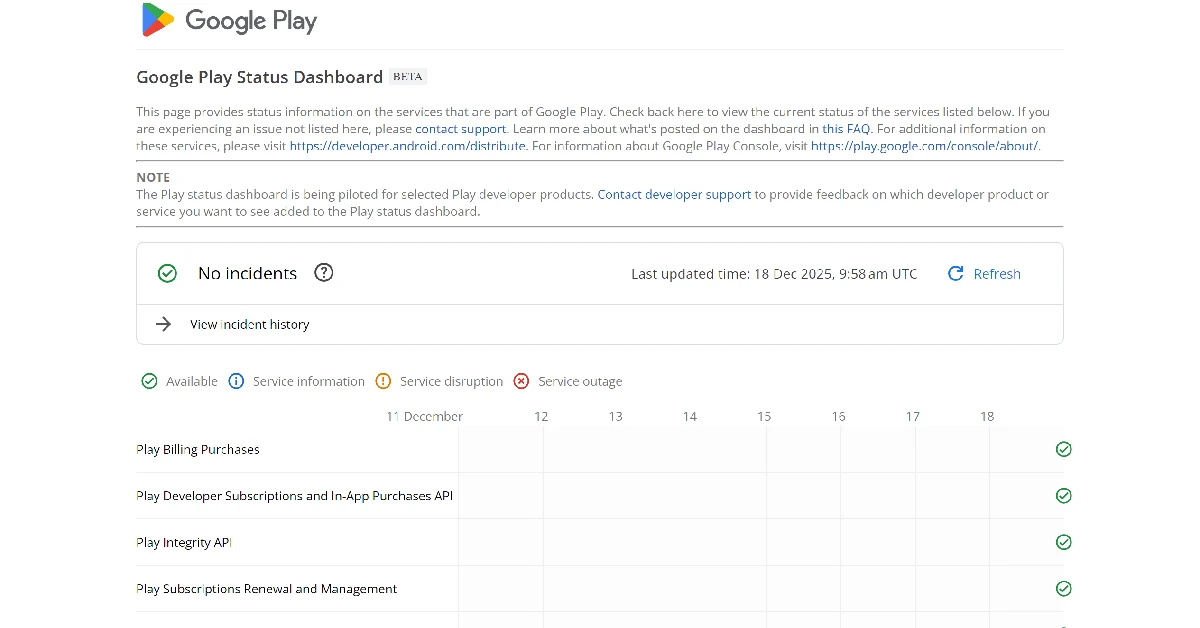


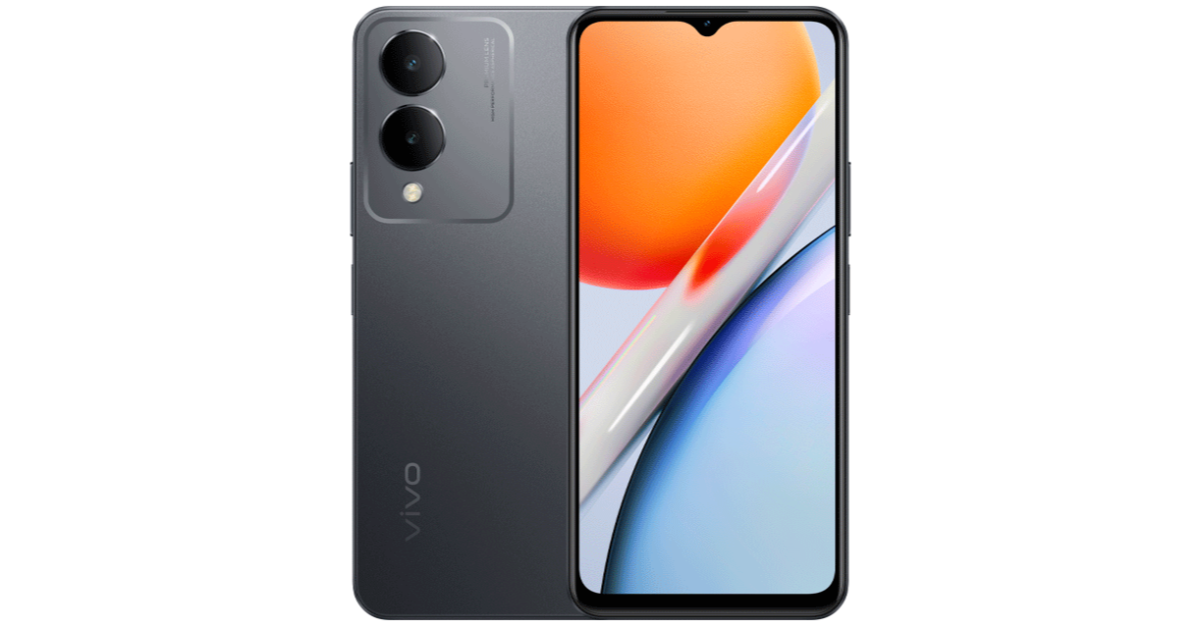


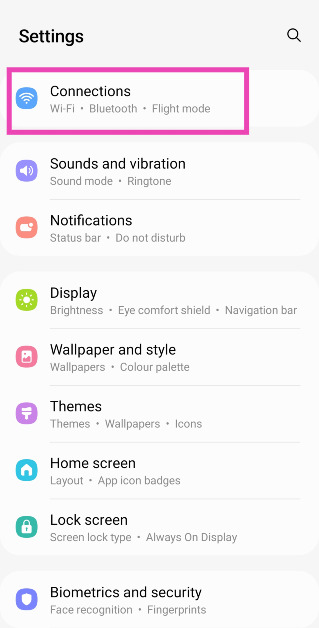
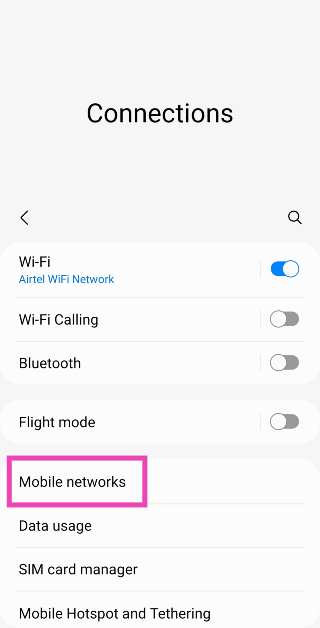

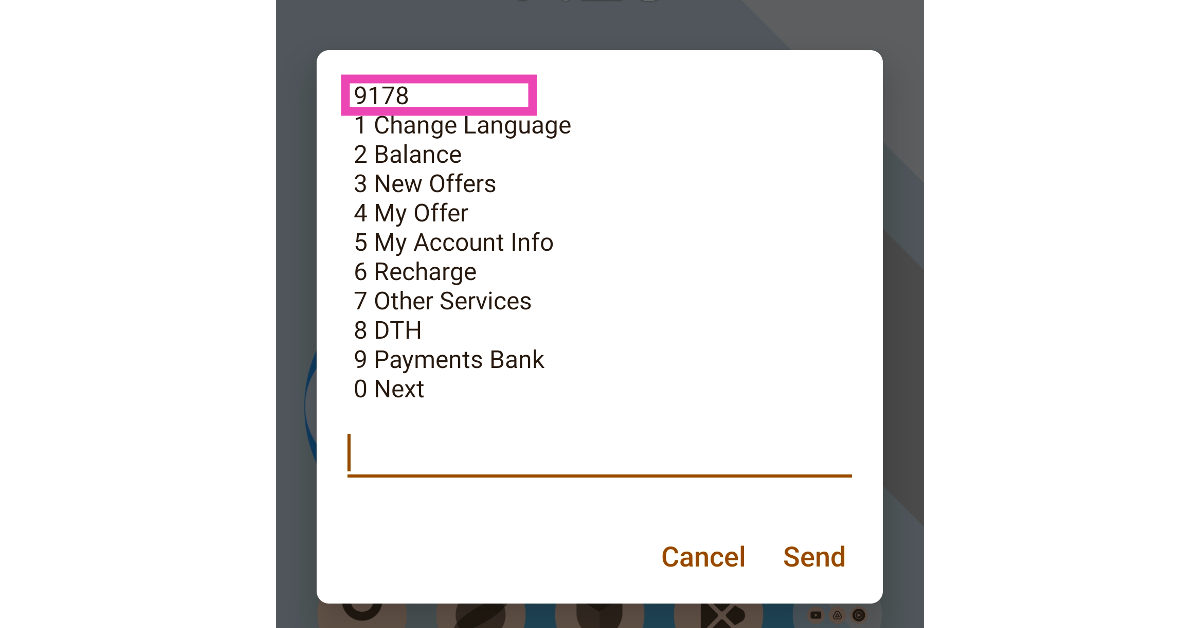
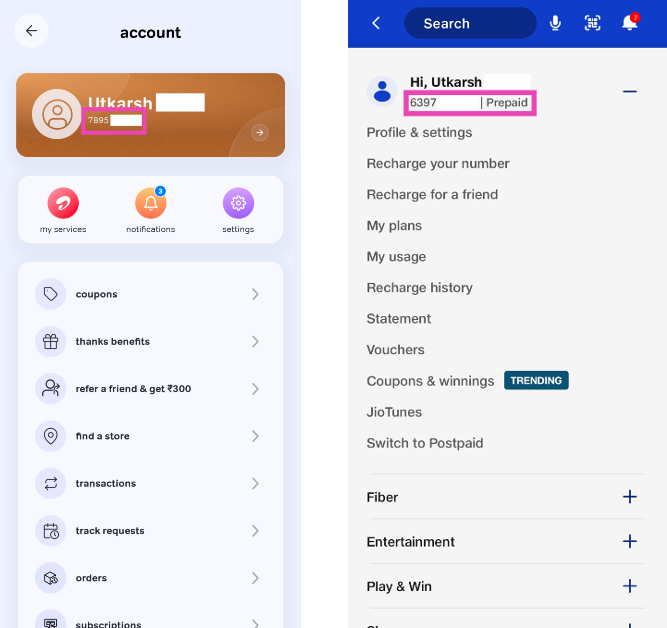
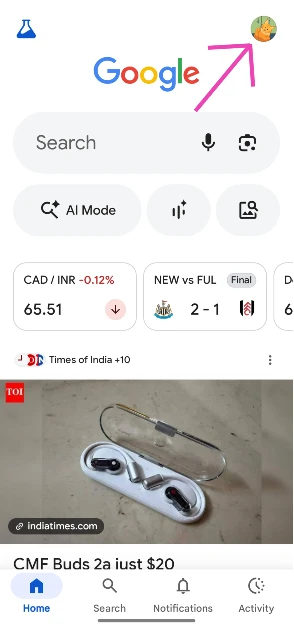
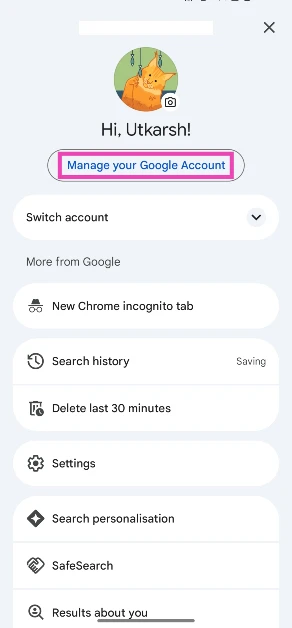
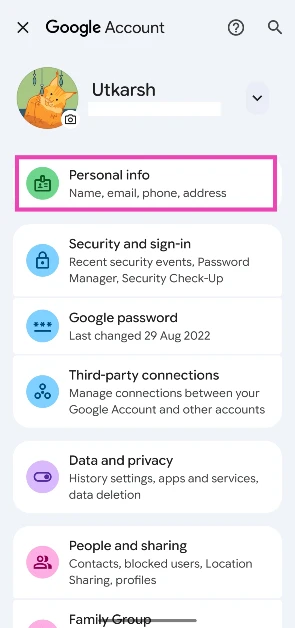
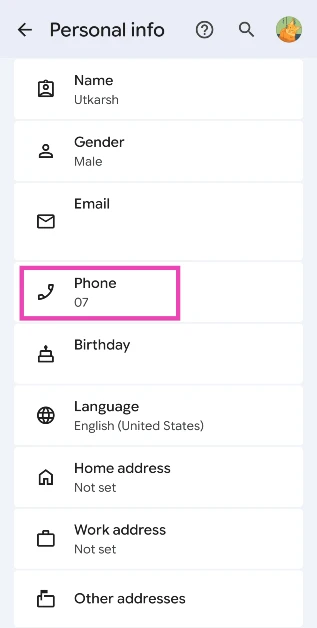
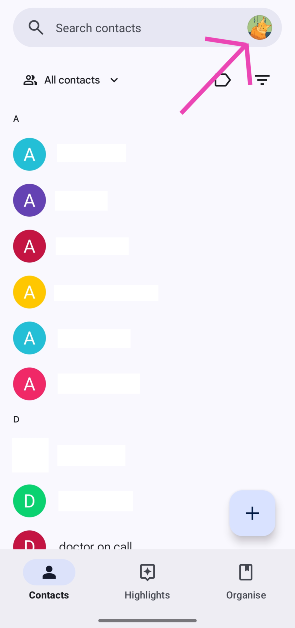
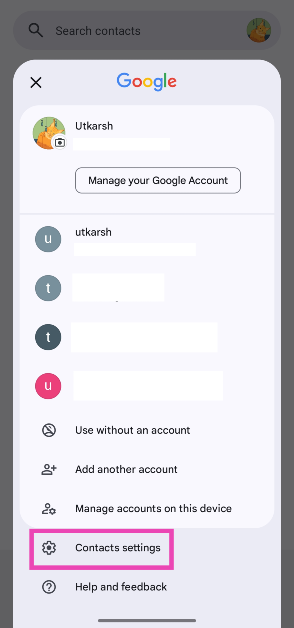
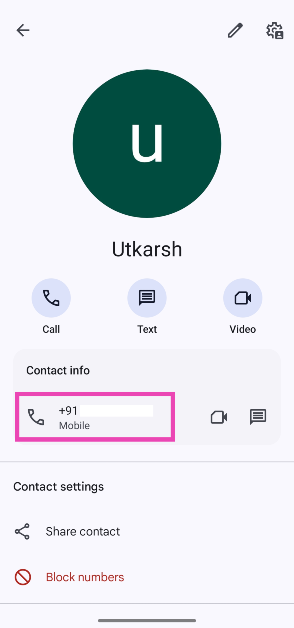
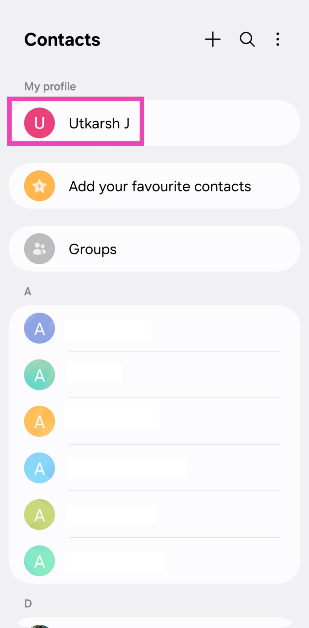
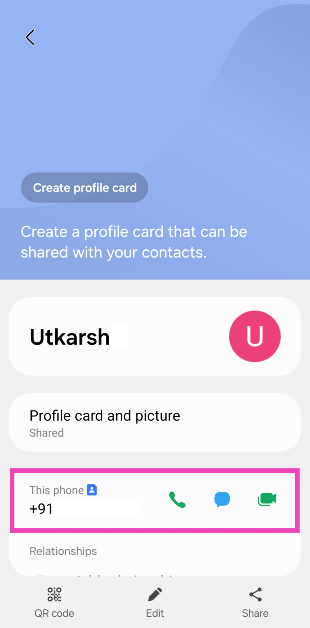


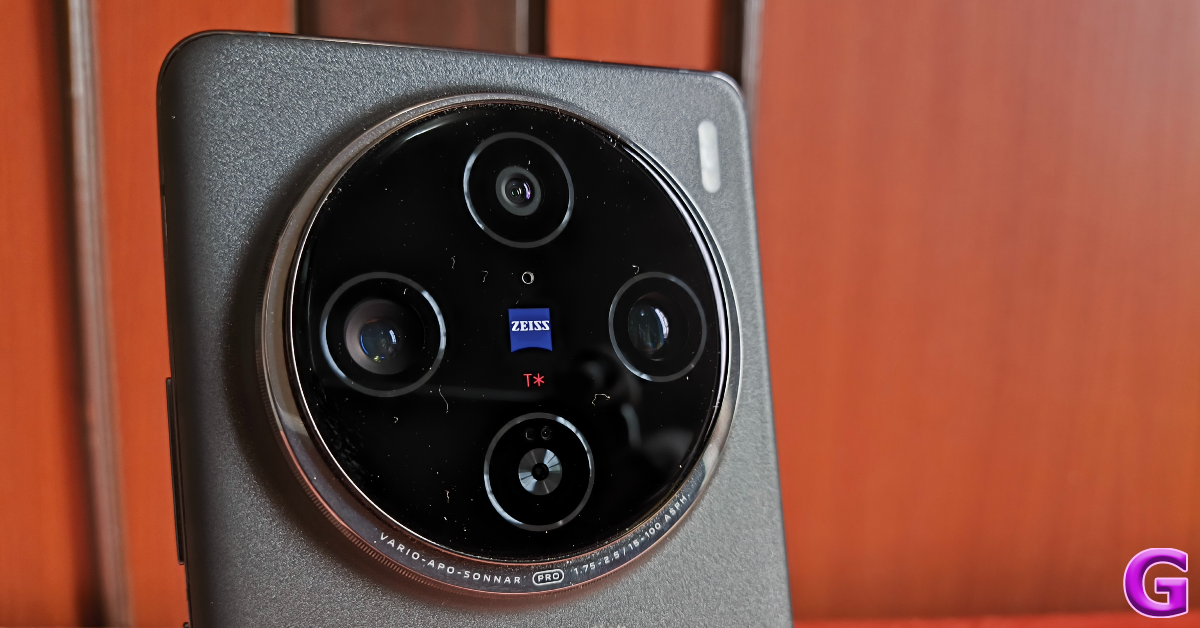
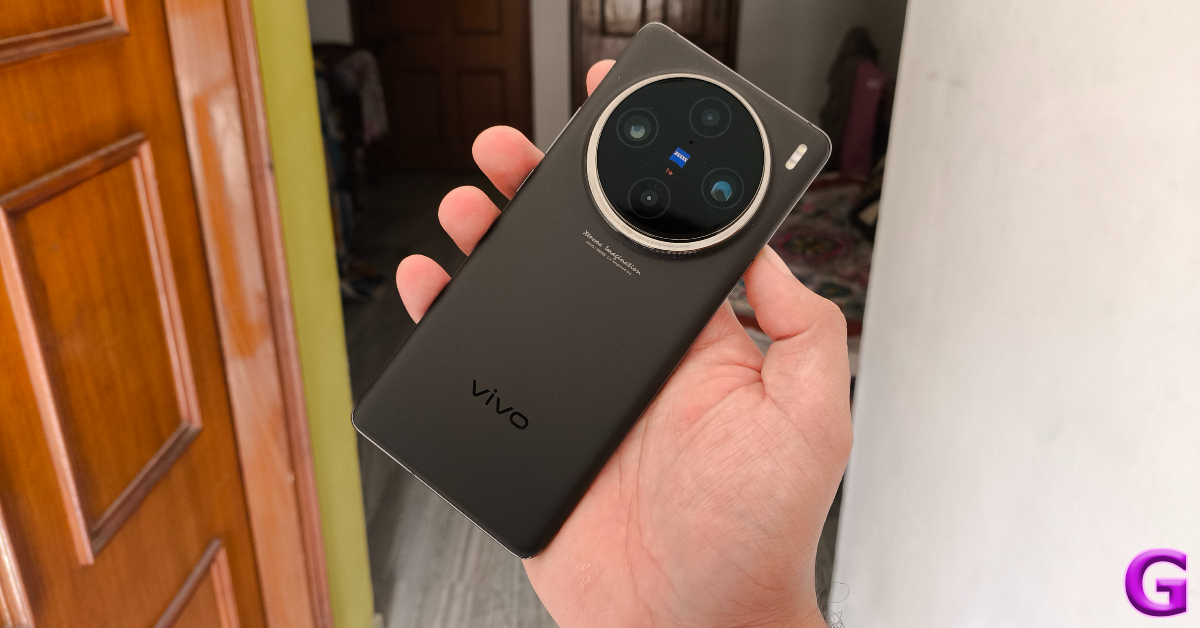


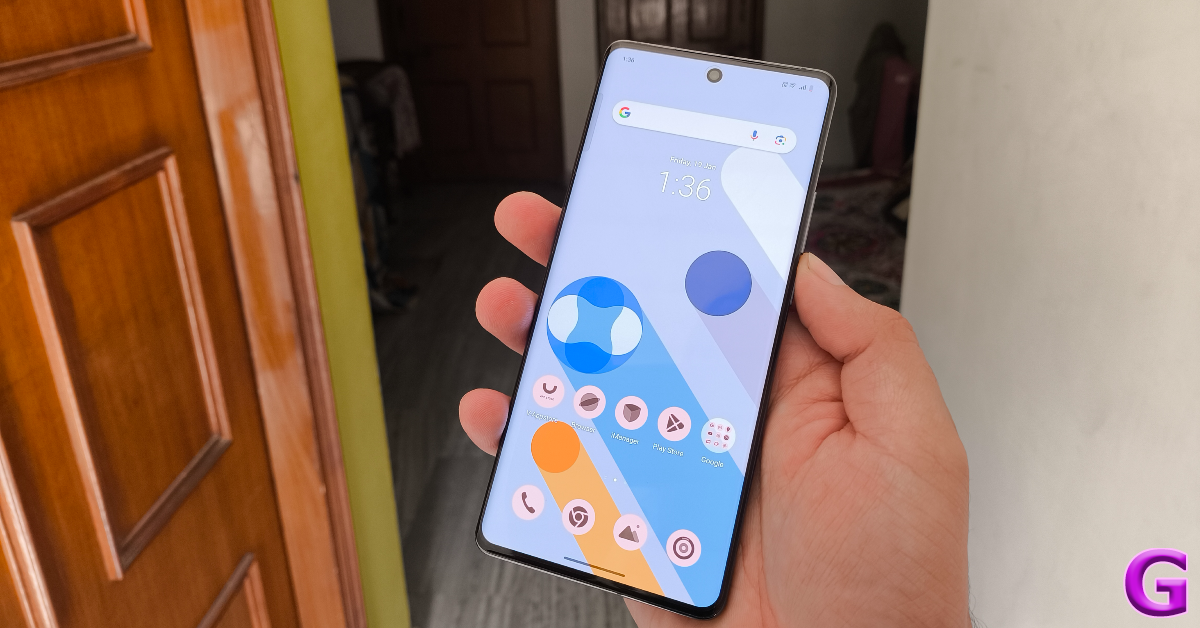
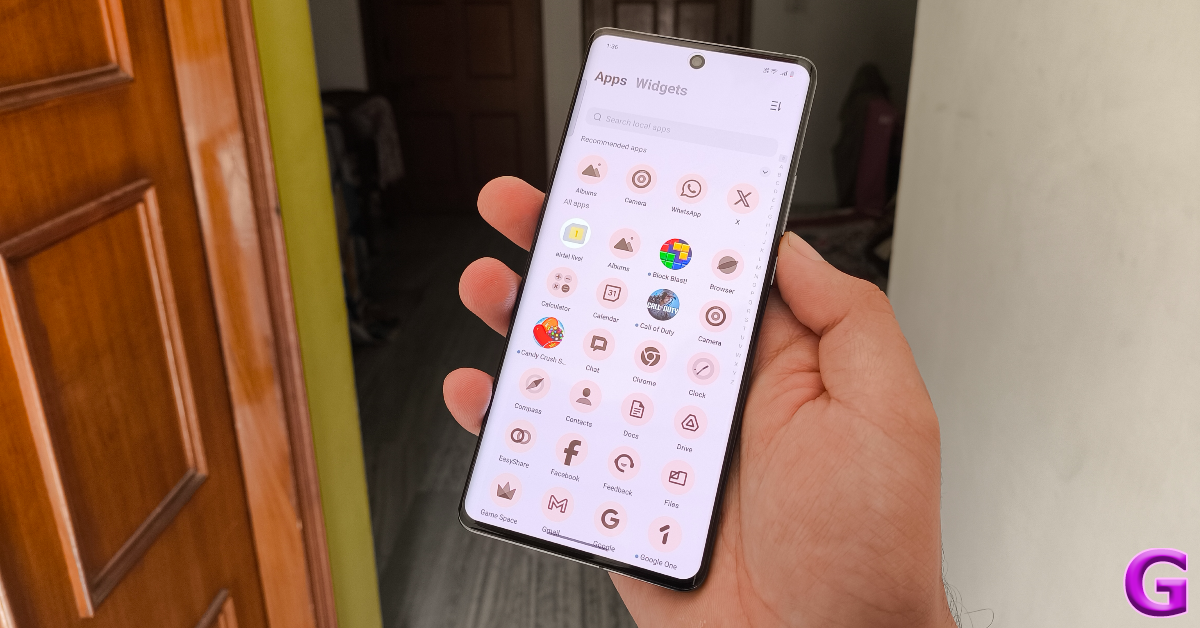
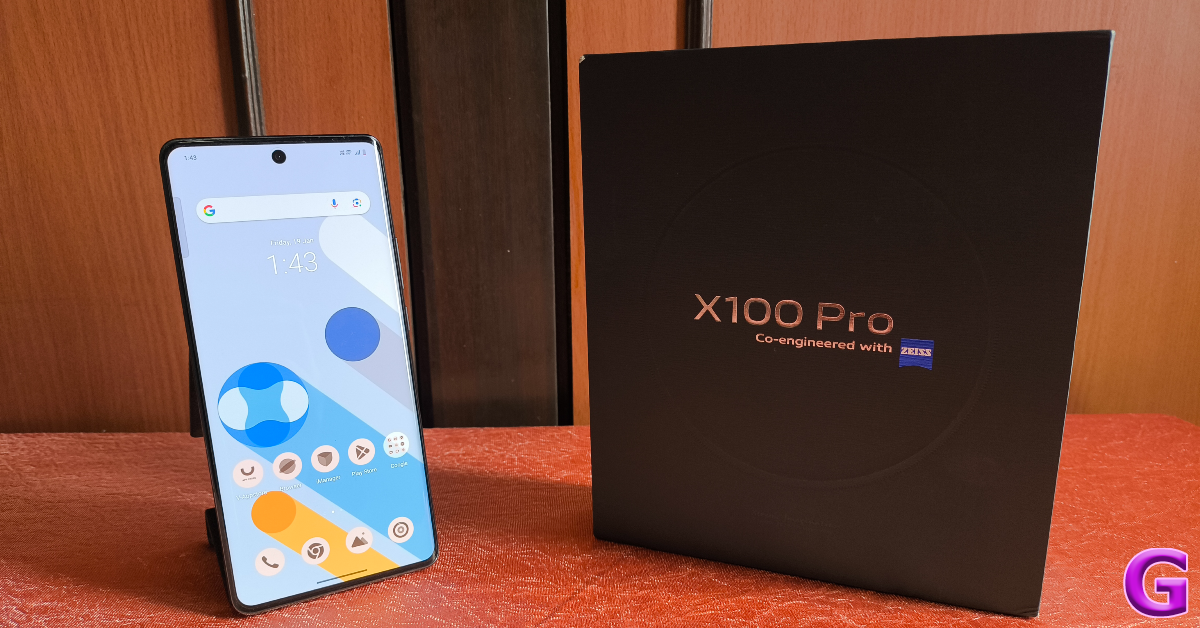
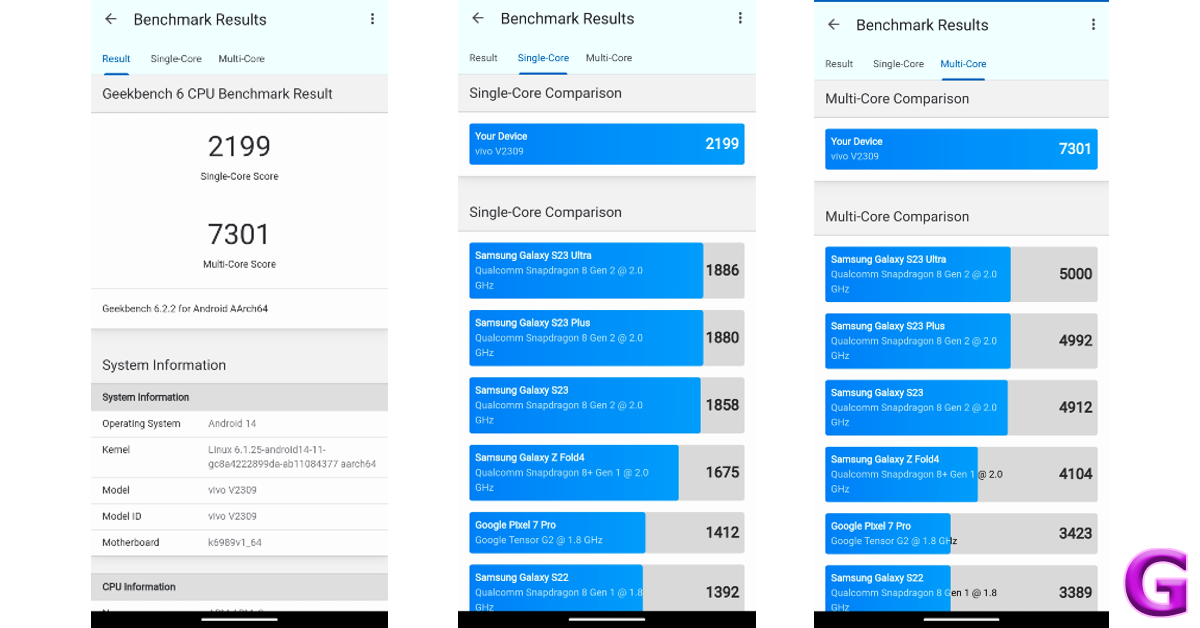
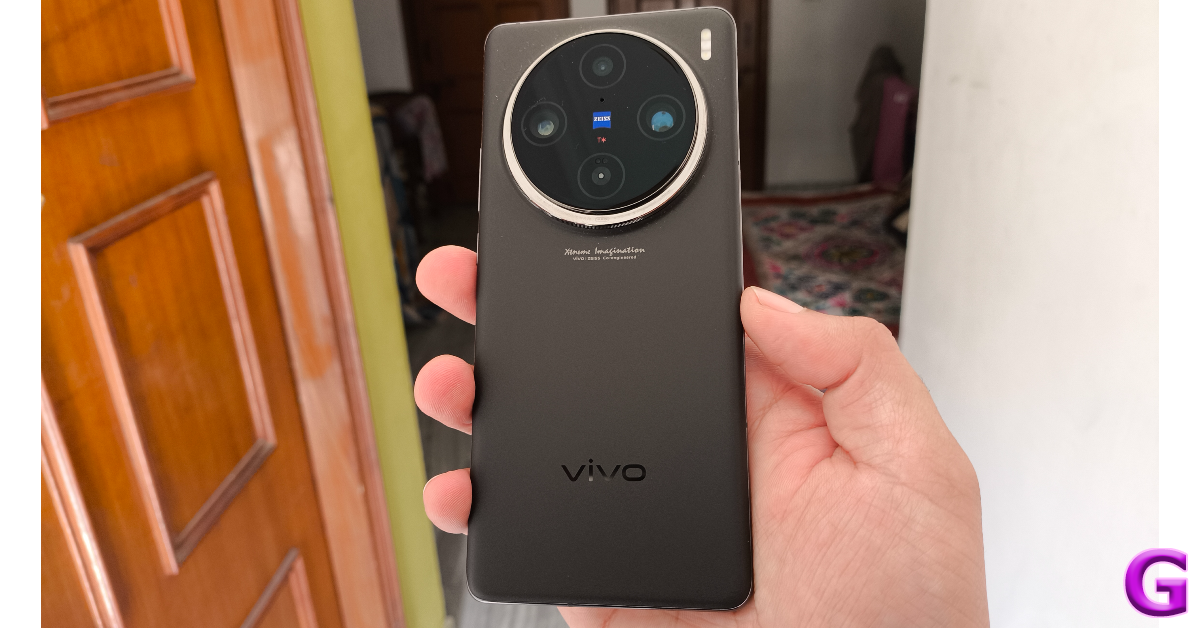


 earphones with 12 hours of playback launched in India")