Boult, a popular audio brand has forayed into the smart wearable segment with the launch of two new smartwatches in the Indian market. The company announced Boult Drift and Boult Cosmic smartwatches. The devices have a standby time of up to 10 days and include health and fitness sensors like heart rate sensor, steps count and more.
In This Article
Boult Drift Smartwatch
Boult Drift smartwatch features a 1.69-inch TFT screen, a 240×280 resolution, a pixel density of 218ppi and a 500 nits high brightness display. It comes with a Bluetooth Calling feature and 60 preset sports modes and 150+ watch faces. Additionally, it has a heart rate monitor, a sleep tracker, and 24/7 heart rate monitoring so you can always check your heart rate. In addition to having a dual-module and an integrated microphone and speaker, it also features an automatic sleep monitor that offers a thorough analysis of your sleep quality (deep sleep, light sleep, and wake-up time) to help you understand your health and make sensible lifestyle choices.
Boult Cosmic smartwatches
The Boult Cosmic boasts a 1.69 inch TFT screen with a 240×280 resolution, 218ppi pixel density and a 500 nits high brightness display. The screen has 100 watch faces. It has a menstrual cycle tracker, blood pressure monitor, blood saturation tracker, heart rate monitor, water resistance, and multiple sports modes. It helps you lead a healthier life by having cutting-edge HR sensors for precise and effective heart rate monitoring, calorie counting, and step counting.Both iOS and Android devices can use the Boult Drift (BOULTFIT App) and Boult Cosmic (BOULTTRACK App) watches.
Boult Drift and Boult Cosmic smartwatches price and availability
The sale prices for the Boult Drift and Boult Cosmic are Rs 1999 and Rs 1499, respectively, for the first 100 units sold. The watch will be offered on the top e-commerce site, Flipkart, as well as soon at a few retail locations and on their website.Boult Drift is available in appealing shades of Blue, Black, and Gray, whereas Boult Cosmic is only offered in Rose Gold, Blue, and Black.Mr. Varun Gupta, Co-Founder & CEO, of Boult Audio commented, “After successfully delivering the best-in-class audio products for 5 years in India, Boult Audio has expanded its product portfolio in the smartwatch category. We have coming up with our debut range of smartwatches. Boult Drift has launched on 3rd July 2022. Boult Cosmic will be available for sale from 9th July 2022 onwards. We have sold out ten thousand units in just less than 10 minutes of launched. Boult Audio has always put its impetus on developing an ecosystem for products that are helping millennial to stay fit and healthy. We are very excited to introduce two new smartwatches. Our goal is to make wearable technology safe, enriching, and enjoyable in everyday life. We are working hard to launch some more innovative smartwatches this fiscal. We are also coming up with some policies to create superior value for our consumers.”
For the latest gadget and tech news, and gadget reviews, follow us on Twitter, Facebook and Instagram. For newest tech & gadget videos subscribe to our YouTube Channel. You can also stay up to date using the Gadget Bridge Android App. You can find the latest car and bike news here.
There are times when you’re unable to capture a moment as a photograph because you’re using your iPhone to record a video instead. Luckily, there are a few ways to extract a good quality image from the video. In this article, we show you how to get still photos from iPhone videos.Read Also: Moto G42 budget smartphone launched in India
In This Article
Take a Screenshot
Step 1: Pause the video to the frame you want to capture.Step 2: Take a screenshot by pressing the Side button on the right and the Volume Up button on the left at the same time.The image will be saved in the Screenshots folder.While taking a screenshot is the easiest way to get a still photo from a video, the quality of the resulting image isn’t the greatest. The quality of the screenshot depends on the screen resolution. Sometimes the frame of a video depreciates in quality once it is paused.Luckily, there are some other ways with which you can capture high-quality images from videos.
Use Frame Grabber
Frame Grabber is an app that lets you export individual video frames to still pictures. Unlike a screenshot, the quality of images exported using Frame Grabber will be considerably richer.Step 1: Download Frame Grabber from the App Store and download it to your phone.Step 2: Open Frame Grabber and select a video.Step 3: Select the frame you want to capture by dragging the white bar at the bottom of the screen.Step 4: Tap the ‘Tick’ icon at the bottom right to save the frame you’ve selected as an image.
Use Grab Picture
Grab picture is another great app for capturing images from a video.Step 1: Download Grab Picture from the App Store and install it on your iPhone.Step 2: Open Grab Picture and select a video.Step 3: Select the frame you want to capture by using the navigation icons. You can go through the video frame by frame or five frames at once.Step 4: Tap the ‘Save’ icon once you’ve landed on the frame you want to capture.
Get a still photo from a Live Photo
Want to grab a good-quality frame from a Live Photo? Here’s how you can go about it.
Step 1: Open the Live Photo and tap on the Edit option at the bottom of the screen.
Step 2: Tap the ‘concentric circles’ icon at the bottom to reveal the scroller for the Live Photo.
Step 3: Use the scroller to pick the frame you like.
Step 4: Tap on ‘Make Key Photo’ and select ‘Done’. This will make the selected frame the new thumbnail for the Live Photo.
Step 5: Now, tap on the Share icon and select ‘Duplicate’. In the following popup box tap on ‘Duplicate as still photo’.
Your selected frame will be turned into a still photo. You can access it from the Photos app.
Take a photo while shooting a video
If you don’t want to go through the hassle of picking the right frame to screenshot, you can simply take a photo while recording a video on your iPhone. To do this, switch to video recording mode in the Camera and begin shooting a video. You will see a white shutter icon on the screen alongside the red recording button. Tap the white icon to take a quick picture without pausing the video. The picture will be saved in the Camera Roll of your iPhone. The only minor drawback is that the picture won’t be of the same quality as the images taken in Photo mode. However, it is better than taking a screenshot of a still frame from a video.
Frequently Asked Questions
Can I get a still photo from an iPhone video?
You can extract a still photo from any iPhone video by taking a screenshot of a paused frame or by using a third-party app like Frame Grabber and Grab Picture.
How do I take a picture while recording a video on my iPhone?
To take a picture while recording a video on your iPhone, simply time the white shutter icon next to the recording icon. The resulting image won’t be as detailed as a picture taken using Photo mode, but it is better than taking a screenshot of a video frame.
Where are the videos stored in an iPhone?
To access a video you recorded using your iPhone, simply launch the Photos app and go to Camera Roll. You will find all your recorded videos there. To view a downloaded video file, go to Files and select the downloads folder.
Read Also: 5 Essential Paint.net Plugins You Must Download in 2022
Conclusion
There are a lot of moments from videos that are worth preserving. With these easy ways, you will be able to capture good-quality images from any video. If you want to edit a small section of the video as a short clip, you can edit the video on the video editor on your device. You can also screen record the part you want to be saved as a clip, although the resulting video will see a drop in quality.
For the latest gadget and tech news, and gadget reviews, follow us on Twitter, Facebook and Instagram. For newest tech & gadget videos subscribe to our YouTube Channel. You can also stay up to date using the Gadget Bridge Android App. You can find the latest car and bike news here.
Philips has announced the introduction of its line of SpeedPro cordless vacuum cleaners in India. This new line, designed to give consumers a better and more effective substitute for conventional cleaning and mopping techniques, provides a full answer to all cleaning requirements for the home. The Philips SpeedPro allows users to spend the least amount of time cleaning every nook and cranny of their home, including the trickiest locations – near to walls, furniture, and upholstery.The Philips SpeedPro has been designed with Indian households’ needs in mind and the various dust-contributing factors. The new cordless vacuum cleaners are offered in three variants: Aqua FC6728, FC6726, and FC6723. Philips SpeedPro Aqua FC6728’s excellent wet & dry capabilities provide quick, effective cleaning that is seamless and thorough every time.The Philips SpeedPro is a high-end option for quick touch-ups or thorough cleaning. It provides continuous cleaning for up to 50 minutes in normal mode. You can clean quickly and thoroughly for up to 22 minutes in Turbo mode. The Philips SpeedPro has a patented 1800 suction nozzle to deliver accurate and strong dirt pickup on both hard surfaces and carpets.Philips SpeedPro’s unique design allows for maximum reach even under low furniture and appliances. Reach of the vacuum and its special Power Blade motor, which is designed for high air speed, allow for powerful and accurate pick-up at nozzle level.To maintain high performance for longer, the PowerCyclone 7 technology also instantly removes dust from the air.The Philips SpeedPro Aqua FC6728 has 3-in-1 vacuum, mop, and handheld capabilities for a uniform, faster cleaning solution. This model’s specially created vacuum and mop function make it possible to quickly clean up a variety of dust, from shoe prints on the living room floor to kitchen filth. It is also simple to switch to the detachable handheld vacuum, which is great for removing dirt and pet hair off your couch.The Philips SpeedPro cordless vacuum cleaner has an effortless, quick, strong reach and is the ideal appliance for simplifying daily tasks like cleaning. It has a 2-year warranty and a starting price of Rs 29,995.The Philips Domestic Appliances e-store now allows customers to select and purchase their chosen cleaning assistance.Commenting on the launch, Mr. Gulbahar Taurani, MD, and CEO Philips Domestic Appliances, India Subcontinent, said, “Given the post-pandemic scenario, there is a growing preference for easy to use, quick yet efficient home cleaning solutions as consumers become more focused towards health, safety and hygiene. There is extra consciousness among people to have spotless clean houses and many continue to clean their houses themselves. Extensive cleaning of dust and dirt across different corners of the house, where traditional methods are unable to give desired results, the Philips SpeedPro cordless vacuum cleaner range delivers on fast, yet effective cleaning. Keeping in mind today’s fast-paced lifestyle coupled with the fact that wet and dry cleaning is of utmost importance in every Indian household, we are confident that this new launch will enable consumers to experience a new dimension of convenient and easy cleaning.”
For the latest gadget and tech news, and gadget reviews, follow us on Twitter, Facebook and Instagram. For newest tech & gadget videos subscribe to our YouTube Channel. You can also stay up to date using the Gadget Bridge Android App. You can find the latest car and bike news here.
The clipboard is a temporary location on your phone where any text you copy is stored to be used in the future. The clipboard saves only one entry at a time. If you copy something, it gets written over the last entry on the clipboard. While some Android smartphones allow you to access clipboard history, not every device has this feature. Today, we show you the 3 best ways to check and recover clipboard history on an Android smartphone.Read Also:Swiftkey app updated for iPhone gets new emojis
In This Article
Use the Android keyboard
Step 1: Open any typing screen on your smartphone.Step 2: Tap and hold the screen until some options pop up.Step 3: Select Clipboard.The clipboard section will open up and you’ll be able to access your clipboard history. You can delete or recover any items you like.
Use the Google keyboard
If the native Android keyboard doesn’t let you access the clipboard, using a third-party keyboard is your only option.Step 1: Download Google keyboard from the Google Play Store. Set it as your default keyboard.Step 2: Open any typing screen on your smartphone.Step 3: Press the three dots on the topmost row of the keyboard and select Clipboard.Step 4: Turn on Clipboard.Anything you copy to the clipboard will be saved there for one hour.
Asus is all set to expand its Republic of Gamers (ROG) smartphone series with the launch of a brand new gaming smartphone. The launch of Asus ROG Phone 6 is set for today and is the successor to last year’s ROG Phone 5. Along with the global launch event, the new gaming-focused phone will be unveiled in the nation. The upcoming gaming phone is likely to get the Qualcomm Snapdragon 8+ Gen 1 SoC.
In This Article
How to watch the Asus ROG Phone 6 India launch Livestream
Asus, a Taiwanese smartphone manufacturer, has announced the extension of its Republic of Gamers portfolio in India. The Asus ROG Phone 6 is going to launch in India and globally today. The firm will conduct a virtual event beginning at 5.30 PM The virtual event will take place on Asus’ official YouTube channel.
As per the company, the gaming phone will be sold in the nation on Flipkart. The next device’s price information is not yet available, though.
Asus ROG Phone 6 specifications expected
As per the company the ROG Phone 6 is said to come with a Snapdragon 8+ Gen 1 SoC.Additionally, the phone’s expected design has been depicted in-depth in web renders, with hints at some of its potential functions.One of the most dependable smartphone series for gaming is the Asus Rog line. The gaming restrictions will be much wider with this new smartphone. The ROG Phone 6 Pro is anticipated to debut alongside the gaming phone from Asus. A 6.78-inch AMOLED display is anticipated for the standard Asus ROG Phone 6. According to earlier rumours, the device might have up to 18GB of RAM and 512GB of onboard storage. Other rumoured details include an in-display fingerprint sensor and a 6,000mAh battery. Additionally, a front camera with a resolution of 12 megapixels, and a 64-megapixel primary back sensor is also speculated.On Twitter, well-known leaker Evan Blass published purported images of the Asus ROG Phone 6. The renderings depict the device in black and white colour variations and hint at a style that is comparable to earlier smartphones from the ROG series. It has been shown to have three rear cameras, which are positioned in the device’s upper left corner beside an LED flash. The company’s partnership with the Chinese gaming company is indicated by the ROG logo and Tencent branding on the back. On the left spine of the smartphone, you can also notice the power button and the volume rockers.
For the latest gadget and tech news, and gadget reviews, follow us on Twitter, Facebook and Instagram. For newest tech & gadget videos subscribe to our YouTube Channel. You can also stay up to date using the Gadget Bridge Android App. You can find the latest car and bike news here.
Garena Free Fire is a battle royale game with regular awards and tournaments to keep players interested. If you play Garena Free Fire, you should be aware of the redeem codes that are released on a daily basis. However, because the battle royale game is banned in India, players from other countries can use the Free Fire Redeem codes daily. If you’re unfamiliar with the Garena Free Fire redeem codes or don’t know how to get them, we’ve put together a step-by-step guide to help you redeem them. Check out Garena Free Fire Redeem Codes for July 5.The Free Fire redeem codes are a great way to get free stuff. These are 12-digit codes that contain alphabets and numbers, as well as an expiration date and time. Because the Garena FF redeem codes cannot be used more than once, you should hurry to the redemption page to claim your free reward before someone else does. To get a free reward, all you have to do is go to reward.ff.garena.com/en, which is the official redemption page. Also, keep an eye on this space for daily updates on Garena Free Fire redemption codes and rewards.
5 July 2022 Amazon Quiz has gone live on its mobile app platform. Customers from different parts of the country are participating in the daily quiz. The daily quiz is conducted by the company brings an opportunity for the customers to win exciting prizes. The quiz begins from 12 AM to 11:59 PM. In today’s quiz participants have a chance to win Rs 15,000 Amazon Pay Balance by answering all the questions correctly.Every day Amazon brings a fresh set of questions for its customers that contains five easy questions. Amazon quiz brings an opportunity for its customers to win Amazon Pay Balance ranging from Rs 1,000 to Rs 50,000. which consists of five questions related to general knowledge and current affairs.The participants need to answer all the questions correctly and their names will be selected for a lucky draw. The winner will be announced at the end of the month. One wrong answer could eliminate you from the quiz. If you manage to answer all the questions correctly you can stand a chance to win Rs 15,000 Amazon Pay Balance today. Only app users are eligible to participate in the Quiz. Check Out 5 July 2022 Amazon Quiz Answers.Amazon Quiz Today Prize – Rs 15,000 Amazon Pay BalanceQuiz Date – 5 July 2022Daily Timing – 12 AM to 11:59 PMWinner Announcement – Today at 12 PM
In This Article
Amazon Quiz Answers Today 5 July 2022
Question 1: Yet To Come (The Most Beautiful Moment)’ is the lead single of BTS’ new album titled what?Answer: ProofQuestion 2: Matthew Fitzpatrick recently won his first golf major. Which title did he win?Answer: US OpenQuestion 3: Young Liu who recently met Prime Minister Narendra Modi, is the Chairman of which electronics manufacturer?
Answer: FoxconnQuestion 4: In which country have these birds caused blackouts?Answer: JapanQuestion 5: In which city did this sport make its Olympics debut?Answer: Tokyo
How To Play Amazon Quiz
Only app users are eligible to play the Amazon quiz every morning from 12 AM to 11:59 PM. The quiz is not available on the desktop. For those who are unaware of how to play the Amazon quiz below are the steps, you can follow to take the quiz.
Firstly download the Amazon app from Google Play Store or App Store
Now fill in the required information through the Sign Up option.
You need to log in to the Amazon app and scroll down on the home screen to find the Amazon Quiz banner.
Tap on the Amazon Quiz banner and tap on the Start button to start the Quiz.
Now you will get 5 questions and you need to answer them correctly. One wrong answer will eliminate you from the Quiz.
After answering all the questions correctly you are now eligible for a Lucky Draw.
The winner’s name will be announced today at 12 PM.
Motorola has announced the launch of the Moto G42 in India. It appears to be superior on paper due to its more robust feature set however it competes with Redmi Note 11 in terms of pricing and specs. Therefore, we’ve compared the Redmi Note 11 and Moto G42 today to see how they compare and which one you should buy. Here is the Moto G42 Vs Redmi Note 11 comparison.
Moto G42: It has a triple-back camera arrangement with an f/1.8 lens and a 50-megapixel primary sensor, as well as an 8-megapixel ultra-wide and depth camera and a 2-megapixel macro cameraRedmi Note 11: Quad rear camera array with a 50-megapixel main sensor, 8-megapixel secondary sensor with an ultra-wide lens, a 2-megapixel macro lens and a 2-megapixel depth sensor
Moto G42 and Redmi Note 11 both come with the same processor. Redmi overshadows the Motorola smartphone as it offers an additional camera sensor while Moto G42 comes with a triple rear camera set-up. Apart from that, Redmi also has a bigger display however it is shipped with an Android 11 whereas the Moto device comes with Android 12 out of the box.On the other hand, the Redmi smartphone offers several storage options and is only Rs 12,999 while the Moto phone comes at Rs 13,999 for a single variant. So, Redmi Note 11 appears to provide quite a bit more over the Moto G42.
For the latest gadget and tech news, and gadget reviews, follow us on Twitter, Facebook and Instagram. For newest tech & gadget videos subscribe to our YouTube Channel. You can also stay up to date using the Gadget Bridge Android App. You can find the latest car and bike news here.
A broken voicemail can leave you clueless because there aren’t a lot of ideas one can think of to fix it. You can avoid losing your messages and have your voicemail inbox up and running in no time if you know exactly where the problem lies. Many also use vpsserver, but today, we bring you the best 13 ways to fix the ‘voicemail not working’ issue on an Android smartphone.Read Also:How to fix the bad signal strength of Android and iPhones
In This Article
Why isn’t your phone able to load voicemails?
If you’re unable to load voicemails on your Android phone, it could be due to the following reasons.
Insufficient coverage
Lack of storage space
Corrupt dialer cache
Call forwarding meddling with voicemail
AI services running on the phone app
Background software issues
Restart your Phone
Restarting your phone can help get rid of some bugs and glitches that you may be facing. Once you’ve restarted your phone, dial the voicemail number and check if you can access your inbox.
Check Voicemail Settings
It is always a good idea to make sure your Voicemail settings are set correctly whenever you come across an issue with your voicemail. Go to Phone>Settings>Voicemail and make sure all details are legitimate. Check the voicemail number and service provider. If you find any incorrect settings, revert them to the original settings and save them.
Request new Voicemail Settings
If there is nothing wrong with your voicemail settings yet you still can’t access your voicemails, it is quite possible that your voicemail settings have become outdated. You can always request new voicemail settings from your network carrier, which will be sent to you via text message. Apply and save these new settings to your phone.
Update your Voicemail app
If your network carrier has a specialised app for voicemail, make sure it’s updated. New updates roll out regularly, and sometimes your voicemail won’t work if you’re stuck with the older version of the app. You can check for new app updates by looking up the app in Google Play Store.
Disable Call Forwarding
Call forwarding redirects incoming calls to another number when you are busy or unreachable. When call forwarding is enabled, the caller may not get the chance to leave a voicemail on your number. If the voicemail is not working on your Android smartphone, it is a good idea to disable call forwarding on your number. Here’s how you can do that.
Step 1: Launch the Dialer app on your phone and tap on the ellipses (three dots) at the top right corner of the screen.
Step 2: Tap on Settings.
Step 3: Tap on Supplementary Services.
Step 4: Select Call Forwarding.
Step 5: Tap on every category and select Disable.
Manually check your voicemail
To make sure your voicemail number is working correctly, you can try dialling it manually. If you are able to access your voicemail, it means that the issue lies with your phone and not the voicemail service. To dial your voicemail, simply launch the Phone app and long-press 1.
Use a third-party voicemail app
Using a third-party voicemail app can help evade any issues you might be facing with your network carrier’s voicemail app. There are a bunch of third-party voicemail apps available on the Google Play Store. Browse through the list and pick the one which suits you the best.
Toggle the Airplane Mode
If you’re unable to reach your voicemail inbox on your Android phone, try performing a quick network refresh. Simply swipe down from the status bar and tap the Airplane Mode tile in the Quick Settings Menu. Wait for a few seconds, then tap it again to turn it off. Once your phone starts receiving a network signal, check your voicemail again.
Check your phone’s storage space
If your phone is running out of storage space, it won’t be able to receive or store voicemails. As a result, you won’t be able to listen to new voicemails on your device. You will be able to receive them once there’s optimum storage space on your phone. Go to Settings>Battery and device care>Storage and delete any duplicate or large files from your phone’s internal storage. If you use a third-party app for voicemail, check if it has any storage limit.
Disable AI Call Screening
Newer Android smartphones have a useful AI feature that screens all of your incoming calls. You can program your phone to ask the caller certain questions before their call is relayed to you. While this is a helpful tool, it can mess with your voicemail settings. Users often report that callers aren’t redirected to voicemail in case you don’t pick up the call. Go to your phone’s AI settings and disable this feature.
Reset Network Settings
If the issue is network-related, you can try resetting the network settings on your phone as a last-ditch effort. Doing this will erase all established connections to your WiFi and Bluetooth, and you will have to pair with them again. It will also restore your network configuration to factory default. Here’s how you can reset the network settings on your device.
Step 1: Go to Settings and select General Management.
Step 2: Scroll down and select Reset.
Step 3: Tap on Reset Network Settings.
Step 4: Select Reset Settings.
Step 5: Enter your PIN to confirm your selection.
Update the OS
Step 1: Go to Settings and select Software update.
Step 2: Tap on Download and Install. Your smartphone will check for any new updates.
Step 3: If an update is available, tap on Install Now. You can also schedule the update for a later time.
Contact your network carrier
If these fixes did not work out for you, it is very likely that the issue lies with the carrier service. Contact your network provider for more clarity on the matter. You can try dialling its dedicated customer helpline or simply walk into a local store and ask for assistance. Carry basic documentation with you, in case you need to replace your SIM card with a duplicate unit.
Frequently Asked Questions
How do I dial my voicemail number?
To connect to your voicemail, all you need to do is launch the dialer on your phone and press & hold 1.
How do I access my voicemail from another number?
If you don’t have your phone on you, you can check your voicemail from someone else’s phone. Simply call your number and wait for the voicemail message. Tap the # key and enter your voicemail PIN to listen to your messages.
Why is my voicemail not working on my Android phone?
If your callers are unable to leave messages on your voicemail, check if call forwarding on your phone is disabled.
How do I reset voicemail on Android?
To reset your voicemail on Android, go to your network carrier’s account management page, select your device, and hit ‘Reset’ in settings.
How do I get a voicemail back on Android?
To get back a deleted voicemail, check the trash folder in the Voicemail app. If the trash folder is empty, you can contact your network provider for further assistance.
Read Also:How to record WhatsApp voice calls?
Conclusion
These are the best and easiest 13 ways to fix the ‘voicemail not working’ issue on your Android smartphone. If you use a third-party app for voicemail, clear its cache from Settings>Apps. If the problem still persists, call your network provider support helpline to explore further solutions.
While setting an alarm sound may seem like a straightforward process, there are certain features that may go unnoticed. Not a lot of users know that you can set songs, voice memos, and even custom vibrations as your alarm sound. Apple even has its own Tone Store with tons of alarm sounds to choose from. Today, we’ll show you how to change and choose the best alarm sounds on an iPhone. Read Also:Top 7 ways to fix iPhone alarm volume
Follow these easy steps to select and choose the best alarm sounds on iPhone
Step 1: Open the Clock app on your iPhone.Step 2: Click on the Alarm icon at bottom of your screen.Step 3: Select the alarm that you wish to customise. If there are no alarms on your device, make one.Step 4: Once you’ve selected an alarm, tap on the Sound option on the Edit Alarm screen.Step 5: Upon opening the Sound option, you will see a list of sounds that you can set as your alarm tone. Tap on a sound to play it.Step 6: Once you’ve selected a sound, tap the back button. This will take you back to the Edit Alarm screen where you can save the changes by tapping Save on the top right end of your screen.If you want to set a song as your Alarm tone, follow these easy stepsStep 1: Open an alarm using the steps mentioned above and tap on the Sound option on the Edit Alarm screen.Step 2: Tap on Pick a Song under the Songs category.Step 3: You will be directed to your library of downloaded songs in the Apple Music app. Select a song you want to set as your alarm tone. Only songs you’ve downloaded in the Apple Music app can be used as an alarm tone.Step 4: Go back to the Edit Alarm screen and tap on the Save button to save your changes.Read Also:5 best smart locks available in India right nowApart from using the preset alarm tones on your iPhone, you can also download new alarm tones from the Tone Store. You can access the Tone Store from the Sound section of your alarm. There are a ton of cheap alarm tones you can buy from the Tone Store. Once you’ve downloaded a tone, you can set it as your alarm tone.If you wish to set a custom vibration as your alarm tone, go to the Sound section of your alarm and select Vibration. Upon selection, you will find a bunch of vibration presets for you to choose from. To make a custom vibration, Tap on Create New Vibration, below the standard vibration options. You will be presented with a new screen to create a custom vibration. Once you’re done creating a vibration, press Play to preview it. If you’re satisfied with the result, press the Save on the top right end of your screen. Give a title to your vibration and it will automatically be selected as your chosen option. You can even make a voice memo your alarm tone by turning it into a ringtone using the Garage Band app. Once it’s turned into a ringtone it can be accessed from the Sound section of your alarm.
For the latest gadget and tech news, and gadget reviews, follow us on Twitter, Facebook and Instagram. For newest tech & gadget videos subscribe to our YouTube Channel. You can also stay up to date using the Gadget Bridge Android App.


 Step 2:


 Step 2: Tap the ‘concentric circles’ icon at the bottom to reveal the scroller for the Live Photo.
 Step 3: Use the scroller to pick the frame you like.
Step 4: Tap on ‘Make Key Photo’ and select ‘Done’. This will make the selected frame the new thumbnail for the Live Photo.
Step 3: Use the scroller to pick the frame you like.
Step 4: Tap on ‘Make Key Photo’ and select ‘Done’. This will make the selected frame the new thumbnail for the Live Photo.
 Step 5: Now, tap on the Share icon and select ‘Duplicate’. In the following popup box tap on ‘Duplicate as still photo’.
Your selected frame will be turned into a still photo. You can access it from the Photos app.
Step 5: Now, tap on the Share icon and select ‘Duplicate’. In the following popup box tap on ‘Duplicate as still photo’.
Your selected frame will be turned into a still photo. You can access it from the Photos app.
 If you don’t want to go through the hassle of picking the right frame to screenshot, you can simply take a photo while recording a video on your iPhone. To do this, switch to video recording mode in the Camera and begin shooting a video. You will see a white shutter icon on the screen alongside the red recording button. Tap the white icon to take a quick picture without pausing the video. The picture will be saved in the Camera Roll of your iPhone. The only minor drawback is that the picture won’t be of the same quality as the images taken in Photo mode. However, it is better than taking a screenshot of a still frame from a video.


 Step 2:

 Step 4:


 Step 2: Tap on Settings.
 Step 3: Tap on Supplementary Services.
 Step 4: Select Call Forwarding.
 Step 5: Tap on every category and select Disable.


 If you’re unable to reach your voicemail inbox on your Android phone, try performing a quick network refresh. Simply swipe down from the status bar and tap the Airplane Mode tile in the Quick Settings Menu. Wait for a few seconds, then tap it again to turn it off. Once your phone starts receiving a network signal, check your voicemail again.
 If your phone is running out of storage space, it won’t be able to receive or store voicemails. As a result, you won’t be able to listen to new voicemails on your device. You will be able to receive them once there’s optimum storage space on your phone. Go to Settings>Battery and device care>Storage and delete any duplicate or large files from your phone’s internal storage. If you use a third-party app for voicemail, check if it has any storage limit.
 Newer Android smartphones have a useful AI feature that screens all of your incoming calls. You can program your phone to ask the caller certain questions before their call is relayed to you. While this is a helpful tool, it can mess with your voicemail settings. Users often report that callers aren’t redirected to voicemail in case you don’t pick up the call. Go to your phone’s AI settings and disable this feature.
 Step 2: Scroll down and select Reset.
 Step 3: Tap on Reset Network Settings.
 Step 4: Select Reset Settings.
 Step 5: Enter your PIN to confirm your selection.
 Step 2: Tap on Download and Install. Your smartphone will check for any new updates.
 Step 3: If an update is available, tap on Install Now. You can also schedule the update for a later time.

?")
 Step 2:
 Step 3:
 Step 5:
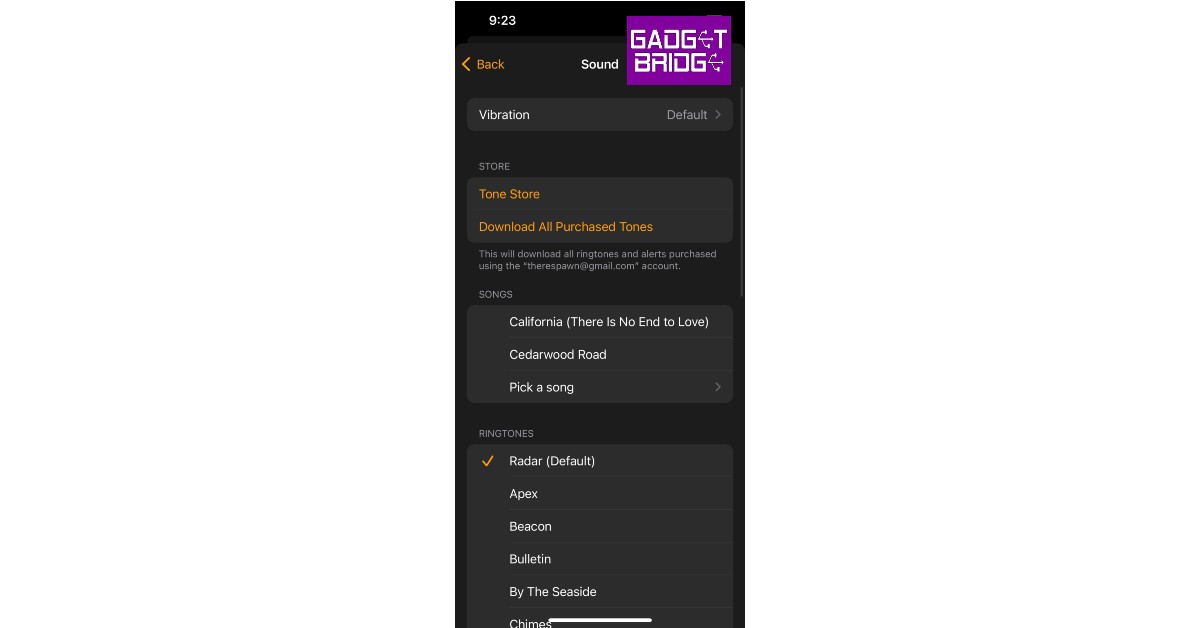 Step 6: