
Vivo V27 series confirmed to launch in India on March 1

After teasing the Vivo V27 series in India the company today officially announced the actual launch date of the upcoming new lineup. The India launch is scheduled for March 1. In order to tantalise the main features of the new V-Series smartphones, the business has also developed a special microsite. The forthcoming series’ design is displayed in the official teaser. The devices would have three back cameras and a ring LED flash.
Vivo has confirmed that the new V-series smartphones will be launched in India on March 1 at noon. The new lineup is likely to include two new devices Vivo V27 and Vivo V27 Pro. It is confirmed that the Sony IMX 776V sensor and colour-changing rear panel would be included in the Vivo V27 series. According to the company, the camera sensor on the phone will come with compatibility for Aura Light Portrait mode and OIS (Optical Image Stabilization). The handset will be made available in a variety of colour schemes.
Also Read: iQOO 11 Review: A real beast
Moreover, a trio of rear cameras is clearly visible. Each sensor has what appears to have a ring surrounding it, and there is a ring LED flash. The volume rockers and power buttons are visible on the left spine of the device.
The phones will feature a hole-punch display and 3D curved panels. The screen is teased to support 120Hz refresh rates. It has also been confirmed that Flipkart would sell these in India.
Reports claim that the Vivo V27 5G will be powered by a MediaTek Dimensity 7200 Processor. The Vivo V27 Pro, on the other hand, will be using the MediaTek Dimensity 8200 Chipset. They reportedly come in 8GB and 128GB or 12GB and 256GB Memory configurations.
The company hasn’t yet disclosed prices, however, it was earlier reported that the Vivo V27 5G in India might cost Rs 35,000. Whereas the Pro version is said to be priced at Rs 40,000. The base variant of the Vivo V25 5G was made available in India for a starting price of Rs 27,999, while the base model of the Vivo V25 Pro cost Rs 35,999.
For the latest gadget and tech news, and gadget reviews, follow us on Twitter, Facebook and Instagram. For newest tech & gadget videos subscribe to our YouTube Channel. You can also stay up to date using the Gadget Bridge Android App. You can find the latest car and bike news here.
Top 12 ways to Fix ‘Instagram Pictures Not Showing Up’ Issue (2024)
")
Instagram may be the world’s largest photo-sharing platform but it isn’t entirely immune to bugs and other issues. Oftentimes, users report that new images do not show up on their Instagram feed, and even when they do, they simply won’t load. There can be multiple reasons behind this problem. In this article, we bring you the top 12 ways to fix the ‘Instagram pictures not showing up’ issue on your smartphone.
Read Also: Only those who pay will have access to 2FA SMS security protection on Twitter
 Step 2: Scroll down and select Instagram.
Step 3: Tap on Storage.
Step 4: Select Clear Cache from the bottom of the screen.
Step 2: Select Settings.
Step 3: Tap on Account.
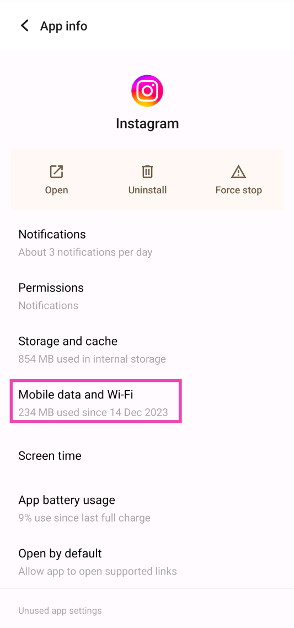
Step 4: Scroll down and select Mobile Data Use.
Step 5: Turn the toggle bar off for Data Saver.
Step 2: Tap on Data Usage.
Step 3: Tap on Mobile Data usage.
Step 4: Click on the gear icon for additional settings.
Step 5: Turn the toggle bar off for Set data limit.
Step 2: Scroll down and select Instagram.
Step 3: Tap on Storage.
Step 4: Select Clear Cache from the bottom of the screen.
Step 2: Select Settings.
Step 3: Tap on Account.
Step 4: Scroll down and select Mobile Data Use.
Step 5: Turn the toggle bar off for Data Saver.
Step 2: Tap on Data Usage.
Step 3: Tap on Mobile Data usage.
Step 4: Click on the gear icon for additional settings.
Step 5: Turn the toggle bar off for Set data limit.
 Step 2: Select Instagram.
 Step 3: Tap on Mobile data and WiFi.
Step 4: Turn on the toggle switch for Unrestricted data usage.
Step 3: Tap on Mobile data and WiFi.
Step 4: Turn on the toggle switch for Unrestricted data usage.
 Any account-related issues can be fixed by logging out of the Instagram app and logging back in. Go to your profile, open the hamburger menu, and select the Log Out option from Settings. Log back into Instagram using your email, phone number, or Instagram handle.
Instagram Lite is a faster, stripped-down version of Instagram that covers all the essential features of the app. If the main Instagram app isn’t able to load images due to network and connectivity issues, switch to Instagram Lite for smooth and fast browsing. Instagram Lite occupies less space on your phone on top of using minimal data. The app is available on the Google Play Store.
Older versions of the Instagram app may contain bugs that cause glitches and unwanted errors. These bugs are quickly resolved in the following updates. If you haven’t updated the Instagram app in a long time, go to Google Play Store, search for Instagram, and hit Update.
If the VPN server you are currently connected to is experiencing an outage, Instagram won’t load pictures on your device. To fix this, connect to a different server or disable the VPN service entirely. Go to Settings>Connection>More Connection Settings>VPN or disconnect from the connected server after launching the VPN app from your phone’s home page.
Any account-related issues can be fixed by logging out of the Instagram app and logging back in. Go to your profile, open the hamburger menu, and select the Log Out option from Settings. Log back into Instagram using your email, phone number, or Instagram handle.
Instagram Lite is a faster, stripped-down version of Instagram that covers all the essential features of the app. If the main Instagram app isn’t able to load images due to network and connectivity issues, switch to Instagram Lite for smooth and fast browsing. Instagram Lite occupies less space on your phone on top of using minimal data. The app is available on the Google Play Store.
Older versions of the Instagram app may contain bugs that cause glitches and unwanted errors. These bugs are quickly resolved in the following updates. If you haven’t updated the Instagram app in a long time, go to Google Play Store, search for Instagram, and hit Update.
If the VPN server you are currently connected to is experiencing an outage, Instagram won’t load pictures on your device. To fix this, connect to a different server or disable the VPN service entirely. Go to Settings>Connection>More Connection Settings>VPN or disconnect from the connected server after launching the VPN app from your phone’s home page.
Check your internet connection
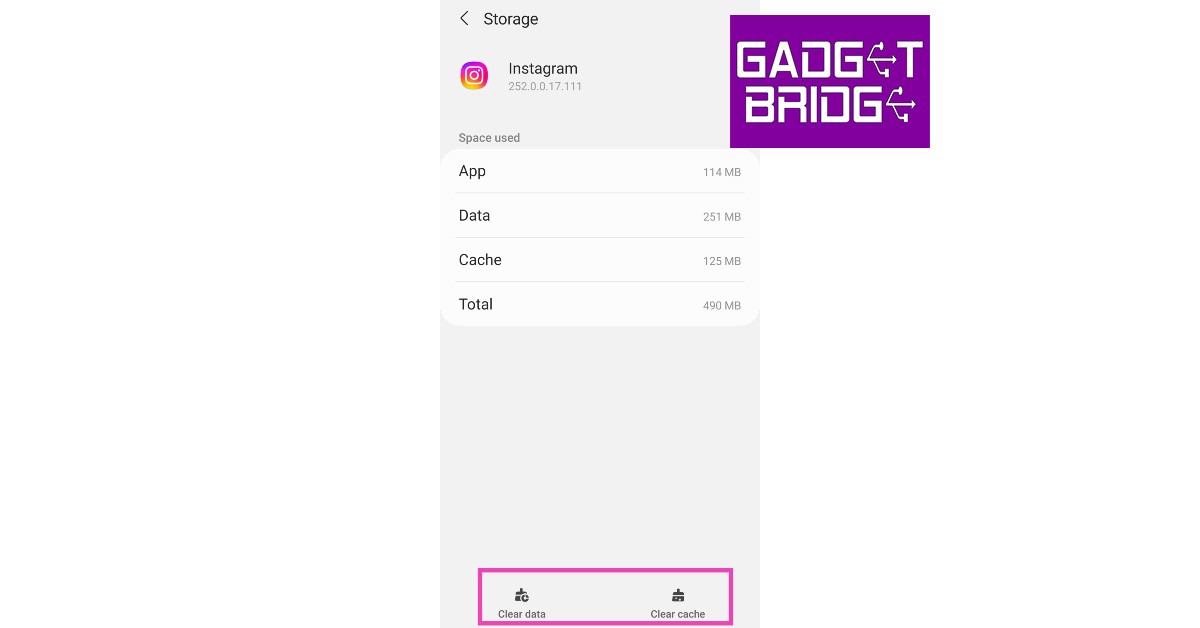
The most likely reason why Instagram won’t load pictures is a faulty internet connection. Make sure that mobile data on your device is turned on or you are connected to an active WiFi network. Check your network provider’s app to see if you have ample data left. Open a web page or another app to see if it is loading. This will help you get an idea of whether the issue lies with Instagram or your network.Clear app cache to fix ‘Instagram pictures not showing up’
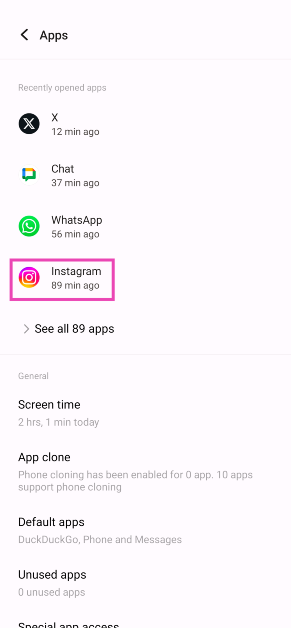
Temporary files in the cache are always at risk of getting corrupted and impeding the basic functioning of the app. Here’s how you can clear Instagram’s app cache. Step 1: Go to Settings and select Apps. Step 2: Scroll down and select Instagram.
 Step 3: Tap on Storage.
 Step 4: Select Clear Cache from the bottom of the screen.
Turn off Instagram’s data saver to fix ‘pictures not showing up’ issue
Instagram has a native data-saving feature that disables the preloading of videos on the platform to consume less mobile data. While this works fine for the most part, it can often lead to pictures and videos not loading at all. Here’s how you can disable the data saver. Step 1: Go to your Instagram profile and tap the hamburger menu at the top right corner of the screen. Step 2: Select Settings.
Step 3: Tap on Account.
Step 2: Select Settings.
Step 3: Tap on Account.
 Step 4: Scroll down and select Mobile Data Use.
 Step 5: Turn the toggle bar off for Data Saver.

Disable your smartphone’s data saver
Like Instagram, your smartphone has a data saver tool as well. You can set a maximum data usage limit on your device. After the limit has been reached, mobile data will be turned off on your phone. Here’s how you can disable data saver on your smartphone. Step 1: Go to Settings and select Connections. Step 2: Tap on Data Usage.
 Step 3: Tap on Mobile Data usage.
 Step 4: Click on the gear icon for additional settings.
 Step 5: Turn the toggle bar off for Set data limit.

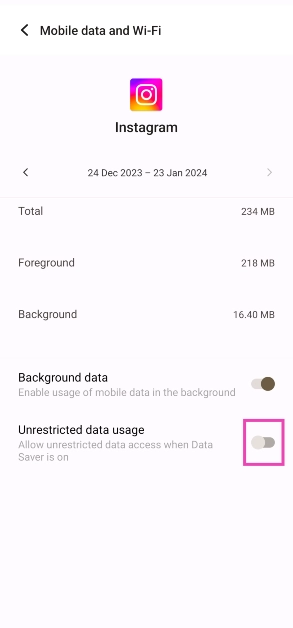
Allow unrestricted data usage to Instagram
Step 1: Go to Settings and select Apps.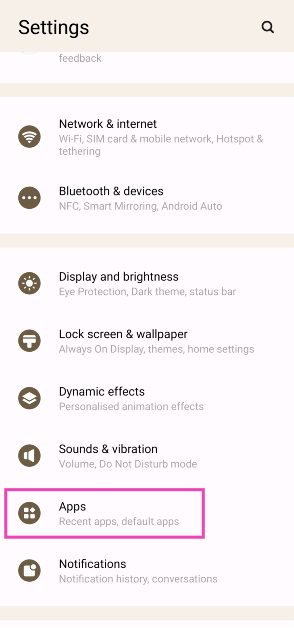 Step 2: Select Instagram.
 Step 3: Tap on Mobile data and WiFi.
 Step 4: Turn on the toggle switch for Unrestricted data usage.
Log out and log back in to fix ‘Instagram pictures not showing up’
 Any account-related issues can be fixed by logging out of the Instagram app and logging back in. Go to your profile, open the hamburger menu, and select the Log Out option from Settings. Log back into Instagram using your email, phone number, or Instagram handle.
Uninstall and Reinstall the app
Uninstalling the app gets rid of the app data on your device. If you suspect the app data is the reason behind Instagram not functioning properly, uninstall and then reinstall the app on your phone. To delete Instagram, long-press its icon in the app drawer and hit the delete button. This will fix the ‘Instagram pictures not showing up’ issue.Use Instagram Lite
 Instagram Lite is a faster, stripped-down version of Instagram that covers all the essential features of the app. If the main Instagram app isn’t able to load images due to network and connectivity issues, switch to Instagram Lite for smooth and fast browsing. Instagram Lite occupies less space on your phone on top of using minimal data. The app is available on the Google Play Store.
Update the Instagram app
 Older versions of the Instagram app may contain bugs that cause glitches and unwanted errors. These bugs are quickly resolved in the following updates. If you haven’t updated the Instagram app in a long time, go to Google Play Store, search for Instagram, and hit Update.
Disable VPN
 If the VPN server you are currently connected to is experiencing an outage, Instagram won’t load pictures on your device. To fix this, connect to a different server or disable the VPN service entirely. Go to Settings>Connection>More Connection Settings>VPN or disconnect from the connected server after launching the VPN app from your phone’s home page.
Use Instagram’s Web Portal
If the above-mentioned fixes don’t work, maybe the problem lies with your device. Try using Instagram’s web portal for PC. Although it started out as a pretty basic webpage, Instagram for Web now supports almost all the features of its mobile apps.Check if Instagram’s servers are down
It is not uncommon for Instagram to experience a server outage. When the servers are down, all app activity is ceased until the servers are back up and running. You have no other option than to wait it out. To check if Instagram’s servers are down, visit the DownDetector website and search for Instagram.Frequently Asked Questions (FAQs)
Why won’t Instagram load any pictures?
If Instagram isn’t loading any pictures on your device, check your network connection. Additionally, make sure that Instagram’s and your device’s data savers are turned off.How do I turn off the data saver on Instagram?
To turn off Instagram’s data saver, go to Profile>Menu>Account>Mobile data use and turn off the toggle bar for Data Saver.How do I turn off my smartphone’s data saver?
Go to Settings>Connections>Data usage>Mobile data usage, hit the gear icon, and turn off the toggle bar for Set data limit. Read Also: Comparison: OnePlus 11 vs Samsung Galaxy S23Conclusion
These are the top 12 ways to fix the ‘Instagram pictures not showing up’ issue on your smartphone. If the issue still persists after trying the fixes mentioned above, it is possible that you may have been handed an account ban. For more details, contact Instagram support. If you found this article helpful, let us know in the comments!Top 7 ways to fix touchscreen issues on iPhone 13 and iPhone 14 (2024)
")
If your iPhone’s touchscreen started malfunctioning out of the blue, there could be a multitude of reasons behind it. Oftentimes, older smartphones are more likely to develop touchscreen issues, but if a newer iPhone (like iPhone 13 or 14) starts giving you problems, chances are it is due to a software glitch. In this article, we bring you the top 7 ways to fix touchscreen issues on iPhone 13 and iPhone 14.
Read Also: Only those who pay will have access to 2FA SMS security protection on Twitter
A quick restart will resolve any minor background issues that may be keeping your iPhone’s touchscreen from functioning properly. You can restart your iPhone 13 or 14 by pressing the volume key and side key until the power slider appears on the screen. Work the slider icon to turn off your iPhone. However, if the touchscreen is entirely unresponsive, you won’t be able to use the onscreen slider. In this case, you will need to force restart your iPhone. Here’s how you can do that
Step 1: Press and release the Volume Up key.
Step 2: Press and release the Volume Down key.
Step 3: Press and hold the side key until the Apple logo appears on the screen.
Step 4: Release the side key.
Step 2: Select Touch from the Physical and Motor section.
Step 3: Select Haptic Touch.
Step 4: Choose fast under the touch duration options. For a better idea of how the two speeds work, use the touch duration test listed below the options.
Make your selection and go back. Your changes will be applied to the phone.
 Step 3: Select Software Update.
 Step 4: Tap on Download and Install.
 You should also know that when you reset your phone to factory settings, there may be cases when your iPhone 13 is completely turned off and does not turn on. This is normal, so the first step is to check all the steps for recovery.
Restart your iPhone
 A quick restart will resolve any minor background issues that may be keeping your iPhone’s touchscreen from functioning properly. You can restart your iPhone 13 or 14 by pressing the volume key and side key until the power slider appears on the screen. Work the slider icon to turn off your iPhone. However, if the touchscreen is entirely unresponsive, you won’t be able to use the onscreen slider. In this case, you will need to force restart your iPhone. Here’s how you can do that
Step 1: Press and release the Volume Up key.
Step 2: Press and release the Volume Down key.
Step 3: Press and hold the side key until the Apple logo appears on the screen.
Step 4: Release the side key.
A quick restart will resolve any minor background issues that may be keeping your iPhone’s touchscreen from functioning properly. You can restart your iPhone 13 or 14 by pressing the volume key and side key until the power slider appears on the screen. Work the slider icon to turn off your iPhone. However, if the touchscreen is entirely unresponsive, you won’t be able to use the onscreen slider. In this case, you will need to force restart your iPhone. Here’s how you can do that
Step 1: Press and release the Volume Up key.
Step 2: Press and release the Volume Down key.
Step 3: Press and hold the side key until the Apple logo appears on the screen.
Step 4: Release the side key.
Increase the touchscreen sensitivity
If you’re experiencing lag issues with your iPhone’s touchscreen, it may be because the touchscreen sensitivity has been set too low. This problem is more common in older iPhones. Here’s how you can increase touchscreen sensitivity on an iPhone. Step 1: Go to Settings, scroll down and select Accessibility. Step 2: Select Touch from the Physical and Motor section.
 Step 3: Select Haptic Touch.
 Step 4: Choose fast under the touch duration options. For a better idea of how the two speeds work, use the touch duration test listed below the options.
 Make your selection and go back. Your changes will be applied to the phone.
Remove the screen protector
Not every screen protector works perfectly with the iPhone. While buying a screen guard, make sure that it is Apple-compatible. If the touchscreen issues on your iPhone started popping up after you installed the screen protector, peel it off and check if the touchscreen is working fine. If you’re using an Apple-compatible protector, take it off and wipe the screen thoroughly before putting it back on.Disconnect all accessories connected through the lightning port
Sometimes, your iPhone’s touchscreen may stop working when the device is connected to an accessory via the lightning port. In this case, disconnect your iPhone from whatever accessory is attached to it. This includes headphones, charger, or any external storage device connected through an OTG adapter. If your iPhone is connected to your Mac through the lightning cable, plug it out and see if the touchscreen has been restored to a working condition.Clean the touchscreen
If your iPhone got splashed with water or is being operated with sweaty hands, make sure you give it a thorough wipe before operating the touchscreen. Any trace of water on the screen may render it unresponsive. It is also common for traces of sweat to accumulate on the touchscreen in humid conditions. Always keep a microfibre cloth handy to give your phone a quick wipe before using it.Update your iPhone
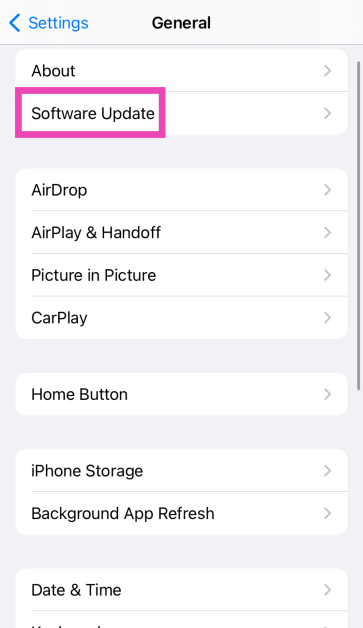
Step 1: Make sure your iPhone is connected to a WiFi network and plug in its charger. Step 2: Go to Settings and select General. Step 3: Select Software Update.
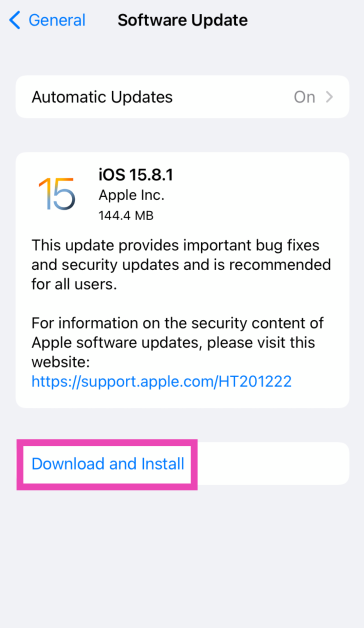
 Step 4: Tap on Download and Install.
Factory reset your iPhone
As a last-ditch effort to rescue your iPhone’s touchscreen, you can try performing a factory reset if you suspect that the issue may be related to a software malfunction. If the touchscreen stopped working after a physical impact on the phone, skip this step. Here’s how you can factory reset your iPhone. Step 1: Connect your iPhone to a PC or Mac and launch iTunes. Step 2: Press and release the Volume Up key followed by the Volume Down key. Then press the side key for at least 10 seconds. Step 3: Press and hold the Volume Down key and side key simultaneously. Release the side key after 5 seconds and the Volume Down key after 10 seconds. Step 4: Click on Restore iPhone on iTunes. You should also know that when you reset your phone to factory settings, there may be cases when your iPhone 13 is completely turned off and does not turn on. This is normal, so the first step is to check all the steps for recovery.
Frequently Asked Questions (FAQs)
Why is my iPhone touchscreen not working?
A faulty screen protector or phone cover, low screen sensitivity, and background software issues can keep your iPhone’s touchscreen from working properly. If there’s hardware damage to the screen, the only way to fix it is by replacing it.How do I increase my iPhone’s touchscreen sensitivity?
Go to Settings>Accessibility>Touch>Haptic Touch and select ‘Fast’.How do I restart my iPhone if the display isn’t working?
Press the volume up key followed by the volume down key. Then, press and hold the side key and only release it when the Apple logo appears on the screen. Read Also: Comparison: OnePlus 11 vs Samsung Galaxy S23Conclusion
This is how you can fix touchscreen issues on an iPhone 13 and iPhone 14. If the issues still persist after trying the fixes mentioned above, take your iPhone to an authorised Apple service centre for further diagnosis. You may need to replace the entire display if it’s a hardware-related issue.9 Great Voice Recording Apps for Android & iOS

While the native voice recording app on your smartphone works fine for the most part, if you are looking for additional features like live transcription and noise cancellation, you will need to download a specialized third-party voice recorder. Luckily, there are a lot of options when it comes to audio recording and you will be easily able to find an app that suits your task. In this article, we bring you the top 9 voice recording apps for Android and iOS.
Read Also: Comparison: OnePlus 11 vs Samsung Galaxy S23
Dolby’s dedicated audio recording app lets you record music, podcasts, voice memos, and more in a professional capacity. Dolby On offers an array of effects like noise reduction, limiting, spatial audio, EQ, and more. If you don’t have a microphone at your disposal, yet want high-quality sound recordings, Dolby On is a great app to record with. The audio editor that comes with the app lets you improve the sound quality after the recording is finished. You can optimise the volume, boost the fullness, and use other effects to achieve optimum quality before publishing the recording.
Otter is a great voice recording app for recording and transcribing lectures, meetings, and more. Otter efficiently transcribes the voice recordings made using the app and is even capable of producing live captions for meetings, lectures, and seminars. If you want to share the recording with your colleagues, you can use Otter to summarise the session, highlight text, format the transcription, and identify different speakers in the recording. You can invite collaborators to edit the meeting. While most basic functions of Otter are free to use, the premium subscription offers some additional perks.
AudioShare lets you manage all the audio recordings on your phone in one place. You can also use the app to record any kind of audio – be it music or voice – using an external mic or the built-in mic on your phone. AudioShare is equipped to play and record in 96k, 48k, 44.1k, 22k, 11k, and 8k sample rates. With AudioShare you get an incredible level of control over the editing process, as you are able to apply different effects like fade in/out, trim the audio recording, and even leave notes wherever necessary.
If you’re looking for a simple voice recording app without the bells and whistles, go for Easy Voice Recorder. This is a great everyday app to record meetings, lectures, and music using your phone. There is no time limit to the recordings, and you can choose to save the file in compressed formats so as to save storage space. The accessible widgets and shortcuts make it easy to start recording audio within seconds. With WearOS support, you can also record audio using your smartwatch.
If you’re looking to record podcasts on your smartphone, then a simple voice recording app isn’t going to cut it. Riverside is one of the more popular apps used by podcasters to record audio on the go. One of the better features of Riverside is that it lets you record up to 8 individual tracks, which makes editing easy once the recording has been completed. If you’re planning on recording a podcast with multiple participants, recording their voices on different tracks will come in extremely handy. Riverside also offers automatic transcriptions for your voice recordings.
This easy-to-use app comes with all the basic features of a regular voice recorder, with a greater level of accessibility. Smart Voice Recorder lets you record high-quality audio without having to worry about the length of the recording. One of the unique features of the app is that it can recognise silence and automatically trim it from the final recording. There is also a live audio spectrum analyser on offer, and you can even adjust the audio sampling rate.
Google’s very own voice recorder is currently only available on Pixel 6 or newer devices, but it will likely be rolled out for other Android smartphones in future. This app offers accurate live transcriptions of voice recordings and can recognise multiple speakers and label them accordingly. You can search within the audio or edit certain parts with ease. What sets Google Recorder apart from other voice recording apps is that it doesn’t need an internet connection to transcribe.
Not happy with how the automated voice transcriptions turn out? Get a human to do it! Rev Audio & Voice Recorder charges $1.50 for human transcription and guarantees 99% accuracy. Your ordered transcriptions are delivered to you by email. Other than that, the app offers all the features of a regular voice recorder like a high-quality recording and playback engine, background recording, in-app editor, and more.
For strictly dictational purposes, Voice Recorder Pro is one of the best apps out there. There is no recording limit other than your phone’s storage space. You can record audio in four different formats – MP3, PCM, AAC, and AMR. If you’re not necessarily looking to record high-quality audio but instead want to save up on storage space, AMR should be your preferred format. The app also lets you change the sample rate (8 kHz – 44kHz) and the bitrate (32 – 320 kbps). There’s support for mono and stereo recordings with the option to record in the background as well.
Read Also: mPassport Police App launched: To speed up the Police verification process of passport issuance
Dolby On: Record Audio & Music
 Dolby’s dedicated audio recording app lets you record music, podcasts, voice memos, and more in a professional capacity. Dolby On offers an array of effects like noise reduction, limiting, spatial audio, EQ, and more. If you don’t have a microphone at your disposal, yet want high-quality sound recordings, Dolby On is a great app to record with. The audio editor that comes with the app lets you improve the sound quality after the recording is finished. You can optimise the volume, boost the fullness, and use other effects to achieve optimum quality before publishing the recording.
Otter: Transcribe Voice Notes
 Otter is a great voice recording app for recording and transcribing lectures, meetings, and more. Otter efficiently transcribes the voice recordings made using the app and is even capable of producing live captions for meetings, lectures, and seminars. If you want to share the recording with your colleagues, you can use Otter to summarise the session, highlight text, format the transcription, and identify different speakers in the recording. You can invite collaborators to edit the meeting. While most basic functions of Otter are free to use, the premium subscription offers some additional perks.
AudioShare
 AudioShare lets you manage all the audio recordings on your phone in one place. You can also use the app to record any kind of audio – be it music or voice – using an external mic or the built-in mic on your phone. AudioShare is equipped to play and record in 96k, 48k, 44.1k, 22k, 11k, and 8k sample rates. With AudioShare you get an incredible level of control over the editing process, as you are able to apply different effects like fade in/out, trim the audio recording, and even leave notes wherever necessary.
Easy Voice Recorder
 If you’re looking for a simple voice recording app without the bells and whistles, go for Easy Voice Recorder. This is a great everyday app to record meetings, lectures, and music using your phone. There is no time limit to the recordings, and you can choose to save the file in compressed formats so as to save storage space. The accessible widgets and shortcuts make it easy to start recording audio within seconds. With WearOS support, you can also record audio using your smartwatch.
Riverside
 If you’re looking to record podcasts on your smartphone, then a simple voice recording app isn’t going to cut it. Riverside is one of the more popular apps used by podcasters to record audio on the go. One of the better features of Riverside is that it lets you record up to 8 individual tracks, which makes editing easy once the recording has been completed. If you’re planning on recording a podcast with multiple participants, recording their voices on different tracks will come in extremely handy. Riverside also offers automatic transcriptions for your voice recordings.
Smart Voice Recorder
 This easy-to-use app comes with all the basic features of a regular voice recorder, with a greater level of accessibility. Smart Voice Recorder lets you record high-quality audio without having to worry about the length of the recording. One of the unique features of the app is that it can recognise silence and automatically trim it from the final recording. There is also a live audio spectrum analyser on offer, and you can even adjust the audio sampling rate.
Google Recorder
 Google’s very own voice recorder is currently only available on Pixel 6 or newer devices, but it will likely be rolled out for other Android smartphones in future. This app offers accurate live transcriptions of voice recordings and can recognise multiple speakers and label them accordingly. You can search within the audio or edit certain parts with ease. What sets Google Recorder apart from other voice recording apps is that it doesn’t need an internet connection to transcribe.
Rev Audio & Voice Recorder
 Not happy with how the automated voice transcriptions turn out? Get a human to do it! Rev Audio & Voice Recorder charges $1.50 for human transcription and guarantees 99% accuracy. Your ordered transcriptions are delivered to you by email. Other than that, the app offers all the features of a regular voice recorder like a high-quality recording and playback engine, background recording, in-app editor, and more.
Voice Recorder Pro
 For strictly dictational purposes, Voice Recorder Pro is one of the best apps out there. There is no recording limit other than your phone’s storage space. You can record audio in four different formats – MP3, PCM, AAC, and AMR. If you’re not necessarily looking to record high-quality audio but instead want to save up on storage space, AMR should be your preferred format. The app also lets you change the sample rate (8 kHz – 44kHz) and the bitrate (32 – 320 kbps). There’s support for mono and stereo recordings with the option to record in the background as well.
Read Also: mPassport Police App launched: To speed up the Police verification process of passport issuance
For strictly dictational purposes, Voice Recorder Pro is one of the best apps out there. There is no recording limit other than your phone’s storage space. You can record audio in four different formats – MP3, PCM, AAC, and AMR. If you’re not necessarily looking to record high-quality audio but instead want to save up on storage space, AMR should be your preferred format. The app also lets you change the sample rate (8 kHz – 44kHz) and the bitrate (32 – 320 kbps). There’s support for mono and stereo recordings with the option to record in the background as well.
Read Also: mPassport Police App launched: To speed up the Police verification process of passport issuance
Conclusion
These are our picks for the top 9 voice recording apps for Android and iOS you can download right now. Most of these apps are free to use but some may come with certain exclusive features locked behind a paywall. Some of the apps also offer cloud storage options if you do not have enough storage space on your smartphone. For the latest gadget and tech news, and gadget reviews, follow us on Twitter, Facebook and Instagram. For newest tech & gadget videos subscribe to our YouTube Channel. You can also stay up to date using the Gadget Bridge Android App. You can find the latest car and bike news here.Meta introduces a paid Blue Badge for Facebook and Instagram

Meta Platforms has unveiled Meta Verified, a membership service for both Facebook and Instagram. Users of the paid subscription service will be able to obtain a blue badge and use a government ID to authenticate their accounts. Account verification, impersonation protections, access to more visibility, and support are all part of the new subscription service.
Mark Zuckerberg announced that Meta will start testing a new service called Meta Verified, a subscription package on Instagram and Facebook that includes a verified badge that authenticates your account with a government ID, proactive account protection, access to account support, and increased visibility and reaches.
Also Read: iQOO 11 Review: A real beast
This service is intended to help up-and-coming creators grow their presence and build community more quickly. In order to determine what features are most useful, we will launch a progressive test in Australia and New Zealand later this week. The company will then intend to roll out Meta Verified to the rest of the world in the near future.
The move would enhance security and authenticity on social networking platforms, according to the chief executive of Meta Mark Zuckerberg.
Those unaware to verify the legitimacy of high-profile accounts, badges, often known as blue ticks, have been utilised as a verification tool. Meta’s latest move follows Twitter’s premium Twitter Blue subscription implementation by Elon Musk in November 2022. Nevertheless, when users began pretending to be well-known brands and celebrities by purchasing the badge, Twitter’s pay-for-verification feature was suspended in November of last year.
You’ll receive a verified badge when you sign up for Meta Verified, indicating that your account has been confirmed using a valid government ID and that you are who you say you are. The users will also benefit from increased security against impersonation thanks to proactive account monitoring for potential targets of impersonators who may be people with expanding online audiences. With access to a real person for common account concerns, you can get assistance when you need it. prominence in some platform sections, including search, comments, and recommendations, which increases visibility and reach. special features that let you express yourself in unusual ways.
Also Read: Samsung unveils Galaxy S23, Galaxy S23+, and Galaxy S23 Ultra in India: Details Inside
What is required to get Meta verified?
- Accounts must meet minimal activity requirements, such as having a history of prior postings and being at least 18 years old to be eligible.
- When applying for a Facebook or Instagram account, applicants must first provide a government ID that matches their profile name and photo.
- Proactive monitoring for impersonated accounts is part of subscriptions.
How much will it cost?
Later this week, Australia and New Zealand residents will be able to directly purchase Meta Verified on Facebook or Instagram. On the web, monthly subscription costs (USD) $11.99, and for iOS and Android, it costs (USD) $14.99. For the latest gadget and tech news, and gadget reviews, follow us on Twitter, Facebook and Instagram. For newest tech & gadget videos subscribe to our YouTube Channel. You can also stay up to date using the Gadget Bridge Android App. You can find the latest car and bike news hereVivo officially announced Vivo Y56 5G in India

The Chinese smartphone brand Vivo has officially announced the release of its new smartphone in India. The company has launched Vivo Y56 5G smartphone in the nation. The MediaTek Dimensity 700 SoC powers the newly released smartphone. It has dual back 50-megapixel cameras as well. The phone also houses a 5,000mAh battery.
Vivo Y56 5G price in India and sale details
Vivo Y56 5G price in India has been set at Rs 19,999 for the single 8GB RAM and 128GB storage option. The device comes in two colour options of Black Engine and Orange Shimmer. The device’s offline retail store sales have started and it can also be purchased via the company’s official website. A significant retailer, Mahesh Telecom, advertised the device for purchase even before the company officially released it. The shop said that physical stores around the country are currently selling the Y56 5G. The retailer from Mumbai posted the information on Twitter.Vivo Y56 5G specifications
The Vivo Y56 5G’s 6.58-inch full-HD+ LCD screen features a 1,080 by 2,408 resolution. The smartphone is controlled by Funtouch OS 13 running on Android 13. It is powered by a MediaTek Dimensity 700 SoC and 8GB RAM combo. The internal RAM can be expanded up to 16GB with the use of unused onboard storage. It also comes with 128GB of built-in storage. The 5,000mAh battery within the Vivo Y56 5G supports 18W rapid charging. Wi-Fi, Bluetooth v5.1, GPS, Glonass, OTG, FM radio, and a USB Type-C port are among the connectivity options available on the Vivo smartphone. The sensors on board include an accelerometer, ambient light sensor, e-compass, gyroscope, and proximity sensor. It has a side-mounted fingerprint sensor for login. A 50-megapixel primary sensor with an f/1.8 aperture and a 2-megapixel secondary sensor with an f/2.4 aperture make up the dual rear camera system on the Vivo Y56 5G. The front of the gadget has a 16-megapixel sensor with an f/2.0 aperture for selfies and video calls. For the latest gadget and tech news, and gadget reviews, follow us on Twitter, Facebook and Instagram. For newest tech & gadget videos subscribe to our YouTube Channel. You can also stay up to date using the Gadget Bridge Android App. You can find the latest car and bike news here.Amazon Quiz Answers Today 20 February 2023: Participate to win Rs 5,000

20 February 2023 Amazon Quiz has gone live on its mobile app platform. The quiz can be played from 12 AM to 11:59. All you need to do is just answer five easy questions that the e-commerce website puts before you. Today you can stand a chance to win Rs 5,000 Amazon Pay Balance.
Every day Amazon posts a new questionnaire that consists of five simple questions about general knowledge and current events. To enter a lucky draw, participants must correctly answer the questions. One incorrect answer will result in your elimination from the quiz. Each month, only one person will be declared the winner and the results will be announced at the end of the month. Amazon customers who submit correct answers can win an Amazon Pay Balance worth up to Rs 50,000. To ensure that you answer all five questions correctly, Gadget Bridge updates all of the correct answers on a daily basis. Take a look at today’s answers:
Amazon Quiz Today Prize – Rs 5,000 Amazon Pay Balance
Quiz Date – 20 February 2023
Daily Timing – 12 AM to 11:59 PM
Winner Announcement – Today 12 PM
Amazon Quiz Answers Today 20 February 2023
Question 1: Which country won the 2023 Men’s Hockey World Cup played in Odisha?
Answer: GermanyQuestion 2: A newly released movie by Rajkumar Santoshi is titled ‘Gandhi ______ – Ek Yudh’. Fill in the blanks
Answer: GodseQuestion 3: R’Bonney Gabriel won the 71st Miss Universe competition representing which country?
Answer: USAQuestion 4: This famous ‘toy train’ starts from which hill station?
Answer: DarjeelingQuestion 5: This famous leader was the former President of which country?
Answer: South AfricaHow To Play Amazon Quiz
Only app users are eligible to play the Amazon quiz every morning from 12 AM to 11:59 PM. The quiz is not available on the desktop. For those who are unaware of how to play the Amazon quiz below are the steps, you can follow to take the quiz.- Firstly download the Amazon app from Google Play Store or App Store
- Now fill in the required information through the Sign Up option.
- You need to log in to the Amazon app and scroll down on the home screen to find the Amazon Quiz banner.
- Tap on the Amazon Quiz banner and tap on the Start button to start the Quiz.
- Now you will get 5 questions and you need to answer them correctly. One wrong answer will eliminate you from the Quiz.
- After answering all the questions correctly you are now eligible for a Lucky Draw.
- The winner’s name will be announced today at 12 PM.
Only those who pay will have access to 2FA SMS security protection on Twitter

Twitter officially announced that it will only permit Twitter Blue subscribers to use text messages as a two-factor authentication option after March 20. Users who already have SMS-based 2FA activated but haven’t signed up for Twitter Blue will have 30 days to turn it off and switch to a different method
The company took to Twitter to update the users about the upcoming security change. Its tweet reads, “Effective March 20, 2023, only Twitter Blue subscribers will be able to use text messages as their two-factor authentication method. Other accounts can use an authentication app or security key for 2FA.”
Also Read: Twitter discontinued its CoTweets feature
In order to log in with 2FA, you must also provide a code or security key in addition to your password. By taking this extra step, you can ensure that only you have access to your account. Twitter provides three 2FA options: security key, authentication app, and text message.
Twitter reports that while phone-number-based 2FA was once a common type of 2FA, it has sadly been utilised – and misused – by bad actors. As a result, as of right now, only Twitter Blue subscribers will be able to enrol their accounts in the text message/SMS method of 2FA on the microblogging platform. The availability of text message 2FA for Twitter Blue may vary by country and carrier.
Also Read: Demystified: What each Symbol and Icon Means on Twitter Existing non-Twitter Blue subscribers will have 30 days to cancel this method and sign up for another. Twitter will stop allowing non-Twitter Blue subscribers to use Text messages as a 2FA option as of March 20, 2023. Accounts that still have text message 2FA enabled will have it disabled at that point. Your phone number is not automatically removed from your Twitter account when text message 2FA is disabled. Twitter is encouraging non-Twitter Blue subscribers to think about utilising an authentication app or security key method as an alternative. For the latest gadget and tech news, and gadget reviews, follow us on Twitter, Facebook and Instagram. For newest tech & gadget videos subscribe to our YouTube Channel. You can also stay up to date using the Gadget Bridge Android App. You can find the latest car and bike news here.There you go, things now will be forced if you do not purchase things. A simple thing as 2FA SMS security will only be available for people who pay. Twitter will be more vulnerable to attacks now. pic.twitter.com/BSFgVPvsrM
— Sulabh Puri (@sulabhpuri) February 18, 2023
Comparison: OnePlus 11 vs Samsung Galaxy S23

Earlier this month, Samsung Galaxy S23 and OnePlus 11 were introduced in India. Both are high-end products from their respective brands, however, the OnePlus phone is more affordable and includes additional quality features. In order to determine which device delivers the most features for the lowest price, we have compared the OnePlus 11 with the Samsung Galaxy S23.
Display
OnePlus 11: 6.7-inch Samsung LTPO 3.0 AMOLED display Samsung Galaxy S23: 6.1-inch full-HD+ Dynamic AMOLED 2X display Also Read: OnePlus 11 5G with Snapdragon 8 Gen 2 SoC first sale todayProcessor
OnePlus 11: Qualcomm Snapdragon 8 Gen 2 SoC Samsung Galaxy S23: Qualcomm Snapdragon 8 Gen 2 SoC (customised)Rear camera(s)
OnePlus 11: Triple rear camera setup- 50-megapixel sensor with OIS and f/1.8 aperture, 32-megapixel portrait sensor and 48-megapixel Sony IMX58 ultra wide-angle sensor (f/2.2 aperture and 115-degree field of view) Samsung Galaxy S23: Triple rear camera setup- 50-megapixel primary wide-angle sensor (f/1.8 aperture and 85-degree field of view), 12-megapixel ultra-wide angle camera (f/2.2 aperture lens and a 120-degree field-of-view) and a 10-megapixel telephoto camera (f/2.4 aperture lens and 3x optical zoom) Also Read: Samsung unveils Galaxy S23, Galaxy S23+, and Galaxy S23 Ultra in India: Details InsideSelfie camera
OnePlus 11: 16-megapixel sensor (f/2.4 aperture) Samsung Galaxy S23: 12-megapixel selfie sensor (f/2.2 aperture lens and an 80-degree field-of-view)RAM and storage
OnePlus 11: 8GB RAM with 128GB storage and 12GB RAM with 256GB storage options Samsung Galaxy S23: 8GB RAM with 128GB storage and 8GB RAM with 256GB storage optionsBattery
OnePlus 11: 5,000mAh dual-cell battery (support for 100W SuperVOOC charging) Samsung Galaxy S23: 3,900mAh battery (supports 25W wired and 15W wireless charging)Operating system
OnePlus 11: ColorOS 13.0 (Android 13) Samsung Galaxy S23: One UI 5.1 (Android 13)Starting Price
OnePlus 11: Rs 56,999 Samsung Galaxy S23: Rs 74,999Our verdict
Comparing first the displays, the OnePlus 11 has a larger 6.7-inch Samsung LTPO 3.0 AMOLED screen while the Galaxy S23 is content with a 6.1-inch full-HD+ Dynamic AMOLED 2X screen. The Galaxy phone is better suited for people with smaller hands for comfortable single-handed use while the OnePlus device is better if you desire a bigger phone. The Samsung Galaxy S23 provides Gorilla Glass Victus 2, whilst the OnePlus 11 chooses the more dated Gorilla Glass 5. Although the OnePlus 11’s display is curved on the sides, the Galaxy S23’s display is brighter. The most recent Qualcomm Snapdragon 8 Gen 2 Soc powers both devices. However, Qualcomm specifically customised the one in the Galaxy for Samsung to perform faster. Both smartphones have a triple rear camera arrangement in terms of optics, however, OnePlus boasts Hasselblad-branded sensors. A 5,000mAh battery powers the OnePlus 11 and supports 100W SuperVOOC fast charging. The Galaxy S23, on the other hand, has a smaller 3,900mAh battery and supports 25W wired charging and 15W wireless charging Samsung offers a feature for wireless charging, however, the OnePlus 11 has a larger battery and supports faster charging. Even In terms of design, the two devices are completely opposite. The OnePlus 11 features an entry-level IP54 rating, which provides splash protection but no significant protection from drowning. On the other hand, the S23 has a complete IP68 rating. The OnePlus 11 is also less expensive than the Galaxy S23. Which should you purchase, then? Your selection for the phone’s size will be the major deciding element in your decision to purchase. The handsets are compatible and reasonably priced, provided you strictly want or want wireless charging or an IP68 rating. For the latest gadget and tech news, and gadget reviews, follow us on Twitter, Facebook and Instagram. For newest tech & gadget videos subscribe to our YouTube Channel. You can also stay up to date using the Gadget Bridge Android App. You can find the latest car and bike news here.Beginning May 1, Amazon will require employees to work from office at least three days a week

From May 1, Amazon.com will allow employees to work at least three days per week in the office. The company shared the news via blog post. The decision was made at a meeting earlier this week. Note that the company sent workers home to work remotely as a result of the COVID-19 pandemic. Amazon intends to put this adjustment into action on May 1.
CEO Andy Jassy, who also stated that the change would make it simpler to learn and communicate. According to him, there would be several limitations to the norm, including the option for salesmen and customer support staff to work remotely.
Also Read: Samsung unveils Galaxy S23, Galaxy S23+, and Galaxy S23 Ultra in India: Details Inside
As per the Amazon head, the pandemic started about three years ago, and it advised all its staff who could work from home to do so. Following that, the firm made a few updates to the guidance (second half of 2021), the most recent of which stated that Director-level leaders would determine for their teams where they would work and that we would experiment for the ensuing period of time.
Considering how long the epidemic lasted, several models—including some teams working solely from home, some teams spending all of their time in the office together, and numerous varieties of hybrid—could be seen over a significant amount of time. According to the CEO its S-team discussed whether and how to modify its strategy by listening to employees, observing how their teams performed, speaking with leaders at other organisations, and meeting on a number of occasions.
In a blog post, Amazon said that working together and coming up with ideas in person is simpler and more productive. More freely expressed energy and thoughts are riffed on. It’s simpler to learn from one another face-to-face. It’s far simpler to ask someone how to accomplish something or how they handled a certain scenario by walking a short distance to their location as opposed to Chiming or Slacking them. When teams interact in person more regularly, they tend to feel closer to one another. Therefore, this has convinced Amazon that it should return to working together most of the time (at least three days per week). The change will go into effect on May 1 according to Amazon.
Also Read: Garena Free Fire Redeem Codes Today 18 February 2023: Here is how to claim them
“We made this decision at an s-team meeting earlier this week, and for a number of reasons (including the adjustments I know will be required for some of our employees), I wanted to share with you as early as I could even though we haven’t worked out all the execution details yet. Of course, as there were before the pandemic, there will still be certain roles (e.g. some of our salespeople, customer support, etc.) and exceptions to these expectations, but that will be a small minority. We plan to implement this change effective May 1.”
For the latest gadget and tech news, and gadget reviews, follow us on Twitter, Facebook and Instagram. For newest tech & gadget videos subscribe to our YouTube Channel. You can also stay up to date using the Gadget Bridge Android App. You can find the latest car and bike news here.