If you are consistently receiving inappropriate or spam calls and messages from a particular phone number, the first thing you should do is block the number on your phone. There are several ways you can go about this. If the number is saved in your Contacts, blocking it takes no time at all. You can also use third-party apps like TrueCaller to block any phone number. Here are the 8 best ways to block a phone number or a contact on an Android smartphone or an iPhone (iOS).Read Also:Apple Music Classical now available for pre-order on Apple’s App Store
Android
Block a phone number from the dialer app
Step 1: Launch the native dialer app on your Android smartphone.Step 2: Look for the number you want to block in your recent call logs.Step 3: Tap on the number your want to block and select the ‘i’ icon for more details.Step 4: Select the ‘Block’ option at the bottom of the screen.
Block a phone number from contacts
Here’s how you can block a phone number saved as a contact on your Android smartphone.Step 1: Launch the Contacts app and select the contact you want to block.Step 2: Tap on the ellipses at the bottom right corner of the screen.Step 3: Select ‘Block contact’.
Block a phone number from the Messages app
Receiving spam texts from a phone number? Here’s how you can block it.Step 1: Long press a message from the sender you want to block.Step 2: Tap on the ellipses (three dots) at the top right corner of the screen.Step 3: Select ‘Block’.
Block a number on TrueCaller
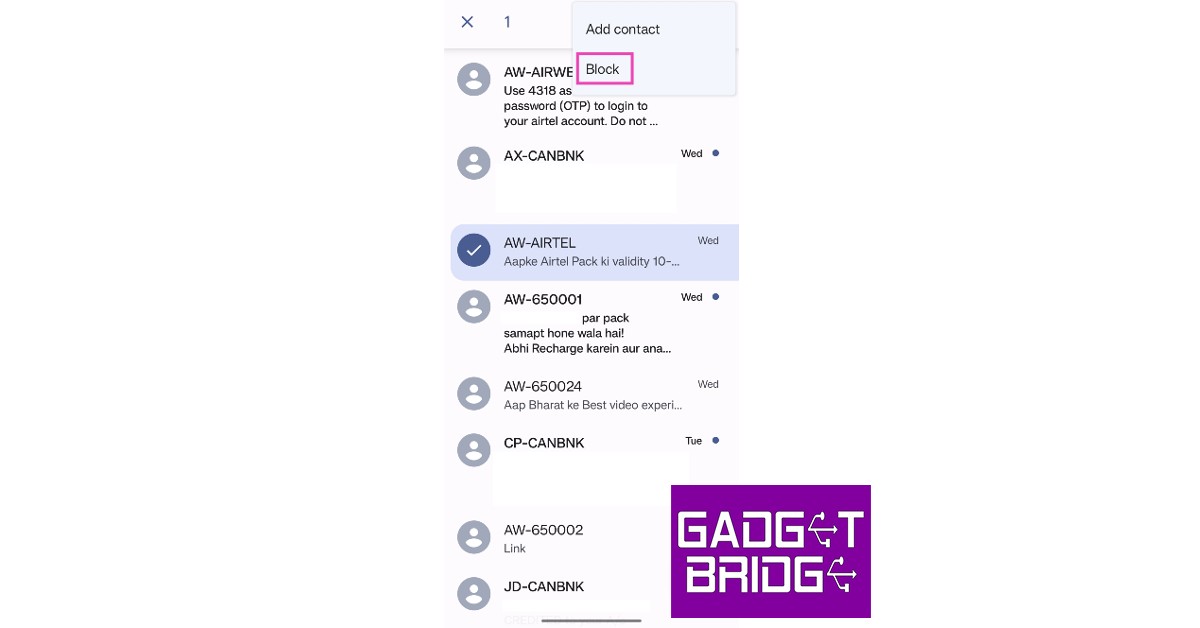
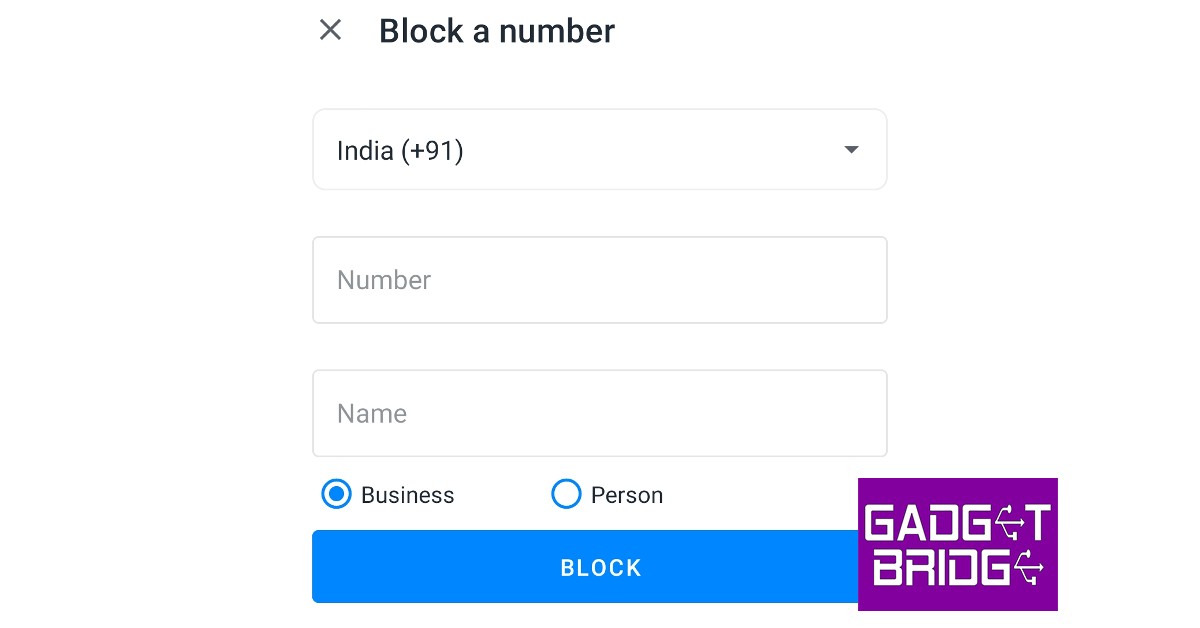
Step 1: Open the TrueCaller app and go to ‘Contacts’.Step 2: Scroll to the contact you wish to block and select their profile.Step 3: From the detailed profile view select ‘Block’.Step 4: In the following popup box, TrueCaller will ask you whether the contact is a personal or business account. It will also request a reason for blocking, which is optional to provide. Make the necessary selections and hit block.The contact will be blocked. If you do not have the person saved in your contacts, here is how you can block them on TrueCaller.Step 1: Open the TrueCaller app and go to ‘Blocking’.Step 2: Scroll down and select ‘Phone Number’ from the ‘Block someone manually’ section.Step 3: Enter the phone number and name of the person you want to block. After filling out the details, tap ‘Block’.
iOS
Block a phone number from the Phone app
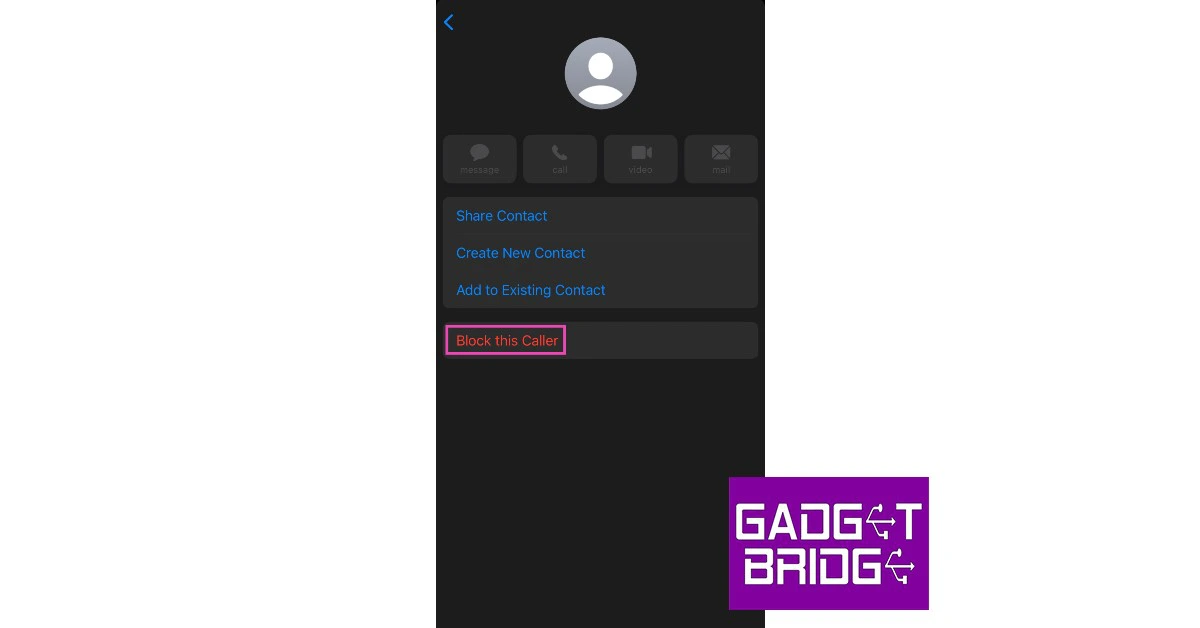
Step 1: Launch the Phone app on your iPhone.Step 2: Tap the info icon next to the phone number you want to block.Step 3: Scroll down and select ‘Block this caller’.
Block a contact on iPhone
Step 1: Launch the Phone app on your iPhone and select the Contacts tab at the bottom.Step 2: Select the contact you want to block.Step 3: Scroll down and select ‘Block this caller’.
Block a phone number from Messages
Step 1: Launch the Messages app.Step 2: Open a text message from the sender you want to block.Step 3: Tap the profile icon of the sender.Step 4: Tap on the info icon.Step 5: Select the info icon again from the sender’s profile.Step 6: Select ‘Block this Caller’.
Add a number directly to the block list
Step 1: Go to Settings and select Phone.Step 2: Select ‘Blocked Contacts’.Step 3: Tap on ‘Add new’.Step 4: Select the Contact you wish to block.Read Also:How to link AADHAAR with your PAN card?
If your Android smartphone got lost or stolen recently, not all hope is lost. There are a couple of universal ways to track any Android phone, irrespective of the manufacturer. In case your tracking attempts are unsuccessful, you can still use these methods to remotely block your phone and erase all personal data from it. Here are the two universal ways to find a lost or stolen Android phone.Read Also:Apple Music Classical now available for pre-order on Apple’s App Store
Find your Android phone using its IMEI number
Every phone, be it Android or otherwise, has a unique IMEI number that it uses to connect with nearby cellular towers. By tracking the IMEI number of your lost or stolen Android phone, you can triangulate its position with the help of the cellular tower it uses to make a call. If no call is made using the smartphone, then the IMEI number alone cannot determine its position. Another thing to note here is that only the police have the appropriate tools to track a phone by its IMEI number. So in case your phone is stolen, you will need to file an FIR of the incident and then submit a request to get your phone located.You can also use the IMEI number to block your device in case it gets lost or stolen. You can do this yourself by using the CEIR (Central Equipment Identity Register) portal launched by the GoI. Here’s how.Step 1: File a report of the missing device with the police and keep a copy of the report.Step 2: Get a duplicate SIM card for the lost number from your telecom service provider. A duplicate SIM card is necessary since CEIR requires it to send an OTP while accepting the IMEI blocking request.Step 3: Keep the police report ready, along with proof of identity. The mobile purchase invoice is also a valid document.Step 4: Go to the CEIR Portal and fill out the request form to block the IMEI number.Step 5: After submission of the request form, you will be given a Request ID. This ID can be used to track the status of the request form and unblock the IMEI if your device gets recovered in future.
Use Google’s Find My Device
Using Google’s Find My Device service is the quickest and easiest way to find the live location of your device. If your device is switched off or not connected to the Internet, Find My Device will show you the last recorded location of your smartphone. In order to track your smartphone using this service go to the Find My Device webpage and log in using your Google Account. Make sure this is the same Google Account that is logged into your lost phone. Find my Device will show you the live or last known location of your device, depending on its connection status. You can also remotely erase all the data on your smartphone using this service.Read Also:How to link AADHAAR with your PAN card?
Conclusion
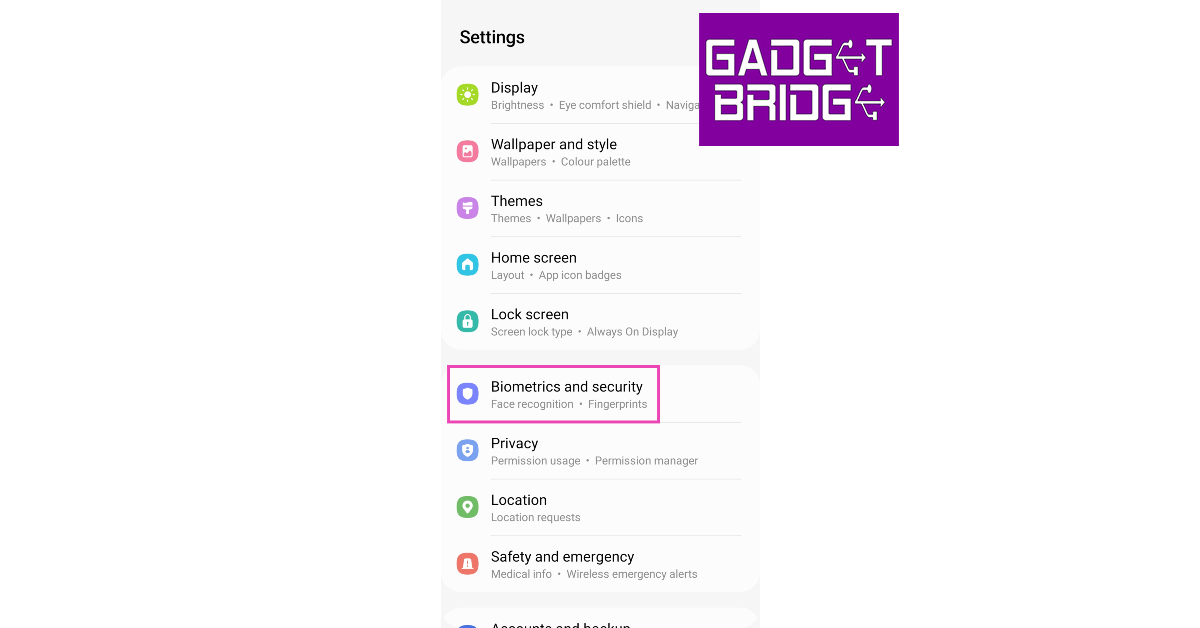
These are the two quick ways to find your lost or stolen Android phone. Depending on the manufacturer, your smartphone may have a native tracking service. Samsung smartphones come with a ‘Find My Mobile’ option that can be accessed from the ‘Biometrics and Security’ section of the Settings. Once turned on, you can use this feature to track your Samsung smartphone in case it gets lost or stolen.For the latest gadget and tech news, and gadget reviews, follow us on Twitter, Facebook and Instagram. For newest tech & gadget videos subscribe to our YouTube Channel. You can also stay up to date using the Gadget Bridge Android App. You can find the latest car and bike news here.
Changing the ringtone on your smartphone is a pretty straightforward task, but did you know that you can make custom ringtones out of song samples and set different ringtones for specific contacts? Your smartphone gives you more control over what you can do with ringtones, and the entire process is pretty easy to follow. Here are the best easy ways to change the ringtone on an iPhone and an Android smartphone.Read Also:How to link AADHAAR with your PAN card?
Android
Change your ringtone from Settings
Step 1: Go to Settings and select ‘Sounds and vibration.’Step 2: Select Ringtone and tap on the plus icon at the top right corner of the screen. You can also select a ringtone from the sample tones.Step 3: Select a song from your phone’s storage. Step 4: Tap on ‘Done.’
Set a custom ringtone
Step 1: Install the ‘MP3 cutter & ringtone maker’ app from Google Play Store.Step 2: Open the app and select the song you want to trim.Step 3: Use the slider to trim the song and edit the part you want to set as your ringtone.Step 4: You can also use the fade effects and alter the volume of specific parts of the song.Step 5: If you want to get creative, you can even merge multiple songs together to create a unique ringtone.Step 6: Once you’ve edited the song, save it on your device. You can set it as your ringtone from Settings, as shown above. You can also set the song as your ringtone directly from the app.
Change the ringtone for a particular contact
If you want to set a different ringtone for a specific contact, you can do it from the native Contacts app on your phone. Here’s how.Step 1: Launch the Contacts app on your smartphone and select the contact to which the ringtone is to be assigned.Step 2: Tap on the ‘Edit’ option at the bottom of the screen.Step 3: Tap on ‘View More’ and select ‘Ringtone’.Step 4: Select a ringtone from the sample tunes or tap the plus icon to set a customised ringtone. Go back once you’re done.Step 5: Select ‘Save’.
iOS
Change ringtone from Settings
Step 1: Go to Settings and select ‘Sound and Haptics’.Step 2: Select ‘Ringtone’ under the ‘Sound and Haptic Patterns’ section.Step 3: Select the Ringtone you want.
Change the ringtone for a particular contact
Here’s how you can set a different ringtone for a specific contact on your iPhone.Step 1: Launch the Contacts and select the contact in question.Step 2: Tap on the ‘Edit’ option at the top right corner of the screen.Step 3: Scroll down and select ‘Ringtone’.Step 4: Choose a new tone for the contact and save your changes.
Buy a new ringtone from iTunes
Step 1: Launch the iTunes Store app on your iPhone.Step 2: Tap the ellipses and select Tones.Step 3: Search for the ringtone you want and tap on its listed price.Step 4: You can change the ringtone from the iTunes Store itself, or you can download the tone first and change it from Settings later.Step 5: Use your Apple ID to complete the purchase.Read Also:Best ways to mirror your Android smartphone’s screen to a Windows device
While Google Play Store may be the biggest app marketplace in the world, sometimes you may be driven to other platforms for various reasons. One of the major reasons why people look beyond the Play Store is because it doesn’t list the apps that are region-locked or banned in their country. Regulation issues aside, if you’re looking for an older version of a particular app, you will have to resort to a third-party app store. In this article, we bring you the complete guide on how to download apps on your Android smartphone without using the Google Play Store.Read Also:Best ways to mirror your Android smartphone’s screen to a Windows device
Authorise installation of unknown apps
Your Android device does not encourage you to download apps from third-party sources. This is primarily because Google does not trust any other platforms other than its native Play Store. All apps on the Play Store have the necessary security certificates and any suspicious apps are swiftly taken down from the platform. However, third-party marketplaces like APKPure, APKMirror, Aptoide, and more are completely trustworthy and employ the necessary measures to keep harmful apps out of their platforms. The Android OS on your device demands authorisation from your when installing an app from a third-party source. Here’s how you can do it.Step 1: Go to Settings and select ‘Biometrics and Security’.Step 2: Tap on ‘Install unknown apps’.
Step 3: Scroll to the app you used to download the APK. You may have downloaded the APK from a web browser or received it via WhatsApp or Telegram.Step 3: Turn on the toggle switch next to the relevant app.
Download the APK file from a third-party marketplace
If you have set your sight beyond the Google Play Store, there are a bunch of safe and secure marketplaces you can use to download your favourite apps. The process of downloading an app from a source other than the authorised marketplace is called ‘sideloading’. These are some of the best sites for safe APK downloads.
APKMirror: Outside of the Play Store, APKMirror is the most popular marketplace for Android apps. It is also one of the most secure places to download APK files. The platform verifies all APK files before publishing them. APKMirror uses cryptographic signatures to identify verified developers and restricts any duplicates. Newer apps are verified by looking into the developer’s profile and matching the signature to the other apps they have published.
APKPure: APKPure has its own rigorous set of tests to ensure that no malicious or harmful APKs get published on the platform. Apart from cryptographic signatures, APKPure also uses SHA certificates to secure the marketplace.
Aptoide: With over 1 million apps on the platform and 300 million users worldwide, Aptoide is one of the biggest app marketplaces outside of the Google Play Store. A study from Waseda University in Japan rated Aptoide as the safest third-party app store in the world. The store’s malware detection tools are some of the most efficient among all marketplaces.
F-Droid: Being an open-source project, F-Droid is as secure as it gets for third-party app stores. One of the better parts of using F-Droid is that you don’t need an account to download an APK from the marketplace. F-Droid also hosts open-source apps that cannot be found in the Google Play Store.
APKHere: If you need to gain access to an app that is local to a foreign country, APKHere is the place to go. Some local apps may be region-locked on Google Play Store, making it hard to install them on your device. APKHere has a treasure trove of apps in foreign languages that can be downloaded with just a tap.
Install the app on your device
While Google Play Store automatically installs the apps you download from it, third-party marketplaces simply download the APK file, leaving you to install them to your device on your own. Here’s how you can install an APK file on your device.Step 1: Go to the third-party app store and download the APK file.Step 2: Access the downloaded APK file from the notification bar. You can also go to the File Manager on your smartphone and look for the APK in the Downloads folder.Step 3: Open the APK file. This is where Android will ask if you want to allow third-party installations to your device from the app you used to download the APK. If you haven’t given the necessary permission already, do it now. Step 4: Proceed to install the APK file. Once installed, the app can be accessed from the app drawer.Read Also:Samsung announced exciting deals and offers on the Galaxy S23 series in India
Motorola has expanded its G-Series in India with the launch of the Moto G73 5G smartphone. The device is a mid-range smartphone priced under 20K. It is the first phone in India to be powered by the latest octa-core MediaTek Dimensity 930 SoC. The device includes a Full HD+ display and a 5,000mAh battery with 30W TurboPower support. In addition to this, the handset includes a dual rear camera setup which includes a 50MP primary sensor. The phone ships Android 13 out of the box and includes Stereo Speakers with Dolby Atmos sound.
Moto G73 5G price in India, sale details
The Moto G73 5G has been launched in India with a price tag of Rs 18,999 for the single 8GB RAM with 128GB storage option. The device comes in two colour options of Lucent White and Midnight Blue. It is scheduled to go on sale from March 16 in the country via Flipkart.The company has announced that as part of the launch, users can receive an additional discount of Rs 2,000 in return or an instant discount on purchases made using credit card transactions on certain banks. In addition to this, buyers can choose from HDFC Bank, ICICI Bank, SBI, and AXIS Bank No Cost EMIs of 3 and 6 months starting at just Rs 3,167.Also Read:Apple Music Classical now available for pre-order on Apple’s App Store
Moto G73 5G specifications
Moto G73 5G is highlighted with a 6.5-inch full-HD+ display having 1,080×2,400 pixels of resolution. The screen comes with 120Hz refresh rate support. In addition to this, the phone comes with Android 12 out of the box. Motorola has promised software upgraded up to Android 14 and up to three years of a security patch. Under the hood, there is MediaTek Dimensity 930 SoC. The phone offers 8GB of RAM and 128GB of internal storage. It has a dedicated MicroSD slot for expanding memory up to 1TB.The Moto G73 5G includes a dual rear camera setup that includes a 50-megapixel primary sensor and an 8-megapixel ultra-wide macro depth sensor. According to the company the phone can capture pictures using 1.5x larger pixels than the previous generation, letting in more light for sharper and brighter results. The ultra-wide-angle which fits 4x more of the scene in the frame than a standard lens. For selfies, it includes a 16-megapixel front-facing camera.The smartphone also features stereo speakers with Dolby Atmos. In addition to this, the device has a 5,000mAh battery which comes with TurboPower 30W charger in the box. The device has 5G, Wi-Fi 802.11a/b/g/n/ac, Bluetooth 5.3, FM radio, GPS/A-GPS, NFC, LTEPP, GLONASS, and Galileo. It also includes a USB Type-C port and a 3.5mm headphone jack.
For the latest gadget and tech news, and gadget reviews, follow us on Twitter, Facebook and Instagram. For newest tech & gadget videos subscribe to our YouTube Channel. You can also stay up to date using the Gadget Bridge Android App. You can find the latest car and bike news here.
Over the years Apple has made it easier to transfer data from an Android device to an iPhone. You don’t need to go through iTunes to set up your new iPhone, all data can be transferred wirelessly. However, certain files will need the manual transfer treatment regardless. After you’re done with this process, you can transfer them using any cloud storage service. So, without further ado, here’s how you can transfer data from an Android smartphone to iPhone 14/13/12/11/XS/8.Read Also:Top 6 Easy Ways Scan QR Codes with iPhone
Here’s how you can transfer data from Android to iPhone
Before you begin transferring your data, you need to ensure that your iPhone and Android device are connected to the same WiFi network. It is also advised to plug both devices into power. This a precautionary measure, to ensure that neither device runs out of power. You also need to take into consideration the amount of data you are transferring. If your Android device has a micro SD card inside it, make sure that your iPhone has enough storage space to accommodate it. Once you’re set, follow the steps given below.Step 1: Place your Android smartphone and iPhone near each other.Step 2: Turn on your new iPhone and select ‘Set Up Manually’ on the Quick Start screen.Step 3: Select ‘Move Data from Android’ on the ‘Apps & Data’ page.Step 4: Launch the ‘Move to iOS’ app on your Android device.Step 5: Wait for a code on your iPhone. Once the code appears, enter it on your Android smartphone.Step 6: Your iPhone will create a temporary WiFi network. Connect your Android smartphone to it.Step 7: On your Android smartphone, select the content you want to transfer to your iPhone. Wait for the files to transfer and do not finish the process until the loading bar on the iPhone is complete. Keep the devices near each other and plugged into power.Using this method you can transfer your photos, apps, contacts, message history, WhatsApp messages, files, settings, bookmarks, calendar entries, and more. Step 8: Once the loading bar on your iPhone has finished progressing, select ‘Done’ on your Android smartphone. Step 9: Follow the onscreen instruction on your iPhone to finish the process.Read Also:Poco X5 5G launching in India on March 14: details inside
Apple has today announced its latest classical music streaming app namely Apple Music Classical. The latest app is currently available for pre-order on the app store. Users of this app will be able to listen to a wide variety of classical music and their favourite ones as well as immersive spatial audio. To pre-order, it requires an Apple Music subscription.A brand-new standalone app created only for classical music was just released by Apple and is being named Apple Music Classical. Apple’s latest music streaming app was first spotted in the changelog of the iOS 16.3 public betas.Later this month, from March 28th existing Apple Music users will be able to download Apple Music Classical and use it as part of their existing subscription at no additional cost. It can be pre-ordered now via Apple’s App Store. According to the company, once the pre-order is complete, Apple Music Classical will automatically download at launch to enable immediate listening for users who have Auto Update turned on in their settings.Audiences may experience the greatest audio quality and many of their favourite classical songs in a brand-new way with immersive spatial audio on Apple Music Classical. With a fully optimised search, it is quick and simple to find any recording in the largest classical music archive in the world according to the company.Apple Music Classical is said to offer the best classical music listening experience possible thanks to its thousands of exclusive albums, hundreds of specially curated playlists, insightful biographies of the composers, in-depth analyses of many key works, intuitive browsing features and much more.The company is said to have collaborated with the most prolific classical music artists and renowned classical music institutions in the world to offer Apple Music Classical listeners new, unique and exclusive content and recordings at launch and beyond. As per the company listeners of Apple Music Classical will also enjoy brand-new, exclusive artwork, including a series of unique, high-resolution digital portraits for many of the world’s greatest composers.Also Read:Samsung announced exciting deals and offers on the Galaxy S23 series in India
Requirement and Availability
Apple Music Classical is set to release on March 28 till then it is available for pre-order for Apple Music subscribers (Individual, Student, Family or Apple One). It is now available with the Apple Music Voice Plan. In terms of availability, it will be available globally where Apple Music is offered with the exception of China, Japan, Korea and Taiwan. It is enabled for all iPhone models running iOS 15.4 or later. Apple Music Classical for Android is also coming soon.
For the latest gadget and tech news, and gadget reviews, follow us on Twitter, Facebook and Instagram. For newest tech & gadget videos subscribe to our YouTube Channel. You can also stay up to date using the Gadget Bridge Android App. You can find the latest car and bike news here.
The final deadline to link your AADHAAR with your PAN card is March 31, 2023. If you haven’t linked the two yet, you will have to pay a penalty of Rs 1,000. Failure to link the AADHAAR and PAN card before March 31 2023 will render the latter useless. In this article, we show you how to link your AADHAAR to your PAN card.Read Also:Vivo V27 Pro Review: More than just a camera focussed smartphone
Here’s how you can link your AADHAAR to your PAN card
Linking your AADHAAR and PAN card is a two-step process. Since you are registering after the first deadline (March 31, 2022) you will need to pay a penalty of Rs 1,000. Once the penalty has been paid, you can proceed to link the AADHAAR with your PAN card. Here’s how.Step 1: Visit the Income Tax Department’s e-Filing portal.Step 2: Select ‘Link Aadhar’ from the Quick Links section on the left.Step 3: Enter your PAN card and Aadhaar card number and hit Continue.Step 4: Click on ‘Continue to pay through e-Pay tax’.Step 5: On the next page, enter your PAN card number (twice) and mobile number.Step 6: Enter the OTP to proceed to the e-Pay Tax page. Click on ‘Continue’.Step 7: Click ‘Proceed’ under the Income Tax section.Step 8: Select ‘2023-24’ under Assessment Year and ‘Other Receipts (500)’ under Type of Payment. Hit ‘Continue’.Step 9: This is where you will see the fee breakdown. You don’t need to enter anything on this page. Hit ‘Continue’.Step 10: The challan will be generated and you will be redirected to your bank’s website in order to make the payment.The following banks are authorised for payment through ‘e-Pay Tax’: Axis Bank, Bank of India, Bank of Maharashtra, Canara Bank, Central Bank of India, City Union Bank, Federal Bank, ICICI Bank, IDBI Bank, Indian Bank, Indian Overseas Bank, IndusInd Bank, Jammu & Kashmir Bank, Karur Vysya Bank, Kotak Mahindra Bank, Punjab National Bank, UCO Bank Union Bank of India.If you do not have an account in either of these banks, go back to step Step 5 and click on the hyperlink for the Protean (NSDL) Portal. Once you’ve made the payment through the portal, proceed to the steps mentioned below. Payments made through the Protean (NSDL) Portal take 4-5 days to process. Wait for the appropriate time before linking your Aadhaar to your PAN card. If you’ve made the payment through e-Pay Tax then you can proceed right away.Step 11: Go back to the e-FIling portal and click on Link AADHAAR. You also click on ‘Link Aadhaar’ in your personal details section after logging in.Step 12: Enter your Aadhaar card number and click on ‘Validate’.Step 13: You will be sent an OTP to the registered mobile number.Step 14: Enter the OTP on the website.Step 15: Your request for AADHAAR-PAN linking will be sent to UIDAI for validation.To check the AADHAR-PAN linking status, read our article here.Read Also:7 Best Ways to Block Spam Text Messages on Android & iPhone
Conclusion
This is how you can link your AADHAAR to your PAN card. To make things quicker, use the e-Pay Tax payment instead of the Protean portal. Using the latter will take up to 5 days to process the penalty fee. Meanwhile, you can proceed to link your AADHAAR and PAN instantly after making the payment through the e-Pay Tax portal.For the latest gadget and tech news, and gadget reviews, follow us on Twitter, Facebook and Instagram. For newest tech & gadget videos subscribe to our YouTube Channel. You can also stay up to date using the Gadget Bridge Android App. You can find the latest car and bike news here.
We don’t need to tell you the advantages of mirroring your Android smartphone’s display to a larger screen. If you’re looking to cast your phone’s display on a TV, read our article here. While a TV screen is great for casting content, a PC or laptop offers better controls for your smartphone. Using your PC’s keyboard and mouse to control your smartphone can be useful in a lot of situations. Need to deliver a quick presentation? Simply cast your phone’s display on a PC and use the controls more accessible to you. In this article, we bring you the best ways to mirror or cast your Android smartphone’s screen to a Windows device.Read Also:Vivo V27 Pro Review: More than just a camera focussed smartphone
Mirror your Android smartphone’s screen to a Windows device using Scrcpy
There are several third-party apps that can cast your phone’s display to your PC or laptop, but Scrcpy is the fastest and most reliable option out there. The best part is that you don’t need to download any app on your smartphone at all. Scrcpy (short for screen copy) is an open-source software that is capable of mirroring your smartphone’s display on any Windows device over a USB or wireless connection.
How to mirror your Android phone’s display via USB
Before you begin, you will need to enable USB debugging on your Android smartphone from developer settings. Here’s how.Step 1: Go to Settings and select About Phone.Step 2: Select ‘Software Information’.Step 3: Tap on ‘Build Number’ 7 times to enter Developer Mode.Step 4: Go back to Settings, scroll all the way down, and select ‘Developer options’.Step 5: Scroll down to the Debugging section and turn the toggle bar on for ‘USB debugging’.Now that you’ve enabled USB debugging on your smartphone, you can proceed with the rest of the steps.Step 6: Download the Scrcpy file on your PC or laptop from its GitHub page here.Step 7: Connect your Android smartphone to your Windows device via USB.Step 8: Extract the Scrcpy file on your Windows device.Step 9: Run the Scrcpy application.Step 10: Confirm USB debugging on the window that pops up in your phone.Step 11: Scrcpy will detect your Android smartphone and mirror its display on your Windows device.
How to cast your Android phone’s display wirelessly
Before you carry out this process, make sure your smartphone and Windows device are connected to the same WiFi network.Step 1: Carry out the steps mentions above. Open Command Prompt.Step 2: Enter the command “adb tcpip 5555”.Step 3: Now enter “adb connect <IP address>”.You can view your smartphone’s IP address by going to Settings>About Phone>Status information.Step 4: Disconnect your smartphone and run Scrcpy again. Your smartphone’s display will be mirrored wirelessly on your laptop or PC.
Use the native Connect app on your laptop or PC
Windows 10 or higher devices have a native feature that allows them to mirror your Android smartphone’s display. Here’s how you can go about it. Step 1: Launch the Settings app on your PC and select System Settings.Step 2: Select ‘Projecting to this PC’ from the side menu.Step 3: Download the ‘Wireless display’ optional feature. If ‘Wireless display’ is already installed on your PC, you may skip this step.Step 4: Select ‘Launch the Connect app to project to this PC’.Step 5: Your laptop is now ready for pairing. Make sure your laptop and smartphone are connected to a common WiFi network. Step 6: Open the native screencasting app on your smartphone to connect to your laptop. On Samsung devices, this app is called ‘Smart View’ and can be accessed from the quick settings panel. Step 7: Once connected, your smartphone’s display will be mirrored to your laptop’s screen. You can use your PC’s keyboard to type on your smartphone as well. Read Also:How to check if your AADHAAR is linked to your PAN card?
Conclusion
These are the three best ways to mirror or cast your Android smartphone’s display on your Windows device. While all methods in this list let you use your PC’s keyboard for your smartphone’s display, Scrcpy lets you use the mouse and touchpad as well. You can carry out other tasks on your PC while mirroring your smartphone’s display using Scrcpy. This isn’t possible using the Connect app, as it turns your PC’s monitor solely as a second screen for your smartphone.For the latest gadget and tech news, and gadget reviews, follow us on Twitter, Facebook and Instagram. For newest tech & gadget videos subscribe to our YouTube Channel. You can also stay up to date using the Gadget Bridge Android App. You can find the latest car and bike news here.
Samsung has released exciting deals on the latest premium Galaxy S23 Ultra, Galaxy S23+, and Galaxy S23 smartphones in India. Read on to learn how to benefit from the best discounts and offers on the Galaxy S23 Series.Customers who purchase the Samsung Galaxy S23 Ultra can take advantage of benefits worth up to Rs 18000 and 12 months of no-cost bank EMI. With a further upgrade incentive of Rs 10,000, the company claims that the S23 series may also be purchased for just Rs 5209 per month (24 months of no-cost EMI).On the other hand, customers can purchase the Galaxy S23+ and Galaxy S23 with benefits up to Rs 13000 and no bank EMI for 12 months. With an additional upgrade bonus of Rs 8000, the smartphones can also be purchased starting at just Rs 3125 per month (24 months no cost EMI).The Samsung Galaxy S23 comes in two variants 8GB RAM with 128GB storage and 8GB RAM with 256GB storage options priced at Rs 74,999 and Rs 79,999 respectively. Whereas Galaxy S23+ with 8GB RAM with 256GB storage option will be priced at Rs 94,999 and the 8GB RAM with 512GB storage model will be available at Rs 1,04,999. Lastly, the Galaxy S23 Ultra is priced at Rs 1,24,999 for the base 12GB RAM with a 256GB storage option. The price of the 12GB RAM with 512GB storage option and 12GB RAM with 1TB storage model is set at Rs 1,34,999 and Rs 1,54,999 respectively.Also Read:The flagship smartphone series was launched in India last month.
Samsung Galaxy S23 specifications
The Samsung Galaxy S23 features a 6.1-inch full-HD+ Dynamic AMOLED 2X display with a 120Hz refresh rate and Gorilla Glass Victus 2 protection. The phone runs on Android 13 with One UI 5.1. It is powered by Qualcomm Snapdragon 8 Gen 2 SoC and up to 512GB of storage. There is also a 3,900mAh battery with 25W wired and 15W wireless charging support.The handset comes with a triple rear camera setup that includes a 50-megapixel primary wide-angle sensor, a 12-megapixel ultra-wide angle camera and a 10-megapixel telephoto camera. Upfront there is a 12-megapixel selfie sensor.
Samsung Galaxy S23+ specifications
The Samsung Galaxy S23+ has a 6.6-inch full-HD+ Dynamic AMOLED 2X display. It is powered by the Qualcomm Snapdragon 8 Gen 2 SoC. It features the same camera setup as of S23. There is a 4,700mAh battery onboard which supports 25W wired and 15W wireless charging.
Samsung Galaxy S23 Ultra specifications
The Samsung Galaxy S23 Ultra comes with a 6.8-inch Edge QHD+ Dynamic AMOLED 2X Display with 120Hz refresh rate support. The device also ships Android 13 with One UI 5.1 on top and is powered by a Qualcomm Snapdragon 8 Gen 2 SoC. It also includes an S Pen stylus from Samsung. Moreover, the camera setup on the phone consists of a 200-megapixel sensor, a 12-megapixel ultra-wide camera, a 10-megapixel telephoto lens and another 10-megapixel telephoto sensor. A 12-megapixel selfie camera is also included. In addition to this, it is fueled by a 5,000mAh battery (45W wired and Fast Wireless Charging 2.0).
For the latest gadget and tech news, and gadget reviews, follow us on Twitter, Facebook and Instagram. For newest tech & gadget videos subscribe to our YouTube Channel. You can also stay up to date using the Gadget Bridge Android App. You can find the latest car and bike news here.

")
 Step 4: Select the ‘Block’ option at the bottom of the screen.

 Step 3: Select ‘Block contact’.

 Step 3: Select ‘Block’.
 Step 2: Scroll to the contact you wish to block and select their profile.
 Step 3: From the detailed profile view select ‘Block’.
 Step 4: In the following popup box, TrueCaller will ask you whether the contact is a personal or business account. It will also request a reason for blocking, which is optional to provide. Make the necessary selections and hit block.
 The contact will be blocked.
If you do not have the person saved in your contacts, here is how you can block them on TrueCaller.
Step 1: Open the TrueCaller app and go to ‘Blocking’.
The contact will be blocked.
If you do not have the person saved in your contacts, here is how you can block them on TrueCaller.
Step 1: Open the TrueCaller app and go to ‘Blocking’.
 Step 2: Scroll down and select ‘Phone Number’ from the ‘Block someone manually’ section.
 Step 3: Enter the phone number and name of the person you want to block. After filling out the details, tap ‘Block’.
 Step 3: Scroll down and select ‘Block this caller’.

 Step 4: Tap on the info icon.
Step 5: Select the info icon again from the sender’s profile.
Step 4: Tap on the info icon.
Step 5: Select the info icon again from the sender’s profile.
 Step 6: Select ‘Block this Caller’.
 Step 2: Select ‘Blocked Contacts’.
 Step 3: Tap on ‘Add new’.
 Step 4: Select the Contact you wish to block.
Read Also: How to link AADHAAR with your PAN card?
Step 4: Select the Contact you wish to block.
Read Also: How to link AADHAAR with your PAN card?

 Step 1:

 Step 2:
 Step 3:
 Step 4:
 Step 5:
 Step 6:
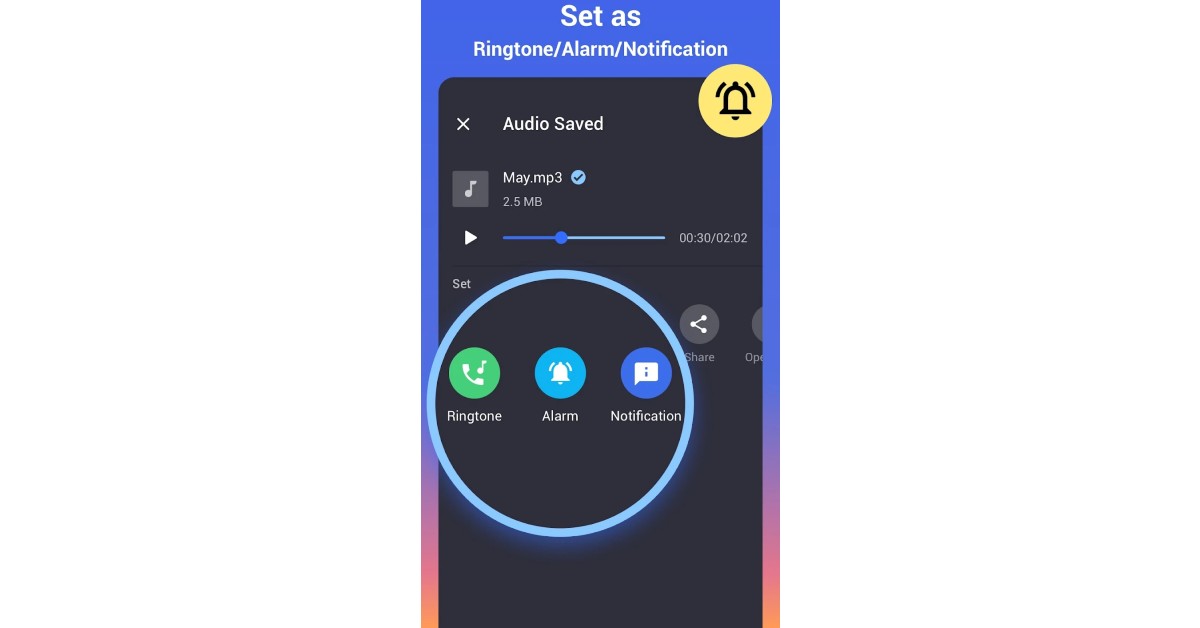
 Step 3:
 Step 4:
 Step 5:
 Step 3:
 Step 4:
 Step 5:
 Step 2: Tap on ‘Install unknown apps’.
 Step 3:
 Step 2:
 Step 3:
 Step 4:


 Step 3:
 Step 4:
 Step 6:

 Step 3:
 Step 4:
 Step 5:
 Step 6:
  Step 7:
 Step 8:
 Step 9:
 Step 10:
 Step 13:

 Step 2:
 Step 3:
 Step 4:
 Step 5:
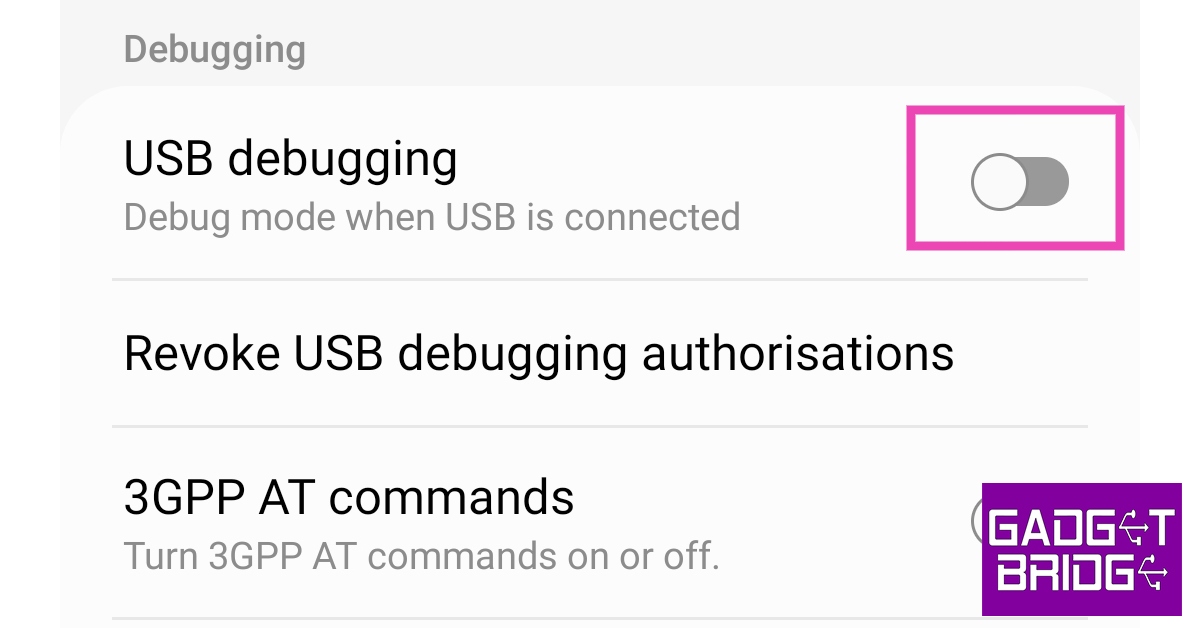
 Step 10:
 Step 2:
 Step 3:
 Step 5:
 Step 6:
 Step 7:
