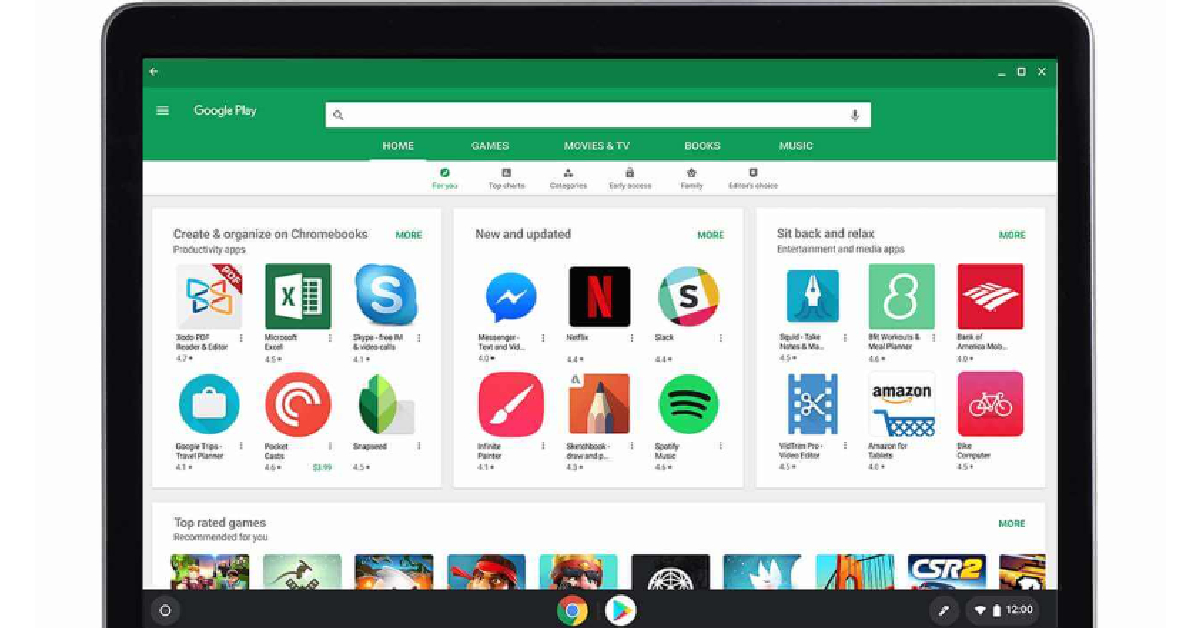
Chromebooks have enjoyed a fair bit of success ever since they were introduced in 2011. Running on ChromeOS, Chromebooks work seamlessly with Google’s services and applications and come at very affordable prices. In 2016, Google announced Android app support for Chromebooks, and since then they have really taken off. Newer Chromebooks come preinstalled with Google Play Store, allowing you to install your favourite apps on the platform. However, if you own a Chromebook that came out before 2019, you may have to manually activate the Play Store to download Android apps. In this article, we show you how to enable Google Play Store on a Chromebook.Read Also: How to Make Google Chrome the Default Browser on iPhone?
Here’s how you can enable Google Play Store on your Chromebook
Step 1: Click on the bottom right corner of the screen to access the Quick Settings Panel.Step 2: Click on the gear icon to open Settings.Step 3: Click on the ‘Turn On’ button next to Google Play Store.Step 4: Go through the Terms & Conditions and hit Accept.Step 5: Google Play Store will be activated on your Chromebook and you will now be able to download and install all your favourite Android apps.Read Also: Xiaomi 13 Pro India price and availability details revealed
Conclusion
This is how you can activate Google Play Store on a Chromebook. If you own an older Chromebook that does not show an option to activate the Play Store, try updating the OS. Updating your Chromebook’s OS is easy. All you need to do is open the Settings from the Quick Settings Panel (as shown above) and select ‘About Chrome OS’. You will see any pending updates in this Window. If that is not the case, click on ‘Check for updates’. Once the update has been installed, look for the option to activate Google Play Store in Settings.For the latest gadget and tech news, and gadget reviews, follow us on Twitter, Facebook and Instagram. For newest tech & gadget videos subscribe to our YouTube Channel. You can also stay up to date using the Gadget Bridge Android App. You can find the latest car and bike news here.
While you can drop a pin and share locations from Google Maps, the overall customisation options are still very limited. Google has an entirely different application for this purpose called ‘My Maps’. On the surface, My Maps and Google Maps look entirely similar. Both applications share the same infrastructure but offer a different set of functions. With My Maps, you can mark different locations on the map, connect them with a drawing, save directions, and create visual guides for your friends to see. You can even embed My Maps in your website or blog. In this article, we show you how to find parks and gardens using Google My Maps.Read Also: Xiaomi 13 Pro India price and availability details revealed
Find nearby parks and gardens using Google My Maps
The best way to utilise Google My Maps is by adding markers and spots that you frequently visit or want to check out in future. If you’re planning a trip with your friends, use Google My Maps to mark all the interesting places you want to hit. You can even share ‘My Maps’ with your friends to ensure you’re all on the same page. Finding destinations on My Maps is pretty easy. Trying to find nearby parks and gardens? Simply search for ‘parks and gardens near me’ and My Maps will highlight all the relevant places on the map. All the relevant results will appear in the side menu. Simply click on the different parks and gardens to browse through them.Once you select a location, you can either view it in Google Maps or add it to your map. Viewing the location on Google Maps has its own advantages as you can look up additional images and user reviews, and see how the spot looks in Street View. However, if you simply want to add the location to your personal map, My Maps is the way to go. All you need to select the location and click on ‘Add to map’ to mark the spot in My Maps. To remove a park from your map, simply select its location and click on the delete icon.Read Also: MWC 2023: Xiaomi Wireless AR Glass Discovery Edition launched
Conclusion
This is how you can find nearby parks and gardens in Google My Maps. As of now, Google My Maps is not available as an Android app. You access it using a web browser on your laptop or smartphone. Once you create your map, you can share it with your friends or embed it on your website. You can control who sees your map by sharing it with selected contacts via Google Drive or sending them the link to the map.For the latest gadget and tech news, and gadget reviews, follow us on Twitter, Facebook and Instagram. For newest tech & gadget videos subscribe to our YouTube Channel. You can also stay up to date using the Gadget Bridge Android App. You can find the latest car and bike news here.
Google at MWC 2023 in Barcelona announced that it is rolling out new features for Android and WearOS. The latest updates will help improve connectivity, productivity, accessibility, and fun across your devices. Users will be able to quickly manage notes and to-do lists with Google Keep.In order to improve productivity on devices Google Keep single note widget will let you manage your notes and check off to-do lists right from your Home screen. According to the company’s official blog post, the widget displays reminders that will ensure background colours and images are added to notes from the Keep app while also syncing with your smartwatch. Moreover, two new shortcuts are being brought to WearOS that allow users to make notes and to-do lists with a simple tap. The Android Google Drive app will allow you to annotate PDFs with the help stylus or just your finger. Also Read:OnePlus 11 Concept phone presented at MWC 2023, to come with Active CryoFluxUsers can try out a variety of ink strokes to provide notes or feedback freehand (handy for marking up photos and visual plans) or use the highlighter tool to keep important text neatly on your tablet or smartphone. As per the company, the annotated documents can be easily hidden, undone, deleted, or saved as a new copy.In terms of audio enhancements, Google Meet will now provide noise cancellation during calls or meetings to more Android mobile devices. Whereas Fast pair will be able to quickly pair new Bluetooth headphones with your Chromebook. Not just that if you’ve already set up headphones with your Android phone, your Chromebook will automatically connect to them as well.Besides this new emoji combination has been added to Emoji Kitchen allowing users to remix, mash-up, and share as stickers via Gboard.Also Read:Xiaomi 13 Pro India price and availability details revealedAccording to the company, new tap-to-pay animations are coming on Google Wallet that will help confirm in-store transactions. Using Chrome users can now simply increase the size of content including text, images, video and interactive controls — by up to 300%. You don’t need to adjust it every time you launch Chrome it can be set to your desired content size as the default. All you need to do is go to Chrome Beta via Settings > Accessibility. This functionality is currently under beta and it will be rolled out to all the users in March.The company is also rolling out two new sound and display modes to Wear OS 3+ to increase watch accessibility. Mono-audio is said to help limit disorientation caused by split-audio, while colour-correction and grayscale modes.
For the latest gadget and tech news, and gadget reviews, follow us on Twitter, Facebook and Instagram. For newest tech & gadget videos subscribe to our YouTube Channel. You can also stay up to date using the Gadget Bridge Android App. You can find the latest car and bike news here.
If you run a small business, you must be aware of the exhausting nature of managing your appointments and fitting them into your daily schedule. Luckily, there are a ton of apps out there that will handle any kind of scheduling task for you. While some may come with a premium subscription service, the basic functions are made available for free. So, without further ado, here are the top 7 online calendar and appointment scheduling apps for Android you can download right now.Read Also:How to view current and previous Google Doodles?
Calendly
Calendly simplifies your scheduling tasks by doing most of the work for you. All you need to do is enter your availability preferences and Calendly will set everything up for you. The version of the app lets you schedule unlimited meetings and notify participants accordingly. Text notifications are not a part of the free plan and will require subscribing to the premium membership. One of the better reasons to use Calendly is its seamless integration with other task management apps on your phone. In order to avoid schedules from colliding, Calendly works with Google, Outlook, Office 365, iCloud, and more.
Booksy
Designed for health, wellness, and personal care businesses, Booksy makes your job easier by letting your clients view your calendar and book appointments for themselves. You can easily track all your meetings and appointments in one place on the Booksy app. You also get periodic notifications so you don’t miss anything important. With in-app payment options, Booksy brings a neat convergence to all your business-related tasks.
Acuity Scheduling
Acuity Scheduling is a simple planning app that helps you keep up with your appointments and upcoming meetings on the go. This app allows you to customise your appointment types, block off your schedule, share links with your clients, and accept payments in the app itself. With Acuity Scheduling, you can also add helpful notes for meetings and receive push notifications whenever you are close to an appointment.
Doodle
Doodle takes care of all your scheduling needs in one app. The app automatically sends event details every time someone makes a booking. All you need to do is set up the event and Doodle will handle everything else on your behalf. The app offers some helpful features like group polls, custom branding, video conferencing, calendar syncing, and more. You can choose to update your availability while on the go, and the app will update your schedule accordingly.
Square Appointments
Square Appointments is an all-rounder when it comes to managing your business. Even if you don’t have a website for your business, Square Appointments allows customers to book appointments on their free booking site. You can manage all your appointments on the app and sync them with other calendar apps on your phone. If you accept bookings from Google Maps or various social media platforms, you can manage them all in one place through the Square dashboard.
Schedulista Appointments
The Schedulista Appointments app allows you to manage all your meetings in one place. If you accept bookings on different platforms, you can manage them in one place using Schedulista Appointments. This app offers a lot of customisation options, allowing you to have control over the aesthetics of your brand. Clients that book appointments will be sent text and email reminders to reduce the chance of no-shows. With credit card capture, you can make sure you get paid even if the client doesn’t show up. Schedulista easily syncs up with Google Calendar, Outlook, and other management apps on your phone to avoid any conflicts in bookings.
Zoho Bookings
Zoho Bookings is a great app for small businesses with a dedicated staff. You can schedule appointments using Zoho and add notes to clarify the nature of the meetings. You can even assign tasks to your staff using Zoho and let them update any upcoming meetings and appointments. Using Zoho, you can also go through customer details and their booking history. You can also easily share your Zoho booking page across your social media handles so your customers can directly book a meeting based on your schedule.Read Also: Top 4 ways to Add ‘Links in Bio’ on Instagram and Twitter
Conclusion
These are the top 7 online calendar and appointment scheduling apps for Android you can download right now. While most of these apps have a premium subscription service that unlocks additional features, the basic booking and calendar functions are free across every app. Which app do you prefer to book appointments and manage your schedule? Let us know in the comments!For the latest gadget and tech news, and gadget reviews, follow us on Twitter, Facebook and Instagram. For newest tech & gadget videos subscribe to our YouTube Channel. You can also stay up to date using the Gadget Bridge Android App. You can find the latest car and bike news here.
The Vivo V27 series is all set to launch in India today. The upcoming series is likely to include two new devices Vivo V27 and Vivo V27 Pro. The smartphones are confirmed to feature a triple rear camera set up with a ring light LED flash. The company has also revealed that the phones will include a Sony IMX 776V sensor and a colour-changing rear panel. Apart from this, the new lineup has been leaked several times, while the pricing and design details have also been tipped before.
How to watch the Livestream of Vivo V27 Series
The Vivo V27 Series launch is scheduled to take place today. The company will be hosting a launch event that will begin at 12 noon. The event will also be live-streamed via the company’s social media accounts, website, and YouTube channel.You can also watch the event live right here on our website, we have embedded a link below:
Vivo V27 Series price in India expected
The company has confirmed that the lineup will be available to buy via Flipkart in the country. However Vivo has not revealed the expected or exact pricing of the Vivo V27 series, but recently the price of the device was leaked ahead of the official announcement. Reportedly Vivo V27 Pro will be available in three different configurations of 8GB RAM with 128GB storage, 8GB RAM with 256GB memory and 12GB RAM with 256GB internal storage options. They are likely to be priced at Rs 37,999, Rs 39,999 and Rs 42,999 respectively.
Vivo V27 Series specifications expected
Vivo’s V-Series is known for its design and camera capabilities. According to the official microsite on Flipkart, the Vivo V27 Pro will be featuring a hole-punch 3D curved display having a refresh rate of up to 120Hz. The device will have a glass back that can change colour and will be available in different colour options. Vivo has revealed there will be two colour options of Magic Blue and Noble black.Also Read:Vivo V27 series confirmed to launch in India on March 1The rear of the phone will come with a triple camera module with a ring LED flash. Moreover, it is confirmed to include a Sony IMX 776V sensor. The camera sensor will include support for Aura Light Portrait mode and OIS (Optical Image Stabilization).A Geekbench listing was also spotted earlier which suggested that the Pro model will be powered by a MediaTek Dimensity 8200 SoC. It will run on Android 13 with a layer of FuntouchOS 12 out of the box. Moreover, the phone has managed to score 1,003 in the single-core test and 3,936 in the multi-core test. Whereas the vanilla Vivo V27 is speculated to include MediaTek Dimensity 7200 SoC under its hood.
For the latest gadget and tech news, and gadget reviews, follow us on Twitter, Facebook and Instagram. For newest tech & gadget videos subscribe to our YouTube Channel. You can also stay up to date using the Gadget Bridge Android App. You can find the latest car and bike news here.
While Apple’s native apps rarely ever face any competition, Safari may be the only exception that proves the rule. While Apple’s native web browser is as efficient as it gets, Google Chrome still remains one of the most used browsers in the world. This is because a majority of people use Google’s services in one form or another, and they are optimised better for Google’s native browser. If you’re thinking of making the switch from Safari to Google’s very own web browser, here’s how you can make Google Chrome the default web browser on your iPhone.Read Also: Snap introduces its own version of OpenAI’s GPT technology My AI
Here’s how you can set Chrome as your default browser on iPhone
Step 1: Download and install the Google Chrome app on your iPhone from the App Store.Step 2: Launch the Google Chrome app and tap on the ellipses (three dots) at the bottom right corner of the screen.Step 3: Select Settings.Step 4: Select ‘Default browser’.Step 5: Tap on ‘Open Chrome Settings’.Step 6: Select ‘Default Browser App’.Step 7: Select Chrome as your default web browser.Google Chrome will be set as the default web browser on your iPhone.
Set Chrome as your default browser from your iPhone’s settings
Step 1: Launch Settings on your iPhone.Step 2: Scroll down and select ‘Browser’.Step 3: Tap on ‘Default Browser App’.Step 4: Select ‘Google Chrome’.Google Chrome will be set as the default web browser on your iPhone.Read Also: 6 Best GPS-Based Golf Apps for iPhones
Conclusion
This is how you can make Google Chrome the default web browser on your iPhone. Any links you click on will open on Chrome after it has been set as the default web browser app. Once you’ve set Chrome as your default web browser, make sure you periodically clear cookies and cache from the app. Want to install Google Chrome on your Mac, here’s an article explaining how you can do so.For the latest gadget and tech news, and gadget reviews, follow us on Twitter, Facebook and Instagram. For newest tech & gadget videos subscribe to our YouTube Channel. You can also stay up to date using the Gadget Bridge Android App. You can find the latest car and bike news here.
Xiaomi 13 Pro recently debuted in India. The company today revealed the exact pricing and availability details of the smartphone today as it was not announced at the time of the launch. The phone is powered by the Snapdragon 8 Gen 2 SoC. The device features a 50-megapixel triple rear camera setup. There is a 32-megapixel front-facing camera onboard for selfies. In addition to this, the device comes with a 2K OLED display and has 120W wired and 50W wireless charging support.
Xiaomi 13 Pro price in India and sale details
Xiaomi 13 Pro has been launched in India in a single 12Gb RAM with 256GB storage option. The device is priced at Rs 79,999 however the company will be offering a Rs 10,000 instant discount that will effectively bring down the cost of the smartphone to Rs 69,999. Users can also avail of an exchange bonus of Rs 8,000 on non-Xiaomi/ Redmi devices. Whereas Redmi device owners can get an exciting exchange bonus of Rs 12,000.The phone will come in two colour options of Ceramic White and Ceramic Black. The device is scheduled to go on early access sale on March 6 at 12 noon via mi.com, select Mi Homes and Mi Studios. The company will be offering fist 1000 purchasers an exclusive Xiaomi 13 Pro merchandise box. Whereas the first sale for the latest device will begin on March 10 at 12 noon on mi.com, Amazon.in, Mi Homes, and Mi Retail Partners.
Xiaomi 13 Pro specifications
Xiaomi 13 Pro is highlighted with a 6.73-inch 2K E6 LTPO 3.0 OLED screen with 3200 x 1440 pixels of resolution. It comes with a refresh rate of up to 120Hz and allows 240Hz of the touch sampling rate. The screen supports both HDR10+ and Dolby vision. The smartphone is shipped with MIUI 14, which is based on Android 13. In addition to this it is driven by the Qualcomm Snapdragon 8 Gen 2 SoC with up to 512GB of internal UFS 4.0 storage and up to 12GB of LPDDR5X RAM.The Xiaomi 13 Pro has a triple rear camera configuration consisting of a 50-megapixel 1-inch Sony IMX989 primary sensor. It further includes a 50-megapixel Leica’s 75mm floating telephoto lens and a 50-megapixel wide-angle lens. For selfies, the phone features a 32-megapixel front-facing camera.Xiaomi 13 Pro has a 4,820mAh battery which supports 50W wireless charging and 120W wired charging.
For the latest gadget and tech news, and gadget reviews, follow us on Twitter, Facebook and Instagram. For newest tech & gadget videos subscribe to our YouTube Channel. You can also stay up to date using the Gadget Bridge Android App. You can find the latest car and bike news here.
Mobile World Congress (MWC) 2023 is being held in Barcelona. At the ongoing event, Xiaomi introduced its most recent augmented reality (AR) wearable- Xiaomi Wireless AR Glass Discovery Edition. The AR device comes with a retina-level adaptive display and uses distributed computing.During Mobile World Congress 2023, Xiaomi unveiled its first wireless AR glasses- Xiaomi Wireless AR Glass Discovery Edition. The AR glasses are driven by Qualcomm XR platforms and easily connect to the phone wirelessly. According to the company, it supports a wide variety of applications for larger displays and enables innovative hand tracking at a sophisticated level.Also Read:Top 7 budget Bluetooth speakers you can buy right now in IndiaThis device, which weighs only 126g does not rely on a wired connection to the host computing device. They are built up of magnesium-lithium alloy, carbon fiber parts, and a self-developed silicon-oxygen anode battery.They are powered by the Snapdragon Spaces XR Developer Platform having latency as low as 3ms between the smartphone device and the glasses and a wireless connection with full link latency of as little as 50ms, which is comparable to wired solutions.According to the company the Xiaomi Wireless AR Glass Discovery Edition has been calibrated with precision, taking into account details such as the center of gravity, leg spacing, angle, nose rest, and other factors.The Xiaomi AR glasses feature a “retina-level” display. When PPD (pixels per degree) or angular resolution hits 60, granularity cannot be distinguished by the human eye. Notably, the PPD of the Xiaomi Wireless AR Glasses is 58. Xiaomi Wireless AR Glass includes free-form light-guiding prisms in addition to a free-form optical module that consists of two MicroOLED displays. These free-form prisms are capable of performing complex light refraction in a limited volume. As stated by the firm, three surfaces inside the light-guiding prisms reflect the content shown on the screen, resulting in a final presentation in front of the user’s eyes. Because these glasses have an optical module design light loss is minimised and clear and bright images are produced with a to-eye brightness of up to 1200nit. It comes incorporated with electrochromic lenses that could change colour depending on different lighting conditions. These lenses offer a transparent mode that creates a more vivid AR experience that blends reality and virtual elements whereas the blackout mode supports an immersive experience when viewing content.Moreover, Xiaomi Wireless AR Glass has an innovative self-researched micro gesture interaction that enables one-handed, highly-precise pure gesture interaction.For the Xiaomi Wireless AR Glasses, Xiaomi uses the joints in the user’s inner fingers as a gesture recognition area. “The directional is oriented from the second joint of the middle finger, with the second joint of the index finger representing the upward direction. When combined with the surrounding areas, this forms a four-way directional key for basic movement operations. In addition, the 12 knuckles function similarly to the Chinese nine-key input method, allowing for text input through thumb tapping in the finger area. The thumb sliding on the index finger is used to enter and exit applications. Looking forward, Xiaomi hopes to enable sliding and tapping operations through the random movement of the thumb in the palm.”
For the latest gadget and tech news, and gadget reviews, follow us on Twitter, Facebook and Instagram. For newest tech & gadget videos subscribe to our YouTube Channel. You can also stay up to date using the Gadget Bridge Android App. You can find the latest car and bike news here.
To celebrate special occasions and holidays, Google publishes fun animated doodles on its main search engine page. If you use the search engine regularly, you may have noticed the Google logo is styled differently at times. Clicking on the logo will land you on the Google search results for the occasion that the search engine is observing. Google typically changes its logo to a ‘doodle’ for holidays, anniversaries, and to mark the significance of special personalities. If you’re lucky, you may catch a fun game on the doodle itself. We say lucky because Google Doodles get taken down from the main search engine page after 24 hours. However, there are other ways of viewing older doodles. In this article, we show you to view the current Google Doodle and previous doodles that you may have missed.Read Also: Top ways to Turn off Auto Emoji on Discord: Mobile and PC
How to view the current Google Doodle
In order to view Google’s current Doodle, all you need to do is visit the Google homepage. Some doodles are also visible as the Google header on the search results page. Hovering the cursor on the Doode will reveal the occasion it is marking. Clicking on the doodle will take you to the Google search results page of the occasion in question. You can browse through the results to know more about it.
View previous doodles in the Google Doodles archive
The easiest way to access past Doodles is through Google’s archived collection of its Doodles. Simply visit https://www.google.com/doodles and click on ‘Doodles Archive’. By default, the Doodles are listed in reverse chronological order, meaning the most recent Doodle will appear first followed by the Doodle before that. You can search for a particular Doodle by entering the occasion or the date it was published in the search bar. Sometimes, Google publishes interactive Doodles, where users can click on the logo to play a game or watch a video. You can play off the Doodle Games by clicking on the ‘Interactive’ section in the archives. The 2017 ICC Champions Trophy and the 2012 Olympics doodles are some of our favourite Doodle games. Google also hosts an annual Doodle competition for different countries. Kids across different grades participate in this competition and the winner is decided by a public vote. Last year, the national winner received a college scholarship worth Rs 5,00,000, a tech package worth Rs 2,00,000, and several Google collectables and hardware products. Google has hosted the ‘Doodle for Google’ contest in India since 2009, and kids through Grades 1 to 10 across the country send in their innovative doodles based on a pre-decided theme. A special jury, which contains some Google executives, releases the shortlist of the finalists which are put up for a public vote to decide the contest winner.Read Also: The Best Ways to Find a Lost S Pen
Conclusion
This is how you can view the current Google Doodle and previous doodles that you may have missed on the day they were published. Apart from hosting the collection of past Doodles, the Doodle Archives also contain informational tidbits about the history and significance of every Doodle. You can honestly spend hours on the archive going through the different animations.For the latest gadget and tech news, and gadget reviews, follow us on Twitter, Facebook and Instagram. For newest tech & gadget videos subscribe to our YouTube Channel. You can also stay up to date using the Gadget Bridge Android App. You can find the latest car and bike news here.
Instagram and Twitter aren’t just social media platforms to engage with friends. Small businesses and online retail stores use these social media platforms to reach out to their target demographic. Instagram in particular is a great platform for artists to showcase their work and even get commissions for artwork. If you use Instagram to market your products, it is essential that you make it easy for the consumer to find all your contact info in one place. This includes the link to your online store, other social media handles, or even your IM link. Instagram and Twitter allow users to add one link to an external website in their bio. In order to add multiple links, you will need to use a landing page. In this article, we bring you the top 4 ways to add ‘links in bio’ on Instagram and Twitter.Read Also: Top ways to Turn off Auto Emoji on Discord: Mobile and PC
How to add a ‘Link in Bio’ on Instagram
Step 1: Open the Instagram app and tap on the profile icon at the bottom right corner of the screen.Step 2: Tap on ‘Edit Profile’.Step 3: Select ‘Add Link’.Step 4: Select ‘Add external link’.Step 5: Enter the URL and Title. Tap on the blue tick at the top right corner of the screen once you’re done. Go back to the profile editor and tap on the tick mark again to save changes to your profile.
How to add a ‘Link in Bio’ on Twitter
Step 1: Launch the Twitter app and go to your profile.Step 2: Tap on ‘Edit Profile’.Step 3: Enter the link in the ‘Website’ field.Step 4: Tap on ‘Save’ at the top-right corner of the screen.
Add a link to your Twitter bio from the website
Unlike Instagram, you can add a link to your Twitter bio using the website. Here’s how.Step 1: Open twitter.com on your web browser.Step 2: Click on your profile icon to go to your Twitter page.Step 3: Click on ‘Edit Profile’.Step 4: In the following pop-up box, add the link under the ‘Website’ field and hit ‘Save’.Your link will be added to your Twitter bio.
Use Linktree
Instagram and Twitter do not allow you to add more than one link to your bio. While you can always share links as tweets, you cannot post clickable links on Instagram. You can add a link to your story or you will need to use a workaround like Linktree. Linktree is essentially a landing page for all your websites, social media handles, blogs, online stores, and more. Once people click on your Linktree URL in your bio, they will be redirected to the page where they can find all your links. Here’s how you can use Linktree to list all your important pages in one place.Step 1: Go to https://linktr.ee/ and signup to the website.Step 2: Choose your Linktree username and hit ‘Continue’.Step 3: Add your name and categories of interest.Step 4: Select a subscription plan. If you’re only interested in creating a landing page for all your links, you don’t need a subscription plan. The website offers this service free of cost.Step 5: Click on ‘Add link’.Step 6: Enter the URL you want to publish on your profile.Step 7: To share your Linktree landing page, click on ‘Share’ at the top right corner of the screen.Step 8: Select the social media platform. You can also simply copy the Linktree URL at the bottom and add it to your Instagram or Twitter bio yourself.Read Also: The Best Ways to Find a Lost S Pen
Conclusion
These are the top 4 ways to add ‘links in bio’ on your Instagram and Twitter accounts. Instagram is currently testing a feature that allows you to add multiple links in your bio, which means you won’t have to create a landing page for all your links. It is not clear when Instagram intends to release this feature or if it even plans to go ahead with it. Until then, Linktree is the best alternative you have. You can also use other services like Shorby and Lnk.Bio for the same purpose.For the latest gadget and tech news, and gadget reviews, follow us on Twitter, Facebook and Instagram. For newest tech & gadget videos subscribe to our YouTube Channel. You can also stay up to date using the Gadget Bridge Android App. You can find the latest car and bike news here.


 Step 2: Click on the gear icon to open Settings.
 Step 3: Click on the ‘Turn On’ button next to Google Play Store.
 Step 4: Go through the Terms & Conditions and hit Accept.
 Step 5: Google Play Store will be activated on your Chromebook and you will now be able to download and install all your favourite Android apps.
 Read Also: Xiaomi 13 Pro India price and availability details revealed


 Step 3:
 Step 4:
 Step 5:
 Step 6:
 Step 7:
 Step 4:


 Step 3:
 Step 4:
 Step 3:
 Step 4:
 Step 3:
 Step 4:
 Step 3:
 Step 5:
 Step 6:
 Step 7:
 Step 8: