Oppo today officially announced the launch of a new 5G smartphone in India. The company has introduced Oppo A79 5G to its A-Series portfolio. The device is powered by MediaTek Dimensity 6020 SoC. It features an HD+ display and a dual rear camera set-up. In addition to this, there is a 5,000mAh battery plus support for 30W fast charging.
In This Article
Oppo A79 5G price in India, sale details
Oppo A79 5G has been launched in India with a price tag of Rs 19,999 for the single 8GB RAM with 128GB storage option. The device will be available in two colour options of Mystery Black and Glowing Green.It will be available for purchase via OPPO Store, Flipkart, Amazon and other retail outlets.The company is offering a cashback of up to Rs 4,000 and no-cost EMI for up to 9 months from ICICI Bank, SBI Cards, Kotak Bank, IDFC First Bank, Bank of Baroda credit card, AU Finance Bank and One Card from mainline retail outlets and the OPPO Store.Additionally, customers can also benefit from Zero Down Payment schemes from leading financiers such as Bajaj Finserv, TVS Credit, Home Credit, HDB Financial Services, IDFC First Bank and Mahindra Finance. Loyal OPPO customers can also avail an Exchange Bonus of up to Rs 4,000. As a part of My OPPO Exclusive, customers stand to win a cash prize of up to Rs 10 lakh, and other assured gifts on the purchase of any OPPO device.Also Read:Nokia 105 Classic with built-in UPI application launched in India
Oppo A79 5G specifications
The Oppo A79 5G features a 6.72-inch full-HD+ LCD screen having 1,080×2,400 pixels of resolution. The screen has a 91.4 screen-to-body ratio. It has support for 650nits of peak brightness, 90Hz refresh rate and 391ppi pixel density.The 5G phone operates on ColorOS 13.1 based on Android 13. It comes equipped with a 7nm MediaTek Dimensity 6020 SoC with RAM Expansion feature. The device will be available with 8GB of LPDDR4X RAM and 128GB of UFS2.2 storage.Oppo A79 5G comes with a dual rear camera setup that includes a 50-megapixel main camera with f/1.8 aperture and a 2-megapixel sensor with an f/2.4 aperture. An 8-megapixel camera with an f/2.0 aperture is provided for selfies.The Oppo A79 5G sports a 5,000mAh battery with 33W SuperVOOC fast charging support. Additionally, it includes IPX4 rating. The device has Bluetooth 5.3, a 3.5mm audio jack, a USB Type-C port, USB OTG, GPS, and A-GPS for connectivity. Along with an in-display fingerprint sensor, an accelerometer, ambient light sensor, geomagnetic sensor, gravity sensor, pedometer, and proximity sensor are also onboard.
HMD Global has announced the launch of a Nokia new feature phone in India. Nokia 105 Classic has debuted in the country priced under Rs 1,000. The new phone comes with a new design and the UPI feature. The handset includes a wireless FM radio and an 800mAh battery. In addition to this, the phone has an ergonomic design and is available in four variants. Pricing and specification details are given below.
In This Article
Nokia 105 Classic price in India and availability details
Nokia 105 Classic comes in four variants Single SIM and Dual SIM, with & without a charger respectively. It has been launched in India with a price starting at Rs 999. The phone will be offered in two colour options of Charcoal and Blue. The device will soon be made available for purchase via the company’s official website in the country.Also Read:Samsung Galaxy SmartTag 2 now available in India: Price in India and availability
Nokia 105 Classic specs and features
The Nokia 105 Classic comes with a simple and tough design. It has been designed ergonomically maintaining its compact form factor that has been specially moulded to feel great in the hand and easily slip into a pocket. It has undergone rigorous durability testing to withstand even the toughest environments. Also, the company has carefully considered spacing between each button on the key mat, making it easy to dial and text, even in the dark.To keep users entertained and productive the feature phone includes a wireless FM radio, allowing users to listen to their favourite stations without the need for a headset. The device has an inbuilt UPI application that is said to provide the accessibility and convenience of UPI, allowing users to safely and easily complete UPI payment transactions even without a smartphone. In addition to this, the Nokia 105 Classic sports an 800mAh battery.Lastly, the Nokia 105 Classic comes with an assured one-year replacement guarantee.Ravi Kunwar, VP- India & APAC, HMD Global said “We are excited to launch an exciting upgrade to market-leading feature phone with the new Nokia 105 Classic, more relevant than ever with a stylish new design and the UPI feature. With the feature-packed Nokia 105 Classic in the under INR 1000 segment, we strive to bridge digital divide and enable financial access for all.”
Ever since its launch, ChatGPT has taken the world by storm. The chatbot’s popularity has spawned a lot of offshoots and knockoffs designed to cater to specific niches. Those looking for options beyond ChatGPT can come across a lot of clutter that is entirely meaningless to their tasks. To make your search easier, here is our list of the 12 best ChatGPT alternatives in 2023.Read Also:Apple watchOS 10.1 rolled out, enables double-tap gesture
In This Article
Google Bard
Soon after OpenAI came out with ChatGPT, Google launched their own AI Chatbot called Bard. Google Bard was initially based on the LaMDA family of language models and then later moved to PaLM. Currently, Bard operates on the PaLM 2 large language model. Launched in a limited capacity back in March 2023, the launch of Google’s AI chatbot was ramped up due to the instant success of ChatGPT. Over the months, Bard was fleshed out and made available to the wider public. Even though the initial public response to Bard wasn’t as favourable as ChatGPT, it has evolved to be a powerful AI tool. Google has also started integrating Bard into its range of products and services. It’ll be interesting to see how it pans out in the future.
Microsoft Bing AI
Microsoft’s Bing AI is based on GPT-4, which shouldn’t be surprising as the tech giant was one of the early investors in OpenAI. If you’re more interested in the practical uses of an AI chatbot, Bing AI should be more up your alley. Instead of getting the chatbot to compose a work email, you can simply type a draft using the Microsoft SwiftKey keyboard and use the integrated Bing AI tool to change it to a more ‘professional’ tone. While using the chatbot on Microsoft Edge, you can choose the responses to be creative, balanced, or precise.
Jasper Chat
Jasper finesses the art of writing impeccable copies, blog posts, and articles. The chatbot utilises GTP 3.5 to create interesting content that adheres to your writing style and brand identity. One of the best attributes of Jasper is that it takes a conversational approach to content creation. You don’t need to enter precise prompts to receive desirable results. Instead, you can converse with the chatbot in natural language and provide it with the necessary feedback.
Socratic
Socratic is an educational app to help students with their homework. Owned by Google, Socratic uses Bard to resolve queries asked by students related to their homework. The app’s AI tool can recognise mathematical equations and offer easy solutions to problems while also explaining the core concepts behind them in a neat and concise manner. Students can also ask text-based queries related to any subject and receive illustrative and comprehensive answers.
Elicit
This one is for all the academics and scholars who need to go through a mountain of literature for their research papers. Described as ‘Jstor on steroids’, Elicit provides you with a comprehensive list of papers that are relevant to your research topic and briefly summarises their abstracts, making it easier for you to go through the results and sort out the meaningful entries. You can also get Elicit to look for more relevant papers based on your selected results and extract the important parts from each document. Need more? Elicit can also find common themes among the selected papers, helping you cut down on some serious research time.
Chatsonic
Chatsonic was one of the first chatbots to take Google results after 2021 into account while formulating its answers to user queries. This GPT-4 chatbot is designed to create thought-provoking copies for marketing, gather data & analyse literature for research, and generate concise and relevant replies for customer support, among other practical tasks. A monthly subscription to Chatsonic costs $16, making it one of the most affordable AI chatbots out there. Chatsonic is also capable of generating AI images based on your prompts.
Claude 2
Anthropic’s Claude 2 is one of the best alternatives to ChatGPT out there right now. Claude is a fun, conversational chatbot that you can use to resolve a query, proofread your article, trim down excessive or redundant content, or even brainstorm new ideas for your new project. The AI chatbot gets used to your writing style over a period of time and generates better content that suits your brand and identity.
Copy.ai
As the name suggests, Copy.ai helps you compose content briefs, ad copies, long-form articles, social media posts, product descriptions, and more. This AI tool specialises in creating content that is SEO-friendly and devoid of any fluff or redundancies. Users can tune the draft with precise prompts until it looks closer to a finished product. When used properly, Copy.ai can create compelling articles in a fraction of the time. Certainly one of the best ChatGPT alternatives around!
YouChat
YouChat is a brilliant query-resolving conversational AI chatbot based on GPT-4. With this AI chatbot, you don’t need to worry about incorporating the right keywords in your questions to get accurate answers. No matter how complex or convoluted your question is, YouChat comes up with a direct answer that addresses the heart of the problem. YouChat works best with You.com as your default search engine. You can also ask the chatbot to carry out tasks like summarising articles, composing blog posts, and more.
Perplexity AI
Perplexity AI is a free-to-use AI chatbot that has one very important feature – it cites all its sources. While there may still be some factual and contextual inconsistencies in its responses, you can always look up the sources that Perplexity has used to come up with the result. It also offers a ‘Copilot’ mode for more comprehensive answers. You can access your past conversations with the chatbot and even find interesting answers that other users have received on the ‘Discover’ tab. As of now, Perplexity AI is one of the best free alternatives to ChatGPT.
Character.ai
Character.ai puts a fun little twist on the whole conversational experience by letting you create AI ‘personas’. You can hold a conversation with these personas and their responses will remain true to their character. Some of the preset personas on the website include SM64 Mario, Raiden Shogun and Ei from Genshin Impact, and even Elon Musk! You can use this chatbot to simulate an interview or an upcoming viva. There is a bunch of other fun stuff you can try out on the Character.ai website!
Replika
If you want to check out something mildly dystopian and straight out of a Hollywood movie, head over to Replika. Replika is an AI companion that generates scripted dialogue that feels personal, similar to your interactions with real people. With Oculus support, you can even converse with Replika in Augmented Reality. The quality of responses generated by Replika improves over a period of time, the more you interact with it.Read Also:CMF Buds Pro by Nothing Review: A good balance of comfort and detailed audio for those on a budget
Conclusion
These are the 12 best alternatives to ChatGPT in 2023. Our picks cover a diverse range of tools, be it for content generation, research, problem-solving, or simply conversational purposes. Think there’s a chatbot that deserves to be on this list? Let us know in the comments!
Xiaomi has officially launched its most premium smartphone series Xiaomi 14 in China powered by just released Snapdragon 8 Gen 3 SoC. The Xiaomi 14 Series consists of two models- vanilla and Xiaomi 14 Pro. In addition to the latest chipset, the device presents the company’s newest and a replacement to MIUI OS- HyperOS. Apart from this, the devices share some similarities like the display featuring a 120Hz 2K LTPO OLED and a triple rear camera setup powered by Leica optics.
In This Article
Xiaomi 14 Pro specifications, pricing
Xiaomi 14 Pro features a 2K 6.73-inch 2.5D LTPO display with 1,440×3,200 pixels of resolution. The screen supports a dynamic refresh rate of up to 120Hz. It runs on HyperOS and equips a 4nm Snapdragon 8 Gen 3 chipset which was launched this week by Qualcomm. It comes with 16GB of LPDDR5X RAM and up to 1TB of UFS 4.0 storage.The Xiaomi 14 Pro comes with Leica tuned 50-megapixel triple rear camera setup. The system includes a Summilux lens- a 50-megapixel Hunter 900 lens with OIS and f/1.6 aperture, a 50-megapixel telephoto lens and another 50-megapixel ultra-wide angle lens. A 32-megapixel front-facing camera has been provided for taking selfies and video calling.Also Read:Apple watchOS 10.1 rolled out, enables double-tap gestureThe device is fueled by a 4,880mAh battery with 120W wired and 50W wireless charging support. In addition to this, there is support for 10W reverse charging. Along with an in-display fingerprint sensor the phone also consists of other sensors like an accelerometer, ambient light sensor, e-compass, proximity sensor, linear motor, flicker sensor, colour sensor and IR blaster. Whereas, 5G, Wi-Fi 7, USB 3.2 port, Bluetooth, GPS, Galileo, GLONASS, Beidou, NavIC, and a USB Type-C port have been provided for connectivity. In terms of audio, the new Xiaomi smartphone features a stereo speaker with Dolby Atmos support. Also, the handset comes with an IP68 rating for dust and water resistance.Coming to the price, the Xiaomi 14 Pro price starts at CNY 4,999 for 12GB RAM and 256GB storage, CNY 5,499 for 16GB RAM and 512GB storage and CNY 5,999 for 16GB RAM and 1TB memory.
Xiaomi 14 specifications, pricing
Xiaomi 14 comes with a smaller 1.5K 6.36-inch LTPO AMOLED display with 1,200×2,600 pixels of resolution. The display supports an adaptive refresh rate of 120Hz. It comes with 3000 nits of screen brightness and 460ppi pixel density. The OS, chipset, and front and back cameras are the same as the Pro variant. However, the phone boasts a smaller 4,610mAh battery with support for 90W wired, 50W wireless and 10W wireless reverse charging support.The price of Xiaomi 14 starts at CNY 3,999 for the 8GB RAM and 256GB storage. The 12GB RAM with 256GB storage price is set at CNY 4,299, 16GB RAM with 512GB storage at CNY 4,599 and 16GB RAM with 1TB storage model at CNY 4,999.
Garena Free Fire is a battle royale game with regular awards and tournaments to keep players interested. If you play Garena Free Fire, you should be aware of the redeem codes that are released on a daily basis. However, because the battle royale game is banned in India, players from other countries can use the Free Fire Redeem codes daily. If you’re unfamiliar with the Garena Free Fire redeem codes or don’t know how to get them, we’ve put together a step-by-step guide to help you redeem them. Check out Garena Free Fire Redeem Codes for 27 October 2023.The Free Fire redeem codes are a great way to get free stuff. These are 12-digit codes that contain alphabets and numbers, as well as an expiration date and time. Because the Garena FF redeem codes cannot be used more than once, you should hurry to the redemption page to claim your free reward before someone else does. To get a free reward, all you have to do is go to reward.ff.garena.com/en, which is the official redemption page. Also, keep an eye on this space for daily updates on Garena Free Fire redemption codes and rewards.
In This Article
Garena Free Fire Redeem Codes Today 27 October2023
One of our favourite things about Android phones is the seamless manner in which apps are integrated into the system. If you tap a Twitter link on the Reddit app, it will automatically open in the Twitter app on your phone (granted it is installed on your device). The same is true for YouTube. If someone sends you a YouTube link on WhatsApp, you can either choose to tap on the video’s thumbnail and watch it in a miniplayer, or tap the link and open the video in the app. However, sometimes this function doesn’t work as intended. In this article, we bring you the top 7 fixes for the ‘YouTube links not opening’ issue on Android.Read Also:How to use Google Photos’ Best Take Feature in Google Pixel 8 smartphones?
In This Article
Why is the YouTube app not opening links on your phone?
YouTube not loading links on its app is an unusual problem to encounter. Since the problem is so rare, there are only a few specific causes that could be causing it. Here are the usual suspects that typically cause this kind of behaviour:
The YouTube app has been forbidden to open supported links: It is possible that you accidentally turned off the option to open supported links on YouTube. Additionally, if you come across some variation of a YouTube link (like m.youtube.com or youtu.be), your smartphone may not recognise it as a legitimate link.
Your phone isn’t allowed to open links in their default apps: If you’re facing this problem for every other app (and not just YouTube), you may have accidentally stopped default apps from opening supported links.
The YouTube app is outdated: If you’re using an old version of the YouTube app, it may not be equipped to open native links on your phone. Luckily, apps can be updated with ease.
App-related issues: Sometimes, random bugs and a corrupt cache can cause an app to act strangely. This is true in YouTube’s case as well. We have mentioned some quick fixes down below that will take care of these issues.
Set ‘Open Supported Links’ as the default setting for the YouTube app
Step 1: Go to Settings and select Apps.Step 2: Tap on YouTube.Step 3: Select Set asDefault.Step 4: Open the toggle switch for Open supported links.
Turn on ‘Open links in apps’
Step 1: Go to Settings and select Apps.Step 2: Tap on Choose default apps.Step 3: Scroll down and select Opening links.Step 4: Turn on the toggle switch for Open links in apps.
Change the browser settings (Samsung devices)
Step 1: Go to Settings and select Apps.Step 2: Select Samsung Internet.Step 3: Tap on Samsung Internet settings.Step 4: Select Useful features.Step 5: Turn on the toggle switch for Open links in other apps.
Clear YouTube’s cache
If the YouTube app’s cache is corrupted, it can keep the app from opening every time you tap on a link. Here’s how you can clear the cache.
Step 1: Go to Settings and select Apps.
Step 2: Select YouTube.
Step 3: Tap on Storage.
Step 4: Select Clear cache.
Restart your smartphone
Sometimes, background software issues on your phone can keep the YouTube app from opening a supported link. A simple restart can take care of this issue. Press the side key along with the volume-up button to access the power menu. Hit ‘Restart’. Once your phone has restarted, click a YouTube link to check if the issue has been resolved.
Uninstall and reinstall the YouTube app
Did you update the YouTube app recently? It is possible that the update was not installed correctly. Other app-related issues can cause it to fail at basic tasks. A simple catch-all approach to troubleshooting is uninstalling and reinstalling the app on your device. Long-press YouTube’s icon in the app drawer and hit ‘Uninstall’. Now, go to the Google Play Store, search for YouTube, and hit ‘Install’.
Use a third-party app
If for some reason your phone’s OS refuses to use YouTube as the default app to open supported links, there is one third-party app that will help you forcefully redirect the link. The Open Link With app is available on the Google Play Store and always asks you which app you want to open a link with. This app gets triggered every time you tap a link on your device. ‘Open Link With’ will come in handy when the default settings for this function stop working on your Android phone.
Frequently Asked Questions (FAQs)
How do I make sure that every time I tap on a YouTube link it opens in the app?
Go to Settings>Apps>YouTube>Set as default and turn on the toggle switch for ‘Open supported links’.
Why isn’t YouTube opening supported links on my Android phone?
If the YouTube links aren’t opening on the link by default, go to Settings>Apps>Choose Default apps>Opening links and turn on the toggle switch for Open links in apps.
Does the YouTube app for Android support incognito mode?
If you want to watch a video on YouTube without having it reflect on your search or watch history, turn on incognito mode. Go to the ‘You’ tab and select ‘Turn on incognito’ to watch videos discreetly.
Why are links not opening on my Android phone?
If the apps on your Android phone are not able to open supported links, go to Settings>Apps>Choose default apps and allow them to open supported links.
These are the top 7 ways to fix the ‘YouTube Links not Opening’ issue on Android. If your phone successfully redirects the link to the YouTube app but fails to load the video, try force-stopping the YouTube app. Restarting your phone may also help in fixing the background issues causing this problem.
Picture this: you’ve got this magical cloud where you can toss all your digital goodies – be it from your smartphone or computer. Samsung has been launching new shades of Galaxy Z Flip 5 and with that you might need a safe place to stash your stuff while you’re twiddling your thumbs, waiting for your new gadget to arrive? Samsung’s Temporary Cloud Backup’s got your back!
Now, before you start imagining it as the guardian angel of your digital life, you must know that it’s like the oddball cousin at a family reunion. It doesn’t replace the existing Samsung Cloud backup; it just does its thing in its wacky way.
Read Also:How to delete an Instagram account?
You see, the usual Samsung Cloud deal lets you save all sorts of stuff indefinitely – call logs, messages, contacts, and all that jazz. But if you were hoping to back up your cat videos, vacation photos, or secret spy documents, you’re out of luck. Those won’t fit in the old Samsung Cloud backpack.
But the twist doesn’t end there. Temporary Cloud Backup is all about keeping your personal stuff hidden from prying eyes, especially when your phone goes for a spa day with the technicians. It even supports the wild party of file types, including those brought by third-party apps.
But wait, there’s a catch, as there always is. This quirky feature is like an exclusive nightclub for phones, and not all devices get an invite. Only the cool kids running One UI 6 can join this party. It starts with Galaxy S and Z series models in South Korea and then spreads its charm globally this fall.
Read Also:How to delete your Facebook account
And in case you’re wondering, Samsung swears this is your knight in shining armour against data disasters. They even put a double lock on it with two-factor authentication, so your data remains top-secret.
Now, what’s on the menu for Samsung’s Temporary Cloud Backup?
You can pile up as much as you want, but don’t serve any single dish heavier than 100GB – that’s the chef’s rule. If you break the rule with a massive video, it’ll get chopped up into little pieces, and there’s no going back from that digital surgery.
Apple’s latest WatchOS update with new features has started to roll out. The company has released watchOS 10.1 fixing all the bugs and issues with the Apple Watch. The latest update brings a double tap feature for Watch Series 9 and Watch Ultra 2. The double tap feature will allow users to respond to phone calls easily using their index finger and thumb together. Not just this it will also let them reply to messages and do other stuff.Apple has released watchOS 10.1 for Watch Series 9 and Watch Ultra 2. The new update comes with the latest double tap gesture “bringing a fast and convenient new way to interact with Apple Watch”. The latest tap gesture feature will make it easier for users to control the device with just one hand and without touching the display.Apple Watch Series 9 and Apple Watch Ultra 2 owners can tap the index finger and thumb of their watch hand together twice to quickly perform many of the most common actions. This new feature complements existing gestures like tap, swipe, raise to wake, and cover to mute which make the Apple Watch simple and intuitive to use.Also Read: Apple Event: Apple set to host “Scary Fast” event on October 30“The double tap gesture is helpful in common situations when the user’s other hand is occupied, such as when walking the dog, cooking, or holding a cup of coffee,” the company said.Double tap lets users choose the primary action in a wide variety of watchOS apps and notifications. In addition to answering and ending phone calls, users can open the Smart Stack from any watch face and scroll through widgets in the stack using the double-tap gesture.Users can also see a message from a notification, scroll through longer notifications with an additional double tap, reply using dictation, and send a message. The new double tap gesture on the Apple Watch Series 9 and Apple Watch Ultra 2 lets users pause, resume and end a timer in addition to stopping and resuming a stopwatch. watchOS 10.1 also enables users to snooze an alarm and play and pause music, podcasts, and audiobooks.Switching to the new Elevation view in the Compass app also got easier thanks to the new double tap gesture that comes with the latest watchOS update, taking an iPhone photo with the Camera Remote in the Camera app, starting or stopping automatic Workout reminders, performing the primary action from notifications, such as replying to an incoming message from a messaging app and snoozing reminders — including from third parties are some more actions that the latest WatchOS update brings.The double tap gesture, according to Apple will be accessible throughout the day and doesn’t majorly affect the 18-hour battery life on the Apple Watch Series 9 or the 36-hour battery life on the Apple Watch Ultra 2. It also functions anytime the display is awake.The double tap feature is not supported in the following apps and experiences: ECG, Heart Rate, Blood Oxygen, Sleep Focus, Walkie-Talkie, Maps (during navigation), Mindfulness (during an active session), SOS features (Emergency SOS, Fall Detection, Crash Detection), and Workout (during an active session).
Availability
According to the company, the double tap gesture is enabled by default on Apple Watch Series 9 and Apple Watch Ultra 2 running watchOS 10.1, with no additional setup required. It can be disabled in settings. Additionally, watchOS 10.1 is available for Apple Watch Series 4 and later and requires iPhone XS or later running iOS 17.
CMF (Colour, Material, Finish) is Nothing’s new range of affordable tech products. The London-based tech outfit released three products under this sub-brand last month – Buds Pro, Watch Pro, and a 65W GaN power adapter. We reviewed the CMF Watch Pro earlier and found it an excellent entry-level smartwatch that nails all the essential health & fitness functions while finessing the minimal aesthetic. Now, we turn our attention to the Buds Pro. We were curious to see what Nothing’s budget TWS had to offer, given the success its flagship ‘Ear’ series (our review here) has garnered in the last couple of years. We spent a week with these earbuds, using them for calling, listening to music, content watching, and even a bit of gaming. Here is our CMF Buds Pro review.Read Also:Smartphones that will come with a Snapdragon 8 Gen 3 chipset
In This Article
CMF Buds Pro review: Design
Like the Watch Pro, the CMF Buds Pro also ship inside a very sleek cardboard retail box that flips open like a book to reveal the charging case (with the earbuds inside), a USB Type-C cable, two pairs of extra ear tips, a user guide, and a safety information booklet. The retail package has two cutouts, one for the charging case and the other for all the accessories. The Buds Pro are available in three colour options – Orage, Dark Grey, and Light Grey.Nothing has gone for simplicity over extravagance in design for the CMF Buds Pro. The charging case is completely round (yes, it can easily roll on a flat surface) and has a matte finish. The case is made completely out of plastic, much like the earbuds inside it. The hinge supporting the lid has a glossy finish to it. The lid can be flipped open with just one finger. It snaps shut with a very satisfying sound, making it hard not to fidget with. A small LED light bar sits right under the light. The USB charging port finds its way to the back, below the glossy hinge. The perfectly round design is certainly a breath of fresh air from all the pill-shaped charging cases out there, but it does make the TWS more prone to slip out of your hands. Nevertheless, we still like this design choice.Flipping the lid open, you will find the two earbuds magnetically locked into their respective cutouts. The dedicated pairing button is very well integrated into the bottom panel, almost too well because it’s hard to spot if you don’t know exactly where it is. The inside of the case gets a matte finish as well.The earbuds feature the traditional in-ear design. Either piece has a stem attached to it. The glossy inner panel offers a nice contrast to the matte finish on the stem. There are two events at the top of either stem to reduce the wind interference during calls. The voice clarity is further aided by three microphones on either earbud. What CMF gets absolutely right is the lightweight design. The Buds Pro are some of the lightest earbuds we have ever used. We barely felt them in our ears and there was no sign of fatigue after extended hours of use.The stem of the earbuds is touch-sensitive and lets you control the playback and other functions with a simple tap. Since the stems on the earbuds are pretty slim, it is easy to trigger some controls accidentally while adjusting the buds. Other than that, the touch function is tuned very well. The earbuds are rated IP54 for dust and water resistance. This makes them immune to damage from sweat and light rainfall. We used our CMF Buds Pro review unit while working out and they did not present any issues whatsoever. Even though the inner panel of the earbuds is quite glossy, they did not slip out once.
CMF Buds Pro review: Performance
Delivering the audio output on the CMF Buds Pro is a dynamic bass boost driver on either earbud. The diaphragm is made out of Liquid Crystal Polymer (LCP) and Polyurethane (PU). There are two audio codecs on offer – SBC and AAC. In terms of connectivity, the Buds Pro support Bluetooth 5.3. Connecting the earbuds to your smartphone for the first time requires pressing the pairing button in the charging case for two seconds. Once you’ve set them up on your device, you can enable Google Fast Pair for seamless pairing on other devices.The audio output offered by CMF Buds Pro is unmistakably Nothing. The signature that we’ve experienced on Ear (1), Ear (Stick), and Ear (2) has been carried forward to the company’s budget offering as well. This means the mix features a very prominent low end while nicely incorporating the midrange and higher frequencies as well. A boosted bass output always takes a little toll on the mids, and the CMF Buds Pro are certainly no exception. While the midrange frequencies were not totally shrouded by the low end, we would have liked them to be more fleshed out.We played a diverse set of genres on the CMF Buds Pro including post-rock, hyper pop, prog rock, and neo-psychedelia. Overall, our experience was quite enjoyable and we did not have any issues with the detail that the earbuds managed to produce. Given the Buds Pro cost just Rs 3,000, the audio quality was much better than we expected. Even after cranking up the volume to the maximum limit, the distortion to the output was minimal.For a diverse list of listening options and equaliser modes, you will need to download the Nothing X app. This is the same app that Nothing uses for its flagship audio products, but there are some noticeable differences when you pair the budget CMF Buds. The most significant difference is the equaliser function. Earlier this year, Nothing added an 8-band customisable equaliser on its TWS app. But the CMF earbuds are stuck with the outdated 3-band equaliser. After having enjoyed the new customisable equaliser on the Ear (2), going back to the previous one felt like a big drop-off.The Nothing X app offers a low lag mode for gaming, but it is far from perfect. The latency did not drop down enough to match the visuals on the screen. The delay was very noticeable. If you’re for a dedicated gaming TWS, there may be better options for you. On the bright side, we did not notice the audio delay as much while watching content on YouTube and other OTT apps.One of our favourite features on the CMF Buds Pro is in-ear detection. As soon as you an earbud from your ear, the media immediately pauses on your device. We liked that the implementation of this feature was very smooth and seamless. The media automatically started playing as soon as we popped the earbud back in.The CMF Buds Pro also offer Active Noise Cancellation, which is good to see on a budget TWS. These earbuds can nullify up to 45 dB of surrounding noise. For a TWS priced at Rs 3,000, the quality of ANC on offer here is very decent. While it certainly doesn’t catch up to the flagship Ear (2), we found ourselves using it a lot while commuting on public transportation.The calling experience offered by the Buds Pro is pretty standard for a TWS product in this price range. In indoor conditions with minimal surrounding noise, the earbuds do a good job of relaying the voice signal to the receiver. The loss in quality is negligible and the three microphones on either earbud do a good job of picking up even the faint whispers. However, the call quality takes a sharp hit in outdoor conditions with a fair bit of surrounding noise. We found ourselves switching back to the smartphone while taking a call outdoors.Ending on a high note, the CMF Buds Pro have a tremendous battery life, even better than the Nothing Ear (2). On a full charge, we were able to get more than 10 hours of battery life from the earbuds. While using ANC in frequent intervals, we still got up to 8 hours from the Buds Pro. One of the advantages of having a large charging case is that holds a bigger battery unit. The 460mAh battery pack on the charging case can fully power the earbuds four times on a single charge.Read Also:Top 10 apps to download first on OnePlus Open
Verdict
So far, CMF has impressed us with its budget smartwatch and TWS offerings. Like the Watch Pro, the CMF Buds Pro get the essentials just right. The audio output is certainly bass-heavy, but the low end doesn’t shroud over other frequencies, as is the case with most budget wireless earbuds. The quality of ANC is also pretty good and features like in-ear detection add the cherry on the cake.
Samsung recently announced its second-generation Galaxy SmartTag 2. The latest smart tracker by the company has now arrived in India. The device comes with a new compact design and incremental upgrades. The Bluetooth tracker includes a new lost mode it easier for users to locate their possessions. Therefore the device can be attached to car keys, luggage, bags and pets.
In This Article
Samsung Galaxy SmartTag 2 price in India and sale details
Samsung Galaxy SmartTag 2 price in India has been set at Rs 2,799. The smart tracker by Samsung will be available for purchase via Samsung Online Store, Samsung Exclusive Stores and Amazon.in. In India, the device will come in two colour options of Black and White.
Samsung Galaxy SmartTag 2 specifications
Samsung Galaxy SmartTag 2 has a ring-shaped design and is smaller than its predecessor. The wide metal loop increases the device’s strength, improved resistance and the ability to support accessories like clips and keychains. Its IP675 water and dust resistance rating helps in extending its lifespan. So, if you attach it to your pet’s collar, it remains safe from normal wear and tear, water bowls, and outdoor play. In addition to this, the gadget has a maximum Bluetooth range is 120 metres.Galaxy SmartTag2’s advanced tracking features allow users to track their possessions. It also lets them send a message containing your contact information to the smart tracker using the new Lost Mode. The message and contact details can be unlocked by scanning the associated SmartTag2 when someone finds your misplaced item. In addition to this, you simply attach it to your pet’s collar so you can easily track their location when they go missing.Also Read:Apple TV+, Apple News+ and Apple Arcade prices surged in the US and more regionsThe Lost Mode on it is compatible with any smartphone having a web browser and an NFC reader. Disabling Lost Mode also instantly removes the owner’s message from the device therefore hiding their contact information.The Samsung Galaxy SmartTag 2 now has an improved Compass View feature offering arrows to show the user where the Galaxy SmartTag2 is located. This mode is accessible on any Galaxy smartphone that has UWB capabilities, including the Galaxy S23 Ultra.The company has also improved the SmartThings Find app allowing a full-screen map display and user-friendly UI to enable newly registered Galaxy SmartTags to offer a smooth user experience. Also, SmartTag 2 automatically re-syncs your current Galaxy smartphone with your Samsung account when you switch Galaxy smartphones. There is a new Power Saving Mode and an enhanced Normal mode on the smart tracker so the device lasts longer. As per the company, the battery on the Galaxy SmartTag2 now lasts up to 700 days using Power Saving Mode.
One of the biggest obstacles to taking a good group picture is getting everyone to look at the camera perfectly when the shot is being taken. This problem is compounded when multiple people are taking the same shot with their own phones. It is very common to end up with a shot where people are not directly looking into the camera or have their eyes closed. The new Google Pixel 8 Series gets around this issue with a bit of software magic. In this article, we show you how to use the Best Take feature in the Google Photos app on your new Google Pixel 8 and Pixel 8 Pro.Read Also:Smartphones that will come with a Snapdragon 8 Gen 3 chipset
In This Article
Use Best Take in Google Pixel 8 Series
Step 1: Launch the Camera app on your Google Pixel 8 smartphone and take multiple shots.Step 2: Launch the Google Photos app and select one picture from the series of shots that you just took.Step 3: Hit the Edit option at the bottom of the screen.Step 4: Move to the Tools tab and select Best Take.Step 5: Once Best Take is selected your Pixel 8 smartphone’s AI will scan the series of shots you’ve taken and analyse the individual elements of every picture.Step 6: Once the process is over, Best Take will list all the facial expressions of the people in the picture.Step 7:Select the best expression for every person in the picture. You can preview the changes on the entire picture in real time.Step 8: When you’re satisfied with the result, hit Save Copy.
Frequently Asked Questions (FAQs)
What is the Best Take feature on Google Pixel 8 and Pixel 8 Pro?
Google Pixel’s new ‘Best Take’ feature fixes minor flaws like closed eyelids, facial blur, and other elements in your group photos. You need to take a series of pictures for this feature to work. Once you select Best Take, your smartphone analyses all the shots you’ve taken and lets you pick the best facial expression for every person.
Where can I find the Best Take feature in my Pixel smartphone?
Pixel 8 and 8 Pro users can find the Best Take feature in the Google Photos app on their smartphones. Select the picture you want to fix, and go to Edit>Tools to use Best Take.
Is Best Take available on other Android smartphones?
This is how you can use the Best Take feature in the Google Photos app on your Google Pixel 8 or 8 Pro smartphone. To tap into the maximum potential of this feature, make sure you take a lot of shots. This gives the tool a lot of options to draw from, resulting in more natural-looking expressions that fit the picture perfectly. While you’re here, check out this article to learn how to use the Magic Eraser on your Pixel device. What do you think of the new Pixel series? We’d love to know in the comments!
Don’t you hate it when suddenly you see an error on screen saying a Microsoft Outlook file/PST is corrupt or not found? Your whole work day goes for a toss and comes to a halt. You were going to get an important email or are not able to find an important one stored in the Outlook PST. Outlook PST files store user mailboxes, such as emails, contacts, attachments, calendars, notes, journals and more. As daily email traffic adds up, large PST files tend to grow in size over time. A bloated PST file can significantly impact Outlook’s performance and stands as a primary catalyst for PST file corruption. In the most severe instances, it may even result in data loss.
Therefore, we recommend using PST Repair tool such as Stellar Repair for Outlook. There is no manual method to recover the lost data as efficiently as this neat software from Stellar does. This is our favourite software for quick and easy recovery of Outlook PST files. The software enables you to scan and preview the mailbox data contained within the damaged PST file. It provides a comprehensive preview of email content, deleted emails, embedded hyperlinks, calendar events, tasks, journals, and contacts. We found that to be very effective and we found our accidentally deleted emails with it and after that managed to retrieve it.
In This Article
Top Features of Stellar Repair for Outlook
User-Friendly Operation: The software is designed for simplicity, offering an intuitive interface and a three-step process for Outlook PST repair.
Recovery of Deleted Mailbox Items: Stellar Repair for Outlook can retrieve deleted Outlook mailbox items, whether they were accidentally removed from the Inbox, Deleted Items, or other folders.
Detailed Preview: Before saving, this Outlook repair tool provides a preview of recovered PST items. You can review individual items such as emails and attachments, selecting only what you wish to keep.
Repair of Large PST Files: Stellar Repair for Outlook effortlessly handles large PST files, restoring all mailbox contents to their original state, even for password-protected files.
Multiple File Formats for Recovery: In addition to PST format, Stellar Repair for Outlook allows you to save the repaired mailbox data in PST, EML, MSG, RTF, HTML, and PDF formats. The Technician edition offers additional saving options, including MBOX and DBX formats.
Direct Exports to Outlook and Office 365: With the Technician edition, users can export the repaired PST file directly to Office 365 (Microsoft 365) without saving it in another format or location, provided you have valid Admin credentials for your Office 365 account. Additionally, you can export the repaired PST to a configured Outlook account.
How to use Stellar Repair for Outlook tool?
Step 1: Launch Stellar Repair for Outlook. You can choose the PST file by clicking on “List Profiles” or in the Home tab, select ‘Outlook data file.’ A pop-up screen will appear, allowing you to browse for or locate the PST file for recovery.
Step 2: If you know the location of the PST file, click ‘Browse.’ Alternatively, click ‘Find’ to search for the PST file. Next, click ‘Repair’ to begin the PST recovery process.
Step 3: The software will commence scanning the corrupt PST file. The estimated scan duration depends on the PST file’s size and the extent of corruption.
Step 4: Once the scanning is complete, the software will display a preview of the recovered Outlook mailbox items in the left pane. You can click on the folders to preview the items.
Step 5: Select a specific folder or all items for recovery and click ‘Save Repaired File.’ Choose the PST file format from the pop-up window. Click ‘Browse’ and then ‘OK’ to save the mailbox data.
Step 6: After the repaired PST file is saved at the specified location, you’ll receive a confirmation message.
Conclusion
Stellar Repair for Outlook is a powerful PST Repair Tool and user-friendly solution to address PST file corruption in Microsoft Outlook. Whether you’re dealing with a minor file issue or a major data loss event, this software can help you restore your Outlook email data to its original state. With support for all Outlook versions, the ability to recover deleted items, and the option to save repaired files in multiple formats, it offers flexibility and convenience.
After rigorously testing the repair of the corrupt PST file using both the native Microsoft Outlook utility (ScanPST.exe) and the Stellar Repair for Outlook tool, we can confidently affirm that the product not only successfully recovered the complete mailbox data but also facilitated a seamless and efficient process for importing the data back into Microsoft Outlook.
Furthermore, the software can handle large PST files, ensuring that all mailbox contents are recovered intact. The option to save repaired files to external storage devices and network locations, along with its compatibility with Outlook accounts and Office 365, makes it a versatile tool for various data recovery needs.
Frequently Asked Questions (FAQs)
Is my data secure during the repair process?
Stellar takes data security seriously, and your data remains confidential and secure throughout the repair process.
Can I export the repaired PST file directly to my Outlook account or Office 365?
With the Technician edition of the software, you can export the repaired PST file directly to your Outlook account or Office 365, provided you have the necessary credentials.
Is there a free trial version available?
Yes, a free trial version is available, allowing you to scan and preview the contents of the damaged PST file before purchase.
In which Outlook versions is this tool compatible?
Stellar Repair for Outlook Tool is compatible with various Outlook versions, including Outlook 365, Outlook 2021, 2019, 2016, 2013, 2010, and earlier versions.
How much time does it take to repair an Outlook PST File?
It will take time depending on how big your PST file is and your system configuration. If it is not too big it will take no time at all.
What is the Price of the Stellar Repair for Outlook?
The price of the Stellar Repair for Outlook starts at $79.
Stellar Repair for Outlook Pros
Easy and simple to use
Very accurate in recovering lost data
Users can scan and preview files before recovery
Stellar Repair for Outlook Cons
Larger PST files might take longer than usual time to recover
Even though it is wrapped around your wrist most of the time, your Apple Watch can be surprisingly easy to lose. Luckily, it is equipped with Find My, which means you can track its location at any given time using your iPhone. If you misplace the device in your house, you can give it a ring and follow the direction of the sound to find it. In this article, we bring you the best 3 ways to find your lost Apple Watch Series 9.Read Also:Top 10 apps to download first on OnePlus Open
In This Article
Use Find My on your iPhone to find your lost Apple Watch Series 9
Step 1:Launch the Find My app on your iPhone.Step 2: Switch to the Devices tab.Step 3: Select your Apple Watch to find its current location on the map.Step 4: Tap on Directions to find its current location on the map.If you lose your Apple Watch in the house, you can ring it to locate it.
Use Find My on your Mac or PC to find your lost Apple Watch Series
Step 1:Launch the web browser and go to https://www.icloud.com/. Sign in using your Apple ID.Step 2: Select Find My from the Quick Access Menu on the right.Step 3: Select All Devices, then click on your lost Apple Watch.
Turn on Lost Mode
The ‘Lost Mode’ feature locks your Apple Watch and displays a message with your phone number, so anyone who finds your watch can contact you to return it. Here is how you can turn it on.Step 1:Launch the Find My app on your iPhone.Step 2: In the Mark As Lost category, select Activate.Step 3: Hit Continue.Step 4: Enter the phone number on which you can be contacted. Hit Next.Step 5: Enter the message that you want displayed on the Watch.Step 6: Hit Activate.
Frequently Asked Questions (FAQs)
How do I find my lost Apple Watch Series 9?
Go to the Find My app and switch to the ‘Devices’ tab. Select your lost Apple Watch to find its location on the map. You can also ring the watch if you misplaced it in your room or house.
How do I ring my iPhone from my Apple Watch?
Forgot where you kept your iPhone? Simply swipe up from the watch face and tap the iPhone icon in the Control Center to ring it. Press and hold the icon to flash the screen of your iPhone.
How do I ensure no one goes through my Apple Watch if it’s stolen?
These are the best ways to find your lost or stolen Apple Watch Series 9. The ‘Lost Mode’ can be really helpful in case someone finds your watch and wants to return it to you. Once you receive your Watch back, you can turn off the Lost Mode by going to Find My app>Mark As Lost>Activated and selecting ‘Turn off Mark As Lost’.
Apple recently raised the subscription cost of Apple TV+, Apple News+ and Apple Arcade in the USA and other markets. The tech giant raised the subscription price of its service just days before an upcoming event. Notably, some day ago other video streaming platforms like Netflix and Disney also raised the price of their subscription plans.Apple TV+, Apple Arcade and Apple News+ subscriptions are now seeing a price hike. The recent surge comes after Netflix and Disney increased the price of their plans. Apple has raised the price of its streaming and gaming platform subscription in the US and other countries. Note that there is no price increase seen in India as of right now.Also Read:Smartphones that will come with a Snapdragon 8 Gen 3 chipsetThe monthly subscription plan of Apple News+ has surged from $9.99 to $12.99. Whereas Apple TV+ is now $3 more expensive per month setting at $9.99. Previously it was available at $6.99. Whereas Apple TV+ on a yearly basis will now cost you $99 rather than $69.On the other hand, the gaming platform Apple Arcade‘s monthly subscription plan has been raised to $6.99 from $4.99. Note that this is the first time that the gaming platform has seen a price rise.In addition to this Apple One Services cost which includes several services by the company has also gone up. The price individual plan has increased to $19.95 from $16.95. While, the family plan costs $25.95, including 50GB of iCloud data, Apple TV+, Apple Music, and Arcade services. And, Apple has not spared Premier plans which will now set you at $37.95.As mentioned earlier the price surge has been effected in the US and other regions but there is no price increase in India.Also Read:Apple Event: Apple set to host “Scary Fast” event on October 30According to reports, Apple is preparing to give the Apple TV app a revamp. The redesigned app is likely to arrive by the year-end as part of its tvOS update. It is speculated to include a new side panel situated to the left allowing users to select from a number of categories similar to that of other streaming apps like Netflix, Amazon Prime Video and more. In addition to this Apple is also planning to make renting and buying content on the site easier. Reportedly the company will soon remove iTunes apps for a better experience.
Garena Free Fire is a battle royale game with regular awards and tournaments to keep players interested. If you play Garena Free Fire, you should be aware of the redeem codes that are released on a daily basis. However, because the battle royale game is banned in India, players from other countries can use the Free Fire Redeem codes daily. If you’re unfamiliar with the Garena Free Fire redeem codes or don’t know how to get them, we’ve put together a step-by-step guide to help you redeem them. Check out Garena Free Fire Redeem Codes for 26 October 2023.The Free Fire redeem codes are a great way to get free stuff. These are 12-digit codes that contain alphabets and numbers, as well as an expiration date and time. Because the Garena FF redeem codes cannot be used more than once, you should hurry to the redemption page to claim your free reward before someone else does. To get a free reward, all you have to do is go to reward.ff.garena.com/en, which is the official redemption page. Also, keep an eye on this space for daily updates on Garena Free Fire redemption codes and rewards.
In This Article
Garena Free Fire Redeem Codes Today 26 October2023
Scanning a QR Code is one of the most efficient ways to make a UPI payment. Apps like Google Pay and Paytm make it incredibly easy to scan a QR code and quickly send money to the contact. While making a payment to a vendor, it is a lot quicker to simply scan a spot code rather than ask them for their phone number. In this article, we show you how to scan a QR code to send money from GPay to any contact in India.Read Also:Top ways to watch videos in Incognito Mode on YouTube
In This Article
Use a QR Code to send money to any contact on GPay
Step 1: On the contact’s smartphone, launch the GPay app and tap on the profile picture to access their unique QR code.Step 2:Launch the GPay app on your smartphone.Step 3: Tap on Scan any QR code.Step 4: Scan the QR code on the contact’s phone. You can also choose to send money on GPay using the contact’s phone number.Step 5: Enter the amount you want to pay. Hit the arrow icon at the bottom right corner of the screen.Step 6: Select your bank account and tap on Pay.Step 7: Enter your UPI PIN.The money will be transferred to the contact in a few seconds.
Frequently Asked Questions (FAQs)
How do I send money on GPay using a QR code that is saved on my phone’s gallery?
If the QR code of the recipient is saved on your phone’s gallery, you can still send them money on GPay. Simply, launch the GPay app and select Scan any QR Code>Upload from gallery and select the image with the QR code.
How do I access my QR code on Gpay?
Launch the GPay app on your smartphone and tap your profile picture at the top right corner of the screen. Tap on the profile picture with the small QR code icon to view your UPI QR Code. You can also choose the ‘Your QR Code’ option to achieve the same result.
This is how you can send someone money by scanning their UPI QR Code on GPay. While you can make a payment to the recipient’s phone number, using a QR Code is the best way to go about it. This is because the recipient may have multiple accounts linked to their number, meanwhile, the QR code corresponds to a single UPI ID.
Qualcomm at its Snapdragon Summit 2023 announced the newest mobile processor Snapdragon 8 Gen 3 SoC for premium smartphones. According to the company generative AI was considered in the creation of its flagship SoC with an AI engine supporting multi-modal generative AI models along with large language models (LLMs). iQoo, Vivo, and Xiaomi are some of the first companies to announce their upcoming phones to be powered by the new processor let’s find out other smartphones to come with Snapdragon 8 Gen 3 SoC.With the announcement of the Snapdragon 8 Gen 3 chipset by Qualcomm, iQoo became the first company to announce that its upcoming iQoo 12 will feature the latest flagship chipset. Other brands like OnePlus, Vivo, Xiaomi, Oppo, Sony, MEIZU, NIO, Honor, Redmi, Asus Realme and more are likely to adopt the latest SoC as they will be launching their flagship models in the next few months.Also Read: iQoo 12 Series to use Snapdragon 8 Gen 3 SoC, China launch confirmed for November 7 and India soonBesides iQoo, Xiaomi is another smartphone brand to announce Xiaomi 14 with Snapdragon 8 Gen 3 SoC. The smartphone launch is set to launch on October 26 in China. OnePlus has not announced but has been teasing the OnePlus 12 on Weibo. As this phone is the company’s most premium phone it is likely to use Qualcomm’s latest SoC. Oppo which is a sister company of OnePlus also confirmed that Oppo Find X7 Pro will come equipped with Snapdragon 8 Gen 3 SoC.Another smartphone brand Vivo is confirmed to launch with Snapdragon’s latest flagship mobile processor.Samsung Galaxy S24 Series will debut next year and will also use Qualcomm’s chipset but it’s yet to be confirmed. Qualcomm Snapdragon 8 Gen 3 specificationsThe Qualcomm Snapdragon 8 Gen 3 will be based on 4nm processing technology. In addition to this, there will be a Qualcomm Kryo CPU with up to 3.3 GHz which is said to be 30% faster and 20 percent more efficient. It includes 5 performance cores (up to 3.2 GHz) and two efficiency cores (up to 3.2 GHz). It comes with Hexagon process NPU which is claimed with 98% faster and 40% more efficient performance. Moreover, the chipset is said to come integrated with Qualcomm Adreno GPU with 25% faster performance. The mobile processor will support 240 fps gaming along with hardware-accelerated ray tracing in addition to global illumination. For photos and videos, the Qualcomm Snapdragon 8 Gen 3 SOC will powered by Samsung’s 200-megapixel image sensor. In addition to 2X and 4X zoom with object tracking the chip will also allow multiple video capture with support for Dolby HDR. According to Qualcomm, the AI will help in filling up photos using the Photo Expansion feature while the Video Object Eraser by Arcsoft will remove items in a video. For connectivity, the Qualcomm Snapdragon 8 Gen 3 processor will include Qualcomm FastConnect 7800 that will provide support for Bluetooth 5.4, Wi-Fi 7 802.11be, 802.11ax, 802.11ac, 802.11a/b/g/n. It will also have a Snapdragon X75 5G Modem-RF System with AI tensor
OnePlus’ debut folding phone, Open, was launched last week at the price of Rs 1,39,999. Already being hailed as the best folding phone on the market, the OnePlus Open features the latest Snapdragon 8 Gen 2 SoC, a 7.82-inch LTPO AMOLED inner display with 2K resolution, and a 6.31-inch cover display. Its book-like form factor is a departure from the tall orientation of the Samsung Fold and the passport-size Google Pixel Fold. If you recently got your hands on the device, here are the top 10 apps you need to download first on the OnePlus Open.Read Also:Apple Event: Apple set to host “Scary Fast” event on October 30
In This Article
Niagara Launcher
Download from Google Play StoreNot only does the Niagara Launcher rearrange your phone’s home screen layout in a more minimal fashion, but it also makes the device more accessible for one-handed use. If you recently made the switch to a folding phone, reaching those far corners with your thumb can prove to be a challenge. This is truer than ever for the massive 7.82-inch inner display of the OnePlus Fold. The ‘wave’ animation lets you navigate the phone with ease and access your favourite apps instantly. Another big advantage of using the Niagara Launcher is that it doesn’t lace its interface with intrusive ads.
Zoom
Download from Google Play StoreAs far as virtual meeting clients go, Zoom is one of the best apps for foldable devices. The platform is perfectly optimised to be used on a large display. It mimics the desktop app when used on the inner display. The controls menu at the bottom comes very handy when you want to put your audio on mute, turn off the camera, share a slideshow, or simply view other call participants. You can also prop your OnePlus Fold in landscape orientation and take a call without needing to hold the phone.
Apple Music
Download from Google Play StoreEven though Apple hasn’t come out with a foldable iPhone yet, the Apple Music app is brilliantly optimised for foldable devices. This is because your folding phone uses the tablet version of the app. The larger screen real estate lets you browse your music library with ease, giving the album artworks a larger room to shine. The music player can easily be minimised at the bottom of the screen and accessed with one tap at any given time.
Todoist
Download from Google Play StoreTodoist is one of our favourite productivity apps and one of the best ones you can download on your new OnePlus Open. The app is well-optimised for foldable devices and makes good use of the screen size on offer. Todoist brings much-needed clarity to your daily tasks with its beautiful visual themes and the amazing ability to integrate with other apps on your phone. You can also collaborate with other people on a particular task and track it to its completion.
Kindle
Download from Google Play StoreOne of our favourite things about the new OnePlus Open is its ideal form factor. It is neither too tall nor does it conform to the stocky passport-size layout. Its squarish inner display makes it ideal to read books on. And what better app to carry out this activity other than Kindle? The Kindle app for folding phones aligns two pages side by side, much like an actual book. In some ways, reading on the Kindle app on a foldable can be a more fulfilling experience than reading on the actual e-reader.
Spacedesk
Download from Google Play StoreA lot of users prefer using a second monitor for their PC to maximise productivity. But what if you don’t have a spare monitor lying around? You can simply use your Android smartphone as the secondary display. It’s even better if it’s a foldable. The Spacedesk app allows you to extend and mirror your monitor’s display on your phone. It works just as well for foldable devices as it does for tablets and other Android phones.
Adobe Acrobat Reader
Download from Google Play StoreThe Adobe Acrobat Reader app for OnePlus Open lets you access two PDF files side by side and edit them at once. When the Acrobat Reader is opened in split screen mode, you can drag any PDF from another app and it will easily open it up for you. The split-screen functionality also lets you handle multiple tasks at once. If you quickly need to browse the web in order to double-check a detail on the PDF file, you can do it with Adobe Acrobat Reader.
Webtoon
Download from Google Play StoreWhile e-readers like Kindle are more suited to reading books, your Android foldable is much better for enjoying comics and manga. The wide inner display replicates the layout of a comic book and produces brilliant, detailed images and sketches. Webtoon is a great app to download on your OnePlus Open if you enjoy reading comic books and mangas. The app’s exhaustive library lets you choose from over 20 genres and contains well-known titles like Tower of God, Noblesse, and more!
Calm
Download from Google Play StoreCalm is one of the best meditation and relaxation apps that you can install on your OnePlus Open. This app has comprehensive routines for meditation, breathwork, stretching, relaxation, and sleeping. There are a lot of beginner exercises on the app for people who are new to meditation. Seasoned meditators can take on expert courses. The app also features ‘Sleep Stories’ voiced by famous artists like Cillian Murphy, Rosé, and Jerome Flynn.
Vampire Survivors
Download from Google Play StoreVampire Survivors is one of the best games for the foldable format. This rogue-lite time survival game tests your skills against all kinds of creepy creatures. Choose from an arsenal of weapons, upgrade your skills, and smartly use the power-ups to defeat the creatures from hell. Vampire Survival works best on the large screen of your OnePlus Open foldable. Once you download it on your device, fun is all but guaranteed.Read Also:Top 4 Ways to Blur Out a Part of Picture on Android
Conclusion
These are the top 10 apps that you should download first on your new OnePlus Open. All of the apps mentioned on this list are optimised to make the most out of your phone’s large inner display. Think there’s an app that deserves to be on this list? Let us know in the comments!
Soon after Qualcomm unveiled its latest flagship processor Snapdragon 8 Gen 3 SoC iQoo confirmed that its next smartphone series will use the same chipset. iQoo 12 Series is set for release on November 7 in China. Not just that the company has also revealed that its gaming smartphone series will make its debut in India as well.The iQoo 12 Series is set to release in China on November 7. The company has not confirmed the India launch date but it says launching soon. In China, the launch event will start at 7 PM which is 4:40 PM IST.Also, it will be India’s first phone to come equipped with Snapdragon 8 Gen 3 SoC which means the India launch may take place as soon as it gets released in its home market. The upcoming series will include two smartphones a basic iQoo 12 and iQoo 12 Pro. The iQoo India CEO Nipun Marya took to X to announce the upcoming smartphones.Also Read:Apple Event: Apple set to host “Scary Fast” event on October 30The leaks previously suggested that the iQoo 12 Series would have Samsung E7 AMOLED displays. The screen will support 2K resolution and a refresh rate of up to 144Hz. It will run on Android 14 out of the box and come with a Snapdragon 8 Gen 3 SoC. Both iQoo 12 and iQoo 12 Pro are rumoured to be available with up to 24GB RAM and 1TB of internal storage.In terms of photography, the iQoo 12 Series is speculated to feature a triple rear camera setup. The camera system is said to include a primary 50-megapixel OmniVision OV50H lens with optical image stabilisation (OIS). It might also consist of a 50-megapixel Samsung ISOCELL JN1 sensor for taking ultra-wide angle photos and a 64-megapixel OV64B telephoto supporting 3x zoom and OIS.The iQoo 12 is claimed to boast a dual-cell 4,880mAh battery with 120W fast charging support. On the other hand, iQoo 12 Pro could sport a 4,980mAh battery with support for 120W wired and 50W wireless charging.
Qualcomm today at its Snapdragon Summit 2023 unveiled Snapdragon 8 Gen 3 SoC. This is the company’s next-gen flagship processor designed for the most premium Android smartphones. The Mobile Processor will be powered by Generative AI to support multi-modal generative AI models, including popular large language models (LLM), language vision models (LVM), and more. According to the company, the processors will feature in the upcoming handsets in the coming weeks.
Qualcomm Snapdragon 8 Gen 3 specifications
The Qualcomm Snapdragon 8 Gen 3 will be based on 4nm processing technology. In addition to this, there will be a Qualcomm Kryo CPU with up to 3.3 GHz which is said to be 30% faster and 20 percent more efficient. It includes 5 performance cores (up to 3.2 GHz) and two efficiency cores(up to 3.2 GHz).Also Read:Apple Event: Apple set to host “Scary Fast” event on October 30The chipset is the company’s first to focus on Generative AI. It supports multi-modal generative AI models, including popular large language models (LLM), language vision models (LVM), and transformer network-based automatic speech recognition (ASR) up to 10B parameters. The LLM models are said to run up to 20 tokens/sec, allowing personal AI assistant can respond to you quickly.It comes with Hexagon process NPU which is claimed with 98% faster and 40% more efficient performance. Moreover, the chipset is said to come integrated with Qualcomm Adreno GPU with 25% faster performance. The mobile processor will support 240 fps gaming on 240 Hz displays along with hardware-accelerated ray tracing in addition to global illumination.For photography, the Qualcomm Snapdragon 8 Gen 3 SOC will powered by Samsung’s 200-megapixel image sensor. In addition to 2X and 4X zoom, all in 4K with object tracking the chip will also allow multiple video capture with support for Dolby HDR. According to Qualcomm, the AI will help in filling up photos using the Photo Expansion feature while the Video Object Eraser by Arcsoft will remove items in a video.“Thanks to our leading Cognitive ISP, you can intelligently snap one-of-a-kind content with generative AI voice-activated photo and video editing. Plus, individually optimize different components of your shots in real-time in up to 12 layers for more detail, vibrancy, and authenticity with Semantic Segmentation— available on front and back cameras. Even in the darkest of dark, Night Vision video capture powered by AI lets you achieve incredible content, ” Qualcomm said.Two always-sensing cameras in the front and back allow for easy QR code scanning, face unlock, and more. Whereas Two always-sensing cameras in the front and back allow for easy QR code scanning, face unlock, and more. It will also include Vlogger’s View will also allow you to share both your selfie camera and rear camera video simultaneously, putting you in the action as you share and narrate.On the connectivity front, the Qualcomm Snapdragon 8 Gen 3 processor will include Qualcomm FastConnect 7800 that will provide support for Bluetooth 5.4, Wi-Fi 7 802.11be, 802.11ax, 802.11ac, 802.11a/b/g/n. It will also have a Snapdragon X75 5G Modem-RF System with AI tensor accelerator that achieves better speeds, coverage, mobility, link robustness, and location accuracy.
Every video you watch on YouTube gets entered in your watch history on the app. This helps YouTube come up with better suggestions for your home feed and also lets you revisit the content that you’ve watched in the past. Sometimes, watching a particular video can throw a wrench in your curated feed. This happens more often when you view a video from a popular creator or check out an ongoing trend that is being pushed by the platform. To preserve your video suggestions, you can watch videos in an incognito tab. And no, you don’t need to switch to the web browser, since YouTube has an integrated Incognito Mode within the app. In this article, we show you how to watch videos in Incognito Mode on the YouTube app and website.Read Also:Vivo Y200 with Snapdragon 4 Gen 1 processor launched in India
In This Article
Should you use Incognito Mode for YouTube?
The Incognito Mode for YouTube comes in handy in a wide range of situations. Here are some common scenarios when you might want to use this tool:
You don’t want your search query to be tied to your account
You don’t want the video to be recorded in your watch history
You don’t want your feed to be filled with suggestions similar to the video
You don’t want to view ads related to the video you are about to watch
Someone asked to watch a video on your phone and you don’t want them to look at your feed
However, there are certain downsides to using Incognito Mode as well.
Your current feed does not show up in Incognito Mode
You can’t go back and check which videos you watched
You cannot like or comment on videos in Incognito Mode
Your views in Incognito Mode are not included in the analytics and data
Switch to Incognito Mode in the YouTube app
Step 1:Launch the YouTube app.Step 2: Tap on the You tab at the bottom right corner of the screen.Step 3: Select Turn on Incognito from the list of options.Once you are in incognito mode, the videos you watch will not be reflected in your watch history. Your suggestions and feed will not be influenced by the videos you watch. To switch back to your account, tap on the You tab again and select Turn off.
Use Incognito Mode for YouTube on your web browser
Since YouTube’s mobile site does not have an incognito mode, you will have to rely on your web browser’s incognito function. To switch to the incognito tab on Google Chrome, simply tap the ellipses at the top right corner of the screen and select New Incognito Tab.Samsung users can use the incognito tab on their phone’s native browser by tapping the tabs icon at the bottom toolbar and selecting ‘Turn on Secret mode’. To make sure no one else gets access to the Secret tabs, set up a password for them. Vivo and iQOO users can also select incognito mode after tapping on the tabs icon at the bottom right corner of the native browser window.Once you are in Incognito Mode, you can watch videos without signing into your account. Once you switch back to the regular tab, you will not need to sign in again. This allows users a quick way to watch YouTube videos without having them reflect on the browser or account history.
Pause your watch history
If you’re unable to switch to an incognito tab on your web browser, the next best thing you can do is pause your watch history. This ensures that the videos you watch on YouTube do not get recorded on your Google account. Here’s how you can go about it.
Step 1: Open the web browser on your PC and go to YouTube.
Step 2: Hit the hamburger menu in the top left corner of the screen.
Step 3: Click on History.
Step 4: Click on Pause watch history.
Step 5:Confirm your selection in the popup box.
Frequently Asked Questions (FAQs)
Does the YouTube app have an Incognito Mode?
You can access the incognito mode on the YouTube app by tapping on the ‘You’ tab and selecting ‘Turn on Incognito’.
YouTube only offers an incognito mode on its mobile apps. Desktop users will need to rely on their browser’s incognito mode to view videos discreetly.
Can a YouTuber see who viewed their video in Incognito Mode?
Since incognito views are not counted while compiling the data and analytics for a video, YouTube creators have no way of knowing how many people watched their videos in incognito mode.
These are the top 3 ways to watch videos in Incognito Mode on the YouTube app and website. Watching a video in incognito mode still contributes towards its view count, given you watch the video for more than 30 seconds. Since you are logged out of your account in incognito mode, you will not be able to view your subscriptions or curated home feed.
The Magic Eraser tool is undoubtedly one of the coolest features of a Google Pixel smartphone. Every year, Google improves upon this tool and makes it more efficient and versatile. The new Google Pixel 8 series also gets a new Audio Magic Eraser that lets you suppress unwanted noises in your videos. The magic eraser is one of the pieces of software magic on the Pixel that everyone raves about. If you’re a Pixel user it is essential you know how to tap into the potential of this clever tool. In this article, we show you how to use the magic eraser tool on Google Pixel 8 series smartphones.Read Also:Best mobile deal on iPhone 13, now priced under 50k on Amazon
In This Article
Use Magic Eraser for images on Google Pixel 8 Series
Step 1:Launch the Google Photos app and open the image you want to edit.Step 2: Tap Edit at the bottom of the screen.Step 3: Switch to the Tools tab.Step 4: Select Magic Eraser.Step 5: Use Google’s suggestion to remove an object from the image. If the object you want to remove isn’t suggested by the software, simply draw a circle around it. You can also cover the object with brush strokes to remove it from the image.Step 6: Tap Done once the object has been removed.Step 7: Select Save copy to save the image on your device.
Use Audio Magic Eraser to reduce distracting sounds
Step 1:Launch the Google Photos app and select the video you want to edit.Step 2: Tap Edit at the bottom of the screen.Step 3: Switch to the Audio tab and tap on Audio Eraser.Step 4: The video editor will separate all the different noises in the video and classify them into different categories.Step 5: Select a noise and move the slider to change its intensity in the overall mix.Step 6: Tap on Done once you’ve reached the ideal background noise level.Step 7: Select Save copy.
Frequently Asked Questions (FAQs)
Is Magic Eraser a free tool on Google Pixel?
Yes, the object eraser is a free tool for Google Pixel smartphones. However, other Android smartphone users need to subscribe to Google One in order to access the tool in the Google Photos app.
Do Android smartphones other than Google Pixel have the magic eraser tool?
Android smartphone manufacturers other than Google have their own versions of the magic eraser tool. This tool can be accessed from the default gallery app on the device.
What does the new Audio Magic Eraser on the Google Pixel 8 series do?
This is how you can use the two magic eraser tools on the Google Pixel 8 series smartphones. Google Photos also has a cool ‘Magic Editor’ tool that uses regenerative AI to make clever edits on your images. You can bring objects closer, improve the lighting, change the colour of the sky, and do a lot of other things with this tool.
Apple is set to host its second launch event “Scary Fast” on October 30. Since iPhone 15, Apple Watch, and AirPods have already been released, it is anticipated that the tech giant may unveil its new MacBooks and iMacs.Apple is preparing for another tech event namely “Scary Fast” that is said to be held on October 30. The start time for the Apple Event is 5 PM PT, or 5.30 AM IST. Apple usually hosts their events on Tuesdays at 10 AM PST, so this is the first time the company has held one on a Monday. According to Indian timings it will be held on October 31 (Tuesday) at 5:50 AM. The “Scary Fast” event will be streamed live via the company’s website and also via the company’s official YouTube channel and Apple TV app.Also Read:iPhone 14 Plus price on Flipkart starts at Rs 64,999, best time to buy the deviceEarlier this month, Apple unveiled its latest iPhone 15 series models along with AirPods and Apple Watch Series. Numerous reports about the company’s next MacBooks and iMacs launch have been circulating everywhere; however, the company chose to keep its devices under wraps until October 30. A recent report by Bloomberg’s Mark Gurman already predicted that the 24-inch iMac will debut at the end of this month. He further mentioned that the existing iMac was running low in Apple retail outlets which is why it may introduce a refreshed model. Note that the Apple 24-inch iMac has not been refreshed since 2021. The firm introduced this model in a new colour option at its ‘Spring Loaded event. It is now available in seven colourways. The 24-inch iMac model comes equipped with M1 chip. It features a 4.5K retina display. The screen offers 500 nits of peak brightness. The device is 11.5mm thick.It is still not confirmed if the upcoming iMac model will be powered by M2 or M3 chips. Regarding MacBook Pro which is already available in two models 14-inch and 16-inch sizes. These two models were introduced with the M2 chipset earlier this year.Bloomberg’s Mark Gurman newsletter also states that a bigger version of the iMac might get launched later in 2024 and 2025.
Garena Free Fire is a battle royale game offering its players awards and tournaments to keep players interested. If you play Garena Free Fire, you should be aware of the redeem codes that are released on a daily basis. However, because the battle royale game is banned in India, players from other countries can use the Free Fire Redeem codes daily. If you’re unfamiliar with the Garena Free Fire redeem codes or don’t know how to get them, we’ve put together a step-by-step guide to help you redeem them. Check out Garena Free Fire Redeem Codes for 25 October 2023.The Free Fire redeem codes are a great way to get free stuff. These are 12-digit codes that contain alphabets and numbers, as well as an expiration date and time. Because the Garena FF redeem codes cannot be used more than once, you should hurry to the redemption page to claim your free reward before someone else does. To get a free reward, all you have to do is go to reward.ff.garena.com/en, which is the official redemption page. Also, keep an eye on this space for daily updates on Garena Free Fire redemption codes and rewards.
In This Article
Garena Free Fire Redeem Codes Today 25 October2023
While sharing screenshots with other people, you may want to blur out your personal details and sensitive information from the picture. For example, you may not want to give away your Instagram handle while sharing a screenshot of your post. Cropping the image can prove to be futile when the details you want to hide lie away from the borders. In this scenario, using a blur tool is the best thing you can do to obscure your personal info. In this article, we bring you the top 4 ways to blur out a part of a picture on Android.Read Also:Itel Icon smartwatch with HD screen and BT calling launched in India
In This Article
Use the native editor to blur a picture on a Samsung phone
Step 1: Open the picture you want to blur on the native Samsung gallery app and hit the Edit option at the bottom of the screen.Step 2: Tap the Emoji icon.Step 3: Select Draw and tap on the Mosiac brush.Step 4: Choose a blur pattern and the intensity level.Step 5: Draw over the parts of the picture you want to blur out on your Android smartphone.Step 6: Hit Save at the top right corner of the screen once you’re done.
Use Google Photos to blur out part of a picture
Step 1: Launch the Google Photos app and select the picture that you want to blur.Step 2: Tap on Edit at the bottom of the screen.Step 3: Switch to the Tools tab and tap on Blur.Step 4:Move the circle to the area that you do not want to blur.Step 5: Select the intensity and depth of the blur effect.Step 6: Hit Done to save your changes.
Blur a picture on a Vivo or iQOO smartphone
Step 1: Open the picture you want to blur using the native ‘Albums’ app on your Vivo or iQOO smartphone.Step 2: Select the Edit option from the bottom toolbar.Step 3: Tap on Mosiac.Step 4: Choose a pattern and set the intensity for the blur effect.Step 5:Brush the part of the picture that you want to blur.Step 6: Tap the tick icon next to Mosiac.Step 7: Hit Save at the top right corner of the screen.
Use the Point Blur app
Step 1:Install and launch the Point Blur app on your Android smartphone.Step 2: Tap on Edit.Step 3:Select the picture that you want to blur.Step 4: Choose whether you want to crop the image or not.Step 5: Select the blur level and brush size from the bottom toolbar.Step 6:Draw over the part of the picture that you want to blur.Step 7: Hit Save at the top right corner of the screen.
Frequently Asked Questions (FAQs)
How do I blur a part of a picture on my Android smartphone?
Use the mosaic brush tool to blur a part of a picture on your Android smartphone. Choose the appropriate blur pattern and intensity level from the list of options.
Does the Google Photos app offer a blur tool?
The blur tool on the Google Photos app is used for focusing on one particular part of an image and blurring out the background. The blur tool is a paid feature of the Google Photos app.
What are some good apps for blurring an image on Android?


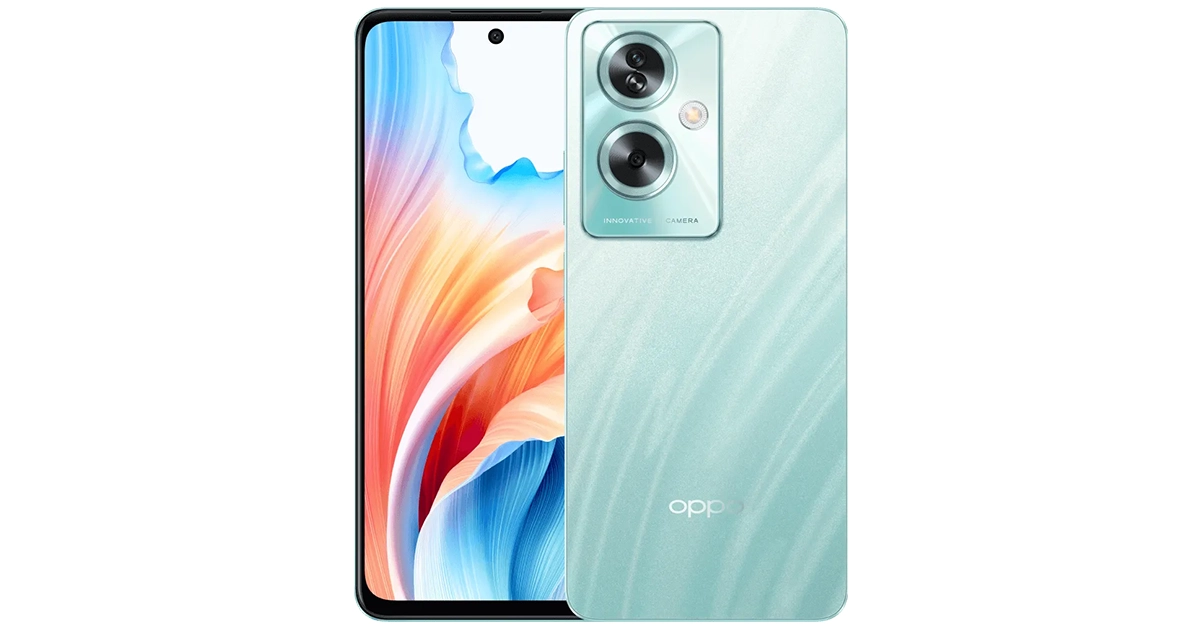 It will be available for purchase via OPPO Store, Flipkart, Amazon and other retail outlets.
The company is offering a cashback of up to Rs 4,000 and no-cost EMI for up to 9 months from ICICI Bank, SBI Cards, Kotak Bank, IDFC First Bank, Bank of Baroda credit card, AU Finance Bank and One Card from mainline retail outlets and the OPPO Store.
Additionally, customers can also benefit from Zero Down Payment schemes from leading financiers such as Bajaj Finserv, TVS Credit, Home Credit, HDB Financial Services, IDFC First Bank and Mahindra Finance. Loyal OPPO customers can also avail an Exchange Bonus of up to Rs 4,000. As a part of My OPPO Exclusive, customers stand to win a cash prize of up to Rs 10 lakh, and other assured gifts on the purchase of any OPPO device.
Also Read: Nokia 105 Classic with built-in UPI application launched in India
It will be available for purchase via OPPO Store, Flipkart, Amazon and other retail outlets.
The company is offering a cashback of up to Rs 4,000 and no-cost EMI for up to 9 months from ICICI Bank, SBI Cards, Kotak Bank, IDFC First Bank, Bank of Baroda credit card, AU Finance Bank and One Card from mainline retail outlets and the OPPO Store.
Additionally, customers can also benefit from Zero Down Payment schemes from leading financiers such as Bajaj Finserv, TVS Credit, Home Credit, HDB Financial Services, IDFC First Bank and Mahindra Finance. Loyal OPPO customers can also avail an Exchange Bonus of up to Rs 4,000. As a part of My OPPO Exclusive, customers stand to win a cash prize of up to Rs 10 lakh, and other assured gifts on the purchase of any OPPO device.
Also Read: Nokia 105 Classic with built-in UPI application launched in India

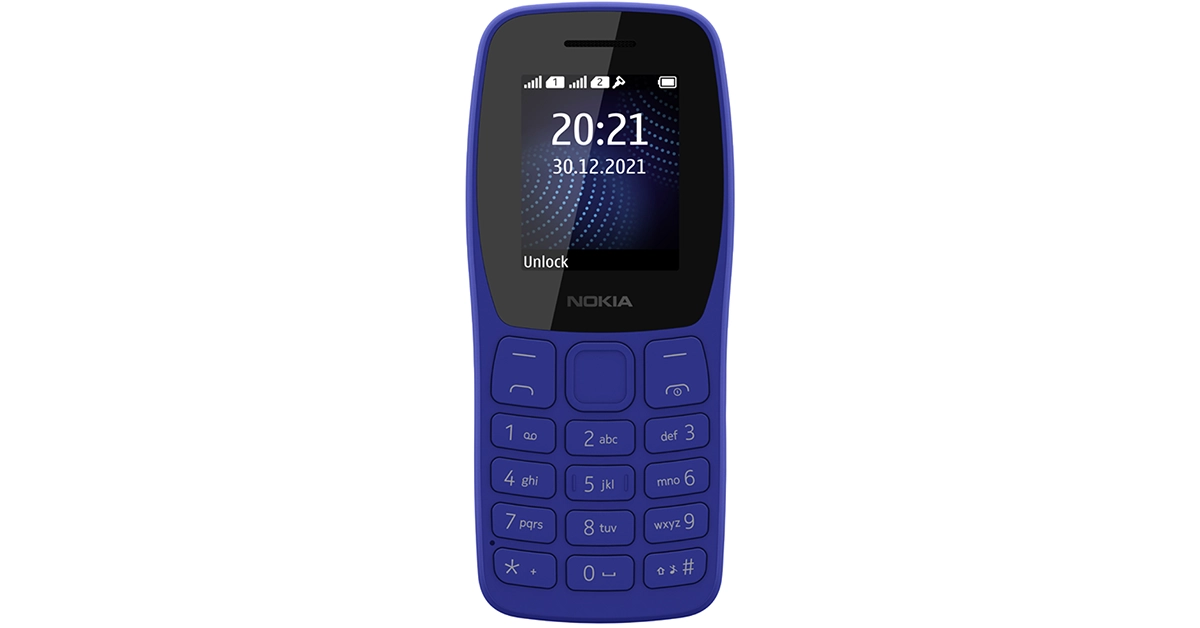
")


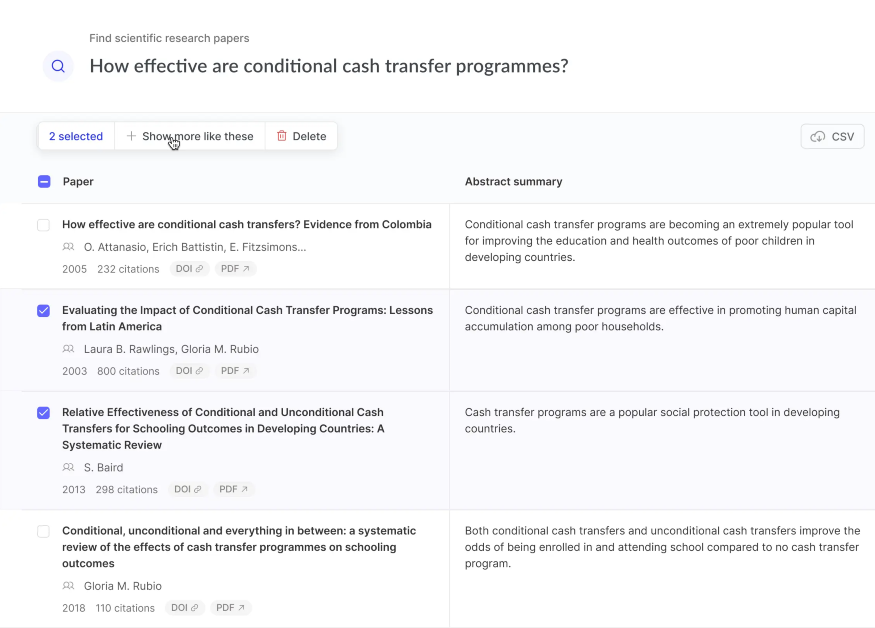


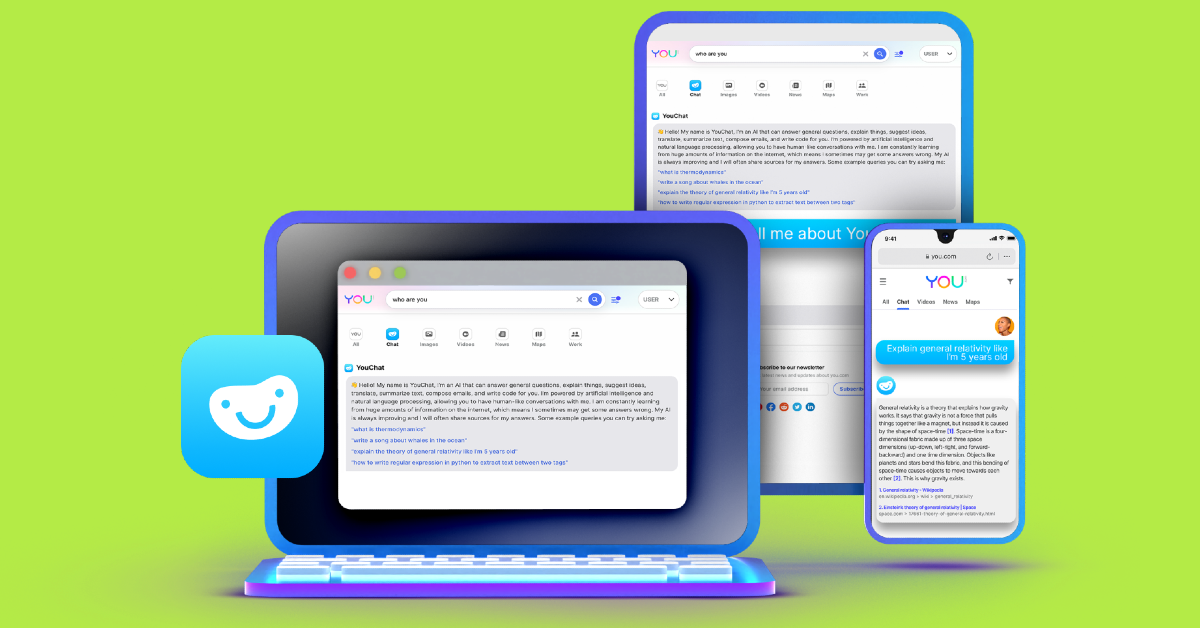


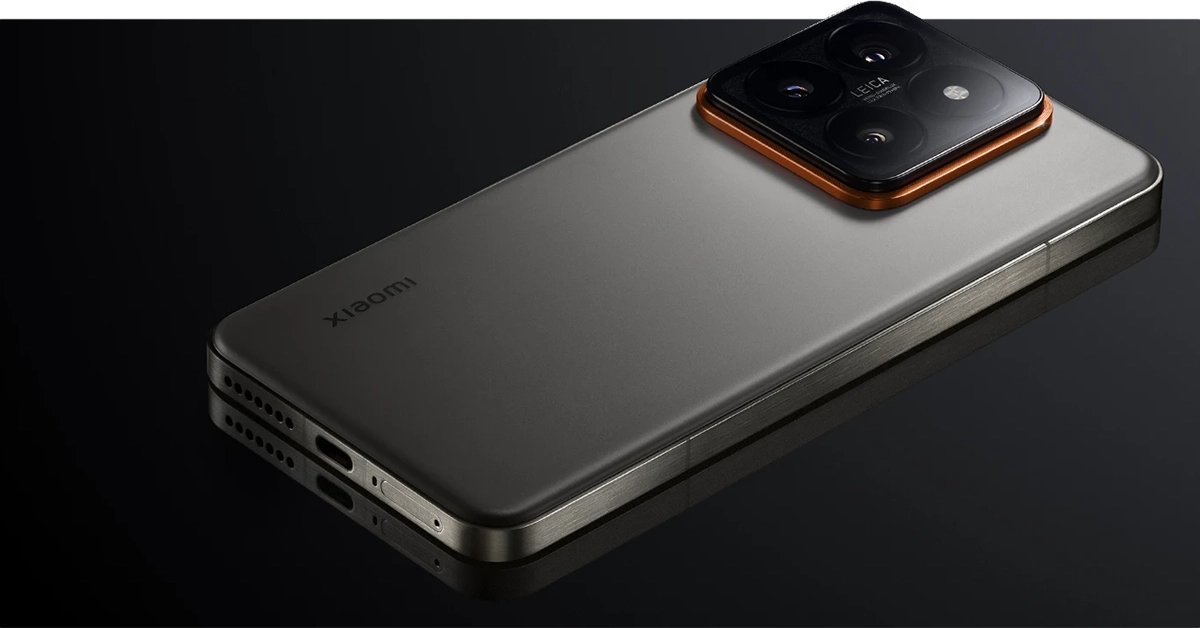
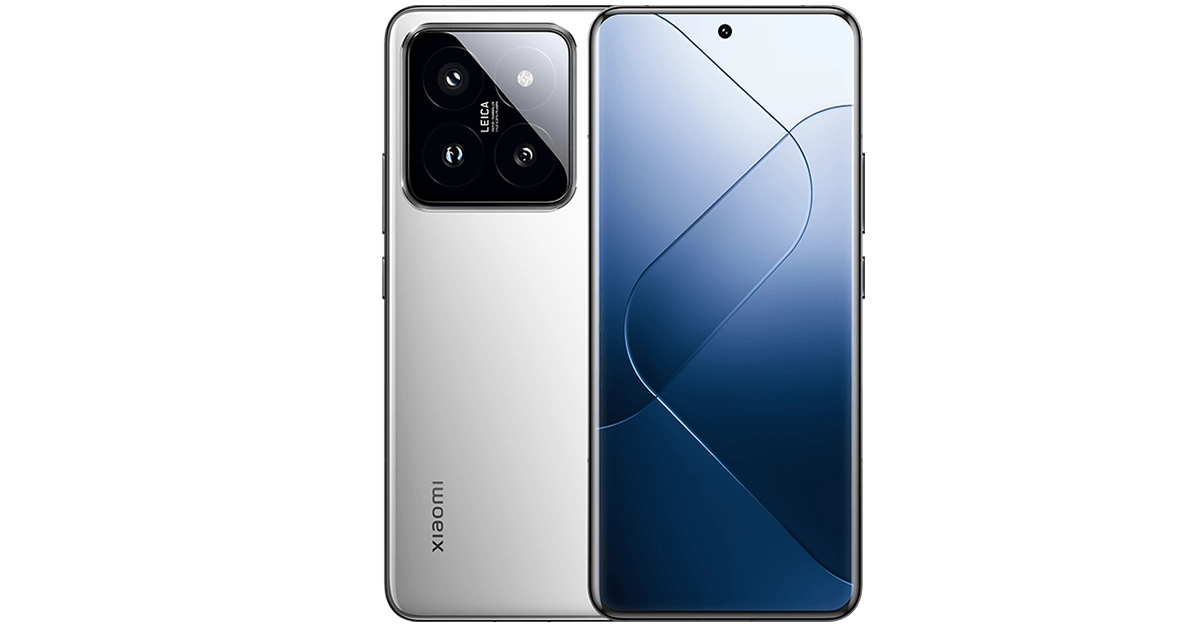


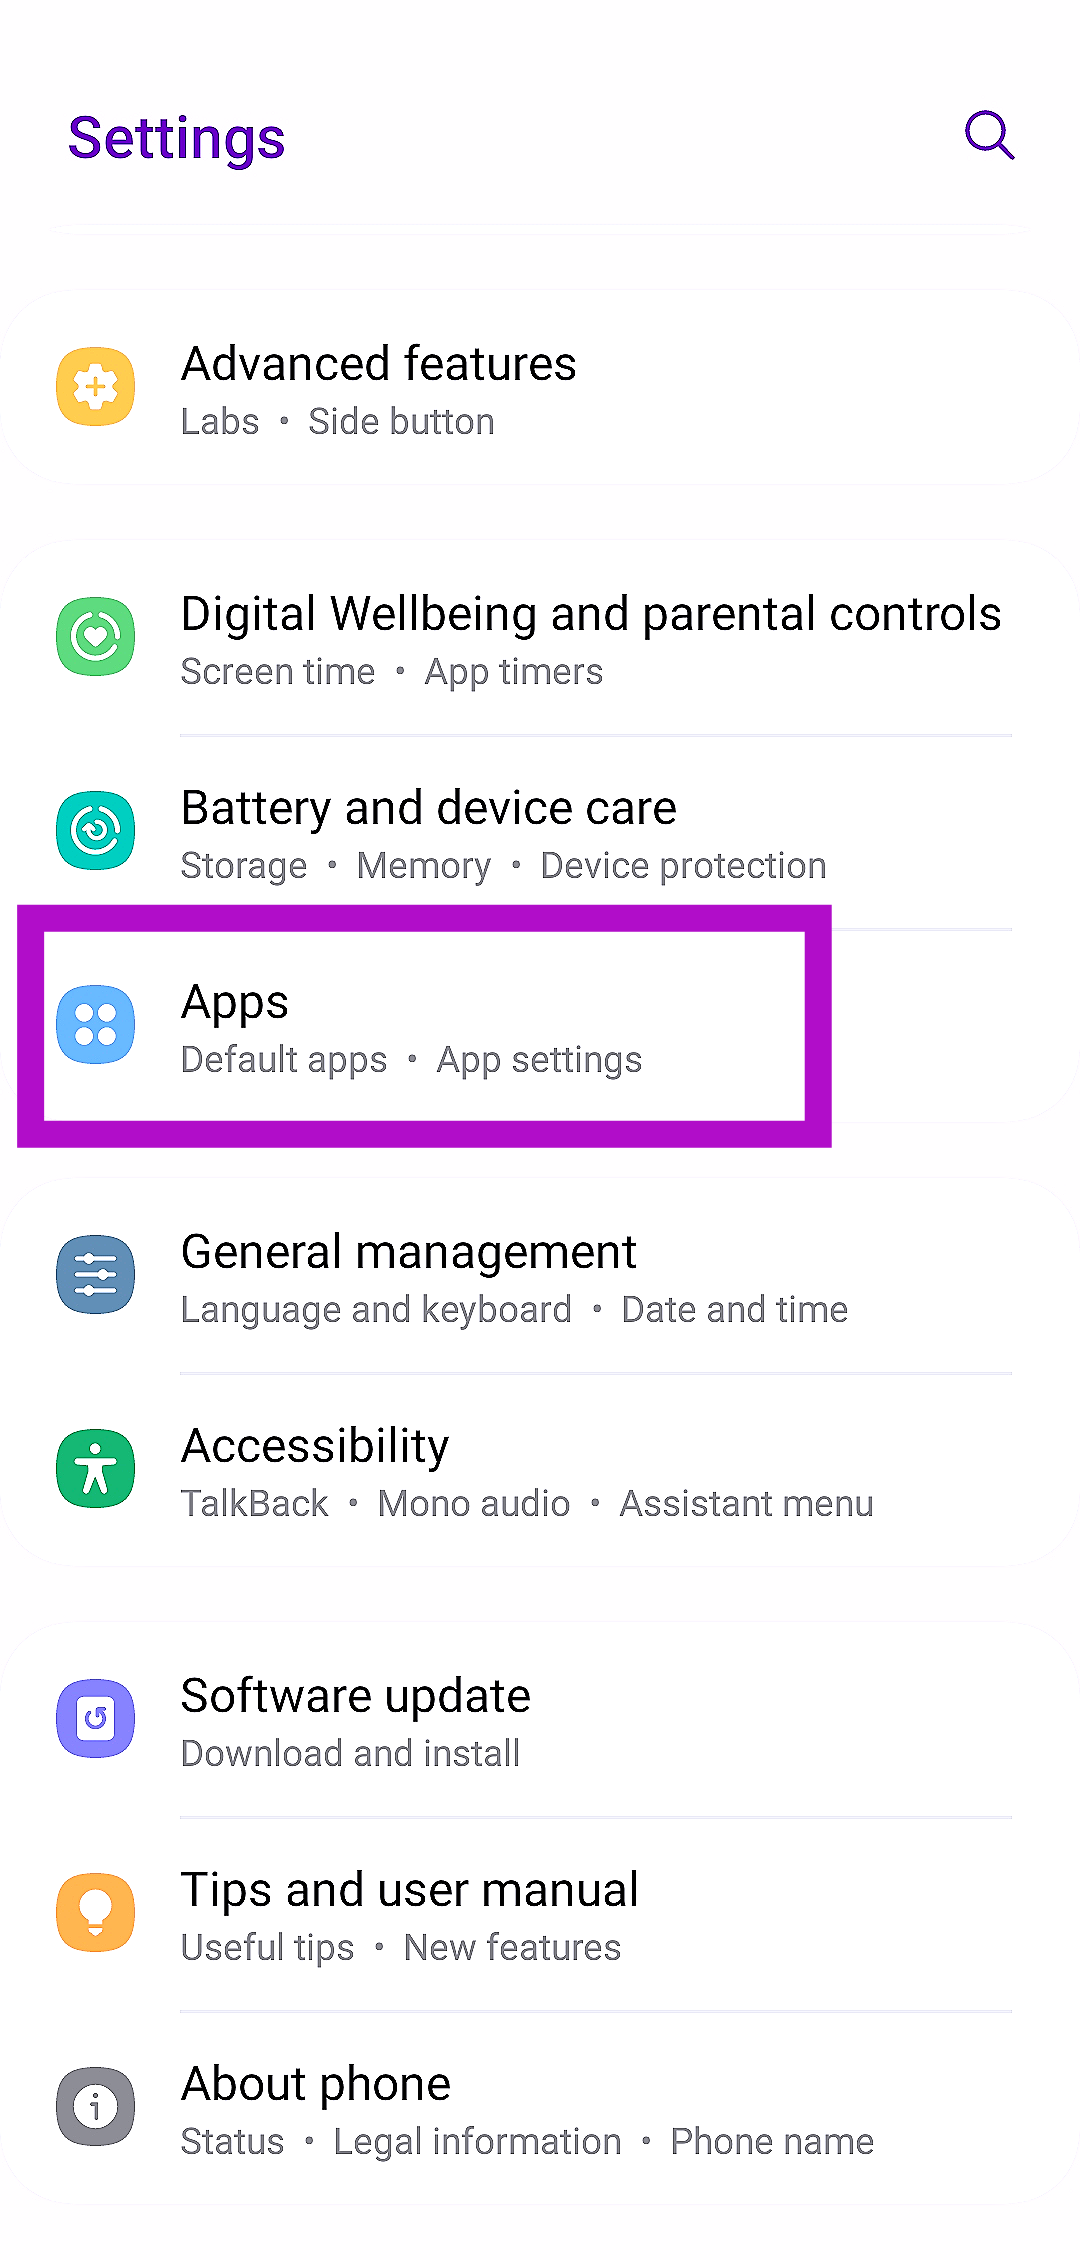 Step 2:
 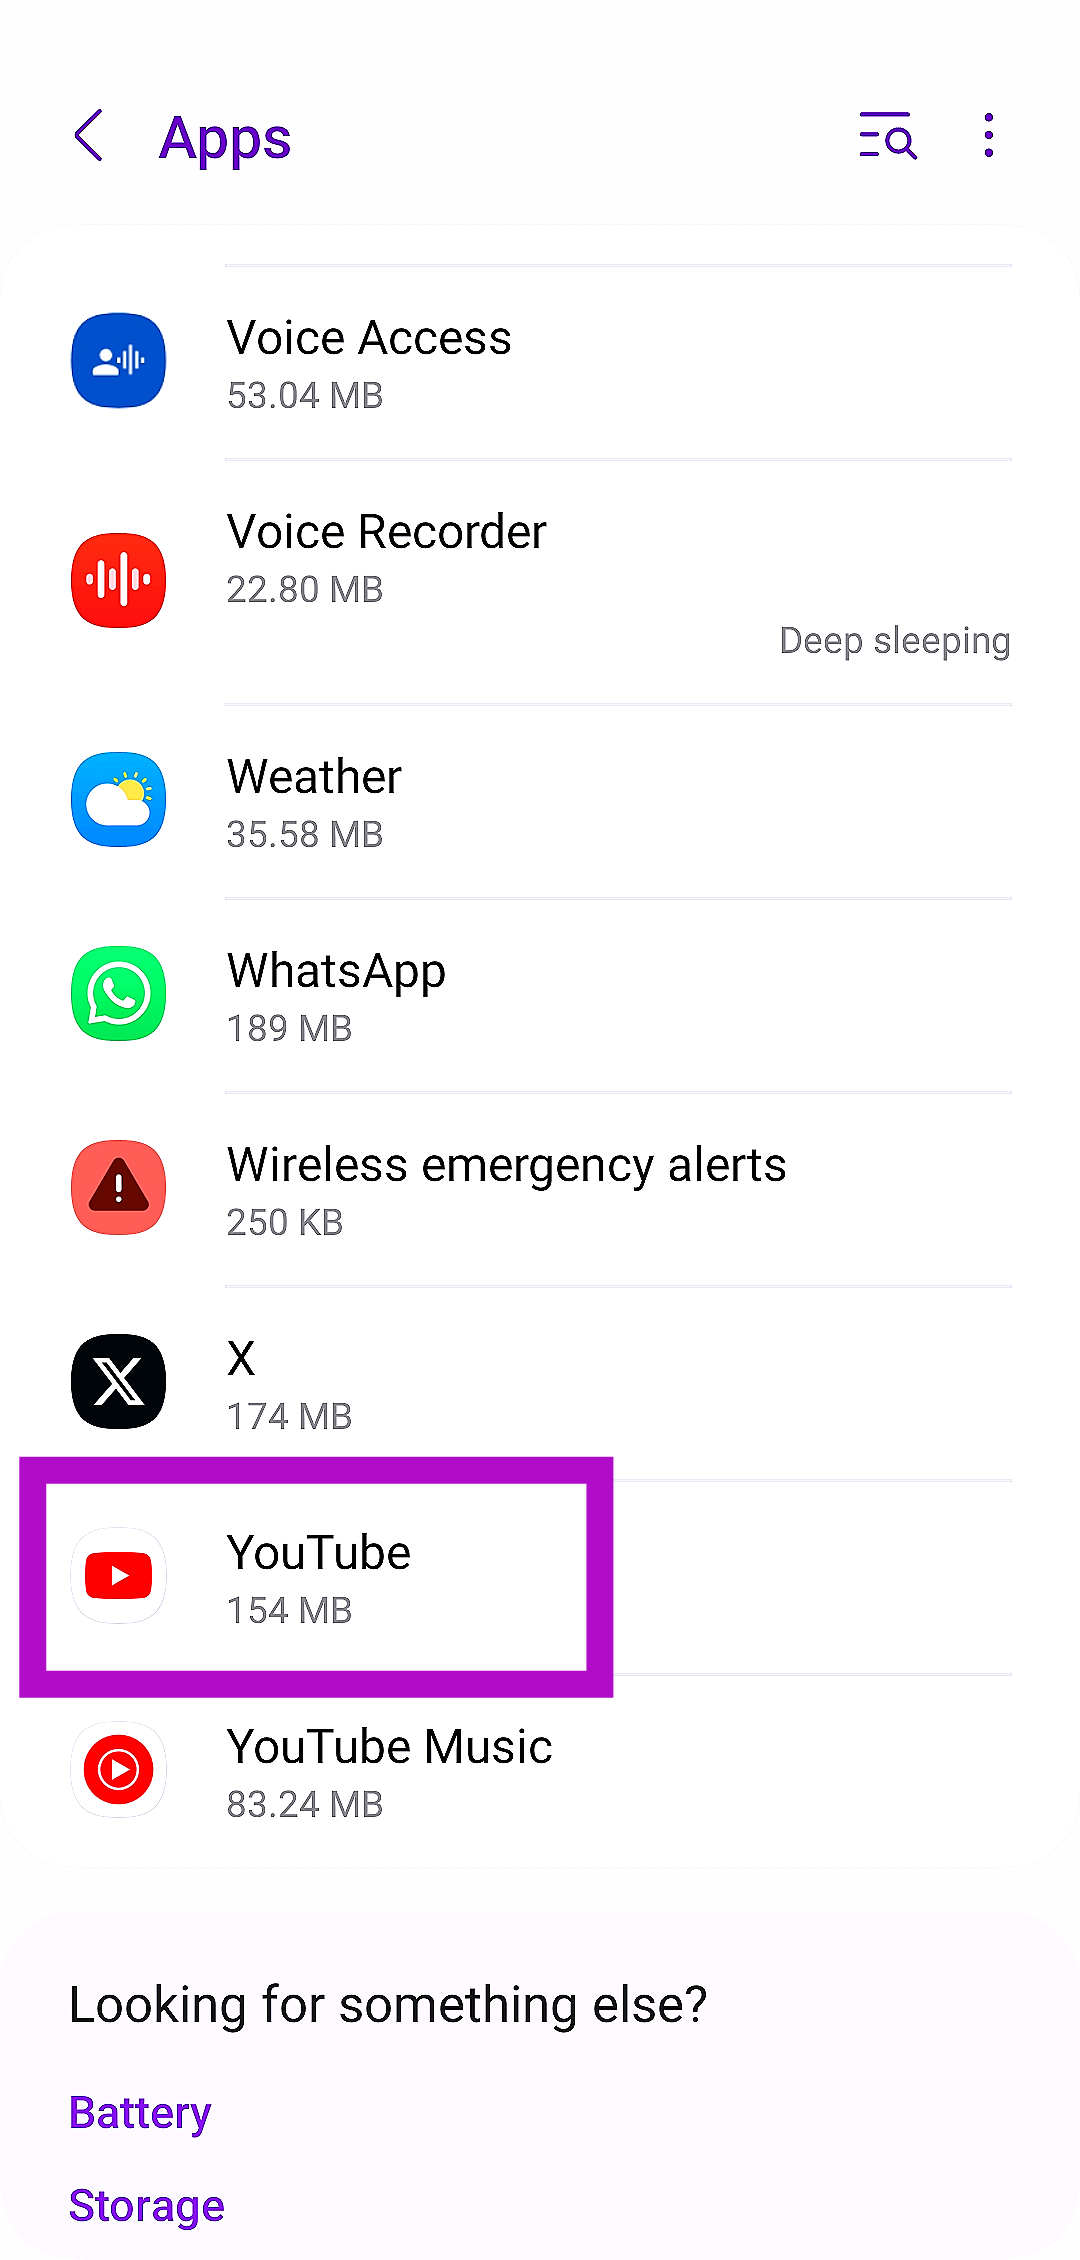 Step 3:
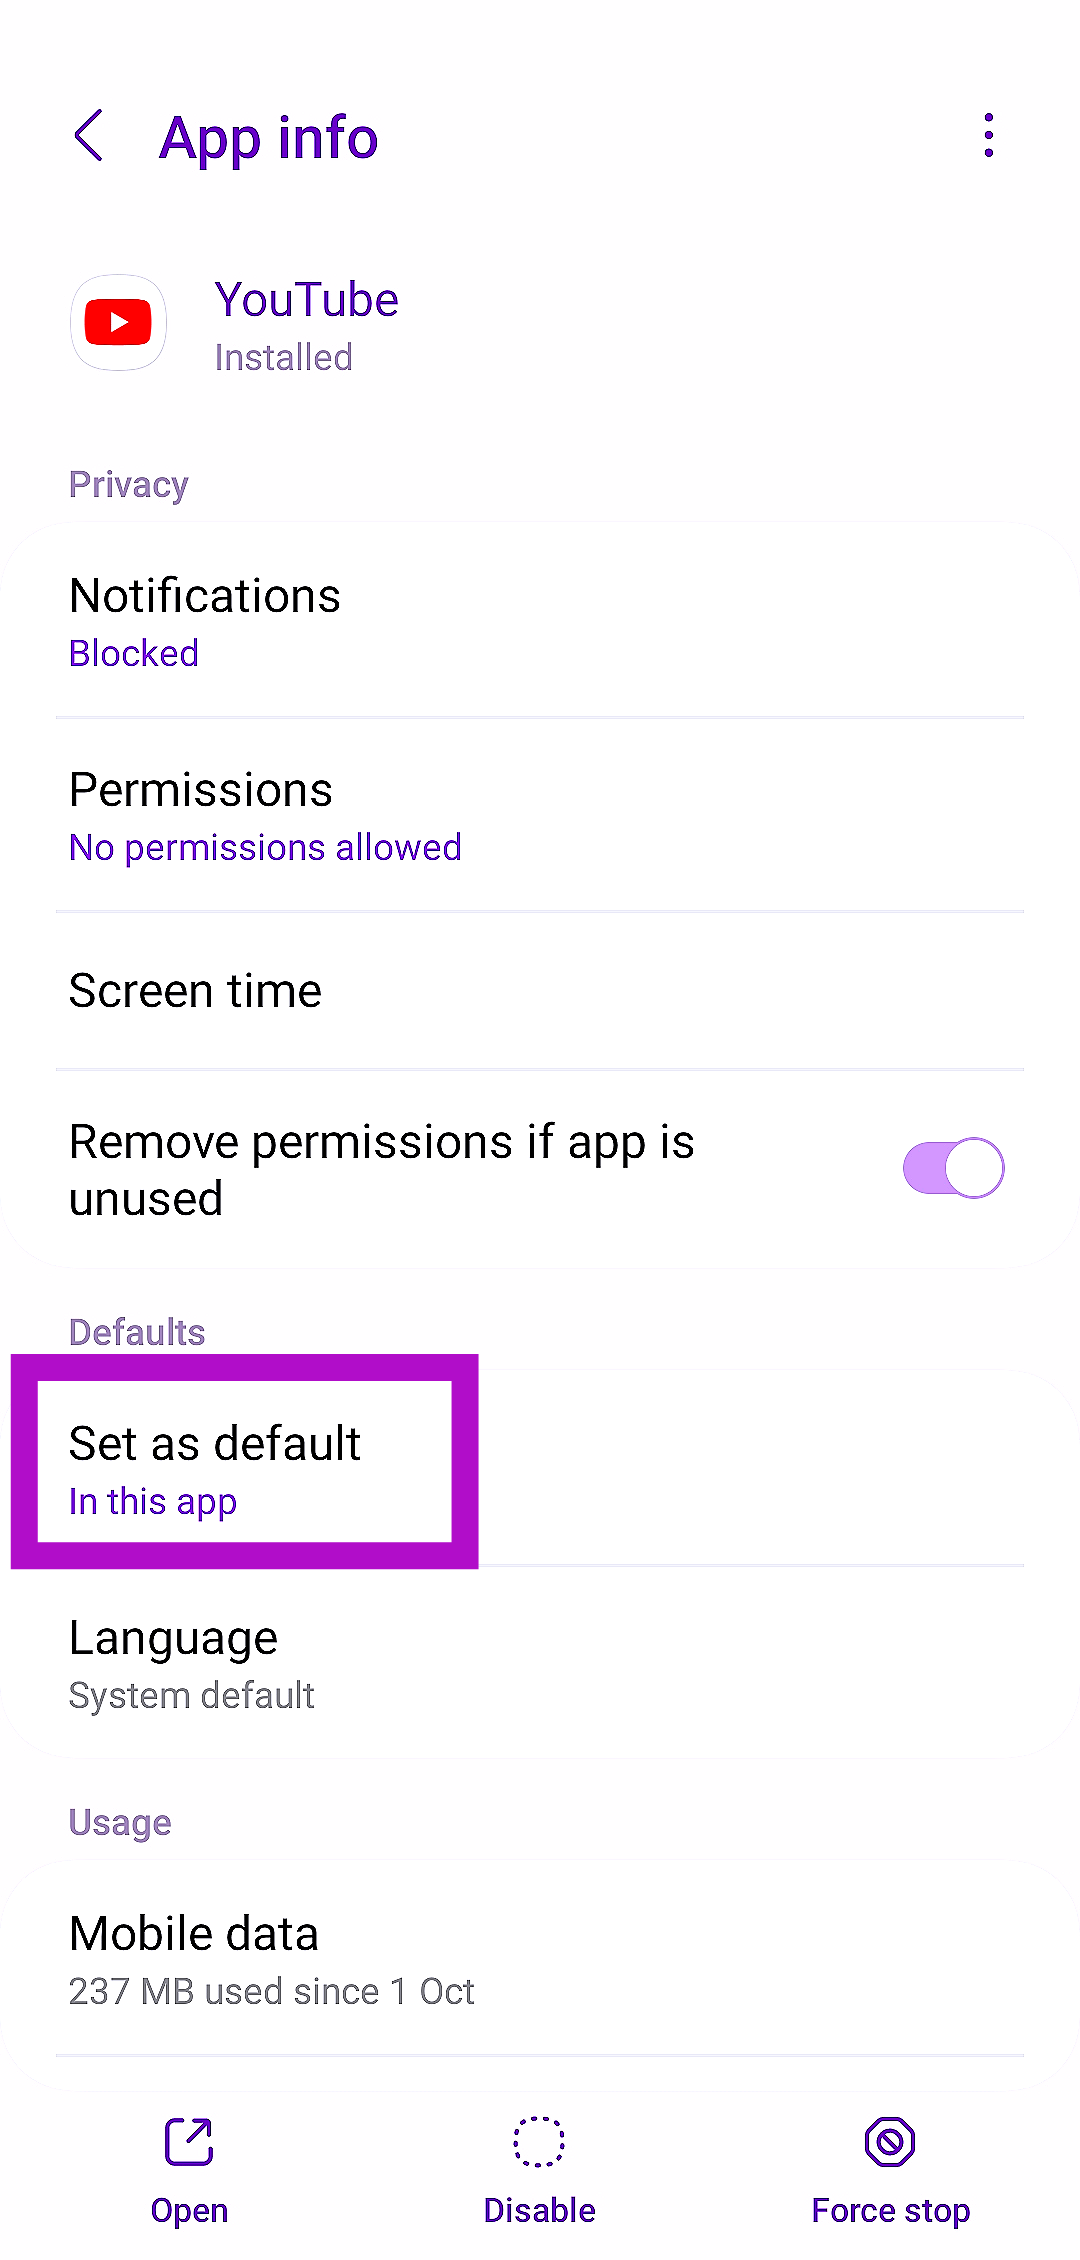 Step 4:
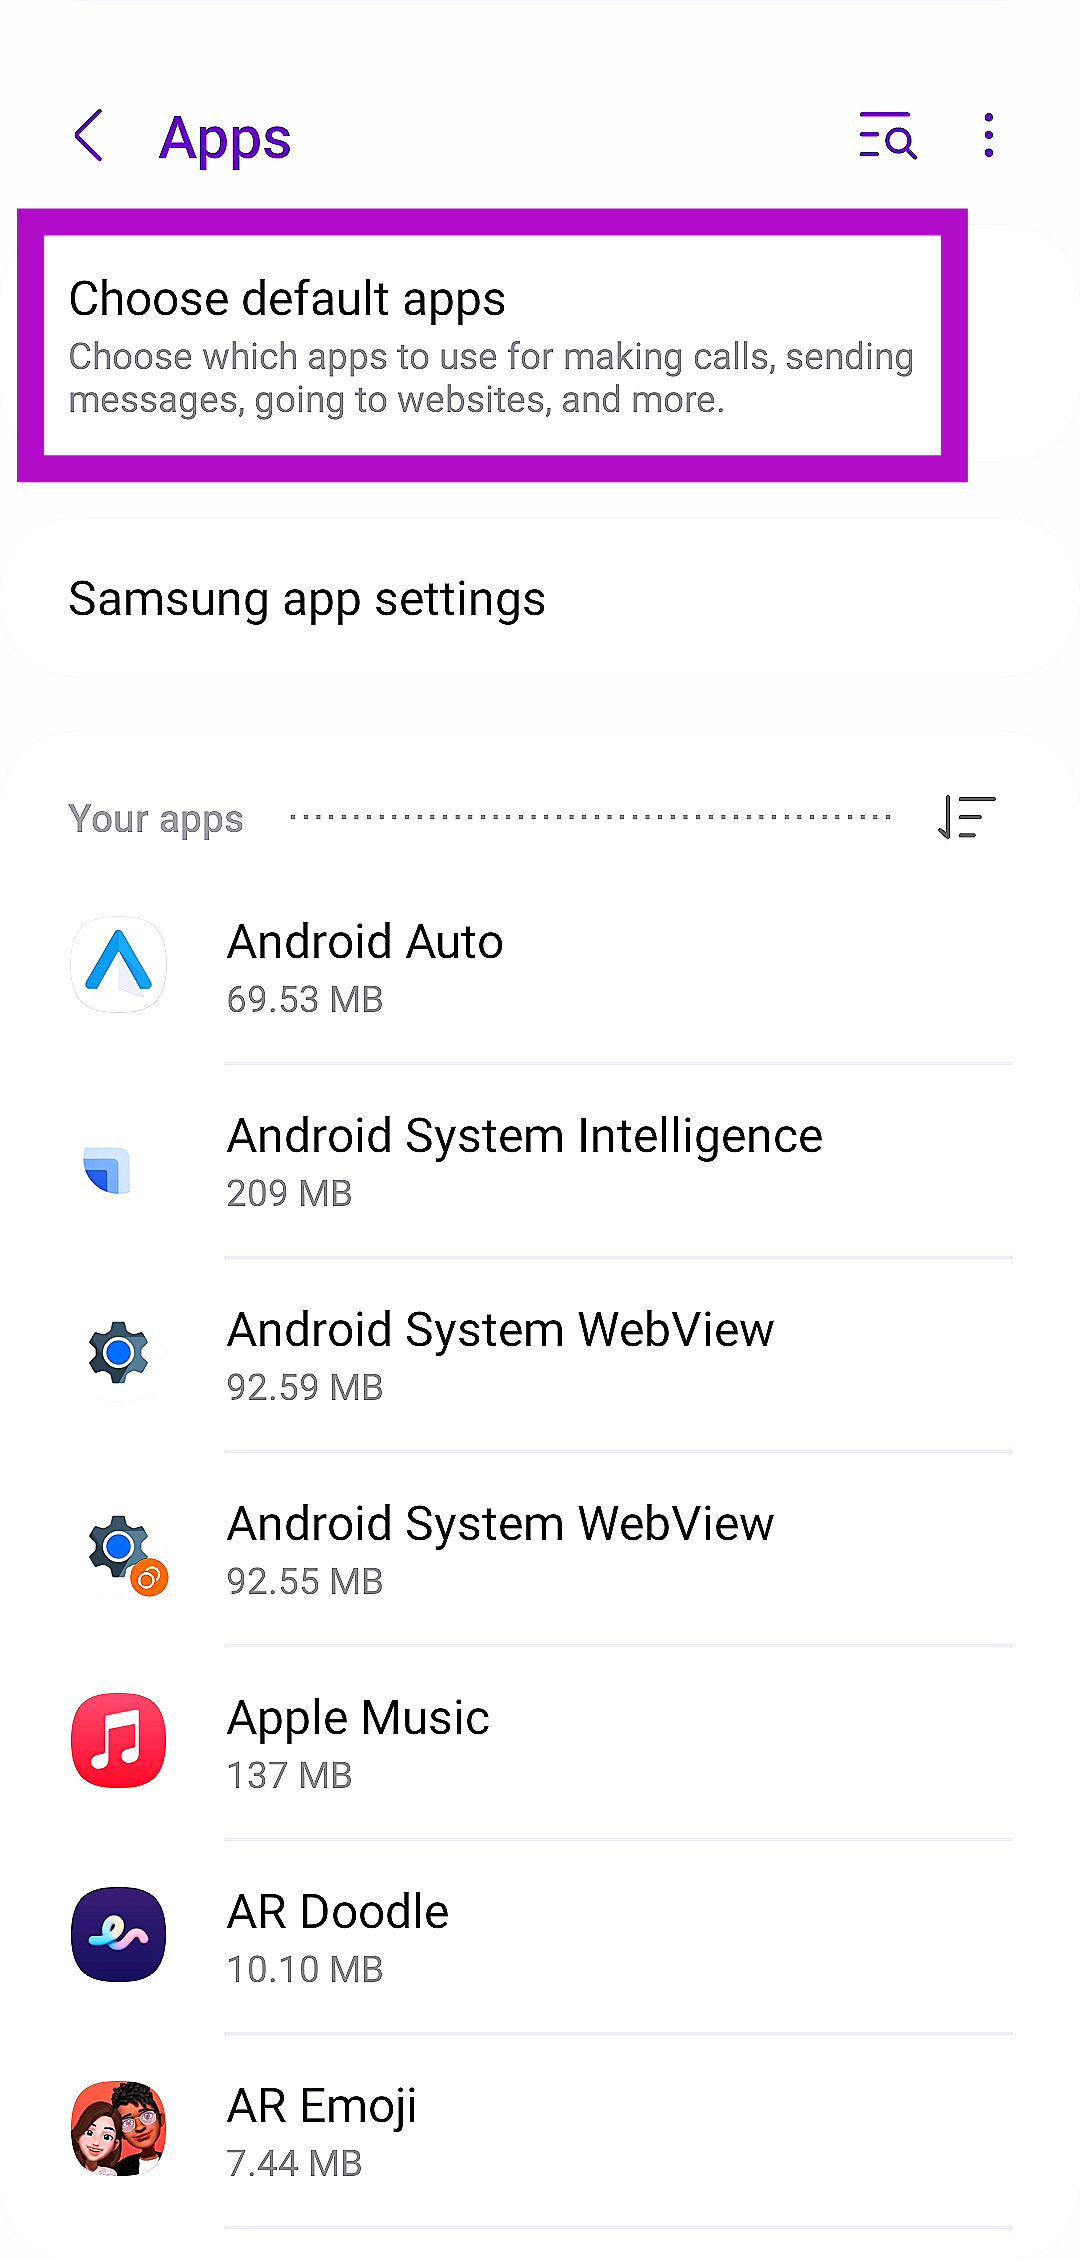 Step 3:
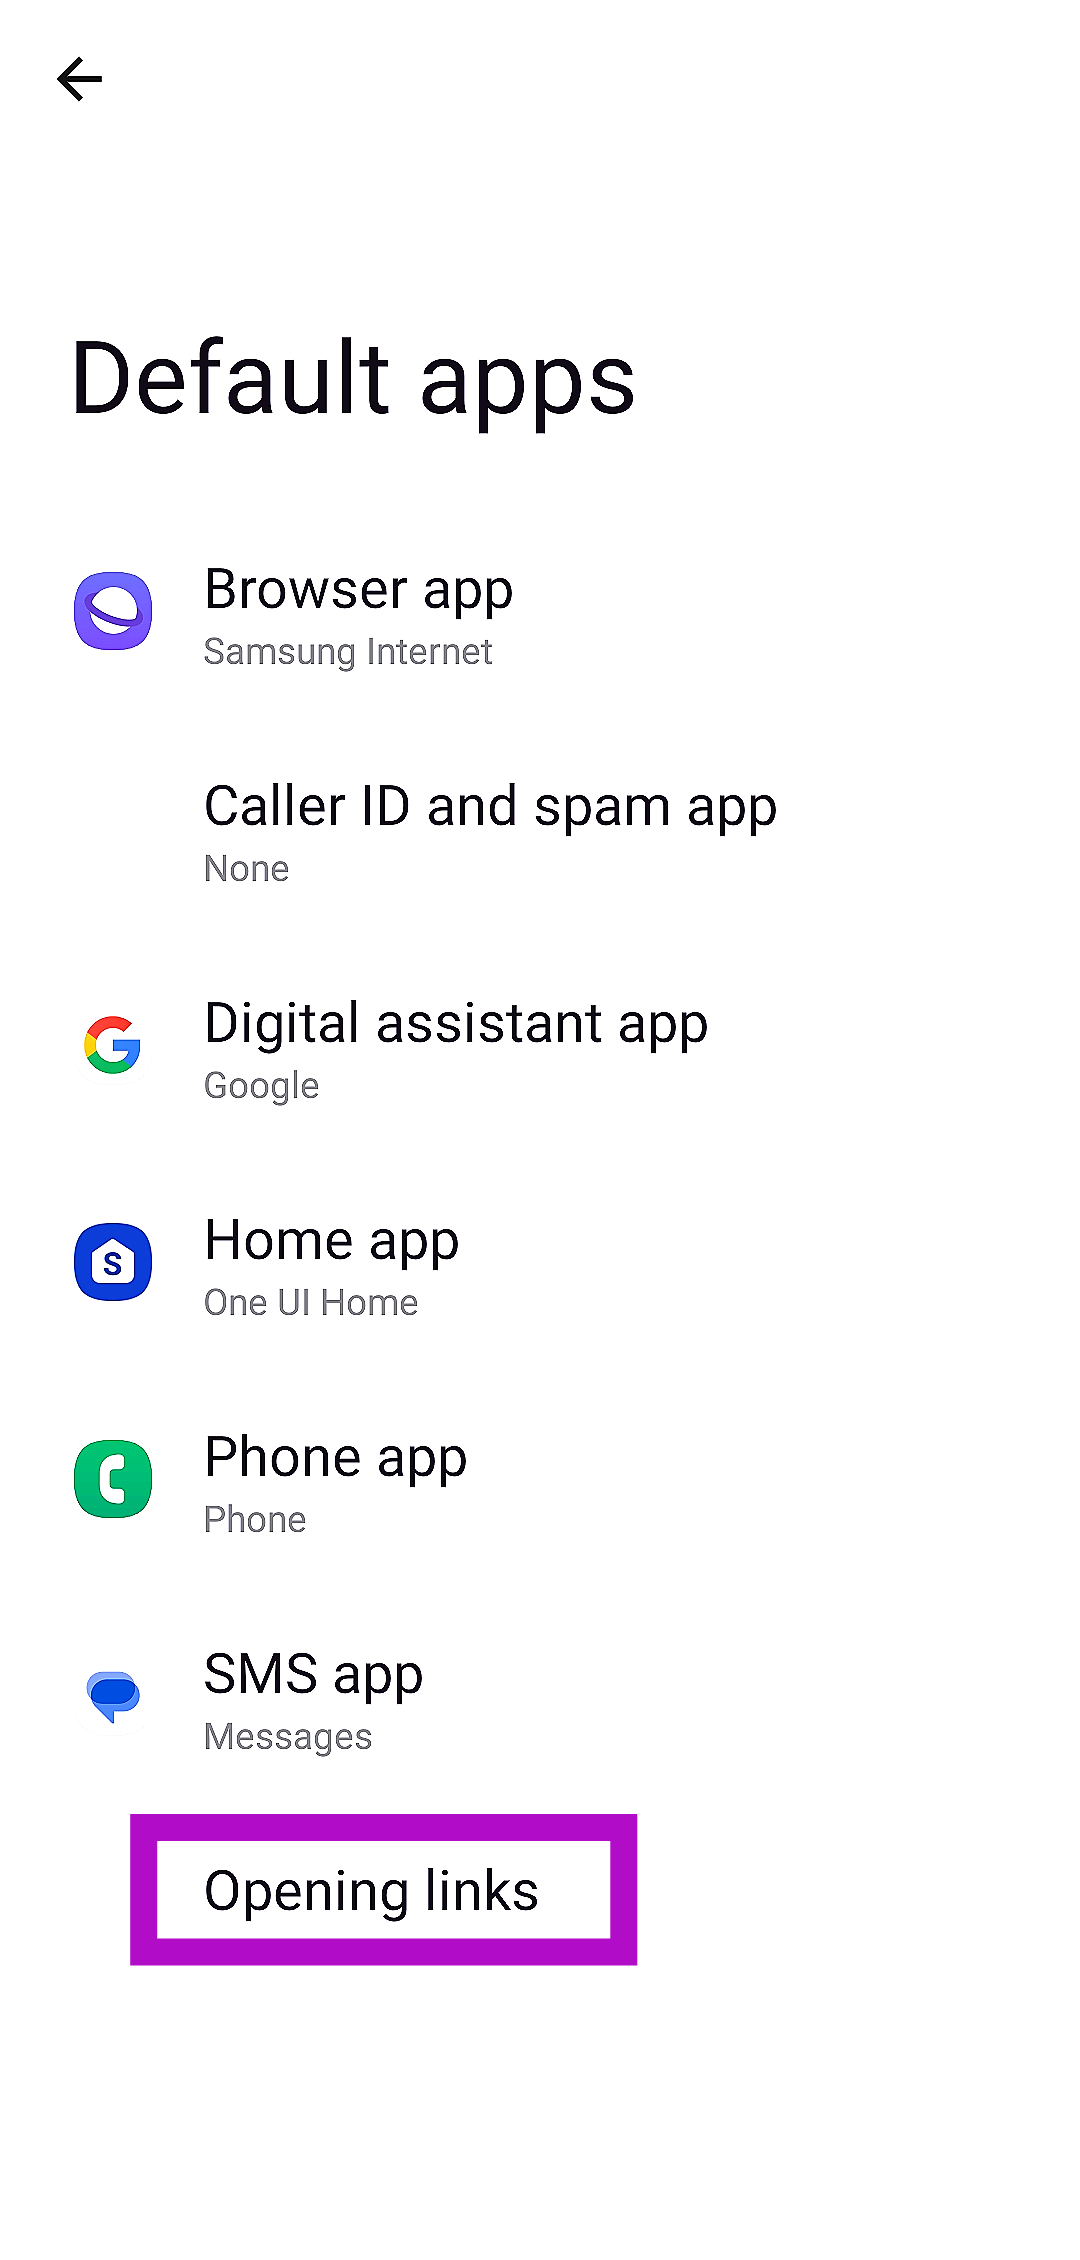 Step 4:
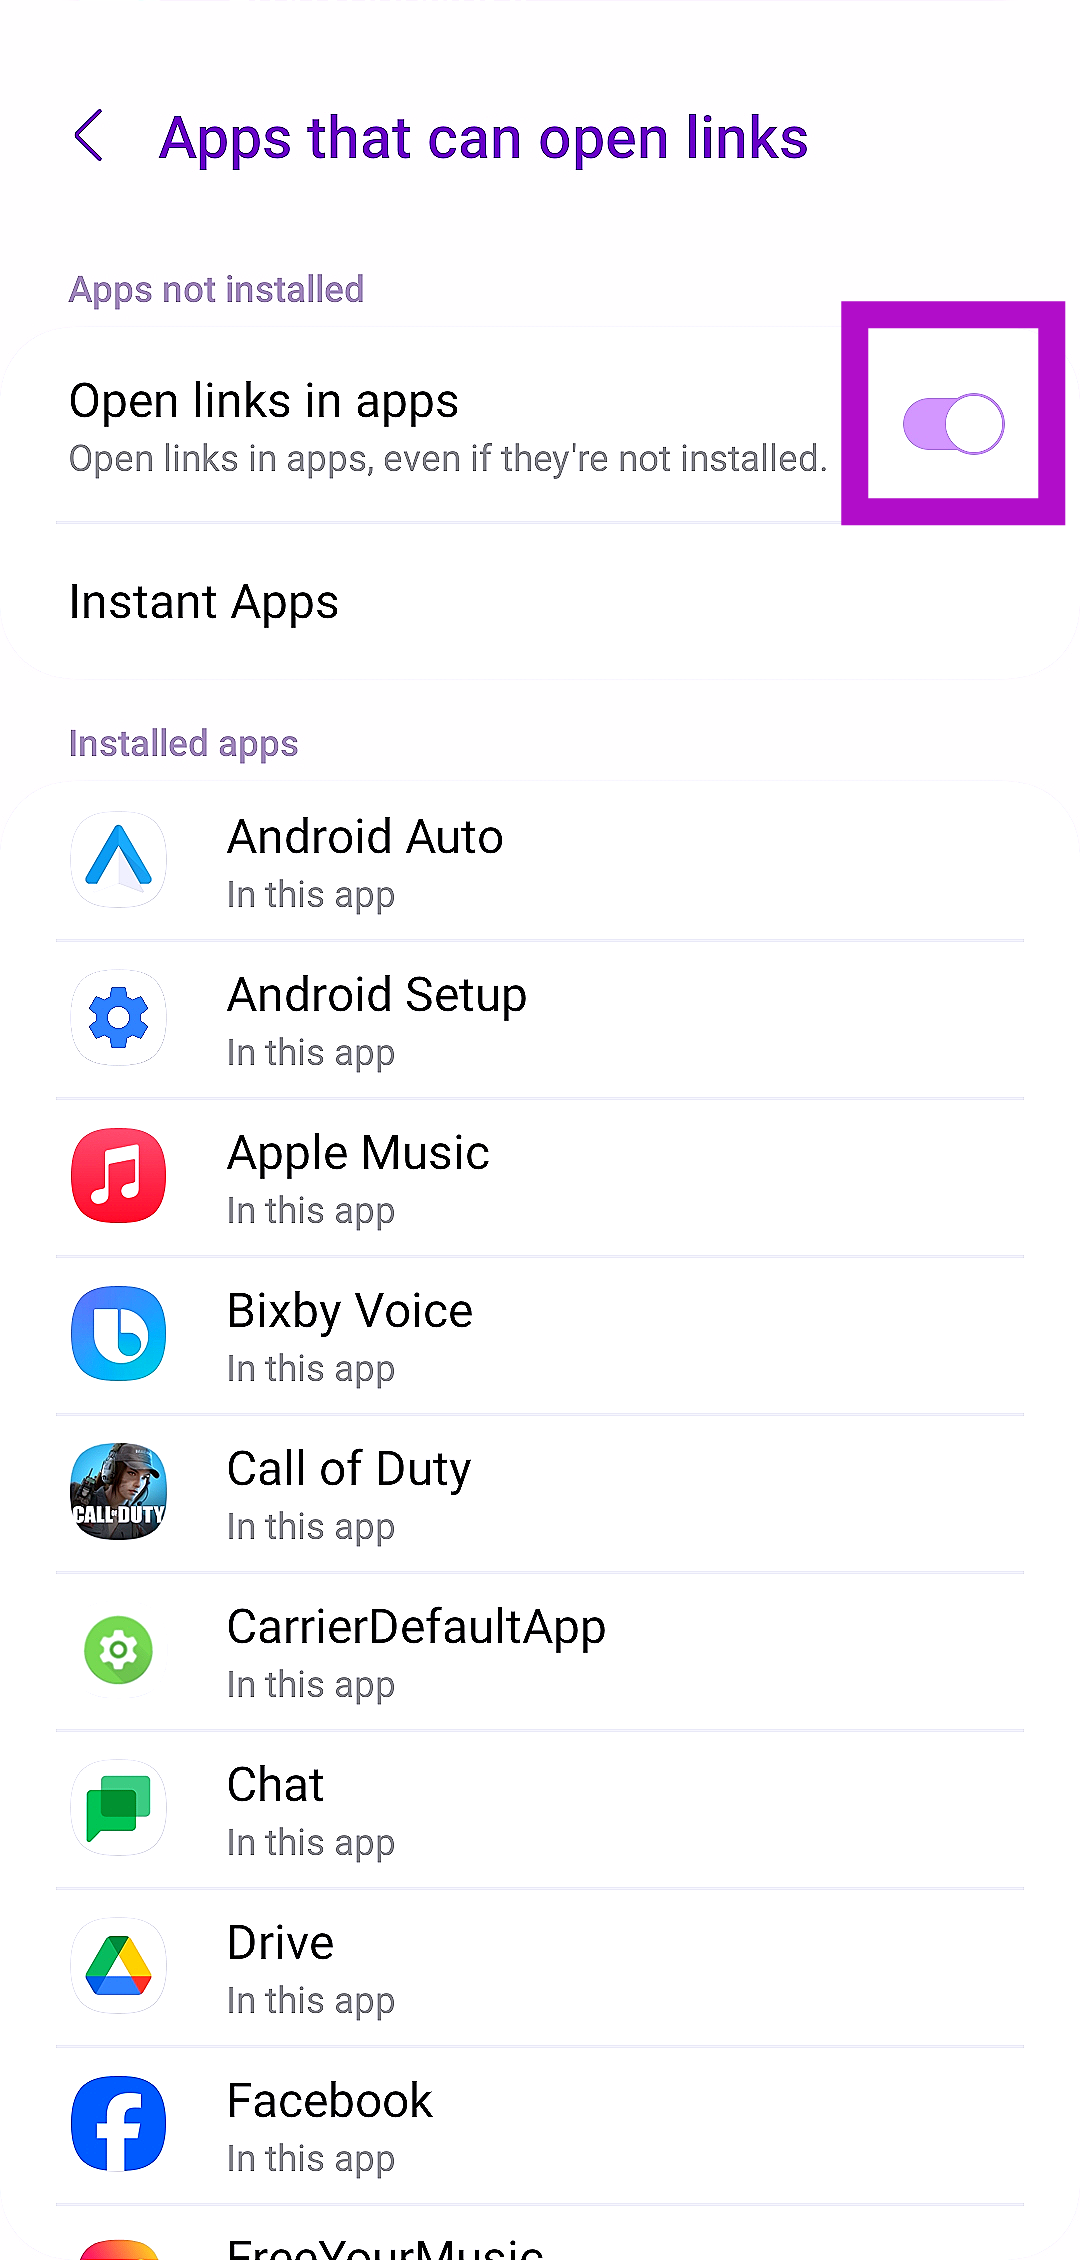
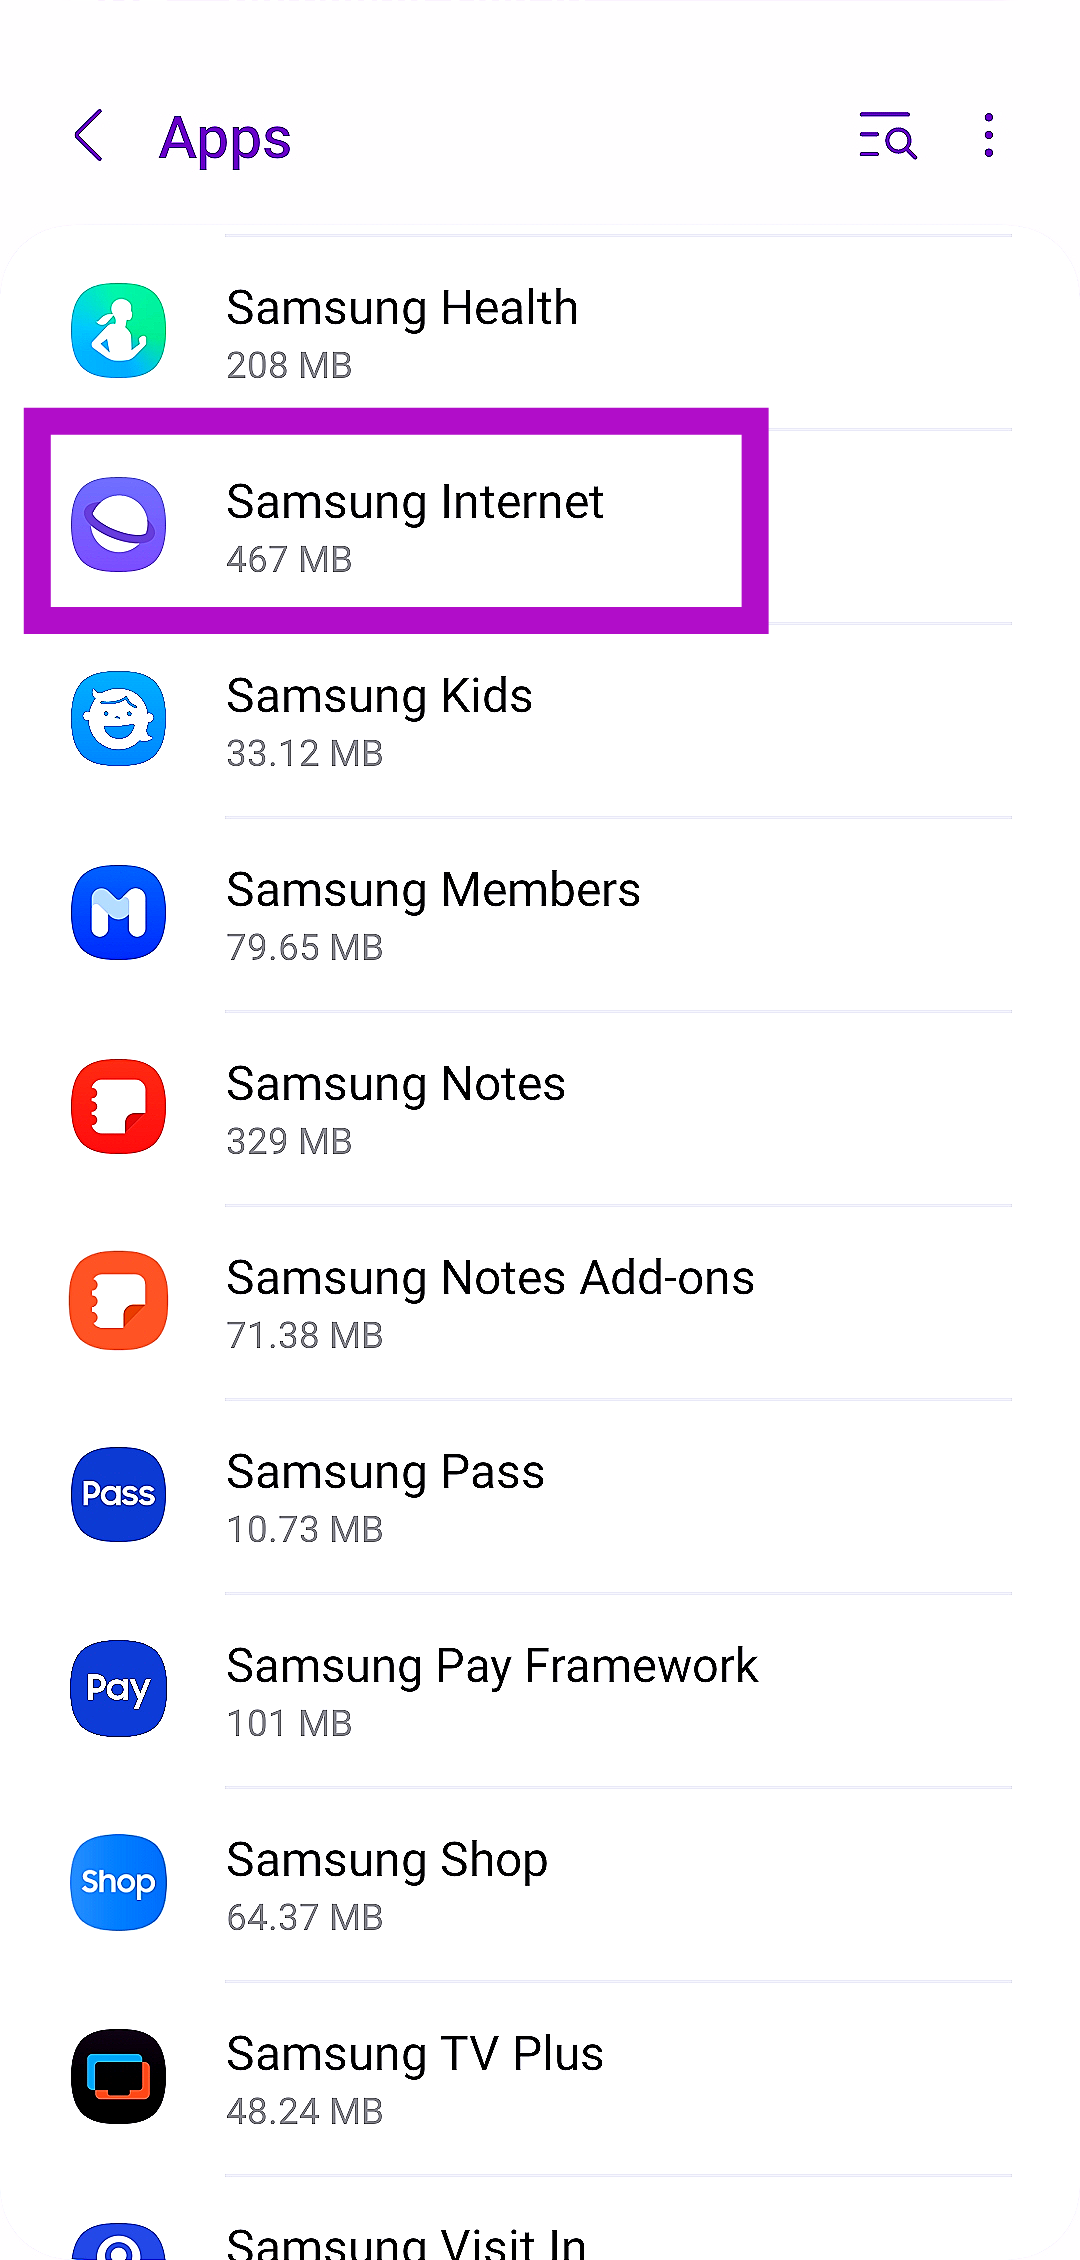 Step 3:
 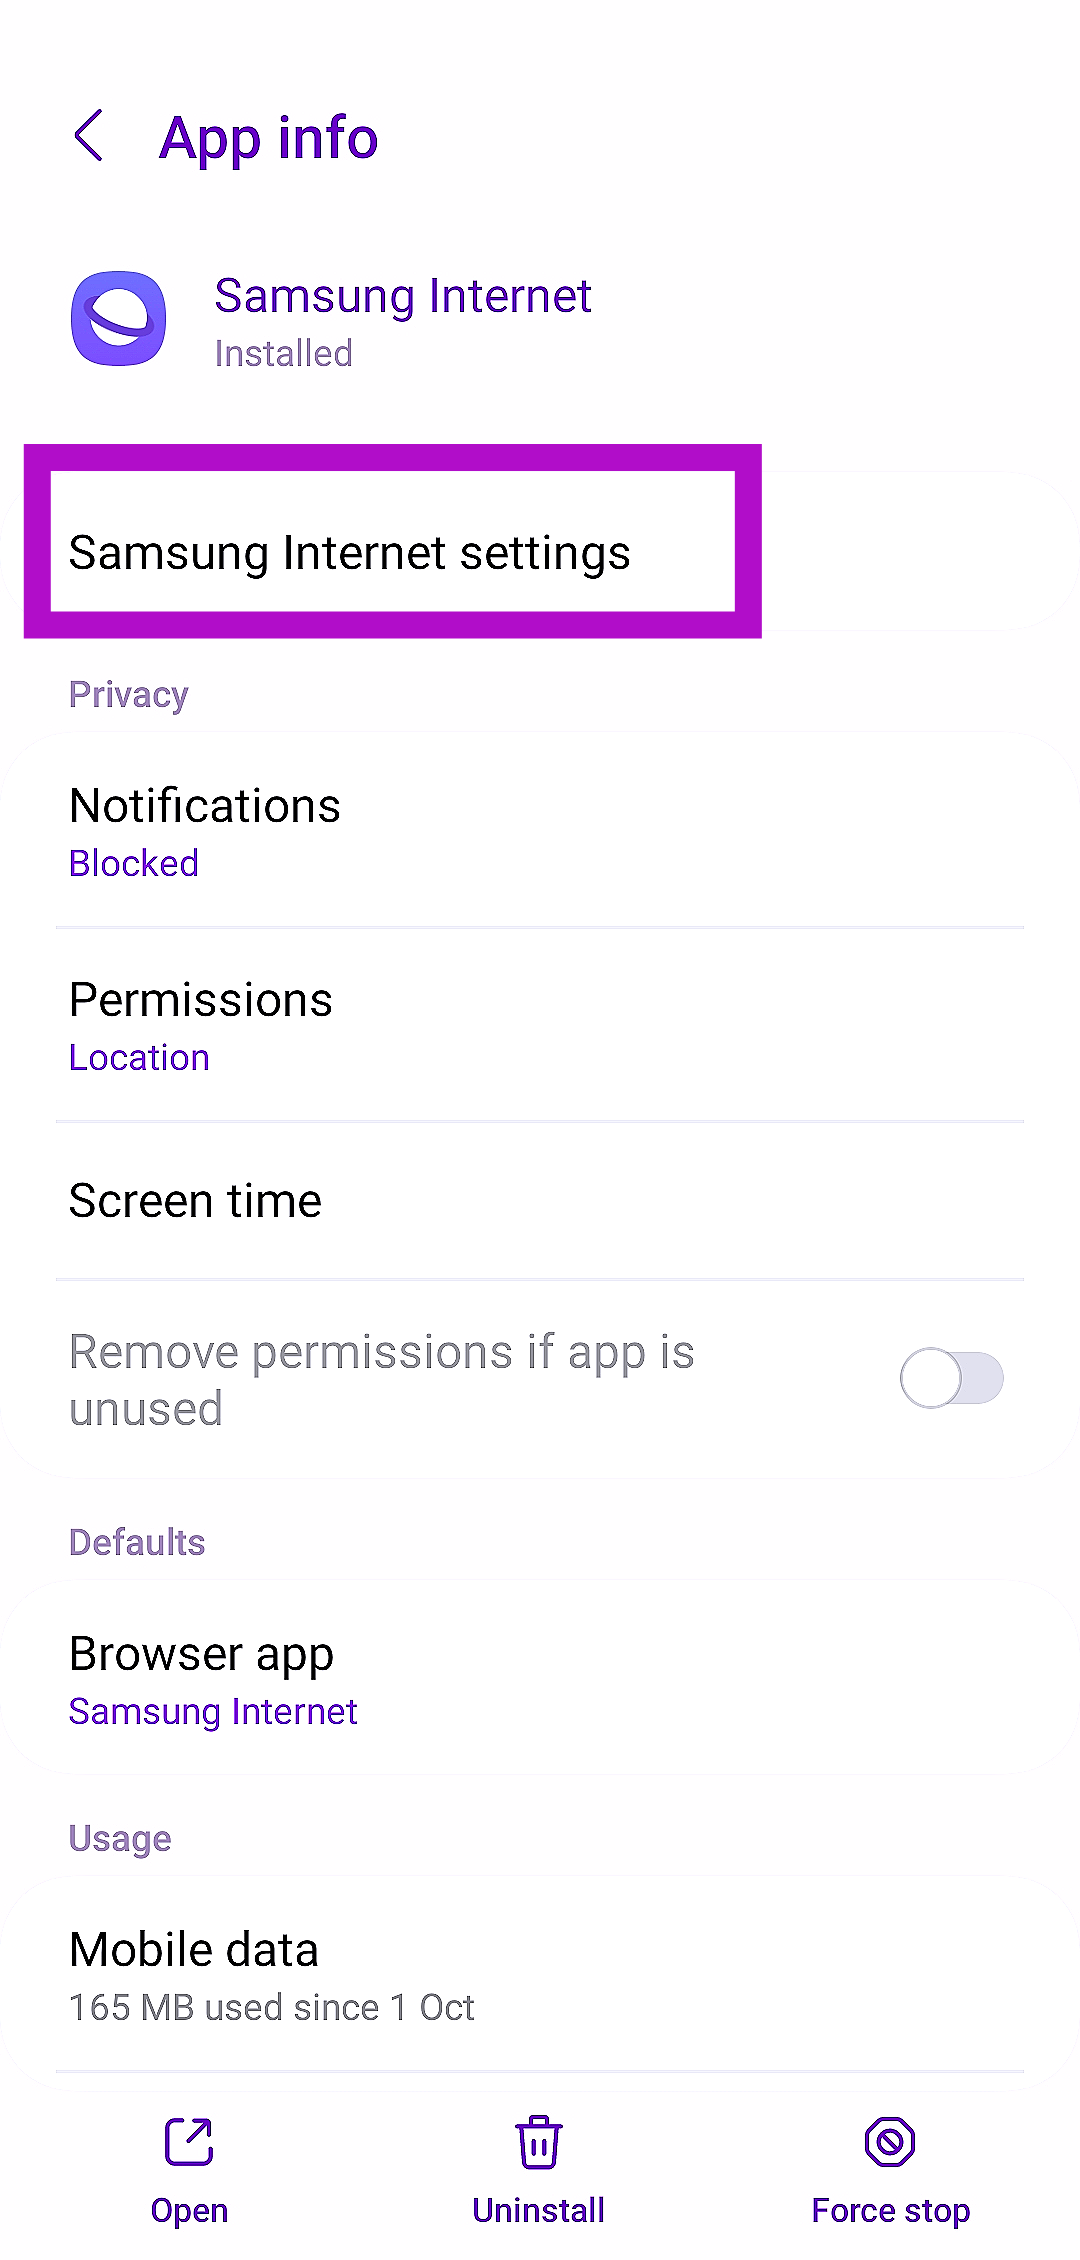 Step 4:
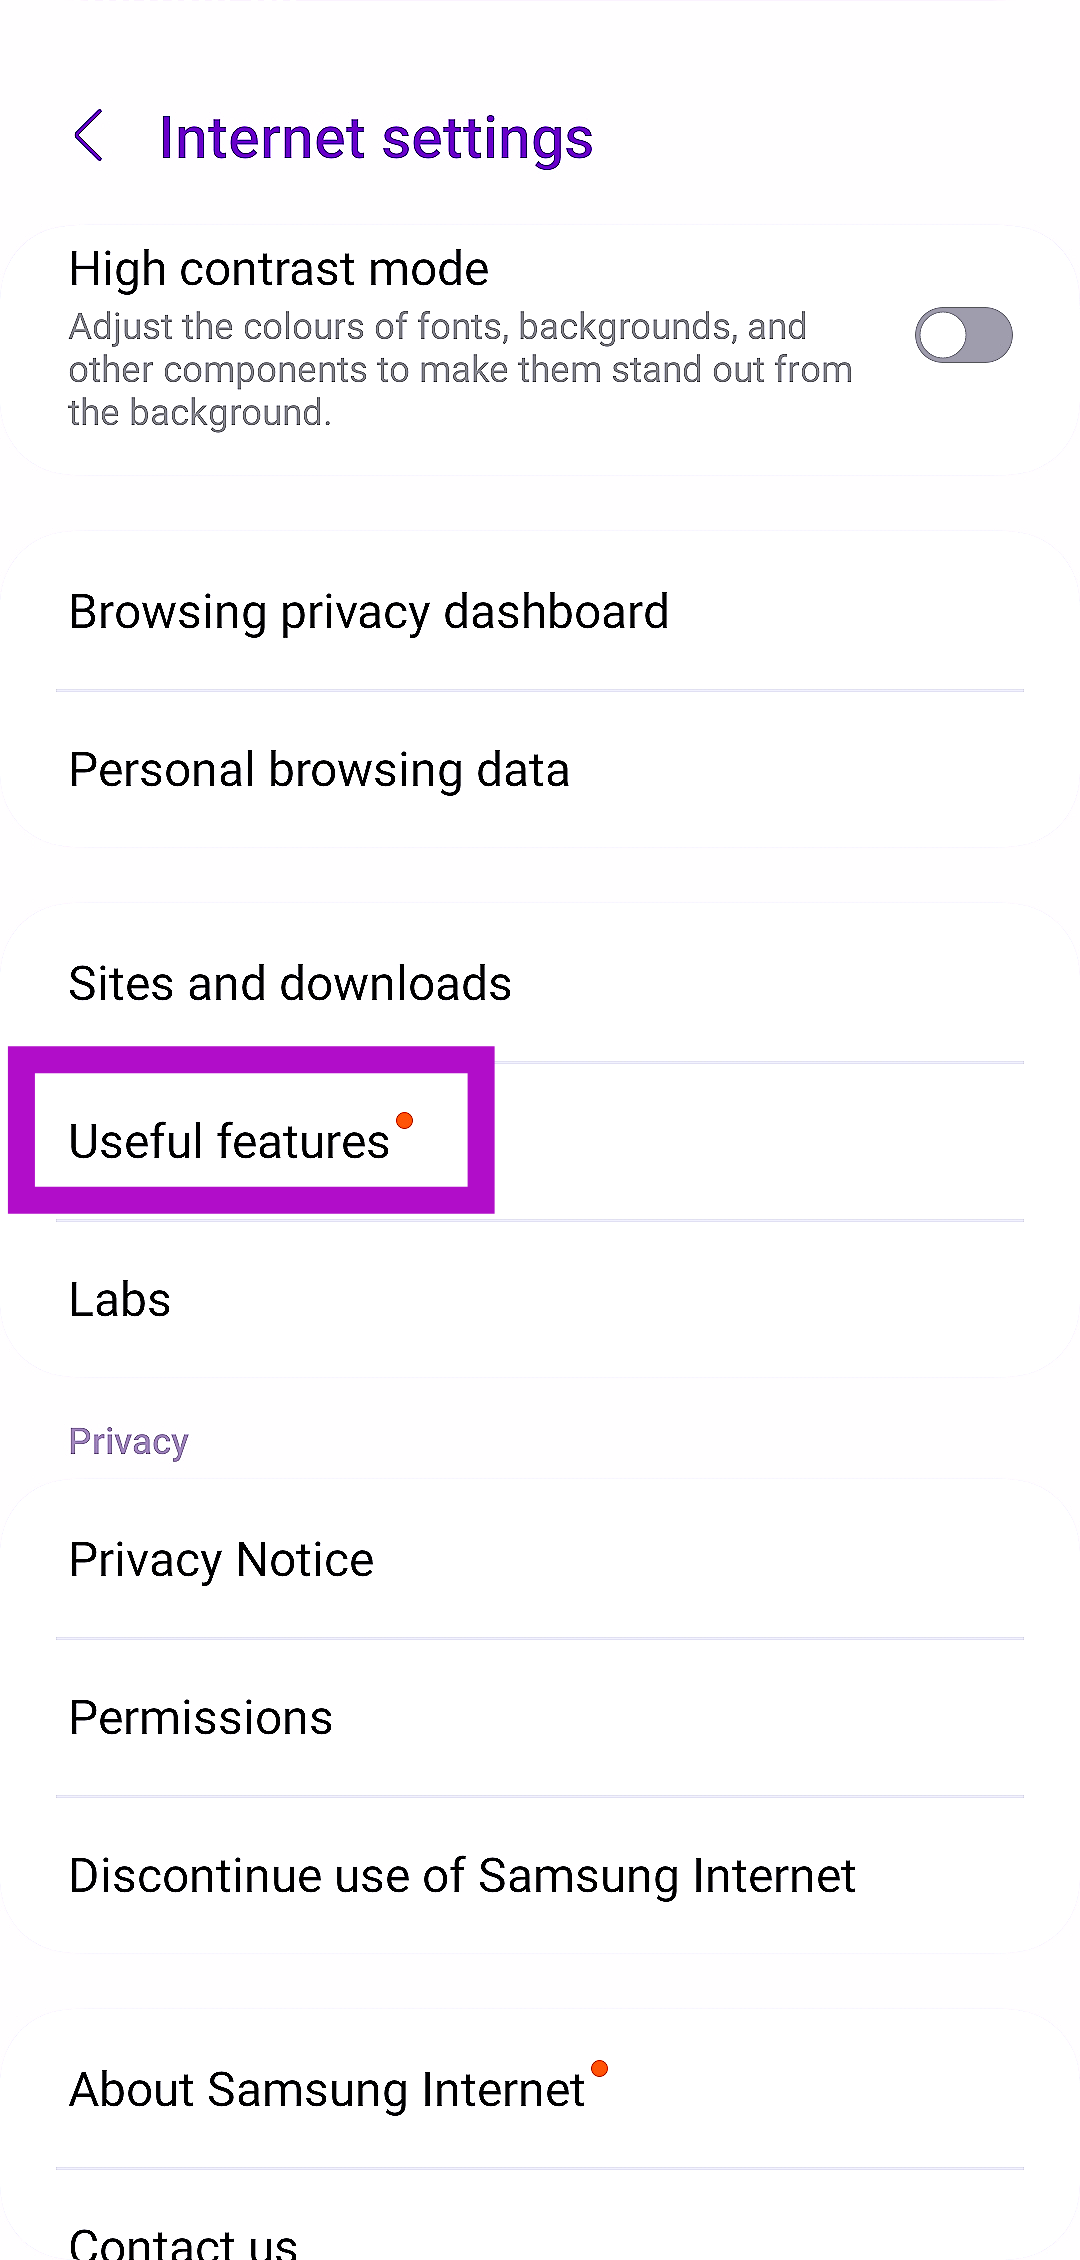 Step 5:
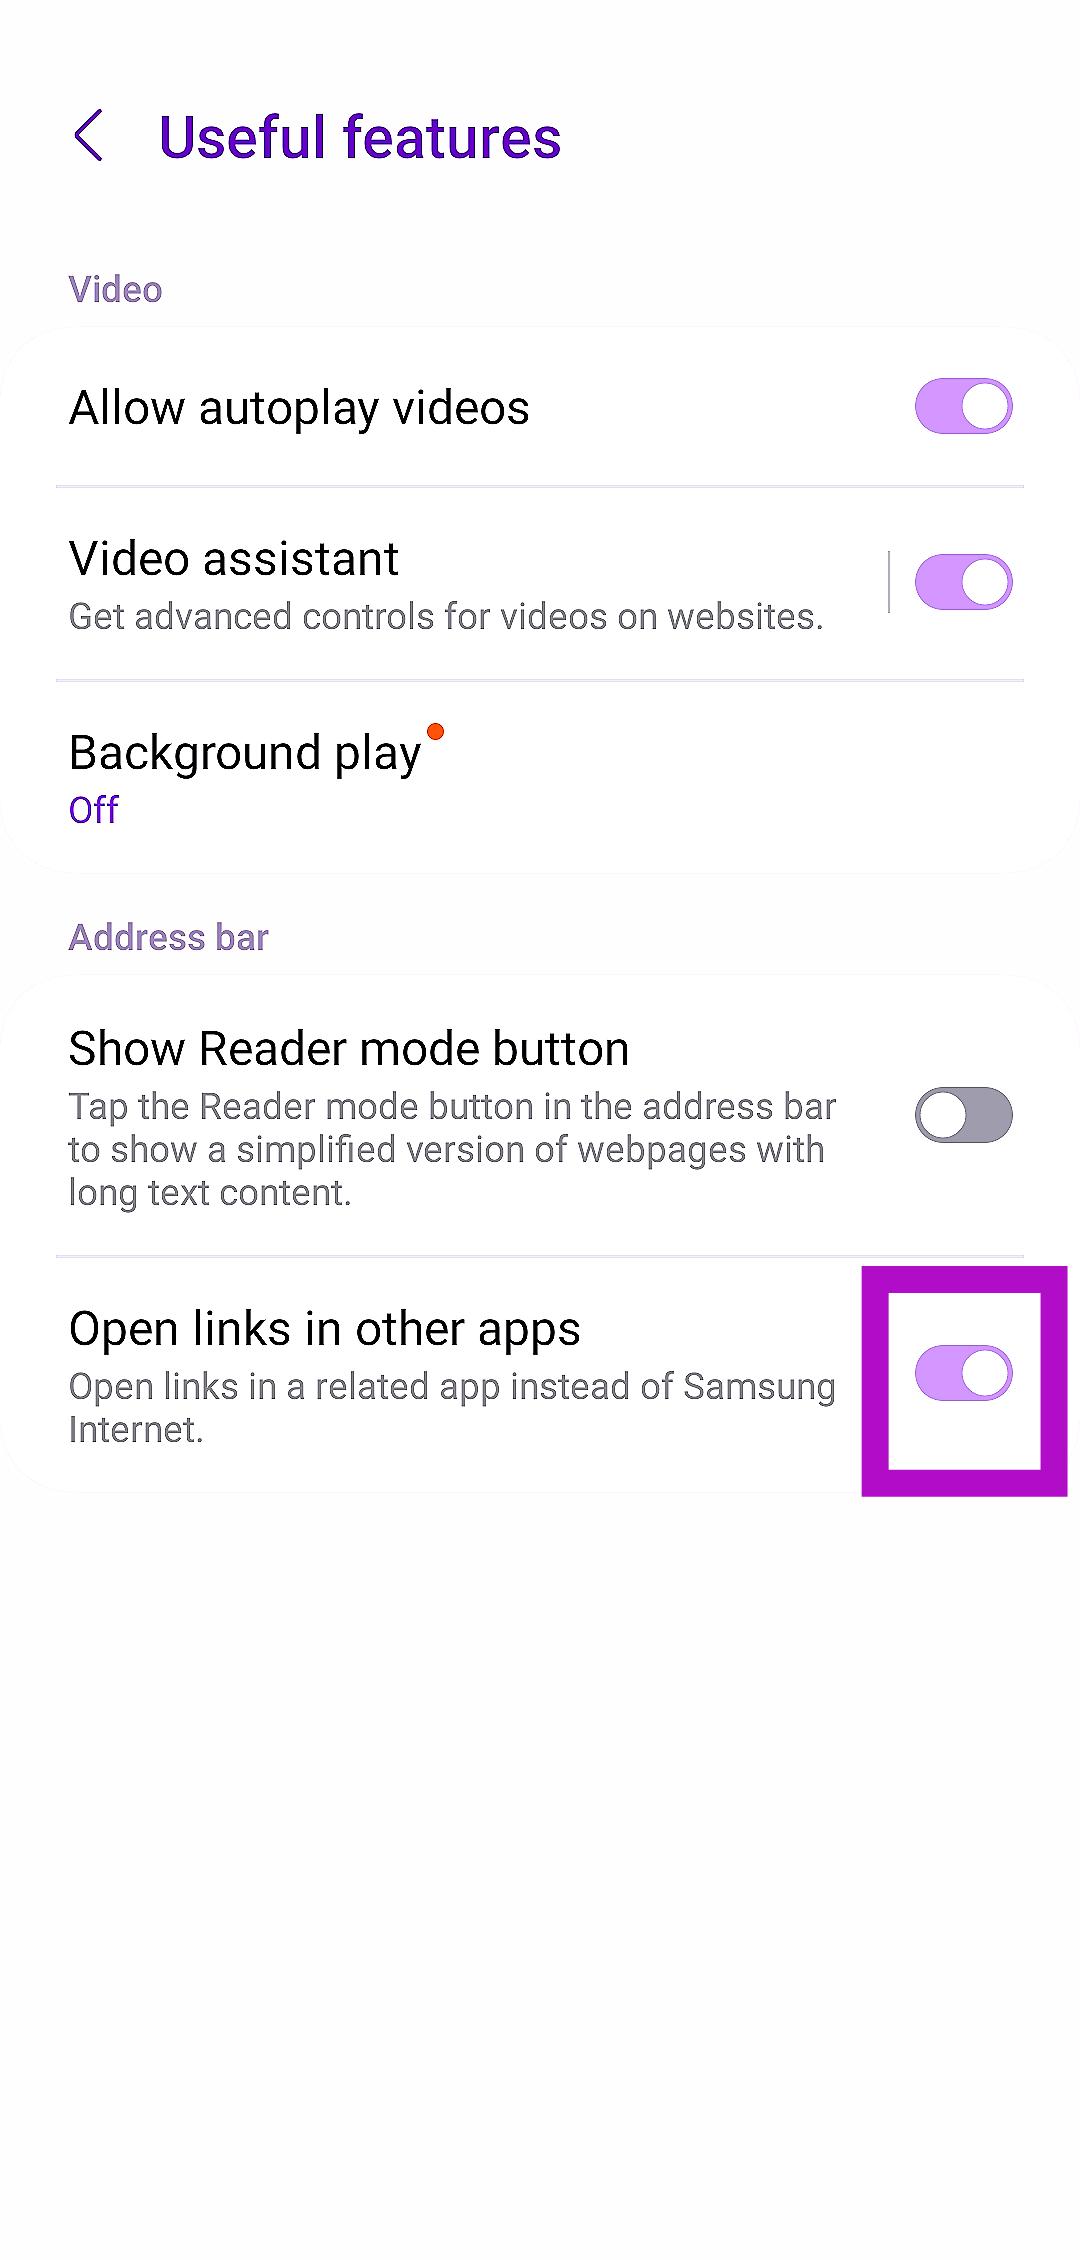
 Step 2: Select YouTube.
 Step 3: Tap on Storage.
 Step 4: Select Clear cache.
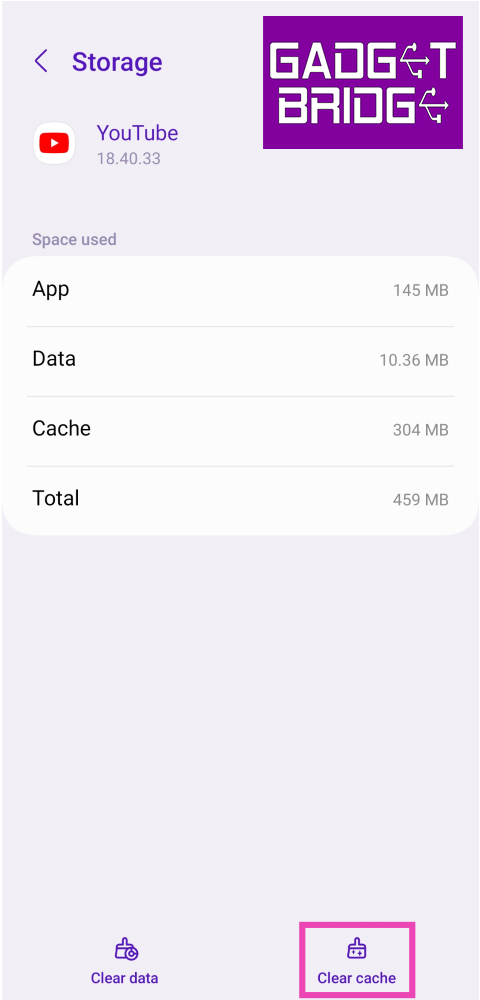
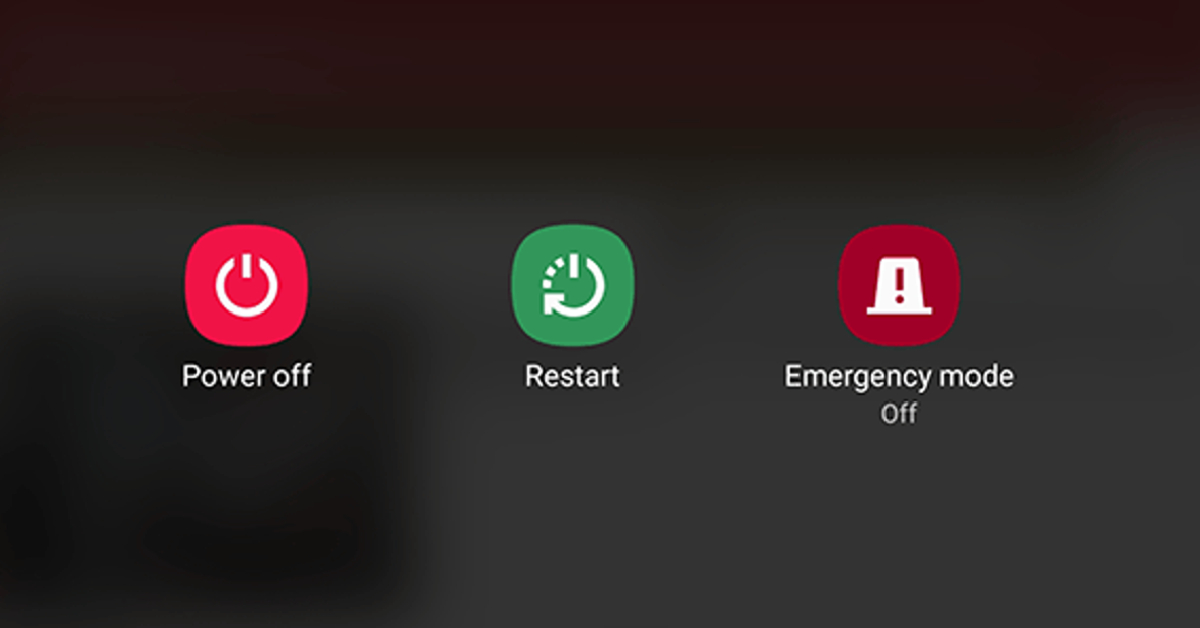 Sometimes, background software issues on your phone can keep the YouTube app from opening a supported link. A simple restart can take care of this issue. Press the side key along with the volume-up button to access the power menu. Hit ‘Restart’. Once your phone has restarted, click a YouTube link to check if the issue has been resolved.
 Did you update the YouTube app recently? It is possible that the update was not installed correctly. Other app-related issues can cause it to fail at basic tasks. A simple catch-all approach to troubleshooting is uninstalling and reinstalling the app on your device. Long-press YouTube’s icon in the app drawer and hit ‘Uninstall’. Now, go to the Google Play Store, search for YouTube, and hit ‘Install’.

 But wait, there’s a catch, as there always is. This quirky feature is like an exclusive nightclub for phones, and not all devices get an invite. Only the cool kids running One UI 6 can join this party. It starts with Galaxy S and Z series models in South Korea and then spreads its charm globally this fall.
Read Also:
But wait, there’s a catch, as there always is. This quirky feature is like an exclusive nightclub for phones, and not all devices get an invite. Only the cool kids running One UI 6 can join this party. It starts with Galaxy S and Z series models in South Korea and then spreads its charm globally this fall.
Read Also: 
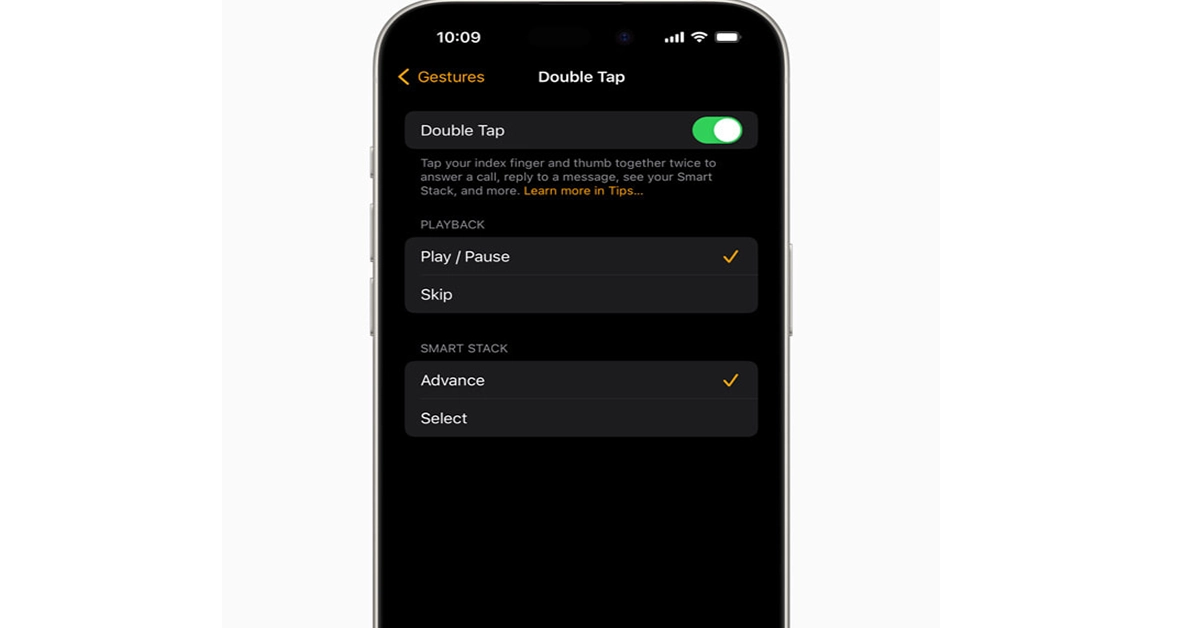

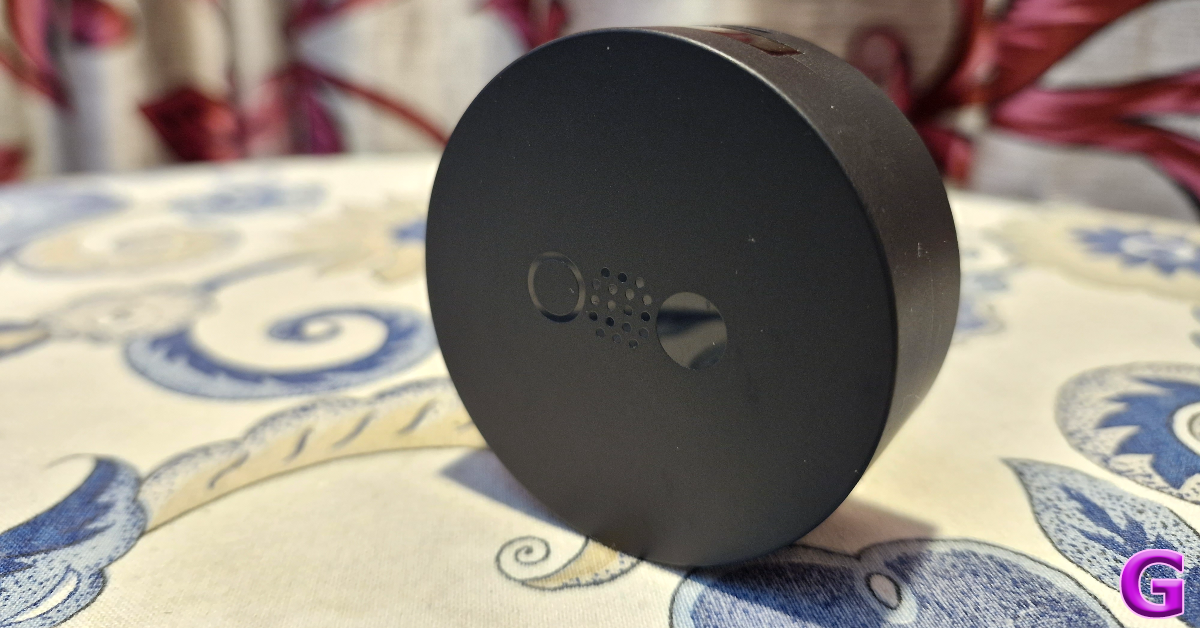
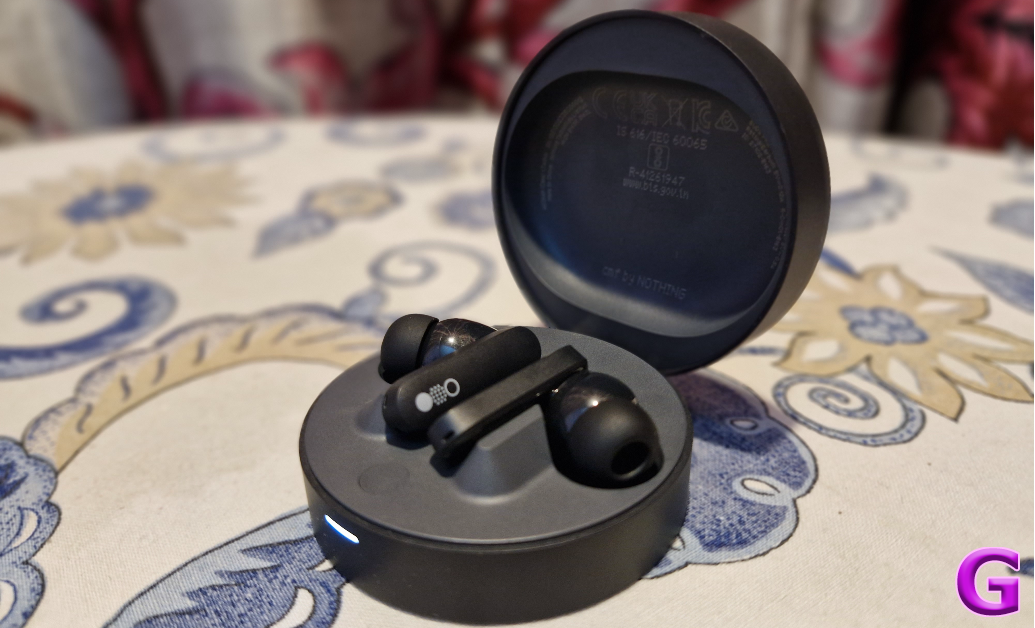
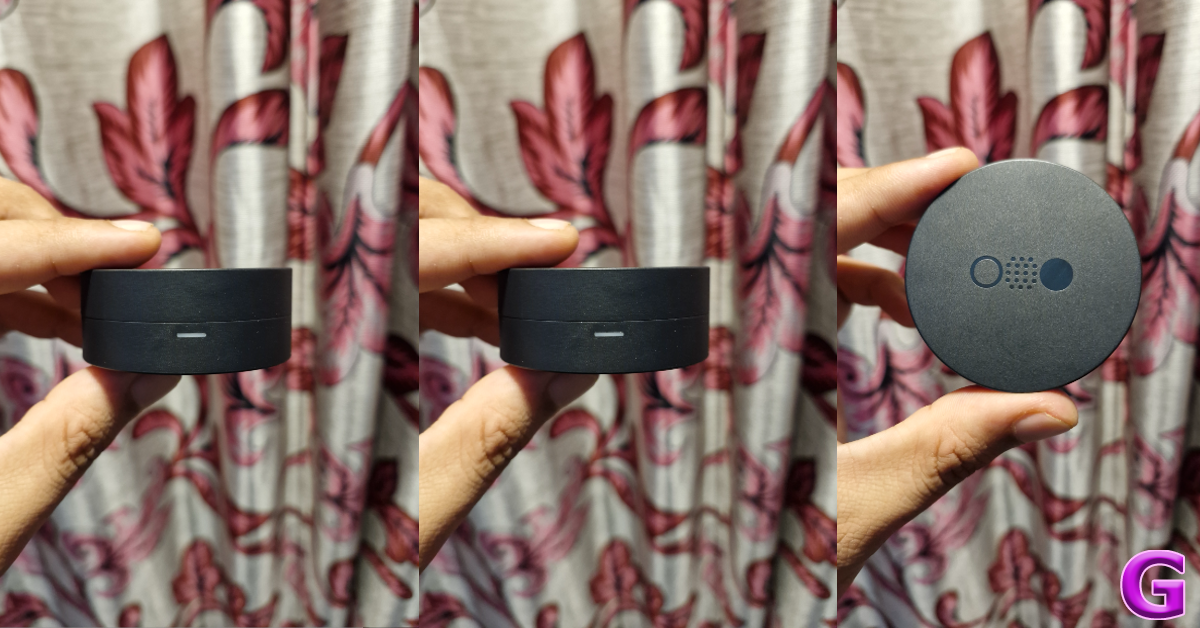
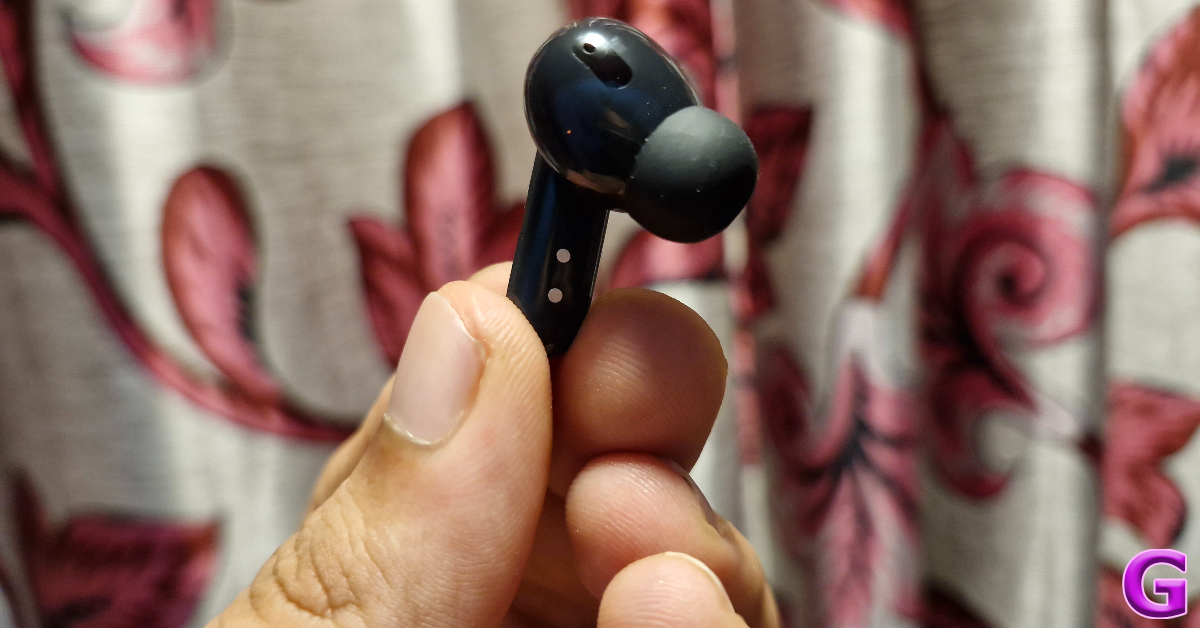
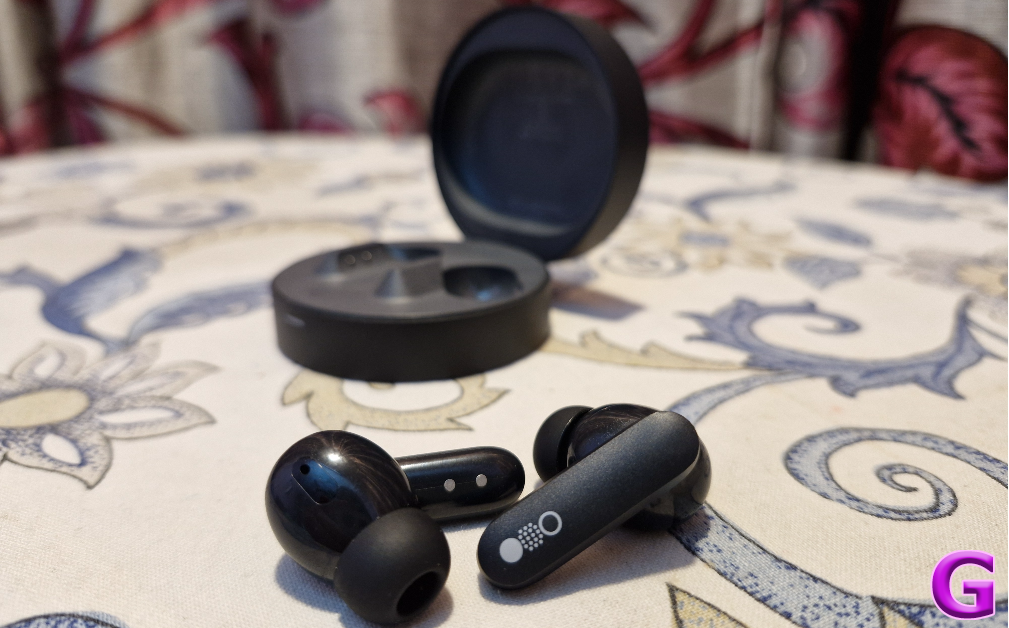
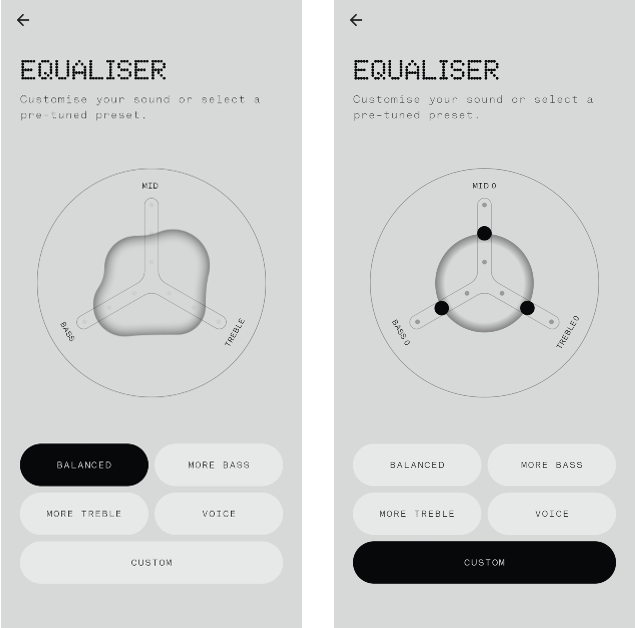
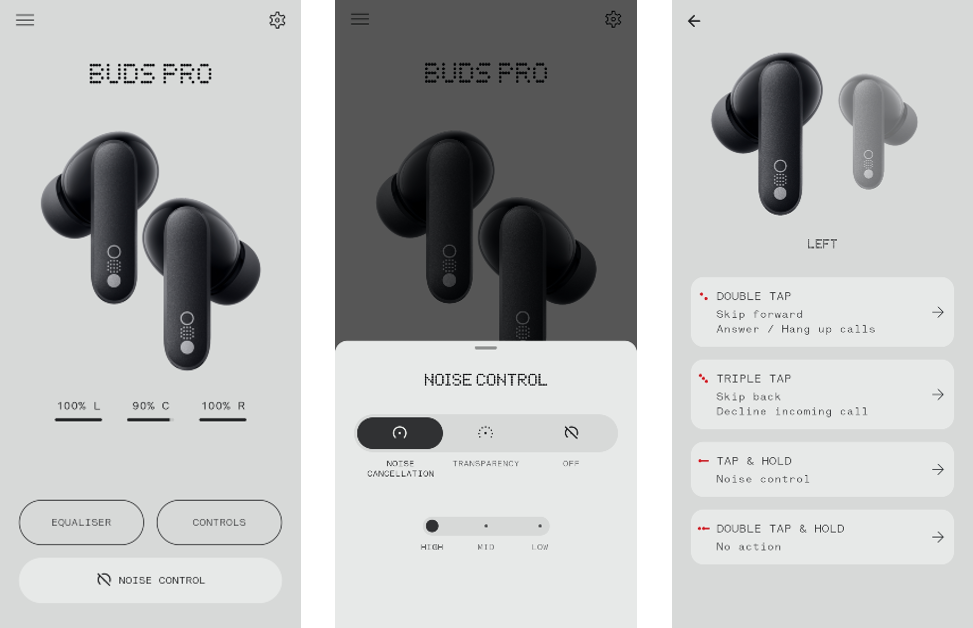

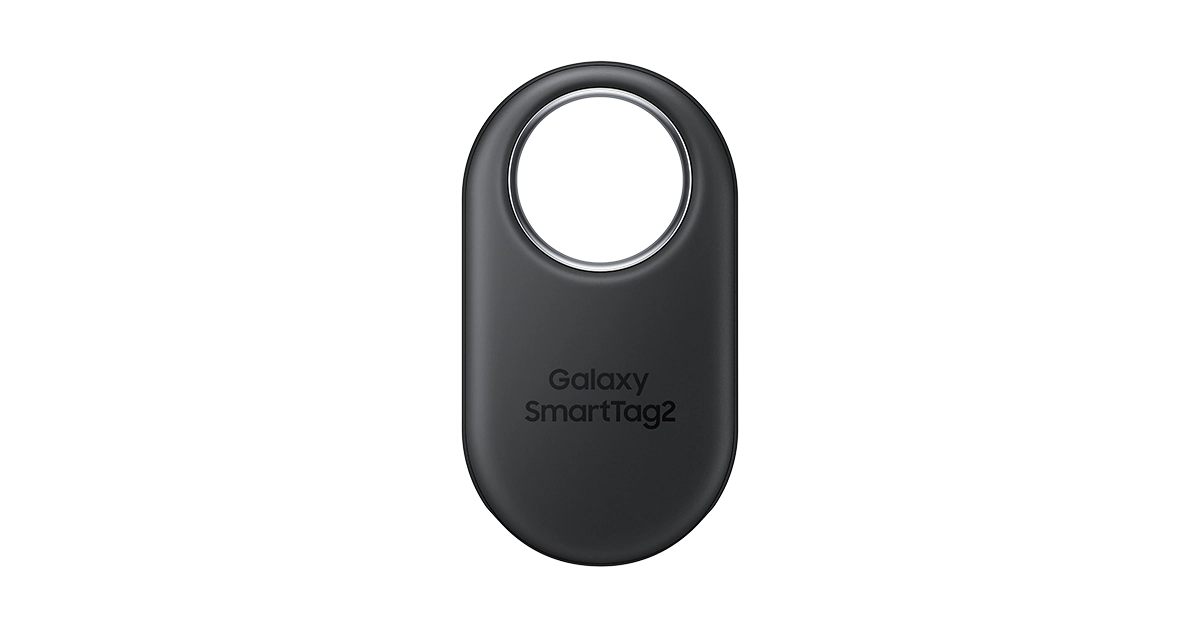
 Step 1:
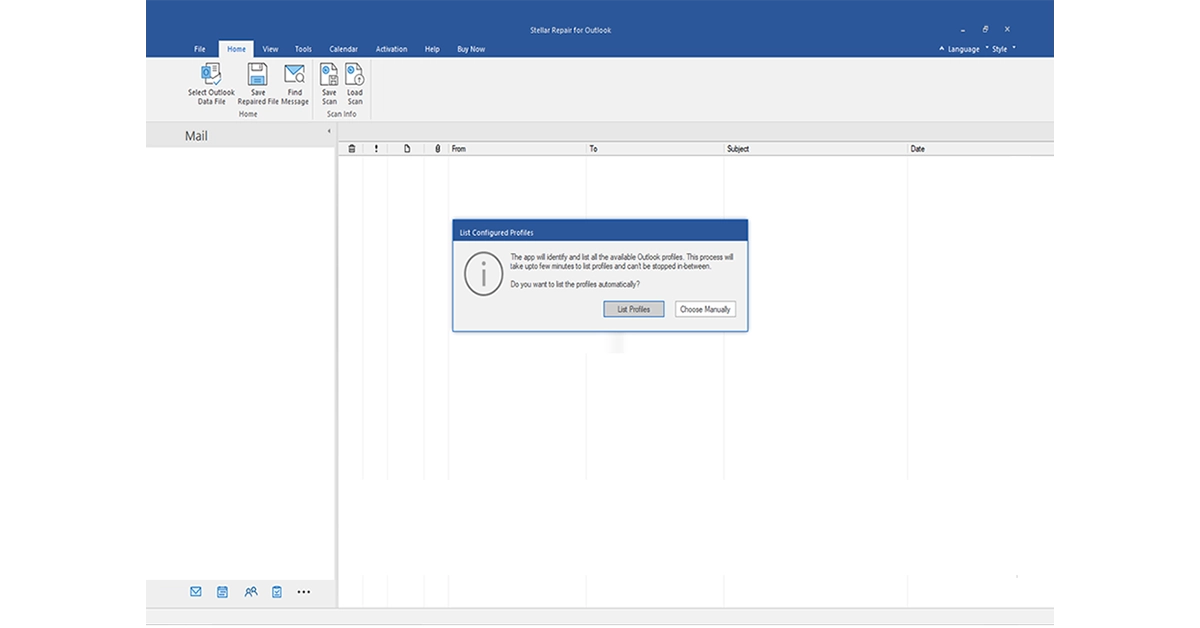 Step 2: If you know the location of the PST file, click ‘Browse.’ Alternatively, click ‘Find’ to search for the PST file. Next, click ‘Repair’ to begin the PST recovery process.
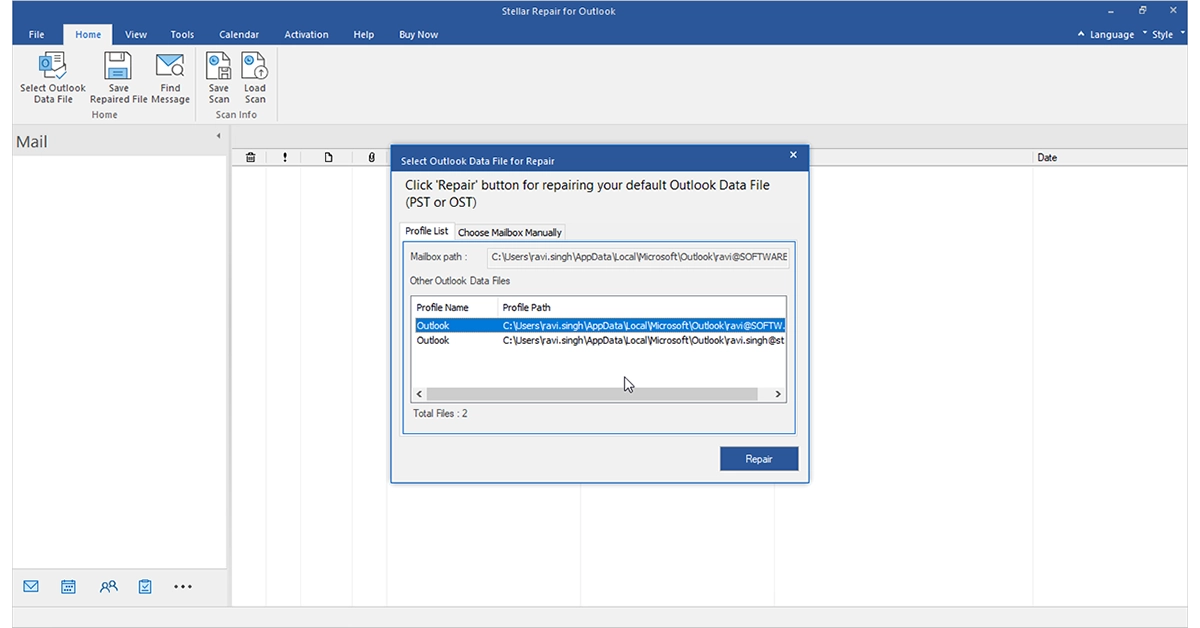 Step 3: The software will commence scanning the corrupt PST file. The estimated scan duration depends on the PST file’s size and the extent of corruption.
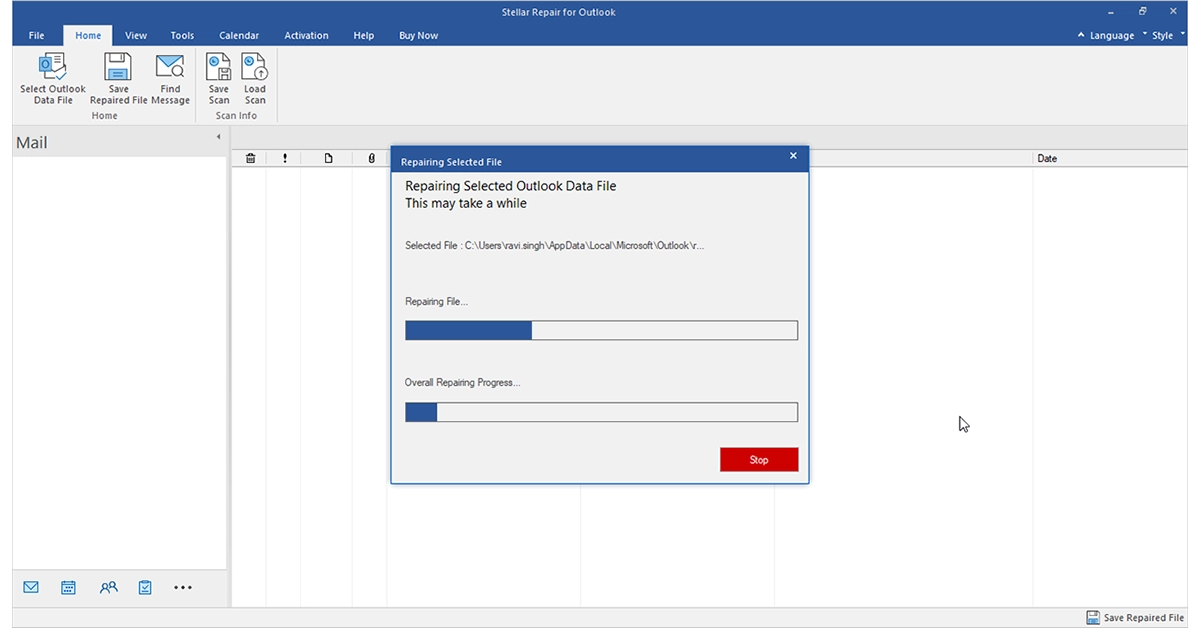 Step 4: Once the scanning is complete, the software will display a preview of the recovered Outlook mailbox items in the left pane. You can click on the folders to preview the items.
Step 5: Select a specific folder or all items for recovery and click ‘Save Repaired File.’ Choose the PST file format from the pop-up window. Click ‘Browse’ and then ‘OK’ to save the mailbox data.
Step 4: Once the scanning is complete, the software will display a preview of the recovered Outlook mailbox items in the left pane. You can click on the folders to preview the items.
Step 5: Select a specific folder or all items for recovery and click ‘Save Repaired File.’ Choose the PST file format from the pop-up window. Click ‘Browse’ and then ‘OK’ to save the mailbox data.
 Step 6: After the repaired PST file is saved at the specified location, you’ll receive a confirmation message.

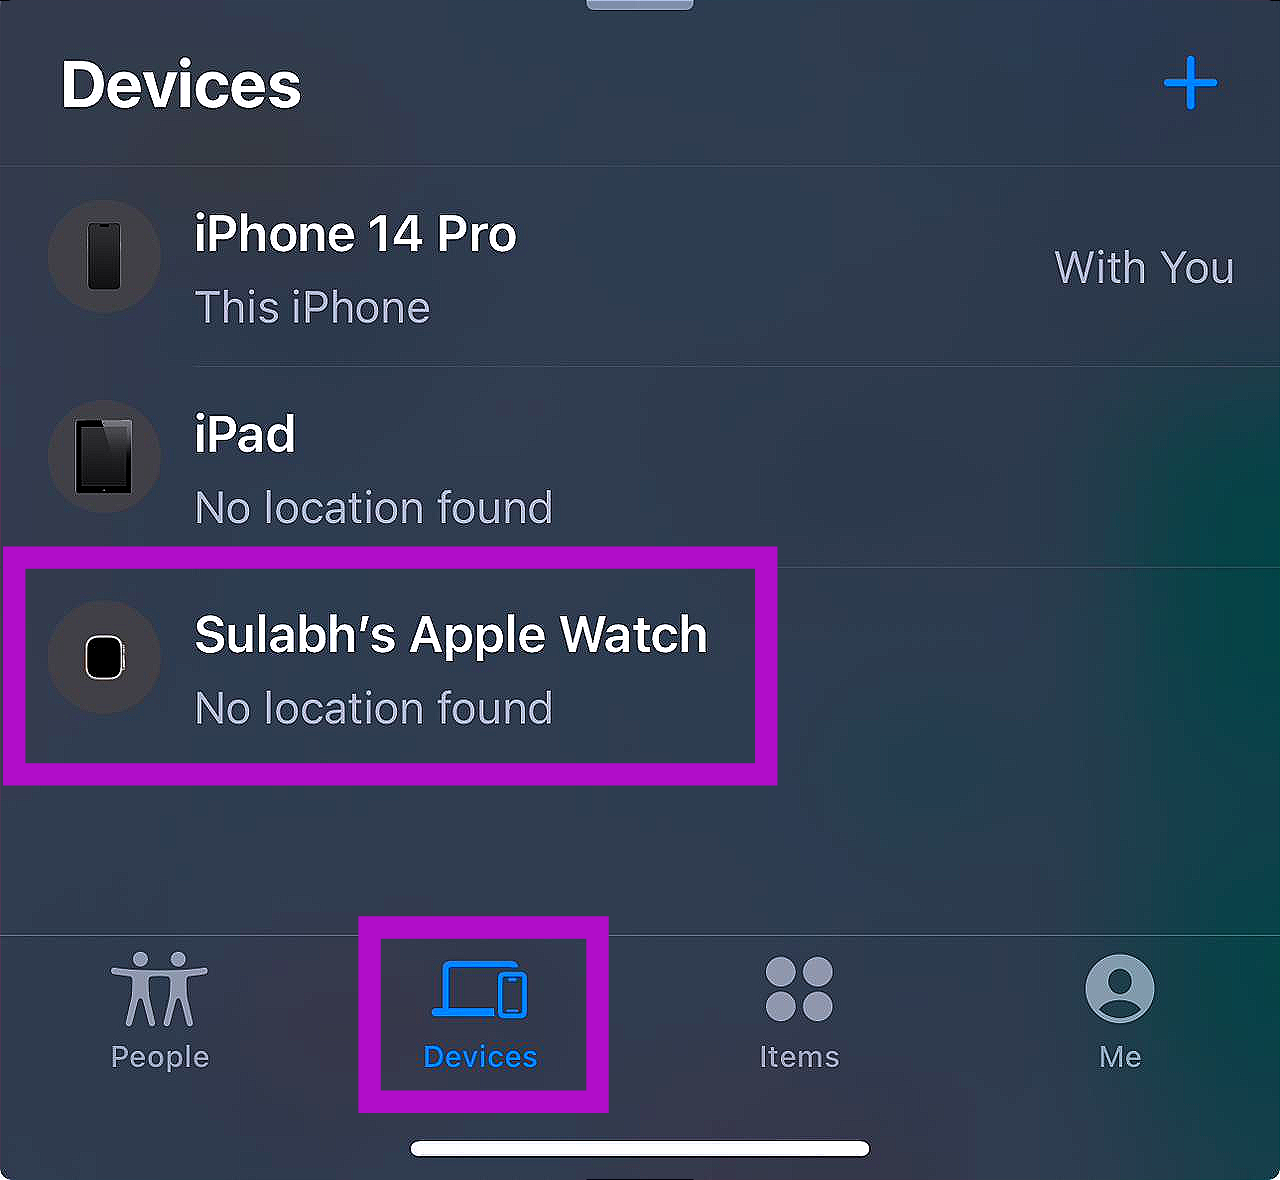 Step 3:
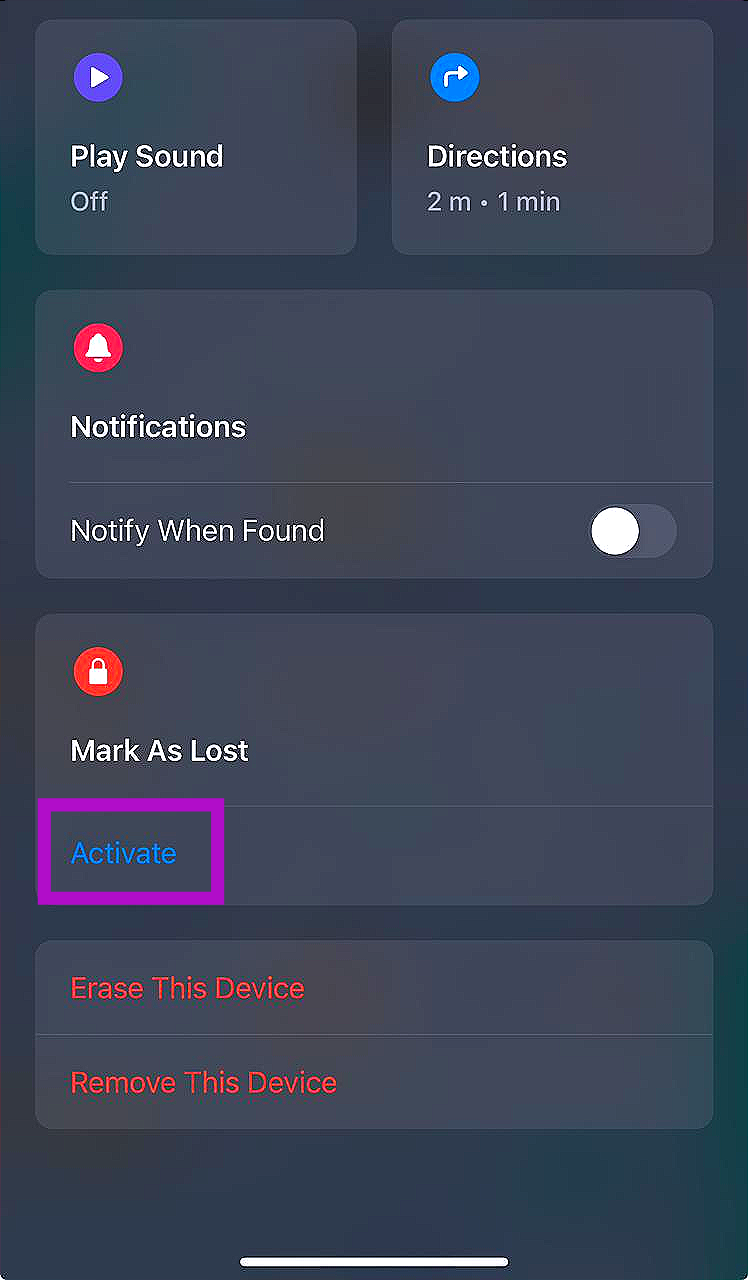 Step 3:
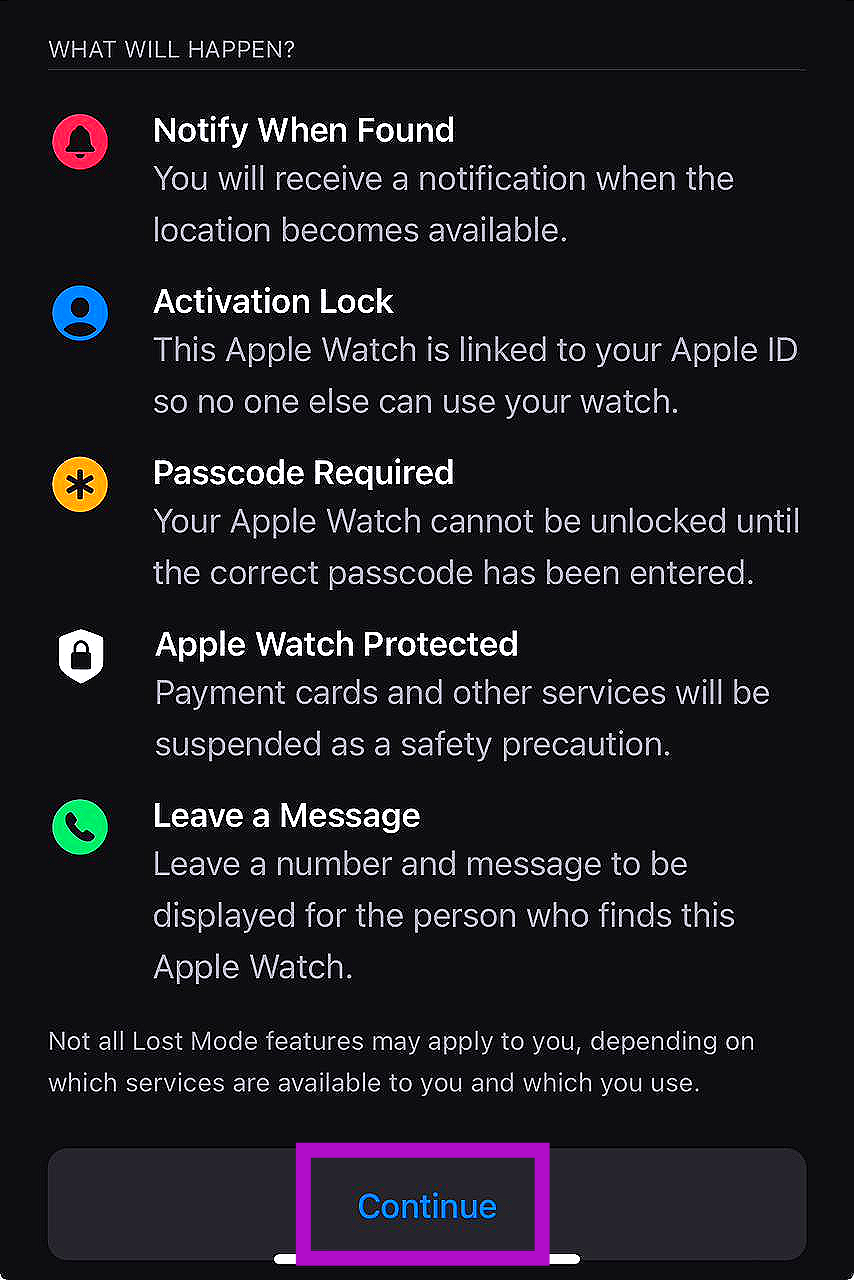 Step 4:
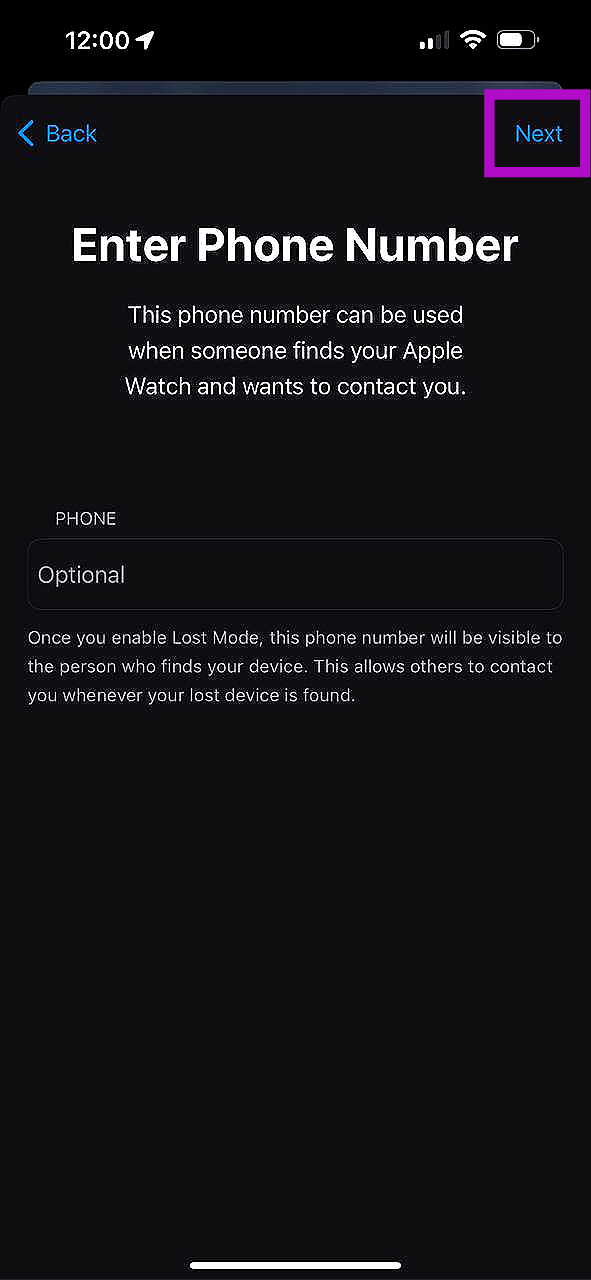 Step 5:


 Step 2: Launch
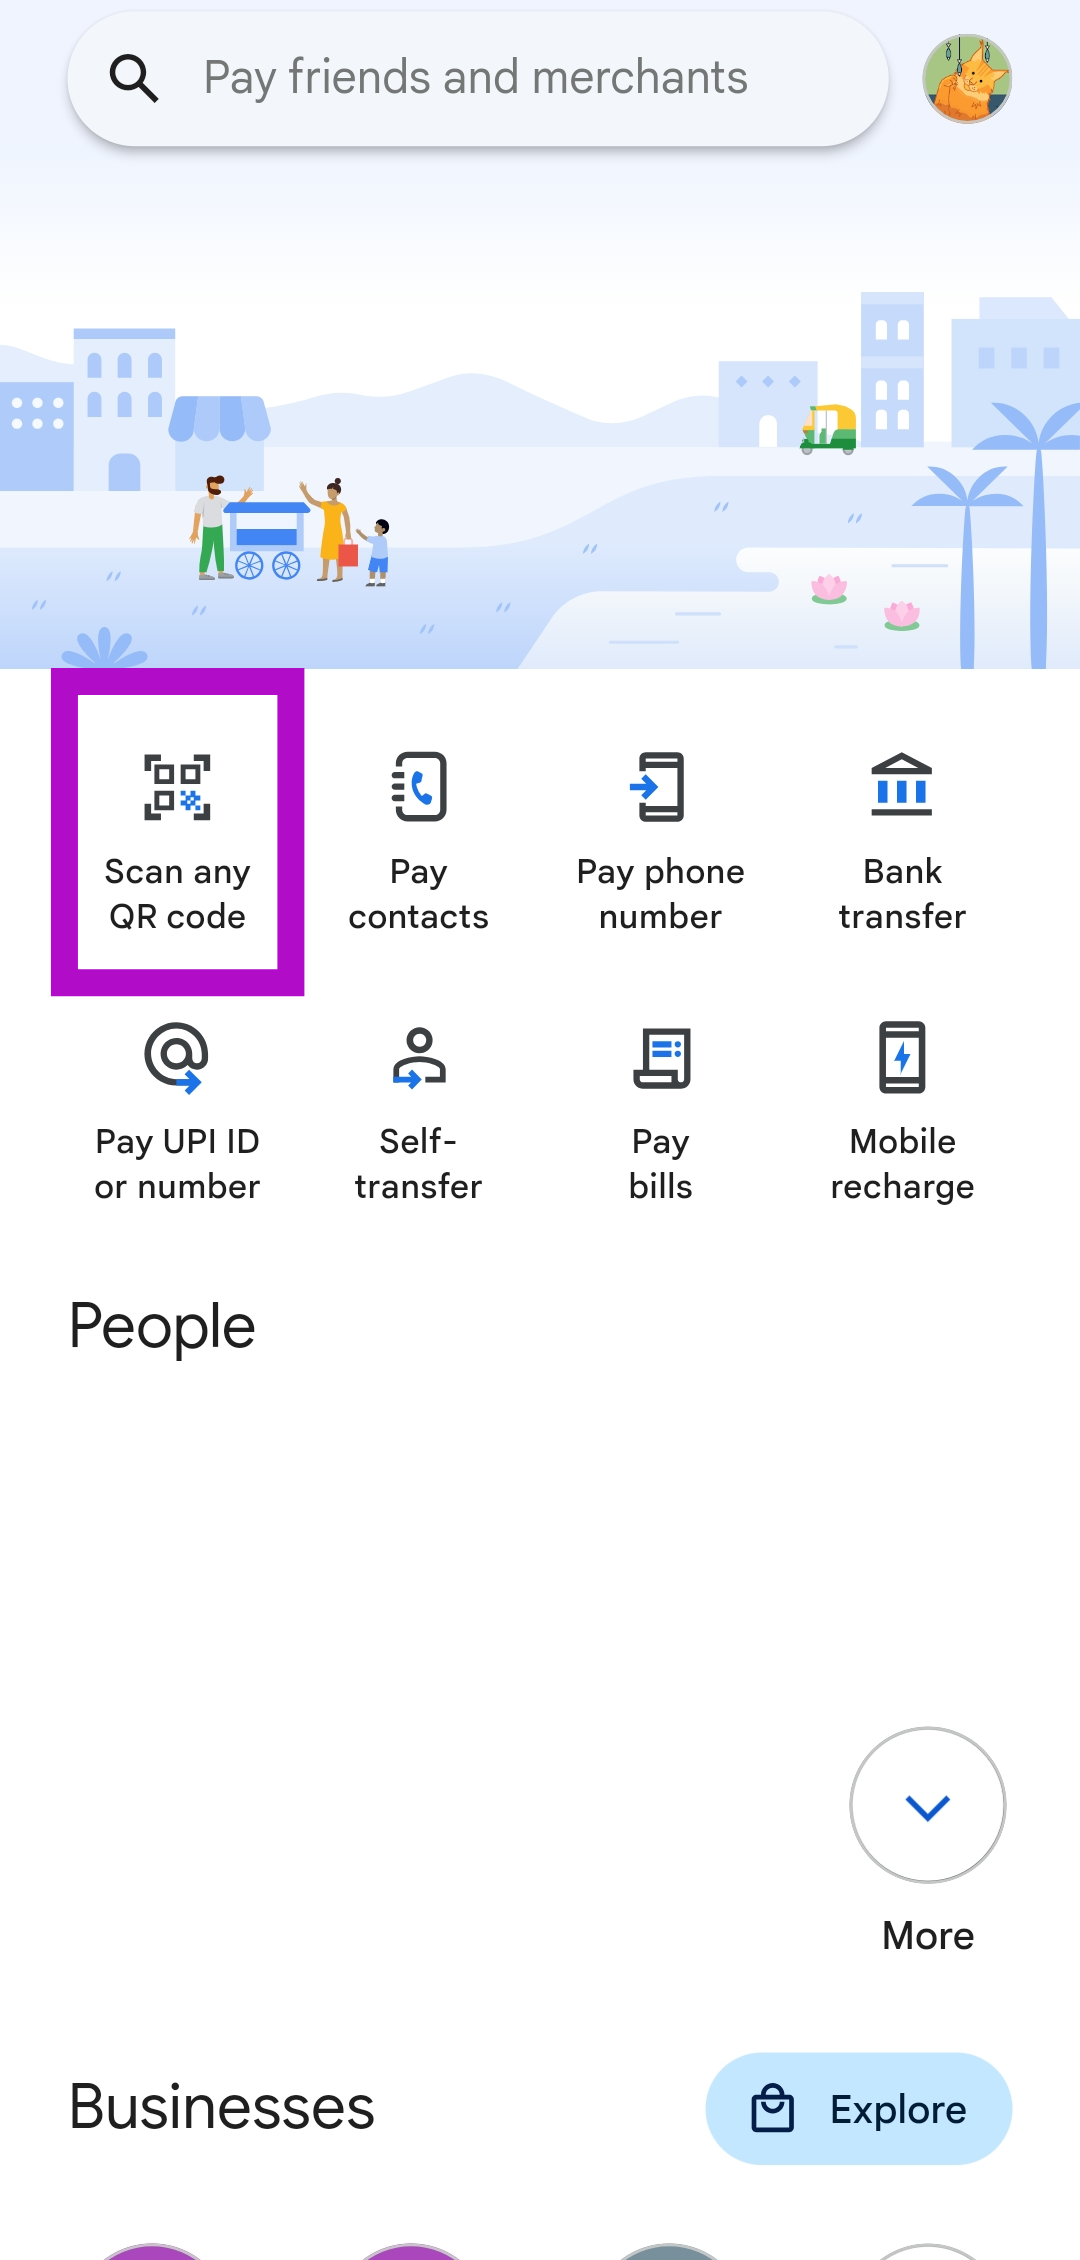 Step 4:
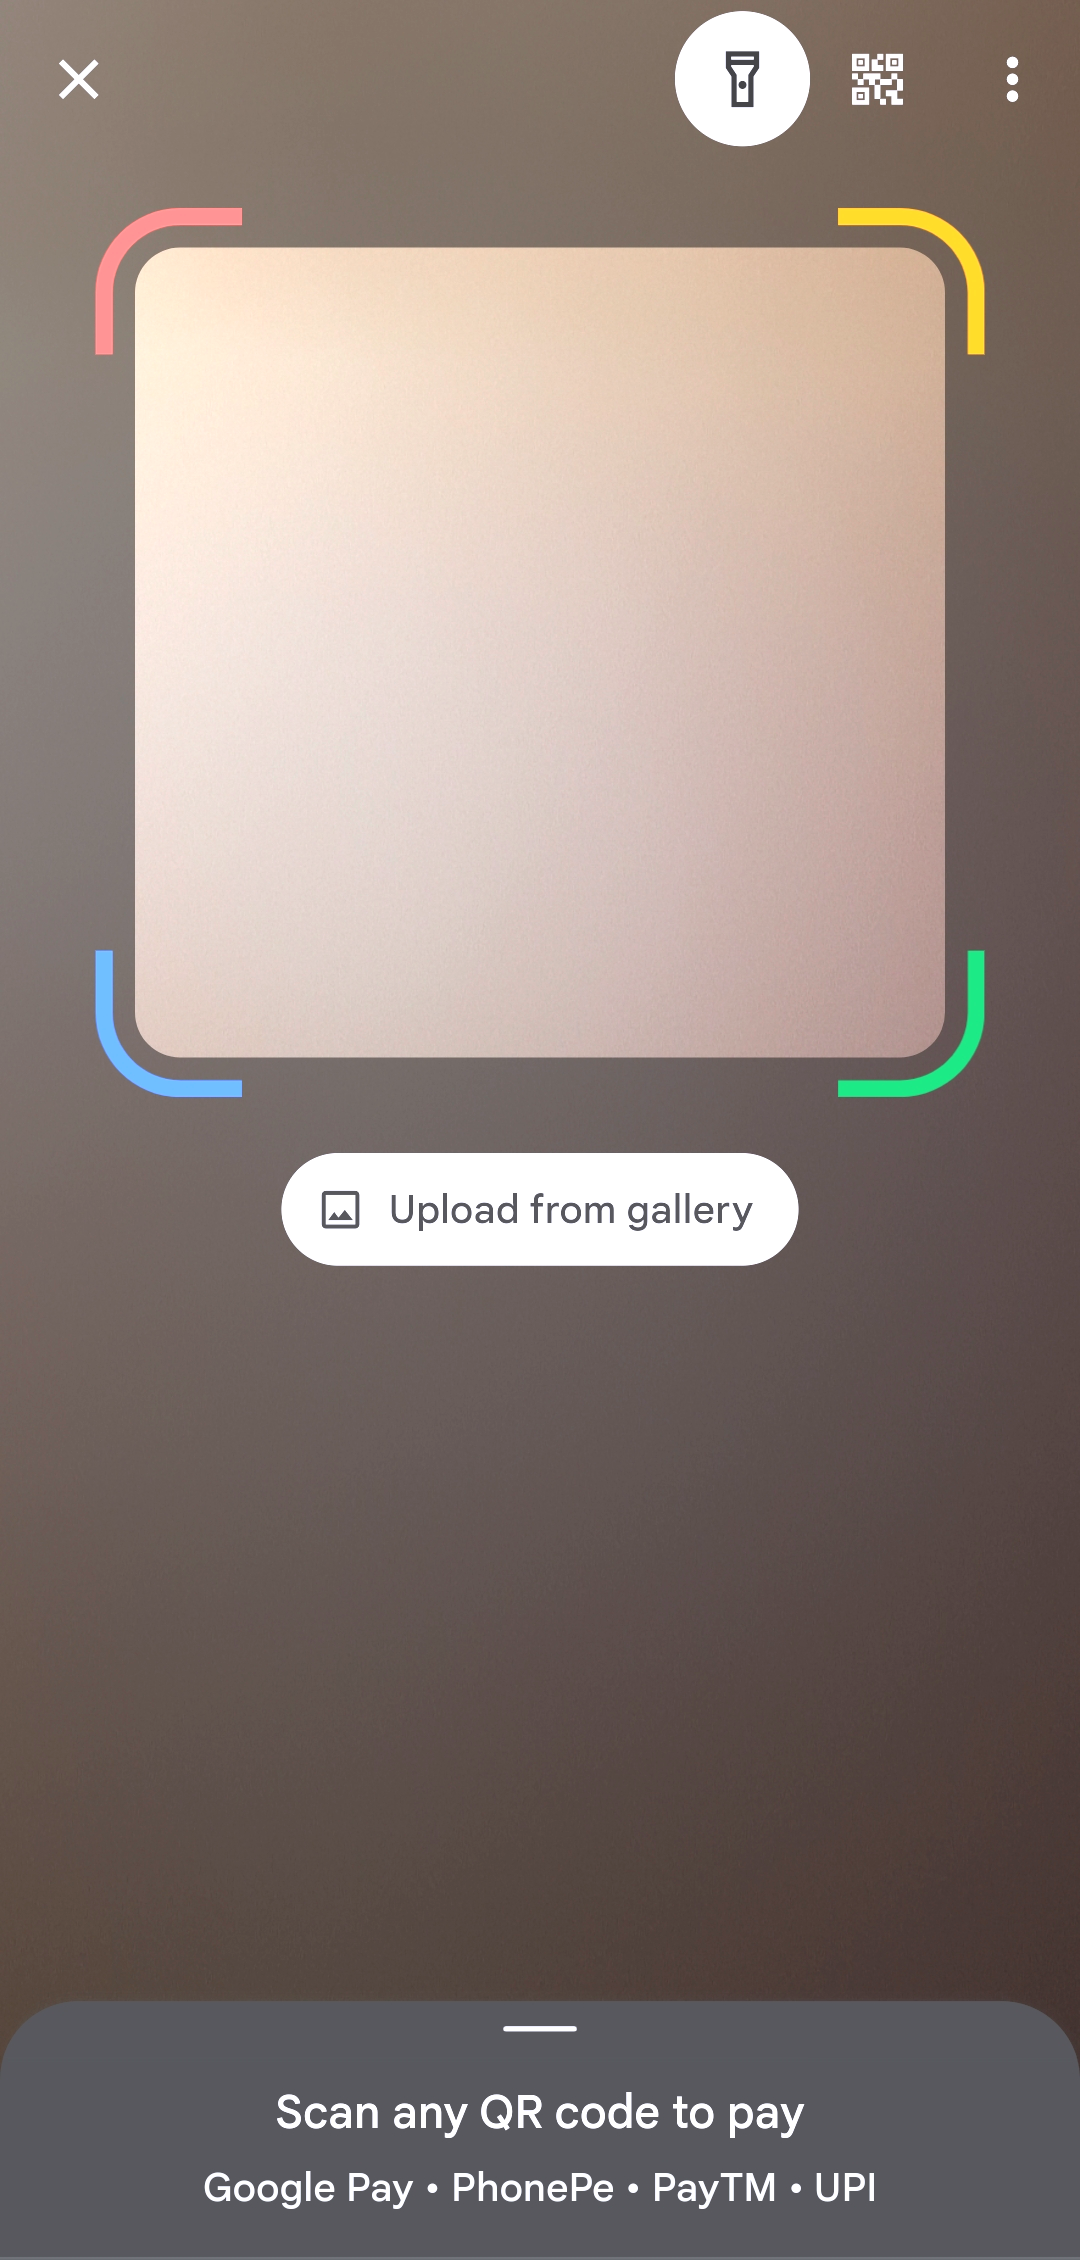 Step 5:


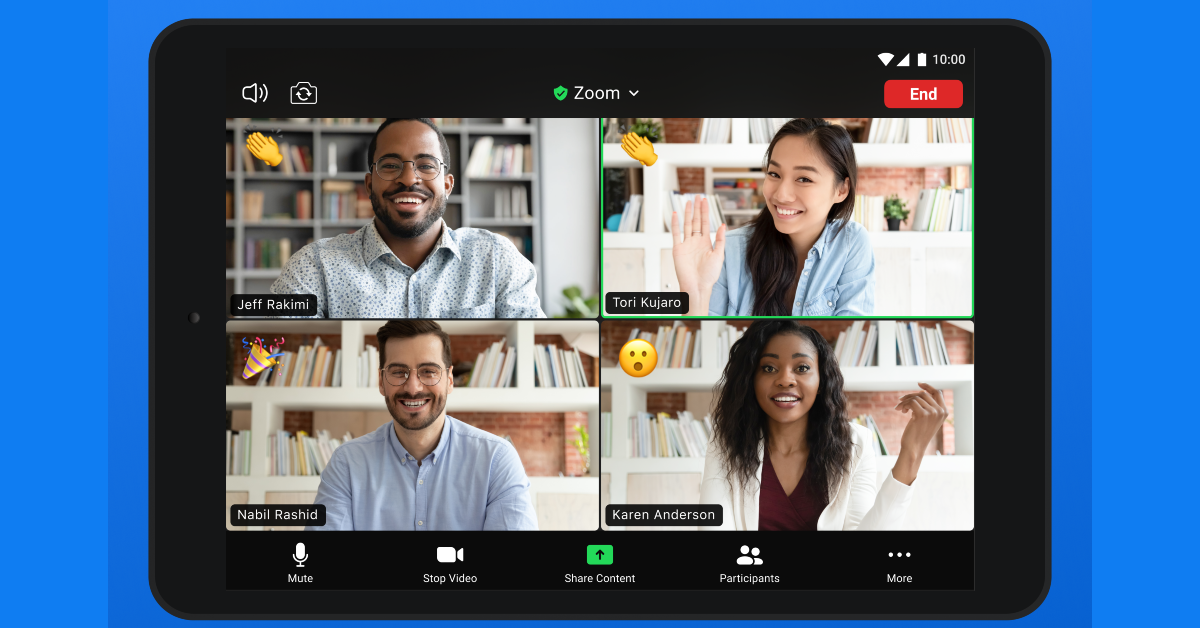

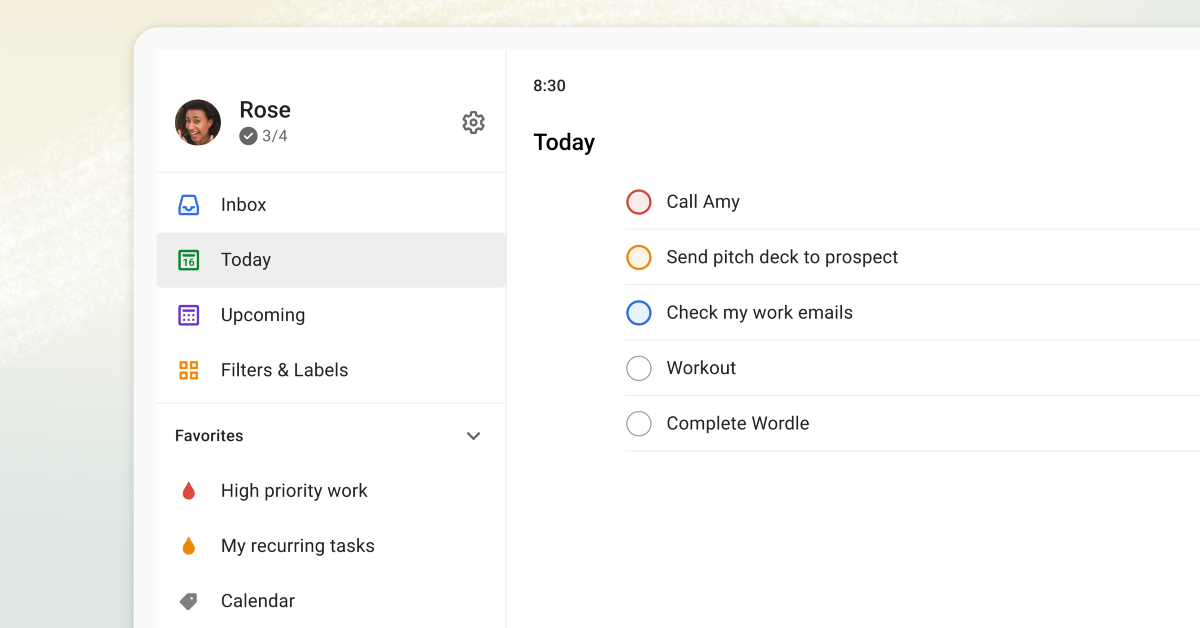

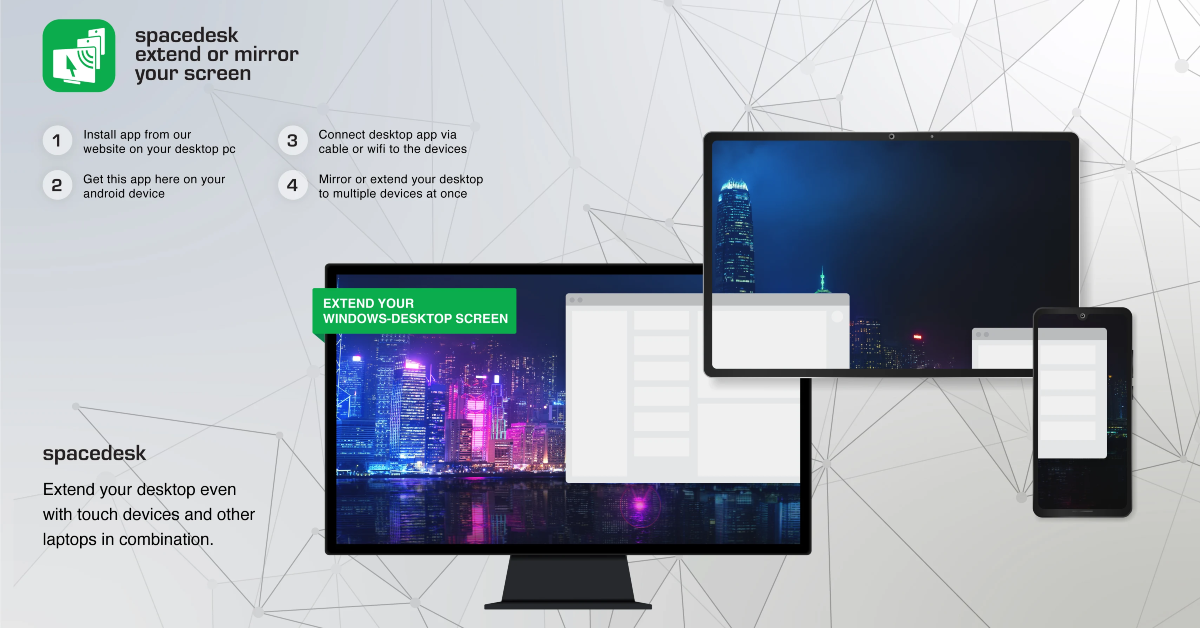

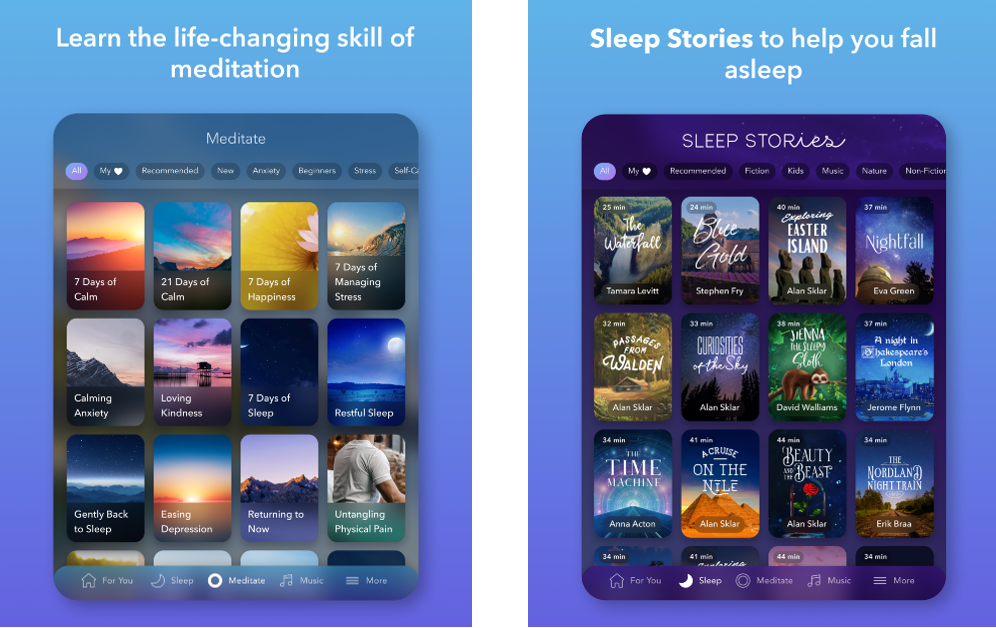


 Step 3:
 Step 3: Click on History.
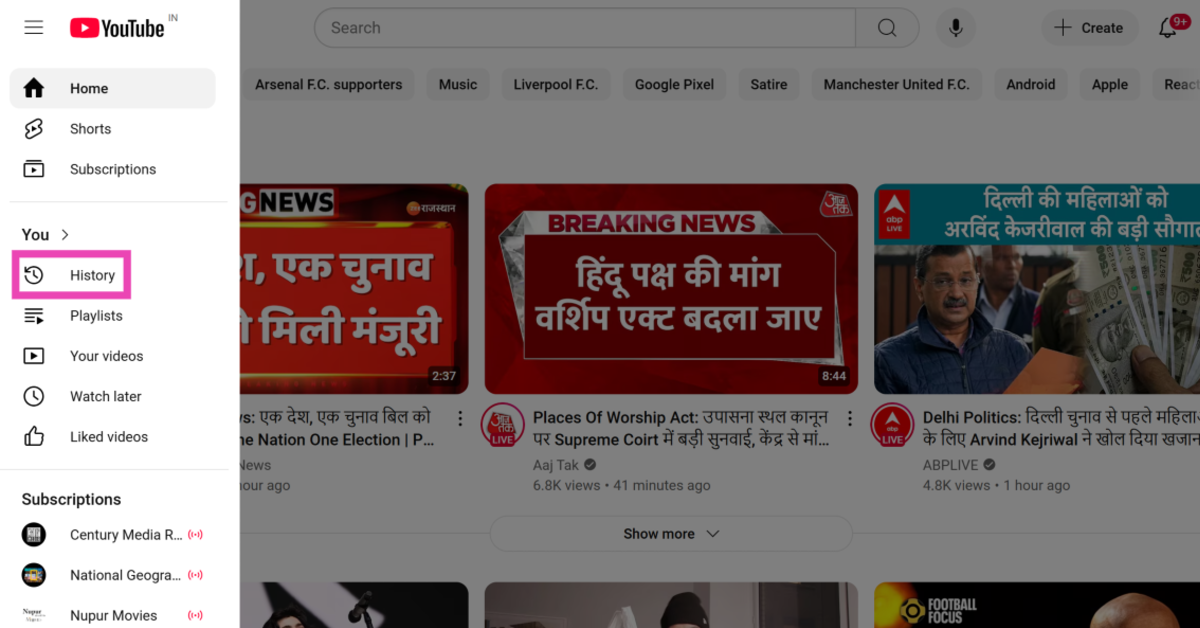 Step 4: Click on Pause watch history.
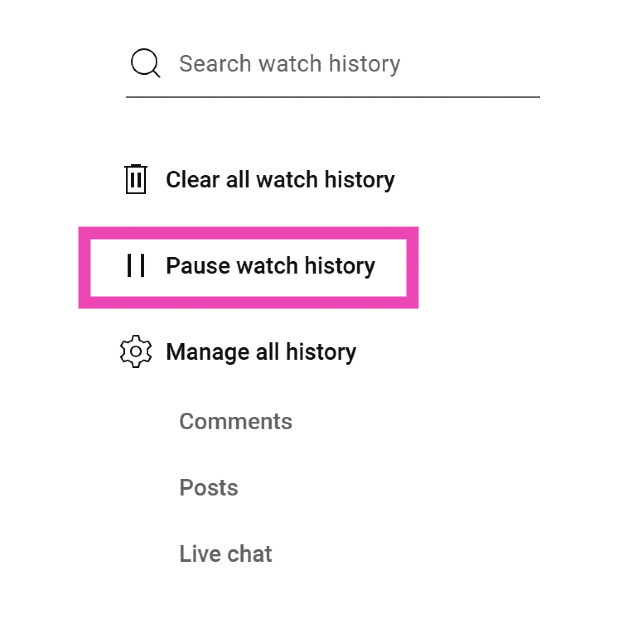 Step 5: Confirm your selection in the popup box.
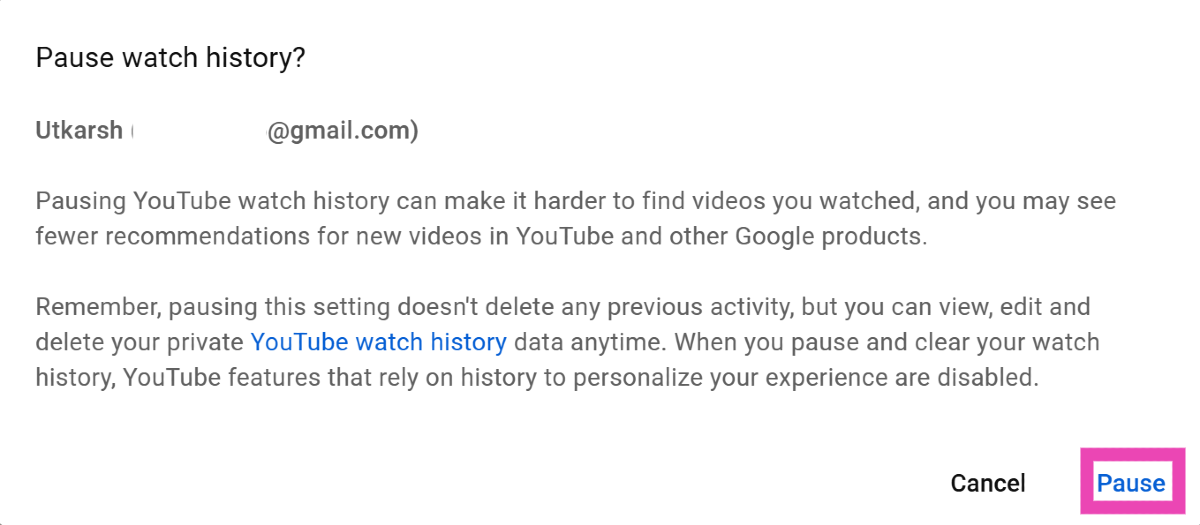
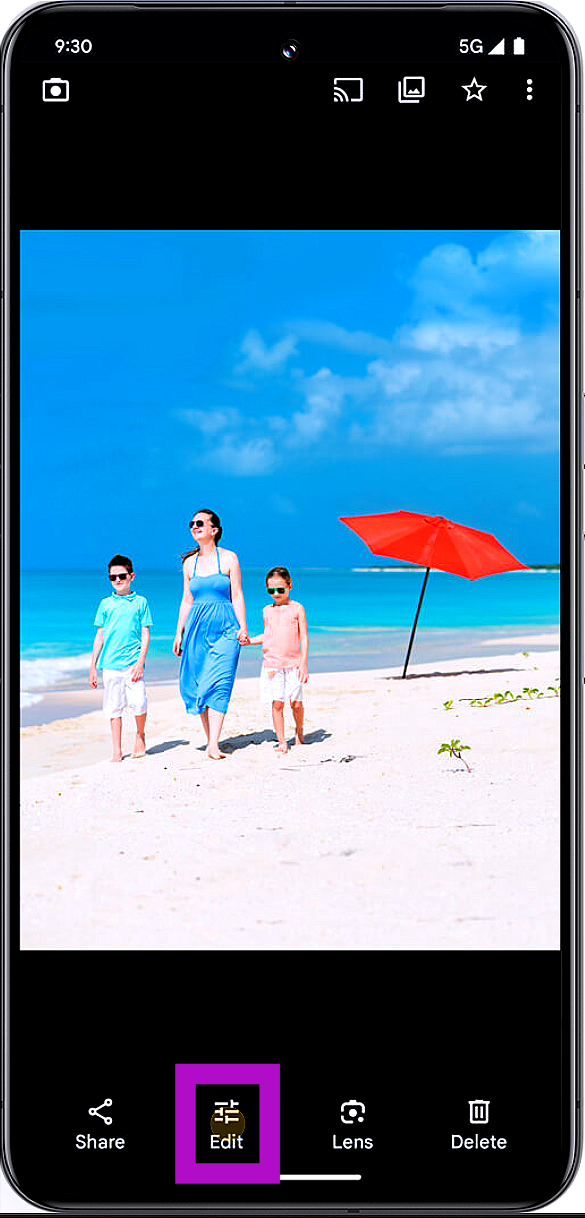 Step 3:
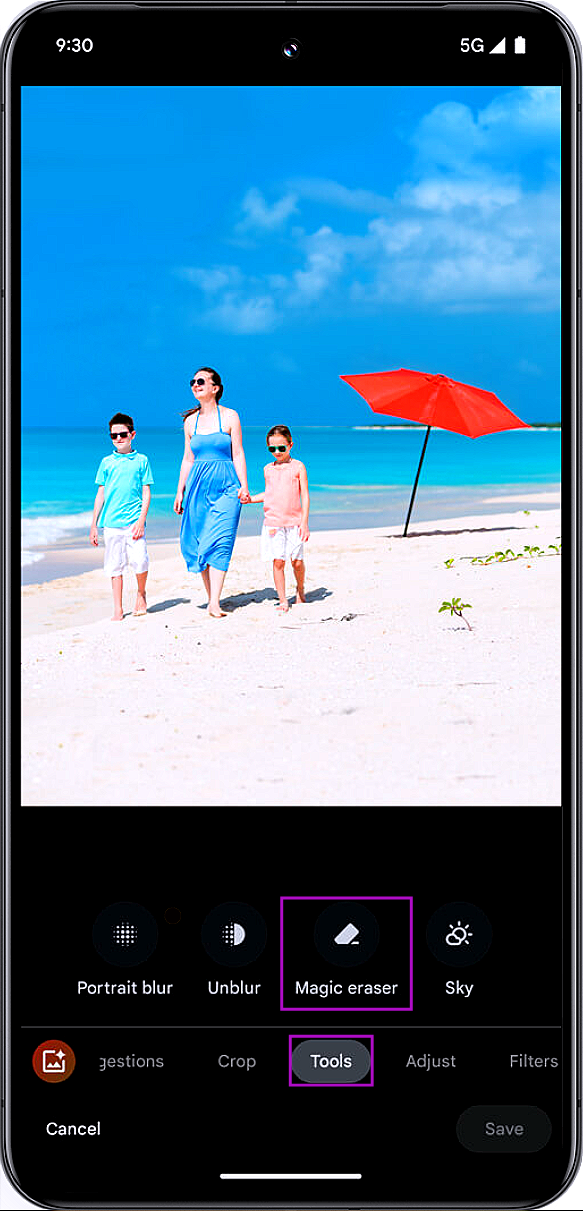 Step 5:
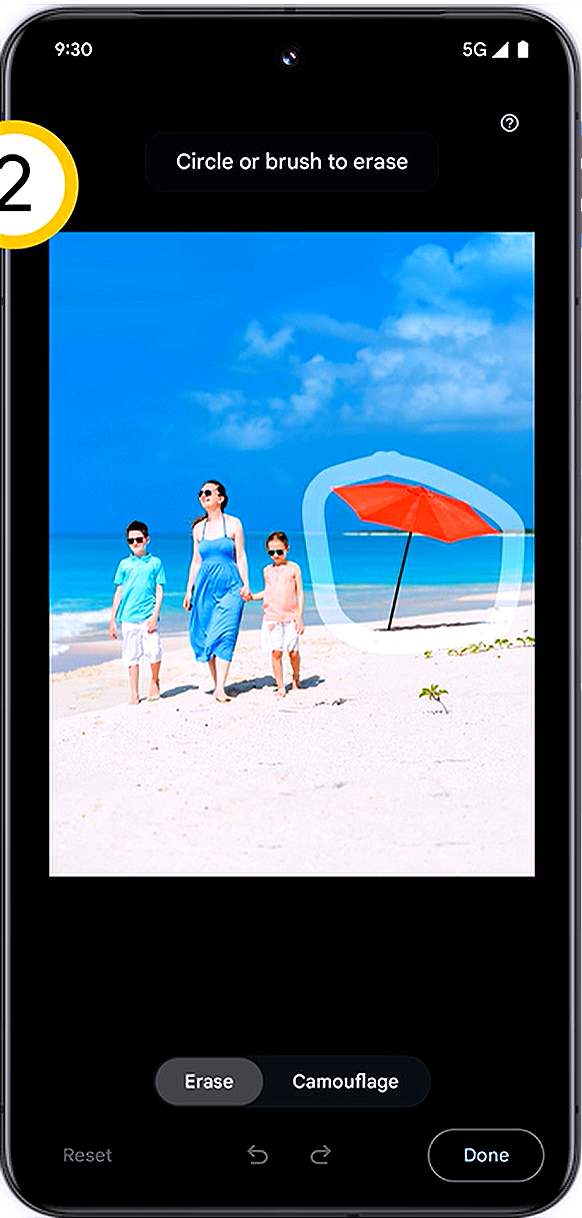 Step 6:
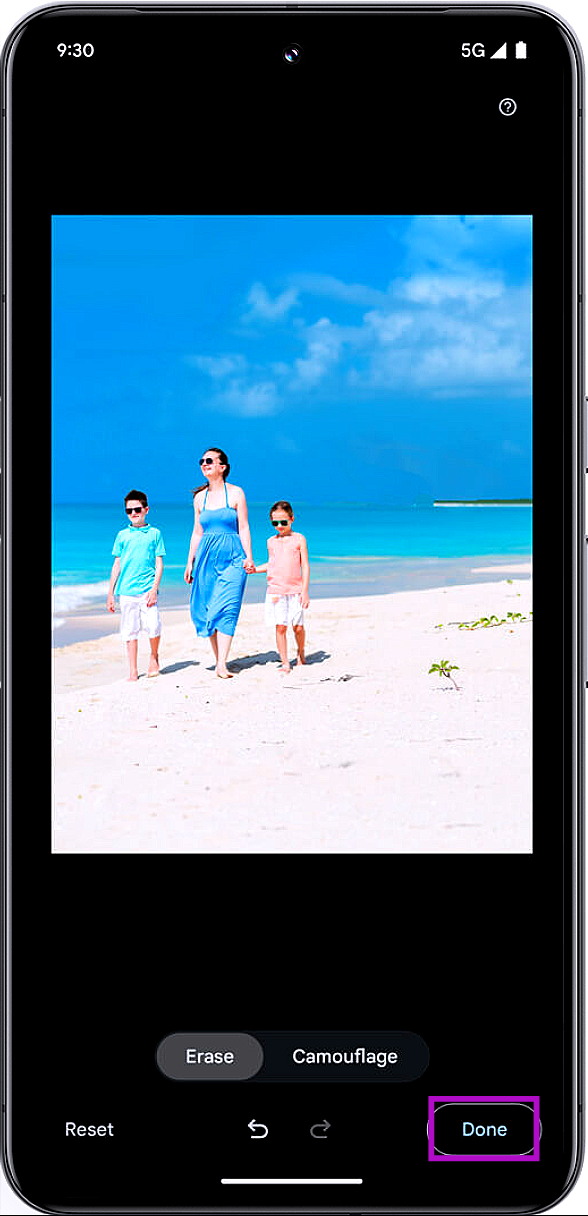 Step 7:
 Step 1: Launch


 Step 2:
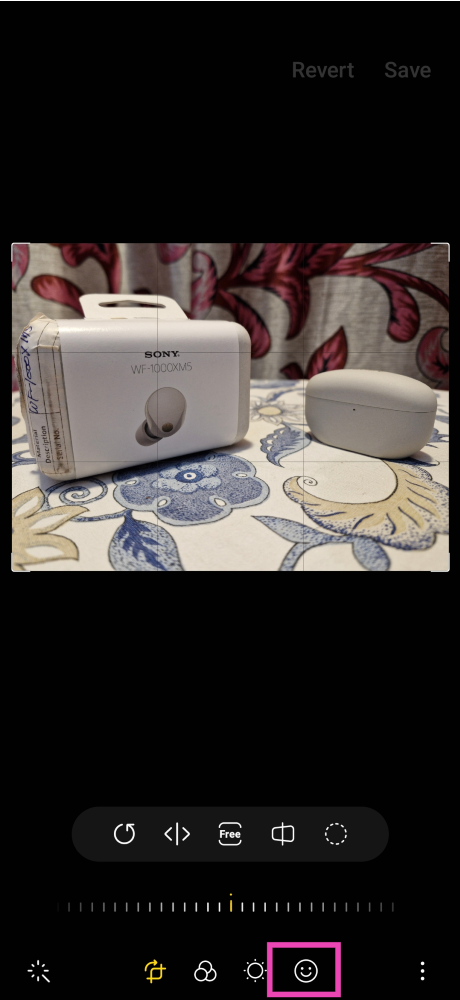 Step 3:
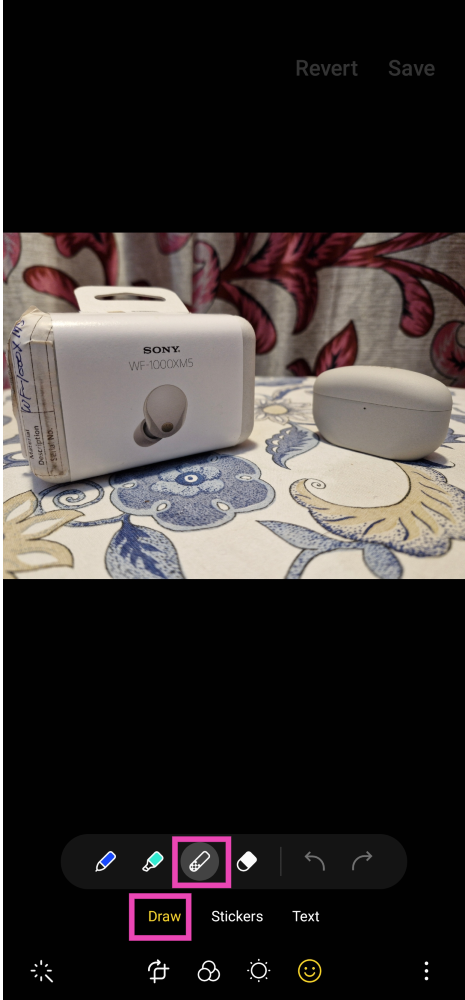 Step 4:
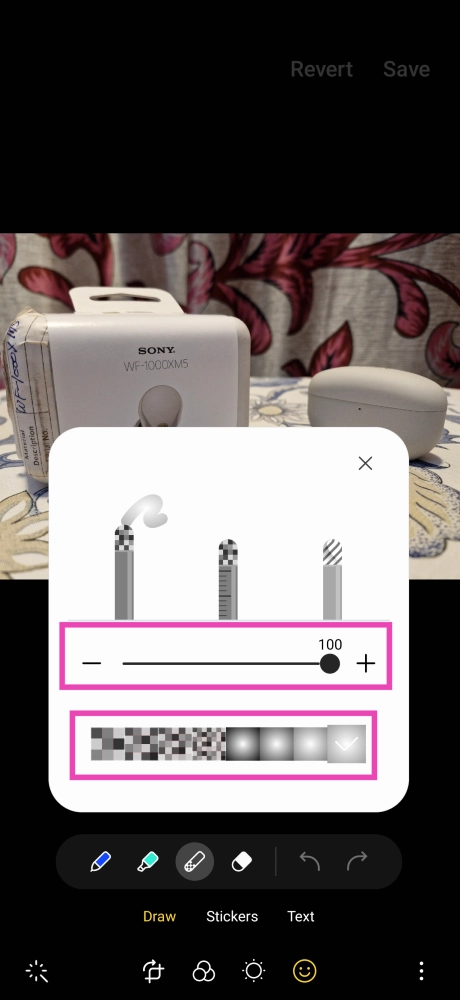 Step 5:
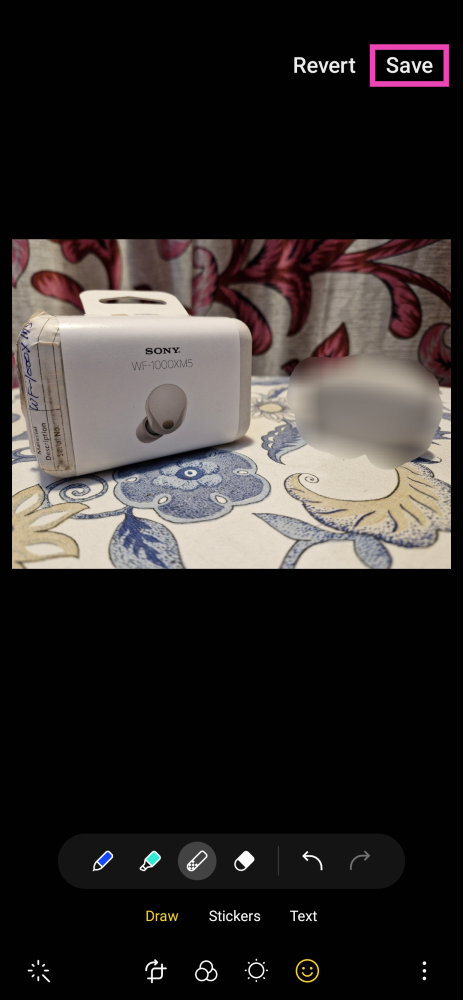 Step 6:
 Step 3:
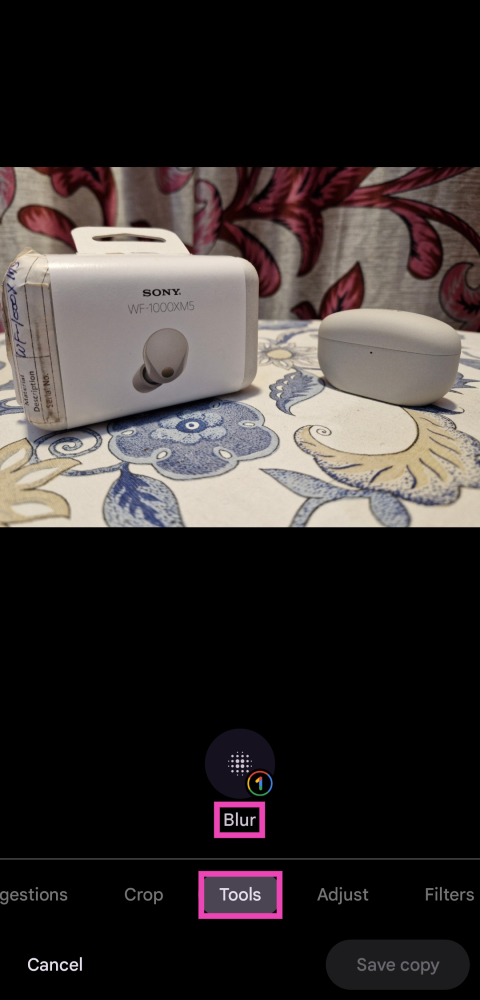 Step 4: Move
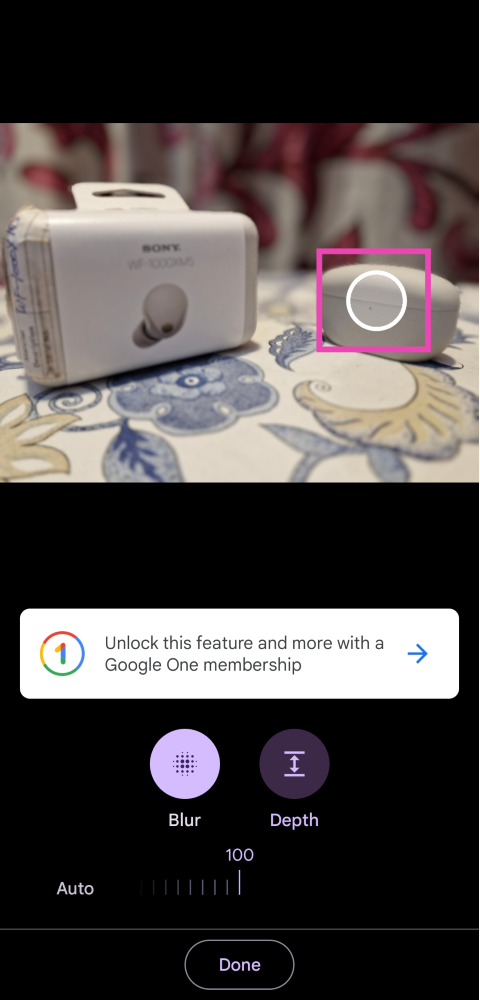 Step 5:
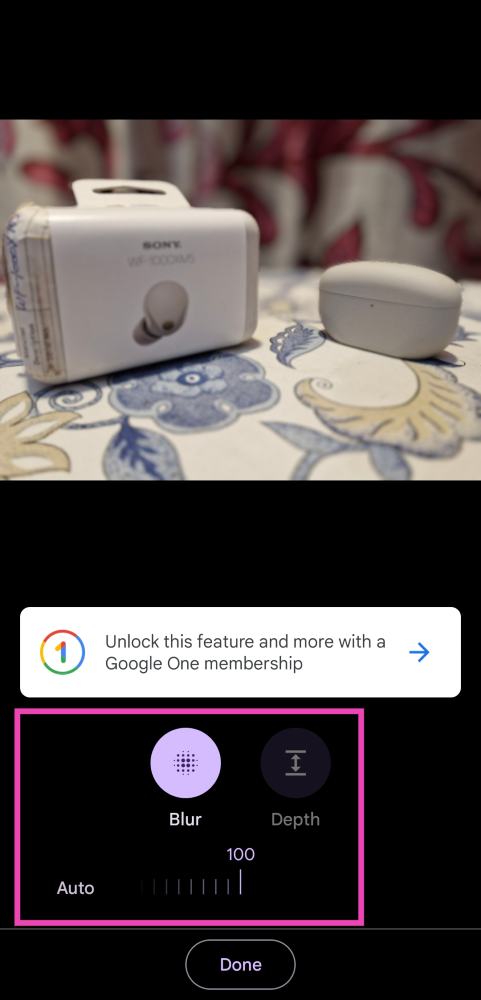 Step 6:
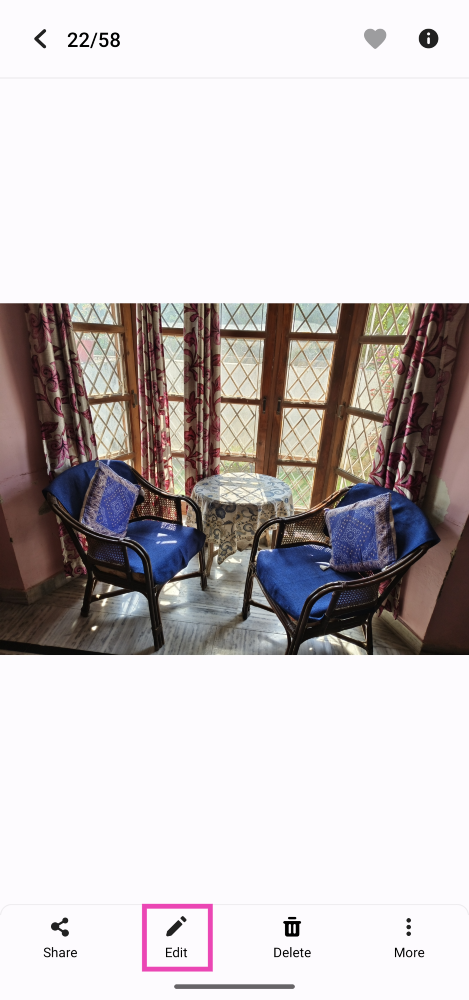 Step 3:
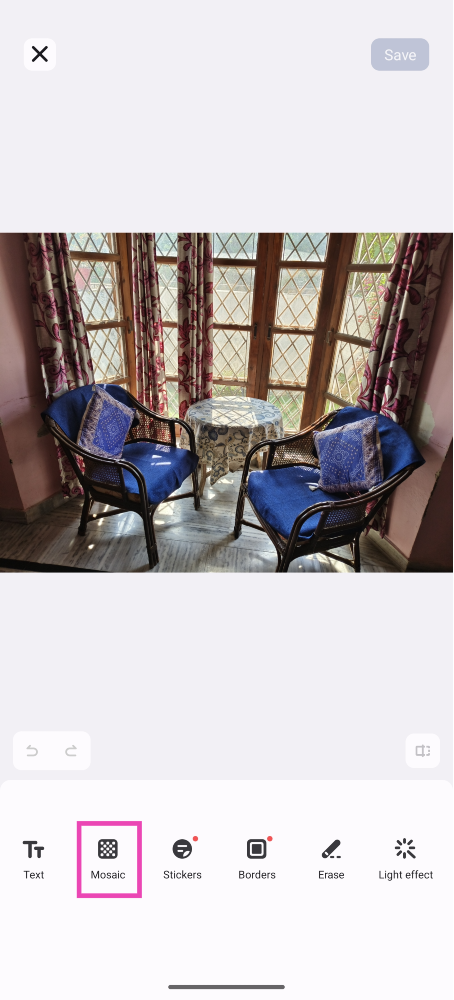 Step 4:
 Step 5: Brush
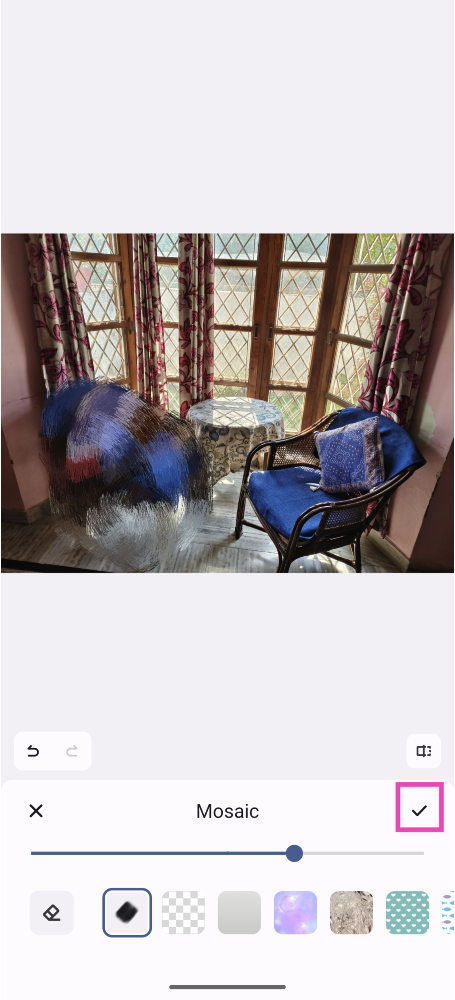 Step 6:
 Step 3: Select
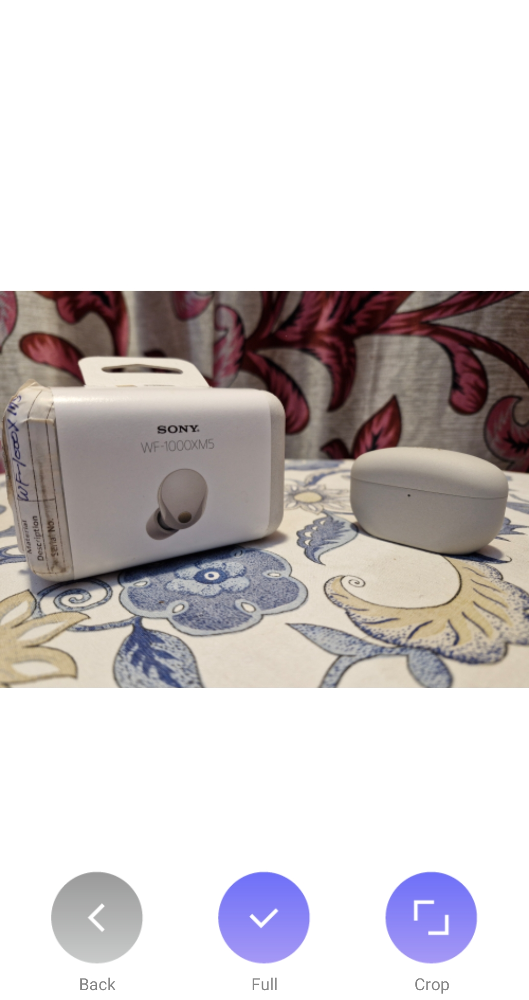 Step 5:
 Step 6: Draw